

Page 1

1
USER’S MANUAL
2.0
ARTURIA – JUPITER-8V – USER’S MANUAL
Page 2

2
PROGRAMMING:
Nicolas Bronnec
Fabrice Bourgeois
Gavin Burke
Vincent Travaglini
Jean–Michel Blanchet
Philippe Wicker
Cristian Kreindler
Damien Vanderbeyvanghe
Thomas Diligent
MANUAL:
Thomas Diligent (English version)
Christiaan de Jong (English version)
Houston Haynes (English version)
Richard Phan (English version)
Jean-Michel Blanchet (French version)
Antoine Back (French version)
Kenta Sasano (Version japonaise)
Kiriko Ishida (Version japonaise)
Tomoya Fukushi (Version japonaise)
DESIGN:
Yannick Bonnefoy (Beautifulscreen)
Elisa Noual
SOUND DESIGN:
Jean–Michel Blanchet
Thomas Binek (Tasmodia)
Stephan Muësh (Rsmus7)
Celmar Engel
Ruff & Jam
Katsunori Ujiie
Sato Fujimori
Richard James
Nori Ubutaka
© ARTURIA SA – 1999-2010 – All rights reserved.
4, Chemin de Malacher
38240 Meylan
FRANCE
http://www.arturia.com
Information contained in this manual is subject to change without notice and does not represent a commitment
on the part of Arturia. The software described in this manual is provided under the terms of a license
agreement or non-disclosure agreement. The software license agreement specifies the terms and conditions for
its lawful use. No part of this manual may be produced or transmitted in any form or by any purpose other than
purchaser’s personal use, without the express written permission of ARTURIA S.A.
The mark “Jupiter-8V” and “Roland” are property of Roland Corporation. The Jupiter-8 interface is also owned
by Roland Corporation, the design and model being registered trademarks. All other products, logos or
company names quoted in this manual are trademarks or registered trademarks of their respective owners.
ARTURIA – JUPITER-8V – USER’S MANUAL
Page 3

3
TThhaannkk yyoouu ffoorr ppuurrcchhaassiinngg tthhee AARRTTUURRIIAA JJuuppiitteerr--88VV!!
In this package you will find:
• This paper manual for the Jupiter-8V
• One CD-ROM containing the Jupiter-8V installer for MAC OSX and Windows XP/Vista/7
• The registration Card
Carefully store your card!
In order to be able to use the software, you have to register your product. By registering,
you identify yourself as the legitimate owner and will be sure to receive the latest news
and updates for your product. After registration, you will receive a user ID and password
in order to access a protected area on our site. It also puts you on our user notification
list, so that you can be the first to know when there are updates or new product offers.
ARTURIA – JUPITER-8V – USER’S MANUAL
Page 4

4
NNeeww ffeeaattuurreess iinn JJuuppiitteerr--88VV 22..00
If you already own Jupiter-8V, version 2 includes the following changes:
• “Sound Map” graphical preset browser added
• RPN “pitch bend range” message is now recognized
• NRPN midi controls can be used for automation
• Increase of overall volume
• Switched to eLicenser Protection
• Fixed issue related to modulation wheel in Pro Tools (MAC OSX)
• Fixed issue related to triangle signal amplitude
• Miscellaneous fixed issues
ARTURIA – JUPITER-8V – USER’S MANUAL
Page 5

5
TTaabbllee ooff ccoonntteennttss
1
INTRODUCTION 8
1.1
Roland/Jupiter-8 Story 8
1.2
TAE® 12
1.2.1 Aliasing-free oscillators 12
1.2.2 A better reproduction of analog oscillator waveforms 12
1.2.3 Direct Filter Circuit Modeling 14
2
INSTALLATION 15
2.1
Notes about software protection and the installation 15
2.2
Windows Installation 15
2.3
Mac OS X Installation 18
3
AUTHORIZATION 19
4
QUICK START 25
4.1
Structure of the Jupiter-8V 25
4.2
Using the presets 26
4.2.1 Selecting the presets 26
4.2.2 Editing the presets 28
4.3
The 4 main parts of the Jupiter-8V 29
4.4
Overview of the Jupiter-8V user interface 30
4.5
The (Advanced) Modulations section 32
4.5.1 Creating a melodic sequence with the SEQUENCER 33
4.5.2 Create progressive modulations with the GALAXY unit 35
4.5.3 Control parameters with the Keyboard unit 37
4.6
The Effects 38
4.7
The “Patch” section of the effects 40
4.7.1 The chorus 40
4.7.2 The delay 41
4.8
Realtime controllers and MIDI assign 42
5
A UNIQUE SYNTHESIZER, WHY ? 44
5.1
The Roland Jupiter-8 44
5.2
The Arturia Jupiter-8V 44
6
THE INTERFACE 46
6.1
Tool bar 46
6.2
Using the presets 47
6.2.1 The types of presets 47
6.2.2 Selection of a preset PATCH or PROGRAM 47
6.2.3 Creating a new preset 50
6.2.4 Save a user preset 50
6.2.5 Save a user preset using the “Save as” option 50
6.2.6 Delete a preset 51
6.2.7 Import / Export a preset bank 51
6.3
Using the controllers 52
6.3.1 Knobs 52
6.3.2 Buttons 53
6.3.3 Switches 53
6.3.4 Pitch Bend wheel 53
ARTURIA – JUPITER-8V – USER’S MANUAL
Page 6

6
6.3.5 Modulation button 54
6.3.6 Virtual keyboard 54
6.3.7 LCD Screen 54
6.3.8 MIDI Control 55
6.3.9 The preference screen 55
6.4
The Sound Map 56
6.4.1 The MAP main interface 57
6.4.2 The Sound Map overview 58
6.4.3 The LIST preset manager 61
6.4.4 The COMPASS morphing interface 62
7
THE DIFFERENT MODULES 64
7.1
The original Jupiter-8 64
7.1.1 The oscillators (« VCO 1 and 2 ») 65
7.1.2 The mixer (“VCO1 / VCO2”) 67
7.1.3 The filter (“VCF”) 67
7.1.4 The Amplifier (“VCA”) 69
7.1.5 The ADSR Envelopes 70
7.1.6 The LFO 71
7.1.7 The VCO modulator 71
7.1.8 The LFO MODULATION, PORTAMENTO and BEND section 72
7.1.9 The pitch bend wheel and LFO MOD button 73
7.1.10 The Master Tune section 73
7.1.11 The arpeggiator (“ARPEGGIO”) 74
7.1.12 The keyboard assign section (“ASSIGN MODE”) 74
7.1.13 The play modes selection (“KEY MODE”) 75
7.2
Step Sequencer 76
7.2.1 The transport 76
7.2.2 Edit the sequence 77
7.2.3 Outputs 78
7.3
Galaxy 79
7.4
Voice Effects 80
7.4.1 Chorus /Flanger 80
7.4.2 Distortion 81
7.4.3 Parametric EQ 82
7.4.4 Phaser 83
7.4.5 Ring Mod 84
7.5
Patch Effects 85
7.5.1 Chorus/Flanger 85
7.5.2 Stereo Analog Delay 86
7.5.3 Reverb 87
7.5.4 Dual Phaser 87
8
THE BASICS OF SUBTRACTIVE SYNTHESIS 89
8.1
The main elements 89
8.1.1 The Oscillator or VCO 89
8.1.2 The Mixer 93
8.1.3 The filter or VCF 93
8.1.4 The amplifier or VCA 96
8.2
Other modules 96
8.2.1 The keyboard 96
8.2.2 The envelope generator or ADSR 97
8.2.3 The low frequency oscillator 98
8.3
Modules of the Jupiter-8V 99
9
SOME ELEMENTS OF SOUND DESIGN 100
9.1
A polyphonic violin preset made with the Jupiter- 8 V 100
ARTURIA – JUPITER-8V – USER’S MANUAL
Page 7

7
9.2
Arpeggiated sounds 103
9.3
A sequence with the Jupiter-8V 107
10
MODES OF OPERATION 111
10.1 Stand-alone 111
10.1.1 Launching the Stand-alone application 111
10.1.2 Preference Configuration 111
10.2 Using a VST and Audio Unit instrument in Ableton Live 112
10.3 RTAS - Pro Tools 113
10.3.1 Utilization of the plug-in 113
10.3.2 Connection to a MIDI channel 114
10.3.3 Saving the presets 115
10.3.4 Automation under Pro Tools 115
10.4 Cubase VST 116
10.4.1 Instrument use in VST mode 116
10.4.2 Rescan the plug-ins directory in Cubase 116
10.4.3 Connection to a MIDI track 117
10.4.4 Saving of presets 117
10.5 Logic & Audio Unit (Max OSX only) 117
10.5.1 Use in Logic Audio 117
10.6 Sonar VST (Windows only) 119
10.6.1 Opening the instrument (Sonar) 119
10.6.2 Connection to a MIDI track 119
10.6.3 Save the presets 120
10.6.4 Automation 120
10.7 Use in Digital Performer 120
ARTURIA – JUPITER-8V – USER’S MANUAL
Page 8

8
1 INTRODUCTION
1.1 R
OLAND/JUPITER-8 STORY
The history of Roland is intimately tied to the personal story of its founder, Mr Ikutaro
Kakehashi.
When he was just 16 years old, the young Mr Kakehashi noticed there was no watch or
clock industry in post-war Japan. He therefore understood there was a thriving business
to develop repairing existing timepieces.1
Mr Kakehashi found a part-time job in a watch repair store, but he quickly felt frustrated
with the pace at which things were progressing. In the traditional Japanese organization
of work, becoming a master in any technical area would take a seven-year
apprenticeship. Consequently he left after a few months, bought a book on how to repair
watches and set up the “Kakehashi Watch Shop”.
This first venture happened to be so successful that he quickly decided to expand and
turn his enthusiasm for music into business. It became legal at that time to have a shortwave radio and to listen to foreign broadcasts. While he scanned the airwaves for new
music, Mr Kakehashi learned the basics of how radios operated. He then used broken
sets to create working units. His repair shop started to repair broken radios in addition to
clocks and watches.
1
It is remarkable that a man named Mr Torakusu Yamaha had also started out as a watch repairer. In fact the
same is true of Matthias Hohner, the founder of Hohner. Even the Hammond Organ Company started out as a
sub-division of the Hammond Clock Company.
ARTURIA – JUPITER-8V – USER’S MANUAL
Page 9

9
In 1954 Mr Kakehashi opened an electrical goods and repair shop by the name of
“Kakehashi Musen”. - Later the name was to be changed to Ace Electrical Company. His
initial goal was to produce an electronic instrument capable of generating simple
monophonic melodies, and so he ended up building a Theremin. Looking for a new
challenge, he later built a four-octave organ using parts from a reed organ, bits of
telephones, and simple transistor oscillators. In 1959, he designed and built a Hawaiian
guitar amplifier, but he also went on with his further organ developments.
On the 18th of April 1972, Mr. Kakehashi established the Roland Corporation.
The first synthesizer from Roland was also Japan's first synthesizer. The SH1000 came to
the market in 1973, just before the Korg 700 did. It was a remarkable instrument,
offering 10 preset tones selectable from colored tabs. You could add vibrato, growl and
portamento to modify the sound.
The System 100, launched in 1975, is another Roland monosynth that would become
sought-after long after production stopped. The System 100 consisted of five semimodular products. These were the 101 Synthesizer, the 102 Expander, the 103 Mixer
(including a simple reverb), the 104 Sequencer, and the 109 Monitor Speakers. These
units fit together to produce a system that sounded really interesting.
The first results from 1976's expansion in the development team, led to an explosion in
Roland's product range. There were more synthesizers, a piano, more speaker systems
and some now-classic instruments that included the Jupiter-4 Compuphonic polysynth.
The Jupiter-4 was the company's first true polysynth. It used Roland's trademark chorus
and three Unison options that made it a powerful monosynth. There also was an
excellent arpeggiator.
ARTURIA – JUPITER-8V – USER’S MANUAL
Page 10

10
By the end of the 1970s, Roland established itself as a major manufacturer, and in 1981
Mr. Ikutaro Kakehashi opened four new companies in three months. Roland UK, Roland
GmbH and Musitronic AG in Switzerland. He also established a new Japanese division
called AMDEK (Analogue Music Digital Electronics Kits)
Back to the early 80’s, the Prophet 5 and Oberheim OB series dominated the polyphonic
synthesizer market. Having that in mind the Jupiter-8’s success, initiated in 1981, took
every one by storm.
But what made the Jupiter-8 so successful? Well, in terms of sonic possibilities, it
complemented its competition by bringing something different. The Jupiter-8 was capable
of creating very versatile sounds. You could easily make “fat” or “crystal” sounds with it.
In fact, the Jupiter-8 sounded the way it looked, ‘sleek and polished’. Offering oscillator
sync, cross modulation, a switchable 12dB/24dB filter and polyphonic portamento, the
sound design opportunities were endless. You could easily save and load patches via its
cassette interface. Even a superb arpeggiator was included. And last but not least, the
Jupiter 8 was more reliable than its competition, and the sound was more consistent
from model to model. Therefore it was very attractive for stage and studio use. In 1982,
Roland released an upgraded Jupiter-8, the JP8A. It upgraded the Jupiter-8 with a
number of enhancements including an improved DAC with a higher resolution of the
auto-tuning system from 12- to 14-bit, plus a brighter LED screen. The Jupiter-8 has
become one of the most revered of all synthesizers.
The electro-pop community became quickly convinced by the qualities of the Jupiter-8.
“Relax” by Frankie Goes to Hollywood was produced incorporating a Jupiter 8, and
players such Vince Clarke, Howard Jones, John Foxx, and Martyn Ware were also using it.
The path to classic status of the Jupiter started there.
Other artists that have used The Jupiter-8 include: Tangerine Dream, Underworld, Jean
Michel Jarre, Depeche Mode, Prince, Gary Wright, Adrian Lee, Heaven 17, Kitaro, Elvis
ARTURIA – JUPITER-8V – USER’S MANUAL
Page 11

11
Costello, Tears for Fears, Huey Lewis and the News, Journey, Moog Cookbook, Yes, Devo,
Freddy Fresh, Simple Minds, Jan Hammer, and BT.
In the early 80’s Roland and Sequential Circuits combined forces to create the MIDI
protocol. The technology was derived from Roland’s earlier DCB bus Format. MIDI is still
being used today with great success. In 1982, Roland launched the Jupiter-6, the first
synthesizer including the MIDI protocol on board. This new synthesizer was introduced as
an enhancement of the Jupiter-8.
In 1982 Roland also released the TB303 Bass line. Initially marketed as a “computerised
bass machine”, the little silver box and its companion, the TR606 “Drumatix”, were
intended for use as replacements for a bass guitarist and a drummer. The TB303 had a
very characteristic filter, and a built-in sequencer.
In 1984 there was the introduction of three synthesizers: the Juno 106, the JX8P and the
JX10P. The last one was the replacement for the Jupiter-8. Unfortunately, the JX10 was
never destined for the same success as the Jupiter 8.
ARTURIA – JUPITER-8V – USER’S MANUAL
Page 12

12
It was the introduction of COSM and the “V” products in 1995 that set the future
direction for Roland. Mr. Kakehashi and his teams had recognized that digital signal
processing and physical modeling were the future of the electronic audio industry. Roland
applied these technologies to a broad range of products. From sound modules and danceoriented groove boxes to their most expensive digital mixers and audio workstations,
Roland remains at the forefront of synthesizers and electronic music.
1.2 TAE®
TAE® - True Analog Emulation - is Arturia's outstanding technology dedicated to the
digital reproduction of analog circuits used in classic analog synthesizers.
The Jupiter-8V benefits from an enhanced version of TAE®, optimizing CPU allocation
and memory usage, while being even more accurate than in previous products.
When implemented in software code, TAE®’s algorithms guarantee authentic emulation
of hardware specifications. This is why the Jupiter-8V, and all of Arturia’s virtual
synthesizers, offer an unparalleled quality of sound.
TAE® combines four major advances in the domain of synthesis:
1.2.1 Aliasing-free oscillators
Standard digital synthesizers produce aliasing in high frequencies, and also when using
Pulse Width Modulation or FM.
TAE® allows the production of totally aliasing-free oscillators in all contexts (PWM, FM…),
and at no extra CPU cost.
Linear frequency spectrum of the Jupiter-8V oscillator made with TAE
1.2.2 A better reproduction of analog oscillator waveforms
The waveforms produced by the oscillators in analog synthesizers are marked by the
presence of a capacitor in the circuits. The discharge of the capacitor results in a light
bend in the original waveform (notably for saw tooth, triangular and square waveforms).
TAE® allows the reproduction of this capacitor discharge. This is the analysis of the
ARTURIA – JUPITER-8V – USER’S MANUAL
Page 13

13
Roland Jupiter 8 waveform, and that of the Jupiter-8V. They are both equally deformed
by the low-pass and high-pass filtering.
Temporal representation of a “saw tooth” waveform of the Jupiter 8
Temporal representation of a “saw tooth” waveform reproduced by the Jupiter-8V
ARTURIA – JUPITER-8V – USER’S MANUAL
Page 14

14
What’s more, the hardware analog oscillators were unstable. In fact, their waveform
varies slightly from one period to another. If we add this to the fact that the starting
point for each period (in Trigger mode) can vary with the temperature and other
environmental conditions, we find another one of the characteristics that contributed to
the typical sound of vintage synthesizers.
TAE® reproduces the instability of oscillators, bringing a fatter and “bigger” sound.
1.2.3 Direct Filter Circuit Modeling
Due to advances in computer processing power, the Jupiter-8V can now employ direct
filter modeling techniques to achieve unprecedented accuracy in the emulation of a
hardware synthesizer’s filter. By modeling the operation of the individual hardware
components of the filter circuit, the warm nuances synonymous with analog sounds are
recreated. This graph is a frequency domain plot as just a single example of direct circuit
modeling in action; it shows the generation of harmonics at multiples of the resonant
frequency, for both the Arturia Jupiter-8V and the Roland Jupiter-8. These harmonics are
characteristic of the hardware synthesizer’s filters and are due to the non-linear behavior
inherent in its analog circuitry. The harmonics generated add to the richness and warmth
of the sound produced by the filter. As a result of the direct recreation of this analog
circuitry, the same characteristics of the sound are present, thus giving the user a truly
analog sound.
Comparison of Harmonics generated by the filter circuits of the Arturia Jupiter-8V and the Roland Jupiter-8
ARTURIA – JUPITER-8V – USER’S MANUAL
Page 15

15
2 INSTALLATION
2.1 N
Jupiter-8V2 includes the Soft-eLicenser protection system. Compatibility with v1.0 USBeLicenser dongles is carried on to v2.0. Thus Jupiter-8V1 owners can use their USB
dongles to authorize Jupiter-8V2 update. Jupiter-8V2 owners only (not 1.x) will store
their licenses on a virtual dongle.
Please refer to authorization section for further details about protection schemes.
2.2 W
If you purchased the Boxed version of the Jupiter-8V2, insert the CD-ROM into the
If you purchased the Download version of the Jupiter-8V2, double click on the file
The installer guides you through multiple steps
OTES ABOUT SOFTWARE PROTECTION AND THE INSTALLATION
INDOWS INSTALLATION
drive. Explore the contents of the CD-ROM and double click on the icon called
Jupiter-8V2 Setup.exe.
called Jupiter-8V2 Setup.exe that you saved from the Arturia web site.
After having accepted the license agreement, you can choose the folder in which
the Jupiter-8V will be installed
ARTURIA – JUPITER-8V – USER’S MANUAL
Page 16

16
Choose the installation folder
Next, select the application or plug-ins that you wish to install. For more
information on those protocols, please see to chapter 10 of this manual. The
available options are:
Choose the components to be installed
For the installation of the VST protocols, you should select the installation folder of
these plug-ins to allow the host application to use them. If you don’t know how to
do this, refer to the appropriate chapter (Ch. 10).
ARTURIA – JUPITER-8V – USER’S MANUAL
Page 17

17
Select installation folder for plug-ins
Set up the program’s shortcut in the Start menu, or use the default setting.
Check or not to install an icon on your desktop (disabled by default).
Before performing the installation, the installed components are summarized. Click
on “Install”.
Finally, the installation of the eLicenser Control Center and the creation of a virtual
dongle are proposed. Click on “Finish”.
eLicenser Control Center Installation Dialog box
The installation program now has enough information to finish. In a few seconds you will
be able to authorize the Jupiter-8V2.
ARTURIA – JUPITER-8V – USER’S MANUAL
Page 18

18
2.3 M
AC OS X INSTALLATION
If you purchased the Boxed version of the Jupiter-8V2, insert the CD-ROM into the
drive. Explore the contents of the CD-ROM and double click on the icon called
Jupiter-8V2.pkg.
If you purchased the Download version of the Jupiter-8V2, double click on the file
called Jupiter-8V2.dmg that you saved from the Arturia web site. Once the virtual
disk is mounted, double-click on Jupiter-8V2.pkg.
The installation program, requiring administrative rights, may have the system ask
you to enter the login of an administrative user of the system. In this case, enter
your login and administrative password, and click on OK to continue the installation.
The installation program first displays a welcome page.
Next installed components will be displayed in a “Read Me” page.
After the software license has been validated, the installation program will select
the system disk as target by default. It is not possible to install Jupiter-8V on
another disk. Click on continue to proceed with the installation.
Choice of installation disk
Jupiter-8V will automatically install as a standalone application (functioning
independently and apart from any sequencer host). In the same way, all the
available protocols (VST, Audio Unit and RTAS) will be installed. For more
information on these protocols, go to chapter 10.
Next, the installation program proceeds with the installation of the eLicenser Control
Center and the creation of a virtual dongle.
The standalone application will be installed in the “Applications” folder, and the different
plug-ins will be installed in folders reserved to each type of plug-in.
ARTURIA – JUPITER-8V – USER’S MANUAL
Page 19

19
3 AUTHORIZATION
Now that your Jupiter-8V2 has been installed, you need to authorize the synthesizer.
This doesn’t apply to owners of the Jupiter-8V previous version, who may use the software right away using
their USB-eLicenser hardware dongle.
Contrary to 1.x versions that used the USB-eLicenser protection scheme, the Jupiter-8V2
uses the “Soft-eLicenser” virtual dongle solution by default. Avoiding the use of a USB
port, this system allows using the synthesizer on one machine, which must be connected
to the Internet during the authorization process.
To transfer your license on another computer, or simply use your synthesizer on several computers (one
instance at a time), you will need:
_ to use one USB-eLicenser hardware dongle (sold separately, also used by many other software editors);
_ in the eLicenser Control Center, to drag-and-drop your license from Soft-eLicenser to USB-eLicenser.
This transfer, requiring a valid Internet connection, can be done both ways:
_ from Soft-eLicenser to USB-eLicenser;
_ from USB-eLicenser to Soft-eLicenser.
Please check the eLicenser documentation installed on your computer for any further technical detail.
The first step is to register your software in order to obtain the activation code that will
enable you to actually use the software.
You should have handy the license serial number of Jupiter-8V2 and the unlock code
(these are an integral part of the software and are printed on a small plastic card)
Connect your computer to the Internet, and go to this web page:
http://www.arturia.com/login
If you don’t have any Arturia account yet, please create one now:
This will bring you to this form:
ARTURIA – JUPITER-8V – USER’S MANUAL
Page 20

20
If you already have an account, simply log in:
Once you are logged into your account, you can register your Jupiter-8V2 and
request your activation code. Go to the “My Registered Products” section of your
account and click on the “Add” button:
ARTURIA – JUPITER-8V – USER’S MANUAL
Page 21

21
In the form that appears, select “Jupiter-8V” from the drop down menu, and type in
your synthesizer serial number and unlock code (as written on the registration
card):
You will then see the confirmation screen:
And finally there is a screen from which you can copy the eLicenser activation code.
The very same information is sent to you by email as a backup.
Now that you have retrieved the activation code, launch the eLicenser Control
Center. This application has been automatically installed on your computer along
with the Jupiter-8V2; it is accessible here:
•
Windows: Start > Programs > eLicenser > eLicenser Control Center
•
Mac OS X: Finder > Applications > eLicenser Control Center
The screenshots below have been taken using a computer running Mac OS X; however the process is strictly
identical with a machine running under Windows XP/Vista/7. The same functions apply, only the graphical user
ARTURIA – JUPITER-8V – USER’S MANUAL
Page 22

22
interface differs, and possibly also the language used. These little details should not prevent you from
understanding the full process.
In the eLicenser Control Center main window you should see a “SeL” virtual
dongle installed onto your computer.
The eLicenser Control Center main window, showing an empty Soft-eLicenser.
In the eLicenser Control Center menu, click on the “Enter Activation Code” button,
and enter the code when prompted. Simply paste in the 32-digit code you’ve just
copied from your account on the ARTURIA website:
ARTURIA – JUPITER-8V – USER’S MANUAL
Page 23

23
Enter the activation code
Jupiter-8V2
Jupiter
-
8V 2.0
Jupiter
-
8V 2.0
The eLicenser Control Center is now ready to download the software license that
will allow you to use Jupiter-8V2. Click on Start, the progress bar should anime
until download completion. A popup window will confirm completion, just click
“Close”.
Now the main eLicenser Control Center window should show your Jupiter-8V2
license installed and activated:
License is installed and activated
ARTURIA – JUPITER-8V – USER’S MANUAL
Page 24

24
It’s now time to launch Jupiter-8V2.
ARTURIA – JUPITER-8V – USER’S MANUAL
Page 25

25
4 QUICK START
Toolbar
Preset
/
Modulation /
Sequencer /
Galaxy /
Sequencer’s
LFO
VCOs settings
Arpeggio’s
rate & gen.
Master & Voice
Modulation
Arpeggio
Assign
Hold Key & Panel
Screen
Mixer HPF/V
CF
VCA
Sequencer
Steps Settings
Envelopes
General info /
440 Hz tone
Import /
Export
Favorite
presets
This chapter will allow you to familiarize yourself with the general functioning of the
Jupiter-8V. This is a summarized presentation of the different parts of the synthesizer.
You will find specified descriptions and details of all the parameters and screenshots in
the following chapters.
Chapter 9, entitled “Some Elements of Sound Design”, is particularly aimed at users that
have no experience with a subtractive synthesizer, and wish to obtain basic knowledge in
this domain.
Effects tabs
Keyboard
transport
volume
Detune
Settings
Settings
Modes
Modes
The Jupiter-8V interface
Outputs
Virtual
Keyboard
4.1 S
TRUCTURE OF THE JUPITER
-8V
The structure of the Jupiter-8V allows you to play two tones at once (called “Lower” and
“Upper” Programs in the terminology of the Jupiter-8). You can play the keyboard in
three different ways:
• “DUAL”: allows you to play the two Programs “Lower” and “Upper”,
simultaneously on the entire keyboard.
• “Split”: allows you to play the two Programs “Lower” and “Upper” divided
separately over the two zones of the keyboard.
ARTURIA – JUPITER-8V – USER’S MANUAL
Page 26

26
• “Whole”: allows you to play the “Upper” Program over the full range of the
keyboard.
These three methods allow you to create very rich sonic combinations.
4.2 U
SING THE PRESETS
4.2.1 Selecting the presets
The Jupiter-8V has two kinds of presets:
4.2.1.1 The Patches
The “PATCH” presets can save:
• The configuration of the keyboard (methods “Whole”, “Dual” et “Split”)
• The division zones of the keyboard (“Split”)
• The types of playing (SOLO, UNISON, POLY1 and 2)
• The midi configuration of the synthesizer
• The settings of the arpeggiator
• The settings of the “Modulation” zone (“BEND”, “MOD”, “PORTAMENTO”…)
• The setting of the master effect (delay, chorus).
4.2.1.2 The Programs
The “PROGRAM” presets are the composed sounds of the Jupiter-8V. They contain:
• All the synthesis parameters,
• All the parameters of the Galaxy module and the sequencer.
• The parameters of the voice effects (“Voices Effects”)
Preset organization of the Jupiter-8V
ARTURIA – JUPITER-8V – USER’S MANUAL
Page 27

27
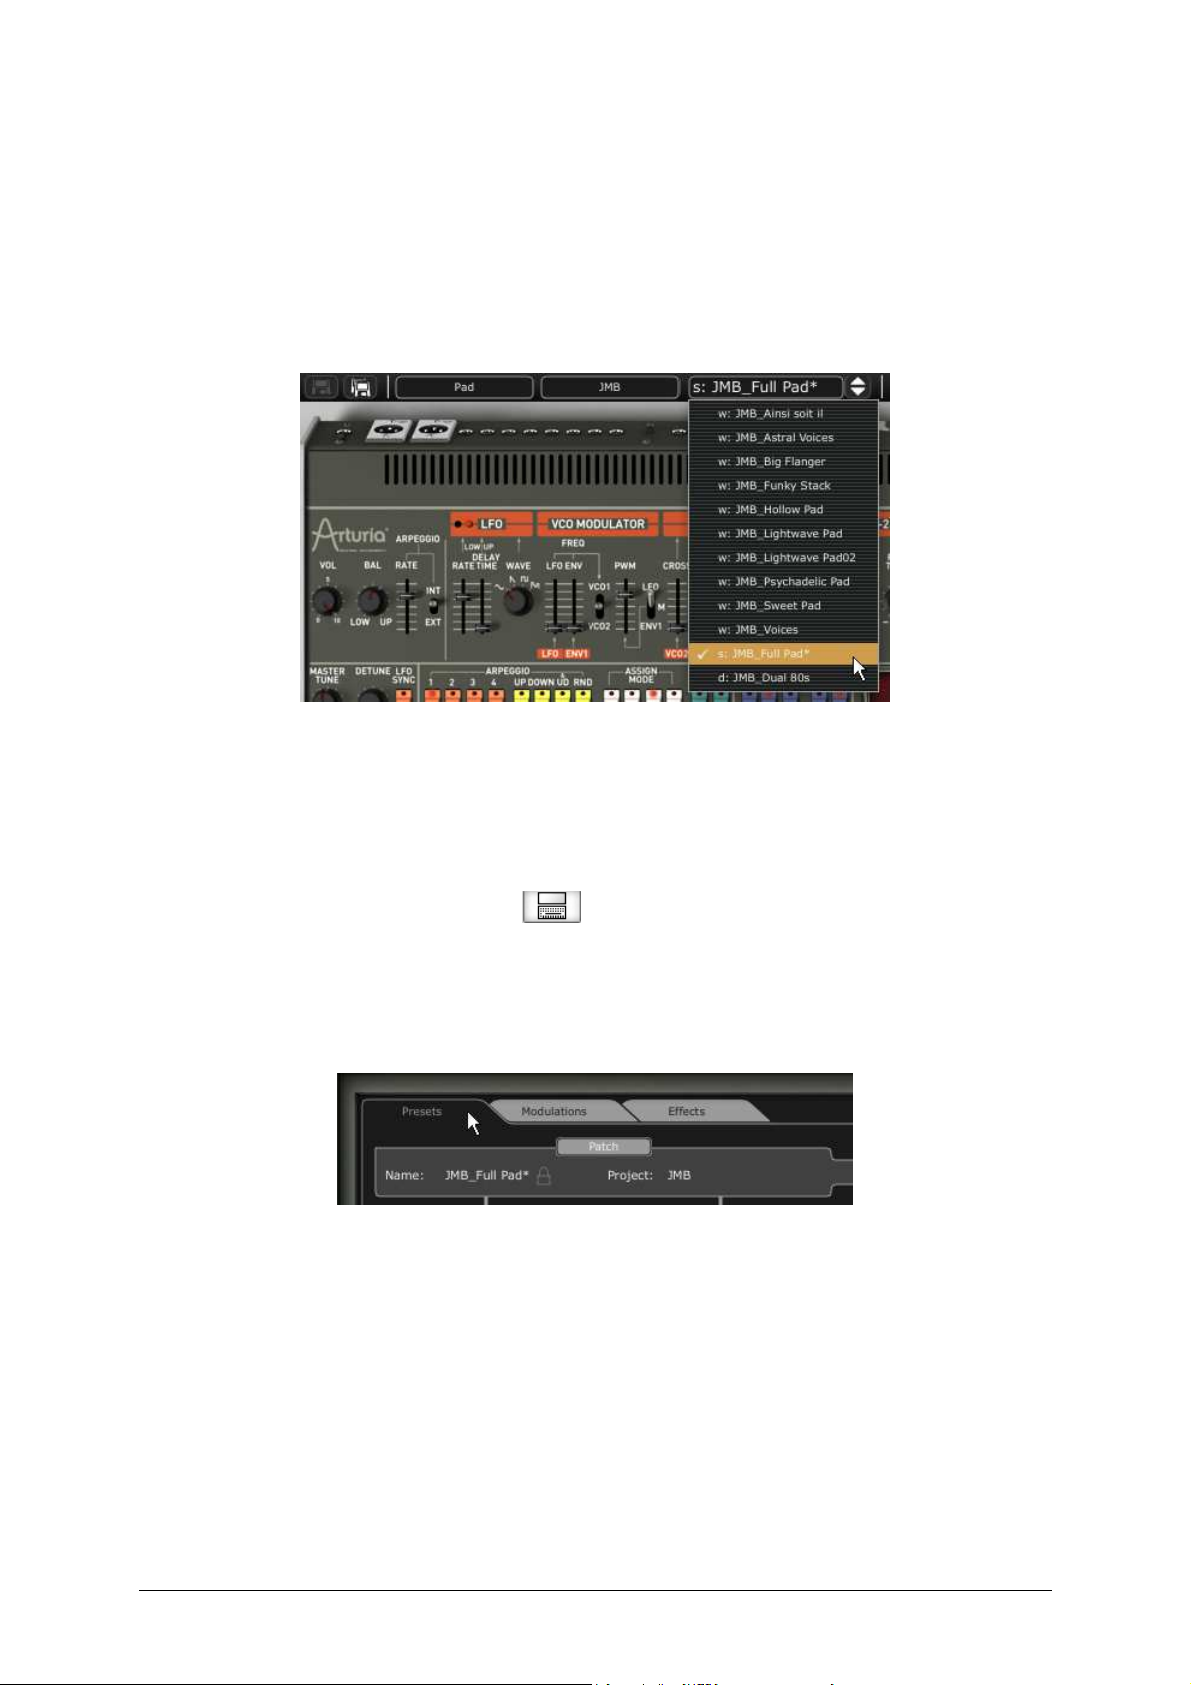
To familiarize yourself with the different included sounds of The Jupiter-8V, we will select
the preset “Full_Pad” situated in the bank “JMB / Pads/ JMB_Full_Pad”.
First, click on the button, on the toolbar, to open the expansion interface.
Then, click on the button “Presets” situated above the programming interface of
the Jupiter-8V. This screen presents the interface in which to choose different
presets.
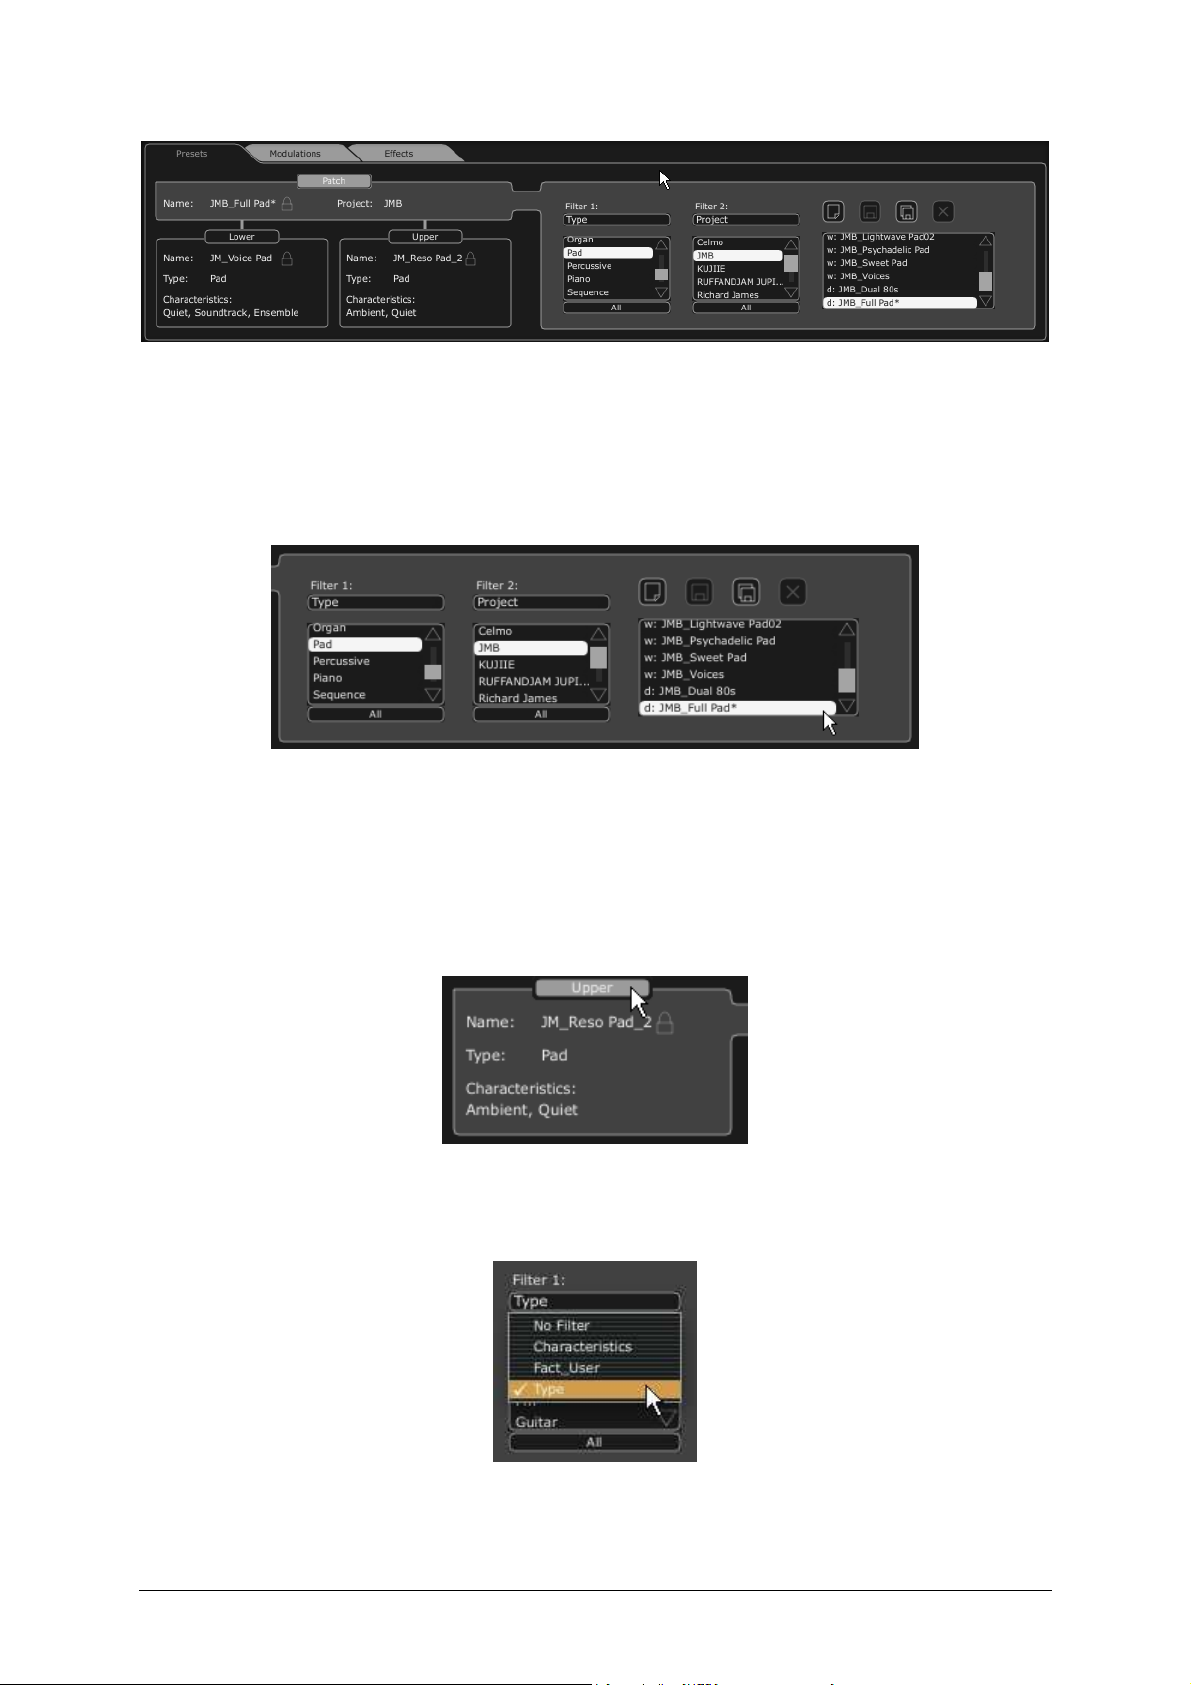
Click on the “presets” tab
o 2 filtering lists allow you to select the search options that will help you find your
preset. If you click on the first one, you will see an unfolding menu appear
indicating the list of the available banks.
In the first filter, choose “Project” then select “JMB”.
In the second filter, choose “Mode” then select “Whole”.
Finally select the preset named “JMB_Full_Pad” preset in the result list.
Select the preset “JMB_Full Pad”
It is also possible to directly select the presets on the toolbar situated on the top of the
Jupiter-8V interface:
Click on the one of the first 2 tabs situated on the tool bar to choose a filtering
criteria – the name of the project for example.
Then click on the third tab to choose the name of the preset that you wish to edit.
ARTURIA – JUPITER-8V – USER’S MANUAL
Page 28

28
Choose a preset patch from the toolbar
The Jupiter-8V is delivered with 400 factory presets that will allow you to become
familiarized with the tones of the synthesizer.
It is also possible to show all the presets when choosing the option “All” in the bank. For example, to see the
bass presets, click on “All” in the selection of the bank and then click on “Bass”.
4.2.2 Editing the presets
To begin, we will start with a very simple manipulation.
Modify the brightness of the sound “Full_Pad” with the “CUT” slider (VCF for Voltage
Controlled Filter). To do this, push or pull the slider. The timbre of the sound will
become more or less “brilliant”. Tune this slider to your liking.
Change the brightness of the sound
In the same way, you can increase the range of oscillator 2 (VCO2 for Voltage
Controlled Oscillator) by an octave with the knob “RANGE”. Choose a value of “4'”.
Tuning the second oscillator
ARTURIA – JUPITER-8V – USER’S MANUAL
Page 29

29
While changing these first settings, you have modified the preset “Full_Pad”. Now you
will be able to save the sound that you have just created.
To choose another destination for this sound, click on the icon “Save As” , then
choose your location. For example, create a new Project while writing your name in
the display.
Click on the display again to give the name that you wish to this new Patch.
Saving a patch
To save a user preset (“Users”), click on the save button “Save”, in tool bar: The
new settings will be saved in the framework of the currently selected preset without
changing the name. If the modified preset is a «factory preset» (factory), it will not
be overwritten and the window «save as» appears to create a user preset.
It is important to change the name of a preset in order to create a new one! Then the name of the preset
that has been edited will be modified.
4.3 T
HE 4 MAIN PARTS OF THE JUPITER
-8V
The Jupiter-8V offers 4 main parts:
• The “Jupiter-8V” interface represents the interface of the original;
• The “PRESETS” manager section;
• The “SEQUENCER / GALAXY” interface to access the SEQUENCER and GALAXY
modules;
• The “EFFECTS” interface to access the effects;
To open the extension panel of the Jupiter-8V, click on the then choose one of the
3 tabs available.
ARTURIA – JUPITER-8V – USER’S MANUAL
Page 30

30
4.4 O
VERVIEW OF THE JUPITER
-8V
USER INTERFACE
The interface of the Jupiter-8V has 54 synthesis parameters and a programmer that
allows you to navigate quickly through the 44 factory presets of the original machine.
The knobs and associated switches to these parameters will allow you to create a nearly
infinite variety of sounds.
These parameters consist of:
• 2 oscillators (VCOs) that deliver the basic audio signal thanks to the waveforms and
allow the tuning of the sound (the frequency). VCO1 can produce triangle, saw tooth,
variable pulse or square signals while VCO2 can produce sine, saw tooth, variable
pulse or noise signals.
• A mixer to mix the 2 VCO’s
• A non resonant high pass 6 dB/oct filter
• A resonant low pass 12/24 dB/oct filter
• An LFO
• 1 amplifier (VCA) allowing amplification of the signal between the filter to the stereo
output.
• Two envelopes (ADSR) to modulate the low pass filter and the VCA
The synthesis parameters
See how to quickly create a polyphonic sound with the Jupiter-8V:
To be able to understand the principle of how to program the Jupiter-8V, we will take a
very simple sound. Select the preset “UJ Brass» in the bank “KUJIIE” / “Brass”. The
synthesis structure of this sound is relatively simple: the sawtooth waveforms of VCO 1
are 2 are active and their signals are directed through the low pass filter. Afterwards the
signal is routed through the mixer, and finally into the amplifier. An ADSR envelope
modulates the cutoff frequency of the filter and a second ADSR envelope modulates the
volume of the amplifier.
ARTURIA – JUPITER-8V – USER’S MANUAL
Page 31

31
Signal path of the Jupiter-8V
Start lowering the cutoff frequency of the low pass filter “VCF”. A sound with less
brightness will result.
To do this, adjust the knob “Cutoff”. (For fine tuning, use the right mouse button or
[Alt]+click on Mac)
Note that the cutoff frequency of the filter is also modulated by an ADSR envelope
(Attack, Decay, Sustain and Release).
Lower the cut frequency of the VCF
To hear the effect of the ADSR envelope on the cut frequency of the filter more
clearly, increase the value of the resonance. This will amplify the filtering effect and
the sound will begin to “ring”.
Increase the value of the resonance
Change the length of the attack of this envelope (“Attack time” ENV1) so that filter
rise time increases more or less quickly when a note is played.
ARTURIA – JUPITER-8V – USER’S MANUAL
Page 32

32
Increase the length of the attack
In the same manner, change the value of the Decay; the filter frequency will
decrease more or less quickly while you will play the keyboard.
The filter envelope “Decay” parameter.
Carry out a short modification on the second “ADSR” envelop to modulate amplitude.
Increase the “Attack” time of this envelope so that the volume of the sound
increases progressively.
Increase the “Attack” time of the amplitude envelope.
Don't forget to save your work by clicking on the “SAVE AS” button, situated on the
Jupiter-8V toolbar.
4.5 T
HE (ADVANCED) MODULATIONS SECTION
In the “MODULATIONS” section, there are sources of additional modulations allowing an
extension of the playing possibilities and of the synthesis. This section offers two types of
interfaces: SEQUENCER is accessible while clicking on the “SEQ” button.
ARTURIA – JUPITER-8V – USER’S MANUAL
Page 33

33
4.5.1 Creating a melodic sequence with the SEQUENCER
The sequencer is accessible by clicking on the “MODULATIONS” tab, situated on the
expansion panel. Click on the “SEQUENCER” icon.
The sequencer is a 32-step “step sequencer”. It allows the creation of several melodic
lines (when one of the three available modulations is affecting the frequencies of the
VCO) as well as creation of dynamic modulations of other parameters such as the cut-off
frequency of the VCF or on the width of the square waveform of the VCO's.
It enables you to affect up to 3 simultaneous parameters.
The step sequencer
In this chapter we will see how to create a simple melodic sequence.
Click on the “MODULATIONS” tab, and then click on the “SEQUENCER” tab to bring
up the interface.
Click on the “SEQUENCER” button
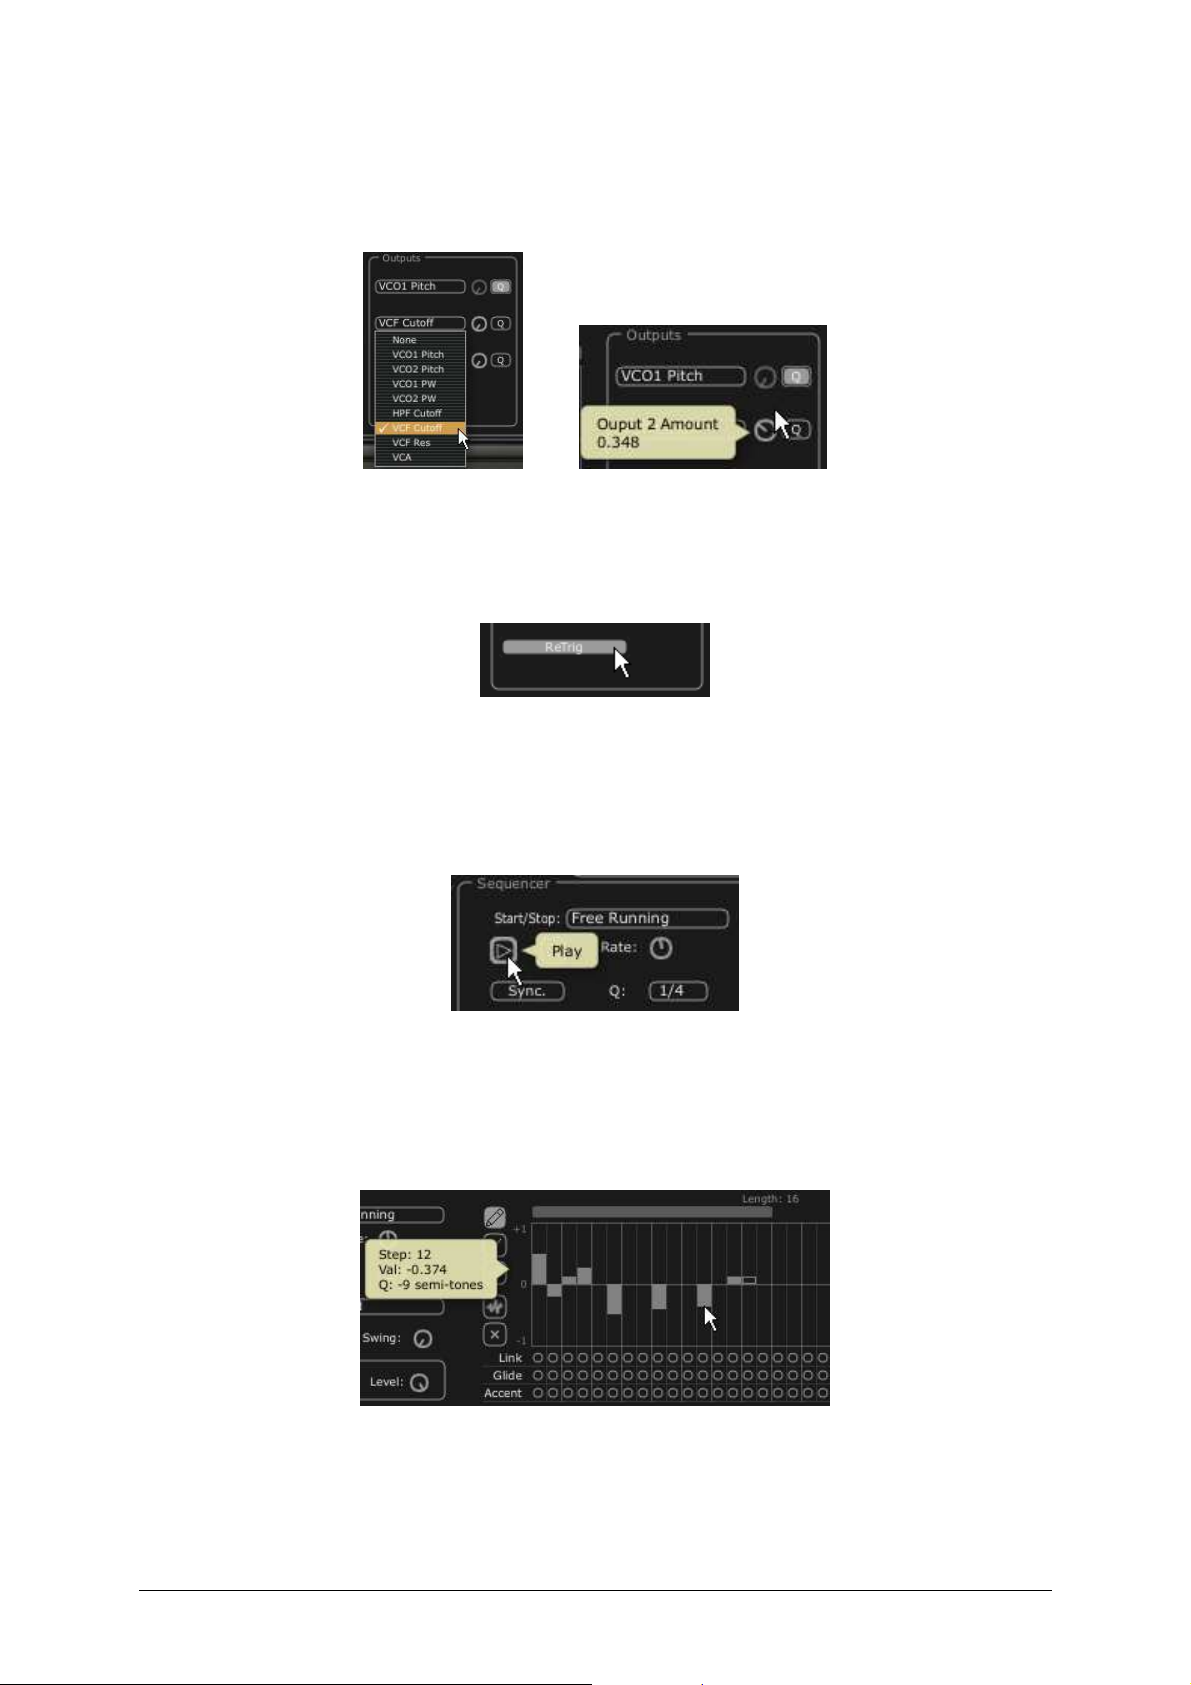
Connect the frequency of VCO1 to the first modulation output and click the “Q”
button to activate the quantize factor by half-tones for the frequency values.
Set Sequencer Output 1
ARTURIA – JUPITER-8V – USER’S MANUAL
Page 34
34
Connect the frequency of VCF to the second modulation output and set the amount
knob to let it blend in to your liking.
Set Sequencer Output 2
Enabling “Retrig” button triggers envelopes at each steps of the sequence
Set Retrig
To start the sequencer, set the “start/stop” mode to “Free running” and click on
“Play”
Play Sequence
Set the value of each step by clicking and dragging the 16 bars up or down to
create your melody.
Set the value of each step
Set the speed of the sequencer with the “Rate” knob.
ARTURIA – JUPITER-8V – USER’S MANUAL
Page 35
35
If it is synchronized with an external sequencer like Cubase or Logic Audio for example, use the
“Quantization” (“Q”) parameter, situated next to the “sync” button in the same section. Choose one of the
tempo divisions to set the speed to your likings.
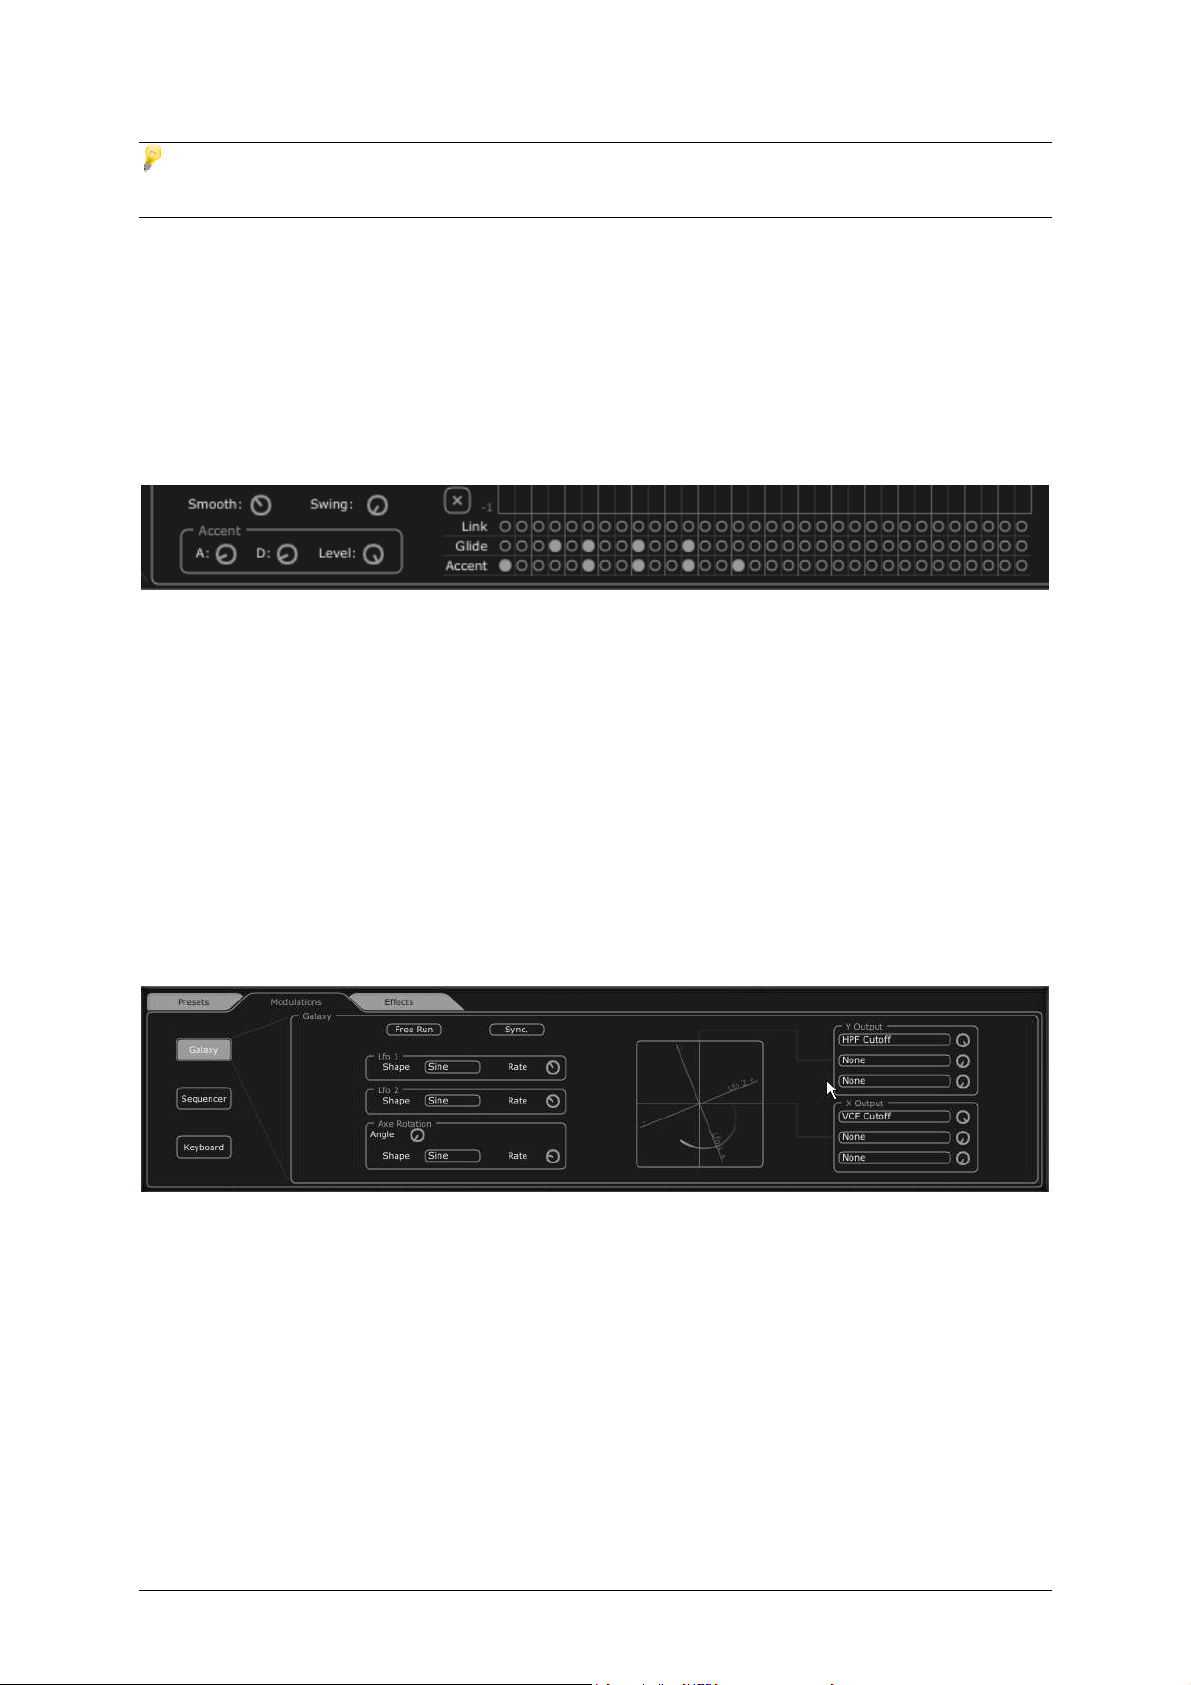
To add additional punch to the sequence, place accentuations on certain notes (“Accent”
- envelopes “Attack and Decay” are effective on the cutoff frequency of the VCF):
Click on the “Accent” button and apply it to the steps you want to accentuate.
Set the intensity of this modulation with the “Level” knob.
Set the attack time “A” and decay time “D” of the envelope to your convenience
The accent settings
There is also the option to add alternative quantization («SWING») to the sequence.
This quantization can be useful for the composition of a piece of «house music», for
example.
4.5.2 Create progressive modulations with the GALAXY unit
Galaxy allows creating very complex modulations thanks to the interaction of 3 LFOs. The
first two LFOs allow inter-modulation with a different parameter on the X and Y axes.
They are represented on the graphical interface of the unit. A third LFO allows modifying
the alpha angle between the 2 X and Y axes.
The «GALAXY» module
Click on the “MODULATIONS” tab then on the “GALAXY” tab to show the interface.
ARTURIA – JUPITER-8V – USER’S MANUAL
Page 36

36
Click on the “GALAXY” tab
Choose a parameter (for example, the HP VCF Cutoff) for the X axis, then adjust
the speed parameter of the LFO to your liking.
Choose a destination for the modulation of the X axis.
Choose a parameter for the Y axis (for example the LP VCF Cutoff) then adjust the
speed parameter of the LFO to your liking.
Adjust the speed of the LFO of the Y axis
See how to apply a modulation to automate the movements of the axis. This will shift the
position in a cyclical way. You will obtain unusual and very progressive modulations
thanks to this unit.
You also can modify this angle manually thanks to the “ANGLE” knob.
Choose the triangle waveform then adjust the speed parameter of the LFO to your
liking.
ARTURIA – JUPITER-8V – USER’S MANUAL
Page 37

37
Choose the triangle waveform for the α (alpha) angle
4.5.3 Control parameters with the Keyboard unit
The Keyboard unit enables you to control parameters via velocity and aftertouch.
Click on the “MODULATIONS” tab then on the tab called “KEYBOARD” to show the
interface.
Click on the “KEYBOARD” tab
Select the parameter to be controlled by the velocity and then set the amount knob
to your liking.
Choice of the modulation destination, setting its amount
Customize how velocity modifies the selected parameters thanks to a curve. The X
axis represents the amount of velocity while the Y axis represents the amount sent
to the parameters. This curve can be controlled thanks to 3 points.
ARTURIA – JUPITER-8V – USER’S MANUAL
Page 38

38
Customize the velocity curve
You can do the same for the aftertouch.
4.6 T
HE EFFECTS
Customize the aftertouch curve
The “EFFECTS” interface of the Jupiter-8V offers unique signal processing possibilities,
allowing you to insert effects in the synthesis chain, between the VCO and the VCF and
between the VCF and the VCA. These combinations allow you to create a wide variety of
new sounds.
Additionally, you will be able to connect two effects “Patches” that are situated at the
audio output of the synthesizer.
The interface of the effects
To familiarize yourself with this function, click on the “EFFECTS” button situated with the
other tabs.
Using the preset filters, choose the Project “JMB” / Type “Bass” / Preset
“JMB_Bass01”.
ARTURIA – JUPITER-8V – USER’S MANUAL
Page 39

39
In order to enrich the sound, the effect “Distortion” has been inserted between the
VCO and VCF (Filter). Change this effect to “No Effect” and back to “Distortion” to
observe the differences of sound.
Choose the effect of “Distortion” in the effects menu.
The interface of the distortion effect is now on screen.
Adjust the distortion amount with to the “Drive” knob and see the changes in the
sounds as well as in the curve.
Change modulation source and amount.
Adjust the mix of Dry/Wet signals.
The “Distortion” effect
Place a second effect between the VCF and the VCA. Take the “Param EQ”. Certain
parameters of this effect will be modulated by the LFO in order to create an effect similar
to phasing. The Param EQ is composed of 4 filters: Band 1 is a low shelving filter, Band 2
and 3 are middle peaking filters and Band 4 is a high shelving filter. They can be
activated or deactivate by clicking on the “Band 1/2/3/4” buttons.
• Adjust the volume of the frequency of “band 3” with the knob “G” (GAIN) or simply
modify the point in the gain curve
Set the volume of the frequency for « band 3 »
ARTURIA – JUPITER-8V – USER’S MANUAL
Page 40

40
Apply a modulation on the frequency of band “3” with the LFO. To do that click on
the button “Mods” situated on the right of the EQ interface. This will show you the
possible modulation connections available.
Click on the display situated next to “Band3” / “F” to open the menu of the
modulation sources. Choose the “LFO”.
Increase the level of the knob “Modulation amount” situated next to the display to
hear the modulation on the frequency of the band 3.
4.7 T
Increase the “Modulation amount” potentiometer
HE “PATCH” SECTION OF THE EFFECTS
The section of the “patch” effects allows you to add 2 master effects to your sound. They
are accessible while clicking on one of the 2 displays situated down below to the left of
the interface “Effects”. Choose the “St Chorus” for the first effect and “St Delay” for the
second one. The editor will appear to the right (as for the effects “Voices”).
Click on the display “patch”
4.7.1 The chorus
The Chorus effect allows doubling the original sound with slightly out of tune copies in
order to make a deeper and livelier sound. Three types of stereo chorus are available,
from simple to very wide.
Activate the “ON/OFF” button of the Chorus in the effects section, placed to right of
the tool bar.
ARTURIA – JUPITER-8V – USER’S MANUAL
Page 41

41
Activate the button «ON/OFF» of the Chorus
Adjust the “Dry/Wet” knob of the Chorus in a manner that is balanced between the
original sound and the treated sound.
Next, turn the “Rate” knob of the Chorus to set the speed of the oscillations
affecting pitch.
Finally, set the stereo width of the Chorus by turning the “Spread” knob.
The settings of the chorus
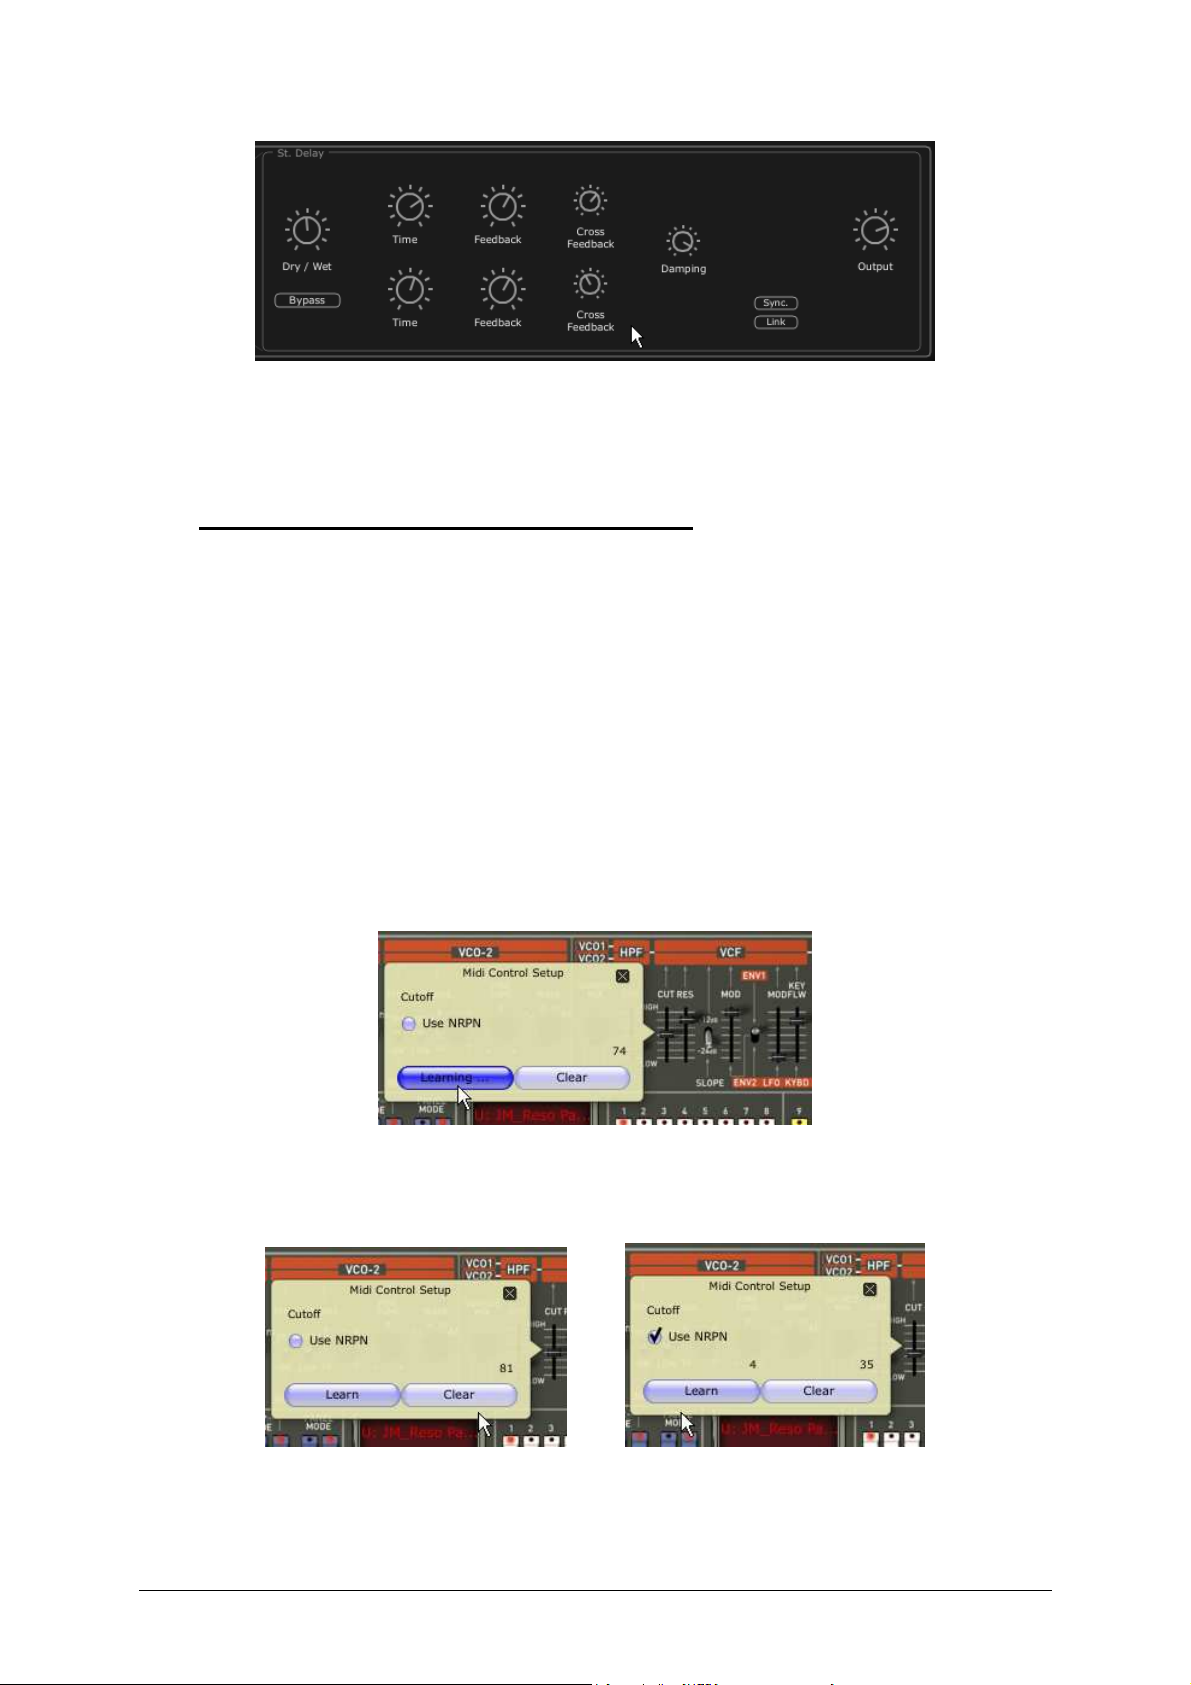
4.7.2 The delay
The Delay is a stereo echo effect that adds space to your sound. It possesses
independent settings for speed and the number of repetitions on the right and left side.
Therefore it is possible to create a big number of rhythmic combinations between the
repetitions. The speed of the Delay can also be synchronized to the MIDI tempo of your
sequencer. Let’s use the “JMB_Bass1” example again and see how to use the effect on
this sound:
Activate the “Delay” button on the tool bar. The effect is activated
Set the “Dry/Wet” knob of the Delay in a manner to balance between the original
and the treated sound
Turn next the 2 knobs “TIME L / TIME R” to set the speed of the repetitions for the
right and left side.
It is also possible to set the number of repetitions (Feedback) for each stereo side
(“Feedbk R” and “Feedbk L”).
ARTURIA – JUPITER-8V – USER’S MANUAL
Page 42
42
The settings of the delay
4.8 R
EALTIME CONTROLLERS AND
MIDI
ASSIGN
As its brilliant sounding ancestor, The Jupiter-8V is particularly adapted for playing in real
time. One of the big evolutions in comparison with the original is the possibility to assign
any knob of the Jupiter-8V to an external midi controller.
For example:
Click on the knob “Cutoff” while holding the [Ctrl] key ([Command] on Mac). The
MIDI assign option appears.
Click on “Learn” then move the controller of your choice (the knob of modulation for
example). The knob of the Jupiter-8V will begin moving at the same time.
Then you will be able to record the movements of your MIDI controller in your MIDI
sequencer or simply manipulate the sound in real time with your controller live.
”Cut-off” parameter waiting for the control to be assigned
MIDI CC #81 assigned MIDI NRPN MSB:4 LSB:35
ARTURIA – JUPITER-8V – USER’S MANUAL
Page 43

43
In addition to the “Learn” button, midi assignments can be set by clicking on the midi
channel labels and “Use NRPN” checkbox.
To save the setting that we have just carried out during this chapter, click on the button
«Save» situated on tool bar.
The MIDI settings will only be saved when you quit the application of the Jupiter-8V. This is the same with
the stand alone version and the plug-in version as well.
ARTURIA – JUPITER-8V – USER’S MANUAL
Page 44

44
5 A UNIQUE SYNTHESIZER, WHY ?
5.1 T
The Jupiter-8 is capable of creating very versatile sounds. The Jupiter-8 sounds the way
it looks, ‘sleek and polished’. It offers oscillator sync, cross modulation, a switchable
12dB/24dB filter and polyphonic portamento. It also features a superb arpeggiator. The
sound design opportunities are virtually endless.
The filter (VCF) structure is one of a special kind. It is composed of two independent filter
units, a non-resonant 6 dB/Octave high pass filter and a resonant 12 or 24 dB/Octave
low pass filter. The combination of the non-resonant high pass filter with the resonant
low pass filter, enables creating very characteristic Roland style sounds. This structure
can also be found on the Roland Juno series.
The Jupiter-8 is often considered the biggest and fattest of the Roland Jupiter family. The
Jupiter-8 offers eight analog voices. The sound of the Jupiter-8 is often referred to as fat
and crispy clear at the same time. The Fast envelopes make it possible to create punchy
sounds. This is great for bass and stab sounds in particular. The colorful interface with
lots of sliders and knobs is inviting for sound designers and producers. Furthermore, it
was one of the first synthesizers that offered a keyboard split and layer possibility. In
fact, the Jupiter-8 complemented its competition by bringing something different.
In 1982, Roland released an upgraded Jupiter-8, the JP8A. It upgraded the Jupiter-8 with
a number of enhancements. The most noticeable changes where an improved DAC with a
higher resolution of the auto-tuning system from 12- to 14-bit, and a brighter LED
screen. The Jupiter-8 has become one of the most revered of all synthesizers.
HE ROLAND JUPITER
-8
The electro-pop community became quickly convinced by the qualities of the Jupiter-8.
'Relax', by Frankie Goes to Hollywood was produced incorporating a Jupiter-8, and
players such Vince Clarke, John Foxx, Howard Jones and Martyn Ware also used it
enormously. The path to classic status of the Jupiter started there.
5.2 T
Aside from recreating the original in every aspect, the Jupiter-8V adds many new
functions which make it even more attractive to use. The Jupiter-8V offers various new
editing possibilities which can result in sounds that were never heard before.
The galaxy module creates very complex modulations with interaction of 3 LFO’s. The
first 2 LFO's can each modulate a different parameter on a X/Y axis. The third LFO can be
set to rotate the X/Y axis at a certain speed. This is beautifully visualized in the interface
of the Jupiter-8V and enables a totally new dimension for sound design.
Furthermore the Jupiter-8V offers two connections of «Voice» effects. The connections of
the effects can be made inside the synthesis chain, between the VCO and the VCF and
between the VCF and the VCA. These effects can be modulated by the different available
sources of modulations such as the LFO or the envelopes. Combinations of effects and
modulations provide the Jupiter-8V with even more sonic power. Two « PATCH » effect
HE ARTURIA JUPITER
-8V
ARTURIA – JUPITER-8V – USER’S MANUAL
Page 45

45
modules are available on the end of the synthesis chain. The two modules are placed on
top of the output of the VCA, and cannot receive external modulations. Amongst these
«PATCH» effects are a delay, reverb, flanger and a phaser.
Another addition is the sequencer which is a 32-step «step-sequencer» It allows the
creation of several melodic lines as well as creation of dynamic modulations of different
parameters such as the cutoff frequency of the VCF or the width of the square waveform
of the VCO's.
There is a user friendly preset and patch structure for easy yet expandable management
of the sounds. It is possible to add characteristics to sounds to be saved. This provides
an easy and effective way to browse patches and find the most relevant one quickly.
As a matter of fact, every single setting can be saved and recalled in a heartbeat. This
allows perfect integration with your project and saves a lot of time compared to the
original Jupiter-8.
The Jupiter-8V delivers a sound that is full of character and highly editable. It can be the
perfect companion on every kind of musical project, with the ease of use of the 21st
century.
ARTURIA – JUPITER-8V – USER’S MANUAL
Page 46

46
6 THE INTERFACE
6.1 T
The tool bar consists of an ensemble of essential icons for the Jupiter-8V organized from
left to right allowing you to:
• Access drop menus offering filters with the following criteria:
• MIDI activity light
• Choice of MIDI channels:
• The number of polyphonic voices
• Playing Modes:
OOL BAR
o Characteristics
o Factory / User
o Mode (Whole / Dual / Split)
o Project
o Type
o All
o 1 to 16
o Poly/Mono Low: when legato between two notes, the lowest note gets priority
o Mono High: when legato between two notes, the highest note gets the priority
o Mono Last: when legato between two notes, the last note played gets the
priority
• Unison: number of voices
• CPU meter
• “Open Sound Map” button
• “Open” and “Close” buttons (access to preset, advanced modulation and effects
panels)
Tool Bar
ARTURIA – JUPITER-8V – USER’S MANUAL
Page 47
47
6.2 U
SING THE PRESETS
The presets allow saving and recalling the sounds of the Jupiter-8V. A preset contains all
the new settings of the various controllers to reproduce a sound. In the software version,
just like on the original one, the presets are classified in two categories of presets: The
“Patches” and the “Programs”.
6.2.1 The types of presets
6.2.1.1 The patches
The “PATCH” presets can save:
• The modes of playing (“Whole”, “Dual” or “Split”)
• The settings of the keyboard (“Split”)
• The types of playing (SOLO, UNISON, POLY1 et 2)
• The MIDI configuration
• The settings of the arpeggiator
• The modulation module settings (“BEND”, “MOD”, “PORTAMENTO”…)
• The master effect settings (delay, chorus).
6.2.1.2 The Programs
The “PROGRAM” presets are composed of sounds from the Jupiter-8V. They contain:
• All the synthesis parameters,
• All the Galaxy, Sequencer and Keyboard parameters
• The voice effects parameters (“Voices Effects”)
Patch/preset window
The Jupiter-8V is delivered with several factory sound banks. Of course, it is also possible
to create sound banks yourself, containing any number of banks and presets. The factory
sound banks are not directly modifiable. Nevertheless it is possible to modify a sound
based on a factory preset and save it in a “user” bank.
6.2.2 Selection of a preset PATCH or PROGRAM
The Preset PATCH banks of the Jupiter-8V are permanently selectable from the left part
of the toolbar.
ARTURIA – JUPITER-8V – USER’S MANUAL
Page 48
48
You have two options to select a preset:
6.2.2.1 Select from the toolbar
The fastest way to select a preset is to click on the “preset” buttons on the toolbar. Two
preset filter windows, situated on the left of the preset screen allow preset selection
according to available criteria.
Select a preset from the toolbar
6.2.2.2 The “PRESETS” screen
The second solution is to use the “PRESETS” screen to select a preset PATCH or
PROGRAM.
To do that, open the extension panel (click on the button) situated on the left right
of the tool bar.
Then, click on the “PRESETS” tab to open the presets page. This page offers you two
possibilities.
Click on the preset tab
This page shows two distinct sections:
• The left portion allows selection of presets by category (PATCH / PROGRAM
Lower or Upper).
• The right portion allows searching with the help of two filter criteria.
Four buttons situated above the choice fields, allow you to create, save, save as or delete
a preset.
ARTURIA – JUPITER-8V – USER’S MANUAL
Page 49
49
The Preset page
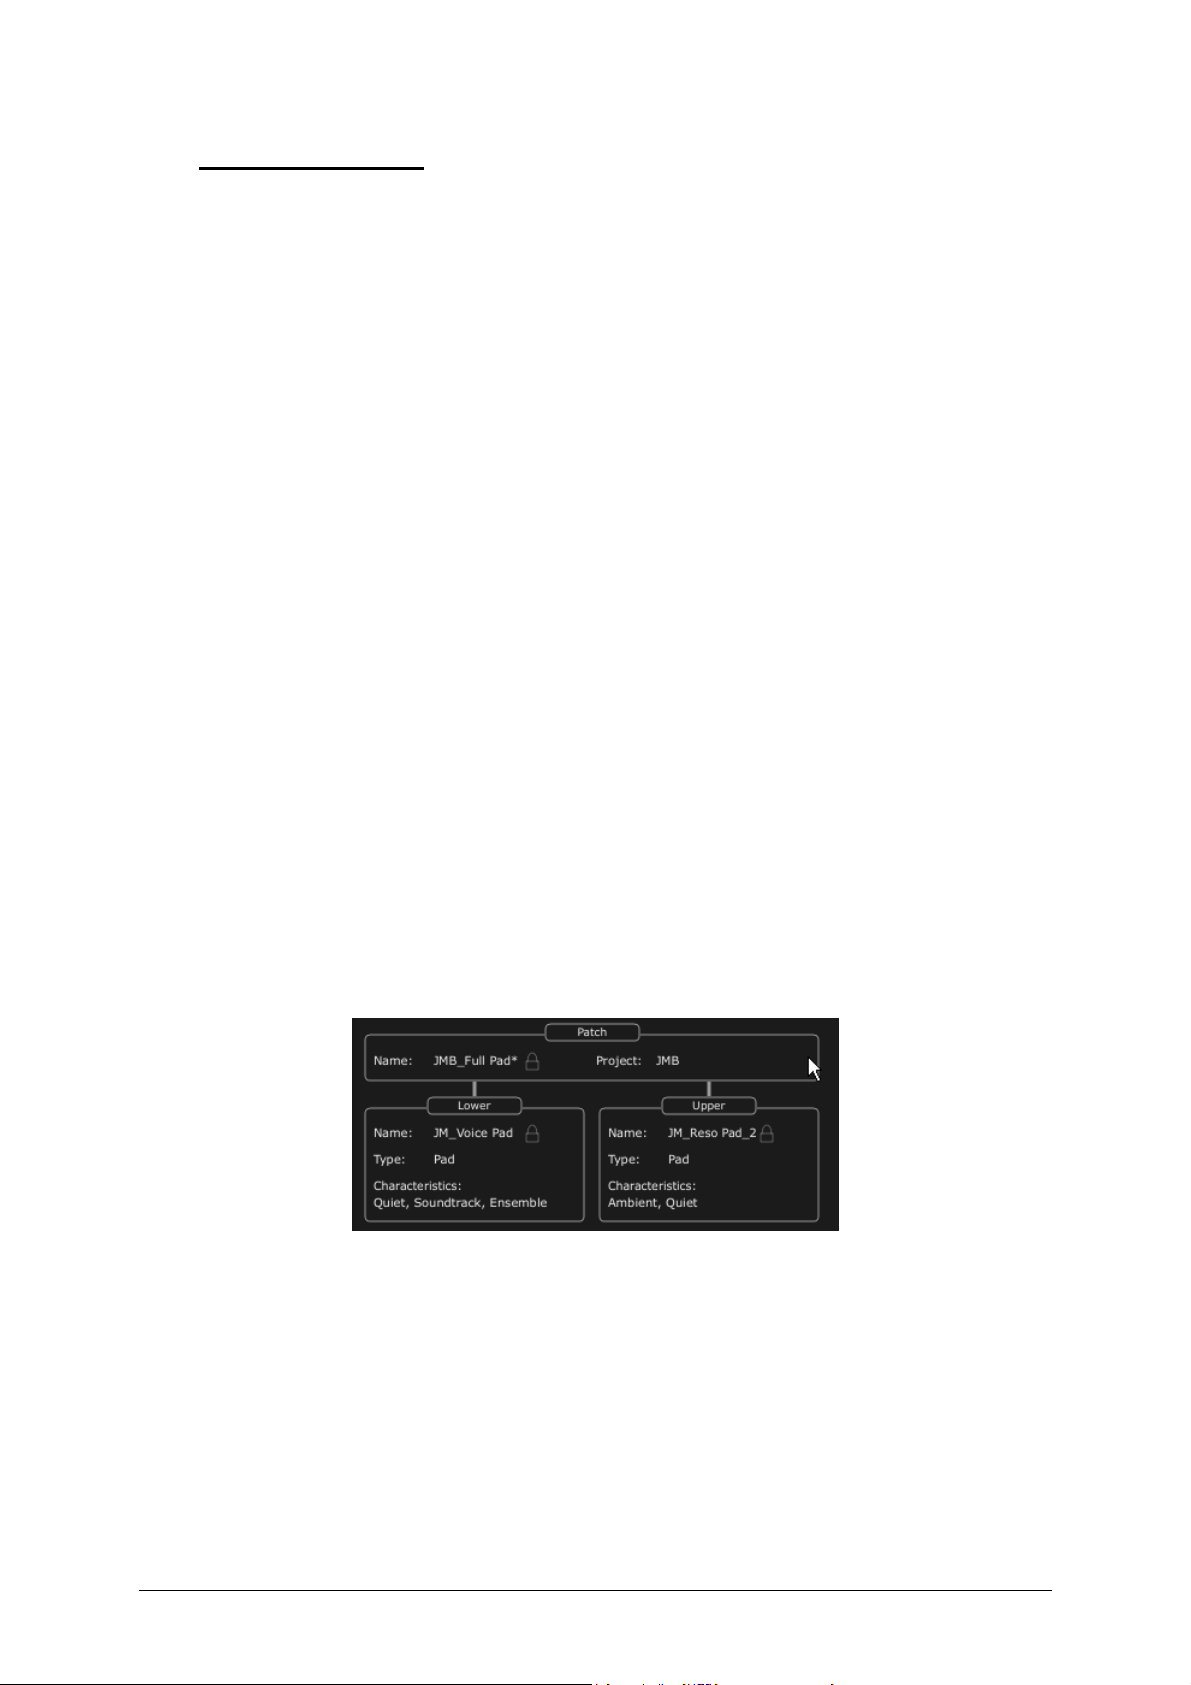
Once the filters criteria are set, you can select Patch presets in the resulting list on the
right of the page. Click on “PATCH”, then select criterion (for instance, Project: JMB,
Type: Pad) and finally choose a preset in the list.
Selection of a preset from the same bank
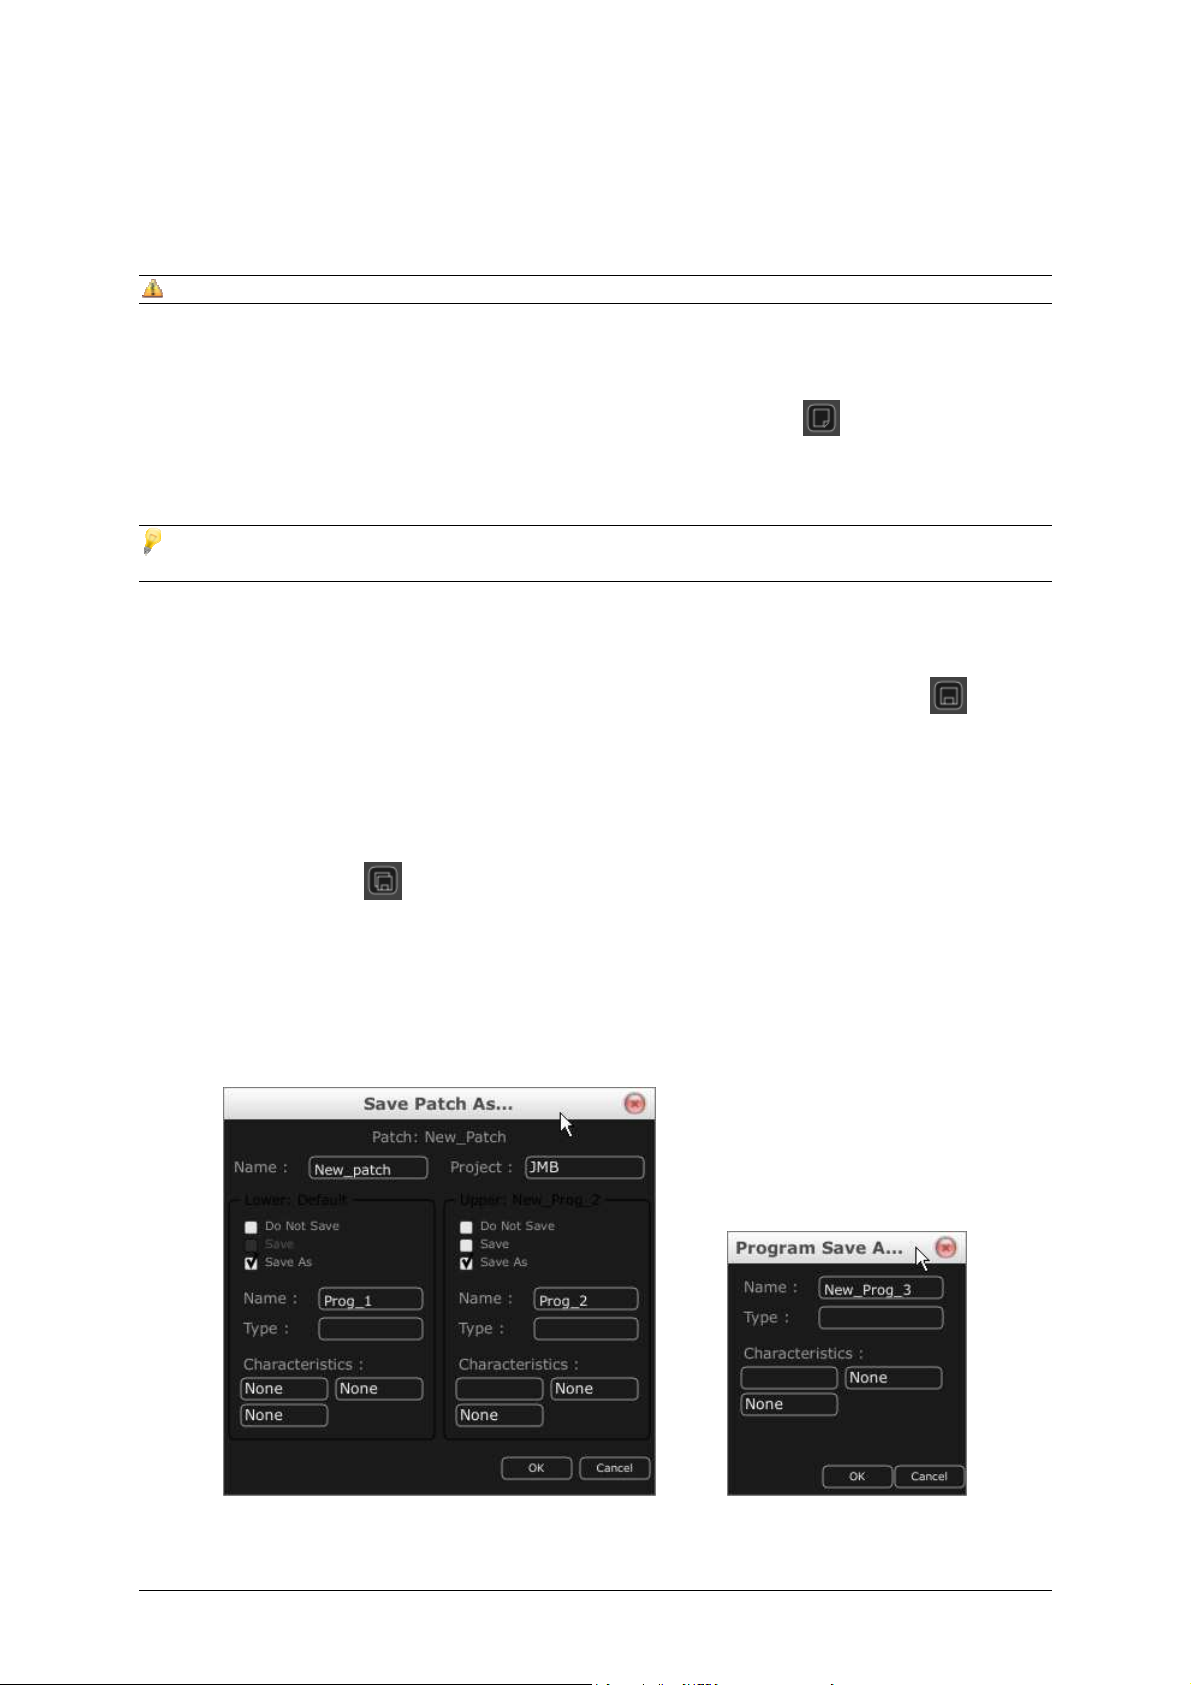
To select a preset “PROGRAM” click on the “UPPER” or “LOWER” button. The name and
the filter criteria of the preset are shown in the field above the button. A list of selection
filters appears. After selection of the filter categories of interest, simply select the preset
by clicking on the preset name.
Click on the button “upper”
Selection of the filter criteria
ARTURIA – JUPITER-8V – USER’S MANUAL
Page 50
50
The choice of filters is the same as with “PATCH” presets.
In the unfolding menu, the choice “No filter” is particularly useful to quickly pass through
presets of the same type.
If a preset is modified, this symbol “*” will appear next to the name of the preset.
The key mode must be in Dual or Split in order to get access to the Lower “Prog” part.
6.2.3 Creating a new preset
To create a new preset (PATCH or PROGRAM), click on the button, the name:
“New_Patch” or “New_Prog” will appear. Then you can work on the parameters of the
sound, to save the sound under the same preset name while clicking on the save button.
You can also change the name of the new preset by clicking on the name.
The new preset will always be a patch of the type WHOLE by default. To change the preset mode, click on
one of the two other types you would like to choose.
6.2.4 Save a user preset
To save your current settings of the preset, click on the “Save” button on the
toolbar.
6.2.5 Save a user preset using the “Save as” option
To save your current settings of the preset under another name, click on the «save as»
button on the toolbar . A dialog window will appear. It will let you set the name of the
preset PATCH and set the search filter type of the preset “PROJECT”. Click on “OK” to
save. At this point, the preset PROGRAM will not be modified, even if you changed the
synthesis parameters. To save a preset PROGRAM, check “Save As”. You can fill in the
name of the project and the name of the patch to define the search criteria. You can also
click cancel to exit this menu without saving.
“Save As” and the save menu
ARTURIA – JUPITER-8V – USER’S MANUAL
Page 51

51
When you work from a factory preset, it cannot be overwritten. Clicking on the “Save” button will not
replace the factory preset, but will automatically open the “Save As” dialog to save it as a user preset.
6.2.6 Delete a preset
To delete a selected PATCH or PROGRAM, click on the “Erase” button . A dialog
window will appear. Click on “OK” to delete the preset.
6.2.7 Import / Export a preset bank
It is possible to import new banks of presets for the Jupiter-8V.
To import a new “project” bank, click on the import button situated on the right of the
interface of the Jupiter-8:
Preset “Import” button
When this button is selected, a window appears, allowing the choice of a preset bank for
the Jupiter-8V. Choose a file to import, (it will be shown as a “xxx.j8e” file) and click on
“Open”. The new bank of presets will appear automatically among the available “Project”
banks.
The Jupiter-8V offers the possibility to export user created sounds in order to use them
on other machines, or to share them with other users. It is possible to export a preset, a
sub-bank, or a complete bank. To export the “project”, click on the export button for the
preset-bank on the tool bar.
Then select the type of export that you want to carry out (bank, sub-bank or preset), in
the list. A window appears, allowing the choice of a destination folder and a file name for
the bank to export:
ARTURIA – JUPITER-8V – USER’S MANUAL
Page 52

52
Export a preset “project” bank
6.3 U
SING THE CONTROLLERS
6.3.1 Knobs
Generally DAWs offer several knob control modes.
The default control mode for knobs with the mouse is the circular mode: click on the
knob and turn around it in order to change the value of the controller. The circular mode
gives high precision in the manipulation of controls: The further the mouse goes from the
knob, the higher the precision of the setting.
In linear mode, the knob can be set only by vertically moving the mouse, not by going
around it. Like the sliders, it is possible to obtain a higher precision by right clicking or
[Alt]+click on the knob concerned.
The linear mode can sometimes be simpler to use than the circular mode, although we
can lose in precision (the precision is limited by the number of vertical pixels on the
screen on which the mouse movements are being evaluated). Movement to linear mode
is available in the options of your DAW. In Cubasetm, for example, this choice can be
found via the “File/Preferences/Edit/Controls” menu, and is found in the “General” tab of
the window.
6.3.1.1 Potentiometers
As this name indicates, this type of control can be rotated. They can set a continuous
value (frequency of the VCO, balance programs for Lower and Upper keyboard for
example) or a set a parameter for an individual selection (choices of the wave forms of
the oscillators or LFO, for example)
ARTURIA – JUPITER-8V – USER’S MANUAL
Page 53

53
A rotary knob
6.3.1.2 Sliders
These controls are vertical and linear. They set a continuous setting (cutoff frequency of
the VCF filters, or settings of the two ADSR envelopes, for example)
A vertical slider
6.3.2 Buttons
There are several types of buttons on the Jupiter-8V. Some activate or deactivate a
parameter (activation of the arpeggiator, for example). A red led on the button indicates
that the parameter is active.
A selection button
6.3.3 Switches
There are several types of switches on the Jupiter-8V. Certain ones activate/deactivate a
parameter. For example, one is used to turn “ON” or “OFF” modulation towards oscillator
synchronization. To change its state, simply click the switch.
A switch
6.3.4 Pitch Bend wheel
The Pitch bend controls the frequency/pitch of the synthesizer oscillators. Simply click on
the wheel while playing a note on the master keyboard or from a sequencer, then move
ARTURIA – JUPITER-8V – USER’S MANUAL
Page 54

54
the mouse horizontally to modify the pitch. The wheel comes back to its initial position at
the release of the mouse.
The Pitch Bend Wheel
6.3.5 Modulation button
The modulation button applies the modulation created by the LFO, according to the
modulation rate set by the LFO. The manipulation of this button is very simple:
Click on it to apply the modulation then click again to stop it.
To adjust the rate of modulation, set the linear potentiometer called “LFO mod”
situated on the left side of the pitch bend. Using this you can control the rate of
modulation towards the oscillators’ pitches (VCO) to obtain an effect of vibrato, or
towards the filter (VCF) to obtain a “wah wah” effect.
The modulation button
6.3.6 Virtual keyboard
The keyboard lets you listen to the synthesizer sounds without the need for an external
master MIDI keyboard, and without programming a melody in the sequencer. Just click
on a virtual key to hear the corresponding sound. There is no MIDI output for the
keyboard.
6.3.7 LCD Screen
The LCD screen on the extension panel of the Jupiter-8 allows selection of presets,
editing of the sequencer, as well as the Galaxy interface, the keyboard settings and the
effects.
To open the extension panel, click on the “Open” button situated on the tool bar.
To choose which function to edit, click on one of the buttons situated on left top
corner of the screen. (« PRESET » for example). The
« SEQUENCER/GALAXY/KEYBOARD » screen has two tabs that let you edit the
sequencer and the galaxy module.
ARTURIA – JUPITER-8V – USER’S MANUAL
Page 55

55
LCD screen
6.3.8 MIDI Control
Most of the knobs, sliders and switches on the Jupiter-8V can be manipulated with
external MIDI controllers. Before anything else, make sure that the MIDI device is
correctly connected to the computer, and that the sequencer or the standalone Jupiter8V application is correctly configured to receive MIDI events coming from the device.
Every instance of the Jupiter-8V receives MIDI events transmitted on a given channel.
This reception channel is defined in a global manner for the synthesizer, either through
the sequencer, or in the standalone Jupiter-8V application. The Jupiter-8V can receive up
to 120 different MIDI controls. It is possible to choose a control for each knob. For this,
click on the knob while holding down the Control key. A configuration window appears
and will allow you to choose a MIDI control number. You can also click on the “Learn”
button and move one of your physical MIDI controllers. In this case, the control number
will be detected and configured automatically. To deactivate the MIDI control of a knob,
simply uncheck the “Active” option in the MIDI control window.
MIDI configuration window of a knob
6.3.9 The preference screen
On this screen, you are able to:
• See the version of the software
• Read the credits
• Activate or deactivate the pop-up windows animations
To open this window, click on the “About” button situated on the bottom right of the
Jupiter-8V interface.
ARTURIA – JUPITER-8V – USER’S MANUAL
Page 56

56
6.4 T
HE SOUND MAP
The sound map is an innovative preset explorer which offers an easy and revolutionary
way to locate and choose a preset on a map area, thus simplifying preset management
and making it much quicker to find an appropriate sound.
The sound map also offers a brand new interface for creating new sounds thanks to
morphing feature works between four presets.
The Sound Map offers three views:
• The MAP main interface: the sound map classifies the presets thanks to statistical
methods in order to organize the sounds on a map from their own audio
characteristics.
• The LIST presets list: this page offers a more classical interface to classify the
presets using lists and filters to find the desired sound.
• The COMPASS morphing interface: this page allows creating new sounds in real
time thanks to a morphing result with up to 4 presets.
Let’s have a deeper look in the Sound Map different views:
o To open the main Sound Map interface, click on the SOUND MAP button located
in the toolbar.
o To open the preset list page, click on the LIST button, on the top right of the sound
map interface.
Open the List interface
o To open the preset morphing page, click on the COMPASS button.
Open the Morphing interface
o To return back to the main sound map interface, click on the MAP button
Return back on the map interface
ARTURIA – JUPITER-8V – USER’S MANUAL
Page 57

57
6.4.1 The MAP main interface
The Sound Map main interface shows a map where all the presets of the Jupiter-8V2 are
spread out, organized by their different types of sound and their own audio
characteristics.
The Map interface
The types of presets are represented by different geometrical symbols and colors for an
easy way to locate them:
“Bass” sounds
“Brass” sounds
“EFX” sounds
“FM” sounds
“Guitar” sounds
“Keyboard” sounds
“Lead” sounds
“Pad” sounds
“Percussive” sounds
“Sequence” sounds
“Strings” sounds
“Others” sounds
• To select and to listen a preset, directly click on one of the icons, anywhere you
want on the map area. The icon is now highlighted in red. If you hold a few seconds
on the selected preset, a popup appears and indicates the name of the preset.
ARTURIA – JUPITER-8V – USER’S MANUAL
Page 58

58
Select a preset
You can create new presets thanks to an exclusive real time morphing feature:
o Click between several presets and drag the mouse. Four red arrows drawing a cross
appear linking the group of four presets. The sound of the Jupiter-8V2 will modified
with regards to the distance between the mouse pointer and the selected presets.
Get closer to a preset to make the synth sound like this preset does.
Morphing between a group of presets
o You can now drag your mouse between those presets. The green arrow shows you
the starting point of your motion.
o When you release the left mouse button, you can play the resulted sound and, if
you wish, you can save it on a Jupiter-8V2 user bank.
In this way it is very easy to quickly get some new and exciting sounds without
programming anything on the synthesizer interface.
6.4.2 The Sound Map overview
On the top right of the Sound Map main interface, you can see an overview of this map.
You can use the map overview for navigating into the map and to zoom in or out inside
of the map area.
ARTURIA – JUPITER-8V – USER’S MANUAL
Page 59

59
The map overview interface
o To navigate into the map, click inside of the red square and drag it on the map area
to view other sections of the Sound map.
o To zoom in the view on the sound map, click on the Zoom slider, under the
overview window, and drag it towards the right to increase the size of the map.
o To zoom out the view on the sound map, click on the Zoom slider, and drag it
towards the left to decrease the size of the map.
The zoom slider
You can also use the “ZOOM +” or “ZOOM -” buttons, under the slider, to increase or decrease the map size
step by step (by a factor of 1).
o Clicking on the FIT ZOOM button allows resizing the map to its global size.
6.4.2.1 The instrument type filter window
On the right of the map main interface, an instrument type filter window allows you to
choose which type of preset you want to see (or to hide) on the map. By default, all
types of presets are selected.
The instrument type filter
To select an individual or a group of instrument types:
ARTURIA – JUPITER-8V – USER’S MANUAL
Page 60

60
o First click on the All button , on the bottom of the type filter window: this
will hide all the instrument types from the sound map.
o Then, select the type(s) you want to see by clicking on the corresponding square
box(es). A check appears on the selected box(es) and the type(s) of preset appears
on the map interface.
Show pad presets
This is a good way to simplify and refine the preset search.
• If you click again on the All button, all types of presets will be displayed on the
map.
6.4.2.2 Preset snapshot memories
You can select up to four presets, anywhere on the map interface, and save them on up
to four snapshot memories. You will be able to use those four presets on the COMPASS
view to create new sounds by morphing feature (see below for more details on this
feature).
Of course, you can save any kind of preset on these four snapshot memories.
Select a snapshot memory
To save a preset on a snapshot memory:
o Select a preset on the sound map main interface.
o Hold the [Shift] key and select one of the four snapshot memory buttons. The
snapshot memory button is now highlighted in red.
o Repeat the same actions if you wish to save presets on the three other snapshot
memories.
o When all memories already contain a saved preset, you can replace them with other
presets.
o Select another preset anywhere on the Sound Map interface, click on any of the 4
snapshot buttons while pressing the [Shift] key.
ARTURIA – JUPITER-8V – USER’S MANUAL
Page 61

61
6.4.3 The LIST preset manager
The list preset manager offers a more traditional way to explore presets using a list
interface in which the presets are classified and filtered in order to simplify preset
management.
o To open the list interface, click on the LIST button located on the toolbar of the
Sound Map.
Click on the LIST button
The list preset interface is very simple; you can see four columns showing, from left to
right:
The preset names
The instrument type
The name of the sound designers
A reminder of the presets added to a snapshot memory
Preset list interface
All this data is classified by alphabetical order.
o To select a preset, simply browse the list and click on the name of a desired preset.
o You can reverse the order (from A to Z or from Z to A) by clicking on the column
title: an ascendant or descendant arrow shows you the order type.
ARTURIA – JUPITER-8V – USER’S MANUAL
Page 62

62
Inverse the order of the instrument types
6.4.4 The COMPASS morphing interface
The Morphing page is an independent module allowing you to quickly create some new
sounds thanks to a real time morphing feature between the four selected presets saved
on the snapshot memories.
The four presets are placed on the four cardinal points of the compass.
The Morphing interface
o To open the Morphing page, click on the COMPASS button, located on the toolbar of
the Sound map.
To create a new morphed sound from these presets:
o Click anywhere on the centre of the compass area (four red arrows appear
converging to the location).
o Hold the left button of your mouse and drag the convergence point until you have
found the right sound. The green arrow shows you the starting point of your
motion.
ARTURIA – JUPITER-8V – USER’S MANUAL
Page 63

63
Create a new sound
o If you wish, you can save it on a User bank of the Jupiter-8V2 memory.
ARTURIA – JUPITER-8V – USER’S MANUAL
Page 64

64
7 THE DIFFERENT MODULES
The interface of the Jupiter-8V consists of four main parts:
• The interface of the original Jupiter-8V
• The “PRESET MANAGER” offers a dedicated interface to manage the presets
• The “EXPANDED PARAMETERS” part offers a selection of real-time controllers
(“GALAXY” “SEQUENCER” and “KEYBOARD”), as well as access to the modulation
options available for the synthesis and effects parts of the Jupiter-8V
• The effect section (“EFFECTS”)
These four parts are accessible by clicking on the tabs situated above the synthesis part
of the interface.
7.1 T
The « Jupiter-8V » interface takes on all the original parameters and characteristics of
the synthesizer it is based on. Likewise, the 40 factory presets of the original machine
are included (these can not be deleted).
HE ORIGINAL JUPITER
-8
The Jupiter-8V
The Jupiter-8V consists of:
• 2 oscillators (« VCO 1 and 2 ») in which the second can equally be used as a
source of modulation
• 1 mixer for the volume of the 2 oscillators.
• 1 High pass filter (« HPF ») 6dB/oct non-resonant
• 1 low pass resonant filter (« VCF ») 12/24dB/oct
• 1 amplifier
• 2 envelopes dedicated to filter and amplitude modulations
ARTURIA – JUPITER-8V – USER’S MANUAL
Page 65
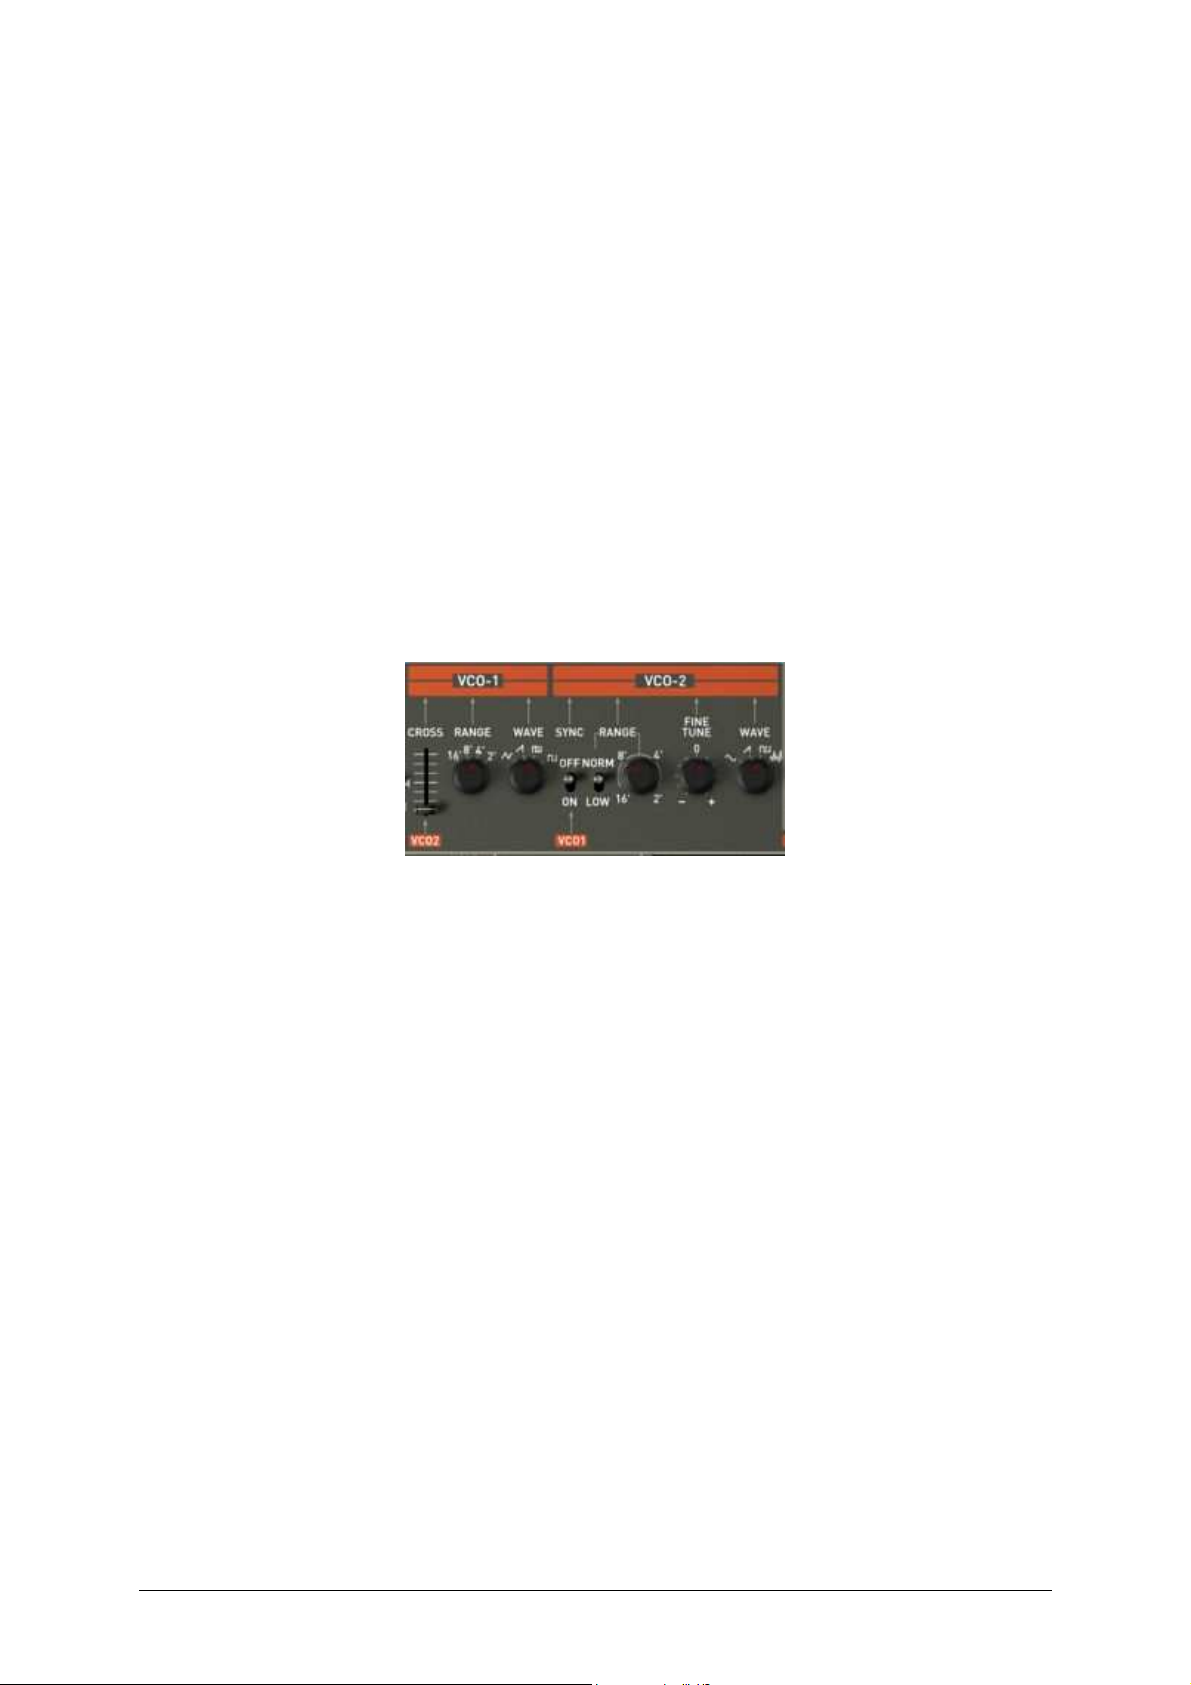
65
• 1 LFO (low frequency oscillator)
• 1 modulation section (WHEEL MOD) dedicated to the LFO
7.1.1 The oscillators (« VCO 1 and 2 »)
There are two oscillators.
The oscillator controls the basic frequencies and timbres of the Jupiter-8V with the
frequency settings, choice of waveform, and the pulse width associated to the square
waveform. These settings are made either with various knobs (static settings) or by the
means of the modulation sections. These can be activated in the «LFO-MODULATION »
section (monophonic modulation by the LFO) or the « CROSS MOD » (polyphonic
modulation using the frequency of oscillator 2 on oscillator 1).
The oscillators can be tuned and edited separately. They allow selecting one of four
waveforms on each oscillator. The two oscillators have some different waveforms. (E.g.
OSC1: triangle, square / OSC2: white noise, Sine) These waveforms can be used
simultaneously. Whether tuned separately or when using several mixed waveforms, the
two oscillators allow you to quickly obtain a rich variety of sounds.
Two Oscillators
7.1.1.1 VCO 1
RANGE Switch the frequency range for VCO 1 («RANGE»), between one of
four octaves 16', 8', 4', 2'. (The unities are indicated in feet, referring
to the sizes of the pipes of church organs)
WAVE Switch for the four waveforms:
• Triangle
• Saw Tooth
• Variable Pulse
• Square
CROSS MOD Knob to set the frequency rate of modulation between the frequencies
of VCO 2 towards the frequencies of VCO 1
7.1.1.2 VCO 2
RANGE Switch the frequency range for VCO 2 («RANGE»), choose between
four octaves 16', 8', 4', 2'
LOW FREQ Switch for the «FREQ /NORMAL» (low frequencies / audible
frequencies), of VCO 2, of which the oscillation frequency is lower,
and enables you to use it as an LFO to modulate the frequency of the
VCO1.
ARTURIA – JUPITER-8V – USER’S MANUAL
Page 66

66
FINE TUNE Knob to fine tune pitch with the range of plus or minus one half tone.
SHAPE • Switch for the four waveforms:
• Sine
• Saw Tooth
• Variable Pulse
• White noise
The white noise waveform brings an interesting complement to the sonic possibilities.
It is very useful to create breath effects (flute tones for example) or special effects like
the sound of wind for example.
SYNC The synchronization between oscillators allows you to create very
complex waveforms and overtones. When oscillator 2 is synchronized
with oscillator 1, oscillator 2 will restart a new period every time the
first oscillator completes its period, even if oscillator2 has not fully
completed its current cycle (this signifies that it is not tuned to the
same tonality!)
Here are some of the representations of the different waveforms used by the oscillators
of the Jupiter-8V:
Saw tooth
Square
ARTURIA – JUPITER-8V – USER’S MANUAL
Page 67

67
Triangle
Sine
7.1.2 The mixer (“VCO1 / VCO2”)
The mixer allows regulating the volume of the mix between oscillators 1 and 2.
VCO 1 Knob to set the volume for Oscillator1 (LEFT)
VCO 2 Knob to set the volume for oscillator 2 (RIGHT)
VCO 1/2 Knob to set the volume for both oscillators (CENTERED)
The mixer
7.1.3 The filter (“VCF”)
The Jupiter-8V has a filter that is an emulation of the original Jupiter 8 filter. It is made
up of two independent filter units:
ARTURIA – JUPITER-8V – USER’S MANUAL
Page 68

68
7.1.3.1 A non-resonant 6 dB/octave high-pass filter
The high-pass filter eliminates the frequencies while letting high frequencies go through.
The sound will become thinner. It is very useful to remove bass frequencies of a pad
sound for example.
The non-resonant high pass filter
CUTOFF FREQ Knob to set of the cut off frequency of the filter
Non-resonant high-pass filter
7.1.3.2 A resonant 12 or 24 dB/Octave low-pass filter
The low-pass filter is characteristic of the Jupiter-8V’s sound. It eliminates the
frequencies situated above the frequency setting (the cut off frequency).
The resonance amplifies the frequencies near the cutoff frequency. Turn this knob toward
the right, and the filter will become more selective. At extreme settings, the sound will
eventually begin to “whistle” as the filter begins to self-oscillate.
Note that the filtering will be less strong with the filter type set on 12 dB instead of 24
dB.
For hosts that allow “linear” control of knobs and sliders, right-click the mouse or [Command]+lick on Mac
for additional precision. This is useful when trying to regulate the level of the cut off frequency precisely, for
example. When in “circular” control mode, simply click on the knob and drag the mouse pointer out into a
broader arc for a more precise setting.
ARTURIA – JUPITER-8V – USER’S MANUAL
Page 69

69
Resonant low-pass filter
CUTOFF FREQ Knob to set of the cut off frequency of the filter, From 10 Hz to 25
KHz.
RES Knob to set the resonance of the filter.
SLOPE Switch the filtering slope 12 or 24 dB/ octave.
ENV. AMT Knob to manually set the rate of filter modulation by the ADSR
envelope.
ENV1 / ENV 2 Switch to choose whether the modulation source for the cutoff is
envelope 1 or envelope 2.
LFO MOD Knob to set the level of modulation by the LFO (use this parameter to
make a wah-wah effect).
KEY FOLLOW Knob to manually set the keyboard follow.
For a conventional setting of the keyboard follow, place the knob in the middle (value 1.00).
The cutoff frequency of the filter can be modulated by one of the two ADSR envelopes
(see the following chapter). It can also be modulated by the LFO.
The VCF
7.1.4 The Amplifier (“VCA”)
The amplifier is the last step in controlling the sound. It allows setting the general
volume of the Jupiter-8V.
ARTURIA – JUPITER-8V – USER’S MANUAL
Page 70

70
The amplifier (VCA)
This module is very simple, it consists of:
VOLUME Knob to set the volume of the synthesizer
LFO MOD Slider to set the intensity level of the modulation by the LFO.
The amplifier’s volume is directly affected by envelope 2 (ADSR2).
7.1.5 The ADSR Envelopes
The «ADSR» envelopes allow several parameters to be controlled with the help of the
keyboard as a trigger. You will find two envelopes on the Jupiter-8: one unit for the
cutoff frequency of the filter (as well as the frequency of VCO2) and another one to
modulate the VCA amplitude.
When playing the keyboard, the envelopes will trigger and modify the way to sound will
be heard.
The ADSR envelope of the filter
The ADSR envelope consists of 4 different parameters:
ATTACK The Attack is the time that the sound will take to reach its maximum
volume once we have pressed a key on the keyboard.
DECAY The Decay is the time that the sound will take to diminish after the
attack portion is complete.
SUSTAIN The Sustain is the maximum volume level that the sound will reach
after the decay is complete.
RELEASE The Release is the time that the sound will take to diminish once the
key has been released.
KEYFLW Switch to connect envelope 1 and/or 2 to the keyboard follow. When
the switch is “ON”, the envelope times – “A”, “D” and “R” – will be as
shorter as you will play the higher notes on your MIDI keyboard.
ARTURIA – JUPITER-8V – USER’S MANUAL
Page 71

71
POLARITY Switch to set the polarity for envelope1:
• If the switch is on the top, the envelope polarity is positive (this is
the more common way to use an envelope).
• If the switch is on the bottom, the polarity is negative. The
envelope’s time settings are reversed: the shorter times will be
heard when the faders are on their higher positions.
This type of polarity is very nice to create some inverted effects.
Take a look on the preset “Original JP-8 Preset / EFX /JP8_66_Fact” to hear an example of this special effect.
7.1.6 The LFO
Using the LFO as a modulation source is very common. It can be used to create a vibrato
effect (when the LFO modulates the frequency of an oscillator) or a “wah-wah” effect
(when it modulates the cutoff frequency of the filter).
RATE Knob to set the speed of the LFO
DELAY TIME Knob to set the delay time before the LFO becomes active
WAVEFORM Switch the LFO’s waveform:
• Sine
• Saw tooth
• Square
• Random
The LFO
7.1.7 The VCO modulator
The VCO modulator section allows adding modulations to both of the oscillators’
frequencies (for vibrato or automatic pitch bending effects) and on the pulse width of
their waveforms.
Frequency modulation
LFO Slider to set the level of modulation from LFO on the VCO frequencies.
ENV1 Slider to set the level of modulation from Envelope 1 on the VCO
frequencies.
VCO 1
VCO 2
Selector to choose either oscillator 1, oscillator 2 or both oscillators as
destinations for LFO / ENV modulation.
PWM Slider to set the level of modulation on the VCOs’ pulse width.
ARTURIA – JUPITER-8V – USER’S MANUAL
Page 72

72
LFO
M
ENV1
Selector to choose either a manual setting (via the fader), LFO or
envelope 1 as a source for the pulse width modulation.
The VCO modulator section
7.1.8 The LFO MODULATION, PORTAMENTO and BEND section
The “LFO MOD” section shows the parameters that can be modulated by the LFO. There
is a white button to activate the LFO. When it is pressed, the modulation is activated.
When it is raised, the modulation stops.
LFO MOD RISE Knob to set the triggering time of the LFO.
LFO MOD Chooses the destinations that can be modulated by the LFO:
• ON / OFF switch (« VCO »)
• ON / OFF switch (« VCF »)
VCO level Slider to set the level of modulation from the LFO to the VCO
VCF level Slider to set the level of modulation from LFO to the VCF
BEND Selectors of the destinations that can be modulated by the PITCH
BEND
• ON / OFF switch (« VCO 1»)
• ON / OFF switch (« VCO 2»)
• ON / OFF switch (« VCF »)
VCO level Slider to set the intensity of the BEND modulation affecting the VCO
(From 0 To +24 semi-tones / – 24 semi-tones).
VCF level Slider to set the intensity level of the BEND modulation affecting the
VCF.
BENDER Pitch bender (movement towards the left: the tuning is diminished;
movement towards the right, the tuning of the oscillators is
increased)
PORTAMENTO
Slider to set the level of portamento.
level
PORTAMENTO
select
Switch to use the portamento:
• Connection Section UPPER (« UPPER ONLY»)
• Connection PORTAMENTO OFF
• Connection Sections LOWER et UPPER (« ON »)
ARTURIA – JUPITER-8V – USER’S MANUAL
Page 73

73
Destination connections
7.1.9 The pitch bend wheel and LFO MOD button
The pitch bend wheel and the push button for the amount of modulation by the LFO
(« MOD ») are situated to the left side of the virtual keyboard.
PITCH This wheel controls the pitch bend of the two oscillators
LFO MO Push Button to control LFO modulation
The Pitch Bend wheel and the LFO mod button
7.1.10 The Master Tune section
Among these parameters you will find: the general tuning of the Jupiter-8V, the detune
option for the voices and a 440 Hz tone to tune the Jupiter-8V.
TUNE Knob to set the general tuning of the synthesizer (+/- one semitone).
DETUNE Set the amount of detune of the polyphonic voices.
The detune knob of the polyphonic voices is very useful to make out-of-tune sounds in
the “unison” mode. It will sound a little like the effect of a chorus. When the «Unison» is not
active, this parameter brings a little more instability to the tuning of the oscillators, a typical
characteristic of the original machine.
The Master Tune parameters
ARTURIA – JUPITER-8V – USER’S MANUAL
Page 74

74
7.1.11 The arpeggiator (“ARPEGGIO”)
This section shows the connections that are necessary to make the arpeggiator work. It
allows performance of patterns of notes in a particular order, evolving according to the
notes played.
• In SPLIT mode, the arpeggiator only works with the lower part of the keyboard.
• In DUAL MODE, the arpeggiator works on both parts of the keyboard.
The pattern development is possible to control with two parameters:
RANGE Choose the range of the arpeggiator 1-4(in octaves):
• One octave (button ON/OFF “1”)
• Two octaves (button ON/OFF “2”)
• Three octaves (button ON/OFF “3”)
• Four octaves (button ON/OFF “4”)
MODE Choose the playing mode:
• UP (button ON/OFF)
• Down (button ON/OFF)
• Up and Down (button ON/OFF)
• Random (button ON/OFF)
The rate of the arpeggiator can be set on the left side of the LFO section (next to the
general volume and LOWER / UPPER balance potentiometers).
In the same area, you can also affect the MIDI synchronization for the arpeggiator rate
(“EXT” position).
The arpeggiator section
The arpeggiator rate section
7.1.12 The keyboard assign section (“ASSIGN MODE”)
This section allows selecting the play modes as follow:
ARTURIA – JUPITER-8V – USER’S MANUAL
Page 75

75
SOLO Button for selecting the monophonic mode.
UNISON Button for selecting the Unison mode. When “UNISON” is activated, all
the voices are regrouped to be played by one note of the keyboard. The
result is a rich harmonic sound. It sounds similar to a chorus effect. When
the Unison mode is activated the patch is still polyphonic (the amount of
polyphony depends on the number of voices available)
POLY 1 The most natural polyphonic playing mode. The envelopes are not
reinitialized by each note played.
POLY 2 Polyphonic playing mode reinitializing the envelopes with each note
played. The « release » time is cut by the next note played.
HOLD LOW This mode allows holding the played notes on the LOWER part. (This
effect is similar to a sustain pedal action).
HOLD UP This mode allows holding the played notes on the UPPER part.
In SPLIT mode, the HOLD function can be assigned to both the LOWER and UPPER parts
independently.
In DUAL and WHOLE modes, the HOLD function simultaneously affects both parts.
Only the volume envelope will be used by the hold function. That allows you to bring life to the sound while
keeping the envelope free for the filter.
Play mode section
7.1.13 The play modes selection (“KEY MODE”)
The methods of playing indicate the distribution of the programs on the keyboard. They
are 3 selectable configurations that can be set to: “ON/OFF”:
DUAL Two selected programs on the LOWER and UPPER part can be played
simultaneously on the keyboard. The polyphony is then divided by two.
SPLIT Two selected programs are assigned the LOWER and UPPER part of the
keyboard. The polyphony is then divided between the two selected
programs.
WHOLE A single program is assigned to the entire keyboard range.
Key modes
ARTURIA – JUPITER-8V – USER’S MANUAL
Page 76
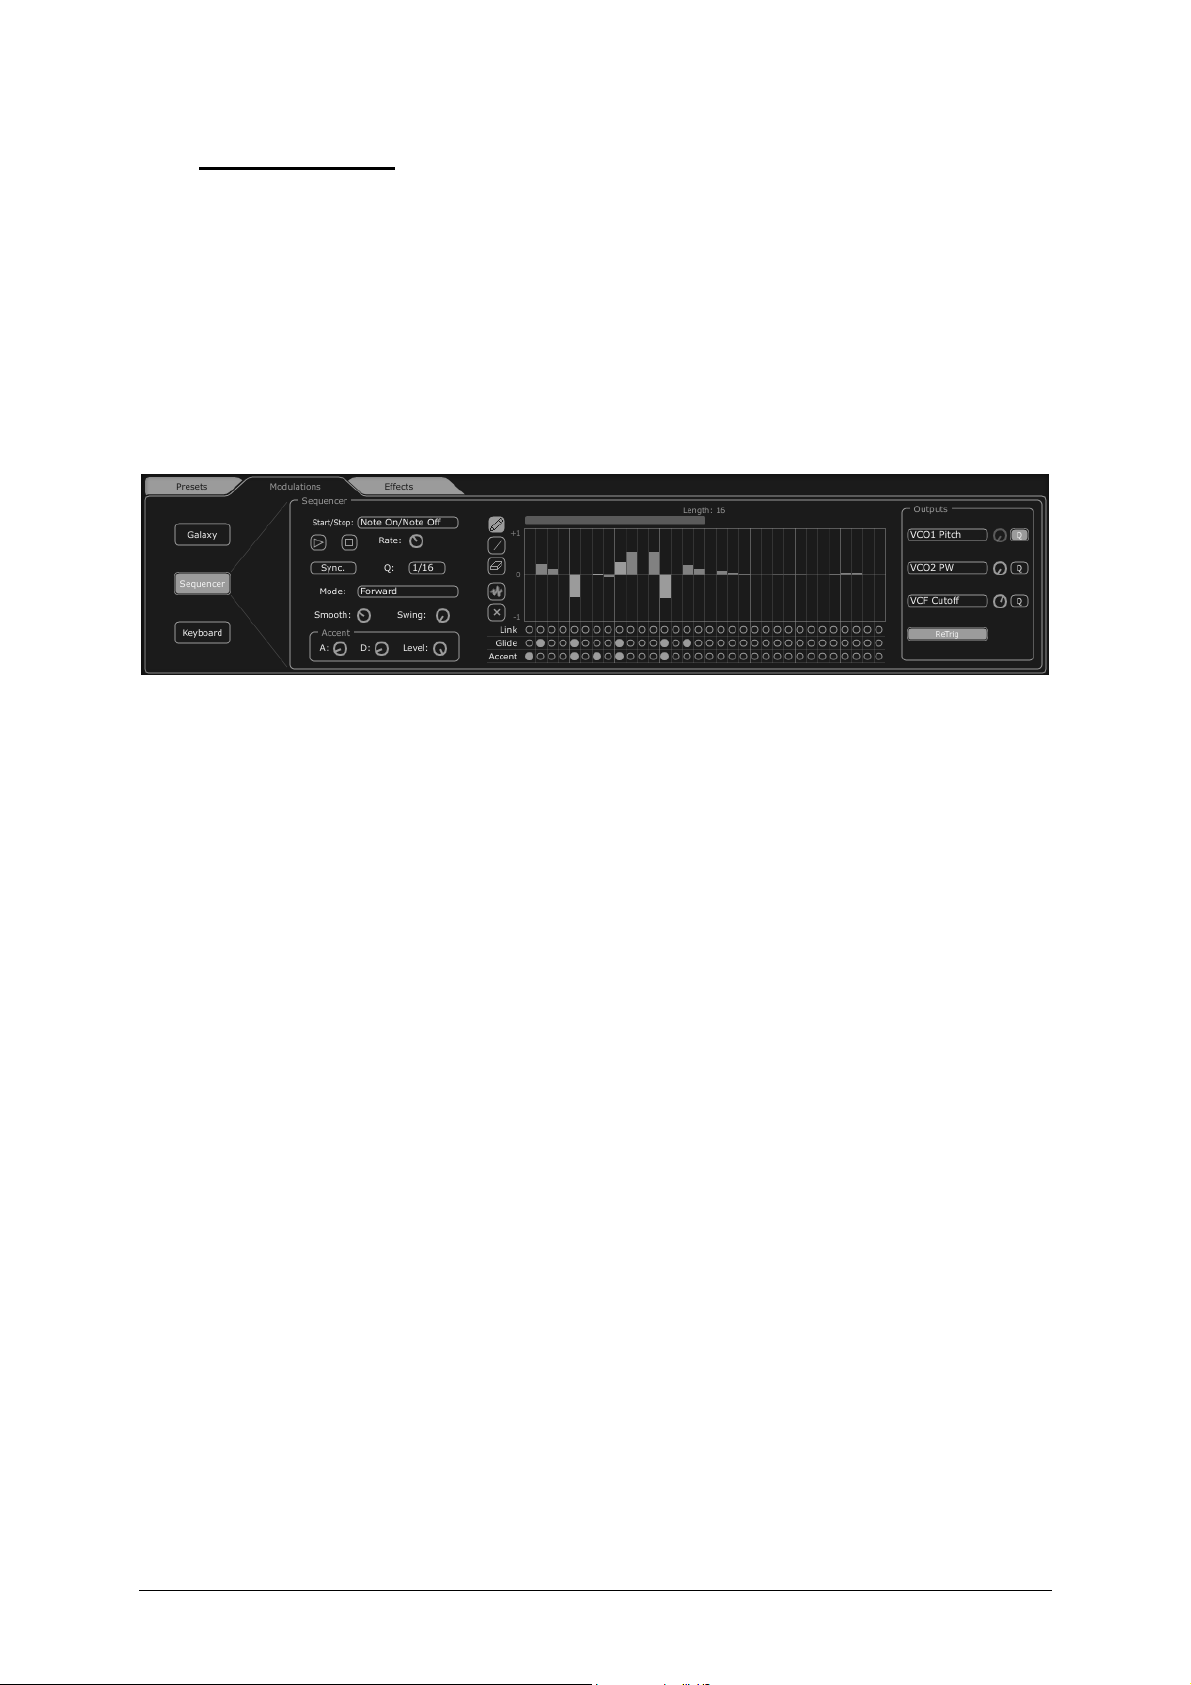
76
7.2 S
TEP SEQUENCER
The sequencer is a 32-step sequencer.
It allows the creation of several melodic lines (when one of the three available
modulations is affecting the pitch of the VCO) as well as creation of dynamic modulations
of other parameters such as the cutoff frequency of the VCF or the width of the VCO
square waveform.
Click on the “Modulations” tab, then, click on the “Sequencer” button to bring up the
interface.
The step sequencer
The interface of the sequencer consists of three main parts:
7.2.1 The transport
The transport is on the left side of the sequencer. It consists of the necessary parameters
to play and stop the sequence, MIDI synchronization, quantification and trigger (“trigg”)
parameters:
START
STOP
Selection screen to control the sequencer’s playing mode:
• Note On/ Note OFF: Start / Stop with a note ON / OFF message.
• MIDI Start / Stop : Start / Stop the sequencer with a MIDI sequencer
(or a drum machine for instance)
• Free running: Start / Stop the sequencer with the Start/Stop buttons
of the step sequencer.
START
Start / Stop the sequencer, in “free running” mode only
STOP
buttons
RATE Set the speed of the sequencer, in “free running” mode only
SYNC
ON/OFF
Q Subdivision of MIDI tempo to adjust the speed of the sequencer in “MIDI
Synchronization to an external MIDI clock
Sync” mode:
1/2 ;1/4 ;1/4T ;1/8 ;1/8T ;1/16 ;1/16T ;1/32 ;1/32T ;1/64 ;1/128
ARTURIA – JUPITER-8V – USER’S MANUAL
Page 77

77
Mode Playing modes of the sequencer:
• FORWARD: Playing the sequence forward
• BACKWARD: Playing the sequence backward
• FORWD/ BACKWD: Playing the sequence forward and backward
• RANDOM: Playing the sequence randomly
SMOOTH Amount of interpolation between values of each step in a sequence.
SWING Automatically bring a ternary quantification to the sequence. This
parameter will be very useful to add “groove” to a sequence for hip hop
music, for example.
ACCENT Bring an additional modulation to the selected step thanks to an “Attack” /
“Decay” envelope applied to the cutoff frequency of the VCF low pass
filter. This unit is comparable to the one that is located on the very
famous TB303. The possibility to edit the attack time was added to the
original unit to allow more flexibility.
• A: Attack time of the accent envelope
• D: Decay time of the accent envelope
• LEVEL: Knob that controls the modulation amount of the accent to the
low pass VCF Filter.
The transport section
7.2.2 Edit the sequence
The editable part of the sequencer is located in the center of the sequencer's interface.
Edit tools Five tools are available for editing the sequence:
• Pencil: drawing of the values of the steps
• Line: drawing of the values of the steps in line
• Eraser: Delete certain values and settings
• Noise: Automatically create a sequence
• Reset: Reset the sequencer
STEPS The steps. They contain bi-directional values (positive or negative).
LENGTH To set the length of the sequence, 32 steps maximum.
LINK Link the selected step with the following step, « Legato »).
ARTURIA – JUPITER-8V – USER’S MANUAL
Page 78

78
GLIDE Place an effect of portamento between the selected step and the following
step.
ACCENT Place an accent effect on the selected step.
The edit section of the sequencer
7.2.3 Outputs
The modulation destination (“OUTPUT”) is located to right of the interface of the
sequencer, where the synthesis parameters that will be affected by the sequencer are
selected.
It is also possible to connect the parameters of the voice effects to the sequencer. To do that, go to the
“Effects” / “Voice Effects” page. Then choose the source “Sequencer” among the choices of sources of proposed
modulations for the parameters of these effects. (see paragraph “Voice Effects” for more details)
Three connection locations are available for the sequencer. For each of them the
following destinations are available:
DESTINATION Choice of available modulation destinations
• None: Nothing is connected
• VCO1 Pitch: VCO1 FREQUENCY
• VCO2 Pitch: VCO2 FREQUENCY
• VCO1 PW: Pulse width of the square wave form of VCO1
• VCO2 PW: Pulse width of the square wave form of VCO2
• HPF Cutoff: Frequency of the high pass filter
• VCF Cutoff: Frequency of the low pass filter
• VCF Res: Resonance of the low pass filter
• VCA: Volume of the VCA
AMOUNT Sets the level of modulation
Q Quantification of the modulation settings by semitones. This parameter
is essential to regulate the levels of each step for the creation of a
melodic sequence
RETRIG Automatically place a «trig» envelope on all the steps.
ARTURIA – JUPITER-8V – USER’S MANUAL
Page 79

79
The connection section
7.3 G
ALAXY
The galaxy module creates very complex modulations with the interaction of 3 LFOs.
The first 2 LFOs can each modulate a different parameter on the X/Y axes, represented in
the framework of the interface. A third LFO allows modifying the alpha angle between the
X and Y axes.
Each of these 3 LFOs have two parameters:
SHAPE Selection screen for the waveform of the LFO and X/Y axis (“Sine”, “Tri”,
“Saw” and “Square”) and “Sine”, “Tri” and “Saw” for the third LFO.
RATE Knob to set the modulation frequency of the LFO.
ANGLE Knob to set the rotation angle of the X/Y axis manually.
Three modulation outputs can be connected. For each, the following modulation
destinations are available:
• “None”: Nothing is connected
• “VCO1 Pitch” VCO1 FREQUENCY
• “VCO2 Pitch”: VCO2 FREQUENCY
• “VCO1 PW”: Pulse width of the square wave form of VCO1
• “VCO2 PW”: Pulse width of the square wave form of VCO2
• “HPF Cutoff”: Frequency of the high pass filter
• “VCF Cutoff”: Frequency of the low pass filter
• “VCF Res”: Resonance of the low pass filter
• “VCA”: Volume of the VCA
A reset setting of the movements for the three LFO's by a played note is available by
using the “RETRIG” button.
ARTURIA – JUPITER-8V – USER’S MANUAL
Page 80

80
The Galaxy module
7.4 V
OICE EFFECTS
The Jupiter-8V offers two connections of “Voice” effects. These connections can be made
inside the synthesis chain, between the VCO and the VCF and between the VCF and the
VCA.
These effects can be modulated by sources of modulation such as the LFO or the
envelopes. These combinations of effects and of modulations will bring an additional
dimension to the original sound of the Jupiter-8.
Connections of the voice effects
The effects are accessible when you click on the “EFFECTS” tab, situated on the LCD
screen, on the right part of the Jupiter-8V. They will be activated or deactivated when
you click on the “EFFECT” button, situated on the toolbar.
7.4.1 Chorus /Flanger
This monophonic Chorus/Flanger module adds a comb filtering aspect to the sound.
RATE Knob to set the frequency of the chorus
DEPTH Knob to set the depth of the modulation
FEEDBACK Knob to set the feedback of the modulation. (to achieve more of a flanged
effect)
AMOUNT Knob to set the depth of the modulation
DRY/WET Knob to set the balance between the original signal and the output of the
effect
OUTPUT Knob to set the output volume of the chorus
The “MOD” display allows accessing the modulation connections of each of the
parameters of the chorus as well as the choice of the sources of modulation:
ARTURIA – JUPITER-8V – USER’S MANUAL
Page 81

81
• KEY FOLLOW
• VELOCITY
• AFTERTOUCH
• ENVELOPE 1
• ENVELOPE 2
• GALAXY Y
• GALAXY X
• LFO
• SEQUENCER
The “BYPASS” button deactivates the Chorus / Flanger effect.
The Chorus/Flanger
7.4.2 Distortion
The distortion unit brings a soft or strong saturation to the sound, on the output of the
VCO or VCF.
Three modes of distortion are available:
Soft Soft distortion comparable to setting an analog amplifier to the maximum
volume.
Hard Extreme distortion ideal for destructive lead sounds!
DRY/WET Knob to set the balance between the original signal and the output of the
effect.
DRIVE Sets the distortion amount.
SYMMETRY Set the symmetry of the out-going signal.
OUTPUT Knob to set the output volume of the distortion.
The LCD screen allows to graphically show the distortion curve.
The “MOD” display allows accessing the modulation connections for each of the
parameters of the distortion as well as the choice of the sources of modulation:
• KEY FOLLOW
• VELOCITY
• AFTERTOUCH
ARTURIA – JUPITER-8V – USER’S MANUAL
Page 82

82
• ENVELOPE 1
• ENVELOPE 2
• GALAXY Y
• GALAXY X
• LFO
• SEQUENCER
The “BYPASS” button deactivates the distortion effect.
Distortion
7.4.3 Parametric EQ
This equalizer unit adjusts the harmonic content of the sound with four bands of
frequency control.
Bands 1 and 4 (low and high) are semi-parametric; bands 2 and 3 (mid) are fully
parametric.
Each of the parameters of the equalizer can be modulated by sources of modulation. This
allows you to create effects that sweep frequencies, resulting in a complex «phasing» or
filtering effect.
BAND 1 (bass frequencies)
FREQUENCY (F) Knob to set the band of the bass frequencies
GAIN (G) Knob to set the gain of the bass frequency band
BAND 2 (Mid-low frequencies)
FREQUENCY (F) Knob to set the band of the mid-low frequencies
GAIN (G) Knob to set the gain for the band of the mid-low frequencies
BAND WIDTH (Q) The setting of the band width of the mid-low frequencies
BAND 3 (Mid-high frequencies)
FREQUENCY (F) Knob to set the band of the mid-high frequencies
GAIN (G) Knob to set the gain for the band of the mid-high frequencies
BAND WIDTH (Q) The setting of the band width of the mid-high frequencies
ARTURIA – JUPITER-8V – USER’S MANUAL
Page 83
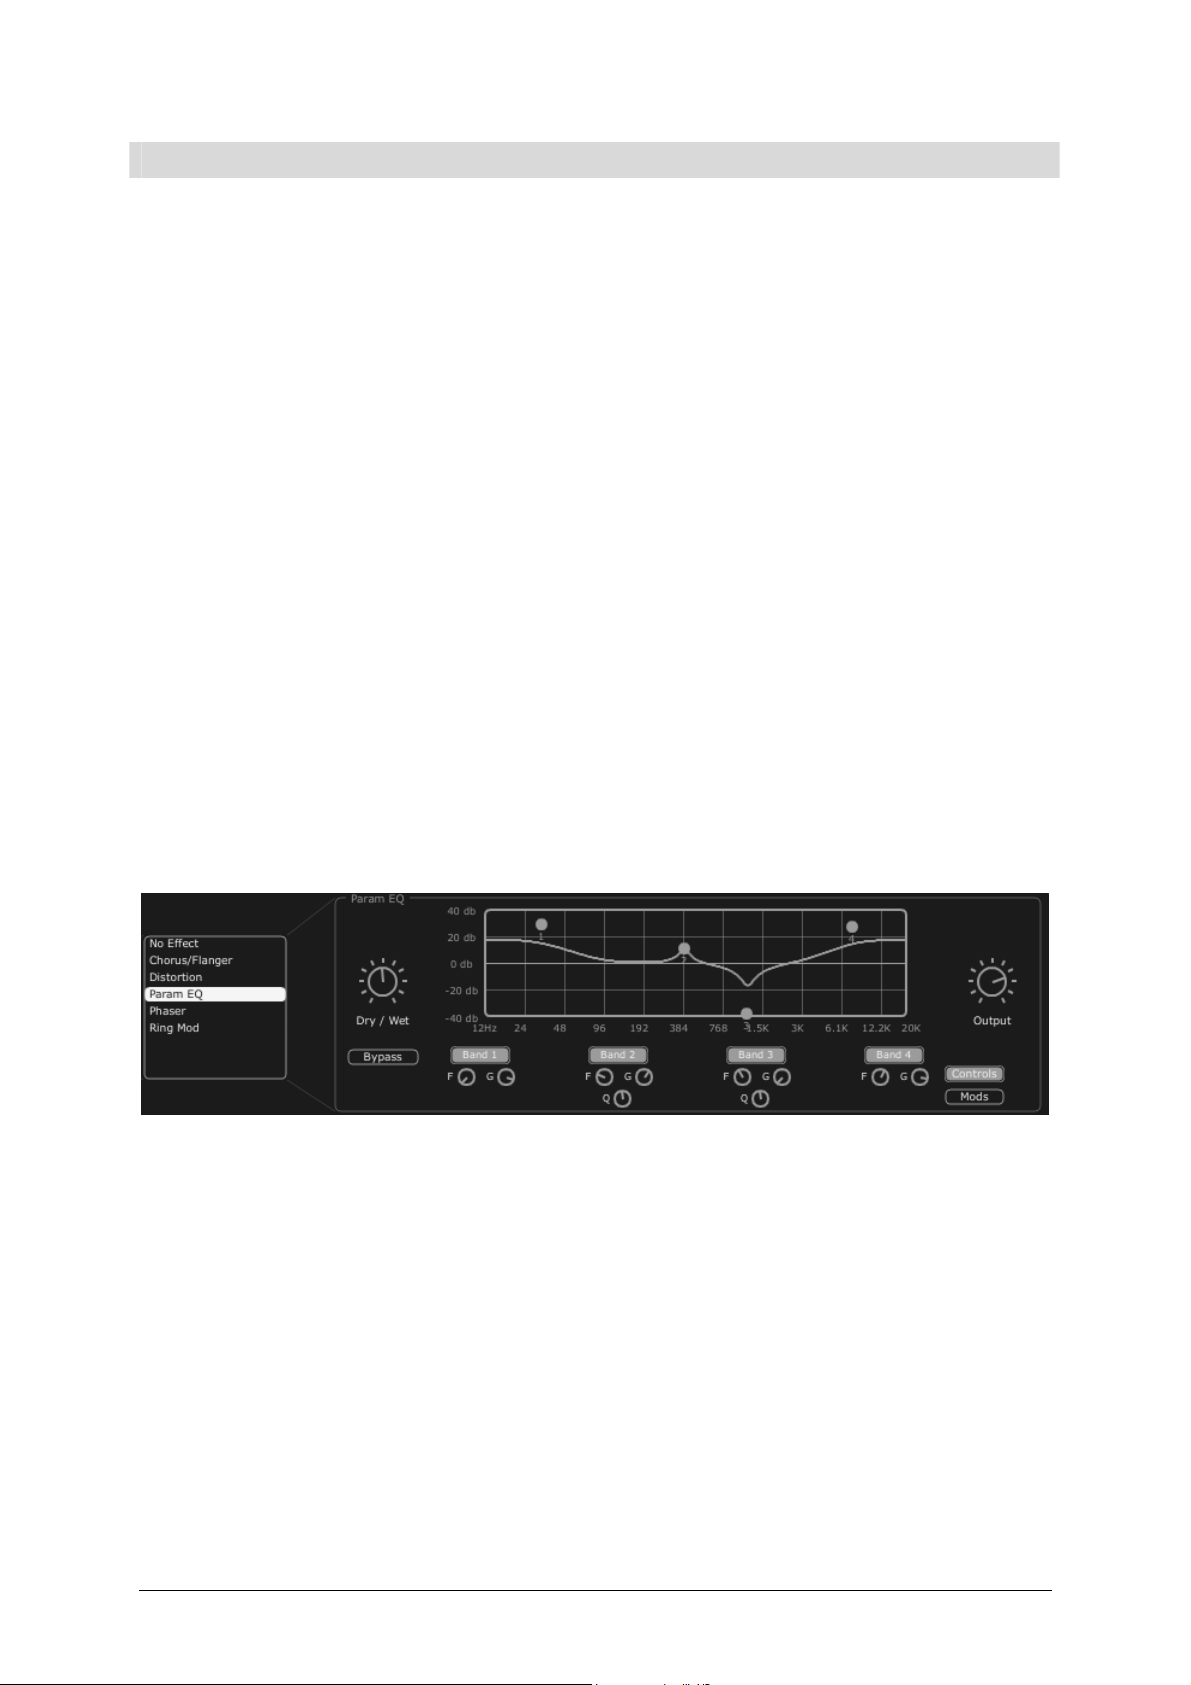
83
BAND 4 (High frequencies)
FREQUENCY (F) Knob to set the band of the high frequencies
GAIN (G) Knob to set the gain for the band of the high frequencies
DRY/WET Knob to set the balance between the original signal and the output
of the effect
OUTPUT Knob for the PARAM EQ‘s output volume.
The LCD screen allows you to graphically show the positions of each band.
The “MOD” button allows accessing the modulation connections for each of the
parameters of the PARAM EQ as well as the choice of the sources of modulation:
• KEY FOLLOW
• VELOCITY
• AFTERTOUCH
• ENVELOPE 1
• ENVELOPE 2
• GALAXY Y
• GALAXY X
• LFO
• SEQUENCER
The “BYPASS” button allows deactivating the parametric equalizer effect.
Parametric EQ
7.4.4 Phaser
The PHASER effect provides a classic phasing sound similar to analog effects used in the
70's.
SWEEP START Knob to set the reference frequency
FEEDBACK Knob to set the feedback of the modulated signal
SWEEP AMOUNT Knob to set the amplitude of the modulation
SWEEP RATE Knob to set the speed of the modulation
DRY/WET
Knob to set the balance between the original signal and the output of
the effect
ARTURIA – JUPITER-8V – USER’S MANUAL
Page 84

84
OUTPUT Knob for the volume of the output of the phaser.
The “MOD” display allows accessing the modulation connections for each of the
parameters of the PHASER as well as the choice of the sources of modulation:
• KEY FOLLOW
• VELOCITY
• AFTERTOUCH
• ENVELOPE 1
• ENVELOPE 2
• GALAXY Y
• GALAXY X
• LFO
• SEQUENCER
The “BYPASS” button allows deactivating the PHASER effect.
Phaser
7.4.5 Ring Mod
The RING MODULATOR allows adding metallic effects to the sound with modulation of the
output of the VCO or filter VCF.
MOD FREQ Knob to set the speed of the modulation
MOD AMOUT Knob to set the amplitude of the modulation
DRY/WET Knob to set the balance between the original signal and the output of
the effect
OUTPUT Knob for the volume of the output of the ring modulator.
The “MOD” display allows accessing the modulation connections for each of the
parameters of the RING MOD as well as the choice of the sources of modulation:
• KEY FOLLOW
• VELOCITY
• AFTERTOUCH
• ENVELOPE 1
ARTURIA – JUPITER-8V – USER’S MANUAL
Page 85

85
• ENVELOPE 2
• GALAXY Y
• GALAXY X
• LFO
• SEQUENCER
The “BYPASS” button allows deactivating the RING MOD effect.
Ring Mod
7.5 P
ATCH EFFECTS
Two “PATCH” effect modules are available on the end of the synthesis chain. The two
modules are placed after the output of the VCA, and cannot receive external
modulations.
Patch effect connections
7.5.1 Chorus/Flanger
The stereo Chorus/Flanger module adds thickness and width to the sound. This effect is
often used to create string pads for example (the “Ensemble” effect of old analog
synthesizers)
RATE Knob to set the frequency of the chorus
DEPTH Knob to set the depth of the modulation
FEEDBACK Knob to set the feedback of the modulation, to achieve more of a flanged
effect
AMOUNT Knob to set the depth of the modulation
DRY/WET Knob to set the balance between the original signal and the output of the
effect
OUTPUT
Knob to set the output volume of the chorus
ARTURIA – JUPITER-8V – USER’S MANUAL
Page 86
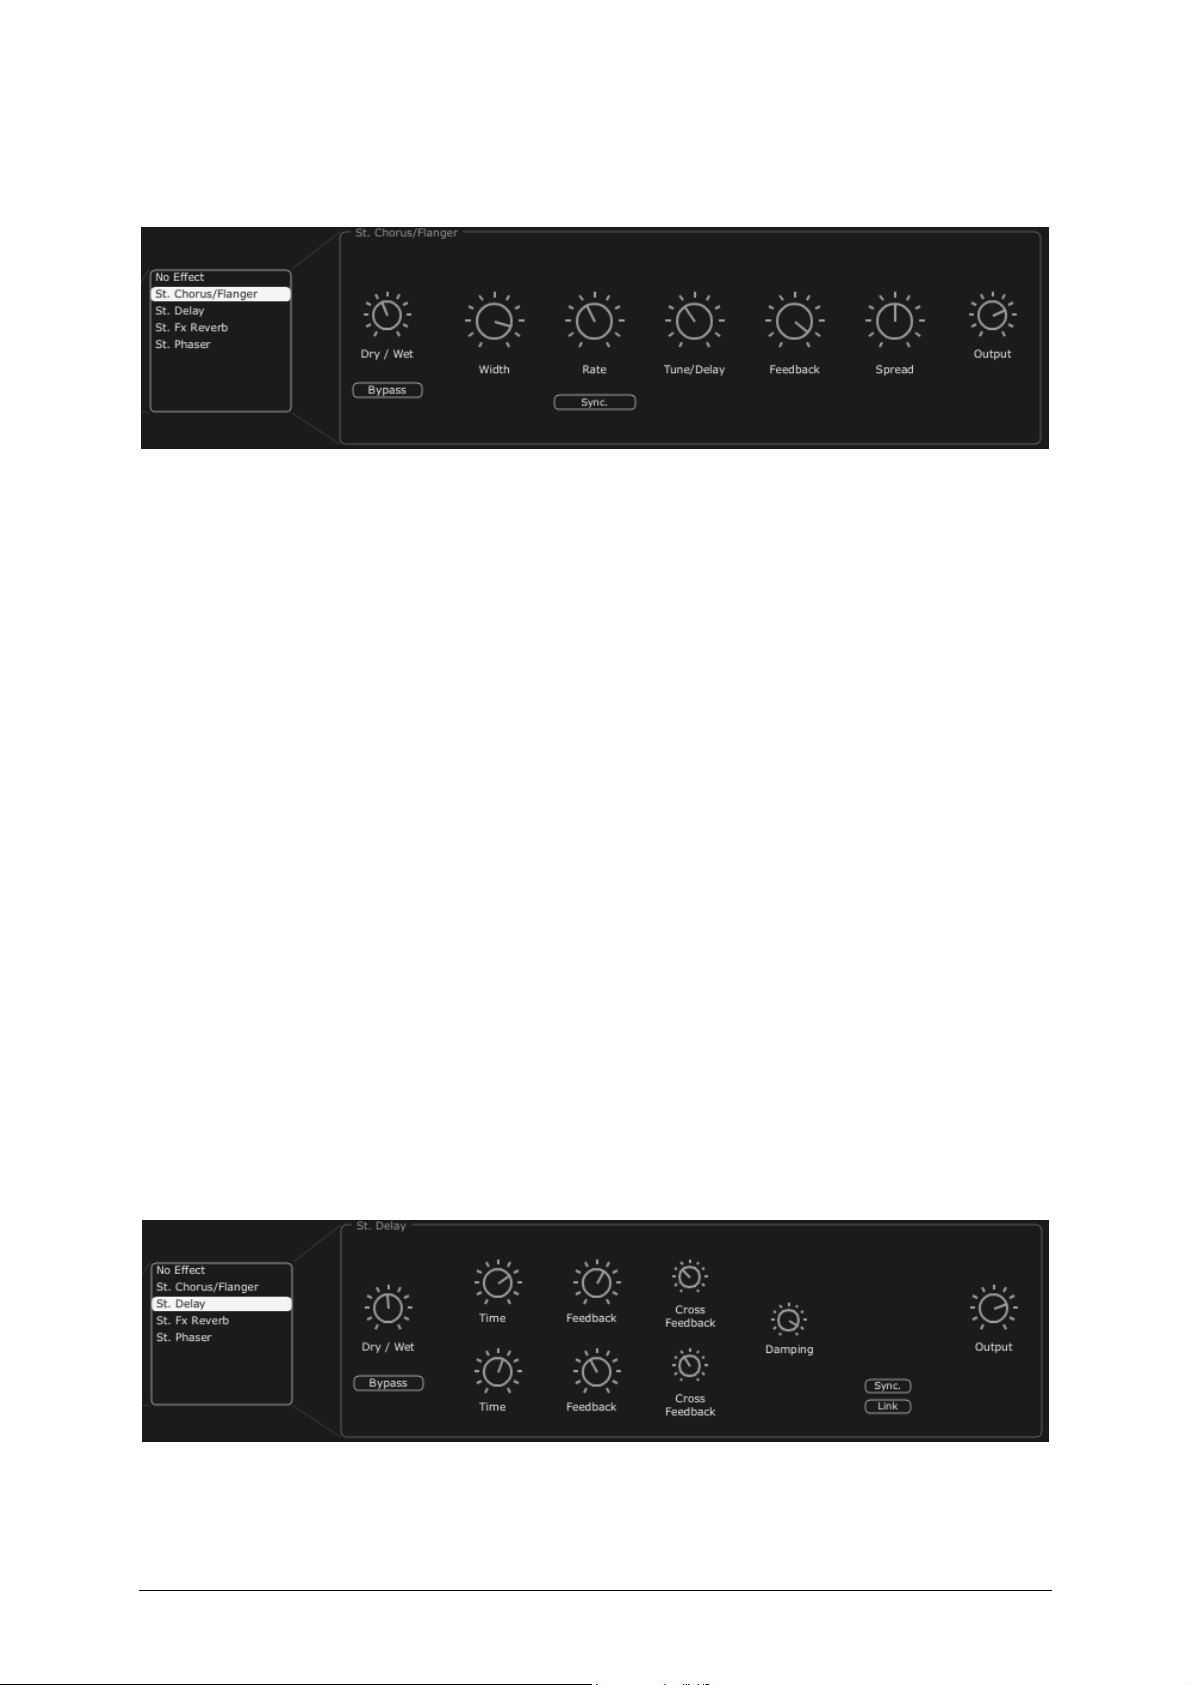
86
The “BYPASS” button allows deactivating the “CHORUS/ FLANGER” effect.
Chorus / Flanger
7.5.2 Stereo Analog Delay
The delay effect allows creating echo effects or doubling in the sound. This effect is used
on all types of sounds to add stereo space.
This effect recreates the characteristics of the analog delays of the 70's, which are very
popular today for their unique sound (the famous “tape delays”).
RIGHT TIME Knob to set the time for the right channel
LEFT TIME Knob to set the time for the left channel
FEEDBACK RIGHT Knob to set the feedback for the right channel
FEEDBACK LEFT Knob to set the feedback for the left channel
CROSS FEEDK R Knob to set the feedback of the right channel towards the left
channel
CROSS FEEDK L Knob to set the feedback of the left channel towards the right
channel
DAMPING Knob to set the amount of high frequencies that are rolled off with
each repetition
DRY/WET Knob to set the balance between the original signal and the output
of the effect
OUTPUT Knob to set the output volume of the delay
The “BYPASS” button allows deactivating the delay effect
The “SYNC” button allows synchronize the delay to MIDI
The “LINK” button allows linking of the left and right channel of the delay.
Stereo Delay
ARTURIA – JUPITER-8V – USER’S MANUAL
Page 87

87
7.5.3 Reverb
The reverb effect creates a very dense series of decaying echoes in the sound, simulating
the sound's performance within a three-dimensional space.
FEEDBACK Knob to set feedback time for the reverb
DAMPING Knob to set the rate at which high frequencies that are rolled off as the
reverb decays
DRY/WET Knob to set the balance between the original signal and the output of the
effect
OUTPUT Knob to set the output volume of the reverb
A visual interface shows the characteristics of the REVERB for convenient editing.
The “BYPASS” button allows deactivating the “REVERB” effect.
The Reverb effect
7.5.4 Dual Phaser
The Phaser unit provides a classic phasing sound similar to analog effects used in the
70's.
SWEEP
GENERATOR
1/2
Selection of the waveforms for the modulations of phasers 1 and 2:
• Sin
• Square
• Saw
• Triangle
RATE 1/2 Knob to set the rate for Phaser 1 /2
DEPTH 1/2 Knob to set the depth of the modulation for Phaser 1/2
FEEDBACK 1/2 Knob to set feedback time for Phaser 1/2
DRY/WET Knob to set the balance between the original signal and the output of
the effect
OUTPUT Knob to set the output volume of the DUAL PHASER
SWEEP SYNC Button allows activating the synchronization of the two modulation
frequencies.
INVERT Button allows inverting the phase of the modulation frequencies
BYPASS Button allows deactivating the “DUAL PHASER” effect.
ARTURIA – JUPITER-8V – USER’S MANUAL
Page 88

88
Dual Phaser
ARTURIA – JUPITER-8V – USER’S MANUAL
Page 89

89
8 THE BASICS OF SUBTRACTIVE SYNTHESIS
Subtractive synthesis appeared at the end of the 1960’s, giving birth to the first analog
synthesizers: Moog, ARP, EMS, Oberheim, Roland (SH, Juno or Jupiter series), Yamaha
(CS series) and Korg (MS and PS series).
Of all forms of audio synthesis, subtractive is one of the oldest, and to this day, the most
frequently employed by sound designers and musicians alike. This is due to the simplicity
with which complex sounds can be created, over the more difficult types of synthesis,
many of which employ elements of subtractive synthesis as well, such as low-pass
filtering. As a basic overview to subtractive synthesis, one may consider any sound
created, either in real life or on the synthesizer of your choice, as consisting of a number
of sine waves, or harmonics grouped together. In subtractive synthesis, we start with a
harmonically rich sound such as a saw wave, and through filtering, we remove the sine
waves (or harmonics) that we do not want. This as you can imagine is much more
complex than turning a filter control knob!
The Jupiter-8V you own shows some very good examples of the subtractive synthesis
possibilities.
8.1 T
8.1.1 The Oscillator or VCO
The oscillator or VCO (Voltage Controlled Oscillator) is the starting module (with the
noise module which is often classed among the oscillators) for the creation of a sound on
an analog system.
It will generate the initial sound signal. We can think of the oscillator like a violin string
that once stroked or plucked, vibrates to create its sound.
HE MAIN ELEMENTS
Oscillator Section on the Jupiter 8
The main oscillator settings are:
The pitch determined by the oscillation frequency. You can set the frequency of the
oscillator with 3 controllers:
• The “RANGE” parameter allows setting the tuning of the oscillator by octave. Usually,
on four octaves 16', 8', 4', 2'. (The unities are indicated in feet, referring to the sizes
of the pipes of church organs). The Jupiter-8 also has a “LOW” range to set the
oscillator2 to low frequencies.
ARTURIA – JUPITER-8V – USER’S MANUAL
Page 90

90
• The tuning parameter (“COARSE” or “FREQUENCY”) allows you to tune the oscillator
by semi-tones on a range of 5 octaves.
• The fine tuning parameter (“FINE”) finely tunes the oscillator upwards or downwards
by a semi-tone. This parameter gives a bit more life to your sound when you use
several oscillators simultaneously, due to difference in frequencies between the
oscillators.
The waveform determines the harmonic richness of the audio signal. On the Jupiter-8V,
four waveforms are available:
• The saw tooth wave presents the richest audio signal of the available waveforms (it
contains all of the harmonics at decreasing volume levels in high frequencies). Its
sound is ideal for brass sounds, percussive bass sounds or rich pad sounds.
The Sawtooth waveform and its harmonic spectrum
• The square wave possesses a more “hollow” sound than the saw tooth (it only
contains odd harmonics) but none the less, its rich sound (notably in low frequencies)
can be used for sub-bass sounds that will come out well in the mix (the square
oscillator is often set an octave below that of the saw tooth), wood sounds (clarinet, if
the square signal is a little filtered), etc.
ARTURIA – JUPITER-8V – USER’S MANUAL
Page 91

91
The PWM (top) and the Square (bottom) waveforms and their respective harmonic spectrums
• The PWM (Pulse Width Modulation) is a setting that allows you to modify the
waveform cycle (or wave length). This can be done manually with the help of a knob
“PW” or by modulation (with an envelope or LFO). Pulse width variation creates a
spectrum modification that cannot be duplicated with subtractive filtering.
• The triangle wave can be considered as a very filtered (and soft) square signal. It is
very low in harmonics (odd only) and can be very useful for creating sub basses, flute
sounds, etc.…
The Triangle waveform and its harmonic spectrum
• The sine wave is the purest waveform of all. It produces only a single harmonic,
referred to as “the fundamental”. It can be used to reinforce the low frequencies of a
bass sound or as a modulation of the frequency in order to create harmonic
waveforms. This wave form is available on VCO2.
ARTURIA – JUPITER-8V – USER’S MANUAL
Page 92
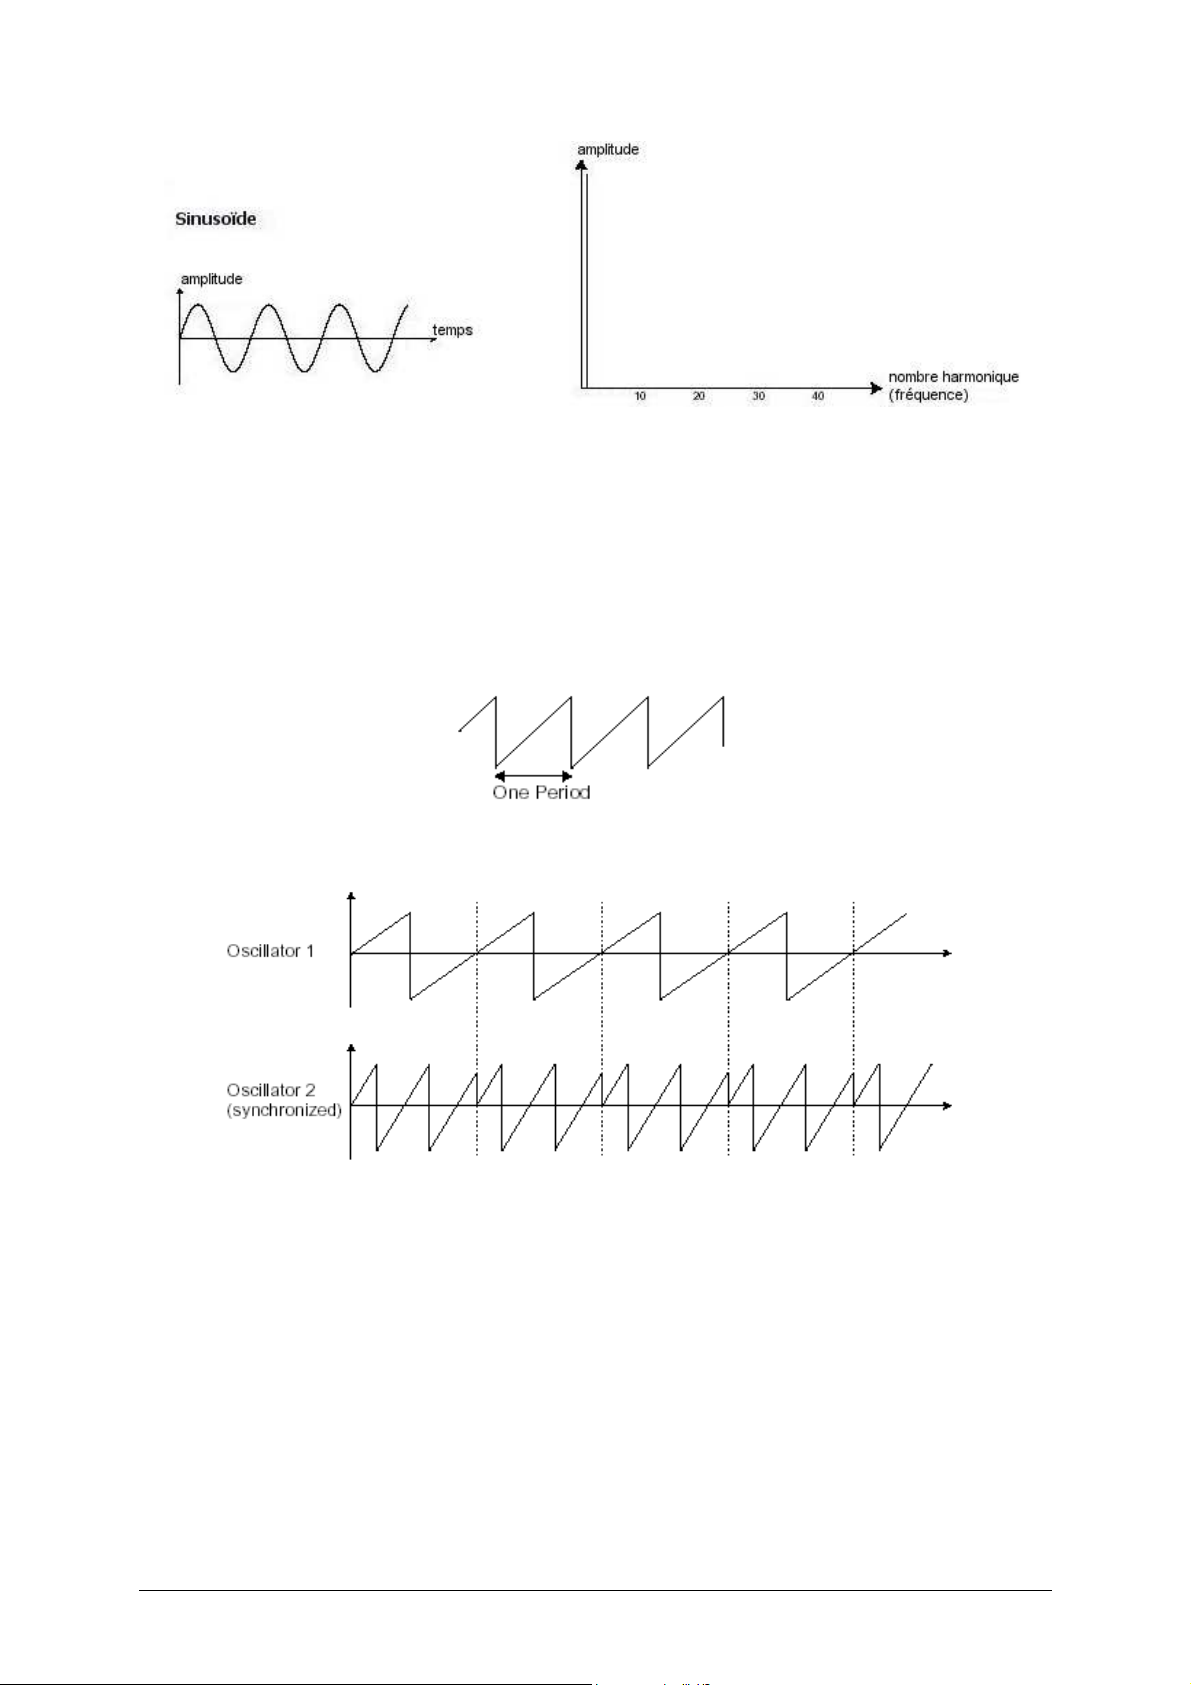
92
The Sinusoid waveform and its harmonic spectrum
• The synchronization of an oscillator with another creates more complex waveforms.
If for example, you synchronize oscillator2 with oscillator1, oscillator2 will restart a
new period every time the first oscillator completes its period, even if oscillator2 has
not fully completed its current cycle (this signifies that it is not tuned to the same
tonality!) The more you tune oscillator2 upwards, the more you will encounter
composite waveforms.
In the image above, osc2 is synchronized with osc1 and tuned to with double the tonality.
• Frequency modulation (FM or CROSS MOD in case of the Jupiter-8) can be created
between 2 oscillators by connecting the audio output from a first oscillator to the
modulation input of a second oscillator. On the Jupiter-8V, if you turn the CROSS
MOD knob, you will obtain a sound that is richer in harmonics. If you introduce a
square or sawtooth signal, the result can be quickly distorted… but interesting for
enharmonic sonorities like bell sounds or special effects for example.
ARTURIA – JUPITER-8V – USER’S MANUAL
Page 93

93
• The noise generator: the noise signal produces acoustic energy across a broad
spectrum of frequencies with no discernible “fundamental” or harmonic signature. For
this reason, the noise module is used to create different noises like the imitation of
wind or special effects. White noise is the richest of noises. Pink noise is also regularly
present on synthesizers. It is less rich in the high frequencies than white noise. In the
Jupiter-8V section, you will find the noise generator as a selectable waveform on OSC
2.
8.1.2 The Mixer
The audio signal generated by an oscillator (the waveform) is generally directed toward a
filter module (Voltage Controlled Filter).
With the mixer of the Jupiter-8V: you are able to set the volume between OSC1 and 2
with the “Source Mix” knob. The mixer has no modulation input. Therefore this setting is
to be done manually.
The Mixer of Jupiter-8V
8.1.3 The filter or VCF
The audio signal generated by an oscillator (the waveform) is next generally directed to a
filter module or VCF (Voltage Controlled Filter). It is this module that we use to
control the sound by filtering (by removing or subtracting certain frequencies, which
explains the name given to this type of synthesis) the harmonics situated around a cutoff frequency. It can be considered to be a sophisticated equalizer that reduces,
depending on the filter type, a range of frequencies of a sound.
The removal of undesirable frequencies at the cut-off frequency is not done suddenly but
progressively, depending on the filtering slope. This filtering slope is expressed in
ARTURIA – JUPITER-8V – USER’S MANUAL
Page 94

94
decibels per octave (or dB/oct). Most filters used in classic analog synthesizers have 24
dB/oct or 12 dB/oct slopes.
The removal of undesirable frequencies at the cut-off frequency
On the Jupiter-8V, you have access to a type of filtering with a 24 dB/Oct slope and to a
type of filtering with a 12 dB/Oct slope. Let’s have a look at some of its properties:
8.1.3.1 High-Pass Filter (HP Filter)
The high-pass filter acts symmetrically to that of the low pass filter. It eliminates
frequencies below the cut-off frequency. The High-pass filter on the Jupiter-8 is non
resonant.
Non-resonant high-pass filter
8.1.3.2 The low-pass filter (LPF)
The low-pass filter (LPF) progressively removes high frequencies above the assigned
frequency limit (the cut-off frequency) and allows the sound below the cut-off to pass
through unchanged. Depending on the settings we will hear the sound becoming more or
less “brilliant”, more or less “dampened”.
This is the type of filtering that you will find most often on synthesizers that use
subtractive synthesis. It can be found on most of the recent analog and digital
synthesizers.
ARTURIA – JUPITER-8V – USER’S MANUAL
Page 95

95
Resonant low-pass filter
8.1.3.3 The resonance
A second setting to compliment the cut-off frequency is the resonance (you will also find
it called “emphasis” or “Q” (for Quality of filtering) elsewhere).
The resonance is able to amplify frequencies close to the cut-off frequency. Then the
other frequencies remaining are either unchanged (below the cut-off frequency) or
reduced (above the cut-off frequency). Resonance will also cause the frequencies below
cut-off to be reduced, which is one factor in the resonance sounding more pronounced.
On the Jupiter-8 you can increase the resonance through the “RES” Slider.
When you increase the resonance, the filter becomes more selective, the cut-off
frequency is amplified, and the sound will begin to “ring” at higher settings.
The resonance amplifies frequencies close to the cut-off frequency
With a high resonance level, the filter itself will begin to produce a sound close to a sine
waveform with no outside input, which is referred to as self-oscillation. At this stage, the
use of a key follow is very important as you can create a melody by tuning the cut-off
frequency of the filter with the frequency of the oscillators.
ARTURIA – JUPITER-8V – USER’S MANUAL
Page 96

96
The filter settings of the Jupiter-8V
8.1.4 The amplifier or VCA
The amplifier (Voltage Controlled Amplifier) receives the audio signal coming from the
filter (or directly from the oscillator if it is not being filtered) to be adjusted before the
volume is sent to the speakers.
Jupiter-8V VCA
In conclusion, here is a diagram that should help you to understand the composition of a
basic sound:
8.2 O
THER MODULES
8.2.1 The keyboard
To start and stop the sound at a specific pitch, we most often use a keyboard that is
connected to the ADSR through a gate and separately to the frequency control of the
oscillators. This will “play” the sound as soon as a key is pressed and end it when
released, as well as tune the oscillator to the selected key.
ARTURIA – JUPITER-8V – USER’S MANUAL
Page 97

97
Secondarily, the keyboard's pitch is also used to modulate other sources, such as filter
cutoff.
If you do not use a MIDI keyboard, you can also play on the virtual keyboard of the Jupiter-8V, but your
MIDI sequencer will not record those actions, it is for auditioning presets and programming only.
8.2.2 The envelope generator or ADSR
If we stop here, the sound that you will obtain will be uniform, without life and without
an end!! The oscillator delivers a sound signal (the audio output of a waveform) of a
fixed pitch in a continuous manner. In the diagram above, the only way to control this
sound is to lower the filter cut-off frequency so that it becomes more and more damp
until it finally disappears; or simpler yet, lower the volume of the amplifier.
The envelope generator, connected to the VCA, is used to «sculpt» the volume of the
sound when we press a key on the keyboard and ends after the note is released.
The most common modules developed use 4 settings that we can vary:
• The Attack is the time that the sound will take to reach its maximum volume once
we have pressed a key on the keyboard.
• The Decay is the time that the sound will take to diminish after the attack portion
is complete.
• The Sustain is the maximum volume level that the sound will reach after the
decay is complete.
• The Release is the time that the sound will take to diminish once the key has been
released.
The ADSR Envelope
ARTURIA – JUPITER-8V – USER’S MANUAL
Page 98

98
The envelope generator of the Jupiter-8V
8.2.3 The low frequency oscillator
The LFO (Low Frequency Oscillator – or LFO on the Jupiter-8V) possesses more or less
the same characteristics of the classic oscillator but it only produces frequencies lower
than 20 Hz. In other words, you won’t hear the pitch of its sound.
It will create a cyclic modulation on the setting to which it is connected. For example:
• If the sine waveform of an LFO modulates the volume of an amplifier, the sound
will increase in volume then disappear in a varying manner following the speed
(the frequency) of this LFO. This will produce a tremolo effect.
• A sine waveform on an LFO modulating the frequency of an oscillator would
produce a vibrato effect.
• With an LFO sine wave modulating the cut-off frequency of a lightly resonant lowpass filter, you will obtain a “wah wah” effect.
The LFO modulating an VCA volume for a tremolo effect
ARTURIA – JUPITER-8V – USER’S MANUAL
Page 99

99
The LFO module of the Jupiter-8V
The Jupiter-8V allows you to use VCO2, placed at a low frequency (position «LOFREQ»), to modulate the
frequency of VCO1.
8.3 M
ODULES OF THE JUPITER
-8V
The essential elements of the Jupiter-8V consist of:
• 2 oscillators
• 1 noise generator
• 1 mixer
• 2 filters (one high-pass without resonance, and one low-pass)
• 1 output amplifier (VCA)
• 2 ADSR envelopes
• 1 LFO
ARTURIA – JUPITER-8V – USER’S MANUAL
Page 100

100
9 SOME ELEMENTS OF SOUND DESIGN
Here are five examples that can guide you when programming different tones on the
Jupiter-8V. These tones are classified from simple to complex, and are organized in 3
parts:
• The first part will allow you to explore the basis of the subtractive synthesis with
the Jupiter-8V. While starting off with a basic preset, you will make a polyphonic
violin sound that is typical for this synthesizer. After that, you will approach the
programming of a richer sound (complex modulations, cross modulation…) in the
form of a bell tone.
• The second part will allow you to explore the newly added functionalities of the
Jupiter-8V. After this the «Galaxy» and «Step Sequencer» modules will not be a
mystery anymore!
• The third part will allow you to create a very rich and progressive tone thanks to
the combination of the «voice» effects and numerous possibilities of modulations
that have already been presented.
9.1 A
To begin, we will learn how to program a basic polyphonic sound. It will be simply
composed of four elements:
By doing this you will obtain a basic preset offering an overall tone of violins. Figure 1
shows you the position of the different knobs.
To begin, choose the preset “UJ Brass» in the project «KUJIIE» / “Brass”. As you
POLYPHONIC VIOLIN PRESET MADE WITH THE JUPITER- 8 V
• Two oscillators (VCO1 and 2)
• A high pass filter (HPF)
• A low pass filter (VCF)
• An ADSR envelope connected to the filter
• An ADSR envelope connected to the amplifier
• An LFO connected to the width of the “square” waveform of VCO2
will notice, the sound is very basic and not very alive when you play a note. In fact,
this very simple preset (continuous and brilliant) is our starting point for the sound
design.
Choose the preset « Default » of the project « Template »
On VCO 1, the “SAW” wave form is selected. This waveform is very rich in
harmonics and will be perfectly suitable to create the violin sound.
Change the range of this oscillator (by octave). Click on the selector “Range” and
place it on “16'”
ARTURIA – JUPITER-8V – USER’S MANUAL
 Loading...