

Page 1
Care, Use and Installation booklet
TUMBLE DRYER
EN F ES
English, 1
Français, 13 Espanol, 25
TVM63
Contents
Warnings and Safety instructions, 3
Important safety instructions
Grounding Instructions
Dryer Description, 4
The front
The back
Control panel
Start and Programs, 5-6
Choosing a Program
Table of Programs
Laundry, 6-7
Sorting your laundry
Wash care labels
Special clothing items
Drying times
Maintenance and Care, 9
When to Switch off the
electricity
Clean the filter after
each cycle
Check the drum after
each cycle
Cleaning the dryer
Troubleshooting, 10
Spare Parts
Installation, 11-12
Electrical
Where to put your dryer
Exhaust Ducting
Stacking Kit
Warranties, 13
3
Page 2

2
Page 3
TD4176 Issue 1
WARNING–Risk of Fire
Clothes dryer installation must be performed by a qualified installer.
Install the clothes dryer according to the manufacturer’s instructions and local codes.
Do not install a clot hes dryer with flexible plastic ven ting materials.
If flexib le metal (foil type) du ct is in stalled, it must be of a specific type
ident ified by the appliance manufactu rer a s suitable for use with clothes dryers.
Flexible venting mat erials are known to collapse, be easily crushed, and trap lint.
These conditions will obstruct clothes d ryer airflow and increa se the ri sk of fire.
To red uce the risk of severe injury or death , follow all installatio n instructions.
Save these instructions.
« AVERTISSEMENT. Risque d’incendie.»
«Les sécheu ses d oivent être installé espar un installateu r qualifié.»
«Les séche uses doivent être insta llées selon les instructions du fabricant et les codes locaux.»
«Ne pas ra ccorde r de matériaux d’évacuation en plastique à une sécheuse. Si une gaine métallique flexible (de
type pe llicule métallique) est insta llée, elle doit ê tre d’un type rec ommandé pa r le fabricant pour utilisation av ec la
sécheuse. Les matériaux d’évacuation en pl asti que ont tendance à s’affaisser, et ils sont faciles à écraser et
retiennent la charpie. Ces cond itions obstruero nt la circulation de l’air et au gmenteront le risque d’incendie.»
«Afin de réduire le risque de blessure grave ou de mort, suivre tou tes les instructions d’installa tion.»
«Conserver ces instru ctions.»
Advertencia - Riesgo de Incendio
La instalación de la secadora de ropa debe ser realizada por un instalador calificado.
Instale la secad ora de ropa de acuerdo con las instrucciones d el fabricante y los código s locales.
No instale la secadora de ropa con materiales de ventilación de plástico fle xib les.
Si instala un conducto de meta l flexible (tipo lámina), éste d ebe ser del tipo específico identificado por el
fabricante del electrodom éstico com o adecuado para su ut ilización en secad oras de ro pa.
Se c onoce que los materiales de ventil ació n de plástico colapsan, se ap lastan fácilmente y atra pan pelusas.
Es tas condicione s obstruirá n la salida se a ire y aumenta rán el riesgo de incendio.
Para re ducir el riesgo de daño severo o muerte, si ga todas las instruccion es de i nstalación.
Guarde estas instrucciones.
1
Page 4

Warnings and Safety Instructions
.
WARNING
.
should never be obstructed.
SAVE THESE INSTRUCTION
(see
•
Do not use the dryer unless the filter is securely in place
(see Maintenance)
•
Do not overload the dryer
loads).
•
Do not load items that are dripping wet.
•
Tumble dry items only if they have been washed with
detergent and water, rinsed, and been through the
spin cycle. It is a fire hazard to dry items that HAVE
NOT been washed with water.
•
Carefully check all instructions on clothing labels
Laundry).
•
Do not tumble dry large, very bulky items.
•
Do not tumble dry acrylic fibers at high
temperatures.
•
Complete each program with its Air Fluff
phase.
•
Do not turn off the dryer when there are still warm
items inside.
•
Never climb on top of the dryer. It could result in
damage.
•
Comply with specified electrical requirements.
Installation).
•
Always buy original spare parts and accessories
(see Troubleshooting).
Grounding Instructions
THIS APPLIANCE MUST BE GROUNDED
Improper connection of the equipment-grounding conductor can
result in a risk of electric shock. Check with a qualified
electrician or service representative or personnel if you are in
doubt as to whether the appliance is properly grounded.
In the event of malfunction or breakdown, grounding will
reduce the risk of electric shock by providing a path of
least resistance for electric current. This appliance is
equipped with a cord having an equipment-grounding
conductor and a grounding plug. The plug must be
plugged into an appropriate outlet that is properly
installed and grounded in accordance with all local
codes and ordinances.
DO NOT modify the plug provided with the appliance: if
it will not fit the outlet, have a proper outlet installed by a
qualified electrician or exchange the cord with an
appropriate one rated for the dryer
REFER TO THE RATING PLATE FOR VOLTAGE
AND CURRENT REQUIREMENTS.
location)
The dryer should be connected to the mains supply via
a suitable socket which is
your dryer
This dryer must be connected to 15A INDIVIDUAL
BRANCH CIRCUIT.
For full details see Installation Instructions sections of
this book.
IF IN DOUBT ABOUT ANY OF THE ABOVE
CONSULT A QUALIFIED ELECTRICIAN
(see Laundry
for maximum
(see Installation).
WARNING:
.
(See diagram for
accessible
after installing
TD4079C15 Issue 1
!
This appliance has been designed and built according
to international safety standards. These warnings are
given for safety reasons and must be read carefully.
Important Safety Instructions
To reduce the risk of fire, electric shock or injury
to persons when using your appliance, follow
the basic precautions including the following.
Read all the instructions before using the appliance.
•
•
Do not dry articles that have been previously cleaned
in, washed in, soaked in, or spotted with gasoline, drycleaning solvents, or other flammable or explosive
substances, as they give off vapors that could ignite or
explode
•
Do not allow children to play on or in the appliance.
Close supervision of children is necessary when the
appliance is used near children.
•
Before the appliance is removed from service or
discarded, remove the door to the drying
compartment
•
Do not reach into the appliance if the drum is moving.
•
Do not install or store this appliance where it will be
exposed to the weather.
•
Do not tamper with the controls.
• Do not repair or replace any part of the appliance or
attempt any servicing unless specifically
recommended in the user-maintenance instructions.
•
Do not use fabric softeners or products to eliminate
static unless recommended by the manufacturer of
the fabric softener or product
•
Do not use heat to dry articles containing foam rubber
or similarly textured rubber-like materials.
•
Clean lint filter before and after each load.
Maintenance
•
Keep area around the exhaust opening and adjacent
surroundings free from the accumulation of lint, dust,
and dirt.
•
The interior of the appliance and exhaust duct should
be cleaned periodically by qualified service personnel.
•
Do not place items exposed to cooking oils in your
dryer. Items contaminated with cooking oils may
contribute to a chemical reaction that could cause a
load to catch fire.
•
This tumble dryer has been designed for home, and not
professional, use.
• This dryer must be used by adults, and the instructions
in this booklet should be followed carefully.
•
Do not touch the appliance while barefoot or with wet
hands or feet.
• The appliance must be installed correctly and have
proper ventilation. The air intake vents behind the
machine, the outlet vents.
(see Installation).
•
Check to see if the dryer is empty before loading it.
The back of the dryer could become very
•
hot. Never touch it while in use.
(see
(see
EN
.
!
4
Page 5
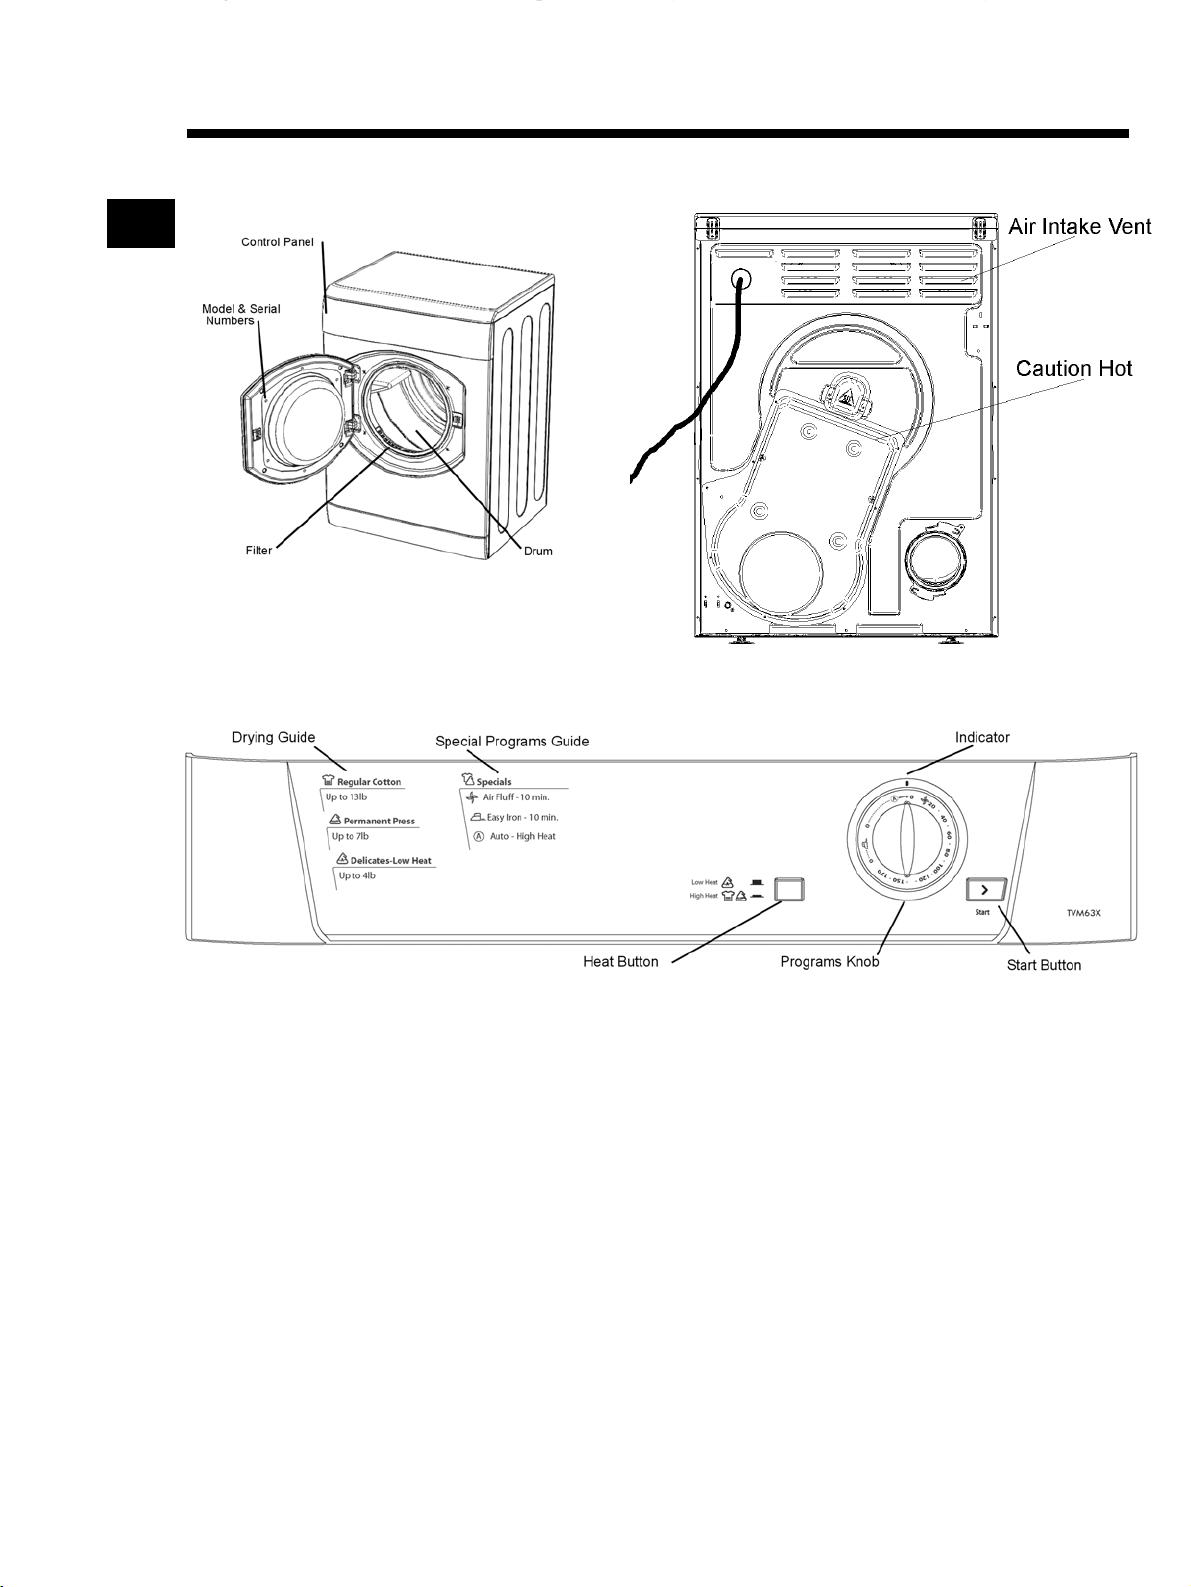
Dryer Description
TD4177W Issue 1
EN
The front
Control Panel
The back
The START button begins drying a s elected
program (see Start and Programs).
The HEAT button selects drying temperature
(see Start and Programs).
In HIGH heat.
Out: LOW heat.
The Dry ing Guide allows you to consult a user
friendly table of fabric types and load capacities.
The Special Pr ograms Guide gives a guide to the
available pro grams.
The PROGRAMS k nob sets the program: rotate it
clockwise, never counter-clockwise, until the indicator is
pointing to the program you want to select (see Start
and Programs). The program knob will advance to the 0
position after the program ends.
5
Page 6

Start and Programs
TD4081 Issue 1
Choosing a Program
1. Plug the dryer into the electrical socket.
2. Sort your laundry according to fabric type
(see Laundry).
3. Open the door and make sure the filter is clean
and in place
4. Load the machine and make sure that the items
are not in the way of the door seal. Close the door.
5. Choose a drying program by checking the Programs
(see Programs)
table
each type of fabric
with the HEAT button; - select a program or drying
time by rotating the PROGRAM knob clockwise.
(see Maintenance).
as well as the indications for
(see Laundry). -
set temperature
6. Press the START button to begin.
During the drying program, you can check on your
laundry and take out the items that are dry while the
others continue drying. When you close the door
again, press START in order to resume drying
7. About 10 minutes before the program is completed,
it enters the final AIR FLUFF phase (fabrics are
cooled), which should always be allowed to complete.
8. Open the door, take your laundry out, clean the
filter and replace it
9. Unplug the dryer.
(see Maintenance).
EN
6
Page 7

y
EN
Programs
TD4087 Issue 1
Program What it does How to set it Note
Timed Drying
(Up to 170 minutes)
Fabric Care
Air Fluff Phase
Fabric Care
Easy Iron
Fabric Care
Automatic Drying
A
Dries wet clothing that will be
ironed, acrylic fibers or small
loads (less than 2 lb / 1 kg).
Heating Elements turn
themselves off and clothing is
cooled down.
Brief program (approximately
10 minutes) that softens fibers
of clothing that is ready for
ironing.
Dries completely: your clothes
are ready to be worn
Regular Cottons
, Permanent Press,.
1. Select required Heat setting HIGH HEAT or
LOW HEAT by pressing the HEAT Button.
2. Position the PROGRAM knob on the desired
time.
3. Press the start Button..
This is the’ final phase of all programs. Approximatel
10 minutes before the finish, the knob advances
automatically to the Air Fluff phase. After this the
clothing is ready to be taken out.
1. Select HIGH HEAT by pressing the HEAT Button.
2. Position the PROGRAM knob on
3. Press the start Button..
1. Select HIGH HEAT by pressing the HEAT
Button.
2. Position the PROGRAM knob on
3. Press the start Button..
A
Consult suggested drying
times (see Laundry)
Always allow the dryer to
complete this phase.
! This is not a drying
program (see below)
!
If you select LOW HEAT,
this program will not dry
your clothes. For Acrylic
fibers or small loads select
Timed Drying.
.
Easy Iron Program
Easy Iron is a short 10 minute program (8 minutes of heat followed by a 2 minute Air Fluff period) which fluffs the
fibers of clothing that has been left in the same position/location for an extended period of time. The cycle relaxes
the fibers and makes them easier to iron and fold.
Easy Iron is not a drying program and should not be used for wet articles of clothing.
!
For best results:
1. Do not load more than maximum capacity. These numbers refer to dry weight:
Fabric: Max load:
Regular Cottons and Regular Cottons mix 5.5 lb / 2.5 kg
Permanent Press 4 lb / 2 kg
Denim 4 lb / 2 kg
2. Unload the dryer immediately after the end of the drying cycle, hang, fold or iron the articles and put them
away. Should this not be possible, repeat the cycle.
The Easy Iron effect varies from one fabric to the next. It works very well on traditional fabrics like Regular
Cottons or Regular Cotton mix, and less well on acrylic fibers.
7
Page 8

Laundry
g
TD4003NA6 Issue 1
Sorting your laundry
• Check symbols on clothing labels to
make sure that the articles can be tumble dried
• Sort laundry by fabric type.
• Empty pockets and check buttons.
• Close zippers and hooks and tie loose belts and
strings
• Wring out each item in order to eliminate as much
excess water as possible.
!
Do not load dripping wet clothes into the dryer
Maximum load
Do not load more than maximum capacity.
These numbers refer to dry weight:
Natural fibers: 6 kg max (13 lb)
Synthetic fibers: 3 kg max (6.6 lb)
! Do not overload the dryer as this could result in
reduced drying performance.
Typical weights
Clothes
Blouse
Dress
Jeans 700 g 1 lb 6 oz
10 Diapers 1000 g 2 lb 6 oz
Shirt
T - Shirt 125 g 4 oz
Household items
Duvet cover
(Double)
Large Tablecloth 700 g 1 lb 6 oz
Small Tablecloth 250 g 9 oz
Tea Towel 100 g 3 oz
Bath Towel 700 g 1 lb 6 oz
Hand Towel 350 g 12 oz
Double Sheet 500 g 1 lb 2 oz
Single Sheet 350 g 12 oz
Cotton
Other
Cotton
Other
Cotton
Other
Cotton
Other
1500g
1000g
150g
100
500g
350g
300g
200g
5 oz
3 oz
1lb 2 oz
12 oz
10 oz
7 oz
3 lb 5 oz
2 lb 3 oz
Wash care labels
Look at the labels on your garments, especially
when tumble drying for the first time. The following
symbols are the most common:
May be tumble dried.
not
Do
tumble dry.
Tumble dry at high heat setting.
Tumble dry at low heat setting.
What not to tumble dry in your dryer:
• Articles that contain rubber or rubber-like materials,
or plastic film (pillows, cushions, or PVC rainwear);
any other flammable objects, or objects that contain
flammable substances (towels soiled with
hairspray).
• Glass fibers (certain types of draperies).
• Items that have been Dry Cleaned.
• Items with the ITLC code
(“Special clothing items”)
. These can be cleaned with special at-home
dry cleaning products. Follow instructions carefully.
• Large bulky items (quilts, sleeping bags, pillows,
cushions, large bedspreads, etc.). These expand
when drying and would prevent airflow through the
dryer.
At the end of a drying cycle, cottons could still be
damp if you grouped cottons and permanent press
items together. If this happens simply give them an
additional short period of drying.
8
Page 9

g
g
0
(
A
EN
Special clothing items
Blankets and bedspr eads: acrylic items (Acilan,
Courtelle, Orion, Dralon) must be dried with special care
on a low heat setting. Avoid drying for a long period of
time.
Pleated or creased garments: read manufacturers
drying instructions on the garment.
Starched articles: do not dry these items with nonstarched items. Make sure that as much of the starch
solution is removed from the load as possible before
placing it in the dryer. Do not over-dry: the starch will
become powdery and leave your clothing limp, which
defeats the purpose of starch.
Drying times
The table below presents APPR OXIMATE dryin g
times in minutes. Weights refer to dry garments:
Regular Cottons
High (Fu ll) Heat
Drying t imes 800-1000 rpm in washing machine
Half Load Full Load
2 lb 4 lb 7 lb 9 lb 11 lb 13 lb
1 kg 2 kg 3 kg 4 kg 5 k
25-35 55-65 80-95 100-120 125-145150-17
Permanent Press
6 k
Times are approximate a nd can vary depending
upon:
mount of water retai ned in clothes after spin cycle:
•
towels and delicates retain a lot of water.
• Fabrics: items that have the same type of fabric but
different textures and thicknesses may not have
the same drying times.
• Quantity of la undry: single items or small loads
may take longer to dry.
• Dryness: if you are going to iron some of your
clothes, they can be taken out while still a bit
damp. Others can be left longer if you need them
to be completely dry.
• Heat setting.
• Room temperature: if the room whe re the dryer is
located is cold, it will take longer for the dryer to dry
your clothes.
• Bulk: some b ulky items can be tumble dried with
care. We suggest that you remove these items
several times, shake them out, and return them to
the dryer un til finished.
! Do not over-dry your clothes.
All fabrics contai n a little natural moisture, which
keeps them soft and fluffy.
High (Fu ll) Heat
Drying times on redu ced spin in was hing machine
Half L oad Full Load
2 lb 4 lb 7 lb
1 kg 2 k g 3 kg
20-35 45-55 65-80
Deli cates/Acrylics
Low) Heat
Gentle
Drying times on redu ced spin in was hing machine
Half Load Full Load
2 lb 4 lb
1 kg 2 kg
100-115 140-150
TD4088VS6 issue 1
9
Page 10

Maintenance and Care
TD4005NA Issue 2
EN
When you should Switch off the
electricity
Unplug the dryer when not using it, when cleaning it,
and during maintenance activities.
Clean the filter after each cycle
The filter is an important part of your dryer: it
accumulates lint and fluff that is formed while drying.
Small items could also become trapped in the filter.
When finished drying, therefore, clean the filter by
rinsing it under running water or with your vacuum
cleaner. Should the filter become clogged up, the
airflow inside the dryer will be seriously
compromised: drying times lengthen and you will
consume more energy. It may also damage your
dryer.
The filter is found in front of the dryer trim
(see diagram).
Removing the filter:
1. Pull the plastic grip of the filter upwards
diagram).
2. Clean the filter and replace it correctly.
Ensure the filter is fully located flush into the
tumble dryer trim.
! Do not use dryer without replacing the filter.
(see
Check the drum after each cycle
Turn the drum manually in order to remove small
items (handkerchiefs) that could have been left
behind.
Cleaning the drum
! Do not use abrasives, steel wool or stainless steel
cleaning agents to clean the drum
A colored film may start to appear on the stainless
steel drum, this may be caused by a combination of
water and, or cleaning agents such as fabric
conditioner from the wash. This colored film will not
affect the dryer performance.
Cleaning the dryer
• External parts in metal or plastic and rubber parts can
be cleaned with a damp cloth.
Periodically check the vent tube and any
•
permanent venting fixture to make sure that there
has been no accumulation of fluff or lint, and
remove it.
Remove lint that collects around filter and the outlet
•
vents.
Do not use solvents or abrasives.
!
! Your dryer uses special bearing components which
do not need lubrication.
! Have your dryer checked regularly by authorized
technicians to ensure electrical and mechanical
.
safety
10
Page 11

Troubleshooting TD4183 Issue 1
efore you call our Customer care department, go through the following troubleshooting suggestions.
EN
Problem:
The dryer won’t start
It is taking a long time to dry
Possible causes / Solutions:
• The plug is not plugged into the socket, or not making contact.
• There has been a power outage.
• The fuse has blown.
• The door is not closed securely.
• The PROGRAMS knob has not been set properly (see Start and
Programs).
• The START button has not been pressed (see Start and Programs).
• The filter has not been cleaned (see Maintenance).
• The temperature setting is not ideal for the type of fabric you are
drying (see Start an d Programs).
• Automatic / Sensor Dry Programs require a
HIGH temperature setting (see Start and Program s).
• The correct program has not be en selected fo r this load
(see Start and Laundry).
• The Exhaust Duct is obstructed (see Installation).
• The air intake vent is obstructed (see Installation).
• The permanent Ventilation flap on the storm cover is obstructed
(see Installation).
• The items are too wet (see Laundry).
• The dryer is overloaded (see Laundry).
If you still have a problem call our Customer Care Department on 1 800 356 0766
Spare Parts
This dryer is a complex machine. Repairing it yourself or having a non-authorized person try to repair it could cause
harm to one or more persons and to the ma chine, and could invalidate the spare parts warranty.
TD4083 Issue 2
Call an auth orized service center i f you experience problems while using the m achine.
Contact number:1 800 356 0766
11
Page 12

(
)
p
TD408 9 issue 3
Installation Instructions
Read these instructions with care.
These instructions are provided for us e by qualified installers, in addition the installation must comply with:
• In the United States, in ac cordance with the National Electric Code ANSI/NFPA70 – latest edition and any State,
Municipal or local codes.
• In Canada, in accordance with the Canadian Electric Code C22.1 – latest edition and any Provincial, Municipal or
local codes
Electrical
The dryer comes with a three cord power supply cord fitted with a 5-15P (plug), a receptacle should be installed in a
location acc ess ible after the dryer is installed.
Grou nding
Some local codes may require a separate ground. In such cases the required ground wire, clamp and screw
must be purchased separately.
NEVER ground the dryer to plastic plumbing lines , gas lines or water pipes.
NOTE: IF IN DOUBT ABOUT ANY OF THE ABOVE
CONSULT A QUALIFIED ELECTRICIAN
Where to put your dryer
Check local codes before choosing a location. Some codes do not per mit installation in a garage, closet, mobile home
or bedroom.. DO NOT install the dryer in an area where gasoline or other flammable materials are kept or stored.
When operating the dryer, there has to be adequate ventilation to avoid the back flow of gases into the room from
applianc es bu rn ing o t her f u els, in clu din g open f ires .
Minimu m installation clearances.
Closet Closet
Sides
Top
Rear
Front
Vent Opening –
Distance from
of closet
To
If installed in a closet it must have the following dimensions and have two ventilation openings each having and area 72
sq. ins. (450 sq. cm) loc ated) 2” (50mm or 6” (150mm) from top[see table] and 6” (150mm) from bottom of door.
It must NEVER be installed in a closet with a solid door.
The dryer has adjustable height feet, use these to level the dryer after fitting into its final position.
¾” (15 mm) 0 ¾” (15 mm)
½” (10 mm) 4” (100 mm) ½” (10 mm)
¾” (15 mm) ¾” (15 mm) ¾” (15 mm)
¾” (15 mm) ¾” (15 mm) not applicable
6” (150mm) 2” (50mm) not applicable
alternative
RV/Marine Installations
W hen locating the appl iance in a to wable trai ler or watercraft, position the dryer o ver th e ax les or mid-ship
where movemen t is at a minimum. Blo ck th e dryer to prevent extreme movement or tipping.
Under Counter
12
Page 13

TD4 178W issue 1
g
(
)
)
Installation Instructions
Exhaust Ducting
The ducting system for the dryer must be as short and straight as possible and with as few elbows as poss ible. Fourinch (102 mm in Canada) rigid metal ducting should be used, metal flexible ducting can be used but the maximum
length of ducting if used is 7ft (2.4 m). and provided it complies with the following:
In Canada, that only those foil-type flexible ducts, If any, specifically identified for use with the appliance by the
manufacturer shall be used. In the United States, that only those foil-type flexible ducts, if any, specifically identified for
use with the appliance by the manufacturer and that comply with the Outline for Clothes Dryer Transition Duct, Subject
2158A, shall be used;
Nev er use plastic ducting. All elbows must also be a minimum of 4-inch (102 mm) diameter. Joints must be secured
with ducting tape. Do not use screws or other metal fastenings that extend into the duct as lint can collect on the
screws.
The above assumes that an approved venting hood is used and that the flap on this hood must not have magnetic
catches.
-The appliance MUST NOT be exhausted into a chimney, a wall, a ceiling, a wall, a ceiling, an attic, a crawl space or a
concealed space of a building.
- To reduce the risk of fi re, this appliance MUST BE EXHAUSTED OUTDOORS
- Do not d ischarge the exhaust air into a f lue, which is used for exhausting fu mes from other appliances
burning gas or oth er fuel.
Depending on the frequency of use it is essential that the ducting is checked periodically and any fluff or debris removed
Stacking Kits
A stacking kit Ariston reference number 66 911 is available from your dealer, which allows the d ryer to b e
fitted to th e top of an Ariston washing m achine
The kit contains, all the necessary brackets and screws.
Too ls nee ded; - No 2 P hilips Scre wdriver, 2mm dri ll, powe r or hand drill
For personal safety, DO NOT try to fit the dryer on top of the washing machine on your own. A
second person should help to lift the tumble dryer onto the washer, and to relocate the stacked
washer and dryer.
1. You will need to get to the sides of the washing machine to fit the stacking kit a nd
2. Follow the instructions provided with the stacki ng kit.
Alternative stacking kit.
RV/Marine S tacking Kit ~SK02 availabl e from Westland Sales: 1-800-356-0766
Maximu m len
Number of
Elbows
0 22 ft. (6. 6m)
1 18 ft.
2 14 ft.(4.2m)
3 6 ft.(1.8m
th of Rigid duct
Rigid Du ct (only)
5.4.m
WA RNING:
SAFETY
dryer. If necessary pull the machine a way fro m its locati on to gain access to the machine to fit the stacking
kit and dryer.
13
Page 14

TD4084 issue 3
ARISTON ONE-YEAR LIMITED WARRANTY
(USA & CANADA ONLY
WHO IS COVERED BY THIS WARRANTY
This limited one-year warranty (“Warranty”) is given only to the original end-use/retail pur chaser (the “Fir st Using Purchaser”) of the
accompanying Ariston pr oduct(s) (the “Ariston Product”).
If you purchased this Ariston Product fr om someone other than an authorized Ariston r eseller /dealer in the United Sta te s or Canada , or i
the Ariston Pr oduc t was used (including but not limited to f loor models or refurbished products) prior to your purchase, then you are not
the Fir st Using Purchaser and the Ariston Pr oduct that you purchased is not c overed by this Warranty. This Warranty is not tr ansferable.
WHAT IS CO VE RED BY THIS WARRANTY
Ariston will repair or re
norma l home-use conditions. Ariston will also provide, free of charge, all labor to repair or r eplace the def ective pa rt.
This Warranty applies only to Ariston Products purchased and used in the United States or C anada. Subject to the exclusions below , fo
Ariston Products purchased in, but used outside, the United States or Canada, this Warranty covers only warr anty service within the United
State s or Canada (and does not include shipping outside the United Sta tes or Canada).
LENGTH OF THE WAR RANTY
This Warra nty runs f or a period of one (1) year from the date of the original purchase by the First Using Purc haser. Please note that a cop
of your original pur chase receipt showing the purchase date and the vendor’s name and address are required to obtain service under this
Warr anty. For the purposes of determining the applicable warranty period, please note that any and all replaced or repaired parts shall
assume the identity of the original.
place any part of the Ariston Product which fails due to a defect in mater ials or workmanship when used under
WHAT IS NOT COVERED BY THE WARRANTY (EXCLUSIONS)
This Warra nty does not cover:
1. Improper installation, delivery, maintenance a nd/or improper operation of the Ariston Product. 2. Damage c aused if the Ariston Product
has not been used in compliance with the electricity or gas supply specifications printed on the rating plate. 3. Failure of or damage to the
Ariston Product if it is altered, abused, misused, or used for other than the intended purpose, or if it is used commercially. 4. Service trips to
your home to provide instr uctions on the use of your Ariston Product. 5. Replacement of house fuses or corre ction of the plumbing or
electric wiring in your home. 6. Damage cause d by neglect, accident, fire, floods or acts of God.
7. Physical Da mage to the appearanc e of your Ariston Product including, without limita tion, scratches, rust, dents, warping, peeling and
the like. 8. Damage caused by transportation.
9. Replacement of any consumable or degr adable item or accessory including, but not limited to: plugs, cables, batteries, light bulbs,
fluorescent tubes and starters, covers and filters, or replacement of any removable parts m ade of glass or plastic.
10. Damage caused after delivery. 11. Water damage of any kind.
12. An Ariston Product not acce ssible to provide required service.
13. Problems arising from other than defects in materials or workmanship.
14. Travel time when installed in a recreational vehicle or marine application.
This Warra nty is void if the Ariston Product is alter ed, serviced, m aintained, dismantle d, or otherwise interfered with by a ny person who
is not authorized by Ariston.
15. Non-standard labor when installed in a ma rine application.
16. Water leaks of any kind
TO THE EXTENT PERM ITTED BY LAW, THIS WARRANTY IS IN LIEU OF ALL OTHER WARRANTIES, WRITTEN OR ORAL,
WHETHER EXPRESSED BY AFFIRMATION, PROMISE, DESCR IPTION, DRAWING, MODEL OR SAMPLE. ANY AND AL
WAR RANTIES OTHER THAN THIS ONE, WHETHER EXPRESS OR IMPLIED, INCLUDING IMPLIED WARRANTIES OF
MERCHANTABILITY AND FITNESS FOR A PARTICULAR PURPOSE, ARE HEREBY DISCLAIMED. IMPLIED WAR RANTIES
INCLUDING, BUT NOT LIM ITED TO, THE IMPLIED WARRANTIES OF MERCHANTABILITY AND FITNESS THAT CANNOT BE
EXCLUDED BY LAW, S HALL BE LIMITED TO THE SAME DUR ATION AS THIS WARRANTY. EXCEPT FOR THAT REPAIR O
REPLACEMENT AS DESCRIBED ABOVE, ARISTON SHALL NOT BE LIABLE FOR ANY DIRECT, INDIRECT, INCIDENTAL O
CONSEQUENTIAL DAMAGES OR SPECIFIC RELIEF.
Some States and Provinces do not allow the exclusion or limita tion of incidental or consequential dam ages and/or implied warranties, so
the above lim ita tions or exclusions may not a pply to you. This War ranty gives you specific legal rights and you may a lso have other legal
rights whic h vary from State to State or Provinc e to Provinc e.
R
R
f
r
y
L
WHAT YOU SHOU LD DO TO OBT AIN W ARRAN TY S ER VI CE
All repairs or warranty service must by provided by Ariston or an Authorized Ariston Servic e Center.
To schedule warra nty service please call 1-8
Ariston Product’s model number and serial number.
Plea se note that a copy of your original purchase receipt showing the purchase date and the vendor’s name and a ddr ess are required to obtain
service under this Warranty. If the Ariston Product is located in an area where service by an Authorized Ariston Service Center is not
available, you may be responsible for a trip charge or you may be required to bring the Ariston Pr oduct to an Authorized Ariston Service
Center for service.
The foregoing are your sole (i.e., only) and exclusive remedies under this Warranty. This Warranty is the only warranty that Ariston is giving
for this Ariston Product. This Warranty replace s all other agreements and understandings that you may have with Ariston or its
re
presentatives.
00-356-0766, email service@westlandsales.com. Please remember to provide us with your
14
Page 15

2
 Loading...