

INSTRUCTION MANUAL
MODEL: MWA 122.1 X
GB
English Français
PT
Portuges
FR
AR
ES
Español
MICROWAVE OVEN
Contents
Precautions and suggestions, 2
Oven installation, 8
Operating instructions, 9
Troubleshooting, 13
Installation, 14
GB
Read these instructions carefully before using your microwave
oven, and keep it carefully.
If you follow the instructions, your oven will provide you with many
years of good service.
SAVE THESE INSTRUCTIONS CAREFULLY
PRECAUTIONS TO AVOID POSSIBLE EXPOSURE
2
TO EXCESSIVE MICROWAVE ENERGY
(a) Do not attempt to operate this oven
GB
with the door open since this can
result in harmful exposure to
microwave energy. It is important not
to break or tamper with the safety
interlocks.
(b) Do not place any object between the
oven front face and the door or allow
soil or cleaner residue to accumulate
on sealing surfaces.
(c) WARNING: If the door or door seals
are damaged, the oven must not be
operated until it has been repaired
by a competent person.
ADDENDUM
If the apparatus is not maintained in a
good state of cleanliness, its surface
could be degraded and aect the
lifespan of the apparatus and lead to a
dangerous situation
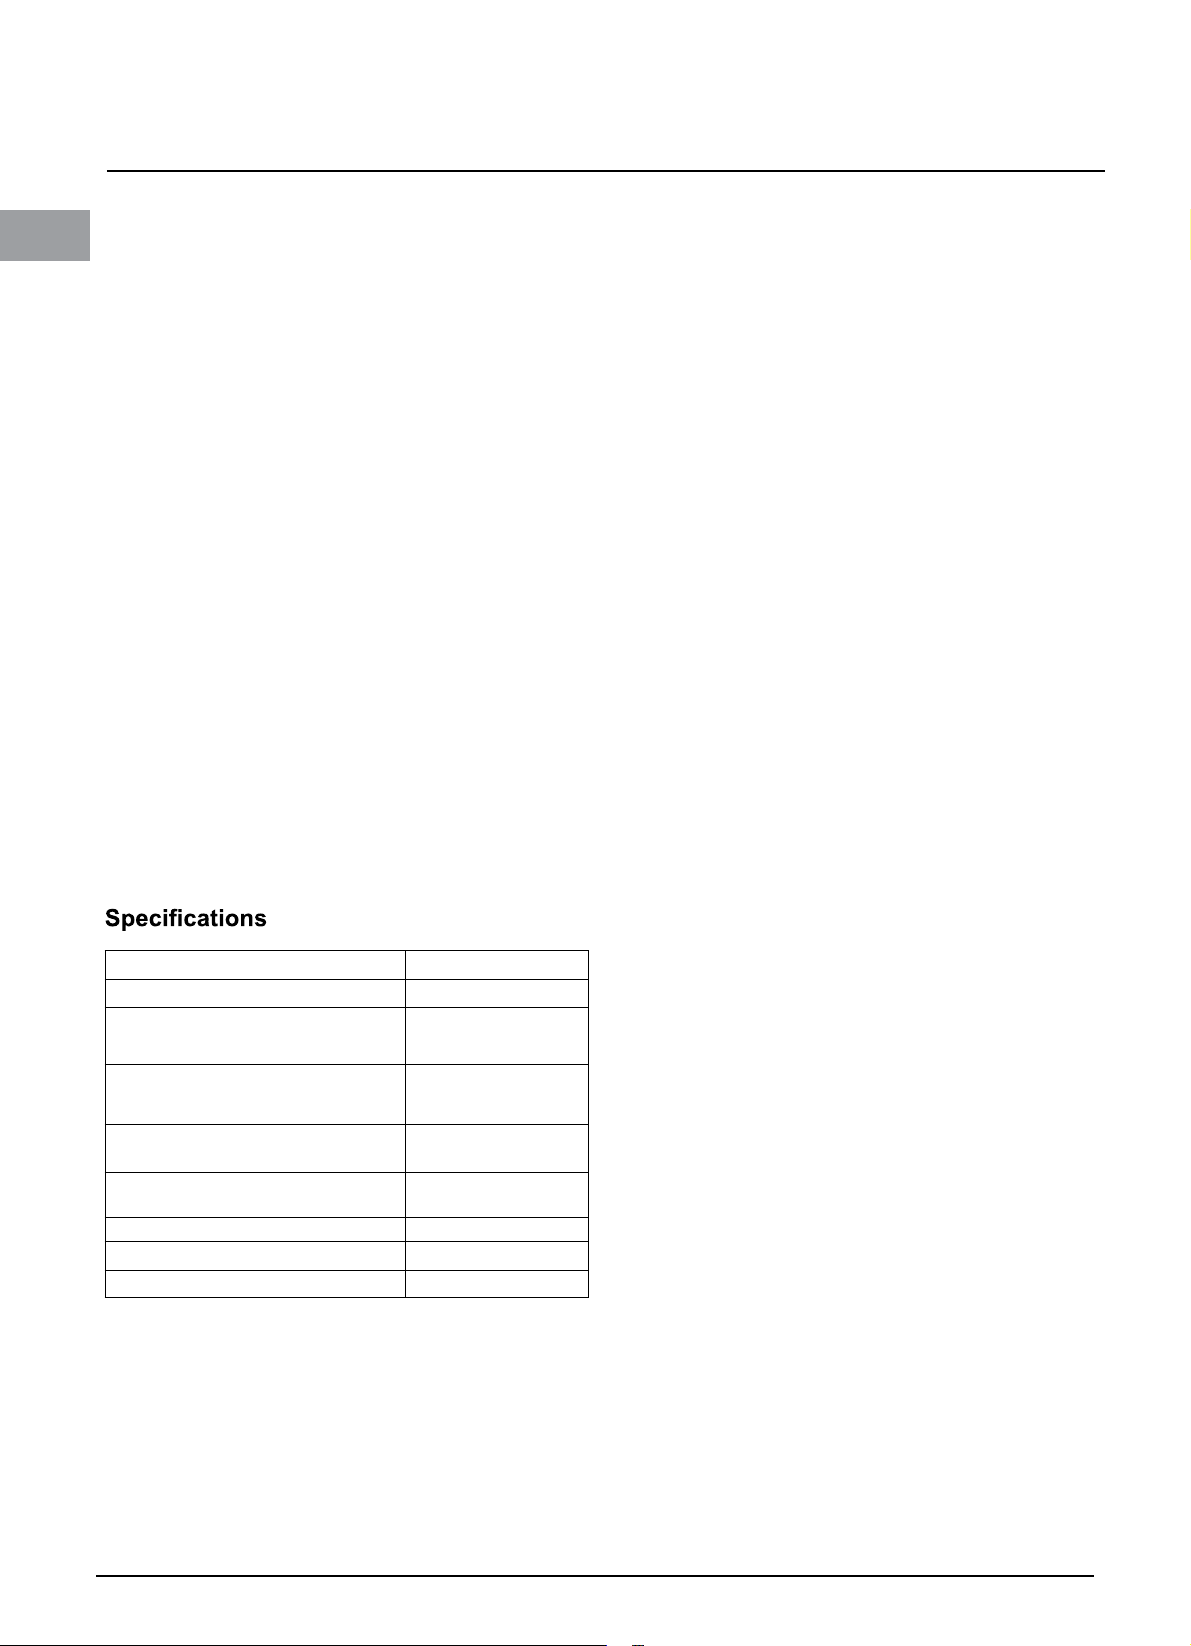
Model:
Rated Voltage:
Rated Input Power (Microwave): 1250W
Rated Output Power
(Microwave):
Rated Input Power (Grill): 1000W
Oven Capacity: 20 L
Turntable Diameter: Ø 245mm
External Dimensions: 594x343.5x388mm
Net Weight: Approx. 15Kg
.
MWA 122.1 X
230- 240V~50Hz
800W
IMPORTANT SAFETY
INSTRU C TIONS
WARNING
To reduce the risk of re, electric shock,
injury to persons or exposure to
excessive microwave oven energy
when using your appliance, follow basic
precautions, including the following:
1. Warning: Liquids and other foods
must not be heated in sealed
containers since they are liable to
explode.
2. Warning: It is hazardous for anyone
other than a competent person to
carry out any service or repair
operation that involves the removal of
a cover which gives protection
against exposure to microwave
energy.
3. Warning: On
the oven without supervision when
ly allow children to use
adequate instruct ions have been
given so that the child is able to use
the oven in a safe way and
understand the hazards of improper
use.
4. Warning: When the appliance is
operated in the combination mode,
children should only use the oven
under adult supervision due to th e
temperatures generated. (only for grill
series) .
5. Only use utensils suitable for use in
microwave ovens.
6. The oven should be cleaned regularly
and any food deposits should be
removed.

7. Read and follow the
3
specic:”PRECAUTIONS TO AVOID
POSSIBLE EXP OSURE TO
EXCESSIVE MICROWAVE
ENERGY”.
8. When heating food in plastic or paper
containers, keep an eye on the oven
due to the possibility of ignition.
9. If smoke is observed, switch o or
unplug the appliance and keep the
door closed in order to stie a ny
ames.
10. Do not overcook food.
11. Do not use the oven cavity for
storage purposes. Do not store
items, such as bread, cookies, etc.
inside the oven.
12. Remove wire twist-ties and metal
handles from paper or plastic
containers/bags before placing th em
in the oven.
13. Install or locate this oven only in
accordance
with the installation
instructions provided.
14. Eggs in the shell and whole
hard-boiled eggs should not be
heated in microwave ovens since
they may explode, even after
microwave heating has ended.
15. Use this appliance only for its
intended uses as described in
manual. Do not use corrosive
chemicals or vapors in this
appliance. This oven is especially
designed to heat. It is not designed
for industrial or laboratory use.
16. If the supply cord is damaged, it
must be replaced by the
manufacturer, its service agent or
similarly qualied persons in order
to avoid a hazard.
17. Do not store or use this appliance
utdoors.
o
18. Do not use this oven near water, in a
wet basement or near a swimming
pool.
19. The temperature of accessible
surfaces may be high when the
appliance is operating. The surfaces
are liable to get hot during use.
Keep cord away from heated
surface, and do not cover any
events on the oven.
20. Do not let cord hang over edge of
table or counter.
21. Failure to maintain the oven in a
clean condition could lead to
deterioration of the surface that
could adversely aect the life of the
appliance and possibly result in a
hazardous situation.
22. The contents of feeding bott les
and
baby food jars shall be stirred or
shaken and the temperature
checked before consumption, in
order to avoid burns.
23. Microwave heating of beverages
can result in delayed eruptive boiling,
therefore care must be taken when
handling the container.
GB

24. The appliance is not intended for
4
GB
use by persons (including children)
with reduced physical , sensory or
mental capabilities, or lack of
experience and knowledge, unless
they have been given supervision or
instruction concerning use of the
appliance by a person responsible
for their safety.
25. Children should be supervised to
ensure that they do not play with the
appliance.
26. The microwave oven shall not be
placed in a cabinet unless it has
been tested in a cabinet.
27. The appliances are not intende d to
be operated by means of an
external timer or separate
remote-control system.
28. WARNING: Ensure that the
appliance is switched o before
replacing the lamp to avoid the
possibility of electric shock.
29. Accessible parts may become hot
during use. Y oung children should
be kept away.
30. Steam cleaner is not to be used.
31. Surface of a storage drawer can get
hot.
32. Do not use harsh abrasive cleaners
or sharp metal scrapers to clean the
oven door glass since they can
scratch the surface, which may
result in shattering of the glass.
33. During use the appliance becomes
hot. Care should be taken to avoid
touching heating elements inside
the oven.
34. Only use the temperature probe
recommended for this
oven.(for
ovens provided with a facility to use
a temperature -sensing probe.)
35. During the rst use there is a
particular smell due to production
oils to protect some components.
36. This appliance can be used by
children aged from 8 years and
above and persons with reduce d
physical, sensory or mental
capabilities or lack of experience
andknowledge if they have been
givensupervision or instruction
concerning useof the appliance in a
safe way andunderstand the
hazards involved.Children shall not
play with the appliance.Cleaning
and user maintenance shall not be
made by children unless they are
older than 8 and s
upervised.
37. Keep the appliance and its cord out
of reach of children less than 8
years.

38. This appliance is intended to be
5
used in household and similar
applications such as:
-sta kitchen a reas in shops, oces
and other working environments;
-by clients i n hotels, motels and
other residential type environments;
-farm houses;
-bed and breakfast type
environments.
READ CAREFULLY AND KEEP FOR FUTUREREFERENCE
39. WARNING: The appliance and its
accessibleparts b ecome hot during
use.Care should be taken to avoid
touching heating elementsChildren
less th an 8 years of age shall be
kept away unless continuously
supervised.
GB
GB
6
To Reduce the Risk of Injury to Persons
Grounding Installation
This appliance must be grounded. In the event of an
electrical short circuit, grounding reduces the risk of
electric shock by providing an escape wire for the electric
current. This appliance is equipped with a cord having
a grounding wire with a grounding plug. The plug must
be plugged into an outlet that is properly installed and
grounded.
grounding instructions are not completely understood
or if doubt exists as to whether the appliance is properly
grounded. If it is necessary to use an extension cord ,
use only a 3-wire extension cord.
1. A short power-supply cord is provided to reduce the
risks resulting from becoming entangled in or tripping
over a longer cord.
2. If a long cord set or extension cord is used:
1) The marked electrical rating of the cord set or
extension cord should be at least as great as the
electrical rating of the appliance.
2) The extension cord must be a grounding type 3-wire
cord.
3) The long cord should be arranged so that it will
not drape over the counter top or tabletop where
it can be pulled on by children or tripped over
unintentionally.
DANGER
Electric Shock Hazard
Touching some of the internal components can cause
serious personal injury or death. Do not disassemble this
appliance.
UTENSILS
See the instructions on “Materials you can use in
microwave oven or to be avoided in microwave oven.”
There may be certain non-metallic utensils that are not
safe to use for microwaving. If in doubt, you can test the
utensil in question following the procedure below.
Utensil Test:
1. Fill a microwave-safe container with 1 cup of cold
water (250ml) along with the utensil in question.
2. Cook on maximum power for 1 minute.
3. Carefully feel the utensil. If the empty utensil is warm,
do not use it for microwave cooking.
4. Do not exceed 1 minute cooking time.
CAUTION
Personal Injury Hazard
It is hazardous for anyone other than a competent person
to carry out any service or repair operation that involves
the removal of a cover which gives protection against
exposure to microwave energy.
WARNING
Electric Shock Hazard
Improper use of the grounding can result in electric
shock. Do not plug into an outlet until appliance is
properly installed and grounded.
CLEANING
Be sure to unplug the appliance from the power supply.
1. Clean the inside of the oven after using with a
slightly damp cloth.
2. Clean the accessories in the usual way in soapy
water.
3. The door frame and seal and neighboring parts
must be cleaned carefully with a damp cloth when
they are dirty.
Materials you can use in microwave oven
7
Utensils Remarks
Aluminum foil Shielding only. Small smooth pieces can be used to cover thin parts of meat or poultry to
prevent overcooking. Arcing can occur if foil is too close to oven walls. The foil should be at
least 1 inch (2.5cm) away from oven walls.
Browning dish Follow manufacturer’s instructions. The bottom of browning dish must be at least 3/16 inch
(5mm) above the turntable. Incorrect usage may cause the turntable to break.
Dinnerware Microwave-safe only. Follow manufacturer’s instructions. Do not use cracked or chipped
dishes.
Glass jars Always remove lid. Use only to heat food until just warm. Most glass jars are not heat resistant
and may break.
Glassware Heat-resistant oven glassware only. Make sure there is no metallic trim.
Do not use cracked or chipped dishes.
Oven coking bags Follow manufacturer’s instructions. Do not close with metal tie. Make slits to allow steam to
escape.
Paper plates and cups Use for short–term cooking/warming only. Do not leave oven unattended while cooking.
Paper towels Use to cover food for reheating and absorbing fat. Use with supervision for a short-term
cooking only.
Parchment paper Use as a cover to prevent splattering or a wrap for steaming.
Plastic Microwave-safe only. Follow the manufacturer’s instructions. Should be labeled “Microwave
Safe”. Some plastic containers soften, as the food inside gets hot. “Boiling bags” and tightly
closed plastic bags should be slit, pierced or vented as directed by package.
Plastic wrap Microwave-safe only. Use to cover food during cooking to retain moisture. Do not allow plastic
wrap to touch food.
Thermometers Microwave-safe only (meat and candy thermometers).
Wax paper Use as a cover to prevent splattering and retain moisture.
GB
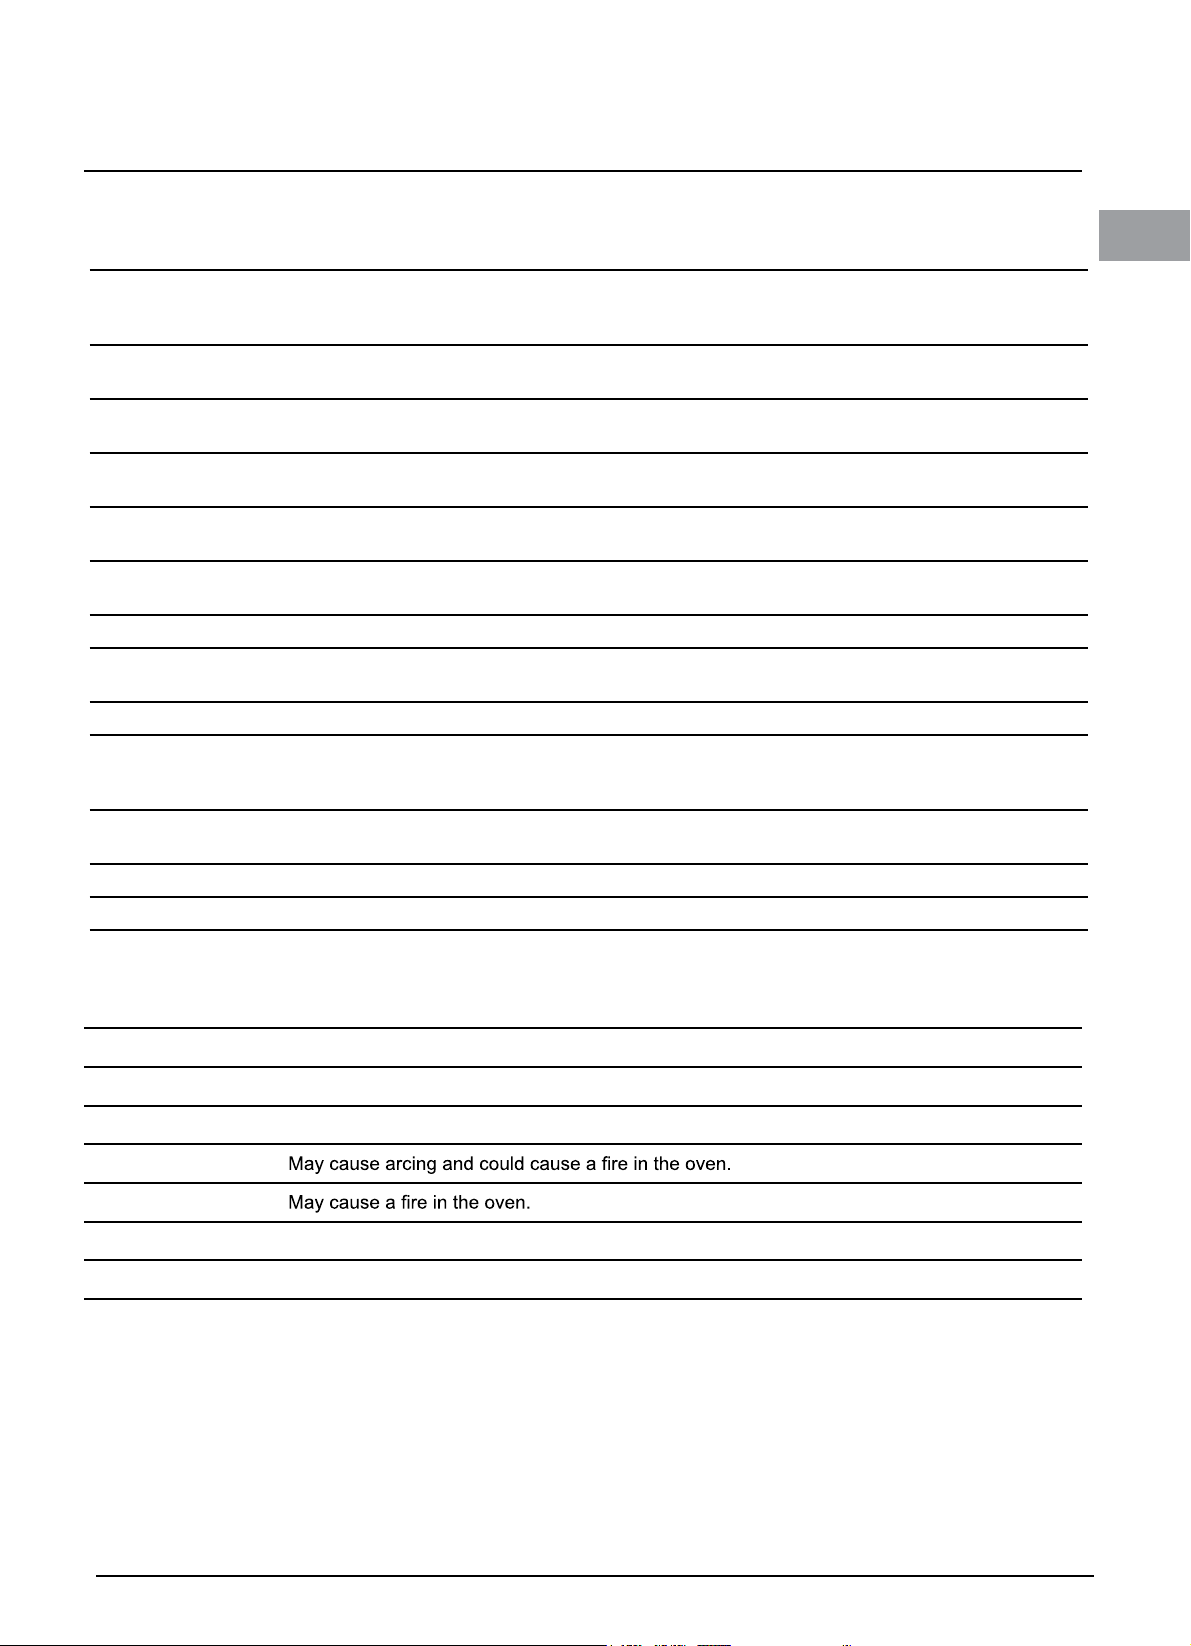
Materials to be avoided in microwave oven
Utensils Remarks
Aluminum tray May cause arcing. Transfer food into microwave-safe dish.
Food carton with metal handle May cause arcing. Transfer food into microwave-safe dish.
Metal or metaltrimmed utensils Metal shields the food from microwave energy. Metal trim may cause arcing.
Metal twist ties
Paper bags
Plastic foam Plastic foam may melt or contaminate the liquid inside when exposed to high temperature.
Wood Wood will dry out when used in the microwave oven and may split or crack.
SETTING UP YOUR OVEN
8
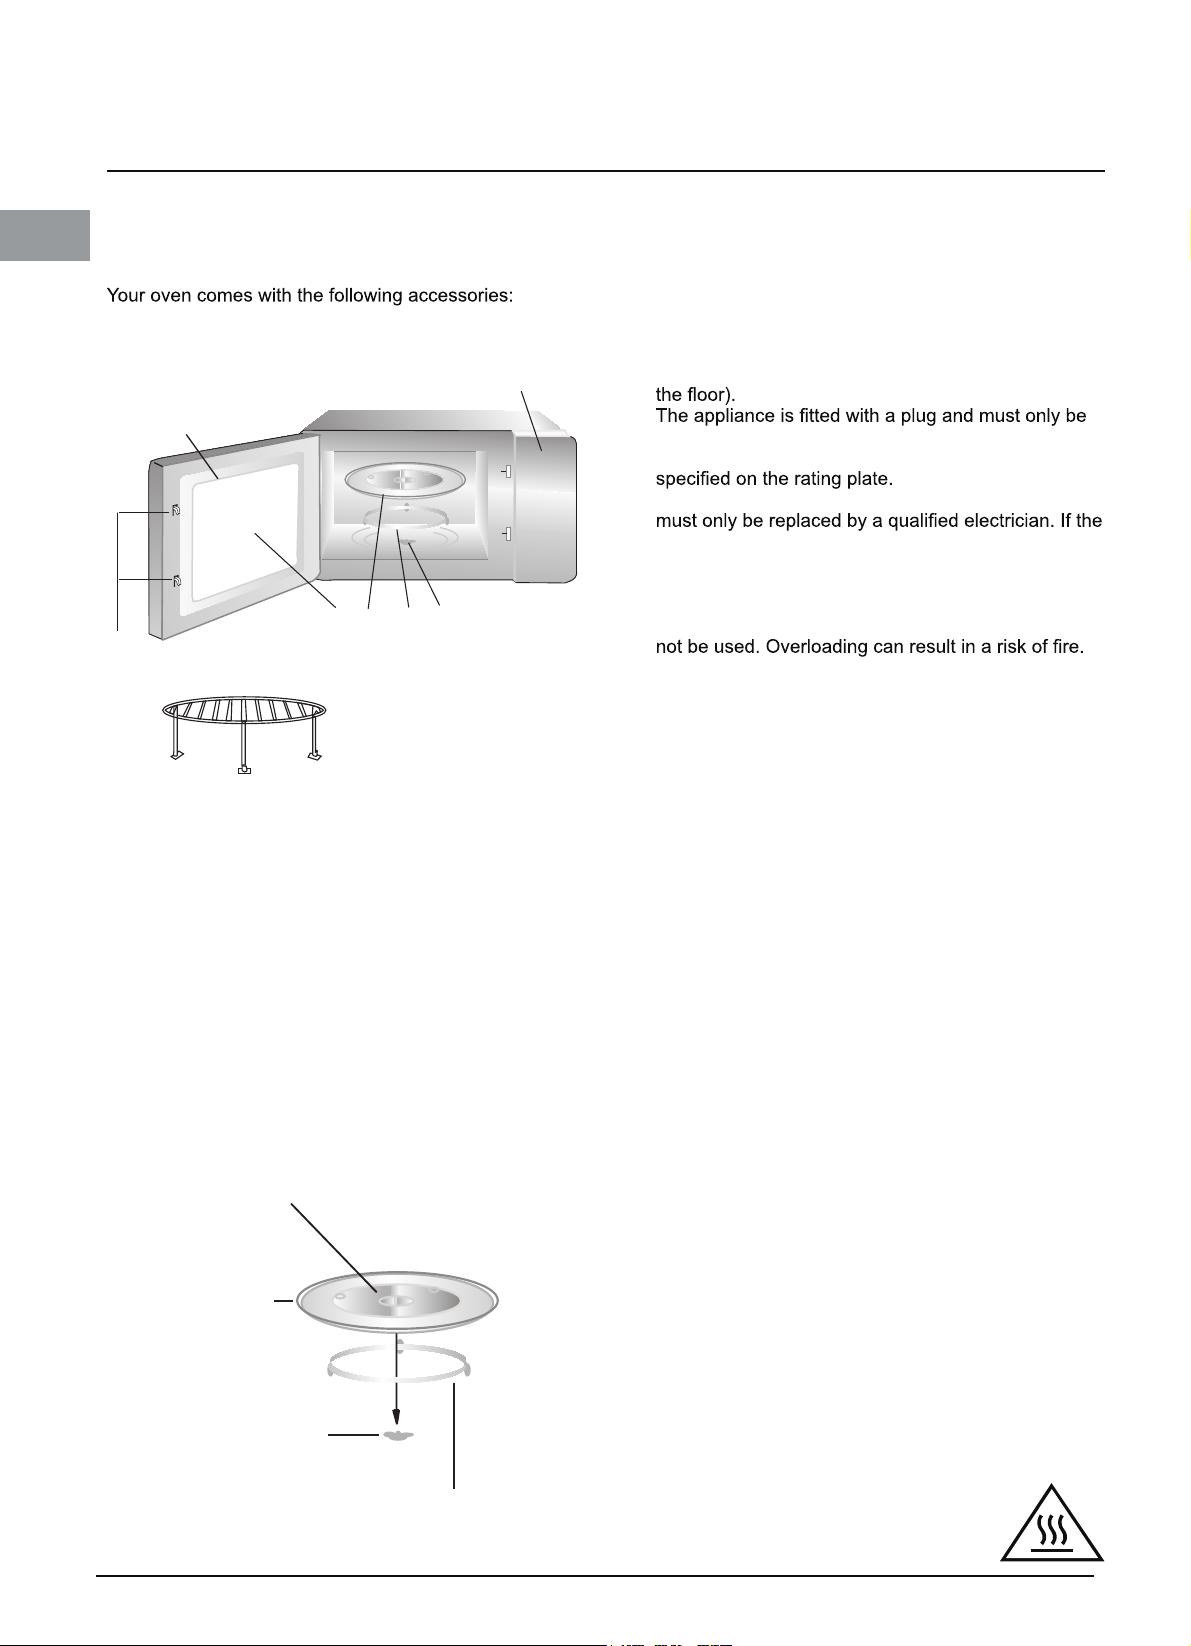
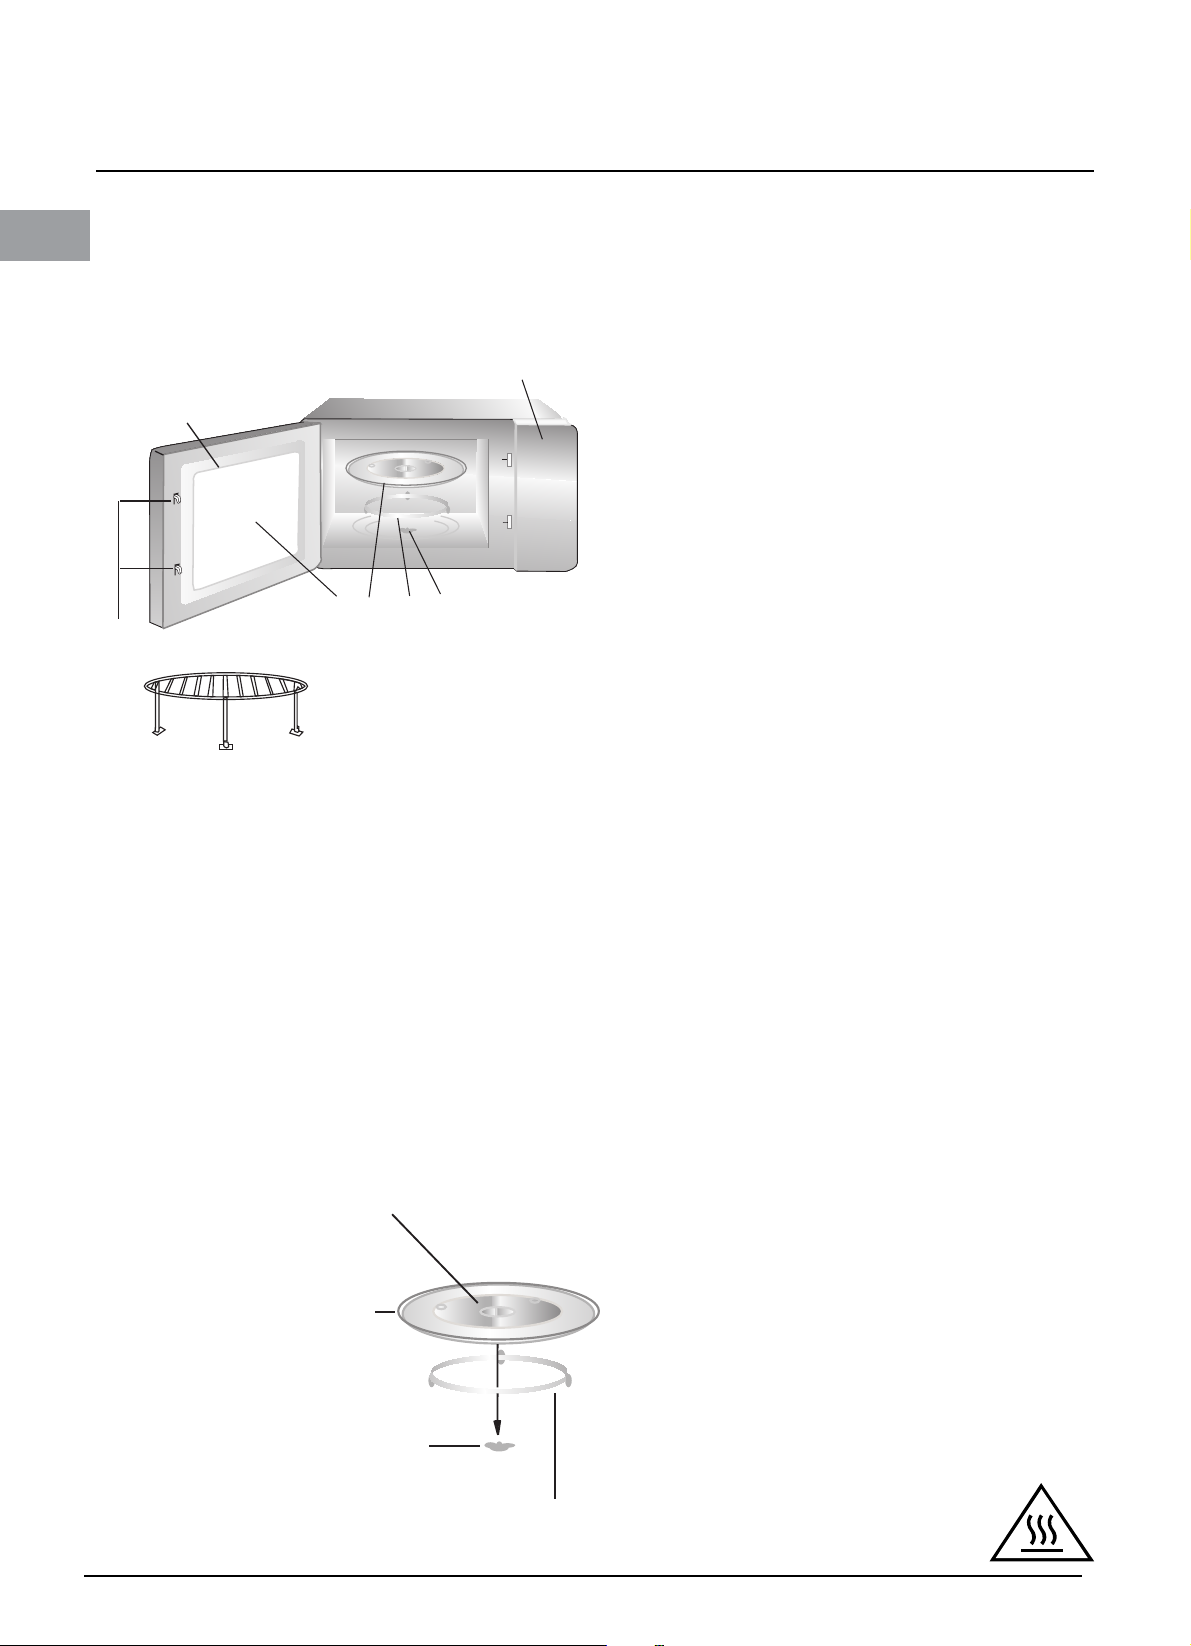
Names of Oven Parts and Accessories
GB
Remove the oven and all materials from the carton and
oven cavity.
Glass tray 1
Turntable ring assembly 1
Instruction Manual 1
F
E
G
Grill Rack( Only for Grill series )
C B
D
A) Control panel
B) Turntable shaft
C) Turntable ring assembly
D) Glass tray
E) Observation window
F) Door assembly
G) Safety interlock system
Installation and connection
1. This appliance is only intended for domestic use.
2. This oven is intended for built-in use only. It is not
intended for counter-top use or for use inside a
cupboard.
3. Please observe the special installation instructions.
4. The appliance can be installed in a 60cm wide wall-
A
mounted cupboard(at lease 55cm deep and 85cm off
5.
connected to a properly installed earthed socket.
6. The mains voltage must correspond to the voltage
7. The socket must be installed and connecting cable
plug is no longer to accessible following installation,
an all-pole disconnecting device must be present on
the installation side with a contact gap of at lease
3mm.
8. Adapters,multi-way strips and extension leads must
Turntable Installation
a. Never place the glass tray upside down. The glass
tray should never be restricted.
b. Both glass tray and turntable ring assembly must
always be used during cooking.
c. All food and containers of food are always placed on
the glass tray for cooking.
d. If glass tray or turntable ring assembly cracks or
breaks, contact your nearest authorized service
center.
Hub (underside)
Glass tray
Turntable shaft
Turntable ring assembly
The accessible surface may be hot
during operation.
OPERATION INSTRUCTION
9
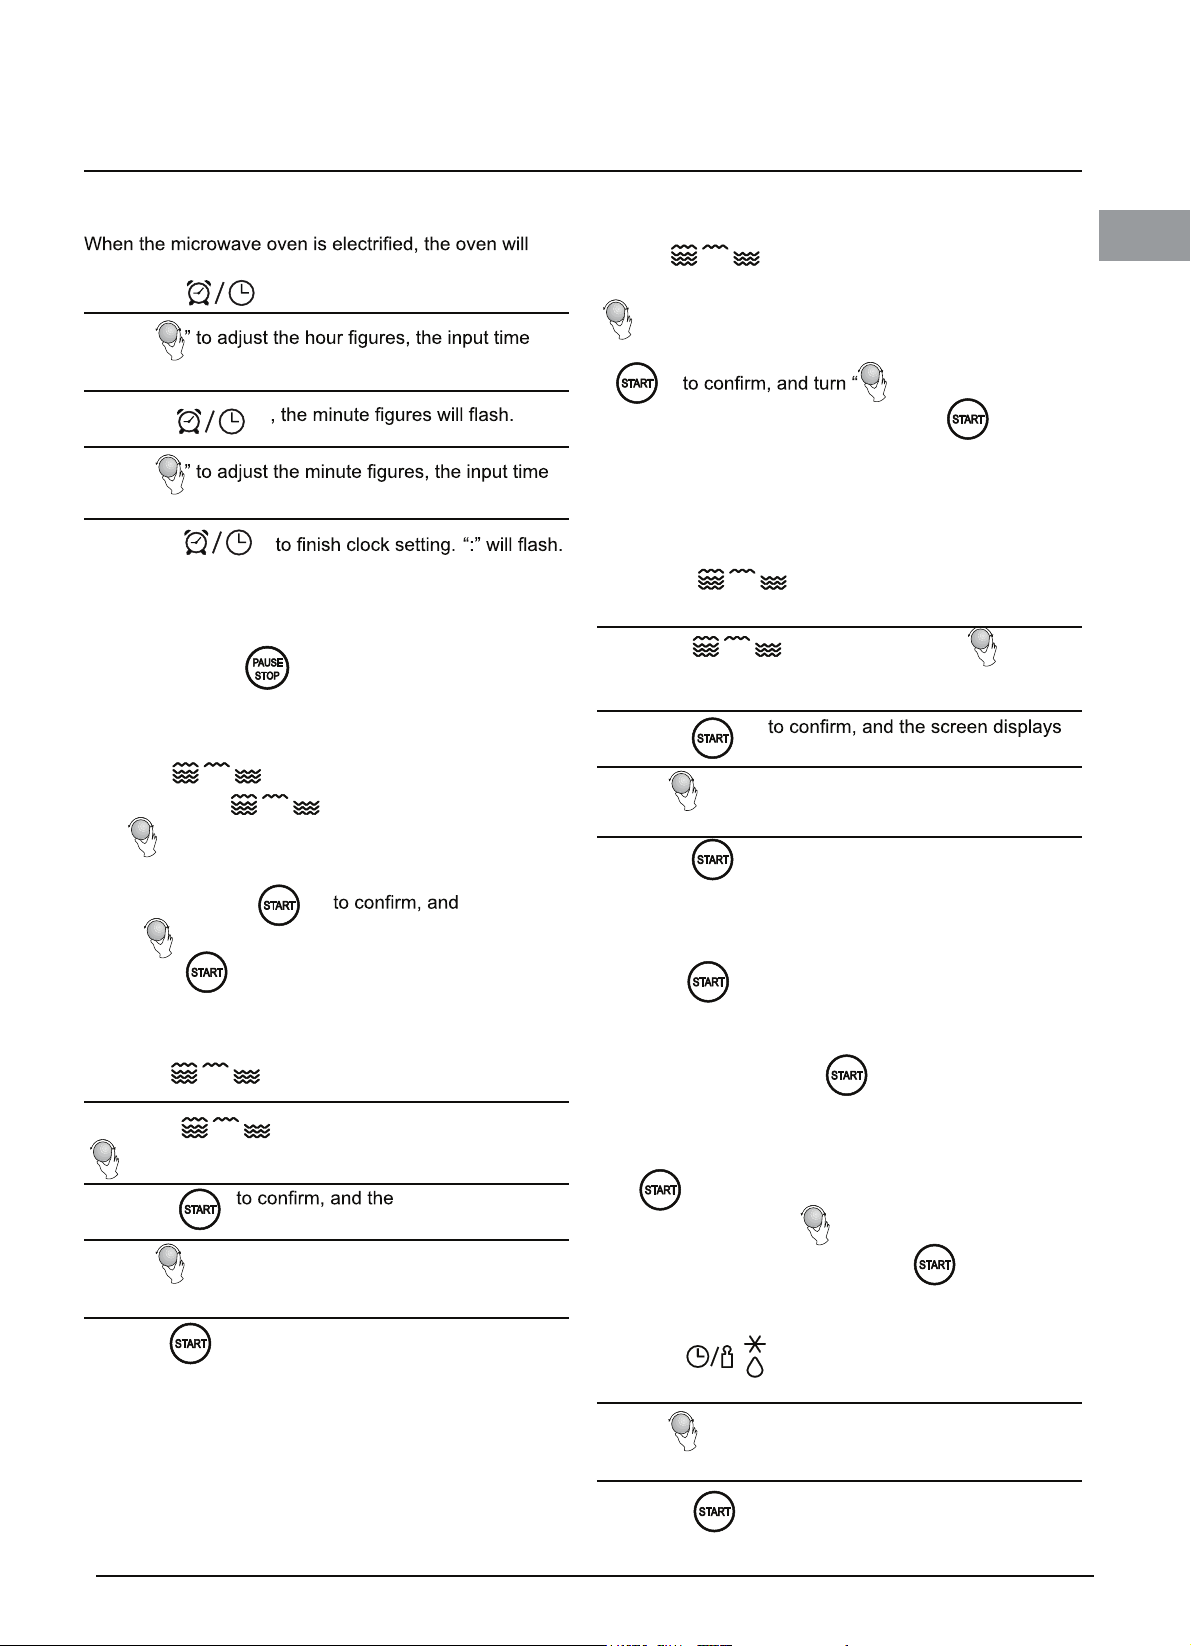
1.Clock Setting
display “0:00”, buzzer will ring once.
1) Press “
2) Turn “
should be within 0--23(24-hour).
3) Press “
4) Turn “
should be within 0--59.
5) Press “
Note: 1) If the clock is not set, it would not function when
powered.
2) During the process of clock setting, if you
press “ ”, the oven will go back to the
previous status automatically.
2. Microwave Cooking
Press “
“P100”. Press “
turn “
“P80” “P50”, “P30” or “P10” will display for each added
press. Then press “
turn “
Press “ ” again to start cooking.
Example: If you want to use 80% microwave power to
cook for 20 minutes, you can operate the oven as the
following steps.
1) Press “ ” once, the screen
2) Press “ ” once again or turn
“
3) Press “ ”
“P 80”.
4) Turn “
displays “20:00”.
5) Press “
” to choose the power you want, and “P100”,
” to set cooking time from 0:05 to 95:00.
” to choose 80% microwave power.
” to adjust the cooking time until the oven
” once. “00:00” displays.
”
”
” the LED will display
” for times or
”
display “P100”.
screen displays
” to start cooking .
3. Grill or Combi. Cooking
Press “ ” the LED will display
“G”, and press the same button for times or turn the
“ ” to choose the power you want, and “G”,”C-1” or
“C-2” will display for each added press. Then press
“
cooking time from 0:05 to 95:00. Press “
start cooking.
Example: If you want to use 55% microwave power
1) Press “ ” once, the screen
2) Press “ ” for timers or turn
choose combi. 1 mode.
3) Press “
“C-1”.
4) Turn “
displays “10:00”.
5) Press “ ” to start cooking .
Note: If half the grill time passes, the oven sounds
4. Quick Start
1) In waiting state, Press “ ” to start cooking
with 100% power, each added press will increase 30
seconds cooking time up to 95 minutes.
2) In microwave cooking or time defrost state, each press
of “ ” can increase 30 seconds of cooking time.
3) In waiting state, turn “
100% microwave power, then press “
5. Defrost By Weight
1) Press “ ” w nevo eht dna ,ecno
”
and 45% grill power(C-1) to cook for 10
minutes, you can operate the oven as the
following steps.
”
” to adjust the cooking time until the oven
twice, and this is normal. In order to have a
better effect of grilling food, you should turn
the food over close the door, and then press
“
the oven will continue working.
” to continue cooking. If no operation,
” to set
” again to
display “P100”.
“
” to
” left to set cooking time with
” to start cooking.
will display “dEF1”.
GB
2) Turn “
2000 g.
3) Press “ ” to start defrosting.
” to select the weight of food from 100 to

“ ” Pad instructions
10
GB
Order Display Microwave Power Grill Power
1 P100 100%
2 P80 80%
3 P50 50%
4 P30 30%
5 P10 10%
6 G 0% 100%
7 C-1 55% 45%
8 C-2 36% 64%
6. Defrost By Time
1) Press “
display “dEF2”.
2) Turn “
95 minutes.
3) Press “ ” to start defrosting.
The defrost power is P30 , and it will not be changed.
7. Kitchen Timer
(1) Press “ ” twice, LED will display
(2) Turn “
(3) Press “ ”
(4) When the kitchen time is reached, timer indicator will
If the clock be set (24-hour system), LED will display
Note: The kitchen Time is differ from 24-hour system.
Kitchen Timer is a timer.
8. Inquiring Function
(1) In states of microwave, grill and combination cooking,
press “ ” , the current power will be displayed
for 3 seconds. After 3 seconds, the oven will turn back to
the former state;
(2) In cooking state, press “ ” to
time and the time will display for 3 seconds.
” to select the defrost time. The MAX time is
00:00, timer indicator will light.
” to enter the correct time.(The maximum
cooking time is 95 minutes.)
will be lighted.
go out. The buzzer will ring 5 times.
the current time.
” twice, and the oven will
inquire the
9. Auto Menu
“ ”
1) Turn
10” will display.
2) Press “ ”
3) Turn
chart.
4) Press “ ” to start cooking.
350g.
1) Turn
2) Press “
3) Turn
4) Press “ ” to start cooking.
10. Multi-section cooking
At most 2 sections can be set for cooking. In multi-section
cooking, if one section is defrosting, then defrosting shall
Example: If you want to defrost food for 5 minutes
1) Press “ ” twice, and the oven
“dEF2”.
2) Turn
3) Press “ ” once, the screen display
“P100”.
right to choose the menu, and “A-1” to “A-
“ ”
to choose the default weight as the menu
“ ”
clockwise till “A-4” display.
”
“ ”
and then cook with 80% microwave power
for 7 minutes, operate it as the following:
“ ”
to select the defrost time till “5:00” display.
will display
“ ”
4) Press “ ” once again or turn
80% microwave power.
to choose
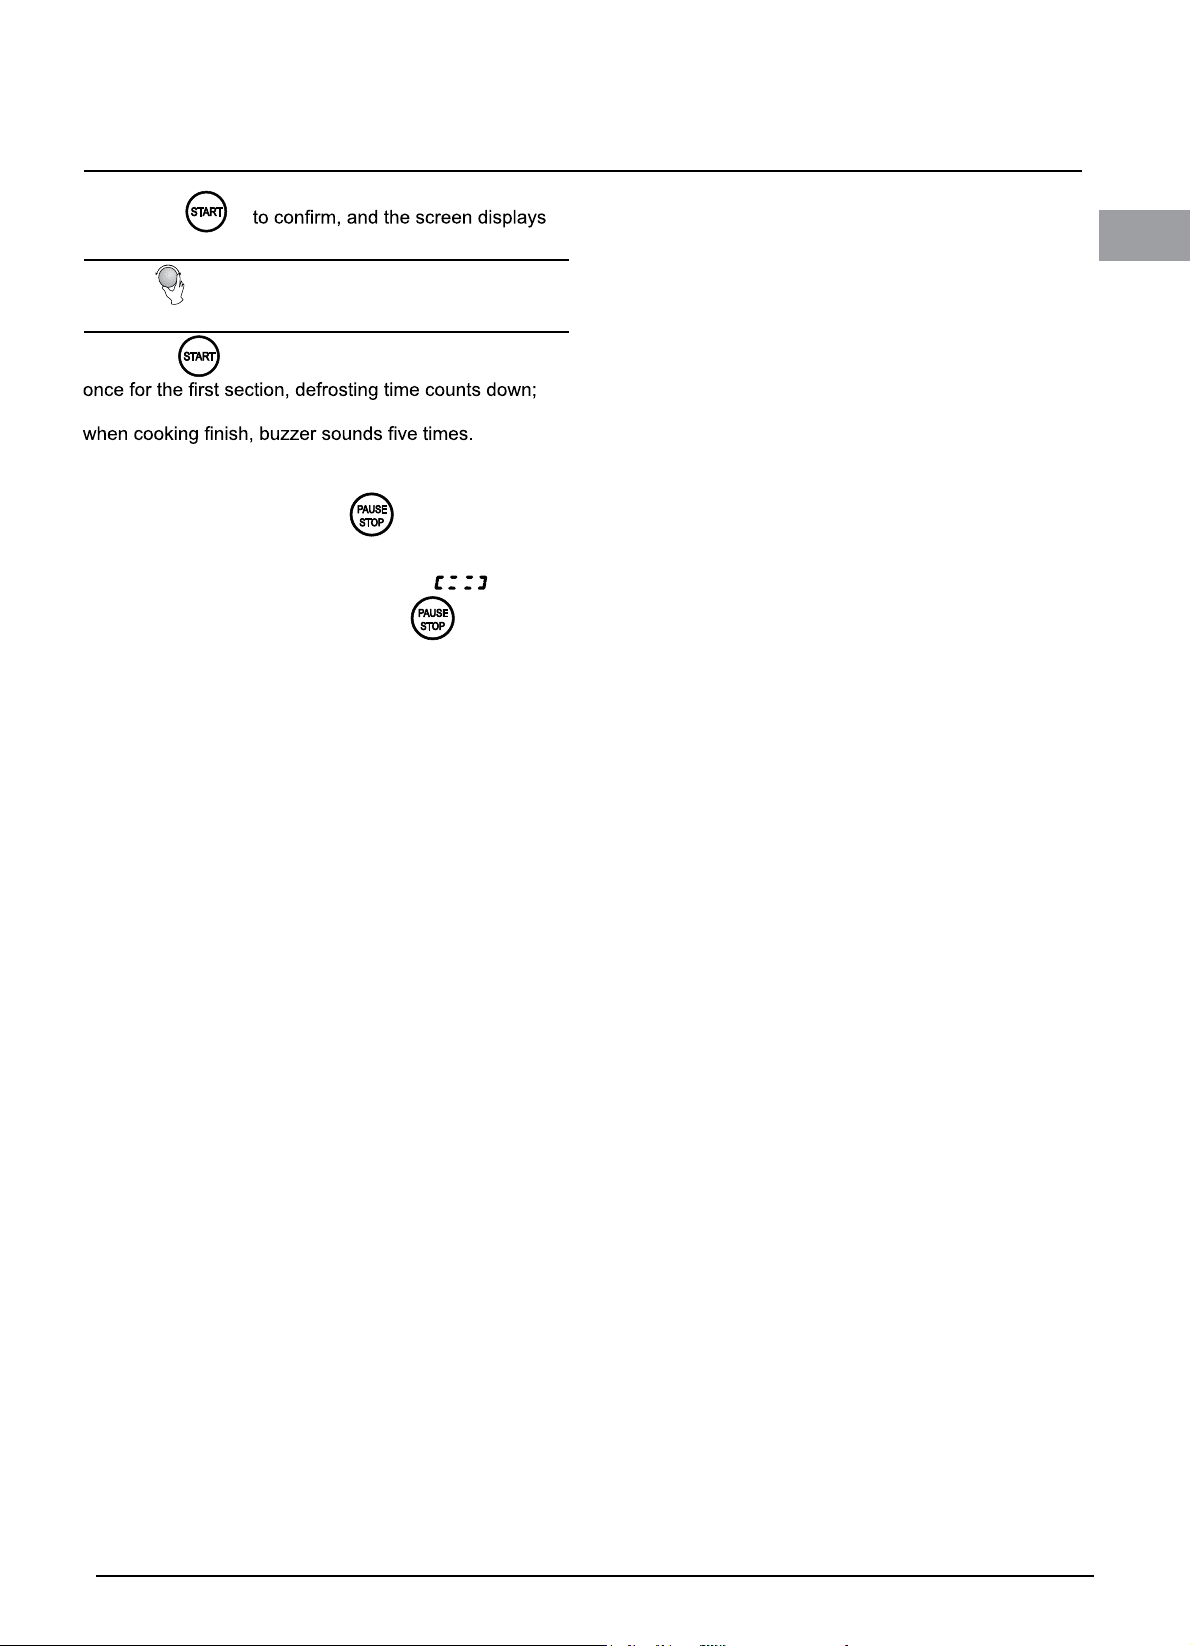
5) Press “ ”
11
“P 80”.
GB
6) Turn
displays “7:00”.
7) Press “ ” www rezzub dna ,gnikooc trats ot
buzzer will sound once again entering the second cooking.
11. Lock-out Function for Children
Lock: In waiting state, press “
there will be a long beep denoting entering the children-
lock state and current time will display if the time has
been set, otherwise, the LED will display “
Lock quitting: In locked state, press “
seconds, there will be a long “beep” denoting that the
lock is released.
“ ”
to adjust the cooking time till the oven
” for 3 seconds,
will sound
”.
” for 3
The menu chart:
12
GB
Menu Weight (g) Display
A-1
PIZZA
A-2
Potato
A-3
Meat
A-4
Fish
A-5
Vegetable
A-6
Beverage
200 g 200
400 g 400
200 g 200
400 g 400
600 g 600
250 g 250
350 g 350
450 g 450
250 g 250
350 g 350
450 g 450
200 g 200
300 g 300
400 g 400
1 cup (120 ml) 1
2 cups (240 ml) 2
A-7
Pasta
A-8 Popcorn
A-9
Chicken
A-10
Reheat
3 cups (360ml) 3
50g(with 450 ml cold water) 50
100g(with 800 ml cold water) 100
50 g 50
100 g 100
400 400
800 800
1200 1200
200 200
400 400
600 600
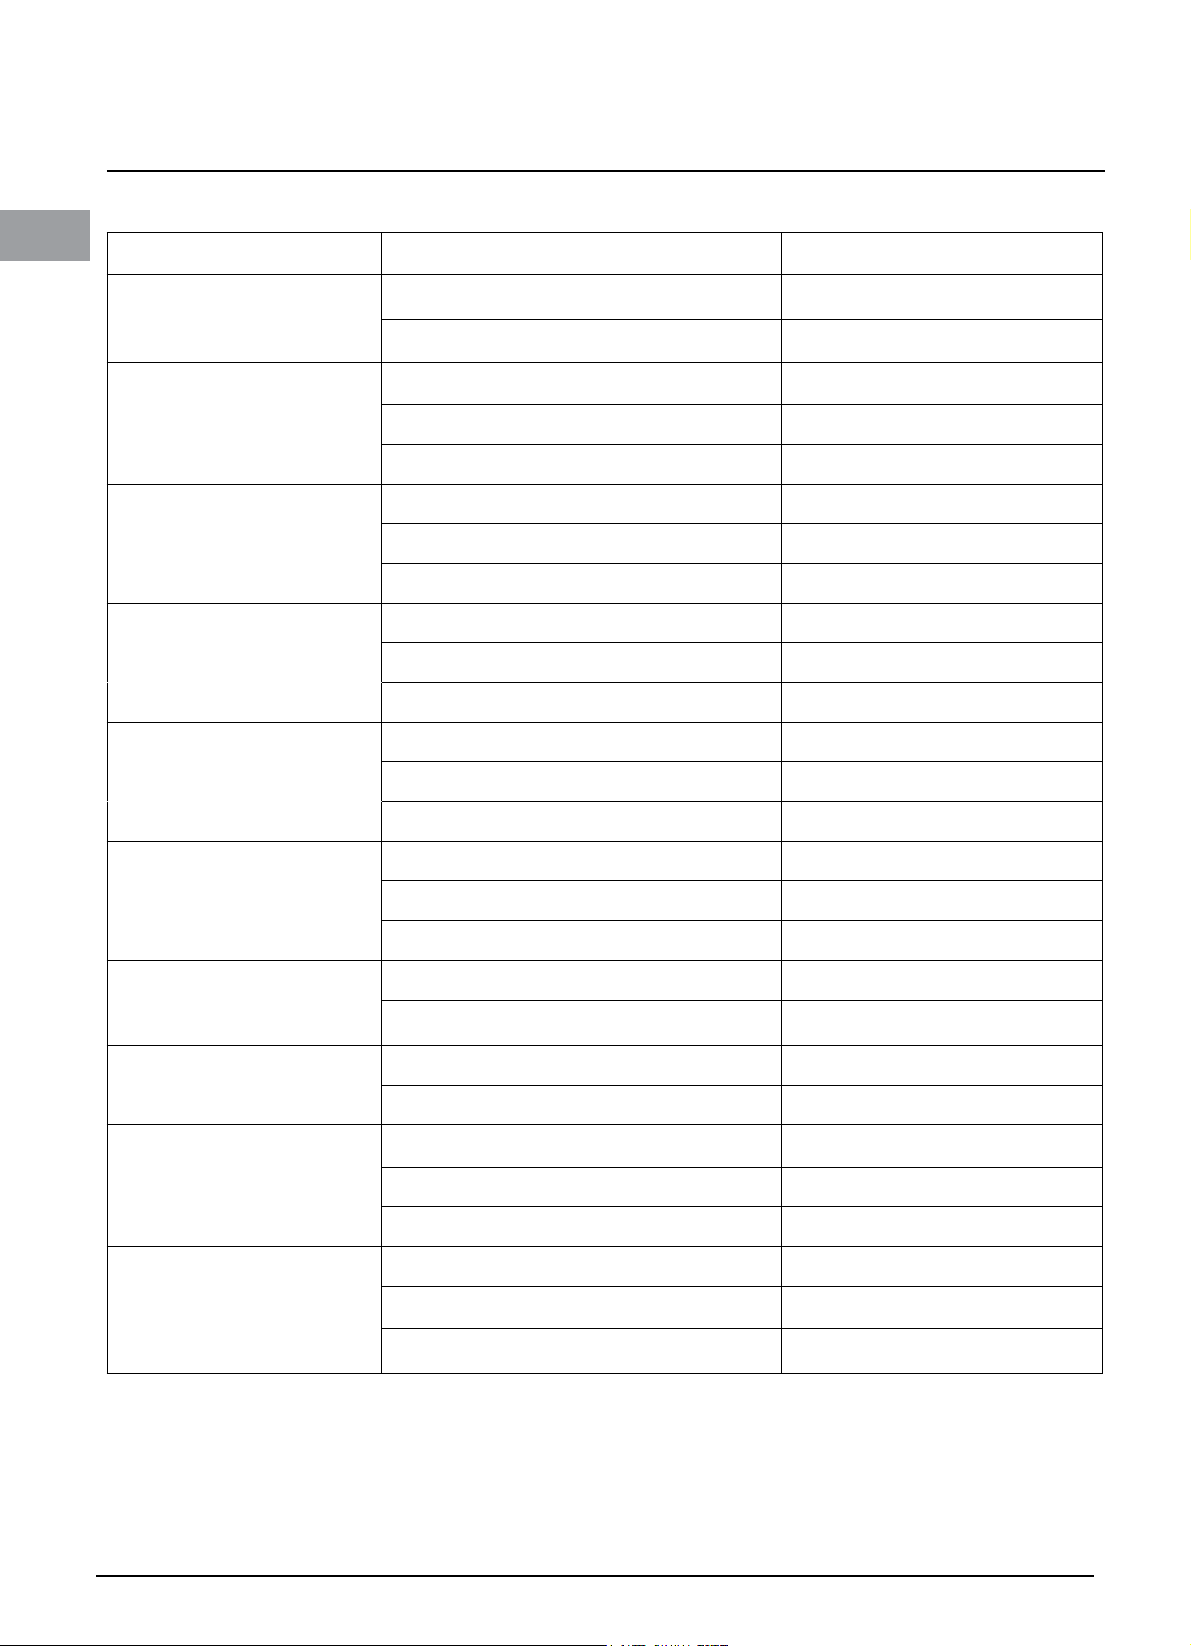
TROUBLE SHOOTING
13
Normal
Microwave oven interfering TV
reception
Dim oven light In low power microwave cooking, oven light may become dim. It is normal.
Steam accumulating on door, hot
air out of vents
Oven started accidentally with no
food in.
Trouble Possible Cause Remedy
Oven cannot be started
Radio and TV reception may be interfered when microwave oven operating.
It is similar to the interference of small electrical appliances, like mixer,
vacuum cleaner, and electric fan. It is normal.
In cooking, steam may can out of food. Most will get out from vents. But
some may accumulate on cool place like oven door. It is normal.
It is forbidden to run the unit without any food inside.
It is very dangerous.
(1) Power cord not plugged in tightly
(2) Fuse blowing or circuits breaker
works.
Unplug. Then plug again after 10
seconds.
Replace fuse or reset circuits breaker
(repaired by professional personnel of
your company)
GB
(3) Trouble with outlet
Oven does not head (4) Door not closed well Close door well
Glass turntable makes noise when
microwave oven operates
(5) Dirty roller rest and oven bottom
Test outlet with other electrical
appliances.
Refer to “Maintenance of Microwave”
to clean dirty parts.
According to Waste of Electrical and Electronic Equipment (WEEE) directive, WEEE should
be separately collected and treated. If at any time in future you need to dispose of this
product please do NOT dispose of this product with household waste. Please send this
product to WEEE collecting points where available.
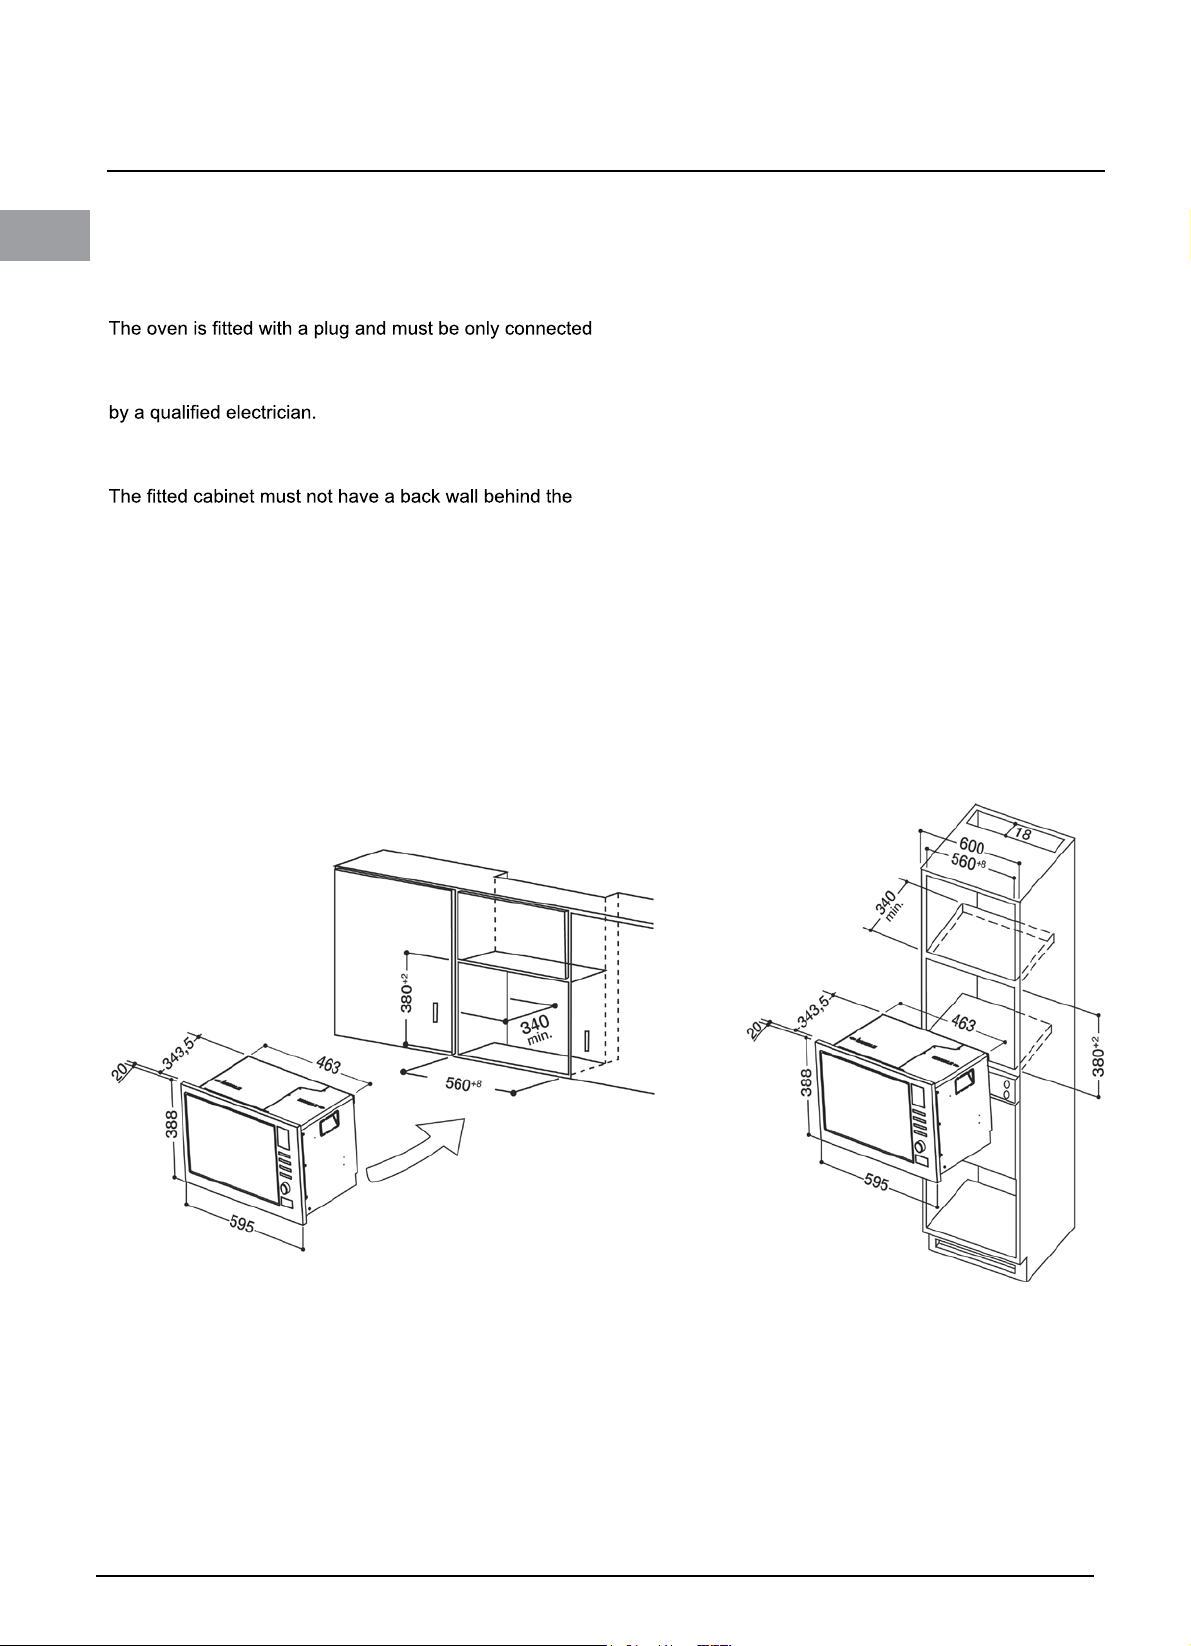
Installation Instruction
14
Please Read the Manual Carefully Before
Installation
GB
Please Note
Electrical connection
to a properly installed earthed socket. In accordance
with the appropriate regulations, the socket must only be
installed and the connecting cable must only be replaced
If the plug is no longer accessible following installation
and all-pole isolating switch must be present on the
installation side with a contact gap at least 3mm.
appliance.
Minimum installation ventilation slots and suction holes.
Note:
Do not trap or bend the power cable.
A. Built-in furniture
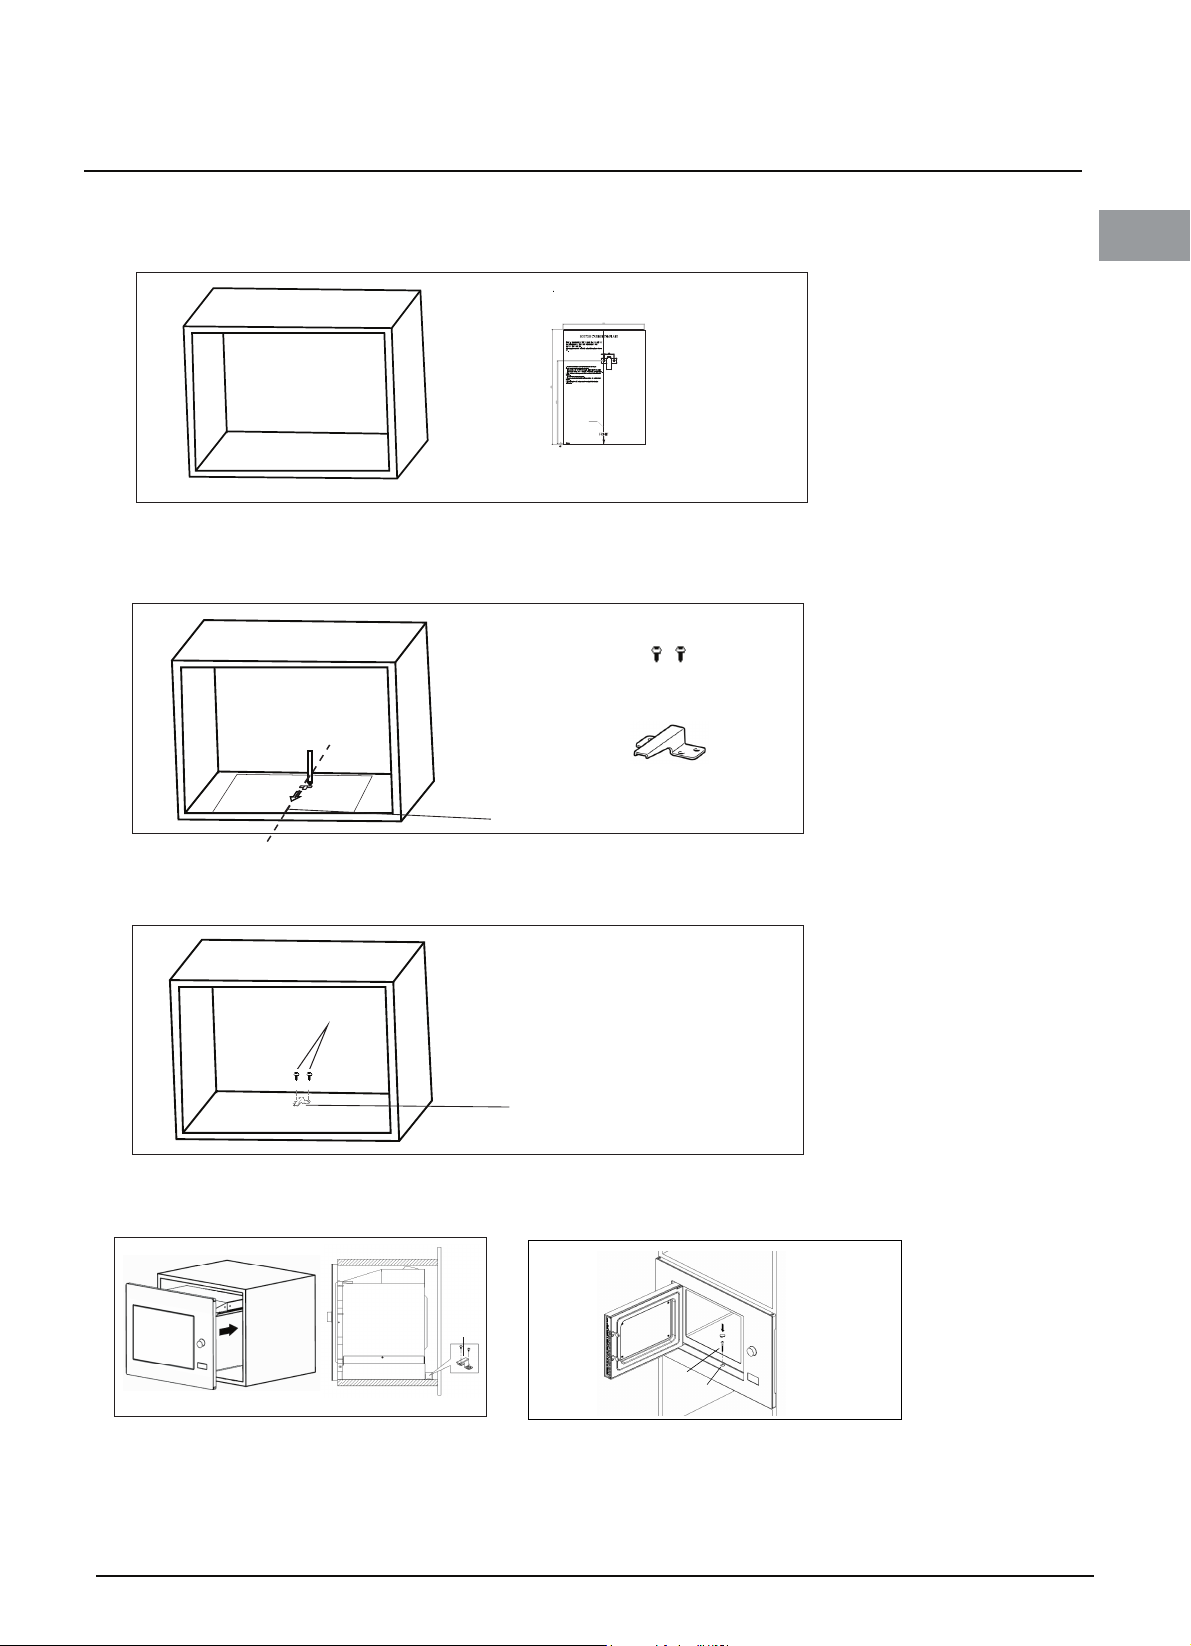
teni ibac eht era perP.B
15
1. Read the instruction on the BOTTOM CANINET TEMPLATE ,
put the template on the bottom plane of cabinet.
GB
a
a
LEFT EDGE
FRONT EDGE
T EDGE RIGH
CENTER LINE
2. Make the marks on the bottom plane of cabinet according to marks"a" of
of the template
SCREW A
BRACKET
a
a
CENTRE LINE
3. Remove the bottom cabinet template and fix the bracket with screw A.
Screw A
BRACKET
C
.
Install
the
ove
n
bracket
Screw B
Installation Hole
4. Install the oven to the cabinet
- Make sure the back of the oven is locked by bracket.
- Do not trap or kink the power cord.
5. Open the door, fix the oven to the cabinet with Screw B, at the installa tion hole.
PN:26180031

GB
16
MODE D’EMPLOI
MODÈLE : MWA 122.1 X
EN
English Français
PT
Portuges
FR
AR
ES
Español
FOUR À MICRO-ONDES
FR
Veuillez lire ces instructions avec attention avant d’utiliser
votre four à micro-ondes et les conserver précieusement.
Si vous suivez les instructions, votre four vous satisfera pleinement
pendant de longues années.
VEUILLEZ CONSERVER CES INSTRUCTIONS
PRÉCIEUSEMENT
PRÉcaUTIONS à SUIVRE POUR ÉVITER
18
LES ÉVENTUELLES EXPOSITIONS
EXcESSIVES aUX MIcRO-ONDES
(a) N’essayez pas de faire fonctionner
FR
ce four avec la porte ouverte, sous
peine de vous exposer à des
micro-ondes dangereuses. Il est
important de ne pas casser ou
modifier les verrouillages de
sécurité.
(b) Ne placez jamais d’objets entre
la façade du four et la porte et ne
laissez pas de saletés ou de résidus
de produits de nettoyage
s’accumuler sur les surfaces
d’étanchéité.
(c) AVERTISSEMENT : Si la porte ou
les joints de la porte sont
endommagés, le four ne doit pas
être utilisé tant qu’il n’a pas été
réparé par une personne
compétente.
ADDENDUM
Si l’appareil n’est pas maintenu en
parfait état de propreté, sa surface
risque de se dégrader, ce qui réduirait
sa durée de vie et pourrait mener à une
situation dangereuse.
Spécications
Modèle :
Tension nominale :
Puissance d'entrée nominale
(micro-ondes) :
Puissance de sortie nominale
(micro-ondes) :
Puissance d'entrée nominale
(grill) :
Capacité du four : 20 L
Diamètre du plateau tournant : Ø 245 mm
Dimensions extérieures : 594x343,5x388 mm
MWA 122.1 X
230-240 V~50 Hz
1250W
800W
1 000 W
CONSIGNES DE SÉCURITÉ
IMPORTANTES
AVERTISSEMENT
Pour réduire le risque d’incendie,
d’électrocution, de blessure ou
d’exposition excessive aux micro-ondes
lors de l’utilisation de l’appareil, vous
devez suivre quelques précautions de
base, notamment les suivantes :
1. Avertissement : Les liquides et
autres aliments ne doivent être mis à
chauffer dans des récipients fermés
car ces derniers risqueraient
d'exploser.
2. Avertissement : Toute opération de
réparation ou d'entretien impliquant le
retrait d'un couvercle destiné à
protéger les utilisateurs contre
l'exposition aux micro-ondes peut
s'avérer dangereuse si elle n'est pas
réalisée par une personne
compétente.
3. Avertissement : Ne laisser les enfants
utiliser le four sans surveillance que si
on leur a expliqué comment faire pour
utiliser le four en toute sécurité et s'ils
ont bien compris les dangers que
peut représenter une mauvaise
utilisation.
4. Avertissement : Les enfants ne
peuvent utiliser le four en mode
combiné que sous la surveillance
d'un adulte, étant donné les
températures atteintes. (Uniquement
pour les fours équipés d'un grill)
5. Utiliser uniquement des ustensiles
adaptés pour une utilisation dans les
fours à micro-ondes.
Poids net : Environ 15 kg

6. Le four doit être nettoyé
19
régulièrement et les dépôts de
nourriture doivent être éliminés.
7. Prière de lire et de respecter les
instructions de la section suivante : «
PRÉCAUTIONS À SUIVRE POUR
ÉVITER TOUTE EXPOSITION
EXCESSIVE AUX MICRO-ONDES ».
8. Lorsque l'on fait chauffer des
aliments dans des récipients en
plastique ou en papier, toujours
garder un œil sur le four car il existe
un risque que le récipient prenne feu.
9. En cas de dégagement de fumée,
éteindre ou débrancher l'appareil et
laisser la porte fermée pour éviter la
formation de flammes.
10. Ne pas faire trop cuire les aliments.
11. Ne pas utiliser la cavité du four à
des fins de stockage. Ne pas
stocker d'aliments tels que du pain,
des biscuits, ou autres, à l'intérieur
du four.
12. Retirer les liens et poignées
métalliques des récipients/sacs en
papier ou plastique avant de les
mettre dans le four.
13. Installer et positionner ce four
uniquement en conformité avec les
instructions d'installation fournies.
14. Les œufs à la coque et les œufs
durs ne peuvent pas être cuits au
four à micro-ondes car ils
risqueraient d'exploser, même une
fois la période de chauffe terminée.
15. N'utiliser cet appareil que pour les
usages pour lesquels il a été prévu,
tel que décrit dans ce mode
d'emploi. Ne pas utiliser de produits
chimiques corrosifs ou émettant des
vapeurs dans cet appareil. Ce four
est spécialement conçu pour
chauffer les aliments. Il n'est pas
conçu pour une utilisation
industrielle ou en laboratoire.
16. Si le cordon d'alimentation est
endommagé, il doit être remplacé
par le fabricant, un agent de
maintenance de ce dernier ou une
autre personne qualifiée afin d'éviter
tout danger.
17. Ne pas stocker ni utiliser cet
appareil à l'extérieur.
18. Ne pas utiliser ce four à proximité de
l'eau, dans un sous-sol humide ou
près d'une piscine.
19. La température des surfaces
accessibles peut être élevée
pendant le fonctionnement de
l'appareil. Les surfaces sont
susceptibles de devenir chaudes
pendant l'utilisation. Garder le
cordon à distance de toute surface
chaude et ne couvrir en aucun cas
le four.
20. Ne pas laisser le cordon pendre sur
le bord de la table ou du plan de
travail.
21. Le fait de ne pas maintenir le four en
parfait état de propreté peut mener
à une détérioration de sa surface, ce
qui peut réduire sa durée de vie et
éventuellement être à l'origine de
situations dangereuses.
FR

20
22. Pour éviter les risques de brûlure,
FR
bien mélanger ou secouer les
biberons et les petits pots pour bébé
et vérifier la température de leur
contenu.
23. Lorsque l'on fait chauffer des
boissons au micro-ondes, une
ébullition à retardement peut se
produire. Il faut donc être très
attentif lors de la manipulation des
récipients.
24. L'appareil n'est pas conçu pour être
utilisé par des personnes
(notamment les enfants) présentant
des capacités physiques,
sensorielles ou mentales réduites,
ou ne disposant pas de l'expérience
et des connaissances requises, à
moins qu'elles soient surveillées par
une personne responsable de leur
sécurité leur ayant donné les
instructions d'utilisation nécessaires.
25. Prière de surveiller les enfants afin
qu'ils ne jouent pas avec l'appareil.
26. Le four à micro-ondes ne doit pas
être installé dans une armoire, à
moins qu'il ait été testé dans ces
conditions.
27. Les appareils ne sont pas conçus
pour être commandés par le biais
d’une minuterie extérieure ou d’un
système de commande à distance
séparé.
28. AVERTISSEMENT : Veiller à ce que
l’appareil soit bien mis hors tension
avant de remplacer l’ampoule, afin
d’éviter tout risque d’électrocution.
29. Certaines pièces accessibles
deviennent chaudes pendant
l’utilisation. Les jeunes enfants
doivent être tenus à l’écart.
30. Ne pas utiliser de nettoyeur vapeur.
31. La surface du tiroir de stockage peut
devenir chaude.
32. Ne pas utiliser de détergents
abrasifs puissants ou de grattoirs
métalliques pour nettoyer la vitre de
la porte du four. En effet, ils
pourraient rayer la surface et la vitre
pourrait se briser.
33. Pendant l’utilisation, l’appareil
devient chaud. Il faut faire attention
de ne pas toucher les éléments
chauffants situés à l’intérieur du
four.
34. Utiliser uniquement la sonde de
température recommandée pour ce
four (pour les fours dotés d'un
système permettant l'utilisation
d'une sonde de température.)
35. Lors de la première utilisation, une
odeur particulière peut se dégager,
due aux huiles utilisées lors de la
fabrication pour la protection de
certains composants.
36. Cet appareil peut être utilisé par des
enfants de l’âge de 8 ans et plus et
les personnes à capacités
physiques, sensorielles ou mentales
réduites ou qui n’ont pas
d'expérience et des
connaissances en rapport, si elles
ont été supervisées et formées sur
l'utilisation de cet appareil en toute
sécurité et qu’elles ont compris les
risques possibles. Les enfants ne
doivent pas jouer avec l'appareil.
Le nettoyage et l’entretien par
l’utilisateur ne doit pas être
effectués par les enfants sans
surveillance.

37. Gardez l'appareil et son cordon
21
d’alimentation hors de la portée
des enfants de moins de 8 ans.
38. Cet appareil est conçu pour usages
domestiques et d’autres usages
analogues tels que: - les zones de
cuisine du personnel dans les
magasins, bureaux et autres
environnements de travail; - par les
clients dans les hôtels, motels et
autres environnements de
résidence; - les fermes; - les
environnements de chambre d’hôte.
39. AVERTISSEMENT: L'appareil et ses
accessoires se chauffent pendant
le fonctionnement. Il faut veiller à
éviter de toucher les pièces
chauffantes. Les enfants de moins
de 8 ans doivent être tenus à l'écart
ou surveillés en permanence.
FR
LISEZ ATTENTIVEMENT ET
CONSERVEZ POUR RÉFERENCE ULTÉRIEURE

Instructions à suivre pour réduire les
22
FR
risques de blessures
Mise à la terre de l’installation
Cet appareil doit être mis à la terre. En cas de courtcircuit électrique, la mise à la terre réduit les risques
d’électrocution car le courant électrique peut alors
s’échapper par le biais du l de terre. Cet appareil est
équipé d’un cordon présentant un l de terre avec une
che de terre. La che doit être branchée dans une prise
de courant correctement installée et mise à la terre.
En cas de mauvaise compréhension des instructions de
mise à la terre ou de doutes quant à la mise à la terre
correcte de l’appareil, consultez un électricien qualié
ou un technicien de maintenance. Si l’utilisation d’une
rallonge s’avère nécessaire, utilisez une rallonge à 3 ls.
USTENSILES
Veuillez consulter les instructions de la section
« Matériels pouvant être utilisés dans le four à microondes et matériels à éviter ».
Il peut exister certains ustensiles qui, bien que n'étant
pas métalliques, ne peuvent pas être utilisés en toute
sécurité dans le four à micro-ondes. En cas de doute,
vous pouvez tester les ustensiles en suivant la procédure
ci-dessous.
Test des ustensiles :
1. Versez 250 ml d'eau froide dans un récipient allant au four à
micro-ondes et placez-y l'ustensile en question.
2. Allumez le four à la puissance maximale pendant une minute.
3. Touchez l'ustensile en faisant bien attention. Si l'ustensile est
chaud, ne l'utilisez pas dans votre four à micro-ondes.
4. Ne dépassez pas un temps de cuisson d'une minute.
1. L’appareil est doté d’un cordon d’alimentation court
an de réduire les risques que le l s’emmêle ou que
quelqu’un trébuche dessus, choses courantes avec
un cordon plus long.
2. En cas d’utilisation d’un cordon amovible long ou
d’une rallonge :
1) Les caractéristiques électriques du cordon
amovible ou de la rallonge doivent être au moins
identiques à celles de l’appareil.
2) La rallonge doit être un cordon à 3 ls avec l de
terre.
3) Le cordon amovible doit être agencé de sorte qu’il
ne dépasse pas de la table ou du plan de travail. Les
enfants pourraient en effet tirer dessus ou quelqu’un
pourrait accidentellement trébucher dessus.
DANGER
Risque d’électrocution
Le fait de toucher certains des composants internes
peut causer des blessures graves voire fatales. Ne pas
démonter cet appareil.
AVERTISSEMENT
Risque d’électrocution
Une mauvaise mise à la terre de l’appareil peut
provoquer une électrocution. Ne pas brancher
l’appareil sur une prise de courant tant qu’il n’a pas été
correctement installé et mis à la terre.
ATTENTION
Danger de blessure
Toute opération de réparation ou d'entretien impliquant
le retrait d'un couvercle destiné à protéger les utilisateurs
contre l'exposition aux micro-ondes peut s'avérer
dangereuse si elle n'est pas réalisée par une personne
compétente.
NETTOYAGE
Veiller à débrancher l’appareil de la prise de courant.
1. Nettoyez l’intérieur du four à l’aide d’un chiffon
légèrement humide.
2. Nettoyez les accessoires comme d’habitude avec de
l’eau savonneuse.
3. Le cadre de la porte, le joint et les parties adjacentes
doivent être nettoyés avec précaution avec un un
chiffon humide lorsqu’ils sont sales.
Matériels pouvant être utilisés dans le four à micro-ondes
23
Ustensiles
Papier aluminium
Plat à brunir Veuillez suivre les instructions du fabricant. Le fond du plat à brunir doit être à au moins 5
Vaisselle de table
Pots en verre
Vaisselle en verre Uniquement s'il est spécié qu'elle résiste à la chaleur et peut aller au four. Assurez-vous
Sachets pour
cuisson au four
Assiettes et tasses
en papier
Serviettes en papier
Papier cuisson Utilisez-le pour couvrir les plats et éviter les éclaboussures ou pour emballer les aliments pour
Vaisselle Uniquement si elle est prévue pour passer au four à micro-ondes. Veuillez
en plastique suivre les instructions du fabricant. La vaisselle en plastique doit porter le symbole indiquant
Film étirable Uniquement s'il est prévu pour passer au four à micro-ondes. Utilisez le lm étirable pour
Thermomètres Uniquement s'ils sont prévus pour passer au four à micro-ondes (thermomètres à viande et à
Papier ciré
Utilisez-les pour couvrir les aliments à réchauffer et absorber la graisse. Utilisez-les sous
Remarques
Protection uniquement. Il est possible d'en utiliser de petits morceaux pour couvrir de nes
tranches de viande ou volaille an d'éviter qu'ils ne soient trop cuits. Des arcs électriques
peuvent se former si la feuille de papier aluminium est trop près des parois du four. Elle doit être
placée à au moins 2,5 cm des parois.
au-dessus du plateau tournant. Une utilisation incorrecte peut provoquer une rupture du
plateau tournant.
Uniquement si elle est prévue pour passer au four à micro-ondes. Veuillez suivre les instructions
du fabricant. N'utilisez pas de vaisselle ssurée ou ébréchée.
Retirez toujours le couvercle. Utilisez les pots en verre au micro-ondes uniquement pour réchauffer
les aliments. La plupart des pots en verre ne résistent pas à la chaleur et pourraient casser s'ils
sont chauffés à une température trop élevée.
qu'elle ne présente pas de décors métalliques.
N'utilisez pas de vaisselle ssurée ou ébréchée.
Veuillez suivre les instructions du fabricant. Ne fermez pas les sacs avec un lien
métallique. Réalisez des entailles pour permettre à la vapeur de s'échapper.
Utilisez-les uniquement pour les cuissons rapides ou pour réchauffer les aliments.
Ne les laissez pas dans le four sans surveillance.
surveillance pour des cuissons rapides uniquement.
une cuisson à la vapeur.
qu'elle peut passer au four à micro-ondes. Certains récipients en plastique ramollissent
alors que les aliments situés à l'intérieur chauffent. Les sacs de cuisson et les sacs en
plastique fermés doivent être entaillés, percés ou ouverts selon les instructions présentes sur
l'emballage.
couvrir les aliments pendant la cuisson an de retenir l'humidité. Le lm étirable ne doit pas
entrer en contact avec les aliments.
bonbons).
Utilisez-le pour couvrir les aliments an d'éviter les éclaboussures et de retenir l'humidité.
mm
FR
Matériels à éviter dans le four à micro-ondes
Ustensiles Remarques
Plats en Ils peuvent entraîner la formation d'arcs électriques.
aluminium Transférez les aliments dans un plat allant au four à micro-ondes.
Boîtes alimentaires
en carton avec Transférez les aliments dans un plat allant au four à micro-ondes.
poignée métallique
Ustensiles
métalliques ou Les décors métalliques peuvent entraîner la formation d'arcs électriques.
présentant des
décors métalliques
Liens métalliques Ils peuvent entraîner la formation d'arcs électriques et pourraient être à l'origine d'un incendie
Sacs en papier Ils peuvent être à l'origine d'un incendie dans le four.
Mousse en La mousse en plastique peut fondre ou contaminer le liquide se trouvant à
plastique l'intérieur si elle est exposée à une température élevée.
Bois Le bois se dessèche s'il est utilisé dans le four à micro-ondes et peut alors se casser ou se
Ils peuvent entraîner la formation d'arcs électriques.
Le métal protège les aliments des micro-ondes en empêchant celles-ci de passer.
dans le four.
ssurer.
INSTALLATION DE VOTRE FOUR
24
Noms des pièces et accessoires du four
FR
Retirez le four et tout le matériel du carton ainsi que tout
ce qui se trouve dans la cavité du four.
Votre four est fourni avec les accessoires suivants :
Plateau en verre 1
Support de plateau tournant
Mode d’emploi
1
1
F
E
G
Grille (uniquement pour les
modèles avec grill)
C B
D
A) Panneau de commande
B) Axe du plateau tournant
C) Support du plateau tournant
D) Plateau en verre
E) Vitre de la porte
F) Porte
G) Système de verrouillage de
sécurité
Installation et branchement
1. Cet appareil est destiné exclusivement à un usage
domestique.
2. Ce four est conçu uniquement pour être encastré. Il
n’est pas prévu pour être utilisé posé sur un plan de
travail ou dans une armoire.
A
3. Veuillez respecter les instructions d’installation
particulières.
4. L’appareil peut être installé dans un élément de
cuisine mural de 60 cm de large (d’au moins 55 cm
de profondeur et à 85 cm du sol minimum).
5. L’appareil est doté d’une che et doit être branché
uniquement sur une prise de courant correctement
installée et mise à la terre.
6. La tension du réseau doit correspondre à la tension
indiquée sur la plaque signalétique.
7. La prise doit être installée par un électricien qualié.
Il en va de même du remplacement du câble
d’alimentation. Si la che n’est plus accessible une
fois l’installation terminée, un dispositif de coupure
omnipolaire doit être présent sur l’installation
électrique, avec un intervalle de contact d’au moins
3 mm.
8. Il ne faut pas utiliser d’adaptateurs, de multiprises
ni de rallonges. Une surcharge peut provoquer un
risque d’incendie.
Installation du plateau tournant
a. Ne placez jamais le plateau en verre à l’envers.
La rotation du plateau en verre ne doit jamais être
empêchée.
b. Le plateau en verre et son support doivent toujours
être utilisés pendant la cuisson.
c. Tous les aliments et les récipients doivent toujours
être placés sur le plateau en verre pour la cuisson.
d. le plateau en verre ou son support se ssurent ou
cassent, veuillez contacter le service après-vente
agréé le plus proche.
Moyeu (dessous)
Plateau en verre
Axe du plateau tournant
Support du plateau tournant
Les surfaces accessibles peuvent
devenir chaudes pendant le
fonctionnement du four.
 Loading...