

Page 1
Instruction booklet
TUMBLE DRYER
GB
English, 1
AS600V
E
Español, 14PPortuguês, 27
Contents
Important information, 2
Installation, 3-4
Where to put your dryer
Ventilation
Electrical connection
Before you start using your dryer
Dryer description, 5
The front
The back
Control panel
Start and programmes, 6-7
Choosing a programme
Table of programmes
Laundry, 8-9
Sorting your laundry
Wash care labels
Special clothing items
Drying times
GB
Warnings and Suggestions, 10
General safety
Disposal
Saving energy and respecting the environment
Maintenance and Care, 11
Switching off the electricity
Cleaning the filter after each cycle
Check the drum after each cycle
Cleaning the dryer
Troubleshooting, 12
Service, 13
Spare parts
! Keep this instruction booklet on hand in order to refer to it when necessary. Take it with you when you move, and
should you sell this appliance or pass it on to another party, make sure that this booklet is supplied along with the
dryer so that the new owner may be informed about warnings and suggestions on how the appliance works.
! Read these instructions carefully; the following pages contain important information on installation and suggestions
on how the appliance works.
1
Page 2
Important Information
GB
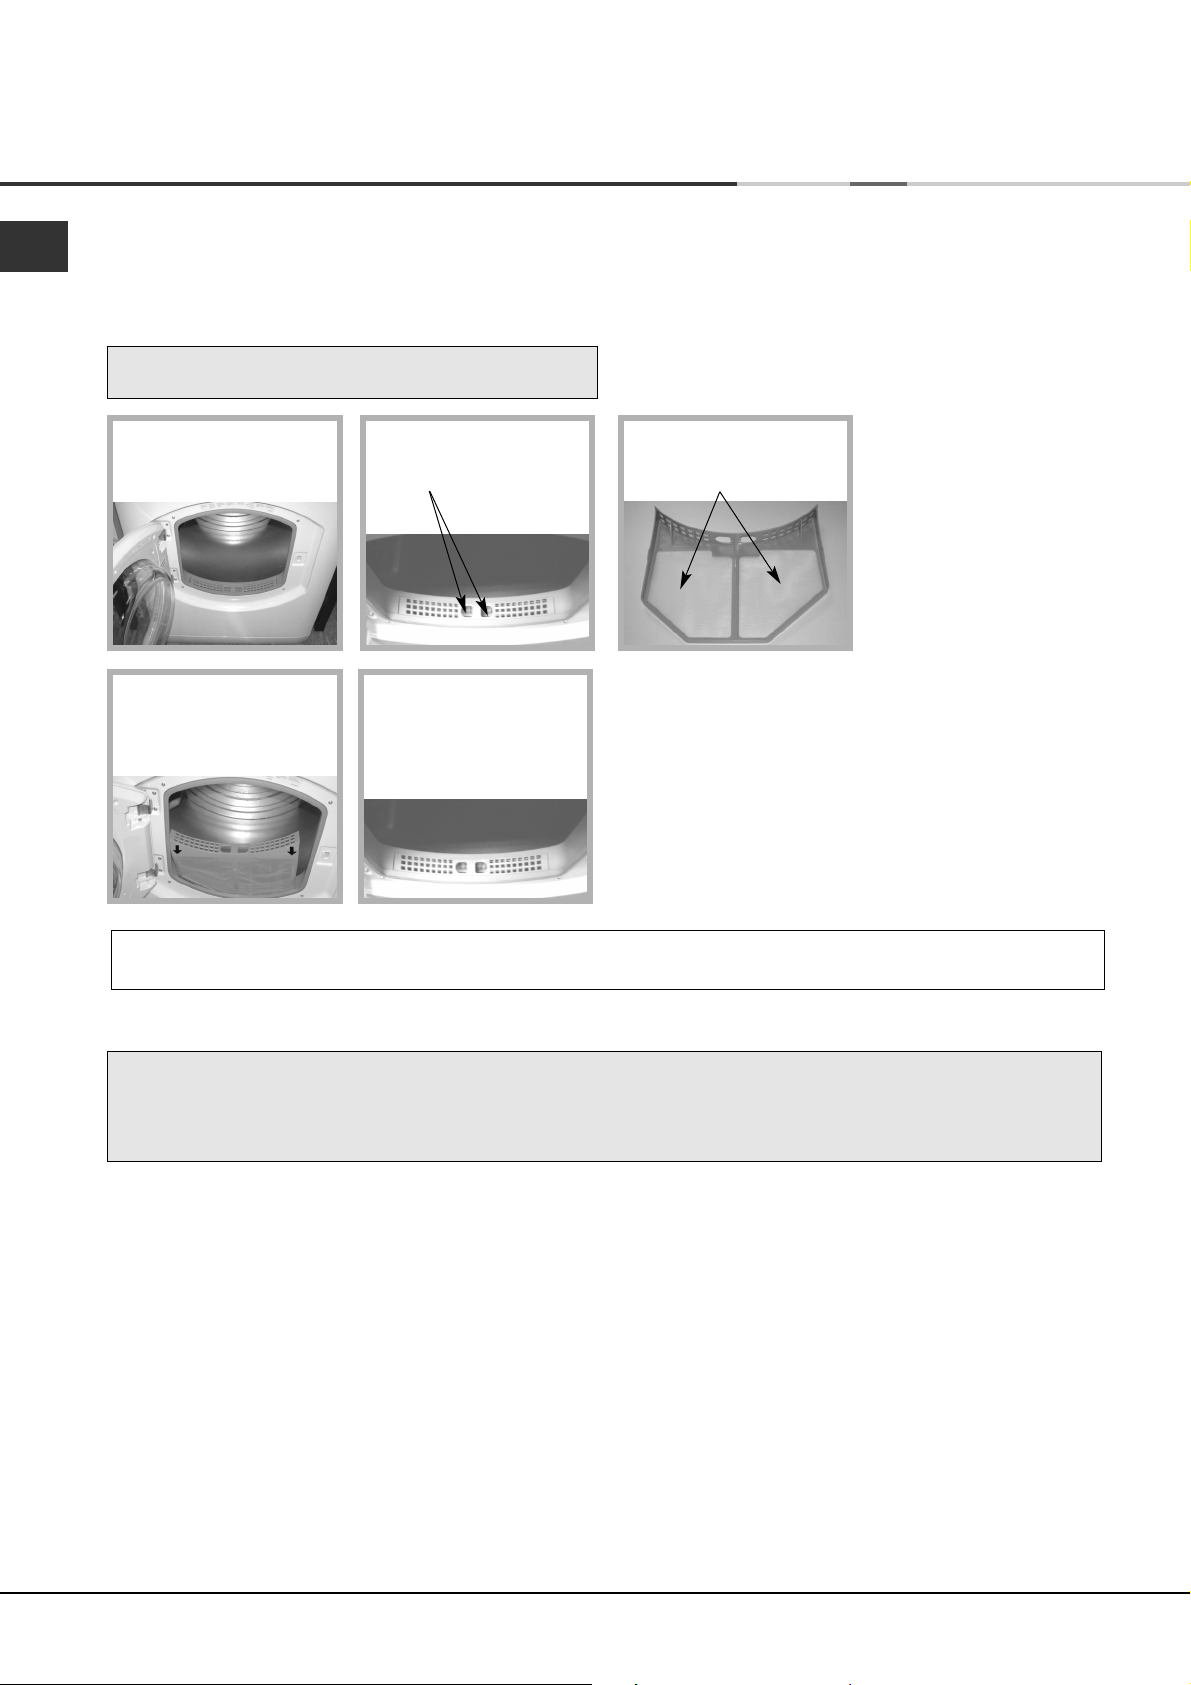
For your Venting dryer to operate efficiently, you must follow the regular maintenance schedule shown below:
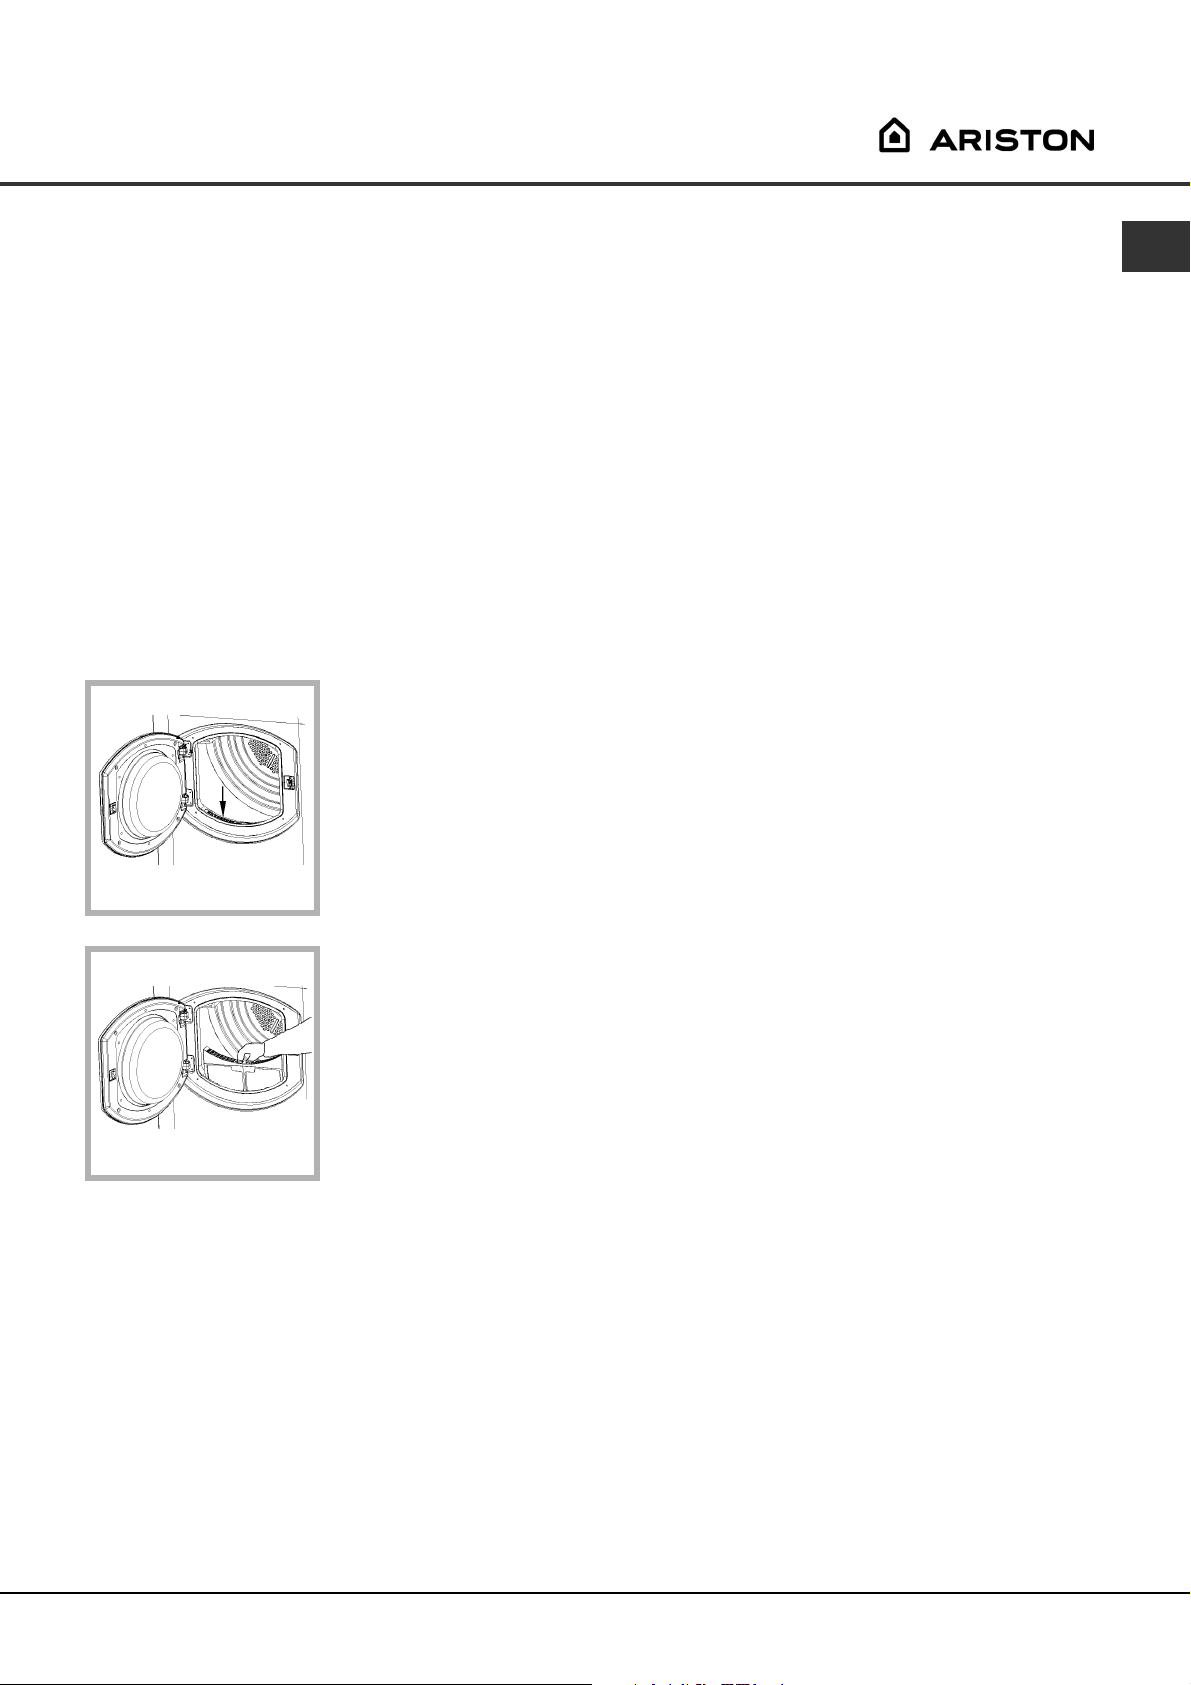
Fluff Filter...
! You MUST clean the fluff filter after EVERY drying
cycle.
STEP 1.
Open the door of your
dryer.
STEP 4.
Refit the filter.
- Make sure the arrows
are facing you.
STEP 2.
Pull out the filter (using
the two finger grips).
STEP 5.
Make sure the filter is
pushed fully home.
- NEVER run the dryer
without the filter in position.
STEP 3.
Clean any fluff deposits
from the filter mesh.
! Failure to clean the filter after EVERY drying cycle will affect the drying performance of your machine.
- It will take longer to dry and as a result will use more electricity during drying.
! You MUST clean fluff build up around the filter housing and the vent tube periodically, EVERY two or three months:
- Check the vent tube and any permanent venting fixture to make sure that there has been no accumulation
of fluff or lint, and remove it.
- Remove lint that collects around the filter and the outlet vents.
2
Page 3
Installation
Where to put your dryer
●
Place your dryer at a distance from gas ranges,
stoves, heaters, or cook tops because flames can
damage the appliance.
●
Minimum gap 10mm
Minimum gaps
15mm
proper air circulation. Make sure that the back
vents are not obstructed.
●
Make sure you put your dryer in an environment
that is not damp and has proper air circulation
throughout, the dryer will not operate efficiently in
an enclosed space or cupboard.
! We do not recommend that the dryer is installed in a
cupboard but the dryer must never be installed
behind a lockable door, a sliding door or a door with a
hinge on the opposite side to that of the dryer door.
If you are going to install the
appliance under a work
counter, be sure to leave a
10mm space between the
top and any other objects on
or above the machine and a
15mm space between the
sides and lateral furnishings
or walls. This is to ensure
Ventilation
Permanent venting
In conjunction with the vent tube we recommend
using a Wall/Window Vent Kit, available at a retail
location or the nearest Spare Parts Dealer.
Wall mounting
1. Leave an opening in
the wall to the left of the
dryers proposed position.
2. Keep the tube as short
and straight as possible
to prevent condensed
moisture from backing up
into the dryer.
3. Similarly, the duct in
the wall should slope
downwards towards the
outside.
Window mounting
1. With a stacked dryer
the hole in the window
should ideally be made
below the vent.
2. The tube should be
kept as short as possible.
GB
The Dryer dries your laundry by drawing in cool, clean
and relatively dry air, heating it, and then distributing it
through the clothes as they are gently tumbled. For
optimum performance, the moist air is then blown out
through a vent tube at the back of the dryer.
When the dryer is in use, there has to be adequate
ventilation to avoid the back flow of gases into the room
from appliances burning other fuels, including open fires.
Mobile venting
A vent tube must always be fitted when the dryer is
used in conjunction with Mobile Venting.
The tube must be fitted securely into the back of the
dryer (see Dryer Description). If possible, it is always
best to connect the tube to a permanent
outlet close to the dryer. If permanent installation is
not possible, the dryer will work just as well with the
tube passing through a partly-opened window.
! Ensure that the end of the tube is not directed
toward the air intake vent at the rear of the dryer.
! The vent tube should not exceed 2.4 metres in
length and should be kept free of any possible
accumulation of fluff, lint and water by shaking it out
frequently. Always ensure that the tube is not
squashed.
Depending on how often you use your dryer, it is
essential that areas A and B are checked periodically
to remove lint or debris.
The vent tube adaptor must be fitted securely thus
preventing any humid air from being emitted back into
the room.
! The Dryer should not be pushed so far back that the
tube adaptor is pulled out of position or the tube is
squashed or bent.
! The tube should be kept clear of the air intake vent
and kinks or ‘U’ bends must be avoided as these will
obstruct the tube or trap condensation.
3
Page 4
Installation
GB
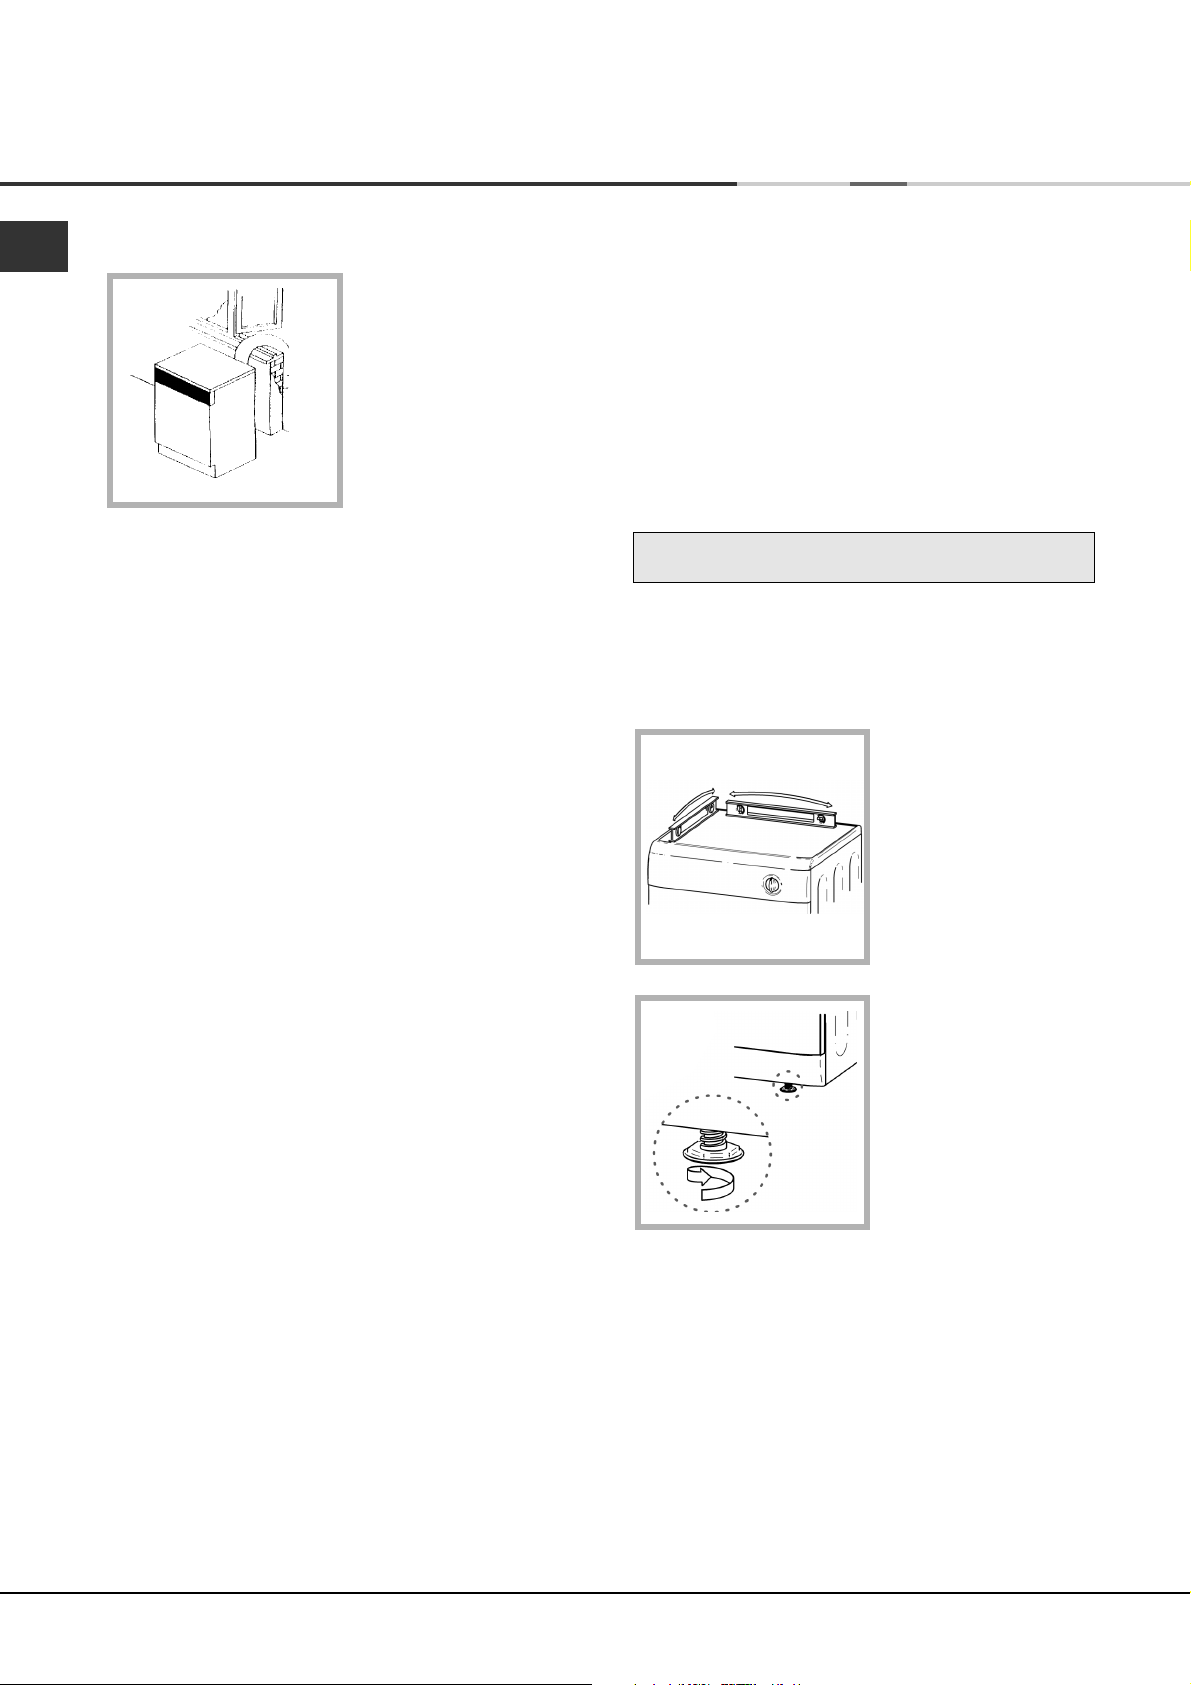
Open window venting
The end of the tube
should be directed
downwards, to prevent
warm moist air from
condensing in the room or
in the dryer.
! Ensure that the dryer is adequately ventilated and
that the end of the vent tube is not directed towards
the air intake duct.
! The vent tube must always be fitted for optimum
performance.
! Make sure that the vent tube and air intake vents are
not obstructed or blocked.
! The dryer must not recycle exhaust air.
! Misusing a tumble dryer may create a fire hazard.
! Do not discharge exhaust air into a flue which is
used for exhaust fumes from other appliances that
burn gas or other fuels.
! Do not discharge exhaust air into an extraction
system or any duct with an extractor fan. This will
affect the way the thermal controls operate and can
result in a fire hazard.
! Do not use extension cords.
! The power cord must not be bent or squashed.
! The power supply cord should be checked periodically
and replaced by a cord specially prepared for this dryer
and fitted only by authorised technicians (see
Service). New or longer power cords are supplied at
an extra charge by authorised dealers..
! The manufacturer denies any responsibility should
any of these rules not be followed.
! If in doubt about any of the above consult a qualified
electrician.
Levelling your dryer
The dryer must be installed level for correct operation.
When you have installed
your dryer in its final
location check that it is
level first side to side,
then front to back.
Electrical connections
Make sure of the following before you insert the plug
into the the electrical socket:
●
The socket must be grounded.
●
The socket must be able to sustain the machines
maximum power, which is indicated on the rating
label (see Dryer Description).
●
Power voltage must be within the values indicated
on the rating label (see Dryer Description).
●
The socket must be compatible with the dryers
plug. Should this not be the case, replace the
plug or the socket.
! The dryer must not be installed outdoors, even if the
space is sheltered. It can be very dangerous if it is
exposed to rain or storms.
! Once installed, the dryers electrical wire and plug
must be within easy reach.
If the dryer is not level,
use a wooden block to
support it while adjusting
the two front legs up or
down, until your dryer is
level.
Before you start using your dryer
Once you have installed your dryer and before you
use it, clean the inside of the drum to remove any
dust that could have accumulated during transport.
4
Page 5
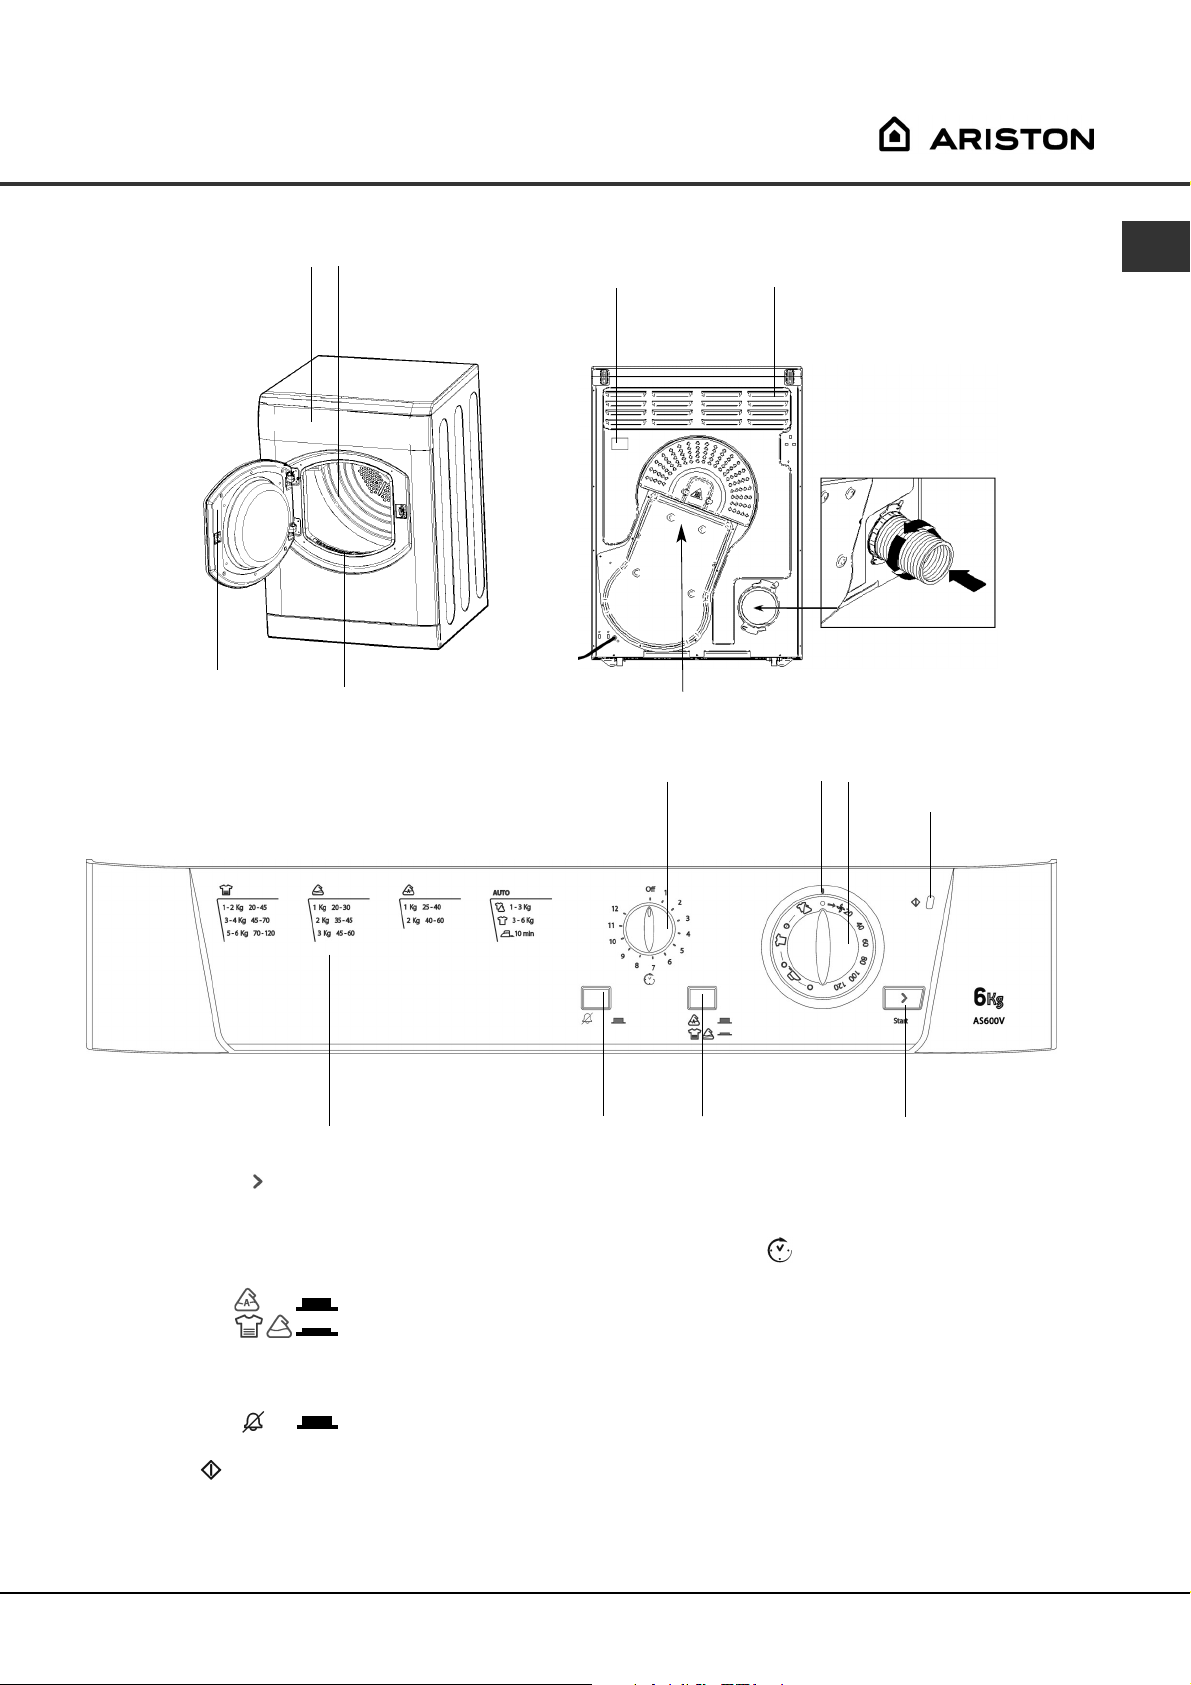
Dryer Description
The front The back
Control Panel
Model & Serial
numbers
Drum
Filter
Rating plate
Caution: Hot!
Control panel
TIMER
Knob
Air Intake Vent
Indicator
Vent Tube fitted here
PROGRAMMES
Knob
ACTIVE
Light
GB
Drying Guide
The START button begins drying a selected
programme (see Start and Programmes).
The HEAT button selects drying temperature (see
Start and Programmes).
OUT: LOW heat
IN: HIGH heat
The ALARM buzzer signals the end of a drying cycle.
IN: Buzzer ON
OUT: Buzzer OFF
The ACTIVE indicator light signals that your dryer
is in use. This light will glow when the START button is
pressed. It will remain on until the door is opened or
the power is turned off. This light will be on during a
delayed start programme.
ALARM
Button
The Drying Guide allows you to consult a user
friendly table of fabric types and load capacities.
The TIMER knob sets a delay on the dryer’s start
time. Rotate it clockwise until you reach the number of
hours you want to delay the start time: If you have
gone too far, turn the knob counter-clockwise (see
Start and Programmes).
The PROGRAMMES knob sets the programme: rotate
it clockwise, never counter-clockwise, until the
indicator is pointing to the programme you want to
select (see Start and Programmes).
HEAT
Button
START
Button
5
Page 6

Start and Programmes
GB
Choosing a programme
1. Plug the dryer into the electrical socket.
2. Sort your laundry according to fabric type (see
Laundry).
3. Open the door and make sure the filter is clean
and in place (see Maintenance).
4. Load the machine and make sure items are not
in the way of the door seal. Close the door.
5. Choose the drying programme by checking the
Programmes table (see Programmes) as well as
the indications for each type of fabric (see
Laundry).
- Set the temperature with the HEAT button.
- Select a programme or drying time by rotating
the PROGRAMMES knob clockwise.
6. Set a delay time by using the TIMER knob if
necessary.
7. If you wish to eliminate the buzzer sound, press
the ALARM button.
8. Press the START button to begin. The DRYING
indicator light will turn on and will stay on, even
during the delay. The indicator light will remain
on until you open the dryer door.
During the drying programme, you can check on
your laundry and take out items that are dry
while others continue drying. When you close
the door again, press the START button in order
to resume drying.
9. About 10 minutes before the programme is
completed, it enters the final COOL TUMBLE
phase (fabrics are cooled), which should always
be allowed to complete.
10. The buzzer will warn you when drying is
complete. Open the door, take the laundry out,
clean the filter and replace it (see Maintenance).
11. Unplug the dryer.
6
Page 7
Start and Programmes
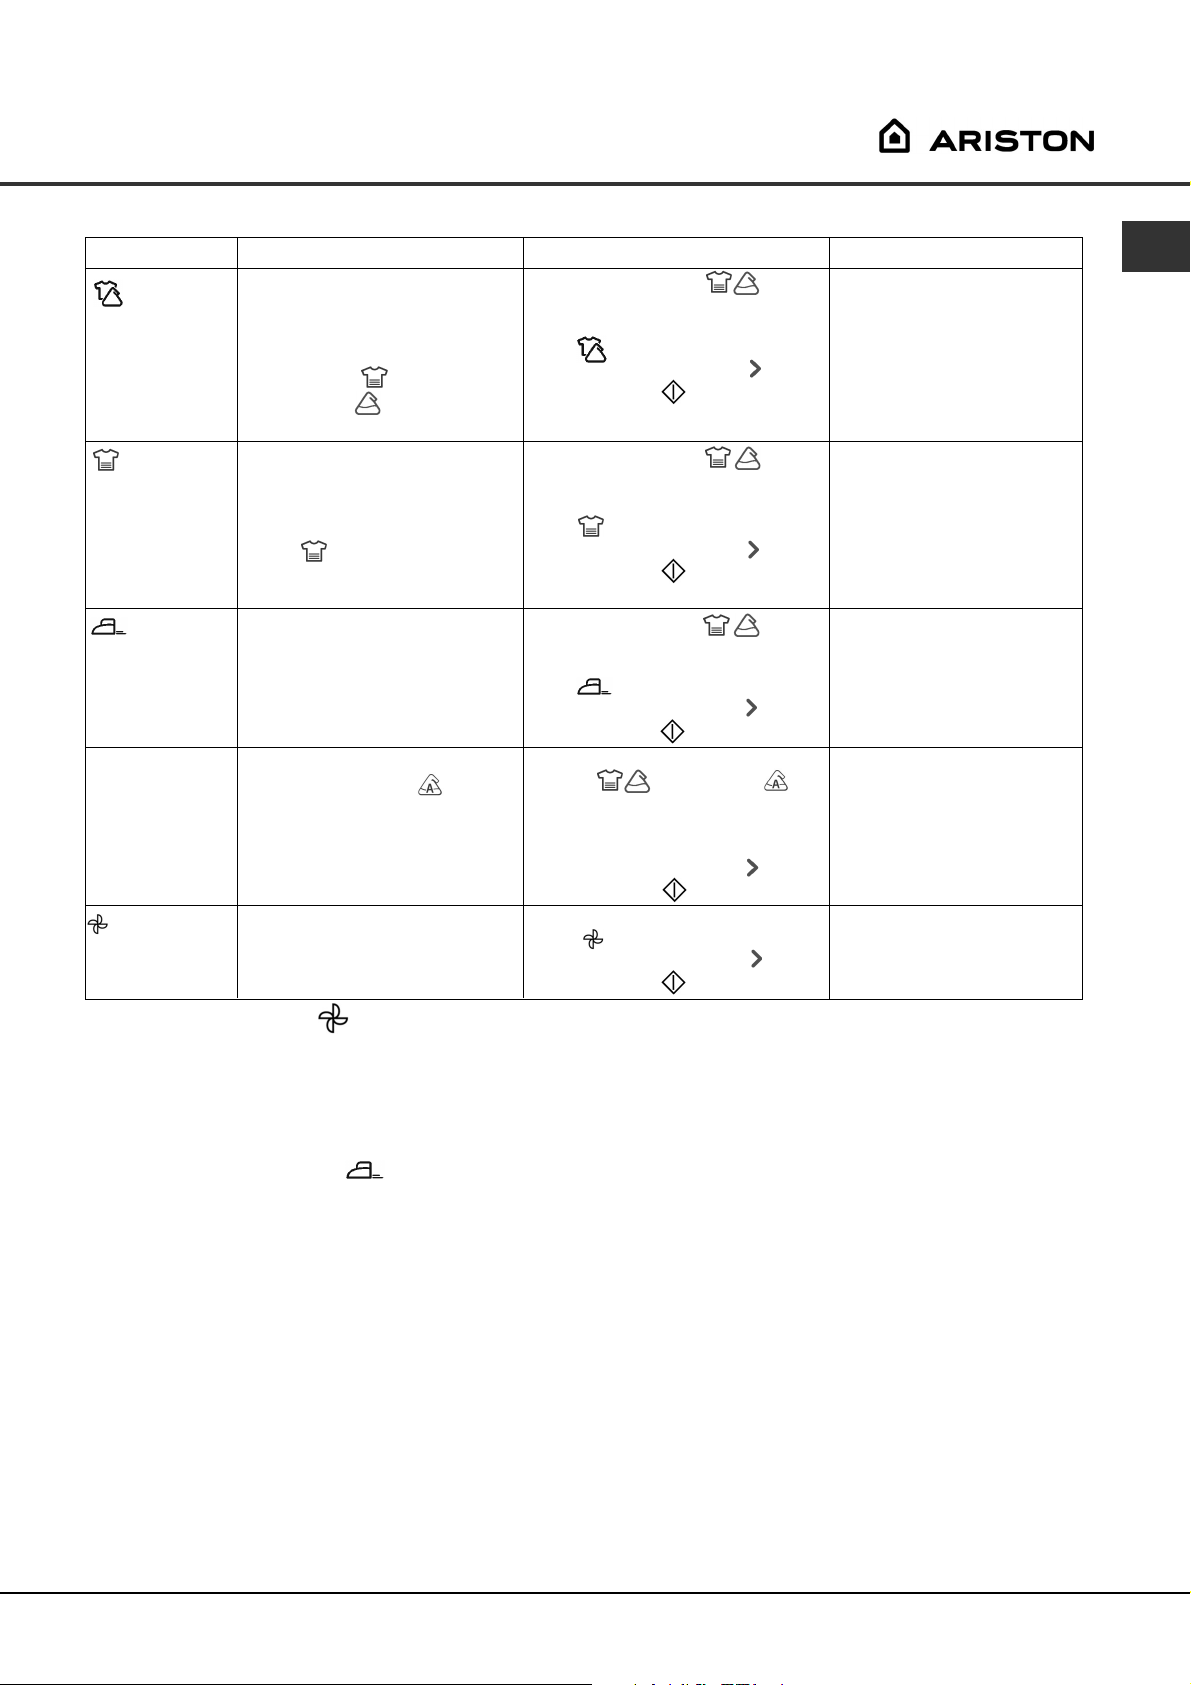
Programmes
Programme
Automatic
Drying
(average loads)
Automatic
Drying
(large loads)
Easy Iron
Timed Drying
up to 120 minutes
Cool Tumble
What it does... How to set it... Note:
Dries completely:
your clothes are ready to be
worn.
For average loads (from 1 to
3kg) of Cotton , polycotton
or synthetics .
Dries completely:
your clothes are ready to be
worn.
For large loads (from 3 to 6kg) of
Cotton .
Brief programme (approximately
10 minutes) that softens fibres of
clothing that is ready for ironing.
Dries wet clothes that will be
ironed, Acrylic fibres , or small
loads (less than 1kg).
If you prefer a timed programme
can be used for other fabrics on
HIGH or LOW heat as appropriate
(see Laundry).
Use to refresh fibres of clothing
(approximately 10 minutes).
1. Select HIGH HEAT
by pressing the HEAT button.
2. Position the PROGRAMMES knob
on .
3. Press the START button , the
ACTIVE light will turn on.
1. Select HIGH HEAT
by pressing the HEAT button.
2. Position the PROGRAMMES knob
on .
3. Press the START button , the
ACTIVE light will turn on.
1. Select HIGH HEAT
by pressing the HEAT button.
2. Position the PROGRAMMES knob
on .
3. Press the START button , the
ACTIVE light will turn on.
1. Select required heat setting HIGH
HEAT or LOW HEAT by
pressing the HEAT button.
2. Position the PROGRAMMES knob
on the desired time.
3. Press the START button , the
ACTIVE light will turn on.
1. Position the PROGRAMMES knob
on .
2. Press the START button , the
ACTIVE light will turn on.
GB
! If you select LOW HEAT,
this programme will not dry
your clothes. For Acrylic
fibres or small loads select
Timed Drying.
This programme can also be
used for large loads if you
require a slightly drier result.
! If you select LOW HEAT,
this programme will not dry
your clothes. For Acrylic
fibres or small loads select
Timed Drying.
This programme can also be
used for average loads if you
prefer a damper result.
! This is not a drying
programme (see below).
Consult suggested drying
times (see Laundry).
! This is not a drying
programme (see below).
Cool Tumble Phase
This is the programmes’ final phase. Approximately 10 minutes before the finish, the knob advances automatically to
the Cool Tumble Phase. Heating elements turn themselves off and clothing is cooled down, after this the Buzzer will
sound (if selected) and the clothing is ready to be taken out.
! Always allow the dryer to complete this phase.
Easy Iron Programme
‘Easy Iron’ is a short 10 minute programme (8 minutes of heat followed by a 2 minute cool tumble period) which
fluffs the fibres of clothing that have been left in the same position/location for an extended period of time. The cycle
relaxes the fibres and makes them easier to iron and fold.
! ‘Easy Iron’ is not a drying programme and should not be used for wet articles of clothing.
For best results:
1. Do not load more than the maximum capacity.
These numbers refer to the dry weight:
Fabric Maximum load
Cotton and Cotton mixtures 2.5kg
Synthetics 2kg
Denim 2kg
2. Unload the dryer immediately after the end of the programme, hang, fold or iron the articles and put
them away in the closet. Should this not be possible repeat the programme.
The ‘Easy Iron’ effect varies from one fabric to the next. It works well on traditional fabrics like Cotton or Cotton mix,
and less well on acrylic fibres and on materials such as Tencel®.
7
Page 8
Laundry
GB
Sorting your laundry
●
Check symbols on clothing labels to make sure
that the articles can be tumble dried.
●
Sort laundry by fabric type.
●
Empty pockets and check buttons.
●
Close zippers and hooks and tie loose belts and
strings.
●
Wring out each item in order to eliminate as much
excess water as possible.
! Do not load dripping wet clothes into the dryer.
Maximum load size
Do not load more than maximum capacity.
These numbers refer to dry weight:
Natural fibres: 6kg max (13lb)
Synthetic fibres: 3kg max (6.6lb)
! DO NOT overload the dryer as this could result in
reduced drying performance.
Typical load
Note: 1kg = 1000g (1lb = 16oz)
Clothes
Blouse Cotton 150g (5oz)
Other 100g (3oz)
Dress Cotton 500g (1lb 2oz)
Other 350g (12oz)
Jeans 700g (1lb 6oz)
10 nappies 1000g (2lb 3oz)
Shirt Cotton 300g (10oz)
Other 200g (7oz)
T-Shirt 125g (4oz)
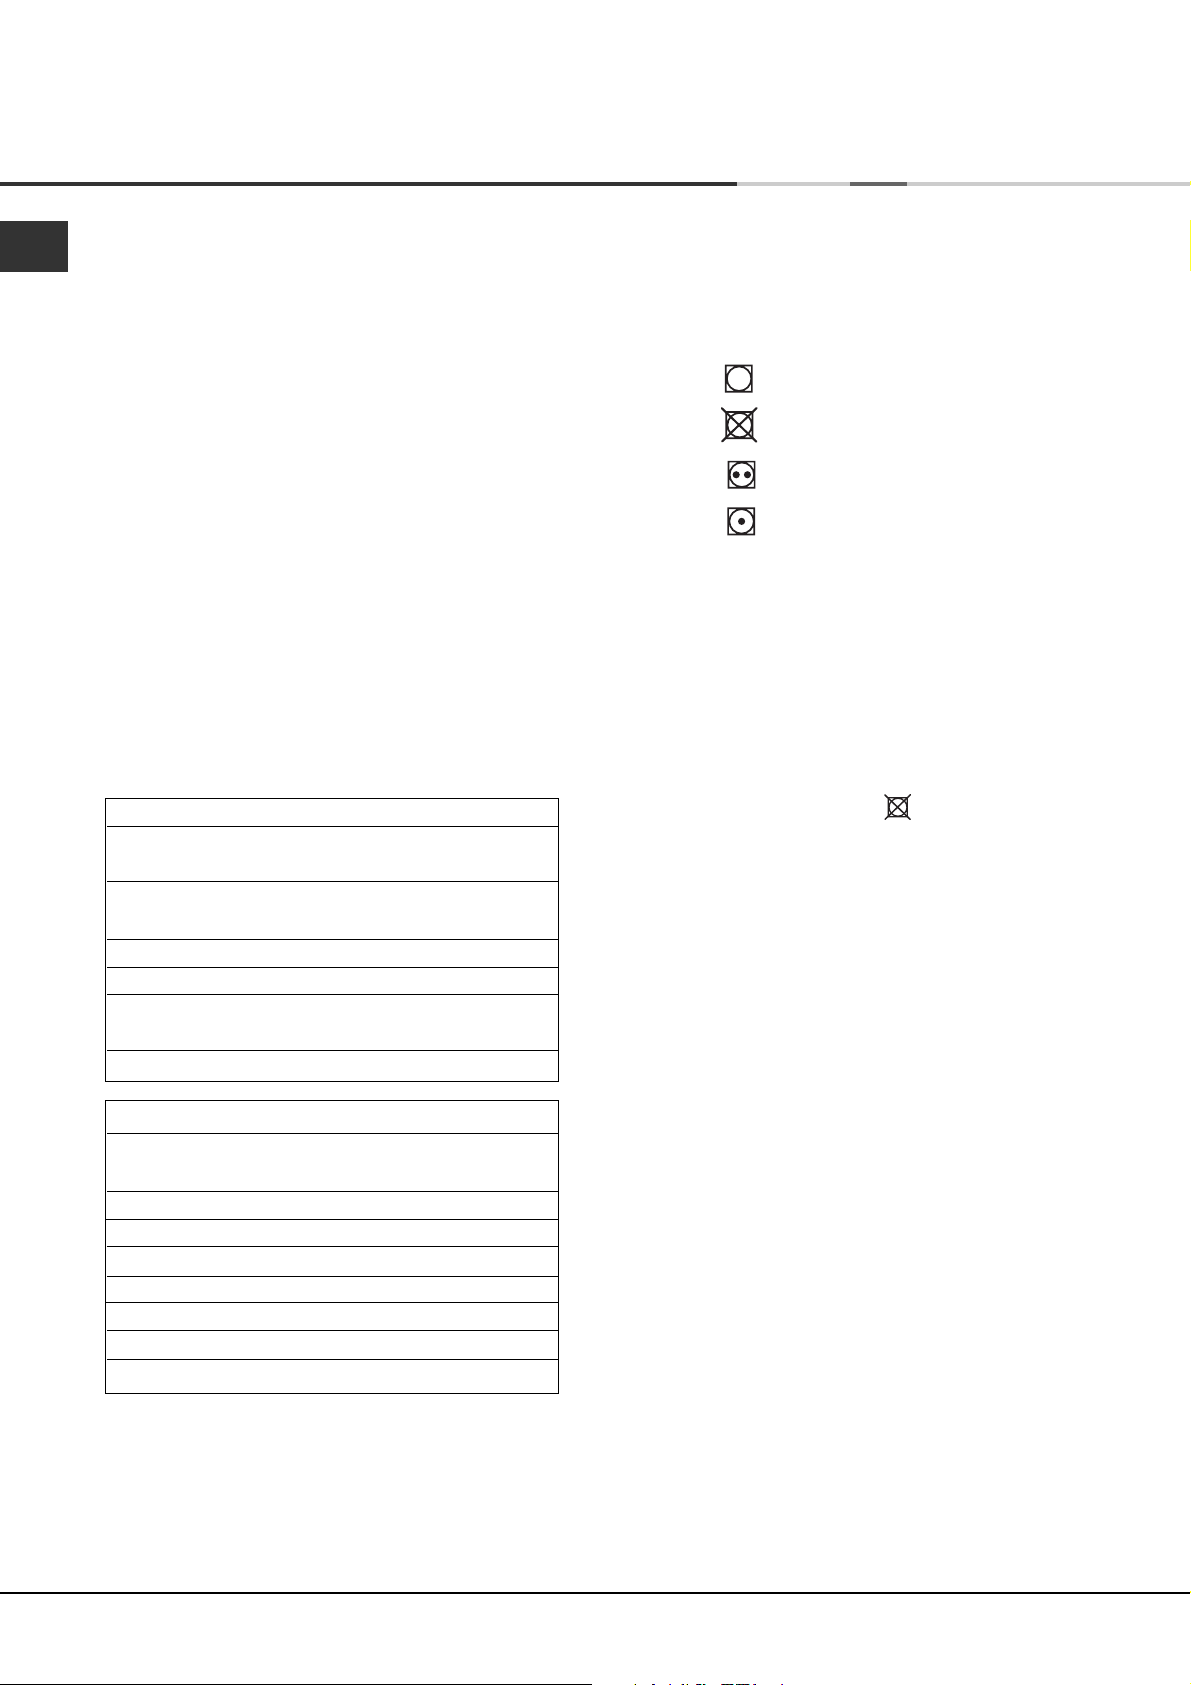
Wash Care Labels
Look at the labels on your garments, especially when
tumble drying for the first time. The following symbols
are the most common:
May be tumble dried
Do not tumble dry
Tumble dry at high heat setting
Tumble dry at low heat setting
Items not suitable for tumble drying
●
Articles that containing rubber or rubber-like
materials or plastic film (pillows, cushions, or PVC
rainwear), any other flammable articles or objects
that contain flammable substances (towels soiled
with hair spray).
●
Glass fibres (certain types of draperies)
●
Items which have been dry cleaned
●
Items with the ITCL Code (see Special
clothing items). These can be cleaned with special
at-home dry cleaning products. Follow instructions
carefully.
●
Large bulky items (quilts, sleeping bags, pillows,
cushions, large bedspreads etc). These expand
when drying and would prevent airflow through
the dryer.
Household Items
Duvet cover Cotton 1500g (3lb 5oz)
(Double) Other 1000g (2lb 3oz)
Large Tablecloth 700g (1lb 6oz)
Small Tablecloth 250g (9oz)
Tea Towel 100g (3oz)
Bath Towel 700g (1lb 6oz)
Hand Towel 350g (12oz)
Double Sheet 500g (1lb 2oz)
Single Sheet 350g (12oz)
At the end of a drying cycle, cottons could still be
damp if you grouped cottons and synthetics together.
If this happens simply give them an additional short
period of drying.
●
Note: The last 10 minutes of any time set is the
Cool Tumble, so allow for this when setting the time,
as this period will not dry your laundry.
8
Page 9
Laundry
Special clothing items
Blankets and Bedspreads: acrylic items (Acilan,
Courtelle, Orion, Dralon) must be dried with special
care on LOW heat setting. Avoid drying for a long
period of time.
Pleated or creased garments: read the manufacturer’s
drying instructions on the garment.
Starched articles: do not dry these with non-starched
items. Make sure that as much of the starch solution is
removed from the load as possible before placing it in
the dryer. Do not over-dry: the starch will become
powdery and leave your clothing limp, which defeats
the purpose of starch.
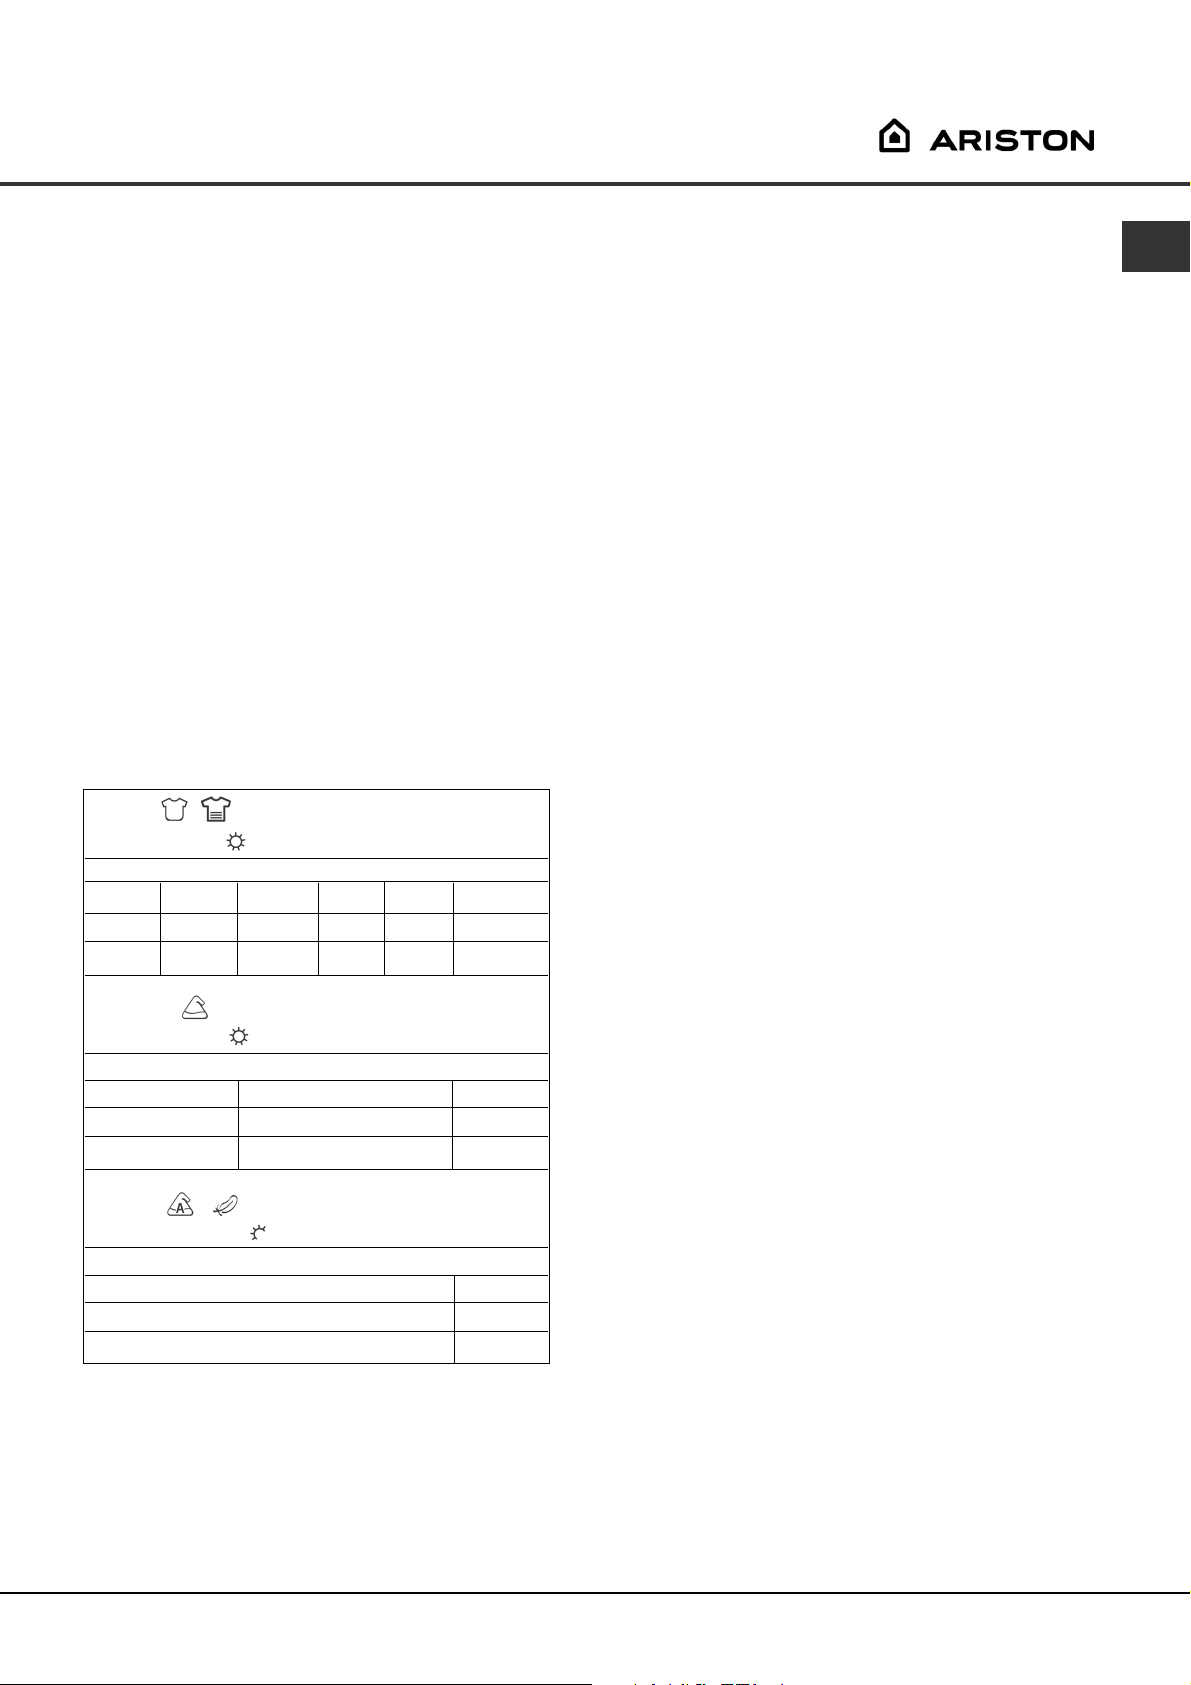
Drying times
The table below presents APPROXIMATE drying times
in minutes. Weights refer to dry garments:
Cottons
High (full) Heat
Drying times 800-1000rpm in washing machine
Half Load Full Load
1kg 2kg 3kg 4kg 5kg 6kg
20-30 35-45 45-60 60-70 70-80 80-100
Synthetics
High (full) Heat
Drying times on reduced spin in washing machine
Half Load Full Load
1kg 2kg 3kg
20-30 35-45 45-60
Times are approximate and can vary depending
upon:
●
Amount of water retained in clothes after spin
cycle: towels and delicates retain a lot of water.
●
Fabrics: items that are the same type of fabric but
different textures and thicknesses may not have
the same drying time.
●
Quantity of laundry: single items or small loads
may take longer to dry.
●
Dryness: If you are going to iron some of your
clothes, they can be taken out while still a bit
damp. Others can be left longer if you need them
to be completely dry.
●
Heat setting.
●
Room temperature: if the room where the dryer is
located is cold, it will take longer for the dryer to
dry your clothes.
●
Bulk: some bulky items can be tumble dried with
care. We suggest that you remove these items
several times, shake them out, and return them to
the dryer until finished.
! Do not over-dry your clothes.
All fabrics contain a little natural moisture, which
keeps them soft and fluffy.
GB
Acrylics /
Low (gentle) Heat
Drying times on reduced spin in washing machine
Half Load Full Load
1kg 2kg
25-40 40-60
9
Page 10
GB
Warnings and Suggestions
●
! The appliance has been designed and built according
to international safety standards.
These warnings are given for safety reasons and must
be followed carefully.
General safety
●
This tumble dryer is not intended for use by
persons (including children) with reduced physical,
sensory or mental capabilities, or lack of experience
and knowledge, unless they have been given
supervision or instruction concerning use of the
appliance by a person responsible for their safety.
●
This tumble dryer has been designed for home,
and not professional use.
●
Do not touch the appliance while barefoot or with
wet hands or feet.
●
Unplug the machine by pulling on the plug, not
the cord.
●
Children must not be in proximity of the dryer
when in use. After using the dryer, turn it off and
unplug it. Keep the door closed to make sure that
children do not use it as a toy.
●
Children should be supervised to ensure that they
do not play with the dryer.
●
The appliance must be installed correctly and
have proper ventilation. The air intake vents
behind the machine, the outlet vents and the vent
tube should never be obstructed (see Installation).
●
Never direct the vent tube outlet towards the air
intake at the back of the machine.
●
Never allow the tumble dryer to recycle exhaust air.
●
Never use the dryer on carpeting where the pile
height would prevent air from entering the dryer
from the base.
●
Check to see if the dryer is empty before loading it.
●
●
●
●
●
●
●
●
●
●
The back of the dryer could become very
hot. Never touch it while in use.
Do not use the dryer unless the filter is securely
in place (see Maintenance).
Do not use liquid fabric softeners in the dryer, add
it to the final rinse of your wash.
Do not overload the dryer (see Laundry) for
maximum loads.
Do not load items that are dripping wet.
Tumble dry items only if they have been washed
with detergent and water, rinsed and been through
the spin cycle. It is a fire hazard to dry items that
HAVE NOT been washed with water.
Carefully check all instructions on clothing labels
(see Laundry).
Do not dry garments that have been treated with
chemical products.
Never dry articles that are contaminated with
flammable substances (cooking oil, acetone, alcohol,
petrol, kerosene, spot removers, turpentine, waxes,
wax removers and hair sprays), unless washed in
hot water with an extra amount of detergent.
Do not tumble dry rubber, rubber backed articles and
clothes, pillows fitted with foam rubber pads, foam
(latex foam), rubber, plastic, shower caps, waterproof
textiles, nappy pants or liners, polythene or paper.
Do not tumble dry large, very bulky items.
●
Do not tumble dry acrylic fibres at high temperatures.
●
Remove all objects from pockets, especially lighters
(risk of explosion).
●
Complete each programme with its Cool Tumble Phase.
●
Do not turn off the dryer when there are still warm
items inside.
●
Clean the filter after each use (see Maintenance).
●
Do not allow lint to collect around the dryer.
●
Never climb on top of the dryer. It could result in
damage.
●
Always follow electrical standards and requirements
(see Installation).
●
Always buy original spare parts and accessories
(see Service).
! WARNING: Never stop the dryer before the end of the
drying cycle unless all items are quickly removed and
spread out so that the heat is dissipated.
Recycling and disposal information
As part of our continued commitment to helping the
environment, we reserve the right to use quality recycled
components to keep down customer costs and minimise
material wastage.
●
Disposing of the packaging material: follow local
regulations, so the packaging can be recycled.
●
To minimise risk of injury to children, remove the
door and plug - then cut off mains cable, flush
with the appliance. Dispose of these parts separately
to ensure that the appliance can no longer be
plugged into a mains socket.
Disposal of old electrical appliances
The European Directive 2002/96/EC on Waste Electrical
and Electronic Equipment (WEEE), requires that old
household electrical appliances must not be disposed
of in the normal unsorted municipal waste stream. Old
appliances must be collected separately in order to
optimise the recovery and recycling of the materials
they contain and reduce the impact on human health
and the environment.
The crossed out “wheeled bin” symbol on the
product reminds you of your obligation, that
when you dispose of the appliance it must be
separately collected.
Consumers should contact their local authority or
retailer for information concerning the correct disposal
of their old appliance.
Saving energy and respecting the
environment
●
Wring out items to eliminate excess water before
tumble drying (if you use a washing machine first,
select a high spin cycle). Doing this will save time
and energy during drying.
●
Always dry full loads - you save energy: single
items or small loads take longer to dry.
●
Clean the filter after each use to contain energy
consumption costs (see Maintenance).
10
Page 11
Maintenance and Care
Switching off the electricity
Unplug your dryer when not using it, when cleaning it
and during all maintenance operations.
Clean the filter after each cycle
The filter is an important part of your dryer:
it accumulates lint and fluff that is formed while drying.
Small items could also become trapped in the filter.
When finished drying, therefore, clean the filter by
rinsing it under running water or with your vacuum
cleaner. Should the filter become clogged up, the airflow
inside the dryer will be seriously compromised: drying
times lengthen and you will consume more energy. It
may also damage your dryer.
The filter is found in front
of the dryer trim
(see diagram).
Check the drum after each cycle
Turn the drum manually in order to remove small items
(handkerchiefs) that could have been left behind.
Cleaning the drum
! Do not use abrasives, steel wool or stainless steel
cleaning agents to clean the drum.
A coloured film may start to appear on the stainless
steel drum, this may be caused by a combination of
water and, or cleaning agents such as fabric conditioner
from the wash. This coloured film will not affect the
dryer performance.
Cleaning
●
External parts in metal or plastic and rubber parts
can be cleaned with a damp cloth.
●
Periodically check the vent tube and any
permanent venting fixture to make sure that there
has been no accumulation of fluff or lint, and
remove it.
GB
Removing the filter:
1. Pull the plastic grip of
the filter upwards (see
diagram).
2. Clean the filter and
replace it correctly.
Ensure the filter is fully
located flush into the
tumble dryer trim.
! Do not use the dryer without replacing the filter..
●
Remove lint that collects around the filter and the
outlet vents.
! Do not use solvents or abrasives.
! Your dryer uses special bearing components which
do not need lubrication.
! Have your dryer checked regularly by authorised
technicians to ensure electrical and mechanical safety
(see Service).
11
Page 12

Troubleshooting
GB
One day your dryer seems not to be working. Before you call your Service Centre (see Service), go through the
following troubleshooting suggestions:
Problem:
The tumble dryer won’t start.
Possible causes / Solution:
●
The plug is not plugged into the socket, or not making contact.
●
There has been a power failure.
●
The fuse has blown. Try to plug another appliance into the socket.
●
You are using an extension cord? Try to plug the dryer’s power cord
directly into the socket.
●
The door is not closed securely?
●
The PROGRAMMES knob has not been set properly (see Start and
Programmes).
●
The START button has not been pressed (see Start and Programmes).
Drying cycle will not begin.
Its taking a long time to dry.
●
You have set a delayed time (see Start and Programmes).
●
The filter has not been cleaned (see Maintenance).
●
The temperature setting is not ideal for the type of fabric you are drying
(see Start and Programmes).
●
Auto Programmes require a HIGH temperature setting (see Start and
Programmes).
●
The correct programme has not been selected for the load (see Start
and Programmes).
●
The flexible vent tube is obstructed (see Installation).
●
The air intake vent is obstructed (see Installation).
●
The permanent ventilation flap on the storm cover is obstructed (see
Installation).
●
The items were too wet (see Laundry).
●
The dryer was overloaded (see Laundry).
12
Page 13

Service
Before calling the Service Centre:
●
Use the troubleshooting guide to see if you can
solve the problem yourself (see Troubleshooting).
●
If not, turn off the dryer and call the Service Centre
closest to you.
What to tell the Service Centre:
●
name, address and post code.
●
telephone number.
●
the type of problem.
●
the date of purchase.
●
the appliance model (Mod.).
●
the serial number (S/N).
This information can be found on the data label inside
the door of the machine.
Spare Parts
This dryer is a complex machine. Repairing it yourself
or having a non-authorised person try to repair it could
cause harm to one or more persons, could damage
the machine and could invalidate the spare parts
warranty.
Call an authorised technician if you experience problems
while using the machine.
The spare parts have been designed exclusively for
this appliance and not for other uses.
GB
This appliance conforms to the following EC Directives:
- 2006/95/EC (Low Voltage Equipment)
- 89/336/EEC, 92/31/EEC and 93/68/EEC (Electromagnetic Compatibility)
13
Page 14

Folleto de instrucciones
SECADORA
E
GB
English, 1
E
Español, 14
P
Português, 27
Índice de materias
Información Importante, 15
Instalación, 16-17
Dónde instalar la secadora
Ventilación
Conexiones eléctrica
Antes de empezar a utilizar la secadora
Descripción de la secadora, 18
La sección delantera
La sección trasera
El panel de control
Comienzo y programas, 19-20
Seleccionar un programa
Tabla de programas
AS600V
La colada, 21-22
Clasificar la colada
Etiquetas de recomendaciones durante el lavado de la ropa
Prendas especiales
Tiempos de secado
Advertencias y recomendaciones, 23
Seguridad general
Disposición
Ahorro energético y respeto del medio ambiente
Mantenimiento y cuidados, 24
Desconectar la electricidad
Limpiar el filtro después de cada ciclo
Comprobar el tambor después de cada ciclo
Limpiar la secadora
Resolución de problemas, 25
Servicio, 26
Piezas de repuesto
¡Guarde este manual de instrucciones a mano a fin de consultarlo cuando sea necesario. Llévelo con usted
cuando se traslade, y, si vendiera este electrodoméstico o si lo pasa a terceros compruebe que este manual se
incluya con la secadora de forma que el nuevo propietario quede informado acerca de las advertencias y
recomendaciones, además del funcionamiento de la secadora.
¡Lea estas instrucciones detenidamente; las páginas que aparecen a continuación contienen información
importante sobre la instalación, además de recomendaciones sobre el funcionamiento del electrodoméstico.
14
Page 15

Información Importante
Para que la secadora por evacuación funcione de forma eficaz, debe seguirse el siguiente plan de
mantenimiento regular:
Filtro...
! DEBE limpiar el filtro de pelusas después de CADA
ciclo de secado.
PASO 1.
Abra la puerta de la
secadora.
PASO 4.
Vuelva a colocar el filtro.
- Asegúrese de que las
flechas están en el lado
exterior.
PASO 2.
Tire del filtro para sacarlo
(usando las sujeciones
para los dedos).
PASO 5.
Asegúrese de empujar el
filtro hasta el fondo.
- NUNCA ponga en
marcha la secadora si el
filtro no está en su sitio.
PASO 3.
Limpie todas acumulación
las pelusas que se hayan
acumulado en la rejilla
del filtro.
E
! No limpiar el filtro después de CADA ciclo de secado afectará a la capacidad de secado de la máquina.
- Tardará más tiempo en secar la ropa y, como consecuencia, usará más electricidad durante el secado.
! DEBE limpiar de forma regular (CADA dos o tres meses) la acumulación de pelusas alrededor del segmento
del filtro y del tubo.
- Compruebe el tubo de evacuación y la instalación de ventilación permanente para asegurarse de que
no se haya acumulado polvo alrededor del filtro y de los respiraderos de salida.
15
Page 16

Instalación
E
Dónde instalar la secadora
●
Instale la secadora lejos de estufas, calentadores o
cocinas, ya que las llamas pueden dañar el
electrodoméstico.
●
espacio mínima 10mm
espacio mínima
15mm
el mobiliario lateral o paredes. Esto asegura la
correcta circulación de aire. Asegúrese que los
respiraderos traseros no estén obstruidos.
●
Asegúrese que coloca la secadora en un lugar que
no tenga humedad y con una circulación de aire
adecuada. La secadora no funcionará eficazmente
en un espacio cerrado armario.
! No es aconsejable instalar la secadora en un armario
y bajo ningún concepto debe instalarse detrás de una
puerta con un mecanismo de seguridad con bloqueo, una
puerta corredera o una puerta con una bisagra colocada
en el lado opuesto a la de la puerta de la secadora.
Si va a instalar el
electrodoméstico debajo de
una encimera, asegúrese de
dejar un espacio de 10 mm
entre la parte superior y
cualquier otro objeto que
vaya encima o sobre la
máquina y un espacio de
15 mm entre los costados y
Ventilación
La secadora seca la colada aspirando aire frío, limpio
y relativamente seco, calentándolo y luego
distribuyéndolo a través de la ropa a medida que la
colada da vueltas suavemente. Con objeto de ofrecer
el rendimiento más óptimo, el aire húmedo se extrae a
través de un tubo de ventilación ubicado en la parte
trasera de la secadora.
Cuando la secadora está en uso, debe haber una
ventilación adecuada a fin de evitar el flujo de retorno
de gases en la zona de electrodomésticos que queman
otros combustibles, incluyendo fuegos abiertos.
¡Compruebe que el extremo del tubo no esté
orientado hacia el respiradero de la entrada de aire
en la parte de atrás de la secadora.
¡El tubo de ventilación no debe superar 2,4 metros de
largo y debe permanecer libre de cualquier posible
acumulación de pelusas, hilos y agua, sacudiéndolo
con frecuencia. Asegúrese siempre que el tubo no
está aplastado.
Ventilación permanente
Junto con el tubo de ventilación, recomendamos
utilizar un juego de ventilación de pared/ventana,
disponible en cualquier comercio o del distribuidor de
piezas de repuesto más cercano.
Montaje en la pared
1. Deje una abertura en la
pared, al lado izquierda
de la ubicación
propuesta para la
secadora.
2. Mantenga el tubo lo
más corto y recto
posible a fin de evitar
que la humedad
condensada se
introduzca en la
secadora.
3. De manera similar, el conducto en la pared debe
estar orientado hacia el exterior.
Montaje en una ventana
1. En el caso de una
secadora instalada en
columna, el orificio de
la ventana debería
hacerse debajo del
respiradero.
2. El tubo debe
mantenerse lo más
corto posible.
Ventilación móvil
Siempre debe ajustarse un tubo de ventilación cuando la
secadora se utiliza en combinación con la ventilación
móvil. El tubo debe instalarse de forma segura en la
parte trasera de la secadora (véase Descripción de la
secadora). A ser posible, siempre es mejor conectar
el tubo a una salida permanente cerca de la secadora. Si
no es posible realizar una instalación permanente, la
secadora funcionará igual de bien con el tubo fuera
de una ventana parcialmente abierta.
16
Dependiendo de la frecuencia con la que use la
secadora, es esencial que las áreas A y B se
comprueben periódicamente para retirar las pelusas o
la suciedad. El adaptador del tubo de ventilación
debe ajustarse de forma segura a fin de evitar que el
aire húmedo se distribuya por la habitación.
¡La secadora no se debería empujar muy al fondo para
evitar que le tubo de evacuación salga de su
ubicación.
¡El tubo debe permanecer lejos del respiradero de la
entrada de aire y deben evitarse las dobleces o
codos en “U” ya que éstos obstruirán el tubo o
atraparán condensación.
Page 17

Instalación
Ventilación mediante una ventana abierta
El extremo del tubo debe
orientarse hacia abajo, a
fin de evitar que el aire
húmedo y caliente se
condense en la
habitación o en la
secadora.
¡Compruebe que la secadora tenga la ventilación
adecuada y que el extremo del tubo de ventilación no
esté orientado hacia el conducto de entrada de aire.
¡El tubo de ventilación siempre debe estar ajustado a
fin de ofrecer el rendimiento más óptimo.
¡Asegúrese que el tubo de ventilación y los respiraderos
de entrada de aire no estén obstruidos o bloqueados.
¡La secadora no debe reciclar el aire de salida.
¡El mal uso de cualquier secadora tiene el riesgo de
que se produzcan incendios.
¡No expulsar el aire de salida a un conducto de
humos que se utilice para gases de salida de otros
electrodomésticos que quemen gas u otros
combustibles.
¡No expulsar el aire de salida a un sistema de
extracción ni a un conducto de aire con ventilador
extractor: afectaría al funcionamiento de los controles
térmicos y podría producir un incendio.
¡No utilice cables alargadores.
¡El cable de alimentación no debe estar ni doblado ni
torcido.
¡Debe comprobarse periódicamente el cable de la
fuente de alimientación y cambiarse con un cable
especialmente preparado para esta secadora e
instalarse únicamente por técnicos autorizados (véase
Servicio). Los cables de alimentación nuevos o más
largos pueden adquirirse adicionalmente de
distribuidores autorizados.
¡El fabricante declina toda responsabilidad en caso
de no seguirse alguna de estas normas.
¡En caso de cualquier duda consulte con un
electricista cualificado.
Nivelación de la secadora
Para un funcionamiento correcto, la secadora debe
instalarse nivelada.
Cuando haya instalado la
secadora en su ubicación
definitiva, en primer lugar,
compruebe que esté
nivelada de lado a lado y
de adelante a atrás.
E
Conexiones eléctricas
Compruebe lo siguiente antes de introducir el enchufe
en la toma eléctrica:
●
El enchufe debe llevar conexión a tierra.
●
El enchufe debe tener la capacidad suficiente para
soportar la máxima potencia de los electrodomésticos,
lo que se indica en la matrícula (véase Descripción
de la secadora).
●
El voltaje de potencia debe encontarse dentro de
los valores indicados en la matrícula (véase
Descripción de la secadora).
●
La toma debe ser compatible con el enchufe de la
secadora. Si este no es el caso, cambie el
enchufe o la toma.
¡La secadora no debe instalarse en el exterior, incluso
si el espacio destinado a estos efectos está
resguardado. Puede ser muy peligroso si está
expuesta a la lluvia o tormentas.
¡Una vez instalada, el cable eléctrico y el enchufe de
la secadora deben estar al alcance de la mano.
Si la secadora no está
nivelada, utilice una cuña
de madera para
soportarla mientras ajusta
las patas hacia arriba o
abajo, hasta que la
secadora quede nivelada.
Antes de empezar a utilizar la secadora
Una vez haya instalado la secadora y antes de
utilizarla, limpie el interior del tambor para retirar el
polvo que haya podido acumularse durante el
transporte.
17
Page 18

Descripción de la secadora
E
La sección delantera La sección trasera
Panel de control
Modelo y
número de
serie
Tambor
Filtro
Matrícula
Precaución:
Caliente
Respiradero de
entrada de aire
Tubo de ventilación
ajustado aquí
Panel de control
Indicador
TEMPORIZADOR
PROGRAMADOR
Luz de
ENCENDIDO
Tabla de programas
de secado
El botón de INICIO comienza a secar un programa
seleccionado (véase Comienzo y Programas).
El TERMOSTATO selecciona la temperatura de
secado (véase Comienzo y Programas).
FUERA: POCO calor
DENTRO: MUCHO calor
El sonido de la ALARMA indica el fin del ciclo de
secado.
DENTRO: Sonido encendido
FUERA: Sonido apagado
El indicador de ENCENDIDO indica que se está
utilizando la secadora. Esta luz se iluminará cuando
se presione el botón de INICIO. Permanecerá
encendida hasta que se abra la puerta o se
desconecte la potencia. Esta luz permanecerá
encendida durante el programa de inicio retardado.
18
Botón de
ALARMA
TERMOSTATO
La Tabla de programas de secado le permite
consultar una tabla fácil de usar de tipos de tejido y
capacidades de carga.
El TEMPORIZADOR establece una demora en el
tiempo de inicio de la secadora. Girar hacia la
derecha hasta que llegue al número de horas que
desea demorar el tiempo de inicio. Si se ha pasado
del tiempo, gire el pomo hacia la izquierda (véase
Comienzo y Programas).
El PROGRAMADOR establece el programa: girarlo
hacia la derecha, nunca hacia la izquierda, hasta
que el indicador señale el programa que desea
seleccionar (véase Comienzo y Programas).
Botón de
INICIO
Page 19

Comienzo y Programas
Seleccionar un programa
1. Enchufar la secadora a la toma eléctrica.
2. Clasifique la colada según la clase de tejido
(véase La colada).
3. Abra la puerta y asegúrese que el filtro está
limpio y en posición (véase Mantenimiento).
4. Cargue la máquina y asegúrese que no haya
ninguna prenda atrapada en el cierre de la
puerta. Cierre la puerta.
5. Seleccione el programa de secado que desee,
comprobando la tabla de programas (véase
Programas) además de las indicaciones para
cada tipo de tejido (véase La colada).
- Ajuste la temperatura con el TERMOSTATO.
- Seleccione un programa o un tiempo de
secado, girando el PROGRAMADOR hacia la
derecha.
6. Ajuste un tiempo de demora utilizando el
TEMPORIZADOR, si fuera necesario.
7. Si desea suprimir el sonido que emite el, pulse el
botón de ALARMA.
8. Pulse el botón de INICIO para empezar.
El indicador de SECADO se iluminará y
permanecerá encendido, incluso durante el
tiempo de demora. El indicador permanecerá
encendido hasta que abra la puerta de la
secadora.
Durante el programa de secado, usted puede
comprobar la colada y sacar las prendas que ya
se han secado mientras el resto continúa
secándose. Cuando vuelva a cerrar la puerta,
pulse el botón de INICIO a fin de Empezar a
secar de nuevo.
9. Aproximadamente 10 minutos antes de que
finalice el programa, la secadora realiza una
secuencia de SECADO EN FRÍO (los tejidos se
enfrían), que siempre debe dejarse que termine.
10. El sonido de la alarma le alertará cuando se ha
terminado el tiempo de secado. Abra la puerta,
saque la ropa, limpie el filtro y vuelva a colocarlo
(véase Mantenimiento).
E
11. Desenchufe la secadora.
19
Page 20

Comienzo y Programas
Programas
E
Programa
Secado
automático
(cargas
normales)
Secado
automático
(cargas
grandes)
Planchado
fácil
Secado
temporizado
hasta 120
minutos
Secado en
frío
Qué hace... Qué programa... Nota:
Seca la ropa totalmente: las
prendas están listas para usar.
Para cargas normales (de 1 a 3
kg) de algodón , polialgodón
o sintéticas .
Seca la ropa totalmente: las
prendas están listas para usar.
Para cargas más grandes (de 3
a 6 kg) de algodón .
Programa corto
(aproximadamente 10 minutos)
que suaviza las fibras de la
ropa, dejándola lista para
planchar.
Seca la ropa mojada que se
planchará, fibras acrílicas , o
cargas pequeñas (menos de
1kg).
Si lo prefiere, puede usar un
programa con temporizador para
otras telas can MUCHO o POCO
calor, según corresponda (
La Colada).
Utilícela para enfriar las fibras de
las prendas (unos 10 minutos).
véase
1. Seleccione MUCHO CALOR
presionando el TERMOSTATO.
2. Coloque el botón PROGRAMAS
en .
3. Pulse el botón de INICIO , se
iluminará la luz de ENCENDIDO
se iluminará .
1. Seleccione MUCHO CALOR
pulsando el TERMOSTATO.
2. Coloque el PROGRAMADOR en
posición de encendido .
3. Pulse el botón de INICIO , se
iluminará la luz de ENCENDIDO
se iluminará .
1. Seleccione MUCHO CALOR
pulsando el TERMOSTATO.
2. Coloque el PROGRAMADOR en
posición de encendido .
3. Pulse el botón de INICIO , se
iluminará la luz de ENCENDIDO
se iluminará .
1. Seleccione el ajuste de calor
deseado MUCHO CALOR o
POCO CALOR pulsando el
TERMOSTATO.
2. Coloque el PROGRAMADOR en el
tiempo deseado.
3. Pulse el botón de INICIO , se
iluminará la luz de ENCENDIDO
se iluminará .
1. Coloque el PROGRAMADOR en
posición de encendido .
2. Pulse el botón de INICIO , se
iluminará la luz de ENCENDIDO
se iluminará .
¡Si selecciona POCO CALOR,
este programa no secará la
ropa. Para fibras acrílicas o
cargas pequeñas seleccione
Secado temporizado.
Este programa también
puede utilizarse para cargas
grandes si precisa un
resultado algo más seco.
¡Si selecciona POCO CALOR,
este programa no secará la
ropa. Para fibras acrílicas o
cargas pequeñas seleccione
Secado temporizado. Este
programa también puede
utilizarse para cargas
normales si desea un
resultado algo más húmedo.
¡Éste no es un programa de
secado (véase abajo).
Consulte tiempos de secado
recomendados (
Colada).
¡Éste no es un programa de
secado (véase abajo).
véase La
Fase de secado en frío
Es la fase final del programa. Aproximadamente unos 10 minutos antes terminar, el regulador se mueve automáticamente
a la fase Secado en frío. Los elementos calentadores se desactivan automáticamente y las prendas se enfrían.
Después se emite una alarma audible (si se ha seleccionado), tras lo cual ya se pueden sacar las prendas.
¡ Deje que la secadora acabe esta fase entera !
Programa de planchado fácil
“Planchado fácil” es un programa corto de 10 minutos (8 minutos de calor seguido de 2 minutos de secado en frío)
que ahueca las fibras de la ropa que se ha dejado en la misma posición/lugar durante un largo periodo de tiempo.
El ciclo relaja las fibras y facilita el planchado y el doblado de la ropa.
¡ “Planchado fácil” no es un programa de secado y no debe utilizarse para prendas mojadas !
Para obtener los mejores resultados:
1. No cargue más que la capacidad máxima.
Estos números se refieren al peso de la ropa en seco:
Tejido Carga máxima
Algodón y mezclas de algodón 2,5 kg
Sintéticos 2 kg
Dril de algodón 2 kg
2. Vacíe la secadora inmediatamente después de que haya finalizado el programa, cuelgue, doble o planche las
prendas y guárdelas en el armario. Si esto no es posible repita el programa.
El efecto de “planchado fácil” varía de un tejido a otro. Funciona bien con tejidos tradicionales como algodón o
mezclas de algodón, y menos bien con tejidos acrílicos y materiales como Tencel®.
20
Page 21

La colada
Clasificar la colada
• Compruebe los símbolos en las etiquetas de la
ropa a fin de asegurar que los artículos pueden
secarse con calor.
• Clasificar la colada por tipo de tejido.
• Vaciar los bolsillos y comprobar los botones.
• Cerrar las cremalleras y los corchetes y atar los
cinturones y cordones sueltos.
• Escurra las prendas a fin de eliminar la mayor
cantidad agua como sea posible.
¡ No meter ropas muy mojadas en la secadora.
Tamaño máximo de la carga
No cargue más que la capacidad máxima. Estos
números se refieren al peso de la ropa en seco:
Fibras naturales: 6 kg máx.
Fibras sintéticas: 3 kg máx.
¡ NO cargar demasiado la secadora ya que esto
podría dar como resultado un rendimiento de secado
reducido.
Carga típica
Nota: 1kg = 1000g
Ropa
Blusa de algodón 150 g
Otro 100 g
Vestido de algodón 500 g
Otro 350 g
Vaqueros 700 g
10 pañales 1000 g
Camisa de algodón 300 g
Otro 200 g
Camiseta 125 g
Etiquetas de recomendaciones durante el lavado de
la ropa
Lea siempre las etiquetas de la prenda, especialmente
cuando se sequen con calor por primera vez. Los
símbolos que aparecen a continuación son los más
comunes:
Puede secarse con calor
No secar con calor
Secar con calor a una temperatura alta
Secar con calor a una temperatura baja
Artículos que no son aptos para secarse con calor
• Artículos que contienen goma o materiales
similares a la goma o películas plásticas
(almohadas, cojines, o prendas impermeables de
PVC), cualquier otro artículo inflamable u objetos
que contengan sustancias inflamables (toallas
manchadas de laca para el cabello).
• Fibras de vidrio (ciertos tipos de cortinas)
• Artículos que se han limpiado en seco
• Artículos con el código ITCL (véase Prendas
especiales). Éstas pueden limpiarse en casa con
productos especiales de limpieza en seco para
usar en casa. Siga las instrucciones
cuidadosamente.
• Artículos grandes y voluminosos (edredones,
sacos de dormir, almohadas, cojines, sobrecamas
grandes, etc). Éstos se agrandan cuando se están
secando y evitarán el flujo de aire por la secadora.
E
Artículos domésticos
Funda de duvet de algodón 1500 g
(Doble) Otro 1000 g
Mantel grande 700 g
Mantel pequeño 250 g
Paño de cocina 100 g
Toalla de baño 700 g
Toalla de mano 350 g
Sábana doble 500 g
Sábana individual 350 g
Al final de un ciclo de secado, es posible que las
prendas de algodón estén todavía húmedas si agrupó
algodones y sintéticos juntos. Si sucediese esto, dele
un tiempo corto de secado.
●
Nota: Los últimos 10 minutos del tiempo que se
haya fijado son para el secado en frío. Tenga esto
en cuenta, ya que esta fase no secará las prendas.
21
Page 22

La colada
E
Prendas especiales
Mantas y sobrecamas: Los artículos acrílicos (Acilan,
Courtelle, Orion, Dralón) deben secarse teniendo
especial cuidado y en ajuste POCO calor. Evite
secarlos durante mucho tiempo.
Prendas plisadas o arrugadas: lea las instrucciones
de secado del fabricante incluidas con la prenda.
Artículos almidonados: no seque estos artículos con
otras prendas no almidonadas. Asegúrese que se
retira la mayor cantidad posible de la solución de
almidón de la carga antes de introducir las prendas
en la secadora. No secar demasiado:
El almidón puede tener una apariencia polvorienta y
dejar la ropa sin vida, lo que hace inútil utilizar almidón.
Los tiempos son aproximados y pueden variar
dependiendo de:
• La cantidad de agua retenida en la ropa después
del ciclo de centrifugado: las toallas y las
prendas delicadas retienen mucha agua.
• Tejidos: las prendas del mismo tejido pero con
diferente textura y espesor es posible que no
tengan los mismos tiempos de secado.
• Cantidad de colada: las prendas sencillas o las
cargas pequeñas pueden tardar más tiempo en
secarse.
• Sequedad: Si va a planchar algunas de las
prendas, puede sacarlas mientras están un poco
húmedas. Otras pueden dejarse más tiempo si
necesita que se sequen completamente.
Tiempos de secado
• Ajuste de calor.
La tabla que aparece a continuación ofrece tiempos
de secado APROXIMADOS en minutos. Los pesos se
refieren a prendas secas:
Algodones
Mucho (máximo) calor
Tiempos de secado a 800-1000 rpm en la lavadora
Media carga Carga entera
1 kg 2 kg 3 kg 4 kg 5 kg 6 kg
20-30 35-45 45-60 60-70 70-80 80-100
Sintéticos
Mucho (máximo) calor
Tiempos de secado con centrifugado reducido en la lavadora
Media carga Carga entera
1 kg 2 kg 3 kg
20-30 35-45 45-60
• Temperatura de la habitación: Si la habitación en
la que se ha instalado la secadora es fría, la
secadora tardará más tiempo en secar la ropa.
• Volumen: algunos artículos voluminosos pueden
secarse con calor teniendo cuidado. Sugerimos
que saque estos artículos varias veces, los
sacuda y los vuelva a meter en la secadora hasta
que finalice el programa.
¡ No seque la ropa en exceso.
Todos los tejidos contienen una cantidad pequeña de
humedad natural, lo que los mantiene suaves y
huecos.
Acrílicos /
Poco (suave) calor
Tiempos de secado con centrifugado reducido en la lavadora
Media carga Carga entera
1 kg 2 kg
25-40 40-60
22
Page 23

Advertencias y recomendaciones
●
¡ El electrodoméstico ha sido diseñado y fabricado
según las normas internacionales de seguridad.
Por razones de seguridad le comunicamos las
siguientes advertencias. Por favor, léalas con atención.
Seguridad general
●
Esta secadora ha sido diseñada para uso doméstico
y no profesional.
●
No tocar el electrodoméstico con los pies descalzos
o con las manos o pies mojados.
●
Desenchufar la máquina tirando del enchufe, no
del cable.
●
Los niños no deben encontrarse cerca de la
secadora mientras se está utilizando. Después de
utilizar la secadora, desenchúfela. Mantenga la
puerta cerrada a fin de asegurar que los niños no
puedan utilizarla como un juguete.
●
El electrodoméstico debe instalarse correctamente y
disponer de la ventilación adecuada. Los respiraderos
de la entrada de aire detrás de la máquina, los
respiraderos de salida y el tubo de ventilación
nunca deben estar obstruidos (véase Instalación).
●
Nunca oriente la salida del tubo de ventilación hacia
la entrada de aire en la parte de atrás de la máquina.
●
Nunca permita que la secadora recircule el aire de
salida.
●
Nunca utilice la secadora sobre alfombras en las
que la altura del pelo evitaría que el aire se introdujera
en la secadora por la base.
●
Compruebe que la secadora esté vacía antes de
cargar la colada.
●
●
●
●
●
●
●
●
●
●
●
●
La parte de atrás de la secadora puede
estar muy caliente. Nunca la toque mientras
está funcionando.
No utilice la secadora a menos que el filtro esté
correctamente instalado (véase Mantenimiento).
No utilice suavizante en la secadora; añada el
suavizante al último aclarado de la lavadora.
No cargue la secadora demasiado (véase La colada)
para las cargas máximas.
No cargue prendas que estén muy mojadas.
Seque las prendas únicamente si se han lavado con
detergente y agua, se han aclarado y centrifugado.
Existe el peligro de incendio si se secan artículos
que NO se han lavado con agua.
Compruebe detenidamente todas las instrucciones
que se ofrecen en las etiquetas de las prendas
(véase La colada).
No seque prendas que hayan sido tratadas con
productos químicos.
Nunca seque prendas que se hayan ensuciado con
sustancias inflamables (aceite de cocinar, acetona,
alcohol, petróleo, queroseno, quitamanchas, aguarrás,
ceras, decapantes de cera o sprays para el cabello),
a menos que las haya lavado en agua caliente con
una cantidad adicional de detergente.
No seque artículos ni prendas de goma o con
refuerzos de goma, almohadas con goma espuma,
espuma (espuma de látex), goma, plástico, gorros
de baño, tejidos impermeables, pañales tipo
braguita ni forros de pañales, polietileno ni papel.
No seque artículos grandes o muy voluminosos.
No seque fibras acrílicas a altas temperaturas.
Saque todos los objetos de los bolsillos, en especial
encendedores (riesgo de explosión).
●
Complete todos los programas con la fase de secado
en frío.
●
No desconecte la secadora cuando los artículos en
su interior están todavía calientes.
●
Limpie el filtro cada vez que use la secadora
(véase Mantenimiento).
●
No permita que se acumulen pelusas cerca de la
secadora.
●
Nunca suba encima de la secadora ya que podría
ocasionar daños.
●
Siga siempre las normas y los requerimientos
eléctricos (véase Instalación).
●
Compre siempre piezas de repuesto y accesorios
originales (véase Servicio).
! ADVERTENCIA: Nunca pare la secadora antes de
terminar el ciclo de secado a menos que saque
inmediatamente todos los artículos y los extienda para
que se disipe el calor.
Información sobre reciclado y disposición
Como parte de nuestro compromiso continuo por ser
responsables con el medio ambiente, nos reservamos
el derecho de utilizar componentes reciclados de
calidad para mantener los costes de nuestros clientes
bajos y reducir el desperdicio de materiales.
●
Desechar el material de embalaje: siga las normativas
locales, de forma que el embalaje pueda reciclarse.
●
Para reducir al mínimo el riesgo de lesiones
personales a los niños, quite la puerta y el enchufe y
a continuación corte el cable de alimentación al ras
con el electrodoméstico. Deshágase de estas piezas
por separado a fin de asegurar que el electrodoméstico
no pueda volverse a enchufar al suministro.
Eliminación del electrodoméstico viejo
En base a la Norma europea 2002/96/CE de Residuos
de aparatos Eléctricos y Electrónicos (RAEE), los
electrodomésticos viejos no pueden ser arrojados en
los contenedores municipales habituales; tienen que
ser recogidos selectivamente para optimizar la
recuperación y reciclado de los componentes y
materiales que los constituyen, y reducir el impacto
en la salud humana y el medioambiente.
El símbolo del cubo de basura tachado se
marca sobre todos los productos para recordar al
consumidor la obligación de separarlos para la
recogida selectiva.
El consumidor debe contactar con la autoridad local o
con el vendedor para informarse en relación a la
correcta eleminación de su electrodoméstico viejo.
Ahorro energético y respeto del medio ambiente
●
Escurrir las prendas para eliminar el exceso de agua
antes de secar con calor (si utiliza una lavadora
primero, seleccione un ciclo de centrifugado alto). Hacer
esto ahorrará tiempo y energía durante el secado.
●
Seque siempre cargas completas – de esta forma
ahorrará energía: una sola prenda o las cargas
pequeñas tardan más tiempo en secarse.
●
Limpie el filtro cada vez que utilice la secadora a fin
de reducir el gasto energético (véase Mantenimiento).
E
23
Page 24

Mantenimiento y cuidados
E
Desconectar la electricidad
Desenchufe la secadora mientras no la esté
utilizando, cuando la limpie y durante los trabajos de
mantenimiento.
Limpiar el filtro después de cada ciclo
El filtro es una pieza importante de la secadora:
acumula las pelusas y los hilos que se forman
mientras se seca la ropa. Las prendas pequeñas
también pueden quedar atrapadas en el filtro.
Cuando termine de secar, por lo tanto, limpie el filtro
aclarándolo debajo del grifo o con la aspiradora. Si el
filtro se obstruye, el flujo de aire en el interior de la
secadora se verá seriamente afectado: los tiempos de
secado se alargarán y consumirá más energía.
Asimismo, podría ocasionar daños a la secadora.
El filtro se encuentra
delante del remate de la
secadora (véase el
diagrama).
Limpieza del tambor
¡ No utilice productos de limpieza abrasivos, lana de
acero o acero inoxidable para limpiar el tambor.
Es posible que comience a formarse una capa de
color en el tambor de acero inoxidable, esto puede
deberse a la combinación de agua y, o, productos de
limpieza como suavizante de ropa. Esta capa de color
no afecta el rendimiento de la secadora.
Limpieza
●
Las piezas externas de metal, plástico o goma
pueden limpiarse con un paño húmedo.
●
Compruebe periódicamente el tubo de ventilación
y cualquier accesorio de ventilación permanente
con objeto de asegurar que no se hayan acumulado
pelusas o hilos, y retirarlos.
●
Retire los hilos que se recojan alrededor del filtro y
de los respiraderos de salida.
Quitar el filtro:
1. Tire del asa de
plástico del filtro hacia
arriba (véase el
diagrama).
2. Limpie el filtro y
vuélvalo a colocar
correctamente.
Asegúrese que el filtro se
ha colocado
completamente a ras con
el remate de la secadora.
¡ No utilice la secadora sin haber colocado el filtro.
Comprobar el tambor después de cada
ciclo
¡ No utilice disolventes ni abrasivos.
¡ La secadora utiliza cojinetes de componentes
especiales que no necesitan lubricarse.
¡ Revise la secadora periódicamente por técnicos
autorizados a fin de asegurar la seguridad eléctrica y
mecánica de la misma (véase Servicio).
Girar el tambor manualmente para retirar las prendas
pequeñas (pañuelos) que pudieran dejarse atrás.
24
Page 25

Resolución de problemas
Si un día la secadora deja de funcionar. Antes de llamar al Centro de Servicio Técnico (véase Servicio), realice
las siguientes comprobaciones:
Problema:
La secadora no se pone en
marcha.
Posibles causas / Solución:
●
El enchufe no está enchufado en la toma, o no hace contacto.
●
Ha habido un fallo de potencia.
●
El fusible se ha fundido. Pruebe a enchufar otro electrodoméstico en la
toma.
●
¿Está utilizando un cable alargador? Pruebe enchufar el cable de
alimentación directamente en la toma.
●
¿Está la puerta bien cerrada?
●
El PROGRAMADOR no se ha ajustado correctamente (véase Comienzo y
Programas).
●
No se ha pulsado el botón de INICIO (véase Comienzo y Programas).
●
No comienza el ciclo de
Ha ajustado un tiempo con demora (véase Comienzo y Programas).
secado.
●
Tarda mucho tiempo en secar.
No se ha limpiado el filtro (véase Mantenimiento).
●
El ajuste de temperatura no es ideal para el tipo de tejido que está
secando (véase Comienzo y Programas).
●
Los programas automáticos precisan un ajuste de temperatura de
MUCHO calor (véase Comienzo y Programas).
●
No se ha seleccionado el programa correcto para la carga (véase
Comienzo y Programas).
●
El tubo de ventilación flexible está obstruido (véase Instalación).
●
El respiradero de entrada de aire está obstruido (véase Instalación).
●
La portezuela de ventilación permanente en la cubierta está obstruida
(véase Instalación).
●
Las prendas no estaban mojadas (véase La colada).
●
La secadora está demasiado cargada (véase La colada).
E
25
Page 26

Servicio
E
Antes de llamar al centro de servicio
técnico:
Piezas de repuesto
Esta secadora es una máquina compleja. Si intenta
●
Utilice la guía de resolución de problemas para ver
si puede resolver el problema usted mismo (véase
Resolución de problemas).
●
Si no es así, desconecte la secadora y llame al
Centro de servicio técnico más cercano.
repararla usted mismo o una persona no autorizada
puede ocasionar daños a la secadora, además de
invalidar la garantía de piezas de repuesto. Llame a
un técnico autorizado si experimenta algún problema
cuando utilice la máquina. Las piezas de repuesto
han sido exclusivamente diseñadas para este
electrodoméstico y no para ningún otro uso.
Qué información debe facilitar al centro de servicio
técnico:
●
nombre, dirección y código postal.
●
número de teléfono.
●
el problema.
●
la fecha de compra.
●
el modelo del electrodoméstico (Mod.).
●
el número de serie (N/S).
Esta información puede encontrarse en la placa
identificativa en el interior de la puerta de la máquina.
26
Este electrodoméstico cumple las siguientes directivas de la CEE:
- 2006/95/CEE (Equipos de bajo voltaje)
- 89/336/CEE, 92/31/CEE y 93/68/CEE (Compatibilidad electromagnética)
Page 27

Folheto de instruções
MÁQUINA DE SECAR ROUPA
GB
English, 1
AS600V
E
Español, 14
P
Português, 27
Índice
Informações Importantes, 28
Instalação, 29-30
Onde colocar a sua máquina de secar roupa
Ventilação
Ligação eléctricas
Antes de iniciar a utilização da sua máquina
de secar roupa
Descrição da máquina, 31
Painel frontal
Painel traseiro
Painel de controlo
Arranque e programas, 32-33
Escolher um programa
Tabela de programas
Roupa, 34-35
Escolher a sua roupa
Etiquetas de cuidado na lavagem
Peças delicadas
Tempos de secagem
P
Avisos e Sugestões, 36
Segurança geral
Eliminação
Poupança de energia e respeito pelo ambiente
Manutenção e cuidado, 37
Desligar a electricidade
Limpar o filtro depois de cada ciclo
Verificar o tambor depois de cada ciclo
Limpar a máquina
Resolução de problemas, 38
Reparações, 39
Peças sobressalentes
! Tenha este folheto de instruções à mão para consultá-lo sempre que necessário. Leve-o consigo se mudar de
casa e, caso venda este aparelho, passe o folheto ao novo proprietário, de modo a certificar-se de que este folheto
permanece com o equipamento e de que o novo proprietário pode estar informado acerca dos avisos e sugestões
sobre o respectivo funcionamento.
! Leia cuidadosamente as instruções; as páginas que se seguem contêm informações importantes acerca da
instalação, bem como sugestões sobre o funcionamento da máquina.
27
Page 28

Informações Importantes
P
Para que a sua secadora com ventilação funcione de forma eficaz, deve seguir o plano de manutenção regular
que se segue:
Filtro...
! DEVE limpar o filtro no final de CADA ciclo de
secagem.
PASSO 1.
Abra a porta da
secadora.
PASSO 4.
Instale novamente o filtro.
- Certifique-se de que as
setas estão voltadas
para si.
PASSO 2.
Puxe o filtro para fora
(utilizando as reentrâncias
para os dedos).
PASSO 5.
Certifique-se de que o
filtro está completamente
encaixado na respectiva
posição. - NUNCA utilize a
secadora sem o filtro
correctamente instalado.
PASSO 3.
Limpe os depósitos de
cotão da quadrícula do
filtro.
! Não limpar no final de CADA ciclo de secagem afecta o desempenho da sua máquina.
- Demorará mais tempo a secar e, como resultado, gastará mais energia durante a secagem.
! DEVE limpar a acumulação de cotão em torno do compartimento do filtro e o tubo de ventilação periodicamente, a
CADA dois meses:
- Verifique o tubo de ventilação e quaisquer acessórios de ventilação permanentes para garantir que não
existe acumulação de cotão e limpe-os se necessário.
- Retire os vestígios de cotão acumulados em torno do filtro e das ventilações de saída.
28
Page 29

Instalação
Onde colocar a sua máquina
●
Instale a sua máquina a alguma distância de ligações
de gás, fogões, aquecedores e placas de cozinha,
uma vez que as chamas podem danificar o aparelho.
●
mínima espaço 10 mm
mínima espaço
15 mm
laterais da máquina e mobiliário ou paredes.
Assegura assim a correcta circulação do ar.
Certifique-se de que as ventilações posteriores não
ficam obstruídas.
●
Certifique-se de que coloca a sua máquina num
ambiente que não seja húmido e de que existe uma
ventilação adequada. A secadora não funciona em
perfeitas condições se encerrada no espaço fechado
ou armário.
! Não recomendamos a instalação da secadora num
armário, mas o aparelho nunca deve ser instalado por
trás de uma porta que se possa trancar, uma porta
deslizante ou com uma dobradiça instalada no lado
oposto à porta da máquina.
Se pretende instalar o
aparelho por baixo de uma
bancada ou de um balcão,
não se esqueça de deixar
um espaço de 10 mm entre
a bancada e quaisquer
objectos ou acima do tampo
da máquina e um espaço de
15 mm entre as partes
! Certifique-se de que a extremidade do tubo não
está directamente voltada para a ventilação de
entrada no painel posterior da secadora.
! O tubo de ventilação não deve exceder os 2,4 metros
de comprimento, que deve manter-se isento de cotão,
restos de linho e água, o que pode fazer agitando o
tubo frequentemente. Certifique-se de que o tubo não
é esmagado/obstruído.
Ventilação permanente
Em conjunto com o tubo de ventilação, recomendamos a
utilização de um Kit de Ventilação de Parede/Janela,
à venda nas lojas da especialidade ou no
Representante de Peças Sobressalentes mais próximo.
Montagem de parede
1. Deixe uma abertura na
parede, à esquerda
da posição proposta
para a instalação da
secadora.
2. Mantenha o tubo o mais
curto e o mais direito
possível para evitar a
acumulação de
humidade condensada
na secadora.
3. De forma semelhante, a conduta de parede deve
estar inclinada para baixo, na direcção da saída.
P
Ventilação
A Secadora seca a sua roupa sugando ar fresco,
limpo e relativamente seco para o interior,
aquecendo-o e, em seguida, distribuindo-o pelas
peças de roupa enquanto giram suavemente. Para
um melhor desempenho, o ar húmido é depois
expelido através de um tubo de ventilação no painel
traseiro da máquina. Quando a secadora estiver em
utilização, tem de existir uma ventilação adequada,
de modo a evitar o fluxo traseiro de gases no espaço
devido a gases de combustão de outros aparelhos,
incluindo chamas.
Ventilação móvel
Um tubo de ventilação deve ser sempre instalado
quando a secadora estiver a ser utilizada em conjunto
com a Ventilação Móvel. O tubo deve ser instalado no
painel traseiro da máquina (ver Descrição da máquina
de secar roupa). Se possível, é sempre melhor ligar o
tubo a uma saída permanente perto da secadora. Se
não for possível uma instalação permanente, a
secadora irá funcionar igualmente bem com o tubo a
passar por uma janela entreaberta.
Montagem de janela
1. Com uma secadora
empilhada, o orifício
na janela deve ser
feito, idealmente, por
baixo da ventilação.
2. O tubo deve ser o mais
curto possível.
Dependendo da frequência com que utiliza a sua
secadora, é essencial que as áreas A e B sejam
verificadas periodicamente para retirar restos de
fibras e resíduos. O adaptador do tubo de ventilação
deve ser encaixado firmemente, evitando assim que
qualquer ar húmido seja emitido no espaço onde está
instalada a máquina.
! A secadora não deve ser empurrada para trás de
forma a que o adaptador do tubo saia da sua posição
ou de forma a que o tubo seja esmagado ou
dobrado.
! O tubo deve ficar desimpedido da entrada de ar e
devem evitar-se instalações dobradas ou em ‘U’, uma
vez que estas configurações provocam obstruções no
tubo e a condensação.
29
Page 30

Instalação
P
Ventilação de janela aberta
A extremidade do tubo
deve ficar voltada para
baixo, para evitar a
condensação de ar
húmido quente no espaço
de instalação ou na
própria máquina.
! Certifique-se de que a secadora está adequadamente
ventilada e de que a extremidade do tubo de ventilação
não está voltado na direcção da conduta de entrada.
! O tubo de ventilação deve ser sempre instalado de
modo a garantir um óptimo desempenho.
! Certifique-se de que o tubo de ventilação e as
entradas de ar não estão obstruídas ou bloqueadas.
! A secadora não deve reciclar ar de escape.
! A utilização indevida da secadora pode dar origem
aa incêndios.
! Não descarregue o ar de escape num tubo de
chaminé, que seja utilizado para o escape de fumos
de outros equipamentos que queimem gás ou outros
combustíveis.
! Não descarregar o ar de escape num sistema de
extracção ou em qualquer conduta de ar com uma
ventoinha de extracção. Este procedimento afecta a
forma como os controlos térmicos funcionam e pode
resultar em risco de incêndio.
! Não utilize cabos de extensão.
! O cabo de alimentação não deve ser dobrado ou
pisado.
! O fio de alimentação eléctrica deve ser verificado
periodicamente e substituído por um fio preparado
especialmente para esta secadora, apenas por técnicos
autorizados (ver Reparações). Fios de alimentação
novos ou mais longos são fornecidos sem custos
adicionais por representantes autorizados.
! O fabricante recusa qualquer responsabilidade caso
estas regras não seja seguidas.
! Se tiver dúvidas sobre o mencionado acima consulte
um electricista qualificado.
Nivelar a sua secadora
A secadora deve ser instalada de forma nivelada
para que funcione correctamente.
Quando instalar a sua
secadora na localização
final, verifique se está
nivelada em cada um dos
lados e, depois, à frente e
atrás.
Ligações eléctricas
Certifique-se do seguinte antes de introduzir a ficha
numa tomada de corrente eléctrica:
●
A tomada tem de ter ligação à terra.
●
A tomada deve ter capacidade para suster a
potência máxima de máquinas, que está indicada
na chapa de classificação (ver Descrição da
máquina de secar).
●
A tensão deve encontrar-se dentro dos valores
indicados na chapa de classificação (ver
Descrição da máquina de secar).
●
A tomada deve ser compatível com a ficha da
máquina. Se não for este o caso, substitua a ficha
ou a tomada.
! A secadora não deve ser instalada ao ar livre, mesmo
que seja num espaço abrigado. Pode ser extremamente
perigosa a exposição à chuva ou tempestades.
! Depois de instalada, a cablagem eléctrica e ficha da
máquina deve estar facilmente alcançável.
Se a secadora não estiver
nivelada, utilize um bloco
de madeira para
suportá-la enquanto
ajusta os dois pés da
frente para cima ou para
baixo até a secadora
estar nivelada.
Antes de iniciar a utilização da sua
máquina de secar roupa
Depois de instalar a sua máquina e antes de iniciar a
sua utilização, limpe o interior do tambor para
remover qualquer pó que se tenha acumulado
durante o transporte.
30
Page 31

Descrição da máquina de secar
Painel frontal Painel traseiro
Painel de controlo
Números de
modelo e de
série
Tambor
Filtro
Chapa de
classificação
Cuidado
Está Quente
Painel de controlo
botão rotativo
TEMPORIZADOR
Indicador
P
Entrada de ar
Tubo de ventilação
encaixado aqui
botão rotativo
PROGRAMAS
luz indicadora
ACTIVA
Guia de Secagem
ALARME
O botão INICIAR inicia a secagem num programa
seleccionado (ver Arranque e Programas).
O botão TEMPERATURA selecciona a temperatura
de secagem (ver Arranque e Programas).
PARA FORA: Temperatura BAIXA
PARA DENTRO: Temperatura ELEVADA
O indicador ALARME indica o fim de um ciclo de
lavagem.
PARA DENTRO: Alarme LIGADO
PARA FORA: Alarme DESLIGADO
A luz indicadora ACTIVA indica que a secadora
está em utilização. Esta luza acende-se quando o
botão INICIAR é pressionado. Permanece acesa até
que a porta seja aberta ou que a máquina seja
desligada. Esta luz acende-se durante um programa
de arranque atrasado.
botão
botão
TEMPERATURA
O Guia de Secagem permite a consulta de uma
tabela de utilização fácil, com a descrição dos tipos
de tecidos e as capacidades de carga.
O botão rotativo TEMPORIZADOR define um
atraso no tempo de arranque da máquina. Rode-o da
esquerda para a direita até atingir o número de horas
que pretende atrasar a hora de arranque da máquina.
Se rodar o botão em demasia, rode o botão da direita
para a esquerda (ver Arranque e Programas).
O botão rotativo PROGRAMAS define o programa:
rode-o da esquerda para a direita e nunca da direita
para a esquerda, até que o indicador esteja a
apontar para o programa que pretende seleccionar
(ver Arranque e Programas).
botão
INICIAR
31
Page 32

Arranque e Programas
P
Escolher um programa
1. Ligue a secadora a uma tomada de corrente
eléctrica.
2. Escolha a sua roupa de acordo com o tipo de
tecido (ver Roupa).
3. Abra a porta e certifique-se de que o filtro está
limpo e bem colocado (ver Manutenção).
4. Carregue a máquina e certifique-se de que
nenhuma peça fica presa no fecho da porta.
Feche a porta.
5. Escolha o programa de secagem após consulta
da tabela de Programas (ver Programas), bem
como as indicações para cada tecido (ver
Roupa).
- Defina a temperatura com o botão
TEMPERATURA.
- Seleccione um programa ou um tempo de
secagem rodando o botão PROGRAMAS da
esquerda para a direita.
7. Se pretende eliminar o sinal de alarme, pressione
o botão ALARME.
8. Pressione o botão INICIAR para começar. A luz
indicadora de SECAGEM acende-se e
permanece acesa, mesmo durante o atraso. A
luz indicador permanece acesa até abrir a porta
da secadora. Durante o programa de secagem,
pode verificar a sua roupa e retirar peças que já
estejam secas enquanto as restantes continuam
a secar. Quando fechar novamente a porta,
prima o botão INICIAR de modo a retomar a
secagem.
9. Cerca de 10 minutos antes do programa estar
concluído, entra na fase de ROTAÇÃO A FRIO
(os tecidos são arrefecidos), que deve ser
sempre concluída.
10. O alarme indica a conclusão da secagem. Abra
a porta, retire a roupa, limpe o filtro e coloque-o
novamente (ver Manutenção).
11. Desligue a secadora.
6. Se necessário, defina um tempo de atraso
utilizando o botão TEMPORIZADOR.
32
Page 33

Arranque e Programas
Programas
Programa
Secagem
automática
(cargas
médias)
Secagem
automática
(cargas
grandes)
Engoma
fácil
Secagem
temporizada
até 120
minutos
Rotação a
frio
Fase de Rotação a Frio
O que faz... Como defini-lo... Nota:
Seca completamente: as
suas roupas ficam prontas a
vestir. Para cargas médias
(de 1 a 3 kg) de algodão ,
poli-algodão ou sintéticos .
Seca completamente: as suas
roupas ficam prontas a vestir.
Para cargas grandes (de 3 a
6 kg) de algodão.
Programa breve
(aproximadamente 10
minutos), que suaviza as
fibras prontas a passar a
ferro.
Seca roupas molhadas que
vão ser passadas a ferro,
fibras acrílicas ou cargas
pequenas (inferiores a 1 kg).
Se preferir que um programa
temporizado possa ser utiliado
com outros tecido nas
temperaturas ELEVADA ou
BAIXA (
Utilizar para refrescar as
fibras de peças de roupa
(cerca de 10 minutos).
ver Roupa).
1. Seleccione TEMP. ELEVADA
premindo o botão TEMPERATURA.
2. Posicione o botão PROGRAMAS
em .
3. Pressione o botão INICIAR , a
LUZ activa acende-se.
1. Seleccione TEMP. ELEVADA
premindo o botão TEMPERATURA.
2. Posicione o botão PROGRAMAS
em .
3. Pressione o botão INICIAR , a
luz ACTIVA acende-se.
1. Seleccione TEMP. ELEVADA
premindo o botão TEMPERATURA.
2. Posicione o botão PROGRAMAS
em .
3. Pressione o botão INICIAR , a
luz ACTIVA acende-se.
1. Seleccione a temperatura
pretendida, TEMP. ELEVADA
ou TEMP. BAIXA premindo o
botão TEMPERATURA.
2. Posicione o botão PROGRAMAS
no tempo pretendido.
3. Pressione o botão INICIAR , a
luz ACTIVA acende-se.
1. Posicione o botão PROGRAMAS
em .
2. Pressione o botão INICIAR , a
LUZ activa acende-se.
! Se seleccionar TEMP. BAIXA,
este programa não seca as suas
roupas. Para Fibras Acrílicas ou
pequenas cargas, seleccione
Secagem Temporizada.
Este programas também pode
ser utilizado para cargas maiores
se pretender um resultado
ligeiramente seco.
! Se seleccionar TEMP. BAIXA,
este programa não seca as suas
roupas. Para Fibras Acrílicas
ou pequenas cargas, seleccione
Secagem Temporizada. Este
programas também pode ser
utilizado para cargas maiores
se pretender um resultado
mais húmido.
! Este não é um programa de
secagem (ver em seguida).
Consulte os tempos de
secagem sugeridos (
Roupa).
! Este não é um programa de
secagem (ver em seguida).
ver
P
Esta é a fase final do programa. Cerca de 10 minutos antes de acabar, o botão avança automaticamente para a
Fase de Rotação a Frio. Os elementos de aquecimento desligam-se automaticamente e a roupa é arrefecida; em
seguida, é emitido um sinal sonoro (se seleccionado) e a roupa está pronta para ser retirada.
! Permitir sempre que a secadora conclua esta fase.
Programa Engoma fácil
O ‘Engoma fácil’ é um programa breve de 10 minutos (8 minutos de calor, seguidos de 2 minutos de um período de
rotação a frio), que ventila as fibras das roupas que foram deixadas na mesma posição/Local durante um período
de tempo prolongado. O ciclo relaxa as fibras e facilita a passagem a ferro.
! O ‘Engoma fácil’ não é um programa de secagem e não deve ser utilizado com peças de roupa molhadas.
Para obter os melhores resultados:
1. Não carregue mais do que a capacidade máxima.
Estes números referem-se ao peso em seco:
Tecido Carga máxima
Algodão e Misturas de algodão 2,5 kg
Sintéticos 2 kg
Gangas 2 kg
2. Descarregue a secadora imediatamente após o fim do programa, pendure, dobre ou engome as peças de
roupa e guarde-as no armário. Caso isto não seja possível, repita o programa.
O efeito ‘Engoma fácil’ varia de tecido para tecido. Funciona bem com tecidos tradicionais como algodão e
misturas de algodão e menos bem em fibras acrílicas e em materiais como Tencel®.
33
Page 34

Roupa
P
Escolher a sua roupa
• Consulte os símbolos nas etiquetas das roupas,
de modo a certificar-se de que os artigos podem
ser utilizados na secadora.
• Escolha a roupa por tipo de tecido.
• Esvazie os bolsos e verifique os botões.
• Feche os fechos de correr e desaperte cintos e
correias.
• Torça cada peça de modo a eliminar o máximo de
água possível.
! Não carregue peças a pingar na secadora.
Carga máxima
Não carregue mais do que a capacidade máxima.
Estes números referem-se ao peso em seco:
Fibras naturais: 6 kg máx.
Fibras sintéticas: 3 kg máx.
! NÃO sobrecarregue a máquina, uma vez que pode
resultar num desempenho de secagem reduzido.
Carga típica
Nota: 1kg = 1000g
Roupas
Blusa de algodão 150 g
Outros 100 g
Vestido de algodão 500 g
Outros 350 g
Calças de ganga 700 g
10 fraldas 1000 g
Camisa de algodão 300 g
Outros 200 g
T-Shirt 125 g
Etiquetas de cuidado na lavagem
Observe as etiquetas nas suas peças de roupa,
especialmente se está a utilizar a secadora pela
primeira vez. Os símbolos que se seguem são os
mais comuns:
Pode ser seco na máquina
Não pode ser seco na máquina
Seque com a temperatura máxima
Seque com a temperatura mínima
Peças não adequadas para secagem na máquina
• Artigos que contenham borracha ou materiais tipo
borracha ou películas de plástico (almofadas ou
material em PVC), quaisquer artigos inflamáveis ou
objectos que contenham substâncias inflamáveis
(toalhas vaporizadas com laca de cabelo).
• Fibras de vidro (alguns tipos de reposteiros)
• Artigos que tenham sido limpos a seco
• Itens com o código ITCL (ver Peças
delicadas). Podem ser limpos com produtos de
limpeza a seco domésticos. Siga as instruções
cuidadosamente.
• Peças volumosas (colchas, sacos-cama,
almofadas, cobertas grandes, etc). Estes artigos
expandem-se e podem impedir o fluxo de ar no
interior da secadora.
Peças domésticas
Capa de edredão em algodão 1500 g
(Duplo) Outros 1000 g
Toalha de mesa grande 700 g
Toalha de mesa pequena 250 g
Pano de cozinha 100 g
Toalhão de banho 700 g
Toalha de rosto 350 g
Lençol de banho 500 g
Lençol (solteiro) 350 g
No fim de um ciclo de secagem, os algodões ainda
devem estar húmidos caso tenha agrupado algodões
e sintéticos. Se isto acontecer, basta aplicar mais um
breve período de secagem.
●
Nota: Nos últimos 10 minutos de cada período de
tempo,procede-se à secagem a frio; tenha em
consideração esta função ao definir o tempo, uma
vez que este período não seca a sua roupa.
34
Page 35

Roupa
Peças delicadas
Cobertores e cobertas de cama: artigos em acrílico
(Acilan, Courtelle, Orion, Dralon) devem ser secos
com especial cuidado com um TEMPERATURA
BAIXA. Evite secar por um longo período de tempo.
Peças pregueadas ou enrugadas: leia as instruções
de secagem do fabricante da peça.
Artigos com goma: não seque estes artigos com
peças sem goma. Certifique-se de que retira o
máximo da solução de goma da carga antes de
colocá-la na secadora. Não seque em demasiado: a
goma transforma-se em pó e deixa a sua roupa mole,
eliminando o propósito da goma.
Tempos de secagem
O quadro que se segue apresenta os tempos de
secagem APROXIMADOS em minutos. Os pesos
referem-se a artigos secos:
Algodões
Temperatura Máxima
Tempos de secagem de 800-1000rpm na máquina de lavar
Metade da Carga completa
carga
1 kg 2 kg 3 kg 4 kg 5 kg 6 kg
20-30 35-45 45-60 60-70 70-80 80-100
Estes tempos são aproximados e podem variar
dependendo de:
• Quantidade de água mantida nas roupas após o
ciclo de centrifugação: as toalhas e peças
delicadas retêm muita água.
• Tecidos: artigos que sejam do mesmo tipo de
tecido, mas que sejam de texturas e espessuras
diferentes poderão não ter o mesmo tempo de
secagem.
• Quantidade de roupa: artigos únicos ou pequenas
cargas podem demorar mais tempo a secar.
• Secagem: Se pretender engomar algumas das
suas roupas, podem ser retiradas da máquina
ainda um pouco húmidas. As restantes poderão
ficar mais tempo, se precisar delas
completamente secas.
• Definição de temperatura.
• Temperatura ambiente: se o espaço em que a
máquina está instalada estiver frio, poderá
demorar mais tempo a secar as suas roupas.
• Volumes: alguns artigos mais volumosos devem ser
secos na máquina com cuidado. Sugerimos que
remova estes artigos várias vezes, sacuda-os e
volte a colocá-los na máquina até que estejam
completamente secos.
P
Sintéticos
Temperatura Máxima
Tempos de secagem em centrifugação reduzida na máquina de lavar
Metade da Carga completa
carga
1 kg 2 kg 3 kg
20-30 35-45 45-60
Acrílicos /
Temperatura Baixa (suave)
Tempos de secagem em centrifugação reduzida na máquina de lavar
Metade da Carga completa
carga
1 kg 2 kg
25-40 40-60
! Não seque em demasiado as suas roupas.
Todos os tecidos contêm um pouco de humidade
natural, que os mantêm suaves e macios.
35
Page 36

Avisos e Sugestões
P
! O equipamento foi concebido e construído de
acordo com normas de segurança internacionais.
Estes avisos são apresentados por razões de
segurança e devem ser seguidos minuciosamente.
fraldas ou pensos descartáveis, polietileno ou papel.
●
Não seque artigos grandes e muito volumosos.
●
Não seque fibras acrílicas a altas temperaturas.
●
Remova todos os objectos dos bolsos, em especial,
isqueiros (risco de explosão).
●
Segurança Geral
●
Esta secadora não se destina à utilização por pessoas
(incluindo crianças) com capacidades físicas,
sensoriais ou mentais reduzidas ou com falta de
experiência ou conhecimento, a menos que tenham
supervisão ou instruções quanto à utilização do
aparelho por parte de uma pessoa responsável
pela sua segurança.
●
Esta secadora foi concebida para utilização
doméstica e não utilização profissional.
●
Não toque no equipamento com os pés descalços,
nem com as mãos ou pés molhados.
●
Desligue a máquina retirando a ficha e não puxando
o fio.
●
As crianças não devem aproximar-se da secadora
durante a sua utilização. Depois da utilização da
secadora, desligue-a no botão e da corrente
eléctrica. Mantenha a porta fechada de modo que as
crianças não utilizem a máquina como um brinquedo.
●
As crianças não devem ser deixadas sozinhas
para se garantir que não brincam com a secadora.
●
O aparelho deve ser instalado correctamente
com a ventilação adequada. As entradas de ar
por trás da máquina, as ventilações de saída e o
tubo de ventilação nunca devem ser obstruídas
(ver Instalação).
●
Nunca dirija a saída do tubo de ventilação na direcção
da entrada de ar, na parte posterior da máquina.
●
Nunca permita que a secadora recicle o ar de escape.
●
Nunca utilize a secadora em carpetes, cuja altura
impeça o ar de entrar na secadora a partir da base.
●
Verifique se a secadora está vazia antes de carregá-la.
●
O painel traseiro da secadora pode ficar
muito quente. Nunca toque neste painel
durante a utilização.
●
Não utilize a secadora sem que o filtro esteja
correctamente instalado (ver Manutenção).
●
Não utilize amaciador líquido na sua máquina de
secar; adicione-o ao enxaguamento final da sua
máquina de lavar.
●
Não sobrecarregue a secadora (ver Roupa) para
além das cargas máximas.
●
Não carregue peças que estejam a pingar.
●
Seque apenas artigos que tenham sido lavados com
água e detergente, enxaguados e centrifugados.
Existe um risco de incêndio se secar peças que
NÃO tenham sido lavadas com água.
●
Verifique cuidadosamente todas as instruções nas
etiquetas das roupas (ver Roupa).
●
Não seque peças de vestuário que tenham sido
tratadas com produtos químicos.
●
Nunca secar artigos contaminados com substâncias
inflam
(óleo de culinária, acetona, álcool,
áveis
Gasolina, querosene, tira-nódoas, turpentina, ceras,
removedores de cera e lacas para o cabelo), a
menos que lavados com água quente e com uma
quantidade considerável de detergente extra.
●
Não secar borracha, artigos com partes em borracha
e peças de vestuário, almofadas com aplicações
em borracha, espuma (espuma de látex), borracha,
plástico, toucas de duche, têxteis impermeáveis,
Complete cada programa com a respectiva Fase
de rotação a frio.
●
Não desligue a máquina quando ainda existirem
artigos quentes no interior.
●
Limpe o filtro após cada utilização (ver Manutenção).
●
Não permita a acumulação de resíduos na secadora.
●
Nunca suba para cima da secadora. Pode resultar
em ferimentos.
●
Siga sempre as normas e requisitos eléctricos
(ver Instalação).
●
Compre sempre peças sobressalentes e acessórios
originais (ver Reparação).
! AVISO: Nunca parar a secadora antes do fim do ciclo
de secagem, a menos que todos os artigos sejam
rapidamente retirados e espalhados de modo a dissipar
o calor.
Informações Acerca de Reciclagem e
Eliminação de Resíduos
Como parte do nosso continuado empenho em ajudar
o ambiente, reservamo-nos o direito de utilizar
componentes de qualidade, de modo a manter os
custos baixos para os clientes e minimizar o
desperdício de material.
●
Eliminação do material da embalagem: siga os
regulamentos locais, de modo que a embalagem
possa ser reciclada.
●
De modo a minimizar o risco de lesões para crianças,
remova a porta e a ficha e corte o fio eléctrico do
aparelho. Elimine estas peças separadamente a
fim de assegurar que o aparelho não possa mais
ser ligado a uma tomada eléctrica.
Recolha dos electrodomésticos
A directiva Europeia 2002/96/CE referente à gestão de
resíduos de aparelhos eléctricos e electrónicos (RAEE),
prevê que os electrodomésticos não devem ser escoados
no fluxo normal dos resíduos sólidos urbanos. Os aparelhos
desactualizados devem ser recolhidos separadamente
para optimizar a taxa de recuperação e reciclagem dos
materiais que os compõem e impedir potenciais danos
para a saúde humana e para o ambiente.
O símbolo constituído por um contentor de lixo
barrado com uma cruz deve ser colocado em
todos os produtos por forma a recordar a
obrigatoriedade de recolha separada.
Os consumidores devem contactar as autoridades locais
ou os pontos de venda para solicitar informação
referente ao local apropriado onde devem depositar os
electrodomésticos velhos.
Poupar energia e respeitar o ambiente
●
Torça as peças de vestuário para eliminar o excesso
de água antes de colocá-las na máquina de secar
(se primeiro utilizar uma máquina de lavar, seleccione
um ciclo de centrifugação elevado).Ao fazer isto,
poupa tempo e energia durante a secagem.
●
Seque sempre com cargas completas – assim,
poupa energia: artigos únicos ou pequenas
cargas podem demorar mais tempo a secar.
●
Limpe o filtro após cada utilização para cortar nos
custos de consumo de energia (ver Manutenção).
36
Page 37

Manutenção e Cuidado
Desligar a electricidade
Desligue a secadora quando não estiver em
utilização, durante tarefas de limpeza e durante todas
as operações de manutenção.
Limpar o filtro depois de cada ciclo
O filtro é uma parte importante da sua secadora:
acumula restos de fibras e resíduos que se formam
durante a secagem. Pequenos objectos também
podem ficar presos no filtro. Assim, após a secagem,
limpe o filtro, lavando-o debaixo de água corrente ou
limpe com o seu aspirador. Caso o filtro fique
entupido, o fluxo de ar no interior da secadora fica
seriamente comprometido: os tempos de secagem
prolongam-se e consome mais energia. Também
pode danificar a sua secadora.
O filtro encontra-se na
grelha frontal da
secadora (ver diagrama).
Limpar o tambor
! Não utilize agentes de limpeza de aço inoxidável ou
palha de aço, abrasivos, para limpar o tambor.
É possível que uma película colorida comece a
aparecer no tambor de aço inoxidável. Tal poderá ser
causado por uma combinação de água e/ou agentes
de limpeza como, por exemplo, amaciador de tecido
da lavagem. Esta película colorida não afectará o
desempenho do secador.
Limpeza
●
As partes externas de metal ou em plástico e
borracha podem ser limpas com um pano húmido.
●
Verifique periodicamente o tubo de ventilação e
qualquer ligação de ventilação permanente, de
modo a certificar-se de que não existe acumulação
de resíduos e remova-os.
●
Remova os resíduos que se acumulam em torno do
filtro e das ventilações de saída.
P
Remoção do filtro:
1. Puxe a pega de
plástico do filtro para
cima (ver diagrama).
2. Limpe o filtro e
coloque-o novamente
correctamente.
Certifique-se de que o
filtro está completamente
encaixado na grelha da
máquina.
! Não utilize a máquina sem colocar novamente o filtro.
Verificar o tambor depois de cada ciclo
Rode o tambor manualmente, de modo a remover
pequenos objectos (lenços) que podem ter ficado na
máquina.
! Não utilize solventes nem produtos abrasivos.
! A sua secadora utiliza componentes de rolamentos
especiais que não necessitam de lubrificação.
! Verifique a sua secadora regularmente por técnicos
autorizados, de modo a certificar-se da segurança
eléctrica e mecânica (ver Reparação).
37
Page 38

Resolução de problemas
P
Um dia a sua máquina parece não querer funcionar. Antes de contactar o seu Centro de Serviços (ver
Reparação), analise as seguintes sugestões de resolução de problemas:
Problema:
A secadora não inicia.
Causas possíveis / Solução:
●
A ficha não está ligada à tomada, ou não está a fazer contacto.
●
Ocorreu uma falha de energia.
●
Há um fusível queimado. Experimente ligar outro aparelho à tomada.
●
Está a utilizar um cabo de extensão? Experimente ligar o fio de
alimentação da secadora directamente à tomada.
●
A porta está bem fechada?
●
O botão PROGRAMAS não foi posicionado correctamente (ver Arranque
e Programas).
●
O botão INICIAR não foi posicionado correctamente (ver Arranque e
Programas).
●
O ciclo de secagem não
Definiu um atraso do tempo (ver Arranque e Programas).
inicia.
●
Demora muito tempo a secar
O filtro não foi limpo (ver Manutenção).
●
A definição de temperatura não é ideal para o tipo de tecido que está a
secar (ver Arranque e Programas).
●
Os programas automáticos requerem uma definição de temperatura
EVELADA (ver Arranque e Programas).
●
Não foi seleccionado o programa correcto para a carga (ver Arranque e
Programas).
●
O tubo de ventilação flexível está obstruído (ver Instalação).
●
O tubo de entrada de ar está obstruído (ver Instalação).
●
A portinhola de ventilação permanente está obstruída (ver Instalação).
●
As peças estavam demasiado molhadas (ver Roupa).
●
A secadora foi sobrecarregada (ver Roupa).
38
Page 39

Reparação
Antes de contactar o Centro de
Serviços:
●
Utilize o guia de resolução de problemas para ver
se consegue resolver o problema (ver Resolução
de problemas).
●
Caso contrário, desligue a secadora e contacte o
Centro de Serviço mais próximo.
O que dizer ao Centro de Serviço:
●
nome, morada e código postal.
●
número de telefone.
●
o tipo de problema.
●
a data de compra.
●
o modelo do aparelho (Mod.).
●
o número de série (S/N).
Estas informações podem ser encontradas na
etiqueta de dados, no interior da porta da máquina.
Peças sobressalentes
Esta secadora é uma máquina complexa. Repará-la
sozinha ou através de um técnico não autorizado
pode provocar danos a uma ou mais pessoas, pode
danificar a máquina e pode invalidar a garantia das
peças sobressalentes. Contacte um técnico
autorizado se tiver problemas durante a utilização da
máquina. As peças sobressalentes foram concebidas
exclusivamente para este equipamento e não se
destinam a outras utilizações.
P
Este equipamento está em conformidade com as seguintes
directivas da UE:
- 2006/95/EC (Equipamento de Baixa Tensão)
- 89/336/EEC, 92/31/EEC e 93/68/EEC (Compatibilidade Electromagnética)
39
Page 40

195066574.00 W
10/2007 - SIMLEX . Four Ashes, Wolverhampton
40
 Loading...