

Page 1

4DxxTVZ
4DAxxTVZ
4DAAxxTVZ
4DAAAxxTVZ
English
Operating Instructions
REFRIGERATOR/FREEZER COMBINATION
Español
Manual de instrucciones
COMBINADO FRIGORÍFICO/CONGELADOR
Sumario
Manual de instrucciones, 1
Asistencia, 2
Descripción del aparato, 5
Descripción del aparato, 7
Instalación, 16
Puesta en funcionamiento y uso, 16
Mantenimiento y cuidados, 17
Precauciones y consejos, 18
Anomalías y soluciones, 19
TürkçeTürkçe
Türkçe
TürkçeTürkçe
Kullaným talimatlarýKullaným talimatlarý
Kullaným talimatlarý
Kullaným talimatlarýKullaným talimatlarý
KOMBÝNE SOÐUTUCU/DONDURUCUKOMBÝNE SOÐUTUCU/DONDURUCU
KOMBÝNE SOÐUTUCU/DONDURUCU
KOMBÝNE SOÐUTUCU/DONDURUCUKOMBÝNE SOÐUTUCU/DONDURUCU
Contents
Operating Instructions, 1
Assistance, 2
Description of the appliance, 4
Description of the appliance, 6
Installation, 8
Start-up and use, 8
Maintenance and care, 9
Precautions and tips, 10
Troubleshooting, 10
Français
Mode d’emploi
COMBINE REFRIGERATEUR/CONGELATEUR
Sommaire
Mode d’emploi, 1
Assistance, 2
Description de l’appareil, 4
Description de l’appareil, 6
Installation, 12
Mise en marche et utilisation, 12
Entretien et soin, 13
Précautions et conseils, 14
Anomalies et remèdes, 15
ÝçindekilerÝçindekiler
Ýçindekiler
ÝçindekilerÝçindekiler
Kullaným talimatlarý, 2
Teknik Servis, 3
Cihazýn tanýmý, 5
Cihazýn tanýmý, 7
Kapýlarýn açýlýþ yönünün deðiþtirilmesi, 16
Montaj, 20
Çalýþtýrma ve kullaným, 20
Bakým ve özen, 21
Önlemler ve öneriler, 22
Arýzalar ve onarýmlar, 22
Page 2

Assistance
Before calling for Assistance:
•
Check if the malfunction can be solved on your own (
Troubleshooting
• If after all the checks, the appliance still does not operate or
the problem persists, call the nearest Service Centre
Communicating:
• type of malfunction
• appliance model (Mod.)
• serial number (S/N)
This information can be found on the data plate located on the
bottom left side of the refrigerator compartment.
Never call on unauthorized technicians and always refuse
spare parts which are not originals.
).
see
Asistencia
Antes de llamar al Servicio de Asistencia Técnica:
• Verifique si la anomalía puede ser resuelta por Ud. mismo
(
ver Anomalías y Soluciones
• Si, no obstante todos los controles, el aparato no funciona y
el inconveniente por Ud detectado continúa, llame al Centro
de Asistencia Técnico más cercano.
Comunique:
• el tipo de anomalía
• el modelo de la máquina (Mod.)
• el número de serie (S/N)
Esta información se encuentra en la placa de características
ubicada en el compartimento frigorífico abajo a la izquierda.
No recurra nunca a técnicos no autorizados y rechace siempre
la instalación de repuestos que no sean originales.
La siguiente información es válida solo para España.
Para otros países de habla hispana consulte a su vendedor.
).
Assistance
Avant de contacter le centre d’Assistance :
•
Vérifiez si vous pouvez résoudre l’anomalie vous-même (
Anomalies et Remèdes
• Si, malgré tous ces contrôles, l’appareil ne fonctionne
toujours pas et si l’inconvénient persiste, appelez le service
après-vente le plus proche.
Signalez-lui :
• le type d’anomalie
• le modèle de l’appareil (Mod.)
• le numéro de série (S/N)
Vous trouverez tous ces renseignements sur l’étiquette
signalétique placée dans le compartiment réfrigérateur en bas à
gauche.
Ne vous adressez jamais à des techniciens non agréés et
exigez toujours l’installation de pièces détachées originales.
).
voir
Ampliación de garantía
Llame al 902.363.539
de ampliación de garantía hasta 5 años.
Consiga una cobertura total adicional de
• Piezas y componentes
• Mano de obra de los técnicos
• Desplazamiento a su domicilio de los técnicos
Y NO PAGUE AVERIAS NUNCA MAS
y le informaremos sobre el fantástico plan
Servicio de asistencia técnica (SAT)
Llame al 902.133.133
rapidez y eficacia, devolviendo el electrodoméstico a sus
condiciones óptimas de funcionamiento.
En el SAT encontrará recambios, accesorios y productos
específicos para la limpieza y mantenimiento de su
electrodoméstico a precios competitivos.
ESTAMOS A SU SERVICIO
y nuestros técnicos intervendrán con
- model
- modèle
- modelo
- model - model
- model
- model - model
2
- serial number
- numéro de série
- número de serie
- seri numarasý - seri numarasý
- seri numarasý
- seri numarasý - seri numarasý
Page 3

TT
eknik Serviseknik Servis
T
eknik Servis
TT
eknik Serviseknik Servis
TT
eknik Servis ile irtibata geçmeden önce:eknik Servis ile irtibata geçmeden önce:
T
eknik Servis ile irtibata geçmeden önce:
TT
eknik Servis ile irtibata geçmeden önce:eknik Servis ile irtibata geçmeden önce:
• Servise baþvurmadan çözülebilecek bir arýza olup olmadýðýný
kontrol ediniz (
• Sonucun olumsuz olmasý durumunda, en yakýn Teknik Servis ile
irtibata geçiniz.
þaðýdaki bilgileri bildiriniz:þaðýdaki bilgileri bildiriniz:
þaðýdaki bilgileri bildiriniz:
þaðýdaki bilgileri bildiriniz:þaðýdaki bilgileri bildiriniz:
• arýza tipi
• cihazýn modeli (Mod.)
• seri numarasý (S/N)
Bu bilgiler, soðutucu bölmesi içinde aþaðýda solda bulunan teknik
veriler etiketi üzerinde bulunmaktadýr.
Kesinlikle sadece yetkili teknik elemanlara baþvurunuzKesinlikle sadece yetkili teknik elemanlara baþvurunuz
Kesinlikle sadece yetkili teknik elemanlara baþvurunuz
Kesinlikle sadece yetkili teknik elemanlara baþvurunuzKesinlikle sadece yetkili teknik elemanlara baþvurunuz
ve her zaman orijinal yedek parçalarý kullanýnýz.ve her zaman orijinal yedek parçalarý kullanýnýz.
ve her zaman orijinal yedek parçalarý kullanýnýz.
ve her zaman orijinal yedek parçalarý kullanýnýz.ve her zaman orijinal yedek parçalarý kullanýnýz.
Arýza ve Onarým bölümüne bakýnýz
).
Cihazýn ömrü 10 yýldýrCihazýn ömrü 10 yýldýr
Cihazýn ömrü 10 yýldýr
Cihazýn ömrü 10 yýldýrCihazýn ömrü 10 yýldýr
getirebilmesi için gerekli yedek parça bulundurmagetirebilmesi için gerekli yedek parça bulundurma
getirebilmesi için gerekli yedek parça bulundurma
getirebilmesi için gerekli yedek parça bulundurmagetirebilmesi için gerekli yedek parça bulundurma
süresi).süresi).
süresi).
süresi).süresi).
Teknik Bilgiler
. (Ürünün fonksiyonunu yerine. (Ürünün fonksiyonunu yerine
. (Ürünün fonksiyonunu yerine
. (Ürünün fonksiyonunu yerine. (Ürünün fonksiyonunu yerine
HOTPOINT ARISTON
4D X T (TVZ)/HA
4D B T (TVZ)/HA
4D W T (TVZ)/HA
T
413
kWh/y
A
87
295
lt
4D AA X T (TVZ)
4D AA B T (TVZ)
4D AA W T (TVZ)
336
290
T
kWh/y
A +
80
lt
INDESIT COMPANY BEYAZ EÞYA PAZARLAMA
A.Þ.
Karahasan Sok. No:11 Balmumcu 34349
Beþiktaþ/Ýstanbul
TEL: (+90) 212 355 53 00
FAKS: (+90) 212 212 95 59
WEB: www.indesit.com.tr
INDESIT COMPANY BEYAZ EÞYA SANAYÝ VE
TÝCARET A.Þ.
Organize Sanayi Bölgesi 45030 / MANÝSA
::
TEL
: (+90) 236 233 19 05 – 233 18 20
::
::
FAKS
: (+90) 236 233 16 52
::
- model
- modèle
- modelo
- model - model
- model
- model - model
- serial number
- numéro de série
- número de serie
- seri numarasý - seri numarasý
- seri numarasý
- seri numarasý - seri numarasý
3
Page 4

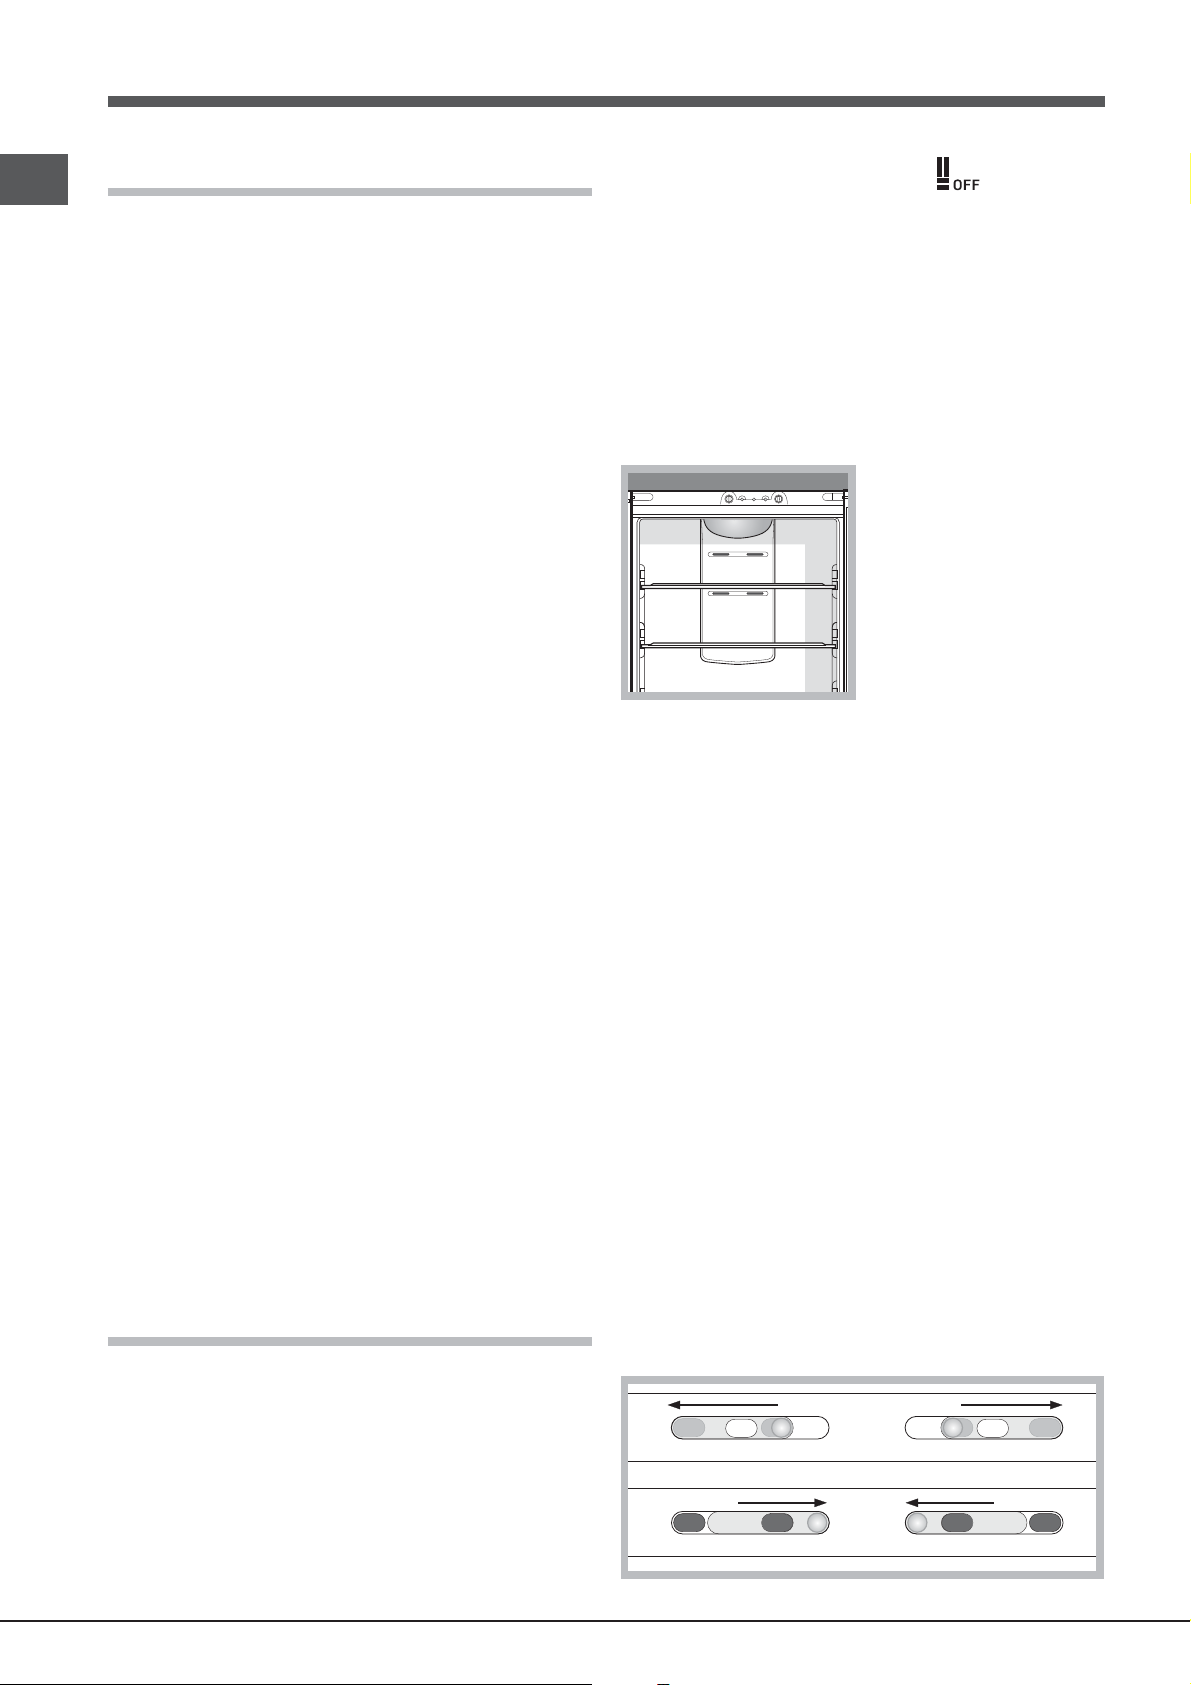
Description of the appliance
Description de l’appareil
Control panel
1 REFRIGERATOR OPERATION Knob
to regulate the temperature of the refrigerator compartment.
is the optimal temperature for energy saving levels.
is the holiday function (
OFF switches the refrigerator off.
2 SUPER COOL
refrigerator compartment rapidly. When it is pressed, the
SUPER COOL indicator light illuminates (
use
).
3 SUPER COOL Yellow indicator light (rapid cooling)
illuminates when the SUPER COOL button is pressed.
4 POWER Indicator light illuminates when the appliance is
connected to the electricity network.
5 SUPER FREEZE button (rapid freezing) to freeze fresh food.
When it is pressed, the SUPER FREEZE indicator light
illuminates (
If pressed for at least 3 seconds, this activates the
“Optimization Energy Saving” function (
maintenance
6 SUPER FREEZE Yellow indicator light (rapid freezing)
illuminates when the SUPER FREEZE button is pressed.
7 FREEZER OPERATION Knob
to regulate the temperature of the freezer compartment.
is the optimal temperature for energy saving levels.
switches the appliance off, including the refrigerator.
TVZ
! The indicator lights are also used to indicate an unusual
temperature increase in the freezer compartment (
Troubleshooting
(quick cool) to lower the temperature of the
see Start-up and use
).
(see Using the freezer to its full potential)
).
see Maintenance and care
see Start-up and
).
see Care and
see
).
Tableau de bord
1 Bouton FONCTIONNEMENT REFRIGERATEUR
pour régler la température à l’intérieur du compartiment
réfrigérateur.
est la température optimale avec une faible
consommation d’électricité.
est la fonction holiday (
OFF éteint le réfrigérateur.
2 Touche SUPER COOL
rapidement la température du compartiment réfrigérateur. Si
elle est enfoncée, le voyant SUPER COOL s’allume(
en marche et utilisation
3 Voyant jaune SUPER COOL (refroidissement rapide) :
il s’allume dès que vous appuyez sur la touche SUPER COOL.
4 Voyant VERT ALIMENTATION il s’allume quand l’appareil est
branché au réseau d’alimentation.
5 Touche SUPER FREEZE (congélation rapide) pour congeler
des aliments frais. Si elle est enfoncée, le voyant SUPER
FREEZE s’allume (
Une pression d’au moins 3 secondes sur cette touche active la
fonction “Optimization Energy Saving” (
6 Voyant jaune SUPER FREEZE (congélation rapide): il s’allume
dès que vous appuyez sur la touche SUPER FREEZE.
7 Bouton FONCTIONNEMENT CONGELATEUR
pour régler la température à l’intérieur du compartiment
congélateur.
est la température optimale avec une faible
consommation d’électricité.
éteint l’appareil, réfrigérateur inclus.
TVZ
! Les voyants servent aussi à signaler toute augmentation
anormale de la température à l’intérieur du compartiment
congélateur (
voir Mise en marche et utilisation
(voir Pour profiter à plein de votre congélateur)
voir Anomalies et remèdes
voir Entretien et soins
(refroidissement rapide) pour abaisser
).
).
).
voir Mise
).
voir Entretien et soin
.
).
4
3 6
654eps
1 2 4 5 7
Page 5

Descripción del aparato
Panel de control
1 Perilla FUNCIONAMIENTO DEL REFRIGERADOR
para regular la temperatura del compartimiento refrigerador.
es la temperatura óptima con bajo consumo.
es la función holiday (
OFF apaga el refrigerador.
2 Botón SUPER COOL (enfriamiento rápido) para disminuir
velozmente la temperatura del compartimiento refrigerador.
Cuando se presiona se enciende la luz testigo SUPER COOL
(
ver Puesta en funcionamiento y uso
3 Luz testigo amarilla SUPER COOL (enfriamiento rápido):
se enciende cuando se presiona el botón SUPER COOL.
4 Luz testigo verde ALIMENTACIÓN: se enciende cuando el
aparato está conectado a la red de alimentación eléctrica.
5 Botón SUPER FREEZE
alimentos frescos. Cuando se presiona se enciende la luz
testigo SUPER FREEZE
Si se presiona durante 3 segundos, como mínimo, se activa la
función “Optimization Energy Saving”
cuidados)
6 Luz testigo amarilla SUPER FREEZE (congelamiento rápido):
se enciende cuando se presiona el botón SUPER FREEZE.
7 Perilla FUNCIONAMIENTO DEL CONGELADOR
para regular la temperatura del compartimiento congelador.
! Las luces testigo sirven también para indicar un anómalo
aumento de temperatura en el compartimiento congelador
ver Anomalías y soluciones
(
.
es la temperatura óptima con bajo consumo.
apaga el aparato, incluido el refrigerador.
TVZ
(ver Utilizar el congelador en forma óptima)
ver Mantenimiento y cuidados
).
(congelamiento rápido) para congelar
(
ver Puesta en funcionamiento y uso
(ver Mantenimiento y
).
).
.
Cihazýn tanýmýCihazýn tanýmý
Cihazýn tanýmý
Cihazýn tanýmýCihazýn tanýmý
Kontrol paneliKontrol paneli
Kontrol paneli
Kontrol paneliKontrol paneli
11
SOÐUTUCU KONTROL SOÐUTUCU KONTROL
1
SOÐUTUCU KONTROL ayar düðmesi ile soðutucu bölmesindeki
11
SOÐUTUCU KONTROL SOÐUTUCU KONTROL
ýsý derecesi ayarlanýr.
düþük tüketim için optimal ýsý derecesidir.
holiday fonksiyonudur (
22
SUPER COOL SUPER COOL
2
SUPER COOL (hýzlý soðutma) tuþu ile soðutucu bölmesi
22
SUPER COOL SUPER COOL
içerisindeki ýsý derecesi hýzlý bir þekilde düþürmek için kullanýlýr.
Bu tuþa basýldýðýnda
Çalýþtýrma ve kullaným
(
33
SUPER COOLSUPER COOL
3 Sarý
SUPER COOL (hýzlý soðutma) lambasý:
33
SUPER COOLSUPER COOL
tuþuna basýldýðýnda yanar.
44
BESLEME BESLEME
4 Yeþil
BESLEME lambasý: cihaz elektrik þebekesine baðlý olduðu
44
BESLEME BESLEME
sürece yanar.
55
SUPER FREEZESUPER FREEZE
5
SUPER FREEZE (hýzlý dondurma) tuþu ile taze gýdalar
55
SUPER FREEZESUPER FREEZE
dondurulur. Bu tuþa basýldýðýnda
hemen yanar (
).
En az 3 saniye süreyle basýlmasý “
(Optimum Enerji Tasarrufu) fonksiyonunu etkinleþtirir (
bakým’a bakýnýz
66
SUPER FREEZESUPER FREEZE
6 Sarý
SUPER FREEZE (hýzlý dondurma) lambasý:
66
SUPER FREEZESUPER FREEZE
FREEZEFREEZE
FREEZE tuþuna basýldýðýnda yanar.
FREEZEFREEZE
77
DONDURUCU KONTROLDONDURUCU KONTROL
7
DONDURUCU KONTROL ayarý ile dondurucu bölmesindeki ýsý
77
DONDURUCU KONTROLDONDURUCU KONTROL
derecesi ayarlanýr.
düþük tüketim için optimal ýsý derecesidir.
TVZTVZ
TVZ
TVZTVZ
!!
! Uyarý lambalarý dondurucu bölmesinde ýsýnýn anormal bir þekilde
!!
arttýðýný belirtmek için kullanýlýr (
bakýnýz).
Çalýþtýrma ve kullaným
).
soðutucu dahil olmak üzere cihazý kapatýr.
(Ariza ve onarým bölümüne bakýnýz bölümüne bakýnýz)
Bakým ve onarým
SUPER COOLSUPER COOL
SUPER COOL uyarý lambasý hemen yanar
SUPER COOLSUPER COOL
bölümüne bakýnýz).
SUPER FREEZESUPER FREEZE
SUPER FREEZE uyarý lambasý
SUPER FREEZESUPER FREEZE
Optimization Energy SavingOptimization Energy Saving
Optimization Energy Saving”
Optimization Energy SavingOptimization Energy Saving
Ariza ve onarým
bölümüne bakýnýz).
SUPER COOLSUPER COOL
SUPER COOL
SUPER COOLSUPER COOL
bölümüne bakýnýz).
bölümüne
Onarým ve
SUPERSUPER
SUPER
SUPERSUPER
654eps
3 6
1 2 4 5 7
5
Page 6

Description of the appliance
Description de l’appareil
Overall view
The instructions contained in this manual are applicable to
different model refrigerators. The diagrams may not directly
represent the appliance purchased. For more complex features,
consult the following pages.
1 Levelling FEET
2 FREEZER and STORAGE compartment
3 TVZ compartment and FREEZER and STORAGE
compartment
4 BOTTLE shelf
5 FRUIT and VEGETABLE bin
6 CAN RACK.
7 Removable multipurpose SHELVES•.
8 Control panel.
9 LAMP (see Maintenance).
• Varies by number and/or position.
8
Vue d’ensemble
Ces instructions d’utilisation s’appliquent à plusieurs modèles, il
se peut donc que les composants illustrés présentent des
différences par rapport à ceux de l’appareil que vous avez
acheté. Vous trouverez dans les pages suivantes la description
des objets plus complexes.
1 PIED de réglage
2 Compartiment CONGELATION et CONSERVATION
3 Compartiment TVZ et Compartiment CONGELATION et
CONSERVATION
4 Balconnet BOUTEILLES
5 Bac FRUITS et LEGUMES
6 Balconnet amovible PORTE-CANETTES
7 Balconnet amovible PORTE-OBJETS•
8 Tableau de bord.
9 ECLAIRAGE (voir Entretien)
• Leur nombre et/ou leur emplacement peut varier.
9
7
7
6
5
4
4
3
2
461eps
1
6
Page 7

Descripción del aparato
Vista en conjunto
Cihazýn tanýmýCihazýn tanýmý
Cihazýn tanýmý
Cihazýn tanýmýCihazýn tanýmý
Genel görünümGenel görünüm
Genel görünüm
Genel görünümGenel görünüm
Las instrucciones sobre el uso son válidas para distintos
modelos y por lo tanto es posible que la figura presente detalles
diferentes a los del aparato que Ud. ha adquirido.
La descripción de las piezas más complejas se encuentra en las
páginas sucesivas.
1 PATAS de regulación
2 Compartimiento CONGELAMIENTO y CONSERVACIÓN
3 Compartimiento TVZ y Compartimiento CONGELAMIENTO y
CONSERVACIÓN
4 Balconcito BOTELLAS
5 Recipiente FRUTA y VERDURA
6 Balconcito PORTALATAS
7 Balconcito extraíble PORTAOBJETOS•
8 Panel de control.
9 BOMBILLA
• La cantidad y/o su ubicación pueden variar.
(ver Mantenimiento)
8
Kullaným talimatlarý birkaç model için geçerli olduðu için þekil satýn
aldýðýnýz cihazda olmayandeðiþik ayrýntýlarý gösterebilir.
Sonraki sayfalarda en karýþýk cisimler açýklanmýþtýr.
11
1 Ayarlanabilir
11
22
DONDURMADONDURMA
2
DONDURMA ve
22
DONDURMADONDURMA
33
TVZTVZ
3
TVZ bölmesi,
33
TVZTVZ
44
SISESISE
4
SISE Tutucusu
44
SISESISE
55
MEYVEMEYVE
5
MEYVE ve
55
MEYVEMEYVE
66
KUTU MEÞRUBAKUTU MEÞRUBA
6
KUTU MEÞRUBA
66
KUTU MEÞRUBAKUTU MEÞRUBA
77
KAPIKAPI
7
KAPI rafý
77
KAPIKAPI
88
Kontrol panosuKontrol panosu
8
Kontrol panosu
88
Kontrol panosuKontrol panosu
99
AMPULAMPUL
9
AMPUL (Bakým bölümüne bakýnýz)
99
AMPULAMPUL
• Sayýsý ve/veya pozisyonu deðiþebilir.
AA
YY
AKLARAKLAR
A
Y
AKLAR
AA
YY
AKLARAKLAR
SAKLAMASAKLAMA
SAKLAMA bölmesi
SAKLAMASAKLAMA
DONDURMADONDURMA
DONDURMA ve
DONDURMADONDURMA
SEBZESEBZE
SEBZE çekmecesi
SEBZESEBZE
TT
T tutucusu
••
•
••
TT
SAKLAMASAKLAMA
SAKLAMA bölmesi
SAKLAMASAKLAMA
9
7
7
6
5
4
4
3
2
461eps
1
7
Page 8
GB
Installation
! Before placing your new appliance into operation please read these
operating instructions carefully. They contain important information for
safe use, for installation and for care of the appliance.
! Please keep these operating instructions for future reference.
Pass them on to possible new owners of the appliance.
Positioning and connection
Positioning
1. Place the appliance in a well-ventilated humidity-free room.
2. Do not obstruct the rear fan grills. The compressor and
condenser give off heat and require good ventilation to
operate correctly and save energy.
3. Leave a space of at least 10 cm between the top part of the
appliance and any furniture above it, and at least 5 cm
between the sides and any furniture/side walls.
4. Ensure the appliance is away from any sources of heat (direct
sunlight, electric stove, etc.).
5. In order to maintain the correct distance between the
appliance and the wall behind it, fit the spacers supplied in
the installation kit, following the instructions provided.
Levelling
1. Install the appliance on a level and rigid floor.
2. If the floor is not perfectly horizontal, adjust the refrigerator by
tightening or loosening the front feet.
Electrical connections
After the appliance has been transported, carefully place it
vertically and wait at least 3 hours before connecting it to the
electricity mains. Before inserting the plug into the electrical
socket ensure the following:
• The appliance is earthed and the plug is compliant with the law.
• The socket can withstand the maximum power of the
appliance, which is indicated on the data plate located on the
bottom left side of the fridge (e.g. 150 W).
• The voltage must be in the range between the values
indicated on the data plate located on the bottom left side
(e.g. 220-240V).
• The socket is compatible with the plug of the appliance. If the
socket is incompatible with the plug, ask an authorised
technician to replace it (
extension cords or multiple sockets.
! Once the appliance has been installed, the power supply cable
and the electrical socket must be easily accessible.
! The cable must not be bent or compressed.
! The cable must be checked regularly and replaced by
authorised technicians only (see Assistance).
The manufacturer declines any liability should these safety The manufacturer declines any liability should these safety
!
The manufacturer declines any liability should these safety
The manufacturer declines any liability should these safety The manufacturer declines any liability should these safety
measures not be observed.measures not be observed.
measures not be observed.
measures not be observed.measures not be observed.
see Assistance
). Do not use
Start-up and use
Starting the appliance
! Before starting the appliance, follow the installation
instructions (
! Before connecting the appliance, clean the compartments and
accessories well with lukewarm water and bicarbonate.
! The appliance comes with a motor protection control system which
makes the compressor start approximately 8 minutes after being
switched on. The compressor also starts each time the power
supply is cut off whether voluntarily or involuntarily (blackout).
see Installation
).
1. Set the FREEZER OPERATION knob on
2. Insert the plug into the socket and ensure that the green
POWER indicator light illuminates.
3. Turn the REFRIGERATOR OPERATION knob to an average
value. After a few hours you will be able to put food in the
refrigerator.
4. Turn the FREEZER OPERATION knob to an average value and
press the SUPER FREEZE button (rapid freezing): the SUPER
FREEZE indicator light will illuminate. Once the refrigerator
has reached the optimal temperature, the indicator light goes
out and you can begin food storage.
.
Chiller system
NO FROST
The No Frost system circulates cold air continuously to collect
humidity and prevent ice and frost formation. The system
maintains an optimal humidity level in the compartment,
preserving the original quality of the food, preventing the food
from sticking together and making defrosting a thing of the past.
!!
! Do not block the aeration cells by placing food or containers in
!!
direct contact with the refrigerating back panel.
!!
! Close bottles and wrap food tightly.
!!
Using the refrigerator to its full potential
• Use the REFRIGERATOR OPERATION knob to adjust the
temperature (
• Press the SUPER COOL button (rapid cooling) to lower the
temperature quickly. For example, when you place a large number
of new food items inside a fridge the internal temperature will rise
slightly. The function quickly cools the groceries by temporarily
reducing the temperature until it reaches the ideal level.
• Place only cold or lukewarm foods in the compartment, not
hot foods (
• Remember that cooked foods do not last longer than raw foods.
• Do not store liquids in open containers. They will increase
humidity in the refrigerator and cause condensation to form.
• SHELVES: with or without grill. Due to the special guides the
shelves are removable and the height is adjustable, allowing
easy storage of large containers and food. Height can be
adjusted without complete removal of the shelf.
FRUIT and VEGETABLE bin
The salad crispers fitted inside the fridge have been specially
designed for the purpose of keeping fruit and vegetables fresh
and crisp. Open the humidity regulator (position B) if you want to
store food in a less humid environment, or close it (position A) to
store food in a more humid environment.
see Description
see Precautions and tips
).
A
B
).
8
Page 9

Using the freezer to its full potential
• Use the FREEZER OPERATION knob to adjust the
temperature (
• Do not re-freeze food that is defrosting or that has already
been defrosted. These foods must be cooked and eaten
(within 24 hours).
• Fresh food that needs to be frozen must not come into contact
with food that has already been defrosted.
• Do not place glass bottles which contain liquids, and which
are corked or hermetically sealed in the freezer because they
could break.
• The maximum quantity of food that may be frozen daily is
indicated on the plate containing the technical properties
located on the bottom left side of the refrigerator compartment
(for example: Kg/24h: 4).
• The top drawer can be used to store several types of food
(semifreddo frozen desserts, ice creams and alcohol) at the
most suitable temperature; the lower drawer (see overall view)
is designed to store frozen food in normal conditions.
To freeze food (if the freezer is already in operation),
deactivate the TVZ and empty the top drawer, press the rapidfreezing SUPER FREEZE button (the corresponding LED lights
up), place the food inside and close the drawer. The function
is deactivated automatically after 24 hours or when the
optimal temperatures have been reached (LED switches off).
The food may now be moved to the lower drawer (so that the
TVZ functions may be used) or left in the TVZ compartment
which, when left inactive, will function as a normal storage
compartment.
• In order to obtain a greater amount of space in the freezer
compartment, you may remove the bins (except the lowest
bin and the special COOL CARE ZONE bin, which has an
adjustable temperature) and place the food directly onto the
evaporator plates.
! To avoid blocking the air circulation inside the freezer
compartment, it is advisable not to obstruct the ventilation holes
with food or containers.
! Do not open the door during freezing.
! If there is a power cut or malfunction, do not open the freezer
door. This will help maintain the temperature inside the freezer,
ensuring that foods are conserved for at least 9 -14 hours.
TVZ compartment
The TVZ is a special compartment in the freezer which allows the
user to choose between 6 different operating modes that may be
set according to specific requirements and the type of food
stored inside. The temperature settings available are 0°C, -6°C,
-12°C and -18°C; these options are displayed on the control
panel (FREEZER COMPARTMENT knob). The TVZ has an
independent control feature; it may also be deactivated using the
control panel, for use as a normal freezer compartment.
WARNING: the TVZ compartment does not instantly shift
from one temperature setting to another, as it requires a
certain amount of time to stabilise.
see Description
).
Maintenance and care
! If this procedure is not followed, the alarm may sound. This alarm
does not indicate a malfunction. To restore normal operation, it is
sufficient to set the FREEZER OPERATION knob on the desired
value. To disconnect the appliance, follow point 1 and 2.
Cleaning the appliance
• The external and internal parts, as well as the rubber seals
may be cleaned using a sponge that has been soaked in
lukewarm water and bicarbonate of soda or neutral soap. Do
not use solvents, abrasive products, bleach or ammonia.
• The removable accessories may be soaked in warm water
and soap or dishwashing liquid. Rinse and dry them carefully.
• The back of the appliance may collect dust which can be
removed by delicately using the hose of a vacuum cleaner set
on medium power. The appliance must be switched off and
the plug must be pulled out before cleaning the appliance.
• During the cleaning of the slide rails for the drawers in the
freezer compartment, it may happen that the automatic drawer
closure mechanism is deactivated. To reactivate it, simply close
the drawer a little more forcefully than is usually necessary.
Avoiding mould and unpleasant odours
• The appliance is manufactured with hygienic materials which
are odour free. In order to maintain an odour free refrigerator
and to prevent the formation of stains, food must always be
covered or sealed properly.
• If you want to switch the appliance off for an extended period
of time, clean the inside and leave the doors open.
Holiday function
To minimise energy usage when on holiday, it is not necessary to
switch the appliance off. The appliance has a function which
allows it to maintain the temperature of the refrigerator
compartment at approximately 12°C (which can also be used to
conserve make-up and beauty products). The freezer temperature
must be set to the minimum value in order to preserve the food.
To enable the function:
set the REFRIGERATOR OPERATION knob on
A double acoustic signal informs you when it has been enabled.
A single acoustic signal informs you when it has been disabled.
.
Optimization Energy Saving function
The “Optimization Energy Saving” function may be activated in
order to optimise energy consumption while maintaining the
cooling performance of the product. This function maximises the
energy saved. It is activated by setting the knobs to “I CARE”,
then pressing and holding the Super Freeze button for at least 3
seconds; the Super Freeze indicator light will begin to flash,
signalling the activation of this function.
The “Optimization Energy Saving” function may also be
deactivated by pressing the Super Freeze button again. The
corresponding indicator light will stop flashing, thereby signalling
that the original operating conditions have been restored.
In humid environments, when the “Optimization Energy
Saving” function is activated, slight condensation may form on
the door of the appliance; normal operating conditions are
restored when the function is deactivated.
GB
Switching the appliance off
During cleaning and maintenance it is necessary to disconnect
the appliance from the electricity supply:
1. set the FREEZER OPERATION knob on
2. pull the plug out of the socket
9
Page 10

GB
Replacing the light bulb
To replace the light bulb in the refrigerator compartment, pull out
the plug from the electrical socket. Follow the instructions below.
Access the light bulb by removing the cover as indicated in the
diagram. Replace it with a similar light bulb within the power
range indicated on the cover (10 W, 15 W or 25 W).
2
• Keep packaging material out of the reach of children! It can
become a choking or suffocation hazard.
• When closing the refrigerator doors, pay attention to the
position of the upright (see figure).
1
Precautions and tips
! The appliance was designed and manufactured in compliance
with international safety standards. The following warnings are
provided for safety reasons and must be read carefully.
This appliance complies with the following Community Directives:
- 73/23/EEC of 19/02/73 (Low Voltage) and subsequent
amendments;
-89/336/EEC of 03.05.89 (Electromagnetic Compatibility) and
subsequent amendments;
- 2002/96/CE..
General safety
• The appliance was designed for domestic use inside the
home and is not intended for commercial or industrial use.
• The appliance must be used to store and freeze food products
by adults only and according to the instructions in this manual.
• The appliance must not be installed outdoors, even in
covered areas. It is extremely dangerous to leave the
appliance exposed to rain and storms.
• Do not touch the appliance with bare feet or with wet or moist
hands and feet.
• Do not touch the internal cooling elements: this could cause
skin abrasions or frost/freezer burns.
• When unplugging the appliance always pull the plug from the
mains socket, do not pull on the cable.
• Before cleaning and maintenance, always switch off the
appliance and disconnect it from the electrical supply. It is not
sufficient to set the temperature adjustment knobs on OFF
(appliance off) to eliminate all electrical contact.
• In the case of a malfunction, under no circumstances should
you attempt to repair the appliance yourself. Repairs carried
out by inexperienced persons may cause injury or further
malfunctioning of the appliance.
• Do not use any sharp or pointed utensils or electrical
equipment - other than the type recommended by the
manufacturer - inside the frozen food storage compartments.
• Do not put ice cubes taken directly from the freezer into your
mouth.
• This appliance is not intended for use by persons (including
children) with reduced physical, sensory or lack of experience
and knowledge unless they have been given supervision or
instruction concerning use of the appliance by a person
responsible for their safety. Children should be supervised to
ensure that they do not play with the appliance.
• Make sure that excessive volumes of food are not placed in
the upper part of the freezer compartment, in the space
reserved for the ice tray (where present).
Disposal
• Observe local environmental standards when disposing
packaging material for recycling purposes.
• The European Directive 2002/96/EC on Waste Electrical and
Electronic Equipment (WEEE), requires that old household
electrical appliances must not be disposed of in the normal
unsorted municipal waste stream. Old appliances must be
collected separately in order to optimise the recovery and
recycling of the materials they contain and reduce the impact
on human health and the environment.
The crossed out “wheeled bin” symbol on the product
reminds you of your obligation, that when you dispose of the
appliance it must be separately collected. Consumers should
contact their local authority or retailer for information
concerning the correct disposal of their old appliance.
Respecting and conserving the environment
• Install the appliance in a fresh and well-ventilated room.
Ensure that it is protected from direct sunlight and do not
place it near heat sources.
• Try to avoid keeping the door open for long periods or
opening the door too frequently in order to conserve energy.
• Do not fill the appliance with too much food: cold air must
circulate freely for food to be preserved properly. If circulation
is impeded, the compressor will work continuously.
• Do not place hot food directly into the refrigerator. The internal
temperature will increase and force the compressor to work
harder and will consume more energy.
• Defrost the appliance if ice forms (
layer of ice makes cold transference to food products more
difficult and results in increased energy consumption.
• Regularly check the door seals and wipe clean to ensure they
are free of debris and to prevent cold air from escaping (
Maintenance
• Thanks to its independent freezer door and drawer opening
system, this product offers a 50% energy saving in comparison
with a normal 2-door combined refrigerator/freezer unit.
).
see Maintenance
). A thick
see
Troubleshooting
If the appliance does not work, before calling for Assistance (see
Assistance), check for a solution from the following list.
The green POWER indicator light does not illuminate.
• The plug has not been inserted into the electrical socket, or not
far enough to make contact, or there is no power in the house.
10
Page 11

The motor does not start.
• The appliance comes with a motor protection control (
Start-up and use
The indicator lights are on but the light is dim.
• Pull out and reverse the plug before putting it back in the socket.
a) The alarm sounds.
a) The refrigerator door has remained open for more than two
minutes (the buzzer will stop sounding when you shut the door)
or the correct switching-off procedure was not followed (
Maintenance
b) The alarm sounds and the two yellow indicator lights
flash.
b) The temperature in the freezer is too high. Check the quality of
the food products and dispose if necessary.
c) The alarm sounds and the two yellow indicator lights as
well as the green one flash.
c) The temperature in the freezer has reached a dangerous
level. The food must be disposed immediately.
).
).
+ buzzer = Heating is excessive
+ buzzer = Heating danger
see
see
The appliance makes a lot of noise.
• The appliance has not been installed on a level surface (
see
Installation).
• The appliance has been installed between cabinets that
vibrate and make noise.
• The internal refrigerant makes a slight noise even when the
compressor is off. This is not a defect, it is normal.
The back wall of the refrigerator unit is covered in frost or
droplets of water
• This shows the appliance is operating normally.
GB
b/c)
In both these cases the freezer will maintain a temperature of
about 0°C so that the food does not re-freeze.
To turn off the acoustic signal open and close the refrigerator door.
To restore normal operation bring the FREEZER OPERATION knob
setting to (off) and turn the appliance on again.
d) The yellow SUPERFREEZE indicator light flashes
d) The Optimization Energy Saving function is activated.
The green POWER indicator light flashes.
• The appliance is not operating correctly. Contact the Technical
Assistance Centre.
The refrigerator and the freezer do not cool well.
• The doors do not close properly or the seals are damaged.
• The doors are opened too frequently.
• The OPERATION knobs are not on the correct setting (
Description
• The refrigerator or the freezer have been over-filled.
The food inside the refrigerator is beginning to freeze.
• The REFRIGERATOR OPERATION knob is not on the correct
setting (
• The food is in contact with the back inside wall of the
refrigerator.
The motor runs continuously.
• The SUPER FREEZE button has been pressed (rapid
freezing): the yellow SUPER FREEZE light is on or flashing
(
see Description
• The door is not closed properly or is continuously opened.
• The outside ambient temperature is very high.
).
see Description
).
).
see
11
Page 12

Installation
F
! Conservez ce mode d’emploi pour pouvoir le consulter à tout
moment. En cas de vente, de cession ou de déménagement, veillez
à ce qu’il suive l’appareil pour informer le nouveau propriétaire sur
son fonctionnement et lui fournir les conseils correspondants.
!
Lisez attentivement les instructions : elles contiennent des
conseils importants sur l’installation, l’utilisation et la sécurité de
votre appareil.
Mise en place et raccordement
Mise en place
1. Placez l’appareil dans une pièce bien aérée et non humide.
2. Ne bouchez pas les grilles d’aération arrière : le compresseur
et le condensateur produisent de la chaleur et exigent une
bonne aération pour bien fonctionner et réduire la
consommation d’électricité.
3. Prévoir au moins 10 cm entre le haut de l’appareil et les
meubles installés au-dessus et au moins 5 cm entre les côtés
et les meubles/parois latérales.
4. Installez l’appareil loin de sources de chaleur (rayons directs
du soleil, cuisinière électrique).
5. Pour maintenir une distance optimale entre le produit et la
paroi arrière, montez les cales d’espacement comprises dans
le kit d’installation et suivez les instructions de la notice
spécialement prévue.
Mise à niveau
1. Installez l’appareil sur un sol plat et rigide.
2. Si le sol n’est pas parfaitement horizontal, vissez ou dévissez
les petits pieds avant pour bien niveler l’appareil.
Raccordement électrique
Après le transport, placez l’appareil à la verticale et attendez au
moins 3 heures avant de le raccorder à l’installation électrique. Avant
de brancher la fiche dans la prise de courant, assurez-vous que:
• la prise est bien munie d’une terre conforme à la loi;
• la prise est bien apte à supporter la puissance maximale de
l’appareil, indiquée sur la plaquette signalétique placée à l’intérieur
du compartiment réfrigérateur en bas à gauche (ex. 150 W);
• la tension d’alimentation est bien comprise entre les valeurs
indiquées sur la plaquette signalétique, placée en bas à
gauche (ex.220-240 V);
• la prise est bien compatible avec la fiche de l’appareil. En cas
d’incompatibilité, faites remplacer la fiche par un technicien
agréé (
voir Assistance
! Après installation de l’appareil, le câble électrique et la prise de
courant doivent être facilement accessibles.
! Le câble ne doit être ni plié ni excessivement écrasé.
! Il doit être contrôlé prériodiquement et ne peut être remplacé
que par un technicien agréé (voir Assistance).
! Nous déclinons toute responsabilité en cas de non respect
des normes énumérées ci-dessus.
); n’utilisez ni rallonges ni prises multiples.
Mise en marche et utilisation
Mise en service de l’appareil
! Avant de mettre l’appareil en service, suivez bien les
instructions sur l’installation (
! Avant de brancher votre appareil, nettoyez bien les compartiments
et les accessoires à l’eau tiède additionnée de bicarbonate.
! Cet appareil est équipé d’un système protège-moteur qui ne
fait démarrer le compresseur que 8 minutes après son
branchement. C’est ce qui se passera aussi après toute coupure
de courant, volontaire ou involontaire (panne d’électricité.
voir Installation
1. Amenez le bouton FONCTIONNEMENT CONGELATEUR sur
.
2. Branchez la fiche dans la prise et contrôlez que le voyant vert
ALIMENTATION ELECTRIQUE s’allume.
3. Amenez le bouton FONCTIONNEMENT REFRIGERATEUR sur
une valeur intermédiaire. Au bout de quelques heures, vous
pourrez commencer à stocker des aliments dans le
réfrigérateur.
4. Amenez le bouton FONCTIONNEMENT CONGELATEUR sur
une valeur intermédiaire et appuyez sur la touche SUPER
FREEZE (congélation rapide) : le voyant jaune SUPER
FREEZE s’allumera. Il ne s’éteindra que quand le congélateur
aura atteint sa température optimale : vous pourrez alors
introduire les aliments.
Système de refroidissement
NO FROST
Le No Frost gère un flux continu d’air froid qui absorbe l’humidité
et empêche la formation de glace et de givre : il maintient un
niveau d’humidité adéquat à l’intérieur du compartiment
réfrigérateur et, grâce à l’absence de givre, il préserve les
qualités originaires des aliments; dans le compartiment
congélateur il évite la formation de glace, il n’y a par conséquent
plus besoin de dégivrer et les aliments ne collent plus entre eux.
! Ne placez pas d’aliments ou de récipients contre la paroi
refroidissante arrière pour ne pas boucher les trous d’aération et
éviter une formation rapide d’eau condensée.
! Fermez bien les bouteilles et emballez les aliments.
Pour profiter à plein de votre réfrigérateur
• Pour régler la température, utilisez le bouton
FONCTIONNEMENT REFRIGERATEUR (
• Appuyez sur la touche SUPER COOL (refroidissement rapide)
pour faire baisser la température rapidement, par exemple
quand vous remplissez le compartiment après avoir fait de
grosses provisions. Cette fonction se désactive
automatiquement une fois le temps écoulé.
• N’introduisez que des aliments froids ou à peine tièdes,
jamais chauds (
• Les aliments cuits contrairement à ce que l’on croit ne se
conservent pas plus longuement que les aliments crus.
• N’introduisez pas de récipients non fermés contenant des
liquides : ces derniers entraîneraient une augmentation de
l’humidité et la formation d’eau condensée.
• CLAYETTES: pleines ou grillagées. Elles sont amovibles et
réglables en hauteur grâce à des glissières spéciales (
figure
), pour le rangement de récipients ou d’aliments de
grande dimension. Pour régler la hauteur, pas besoin de sortir
la clayette complètement.
).
Bac FRUITS et LEGUMES
Les tiroirs à fruits et légumes qui équipent le réfrigérateur sont
spécialement conçus pour garder vos fruits et légumes frais et
savoureux. Ouvrez le régulateur d’humidité (position B) si vous
désirez conserver vos aliments dans un environnement moins
humide ou bien fermez-le (position A) pour les conserver dans
un environnement plus humide.
voir Précautions et conseils
voir Description
).
).
voir
12
Page 13

A
B
Pour profiter à plein de votre congélateur
• Pour régler la température, utilisez le bouton
FONCTIONNEMENT CONGELATEUR (
• Ne recongelez pas des aliments décongelés ou en cours de
décongélation; il faut les faire cuire et les consommer (dans
les 24 heures).
• Les aliments frais à congeler ne doivent pas être placés au
contact d’aliments déjà congelés.
• Ne stockez pas dans votre congélateur des bouteilles en
verre contenant des liquides, bouchées ou fermées
hermétiquement, elles pourraient se briser.
• La quantité journalière maximale d’aliments pouvant être
congelée est indiquée sur l’étiquette des caractéristiques,
placée dans le compartiment réfrigérateur en bas à gauche
(exemple : 4 Kg/24h).
• Le tiroir du haut est un compartiment servant à conserver à la
bonne température des produits spéciaux (desserts glacés
“semifreddi”, glaces et boissons alcooliques); le tiroir du bas
(voir vue d’ensemble) est prévu pour la conservation normale
d’aliments congelés.
Pour congeler (si le congélateur est déjà en service)
désactivez le TVZ et videz le tiroir du haut, appuyez sur la
touche SUPER FREEZE (congélation rapide) (allumage de la
LED correspondante), introduisez les aliments et fermez le
tiroir. Cette fonction se désactive automatiquement au bout de
24 heures ou dès que les températures optimales sont
atteintes (LED éteinte).
Vous pouvez à présent déplacer les aliments dans le tiroir du
bas (pour pouvoir ainsi utiliser les fonctions du TVZ) ou les
laisser dans le compartiment TVZ qui, désactivé, fonctionne
comme un compartiment de conservation courant.
• Pour gagner de la place à l’intérieur du compartiment
congélation, vous pouvez enlever les tiroirs (sauf le tiroir du
bas et celui de la COOL CARE ZONE à température variable
si votre appareil en est équipé) et stocker vos aliments
directement sur les plaques évaporantes.
! Pour éviter d’empêcher la circulation de l’air à l’intérieur du
congelateur, nous recommandons de ne pas boucher avec des
aliments ou des récipients les trous d’aération.
! Evitez d’ouvrir la porte pendant la phase de congélation.
! En cas de coupure de courant ou de panne, n’ouvrez pas la
porte du congélateur : les produits surgelés et congelés se
conserveront ainsi sans problème pendant 9 - 14 heures environ.
Compartiment TVZ
Le TVZ est un compartiment spécial du freezer qui permet de
sélectionner et de programmer 6 modes de fonctionnement
distincts selon les besoins et le type d’aliments conservés.
Les températures disponibles sont 0°C, -6°C, -12°C et -18°C
présentes sur le panneau de commande (bouton
FONCTIONNEMENT CONGÉLATEUR). Le TVZ est équipé d’une
commande indépendante. A partir du panneau de commande,
vous pouvez aussi désactiver le TVZ et l’utiliser comme un
compartiment freezer courant.
ATTENTION : le passage d'une température à un autre n'est
pas immédiat pour le TVZ et nécessite un délai suffisant pour
la stabilisation du compartiment TVZ.
voir Description
).
Entretien et soin
Mise hors tension
Pendant les opérations de nettoyage et d’entretien, débranchez
l’appareil du réseau d’alimentation :
1. amenez le bouton FONCTIONNEMENT CONGELATEUR sur
;
2. débranchez la fiche de la prise de courant.
! Si cette procédure n’est pas respectée, l’alarme peut se
déclencher : ceci ne dénote pas une anomalie. Pour rétablir le
fonctionnement correct de l’appareil, il suffit d’amener le bouton
FONCTIONNEMENT CONGELATEUR sur la valeur souhaitée.
Pour isoler l’appareil, procédez comme indiqué aux points 1 et 2.
Nettoyage de l’appareil
• Nettoyez l’extérieur, l’intérieur et les joints en caoutchouc à
l’aide d’une éponge imbibée d’eau tiède additionnée de
bicarbonate de soude ou de savon neutre. N’utilisez pas de
solvants, de produits abrasifs, d’eau de Javel ou
d’ammoniaque.
• mettez tremper les accessoires amovibles dans de l’eau
chaude additionnée de savon ou de liquide vaisselle. Rincezles et essuyez-les soigneusement.
• Le dos de l’appareil a tendance à s’empoussiérer, pour éliminer
la poussière avec délicatesse, après avoir éteint l’appareil et
débranché la fiche, servez-vous d’un aspirateur montant un
accessoire adéquat et réglé sur une puissance intermédiaire.
• Lors du nettoyage des coulisses des tiroirs des compartiments
du congélateur, il peut arriver que le mécanisme de rappel de
fermeture ne fonctionne plus. Pour rétablir son fonctionnement,
il suffit de fermer le tiroir un peu plus énergiquement.
Contre la formation de moisissures et de
mauvaises odeurs
• Cet appareil est fabriqué dans des matériaux hygiéniques qui
ne transmettent pas d’odeur. Pour sauvegarder cette
caractéristique, veillez à bien emballer et couvrir vos aliments.
Vous éviterez par la même occasion la formation de taches.
• Si vous devez laisser votre appareil éteint pendant une
période de temps prolongée, nettoyez-le bien l’intérieur et
laissez les portes ouvertes.
Fonction holiday
Si vous partez en vacances, pas besoin d’éteindre votre appareil
car il est équipé d’une fonction spéciale qui permet, avec une
faible consommation d’électricité, de maintenir une température
d’environ 12°C dans le compartiment réfrigérateur (pour protéger
de la chaleur vos produits de beauté et de maquillage); réglez
dans ce cas la température du congélateur sur une valeur
minimale, indispensable à la conservation des aliments.
Pour activer la fonction :
amenez le bouton FONCTIONNEMENT REFRIGERATEUR sur
(
voir figure
désactivation est signalée par un seul bip.
Fonction Optimization Energy Saving
L’activation de la fonction Optimization Energy Saving permet
d’optimiser la consommation d’énergie tout en maintenant les
performances de température de l’appareil. Cette fonction
permet un maximum d’économie d’énergie. Pour l’activer,
tourner les boutons sur “I CARE”, appuyer 3 secondes de suite
sur la touche superfreezer; le voyant superfreezer se mettra à
clignoter pour signaler l’activation de la fonction.
). Deux bips confirment son activation; sa
F
13
Page 14

Pour désactiver la fonction Optimization Energy Saving, il suffit
F
d’appuyer à nouveau sur la touche superfreezer. Le voyant
correspondant se mettra à clignoter pour signaler le
rétablissement des conditions initiales.
Dans des endroits humides, l’activation de la fonction
Optimization Energy Saving pourrait entraîner la formation de
condensation sur les portes. La désactivation de cette fonction
rétablit toutefois les conditions standard du produit.
Remplacement de l’ampoule d’éclairage
Pour remplacer l’ampoule d’éclairage du compartiment
réfrigérateur, débranchez la fiche de la prise de courant. Suivez
les indications fournies ci-dessous.
Pour pouvoir remplacer l’ampoule, démontez le couvercle de
protection comme illustré (voir figure). Remplacez-la par une
ampoule semblable dont la puissance doit correspondre à celle
indiquée sur le couvercle de protection (10 W, 15 W ou 25 W).
2
1
• Ne pas utiliser, à l’intérieur des compartiments de conservation
pour aliments congelés, d’ustensiles pointus et coupants ou
d’appareils électriques d’un type autre que celui recommandé
par le fabricant.
• Ne pas porter à la bouche des glaçons à peine sortis du
congélateur.
• Cet appareil n’est pas prévu pour être utilisé par des
personnes (y compris les enfants) dont les capacités
physiques, sensorielles ou mentales sont réduites, ou des
personnes dénuées d’expérience ou de connaissance, sauf si
elles ont pu bénéficier, par l’intermédiaire d’une personne
responsable de leur sécurité, d’une surveillance ou
d’instructions préalables concernant l’utilisation de l’appareil.
Il convient de surveiller les enfants afin qu’ils ne jouent pas
avec l’appareil.
• Les emballages ne sont pas des jouets pour enfants.
• Pour la fermeture des portes du réfrigérateur, attention à
l’emplacement du montant (voir figure).
Précautions et conseils
! L’appareil a été conçu et fabriqué conformément aux normes
internationales de sécurité. Ces conseils sont fournis pour des
raisons de sécurité et doivent être lus attentivement.
Cet appareil est conforme aux Directives Communautaires
suivantes :
- 73/23/CEE du 19/02/73 (Basse Tensione) et modifications
suivantes;
-89/336/CEE du 03/05/89 (Compatibilité Electromagnétique) et
modifications suivantes;
- 2002/96/CE.
Sécurité générale
• Cet appareil a été conçu pour un usage familial, de type non
professionnel.
• Cet appareil qui sert à conserver et à congeler des aliments
ne doit être utilisé que par des adultes conformément aux
instructions du mode d’emploi.
• Cet appareil ne doit pas être installé en extérieur, même dans
un endroit à l’abri, il est en effet très dangereux de le laisser
exposé à la pluie et aux orages.
• Ne touchez pas à l’appareil pieds nus ou si vos mains ou
pieds sont mouillés ou humides.
• Ne touchez pas aux parties refroidissantes: vous pourriez
vous brûler ou vous blesser.
• Pour débrancher la fiche de la prise de courant, sortez la
fiche, ne tirez surtout pas sur le câble.
• Avant d’effectuer toute opération de nettoyage ou d’entretien,
débranchez la fiche de la prise de courant. Il ne suffit pas de
placer le bouton de REGLAGE DE LA TEMPERATURE sur
OFF (appareil éteint) pour éliminer tout contact électrique.
• En cas de panne, n’essayez en aucun cas d’accéder aux
mécanismes internes pour tenter de réparer l’appareil.
• Attention à ne pas stocker d’aliments trop volumineux dans la
partie du tiroir freezer supérieur occupée par la fabrique de
glace s’il y en a une de prévue.
Mise au rebut
• Mise au rebut du matériel d’emballage : conformez-vous aux
réglementations locales, les emballages pourront ainsi être
recyclés.
• La Directive Européenne 2002/96/EC sur les Déchets des
Equipements Electriques et Electroniques (DEEE), exige que
les appareils ménagers usagés ne soient pas jetés dans le
flux normal des déchets municipaux. Les appareils usagés
doivent être collectés séparément afin d’optimiser le taux de
récupération et le recyclage des matériaux qui les composent
et réduire l’impact sur la santé humaine et l’environnement.
Le symbole de la ‘‘poubelle barrée’’ est apposée sur tous les
produits pour rappeler les obligations de collecte séparée.
Les consommateurs devront contacter les autorités locales
ou leur revendeur concernant la démarche à suivre pour
l’enlèvement de leur vieil appareil.
Economies et respect de l’environnement
• Installez votre appareil dans un endroit frais et bien aéré,
protégez-le contre l’exposition directe aux rayons du soleil et
ne le placez pas près de sources de chaleur.
• Pour introduire ou sortir les aliments, n’ouvrez les portes de
l’appareil que le temps strictement nécessaire. Chaque
ouverture de porte cause une considérable dépense d’énergie.
• Ne chargez pas trop votre appareil: pour une bonne
conservation des aliments, le froid doit pouvoir circuler
librement. Si la circulation est entravée, le compresseur
travaillera en permanence.
• N’introduisez pas d’aliments chauds : ces derniers font
monter la température intérieure ce qui oblige le compresseur
à travailler beaucoup plus en gaspillant un tas d’électricité.
• Dégivrez l’appareil dès que de la glace se dépose (
Entretien
considérablement la cession de froid aux aliments et
augmente la consommation d’électricité.
); une couche de glace trop épaisse gêne
voir
14
Page 15

• Gardez toujours les joints propres et en bon état pour qu’ils
adhèrent bien aux portes et ne laissent pas le froid
s’échapper (
• Grâce à une ouverture indépendante des portes et des tiroirs
du freezer, ce produit permet de réaliser 50% d’économie
d’énergie en plus par rapport à un combiné normal 2 portes.
voir Entretien
).
Anomalies et remèdes
Il peut arriver que l’appareil ne fonctionne pas. Avant de téléphoner
au service de dépannage (voir Assistance), contrôlez s’il ne s’agit
pas d’un problème facile à résoudre à l’aide de la liste suivante.
Le voyant vert ALIMENTATION ne s’allume pas.
• La fiche n’est pas branchée dans la prise de courant ou pas
assez enfoncée pour qu’il y ait contact ou bien il y a une
coupure de courant.
Le moteur ne démarre pas.
• L’appareil est équipé d’un système protège-moteur (
en marche et utilisation
Les voyants sont faiblement éclairés.
• Débranchez la fiche et rebranchez-la dans la prise de courant
après l’avoir retournée sens dessus dessous.
a) L’alarme sonne.
a) La porte du réfrigérateur est restée ouverte pendant plus de
deux minutes. Le signal sonore cesse dès fermeture de la
porte. Ou bien vous ne l’avez peut-être pas éteint
correctement (
voir Entretien
).
).
voir Mise
Le réfrigérateur et le congélateur refroidissent peu.
• Les portes ne ferment pas bien ou les joints sont abîmés.
• Ouverture trop fréquente des portes.
• La position des boutons FONCTIONNEMENT n’est pas
correcte (
• Le réfrigérateur et le congélateur sont excessivement remplis.
Les aliments gèlent à l’intérieur du réfrigérateur.
• La position du bouton FONCTIONNEMENT REFRIGERATEUR
n’est pas correcte (
• Les aliments touchent à la paroi arrière.
Le moteur est branché en permanence.
• Quelqu’un a appuyé sur la touche SUPER FREEZE
(congélation rapide): le voyant jaune SUPER FREEZE est
allumé ou clignote (
• La porte n’est pas bien fermée ou trop souvent ouverte.
• La température à l’extérieur est très élevée.
L’appareil est très bruyant.
• L’appareil n’a pas été installé bien à plat (
• L’appareil est installé entre des meubles ou des objets qui
vibrent et font du bruit.
• Le gaz réfrigérant interne produit un léger bruit même quand
le compresseur est à l’arrêt : il ne s’agit pas d’un défaut, c’est
tout à fait normal.
La température est élevée à certains endroits de l’extérieur
du réfrigérateur.
• Les températures élevées sont nécessaires pour éviter la
formation d’eau condensée dans des zones particulières du
produit.
voir Description
voir Description
voir Desc.
).
).
).
voir Installation).
F
b) L’alarme sonne et les deux voyants jaunes clignotent.
b) L’appareil signale un réchauffement excessif du congélateur.
Nous vous conseillons de vérifier l’état des aliments : il se
pourrait qu’il faille les jeter.
+ signal acoustique = Réchauffement excessif
c) L’alarme sonne et les deux voyants jaunes et le voyant
vert clignotent.
c) L’appareil signale un réchauffement dangereux du
congélateur. il faut jeter les aliments.
+ signal acoustique = Réchauffement dangereux
b/c) Dans le premier cas, le congélateur maintient une
température d’environ 0°C pour éviter une recongélation des
aliments. Dans le deuxième cas, il maintient la température
autour de -18°C. Pour éteindre le signal sonore : ouvrez puis
refermez la porte du réfrigérateur. Pour rétablir son
fonctionnement normal : amenez le bouton FONCTIONNEMENT
CONGELATEUR sur (éteint) et rallumez l’appareil.
d) Le voyant jaune SUPER FREEZE se met à clignoter.
• La fonction Optimization Energy Saving est activée
Le voyant vert ALIMENTATION clignote.
• L’appareil ne fonctionne pas correctement. Faites appel au
service d’assistance technique.
15
Page 16

Instalación
E
Puesta en funcionamiento y
! Es importante conservar este manual para poder consultarlo
cuando sea necesario. En caso de venta, cesión o traslado,
verifique que permanezca junto al aparato para informar al
nuevo propietario sobre su funcionamiento y sobre las
precauciones durante su uso
!
Lea atentamente las instrucciones: contienen información
importante sobre la instalación, sobre el uso y sobre la
seguridad.
Colocación y conexión
Colocación
1. Coloque el aparato en un ambiente bien aireado y seco.
2. No obstruya las rejillas posteriores de ventilación: el
compresor y el condensador emiten calor y requieren una
buena aireación para funcionar bien y limitar el consumo
eléctrico.
3. Deje una distancia mínima de 10 cm. entre la parte superior
del aparato y los muebles situados encima y de 5 cm., como
mínimo, entre los costados y los muebles o paredes laterales.
4. Mantenga el aparato lejos de fuentes de calor (por ej. la luz
solar directa o una cocina eléctrica).
5. Para mantener una distancia óptima entre el producto y la
pared posterior, coloque los distanciadores que se
encuentran en la caja de instalación siguiendo las
instrucciones presentes en la hoja correspondiente.
Nivelación
1. Instale el aparato sobre un piso plano y rígido.
2. Si el piso no fuera perfectamente horizontal, compense los
desniveles atornillando o desatornillando las patas
delanteras.
Conexión eléctrica
Después de su transporte, coloque el aparato verticalmente y
espere 3 horas como mínimo antes de conectarlo a la red
eléctrica. Antes de enchufarlo a la toma de corriente, controle
que:
• la toma posea la conexión a tierra y que sea conforme a la
ley;
• el enchufe sea capaz de soportar la carga máxima de
potencia de la máquina indicada en la placa de
características ubicada en la parte inferior izquierda del
frigorífico (ej. 150 W);
• la tensión de alimentación esté comprendida entre los valores
indicados en la placa de características ubicada abajo a la
izquierda (ej. 220-240V);
• la toma sea compatible con el enchufe del aparato. Si no
fuera así, solicite la sustitución del enchufe a un técnico
autorizado (
conexiones múltiples.
! Una vez instalado el aparato, el cable eléctrico y la toma de
corriente deben ser fácilmente accesibles.
! El cable no debe sufrir pliegues ni compresiones.
! El cable debe ser revisado periódicamente y sustituido sólo por
técnicos autorizados (ver Asistencia).
!
La empresa declina toda responsabilidad en los casos en
que no hayan sido respetadas estas normas.
ver Asistencia
); no utilice prolongaciones ni
uso
Poner en marcha el aparato
! Antes de poner en marcha el aparato, siga las instrucciones
sobre la instalación (
! Antes de conectar el aparato, limpie bien los compartimientos
y los accesorios con agua tibia y bicarbonato.
! El aparato posee un control que lo protege contra
sobrecargas, que hace funcionar el compresor sólo después de
aproximadamente 8 minutos del encendido. Esto sucede
también después de cada interrupción de la alimentación
eléctrica, voluntaria o involuntaria (black out).
1. Coloque el mando de FUNCIONAMIENTO DEL
CONGELADOR en ;
2. Enchufe el aparato en la toma y verifique que se encienda el
piloto verde de ALIMENTACIÓN.
3. Gire la perilla de FUNCIONAMIENTO DEL CONGELADOR
hasta un valor medio y pulse el botón SUPER FREEZE
(congelamiento rápido): se encenderá la luz testigo amarilla
SUPER FREEZE.
La misma se apagará cuando el congelador haya alcanzado
la temperatura óptima: a partir de ese momento será posible
introducir los alimentos.
4. Gire la perilla de FUNCIONAMIENTO DEL REFRIGERADOR
hasta un valor medio. Después de algunas horas será posible
introducir alimentos en el refrigerador.
Sistema de enfriamiento
NO FROST
Se puede reconocer por la presencia de celdas de aireación
ubicadas en las paredes posteriores de los compartimentos. El
sistema No Frost administra un flujo continuo de aire frío que
recoge la humedad e impide la formación de hielo y escarcha: en
el compartimento frigorífico mantiene el justo nivel de humedad y,
gracias a la ausencia de escarcha, preserva las cualidades
originales de los alimentos; en el compartimento congelador evita
la formación de hielo volviendo innecesarias las operaciones de
descongelación y evitando que los alimentos se peguen entre sí.
! No introduzca alimentos o recipientes en contacto directo con la
pared refrigerante posterior porque se pueden obstruir los orificios
de aireación y facilitar la formación de condensación.
! Cierre las botellas y envuelva los alimentos.
Utilizar el refrigerador en forma óptima
• Para regular la temperatura utilice la perilla de
FUNCIONAMIENTO DEL REFRIGERADOR (ver Descripción).
• Pulse el botón SUPER COOL (enfriamiento rápido) para
disminuir la temperatura en poco tiempo, por ejemplo cuando
el compartimiento se llena después de una compra
abundante. La función se desactiva automáticamente una vez
transcurrido el tiempo necesario.
• Introduzca sólo alimentos fríos o apenas tibios, nunca
calientes (ver Precauciones y consejos).
ver Instalación
).
16
Page 17

• Recuerde que los alimentos cocidos no se mantienen durante
más tiempo que los crudos.
• No introduzca recipientes destapados con líquidos:
produciría un aumento de humedad con la consiguiente
formación de condensado.
• BANDEJAS: enteras o tipo rejilla. Son extraíbles y su altura
es regulable gracias a las guías especiales, se utilizan para
introducir recipientes o alimentos de gran tamaño.
Recipiente FRUTA y VERDURA
Los cajones de fruta y verdura con los que está dotado el
refrigerador, fueron proyectados especialmente para mantener
frescas y perfumadas las frutas y verduras. Abra el regulador de
humedad (posición B) si desea conservar los alimentos en un
ambiente menos húmedo, o ciérrelo (posición A) para que la
conservación se realice en un ambiente más húmedo.
Compartimiento TVZ
La TVZ es un compartimento que se encuentra en el
congelador y que permite seleccionar 6 modalidades
diferentes de funcionamiento de acuerdo con las necesidades
y con el tipo de alimentos que se van a conservar en su
interior. Las temperaturas que pueden seleccionarse son 0°C,
-6°C, -12°C y -18°C presentes en el panel de control (mando
FUNCIONAMIENTO CONGELADOR). El TVZ posee un mando
independiente, a través del panel de control es posible
desactivar el TVZ y utilizarlo como un normal compartimiento
congelador.
ATENCIÓN: el paso de un valor de temperatura a otro del
TVZ no es inmediato sino que necesita de un cierto tiempo
de estabilización del compartimiento TVZ.
E
A
B
Uso óptimo del congelador
• Para regular la temperatura utilice la perilla de
FUNCIONAMIENTO DEL CONGELADOR (
• No vuelva a congelar alimentos que se están por descongelar
o descongelados; dichos alimentos deben ser previamente
cocinados para ser consumidos (dentro de las 24 horas).
• Los alimentos frescos por congelar no se deben colocar en
contacto con los ya congelados.
• No coloque en el congelador botellas de vidrio que
contengan líquidos, tapadas o cerradas herméticamente
porque podrían romperse.
• La cantidad máxima diaria de alimentos por congelar está
indicada en la placa de características ubicada en el
compartimiento refrigerador abajo a la izquierda (por ejemplo:
4 Kg/24h).
• El cajón superior es un compartimiento que permite
conservar a la temperatura adecuada algunos tipos de
alimentos (semifríos, helados y alcohólicos); el cajón inferior
(ver el conjunto) se adapta para conservar normalmente los
alimentos congelados.
Para congelar (si el congelador está ya funcionando)
desactivar el TVZ y vaciar el cajón superior, presionar el
botón SÚPER FREEZE (congelación rápida) (encendido del
relativo LED), introducir los alimentos y cerrar el cajón. La
función se desactiva automáticamente después de 24 horas
o cuando se alcanza la temperatura óptima (LED apagado).
Ahora los alimentos pueden colocarse en el cajón inferior
(para poder utilizar las funciones del TVZ) o bien dejarse en el
compartimiento TVZ, que al inactivarse funciona como un
normal compartimiento de conservación.
! para evitar obstaculizar la circulación de aire en el interior del
congelador, se recomienda no obstruir los orificios de aireación
con alimentos o recipientes.
! Evite abrir la puerta durante la congelación.
! Cuando se produzca una interrupción de corriente o una
avería, no abra la puerta del congelador: de este modo, los
alimentos congelados se conservarán sin alteración durante
aproximadamente 9-14 horas.
ver Descripción
).
Mantenimiento y cuidados
Cortar la corriente eléctrica
Durante los trabajos de limpieza y mantenimiento, es necesario
aislar el aparato de la red de alimentación eléctrica:
1. coloque la perilla de FUNCIONAMIENTO DEL CONGELADOR
en ;
2. desenchufe el aparato.
! Si no se efectúa este procedimiento puede desconectar la
alarma: dicha alarma no es síntoma de anomalía. Para restablecer
el normal funcionamiento es suficiente colocar la perilla de
FUNCIONAMIENTO DEL CONGELADOR en el valor deseado.
Para aislar el aparato proceda siguiendo los puntos 1 y 2.
Limpiar el aparato
• Las partes externas, las partes internas y las juntas de goma
se pueden limpiar con una esponja embebida en agua tibia y
bicarbonato de sodio o jabón neutro. No utilice solventes,
productos abrasivos, lejía o amoníaco.
• Los accesorios extraíbles se pueden colocar en remojo en
agua caliente y jabón o detergente para platos. Enjuáguelos y
séquelos con cuidado.
• La parte posterior del aparato tiende a cubrirse de polvo que
se puede eliminar, después de haber apagado y
desenchufado el aparato, utilizando con delicadeza la boca
de la aspiradora y trabajando con una potencia media.
• Durante la limpieza de las guías corredizas de los cajones de
los compartimientos congelador, puede ocurrir que el
mecanismo de cierre del cajón se desactive. Para reactivarlo
basta cerrar el cajón con más fuerza.
Evitar la formación de moho y malos olores
• El aparato está construido con materiales higiénicos que no
transmiten olores. Para mantener esta característica es
necesario que los alimentos estén siempre protegidos y bien
cerrados. Esto evitará también la formación de manchas.
• Si se debe apagar el aparato por un largo período, limpie su
interior y deje las puertas abiertas.
Función holiday
Si se parte por un período de vacaciones, no es necesario
apagar el aparato debido a que posee una función que permite,
con bajo consumo eléctrico, mantener la temperatura del
compartimiento refrigerador alrededor de los 15ºC (para
proteger del calor maquillaje y cosméticos); la temperatura del
congelador se debe fijar en el mínimo (1) indispensable para la
conservación de los alimentos.
17
Page 18

Para activar la función:
E
coloque la perilla de FUNCIONAMIENTO DEL REFRIGERADOR
. Una doble señal sonora confirmará su activación; la
en
desactivación se indica con una sola señal sonora.
Función Optimization Energy Saving
Con la finalidad de optimizar el consumo energético
manteniendo la temperatura del producto, se puede activar la
función Optimization Energy Saving. Esta función permite
lograr el máximo ahorro energético. Se activa colocando los
mandos en “I CARE” y manteniendo presionado durante 3
segundos, como mínimo, el botón superfreezer; el piloto
superfreezer comenzará a centellear identificando la activación.
La función Optimization Energy Saving se puede desactivar
presionando una vez más el botón superfreezer. El piloto
correspondiente dejará de centellear para indicar el
restablecimiento de las condiciones iniciales.
En ambientes húmedos, con la función Optimization Energy
Saving activada, podría presentarse una leve formación de
condensación en las puertas; desactivando la función, se
restablecen las condiciones estándar del producto.
Sustituir la bombilla
Para sustituir la bombilla de iluminación del compartimento
frigorífico, desenchufe el aparato. Siga las instrucciones que se
dan a continuación.
Acceda a la lámpara quitando la protección como se indica en la
figura. Sustitúyala con otra bombilla con una potencia igual a la
indicada en la protección (10 W, 15 W o 25 W).
• No toque el aparato estando descalzo o con las manos o pies
mojados o húmedos.
• No toque las piezas refrigerantes internas: podría quemarse o
herirse.
• No desenchufe el aparato tirando del cable sino sujetando el
enchufe.
• Es necesario desenchufar el aparato antes de realizar
operaciones de limpieza y de mantenimiento. No es suficiente
llevar el mando para LA REGULACIÓN DE LA
TEMPERATURA hasta la posición OFF (aparato apagado)
para eliminar todo contacto eléctrico.
• En caso de avería, nunca acceda a los mecanismos internos
para intentar una reparación.
• En el interior de los compartimientos donde se conservan
alimentos congelados, no utilice utensilios cortantes o con
punta ni aparatos eléctricos, que no sean los recomendados
por el fabricante.
• No introduzca en su boca cubitos apenas extraídos del
congelador.
• Este aparato no puede ser utilizado por personas (incluidos
los niños) con capacidades físicas, sensoriales o mentales
disminuidas o sin experiencia, salvo que estén supervisadas
o instruidas sobre el uso del aparato por una persona
responsable de su seguridad. Los niños deberían ser
controlados para garantizar que no jueguen con el aparato.
• Los embalajes no son juguetes para los niños.
• Tener en cuenta la posición del montante para el cierre de las
puertas de frigorífico
(ver figura)
.
2
1
Precauciones y consejos
! El aparato ha sido proyectado y fabricado en conformidad con
las normas internacionales sobre seguridad. Estas advertencias
se suministran por razones de seguridad y deben ser leídas
atentamente.
Este equipamiento es conforme con las siguientes Directivas
Comunitarias:
- 73/23/CEE del 19/02/73 (Baja Tensión) y sucesivas modificaciones;
-89/336/CEE del 03/05/89 (Compatibilidad Electromagnética) y
sucesivas modificaciones;
- 2002/96/CE.
Seguridad general
• El aparato ha sido pensado para un uso de tipo no
profesional en el interior de una vivienda.
• El aparato debe ser utilizado para conservar y congelar
alimentos sólo por personas adultas y según las indicaciones
contenidas en este manual.
• El aparato no se debe instalar al aire libre ni siquiera si el
lugar está protegido debido a que es muy peligroso dejarlo
expuesto a la lluvia y tormentas.
• No colocar alimentos demasiado voluminosos en el cajón
freezer superior si está presente el fabricador de hielo.
Eliminación
• Eliminación del material de embalaje: respete las normas
locales, de esta manera los embalajes podrán ser reutilizados.
• En base a la Norma europea 2002/96/CE de Residuos de
aparatos Eléctricos y Electrónicos (RAEE), los electrodomésticos
viejos no pueden ser arrojados en los contenedores municipales
habituales; tienen que ser recogidos selectivamente para
optimizar la recuperación y reciclado de los componentes y
materiales que los constituyen, y reducir el impacto en la salud
humana y el medioambiente. El símbolo del cubo de basura
tachado se marca sobre todos los productos para recordar al
consumidor la obligación de separarlos para la recogida
selectiva. El consumidor debe contactar con la autoridad local o
con el vendedor para informarse en relación a la correcta
eleminación de su electrodoméstico viejo.
Ahorrar y respetar el medio ambiente
• Instale el aparato en una ambiente fresco y bien aireado,
protéjalo de la exposición directa a los rayos solares y no lo
coloque cerca de fuentes de calor.
• Para introducir o extraer los alimentos, abra las puertas del
aparato el menor tiempo posible. Cada apertura de las
puertas produce un notable gasto de energía.
• No llene con demasiados alimentos el aparato: para una buena
conservación, el frío debe poder circular libremente. Si se
impide la circulación, el compresor trabajará continuamente.
18
Page 19

• No introduzca alimentos calientes: elevarían la temperatura
interior obligando al compresor a un mayor trabajo con un
gran gasto de energía eléctrica.
• Descongele el aparato si se formara hielo (
una espesa capa de hielo vuelve más difícil la cesión de frío a
los alimentos y hace que aumente el consumo de energía.
• Mantenga eficientes y limpias las juntas para que se adhieran
bien a las puertas y no dejen salir el frío (
• Gracias a que las puertas y los cajones del congelador se
abren de forma independiente, este producto permite un
ahorro de energía superior al 50% con respecto a un
combinado de 2 puertas.
ver Mantenimiento
ver Mantenimiento
Anomalías y soluciones
Puede suceder que el aparato no funcione. Antes de llamar al Servicio
de Asistencia Técnica (ver Asistencia), controle que no se trate de un
problema fácilmente solucionable con la ayuda de la siguiente lista.
La luz testigo verde de ALIMENTACIÓN no se enciende.
• El enchufe no está introducido en el tomacorriente o no lo
está suficientemente como para hacer contacto o bien en la
casa no hay corriente.
El refrigerador y el congelador enfrían poco.
• Las puertas no cierran bien o las juntas están dañadas.
• Las puertas se abren demasiado frecuentemente.
• Las perillas de FUNCIONAMIENTO no están en la posición
);
correcta (
• El refrigerador o el congelador se han llenado excesivamente.
).
En el refrigerador los alimentos se congelan.
• La perilla de FUNCIONAMIENTO DEL REFRIGERADOR no
está en la posición correcta (
• Los alimentos están en contacto con la pared posterior.
El motor funciona continuamente.
• Fue pulsado el botón SUPER FREEZE (congelamiento
rápido): la luz testigo amarilla SUPER FREEZE está encendida
o centelleante (
• La puerta no está bien cerrada o se abre continuamente.
• La temperatura del ambiente externo es muy alta.
El aparato hace mucho ruido.
• El aparato no fue instalado en un lugar bien plano (
• El aparato ha sido instalado entre muebles u objetos que
vibran y producen ruidos.
• El gas refrigerante interior produce un ligero ruido aún cuando
el compresor está detenido: no es un defecto, es normal.
ver Descripción
ver Desc.
).
ver Descripción
).
).
ver Instalación).
E
El motor no arranca.
• El aparato posee un control que lo protege contra
sobrecargas (
Las luces testigo están débilmente encendidas.
• Desconecte el enchufe y vuelva a introducirlo en el
tomacorriente después de haberlo girado sobre sí mismo.
a) Suena la alarma.
a) La puerta del refrigerador ha quedado abierta durante más de dos
minutos. El sonido cesa cuando se cierra la puerta. O bien no se ha
seguido el correcto procedimiento de apagado (
b) Suena la alarma y centellean las dos luces testigo amarillas.
b) El aparato señala un calentamiento excesivo del congelador.
Se aconseja verificar el estado de los alimentos: podría ser
necesario desecharlos.
c) Suena la alarma y centellean las dos luces testigo
amarillas y la verde.
c) El aparato señala un calentamiento peligroso del congelador:
los alimentos deben ser desechados.
ver Puesta en funcionamiento y uso
ver Mantenimiento
+ señal sonora = Calentamiento excesivo
+ señal sonora = Calentamiento peligroso
).
La temperatura de algunas partes externas del frigorífico
es elevada.
• Las temperaturas elevadas son necesarias para evitar la
formación de condensación en zonas particulares del producto.
).
b/c)
En ambos casos el congelador se mantendrá a una
temperatura de alrededor de 0ºC para no recongelar los
alimentos. Para apagar la señal sonora: abra y cierre la puerta
del refrigerador. Para restablecer el funcionamiento normal: lleve
la perilla de FUNCIONAMIENTO DEL CONGELADOR hasta la
posición (apagado) y vuelva a encender el aparato.
d) Centellea el piloto amarillo SUPERFREEZE
d) La función Optimization Energy Saving está activada.
El piloto verde de ALIMENTACIÓN centellea.
• El aparato no funciona correctamente. Llame al Servicio de
Asistencia Técnica.
19
Page 20

TR
MontajMontaj
Montaj
MontajMontaj
!!
! Bu kitapçýðý gerektiði her an danýþabilmeniz için özenle
!!
saklayýnýz. Satýþ, devir yada taþýnma halinde, çalýþma sistemi ve
bununla ilgili uyarýlar konusunda cihazýn yeni sahibinin
bilgilenmesi için bu kitapçýðýn cihazla birlikte kalmasýný saðlayýnýz.
! !
! Talimatlarý dikkatlice okuyunuz: montaj, kullaným ve güvenliðe
! !
iliþkin önemli bilgiler içermektedir.
Cihazýn yerleþtirilmesi ve baðlanmasýCihazýn yerleþtirilmesi ve baðlanmasý
Cihazýn yerleþtirilmesi ve baðlanmasý
Cihazýn yerleþtirilmesi ve baðlanmasýCihazýn yerleþtirilmesi ve baðlanmasý
KonumlandýrmaKonumlandýrma
Konumlandýrma
KonumlandýrmaKonumlandýrma
1. Cihazý nemsiz ve havadar bir yere yerleþtiriniz.
2. Arkadaki havalandýrma ýzgaralarýný kapatmayýnýz: kompresör ve
kondenser ýsý yayar, bu yüzden cihazýn iyi çalýþmasýný ve tüketiminin
azalmasýný saðlamak için iyi bir havalandýrma gerektirirler.
3. Cihazýn üst kýsmý ile üstüne konacak mobilya arasýnda en az
10 cm, mobilya/duvar yanýna yerleþtirilmesi durumunda ise en
az 5 cm açýklýk býrakýnýz
4. Cihazэ эsэ kaynaklarэndan uzak tutunuz (цr. doрrudan gьneю
эюэрэ, elektrikli ocak).
5. Ürünün arka kýsmýyla duvar arasýnda uygun bir mesafe
býrakmak için, verilen belge üzerinde bulunan kullaným
talimatlarýna uygun olarak montaj kitinde mevcut olan
uzaklaþtýrýcý çubuklarý monte ediniz.
Cihazýn ayný seviyeye getirilmesiCihazýn ayný seviyeye getirilmesi
Cihazýn ayný seviyeye getirilmesi
Cihazýn ayný seviyeye getirilmesiCihazýn ayný seviyeye getirilmesi
1. Buzdolabýnýzý düz ve sert bir zemin üzerine yerleþtiriniz.
2. Zeminin düz olmamasý durumunda ayarlanabilir ön ayaklarý
gevþeterek veya sýkarak cihazýn tamamen zemine oturmasýný
saðlayýnýz.
Elektrik baðlantýsýElektrik baðlantýsý
Elektrik baðlantýsý
Elektrik baðlantýsýElektrik baðlantýsý
Taþýma sonrasýnda cihazý dik olarak yerleþtiriniz ve elektrik
tesisatýna baðlamadan önce en az 3 saat bekleyiniz. Fiþi prize
takmadan önce aþaðýdaki hususlara dikkat ediniz:
• Prizin topraklamasý yürürlükteki normlara uygun olmalýdýr;
• elektrik prizi, soðutucu bölmesinin sol tarafýnýn aþaðýsýnda
bulunan özellik etiketinde belirtilen makinenin maksimum güç
yükünü çekebilmelidir (örn. 150 W);
• besleme gerilimi, soðutucu bölmesinin sol tarafýnýn aþaðýsýnda
bulunan özellik etiketinde belirtilen deðerler kapsamýnda
olmalýdýr (ör. 220-240 V);
• priz ve cihazýn fiþi, birbiriyle uyumlu olmalýdýr.
Aksi takdirde fiþin yenisi ile deðiþtirilmesi için yetkili Servise
(
Teknik Servis bölümüne bakýnýz
uzatma kablosu ya da çoklu priz kullanmayýnýz.
!!
! Cihaz monte edildikten sonra elektrik kablosu ve priz kolay bir
!!
þekilde eriþilebilir olmalýdýrlar.
!!
! Kablo kývrýlmalara veya ezilmelere maruz kalmamalýdýr.
!!
!!
! Kablonun periyodik olarak kontrol edilmesi ve sadece yetkili
!!
teknik personel tarafýndan deðiþtirilmesi gerekir (Teknik Servis
bölümüne bakýnýz).
! Üretici firma yukarýdaki normlarýn dikkate alýnmamasý! Üretici firma yukarýdaki normlarýn dikkate alýnmamasý
! Üretici firma yukarýdaki normlarýn dikkate alýnmamasý
! Üretici firma yukarýdaki normlarýn dikkate alýnmamasý! Üretici firma yukarýdaki normlarýn dikkate alýnmamasý
durumunda hiçbir sorumluluk kabul etmeyecektirdurumunda hiçbir sorumluluk kabul etmeyecektir
durumunda hiçbir sorumluluk kabul etmeyecektir
durumunda hiçbir sorumluluk kabul etmeyecektirdurumunda hiçbir sorumluluk kabul etmeyecektir
) baþvurmanýz gerekir;
..
.
..
1. DONDURUCU KONTROL ayar düðmesini
getiriniz.
2. Cihazýn fiþini elektrik prizine takýnýz ve yeþil BESLEME uyarý
lambasýnýn yanmasýný saðlayýnýz.
3. DONDURUCU KONTROL ayar düðmesini orta bir deðere
ayarlayýnýz ve SUPER FREEZE (hýzlý dondurma) tuþuna
basýnýz: Sarý FAST FREEZE uyarý lambasý yanacaktýr.
Dondurucu bölmesi optimal ýsý derecesine ulaþýnca
kapanacaktýr: o zaman gýdalarý yerleþtirmeniz mümkün
olacaktýr.
4. SOÐUTUCU KONTROL ayar düðmesini orta bir deðere
ayarlayýnýz. Birkaç saat geçtikten sonra buzdolabýnýza
gýdalarýn yerleþtirilmesi mümkün olacaktýr.
Soðutma sistemiSoðutma sistemi
Soðutma sistemi
Soðutma sistemiSoðutma sistemi
No FrostNo Frost
No Frost
No FrostNo Frost
No frost sistemi ile devamlý soðuk hava dolaþýmý saðlanýr. Böylece
nem toplanýr, buz ve çiy oluþmasý engellenir: soðutucu
bölmesinde gerekli olan nem oraný saðlanýr ve çiy oluþmasýný
engellediði için gýdalarýn besin özelliklerinin korunmasý saðlanýr;
dondurucu bölmesinde ise buz çözme iþlemine gerek kalmadan
ve gýdalarýn birbiriyle yapýþmamasý saðlanarak buz oluþmasý
engellenir. Gýda veya kaplar arka soðutma duvarý ile doðrudan
temasa geçmemelidir. Havalandýrma deliklerinin kapatýlmasý
kondens suyu oluþmasýna sebep olur. Þiþeleri kapatýnýz ve
gýdalarý sarýnýz.
Buzdolabýnýzý en iyi þekilde kullanýnýzBuzdolabýnýzý en iyi þekilde kullanýnýz
Buzdolabýnýzý en iyi þekilde kullanýnýz
Buzdolabýnýzý en iyi þekilde kullanýnýzBuzdolabýnýzý en iyi þekilde kullanýnýz
• Isý derecesini ayarlamak için SOÐUTUCU KONTROL ayar
düðmesini kullanýnýz (
• Az süre içinde ýsý derecesini azaltmak için, ör. büyük miktarda
alýþ veriþ yapýldýktan sonra bölme doldurulduðu zaman,
SUPER COOL (hýzlý soðutma) tuþuna basýnýz. Gereken süre
geçtikten sonra fonksiyon otomatik olarak devreden çýkar.
• Sadece soðuk veya ýlýk, sýcak olmayan gýdalarý yerleþtiriniz
(
Önlemler ve öneriler bölümüne bakýnýz
• Piþmiþ gýdalar, çið gýdalardan daha uzun süre saklanmaz.
• Sývýlarý, kapaksýz kaplara koymayýnýz: nem oranýnýn
yükselmesine ve kondens suyunun oluþmasýna sebep olurlar.
RAFLAR:RAFLAR:
•
RAFLAR: tepsi veya tel. Büyük kaplar veya fazla yer kaplayan
RAFLAR:RAFLAR:
gýdalarýn yerleþtirilmesi için mevcut olan kýlavuzlar sayesinde
çýkarýlabilir ve yüksekliði ayarlanabilir (
Yükseklik, raf tamamen çýkarýlmadan ayarlanabilir.
Açýklama bölümüne bakýnýz
).
þekle bakýnýz
konumuna
).
).
Çalýþtýrma ve kullanýmÇalýþtýrma ve kullaným
Çalýþtýrma ve kullaným
Çalýþtýrma ve kullanýmÇalýþtýrma ve kullaným
Cihazýn çalýþtýrýlmasýCihazýn çalýþtýrýlmasý
Cihazýn çalýþtýrýlmasý
Cihazýn çalýþtýrýlmasýCihazýn çalýþtýrýlmasý
! Cihazý çalýþtýrmadan önce, kurulum talimatlarýný yerine! Cihazý çalýþtýrmadan önce, kurulum talimatlarýný yerine
! Cihazý çalýþtýrmadan önce, kurulum talimatlarýný yerine
! Cihazý çalýþtýrmadan önce, kurulum talimatlarýný yerine! Cihazý çalýþtýrmadan önce, kurulum talimatlarýný yerine
getiriniz (Montaj bölümüne bakýnýz).getiriniz (Montaj bölümüne bakýnýz).
getiriniz (Montaj bölümüne bakýnýz).
getiriniz (Montaj bölümüne bakýnýz).getiriniz (Montaj bölümüne bakýnýz).
!!
! Cihazý elektrik þebekesine baðlamadan önce, tüm bölmeleri ve
!!
aksesuarlarý bikarbonat kullanarak ýlýk su ile iyice temizleyiniz.
!!
! Cihaz, çalýþmaya baþladýktan yaklaþýk 8 dakika sonra kompresörü
!!
devreye sokan aþýrý yüklemeyi devreden çýkarma kontrolüne
sahiptir. Ýstenilen ya da istenilmeyen (black out) sebeplerden dolayý,
elektrik her kesildikten sonra da ayný iþlem tekrarlanýr.
20
MEYVE VE SEBZEMEYVE VE SEBZE
MEYVE VE SEBZE çekmecesi
MEYVE VE SEBZEMEYVE VE SEBZE
Buzdolabýnda mevcut olan meyve ve sebze çekmeceleri içerde
saklanan meyve ve sebzeleri taze ve kokulu saklamak üzere
tasarlanmýþtýr. Gýdalarý daha az nemli bir ortamda saklamak için
nem ayarýný
konumuna getiriniz.
B B
B konumuna getiriniz, daha nemli bir ortam için ise
B B
AA
A
AA
Page 21

A
B
Dondurucuyu en iyi þekilde kullanýnýzDondurucuyu en iyi þekilde kullanýnýz
Dondurucuyu en iyi þekilde kullanýnýz
Dondurucuyu en iyi þekilde kullanýnýzDondurucuyu en iyi þekilde kullanýnýz
• Isý derecesini ayarlamak için, DONDURUCU KONTROL ayar
düðmesini kullanýnýz (Açýklama bölümüne bakýnýz).
• Erimiþ veya erimek üzere olan yiyecekleri bir daha
dondurmayýnýz; bu gýdalar, tüketilmesi için (24 saat içinde),
piþirilmelidir.
• Taze dondurulacak gýdalar, dondurulmuþ gýdalar ile temasa
geçmeyecek þekilde saklanmalýdýr.
• Dondurucu içine sývý içeren, kapaklý veya hava geçirmez bir
þekilde kapatýlmýþ cam þiþeleri koymayýnýz, patlayabilirler.
• Günlük en fazla yiyecek dondurma miktarý soðutucu
bölmesinde aþaðýda solda bulunan teknik veriler etiketi
üzerinde yazýlýdýr (örneðin: Kg/24s 4).
• Ьst зekmece зeюitli yiyecekleri en uygun sэcaklэkta saklamak
iзin kullanэlabilir (semifreddo, donmuю tatlэlar, dondurmalar ve
alkollь iзecekler), alt зekmece (genel gцrьnьme bakэnэz)
dondurulmuю yiyecekleri normal koюullarda saklamak iзin
tasarlanmэюtэr.
Yiyeceрi dondurmak iзin (buzdolabэ зalэюэr haldeyken) TVZ’yi
devre dэюэ bэrakэn ve ьst зekmeceyi boюaltэn, hэzlэ dondurma
SUPER FREEZE (Sьper Dondurma) dьрmesi basэn (Эlgili LED
эюэрэ yanacaktэr), yiyeceрi iзerisine yerleюtirip, зekmeceyi
kapatэn. Эюlev 24 saat sonra ve en uygun sэcaklэрa
ulaюэldэрэnda otomatik olarak devre dэюэ bэrakэlэr (LED эюэрэ
kapanэr). Yiyecek юimdi alt зekmeceye taюэnabilir (TVZ
fonksiyonlarэnэn kullanэlabilmesi iзin) yada devre dэюэ
bэrakэldэрэnda normal saklama bцlmesi olarak зalэюacak olan
TVZ bцlmesinde bэrakэlabilir.
!!
! Dondurucu bölmesi içerisinde hava dolaþýmýný saðlamak için
!!
gýdalarýn havalandýrma deliklerini kapatmayacak þekilde
yerleþtirilmesi tavsiye edilir.
!!
! Dondurma iþlemi sýrasýnda kapýyý açmamaya özen gösteriniz.
!!
!!
! Elektrik kesintisi veya arýza durumunda, dondurucunun kapaðýný
!!
açmayýnýz: bu þekilde dondurulmuþ gýdalar yaklaþýk 9-14 saate
kadar, hiç bir deðiþikliðe uðramadan korunacaklardýr.
TVZ bölmesiTVZ bölmesi
TVZ bölmesi
TVZ bölmesiTVZ bölmesi
TVZ kullanýcýnýn belirli gereksinimlere ve içeride saklanan yiyeceðin
türüne göre ayarlanabilen 6 farklý çalýþma modu arasýnda seçim
yapmasýna izin veren buzluktaki özel bir bölmedir. Kullanýlabilen
sýcaklýk ayarlarý 0°C, -6°C, -12°C ve -18°C’ dýr; bu seçenekler
kumanda panelinde gösterilmektedir (FREEZER COMPARTMENT
(BUZLUK BÖLMESÝ) döner düðmesi). TVZ baðýmsýz kumanda
özelliðine sahiptir, normal buzluk bölmesi olarak kullanmak için
kumanda panelinde de devre dýþý býrakýlabilir.
DIKKADIKKA
TT
: :
DIKKA
DIKKADIKKA
digerine geçis anlik degildirdigerine geçis anlik degildir
digerine geçis anlik degildir
digerine geçis anlik degildirdigerine geçis anlik degildir
kalmasini saglayacak gerekli sürenin birakilmasi gereklidirkalmasini saglayacak gerekli sürenin birakilmasi gereklidir
kalmasini saglayacak gerekli sürenin birakilmasi gereklidir
kalmasini saglayacak gerekli sürenin birakilmasi gereklidirkalmasini saglayacak gerekli sürenin birakilmasi gereklidir
TVZ fonksiyonu kullanildiginda, bir sicaklik ayarindanTVZ fonksiyonu kullanildiginda, bir sicaklik ayarindan
T
:
TVZ fonksiyonu kullanildiginda, bir sicaklik ayarindan
TT
: :
TVZ fonksiyonu kullanildiginda, bir sicaklik ayarindanTVZ fonksiyonu kullanildiginda, bir sicaklik ayarindan
. .
TVZ bölgesi sicakliginin sabitTVZ bölgesi sicakliginin sabit
.
TVZ bölgesi sicakliginin sabit
. .
TVZ bölgesi sicakliginin sabitTVZ bölgesi sicakliginin sabit
..
.
..
Bakým ve özenBakým ve özen
Bakým ve özen
Bakým ve özenBakým ve özen
Elektrik akýmýný kesinizElektrik akýmýný kesiniz
Elektrik akýmýný kesiniz
Elektrik akýmýný kesinizElektrik akýmýný kesiniz
Temizlik ve bakým iþlemleri sýrasýnda, cihazýn elektrik baðlantýsýný
kesiniz:
1. DONDURUCU KONTROL ayar düðmesini konumuna
getiriniz.
2. fiþi prizden çekiniz.
!!
! Bu prosedürün uygulanmamasý durumunda alarm çalabilir: bu
!!
alarm bir anormallik belirtisi deðildir. Cihazýn normal çalýþmasýný
saðlamak için DONDURUCU KONTROL ayar düðmesini istenilen
deðer üzerine getirmeniz yeterlidir. 1 ve 2 noktalarýný uygulayarak
cihazýn elektrik þebekesi ile baðlantýsýný kesiniz.
Cihazý temizleyinizCihazý temizleyiniz
Cihazý temizleyiniz
Cihazý temizleyinizCihazý temizleyiniz
• Buzdolabýnýn dýþ, iç duvarlarýný ve contalarýný karbonat (yemek
sodasý) veya nötr sabun eklenmiþ ýlýk su ile ýslatýlmýþ yumuþak
bir sünger ile temizleyiniz. Aþýndýrýcý maddeler ve çözücü,
amonyak, beyazlatýcý türü maddeleri kesinlikle kullanmayýnýz.
• Sökülebilen aksesuarlarý deterjan veya sabun eklenmiþ ýlýk su
içine batýrýnýz. Çalkalayýnýz ve dikkatlice kurulayýnýz.
• Buzdolabýnýzýn arkasý toz dolu ise, cihazý kapatýp elektrik
baðlantýsýný kestikten sonra elektrik süpürgesini orta watt’a
ayarlayarak uzun ucu ile arkasýndaki tozlarý iyice alýnýz.
• Derin dondurucu bölmesindeki çekmecelerin sürgülü raylarýnýn
temizlenmesi sýrasýnda otomatik çekmece kapanma
mekanizmasý devre dýþý kalabilir. Yeniden etkin hale getirmek
için, çekmeceyi normalde gerekli olandan biraz daha sert
kapatýn.
Ýstenmeyen kokularý ve küfü önleyinizÝstenmeyen kokularý ve küfü önleyiniz
Ýstenmeyen kokularý ve küfü önleyiniz
Ýstenmeyen kokularý ve küfü önleyinizÝstenmeyen kokularý ve küfü önleyiniz
• Cihaz, kokularý önleyici hijyenik malzemelerle üretilmiþtir. Bu
özelliði kaybetmemek için gýdalarýn her zaman iyice sarýlýp
kapatýlmasý gerekir. Böylece leke oluþmasý engellenecektir.
• Cihazýn uzun süre devre dýþý býrakýlmak istenmesi durumunda,
içini iyice temizleyiniz ve kapýlarýný açýk býrakýnýz.
HOIDAHOIDA
HOIDA
HOIDAHOIDA
Tatile gidiyorsanýz, cihazý kapatmanýz gerekir, ürünlerin içeride
bozulmadan saklanmasýný saðlamak için buzdolabý bölmesinin
sýcaklýðýný uygun hale getiren düþük enerji fonksiyonu özelliðine
sahiptir 12°C (örneðin, kozmetik ve güzellik ürünlerini ýsýdan
korumak isteyebilirsiniz). Gýdalarý saklamak üzere dondurucu
bölmesinin ýsý derecesi minimum (1) konumuna ayarlanmalýdýr.
Fonksiyonu çalýþtýrmak için:Fonksiyonu çalýþtýrmak için:
Fonksiyonu çalýþtýrmak için:
Fonksiyonu çalýþtýrmak için:Fonksiyonu çalýþtýrmak için:
SOÐUTUCU KONTROL ayar düðmesini
(þekle bakýnýz). Sesli bir sinyal iki kere kýsa çalýp devrede olduðunu
belirtir; sesli sinyal tek çalarsa devrede olmadýðýný belirtir.
Optimum Enerji Optimum Enerji
Optimum Enerji
Optimum Enerji Optimum Enerji
Ürünün sýcaklýðýný korurken güç tüketimini en uygun düzeyde
tutmak için,
TT
asarrufu)asarrufu)
T
asarrufu) açabilirsiniz.
TT
asarrufu)asarrufu)
Bu fonksiyon enerji tasarrufunu en yüksek seviyeye çýkarýr.
Düðmeler “I CARE”’e ayarlanarak ve daha sonra Super Freeze
(Süper Dondurma) düðmesi en az 3 saniye basýlý tutularak
ayarlanabilir, Super Freeze (Süper Dondurma) gösterge lambasý
bu fonksiyonun etkinleþtirildiðini ikaz ederek yanýp sönmeye
baþlayacaktýr.
Optimization Energy SavingOptimization Energy Saving
Optimization Energy Saving (Optimum Enerji Tasarrufu
Optimization Energy SavingOptimization Energy Saving
Fonksiyonu), Super Freeze (Süper Dondurma) düðmesine tekrar
basýlarak devre dýþý býrakýlabilir. Ýlgili gösterge lambasý yanýp
sönmeye son verecek ve böylece yeniden ilk çalýþma koþullarýna
tekrar dönüldüðüne iþaret edecektir.
YY
fonksiyonu fonksiyonu
Y
fonksiyonu
YY
fonksiyonu fonksiyonu
konumuna getiriniz
TT
asarrufu Fonksiyonuasarrufu Fonksiyonu
T
asarrufu Fonksiyonu
TT
asarrufu Fonksiyonuasarrufu Fonksiyonu
Optimization Energy Saving (Optimum EnerjiOptimization Energy Saving (Optimum Enerji
Optimization Energy Saving (Optimum Enerji
Optimization Energy Saving (Optimum EnerjiOptimization Energy Saving (Optimum Enerji
TR
21
Page 22

TR
Optimization Energy SavingOptimization Energy Saving
Optimization Energy Saving (Optimum Enerji Tasarrufu)
Optimization Energy SavingOptimization Energy Saving
fonksiyonu nemli ortamlarda etkinleþtirildiðinde, cihazýn
kapaðýnda bir miktar yoðuþma meydana gelebilir, fonksiyon devre
dýþý býrakýldýðýnda yeniden normal çalýþma koþullarýna dönülür.
Soðutucu lambasýnýn deðiþtirilmesiSoðutucu lambasýnýn deðiþtirilmesi
Soðutucu lambasýnýn deðiþtirilmesi
Soðutucu lambasýnýn deðiþtirilmesiSoðutucu lambasýnýn deðiþtirilmesi
Soðutucu bölmesinin ampulünü deðiþtirmeden önce buzdolabýnýn
fiþini prizden çýkarýnýnz. Aþaðýdaki Talimatlarý özenle uygulayýnýz.
Sekilde gösterildigi gibi koruma zarýný çýkartýktan sonra ampulü
açýnýz. Koruma zarýnda belirtildigi (10 W, 15 W veya 25 W) gücü
esit olan bir yenisi ile degistiriniz.
2
veya tecrübe ve bilinçten yoksun kiþilerin (çocuklar dahil) kullanýmý
için uygun deðildir, emniyetlerinden sorumlu bir kiþi tarafýndan
cihazýn kullanýmý konusunda eðitim almamýþ kiþiler tarafýndan da
kullanýma uygun olarak amaçlanmamýþtýr. Çocuklar, cihaz ile
oynamamalarý saðlanarak, denetlenmelidirler.
• Ambalajlar çocuklar için oyuncak deðildir.
• Soðutucunun kapýlarýný kapatýrken, kanatçýðýn dik konumda
olmasýna dikkat edin (þekle bakýnýz).
1
Önlemler ve önerilerÖnlemler ve öneriler
Önlemler ve öneriler
Önlemler ve önerilerÖnlemler ve öneriler
!Cihaz, uluslararasý güvenlik normlarýna uygun olarak tasarlanýp
üretilmiþtir. Aþaðýdaki bilgiler, güvenliði saðlamak amacýyla verilmiþtir.
Bu yüzden dikkatlice okunmasý gerekir.
Bu cihaz aþaðýdaki AB Yönergeleri ile uyumludur:
- 2006/95/AT Belirli Gerilim Sýnýrlarý Dahilinde Kullanýlmak
Üzere Tasarlanmýþ Elektrikli Teçhizat Ýle Ýlgili Yönerge
- 2004/108/AT Elektromanyetik Uyumluluk Yönergesi
- 96/57/AT Ev tipi elektrikli soðutucular , dondurucular ve
kombinasyonlarýnýn enerji verimlilik þartlarý ile ilgili yönerge
Genel güvenlik uyarýlarýGenel güvenlik uyarýlarý
Genel güvenlik uyarýlarý
Genel güvenlik uyarýlarýGenel güvenlik uyarýlarý
• Cihaz, meskenlerde kullanýlmak üzere tasarlanmýþ olup
profesyonel kullaným amaçlý deðildir.
• Cihaz, sadece yetiþkin kiþiler tarafýndan ve bu kitapçýkta
aktarýlan talimatlara göre, gýdalarý saklamak ve dondurmak için
kullanýlmalýdýr.
• Cihaz, üzeri kapalý bile olsa açýk alanlara monte edilmemelidir,
çünkü yaðmur ve fýrtýnaya maruz kalmasý son derece
tehlikelidir.
• Cihaza ayaklarýnýz çýplakken yada elleriniz veya ayaklarýnýz
ýslak yada nemliyken dokunmayýnýz.
• Buzdolabýnýn soðutma yapan iç kýsýmlarýna dokunmayýnýz:
yanma veya yaralanma tehlikesi vardýr.
• Fiþi prizden çekerken kablosundan deðil fiþin kendisinden
tutarak çekiniz.
• Temizlik ve bakým iþlemlerini gerçekleþtirmeden önce fiþ
elektrik þebekesinden çýkarýlmalýdýr. Buzdolabýnýn tüm elektrik
baðlantýlarýný kesmek için ISI AYAR DÜÐMESÝNÝ OFF
konumuna (cihaz kapalý) getirmek yeterli deðildir.
• Arýza halinde, onarmak amacýyla iç mekanizmalarý hiçbir
þekilde kurcalamayýnýz.
• Dondurulmuþ gýda saklama kaplarýnda üretici tarafýndan
tavsiye edilen tip hariç ucu sivri ve keskin aletleri
kullanmayýnýz.
• Buz küplerini dondurucu bölmesinden çýkarýr çýkarmaz
aðzýnýza sokmayýnýz.
• Bu cihaz fiziksel, duyumsal veya mental kapasite azlýðýna sahip,
• Buz tepsisi (varsa) için ayrýlan boþluktaki, derin dondurucu
bölmesinin üst kýsmýna aþýrý hacimli yiyecek
yerleþtirmediðinizden emin olun.
Atýklarýn tasfiye edilmesiAtýklarýn tasfiye edilmesi
Atýklarýn tasfiye edilmesi
Atýklarýn tasfiye edilmesiAtýklarýn tasfiye edilmesi
• Ambalaj malzemelerinin tasfiye edilmesi: yerel yasalara uyunuz,
bu þekilde ambalajlarýn geri dönüþümü saðlanabilecektir.
• Elektrik ve elektronik cihazlarýn atýklarý hakkýndaki 2002/96/CE
sayýlý Avrupa Konseyi yönetmeliðinde (RAEE); beyaz eþyalarýn
kentsel katý atýk genel yöntemi ile tasfiye edilmemesi
öngörülmüþtür. Kullanýlmayan cihazlarýn, madde geri kazaným
ve geri dönüþüm oranýný en yüksek seviyeye yükseltmek,
çevre ve insan saðlýðýna olasý zararlarý engellemek amacýyla
ayrý ayrý toplanmasý gerekir. Tüm ürünlerin üzerinde; ayrý
toplama hükümlerini hatýrlatmak amacýyla üstünde çarpý iþareti
olan sepet sembolü aktarýlmaktadýr.
Elektrikli ev aletlerinin doðru bir þekilde tasfiye edilmesi
konusunda daha geniþ bilgi almak için, cihaz sahipleri mevcut
müþteri hizmetine veya satýþ noktalarýna baþvurabilirler.
TT
asarrufa yöneliniz ve çevreye saygýlý olunuzasarrufa yöneliniz ve çevreye saygýlý olunuz
T
asarrufa yöneliniz ve çevreye saygýlý olunuz
TT
asarrufa yöneliniz ve çevreye saygýlý olunuzasarrufa yöneliniz ve çevreye saygýlý olunuz
• Buzdolabэnэ doрrudan gьneю эюэрэna maruz kalmayacak, serin
ve havadar uygun bir yere yerleюtiriniz. Ayrэca, эsэ
kaynaklarэndan uzakta olmalэdэr.
• Gýdalarý yerleþtirmek ya da çýkarmak için, cihazýn kapýlarýný
mümkün olduðu kadar az açýk tutunuz. Buzdolabýnýn kapýlarý
her açýldýðýnda büyük ölçüde enerji tüketilir.
• Cihazý fazla miktarda gýda ile doldurmayýnýz: gýdalarýn iyi
saklanmasý için soðuk hava serbest bir þekilde dolaþmalýdýr.
Hava dolaþýmýnýn engellenmesi durumunda, kompresör
devamlý çalýþacaktýr.
• Buzdolabýnýn içine sýcak gýda koymayýnýz: dahili ýsý derecesini
yükseltir, kompresör yoðun çalýþmak zorunda kalýr ve elektrik
enerjisi büyük miktarda tüketilir.
• Buz oluþumu halinde dondurucu bölmesindeki buzu eritiniz (
Bakým bölümüne bakýnýz ); Kalýn bir buz tabakasý soðutma
iþlemini engellediði için daha fazla enerji tüketilir.
Arýzalar ve onarýmlarArýzalar ve onarýmlar
Arýzalar ve onarýmlar
Arýzalar ve onarýmlarArýzalar ve onarýmlar
Buzdolabýnýz bazen çalýþmayabilir. Teknik Servis ile irtibata
geçmeden önce (
yardýmýyla kolaylýkla çözülebilecek bir problem olup olmadýðýný
kontrol ediniz.
YY
eþil BESLEME uyarý lambasý yanmýyoreþil BESLEME uyarý lambasý yanmýyor
Y
eþil BESLEME uyarý lambasý yanmýyor
YY
eþil BESLEME uyarý lambasý yanmýyoreþil BESLEME uyarý lambasý yanmýyor
• Fiþ prize takýlý deðil veya kontaða girecek kadar yeterli deðil,
veya evdeki elektrik akýmý kesik.
Teknik Servis bölümüne bakýnýz
..
.
..
), aþaðýdaki liste
22
Page 23

Motor çalýþmaya baþlamýyorMotor çalýþmaya baþlamýyor
Motor çalýþmaya baþlamýyor
Motor çalýþmaya baþlamýyorMotor çalýþmaya baþlamýyor
• Cihaz, aþýrý yüklemeyi devreden çýkarma kontrolüne sahiptir
(
Çalýþtýrma ve kullanma bölümüne bakýnýz
..
.
..
).
TR
Uyarý lambalarý zayýf bir þekilde yanýyorUyarý lambalarý zayýf bir þekilde yanýyor
Uyarý lambalarý zayýf bir þekilde yanýyor
Uyarý lambalarý zayýf bir þekilde yanýyorUyarý lambalarý zayýf bir þekilde yanýyor
• Fiþi prizden çekiniz ve tersine çevirip tekrar prize takýnýz.
a) a)
Alarm çalýyorAlarm çalýyor
a)
Alarm çalýyor
a) a)
Alarm çalýyorAlarm çalýyor
a) Soðutucu kapýsý, iki dakikadan fazla açýk kalmýþ.
Kapý kapandýðýnda sesli alarm durur.
b) b)
Alarm çalýyor ve iki adet sarý uyarý lambasý yanýp sönüyorAlarm çalýyor ve iki adet sarý uyarý lambasý yanýp sönüyor
b)
Alarm çalýyor ve iki adet sarý uyarý lambasý yanýp sönüyor
b) b)
Alarm çalýyor ve iki adet sarý uyarý lambasý yanýp sönüyorAlarm çalýyor ve iki adet sarý uyarý lambasý yanýp sönüyor
b)b)
b) Cihaz, dondurucunun fazla ýsýnmýþ olduðunu belirtir.
b)b)
Gýdalarýn durumunun kontrol edilmesi tavsiye edilir: çöpe
atmanýz gerekebilir.
c) c)
Alarm çalýyor ve sarý ve yeþil uyarý lambasý yanýp sönüyorAlarm çalýyor ve sarý ve yeþil uyarý lambasý yanýp sönüyor
c)
Alarm çalýyor ve sarý ve yeþil uyarý lambasý yanýp sönüyor
c) c)
Alarm çalýyor ve sarý ve yeþil uyarý lambasý yanýp sönüyorAlarm çalýyor ve sarý ve yeþil uyarý lambasý yanýp sönüyor
c) Cihaz, dondurucunun tehlikeli olacak þekilde fazlasýyla ýsýnmýþ
olduðunu belirtir: gýdalar çöpe atýlmalýdýr.
b/c) Bu iki durumda gýdalarý tekrar dondurmamak için dondurucu
bölmesi içerisinde ýsý derecesi 0°C civarýnda olacaktýr. Sesli
sinyali kapatmak için: buzdolabýnýn kapýsýný açýp kapatýnýz.
Cihazýn normal çalýþmasýný saðlamak için: DONDURUCU
KONTROL ayar düðmesini konumuna getirdikten sonra
(cihaz kapalýdýr), cihazý tekrar çalýþtýrýnýz.
..
.
..
+ sesli sinyal =
+ sesli sinyal =
TT
ehlikeli ýsýnmaehlikeli ýsýnma
T
ehlikeli ýsýnma
TT
ehlikeli ýsýnmaehlikeli ýsýnma
..
.
..
Aþýrý ýsýnmaAþýrý ýsýnma
Aþýrý ýsýnma
Aþýrý ýsýnmaAþýrý ýsýnma
..
.
..
..
.
..
d)Lamba sarý renkte SUPERFREEZE yazýsý görünecekd)Lamba sarý renkte SUPERFREEZE yazýsý görünecek
d)Lamba sarý renkte SUPERFREEZE yazýsý görünecek
d)Lamba sarý renkte SUPERFREEZE yazýsý görünecekd)Lamba sarý renkte SUPERFREEZE yazýsý görünecek
þekilde yanýp sönerþekilde yanýp söner
þekilde yanýp söner
þekilde yanýp sönerþekilde yanýp söner
d) Enerji Tasarrufu Optimasyonu etkinleþtirilir.
YY
eюil BESLEME uyarэ эюэрэ yanэp sцnьyoreюil BESLEME uyarэ эюэрэ yanэp sцnьyor
Y
eюil BESLEME uyarэ эюэрэ yanэp sцnьyor
YY
eюil BESLEME uyarэ эюэрэ yanэp sцnьyoreюil BESLEME uyarэ эюэрэ yanэp sцnьyor
• Cihaz gerektiði gibi çalýþmýyor. Teknik Servisi çaðýrýnýz
Soðutucu ve dondurucu az soðutma yapýyorSoðutucu ve dondurucu az soðutma yapýyor
Soðutucu ve dondurucu az soðutma yapýyor
Soðutucu ve dondurucu az soðutma yapýyorSoðutucu ve dondurucu az soðutma yapýyor
• Kapýlar tamamen kapanmýyor veya contalar bozuk.
• Kapýlar sýk sýk açýlýyor.
• KONTROL ayar düðmeleri doðru konumda deðildir
(
Açýklama bölümüne bakýnýz
• Soðutucu veya dondurucu fazla doldurulmuþ.
Soðutucu bölmesinde gýdalar donuyorSoðutucu bölmesinde gýdalar donuyor
Soðutucu bölmesinde gýdalar donuyor
Soðutucu bölmesinde gýdalar donuyorSoðutucu bölmesinde gýdalar donuyor
• SOÐUTUCU KONTROL ayar düðmesi doðru konumda deðildir
(
Açýklama bölümüne bakýnýz
Motor sürekli bir þekilde çalýþýyorMotor sürekli bir þekilde çalýþýyor
Motor sürekli bir þekilde çalýþýyor
Motor sürekli bir þekilde çalýþýyorMotor sürekli bir þekilde çalýþýyor
• SUPER FREEZE (hýzlý dondurma) tuþuna basýlmýþ: SUPER
FREEZE sarý uyarý lambasý yanýyor (
bakýnýz
) .
• Kapý tam kapalý deðil veya sürekli olarak açýlýyor.
• Dýþ ortam sýcaklýðý çok yüksek.
Cihaz çok gürültü yapýyorCihaz çok gürültü yapýyor
Cihaz çok gürültü yapýyor
Cihaz çok gürültü yapýyorCihaz çok gürültü yapýyor
• Cihaz tamamen düz bir zemine montaj edilmemiþ (
).
).
..
.
..
..
.
..
..
.
..
..
.
..
..
.
..
Açýklama bölümüne
Montaj
bölümüne bakýnýz).
• Cihaz sarsýntý yapan ve gürültü çýkaran mobilya veya eþyalar
arasýna yerleþtirilmiþ.
• Dahili soðutucu gaz, kompresör çalýþmadýðý zaman bile, hafif
bir ses çýkarýyor: bu bir arýza deðildir, normaldir.
Buzdolabýnýn bazý dýþ kýsýmlarýnýn ýsýsý yüksek.Buzdolabýnýn bazý dýþ kýsýmlarýnýn ýsýsý yüksek.
Buzdolabýnýn bazý dýþ kýsýmlarýnýn ýsýsý yüksek.
Buzdolabýnýn bazý dýþ kýsýmlarýnýn ýsýsý yüksek.Buzdolabýnýn bazý dýþ kýsýmlarýnýn ýsýsý yüksek.
• Yüksek ýsýlar, ürünün bazý özel bölgelerinde nem oluþmasýný
engellemek için gereklidir.
23
Page 24

TR
195077547.05
05/2012
24
 Loading...