


User Manual

44601 Fremont Blvd., Fremont, CA 94538, USA
Tel: +1.510.440.9901 • Fax: +1.510.440.1270 • www.arcsoft.com
Copyright © 2007 ArcSoft, Inc. All rights reserved. ArcSoft, the ArcSoft logo, and ArcSoft ShowBiz are registered trademarks of ArcSoft, Inc. in the United States. All other product and companies named herein may be trademarks of their respective owners.
Table of Contents |
|
|
1. |
Introduction ............................................. |
1 |
1.1 |
Installation ............................................. |
3 |
1.2 |
System Requirements............................... |
4 |
1.3 |
Workflow Overview .................................. |
5 |
2. |
Capture..................................................... |
7 |
2.1 |
Video Capture ......................................... |
9 |
2.2 |
Audio Capture ........................................ |
14 |
3. |
Edit......................................................... |
15 |
3.1 |
Video Clip Components ............................ |
17 |
3.2 |
Player ................................................... |
18 |
3.3 |
Media.................................................... |
20 |
3.4 |
Storyboard............................................. |
23 |
3.5 |
Timeline ................................................ |
26 |
3.6 |
Text...................................................... |
30 |
3.7 |
Transitions............................................. |
32 |
3.8 |
Effects................................................... |
33 |
3.9 |
Export................................................... |
34 |
4. |
Create..................................................... |
35 |
4.1 |
Media.................................................... |
37 |
4.2 |
Themes ................................................. |
38 |
4.3 |
Customize.............................................. |
39 |
4.4 |
Text...................................................... |
40 |
4.5 |
Set Chapters .......................................... |
41 |
4.6 |
Preview Area .......................................... |
43 |
4.7 |
Slide Shows ........................................... |
45 |
4.8 |
Write Disc.............................................. |
48 |
5. |
Quick DVD .............................................. |
49 |
5.1 |
Quick DVD Steps .................................... |
51 |
6. |
Menus..................................................... |
55 |
6.1 |
File ....................................................... |
57 |
6.2 |
Edit....................................................... |
58 |
6.3 |
View ..................................................... |
59 |
6.4 |
Options ................................................. |
60 |
6.5 |
Play ...................................................... |
61 |
6.6 |
Extras & Help ......................................... |
62 |
6.7 |
Keyboard Shortcuts................................. |
63 |
7. |
How Tos ................................................. |
67 |
7.1 |
Capture Video ........................................ |
69 |
7.2 |
Capture Audio ........................................ |
70 |
7.3 |
Create New Album .................................. |
71 |
7.4 |
Add Content to Storyboard....................... |
72 |
7.5 |
Modify Content ....................................... |
73 |
7.6 |
Create DVD............................................ |
74 |
7.7 |
Create Slide Show................................... |
75 |
7.8 |
Add Pan & Zoom..................................... |
76 |
7.9 |
Perform Advanced Editing ........................ |
78 |
7.10 |
Design Menus......................................... |
80 |
7.11 |
Burn To Disc .......................................... |
82 |
Reference...................................................... |
85 |
|
Customer Support............................................. |
86 |
|
Technical Support ............................................. |
87 |
|
Registering Your Product.................................... |
88 |
|
ArcSoft Product Family ...................................... |
89 |
|
Licensing Agreement ......................................... |
92 |
|
About ArcSoft................................................... |
96 |
|
INDEX ........................................................... |
97 |
|

Chapter 1: Introduction
1. Introduction
Installation
System Requirements
Workflow Overview
1

Chapter 1: Introduction
Welcome to ArcSoft ShowBiz® DVD 2, a powerful video application that includes everything you need to edit your home videos and create spectacular DVDs.
This Introduction covers the installation and system requirements and provides an overview of the typical ShowBiz workflow. The rest of the user manual covers how to capture video, edit and assemble video clips, and create a DVD movie. There is also a chapter that covers the program's menus and commands, and a set of "how tos" to walk you through common tasks.
2

Chapter 1: Introduction
1.1Installation
1.Insert the CD into your CD-ROM drive.
2.The installer should start automatically.
3.Follow the on-screen instructions to complete the installation.
Take note as to where the program is installing, and where it can be found in the Start menu.
Note: If the installer does not start automatically, you will need to run it manually:
1.Insert the CD into your CD-ROM drive.
2.Click Start>Run.
3.In the Run dialog, type "X:/setup.exe". ("X" is the drive letter associated with your CD-ROM drive. This letter will vary from system to system.)
4.Click OK.
5.Follow the on-screen instructions to complete the installation.
3

Chapter 1: Introduction
1.2System Requirements
Minimum System Requirements
OS |
Windows 2000/XP/Vista |
CPU |
Pentium III 800 MHz or higher (P4 1.6 GHz or higher |
|
recommended) |
Memory |
128 MB RAM (512 MB recommended) |
Hard disk space 400 MB available hard disk space for program installation
4 GB+ free hard disk space recommended for video capture and editing (1 hour of DV video requires 13 GB of hard disk space)
Hard drive |
7200 RPM hard drive recommended |
Display |
16-bit color monitor at 1024 x 768 or higher |
Other |
- DirectX 9 |
|
- TV-tuner or video capture board for analog |
|
video capture |
|
- OHCI-compliant IEEE-1394 card and DV |
|
camera for digital video capture |
|
- Windows Media Player 9.0 recommended |
4

Chapter 1: Introduction
1.3Workflow Overview
ShowBiz DVD 2 is divided into four main sections, or "modules." You can start in any module, depending on what you are interested in!
Capture
Record video from your DV camera or other video device.
Edit
Edit your videos and combine them with other video clips, transitions, effects, text, and more.
Create
Use your finished video clips to create your DVD or VCD (each clip will become an individual chapter in your final movie); customize the menu; and burn your movie to a DVD disc or a CD.
Quick DVD
Capture video and create a DVD movie with just a few clicks.
5
Chapter 1: Introduction
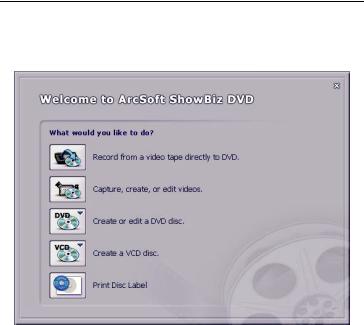
When you first launch ShowBiz, the Welcome screen offers several options for common starting places. Selecting an option takes you right into one of the four modules: Create, Edit, Capture, or Quick DVD.
6
Chapter 2: Capture
2. Capture
Video Capture
Audio Capture
7

Chapter 2: Capture
The Capture module is where you record video and audio. It consists of two tabs: Video and Audio.
Choose Video to record video from DV camcorders and other connected devices.
Choose Audio to record sound clips, voiceovers, and other sounds.
When you are in the Capture module, a red Record button in the Player lets you start capturing video. The Live and Playback buttons let you toggle between viewing the video as it's captured from your device and reviewing the captured video. When you are recording, the Record button turns into a Stop button.
8
Chapter 2: Capture
2.1Video Capture
You can capture video from a multitude of video devices, including DV camcorders. The available options vary depending on the device.
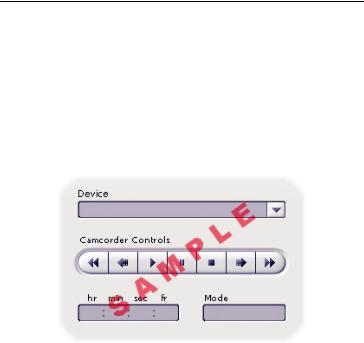
Capturing from a DV Tape
When capturing from a DV device, playback controls appear. You can use these controls to navigate to a specific location on the DV tape. Use these controls to go to the beginning of the section you wish to capture.
When you're ready, click the red Record button within the Player.
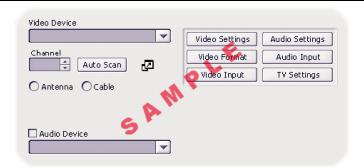
Capturing from a TV Tuner
When capturing from a TV tuner, first select the channel from which you would like to record. You can choose between cable and antenna reception.
9
Chapter 2: Capture
Auto Scan: Click to have the program scan for available channels.
Audio Device: Check the box if you would like to record audio as well. If you check the box, choose your device from the pull-down.
The following buttons may also be available. (Specific options are dependent on your device. Contact the device manager if you have any questions regarding what these options do.)
Video Settings: Generally contains options for selecting your video standard (NTSC or PAL) as well as basic video enhancement settings.
Video Format: Options here typically include frame rate, compression, and output size (resolution).
Video Input: If your capture card has various input options, select the one you want to use here.
Audio Settings: Choose the bit rate and frequency of your captured audio.
Audio Input: Contains options specific to your sound capture device.
TV Settings: Properties and settings for your TV tuner.
To start recording, click the red Record button within the Player.
10
Chapter 2: Capture
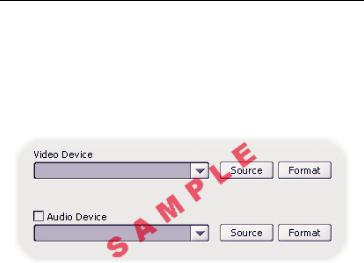
Capturing from VFW Devices
VFW ("Video for Windows") devices follow an older Microsoft multimedia framework. Older webcams, USB devices, or PCI devices may use the VFW standard.
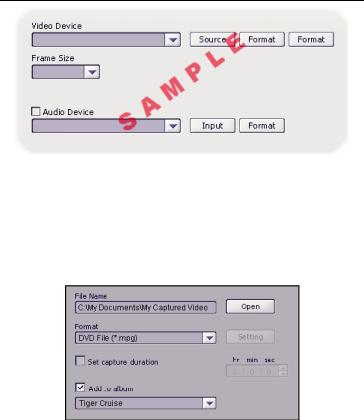
To capture video from VFW devices, select your desired VFW device from the pull-down. The Source and Format buttons may have various image size and format options available, and will vary from device to device.
Check the Audio Device box to record audio from your selected sound source.
When you're ready, click the red Record button.
Capturing from WDM Devices
WDM ("Windows Driver Model") devices follow a newer Microsoft driver framework. Newer webcams, USB devices, or PCI devices might use the WDM standard.
To capture video from WDM devices, select your desired WDM device from the pull-down. The Settings, Format, and Input buttons may contain various options including enhancement features and compression, depending on the device.
11
Chapter 2: Capture
Check the Audio Device box to record audio from your selected sound source.
When you're ready, click the red Record button.
Save As
For capturing from any device, after you click the red Record button, you'll be prompted with the Save As window.
In the Save As window, enter in the file name and save location for the captured video. You can also select the save format. (AVI is generally the format for video coming from a DV tape.)
Check the "Set Capture Duration" box if you would like to stop capturing after a set amount of time.
Check the "Add to Album" box if you would like the captured video included into an album of your choice. Albums are discussed in more detail in Section 3.3.
12

Chapter 2: Capture
Lastly, you can set the scene detection. Scene detection is discussed further in Section 3.3.
If you choose to have scene detection, you can either do it manually during the capture process (by pressing the space bar on your keyboard), or automatically. For automatic scene detection, scenes can either be separated by date and time, or by changes in content. Use the slider to adjust the sensitivity of the automatic scene detection.
When you're ready, click OK. The program begins to capture video from your device. Click the Stop button within the Player to stop recording. Click the Playback button to review the video you just recorded.
If you enabled scene detection, the album thumbnail representing the file displays a folder icon. Click the folder icon to bring up a window that contains each individual scene.
13
Chapter 2: Capture
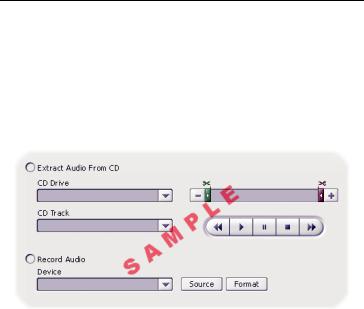
2.2Audio Capture
When capturing audio, you have the choice of extracting music from a CD, or recording audio from a sound device.
If you are extracting audio from a CD, select the letter associated with the drive you plan to use. You can then preview the CD tracks with the standard playback controls (play, stop, rewind, etc.).
Use the Start and End markers (scissors) to trim the audio if you wish. Simply drag the marks to the desired spots.
If you are recording audio from a sound device, choose the device from the pull-down. The Format button lets you select the bit rate and other audio settings. The options available after clicking the Source button are dependent on your sound capture device.
When you're ready, click the Record button in the Player. You must then specify the file name for the soon-to-be recorded audio, along with the save location. If you want, you can have the audio automatically put into an album of your choice upon being recorded. Albums are discussed in more detail in Section 3.3
To stop recording, click the Stop button within the Player.
To play back your new recording, click the Playback button within the Player. Standard playback controls become available.
14

Chapter 3: Edit
3. Edit
Video Clip Components
Player
Media
Storyboard
Timeline
Text
Transitions
Effects
Export
15
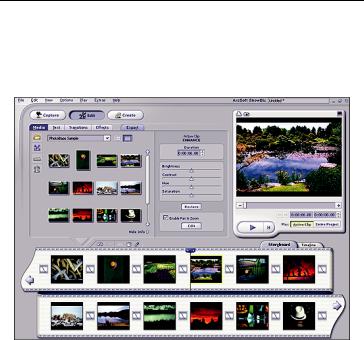
Chapter 3: Edit
The Edit module is where you assemble various components to create a new video clip. It contains four primary tabs, one for each type of component you can add to your video clip: Media, Text, Transitions, Effects. A fifth tab, Export, appears as soon as you have content in your video clip. When you're finished, you can use the video clip in your final DVD or VCD movie.
16
Chapter 3: Edit
3.1Video Clip Components
Everything you need to create your video clips is in one of four tabs: Media, Text, Transitions, and Effects.
Media – Choose still images, video files, and audio files that you'd like to use to create a new video clip.
Text – Choose text templates to apply to your video clip, such as scrolling text.
Transitions – Add cool effects between each still image or video file. For example, if you have added two video files (from the Media tab), you can add a transition that shows the first video fading away as the second one fades in.
Effects – Apply frames and various "filters" to your video clip components.
Export – This fifth tab appears as soon as you have content in your video clip. Here, you can save all of the components you have added as a single video clip.
17

Chapter 3: Edit
3.2Player
The Player consists of the preview area on the right side of the screen and all the controls below it. Use the Player to preview and trim your video clip as you compile it. The Player contains standard play/pause/rewind buttons, along with other controls that depend on what you are previewing or recording.
The Player can play back either selected clips (Active Clip) or the entire movie on the Storyboard/Timeline (Entire Project) when you are in the Edit module.
18

Chapter 3: Edit
There are two timers. The left timer indicates the total playing time of the selected component. The right timer indicates the current time.
When viewing an audio or video component, the timer (slider) beneath the preview window has two markers: the Start Marker and the End Marker. You can click and drag these to trim the component. You can also click one of the two Trim buttons to set the Start/End Marker at the current point in the component.
Other Player Options:
 Print Frame - Click this button to print the current frame shown in the preview window.
 Save Frame - Click this button to save the current frame within the preview window as a standard image file.
 Full Screen Preview - Click this button to view the preview window full screen.
19
Chapter 3: Edit
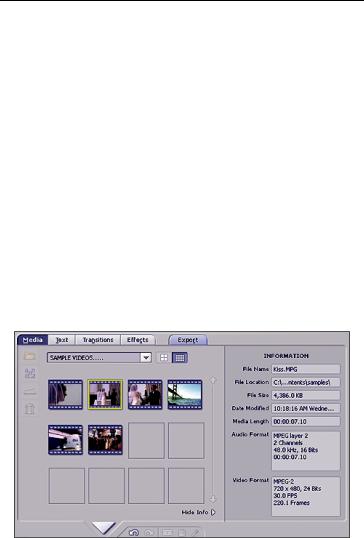
3.3Media
The Media tab of the Edit module is where you browse your albums for video content. Content includes still images, video files, and audio files.
Albums
Albums are collections of shortcuts to files stored on your system. The program uses albums to help you organize your media components.
You can "add" files to an album, which means you add a shortcut. For example, when you capture a video or audio clip and save the recorded file, you can automatically add that file to an album.
When you add an album component to the Storyboard/Timeline, the program grabs the actual file. You can delete the contents of an album without worrying about affecting the actual files.
Compiling Media
To start compiling a video clip, add media components to the Storyboard/Timeline. To add a file to the Storyboard/Timeline, simply click it to select it. Then, click the arrow beneath the thumbnails.
20
Chapter 3: Edit
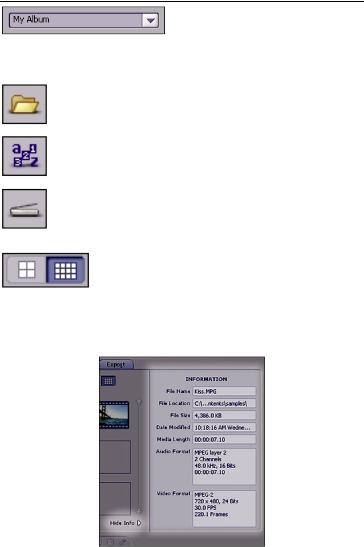
Use this pull-down to choose your album. To create a new album, choose "< New Album >". Enter a
new name for your album (or rename any album) by simply typing over the existing name.
Add - Click this button to add files to your album. A standard Open window lets you browse your system for files to add.
Sort - Click this button to sort the content of your album in a number of ways.
Acquire - Click this button to capture an image from a connected device. The driver for the device will run; follow the directions by the device manufacturer if you have problems.
These two buttons alter the size of the thumbnails.
To the right of the album thumbnails are the file properties for the currently selected file. You can hide this information if you would like more thumbnails displayed at one time.
21
Chapter 3: Edit
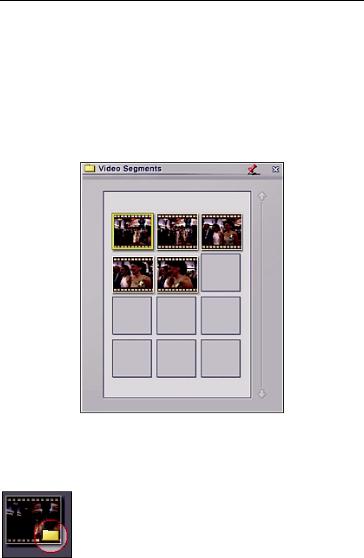
Scene Detection
Scene detection makes it easy for you to break up long video clips into separate components without having to save each clip individually. The program scans the selected video file and automatically breaks it up according to changes in time or content.
When you right-click a video thumbnail in an album, you see an option called "Scene Detect." This command scans the video and breaks it up into separate video clips. The results are displayed in a separate window with new thumbnails for each clip.
Click the red thumbtack to make the window "sticky." It will remain on top of the program desktop as long as it is stuck. You can click and drag the thumbnails to the Storyboard/Timeline just as you can any other thumbnail from the Media section.
Scene detection is noted on the original thumbnails with the addition of a folder icon in the lower right. To remove scene detection, right-click the thumbnail and select "Delete Scene."
22
Chapter 3: Edit
3.4Storyboard
The Storyboard is one place where you arrange your video clip components. It serves as the template for video construction. You add a still image or video clip to each spot on the Storyboard. Then, when you save your video, all of the components are combined into a single file. You can then use the file in the Create module as a chapter in a DVD movie. Or, you can just leave it as a stand-alone file.
When constructing a video, you can add components by going to the Media, Text, Transitions, and Effects tabs. (The Media tab is where you add still images, video, and audio.) The Storyboard displays the Media and Transitions components that you have added (except for audio). For a more detailed view of everything you are using to make your video, as well as additional editing options, switch to the Timeline (see Section 3.5).
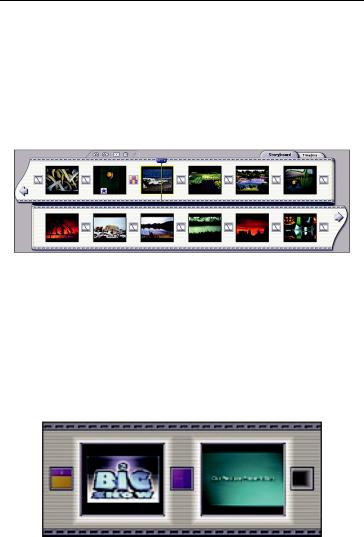
The Storyboard is divided into several large squares, with smaller squares in between. The larger squares are spots that are reserved for still images and video files.
As you add still images or video from the Media tab, the larger squares fill up. As you add transitions from the Transitions tab, the smaller squares fill up.
23
Chapter 3: Edit
All of the components on the Storyboard are swappable, meaning you can drag and drop them to swap them with other components. This makes it easy to rearrange video clips and still images, or swap transitions from one spot to another.
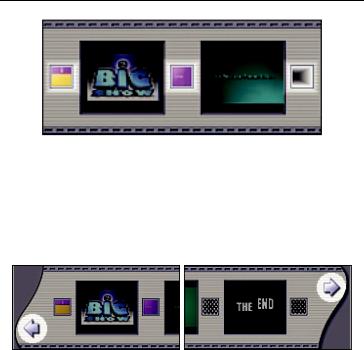
Use the arrows at the beginning and end of the Storyboard to scroll through additional components if you cannot view them all on screen.
While working in the Storyboard, you have the following options available:
 Undo – Undoes the last command.
 Redo – Undoes the last undo command. You can perform the Undo/Redo commands multiple times to go back and forth between various editing stages of your video.
 Split and Combine
The Split command divides a single video into two components on the Storyboard or Timeline. It creates two separate video files, split at the current point of the timer in the Player. Click and drag
24

Chapter 3: Edit
the timer to the spot where you want the split performed, then right-click the video component on the Storyboard or Timeline and select Split. You can recombine two split videos by selecting them both on the Storyboard or Timeline, right-clicking, and selecting Combine.
 Delete – Removes the selected clip(s) from the Storyboard.
 Record Audio – Opens the Record Audio window. See Section 7.2 for more information.
25
Chapter 3: Edit
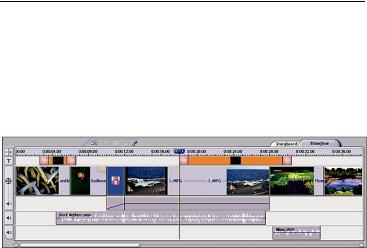
3.5Timeline
The Timeline is the other place where you arrange your video clip components. It serves as the template for video construction. It offers a more in-depth view of your constructed movie than the Storyboard. Every component that you have added (still images, videos, audio, transitions, text, and special effects) can be seen and altered here.
The top area of the Timeline shows any added text effects. The section below shows all of your still images, video files, transitions, and any associated special effects. Immediately beneath are the various audio tracks, the first being reserved for audio that is embedded into video files. Two additional audio tracks are available.
The "-" and "+" buttons let you contract and expand the Timeline. If you want to focus on one key area of the Timeline, expand it. If you want to see more components at one time, contract it.
Text Track
Items on the Text Track include text and text effects added from the Text tab of the Edit module (see Section 3.6). Text effects can be added to either the beginning or end of their respective text component.
Click and drag the edge of a text component to adjust the display time.
Right-click a Text Track component to display a pop-up menu with various options. These include delete options (for deleting everything on the Text Track as well as individual or every text effect), alignment options (you can align added text to the
26
 Loading...