


PHOTO IMPRESSION 3


PhotoImpression Quick Start Guide
Software Installation:
Installing Photo Impressions 3
Insert the Installation Software CD in the CD drive tray. Your System should
automatically recognize the CD drive and start automatically. The Arcsoft
Photo Impressions setup dialog box should appear on your Windows Desktop.
Click the "Next" button to start the installation and follow the instructions on
the screen.
If the Photo Impressions CD does not automatically start, make sure the CD
drive's door is completely shut. It the CD still doesn't start, the Autorun
option on your computer is turned off. You can start the CD by going to
Window Explorer. Select the drive where the Photo Impressions CD is
located. Locate the file named setup.exe and double click on it to start set up.
The Arcsoft Photo Impressions setup dialog box should appear. Click on the
"Next" button to begin the installation and follow the instructions on the
screen to complete the installation.
Table of Contents
Table of Contents:
Software Installation . . . . . . . . . . . . . . . . . . . . . . . . . . . . . . . . . . . . . . . . . . .2
Welcome to PhotoImpression . . . . . . . . . . . . . . . . . . . . . . . . . . . . . . . . . . . .3
System Requirements . . . . . . . . . . . . . . . . . . . . . . . . . . . . . . . . . . . . . . . . . .4
Main Screen . . . . . . . . . . . . . . . . . . . . . . . . . . . . . . . . . . . . . . . . . . . . . . . . .5
Get Photo . . . . . . . . . . . . . . . . . . . . . . . . . . . . . . . . . . . . . . . . . . . . . . . . . . .8
Edit Screen . . . . . . . . . . . . . . . . . . . . . . . . . . . . . . . . . . . . . . . . . . . . . . . . . .9
Create Screem . . . . . . . . . . . . . . . . . . . . . . . . . . . . . . . . . . . . . . . . . . . . . .15
Save Screen . . . . . . . . . . . . . . . . . . . . . . . . . . . . . . . . . . . . . . . . . . . . . . . .17
Print Screen . . . . . . . . . . . . . . . . . . . . . . . . . . . . . . . . . . . . . . . . . . . . . . . .18
2

4
• Huge assortments of project templates enable you to create customized greeting
cards and calendars with your own images.
• TWAIN compliance allows you to acquire images directly from devices such as
digital cameras and scanners.
• Powerful print command allow you to print a single image, multiple images of
different sizes, thumbnails, or greeting cards on a single sheet of paper.
System Requirements
• Windows 98/ME/2000/XP
• Pentium-based PC or equivalent
• 175 MB free hard disk space
• 64 MB RAM
• 16-bit (or higher) color display
PhotoImpression Quick Start Guide
3
Welcome to PhotoImpression
Visioneer brings you ArcSoft PhotoImpression™, a simple yet powerful
program for editing your imagings and creating fun photo projects. The
program enables you to edit, retouch, enhance or add special effects to digital
images with point-n-click simplicity. It offers many project templates for
greeting cards and calenders, along with the ability to print your creations on
specialized photo paper.
Highlights of PhotoImpression
• A robust, easy-to-understand graphic user interface ensures that you can learn the
program in the shortest possible time.
• Powerful, comprehensive editing and retouching tools provide a total digital
image-editing solution.
• A wide variety of special effect and enhancement options give you the incredible
power to manipulate images like a pro.
• Huge collections of frames, brushes and shapes let you add an artistic appeal to
your images.
• An easy-to-use text tool allows you to add catchy titles and captions to images.
You can even add a shadow to create a 3-D effect.
• A dynamic image layer feature enables you to work on one specific image layer at
a time without affecting the whole picture.
• Multiple undo/redo functionality makes it possible for you to experiment with
various commands and options without the fear of making irreversible errors.
PhotoImpression Quick Start Guide
6
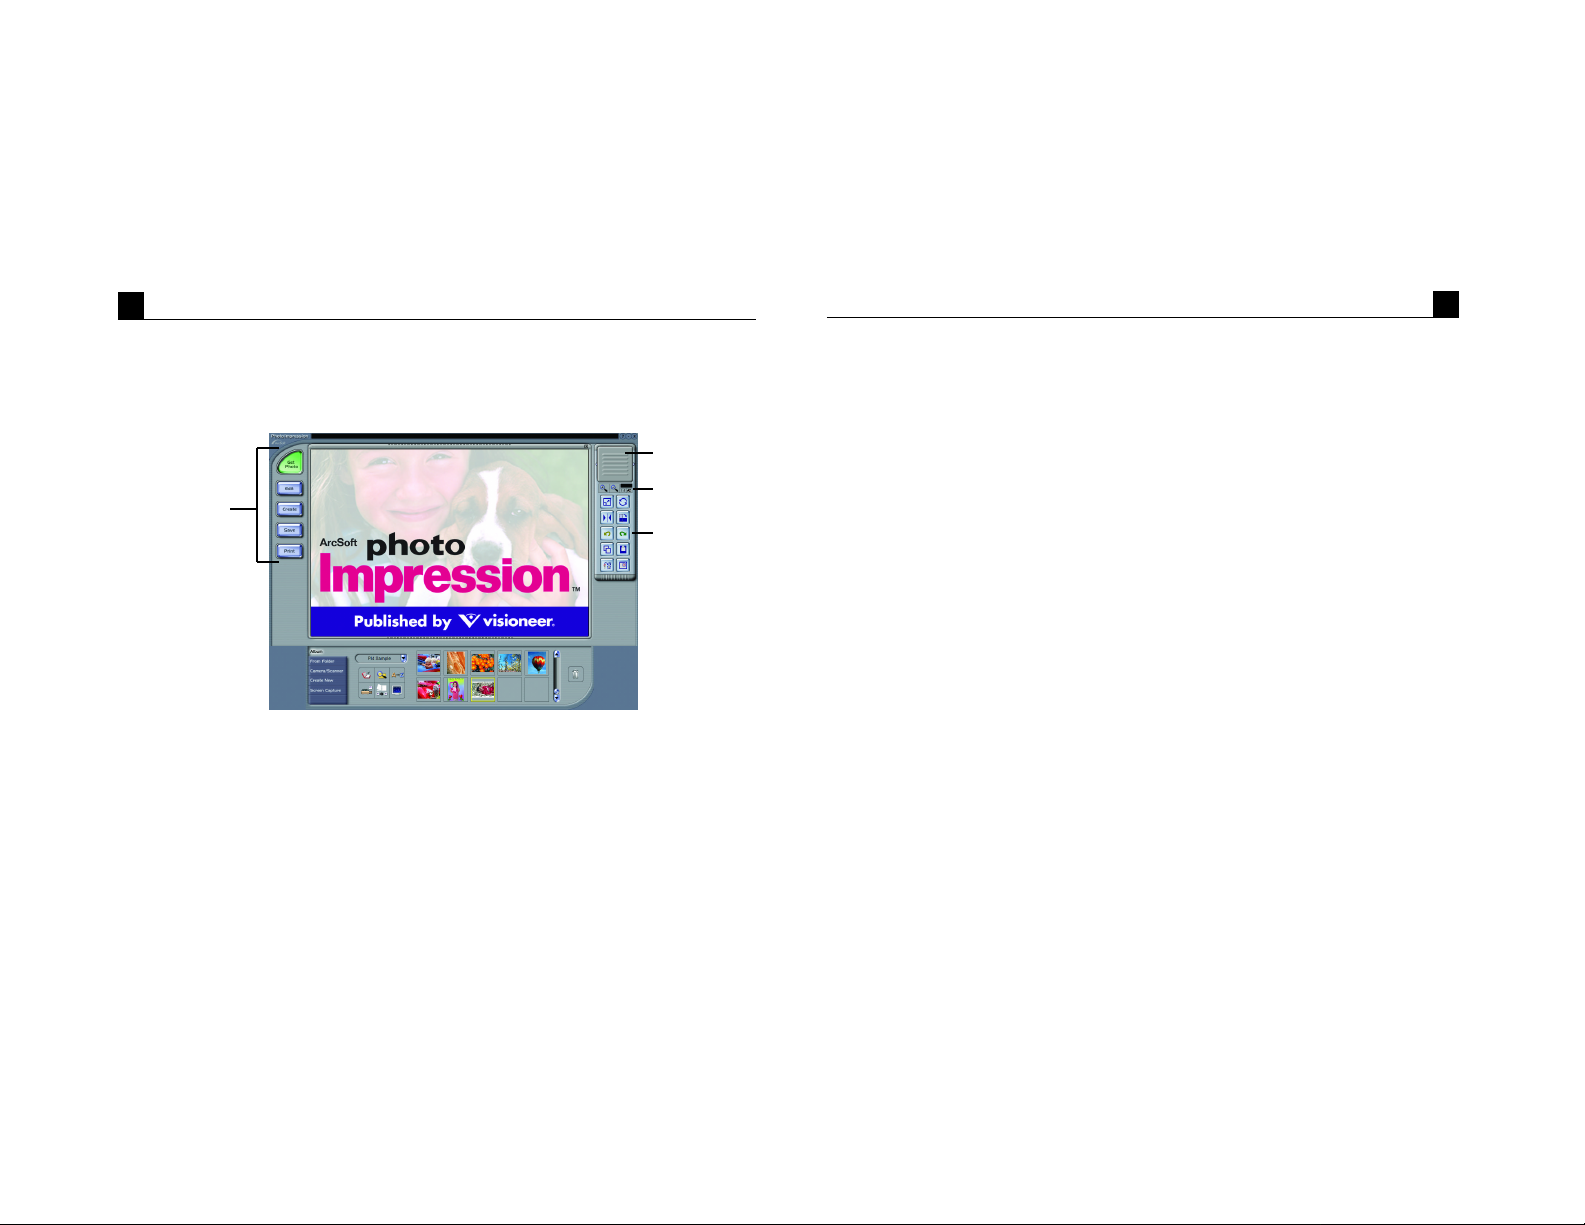
Create - brings up creative options, including Frames & Edges, Cookie
Cutter, Calendars, Greeting Cards, and Photo Fun.
Save - lets you save or export your image in a variety of ways. The To File
option lets you either save your image normally, or as a new file. The
Email option lets you send the image in various sizes as a file attachment
in an email (a MAPI-compliant software program is required). The To
Desktop option lets you set the current image as your desktop background.
Print – offers three printing options: one image per page (Standard Printing),
multiple images of different sizes per page (Greeting Card/Multiple
Printing), and album printing (Thumbnail Printing).
View Controls:
Navigation Window - shows a miniature view of the current image. Even if
you zoom in on a specific part of the image, you will still be able to see
the whole picture in the Navigation Window. You can drag the box in the
Navigation Window to focus on specific areas of the image.
Magnification Controls - display the currently viewed size of the image as a
percentage. They allow you to zoom in (+), out (-), or reset the image to
its original, full size (1:1). The Full Screen icon (to the right of the 1:1
icon) allows you to display the image on the entire screen. You can get
out of the full screen mode by pressing the Esc key on the keyboard.
PhotoImpression Quick Start Guide
5
Main Screen
Command Buttons:
Get Photo - opens images from an album (Album) or a disk drive (From
Folder). You can also acquire images from TWAIN devices
(Camera/Scanner), get screenshots (Screen Capture), and create new
images from scratch (Create New).
Edit - brings up editing tools for manipulating images. Options include
Select/Crop, Retouch, Text, Enhance, Effects, and Layers.
PhotoImpression Quick Start Guide
Command
Buttons
Toolbar
Nagivation
Window
Magnification
 Loading...