

Page 1
AVR400
H A N D B O O K AVR surround amplier
Page 2

Page 3
AVR400
H A N D B O O K AVR surround amplier
English
Page 4

safety
CAUTION: To reduce the risk of electric shock, do not remove cover (or back). No user serviceable parts inside. Refer servicing to qualified
service personnel.
WARNING: To reduce the risk of fire or electric shock, do not expose this apparatus to rain or moisture.
The lightning flash with an arrowhead symbol, within an equilateral triangle, is intended to alert the user to the presence of
uninsulated ‘dangerous voltage’ within the product’s enclosure that may be of sufficient magnitude to constitute a risk of electric
shock to persons.
The exclamation point within an equilateral triangle is intended to alert the user to the presence of important operating and
maintenance (servicing) instructions in the literature accompanying the appliance.
CAUTION: In Canada and the USA, to prevent electric shock, match the wide blade of the plug to the wide slot in the socket
and insert the plug fully into the socket.
Class II product
is equipment is a Class II or double
insulated electrical appliance. It has been
designed in such a way that it does not
require a safety connection to electrical
earth (‘ground’ in the U.S.).
Important safety instructions
1. Read these instructions.
2. Keep these instructions.
3. Heed all warnings.
4. Follow all instructions.
5. Do not use this apparatus near water.
6. Clean only with a dry cloth.
Unplug the unit from the mains supply before cleaning.
e case should normally only require a wipe with a so,
lint-free cloth. Do not use chemical solvents for cleaning.
We do not advise the use of furniture cleaning sprays or
polishes as they can cause permanent white marks.
7. Do not block any of the ventilation openings.
Install in accordance with the manufacturer’s
instructions.
8. Do not install near any heat sources such as
radiators, heat registers, stoves, or other apparatus
(including ampliers) that produce heat.
9. Do not defeat the safety purpose of the polarized or
grounding type plug.
A polarized plug has two blades with one wider than the
other. A grounding type plug has two blades and a third
grounding prong. e wide blade or the third prong
is provided for your safety. When the provided plug
does not t into your outlet, consult an electrician for
replacement of the obsolete outlet.
10. Protect the power cord from being walked
on or pinched particularly at plugs, convenience
receptacles, and the point where they exit from the
apparatus.
11. Only use the attachments/accessories specied by
the manufacturer.
12. Use only with a cart, stand,
tripod, bracket, or table specied
by the manufacturer, or sold with
the apparatus.
When a cart is used, use caution
when moving the cart/apparatus combination to avoid
injury from tip-over.
13. Unplug this apparatus during lightning storms or
when unused for long periods of time.
14. Refer all servicing to qualied service personnel.
Servicing is required when the apparatus has been
damaged in any way, such as power supply cord or plug
is damaged, liquid has been spilled or objects have fallen
into the apparatus, the apparatus has been exposed to
rain or moisture, does not operate normally, or has been
dropped.
15. Object or liquid entry
WARNING – Take care that objects do not fall and
liquids are not spilled into the enclosure through any
openings. e equipment shall not be exposed to
dripping or splashing. Liquid-lled objects such as vases
should not be placed on the equipment.
16. Service Instructions
CAUTION – ese servicing instructions are for use by
qualied service personnel only. To reduce the risk of
electric shock, do not perform any servicing other than
that contained in the operating instructions unless you
are qualied to do so.
17. Climate
e equipment has been designed for use in moderate
climates and in domestic situations. Unplug this
equipment during lightning storms to prevent possible
damage from a strike or mains surge.
18. Power sources
Only connect the equipment to a power supply of
the type described in the operating instructions or as
marked on the equipment.
e primary method of isolating the equipment from
the mains supply is to remove the mains plug. e
equipment must be installed in a manner that makes
disconnection possible.
19. Power-cord protection
Power supply cords should be routed so that they are not
likely to be walked on or pinched by items placed upon
or against them. Pay particular attention to the point
where they exit from the equipment.
20. Power lines
Locate any outdoor antenna/aerial away from power
lines.
21. Speaker connections
Any speakers must be connected to the AVR400 using
class II wire (i.e. no connection to Earth should be
made). Failure to observe this precaution may cause the
unit to become damaged.
22. Non-use periods
If the equipment is not being used for an extended
period, we recommend that you unplug the power cord
of the equipment from the outlet, to save power.
23. Abnormal smell
If an abnormal smell or smoke is detected from the
equipment, turn the power o immediately and unplug
the equipment from the wall outlet. Contact your dealer
and do not reconnect the equipment.
CAUTIONS ON INSTALLATION
For proper heat dispersal, do not install this unit
in a conned space, such as a bookcase or similar
enclosure.
• More than 0.3 m (12 in.) is recommended.
• Do not place any other equipment on this unit.
z
zz
z
Wall
E-2
Page 5

FCC INFORMATION FOR US CUSTOMERS
1. PRODUCT
is product complies with Part 15 of the FCC Rules.
Operation is subject to the following two conditions:
(1) is device may not cause harmful interference,
and (2) this device must accept any interference
received, including interference that may cause
undesired operation.
2. IMPORTANT NOTICE:
DO NOT MODIFY THIS PRODUCT
is product, when installed as indicated in the
instructions contained in this manual, meets FCC
requirements. Modication not expressly approved
by ARCAM may void your authority, granted by the
FCC, to use the product.
3. NOTE
is product has been tested and found to comply
with the limits for a Class B digital device, persuant
to Part 15 of the FCC Rules. ese limits are designed
to provide reasonable protection against harmful
interference in a residential installation.
is product generates, uses and can radiate radio
frequency energy and, if not installed and used in
accordance with the instructions, may cause harmful
interference to radio communications. However,
there is no guarantee that interference will not occur
in a particular installation. If this product does cause
harmful interference to radio or television reception,
which can be determined by turning the product
OFF and ON, the user is encouraged to try to correct
the interference by one or more of the following
measures:
• Reorient or relocate the receiving antenna.
• Increase the separation between the equipment
and receiver.
• Connect the product into an outlet on a circuit
dierent from that to which the receiver is
connected.
• Consult the local retailer authorized
to distribute this type of product or an
experienced radio/TV technician for help.
English
SAFETY INFORMATION
FOR EUROPEAN CUSTOMERS
• Avoid high temperatures. Allow for sucient
heat dispersion when installed in a rack.
• Handle the power cord carefully. Hold the plug
when unplugging the cord.
• Keep the unit free from moisture, water, and
dust.
• Unplug the power cord when not using the unit
for long periods of time.
• Do not obstruct the ventilation holes.
• Do not let foreign objects into the unit.
• Do not let insecticides, benzene, and thinner
come in contact with the unit.
• Never disassemble or modify the unit in any way.
• Ventilation should not be impeded by covering
the ventilation openings with items, such as
newspapers, tablecloths or curtains.
• Naked ame sources such as lighted candles
should not be placed on the unit.
• Observe and follow local regulations regarding
battery disposal.
• Do not expose the unit to dripping or splashing
uids.
• Do not place objects lled with liquids, such as
vases, on the unit.
• Do not handle the mains cord with wet hands.
• When the switch is in the OFF position, the
equipment is not completely switched o from
MAINS.
• e equipment shall be installed near the
power supply so that the power supply is easily
accessible.
A NOTE ABOUT RECYCLING:
is product’s packaging materials are recyclable and can be reused. Please dispose of any materials in accordance
with the local recycling regulations.When discarding the unit, comply with local rules or regulations.
Batteries should never be thrown away or incinerated but disposed of in accordance with the local regulations
concerning battery disposal.
is product and the supplied accessories, excluding the batteries, constitute the applicable product according to
the WEEE directive.
CORRECT DISPOSAL OF THIS PRODUCT
ese markings indicate that this product should not be
disposed with other household waste throughout the EU.
To prevent possible harm to the environment or human
health from uncontrolled waste disposal and to conserve
material resources, this product should be recycled
responsibly.
To dispose of your product, please use your local return and collection systems or contact the retailer where the
product was purchased.
E-3
Page 6

Page 7

Contents
Safety ...........................................................E-2
Welcome .....................................................E-5
Before you begin .......................................E-6
Rear Panel Connectors .............................E-9
Audio/Video Connections .................... E-10
Connection Guide ................................................ E-14
Radio Connectors .................................. E-16
Other Connectors .................................. E-17
Speakers .................................................. E-18
Operation ................................................ E-20
Front Panel Operation .......................... E-22
Remote Control ......................................E-23
Essential Setup ....................................... E-32
Auto Speaker Setup...............................E-33
Setup Menus ........................................... E-34
Decoding Modes .................................... E-40
Dolby Volume ........................................................E-42
Tuner Operation .....................................E-44
Network/USB Operation....................... E-45
Multi-Room Set Up ................................ E-46
Multi-Room Connection Guide ...................... E-47
Customising the CR102 ........................E-48
Command Summary .......................................... E-51
Device Codes .........................................................E-51
Trouble shooting .................................... E-52
Specications.......................................... E-54
Product Guarantee ................................ E-55
Device Code Tables ....................................56
ank you and congratulations on purchasing your Arcam FMJ AVR400 Receiver.
Arcam has been producing specialist audio products of remarkable quality for over three
decades and the new AVR400 Receiver is the latest in a long line of award winning Hi-Fi. e
design of the FMJ range draws upon all of Arcam’s experience as one of the UK’s most respected
audio companies, to produce Arcam’s best performing range of products yet – designed and built
to give you years of viewing and listening enjoyment.
is handbook is intended to give you a detailed guide to using the AVR400 Receiver. It starts
by giving advice on installation, moves on to describe how to use the product and nishes with
additional information on the more advanced features. Use the contents list shown on this page
to guide you to the section of interest.
We hope that your FMJ receiver will give you years of trouble-free operation. In the unlikely
event of any fault, or if you simply require further information about Arcam products, our
network of dealers will be happy to help you. Further information can also be found on the
Arcam website at www.arcam.co.uk.
e FMJ development team
welcome
English
Professional Installation?
It may be that the AVR400 has been installed and set up as part of your Hi-Fi installation by a qualied Arcam
dealer. In this case, you may wish to skip the sections of this handbook dealing with installation and setting up,
and move directly to the sections dealing with using the unit. Use the Contents list to guide you to these sections.
DIY setup?
e AVR400 is a powerful and sophisticated piece of AV equipment. If you are setting the unit up yourself,
it is recommended that you read this handbook thoroughly before beginning. For instance, correct speaker
conguration and placement is a key to getting the most out of your AVR400 and making sure that all the
elements of your system work in harmony.
E-5
Page 8
before you
begin…
e AVR400 is a high-quality and high-performance
home-cinema processor and amplier built to Arcam’s
quality design and manufacturing standards. It
combines digital processing with high-performance
audio and video components to bring you an unrivalled
home-entertainment centre.
e AVR400 allows switching and control of seven
analogue and six digital audio sources in addition to
internal AM, FM and DAB radio – as well as networked
and USB audio sources – making it an ideal hub for both
home-cinema and two-channel stereo systems.
Since many of these source components are also capable
of generating video signals, the AVR400 includes
broadcast-quality switching for HDMI, Composite,
S-Video, RGB and Component video signals. BD-Audio
and SACD can be connected via the multi-channel
input. Control of the AVR400 is either by front panel
control buttons, IR remote control or RS232 port.
e CR102 remote control supplied with the AVR400
is an eight-device ‘universal’ learning remote control
which is simple to use, and once set up is able to control
a complete system. It can be programmed using its vast
internal code library to control CD and BD players,
PVRs, TVs and other devices.
e installation of the AVR400 in a listening room
is an important process which requires care at every
stage. For this reason, the installation information is
very comprehensive and should be followed carefully to
achieve an unrivalled level of performance.
e AVR400 receiver is designed to produce a level of
performance that will truly bring music and movies
to life.
4
E-6
Page 9

Placing the unit
< Place the unit on a level, rm surface, avoiding
direct sunlight and sources of heat or damp.
< Do not place the AVR400 on top of a power
amplier or other source of heat.
< Do not place the amplier in an enclosed space
such as a bookcase or closed cabinet unless there is
good provision for ventilation. e AVR400 will run
warm during normal operation.
< Do not place any other component or item on top of
the amplier as this may obstruct airow around the
heat-sink, causing the amplier to run hot. (e unit
placed on top of the amplier would become hot,
too.)
< Make sure the remote-control receiver on the front
panel display is unobstructed, otherwise this will
impair the use of the remote-control. If line-of-sight
is impractical, a remote-control repeater can be used
with the rear panel connector (see page E-17).
< Do not place your record deck on top of this
unit. Record decks are very sensitive to the noise
generated by mains power supplies which will be
heard as a background ‘hum’ if the record deck is too
close.
Power
e amplier is supplied with a moulded mains plug
already tted to the lead. Check that the plug supplied
ts your supply – should you require a new mains lead,
please contact your Arcam dealer.
If your mains supply voltage or mains plug is dierent,
please contact your Arcam dealer immediately.
e AVR400 can be switched for operation between
220–240V (switch position 230V) and 110–120V
(switch position 115V).
NOTE
Ensure that the AVR400 is switched o and the
power lead removed before changing the position of
the voltage range switch.
Push the IEC plug end of the power cable into the
socket on the back of the amplier, making sure that it
is pushed in rmly. Plug the other end of the cable into
your mains socket and, if necessary, switch the socket
on.
e AVR400 can be turned on using the
on the front panel. While switched on, the front panel
LED will glow green.
Standby power
e AVR400 can be switched into standby mode using
the 2 button on the CR102 remote control. While in
standby mode the front panel LED will glow red and
power consumption is less than 0.5 Watts.
While in Standby mode, it may be possible to hear a
slight residual hum coming from the mains transformer
inside the amplier. is is perfectly normal. However,
if the unit is to be le unused for an extended period,
we recommend that you disconnect it from the mains
supply to save power.
POWER switch
Interconnect cables
We recommend the use of high-quality screened cables
that are designed for the particular application. Other
cables will have dierent impedance characteristics
that will degrade the performance of your system (for
example, do not use cabling intended for video use to
carry audio signals). All cables should be kept as short
as is practically possible.
It is good practice when connecting your equipment to
make sure that the mains power-supply cabling is kept
as far away as possible from your audio cables. Failure to
do so may result in unwanted noise in the audio signals.
For information on speaker cabling, please refer to the
‘Speakers’ section, beginning on page E-18.
Radio interference
e AVR400 is an audio device containing
microprocessors and other digital electronics. It has
been designed to very high standards of electromagnetic
compatibility.
is is a Class A product. In a domestic environment
this product may cause radio interference, in which case
the user may be required to take adequate measures.
If the AVR400 causes interference to radio or television
reception (which can be determined by switching the
AVR400 o and on), the following measures should be
taken:
< Re-orient the receiving antenna or route the antenna
cable of the aected receiver as far as possible from
AVR400 and its cabling.
< Relocate the receiver with respect to the AVR400.
< Connect the aected device and the AVR400 to
dierent mains outlets.
If the problem persists, please contact your Arcam
dealer.
English
E-7
Page 10

Trademark acknowledgements
Arcam is a registered trademark of A & R Cambridge Ltd.
Dolby Volume
Manufactured under license from Dolby
Laboratories. Dolby and the double-D symbol
are trademarks of Dolby Laboratories.
Dolby TrueHD, Digital, Digital Plus,
PL IIx
Manufactured under license from Dolby
Laboratories. Dolby, Pro Logic, and the
double-D symbol are trademarks of Dolby
Laboratories.
DTS-HD Master Audio
Manufactured under license under U.S. Patent
#’s: 5,451,942; 5,956,674; 5,974,380; 5,978,762;
6,226,616; 6,487,535; 7,212,872; 7,333,929;
7,392,195; 7,272,567 & other U.S. and worldwide
patents issued & pending. DTS and the Symbol
are registered trademarks, & DTS-HD, DTS-HD
Master Audio, and the DTS logos are trademarks
of DTS, Inc. Product includes software.
© DTS, Inc. All Rights Reserved.
DTS-HD High Resolution Audio
Manufactured under license under U.S.
Patent #’s: 5,451,942; 5,956,674; 5,974,380;
5,978,762; 6,226,616; 6,487,535; 7,212,872;
7,333,929 & other U.S. and worldwide patents
issued & pending. DTS and the Symbol are
registered trademarks, & DTS-HD, DTS-HD
High Resolution Audio and the DTS logos
are trademarks of DTS, Inc. Product includes
software. © DTS, Inc. All Rights Reserved.
DTS Digital Surround
ES|Neo:6|96/24
Manufactured under license under U.S. Patent
#’s: 5,451,942; 5,956,674; 5,974,380; 5,978,762;
6,226,616; 6,487,535; 7,003,467; 7,212,872 &
other U.S. and worldwide patents issued &
pending. DTS, the Symbol, ES, and Neo:6 are
registered trademarks & DTS Digital Surround,
DTS 96/24 and the DTS logos are trademarks of
DTS, Inc. Product includes software.
© DTS, Inc. All Rights Reserved.
AAC/AAC Plus
aacPlus is a trademark of Coding Technologies.
See www.codingtechnologies.com for more
information.
FLAC
vTuner
MP3
iPod
FLAC Decoder Copyright © 2000, 2001, 2002,
2003, 2004, 2005, 2006, 2007, 2008 Josh Coalson
Redistribution and use in source and binary
forms, with or without modification, are
permitted provided that the following conditions
are met:
- Redistributions of source code must retain the
above copyright notice, this list of conditions
and the following disclaimer.
- Redistributions in binary form must
reproduce the above copyright notice, this list of
conditions and the following disclaimer in the
documentation and/or other materials provided
with the distribution.
- Neither the name of the Xiph.org Foundation
nor the names of its contributors may be used
to endorse or promote products derived from
this software without specific prior written
permission.
THIS SOFTWARE IS PROVIDED BY
THE COPYRIGHT HOLDERS AND
CONTRIBUTORS “AS IS” AND ANY EXPRESS
OR IMPLIED WARRANTIES, INCLUDING,
BUT NOT LIMITED TO, THE IMPLIED
WARRANTIES OF MERCHANTABILITY AND
FITNESS FOR A PARTICULAR PURPOSE
ARE DISCLAIMED. IN NO EVENT SHALL
THE FOUNDATION OR CONTRIBUTORS
BE LIABLE FOR ANY DIRECT, INDIRECT,
INCIDENTAL, SPECIAL, EXEMPLARY, OR
CONSEQUENTIAL DAMAGES (INCLUDING,
BUT NOT LIMITED TO, PROCUREMENT OF
SUBSTITUTE GOODS OR SERVICES; LOSS
OF USE, DATA, OR PROFITS; OR BUSINESS
INTERRUPTION) HOWEVER CAUSED AND
ON ANY THEORY OF LIABILITY, WHETHER
IN CONTRACT, STRICT LIABILITY, OR
TORT (INCLUDING NEGLIGENCE OR
OTHERWISE) ARISING IN ANY WAY OUT
OF THE USE OF THIS SOFTWARE, EVEN IF
ADVISED OF THE POSSIBILITY OF SUCH
DAMAGE.
This product is protected by certain intellectual
property rights of NEMS and BridgeCo. Use
or distribution of such technology outside of
this product is prohibited without a license
from NEMS and BridgeCo or an authorized
subsidiary.
MPEG Layer-3 audio decoding technology
licensed from Fraunhofer IIS and Thomson
multimedia
iPod is a trademark of Apple Inc., registered in
the US and other countries.
ROVI
HDMI, the HDMI logo and High-Definition
Multimedia Interface are trademarks or
registered trademarks of HDMI Licensing LLC.
This item incorporates copy protection
technology that is protected by U.S. patents
and other intellectual property rights of
Rovi Corporation. Reverse engineering and
disassembly are prohibited.
E-8
Page 11
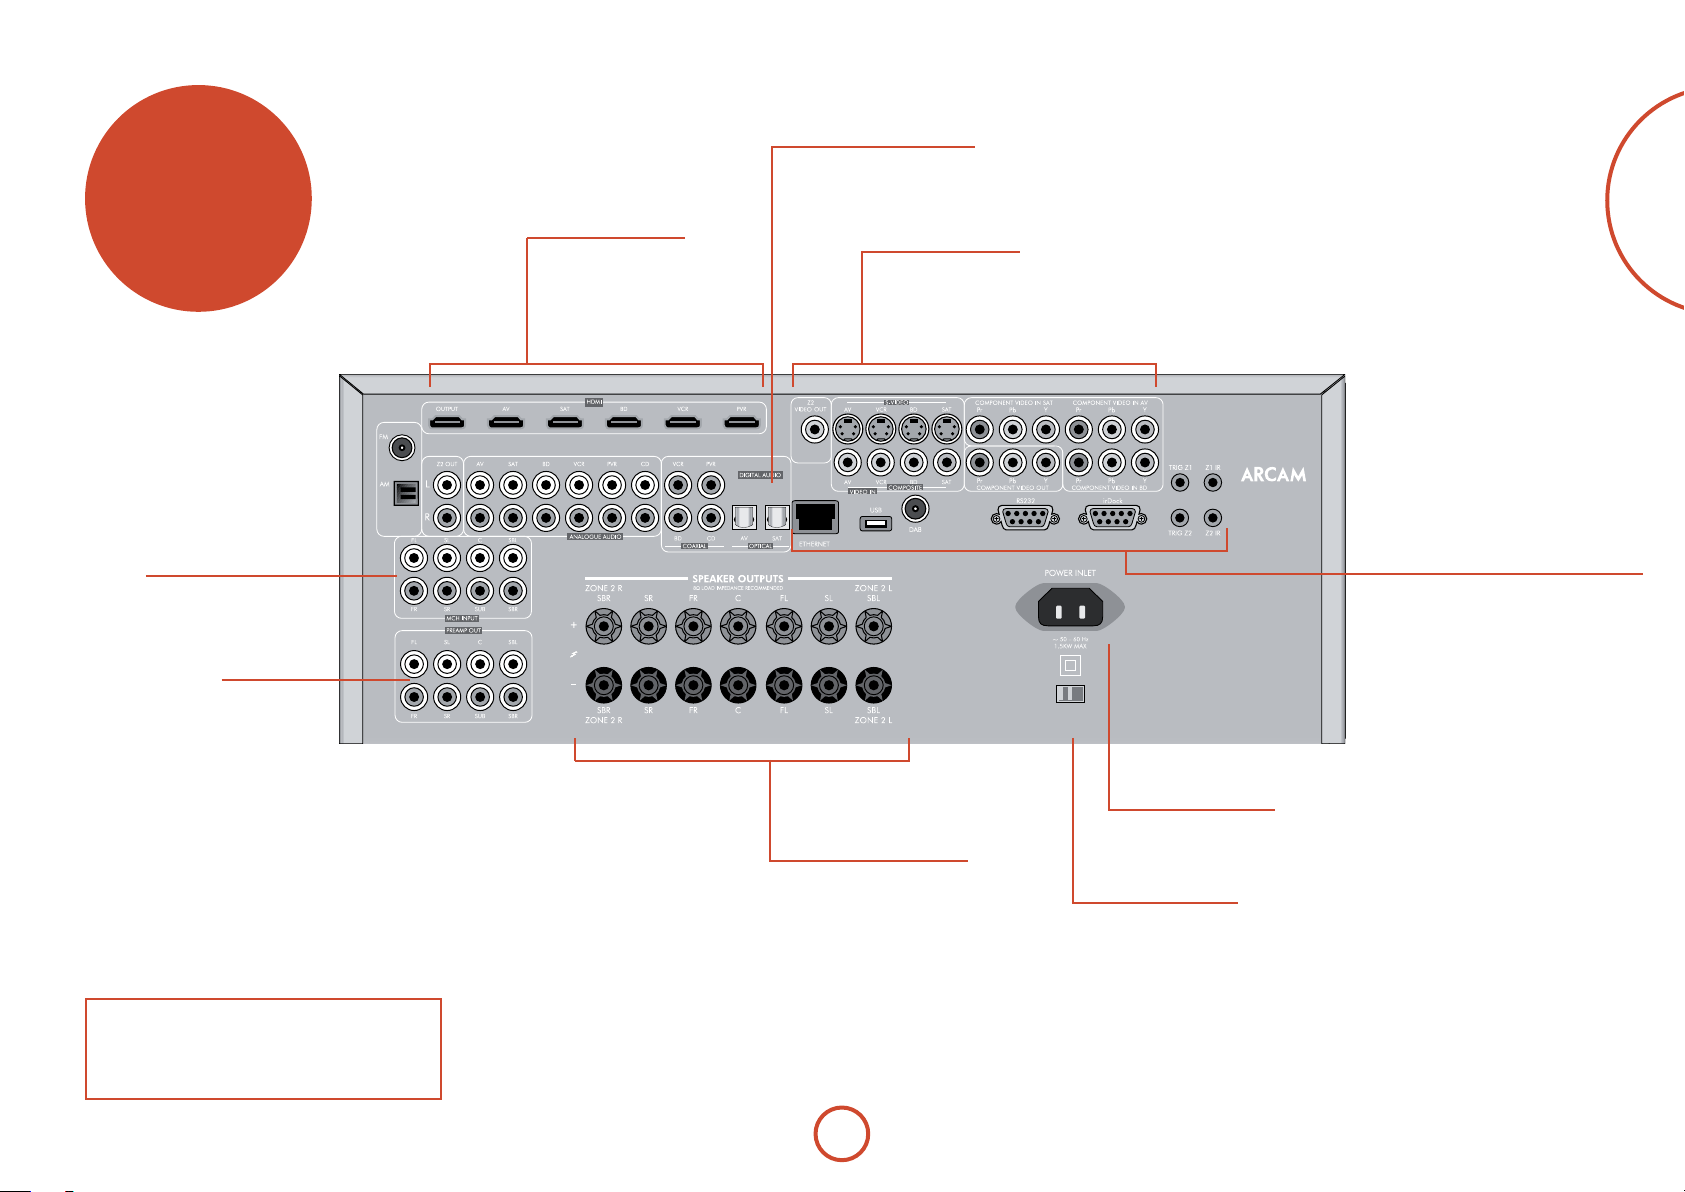
rear panel
Digital connectors
Optical and electrical digital
audio connectors, seepage E-11.
connectors
Audio connectors
Two-channel and multichannel, see page E-12.
Preamplier output
See page E-12
HDMI
For information, see page E-10.
Video connectors
Component, S-Video and Composite connectors,
see page E-11.
Zone2 connection, see page E-11.
Speaker connectors
For information, see page E-19.
English
Aerials, control and communication
FM/AM/DAB radio, rLead/irDock, RS232,
Network/USB, IR and trigger connectors,
see page E-16, page E-17.
230V115V
Power inlet
Connect the correct mains
cable here
Voltage select
Ensure the voltage selected
matches your local power supply
NOTE
Please read the ‘Placing the unit’, ‘Power’ and
‘Interconnect cables’ sections on page E-7 before
connecting up your AVR400 integrated amplier!
E-9
Page 12
audio/video
connections
Before connecting your AVR400 to your source
components and speakers, please read through the
next few pages which will explain all the input and
output connectivity that is available. e ‘Speakers’
section explains how to connect up your speakers to
avoid damage to the amplier and how to arrange your
speakers for best performance.
General
e inputs are named to make it easier to reference
connected devices (e.g. ‘BD’ or ‘VCR’). ey all have the
same input circuit, so there is no reason why you should
not connect a dierent device to any of the inputs. For
example, if you had two BD players and the AV input
was not being used, then the second BD player could be
connected to the AV input.
When connecting a video source, its audio must be
connected to the corresponding sockets. For example,
if you a had a satellite decoder plugged into a
input, the audio must be connected to the SAT audio
inputs!
e hierarchy for video connections for best quality is
as follows:
< HDMI
< Component/RGB
< S-Video
< Composite.
For any video source to be available in Zone2 you must
have a Composite connection between AVR400 and the
source.
SAT video
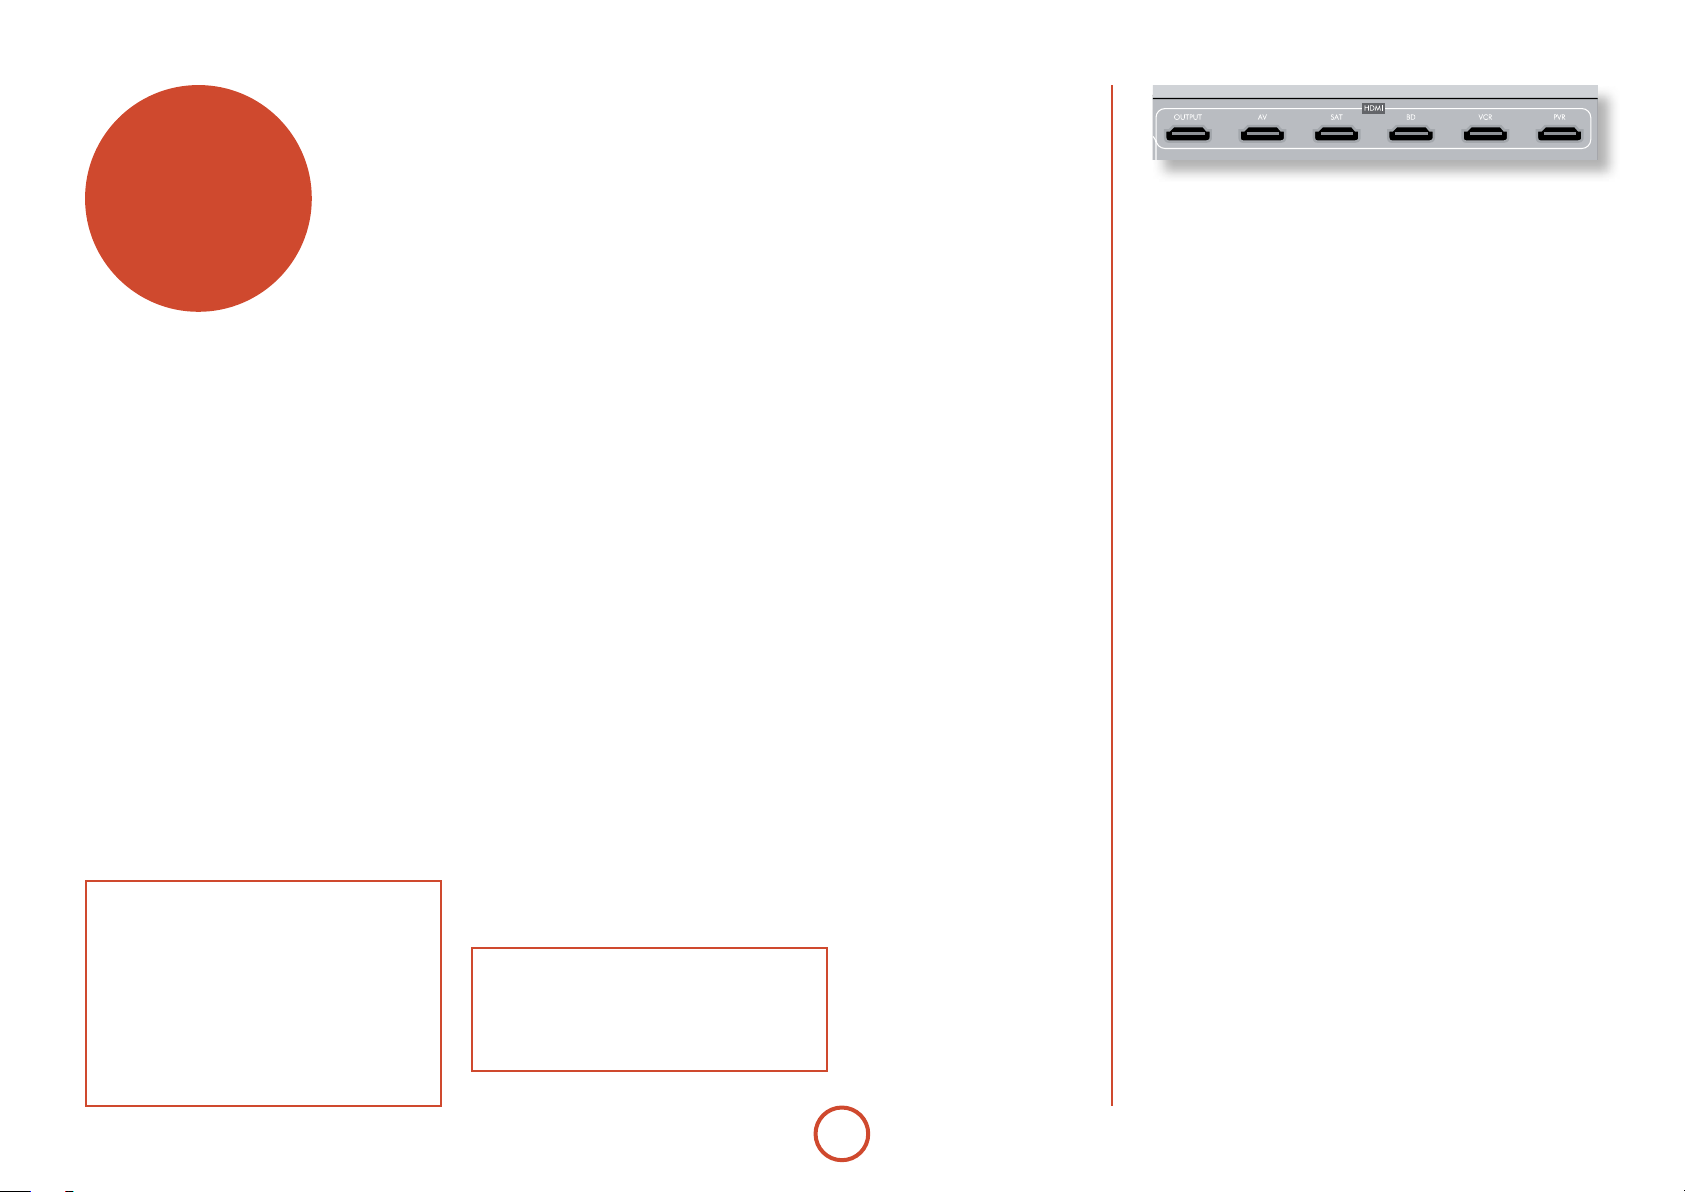
HDMI connectors
AV, SAT, BD, VCR, PVR
Connect the HDMI video outputs of your source equipment to these
corresponding HDMI inputs.
OUTPUT
Connect this output to the HDMI video input of your display device.
is output is compatible with the HDMI 1.4 Audio Return Channel
(ARC). If you have a supported television then sound from the
television’s internal tuner (e.g. Freeview, Freesat, DVB-T) will be
available using the AVR400’s “Display” input.
Important notes about Component/RGB
video inputs and outputs
< When you connect your devices to these
connectors, take care to follow the letter/colour
coding for each input. No damage will occur but
incorrectly coloured or unstable pictures will
result.
< e Component video inputs have sucient
bandwidth for NTSC (525/60) or PAL (625/50)
video and HDTV video signals.
Making connections
< Wherever possible, connect both the analogue
and digital outputs of digital sources. is enables
use of a digital input for the main zone and the
corresponding analogue input for the Zone2 output.
< Take care to place cables as far from any power
supply cabling as is practicable, to reduce hum and
other noise problems.
NOTE:
For each input, you must set the “Video Source”
and “Audio Source” settings according to the
connection type.
(see “Input Cong.” on page E-35)
E-10
Page 13
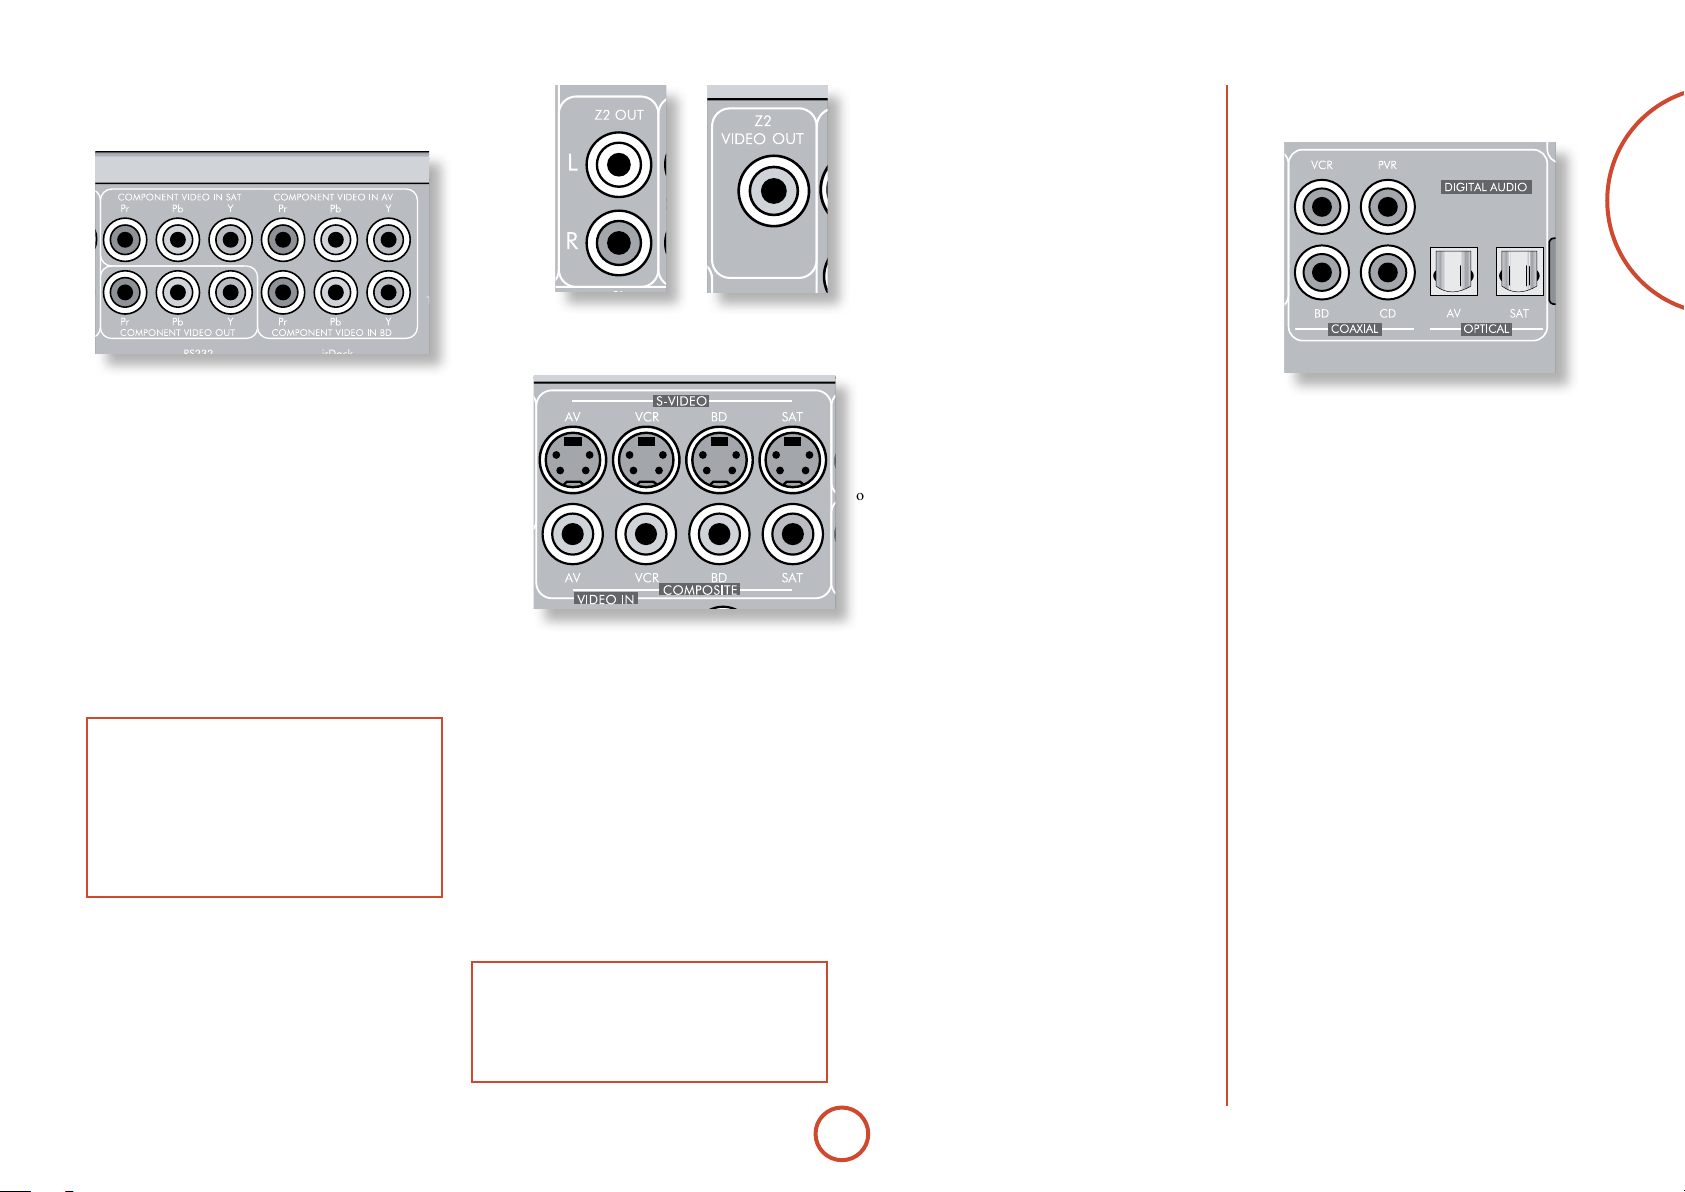
Component/RGB video
connectors
Zone2 connectors
e Z2 out analogue audio connector can be used
to connect the stereo audio output of the AVR400
to an amplier located in a second room. Connect
the analogue video output to your Zone2 display
equipment. See ‘Multi-room Setup’ on E-46 for
information.
Digital audio connectors
English
ese inputs are suitable for connection to source
devices which output Component (YUV or YPbPr) or
RGB high quality analogue video signals. ese signals
are usually available from BD players, set-top boxes or
games consoles.
If you are connecting up to an RGB source you may also
need to connect the source’s Composite output to the
AVR400 Composite input to act as a video sync (‘RGB
+ Sync’ format). e Composite signal should be on the
same named input as the RGB signals. e AVR400 is
also compatible with ‘Sync on Green’ or ‘RGsB’ signals.
RGB video outputs on source equipment are oen on
SCART connectors. You will need to use a SCART to
‘RGB+Sync on phono’ breakout cable, available from
your Arcam dealer.
NOTE
When setting up the AVR400 menus (later in
this manual), you will need to select whether the
three-wire high quality video input is Component
(‘Normal’), ‘RGsB’ or ‘RGB + Sync’ for each input.
is is done on the ‘Component Mode’ line in the
Input Cong menu. Failure to do this can result in a
green looking picture or a picture that is unstable.
COMPONENT VIDEO IN SAT, AV, BD
Connect the Component video outputs of your source
equipment to these inputs.
COMPONENT VIDEO OUT
Connect this output to the Component video input of
your display device.
NOTE
Analogue RGB video output is not available from
the AVR400. e analogue three-wire high quality
video output is always congured as Component
video.
S-Video and Composite
connectors
AV, VCR, BD, SAT
Connect these inputs to the S-Video and Composite
outputs of your available source equipment.
VCR, PVR, BD, CD, AV, SAT
Connect these inputs to the digital outputs of your
available source equipment.
E-11
Page 14
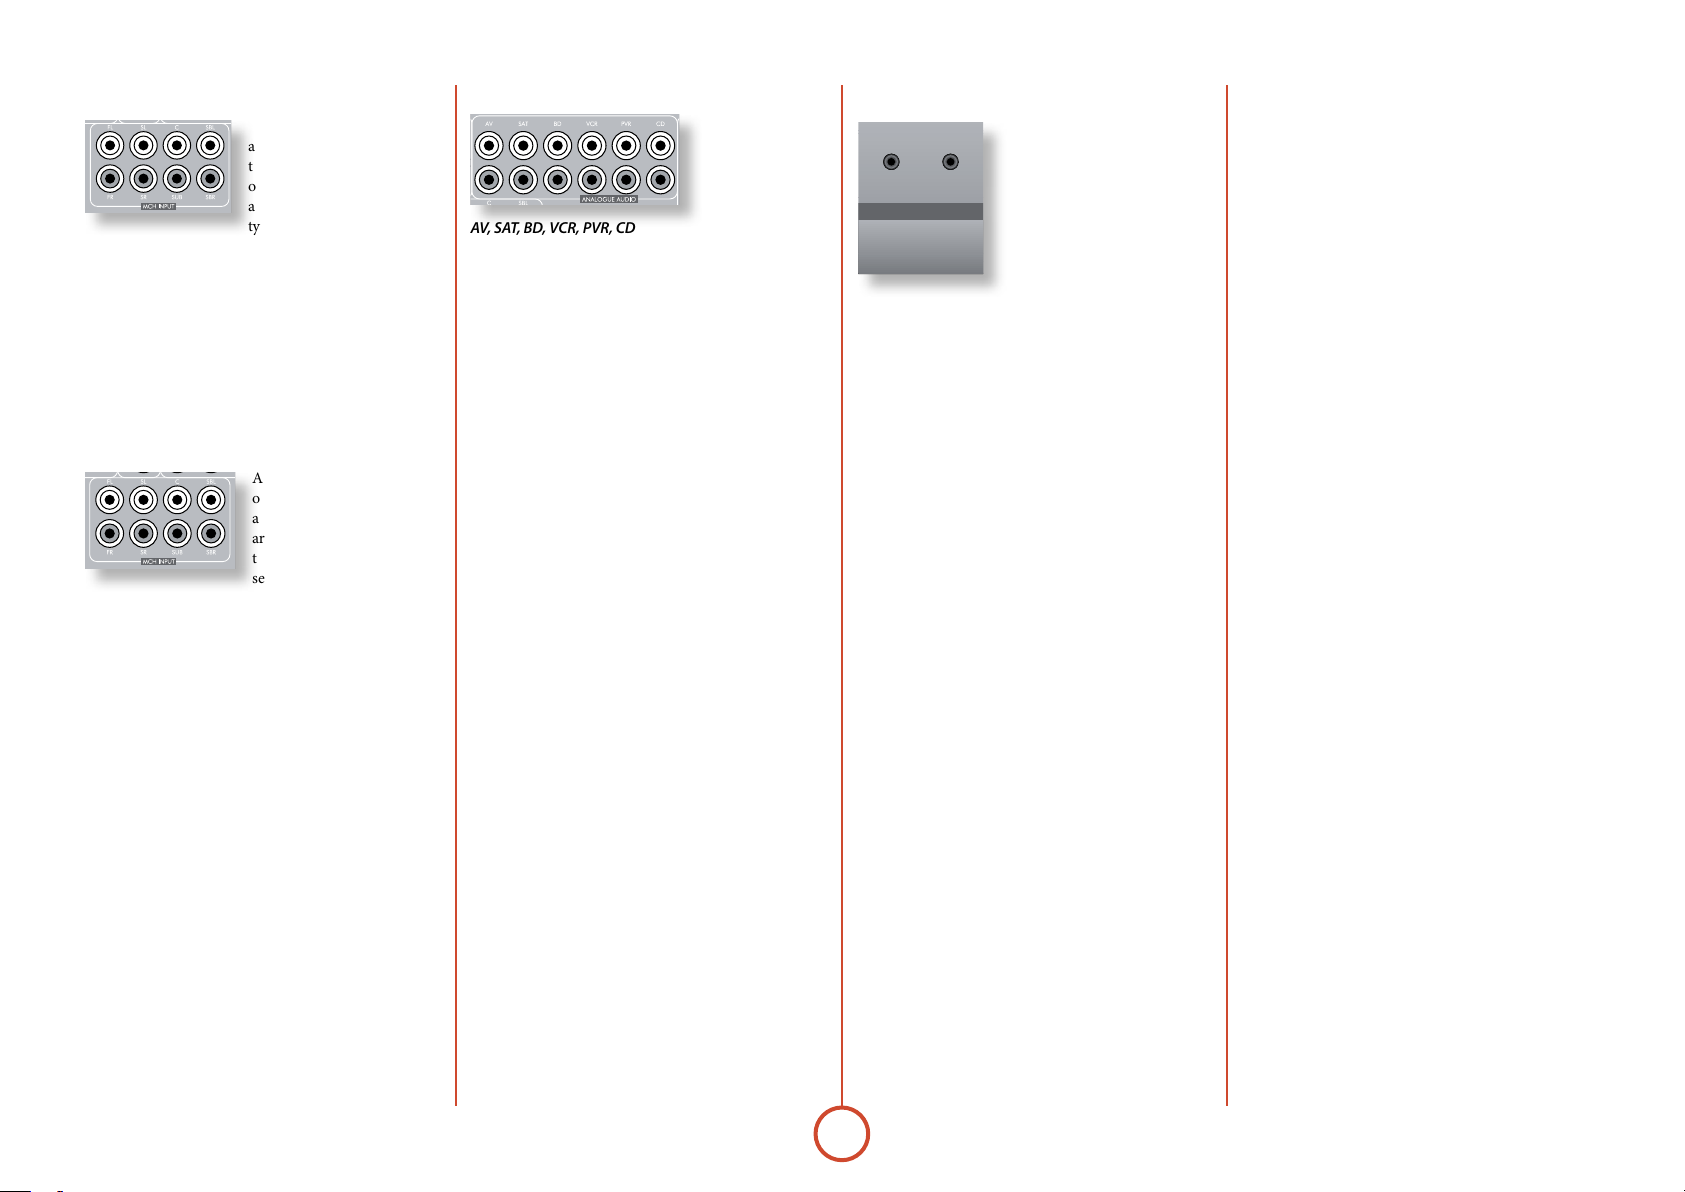
MCH input
ANDBY
MUZ NDI LAYDI CM DINFKÐ IN U +M NU Ð V LUM +
is multi-channel analogue
audio input can be connected
to a source device which
outputs surround sound on its
analogue outputs. Such devices
typically include DVD-Audio
and SACD players. is input does not pass through
any of the audio processing in the AVR400, therefore
functions such as speaker size and distance from the
listening position should be copied from the AVR400
Setup menus into the Setup menus of your multi-channel
source. Note however that speaker level trims are applied
to the MCH input on the AVR400. erefore speaker level
trim settings on multichannel source equipment should be
le unset at zero.
Analogue pre-amplifier outputs
All pre-amplier analogue
outputs are buered, have
a low output impedance,
are at line level and follow
the Zone1 volume control
setting. ey are able to drive
long cables or several inputs in parallel if required.
For more information on connecting speakers or
additional power ampliers, see page E-18 and E-19.
Analogue audio inputs
AV, SAT, BD, VCR, PVR, CD
Connect the le and right inputs to the le and right
outputs of your source equipment.
Front panel AUX input
e front panel AUX input can be
used as an analogue or optical
PHONES
AUX
digital input.
For analogue sources, use a stereo
3.5mm lead; for digital sources
use a 3.5mm optical lead. e
front input is also used for the
auto-setup microphone input.
Front panel PHONES socket
is socket accepts headphones with an impedance
rating between 32 and 600, tted with a 3.5mm
stereo jack plug. e headphone socket is always active,
except when AVR400 is muted.
When the headphone jack is inserted, the speaker
outputs and analogue pre-amplier outputs are
automatically muted.
E-12
Page 15

English
E-13
Page 16
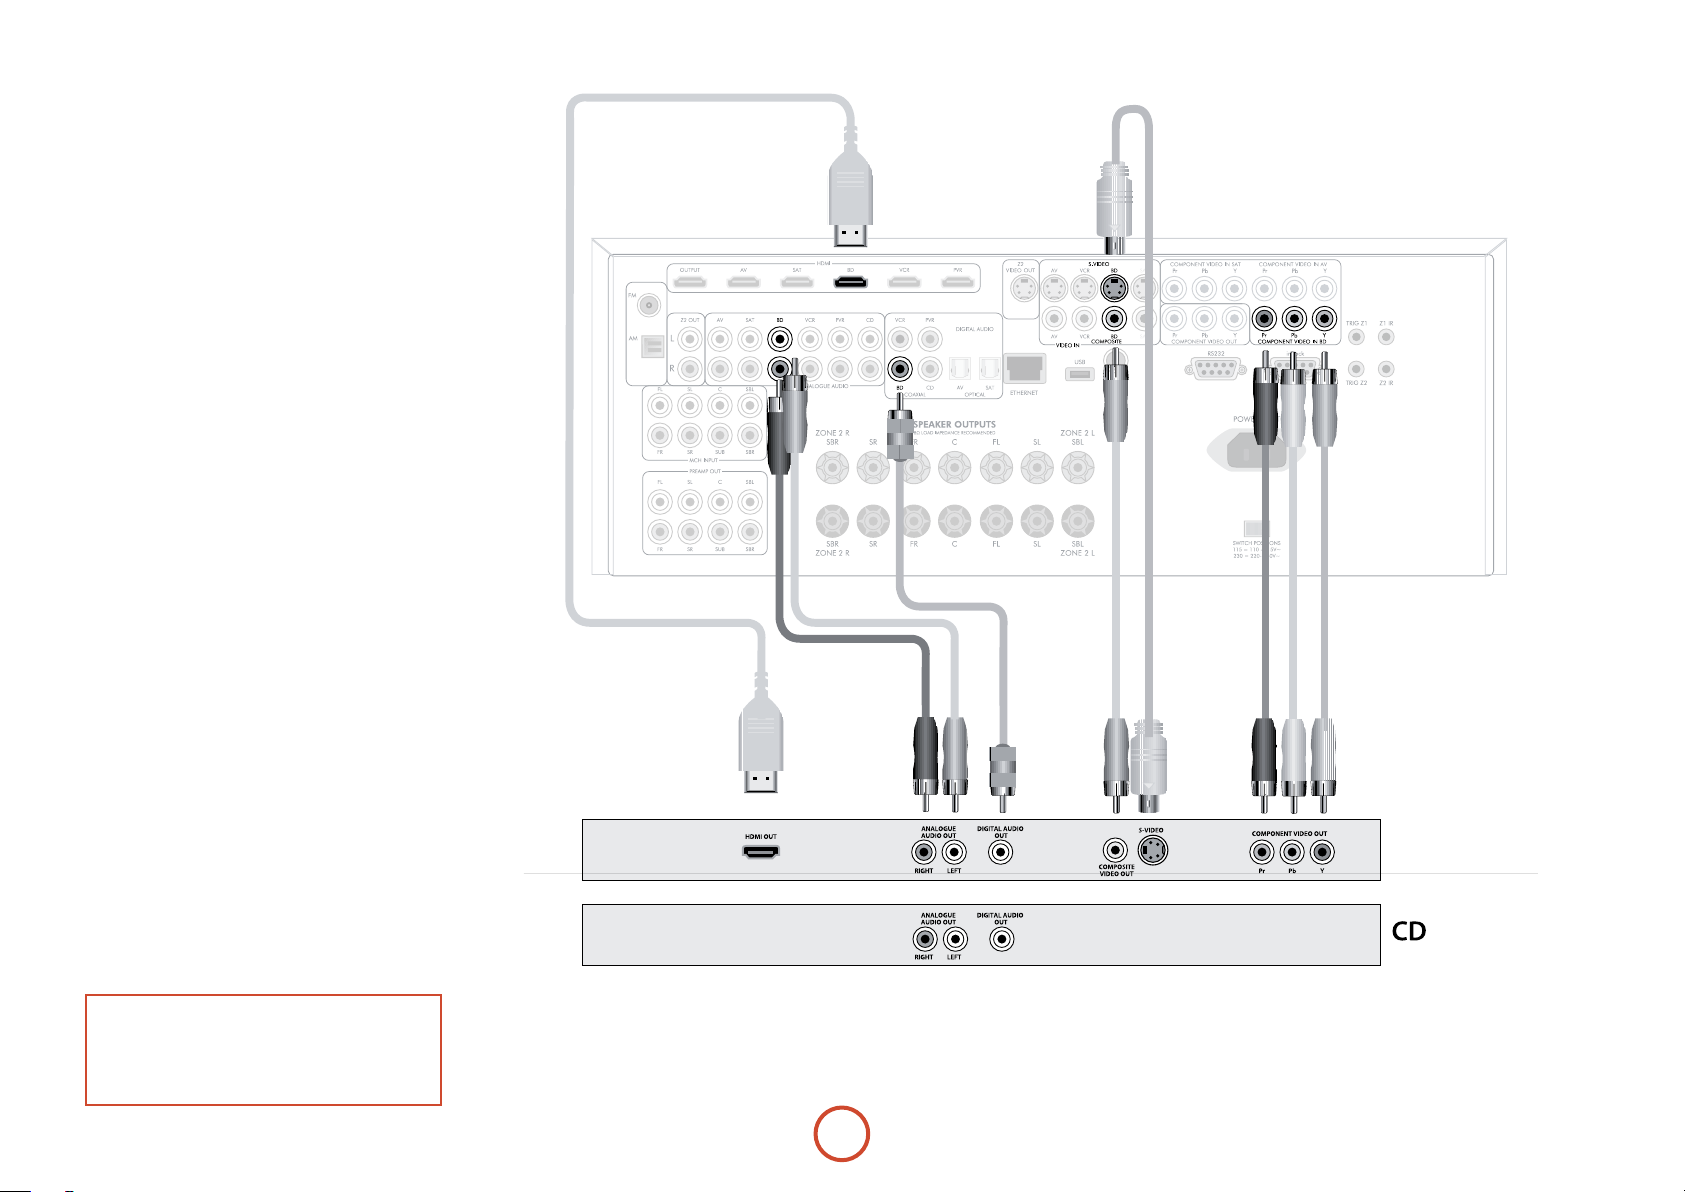
Connection guide
Blu-ray Disc (BD) / DVD player
e diagram shows how to make audio and video
connections from a typical BD/DVD player.
e preferred video hook-up, in order of preference is:
use the HDMI connector (if HDMI output is
<
provided by the player), otherwise connect the three
Component or four RGB+Sync video connectors.
use the S-Video connection if HDMI or Component
<
/RGB+Sync outputs are not provided by your player.
use the Composite connection if HDMI,
<
Component/RGB+Sync or S-Video are not provided
by your player.
In each case, connect the video inputs labelled
AVR400.
e preferred audio hook-up is using the coaxial digital
connector (usually marked
addition to the coaxial analogue outputs for le and
right channels.
In each case, use the audio inputs labelled
AVR400.
DIGITAL AUDI O OUT), in
Satellite receiver
A satellite receiver is connected in the same way as a BD
player, with the same order of preference according to
the outputs provided by the satellite receiver.
In each case, use the inputs labelled
Note that digital audio input from a satellite receiver
sometimes requires a coaxial/TOSLINK (digital
connector) interconnect cable, as some satellite receivers
do not implement audio over HDMI properly or at all.
SAT on the AVR400.
BD on the
BD on the
CD player
Connect the digital audio output (if provided by the CD
player) to the digital CD input of the AVR400, using a
high quality coaxial interconnect cable.
Connect the right and le analogue audio outputs of
the CD player to the analogue
using a pair of high quality coaxial interconnect cables.
NOTE:
For each input, you must set the “Audio Source”
setting according to the connection type.
(see “Input Cong.” on page E-35)
CD inputs of the AVR400,
BD/SAT
E-14
Page 17

Connecting an iPod using the Arcam irDock
e combination of the AVR400 and Arcam’s optional
irDock or rLead accessory provides a great platform for
your iPod.
Connect the irDock as shown, power on the irDock,
slot in your iPod and select iPod as the source. Note that
the default input is VCR but this can be changed in the
General Setup menu.
Navigating through music and podcasts on your iPod is
simple using the CR102 remote, with text appearing on
the AVR400 display.
More information is given in the irDock quick start
guide (or rLead quick start guide) supplied with these
accessory units.
English
E-15
Page 18

radio
connectors
Aerial connectors
e AVR400 is tted with an AM/FM receiver module
and a DAB receiver, depending on the region where it
was sold. e type of aerial you need depends on your
listening preferences and the local conditions.
Your AVR400 is capable of superb radio reception, but
only if it is receiving a good quality transmission signal.
Try the aerials supplied with your unit. If you are in a
medium to strong signal area, these should be adequate
for good reception. In areas with poor signal strength,
you may require a roof or lo mounted aerial.
Contact your local Arcam dealer or aerial installation
experts for advice about local reception conditions.
DAB
(where tted)
In strong signal areas,
the DAB ‘T’ wire aerial
supplied can be used
with reasonable results.
Mount the aerial as high
up as possible on a wall.
In the UK the
‘T’-elements need to be positioned vertically for
DAB reception since broadcasts are
vertically polarised. In other localities,
check with your Arcam dealer or try
both horizontal and vertical positions
for best reception.
Try each usable wall of the room
to see which gives best reception
and use tacks or adhesive tape
to secure the aerial in a ‘T’
shape, but note that no tacks
should come into contact with the
internal wire of the aerial.
When installed and receiving DAB,
check the signal strength by pressing
the front panel or remote control’s
INFO button until the signal quality
indicator is displayed.
In weak signal areas, a high-gain, externallymounted or roof-mounted aerial is desirable in
order to receive the highest number of services.
In Band III transmission areas (such as the UK),
use a multi-element Yagi aerial with the elements
mounted vertically, as the transmissions are
vertically polarised. If you are close to more
than one transmitter, use an omnidirectional or
folded dipole aerial.
If the DAB services in your area are transmitted
on L-band, then ask your dealer for advice for
the best aerial to use.
FM
Connecting an aerial
A suitable FM aerial
must be connected to
the AVR400 before FM
radio can be received.
In strong signal areas,
the wire FM aerial
supplied can be used with
reasonable results.
When installed and
receiving FM radio, check the signal
strength by pressing the front panel or
remote control’s
signal indicator is displayed.
In weak signal areas, or for optimal
FM radio reception, a roof- or lo-
mounted aerial is advised as this
will give superior reception.
In some areas, cable radio may be available or, in an
apartment building, a distributed aerial system may
be installed. In either of these cases you should have
sockets in your home marked
those marked TV); these should be connected to the FM
coaxial connector on the rear of the AVR400.
INFO button until the
FM or VHF (do not use
AM
Connecting an aerial
An AM aerial is required to receive AM/medium wave
radio signals, so a simple loop aerial is supplied with
the AVR400. Follow the assembly instructions in the
diagram below.
Make sure that the aerial is positioned well away from
the AVR400 itself, TVs, computers and other sources
of RF ‘interference’. Rotate the aerial to discover which
position gives the best reception.
3. Connect the lead wires to the AM socket
at the rear of the AVR400 (the wires are
not polarised). Rotate the aerial’s stand
until you obtain the best reception.
2. Push the tab into the open slot in the
base of the stand. Press until the tab
clicks home.
E-16
1. Release the tie-wrap and unwind the
twisted lead. Fold the plastic stand
forward through the loop frame.
Page 19
other
NOTE
Sockets referring to ‘Z2’ relate to connections used
in multi-room installation. For more information on
these connectors, see page E-46.
connectors
Data connectors
rLead/irDock
For use with an Arcam rLead or irDock accessory. See
page E-15 and the accessory documentation for details.
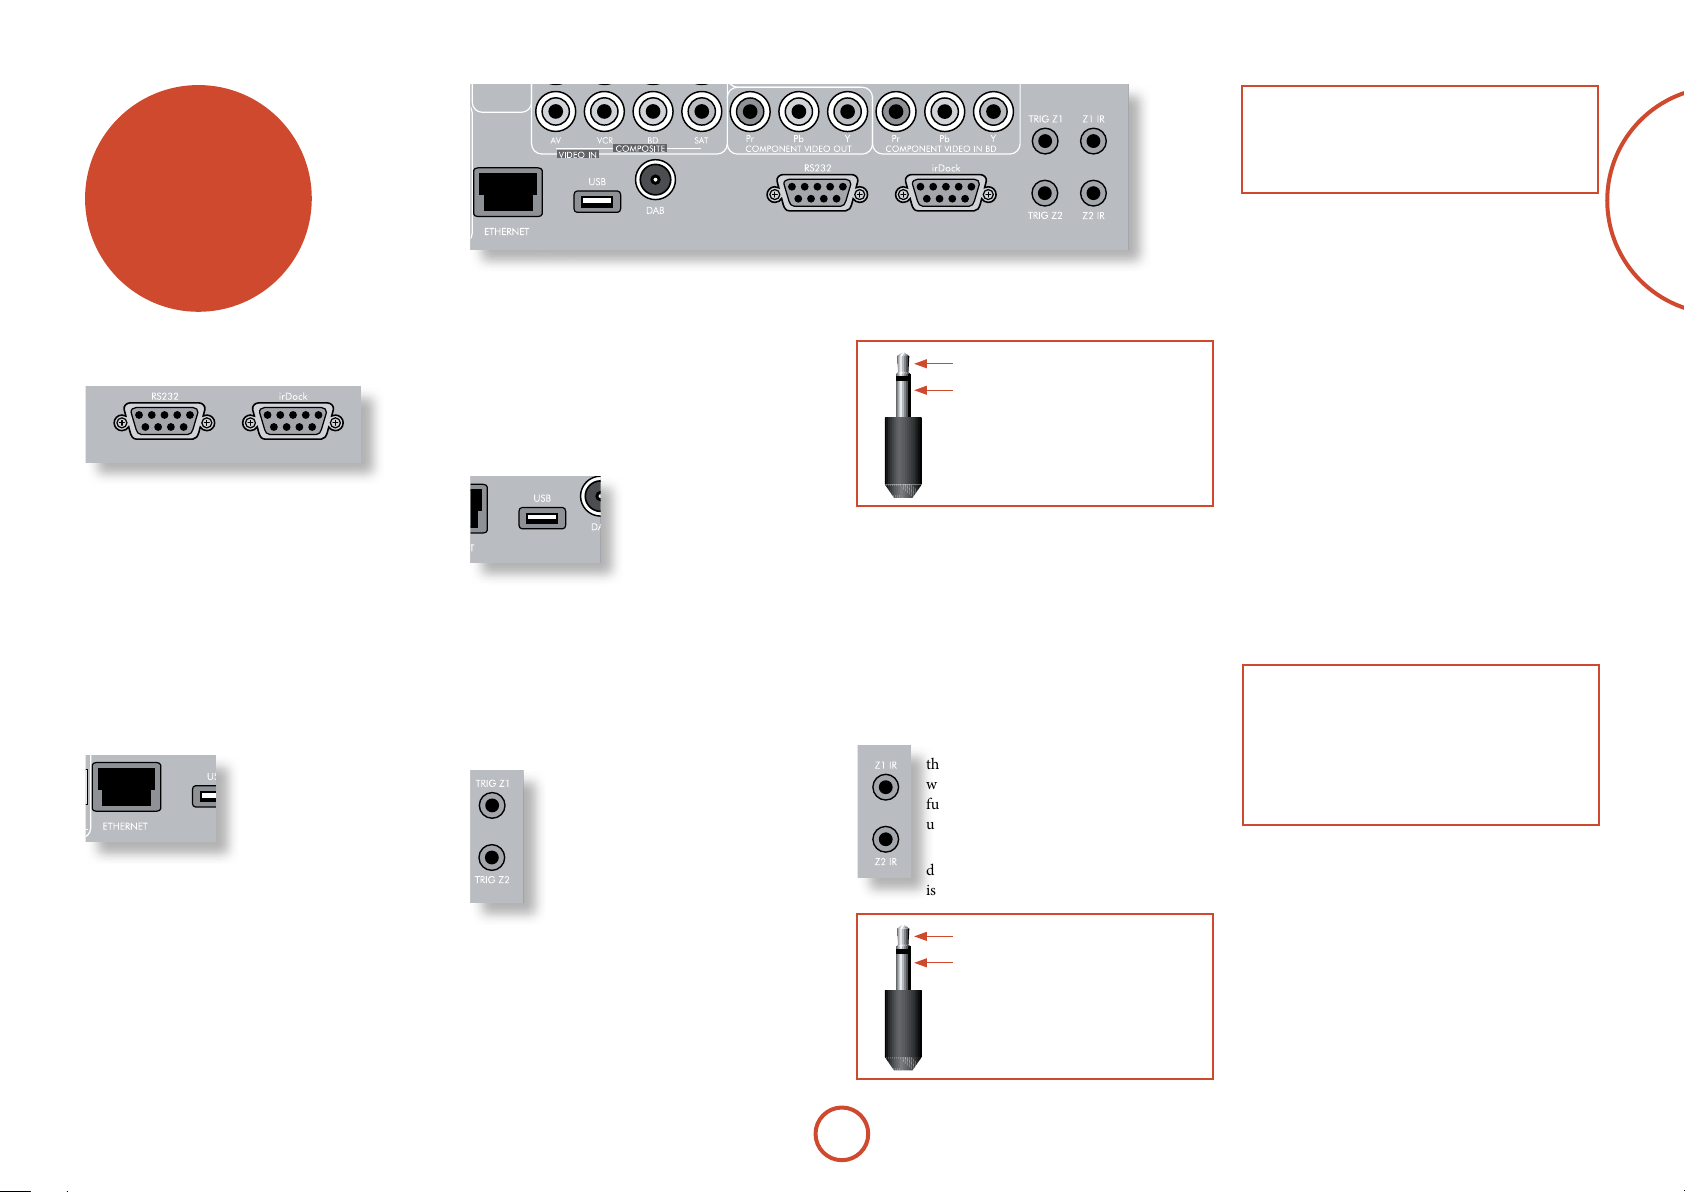
RS232 serial connector
Use with control devices having an RS232 serial
port (for example, Crestron and AMX touch screen
controllers).
Network connector
is section deals with installation of the unit into an
existing home network. For
information on how to use the
AVR400’s network features,
the USB socket, and for a list
of supported le types, refer
to page E-45.
Networking is a large subject
and only the briefest guidelines are presented in
this handbook. Please contact your Arcam dealer
or specialist installer for more information about
introducing the AVR400 into your computer network.
Ethernet
If an Ethernet cable is connected, the AVR400 will
automatically attempt to connect to your network.
You should use CAT5 cable plugged into the RJ45 socket
labelled
ETHER NET on the rear panel.
If your network uses static IP addressing rather than
DHCP, you will need to provide IP address, gateway,
DNS and proxy information. See page E-39 for
information on setting up the network.
USB connector
e AVR400 can play les
stored on a USB mass storage
device, typically a pen drive,
but any USB device that
complies with the ‘mass storage
device‘ class is compatible.
e AVR400 only supports the direct connection of USB
devices and will not support devices connected through
a hub. If regular access to the
may nd it convenient to use a USB extension lead.
See page E-45 for details of supported le types.
USB socket is required, you
Trigger connectors
e trigger connectors (TRIG Z1 and
TRIG Z2) provide an electrical signal
whenever the AVR400 is switched on and
the relevant zone enabled.
e trigger signal can be used to switch
on and o compatible pieces of home
entertainment equipment, for example,
you could set up a trigger to turn on your
television and BD player whenever the
AVR400 was switched on.
ere are two trigger output sockets on the AVR400,
each capable of outputting a 12V, 70mA switching
signal. e socket is designed for mono 3.5mm jacks: tip
is the trigger output, sleeve is ground.
tip: Trigger output
sleeve: Ground
TRIG Z1
Use for remotely turning on and o power amps or
source equipment for Zone1. On = 12V, O = 0V.
TRIG Z2
Use for remotely turning on and o power amps or
source equipment for Zone2. On = 12V, O = 0V.
Infra-red (IR) connectors
e infra-red inputs (Z1 IR and Z2 IR) allow
the connection of external IR receivers, either
when the AVR400 front panel IR receiver is
fully or partially obstructed or to allow the
use of a remote control in Zone2.
ere are two IR inputs on the AVR400, each
designed for stereo or mono 3.5mm jacks. Tip
is the modulated signal, sleeve is ground.
tip: Modulated signal
sleeve: Ground
Z1 IR
is input is intended for use with a local IR receiver
when the front panel of the AVR400 is blocked.
Connecting an IR receiver to
panel IR receiver to prevent problems with multiple
commands if the front panel IR receiver is only partially
obstructed.
Z2 IR
is input is intended for use with an IR receiver in
Zone2 to allow remote control of AVR400 from a
second room.
A supplier of infra-red receivers and emitter accessories
and systems is Xantech. See www.xantech.com for
more information, or ask your Arcam dealer.
NOTE
e IR inputs on the AVR400 are designed for
modulated signals. If the external IR receiver
demodulates the IR signal, it will not work. Also
the AVR400 does not provide power for external
receivers on the IR jack, therefore an external power
source will be required.
Z1 IR will disable to front
English
E-17
Page 20

speakers
e AVR400 allows you to connect up to seven speakers
and an active subwoofer in the main system. e output
channels correspond to speakers installed in the front
le, centre, front right, surround le, surround right,
surround back le, surround back right and an active
subwoofer.
e conguration and placement of your speakers
is very important. All speakers, with the exception of
the subwoofer, should be arranged around your normal
viewing/listening position. e subwoofer should be
placed in a position which gives an even frequency
response in all listening positions. Incorrect placement
leads to bass boom in some areas. Oen the only
way to nd a good position for your subwoofer is by
experimentation. A good place to start experimenting
is close to a wall but at least 1m away from any corners.
You can also consult your subwoofer handbook for
placement suggestions.
Centre
e centre speaker allows for a more realistic
reproduction of dialogue. e centre speaker
should have a similar tonal balance to the front
le and right speakers and be positioned at a
similar height.
Subwoofer
A subwoofer will greatly improve the bass performance of
your system. is is useful for reproducing special cinema
eects, especially where a dedicated LFE (Low Frequency
Eects) channel is available, as with many discs encoded
with Dolby or DTS technologies.
More than one subwoofer unit may be required for larger
installations, particularly in rooms of a timber frame
construction. Multiple subwoofers need care in placement
because there may be cancellation eects between the
units and you may require expert advice.
Front left and right
Position your front le and right speakers to
achieve a good stereo image for normal musical
reproduction as well as for the multichannel
modes. If they are placed too close together there
will be a lack of spaciousness; if they are placed
too far apart a stereo image will appear to have a
large ‘hole’ in the middle and will be presented in
two halves. If there is no practical alternative to
placing the speakers widely apart, this eect can
be overcome in music reproduction by using the
centre sound extraction from the le and right
speakers (see Dolby Pro Logic II Music mode).
Surround back left and right
e surround back le and right speakers
are used to add extra depth and better
sound localisation and should be installed
approximately one metre higher than the
listener’s ears. Place the two surround
back speakers such that there is an arc of
approximately 150 degrees between each
surround back speaker and the centre speaker.
e surround back speakers should face the front
of the room as shown in the diagram to provide
the largest ‘sweet spot’.
E-18
Surround left and right
e surround le and right speakers reproduce
the ambient sound and eects present in a
multichannel home cinema system and should be
installed slightly higher than the listener’s ears.
Page 21
Connecting speakers
To connect each of the speakers, unscrew the
corresponding terminals on the back of the AVR400,
insert the speaker wires through the hole in each post
and screw the terminals back up. Make sure that the
red (positive/+) terminal of the speaker is connected to
the red (positive/+) terminal on the back panel, and the
black (negative/) terminal of the speaker is connected
to the black (negative/) terminal on the back panel.
It is important that no stray strands of wire from these
connections are allowed to touch another cable or the
product casing. Failure to ensure this can cause a short
circuit and damage your AVR400.
Do not over-tighten the loudspeaker terminals, or use a
wrench, pliers, etc., as this could damage the terminals
and this would not be covered under the product’s
warranty.
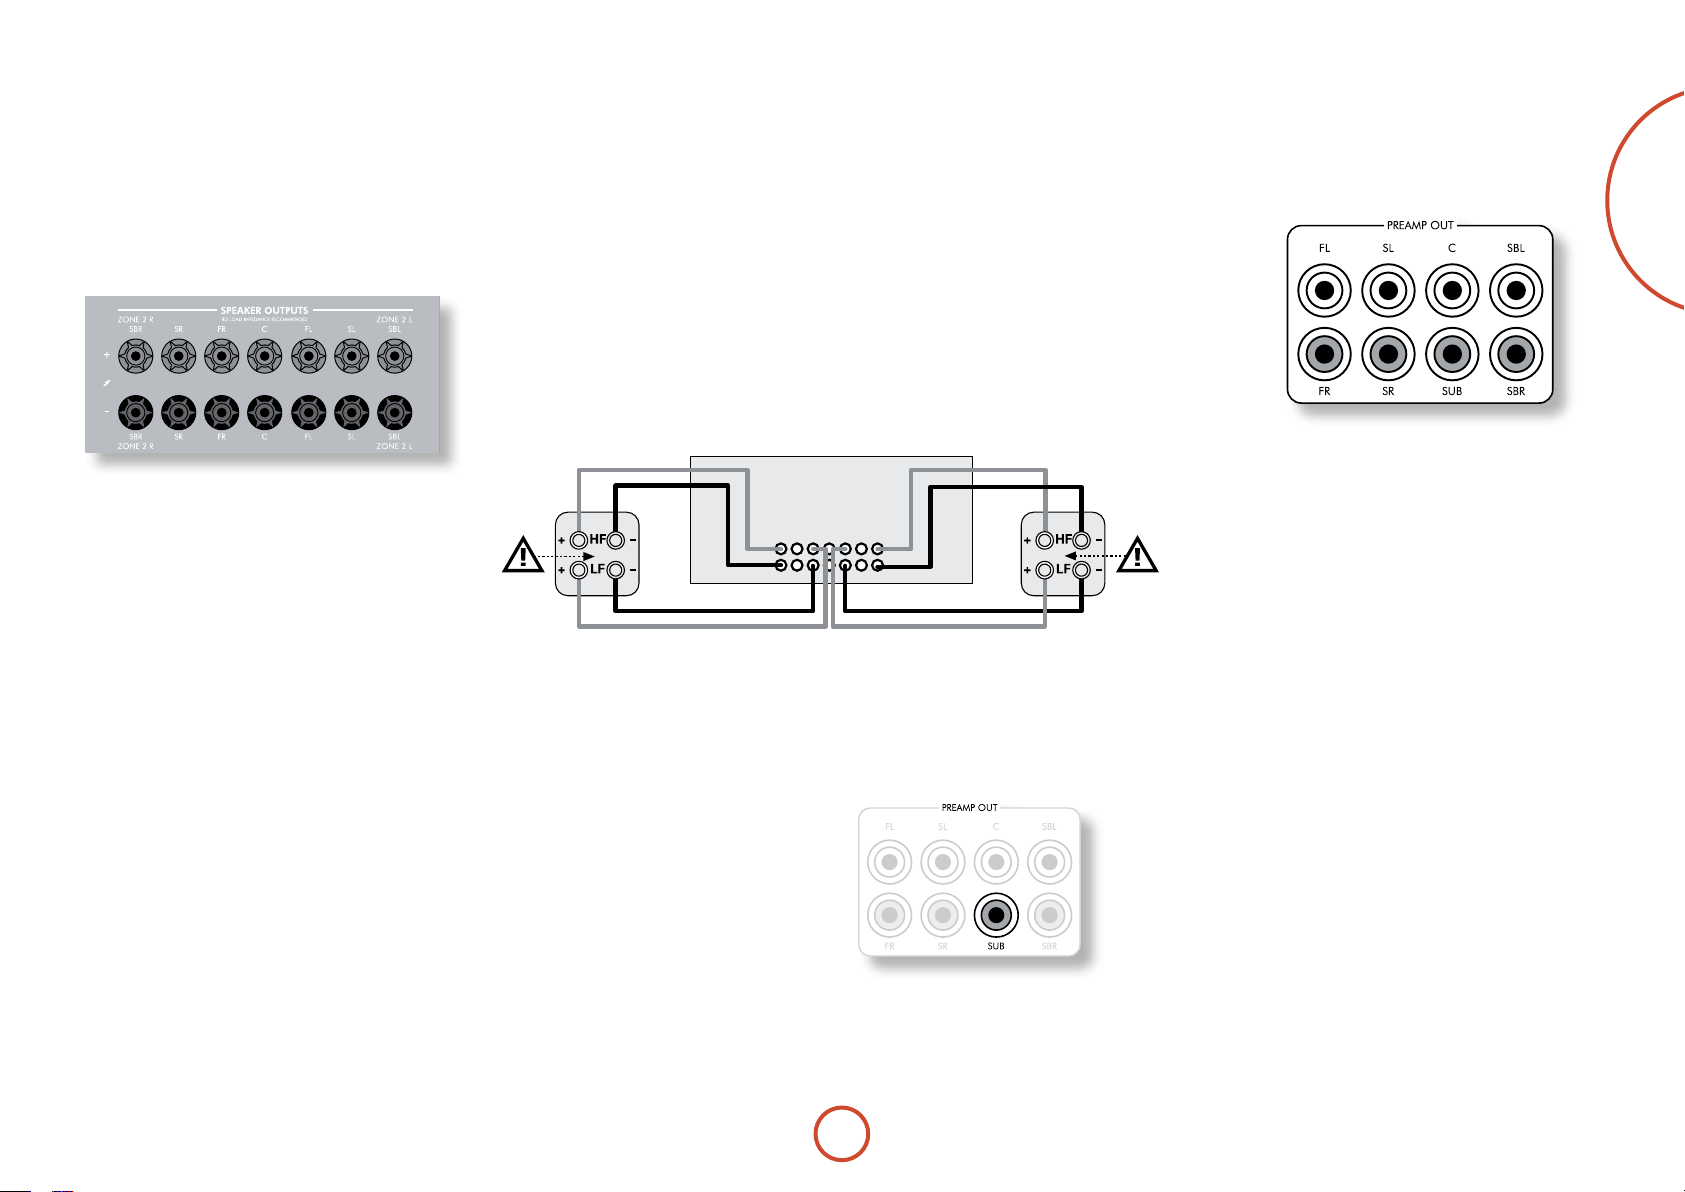
Link MUST
be removed
Bi-Amping the Front Left & Right speakers
Bi-amping is the use of two amplier channels per speaker. Bi-amping can
provide better sound quality than conventional single wiring. If you do not have
Surround Back speakers (i.e. you have a 5.1 surround system, not a 7.1 system)
then you can use the spare Surround Back speaker outputs to bi-amplify the
front le and right speakers, if your speakers support bi-amping. e spare
channels can alternatively be used to power stereo speakers in another room
(Zone 2).
Speakers that support bi-amping have two sets of +/- terminals per speaker,
usually linked together by metal strips. ese metal strips MUST be removed
when bi-amping; failure to remove them will result in damage to the amplier
that is not covered under warranty.
To bi-amp the front le and right speakers, remove the metal strips from
the speaker terminals. Connect the woofer or LF terminals to the FL and FR
terminals on the AVR400. Connect the tweeter or HF terminals to the SBL and
SBR terminals on the AVR400. Finally, navigate to the Setup Menu “Spkr Types”
and set the ‘Use Channels 6+7 for” menu option to “BiAmp L+R” — see page E-32.
SBL
SBR
FL
FR
Link MUST
be removed
Using external power ampliers
e internal power amplier of the AVR400 can
be supplemented or replaced with external power
amplication. Connect the PREAMP OUT sockets to your
power amplier inputs:
English
FL, FR, C
Connect these to the equivalent (Right, Le and Centre)
front channels of your power amplier.
SUB
Subwoofer output. Connect this to the input of your
active subwoofer, if present.
SR, SL
Surround Right and Surround Le outputs. Connect
these to the Surround Right and Le power amplier
inputs.
Speaker cables
e speakers should be connected to the amplier using
good-quality, high-purity, low impedance copper cables.
Cheap speaker cables should be avoided – they are a
false economy and can signicantly degrade the sound
quality.
e cable runs to the speakers should be as short as
practicable. Connections to the speaker terminals
should always be nger tight, whether using bare wires
or spade connectors.
Connecting subwoofers
e AVR400 also allows an active subwoofer to be connected to the SUB output.
See your subwoofer handbook for the
correct setting up and connection for
your particular subwoofer.
E-19
SBR, SBL
Surround Back Right and Surround Back Le outputs
(only used in 7.1 channel systems). Connect these to the
Surround Back Right and Surround Back Le power
amplier inputs.
All pre-amplier analogue outputs are buered, have
a low output impedance and are at line level. ey are
able to drive long cables or several inputs in parallel if
required.
Page 22

operation
Operating your AVR400
For information display we recommend you use the
OSD (On-Screen Display) on your display device
whenever possible.
Switching on
Press the front panel power button in. e power
LED will glow green, the front display shows the word
‘ARCAM’. When initialisation is complete, the display
shows the volume setting and the name of the selected
input.
Please wait until the unit has nished initialising before
operating the AVR400. It is recommended that if the
unit is switched o, you should wait at least 10 seconds
before switching the unit back on.
Standby
e AVR400 has a standby mode which can be entered
by pressing STANDBY on the remote control. When in
standby mode, the display is blank and the POWER LED
glows red.
If the unit is to be le unused for an extended period,
we recommend that you disconnect it from the mains
supply to save power.
To switch on from standby
Press the STANDBY button on the remote control or any
key on the front panel (other than the power button).
Front panel display
e AVR400 is ready for use aer about four seconds.
B D 3 7
D O L B Y T R U E H D 5 . 1
e display window shows the currently selected source
and the last selected information view setting (this
information line can be changed using the INFO button).
e current volume setting for Zone 1 (37.0dB in the
above example) is displayed on the front panel. e
volume setting for Zone 2 is displayed temporarily
whenever it is adjusted.
Selecting a source
To select a particular source, press the –INP UT or
INPUT + buttons until that source is shown on the front
panel display, or (if available) press the corresponding
source button on the remote. e following sources are
available:
CD
BD
AV
SAT
PVR
VCR
IPOD
AM
FM
DAB* Internal tuner input
NET
MCH
AUX
DISPLAY
*ese sources are market dependent and may not be
available on your AVR400
Most audio inputs have both analogue and digital
connections. You must specify the type of connection
used for each input using the “Audio Source” option
in the “Input Cong.” menu, see page E-35. Note that an
incorrect setting will result in no sound — the default is
HDMI audio. If you are not using HDMI audio then this
setting must be changed.
e processing mode and Stereo Direct functions are
remembered and recalled for each individual input.
e
MCH input is intended for direct analogue pass-
through of DVD-Audio or SACD sources. Apart from
volume control and level trim, no processing modes
are possible on this input, including AVR400 bass
management and delays. Please set bass management,
speaker size and speaker delays in the source player. You
Compact Disc player input
Blu-ray Disc player input
Audio-Visual input
Satellite receiver input
Personal Video Recorder input
Video Cassette Recorder input
Requires an iPod® and Arcam irDock
or rLead.
Internal tuner input
Internal tuner input
Internal (Ethernet) and external USB
solid-state device (e.g. pen drive) input.
Selects MCH (multi-channel)
analogue input
Auxiliary (front panel) input
e Audio Return Channel (ARC)
from an HDMI 1.4-compliant display.
Use this with an HDMI 1.4-compliant
television using internal TV tuners.
can copy the distances and relative speaker levels from
the Setup menus in the AVR400.
Stereo Direct
To listen to a pure analogue stereo input, press the
DIREC T button. e Stereo Direct mode automatically
bypasses all processing and any surround functions. In
direct mode, digital processing is shut down to improve
the sound quality and reduces digital noise with the
AVR400 to an absolute minimum.
Note: when Stereo Direct mode is selected, no
digital output is available and no bass management
is performed, meaning that bass signals will not be
redirected to a subwoofer.
Volume control
It is important to realise that the level of the volume
indicator is not an accurate indication of the power
delivered to your loudspeakers. e AVR400 oen
delivers its full output power long before the volume
control reaches its maximum position, particularly when
listening to heavily recorded music. In comparison,
some movie sound tracks can appear very quiet, as
many directors like to keep maximum levels in reserve
for special eect sequences.
Headphones
To use headphones with the AVR400, plug the
headphones into the PHONES socket in the centre of the
front panel.
When headphones are plugged into the front panel
PHONES socket, the outputs for Zone1 are muted and
the audio will be down-mixed to two channels (2.0). e
two-channel down-mix is required so that the centre
channel and surround information can be heard via the
headphones.
E-20
Page 23

Using Zone2
Zone2 provides the option for the occupants of the
master bedroom, conservatory, kitchen, etc. to view or
listen to a dierent source at a dierent volume level
from the main zone (Zone1).
Source selection and volume control for Zone 2 is
achieved either by using an IR receiver in Zone 2 (see
“Zone2 control connections” on page E-46) or by switching
over to Zone 2 control by pressing the front panel zone
button or by pressing
on the remote control. e front panel VFD display
indicates that control has been switched to Zone 2.
S T A N D B Y Z 2 5 0
D O L B Y T R U E H D 5 . 1
To turn on Zone 2, press the Zone button (or shi+ok)
then press the standby power button on the remote
control. Press a source select button to select a dierent
source to Zone 1.
F O L L O W Z 1 Z 2 5 0
D O L B Y T R U E H D 5 . 1
Note that Zone 2 control from within Zone 1 will pass
automatically back to Zone 1 control aer a few seconds
of inactivity.
Zone 2 can also be controlled using a third-party
programmable remote control or a home automation
system. Please contact your dealer or installer for further
details.
AMP followed by SHIFT then OK
Extended front panel menu
Pressing the MENU key and holding it for longer than
four seconds will bring up the Extended Menu, allowing
you to perform the following:
Restore to factory defaults
is option allows you to restore all settings on your
AVR400 to the defaults that it le the factory with.
Change remote code
e default RC5 system code the AVR400 responds to
is 16. If required, for example due to another device in
your system also using this RC5 system code, it can be
changed to 19.
Restore secure backup
is option allows you to restore all settings to their
state as saved using the ‘Store secure backup’ feature.
is option is useful if settings are accidentally changed.
It also allows the unit to be returned to the saved state
following a rmware update.
Store secure backup
is option allows you to save all the AVR400 settings to
a secure area of memory. e settings can be retrieved
using the Restore option above.
– Enter PIN
Enter the secure backup PIN using the ', ,, <
and > keys on the remote control (do not use the
numeric keypad). The default PIN is 1234.
– Change PIN
Allows the PIN to be changed to a number other
than the default. Enter the current secure backup
PIN using the ', ,, < and > keys on the
remote control (do not use the numeric keypad).
The default PIN is 1234. After the current PIN has
been entered correctly, enter a new PIN as prompted
and again to confirm.
– EXIT
Cancel and return to the extended menu.
Updating firmware via USB
e rmware in your AVR400 can be updated using a
USB ash drive containing a rmware update le.
English
E-21
Page 24

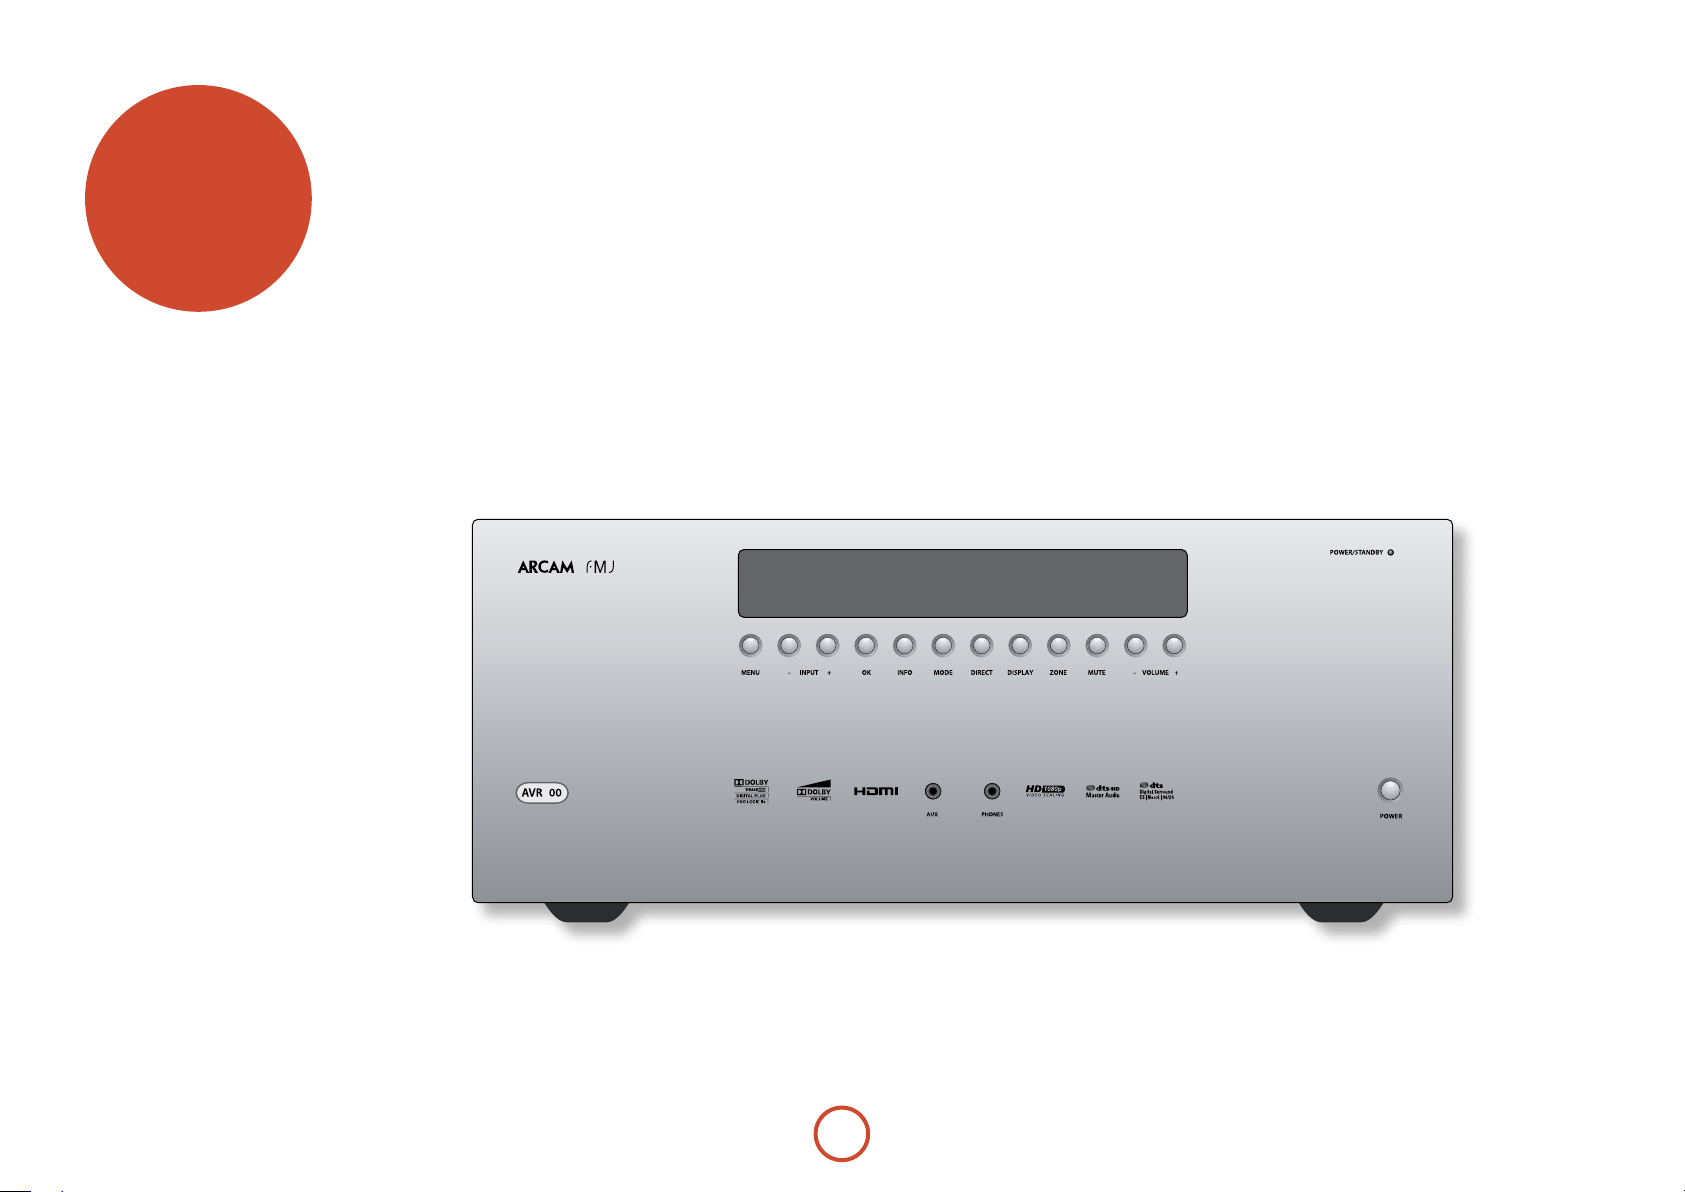
front panel
operation
Selects between Stereo and the available
surround modes for the current source.
Selects the information displayed on the
lower le portion of the front panel.
OK
Used to enter selections made in the
Setup menu. Press and hold to reset
video outputs to the lowest resolution
(HDMI: 480p; Component 480i).
Info
Mode
Direct
Stereo Direct on/o. Provides a direct analogue path from
the analogue inputs to the le and right front outputs.
Switches o any surround processing modes and shuts
down the DSP circuits for best stereo sound quality.
Display
is switches the display brightness
between o/dim/bright.
Zone
Selects between Zone1 and
Zone2 control.
Mute
Mutes all analogue audio outputs in the
currently selected zone.
Power / Standby LED
is indicates the status of the receiver and is
green when the AVR400 is powered on. Red
indicates the AVR400 is in Standby mode.
Input
ese buttons select the source
connected to the corresponding
input (or internal input)
Unused sources can be prevented
from being selected in the setup
menu.
4
Menu
Selects the Setup menus on the
on-screen display (OSD).
Aux
Multi purpose auxiliary
line level input,
calibration microphone
input and 3.5mm optical
digital (SPDIF) input.
E-22
Phones
is socket accepts headphones
with an impedance rating between
32 and 600, tted with a 3.5mm
stereo jack plug.
Volume
Adjusts the analogue output
volume in the selected zone
(line out, speakers and
headphones).
Power
Switches the main power to the
AVR400 on and o.
Once the unit is switched o,
it should be le for at least ten
seconds before switching on
again.
Remote control receiver. is is positioned behind
the display window, above the MENU button on the
front panel. Ensure the receiver is in a clear line of
sight from the remote control for operation. If this is
not possible, use a separate sensor connected to the
Z1 IR input on the rear panel.
Page 25

remote
control
The CR102 universal remote
controller
e CR102 is a sophisticated ‘universal’ backlit remote
control that can control up to eight devices. It is preprogrammed for use with the AVR400 and many other
Arcam products (FM/DAB tuners, CD players and DVD
players).
With its extensive built-in library of codes, it can also
be used with thousands of third party audio-visual
components – TVs, satellite and set-top boxes, PVRs,
CD players, etc. See the list of codes at the back of this
handbook, beginning on page 56.
e CR102 is a ‘learning’ remote, so you can teach it
almost any function from an old single-device remote.
You can also program the CR102 to issue a sequence of
commands (‘macros’) from a single button press.
Inserting batteries into the
remote control
English
1. Open the battery compartment by pressing the
button on the back of the handset.
2. Insert four ‘AAA’ batteries into the battery
compartment – two facing the top of the unit,
and two facing the end, as in the diagram.
3. Lower the end cap onto the plastic locating plate
in the handset. is acts as a hinge, and you
can now push the end cap rmly into its locked
position with a click.
Using the remote control
Please keep in mind the following when using the
remote control:
< Ensure there are no obstacles between the
remote control and the remote sensor on the
AVR400. e remote has a range of about 7
metres. (If the remote sensor is obscured, the Z1
IR remote control input jack on the rear panel is
available. Please consult your dealer for further
information.)
< Remote operation may become unreliable if
strong sunlight or uorescent light is shining on
the remote sensor of the AVR400.
< Replace the batteries when you notice a
reduction in the operating range of the remote
control.
E-23
Notes on batteries:
Incorrect use of batteries can result in hazards such
<
as leakage and bursting.
Do not mix old and new batteries together.
<
Do not use non-identical batteries together –
<
although they may look similar, dierent batteries
may have dierent voltages.
Ensure the plus (+) and minus (-) ends of each
<
battery match the indications in the battery
compartment.
Remove batteries from equipment that is not going
<
to be used for a month or more.
When disposing of used batteries, please comply
<
with governmental or local regulations that apply in
your country or area.
Page 26

Useful information
Backlight
A blue backlight comes on for ve seconds whenever
a key is pressed. is helps you use the handset in
subdued lighting conditions. It may be possible to hear a
quiet tone being emitted from the remote control when
the backlight is on. is is perfectly normal.
Power LED blinks
Short blinks indicate a valid key press.
Multiple short blinks convey information (such as a
device code) or signal the beginning and successful
completion of a programming sequence.
Long blinks indicate an invalid key press or entry.
e symbol ‘*’ is used in the manual to indicate a
power LED blink.
Timeouts and unassigned keys
Time out – Aer 10 seconds the CR102 exits the
programming state and returns to normal operation.
Stuck key timeout – Aer any key is pressed
continuously for 30 seconds, the CR102 stops sending
IR transmission to conserve battery life. e CR102
remains o until all keys are released.
Unassigned keys – the CR102 ignores any unassigned
key presses for a particular Device Mode and does not
transmit IR.
Low voltage indicator
When the batteries are running down, the IR transmit
indicator on the CD102 (the LED under the Power
button) ashes ve times whenever you press a button:
* * * * *
If this happens, please t four new AAA alkaline
batteries as soon as possible.
Device Mode / Source keys
As the CR102 can control your AVR400 as well as a
range of other equipment, many of the buttons have
more than one function depending on the ‘device mode’
selected on the remote control.
e Device Mode keys (shown below) select the source
on the AVR400. If one of these keys is pressed briey,
a command is transmitted to change the source on the
AVR400. Also the functionality of the remote control
changes to operate the selected source device. it’s like
having eight dierent remotes in your hand!
DVD
SAT
AV
TUN
AMP
DVD player or Blu-ray Disc player
Satellite set-top box
Audio-visual sound input (use with TV)
DAB, FM or AM tuner
Controls the amplier and setup features
of the AVR400
PVR
Auxiliary input, or an iPod® via an
Arcam irDock or rLead
VCR
Personal Video Recorder (or Digital
Video Recorder)
CD
Compact Disc player
If you press and hold a Device Mode key for about four
seconds, you change the Device Mode of the CR102
without changing the signal source on the AVR400. is
can also be done by pressing S followed by a Device
Mode key (within two seconds). ese two methods
allow you to change which device the CR102 controls
without also changing the AVR400 source, allowing
uninterrupted listening.
Each Device Mode changes the behaviour of many
of the CR102 keys to control the source device
appropriately. For example:
In
CD mode
In
AV mode
plays the previous CD track.
0
issues the TV ‘channel down’ command.
0
e CR102 remains in the last selected Device Mode
so it is not necessary to press a Device Mode key before
every command key if all you are doing is playing or
skipping tracks on a CD, for example.
Navigation keys
e Navigation keys steer the cursor in Setup
menus or on-screen menus. ey also replicate
the navigation functions of original remotes
supplied with other home entertainment
devices in your system.
conrms a setting.
O
Volume control
By default, the CR102 is set up so that the volume
control buttons always control the volume of the
AVR400, regardless of which Device Mode the remote
is currently set for. is is known as volume ‘punch
through’.
For example, if you are listening to a CD, you will
probably have the CR102 in
the CD player. You can use the volume controls on the
remote directly to adjust the volume of the AVR400
without rst having to press A to put the remote
into AMP Device Mode. e volume buttons ‘punch
through’ the CD Device Mode on the remote to the AMP
Device Mode. Volume ‘punch through’ can be disabled
individually for any Device Mode if desired.
CD Device Mode to control
The CR102 complies with Part 15 of the
FCC rules
is equipment has been tested and found to
comply with the limits for a class B digital device,
pursuant to part 15 of the FCC Rules. ese limits
are designed to provide a reasonable protection
against harmful interference in a residential
installation. is equipment generates, uses, and can
radiated radio frequency energy and if not installed
and used in accordance with the instructions,
may cause harmful interference to radio
communications. However, there is no guarantee
that interference will not occur in a particular
installation. If this equipment does cause harmful
interference to radio or television reception, which
can be determined by turning the equipment o
and on, the user is encouraged to try to correct
the interference by one or more of the following
measures:
Reorient or relocate the receiving antenna.
Increase the separation between the equipment and
receiver.
Connect the equipment into an outlet or a circuit
dierent from that to which the receiver is
connected.
Consult the dealer or an experienced radio/TV
technician for help.
E-24
Page 27

Controlling other devices
Code blink-back
Method 1 (Direct code setup)
is section describes the simplest (preferred) way to
program the CR102’s Device Mode keys to control the
non-Arcam devices in your system.
Some of the modes are locked to Arcam operation but
<
can be unlocked if required (see page E-50).
A mode only controls Arcam equipment.
<
BD mode Locked
SAT mode Unlocked
AV mode Unlocked
TUN mode Locked
PVR mode Locked
VCR mode Unlocked
CD mode Locked
Here is a specic example of how to program the a
key to control an Addison television. e principles for
controlling other devices are exactly the same.
1. Make sure your device is switched on (not just on
standby).
2. Find the correct Device Code table (e.g. TV) for the
type of device you want to control from the CR102.
3. Find the row containing the codes for the
manufacturer of your device (e.g. Addison) (page 56).
e most popular code is listed rst.
4. Press the appropriate Device Mode key (e.g. a) on
the CR102.
5. Press and hold S until the red Power LED blinks
twice:
(It actually blinks once when you press
* *
the key, then twice aer about three seconds).
6. Enter the rst four-digit device code using the
number keys. e power key blinks twice:
7. Aim the CR102 at the device and press P. If the
device switches o, the setup is complete.
8. Turn your device back on and test all the CR102’s
functions to ensure they are working properly.
9. Important! Write your device code down on the
right hand side of the page so you can remember it if
you ever reset the CR102.
* *
What if I still can’t control my device?
If your device doesn’t respond, repeat the above
<
steps until one of the device codes listed for your
brand works.
If none of the codes listed for your brand operates
<
your device, or if your brand is not listed at all, try
the Library Search Method described in the next
section.
Notes:
Some codes are quite similar. If your device does not
<
respond or is not functioning properly with one of
the codes, try another code listed under your brand.
If your device’s original remote control does not have
<
a P (POWER) key, press $ instead of P when
setting up your device.
Remember to press the corresponding device key
<
before operating your device.
Many TVs do not switch on pressing P. Please try
<
pressing a number key (‘channel select’) to switch
your TV back on.
To search for the code for another device follow the
<
instructions above, but press the appropriate device
key instead of a during step 2.
.
Method 2 (Library search)
is section describes another way to program the
CR102 to control third-party equipment.
Library Search allows you to scan through all the
codes contained in the CR102’s memory. It can take a
lot longer than the previous method, so only use this
method if:
Your device does not respond to the CR102 aer you
<
have tried all the codes listed for your brand.
Your brand is not listed at all in the Device Code
<
tables.
Example: To search for a TV code
1. Switch your TV on (not standby) and aim the
CR102 at it.
2. Press a on your CR102.
3. Press and hold S until the power LED blinks twice.
4. Press 9 9 1. e power LED key blinks twice:
.
* *
5. Press P.
6. Aim the CR102 at your Television and press [
repeatedly until your Television turns o.
Every time you press [ the CR102 sends out a
POWER signal from the next code contained in its
memory. In the worst case, you may have to press this
key up to 150 times, so patience is required! If you
skip past a code, step back by pressing ]. Remember
to keep pointing the CR102 at your Television while
pressing this key.
7. As soon as your television turns o, press S to
store the code.
Notes:
Many TVs do not switch on by pressing P. Try
<
pressing a number key (‘channel select’) to switch
your TV back on.
If you cannot control your Television properly,
<
please continue the Search Method: you may be
using the wrong code.
To search for the code for another device follow the
<
instructions above, but press the appropriate Device
Mode key instead of a during step 2.
If your device’s original remote control does not have
<
a P (STANDBY) key, press $ instead during step 5.
Once you have set up your CR102, you can blink back
your device set-up codes for future reference.
Example: To blink back your Television code
1. Press the appropriate Device Mode key (e.g. a)
once.
2. Press and hold S until the red Power LED blinks
twice *
(It actually blinks once when you press
*
the key, then twice aer about three seconds).
3. Press 9 9 0. e P key blinks twice.
4. For the rst digit of your four-digit code, press 1
and count all the red blinks. If there are no blinks,
the digit is ‘0’.
5. For the second, third and fourth digits, repeat the
previous step, pressing 2, 3, or 4 in order.
Now you have the four-digit code.
Make a note of the codes
Write down the codes for your devices in the boxes
below for future reference.
Device Code
1
2
3
4
5
6
7
8
English
E-25
Page 28

AMP Device Mode
e A Device Mode button congures the CR102 to
control the AVR400. Pressing this button does not aect
the currently selected input on the AVR400.
IMPORTANT: e CR102 must also be in
AMP Device
Mode to control the following sources: MCH (multichannel analogue), AUX, NET (optional network audio),
USB, IPO D (for use with the optional Arcam rLead or
irDock).
However to control the internal Tuner (AM/FM/DAB
(if tted)) the CR102 must rst be in
TUN Device Mode
(see later).
e functionality of the CR102 is context sensitive for
the internal sources and is described in the following
table.
P
0…9
PHONO
E
RPT
r
S
AUX
H
NET
e
M
U
Single press – Toggles AVR400 power
between standby and on in the current zone
(zone in which the command is received).
Press and hold – Forces all AVR400 zones
into standby, regardless of which zone the
command was received in.
e number keys can be used for source
selection (without changing the CR102
Device Mode). Alternatively the Device
Mode buttons can also be used with the
SHIFT key.
SAT (satellite) input
0
AV input
2
TUNER input
3
BD input
4
DISPLAY input
5
VCR input
6
CD input
7
AUX (front panel) input
8
MCH (multichannel) input
9
Selects the Display input on the AVR400
(television Audio Return Channel).
IPOD and NET sources)
(for
Modies many keys (see individual key
descriptions below).
MCH (multichannel) input on the
Selects
AVR400
SHIFT +
Selects
SHIFT +
input on the AVR400
selects AUX input on the AVR400
H
IPOD input on the AVR400
selects network (NET) internal
e
Navigate menus
OK conrms a setting (equivalent to ‘Enter’
or ‘Select’ on some remote controls)
SHIFT +
SHIFT +
increases the picture resolution.
>
turns current zone (in which
'
command is received) on
SHIFT +
turns current zone (in which
,
command is received) o.
Cycles through the available surround and
downmix modes.
Displays the AVR400 setup menu on the On
Screen Display (see page E-34).
D
@
] [
- +
DIRECT
)
EQ
$
EFFECT
&
BASS
(
TRIm
!
SyNC
#
Cycles through the front panel display’s
brightness options
Toggles the mute function of the AVR400
(track control for
SHIFT +
[
IPOD and NET sources)
Follow Zone1 source.
When the command is received in Zone2
the source for that zone follows whatever
input source is selected in Zone1
Decrease () and increase (+) AVR400
volume
Stereo direct on/o. Provides a direct
analogue path from the analogue inputs to
the le and right front outputs. Switches o
any surround processing modes and shuts
down the DSP circuits for the best stereo
sound quality.
Displays the room EQ settings menu
IPOD and NET sources)
(for
Calls up a pop-up (and front screen) to
adjust the bass setting for a particular input.
Brings up the speaker trim menu.
Use the
B, C, D
and E navigation
buttons. Press TRIM again to exit the speaker
trim menu.
As this is a temporary adjustment, these
additional trim levels are reset back to the
values set in the Speaker Levels menu when
the unit is turned o or the unit is put
into standby. ese temporary trim levels
override the speaker levels found in the
setup menu.
Delays may be introduced into the video
signal by video processing which causes
a mismatch between the audio and video
timing. You will notice this by speech sound
being out of synchronization with the lip
movements in the video.
To compensate for this, you can adjust the
lip sync delay. Press the
SYNC button and
use the D and E navigation buttons. Press
again to exit the lip sync trim menu.
SUB
Brings up a temporary subwoofer trim
control. Use the
%
buttons. Press SUB again to exit the sub trim
and E navigation
D
menu.
As this is a temporary adjustment, the sub
trim level is reset back to the value set in
the Speaker Levels menu when the unit is
turned o or the unit is put into standby.
TREBLE
Calls up a pop-up (and front screen) to
adjust the treble setting for a particular
h
input.
FAV+
IPOD and NET sources)
(for
u
FAV-
IPOD and NET sources)
(for
t
HOmE
NET source)
(for
o
INFO
Cycles through the information displayed
on the lower le portion of the front panel
b
display.
iPod commands
e iPod interface is selected by pressing e in AMP
Device Mode on the CR102. When connected to an
iPod via an optional rLead/irDock, the keys below are
used to navigate music les in AMP Device Mode.
Navigate the files on screen.
OK selects/play the highlighted file.
Toggles random (shuffle) play of the playlist
RPT
on and off.
r
] [
$
&
#
SHIFT +
Selects the previous/next track in the
current playlist
Begins or resumes playback at the currently
highlighted track
Toggles pause and playback of the current
track
Stops playback
cycles through the repeat options
r
E-26
Page 29

Network commands
e AVR400 Network client is selected by pressing S +
in AMP Device Mode on the CR102.
e
When using the network client, the keys below are used
to navigate music les in
Navigate the files and menus on the screen.
OK selects the highlighted file or enters the
highlighted menu on the screen
RPT
Toggles random (‘shuffle’) play of the playlist
on and off
r
SHIFT +
] [
Selects the previous/next track in the
current playlist
EQ
Begins or resumes playback at the currently
highlighted track
$
EFFECT
Pauses the currently-playing track
&
SyNC
Stops playback
#
FAV+
Adds the currently displayed radio station
to favourites list when using the internet
u
radio function
FAV-
Removes the currently displayed radio
station from favourites list when using the
t
internet radio function
HOmE
Returns navigation to the top level of the
network client menus (‘Home’)
o
INFO
Cycles through the information displayed
on the lower le portion of the front panel
b
display
AMP Device Mode.
cycles through the repeat options
r
TUN Device Mode
e T Device Mode button congures the CR102 to
control the tuner functions of the AVR400. Pressing this
button also selects TUNER as the source.
When switching to
TUNER from a dierent source, the
AVR400 enters the last used tuner band, be it AM / FM /
DAB (if tted). Further presses of the TUN Device Mode
button cycle through the available tuner bands.
Further information on the tuner can be found in the
‘Tuner Operation’ section on page E-44.
(not used)
P
0…9
' ,
Number keypad used to store and recall
presets
Allows selection of previously stored Tuner
presets.
AM/FM Tuner: allows frequency tuning.
< >
DAB Tuner (where tted): scrolls through
the channel list.
Selects (tunes to) the currently displayed
O
preset, or selects the currently displayed
DAB channel when scrolling through the
channel list.
Page up to the previous 10 presets on
u
screen
Page down to the next 10 tuner presets on
t
screen
Delete the currently highlighted preset.
o
INFO
Cycles through the information displayed
on the lower le portion of the front panel
b
display.
DVD/BD Device Mode
e d Device Mode button congures the CR102
to control the functions of Arcam Blu-ray Disc and
DVD players, although this can be changed (see page
E-25). Pressing this button also selects BD as the AVR400
source.
Toggles power between standby and on
P
Searches for and plays the track
…
0
9
corresponding to the key pressed
Selects Display input on the AVR400.
PHONO
E
Toggles random (‘shue’) play on and o.
RPT
r
SHIFT +
cycles through the repeat
r
options (track, disc, etc)
Modies many keys (see individual key
S
descriptions, below)
Selects multichannel (
AUX
AVR400
H
SHIFT +
AVR400
NET
Selects
e
SHIFT +
selects AUX input on the
H
IPOD input on the AVR400.
selects network (NET) internal
e
MCH) input on the
input on the AVR400
Navigate setup and BD programme
selection menus.
OK conrms a setting (‘Enter’ or ‘Select’ on
some remotes).
SHIFT +
SHIFT +
Cycles through available surround sound
M
modes.
SHIFT + MO DE changes the HDMI setting.
Activates BD player menu, if available.
U
Cycles through the front panel display’s
D
brightness options.
SHIFT +
Toggles the mute function.
@
By default this key operates the AVR400 Mute
Press and release to skip back to the
]
beginning of the current/previous track.
Press and release to skip forwards to the
[
beginning of the next track.
to switch on from standby
B
to switch to standby from on.
C
enables RPT AB functionality
D
- +
)
$
&
(
TRIm
!
#
%
h
FAV+
u
FAV-
t
HOmE
o
INFO
b
Decrease (
) and increase (+) AVR400
volume
Fast rewind.
SHIFT +
cycles through slow play
7
backwards speeds
Starts the playback of a BD.
SHIFT +
cycles through the Angle options
4
on an Arcam BD player.
Pauses BD play-back. Press
to restart
4
playback.
SHIFT +
cycles through Zoom options.
;
Fast forward.
SHIFT +
cycles through slow forward
8
speeds
Ejects disc.
SHIFT +
displays speaker Trim menu on
!
Arcam BD players.
Stop playback of a BD
Start recording (on products that have this
feature).
Displays Search menu with Title, Track and
Time options.
Displays Setup menu.
SHIFT + SE TUP displays programming screen
on Arcam BD players
Displays Title menu.
SHIFT + TI TLE clears bookmark, search and
program display entries on Arcam BD
players
Changes Audio decode format (Dolby
Digital, DTS, etc.)
+ o displays the ‘Memory’ function
SHIFT
.
(Bookmarks)
Cycles through BD subtitle language
options, if available.
SHIFT +
displays STATUS INFO on
b
Arcam BD players
English
E-27
Page 30

SAT Device Mode
e z Device Mode button congures the CR102
to control the functions of a satellite receiver. You will
need to congure this Device Mode to work with your
equipment. Pressing this button also selects SAT as the
AVR400 source.
Toggles power between standby and on
P
Functions as original remote number key.
…
9
0
Selects Display input on the AVR400.
PHONO
E
Toggles between the available inputs on
TV/AV
your satellite receiver
r
Modies many keys (see individual key
S
descriptions, below)
AUX
Selects multichannel (
AVR400.
H
SHIFT +
AVR400.
NET
Selects
SHIFT +
e
input on the AVR400
selects AUX input on the
H
IPOD input on the AVR400
selects network (NET) internal
e
MCH) input on the
Navigate menus.
OK conrms a setting (equivalent to ‘Enter’
or ‘Select’ on some remotes).
Controls Backup function, if available.
M
Performs same function as on original
U
remote, if available.
On some Satellite and Cable set top boxes
D
this key functions as the Guide key to open
the EPG (Electronic Program Guide).
Toggles the mute function.
@
By default this key operates the AVR400 Mute
Channel down
]
Channel up
[
- +
)
$
&
(
Decrease (
Fast rewind
Starts the playback
Toggles pause of playback
Fast forward
) or increase (+) AVR400 volume
(not used)
!
Stop playback
#
Start recording
%
(not used)
h
Duplicates function of RED key for some
u
(RED)
Satellite and Cable set-top boxes
Duplicates function of GREEN key for some
t
(GREEN)
Satellite and Cable set-top boxes
Duplicates function of YELLOW key for some
o
(yELLOw)
Satellite and Cable set-top boxes
Duplicates function of BLUE key for some
b
(BLUE)
Satellite and Cable set-top boxes
AV Device Mode
e a Device Mode button congures the CR102 to
control the functions of a television or other display
device. You will need to congure this Device Mode to
work with your equipment. Pressing this button also
selects AV as the AVR400 source.
Toggles power between standby and on.
P
(Some TVs require you to use a number
key to turn them on.)
0
usually for channel selection.
Selects Display input on the AVR400.
PHONO
Functions as original remote number key –
…
9
E
Toggles between the available inputs on
TV/AV
your display device (e.g. TV/AV)
r
Modies many keys (see individual key
S
descriptions, below)
AUX
Selects multichannel (
AVR400.
H
SHIFT +
AVR400.
selects AUX input on the
H
MCH) input on the
Navigate setup and programme selection
menus.
OK conrms a selection (equivalent to
‘Enter’ or ‘Select’ on some remotes).
EXIT function on some models.
M
Functions as original remote key, if
U
available.
Display INFO or OSD (On Screen Display)
D
function, if available.
Toggles the mute function.
@
By default this key operates the AVR400
Mute
Channel down
]
Channel up
[
- +
)
$
&
Decrease (
volume.
Toggles TEXT page on/o
TEXT page o
Turns Programme-In-Programme (PIP)
on, if available
) and increase (+) AVR400
Activates PIP move, if available
(
Activates PIP swap, if available
!
Activates PIP freeze, if available
#
Activates PIP channel up, if available
%
Activates PIP channel down, if available
h
Duplicates function of RED key for Text TV
u
(RED)
Duplicates function of GREEN key for Text
t
(GREEN)
TV
Duplicates function of YELLOW key for Text
o
(yELLOw)
TV
Duplicates function of BLUE key for Text
b
(BLUE)
TV
E-28
Page 31

PVR Device Mode
e v Device Mode button congures the CR102
to control the functions of a video recorder or similar
device. You will need to congure this Device Mode to
work with your equipment. Pressing this button also
selects PVR as the AVR400 source.
Toggles power between standby and on.
P
Functions as original remote number key.
…
0
9
Selects Display input on the AVR400.
PHONO
E
Toggles between available inputs (e.g. AV1,
TV/AV
AV2)
r
Modies many keys (see individual key
S
descriptions, below)
Selects multichannel (
AUX
AVR400.
H
SHIFT +
selects AUX input on the
H
MCH) input on
AVR400.
Selects
NET
e
IPOD input on AVR400.
SHIFT +
selects network (NET internal
e
input on the AVR400.
Navigate setup and programme selection
menus.
OK is equivalent to ‘Enter’ or ‘Select’ on
some remotes.
Operates the Exit function if the PVR uses
M
this feature
Turns on the Menu function if the PVR
U
uses this feature
Toggles display between TV and PVR
D
Toggles the mute function. By default this
@
key operates the AMP Mute
Channel down
]
Channel up
[
- +
)
$
&
Decrease (
volume
Fast rewind
Play
Toggles pause of playback
) and increase (+) AVR400
Fast forward
(
Operates the Favourites function if the PVR
!
uses this feature.
Stop playback
#
Starts recording
%
(not used)
h
Duplicates function of RED key (if used)
u
(RED)
Duplicates function of GREEN key (if used)
t
(GREEN)
Duplicates function of YELLOW key (if used)
o
(yELLOw)
Duplicates function of BLUE key (if used).
b
(BLUE)
VCR Device Mode
e w Device Mode button congures the CR102
to control the functions of a video recorder or similar
device. You will need to congure this Device Mode to
work with your equipment. Pressing this button also
selects VCR as the AVR400 source.
Toggles power between standby and on.
P
Functions as original remote number key.
…
9
0
Selects Display input on the AVR400.
PHONO
E
Toggles between available inputs (e.g. AV1,
TV/AV
AV2)
r
Modies many keys (see individual key
S
descriptions, below)
Selects multichannel (
AVR400.
AUX
SHIFT +
H
selects AUX input on the
H
MCH) input on
AVR400.
Selects
NET
e
IPOD input on AVR400.
SHIFT +
selects network (NET internal
e
input on the AVR400.
Navigate setup and programme selection
menus.
OK is equivalent to ‘Enter’ or ‘Select’ on
some remotes.
Operates the Exit function if the VCR uses
M
this feature
Turns on the Menu function if the VCR
U
uses this feature
Toggles display between TV and VCR
D
Toggles the mute function, if available.
@
By default this key operates the AMP Mute
Channel down
]
Channel up
[
- +
)
$
&
Decrease (
volume
Fast rewind
Play
Toggles pause of playback
) and increase (+) amplier
Fast forward
(
Ejects tape
!
Stop playback
#
Starts recording
%
(not used)
h
Duplicates function of RED key (if used)
u
(RED)
Duplicates function of GREEN key (if used)
t
(GREEN)
Duplicates function of YELLOW key (if used)
o
(yELLOw)
Duplicates function of BLUE key (if used).
b
(BLUE)
English
E-29
Page 32

CD Device Mode
e c Device Mode button congures the CR102
to control the CD functions of Arcam CD players,
although this can be changed (see page E-25). Pressing this
button also selects CD as the AVR400 source.
0
Toggles power between standby and on.
P
Functions as original remote number key.
…
9
Selects Display input on the AVR400.
PHONO
E
Toggles random (‘shue’) play on and o.
RPT
SHIFT +
r
options (track, disc, etc.).
Modies many keys (see individual key
S
descriptions, below)
Selects multichannel (
AVR400.
AUX
SHIFT +
H
cycles through the repeat
r
MCH) input on
selects AUX input on the
H
AVR400.
Selects
NET
e
IPOD input on AVR400.
SHIFT +
selects network (NET) internal
e
input on the AVR400.
Navigates track listings if supported by the
player.
OK selects the currently highlighted track if
supported by the player
Changes the time display modes on Arcam
M
CD player
(not used)
U
Cycles through the front panel display’s
brightness options.
D
SHIFT +
supported by the player.
Toggles the mute function. By default this
@
key operates the AVR400 Mute.
Press and release to skip back to the
]
beginning of the current/previous track.
Press and release to skip forwards to the
[
beginning of the next track.
enables RPT AB functionality if
D
- +
)
$
&
(
!
#
%
h
FAV+
u
FAV-
t
HOmE
o
INFO
b
Decrease (
) and increase (+) AVR400
volume.
Fast rewind
Play
Toggles pause of playback
Fast forward
Open/close disc tray
Stop playback
Start recording (on products that have this
feature)
Scans rst 10 seconds of each track on CD,
if supported by the player (Audio search)
Starts Program mode
Clears programmed item
(not used)
(not used)
E-30
Page 33

English
E-31
Page 34

essential
setup
Before you use your AVR400 it is essential that you
enter some information into the Setup menus about
your speaker conguration. is allows the AVR400 to
process any surround sound digital source to exactly
match your system and give you the ultimate surround
sound experience.
ere are three pieces of vital information which are
outlined in the sections: ‘Speaker Types’, ‘Speaker
Distances’ and ‘Speaker Levels’.
e way you enter this information manually into the
AVR400 is given later in the ‘Setup Menus’ section on
page E-34. e settings can also be established
automatically using the Arcam Auto Speaker Setup
function. However it is important to understand why
these speaker settings must be entered, which is why this
section is presented rst.
Speaker types
You need to set the type of speakers that you have
connected to your AVR400:
Large capable of full frequency range reproduction
Small not capable of full frequency range
reproduction at the low frequency end
None speaker not present in your configuration
e terms ‘Large’ and ‘Small’ do not necessarily relate to
the physical size of your speakers. As a rule of thumb,
if a speaker cannot reproduce a at frequency response
down to about 40Hz (and very few can!) it is oen better
to consider them as ‘Small’ for setup purposes of home
cinema.
When a speaker is set to ‘Small’, very low frequency
sounds are redirected away from that speaker to a ‘Large’
speaker or a subwoofer, which are far better suited to
reproducing these low frequency sounds.
Note that it is not possible to set all speakers to
‘Small’ unless there is a subwoofer in your speaker
conguration. If you do not have a subwoofer, you will
be forced to set your front speakers to ‘Large’.
(Advanced users may wish to automatically override the
‘Small’ speaker setting for purely stereo music listening
when not watching movies. is can be achieved in the
‘Input Cong.’ menu – see page E-35.)
Crossover frequency
If you have set any speakers as being Small, then you will
be required to set a value for the crossover frequency.
is is the frequency below which signals are ltered
away from these Small speakers and redirected to Large
speakers or the subwoofer (if present). A frequency
of 80Hz is oen a good starting point, however you
will probably have to experiment with dierent values
to nd the best value for your system or consult your
speaker handbook.
Use Channels 6+7 for
If not used in the main zone, it is possible to assign the
Surround Back channels to bi-amp the Front Le/Right
channels or to provide an amplied output to Zone2.
Speaker Distances
It is essential for the distance from each speaker to the
listening position to be accurately measured and entered
into the ‘Setup’ menu. is ensures that the sounds from
the various speakers arrive at the listening position at
the correct time to recreate a realistic surround eect.
e distance can be entered in centimetres or inches.
Speaker Levels
Finally the levels of all the speakers in the system need
to be adjusted to match each other at the listening
position, again to create a proper surround eect. To
help with this the AVR400 can generate a test noise
for each speaker which should be measured with a
sound pressure level (SPL) meter. e meter should
be set to ‘C’ weighting and slow response. e level
of noise measured at the listening position from each
speaker should be adjusted on the Speaker Trims page
of the Setup menu so that the meter reads 75dB SPL.
It does not matter what the system volume setting of
the AVR400 is before turning the test noise on as the
volume setting is over-ridden for the duration of the
speaker noise test.
ere are several basic SPL meters on the market at
reasonable prices aimed at home cinema enthusiasts.
Check your local technology store, search online or ask
your dealer.
If you do not have an SPL meter, you can try to adjust
the noise level of each speaker by ear. In this case it is
not possible to adjust the speakers to the absolute 75dB
SPL volume level, but you should aim for all speakers
sounding equally loud. Setting speaker test noise levels
by ear is not recommended as it is very dicult to do
accurately, but is oen better than doing nothing at all!
MCH sub level
If a subwoofer is present, this setting allows for a 10dB
compensation on the subwoofer output when using the
MCH input as required by many DVD-A players with
audio outputs.
E-32
Page 35

auto speaker
setup
NOTE
Auto calibration is possible only for a 7.1 Or 5.1
Speaker conguration. Oher speaker congurations,
such as a 2.1 setup (le, right and subwoofer),
must be congured manually using the speaker
conguration menus (see page E-37), referring to the
guidelines on page E-32 for speaker types, speaker
distance and speaker levels.
ere is a proprietary automatic loudspeaker setup
function built into your AVR400. e Arcam Auto
Speaker Setup function attempts to set all the essential
speaker settings for all the speakers in your system.
It also calculates room equalisation (Room EQ) lter
values to remove some of the worst eects of resonant
frequencies in the listening room.
Your AVR400 package is supplied with a calibration
microphone, which should be inserted into the
socket on the front panel and positioned at the main
listening position. is microphone picks up the special
calibration tones generated by the speakers when Auto
Speaker Setup is run. e AVR400 then analyses the
signal and computes:
which speakers are present,
<
speaker type,
<
speaker distance,
<
speaker level,
<
crossover frequency to the subwoofer (or large front
<
speakers if no subwoofer is present),
problem resonant frequencies in the room which
<
need control by ltering.
To help the system be as accurate as possible when
performing Auto Speaker Setup, there are a few
guidance rules that should be followed:
Minimise any background sounds in the listening
<
room and other nearby rooms.
Close all windows and doors in the listening room.
<
Turn o all fans including air-conditioning systems.
<
If holding the microphone in the hand rather than
<
mounting on a tripod or similar, keep your hand and
ngers still to avoid generating ‘handling noise’.
Position the set up microphone pointing upwards at
<
roughly head height in the normal listening position.
It is not necessary to point the microphone directly
at the speaker generating the test tone. (It helps if
you are able to position the microphone exactly
where your head would normally be for listening,
with the microphone in direct unobstructed view of
all speakers.)
If your system includes an active subwoofer, start
<
by setting its output level / gain control to a value
halfway between maximum and minimum.
When activated, a calibration tone is played through
each channel of the AVR400 in turn, including the
subwoofer channel. e calibration tone cycles round
each of the speakers multiple times as the dierent
parameters are calculated. If you do not have a full 7.1
AUX jack
speaker conguration there will be periods of silence
between some speaker channels. Follow the ‘progress’
information on-screen.
Aer all the channels have been measured, a summary
of the speaker conguration will be displayed on-screen.
You can then choose to accept the settings, re-measure
your system again or cancel Auto Speaker Setup without
storing the settings.
e Auto Speaker Setup function is found within the
Setup menus, see page E-36. By default, Room EQ is not
applied to any of the source inputs. You should enable
Room EQ on inputs you think benet from this feature,
as required, by listening when playing typical source
material through each input. is is enabled from within
the Input Cong menu.
While room equalisation can help to reduce problems
with listening room acoustics, it is usually far better
to try to solve these problems with the room directly.
Proper loudspeaker positioning, acoustic wall
treatments and moving the listening position away from
walls should produce far better results overall. However
it may be dicult to do this in a home environment, so
Room EQ is your next best choice.
Problems
We advise you to look over the reported measurements
on the screen following Auto Speaker Setup for any
obviously incorrect results, in particular to ensure the
reported speakers match your conguration and that the
speaker distances to the listening position appear look
roughly correct. If the results are not what you expected
re-run Auto Speaker Setup.
e Auto Speaker Setup function is normally quite
accurate but occasionally false results can be generated.
Problems may be as a result of:
external sounds or rumbling / handling noises
<
picked up by the microphone
sound reections o hard surfaces (e.g. windows or
<
walls) close to the listening position,
very strong acoustic resonances within the room,
<
obstacles (such as a sofa) between speakers and the
<
microphone.
If you are still experiencing diculties or you wish to
have the most accurate results for ultimate surround
performance, we recommend using the manual method
of establishing speaker distances and levels.
Using a subwoofer
If your system includes an active subwoofer you may
need to re-run Auto Speaker Setup with the subwoofer
output level / gain control set to a higher or lower value,
if the summary screen reports problems setting the
subwoofer up.
Auto Speaker Setup will attempt to choose a crossover
frequency that allows the smoothest low frequency
transition from the main speakers to the subwoofer.
However if this does not produce pleasing results we
recommend manually trying other crossover frequencies
to nd something more to your preference.
See the next sections for information of how to enter or
change speaker settings manually.
English
E-33
Page 36

setup menus
e Setup menus allow you to congure all aspects
of your AVR400. e next few pages will go through
the menu items and explain their function. e Setup
menus will probably look quite daunting if you are new
to setting up home cinema, but the majority of them
need only be congured once when you rst install the
system (or if your system changes or you move house!)
e only way to view the Setup menus is on your display
device (TV or projector) using the on-screen display
(OSD) capability of the AVR400. To view the OSD for
the initial setting up, connect any of the video outputs
to your display device. You do not need to have a video
source connected to the AVR400 video inputs.
Entering Setup mode
To enter the setup menu, press the MENU button on the
remote control or font panel. e front panel display
shows ‘SETUP MENU’ and the setup menu (pictured
right) is displayed.
Unstable OSD menu or picture display?
e default AVR400 output video resolution when rst
powered up out of the box is 525-line/60Hz NTSC for
analogue video and “Preferred” for digital video. is
has been chosen as most display devices can synchronise
to this automatically. is can be changed in the Video
Outputs section of the Setup Menus.
If the output resolution and frame rate is forced to a
setting your display device does not support, the picture
may become unstable or may not display at all. To reset
the output video resolution and frame rate to the default
values to restore the display, press and hold the front
panel
OK button for three seconds. Alternatively, press
SHIFT then
dierent output resolutions until the picture returns.
on the remote control to cycle between
>
Menu panel
e le-hand panel lists the setup
screens available for adjustment. e
selected menu is highlighted with a grey
band.
Help screen
e lower right-hand panel gives a short
help text for the feature being adjusted.
Navigating the setup menu
… using the remote control
e setup menu can be navigated by using the cursor
(arrow) keys on the remote control. is is by far the
easiest method.
1. To enter the setup menu, press the
(which is located immediately under the navigation
buttons).
2. Use the
the main section headings in the le-hand panel.
3. Once you have the main section that you require
highlighted, use the
4. Use the
down the section settings in the right-hand panel.
Some settings may be greyed out. ese are either
for information only (e.g. incoming sampling
and C keys to navigate up and down
B
key to enter the section.
E
and C keys to navigate up and
B
MENU button
Adjustment panel
e upper right-hand panel lists the
parameters you can change as a user.
e selected line is highlighted with
a black band. Lines that cannot be
selected are greyed-out.
Scroll bars
ese indicate the
position of the
displayed screen
within longer menus.
frequency) or are not currently selectable (e.g.
network IP address when DHCP is used). Scroll bars
on the sides of the right hand panel indicate your
position in the settings list where there are more
items than can be displayed at once.
5. Pressing
6. At any time, press the
OK selects a setting to change it, pressing OK
again de-selects the setting.
MENU button to exit the menu.
Any changes to settings are saved.
… using the keys on the front panel
e AVR400 front panel controls can be used to
congure the unit. Follow the instructions for using
the remote control, in this case using INPUT for down,
INPUT+ for up, INFO for le and OK for right.
E-34
Page 37

Input Config.
e audio and video settings on this page of the Setup
menu can be tailored specically and independently to
the currently selected input.
When a dierent input is selected on the Input line, all
the input-specic settings for that input are displayed
below it. ese settings are applied to the named Input
only and are stored in memory and recalled each time
the unit is powered up and whenever that input is
selected.
Input – e currently selected input connectors to
which the settings below relate.
Name – e display name of the input. You can change
the name of any input to more closely match your setup.
For example, if you had two satellite receivers, you could
connect the main receiver to the Sat audio and video
input connectors and change the Name to ‘SAT 1’. You
could then connect the second satellite receiver to the
VCR audio and video input connectors, but change the
VCR Name to ‘SAT 2’. It is then clearer to users of your
AVR400 which inputs they wish to select when scrolling
though.
Lip Sync – Each input can have its own setting
to add a time delay between the audio and video
signals to compensate for the sound and picture not
being synchronised. is is normally required when
video processing is used in the system for scaling or
de-interlacing video. e range of lip sync delay is 0 to
250 milliseconds.
e lip sync adjustment can only correct for delayed
video. If the audio is late set lip sync to its minimum.
Mode – Sets the initial audio decode mode for stereo
sources on this input.
<Last Mode recalls the last used setting for this
input when a stereo source was applied. See section
“Two-channel source modes” on page E-40 for more
information.
Ext. Mode – Sets the initial audio decode mode for
multi-channel digital sources on this input.
<Last Mode recalls the last used setting for this
input when a stereo source was applied. See section
“Multi-channel source modes” on page E-41 for more
information.
Treble –
Bass –
ese allow you to alter the bass and treble tone controls
for all currently active speakers for each individual
input. For example, if your PVR source sounds a little
bass light, you can always correct for this by selecting
PVR on the Input line at the top of this menu and add
2 or 3dB to the Bass control. en, whenever the PVR
input is selected, the bass is automatically boosted for as
long as that input is selected.
Room EQ – When the Auto Speaker Setup function is
run it also calculates Room Equalisation coecients to
remove some of the worst eects of resonant frequencies
of the room at the listening position. By default Room
EQ is not applied to any of the source inputs, however
you can enable them on a per-input basis as you wish.
<Not Calculated: (Information only) Auto Speaker
Setup has not been run or has errors so cannot be
selected.
<On: Room EQ is applied to the current source.
<O: Room EQ is not applied to the current source.
Input Trim – Sets the maximum analogue input
signal level (sensitivity) on this input before the ADC
(Analogue-to-Digital converter) signal path clips.
Options are 1, 2 and 4 volts RMS maximum input. e
default is 2Vrms maximum.
For example, analogue sources with low output levels
may benet by choosing the 1V maximum setting.
is helps maximise signal-to-noise performance of
the AVR400 and also helps keep the various analogue
sources sounding about the same level for any given
AVR400 volume control setting.
Dolby Volume –Dolby Volume is an intelligent system
that improves the perceived audio frequency response
at lower listening levels and corrects for volume
inconsistencies between sources (e.g. a rock radio
station and a BD) and between programming (e.g. a TV
show and advertisement breaks).
<On: Dolby Volume is applied to this input.
<O: (default) Dolby Volume is not applied to this
input.
Dolby Leveller – is setting of Dolby Volume controls
how closely quiet and loud sources and programme
content are matched to each other, based on the
ear’s perception of loudness. e range of values is
0 (minimal levelling) to 10 (maximum levelling).
e default setting is 2, however we recommend
experimenting with higher values if your source
material is less closely matched in level. If the Volume
Leveller function is set o, no level matching between
sources and programme material is performed. Note
however that turning the Dolby Leveller setting of Dolby
Volume to ‘O ’ is not the same as turning the entire
function of Dolby Volume to ‘O ’, as volume related
frequency response processing is still active. See “Dolby
volume” on page E-42 for more information.
DV Calib. Oset – e Calibration Oset parameter of
Dolby Volume allows you to compensate for speaker
eciencies and listening position. e default value
is 0 and this should normally produce a good result
when the AVR400 speaker levels are set using a sound
pressure level meter.
See “Dolby volume” on page E-42 for further information
on Calibration Oset.
Surround EX – Sets how the AVR400 should congure
its decode mode when a Dolby Digital EX bitstream
is received. Note that this setting only applies if you
have Surround Back loudspeakers. You may wish to
experiment with these two decode modes to see which
you prefer with Dolby Digital EX encoded material.
Options are Auto DD EX, Auto PLIIx and Manual.
< Auto DD EX: When a Dolby Digital EX-agged
bitstream is detected, the decode mode
automatically changes to Dolby Digital EX. is can
be temporarily overridden by pressing the MODE
button on the remote or front panel.
< Auto PLIIx Movie: When a Dolby Digital
EX-agged bitstream is detected, the decode mode
automatically changes to Pro Logic IIx Movie. is
can be temporarily overridden by pressing the
button on the remote or front panel.
< Manual: e received Dolby Digital EX is treated
as if it is an ordinary Dolby Digital stream in that it
does not automatically select the EX or PLIIx decode
modes. Instead, the previously used decode mode
for a multi-channel digital source on this input is
applied. However, either of the EX or PLIIx decode
modes can be applied manually by pressing the
MODE button.
Stereo Mode – If you have congured your system to
have a subwoofer, then you have the exibility to
choose how bass information is distributed between
the front le/right speakers and the subwoofer when
listening to stereo (two channel only) analogue and
digital sources. Choose the option which gives you
the most solid, even sounding bass. If you are using
a subwoofer for stereo, please also see Sub Stereo
below to set the level of the subwoofer. For best
results test with a set-up disc or live programme
material. is setting can be used to override your
normal speaker settings in the Spkr Types menu
whenever the AVR400 plays stereo material. It is
quite common to nd that two channel stereo music
MODE
listening is best done with a slightly dierent sub/
speaker setting than for surround movies.
< As Spkr Types: When an analogue or digital stereo
source is played, your normal speaker conguration
(as in Spkr Types menu) is used to reproduce the
signal.
< Le/Right: Full frequency stereo information. All
audio is sent to the front le and right speakers only
without any bass redirection. You can use this setting
if you consider your front le/right speakers to be
able to handle the full frequency range of music.
If you have set your front le/right speaker size as
Small in the Spkr Types setup page, you may wish
to use this option to override the setting to Large
for stereo music listening, if you have full frequency
range le/right speakers.
It can oen be benecial to set full frequency range
speakers to Small in the Spkr Types setup page for
use with movies, if you have a subwoofer in your
system. Doing so may deliver more impact on
movie soundtracks as subwoofers are designed to
handle reproduction of high bass content. However
you may nd that for stereo music a better overall
result is obtained by not using the subwoofer and
eectively treating the front le/right speakers as
Large.
< Le/Right+Sub: Full frequency range stereo is fed to
the front le and right speakers and extracted bass is
sent to the subwoofer. In this case the low frequency
information is eectively duplicated.
< Sat+Sub: Use this setting if you really do have Small
satellite front le and right speakers, or if you prefer
the overall sound of bass being handled by the
subwoofer. Full bass management is used so that
analogue and digital stereo sources are fed to the
DSP where the bass is ltered o front le and right
and redirected to the subwoofer.
NOTE
e Stereo Mode function is not available when
using an analogue source in Stereo Direct mode.
Sub Stereo – If Le/Right+Sub or Sat+Sub is selected in
Stereo Mode above, this setting adjusts the level of the
subwoofer when the source is two channel stereo.
Brightness – Sets the video brightness for this input.
is setting can be used to compensate for an overly
dark or bright source picture on this input when
compared with other video sources.
English
E-35
Page 38

Contrast – Sets the video contrast for this input. is
setting can be used to compensate for too much or too
little contrast in the source picture on this input when
compared with other video sources.
Colour – Sets the video colour saturation for this input.
is setting can be used to compensate for too much or
too little colour in the source picture on this input when
compared with other video sources.
Picture Mode – Sets how the video processor in the
AVR400 interprets the video on this input. Normally
the video processor automatically detects the original
source type and correctly sets either Video mode or
Film mode processing. In the unlikely event that the
video processor misinterprets the video type, resulting
in subtle picture artefacts, the video processor can be
manually forced into Video mode or Film mode. is
function should normally be set to Auto.
Edge Enhancement – Sharpens the picture from a
source on this input.
MPEG N.R. – Removes artefacts in overly compressed
digital video from a source on this input.
Noise Reduction – Removes random noise within the
picture from a source on this input.
Component Mode – Congures the current three-wire
high quality analogue video input for component (YUV)
video signals or RGB video signals. It is important
to match the setting to the incoming video format
otherwise the colours will be incorrect and the picture
may be unstable.
Options are Normal, RGsB and RGB+Sync.
< Normal: (default) the three-wire input is congured
for normal Component (YUV / YPbPr) analogue
video.
< RGsB: the three-wire input is congured for RGB
analogue video with video ‘sync-on-green’.
< RGB+Sync: the three wire input is congured for
RGB analogue video, with the video sync signal on
the composite input for the current named source.
You should typically select RGB+Sync if you are using
a standard SCART to 4-wire phono breakout cable to
connect an RGB SCART source.
NOTE: If RGB+Sync is selected, the S-Video and
Composite inputs cannot be selected as video inputs for
the current source.
Video Source – Selects the video signal connection for
this source. e default is HDMI; this setting must be
changed if another connection is used.
< HDMI: the unit is forced to use the HDMI video
input for this source.
< Component: the unit is forced to use the
COMPONE NT/RGB video input for this source.
< S-Video: the unit is forced to use the
for this source.
< Composite: the unit is forced to use the
video input for this source.
Audio Source – Selects the particular connection type
for each input. e default is HDMI; this setting must be
changed if another connection is used.
Select from the list the audio type you are using on this
source.
HDMI: the unit is forced to use the HDMI audio
<
input for this source.
Digital: the unit is forced to use the optical (TOSLINK)
<
or coaxial (S/PDIF) digital audio input for this source
Analogue: the unit is forced to use the analogue
<
audio input for this source.
SVIDE O input
COMPOSI TE
General Setup
General information and system controls.
Source Input – (Information only) e currently
selected input to which the settings below relate.
Incoming Format – (Information only) e format
of the digital audio stream connected to this input, if
present.
Incoming Sample Rate – (Information only) e
sample rate of the digital audio stream connected to this
input, if present.
Incoming Bit Rate – (Information only) e bit rate
of the digital audio stream connected to this input, if
present.
Dialnorm – (Information only) If a Dolby Digital audio
stream is connected to this input, this is the Dialogue
Normalisation setting requested by the stream.
Video Input – e currently selected video input. For
inputs that have video connections (e.g.
audio and video inputs normally switch over together.
However, here you can temporarily select a dierent
video source for the current audio source. is feature
may be useful, for example, if you are watching a sports
game on satellite but on this occasion wish to listen to
the commentary on the radio instead. is temporary
override is reset when the input source is changed so
SAT, PVR etc),
that the Video Input follows the Audio Input setting (or
the setting in the Video Inputs menu, if applicable).
Audio Compression – Allows selection of compression
which is ideal for late night listening. e compression
eect increases the volume of the quiet passages
and decreases the volume of the louder passages.
Compression only applies to Dolby soundtrack formats
that support this function (DTS is not supported).
< O: (default) no audio compression is applied.
< Medium: compression is applied so that loud
portions of a soundtrack are reduced in level.
< High: the maximum amount of dynamic range
compression is applied, so that the dierence
between loud and quiet portions of a soundtrack is
minimised.
is setting applies to all inputs when a relevant digital
audio stream is detected. It is stored in memory and
recalled each time the unit is powered up.
Balance – To alter the sound balance temporarily
between front le and right speakers. You can alter
the sound stage to either the le or the right by up to
6dB. Note that it is not possible to shi the audio signal
completely over to one channel. is function resets to
equal le/right balance when the input is changed.
PLII Dimension –
PLII Centre Width –
PLII Panorama –
ese allow the adjustment of the sound eld for Dolby
Pro Logic II Music mode decoding of two-channel
sources. ese setting apply to all inputs when PLII or
PLIIx Music decoding is selected. e settings are stored
in memory and recalled each time PLII or PLIIx Music
mode is selected.
< PLII Dimension: Allows the user gradually to
adjust the sound eld either towards the front or
towards the rear. Settings range from -3 to +3. We
recommend Dimension is set to 0 for normal use.
< PLII Centre Width: Controls the centre image
width.With Pro Logic decoding, dominant centre
signals come only from the centre speaker. If no
centre speaker is present, the decoder splits the
centre signal equally to the le and right speakers
to create a ‘phantom’ centre image. e Centre
Width control allows variable adjustment of the
centre image so it may be heard only from the
centre speaker; only from the le/right speakers as a
phantom image; or from all three front speakers to
varying degrees. We recommend Centre Width is set
to 3 for normal use.
< PLII Panorama: Extends the front centre image to
include the surround speakers for an exciting ‘wraparound’ eect with side-wall imaging.
Digital Output Freq. – Sets the sampling frequency of
the audio Analogue-to-Digital converter. is setting
applies to all inputs when analogue audio is being
processed (i.e. not Stereo Direct mode). It is stored in
memory and recalled each time the unit is powered up.
Maximum Volume – Limits the maximum volume
setting the system can be turned up to in the main zone.
is is a useful feature to prevent accidental overdriving
of low power-handling speakers (for example). It is
stored in memory and recalled each time the unit is
powered up.
Max On Volume – Limits the maximum volume the
system operates in the main zone when it is switched
on or comes out of Standby. e system comes on at
this stored volume setting if the last used (possibly very
loud) volume exceeds this value. It is stored in memory
and recalled each time the unit is powered up.
Display on time – Sets the time that the front panel
display remains illuminated aer receiving a command.
e default is always on.
Audio In iPod – If you have an iPod connected to the
AVR400 using an Arcam irDock or rLead, this control
allows you to set which audio input is used.
CEC Control – Enables or disables HDMI CEC control,
a system that allows devices connected with HDMI to
control other compatible connected devices.
ARC Control – Enables or disables the HDMI 1.4 Audio
Return Channel. is allows for television sound to be
sent back to the AVR400, via the “Display” input.
HDMI Audio To T V – Enables or disables the
transmission of HDMI audio from the HDMI output
connector. Enable this setting if you wish to be able to
listen using your TV speakers.
RS232 Control – Enables or disables RS232 control,
a system that allows control from various third-party
home automation systems.
Auto Setup
Auto Speaker Setup of your loudspeakers and subwoofer
(if present) is controlled by this menu. A full description
of how Auto Speaker Setup works is given on page E-33.
Remember to insert the calibration microphone into
the AUX input on the front panel and position the
E-36
Page 39

microphone at the listening position before running
Auto Setup.
Run Auto Setup – Press
start Auto Speaker Setup. e process will generate test
tones from the speakers and will typically take less than
two minutes. e test tone generator will cycle round
each speaker twice.
Accept Setup – When Auto Speaker Setup has
completed without errors you can choose to accept or
reject the settings
< No: e settings are not stored in memory.
< Yes: All the speaker settings (speakers present, type,
distance, level and crossover frequency) are stored
in the relevant sections of the Setup Menu and
overwrite any previous settings.
Auto Setup Progress – Gives a summary of what Auto
Speaker Setup is doing as it progresses, starting with
which speaker is being tested.
<Noise Level: Checking noise level relative to each
speaker and subwoofer.
<Number of Speakers: Speaker conguration is
detected including the number of surround speakers
and whether a subwoofer and center speaker are
connected.
<Speaker Distance: Accurately detects the
appropriate distance of each speaker position as well
as the subwoofer with respect to the microphone
position.
< Speaker Level and Size: e crossover is set based
on each channel’s signal handling capability and the
subwoofer crossover is automatically set. e SPL
(Sound Pressure Level) of each speaker is matched
with respect to the microphone position.
< Calculating EQ: Data gathered from each of the
speakers is being processed.
< Completed Error: A problem was detected with the
speaker setup. See the descriptions for each of the
individual speakers, below. Alternatively an invalid
speaker conguration was detected.
OK (or
on the remote) to
O
Front Left –
Centre –
Front Right –
Surr. Right –
Surr. Back Right –
Surr. Back Left –
Surr. Left –
Subwoofer –
If the above speakers are correctly detected as present in
your speaker conguration, their size (Small or Large),
distance from the listening position and trim level
(dB) will be displayed. Note that size does not apply
to the subwoofer. Otherwise an error message will be
displayed:
< Not Present: A speaker was not detected on this
channel.
Crossover Freq. – e frequency at which Auto Speaker
Setup determined is the best point to lter low frequency
sounds away from Small speakers and into the subwoofer
(or Large speakers if a subwoofer is not present).
NOTE
Auto calibration is possible only for a 7.1 or
5.1 speaker conguration. For other speaker
congurations such as a 2.1 (stereo + subwoofer)
setup, you must complete setup manually by
referring to the guidelines below for Speaker
Conguration, Speaker Distance and Speaker
Levels.
Spkr Types
Settings for the types of loudspeaker you have connected
in your conguration. ese settings are applied to all
audio inputs and are stored in memory and recalled
each time the unit is powered up.
Front Left / Right –
Centre –
Surr. Left / Right –
Surr. Back L / R –
Here you set the type of speakers that you have
connected to your AVR400:
< Large: capable of full frequency range reproduction
< Small: not capable of full frequency range
reproduction at the low frequency end
< None: speaker not present in your conguration
< Subwoofer: Set whether a subwoofer is present or not.
NOTE
It is not possible to set all speakers to Small unless
there is a subwoofer in your speaker conguration.
If you do not have a subwoofer, you will be forced to
set your front speakers to Large.
Crossover Freq – is is the frequency at which
loudspeakers set as Small start to redirect bass signals to
the Subwoofer or Large speakers in your system. Small
speakers redirect bass to the subwoofer, if present. e
exception is the Centre speaker which, if Small, redirects
its bass to front le/right provided that they themselves
are Large. is is done to help keep Centre bass directly
in front of the listening position.
MCH Sub Levels – is setting controls the subwoofer
level from an externally decoded multi-channel source
(BD-A, SACD, etc). Most BD players require a +10dB
compensation on the subwoofer channel to maintain the
correct balance with the main channels.
< +10dB: for normal BD players which output the
analogue subwoofer channel at the low 0dBr level.
Gain compensation of +10dB is added to the
subwoofer channel of the
< 0dB Normal: for BD players which output the
analogue subwoofer channel at the correct +10dBr
level. No subwoofer gain compensation is needed
on the subwoofer channel of the
AVR400.
Use Channels 6+7 for – If your main zone speaker
set up does not include Surround Back Le and Right
speakers, you can choose to use the Surround Back
amplier channels to Bi-Amp the Front Le and Right
pair, or as a stereo power amplier for Zone2.
MCH INP UT in the AVR400.
MCH INP UT in the
Spkr Distance
Calibration settings for the distances between the
loudspeakers and the listening position.
NOTE
Speakers that are not present in your conguration
will be greyed out.
ese settings are applied to all audio inputs and are
stored in memory and recalled each time the unit is
powered up.
Units – Select whether you wish to measure distances in
imperial or metric units.
Front Left –
Centre –
Front Right –
Surr. Right –
Surr. Back Right –
Surr. Back Left –
Surr. Left –
Subwoofer –
As described in “essential setup” on page E-32, measure the
distance from each loudspeaker in your system to your
ear in the main listening position and enter the values.
is allows the AVR400 to calculate the correct relative
delay for each loudspeaker.
Spkr Levels
Calibration settings for the test noise signal level
through the loudspeakers and measured at the listening
position.
NOTE
Speakers that are not present in your conguration
will be greyed out.
ese settings are applied to all audio inputs and are
stored in memory and recalled each time the unit is
powered up.
Use the
control to select the relevant speaker. Press O to
enable/disable the calibration noise and the D and E
navigation buttons to adjust the noise level from each
speaker.
Front Left –
Centre –
Front Right –
Surr. Right –
Surr. Back Right –
Surr. Back Left –
Surr. Left –
Subwoofer –
As described in “essential setup” on page E-32, adjust the
level of the test noise from each speaker so that an SPL
meter at the listening position measures 75dB SPL.
and C navigation buttons on the remote
B
English
E-37
Page 40

Video Inputs
Settings to optionally assign a video source to each of
the normally audio-only inputs.
ese settings are stored in memory and recalled each
time the unit is powered up.
Video Input CD –
Video Input Aux –
Video Input AM / FM –
Video Input MCH –
Video Input iPod –
Video Input Net –
Video In Digital Radio –
e default for each of the audio inputs is ‘None’,
however for example you could associate the satellite
‘Sat’ video with AM, FM and Digital Radio audio if you
wished. is way you could listen to the FM or AM or
Digital Radio commentary of a sports game but have the
pictures from the satellite coverage.
Video Outputs
e settings in this menu control the output resolution
from the video processor in the AVR400. ese settings
are applied to all video inputs and are stored in memory
and recalled each time the unit is powered up.
NOTE
Important points to remember:
For the analogue output
You should set the frame rate (50Hz Interlaced for
PAL, 60Hz Interlaced for NTSC) and the aspect
ratio (4:3 standard or 16:9 widescreen) to match
your display device.
For the HDMI output
e output resolution, frame rate and display
aspect ratio can be automatically determined by
the AVR400. Alternatively these settings can be
manually selected.
Zone1 OSD – Selects whether the main zone pop-up
OSD messages are On or O. It is stored in memory and
recalled each time the unit is powered up.
< When On, all user adjustments that are made
during the general use of the AVR400 are displayed
on screen as well as the front panel display. is
includes the adjustment of volume, subwoofer level,
lip sync, tone controls, etc. It is stored in memory
and recalled each time the unit is powered up.
< When O, the above user adjustments will not
appear on screen, only on the front panel display.
is leaves the picture on your display device clear
of pop-up text. However, regardless of this setting
the Setup menus are always displayed on screen.
Zone2 OSD – Selects whether the Zone 2 pop-up OSD
messages are On or O. It is stored in memory and
recalled each time the unit is powered up.
Analogue Output – is setting controls the output
resolution of the analogue video output of Zone1. e
dropdown list shows all the resolutions that the AVR400
video processor can output.
Analogue Frame Rate – is setting controls the output
frame rate of the analogue video outputs of Zone1. is
setting is only valid if the HDMI output is not being
used at the time. See the Note ‘Important points to
remember’ regarding analogue frame rates.
Display Type – Set the aspect ratio of your display
device; 4:3 standard or 16:9 widescreen.
HDMI Output Resolution – is setting controls the
output resolution of the HDMI output.
<e dropdown list shows all the resolutions that the
AVR400 video processor can output. Resolutions
that are not supported by the connected display
device are greyed out and cannot be selected.
< Preferred: sets the output resolution to be the
preferred resolution that is requested by the display
device. is is oen the highest resolution the
display device can receive.
< Bypass: this is a special mode where video passes
straight through the AVR400 without alteration.
Use this mode to watch 3D content on a 3D
television. is mode also allows the AVR400 to
output video with a 23.976Hz frame rate. e output
resolution and frame rate will be identical to the
input resolution and frame rate. e display must be
capable of supporting the input resolution and frame
rate — if the input video format is not supported by
the display there will be no picture.
Output Frame Rate – is setting controls the output
frame rate of the HDMI output.
<e dropdown list shows all the frame rates that the
AVR400 video processor can output. Frame rates
that are not supported by the connected display
device at the above resolution are greyed out and
cannot be selected.
<Auto sets the
preferred frame rate that is requested by the display
device for the currently used resolution.
<Follow input sets the
same as the input frame rate. Use this setting if you
regularly switch between 24Hz and 50/60Hz content
and have a 24p compatible TV.
Lipsync – (Information only) Displays how much lip
sync is automatically applied to the HDMI output to
compensate for video processing delays in the attached
display device. Not all display devices support this
function.
HDMI OU T frame rate to be the
HDMI OU T frame rate to be the
Mode
Lists the decode and downmix options you wish to
include when cycling through the options on the MODE
button. Settings are Yes or No. e list is divided into
two sections depending on the source audio type.
See section “decoding modes” on page E-40 for more
information on each processing and decoding mode.
ese settings are applied to all audio inputs and are
stored in memory and recalled each time the unit is
powered up.
For Stereo sources:
Dolby ProLogic –
Dolby PLIIx Movie –
Dolby PLIIx Music –
Dolby PLIIx Game –
Neo:6 Cinema –
Neo:6 Music –
e rst section, ‘Stereo sources’ is the list of processing
modes you wish to make available for stereo signals
(analogue stereo, digital PCM stereo, Dolby 2.0, DTS
2.0, etc). When a stereo signal is applied, each press of
the
MODE button cycles through the processing modes
you have enabled in the ‘Stereo sources’ section. e
unprocessed Stereo option is always available for stereo
signals therefore it is not shown in the list.
For Multi-channel sources:
Stereo Downmix –
Dolby Digital EX –
Dolby PLIIx Movie –
Dolby PLIIx Music –
e second section, ‘Multi-channel sources’ is the list
of processing modes you wish to make available for
multi-channel digital signals (any Dolby or DTS digital
stream that has more channels than stereo 2.0). When a
multi-channel digital signal is applied, each press of the
MODE button cycles through the processing modes you
have enabled in the ‘Multi-channel sources’ section.
E-38
Page 41

Zone Settings
Lists the volume and control settings for Zone2 . ese
settings are applied to all audio inputs and are stored in
memory and recalled each time the unit is powered up.
Z2 Input – Selects the analogue audio and composite
video source to be routed to Zone2. e default is
‘Follow Z1’, i.e. the same source as currently selected in
Zone 1.
Zone 2 Status – displays whether Zone 2 is in Standby
or On, for information only.
Zone2 Volume – e current volume in Zone2.
Zone2 Max. Vol – Limits the maximum volume setting
the system can be turned up to in the Zone2. is is a
useful feature to prevent accidental overdriving of low
power-handling speakers, for example.
Zone2 Fixed Vol – e Zone2 volume control can be
locked at the current value for use with an external
amplier with its own volume control in Zone2.
Zone2 Max On Vol – Limits the maximum volume the
system operates in the Zone2 when it is switched on
or comes out of Standby. e system comes on at this
volume if the last used (possibly very loud) volume
exceeds this value.
Zone 2 format – Selects the video format used for the
Zone 2 composite video output. PAL is mostly used in
Europe and NTSC is mostly used in North America.
is setting should only be changed if there is an
unstable OSD on the Zone 2 display.
Network
e AVR400 is tted with an network audio client which
is capable of playing internet radio stations as well as
stored music on a network storage device such as a PC,
or on a USB ash drive.
Use DHCP – Select if your network uses DHCP
<No: To assign a xed IP address manually.
<Yes: To use network parameters given by the DHCP
server.
IP Address – If not using DHCP, enter the IP address
you have assigned to the AVR400 for your network.
Subnet Mask – If not using DHCP, enter the subnet
mask for the AVR400 on your network.
Gateway – If not using DHCP, enter the IP address of
the router the AVR400 is connected to.
Primary DNS – If not using DHCP, enter the Primary
DNS IP address of your internet service provider.
Alternate DNS – If not using DHCP, enter the Secondary
DNS IP address of your internet service provider.
MAC address – (Information only) e unique address
of the network card in your AVR400.
English
E-39
Page 42

decoding
modes
Introduction
Your AVR400 receiver provides all the key decoding
and processing modes for analogue and digital signals,
including the latest high denition audio formats over
HDMI.
Modes for digital sources
Digital recordings are usually encoded to include
information about their format type. e AVR400
detects automatically the relevant format in a digital
signal – such as Dolby TrueHD, Dolby Digital Plus,
DTS-HD Master Audio, Dolby Digital, or DTS – and
switches in the appropriate decoding.
Modes for analogue sources
Analogue recordings do not contain information about
their encoding formats, so the desired mode – such as
Dolby Pro Logic – needs to be selected manually.
Mode memory
Dolby Digital or DTS audio (including the high
denition formats) can be output in two mix modes,
selected using the MOD E button:
< Surround (e.g., ve main channels plus a subwoofer
for a 5.1 source)
< Stereo downmix.
Two-channel audio, regardless of whether it is analogue
or digital can also be output in two mix modes, selected
using the mode button:
< Surround (e.g., Dolby Pro Logic II Movie, Neo:6
Music, etc.)
< Stereo.
e AVR400 stores the settings for each source (except
MCH). us the decoding mode for the following
groups of source material can be stored independently:
< Dolby Digital (multi-channel) and DTS source
material
< Two channel Dolby, PCM or Analogue source
material
Two-channel source modes
e following decoding and surround modes are
available for standard and high denition Dolby Digital
2.0, DTS 2.0, PCM or analogue sources:
Stereo
Pro Logic II Movie
Pro Logic II Music
Pro Logic II Game
Pro Logic IIx Movie
Pro Logic IIx Music
Pro Logic IIx Game
Pro Logic
Neo:6 Cinema
Neo:6 Music
NOTE
Pro Logic IIx modes are only selectable when
Surround Back speakers are present.
Stereo
In this mode the AVR400 works as a conventional high
quality audio amplier. Note that if the subwoofer is
enabled in stereo mode, then some processing of the
signal will be carried out. To achieve ultimate sound
quality with analogue sources, select the Stereo Direct
function if an analogue connection is present.
Dolby Pro Logic II
Dolby Pro Logic II decoding is designed to produce vechannel output from two-channel source material.
ere are three dierent modes available in Pro Logic II:
‘Movie’, ‘Music’ and ‘Game’ modes, which are intended
for use as their names suggest. Due to the dierent
recording methods used for movies, music and video
games, it is recommended that the correct decoding
mode for your source material is used to obtain best
results.
< Movie mode: is is intended for use with
‘cinematic’ material, which is mixed and monitored
in a calibrated multi-channel environment. Movie
mode is a ‘xed’ mode that is designed to give a
similar sound when listening using a home cinema
system to that obtained in a cinema.
< Music mode : Stereo music is not designed for
surround processing, although good surround
eects can be obtained through careful production.
As the optimum decoding method varies according
to the recording, Music mode allows the user
adjustment of the processing characteristics.
< Game mode: Video games today are extremely
sophisticated, with dramatic 5.1 surround
audio tracks. Game mode gives augmented bass
management to capture the full eect of game
sounds panned to the surrounds, ensuring the
bass impact from purer surround eects are fully
delivered to the subwoofer.
Dolby Pro Logic IIx
Dolby Pro Logic IIx is an extension of the Dolby Pro
Logic matrix-decoding method. e decoder allows
the processor to derive seven outputs from a two or
multi-channel (up to 5.1 with EX) source to take better
advantage of all ampliers and speakers in a 7.1 setup.
As with Pro Logic, there are three dierent modes
available: Movie, Music and Game. Due to dierent
recording methods used for movies and music, you
should select the correct mode for your source material.
Dolby Pro Logic
Dolby Pro Logic is a legacy mode that is designed
to produce a ve-channel output from two-channel
source material. It should be used only when the source
material is encoded as Dolby Pro Logic; otherwise,
we recommend the use of Dolby Pro Logic II. is is
because Pro Logic processing on straight stereo sources
can sound mued and compressed.
DTS Neo:6
DTS Neo:6 provides up to six full-band channels of
decoding from stereo material. e AVR400 will derive
separate channels corresponding to the standard home
theatre layout.
< Cinema : A movie mode designed to reproduce
a movie theatre environment. Neo:6 technology
allows various sound elements within a channel or
channels to be steered separately, and in a way which
follows the original presentation naturally.
< Music : A music mode designed to produce a lively,
high-integrity surround-eect from most twochannel music sources from all available speakers.
Neo:6 music mode expands stereo recordings into
the ve or six-channel layout without diminishing
the subtlety and integrity of the original stereo
recording.
E-40
Page 43

Multi-channel source modes
Digital multi-channel source material is normally
provided as ‘5.1 audio’. e ‘5.1 channels’ comprise
of: le, centre and right front speakers, two surround
speakers and a low frequency eects (LFE) channel.
Since the LFE channel is not a full range channel, it is
referred to as ‘.1’.
Surround systems decode and reproduce the 5.1
channels directly. Dolby Digital EX and DTS-ES matrix
enhanced decoding systems create one extra rear
channel from information buried in the two surround
signals of the 5.1 source. ese EX and ES enhanced
systems are sometimes referred to as ‘6.1’ systems. is
extra surround back channel is normally reproduced
through two separate loudspeakers, creating a ‘7.1’
system.
DTS-ES discrete is a true ‘6.1’ source, with six discretely
encoded channels, plus the ‘.1’ LFE channel.
Dolby Digital Plus, Dolby TrueHD and DTS-HD are
high-resolution surround formats found on Blu-Ray
discs
Decoding modes
e modes given in the following table are available for
multi-channel digital sources.
Special modes such as DTS-ES 6.1 discrete, Dolby
Digital Plus, Dolby TrueHD and DTS-HD are only
available from the correct source material.
High resolution audio sources
Dolby TrueHD Provides up to 7.1 full channel at 96kHz, 24bit resolution, with potentially no
losses in the compression process. Data rates can be up to 18Mbps.
Dolby Digital Plus Provides up to 7.1 discrete channels of audio with less compression than
traditional Dolby Digital encoding. Data rates can be up to 6Mbps.
DTS-HD Master Audio Provides up to 7.1 full channel at 96kHz, 24bit resolution, with potentially no
losses in the compression process. Data rates can be up to 24.5Mbps.
For Dolby Digital sources
Dolby Digital 5.1 e most commonly used sound format for DVD video, and is also the
standard for US television. Dolby Digital 5.1 sources deliver sound with ve
discrete full-range channels; le, centre, right, surround le, surround right,
plus a low frequency eects (LFE) channel.
Dolby Digital 5.1 Stereo
Downmix
Dolby Digital EX is is an extension to Dolby Digital decoding that provides a 6-channel output
Dolby Digital 5.1 + Pro Logic
IIx Movie
Dolby Digital 5.1 + Pro Logic
IIx Music
For DTS sources
DTS 5.1 Less common than the Dolby Digital format, but generally recognised within
DTS 5.1 Stereo Downmix Provides a stereo downmix of the source material for use with headphones.
DTS-ES 6.1 Matrix is is a 6.1 channel format based on DTS 5.1. It has the sixth channel matrix
DTS-ES 6.1 Discrete is is a true discrete 6.1 channel sound format (unlike DTS-ES Matrix).
DTS96/24 Provides up to 5.1 channels of audio at 96kHz, 24bit resolution for superior
Provides a stereo downmix of the source material for use with headphones.
from a 5-channel input. e extra channel is the centre-surround channel (for
which the two surround back speakers are used), and is derived from the le
and right surround channel information. is decode mode should be used
only when the source material is ‘Surround EX’ encoded (which is normally
indicated on the disc packaging and should be detected automatically by the
AVR400), but may be used at other times if desired.
is mode is used to derive information for the individual surround back
channels from the surround channels, using the Pro Logic IIx Movie decoder.
is mode is used to derive information for the individual surround back
channels from the surround channels, using the Pro Logic IIx Music decoder.
e controls for adjusting Pro Logic IIx Music in ‘General Setup’ can be used in
this mode.
the audio industry as being of superior sound quality. DTS 5.1 delivers
surround sound with ve full range channels plus an LFE channel.
encoded into the surround le and surround right channels. e sixth channel
is a surround centre channel and is directed to the surround back le and
surround back right speakers.
DTS-ES discrete mode operates only on sources with DTS-ES 6.1 discrete
audio encoding.
sound quality compared to standard DTS 5.1
English
E-41
Page 44

Dolby volume
Dolby Volume is a sophisticated new
technology that resolves the problem of
dierent volume levels between programme content
(e.g. a TV show and advert breaks) and between sources
(e.g. a rock radio station and DVD, or between two
TV stations). It lets the listener enjoy everything at the
same preferred listening level without having to reach
for the volume control to compensate for the dierent
recording/output levels. is is the Volume Leveller
function of Dolby Volume.
Dolby Volume also works in conjunction with the
AVR400 volume control setting to compensate for
the ear’s changing sensitivity at dierent frequencies
depending on how loud the audio is. It is based on
a model of how human hearing works. It properly
balances low, mid and high frequencies to maintain all
the nuances and impact of the original audio regardless
of the actual selected playback volume level. is is the
Volume Modeller function of Dolby Volume.
Dolby Volume measures, analyses and maintains volume
levels based on how people perceive sound. A variety of
audio parameters are monitored including spectral- and
time-based loudness to ensure that perceived dynamics,
timbre and bass performance remain consistent at all
volume levels.
Dolby Volume also lets the listener control a
programme’s dynamic range – the range between loud
and quiet sounds. For example, with the volume turned
down for late-night viewing, dynamic range can be
adjusted so that speech remains clear and loud eects or
music passages retain their impact without waking up
the family.
between sources and frequency response regardless of
the volume setting. Most of the controlling parameters
of Dolby Volume are automatic as they are dependent
on analysis of the audio signal and the volume setting
of the AVR400. However, the Volume Leveller and
Calibration Oset controls (see below) can be adjusted
to your preference.
Volume Leveller
e Volume Leveller function of Dolby Volume controls
how closely quiet and loud sources and programme
content are matched to each other, based on the
ear’s perception of loudness. e range of values is 0
(minimal levelling) to 10 (maximum levelling). e
default setting is 2. If the Volume Leveller function
is turned o, no level matching between sources and
programme material is performed. is is not the
same as turning Dolby Volume o as volume related
frequency response processing is still active.
When Dolby Volume is being applied to the current
input, a Dolby Volume processing mode indicator is
shown on the OSD and the front panel display.
Calibration Oset
e Calibration Oset parameter of Dolby Volume
allows you to compensate for speaker eciencies and
listening position – eectively moving the reference
listening level up or down the volume scale. e default
value is 0 and this should normally produce a good
result when the AVR400 speaker levels are set using
a sound pressure level meter at the listening position
(75dB SPL, ‘C’ weighting, slow response).
Settings
Dolby Volume can be applied to any analogue or digital
stereo source or any digital multi-channel source. It is
not available in Stereo Direct or on the analogue multichannel input. Dolby Volume can even be applied to
processing of stereo signals (e.g. PLII Music) or when
down-mixing a digital multi-channel source (e.g. Dolby
Digital 5.1 down to stereo).
Dolby Volume can be enabled and congured separately
for each audio input in the Input Cong menu. e
default is ‘O’ for ‘audiophile’ listening. You may wish
to turn Dolby Volume ‘On’ for TV and movie sources
to maintain the same perceived overall listening level
E-42
Page 45

English
E-43
Page 46

tuner
operation
e AVR400 is tted with an internal AM/FM tuner
and a DAB (digital radio) tuner. DAB broadcasts are not
available in all locations.
is section deals with tuner operation, for information
on setting up the tuner and installing aerials, see page E-16.
When a tuner input is selected, the OSD shows a list
of radio presets plus an information panel giving all
available information about the current frequency (for
AM and FM) or station (for DAB).
e front panel will also give the same information,
pressing the
items of information:
AM
• Processing mode (default)
• Frequency
• Signal strength
FM
• Processing mode (default)
• Radiotext (if available)
• Programme type (if available)
• Signal strength
DAB
• Processing mode (default)
• Radiotext (if available)
• Programme type
• Signal quality
• Bit-rate of transmission
INFO key will cycle through the various
Tuning/Channel Selection
When switching to the internal TUNE R source, the
AVR400 enters the last used tuner band, be it AM / FM
/ DAB (if tted). Repeatedly pressing T cycles through
the available tuner bands on your AVR400.
FM/AM analogue radio
Frequency tuning on FM and AM radio is done using
the < and > buttons on the CR102 remote control in
TUN device mode. Individual presses move the frequency
down and up one step. If you press and hold either of
the tuning buttons for two seconds, the tuner scans to
the next strong signal. You can stop a scan at any time by
pressing one of the tuning buttons again.
In Europe, the internal FM radio is capable of receiving
RDS (Radio Data System) radiotext signals that are
transmitted on some stations. e RDS information
typically includes the radio station name, the music or
speech genre as well as additional information related to
the current programme. On music stations this is oen
information on the currently playing track.
DAB digital radio
If your AVR400 is tted with the optional DAB tuner
you will need to scan for available stations before being
able to listen to them.
To scan for DAB stations, rst select the DAB tuner then
press and hold O until the display indicates scanning
has started. e AVR400 will then scan all the DAB
radio frequencies and compile a list of the stations that
are available.
When the scan is complete, you can scroll through the
station list using the < and > buttons on the CR102
remote control. To listen to the currently displayed
station press the O. If you do not press O within
two seconds, the display will revert to displaying the
currently playing station.
Internet radio
Please see the Network/USB Operation section on
page E-45 for details of internet radio operation.
Saving and selecting Presets
Preset selection uses the B and C keys on the
remote to browse and O to select the preset when the
CR102 is in TUN device mode.
Up to 50 presets can be stored and these can be from
any band, for example Preset 1 could be an AM station,
preset two a DAB station, etc. Pressing the
the next available preset number to be displayed, then
pressing the OK key again stores the current frequency/
channel in that preset. If a dierent preset number is
required, press the B or C keys until the desired
number is displayed before pressing the OK key for a
second time.
OK key causes
Deleting Presets
When in tuner browse mode (using B and , to
scroll through the presets), the yellow button on the
CR102 remote is used to delete the currently highlighted
(but not playing) station or frequency.
E-44
Page 47

network/usb
operation
e AVR400 is tted with a network audio client which
is capable of playing internet radio stations as well as
stored music on a network storage device such as a PC,
or from a USB ash drive.
For information on installing the AVR400 on your
network, see page E-17.
e AVR400 supports the following le formats:
MP3
<
WMA (Windows Media Audio)
<
WAV
<
FLAC (Free Lossless Audio CODEC)
<
MPEG-4 AAC (iTunes) with DRM10 support
<
Favourites
You can store internet radio stations in your ‘favourites’
folder for easy access later. Once playing, pressing
the FAV+ key adds the track to the ‘favourites’ folder.
Pressing FAV- removes the station from the ‘favourites’
folder (this key only has an eect if the station is in the
favourites folder).
NOTE
For playback from a network device, the network
device needs to running a universal plug and play
(uPnP) service, such as Windows Media Player 11.
is can be downloaded free of charge from
www.microsoft.com or installed via the Windows
update installer. Windows 7 and Vista™ have this
functionality built in. Windows Media Player
requires music library sharing/streaming to be
enabled in order to serve music to the AVR400.
Other free and paid-for uPnP services are available
for other computer operating systems. Some
network attached storage (NAS) systems include a
built-in version of a uPnP service.
Selecting the playback source
Selecting the network client will allow playback of
internet radio stations and stored music on a networked
storage device or USB memory device.
To select the network source the CR102 remote must
rst be in
+ e on the remote to select the Network source. You
can also cycle to it using the INPUT / INPU T+ keys on the
front panel.
e ‘home’ page has options for playing audio from a
USB device, Internet Radio or from your home network
using the ‘Music Player’ option. Navigate through these
items using the
may contain playable les have a symbol, playable
les have a symbol. Once you reach the track you
wish to play, press OK key.
Once playing, pressing
Internet Radio).
Pressing the
track is reached the key is ignored.
Pressing the
is reached, the key is ignored.
Pressing the r key on the remote plays the tracks in
the current folder in a random order.
Pressing the R key on the remote repeats all the les
in the current folder. Pressing it again cancels the repeat
function.
AMP device mode (press
B, C, D
key skips forward one track. If the last
/
key skips back one track. If the rst track
0
and E keys. Folders that
will pause the track (except
;
). en press S
A
USB playback
Insert a USB device into the socket on the AVR400 and
select the network client input. e USB device appears
in the list of folders that can be navigated. Highlight it
using the Band C keys and press E to navigate the
contents of the USB device. Navigate through folders
(using the B, C, D and E keys) to a music le
and press the OK key to play the le.
Internet radio stations
Although you can manually browse for an internet radio
station, the AVR400 uses the vTuner service to allow
easy selection of favourite internet radio stations and
podcasts. To set up this service for your AVR400, please
visit www.arcamradio.co.uk
ere, you will be asked to enter the Media Access
Controller (MAC) address which is the unique ID of
your AVR400. is MAC address can be found in the
network section of the setup menu.
Once you have entered the MAC address, you can then
browse stations and podcasts and set up groups of
favourite stations. When you next connect your AVR400
to the internet, these groups will appear in the ‘My
favourites’ folder.
Pressing the
lower portion of the front panel display between:
Elapsed Time (default)
<
Processing mode
<
Album (if available)
<
Artist (if available)
<
File information (bitrate, type).
<
INFO key will cycle what is shown on the
iPod
It is possible to connect an iPod to your AVR400 using
either the Arcam rLead or irDock accessories (please
contact your dealer).
Connect the 9-way plug into the socket marked ‘irDock’
and the audio leads to the VCR input (the iPod input
can be changed in the General Setup menu). If your
iPod has video output and you are using the irDock,
connect the composite and S-Video leads to the VCR
video inputs.
To select the iPod input,
press the e key on the
remote while in
Device Mode, or cycle
to it using the INPUT /
INPUT + keys on the front
panel. Find songs to play by navigating through Artists,
Albums etc. using the B, C, D and E keys.
AMP
English
E-45
Page 48

multi-room
set up
e AVR400 allows independent routing and control of
analogue audio and Composite video to a separate set of
equipment, typically used for a second living space, e.g.,
bedroom or lounge.
e connection guide on the following page shows how
the AVR400 is normally connected in a multi-room
installation.
Zone2
Zone2 receives only signals obtained by the AVR400
from the analogue audio and Composite video inputs.
e analogue inputs are required because there is
no analogue-to-digital, digital-to-analogue or DSP
processing available for Zone2 signals – the AVR400
only converts video formats for Zone1.
For this reason, we recommend that in addition to any
digital connections, the analogue audio and Composite
video outputs from your source devices are connected to
the AVR400.
Video outputs
e Z2 Composite video output connectors of the
AVR400 should be connected to the analogue video
inputs (usually labelled VIDEO IN or COMP OSITE VIDEO IN)
of the display device in Zone2.
Audio outputs
e Z2 OUT, R and L phono sockets should be connected
to the analogue audio inputs (Usually labelled
ANALOGUE AUDIO IN) of the Zone2 display device, or
to the inputs of an additional stereo power amplier in
Zone2 (for example, the Arcam P38).
Speaker outputs
If the main zone has a 5.1-channel surround sound
speaker system (not a 7.1-channel system), the spare
SBL and SBR speaker outputs can be used to power
speakers in Zone 2, so that a power amplier is not
required. To congure the outputs, navigate to the “Spkr
Types” option in the Setup Menu and set the option
“Use Channels 6+7 for” to “Zone 2” (see page E-32).
Zone2 control connections
e AVR400 also allows remote control from Zone 2.
Z2 IR
is allows the AVR400 to be
controlled remotely from Zone2
via Infra-red remote control.
Connect a remote IR receiver
in Zone2 to allow control of
the AVR400 from this listening/
viewing area.
For more information on remote IR receivers, see ‘Z1
IR’ on page E-17.
TRIG Z2
is allows the AVR400 to remotely switch on devices
in Zone2 when Zone 2 is selected. For example you
could set your television in Zone2 to switch on when
‘Zone2’ is selected on AVR400.
For more information on triggers, see ‘Trigger
connectors’ on page E-17. Please note that not all AV devices
have this feature, nor are triggers essential for listening
and viewing in a separate zone.
E-46
Page 49

Multi-room connection guide
Zone1
Zone2
English
E-47
Page 50

customising
the CR102
Code Learning
e CR102 comes with a complete library of
preprogrammed codes. Aer you have set up the CR102
for your device, you may nd that there are one or more
functions on your original remote which do not have a
place on the CR102 keypad. For convenience, the CR102
oers a Code Learning feature that allows you to copy
up to 16 functions from an original remote control onto
the CR102 keypad.
Before you start, make sure that:
e original remote control is working correctly.
<
e remotes are not pointing at your device.
<
e remotes have new batteries.
<
e remotes are not in direct sunlight or under
<
strong uorescent lights.
Learned functions are mode-dependent: You could
theoretically assign up to eight dierent functions
to a single key (the CR102 can handle a total of 16
learned functions).
Example: To copy the ‘text hold’ function
from a TV remote onto the ( key of your
CR102
1. Place both remotes on a at surface, 2 to 5cm apart,
with the IR ports facing each other.
2. On the CR102, press and hold S until the power
LED blinks twice:
3. Press 9 7 5. e power LED blinks twice:
.
* *
4. On the CR102, press the device key that matches the
‘source’ device (e.g. if you’re learning a TV function,
press a).
5. On the CR102, press the key to which you want to
assign the learned function (e.g. (). e device key
blinks rapidly.
6. On the original remote, press and hold the function
key that you want to learn (e.g.
CR102 device key blinks twice:
7. If you want to learn other functions from the same
source device, simply repeat steps 5 and 6 pressing
the next key you want to learn.
8. To exit Code Learning mode, press and hold S
until the device key blinks twice: * *.
* *
.
TEXT H OLD) until the
* *
.
9. To use the learned function on the CR102, press the
Device Mode key, followed by the function key.
In this example, you’d press
followed by
a
(
Shifted Learning
You can assign a learned function to a CR102 key
without sacricing its original function.
You can assign Shied Learning functions to any key
except for: Device Mode keys (e.g. a), S, or number
keys (0 to 9).
1. To assign a Shied Learning function, simply follow
Code Learning steps in the previous section. During
step 5, press S once before you press the key to
which you want to assign the learned function.
2. To access the shied function, press S and then the
target key.
Important notes
Once you start a Code Learning session, you have
<
approximately 10 seconds to conduct each step. Any
longer, and a timeout means that you’ll have to start
the process again.
e Learning feature is mode-specic – you can
<
copy one feature per mode onto a key.
e CR102 can learn approximately 16 functions in
<
total.
To replace a learned function, simply assign a new
<
one to the same key.
Learned functions are retained when you change
<
batteries.
If Code Learning fails, try altering the distance
<
between the two remotes; make sure that the light in
the area is not too bright.
To delete a learned function
1. Press and hold S until the power LED blinks twice:
.
* *
2. Press 9 7 6. e power LED blinks twice:
.
* *
3. Press a Device Mode key once. For example, if you
want to delete one of your learned TV functions,
press a.
4. Press twice on the key you want to deassign. e
handset blinks twice: * * to conrm.
e original function of the CR102 is restored.
To delete a Shifted Learned function:
To delete a Shied Learned function, press S before
you press the key to be deassigned (during step 4 above).
To delete ALL learned functions within a
given Device Mode
1. Press and hold S until the power LED blinks twice:
.
* *
2. Press 9 7 6 – the power LED blinks twice:
.
* *
3. Press the appropriate Device Mode key twice.
E-48
Page 51

Creating Macros
You can program your CR102 to issue a sequence of
commands when you press a single key. Any sequence of
commands you regularly use can be reduced to a single
key press for your convenience.
For example, you might want to turn o your TV, VCR
and Satellite at the same time.
A key programmed with a Macro is available in all
<
modes; it will replace that key’s dierent functions
for all modes.
A Macro can consist of up to eight key presses.
<
Example: To assign a Macro to the h key
1. Press and hold S until the power LED blinks twice:
.
* *
2. Press
9 9 5
3. Press h (the Macro will be assigned to this key).
4. Press a, P, w, P, z, P. (ese are the
Macro steps you wish to record.)
5. To store the Macro, press and hold S until the
power LED blinks twice: * *.
Now, whenever you press h, the CR102 will toggle the
power to your TV, VCR and Satellite.
e important word here is ‘toggle’. For example, if
<
the TV and Satellite devices are currently on, but
the VCR is o, pressing h will switch o the TV
and Satellite and switch on the VCR (rather than
switching all three devices on or o).
When using Macros, remember that you may need
<
to change mode or use S, and that each key press
(including changing modes and pressing S) counts
as one of the Macro steps. You cannot use a Macro
key within another Macro.
If the amount of memory storage for a particular
<
Macro is exceeded, the power LED comes on for ve
seconds. You can, however, save the macro steps up
to that point by pressing S, or you can cancel the
Macro recording by pressing any other key.
e delay between key presses is recorded as part of
<
the Macro. A delay of up to 30 seconds is permitted.
.
Example: To deassign the Macro associated
with the h key
1. Press and hold S until the power LED blinks twice:
.
* *
2. Press 9 9 5.
3. Press h.
4. Press and hold S until the power LED blinks twice:
.
* *
Volume punch-through
Volume punch-through means that, no matter which
Device Mode is selected, the CR102 controls the
AVR400 volume. You don’t need to press A on your
CR102; this feature is switched on by default.
ere are times, however, when you might want to
control a device’s volume directly when in a specic
Device Mode.
Example: To cancel volume punch-through
for a TV (AV mode)
1. Press a once.
2. Press and hold S until the power LED blinks twice:
.
* *
3. Press 9 9 3.
4. Press -. e power LED blinks four times.
Now, while in TV (AV) mode, you will be able to control
the volume or mute functions of your TV directly.
To completely cancel all volume punchthrough settings
1. Press and hold S until the power LED blinks twice:
.
* *
2. Press 9 9 3.
3. Press +. e power LED blinks four times *
.
* *
Now, whichever mode you’re in, you will have direct
access to that device’s volume or mute functions,
assuming they are available. You would need to switch to
AMP mode to alter the AVR400 volume.
Example: To restore default volume punchthrough settings to all Device Modes
1. Press and hold S until the power LED blinks twice:
.
* *
2. Press
9 9 3
3. Press A. e power key LED blinks twice: * *.
.
*
Key Mover
Sometimes you might nd that a key you use a lot for
your system is in the ‘wrong’ place on the CR102 keypad
for your comfort. It’s quite easy to reassign a favourite
function to a more accessible key. It is even possible
to move a function from one Device Mode to another
Device Mode.
Example: To assign the D function to the U
key in SAT mode
1. Press z.
2. Press and hold S until the power LED blinks twice:
.
* *
3. Press 9 9 4.
4. Press the key you want to move (e.g. D)
5. Press the key you want to move the key to (e.g. U).
Now, pressing either D or U while in SAT Device
Mode makes the CR102 transmit the D function.
To completely swap over the functionality of the two
keys to put the U functionality on the D key, repeat
the above process again, but swap over the D and U
key presses in the example.
Note that the function that is copied over to the new key
is always the original function of the old key.
Restore a moved key
To restore a key to its previous function, repeat the
example above, pressing the key to be restored twice
(copy it back to itself).
Restore all moved keys for a Device Mode
To restore all keys in a Device Mode to their original
functional positions, repeat the example above, but press
the relevant Device Mode key (e.g. A) at points 1,4 and
5 in the example.
English
E-49
Page 52

Copy a key between Device Modes
It is possible to copy functions between Device Modes.
However, remember that button functions are Device
Mode specic and therefore eectively ‘punch-through’
to the original Device Mode when copied over.
e following example copies the AVR400
function from the CR102 AMP device mode to the
shied function of the # button on AV Device Mode.
1. Press and hold S until the power LED blinks twice:
.
* *
2. Press 9 9 4.
3. Press the Device Mode key of the function you want
to move (e.g. A).
4. Press the function key you want to move (e.g.)/
DIREC T)
5. Press the key of the Device Mode you want to copy
the function to (e.g. a)
6. Press the S button graphic
7. Press the key you want to copy the function to (e.g.
)
#
If you prefer to copy the key to the main function of the
button instead of the ‘shied’ function, omit point 6
#
in the above example.
DIREC T
Mode Mover
If your home entertainment setup contains devices of
the same type (e.g. two TVs, perhaps from dierent
manufacturers) you can still control both those devices
with the CR102. You simply need to reassign an unused
Device Mode key.
NOTE
Before using Mode Mover, make sure both the
source and destination Device Mode keys are
unlocked (see next section).
Example: To use the z key to control a
second TV
1. Press and hold S until the power LED blinks twice:
.
* *
2. Press 9 9 2.
3. Press the Device Mode key for the type of device you
want to control (e.g. for a TV, press a).
4. Press the Device Mode key you want to use
(e.g. z).
5. Don’t forget to set up the CR102 to control the
second device, using one of the methods on page E-25.
Note that volume punch-through is not applied to a
Device Mode that has been copied using Mode Mover.
However, AVR400 volume punch-through functionality
can be restored when you have used Mode Mover, by
copying -, + and @ from the AMP Device Mode
to the same physical buttons on the new moved Device
Mode using the last example shown in Key Mover.
To restore a moved Device Mode key to its
original state
1. Press and hold S until the power LED blinks twice:
.
* *
2. Press 9 9 2.
3. Press the Device Mode key you want to restore
twice.
Locking/Unlocking a specific
Device Mode
When you rst unpack your CR102 and insert the
batteries, for your convenience it is able to control
certain Arcam components automatically (e.g. BD
players, Ampliers, Tuners and CD Players). We achieve
this by preprogramming specic Arcam device codes
onto the relevant Device Mode keys, then locking
the Device Modes so you don’t reprogram them
inadvertently.
If you want to override these locked default settings – to
control a third-party DVD player, for example – you will
rst need to unlock DVD Mode before setting up the
CR102 using one of the methods described at the start
of this guide.
Here are the factory default settings:
Device Mode Default status Default Arcam
codes
DVD
SAT
AV
TUN
AMP
PVR
VCR
CD
Alternative codes are available for multi-room solutions,
or in the case of code clashes with other manufacturer’s
products.
For example:
DVD (system code 12) 1655
AMP (system code 19) 1954
You will need to change the system code on the product
you wish to control, as well as the CR102.
NOTE
e
AMP Device Mode can only be used to control
Arcam ampliers like the AVR400, either on its
default or alternative IR system codes.
Locked 0762
Unlocked 1205
Unlocked 0586
Locked 2009
Locked 1242
Unlocked 1930
Unlocked 0111
Locked 2010
To toggle a Device Mode lock setting:
1. Press the Device Mode key you want to unlock (e.g.
)
d
2. Press and hold S until the power LED blinks twice:
.
* *
3. Press 9 8 2.
e power LED blinks twice when being locked, and
<
blinks four times when being unlocked.
If you enter an invalid key sequence, the power
<
LED gives one long blink and returns to normal
operation.
While the Device Mode key is locked, the Direct Code
Setup and Move Mode functions are not available.
E-50
Page 53

Mode key IR punch-through
e Mode key IR punch-through default is ‘on’.
Example: To set the Mode key IR punchthrough to AMP
1. Press and hold S until the power LED blinks twice:
.
* *
2. Press 9 7 1. e power LED blinks twice:
.
*
3. Press A to punch through IR from it.
Now, whenever you press and release a Mode key, the
IR data assigned to
the current mode is (i.e. it ‘punches through’ any other
device).
AMP is transmitted, no matter what
*
To cancel Mode key IR punch-through
1. Press and hold S until the power LED blinks twice:
.
* *
2. Press 9 7 1. e power LED blinks twice: *
.
*
3. Press S until the power LED blinks twice: * *.
Resetting the CR102
Resetting the CR102 will erase all learned functions
across all modes, as well as some other programmed
functions like Macros. It will not reset the Device Mode
keys; these will remain programmed to your choice of
component.
1. Press and hold S until the power LED blinks twice:
.
* *
2. Press 9 8 0. e power LED blinks four times:
* * * *
3. Press and hold S until the power LED blinks twice:
* *
4. Press 9 9 3.
5. Press A. e power key LED blinks twice: * *.
6. Press and hold S until the power LED blinks twice:
* *
7. Press 9 7 1. e power LED blinks twice: *
.
*
8. Press A. e power key LED blinks twice: * *.
.
.
.
Command summary
Direct code setup
(e.g. AV mode, NNNN=code number)
a S * *
Library search
(e.g. AV mode)
a S 9 9 1 * * P [
to save
S
Code blink back
a S 9 9 0 **
1 count blinks for rst N
2 count blinks for second N
3 count blinks for third N
4 count blinks for fourth N
Code learning
(e.g. AV mode fast forward key)
S * * 9 7 5 * * a ( *
rapid blinks)
(Press key on original remote that you wish to copy)
* * S * *
Delete a learned function
(e.g. AV mode fast forward key)
S * * 9 7 5 * * a ( ( * *
Delete all learned functions with a device
(e.g. AV mode)
S * * 9 7 5 a a
Creating macros
(e.g. SRCH key)
S * * 9 9 5 h a P w P z P S
* *
Deassign macro
S * * 9 9 5 h S * *
NNNN * *
P
until unit turns o
(many
Key mover
(e.g. SAT mode, DISP key to MENU key)
z S * * 9 9 4 D U
Mode mover
(e.g. change SAT to TV(AV))
S * * 9 9 2 a z
Restore device mode
(e.g. restore SAT)
S * * 9 9 2 z z
Locking/unlocking a mode
(e.g. DVD mode)
d S * * 9 8 2 * *
(i.e. two blinks for lock)
d S * * 9 8 2 * * * *
(i.e. four blinks for unlock)
Cancel all volume punch-through
S * * 9 9 3 + * * * *
Restore volume punch-through
S * * 9 9 3 A * *
Mode key IR punch-through
S * * 9 7 1 * * A
Cancel mode key IR punch-through
S * * 9 7 1 * * S * *
NOTE
As elsewhere in this Handbook, a single ‘blink’ of
the red LED behind the power button is indicated
by the symbol
.
*
Device codes
e tables that begin on page 56 (in the nal section of
this Handbook) list the four-gure codes for dierent
manufacturers’ devices.
Use these when setting your CR102 up to control your
devices, as described in Method 1 (see page E-25).
If more than one code number is listed, try the rst
number. If the results are unsatisfactory, continue trying
the numbers for that manufacturer to get the best ‘t’
with the functionality required.
If the manufacturer of your equipment is not listed, you
can try Method 2, the Library Search (see page E-25). is
allows you to scan through every set of codes contained
in the CR102’s memory.
English
E-51
Page 54

trouble-
shooting
Problem Check that...
ere are no lights on the unit
e unit responds erratically
or not at all to the remote
control
e front panel display is
blank
No picture is being produced
ere are bright edges or
‘ghosts’ on the picture
No sound is produced
e sound is poor or distorted
the power cord is plugged into the AVR400 and the mains socket it is
<
plugged into is switched on.
the power button is pressed in.
<
If a red LED is present, the AVR400 is in standby mode. Press any button on the
front panel or remote control.
there are fresh batteries in the remote control.
<
the front panel window is visible and you are pointing the remote control
<
towards it.
the display hasn’t been turned o. Press the DISPLAY button on the front
<
panel or remote control.
your viewing device is turned on and switched to display your AVR400. Test
<
by pressing the MENU button on the AVR400 or on the remote and look for
the main menu screen on your display device.
the correct video input is selected on the AVR400.
<
the “Video Source” has been set correctly in the “Input Cong.” menu
<
the video source is on, is operating normally, and is in ‘play’ mode if
<
appropriate.
you have the AVR400 in a video resolution that is compatible with the
<
connection you are using and with your display device. For example,
composite video is only capable of carrying 480i and 576i resolutions. Test
this by pressing and holding the OK key for more than two seconds to force
480i / 576i output resolutions.
the cables used for analogue video connections are designed to carry video
<
(i.e., they are 75 coaxial cables).
ensure the ‘sharpness’ control on your display device is switched o or set to
<
near minimum.
for HDMI connections, try using a shorter cable or alternatively a dierent
<
brand.
the correct input has been selected.
<
the “Audio Source” has been set correctly in the “Input Cong.” menu
<
the source equipment is on, is operating normally and is in ‘play’ mode if
<
appropriate.
the volume is turned up to a reasonable level and the AVR400 is not in mute
<
mode.
you have not excessively increased the input sensitivity (i.e. reduced the
<
maximum input signal voltage) in the Input Cong. menu if an analogue
input is being used.
you have selected the correct size of speakers to suit your system in the setup
<
menu.
E-52
Page 55

Problem Check that...
Sound only comes from some
of the speakers
Unable to select Dolby Digital
or DTS decoding modes
When playing a Dolby Digital
BD, the AVR400 selects Dolby
Pro Logic
Hum on the analogue input
ere is radio or television
reception interference
you have an appropriate surround source selected and playing.
<
the BD/DVD disc is encoded in the appropriate format, and the correct
<
format has been selected in the disc start menu of the BD player (if
applicable).
the BD/DVD player has been set to output ‘bitstream’ audio on the digital
<
output.
the display window indicates that the disc you are playing is a multichannel
<
recording (you may need to press the INFO key several times until you get to
the ‘incoming format’ display).
all the speakers are correctly connected to the speaker terminals and are
<
secure.
you have not selected ‘Stereo’ as the decoding mode.
<
your speaker balance is correct.
<
you have congured the AVR400 to include all the speakers in your system.
<
e AVR400 can only apply Dolby Digital and DTS decoding to sources which
have been encoded in the same format.
Check that:
digital source is selected and connected.
<
the source is playing appropriately encoded material.
<
the BD/DVD disc is encoded in the appropriate format and that the
<
correct format has been selected in the disc start menu of the BD player (if
applicable).
the BD/DVD player has been set to output ‘bitstream’ audio on the digital
<
output.
you have a digital connection from your BD player.
<
sometimes Dolby Digital BD/DVD discs contain material at either the
<
beginning or the end of the main movie that is not in full 5.1 format, but in
two-channel or Pro Logic decoding.
all cables are making a good connection. If necessary withdraw the cable
<
from the connector and plug it fully in again (turn the power o before
doing this).
the connections inside the source cable connector are not broken or badly
<
soldered.
if the hum originates only when one particular source component is
<
connected, that an aerial cable, or dish connection to this source is ground
isolated. Contact your installation contractor.
where the interference is coming from. Switch o each source component in
<
turn, then any other equipment. Most electronic equipment does generate
low levels of interference.
try re-arranging cabling from the nuisance source away from other cabling.
<
ensure that the cabling used is high quality, specied for its purpose, and is
<
properly screened.
if the problem persists, contact your dealer.
<
Problem Check that...
e source switching changes
randomly or freezes on one
source
Volume is always too loud
when I turn on
When Zone2 is put into
standby, the main zone is also
switched o
When a USB memory device is
connected, ‘USB’ is not shown
in the network client’s list of
folders
If les on a USB memory
device cannot be played:
If les on a computer cannot
be played
If you cannot connect to a
wired network
If you cannot connect to a
favourite internet radio station
If the internet radio station
sound quality is poor or
broken
there are no static or impulse interference problems caused by nearby power
<
equipment switching, e.g., heating or air conditioning control. Switch the
AVR400 o, wait ten seconds, then switch it on again to clear an operating
problem. Contact your installer if the problem returns or persists.
there is no direct sunlight shining on the infra-red detector behind the front
<
panel display.
the ‘max on volume’ setting is not set too high.
<
the ‘zone standby‘ setting in the setup menu is set to LOCAL.
<
a USB memory device is connected that conforms to the mass storage class.
<
a USB hub is not being used.
<
the USB device is formatted in FAT16 or FAT32.
<
the USB device does not have multiple partitions.
<
the les are in a compatible format.
<
the les are in a compatible format.
<
the computer is connected via a network and not USB – the AVR400 USB
<
port cannot be used for a direct connection to a computer
the Ethernet cable you are using is correctly connected between the AVR400
<
and the network hardware.
the network is set up for xed IP addressing and you have the AVR400 set to
<
use DHCP.
the network is set up for DHCP and you have the AVR400 set to use xed IP
<
addressing.
the station is still broadcasting or is not congested – try again later.
<
the radio station does not have a low bit rate (use the INFO key to nd this or
<
look on the OSD).
the network is not slow or congested.
<
English
E-53
Page 56

specications
Continuous power output, per channel, 8
2 channels driven, 20Hz - 20kHz, <0.02% THD 100W
2 channels driven, 1kHz, 0.2% THD 125W
7 channels driven, 1kHz, 0.2% THD 90W
Residual noise & hum <0.3mV
Inputs
Line inputs:
Nominal sensitivity 1V, 2V, 4V (user adjustable)
Input impedance 47k
Signal/noise ratio (CCIR, 100W) 100dB
Preamplier outputs
Nominal output level 1V RMS
Output impedance 560
THD+N (20Hz—20kHz) -100dB
Video inputs
Component video signal/noise 85dB
Composite video signal/noise 70dB
Headphone output
Maximum output level into 32
Output impedance <5
General
Mains voltage 110–120V or 220–240V, 50 –60Hz
Power consumption (maximum) 1.5kW (ermal dissipation approx. 5200 BTU/hour)
Power consumption (idle, typical) 100W (ermal dissipation approx. 340 BTU/hour)
Power consumption (standby) <0.5W
Dimensions
W x D (including speaker terminals) x H (including feet)
Weight (net) 15.5Kg
Weight (packed) 20Kg
Supplied accessories Mains lead
E&OE
NOTE: All specication values are typical unless otherwise stated.
Ω 2Vrms
433 x 425 x 171mm
CR102 remote control
4 x AAA batteries
Calibration microphone
Ω
Ω
Ω
Manual
DAB aerial
FM aerial
AM loop aerial
Continual improvement policy
Arcam has a policy of continual improvement for its
products. is means that designs and specications
are subject to change without notice.
E-54
Page 57

product
guarantee
Worldwide Guarantee
is entitles you to have the unit repaired free of charge, during the rst two years aer
purchase, provided that it was originally purchased from an authorised Arcam dealer.
e Arcam dealer is responsible for all aer-sales service. e manufacturer can take no
responsibility for defects arising from accident, misuse, abuse, wear and tear, neglect or
through unauthorised adjustment and/or repair, neither can they accept responsibility
for damage or loss occurring during transit to or from the person claiming under the
guarantee.
The warranty covers:
Parts and labour costs for two years from the purchase date. Aer two years you must pay
for both parts and labour costs. e warranty does not cover transportation costs at any
time.
Claims under guarantee
is equipment should be packed in the original packing and returned to the dealer from
whom it was purchased. It should be sent carriage prepaid by a reputable carrier – not
by post. No responsibility can be accepted for the unit whilst in transit to the dealer or
distributor and customers are therefore advised to insure the unit against loss or damage
whilst in transit.
For further details contact Arcam at:
Arcam Customer Support Department,
Pembroke Avenue, Waterbeach, CAMBRIDGE, CB25 9QR, England
or via www.arcam.co.uk.
Problems?
If your Arcam dealer is unable to answer any query regarding this or any other Arcam
product please contact Arcam Customer Support at the above address and we will do our
best to help you.
English
On-line registration
You can register your product on-line at www.arcam.co.uk.
E-55
Page 58

Page 59

device code
tables
tableaux des
codes d’unité
source
code-
tabelle für
fremdgeräte
tabellen
apparaatcodes
TV
888 0294
A.R. Systems 0067 0382 0586
Accent 0039 0067 0586
Accusound 0890
Acoustic Research 1299
Acoustic Solutions1179 1067
Acura 0039
Adcom 0655
Addison 0683 0138
ADL 1247 0920
Admiral 0123 0193 0448
Advent 0906
Adyson 0247 0246
AEA 0067 0586
AEG 0636 1067 1179
Aftron 0921
Agashi 0294 0246 0247
Aiko 0039 0067 0586
Aim 0067 0586 0783
Aiwa 1535
Akai 0039 0238 0586
Akashi 0890 0039
Akiba 0485 0067 0586
Akira 0448 0783 0067
Akito 0067 0586
Akura 0067 0294 0586
Alaron 0246
Alba 0039 0067 1067
Alkos 0065
Allorgan 0247
Allstar 0067 0586
All-Tel 0895 1299
Amplivision 0247 0400
Amstrad 0039 0067 0294
Anam 0067 0586 0039
Anam National 0067 0586 0680
Andersson 1193 1179
Anglo 0039 0294
Anitech 0039 0294 0067
Ansonic 0400 0067 0586
AOC 0655 0039 0090
Aolinpike 0294
Apex Digital 1247
Apollo 0503
Arc en Ciel 0139
0404 0485
0294
1193
0246 0065 0463
0910 0294 0247
0238 0736 0728
0664 0404 0485
0636 0529
0067 0463 0065
0783 0193 0759
0744 0736 0728
0745 0632 0578
0510 0247 0294
0661 0246 0208
0407 0636 1067
0503 1289 1278
0698 0039 0744
1393
0586 0744 0448
0400 0698 0246
0193 0517 0473
0463 0586 1067
0680
0586
0039 0698 0404
0193
0123 0138 0208
Arcam 0246 0247
Arçelik 0744
Ardem 0744 0516 0663
Arena 0067
Aristona 0586 0067
Arthur Martin 0193
ASA 0135 0376 0100
Asberg 0067 0586
Asora 0039
Astra 0067 0586
Asuka 0247 0246 0294
ATD 0728
Atlantic 0067 0586 0246
Atori 0039
Auchan 0193
Audiosonic 0039 0067 0404
Audioton 0247 0516 0400
Audioworld 0728
Aumark 0090
Autovox 0247
AWA 0039 0404 0067
Axxent 0039
Axxon 0744
B&D 1247
Baier 0906
Baihe 0039 0294
Baile 0039 0404 0691
Baird 0373 0139 0247
Bang & Olufsen 0595
BaoHuaShi 0294
Baosheng 0039
Barco 0193
Base 0810
Basic Line 0039 0404 1179
Bastide 0247
Bauer 0039 0728 0736
Baur 0039 0067 0542
Bazin 0247
Beaumark 0208
Beijing 0039 0238 0256
Beko 0400 0744 0516
Belson 0728 1221
Bennett 0586 0067
Beon 0067 0586 0448
Berthen 0698 0586
Best 0400
Bestar 0067 0586 0400
Bestar-Daewoo 0404
Binatone 0247
Black Diamond 0850 1067 0586
Black Strip 0065
0067 0586
0193
0850 0586 0139
0744 0745 0247
0400 0294 0516
0294
0586 0246 0636
0247 0138 0294
1406 0208 0728
0238 1226 0636
0067 0193 0698
0586 0247 0485
1067
0294
0225 0586 1535
0294 0404 0512
0691
0065 0745 0067
0448 0586 0636
0838
0404
1193 0783 0617
Blaupunkt 0225 0230 0357
Blauren 0404
Blue Sky 0067 1067 0586
Boots 0247 0039
Bork 1393
Bosch 0357
BPL 0067 0586 0926
Brandt 0139 0655 0365
Brandt
Electronique
Brinkmann 0067 0586 0698
Brionvega 0067 0586
Britannia 0246 0247
Brother 0294
Bruns 0516
BSR 0193
Bush 0039 1067 0067
Caihong 0039
Caishi 0921
Cameron 0586
Camper 0067 0586 0516
Capsonic 0294
Carad 0640 0067 0586
Carena 0485 0067 0586
Carrefour 0100 0067 0586
Carver 0200
Cascade 0039 0067 0586
Casio 0067 0586 0193
Cathay 0067 0586
CCE 0067 0247 0586
Celestial 0850
Centrex 0810 0921 0728
Centrum 1067
Centurion 0067 0586
CGE 0104 0448 0400
Changcheng 0039 0294 0404
Changfei 0039 0404
Changfeng 0294 0783
Changhai 0039
Changhong 0850 0039 0294
Chengdu 0039
Chimei 1535
Ching Tai 0039
Chun Yun 0039
Chunfeng 0039 0294
Chung Hsin 0138
Chunsun 0039
Cimline 0039
Citizen 0090
City 0039
Clarivox 0067 0448 0586
Clatronic 0067 0400 0744
Clayton 1067
CMS 0246
CMS hightec 0247
0485 0200
0698 0744 1179
0517 0745 0655
1939 0485 1221
0838 1393
0373 0590
0365
0448 0516
0744 0698 0404
0193 0728 0294
0517 0238 0247
0586 0808 1289
1278 0617
0698 1067
0193
0691
0538
0100
0294 0586 0247
0039 0636 1193
Cobolt 0921
Concorde 0039
Condor 0067 0400 0586
Conia 0784 0850
Conrac 0838
Conrad 0067 0586
Conrowa 0039 0294 0728
Contec 0039 0246 0294
Continental
Edison
Cosmel 0039 0067 0586
CPTEC 0655 1393
Crosley 0104 0193
Crown 0039 0742 0067
CS Electronics 0246
Curtis Mathes 0090 0123
Cytronix 1328
D.Boss 0067
Daewoo 0664 0691 0529
Dainichi 0246
Dansai 0067 0586 0294
Dantax 0400 0516 0744
Datsura 0238
Dawa 0039 0067 0586
Daytek 0728 0736 1406
Dayton 0039
Daytron 0039 0404 0067
Dayu 0404 0691
de Graaf 0238 0578 0193
DEC 0890 0921 0926
Decca 0067 0586 0247
Deitron 0067 0586 0404
Denko 0294
Denver 0067 0586 0636
Desmet 0067 0586 0039
Diamant 0067 0586
Diamond 0294 0728 0039
DiBoss 0067 0586
Digatron 0067 0586
Digihome 1179
Digiline 0067 0586 0135
DigiLogic 0067 0586
Digimate 0920
Digitex 0850
Digitor 0067 0586
DigiX 0910
DiK 0067 0586
Dixi 0039 0067 0586
DL 0921 0810 0067
0246 0039 0448
0193 0294
0783 1200
0067 0586
0139 0517
0400 0516 0586
0448 0517 0744
0636 0745 0238
0683 1067 0698
0404 1939 0067
0586 0039 0246
0247 1167 0208
0200 0910 0138
0906 0895 0728
0744 0736 0808
0065 0246 0039
0247 0238
1067 0636 0745
0294
0586
1167
1219 0617
0855 0246 0890
0850 0926 0736
0698
0247
0617 0895 1393
Domeos 0698 0067 1067
Domland 0424
Dongda 0039
Donghai 0039
Dream Vision 1734
DSE 0850 0728
DTS 0039
Dual 0247 0373 0067
Dual Tec 0247
Dumont 0100 0247
Dunai 0193
Durabrand 0067 0208 0586
Dux 0067 0586
D-Vision 0067 0586
DVX 0921
Dynatech 0247
Dynatron 0067 0586
e:max 0636
Easy Living 1278 1289 1247
Ecco 0803 0736 0728
ECE 0067 0586
Edison-Minerva 0517
Elbe 0640 0400 0193
Elcit 0193
Electrograph 1785
Elekta 0039 0067 0586
Elfunk 1238 1067
ELG 0067 0586
Elin 0067 0246 0578
Elite 0067 0586
Elta 0039 0294 0246
Emerson 0208 0744 0067
Enzer 0783 0803 0890
Erae 1401 1221
Erres 0067 0586
ESC 0067 0586 0247
Estèle 0193
Ether 0039
Etron 0039 0067 0586
Eurofeel 0294 0247
EuroLine 0067
Euroman 0246 0294 0067
Europa 0067 0586
Europhon 0067 0193 0247
Evesham 1278 1289
Excel 0067 0586
Excello 1067
Expert 0193
Exquisit 0067 0586
Fagor 0067 0586
FairTec 1221
Family Life 0067 0586
Feilang 0039
Feilu 0039
Feiyan 0294
Feiyue 0039
Fenner 0404 0039
0586 0382 0424
0193 1167 0661
1179 1067 0808
1193
1067
0907
0067 0586 0247
0294
0586 0135 0193
0039
0586 0100 1939
0516 0400 0193
0698
0850 0193
0586 0247 0400
0586 0246
56
Page 60

Ferguson 0067 0139 0655
Fidelity 0193 0246 0542
Filsai 0247
Finlandia 0238 0376 0578
Finlux 0067 0135 0100
Firstar 0039
Firstline 0039 0067 0586
Fisher 0247 0238 0400
Flint 0067 0485 0586
Force 1179
Formenti 0067 0193 0586
Formenti-Phoenix0246
Fortress 0123
Fraba 0067 0586 0400
Friac 0039 0067 0586
Frontech 0193 0294 0247
Fuchsware 0810
Fujimaro 0895
Fujitsu 0713 0883 0247
Fujitsu General 0039 0247 0193
Fujitsu Siemens 1328 1289 1278
Funai 0294 1067 0698
Furi 0294
Furichi 0890
Futronic 0294 0890 0728
Future 0067 0586
Gaba 1067 0067
Galaxi 0067 0586 0193
Galaxis 0400 0448 0067
Galeria 0039
Garza 0586
Gateway 1785
GBC 0193 0039 0404
GE 0373 0208 0123
Geant Casino 0193
GEC 0067 0193 0247
Geloso 0039 0193 0404
General 0139
General Electric 0373
General Technic 0039
Genesis 0039 0067 0586
Genexxa 0193 0067 0586
Gericom 0895 1328 1247
Gevalt 1401 1221
0365 0373 0590
0586 0065 0683
0138 0578 0473
1067
0067 0586 0294
0193 0373
0586 0744 0376
0247 0193 0745
0661 0522 0510
0503 0448 0636
0838 1278
0246 0247 0404
0698 0744 0193
1939 0238 1067
1221 0838 1393
1193 1401
0193
0640 0294
0516 0246
0400 0529 0640
0039
0193 0039 0382
0067 0586
1193 0838
1535 0744
0586
0590 0139 0365
0655
0586
0039
0910 0838
G-Hanz 1393
Giant 0247 0039
Go Video 0090
Goldfunk 0698
Goldhand 0246
GoldStar 0067 0039 0208
Gooding 0517
Goodmans 0664 0745 1289
Gorenje 0400
GP 0783
Gradiente 0683 0200 0067
Graetz 0744 0193 0067
Granada 0067 0586 0238
Grandin 0067 0586 0039
Gronic 0247 0193
Grundig 0225 0538 1401
Grunkel 1193
H&B 0838
Haaz 0736
Haier 0728 0294 0067
Haihong 0039
Haiyan 0294
Halifax 0294 0246 0247
Hallmark 0208
Hammerstein 0294 0090
Hampton 0246 0247
Hankook 0208
Hanseatic 0067 0586 0529
Hantarex 0039 0067 0586
Hantor 0067 0586
Harsper 0895
Harwa 0803 1226 1299
Harwood 0039 0067 0586
Hauppauge 0067 0586
Havermy 0123
HCM 0039 0067 0586
Hedzon 0586 0067
Hema 0247 0039
Hicon 1328
Hifivox 0139
Higashi 0246
0400 0407 0247
0586 0246 0193
0139 0636 0744
0745 0485
1067 1278 0067
0529 0586 0247
0744 0698 0373
1939 0404 1193
0294 0039 0517
0065 0510 0590
0365 0691 0910
0617 1406 1179
0586
0586 1193
0256 0247 0138
0503 0365 0590
0193 0373 0578
0193 0640 0744
0745 0698 0404
0485 1067 0895
1221 0910
1221 0067 0100
0473 0517 0586
0617 0736 1067
0039 0400 0208
1406 0373 1289
0538 0617 0926
0193 0691 0424
0664 0400 0039
0247 0407 0744
0838 0516 0655
0895
0517
0247 0448 0294
1226
Highline 0294 0067 0586
Hinari 0039 0238 0067
Hisawa 0485 0640 0744
Hisense 1393 0238 0039
Hitachi 1606 0039 0511
Hitachi Fujian 0138 0067 0586
Hitsu 0039 0640 0485
Höher 0744 0895 1193
Home Electronics 0636
Hongmei 0039 0123 0294
Hongyan 0294
Hornyphon 0067 0586
Hoshai 0485
Hua Tun 0039
Huafa 0039
Huanghaimei 0039
Huanghe 0039
Huanglong 0039
Huangshan 0039 0294
Huanyu 0246 0404 0294
Huaqiang 0294
Huari 0294
Hugoson 0920 1247
HYD 1406
Hygashi 0247 0246
Hyper 0039 0246 0247
Hypson 0067 0294 0586
Hyundai 0067 0890 0895
Iberia 0067 0586
ICE 0247 0294 0067
Ices 0246
Ict 0067 1167 0586
IISonic 1406
Iiyama 1247 0920
Imperial 0067 0104 0193
Imperial Crown 0039 0294 0404
Indiana 0067 0586
InFocus 0782 1194
Ingelen 0193 0517 0640
Ingersoll 0039
Inno Hit 0039 1067 0067
Innova 0067
Innovation 0067 0586
Innowert 0895 1328
Inotech 0803 0850
Interactive 0067 0586 0542
0586 0193 0473
0517 0294
0538 0783 0728
0921 0890 0810
1200 1238 0586
0608 0138 0774
1067 1511 0139
0193 1255 0664
0208 0503 0247
0373 0538 1193
0578 0529 1179
1200 0510 0067
0586 1167 0135
0522 0907
0890 0529
0744 0745 0247
0485 1067 0698
0516
0586 0728 0783
0294 1067 0906
0736 1406 0808
0039 0586 0246
0400 0448 0538
0586
0691
0744
0586 0247 1193
0357 0193 0400
0139
Interbuy 0039 0067 0294
Interfunk 0067 0193 0586
Internal 0067 0586 0529
International 0246
Intervision 0067 0247 0485
Ipure 1406
Irradio 0039 0067 0586
IRT 0728
Isukai 0067 0586 0485
ITC 0247
ITS 0067 0294 0246
ITT 0193 0510 0578
ITT Nokia 0578 0193 0503
ITV 0067 0294 0586
Jean 0039
JEC 0065
Jialicai 0039 0294
Jinfeng 0238 0256
Jinque 0039 0294
Jinta 0039 0294
Jinxing 0039 0294 0728
JMB 0067 0529 0664
JNC 0906 0926
Jocel 0742
JTV 0890
Jubilee 0586
Juhua 0294
JVC 0683 0761 0636
Kaige 0039 0294
Kaisui 0039 0246 0247
Kambrook 0407 0294
Kamp 0246
Kanghua 0926
Kangli 0039 0294 0404
Kangyi 0039 0294
Kapsch 0193
Karcher 0067 0586 0400
Kathrein 0586 0067 0910
Kawasho 0246
KB Aristocrat 0193
Kendo 0067 0640 0586
Kennedy 0193
Kennex 1067
Kenwood 0135
KIC 0247
Kingsbrook 1067
Kingsley 0246
Kioto 0586 0736
Kiton 0586 0067 0698
0542 0586
0542 0357 0400
0139 0230
0404 1939
0294 0407 0516
0400 0424 0517
0193 0039 0586
0744
0039 0586
0503 0376 0238
0640
0510 0376 0238
0636 0640 0661
0404
0067 0586
0404 0586 0473
0538 0713 0448
0123 0680
0067 0586 0485
0691
0640 0193 0294
0808 0744 0636
0193 0542 0400
0407 1067 0516
1179 1193 1167
KLL 0067
Kneissel 0067 0400 0640
Kobra 1328
Kolin 0138
Kolster 0067 0586
Kongque 0039 0294
Konichi 0039
Konka 0067 0586 0744
Kontakt 0517
Korpel 0067 0586
Korting 0400
Kosmos 0067 0586
Kotron 0294
Koyoda 0039
Kreisen 0906
KTV 0247
Kuaile 0039 0294
Kuba 0193
Kuba Electronic 0193
Kulun 0039
Kunlun 0238 0256 0294
Kyoshu 0448 0294
Kyoto 0193 0246 0247
L&S Electronic 0895 0744
LaSAT 0516 0400
Lavis 1067 0067 0193
Leader 0039
Lecson 0067 0586
Legend 0039
Lenco 0039 0067 0193
Lenoir 0039 1219 0920
Lenoxx 1219
Levis Austria 0067 0586
Lexsor 1226
Leyco 0067 0294 0586
LG 1179 0208 0067
Liesenkötter 0067 0357 0586
Lifetec 0067 0698 1067
Lloyd's 0039
Lodos 1067 1179
Loewe 0542 0663 0820
Logik 0728 0090 0803
Logix 0698
Longjiang 0294
Luma 0067 0193 0586
Lumatron 0067 0586 0193
Lumenio 0067
Lux May 0067 0039 0586
Luxor 1193 0510 0522
LXI 0208
0404 0529 0586
0448 0617 0784
0636
0404 0691
0404 0586 0617
1067
0586 0906 0744
1667 0674 0636
0090 0138 1295
0407 0039 0745
0247 0246 0193
0139 0728 1221
1167 0404 0039
0542 0586 0744
0294 0713 1278
1289
0586 0400
0039 0294 0910
1247 1067
0404 0039
0247 0294
0238 0578 0193
0376 0503 1067
0247 0661
Madison 0067 0586
Magnadyne 0193
Magnafon 0246
Magnavox 0067 0586 0736
Magnum 0744 0067 0586
Mandor 0294
Manesth 0067 0247 0586
Manhattan 0067 0906 0586
Maqma 1328
Marantz 0067 0586
Mark 0067 0586 0247
Mascom 0586 0067
Master's 0529 0067
Masuda 0039 0294 0067
Matsui 0039 0067 1193
Matsushita 0680
Matsuviama 0617
Maxam 0294
Maxdorf 0803 0728 0736
Maxent 1785
MCE 0039
Mediator 0067 0586
Medion 0698 0744 0838
MegaDrive 1289
Megas 0640
Megatron 0208
MEI 1067 0067 0586
Meile 0294
Melectronic 0039 0376 0067
Memorex 0039 1067 0208
Memphis 0039
Mercury 0067 0728 0039
Mermaid 0067
Merritt 0578 0193
Metronic 0655
Metz 1563 0776 0418
MGA 0208 0067 0586
Micromaxx 0067 0586 0698
Microstar 0838
MicroTEK 0850 0728 0890
Mikomi 1179 1193 0774
Minato 0067 0586
Minerva 0100 1278 0517
Minoka 0067 0586
0810 0783
0745 1319
0294 0065 0193
0698 1067 0193
0808
0246 0404 0039
0744 0745
0247 0586
0586 0517 0065
0473 0238 0247
0463 0485 0193
0225 0365 0744
1067 0910
0294
1067 0067 0586
0542 1167 0728
1278 1289 0661
0910 1319 1179
0542 0139 0373
0193 0135 0247
0404 0510 0522
0246 0586 0664
0225 0691 0744
0680 0090
0294 0586 0736
0090
0477 1193 0225
0067 0586 0617
0698 1067
1067 0838 0744
0736 0294
0225 0138
Mirai 1681
Mitsubishi 0138 0123 0542
Mitsuri General 0193
Mivar 0246 0639 0400
Monaco 0039
Moree 0067
Morgan's 0067 0586
Motorola 0123
MTC 0090 0400 0542
MTlogic 0744
Mudan 0039 0238 0256
Multitec 0067 0586 0516
Multitech 0039 0246 0516
Murphy 0246 0193
Musikland 0067 0586
MyCom 1406 0208
Myryad 0586 0067
NAD 0208 0895 0193
Naiko 0067 0636 0586
Nakimura 0404 0067 0586
Nanbao 0039 0294
Nansheng 0294
Naonis 0193
NAT 0256
National 0256 0238 0538
NEC 0200 0617 1200
Neckermann 0067 0400 0586
NEI 0067 0586 0193
NEO 0784
Neovia 0895 1401 0906
Netsat 0067 0586
Neufunk 0067 0039 0586
New Tech 0067 0039 0586
Newave 0039 0208 0123
Nicamagic 0246
Nikkai 0065 0067 0586
Nikkei 0744
Nikko 0208
Nintaus 0921
Nishi 0512
Nobliko 0100 0246
Nogamatic 0139
Nokia 0193 0503 0510
Nordic 0247
Nordmende 0139 0921 0373
Norfolk 0193
0208 0067 0586
0238 1067 1423
0247
0193 0246
0294
0698 1067
0247 0067 0400
0586 0294
0208 0039 0906
0485 0404 0247
0067 0586 0294
0538 1734 0529
0683 0691
1535 0230 0193
0357 0448 0247
0542
1067
1406 1221
0640 0744
0373 0247
0246 0247 0294
0039
0578 0636 0661
0522 0238 0404
0376 0640 0139
0590 0225 0067
0586 0365 0193
1289 1278 0744
1319 0473 1193
57
Page 61

TV (cont.)
Normerel 0067 0586
Novak 0067 0586
Novatronic 0067 0135 0404
Nurnberg 0193
NU-TEC 0485 0728 0850
O.K.Line 1067
Oceanic 0193 0238 0503
Odeon 0294
Okano 0400 0067 0586
OKI 1067
Olidata 1406
Omega 0294
Omni 0810 0921 0728
Onida 0683
Onn 1179 0586
Onwa 0632 0463
Opera 0067 0586 0744
Optimus 0680
Optonica 0123
Orava 1067
Orbit 0067 0586
Orion 0067 0473 0744
Orline 0067 0586
Ormond 0698 1067 0067
Osaki 0247 0294 0067
Osio 0067 0586
Osume 0067 0586
Otto Versand 1535 0067 0247
Pacific 0067 0586 1167
Pael 0246
Palladium 0400 0448 0067
Palsonic 0294 0803 0067
Panama 0039 0247 0294
Panasonic 0680 0256 0067
Panavision 0067 0586
Panda 0039 0238 0256
Papouw 0067 0586
Pathe Cinema 0193 0246 0400
Pathe Marconi 0139
Pausa 0039
Peng Sheng 0921
Penney 0208 0090
Perdio 0193 0067 0246
Perfekt 0067 0586
Philco 0104 0448 0067
0586
0067 0586 0736
0294
0578 0510
0294 0039
0586 0039 0294
0910 1226
0586
0404 0586
0373 0542 0123
0586 0225 0139
0256 0039
0744 1067 0473
0744 1167 1535
0230 0586 0357
0193 0247
0247 0407 0728
0586 0448 0808
1226 1299
0246 0067 0586
1340 0586 0193
0238 0538 0926
0883 0578 0138
0294 0538 0728
0810 0736 0921
0586
0193 0586 0400
0208 0511
Philex 0193
Philharmonic 0247
Philips 0067 0586 0802
Phocus 1319 0744
Phoenix 0067 0586 0400
Phonola 0067 0586 0246
Pilot 0586 0067 0742
Pioneer 1290 0790 0200
Pionier 0400 0516
Plantron 0067 0586 0294
Playsonic 0744 0067 0247
Polar 0067
Polaroid 0895
Policom 0139 0193 0100
Poppy 0039
Portland 0404 1939
Powerpoint 0517 0067 0586
Precision 0247
Premier 0039 0294 0921
President 0890
Prima 0039 0294 1299
Princess 0728
Prinston 1067
Profex 0039 0193
Profi 0039
Profitronic 0067 0586
Proline 0067 0586 0655
Prosonic 0067 0586 0400
Protech 0039 0067 0586
Proton 0208 0039 0674
Provision 0529 0067 0586
PVision 1221 0906
Pye 0067 0586 0404
Pymi 0039
Qingdao 0238 0256 0294
Quadro 0783 0586 0067
Quasar 0680 0895 0039
Quelle 0067 1535 0100
Radialva 0139 0193 0067
Radiola 0067 0586 0247
Radiomarelli 0067 0586
Radionette 0744
RadioShack 0067 0586 0208
Radiotone 0039 0067 0586
Rank 0100
0208 0138 0404
0373 0039 0230
0516 0193 0246
0736
0139 0193 0067
0586 0373 0516
0542
0039
0745
0104
0728
1226
0664 1406 1067
0404 0910 0698
1406 0744 0246
0247 0636 0745
1226
0247 0294 0448
0698 0193 0516
1067
1067 0744
1179 1193
0104 0139 0542
0247 0357 0135
0698 0586 0225
0230 0294 1067
0376 0039
0586
0400 0448 0698
0294 1067
Rank Arena 0632 0783
RBM 0100
RCA 0655 0090 0123
Realistic 0208
Recor 0067 0448 0586
Rectiligne 0067 0586
Rediffusion 0578 0376
Redstar 0067 0586
Reflex 0067 0586 1067
Relisys 0895 0906 0907
Reoc 0744 0664 1939
Revox 0067 0838 0586
Rex 0193 0294
RFT 0400 0294 0067
Rhapsody 0246
Ricoh 0067 0586
Rinex 0803 0448 0728
R-Line 0067 0586 0193
Roadstar 0039 1067 0745
Rodex 0067 0586
Rolsen 1401 1221 0067
Rover 0907
Rowa 0067 0294 0728
Royal 0448 0855 0636
Royal Lux 0400 0365
Rukopir 0586 0067
Saba 0139 0655 0193
Sagem 0640 0485 0860
Saige 0039
Saisho 0039 0664 0404
Saivod 0067 0586 1193
Sakaï 0193
Sakyno 0485
Salora 0193 0578 0238
Salsa 0365
Sampo 1785 0039 0123
Samsung 0674 0796 0090
Sandra 0246 0247
Sanjian 0294
Sansui 0067 0759 0586
Santon 0039
0208 0590 0365
0648 0373 0783
0855
0698
1328 1406
0400
0586 0516
0294 0736
0294 0448 0067
0586 0744 0698
1219
0586
0742 0247 0039
0246 0736 0617
0586
0590 0365 0373
0578 0680 0744
1343 0648
0294 0247 0193
0698 0742 1067
0510 0661 0808
1401
0208 0680
0648 0208 0617
0123 0039 0586
1279 0512 1265
0067 0294 0247
0400 0238 0256
0246 0193
0736 0632 0485
0783 1401 1221
0728 0294 0744
1278
Sanyo 0238 1238 0400
Sanyuan 0039 0123
Save 0067 0586
SBR 0067 0586
Schaub Lorenz 0578 0744 0636
Schneider 0067 1167 0586
Schöntech 1067
Scotch 0208
Scotland 0193
Scott 1219 0208
Sears 0208
Seaway 0664
Seelver 0586 1067 0067
SEG 1067 0247 0067
SEI 1535 0193 0067
Sei-Sinudyne 1535 0067 0586
Seitech 1247
Seleco 0193 0294 0376
Sencora 0039
Sentra 0065 0039
Serie Dorada 0208
Serino 0640 0485 0246
Shancha 0294
Shanghai 0039 0238 0256
Sharp 0123 1223 0039
Shen Ying 0039
Shencai 0039 0294
Sheng Chai 0039
Sheng Chia 0039 0123
Shenyang 0039 0294 0783
Sherwood 0039
Shintoshi 0067 0586
Shivaki 0067 0586 0473
Show 0448 0039 0728
Siarem 0193
Siemens 0067 0225 0230
Siera 0067 0586 0617
Siesta 0400
Silva 0067 0586 0246
Silva Schneider 0783
Silver 0485 0067 0586
SilverCrest 1067 0067 0586
Singer 0039 0728 0067
Sinotec 0803 0448 0636
Sinudyne 0193 1535 0067
Sky 0067 0910 0208
Skymaster 0135
0246 0247 0039
0538 0193 0067
0138 0586 0516
0200 0294 1067
1179 1193
0516 0404 1221
1393 1401 0906
0698 0424 0382
0373 0247 1067
0193 0744 1939
0100
0294 1193 0586
0698 0517 0039
0193 0664 0246
1939 1179
0586
0123
0294
1423 0680 0230
0404 0208
0294 0736 0067
0357 0586
0745 0193
0586 0365 0193
0728
0586 0636
0586 1406 0691
0895
Skysonic 0783
Skyworth 0067 0586 0039
Sliding 0895 0910
SLX 0698
Smaragd 0517
S-Media 1247
Soemtron 0895 1328
Sogo 1406
Solavox 0193 0578 0067
Songba 0039
Sonic 0783
Soniko 0067 0586
Soniq 1328
Sonitron 0238 0400 0247
Sonneclair 0067 0586
Sonoko 0039 0067 0586
Sonolor 0193 0238 1535
Sontec 0067 0586 0400
Sony 1535 1681 0680
Sound & Vision 0404 0067 0586
Soundesign 0208
Soundwave 0067 0448 0586
Sowa 0090 0256 0208
Soyea 0803
Spectra 0039
Ssangyong 0039
Staksonic 0039
Standard 0039 0067 0247
Starion 1067
Starlite 0039 0193 0067
Stern 0193 0294
Strato 0067 0586 0294
Strong 1193 1179 1067
Stylandia 0247
Sungoo 1278
Sunic Line 0067 0586
Sunkai 0485 0640 0067
Sunny 0067
Sunstar 0067 0586 0039
Sunwatt 0485
Sunwood 0067 0586 0039
Super 1219
Superla 0246 0247
SuperScan 0123
Supersonic 0039 0238 0586
SuperTech 0039 0246 0067
Supervision 0728 0294
Supra 0208 0404 0039
Susumu 0365
Sutron 0039
SVA 0617 0728 0294
Svasa 0728 0238 0736
Swisstec 0910 1406 0895
0294 0728 0783
0855
0586
0294 0247
0578
0039
1781 0383
0745
0586 1067 0404
0586 0294
0039
0067 0586
0586 0517 0895
0294
0728 0294 0485
0067
0586
0067
0485 0895 0238
0736
0294
Sydney 0246 0247
Synco 0090 0123 0208
Sysline 0067 0586
Sytong 0246
T+A 0477
Tacico 0208 0039
Tai Yi 0039
Taishan 0039 0404
Tandberg 0139 0193
Tandy 0123 0247 0193
Targa 1401 1221 0648
Tashiko 0247 0680 0200
Tatung 0039 0067 1278
TCL 0655 0728 0736
TCM 0744 1319 0838
Teac 0039 0728 0067
TEC 0247 0039 0365
Tech Line 0067 0586 0698
Tech Lux 1219
Technics 0680
TechniSat 0067 0586 0193
Technisson 0744 1319
Techno 1067
Technol Ace 0728 0294 0664
Technosonic 0067 0586 0529
Techwood 1193 1067
Teckton 1406
Tecnimagen 0586
Teco 1343 0039 0123
Tedelex 0247 0728 0736
Teiron 0039
Tek 0850 0067 0728
Teknika 0090
TELE System 0906
Teleavia 0139 0373
Telecor 0067 0586 0193
Telefunken 0655 0590 0104
Telefusion 0067 0586
Telegazi 0067 0193 0294
Telemeister 0067 0586
Telesonic 0067 0586
Telestar 0039 0067 0586
Teletech 0039 0067 0586
Teleton 0247 0193
Televideon 0193 0246
Teleview 0067 0586
Tempest 0039 0067 0586
0246 0193
0090 0586 0247
1401 1289 1221
0294 1067 0586
0448 0542 0742
0485 0698 0247
0736 1939 0208
0200 0744 1179
1785 1393 0617
0067 0586 0193
1193
0404 0246
0910
0208 0294 0683
0636 0448 0067
0039 0238 0921
0617 0586 0294
0039
0247 0424
0139 0617 0728
0365 0373 0742
0850 0926 0784
0810 0921 0783
0736 0067 0586
0516 0744 0376
0586
0698 1067
0294
Tennessee 0067 0586
Tensai 0067 0586 0247
Tenson 0039
Tesla 1067 0067 0698
Tevion 1328 1278 1289
Texet 0246 0247 0404
Thomson 0590 0655 0373
Thorn 0065 0138 0139
Thorn-Ferguson 0138 0373 0139
Tiane 0123
Tiny 1226 1299
TMK 0208
Tobo 0039 0294
Toka 0067 0586 0698
Tokaido 1067
Tokyo 0246 0065
Tongguang 0294
Tongtel 0810 0617
Top Show 0728 0803 0448
Topline 1067 0698
Toshiba 1538 0538 0680
Towada 0247
Toyoda 0039 0294
Trakton 0039 0294 0247
TRANS-
continents
Transonic 0067 0728 0742
Transtec 0246
Triad 0067 0586 0039
Trident 0247
Trio 1278
Tristar 0294
Triumph 0376 0586 0067
Tuntex 0039
TVTEXT 95 0586
Uher 0067 0586 0404
Ultravox 0404 0246 0193
Unic Line 0067 0586 0503
United 0744 0067 0745
Universal 0744 0067 0586
0039 0135 0404
0407 0745 0193
1067
0744 0745 1167
0855 0783 0586
0640
0067 0586 0838
0895 0698 1167
0744 1067 1319
0039
0139 0783 0365
0067 0586 0246
0067 0104 0373
1535 0529 0542
0586 0365 0404
0100
0365 0529 0065
0193 0247 0404
0039 1067
0039 0294 0736
0090 0039 0065
1734 1194 1319
1295 0744 0100
0123 0294 0648
0674 0247 0139
0225 0728 0067
1067
0698 1067 0895
0586 0067 0516
0247
0586 0485 0617
0542 0294 0448
0039 1393 0810
0448 0516 0400
0510
0067 0586
0485
0586 1067 0617
58
Page 62

Universum 0838 1067 0067
Univox 0067 0586 0193
Utax 0193
V7 Videoseven 1785 0208 0910
Vanguard 0067 0586
Vestel 0067 1067 1193
Vexa 0039 0067 0586
Victor 0683 0680
Videocon 0538
Videologic 0246
Videologique 0246 0247
VideoSystem 0067 0586
Videotechnic 0246 0247 0404
Videoton 0193
Vidtech 0208
Viewpia 0906
ViewSonic 1785
Visiola 0246
Vision 0067 0294 0586
Vistron 1393
Vivax 0067
Vortec 0067 0586
Voxson 0193 0208 0067
Walker 1179
Waltham 0247 0448 0067
Wards 0208
Warumaia 0404 0691 0664
Watson 0067 1067 1278
Watt Radio 0193 0246 0516
Wega 0067 0586
Wegavox 0039 0067 0586
Weipai 0039
Welltech 0744
Weltblick 0067 0586 0247
Weltstar 1067
Westinghouse 0920
Weston 0067 0586
Wharfedale 0067 0926 0921
White
Westinghouse
Wilson 0586
Windsor 0698 1067
Windy Sam 0586
Wintel 0744
World-of-Vision 0910 0920 0895
Worldview 0485
XDome 0538
Xenius 0664 0691
Xiahua 0039 0294 0728
0104 1193 0294
0376 0400 0698
0135 0510 0225
0503 1179 0542
0522 0230 0448
0100 0193 0586
0357 1535 0247
0139 0661 0039
0200 0648
1406 1247 0648
1681 1535
0698 0193 0247
0586
0247
0586 0448
0586 0698 0139
1067 0193 0473
1289 0586 0193
0039 0698 0424
1406 0357
0890 0586 0728
0736
0067 0246 0586
1939
1319 1328 0907
1247
0803
Xianghai 0039
Xiangyang 0294
Xiangyu 0039
Xihu 0294
Xingfu 0039
Xinghai 0294
Xingyu 0039
XLogic 0728 0890
Xoro 1226 1247
Xrypton 0067 0586
X-View 1221
Yamaha 0680 1606
Yamishi 0485 0067 0586
Yingge 0039
Yokan 0067 0586
Yoko 0067 0247 0294
Yonggu 0039
Yoshita 0855
Yousida 0039
Yuhang 0039
YU-MA-TU 0067
Zaapa 1219
Zanussi 0247
Zenith 1939 0208 1295
Zhuhai 0039 0404
Zonda 0728
0247
0586 0039 0400
0246
VCR
Accent 0102
Adyson 0102
Aim 0308 0672 0378
Aiwa 0030 0378 0382
Akai 0030 0067 0136
Akashi 0102
Akiba 0102
Akura 0102
Alba 0308 0102 0382
Allorgan 0270
Allstar 0111
Amstrad 0030 0308 0102
Anitech 0102
Ansonic 0030
Aristona 0111
ASA 0067 0111
Asuka 0102 0067 0111
Audiosonic 0308
AVP 0382 0030
AWA 0067 0308 0672
Baird 0136 0308 0134
Basic Line 0308 0102 0134
Beko 0134
Bestar 0308
Black Diamond 0672 0308
Black Panther 0308
Blaupunkt 1592 0256 0111
Blue Sky 0067 0378 0102
Bondstec 0102
Brandt 0350
Brinkmann 0378
Broksonic 0378 0772 0382
Bush 0102 0308 0345
Carena 0111
Carrefour 0075
Casio 0030
Cathay 0308
CGE 0030
Cimline 0102
CineVision 1167
Clatronic 0102 0030
Combitech 0382
Condor 0308
Crown 0067 0308 0510
Cyrus 0111
Daewoo 0308 0672 1167
Dansai 0102 0308
Dantax 0382 0772
Daytron 0308
de Graaf 0072 0196 0111
Decca 0030 0111 0097
Deitron 0308
0067 0772 1167
0062
0345 0672 0382
0270 0378
0030 0345 0378
0111
0030
0073
0030
0382 0308 0030
0510 0672 1167
0772
0382 0030 0378
0111 0672 0772
0102
0667 0378 0382
0075
0134 0078
0378 0382
Denko 0102
Denon 0072
Diamant 0067
Diamond 0308
Digitor 0672
DSE 0672
Dual 0111 0308 0030
Dumont 0030 0111 0134
Durabrand 0672
Elbe 0308
Elcatech 0102
Elin 0270
Elsay 0102
Elta 0102 0308
Emerson 0102 0075 0030
ESC 0308 0270
EuroLine 0378
Ferguson 0350 0030 0308
Fidelity 0030 0102 0270
Finlandia 0134 0111 0072
Finlux 0030 0111 0134
Firstline 0102 0378 0073
Fisher 0134
Flint 0378
Frontech 0102
Fujitsu 0030
Fujitsu General 0067
Funai 0030
Galaxi 0030
Galaxis 0308
GE 0350
GEC 0111
General Technic 0378
Genexxa 0134
Go Video 1167
Goldhand 0102
GoldStar 0067 0510 0030
Goodmans 0030 0102 0270
GPX 0067
Graetz 0134 0270
Granada 0134 0078 0111
Grandin 0102 0067 0030
Grundig 0377 0111 0256
Haaz 0378
Hanimex 0382
Hanseatic 0067 0308 0111
Harwood 0102
HCM 0102
Hinari 0102 0382 0308
Hisawa 0382
Hischito 0075
Hitachi 0072 0196 0030
Höher 0308 0672
Hornyphon 0111
0378
1167
0378 0772
0462 0382
0196 0030 0078
0067 0073 0136
0256
0072
0067 0075 0072
0308 1167
0308 0067 0111
0378 0667 0382
0672
0270 0067 0256
0072 0030
0308
0350 0378 0102
0382 0772
0270
0270 0111 0134
Hypson 0102 0378 0308
Imperial 0030 0270
Ingersoll 0270
Inno Hit 0270 0308 0102
Interbuy 0067 0102
Interfunk 0111 0134
Internal 0308 0667
International 0308 0067
Intervision 0030 0308 0067
Irradio 0102 0067 0111
ITT 0136 0134 0270
ITT Nokia 0078
ITV 0308 0067
JMB 0382 0378
Joyce 0030
JVC 0097
Kaisui 0102
Kambrook 0067
Karcher 0308
Kendo 0136 0345 0378
KIC 0030
Kneissel 0382 0378 0067
Kolster 0378
Korpel 0102
Kyoto 0102
Lenco 0308
Leyco 0102
LG 0067 0510 0030
Lifetec 0378
Loewe 0111 1592 0256
Logik 0270 0102 0136
Lumatron 0308
Lux May 0102
Luxor 0136 0073 0102
Magnavox 0111 0672
Magnum 0672
Manesth 0102 0075 0111
Marantz 0111
Mark 0308 0030
Mascom 0672
Mastec 0672
Master's 0308
Matsui 0378 0067 0270
Maxton 0111
Mediator 0111
Medion 0378 0382
Melectronic 0030 0067
Memorex 0134 0030 0067
Memphis 0102
Metronic 0111
Metz 1592 0377 0866
Micormay 0378
Micromaxx 0378
Migros 0030
Mitsubishi 0073 0097 0111
Multitec 0067
Multitech 0030 0102 0134
Murphy 0030
Myryad 0111
0382 0030 0067
0510
0378
1167
0102 0067 0308
0308
0308 1167
0067
0134 0078 0345
0382 0030 0772
0078 0378
0111 0256 0067
0510 0030 0672
NAD 0134
Naiko 0672 0378
National 1592 0256
NEC 0097 0070 0134
Neckermann 0111
Nesco 0102 0030 0382
Neufunk 0067
Nikkai 0102 0308
Nokia 0134 0136 0345
Nordmende 0350 0097 0672
NU-TEC 0378
Oceanic 0030 0350 0078
Okano 0345 0378 0102
Onimax 0672
Orbit 0102
Orion 0378 0382 0772
Orson 0030
Osaki 0030 0067 0102
Osume 0102
Otto Versand 0111
Pace 0382
Pacific 0030
Palladium 0102 0345 0067
Palsonic 0102 0030 0672
Panasonic 1592 0256 0866
Pathe Cinema 0073
Perdio 0030
Philco 0102
Philips 0111
Phoenix 0308
Phonola 0111
Pioneer 0097 0111 0072
Portland 0308 0667
Prinz 0030
Profitronic 0111 0270
Proline 0030 0308 0350
Prosco 0308
Prosonic 0308 0030
Protech 0111 0308
Provision 0308
Pye 0111 0030
Quasar 0308
Quelle 0111
Radialva 0067 0102 0111
Radiola 0111
Radionette 1167 0067
RCA 0136 0350
Reoc 0378 0667 0308
RFT 0102
Roadstar 0270 0102 0067
Royal 0102
Saba 0350 0308
Saisho 0378
Salora 0073 0136 0134
Samsung 0270 0462
Sansui 0097 0136 0102
Sanyo 0134 0270 0078
Saville 0382 0308 0270
SBR 0111
ScanSonic 0270
0067 0308 1167
0308 0270 0078
0072 0111
0136 0111 0134
0308
0270 0378 0462
0672
0078
0308 0772 0111
0378
0097 0378
Schaub Lorenz 0134 0030 0136
Schneider 0102 0030 0067
Seaway 0308
SEG 0308 0102 0270
SEI 0111
Sei-Sinudyne 0111
Seleco 0067
Semp 0075
Sentra 0102
Setron 0102
Sharp 0078 0067 0599
Shintom 0102 0134
Shivaki 0067
Siemens 0067 0134 0111
Siera 0111
Silva 0067
Silver 0308
SilverCrest 0672
Singer 0378 0075
Sinudyne 0111 0382
Skantic 0378
Smaragd 0378
Sonneclair 0102
Sonoko 0308
Sonolor 0078
Sontec 0067 0308
Sonwa 0672
Sony 0062 0136
Soundwave 0067 0378
Ssangyong 0102
Standard 0308
Starlite 0067 0134
Stern 0308
Sunkai 0378 0308
Sunstar 0030
Suntronic 0030
Sunwood 0102
Supra 0067 0270 0378
Symphonic 0030 0102
T+A 1592 0256
Tandberg 0308
Tashiko 0030 0078 0270
Tatung 0030 0111 0078
Tchibo 0378
TCM 0378
Teac 0102 0030 0308
TEC 0308 0102
Tech Line 0102
Technics 0256
TechniSat 0378
Tedelex 0067 0378 0672
Telefunken 0672 0350 0030
Telestar 0067
Teletech 0102 0308 0030
Tenosal 0102
Tensai 0030 0067 0102
Tesla 0111
Tevion 0378 0672
Texet 0308
0345
0111 0308 0270
1167 0072 0382
0672
0672 0111 0667
0350 0377
0308
0111 0067
0073 0378 0382
0672 0067 0111
0667
0308
0308
59
Page 63

VCR (cont.)
Thomson 0350 0097 0308
Thorn 0134 0067
Thorn-Ferguson 0350
Tokai 0102 0067 0134
Tokiwa 0102
Topline 0378
Toshiba 0075 0073 0111
Towada 0102
Tradex 0111
Tredex 0308
Triad 0308
Uher 0067 0270
Ultravox 0308
Unitech 0270
United 0378 0772
Universum 0030 0111 0270
Victor 0097
Video Technic 0030
Watson 0111 0382 0308
Weltblick 0067
Wharfedale 0672
White
Westinghouse
World 0378
Yamishi 0102 0308
Yokan 0102
Yoko 0067 0102 0270
Yoshita 0102
Zenith 0667 1167
ZX 0378 0382
Stern 0308
STS 0072
Sunkai 0378 0308
Sunstar 0030
Suntronic 0030
Sunwood 0102
Supra 0067 0270 0378
Sylvania 0030 0073 0111
Symphonic 0030 0102
T+A 0256
Tandberg 0308
Tandy 0030 0134
Tashiko 0030 0078 0270
Tatung 0030 0111 0078
Tchibo 0378
TCM 0378
Teac 0102 0030 0308
TEC 0308 0102
Tech Line 0102
Technics 0256
TechniSat 0378
Tedelex 0067 0378 0672
Teknika 0030 0067
Telefunken 0672 0350 0308
Telestar 0067
Teletech 0102 0308 0030
Tenosal 0102
Tensai 0030 0067 0102
Tevion 0378 0672
Texet 0308
0772 0382
0067 0136 0378
0134
0672
0102
0308
0111 0067
0073 0378 0382
0672 0067 0111
0667
0308
Thomas 0030
Thomson 0350 0097 0308
Thorn 0134 0067
Thorn-Ferguson 0350
TMK 0270
Tokai 0102 0067 0134
Tokiwa 0102
Topline 0378
Toshiba 0073 0075 0111
Totevision 0067 0270
Towada 0102
Tradex 0111
Tredex 0308
Triad 0308
Uher 0067 0270
Ultravox 0308
Unitech 0270
United 0378 0772
United Quick Star0308
Universum 0030 0111 0270
Vector 0075
Vector Research 0070
Victor 0097
Video Concepts 0070 0075
Video Technic 0030
Videosonic 0270
Wards 0030 0072 0078
Watson 0111 0382 0308
Weltblick 0067
Wharfedale 0672
White
Westinghouse
World 0378
XR-1000 0030 0102
Yamishi 0102 0308
Yokan 0102
Yoko 0067 0102 0270
Yoshita 0102
Zenith 0030 0667 1167
ZX 0378 0382
0772 0382
0067 0136 0378
0134
0102 0111 0270
0672
0102 0308
VIDAC
Elonex 1302
Fujitsu Siemens 1302
Gateway 1302
Hewlett Packard 1302
hFX 1302
Microsoft 1302
Pinnacle Systems 1477
Ricavision 1302
Sony 1302
Trust 1302
Via Technologies 1302
XBox 1302
CBL
@Home 1696
ADB 1260 1299
Alice 1654
Amstrad 1252
Auna 1299 1260
Austar 0306
Cablecom 1612
Canal Plus 0473
Com Hem 1696 0847
Comcrypt 0473
Daeryung 0507
Fastweb 1660
Filmnet 0473
Foxtel 1252
France Telecom 0847 1764
freebox 1512
Funai 0049
General
Instrument
Jerrold 0306
KabelBW 1090
Macab 0847
Madritel 1260
MNet 0473 0049
Motorola 0306 1136 1513
Multichoice 0049 0473
Nokia 1599
Noos 0847 1654
NTL 1090 1098
Numericable 0847
Oak 0049
Ono 1098 0306
Optus 0306 1090
Orange 0847 1764
Pace 1098 1607 1090
Philips 0847 1612
Premiere 1607
Sagem 0847 1654
Samsung 1090 1696
Scientific Atlanta 0507
SKY Deutschland1607
StarHub 0306
Tele Danmark 0847
Tele+1 0473
Telepiu 0473
Telewest 1098 1090
Telsey 1660
Thomson 1612 1764
Trans PX 0306
UPC 1612
US Electronics 0306
Virgin Media 1090 1098
Visiopass 0847
YouSee 0847
Ziggo 1599 1696
0306
CD
Advantage 0062
AH! 0187
Aiwa 0187
Arcam 0187
Atoll
Electronique
Audio Research 0187
Audiolab 0187
Audiomeca 0187
Audioton 0187
Balanced Audio
Technology
Cairn 0187
California Audio
Labs
Cambridge
Audio
Carver 0187
Copland 0423
Cyrus 0187
Denon 0033 0796 0656
DKK 0030
Dual 0033
Dynaco 0187
Elektra 0423
Garrard 0423
Genexxa 0030 0062
Goldmund 0187
Grundig 0187
Harman/Kardon 0187
Hitachi 0062
JVC 0102
Kenwood 0220 0656 0066
Krell 0187
Linn 0187
Loewe 0187
Magnavox 0187
Marantz 0187 0656 0059
Matsui 0187
MCS 0059
Memorex 0062
Meridian 0187
Micromega 0187
Mission 0187
Musical Fidelity 0423
Myryad 0187
NAD 0751 0030
Naim 0187
NSM 0187
Onkyo 0131
Optimus 0030 0062
Orion 0423
Panasonic 0333 0059
Philips 0187 0656
Pioneer 0062
Primare 0187
Proton 0187
QED 0187
Quad 0187
Quasar 0059
Radiola 0187
Restek 0187
Revox 0187
Rotel 0187
SAE 0187
Sansui 0187
Siemens 0187
Simaudio 0187
Sony 0030 0520 0187
0187
0187
0059 0333
0187
Tag McLaren 0187
Tandy 0062
Teac 0423
Technics 0333 0059
Thorens 0187
Thule Audio 0187
Traxdata 0656
Universum 0187
Victor 0102
Wards 0187
Yamaha 0066 0520 0062
TUNER
AEG 1420 1419
AFK 1419
Aim 1420
Aiwa 0151 0219 1088
Akai 0639 1250 1420
All-Tel 1420
Amstrad 1420
Anam 0639
Arcam 0219 1119 1219
ASCOMTEC 1419
Audiolab 1119 1219 1299
Audiosonic 1419
Audiovox 1420
Audioworld 1420
Balanced Audio
Technology
Bang & Olufsen 0829
Basic Line 1584
Belson 1419
Blue Sky 1420
Bonnec 1219
Bose 1259 1385
Bush 1119 1219 1299
Cairn 0219
Cambridge Audio 1219 0219
Carver 0219 1119 1219
CCE 1382
Centrum 1250 1584 1419
Classic 1382
Clatronic 1250
Copland 1119 1219 1299
Denon 1390 1134
Denver 1419
Diamond 1420
DK digital 1450
DMTECH 1420
Dual 1250 1420 1450
Electrocompaniet 1219
Elta 1420
Fisher 1831
Genexxa 0216
1188 1288 1652
1752
1299 1319
1319 0219
1119 1219 1299
1319 0219
1319
1319
Goldmund 0219 1119 1219
Goodmans 0639 1229 1450
Grundig 1119 1219 1299
Hanseatic 1420
Harman/Kardon 1334 1119 1219
HCM 1420
HE 1419
Hitachi 1831 1250 1584
Hiteker 1419
Home Tech
Industries
Integra 0165 1350
JVC 0104 1404 1525
Kenwood 1343 1057 1599
KLH 1420
KXD 1419
Lenoxx 1419 1641
Lenoxx Sound 1641
LG 1323
Linn 0219 1119 1219
Loewe 1119 1219 1299
Magnavox 0219 1119 1219
Magnum 1641
Marantz 1119 1219 1299
Mark 1119 1219 1299
MBO 1382
Medion 1450
MEI 1420
Melectronic 0639
Meridian 1119 1219 1299
Metz 1584
Micromaxx 1450
Micromega 1119 1219 1299
Mustek 1382
Myryad 1219 1119 1299
NAD 0350 0639
Naim 1119 1219 1299
Nexius 1420
Nikkai 1419
Nikko 0639
Norcent 1419
Okano 0639
Onkyo 1350 0165
Optimus 0216 1053
Orava 1419
Palladium 1250
Panasonic 1809 1548 1338
Paramount Pictures1250
Philips 1219 1299 1119
Pioneer 1053 0216 1119
Polk Audio 1319
Proceed 1219
Proline 1420
Proson 0639
Provision 1419
1299 1319
1641 1419
1319 0219
1299 1319 0219
1229
1419
0216 1323
1299 1319
1319 0219
1299
1319 0219
1319
1319
1319 0219
1319 0219
1319
1793 1795 1339
1319 0219
1219 1299 1319
1489
QONIX 1450
Quad 1119 1219 1299
Radiola 1119 1219 1299
Radionette 1664 1323
RCA 1184 1420 1489
Red Star 1419
Restek 0219
Revox 1119 1219 1299
Revoy 1119 1219 1299
Roadstar 1641
Rotel 0823
Saba 1184
Samsung 1325 1229
Sansui 0219 1119 0639
Sanyo 1831
Schneider 1420 1229 1250
SEG 1584
Sharp 0216 1664 1644
Sherwood 0683
Siemens 0639
Silva Schneider 1323
Sony 1188 1888 1789
Soundwave 0639
Sunfire 1343
Sunstech 1450
Tag McLaren 1219
Targa 1323
Teac 1229 0639 1420
Technics 1793 1548 1809
Techwood 0639 1584
Telefunken 1420 1419
Tevion 1641
Thomson 1184 1384
Thorens 1219 1119 1299
Toshiba 1602
United 1420
Universum 1250 1420 0639
Venturer 1420
Victor 0104
Voxson 1450
Waitec 1382
Wards 0219
Wharfedale 0639 1420
Xenon 1419
Yamaha 0206 1361 1306
Yukai 1382
1319
1319 0219
1319 0219 0216
1319
1688 1088 1288
1752 1652 1142
1339 1338 1795
1319 0219
1119 1219 1299
1319 0219
0742 0216
60
Page 64

DVD
3 Plus 0520
3D LAB 0569
4Kus 1188
Acoustic Solutions 0760 0743 1258
AEG 0818 0800 0820
AFK 1258 1182 1081
AG Electronics 1258
Aim 0808 1195 0702
Airis 1254 1351 0702
Aiwa 0725 0899 0563
Akai 0820 0809 0818
Akashi 0868
AKI 1035
Akira 0808 1351
Akura 1201 0928 1081
Alba 0747 0743 0753
Alize 1181
All-Tel 0820 1481 0865
Amitech 0800 0880
Amoi 0882
Amoisonic 0865
Amstrad 0743 1145 1181
AMW 0902
Ansonic 0789 0861
Apex Digital 0702 0747 1034
Arena 0882 1145
Aristona 0569 0676
Art Mito 1451
Asono 1254
ATACOM 1254
A-Trend 0744
Audiovox 0820 0747
Audioworld 0820
Audix 1134 1182 0743
Autovox 0743
Auvio 0873
Avious 1195
AWA 0760 0902
Axion 0760
Base 1481
Basic Line 0743
Baze 1195 0928 0702
BBK 0892 1254
Bel Canto Design 1601
Bellagio 0902 1034
Best Buy 0887
Biostek 1035
Black Diamond 0743 0863
Blaupunkt 0747
Blu:sens 1263 1351
Blue Parade 0601
Blue Sky 0743 0725 0702
BNI 1351
Boghe 1034
Boman 0818 0928 1035
Brainwave 0800 1145
1263 0705
0820
1035 1375 1137
0800 0725 1145
0928 0705 0746
0743 0882 0735
1725 1263
1170
0725 0760 0569
0702 1170 1081
1560 1725
1601 0820 0800
0873 0808 0681
0820
Brandt 0681 0581 0533
Broksonic 0725 1449
Bush 0743 0725 0863
Cambridge Audio 1139 0781
Campomatic
Digital
CAT 0819
Celestial 0702
cello 1760
Centrex 0702 1034
Centrum 0743 0819 0809
CGV 0800 0781
Cinea 0871
Cineral 0760
Cinetec 0743 0902
CineVision 0899 0863
Classic 0760 1760
Clatronic 0818 0809 0848
Clayton 0743
Coby 0808 1137 1195
Codex 1263
Compacks 1137
Conia 0702 0882 0546
Contel 0818
Continental
Edison
Craig 0861
Crown 0800 0681
Crypto 1258
C-Tech 0798 1182
Cybercom 0861
CyberHome 0744 0846
Cytron 0746 0681 0735
Daenyx 0902
Daewoo 0863 0899 1513
Dalton 1066
Dansai 0800 1145 1725
Dantax 0753 0725 0743
Daytek 0902 1035
Dayton 0902
DCE 0861
DEC 0808 0848
Decca 0800
Denon 0520 0664 1664
Denver 0808 0818 0928
Denzel 0695
Diamond 0681 0798 0808
Digihome 0743
DigiLogic 0743
digiRED 0747
Digitor 1035 0681
Digitrex 0702 1034
DiK 0861
Dimarson 1263
Dinamic 0818
Disney 1253 0861
1725 0760 0861
0747 0808 0546
0848 0753 1195
1466 1449 1513
1170 1560
1081
1035 0705
0702 1195 0705
1263
0760 0882
0865 1351
0902 0861
0861 1377
0735 0800 0744
1466 0902 0808
0848 1137 1351
0702
0781 0753 0820
1182 0800 1145
DiViDo 0735
DK digital 0861
DMTECH 0820 1301
Dragon 0861
DSE 1760 0863 1182
Dual 0861 0743 0695
Durabrand 0861 0705 0743
D-Vision 1145
DVX 0798 1182
e:max 1263 1351 0800
EagleTec 0744
eBench 1182
E-Boda 0753
Eclipse 0753 0781
E-Dem 1254
Electrohome 0800
Elenberg 1258
Elfunk 0880 0743 0793
Elin 0800
Ellion 0880 1451
Elta 0800 0818 0820
Eltax 1351
Emerson 0621 0735 0899
Enterprise 0621
Enzer 0695 1258 1035
EuroLine 0818 1145 1263
Ferguson 0681 1760 0928
Finlux 0771 0800 0621
Fintec 0743 1560
Firstline 0899 0681 1560
Fisher 0700
Funai 0725 0705
Futronic 1035
Gateway 1188
GE 0747
General Electric 0747
Germatic 1081
Global Link 1254
Global Solutions 0798 1182
Global Sphère 0798 1182
Go Video 0774 1188 0899
GoldStar 0621 0771
Goodmans 0743 1034 0753
GP Audio 1170
GPX 0771
Gradiente 0681
Graetz 0695
Gran Prix 0861 0928
Grandin 0746 0702 0743
Greenhill 0747
Grundig 0725 0805 0569
Grunkel 0800 0861
H&B 0848 0743 0871
0705
0681 0760 0809
0820 1466 1560
1145
1560
1145 1181 1263
1081
0705
0800
0705
0743 1725
0702 0781 1195
0863
0781 0760 0681
0820 0848 0863
1170 1760 1560
0681 0735 0820
0743 0700 0753
1725 1034 0581
1760 1466 1513
0880 1263 1451
Haaz 0798 0781
Haier 0873
Hanseatic 0771 0820 1301
Harman/Kardon 0732
HCM 0818
HDT 0735 1227
HE 0760
Hello Kitty 0861
Henß 0743
Hicon 0702
HiMAX 0887 0873
Hitachi 0694 0809 0695
Hiteker 0702
Höher 0861 1034 1254
Home Electronics 0760 0800
Home Tech
Industries
HYD 1263
Hyundai 0880 1258 0818
ICP 1182
Iekei 1137
Ingelen 0818
Inno Hit 0743
Insignia 0705
Integra 0657
Irradio 0771 1145 1254
ISP 0725
it's 0747
ITT 1263
Jamo 1066
Jaton 0695
JBL 0732
JDB 0760
JDV 1258
Jeken 0808
Jepssen 1213
JGC 1560
JMB 0725
JNC 1301
JVC 0653 0588 1194
jWIN 1081
Kansai 1137
Kansas
Technologies
Kendo 0743 0861 0702
Kennex 0800 0743 0928
Kenwood 0564 0520 1936
KeyPlug 0800
Kiiro 0800
King D'Home 0863
Kingavon 0848
Kiss 0871 0695
KLH 0820
KLH Digital 0747
Koda 0848
Koss 0681
Kreisen 1451
KXD 0887 1137 1351
Lawson 0735 0746 0798
Leiker 0902
Lenco 0681 0800 0808
Lenoir 1258
0603 0887 0743
0743 1560
1254
0798 1451 1560
1182 0863
1263 0899 0800
0569 0533 0897
1263 1560
1377 1725
1182
0848 0743 0861
1195
Lenoxx 0868 1035
Lexia 1182 0798
LG 0771 0621 1936
Lifetec 0681 0861 1377
Limit 0746 1182 0798
LiteOn 1188
Lodos 0743
Loewe 0569 0771
Logic3 0802
LogicLab 0798 1182
Logik 0743
Logix 0735
Lumatron 0735 1145 0771
Luxman 0603
Luxor 1034 0743 1760
Magnavox 0533 0705 0848
Magnex 0753 1195
Magnum 1466 1412
Majestic 1137 1375
Manhattan 0735 0743
Marantz 0569
Mark 0743 0725 1725
Marquant 0800 1481
Mastec 1036
Matsui 0681 0743 0702
Maxdorf 0818
Maxent 1377
Maxim 0743
Maya 1375
MBO 0760
MDS 0808
Mecotek 0800
Medialine 1301
Mediencom 0781
Medion 0861 1377 0681
MEI 0820
Memorex 0861
Memory 0760 1081
Metz 0601 0555 0743
MiCO 0753 0781 1253
Micromaxx 1725 0725 1377
Micromedia 0533 0569
Micromega 0569
Microsoft 0552
Microstar 0861
Minax 0743
Minerva 0735
Minoka 0800 1145
Minowa 1195
Mintek 0747
Mitsubishi 0743
Mizuda 0848 0887 1481
Monyka 0695
MPX 0873
Mustek 0760 1760
Mx Onda 0681 0781 0753
Mystral 0861
NAD 0771
Naiko 0800 1034
NEC 0899 0621 0771
Neovia 1301
Nesa 0747
Neufunk 0695
0899 1263
0863 1351 0743
0760 0928
0760 0747
1170 0569 0743
0725 1760
0746 1375 0660
1195 1036 0771
1253
Nevir 0861 0800 0702
Nexius 0820
Nintaus 1081
Nordmende 0861 1560
Nowa 0873
NU-TEC 0546 1258
Omni 0808 0863 1134
Onix 0868
Onkyo 0657 0533
Oopla 1188
Oppo 1254
Optim 0873
Optimus 0601 0555
Orava 0848
Orbit 0902
Orion 0725 1725 1036
Oritron 0681
P&B 0848 1481
Pacific 0820 1182 0798
Packard Bell 0861
Palladium 0725 0809 0743
Palsonic 0865 0702 0882
Panasonic 0520 1864 1938
Panda 0747 1137
Papouw 0563
Paramount
Pictures
peeKTON 1254 0928
Philips 0569 0676 1370
Philo 1375
Phonotrend 1195
Pioneer 0601 0661 1995
Plu2 0880
Pointer 0800
Polk Audio 0569
Portland 0800
Powerpoint 0902 1035
Presidian 0705
Prima 1258
Prinz 0861
Prism 1036 0861
Pro2 1375
ProCaster 1034
Proline 0681 0702 0820
Proscan 0552
Proson 0743 1035
Prosonic 1137
Provision 0848 1351 1137
Pye 0676 0569
QONIX 0808 1081
Qwestar 0681
Radionette 0771 0899 1936
Radiotone 0743
Raite 0695
RCA 0552 0681 0820
REC 0520
Red Star 0789 0793 0800
Relisys 1377
Reoc 0798 1182
Revoy 0871
Rex 0868
1258
1263 1449 0928
0789 0743 0861
0863
0809
0705 0533 1188
0555 1601
1034 1513 0863
0760
1995
0818 0928 1137
1375
Richmond 1263
Rimax 1181
Rio Audio 0899
Roadstar 0743 0848 0760
Rocksonic 0819
Ronin 0902
Rotel 0653 0588
Rowa 0789 1034 0546
Rownsonic 0819 0753
S&V 1195
Saba 0681 0581
Sabaki 0798
Saivod 0861 0789 0800
Sakyno 1182 0798
Salora 0771
Sampo 1377
Samsung 0603 0774 1962
Sansui 0725 0746 0798
Sanyo 0700 0903 0725
Scan 0735 0865 0880
ScanMagic 0760 1760
ScanSonic 0887
SCE 0819
Schaub Lorenz 0818 1195 0800
Schneider 0861 0809 0569
Schöntech 0743
Scientific Labs 0798 1182
Scott 0681 0702 1066
Seeltech 1254 1481
SEG 0743 0695 0798
Shanghai 0702
Sharp 1286 0660 0743
Sherwood 0747 0771
Shinco 0747
Siemssen 1412
Sigmatek 0887 1254
Siltex 1254
Silva 0818 0928 0861
Silva Schneider 0861 1936 0771
SilverCrest 1182 0798
Singer 0746 0753 0781
Sinotec 0800 1145
Sinudyne 1170
Sistemas 0702
Skymaster 0760 0798 1182
Skyworth 0928
Sliding 1145
Slim Art 0800
Slim Devices 0563
SM Electronic 0760 0798
Smart 0735 0743
Sonashi 0746 0861
Sonic Blue 0899
Soniko 0818
Sonwa 1034
1081 0928 0863
1257
0555 0747
0520
0800 1182 0753
0781 1258 1725
1081 1145 0793
0820 1466 0743
1258
1182
0735 0818 0743
0681 0899 0820
0676 1257
1263
1182 0902 0793
1560 1513
0725 1449
0798 1182
61
Page 65

DVD (cont.)
Sony 0563 0802 0894
Sound Color 1263
Soundmaster 0798 1182
Soundmax 0798 1182
Soundwave 1560
Spectra 0902
Standard 0681 1182 0798
Star Clusters 0798 1257 1182
StarLogic 1035
Starmedia 0848 1254 1035
Strato 1412 1182
Strong 0743
Sunfly 0887
Sunkai 0800 0880
Sunstech 0861 1301
Sunwood 0818
SuperDigital 1217
Supervision 0760 0798
SVA 0702
Sylvania 0705 0660
Symphonic 0705
Synn 0798 1182
Sytech 0861
Tandberg 0743 1725
Tangent 1351
Targa 1188 1257 1936
Tatung 0800
Tchibo 0771
TCM 0771
Teac 0747 0771 0820
TEC 0928
Technics 0520 1938
Technika 0800 1145 0861
Technisson 0702
Technosonic 1081 1145
Techwood 0743 1560 0569
Tecnimagen 1263
Tedelex 1034 1258 0798
Telefunken 0820 0819 0818
Teletech 0743 1182 0798
Tensai 0681 0800
Tevion 0681 1066 1412
Theta Digital 0601
Thomson 0581 0552 0861
Tokai 0695 0928 0818
Tokiwa 0735 0746
Tom-Tec 0819 0863
Top Suxess 1254
Toshiba 0533 0725 1075
TRANScontinents
Transonic 0702 1195
Tredex 0873
1100 2011 1663
1463
0818 0861 0928
0771
0546 0601 0798
1036 1182 0621
1227 0789 0863
1257 1195 0705
1254 1258
1195 1560 1182
0800 1182
1258 0863 1513
1145 0800 1375
1451 1182 0798
1034 1257 0863
1377 1760
1263
1540
0902 0861 1195
1263 0863
Trevi 0861
Trio 0800
TruVision 0887 1481
TSM 1254
TVE 0743
Umax 1181
United 0818 0760 0820
Universal
Multimedia
Universum 0771 0743 0621
Uptek 0793
upXus 1375
Urban Concepts 0533
Venturer 0820
Vestel 0743 1560
Vieta 0735
Viewmaster 0892 1254
Voxson 0760 0861
VTrek 1258
Waitec 1254 0760
Walkvision 0747
Waltham 1560
Welkin 0861
Wellington 0743
Weltstar 0743
Wharfedale 0798 0820 0753
Wilson 0861 1263
Windy Sam 0603
Wintech 1217
Woxter 1181 1254
XBox 0552
XLogic 0800 0798 1182
XMS 0818 0800
Xoro 1213
Yakumo 1034
Yamada 1034 0902 1181
Yamaha 0569 0676 0520
Yamakawa 0695 0902 1134
Yukai 0760
Zenith 0533 0899 0621
1258 0702 1195
0725 1145 0798
1263 0743 1182
0705
0798 1182
0809 1257 0820
1560
0781 1182 0800
1145
1258
1188
1188
0771
PVR
@sat 1330
@Sky 1364
Amstrad 1205
Arnion 1330
ASCI 1364
Astro 1130
Aurora 1463
Austar 1206
B@ytronic 1442
Brainwave 1244
British Sky
Broadcasting
BSkyB 1205
Bush 1675
CanalSatellite 1369
Chess 1364
CityCom 1206
Comag 1442
DigiFusion 1675
DigiQuest 1330
Dream Multimedia1267
eMTech 1244
Foxtel 1206 1386
Galaxis 1206
GbSAT 1244
Gecco 1442
General Satellite 1206
Globo 1364 1442
Hanseatic 1130
HB 1244
HDT 1189
Hirschmann 1442
Homecast 1244
Humax 1206 1457 1705
Hyundai 1189
ID Digital 1206
Imperial 1130 1364
Interstar 1244
Jaeger 1364
Jepssen 1244
Kathrein 1591
Kongque 1330
L&S Electronic 1364
Maximum 1364
Mediacom 1236
Medion 1364 1442
Multichoice 1463
Neotion 1364
Opentel 1442
Orbis 1364 1442
Orbitech 1130
Pace 1205 1386 1453
Panasonic 1334
Pilotime 1369
Pino 1364
Premiere 1130 1206
Rebox 1244
Sagem 1283
Samsung 1236
Sat Control 1330
Satplus 1130
Schaub Lorenz 1244
Schneider 1236
Schwaiger 1364 1442
Siemens 1364
Sky 1205
SKY Italia 1878 1880
1205
1880
Sky XL 1442
SKY+ 1205
Skymaster 1364
skyplus 1364 1442
Stream 1878
Strong 1189 1330
Sunny 1330
Systec 1364
TechniSat 1130
Technosat 1236
Telestar 1130 1364
Televes 1244 1330 1364
Tevion 1364
Thomson 1205 1930
Topfield 1236 1575 1813
TPS 1283
UEC 1386
Worldsat 1244
XSat 1244
Xtreme 1330
Zehnder 1364 1442
Zinwell 1206
SAT
@sat 1330
@Sky 1364
ABsat 1353 0743
Acoustic Solutions 1314
ADB 0672 0917 1289
Adcom 0230
Akai 0230
Akura 1656
Alba 1314 0743
Allsat 0230 1047
Allsonic 0399
Alltech 0743
Allvision 1262 1364 1442
Alpha 0230
Amitronica 0743
Ampere 0162
Amstrad 0162 0877 1205
Anglo 0743
Ankaro 0399 0743 1309
AntSat 1047
Apro 1702
Arcon 1309 0162 1105
Arion 1309
Armstrong 0230
Arnion 1330
ASA 0329
Asat 0230
ASCI 1364
ASLF 0743
AssCom 0883
Aston 1159 1291
Astra 0743
Astratec 1773
Astro 0163 0203 0399
Audioline 1459
Aurora 0909 0672 1463
Austar 1289 0672 0909
Avanit 0329
Axil 1487
Axis 1141 0399
Axitronic 1656
B.net 1702
B@ytronic 1442 0329
Balmet 1487
Bentley Walker 1047
Best 0399
Big Sat 1487
Black Diamond 1314
Blaupunkt 0203
Blue Sky 0743
Blue Star 1309
Boca 0162 1396 0743
Boshmann 1443
Boston 0162
Boxer 1488
Brainwave 1244 0688 1702
British Sky
Broadcasting
Broco 0743
BSkyB 1205 0877
BT 1326
Bubu Sat 0743
1397 1503 1521
1831 1143 1878
0743
0688 1143 1129
1130 0230 1303
1262
1205 0877
Bush 1314 1656 1702
Canal Digitaal 0883
Canal Digital 1883 0883 0197
Canal+ 0883 1883
CanalSat 0883
CanalSatellite 0883 1369 1883
Centrex 1577
CGV 1443 1597
Champion 1309
Cherokee 1353
Chesley 1577
Chess 1364 0743 1656
CityCom 1206 1262 0329
Clatronic 1443
Clayton 1656
Colombia 0162
Columbia 0162
Com Hem 1206
Comag 1262 1443 1442
Comsat 1443
Condor 0399
Connexions 0399
Conrad 0399 0162
Coship 1487 1702
Crown 1314
Cyfra+ 1883 1439 0883
Cyfrowy Polsat 0883
Cyrus 0230
Daewoo 1326 1773 0743
Dantax 1656
D-box 1144 0753
Deltasat 1105
DGTEC 1272 1572
Digatron 1324
Digenius 0329 1191
Digi Raum
Electronics
Digiality 1364
DigiFusion 1675 1773
Digihome 1314
Diginet 1577
DigiQuest 1503 1487 1330
DigiSat 1262
Digisky 1487
Digital+ 1883 1076 0883
DigitAlb 1262 1577
DigitalBox 1130
DigitAll World 1257
DiPro 1577 1503 1397
DirecTV 0129
Distratel 1313
Distrisat 0230
DMT 1105
DNT 0230
Doro 1702
DRE 1206
Dream Multimedia 1267
DStv 0672 0909
Dune 0399
Durabrand 1314
Echolink 1396
Echostar 1230 0640 0197
Eco-Star 1443
1675 1501 1773
1321 0382 0672
1076 1364
0848 0534 1105
0688
1396 0162
1141
1206
0883 0743 1353
1503 1439 1797
Edision 1309
Einhell 0162 0743
Elap 0743 1641 1159
Electron 1309
Elsat 0743
Elta 0230 0399
Emme Esse 0399
eMTech 1244
Engel 1047 0743 1281
EuroLine 1281
Europa 0230
Europhon 0329 0162 0743
Europsat 1443 1641
Eurosat 1597
Eurosky 0162 0329 0399
Eurostar 0848
Eutelsat 0743
Eycos 1309
Fagor 1641
Fenner 0743 0399
Ferguson 1321 0741 1773
Finlux 1656 1262
Flair Mate 0743
FMD 1281 1487 1443
Force 1224
Fortec Star 1047
Foxtel 1386 0909 0750
Fracarro 0155
Free Wave
Technology
Freecom 0203
FTEmaximal 0399 0743
Fuba 1831 0399 0203
Fugionkyo 0155
Galaxis 1141 1206 0883
Gardiner 0848
Garnet 1105
GbSAT 1244
Gecco 1442 1303
General Satellite 1206
Globo 1281 1656 1442
GOD Digital 0230
Gold Box 0883
Gold Vision 1047
Golden Interstar 1313
GoldMaster 1364
Goodmans 1314 1321
Gradiente 0917
Grandin 1656
Grocos 1439 1487
Grundig 0203 0877 1321
H&B 1577
Hallo 1656
Hama 1597
Hanseatic 1129 1130
Hänsel & Gretel 0162
Hauppauge 1324 1702
HB 1244 1831
HDT 1189
HE@D 1309
Healing 1577
Hills 1262
1597 1443
1831
1364
1309
1206 1192
1773
1191 0329 1281
0399 0909
1459 1364
1314 0909 0883
62
Page 66

SAT (cont.)
Hirschmann 1141 1143 0203
Hitachi 1314
HNE 1262 0162
Homecast 1244
Humax 1206 1262 1457
Huth 0162 1047 1105
Hyundai 1189 1105 1446
i-CAN 1397
ID Digital 1206
IDTE 1189
Imperial 1459 1364 1129
Inno Hit 1656
International 0162
Interstar 1047 1244
Inves 1773
iotronic 1443 0162
ITT Nokia 0753
Jadeworld 0672
Jaeger 1364
Jepssen 1244
KabelBW 1225 1227 1076
Kamm 0743
Kansalaisboksi 1577
Kaon 1330
KaTelco 1141
Kathrein 1591 1597 0688
Kennex 0155
Kenwood 0883
Key West 0162
Kongque 1330
König 1309
KPN 1575
Kreiling 0688 1656
Kreiselmeyer 0203
K-SAT 0743
Kyostar 0162
L&S Electronic 0399 0162 1364
Labgear 1326
LaSAT 0399 0162 0329
Leiko 1656
Lemon 1364
Lenco 0743 0399
Lennox 0399
Lenoxx 1641
Lexus 0230
LG 1444 1105
Lifesat 0162 0399 0329
Linsar 1314
Listo 1656
Lodos 1314
Logik 1314
Logix 1047 1105
Lorenzen 0329 1324 1191
Lupus 0399
Macab 0883
Madritel 0672
Manata 0743 0162
Manhattan 1047 1330
0329 1262 0399
0155 1442
1705 1773 1255
1130 1227 1225
0230 1702
1206
0510 0534 0203
0230 0743 0848
1353 1446
0203
0743
0162
Marantz 0230
Maspro 0743 0203
Matsui 1656 0203 1773
Maximum 1105 1364
MDS 1255
Mediabox 0883
Mediacom 1236
MediaSat 0883
Medion 1262 0329 0743
Medison 0743
Mega 0230
Melectronic 0848
Metronic 0743 1309 1313
Metz 0203
Micro 0743 1324
Micro electronic 0743
Micro Technology 0743
Micromaxx 0329 0399
Microstar 1105 0329 1191
Microtec 0743
Morgan's 0162 0743 0230
Motorola 0886 1503
Multichoice 0909 1463 0672
Myryad 0230
Mysat 0743
MySky 1880 1386 1878
Neotion 1364
Netgem 1352
Netsat 0917 0129
Neuf TV 1352
Neuhaus 0743
Neuling 1262 0162
Neusat 0743 1309
Neveling 1191
NextWave 1047
Nikko 0743 0753 0230
Nokia 1144 1753 1053
Noos 0883
Nordmende 1641
Nova 0909
Numericable 0883
OctalTV 1324 1459
OKI 1597 1487
Onn 1314
Opentel 1262 1442
Optex 1313 0743 1641
Optima 1577
Optus 0909 0883 1386
Orbis 1364 1442 1262
Orbitech 1129 1225 1227
P/Sat 1262
Pace 1386 1205 0877
Pacific 1314
Packard Bell 1141
Palcom 0329 1641 1191
Panasat 0909
Panasonic 0877 1334 1434
Panda 0203
Patriot 0162
0162 1105 1442
1656 1364 0399
0848 0162 1443
1702
1262 1442 1439
1253 0753 0883
1656 1443
1130 0230
1453 1878 0917
1353 1880 0271
0821 0750 0230
0883
1439
peeKTON 1487
Philips 0129 1144 0883
Phoenix 1303 1577
Phonotrend 1047 1230
Pilotime 1369
Pino 1364
Pioneer 0883 1338 0382
PMB 1641 0743
Portland 1326
Power Sky 1309
Preisner 0162 1143 1396
Premiere 1144 0753 1206
Primacom 1141
Pro Basic 0883
Proline 1314
PYROD 1577
QNS 1434
Quadral 0399 1353
Quelle 0329
Radiola 0230
Radix 1143
RCA 1321
Rebox 1244
Red Star 0399
Regal 1281
RFT 0230
Roadstar 0743 0883
Rollmaster 1443
Rover 0743 0399
Rownsonic 1597
SAB 1281 1330
Sagem 1144 1720
Salora 1262
Samsung 1273 1600 1488
Sansui 1575 1281
Sanyo 1656
Sat Control 1330
Sat Industrie 1641
Sat Team 0743
SAT+ 1439
Satec 0743
Satelco 0399
Satlink 1597
Satplus 1130
Schaub Lorenz 1244
Schneider 1281 1236
Schwaiger 0534 1364 1487
SCS 0329
Sedea Electronique 0155 0162 1313
SEG 1281 0399 1656
Serino 0640
Servimat 1641
ServiSat 1281 0743
Sherwood 1641 1439
Siemens 0203 1656 1364
Silva 0329
Skantin 0743
SKR 0743
SKT 0162
0163 0230 1702
1773 0848 0203
1459
1225 1130 1705
1141 0688
1047 1236 0883
1205
1442 1459 1141
1702 0162 1105
1656 1309
1105 1314
1459 1702
Sky 0129 0886 1205
SKY Deutschland 1144 0753 1206
SKY Italia 1878 1880
Sky XL 1442 1281
SKY+ 1205
Skymaster 1439 1641 0743
Skymax 0230 1443
Skypex 0329
skyplus 1262 1364 1205
SkySat 0743
SL 0162 1702
SM Electronic 0743 1230 1105
Smart 1303 0162 0329
SmartVision 1487
Soniq 1597
Sony 0877 1588 0312
SR 0162
Star Sat 0162
Starland 0743
Stream 1878
Stream System 1330
Strong 1397 1439 0743
Sumin 1442
Sunny 1330
Sunny Sound 0399
Sunsat 0743
Sunstar 0399 0162 0672
SuperMax 1313
Supratech 1443
Systec 0162 1364
S-ZWO 1237
Tarbs 1255
TBoston 1487 1281
Teac 1257 1255 1352
Tecatel 1230
Technika 1314 1702
TechniSat 1225 1227 1130
Technomate 1313
Technosat 1236
Technosonic 1702
Technotrend 1459 1702
Technowelt 0162
Techsan 1047
Techwood 1314 1656 1281
tekComm 1047
TELE System 1641 1831 1189
TeleClub 1397
Telecom 0743
Telestar 1129 1130 0230
Televes 0162 1244 1330
Televisa 0917
Telewire 1262
Tesla 1656
0877 0917 0741
1225 1130 1705
1141 0688
1230 1105 1364
1597 1575
1442 1487
1143 1262 0743
1443 1434
0883
1656 1831 0883
1314 1189 1330
0155 0399 0909
1503
1577
1129 1352 0230
1439 1281
1459 1281 1364
1656 1702 1225
1227
1364 1439
Tevion 1702 1364 0743
Thomson 0741 0877 1321
Tiny 1702
Tioko 0162
Tividi 1459
Tokai 0230
Tonna 1641 0743
Topfield 1575 1813 1236
Toshiba 1314
TPS 1283
Triax 0230 0743 0883
Tricolor TV 1206
Trio 1105
TT-micro 1459
Turnsat 0743
Twinner 0162 0743 1641
UEC 0909 1192 1386
Unimax 1577
Unisat 0230 0162
United 1281
Unitymedia 1459 1206 1225
Universum 0203 0329 1129
Van Hunen 1191 0329
Vantage 1488
Variosat 0203
Vega 0399
Ventana 0230
Vestel 1314 1281
VH Sat 1191 0329
Viasat 1353 1053 1225
Viola Digital 1702
Vision 1656
Visionic 0155 1309
Visiosat 1443 0743 1159
Vitecom 1443
Vivid 1192
Voo 0883
VTech 0848
Wavelength 1262 1443
Wharfedale 1314 0230
Winbox 1831
Wisi 0203 0329 0162
Worldsat 1503 1244 1281
XMS 1105
Xrypton 0399
XSat 0743 1244 0877
Xtreme 1330
Yakumo 1443
YES 0917
Yess 1577
Zehnder 1281 1364 1105
Zenith 0886
Zeta Technology 0230
Zinwell 1206
Zodiac 1831 1309
1439 1597
1883 1076 1205
0883 1930 0743
1237
1281 1326 1321
0162 1129 1143
1257 1656 1641
1443
1227
1227
1487
1442 1262
1353
1262 1443 1442
0534 0848 0399
63
Page 67

Page 68

SH230 Issue 2
A&R CAMBRIDGE LTD, PEMBROKE AVENUE, WATERBEACH, CAMBRIDGE CB25 9QR, ENGLAND
 Loading...