

Page 1
AVR400 Service Manual Issue 1
Page 2
1
F
2
3
3
4
2
5
ECO NR.
--
--
--
--
--
6
DATE
--
--
--
--
-- --
CHG.
-- --
--
--
--
ZONE
--
--
--
--
7
DESCRIPTION OF CHANGE
--
--
--
--
--
8
DR.
CHK.
--
--
--
--
--
--
--
--
--
--
F
REL.
--
--
--
--
--
E
D
C
E
D
C
ITEM NO.
1
2
3
B
A
1
TGP3523 / TGP3524
TGP3526 / TGP3527
HA4V06S
PART No.
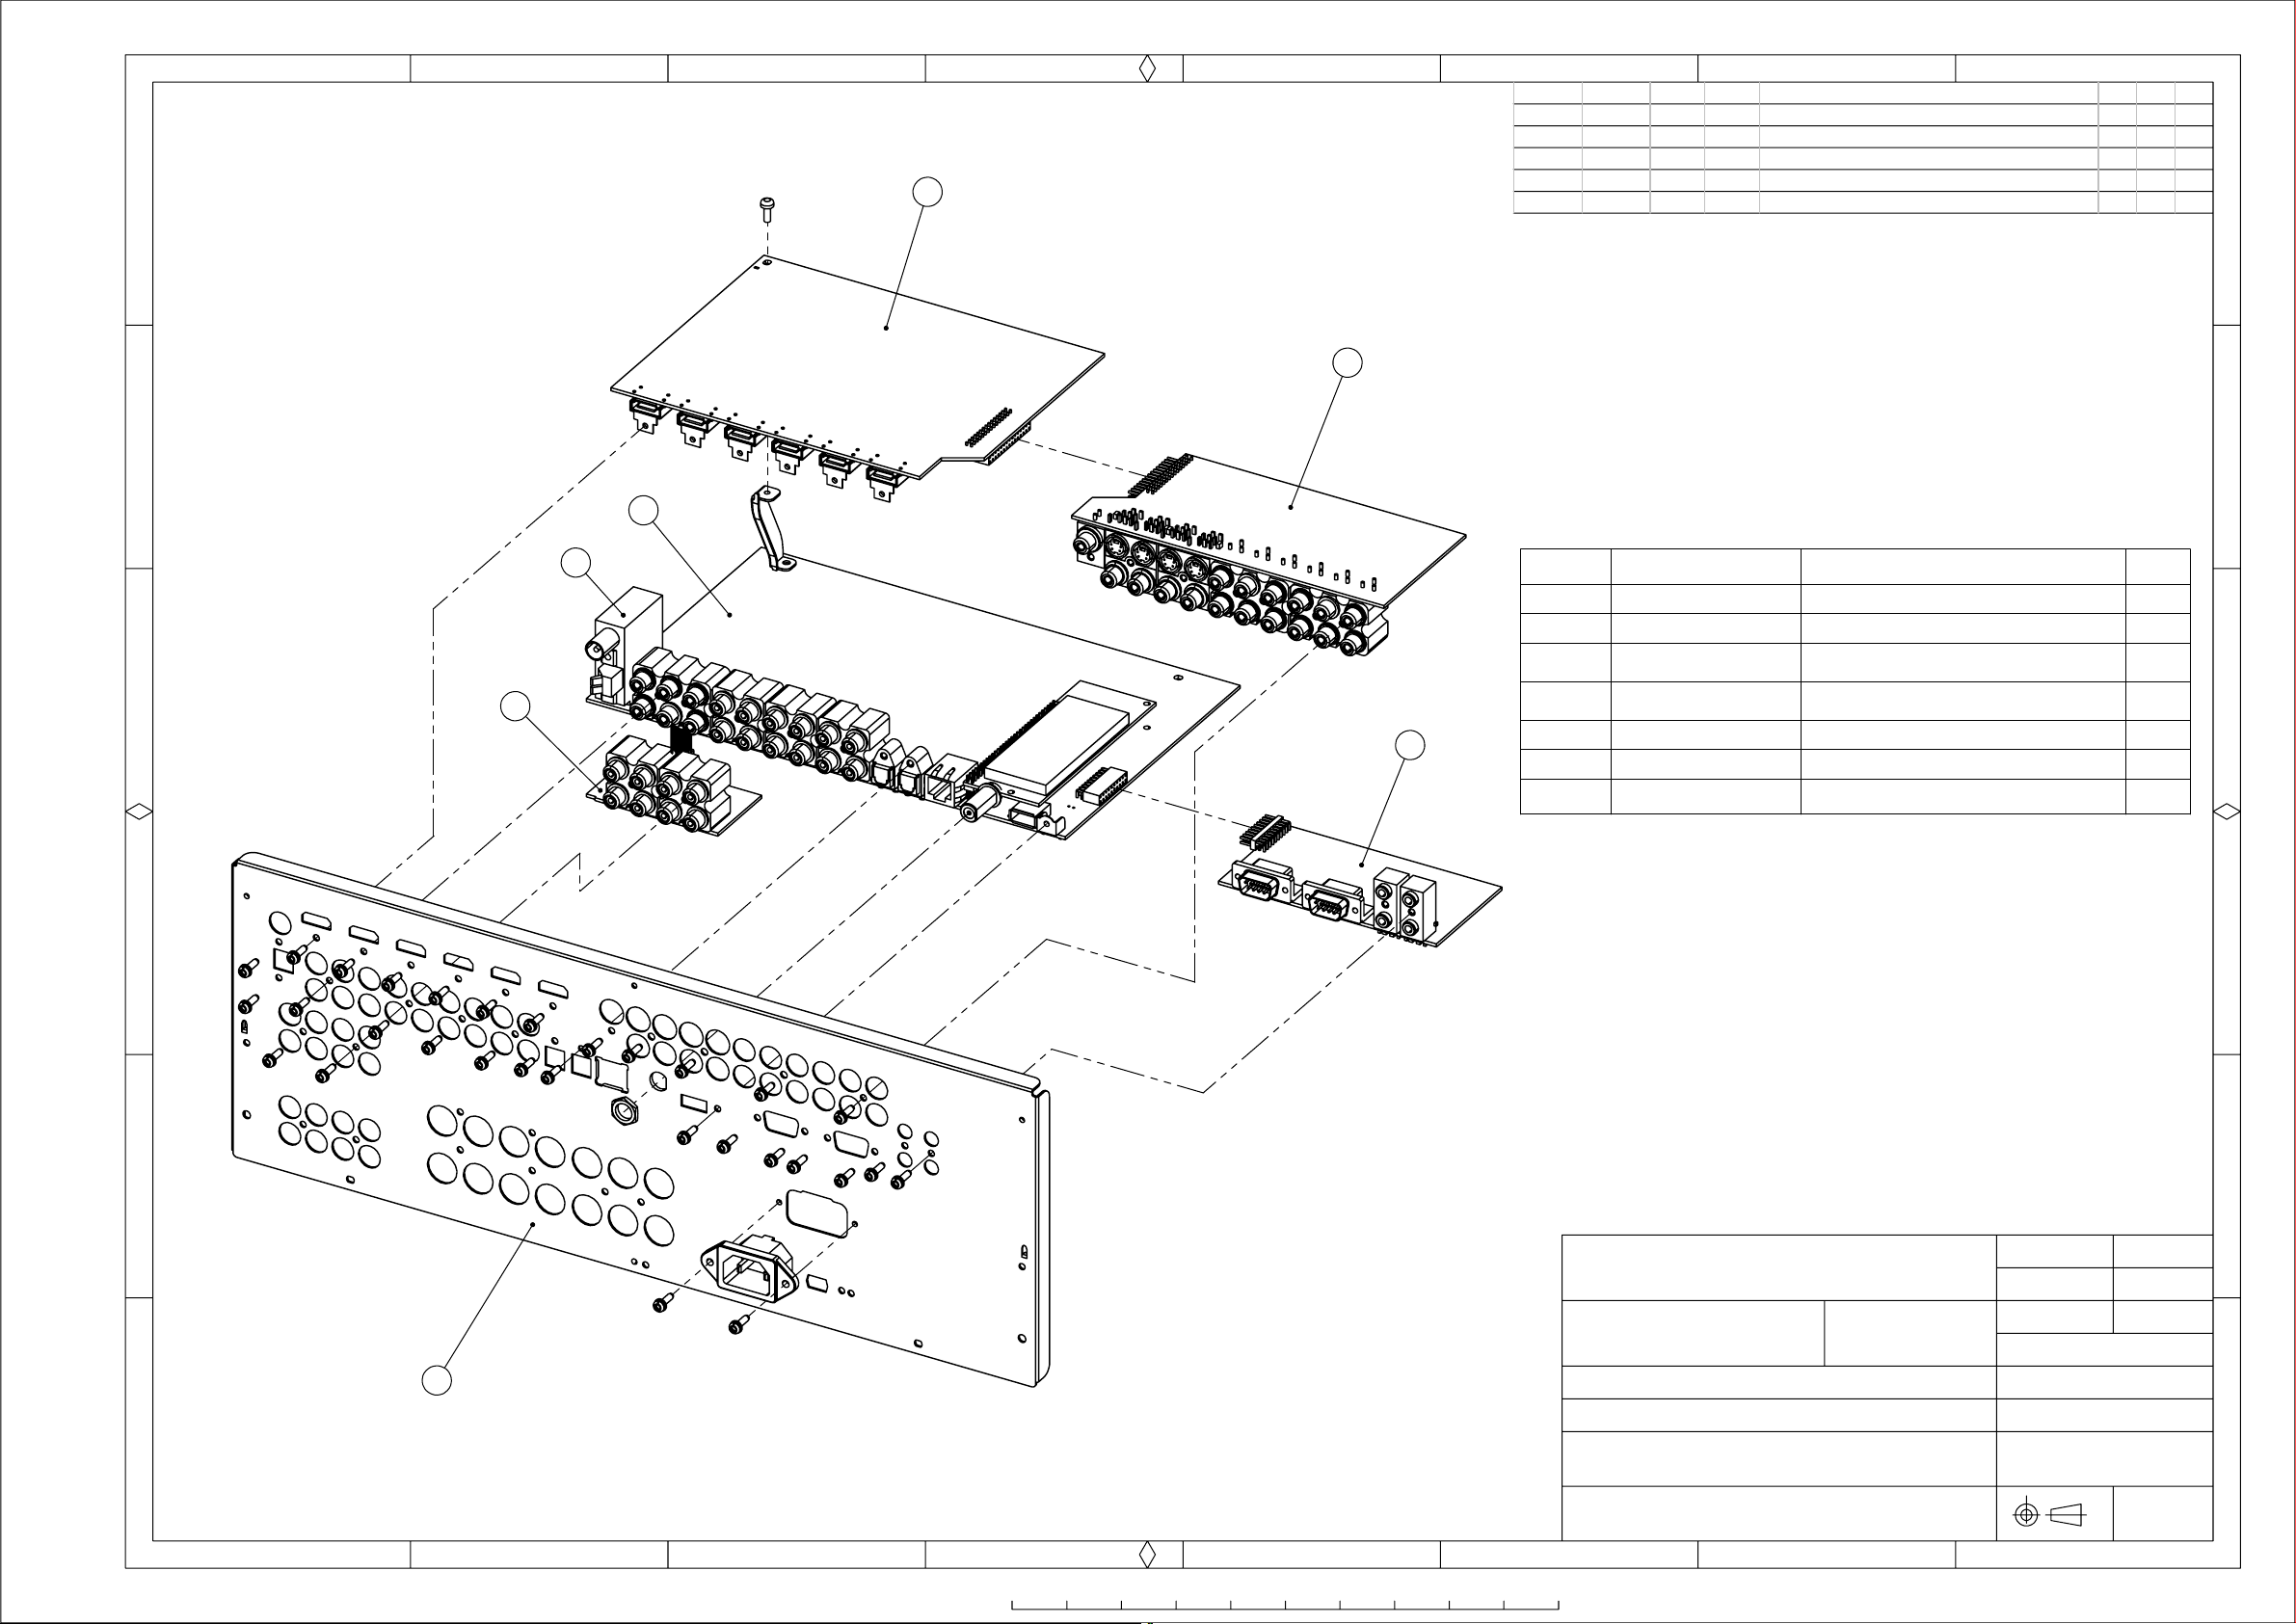
FASCIA ASSEMBLY BLACK / SILVER
COVER BLACK / SILVER
TORX SCREW M4 x 6
23425
TOLERANCES UNLESS 0.00±0.10
OTHERWISE STATED 0.0 ±0.20
ANGULAR TOL. +2 DEGREES
MATERIAL:
FINISH:
PART NUMBER AND DRAWING NUMBER
DESCRIPTION
A & R CAMBRIDGE LTD
ALL DIMENSIONS IN
MILLIMETERS UNLESS
OTHERWISE STATED
QTY
1
1
4
DRAWN BY:
DATE:
CHECKED BY:
ORIGINAL SCALE 1:4
SHT 1 OF 4
B
MCM
7-9-2010
MGB
A
AVR400 MAIN ASSEMBLY
DRAWING TITLE
COVER + FASCIA
1
2
3
4
5
6
7
8
A3
10
0
30
20
50
40
60
80
70
90
100
Page 3
1
F
2
3
4
5
ECO NR.
--
--
--
--
--
6
DATE
--
--
--
--
-- --
CHG.
-- --
--
--
--
ZONE
--
--
--
--
7
DESCRIPTION OF CHANGE
--
--
--
--
--
8
DR.
CHK.
--
--
--
--
--
--
--
--
--
--
F
REL.
--
--
--
--
--
ITEM NO.
1
2
E
1
D
3
PART No.
TGP3539
DESCRIPTION
TRANSFORMER - POWER
FAN 80 x 80 x 25mm
FAN MOUNTING BRACKET
QTY
1
2
2
E
D
C
2
B
A
3
MCM
7-9-2010
MGB
23425
TOLERANCES UNLESS 0.00±0.10
OTHERWISE STATED 0.0 ±0.20
ANGULAR TOL. +2 DEGREES
MATERIAL:
FINISH:
PART NUMBER AND DRAWING NUMBER
A & R CAMBRIDGE LTD
ALL DIMENSIONS IN
MILLIMETERS UNLESS
OTHERWISE STATED
DRAWN BY:
DATE:
CHECKED BY:
ORIGINAL SCALE 1:4
SHT 2 OF 4
C
B
A
AVR400 MAIN ASSEMBLY
DRAWING TITLE
FANS + TRANSFORMERS
1
2
3
4
5
6
7
8
A3
10
0
30
20
50
40
60
80
70
90
100
Page 4
1
F
2
3
4
5
ECO NR.
--
--
--
--
--
6
DATE
--
--
--
--
-- --
CHG.
-- --
--
--
--
ZONE
--
--
--
--
7
DESCRIPTION OF CHANGE
--
--
--
--
--
8
DR.
CHK.
--
--
--
--
--
--
--
--
--
--
F
REL.
--
--
--
--
--
SOLDERED TO
E
2
D
C
1
POWER AMP PCB
5
ITEM NO.
1
2
3
3
4
5
PART No.
TGP3534
TGP3535
TGP3538
TGP3525
TGP3540
DESCRIPTION
CHASSIS ASSY
FRONT PCB ASSY
POWER AMP PCB ASSY
FOOT ASSY
TRANSFORMER - STANDBY
QTY
1
1
1
4
1
E
D
C
B
DRAWN BY:
23425
TOLERANCES UNLESS 0.00±0.10
OTHERWISE STATED 0.0 ±0.20
4
A
ANGULAR TOL. +2 DEGREES
MATERIAL:
FINISH:
PART NUMBER AND DRAWING NUMBER
A & R CAMBRIDGE LTD
ALL DIMENSIONS IN
MILLIMETERS UNLESS
OTHERWISE STATED
DATE:
CHECKED BY:
ORIGINAL SCALE 1:4
SHT 3 OF 4
MCM
7-9-2010
MGB
B
A
AVR400 MAIN ASSEMBLY
DRAWING TITLE
POWER PCBs + FEET
1
2
3
4
10
0
30
20
40
5
50
60
80
70
90
100
6
7
8
A3
Page 5
1
F
2
3
5
4
5
6
ECO NR.
--
--
--
--
--
6
DATE
--
--
--
--
-- --
CHG.
-- --
--
--
--
ZONE
--
--
--
--
7
DESCRIPTION OF CHANGE
--
--
--
--
--
8
DR.
CHK.
--
--
--
--
--
--
--
--
--
--
F
REL.
--
--
--
--
--
E
2
7
D
4
3
C
ITEM NO.
1
2
3
4
5
6
7
PART No.
TGP3528
TGP3536
TGP3536 (part)
TGP3536 (part)
TGP3537
TGP3537 (part)
TGP3529 / TGP3530
DESCRIPTION
QTY
REAR PANEL ASSY
INPUT PCB ASSY - MAIN 1
INPUT PCB ASSY - ETHERNET
INPUT PCB ASSY - CONNECTORS
HDMI PCB ASSY - MAIN
HDMI PCB ASSY - VIDEO
AM/FM TUNER EU / US
1
1
1
1
1
1
E
D
C
B
DRAWN BY:
23425
TOLERANCES UNLESS 0.00±0.10
OTHERWISE STATED 0.0 ±0.20
ANGULAR TOL. +2 DEGREES
1
A
MATERIAL:
FINISH:
PART NUMBER AND DRAWING NUMBER
A & R CAMBRIDGE LTD
ALL DIMENSIONS IN
MILLIMETERS UNLESS
OTHERWISE STATED
DATE:
CHECKED BY:
ORIGINAL SCALE 1:2.5
SHT 4 OF 4
MCM
7-9-2010
MGB
B
A
AVR400 MAIN ASSEMBLY
DRAWING TITLE
REAR PANEL + PCBs
1
2
3
4
10
0
30
20
40
5
50
60
80
70
90
100
6
7
8
A3
Page 6

AVR400 Power Amplier Circuit Description
Apart from the power transformer, the power amplier electronics is fully contained on the large
double sided PTH PCB and heatsink located at the bottom of the AVR400. This is called the Main Board
on the schematic diagrams (pages 11 and 12). The Main Board also contains the mains input circuitry, in-
cluding the safety fuses and standby power transformer, so great care should be exercised when probing this
area of the board.
Note that some small surface mount components are soldered to the underside of this PCB.
The 7 power ampliers are identical in terms of circuitry, although necessary compromises in the physical layout may give rise to slight dierences in measured noise, crosstalk and distortion performance.
The two channels at the extreme ends of the heatsink have less radiating area available to them and will
run hotter under load – this is not normally an issue as these are assigned to the SBL and SBR channels.
Looking from the rear of the AVR, facing the at face of the heatsink, the channel order is SBR, SR, FR,
C, FL, SL and SBL, the same order as the loudspeaker terminals. The SBL and SBR channels can also be
assigned to zone 2 or as duplicates of the FL and FR channels for when passively biamping the main
stereo loudspeakers. In this latter condition we recommend assigning the SBL and SBR outputs to the
tweeters of the FL and FR speakers, in order to minimize the power ampliers’ heat dissipation.
Note that the 8 pre-amplier outputs are also on this PCB – apart from SUB their phono sockets are
eectively in parallel with the power amplier inputs, which are fed from the Input Board via a ribbon
cable and CON103. This connector also carries 5 power supply and power amplier control signals to
and from the system microprocessor (μP) IC151 situated on the Input Board above the Main Board.
The ampliers’ power supply is provided from a centre-tapped secondary winding on the toroidal
power transformer, via the connector BN508, to the bridge rectier D5830. This is mounted on a
small PCB near the top of the heatsink. The rectied AC is then sent to the main PCB via connectors
BN581/582. To avoid induced hum and distortion it is important to keep these cables twisted tightly
together and well away from the actual power amplier circuitry. The main 15,000μF 80V reservoir
capacitors, C835 and C836, are positioned on the main PCB well away from the power amplier input
traces and close to the system star ground. The smoothed DC is fed to the power ampliers’ Vcc and
Vee lines near the centre of the heatsink via a twisted-pair cable, again to minimize induction into the
power ampliers. Vcc and Vee are typically +/- 52V at 234VAC with no signal. Q5845 sends a fraction of
Vcc to the muting control on the Input Board.
The FL (front left) channel will now be described in detail.
The input stage is a long tailed pair Q5101 and Q5102, with local degeneration provided by R5105 and
R5107. The tail is fed from the negative rail via an approx 3mA ring-of-two constant current source,
Q5109 and Q5110. R5101 and C5101 at the input provide high frequency rollo and help keep residual
DAC ultrasonic noise above 100kHz out of the power amplier. DC blocking is provided by C5102 at
the input and C5107 in the feedback loop so that the whole power amplier has unity gain at DC. The
midband AC gain is 22000/680 = 32.35 after allowing for the attenuation provided by R5101 and R5102.
Thus 875mV at the input produces 100W into 8 ohms at the output.
The long tailed pair’s collectors are loaded by a current mirror, Q5103 and Q5104. The resistors R5103/4
and R5105/6 are 1% tolerance to minimize even order distortion. The collector of Q5101 also feeds the
Darlington class A voltage amplier stage (VAS) made up of Q5115 and Q5116. Q5113 is loaded by the
output stage and the 8mA constant current source made up by Q5125 and Q5126. The amplier’s main
frequency compensation network (for stability) comprises C5115 plus the combination of C5116 and
R 5115. This adds gain inside the loop (two pole compensation) at high audio frequencies so that the
Page 7

additional feedback further reduces high frequency distortion and crossover distortion within the audio
band.
These stages are partially decoupled from the Vcc and Vee power supplies by D5130/R5130/C5130 and
D5129/R5129/C5129 respectively. They are also bootstrapped to the amplier output via the networks
R5118/C5128/R5128 and R5117/C5127/R5127. This raises the supply lines by approximately 3V at full
output to avoid clipping the driver stage prematurely.
The output stage comprises classic complementary emitter followers Q5150/Q5170 (NPN) and Q5160/
Q5180 (PNP). The On Semiconductor output transistors have a current gain that is sustained to about
10 amps and a very large safe operating area, which allows the ampliers to drive low impedances well.
They also have built-in thermal compensation diodes which helps stabilize the quiescent current both
statically (when hot) and dynamically (when playing music at high level) – this minimizes crossover
distortion and improves sound quality.
The output stage biasing is performed in the network around the amplied diode Q5120, which is
mounted in intimate thermal contact with the driver transistor Q5130, plus the two built-in diodes
associated with the output transistors. The thermistor R5122 is positioned on the PCB close to the
heatsink and provides extra downward compensation at very high temperatures. Bias is set by VR51 and
is largely independent of temperature – it should be set to16-20mV when measured across the outer
terminals of the compound emitter resistor R5175, using the 2 pin connector CN51, 5 minutes or more
after the AVR400 is powered up.
The power amplier output is routed across the PCB to the back panel. It includes a Zobel network
(sometimes called a Boucherot cell) R5183/C5183 and a series inductor L5185 damped by a 4.7R 2W resistor R5184. These components help isolate the amplier from reactive loads to ensure high frequency
stability. One half of the normally-o relay RL52 is used to switch the load in and out.
Each power amplier is protected against overload in a number of ways. The complementary transistors
Q5130 and Q5131 protect the NPN half of the output stage and Q5140 and Q5141 the PNP half. They
operate as Sziklai pairs, passing negligible current until a threshold voltage of approx 600mV is reached
across R5132 and R5142. Between 600 and 700mV the pairs then ramp up current smoothly, diverting it
away from the bases of Q5150 and Q5160 to limit the output stage drive to a safe level, within the power
transistors’ SOA (safe operating area). The 600mV threshold voltage depends upon both the instantaneous current and voltage across the output transistors, set by the networks R5132/R5136/R5137/R5138/
R5175 for the top half and R5142/R5146/R5147/R5148/R5175 for the bottom half. R5135/R5145 and the
zener diodes D5135/D5145 change the slope of the protection locus at high Vce voltages. R5134/R5135
plus C5134/C5145 prevent fast transients and brief overloads from prematurely triggering the protection.
The above dual slope SOA protection is self resetting but if a gross overload persists for more than a
second or two (such as when a channel’s output is short circuited with music playing at a moderate to
loud level) then the open collector transistor Q5181 sinks current for long enough to initiate the amplier’s full shutdown procedure via the line SOA_PROTECT. This can also be triggered by a total output
stage failure (which passes enough current through R5175 to turn on Q5188) via OVERLOAD or by an
excessive DC oset at the output terminals (via R5185) via V_DET. All these signals, and others, feed into
the protection module, described below.
The protection module comprises 8 transistors and associated parts positioned at the back of the PCB
near the preamplier output sockets. It has a single output line named PROTECT which, when pulled
down from Vcc to ground, instructs the system μP IC151 to shut down the whole amplier. This occurs
when any of the following events happen:
Page 8

1) Any amplier channel pulls current through the SOA_PROTECT line for long enough to charge
up capacitors C5871 and then C5872 so that Q5874 turns on.
2) Any amplier channel pulls current through the OVERLOAD line for long enough to charge up
C5882 and turn on Q5882 and thus Q5884.
3) Any amplier channel has a large long term (DC) oset (typically greater than +/-3V) sμFcient
to charge up C5861 enough to turn on either Q5862 (positive oset) or Q 5864 (negative oset).
These then turn on Q5863. N.B. This circuit is also used to detect imbalances in both the Vcc/Vee
and +/-15V power supplies (the latter is generated on the Power Supply board).
4) When the PTC thermistor TH585 mounted at the top centre of the heatsink gets sμFciently hot
(around 100C) and thus high resistance enough to cause Q5855 to turn on via the +12V supply.
Intermediate temperatures will not activate PROTECT but will provide signals to the level detectors associated with the FAN_1 and FAN_2 lines, to run the cooling fans at high or low speeds
respectively.
Note that the fans’ 12V supply is gated via Q5909 and Q5911. This means the fans will not run when
no signal is present on the FL, C or SR channels, so that during quiet passages no fan noise should be
audible.
AVR400 Main Power Supplies Circuit Description
The main DC power supplies are located on the Power Supply Board - a double sided PTH PCB adjacent
to the Main Board. Note that the mains input switching, mains fuses, standby power transformer with
its associated unregulated DC supply and the relay for enabling the power amplier supply rails are
located on the Main Board. The two boards communicate via CON501.
Considering the Main Board rst, the mains voltage switching uses a double pole double throw slide
switch accessible from the back panel. One pole addresses the standby transformer and the other the
toroidal power transformer. Ensure the switch setting matches the supply voltage before switching on the
AVR400. Nominal settings are 115 and 230V +/- 15%. The 20mm 115V fuse in line with the toroidal transformer is rated at 15A T (Time delay) and the 20mm 230V fuse is rated at 8A T. Always replace these fuses
with the same type and value. The standby transformer T5941 is not fused but is designed to go open
circuit in case of overheating (e.g. if left connected to a 230V supply for longer than a few minutes when
the mains voltage selector is set to 115V).
The standby transformer generates approximately +9V DC via the bridge rectier diodes D5495/6/7/8
and the 1,000μF reservoir capacitor C5947.This is sent via pin 7 of CN501 to the Power Supply PCB
(confusingly marked as 5V). The rail voltage is also routed to the system microprocessor (μP) via D5965/
R5965 and pin 6 of CN103 as POWER_MUTE.
The 5V relay RY594 is normally open. When the mains switch is closed then the SUB_POWER rail (approx
+4.3V) is activated from the Power Supply PCB via the standby transformer. When the system has
booted correctly, without any shutdown signals, then the POWER_RELAY signal from the system μP also
goes high, pulling down Q5947 hard. Only then does the relay close and switch on the main toroidal
power transformer, enabling the rest of the system to boot up.
Now consider the Power Supply Board, found on page 14 of the schematic. This generates all the main
DC supplies for the AVR400 except +Vcc and -Vee for the power ampliers and the non-logic part of the
VFD display requirements of the Front Panel Board. Note that additional local regulation also takes place
on the other PCBs, e.g. for large digital ICs.
Page 9

Two secondary windings from the toroidal power transformer are fed in via CN63. Pins 1, 2 and 3 connect to a centre-tapped secondary winding used to generate approx +/- 20VDC via the bridge rectier
diodes D603/3/4/5 and the 2,200μF 35V reservoir capacitors C609 and C610. R603 and R604 are 0.47R 1W
fusible resistors for circuit protection – if they fail replace only with the same type and value.
The 3 terminal regulators IC63 and IC62 are mounted on two of the larger heatsinks near the back of the
amplier. These provide +/-15V to the op amps on the amplier’s Input Board via the 11-way connector
BN62. The Input Board also then routes the +/-15V onwards to the Front Panel Board.
Pins 4 and 5 of CN63 receive AC from another transformer secondary to generate approx +15VDC via the
heatsink mounted bridge rectier D601 and the 18,000μF 25V reservoir capacitor C631. F601 and F602
are hard wired 6.3Amp T (time delay) fuses for circuit protection – if they fail replace only with the same type
and value.
This +15V unregulated supply has 4 main outputs:-
1) It is regulated down to +12V with the low dropout (LDO) 3 terminal regulator IC64. This is situated on the heatsink closest to the Main Board, near the back panel. Its output goes to BN62 for
the +12V triggers and also to CN501, to drive the power ampliers’ cooling fans.
2) It supplies the HDMI Board via CN61. To minimize ripple currents in the ground return, Q643 is
wired as a low dropout voltage follower with low pass ltering via R650 and C569.
3) It feeds the switched mode buck regulator IC61 via L631 and C615. The tank circuit comprises
L632, C640 and C641, discharged via D631. R636 and C643 make up a snubber to reduce overshoot. This provides a high current +5V supply to the Input Board via pins 4 and 5 of BN62. This
5V supply also feeds two 3V3 linear regulators, IC67 and IC68. These in turn supply the audio DSP
ICs on the Input Board via pins 10 and 11 of BN62.
4) It feeds the +5V 3 terminal LDO regulator IC66 via the diode D616, which itself is preceded by the
smoothing network comprising R615 (2W 15R) and C615. Note IC66’s output is actually approx
+5.7V because of D644 in its ground line; this is brought back to +5V after D643, to feed the relay
IC66 is noteworthy because it continues working when the amplier is in standby.
It takes a second input from the +9V standby power supply on the Power Amplier PCB – D616 acts as a
gate to prevent this from feeding back to the +15V supply when the system is in standby. It also allows
the +15V supply to override and remove the load from the +9V supply when the amplier is fully booted
up.
D606 and D607 form half of a second bridge rectier (with the other two diodes coming from the full
bridge rectier D601). These diodes charge up the 1μF/50V capacitor C604 to +15V, generating a “mains
power present” signal. The 10K resistor R614 in parallel with C604 continually discharges it so that this
signal eectively disappears within about 50 milliseconds of the mains being switched o. This +15V
goes to the Main Board via pin 8 of BN62, where it is used as a “pull up” signal to help control the various audio muting circuits.
AVR400 Front Panel Board Circuit Description
The Front Panel Board is a double-sided PTH PCB. It contains the VFD (Vacuum Fluorescent Display) and
its associated electronics, plus the keyboard, power status LED, IR remote receiver and headphones
amplier. A daughter board carries the front panel I/O socketry. See page 1 of the schematic diagram.
Page 10

It communicates with the Input Board via CN101 and a 31 way ribbon cable. Other connectors comprise
CN94 which connects to two secondaries of the main power transformer and the hard wired BN93
which connects up the daughter board.
There are two associated break o boards. One houses the front panel mounted single pole mains
switch plus its suppression capacitor C901 and a connector BN502. The second is mounted on the
power ampliers’ heatsink and is used to route power to the cooling fans and also to guide the 31 way
ribbon cable.
The VFD draws AC lament power from a centre tapped winding of the power transformer connected
to pins 1, 2, and 3 of CN94. The centre tap connects to ground via the zener diodes D901/2 and C903
to provide the lament with its required DC oset. Pins 4 and 5 connect to a relatively high voltage
transformer secondary which is half wave rectied by D916 and smoothed by C907 and C960. The zener
diodes D903 and D904 in series with R906 generate +40V which is then coupled to the emitter follower
Q901 to provide a nominal regulated 40V HT power rail for the VFD.
The VFD’s internal driver IC and external data bμFfer IC901 run from the main +5V supply generated in
the Power Supply board and routed onwards through the Input Board. The drive signals (data, clock,
chip select and reset) come directly from the system microprocessor via CN101.
The 12 front panel switches are arranged in 2 blocks of 6 with resistive divider chains connected to two
ADC inputs on the system micro. These have 10K pull-up resistors at the system μP end to complete the
potential divider chains. The pnp switching transistors Q906 and Q907 turn on the 3V3 supply from the
system μP via another 10K pull-up resistor at the μP end to provide interrupt control.
The power status LED D905 is a tri-colour type. The green side indicates power on and the red side
standby. A high signal on the LED net turns on Q902 and Q903. This turns o the npn Q913 to disable
the red LED and turns on the pnp Q912 to enable power to the green LED. The reverse is true when the
LED line is low. Pulling the STB(LED) line low when the LED line is also low powers both LEDs and gives
a yellow light to show when the unit is booting up. Note that the power supply is STBY+5V to allow the
red LED to operate in standby mode.
RC901 is a Kodenshi KSM603TH5B encapsulated infra red receiver for processing commands from an
external IR remote control. It is designed to work with the 36-38kHz carrier frequencies associated with
the Philips RC5 protocol. Note that it operates from the ST+5V rail to enable the AVR400 to be woken up.
It does not demodulate the IR – this is done by the system microprocessor.
The headphones amplier IC902 drives external headphones directly via the 330μF series capacitors
C935 and C936. IC902 has a gain of about 4, meaning that the headphones output will be about 4V rms
when the volume control is set to clip the L and R main power ampliers (equivalent to about 120WPC
into 8 ohms). IC902 is a JRC NJM5556AL capable of driving 7V rms into150 ohm loads and about +/100mA peak current into lower impedances. Mute transistors Q904/905 in series with 100R resistors are
tted in front of its input to minimize switching transients and it is powered from the +/-15V supplies
generated on the Power Supply Board.
The L and R headphones outputs go via BN93 to the Headphones Board, after passing through relay
RL902 which is normally o. A positive voltage from the μP at the emitter of pnp Q911 turns on Q911
and generates the same positive voltage at the base of the npn transistor Q909. Because its emitter is
connected to the -15V rail this pulls the relay on.
The FRONT AUX and MIC inputs come from the Headphones Board and through the microphone relay
RL901. When the relay is o the AUX line level L and R signals are switched through to the unity gain
bμFfer IC904 and then on to the Input Board via pins 3 and 1 of CON101. When the relay is closed (in
Page 11

the same manner as described above for RL902) then the L front input is routed to the low noise microphone amplier IC903. This operates as two cascaded virtual earth ampliers, each with a voltage gain
of approximately 21 (R961/960 and then R965/962). Note the MIC line is biased at +6V via resistors R956,
R957 and R958. The amplied signal is output to the Input Board on pin 5 of CON101.
AVR400 Input Board Circuit Description
The Input Board comprises a 4 layer PCB; this is attached directly to the back panel via its various sockets and to the heatsink by two steel brackets. It is positioned underneath the HDMI Board and above
the Main Board. 5 ribbon cable sockets connect it to the other 4 boards. CN71 connects it to a daughter
board containing two 9 Pin D socket connectors (an RS232 serial port and an iPod dock interface), plus
two 12V trigger sockets and 2 IR receiver sockets. Note some passive components are mounted on the
underside of the PCB.
The Input Board circuitry is shown on pages 2 – 5 of the schematic diagram.
Page 2 covers the analogue inputs, volume control and line level outputs.
Page 3 covers the SPDIF (digital) inputs, clock recovery, audio DSPs and the codec (stereo ADC plus
8-channel DAC).
Page 4 covers the system microprocessor and a slaved support microprocessor
Page 5 covers interfaces to the DAB/Ethernet module, and the boot loader microprocessor used to
update the system SW via USB.
Analogue inputs, volume control and outputs
IC101 is a Renesas R2A15218FP analogue multiplexer and volume control, with a gain range of +42 to
-95dB in 0.5dB steps. It is digitally controlled from the system microprocessor via the I2C bus on pins 49
and 50. A high logic signal on pin 51 enables the system mute. IC101 has +/- 7V supplies generated from
the +/-15V rails with the regulators IC102 and IC103.
All stereo external line level inputs using phono sockets are routed to IC101 via 100R/220pF low pass
CR lters. IC101 also handles the AUX-L, AUX-R and the (mono) MIC_SIGNAL setup microphone inputs
coming from the front panel, plus the internal stereo outputs from AM/FM tuners (TUN-L and TUN-R)
and the DAB/ethernet receiver (VENICE_L and VENICE_R). IC101 additionally switches two multichannel
signals - the 8 channel direct input and the outputs from the 8 post-DAC lters. Note that the +/- 7V
power supply limits the input signals to approximately 4V rms before overload occurs.
The post-DAC lters comprise 4 low noise NJM2068 dual op amps, running from the +/- 7V supplies.
One op amp is assigned to each channel and performs the dual functions of converting a dierential
input from the DAC to a single ended output, whilst simultaneously functioning as a three pole 50kHz
active lter.
The AM/FM tuner module’s outputs pass through the inductors L310 and L302 (providing 19kHz notch
and 38 kHz low pass ltering) and the shunt mute circuits formed by the 330R resistors R354/R369 and
the two halves of Q306 plus Q307.
IC101 has a xed level stereo output for Zone 2 (SUB_L and SUB_R) and a second one, adjustable from
0dB to -18dB in 6dB steps, for the AVR400’s analogue to digital converter (ADC_L and ADC_R).
Page 12

IC101 has one 8 channel variable level output bus labelled VOL01 through to VOL08. Capacitors C295-8
and C231-4 oat the ground ends of the associated internal potentiometers to minimize clicks This bus
goes via specially selected 100μF/25V capacitors to the dual op amps IC121-124, wired as voltage followers and running from the +/- 15V supplies. The C, SL, SR, SBL and SBR outputs are shunt muted when
required via the 560R resistors R383-388 and the dual transistors Q303-305.
The subwoofer output SW has two shunt mute circuits. One using Q311 works in parallel with the rest of
the channels. The other, using Q308 and half of Q303 allows muting of the SW channel alone.
The FL and FR channels take o the stereo headphones amplier feed from IC121 (it goes via the connector WF101 to the Front Panel Board), then add an extra dual voltage follower IC125 and a double
pole shunt mute switch using 4 x 270R resistors and Q301-302. All the above ICs are JRC NJM2068s or
equivalent.
All 8 of these outputs go to via the connector WF103 to the preamplier output sockets and (except for
the subwoofer output) to the 7 power amplier inputs located on the Main Board.
The ADC input ampliers use a JRC NJM2068 for each channel, operating as a single-ended input to
dierential output converter, with HF ltering above about 400kHz. This is sμFcient for anti-aliasing
purposes as the analogue modulator of the ADC samples at 6.144 MHz and only needs to keep out
frequencies above 6MHz.
The array of 12 switching transistors in the bottom right hand corner of the schematic is arranged in
4 blocks of 3 devices (two npn and one pnp per block). The array is used to control the muting of 4
specic groups of audio outputs, taking into account the presence of AC mains via P_U (the pull up line
from the Power Supply board) and the MUTE_POWER line derived from the power ampliers’ Vcc rail
– this is normally high when Vcc is high. The output lines are SB_MUTE2 (for the surround back channels SBL and SBR), ZONE2_MUTE2, HP_MUTE2 (for the headphones relay on the Front Panel board) and
FUNC_MUTE2 (for the 6 main audio channels excluding SBL and SBR).
Zone 2 volume is independently adjustable in 1dB steps via IC131 (rohm BD3812F). Its outputs are
bμFfered and amplied 15dB by the dual op amp IC132 and can be muted when required by Q402. The
output goes directly to two phono sockets forming half of JK11 on the back panel.
SPDIF inputs, ADCs, DACs and Audio DSPs
The AVR400 has 4 coaxial 75 ohm SPDIF (Sony/Philips Digital InterFace) inputs and 2 TOSLINK optical
inputs on its back panel. A further optical input is located on the front panel as part of JK92 (this socket
also includes the AUX and MIC inputs). There are 6 further external SPDIF inputs - one per HDMI input
socket and one on the HDMI output socket (the Audio Return Channel or ARC).
Each of the 4 coaxial inputs is bμFfered by two NOR gates, contained in IC159 and IC160, before being
switched by one half of the dual 4 input multiplexer IC147. The output on pin 7 is then sent to the 8
input multiplexer IC140. Its other 6 inputs comprise the 3 optical receivers already mentioned, the HDMI
input (multiplexed down from 5:1 on the HDMI board), the HDMI ARC and the output of the Venice 6
DAB/Ethernet module. The 8th input is unused. The output MUX_SPDIF is sent to the SPDIF receiver
IC153.
IC153 is a Wolfson WM8804 run in hardware mode. It uses X707 to generate its own 12MHz internal
clock. IC153 automatically identies and dejitters incoming SPDIF signals with sample rates of 32kHz,
44.1kHz, 48kHz, 88.2kHz, 96kHz and 192kHz. Its output, still in SPDIF format, WM_SPDIF, is sent to pin 43
of the system codec IC143.
Page 13

IC143 is the Cirrus Logic CS42548. It includes an SPDIF receiver, 2 channel ADC and 8 channel DAC. Only
one input (pin 43) of the SPDIF receiver is used; the others are grounded.
IC143 has +5V analogue supplies, locally decoupled to analogue ground by C721/722 for VA (pin 24)
and C703/704 for VARX (pin 41). The digital supply is also +5V, decoupled to digital ground by C705/706
(pin 5) and C750/756 (pin 51). The control port power VLC (pin 6) is 3V3, decoupled to digital ground by
C752/773 and the serial port power VLS (pin 53) is also +3V3, decoupled to digital ground by R726 and
C753/754. The 3V3 is generated from the +5V supply by the linear regulator IC148.
The system master audio clock is generated by IC143 on pin 55 whenever an SPDIF signal is present (i.e.
in all cases except when an HDMI multichannel signal in I2S is required to be processed or when using
the ADC). Although IC143 has no jitter rejection below 20kHz its master clock is kept clean from incoming jitter by IC153. The PLL lter is located at pin 39. When SPDIF is not in use IC143 inputs its clock on
pin 59 – this can be 24.576 MHz from the crystal oscillator X701 associated with DSP1 when ADC mode is
engaged, or the recovered clock from the HDMI Board. This is switched by the 4 way change over multiplexer IC145 on pins 9, 10 and 11. IC145 also routes IC143’s recovered master clock or the HDMI master
clock to DSP1 on pins 5, 6 and 7.
Pins 1, 62, 63 and 64 receive the 24 bit serial audio data that has been processed by the DSPs.
The DAC’s 8 analogue outputs are in dierential mode, so making 16 output lines in total, from pins
20-23 and 26-37. These feed the post-DAC lters IC111-114, described above.
The main audio DSP is a Cirrus Logic CS 497024, IC141.This is a 300MIPS dual core 32 bit xed point DSP,
with 72 bit accumulators. The rst core is used for decoding standard and high denition audio formats
(Dolby, DTS etc) and the second is reserved for post processing such as bass management, delay and
room correction. The secondary DSP, IC142, is a Cirrus Logic CS49DV8, responsible for the Dolby Volume
processing. IC141 gets the 1.8V for its core from the 3-terminal regulator IC149. IC142 gets its 1.8V from
IC150. The 3V3_1 and 3V3_2 supplies for these regulators are generated on the Power Supply Board.
IC141, 142 and 143 communicate with the system microprocessor via an SPI bus. For IC141 and IC142
the chip select lines are on pin 6, the clock is on pin 126, the MISO line on pin 124 and the MOSI on
pin 123. For IC 143 the corresponding pins are pins 10, 7, 8 and 9. Note that the 3 chips receive data on
a common line but transmit to the μP on two separate ones (DSPDATA for both DSPs and D_OUT for
IC143).
IC141 communicates with its external memory via a 36 line data bus running at 150MHz. This is needed
when providing lip sync delay for audio accompanied by video. IC144 is a 200MHz 16Mbit SDRAM, organized as 512Kbits x 16bits x 2. It is powered from the board’s 3V3 line via 6 pins, with local decoupling
provided by C758-763.
The DSPs’ programs are stored in two external 3V3 SPI ash memory chips – IC106 (8Mbit) for IC141 and
IC107 (4Mbit) for IC142.
IC141 has two sets of I2S data inputs. DAI (pins 23, 24, 26, 27 for data, pin 29 for the system clock and pin
30 for the LR clock) is for up to 8 channels from the HDMI Board via connector WF104.
DA2 (pins 32 for the LR clock, 33 for system clock and 34 for data) is for audio from the codec IC143. This
includes bitstream SPDIF such as Dolby Digital, uncompressed two channel I2S audio decoded from
SPDIF and ADC generated I2S two channel audio.
The DSP master clock is input on pin 40 of IC141 from pin 9 of IC145 as noted earlier.
Page 14

IC141 also has two sets of I2S data outputs. DA1 is an 8 channel I2S signal (pins 47, 48, 49 and 51) shown
as part of the bus DA0(04:07). This feeds the input of the second DSP IC142 (on pins 23, 24, 26 and 27).
The system clock is on pin 52 of IC141 and the LR clock on pin 54. These go to pins 29 and 30 of IC142.
DA2 is a stereo I2S output (pin 43 for data, pin 44 for the system clock and pin 46 for the LR clock). This
feeds the HDMI board via WF104 and the octal bus switch IC146. The DSP master clock output from
pin 9 of IC145 follows the same route. An SPDIF output from pin 35 of IC141 goes directly to pin 12 of
WF104.
There is one set of 8 channel I2S outputs from IC142 – DA1 (pins 47, 48, 49 and 51). These form part of
the data bus DA0(00:03) where they are routed back to the DACs in IC143 (pins 62, 64, 63 and1 respectively). The I2S system clock and LR clock (pins 52 and 54) also go directly to IC143 (pins 2 and 3).
System Control Microprocessors
There are 3 microprocessors on the Input Board, the main, the sub and the USB micro. The latter is also
kept separate in order to perform upgrades over USB.
The AVR400’s main system microprocessor IC151 is a Toshiba T5CN5 microcontroller. This has an ARM
Cortex 3 core with 512KB of ROM and 32KB of ash memory. It is a 3V3 part, with this power supply
being derived from the main 5V supply via the 3-terminal regulator IC156. It has a 40MHz system clock
derived from crystal X702 and a real time clock from the 32.768 kHz crystal X708.
IC152 is a 32Kbit EEPROM for retaining system settings at power down.
IC155 is a MOSFET switch to enable the HDMI CEC (Consumer Electronic Control) bus when the unit is
powered up, and to isolate the parts of the bus external to the AVR400 when it is powered down.
IC151 has several sets of comms busses - SPI, I2C and UARTs - depending on which system or peripheral
ICs are being addressed. SPI (Serial Peripheral Interface) is a fast 3-wire interface (clock, transmit and
receive) with chip select being addressed by individual I/Os. I2C (Inter Integrated Circuit) is a relatively
slow bidirectional 2-wire interface, with open-collector/source clock and transmit/receive busses, each
with a pull up resistor, and a limited number of embedded chip addresses. UART stands for Universal
Asynchronous Receiver/Transmitter and is a form of bus that takes bytes of information and turns them
into serial data on a bus before reassembling them into bytes at the other end.
SPI is used to talk to the codec IC143 and the two DSPs IC141 and IC142.
I2C is used for both the main and zone 2 volume controls IC101 and IC131. I2C also connects to the sub
micro IC154 and to the NJW1321 video input decoders IC81 and IC81.
IC151’s UARTs are used for USB Tx/Rx, the Torino (video processor) Tx/Rx and the external RS232 Tx/Rx.
Further UARTs on the sub micro IC154 communicate with the Venice 6.2 DAB/Ethernet receiver and
the iPod external interface. IC154 is a Toshiba M333FWFG ARM Cortex 3 microcontroller with 128K ROM
and 8K of ash, eectively used as a helper for IC151. Its 3V3 power supply regulator IC158 runs from the
board’s main 5V supply.
The USB micro (“Bolero”) IC162 is a Toshiba TMP92FD28FG, a 32-bit CISC microcontroller with a built-in
USB2 host controller capable of supporting 12Mbps. Its primary function is to provide a “bullet-proof”
system updating process via an external USB stick. When the AVR400 is powered up IC162 rst self
boots, then interrogates the rest of the system – if it receives the wrong response (e.g. if a previous
update failed part way through) then the unit will appear dead. However IC162 will be constantly inter-
Page 15

rogating the USB socket and insertion of a clean USB stick containing only the system rmware will
initiate a complete recovery automatically.
IC164 is a MiniLogic ML61C282PR precision voltage detector, with a threshold of 2.8V, built in hysteresis
and a CMOS output, used to reset IC162 at power on.
IC163 is an Intersil USB switch, type ISL54220, which routes the USB socket on the rear panel either to
the Venice 6.2 module, for normal audio applications, or to IC162 when the system SW is being upgraded from a USB stick. Note that it is positioned underneath the Venice 6.2 module, close to the USB
socket.
The USB high side power switch IC168 is close to IC163. It is a Richtek RT9702A fed from the main +5V
power supply. It is rated at 1.1 amps output and can ag up a fault condition on the USB bus from pin 3;
this is routed to IC162.
The Frontier Silicon Venice 6.2WB module is plugged into the input board via a 64 way connector CN62. This WB version of the module supports Band 3 DAB/DAB+ digital radio for use in Europe,
Australia, Canada, Korea and other Digital Radio markets. It also supports USB2, and Ethernet up to 100
Mb/s, enabling the AVR400 to be a network audio client. A spare copy of the AVR400’s unique MAC
(Media Access Controller) address can be found on the screening can of the Venice 6.2 module. Its FM
radio function is not used.
The Venice 6.2 is operated in slave mode via the UART pins 9 and 10 on CN62. These connect to the sub
micro IC154. The USB I/O signal pins are 11 and 12, routed to the USB switch IC163. The other USB pins
are not used. Pins 26, 27, 28 and 29 make up an SPI bus to work with the Ethernet PHY IC161 (pin 33
receives interrupts from IC161).
Audio is decoded inside the Venice 6 (i.e. from AAC, FLAC, MP3, WMA or WAV) and sent out by two
routes. Pin 32 carries an SPDIF signal (at 48ks/s) for the main system and pins 64 and 63 carry L/R linear
audio for zone 2 to the volume control IC101.
The Venice 6.2 requires +3V3 at up to 300mA average and +1V2 at 200mA average for the core of its
main processor. 3V3 is provided from the main +5V supply via the three terminal regulator IC165 – this
also provides the soft start signal to pin 2 of the 1V2 regulator IC167 (also fed from +5V with some voltage drop provided by diodes D803/4). Both regulators are SM types, positioned underneath the Venice
6.2 module.
IC161 is a Micrel KSZ8851 single port Fast Ethernet MAC/PHY controller with an SPI interface. It has a
12KB receive bμFfer and a 6KB transmit bμFfer. It has its own 25MHz crystal oscillator X777. Its 4 I/Osgo
to the Ethernet socket JK52 on the back panel. Its +3V3 power rail is derived from the board’s +5V
supply via the three terminal regulator IC166.
AVR400 RS232 board
This is a daughter board connected to the Input Board via an 18 way plug and socket BN71. The circuitry
is shown on page 14 of the schematic diagram.
It contains two 9 way D-type board mounted plugs JK71 and JK72. JK71 is for RS232 control of the
AVR400. JK72 is used to control an iPod or iPhone via an Arcam rDock or rLead (the latter also supports
iPads).
The RS232 dual transmitter and receiver IC73 is an ST3232 run from the standby +5V supply via D721/
R727 and a series pnp transistor Q722 in common emitter mode referred to the +12V rail. Q721 provides
Page 16

the necessary level shifting. IC73 includes internal charge pumps to convert CMOS logic level inputs
to +/-5V RS232 level outputs and +/-25V tolerant RS232 inputs to CMOS logic level outputs. Maximum
rated speed is 300kb/sec.
JK73 is a dual mono 3.5mm jack socket providing two +12V trigger outputs Z_1 and Z_2. The series pass
transistors Q712/715 are pnp T0-92 types with emitters referred to the +12V rail via the paralleled 4.7R
resistors R714/715 and R711/712. In conjunction with the pairs of diodes D711/712 and D714/715 this
provides current limiting at approximately 200mA if the trigger outputs are inadvertently shorted to
ground.
JK72 is a dual 3.5mm mono jack socket providing inputs for two modulated infra-red remote control
signals. These are connected to the opto-isolators IC72 and IC71. Note the use of the standby power
supply ST+5V for the subsequent logic.
AVR400 HDMI Input/Output Board
The HDMI Board is described on pages 6 – 10 of the schematics diagrams. Note that it has components
tted to both sides of the PCB. HDMI stands for High Denition Multimedia Interface. The AVR400’s
system supports certain parts of the HDMI 1.4a specication (3D video compatibility and Audio Return
Channel)
The HDMI Board has 5 type A HDMI input sockets and one type A HDMI output socket, which are ush
with the back panel. It gets its power via the hard wired connector and ribbon cable CN61 and communicates with the Input Board via two ex foil cables attached to connectors CN104 (17 ways) and
CN105 (19 ways). It is tted with a 30 way socket BN301 which attaches to a daughter board handling all
analogue video I/O signals (the Analogue Video Board).
The HDMI Board contains 10 separately regulated local power supplies, mostly derived from the
unregulated but hum ltered +15V supply on the Power Supply Board. This is input on pins 3 and 4 of
the hard wired connector CN61 for +15V and pins 5, 6 and 7 for the ground returns. Pins 1 and 2 are not
used. See page 10 of the schematic diagram for all but the last of these supplies, as described below.
IC923, IC927 and IC930 are all Sanken SI-8005Q 3.5 Amps step-down switching regulators operating at
500kHz +/-10% and drawing power from the +15V line. They are used to generate +3.3VDD, +1.8VDD
and +1.8VH1 (video processor supply) respectively. The potential dividers in their outputs (R839+R844/
R847, R838+852/R851 and R841+843/840) are used to set the required voltages.
All other local power supplies use linear SM 3-terminal regulators.
IC922 and IC929 provide +2.5VH1 and +2.5VH2 for the two DDR memory chips supporting the video
processor. The source supply is +3.3VDD.
IC925 is a KIA7809 generating +8VA from the system’s +15VA line (NOT the unregulated +15V used
elsewhere on the board). This is further dropped to +5VA by IC924, a KIA1117S50. Inductor L860 provides
decoupling for the +5VH1 line. The video processor digital power supply lines +3.3VH1, +3.3VH2 and
+1.8VH2 are sourced from the +3.3VDD and +1.8VDD lines via L-C decoupling.
The video ADC’s analogue supplies, +3.3VA and +1.8VA, are generated from the +5VA line via IC926
(NJM2845DL133) and IC928 (NJM2845L118) respectively.
The 10th regulator, IC917, an NJU7754 found on sheet 9 of the schematic, is used to provide +5V to the
HDMI output socket. It is enabled via SW_P+5V and derives its input from the +8VA supply described
abov
Page 17

The HDMI input SOC, IC901, is a 144 pin LQFP Analog Devices ADV3014B. This is a 4 into 1 HDMI 1.4a
multiplexer and is connected to inputs 4 and 5 (VCR and PVR) on the rear panel (JK95 and JK96). The
other two inputs on IC901 are not used. The core power supply is +1.8V and the receiver terminator
supply voltage is +3.3V. Note that most power supply decoupling components are on the underside of
the PCB. +5V detect and hot plug assert control is carried out by the complementary pairs of switching
transistors Q904/907 and Q910/909. The video system clock is provided by a 28.63636MHz crystal X901
connected across pins 101 and 102.
Pin 63 is set low by R602 meaning IC 901 is controlled by I2C at 3.3V via pins 78 (HDMI_SDA) and 79
(HDMI_SCL) from IC902. The HDMI output from IC901 is sent to input A of IC902.
IC902 is an Analog Devices ADV7844, packaged in a 425 pin BGA. It has a 4-input HDMI 1.3 receiver and
one video input supporting standard analogue video formats, from 525/625i up to 1080p, with 12-bit
ADCs. Its primary function is to prepare these signals for the main video processor IC906. Its second
function is to extract digital audio from the HDMI signals, including the reconstruction of a good quality
master clock, and to output all this in I2S or SPDIF format to the DSPs on the Input Board.
JK92 (AV), JK93 (SAT) and JK 94 (BD) connect to 3 of IC902’s HDMI input ports. Hot plug detect on
these 3 inputs is carried out by the complementary pairs of switching transistors Q905/906, Q908/901
and Q902/903. The 4th input receives the output of the HDMI switch IC 901. The core power supply is
+1.8VH2 and the receiver terminator supply voltage is +3.3VH2, with heavy local L-C decoupling. Note
that most of these power supply decoupling components are on the underside of the PCB. The video
system clock is provided by a 28.63636MHz crystal X902.
IC902 has a 256Mb SDRAM IC904 connected via 9 x 4-way 33 ohm resistor packs. This is used as a line/
frame store for digitizing the analogue video signals (CVBS, S-Video and Y, Cr, Cb) received from the
external video inputs and also separate i-Pod derived analogue video signals. It runs from the +2.5VH2
supply with further local decoupling components mounted on both sides of the PCB.
The 12-bit RGB video outputs are sent via 10 x 33ohm resistor packs to the tri-state bμFfers IC911 and
IC912. A 10-bit subset of these is also sent to the video processor IC906. Note that the critical video clock
is expanded to drive two output lines HD_VCLK1 (for IC906) and HD_VCLK2 (for IC911) via IC905 and 3 x
33ohm resistors.
The extracted digital audio outputs are sent as I2S and SPDIF signals to the audio DSPs on the input
board via 2 x 33 ohm resistor packs and the switch IC903. IC903 is enabled via Q913.
The video processor IC906 is an ST (formerly Genesis) “Torino” type FLI30336AC in a large 416 pin
BGA package. It is used to de-interlace and scale all the AVR400’s video inputs to the required output
resolution(s) up to 1080p and also to generate the system OSD (on screen display). Note that IC906’s
analogue video inputs are not used in this application and are either grounded via an array of resistors
and coupling capacitors close to one long edge of the heatsink or left open (R879-882 are no ts).
IC906 dissipates considerable power (about 4 watts) and is thus equipped with a heatsink soldered
to the PCB via two pins. Its core voltage is +1.8VH1, with +2.5V_DDR being used for its RAM bus and
+3.3VH1 for I/O and 19.66MHz crystal clock X903, all followed by copious local L-C decoupling. Note that
the decoupling capacitors and series inductors required are mounted on the underside of the PCB.
IC906 supports two 256Mbit DDR-1 500MHz 2.5V SDRAMs (IC908 and IC909) via a mix of 33R and 0R
series resistors in the data busses. On the other side of IC906 is its 32Mbit 3.3V ash memory IC907 (Macronix MX29LV320). IC931 is an Atmel AT24C64C 64K EEPROM with +3.3VH1 power.
Page 18

Q914 and Q915 (on the underside of the PCB) send BYPASS_ON and BYPASS_OFF logic signals from
IC906 to the array of 4 x 20-bit non-inverting line driver/bμFfers with tri-statable outputs, IC911/912 and
IC915/916. These are arranged as a 40 way 2-in, 1-out fast switch to bypass IC906 when required (e.g.
if 3D video is present). The video is in 12-bit RGB format and 4 more bμFfers are required for the video
clock, H and V syncs and the DE (data enable) line, thus using up all of the available 40 ways. See sheet 9
of the schematic diagram. Power is provided via local L-C decoupling from +3.3VH2.
The HDMI output is handled by IC918, an Analog Devices ADV7511 in a 100 pin LQFP package. It is a
225MHz output part that can handle 12-bit 1080p video (up to 165MHz clock speed) and embedded HD
audio. It is compatible with certain parts of the HDMI 1.4 specication, supporting 3D video and an ARC
(audio return channel).
As with the other Analog Devices parts IC918 uses two power rails, namely +1.8VH2 and +3.3VH2. The
necessary decoupling capacitors are mounted on the underside of the PCB.
In the AVR400’s implementation the HDMI audio output is limited to stereo rather then 8 channels – via
I2S0 (pin 12), plus MCLK (pin 11), SCLK (pin16) and LRCLK (pin 17). SPDIF from the AVR400 is input to pin
10.
The ARC signal, if received from a downstream sink such as a TV, is output from pin 46 of IC918 and sent
via back to the input board. Note that IC921 is not tted.
The HDMI output is via JK97, a type A HDMI socket. As the AVR400’s output is partly HDMI 1.4 compliant,
pin 14 now becomes the HEAC+ and pin 19 HEAC- as well as HPD (Hot Plug Detect). However, because
the Ethernet part of the HDMI1.4 specication is not supported by the AVR400, the ARC is congured
by the sink to be carried in single (i.e. non-dierential) mode using HEAC+ as the signal line. HEAC+ and
HEAC- are then AC coupled to pins 52 and 51 of IC918 via the 1μF series capacitors C439 and C428. R771,
R777, R785, R795 and R799 bias the inputs and load the cable correctly.(Note – HEAC is short for HDMI
Ethernet and Audio (return) Channel).
Q916 is a twin n-channel MOSFET which only turns on when +5VH1 is present. This isolates the DDC
clock and data lines when the AVR400 is turned o.
IC917 is a low dropout voltage regulator feeding +5V power to pin 18 of JK97 from the +8VA supply,
when enabled by the SW_P+5V line.
Analogue video output of digitized and processed 10-bit video from IC906 is available from the AVR400
via the video encoder IC919 – an Analogue Devices ADV7342B. Composite, s-video and component
video are supported, although only component analogue video is output by the AVR400.
IC919 is in a 64 pin LQFP powered from the +18VA and +3.3VA lines. Once again most decoupling components are on the underside of the PCB.
The 6 x 11-bit video DACs inside IC919 are each loaded with 300R to ground before being AC coupled to
IC913. This is a JRC NJM2566 6-channel video amplier for SD and HD signals, powered from the +5VA
line. The FS_SEL signal on pin 17 sets the bandwidth on component video to 13.5MHz or 30MHz, to suit
progressive SD or HD signals respectively. The composite and s-video bandwidths are xed at 6.75MHz.
The outputs go to the analogue video daughter board via the 30 way socket BN301.
Note that the composite and s-video outputs are not actually used in the AVR400 so are not wired
beyond CN301 on the daughter board. The Y, Cr, Cb component video outputs are terminated with 75
ohm series resistors on the Analogue Video daughter board described next.
Page 19

AVR400 Analogue Video Board
This is connected into the rest of the system via the HDMI board using CN301.The circuitry is shown on
sheet 13 of the schematic diagram.
The purposes of this PCB are:
(1) to switch between the various analogue video inputs (comprising 4 each composite and s-video
and 3 component video)
(2) to route the chosen video signal to the HDMI board for processing
(3) to provide one set of zone 1 video component video outputs
(4) to provide one zone 2 video output (composite video, with its own OSD) from any of the 4 com-
posite video signal inputs.
The PCBs power supplies are +9VV and +5VV, generated from the three-terminal regulators IC88 and
IC89 from the system’s +15VA supply on pin 1 of CN301. Pin 2 carries the system’s -15VA supply – this is
unused on this PCB.
Note that all video inputs are terminated with 75ohm resistors to ground close to the actual sockets.
IC81 is a JRC NJW1321 – a wide bandwidth video switch with 4 inputs, 2 outputs and a 6dB amplier.
It is used to select between the 4 composite and 4 s-video inputs routed to the HDMI board and also
to output any one of the 4 composite video inputs to the On-Screen Display Controller IC83. IC81 runs
from the +9VV supply, consuming about 85mA so it gets quite hot. It is controlled by i2C commands on
pins 15 and 16.
IC82 is also an NJW1321. It selects between the 3 component video inputs and its fourth input is
unused. Its Y, Cr, Cb outputs and the Y, C and CVBS outputs of IC81 are then AC coupled to IC84 – an
NJM2566 6 way video amplier/lter with 6dB gain, powered from the +5VV rail. Its outputs are also AC
coupled and terminated with 75 ohm series resistors before being routed to CN301.
IC86 is a hex inverter used to bμFfer the 3V3 logic level OSD control signals from the HDMI board and
convert them to 5V level for IC83. This is a Sanyo LC74763 in a 30 pin SM package running from the +5VV
rail. It has two crystal oscillators X801 (17.734MHz) and X802 (14.318MHz) to provide composite video
outputs for both PAL and NTSC standards.
IC86’s video input signal is AC coupled to and bμFfered by the emitter follower Q802 before pin 18.
Similarly its output signal (which now includes an OSD) is bμFfered by the pnp transistor Q801 and AC
coupled to the video amplier/switch IC85 (NJM2244), used here purely as a composite video amplier/
lter with 6dB gain. Its AC coupled output to the Z 2 OUT single phono socket JK85 is terminated with a
68 ohms series resistor.
Page 20

6
12345
FROM POWER TRANS
CN94
54321
GND
GND
V DISP
Filament V(AC)
M_GND
10
R902
4.3V
D901
47/25V
D902
M_GND
C908
3.3
R901
3.9V
D916
1N4003
2010.04.12
C903 : 100uF/63V -> 47uF/63V 2EA
100K
0.01uF
R905
OPEN
C906
C960
C907
47/63V
47/63V
FAN
321
GND
CN91
FAN
CUP12326Z-3
FAN
GND
CN96
2 1
GND
21
FAN
CN95
D
FROM FAN
FROM AMP BD
A_GND
Q912
HVTKRA107MT
R959
D906
M_GND
STBY+5V
10K
R989
L.E.D
STBY
PWR ON
220
R978
OPEN
R980
+15V
100
R963
100K
C940
47/25V
C941
47/25V
A_GND
R964
100
-15V
Q909
C107M
RED
GREEN
D905
G R
0.01uF
C927
M_GND
-15V
Q908
C107M
Q913
C107M
Q903
330
R979
OPEN
0.01uF
R981
C928
C107M
M_GND
BN93
HP_L
HP_GND
HP_GND
HP_GND
HP_R
HP_DETECT
FRONT AUX_L(MIC)
A_GND
A_GND
A_GND
FRONT AUX_R
+5VD
+5VD
GND
D_
F_OPT
D_GND
CWB1B01312047
13 12 11 10 9 8 7 6 5 4 3 2 1
TO AMP BD
SWITCH
C901
BN502
2 1
CWB4F032950UZ
470P
S913
KSH1A001ZV
CUP12326Z-2
C
B
TO HEADPHONE BD
MP
REVISION12
3
SCHEMATIC DIAGRAM
MODEL
AVR400
APPROVECHECKDESIGN DRAWING NO
4
5
6
7
A
SHEET
1
15
R903
0
R904
3.3
C903 : 47uF/50V -> 47uF/25V
Q901
C1027Y
47/63
C909
R961
10K
C939
47P
A
- +
L-CH
A-INPUT
A=-Rout/Rin=-10K/1K=-10
FRONT AUX_L(MIC)
271
FRONT AUX_R
HP_RELAY_ON
8
Filament V(AC)
C903
C902
0.022u
M_GND
2010.04.12
R906
1.2K
13V
D903
27V
D904
Q902
C107M
M_GND
R960
470
R-CH
-+
B-INPUT
B
B+INPUT
-15V
V-
A+INPUT
4321
MIC_RELAY_ON
8
D907
M_GND
FRONT
1.25mm Angle FFC
CN101
CUP12326Z-1
M_GND
3123
LED
30
STBY(LED)
VOL_EN1
28
VOL_EN2
27
KEY1
262414 16
KEY2
25 29
VFD_CS
VFD_CLK/Z2 OSD CLK
VFD_DATA/Z2 OSD DATA
22
VFD_RST
21
IR_IN
20
MIC_IN
1915
HP_IN
18
HP_MUTE2
17
ST +5V
+5VD
D_GND
F_OPT
1393 7
D_GND
12
HPL_OUT
11
HP_GND
HPR_OUT
KEY_INPUT_INT
8 10
+15V
-15V
6
MIC_SIGNAL
5
HP_RELAY_ON
42
AUX_L
A_GND
AUX_R
1
FIP91
ESD
C953 OPEN
R977 OPEN
D908
D909
M_GND
REMOTE_IN
D917
ST+5V
KEY_INPUT_INT
R932
OPEN
D_GND
A_GND
100
R984
47/25V
C958
A_GND
100
R985
C959
47/25V
8 7 6 5
IC904
V+
A OUTPUT
B OUTPUT
A
- +
A-INPUT
R934
OPEN
JW901
OPEN
OPEN
CHGND
OPEN
RC901
VccGNDVOUT
321
150P
C922
C924
100/16V
OPEN
R986
M_GND
4.7
R931
0.1uF
C926
C925
10/16V
M_GND
Q906
HVTKRA107MT
M_GND
Q907
HVTKRA107MT
M_GND
LED
KEY1
KEY2
MIC_RELAY_ON
HP_IN
H/P MUTE
+5VD
D_GND
F_OPT
D_GND
HPL_OUT
HP_GND
HPR_OUT
+15V
-15V
MIC_SIGNAL
HP_RELAY_ON
R933
OPEN
56K
R987
-+
B-INPUT
B
B+INPUT
V-
A+INPUT
A_GND
4321
56K
R988
+5VD
S901
KEY_1
HPL_OUT
GND
HPR_OUT
KEY_2
R937
100
R938
100
MENU
1K
R921
1000P
C920
M_GND
S907
DIRECT
1K
R926
1000P
C921
M_GND
+15V
-15V
MIC SIGNAL
C929
10/50V
R935
4.7K
Q904
C2874
HP_GND
R936
4.7K
Q905
C2874
C930
10/50V
INPUT-
DISPLAY
VFD_CS
VFD_CLK
VFD_DATA
VFD_RST
F2
F2
LGND
VDISP
5862
61
C905
0.022u
10
R911
M_GND
0.1uF
C913
0.1uF
C914
C957
100/16V
+5VD_SYS
R912
4.7
S902
S908
-15V
S904
S903
INPUT+
1.5K
R922
ZONE
1.5K
R927
INFO
OK
1.8K
2.7K
R923
R924
S909
S910
MUTE
VOL-
1.8K
2.7K
R928
R929
IC902
8 7 6 5 4 3 2 1
J966
+15V
C931
47/25V
C932
47/25V
J967
CS
VDD
OSCO
DGND
RESET
5354
8.2K
R910
39P
C912
S906
S905
MODE
3.3K
M_GND
R925
S911
S912
VOL+
3.3K
M_GND
R930
R917
R918
1K
R919
1K
R920
1K
1K
IC902 NJM4556AL
A=1+(Rout/Rin)=1+(3.9K/1K)=4.9
-
L-CH
C933
680P
R941
3.9K
56K
56K
HP_GND
FRONT AUX_L
FRONT AUX_R
+
CP
R942
R943
DA
DO
C915 0.1uF
C916
C917 1000P
C918 1000P
+15V
-15V
MIC SIGNAL
-15V
HP_GND
TEST
1000P
0.1uF
C919
M_GND
R-CH
1K
R944
1K
R945
CFLHCA16S202T
R909
10
47
R913
47
R915
IC901
HVITC74HCT7007F
1 2 3 4 5 6 7
-++15V
C934
680P
R946
3.9K
VFD_DATA
47
VFD_CLK
R914
VFD_CS
47
VFD_RST
R916
C935
330uF/10V
56K
R947
56K
R948
C936
330uF/10V
HP_IN
D_GND
F_OPT
D_GND
IC
IC
F1
F1
NC
25556
1674849505152 557
C904
0.022u
M_GND
40V
47K
47/63
C910
0.01uF
C911
8 7 6 5
+15V
V+
IC903
NJM2068M
A OUTPUT
HP_L
RL901
A_GND
65
RL902
34
HP_R
Q911
A107M
Q910
A107M
R907
C943
150P
R965
10K
271
M_GND
100K
B OUTPUT
65
34
R908
M_GND
891011121314
M_GND
HIGH : PWR_ON(LED)
LOW : STBY(LED)
R956
R957
MIC SIGNAL OUT
MIC SIGNAL IN
-15V
2.2K
1.5K
A_GNDA_GND
HP_RELAY_ON
MIC_RELAY_ON
C938
10/50V
10K
R958
470
R962
0.047
C937
470P
C942
A_GND
M_GND
MIC SIGNAL IN
C944
10/50V
56K
R955
A_GND
FRONT AU
X_L
HP_L
HP_R
FRONT AUX_R
D
C
B
TO INPUT BD
A
J.I.H
10.11.17
L.J.H S.H.S
10.11.17 10.11.17
2326SCMZ
(FRONT)
1
1
Page 21

Page 22

Page 23

Page 24

Page 25

6
12345
ADV3014 Decoupling Capacitor
CVDD_1V8_3014
9R005Z
L803
L806
9R005Z
47K
R635
C119
TVDD_3V3_3014
C121
1K
R636
R659
1K
R661
R638
C151
C148
10uF/6.3V
0.1uF / 16V
10uF/6.3V
0.1uF / 16V
22K
22K
Worst Measured Currents
428mA
C113
C116
25V/0.01UF
Worst Measured Currents
238mA
C102
C109
25V/0.01UF
KRA102S
Q903
0.1uF
KRA102S
Q908
0.1uF
C115
C122
0.1uF / 16V
C106
C125
0.1uF / 16V
#21: HPD Part
#21: HPD Part
C131
C117
0.1uF / 16V
25V/0.01UF
C126
C123
0.1uF / 16V
25V/0.01UF
KRC103S
Q902
KRC103S
Q901
+1.8VH2
D
+3.3VH2
47K
HP DET
+5V
GND
DDC DATA
DDC CLK
C
B
CE REMOTE
D1 SHIELD
INPUT-3
D1 SHIELD
D2 SHIELD
D2 SHIELD
DDC DATA
DDC CLK
CE REMOTE
D1 SHIELD
D1 SHIELD
INPUT-2
D2 SHIELD
D2 SHIELD
HP DET
NC
CK-
CK+
D0-
D0+
D1-
D1+
D2-
D2+
+5V
GND
NC
CK-
CK+
D0-
D0+
D1-
D1+
D2-
D2+
CEC
R658
19
18
17
16
15
14
13
12
11
10
9
8
7
6
5
4
3
2
1
JK94
19
18
17
16
15
14
13
12
11
10
9
8
7
6
5
4
3
2
1
JK93
DVDD_1V8_3014
C130
L805
9R005Z
0.1uF / 16V
25V/0.01UF
R660
R639
47K
Worst Measured Currents
390mA
C120
10uF/6.3V
+3.3VH2
C128
1K
R632
10K_NC
#7: Added pull-up
1K
10K_NC
R633
#7: Added pull-up
0.1uF / 16V
L804
9R005Z
C107
C108
DVDDIO_3V3_3014
0.1uF / 16V
25V/0.01UF
C142
C110
C134
Worst Measured Currents
2.3mA
10uF/6.3V
0.1uF / 16V
R657
100
R634
100
C135
C133
0.1uF / 16V
25V/0.01UF
25V/0.01UF
C132
C129
C136
0.1uF / 16V
25V/0.01UF
HDMI_HPD2
PWR2
HDMI2_DDC_SDA
HDMI2_DDC_SCL
HDMI2_CK-
HDMI2_CK+
HDMI2_D0-
HDMI2_D0+
HDMI2_D1-
HDMI2_D1+
HDMI2_D2-
HDMI2_D2+
HDMI_HPD3
PWR3
HDMI3_DDC_SDA
HDMI3_DDC_SCL
HDMI3_CK-
HDMI3_CK+
HDMI3_D0-
HDMI3_D0+
HDMI3_D1-
HDMI3_D1+
HDMI3_D2-
HDMI3_D2+
+1.8VH2
25V/0.01UF
C124
0.1uF / 16V
25V/0.01UF
R655
47K
R656
PVDD_1V8_3014 TXAVDD_1V8_3014
Worst Measured Currents
35mA
L808
+1.8VH2 +1.8VH2
9R005Z
C139
C112
C137
0.1uF / 16V
Worst Measured Currents
4.33mA
C127
C114
0.1uF / 16V
C118
0.1uF / 16V
25V/0.01UF
+1.8VH2+1.8VH2
25V/0.01UF
10uF/6.3V
L801
9R005Z
C140
10uF/6.3V
Option : Front HDMI Input port
CN63
HP DET
CE REMOTE
DDC DATA
DDC CLK
CK SHIELD
D1 SHIELD
FRONT_HDMI
D1 SHIELD
D2 SHIELD
D2 SHIELD
TX_EN
+3.3VA
+3.3VA
D2+
+5V
+5VA
GND
CK-
CK+
D0-
D0+
D1D1+
CJP23GB210ZY NC
2
4
6
810
1214
16
1820
D2-
22
L866
TXEN
1
2
3
CEC
3
4
5
5
6
7
7
8
911
9
10
11
12
1315
13
14
15
16
17
17
18
1921
19
20
21
22
23 1
23
DDC DATA
DDC CLK
CE REMOTE
D1 SHIELD
INPUT-5
D1 SHIELD
D2 SHIELD
D2 SHIELD
+3.3VH2+5VA
9R005Z_NC
HP DET
Worst Measured Currents
22.7mA
L807
9R005Z
C138
C104
C105
10uF/6.3V
0.1uF / 16V
TXPLVDD_1V8_3014TXPVDD_1V8_3014
ed Currents
Worst Measur
24.3mA
L802
9R005Z
C141
C101
C103
10uF/6.3V
0.1uF / 16V
1K_NC
47K_NC
L865
9R005Z_NC
R640
R643
22K_NC
R642
0.1uF_NC
C149
1K
47K
R647
R650
19
+5V
GND
NC
CK-
CK+
D0-
D0+
D1-
D1+
D2-
D2+
JK96
R646
18
17
16
15
14
13
12
11
10
9
8
7
6
5
4
3
2
1
ADV7844 Worst Measured Currents
1.8V Total : 904.33mA
3.3V Total : 240.3mA
C111
0.1uF / 16V
25V/0.01UF
25V/0.01UF
KRA102S_NC
#21: HPD Part
Q912
Q911
KRA102S
Q909
22K
0.1uF
C146
KRC103S_NC
#21: HPD Part
CEC
D
DVDDIO_3V3_3014
ADV3014_RESET
2.2K
R614
C144
X901
105
DDCA_SCL
CVDD
CGND
0.1uF_NC
0
28.6363MHz
PVDD_1V8_3014
R612
100
101
102
103
104
XTAL
PVDD
PVDD
PGND
PGND
XTAL1
HP_CTRLA
RTERM
5V_DETA
DDCA_SDA
DDCC_SCL
CGND
CVDD
CGND
RXC_1-
RXC_0+
TVDD
RXC_0-
RXC_C+
RXC_C-
101112131415161718192021222324252627282930313233343536
#12: Added Pull-down 500 ohm
R645
1K_NC
R641
47K_NC
R644
100_NC
R858
0_NC
10K
R857
R857 : Front HDMI don`t used
KRC103S
Q910
1K
R631
R654
47K
R652
100
R610
R611
R603 10K
DVDD_1V8_3014
1K(1%)
1K(1%)
47P
C145
47P
C143
106
107
108
108 107 106 105 104 103 102 101 100 99 98 97 96 95 94 93 92 91 90 89 88 87 86 85 84 83 82 81 80 79 78 77 76 75 74 73
109
109
110
110
111
111
112
112
RXA_C-
113
113
RXA_C+
114
114
TVDD
115
115
RXA_0-
116
116
RXA_0+
117
117
CGND
118
118
RXA_1-
119
119
RXA_1+
120
120
TVDD
121
121
RXA_2-
122
122
RXA_2+
123
123
HP_CTRLB
124
124
5V_DETB
125
125
DGND
126
126
DVDD
127
127
DDCB_SDA
128
128
DDCB_SCL
129
129
CVDD
130
130
CGND
131
131
RXB_C-
132
132
RXB_C+
133
133
TVDD
134
134
RXB_0-
135
135
RXB_0+
136
136
CGND
137
137
RXB_1-
138
HP_CTRLC
138
RXB_1+
5V_DETC
139
DDCC_SDA
139
TVDD
140
140
RXB_2-
141
141
RXB_2+
142
142
143
143
144
144
123456789
R867
0
R613
TEST16
RESETB
PWRDNB
TVDD
RXC_2-
RXC_1+
DVDDIO_3V3_3014
10K
DVDD
DGND
TEST13
TEST14
TEST15
IC901
CVIADV3014BSTZ
HP_CTRLD
5V_DETD
DGND
DVDD
RXC_2+
DVDD_1V8_3014
ADV3014_INT2
ADV3014_INT
ADV3014_INT_TX
HDMI_SCL
2.2K
R620
R606
10K
R866
0
TEST9
INT_TX
TEST10
TEST11
TEST12
DVDDIO
DGNDDIO
DDCD_SDA
TVDD
RXD_C+
DDCD_SCL
CVDD
CGND
RXD_C-
HDMI_SDA
R605
R619
DVDD_1V8_3014
0
0
R618
R604
100
100
SCL
INT
INT2
DVDD
DGND
TXPLGND
TXPGND
TXPLVDD
TXPVDD
CVDD
CGND
RXD_1+
RXD_1-
CGND
RXD_0+
RXD_0-
DVDDIO_3V3_3014
737475767778798081828384858687888990919293949596979899
72
72
TEST7
TEST8
SDATA
71
71
70
70
TEST2
69
TEST6
TEST5
69
DVDDIO
DGNDIO
TEST1
68
68
TEST4
EP_MISO
TEST3
67
67
EP_MOSI
66
66
EP_CS
65
65
EP_SCK
64
64
CSB
63
63
ALSB
62
62
DVDD
61
61
DGND
60
60
CEC
59
59
TXGND
58
58
TX2+
57
57
TX2-
56
56
TXAVDD
55
55
TX1+
54
54
TX1-
53
53
TXGND
52
52
TX0+
51
51
TX0-
50
50
TXGND
49
49
TXC+
48
48
TXC-
47
47
TXGND
46
46
TXAVDD
45
45
TXDDC_SCL
44
44
TXDDC_SDA
43
43
TEST0
42
42
HP_TX
41
41
EXT_SWING
40
40
39
39
38
38
37
RXD_2+
TVDD
RXD_2-
37
363534333231302928272625242322212019181716151413121110987654321
TXPLVDD_1V8_3014
TXPVDD_1V8_3014
TVDD_3V3_3014
CVDD_1V8_3014
R865
DVDD_1V8_3014
TXAVDD_1V8_3014
1K(1%)
8.2K(1%)
R621
R607
TMDS Signal Amplitude Circuit
10K
_3V3_3014 DVDDIO_3V3_3014
DVDDIO
R617
10K_NC
10K
R602
10K
R616
R601
10K_NC
C
HDMI1_D2+
HDMI1_D2-
HDMI1_D1+
HDMI1_D1-
HDMI1_D0+
HDMI1_D0-
+5VH1
HDMI1_CK+
HDMI1_CK-
R622
0
R608
0
R615
0
2.2K
2.2K
2.2K
R609
R623
R878
HDMI1_DDC_SCL
HDMI1_DDC_SDA
HDMI_HPD1
To : ADV7844 HDIM Input port
B
CUP12328Z
#21: HPD Part
KRA102S
Q905
1K
47K
R653
R662
22K
HP DET
+5V
18
GND
DDC DATA
16
DDC CLK
NC
14
CE REMOTE
CK-
12
D1 SHIELD
CK+
10
D0-
8
D1 SHIELD
INPUT-1
D0+
6
A
D1-
D2 SHIELD
D1+
D2-
D2 SHIELD
D2+
4
2
JK92
R630
19
17
0.1uF
C147
15
13
11
9
7
5
3
1
KRC103S
Q906
1K
R624
R629
R628
47K
R651
100
10K_NC
#7: Added pull-up
HDMI_HPD4
PWR4
HDMI4_DDC_SDA
HDMI4_DDC_SCL
HDMI4_CK-
HDMI4_CK+
HDMI4_D0-
HDMI4_D0+
HDMI4_D1-
HDMI4_D1+
HDMI4_D2-
HDMI4_D2+
DDC DATA
DDC CLK
CE REMOTE
D1 SHIELD
INPUT-4
D1 SHIELD
D2 SHIELD
D2 SHIELD
HP DET
+5V
GND
NC
CK-
CK+
D0-
D0+
D1-
D1+
D2-
D2+
47K
R626
19
18
17
16
15
14
13
12
11
10
9
8
7
6
5
4
3
2
1
JK95
KRA102S
#21: HPD Part
Q907
1K
R627
22K
R649
0.1uF
C150
KRC103S
Q904
1K
R637
R625
47K
CEC
R648
100
MP
REVISION12
3
SCHEMATIC DIAGRAM
MODEL
AVR400
4
5
6
7
A
SHEET
6 15
APPROVECHECKDESIGN DRAWING NO
S.K
10.11.16
L.J.H S.H.S
10.11.16 10.11.16
HDMI INPUT
51
Page 26
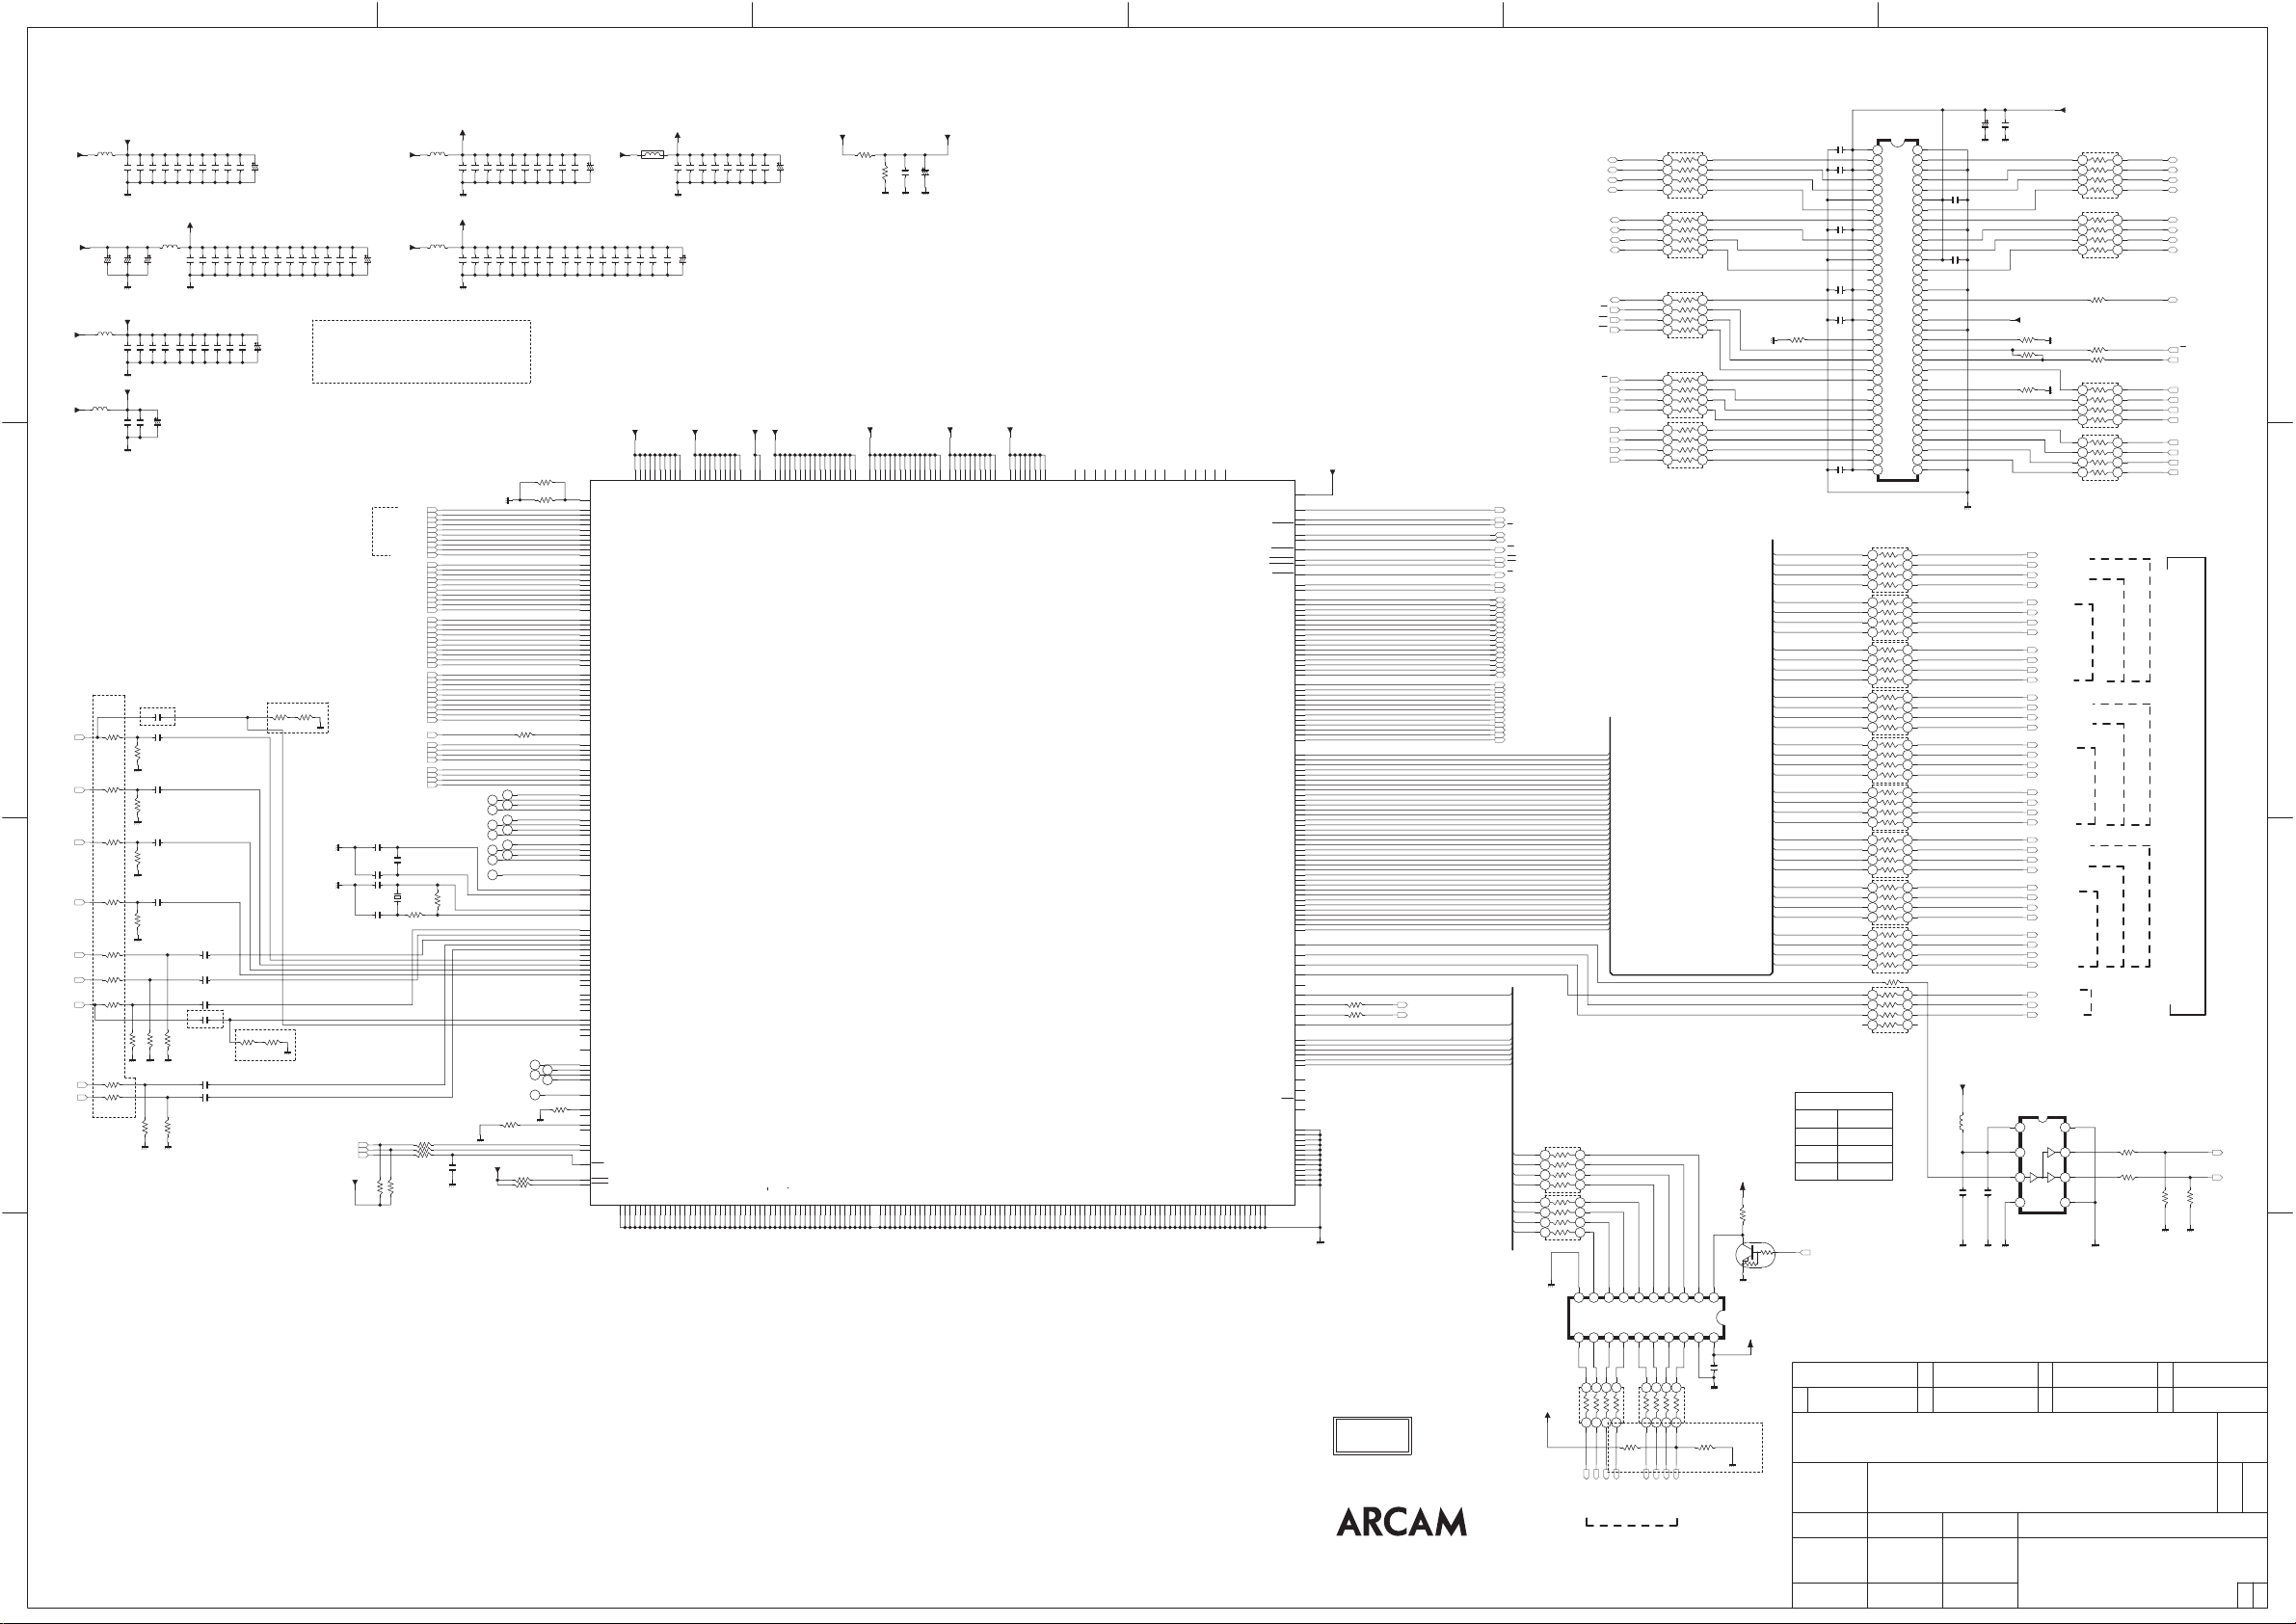
IN
0.1uF / 16V
R677 270
DDR_VREF
R710
4.7K
R689
0
IC905
74FCT38072DCGI
1234
HD_DB00
HD_DB01
HD_DB02
HD_DB03
HD_DB04
HD_DB05
HD_DB06
HD_DB07
HD_DB08
HD_DB09
HD_DB10
HD_DB11
HD_DG00
HD_DG01
HD_DG02
HD_DG03
HD_DG04
HD_DG05
HD_DG06
HD_DG07
HD_DG08
HD_DG09
HD_DG10
HD_DG11
HD_DR00
HD_DR01
HD_DR02
HD_DR03
HD_DR04
HD_DR05
HD_DR06
HD_DR07
HD_DR08
HD_DR09
HD_DR10
HD_DR11
HD_DE
HD_HSYNC
HD_VSYNC
12345
Worst Measured Currents
250mA(20%:290mA)
+2.5V_DVDDIO_SDRAM
33ohm (1005SIZE X 4),1/16W
4321
RN24
33ohm (1005SIZE X 4),1/16W
4321
RN29
R703
33
R674 33
R711
33ohm (1005SIZE X 4),1/16W
4321
RN10
33ohm (1005SIZE X 4),1/16W
4321
RN15
Sync & Control
OUT
OUT
5 6 7 8
8765
8765
33
8765
8765
BLUE:12bit
BLUE:10bit
BLUE:08bit
GREEN:10bit
GREEN:12bit
GREEN:08bit
RED:12bit
RED:10bit
RED:08bit
1-TO-2 CLOCK DRIVER
R685
33
33
R691
100K
R883
DQ15
DQ14
DQ13
DQ12
DQ11
DQ10
DQ9
DQ8
UDQS
CK
CK
CKE
A11
A9
A8
A7
A6
A5
A4
D
C
HDMI 24/30/36Bit TTL Output
B
HD_VCLK1
HD_VCLK2
100K
R884
6
DVDDIO_3.3V
0.1uF / 16V
0.1uF / 16V
0.1uF / 16V
TVDD_3.3V
Worst Measured Currents
190mA(20%:228mA)
C208
C161
C169
C172
C181
C188
C193
C201
C218
C232
C255
0.1uF / 16V
0.1uF / 16V
0.1uF / 16V
0.1uF / 16V
0.1uF / 16V
Worst Measured Currents
260mA(20%:312mA)
C183
C196
C203
C204
C220
0.1uF / 16V
0.1uF / 16V
0.1uF / 16V
0.1uF / 16V
0.1uF / 16V
R676 0_NC
T904
T906
T908
T910
T912
T914
T915
T916
T917
T918
T919
T901
T902
R668 10K
DVDDIO_3.3V
R692
R707
T911
T907
T903
4.7K
0.1uF / 16V
C171
0.1uF / 16V
0
0.1uF / 16V
C163
0.1uF / 16V
CVIADV7844KBCZ
R687
1K
R681
1K
T909
T905
R664 10K
10/16V
0.1uF / 16V
0.1uF / 16V
C244
C250
C257
C264
C158
0.1uF / 16V
0.1uF / 16V
0.1uF / 16V
0.1uF / 16V
0.1uF / 16V
IC902
D18
RTERM
F22
RXA_0+
F23
RXA_0-
E22
RXA_1+
E23
RXA_1-
D22
RXA_2+
D23
RXA_2-
G22
RXA_C+
G23
RXA_C-
F20
DDCA_SCL
E20
DDCA_SDA
B20
RXB_0+
A20
RXB_0-
B19
RXB_1+
A19
RXB_1-
B18
RXB_2+
A18
RXB_2-
B21
RXB_C+
A21
RXB_C-
D20
DDCB_SCL
D19
DDCB_SDA
B14
RXC_0+
A14
RXC_0-
B13
RXC_1+
A13
RXC_1-
B12
RXC_2+
A12
RXC_2-
B15
RXC_C+
A15
RXC_C-
D17
DDCC_SCL
D16
DDCC_SDA
B8
RXD_0+
A8
RXD_0-
B7
RXD_1+
A7
RXD_1-
B6
RXD_2+
A6
RXD_2-
B9
RXD_C+
A9
RXD_C-
D15
DDCD_SCL
D14
DDCD_SDA
D7
CEC
D12
RXA_5V
D9
RXB_5V
C10
RXC_5V
C9
RXD_5V
D13
HPA_A
D10
HPA_B
D8
HPA_C
C8
HPA_D
B22
HEAC_1+
A22
HEAC_1-
B10
HEAC_2+
A10
HEAC_2-
C4
E1_RX+
D4
E1_RX-
C3
E1_TX+
D3
E1_TX-
A4
E2_RX+
B4
E2_RX-
A3
E2_TX+
B3
E2_TX-
W4
SPDIF_IN
M23
REFP
M22
REFN
K22
XTALN
K23
XTALP
AC20
AIN1
AC21
AIN2
AC22
AIN3
AA23
AIN4
Y22
AIN5
Y23
AIN6
V23
AIN7
U23
AIN8
U22
AIN9
R23
AIN10
P22
AIN11
P23
AIN12
AB21
HS_IN1/TRI5
AB22
VS_IN1/TRI6
R20
HS_IN2/TRI7
R21
VS_IN2/TRI8
AB20
SYNC1
AA22
SYNC2
V22
SYNC3
R22
SYNC4
Y20
AOUT
V20
TRI1
V21
TRI2
U21
TRI3
U20
TRI4
V4
AVLINK
G20
VGA_SCL
H20
VGA_SDA
H4
TTX_SCL
H3
TTX_SDA
P3
SCL
P4
SDA
V3
RESET
C6
PWRDN1
C7
PWRDN2
GND_01
A1
AVDD_1.8V
Worst Measured Currents
L814
+1.8VH2
9R005Z
D
+1.8VH2
C152
+1.8VH2
L809
9R005Z
+1.8VH2
L810
9R005Z
240mA(20%:288mA)
C153
C259
C267
C154
C165
C176
C195
C225
C236
C239
C251
0.1uF / 16V
0.1uF / 16V
C159
22/6.3V
22/6.3V
CVDD_1.8V
C187
0.1uF / 16V
0.1uF / 16V
PVDD_1.8V
C229
0.1uF / 16V
0.1uF / 16V
0.1uF / 16V
0.1uF / 16V
9R005Z
C185
22/6.3V
C175
C184
0.1uF / 16V
0.1uF / 16V
Worst Measured Currents
90mA(20%:108mA)
C216
0.1uF / 16V
L815
C156
0.1uF / 16V
C186
22/6.3V
0.1uF / 16V
0.1uF / 16V
DVDD_1.8V
C256
0.1uF / 16V
0.1uF / 16V
Worst Measured Currents
420mA(20%:504mA)
C213
C221
0.1uF / 16V
0.1uF / 16V
0.1uF / 16V
0.1uF / 16V
C248
C249
0.1uF / 16V
0.1uF / 16V
C212
0.1uF / 16V
0.1uF / 16V
Worst Measured Currents
590mA(20%:708mA)
C233
C243
0.1uF / 16V
0.1uF / 16V
C191
C235
C246
0.1uF / 16V
0.1uF / 16V
22/6.3V
C174
C189
C194
C202
C214
C219
C227
0.1uF / 16V
0.1uF / 16V
0.1uF / 16V
0.1uF / 16V
0.1uF / 16V
0.1uF / 16V
0.1uF / 16V
ADV7844 Worst Measured Currents
1.8V Total : 1340mA(20%: 1608mA
C160
22/6.3V
2.5V Total : 100mA(20%: 120mA)
3.3V Total : 450mA(20%: 540mA)
C
Option
Option
C242 1000P
C247
IPOD_Y/SC
SV_Y_THRU
SV_C_THRU
R712
24
R686
24
R706
24
R665
24
R699
24
R704
24
R684
24
R679 24
R698 24
51
R695
V-GND
51
R713
V-GND
51
R697
V-GND
51
R715
V-GND
51
R667
R678
V-GND V-GND V-GND
R714
V-GND V-GND
0.1uF / 16V
C226
0.1uF / 16V
C241
0.1uF / 16V
C210
0.1uF / 16V
51
51
R663
R690
C265 0.1uF / 16V
C157 0.1uF / 16V
C190 1000P
Option
51
C240 0.1uF / 16V
C262 0.1uF / 16V
51
C182 0.1uF / 16V
COM_Y_THRU
COM_PR_THRU
COM_PB_THRU
CVBS_THRU
IPOD_PB/CVBS
IPOD_PR/SY
B
R708
R701
1M_NC
1M_NC
R671
R700
1M_NC
1M_NC
HDMI_SCL
HDMI_SDA
ADV7844_RESET
DVDDIO_3.3V
+3.3VH2 +2.5VH2
L813
9R005Z
+3.3VH2
L816
C230
22/6.3V
R694
4.7K
HDMI1_D0+
HDMI1_D0-
HDMI1_D1+
HDMI1_D1-
HDMI1_D2+
HDMI1_D2-
HDMI1_CK+
HDMI1_CKHDMI1_DDC_SCL
HDMI1_DDC_SDA
HDMI2_D0+
HDMI2_D0-
HDMI2_D1+
HDMI2_D1-
HDMI2_D2+
HDMI2_D2-
HDMI2_CK+
HDMI2_CKHDMI2_DDC_SCL
HDMI2_DDC_SDA
HDMI3_D0+
HDMI3_D0-
HDMI3_D1+
HDMI3_D1-
HDMI3_D2+
HDMI3_D2-
HDMI3_CK+
HDMI3_CKHDMI3_DDC_SCL
HDMI3_DDC_SDA
HDMI4_D0+
HDMI4_D0-
HDMI4_D1+
HDMI4_D1-
HDMI4_D2+
HDMI4_D2-
HDMI4_CK+
HDMI4_CKHDMI4_DDC_SCL
HDMI4_DDC_SDA
HDMI_HPD1
HDMI_HPD2
HDMI_HPD3
HDMI_HPD4
10uF/6.3V
X902
R682
R688
R693
R696
4.7K
9R005Z
CEC
PWR1
PWR2
PWR3
PWR4
C253
R702
1M_NC
R680
28.63636MHz
0
22
22
1K
C211
C162
C173
0.1uF / 16V
from : ADV3014 HDMI Out
C167
0.1uF / 16V
C155
0.1uF / 16V
C209 22P
C199 27P
+2.5V_DVDDIO_SDRAM
Worst Measured Currents
W23
AVDD_10
C217
0.1uF / 16V
10/16V
CVDD_1.8V
E21
GND_15
G10
G13
100mA(20%:120mA)
C164
C178
C179
C192
C200
0.1uF / 16V
0.1uF / 16V
F21
G15
G16
G17
CVDD_01
CVDD_02
CVDD_03
CVDD_04
CVDD_05
GND_18H8GND_19H9GND_20
GND_16
GND_17
H7
G14
C197
C198
10/16V
0.1uF / 16V
0.1uF / 16V
0.1uF / 16V
0.1uF / 16V
J20
K20
A5
G21
H10
A11
H21
H15
H16
H17
PVDD_02
PVDD_01
TVDD_01
CVDD_06
CVDD_10
CVDD_07
CVDD_08
CVDD_09
GND_31
GND_30
GND_29
GND_28
GND_27
GND_26
GND_32
GND_21
GND_22
GND_23
GND_24
GND_25
J9
J8
J7
J12
J11
J10
J14
J13
H11
H12
H13
H14
L811
0.1uF / 16V
C245
C222
C223
C234
C237
C266
0.1uF / 16V
0.1uF / 16V
0.1uF / 16V
0.1uF / 16V
AVDD_1.8V PVDD_1.8V TVDD_3.3V
W22
W21
W20
N20
N21
N22
N23
P20
P21
AVDD_09
AVDD_08
AVDD_07
AVDD_01
AVDD_02
AVDD_03
AVDD_04
AVDD_05
AVDD_06
GND_09
GND_08
GND_07
GND_06
GND_05
GND_04
GND_02
GND_03
GND_12G8GND_13G9GND_14
GND_10E4GND_11
E3
G7
B23
C17
C16
C15
C14
C13
C12
A23
A17
TVDD_02
GND_33
J15
C205
B11
B5
TVDD_03
TVDD_05
TVDD_04
GND_35
GND_34
GND_36
J16
J17
C18
C5
C11
B17
TVDD_09
TVDD_07
TVDD_08
TVDD_06
GND_38
GND_37
GND_40K9GND_41
K8
J23
J22
+2.5V_DVDDIO_SDRAM
R669
1K(1%)
DVDD_1.8V DVDDIO_3.3V +2.5V_DVDDIO_SDRAM
C19
C20
C21
C22
C23
L7
D5
K7
D11
D21
VDD_01
TVDD_10
TVDD_11
TVDD_12
TVDD_13
TVDD_14
TVDD_15
TVDD_16
TVDD_17
C207
R666
C261
10/16V
1K(1%)
0.1uF / 16V
U11
U12
U13
U14
U10
U7
R7
M7
N7
T7
P7
VDD_12
VDD_13
VDD_14
VDD_15
VDD_11
VDD_08U8VDD_09U9VDD_10
VDD_02
VDD_06
VDD_03
VDD_07
VDD_04
VDD_05
ADV7844
cessor & ADC & Decoder
HDMI Pro
SD to I/P Converter
GND_66
GND_65
GND_64
GND_63
GND_62
GND_61
GND_60
GND_59
GND_58
GND_57
GND_56
GND_55
GND_54
GND_52
GND_51
GND_42
GND_43
GND_44
GND_45
GND_46
GND_47
GND_48
GND_49
GND_50
L9
L8
L4
L3
K10
K11
K12
K13
K14
K15
K16
K17
K21
L23
L22
L21
L20
L17
L16
L15
L14
L13
L12
L11
L10
DDR_VREF
CUP12328Z
U4
U3
U2
U1
L2
AA6
AC6
AC18
A16
E1
L1
DVDDIO_03
DVDDIO_01E2DVDDIO_02
GND_67
GND_70
GND_69
GND_68
M8
M9
M11
M10
AA18
Y18
AB6
Y6
DVDDIO_08
DVDDIO_07
DVDDIO_06
DVDDIO_05
DVDDIO_04
DVDDIO_10
DVDDIO_09
VDD_SDRAM_03
VDD_SDRAM_04
VDD_SDRAM_02
VDD_SDRAM_01
D_79
GN
GND_78
GND_77
GND_76
GND_75
GND_74
GND_73
GND_72
GND_71
GND_80N9GND_81
GND_82
GND_83
N8
N10
N11
M21
M20
M17
M16
M15
M14
M13
M12
B16
AB12
AB18
VDD_SDRAM_05
GND_84
N12
N13
H22
AC12
VDD_SDRAM_06
VDD_SDRAM_07
GND_85
GND_86
N14
N15
H23
NC_01
NC_02
NC_03
VDD_SDRAM_08
GND_87
NC_04
GND_88
N16
N17
GND_100
GND_89
GND_90P9GND_91
GND_92
GND_93
GND_94
GND_95
GND_96
GND_97
GND_98
GND_99
P8
R8
P10
P11
P12
P13
P14
P15
P16
P17
C252
0.1uF / 16V
0.1uF / 16V
C177
10/16V
C238
C224
+3.3VH2
L812
9R005Z
C180
C168
0.1uF / 16V
25V/0.01UF
IC904
CVIA3S56D40FTPG5
BLUE_RX00
BLUE_RX01
BLUE_RX02
BLUE_RX03
BLUE_RX04
BLUE_RX05
BLUE_RX06
BLUE_RX07
BLUE_RX08
BLUE_RX09
BLUE_RX10
BLUE_RX11
GREEN_RX00
GREEN_RX01
GREEN_RX02
GREEN_RX03
GREEN_RX04
GREEN_RX05
GREEN_RX06
GREEN_RX07
GREEN_RX08
GREEN_RX09
GREEN_RX10
GREEN_RX11
RED_RX00
RED_RX01
RED_RX02
RED_RX03
RED_RX04
RED_RX05
RED_RX06
RED_RX07
RED_RX08
RED_RX09
RED_RX10
RED_RX11
ON : HIGH
HDMI_AUDIO_ON
R675
4.7K
I2S0
I2S1
I2S2
I2S3
0.1uF / 16V
C231
0.1uF / 16V
C254
0.1uF / 16V
C258
0.1uF / 16V
C260
0.1uF / 16V
C263
0.1uF / 16V
C166
In case of PCM
FL/FR
SUB/CEN
SL/SR
SBL/SBR
VDD
VSS
DQ0
DQ15
VDDQ
VSSQ
DQ1
DQ14
DQ13
DQ2
VDDQ
VSSQ
DQ12
DQ3
DQ11
DQ4
VSSQ
VDDQ
DQ10
DQ5
DQ9
DQ6
VDDQ
VSSQ
DQ8
DQ7
NC
NC
VSSQ
VDDQ
UDQS
LDQS
NC
NC
VREF
VDD
VSS
DNU
UDM
LDM
/WE
/CK
CK
/CAS
CKE
/RAS
NC
/CS
A12
NC
A11
BA0
BA1
A9
A8
A10/AP
A7
A0
A6
A1
A2
A5
A4
A3
VSS
VDD
33 32 31 30 29 28 27 26 25 24 23 22 21 20 19 18 17 16 15 14 13 12 11 10 9 8 7 6 5 4 3 2 1
33ohm (1005SIZE X 4),1/16W
4321
33ohm (1005SIZE X 4),1/16W
RN25
4321
33ohm (1005SIZE X 4),1/16W
RN30
4321
33ohm (1005SIZE X 4),1/16W
RN17
4321
33ohm (1005SIZE X 4),1/16W
RN21
4321
33ohm (1005SIZE X 4),1/16W
RN16
4321
33ohm (1005SIZE X 4),1/16W
RN27
4321
33ohm (1005SIZE X 4),1/16W
RN12
4321
33ohm (1005SIZE X 4),1/16W
RN31
4321
CRJ10DJ330T
RN26
R705
1 2
RN22
4 3 2 1
33ohm (1005SIZE X 4),1/16W
666564636261605958575655545352515049484746454443424140393837363534
8765
8765
8765
8765
8765
8765
8765
8765
8765
8 7 6 5
DQ0
DQ1
DQ2
DQ3
DQ4
DQ5
DQ6
DQ7
LDQS
SDRAM_VREF
SDRAM_CKE
SDRAM_CK
SDRAM_CK
SDRAM_UDQS
SDRAM_LDQS
SDRAM_WE
SDRAM_CAS
SDRAM_RAS
SDRAM_CS
SDRAM_BA1
SDRAM_BA0
SDRAM_DQ15
SDRAM_DQ14
SDRAM_DQ13
SDRAM_DQ12
SDRAM_DQ11
SDRAM_DQ10
SDRAM_DQ9
SDRAM_DQ8
SDRAM_DQ7
SDRAM_DQ6
SDRAM_DQ5
SDRAM_DQ4
SDRAM_DQ3
SDRAM_DQ2
SDRAM_DQ1
SDRAM_DQ0
SDRAM_A11
SDRAM_A10
SDRAM_A9
SDRAM_A8
SDRAM_A7
SDRAM_A6
SDRAM_A5
SDRAM_A4
SDRAM_A3
SDRAM_A2
SDRAM_A1
SDRAM_A0
VS/FIELD
FIELD/DE
SYNC_OUT
EP_MISO
EP_MOSI
GND_132
GND_133
GND_134
GND_135
GND_136
GND_137
GND_138
GND_139
GND_140
GND_141
GND_142
GND_143
GND_131
DDR_VREF
AC14
Y17
AA17
AB17
AC17
Y11
AC11
AB11
AA10
Y10
AB10
AC10
Y15
AC15
AB15
AA15
Y16
AC16
AB16
AA16
AA11
Y13
AA13
AB13
AC13
Y14
AA14
AB14
Y7
AC9
AA7
AB7
AC7
Y8
AA8
AB8
AC8
Y9
AA9
AB9
C1
P0
C2
P1
D1
P2
D2
P3
F2
P4
F1
P5
G2
P6
G1
P7
H2
P8
H1
P9
J2
P10
J1
P11
K2
P12
K1
P13
M2
P14
M1
P15
N2
P16
N1
P17
P1
P18
P2
P19
R1
P20
R2
P21
T1
P22
T2
P23
V2
P24
W1
P25
W2
P26
Y1
P27
Y2
P28
AA1
P29
AA2
P30
AB1
P31
AB2
P32
AC2
P33
AB3
P34
AC3
P35
V1
LLC
B1
HS/CS
A2
B2
D6
J3
MCLK
R672
R4
INT1
T4
INT2
K4
SCLK
J4
AP0
N4
AP1
N3
AP2
M4
AP3
M3
AP4
K3
AP5
F3
F4
G3
EP_CS
G4
EP_SCK
AA3
AA4
AA5
AA19
AA12
AB5
AB19
AB23
AC1
AC5
AC19
AC23
0
ADV7844_INT
0
R670
HDMI_MUTE
SDATA0
SDATA1
SDATA2
SDATA3
MCLK
SCLK
SPDI
LRCLK
CKE
CK
CK
UDQS
LDQS
WE
CAS
RAS
CS
BA1
BA0
DQ15
DQ14
DQ13
DQ12
DQ11
DQ10
DQ9
DQ8
DQ7
DQ6
DQ5
DQ4
DQ3
DQ2
DQ1
DQ0
A11
A10
A9
A8
A7
A6
A5
A4
A3
A2
A1
A0
F
HDMI_I2S
MCLK
SCLK
LRCLK
SPDIF
HDMI_I2S
SDATA3
SDATA2
SDATA1
SDATA0
RN32
4 3 2 1
RN13
33ohm (1005SIZE X 4),1/16W
4 3 2 1
33ohm (1005SIZE X 4),1/16W
BLUE_RX00
BLUE_RX01
BLUE_RX02
BLUE_RX03
BLUE_RX04
BLUE_RX05
BLUE_RX06
BLUE_RX07
BLUE_RX08
BLUE_RX09
BLUE_RX10
BLUE_RX11
GREEN_RX00
GREEN_RX01
GREEN_RX02
GREEN_RX03
GREEN_RX04
GREEN_RX05
GREEN_RX06
GREEN_RX07
GREEN_RX08
GREEN_RX09
GREEN_RX10
GREEN_RX11
RED_RX00
RED_RX01
RED_RX02
RED_RX03
RED_RX04
RED_RX05
RED_RX06
RED_RX07
RED_RX08
RED_RX09
RED_RX10
RED_RX11
8 7 6 5
8 7 6 5
AA21
Y21
AA20
W3
NC_07
NC_05
NC_06
GND_106
GND_105
GND_104
GND_103
GND_102
GND_101
R9
R15
R14
R13
R12
R11
R10
J21
R3
AB4
AC4
NC_08
NC_09
GND_109
GND_108
GND_107
GND_110T9GND_111
T8
R17
R16
T3
G11
G12
TEST3
TEST4
TEST5
TEST1
TEST2
NC_10
GND_125
GND_126
GND_124
GND_120
GND_121
GND_122
GND_123
GND_115
GND_116
GND_117
GND_118
GND_119
GND_112
GND_113
GND_114
T10
T11
T12
T13
GND_127Y4GND_128Y5GND_129
GND_130
Y3
T21
T22
T23
T14
T15
T16
T17
T20
Y12
Y19
U17
U16
U15
33ohm (1005SIZE X 4),1/16W
8765
4321
RN23
33ohm (1005SIZE X 4),1/16W
8765
4321
RN18
33ohm (1005SIZE X 4),1/16W
8765
RN19
33ohm (1005SIZE X 4),1/16W
8765
33ohm (1005SIZE X 4),1/16W
RN28
8765
RN11
4321
4321
4321
HDMI_RX
+3.3VH2
10K
R709
KRC103S
Q913
WE
CAS
RAS
CS
BA0
BA1
A10
A0
A1
A2
A3
HDMI_RX
12345678910
A8A7A6A5A4
GND
Y8
11 12 15 16 17 18 19 201413
22X4
A
+3.3VH2
RN14
MP
HDMI_SDATA0
HDMI_SDATA2
HDMI_SDATA1
I2S HDMI RX to DSP
A3A2A1
OE1VCC
IC903
OE2
Y1Y2Y3Y4Y5Y6Y7
+3.3VH2
C206
1234
22X4
RN20
5678
100K_NC
R683
HDMI_LRCK
HDMI_SPDIF
HDMI_SDATA3
0.1uF
1234
5678
09.03.18
Added : 100K ohm
100K
R673
HDMI_SCLK
HDMI_MCLK
REVISION12
3
4
5
SCHEMATIC DIAGRAM
MODEL
AVR400
6
7
A
SHEET
157
APPROVECHECKDESIGN DRAWING NO
S.K
10.11.16
L.J.H S.H.S
10.11.16 10.11.16
HDMI RX & Decoder
52
Page 27
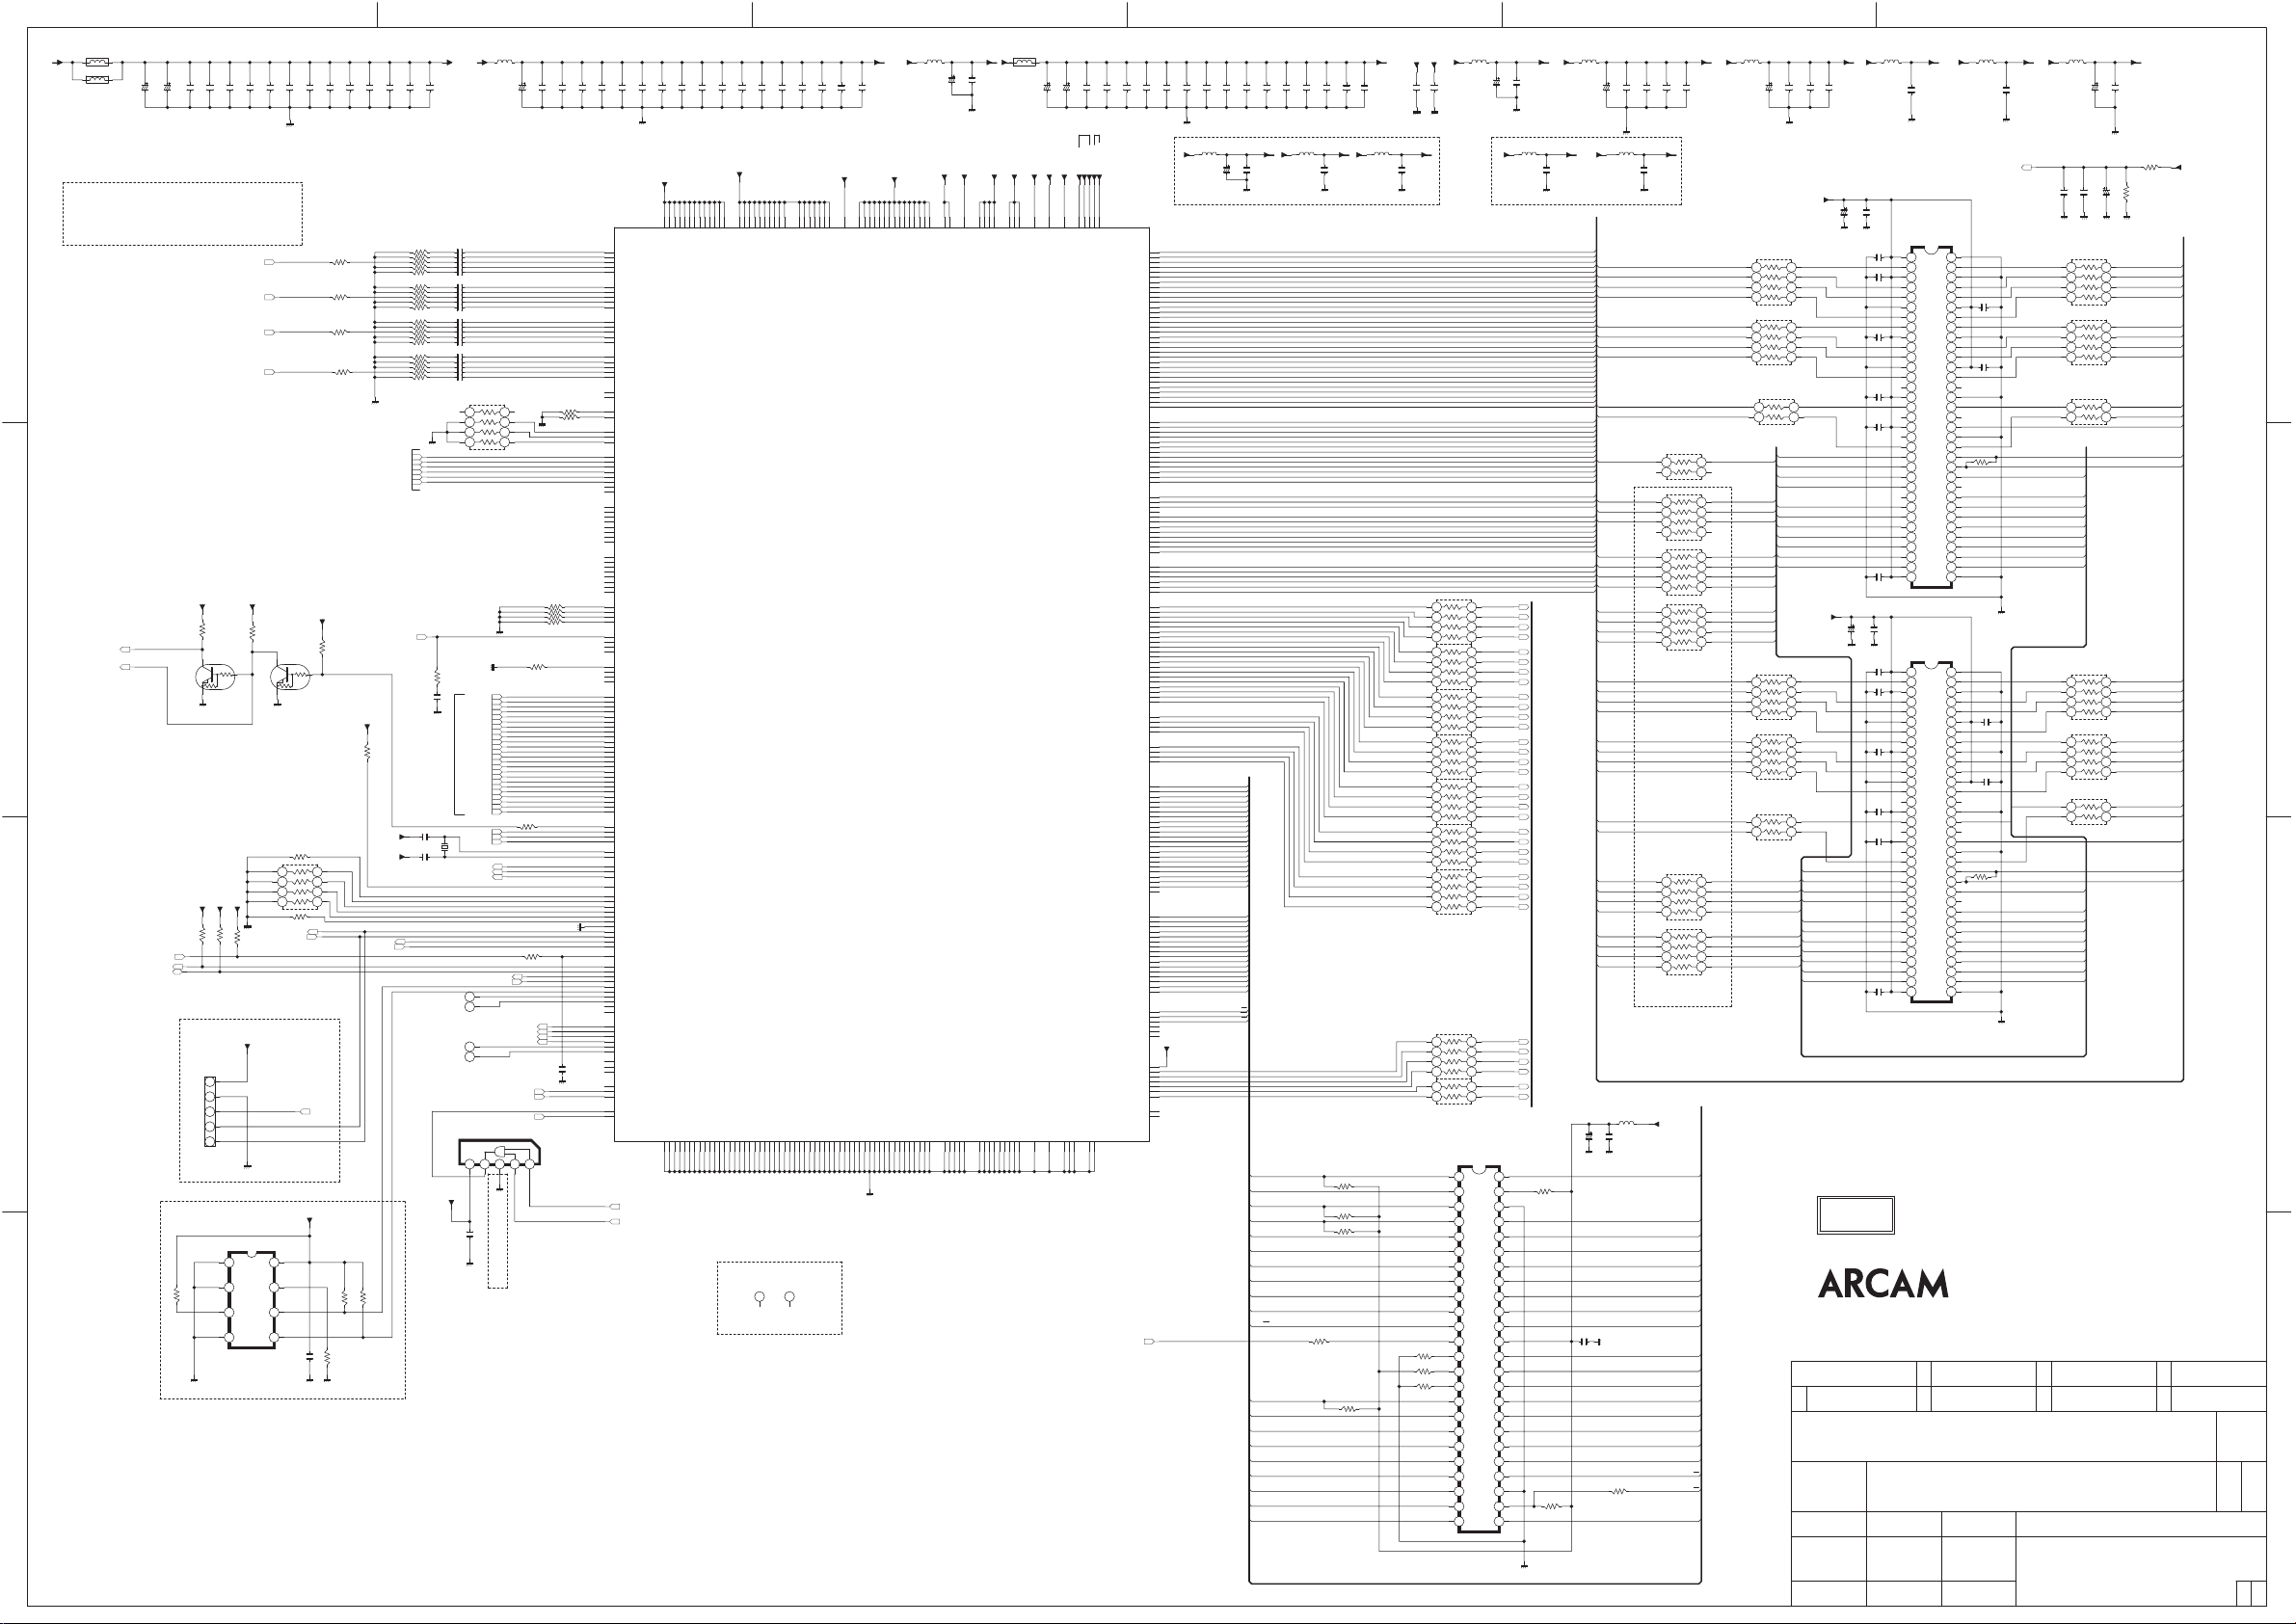
+1.8VH1
L824
C328
C320
22/6.3V
22/6.3V
FLI30336 Worst Measured Currents
1.8V Total : 1923mA(Max: 2012mA)
2.5V Total : 385mA(Max: 412mA)
D
3.3V Total : 166.3mA(2Max: 202.1mA)
C
BYPASS_ON
BYPASS_OFF
/RESET
HDMI_SCL
HDMI_SDA
B
Option
R870
A
6
C303
C309
C317
0.1uF / 16V
0.1uF / 16V
0.1uF / 16V
COM_PB_THRU
COM_Y_THRU
COM_PR_THRU
CVBS_THRU
R737
4.7K
Q914
KRC103S
+3.3VH1+3.3VH1+3.3VH1
R731
R734
4.7K
4.7K
R864
GPROBE_UPGRADE
Added:2009.01.04
1
CN62
2
3
CJP05GA19ZY
4
5 4 3 2 1
5
*EEPROM
IC931
CVIAT24C64CNSHT
A0
A1
2.2K
A2
4 3 2 1
GND
+5VA
C324
+3.3VH1+3.3VH1
R756
4.7K
C331
0.1uF / 16V
4.7K
VCC
WP
SCL
SDA
C338
C344
0.1uF / 16V
0.1uF / 16V
+3.3VH1
Q915
KRC103S
*GPROBE
R768
10K
5 6 7 8
R730 10K
GPROBE_TXD
GPROBE_RXD
+3.3VH1
8765
C550
12345
Worst Measured Currents
Worst Measured Currents
1850mA(Max:1925mA)
+1.8V_CORE
+3.3VH1 +3.3VH1 +2.5VH1
L826
9R005Z
0.1uF / 16V
0.1uF / 16V
0.1uF / 16V
0.1uF / 16V
0.1uF / 16V
0.1uF / 16V
0.1uF / 16V
0.1uF / 16V
0.1uF / 16V
0.1uF / 16V
0.1uF / 16V
0.1uF / 16V
0.1uF / 16V
0.1uF / 16V
0.1uF / 16V
0.1uF / 16V
0.1uF / 16V
0.1uF / 16V
0.1uF / 16V
0.1uF / 16V
5678
HD_DB04
HD_DB05
HD_DB06
HD_DB07
HD_DB08
HD_DB09
HD_DB10
HD_DB11
HD_DG04
HD_DG05
HD_DG06
HD_DG07
HD_DG08
HD_DG09
HD_DG10
HD_DG11
HD_DR04
HD_DR05
HD_DR06
HD_DR07
HD_DR08
HD_DR09
HD_DR10
HD_DR11
HD_VSYNC
HD_HSYNC
RN44
HD_DE
PWR1
WP_2
WP_1
HVIKIC7SZ08FU
10K
SW_P+5V
HDMI_MUTE
1234
R760 22
HDMI_AUDIO_ON
V_CL
BUSY_CHECK
ADV7511_INT
ADV7844_INT
ADV3014_INT_TX
C333
C271
10/16V
R720 10K
R749 10K
R718 10K
R762 10K
R717
10K
R728
22
FS_SEL
K_SEL
IC910
C371
C358
C353
0.1uF / 16V
0.1uF / 16V
R879
0_NC
R880
0_NC
R881
0_NC
R882
0_NC
R757
4.7K
C381
C366
0.1uF / 16V
+3.3VH1
R759
RGB 10BIT INPUT
10K_NC
0.1uF / 16V
0.1uF / 16V
R741 22
R747
R764
R727
R725
R721
R736
R724
R744
R732
R753
R735
R740
R755
R746
R765
R738
R752
R758
R761
HD_DB02
HD_DB03
HD_DG02
HD_DG03
HD_DR02
HD_DR03
H
D_VCLK1
C387
0.1uF / 16V
0.1uF / 16V
C299
22
C341
22
C278
22
C282
56
C281
56
C293
56
C313
22
C279
22
C321
56
C292
56
C377
22
C319
22
C311
22
C350
56
C327
56
C273
22
C368
22
C347
22
C360
56
C374
R766
75_NC
C389
100P_NC
8BIT RGB INPUT
C291
+3.3V_PLL
47P
C286
X903
+3.3V_PLL
RN47
10K
1 2 3 4
UART_TX
UART_RX
/RESET
19.660M
47P
ADV7844_RESET
ADV3014_RESET
T920
T921
T922
T923
C277
0.1uF / 16V
R763 10K
R767
0.1uF / 16V
C290
C285
0.1uF / 16V
0.1uF / 16V
10K
C272
5 4 3 2 1
DVDDIO_3V3_3014
C373
0.1uF / 16V
C325
0.1uF / 16V
AB1
A1P
AF1
A2P
AF4
A3P
AF7
A4P
AD1
AN
AC2
B1P
AE2
B2P
AE5
B3P
AE8
B4P
AF3
BN
AC1
C1P
AF2
C2P
AF5
C3P
AF8
C4P
AF6
CN
AB2
SV1P
AE1
SV2P
AE4
SV3P
AE7
SV4P
AF9
SVN
AA1
ADC_+TEST
AC7
VOUT2
AF12
AIP_RAW_HS_CS
AE12
AIP_RAW_VS
AD13
EXT_OSD_VS
AC13
EXT_OSD_HS
AF13
EXT_OSD_CLK
P3
ADATA0
P2
ADATA1
P1
ADATA2
R4
ADAT
R3
ADATA4
R2
ADATA5
R1
ADATA6
T4
ADATA7
T3
ADATA8
T2
ADATA9
T1
ADATA10
U4
ADATA11
U3
ADATA12
U2
ADATA13
U1
ADATA14
V4
ADATA15
V3
ADATA16
V2
ADATA17
V1
ADATA18
W4
ADATA19
W3
ADATA20
W2
ADATA21
W1
ADATA22
Y4
ADATA23
N3
DIP_AODD
Y1
AVS
Y2
AHS
Y3
AHRFE_DE
N1
IPCLK0
P4
IPCLK1
M4
IPCLK2
L1
IPCLK3
N2
DIP_RAW_HS_CS
M2
DIP_EXT_CLAMP
M3
DIP_EXT_COAST
M1
DIP_CLEAN_HS_OUT
B1
BDATA0
C3
BDATA1
C2
BDATA2
C1
BDATA3
D3
BDATA4
D2
BDATA5
D1
BDATA6
E3
BDATA7
E2
BDATA8
E1
BDATA9
F3
BDATA10
F2
BDATA11
F1
BDATA12
G3
BDATA13
G2
BDATA14
G1
BDATA15
H3
BDATA16
H2
BDATA17
H1
BDATA18
J3
BDATA19
J2
BDATA20
J1
BDATA21
K3
BDATA22
K2
BDATA23
N4
DIP_BODD
L2
BVS
L3
BHS
K1
BHREF_DE
B26
XTAL
C26
TCLK
V24
PWM0
U23
PWM1
U24
PWM2
AB24
IR0
AE11
LBADC_IN6
AF11
LBADC_IN5
AC10
LBADC_IN4
AD10
LBADC_IN3
AE10
LBADC_IN2
AF10
LBADC_IN1
AD11
LBADC_RETURN
W26
OCM_UDO_0
W25
OCM_UDI_0
B2
OCM_UDO_1
B3
OCM_UDI_1
AD9
/RESET
AA24
MSTR0_SCL
AA23
MSTR0_SDA
A3
MSTR1_SCL
A2
MSTR1_SDA
AB26
MSTR2_SCL
AB25
MSTR2_SDA
AA26
VGA0_SCL
AA25
VGA0_SDA
Y26
VGA1_SCL
Y25
VGA1_SDA
AF14
AVS_IN_SCL
AD12
AVS_IN_WORD_SEL
AC12
AVS_IN_DATA
AD14
AVS_OUT_DATA
AE13
AVS_OUT_SCL
AE14
AVS_OUT_WORLD_SEL
M24
VCO_LV
D25
OBUFC_CLK
A1
SCAN_EN
W24
OCM_TIMER1
Y24
/OCM_INT2
W23
/OCM_INT1
V26
SLAVE_SCL
V25
SLAVE_SDA
C332
0.1uF / 16V
A3
ADV3014_INT2
ADV3014_INT
0.1uF / 16V
C339
+1.8V_CORE
K10
L10
C354
C359
C345
0.1uF / 16V
L11
K11
U10
CORE1.8-2
CORE1.8-0
CORE1.8-1
DGND-3
DGND-4
DGND-5
P10
N10
M10
C367
0.1uF / 16V
0.1uF / 16V
0.1uF / 16V
0.1uF / 16V
+3.3V_IO
U11
U16
U17
L16
T11
T16
E4
K17
T17
K16
IO3.3-0F4IO3.3-1G4IO3.3-2H4IO3.3-3
CORE1.8-5
CORE1.8-9
CORE1.8-3
CORE1.8-7
CORE1.8-4
CORE1.8-8
CORE1.8-6
CORE1.8-12
CORE1.8-11
CORE1.8-10
DGND-9
DGND-10
DGND-11
DGND-12
DGND-6
DGND-7
DGND-13
DGND-14
DGND-15
DGND-8
DGND-16
DGND-17
DGND-18
DGND-19
DGND-20
L12
P11
K12
K13
P12
R11
R10
T10
R12
T12
N11
N12
U12
M11
M12
Worst Measured Currents
24mA(Max:24mA)
+3.3V_IO +2.5V_DDR +3.3VH1
C372
C382
C378
0.1uF / 16V
0.1uF / 16V
AC16
L4
K4
AC14
J4
AC22
AC18
IO3.3-8
IO3.3-6
IO3.3-7
IO3.3-5
IO3.3-9
IO3.3-4
DGND-21
DGND-22
DGND-23
DGND-29
DGND-24
DGND-200
DGND-26
DGND-27
DGND-28
L13
L14
K14
P13
R13
T13
N13
U13
M13
C384
0.1uF / 16V
0.1uF / 16V
+3.3V_LBADC +2.5V_DDR
V23
Y23
T23
M23
AB23
P23
3-15
IO3.3-10
IO3.3-13
IO3.3-12
IO3.3-14
IO3.3-16
IO3.3-11
IO3.
DGND-34
DGND-35
DGND-36
DGND-30
DGND-31
DGND-32
DGND-33
K15
P14
R14
T14
U14
N14
M14
C394
C388
0.1uF / 16V
0.1uF / 16V
D6
D4
D7
AC9
DDR2.5-1
DDR2.5-0
DDR2.5-2
LBADC3.3
FLI30336AC
DGND-37
DGND-38
DGND-39
DGND-40
DGND-41
DGND-42
DGND-43
DGND-44
L15
P15
R15
T15
N15
U15
M15
L821
9R005Z
C334
10/16V
Worst Measured Currents
0.5mA(Max0.6mA)
FSVREF
D12
D18
D11
D17
C9
D13
D20
D10
D15
D23
D8
D14
C19
D22
FSVREF-0
DDR2.5-6
DDR2.5-5
DDR2.5-4
DDR2.5-3
IC906
DGND-45
DGND-46
DGND-47
DGND-48
L17
P16
R16
N16
M16
FSVREF-1
DDR2.5-7
DDR2.5-9
DDR2.5-8
DDR2.5-12
DDR2.5-14
DDR2.5-13
DDR2.5-11
DDR2.5-10
DGND-49
LVDS_GND-3
DGND-50
M17
LVDS_GND-4
DGND-ADC0
LVDS_GND-2
LVDS_GND-1
DGND-ADC2
DGND-51
DGND-ADC1
DGND-52
DGND-53
J25
E25
P17
R17
H25
N17
M25
AA2
AA4
AA3
C269
+3.3V_LVDS_PLL
H24
LVDS_PLL_3.3
LVDS_PLL_GND
H23
+3.3V_LBADC
0.1uF / 16V
E26
LVDS3.3-0
AGND-0
AB3
L827L822
C349
C375
C289
10/16V
10/16V
ADC1 A DC2
+3.3V_ADC
+3.3V_PLL
+1.8V_PLL
+1.8V_DLL
+1.8V_ADC
+3.3V_LVDS
C25
AC4
AB4
H26
AC5
M26
J26
3-1
ADC1.8-1
ADC1.8-0
LVDS3.3-3
LVDS3.3-2
LVDS3.
AGND-3
AGND-1
AGND-5
AGND-2
AGND-4
AGND-6
AGND-7
AE3
AE9
AE6
AC3
AC6
AC8
AD2
AD8
AD3
D26
A14
RPLL_33
ADC_3.3
RPLL_1.8
ADC1.8-2
VDDA18_DLL
LBADC_GND
RPLL_AGND
RPLL_DGND
AGND-8
RPLL_AGND-1
VSSA18_DLL
B25
B14
A25
A26
AC11
C330
C296
25V/0.01UF
CK3E-/EBLU5
CK3E+/EBLU4
CH2E-/EGRN1
CH2E+/EGRN0
CH1E-/EGRN3
CH1E+/EGRN2
CH0E-/EGRN5
CH0E+/EGRN4
CH3O-/EGRN7
CH3O+/EGRN6
CKO+/ERED0
CH2O-/ERED3
CH2O+/ERED2
CH1O-/ERED5
CH1O+/ERED4
CH0O-/ERED7
CH0O+/ERED6
OCMADDR21
OCMADDR20
OCMADDR19
OCMADDR18
OCMADDR17
OCMADDR16
OCMADDR15
OCMADDR14
OCMADDR13
OCMADDR12
OCMADDR11
OCMADDR10
OCMDATA15
OCMDATA14
OCMDATA13
OCMDATA12
OCMDATA11
OCMDATA10
JTAG_BS_TMS
JTAG_BS_TDO
JTAG_BS_TDI
JTAG_BS_RST
JTAG_BS_TCK
C297
C302
0.1uF / 16V
0.1uF / 16V
25V/0.01UF
+3.3VH1
ADC1
Worst Measur
25mA(Max:34mA) 27mA(Max:38mA)
B4
FSDATA0
A4
FSDATA1
B5
FSDATA2
A5
FSDATA3
B7
FSDATA4
A7
FSDATA5
B8
FSDATA6
A8
FSDATA7
B9
FSDATA8
A9
FSDATA9
B10
FSDATA10
A10
FSDATA11
B12
FSDATA12
A12
FSDATA13
B13
FSDATA14
A13
FSDATA15
B15
FSDATA16
A15
FSDATA17
B16
FSDATA18
A16
FSDATA19
B18
FSDATA20
A18
FSDATA21
B19
FSDATA22
A19
FSDATA23
B20
FSDATA24
A20
FSDATA25
B21
FSDATA26
A21
FSDATA27
B23
FSDATA28
A23
FSDATA29
B24
FSDATA30
A24
FSDATA31
C18
FSADDR0
C17
FSADDR1
C16
FSADDR2
C15
FSADDR3
C13
FSADDR4
C10
FSADDR5
C8
FSADDR6
C7
FSADDR7
C6
FSADDR8
C12
FSADDR9
D16
FSADDR10
C14
FSADDR11
C11
FSADDR12
D5
FSCLKP
C5
FSCLKN
D21
FSCS0
C22
FSCS1
B6
FSDQS0
B11
FSDQS1
A17
FSDQS2
A22
FSDQS3
A6
FSDQM0
A11
FSDQM1
B17
FSDQM2
B22
FSDQM3
C23
FSWE
D24
FSCAS
C24
FSRAS
C4
FSCKE
C21
FSBKSEL0
C20
FSBKSEL1
L24
L23
L26
CKE-/EBLU7
L25
CKE+/EBLU6
K24
K23
K26
K25
J24
J23
G24
G23
G26
CKO-/ERED1
G25
F24
F23
F26
F25
E24
E23
N23
EBLU0
N24
EBLU1
N25
EBLU2
N26
EBLU3
P24
DCLK
P25
DHS
R26
DVS
P26
DEN
AF15
AE15
AD15
AC15
AF16
AE1
6
AD16
AF17
AE17
AD17
AC17
AF18
AE18
OCMADDR9
AD18
OCMADDR8
AF19
OCMADDR7
AE19
OCMADDR6
AD19
OCMADDR5
AC19
OCMADDR4
AF20
OCMADDR3
AE20
OCMADDR2
AD20
OCMADDR1
AF21
OCMADDR0
AE21
AD21
AC21
AF22
AE22
AD22
AF23
OCMDATA9
AE23
OCMDATA8
AD23
OCMDATA7
AC23
OCMDATA6
AF24
OCMDATA5
AF25
OCMDATA4
AF26
OCMDATA3
AE24
OCMDATA2
AE25
OCMDATA1
AE26
OCMDATA0
AC25
/OCM_RE
AC26
/OCM_WE
AD24
/ROM
_CS
AD25
/OCM_CS0
AD26
/OCM_CS1
AC24
/OCM_CS2
+3.3VH1
AC20
/JTAG_BS_E
T24
T25
T26
GPIO44
R23
R24
R25
U25
PPWR
U26
PBIAS
C323
0.1uF / 16V
+3.3V_ADCSC
+3.3V_ADCC
+3.3V_ADCB
+3.3V_ADCA
AD4
AD5
AD6
AD7
ADCB_3.3
ADCC_3.3
ADCA_3.3
ADCSC_3.3
FSVREFVSS2
FSVREFVSS1
D9
D19
C337
C308
C316
0.1uF / 16V
0.1uF / 16V
0.1uF / 16V
L828
9R005Z
C376
C315
10/16V
ed Currents
OCMADDR21
OCMADDR20
OCMADDR19
OCMADDR18
OCMADDR17
OCMADDR16
OCMADDR15
OCMADDR14
OCMADDR13
O
CMADDR12
OCMADDR11
OCMADDR10
OCMADDR9
OCMADDR8
OCMADDR7
OCMADDR6
OCMADDR5
OCMADDR4
OCMADDR3
OCMADDR2
OCMADDR1
OCMDATA15
OCMDATA14
OCMDATA13
OCMDATA12
OCMDATA11
OCMDATA10
OCMDATA9
OCMDATA8
OCMDATA7
OCMDATA6
OCMDATA5
OCMDATA4
OCMDATA3
OCMDATA2
OCMDATA1
OCMDATA0
OCM_RE
OCM_WE
ROM_CS
HEATSINK_HOLE
Connect pin3 to CHGND
2.7K
2.7K
R868
R869
0.1uF
47K
R831
2007.10.06
H1 H2
/RESET
Worst Measured Currents
385mA(Max:412mA)
C357
C390
C340
C352
C391
0.1uF / 16V
25V/0.01UF
25V/0.01UF
+3.3VH1
+3.3V_ADC
0.1uF / 16V
OCMADDR15
OCMADDR14
OCMADDR13
OCMADDR
12
OCMADDR11
OCMADDR10
OCMADDR9
OCMADDR20
OCMADDR21
OCM_WE
OCMADDR19
OCMADDR18
OCMADDR8
OCMADDR7
OCMADDR6
OCMADDR5
OCMADDR4
OCMADDR3
OCMADDR2 OCMADDR1
C393
0.1uF / 16V
25V/0.01UF
0.1uF / 16V
+3.3VH1 +3.3VH1
L823
9R005Z
C351
0.1uF / 16V
R751
10K_NC
R716 10K
R719 10K
R723
0
R742 10K
FSVREF
C355
C379
0.1uF / 16V
0.1uF / 16V
L833
9R005Z
C343
0.1uF / 16V
33ohm (1005SIZE X 4),1/16W
33ohm (1005SIZE X 4),1/16W
33ohm (1005SIZE X 4),1/16W
33ohm (1005SIZE X 4),1/16W
33ohm (1005SIZE X 4),1/16W
33ohm (1005SIZE X 4),1/16W
33ohm (1005SIZE X 4),1/16W
33ohm (1005SIZE X 4),1/16W
R739 10K
R726 10K
R722 10K
FSVREF
+3.3VH1
0.1uF / 16V
4321
RN53
4321
RN46
4321
RN39
4321
RN34
4321
RN58
4321
RN54
RN42
4 3 2 1
RN48
4 3 2 1
RN49 33
2 1
#FLASH MEMORY
IC907
CVIMX29LV320DTTI-70G
24 23 22 21 20 19 18 17 16 15 14 13 12 11 10 9 8 7 6 5 4 3 2 1
L825
9R005Z
8765
8765
8765
8765
8765
8765
8 7 6 5
8 7 6 5
4 3
A15
A14
A13
A12
A11
A10
A9
A8
A19
A20
WE#
RESET#
NC
WP#/ACC
RY/BY#
A18
A17
A7
A6
A5
A4
A3
A2
A1 A0
A16
BYTE#
Vss
DQ15
/A-1
DQ7
DQ14
DQ6
DQ13
DQ5
DQ12
DQ4
Vcc
DQ11
DQ3
DQ10
DQ2
DQ9
DQ1
DQ8
DQ0
OE#
Vss
CE#
11mA(Max:12mA)
C362
C369
10/16V
ADC2
Worst Measured Currents
SC_DB07
SC_DB06
SC_DB09
SC_DB08
SC_DG03
SC_DG02
SC_DG05
SC_DG04
SC_DG07
SC_DG06
SC_DG09
SC_DG08
SC_DR03
SC_DR02
SC_DR05
SC_DR04
SC_DR07
SC_DR06
SC_DR09
SC_DR08
SC_DB02
SC_DB03
SC_DB04
SC_DB05
SC_VCLK
SC_HSYNC
SC_VSYNC
SC_DE
SC_DB00
SC_DB01
SC_DG00
SC_DG01
SC_DR00
SC_DR01
484746454443424140393837363534333231302928272625
+3.3V_LVDS_PLL
0.1uF / 16V
L831
9R005Z
Worst Measured Currents
+3.3V_LVDS
69mA(Max:83mA)
L820
9R005Z
C287
C370
C386
C380
10/16V
0.1uF / 16V
0.1uF / 16V
FSDATAU31
FSDATAU30
FSDATAU29
FSDATAU28
FSDATAU27
FSDATAU26
FSDATAU25
FSDATAU24
FSDQSU3
FSDQMU3
FSADDRU6
FSADDRU7
FSADDRU8
FSCKEU
FSDATAU15
FSDATAU14
FSDATAU13
FSDATAU12
FSDATAU11
FSDATAU10
FSDATAU9
FSDATAU8
FSDQSU1
FSDQMU1
FSBKSELU0
FSBKSELU1
FSADDRU0
FSADDRU1
FSADDRU2
FSADDRU10
FSADDRU3
FSADDRU11
10/16V
/FSCS0U
/FSCASU
/FSRASU
/FSWEU
FSADDRU4
FSADDRU9
FSADDRU12
FSADDRU5
C305
L830
9R005Z
L818
9R005Z
0.1uF / 16V
R745
0
+3.3V_ADCSC+3.3V_ADCC+3.3V_ADCB+3.3V_ADCA
C329
0.1uF / 16V
0ohm (1005SIZE X 4),1/16W
0ohm (1005SIZE X 4),1/16W
0ohm (1005SIZE X 4),1/16W
0ohm (1005SIZE X 4),1/16W
0ohm (1005SIZE X 4),1/16W
2010.09.27
Change Value : 33ohm-->0ohm
+3.3VH1
+3.3VH1
C336
0.1uF / 16V
FSDATAU0
FSDATAU1
FSDATAU2
FSDATAU3
FSDATAU4
FSDATAU5
FSDATAU6
FSDATAU7
FSDATAU8
FSDATAU9
FSDATAU10
FSDATAU11
FSDATAU12
FSDATAU13
FSDATAU14
FSDATAU15
FSDATAU16
FSDATAU17
FSDATAU18
FSDATAU19
FSDATAU20
FSDATAU21
FSDATAU22
FSDATAU23
FSDATAU24
FSDATAU25
FSDATAU26
FSDATAU27
FSDATAU28
FSDATAU29
FSDATAU30
FSDATAU31
FSADDRU0
FSADDRU1
FSADDRU2
FSADDRU3
FSADDRU4
FSADDRU5
FSADDRU6
FSADDRU7
FSADDRU8
FSADDRU9
FSADDRU10
FSADDRU11
FSA
DDRU12
FSCLK+
FSCLK-
/FSCS0U
FSDQSU0
FSDQSU1
FSDQSU2
FSDQSU3
FSDQMU0
FSDQMU1
FSDQMU2
FSDQMU3
/FSWEU
/FSCASU
/FSRASU
FSCKEU
FSBKSELU0
FSBKSELU1
TTL OUTPUT
C361
R729
10K
0.1uF / 16V
C310
R733
10K
0.1uF / 16V
RN52 33
2 1
RN45
1234
RN41
1234
RN40
1234
RN36
1234
RN50
1234
OCMADDR17OCMADDR16
OCMDATA15
OCMDATA14
OCMDATA13
OCMDATA12
OCMDATA11
OCMDATA10
C392
FLASH_MEMORY
OCMDATA7
OCMDATA6
OCMDATA5
OCMDATA4
OCMDATA3
OCMDATA2
OCMDATA9
OCMDATA1
OCMDATA8
OCMDATA0
OCM_RE
ROM_CS
+1.8VH1
0.1uF / 16V
4 3
5678
5678
5678
5678
5678
Worst Measured Currents
43mA(Max:45mA)
L819
9R005Z
C280
C275
22/6.3V
33ohm (1005SIZE X 4),1/16W
4321
RN43
33ohm (1005SIZE X 4),1/16W
4321
RN37
RN61 33
21
DDR
/FSWE
/FSCS0
/FSCAS
/FSRAS
/FSCS0
/FSCAS
FSBKSEL0
/FSRAS
FSBKSEL1
/FSWE
FDADDR10
FDADDR0
FDADDR1
FDADDR4
FDADDR2
FDADDR9
FDADDR3
FDADDR12
FDADDR5
FDADDR6
FDADDR7
FDADDR8
FSCKE
33ohm (1005SIZE X 4),1/16W
4321
RN56
33ohm (1005SIZE X 4),1/16W
4321
RN51
21
RN55 33
FSBKSEL0
FSBKSEL1
FDADDR0
FDADDR1
FDADDR2
FDADDR10
FDADDR3
FDADDR1
+1.8V_ADC +3.3V_PLL
+1.8VH1
+1.8V_DLL
C356
0.1uF / 16V
CVIA3S56D40FTPG5
VDD
DQ0
VDDQ
DQ1
DQ2
VSSQ
DQ3
DQ4
VDDQ
DQ5
DQ6
VSSQ
DQ7
NC
VDDQ
LDQS
NC
VDD
DNU
LDM
/WE
/CAS
/RAS
/CS
NC
BA0
BA1
A10/AP
A0
A1
A2
A3
VDD
33 32 31 30 29 28 27 26 25 24 23 22 21 20 19 18 17 16 15 14 13 12 11 10 9 8 7 6 5 4 3 2 1
CVIA3S56D40FTPG5
VDD
DQ0
VDDQ
DQ1
DQ2
VSSQ
DQ3
DQ4
VDDQ
DQ5
DQ6
VSSQ
DQ7
NC
VDDQ
LDQS
NC
VDD
DNU
LDM
/WE
/CAS
/RAS
/CS
NC
BA0
BA1
A10/AP
A0
A1
A2
A3
33 32 31 30 29 28 27 26 25 24 23 22 21 20 19 18 17 16 15 14 13 12 11 10 9 8 7 6 5 4 3 2 1
VDD
IC909
IC908
VSS
DQ15
VSSQ
DQ14
DQ13
VDDQ
DQ12
DQ11
VSSQ
DQ10
DQ9
VDDQ
DQ8
NC
VSSQ
UDQS
NC
VREF
VSS
UDM
/CK
CK
CKE
NC
A12
A11
A9
A8
A7
A6
A5
A4
VSS
VSS
DQ15
VSSQ
DQ14
DQ13
VDDQ
DQ12
DQ11
VSSQ
DQ10
DQ9
VDDQ
DQ8
VSSQ
UDQS
VREF
VSS
UDM
/CK
CKE
A12
VSS
+1.8VH1
Worst Measured Currents
25mA(Max:26mA)
666564636261605958575655545352515049484746454443424140393837363534
666564636261605958575655545352515049484746454443424140393837363534
NC
NC
CK
NC
A11
A9
A8
A7
A6
A5
A4
L817
9R005Z
Worst Measured Currents
+2.5V_DDR
C288
0.1uF / 16V
+2.5V_DDR
0.1uF / 16V
Worst Measured Currents
250mA(20%:290mA)
C298
10/16V
Worst Measured Currents
250mA(20%:290mA)
C312
15mA(Max:16mA)
C270
0.1uF / 16V
0.1uF / 16V
0.1uF / 16V
0.1uF / 16V
0.1uF / 16V
0.1uF / 16V
C318
10/16V
0.1uF / 16V
0.1uF / 16V
0.1uF / 16V
0.1uF / 16V
0.1uF / 16V
0.1uF / 16V
0.1uF / 16V
C294
C295
C300
C306
C307
C314
0.1uF / 16V
C326
C335
C342
C363
C364
C365
C283
0.1uF / 16V
8765
8765
43
8765
8765
43
/FSWE
/FSCAS
/FSRAS
/FSCS0
FSBKSEL0
FSBKSEL1
FDADDR10
FDADDR0
FDADDR1
1
FDADDR2
+1.8V_PLL
L829
9R005Z
C322
0.1uF / 16V
FSVREF +2.5V_DDR
C268
0.1uF / 16V
C274
0.1uF / 16V
R743
280(1%)
C276
0.1uF / 16V
C284
0.1uF / 16V
R748
280(1%)
MP
REVISION12
3
SCHEMATIC DIAGRAM
MODEL
AVR400
APPROVECHECKDESIGN DRAWING NO
+3.3VH1
25V/0.01UF
33ohm (1005SIZE X 4),1/16W
33ohm (1005SIZE X 4),1/16W
FDADDR12
FDADDR11
33ohm (1005SIZE X 4),1/16W
33ohm (1005SIZE X 4),1/16W
FDADDR12
FDADDR11
4
5
FDADDR9
FDADDR8
FDADDR7
FDADDR6
FDADDR5
FDADDR4
FDADDR9
FDADDR8
FDADDR7
FDADDR6
FDADDR5
FDADDR4FDADDR3
9R005Z
L832
C346
0.1uF / 16V
8 7 6 5
8 7 6 5
RN57 33
4 3
FSCKE
8 7 6 5
8 7 6 5
RN33 33
4 3
FSCKE
Worst Measured Currents
9.8mA(Max:10.5mA)
C383
C301
10/16V
C348
C385
22/6.3V
RN59
4 3 2 1
RN35
4 3 2 1
2 1
RN60
4 3 2 1
RN38
4 3 2 1
2 1
0.1uF / 16V
R750
10K(1%)
R754
10K(1%)
TORINO<-->DDR
FSDATAU16
FSDATAU17
FSDATAU18
FSD
ATAU19
FSDATAU20
FSDATAU21
FSDATAU22
FSDATAU23
FSDQSU2
FSDQMU2
FSVREF
FSCLK-
FSCLK+
D
C
FSDATAU0
FSDATAU1
FSDATAU2
FSDATAU3
FSDATAU4
FSDATAU5
FSDATAU6
FSDATAU7
FSDQSU0
FSDQMU0
FSVREF
FSCLK-
FSCLK+
B
6
7
A
SHEET
158
CUP12328Z
S.K
10.03.30
L.J.H
10.11.16
S.H.S
10.11.16
SCALER
53
Page 28

6
5 4 3 2 1
C403
C460
22/6.3V
22/6.3V
Scaling Mode Interface
IC915 74ALVCH16827DGG
1OE2
55
1A1
5453525150494847464544434241403938373635343332313029 56
1A2
GND
1A3
1A4
Vcc
1A5
1A6
1A7
GND
1A8
1A9
1A10
2A1
2A2
2A3
GND
2A4
2A5
2A6
Vcc
2A7
2A8
GND
2A9
2A10
2OE2
IC916 74ALVCH16827DGG
1OE2
55
1A1
5453525150494847464544434241403938373635343332313029 56
1A2
GND
1A3
1A4
Vcc
1A5
1A6
1A7
GND
1A8
1A9
1A10
2A1
2A2
2A3
GND
2A4
2A5
2A6
Vcc
2A7
2A8
GND
2A9
2A10
2OE2
10K
R773
3.3V_TTL_MUX1
0.1uF
C462
C470
1OE1
1Y1
1Y2
GND
1Y3
1Y4
Vcc
1Y5
1Y6
1Y7
GND
1Y8
1Y9
1Y10
2Y1
2Y2
2Y3
GND
2Y4
2Y5
2Y6
Vcc
2Y7
2Y8
GND
2Y9
2Y10
2OE1
1OE1
1Y1
1Y2
GND
1Y3
1Y4
Vcc
1Y5
1Y6
1Y7
GND
1Y8
1Y9
1Y10
2Y1
2Y2
2Y3
GND
2Y4
2Y5
2Y6
Vcc
2Y7
2Y8
GND
2Y9
2Y10
2OE1
C404
0.1uF / 16V
V-GND V-GND
C437
0.1uF / 16V
C456
0.1uF / 16V
0.1uF
33ohm (1005SIZE X 4),1/16W
8765
4321
0.1uF / 16V
C482
0.1uF / 16V
C483
27 26 25 24 23 22 21 20 19 18 17 16 15 14 13 12 11 10 9 8 7 6 5 4 3 2 1
28
C398
0.1uF / 16V
C406
0.1uF / 16V
27 26 25 24 23 22 21 20 19 18 17 16 15 14 13 12 11 10 9 8 7 6 5 4 3 2 1
28
+5VA
L836
9R005Z
C474
10/16V
0.1uF / 16V
C412
0.1uF / 16V
C405
0.1uF / 16V
C473
10/16V
C459
V-GND
0.1uF / 16V
C465
10/16V
C447
V-GND V-GNDV-GNDV-GNDV-GND V-GND V-GND
V-GNDV-GND
0.1uF / 16V
C407
RN72
33ohm (1005SIZE X 4),1/16W
4321
33ohm (1005SIZE X 4),1/16W
RN73
4321
33ohm (1005SIZE X 4),1/16W
RN74
4321
33ohm (1005SIZE X 4),1/16W
RN75
4321
RN76
33ohm (1005SIZE X 4),1/16W
4321
RN77
33ohm (1005SIZE X 4),1/16W
4321
33ohm (1005SIZE X 4),1/16W
RN78
4321
33ohm (1005SIZE X 4),1/16W
RN79
4321
33ohm (1005SIZE X 4),1/16W
RN80
4321
RN81
0.1uF / 16V
C401
10/16V
C448
8765
8765
8765
8765
8765
8765
8765
8765
8765
L838
L842
L847
0.01uF
C418
0.01uF
C545
0.01uF
C546
0.01uF
C547
0.01uF
C548
0.01uF
C549
TX_DG04
TX_DG05
TX_DG06
TX_DG07
TX_DG08
TX_DG09
TX_DG10
TX_DG11
TX_DR00
TX_DR01
TX_DR02
TX_DR03
TX_DR04
TX_DR05
TX_DR06
TX_DR07
TX_DR08
TX_DR09
TX_DR10
DR11
TX_
TX_VCLK
TX_VSYNC
TX_HSYNC
TX_DE
TX_DB00
TX_DB01
TX_DB02
TX_DB03
TX_DB04
TX_DB05
TX_DB06
TX_DB07
TX_DB08
TX_DB09
TX_DB10
TX_DB11
TX_DG00
TX_DG01
TX_DG02
TX_DG03
+1.8VA
L845
9R005Z
C432
300
300
300
R772
R784
R778
+3.3VA
V-GNDCHGND
CUP12328Z
6.8K_NC
R782
3.9K
R833
R809
3.9K
R82320R829
C484
25V/0.012UF
R789
20
C421
25V/0.012UF
C400
0.1uF / 16V
C477
C475
0.1uF / 16V
C458
R807
220
L840
9R005Z
10/16V
22/6.3V
150
R781
150
C434
R788
2200P
220
C444
2200P
+1.8VH2
TX_DG05
TX_VCLK
TX_DG04
TX_DG03
TX_DG02
TX_DG01
TX_DG00
TX_DB11
TX_DB10
TX_DB09
TX_DB08
TX_DB07
TX_DB06
TX_DB05
TX_DB04
TX_DB03
TX_DB02
TX_DB01
TX_DB00
TX_DE
TX_HSYNC
TX_VSYNC
C449
0.15
C417
0.15
C416
22/6.3V
0.1uF / 16V
300
300
300
R825
R832
R812
V-GND
L848
9R005Z
C486
10/16V
0.1uF / 16V
V-GND
C408
C411
0.1uF / 16V
0_NC
0_NC
R819
R803
C443
C453
0.1uF / 16V
0.1uF / 16V
C455
0.1uF / 16V
SC_DB05
SC_DB06
SC_DB07
SC_DB08
SC_DB09
ENC_VCLK1
R817
75_NC
10
R835
C422
100P_NC
PGND
EXT_LF2
CLKIN_A
33
EXT_LF1
C6
C7
S0S1S2
SC_DR02
CVIADV7342BSTZ
SC_DR04
SC_DR03
C3C4C5
IC919
VDD
C414
SC_DR05
34
PVDD
35
COMP2
36
REST2
37
DAC6
38
DAC5
39
DAC4
40
AGND
41
VAA
42
DAC3
43
DAC2
44
DAC1
45
COMP1
46
VREF
47
REST1
SFL/MISO
48
49 50 51 52 53 54 55 56 57 58 59 60 61 62 63 64
SC_DE
SC_VSYNC
SC_HSYNC
X_DG11
TX_DG09
TX_DG06
TX_DG07
TX_DG08
75 74 73 72 71 70 69 68 67 66 65 64 63 62 61 60 59 58 57 56 55 54 53 52 51
DVDD
76
DVDD
D19
D18
GND
77
78
D17
79
CLK
80
D16
81
D15
82
D14
83
D13
84
D12
85
D11
86
D10
87
D9
88
D8
89
D7
90
D6
91
D5
92
D4
93
D3
94
D2
95
D1
96
D0
97
DE
98
HSYNC
GND
99
GND
DSD0
DVDD
VSYNC
100
SC_DE
0.1uF / 16V
SC_HSYNC
SC_VSYNC
HDMI_SCL
R818 100
P_HSYNC
P_VSYNC
P_BLANK
DGNDS3S4S5S6
SC_DR07
SC_DR06
SC_DB04
SC_DB03
HDMI_SDA
R810 100
C1
C2
ALSB
17181920212223242526272829303132
16
C0
SDA
SCL
TEST3
15
TEST2
14
13
Y7
12
Y6
11
DGND
10
VDD
9
Y5
8
Y4
7
Y3
6
Y2
5
Y1
4
Y0
TEST1
3
TEST0
2
VDD_IO
1
S7
R802 0_NC
R808
SC_DR08
SC_DR09
TX_DR02
TX_DR03
TX_DR04
TX_DR05
TX_DR01
TX_DR00
TX_DG10
T
D20
D21
D22
D23
D24
D25
D26
D27
D28
D29
IC918
ADV7511
DSD1
DSD2
DSD3
DSD4
DSD5
DSD_CLK
SPDIF I/O
MCLK
I2S0
I2S1
33
33
33
R861
R859
R860
DSP_MCLK
DSP_S0/DR0
DSP_SPDIF
R783
0_NC
10/16V
0
R790
C402
0.1uF / 16V
C487
0.1uF / 16V
0_NC
C472
R824
0
TX_DR06
TX_DR07
TX_DR08
D30
D31
D32
I2S2
I2S3
SCLK
33
DSP_SCLK/CLK
C461
C435
0.1uF / 16V
C476
22/6.3V
0.1uF / 16V
Option
HDMI_SDA
HDMI_SCL
1000P_NC
C543
1000P_NC
C544
TX_DR09
TX_DR10
TX_DR11
R826
R834
D33
D34
D35
SDA
GND
DVDD
GND
LRCLK
C467
0.1uF / 16V
33
R863
R862
DSP_LRCK/DR2
+3.3VA
L834
9R005Z
+1.8VA
L846
9R005Z
+1.8VH2
100
100
49.9
49.9
R795
R799
R777
49.9
R785
49.9
HEAC-
DDCSCL
HEAC+
DDCSDA
50
CEC_CLK
SCL
49
DVDD
48
CEC_IN
47
DVDD33
46
SPDIF OUT
45
INT
44
GND
43
TX2+
42
TX2-
41
AVDD
40
TX1+
39
TX1-
38
PD/AD
37
GND
36
TX0
+
35
TX0-
34
AVDD
33
TXC+
32
TXC-
31
GND
30
HPD
29
AVDD
28
R_EXT
27
GND
BGVDD
GND
PLVDD
GND
26
25242322212019181716151413121110987654321
PVDD
PVDD
C409
C413
0.1uF / 16V
0.1uF / 16V
C445
C480
0.1uF / 16V
25V/0.01UF
C446
C396
22/6.3V
0.1uF / 16V
SC_VCLK
SC_DB02
SC_DG09
SC_DG08
SC_DG07
V_CLK_SEL
SC_DG06
ENC_VCLK1
SC_DG05
SC_DG04
SC_DG03
SC_DG02
ENC_VCLK1
R798
L837
9R005Z
ENC_VCLK2
0.1uF / 16V
0.1uF / 16V
R804 22
0.1uF / 16V
0.1uF / 16V
0.1uF / 16V
0.1uF / 16V
25V/0.01UF
+3.3VH2
R771
C479
0_NC
C423
C438
C436
C425
C468
C555
R871
4.7K
R821
C439 1uF
C428 1uF
4.99
10K
R776
+1.8VH2
4 3 2 1
S0
33_NC
S1
R828
33
R814
33
R787
0
10K
R792
0
1K
R797
R779
R796
8.2K
+5VH1
R836
R822
1.8K
4.7K
456
Q916
UPA672T
1 2 3
R780
R774
4.7K
1.8K
Option
IC921
TC7SH125FU_NC
R801
R816
0_NC
0_NC
R775
C433
22_NC
0
R793
+5VH1
+3.3VH2
54321
0.1uF / 16V_NC
ARC_SPDIF_OUT
CLOCK DOUBLER
+3.3VH2
IC920
MK2302S01T
0.1uF
0.01uF
C554
(13.5M*2=27M)
CLK1
S1:HIGH
ICLK
S1:LOW
2*ICLK
FBIN
GND
ICLK
VDD
CLK1
CLK2
8765
C397
L839
9R005Z
REVISION
1
MP
MODEL
Option
+3.3VH2
R805
27K_NC
2
1
D901
BAR43C_NC
3
CEC
R830
0
L841
+3.3VH2
9R005Z
C426
C442
10/16V
0.1uF / 16V
L843
+1.8VH2
9R005Z
C427
C454
22/6.3V
0.1uF / 16V
ADV7511_INT
+8VA
5
0.1uF
C424
1 3
SW_P+5V
Added_ARC_SPDIF
HDMI_SPDIF
HDMI_SDATA1
HDMI_SDATA0
ARC_SPDIF_OUT
171615 13
14 12
+5VH1
0_NC
R794
IC917
NJU7754
4
Vin
Vout
GND
Cont
NC
2
HDMI_SCLK
HDMI_MCLK
HDMI_LRCK
HDMI_SDATA3
HDMI_SDATA2
11 9
10 8765432
CEC_MCU
DSP_MCLK
DSP_SPDIF
CJP17GB210ZY
1
2
3
4
5
6
7
8
9
10
11
12
13
14
15
16
17
18
19
0.1uF
C410
DSP_S0/DR0
DSP_LRCK/DR2
DSP_SCLK/CLK
1234567891011121314151617
1
CN104
TO DSP PCB
2
3
4
5
SCHEMATIC DIAGRAM
AVR400
HDMI OUTPUT1
JK97
D2+
D2 SHIELD
D2-
D1+
D1 SHIELD
D1-
D0+
D0 SHIELD
D0-
CK+
CK SHIELD
CK-
CE REMOTE
UTILITY/HEAC+
DDC CLOCK
DDC DATA
GND
+5V
HPD/HEAC-
6
7
D
C
B
A
SHEET
9 15
DRAWING NODESIGN CHECK APPROVE
S.K
10.11.16
L.J.H
10.11.16
S.H.S
10.11.16
HDMI TX & Encoder
54
R815
TX_DG04
TX_DG05
TX_DG06
TX_DG07
TX_DB00
TX_DB01
TX_DB02
TX_DB05
TX_DB06
TX_DB07
TX_DB08
TX_DB09
TX_DB10
TX_DB11
TX_DG00
TX_DG01
TX_DG02
TX_DG03
TX_DG08
TX_DG09
TX_DG10
TX_DG11
TX_DR00
TX_DR01
TX_DR02
TX_DR03
TX_DR04
TX_DR05
TX_DR06
TX_DR07
TX_DR08
TX_DR09
TX_DR10
TX_DR11
TX_VCLK
TX_VSYNC
TX_HSYNC
TX_DE
TX_DB03
TX_DB04
0.1uF / 16V
0.1uF / 16V
4.7K
C466
C478
R786
100K
3.3V_TTL_MUX1
3.3V_
BYPASS_OFF
ENC_VCLK2
SC_VSYNC
SC_HSYNC
BYPASS_OFF
SC_DG02
SC_DG03
SC_DG04
SC_DG05
SC_DG06
SC_DG07
SC_DG08
SC_DG09
SC_DR00
SC_DR01
SC_DR02
SC_DR03
SC_DR04
SC_DR05
SC_DR06
SC_DR07
SC_DR08
SC_DR09
TTL_MUX1
SC_DE
SC_DB00
SC_DB01
SC_DB02
SC_DB03
SC_DB04
SC_DB05
SC_DB06
SC_DB07
SC_DB08
SC_DB09
SC_DG00
SC_DG01
R791
10K
+3.3VH2
L835
R800
10K_NC
0.1uF / 16V
C420
0.1uF / 16V
C471
C556
100P_NC
R886
75_NC
R806
10K_NC
C399
0.1uF / 16V
C430
0.1uF / 16V
IC913
NJM2566V
PRINLPFSW
16151413121110987654321
PS2
PROUT
PBIN
GND3
GND2
N.C
N.C
PBOUT
V+2
V+3
YIN
YOUT
CBSW
GND4
SYIN
SYOUT
GND1
V+4
VIN
VOUT
MIXSW
N.C
N.C
SCOUT
V+1
SDCOUT
SCIN
S2
PS1
S1
32 31 30 29 28 27 26 25 24 23 22 21 20 19 18 17
+3.3VH2
L844
3.3V_TTL_MUX
D
C
BYPASS_ON
HD_DG04
HD_DG05
HD_DG06
HD_DG07
HD_DG08
HD_DG09
HD_DG10
HD_DG11
HD_DR00
HD_DR01
HD_DR02
HD_DR03
HD_DR04
HD_DR05
HD_DR06
HD_DR07
HD_DR08
HD_DR09
HD_DR10
HD_DR11
3.3V_TTL_MUX
BYPASS_ON
HD_VCLK2
HD_VSYNC
R827
75_NC
HD_HSYNC
C463
100P_NC
HD_DE
HD_DB00
HD_DB01
HD_D
HD_DB03
HD_DB04
HD_DB05
HD_DB06
HD_DB07
HD_DB08
HD_DB09
HD_DB10
HD_DB11
HD_DG00
HD_DG01
HD_DG02
HD_DG03
B
3.3V_TTL_MUX
0.1uF
C415
C450
22/6.3V
22/6.3V
R813
10K_NC
0.1uF / 16V
0.1uF / 16V
R820
0.1uF / 16V
0.1uF / 16V
0.1uF
C440
HDMI By Pass Mode Interface
74ALVCH16827DGG
IC912
1OE2
1OE1
55
1A1
1Y1
5453525150494847464544434241403938373635343332313029 56
1A2
1Y2
GND
GND
1A3
1Y3
1A4
C419
C429
10K_NC
C457
C464
1Y4
Vcc
Vcc
1A5
1Y5
1A6
1Y6
1A7
1Y7
GND
GND
1A8
1Y8
1A9
1Y9
1A10
1Y10
2A1
2Y1
2A2
2Y2
2A3
2Y3
GND
GND
2A4
2Y4
2A5
2Y5
2A6
2Y6
Vcc
Vcc
2A7
2Y7
2A8
2Y8
GND
GND
2A9
2Y9
2A10
2Y10
2OE2
2OE1
IC911 74ALVCH16827DGG
1OE2
1OE1
55
1A1
1Y1
5453525150494847464544434241403938373635343332313029 56
1A2
1Y2
GND
GND
1A3
1Y3
1A4
1Y4
Vcc
Vcc
1A5
1Y5
1A6
1Y6
1A7
1Y7
GND
GND
1A8
1Y8
1A9
1Y9
1A10
1Y10
2A1
2Y1
2A2
2Y2
2A3
2Y3
GND
GND
2A4
2Y4
2A5
2Y5
2A6
2Y6
Vcc
Vcc
2A7
2Y7
2A8
2Y8
GND
GND
2A9
2Y9
2A10
2Y10
2OE2
2OE1
INPUT OUTPUT
OE1
OE2
A Y
L L L L
L L H H
H X X Z
X H X Z
33ohm (1005SIZE X 4),1/16W
8765
4321
C441
0.1uF / 16V
C451
0.1uF / 16V
27 26 25 24 23 22 21 20 19 18 17 16 15 14 13 12 11 10 9 8 7 6 5 4 3 2 1
28
0.1uF / 16V
C431
0.1uF / 16V
C452
27 26 25 24 23 22 21 20 19 18 17 16 15 14 13 12 11 10 9 8 7 6 5 4 3 2 1
28
RN82
33ohm (1005SIZE X 4),1/16W
8765
33ohm (1005SIZE X 4),1/16W
RN83
8765
33ohm (1005SIZE X 4),1/16W
RN84
8765
33ohm (1005SIZE X 4),1/16W
RN85
8765
RN86
33ohm (1005SIZE X 4),1/16W
8765
RN87
33ohm (1005SIZE X 4),1/16W
8765
33ohm (1005SIZE X 4),1/16W
RN88
8765
33ohm (1005SIZE X 4),1/16W
RN89
8765
33ohm (1005SIZE X 4),1/16W
RN90
8765
RN91
4321
4321
4321
4321
4321
4321
4321
4321
4321
C395
B02
Analog Video Option
HD(30MHZ) MODE : HIGH
SD(13.5MHZ) MODE : LOW
COM_PR_CONV
COM_PB_CONV
COM_Y_CONV
SV_Y_CONV
CVBS_CONV
SV_C_CONV
+3.3VH2
FS_SEL
V-GND
V-GND
V-GND V-GND
V-GND
A
Page 29
6
12345
CUP12328Z
DC/DC REGUALTOR
D
D
TO VIDEO
V-GND
+15VA
IC930
8 7 6 5
SS
D905
22K
10K
0.1uF
C498
R846
PW_GNDPW_GND
+15V_DC/DC
R845
PW_GND
0.1uF
C509
C489
220P
C512
C495
220/25V
62k
R872
PW_GND
HVDUDZS5.1BSR
C
+15V_DC/DC
C531
C518
220P
C513
C527
0.1uF
PW_GND
1000P
62k
R873
220/25V
+15V_DC/DC
B
220P
0.1uF
C534
C511
C520
PW_GND
C539
1000P
62k
R874
220/25V
CVISI8005QTL
BS
1000P
IC927
8 7 6 5
SSBS
CVISI8005QTL
BS
IC923
8 7 6 5
SS
CVISI8005QTL
EN
COMP
VIN
SW
GND FB
4321
L858
C551
0.01uF
PW_GND
EN
COMP
VIN
SW
GND FB
4321
C552
0.01uF
PW_GND
EN
COMP
VIN
SW
GND FB
4321
C553
0.01uF
PW_GND
10UH/3A
D903
CVDSS34SR
L856
10UH/3A
D904
CVDSS34SR
L862
10UH/3A
D902
CVDSS34SR
+1.8VH1
12K
R841
470/16V
C535
2K
R843
C521
0.1uF
5.1K
R840
+1.8VDD
12K
R838
2K
R852
C506
C493
0.1uF
150uF/10V
5.1K
R851
+3.3VDD
27K
R839
470/16V
C505
2.2K
C500
R844
0.1uF
5.1K
R847
L859
L861
L857
0.01uF
PW_GND
C533
DDRMEM_REG_ 2.5V
ADC_REG_ 1.8/3.3V
+3.3VA
22/6.3V
+1.8VA
22/6.3V
SCALER&Analog_REG
+8VA
+5VA
L8609R005Z
+5VH1
L854
+3.3VH1
+3.3VH2
CLZ9Z014Z
C526
C488
10/16V
0.1uF / 16V
L853
CLZ9Z014Z
C515
C494
10/16V
0.1uF / 16V
+2.5VH1
22/6.3V
+2.5VH2
22/6.3V
C496
C507
V-GND
KIA1117S50
0.1uF
0.1uF
IC924
V-GND
+3.3VDD
2.5V
IC922
2
GND
OUT
IN
3 1
2.5V
OUT
3 1
0.1uF
C508
IC929
2
GND
IN
0.1uF
C530
0.1uF
C537
C514
0.1uF
C523
C522
+3.3VDD
L855
1321_SCL
C532
10/16V
+3.3VDD
L863
C490
10/16V
1321_SDA
R856
R854
4.7K
+3.3VH2
TO INPUT
FRONT_HDMI_Option
V-GND
3.3V
IC926
2
GND
OUT
IN
3 1
Option
C503
V-GNDV-GND
C502
V-GND
1.8V
2
GND
OUT
3 1
V-GND
IC928
IN
+5VA
BUSY_CHECK
0.1uF
C529
C538
10/16V
V-GND
V-GND
0.1uF
C516
C501
10/16V
V-GND
V-GND
0_NC
R885
OSD_SDA
OSD_SCL
OSD_CE
R877
0
BUSY
HDMI_MUTE
/RESET
UART_RX
UART_TX
CEC_MCU
1321_SCL
1321_SDA
OSD_H
GPROBE_RXD
GPROBE_TXD
TO POWER
IC925CVIKIA7809AF
INOUT
C519
C536
GND
10/16V
0.1uF / 16V
312
InOut
GND
+1.8VH2
V-GNDV-GND
V-GND
$$$17270
0.1uF
C542
+15VA
123
CLZ9Z014Z
CLZ9Z014Z
C517
10/16V
C510
C491
220/25V
0.1uF / 16V
V-GNDV-GND
+1.8VDD
L849
L851
REVISION12
A
MP
SCHEMATIC DIAGRAM
3
-15VA
OSD_H
SV_Y_THRU
SV_C_THRU
CVBS_THRU
COM_Y_THRU
COM_PB_THRU
COM_PR_THRU
COM_Y_CONV
COM_PB_CONV
COM_PR_CONV
OSD_SDA
_SCL
OSD
OSD_CE
4.7K
CVBS_CONV
SV_Y_CONV
SV_C_CONV
IPOD_PR/SY
IPOD_PB/CVBS
IPOD_Y/SC
R876
BUSY
0_NC
N.D
TXEN
R875
100_NC
+15VA
+15V_DC/DC
0.1uF
C525
PW_GND
+15VA
-15VA
4
5
1200/35V
Option
CLZ9Z014Z
L85210UH/3A
C528
CLZ9Z014Z
Option
1
2
3
4
5
6
8
9 7
11
12 10
BN301
13
1416
1523
1820
1925
21 17
24 22
2628
F_CVBS
2729
30
C
1
1
CN105
2
2
3
3
4
4
5
CJP17GB210ZY
5
6
6
7
7
8
810
9
911
10
11
12
1214
13
1315
14
15
16
16
17
17
B
L850
7654321
7
6
5
PW_GND
4
PW_GND
3
L864
CWB07
2
NC
BN61
1
6
7
A
SHEET
MODEL
S.K
10.11.16
L.J.H
10.11.16
AVR400
APPROVECHECKDESIGN DRAWING NO
S.H.S
10.11.16
POWER&CONNECTOR
1510
55
Page 30
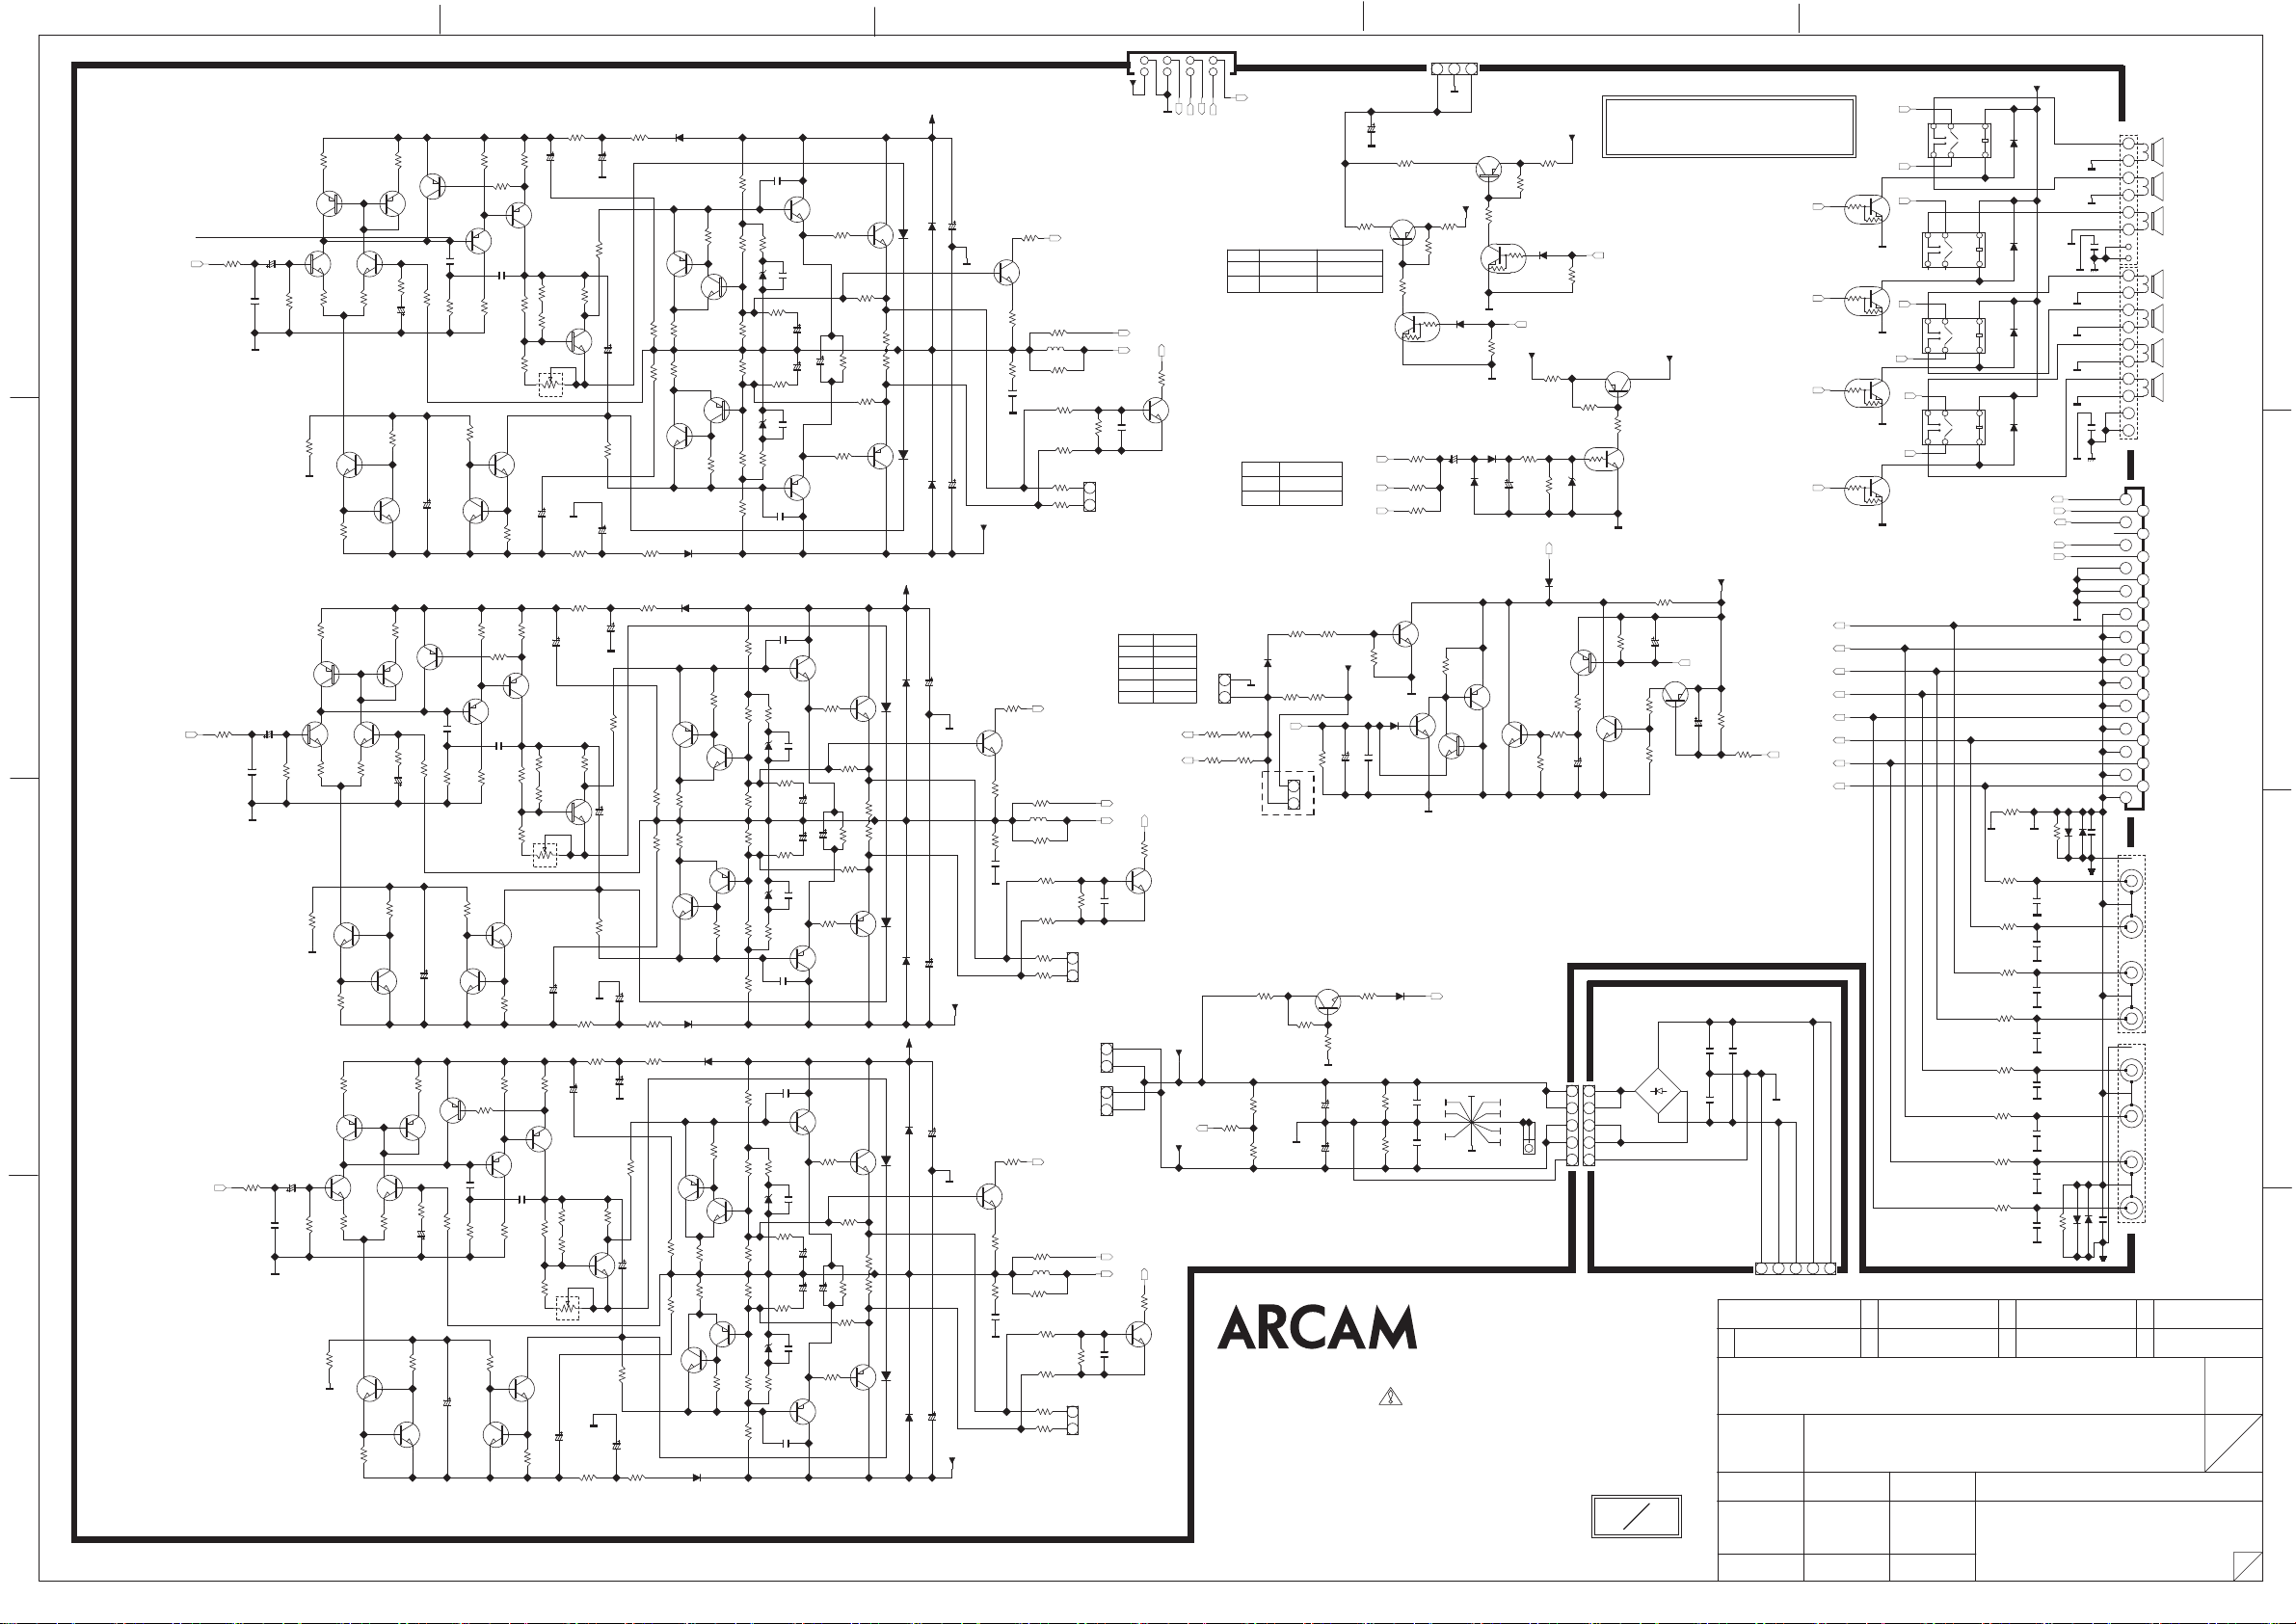
1
+12V
JK51
GND_SBL
GND_C
GND_SR
GND_SBR
1SS355
D5816
1SS355
D5811
GND_SL
C5051
C5052
CGNDCGND
1SS355
D5812
1
2
3
4
5
6
0.1uF
1
+
-
2
3
+
-
4
5
+
-
6
7
+
-
8
9
10
0.1uF
JK52
CN103
1
2
3
4
5
6
7
8
9
10
11
12
13
14
17 15
18 16
2123
2224
25 19
26 20
27
0.1uF
JK581
C5815
SBR
SBL
SUB
CEN
JK582
SR
SL
FR
0.1uF
FL
C5811
CGND
CGND
6
7
R5814
R5801
100(F) 0.1W
R5802
100(F) 0.1W
R5803
100(F) 0.1W
R5804
100(F) 0.1W
R5805
100(F) 0.1W
R5806
100(F) 0.1W
R5807
100(F) 0.1W
R5808
100(F) 0.1W
4
5
D5051
D5052
D5053
D5054
SPK_REALY
POWER_RELAY
POWER_DOWN
POWER_MUTE
4.7
1SS355
1SS355
1SS355
1SS355
PROTECT
GND_SIG
GND_SIG
GND_SIG
GND_SIG
GND_SIG
GND_SIG
GND_SIG
GND_SIG
GND_SIG
GND_FL
GND_FR
4.7
1SS355
R5815
D5815
22P
C5801
22P
C5802
22P
C5803
22P
C5804
22P
C5805
22P
C5806
22P
C5807
4.7
22P
C5808
R5810
DRAWING NODESIGN CHECK APPROVE
2329SCMZ
(AMP PART)
SBL
SL
FL
CEN
FR
SR
SBR
MCU/INPUT BOARD
SHEET
11
15
1
D
C
B
A
2
68K(F)
0.5uH
R5389
21
R5289
21
3
FROM POWER BOARD
+12V
V_DET
FL_OUT
Q5188
MMBT5551
C5189
R5189
5.6K(F)
0.1uF 100V
21
CN51
Thermal Protect Temp. : 100~105'C
*POSISTOR (SYPSX08850JD)
Temp.
25'C
65'C
75'C
100'C
V_DET
CEN_OUT
Q5388
MMBT5551
0.1uF
C5389
5.6K(F)
CN53
CN593
2 1
CN592
2 1
_DET
V
FR_OUT
Q5288
MMBT5551
C5289
5.6K(F)
0.1uF 100V
CN52
2143658
V_DET
GND_DEC
OVERLOAD
R5190
22K(F)
Resistance
85
105
140
1.3K
4K105'C
FAN1
FAN2
OVERLOAD
22K(F)
R5390
VCC
VEE
OVERLOAD
R5290
22K(F)
FAN
CN501
7
SUB_POWER
+5V
POWER-DOWN
POWER_DOWN
Operating Temp.
FAN2
65~70'C
75~80'C
FAN1
GND_DEC
R5925
10 1W
Operating Voltage
8V
10.5V
C5936
BN591
321
GND_DEC
470/16V
R5935
0
Q5924
KTA1271Y
4.7K
R5921
Q5920
KRC107S
Q5934
KTA1271Y
FAN_12V
4.7K
R5923
R5932
4.7 1W
10K(F)
R5924
D5920
GND_DEC
R5920
Q5931
KRC107S
33K
GND_DEC
C5907
R5864
10/50V
47K
Q5864
BC846B
Q5863
BC856B
D5908
1SS133M
D5907
C5908
1SS133M
OUTPUT SIGNAL DETECT
1.6V
1CH
850mV
2CH
550mV
3CH
R5853
1K(F)
D5851
1SS355
21
R5852
GND_DEC
R5902
R5904
1.5K
TH585
15K
R5901
R5903
1K(F)
V_DET
1.5K
470
21
TH586
Fan Test
R5844
10K(F)
R5845
22K(F)
R5851
0
R5861
Q5845
BC846B
R5854
R5905
FL_OUT
7.5K
R5906
FR_OUT
CEN_OUT
15K
+12V
33K
C5861
22K(F)
R5846
7.5K
R5907
7.5K
Q5855
BC846B
1.5K
R5855
Q5862
BC846B
D5862
1SS355
C5862
100/50V
0.1uF 100V
GND_DEC
D5848
R5847
POWER_MUTE
1.5K
RLS4148SR
GND_DEC
GND_FL
GND_DEC
GND_SBL
GND_FR
GND_C
GND_SL
GND_SR
V_DET
R5843
47K
47K
R5841
R5842
C5839
15000uF/80V
C5840
47K
15000uF/80V
47K
R5837
C5835
(CHG1A504)
(CHG1A504)
0.047uF
GND_SBR
47K
C5836
0.047uF
R5838
CUP12329-1
**IMPORTANT SAFETY NOTICE.
COMPONENTS IDENTIFIED BY MARK HAVE SPECIAL CHARACTERISTICS
IMPORTANT FOR SAFETY. WHEN REPLACING ANY OF THESE COMPONENTS,
USE ONLY MANUFACTURER'S SPECIFIED PARTS.
**THE UNIT OF RESISTANCE IS OHM.
K=1000 OHM, M=1000 KOHM
6
-
**THE UNIT OF CAPACITANCE IS MICROFARAD (uF).
1pF = 10 uF
**THIS SCHEMATIC DIAGRAM MAY BE MODIFIED AT ANYTIME
WITH THE IMPROVEMENT OF PERFORMANCE.
5 4
VCC
D5130
R5120
R5320
GND_DEC
R5327
68(F) 0.25W
22uF/100V
Q5220
KTC3114A
NTC THERMISTOR
GND_DEC
R5227
C5130
GND_DEC
R5150
27(F)
C5129
GND_DEC
27(F)
82(F)
R5228
C5117
R5160
C5330
R5360
R5220
100/100V
56(F)
100/100V
R5350
10/50V
C5317
C5329
C5230
GND_DEC
C5229
R5130
22 0.5W(Fusible)
10/50V
82(F)
R5129
22 0.5W(Fusible)
R5330
22 0.5W(Fusible)
100/100V
56(F)
100/100V
22 0.5W(Fusible)
22 0.5W(Fusible)
100/100V
56(F)
R5250
27(F)
C5217
10/50V
82(F)
R5260
100/100V
R5229
22 0.5W(Fusible)
R5329
R5230
1N5819
C5150
(N.F)
R5136
8.2K 0.25W(F)
Q5150
1K(F)
Q5140
BC856B
1K(F)
Q5340
BC856B
Q5240
BC856B
1K(F)
Q5330
BC846B
1K(F)
1K(F)
Q5230
BC846B
1K(F)
2SC4883A
R5137
R5135
3.3K(F)
8.2K 0.25W(F)
27V
0.1uF
D5135
C5135
R5134
330(F)
150(F)
C5134
R5132
150(F)
C5144
R5142
R5144
330(F)
27V
0.1uF
C5145
D5145
Q5160
R5147
R5145
3.3K(F)
2SA1859A
8.2K 0.25W(F)
C5160
R5146
(N.F)
8.2K 0.25W(F)
C5350
(N.F)
R5336
8.2K 0.25W(F)
Q5350
2SC4883A
R5337
R5335
3.3K(F)
8.2K 0.25W(F)
27V
0.1uF
D5335
C5335
R5334
330(F)
150(F)
R5332
150(F)
R5342
R5344
330(F)
27V
0.1uF
D5345
C5345
R5347
Q5360
R5345
3.3K(F)
2SA1859A
8.2K 0.25W(F)
C5360
(N.F)
R5346
8.2K 0.25W(F)
C5250
(N.F)
R5236
8.2K 0.25W(F)
Q5250
2SC4883A
R5237
R5235
3.3K(F)
8.2K 0.25W(F)
27V
0.1uF
D5235
C5235
R5234
330(F)
150(F)
R5232
C5244
150(F)
R5242
R5244
330(F)
27V
0.1uF
D5245
C5245
Q5260
R5245
R5247
3.3K(F)
2SA1859A
8.2K 0.25W(F)
C5260
R5246
8.2K 0.25W(F)
(N.F)
Q5131
R5133
BC856B
Q5130
BC846B
10(F)
R5131
R5118
1K 1W(R)
10(F)
R5141
R5117
1K 1W(R)
Q5141
BC846B
R5143
D5129
1N5819
D5330
1N5819
R5333
Q5331
BC856B
R5318
10(F)
R5331
1K 1W(R)
10(F)
R5341
R5317
1K 1W(R)
Q5341
BC846B
R5343
D5329
1N5819
D5230
1N5819
R5233
Q5231
BC856B
R5218
1K 1W(R)
10(F)
R5231
10(F)
R5241
R5217
1K 1W(R)
Q5241
BC846B
R5243
1N5819
D5229
Q5170
NJL3281DG
R5170
1.0 0.25W
(Fusible)
R5138
820(F)
10/50V
C5155
10/50V
C5334
10/50V
10/50V
C5344
10/50V
C5234
10/50V
R5370
1.0 0.25W
(Fusible)
C5355
R5380
1.0 0.25W
(Fusible)
R5270
1.0 0.25W
(Fusible)
C5255
R5280
1.0 0.25W
(Fusible)
10UF/100V
1.0 0.25W
(Fusible)
10UF/100V
10UF/100V
R5155
R5180
Q5370
NJL3281DG
R5338
820(F)
R5355
R5348
820(F)
Q5380
NJL1302DG
Q5270
NJL3281DG
R5238
820(F)
R5255
R5248
820(F)
Q5280
NJL1302DG
100 0.5W
R5148
820(F)
Q5180
NJL1302DG
R5375
100 0.5W
R5275
100 0.5W
R5175
0.22 X2 5W
0.22 X2 5W
0.22 X2 5W
C5170
D5170
1N4003S
22uF/100V
Q5181
MMBT5551
GND_DEC
C5180
D5180
1N4003S
22uF/100V
VEE
VCC
C5370
D5370
1N4003S
22uF/100V
Q5381
MMBT5551
GND_DEC
GND_C
D5380
C5380
1N4003S
22uF/100V
VEE
VCC
D5270
C5270
1N4003S
22uF/100V
Q5281
MMBT5551
GND_DEC
GND_FR
C5280
D5280
1N4003S
22uF/100V
VEE
SOA_PROTECT
R5181
47K
100(F)
R5182
R5185
L5185
(CHG1A503)
4.7 2W(R)
R5184
4.7 2W(R)
R5183
C5183
R5188
0.1uF/100V
10K(F)
GND_FL
R5186
10K(F)
R5178
1K(F)
R5176
1K(F)
SOA_PROTECT
R5381
47K
100(F)
R5382
R5385
68K(F)
0.5uH
L5385
(CHG1A503)
4.7 2W(R)
R5384
R5383
4.7 2W(R)
C5383
R5388
0.1uF/100V
10K(F)
R5386
10K(F)
R5378
1K(F)
R5376
1K(F)
SOA_PROTECT
R5281
47K
100(F)
R5282
R5285
68K(F)
L5285
0.5uH
(CHG1A503)
4.7 2W(R)
R5284
R5283
4.7 2W(R)
C5283
R5288
0.1uF/100V
10K(F)
R5286
10K(F)
R5278
1K(F)
R5276
1K(F)
R5128
FL
100(F)
R5103
Q5104
Q5103
BC856B
BC856B
D
Q5101
BC846B
R5101
680(F)
C5101
GND_SIG
C5102
100/50V
(ELNA RFO)
(PP Film)
1000pF 100V
R5102
22K(F)
R5111
GND_DEC
68(F)
68(F)
R5105
R5106
Q5110
BC846B
8.2K(F)
Q5109
BC846B
220(F)
R5109
FL_IN
Q5102
BC846B
Q5112
BC856B
10/50V
1K(F)
R5114
R5112
1K(F)
Q5115
BC856B
Q5113
KTA1024Y
(PP Film)
C5115
C5116
100pF 100V
470pF 100V
(PP Film)
R5115
R5116
22K(F)
2.2K 0.25W
R5126
12K(F)
Q5126
KTC3206Y
Q5125
BC846B
R5125
100(F)
R5104
680(F)
R5107
R5108
C5107
22K F (Metal Film)
470/16V
22K(F)
R5110
C5109
68(F) 0.25W
C5128
33(F)
R5113
22uF/100V
1K(F)
R5121
1K(F)
R5123
Q5120
KTC3114A
100K
R5122
NTC THERMISTOR
VR51
470
560(F)
R5124
C5127
22uF/100V
GND_DEC
82(F)
R5127
68(F) 0.25W
C
R5328
Q5312
Q5310
BC846B
220(F)
100(F)
68(F)
R5306
Q5203
BC856B
R5209
Q5304
BC856B
Q5309
BC846B
68(F)
Q5210
BC846B
100(F)
R5304
BC856B
Q5302
BC846B
680(F)
R5307
R5308
C5307
22K F (Metal Film)
470/16V
22K(F)
R5310
C5309
100(F)
R5204
Q5204
BC856B
Q5202
BC846B
680(F)
R5207
68(F)
R5206
C5207
470/16V
22K(F)
R5210
Q5209
BC846B
220(F)
100(F)
C5302
1000pF 100V
(PP Film)
C5201
GND_SIG
R5302
C5202
100/50V
(ELNA RFO)
(PP Film)
1000pF 100V
Q5301
BC846B
22K(F)
R5311
GND_DEC
R5202
R5303
R5305
8.2K(F)
Q5201
BC846B
22K(F)
GND_DEC
R5211
Q5303
BC856B
68(F)
R5309
R5203
R5205
8.2K(F)
CEN
CEN_IN
R5301
680(F)
100/50V
(ELNA RFO)
C5301
GND_SIG
B
FR
FR_IN
R5201
680(F)
A
1K(F)
R5314
R5312
1K(F)
Q5315
BC856B
Q5313
KTA1024Y
C5315
C5316
(PP Film)
100pF 100V
470pF 100V
(PP Film)
R5316
R5315
22K(F)
2.2K 0.25W
Q5326
R5326
12K(F)
KTC3206Y
Q5325
BC846B
10/50V
R5325
Q5212
R5214
BC856B
R5212
1K(F)
Q5215
BC856B
C5215
100pF 100V
(PP Film)
R5208
R5215
R5216
22K F (Metal Film)
2.2K 0.25W
Q5226
R5226
12K(F)
KTC3206Y
C5209
10/50V
Q5225
BC846B
R5313
R5323
R5324
82(F)
1K(F)
Q5213
KTA1024Y
C5216
470pF 100V
(PP Film)
22K(F)
R5225
68(F) 0.25W
33(F)
C5328
22uF/100V
1K(F)
R5321
1K(F)
Q5320
KTC3114A
100K
R5322
NTC THERMISTOR
VR53
470
560(F)
C5327
22uF/100V
68(F) 0.25W
33(F)
R5213
C5228
1K(F)
R5221
1K(F)
R5223
100K
R5222
VR52
470
560(F)
R5224
C5227
22uF/100V
82(F)
68(F) 0.25W
R5934
FAN2
100/35V
Q5874
BC846B
2
SUB_IN
SL_IN
CEN_IN
SR_IN
FL_IN
SBL_IN
FR_IN
SBR_IN
Q5051
KRC107S
Q5052
KRC107S
Q5053
KRC107S
Q5054
KRC107S
GND_DEC
GND_DEC
GND_DEC
GND_DEC
SBL_OUT
SL_OUT
FL_OUT
CEN_OUT
FR_OUT
SBR_OUT
SR_OUT
23
(CHG1A502)
23
(CHG1A502)
23
(CHG1A502)
23
(CHG1A502)
RY51
6154
RY52
6154
RY53
6154
RY54
6154
*CHG1A502 : Rubber Damping Pad 15 X 6 X 3mm
*CHG1A503 : Rubbe
FAN_12V
R5933
1.5 0.2W
10K(F)
D5931
+12V
R5912
1.5 0.2W
R5908
1K(F)
330K
R5909
*CHG1A504: 3M Bumpon SJ-6344
FAN1
47K
R5931
Q5911
KTA1271Y
R5911
10K(F)
4.7K
R5910
Q5909
KRC111M
5.1V
D5909
r Damping Pad 7.5 X 6 X 3mm
SPK_REALY
SPK_REALY
FAN_12V
SPK_REALY
SPK_REALY
GND_DEC
PROTECT
D5885
RLS4148
Q5871
BC856B
120K
R5872
R5873
10K(F)
10K(F)
47/25V
C5872
R5874
CN582
54321
54321
G583
R5885
R5871
3.3K(F)
C5871
Q5884
47K
BC846B
47K
3
CN581
1
2
47K
1/50V
R5883
R5884
SOA_PROTECT
Q5882
BC856B
D5830
25A/600V
4
VCC
R5882
10K(F)
1/50V
C5882
22K(F)
OVERLOAD
R5881
C5832
C5831
0.1u/250V
0.1u/250V
C5833
0.1u/250V
CUP12329-2
*Add Ferrite Clamp(CLZ9Z070Z)
To Cable From Transformer.
CN508
5 4 3 2 1
FROM TRANS
REVISION
1
2
3
SCHEMATIC DIAGRAM
M P
MODEL
L.K.M L.J.H
AVR400
S.H.S
10.11.1810.11.18 10.11.18
Page 31
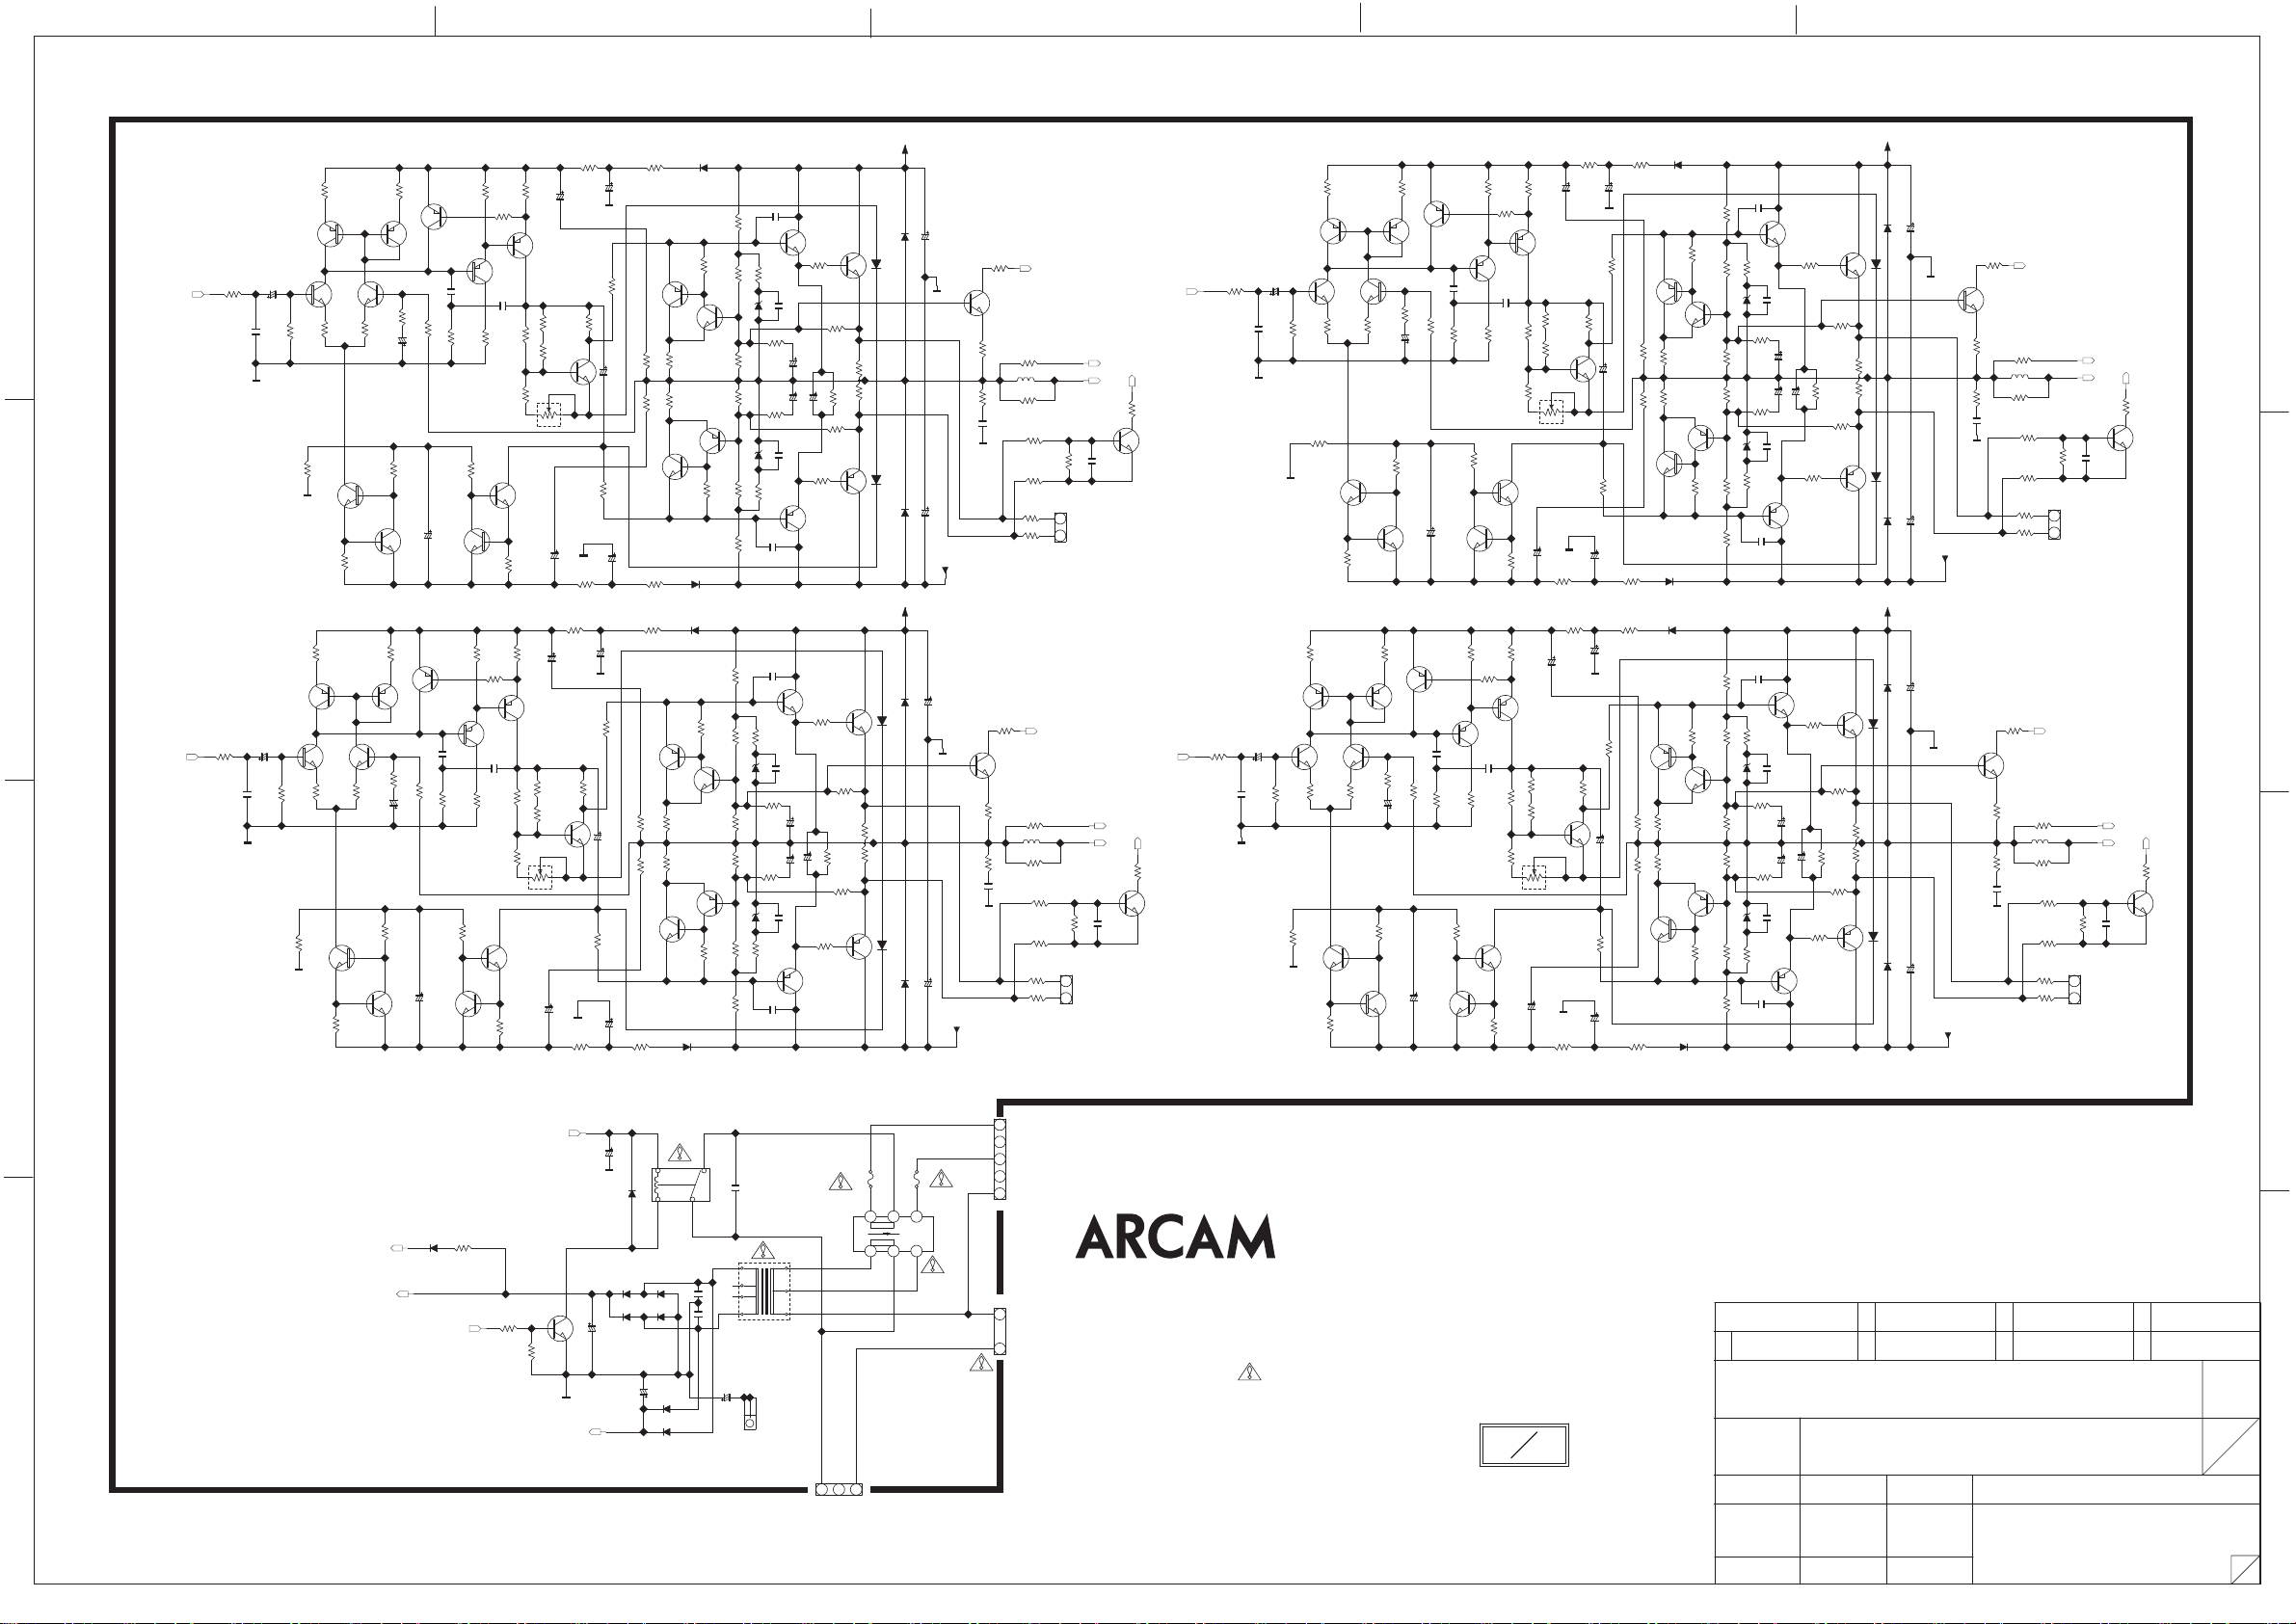
5 4
3
2
1
Q5670
NJL3281DG
R5638
820(F)
100 0.5W
R5648
820(F)
Q5680
NJL1302DG
Q5770
NJL3281DG
R5738
820(F)
100 0.5W
R5748
820(F)
Q5780
NJL1302DG
VCC
D
C5670
D5670
1N4003S
22uF/100V
SOA_PROTECT
R5681
47K
Q5681
GND_DEC
MMBT5551
100(F)
R5682
R5685
R5675
0.22 X2 5W
C5680
D5680
1N4003S
22uF/100V
VCC
C5770
D5770
1N4003S
22uF/100V
GND_DEC
R5775
0.22 X2 5W
D5780
C5780
1N4003S
22uF/100V
L5685
(CHG1A503)
4.7 2W(R)
R5684
R5683
4.7 2W(R)
C5683
R5688
0.1uF/100V
R5782
R5783
C5783
GND_SBR
R5781
47K
Q5781
MMBT5551
100(F)
4.7 2W(R)
0.1uF/100V
10K(F)
10K(F)
R5678
1K(F)
R5676
1K(F)
R5785
L5785
R5784
R5686
GND_SBL
VEE
VEE
68K(F)
0.5uH
SOA_PROTECT
(CHG1A503)(CHG1A503)
4.7 2W(R)
R5788
10K(F)
R5786
10K(F)
R5778
1K(F)
R5776
1K(F)
68K(F)
0.5uH
V_DET
OVERLOAD
SBL_OUT
R5690
22K(F)
Q5688
MMBT5551
C5689
R5689
5.6K(F)
0.1uF 100V
CN56
1 2
C
V_DET
OVERLOAD
SBR_OUT
R5790
22K(F)
Q5788
MMBT5551
C5789
R5789
5.6K(F)
0.1uF 100V
CN57
1 2
B
VCC
D5430
GND_DEC
27(F)
R5460
C5530
R5550
27(F)
R5560
C5430
R5450
C5429
C5517
82(F)
C5529
100/100V
56(F)
C5417
10/50V
82(F)
100/100V
100/100V
56(F)
10/50V
100/100V
22 0.5W(Fusible)
R5430
22 0.5W(Fusible)
R5418
1K 1W(R)
R5417
1K 1W(R)
R5429
22 0.5W(Fusible)
R5530
22 0.5W(Fusible)
R5518
1K 1W(R)
R5517
1K 1W(R)
R5529
1N5819
C5450
(N.F)
R5436
8.2K 0.25W(F)
1K(F)
Q5440
BC856B
1K(F)
Q5530
BC846B
1K(F)
Q5430
BC846B
1K(F)
Q5450
R5435
R5437
3.3K(F)
8.2K 0.25W(F)
27V
D5435
R5434
150(F)
R5432
150(F)
R5442
R5444
27V
D5445
R5447
R5445
3.3K(F)
8.2K 0.25W(F)
R5446
C5460
8.2K 0.25W(F)
C5550
R5536
(N.F)
8.2K 0.25W(F)
Q5550
2SC4883A
R5537
R5535
3.3K(F)
8.2K 0.25W(F)
27V
D5535
R5534
330(F)
150(F)
R5532
150(F)
R5542
R5544
330(F)
27V
D5545
R5547
R5545
3.3K(F)
8.2K 0.25W(F)
C5560
R5546
(N.F)
8.2K 0.25W(F)
Q5431
R5433
BC856B
10(F)
R5431
10(F)
R5441
Q5441
BC846B
R5443
D5429
1N5819
D5530
1N5819
Q5531
R5533
BC856B
10(F)
R5531
10(F)
R5541
Q5540
BC856B
Q5541
BC846B
R5543
D5529
1N5819
2SC4883A
C5435
330(F)
330(F)
C5445
Q5460
2SA1859A
(N.F)
C5535
C5545
Q5560
2SA1859A
Q5470
NJL3281DG
R5470
1.0 0.25W
(Fusible)
0.1uF
R5438
820(F)
10/50V
C5434
C5444
0.1uF
0.1uF
C5534
C5544
0.1uF
R5475
0.22 X2 5W
C5455
10/50V
R5455
100 0.5W
10UF/100V
R5448
820(F)
Q5480
NJL1302DG
R5480
1.0 0.25W
(Fusible)
Q5570
NJL3281DG
R5570
1.0 0.25W
(Fusible)
R5538
820(F)
10/50V
R5575
0.22 X2 5W
R5555
C5555
100 0.5W
10/50V
10UF/100V
R5548
820(F)
Q5580
NJL1302DG
R5580
1.0 0.25W
(Fusible)
C5470
D5470
1N4003S
22uF/100V
Q5481
MMBT5551
GND_DEC
D5480
C5480
1N4003S
22uF/100V
VEE
VCC
C5570
D5570
1N4003S
22uF/100V
GND_DEC
C5580
D5580
1N4003S
22uF/100V
VEE
R5482
R5483
C5483
GND_SL
C5583
GND_SR
SOA_PROTECT
R5481
47K
100(F)
R5485
L5485
(CHG1A503)
4.7 2W(R)
R5484
4.7 2W(R)
R5488
0.1uF/100V
10K(F)
R5486
10K(F)
R5478
1K(F)
R5476
1K(F)
SOA_PROTECT
R5581
47K
Q5581
MMBT5551
100(F)
R5582
R5585
L5585
R5584
R5583
4.7 2W(R)
4.7 2W(R)
0.1uF/100V
R5578
R5576
1K(F)
R5588
10K(F)
R5586
10K(F)
1K(F)
0.5uH
68K(F)
0.5uH
68K(F)
V_DET
OVERLOAD
SL_OUT
R5490
Q5488
22K(F)
MMBT5551
C5489
R5489
5.6K(F)
0.1uF 100V
CN54
1 2
SBR_IN
V_DET
OVERLOAD
SR_OUT
R5590
22K(F)
Q5588
MMBT5551
C5589
R5589
6.8K(F)
0.1uF 100V
CN55
1 2
SBL_IN
SBL
R5601
680(F)
(ELNA RFO)
C5601
GND_SIG
SBR
C5702
R5701
680(F)
100/50V
(ELNA RFO)
C5701
(PP Film)
1000pF 100V
GND_SIG
C5602
100/50V
1000pF 100V
R5702
(PP Film)
R5602
GND_DEC
Q5701
BC846B
22K(F)
R5711
GND_DEC
Q5601
BC846B
22K(F)
8.2K(F)
100(F)
R5603
Q5604
Q5603
BC856B
BC856B
68(F)
68(F)
R5605
R5606
R5611
8.2K(F)
Q5610
BC846B
Q5609
BC846B
220(F)
R5609
100(F)
R5703
68(F)
R5705
Q5703
BC856B
R5709
Q5710
BC846B
220(F)
R5704
Q5704
BC856B
Q5702
BC846B
68(F)
R5706
R5710
Q5709
BC846B
Q5612
100(F)
R5604
BC856B
Q5602
BC846B
680(F)
R5607
R5608
C5607
22K F (Metal Film)
470/16V
22K(F)
R5610
C5609
Q5712
100(F)
BC856B
C5715
680(F)
R5707
R5708
R5715
C5707
22K F (Metal Film)
470/16V
22K(F)
C5709
10/50V
10/50V
Q5715
BC856B
100pF 100V
2.2K 0.25W
1K(F)
R5614
R5612
1K(F)
Q5615
BC856B
Q5613
KTA1024Y
C5615
C5616
100pF 100V
(PP Film)
470pF 100V
(PP Film)
R5623
R5616
R5615
22K(F)
2.2K 0.25W
R5626
12K(F)
Q5626
KTC3206Y
Q5625
BC846B
82(F)
R5625
1K(F)
33(F)
R5714
R5713
R5712
1K(F)
Q5713
KTA1024Y
C5716
(PP Film)
470pF 100V
(PP Film)
1K(F)
R5723
R5716
22K(F)
R5724
560(F)
R5726
Q5726
12K(F)
KTC3206Y
Q5725
BC846B
82(F)
R5725
R5428
Q5412
22K F (Metal Film)
10/50V
C5515
R5515
BC856B
1K(F)
R5414
R5412
1K(F)
Q5415
BC856B
Q5413
KTA1024Y
C5415
C5416
100pF 100V
(PP Film)
470pF 100V
(PP Film)
R5416
22K(F)
R5415
2.2K 0.25W
R5426
12K(F)
Q5425
BC846B
82(F)
R5425
1K(F)
R5514
R5513
R5512
1K(F)
Q5515
BC856B
Q5513
KTA1024Y
C5516
100pF 100V
(PP Film)
470pF 100V
(PP Film)
R5523
22K(F)
R5516
2.2K 0.25W
R5524
R5526
12K(F)
Q5526
KTC3206Y
Q5525
BC846B
82(F)
R5525
Q5410
BC846B
220(F)
R5506
R5406
Q5504
BC856B
68(F)
Q5509
BC846B
Q5409
BC846B
Q5404
BC856B
68(F)
Q5502
BC846B
Q5402
BC846B
R5510
100(F)
R5404
680(F)
R5407
R5408
C5407
470/16V
22K(F)
R5410
C5409
Q5512
100(F)
R5504
BC856B
R5507
680(F)
R5508
C5507
22K F (Metal Film)
470/16V
22K(F)
C5509
10/50V
D
SL
SL_IN
R5401
680(F)
(ELNA RFO)
C5401
GND_SIG
SR
R5501
680(F)
C5501
GND_SIG
C5502
100/50V
(ELNA RFO)
(PP Film)
1000pF 100V
SR_IN
B
C5402
100/50V
1000pF 100V
R5403
100 , 0.125W
Q5403
BC856B
Q5401
BC846B
68(F)
R5405
22K(F)
R5402
(PP Film)
R5411
8.2K(F)
R5409
100(F)
R5503
Q5503
BC856B
Q5501
BC846B
68(F)
R5505
22K(F)
R5502
Q5510
BC846B
R5511
8.2K(F)
GND_DEC
220(F)
R5509
33(F)
R5423
R5424
Q5426
KTC3206Y
33(F)
1K(F)
560(F)
68(F) 0.25W
R5413
C5428
22uF/100V
1K(F)
R5421
R5420
1K(F)
Q5420
KTC3114A
100K
R5422
NTC THERMISTOR
VR54
470
560(F)
C5427
GND_DEC
22uF/100V
R5427
68(F) 0.25W
R5528
68(F) 0.25W
C5528
22uF/100V
GND_DEC
1K(F)
R5521
R5520
Q5520
KTC3114A
R5522
100K
NTC THERMISTOR
VR55
470
C5527
22uF/100V
GND_DEC
R5527
68(F) 0.25W
R5628
68(F) 0.25W
C5630
C5628
33(F)
R5613
22uF/100V
GND_DEC
R5650
1K(F)
R5621
27(F)
R5620
1K(F)
Q5620
KTC3114A
100K
R5622
NTC THERMISTOR
VR56
470
560(F)
R5624
R5660
GND_DEC
C5627
R5721
R5722
VR57
470
C5727
C5728
1K(F)
100K
22uF/100V
22uF/100V
R5627
68(F) 0.25W
Q5720
KTC3114A
NTC THERMISTOR
GND_DEC
R5727
68(F) 0.25W
R5728
68(F) 0.25W
22uF/100V
GND_DEC
R5720
C5629
C5730
27(F)
R5760
C5729
100/100V
22 0.5W(Fusible)
100/100V
R5750
C5717
82(F)
100/100V
R5630
22 0.5W(Fusible)
100/100V
56(F)
R5618
C5617
10/50V
R5617
82(F)
R5629
22 0.5W(Fusible)
R5730
56(F)
R5718
10/50V
R5717
R5729
22 0.5W(Fusible)
D5630
1N5819
C5650
(N.F)
R5636
8.2K 0.25W(F)
Q5650
2SC4883A
3.3K(F)
27V
R5634
330(F)
R5644
330(F)
27V
3.3K(F)
Q5660
2SA1859A
C5660
(N.F)
C5750
(N.F)
Q5750
2SC4883A
3.3K(F)
27V
R5734
330(F)
R5744
330(F)
27V
3.3K(F)
C5760
(N.F)
C5635
C5645
C5735
C5745
Q5760
2SA1859A
R5670
1.0 0.25W
(Fusible)
0.1uF
C5634
10/50V
C5644
C5655
R5655
10/50V
10UF/100V
0.1uF
R5680
1.0 0.25W
(Fusible)
R5770
1.0 0.25W
(Fusible)
0.1uF
C5734
10/50V
C5755
R5755
10/50V
C5744
10UF/100V
0.1uF
R5780
1.0 0.25W
(Fusible)
1K(F)
R5633
Q5631
BC856B
1K 1W(R)
10(F)
R5631
10(F)
R5641
1K 1W(R)
Q5641
BC846B
D5629
1N5819
D5730
1N5819
Q5731
BC856B
10(F)
R5731
1K 1W(R)
10(F)
R5741
1K 1W(R)
Q5741
BC846B
D5729
1N5819
R5635
R5637
8.2K 0.25W(F)
Q5630
BC846B
D5635
150(F)
R5632
150(F)
R5642
Q5640
BC856B
D5645
R5645
1K(F)
R5647
R5643
8.2K 0.25W(F)
R5646
8.2K 0.25W(F)
R5736
8.2K 0.25W(F)
1K(F)
R5733
R5735
R5737
8.2K 0.25W(F)
Q5730
BC846B
D5735
150(F)
R5732
150(F)
R5742
Q5740
BC856B
D5745
1K(F)
R5743
R5747
R5745
8.2K 0.25W(F)
R5746
8.2K 0.25W(F)
CUP12329-1
POWER_MUTE
+5V
D5965
1SS355
R5965
1K(F)
POWER_RELAY
R5946
230V
115V
123
TO TRANS
CN504
CN503
N
21
L
FROM AC INLET
**IMPORTANT SAFETY NOTICE.
COMPONENTS IDENTIFIED BY MARK HAVE SPECIAL CHARACTERISTICS
IMPORTANT FOR SAFETY. WHEN REPLACING ANY OF THESE COMPONENTS,
USE ONLY MANUFACTURER'S SPECIFIED PARTS.
**THE UNIT OF RESISTANCE IS OHM.
K=1000 OHM, M=1000 KOHM
**THE UNIT OF CAPACITANCE IS MICROFARAD (uF).
**THIS SCHEMATIC DIAGRAM MAY BE MODIFIED AT ANYTIME
6
-
1pF = 10 uF
WITH THE IMPROVEMENT OF PERFORMANCE.
M P
REVISION
1
SCHEMATIC DIAGRAM
MODEL
L.K.M
2
3
L.J.H
AVR400
S.H.S
10.11.18 10.11.18 10.11.18
4
5
DRAWING NODESIGN CHECK APPROVE
2329SCMZ
(AMP PART)
6
7
SHEET
A
12
15
2
2
SUB_POWER
C5942
100/16V
GND_STBY
Q5947
KTC3198Y
220
R5947
C5947
100K
POWER-DOWN
3
4700P
C5941
D5941
D5947
1N4003SR
1N4003SR
D5948
1000/16V
124
1N4003S
RY594
0.1uF/100V
C5945
D5945
1N4003SR
1N4003SR
C5946
0.1uF/100V
D5946
C5948
D5949
2.2/50V
1N4003SR
D5950
1N4003SR
C5994
1/50V
34
5
2
6
7
1
T5941
G5901
S594
230V
115V
F5941
6 5 4
CN502
12
F5940
T 8A L 250V
T 15A H 250V
123
TO SWITCH
Page 32

6
12345
VIDEO PART
JK85
D
Z2 OUT
VCR
AV
SAT
C
BD
AV
B
BD
SAT
A
CJJ4M069Z(GOLD)
JK81
JK82
COMPONENT IN3COMPONENT IN2 &
1,4,7 : UPPER
3,6,9 : LOWER
JK84
COMPONENT IN1COMPONENT OUT &
MONITOR OUT
1,4,7 : UPPER
3,6,9 : LOWER
To HDMI B'D
SHEET
13
D
C
B
A
15
C770
470/10V
68P
C769
VGND
VGND
6
5
1
3
C
Y
4
2
R804
7
VGND VGND VGND
8
17
13
9
CJJ9P004Z(GOLD)
11
C
Y
12
10
15
16
14
VGND
R801
VGND VGND VGND
6
5
1
3
C
Y
4
2
7
8
17
13
9
CJJ9P004Z(GOLD)
C
Y
14
CJJ4R046Z(GOLD)
CJJ4R046Z(GOLD)
R810
11
12
VGND VGND VGND
10
15
16
VGND
R807
VGND VGND VGND
JK83
Pr3
9
75
8
R813
Pr2
VGND
7
75
R816
Pb3
VGND
6
75
5
R814
Pb2
VGND
4
75
R817
Y3
VGND
3
75
2
R815
Y2
VGND
1
75
R818
VGND
VGND
Pr1
9
75
8
VGND VGND
Pr_OUT
7
Pb1
6
75
5
R820
Pb_OUT
4
Y1
3
75
2
Y_OUT
1
VGND
68
R825
0.01uF
C806
C827
1/50V
0.01uF
C805
C826
1/50V
75
75
R806
R805
75
75
R803
R802
75
75
R812
R811
75
75
R809
R808
2P
C751
VGND
2P
C754
VGND
2P
C752
VGND
2P
C755
VGND
2P
C753
VGND
2P
C756
VGND
C7602PR819
2P
C757
VGND
2P
C761
VGNDVGND
2P
C758
VGND
C7622PR821
VGNDVGND
2P
C759
VGND
0.01uF
75
C804
C825
1/50V
0.01uF
C803
C824
1/50V
0.01uF
C802
C823
1/50V
0.01uF
C801
C822
1/50V
75
0.01uF
C812
C833
1/50V
0.01uF
C811
C832
1/50V
0.01uF
C810
75
C831
1/50V
0.01uF
C809
C830
1/50V
0.01uF
C808
C829
1/50V
0.01uF
C807
C828
1/50V
75
0.01uF
C813
C771
1/50V
0.01uF
C816
C774
1/50V
0.01uF
C814
C772
1/50V
0.01uF
C817
C775
1/50V
0.01uF
C815
C773
1/50V
0.01uF
C818
C776
1/50V
0.01uF
C819
C766
1/50V
C765
75
R822
1000/6.3
0.01uF
C820
C767
1/50V
C764
75
R823
1000/6.3
0.01uF
C821
C768
1/50V
C763
75
R824
1000/6.3
Pb4
38 37 36 35 34 33 32 31 30 29 28 27 26 25
39
Y4
V+
V+
Pr4
40
41
42
43
44
45
46
47
Y2
48
38 37 36 35 34 33 32 31 30 29 28 27 26 25
39
40
41
42
43
44
45
46
47
Y2
48
V+
Y3
Pb3
V+
Pr3
V+
Pb4
V+
Pr4
V+
Y3
Pb3
V+
Pr3
V+
Y_OUT
IC81
NJW1321FP1
Pr2
Pb2
Y4
V+
Y_OUT
IC82
NJW1321FP1
Pr2
Pb2
Pb_OUT
Y1
V+
T
Pb_OU
V+
Y1
Pr_OUT
Pb1
Pr_OUT
Pb1
AUX3
AUX2
Pr1
V+
J1 J2 J3
AUX4
AUX3
AUX3
AUX2
V+
Pr1
AUX1
AUX0
Pb_OUT2
24
PORT0
23
Y_OUT2
PORT1
Pr_OUT2
Y_OUT2
Pr_OUT2
22
21
V+
20
VREF
19
DGND
18
GND
17
VGND
SDA
16
SCL
15
1413121110987654321
47K
ADR
PORT3
PORT2
R833
J7
AUX2
AUX1
AUX1
AUX0
24
PORT0
23
PORT1
22
21
V+
20
VREF
19
DGND
18
GND
17
VGND
SDA
16
SCL
15
1413121110987654321
ADR
PORT3
PORT2
VGND
Pr_OUT
Pb_OUT
Y_OUT
+9VV
0.1uF
C836
C835
C834
10/50
100/16
VGNDVGNDVGND
R831 33
R832 33
C841
0.01uF
C847 10/50V
C842
0.01uF
C848 10/50V
C843
0.01uF
C849 10/50V
C844
0.01uF
C850 10/50V
C845
0.01uF
C851 10/50V
Pb_OUT2
+9VV
0.1uF
C838
C839
C837
10/50
100/16
VGNDVGND
VGND
R834 33
R835 33
I2C BUS FORMAT
MSB MSB MSBLSB LSB LSB
S(1BIT) SLAVE ADDRESS(8BIT) A(1BIT) DATA(8BIT) A (1BIT) DATA(8BIT) A(1BIT) P(1BIT)
SLAVE ADDRESS
MSB MSB
1 0 0 0 0 0
CONTROL REGISTER TABLE
<WRITE MODE>
NO.
DATA 1
DATA 2
<READ MODE>
NO.
DATA
Slave Address(8BIT) Hex
PS1 PS2 OUT1 OUT2
AUX0 AUX1 AUX2 AUX3
D7
D6 D5 D4 D3 D2 D1 D0
PORT0 PORT1 PORT2 PORT3
C846
0.01uF
C852 10/50V
* DEFINITION OF I2C REGISTER ( NJW1321 )
BIT
BIT
+5VV
S-C
CVBS
S-Y
Y
Pb
Pr
ADR(1BIT) R/NOT W(1BIT)
IC84 CVINJM2566V
C857
R844
PS1
100/16V
1
10K
SCIN
2
V+1
3
NC-0
C853
4
0.1uF
MIXSW
5
VIN
6
GND1
7
SYIN
8
R841
CBSW
9
4.7K
YIN
10
V+2
11
NC-1
C854
12
0.1uF
GND2
13
PBIN
14
R842
PS2
15
10K
PRIN
16 15 14 13 12 11 10 9 8 7 6 5 4 3 2 1
16
-
D0D1D2D3D4D5D6D7
VGND
8 7 6 5
V+
GND
VOUT
IC85
SW1
Vin1
HVINJM2244MTE1
R861 1M
VGND
32313029282726252423222120191817
32
S1
31
S2
30
SDCOUT
29
SCOUT
28
NC-3
27
VOUT
26
V+4
25
SYOUT
24
GND4
23
YOUT
22
V+3
21
PBOUT
20
NC-2
19
GND3
18
PROUT
17
LPFSW
S : Starting Term
A : Acknowledge Bit
P : Ending Term
R/NOT W : Set the Write Mode or Read Mode.
ADR : Set the Slave Address by " ADR" terminal.
PS : POWER SAVE
OUT : OUTPUT
AUX : AUXILIARY (CONTROL SIGNAL OUTPUT)
PORT : INPUT
Vin2
VGND
C865
10/50V
R862 1M
VGND VGND VGND VGND
C855
0.1uF
C856
0.1uF
R843
4.7K
VGND
R/NOT W = 0 : WRITE MODE, ADR = 0/1 ; ADR=0 Hex:94(h), ADR=1 Hex:96(h)
R/NOT W = 0 : READ MODE, ADR = 0/1 ; ADR=0 Hex:95(h), ADR=1 Hex:97(h)
=> PS = 1 ; POWER SAVE ON (MUTE), PS = 0 ; POWER SAVE OFF (OUT ON)
C866
470/10V
470/10V
470/10V
470/10V
470/10V
470/10V
+5VV
0.1uF
C868
C869
100/16
VGND VGND
Vin3
SW2
4321
VGND
C867
0.01uF
0.01uF
R863 1M
C858
75
R845
C859
75
R846
C860
75
R847
C861
75
R848
C862
75
R849
C863
75
R850
C871 C872 X801
17.734
27P 27P
PAL
NTSC
100K
R867
R866
VGNDVGND
14.318
27P 27P
X801
17.734MHz(EU)
27P
27P
C872
C871
VGND VGND
X802
14.318MHz
27P
27P
(EU)
(EU)
C874
C873
VGND VGND
180P
C888
VGND
COMPO OSD IN
COMPO OUT
OPEN
+5VV +9VV
L803
10uH
C897
C896
0.1uF
10/50V
MP
X802
14.318
X
R884 1K
CVIKIA1117S50
OSD_CE1
OSD_DA
R882 1K
R883 1K
OSD_CE1
IC89
213
Out In
GND
* LC74763M OPTION TABLE
L801
+5VV
100UH
IC83
LC74763M
VSS
VGND
Xin1
SYNCDET
Xout1
HSYNCOUT
Xin2
Xout2
VSYNCOUT
notCS
SIN
OSD_CLK
SCLK
SECAM
not525/625
notNTSC/PAL
not3.58/4.43
VGND
notRST
15 14 13 12 11 10 9 8 7 6 5 4 3 2 1
C887
0.47/50
VGND
470/10
C889
C890
10/50
Q801
KTA1504SY
7 6 5 4 3 2 1
VGND
C895
0.1uF
IC83
LC74763M
302928272625242322212019181716
VDD1
VCOOUT
VCOIN
FC
AMPOUT
AMPIN
PDOUT
AMPIN
PDOUT
SYNCIN
CVCR
CVIN
VDD2
CVOUT
VGND VGND
OSD_CE1
C894
10/50V
C876
R871
L802
5.6UH
22P
C880
R875
1.5K
R876
VGND
C883
0.1/50
270
R885
VGND
0
R880
2.2K
R868
IC88
CVIKIA7809AF
L804
10uH
0.022u
1K
R873
1K
39K
R879
C875
C879
VGNDVGND
C884
56P
KTC3875SY
8.2K
R881
1.2K
OSD_CLK
INOUT
GND
VGND
100/16
C881
1/50
Q802
123
100K
R886
VGNDVGND VGND
22P->33P
C882
6800P
141312111098
OSD_DA
C840
C878
0.022u
VGND
VGND
R872
1K
R874
6.8K
2.2K
C885
R877
VGND
10K
C886
R878
VGNDVGND
+9VV
+5VV
D801
C891
IC86
VGND
IC86
SN74ACT0DR
C893
0.1uF
C892
0.022u
1uF
22P
22P
CVD1N4003SRT
10/50V
+15VV
D802
MODEL
R887 1K
R888 1K
R889 1K
OSD_SDA
OSD_SCL
OSD_CE
J9
+15VV
-5VA
VGND
N.D
REVISION12
3
4
5
SCHEMATIC DIAGRAM
AVR400
CN301
+15VA
1
-5VA
VGND
4 2
OSD_H
SV_Y_THURE
6
5 3
SV_C_THURE
CVBS_THURE
8
7
VGND
COM_Y_THURE
9
10
COM_Pb_THURE
COM_Pr_THURE
11
VGND
COM_Y_CONV
13
14 12
COM_Pb_CONV
_Pr_CONV
COM
16
VGND
1321_SCL
17 15
1321_SDA
OSD_DATA
20
OSD_CLK
OSD_CE
2224
21
VGND
N.D
23
N.D
N.D
2527
26
VGND
N.D
28 18
N.D
N.D
30
29 19
N.D
6
7
APPROVECHECKDESIGN DRAWING NO
L.J.Y
10.11.17
S.H.SL.J.H
10.11.17 10.11.17
2330SCDZ
(VIDEO)
1
3
Page 33

6
5 4 3 2 1
POWER PART
+5VD
L653
IC68
C656
0.1uF
L651
IC67
C652
0.1uF
+20V
15K
15K
-20V
CVIKIA78R08PIGA
VOUTVIN
21
CTRL
GND
3
MGND
C615
330/25V
MGND MGND
C638
D632
0.01uF
1 2 3 4
BS
VIN
S
CVISI8005QTL
S
EN
IC61
C637
0.01uF
D616
C648
HVINJM2391DL133
31
IN
OUT
GND
2
MGND
HVINJM2391DL133
31
IN
OUT
GND
2
MGND
CVIKIA7815APIVA
IC63
IN OUT
123
GND
IC62
CVIKIA7915PIVA
213
In Out
GND
DGND DGND DGND
0.1uF
C616
CVDSS34SR
SW
GNDFB
COMP
5678
220P
C630
62k
R632
IN OUT
OUT
123
0.1uF
C647
100/16
D
TO HDMI TO INPUT
+15VD
+15VD
+15VD
DGND
DGND
N.C
N.C
CN61
7654321
Q643
!
CVTD44H11GVA
2.2ohm,1/2W
!
R604
0.47
!
R603
0.47
R650
R649
1W 2.2
R652
100ohm,1/2W
C659
1000/25V
1N4003SRT
D605
C606
0.01uF
C604
DGND
0.1uF
C605
0.01uF
1N4003SRT
D604
1N4003SRT
D603
1N4003SRT
D602
22K
R612
C608
0.047uF
DGND DGND DGNDDGNDDGND
22K
22K
R611
R614
C607
0.047uF
CLZ9Z014Z
+5VD
CLZ9Z014Z
C609
R609
2200/35V
C610
R610
2200/35V
C
IC64
R651
4
68K
R615
CRG2ANJ150H
68K
R631
0.1uF
C635
150uF/25V
C636
22K
R630
1N4003ST
B
TRANSFORMER
CN63
5 4 3 2 1
F601
T6.3A L 250V
F602
!
T6.3A L 250V
CVD1N4003SRT
D606
CVD1N4003SRT
D607
!
C601
0.01uF
0.1uF
C603
C602
0.01uF
J11J12
C651
1/50V
DGND
CLZ9Z014Z
KLZ9H001Z
1 2
KLZ9H001Z
1 2
CLZ9Z014Z
DGND
2
D601
4
1
HVDKBU804F
3
!
L643
L641
L642
MGND
L644
10K
C613
C614
R613
OPEN
1/50V
MGND
MGND
L631
10UH/3A
0.1uF
C631
C632
18000uF/25v
C642
0.047uF
L654
CLZ9Z014Z
C657
C658
100/16V
0.1uF
L652
CLZ9Z014Z
C653
C654
100/16V
0.1uF
+15V
C621
C622
0.047u
100/25V
-15V
C624
C623
0.047u
100/25V
C619
C620
0.047u
47/25V
MGND MGND
+5VD
L632
10UH/3A
C643
CVDSS34SR
1000P
0.1uF
47K
470/16V
5.1K 1%
POWER_ON
ST+9V
150uF/10V
C639
C641
C640
R643
4.7K
R644
4.7K
Q642
KTC3199Y
R635
D631
10
R636
R633
R839=(Vout-Vfb)/Iadj, (5V-0.5V)/0.1mA = 45Kohm
R844+R847 =-Vfb/Iadj,0.5V)/0.1mA = 5Kohm
D643
RLS4148
IC66
NJU7223F50
GND
GND
IN
D644
RLS4148
STBY_GND
Q641
C102S
22K
R647
-15V+15V
+5VD
ST+5V
C625
1000/6.3
MGND
MGND
PULL_UP
8
7
7
6
5
53
4
3
2
1
1
MGND
+12V
R645
1K
22K
R648
C649
0.15/50V
0.1uF
C650
D645
5.1V
_POWER_DOWN
R646
10K
MGND
A
+15V
BN62
MGND
-15V
+5VD
+5VD
ST+5V
MGND
PULL_UP
+12V
+3.3VD1
+3.3VD2
11 10 9 8 7 6 5 4 3 2 1
8
6
42
TO AMP
POWER_ON
ST+9V
POWER_DOWN
_POWER_DOWN
V_DET
MGND
MGND
CJP08GB142ZB
+12V
CN501
AUX & PHONE
HP_L
12345678910111213
CN93
HP_GND
HP_GND
HP_GND
HP_R
HP_DETECT
FRONT AUX_L(MIC)
A_GND
A_GND
FRONT AUX_R
+5VD
D_GND
F_OPT
D_GND
FROM FRONT BOARD
C947
D_GND
RS232 PART
+12V
D742
R742
4.7
C742
0.1uF
1
CJJ9V001Z
6
MALEMALE
RX
2
7
TX
3
8
iPodRS232
4
9
L701
USE CROSS CABLEUSE CROSS CABLE
CLZ9Z014Z
5
JK71
1
6
CJJ9V001Z
RXD
2
7
TXD
3
8
4
9
L702
5
CLZ9Z014Z
JK72
D741
R741
C741
22P
22P
C702
C701
22P
22P
C703
C704
4.7
0.1uF
CHGND
ST202E
ST3232
+5VD
CHGND
47K
R701
R744
0
IC73
R743
OPEN
C722
0.47uF
C723
0.1uF
C724
0.47uF
C725
0.47uF
8 7 6 5 4 3 2 1
C721 C722 C723 C724 C725
0.1 0.1 0.1 0.1 0.1
E
0.1 0.47 0.1 0.47 0.47
RS232_CONT
J4J5J6
+12V
IPOD_PRESENT
17 151613
18
14 1211109876
FROM INPUT
D701
ST+5V
D702
D721
1SS355
OPEN
R728
100
R727
10K
R729
Q722
A1266Y
ST3232ECDR
161514131211109
C1+
Vcc
GND
V+
T1out
C1-
R1in
C2+
R1out
C2-
T1in
V-
T2in
T2out
R2out
R2in
HVTKRC107S
Q721
+5VD
ST+5V
ST+5V
REMOTE_OUT
C721
R743 R744
0 OPEN
OPEN 0
ZONE2_IR
10K
R730
0.1uF
Z2_TRIG
Z1_TRIG
RS232_TX232
RS232_RX232
IPOD_RX232
IPOD_TX232
5 3
1
4 2
BN71
4.7
4.7
R711
C713
47K
+5VD
4.7
4.7
R712
10K
Q711
C711
0.01uF
HVTKRA102S
+5VD
10K
R721
Q714
0.01uF
HVTKRA102S
ST+5V
R732
10K
D718
1SS355T
R734
R731
10K
Q717
HVTKRA107S
47K
R733
R715
R714
KTA1266
Q712
R713
D711
D712
1SS355
1SS355
10K
HVTKRC102S
Q713
1K
R720
CVD1SS355T
D713
KTA1266
Q715
D714
D715
1SS355
1SS355
10K
HVTKRC102S
Q716
1K
R722
D716
CVD1SS355T
43
43
R719
R726
KP1010B
KP1010B
R716
20
R717
20
10K
R718
C712
0.01uF
R724
20
R725
20
10K
R723
C714
0.01uF
IC72
220
R736
2 1
IC71
220
R735
2 1
JK73
2
10
Z_1 TRIG
1
22
24
Z_2 TRIG
21
JK74
2
10
Z_1 IR_IN
1
22
24
Z_2 IR_IN
21
8CH DIRECT INPUT B'D
HEADPHONE(YUQIU)
JK91
HP_DETECT
A_GND
R978
D_GND
CHGND
L901
6.8K
HP_L
HP_R
HP_GND
FRONT AUX_R
FRONT AUX_L(MIC)
R971
VOUT
120
VCC
C948
GND
330P
39K
C957
33P
R977
JW902
HP_GND
C949
560
6
1
4
5
7
3
2
OPTICAL &
AUX & MIC
0.1uF
RECEIVER
1
3
2
5
4
VCC
8
GND
7
VOUT
6
JK92
REVISION
1
R957
100, 1/4W
R958
100, 1/4W
C946
HP_GND HP_GND
R969
A_GND
33P
D_GND
R970
+5VD
F_OPT
R966
470
470P
470P
C945
R967
180
330P
100K
C951
330P
100K
C952
R968
180
+5V
470
R973
R972
C950
100/16V
ESD
OPEN
C956
27
R976
0.1uF
D914
1SS355
D915
1SS355
HP_GND
C955
C954
0.1uF
D_GND
8CH Lch
8CH Rch
8CH SLch
8CH SRch
8CH Cch
8CH SUB
8CH SBL
8CH SBR
JK79
JK78
100
R788
220P
C788
R798
100K
100
R787
R797
100K
100
R786
100K
R796
100
R785
100K
R795
100
R784
100K
R794
100
R783
100K
R793
100
R782
100K
R792
100
R781
100K
R791
2
3
C799
0.1uF
R799
220P
C787
220P
C786
220P
C785
220P
C784
220P
C783
220P
C782
220P
C781
4.7
D783
1SS355
D784
1SS355
8CH-L
2
1
8CH-R
4
35
8CH-SL
8CH-SR
6
8CH-C
8
7
8CH-SUB
9
10
C789
0.1uF
R789
4.7
D781
1SS355
D782
1SS355
4
5
8CH-SBL
8CH-SBR
12
11
6
7
SCHEMATIC DIAGRAM
D
C
B
CN102
2.54mm(Pitch), 29.5mm(Height)
A
SHEET
MP
MODEL
L.J.Y
10.11.17
AVR400
L.J.H S.H.S
10.11.17 10.11.17
DRAWING NODESIGN CHECK APPROVE
2330SCDZ
(VIDEO)
14
15
2
3
Page 34

6
12345
D
C
D
C
SCREW MARK
J15
J16
LAND
1
LAND
1
DGND
B
B
MP
REVISION12
A
3
SCHEMATIC DIAGRAM
MODEL
L.J.Y
10.11.17
L.J.H S.H.S
10.11.17 10.11.17
AVR400
APPROVECHECKDESIGN DRAWING NO
4
5
2330SCDZ
(VIDEO)
6
7
SHEET
15
15
3
A
3
 Loading...