

Page 1

%
ARCAM
ALPHA AV50 HOME CINEMA
AMPLIFIER HANDBOOK
Page 2

Ssfoty instructions - Please read before operating this equipment ENGLISH
SAFETY INSTRUCTIONS
This product was designed and manufactured to meet strict
quality and safety standards. There are, however, some
installation and operation precautions which you should be
particularly aware of:
1. Read Instructions - All the safety and operating
instructions should be read before the appliance is
operated.
2. Retain Instructions - The safety and operating
instructions should be retained for future reference.
3. Heed Warnings - All warnings on the appliance and in
the operating instructions should be adhered to.
4. Follow Instructions - All operating and use instructions
should be followed.
5. Water and Moisture - The appliance should not be used
near water - for example near a bathtub, washbowl,
kitchen sink, laundry tub, in a wet basement or near a
swimming pool, etc.
6. Carts and Stands - The appliance should be used only
with a cart or stand that is recommended by the
manufacturer.
6A. An appliance and cart combination should be moved with
care. Quick stops, excessive force, and uneven surfaces
may cause the appliance and cart combination to
overturn.
13. Cleaning - Unplug the unit from the mains supply before
cleaning. The appliance should normally only require a
wipe over with a clean, dry, lint-free cloth. If it is heavily
soiled then a cloth slightly dampened with a
water/washing up liquid solution may be used. Dry the
unit afterwards with a dry cloth. We do not advise the
use of furniture type cleaning sprays/polishes as this can
cause white marks, which are very difficult to remove, if
the unit is then wiped over with water.
14. Power Lines - An outdoor antenna/ aerial should be
located away from power lines.
15. Non-use Periods - The power cord of the appliance
should be unplugged from the outlet when left unused for
a long period of time.
16. Object and Liquid Entry - Care should be taken so that
objects do not fall and liquids are not spilled into the
enclosure through any openings.
17. Abnormal Smell - If an abnormal smell or smoke is
detected from the appliance, immediately turn the power
off and unplug the unit from the wall outlet. Contact your
dealer immediately.
18. Damage Requiring Service - The appliance should be
serviced by qualified service personnel when:
A. The power-supply cord or the plug has been damaged
or:
7. Wall or Celling Mounting - The appliance should be
mounted to a wall or ceiling only as recommended by the
manufacturer.
8. Ventilation - The appliance should be situated so that its
location or position does not interfere with its proper
ventilation. For example, the appliance should not be
situated on a bed, sofa, rug or similar surface that may
block the ventilation openings or placed in a built-in
installation, such as a bookcase or cabinet that may
impede the flow of air through the ventilation openings.
9. Heat - The appliance should be situated away from heat
sources such as radiators, heat registers, stoves or other
appliances (including amplifiers) that produce heat.
10. Power Sources - The appliance should be connected to
a power supply only of the type described in the
operating instructions or as marked on the appliance.
11. Grounding - Precautions should be taken so that the
grounding means of the appliance is not defeated.
12. Power-Cord Protection - Power supply cords should be
routed so that they are not likely to be walked on or
pinched by items placed upon or against them, paying
particular attention to cords and plugs, convenience
receptacles and the point where they exit from the
appliance.
B. Objects have fallen, or liquid has spilled into the
appliance or:
C. The appliance has been exposed to rain or:
D. The appliance does not appear to operate normally or
exhibits a marked change in performance or:
E. The appliance has been dropped or the enclosure
damaged.
19. Servicing - The user should not attempt to service the
appliance beyond that described in the operating
instructions.
All other servicing should be referred to qualified service
personnel.
Page 3
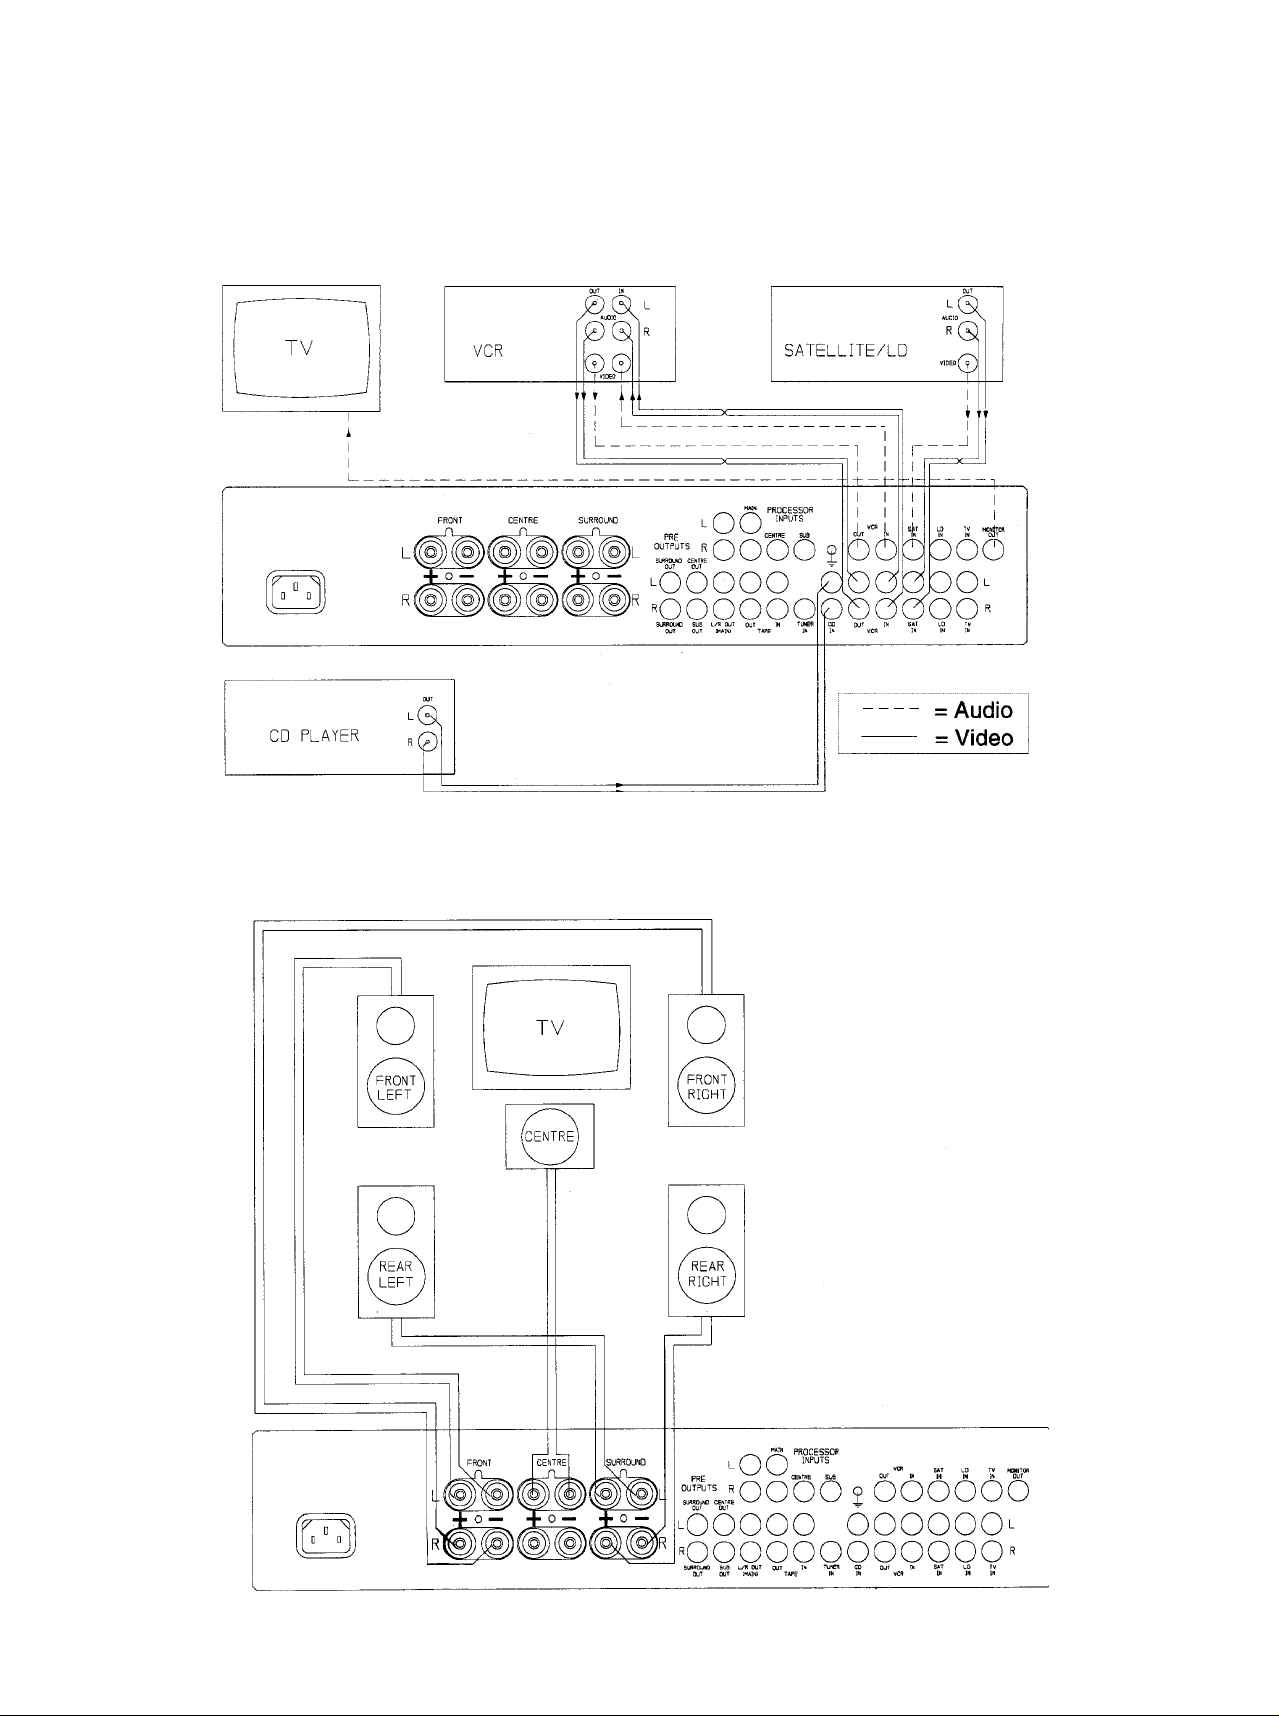
Basic Wiring Diagrams
Page 4

Introduction
ENGLISH
INTRODUCTION
Thank you for purchasing this Arcam product.
The Alpha AV50 is a sophisticated Home Cinema Dolby Pro
Logic amplifier which offers superb sound and picture quality.
The Alpha AV50 is a little more complex to connect up than
an ordinary amplifier. Please read these instructions
carefully. Throughout this booklet there are diagrams of the
Alpha AV50 front and rear panels. Each input and output is
clearly numbered. The numbers correspond with those given
in the instructions.
A combination of your Hi Fi and video components can be
connected to the Alpha AV50 - including the video inputs and
outputs of your TV, video recorder, satellite decoder or
laserdisc player. Switching inputs on the Alpha AV50 can
also change the picture on your TV screen to match the
source that you are listening to.
Please follow these instructions carefully and you'll have your
Alpha AV50 up and running in no time at all!
For ease of use, the Alpha AV50 is supplied with a CR45
infra-red remote control handset. Many functions are only
available via the remote control.
Manufactured under license from Dolby Laboratories Licensing Corporation.
Additionally licensed under one or more of the following patents: U.S. 3,632,886,
3,959,590; Canadian numbers 1,004,603 and 1,037,877.
"Dolby", Pro Logic and the double-D symbol are trademarks of Dolby Laboratories
Licensing Corporation.
LOCATING YOUR LOUDSPEAKERS
With the increasing integration of hi-fi and video equipment,
it is now possible to recreate all the involvement and
excitement of a visit to the cinema in the intimacy of your
living room. A true Home Cinema set up conforming to Dolby
Surround requirements will need five loudspeakers in order
to recreate the surround sound experience: a front pair, a
rear pair and a centre channel.
If you have them, you will probably use your present stereo
loudspeakers as the main front loudspeakers. These should
be positioned roughly equidistant to, and either side of your
TV and typically 8-10 feet (2.4 - 3m) apart. The centre
loudspeaker must be located close to your TV screen so that
the picture and centre sound come from the same location.
In a Home Cinema setup, the centre speaker is very
important, as much of the sound comes from this source.
The rear surround loudspeakers should ideally be placed
behind the listening position or, if this is not possible, then to
either side. The object of the rear speakers is to produce a
diffuse, room filling sound. Locate the rear loudspeakers
away from you and above your head so that they do not fire
directly into your ears. The addition of a subwoofer to
enhance the bass end of your system should also be
considered. The location of a subwoofer Is less critical but
should follow the manufacturer's recommendations.
PROBLEMS?
If your dealer is unable to answer any query regarding this or any other Arcam product
please contact Arcam Customer Support on -i-44 (0)1223 203203 or write to us at the
address on the back cover of this handbook and we will do our best to help you.
Page 5

Installation
ENGLISH
w O ® V ® 00^00^ 0 0 00 0 0 0
INSTALLATION
Circled letters or numbers e.g. 0 refer to items on the
diagrams situated above the corresponding text.
O Check that your mains supply voltage agrees with the
voltage setting indicated on the rear panel of the unit.
■ If your mains supply voltage is different, consult your
Arcam dealer or Arcam Customer Support on one of
the numbers on the back cover of this handbook.
MAINS SAFETY
■ This product is normally supplied with a moulded mains
plug already fitted to the lead. If for any reason the plug
needs to be removed, it must be disposed of
immediately and securely, as it is a potential shock
hazard when inserted into a mains socket.
NOTICE FOR UK OWNERS ONLY
■ If the plug is removed then the remaining lead must be
wired as follows:
The blue wire must be connected to the terminal which is
coloured blue or marked with the letter N.
The brown wire must be connected to the terminal which is
coloured brown or marked with the letter L.
The green and yellow wire must be connected to the
terminal which is coloured green and yellow, or marked
with the letter E or the safety earth symbol.
■ When replacing the fuse in the supplied moulded
mains plug, the integral fuse holder/cover must always
be refitted. Use a 5 amp fuse (UK models only).
■ Warning: This apparatus must be earthed.
LOUDSPEAKER CONNECTIONS
■ This amplifier is fitted with BFA (British Federation of
Audio) loudspeaker connectors, which are designed to
meet EU safety standards. The connector will accept
spade terminals, bare wires up to 4mm in diameter or
a BFA plug. BFA plugs are available from your Arcam
dealer.
■ Insert the red (positive) plugs of your speaker leads
into the red terminals and the other plugs into the black
terminals. If your speaker cable has bare ends, the
positive conductor can usually be identified by a ridge
or coloured marking. Ensure that no stray strands
are allowed to touch another cable or the
amplifier's casing. This can cause a short circuit and
damage your amplifier! The loudspeaker terminals are
marked as follows:
©,o FRONT - Connect your front pair of speakers here.
This usually means your existing stereo pair. Connect
terminals © to your left speaker and terminals ©
to your right speaker ensuring correct polarity.
©,® CENTRE - Connect your centre speaker(s) here. In
some systems, particularly where a large screen TV is
used (around 1 .Om / 37" or larger), you may wish to use
two centre speakers - one above and one below the
TV. Ensure the centre speaker(s) are magnetically
shielded, or the pictures on the TV tube could become
permanently discoloured. Alternatively the two pairs of
sockets can be used to bi-wire one centre speaker if it
has separate terminals for the bass and treble drivers.
©,© SURROUND - Connect your two rear surround
speakers here. Connect terminals © to your left rear
speaker and terminals © to your right rear
speaker, seen as you face the screen, ensuring
correct polarity.
CONNECTING YOUR SOURCE COMPONENTS
MAINS SUPPLY CONNECTIONS
© Insert the lEC line socket of the mains lead fully into
the power inlet on the rear panel. Connect the other
end to your mains supply.
Audio inputs: Up to 7 different audio sources can be
connected to the Alpha AV50. Four inputs are available
for simultaneous audio and composite video, and three
for audio only. All inputs have the same sensitivity and
may be used with equipment other than that labelled,
if you need to do so.
Page 6

ENGLISH
Video inputs: Up to 4 different video sources can be
connected to the Alpha AV50 - VCR, LD or DVD,
Satellite and TV. This allows you to select the TV
picture and sound together and is particularly useful if
your TV has only one video input.
AUDIO CONNECTIONS
■ Using a suitable pair of interconnect cables to connect
each component, insert the red phono plugs into the
appropriate sockets labelled 'R' and the other plugs
into the sockets labelled 'L'.
® TAPE OUT - Connect this output to the input of your
cassette deck (usually labelled RECORD or IN).
® TAPE IN - Connect this input to the output of
your cassette deck (usually labelled PLAY or
OUT).
® TUNER IN - Connect this input to your radio tuner's
audio output.
® CD IN - Connect this input to the analogue outputs of
your CD player or external DAC.
® VCR OUT - Connect this output to the audio input of
your video recorder (VCR).
® VCR IN - Connect this input to the audio output of your
VCR.
External Processor Inputs
These sockets permit access to each of the five
internal power amplifiers within the AV50 via the
volume control. This allows the AV50 to be used with
future 5.1 style discrete multichannel audio sources
such as Dolby Digital AC-3 or Digital Theater
Systems’ (DTS) Coherent Acoustics. See section
“Connecting the AV50 to an external 5.1 channel
decoder” for more details.
COMPOSITE VIDEO CONNECTIONS
■ You will need suitable 75 ohm composite video
cables to connect your equipment to the composite
video inputs and outputs. These should be terminated
with phono plugs at the ends connected to the AV50.
Consult your equipment manuals for the connections
required to your other equipment.
® MONITOR OUTPUT - Connect this output to your TV
composite video input. Most TVs only have SCART
sockets, others use a phono socket or BNC
connector. You will need a suitable lead or use an
adaptor to make this connection. If in doubt consult
your dealer.
® TV IN - You may connect this input to the output of
your TV, but it may also be used for a camcorder,
VCR, laserdisc, etc. Connect this input to the
composite video output of your unit.
if SAT IN - Connect this input to your Satellite TV
decoder's audio output.
® LD IN - This input is compatible with Laserdisc (LD),
Compact Disc Interactive (CD-I), DVD or a Video CD
player. Connect this input to the audio output of the
player.
TV IN - Connect this input to the audio output sockets
of your TV set.
® LD IN - Connect this input to the video input of your
laser disc. This input is also compatible with CD-I,
DVD or a Video CD player.
© SAT IN - Connect this input to the composite video
output of your satellite TV decoder.
© VCR IN - Connect this input to the video output of your
VCR.
VCR OUT - Connect this output to the video input of
your VCR.
Page 7

Front Panel Functions ENGLISH
eH)
BASS - Rotate clockwise to boost the bass response
and anti-clockwise to cut the bass response. For a flat
response leave in the central 'click' position.
TREBLE - Rotate clockwise to boost the treble
response and anti-clockwise to cut the treble
response. For a flat response leave in the central
'click' position.
HEADPHONES - This socket accepts headphones
rated between 8 ohms and 2k ohms fitted with a
6.3mm stereo jack plug. If your headphones are fitted
with a different plug contact your dealer for a suitable
adaptor. Plugging in a pair of headphones
automatically mutes all the loudspeaker outputs and
the MODE defaults to STEREO. It does not mute the
LEFT/RIGHT preamp out or SUB OUT sockets.
® VOLUME - Adjusts the volume level of all the
loudspeaker and preamp outputs simultaneously.
© BALANCE - Rotate clockwise or anti-ciockwise to
move the position of the stereo image. This may be
necessary if it is not possible to sit centrally between
the speakers. In normal use leave it in the central
'click' position. The BALANCE control will only affect
the left and right front speakers and headphones,
assuming that DIRECT is not switched in.
Note that bass, treble and balance controls will affect the
main left and right loudspeakers only.
® DIRECT - Pressing in bypasses the bass, treble and
balance controls in all modes.
SOURCE SWITCHES - Use to select the input you
wish to listen to or record from (see RECORDING
below also). The LED above the input switch will light
to indicate which input is currently selected.
RECORDING
The audio signal of the selected input is also sent to
the TAPE OUT and VCR OUT sockets. This enables
you to record from CD on to a video cassette recorder
or the audio of a laser disc on to a tape cassette
recorder. It is possible to record from VCR to TAPE
but not to record from TAPE on to the VCR.
TAPE - Allows you to hear the input as it is being
recorded on your audio tape deck. If it is a 3 head
cassette deck, switching its monitor button in/out will
allow you to compare the original signal with the
recording. The TAPE button overrides any other
selected input.
POWER - Switches the Alpha AV50 fully on or off.
When this switch is on the AV50 may be put in to
standby mode with the remote control handset.
EXT DECODER SWITCH -This switch allows access
to the AVSO's internal power amplifiers via the volume
control. The PROCESSOR legend on the LCD display
will illuminate and all others will blank, except for the
centre, rear and left/right MUTE legends if active,
when the EXT DECODER switch is operated.
N.B. This switch cannot be operated by remote
control.
MODE SWITCH - Enables switching between Dolby
Pro Logic, Dolby 3 Stereo and Stereo. This button has
no function if headphones are plugged in.
REMOTE RECEIVER - This is housed behind the
badge in the top left hand corner of the amplifier.
Ensure the remote receiver is not obscured or
commands from the remote control handset will not be
received.
FRONT PANEL DISPLAYS
© POWER LED - Upon switching on, the POWER
indicator above the POWER switch will glow green.
© DISPLAY (see diagram below)- The back illuminated
liquid crystal display (LCD) informs you of the current
settings of the AV50 and is also used during set up to
display the various parameters relating to Dolby Pro
Logic operations.
PRO LOGIC RESTORE „ ^
3 STEREO CINEMA EQ
SIMULATED TEST TONE ^
HALL MUTE CALIBRATION DELAY
LEFT NORMAL
/ms
CENTRE PHANTOM
I dB
RIGHT WIDEBAND
SURR PROCESSOR
Page 8

Switching On & Setup
So once you've wired everything up, what’s next?
ENGLISH
First check aii connections again to make sure there are no
ioose wires or piugs in wrong sockets, check your speakers
for any shorts between terminals and turn the volume control
down. Switch your TV on and select the A/V input on the TV
which is connected to the composite video MONITOR
OUTPUT © of the Alpha AV50.
Ensure that the source you wish to listen to is playing. Once
satisfied, switch the Alpha AV50 power on via the front panel
POWER switch and select the correct input that you want to
listen to by pressing the appropriate SOURCE switch on the
Alpha AV50 or on the remote handset.
Increase the volume control of the Alpha AV50 and you
should hear sound from the selected source coming from
your loudspeakers. If this is not the case, try other inputs on
the Alpha AV50 and/or recheck your system connections.
The fault finding guide at the end of these instructions will
also help you.
Once your system is working it is important to balance it for
your components and room environment.
SET UP MODE : SYSTEM BALANCING
Set up mode allows you to customise c^ault settings which
are recalled when the Restore button © is pressed and to
adjust the rear channel time delay and centre speaker mode.
The stored settings can be recalled by pressing the green
Restore button on the remote control.
o>
a>
(D
£
E
o
»1-
<D
U
C
(S
4-*
(It
5
Listening position and optimum delay time for
playback with Dolby Pro Logic surround
c
g
(It
o
a
□)
c
c
<D
Distance from the front speakers to the
listening position.
A
If your dealer has not installed the unit or you wish to modify
the stored settings then select the set up mode by pressing
Restore followed quickly by + in the mode section of the
remote (the + key also has a small green square printed
above it to help you remember the key). The RESTORE
legend on the display will flash to indicate you are in set up
mode.
REMOTE
CONTROL
DELAY TIME: Use the + and - keys to adjust the DELAY
TIME - Surround information is delayed to the rear channels
for psychoacoustic reasons. The range is adjustable and
indicated on the display in 1 ms intervals. In Dolby Pro Logic
mode only the range is adjustable between 15 and 30
milliseconds (ms), and is commonly set at 20ms for most
installations. In HALL and SIMULATED modes the range is
adjustable from 1ms to 32ms. The optimum delay time does
depend on the listening position. Use the chart below to
determine the delay time for the size of your room and
seating position. For example, when the
distance from the
front speakers to the listening position is 3 metres and the
distance from the rear speakers to the listening position is 1
metre, the optimum delay time will be 20 ms.
MODE: - Use the UP or DOWN keys to select the mode in
which you normally wish the selected input to operate.
Choose between the following options:
Dolby Pro Logic - For full surround sound decoding
including rear channel loudspeakers.
Dolby 3 Stereo - AV mode for three front speakers and no
rear loudspeakers.
Stereo - For stereo hi-fi use.
Page 9

Using your Amplifier
ENGLISH
CENTRE SPEAKER MODE
The CENT OFF button, ® , on the remote control is used,
in set up mode only, to set the centre speaker mode. It has
no effect in Stereo mode. This setting is common for Dolby
Pro Logic and Dolby 3 Stereo. Different settings can be made
for the HALL and SIMULATED modes.
The following legends illuminate on the LCD display to
indicate the selected centre speaker mode.
Normal - For a standard centre channel loudspeaker.
Phantom - For no centre loudspeaker. This mode may be of
benefit if your left and right loudspeakers are of very high
quality and you prefer a simple system without a centre
speaker.
NOTE: In Dolby 3 Stereo mode you do not get the phantom
option.
Wideband - For larger centre loudspeakers capable of
working down to low frequencies (50Hz or below).
TEST TONE MODE
Pressing the TEST/FUNC button on the remote control will
put the AV50 in TEST TONE mode. This is an ideal test for
making sure all your speakers are connected properly and
will produce a sequential burst of noise through your
speakers starting with left, centre, right and then rear. The
signal is directed to each speaker in turn every 2-3 seconds
You should adjust the centre and rear volumes via the
remote control until you are happy that all loudspeakers
sound equally loud at your listening position. The TEST
TONE legend on the LCD display will illuminate and the
current active speaker legend will flash. If the Centre or Rear
channel levels are adjusted the noise will immediately be
directed to the speaker whose level is being set. To exit the
TEST TONE mode press TEST/FUNC for a second time.
TEST TONE is not available in STEREO mode and if you
select STEREO mode you will exit TEST TONE mode.
REMOTE CONTROL COMMANDS
Most functions on the remote control are straightforward and
obvious to use.
There are a number of functions described below that will
allow you to optimise the way you use your system. Letters
in the left hand column refer to the remote control drawing.
EFFECTS - The HALL or SIMULATED effects can be added
and set for each individual input, except TAPE, if required.
The selected effect overrides any Dolby mode currently
selected. When the EFFECT is turned off the last selected
Dolby mode will be turned on again. The two available effects
can be selected by scrolling through them by pressing the
EFFECT button on the remote control handset.
EXITING SET UP MODE
To exit from the set up mode press Restore for a second
time. The RESTORE legend will stop flashing and then go off
after a few seconds.
The Alpha AV50 has now been set to your personal settings
which you will be able to recall at anytime by pressing
Restore on the remote control.
Further system tuning will be required if you have a
subwoofer. You will need to adjust its level control and tune
the crossover frequency to integrate smoothly with your main
loudspeakers. Try a variety of source materials to help you
make these adjustments until you are happy with the sound.
The subwoofer instructions may also provide advice on
system balancing. Do not be concerned if the level
adjustment on the sub-woofer needs to be set near maximum
to achieve the right balance.
INPUT SELECTORS: These switch the amplifier to the
required input. The PHONO button has no effect on
the AV50.
o
POWER: Switches the amplifier on or off from
standby. In standby mode all inputs and outputs are
muted, except the MONITOR OUT, TAPE OUT and
VCR OUT, to enable you to make unattended VCR
recordings provided you have selected the appropriate
input before putting the unit in standby mode. We
recommend that you disconnect your amplifier from
the mains if it is to be left unattended over a long
period of time, e.g. a holiday.
TEST/FUNC: Switches the TEST TONE on/off in Set
up mode only. It has no function in normal use.
MODE keys : UP and DOWN buttons will cycle the
Alpha AV50 through the three primary operating
modes. The + and - buttons have no function during
normal operation and are used only in Set up Mode to
adjust the delay time.
DOLBY PRO LOGIC feeds sound information through
rear speakers and front speakers (L, R & C). Use this
mode for surround encoded sources. Video tapes and
discs with surround encoding can be identified by
looking for the Dolby Surround logo.
Page 10

Dolby 3 Stereo feeds sound information through front
speakers. (L, R & C), but not rear speakers. You
should use either this mode or stereo mode for non
surround encoded video sources. Stereo mixes vary
so that it is worth trying this and STEREO mode to see
which one you prefer. If your system has no rear
loudspeakers, use this mode for surround encoded
material.
STEREO is real stereo. For optimal Hi-Fi sound quality
the Dolby Surround processing circuits are actually
bypassed when switched to STEREO. This prevents
the stereo signal being affected by unnecessary circuits
and retains the maximum fidelity. Use Stereo for your
regular hi-fi sources or for non surround encoded video
material.
CINEMA: Switching on Cinema EQ (Equalisation)
reduces the treble output of the centre channel.
Cinema EQ can improve films
recorded with excessive treble and
sibilance. The LCD display
CINEMA EQ legend will illuminate
when this mode is on.
ENGLISH
© CENTRE +/-: Trims the level of the centre speaker in
IdB steps. This function is not available in STEREO or
EXT DECODER (PROCESSOR) mode.
® REAR +/-: Trims the level of the rear speakers in 1 dB
steps. This function is not available in STEREO,
DOLBY 3 STEREO or EXT DECODER (PROCESSOR)
mode.
When any of the +/- buttons are pressed the current level is
shown on the LCD display. The level display is blanked after
10 seconds if no further adjustments are made. The main
LEFT/RIGHT and CENTRE or REAR MUTE are cancelled
when these buttons are pressed. The settings are common
for the Dolby modes. Individual settings can also be made
for both the HALL and SIMULATED effect modes. The
range adjustment is -12dB to +6dB for Dolby modes and -
12dB to +15dB for the effects modes.
Note: Not all films are encoded for
surround identically. It is useful to trim
the rear or front levels slightly for some
recordings.
© EFFECT: Scrolls through the
available effects: None, HALL or
SIMULATED. This feature is
useful to enhance non-surround
encoded sources.
HALL switches in a reverberation
effect giving added ambience
through the rear channels.
SIMULATED provides a simulated
surround effect sound. The HALL
or SIMULATED legend on the LCD
display on the front panel will
indicate which effect is currently
selected. You can trim the amount
of EFFECT by use of the rear +/level buttons (See ®). NB:
Selecting one of the EFFECTS will
override any Dolby mode selected.
CENTRE OFF: Switches the
centre channel off or on. Switching
the centre channel off is also
useful for Karaoke and for nulling
out unwanted sports
commentators! This function is not
available in STEREO MODE or during set up. In Dolby
MODE the MUTE and CALIBRATION legends
illuminate and CENTRE flashes on the LCD display. In
effects or EXT DECODER (PROCESSOR) modes
MUTE illuminates and CENTROashes. It cannot be
selected if the main MUTE, ®, has already been
selected.
® RESTORE: Restores the AV50 to
the condition saved in the set up
mode. This is very useful if the
centre and rear levels have been
adjusted aftenwards as it restores
them to the saved values. The
operating mode and any functions
such as Cinema EQ that were
saved during set up are also
restored. The RESTORE legend will
illuminate for about 3 seconds.
Note: To enter the set up mode press
Restore quickly followed by + (mode), see
Set Up Mode selection for more details.
© MUTE: Mutes and un-mutes the
sound to all loudspeaker and
preamp outputs. MUTE flashes on
the LCD display.
© VOLUME: Master volume control for
the amplifier; this drives the
motorised volume control on the
front panel. Note that a volume up
or down command from the remote
will automatically un-mute the
amplifier if MUTE is on.
The following buttons on the remote control handset have no
function on the AV50. This is because the remote handset
can also be used on the Arcam Xeta One and Xeta 2 home
cinema amplifiers.
DISPLAY: This button switches off the front panel
display.
REAR OFF: Switches the rear channel off or on. Useful
to demonstrate the effectiveness of the surround effect.
This function is not available in STEREO or Dolby 3
Stereo MODE or during set up. When selected MUTE
illuminates and SURR flashes on the IXD display. It
cannot be selected if the main MUTE, ®, has already
been selected.
© AUTOBAL
® <BAL
O >BAL
® SHIFT
SHIFT can be used simultaneously with the VOLUME,
MUTE, POWER or INPUT SELECTOR buttons to control
functions on the Arcam Delta Black Box 500 outboard digital
to analogue converter unit.
Page 11

Advice on using the Aipha AV50
ENGLISH
DIRECT - for the best sound quality in Stereo or Surround
modes. Pressing in Direct on the amplifier bypasses the
bass, treble and balance controls to give an overall cleaner
sound.
As supplied from the factory the Alpha AV50 will
automatically change to STEREO mode when you select a
non-video input (e.g. tuner or CD). When switching back to
a video input it will default back to what it had been
previously set to, for example Dolby 3 Stereo. These settings
can be changed and stored during set up if required. If Dolby
Pro Logic has been stored in set up mode for that input,
pressing Restore on the remote will restore Dolby Pro Logic.
Turn your TV volume down or mute its internal speaker(s)
otherwise it will upset the balance of surround sound created
by the Alpha AV50.
When positioning your front and centre speakers aim to get
them all at roughly the same height. Ensure that the centre
loudspeaker is magnetically shielded. Check with your
dealer if in doubt.
Don't underestimate the importance of the centre speaker.
Much of the soundtrack of a film is dialogue routed through
the centre channel/loudspeaker. A poorly designed centre
speaker will result in compressed dynamics, distortion and
loss of detail. Speakers used for left, right and centre
channels should be of a similar tonal balance or come from
the same manufacturer.
VARIOUS UPGRADE PATHS ARE AVAILABLE
The Alpha AV50 can be used with an Arcam Alpha 8P or
Alpha 9P power amplifier to drive the front left and right
speakers. For even better results you can bi-amplify the front
speakers using 2 x Alpha 8P or 9Ps whilst a third Alpha 8P
or 9P could be added to bi-amp the centre speaker. You
could also add extra power amplifiers to drive the rear
loudspeakers if required.
CENTRE OUT - Provides an output for an external
amplifier for the centre speaker(s).
LEFT AND RIGHT OUT - Provides an output for an
external power amplifier for the front left and right
channels if required.
CONNECTING THE ALPHA AV50 TO AN EXTERNAL
5.1 CHANNEL DECODER
To connect the AV50 to a 5.1 type decoder connect the
external processor’s output sockets to the ^propriate
PROCESSOR INPUTS of the AV50 (marked ® to ®
irglusive) and press the front panel EXT DECODER button
The PROCESSOR legend on the display will illuminate.
The preamp out sockets, © - ® ine. are also available for
use with external power amplifiers if required (see previous
section).
OTHER UPGRADES TO YOUR SYSTEM
The digital output from a Laser disc player (which is normally
an optical connection) may be fed into an external digital to
analogue convertor (DAC) such as an Arcam Black Box 50
or 500, for improved sound quality.
Cables can make or break a system. The quality of
interconnects (audio, video and digital) and speaker cables
you use will be a limiting factor on the performance of your
hi-fi/home cinema system. The better the cable the better
the sound. As a guide plan to invest at least 10% of the
value of your equipment in cables.
SOURCES OF SURROUND ENCODED MATERIAL
The majority of films on video, laser discs and broadcast TV
have surround sound - look for the Dolby Surround logo.
CONNECTING THE ALPHA AV50 TO EXTERNAL POWER AMPLIFIERS
The Alpha AV50 can be used as the control centre with
external power amplifiers being employed for higher output
power or for improving the sound quality. Connect your
additional power amplifier(s) to the appropriate sockets as
described below.
SURROUND OUT - Provides an output for external
power amplifiers for the rear channels if required.
iu) SUB OUT - Provides an output for an active (powered)
sub woofer. If used with a separate power amplifier and
subwoofer loudspeaker then a proper bass crossover
filter should be used in addition.
Surround material requires a stereo source which can be any
of the following:
A stereo TV or TV tuner (NICAM), A hi-fi stereo (NICAM) video
recorder, A laser disc or DVD player, A stereo satellite receiver
or cable system
The Alpha AV50 is compatible with all of these.
Page 12

Trouble Shooting
INITIAL ADVICE
ENGLISH
Please ensure that you have read the instructions and are
operating the equipment accordingly.
Check all cables to your speakers and other components for
any loose or incorrect connections.
Ensure that the rest of the components making up your
system are operating correctly. A fault can occur in another
component or connecting lead that might appear to be an
amplifier problem.
The information on the display will tell you what modes the
amplifier is set to.
It is possible to reset the AV50 to the factory set defaults by
SYMPTOM:
THINGS TO
CHECK:
NO SOUND OR FAINT SOUND
■ Are the speakers connected correctly?
■ Is the source you wish to listen to connected and operating correctly?
■ Is the correct input selected?
■ Is the unit switched on and the POWER LED green?
■ Is the volume turned up?
■ Is the mute switched off?
■ Is the tape monitor ® selected?
the following method:
1. Press the RESTORE button on the handset.
2. Press the front panel MODE button within 3 seconds and
the CALIBRATION legend on the display will begin to
flash.
3. Press the front panel EXT DECODER button within 3
seconds.
All the segments on the display will flash to indicate a
complete reset.
If any problems still persist you may find the following
suggestions useful.
SYMPTOM;
THINGS TO
CHECK:
ADVICE:
SYMPTOM:
THINGS TO
CHECK:
ADVICE:
SYMPTOM:
ADVICE:
NO SOUND FROM ONE LOUDSPEAKER
■ See points listed above.
■ Is the balance control set to centre position?
For the centre or rear channel: ensure these are not switched off via the remote. Also try adjusting the channel
volume.
To check a source component, swap the phono leads over (L with R) at the source equipment only. If the fault
changes over to the other channel, then the fault is in the source component or the cable.
SOUND NOT COMING OUT OF REAR SPEAKERS
■ Is Dolby Pro Logic selected? The relevant legend on the display should illuminate.
■ Are the rear speakers connected properly?
■ Have rear speakers been switched on (via the remote)?
■ Are you replaying Dolby Surround encoded materials?
■ Has the rear volume been turned up?
■ Is your source operating in stereo mode?
Even on Dolby Surround encoded material, sound does not come out of the rear speakers all of the time; the
amount of rear level also varies from film to film.
SOUND COMING OUT OF REAR SPEAKERS WHEN MATERIAL IS NOT DOLBY SURROUND ENCODED
There is nothing to check here. Sometimes on normal broadcasts phase differences in the two channel recording
can confuse the surround steering circuitry, allowing certain signals to be heard from the rear speakers. You can of
course switch off the rear speakers.
SYMPTOM:
THINGS TO
CHECK:
UNABLE TO MONITOR VIDEO FROM THE ALPHA AV50 ON YOUR TV
■ Is your TV switched to the correct AV input?
■ Have you connected the TV correctly to the video monitor socket on the amplifier?
• Have you selected the right video input via the source selector?
■ Is the amplifier properly switched on?
Page 13

Guarantee Information
ENGLISH
GUARANTEE FOR UK SALES GUARANTEE FOR SALES IN THE EUROPEAN ECONOMIC AREA (EEA)
This equipment is guaranteed for two years from the date of purchase (parts and iatxrur
oniy), provided that it was originaiiy purchased from an authorised deaier under a
consumer sale agreement. (The words "consumer sale" shall be constmed in
accordance with Section 15 of the Supply Of Goods [Implied Terms] Act 1973).
The manufacturer can accept no responsibility for defects arising from accident, misuse,
abuse, wear arxi tear, neglect or through unauthorised adjustment and/or repair, neither
can they accept responsibility for damage or loss occurring during transit to or from the
person claiming under this guarantee.
This guarantee is applicable within the UK only. It Is transferable to subsequent
purchasers, but the liability of the manufacturer is limited to the cost of repair of the
defective parts and under no circumstances extends to consequential loss or damage.
CLAIMS UNDER THIS GUARANTEE
This equipment should be packed in the original packing and returned to the dealer
from whom It was purchased, or falling this, directly to Arcam. It should be sent
carriage prepaid by a reputable carrier - NOT by post. No responsiblity can be accepted
for the unit whilst in transit to the factory, or an agent, and customers are therefore
advised to insure the unit against loss or damage whilst in transit.
If the original packing is not available, replacement packing can be purchased from
Arcam.
DO NOT CONSIGN THE EQUIPMENT TO ARCAM UNLESS YOU HAVE BEEN
SPECIFICALLY REQUESTED TO DO SO BY THE CUSTOMER SUPPORT
DEPARTMENT.
DO NOT UNDER ANY CIRCUMSTANCES ATTEMPT TO DISASSEMBLE THE
EQUIPMENT BEFORE DESPATCH.
This unit is covered by a European Economic Area warranty, provided to you under the
terms of Article 85 of the Treaty of Rome 1957.
This entitles you to have the unit repaired tree of charge, during the first two years after
purchase, at any authorised Arcam distributor within the EEA, provided that it was
purchased from an authorised ARCAM dealer or distributor within the EEA.
The manufacturer can accept no responsibility for defects arising from accident, misuse,
abuse, wear and tear, neglect or through unauthorised adjustment and/or repair, neither
can they accept responsibility for damage or loss occurring during transit to or from the
person claiming under this guarantee.
Countries of the European Economic Area are: Belgium, Holland, Norway, Iceland,
Lichtenstein, Luxembourg, Greece, Germany, France, Spain, Portugal, Eire, Italy,
Austria, Denmark, Sweden, Great Britain, Rnland and Switzerland. This includes the
Canary Islands, the Channel Islands, the Isle of Man, Corsica and Sardinia.
This warranty remains in force for two years from the date of purchase as long as the
unit remains in free circulation. Units exported from the EEA and subsequently re
imported are not subject to this warranty.
CLAIMS UNDER GUARANTEE
This equipment should be packed in the original packing and returned to the dealer
from whom it was purchased, or failing this, directly to the Arcam distributor in the
country of residence. It should be sent carriage prepaid by a reputable earner - NOT by
post. No responsiblity can be accepted for the unit whilst in transit to the dealer or
distributor and customers are therefore advised to insure the unit against loss or
damage whilst in transit.
For further details contact Arcam at:
You can contact the manufacturer at the following address:
ARCAM Customer Support Department,
Pembroke Avenue,
Denny Industrial Centre,
Waterbeach,
Cambridge,
CB5 9PB,
England.
Telephone: +44(0)1223 203203
Fax: +44(0)1223 863384
e-mail: custsenr@arcam.co.uk
You should state clearly your name and address, the date and place of purchase
together writh a brief description of the fault
In the event of equipment being returned which, after having been tested, is found to
comply with the published specification, the manufacturer resenres the right to charge
a reasonable fee for testing the equipment and for the return carriage.
THIS GUARANTEE IN NO WAY VARIES OR REMOVES A PURCHASER'S
STATUTORY RIGHTS.
ARCAM Customer Support Department, Pembroke Avenue, Denny Industrial
Centre, Vl/aterbeach, Cambridge, CB5 9PB, England.
Telephone: +44(0)1223 203203 Fax: +44(0)1223 863384
e-mail:
custsenr@arcam.co.uk
GUARANTEE FOR SALES IN THE REST OF THE WORLD
This equipment is guaranteed in the country of purchase only, provided that it was
purchased from an authorised ARCAM dealer or distributor.
The manufacturer can accept no responsibility for defects arising from accident, misuse,
abuse, wear and tear, neglect or through unauthorised adjustment and/or repair, neither
can they accept responsibility for damage or loss occurring during transit to or from the
person claiming under this guarantee.
Full details of the guarantee can be obtained from the distributor in the country of
purchase.
For your convenience a list of Arcam distributors is included in the enclosed ‘After Sales
Care Progarm’ leaflet. For any countries not listed please contact Arcam Customer
Support directly.
CLAIMS UNDER GUARANTEE
This equipment should be packed in the original packing and returned to the dealer
from whom it was purchased, or failing this, directly to the Arcam distributor in the
country of purchase. It should be sent carriage prepaid by a reputable carrier - NOT by
post. No responsiblity can be accepted for the unit whilst in transit to the dealer or
distributor and customers are therefore advised to Insure the unit against loss or
damage whilst in transit.
Page 14

Technical Specifications
Continuous power output per channel
Left + Centre + Right, 8Q, 20Hz - 20kHz SOW each
Single front channel, 8fi, 1 kHz
Rear channels, 80,1kHz
THD, 1kHz, 80% maximum output 0.03%
Peak current rating ±10Amps
Line Inputs (stereo mode)
Frequency response ±0.SdB, 20Hz - 20kHz
S/N ratio (CCIR)ref rated output 90dB
Input sensitivity 220mV nominal (Max input level
Input impedance 7kQ
Overload margin 17dB
4C, 20Hz - 20kHz
40, 1kHz
40, 1kHz 7SW each
75W each
55W
75W
SOW each
Processor Inputs
Input sensitivity 220mV
Preamp Outputs
Nominal output level 700mV
Maximum output level SV
Output impedance 2S0Q
Video Section
Video signal type Universally compatible
Nominal input/output level 1VP-P, 750
Maximum input level 2V P-P
Frequency response
General
Operating voltage
Maximum power consumption
Size (overall) W/D/H mm.
Weight (nett)
(packed)
SHz- 10MHz, -3dB
230V ±12%, 115V ±12%
600VA (10VA in Standby mode)
430x330x100
7.7kg
9.1kg
E&OE
Page 15

ARCAM
Pembroke Avenue, Waterbeach,
Cambridge CBS 9PB, England.
Telephone: +44 (0) 1223 203203
Fax: + 44 (0) 1223 863384
email:
custserv@arcam.co.uk
Issue 7/97
Part NO.SH056E
 Loading...