

Page 1
TJ & TJ UNLIMITED JEEP REAR BAR & WHEEL CARRIER
• PART No 565 0010 REAR BAR.
• PART No 575 0012 WHEEL CARRIER.
• PART No 575 0020 TOW HITCH. (ACCESSORY)
• PART No 575 0030 HI-LIFT JACK ATTACHMENTS. (ACCESSORY)
• PART No 575 0040 WHEEL LOCKING NUTS – SET OF 4. (ACCESSORY)
•
PART No 575 0050 LICENCE PLATE LAMP RE-LOCATION KIT (ACCESSORY)
WARNING
NOTE THE FOLLOWING:
♦ This product must be installed exactly as per these instructions using only the hardware supplied.
♦ In the event of damage to any bull bar component, contact your nearest authorised ARB stockist.
Repairs or modifications to the impact absorption system must not be attempted.
♦ Do not use this product for any vehicle make or model, other than those specified by ARB.
♦ Do not remove labels from this bull bar.
♦ This product or its fixing must not be modified in any way.
♦ The installation of this product may require the use of specialized tools and/or techniques
♦ It is recommended that this product is only installed by trained personnel
♦ These instructions are correct as at the publication date. ARB Corporation Ltd. cannot be held
responsible for the impact of any changes subsequently made by the vehicle manufacturer
♦ During installation, it is the duty of the installer to check correct operation/clearances of all
components
♦ Work safely at all times
♦ Unless otherwise instructed, tighten fasteners to specified torque
ARB 4x4 ACCESSORIES
Corporate Head Office
42-44 Garden St Tel: +61 (3) 9761 6622
Kilsyth, Victoria Fax: +61 (3) 9761 6807
AUSTRALIA 3137
Australian enquiries sales@arb.com.au
North & South American enquiries sales@arbusa.com
Other international enquiries exports@arb.com.au
www.arb.com.au
Last Rev Date: 16/10/2006 Page 1 of 25 3783210 - rev 3
Copyright © 2005 by ARB Corporation Limited. All rights reserved, this document must not be reproduced without the express authority of ARB Corporation Ltd
Page 2
GENERAL CARE AND MAINTENANCE
By choosing an ARB Bar, you have bought a product that is one of the most sought after 4WD products
in the world. Your bar is a properly engineered, reliable, quality accessory that represents excellent
value. To keep your bar in original condition it is important to care and maintain it following these
recommendations:
Prior to exposure to the weather your bar should be treated to a Canuba based polish on all exposed
surfaces. It is recommended that this is performed on a six monthly basis or following exposure to
salt, mud, sand or other contaminants.
As part of any Pre Trip Preparation, or on an annual basis, it is recommended that a thorough visual
inspection of the bar is carried out, making sure that all bolts and other components are torqued to
the correct specification. Also check that all wiring sheaths, connectors, and fittings are free of
damage. Replace any components as necessary. This service can be performed by your local
authorised ARB Stockist.
REQUIRED TOOLS FOR FITMENT OF PRODUCT:
METRIC SOCKET SET, METRIC RING AND OPEN ENDED SPANNER SET, PHILLIPS AND FLAT SCREW
DRIVER SET, ELECTRIC DRILL AND METRIC DRILL BITS 6 mm, 13 mm AND 17 mm, LARGE HAMMER,
CENTRE PUNCH, HEX KEY SET, PIN PUNCH, GREASE, METAL SCRIBE .
WIRE CUTTERS , SOLDERING IRON & SOLDER, INSULATING TAPE AND ELECTRICAL TERMINAL CRIMPERS
( IF RE-CONNECTING THE FACTORY HI LEVEL STOP LAMP ).
NOTE :- The bearings & seals for the wheel carrier are available as spare parts.
PART No QTY DESCRIPTION
732 0003 2 SEAL
732 0002 2 BEARING
HAVE AVAILABLE THESE SAFETY ITEMS WHEN FITTING PRODUCT:
Protective eyewear
NOTE: ‘WARNING’ notes in the fitting procedure relate to OHS situations, where to avoid a potentially
hazardous situation it is suggested that protective safety gear be worn or a safe work procedure be
employed. If these notes and warnings are not heeded, injury may result.
FASTENER TORQUE SETTINGS:
SIZE Torque Nm Torque lbft
M6 9 Nm 4 lbft
Hearing protection
M8 22 Nm 16 lbft
M10 44 Nm 32 lbft
M12 77 Nm 57 lbft
Last Rev Date: 16/10/2006 Page 2 of 25 3783210 - rev 3
Copyright © 2005 by ARB Corporation Limited. All rights reserved, this document must not be reproduced without the express authority of ARB Corporation Ltd
Page 3

USE PART No QTY DESCRIPTION
)
FITTING SLIDER TO
REAR STEP.
FITTING CATCH HOOK TO
REAR BAR.
FITTING BUMP STOP TO
REAR BAR.
FITTING GRABBER TO
REAR BAR.
PIVOT LOCKING BOLT 615 1222 1 BOLT LOCKING M8 x 50 mm LONG (FINE PITCH
INSTALLATION OF
COMPONENTS TO WHEEL
CARRIER.
REINFORCING BRACKET
FITMENT TO CHASSIS.
REINFORCING BRACKET
FITMENT TO CHASSIS
CONTINUED.
566 5677 1 SLIDER
682 1116 2 SQUARE PLASTIC PLUG
615 1283 2 SELF TAPPING SCREWS
459 0007 1 CATCH HOOK
615 1303 2 CAGE NUT M8 SHORT LEG
615 1022 2 BOLT M8 x 25 mm LONG
458 1046 2 SPRING WASHER M8
458 1044 2 FLAT WASHER M8
3756746 2 PACKER CATCH HOOK
584 8322 1 BUMP STOP
615 1312 2 M6 BUTTON HEAD CAP SCREW x 25 mm
615 1162 2 M6 NUT NYLOC
375 6677 1 GRABBER
615 1303 2 CAGE NUT M8 SHORT LEG
615 1022 2 BOLT M8 x 25 mm LONG
458 1046 2 SPRING WASHER M8
458 1063 2 PANEL WASHER M8
459 0011 1 CATCH ASSEMBLY
615 1263 4 SOCKET HEAD CAP SCREWS M8 x 20 mm LONG
458 1046 4 SPRING WASHERS M8
626 0002 1 STOPPER
458 1046 1 SPRING WASHER M8
458 1044 1 FLAT WASHER M8
615 1028 1 NUT M8
626 0001 1 GRABBER BUFFER
615 1331 2 CAP SCREW COUNTERSUNK M6 x 30 mm LONG
615 1162 2 NUT NYLOC M6
459 0001 1 GAS STRUT ASSY (inc 1 strut, 2 clips, 2 spheres)
615 1132 2 NUT FLANGED M8
458 1044 2 FLAT WASHER M8
459 0008 1 LOCKING PIN
459 0009 1 LOCKING PIN SPRING
459 0010 1 ROLL PIN
375 6886 R 1 BRACKET RIGHT HAND
375 6886 L 1 BRACKET LEFT HAND
615 1291 6 TAB BOLT M12 x 40 mm LONG FINE PITCH
458 1049 22 FLAT WASHER M12
458 1050 14 SPRING WASHER M12
615 1135 6 NUT M12 FINE PITCH
615 1250 2 BOLT M12 x 90 mm LONG COARSE PITCH
472 1570 2 DIA 17 mm CRUSH TUBE x 60 LONG
615 1255 4 BOLT M12 x 40 mm LONG COARSE PITCH
615 1189 8 NUT M12 COARSE PITCH
615 1340 2 BOLT M12 x 50 mm COARSE PITCH
Last Rev Date: 16/10/2006 Page 3 of 25 3783210 - rev 3
Copyright © 2005 by ARB Corporation Limited. All rights reserved, this document must not be reproduced without the express authority of ARB Corporation Ltd
Page 4

USE PART No QTY DESCRIPTION
BACKING PLATE TO
CHASSIS BEAM.
WHEEL CARRIER TO
REAR BAR.
MISC ITEMS TO REAR BAR
AND WHEEL CARRIER.
WHEEL MOUNTING PLATE
TO WHEEL CARRIER.
WHEEL MOUNTING PLATE
TO WHEEL CARRIER
PINNING BOLT .
HIGH LEVEL STOP LAMP TO
WHEEL CARRIER .
HIGH LEVEL STOP LAMP
WIRING LOOM EXTENSION
TO TAIL LAMP ON VEHICLE .
COVER PANEL FITMENT TO
REAR BAR.
319 9850 1 PLATE CHASSIS BEAM
615 1300 2 CAGE NUT M6
615 1017 2 BOLT M6 x 16 mm LONG
615 1046 2 FLAT WASHER M6
615 1042 2 SPRING WASHER M6
615 1306 2 CAGE NUT M12 SHORT LEG
615 1340 2 BOLT M12 x 50 mm
458 1049 2 FLAT WASHER M12
458 1050 2 SPRING WASHER M12
615 1330 1 NUT M20 NYLOC
615 1329 1 BOLT M20 x 190 mm LONG
636 4506 1 BUSH – ARM ASSY
625 0002 2 SPACER THIN – 9 mm THICK
180 302 4 CABLE TIES - BLACK
458 1299 5 WASHER FLAT NYLON
375 6909 1 WHEEL MOUNTING BRACKET
615 1382 3 WHEEL STUDS ½ “ WITH WHEEL NUT
615 1305 2 CAGE NUTS M12 LONG LEG
615 1355 2 BOLT M12 x 35 mm LONG
458 1007 2 PANEL WASHER M12 GOLD
458 1050 2 SPRING WASHER M12
615 1357 1 BOLT M10 x 30 mm LONG ( WITH WASHERS )
458 1063 1 FLANGE NUT M10
615 1301 4 CAGE NUTS M8 LONG LEG
615 1234 4 BOLT M8 x 25 mm LONG BLACK
458 1047 4 SPRING WASHER M8 BLACK
458 1045 4 FLAT WASHER M8 BLACK
682 1195 1 REAR DOOR BLANKING GROMMET
6821194 1 TWIN CORE CABLE - 750 mm LONG
CR 07 1 CONVOLUTE TUBING - 7 mm x 750 mm LONG
320 104N 1 TAIL LAMP HOUSING WIRING GROMMET
666 005 1 RING TERMINAL
180 701 1 SCOTCH LOCK CONNECTOR
180 302 6 CABLE TIES - BLACK
455 8424 1 COVER PANEL
615 1300 4 CAGE NUT M6
615 1312 2 SOCKET HEAD CAP SCREW M6 x 25 mm LONG
615 1270 2 BOLT M6 x 40 mm LONG
615 1046 4 FLAT WASHER M6
458 1036 4 SPRING WASHER M6
584 8302 2 PACKER BLACK NYLON
625 0003 2 SPACER 8 mm THICK
Last Rev Date: 16/10/2006 Page 4 of 25 3783210 - rev 3
Copyright © 2005 by ARB Corporation Limited. All rights reserved, this document must not be reproduced without the express authority of ARB Corporation Ltd
Page 5
K
PREPARATION OF THE VEHICLE
LOCATION OF LOWER
RUBBER STOPPER
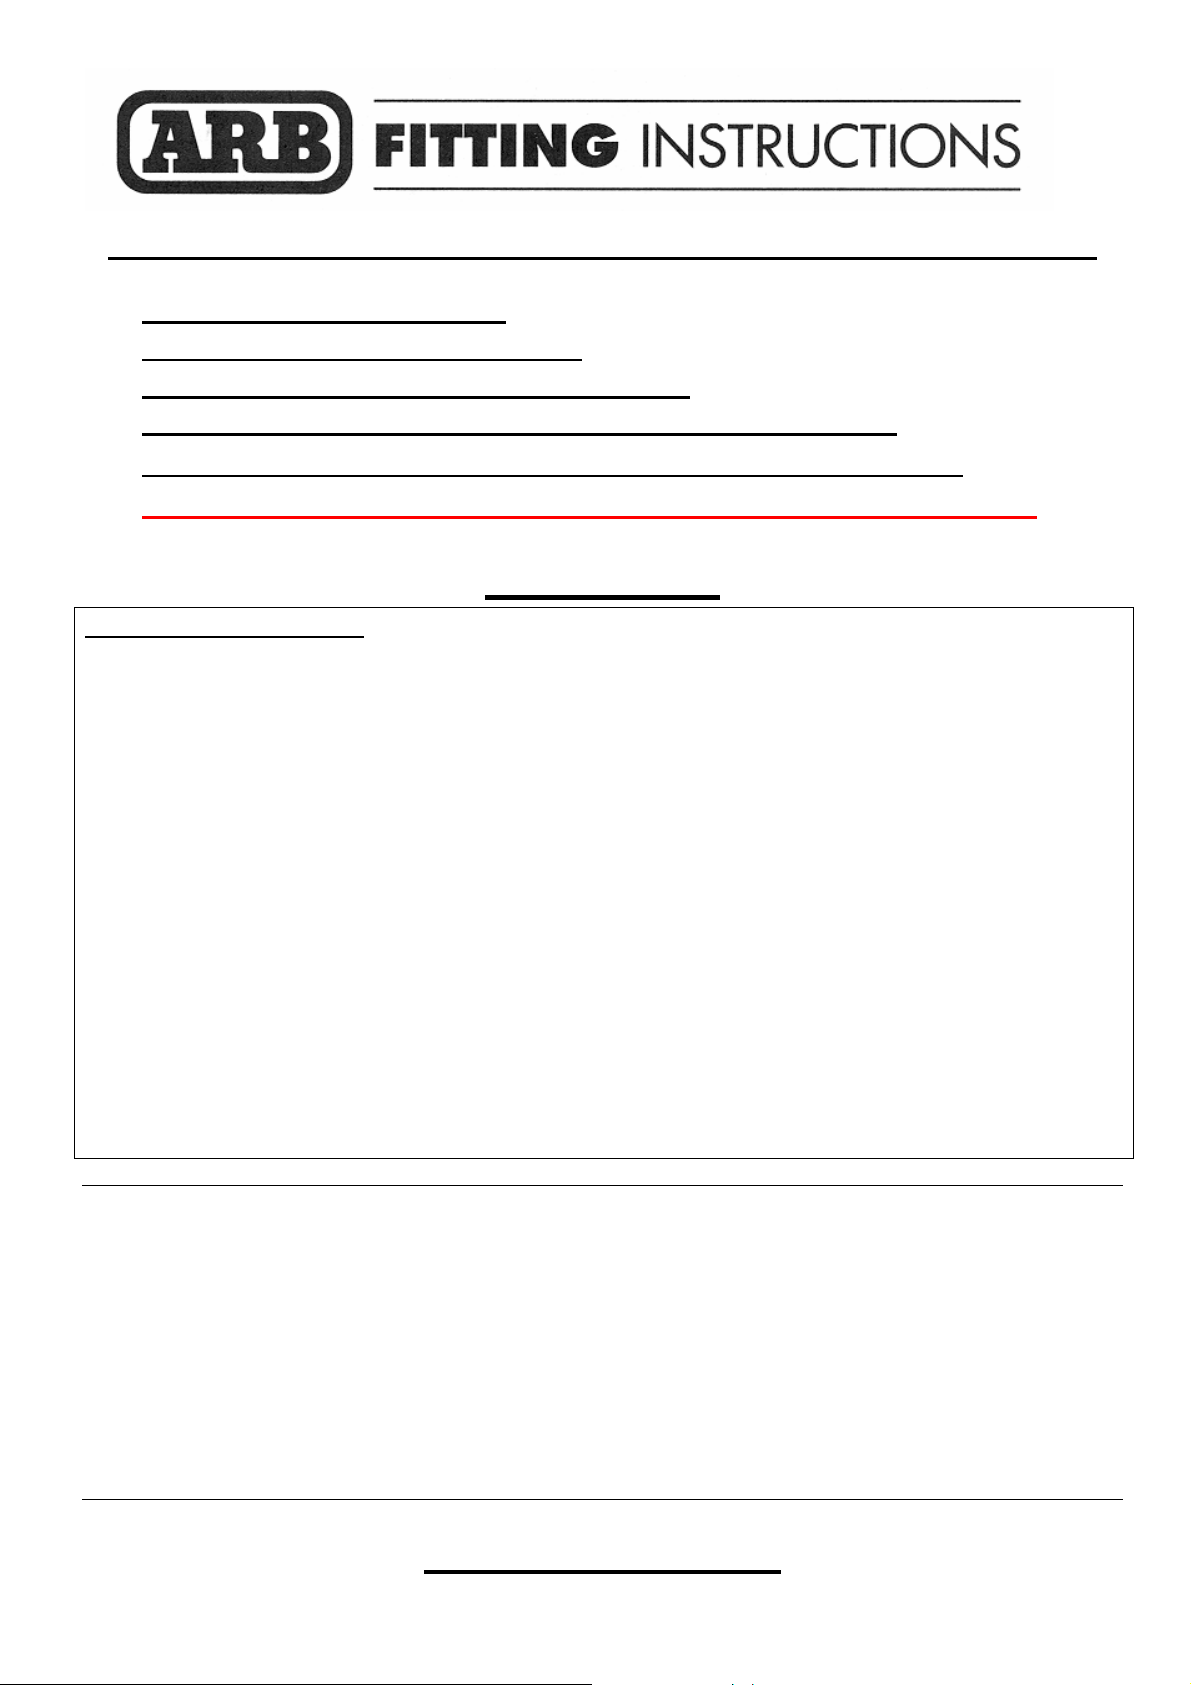
1. REMOVAL OF THE FACTORY SPARE
WHEEL CARRIER.
Remove the spare wheel from the vehicle.
Unbolt the factory hi – level stop lamp and
disconnect the wiring loom.
Remove the five bolts that hold the carrier
to the rear door – remove the carrier and
replace the five bolts in their original
positions and tighten. Fit a nylon washer
under the head of each bolt.
Remove the rear bumper bar from the
vehicle ( On Australian vehicles keep the
licence plate lamp loom as it is re-used when
fitting the optional licence plate lamp kit ) .
Remove the lower rubber tire stopper.
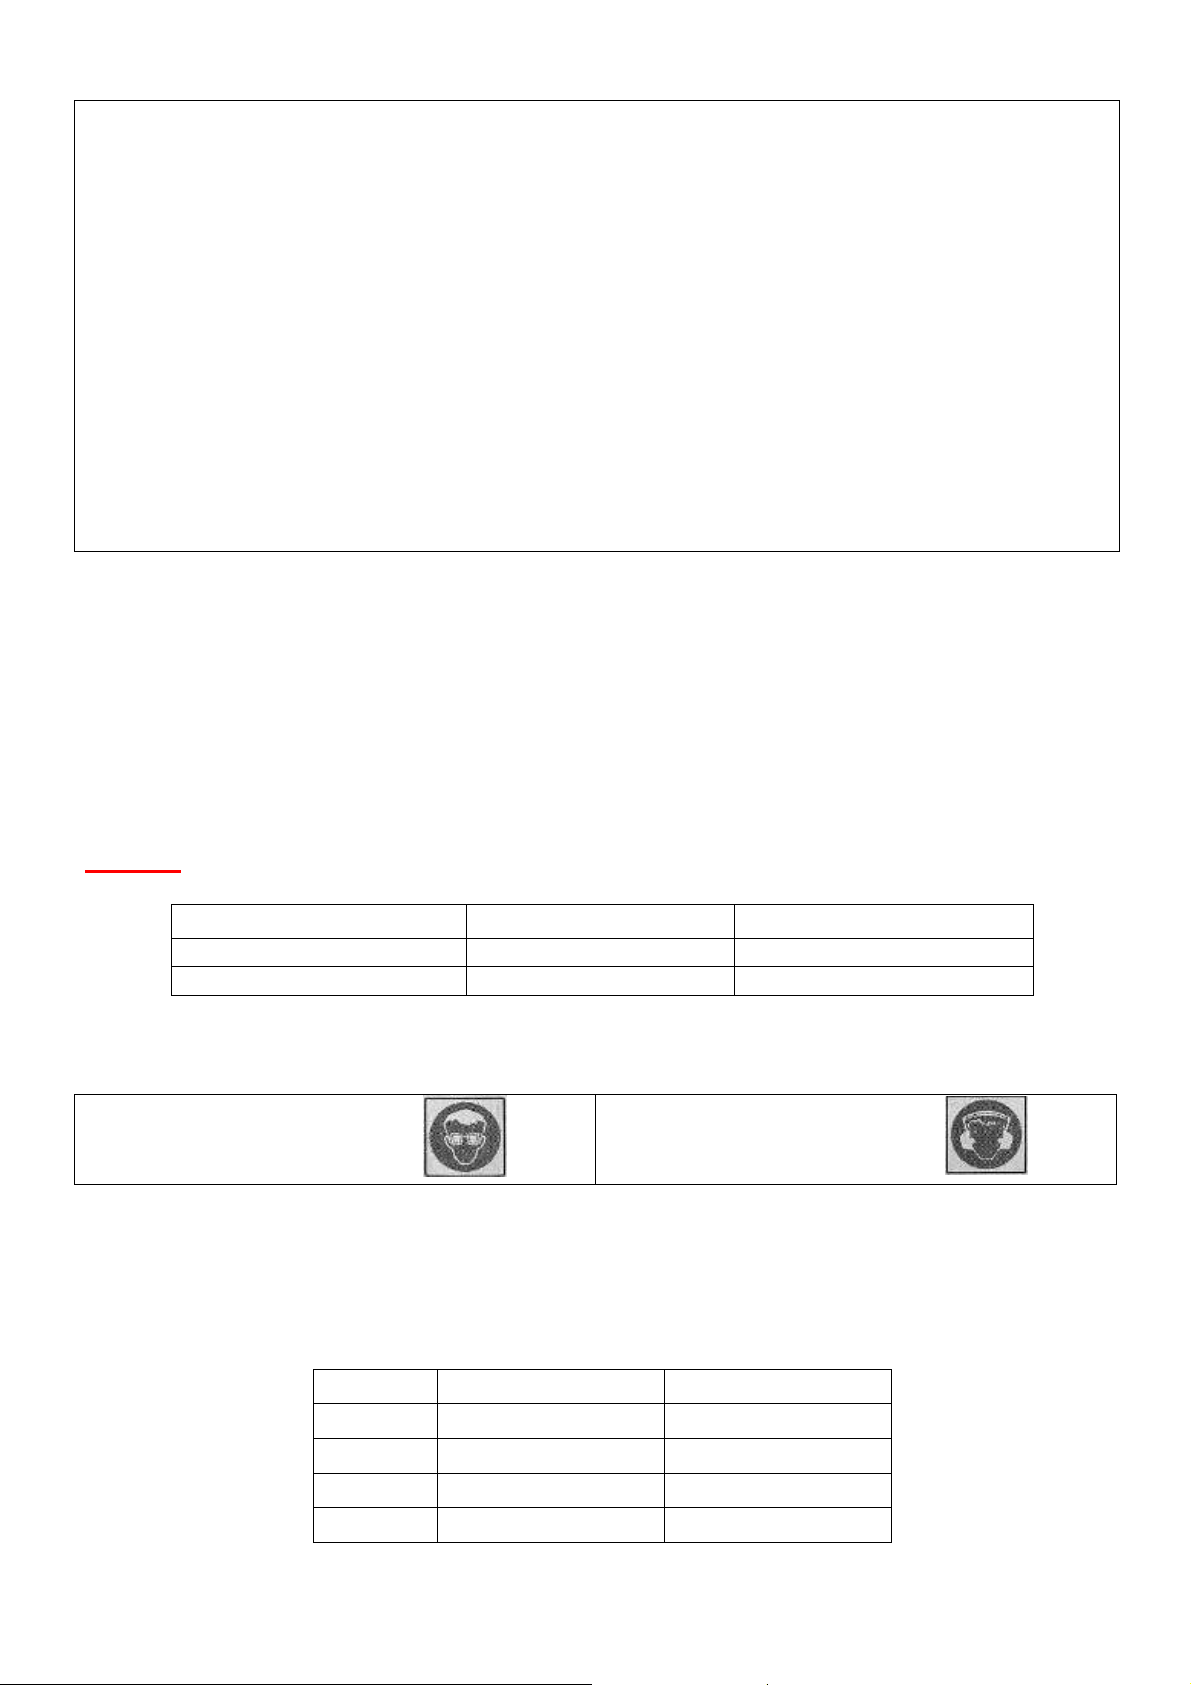
THE FOLLOWING COMPONENTS CAN BE INSTALLED ONTO THE
REAR BAR BEFORE IT IS FITTED TO THE VEHICLE.
CAGED NUTS
FOR INFILL
PANEL
M8 cage nuts
GRABBER
BRACKET
CATCH
HOO
SLIDER
PRE - ASSEMBLY OF REAR BAR
M6 cage nuts
2. INSTALLATION OF THE CAGE NUTS
Install four M8 cage nuts (short leg) from
the back of the bar as shown. These cage
nuts will be used to fasten the grabber
bracket and the catch hook, as shown in the
diagram above.
Install two M6 caged nuts in from the back
of the bar as shown. These caged nuts will
be used to fasten the infill panel.
BUMP
STOP
Last Rev Date: 16/10/2006 Page 5 of 25 3783210 - rev 3
Copyright © 2005 by ARB Corporation Limited. All rights reserved, this document must not be reproduced without the express authority of ARB Corporation Ltd
Page 6
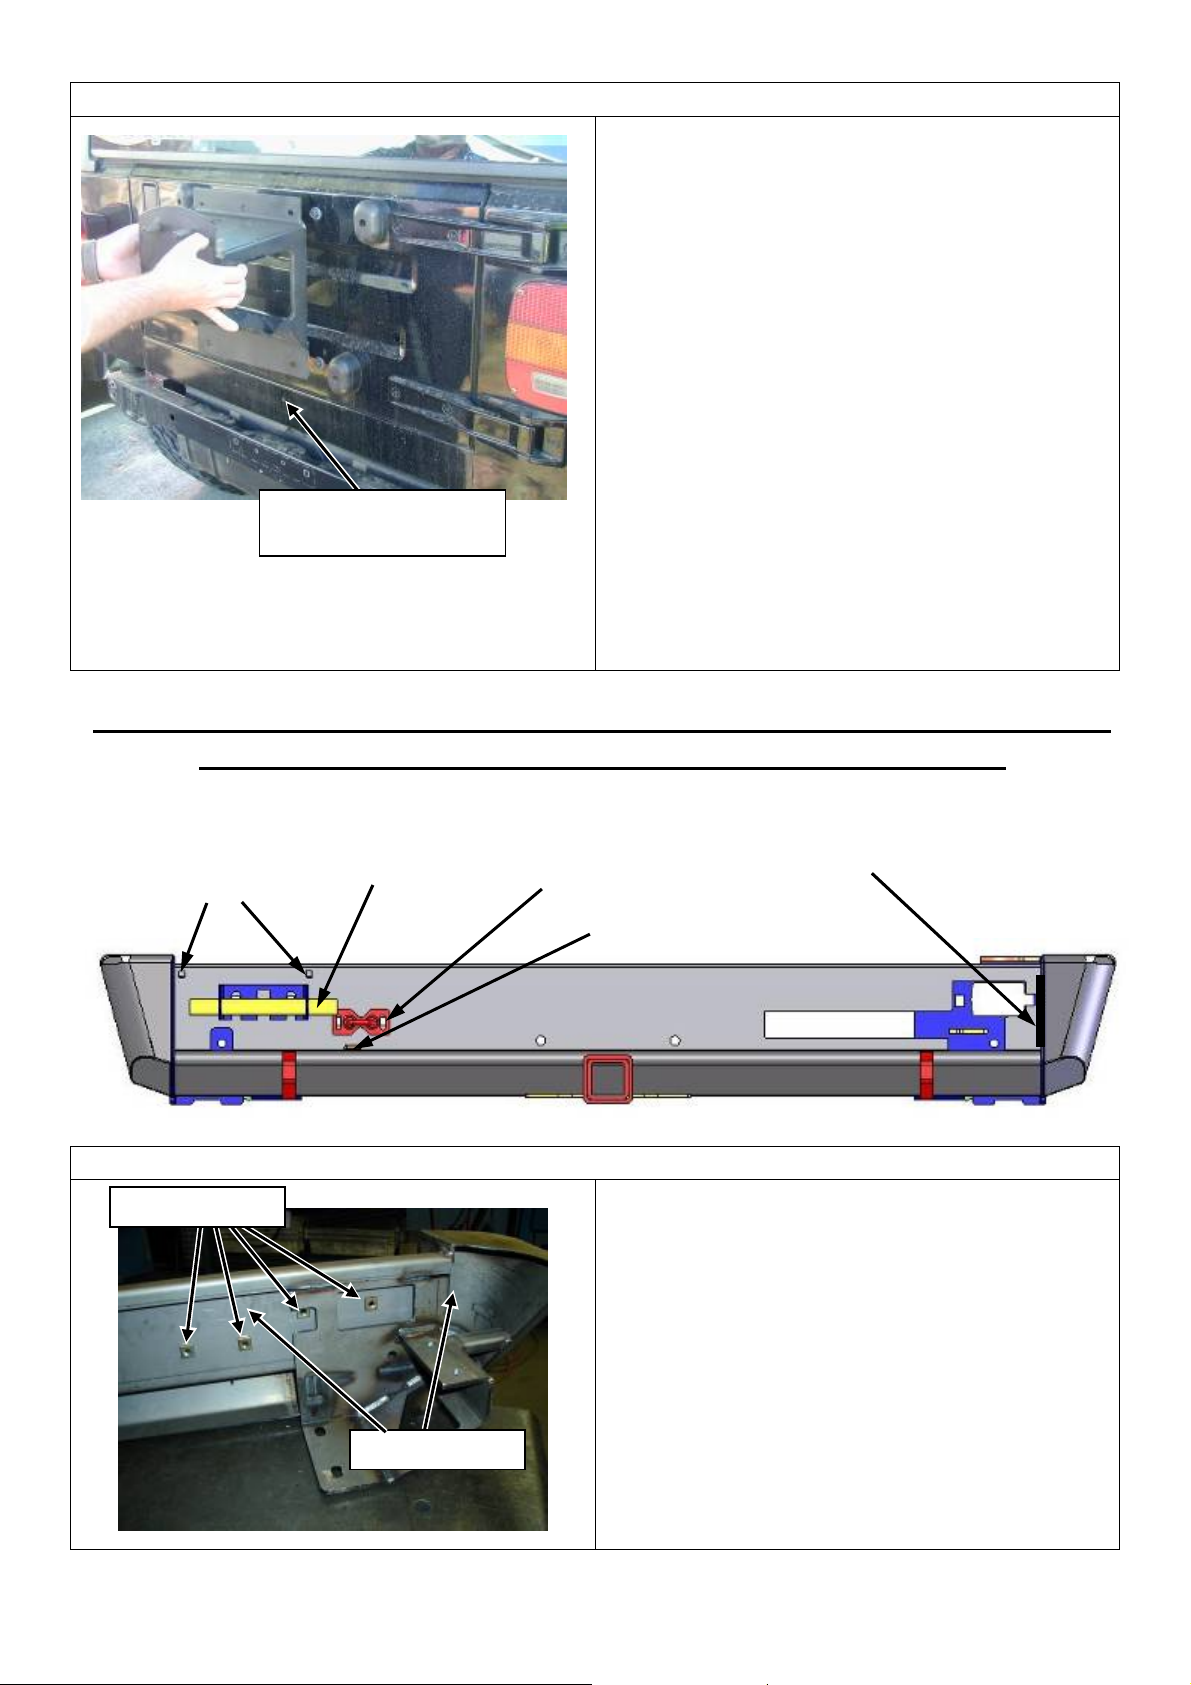
PRE - ASSEMBLY OF REAR BAR
3. INSTALLATION OF THE SLIDER
Insert two plastic square plugs into holes in
the rear bar. The plugs should snap into the
square holes as shown.
Fasten the slider to the rear bar using the
two black self-tapping screws provided.
NOTE: - Place the tapered face of the slider
towards the front face of the rear bar as
shown in the photo.
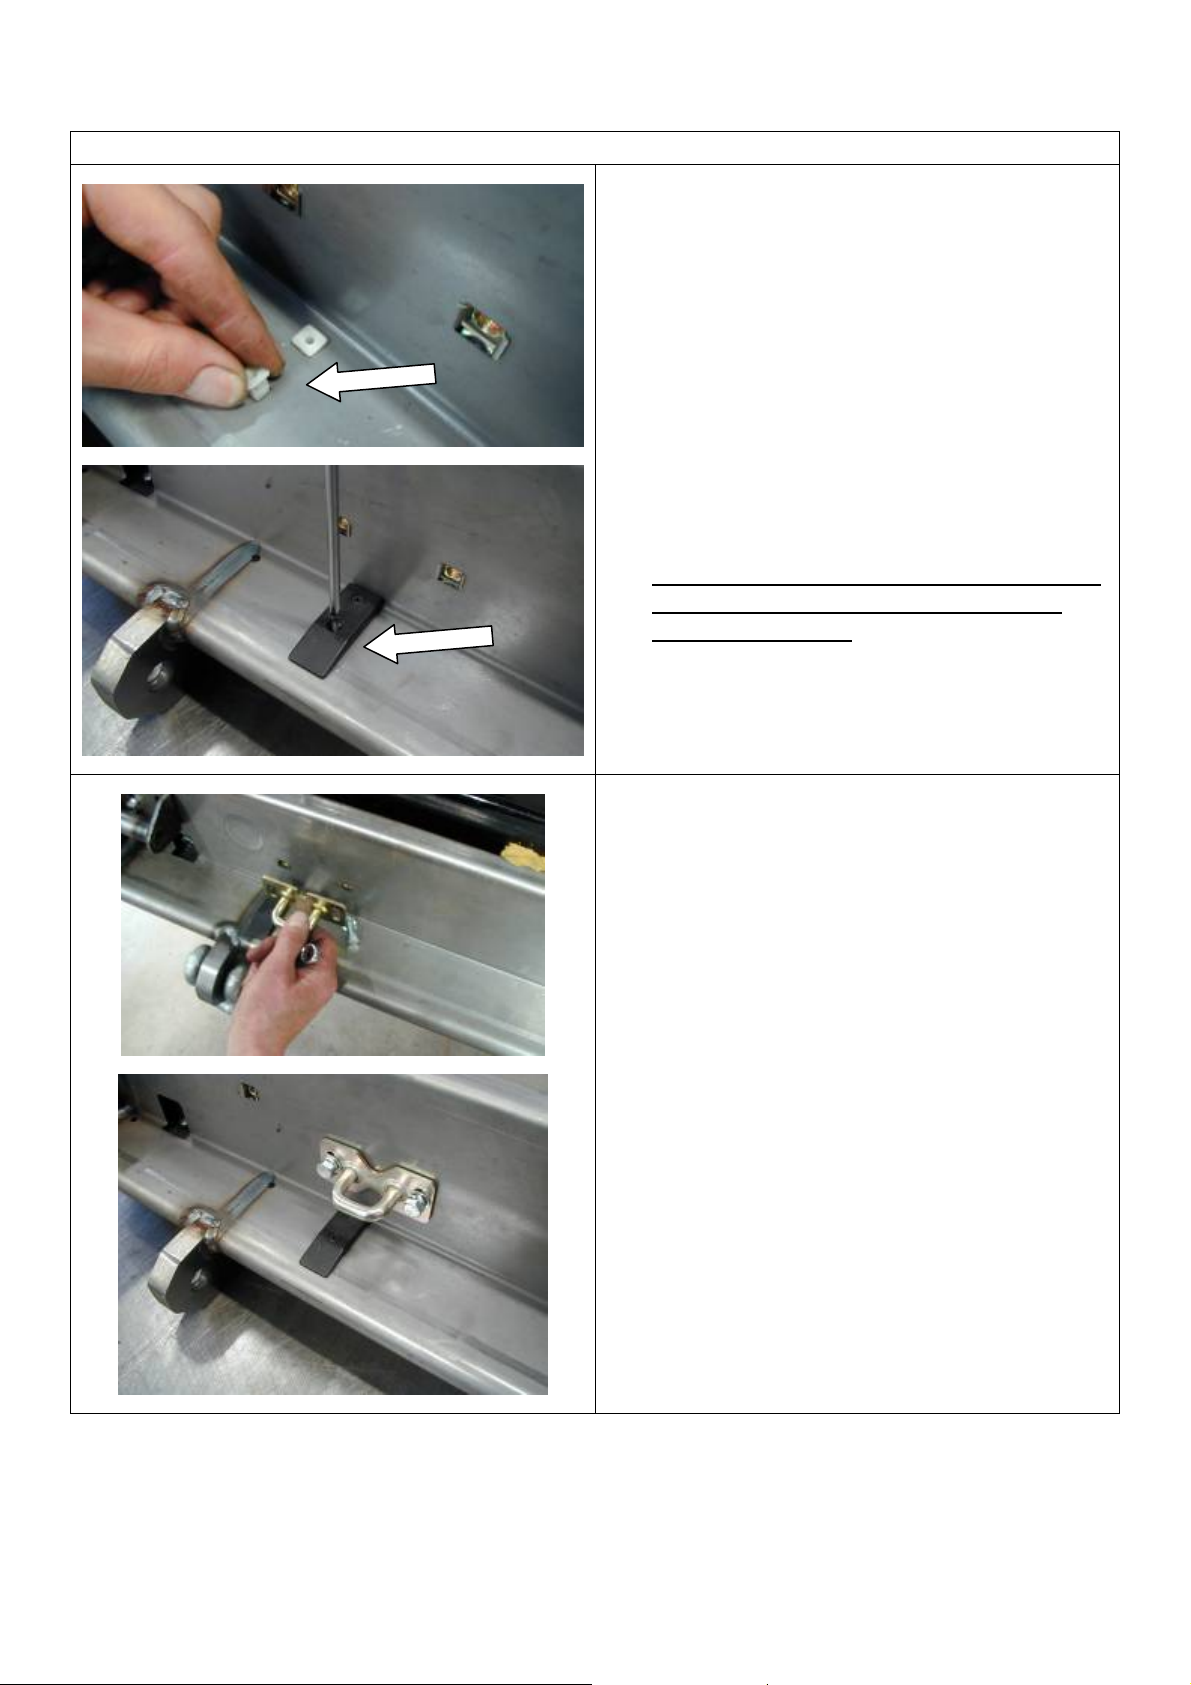
4. INSTALLATION OF THE CATCH HOOK
Fasten the catch hook to the rear bar as
shown.
Use the M8 x 25 mm bolts, spring washers
and panel washers supplied.
Make these bolts finger tight only at this
stage.
They will be tightened after the wheel
carrier has been adjusted.
Last Rev Date: 16/10/2006 Page 6 of 25 3783210 - rev 3
Copyright © 2005 by ARB Corporation Limited. All rights reserved, this document must not be reproduced without the express authority of ARB Corporation Ltd
Page 7
PRE - ASSEMBLY OF REAR BAR
Bump Stop
5. INSTALLATION OF THE BUMP STOP
Fasten the bump stop to the rear bar using
two M6 x 25 mm stainless steel button head
cap screws, flat washers and nyloc nuts.
Place the washers and nyloc nut inside the
right hand wing as shown.
NOTE: Do not over tighten.
M6 Lock Nuts
6. INSTALLATION OF THE GRABBER
BOLTS.
Fit the two M8 x 25 bolts with, spring
washers and flat washers to the bar as
shown engaging only a few threads.
7. INSTALLATION OF GRABBER
Slide the grabber bracket over the bolts as
shown in the photo.
Leave these bolts finger tight only at this
stage. The grabber will require adjustment
when the wheel carrier is fitted.
Last Rev Date: 16/10/2006 Page 7 of 25 3783210 - rev 3
Copyright © 2005 by ARB Corporation Limited. All rights reserved, this document must not be reproduced without the express authority of ARB Corporation Ltd
Page 8
PRE - ASSEMBLY OF REAR BAR
RH Wing Cavity
Adjusting Bolt
Pivot bracket
8. INSTALLATION OF PIVOT
ADJUSTING BOLT
Insert the M8 x 50 mm adjusting bolt (as
shown in the photo) through the hole in the
upright located in the right hand wing
cavity.
There is a corresponding tapped hole in the
pivot bracket that has been pre-drilled and
threaded. Wind the bolt in until a few
threads protrude through the bracket.
PRE - ASSEMBLY OF WHEEL CARRIER
THE FOLLOWING COMPONENTS CAN BE INSTALLED INTO THE WHEEL CARRIER BEFORE IT IS
FITTED TO THE REAR BAR .
NOTE :- THE BEARINGS AND SEALS ARE PRE - ASSEMBLED
ASSEMBLY , THESE PARTS ARE LISTED IN THE PARTS LIST .
INTO THE WHEEL CARRIER BUSH TO AID
STRUT SPHERE
LOCKING PIN
STOPPER
GRABBER
PRE - ASSEMBLY OF THE WHEEL CARRIER
1. INSTALLATION CATCH ASSEMBLY
Install the catch assembly using the four M8
x 20 mm socket head cap screws and spring
washers provided and fully tighten.
NOTE:- The mounting plate has been pre tapped to accept the socket head cap screws.
Last Rev Date: 16/10/2006 Page 8 of 25 3783210 - rev 3
Copyright © 2005 by ARB Corporation Limited. All rights reserved, this document must not be reproduced without the express authority of ARB Corporation Ltd
Page 9

PRE - ASSEMBLY OF THE WHEEL CARRIER
Insert Screws
From This Side
Mounting Plate
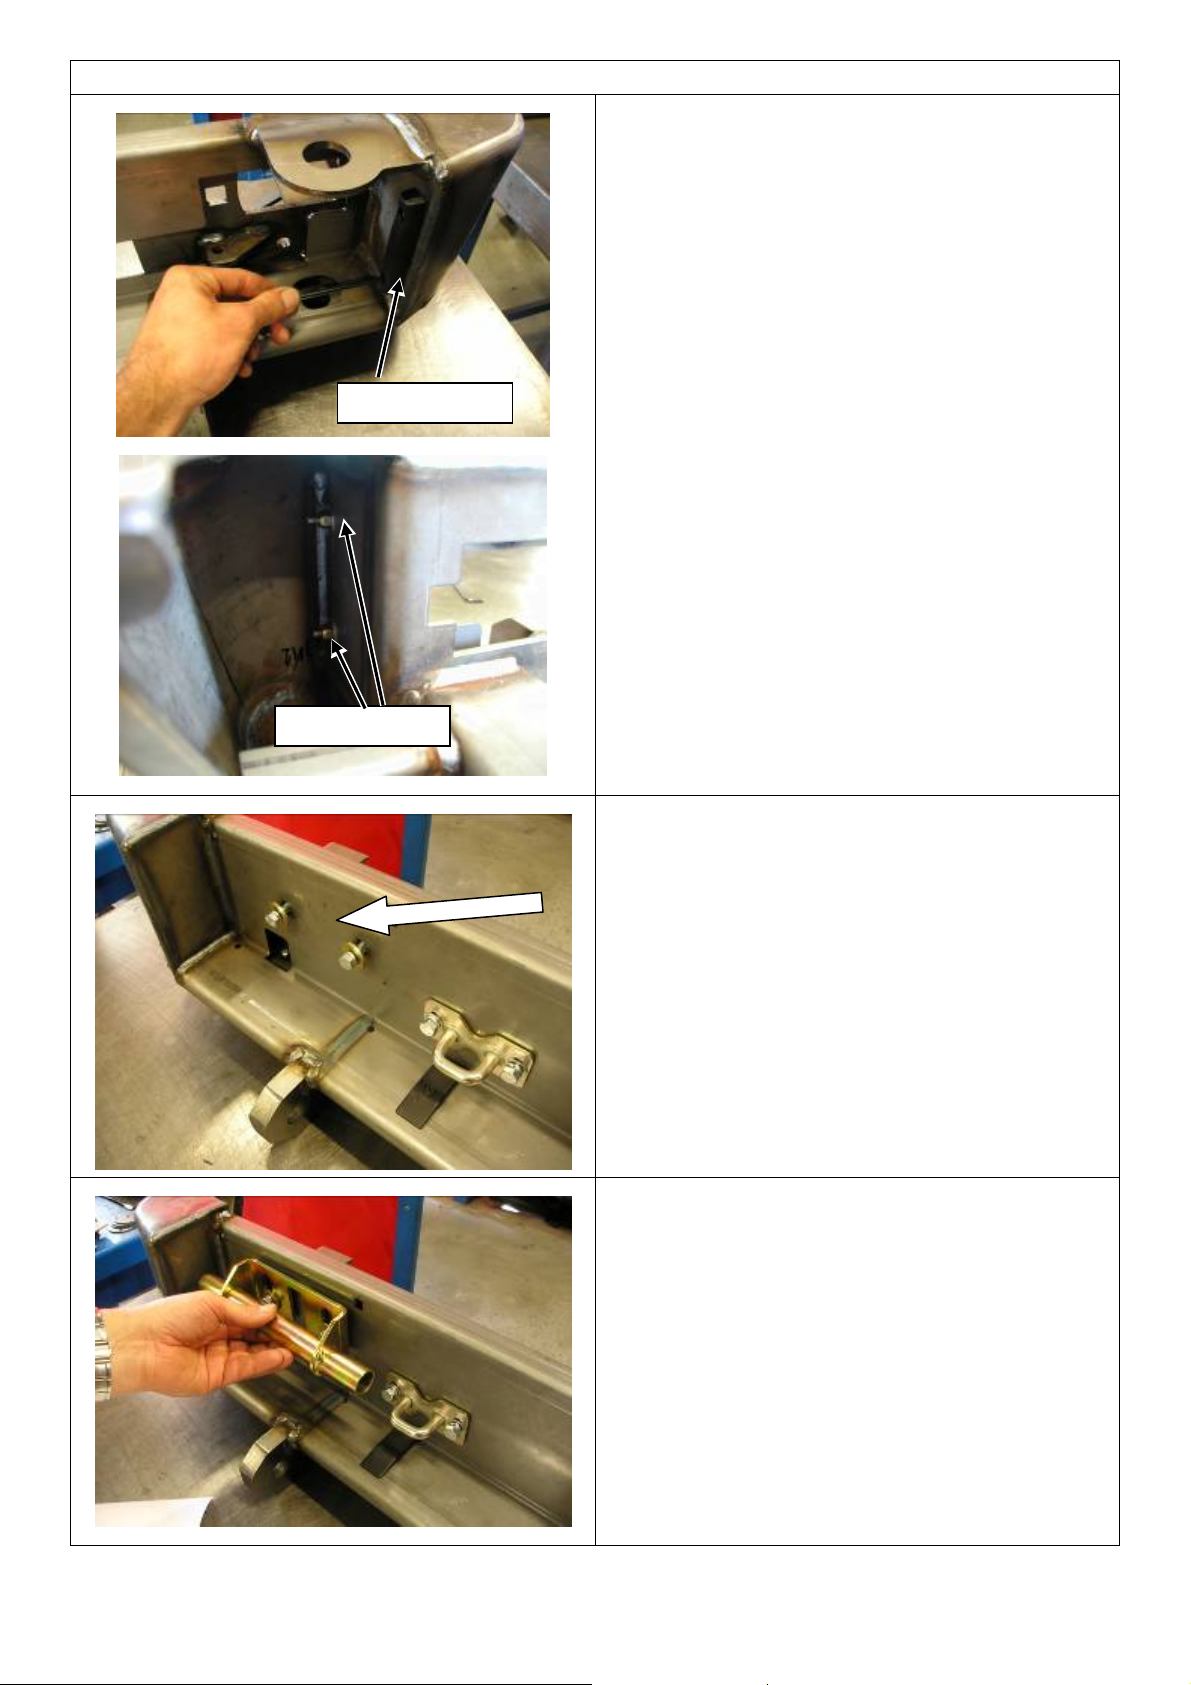
2. INSTALLATION OF THE STOPPER
Install one M8 nut, spring washer and flat
washer onto the threaded section of the
stopper.
Fit the stopper to the wheel carrier plate as
shown (the plate is pre – tapped). The
spring and flat washers should be placed
between the M8 nut and the treaded plate.
Do not tighten the nut at this stage. The
stopper will be adjusted after the wheel
carrier is fitted to the rear bar.
3. INSTALLATION OF GRABBER BUFFER
Install the grabber using the two M6
countersunk cap screws and lock nuts
provided. The grabber buffer should be
installed on the outer face of the mounting
plate as shown.
When tightening the bolts, start at the top
first. Pull the centre of the grabber towards
the top (stretching out the buffer) and
tighten the top bolt, repeat this for the
bottom of the arm as shown.
This will increase the grabber opening.
Ensure the buffer cut out is central to the
cut out in the mounting plate.
4. INSTALL STRUT PIVOT BALL
Install the gas strut pivot ball into the wheel
carrier as shown using the M8 flange nut
and flat washer provided.
Gas Strut Pivot Ball
Last Rev Date: 16/10/2006 Page 9 of 25 3783210 - rev 3
Copyright © 2005 by ARB Corporation Limited. All rights reserved, this document must not be reproduced without the express authority of ARB Corporation Ltd
Page 10

PRE - ASSEMBLY OF THE WHEEL CARRIER
Insert Pin Through Slot
Hole In Locking Pin
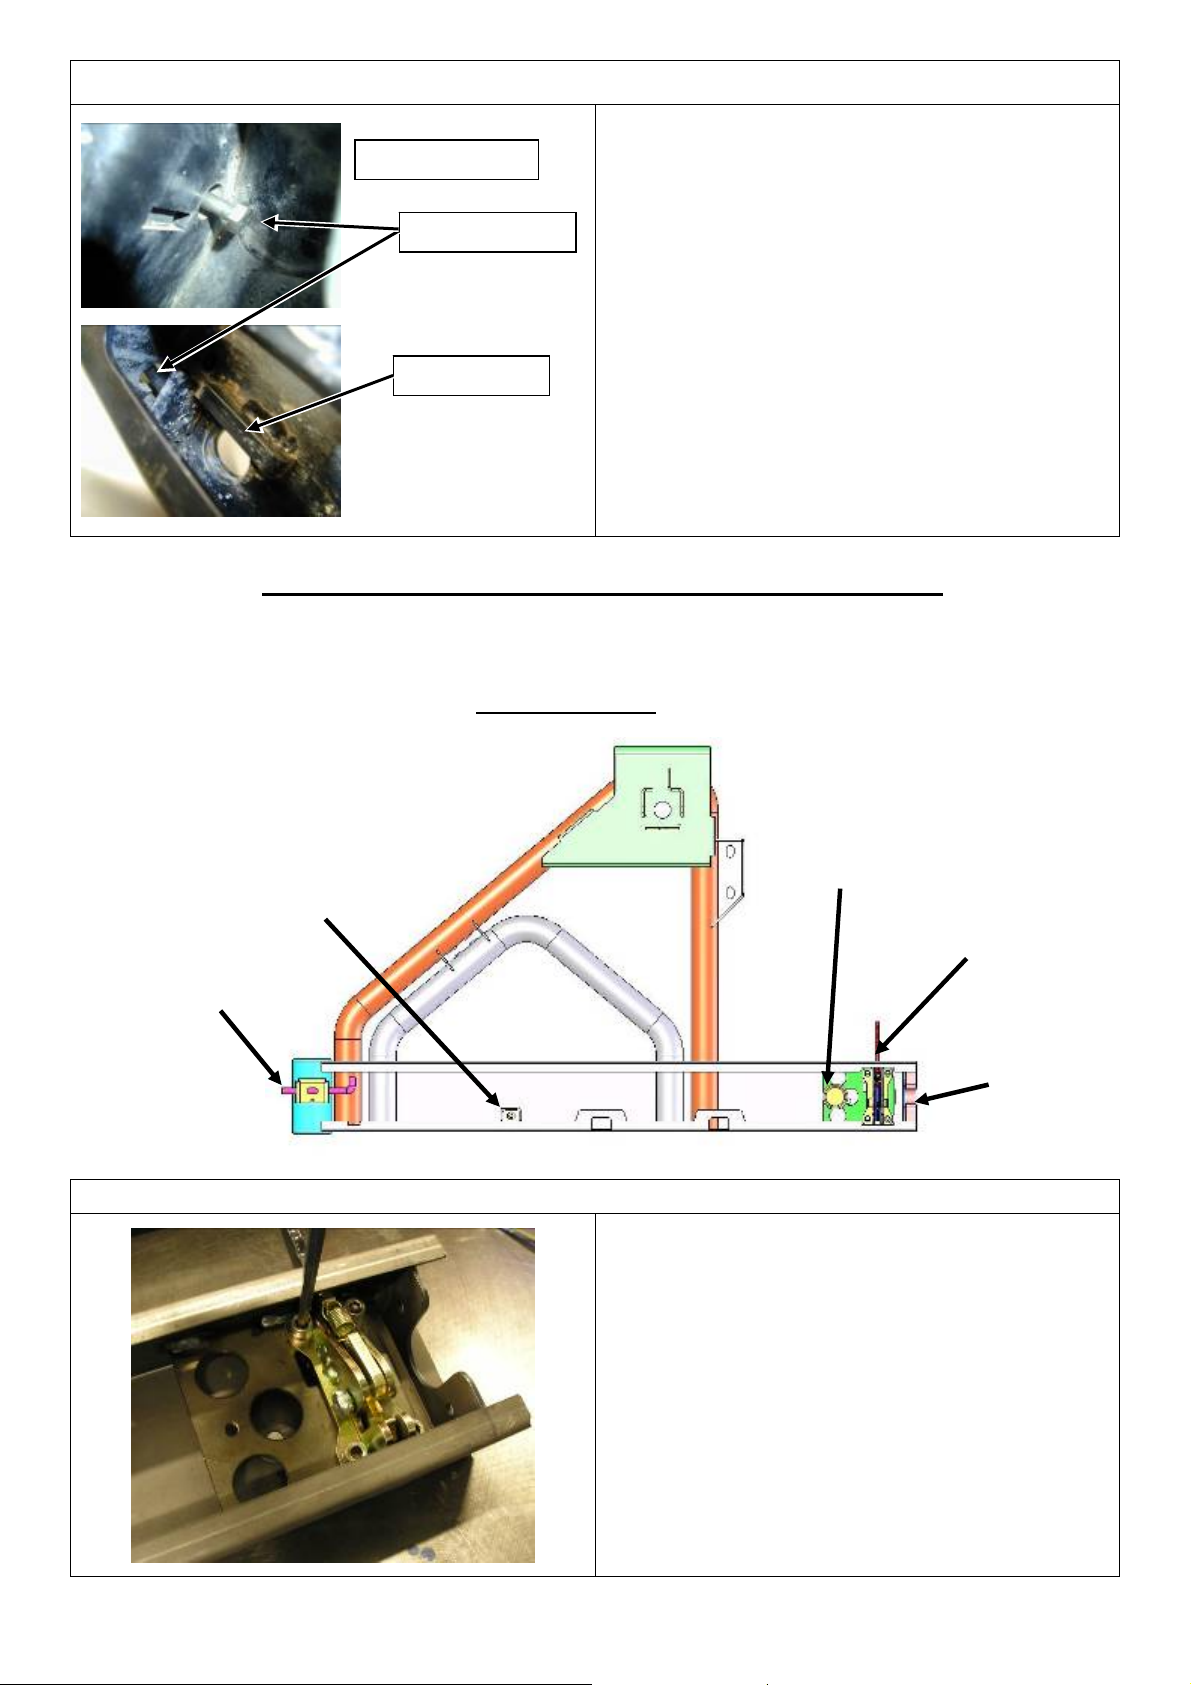
5. INSTALLATION OF THE LOCKING PIN
Place the spring inside the locking bracket
as shown in the photo.
Feed the locking pin through the bracket
and the spring as shown with the upturn of
the locking pin pointing upward.
Using a large flat bladed screwdriver, pull
back the spring as shown and insert the
dowel pin through the slot in the top of the
locking bracket.
Align the dowel pin with the hole in the
locking pin.
Ensure the pin is behind the spring.
Using a hammer, drive the dowel pin
through the hole until it sits flush with the
top surface of the bracket.
Last Rev Date: 16/10/2006 Page 10 of 25 3783210 - rev 3
Copyright © 2005 by ARB Corporation Limited. All rights reserved, this document must not be reproduced without the express authority of ARB Corporation Ltd
Page 11

REINFORCING BRACKET FITMENT TO VEHICLE
RIGHT HAND SIDE SHOWN
M12 x 90 MM BOLT
WITH CRUSH TUBE
Two Tab Bolts
Access Hole In Chassis
6. REINFORCING BRACKET FITMENT
TO CHASSIS. RIGHT HAND SIDE
SHOWN.
Insert an M12 x 90 mm bolt and flat
washer through the chassis reinforcing
bracket as shown. Place an M12 crush tube
over the bolt
Fit the reinforcing bracket against the side
of the chassis rail as shown. Pass the M12
bolt and crush tube through the chassis.
Fasten this bolt using a M12 flat washer,
spring washer and nut.
FOR JEEP UNLIMITED VEHICLES
The hole for the M12 X 90 mm bolt must
be drilled. Mark the position of the hole
using the bracket as a reference. Drill a 13
mm hole through the inner and outer
surfaces of the chassis. Enlarge the hole in
the outer surface of the chassis to 17 mm.
NOTE: Take care when drilling holes not
the damage the fuel tank.
WARNING: Wear eye and ear protection
when using drill.
Insert two M12 x 35 mm tab bolts up
through the access hole in the lower chassis
as shown. Guide the bolt up through the
chassis and through the side hole in the
chassis bracket (the tab on the bolt may
need to be bent to achieve this).
Fasten the bolts using a M12 flat washer,
spring washer and nut.
Make these bolts finger tight only at this
stage. They will be tightened after the rear
bar has been fitted to the vehicle.
REPEAT STEP 6 AS DESCRIBED ABOVE FOR THE LHS OF THE VEHICLE.
Last Rev Date: 16/10/2006 Page 11 of 25 3783210 - rev 3
Copyright © 2005 by ARB Corporation Limited. All rights reserved, this document must not be reproduced without the express authority of ARB Corporation Ltd
Page 12

Vehicle Cross Member
RIGHT HAND SIDE SHOWN
FITTING THE REAR BAR TO THE VEHICLE
Rear Bar
7. INSTALLATION OF THE REAR BAR
TO THE VEHICLES REAR
CROSS MEMBER.
With the assistance of another person lift
the rear bar into position and fit to the
back of the vehicle.
Slide the bar forward on the vehicle until
the uprights touch the rear cross member.
8. POSITIONING OF REAR BAR
ON VEHICLE.
Align the holes in the rear bar so that the
holes line up with the holes in the base of
the chassis.
There should be equal spacing between the
wing and quarter panel on both sides of
the vehicle.
9. ALIGN REAR BAR ON VEHICLE
Align the rear bar so that the gap between
the body and rear bar is parallel and level.
Insert two M12 x 40 mm bolts & flat
washer through the front of the bar as
shown.
Fasten these bolts with M12 flat washers,
spring washers and nuts.
NOTE: The bolts will pass through the
rear bar, the chassis cross member and the
chassis reinforcing bracket.
Do not tighten these bolts, as the rear bar
will be removed temporally after step 10.
LEFT HAND SIDE SHOWN
Last Rev Date: 16/10/2006 Page 12 of 25 3783210 - rev 3
Copyright © 2005 by ARB Corporation Limited. All rights reserved, this document must not be reproduced without the express authority of ARB Corporation Ltd
Page 13

FITTING THE REAR BAR TO THE VEHICLE
Mark these two holes
Narrow edge to top.
Mark & drill these two holes
WARNING: PLACE A BOARD BETWEEN THE
CHASSIS CROSS MEMBER AND THE FUEL TANK
WHEN DRILLING. THIS IS TO PREVENT DAMAGE
TO THE FUEL TANK.
M12 Caged Nuts
M6 Caged Nuts
10. MARKING THE REAR BAR POSITION
TO THE VEHICLE.
With the rear bar in position on the back of the
vehicle, mark the two holes in the centre of the
rear bar onto the rear cross member of the
vehicle. Use a metal scribe or felt tip marker to
do this.
Remove the bolts described in step 9 and
remove the rear bar to enable the holes to be
drilled (refer to step 11.)
11. POSITIONING THE BACKING PLATE
TO THE REAR CHASSIS BEAM.
Align the outer holes in the chassis beam plate
(supplied in the fitting kit) with the newly
marked holes on the cross member. Mark the
position of the two smaller holes.
NOTE: The smaller edge of the bracket is to
the top.
Centre punch the position of the four holes.
Drill the smaller holes using an 8 mm drill bit
and the two larger holes with a 13 mm drill bit.
WARNING: Wear eye and ear protection
when using drill.
12. INSTALLATION OF THE BACKING
PLATE TO THE CHASSIS BEAM
Insert an M12 (short leg) cage nut into the two
outer holes as shown. Insert an M6 cage nut
into the two inner holes as shown.
Place the assembled chassis beam plate in
behind the chassis cross member and align the
smaller inboard cage nuts with the drilled
holes. The position of the bracket is shown
dotted in the above photo.
Bolt the backing plate to the chassis beam
using the M6 bolts, flat washers and spring
washers. Tighten both bolts.
Reinstall the rear bar and hardware by
repeating steps 7 – 9.
Last Rev Date: 16/10/2006 Page 13 of 25 3783210 - rev 3
Copyright © 2005 by ARB Corporation Limited. All rights reserved, this document must not be reproduced without the express authority of ARB Corporation Ltd
Page 14

FITTING THE REAR BAR TO THE VEHICLE
M12 x 50 mm BOLTS
On some vehicles drill this hole in the
Existing Bolt
RIGHT HAND BRACKET SHOWN
Tab Bolt
Guide holes
13. INSTALLATION OF THE REAR BAR
With the rear bar back on the vehicle
insert two M12 x 50 mm bolts, spring
washers and flat washers through the rear
step and chassis rear cross member.
Thread and tighten these bolts into the
caged nuts in the chassis beam plate.
14. Bottom bolts on chassis bracket RHS.
Re-use one of the bolts from the factory
bumper bar as shown.
Insert another M12 x 35 MM tab bolt
(as previously described in step 6) through
the chassis ( existing hole ) and bracket as
shown. On some vehicles this Dia 13 mm
hole may need to be drilled in the chassis .
Fasten the bolt using an M12 spring
washer, flat washer and nut.
15. INSTALLATION OF THE REAR BAR
Drilling the pinning bolts.
With the rear bar and the chassis bracket
fully positioned the rear bar can now be
drilled and pinned.
Using the two small holes in the chassis
bracket as a guide, drill up through both
the chassis bracket & rear bar top plate
using an electric drill.
Use a 6 mm drill bit first as a pilot hole
and then a 13 mm as the final size.
WARNING: Wear eye and ear protection
when using drill
16. INSTALLATION OF THE REAR BAR
Fastening of the pinning bolts.
Insert two M12 x 40 mm bolts and flat
washers through the top of the bar as
shown. Fasten these bolts with M12 flat
washers, spring washers and nuts on the
chassis bracket side.
Do not fully tighten these bolts until the
left hand side has been fully bolted .
RIGHT HAND SIDE SHOWN
WITH THE RHS OF THE REAR BAR BOLTED AND PINNED IN POSITION, THE FASTENERS ON THE LHS
CAN BE SECURED. THIS IS DONE BY REPEATING STEPS 9 - 12
IMPORTANT: - ONCE COMPLETE, TIGHTEN ALL BOLTS BEFORE PROCEEDING.
Last Rev Date: 16/10/2006 Page 14 of 25 3783210 - rev 3
Copyright © 2005 by ARB Corporation Limited. All rights reserved, this document must not be reproduced without the express authority of ARB Corporation Ltd
Page 15

FITMENT OF WHEEL CARRIER TO REAR BAR
Housing retaining bolts
1. REMOVE RIGHT HAND TAIL LIGHT
The right hand tail light lens and housing
will need to be removed as shown , to allow
the pivot bolt (as per step 4 ) to be aligned
and fitted . Remove the lens from the
housing , remove the divider plate that
separates the two lower bulbs from the
housing to access the three housing
retaining bolts – remove as shown .
Tie or tape the housing out of the way to
prevent damage to the tail light housing or
the vehicle.
2. FIT PIVOT LOCK NUT
(fitted up from the underside )
Insert the M20 pivot lock nut below the
lower pivot plate as shown.
Position the nut so that it is central with
the hole on the lower pivot plate.
RIGHT HAND SIDE OF BAR
9 mm Spacers
3. INSERT PIVOT SPACER
Cover both the top and bottom seals and
bearing hubs with a liberal amount of
grease. This will help waterproof the hub
and aid with assembly. It will also hold the
spacer into the hub as covered in the next
step.
Insert a 9 mm spacer up into the underside
of the hub of the wheel carrier as shown in
the photo (the grease will hold it in
position). Push the spacer up through the
seal.
Place the other 9 mm spacer into the lower
hole of the rear bar shell as shown.
Last Rev Date: 16/10/2006 Page 15 of 25 3783210 - rev 3
Copyright © 2005 by ARB Corporation Limited. All rights reserved, this document must not be reproduced without the express authority of ARB Corporation Ltd
Page 16

FITMENT OF WHEEL CARRIER TO REAR BAR
20 mm Pivot Bolt
Bush
Wheel carrier pivot
Wheel carrier frame removed for clarity
Pivot plate
4. FIT WHEEL CARRIER
Assemble the 20 mm pivot bolt with the
bush . The bush when assembled fits into
the top bearing seal and will press against
the bearing.
With assistance, fit the wheel carrier pivot
between the upper and lower pivot plates.
Insert the M20 pivot bolt assembly
through the pivot plates and the top &
bottom bearings.
Align the bolt into the 20 mm lock nut
(installed previously) and - finger tight
only at this stage.
NOTE: - To Aid installation a
15mm – 18 mm rod or aligning pry bar
can be use to centralise the bearings,
spacers and nut so the pivot bolt assy will
pass through all components easily.
5. TIGHTEN PIVOT BOLT
Tighten of the pivot bolt to preload the
bearings.
Tighten the bolt until the free play has
been removed from the pivot assembly.
Back the bolt off by half a turn once this
has been achieved.
The wheel carrier should now swing freely.
Last Rev Date: 16/10/2006 Page 16 of 25 3783210 - rev 3
Copyright © 2005 by ARB Corporation Limited. All rights reserved, this document must not be reproduced without the express authority of ARB Corporation Ltd
Page 17

(B)
BODY PIVOT
BALL (A)
FITTING OF THE GAS STRUT
DESCRIPTION OF STRUT
STRUT
MOUNTING TAB
STRUT ROD
ROD SOCKET
6. FITTING THE STRUT TO REAR BAR
Open wheel carrier to gain access to the strut
mounting tab (located on the carrier).
Insert the body pivot ball (A) - through the
strut mounting tab as shown.
Fasten the threaded section of the pivot ball
to the rear bar using the M8 flange nut.
INSERT FROM
THIS SIDE
PIVOT BALL
7. INSERT THE LOCKING CLIPS
Press the rod socket (B) over the pivot ball in
the wheel carrier as shown.
Insert the locking pin into the rod socket.
Place the straight piece of the clip through
the holes in the side of the sphere.
Roll the ‘C’ shaped clip over the shaft to lock
the pivot ball in place.
This needs to be done to both ends.
8. FITTING THE GAS STRUT TO THE
WHEEL CARRIER
Insert the pivot ball - through the strut
mounting bracket as shown.
Fasten the threaded section of the pivot ball
to the wheel carrier using the M8 flange nut.
NOTE: - The strut must be compressed
slightly to make the threaded section of the
pivot ball align with the gas strut bracket on
the wheel carrier.
Last Rev Date: 16/10/2006 Page 17 of 25 3783210 - rev 3
Copyright © 2005 by ARB Corporation Limited. All rights reserved, this document must not be reproduced without the express authority of ARB Corporation Ltd
Page 18

CATCH
OPENING
CENTRE
LINE
8 MM
ADJUSTMENT OF WHEEL CARRIER
9. ADJUSTING THE HEIGHT OF THE
WHEEL CARRIER
The wheel carrier should sit parallel with the
rear step when viewed horizontally.
The height of the wheel carrier arm can be
adjusted using the M8 bolt located inside the
right hand wing cavity.
M8 ADJUSTING
BOLT
10. ADJUST THE CATCH HOOK
Make sure that the bolts attaching the catch hook to the rear bar
are finger tight.
Slowly close the wheel carrier until the catch almost contacts the
catch hook. Check that the hook is positioned centrally about the
catch opening. If necessary, adjust the height of the catch hook.
When hook is in the correct position, tighten the bolts.
Shut the wheel carrier so that the catch engages. The catch
should make a crisp ‘click’ sound.
Standing behind the vehicle, pull the catch lever towards you.
The catch should make a crisp ‘click’ sound again and the wheel
carrier should be opened by the gas strut.
If the catch does not behave in this manner, the catch hook
requires further adjustment. If the top surface of the hook shows
evidence of scoring or is marked, the hook should be moved
lower down. If the bottom surface of the hook is scored, the hook
CATCH
HOOK
should be moved upward.
Continue adjusting the catch hook until the catch locks and
unlocks freely.
11. ADJUSTING THE STOPPER
Screw the stopper out until it protrudes 8 MM past the inside
edge of the wheel carrier.
Shut the wheel carrier so that the catch engages. If the catch will
not lock (‘click’) - screw the stopper in. If there is free play
between the wheel carrier and the rear bar - screw the stopper
out. Continue to screw the stopper out until the free play is
removed. When happy with the stopper position, tighten the M8
flange nut against the steel mounting plate.
Turning the bolt in raises the arm, raise until
the arm is parallel with the shell of the rear
bar.
Last Rev Date: 16/10/2006 Page 18 of 25 3783210 - rev 3
Copyright © 2005 by ARB Corporation Limited. All rights reserved, this document must not be reproduced without the express authority of ARB Corporation Ltd
Page 19

ADJUSTMENT OF THE REAR STEP COMPONENTS
12. ADJUSTING THE GRABBER BRACKET
With the bolts attaching the catch grabber bracket finger tight, shut the wheel carrier. This will
centralise the grabber bracket.
Taking care not to knock the grabber bracket, release the catch and swing the wheel carrier out into
the open position.
Tighten the bolts securing the grabber bracket to the rear bar.
FINAL CHECK AND ADJUSTMENT ON THE WHEEL CARRIER
With all of the bolts now tightened, shut the wheel carrier until the catch locks. The arm should
meet little resistance as it shuts and the catch should make a crisp ‘click’ sound as it closes.
At this point, it should not be possible to pull the wheel carrier open without releasing the catch.
There should be no free play between the wheel carrier and the rear bar.
Stand behind the vehicle and pull the catch lever. The catch should make a crisp ‘click’ sound and
the arm should open without further assistance.
IMPORTANT: - IF THE ARM DOES NOT OPERATE IN THIS
MANNER REPEAT STEPS 10 TO 13.
FITTING THE WHEEL MOUNTING BRACKET
Studs positioned in the 5 x 4 ½” pattern.
Vacant holes are used for 5 x 5 ½” pattern
1. STUD LOCATIONS ON THE
WHEEL MOUNT BRACKET
Studs can be fitted to the wheel mount
bracket in either a 5 x 4 ½” or 5 x 5 ½”
pattern.
The photo to the right shows the studs
in the 5 x 4 ½” pattern.
The studs are installed in the vacant
holes to achieve the 5 x 5 ½” pattern.
Installation of the studs is covered in
step 2.
Last Rev Date: 16/10/2006 Page 19 of 25 3783210 - rev 3
Copyright © 2005 by ARB Corporation Limited. All rights reserved, this document must not be reproduced without the express authority of ARB Corporation Ltd
Page 20

FITTING THE WHEEL MOUNTING BRACKET TO THE CARRIER
2. INSTALLATION OF THE STUDS
TO THE BRACKET
Using a steel vice or similar place the
stud through the appropriate holes.
NOTE: - 5 x 4½” has two studs at the
top and one in the bottom.
Using a large hammer hit the back of
the stud until it is fully bottomed out
as shown.
Top of bracket
Once all three studs are installed it will
look like the example shown above in
step 1 .
3. WHEEL MOUNTING BRACKET
COMPONENTS
Fit two M12 cage nuts (long leg) to the
wheel mount bracket as shown.
NOTE: The body of the cage nuts
should be on the inside of the channel
as shown.
M12 Caged
nuts
(long leg)
4. WHEEL MOUNTING BRACKET TO
CARRIER
Slide the wheel mount bracket into the
wheel carrier as shown in the photo.
Using the M12 bolts, spring washer
and body washer bolt the wheel mount
bracket to the wheel carrier both sides.
Do not fully tighten these bolts, as the
bracket must now be adjusted.
Last Rev Date: 16/10/2006 Page 20 of 25 3783210 - rev 3
Copyright © 2005 by ARB Corporation Limited. All rights reserved, this document must not be reproduced without the express authority of ARB Corporation Ltd
Page 21

FITTING THE WHEEL MOUNTING BRACKET TO THE CARRIER
Full contact required
Locking bolt
Drill up from underside
5. INSTALLATION OF THE SPARE
WHEEL TO THE BRACKET
Fit the spare wheel to the carrier and
ensure all three wheel nuts are fully
engaged. Slide the spare wheel and
carrier back towards the frames.
The tyre must have full contact with
the frames. Using a marker or scribe
mark the position of the bracket in
relation to the housing (in case it
moves when removing the spare
wheel). Remove the spare wheel.
To enable the tyre to be Pre -loaded on
the frame, push the bracket a further
5 mm inward. Tighten the two M12
side bolts.
6. WHEEL MOUNTING BRACKET
DRILL AND PINNING
From the underside of the wheel
carrier channel, there is a predrilled
pilot hole for the locking bolt.
Using a 10 mm drill bit in an electric
drill, drill through the lower wall of
the wheel mounting bracket . Ensure
eye protection is used.
Place the M10 bolt up through the
drilled hole and fasten on the inside
with the M10 flange nut .
Tighten the nut and bolt .
7. WHEEL MOUNTING BRACKET TO
WHEEL CARRIER
The wheel mounting bracket has been
designed to attach to the wheel carrier
and can slide forward and reward to
accommodate different size tyres and
wheel offsets .
The two components although bolted
together can be removed with the tyre
in place . It is recommended that a
padlock (not supplied) is used to
secure these items to the vehicle.
Last Rev Date: 16/10/2006 Page 21 of 25 3783210 - rev 3
Copyright © 2005 by ARB Corporation Limited. All rights reserved, this document must not be reproduced without the express authority of ARB Corporation Ltd
Page 22

RE-FITTING THE HI LEVEL BRAKE LAMP TO THE WHEEL CARRIER
g
M8 Cage nuts
(long leg)
Feed wiring through here
Grommet
Plu
Existing loom
New wiring
Cable tie as shown
8. INSTALLATION OF THE CAGE
NUTS INTO THE BRACKET
Fit the four M8 cage nuts (long leg) to
the top of the stop lamp bracket using
a small flat bladed screwdriver.
Note:- The body of the cage nut sits on
the underside of the bracket .
Refit the factory high level stop lamp
by aligning the holes in the base of the
lamp with the cage nuts.
Feed the wiring through the hole as
shown .
9. BOLTING THE HIGH LEVEL STOP
LAMP TO THE BRACKET
Use four black M8 bolts , spring
washers and flat washers fasten the
lamp to the bracket as shown .
Cut the wiring loom in between the
door grommet and the protective
tubing as shown .
The two brake lamp wires will need to
be extended . Solder the wires supplied
in the fitting kit to the factory loom .
Insulate the wires where they are
joined to the original loom .
10 . Partially cover the new wiring with
the convoluted tubing starting at the
new join in the loom .
Run the convoluted tube from the
existing loom along the new section of
cable and using the cable ties
provided , tie the wiring loom back to
the wheel carrier frame as shown .
Leave the ( lamp ) end of the wiring
uncovered ( no tubing ) at this stage .
Last Rev Date: 16/10/2006 Page 22 of 25 3783210 - rev 3
Copyright © 2005 by ARB Corporation Limited. All rights reserved, this document must not be reproduced without the express authority of ARB Corporation Ltd
Page 23

(
(
VEHICLE WIRING MODIFICATIONS FOR HI – LEVEL STOP LAMP
Feed wiring through grommet
Grommet
Housing
Ring terminal
Earth )
Scotch lock
Stop lamp
Positive ) wire
11. DRILLING THE TAIL LAMP
HOUSING
Turn the tail lamp housing upside
down as shown .
Using a 12 mm drill bit , drill a hole in
the bottom of the housing in the centre
on the faint mould line as shown .
Ensure the drill bit does not protrude
to far into the housing when drilling
causing damage to the housing or
wiring .
12. GROMMET AND WIRING TO TAIL
LAMP HOUSING
Push the grommet into the hole in the
tail lamp housing .
Re-fit the tail lamp housing to the
vehicle using the top bolt only at this
stage .
Split the twin core wire and push it
through the grommet into the housing
Allow approx 100mm of the wire
inside the housing .
13. WIRING THE LOOM TO THE TAIL
LAMP
Crimp the ring terminal to the earth
wire ( red with a black trace ) and
place the terminal under the head of
one of the two remaining bolts .
The two remaining bolts can now be
re-fitted to the tail lamp housing as
shown .
Attach the scotch lock to the ( white )
stop lamp positive wire and also secure
the red loom wire – crimp the scotch
lock together as shown .
Last Rev Date: 16/10/2006 Page 23 of 25 3783210 - rev 3
Copyright © 2005 by ARB Corporation Limited. All rights reserved, this document must not be reproduced without the express authority of ARB Corporation Ltd
Page 24

RE-FITTING THE TAIL LAMP TO VEHICLE
Cut out in divider
14. DIVIDER PLATE TO TAIL LAMP
HOSING
Re - fit the divider to the housing .
Ensure the wiring sits in the cut out
provided on each side at the back .
Note :- The folded edge of the divider
is on the lower side .
On the tail gate where the factory high
level stop lamp loom passes through
there is an exposed hole – Use the
blanking grommet supplied in the
fitting kit to cover it .
15. LENS TO TAIL LAMP
Re – fit the tail lamp lens to the
housing .
With the wheel carrier door open ,
trim the remaining end of the
convolute tubing to sit under the tail
lamp as shown .
Check that the high level brake lamp
is operational and the loom is tie to the
frame securely ( step 10 ) and does not
hang in the pivot area .
16. RE - FIT THE SPARE WHEEL
Re-fit the spare wheel using the wheel
nuts provided.
Locking wheel nuts are available as an
accessory from your ARB stockist .
( part number 575 0040 ) .
A Hi-Lift jack mounting bracket is
available as an accessory from your
ARB stockist ( part number 575 0030 ).
Last Rev Date: 16/10/2006 Page 24 of 25 3783210 - rev 3
Copyright © 2005 by ARB Corporation Limited. All rights reserved, this document must not be reproduced without the express authority of ARB Corporation Ltd
Page 25

Cover panel
M6 Cage nuts
M6 x 40 mm Bolt
FINAL - ASSEMBLY OF THE REAR BAR
M6 Cap
Nylon Spacer
Spacer
COVER PANEL ASSEMBLY
Now that all adjustments & operations
have been done and checked on the rear
bar and spare wheel carrier, the cover
panel can be fitted. Fit the two M6 cage
nuts to the cover as shown.
Fit the socket head cap screws into the
cover with the black nylon spacers on
the other side.
Place the bottom spacers over the
corresponding holes in the surface of
the rear bar.
INSTALLATION OF THE COVER TO
THE REAR BAR
To fix the cover to the rear bar, place a
hex key through the access hole in the
cover as shown. Thread the two M6
socket head cap screws into the caged
nuts installed at step 2.
The lower part of the cover is fixed by
inserting two M6 bolt from the
underside of the bar. These bolts pass
through the rear bar, through the
spacer and into the caged nut
( previously installed ) .
Tighten the four bolts.
RE - FIT THE LICENSE PLATE
Refit the license plate to the vehicle as
shown .
Note :- If the vehicle is not fitted with a
body lift / spacer kit , the license plate
will not fit as shown it will be necessary
to purchase the additional license plate
kit as listed below .
A licence plate relocation kit is available
as an accessory from your ARB stockist
( part number 575 0050 ).
Last Rev Date: 16/10/2006 Page 25 of 25 3783210 - rev 3
Copyright © 2005 by ARB Corporation Limited. All rights reserved, this document must not be reproduced without the express authority of ARB Corporation Ltd
 Loading...