

Page 1
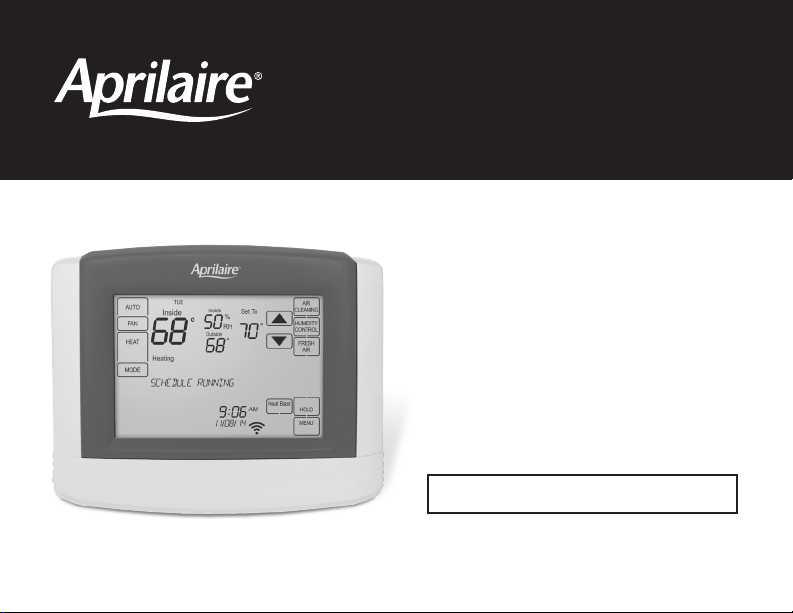
Model 8820 Wi-Fi Thermostat
with Event-Based
™
Air Cleaning and
Humidity or Ventilation Control
Owner’s Manual
Includes
Operating Instructions and
Warranty Information
READ AND SAVE THESE INSTRUCTIONS
Page 2
TABLE OF CONTENTS
ABOUT YOUR NEW THERMOSTAT
ABOUT YOUR NEW THERMOSTAT
Thermostat features ..............................3
Controls & display overview ......................4-5
WI-FI SETUP
Wi-Fi set-up ...................................6-7
OPERATION
Select system mode
(EM HEAT/HEAT/OFF/COOL/AUTO)...................8
Change temperature set point.......................9
Select fan setting (ON/AUTO/CIRC) ..................9
Clean screen ...................................10
Maintenance reminders...........................10
Screen lockout ..................................10
INDOOR AIR QUALITY FUNCTIONS
Event-Based
Humidity control.................................13
Automatic mode . . . . . . . . . . . . . . . . . . . . . . . . . . . . 13-14
Manual mode ..............................15-16
If dehumidification is installed.................17-18
If dehumidification is done with air conditioner ......19
Fresh Air.................................... 20-21
2 3
™
air cleaning . . . . . . . . . . . . . . . . . . . . . . 11-12
PROGRAM SCHEDULE AND HOLDS
Set time and date ...............................22
Understanding program schedules ...............23-24
Progressive recovery .............................24
Changing program schedules ...................25-26
®
Heat Blast
Program schedule holds
Temporary ................................27-28
Permanent ...................................28
Away .......................................29
Vacation..................................30-31
....................................27
WI-FI MAINTENANCE AND TROUBLESHOOTING
Clearing router settings...........................32
Removing the thermostat from a
my.aprilaire.com account ........................32
Disabling the Wi-Fi radio..........................33
Troubleshooting Wi-Fi connection................33-34
SETUP MENU
How to enter the setup menu
to change settings ...............................35
User system settings table .....................36-39
WARRANTY
Limited warranty and registration...................40
WARNING
Do not use sharp instruments to press touch screen. Only use your fingertips.
THERMOSTAT FEATURES
• Remote access and control over Wi-Fi.
• Indoor air quality control.
– Humidification automatic or manual control.
– Dehumidification.
– Event-Based
– Ventilation with temperature and humidity limits.
Note: The 8820 can only control one of the following per installation: ventilation, whole home dehumidifier
or humidifier.
• Temperature control.
• Heat Blast
• Large touch screen with adjustable backlight – constant backlight available.
• Message center provides feedback, instructions, and service reminders.
• 7 day programmability.
• Displays room temperature, room humidity, temperature setting, and outdoor temperature.
• Programmable fan control with fan circulation mode.
• Easy to use temperature control can override program schedule at any time.
™
air cleaning.
®
raises the room temperature 3°F to 5°F.
Page 3
ABOUT YOUR NEW THERMOSTAT
ABOUT YOUR NEW THERMOSTAT
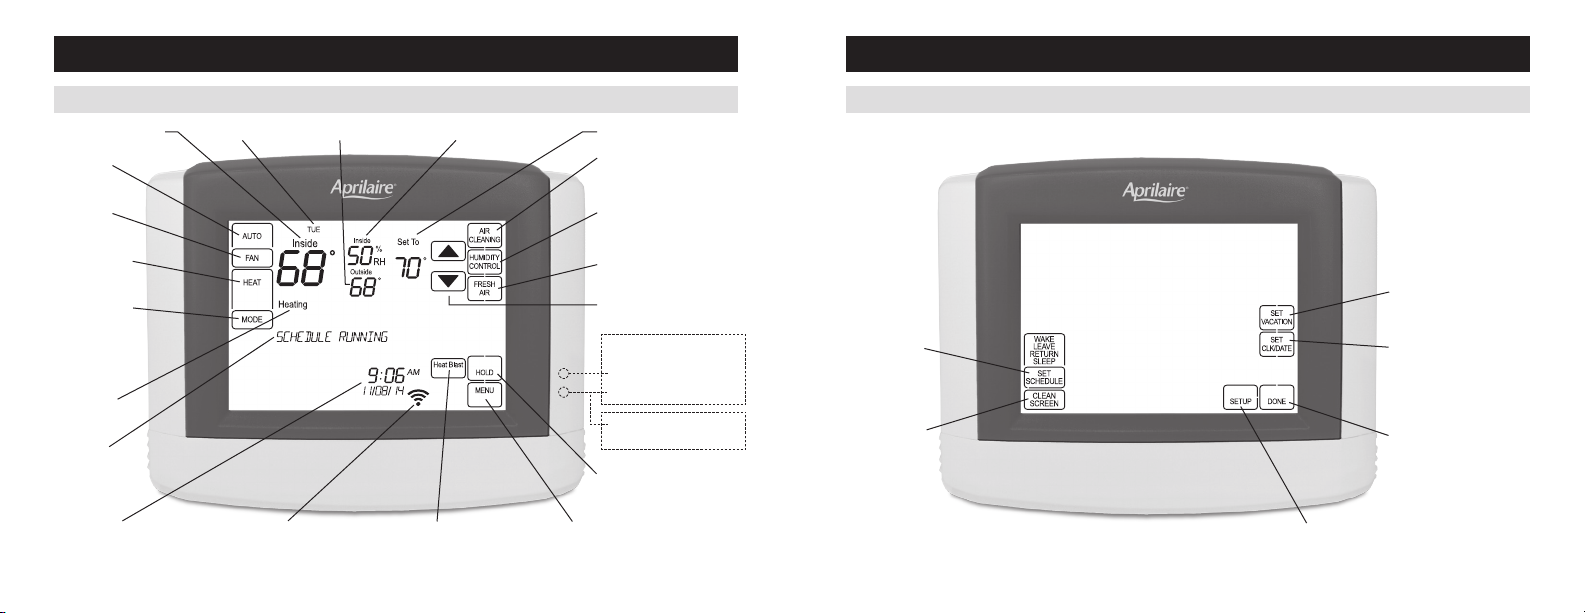
CONTROLS & DISPLAY OVERVIEW – HOME SCREEN
ROOM TEMPERATURE
FAN MODE
SETTING
FAN MODE
BUTTON
SYSTEM MODE
SETTING
SYSTEM MODE
BUTTON
EQUIPMENT
STATUS
MESSAGE
CENTER
(SCROLLING TEXT)
4 5
CURRENT DAY TEMPERATURE SETTINGOUTDOOR TEMPERATURE
WI-FI SIGNAL STRENGTHCURRENT TIME & DATE MAIN MENU BUTTONHEAT BLAST BUTTON
NOTE: BACKLIGHT IS ACTIVATED WITH FIRST BUTTON PRESS AND AUTOMATICALLY TURNS OFF.
NOT ALL BUTTONS WILL BE DISPLAYED IN EVERY INSTALLATION.
ROOM RELATIVE HUMIDITY
AIR CLEANING BUTTON
(ENTERS EVENT-BASED
CLEANING CONTROL SCREEN)
HUMIDITY CONTROL BUTTON
(ENTERS HUMIDITY CONTROL
SCREEN)
FRESH AIR BUTTON (ENTERS
VENTILATION CONTROL SCREEN)
TEMPERATURE ADJUSTMENT
INDICATORS SHOW THROUGH HOUSING
HEAT PUMP ONLY
EMERGENCY HEAT OR
AUXILIARY HEAT (RED)
SYSTEM FAULT (YELLOW)
MAINTENANCE REMINDER
(YELLOW FLASHING)
HOLD BUTTON
(SETS OR CLEARS HOLD)
™
AIR
CONTROLS & DISPLAY OVERVIEW – MAIN MENU
SET SCHEDULE
BUTTON
CLEAN SCREEN
(LOCKOUT TOUCH
SCREEN FOR 30
SECONDS)
USER SYSTEM SETTINGS
SET VACATION HOLD
(HOLD–TO TIME AND DATE)
SET CURRENT
TIME AND DATE
DONE BUTTON
(EXIT MENU)
Page 4
WI-FI SETUP
WI-FI SETUP
To connect the 8820 thermostat to a Wi-Fi network follow the steps below.
Note: You will need a computer or mobile device with Wi-Fi and a web browser.
STEP 1 STEP 2
Verify the thermostat is in
Wi-Fi Connection Mode.
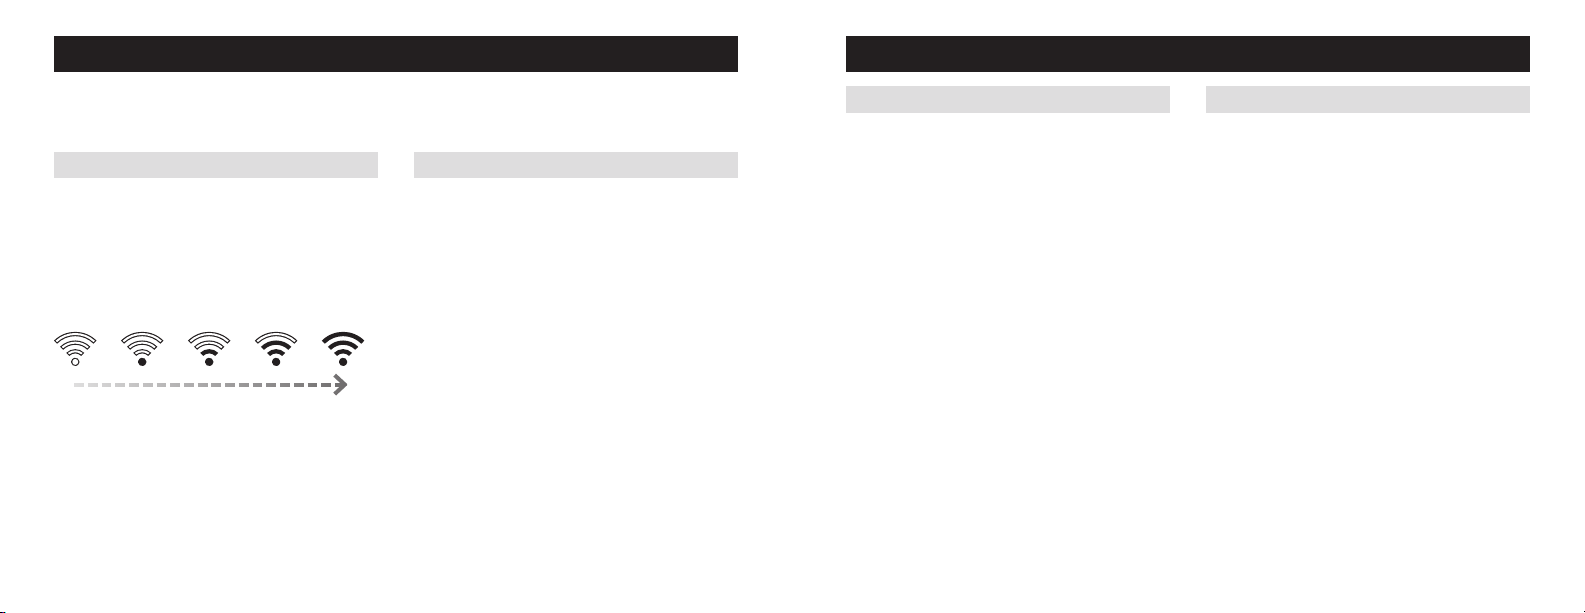
The thermostat by default will be in Wi-Fi Connection
Mode. To confirm that the thermostat is in Wi-Fi
Connection Mode, verify that the radio bars on the
thermostat are strobing as shown below.
Note: If the thermostat is not in Wi-Fi Connection
Mode, refer to Clearing Router Settings on page 32.
6 7
Connect to the thermostat using a
computer or mobile device.
On your computer or mobile device, scan for
available networks. The thermostat should appear
as APRILAIRE8820 followed by a unique identifier,
corresponding to the last 6 digits of the MAC address.
Connect to the thermostat you want to configure.
If you are installing multiple thermostats, the MAC
address of each thermostat will be displayed in the
message center on the display of the thermostat. The
MAC address can also be found by removing the cover
on the front of the thermostat.
(Continued on the following page.)
STEP 3 STEP 4
Configure the thermostat to connect
to the Wi-Fi network.
Open a web browser on your computer or mobile
device. In the browser enter:
http://192.168.1.99/index.html
In the web browser interface select the network you
want to connect the thermostat to, and enter the
network’s security credentials.
Verify the thermostat is connected
to the Wi-Fi network.
Once all the required information is entered in the
web browser interface, the thermostat will connect to
the Wi-Fi network you selected. After the thermostat
is connected to the Wi-Fi network, the thermostat
will display the radio bars based on the Wi-Fi signal
strength. If the radio bars are not displaying the signal
strength, refer to Troubleshooting Wi-Fi Connection on
pages 32-33.
Note: If you are not using the thermostat with a home
automation system, but are instead using an Aprilaire
account to communicate with the thermostat, refer
to Wi-Fi Thermostat App User Guide and then
Start Up on my.aprilaire.com for instructions on
connecting to Wi-Fi and registering to an Aprilaire
account. For additional instructions on using the
Aprilaire web and mobile Apps refer to Wi-Fi
Thermostat App User Guide on my.aprilaire.com.
Page 5
OPERATION
OPERATION
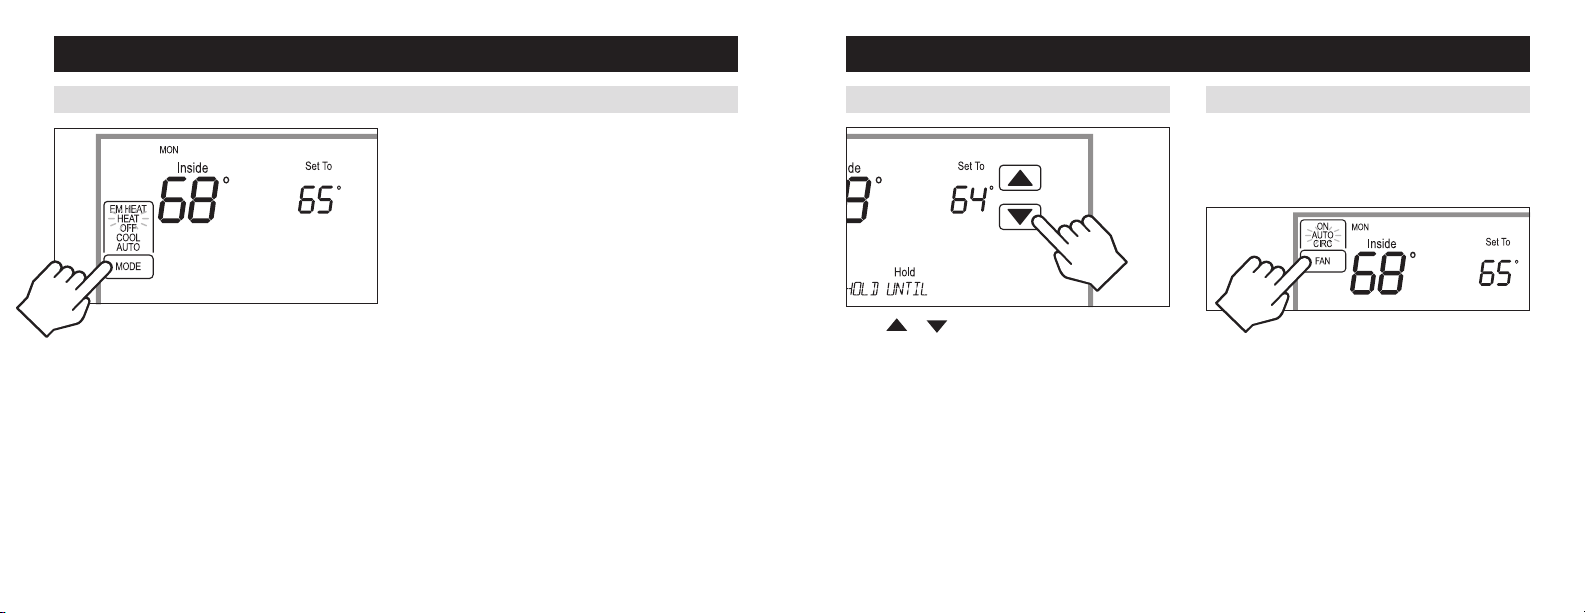
SELECT SYSTEM MODE (EM HEAT/HEAT/OFF/ COOL /AUTO)
Press [MODE] to select:
EM HEAT: (only for heat pumps with auxiliary heat)
Thermostat controls auxiliary heat. Heat pump will not
operate in EM HEAT mode.
HEAT: Thermostat controls only the heating system.
OFF: Heating and cooling systems are off.
COOL: Thermostat controls only the cooling system.
AUTO: (if enabled in installer setup) Thermostat
automatically selects heating or cooling depending on
the indoor temperature.
Press [DONE] to save and exit, Or [CANCEL] to exit
without saving. The thermostat will save and exit if
nothing is pressed within 10 seconds.
8 9
CHANGE TEMPERATURE SET POINT SELECT FAN SETTING (ON/AUTO /CIRC)
When the fan mode is changed during a program event
it remains in that mode until the next event starts. The
fan must be programmed to FAN ON in the schedule to
run continuously through all events.
Press
(See Program Schedule Holds on pages 27-31 for
more information.)
or to adjust the current set point.
Press [FAN] to select:
ON: Fan runs continuously. Use this mode for maximum
air circulation/filtering.
AUTO: Fan runs only when the heating or cooling
system is on.
CIRC: Same as AUTO, but ensures the fan is on for at
least 30 minutes per hour. Use this mode for a balance
of energy savings and air circulation/cleaning.
Press [DONE] to save and exit, Or [CANCEL] to exit
without saving. The thermostat will save and exit if
nothing is pressed within 10 seconds.
Page 6
OPERATION
INDOOR AIR QUALITY FUNCTIONS
CLEAN SCREEN
Press [MENU] to enter the main menu.
Press [CLEAN SCREEN] to disable the touch screen
for 30 seconds for cleaning.
Note: Use a soft damp cloth to clean the screen. Use
water or household glass cleaner. Do not spray liquids
directly on the screen.
MAINTENANCE REMINDERS
Maintenance reminders are set up by the installer to
indicate when the equipment is due for service. If a
maintenance reminder is displayed, call your HVAC
dealer for service. They can be cleared by pressing
[MENU] to enter the main menu. Press
select YES to Service Reminders and then press [Next].
Press
you would like to reset. Press [Next] to go to the next
reminder or [Back] to go to a previous reminder. Press
[DONE] to reset the selected service reminders.
10 11
and to select YES for each reminder
or
SCREEN LOCKOUT
The user can disable certain features of the thermostat.
(See User System Setting Table on pages 36-39 for
details.) This feature can be overridden by pressing and
holding [MENU] for 7 seconds.
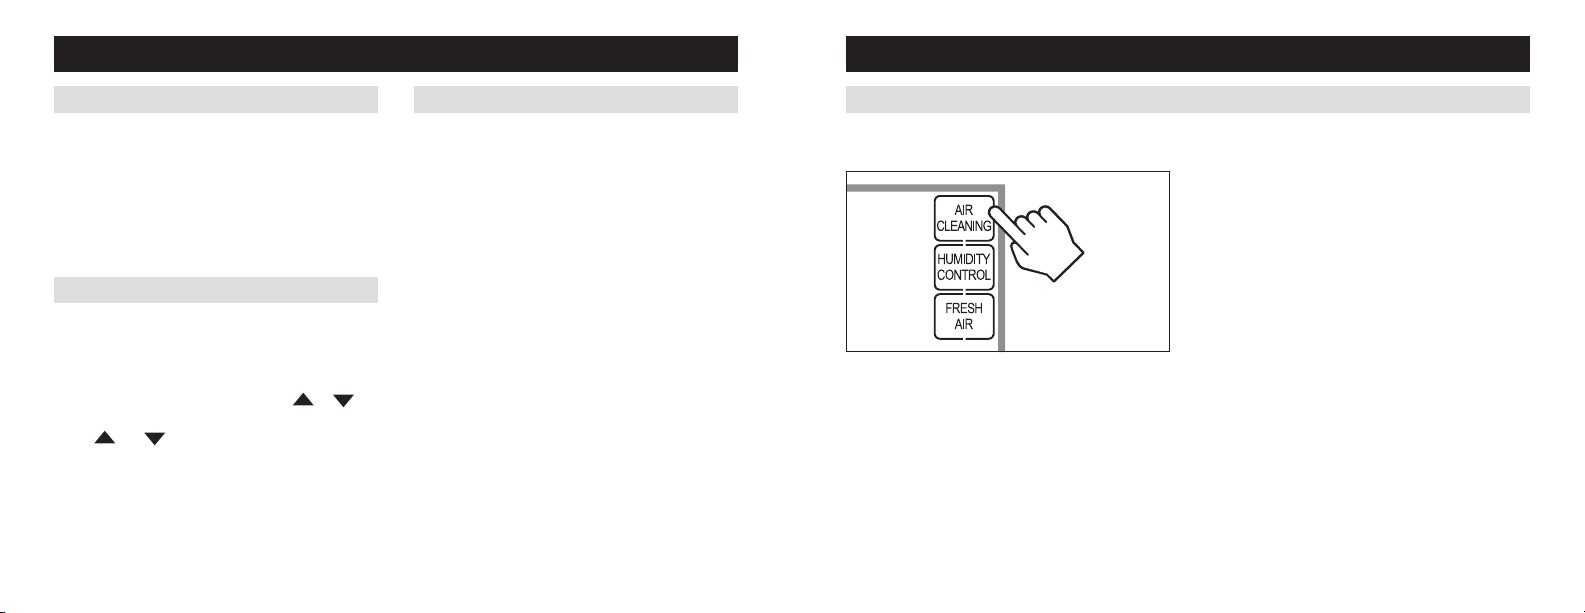
EVENT-BASED™ AIR CLEANING
Press [AIR CLEANING] on the Home screen to enter
the Air Cleaning screen.
If installed, air cleaning can operate in five different
modes. Air cleaning will activate the fan for the purpose
of air cleaning.
Off: The air cleaner will not call the fan for the purpose
of air cleaning. Note: If air cleaning is installed, air
cleaning will still occur during normal fan operation
during heating, cooling or other indoor air quality events.
Constant Clean: This option will provide the maximum
amount of air cleaning available. The air cleaner will be
active for 24 hours a day, seven days a week.
Automatic: The air cleaner will run a minimum of
30 minutes every hour. The air cleaner will monitor
the amount of time your heating and cooling system
runs; if 30 minutes is not reached the air cleaner will
automatically turn on. This will maximize the amount of
air cleaning while minimizing energy consumption.
Event Clean (3 hour cycle): When selected, the air
cleaner will run for 3 hours continuously and then return
to the most recent mode of Off, Automatic, or Constant
Clean. This option only cleans the air when needed; an
example would be while vacuuming.
Allergies (24 hour cycle): When seasonal allergies
spike and outside air quality is at its worst, choose
this option. Your air cleaner will run continuously for
24 hours, then return to the most recent mode of Off,
Automatic, or Constant Clean.
Note: The thermostat will manage fan and air cleaning
selections when the selections overlap.
Page 7
INDOOR AIR QUALITY FUNCTIONS
INDOOR AIR QUALITY FUNCTIONS
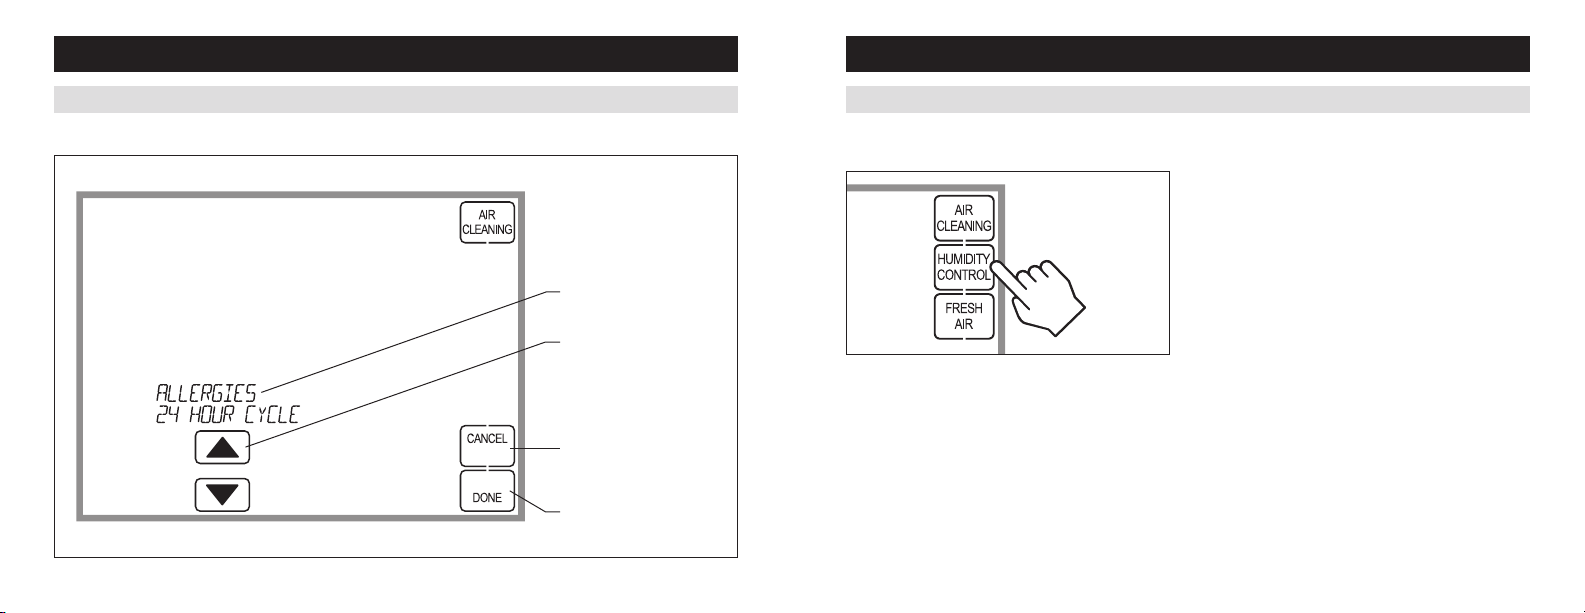
EVENT-BASED™ AIR CLEANING (CONTINUED)
Air Cleaning Screen
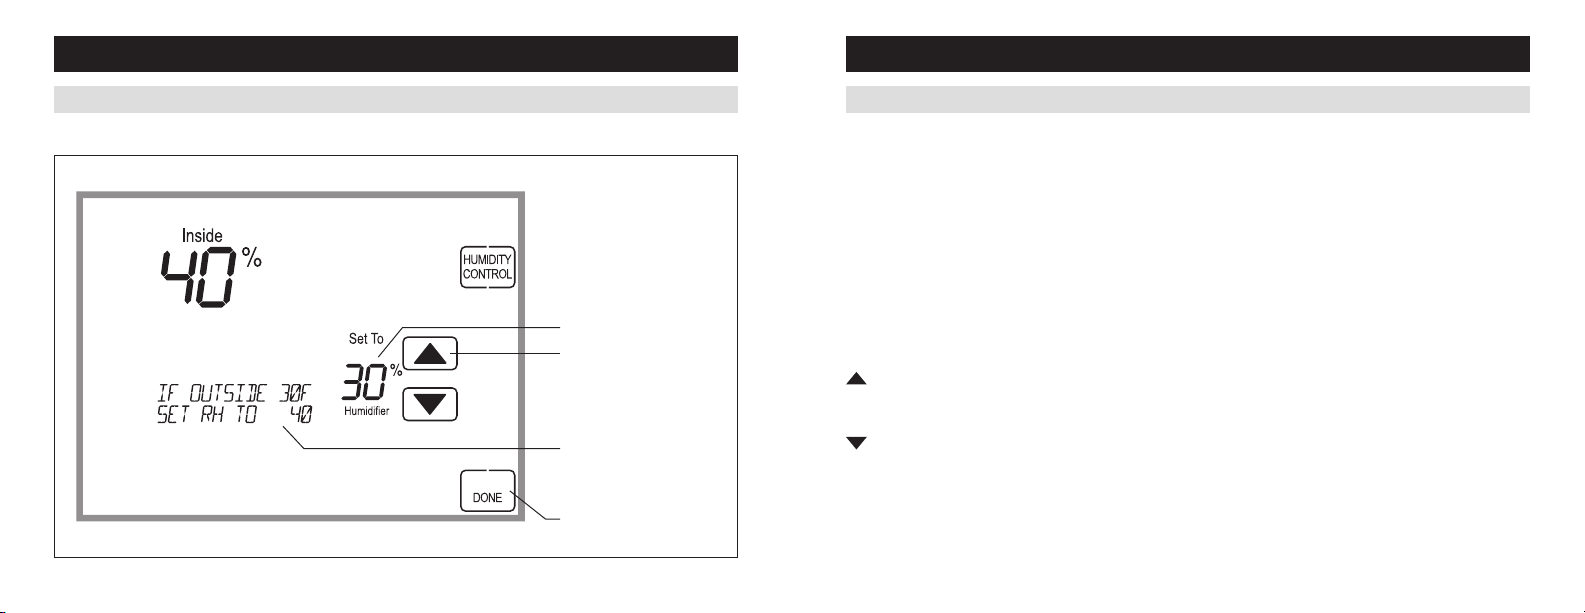
HUMIDITY CONTROL
Press [HUMIDITY CONTROL] on the Home screen to
enter the Humidity Control screen.
In automatic mode you will receive the optimum
amount of humidity so that your home and its
furnishings are protected from the damaging effects
of excess condensation or low humidity during
heating season. The thermostat automatically adjusts
your home’s Relative Humidity based on the outdoor
temperature.
AIR CLEANING MODE
SELECTION
AIR CLEANING MODE
ADJUSTMENT
The Humidity Control screen is used to access control for
both humidification and dehumidification.
If humidification is installed it can be controlled in two
CANCEL BUTTON
(EXIT AIR CLEANING)
modes, automatic or manual.
Automatic or manual mode is configured by the installer.
To determine which mode the thermostat is set to, see
DONE BUTTON (SAVE MODE
AND EXIT AIR CLEANING)
12 13
the diagrams on pages 14 and 16.
The humidity setting needs to be set initially to
meet your home’s conditions. Please follow these
steps when adjusting your thermostat.
1. Adjust the humidity setting to “3” which is within
normal range. During the next 24-48 hours it may
be necessary to adjust the setting for more or less
humidity, depending on your personal comfort and
home’s requirements.
2. During the coldest portion of the first heating
season, minor adjustments may be necessary. This is
dependent upon your home’s construction.
The relative humidity in your home will now be
accurately controlled to meet your needs and should not
need further adjustment during future heating seasons.
Page 8
INDOOR AIR QUALITY FUNCTIONS
INDOOR AIR QUALITY FUNCTIONS
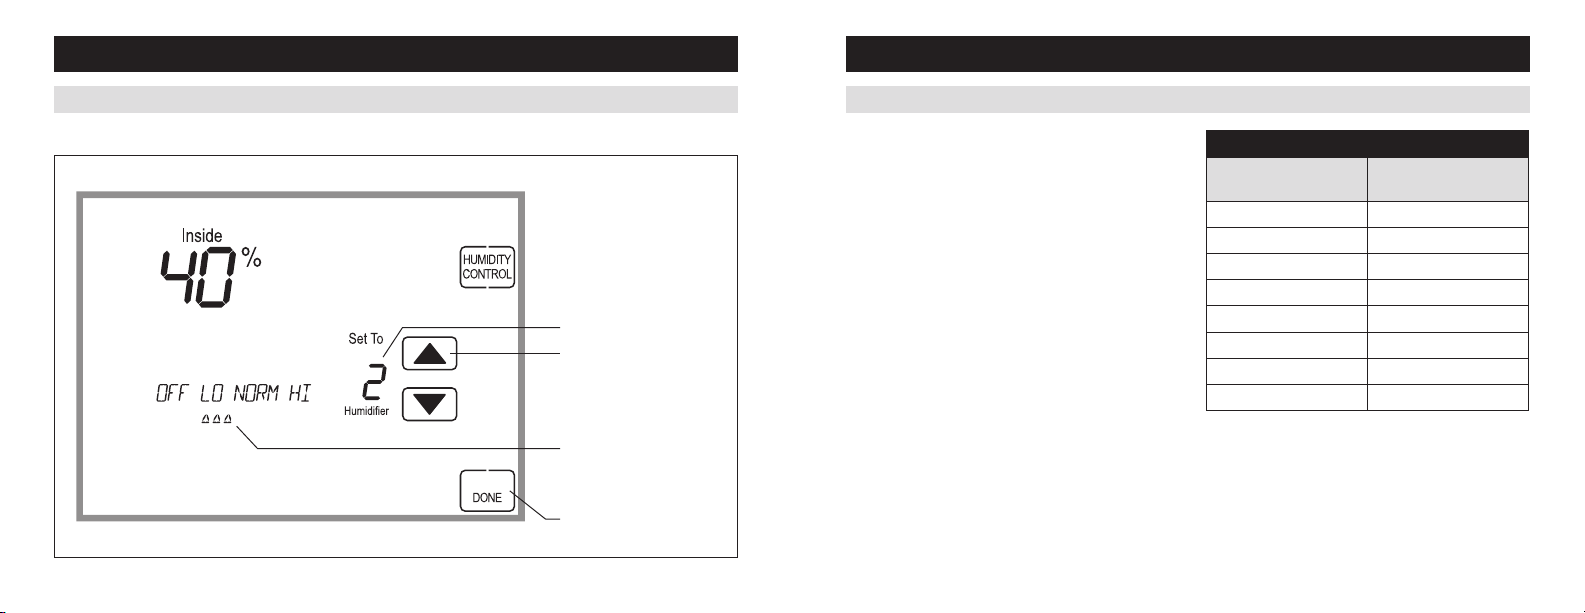
HUMIDITY CONTROL (CONTINUED)
Humidity Control Screen for Humidification in Automatic Mode
HUMIDIFICATION SETPOINT
HUMIDIFIER ADJUSTMENT
AUTOMATIC MODE:
INDICATION OF HUMIDIFICATION
SETPOINT LEVEL
DONE BUTTON
(EXIT HUMIDITY CONTROL)
14 15
HUMIDITY CONTROL (CONTINUED)
In manual mode it is important to anticipate a drop in
outdoor temperature and reduce the setting accordingly
to avoid excessive condensation. Use the following
table to determine the proper Relative Humidity
setting.
Outdoor Temperature/Indoor Relative Humidity
Outside Temperature
+50°F 50%
+40°F 45%
+30°F 40%
+20°F 35%
+10°F 30%
0°F 25%
-10°F 20%
-20°F 15%
Recommended
Relative Humidity
Page 9
INDOOR AIR QUALITY FUNCTIONS
INDOOR AIR QUALITY FUNCTIONS
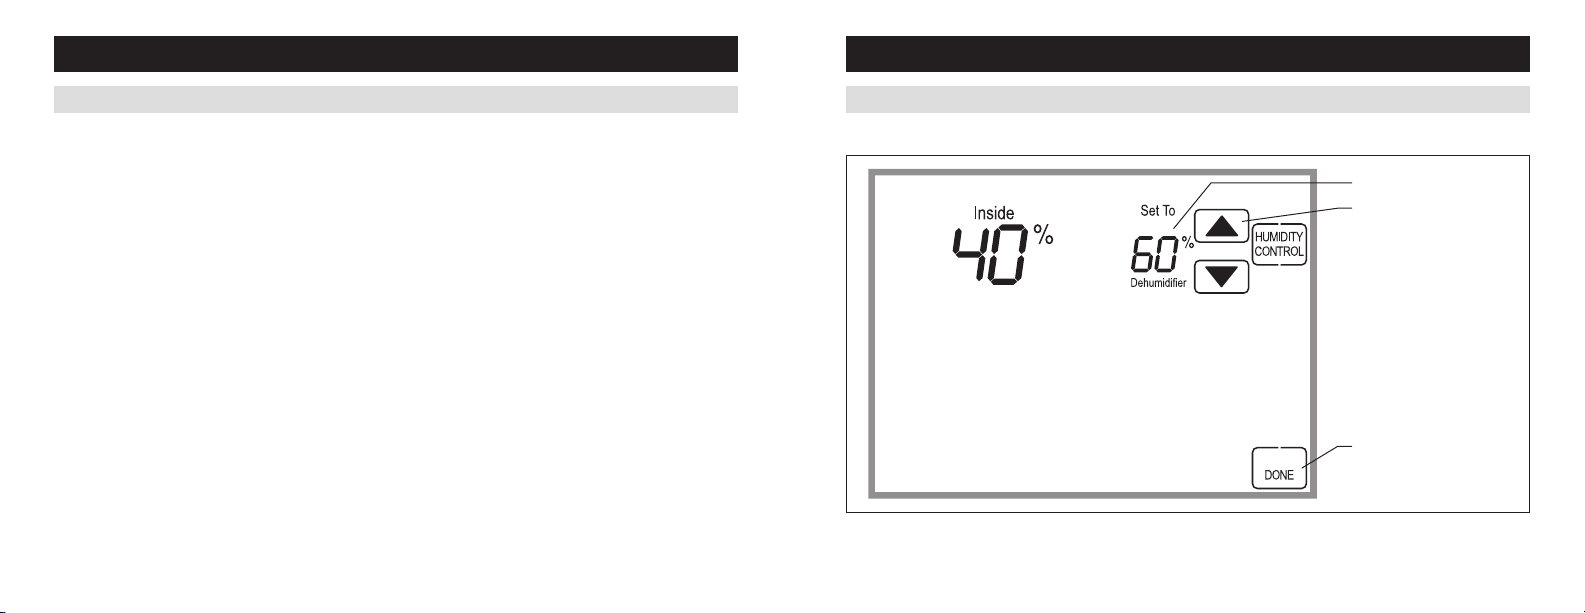
HUMIDITY CONTROL (CONTINUED)
Humidity Control Screen for Humidification in Manual Mode
HUMIDIFICATION SETPOINT
HUMIDIFIER ADJUSTMENT
HUMIDITY CONTROL (CONTINUED)
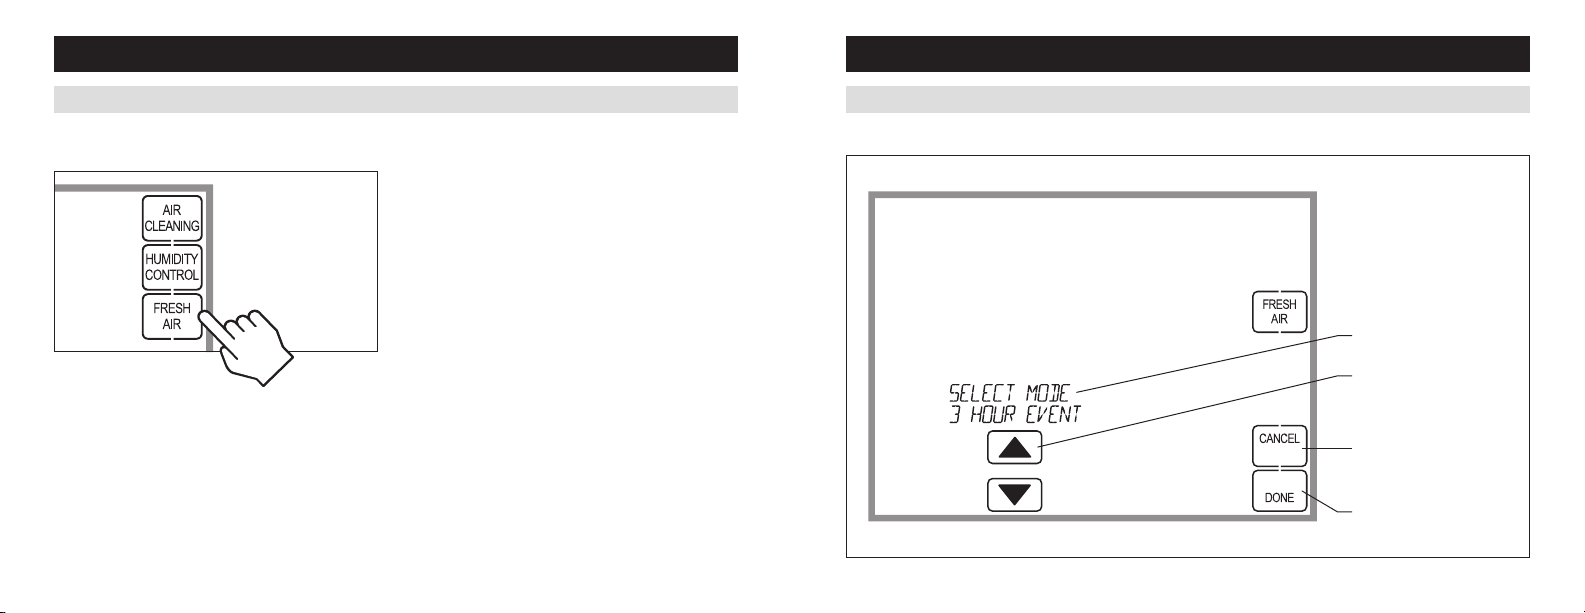
If dehumidification is installed the thermostat
can be configured, through the installer setup, to
control dehumidification with either a whole home
dehumidifier or with the air conditioner (cooling unit).
The thermostat will allow you to set the desired
humidity (% relative humidity) level in your home and
can be used to turn the dehumidification On or Off.
Use the dehumidification adjustment to set the
dehumidification setpoint to 60% when first installed.
Allow dehumidification to run until the initial setpoint
is reached, before deciding if you want to change the
humidity setting.
Your comfort is the best measure of how to adjust
your setting. When first installed, your dehumidifier
has to remove all the moisture that is initially in your
home. The home acts like a sponge so the moisture
in the materials of your home is at the same level
as the air. After drying the air, the materials of the
home will release the moisture back into the air until
they are again at the same level. As a result, it is
not uncommon for dehumidification to operate for an
extended period of time when it is first installed.
Raise the setting if you prefer the air to be
less dry; this will reduce the amount of time that
MANUAL MODE:
SCREEN CYCLES RECOMMENDED
HUMIDIFICATION SETPOINTS
FOR VARIOUS OUTDOOR
TEMPERATURES
DONE BUTTON
(EXIT HUMIDITY CONTROL)
16 17
dehumidification runs.
Lower the setting if you prefer the air to be
more dry; this will increase the amount of time that
dehumidification runs.
Page 10
INDOOR AIR QUALITY FUNCTIONS
INDOOR AIR QUALITY FUNCTIONS
HUMIDITY CONTROL (CONTINUED)
Energy Saving Tip #1:
Adjust the setting to be as high as is comfortable to
reduce dehumidification run time – if it feels clammy or
smells damp or moldy lower the setting. To save energy,
turn the dehumidifier control OFF when you open your
windows just as you would with air conditioning.
Energy Saving Tip #2:
If vacating your home for an extended period in the
summer, set the relative humidity at 60% and set the
cooling setpoint as high as you are comfortable setting it
to in cooling mode. Consult with appropriate professionals
regarding the highest temperature that is safe for your
HUMIDITY CONTROL (CONTINUED)
Humidity Control Screen with only Dehumidification Installed
DEHUMIDIFICATION SETPOINT
DEHUMIDIFIER ADJUSTMENT
pets or possessions. This will keep the humidity at a
controlled level to help prevent mold while minimizing
the amount of the cooling energy used. Vacation hold
is a convenient way to adjust the dehumidification and
cooling setpoint when you will be away.
DONE BUTTON
(EXIT HUMIDITY CONTROL)
If dehumidification is done with the air conditioner, the thermostat will cool up to 3°F beyond the cooling
setpoint for dehumidification. Note overcooling may not be sufficient to meet the dehumidification setpoint.
18 19
Page 11
INDOOR AIR QUALITY FUNCTIONS
INDOOR AIR QUALITY FUNCTIONS
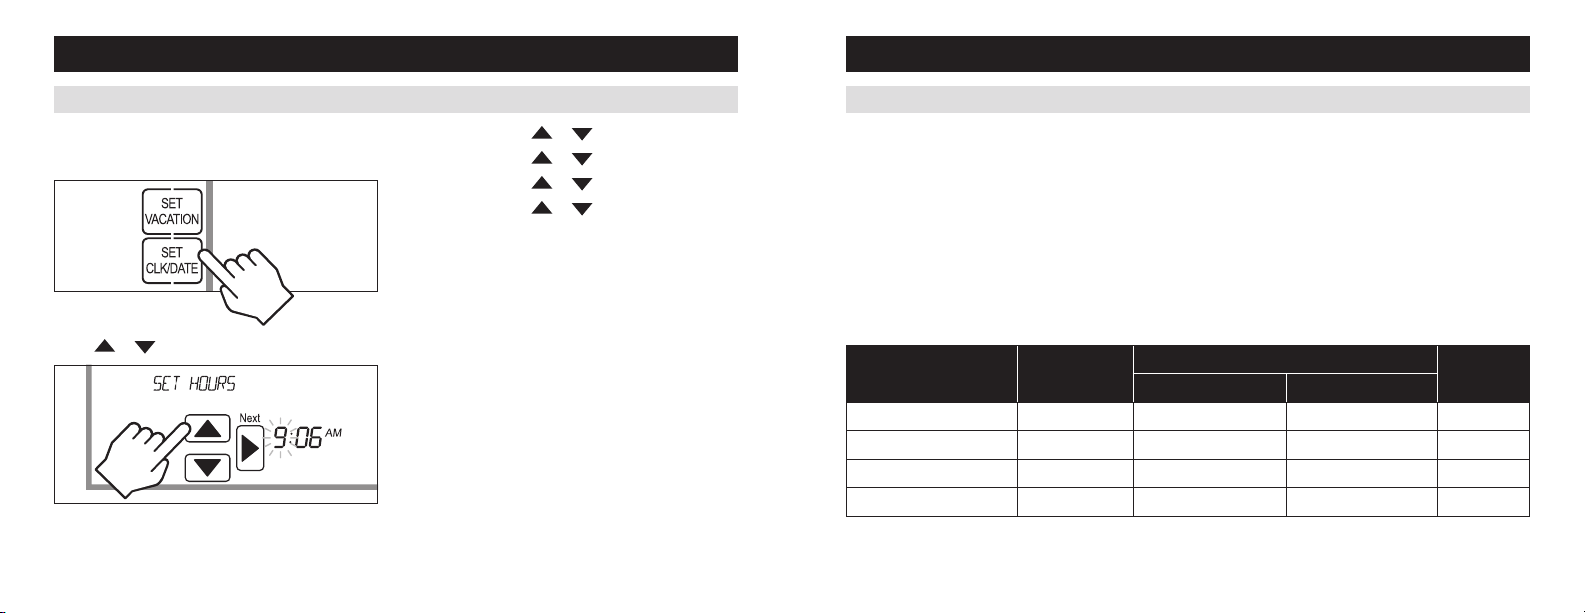
FRESH AIR
Press [FRESH AIR] on the Home screen to enter the
Fresh Air screen.
If ventilation is installed, Fresh Air can operate in four
different modes.
FRESH AIR (CONTINUED)
Fresh Air Screen
Off: Ventilation will not run.
Automatic: Ventilation will cycle based on the
parameters set by the installer to meet your home’s
ventilation requirements.
3 Hour Event: Ventilation will be constantly energized
for 3 hours and then the fresh air mode will return to
Off or Automatic depending on which mode was most
recently active. This option is used when fresh air is
needed. An example would be after cooking.
24 Hour Event: Ventilation will be constantly energized
for 24 hours and then the fresh air mode will return to
FRESH AIR MODE SELECTION
FRESH AIR MODE ADJUSTMENT
Off or Automatic depending on which mode was most
recently active. This option is used when a large amount
of fresh air is desired. An example would be a day with
desirable outdoor conditions.
20 21
CANCEL BUTTON
(EXIT FRESH AIR)
DONE BUTTON (SAVE MODE
AND EXIT FRESH AIR)
Page 12
PROGRAM SCHEDULE AND HOLDS
PROGRAM SCHEDULE AND HOLDS
SET TIME AND DATE
Press [MENU] to enter the main menu.
Press [SET CLK/DATE] to enter clock menu.
Press
22 23
or to set the hour.
Press [Next], then or to set the minute.
Press [Next], then
Press [Next], then
Press [Next], then
Press [DONE] to save and exit, Or [CANCEL] to exit
without saving. The thermostat will save and exit if
nothing is pressed within 20 seconds.
Note: If configured to do so, the home automation
system can send periodic time updates to the thermostat.
If the thermostat is configured to be used with an
Aprilaire account the thermostat’s time and date will be
updated periodically, and will update automatically for
daylight savings.
or to set the month.
or to set the day.
or to set the year.
UNDERSTANDING PROGRAM SCHEDULES
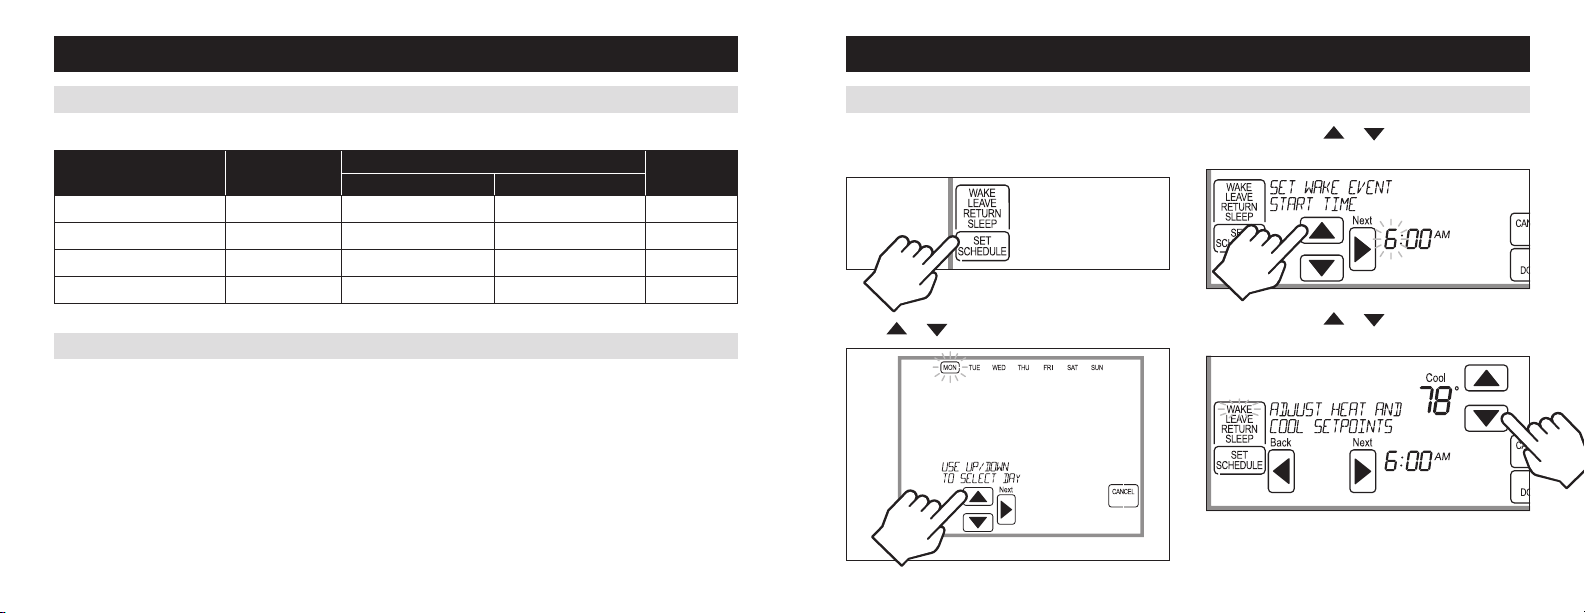
The daily schedule is split into four sections:
WAKE: Temperature you would prefer to wake up to.
LEAVE: Temperature when you are away from the house.
RETURN: Temperature you would prefer to return home to.
SLEEP: Temperature you would prefer while sleeping.
The times shown in the table below are the defaults. The start time and temperature of each section can be changed
to fit your schedule. (See Changing Program Schedules section on pages 25-26.)
This thermostat is pre-set to use the following program settings (see table below). We recommend these settings,
since they can reduce your heating/cooling expenses. The fan program is pre-set to AUTO for all events.
Setpoint
Event designator Start time
WAKE 6:00AM 70°F (21°C) 78°F (25.5°C) AUTO
LEAVE 8:00AM 62°F (16.5°C) 85°F (29.5°C) AUTO
RETURN 5:00PM 70°F (21°C) 78°F (25.5°C) AUTO
SLEEP 10:00PM 62°F (16.5°C) 82°F (27.5°C) AUTO
FanHeat Cool
Page 13
PROGRAM SCHEDULE AND HOLDS
PROGRAM SCHEDULE AND HOLDS
UNDERSTANDING PROGRAM SCHEDULES (CONTINUED)
Use the table below to assist in modifying the schedule.
Setpoint
Event designator Start time
WAKE
LEAVE
RETURN
SLEEP
PROGRESSIVE RECOVERY
The Progressive Recovery feature allows the thermostat to activate the heating and cooling equipment PRIOR to a
scheduled event in order to reach the desired temperature at the start of that scheduled event.
Example: If the WAKE time is 6 am, and the heat setpoint is 70°F, the heat will come on before 6 am, so the
temperature is 70°F by the time you wake at 6 am.
24 25
FanHeat Cool
CHANGING PROGRAM SCHEDULES
Press [MENU] to enter the main menu.
Press [SET SCHEDULE] to enter schedule programming.
Press
or to select the day.
Press [Next], then or to set the start time of
the first event.
Press [Next], then
the first event.
or to set the setpoints of
Page 14
PROGRAM SCHEDULE AND HOLDS
PROGRAM SCHEDULE AND HOLDS
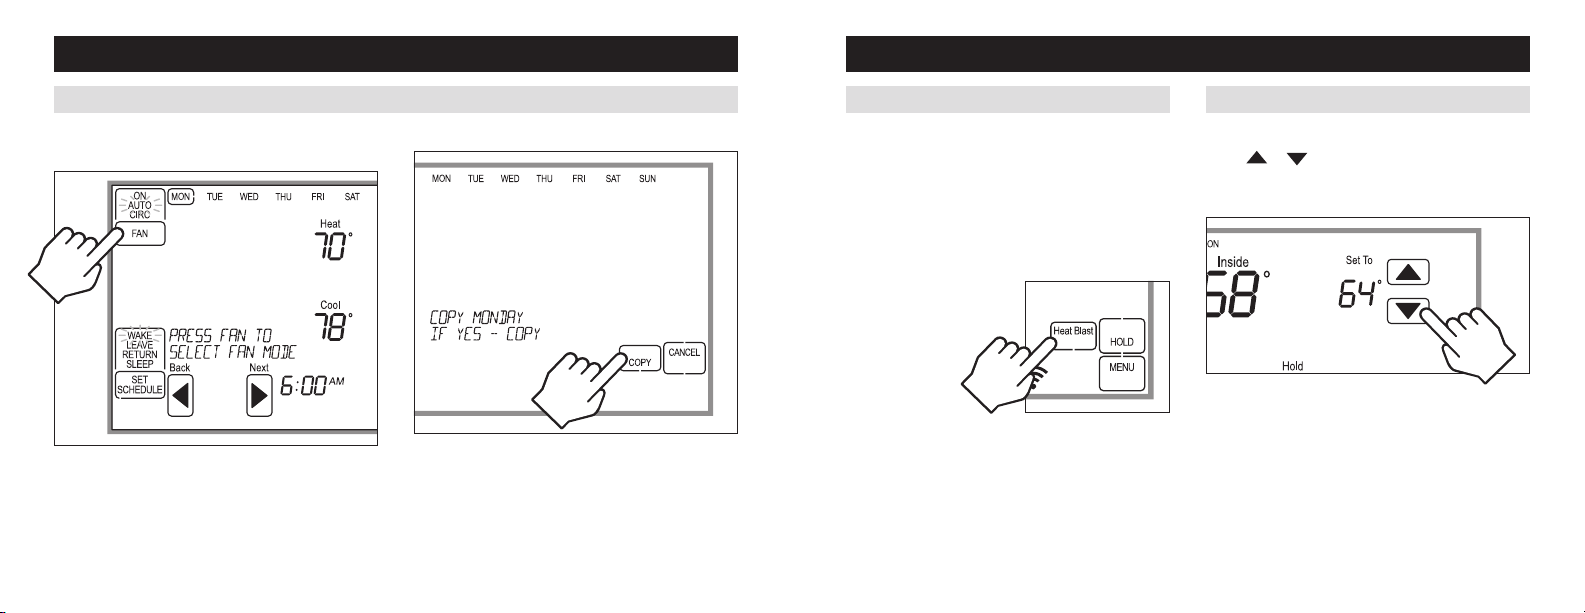
CHANGING PROGRAM SCHEDULES (CONTINUED)
Press [Next], then [FAN] to set the fan mode of the
first event.
The thermostat will display the COPY option.
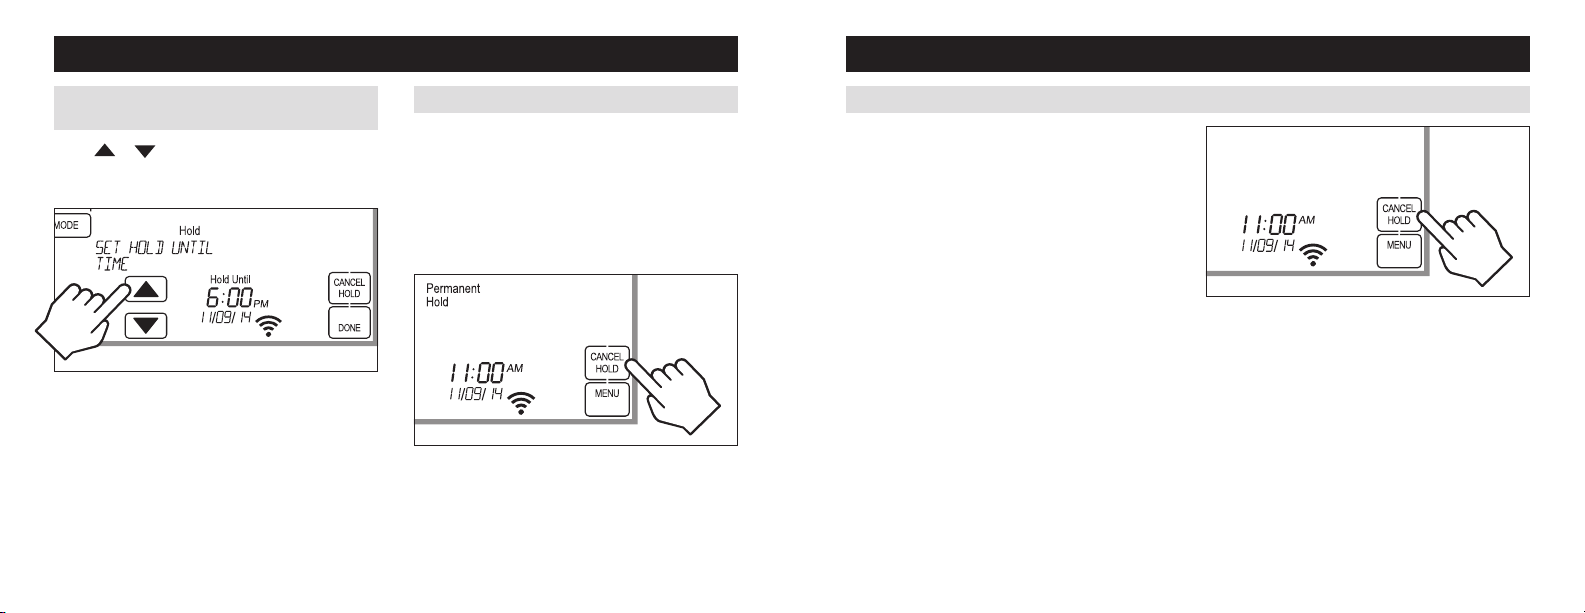
HEAT BLAST
Heat Blast
to 5°F based on the installer setup, and then resume
normal operation.
Press [Heat Blast] to activate Heat Blast.
®
®
will raise the current room temperature 3°F
PROGRAM SCHEDULE HOLDS – TEMPORARY
TEMPORARY PROGRAM HOLD
Press
or to immediately adjust the temperature
when the schedule is running. This will temporarily hold
the temperature setting until the next scheduled event.
Note: Heat Blast button is only available if it is enabled
in the installer setup and the thermostat is in Heat or
Emergency Heat mode.
To cancel Heat Blast
press [CANCEL], or
[Heat Blast], or the
temperature adjust
buttons.
Press [Next] to advance to the next event.
Repeat above process for each remaining event.
Press [DONE] to save the schedule for the day.
Press [COPY] to copy the schedule of the day just
programmed to any other day.
OR
Press [CANCEL] to proceed to the next day and repeat
the above process.
26 27
Page 15
PROGRAM SCHEDULE AND HOLDS
PROGRAM SCHEDULE AND HOLDS
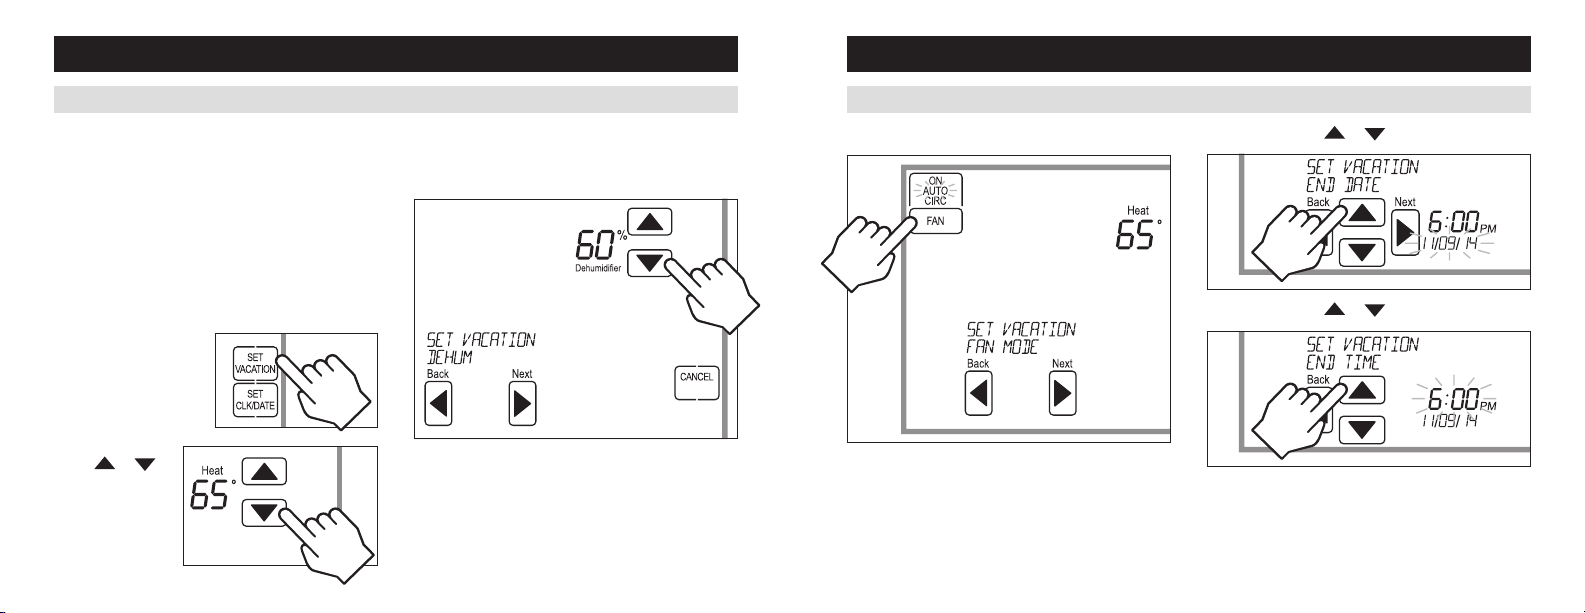
PROGRAM SCHEDULE HOLDS – TEMPORARY
(CONTINUED)
Press
end time is not adjusted, the Temporary Hold will end at
the start of the next event.
To cancel the Temporary Hold, press [CANCEL HOLD].
28 29
or to adjust the end time of the hold. If
PROGRAM SCHEDULE HOLDS – PERMANENT
PERMANENT PROGRAM HOLD
Press [HOLD] to permanently hold the temperature at
its current setting while the schedule is running. This
will override the temperature settings for all events.
With the thermostat in Permanent Hold, the temperature
setting and fan mode can be adjusted and will stay at
that setting until the hold is cancelled.
To cancel the Permanent Hold, press [CANCEL HOLD].
PROGRAM SCHEDULE HOLDS – AWAY
AWAY
The Away feature, if enabled, allows the thermostat
to be set to a predefined setpoint(s) by simply pressing
the Away button in your home automation interface (if
supported). The default cooling setpoint is 85°F (29.5°C),
the default heating setpoint is 62°F (16.5°C) and the
default fan mode is Auto. The default settings can be
modified in the home automation interface (if supported).
To cancel Away at the thermostat press
[CANCEL HOLD].
Page 16
PROGRAM SCHEDULE AND HOLDS
PROGRAM SCHEDULE AND HOLDS
PROGRAM SCHEDULE HOLDS – VACATION
VACATION PROGRAM HOLD
This energy saving feature allows you to suspend the
programmed schedule for extended periods of time. The
temperature and dehumidification setpoint (optional)
you select will be maintained 24 hours a day until the
vacation program hold end date and time. Once the
end date and time have been surpassed, the previously
programmed schedule will resume. If you return earlier
than expected, press [CANCEL HOLD] to resume the
programmed schedule.
Press [MENU] to enter
the main menu.
Press [SET VACATION]
to enter vacation
program hold.
Press
to adjust the
temperature setting.
30 31
or
Press [NEXT], then adjust the dehumidification setting.
Note: If dehumidification in vacation mode is not
enabled this step will be skipped.
PROGRAM SCHEDULE HOLDS – VACATION (CONTINUED)
Press [Next], then [FAN] to set the fan mode.
Press [Next], then or to set end date.
Press [Next], then
Press [DONE] to save and exit, Or [CANCEL] to exit
without saving. The thermostat will save and exit if
nothing is pressed within 20 seconds.
or to set end time.
Page 17

WI-FI MAINTENANCE AND TROUBLESHOOTING WI-FI MAINTENANCE AND TROUBLESHOOTING
CLEARING ROUTER SETTINGS REMOVING THE THERMOSTAT FROM A
If you purchase a new Wi-Fi router or change the
security settings on your existing router, the router
settings in the thermostat need to be cleared so the
new Wi-Fi router settings can be entered. To do this,
enter the user system settings as described in the
Setup Menu section on pages 35-39. Change the
setting for WiFi Disconnect and Clear Settings to
Yes and then press [DONE]. This will remove all the
previous Wi-Fi settings. Refer to Wi-Fi Setup on pages
6-7 for instructions on connecting the thermostat to
your Wi-Fi Network.
32 33
my.aprilaire.com ACCOUNT
The thermostat can only be registered to one web
and mobile app account. If you need to remove the
thermostat from an existing account so it can be
registered to a new account, it can be done at the
thermostat. This may need to be done for instance
if you have purchased a home with the thermostat
and need to remove the thermostat from the previous
owner’s account and register it to your account. To
do this, enter the setup menu as described in the
following section. Change the setting for Unregister
the Thermostat to Yes and then press [DONE]. This
will remove the thermostat from any account that it is
currently registered to. Refer to Wi-Fi Thermostat App
User Guide and then Start Up on my.aprilaire.com
for instructions on registering the thermostat to a new
my.aprilaire.com account.
DISABLING THE WI-FI RADIO
To turn off the Wi-Fi radio on the thermostat, enter the
setup menu as described in the Setup Menu section
on pages 35-39. Change the setting for Turn Off WiFi
Radio to Yes and then press [DONE]. This will turn
off the Wi-Fi radio, but maintain all network settings.
To turn the Wi-Fi radio back on simply enter the setup
menu and change the setting for Turn Off WiFi Radio to
No and then press [DONE].
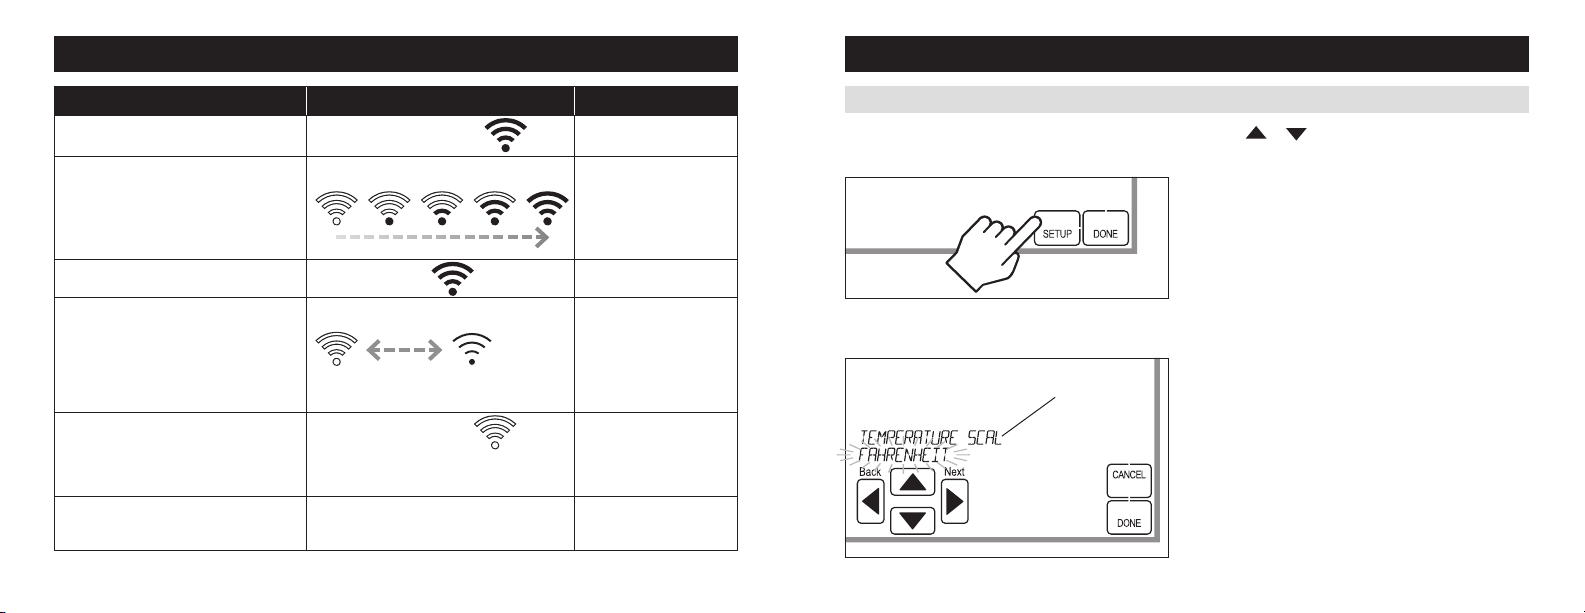
TROUBLESHOOTING WI-FI CONNECTION
The Wi-Fi connection status is communicated through
the use of the radio strength indicator and the message
center. The table on page 34 describes the various
statuses and the corresponding message and radio bar
display.
Page 18
WI-FI MAINTENANCE AND TROUBLESHOOTING
SETUP MENU
Wi-Fi connection status Radio status indicator Message Center
Normal Operation.
The thermostat Wi-Fi settings have not been
entered. Refer to Wi-Fi Setup on pages 6-7 for
instructions for entering the Wi-Fi settings.
The thermostat cannot connect to the Wi-Fi router.
Verify that the router is functioning properly.
Indicates the thermostat was not configured
properly when connecting to the router. Confirm
there is no IP conflict and repeat Wi-Fi setup.
Note: If the thermostat is configured to work
with an Aprilaire account this indicates that the
thermostat cannot connect to the Aprilaire Cloud.
Confirm that the internet connection is working.
There is an internal error with the thermostat
Wi-Fi radio. The thermostat will continue to
control the HVAC and indoor air quality control
equipment, but will not be able to connect to
Wi-Fi. Contact an HVAC professional for repair.
Wi-Fi radio turned off. Refer to the Setup Menu
section for information about turning the Wi-Fi
module on.
Wi-Fi signal strength is indicated
by the appropriate number of bars.
The frame is displayed and the bars cycle
from 0 to 4.
The frame and all bars
flash on and off.
The display will alternate between displaying the
frame and all bars.
The frame will flash on and off.
Not displayed. WiFi Turned Off
No corresponding message
Displays the SSID of the
thermostat. Note: The SSID
will be used to identify the
thermostat when using a
smart device to connect the
thermostat to your Wi-Fi router.
WiFi Connection Lost
Internet Connection Lost
Radio Error
HOW TO ENTER THE SETUP MENU TO CHANGE SETTINGS
Press [MENU] to enter the main menu.
Press [SETUP] to enter the setup menu.
Press [Next] or [Back] to page through the settings
(the setting is displayed in the message center).
MESSAGE CENTER
(SCROLLING TEXT)
Press
or to adjust the setting. (Selected option
flashes.)
Press [DONE] to save and exit, Or [CANCEL] to exit
without saving.
The thermostat will discard changes and exit if nothing
is pressed within 60 seconds.
34 35
Page 19
SETUP MENU
SETUP MENU
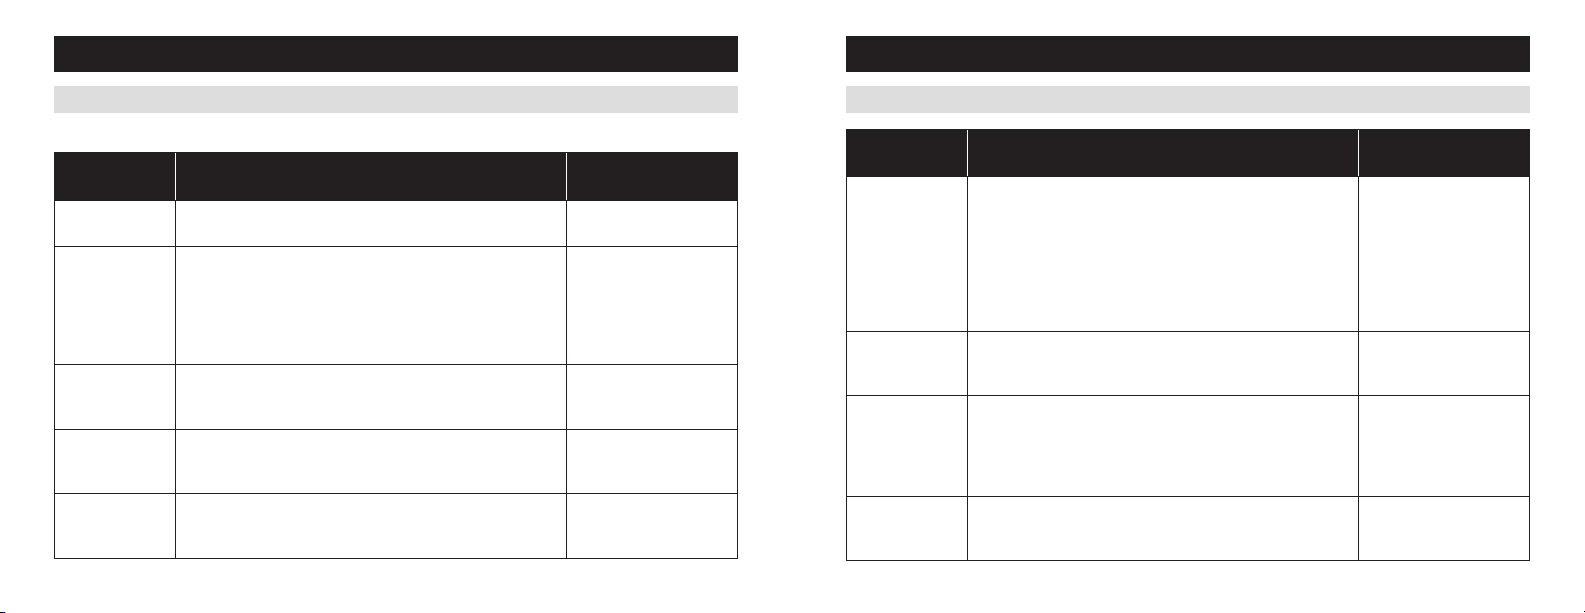
USER SYSTEM SETTINGS TABLE
The following table is the list of the settings and their details. Default settings are shown in bold.
User system
setting Description
Temperature
Scale
Lockout Type Sets the screen lockout level. Setting the Lockout Type to Full
Mode Lockout Prevents changes to the system mode from being made at the
Fan Lockout Prevents changes to the fan mode from being made at the
Dehum Lockout Prevents changes to the dehumidification setpoint from being
36 37
Set the thermostat to Fahrenheit or Celsius mode. Fahrenheit
will prevent any changes from being made at the thermostat.
Setting the Lockout Type to Partial allows individual functions
to be locked out at the thermostat. Set this to None to disable
the lockout feature. Note: The thermostat can be unlocked by
holding the [MENU] button for 7 seconds.
thermostat. Note: Only available when the Lockout Type is set
to Partial.
thermostat. Note: Only available when the Lockout Type is set
to Partial.
made at the thermostat. Note: Only available when the Lockout
Type is set to Partial and dehumidification installed.
Factory default setting
(bold) and setting range
Celsius
None
Partial
Full
Disable
Enable
Disable
Enable
Disable
Enable
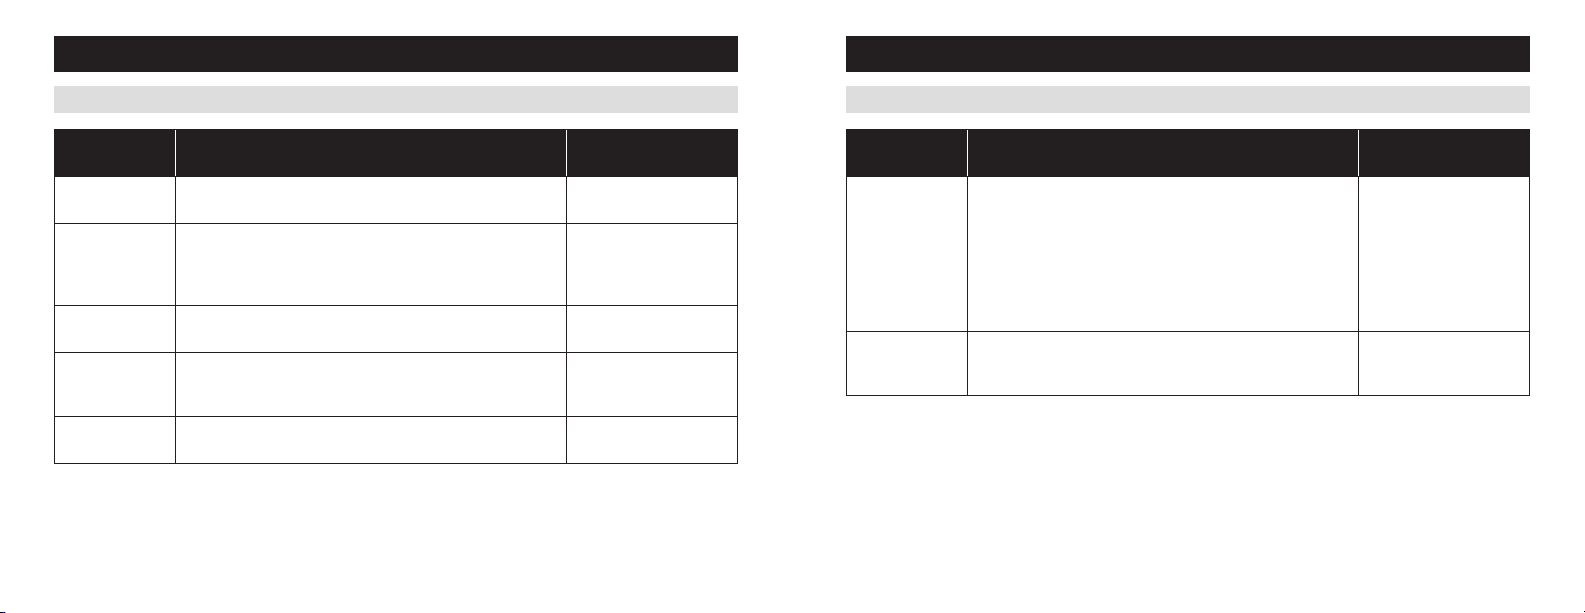
USER SYSTEM SETTINGS TABLE (CONTINUED)
User system
setting Description
Setpoint Lockout Prevents or limits changes to the heating and cooling setpoints
Max Setpoint
Change in Lockout
Setpoint Change
Time Limit in
Lockout
Menu Lockout Prevent the Menu screen from being accessed at the thermostat.
at the thermostat. If set to Full no changes to the setpoints are
allowed. If set to Range, changes to the setpoint are limited by
the Max Temp Setpoint Change in Lockout. If set to Time and
Range, changes to the setpoint are limited by the Max Temp
Setpoint Change in Lockout, and the changes will last for the
duration set by Setpoint Change Time Limit in Lockout. Note:
Only available when the Lockout Type is set to Partial.
Sets the maximum change to the heat or cool setpoint that can
be made at the thermostat. Note: Only available when Setpoint
Lockout is set to Range or Time and Range.
Sets the duration that changes to the setpoint that are
made at the thermostat will last before reverting back to the
original setpoint. Note: Only available when the thermostat is
configured to work with home automation and Setpoint Lockout
is set to Time and Range.
Note: Only available if no other lockouts are enabled. If another
lockout is enabled the Menu screen is automatically locked out.
Factory default setting
(bold) and setting range
Disable
Range
Time and Range
Full
3°F or 1.5°C
1°F to 20°F (0.5° to 10°C)
60 Minutes
15 to 480 Minutes
Disable
Enable
Page 20
SETUP MENU SETUP MENU
USER SYSTEM SETTINGS TABLE (CONTINUED) USER SYSTEM SETTINGS TABLE (CONTINUED)
User system
setting Description
Program Format Enables the 7 day program. 7-Day
Reset Service
Reminders
Backlight
Intensity
WiFi Disconnect
and Clear Settings
Turn Off WiFi
Radio
38 39
Clears the Change Air Filter, Fresh Air, Dehumidifier, and HVAC
service reminders if they are active and resets the start date to
the current date. Clears the Change Water Panel reminder if it is
active. If the reminder is set to timed, the timer will be reset.
Set the active backlight intensity. Note: The minimum setting is
40% when Constant Backlight is enabled.
Disconnects the thermostat from the router and clears the Wi-Fi
settings. Use this to set the thermostat back to provisioning
mode so it can be connected to a new Wi-Fi router.
Use to turn off the Wi-Fi radio. Wi-Fi settings will be
maintained.
Factory default setting
(bold) and setting range
Non-Prog
No
Yes
100 Percent
0 to 100 Percent
No
Yes
No
Yes
User system
setting Description
Unregister the
Thermostat
Display Monitor
Support Module
Sensor
Unregisters the thermostat from an Aprilaire account. Use this
when the thermostat needs to be registered to a new Aprilaire
account. For instance, if you have purchased a home with the
thermostat already installed, this setting would allow you to
clear the previous registration so that you can register the
thermostat to your account. Note: This option is only available
if the thermostat is configured to be used with an Aprilaire
account.
Selects if the temperature or humidity values from support
modules that are configured for monitoring are displayed in the
message center of the thermostat.
Factory default setting
(bold) and setting range
No
Yes
No
Yes
Page 21
THERMOSTAT FIVE YEAR LIMITED WARRANTY
FCC DECLARATION
Your Research Products Corporation Aprilaire® Thermostat is expressly warranted for five (5) years from date of installation to be free from defects
in materials or workmanship.
Research Products Corporation’s exclusive obligation under this warranty shall be to supply, without charge, a replacement for any thermostat
which is found to be defective within such five (5) year period and which is returned, together with the date of installation, no later than thirty
(30) days after said five (5) year period by you to either your original supplier or to Research Products Corporation, Madison, Wisconsin 53701.
THIS WARRANTY SHALL NOT OBLIGATE RESEARCH PRODUCTS CORPORATION FOR ANY LABOR COSTS AND SHALL NOT APPLY TO DEFECTS IN
WORKMANSHIP OR MATERIALS FURNISHED BY YOUR INSTALLER AS CONTRASTED TO DEFECTS IN THE THERMOSTAT ITSELF.
IMPLIED WARRANTIES OF MERCHANTABILITY OF FITNESS FOR A PARTICULAR PURPOSE SHALL BE LIMITED IN DURATION TO THE AFORESAID
FIVE YEAR PERIOD. RESEARCH PRODUCTS CORPORATION’S LIABILITY FOR INCIDENTAL OR CONSEQUENTIAL DAMAGES, OTHER THAN
DAMAGES FOR PERSONAL INJURIES, RESULTING FROM ANY BREACH OF THE AFORESAID IMPLIED WARRANTIES OR THE ABOVE LIMITED
WARRANTY IS EXPRESSLY EXCLUDED. THIS LIMITED WARRANTY IS VOID IF DEFECT(S) RESULT FROM FAILURE TO HAVE THIS THERMOSTAT
INSTALLED BY A QUALIFIED HEATING AND AIR CONDITIONING CONTRACTOR. IF THE LIMITED WARRANTY IS VOID DUE TO FAILURE TO USE A
QUALIFIED CONTRACTOR, ALL DISCLAIMERS OF IMPLIED WARRANTIES SHALL BE EFFECTIVE UPON INSTALLATION.
Some states do not allow limitations on how long an implied warranty lasts or the exclusion or limitation of incidental or consequential damages,
so the above exclusions or limitations may not apply to you.
This warranty gives you specific legal rights and you may also have other rights which vary from state to state.
WARRANTY REGISTRATION
Visit us on-line at www.aprilaire.com to register your Aprilaire product. If you do not have on-line access, please mail a postcard with your
name, address, phone number, product purchased and date of purchase to: Research Products Corporation, P.O. BOX 1467, Madison, WI 53701.
Compliance Statement (Part 15.19)
This device complies with Part 15 of the FCC Rules. Operation is subject to the following two conditions:
1. This device may not cause harmful interference, and
2. This device must accept any interference received, including interference that may cause undesired operation.
Warning (Part 15.21)
Changes or modifications not expressly approved by the party responsible for compliance could void the user’s authority to operate the equipment.
FCC Interference Statement (Part 15.105 (b))
This equipment has been tested and found to comply with the limits for a Class B digital device, pursuant to Part 15 of the FCC Rules. These
limits are designed to provide reasonable protection against harmful interference in a residential installation. This equipment generates uses and
can radiate radio frequency energy and, if not installed and used in accordance with the instructions, may cause harmful interference to radio
communications. However, there is no guarantee that interference will not occur in a particular installation. If this equipment does cause harmful
interference to radio or television reception, which can be determined by turning the equipment off and on, the user is encouraged to try to correct
the interference by one of the following measures:
Reorient or relocate the receiving antenna.
Increase the separation between the equipment and receiver.
Connect the equipment into an outlet on a circuit different from that to which the receiver is connected.
Consult the dealer or an experienced radio/TV technician for help.
FCC RF Radiation Exposure statement
To comply with FCC/IC RF exposure limits for general population / uncontrolled exposure, the antenna(s) used for this transmitter must be installed
to provide a separation distance of at least 20 cm from all persons and must not be co-located or operating in conjunction with any other antenna
or transmitter.
Your Warranty Registration information will not be sold or shared outside of this company.
40 41
Page 22

IC STATEMENT
RSS-GEN, Sec. 7.1.2
Under Industry Canada regulations, this radio transmitter may only operate using an antenna of a type and maximum (or lesser) gain approved for
the transmitter by Industry Canada. To reduce potential radio interference to other users, the antenna type and its gain should be so chosen that
the equivalent isotropically radiated power (e.i.r.p.) is not more than that necessary for successful communication.
Conformément à la réglementation d’Industrie Canada, le présent émetteur radio peut fonctionner avec une antenne d’un type et d’un gain
maximal (ou inférieur) approuvé pour l’émetteur par Industrie Canada. Dans le but de réduire les risques de brouillage radioélectrique à l’intention
des autres utilisateurs, il faut choisir le type d’antenne et son gain de sorte que la puissance isotrope rayonnée quivalente (p.i.r.e.) ne dépassepas
l’intensité nécessaire à l’établissement d’une communication satisfaisante.
RSS-GEN, Sec. 7.1.3
Operation is subject to the following two conditions:
(1) this device may not cause interference, and
(2) this device must accept any interference, including interference that may cause undesired operation of the device.
L’exploitation est autorisée aux deux conditions suivantes:
(1) l’appareil ne doit pas produire de brouillage, et
(2) l’utilisateur de l’appareil doit accepter tout brouillage radioélectrique subi, même si le brouillage est susceptible d’en compromettre le
fonctionnement.
42
Page 23

P.O. Box 1467 • Madison, WI 53701-1467 • Phone: 800/334-6011 • Fax: 608/257-4357
www.aprilaire.com
61001111 8.15
B2206473A
U.S. Patent Numbers 8,146,376, 8,596,078 and other patents pending.
© 2015 Aprilaire – A division of Research Products Corporation
 Loading...