

Page 1
Inside
R
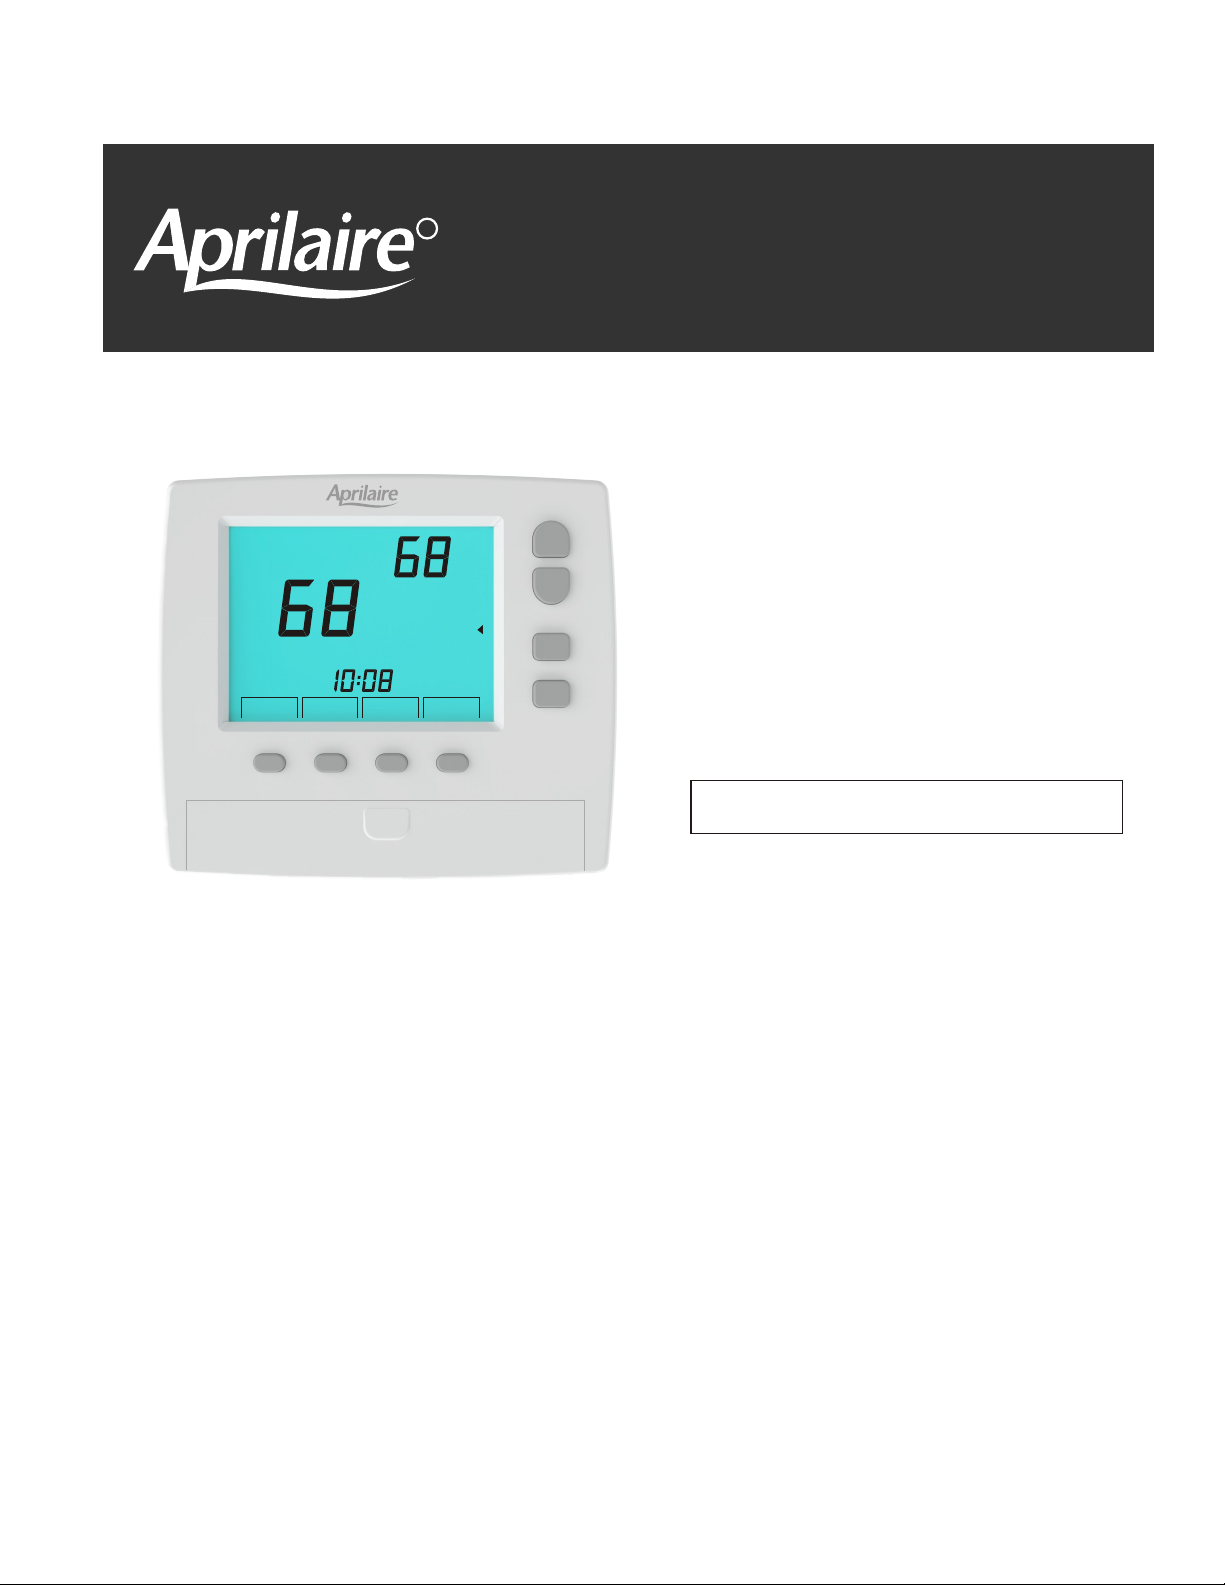
Model 8710
Wireless Thermostat
Owner’s Manual
Heat
Set To
Hold
MENU MODE
Mo
NEXT
AM
HEAT
ENTER
SYSTEM
Includes
Operating Instructions and
Warranty Information
READ AND SAVE THESE INSTRUCTIONS
Page 2

Improved Comfort TABLE OF CONTENTS
Your wireless thermostat provides automatic control of
the temperature. You can set separate temperatures for
heating and cooling for four time periods per day
(morning, daytime, evening and night). Or you can
operate the thermostat without using the schedule
feature (Hold mode).
Energy Savings
Thermostat Overview
Factory Schedule
Selecting System
(OFF, AUTO, HEAT, COOL or EM HT)
Selecting Fan
(AUTO or CONT)
.................................................
......................................................
...................................................
.............
3
4
4
5
The schedule feature can save you energy by reducing
the heating and cooling at night and during the daytime
when you are away.
Selecting Schedule or Hold
Setting the Heating and Cooling Temperature
Setting the Time of Day
Changing the Schedule
Reviewing the Time and Temperature Schedule
Low Battery Indication
Limited warranty
Warranty registration
.......................................................
.......................................
...........
..............................................
.............................................
..............................................
................................................
.......
5
6
6
7
9
10
11
11
2
Page 3
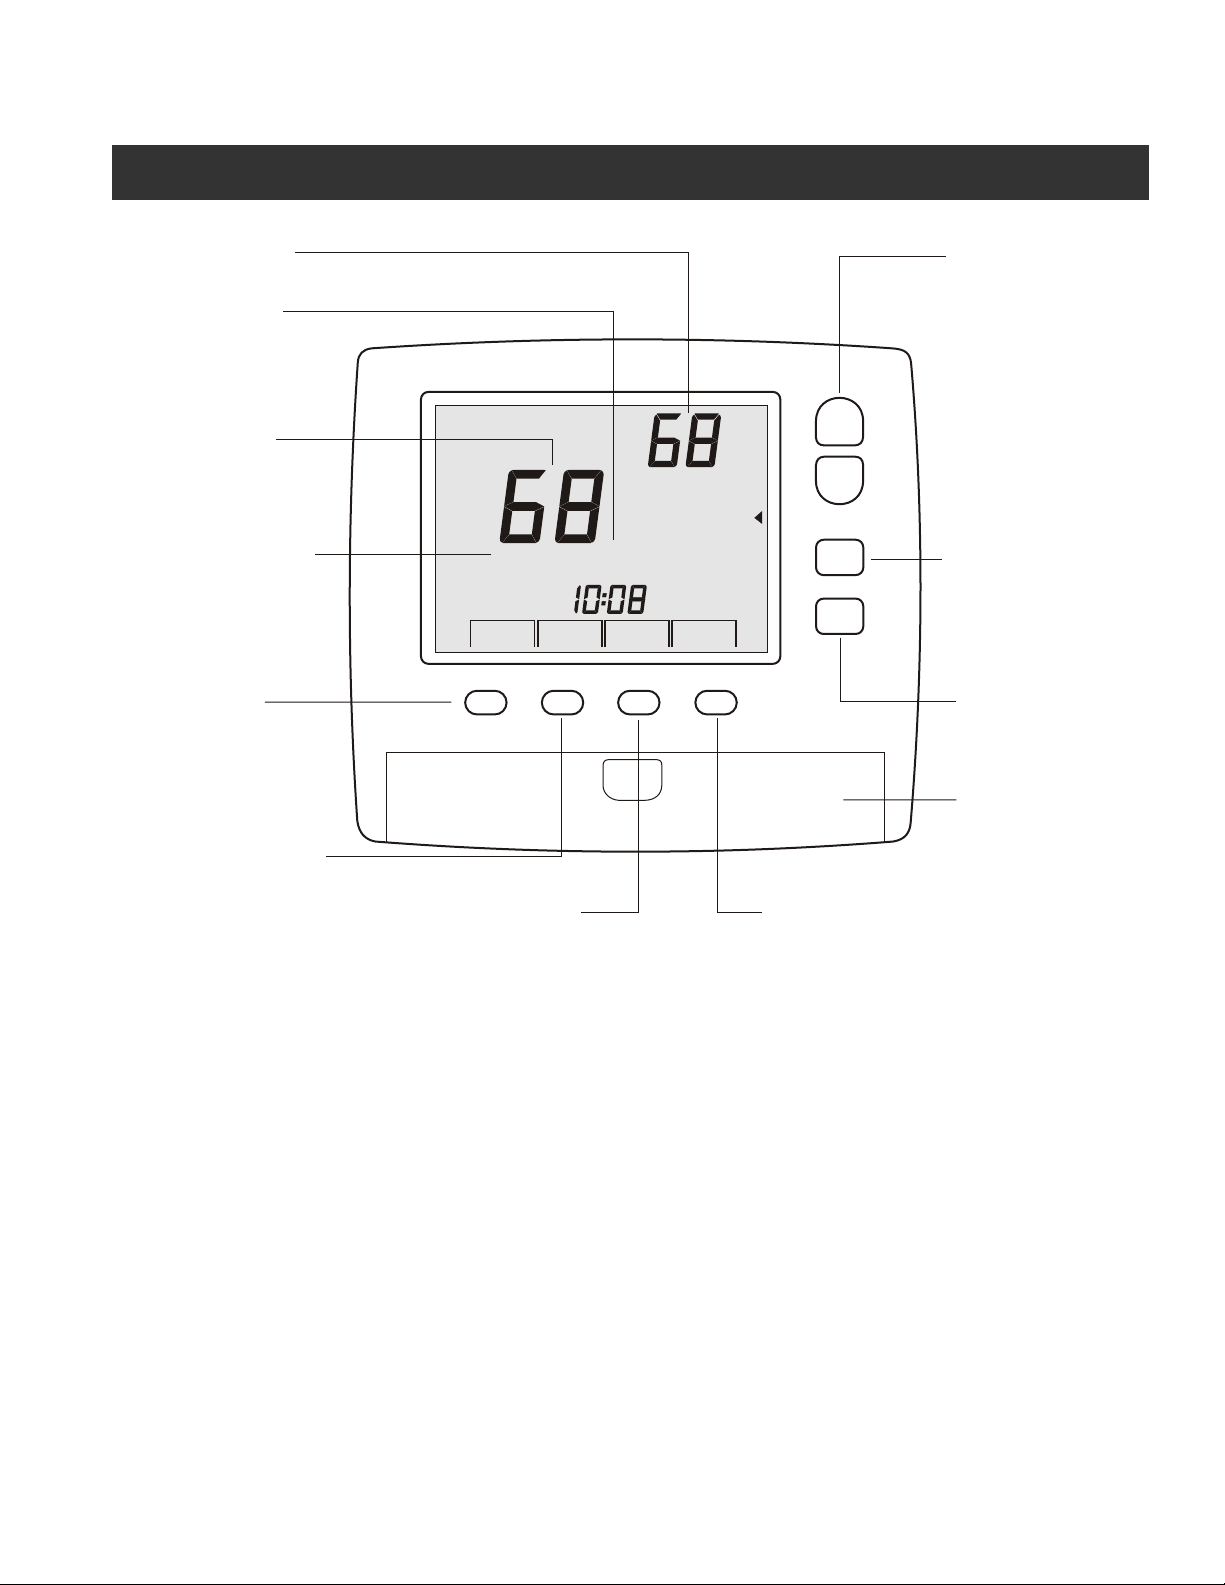
THERMOSTAT OVERVIEW
TEMPERATURE SETTING
INDICATES MORN, DAY,
EVE OR NIGHT SCHEDULE.
SPACE TEMPERATURE
INDICATES THE SCHEDULE
OR HOLD MODE
MENU KEY USED TO
SET TIME OF DAY, DAILY
SCHEDULE AND DISPLAY
SCHEDULE
MODE KEY USED TO SWITCH
BETWEEN SCHEDULE AND
HOLD OPERATION
Schedule
MENU MODE
Day
Mo
NEXT KEY USED WHEN
SETTING TIME OF DAY AND
SCHEDULES AND ADVANCING
THROUGH OPTIONS
Inside
NEXT
AM
AUTO
ENTER
Heat
Set To
SYSTEM
FAN
ENTER KEY USED WHEN
SETTING TIME OF DAY
AND SCHEDULES
UP DOWN AND KEYS
USED WHEN ADJUSTING
TEMPERATURE, TIME OF
DAY, DAY OF THE WEEK,
PROGRAM START TIMES
AND OTHER OPTIONS
SYSTEM KEY SELECTS
HEAT, COOL, AUTO,
HEAT/COOL, OFF AND
EMERGENCY HEATING FOR
A HEAT PUMP APPLICATION
FAN KEY SELECTS AUTO
OR CONT FAN OPERATION
BATTERY COMPARTMENT
2 AA BATTERIES
3
Page 4
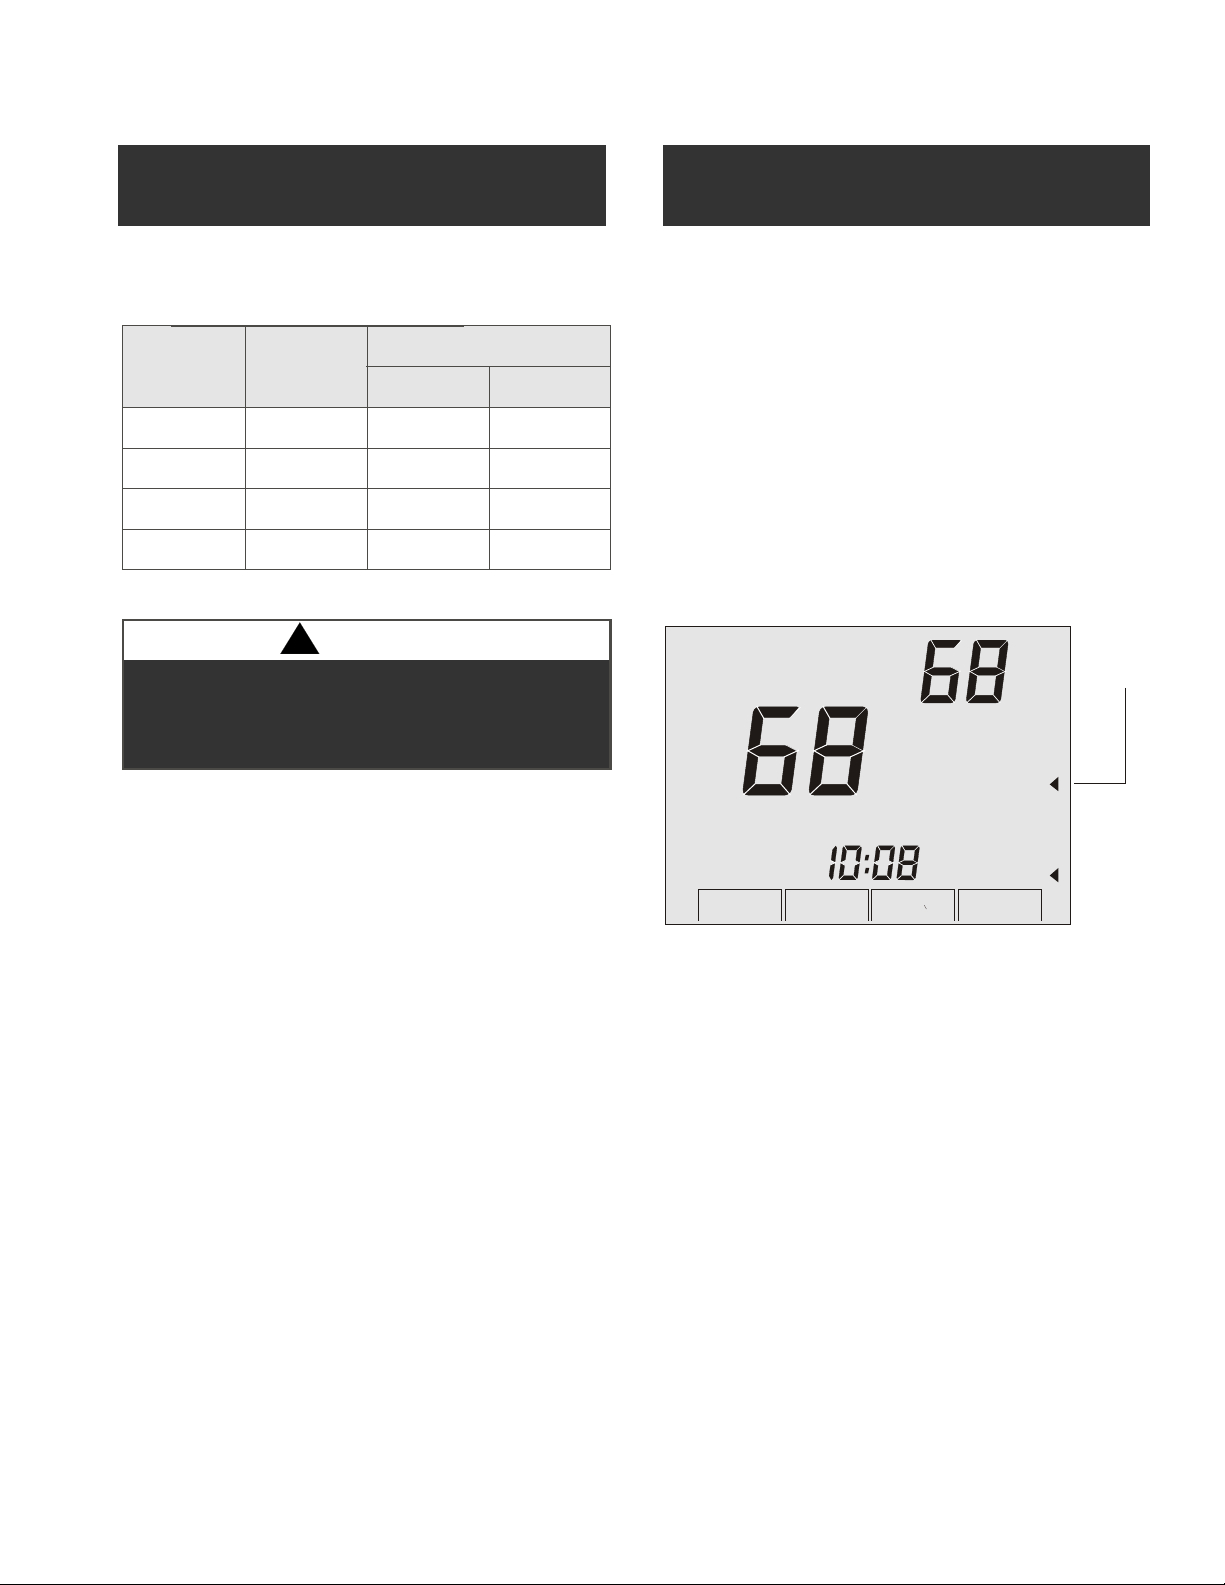
FACTORY SCHEDULE
SELECTING SYSTEM
OFF, AUTO, HEAT, COOL OR EM HT
The thermostat is shipped with the following factory
schedule.
Setpoint
Program Start Time
Heating Cooling
Morning
Day
Evening
Night
The thermostat is battery powered and the
batteries should be changed every year or
when the low battery warning is displayed.
6:00AM
8:00AM
5:00PM
10:00PM
!
WARNING
70F 78F
62F 82F
70F 78F
62F 82F
Press the key to select , (heating
and cooling), (heating), (cooling) or
SYSTEM OFF AUTO
HEAT COOL EM HT
(emergency heating if your system is a heat pump).
AUTO
In the thermostat will call for heating or cooling
based on the heating and cooling set temperatures and
the indoor temperature. To view both the heating and
cooling set temperatures in Auto mode, press and hold
NEXT Heat Set To
the key. The LCD will display and then
Cool Set To
temperatures. Use the and keys to change the
along with the corresponding set
Up Down
set temperature when the proper mode is displayed.
SYSTEM
MODE
MENU MODE
Tu
Inside
NEXT
Heat
Set To
HEAT
AM
AUTO
ENTER
4
Page 5

SELECTING FAN
AUTO OR CONT
Press the key to select or
(continuous) fan operation. In the thermostat
activates the fan during heating and cooling calls. In
CONT
FAN AUTO CONT
AUTO
the fan runs continuously to circulate air.
Heat
Set To
Inside
HEAT
Tu
MENU MODE
AM
NEXT
AUTO
ENTER
FAN
MODE
SELECTING SCHEDULE
OR HOLD
When in operation, adjusting the heating or
cooling temperature using the and keys
switches to the mode. After 3 hours the thermostat
returns to the mode. Press the key at
any time to return to the mode.
The mode maintains the heating and cooling
temperature indefinitely until the key is pressed,
which will return the thermostat to the
Schedule
Up Down
Hold
Schedule MODE
Schedule
Hold
MODE
Schedule
operation.
SCHEDULE
MODE IN
DAY
SCHEDULE
Schedule
MENU MODE
Tu
Inside
Day
NEXT
Heat
Set To
HEAT
AM
AUTO
ENTER
Press the key to switch between or
Schedule. Schedule
MODE Hold
operation automatically changes
the heating and cooling temperature settings at the
four scheduled times - Morning, Day, Evening and
Night.
MODE KEY
5
Page 6

SETTING THE HEATING AND
COOLING TEMPERATURE
SETTING THE TIME AND DAY
Press the or key to change the heating or
cooling temperature. Press the key to switch
Up Down
NEXT
between the heating and cooling temperatures.
SCHEDULE
MODE IN
DAY
SCHEDULE
Schedule
MENU MODE
Tu
Inside
Day
NEXT
Heat
Set To
HEAT
AM
AUTO
ENTER
NEXT KEY
To set the time of day and the day of the week, press
MENU
the key and the LCD will display the hour. Use
Up Down
the and keys to set the hour. Make sure that
the AM or PM is correct.
Press the key to set the minute. Use the or
Down
Press the key to set the current day of the week.
Use the or keys to select the day of the
week and press the key.
NEXT Up
keys to set the minute.
NEXT
Up Down
ENTER
Th
MENU
CANCEL
AM
AUTO
NEXT
ENTER
6
Page 7

CHANGING THE SCHEDULE
Press the key twice until the LCD displays the
schedule screen shown below with the correct day of the
week. Press and hold the or keys to change
the morning ( ) schedule start time.
MENU
Up Down
Morn
Schedule
Heat
Set To
Morn
Th
AM
Schedule
MENU
Press the key to display the morning heating
Heat Up Down
( ) temperature. Use the or keys to
NEXT
Morn
CANCEL
Th
AM
NEXT
change the temperature.
CANCEL
Press the key to display the morning Cooling
Cool Up Down
( ) temperature. Use the or keys to
NEXT
NEXT
change the temperature.
Cool
Set To
Schedule
Morn
CANCEL
Th
AM
NEXT
7
Page 8

Continue using the key and the and
NEXT Up Down
keys to set the start time, heating temperature and
cooling temperature for the , and
Day Evening Night
schedules. After the Night schedule is completed, you
can press the key which will only save the
ENTER
schedule for the current day, or you can apply the same
schedule to other days of the week by pressing the
NEXT
key.
(Monday) will appear on the LCD. Continue to press
Mo
the key to add additional days of the week. Use
NEXT
the and keys to turn days ON or OFF. The
Up Down
schedule will be applied to the days that are ON. These
days will be displayed on the thermostat. The example
below shows a schedule being applied to Monday
through Friday.
Schedule
CANCEL
Mo
NEXT
PM
Night
ENTER
Schedule
Mo
Tu WeTh Fr
CANCEL
Pressing the key will copy and save the
ENTER
NEXT
Night
PM
ENTER
schedule for the days of the week selected. After the
ENTER
key is pressed, the thermostat will return to
normal operation. To change the schedule for other
days of the week, repeat the same programming steps.
8
Page 9

REVIEWING THE TIME AND
TEMPERATURE SCHEDULE
Schedule
After the schedule is completed, press the next
key and (Monday) will appear on the LCD. Continue
to press the key and use the and keys
Night
Mo
NEXT Up Down
Morn
CANCEL
SaSu
AM
NEXT
ENTER
to turn days ON or OFF. The schedule will be applied to
the days that are ON. In the example above,
(Saturday) and (Sunday) have been selected. To
save the schedule, press the key and the
Su
ENTER
Sa
thermostat will resume normal operation. Each day of
the week can have a separate schedule if required. Just
program the schedule and select the day then press the
ENTER
key.
Press the key 3 times until the first schedule is
MENU
displayed as shown below. The display will show the
Monday morning schedule start time and heating
temperature setting.
Heat
Set To
Schedule
Continue pressing the key to display the morning,
Morn
Mo
CANCEL
NEXT
AM
NEXT
day, evening and night schedule along with the heating
and cooling temperatures for each day of the week.
Press the key at any time to exit and return the
CANCEL
thermostat to normal operation.
9
Page 10

LOW BATTERY INDICATION
If the battery voltage drops to where it could interfere
with reliable operation, the LCD will alternately display
in place of the inside temperature.
Lo
Replace batteries as soon as possible. There is
approximately one month of operation left.
Vacant
Schedule
Schedule
Hold
MENU
MENU MODE
Zone
Home
Inside
Inside
Outside
Filter
RH%
MornDay EvenNight
Day
Mo
TuWeThFrSaSu
CANCEL
MODE
NEXT
NEXT
VACANT ENTER
Th
AM
AM
PM
RH%
Cool
Heat
Heat
Set To
Set To
MAN
OFF
AUTO
AUTO
HEAT
COOL
EM HT
CONT
AUTO
ENTER
10
Page 11

THERMOSTAT FIVE YEAR LIMITED WARRANTY
Your Research Products Corporation Aprilaire Thermostat unit is expressly warranted for five (5) years from date of installation to be free from defects in
materials or workmanship.
Research Products Corporation’s exclusive obligation under this warranty shall be to supply, without change, a replacement for any thermostat which is found to
be defective within such five (5) year period and which is returned, together with the date of installation, no later than thirty (30) days after said five (5) year
period by you to either your original supplier or to Research Product Corporation, Madison, Wisconsin 53701.
THIS WARRANTY SHALL NOT OBLIGATE RESEARCH PRODUCTS CORPORATION FOR ANY LABOR COSTS AND SHALL NOT APPLY TO DEFECTS IN
WORKMANSHIP OR MATERIALS FURNISHED BY YOUR INSTALLER AS CONTRASTED TO DEFECTS IN THE THERMOSTAT ITSELF.
IMPLIED WARRANTIES OF MERCHANTABILITY OF FITNESS FOR A PARTICULAR PURPOSE SHALL BE LIMITED IN DURATION TO THE AFORESAID
FIVE YEAR PERIOD. RESEARCH PRODUCTS CORPORATION’S LIABILITY FOR INCIDENTAL OR CONSEQUENTIAL DAMAGES, OTHER THAN
DAMAGES FOR PERSONAL INJURIES, RESULTING FROM ANY BREACH OF THE AFORESAID IMPLIED WARRANTIES OF THE ABOVE LIMITED
WARRANTY IS EXPRESSLY EXCLUDED. THIS LIMITED WARRANTY IS VOID IF DEFECTS RESULT FROM FAILURE TO HAVE THIS THERMOSTAT
INSTALLED BY A QUALIFIED HEATING AND AIR CONDITIONING CONTRACTOR. IF THE LIMITED WARRANTY IS VOID DUE TO FAILURE TO USE A
QUALIFIED CONTRACTOR, ALL DISCLAIMERS OF IMPLIED WARRANTIES SHALL BE EFFECTIVE UPON INSTALLATION.
Some states do not allow limitations on how long an implied warranty lasts or the exclusion or limitation of incidental or consequential damages, so the above
exclusions or limitations may not apply to you.
This warranty give you specific legal rights and you may also have other rights which vary from state to state.
This equipment if installed in strict accordance with the manufacturer’s instructions, complies with the limits for a Class B computing device pursuant to Subpart
J of Part 15 of FCC rules.
WARRANTY REGISTRATION
Please take a few minutes to visit us online at Aprilaire.com to register your Aprilaire product.
If you do not have internet access, please mail a postcard with your name, address, phone number, product purchased
and date of purchase to: Research Products Corporation, PO Box 1467, Madison, WI 53701
Your Warranty Registration information will not be sold or shared outside of this company.
11
Page 12

61000829
B2205617C 6.17
R
P.O. Box 1467 Madison, WI 53701-1467 Phone 800/334-6011 Fax 608/257-4357
www.aprilaire.com
c
2011 Aprilaire - A division of Research Products Corporation
 Loading...