

Page 1
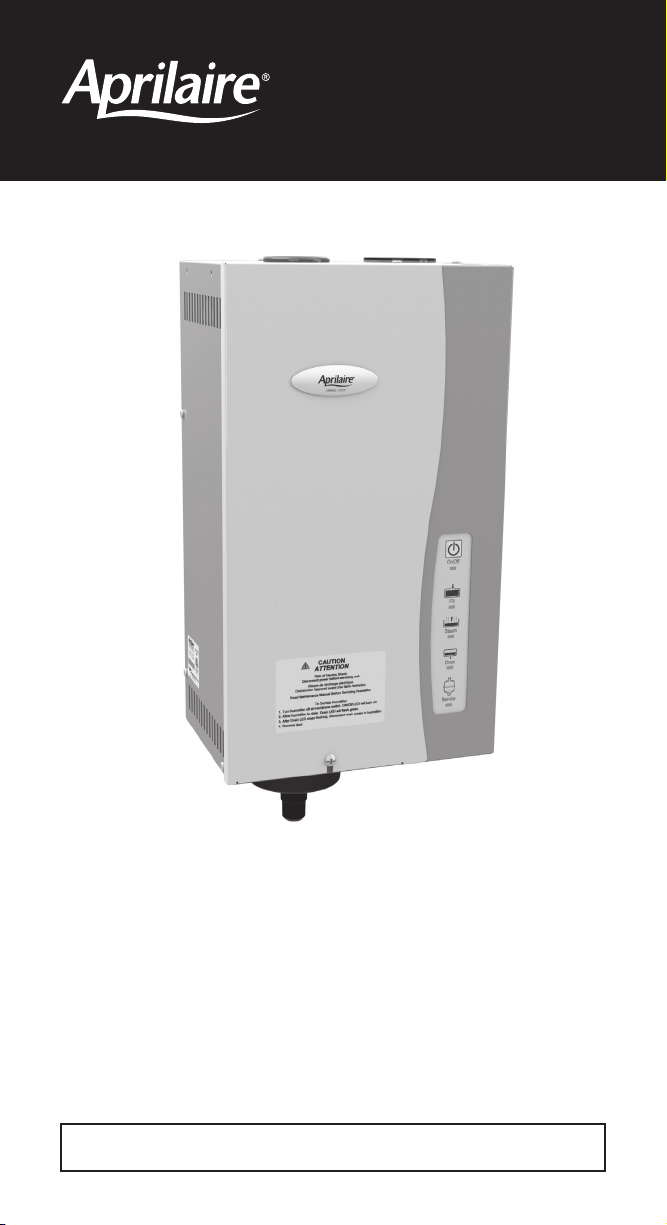
Steam Humidifier
Series 800 Steam Humidifier
Owner’s Manual
Includes Safety & Operating Instructions
and Warranty Information
READ AND SAVE THESE INSTRUCTIONS
Page 2
TABLE OF CONTENTS
Safety Cautions ..............................................3
Introduction .................................................4
Principles of Operation ........................................4
Sequence of Operation ........................................5
Installation Options and Effect of Water Characteristics..............6
Operating Modes ............................................. 7
Display Panel ................................................8
Operating Instructions –
Model 62 Automatic Digital Humidifier Control ..................... 9
Operating Instructions –
Model 65 Manual Digital Humidistat ............................14
Operating Instructions –
Model 63 Automatic Digital Modulating Control . . . . . . . . . . . . . . . . . . . 17
Additional Information........................................20
Maintenance ...............................................20
Limited Warranty............................................22
SAFETY CAUTIONS
CAUTION
Read all cautions and instructions.
Read this manual before performing service or maintenance
procedures on any part of the system. Failure to follow all
cautions and instructions could produce the hazardous
situations described, resulting in property damage, personal
injury, or death.
Failure to follow the instructions in this manual can cause
moisture to accumulate, which can cause damage to structure
and furnishings.
CAUTION
HOT SURFACES AND HOT WATER
This steam humidification system has extremely hot surfaces.
Water in steam canister, steam pipes, and dispersion tube can be
as hot as 212°F (100°C). Discharged steam is not visible. Contact
with hot surfaces, discharged hot water, or air into which steam
has been discharged can cause severe personal injury. To avoid
severe burns, follow procedures in this manual when performing
service or maintenance procedures on any part of the system.
- 2 -
ELECTRICAL SHOCK HAZARD
Follow the shutdown procedure in this manual before performing
service or maintenance procedures on any part of the system.
If the humidifier starts up responding to a call for humidity during
maintenance, severe bodily injury or death from electrical
shock could occur. Follow the procedures in this manual before
performing service or maintenance procedures on this humidifier.
EXCESS HUMIDITY
Do not set humidity higher than recommended. Condensation
may cause damage.
- 3 -
Page 3
Steam
Drain
Electrodes
Inlet
Fill V
INTRODUCTION
Thank you for your recent Aprilaire® humidifier purchase. We appreciate
your business and are pleased to add your name to our growing list of
customers. You have invested in the highest quality equipment available.
Aprilaire manufactures whole-house indoor air quality products and is a
recognized leader in the heating and air conditioning industry.
Your humidifier will require periodic maintenance to assure continued
consistent performance. See page 20.
Please take a few minutes and read this booklet. This will familiarize
you with the benefits you will receive from the humidifier and help you
understand the routine maintenance that will be required.
Be sure to register your humidifier warranty online at:
www.aprilaire.com/warranty.
Genuine Aprilaire Replacement Model 80 Steam Canisters are
available from your installing contractor or from most other heating
and air conditioning contractors in your area. Use the dealer locator on
our web site (www.aprilaire.com) or look in the Yellow Pages under
Humidifying Apparatus or Heating & Air Conditioning Contractors.
PRINCIPLES OF OPERATION
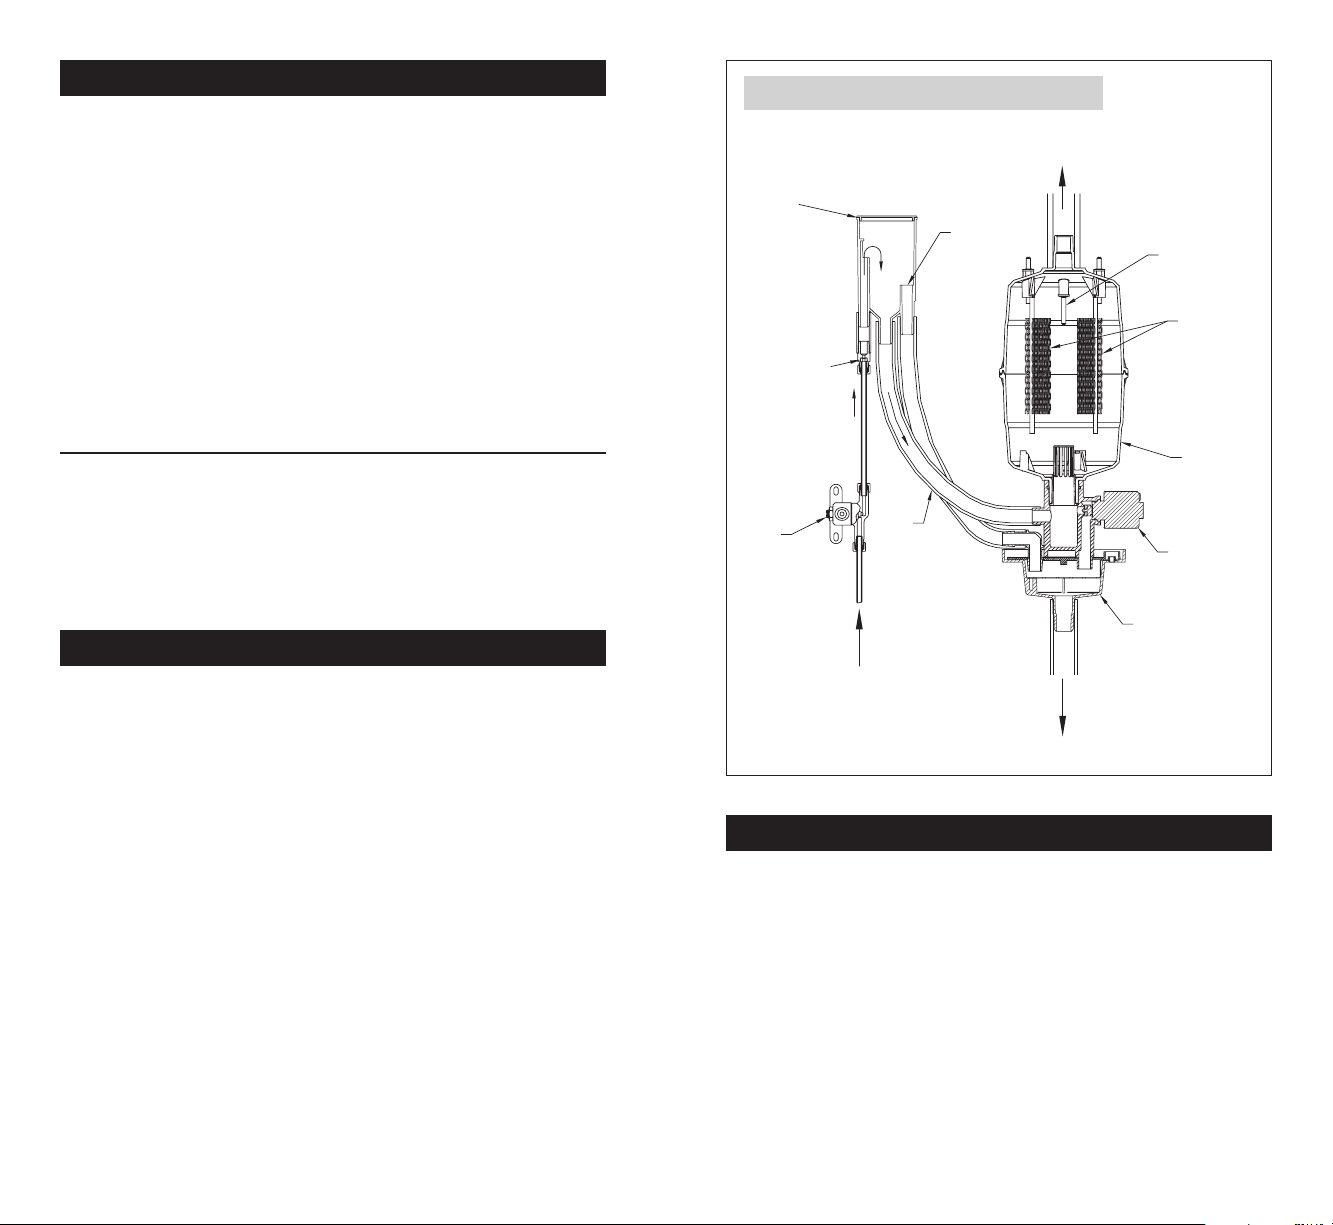
The Aprilaire® Steam Humidifier delivers humidity in the form of steam to
the conditioned space via the HVAC system duct or Aprilaire Fan Pack. The
humidifier generates steam by energizing two electrodes that extend into a
canister of water. Current flowing between the electrodes causes the water
to boil, creating steam. Water is introduced to the humidifier through a fill
valve to a fill cup located in the top of the cabinet. The fill cup serves as
an overflow reservoir and provides an air gap between the humidifier and
water source. The steam canister is filled from the bottom. The canister is
seated in a drain cup assembly which includes a drain valve. The drain and
fill valves work together to maintain water level in the canister to deliver
the rated steam capacity based on the electrical conductivity of the water
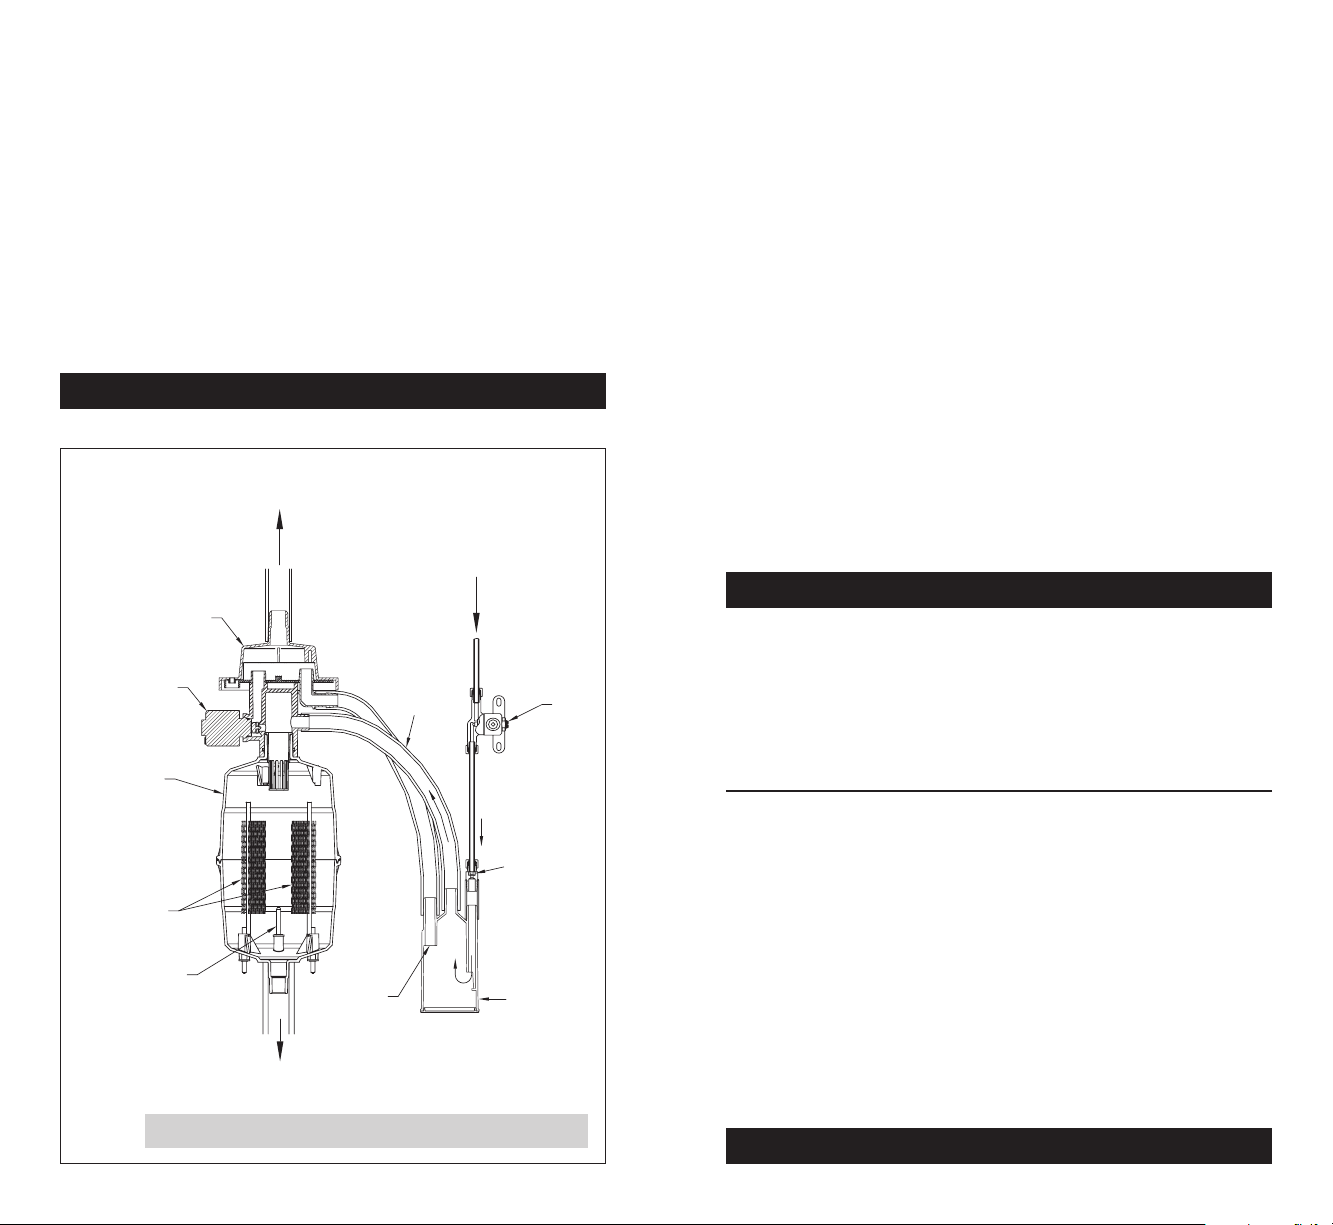
and to temper drain water. See Figure 1 for representation of fill and
drain system and canister.
Steam is delivered into the airstream through a dispersion tube mounted
in the HVAC system ductwork. Openings in the dispersion tube are fitted
with “tubelets™” which extend into the center of the tube. The design of
the dispersion tube and tubelets distribute steam over a wide area in the
duct and direct any condensed moisture back into the steam hose.
FIGURE 1 – Fill and Drain System and Canister
Outlet
Fill Cup
Overflow
High Water
Level Sensor
Flow Control
Orifice
Canister
Fill
alve
Supply
Water
Drain Valve
Drain Cup
90-1522
SEQUENCE OF OPERATION
When the Humidifier Control detects the need for humidity, and provided
the humidifier is turned on and the HVAC system blower is operating,
the internal controller in the humidifier energizes the electrodes and
measures the current flowing through the water between them. The
controller adjusts water level in the canister via a fill valve and a drain
valve to maintain a constant current. The operating water level in the
canister depends on the mineral content of the water which determines
conductivity.
- 4 - - 5 -
Page 4
INSTALLATION OPTIONS AND EFFECT OF
WATER CHARACTERISTICS
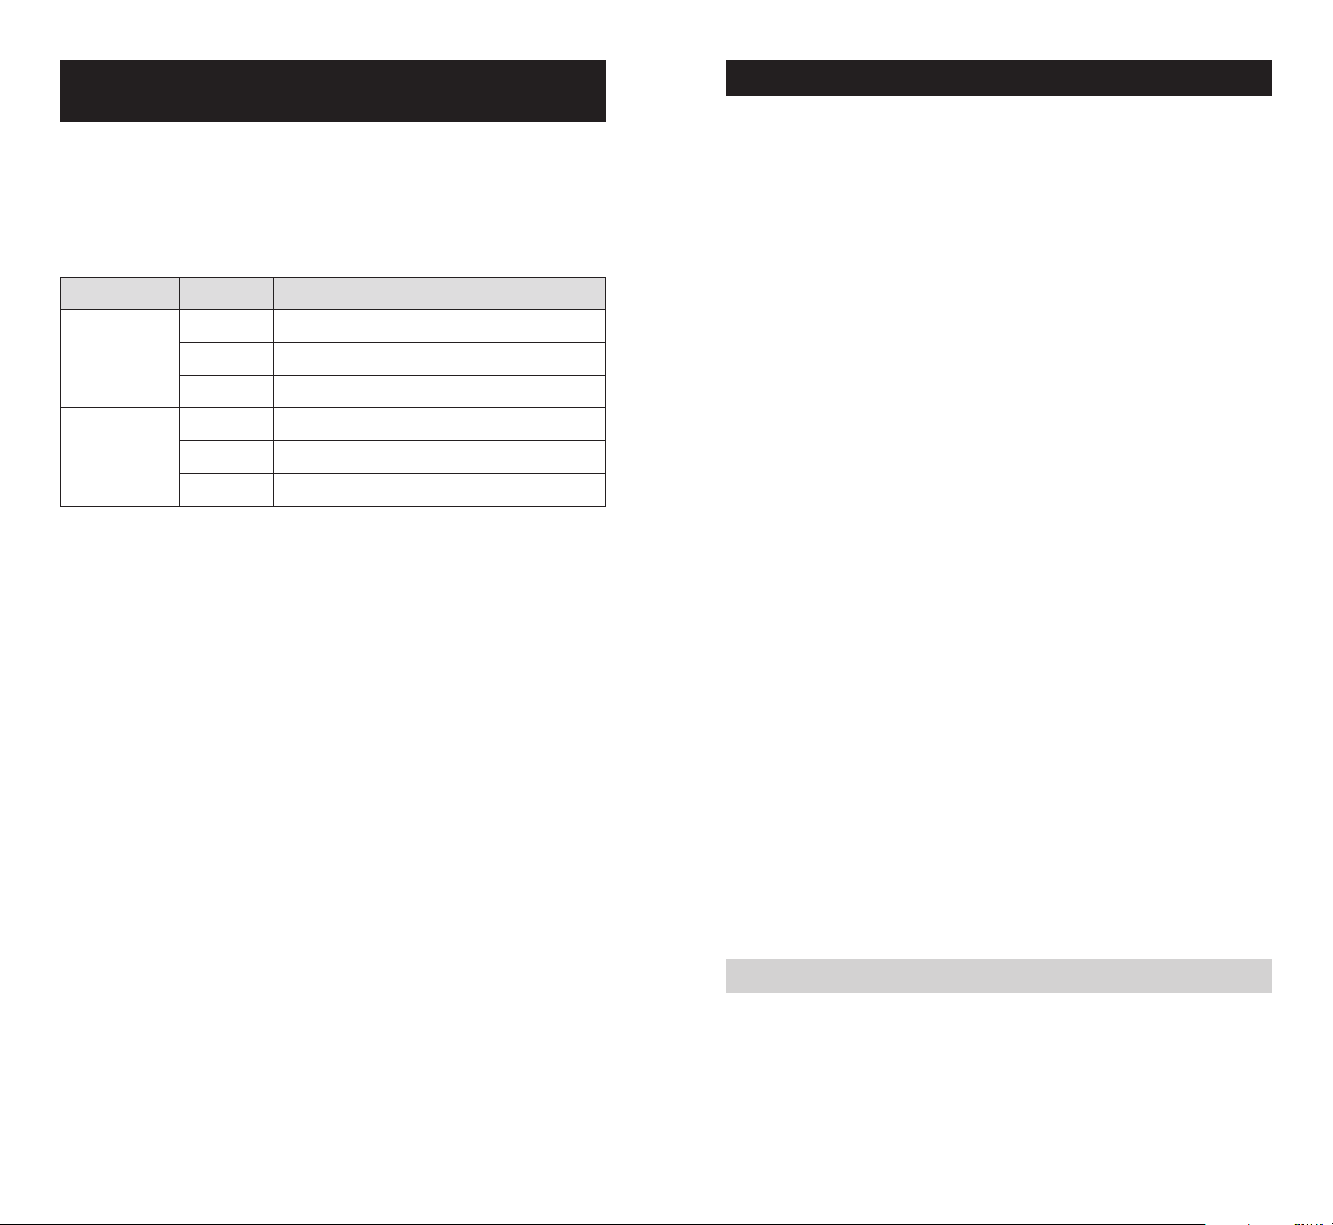
Your Steam Humidifier can be powered with a 120, 208 or 240 volt circuit
and operated at either 11.5 or 16.0 amps. The higher the voltage and
amperage the higher the potential output. The operating voltage and
amperage are set by your installing contractor to meet the humidification
needs of your home.
Amperage Voltage Maximum steam capacity (gal/day)
120V 11.5
11.5
16.0
It may take several days for the humidifier to reach rated capacity
depending on the input voltage and the electrical conductivity of
the water. 120 volt systems take longer to reach rated capacity than 240
volt systems. The humidifier should always be plumbed to cold water but
the water can be softened or unsoftened. “Hard” water, which has a high
mineral content, and softened water generally have higher conductivity
than naturally soft water. Systems plumbed to higher conductivity water
will reach capacity sooner than systems plumbed to low conductivity
water. As the humidifier operates, minerals build up in the canister, which
increases the conductivity of the water. With a new canister, allowing the
humidifier to operate continuously (along with the HVAC system blower)
will allow it to reach rated capacity in the shortest amount of time.
Canister life is highly dependent on water quality. Canisters in systems
plumbed to water with high concentrations of suspended and dissolved
solids will not last as long as canisters operating on water with less
minerals.
208V 20.5
240V 23.3
120V 16.0
208V 30.0
240V 34.6
OPERATING MODES
When the humidifier is powered and turned on, the “On/Off” light is
illuminated green.
When the canister is being filled or replenished with water, the “Fill” light
illuminates green.
When the canister is being drained, the “Drain” light illuminates green.
During initial start up with a new canister, the humidifier may run through
a series of fill/drain cycles until the conductivity of the water is in a range
that allows normal operation. During this time, the “Steam” light illuminates
green. If the humidifier cannot produce steam at the rated level after 168
hours of operation, the “Steam” light illuminates yellow. The humidifier
continues to operate in this state until the rated output is reached.
The conductivity of naturally soft water, hard water, and softened water
changes as the water heats up, the internal controller adjusts the water
level to maintain a nominal current between the electrodes. Over the
life of the canister, minerals that build up on the electrodes will reduce
their effective surface area and affect the resistance between them. The
operating water level will increase with use until it reaches the high water
level probe. At that point, the “Service” light will flash red indicating that
the canister should be replaced. The humidifier will continue to operate
but with reduced output.
When the humidifier begins a drain cycle, the fill valve opens to introduce
cold water into the canister. This is done to prevent hot water from
entering the drain. The drain valve remains open for four minutes to allow
all water to drain from the canister.
Any time power is disconnected or humidifier is turned off, the internal
timer for start-up and drain cycles is reset.
If the humidifier has operated 168 hours without a drain cycle, the drain
valve will open and drain the canister. Normal operation will continue.
If the humidifier is operating and a power failure occurs, once power
is restored, the “On/Off” light will flash green for one minute, then the
humidifier will turn on.
NOTE: Amperage, Voltage and plumbing changes should be made by a
heating and air conditioning contractor.
END OF SEASON/PERIOD OF INACTIVITY SHUT-DOWN
If the humidifier does not receive a call to operate in 72 hours, the
humidifier controller drains the canister, the drain valve will remain open
for 30 minutes. The drain light will remain on until there is a humidity call
or 24 hours has elapsed. The humidifier will resume normal operation when
a call for humidity is made.
- 7 -- 6 -
Page 5
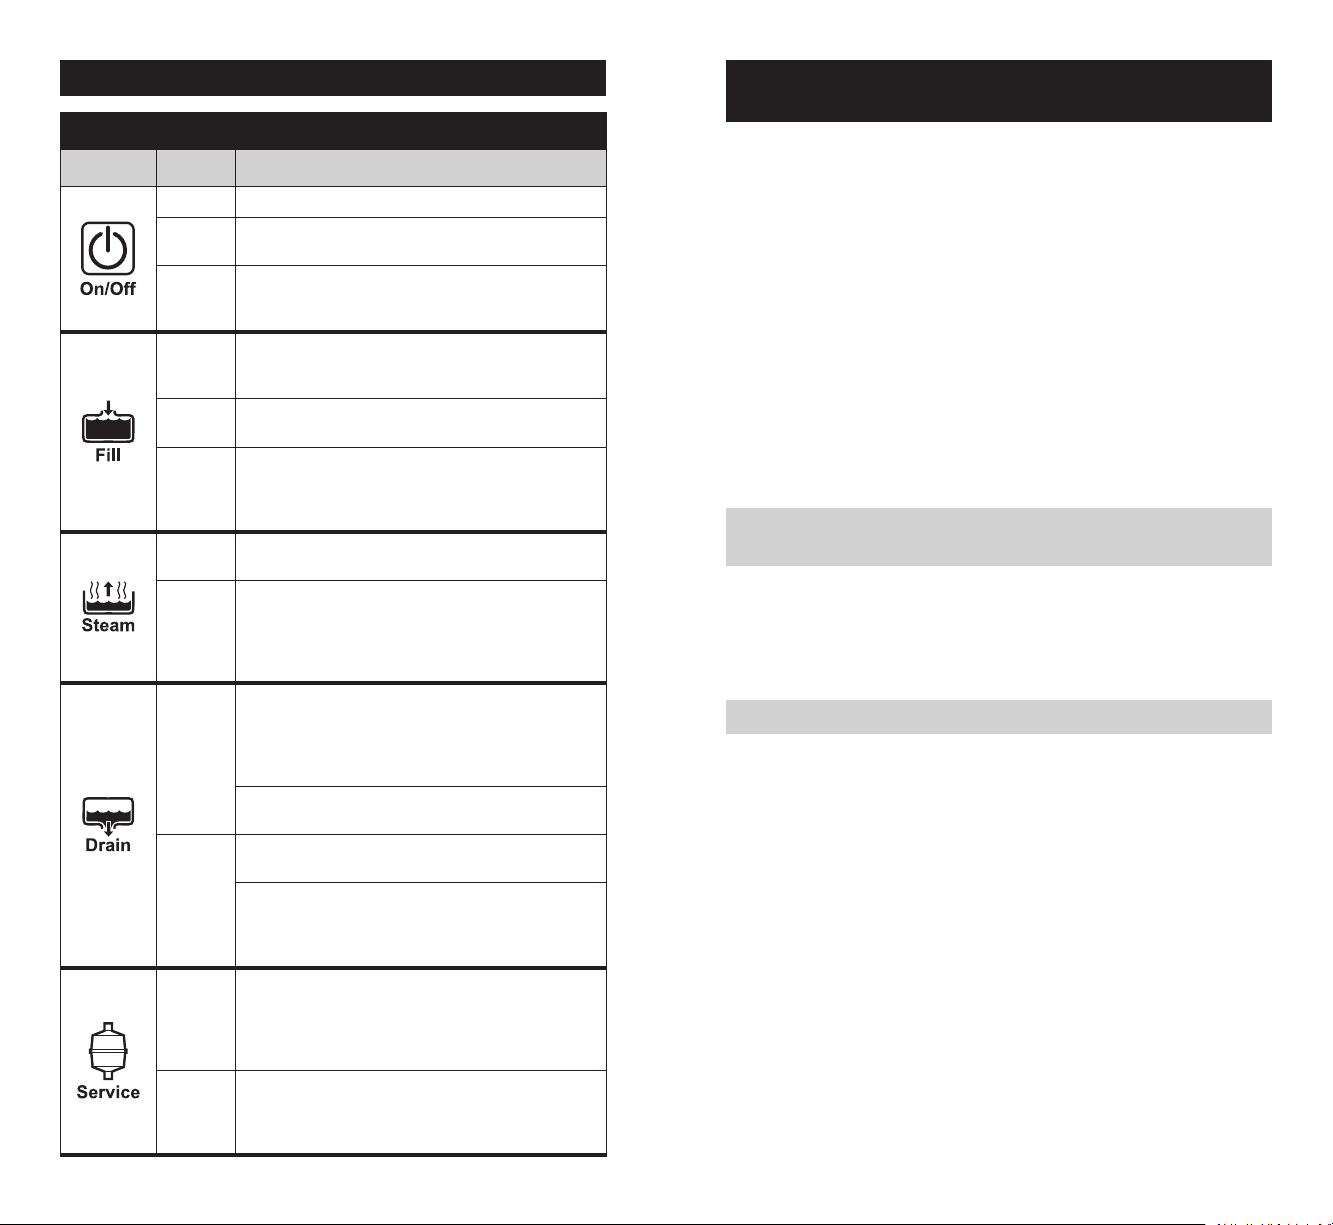
DISPLAY PANEL
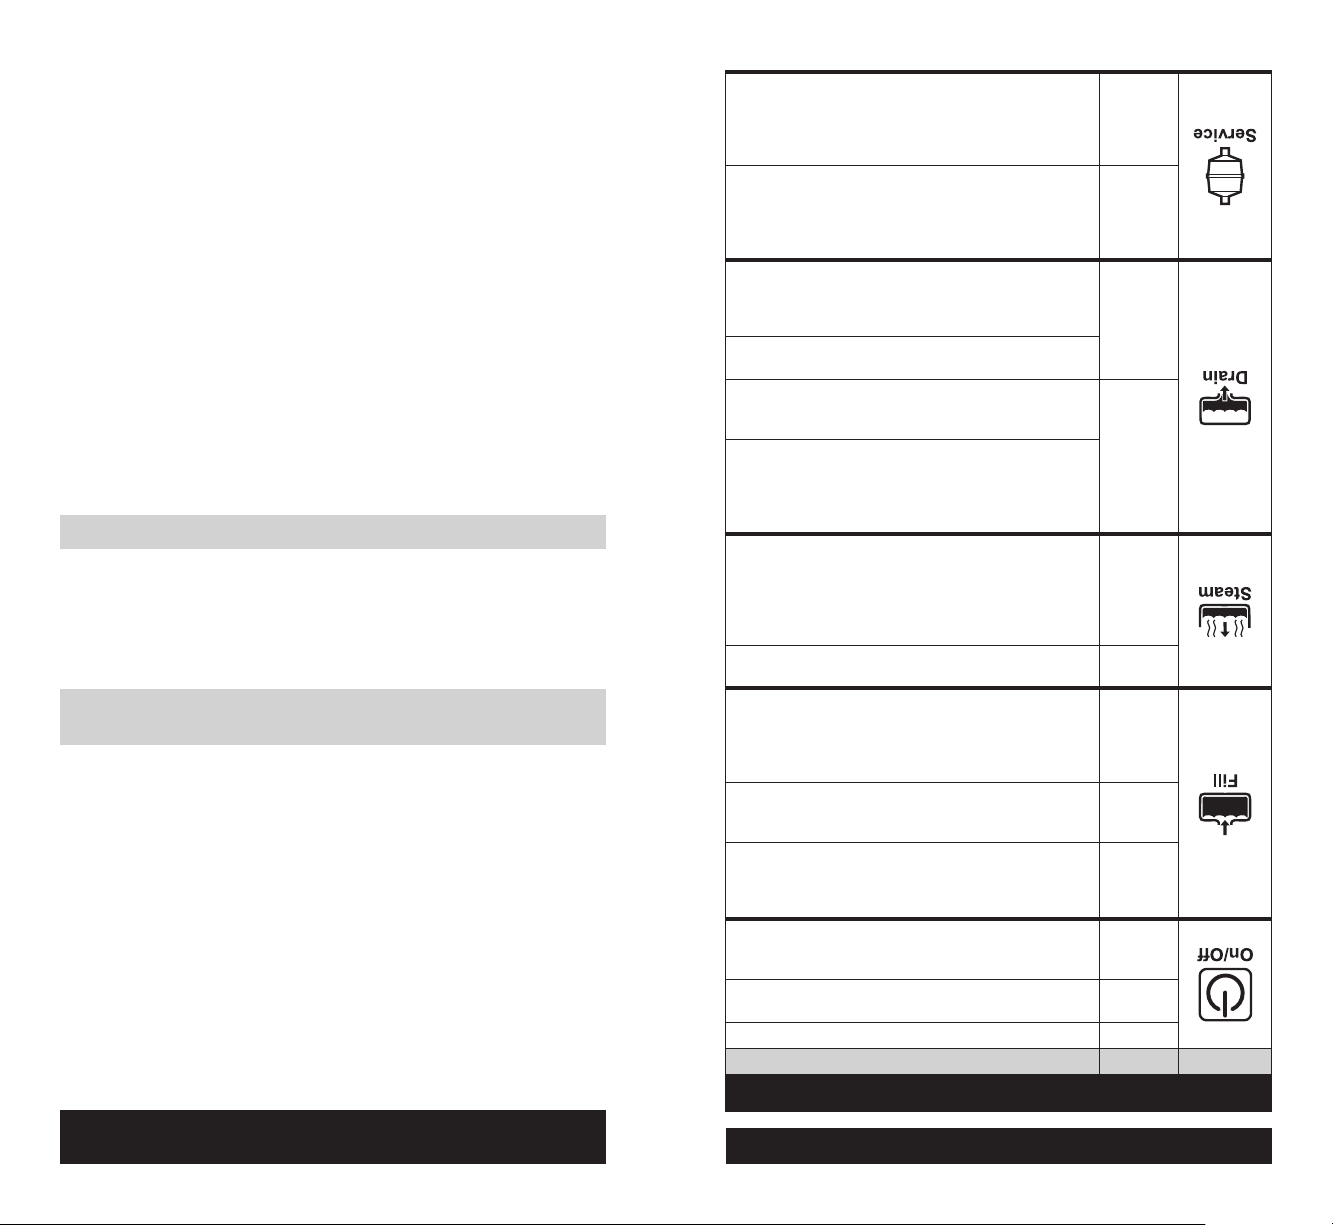
TABLE 1 – Display Panel
Indicator Light Function
Off
Solid
Green
Flashing
Green
Solid
Green
Flashing
Green
Solid Red
Solid
Green
Solid
Yellow
Flashing
Green
Solid
Green
Flashing
Red
Solid Red
Humidifier is turned off or not receiving power.
Humidifier is turned on.
Humidifier is preparing to turn on. Occurs if power is
disconnected, then restored with switch ON. Flashes for one
minute.
Normal Operation. Fill valve is energized allowing water
to flow into canister via fill cup. (Does not illuminate when
tempering water during drain cycle.)
Fill and Drain Valves are pulsing to dislodge mineral build-up in
canister. Flashes 10 times in four seconds.
Fault Mode. Indicates canister needs water but cannot fill.
Humidifier shuts down. (Occurs if high water probe does not
detect water after fill valve is energized for 40 minutes.) Call
your heating and air conditioning dealer for service.
Normal Operation. Humidistat is calling for steam and
humidifier is operating.
Normal Operation. Humidifier is operating but is not delivering
steam at rated capacity. Occurs if humidifier has operated
for 168 hours at less than rated capacity due to low water
conductivity. Light will turn green once water conductivity
increases and humidifier is delivering rated capacity.
Humidifier is preparing to drain. (Fill valve is open tempering
water in canister.) Occurs when humidifier is turned off, at
end of season drain (72 hours with no operation) and during
forced drain down (168 hours of operation with no drain
activity.)
Fill and Drain Valves are pulsing to dislodge mineral build-up in
canister. Flashes 10 times in four seconds.
Drain valve is energized and open, draining canister. Valve
remains energized for four minutes.
Indicates end of season shut-down. Occurs if humidifier does
not receive call for humidity in 72 hours. Light remains on
for 24 hours. Humidifier will turn on with the next call for
humidity.
Canister has reached the end of its life and needs to be
replaced. Occurs after humidifier has operated for at least 168
hours and for an additional 24 hours at a current level below
75% of the maximum operating current. Humidifier continues
to operate, but at reduced capacity.
Operational problem with humidifier. Humidifier shuts down.
Occurs when unit detects over-current which can be caused
by failure to drain or other system failures. Call your heating
and air conditioning dealer for service.
OPERATING INSTRUCTIONS – MODEL 62 AUTOMATIC
DIGITAL HUMIDIFIER CONTROL
The Model 62 Automatic Digital Humidifier Control (ADHC) offers two
modes of operation, Automatic or Manual. An explanation of both modes
follows. (See Figure 2 on page 10 for Automatic Mode. See Figure 3 on
page 12 for Manual Mode.)
When in the Automatic Mode, this system offers the following benefits:
• You will receive the optimum amount of humidity so that your
home and its furnishings are protected from the damaging effects
of excess condensation or low humidity during the heating season.
The ADHC automatically adjusts your home’s humidity based on the
outdoor temperature, increasing the time maximum comfort is maintained.
• Simple operation with few adjustments. In the Automatic Mode, the
ADHC eliminates the need to manually adjust the control when outdoor
temperature changes. It also eliminates the need to turn the dial setting
to “OFF” during the summer season.
MODEL 62 AUTOMATIC DIGITAL HUMIDIFIER CONTROL
INDICATOR LIGHTS
Call Dealer for Service: The red light indicates that the control is not
operating normally and that service is required.
Humidifier On: The green light indicates that the control is operating
normally and sending a call for humidity to the humidifier.
BLOWER ACTIVATION
Set the “Blower Activation Switch” to “ON” to allow the humidifier control
to activate the HVAC fan for maximum humidification.
If the HVAC system has been idle for one hour, the humidifier control will
activate the HVAC system fan to sample the air for 3 minutes. If the RH is
lower than the set point, the humidifier control will activate the humidifier
and keep the fan running. The humidifier will continue to operate for 2
hours or until the humidification set point is reached.
If the RH set point has not been reached by the end of a call for heat, the
control will continue to operate the humidifier and the HVAC fan until the
humidification set point is reached or 2 hours have elapsed.
When the “Blower Activation Switch” is in the “OFF“ position, the humidifier
control will only operate the humidifier if humidity is required and the HVAC
system fan is operating or the HVAC system is producing heat.
NOTE: If used in conjunction with an Aprilaire 8570 Communicating
Thermostat, and the blower activation feature is desired, DO NOT wire the
A B communication terminals.
- 8 - - 9 -
Page 6
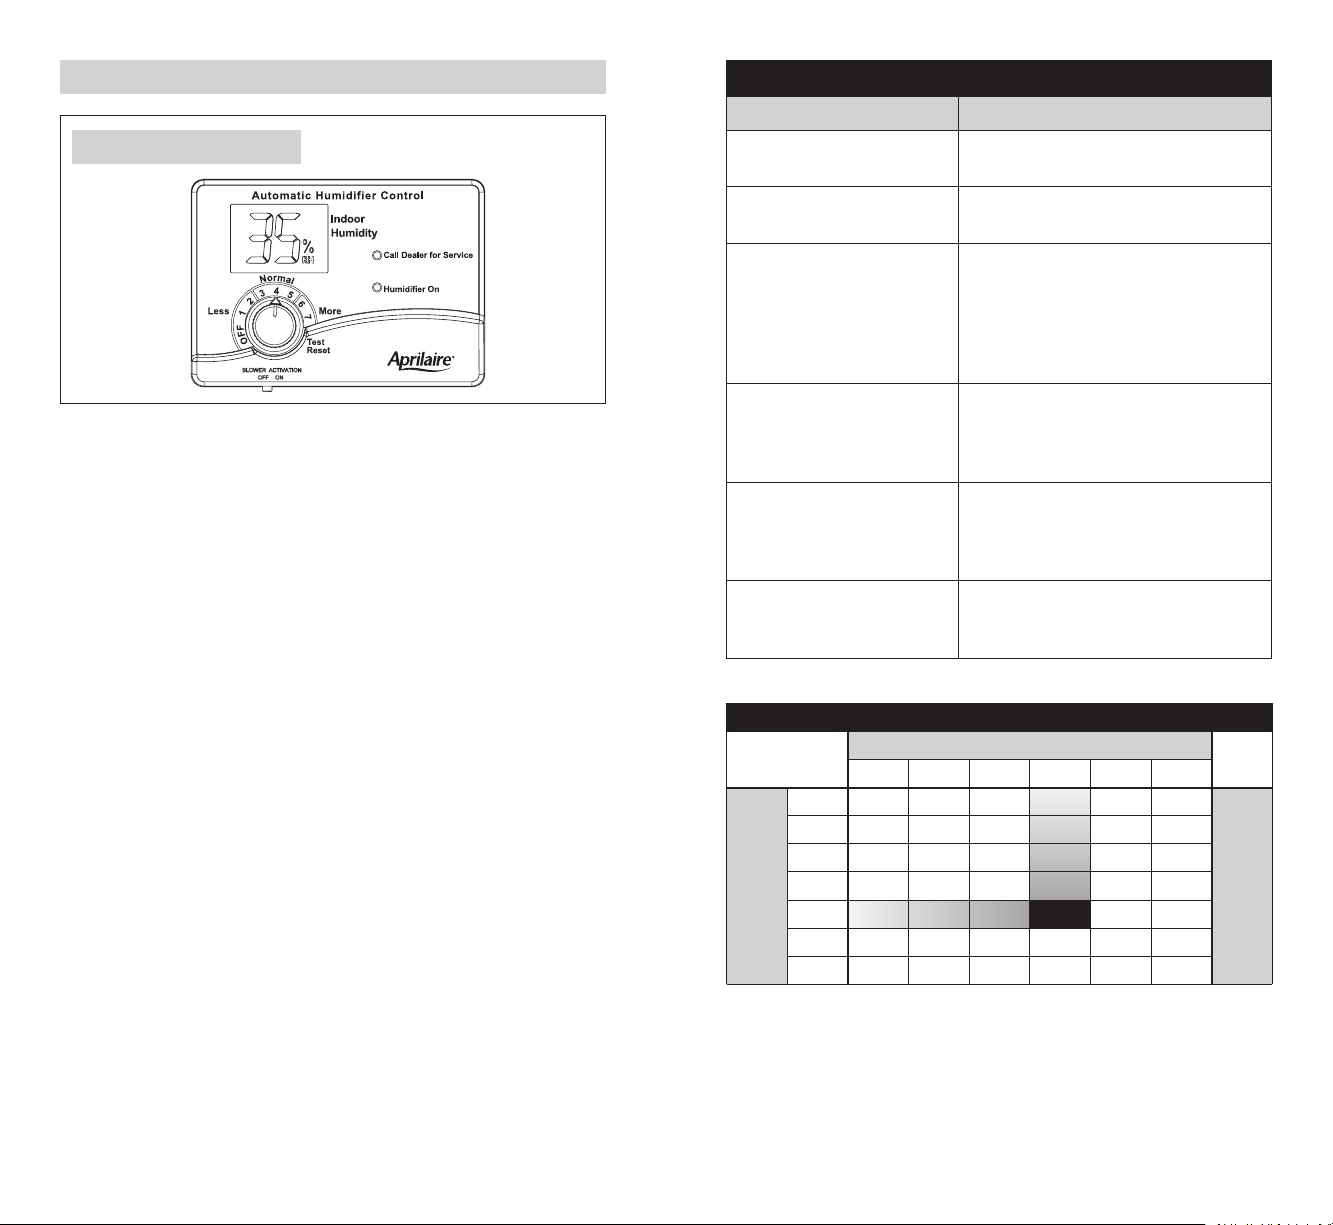
AUTOMATIC MODE
FIGURE 2 – Automatic Mode
90-1235B
Your Aprilaire ADHC must be installed in the cold air return duct. During
the first heating season, your Humidifier Control needs to be set initially
to match your home’s condition. Please follow these steps when adjusting
your control (refer to Figure 2).
1. Turn the dial setting knob to “5”, which is within the normal range.
During the next 24-48 hours it may be necessary to adjust the dial for
more or less humidity, depending on your personal comfort and home’s
requirements. Refer to TABLE 2 – ADHC Operation Guide.
2. During the coldest portion of the first heating season, minor adjustments
may be necessary. This is dependent upon your home’s construction.
Refer to TABLE 2 – ADHC Operation Guide.
The humidity in your home will now be accurately controlled to meet
your needs and should not need further adjustment during future heating
seasons. Make note of the dial setting in the event you temporarily move
the knob to “OFF” when performing annual maintenance of your Aprilaire
humidifier.
Your humidifier is a precision system that will accurately maintain the
humidity in your home. For every 2°F change in outdoor temperature, the
Model 62 Automatic Digital Humidifier Control will automatically adjust the
indoor humidity by 1%.
The Model 62 Automatic Digital Humidifier Control will accurately control
the humidity in your home to a maximum of 45%.
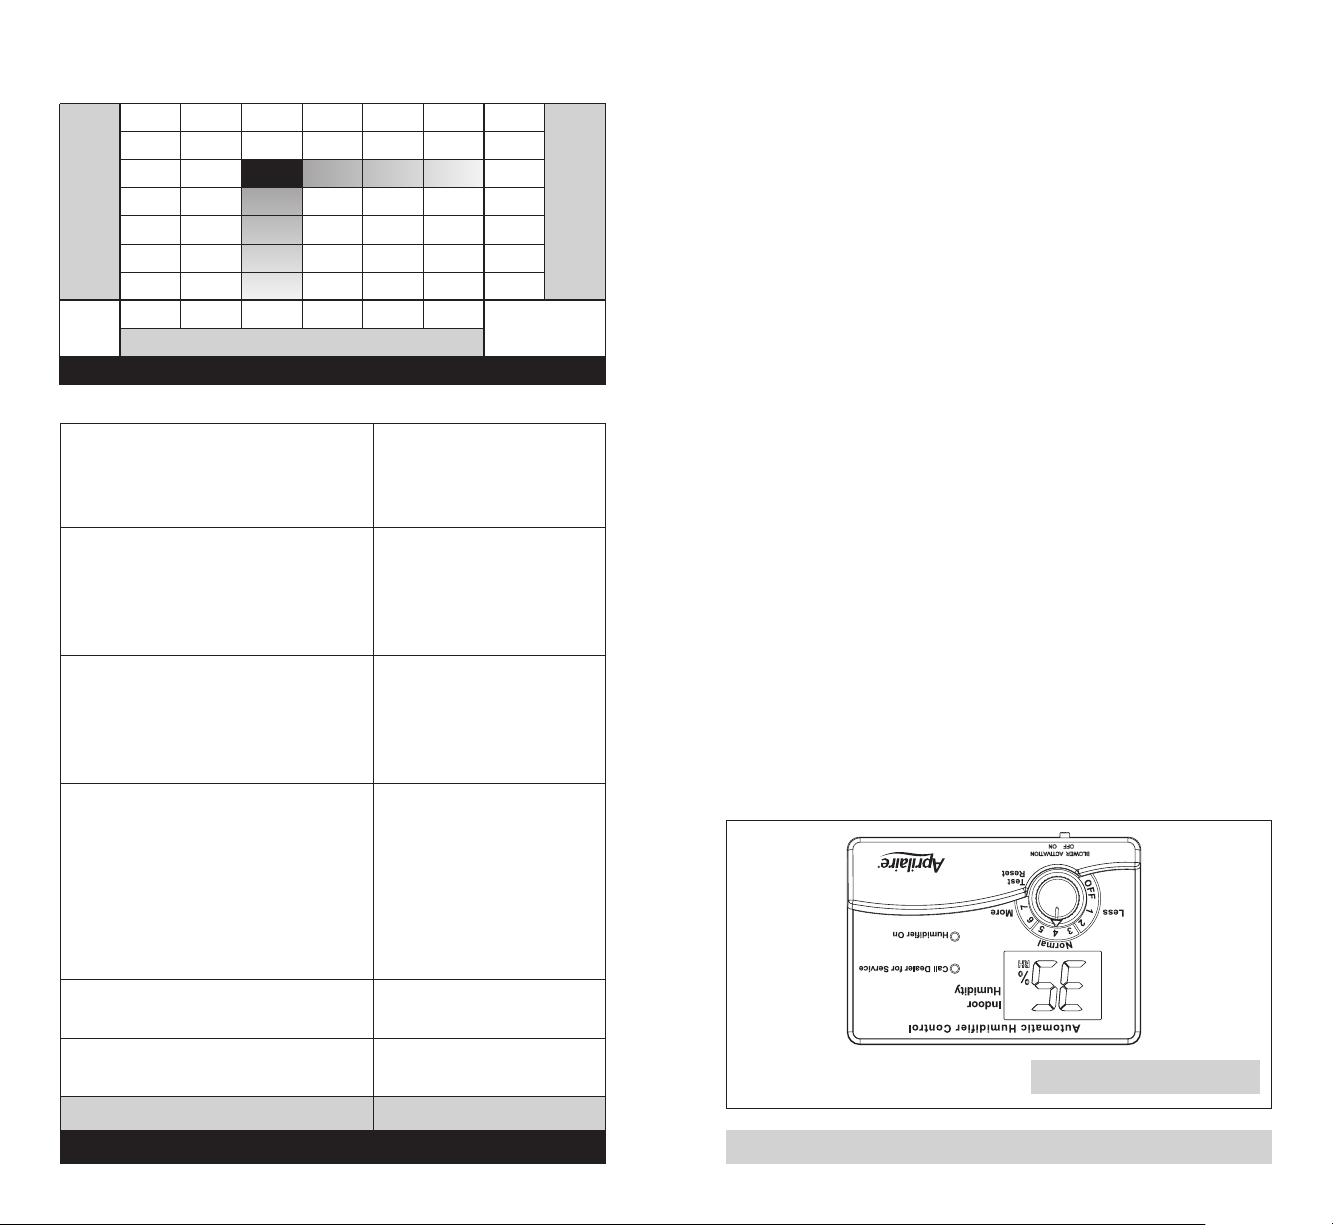
TABLE 2 – ADHC Operation Guide
Condition Solution
Condensation on windows. Reduce the setting on the control dial by 1
increment.
Lack of humidity. Increase the setting on the control dial by 1
increment.
Humidifier does not turn on. Make certain HVAC blower is operating. Turn
dial to “Test/Reset”. If unit still does not
operate, consult a heating contractor. Display
will flash software revision level e.g. r1, if the
control knob is left in test/reset for longer than
1 minute.
Humidifier won’t shut off. Turn control dial to “Off”. If unit continues to
produce steam (steam light on), disconnect
main power to turn off the humidifier and
consult a heating contractor.
Test mode. Make certain HVAC blower is operating.
System operation is checked by setting the
knob to “Test/Reset”. Humidifier will operate
for one minute.
Red “Call Dealer for Service” light
flashes (Figure 2).
TABLE 3 – % Relative Humidity Guide
Outdoor Temperature (°F)
-10°F 0°F 10°F 20°F 30°F 40°F
1 10% 10% 10% 15% 20% 25%
2 10% 10% 15% 20% 25% 30%
3 10% 15% 20% 25% 30% 35%
4 15% 20% 25% 30% 35% 40%
5 20% 25% 30% 35% 40% 45%
Dial Setting
6 25% 30% 35% 40% 45% 45%
7 30% 35% 40% 45% 45% 45%
Note the error code on the display (E1,
E2, E3 or E4) and call your heating and air
conditioning dealer for service.
Relative Humidity (%)
The humidity values in Table 3 are targets based on outdoor temperature
and the Digital Humidifier Control setting. The actual humidity may vary
due to conditions in the home (cooking, showering, etc.).
- 10 - - 11 -
Page 7
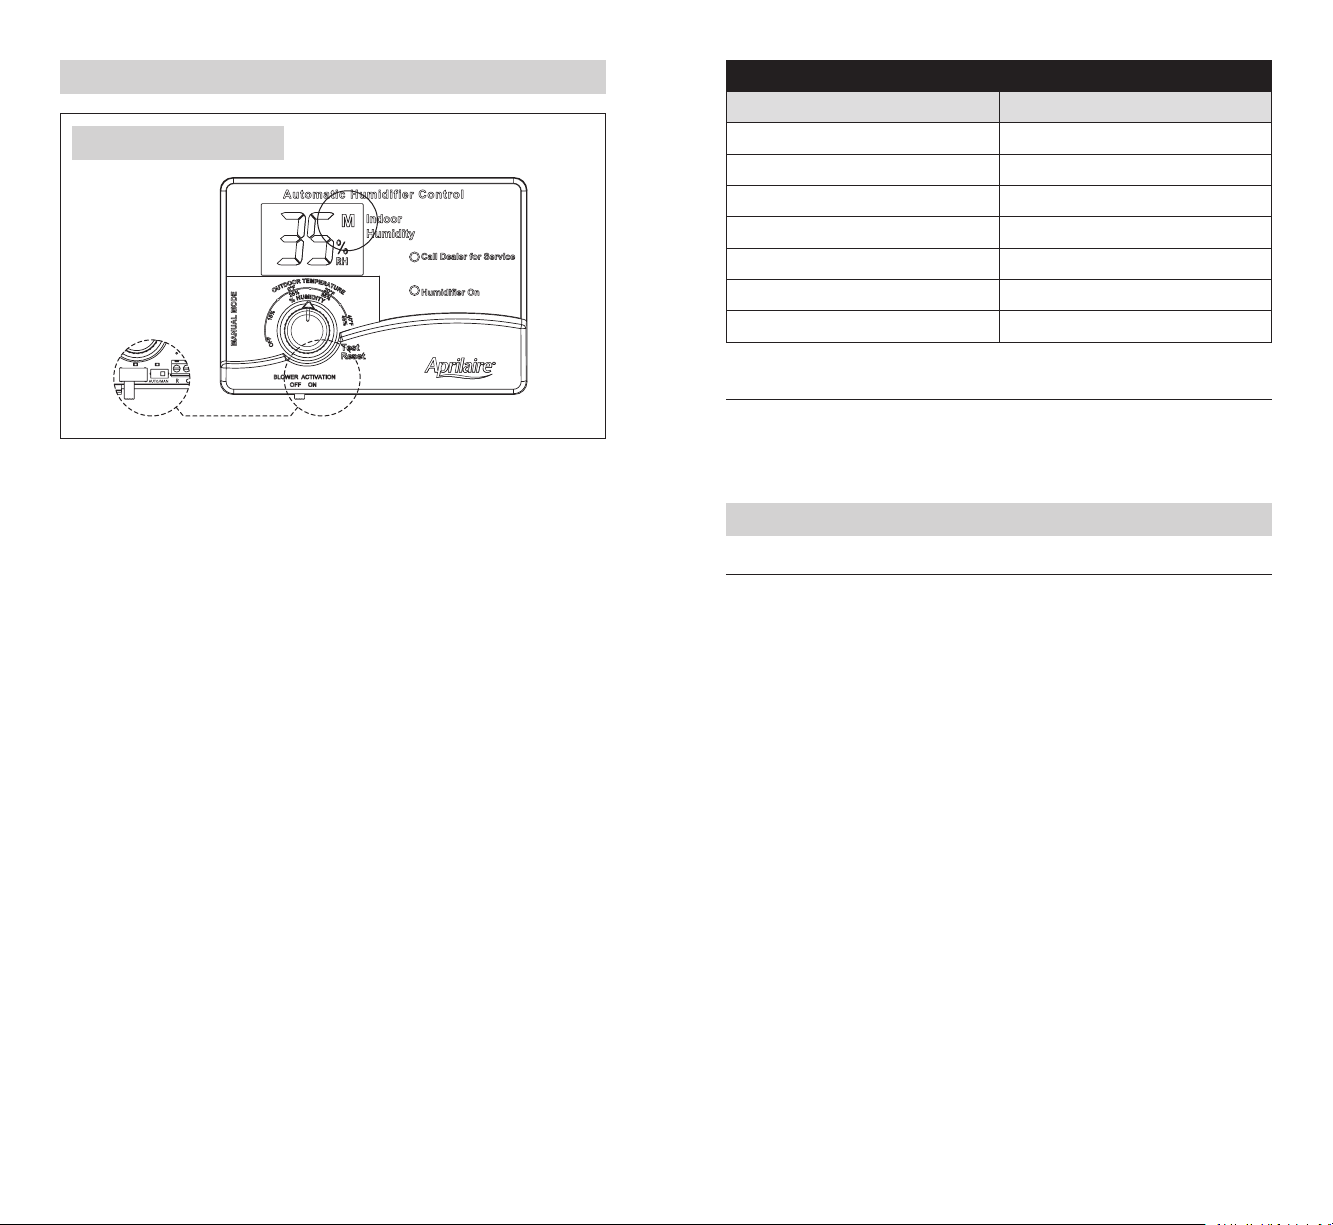
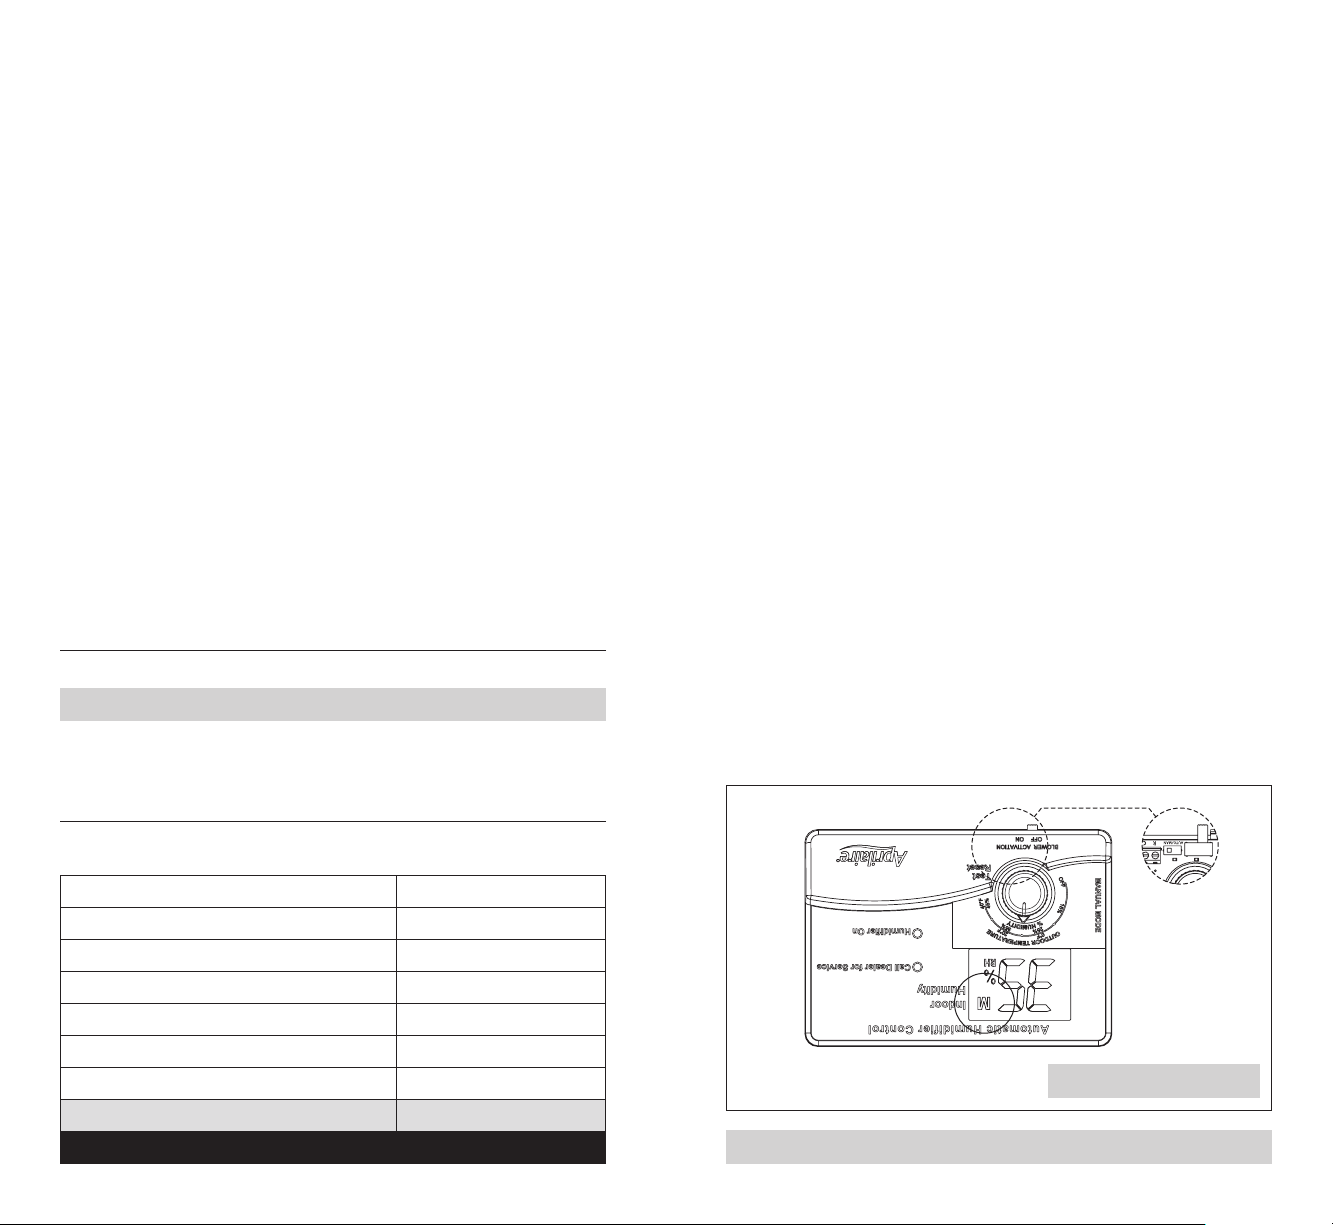
MANUAL MODE
FIGURE 3 – Manual Mode
TABLE 4 – Outdoor Temperature and Recommended Indoor RH Setting
Outdoor Temperature Recommended Indoor RH Setting
+40°F 45%
+30°F 40%
+20°F 35%
+10°F 30%
0°F 25%
-10°F 20%
-20°F 15%
TEST/ RESET
90-1236B
When installed in the Manual Mode (see Figure 3 – internal switch in “MAN”
position and “M” in the display), it is important to anticipate a drop in outdoor
temperature and reduce the setting accordingly to avoid excessive condensation.
For example, with an outdoor temperature of 20°F the recommended setting will
be 35%. If the temperature is expected to fall to 0°F that evening, then merely
reduce the setting to 25% several hours prior to the temperature change.
See Table 4 for the recommended settings. These settings, which are based
on years of research, represent a compromise between humidity levels that
would be most desirable for comfort and humidity levels that are suitable
for protection of your home and to avoid condensation on your windows. For
example, a wintertime indoor humidity of 50% may be considered ideal for
comfort, but unfortunately, it probably would result in condensation, which
can cause damage to your home. Observing the recommended humidity
levels on your Humidifier Control is an important safeguard. Condensation
of water on the inside surface of windows in the form of fogging or frost
is usually an indication of too much humidity. This same condensation can
occur in other areas in your home, possibly resulting in damage.
The Test/Reset feature allows the humidifier operation to be checked even
if there is no call for humidity. See “Check the Humidifier Operation”.
CHECK THE HUMIDIFIER OPERATION
DIGITAL HUMIDIFIER CONTROL
Set the knob to “Test/Reset”, make sure that the water saddle valve is
open and that the humidifier is on. The HVAC fan must be running for the
humidifier to function. The humidifier will only operate for 1 minute in test
mode. Reduce the Humidifier Control setting to the recommended inside
humidity, depending on the outside temperature. DO NOT LEAVE IN
TEST MODE AS HUMIDIFIER WILL NOT OPERATE.
- 12 - - 13 -
Page 8
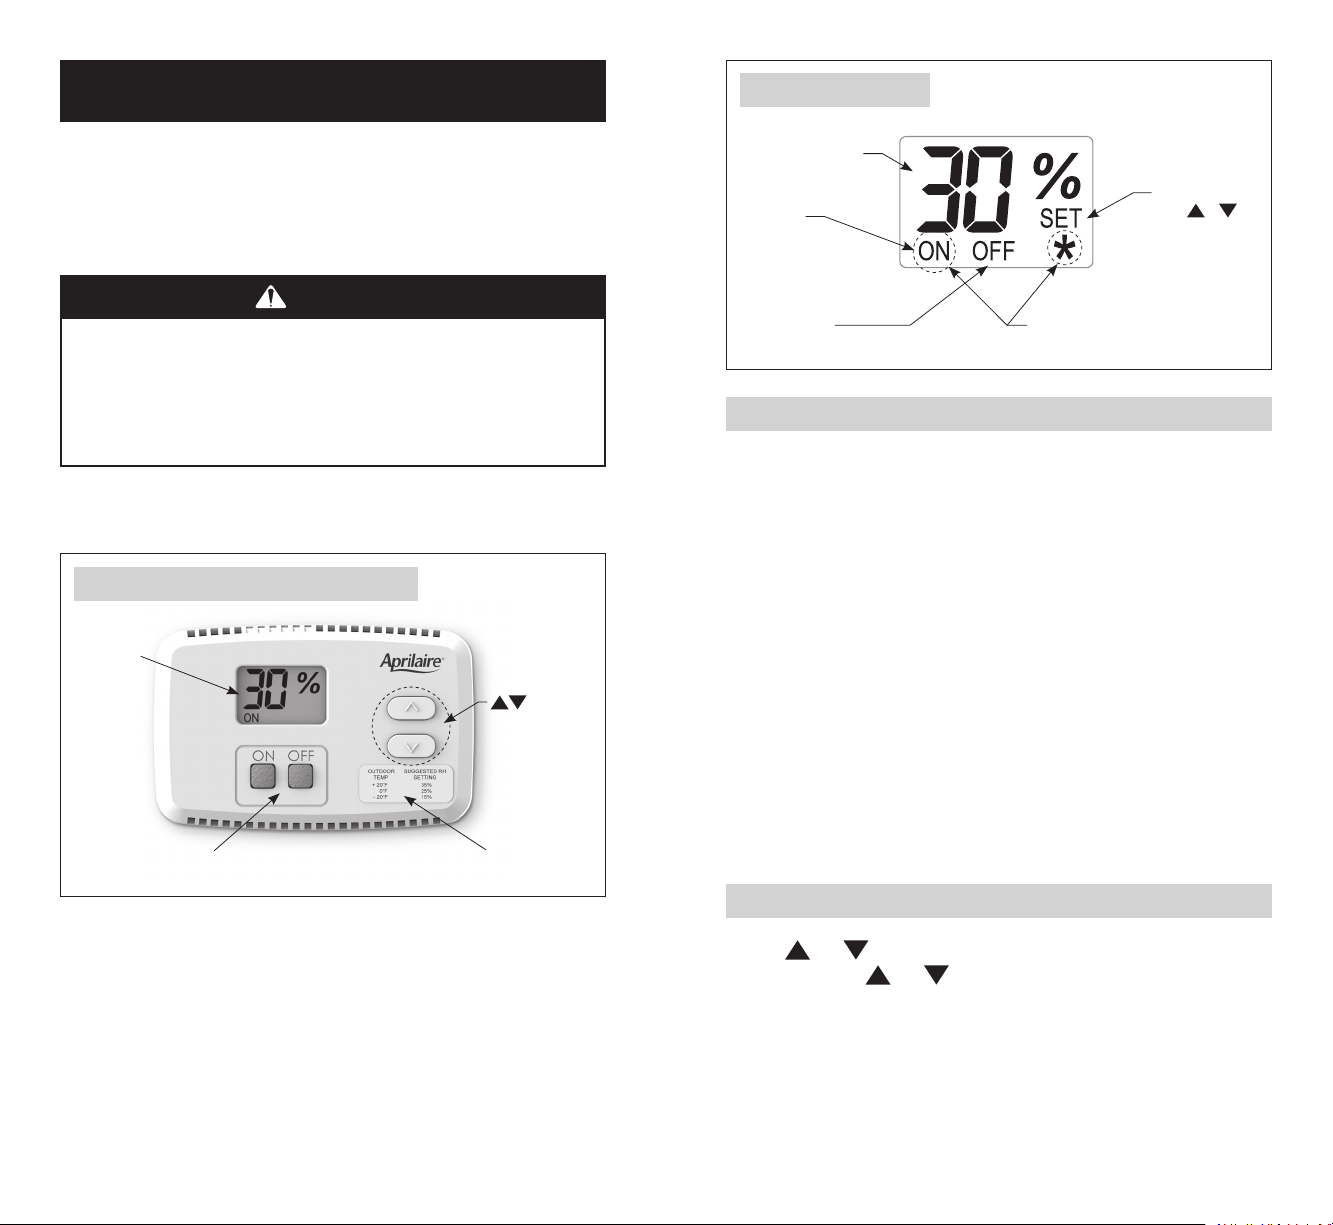
OPERATING INSTRUCTIONS –
MODEL 65 MANUAL DIGITAL HUMIDISTAT
Apply the RH setting label to the front cover if you want a guideline for
setting the control according to outdoor temperature. Since all houses are
different, you will need to determine exactly where to set the control so
that you have enough humidity to meet your needs, but not so much as to
cause excess condensation on windows or other cold surfaces.
CAUTION
Do not adjust humidity set-point above recommended level or to
recommended level if condensation occurs on inside surface of
windows or on other surfaces. Excess condensation can cause
damage to structure or furnishings. Excess moisture can also
allow the possibility for mold growth to occur.
When the control is first powered up, it will display “30%”, which is the
default setting.
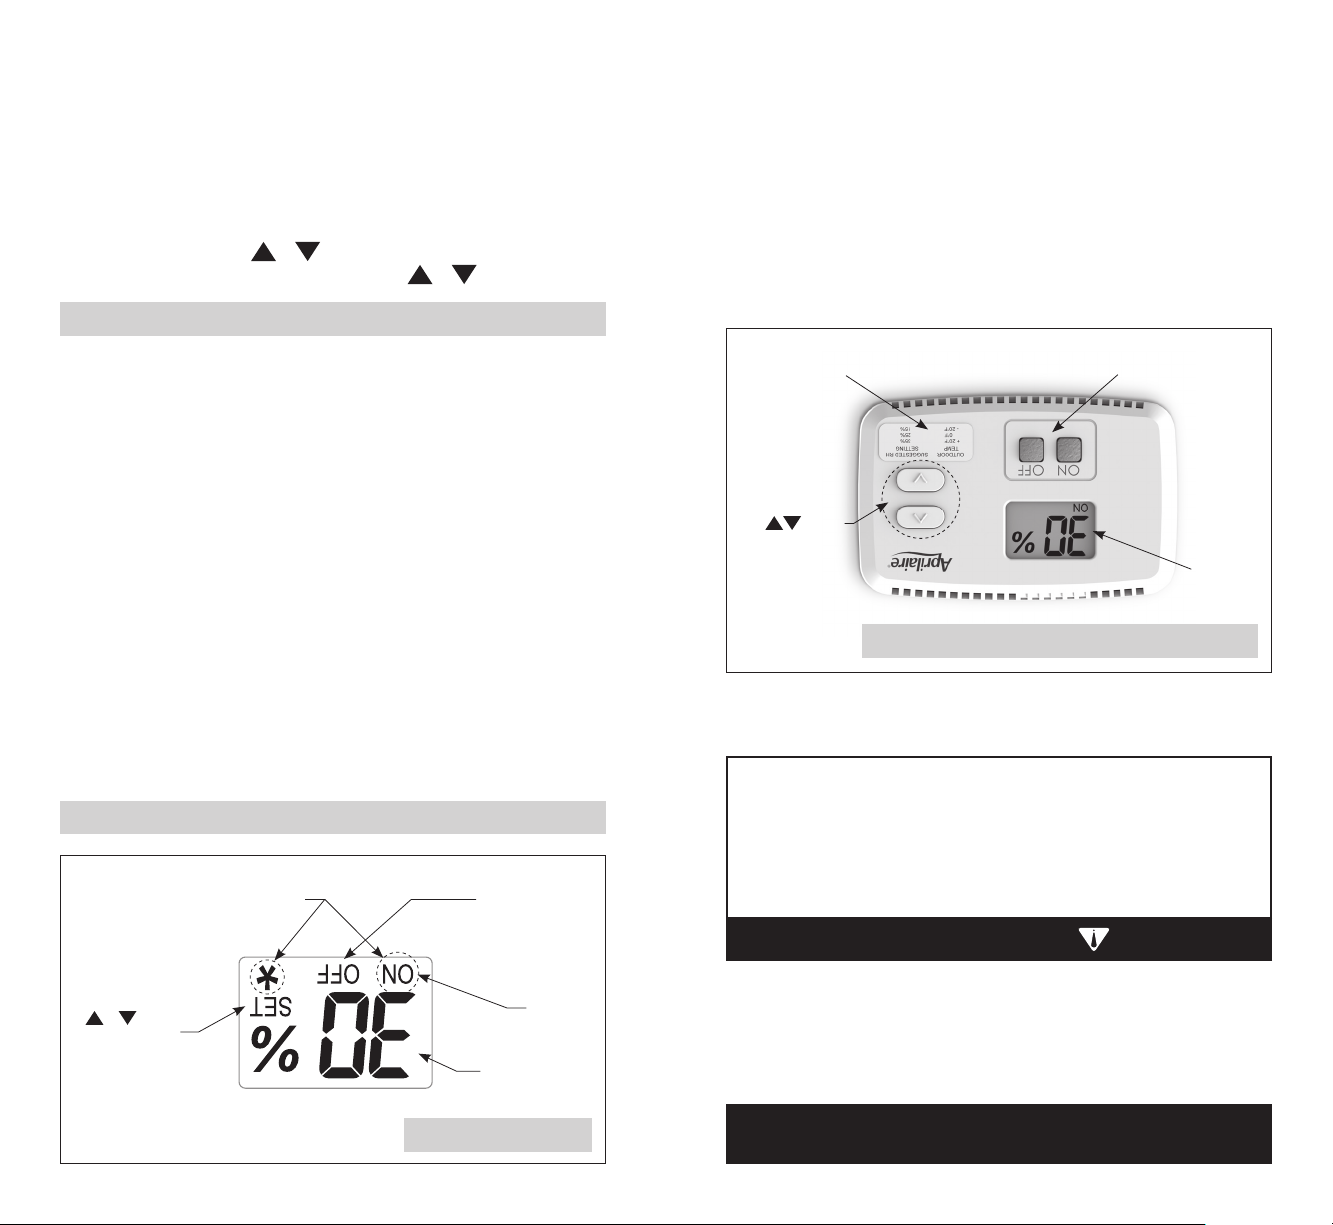
FIGURE 5 – LCD Display
Numbers show
current room humidity
OR humidity setting
SET is displayed
when
or is
Solid ON:
Control On
Blinking ON:
Humidifying
OFF: Control Off
90-1670
Blinking ON + *: Temp Limits Exceeded.
See Operating Limits, page 16.
pressed. The value
displayed is the
relative humidity
setting.
TURNING CONTROL ON & OFF
Begin by pressing the ON button. “ON” will appear on the display. This
means the control is on, but it does not necessarily mean the humidifier
is running. In order for the control to turn on your humidifier, several
conditions must be met:
FIGURE 4 – Control Display and User Buttons
LCD Display
Mode Buttons – Use
to turn control On/Off.
Buttons –
Use to view and
adjust relative
humidity setting.
RH Setting Label
1) The control and humidifier must be powered,
2) the RH level in the conditioned space must be below the set point, and
3) your furnace or furnace blower must be running.
When these conditions are met and the humidifier is operating, “ON” will
blink in the control display.
NOTE: If you have an Aprilaire Model 800 Steam Humidifier and a Model
850 Fan Pack, they will operate independently of any HVAC (Heating,
Ventilating and Air Conditioning) equipment.
To disable the humidifier, press the OFF button. The control will remain on
and display “OFF” plus the actual RH but will not allow the humidifier to
operate. The control must be ON in order to adjust the RH setting.
SETTING THE DESIRED RH LEVEL
Use the
When pressing the
buttons to display and raise or lower the RH setting.
and
buttons, “SET” and the RH setting will be
and
displayed. Each press of the buttons will change the setting by 1% RH.
If a button is pressed and held, the setting will change 1% RH every 1/2
second. “SET” will disappear and the display will once again show the
actual RH 5 seconds after the buttons are pressed.
- 14 - - 15 -
Page 9
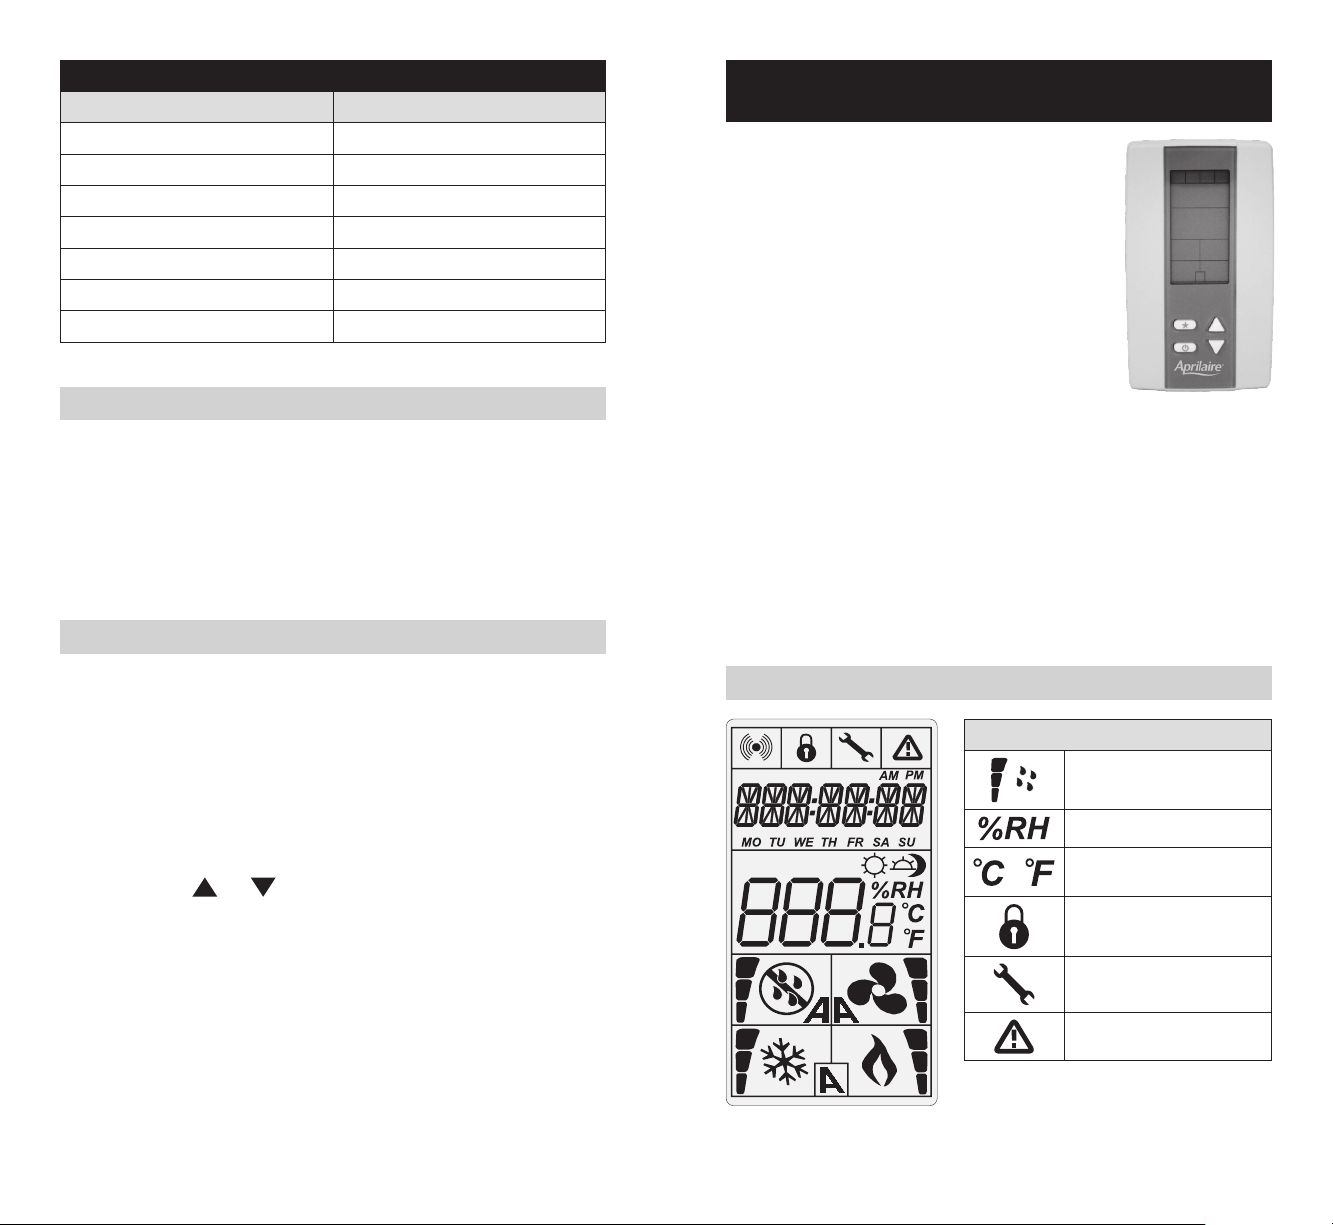
TABLE 5 – Outdoor Temperature and Recommended Indoor RH Setting
Outdoor Temperature Recommended Indoor RH Setting
+40°F 45%
+30°F 40%
+20°F 35%
+10°F 30%
0°F 25%
-10°F 20%
-20°F 15%
OPERATING LIMITS
If the temperature in the space to be conditioned drops below 40°F or
rises above 99°F, the control will not allow the humidifier to operate.
Under these conditions, the display will blink “ON” and “*”. Once the
temperature is in the normal operating range, the control will once again
allow the humidifier to operate and the blinking “ON” and “*” will no
longer be displayed.
ADJUSTING THE RH DISPLAY OFFSET
OPERATING INSTRUCTIONS – MODEL 63 AUTOMATIC
DIGITAL MODULATING CONTROL
The Aprilaire® Model 63 Automatic Digital
Modulating Control (ADMC) offers precise control
of the humidity in your home by providing a variable
output based on the difference between the set
point and the sensed humidity.
The Automatic Digital Modulating Control offers
two modes of operation, Automatic or Manual.
An explanation of both modes follows. When in
Automatic Mode, this system offers the following
benefits:
• You will receive the optimum amount of humidity so that your
home and its furnishings are protected from the damaging effects
of excess condensation or low humidity during the heating
season. The ADMC automatically adjusts your home’s humidity based
on the outdoor temperature, increasing the time maximum comfort is
maintained.
• Simple operation with few adjustments. In the Automatic Mode, the
ADMC eliminates the need to manually adjust the control when outdoor
temperature changes.
If you have another device that displays RH in your home, it may not
match the Model 65 Control display due to placement or a difference in
calibration. If you want the devices to match, the RH displayed by the
Model 65 control can be adjusted higher or lower by up to five percentage
points. Allow the control to acclimate to the space for 48 hours before
adjusting the offset.
The control must be on in order to adjust the offset. Press and hold the
OFF button for 5 seconds or until the display shows a value between -5%
and +5%. Use the
buttons to adjust the offset. The control will
and
revert back to the normal display mode after 5 seconds.
- 16 - - 17 -
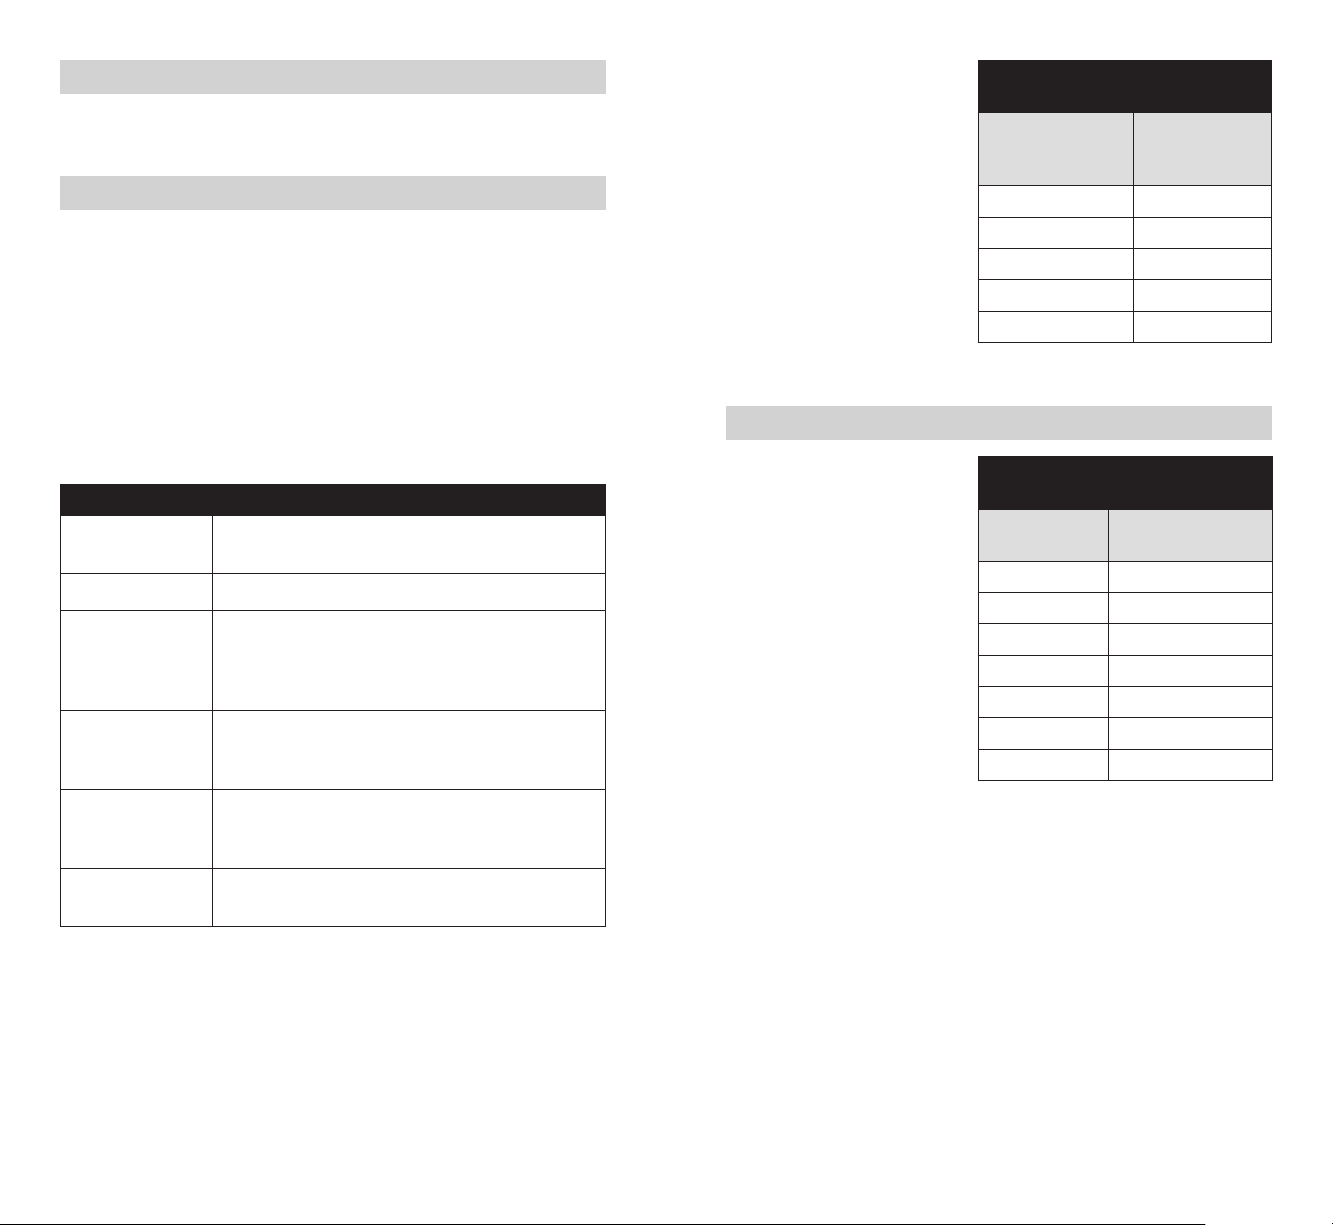
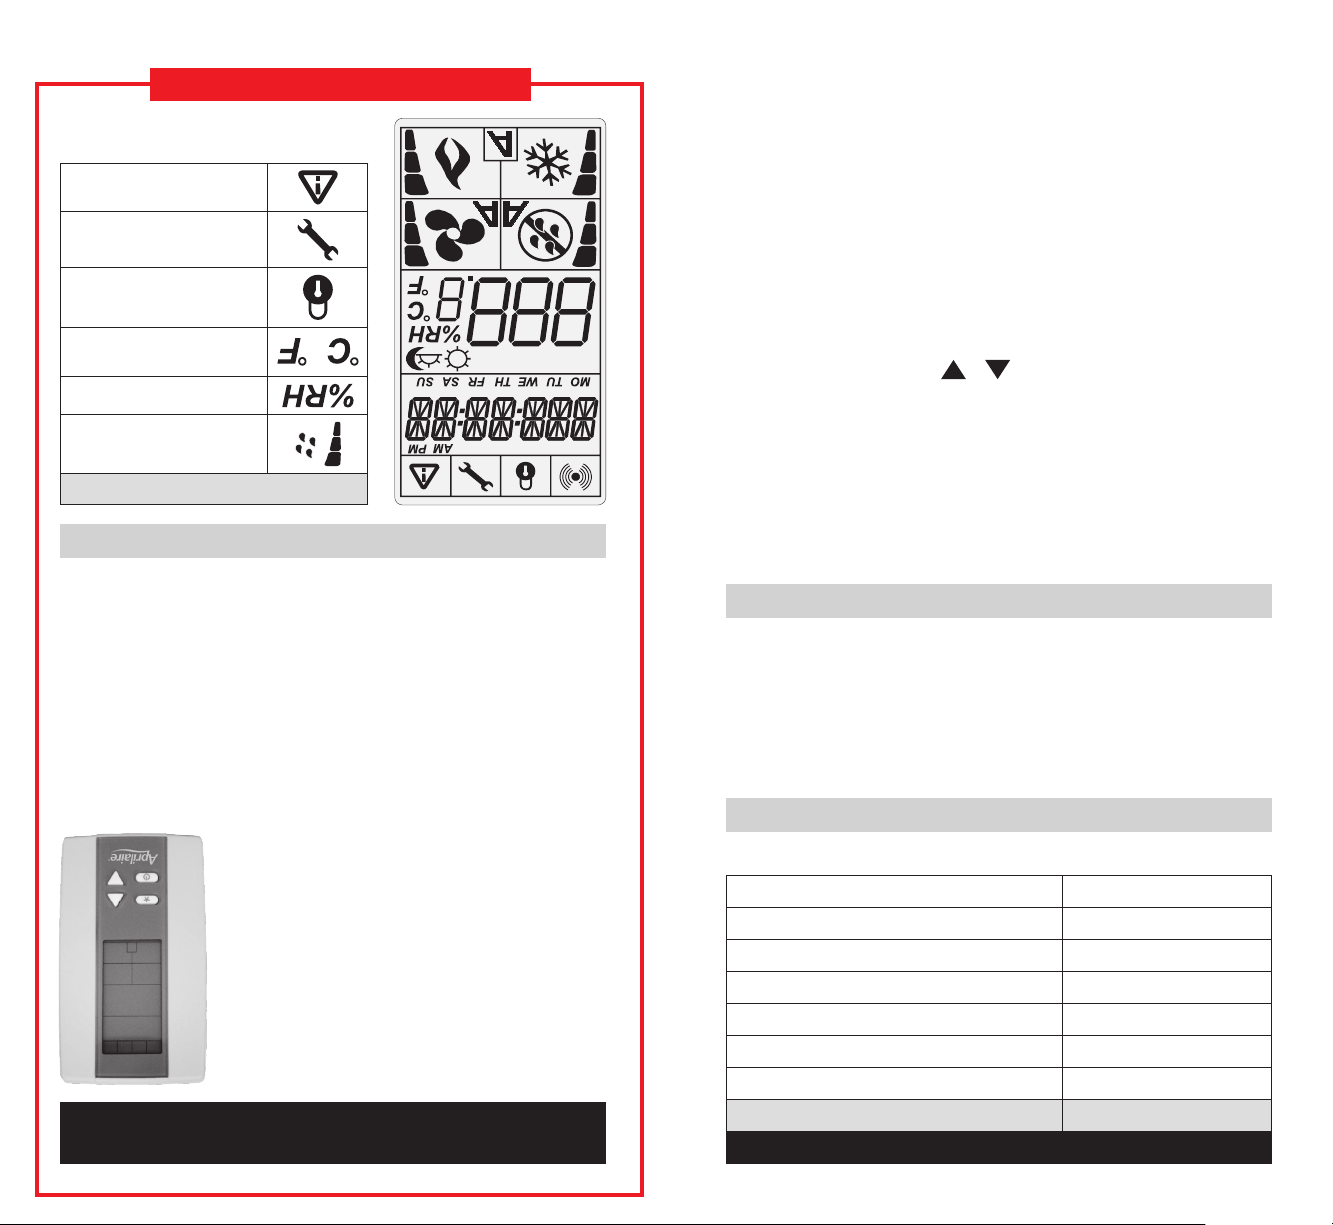
AUTOMATIC DIGITAL MODULATING CONTROL INTERFACE
Symbols on Display
Humidification ON
Low, Medium, High demand.
Percentage of humidity
or
°C: Celsius scale
°F: Fahrenheit scale
Menu set-up Lock
Programming mode
(Technician setting)
Alarm status
Page 10
BLOWER ACTIVATION
The blower Activation feature provided with the Model 63 ADMC turns the
HVAC system fan on when there is a call for humidity.
AUTOMATIC MODE
During the first heating season, your ADMC needs to be set to match
your home’s condition. The ADMC default set point is 40% RH. Follow
these steps when adjusting your control.
1. For the first 24-48 hours of operation, it may be necessary to adjust the
set point for more or less humidity, depending on your personal comfort
and home’s requirements. Refer to Table 6 – ADMC Operation Guide.
2. During the coldest portion of the first heating season, minor adjustments
may be necessary. This is dependent on your home’s construction. Refer
to Table 6 – ADMC Operation Guide.
TABLE 6 – ADMC Operation Guide
Condensation on
windows.
Lack of humidity.
Humidifier does
not turn on.
Humidifier won’t
shut off.
“OFF”, “– – –“
and alarm symbol
are displayed.
“– – –“ is
displayed.
Reduce the setting on the control by 5%.
Increase the setting on the control by 5%.
Check that set point is higher than sensed humidity.
Make certain HVAC blower is operating and humidifier is
On. If humidifier still does not operate consult a heating
contractor.
Turn ADMC Off. If humidifier continues to produce steam
(humidifier steam light On), disconnect main power to
turn off the humidifier and consult a heating contractor.
The humidity sensor is not connected or is short circuited.
Consult a heating contractor.
The temperature sensor is not connected or is short
circuited. Consult a heating contractor.
The humidity in your home will
now be accurately controlled
to meet your needs and should
not need further adjustment
during future heating seasons.
The Aprilaire ADMC measures
outdoor temperature and
automatically adjusts the set
point to prevent condensation
and damage. Table 7 shows the
maximum Humidistat set point
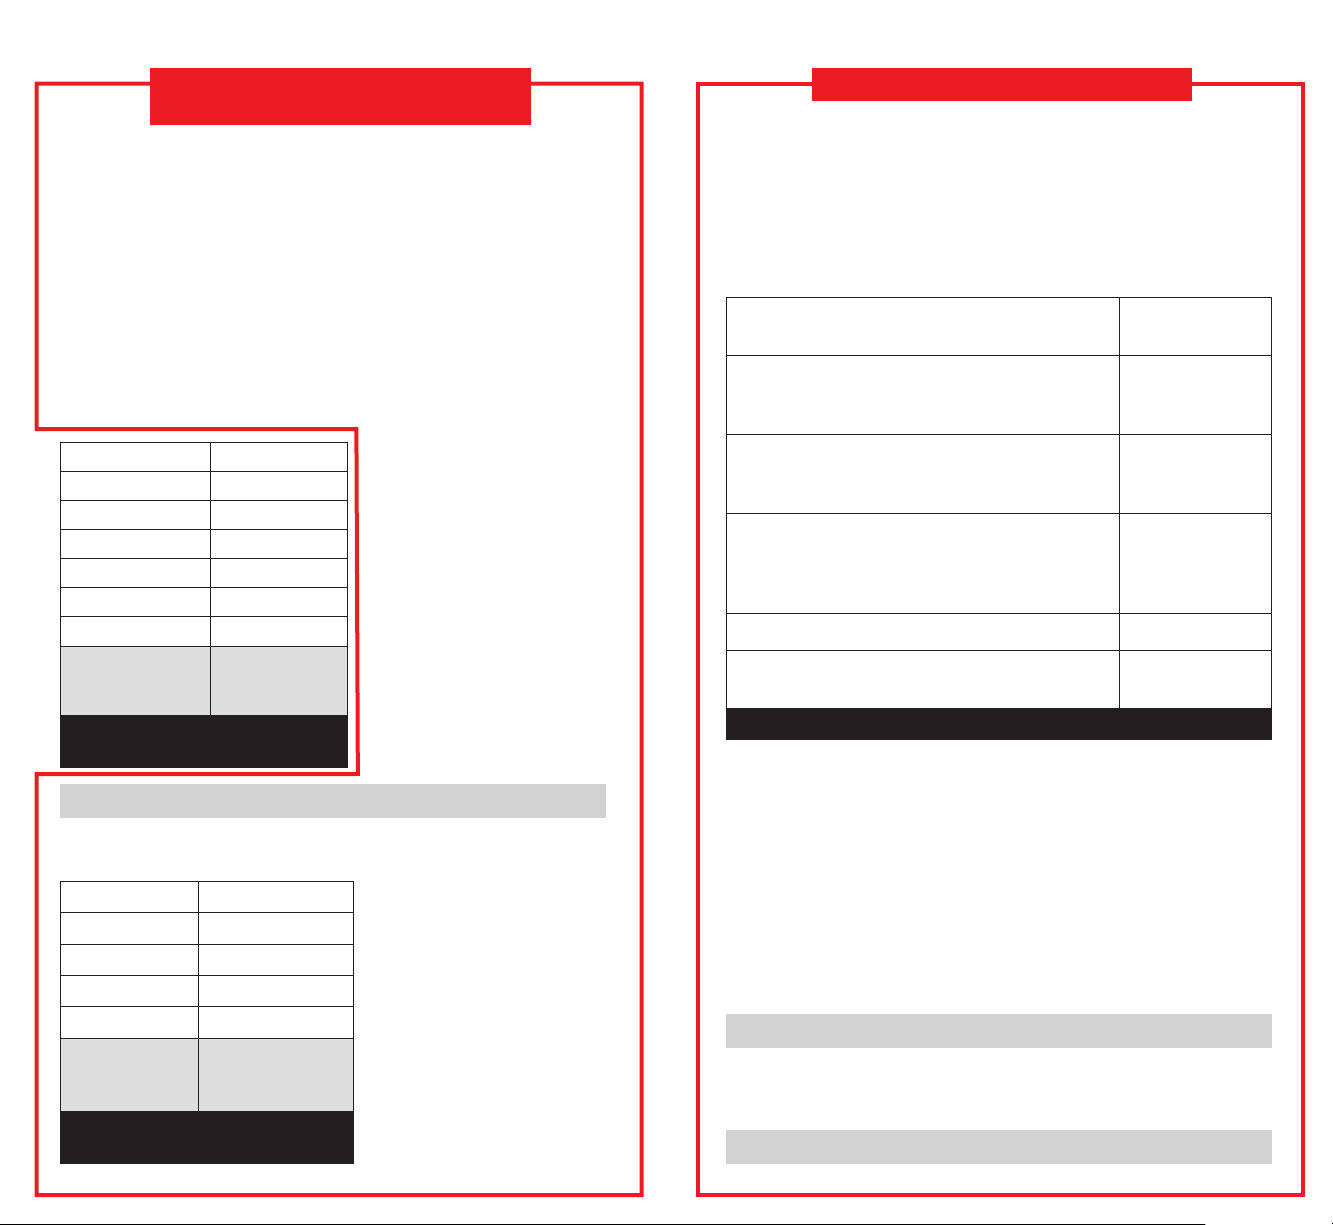
TABLE 7 – ADMC Maximum Set Point
for Outdoor Temperature
Outdoor
Temperature
°F (°C)
20 (-7) 35%
10 (-12) 30%
0 (-18) 25%
-10 (-23) 20%
-20 (-29) 15%
Maximum
Setpoint
(%RH)
the ADMC will allow for various
outdoor temperatures.
MANUAL MODE
If an outdoor temperature
sensor cannot be installed or the
application requires a specific
RH set point, the ADMC can be
configured to Manual Mode. In
Manual Mode, the humidifier
and control will maintain a
constant RH, regardless of
outdoor temperature.
It is important to anticipate a
drop in outdoor temperature
and reduce the setting
accordingly to avoid excessive
TABLE 8 – Outdoor Temperature and
Recommended Indoor RH Setting
Outdoor
Temperature
+40°F 45%
+30°F 40%
+20°F 35%
+10°F 30%
0°F 25%
-10°F 20%
-20°F 15%
Recommended
Indoor RH Setting
condensation. See Table 8 for
the recommended settings. These settings are based on years of research,
represent a compromise between humidity levels that would be most
desirable for comfort and humidity levels that are suitable for protection
of your home and to avoid condensation on your windows. For example, a
wintertime indoor humidity of 50% may be considered ideal for comfort, but
unfortunately, it probably would result in condensation, which can cause
damage to your home. Observing the recommended humidity levels on your
ADMC is an important safeguard. Condensation of water on the inside
surface of windows in the form of fogging or frost is usually an indication
of too much humidity. This same condensation can occur in other areas in
your home, possibly resulting in damage.
- 18 - - 19 -
Page 11

ADDITIONAL INFORMATION
TO REPLACE THE CANISTER
Be sure to keep fireplace dampers closed when not in use. They provide
an excellent escape route for heat, as well as humidity.
On occasion, indoor moisture producing activities such as clothes drying,
cooking, showers, etc., may raise the humidity level higher than it
should be, even though the Aprilaire humidifier is not operating. Telltale
indications are condensation or frost on cold surfaces such as windows,
doors, walls, etc. If such condensation persists for several hours, your home
should be ventilated to dissipate the potentially damaging excess moisture.
MAINTENANCE
Turn humidifier off and allow humidifier to drain. Disconnect
power before servicing.
Inspect Humidifier at approximately 500 hour intervals or several times
during the humidification season.
• Check system operation and inspect all plumbing connections and piping
for signs of cracks or leaks.
• Inspect drain line to make sure it is not blocked and has constant
downward slope. Clean or replace if necessary.
• Inspect steam hose to make sure it has no low spots and has constant
upward slope from humidifier to dispersion tube in duct. If dispersion
tube is mounted below humidifier, inspect drip tee drain.
Replace the canister annually and when prompted by the “Service” light.
Use Only Genuine Aprilaire Model 80 Canister.
1. Press On/Off switch to turn humidifier off. Humidifier will drain for four
minutes.
2. Allow humidifier to drain. When the green “drain” LED stops flashing,
disconnect main electrical power to humidifier.
3. Remove front panel.
4. Pull three wires off posts on top of canister. (Two large electrode
conductors and one water level probe conductor.)
5. Loosen hose clamp at top of canister.
6. Slide hose off top of canister.
7. Slide canister up and out of drain assembly. Discard canister.
8. Remove o-ring from drain assembly using small screw driver.
9. Inspect drain assembly and remove any debris. See drain valve cleaning
procedure in Installation & Maintenance manual.
10. Insert new o-ring into slot in drain assembly. (O-ring is provided with
Model 80 canister.) Dampen o-ring with water before inserting canister.
Do not use oil, grease, or any lubricant besides water.
11. Make sure strainer is inserted into bottom of new canister.
12. Insert canister into drain assembly. Position canister with label facing
outward.
13. Slip steam hose over top of canister and tighten hose clamp.
14. Reattach and fully seat three wires to posts on top of canister. (Larger
electrode conductors are interchangeable.)
15. Replace front panel.
16. Inspect drain line to make sure it is not blocked and has constant
downward slope. Clean or replace if necessary.
17. Inspect steam hose to make sure it has no low spots and has constant
upward slope from humidifier to dispersion tube in duct. If dispersion
tube is mounted below humidifier, inspect drip tee drain.
18. Restore electrical power to humidifier.
19. Turn humidifier on and verify green On/Off light is illuminated.
20. See Start-up procedure in Installation, Operation & Maintenance manual.
TO SERVICE FILL VALVE
If water flow from fill valve is restricted, disconnect inlet fitting and remove
in-line strainer using small screw from inlet port. Clean or replace strainer.
- 20 - - 21 -
Page 12
LIMITED WARRANTY
Your Research Products Corporation Aprilaire® humidifier unit is expressly warranted for five
(5) years from date of installation to be free from defects in materials or workmanship except,
however, for the disposable steam canister which will have to be replaced from time to time
depending upon the amount of use.
Research Products Corporation’s exclusive obligation under this warranty shall be to supply,
without charge, a replacement for any part of the humidifier which is found to be defective within
such five (5) year period and which is returned not later than thirty (30) days after said five (5)
year period by you to either your original supplier or to Research Products Corporation, Madison,
Wisconsin 53701, together with the model number and installation date of the humidifier.
THIS WARRANTY SHALL NOT OBLIGATE RESEARCH PRODUCTS CORPORATION FOR ANY LABOR
COSTS AND SHALL NOT APPLY TO DEFECTS IN WORKMANSHIP OR MATERIALS FURNISHED BY
YOUR INSTALLER AS CONTRASTED TO DEFECTS IN THE HUMIDIFIER ITSELF.
IMPLIED WARRANTIES OF MERCHANTABILITY OR FITNESS FOR A PARTICULAR PURPOSE
SHALL BE LIMITED IN DURATION TO THE AFORESAID FIVE YEAR PERIOD. RESEARCH PRODUCTS
CORPORATION’S LIABILITY FOR INCIDENTAL OR CONSEQUENTIAL DAMAGES, OTHER THAN
DAMAGES FOR PERSONAL INJURIES, RESULTING FROM ANY BREACH OF THE AFORESAID
IMPLIED WARRANTIES OR THE ABOVE LIMITED WARRANTY IS EXPRESSLY EXCLUDED.
THIS LIMITED WARRANTY IS VOID IF DEFECT(S) RESULT FROM FAILURE TO HAVE THIS UNIT
INSTALLED BY A QUALIFIED HEATING AND AIR CONDITIONING CONTRACTOR. IF THE LIMITED
WARRANTY IS VOID DUE TO FAILURE TO USE A QUALIFIED CONTRACTOR, ALL DISCLAIMERS
OF IMPLIED WARRANTIES SHALL BE EFFECTIVE UPON INSTALLATION.
Some states do not allow limitations on how long an implied warranty lasts or the exclusion or
limitation of incidental or consequential damages so the above exclusion or limitations may not
apply to you.
This warranty gives you specific legal rights and you may also have other rights which vary from
state to state.
WARRANTY REGISTRATION
Visit us on-line at www.aprilaire.com to register your Aprilaire product.
If you do not have on-line access, please mail a postcard with your name, address,
phone number, model number of product purchased and date of installation to:
Research Products Corporation, P.O. BOX 1467, Madison, WI 53701
Your Warranty Registration information
will not be sold or shared outside of this company.
P.O. Box 1467 • Madison, WI 53701-1467 • Phone: 800/334-6011 • Fax: 608/257-4357
www.aprilaire.com
10010990 8.14
B2206542A
© 2014 Aprilaire – A division of Research Products Corporation
- 22 -
- 22 -
Printed in U.S.A.
- 22 -
Imprimé aux É.-U.
© 2014 Aprilaire – une division de Research Products Corporation
B2206542A
10010990 8.14
Fax : 608/257-4357 • www.aprilaire.com
P.O. Box 1467 • Madison, WI 53701-1467 É.-U. • Téléphone : 800/334-6011
ni partagés à l’extérieur de notre entreprise.
Les renseignements de l’enregistrement de votre garantie ne seront ni vendus,
Research Products Corporation, P.O. BOX 1467, Madison, WI 53701 É.-U.
et la date de l’installation à :
votre nom, adresse, numéro de téléphone, le numéro de modèle du produit acheté
Si vous n’avez pas accès à Internet, veuillez envoyer une carte postale en indiquant
Rendez-vous en ligne sur www.aprilaire.com pour enregistrer votre produit Aprilaire.
ENREGISTREMENT DE LA GARANTIE
province à l’autre.
Cette garantie vous confère des droits juridiques précis et pouvez aussi avoir d’autres droits qui varient d’une
peuvent ne pas s’appliquer à vous.
limitation des dommages consécutifs ou indirects. Le cas échéant, les limitations ou l’exclusion susmentionnées
Certaines provinces n’autorisent pas les limites sur la durée d’une garantie implicite ou l’exclusion ou la
ENTRENT EN VIGUEUR AU MOMENT DE L’INSTALLATION.
PROFESSIONNEL QUALIFIÉ, TOUTES LES CLAUSES DE NON-RESPONSABILITÉ DES GARANTIES IMPLICITES
SI LA GARANTIE LIMITÉE DEVIENT NULLE ET SANS EFFET PARCE QUE VOUS N’AVEZ PAS FAIT APPEL À UN
FAIT INSTALLER CETTE UNITÉ PAR UN PROFESSIONNEL DU CHAUFFAGE ET DE LA CLIMATISATION QUALIFIÉ.
GARANTIE LIMITÉE EST NULLE ET SANS EFFET SI LE(S) DÉFAUT(S) RÉSULTE(NT) DU FAIT QUE VOUS N’AVEZ PAS
SUSMENTIONNÉES OU À LA GARANTIE LIMITÉE CI-MENTIONNÉE EST EXPRESSÉMENT EXCLUE. CETTE
DOMMAGES POUR DES BLESSURES, RÉSULTANT D’UNE INFRACTION AUX GARANTIES IMPLICITES
PRODUCTS CORPORATION EN CAS DE DOMMAGES INDIRECTS OU CONSÉCUTIFS, AUTRES QUE LES
LIMITENT EN DURÉE À LA PÉRIODE DE CINQ ANS CI-MENTIONNÉE. LA RESPONSABILITÉ DE RESEARCH
LES GARANTIES IMPLICITES DE VALEUR MARCHANDE OU D’ADAPTATION À UN USAGE PARTICULIER SE
INSTALLATEUR, CONTRAIREMENT AUX DÉFAUTS DE L’HUMIDIFICATEUR LUI-MÊME.
D’OEUVRE ET NE S’APPLIQUE PAS AUX DÉFAUTS DE FABRICATION OU DE MATÉRIAUX FOURNIS PAR VOTRE
CETTE GARANTIE N’OBLIGE PAS RESEARCH PRODUCTS CORPORATION À COUVRIR LES FRAIS DE MAIN
modèle et la date d’installation de l’humidificateur.
fournisseur original, soit à Research Products Corporation, Madison, Wisconsin 53701 É.-U. avec le numéro de
et renvoyée au plus tard dans un délai de trente (30) jours après ladite période de cinq (5) ans par vous, soit au
toute pièce de rechange pour l’humidificateur qui serait défectueuse durant une telle période de cinq (5) ans
L’obligation exclusive de Research Products Corporation en vertu de cette garantie sera de fournir gratuitement
cependant, de la cartouche à vapeur qui doit être remplacée de temps à autre selon le niveau d’utilisation.
ans à compter de la date d’installation d’être libre de défauts de matériaux ou de fabrication, à l’exception,
de Research Products Corporation est expressément garanti pendant cinq (5)
®
Votre humidificateur Aprilaire
GARANTIE LIMITÉE
Page 13

- 20 - - 21 -
tournevis. Nettoyez ou remplacez la crépine.
d’admission et retirez la crépine en ligne du port d’admission au moyen d’un petit
Si le débit d’eau du robinet de remplissage est restreint, débranchez le raccord
POUR RÉPARER LE ROBINET DE REMPLISSAGE
fonctionnement et d’entretien.
20. Reportez-vous à la procédure de démarrage dans le manuel d’installation, de
19. Mettez l’humidificateur en marche et vérifiez que le voyant « On/Off » est allumé.
18. Rétablissez l’alimentation électrique de l’humidificateur.
le té d’écoulement et le siphon.
dans le conduit. Si le tube de dispersion est monté sous l’humidificateur, examinez
qu’il ait une inclinaison positive constante de l’humidificateur au tube de dispersion
17. Inspectez le boyau à vapeur pour vous assurer qu’il n’ait pas de zones creuses et
au besoin.
et qu’elle ait une inclinaison négative constante. Nettoyez-la ou remplacez-la
16. Inspectez la conduite d’évacuation pour vous assurer qu’elle n’est pas bloquée
15. Replacez le panneau avant.
interchangeables.)
partie supérieure de la cartouche. (Les conducteurs d’électrodes plus gros sont
14. Rattachez et appuyez complètement trois fils sur les poteaux situés sur la
13. Glissez le boyau à vapeur sur le dessus de la cartouche et serrez la bride de serrage.
manière à ce que l’étiquette soit visible.
12. Insérez la cartouche dans l’assemblage d’évacuation. Placez la cartouche de
11. Assurez-vous que la crépine est insérée dans le fond de la nouvelle cartouche.
de la graisse ou tout autre lubrifiant sauf de l’eau.
torique avec de l’eau avant de réinsérer la cartouche. N’utilisez pas de l’huile,
(Le joint torique est fourni avec la cartouche modèle 80.) Humectez le joint
10. Insérez un nouveau joint torique dans la fente de l’assemblage d’évacuation.
de nettoyage du robinet de purge dans le manuel d’installation et d’entretien.
9. Examinez l’assemblage du drain et retirez tout débris. Reportez-vous à la procédure
8. Retirez le joint torique de l’assemblage d’évacuation au moyen d’un petit tournevis.
cartouche.
7. Glissez la cartouche vers le haut et hors de l’assemblage d’évacuation. Jetez la
6. Glissez le boyau du dessus de la cartouche.
5. Desserrez la bride de serrage située sur le dessus de la cartouche.
gros conducteurs d’électrode et un conducteur de capteur de niveau d’eau.)
4. Tirez les trois fils des poteaux sur la partie supérieure de la cartouche. (Deux
3. Retirez le panneau avant.
clignoter, débranchez l’alimentation électrique principale de l’humidificateur.
2. Laissez l’humidificateur se vider. Lorsque la DEL verte « Drain » cesse de
L’humidificateur se videra pendant quatre minutes.
1. Appuyez sur l’interrupteur de marche/arrêt pour éteindre l’humidificateur.
Utilisez seulement des cartouches originales Aprilaire modèle 80.
Remplacez la cartouche annuellement et lorsque le voyant « Service » vous l’indique.
l’humidificateur, examinez le té d’écoulement et le siphon.
tube de dispersion dans le conduit. Si le tube de dispersion est monté sous
creuses et qu’il ait une inclinaison positive constante de l’humidificateur au
• Inspectez le boyau à vapeur pour vous assurer qu’il n’ait pas de zones
qu’elle ait une inclinaison négative constante. Nettoyez-la ou remplacez-la au besoin.
• Inspectez la conduite d’évacuation pour vous assurer qu’elle n’est pas bloquée et
plomberie et de tuyauterie pour vous assurer qu’il n’y ait pas de fissures ou de fuites.
• Vérifiez le fonctionnement du système et inspectez toutes les connexions de
durant la saison d’humidification.
Examinez l’humidificateur à des intervalles d’environ 500 heures ou plusieurs fois
électrique avant d’effectuer l’entretien.
Arrêtez l’humidificateur et laissez-le se vider. Couper l’alimentation
ENTRETIEN
doit être aérée pour dissiper l’humidité excédentaire possiblement dommageable.
les murs, etc. Si une telle condensation persiste pendant plusieurs heures, votre maison
sont la condensation ou le givre sur les surfaces froides comme les fenêtres, les portes,
qu’elle devrait être, même si l’humidificateur Aprilaire ne fonctionne pas. Des indices
vêtements, la cuisson, les douches, etc., peuvent augmenter l’humidité au-delà de ce
Parfois, les activités produisant de l’humidité à l’intérieur, comme le séchage des
Ils fournissent une excellente voie de sortie pour la chaleur, ainsi que l’humidité.
Assurez-vous de garder les registres de foyer fermés lorsqu’ils ne sont pas utilisés.
POUR REMPLACER LA CARTOUCHE
RENSEIGNEMENTS SUPPLÉMENTAIRES
Page 14
- 18 - - 19 -
GEO – TRANSLATE THIS WHOLE PAGE
(TABLE 8 is done)
-28,9 °C (-20 °F) 15 %
-23,3 °C (-10 °F) 20 %
-17,8 °C (0 °F) 25 %
-12,2 °C (+10 °F) 30 %
-6,7 °C (+20 °F) 35 %
-1,1 °C (+30 °F) 40 %
+4,4 °C (+40 °F) 45 %
recommandée
l’HR intérieure
Réglage de
(%RH)
Setpoint
Maximum
extérieure
Température
réglage de l’HR intérieure recommandée
TABLEAU 8 – température extérieure et
-20 (-29) 15%
-10 (-23) 20%
0 (-18) 25%
10 (-12) 30%
20 (-7) 35%
°F (°C)
Temperature
Outdoor
for Outdoor Temperature
TABLE 7 – ADMC Maximum Set Point
GEO – TRANSLATE THIS WHOLE PAGE
your home, possibly resulting in damage.
of too much humidity. This same condensation can occur in other areas in
surface of windows in the form of fogging or frost is usually an indication
ADMC is an important safeguard. Condensation of water on the inside
damage to your home. Observing the recommended humidity levels on your
unfortunately, it probably would result in condensation, which can cause
wintertime indoor humidity of 50% may be considered ideal for comfort, but
of your home and to avoid condensation on your windows. For example, a
desirable for comfort and humidity levels that are suitable for protection
circuited. Consult a heating contractor.
The temperature sensor is not connected or is short
represent a compromise between humidity levels that would be most
the recommended settings. These settings are based on years of research,
condensation. See Table 8 for
accordingly to avoid excessive
and reduce the setting
drop in outdoor temperature
It is important to anticipate a
temperature.
RH, regardless of outdoor
control will maintain a constant
Manual Mode, the humidifier and
Consult a heating contractor.
The humidity sensor is not connected or is short circuited.
turn off the humidifier and consult a heating contractor.
(humidifier steam light On), disconnect main power to
Turn ADMC Off. If humidifier continues to produce steam
contractor.
On. If humidifier still does not operate consult a heating
Make certain HVAC blower is operating and humidifier is
Check that set point is higher than sensed humidity.
Increase the setting on the control by 5%.
configured to Manual Mode. In
RH set point, the ADMC can be
Reduce the setting on the control by 5%.
application requires a specific
sensor cannot be installed or the
If an outdoor temperature
MANUAL MODE
displayed.
“– – –“ is
are displayed.
and alarm symbol
“OFF”, “– – –“
shut off.
Humidifier won’t
not turn on.
Humidifier does
Lack of humidity.
windows.
Condensation on
TABLE 6 – ADMC Operation Guide
to Table 6 – ADMC Operation Guide.
may be necessary. This is dependent on your home’s construction. Refer
2. During the coldest portion of the first heating season, minor adjustments
outdoor temperatures.
the ADMC will allow for various
maximum Humidistat set point
and damage. Table 7 shows the
point to prevent condensation
automatically adjusts the set
outdoor temperature and
The Aprilaire ADMC measures
and home’s requirements. Refer to Table 6 – ADMC Operation Guide.
set point for more or less humidity, depending on your personal comfort
1. For the first 24-48 hours of operation, it may be necessary to adjust the
these steps when adjusting your control.
your home’s condition. The ADMC default set point is 40% RH. Follow
During the first heating season, your ADMC needs to be set to match
AUTOMATIC MODE
during future heating seasons.
not need further adjustment
to meet your needs and should
HVAC system fan on when there is a call for humidity.
The blower Activation feature provided with the Model 63 ADMC turns the
now be accurately controlled
The humidity in your home will
BLOWER ACTIVATION
Page 15
GEO – TRANSLATE THIS WHOLE PAGE
Alarm status
(Technician setting)
Programming mode
Menu set-up Lock
- 16 - - 17 -
°F: Fahrenheit scale
°C: Celsius scale
Percentage of humidity
Low, Medium, High demand.
Humidification ON
or
Symbols on Display
commande reviendra au mode d’affichage normal après cinq secondes.
et
pour régler le décalage. La
AUTOMATIC DIGITAL MODULATING CONTROL INTERFACE
temperature changes.
entre -5 % et +5 %. Utilisez les boutons
bouton OFF pendant cinq secondes ou jusqu’à ce que l’affichage indique une valeur
La commande doit être en marche afin de régler le décalage. Appuyez et tenez le
l’espace pendant 48 heures avant de régler le décalage.
diminuée jusqu’à cinq points de pourcentage. Laissez la commande s’acclimater à
correspondent, l’HR affichée par la commande modèle 65 peut être augmentée ou
ou d’une variation dans l’étalonnage. Si vous désirez que les dispositifs
correspondre à l’affichage de la commande modèle 65 en raison de l’emplacement
Si vous avez un autre dispositif qui affiche l’HR dans votre maison, il peut ne pas
RÉGLAGE DU DÉCALAGE DE L’AFFICHAGE DE L’HR
ADMC eliminates the need to manually adjust the control when outdoor
• Simple operation with few adjustments. In the Automatic Mode, the
maintained.
on the outdoor temperature, increasing the time maximum comfort is
season. The ADMC automatically adjusts your home’s humidity based
*
» clignoteront à l’écran.
of excess condensation or low humidity during the heating
home and its furnishings are protected from the damaging effects
• You will receive the optimum amount of humidity so that your
» clignotants ne seront plus affichés.
*
et «
commande permettra à nouveau le fonctionnement de l’humidificateur et le « ON »
Une fois la température revenue dans l’étendue de fonctionnement normale, la
de l’humidificateur. Dans ces conditions, « ON » et «
ou dépasse 37,2 °C (99 °F), la commande ne permettra pas le fonctionnement
Si la température dans l’espace à traiter tombe en dessous de 4,4 °C (40 °F)
LIMITES DE FONCTIONNEMENT
benefits:
Automatic Mode, this system offers the following
An explanation of both modes follows. When in
two modes of operation, Automatic or Manual.
The Automatic Digital Modulating Control offers
point and the sensed humidity.
output based on the difference between the set
of the humidity in your home by providing a variable
Modulating Control (ADMC) offers precise control
Model 63 Automatic Digital
®
The Aprilaire
DIGITAL MODULATING CONTROL
OPERATING INSTRUCTIONS – MODEL 63 AUTOMATIC
-28,9 °C (-20 °F) 15 %
-23,3 °C (-10 °F) 20 %
-17,8 °C (0 °F) 25 %
-12,2 °C (+10 °F) 30 %
-6,7 °C (+20 °F) 35 %
-1,1 °C (+30 °F) 40 %
+4,4 °C (+40 °F) 45 %
Température extérieure Réglage de l’HR intérieure recommandée
TABLEAU 5 – température extérieure et réglage de l’HR intérieure recommandée
Page 16
- 14 - - 15 -
l’HR réelle cinq secondes après que les boutons aient été enfoncés.
% toutes les demi-secondes. « SET » disparaîtra et l’affichage montrera à nouveau
de 1 %. Si un bouton est enfoncé et tenu enfoncé, le réglage de l’HR variera de 1
seront affichés. Chaque fois que les boutons sont enfoncés, le réglage de l’HR varie
et
, « SET » et le réglage d’HR
et
pour afficher et augmenter ou réduire le réglage
d’HR. Lorsque vous appuyez sur les boutons
Utilisez les boutons
RÉGLER LE NIVEAU D’HR DÉSIRÉ
marche ou l’arrêter (On/Off).
à l’humidificateur de fonctionner. La commande doit être à ON afin de régler l’HR.
de l’HR
Étiquette de réglage
pour mettre la commande en
Boutons de mode – à utiliser
demeurera allumée et affichera « OFF » en plus de l’HR réelle, mais ne permettra pas
Pour désactiver l’humidificateur, appuyez sur le bouton OFF (arrêt). La commande
équipement de CVC (chauffage, ventilation, climatisation).
ventilateur modèle 820 d’Aprilaire, ils fonctionneront de façon indépendante de tout
REMARQUE : si vous possédez un humidificateur de vapeur modèle 800 et un bloc
clignote sur l’écran de la commande.
– à
relative.
régler l’humidité
utiliser pour voir et
Boutons
Lorsque ces conditions sont remplies et que l’humidificateur fonctionne, « ON »
doivent fonctionner.
Affichage à CL
3) votre appareil de chauffage ou le ventilateur de votre appareil de chauffage
et
2) le niveau d’HR dans l’espace traité doit se trouver en dessous du point de réglage,
FIGURE 4 – écran de la commande et boutons d’utilisation
1) la commande et l’humidificateur doivent être alimentés,
marche, plusieurs conditions doivent être remplies :
que l’humidificateur fonctionne. Afin que la commande mette votre humidificateur en
ce qui est le réglage par défaut.
Lorsque la commande est mise en marche la première fois, elle affichera « 30% »,
Cela signifie que la commande est en marche, mais ne signifie pas nécessairement
Commencez en appuyant sur le bouton ON (en marche). « ON » apparaîtra à l’écran.
METTRE EN MARCHE ET ARRÊTER LA COMMANDE
moisissure.
Un excédent d’humidité peut également favoriser la croissance de
excessive peut causer des dommages à la structure ou à l’ameublement.
intérieure des fenêtres ou sur d’autres surfaces. Une condensation
fonctionnement, à la page 16.
*
: limites de température
relative.
réglage de l’humidité
valeur affichée est le
sont enfoncés. La
ou
lorsque
SET est affiché
dépassées. Reportez-vous aux limites de
Clignote ON +
90-1670
OFF : commande éteinte
humidifie
ON clignote :
en marche
commande
en continu :
ON allumé
d’humidité
la pièce OU le réglage
l’humidité actuelle de
Les chiffres indiquent
MISE EN GARDE
FIGURE 5 – Affichage à CL
au niveau recommandé si de la condensation apparaît sur la surface
Ne réglez pas le taux d’humidité au-delà du niveau recommandé ou
condensation excessive sur les fenêtres ou les autres surfaces froides.
suffisamment d’humidité pour répondre à vos besoins, mais pas trop pour causer de la
sont différentes, vous devrez déterminer exactement où régler la commande afin d’avoir
pour régler la commande selon la température extérieure. Puisque toutes les maisons
Appliquez l’étiquette de réglage d’HR sur le couvercle avant si vous désirez une directive
MODEL 65 MANUAL DIGITAL HUMIDISTAT
OPERATING INSTRUCTIONS –
Page 17
- 12 - - 13 -
L’HUMIDIFICATEUR NE FONCTIONNERA PAS.
la température extérieure. NE LAISSEZ PAS EN MODE TEST PUISQUE
la commande de l’humidificateur à l’humidité intérieure recommandée, selon
fonctionnera que pendant une minute en mode test. Réduisez le réglage de
CVC doit fonctionner pour que l’humidificateur fonctionne. L’humidificateur ne
robinet-valve d’eau est ouvert et que l’humidificateur est en marche. Le ventilateur
Réglez le bouton sur « Test/Reset » (test/réinitialisation), en vous assurant que le
COMMANDE NUMÉRIQUE DE L’HUMIDIFICATEUR
VÉRIFIER LE FONCTIONNEMENT DE L’HUMIDIFICATEUR
le fonctionnement de l’humidificateur ».
l’humidificateur, même si de l’humidité n’est pas requise. Reportez-vous à « Vérifier
La fonction Test/Reset (test/réinitialisation) permet de vérifier le fonctionnement de
90-1 236B
d’autres endroits dans votre maison, pouvant occasionner des dommages.
une indication qu’il y a trop d’humidité. Cette même condensation peut se produire à
surface intérieure des fenêtres sous la forme de brume ou de givre est habituellement
humidificateur est une importante mesure de protection. La condensation de l’eau sur la
maison. Respecter les niveaux d’humidité recommandés sur la commande de votre
elle entraînerait probablement de la condensation, ce qui cause des dommages à votre
% peut être considérée comme étant idéale pour le confort, mais malheureusement,
condensation dans vos fenêtres. Par exemple, une humidité intérieure d’hiver de 50
niveaux d’humidité qui sont appropriés pour la protection de votre maison et éviter la
entre les niveaux d’humidité qui seraient les plus désirés pour le confort et des
réglages, qui sont fondés sur des années de recherche, représentent un compromis
Reportez-vous au Tableau 4 pour connaître les réglages recommandés. Ces
réglage à 25 % plusieurs heures avant le changement de température.
descendre au-delà de 17,8 °C (0 °F) le soir en question, réduisez alors simplement le
-6,7 °C (20 °F), le réglage recommandé sera de 35 %. Si la température doit
toute condensation excessive. Par exemple, avec une température extérieure de
baisse de température extérieure et de réduire le réglage en conséquence pour éviter
interne à la position « MAN » et « M » à l’écran), il est important d’anticiper une
Lors de l’utilisation du mode manuel (reportez-vous à la Figure 3 – interrupteur
TEST/RÉINITIALISATION
-28,9 °C (-20 °F) 15 %
-23,3 °C (-10 °F) 20 %
-17,8 °C (0 °F) 25 %
-12,2 °C (+10 °F) 30 %
-6,7 °C (+20 °F) 35 %
-1,1 °C (+30 °F) 40 %
+4,4 °C (+40 °F) 45 %
Température extérieure Réglage de l’HR intérieure recommandée
TABLEAU 4 – température extérieure et réglage de l’HR intérieure recommandée
FIGURE 3 – mode manuel
MODE MANUEL
Page 18
Humidité relative (%)
7 30 % 35 % 40 % 45 % 45 % 45 %
Réglage du cadran
6 25 % 30 % 35 % 40 % 45 % 45 %
5 20 % 25 % 30 % 35 % 40 % 45 %
4 15 % 20 % 25 % 30 % 35 % 40 %
3 10 % 15 % 20 % 25 % 30 % 35 %
2 10 % 10 % 15 % 20 % 25 % 30 %
1 10 % 10 % 10 % 15 % 20 % 25 %
-23,3 °C -17,8 °C -12,2 °C -6,7 °C -1,1 °C 4,4 °C
Température extérieure (°C)
TABLEAU 3 – guide d’humidité relative en %
climatisation pour obtenir du service.
concessionnaire de chauffage et de
(E1, E2, E3 ou E4) et appelez votre
Notez le code d’erreur affiché à l’écran
pendant une minute.
réinitialisation). L’humidificateur fonctionnera
réglant le bouton sur « Test/Reset » (test/
Le fonctionnement du système est vérifié en
consultez un entrepreneur en chauffage.
principale pour éteindre l’humidificateur et
de vapeur allumé), débranchez l’alimentation
l’unité continue à produire de la vapeur (voyant
réinitialisation pendant plus d’une minute.
commande est laissé à la position test/
logiciel (r1, par exemple), si le bouton de
L’écran clignotera le niveau de révision du
pas, consultez un entrepreneur de chauffage.
(test/réinitialisation). Si l’unité ne fonctionne
Tournez le cadran jusqu’à « Test/Reset »
Assurez-vous que le ventilateur CVC fonctionne.
service) clignote (Figure 2).
concessionnaire pour obtenir du
for Service » (appeler le
Le voyant rouge « Call Dealer
Mode test. Assurez-vous que le ventilateur CVC fonctionne.
L’humidificateur ne s’arrête pas. Tournez le cadran jusqu’à « Off » (arrêt). Si
marche.
L’humidificateur ne se met pas en
- 10 - - 11 -
réelle peut varier en raison de conditions dans la maison (cuisson, douches, etc.).
extérieure et le réglage de la commande numérique de l’humidificateur. L’humidité
Les valeurs d’humidité dans le Tableau 3 sont des cibles fondées sur la température
humidity in your home to a maximum of 45%.
The Model 62 Automatic Digital Humidifier Control will accurately control the
humidity by 1%.
Model 62 Automatic Digital Humidifier Control will automatically adjust the indoor
l’humidité dans votre maison. For every 2°F change in outdoor temperature, the
Votre humidificateur est un système de précision qui gardera avec exactitude
annuel de votre humidificateur Aprilaire.
déplaceriez temporairement le bouton à « OFF » (arrêt) pour effectuer l’entretien
saisons de chauffage subséquentes. Notez le réglage du cadran au cas où vous
répondre à vos besoins et ne devrait pas nécessiter d’autres réglages durant les
L’humidité dans votre maison sera maintenant contrôlée avec exactitude pour
maison. Reportez-vous au TABLEAU 2 – ADHC Operation Guide.
mineurs pourront être nécessaires. Cela dépend de la construction de votre
2. Durant la partie la plus froide de la première saison de chauffage, des réglages
votre maison. Reportez-vous au TABLEAU 2 – ADHC Operation Guide.
obtenir plus ou moins d’humidité selon votre confort personnel et les exigences de
les prochaines 24 à 48 heures, il pourra être nécessaire de régler le cadran pour
1. Tournez le bouton de réglage à cadran à « 5 », ce qui est l’étendue normale. Durant
2).
étapes suivantes lorsque vous réglez votre commande (reportez-vous à la Figure
initialement réglée pour correspondre à l’état de votre maison. Veuillez suivre les
première saison de chauffage, la commande de votre humidificateur doit être
Your Aprilaire ADHC must be installed in the cold air return duct. Lors de la
90-1 235B
commande d’un incrément à la fois.
Manque d’humidité. Augmentez le réglage sur le cadran de
commande d’un incrément à la fois.
Condensation dans les fenêtres. Réduisez le réglage sur le cadran de
FIGURE 2 – mode automatique
État Solution
TABLEAU 2 – ADHC Operation Guide
MODE AUTOMATIQUE
Page 19
- 8 - - 9 -
de communication A B.
8570 d’Aprilaire et la fonction d’activation du ventilateur, ne reliez PAS les bornes
REMARQUE : s’il est utilisé en conjonction avec un thermostat de communication
CVC fonctionne ou le système CVC produit de la chaleur.
l’humidificateur que si de l’humidité est requise et que le ventilateur du système
position « OFF » (arrêt), la commande de l’humidificateur ne fera fonctionner
Lorsque l’interrupteur « Blower Activation » (activation du ventilateur) est à la
se soient écoulées.
jusqu’à ce que le point de réglage d’humidification soit atteint ou que deux heures
commande continuera de faire fonctionner l’humidificateur et le ventilateur CVC
Si le point de réglage de l’HR n’a pas été atteint à la fin d’un appel de chaleur, la
d’humidification soit atteint.
de fonctionner pendant deux heures ou jusqu’à ce que le point de réglage
l’humidificateur et fera fonctionner le ventilateur. L’humidificateur continuera
l’HR est inférieure au point de réglage, la commande de l’humidificateur activera
activera le ventilateur du système CVC pour vérifier l’air pendant trois minutes. Si
Si le système CVC a été inactif pendant une heure, la commande de l’humidificateur
CVC pour maximiser l’humidification.
marche) pour permettre à la commande de l’humidificateur d’activer le ventilateur
Réglez l’interrupteur « Blower Activation » (activation du ventilateur) à « ON » (en
ACTIVATION DU VENTILATEUR
commande fonctionne normalement et envoie un appel d’humidité à l’humidificateur.
Humidifier On (humidificateur en marche) : le voyant vert indique que la
normalement et qu’un service est requis.
obtenir du service) : le voyant rouge indique que la commande ne fonctionne pas
Call Dealer for Service (communiquer avec le concessionnaire pour
INDICATOR LIGHTS
MODEL 62 AUTOMATIC DIGITAL HUMIDIFIER CONTROL
» (arrêt) pendant la saison estivale.
temperature changes. Elle élimine aussi le besoin de tourner le cadran à « OFF
the ADHC eliminates the need to manually adjust the control when outdoor
• Fonctionnement simple avec peu de réglages. In the Automatic Mode,
outdoor temperature, increasing the time maximum comfort is maintained.
chauffage. The ADHC automatically adjusts your home’s humidity based on the
condensation excessive ou d’une faible humidité durant la saison de
et son ameublement soient protégés des effets destructeurs d’une
• Vous obtiendrez la quantité optimale d’humidité afin que votre maison
En mode automatique, ce système offre les avantages suivants :
Reportez-vous à la Figure 3 à la page 12 pour le mode manuel.)
ci-dessous. (Reportez-vous à la Figure 2 à la page 10 pour le mode automatique.
climatisation pour obtenir du service.
du système. Appelez votre concessionnaire de chauffage et de
être causée par une défaillance d’évacuation ou d’autres défaillances
s’éteint. Se produit lorsque l’unité détecte une surintensité qui peut
Problème de fonctionnement avec l’humidificateur. L’humidificateur
fonctionner, mais à capacité réduite.
courant de fonctionnement maximal. L’humidificateur continue de
et 24 heures supplémentaires à un niveau actuel inférieur à 75 % du
Se produit lorsque l’humidificateur a fonctionné pendant 168 heures
La cartouche a atteint la fin de sa durée utile et doit être remplacée.
for humidity.
allumée pendant 24 heures. Humidifier will turn on with the next call
reçoit pas d’appel d’humidité pendant 72 heures. La lumière demeure
Indique l’arrêt de fin de saison. Se produit si l’humidificateur ne
robinet demeure énergisé pendant quatre minutes.
Le robinet de purge est énergisé et ouvert, évacuant la cartouche. Le
quatre secondes.
l’accumulation de minéraux dans la cartouche. Clignote 10 fois dans
Les robinets de remplissage et de purge vibrent pour déloger
fonctionnement sans activité d’évacuation.)
(72 heures sans fonctionner) et durant l’évacuation forcée (168 heures de
l’humidificateur est arrêté, lors de l’évacuation à la fin de la saison
est ouvert tempérant l’eau dans la cartouche.) Se produit lorsque
L’humidificateur se prépare à s’évacuer. (Le robinet de remplissage
l’humidificateur fonctionne à sa capacité nominale.
s’allume en vert lorsque la conductivité de l’eau augmente et
nominale en raison d’une faible conductivité de l’eau. Le voyant
a fonctionné pendant 168 heures à un niveau inférieur à sa capacité
pas de vapeur à la capacité nominale. Se produit si l’humidificateur
Fonctionnement normal. L’humidificateur fonctionne, mais ne fournit
l’humidificateur fonctionne.
Fonctionnement normal. L’humidostat demande de la vapeur et
conditioning dealer for service.
robinet de remplissage pendant 40 minutes.) Call your heating and air
de niveau d’eau élevé ne détecte pas d’eau après avoir activé le
peut pas se remplir. L’humidificateur s’éteint. (Se produit si le capteur
Mode d’anomalie. Indique que la cartouche a besoin d’eau, mais ne
quatre secondes.
l’accumulation de minéraux dans la cartouche. Clignote 10 fois dans
Les robinets de remplissage et de purge vibrent pour déloger
durant un cycle d’évacuation.)
godet de remplissage. (Ne s’allume pas lors du tempérage de l’eau
permettre à l’eau de s’écouler dans la cartouche par l’entremise du
Fonctionnement normal. Le robinet de remplissage est activé pour
marche). Clignote pendant une minute.
le courant est débranché, puis remis avec l’interrupteur à ON (en
L’humidificateur se prépare à se mettre en marche. Se produit si
L’humidificateur est en marche.
L’humidificateur est éteint ou n’est pas alimenté.
of operation, Automatic or Manual. Une explication des deux modes se trouve
The Model 62 Automatic Digital Humidifier Control (ADHC) offers two modes
HUMIDIFIER CONTROL
OPERATING INSTRUCTIONS – MODEL 62 AUTOMATIC DIGITAL
continu
Rouge
clignotant
Rouge
continu
Vert
clignotant
Vert
continu
Jaune
continu
Vert
continu
Rouge
clignotant
Vert
continu
Vert
clignotant
Vert
continu
Vert
Arrêt
Indicateur Voyant Fonction
TABLEAU 1 – panneau d’affichage
PANNEAU D’AFFICHAGE
Page 20

- 6 - - 7 -
normal lorsqu’un appel d’humidité est effectué.
période de 24 heures soit écoulée. L’humidificateur reprend son fonctionnement
voyant du drain demeurera allumé jusqu’à ce qu’il y ait un appel d’humidité ou une
controller drains the canister, the drain valve will remain open for 30 minutes. Le
If the humidifier does not receive a call to operate in 72 hours, the humidifier
FERMETURE À LA FIN DE LA SAISON OU D’UNE PÉRIODE D’INACTIVITÉ
minute, puis l’humidificateur se met en marche.
courant rétabli, le voyant « On/Off » (marche/arrêt) clignote en vert pendant une
Si l’humidificateur fonctionne et qu’une panne de courant survient, une fois le
robinet de purge s’ouvre et vide la cartouche. Le fonctionnement normal se poursuit.
Si l’humidificateur a fonctionné pendant 168 heures sans cycle d’évacuation, le
interne pour les cycles de démarrage et d’évacuation est réinitialisée.
Chaque fois que le courant est coupé ou que l’humidificateur est éteint, la minuterie
pendant quatre minutes pour permettre à toute l’eau de s’évacuer de la cartouche.
empêcher l’eau chaude d’entrer dans le drain. Le robinet de purge demeure ouvert
s’ouvre pour introduire de l’eau froide dans la cartouche. Cela est effectué pour
Lorsque l’humidificateur commence un cycle de purge, le robinet de remplissage
replaced. L’humidificateur continuera de fonctionner, mais à un rythme inférieur.
point, the “Service” light will flash red indicating that the canister should be
avec l’utilisation jusqu’à ce qu’il atteigne le capteur de niveau élevé d’eau. At that
affecteront la résistance entre eux. Le niveau d’eau de fonctionnement augmentera
les minéraux qui s’accumulent sur les électrodes réduiront la surface d’efficacité et
a nominal current between the electrodes. Pendant la durée utile de la cartouche,
as the water heats up, the internal controller adjusts the water level to maintain
The conductivity of naturally soft water, hard water, and softened water changes
que la sortie nominale soit atteinte.
illuminates yellow. L’humidificateur continue de fonctionner de cette façon jusqu’à ce
produce steam at the rated level after 168 hours of operation, the “Steam” light
Pendant ce temps, le voyant « Steam » s’allume en vert. If the humidifier cannot
conductivité de l’eau se trouve dans l’étendue qui permet un fonctionnement normal.
passer à travers une série de cycles de remplissage/d’évacuation jusqu’à ce que la
Durant la mise en marche initiale avec une nouvelle cartouche, l’humidificateur peut
Lorsque la cartouche se vide, le voyant « Drain » (évacuation) s’allume en vert.
(remplissage) s’allume en vert.
Lorsque la cartouche est remplie ou ravitaillée en eau, le voyant « Fill »
(marche/arrêt) s’allume en vert.
Lorsque l’humidificateur est alimenté et mis en marche, le voyant « On/Off »
MODES DE FONCTIONNEMENT
conditioning contractor.
NOTE: Amperage, Voltage and plumbing changes should be made by a heating and air
cartouches fonctionnant avec de l’eau ayant moins de minéraux.
élevées de solides dissous et en suspension ne dureront pas aussi longtemps que les
cartouches dans des systèmes reliés à la plomberie d’une eau ayant des concentrations
La durée utile de la cartouche dépend grandement de la qualité de l’eau. Les
d’atteindre sa capacité nominale dans le plus court laps de temps.
fonctionner continuellement (en plus du ventilateur du système de CVC) lui permettra
augmente la conductivité de l’eau. Avec une nouvelle cartouche, laisser l’humidificateur
l’humidificateur fonctionne, les minéraux s’accumulent dans la cartouche, ce qui
les systèmes reliés à la plomberie d’une eau à faible conductivité. Pendant que
d’une eau à conductivité supérieure atteindront leur capacité plus rapidement que
supérieure à celle de l’eau naturellement adoucie. Les systèmes reliés à la plomberie
une haute teneur en minéraux et l’eau adoucie ont généralement une conductivité
de l’eau chaude, mais l’eau peut être adoucie ou non. L’eau « dure », qui possède
que les systèmes à 240 volts. L’humidificateur doit toujours être relié à la plomberie
systèmes à 120 volts peuvent prendre plus longtemps à atteindre la capacité nominale
nominale selon la tension d’entrée et la conductivité électrique de l’eau. Les
L’humidificateur pourra prendre plusieurs jours pour atteindre sa capacité
240 volts 131,0
208 volts 113,6
120 volts 60,6
240 volts 88,2
208 volts 77,6
120 volts 43,5
16,0
11,5
Intensité Tension Capacité de vapeur maximale (litres/jour)
votre maison.
sont réglées par votre installateur pour répondre aux besoins en humidité de
plus la sortie potentielle sera élevée. La tension et l’intensité de fonctionnement
operated at either 11.5 or 16.0 amps. Plus la tension et l’intensité sont élevées,
Your Steam Humidifier can be powered with a 120, 208 or 240 volt circuit and
CARACTÉRISTIQUES DE L’EAU
OPTIONS D’INSTALLATION ET EFFET DES
Page 21
90-1522
Sortie
Robinet de purge
Entrée
du robinet
de remplissage
Cartouche
Électrodes
Godet d’évacuation
élevé d’eau
Capteur de niveau
Drain
de vapeur
Débordement
d’alimentation
Eau
Remplissage
cartouche dépend de la teneur en minéraux de l’eau qui détermine la conductivité.
pour maintenir un courant constant. Le niveau d’eau de fonctionnement dans la
dans la cartouche par l’entremise du robinet de remplissage et du robinet de purge
flowing through the water between them. Le contrôleur ajuste le niveau d’eau
controller in the humidifier energizes the electrodes and measures the current
humidifier is turned on and the HVAC system blower is operating, the internal
When the Humidifier Control detects the need for humidity, and provided the
SÉQUENCE DES OPÉRATIONS
du flux
de contrôle
Orifice
remplissage
Godet de
FIGURE 1 – Système de remplissage et d’évacuation et cartouche
- 4 - - 5 -
. Nous sommes reconnaissant de
®
conduit et retourne toute humidité condensée dans le boyau à vapeur.
du tube de dispersion et des petits tubes distribue la vapeur dans une vaste zone du
» (petits tubes) qui se prolongent dans le centre du tube. La conception
™
de « tubelets
conduits du système de CVC. Les ouvertures dans le tube de dispersion sont munies
La vapeur est fournie dans le flux d’air par un tube de dispersion monté dans les
une représentation du système de remplissage et d’évacuation et de la cartouche.
électrique de l’eau et pour tempérer l’eau d’évacuation. Reportez-vous à la Figure 1 pour
d’eau dans la cartouche et fournir la capacité nominale de vapeur selon la conductivité
Les robinets de purge et de remplissage fonctionnent ensemble pour maintenir le niveau
La cartouche est appuyée sur un godet d’évacuation qui comprend un robinet de purge.
l’humidificateur et la source d’eau. La cartouche de vapeur est remplie à partir du fond.
de remplissage sert de réservoir de débordement et fournit un espace d’air entre
vers un godet de remplissage situé dans la partie supérieure de l’armoire. Le godet
la vapeur. L’eau est introduite dans l’humidificateur grâce à un robinet de remplissage
d’eau. Le courant s’écoulant entre les électrodes fait bouillir l’eau pour ainsi créer de
génère de la vapeur en énergisant deux électrodes qui se prolongent dans une cartouche
conditioned space via the HVAC system duct or Aprilaire Fan Pack. L’humidificateur
Steam Humidifier delivers humidity in the form of steam to the
®
The Aprilaire
PRINCIPES DU FONCTIONNEMENT
de chauffage et de climatisation.
dans les Pages Jaunes sous appareil d’humidification ou entrepreneurs
de concessionnaire sur notre site Web (www.aprilaire.com) ou regardez
chauffage et de climatisation dans votre région. Utilisez le localisateur
sont offertes par votre installateur ou par la plupart des entrepreneurs de
Des cartouches à vapeur de rechange authentiques Aprilaire modèle 80
www.aprilaire.com/warranty.
Assurez-vous d’enregistrer la garantie de votre humidificateur en ligne à :
aidera à comprendre l’entretien de routine qui sera requis.
familiariser avec les bienfaits dont vous profiterez de l’humidificateur et vous
Veuillez prendre quelques minutes pour lire ce livret. Cela vous permettra de vous
performance uniforme ininterrompue. Reportez-vous à la page 20.
Votre humidificateur nécessitera un entretien périodique pour assurer une
reconnue comme meneur dans l’industrie du chauffage et de la climatisation.
fabrique des produits pour la qualité de l’air intérieur de toute la maison et elle est
Vous avez investi dans l’équipement de la plus haute qualité qui soit. Aprilaire
vos affaires et heureux d’ajouter votre nom à notre liste grandissante de clients.
Merci d’avoir acheté un humidificateur Aprilaire
INTRODUCTION
Page 22
- 2 - - 3 -
La condensation pourrait causer des dommages.
Ne réglez pas l’humidité à un niveau supérieur à celui recommandé.
EXCÉDENT D’HUMIDITÉ
procédure de service ou d’entretien sur cet humidificateur.
les procédures décrites dans ce manuel avant d’effectuer toute
mortelles peuvent survenir à la suite d’un choc électrique. Respectez
d’humidité pendant une procédure d’entretien, des blessures graves ou
Si l’humidificateur se met en marche en réponse à une demande
toute procédure de service ou d’entretien sur toute pièce du système.
Respectez la procédure d’arrêt indiquée dans ce manuel avant d’effectuer
DANGER DE CHOC ÉLECTRIQUE
ou d’entretien sur toute pièce du système.
directives de ce manuel lorsque vous effectuez toute procédure de service
causer des blessures graves. Pour éviter les brûlures graves, suivez les
l’eau chaude évacuée ou l’air dans lequel la vapeur a été évacuée peut
vapeur évacuée n’est pas visible. Tout contact avec les surfaces chaudes,
de dispersion peuvent atteindre une température de 100 °C (212 °F). La
chaudes. L’eau dans la cartouche de vapeur, les tuyaux à vapeur et le tube
Les surfaces de ce système d’humidification à vapeur sont extrêmement
SURFACES CHAUDES ET EAU CHAUDE
MISE EN GARDE
à la structure et aux meubles.
provoquer une accumulation d’humidité pouvant causer des dommages
Le non-respect des instructions se trouvant dans ce manuel peut
causer des dommages matériels et des blessures graves ou mortelles.
instructions pourrait provoquer les situations dangereuses décrites et
sur toute pièce du système. Le non-respect des mises en garde et
Lire ce manuel avant d’effectuer toute procédure de service ou d’entretien
Lisez toutes les mises en garde et les instructions.
MISE EN GARDE
Garantie limitée ....................................................22
Entretien..........................................................20
Renseignements supplémentaires .....................................20
Model 63 Automatic Digital Modulating Control . . . . . . . . . . . . . . . . . . . . . . . . . . 17
Operating Instructions –
Model 65 Manual Digital Humidistat ...................................14
Operating Instructions –
Model 62 Automatic Digital Humidifier Control ............................9
Directives d’utilisation –
Panneau d’affichage .................................................8
Modes de fonctionnement.............................................7
Options d’installation et effet des caractéristiques de l’eau ..................6
Séquence des opérations .............................................5
Principes du fonctionnement...........................................4
Introduction ........................................................4
Précautions de sécurité ...............................................3
PRÉCAUTIONS DE SÉCURITÉ
TABLE DES MATIÈRES
Page 23
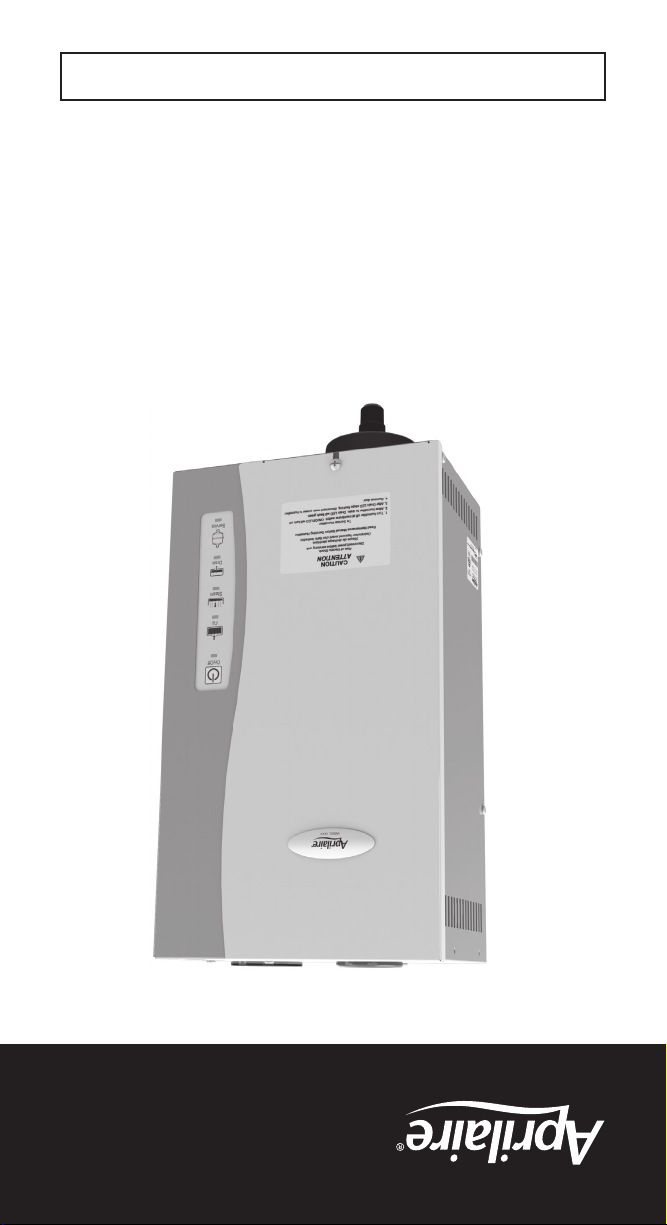
LIRE ET CONSERVER CES INSTRUCTIONS
renseignements sur la garantie
et le fonctionnement ainsi que les
Comprend les directives sur la sécurité
Manuel d’utilisation
Humidificateur à vapeur series 800
Humidificateur à vapeur
 Loading...