

Page 1
Premium Programmable Thermostat
READ AND SAVE THESE INSTRUCTIONS
Owner’s Manual
Model 8570
Includes Operating Instructions
and Warranty Information
Page 2

TABLE OF CONTENTS
PAGE
ENERGYSTAR®Program Information . . . . . . . . . . . . . . . . . . 1
Getting Familiar with your
Aprilaire
®
8570 Thermostat. . . . . . . . . . . . . . . . . . . . . . . 2
Operating Your Thermostat . . . . . . . . . . . . . . . . . . . . . . . 4
Setting the Mode of Operation – Heat, Cool, etc. . . . . . 5
Temporarily Raising and Lowering
the Temperature. . . . . . . . . . . . . . . . . . . . . . . . . . . . . . . . 6
Fan Operation . . . . . . . . . . . . . . . . . . . . . . . . . . . . . . . . . . 7
Setting the Date and Time . . . . . . . . . . . . . . . . . . . . . . . 8
PAGE
Programming your Thermostat . . . . . . . . . . . . . . . . . . . . 9
Holding Temperature – Holiday and Permanent . . . . . 11
Settings Menu . . . . . . . . . . . . . . . . . . . . . . . . . . . . . . . . 13
Info Screen . . . . . . . . . . . . . . . . . . . . . . . . . . . . . . . . . . . 17
Viewing Other Thermostats on the System . . . . . . . . . 18
In Case of Power Failure . . . . . . . . . . . . . . . . . . . . . . . . 19
Cleaning . . . . . . . . . . . . . . . . . . . . . . . . . . . . . . . . . . . . . 19
Limited Warranty . . . . . . . . . . . . . . . . . . . . . . . . . . . . . . 20
Page 3
About half of all energy used by households goes to
heating and cooling the home. By selecting a programmable Aprilaire
®
Electronic Thermostat, you have made
a significant step toward conserving energy usage and
costs, while improving your indoor comfort.
In fact, the Aprilaire
®
Model 8570 Premium Programmable
Thermostat has earned the “E
NERGYSTAR
®
” designation of
the U.S. Environmental Protection Agency (EPA). This
means that your Aprilaire Thermostat is a highly efficient,
cutting edge product that is good for the environment. It
saves energy and costs less to operate than similar
products that do not qualify for the E
NERGYSTAR label.
E
NERGYSTAR products help you differentiate between
standard efficiency and high efficiency products. By
using E
NERGYSTAR products, you are helping to prevent
air pollution while saving money on your utility bills.
According to the EPA, taking advantage of the times that
a home is unoccupied or the occupants are asleep, an
E
NERGYSTAR thermostat can reduce heating and cooling
bills by as much as 30%. The Aprilaire Thermostat has
programmable capabilities that allow you full flexibility to
set your heating and cooling systems to meet your comfort
and energy needs. As an E
NERGYSTAR partner, Aprilaire has
determined that this product meets the E
NERGYSTAR
guidelines for energy efficiency.
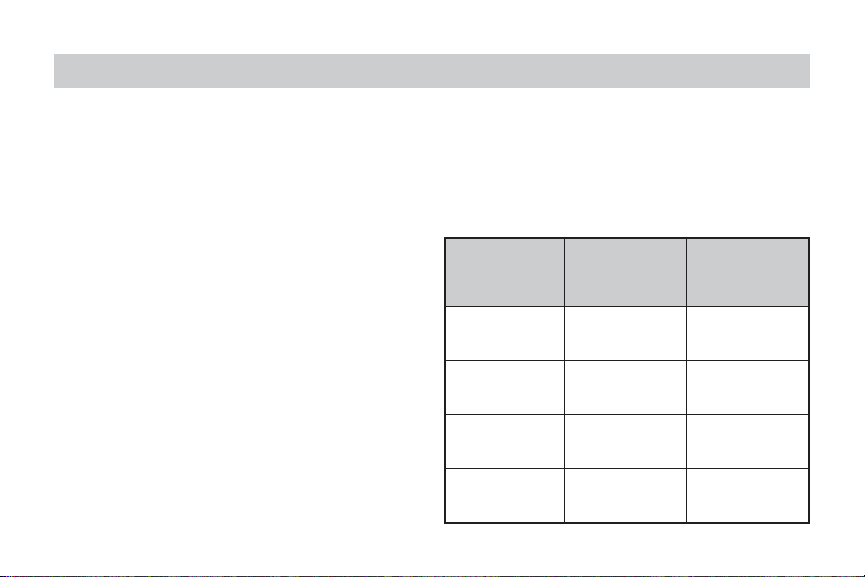
Desired Daily
Event Temperature Time
Setting Schedule
Wake
Heat = 70°
6:00 am
Cool = 78°
Leave
Heat = 62°
8:00 am
Cool = 85°
Return
Heat = 70°
5:00 pm
Cool = 78°
Sleep
Heat = 62°
10:00 pm
Cool = 82°
ENERGYSTAR®PROGRAM INFORMATION
1
Page 4
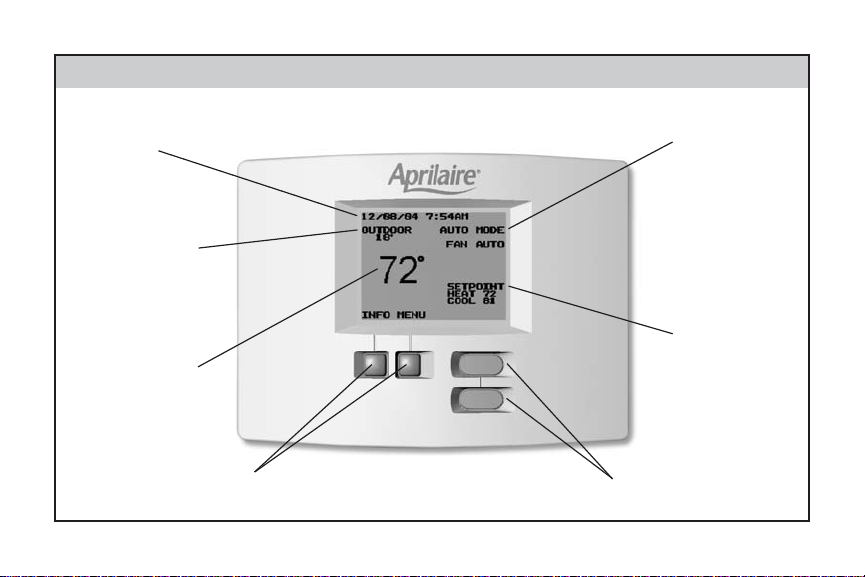
FIGURE 1 – GETTING FAMILIAR WITH YOUR APRILAIRE®8570 THERMOSTAT
EQUIPMENT
STATUS
OUTDOOR
TEMPERATURE
ROOM
TEMPERATURE
MESSAGE
CENTER
SETPOINTS
UP/DOWN BUTTONS
MULTI-FUNCTION
BUTTONS
2
Page 5

MESSAGE CENTER
Normally this is where you will find the current date and time.
If the thermostat is in a Hold State, the thermostat will display
when the Hold State is scheduled to end. The area is also used
to give information on when you should replace your air filter or
UV lamp, when you should service your humidifier and general
HVAC equipment.
When installed with an Aprilaire®Automatic Humidifier Control
and Humidifier, the message center will also inform you if the
humidifier is operating.
When installed with an Aprilaire®Model 6504 Intelligent Zone
System, more information is displayed in this area. For instance,
if you own an Energy Recovery Ventilator (ERV), or an Electronic
Air Cleaner (EAC) the thermostat will be able to display whether
they are active.
EQUIPMENT STATUS
In this area of the display, the thermostat will show the
equipment’s mode and whether the equipment is active. A typical
message in this area would be HEAT MODE when the equipment
is not running and HEATING when the equipment is active.
OUTDOOR TEMPERATURE
The thermostat has terminals that can be hooked up to an
outdoor temperature sensor. If this is installed, outdoor
temperature will be displayed in this area of the screen.
When installed with an Aprilaire®Automatic Humidifier Control
or an Aprilaire®Model 6504 Intelligent Zone System, this
information is communicated to the thermostat so there is no
need for the extra outdoor temperature sensor.
ROOM TEMPERATURE
The large temperature on the screen is the room temperature.
The scale can be changed from Fahrenheit to Celsius if desired.
SETPOINTS
The setpoints are the temperatures to which the thermostat
is controlling.
MULTI-FUNCTION BUTTONS
The multi-function buttons are used throughout the thermostat
menu system and have many functions. The description on the
screen directly above the button is what that button is used for in
that particular screen. In Figure 1, the left button would be used
for INFO and the right button would be used for MENU.
UP/DOWN BUTTONS
These buttons are used to raise and lower temperature and to
navigate through the thermostat’s menus.
3
Page 6

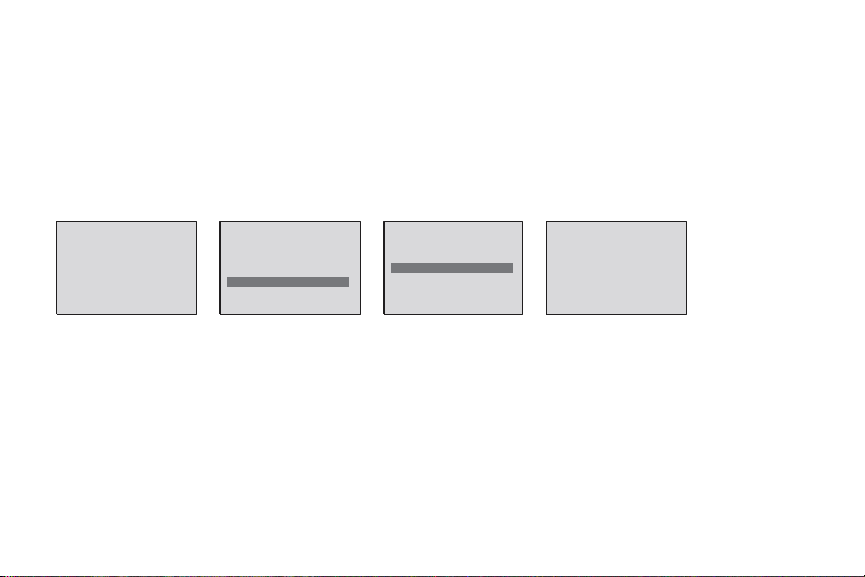
OPERATING YOUR THERMOSTAT
Backlight Operation
When any button is pressed, the backlighting will
illuminate. Once the backlight is on, subsequent button
presses will perform their respective tasks.
Using the Up & Down Buttons and Multi-Function
Buttons on the Thermostat
This thermostat uses a menu driven display and four (4)
buttons. The Up and Down buttons are used to move
between selections in the menu and to raise and lower
different parameters such as temperature, days,
minutes etc., depending on which screen you are
viewing. The multi-function buttons have a variety of
uses. The portion of screen directly above these
buttons will display the button’s function. For instance,
when the main screen is being viewed, the buttons are
titled INFO and MENU from left to right respectively.
To access the menu of the thermostat, press the right
multi-function button. From here if you would like to
change the fan operation, press the down button until
the word FAN is highlighted, then press the
multi-function button titled SELECT (right button).
Within this screen, use the up and down button to
highlight the desired fan operation and press SELECT
again and you are done.
Notes on Temperature Adjustments
The Cool setting must always be 2° (F or C) higher than
the Heat setting. The thermostat will automatically
change the temperature setting not being adjusted to
maintain this 2° difference, even if both settings are
not shown on the display.
4
Page 7
5
1. Setting the Mode of Operation – Heat, Cool, etc.
The thermostat can be set to OFF, HEAT, COOL, AUTO and EMERGENCY HEAT (EMERGENCY HEAT
for heat pumps only) modes. To set the mode, press the MENU button on the main screen.
Once in the Main Menu screen, use the down button to move the highlighted text to MODE.
Press SELECT. Once in the Mode Menu, use the Up/Down Buttons to navigate to the desired mode,
then press SELECT.
Example: Placing thermostat in HEAT MODE.
CAUTION: Do not set to OFF mode during periods when freezing temperatures could occur.
NOTE: When installed with an Aprilaire
®
Model 6504 you will be given the option to CHANGE ALL
THERMOSTATS. If you select YES to this, the mode setting will be set to whatever you have selected
for all the thermostats on the system.
03/31/04 8:32 AM
OUTDOOR
20˚
71˚
INFO MENU
FAN A UTO
OFF
MAIN MENU
SET DATE AND TIME
HOLD
PROGRAM
FAN
MODE - HEAT/COOL/ETC.
SETTINGS
EXIT SELECT
MODE MENU
OFF
AUTO
HEAT
COOL
EMERGENCY HEAT
BACK SELECT
03/31/04 8:32 AM
OUTDOOR
20˚
71˚
INFO MENU
HEAT MODE
FAN AUTO
SETPOINT
HEAT 70
Page 8
6
68˚
RESUME
PROG.
MENU
20˚
OUTDOOR
HOLD TIL 4:00PM
HEAT 72
SETPOINT
HEATING
FAN O N
68˚
INFO MENU
20˚
OUTDOOR
03/31/04 8:32 AM
HEAT 68
SETPOINT
FAN A UTO
HEAT MODE
72˚
HOLD THIS
TEMPERATURE
UNTIL 4:00PM
HEAT
BACK SAVE
68˚
INFO MENU
20˚
OUTDOOR
03/31/04 8:32 AM
HEAT 68
SETPOINT
FAN A UTO
AUTO MODE
COOL 75
72˚
HOLD THIS
TEMPERATURE
UNTIL 4:00PM
HEAT
BACK
75˚
COOL
68˚
RESUME
PROG.
MENU
20˚
OUTDOOR
HOLD TIL 4:00PM
HEATING
FAN ON
HEAT 72
SETPOINT
COOL 75
2. Temporarily Raising and Lowering the Temperature
You can raise or lower the temperature during the current event of the program by simply
pressing the Up/Down buttons.
Example: The Setpoint is at 68°, you want the temperature to be 72°.
If you are in AUTO Mode, both heat and cool settings will be displayed on the hold screen.
First you can change the Heat setting, then the Cool setting. If you do not want to change one
of these settings, simply press select to go to the next setting or to go to the main screen.
The message center displays when the thermostat will return to programmed operation.
Press the RESUME PROG. button to return to programmed operation at any time.
Page 9

7
3. Fan Operation
The thermostat can operate the fan in 3 ways:
• AUTO (on only during heating and cooling calls)
• ON (always on)
• PROGRAMMED FAN (fan follows the program set in the program screen)
The FAN MENU, located in the MAIN MENU, has these three options for you to choose from.
NOTE: When installed with an Aprilaire
®
Model 6504 you will be given the option to CHANGE ALL
THERMOSTATS. If you select YES to this, the fan setting will be set to whatever you have selected for
all the thermostats on the system.
03/31/04 8:32 AM
OUTDOOR
20˚
71˚
INFO MENU
FAN O N
OFF
MAIN MENU
SET DATE AND TIME
HOLD
PROGRAM
FAN
MODE - HEAT/COOL/ETC.
SETTINGS
EXIT SELECT
FAN MENU
AUTO
ON
PROGRAMMED FAN
BACK SELECT
03/31/04 8:32 AM
OUTDOOR
20˚
71˚
INFO MENU
FAN A UTO
OFF
Page 10

8
4. Setting the Date and Time
In the SET DATE AND TIME menu, you can set the correct date and time and activate or deactivate the
automatic Daylight Savings Time Adjustment.
4.1 Automatic Daylight Savings Adjustment
When ‘AUTO DAYLIGHT SAVINGS’ is selected, you have the option of selecting ‘ON’ or ‘OFF’.
When this feature is set to ON, the clock will automatically compensate for Daylight Savings Time.
4.2 Date & Time Screens
When SET DATE and TIME is selected from the Menu, you will be taken through a series of steps to set the
month, day, year, hour and minute. Use the Up/Down buttons to adjust the values.
SET DATE AND TIME
SET DATE / TIME
AUTO DAYLIGHT SAVINGS
BACK SELECT
AUTO DAYLIGHT SAVING
OFF
ON
BACK SELECT
SET MONTH
03/31/04 8:32AM
SET DATE AND TIME
BACK
SET YEAR
03/31/
04 8:32AM
SET DATE AND TIME
SET HOUR
03/31/04
8AM :32
SET DATE AND TIME
SET MINUTES
03/31/04
8:32AM
SET DATE AND TIME
SAVE
72˚
INFO MENU
45˚
OUTDOOR
03/31/04 8:32 AM
OFF
SET DAY
03/
31/04 8:32AM
SET DATE AND TIME
DONE
Page 11

9
5. Programming Your Thermostat
5.1 Programming a Day or Series of Days
The PROGRAM MENU is located in the MAIN MENU. After selecting this menu, you have the
option of programming everyday, weekdays, weekends, or individual days. Once you’ve selected
a certain day to program, a screen appears that allows you to set the time, heat setting, cool
setting, and fan operation for each event.
Once you have set the correct times and settings, highlight DONE and
push the SAVE button. The DONE screen will appear to let you know
your changes are saved. You have now programmed your thermostat.
NOTE: The programmed fan operation will only be followed if the
PROGRAMMED FAN option is set in the FAN MENU.
DONE
MAIN MENU
SET DATE AND TIME
HOLD
FAN
MODE - HEAT/COOL/ETC.
SETTINGS
PROGRAM
EXIT SELECT
PROGRAM MENU
DONE
EVERYDAY
WEEKDAYS
WEEKENDS
TUESDAY
MONDAY
MAIN
MENU
SELECT
MORE >
MONDAY
COOL
76
85
72
72
6:00A
LEAVE
RETURN
SLEEP
DONE
HEAT
68
62
68
65
8:00A
4:30P
10:00P
FAN
ON
AUTO
ON
AUTO
WAKE
PROGRAM MENU
EVERYDAY
WEEKDAYS
WEEKENDS
MONDAY
TUESDAY
DONE
MAIN
MENU
SELECT
MORE >
MONDAY
COOL
76
85
72
72
6:00A
LEAVE
RETURN
SLEEP
HEAT
68
62
68
65
8:00A
4:30P
10:00P
FAN
ON
AUTO
ON
AUTO
CANCEL SAVE
WAKE
DONE
MONDAY
COOL
72
85
UNOCC
DONE
HEAT
68
62
8:00A
5:30P
FAN
AUTO
ON
OCC
MONDAY
COOL
72
85
NIGHT
DONE
HEAT
68
62
8:00A
5:30P
FAN
AUTO
ON
DAY
NOTE: When EVENTS PER DAY are
set to 2-BUSINESS or 2-RESIDENTIAL
(see page 14) the programming
screen will look like above.
2-BUSINESS
2-RESIDENTIAL
Page 12

10
5.2 Copying a Program from One Day to Another
In the PROGRAM MENU, there is an option to COPY. The option can be used to copy the program
from one day to another day or series of days (i.e. weekdays or weekends). After COPY is
selected, the thermostat will prompt you for which day to copy. Next, it will prompt you for which
day to copy the program to. After selecting this information, it will then confirm what is being
copied to where. At this point you have the option of canceling the copy and not saving or saving
and continuing. After selecting OK, the DONE screen will appear, then it will send you back to
the COPY menu. Selecting DONE here will save your copy and return you to the Main Screen.
The BACK button will also save your copy and return you back to the PROGRAM MENU.
COPY FROM WHICH DAY?
DONE
TUESDAY
WEDNESDAY
THURSDAY
FRIDAY
SATURDAY
SUNDAY
MONDAY
BACK SELECT
COPY TO WHICH DAY?
MONDAY
TUESDAY
WEDNESDAY
THURSDAY
FRIDAY
SATURDAY
SUNDAY
WEEKENDS
EVERYDAY
WEEKDAYS
BACK SELECT
COPY PROGRAM
FROM MONDAY
TO WEEKDAYS?
CANCEL OK
PROGRAM MENU
WEDNESDAY
THURSDAY
FRIDAY
SATURDAY
SUNDAY
COPY
MAIN
MENU
SELECT
MORE >
COPY FROM WHICH DAY?
MONDAY
TUESDAY
WEDNESDAY
THURSDAY
FRIDAY
SATURDAY
SUNDAY
DONE
BACK SELECT
DONE
Page 13

6. Holding Temperature
The HOLD MENU, located in the MAIN MENU, allows you to hold a temperature until a set date and time,
as would be done during a holiday, or allows you to hold a temperature permanently.
6.1 Holiday Hold
You can program the thermostat to hold a temperature for a period of time. Whether you want to hold a temperature for a
few hours or for a few weeks, your thermostat can accommodate your schedule. First the thermostat will prompt you for a
temperature to hold. If you are in AUTO MODE you will be prompted for both a heat setting and a cool setting. Next it will
prompt you for a date and time that you wish to return to programmed operation. On the Main Screen, the INFO button
will change to RESUME PROG. If you choose to cancel the hold, simply press this button and the program will resume.
NOTE: When installed with an Aprilaire
®
Model 6504 you will be given the option to CHANGE ALL
THERMOSTATS. If you select YES to this, the hold setting will be set on all the thermostats on the system,
and pressing the RESUME button returns all thermostats to programmed operation.
11
MAIN MENU
SET DATE AND TIME
HOLD
PROGRAM
FAN
MODE - HEAT/COOL/ETC.
SETTINGS
EXIT SELECT
HOLIDAY HOLD
HOLD UNTIL
MAY 30
4:00PM
BACK SAVE
HOLD MENU
HOLIDAY
PERMANENT
BACK SELECT
HOLIDAY HOLD
HOLD UNTIL
4:00PM
CANCEL SAVE
MAY 30
HOLIDAY HOLD
SET HOLD TEMPERATURE
HEAT
72˚
BACK SAVE
DONE
Page 14

12
6.2 Permanent Hold
Similar to the Holiday Hold, the thermostat will prompt you to enter the temperature at which you
would like to hold. Once you have selected the temperature, you are returned to the Main Screen.
In order to resume the program, simply press the RESUME PROG. button.
NOTE: When installed with an Aprilaire
®
Model 6504 you will be given the option to CHANGE ALL
THERMOSTATS. If you select YES to this, the hold setting will be set on all the thermostats on the
system, and pressing the RESUME button returns all thermostats to programmed operation.
MAIN MENU
SET DATE AND TIME
HOLD
PROGRAM
FAN
MODE - HEAT/COOL/ETC.
SETTINGS
EXIT SELECT
HOLD MENU
HOLIDAY
PERMANENT
BACK SELECT
PERMANENT HOLD
SET HOLD TEMPERATURE
HEAT
74˚
CANCEL SAVE
PERMANENT HOLD
OUTDOOR
20˚
74˚
RESUME
MENU
PROG.
HEAT MODE
FAN A UTO
SETPOINT
HEAT 74
Page 15

7. Settings Menu
The SETTINGS menu has many options for you to customize your thermostat.
7.1 Fahrenheit and Celsius
You can change the temperature scale used by the thermostat.
Highlight the scale of your choice and press SELECT.
7.2 12 OR 24 Hour Clock
Within this menu option, you can change the time displayed
by your thermostat to 24 Hour time, (Military Time).
7.3 Display Temperature Setting
If you do not want the temperature setting displayed on the
Main Screen, you can choose to turn it off in this menu.
13
SETTINGS MENU
12 OR 24 HOUR CLOCK
DISPLAY TEMP. SETTING
SET THERMOSTAT NAME
˚F OR ˚C
MAIN
MENU SELECT
MORE >
SETTINGS MENU
EVENTS PER DAY
LOCKOUT OPTIONS
MONITORS
MAIN
MENU
SELECT
MORE >
TEMP SCALE
CELSIUS
FAHRENHEIT
BACK SELECT
12 OR 24 HOUR CLOCK
24 HOUR
12 HOUR
BACK SELECT
DISPLAY SETPOINTS
NO
YES
BACK SELECT
Page 16

14
SET THERMOSTAT NAME
LIVINGROOM
FAMILYROOM
MASTER BEDROOM
BEDROOM
GREAT ROOM
BACK SELECT
MORE >
EVENTS PER DAY
2 - RESIDENTIAL
2 - BUSINESS
4 - RESIDENTIAL
BACK SELECT
LOCKOUT OPTIONS
ALLOW TEMP CONTROL
ALLOW FAN CONTROL
ALLOW TEMP AND FAN
LOCKOUT ALL SETTINGS
BACK SELECT
7.4 Set Thermostat Name
You can give your thermostat a name if you would like. Within this menu, the
thermostat gives you some standard choices. Selecting CUSTOM NAME allows
you to customize the name for your thermostat.
7.5 Events Per Day
This is where you can set the number of events per day. (An event is a period of
time scheduled with a certain heating and cooling setpoint.) For instance if you
are away from your home from 8am to 5pm, make this period of time an event
and set the thermostat at an energy saving setting. You have the option of setting
the events per day to 4-RESIDENTIAL (4 events), 2-RESIDENTIAL (2 events) or
2-BUSINESS (2 events).
7.6 Lockout Options
This menu allows you to enter a pass code to restrict access to changes in the
settings. The thermostat gives you four levels of security:
1. LOCKOUT ALL SETTINGS
2. ALLOW TEMP CONTROL ONLY
3. ALLOW FAN CONTROL ONLY
4. ALLOW TEMP AND FAN CONTROL
Page 17

7.6 Lockout Options (continued)
When any of these options are selected, the thermostat will prompt you for a 4 digit code
to unlock the thermostat. Use the Up/Down buttons to scroll through the numbers (0-9).
Unlocking the Thermostat
When attempting to access a locked setting, the thermostat will prompt you to enter your
four digit code. Once successfully entered, the thermostat will be unlocked. If you forget your
pass code, enter 7777 and press SELECT.
15
UNLOCK CODE
ENTER FIRST DIGIT
0 0 0 0
BACK
UNLOCK CODE
ENTER FOURTH DIGIT
0 0 0 0
SAVE
LOCKED
OUTDOOR
20˚
FAN O N
OFF
UNLOCK CODE
ENTER SECOND DIGIT
0 0 0 0
UNLOCK CODE
YOUR PASSCODE IS:
0000
CANCEL SAVE
UNLOCK CODE
ENTER THIRD DIGIT
0 0 0 0
DONE
72˚
INFO MENU
Page 18

16
7.7 Monitors
The MONITORS Menu is where you can set your HVAC service reminders. The items that the
thermostat will remind you of are servicing your air filter, servicing your humidifier, servicing
your UV lamp, and a general service check for your entire system.
To reset an active monitor:
1. Press the CALL DEALER button.
2. Press the RESET button.
3. This will reset the monitor and return you to the main screen.
MONITORS
AIR FILTER
SERVICE HUMIDIFIER
UV LAMP
HVAC SERVICE TIMER
BACK SELECT
OFF
1 MONTH
3 MONTHS
6 MONTHS
1 YEAR
2 YEARS
BACK SELECT
AIR FILTER
SERVICE HUMIDIFIER
OFF
AUTO
TWICE / SEASON
ONCE / SEASON
BACK SELECT
OFF
1 YEAR
BACK SELECT
UV LAMP
HVAC SERVICE TIMER
OFF
1 MONTH
3 MONTHS
6 MONTHS
1 YEAR
2 YEARS
BACK SELECT
Page 19

17
NOTE: When installed with an Aprilaire®Model 6504 the monitor settings need only to be set on one
thermostat. The other thermostats in the system will update with the new setting.
NOTE: The ‘AUTO’ option shown above in the SERVICE HUMIDIFIER screen is only available if installed with
an Aprilaire
®
Automatic Humidifier Control.
8. Info Screen
The Info Screen can be accessed through the Main Screen by pressing the button corresponding to INFO
on the screen. When pushed, the screen will show the outdoor temperature and indoor relative humidity
(when connected to an Aprilaire
®
Automatic Humidifier Control). Then the thermostat will display the
contact information for your HVAC dealer should you have any problems or need any supplies.
If there is not an Aprilaire
®
Automatic Humidifier Control installed, the following screen will be displayed
instead of the temperature and humidity.
BACK
APRILAIRE 8500 PREMIER
THERMOSTAT
CARL'S HVAC
PHONE: (800) 555-5555
MESSAGES:
45%68˚
OUTDOOR
TEMPERATURE
INDOOR
HUMIDITY
FRESH IDEAS FOR
INDOOR AIR
Page 20

18
9. Viewing Other Thermostats on the System
(Model 6504 Installation Only)
If installed with an Aprilaire
®
Model 6504, you have another option in the MAIN MENU. This option
is to VIEW OTHER THERMOSTATS. When this is selected a list of other thermostats on the system
will be displayed. If you have programmed a name in the THERMOSTAT(S), their respective name(s)
will be displayed. If no names are given, you will see default names such as THERMOSTAT 2.
When viewing other thermostats, you have the option of temporarily changing the temperature
setting or resuming the program. Note that the left multi-function button, says RESUME PROG. at all
times in this screen. This button would be used to resume the program, for the thermostat being
viewed, if it is in hold. Either RESUME PROG. or EXIT returns you to the local thermostat’s screen.
MAIN MENU
SET DATE AND TIME
HOLD
PROGRAM
FAN
MODE - HEAT/COOL/ETC.
VIEW THERMOSTAT LIST
SETTINGS
EXIT SELECT
VIEW THERMOSTAT LIST
THERMOSTAT 2
THERMOSTAT 3
THERMOSTAT 4
BACK SELECT
THEMROSTAT 2
OUTDOOR
20˚
70˚
RESUME
EXIT
PROG.
HEAT MODE
FAN ON
SETPOINT
HEAT 70
Page 21

19
10. In Case of Power Failure
This thermostat does not require a battery. If the power
goes out, the screen is blank. During the period the
power is off, the heating/cooling system will not
operate. When power is restored, the thermostat will
return to the previous settings. If the power is off for
more than 2 hours, you will need to reset the clock on
the thermostat but all other information will be stored.
You will not have to reprogram your thermostat or
change any settings that you have previously set.
11. Cleaning
If the surface of the thermostat becomes dirty it can
be cleaned with plain water or many non-abrasive
household cleaners, including glass cleaner. When
using any cleaner be careful not to get any into the
interior of the thermostat. Do not spray any liquid
directly onto the thermostat. Spray the cleaner onto
a soft cloth and wipe the surface of the thermostat.
Page 22

20
ELECTRONIC THERMOSTAT TWO YEAR
LIMITED WARRANTY
Your Research Products Corporation Aprilaire®Thermostat unit is
expressly warranted for two (2) years from date of installation to
be free from defects in materials and workmanship.
Research Products Corporation’s exclusive obligation under this
warranty shall be to supply, without charge, a replacement for
any thermostat which is found to be defective within a two (2)
year period and which is returned, together with the date of
installation, no later than thirty (30) days after said two (2) year
period by you to either your original supplier or to Research
Products Corporation, Madison, Wisconsin 53701.
THIS WARRANTY SHALL NOT OBLIGE RESEARCH PRODUCTS
CORPORATION FOR ANY LABOR COSTS AND SHALL NOT APPLY
TO DEFECTS IN WORKMANSHIP OR MATERIALS FURNISHED BY
YOUR INSTALLER AS CONTRASTED TO DEFECTS IN THE
THERMOSTAT ITSELF.
IMPLIED WARRANTIES OF MERCHANTABILITY OF FITNESS FOR
A PARTICULAR PURPOSE SHALL BE LIMITED IN DURATION TO
THE AFORESAID TWO YEAR PERIOD. RESEARCH PRODUCTS
CORPORATION’S LIABILITY FOR INCIDENTAL OR
CONSEQUENTIAL DAMAGES, OTHER THAN DAMAGES FOR
PERSONAL INJURIES, RESULTING FROM ANY BREACH OF THE
AFORESAID IMPLIED WARRANTIES OR THE ABOVE LIMITED
WARRANTY IS EXPRESSLY EXCLUDED. THIS LIMITED
WARRANTY IS VOID IF DEFECT(S) RESULT FROM FAILURE TO
HAVE THIS THERMOSTAT INSTALLED BY A QUALIFIED HEATING
AND AIR CONDITIONING CONTRACTOR. IF THE LIMITED
WARRANTY IS VOID DUE TO FAILURE TO USE A QUALIFIED
CONTRACTOR, ALL DISCLAIMERS OF IMPLIED WARRANTIES
SHALL BE EFFECTIVE UPON INSTALLATION.
Some states do not allow limitations on how long an implied
warranty lasts or the exclusion or limitation of incidental or
consequential damages, so the above exclusion of limitations
may not apply to you.
This warranty gives you specific legal rights and you may also
have other rights which vary from state to state.
This equipment if installed in strict accordance with the
manufacturer’s instructions, complies with the limits for a Class B
computing device pursuant to Subpart J of Part 15 of FCC Rules.
WARRANTY
Page 23

Please… Take a few minutes to visit us on-line at www.aprilaire.com
to register your Aprilaire product.
If you do not have on-line access, please mail a postcard with your name, address,
phone number, product purchased and date of purchase to:
Research Products Corporation
P.O. BOX 1828
Madison, WI 53701
WARRANTY REGISTRATION
Thank you!
Your Warranty Registration information will not be sold or shared outside of this company.
21
Page 24

DP 10006197 01.05
B2203357B Printed in U.S.A.
P.O. BOX 1467 • MADISON, WI 53701-1467
 Loading...