

Aprilaire 8551 User Manual

O wner’s Manu al
MODEL 8551
5-2 Day Programmable
Thermostat
110-904 7/11/01 4:29 PM Page 1
ELE CTR ONIC THERMO S T A T
®

OWNER’S MANUAL – TABLE OF CONTENTS
Setting Or Changing The Clock . . . . . . . . . . . . . . . . . . . . . . . . . . . . . . . . . . . . . . . . . . . . . . . . . . . . . . 1
Setting Or Changing The Weekday Program . . . . . . . . . . . . . . . . . . . . . . . . . . . . . . . . . . . . . . . . . .3
Program Schedule . . . . . . . . . . . . . . . . . . . . . . . . . . . . . . . . . . . . . . . . . . . . . . . . . . . . . . . . . . . . . . . . . 4
Setting Or Changing The Weekend Program . . . . . . . . . . . . . . . . . . . . . . . . . . . . . . . . . . . . . . . . . .7
Reviewing Programmed Time Schedules And Temperature Settings . . . . . . . . . . . . . . . . . . . . . 8
To Start Running The Program . . . . . . . . . . . . . . . . . . . . . . . . . . . . . . . . . . . . . . . . . . . . . . . . . . . . . . 8
For Best Performance . . . . . . . . . . . . . . . . . . . . . . . . . . . . . . . . . . . . . . . . . . . . . . . . . . . . . . . . . . . . . . 8
Thermostat Operation . . . . . . . . . . . . . . . . . . . . . . . . . . . . . . . . . . . . . . . . . . . . . . . . . . . . . . . . . . . . . .9
• Temperature Control . . . . . . . . . . . . . . . . . . . . . . . . . . . . . . . . . . . . . . . . . . . . . . . . . . . . . . . . . .9
• Time Control . . . . . . . . . . . . . . . . . . . . . . . . . . . . . . . . . . . . . . . . . . . . . . . . . . . . . . . . . . . . . . . . .12
• Equipment Control . . . . . . . . . . . . . . . . . . . . . . . . . . . . . . . . . . . . . . . . . . . . . . . . . . . . . . . . . . . 13
Optional Settings For Additional Thermostat Features . . . . . . . . . . . . . . . . . . . . . . . . . . . . . . . . .14
In Case Of Power Failure . . . . . . . . . . . . . . . . . . . . . . . . . . . . . . . . . . . . . . . . . . . . . . . . . . . . . . . . . . 20
Cleaning . . . . . . . . . . . . . . . . . . . . . . . . . . . . . . . . . . . . . . . . . . . . . . . . . . . . . . . . . . . . . . . . . . . . . . . . . 20
Limited Warranty . . . . . . . . . . . . . . . . . . . . . . . . . . . . . . . . . . . . . . . . . . . . . . . . . . . . . . . . . . . . . . . . . 21
© Research Products Corporation 2000
110-904 7/11/01 4:29 PM Page 2
– 1 –
IMPORTANT: READ ALL INSTRUCTIONS THOROUGHLY
Programming your Aprilaire®Thermostat is done in three easy steps: setting the clock, setting the event
times, and setting your desired temperatures.
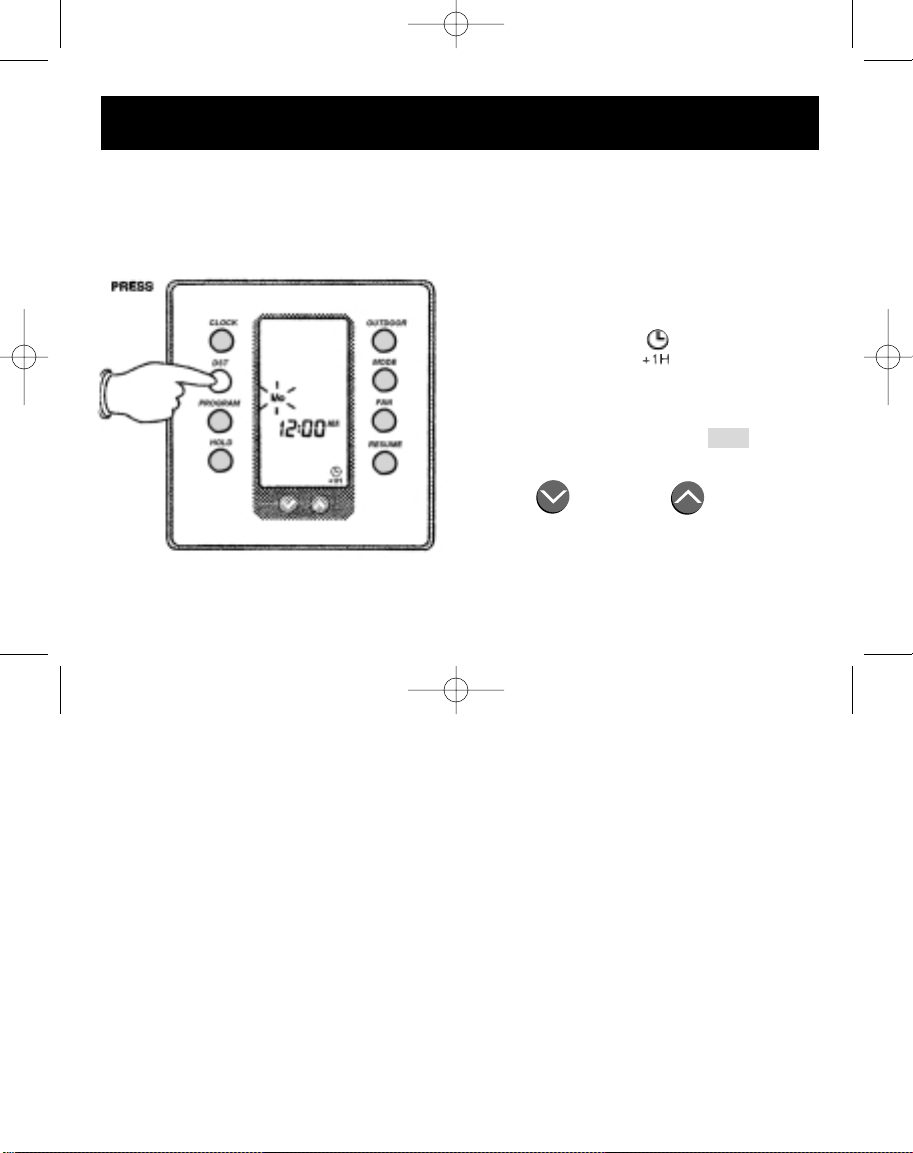
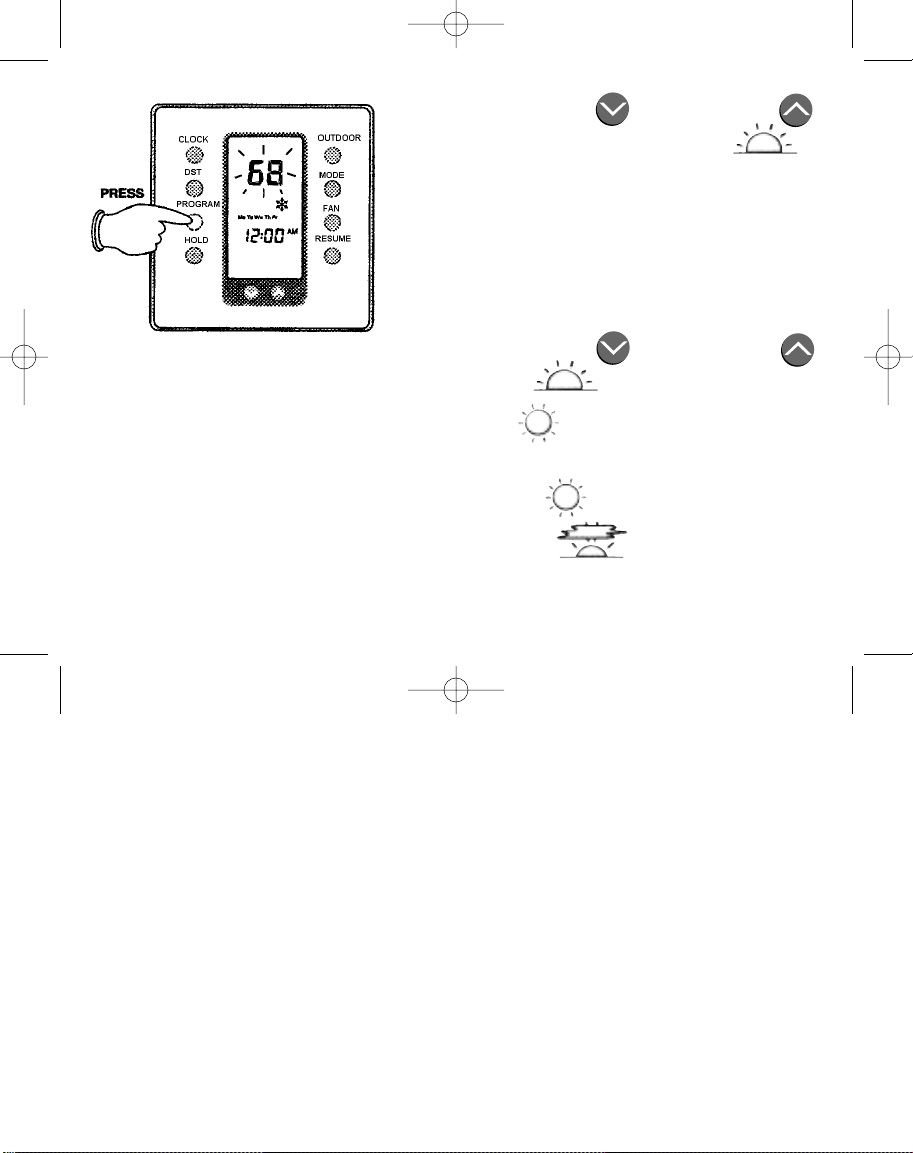
Setting Or Changing The Clock
Step 1: If you are currently in Daylight Saving Time
(first Sunday in April thru fourth Sunday in October),
press the DST button and “ “ will appear in the
lower right-hand corner of the display.
Step 2: Press the CLOCK button and “Mo”
(or another day of the week) will flash. Use the
DECREASE or INCREASE button to
change the flashing symbol to the current day
of week.
110-904 7/11/01 4:29 PM Page 3
– 2 –
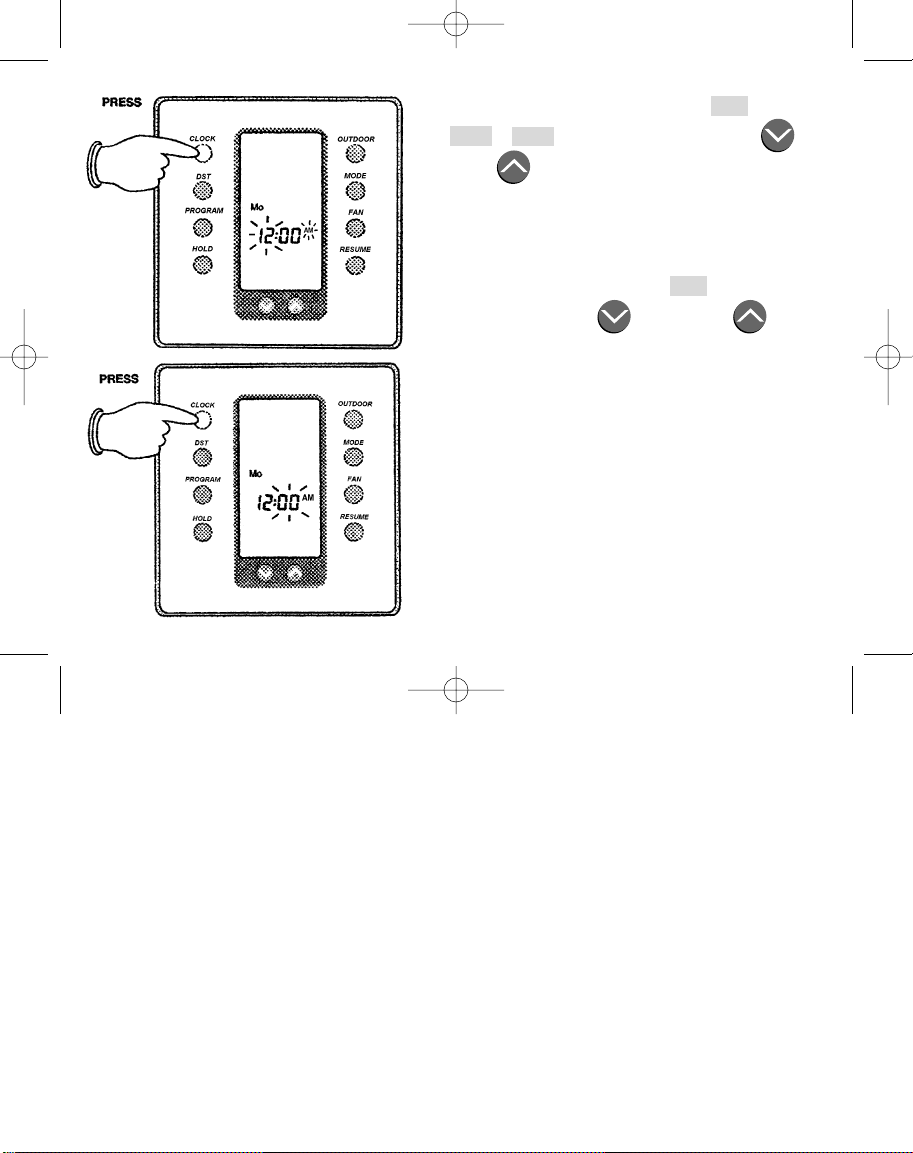
Step 3: Press the CLOCK button again and “12:” (hours)
and “AM” or “PM” will flash. Use the DECREASE or
INCREASE button to change the flashing symbol
to the current hour making sure the hour has the proper
AM or PM designation.
Step 4: Press the CLOCK button and “:00” (minutes) will
flash. Use the DECREASE or INCREASE button
to change the flashing symbol to the current minute.
Step 5: Press the CLOCKbutton again. The clock is now
set and the current time appears on the display.
110-904 7/11/01 4:29 PM Page 4

– 3 –
Setting Or Changing The Weekday Program
Programming your AprilaireElectronic Thermostat involves selecting the temperature you want
in your home and selecting the time you want it to be that temperature. Your Aprilaire Thermostat
will allow a maximum of 4 time schedules per day. Each time schedule is known as an “event.”
The Morning event is typically when you wake up and is the first event of the day. The Day event is
typically set when you leave for work. The Evening event is typically set when you come home from
work and the Night event is set when you go to bed. Each event will have 1 cooling temperature.
Your Aprilaire Thermostat allows 1 program for Monday through Friday and 1 program for Saturday
and Sunday. Complete the chart on page 4 with your desired temperatures and time schedules
before beginning programming.
NOTE: It will take some time for your cooling system to reach the desired temperature when
returning from a setback. Therefore, it is suggested you set your program time before the actual
time you want your home to reach the desired temperature. For example, if you get up at 7:00 AM
and have a 6 degree setback, set your Morning event at 6:00 AM to be sure the desired temperature
is reached by 7:00 AM.
110-904 7/11/01 4:29 PM Page 5
– 4 –
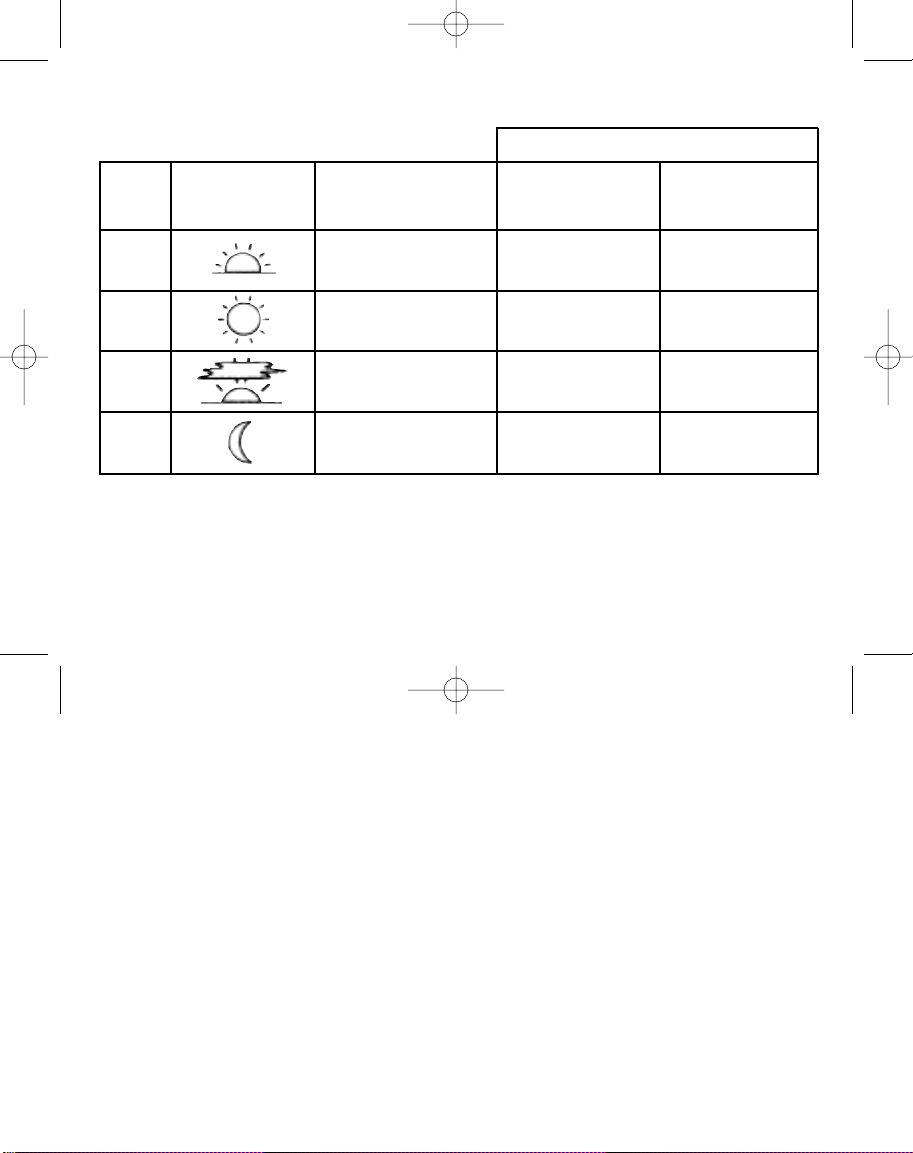
PROGRAM SCHEDULE
TIME SCHEDULE
THERMOSTAT DESIRED MONDAY – SATURDAY &
EVENT SYMBOL TEMPERATURE FRIDAY SUNDAY
SETTING
Morning
Day
Evening
Night
NOTE: While programming you must press a button at least every 15 seconds or the thermostat will revert back to the
operational mode. If this happens, simply repeatedly press the PROGRAM button until you get back to where you left
off. The information you have already entered has been retained.
NOTE: If consecutive events have the same temperature, you can skip an event by simultaneously pressing the
PROGRAM and MODE buttons. Press and release the PROGRAM button to advance to the next event.
110-904 7/11/01 4:29 PM Page 6
– 5 –
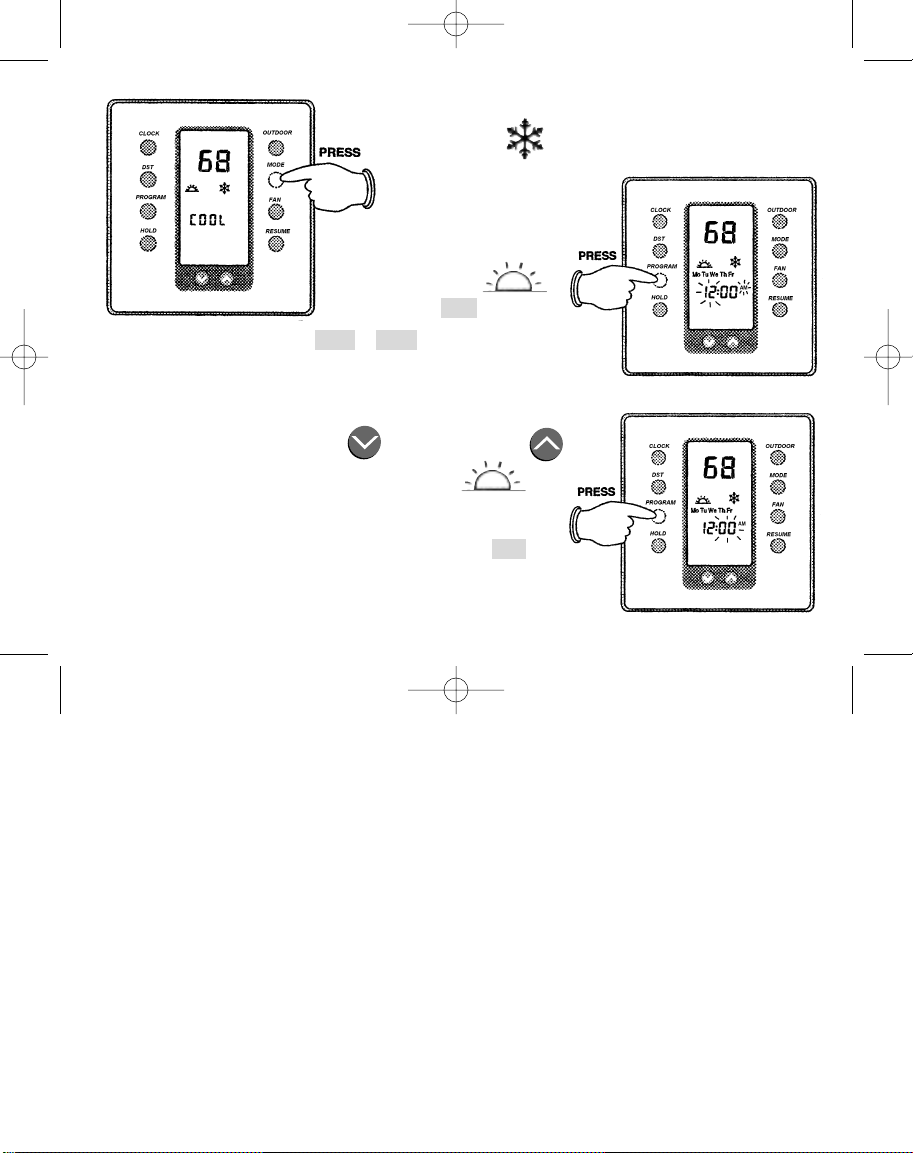
Step 1: Press and release the MODE button until the word
“COOL” and the “ ” cooling symbol appear on the display.
Step 2: Press and release the
PROGRAM button – “Mo Tu
We Th Fr”; Morning
event symbol “ ”;
flashing “12:” (or some
other hour); and flashing “AM” or “PM” will appear on the display.
You are now setting the time you want your cooling equipment to
come on in the morning.
Step 3: Press the DECREASE button or INCREASE
button to set the desired hour for the Morning “”
event.
Step 4: Press and release the PROGRAM button – “:00”
(or some other minutes) will flash.
110-904 7/11/01 4:29 PM Page 7
Step 5: Press the DECREASE button or INCREASE
button to set the desired minutes for the Morning “”
event (program starting times are set in ten-minute
increments).
Step 6: Press and release the PROGRAM button – the current
cooling temperature will begin to flash. You are now setting
the cooling temperature you desire in the morning.
Step 7: Press the DECREASE button or INCREASE
button to set the desired cooling temperature for the Morning “ ” event.
Step 8: Press and release the PROGRAM button – the Day “ ” event symbol will appear. You are
now setting the time and cooling temperature you want throughout the day.
Step 9: Repeat steps 2-6 to complete programming for the Day “ ” event.
Step 10: Press and release the PROGRAM button – the Evening “ ” event symbol will appear.
You are now setting the time and cooling temperature you want during the evening.
– 6 –
110-904 7/11/01 4:29 PM Page 8
 Loading...