

Page 1

Installing the Card
1
in a Power Macintosh 4400 or 7220
This chapter describes how to install the PC Serial and Parallel Card in a
Power Macintosh 4400 or a Power Macintosh 7220.
After you install the PC Serial and Parallel Card hardware, go to Chapter 6,
“Updating Your PC Compatibility Card Software.” Then turn to Chapter 7 to
learn more about connecting PC-compatible equipment to your PC Serial and
Parallel Card.
1
Page 2

What you need
Before beginning the installation process, make sure you have the
necessary parts: the PC Serial and Parallel Card and the peripheral flex
cable. You’ll also need a Phillips screwdriver and your PC Compatibility Card
user’s manual.
Installing the PC Serial and Parallel Card hardware
WARNING
The installation of the PC Serial and Parallel Card is
technically complex. Unless you are comfortable installing components
inside computers, Apple recommends that you have the PC Serial and
Parallel Card installed by your Apple-authorized dealer (who may
charge a fee). If you attempt to install the card yourself, any damage
you may cause to your equipment will not be covered by the limited
warranty on your computer.
Do not attempt to install the card or connect the cables without first
reading this manual.
There are several steps to installing your PC Serial and Parallel Card
hardware:
m opening the computer
m preparing the slots
m attaching the peripheral flex cable to the PC Compatibility Card
m attaching the peripheral flex cable to the PC Serial and Parallel Card
m inserting the PC Serial and Parallel Card
m replacing the computer cover
2
Chapter 1
Page 3
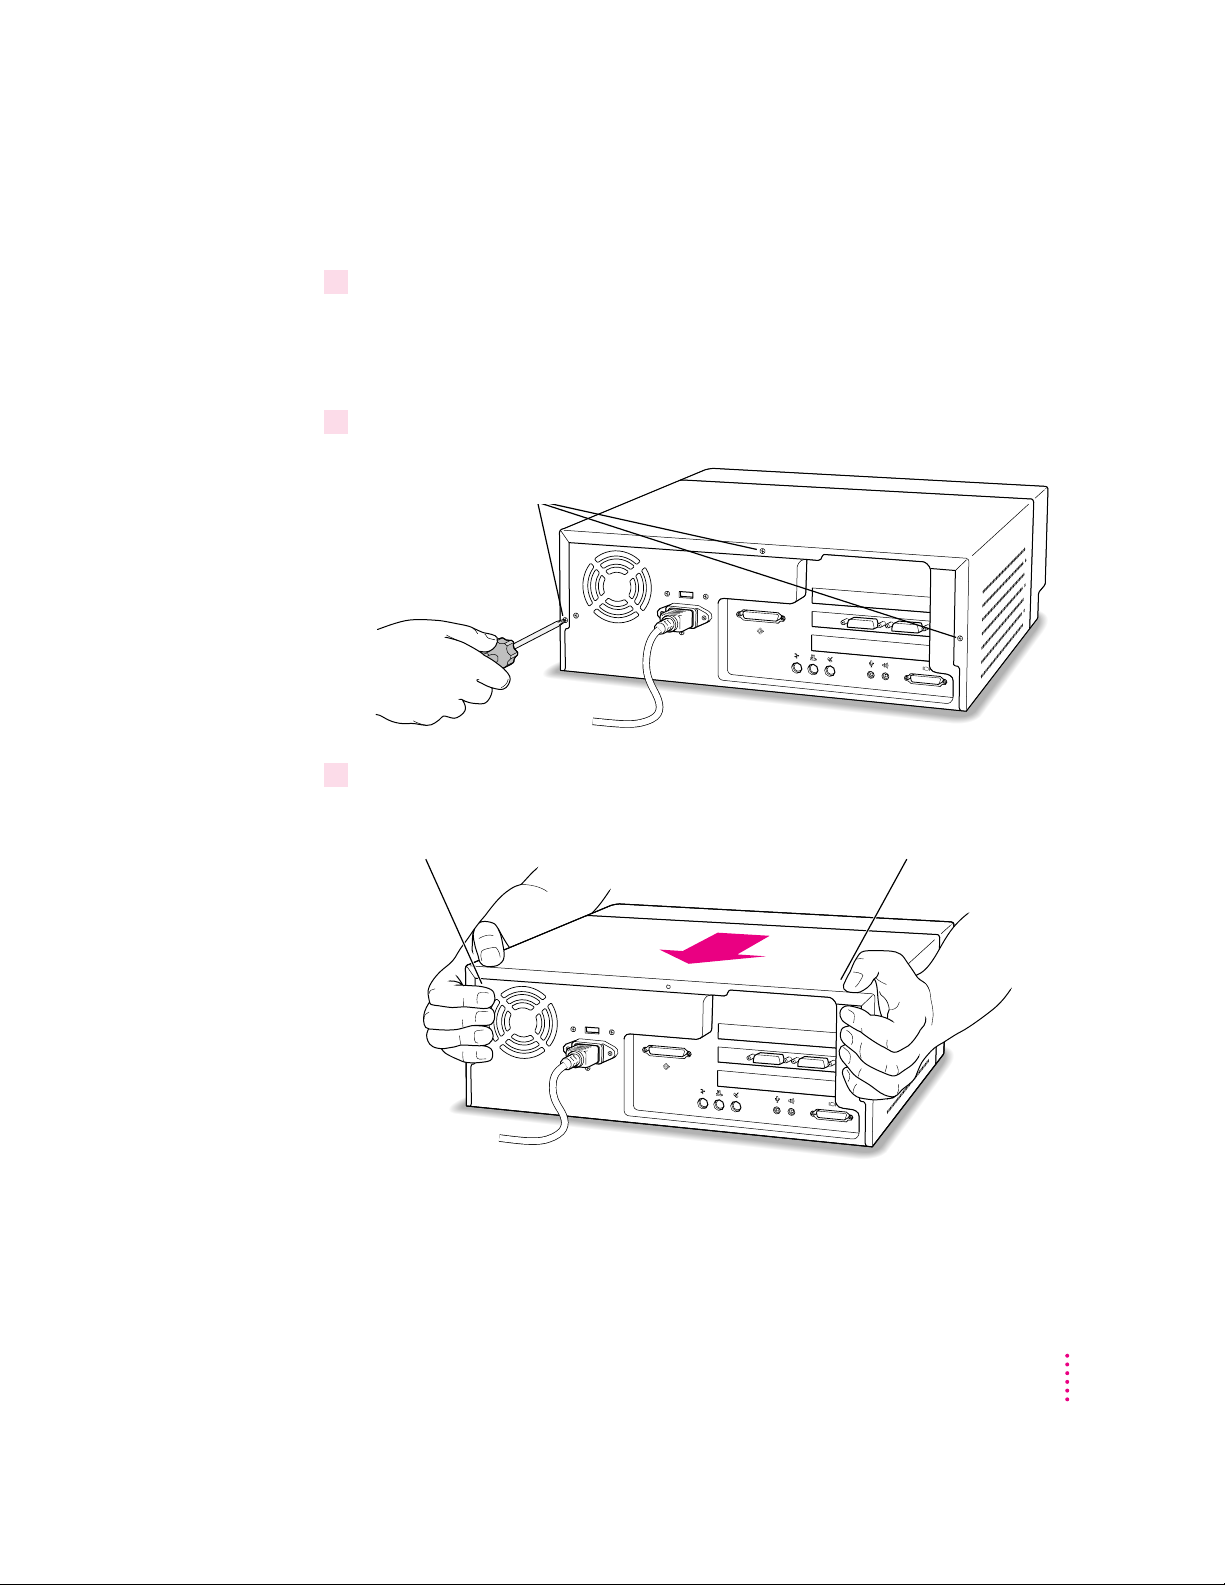
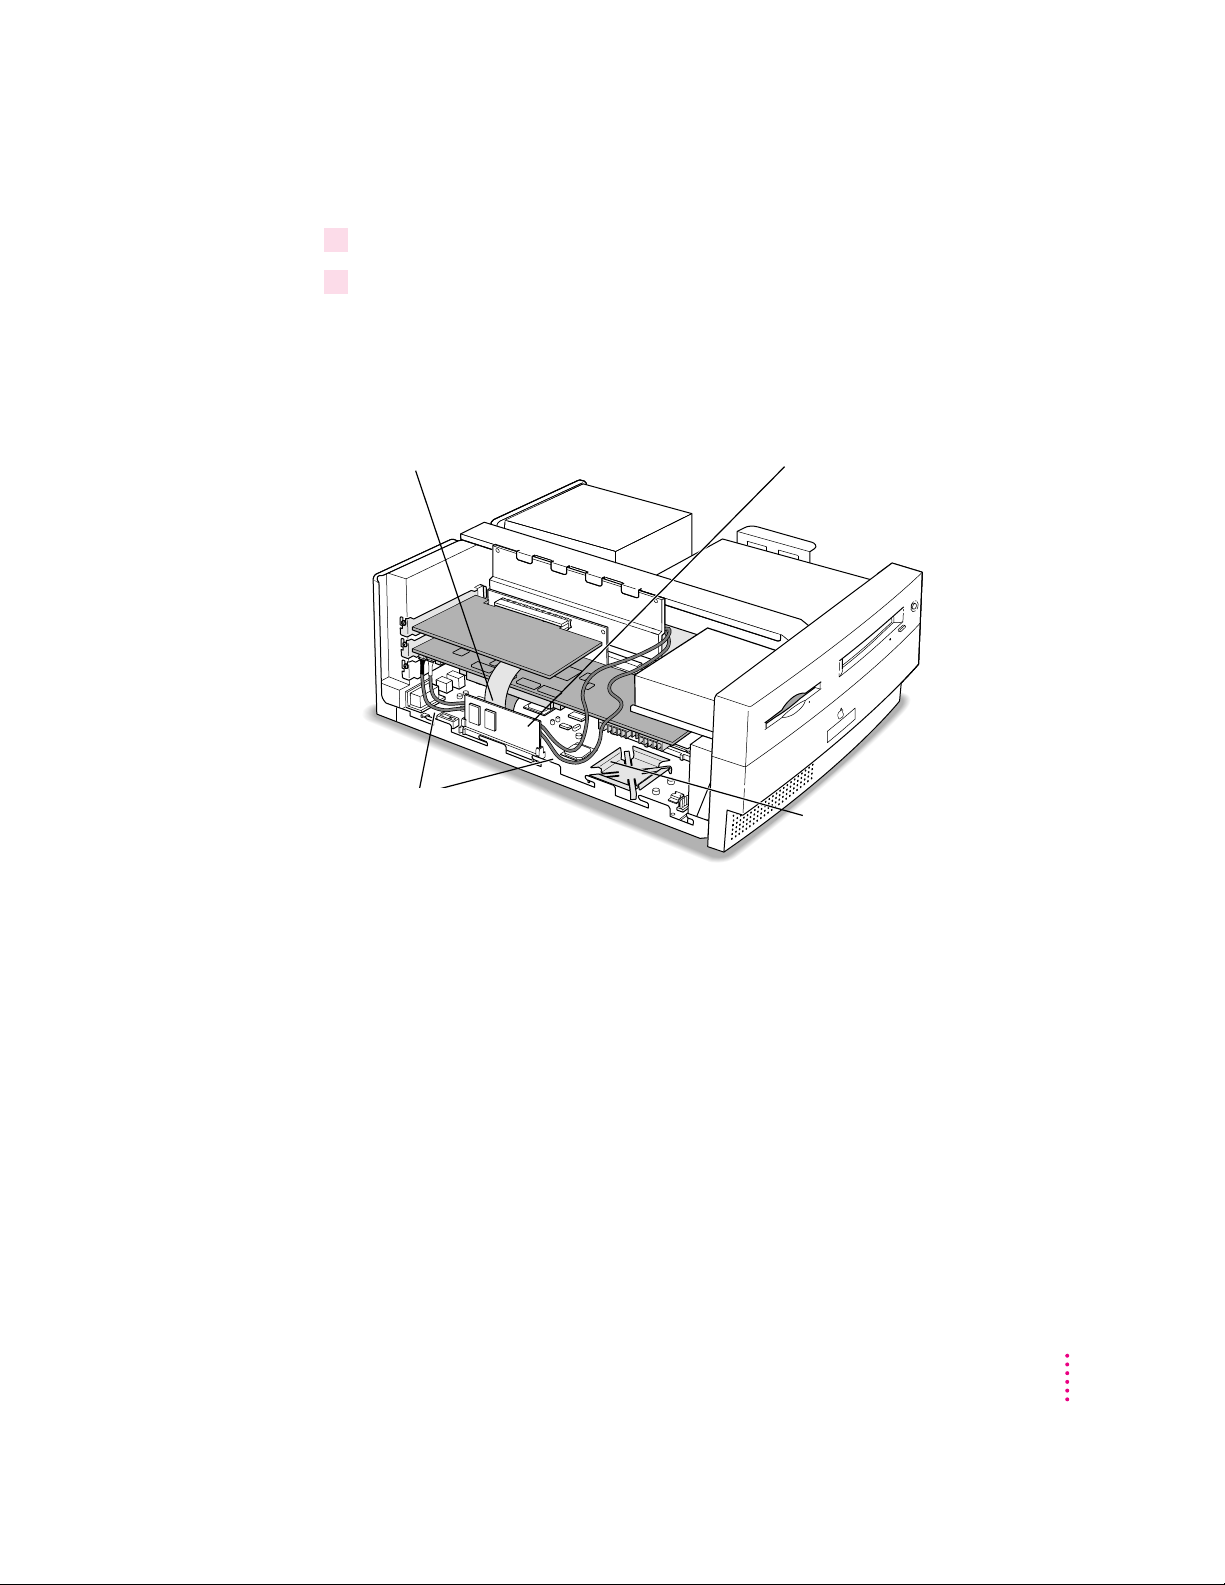
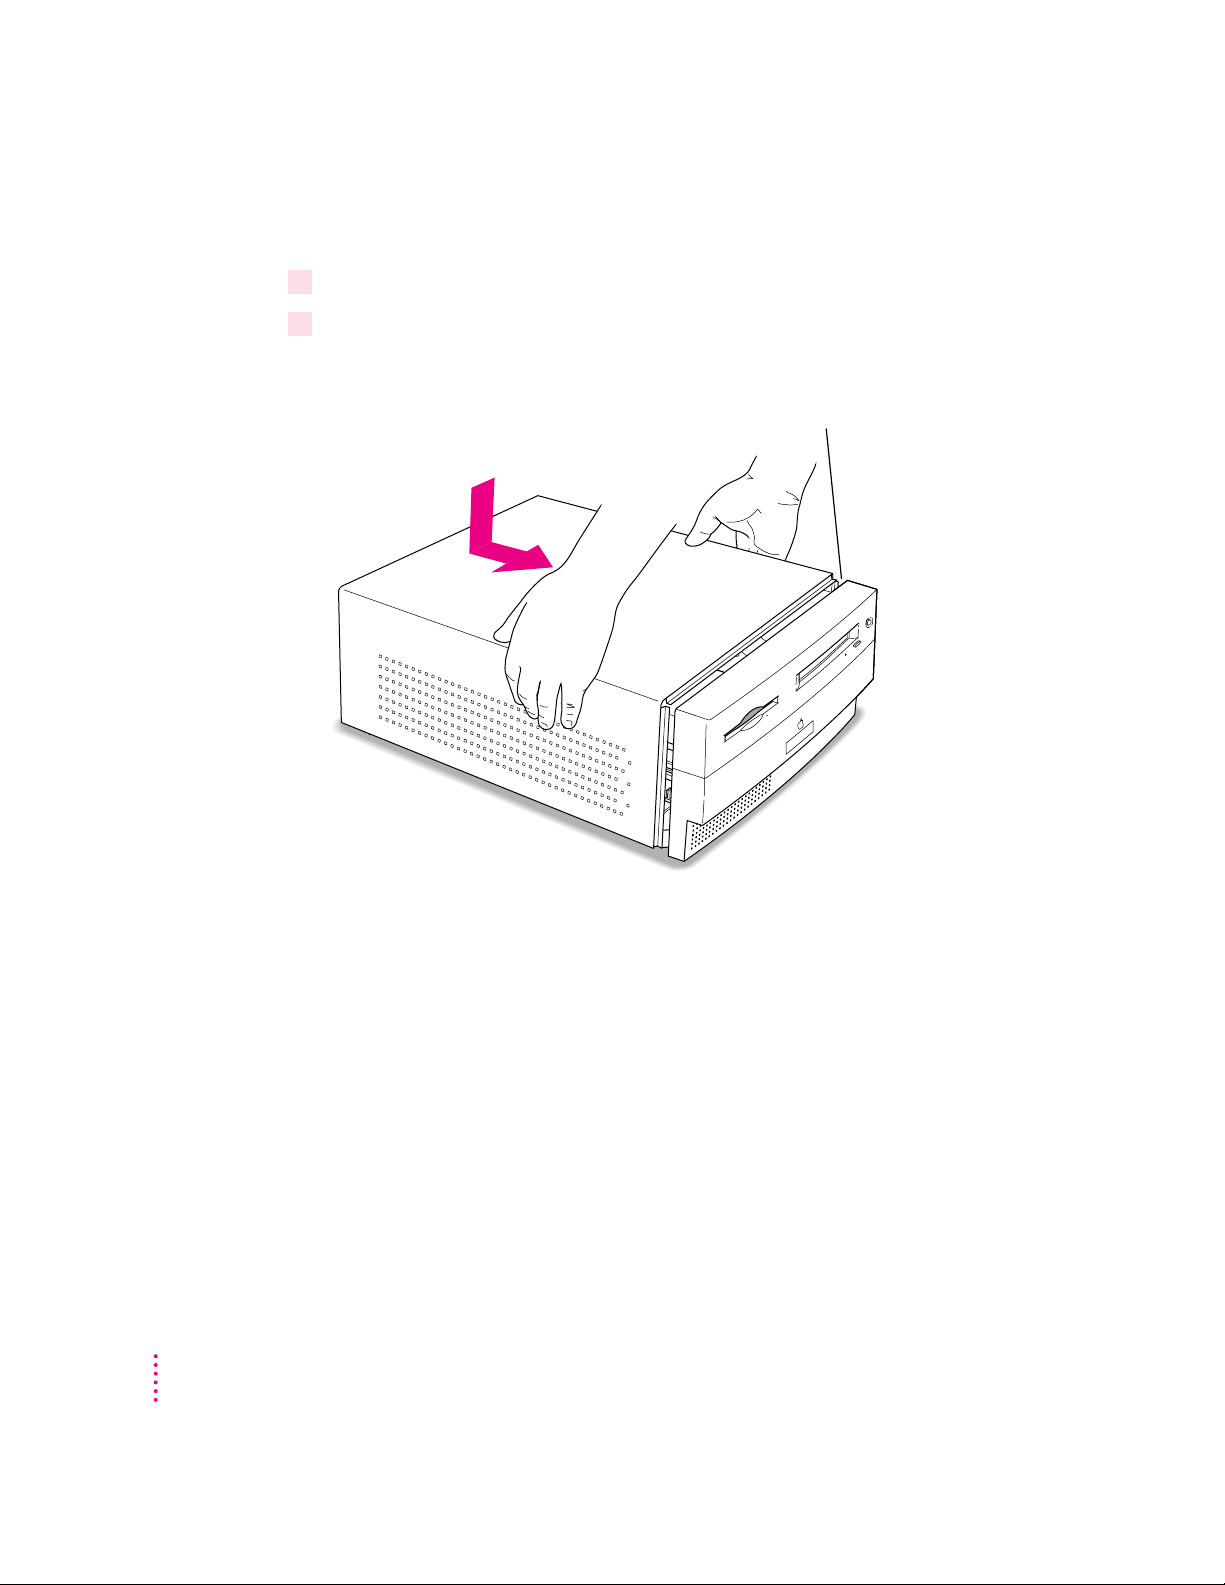
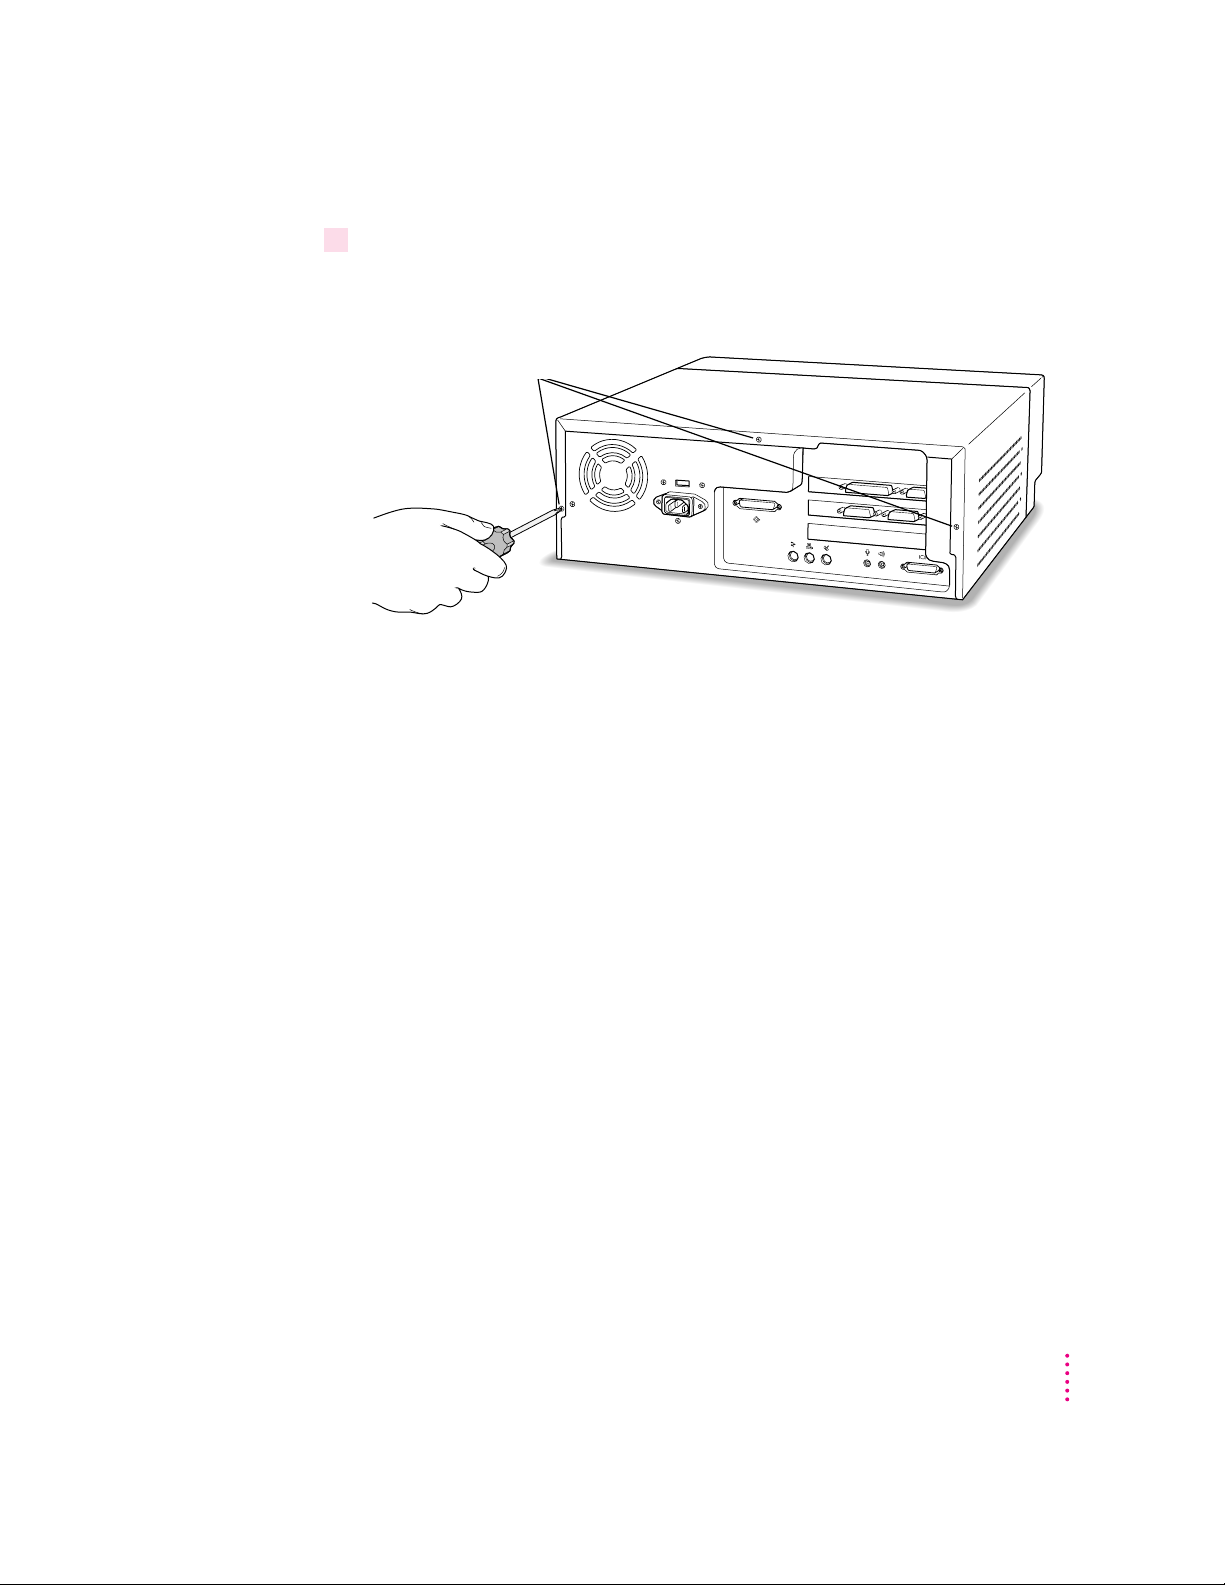
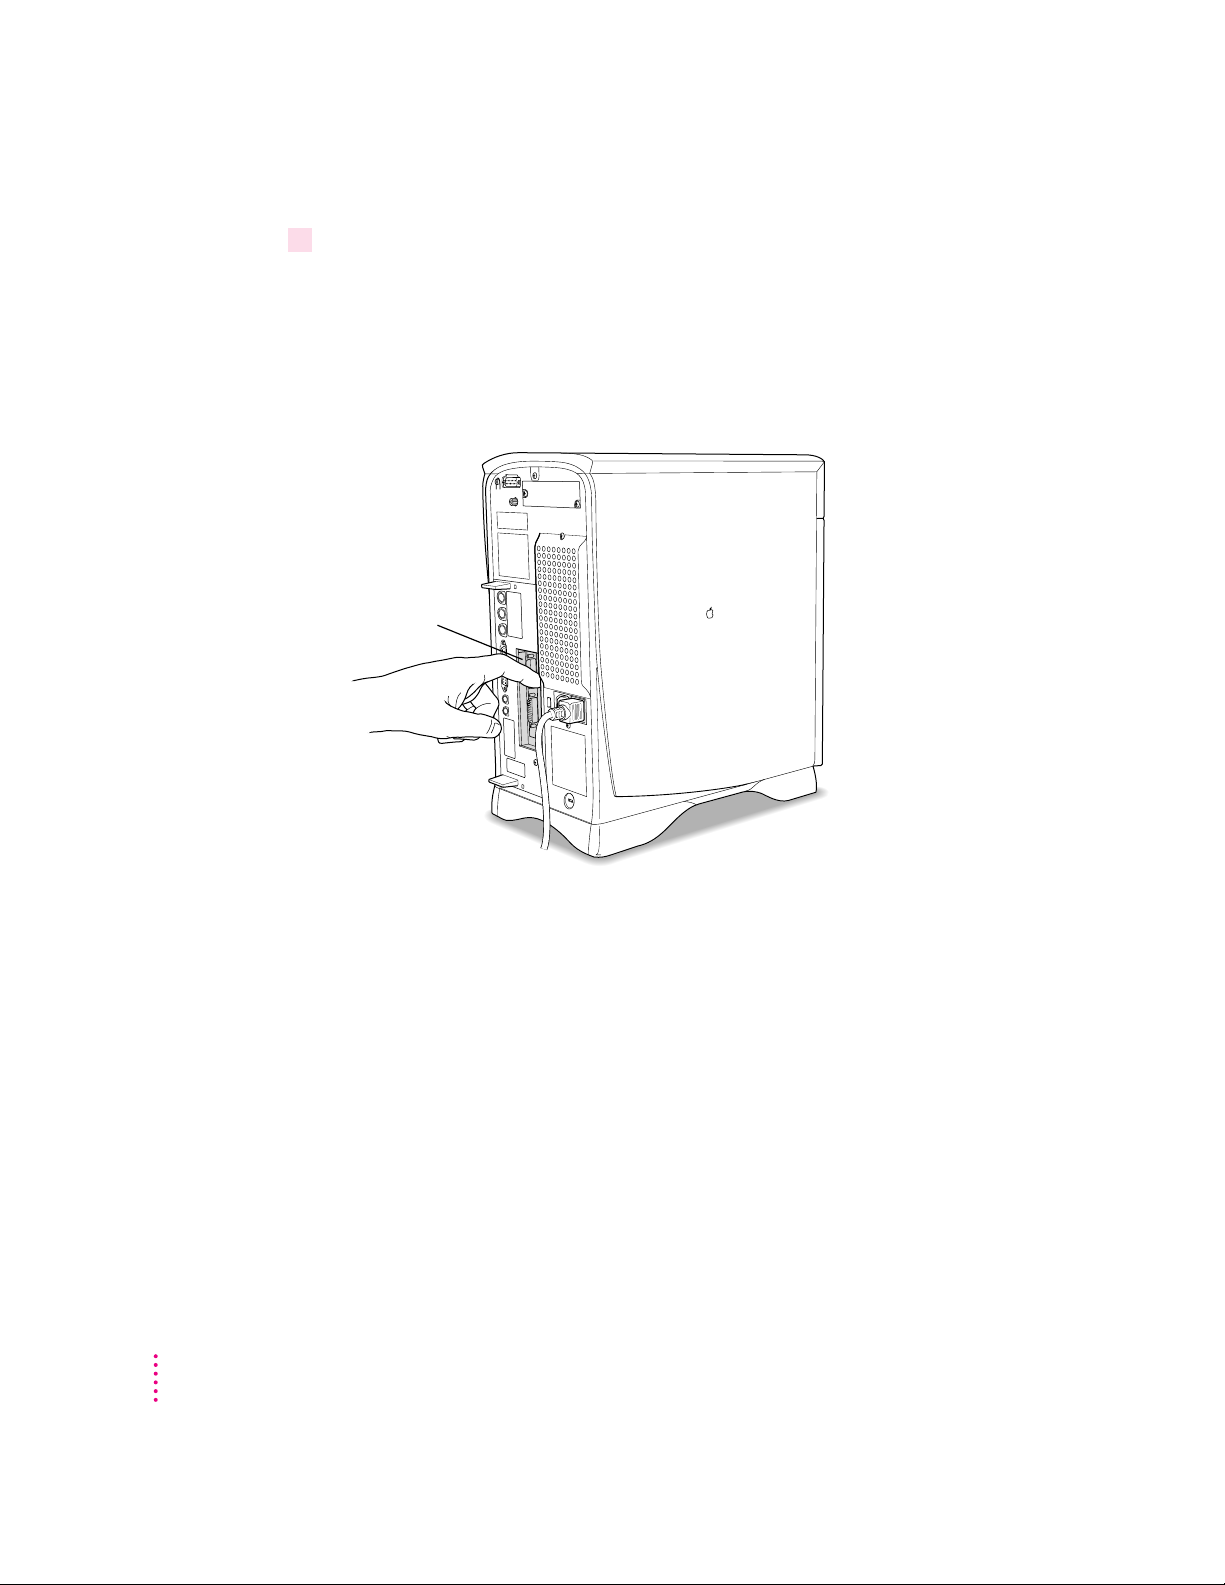
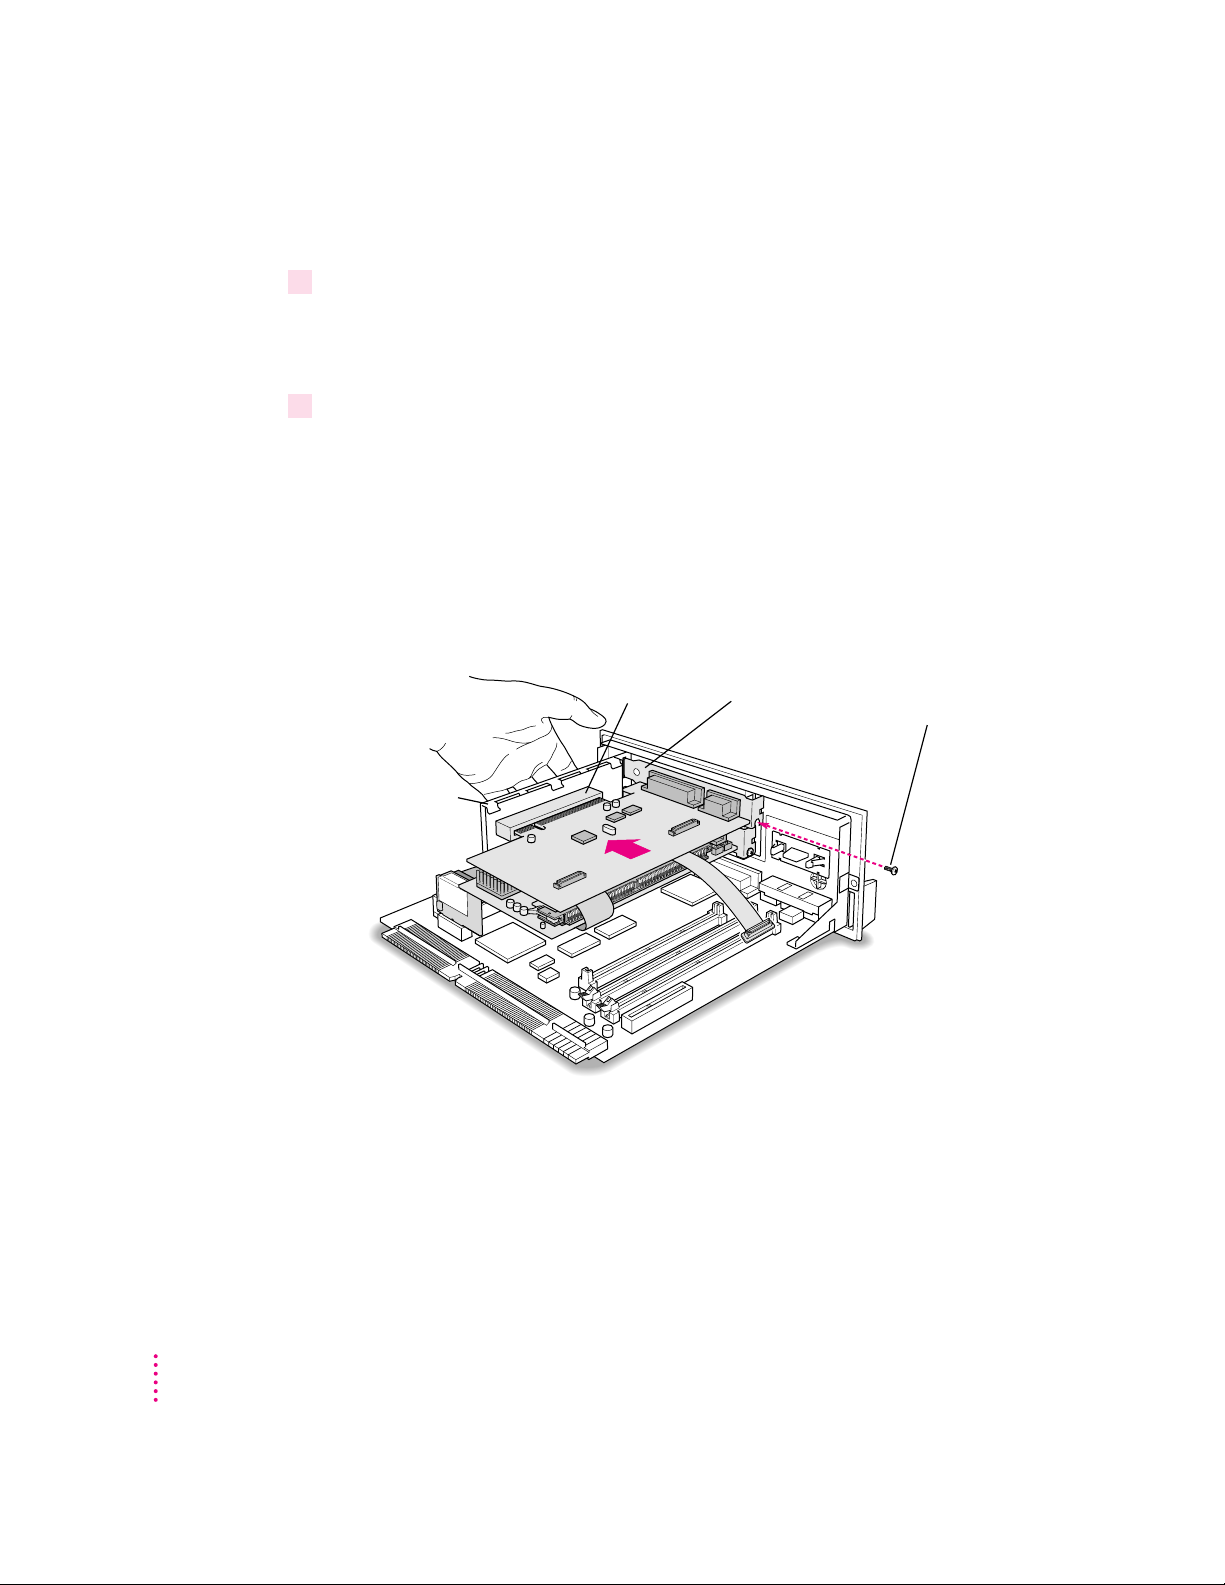
Opening the computer
Firmly grasp the back of the computer and push in on the rear panel with your
fingertips while sliding the top cover back about a quarter of an inch with your thumbs.
Remove these three screws.
1Shut down the computer and disconnect all cables from the computer, except for the
power cord.
Leave the computer plugged in for now, to ground it and protect its
components from static electricity damage.
2 Remove the three screws as shown from the back of the cover.
3Position your hands on the unit as shown and slide the cover back.
Installing the Card in a Power Macintosh 4400 or 7220
3
Page 4

4 Lift the cover up and off the computer.
Power supply case
5 Touch the metal part of the power supply case inside the computer.
Always do this before you touch any parts, or install any components, inside
the computer. Touching the power supply case helps release static electricity
from your body and prevent possible damage to internal components.
IMPORTANT
You can collect static electricity just by walking away from and
then back to your computer. If you need to move away from your computer
during installation, remember to touch the metal part of the power supply
case again before you continue installing.
4
6Disconnect the power cord from the back of the computer.
Chapter 1
Page 5
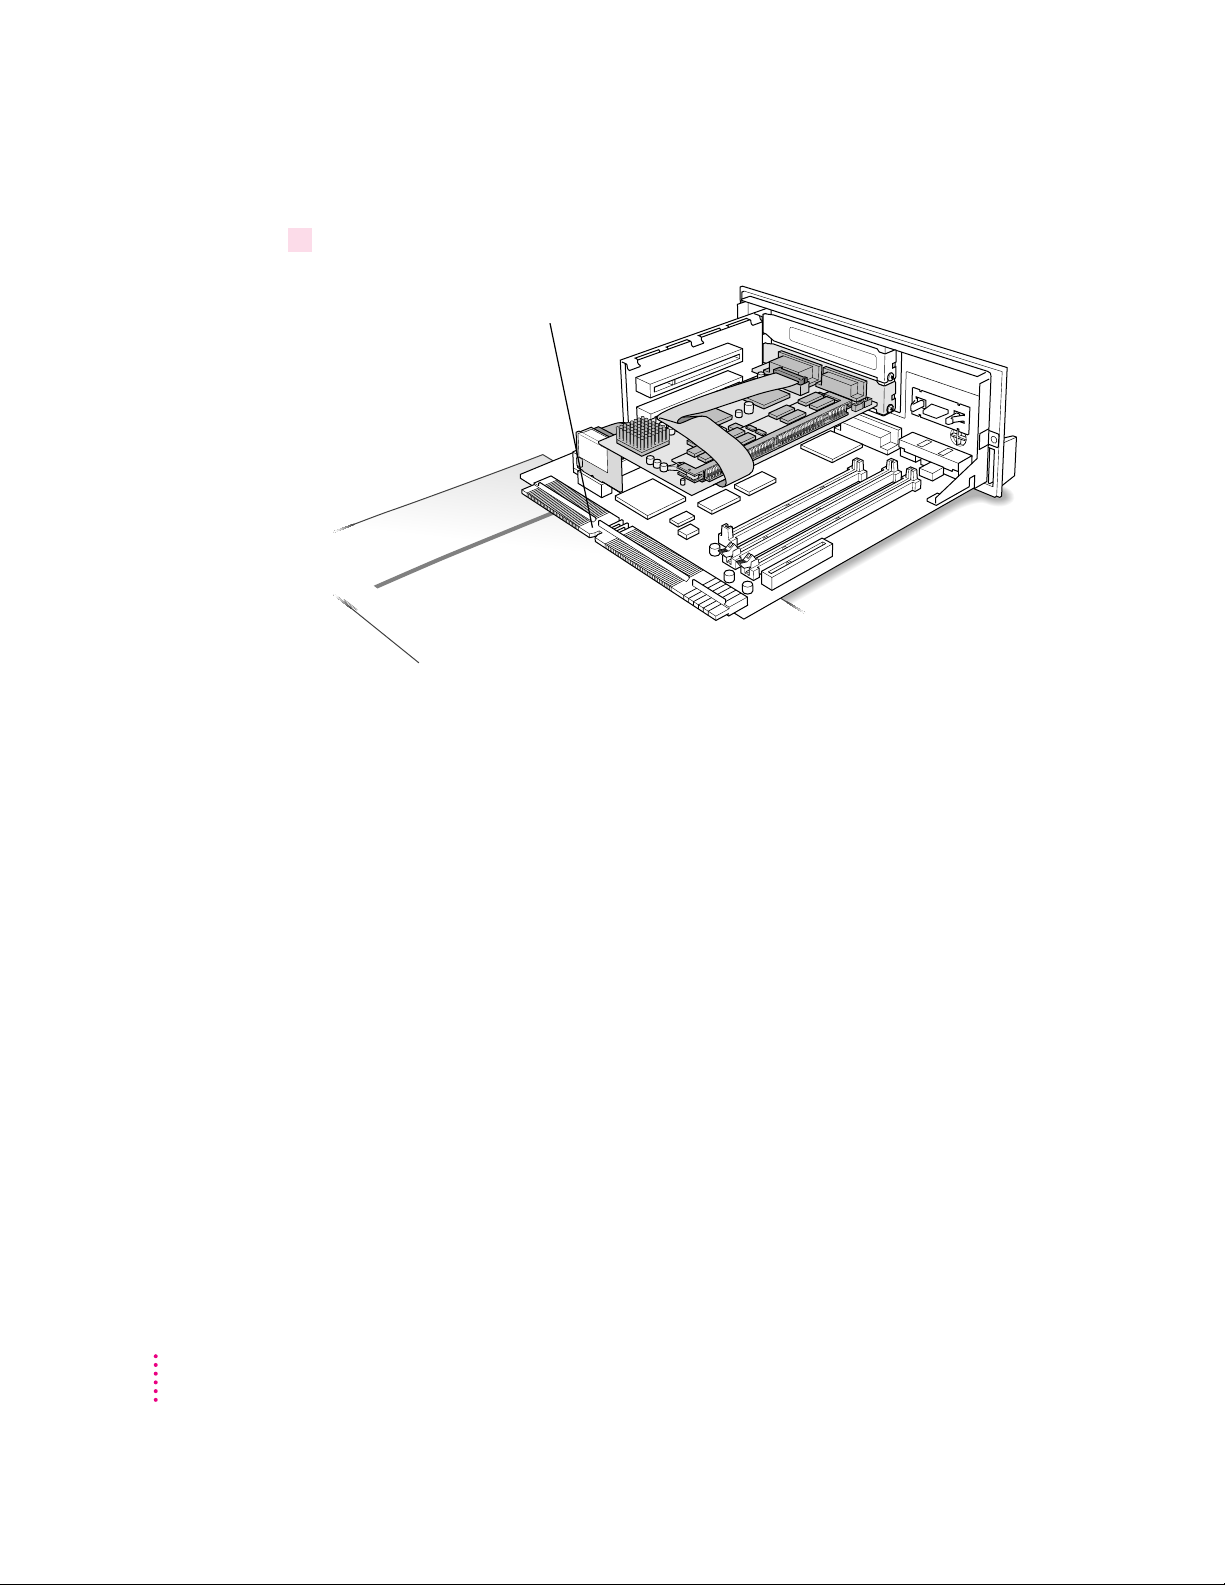
Preparing the slots
First PCI slot
PC Compatibility
Card
Remove the screw that
holds the port cover in place.
Port access cover
7Unscrew and remove the metal port access covers for the slots you need.
If you are installing the PC Serial and Parallel Card at the same time you are
installing a PC Compatibility Card, unscrew and remove the metal covers to
both PCI slots.
If you already have a PC Compatibility Card installed in your computer, then
unscrew and remove the card without disconnecting the audio cables. Refer to
your PC Compatibility Card user’s manual or
for information on how to remove the bracket that holds the PC Compatibility
Card in place.
Next, unscrew and remove the metal port access cover to the top (first) slot.
Keep the screws; you will reinsert them later.
PC Compatibility Card Update
Installing the Card in a Power Macintosh 4400 or 7220
5
Page 6
Attaching the peripheral flex cable to the PC Compatibility Card
Plug the peripheral flex cable
into this connector on a
7" PC Compatibility Card.
Plug the peripheral flex cable
into this connector on a
12" PC Compatibility Card.
8With the PC Compatibility Card turned face up as shown, attach the peripheral flex cable
to the connector.
IMPORTANT
Always hold the card by its edges. Don’t touch any of the
components on the card.
6
9Insert the PC Compatibility Card into the second slot.
Follow the installation instructions in your PC Compatibility Card user’s
manual or PC Compatibility Card Update to install the bracket that holds the
PC Compatibility Card in place. Then continue with the next step.
Chapter 1
Page 7
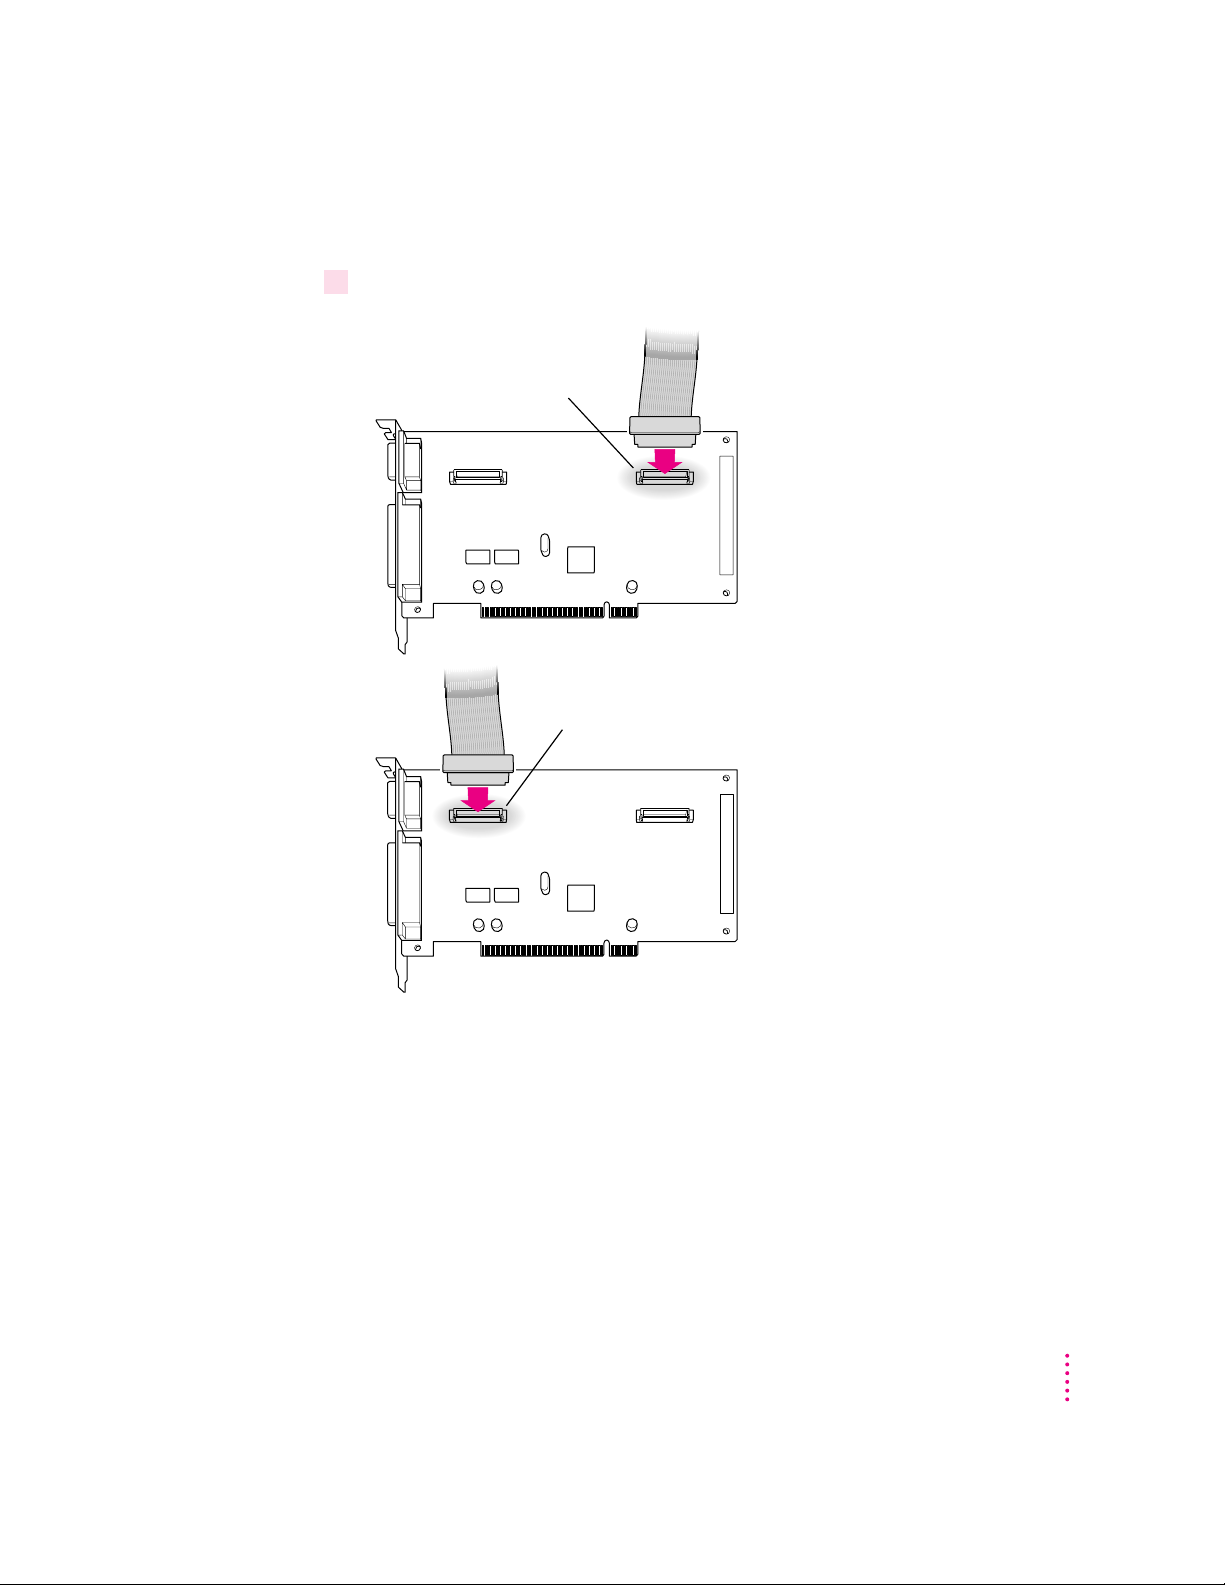
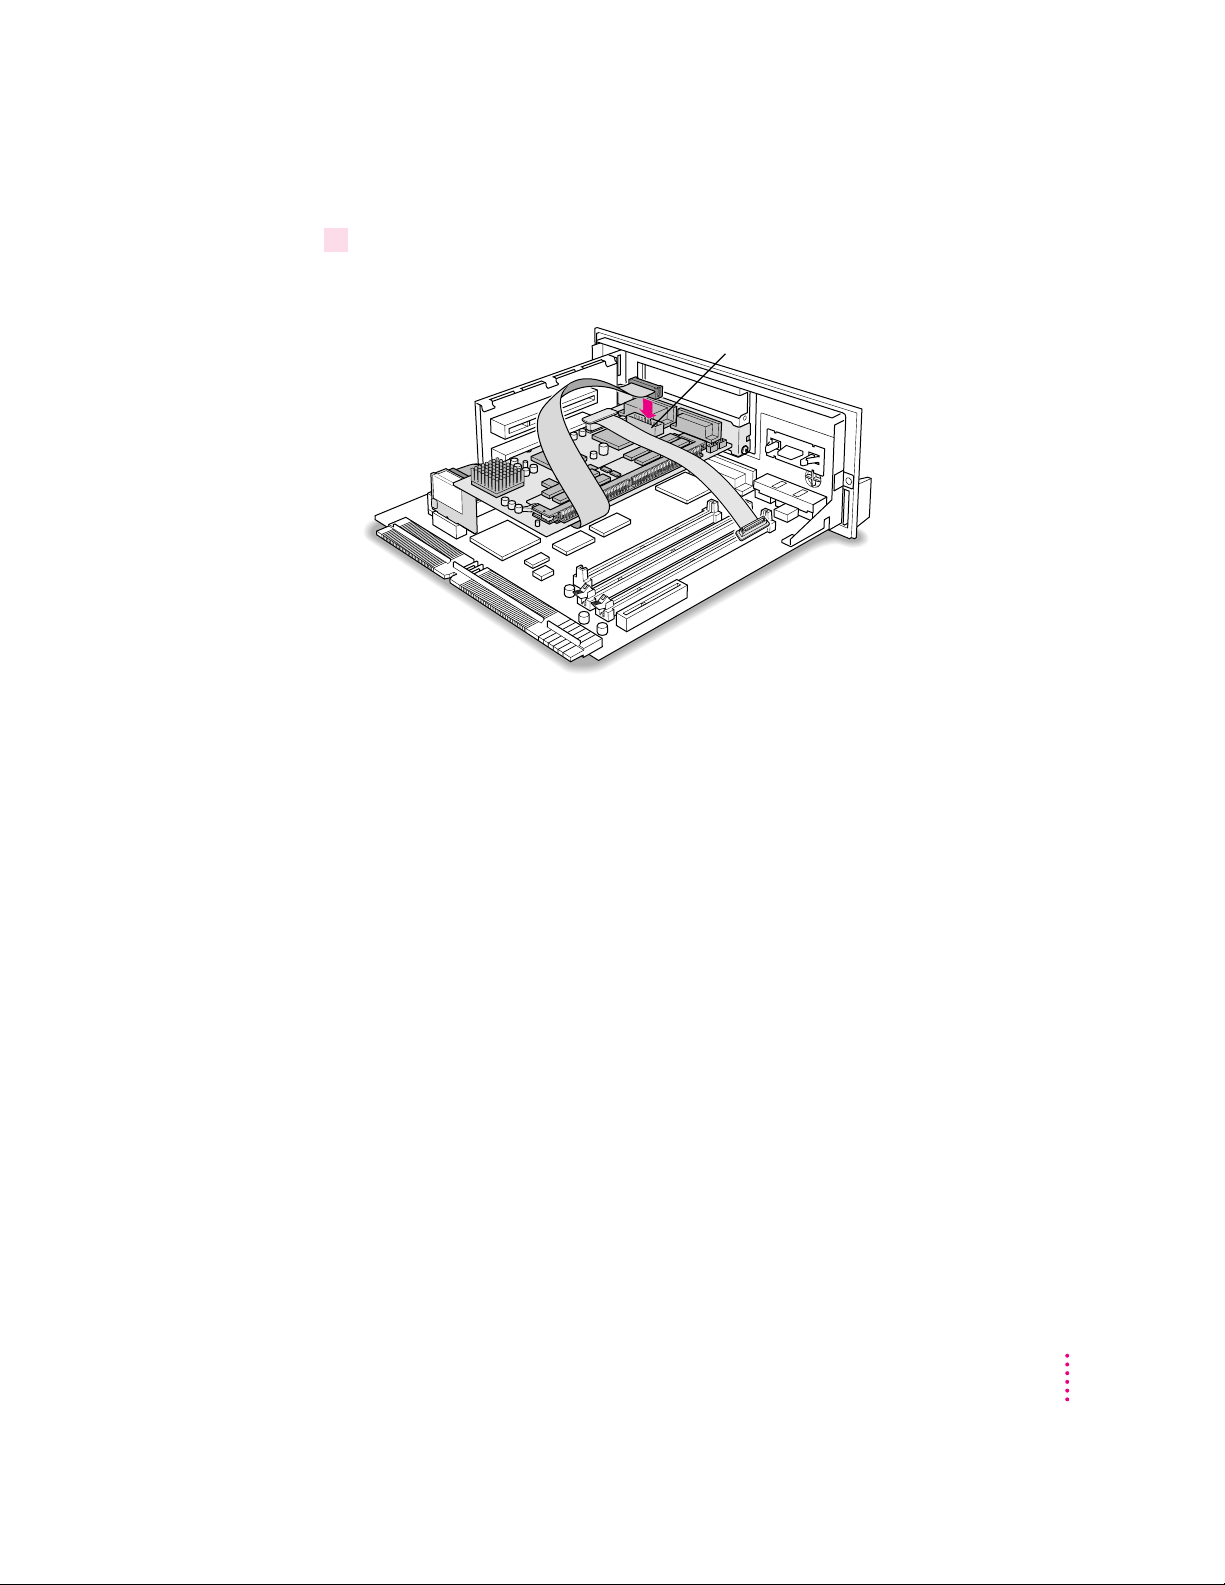
Attaching the peripheral flex cable to the PC Serial and Parallel Card
Plug the peripheral flex cable
into this connector if you have a
12" PC Compatibility Card.
Plug the peripheral flex cable
into this connector if you have a
7" PC Compatibility Card.
10 Connect the peripheral flex cable to the PC Serial and Parallel Card.
Installing the Card in a Power Macintosh 4400 or 7220
7
Page 8

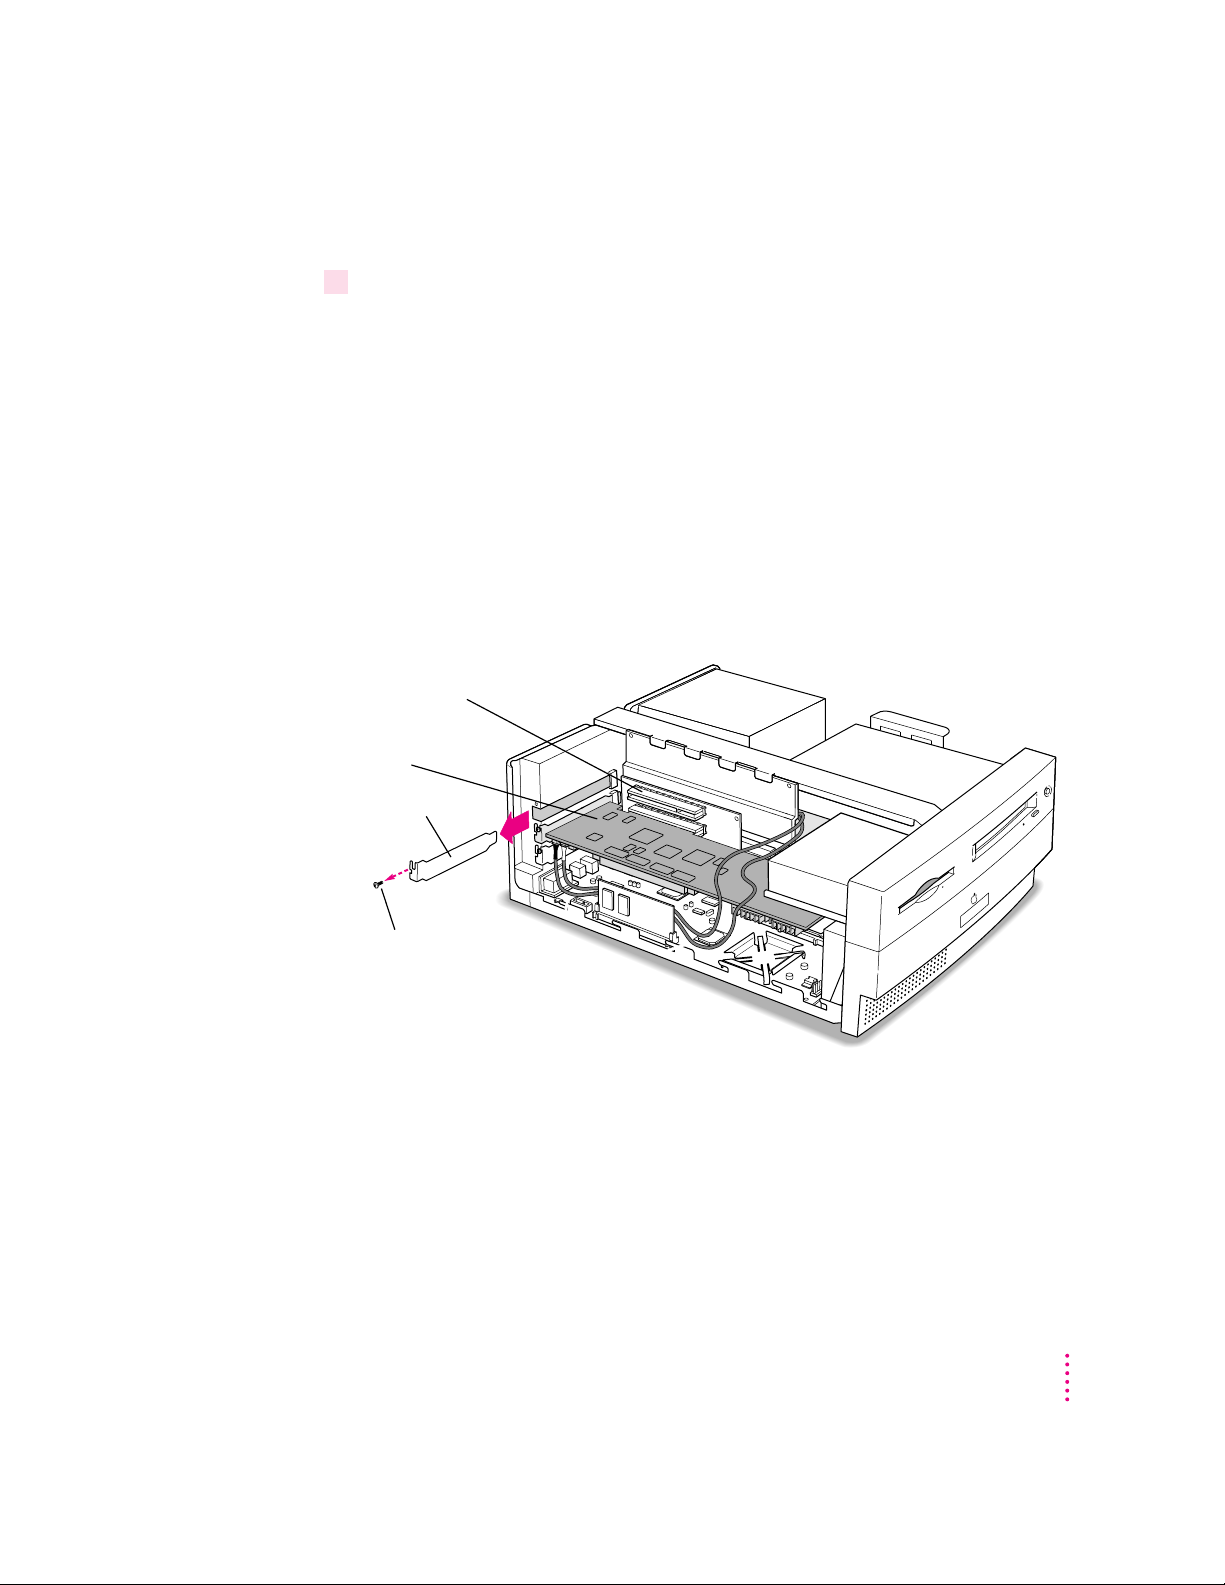
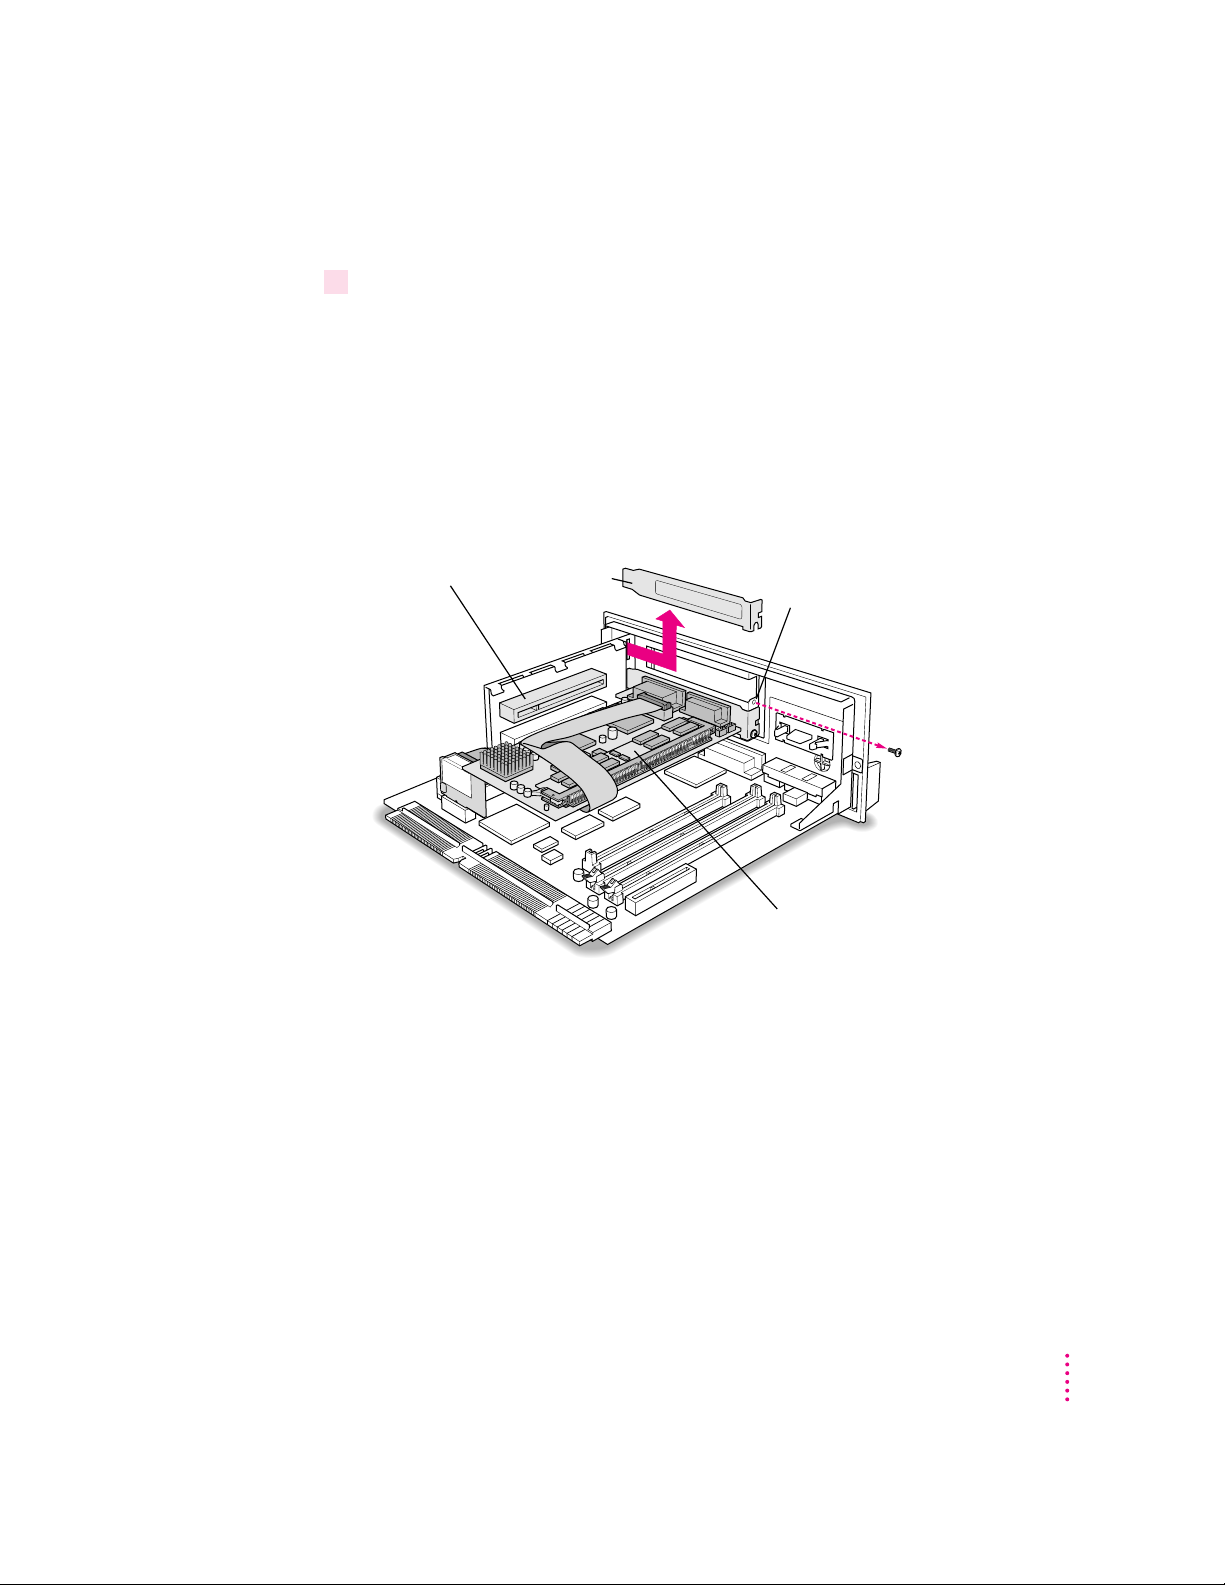
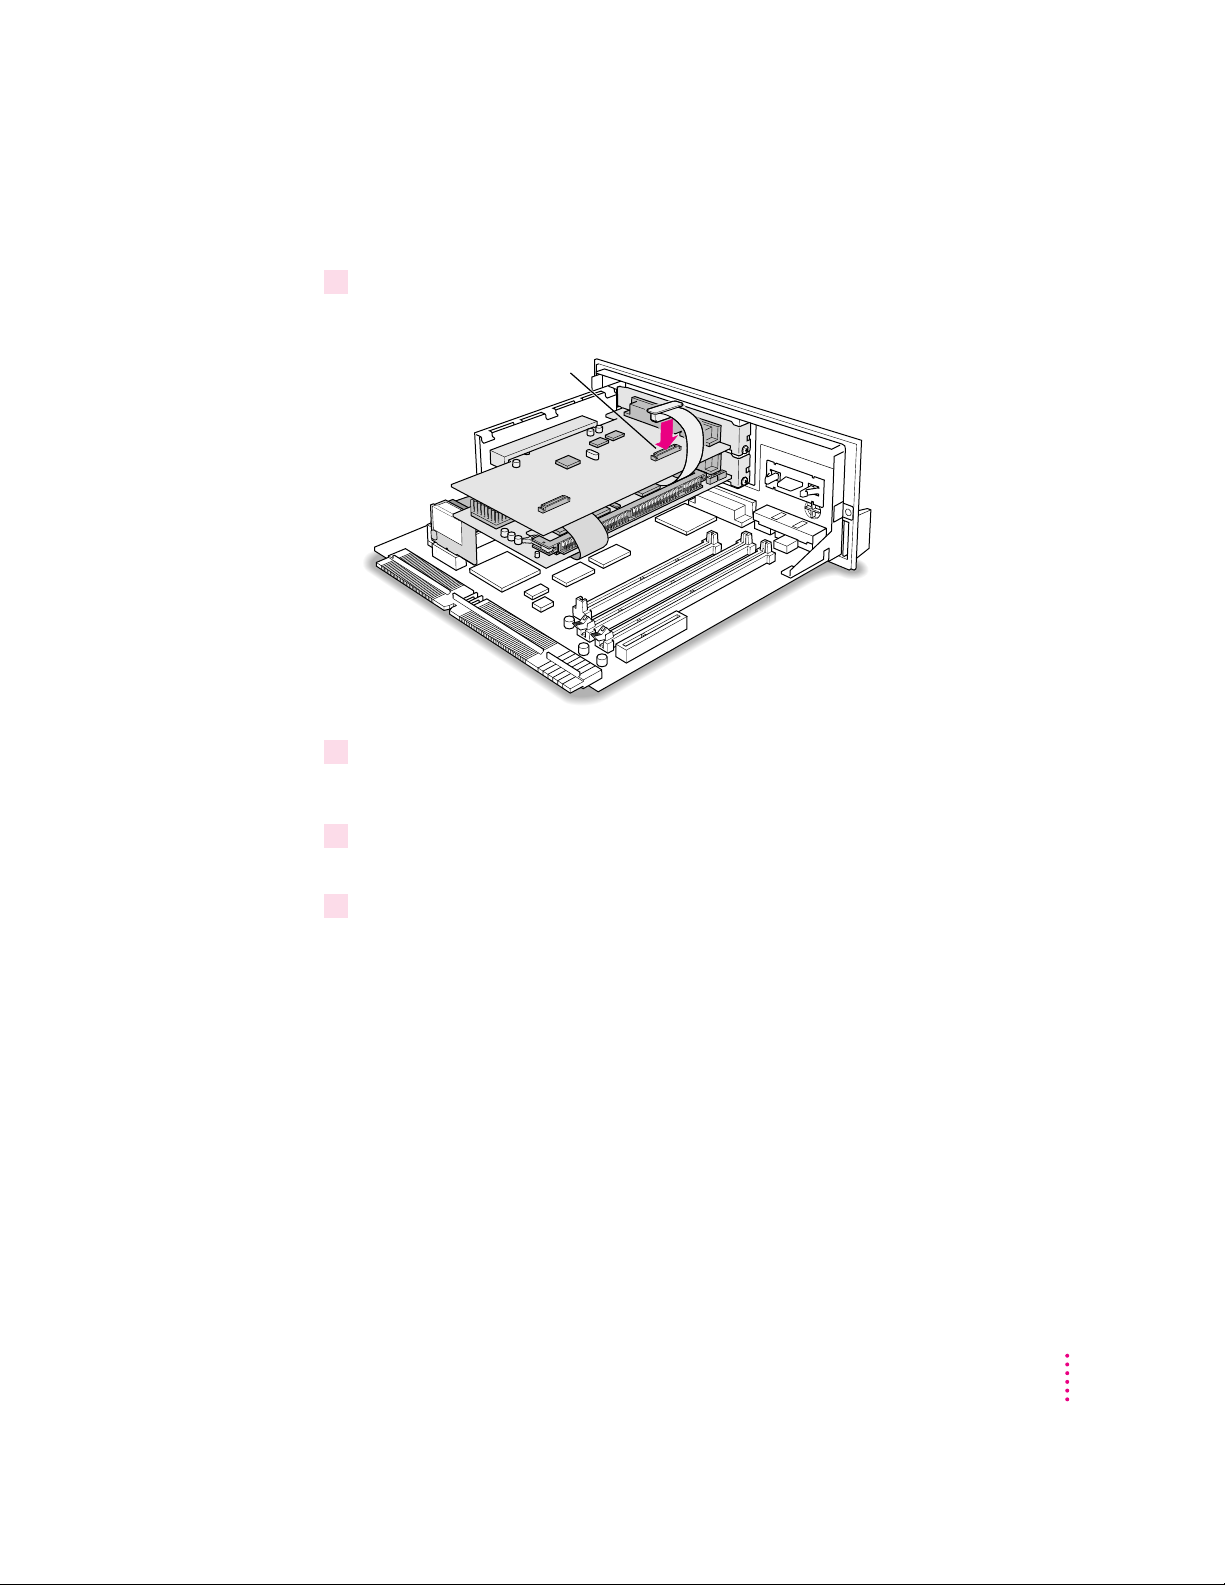
Inserting the PC Serial and Parallel Card
Support the slots with your hand in this
area only (shown tinted here) to avoid
pressing against the soldered pins on
the back of the PCI slots.
First PCI slot
Reinstall the screw
to secure the card
in place.
11 Flip the PC Serial and Parallel Card over and insert it into the first (top) PCI slot.
IMPORTANT
Always hold the card by its edges. Don’t touch any of the
components on the card.
Place one hand behind the PCI slots in the area indicated below. With your
other hand, align the card’s connector end (gold in color) with the first (top)
PCI expansion slot. The ports on the card should face the port access opening
on the computer’s back panel. Press the card in. When the card is fully
inserted, you won’t be able to see the gold-colored connector any more.
m Don’t rock the card from side to side; press it straight into the slot. Rocking
the card can damage the PCI slot.
m Don’t force the card. If you meet a lot of resistance, pull the card out and
try again.
m To see if the card is connected, pull it gently. If it resists, it is connected.
8
Chapter 1
Page 9
12 Reinsert the screws you removed earlier to secure both cards.
Tuck the flex cable behind the video DRAM DIMM. Video DRAM DIMM
The audio cables
connected to the
PC Compatibility Card should not
extend over the bottom edge of the computer.
Make sure the
audio cables don’t
touch the heat sink.
13 Tuck the audio cables as shown. If you have a 12-inch PC Compatibility Card, tuck the
peripheral flex cable down as shown.
If you are installing the PC Compatibility Card for the first time, return to the
PC Compatibility Card user’s manual now and complete the rest of the
instructions for PC Compatibility Card installation.
Installing the Card in a Power Macintosh 4400 or 7220
9
Page 10
Replacing the computer’s cover
Set the cover down so there’s about a quarter of an inch gap here.
Then slide the cover all the way forward.
14 Make sure all cables and cards are firmly connected.
15 Replace the computer cover.
Lower the cover onto the computer vertically.
10
Chapter 1
Page 11
What’s next?
Reinsert these three screws.
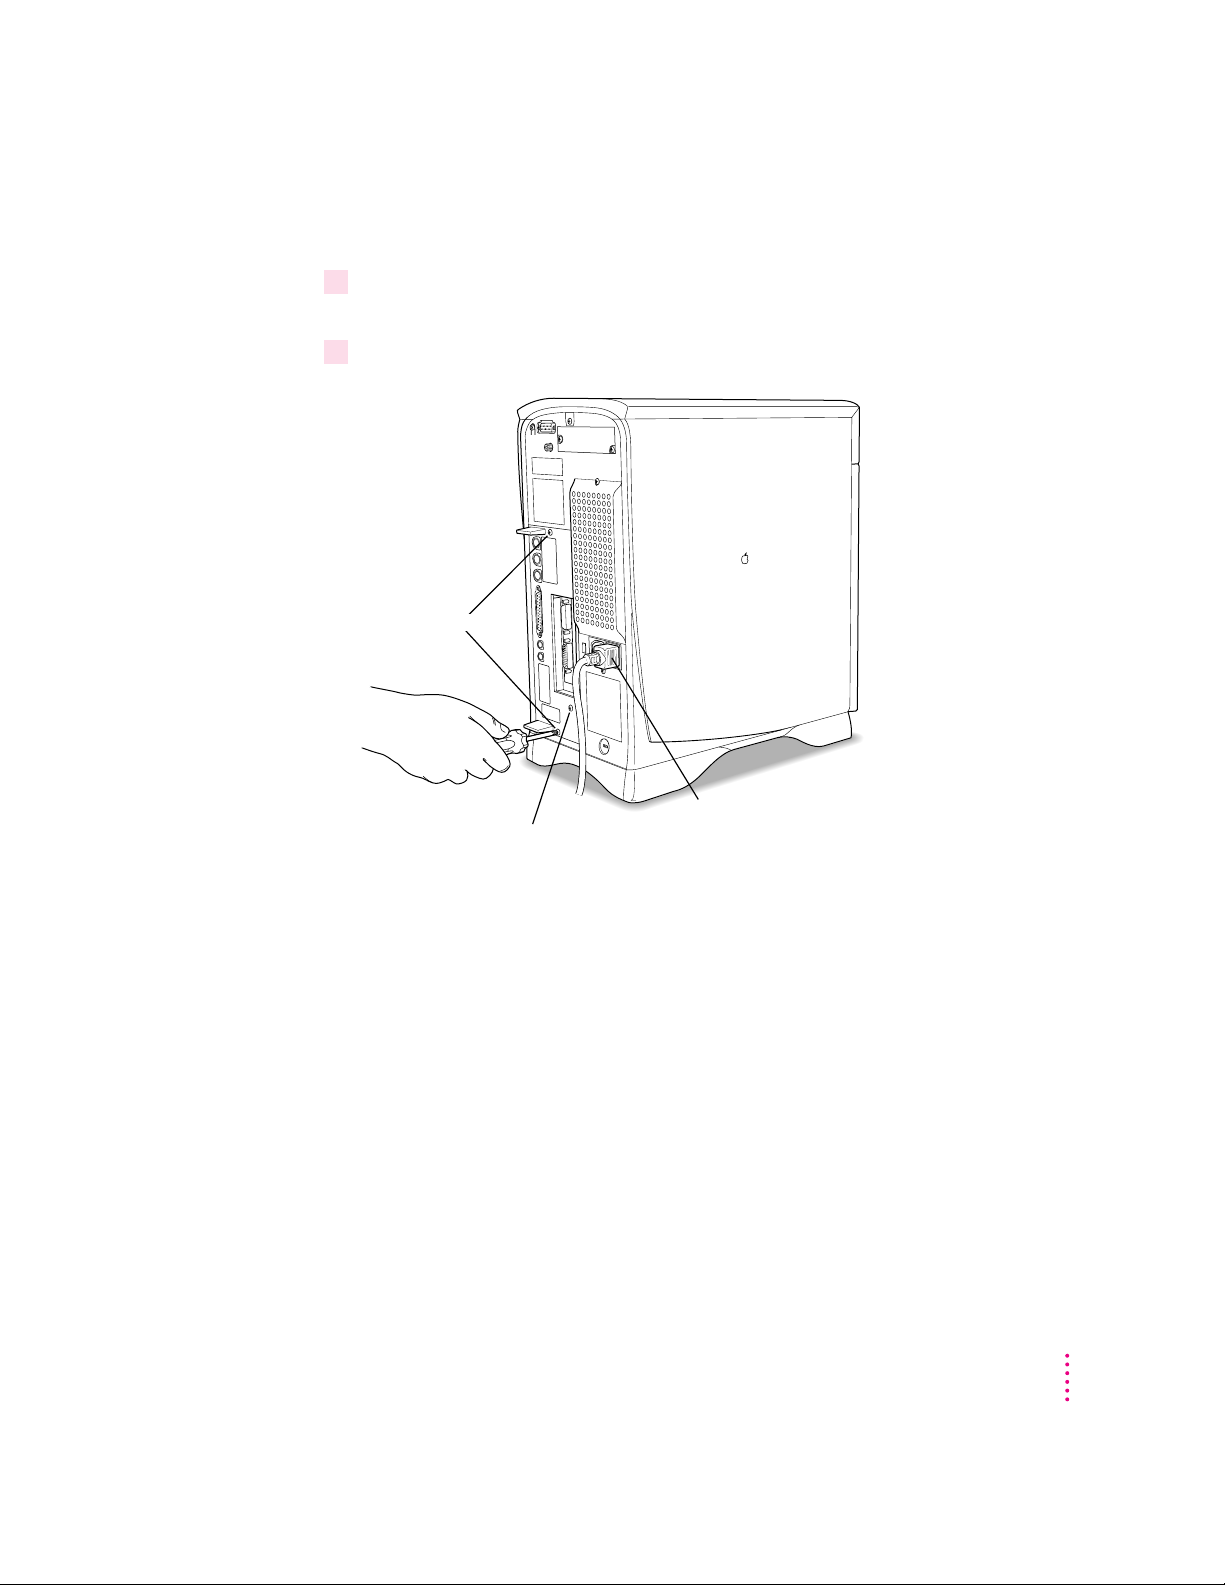
16 Replace the screws and reconnect all equipment.
Reinsert the three screws you removed earlier into the back of the computer.
Then reinsert the power cable and all other equipment cables.
You are now finished installing your PC Serial and Parallel Card.
Next, go to Chapter 6, “Updating Your PC Compatibility Card Software.”
Then go to Chapter 7 for instructions on connecting equipment to your
PC Serial and Parallel Card.
Installing the Card in a Power Macintosh 4400 or 7220
11
Page 12

Page 13

Installing the Card
2
in a Power Macintosh 6400 or 6500
The illustrations in this chapter show the 6400 model. If you have a 6500
model, some of the illustrations may look slightly different from your
computer, but the procedure is the same.
After you install the PC Serial and Parallel Card hardware, go to Chapter 6,
“Updating Your PC Compatibility Card Software.” Then turn to Chapter 7 to
learn more about connecting PC-compatible equipment to your PC Serial and
Parallel Card.
13
Page 14

What you need
Before beginning the installation process, make sure you have all the
necessary parts: the PC Serial and Parallel Card and the peripheral flex cable.
Yo u’ ll also need a Phillips screwdriver, your PC Compatibility Card user’s
manual, and a magazine that you can place the computer’s logic board on.
Installing the PC Serial and Parallel Card hardware
WARNING
The installation of the PC Serial and Parallel Card is
technically complex. Unless you are comfortable installing components
inside computers, Apple recommends that you have the PC Serial and
Parallel Card installed by your Apple-authorized dealer (who may
charge a fee). If you attempt to install the card yourself, any damage you
may cause to your equipment will not be covered by the limited
warranty on your computer.
Do not attempt to install the card or connect the cables without first
reading this manual.
There are several steps to installing your PC Serial and Parallel Card
hardware:
m opening the computer
m preparing the slots
m attaching the peripheral flex cable to the PC Compatibility Card
m inserting the PC Serial and Parallel Card
m attaching the peripheral flex cable to the PC Serial and Parallel Card
m replacing the logic board
14
Chapter 2
Page 15
Opening the computer
Remove these
two screws.
Do not remove this screw.
Leave the power cord plugged
in for now. You’ll unplug it later.
1Shut down the computer and disconnect all cables from the computer, except for the
power cord.
2 Remove the two screws as shown from the computer’s back panel.
Installing the Card in a Power Macintosh 6400 or 6500
15
Page 16
3 Touch the recessed metal parts in the back panel to discharge static electricity from
Touch the metal
parts inside the
recessed area.
your body.
IMPORTANT
You can collect static electricity just by walking away from and
then back to your computer. If you need to move away from your computer
during installation, remember to touch the metal part of the back panel again
before you continue installing.
16
Chapter 2
Page 17

4Unplug the power cord from your computer.
Gently but firmly
pull the logic board
all the way out of
the computer.
You can unplug the power cord now that you discharged static electricity from
your body in the previous step.
5Grasping the two plastic tabs, gently pull the logic board all the way out of the computer.
Installing the Card in a Power Macintosh 6400 or 6500
17
Page 18
6Set the logic board on a clean, flat, stable surface.
I
l
lustr
a
t
i
on
W
or
ld
N
e
w
s
Vol. 1, No. 1
Rest the logic board on a clean, flat, stable surface.
Place a thick magazine under this
end of the logic board to help
protect the components
underneath.
18
Chapter 2
Page 19
Preparing the slots
Remove the screw that holds
the top port cover in place.
7" PC Compatibility Card
Top PCI slot Port access cover
7Unscrew and remove the port access covers for the slots you need.
If you are installing the PC Serial and Parallel Card at the same time you are
installing a PC Compatibility Card, unscrew and remove the port access
covers to the top two PCI slots.
If you already have a PC Compatibility Card installed in your computer, then
unscrew and remove the port access cover to the top slot.
Position your hand so that the screw and the port access cover do not fall onto
the logic board.
Installing the Card in a Power Macintosh 6400 or 6500
19
Page 20

Attaching the peripheral flex cable to the PC Compatibility Card
Peripheral flex cableConnector
Internal PC audio/video ribbon cable
8Disconnect the Internal PC audio/video ribbon cable from the PC Compatibility Card.
9Attach the peripheral flex cable as shown.
Use the connector located near the PCI slot.
20
Chapter 2
Page 21
10 Reinstall the ribbon cable over the top of the peripheral flex cable.
Socket
Push the cable down a little to allow enough room for card installation.
Installing the Card in a Power Macintosh 6400 or 6500
21
Page 22
Inserting the PC Serial and Parallel Card
Adapter fence
Reinstall the screw to
secure the card in place.
Top PCI slot Card fence
11 Insert the card into the PCI slot so that the card fence faces the port access opening.
IMPORTANT
Always hold the card by its edges. Don’t touch any of the
components on the card.
12 Supporting the adapter fence with one hand, push the card until it snaps into place.
Press the card in firmly. If you meet resistance, pull the card out and try again.
To see if the card is connected properly, make sure the card’s metal fence is
flush with the side of the port access cover.
m Don’t rock the card from side to side; press it straight into the slot. Rocking
the card can damage the PCI slot.
m Don’t force the card. If you meet a lot of resistance, pull the card out and
try again.
22
Chapter 2
Page 23
Attaching the peripheral flex cable to the PC Serial and Parallel Card
Use this connector.
13 Attach the peripheral flex cable to the connector located on the right side of the
PC Serial and Parallel Card as shown.
14 Push the peripheral flex cable down.
This allows room to reinstall the logic board in the computer.
15 If you are installing the PC Compatibility Card for the first time, return to the
PC Compatibility Card user’s manual now for the rest of the instructions.
16 Make sure all cables and cards are firmly connected.
Installing the Card in a Power Macintosh 6400 or 6500
23
Page 24
Replacing the logic board
Align and insert the logic
board so that it engages
the guides on the top
and bottom of the
computer chassis.
Fold the peripheral cable towards the
logic board to allow it to fit inside the computer.
17 Align and insert the logic board part way into the computer.
24
Chapter 2
Page 25
18 Press the reset button on the logic board and slide the logic board back into
1 Press the reset button.
2 Gently but firmly push
on the vertical plate until
the logic board is solidly
back in place.
the computer.
Note: When you press the reset button, some of your computer’s software
settings will change. You may want to open the control panels for the date and
time, keyboard, and mouse to make sure that they are set the way you want.
What’s next?
19 Reinsert screws to secure the logic board.
20 Reconnect the power cord.
You are now finished installing the card.
Next, go to Chapter 6, “Updating Your PC Compatibility Card Software.”
Then go to Chapter 7 for instructions on connecting equipment to your
PC Serial and Parallel Card.
Installing the Card in a Power Macintosh 6400 or 6500
25
Page 26

Page 27

Installing the Card
3
in a Power Macintosh 7200, 7300, 7500, or 7600
Except where noted, the illustrations in this chapter show the 7200 model.
If you have a 7300, 7500, or 7600 model, some of the illustrations may look
slightly different from your computer, but the procedure is the same.
After you install the PC Serial and Parallel Card hardware, go to Chapter 6,
“Updating Your PC Compatibility Card Software.” Then turn to Chapter 7 to
learn more about connecting PC-compatible equipment to your PC Serial and
Parallel Card.
WARNING
installed may cause damage to the card or to your computer. Your
PC Compatibility Card should be shipped separately. (See your
PC Compatibility Card user’s manual for instructions on how to remove
the card.)
Shipping your computer with a PC Compatibility Card
27
Page 28

What you need
Before beginning the installation process, make sure you have all the
necessary parts: the PC Serial and Parallel Card and the peripheral flex
cable. You’ll also need a Phillips screwdriver and your PC Compatibility
Card user’s manual.
Installing the PC Serial and Parallel Card hardware
WARNING
The installation of the PC Serial and Parallel Card is
technically complex. Unless you are comfortable installing components
inside computers, Apple recommends that you have the PC Serial and
Parallel Card installed by your Apple-authorized dealer (who may
charge a fee). If you attempt to install the card yourself, any damage you
may cause to your equipment will not be covered by the limited
warranty on your computer.
Do not attempt to install the card or connect the cables without first
reading this manual.
There are several steps to installing your PC Serial and Parallel Card
hardware:
m opening the computer
m opening the expansion card cover
m preparing the slots
m attaching the peripheral flex cable to the PC Compatibility Card
m inserting the PC Serial and Parallel Card
m attaching the peripheral flex cable to the PC Serial and Parallel Card
28
m replacing the expansion card cover
m replacing the computer cover
Chapter 3
Page 29

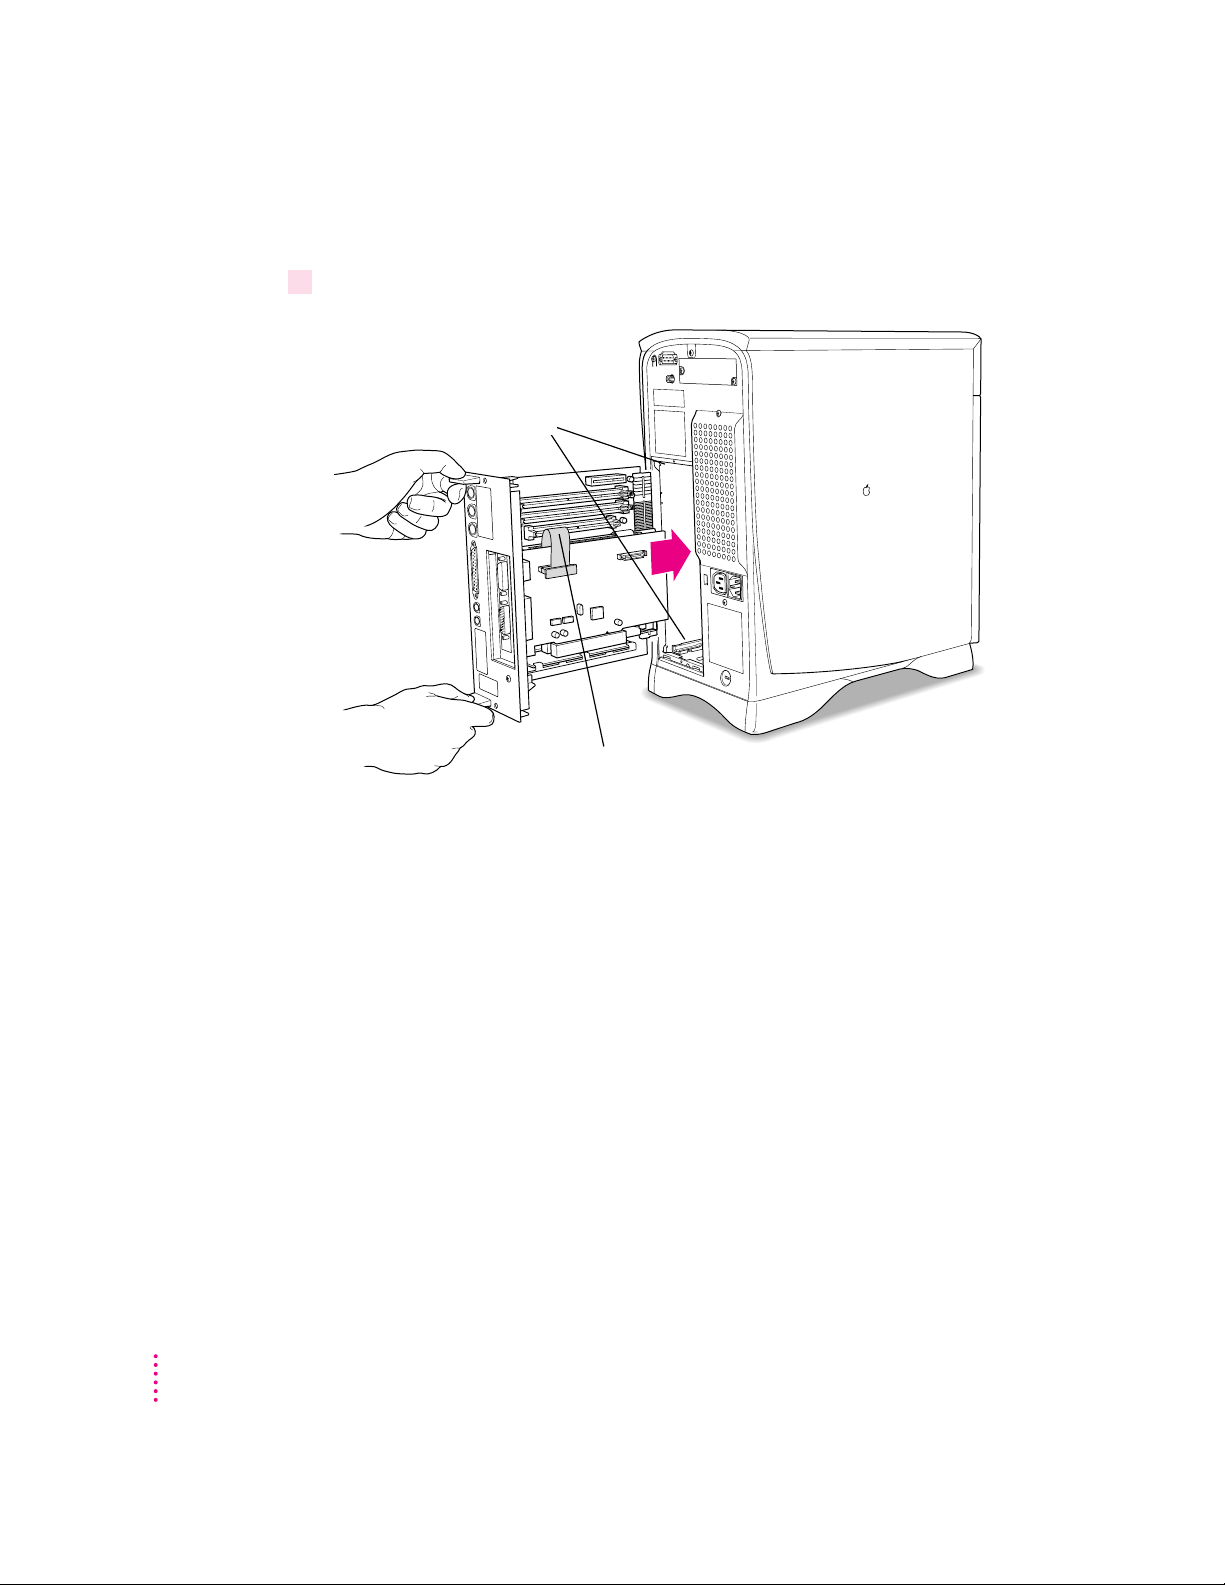
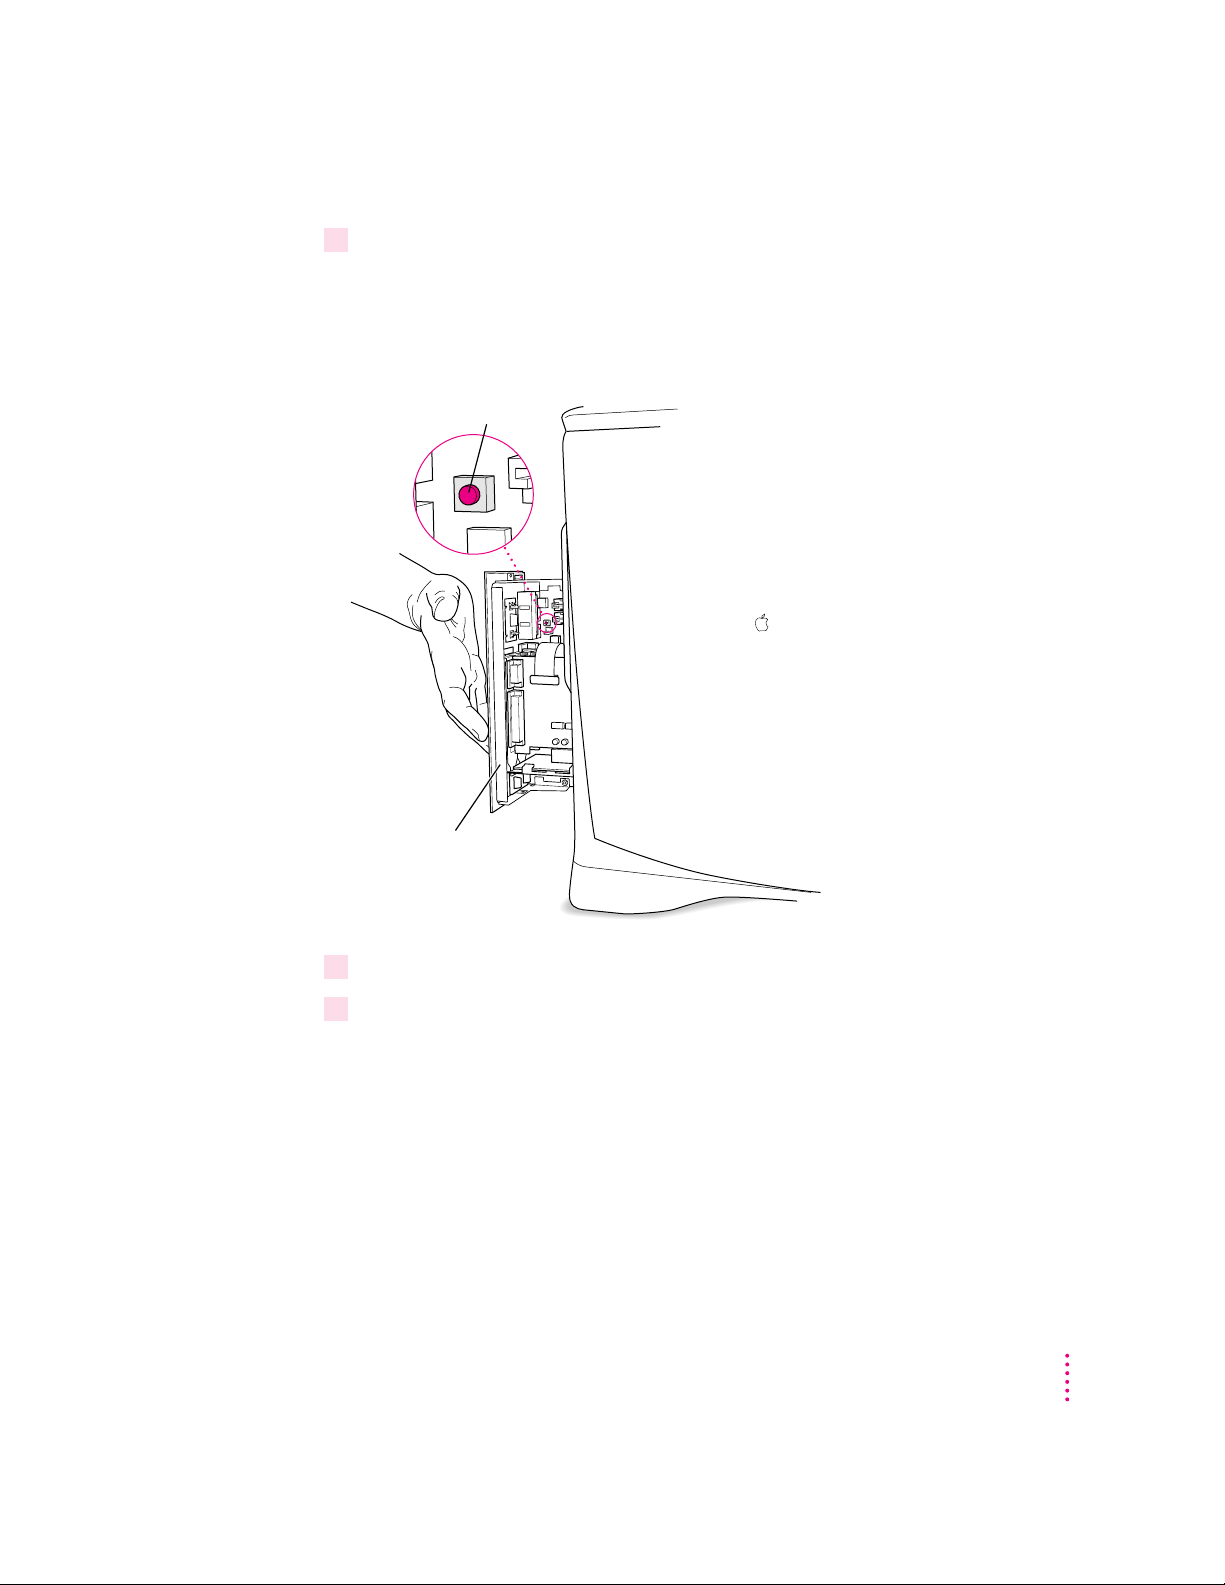
Opening the computer
First remove the screw.
Then press the security bar near
its center to release it from the computer.
1Shut down the computer and disconnect all cables from the computer, except for the
power cord.
Leave the computer plugged in for now, to ground it and protect its
components from static electricity damage.
2If the security bar is installed, remove it by removing the screw under the front panel and
pressing the center of the bar.
Note: The computer in the illustration is a Power Macintosh 7300. Not all
computers come with or can accept a security bar. If your computer did not
come with a security bar, skip this step.
Installing the Card in a Power Macintosh 7200, 7300, 7500, or 7600
29
Page 30

3 Remove the cover from the computer.
Release buttons
Press the two release buttons under the front panel and slide the cover toward
you approximately two inches.
After you’ve slid the cover forward about two inches, lift it straight up and off
the computer.
30
Chapter 3
Page 31

4 Touch the metal part of the power supply case inside the computer.
Power supply case
Always do this before you touch any parts, or install any components, inside
the computer. Touching the power supply case helps release static electricity
from your body and prevent possible damage to internal components.
IMPORTANT
You can collect static electricity just by walking away from and
then back to your computer. If you need to move away from your computer
during installation, remember to touch the metal part of the power supply
case again before you continue installing.
5 Disconnect the power cord.
You can unplug the power cord now that you discharged static electricity from
your body in the previous step.
Installing the Card in a Power Macintosh 7200, 7300, 7500, or 7600
31
Page 32

Opening the expansion card cover
(Front of computer)
6 Flip open the expansion card cover.
32
Chapter 3
Page 33

Preparing the slots
Port access cover
Second PCI slot PC Compatibility Card
7 Remove the metal port access covers for the slots you need.
If you are installing the PC Serial and Parallel Card at the same time you are
installing a PC Compatibility Card, remove the metal covers to the first two
PCI slots.
If you already have a PC Compatibility Card installed in your computer, then
unscrew and remove the metal covers to the second PCI slot.
8If you have a card in the third PCI expansion slot, remove it.
You will have more room to install your PC Serial and Parallel Card if the
third slot is empty. See the user’s manual that came with the card for
instructions on how to remove it.
Installing the Card in a Power Macintosh 7200, 7300, 7500, or 7600
33
Page 34

Attaching the peripheral flex cable to the PC Compatibility Card
Plug the peripheral flex cable
into this connector on a
7" PC Compatibility Card.
Plug the peripheral flex cable
into this connector on a
12" PC Compatibility Card.
9Attach the peripheral flex cable to the side of the PC Compatibility Card.
Note: If you can’t reach the connector on the 7-inch card, remove it without
removing the audio cables. Then attach the peripheral flex cable and reinsert
the card into the PCI slot.
34
Chapter 3
Page 35

Inserting the PC Serial and Parallel Card
PC Serial and Parallel Card
10 Align the card with the second expansion slot.
IMPORTANT
Always hold the card by its edges. Don’t touch any of the
components on the card.
Align the card’s connector end (gold in color) with the second PCI
expansion slot.
11 Insert the card.
Press down on the card. When the card is fully inserted, you won’t be able to
see the gold-colored connector any more.
m Don’t rock the card from side to side; press it straight into the slot. Rocking
the card can damage the PCI slot.
m Don’t force the card. If you meet a lot of resistance, pull the card out and
try again.
m To see if the card is connected, pull it gently. If it resists, it is connected.
Installing the Card in a Power Macintosh 7200, 7300, 7500, or 7600
35
Page 36

Attaching the peripheral flex cable to the PC Serial and Parallel Card
Plug the peripheral flex cable
into this connector if you have a
12" PC Compatibility Card.
Plug the peripheral flex cable
into this connector if you have a
7" PC Compatibility Card.
12 Bend the peripheral flex cable and attach the cable to the connector as shown.
Support the corner of the PC Serial and Parallel Card while you attach the
peripheral flex cable.
36
Chapter 3
13 If you removed a card from the third PCI expansion slot, reinsert it now.
See the user’s manual that came with your card for instructions on how to
install it.
14 If you removed your 7-inch PC Compatibility Card, see the user’s manual that came with
your card for instructions on how to route the cables inside your computer.
Page 37

Replacing the expansion card cover
Bend the peripheral flex cable over as you close the expansion slot cover.
15 Push the peripheral flex cable gently so that it bends towards the PC Compatibility Card.
16 Flip the expansion card cover up and snap it back into place. (Be sure to snap the cover
back down on both ends.)
Make sure no cables are in the way before you snap the cover into place.
Installing the Card in a Power Macintosh 7200, 7300, 7500, or 7600
37
Page 38

Replacing the computer’s cover
Two-inch gap
17 Lower the cover onto the case, leaving a two-inch gap, and then push the cover back.
38
Chapter 3
Page 39

18 If you removed the security bar earlier, replace it now.
Security bar
Install the screw in the hole on the underside of the security bar.
Note: The computer in the illustration is a Power Macintosh 7300. If your
computer did not come with a security bar, skip this step.
Place the security bar under the front panel and tilt the bar so that the hook
slides into the slot. Then reinsert the screw and tighten it into place.
IMPORTANT
19 Reconnect all equipment.
Do not overtighten the screw.
Reinsert the power cord and all other equipment cables.
You are now finished installing the card.
What’s next?
Next, go to Chapter 6, “Updating Your PC Compatibility Card Software.”
Then go to Chapter 7 for instructions on connecting equipment to your
PC Serial and Parallel Card.
Installing the Card in a Power Macintosh 7200, 7300, 7500, or 7600
39
Page 40

Page 41

Installing the Card
4
in a Power Macintosh 8500 or 9500
The illustrations in this chapter show the 9500 model. If you have an 8500
model, some of the illustrations may look slightly different from your
computer.
After you install the PC Serial and Parallel Card hardware, go to Chapter 6,
“Updating Your PC Compatibility Card Software.” Then turn to Chapter 7 to
learn more about connecting PC-compatible equipment to your PC Serial and
Parallel Card.
41
Page 42

What you need
Before beginning the installation process, make sure you have all the
necessary parts: the PC Serial and Parallel Card and the peripheral flex
cable. You’ll also need a flathead screwdriver and your PC Compatibility Card
user’s manual.
Installing the PC Serial and Parallel Card hardware
WARNING
The installation of the PC Serial and Parallel Card is
technically complex. Unless you are comfortable installing components
inside computers, Apple recommends that you have the PC Serial and
Parallel Card installed by your Apple-authorized dealer (who may
charge a fee). If you attempt to install the card yourself, any damage you
may cause to your equipment will not be covered by the limited
warranty on your computer.
Do not attempt to install the card or connect the cables without first
reading this manual.
There are several steps to installing your PC Serial and Parallel Card
hardware:
m opening the computer
m preparing the slots
m attaching the peripheral flex cable to the PC Compatibility Card
m inserting the PC Serial and Parallel Card
m attaching the peripheral flex cable to the PC Serial and Parallel Card
m replacing the computer cover
42
Chapter 4
Page 43

Opening the computer
1 Disconnect all the cables from the computer, except for the power cord.
Leave the computer plugged in for now, to ground it and protect its
components from static electricity damage.
2 Loosen the large screws on the back panel.
If you have a Power Macintosh 8500, there are four screws, one at each
corner of the back panel. If you have a Power Macintosh 9500, there are six
screws, one at each corner and two on the sides of the back panel. Do not
completely remove the screws or the back panel.
Installing the Card in a Power Macintosh 8500 or 9500
43
Page 44

3 Remove the cover from the computer.
Slide the cover away from the back panel about two inches. Then raise the
cover straight up and off the computer.
44
Chapter 4
Page 45

4 Touch the metal part of the power supply case inside the computer.
Power supply case
Always do this before you touch any parts, or install any components, inside
the computer. Touching the power supply case helps release static electricity
from your body and prevent possible damage to internal components.
IMPORTANT
You can collect static electricity just by walking away from and
then back to your computer. If you need to move away from your computer
during installation, remember to touch the metal part of the power supply
case again before you continue installing.
Installing the Card in a Power Macintosh 8500 or 9500
45
Page 46

5Disconnect the power cord from the back of the computer.
To lower the auxiliary fan, squeeze the sides to unlatch it.
You can unplug the power cord now that you discharged static electricity from
your body in the previous step.
6 Lower the retainer or auxiliary fan.
A Power Macintosh 9500 has an auxiliary fan; a Power Macintosh 8500 has
a retainer.
46
Chapter 4
Page 47

Preparing the slots
Press apart the two
levers next to the
card access port to
release the access
port cover.
Second PCI slot PC Compatibility CardSlide the port access cover out
and away from the access port.
7 Remove the metal port access covers for the slots you need.
If you are installing the PC Serial and Parallel Card at the same time you are
installing a PC Compatibility Card, pull out the port access cover behind the
expansion slot closest to the center of the computer. Then pull out the port
access cover behind the second PCI expansion slot.
If you already have a PC Compatibility Card installed in your computer, leave
it in place and pull out the port access cover behind the second PCI
expansion slot.
8If you have a card in the third PCI expansion slot, remove it.
You will have more room to install your PC Serial and Parallel Card if the
third slot is empty. See the user’s manual that came with the card for
instructions on how to remove it.
Installing the Card in a Power Macintosh 8500 or 9500
47
Page 48

Attaching the peripheral flex cable to the PC Compatibility Card
Plug the peripheral flex cable
into this connector on a
7" PC Compatibility Card.
Plug the peripheral flex cable
into this connector on a
12" PC Compatibility Card.
9Attach the peripheral flex cable as shown.
If you have trouble attaching the peripheral flex cable, remove the
PC Compatibility Card (but do not remove the audio cables). If you have a
Power Macintosh 9500, you can remove additional cards to make more room
to maneuver.
48
10 If you removed the PC Compatibility Card to attach the peripheral flex cable, then
reinsert it now.
Tuck the audio cables on top of the card.
Chapter 4
Page 49

Inserting the PC Serial and Parallel Card
Press the levers
apart while installing
the card.
Temporarily fold the
peripheral flex cable
up out of the way
while you insert the
PC Serial and
Parallel Card.
PC Serial and Parallel Card
11 Align the PC Serial and Parallel Card with the second expansion slot.
IMPORTANT
Always hold the card by its edges. Don’t touch any of the
components on the card.
Align the card’s connector end (gold in color) with the second PCI expansion
slot. The ports on the card should face the port access opening on the
computer’s back panel.
12 Insert the card.
Press the card firmly into the slot. When the card is fully inserted, you won’t
be able to see the gold-colored connector any more.
m Don’t rock the card from side to side; press it straight into the slot. Rocking
the card can damage the PCI slot.
m Don’t force the card. If you meet a lot of resistance, pull the card out and
try again.
m To see if the card is connected, pull it gently. If it resists, it is connected.
Installing the Card in a Power Macintosh 8500 or 9500
49
Page 50

Attaching the peripheral flex cable to the PC Serial and Parallel Card
Plug the peripheral flex cable
into this connector if you have a
12" PC Compatibility Card.
Plug the peripheral flex cable
into this connector if you have a
7" PC Compatibility Card.
13 Carefully bend the peripheral flex cable and insert it into the connector located on the
PC Serial and Parallel Card as shown.
50
Chapter 4
14 Reinsert any cards you removed.
15 If you are installing the PC Compatibility Card for the first time, return to the
PC Compatibility Card user’s manual now to finish the card’s installation.
Page 51

Replacing the computer’s cover
Fold the peripheral
flex cable upward
as you snap the
auxiliary fan
back into place.
Snap the auxiliary
fan back into place.
Be sure not to
pinch the audio
cables that are
connected to the
PC Compatibility
Card.
16 Tuck the audio cables in on top of the PC Compatibility Card, so that they’re out of the
way of the retainer or auxiliary fan.
17 Replace the retainer or fan.
Make sure no cables are squeezed between the retainer or fan and the top of
the card.
Installing the Card in a Power Macintosh 8500 or 9500
51
Page 52

18 Replace the cover on the computer.
Lower the cover all the way down onto the case. Push the cover back until it
touches the back panel.
What’s next?
52
Chapter 4
19 Tighten the screws on the back panel and reconnect the power cord and other cables.
You are now finished installing the card.
Next, go to Chapter 6, “Updating Your PC Compatibility Card Software.”
Then go to Chapter 7 for instructions on connecting equipment to your
PC Serial and Parallel Card.
Page 53

Installing the Card
5
in a Power Macintosh 8600 or 9600
The illustrations in this chapter show the 8600 model. If you have a 9600
model, some of the illustrations may look slightly different from your
computer.
After you install the PC Serial and Parallel Card hardware, go to Chapter 6,
“Updating Your PC Compatibility Card Software.” Then turn to Chapter 7 to
learn more about connecting PC-compatible equipment to your PC Serial and
Parallel Card.
53
Page 54

What you need
Before beginning the installation process, make sure you have all the
necessary parts: the PC Serial and Parallel Card and the peripheral flex
cable. You’ll also need a Phillips screwdriver and your PC Compatibility
Card user’s manual.
Installing the PC Serial and Parallel Card hardware
WARNING
The installation of the PC Serial and Parallel Card is
technically complex. Unless you are comfortable installing components
inside computers, Apple recommends that you have the PC Serial and
Parallel Card installed by your Apple-authorized dealer (who may
charge a fee). If you attempt to install the card yourself, any damage you
may cause to your equipment will not be covered by the limited
warranty on your computer.
Do not attempt to install the card or connect the cables without first
reading this manual.
There are several steps to installing your PC Serial and Parallel Card
hardware:
m opening the computer
m preparing the slots
m attaching the peripheral flex cable to the PC Compatibility Card
m inserting the PC Serial and Parallel Card
m attaching the peripheral flex cable to the PC Serial and Parallel Card
m replacing the computer cover
54
Chapter 5
Page 55

Opening the computer
1If your computer is turned on, shut it down and wait 20 minutes.
Before proceeding with these instructions, you need to allow the computer’s
internal components to cool.
2Disconnect all the cables from the computer, including the power cord.
Remove the power cord now so you don’t pull it by accident as you turn
the computer on its side in the next step. You’ll reconnect the power cord in
step 4.
Installing the Card in a Power Macintosh 8600 or 9600
55
Page 56

3 Carefully lay the computer on its side with the cover and release button facing up.
(Back of computer)
Button
4 Reconnect the power cord.
Connect the power cord to your computer and to an electrical outlet. This
helps protect the computer from damage caused by static electricity.
56
Chapter 5
Page 57

5 Touch the metal on the bottom of the computer.
Always do this before you touch any parts, or install any components, inside
the computer. Touching the metal helps release static electricity from your
body and prevent possible damage to internal components.
IMPORTANT
You can collect static electricity just by walking away from and
then back to your computer. If you need to move away from your computer
during installation, remember to touch the metal bottom again before you
continue installing.
6 Disconnect the power cord again.
You can unplug the power cord now that you discharged static electricity from
your body in the previous step.
Installing the Card in a Power Macintosh 8600 or 9600
57
Page 58

7 Remove the computer’s cover.
Button
Press the release button and lift the cover a few inches. Then slide the cover
to the right and lift it off.
58
Chapter 5
Page 59

Preparing the slots
Port access cover
Remove the screw that holds the port access cover in place.
PC Compatibility Card
Second PCI slot
(Front of computer)
8Unscrew and remove the metal port access covers for the slots you need.
If you are installing the PC Serial and Parallel Card at the same time you are
installing a PC Compatibility Card, unscrew and remove the port access
covers to the first two PCI expansion slots.
If you already have a PC Compatibility Card installed in your computer, leave
it in place. Unscrew and remove the port access cover to the second PCI
expansion slot.
Keep the screws; you will reinsert them later.
9If you have a card in the third PCI expansion slot, remove it.
You will have more room to install your PC Serial and Parallel Card if the
third slot is empty. See the user’s manual that came with the card for
instructions on how to remove it.
Installing the Card in a Power Macintosh 8600 or 9600
59
Page 60

Attaching the peripheral flex cable to the PC Compatibility Card
Plug the peripheral flex cable
into this connector on a
7" PC Compatibility Card.
Plug the peripheral flex cable
into this connector on a
12" PC Compatibility Card.
10 Attach the peripheral flex cable as shown.
Use the connector shown in the illustration.
60
Chapter 5
Inserting the PC Serial and Parallel Card
11 Align the PC Serial and Parallel Card with the second expansion slot.
IMPORTANT
components on the card.
Align the card’s connector end (gold in color) with the second PCI expansion
slot. The ports on the card should face the port access opening on the
computer’s back panel.
Always hold the card by its edges. Don’t touch any of the
Page 61

12 Insert the card.
PC Serial and Parallel Card
Reinstall the screw to secure the card in place.
Press down on the card. When the card is fully inserted, you won’t be able to
see the gold-colored connector any more.
m Don’t rock the card from side to side; press it straight into the slot. Rocking
the card can damage the PCI slot.
m Don’t force the card. If you meet a lot of resistance, pull the card out and
try again.
m To see if the card is connected, pull it gently. If it resists, it is connected.
13 Reinsert the screw to secure the card in place.
Installing the Card in a Power Macintosh 8600 or 9600
61
Page 62

Attaching the peripheral flex cable to the PC Serial and Parallel Card
Plug the peripheral flex cable
into this connector if you have a
12" PC Compatibility Card.
Plug the peripheral flex cable
into this connector if you have a
7" PC Compatibility Card.
14 Carefully bend the peripheral flex cable and attach it to the connector located on the PC
Serial and Parallel Card as shown.
62
Chapter 5
15 Reinsert any cards you removed.
16 If you are installing the PC Compatibility Card for the first time, return to the
PC Compatibility Card user’s manual now to finish the card’s installation.
Page 63

Replacing the computer’s cover
Press down on the top edge of the cover panel until it
snaps firmly into place.
Fit the bottom edge of the cover panel into the
floor of the computer.
17 Replace the computer cover.
Align the bottom edge of the cover panel with the computer as shown below.
Then press down on the cover panel until it snaps into place.
Installing the Card in a Power Macintosh 8600 or 9600
63
Page 64

What’s next?
18 Lift up the computer so that it sits upright.
19 Reconnect the power cord and any other cables.
You are now finished installing the card.
Next, go to Chapter 6, “Updating Your PC Compatibility Card Software.”
Then go to Chapter 7 for instructions on connecting equipment to your
PC Serial and Parallel Card.
64
Chapter 5
Page 65

6
Updating Your PC Compatibility Card Software
Once your PC Serial and Parallel Card is installed, you need to update your
PC Compatibility Card Software.
The PC floppy disk and Mac OS CD-ROM disc that came with your PC
Serial and Parallel Card contain the necessary software for using the card.
65
Page 66

Updating the Windows/DOS PC Compatibility software
IMPORTANT
If you have not previously installed the PC Compatibility Card
software and created a drive container, see your PC Compatibility Card user’s
manual and create a drive container before you proceed.
1If necessary, switch to the PC environment.
To switch to the PC environment from the Mac OS, open the PC Setup
control panel and click “Switch to PC.”
2Insert the
3In Windows, choose Run from the File menu. In Windows 95, click the Start button; then
choose Run from the menu that appears.
4In the dialog box that appears, type the following:
A:\SETUP <return>
5 Follow the instructions that appear on the screen.
PC Software–PC Compatibility Card
floppy disk.
The recommended directory to install files in is C:\APPLE.
6When updating is complete, press
7 Restart the PC.
x
-E to eject the floppy disk.
If you have Windows 95, click the Start button; then select Shutdown. A
dialog box appears. Select Restart and then click OK.
66
If you have Windows 3.1, first exit Windows. Then press Control-Alt-… at
the DOS prompt. If you do not have a … key, then press Control-Alt-. at the
DOS prompt.
To restart DOS, quit any open applications. Then press Control-Alt-… or
Control-Alt-. at the DOS prompt.
Next you must update the Mac OS PC Compatibility software. Follow the
steps in the next section.
Chapter 6
Page 67

Updating the Mac OS PC Compatibility software
To update the Mac OS PC Compatibility software so it supports your PC
Serial and Parallel Card, follow these steps:
1 Insert the
PC Compatibility Card–Mac OS Software CD
into the CD-ROM drive.
If necessary, double-click the CD-ROM icon to open it.
2Double-click the PC Compatibility Software folder to open it.
3Double-click the Installer icon in the PC Compatibility folder.
A message appears describing the Installer software. Click OK.
The Installer window appears.
4Make sure the disk named in the box is the one on which you want to install software.
If not, click Switch Disk until the correct disk name appears.
5 Click Install.
The software is automatically installed on your hard disk.
6When the installation is complete, follow the instructions on the screen to quit the
Installer and restart your computer.
Updating Your PC Compatibility Card Software
67
Page 68

Page 69

7
Connecting PC-Compatible Equipment
Your PC Serial and Parallel Card is used in conjunction with a PC
Compatibility Card. When both are installed, you can connect a printer,
modem, image scanner, digital camera, security dongle, or other
PC-compatible device to the serial or parallel port on the card. Before
you connect any device to the card, be sure to read the user’s manual
provided with your PC-compatible equipment.
69
Page 70

What you can connect
RS-232 serial port (DB-9)
Bidirectional parallel port (DB-25)
The equipment you connect to your PC Serial and Parallel Card can be used
from within the DOS or Windows environment. You cannot access equipment
connected to the PC Serial and Parallel Card from the Mac OS. See the
manual that came with your equipment for specific instructions on how to
connect the equipment to a PC-compatible computer and how to set up,
install, and use any software that is supplied with the equipment.
The RS-232 serial port on your PC Serial and Parallel Card lets you connect
PC-compatible equipment such as a modem, image scanner, or a digital
camera.
The bidirectional parallel port on your PC Serial and Parallel Card lets you
connect PC-compatible equipment such as a printer or a security dongle.
70
Chapter 7
Page 71

Appendix
Technical Information
General specifications
Description
m 7-inch PC Serial and Parallel Card (PCI)
Power
m +5 volts (V)
m 1 watt maximum
Ports
m One PC-compatible 16550, RS-232C serial port with a DB-9 connector
m One PC-compatible parallel port with a DB-25 connector
Environment
Temperature
m Operating: 10° C to 40° C (50° F to 104° F)
m Non-operating: –40° C to 65° C (–40° F to 149° F) for 72 hours
Relative humidity
m Operating: 10% to 90% noncondensing
m Non-operating: 5% to 95% noncondensing
Altitude
m Operating: –1,000 to 10,000 feet (–304.8 m to 3,048 m)
m Non-operating: –1,000 to 40,000 feet (–304.8 m to 12,192 m)
71
Page 72

The Apple Publishing System
This Apple manual was written, edited, and produced on a desktop publishing system using
Apple Macintosh computers and QuarkXPress. Technical illustrations were drawn in Adobe
Illustrator; screen shots were created and modified with system software, ExposurePro, and
Adobe Photoshop. Final pages were output using PostScript
®
Text type is Times
, display type is Helvetica®Narrow, and cover type is Apple Garamond,
Apple’s corporate font. Ornaments are custom symbols designed for Apple Computer. Some
elements, such as computer voice, are set in Courier, a fixed-width font.
PostScript, the LaserWriter page-description language, was developed by Adobe Systems
Incorporated.
™
technology.
™
Page 73

Page 74

Apple Computer, Inc.
1 Infinite Loop
Cupertino, California 95014-2084
408-996-1010
http://www.apple.com
034-0181-A
Printed in U.S.A.
Page 75

PC Serial
and Parallel Card
U
ser’s Manual
Page 76

K Apple Computer, Inc.
© 1997 Apple Computer, Inc. All rights reserved.
Under the copyright laws, this manual may not be copied, in whole or in part, without the
written consent of Apple. Your rights to the software are governed by the accompanying
software license agreement.
The Apple logo is a trademark of Apple Computer, Inc., registered in the U.S. and other
countries. Use of the “keyboard” Apple logo (Option-Shift-K) for commercial purposes without
the prior written consent of Apple may constitute trademark infringement and unfair
competition in violation of federal and state laws.
Every effort has been made to ensure that the information in this manual is accurate. Apple is
not responsible for printing or clerical errors.
Apple Computer, Inc.
1 Infinite Loop
Cupertino, CA 95014-2084
408-996-1010
http://www.apple.com
Apple, the Apple logo, LaserWriter, Mac, Macintosh, and Power Macintosh are trademarks of
Apple Computer, Inc., registered in the U.S. and other countries.
Simultaneously published in the United States and Canada.
Other company and product names mentioned herein may be trademarks of their respective
companies. Mention of third-party products is for informational purposes only and constitutes
neither an endorsement nor a recommendation. Apple assumes no responsibility with regard to
the performance or use of these products.
Page 77

Contents
Communications regulation information vii
Preface Read This Before You Install Your Card ix
What comes with your card x
Installing the PC Serial and Parallel Card x
1Installing the Card in a Power Macintosh 4400 or 7220 1
What you need 2
Installing the PC Serial and Parallel Card hardware 2
Opening the computer 3
Preparing the slots 5
Attaching the peripheral flex cable to the PC Compatibility Card 6
Attaching the peripheral flex cable to the PC Serial and Parallel Card 7
Inserting the PC Serial and Parallel Card 8
Replacing the computer’s cover 10
What’s next? 11
iii
Page 78

2 Installing the Card in a Power Macintosh 6400 or 6500 13
What you need 14
Installing the PC Serial and Parallel Card hardware 14
Opening the computer 15
Preparing the slots 19
Attaching the peripheral flex cable to the PC Compatibility Card 20
Inserting the PC Serial and Parallel Card 22
Attaching the peripheral flex cable to the PC Serial and Parallel Card 23
Replacing the logic board 24
What’s next? 25
3 Installing the Card in a Power Macintosh 7200, 7300,
7500, or 7600 27
What you need 28
Installing the PC Serial and Parallel Card hardware 28
Opening the computer 29
Opening the expansion card cover 32
Preparing the slots 33
Attaching the peripheral flex cable to the PC Compatibility Card 34
Inserting the PC Serial and Parallel Card 35
Attaching the peripheral flex cable to the PC Serial and Parallel Card 36
Replacing the expansion card cover 37
Replacing the computer’s cover 38
What’s next? 39
iv
Contents
Page 79

4Installing the Card in a Power Macintosh 8500 or 9500 41
What you need 42
Installing the PC Serial and Parallel Card hardware 42
Opening the computer 43
Preparing the slots 47
Attaching the peripheral flex cable to the PC Compatibility Card 48
Inserting the PC Serial and Parallel Card 49
Attaching the peripheral flex cable to the PC Serial and Parallel Card 50
Replacing the computer’s cover 51
What’s next? 52
5Installing the Card in a Power Macintosh 8600 or 9600 53
What you need 54
Installing the PC Serial and Parallel Card hardware 54
Opening the computer 55
Preparing the slots 59
Attaching the peripheral flex cable to the PC Compatibility Card 60
Inserting the PC Serial and Parallel Card 60
Attaching the peripheral flex cable to the PC Serial and Parallel Card 62
Replacing the computer’s cover 63
What’s next? 64
Contents
v
Page 80

6 Updating Your PC Compatibility Card Software 65
Updating the Windows/DOS PC Compatibility software 66
Updating the Mac OS PC Compatibility software 67
7 Connecting PC-Compatible Equipment 69
What you can connect 70
Appendix Technical Information 71
General specifications 71
Environment 71
vi
Contents
Page 81

Communications regulation information
FCC statement
This equipment has been tested and found to comply with the limits for a Class B digital device
in accordance with the specifications in Part 15 of FCC rules. See instructions if interference to
radio or television reception is suspected.
Radio and television interference
The equipment described in this manual generates, uses, and can radiate radio-frequency
energy. If it is not installed and used properly—that is, in strict accordance with Apple’s
instructions—it may cause interference with radio and television reception.
This equipment has been tested and found to comply with the limits for a Class B digital device
in accordance with the specifications in Part 15 of FCC rules. These specifications are designed
to provide reasonable protection against such interference in a residential installation. However,
there is no guarantee that interference will not occur in a particular installation.
You can determine whether your computer system is causing interference by turning it off. If
the interference stops, it was probably caused by the computer or one of the peripheral devices.
If your computer system does cause interference to radio or television reception, try to correct
the interference by using one or more of the following measures:
m Turn the television or radio antenna until the interference stops.
m Move the computer to one side or the other of the television or radio.
m Move the computer farther away from the television or radio.
m Plug the computer into an outlet that is on a different circuit from the television or radio.
(That is, make certain the computer and the television or radio are on circuits controlled by
different circuit breakers or fuses.)
If necessary, consult an Apple-authorized service provider or Apple. See the service and support
information that came with your Apple product. Or, consult an experienced radio/television
technician for additional suggestions.
IMPORTANT
could void the FCC Certification and negate your authority to operate the product.
This product was tested for FCC compliance under conditions that included the use of Apple
peripheral devices and Apple shielded cables and connectors between system components. It is
important that you use Apple peripheral devices and shielded cables and connectors between
system components to reduce the possibility of causing interference to radios, television sets,
and other electronic devices. You can obtain Apple peripheral devices and the proper shielded
cables and connectors through an Apple-authorized dealer. For non-Apple peripheral devices,
contact the manufacturer or dealer for assistance.
Changes or modifications to this product not authorized by Apple Computer, Inc.,
Communications Regulation Information
vii
Page 82

Industry Canada statement
This Class B device meets all requirements of the Canadian interference-causing equipment
regulations.
Cet appareil numérique de la Class B respecte toutes les exigences du Règlement sur le matériel
brouilleur du Canada.
VCCI Class 2 statement
viii
Communications Regulation Information
Page 83

Read This Before You Install Your Card
The PC Serial and Parallel Card has two standard PC ports that allow you to
use several kinds of PC-compatible peripheral devices from the Windows or
DOS environment (but not from the Mac OS environment). You use this card
in conjunction with a 7-inch or 12-inch PC Compatibility Card. If you do not
already have a PC Compatibility Card installed, you must install it along with
the PC Serial and Parallel Card.
With a PC Serial and Parallel Card connected to a PC Compatibility Card,
you can
m connect high-speed RS-232 serial devices such as modems
m connect parallel devices such as printers, removable media drives, and
security dongles that are supplied with some Windows or DOS software
applications
ix
Page 84

What comes with your card
PC Serial and Parallel Card Peripheral flex cable
Before you begin installation, be sure you have the PC Serial and Parallel
Card and peripheral flex cable, as shown.
Installing the PC Serial and Parallel Card
IMPORTANT
To avoid damage to your computer, Apple recommends that you
have your card installed by an Apple-authorized dealer. If you attempt to
install the card yourself, any damage you may cause to your equipment will
not be covered by the limited warranty on your computer.
If you want to install the card yourself, follow these steps:
m To install your card, turn to the installation chapter for the kind of
computer you have.
m To update your software and begin using your card, turn to Chapter 6,
“Updating Your PC Compatibility Card Software.”
m To connect equipment to your PC Serial and Parallel Card, turn to
Chapter 7, “Connecting PC-Compatible Equipment.”
x
Preface
 Loading...