

Page 1

PC Compatibility Card
User’s Manual
For 12-inch card
Page 2

K Apple Computer, Inc.
© 1996 Apple Computer, Inc. All rights reserved.
Under the copyright laws, this manual may not be copied, in whole or in part, without the
written consent of Apple. Your rights to the software are governed by the accompanying
software license agreement.
The Apple logo is a trademark of Apple Computer, Inc., registered in the U.S. and other
countries. Use of the “keyboard” Apple logo (Option-Shift-K) for commercial purposes without
the prior written consent of Apple may constitute trademark infringement and unfair
competition in violation of federal and state laws.
Every effort has been made to ensure that the information in this manual is accurate. Apple is
not responsible for printing or clerical errors.
Apple Computer, Inc.
1 Infinite Loop
Cupertino, CA 95014-2084
(408) 996-1010
Apple, the Apple logo, AppleShare, AppleTalk, EtherTalk, ImageWriter, LaserWriter,
Macintosh, MacTCP, Power Macintosh, ProDOS, QuickTime, StyleWriter, and TrueType are
trademarks of Apple Computer, Inc., registered in the U.S. and other countries.
AppleVision, AudioVision, Mac, and QuickDraw are trademarks of Apple Computer, Inc.
Adobe and PostScript are trademarks of Adobe Systems Incorporated or its subsidiaries and
may be registered in certain jurisdictions.
Helvetica and Times are registered trademarks of Linotype-Hell AG and/or its subsidiaries.
Simultaneously published in the United States and Canada.
Mention of third-party products is for informational purposes only and constitutes neither an
endorsement nor a recommendation. Apple assumes no responsibility with regard to the
performance or use of these products.
Page 3

Contents
Communications regulation information x
Preface xiii
1Installing the Card in a Power Macintosh 7200, 7500, or 7600 1
What you need 2
Installing the PC Compatibility Card hardware 3
Removing the computer’s case 4
Disconnecting the CD audio cable from the CD-ROM drive 7
Opening the computer 8
Connecting the internal PC audio/video assembly and installing
the card 12
Connecting the CD audio cables to the card and the logic board 15
Closing the computer’s chassis 23
Connecting the CD audio cable to the CD-ROM drive 27
Closing the computer’s cover 28
What’s next? 30
iii
Page 4

2Installing the Card in a Power Macintosh 8500 or 9500 31
What you need 32
Installing the PC Compatibility Card hardware 33
Opening the computer 34
Installing the PC Compatibility Card 40
Connecting the CD audio cables 41
Closing the computer 51
What’s next? 54
3 Connecting Monitors and Other Equipment 55
Connecting a single monitor 55
Connecting a single monitor to a Power Macintosh 7200 using the built-in
monitor port 55
Connecting a single monitor to a Power Macintosh 7200 using a video card
or to a Power Macintosh 7500, 7600, 8500, or 9500 56
Connecting two monitors 60
Connecting a MIDI device 64
Connecting a PC game controller 64
Connecting a mouse 65
Connecting a printer 65
Connecting to a network 66
Connecting a modem or other serial device 66
4 Installing the PC Compatibility Card Software 67
Installing Mac OS software 68
Installing System 7.5 Update 2.0 68
Installing the PC Compatibility Card software 69
Installing mouse software 70
Creating a drive container 71
iv
Contents
Page 5

Installing MS-DOS 73
Installing support software for DOS 74
Installing mouse software 75
Installing Microsoft Windows 75
Installing support software for Windows 76
Configuring network support in Windows 76
Installing PC utilities 77
Installing QuickTime for Windows software 77
Installing Sound Blaster software in DOS or Windows 77
Installing Sound Blaster software in Windows 95 78
Installing and configuring video software 79
Installing keyboard files 82
Installing your own PC software 83
What’s next? 83
5 Setting Up the PC Environment
Setting up your DOS configuration files 86
Editing the CONFIG.SYS file 86
Editing the AUTOEXEC.BAT file 87
About the PC Setup control panel 87
Configuring monitors 89
Configuring monitors in the DOS environment 89
Configuring monitors in the Windows environment 89
Configuring monitors in Windows 95 89
RAM information 90
Setting printer options 90
Setting up printing in the Mac OS 90
Setting up printing in the PC environment 93
85
Contents
v
Page 6

Configuring PC sound 96
Tu rning PC sound on and off 97
Configuring PC drives 98
Creating a drive container 98
Mapping a drive to a PC-formatted hard disk 99
Changing a drive assignment 99
Changing the size of a drive container 100
Using shared volumes 101
Sharing a volume 102
Unsharing a volume 102
Turning off automatic sharing 103
Setting up your PC on a network 103
Configuring the PC serial ports 104
Setting up a modem or other serial device 104
Building a custom cable 105
Connecting a joystick 105
Connecting a MIDI device 105
6 Working in the PC Environment 107
Switching between the Mac OS and PC environments 108
Switching environments with a keyboard command 109
Turning the PC on and off 109
Starting the PC automatically 110
Using floppy disk drives and floppy disks 111
Restarting the PC from a floppy disk 111
Using CD-ROM discs and drives 111
Using a mouse 112
Using keyboards 113
Copying and pasting information between environments 114
Using shared folders and volumes 116
Using PC files in the Mac OS 116
vi
Contents
Page 7

7 Troubleshooting in the PC Environment 119
Starting up 120
Switching to and from the PC 122
Display problems 123
Problems with files and disks 125
Problems with information transfer 126
Configuration problems 127
Sound problems 128
Printing problems 130
Other problems 131
Appendix A Adding Memory to a PC Compatibility Card 133
Opening the computer 134
Removing the card 135
Removing the old DIMM 136
Installing the new DIMM 137
Reinstalling the card 139
Appendix B Installing Network Client Software 141
Installing protocols for use with Open Data-Link Interface (ODI) 142
Installing NetWare client software 142
Installing NetBEUI and IPX/SPX in Windows 95 144
Installing TCP/IP in Windows 95 145
Installing NetBEUI in Windows for Workgroups 147
Installing IPX/SPX in Windows for Workgroups 148
Installing Microsoft’s TCP/IP-32 IP Protocol Stack in Windows for
Workgroups 151
Installing Trumpet WinSock in Windows for Workgroups 152
Installing Spry Air Series TCP/IP in Windows for Workgroups 154
Installing AppleShare for Windows in Windows for Workgroups 155
Installing Novell’s LAN WorkPlace for DOS TCP/IP software 157
Contents
vii
Page 8

Installing protocols for use with Network Driver Interface Specification
(NDIS) 2.0 159
Installing NetBEUI and IPX/SPX in Windows 95 159
Installing Microsoft TCP/IP-32 IP protocol stack and IPX/SPX in
Windows 95 161
Installing NetBEUI and IPX/SPX in Windows for Workgroups 162
Installing Microsoft’s TCP/IP in Windows for Workgroups 164
Using an OS/2 LAN Server with Windows for Workgroups 165
Installing client software for an OS/2 LAN server in DOS or
Windows 166
Installing Banyan Vines in DOS 168
Installing NetManage Chameleon TCP/IP software in Windows for
Workgroups 168
Using a dial-up service 169
Running the Network Protocol Setup (SETNET) utility 169
Avoiding simultaneous networking conflicts 171
Appendix C Configuring Video Software 173
viii
About video capabilities 173
Installing and configuring video software in Windows 174
Configuring video software in DOS 174
Making custom monitor settings in DOS 175
Installing custom video drivers in DOS 176
Installing drivers for Intergraph MicroStation 4.0, 5.0 176
Installing drivers for Microsoft Word (for DOS) 5.x, 6.0 177
Installing drivers for WordPerfect (for DOS) 5.1 178
Installing drivers for WordPerfect 6.0 179
Installing MPEG video support in Windows 180
Installing MPEG video support in Windows 95 180
Installing MPEG video support in Windows 180
Contents
Page 9

ATI DeskTop video configuration software for Windows 181
Using DOS video utilities 182
VESA BIOS Extension 182
DPMS for DOS 182
Tr oubleshooting 183
Using the diagnostics utility 183
Solutions and explanations for problems 184
Video mode tables 186
DRAM accelerator mode (WINBOOST) 186
VESA BIOS Extension modes 188
Fixed-frequency monitors 189
User-adjustable monitors 191
Appendix D Technical Information 193
General specifications 193
Video specifications 194
Environment 195
Index 197
Contents
ix
Page 10

Communications regulation information
FCC statement
This equipment has been tested and found to comply with the limits for a Class B digital device
in accordance with the specifications in Part 15 of FCC rules. See instructions if interference to
radio or television reception is suspected.
Radio and television interference
The equipment described in this manual generates, uses, and can radiate radio-frequency
energy. If it is not installed and used properly—that is, in strict accordance with Apple’s
instructions—it may cause interference with radio and television reception.
This equipment has been tested and found to comply with the limits for a Class B digital device
in accordance with the specifications in Part 15 of FCC rules. These specifications are designed
to provide reasonable protection against such interference in a residential installation. However,
there is no guarantee that interference will not occur in a particular installation.
You can determine whether your computer system is causing interference by turning it off. If
the interference stops, it was probably caused by the computer or one of the peripheral devices.
If your computer system does cause interference to radio or television reception, try to correct
the interference by using one or more of the following measures:
m Turn the television or radio antenna until the interference stops.
m Move the computer to one side or the other of the television or radio.
m Move the computer farther away from the television or radio.
m Plug the computer into an outlet that is on a different circuit from the television or radio.
(That is, make certain the computer and the television or radio are on circuits controlled by
different circuit breakers or fuses.)
If necessary, consult an Apple-authorized service provider or Apple. See the service and support
information that came with your Apple product. Or, consult an experienced radio/television
technician for additional suggestions.
IMPORTANT
could void the FCC Certification and negate your authority to operate the product.
This product was tested for FCC compliance under conditions that included the use of Apple
peripheral devices and Apple shielded cables and connectors between system components. It is
important that you use Apple peripheral devices and shielded cables and connectors between
system components to reduce the possibility of causing interference to radios, television sets,
and other electronic devices. You can obtain Apple peripheral devices and the proper shielded
cables and connectors through an Apple-authorized dealer. For non-Apple peripheral devices,
contact the manufacturer or dealer for assistance.
Changes or modifications to this product not authorized by Apple Computer, Inc.,
x
Communications Regulation Information
Page 11
DOC statement
DOC Class B Compliance This digital apparatus does not exceed the Class B limits for radio
noise emissions from digital apparatus as set out in the interference-causing equipment standard
entitled “Digital Apparatus,” ICES-003 of the Department of Communications.
Observation des normes—Classe B Cet appareil numérique respecte les limites de bruits
radioélectriques applicables aux appareils numériques de Classe B prescrites dans la norme
sur le matériel brouilleur : “Appareils Numériques”, NMB-003 édictée par le ministre des
Communications.
VCCI statement
Communications Regulation Information
xi
Page 12

Page 13

Preface
The PC Compatibility Card lets you use DOS, Windows 3.1, Windows 3.11,
Windows for Workgroups, and Windows 95 applications directly on your
Macintosh computer. It includes a high-performance microprocessor that’s
compatible with the latest DOS and Windows software. You can:
m simultaneously run the Macintosh operating system (Mac OS) and PC
applications
m switch between the Mac OS and PC environments at any time without
quitting the applications you’re using
m view the current environment on a single monitor, or view both
environments simultaneously on two monitors
m use the same hard disk for both Mac OS and PC software
m use your Macintosh keyboard and one-button or multibutton Apple
Desktop Bus (ADB)–compatible mouse with PC software
m use your Macintosh modem, monitor, and printer with PC software, or
connect PC-compatible equipment
m with some models, use a joystick or other game controller with PC
applications
m with some models, connect MIDI equipment
m add random-access memory (RAM) to the PC Compatibility Card
m add 1 MB video DRAM (service technician only)
xiii
Page 14

m use the built-in Macintosh serial ports with PC software
m play and record from PC CD-ROM discs using an Apple CD-ROM drive
m copy and paste data between Mac OS and PC documents
m with some models, play Sound Blaster–compatible sounds and use Sound
m communicate with network servers and other computers running PC
About this manual
This manual describes how to install your PC Compatibility Card, how to
connect additional equipment, how to install the software that came with your
PC Compatibility Card, and how to work with the PC and Mac OS
environments.
To set up your card, follow these steps:
m To install your card, turn to the chapter for the kind of computer you have.
m To connect additional equipment, turn to Chapter 3, “Connecting Monitors
Blaster sound processing utilities
software
and Other Equipment.”
xiv
To install and begin using your software, follow these steps:
m To install your software, turn to Chapter 4, “Installing the PC
Compatibility Card Software.”
m To learn how to configure your software, turn to Chapter 5, “Setting Up the
PC Environment.”
m To learn how to work with the PC and Mac OS environments, turn to
Chapter 6, “Working in the PC Environment.”
m To solve problems that may occur while you’re using your PC-compatible
Macintosh, turn to Chapter 7, “Troubleshooting in the PC Environment.”
Preface
Page 15

Installing the Card in a
1
Power Macintosh 7200, 7500, or 7600
This chapter describes how to install the PC Compatibility Card hardware in
a Power Macintosh 7200, 7500, or 7600.
IMPORTANT
Compatibility Card hardware is already installed. Go to Chapter 3,
“Connecting Monitors and Other Equipment.” If you want to install
additional memory in your card, go to Appendix A, “Adding Memory to a PC
Compatibility Card.” Then turn to Chapters 4 through 7 to learn more about
installing and using PC software.
If you received this manual with a computer, the PC
1
Page 16

What you need
Before beginning the installation process, make sure you have all the
necessary parts: the PC Compatibility Card, internal PC audio/video
assembly (Power Macintosh 7200 models only), two CD audio cables, and the
loopback cable.
Loopback cable
2
PC Compatibility Card
Internal PC audio/video assembly
CD audio cables
Chapter 1
Page 17

Installing the PC Compatibility Card hardware
WARNING
The installation of the PC Compatibility Card is technically
complex. Unless you are comfortable installing components inside
computers, Apple recommends that you have the PC Compatibility Card
installed by your Apple-authorized dealer (for a fee).
To avoid damaging the computer and the card, do not attempt to install
the card, install memory, or connect the cables without first reading this
documentation.
There are several steps to installing your PC Compatibility Card hardware:
m removing the computer’s case
m disconnecting the CD audio cable from the CD-ROM drive
m opening the computer’s expansion card cover and chassis
m connecting the internal PC audio/video assembly (Power Macintosh 7200
models only) and inserting the card
m connecting the CD audio cables to the card and the logic board
m closing the cover and chassis
m connecting the new CD audio cable to the CD-ROM drive
m replacing the computer’s case
Installing the Card in a Power Macintosh 7200, 7500, or 7600
3
Page 18
Removing the computer’s case
1Shut down the computer.
Leave the computer plugged in to ground it and protect its components from
static electricity damage.
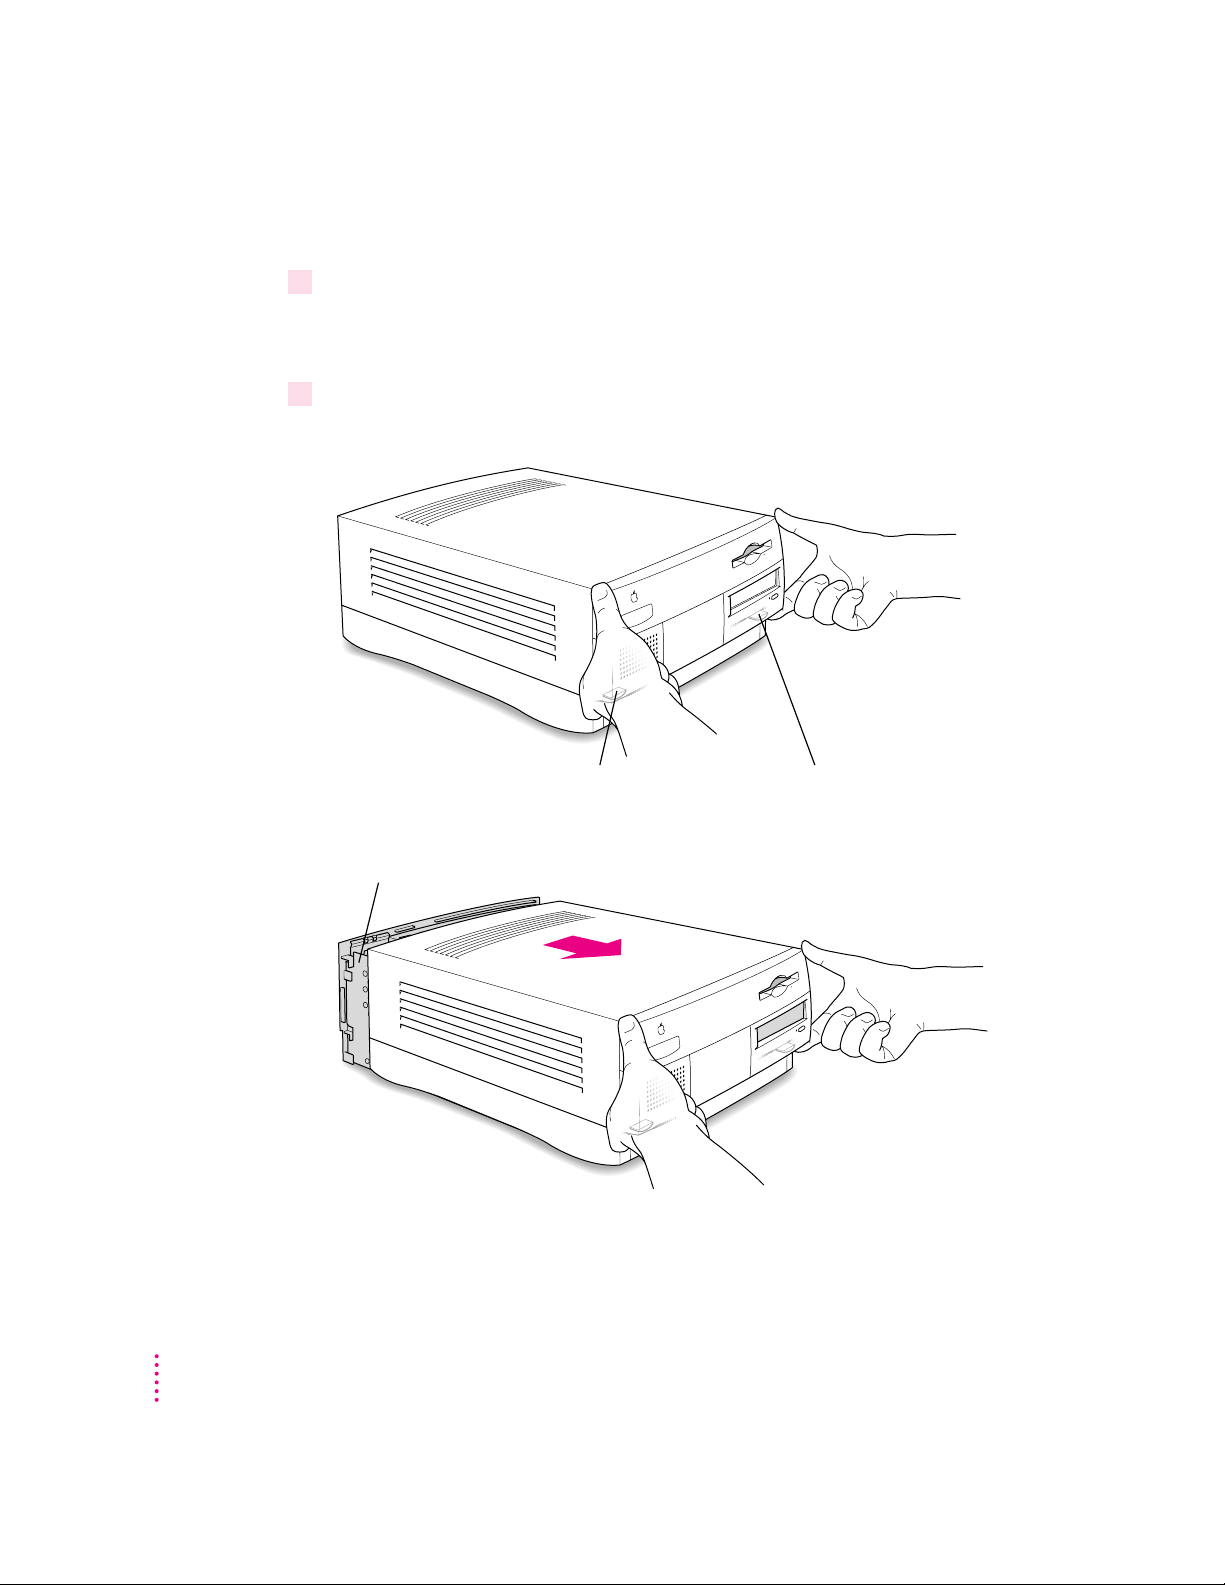
2Press the two release buttons under the front panel and slide the cover toward you
approximately two inches.
Locate the two release buttons under the front panel ledge with your fingertips.
4
While pressing the release buttons, pull the top cover forward
approximately two inches to release it from the chassis.
Chapter 1
Page 19
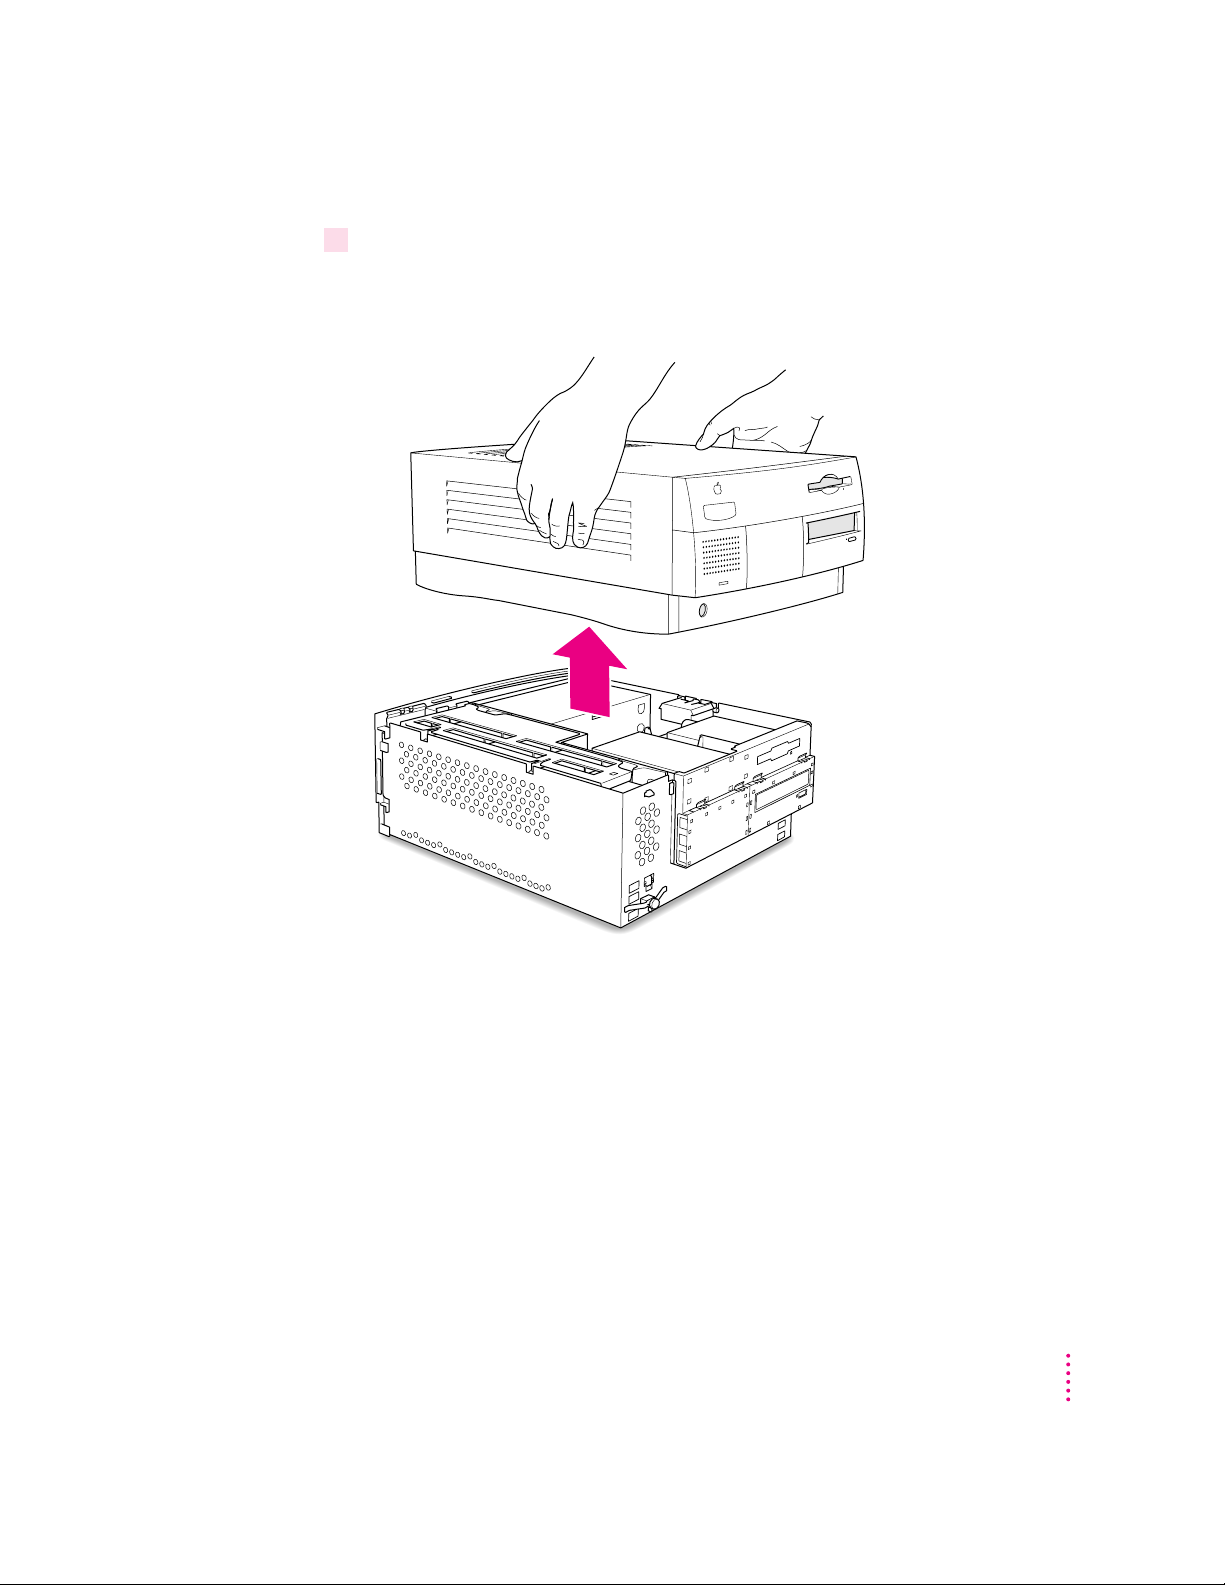
3 Remove the cover from the computer.
After you’ve slid the cover forward about two inches, lift it straight up and off
the computer.
Installing the Card in a Power Macintosh 7200, 7500, or 7600
5
Page 20
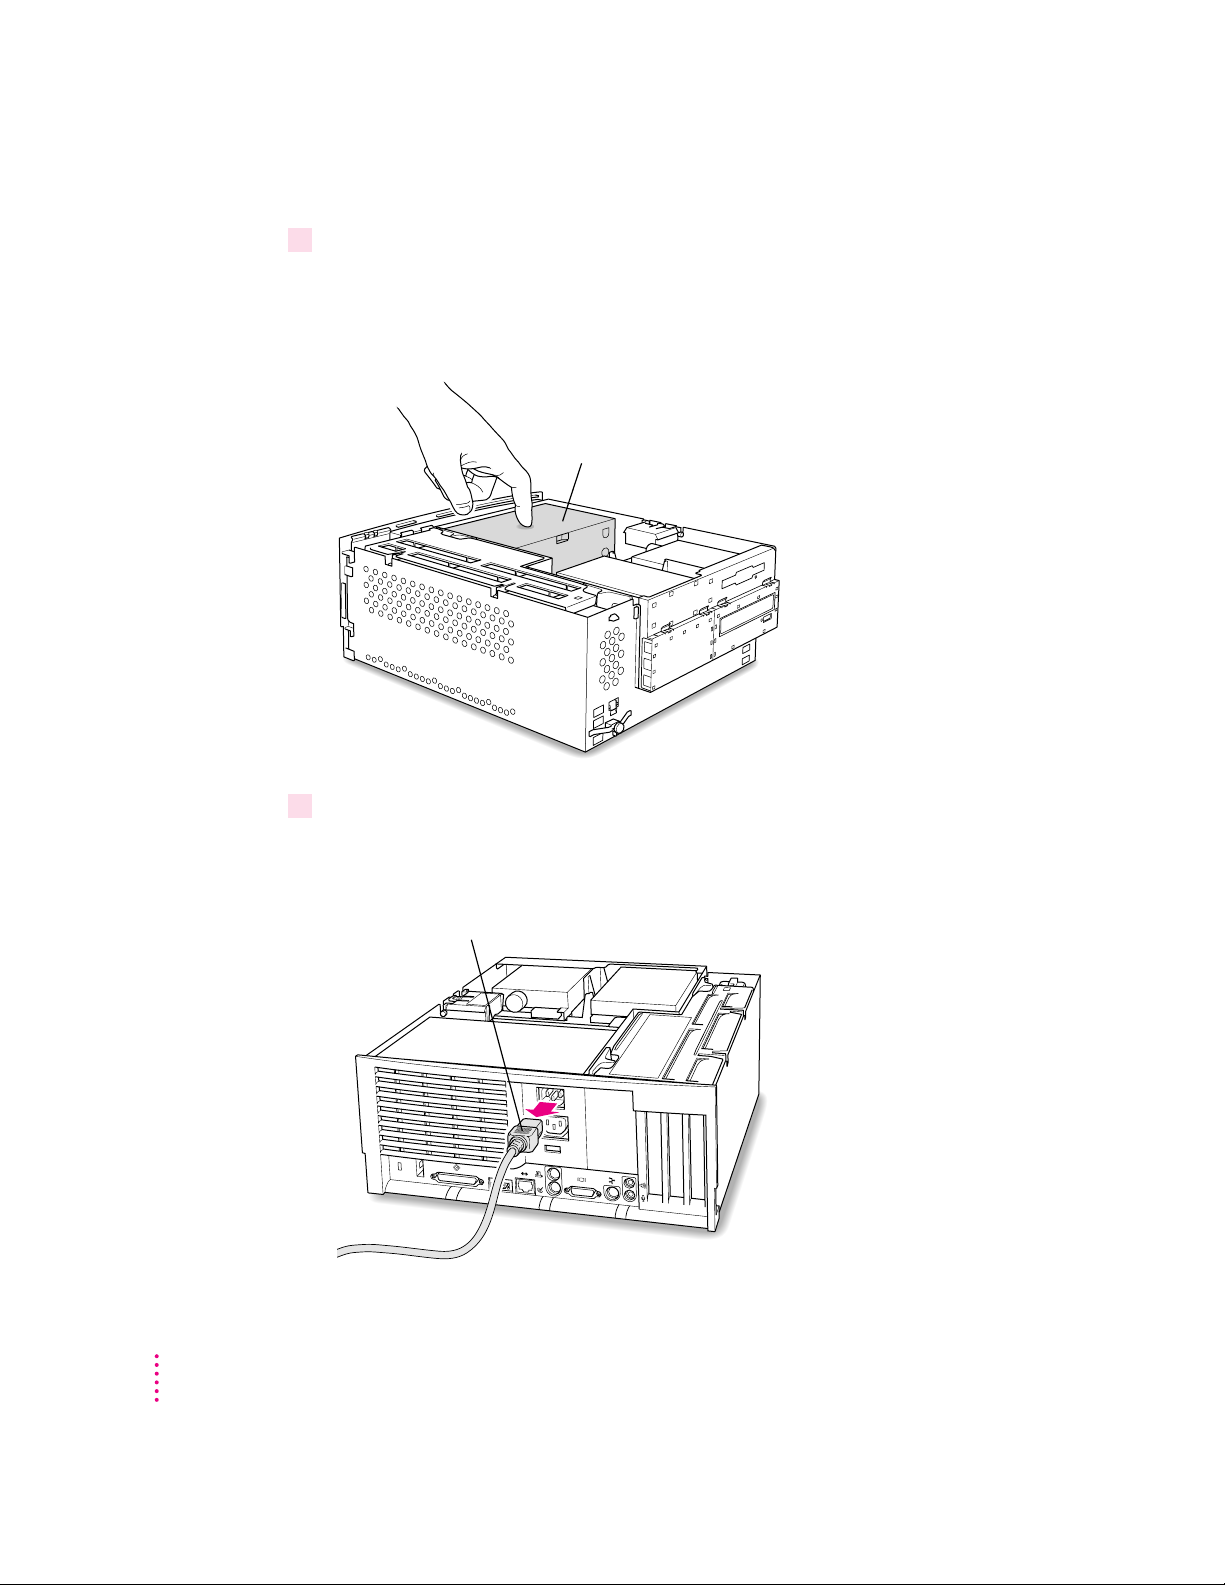
4Touch the metal part of the power supply case inside the computer to discharge static
electricity.
Always do this before you touch any parts, or install any components, inside
the computer.
Power supply case
5Unplug the power cord from the computer’s back panel.
6
You need to unplug the power cord because you’ll be lifting the computer
chassis in steps 10–12.
Remove the power cord from the back of the computer.
Chapter 1
Page 21
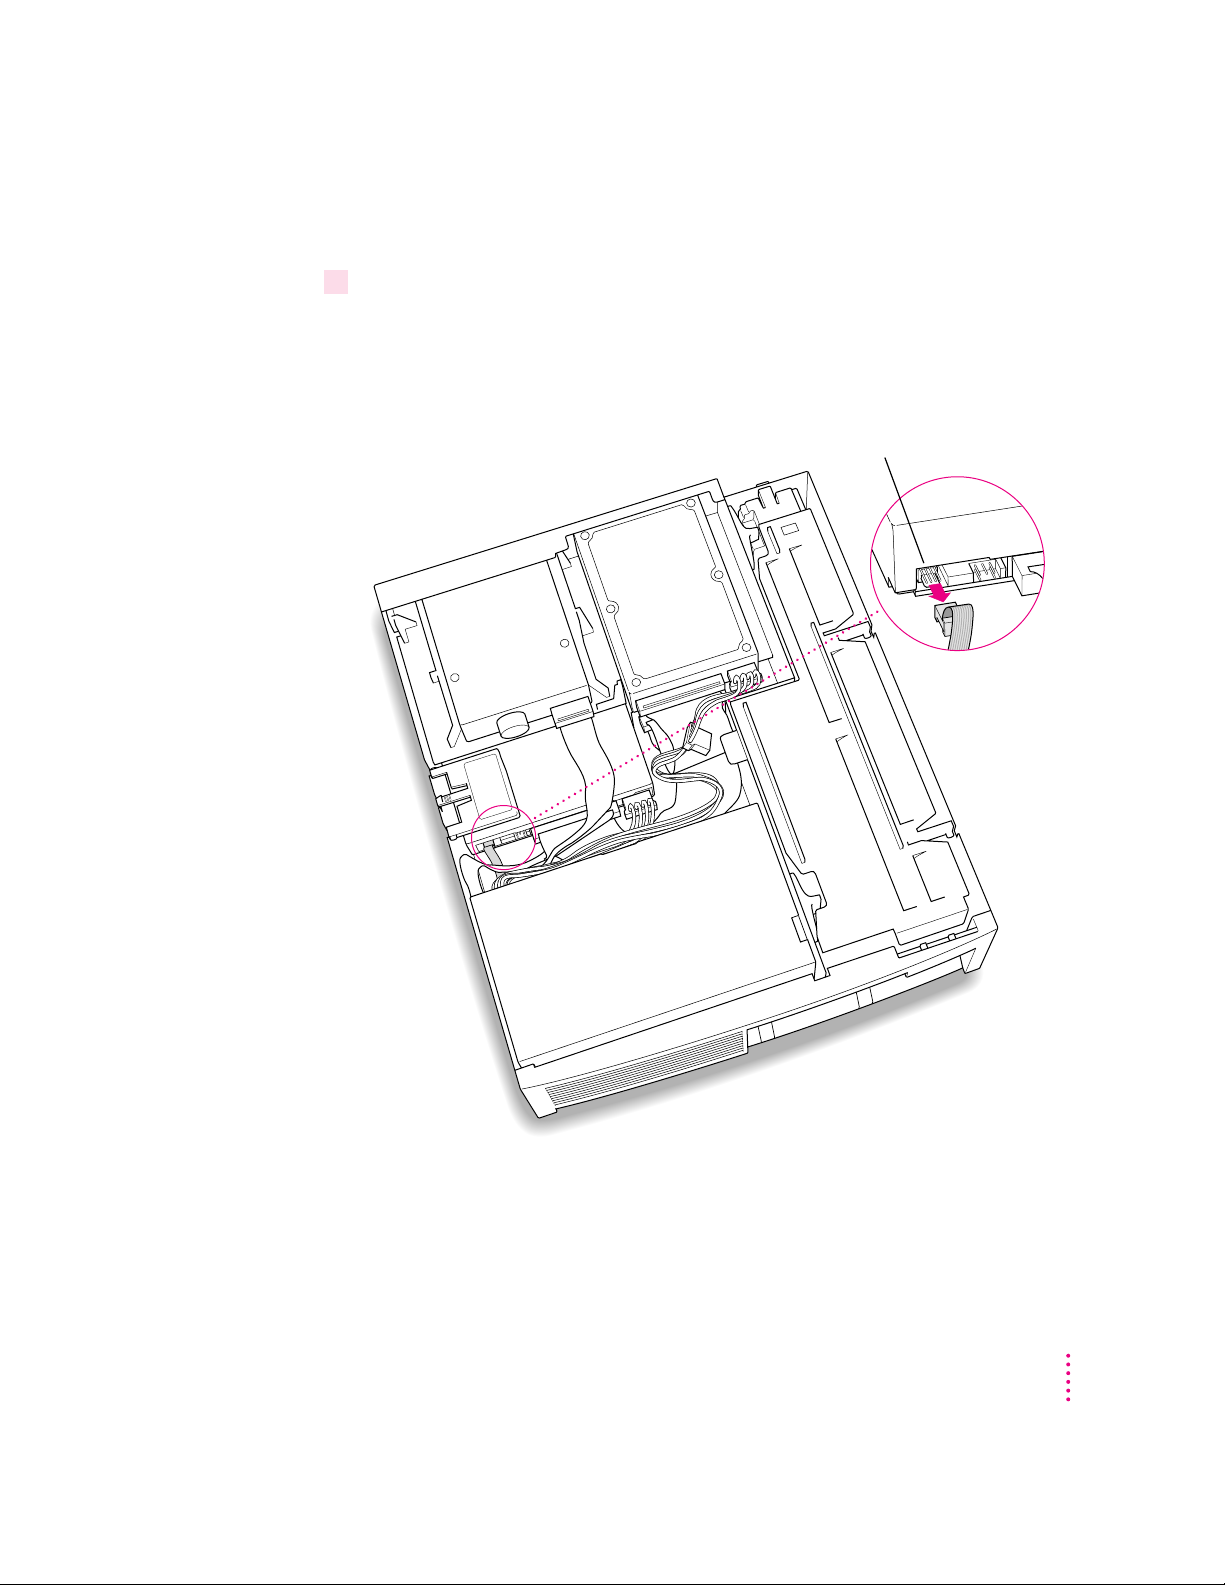
Disconnecting the CD audio cable from the CD-ROM drive
6Disconnect the CD audio cable from the CD-ROM drive.
Be sure to pull the plug, not the cable.
Just disconnect this end of the cable for right now. Later you will replace this
cable with the new cables that came with your PC Compatibility Card.
Disconnect the CD cable from the back of the CD-ROM drive.
(top, back of computer)
Installing the Card in a Power Macintosh 7200, 7500, or 7600
7
Page 22
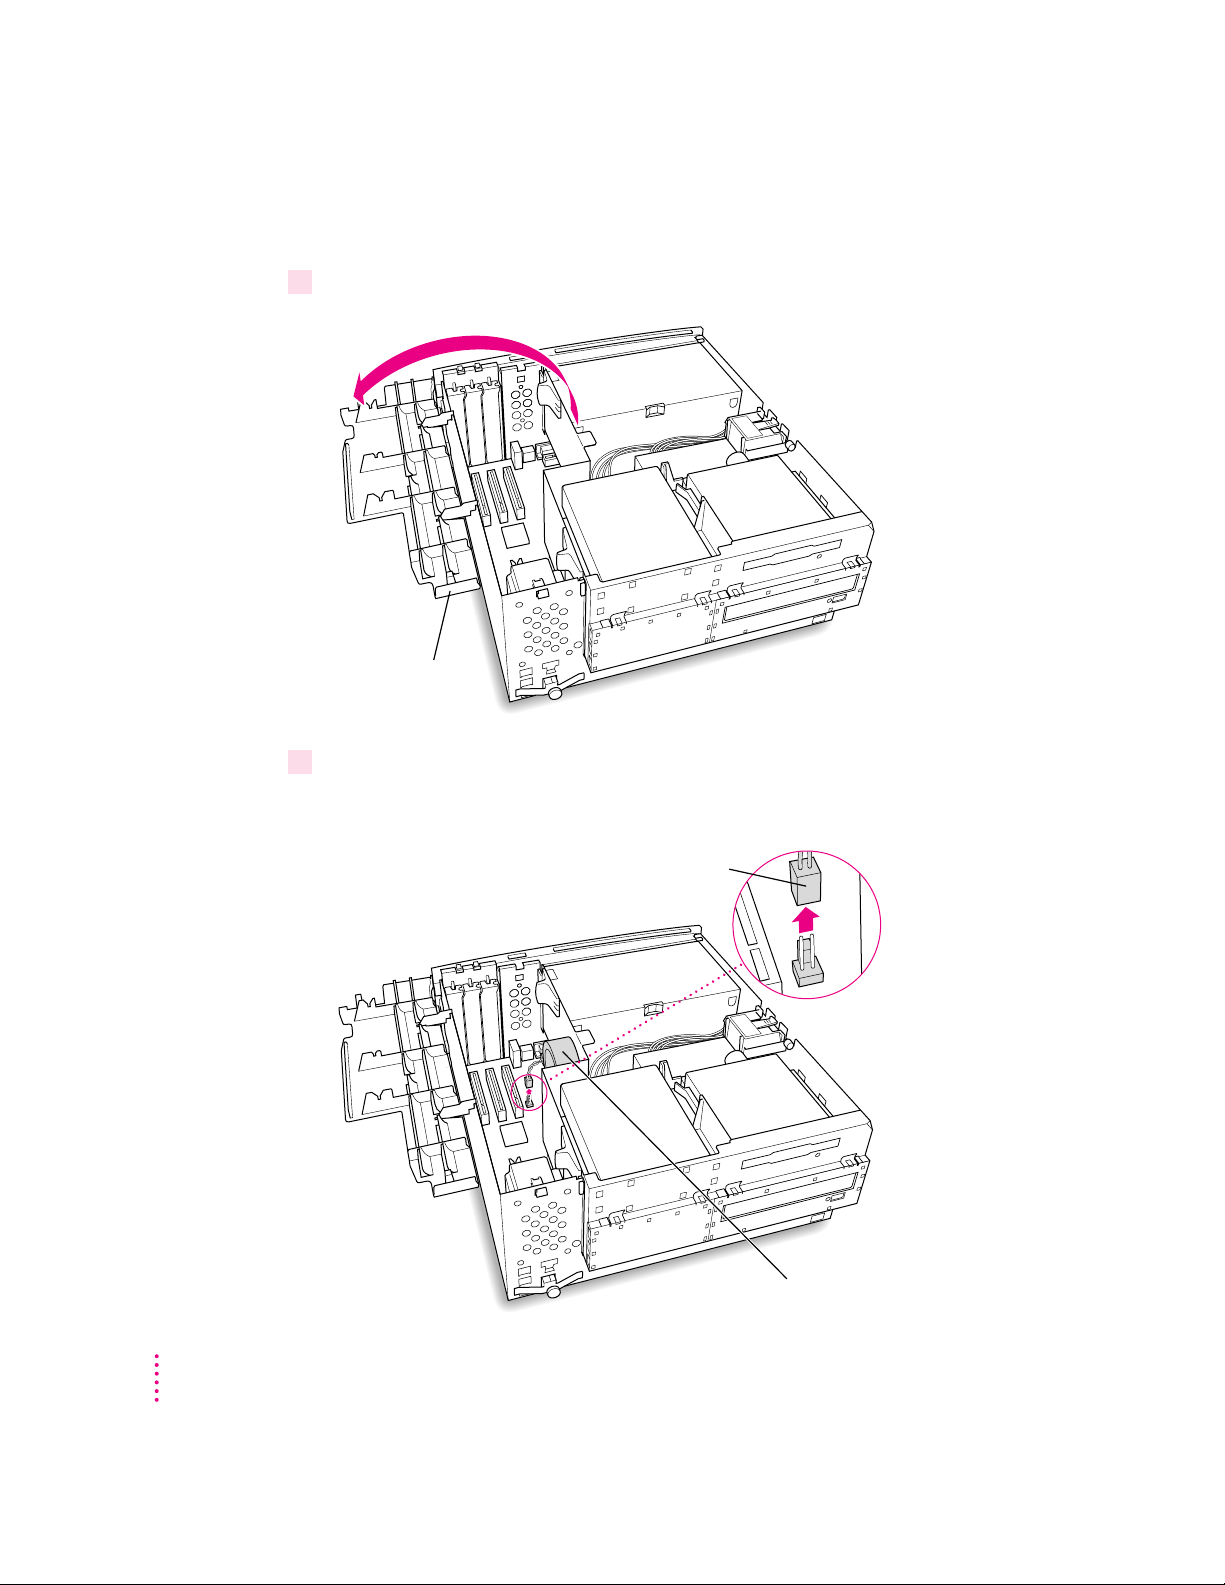
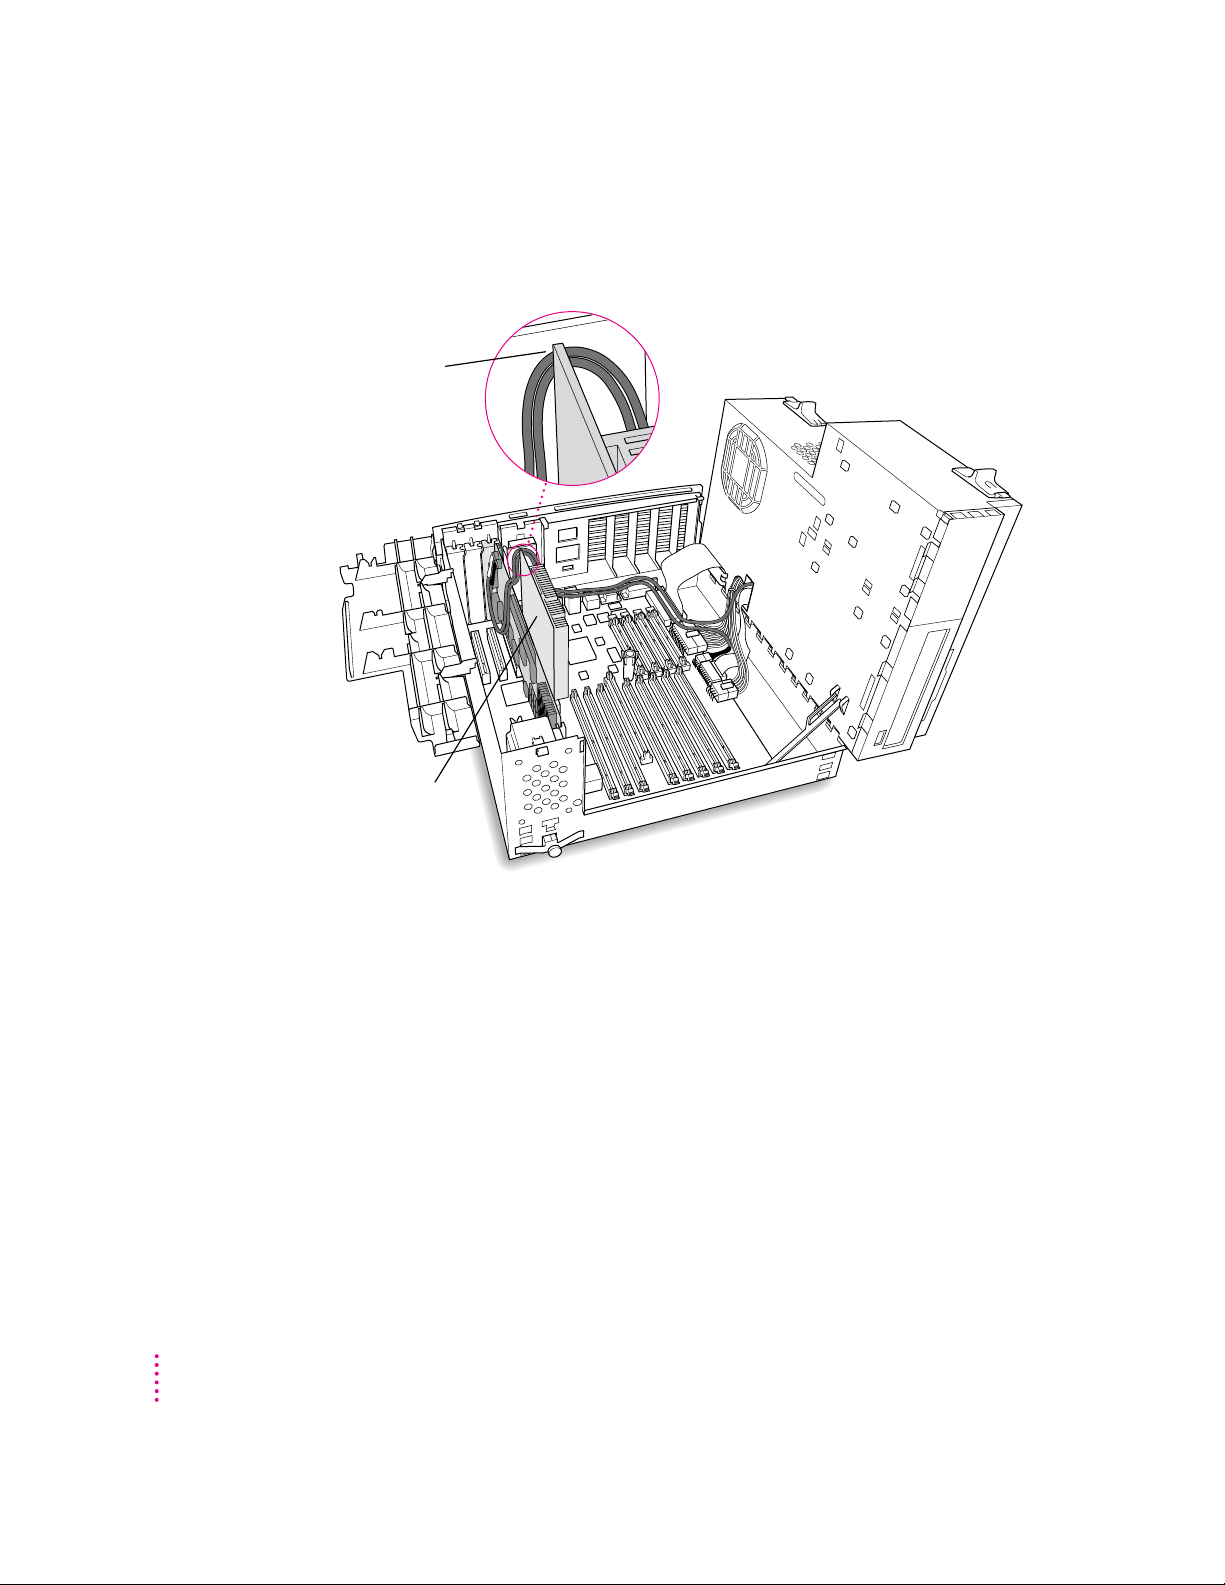
Opening the computer
7 Flip open the expansion card cover.
Flip the expansion
card cover open.
8If there is an auxiliary fan, disconnect the fan cable.
Some computer models do not have a fan.
(front of computer)
8
Unplug the auxiliary fan cable from the main logic board.
Auxiliary fan
Chapter 1
Page 23
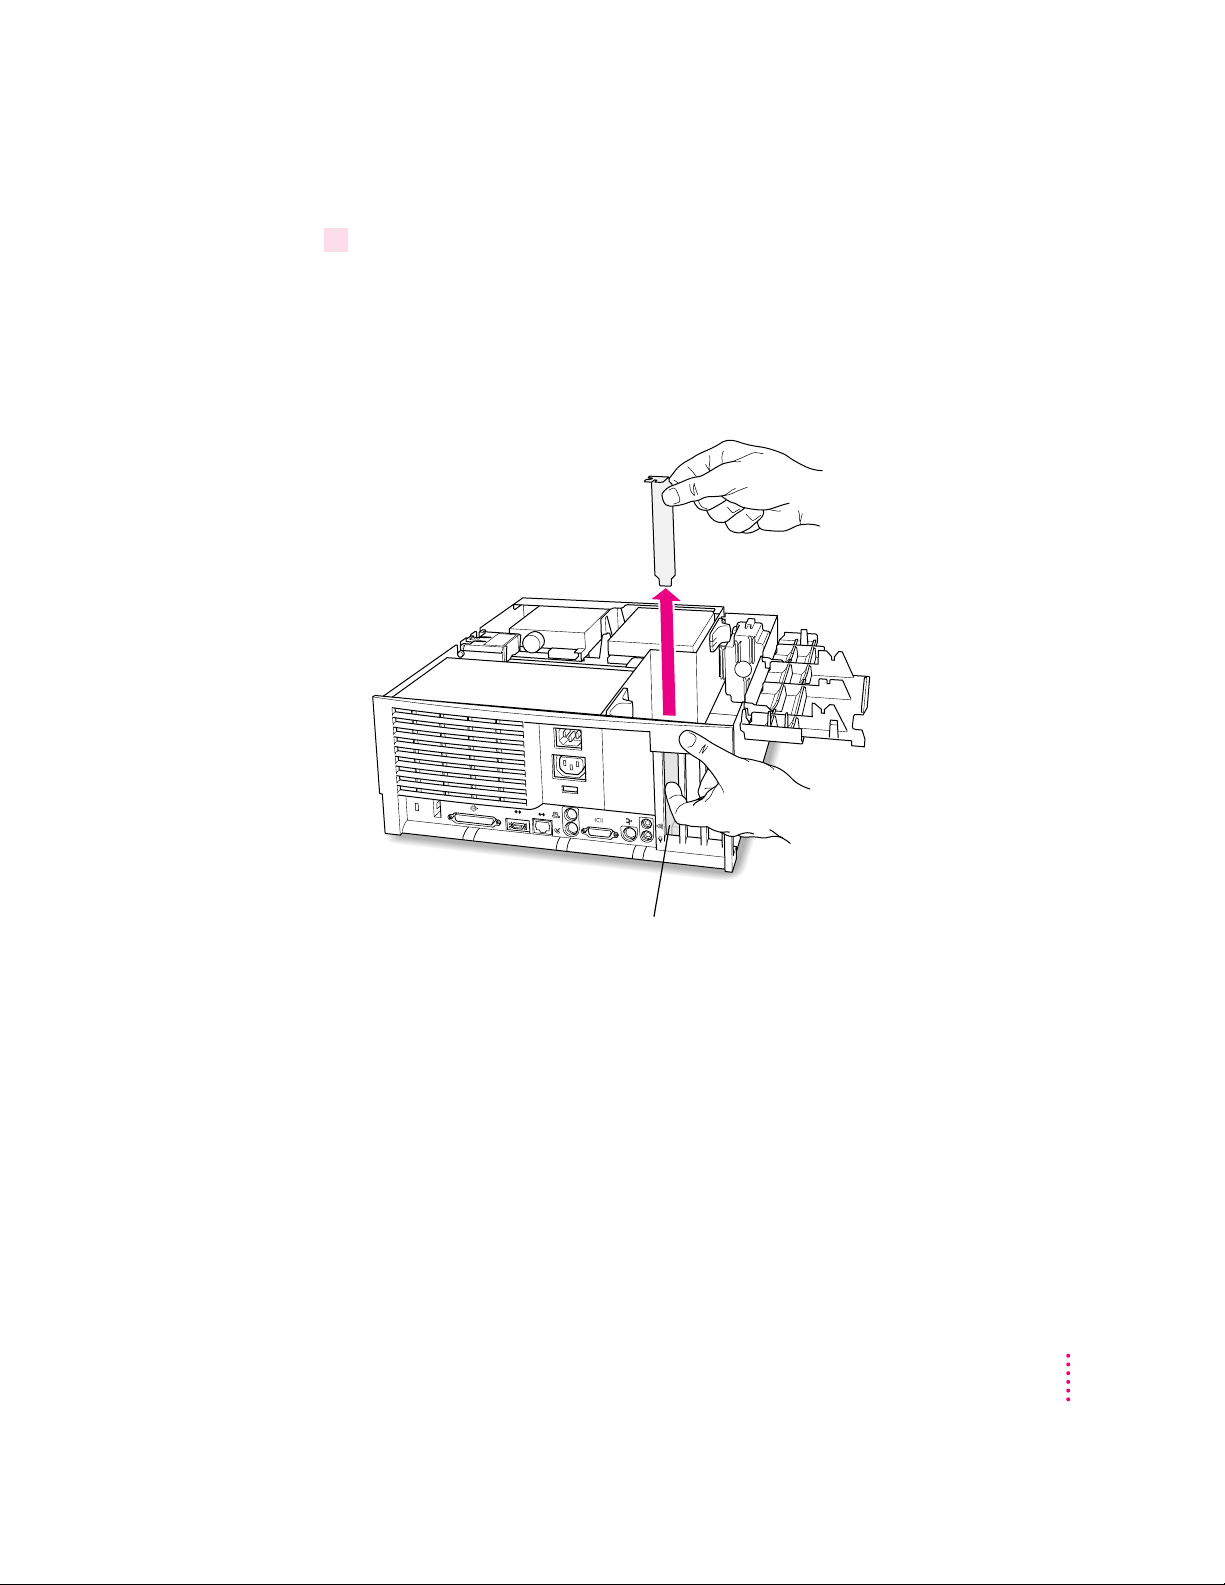
9Pull out the port access cover behind the first expansion slot (the one closest to the
center of the computer).
It’s recommended that you install your PC Compatibility Card in the first
slot (the one closest to the center of the computer). But if a card is already
installed in the first slot, you can install the PC Compatibility Card in
another slot.
(back of computer)
Push the port access cover in gently with the finger of
one hand while pulling it straight up with the other hand.
Installing the Card in a Power Macintosh 7200, 7500, or 7600
9
Page 24
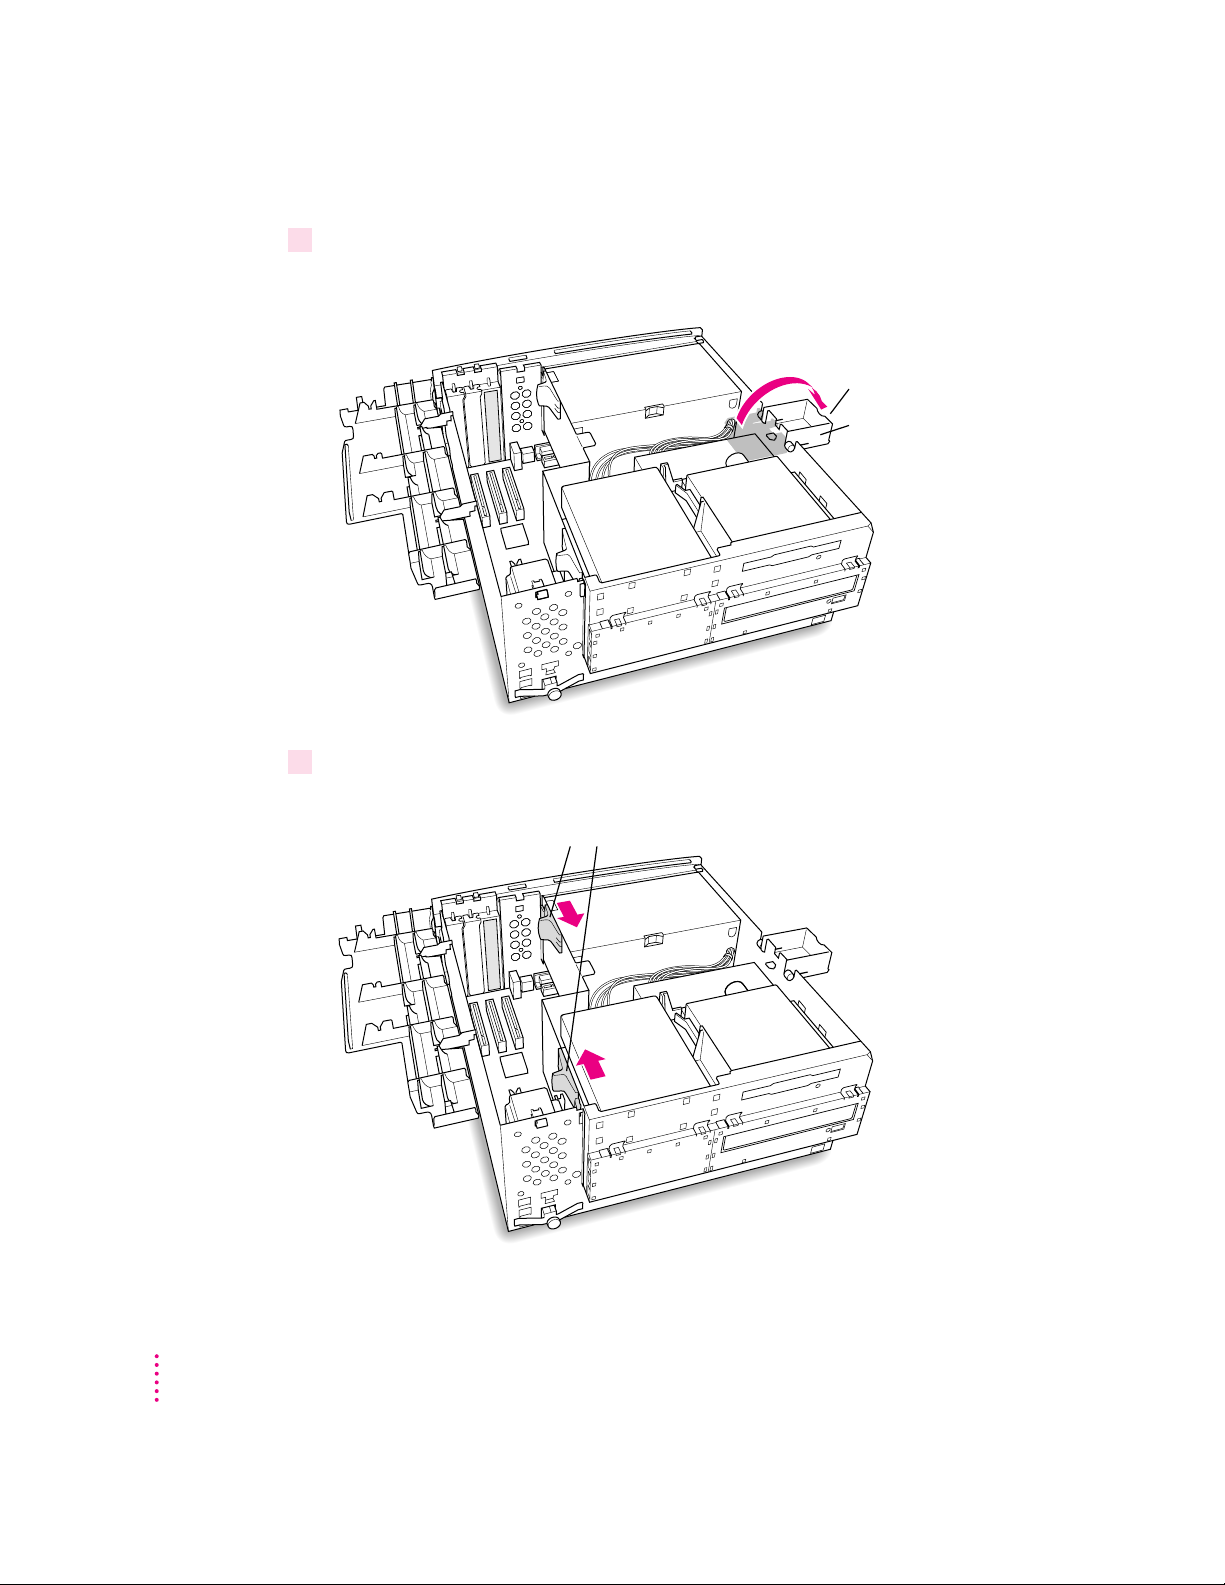
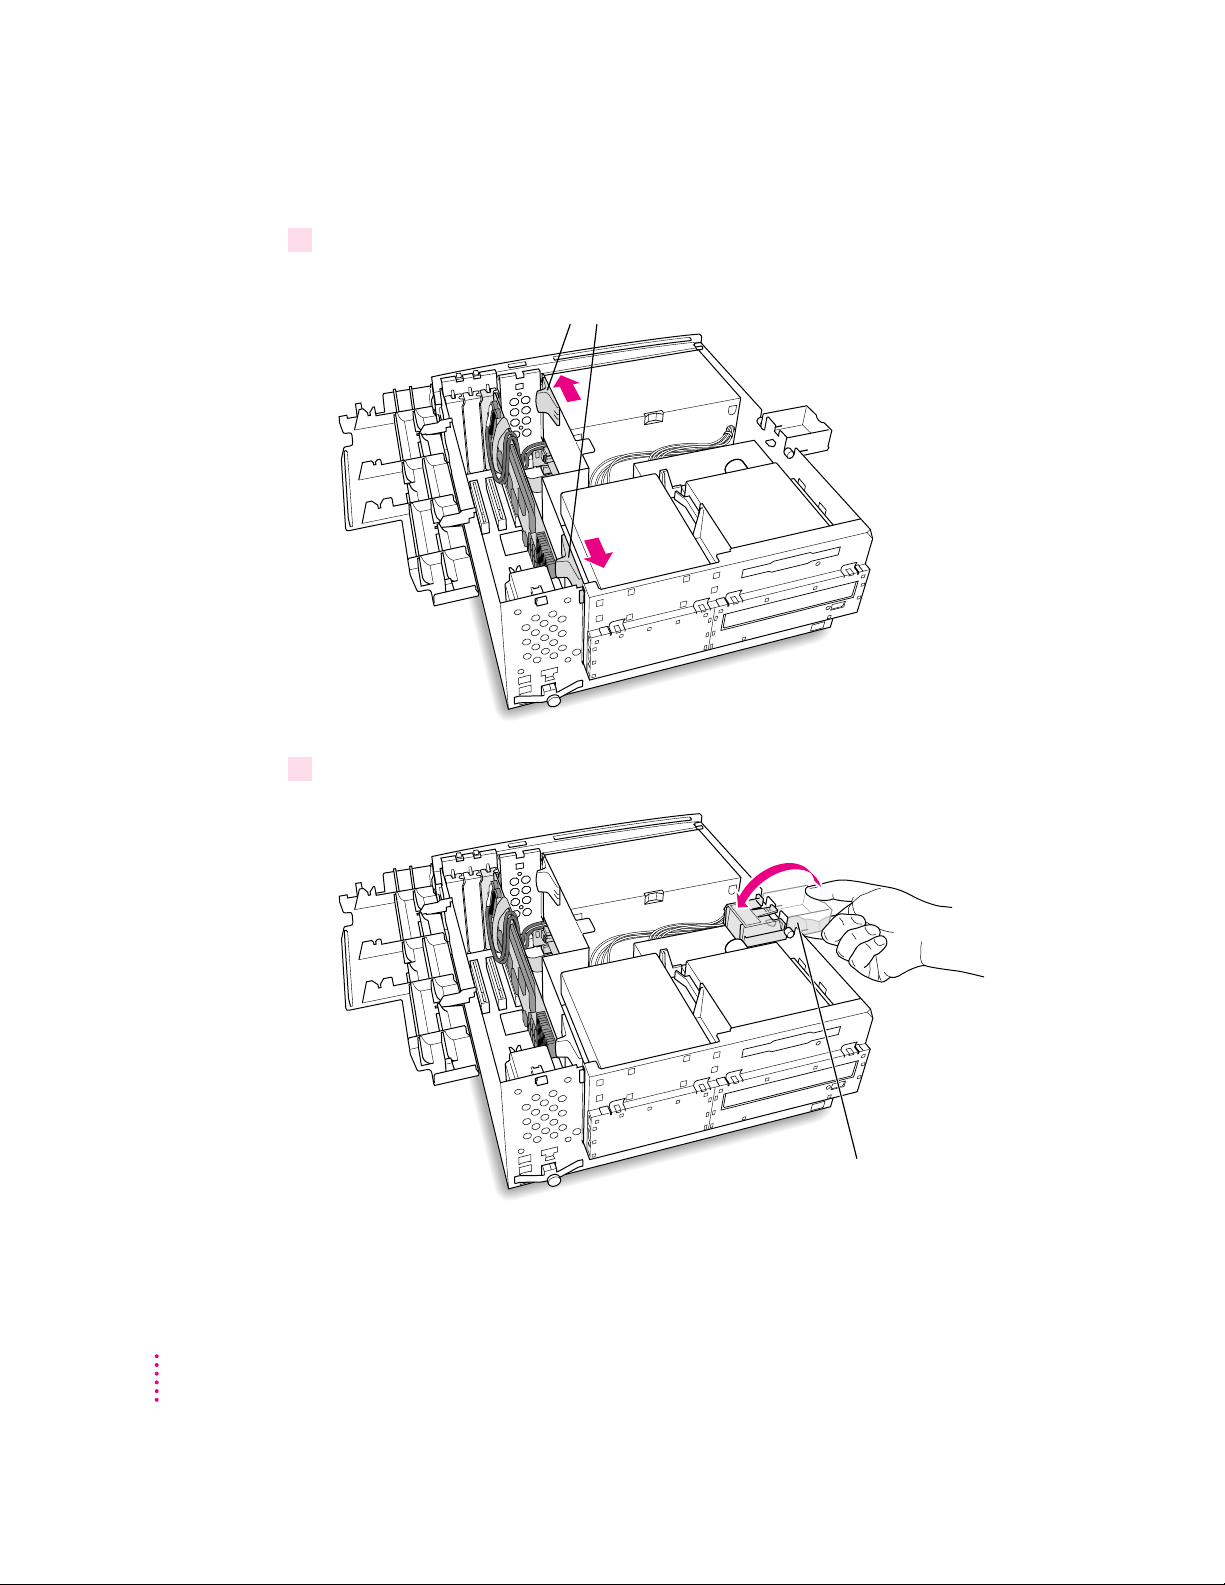
10 Position the support foot.
The support foot holds the computer’s chassis when you open it.
(front of computer)
11 Unlock the chassis release switches.
Move the release switches toward the inside
of the computer to unlock the top chassis.
Flip the support foot
out until it snaps into
its locked position.
Support foot
10
Chapter 1
Page 25

12 Lift the chassis and rest it on the support foot. Make sure the support arm is engaged.
You can use this tab to lift the top chassis.
Gently swing the top part of the chassis
up so that it rests on the support foot.
Support arm
Be sure that the support arm engages this hole on the floor of
the bottom chassis so that the top chassis is locked in place.
Installing the Card in a Power Macintosh 7200, 7500, or 7600
11
Page 26
What you do next depends on whether you want to add a DIMM (dual inline
memory module) to your PC Compatibility Card to increase the amount of
RAM available to the card. The card comes with RAM installed, but adding
more memory may improve the performance of your PC applications.
If you want to add memory to your card, turn now to Appendix A, “Adding
Memory to a PC Compatibility Card.” Then come back to the next section,
“Connecting the Internal PC Audio/Video Assembly and Installing the Card.”
If you don’t want to add memory, go on to the next series of steps,
“Connecting the Internal PC Audio/Video Assembly and Installing the Card.”
Connecting the internal PC audio/video assembly and
installing the card
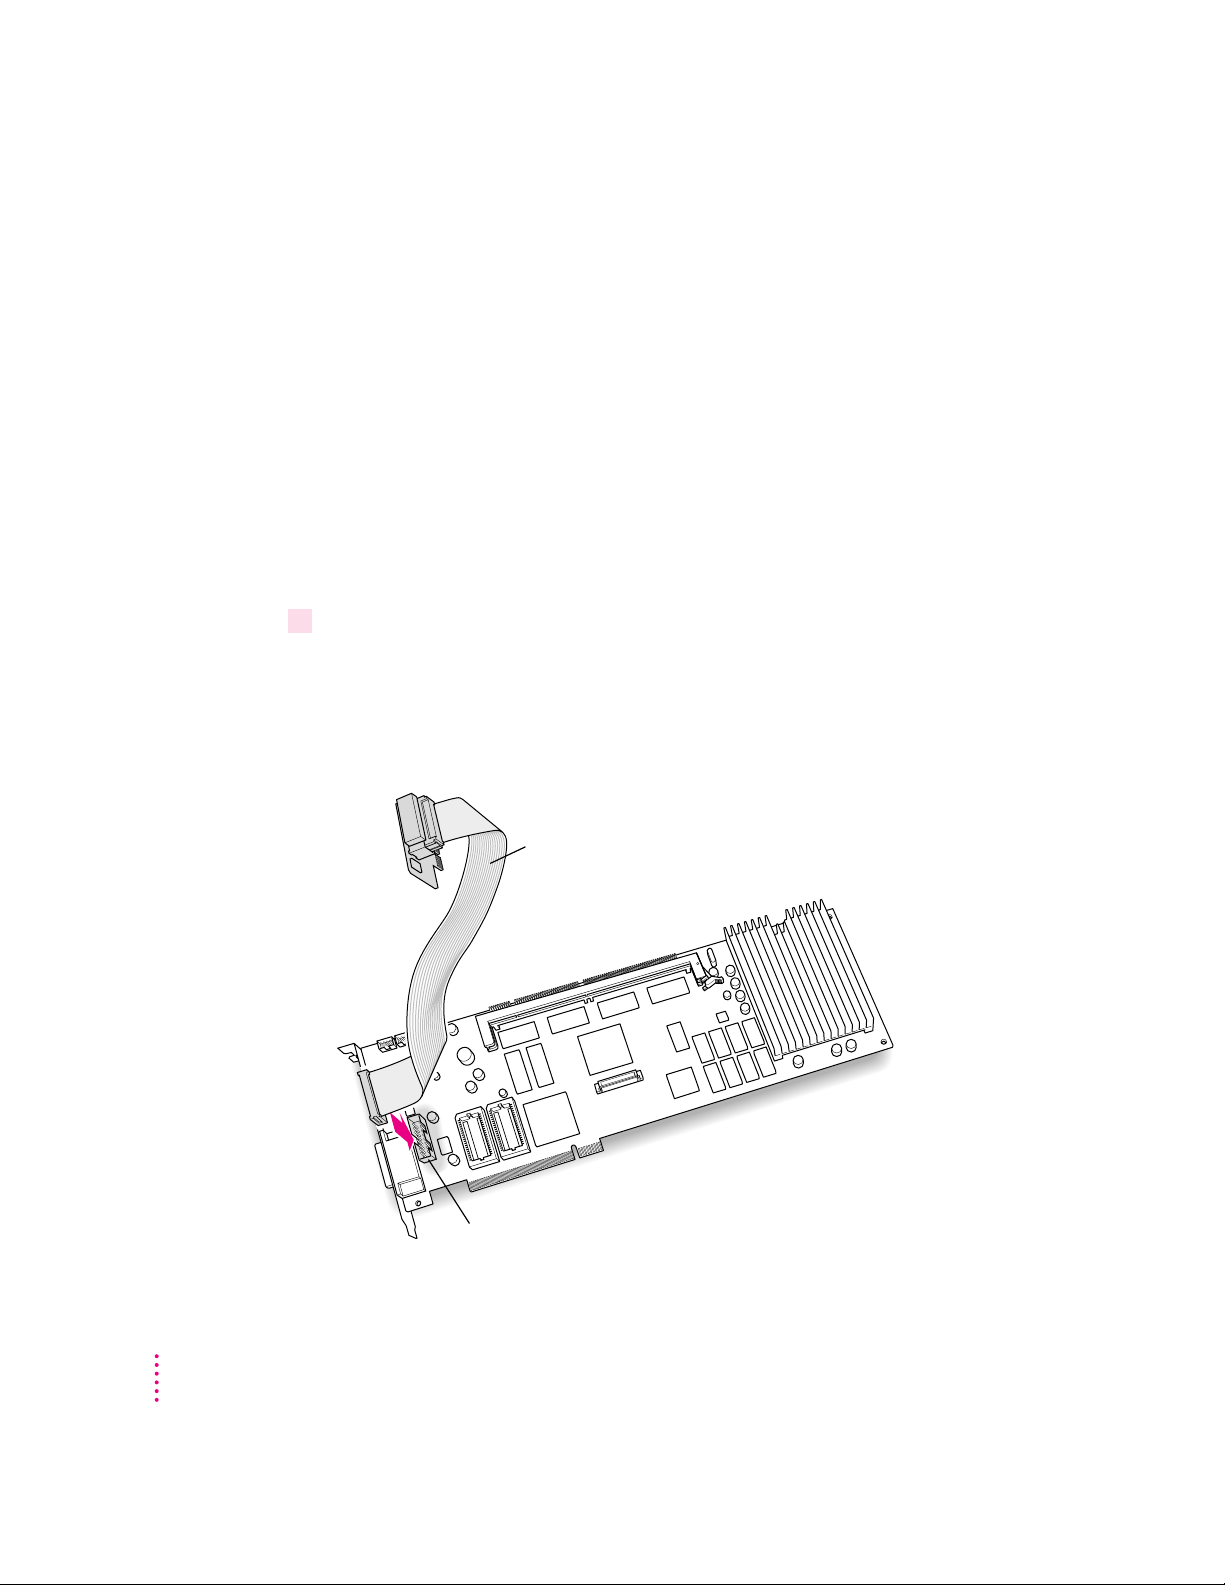
13
(Power Macintosh 7200 only)
the socket in the corner of the PC Compatibility Card. (You will connect the other end to
the computer’s logic board in step 15.)
If you have a Power Macintosh 7500 or 7600, you don’t need the PC
audio/video assembly. Go on to the next step.
Insert the small end of the PC audio/video assembly into
12
Internal PC audio/video assembly
Internal PC audio/video socket
Chapter 1
Page 27
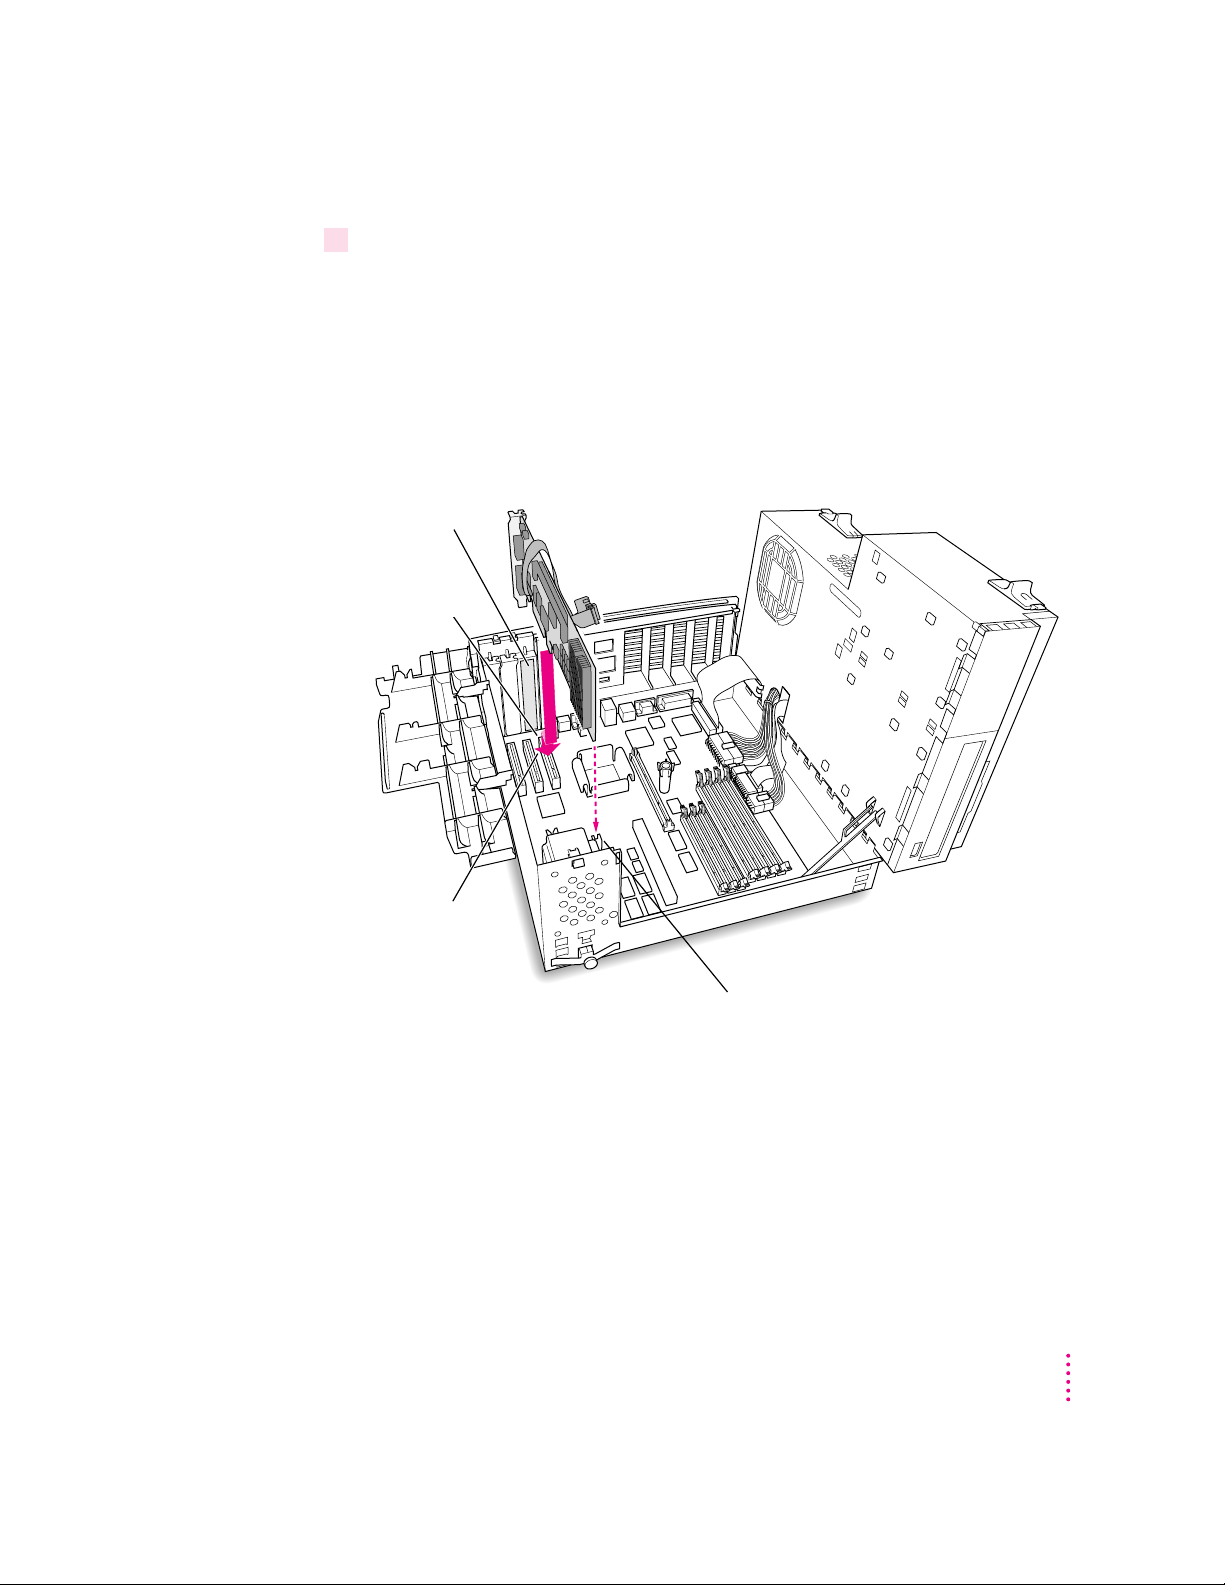
14 Insert the connector on the bottom edge of the card into the slot whose access port
cover you removed.
Line up the connector with the slot. The port on the card should face the port
access opening on the computer’s back panel, and the card should fit inside
the card guide at the front of the computer. Press down firmly on the card
until the connector is fully inserted. Don’t force the card. If you meet a lot of
resistance, pull the card out and try again.
To see if the card is connected, pull it gently. If it resists, it is connected.
Port access
opening
Install the card
into this slot.
As you lower the
card, you may find
it helpful to hold the
card slightly forward
of its final position until you
actually fit the card into its slot.
Be sure that the card engages the
card guide at the front of the computer.
Installing the Card in a Power Macintosh 7200, 7500, or 7600
13
Page 28

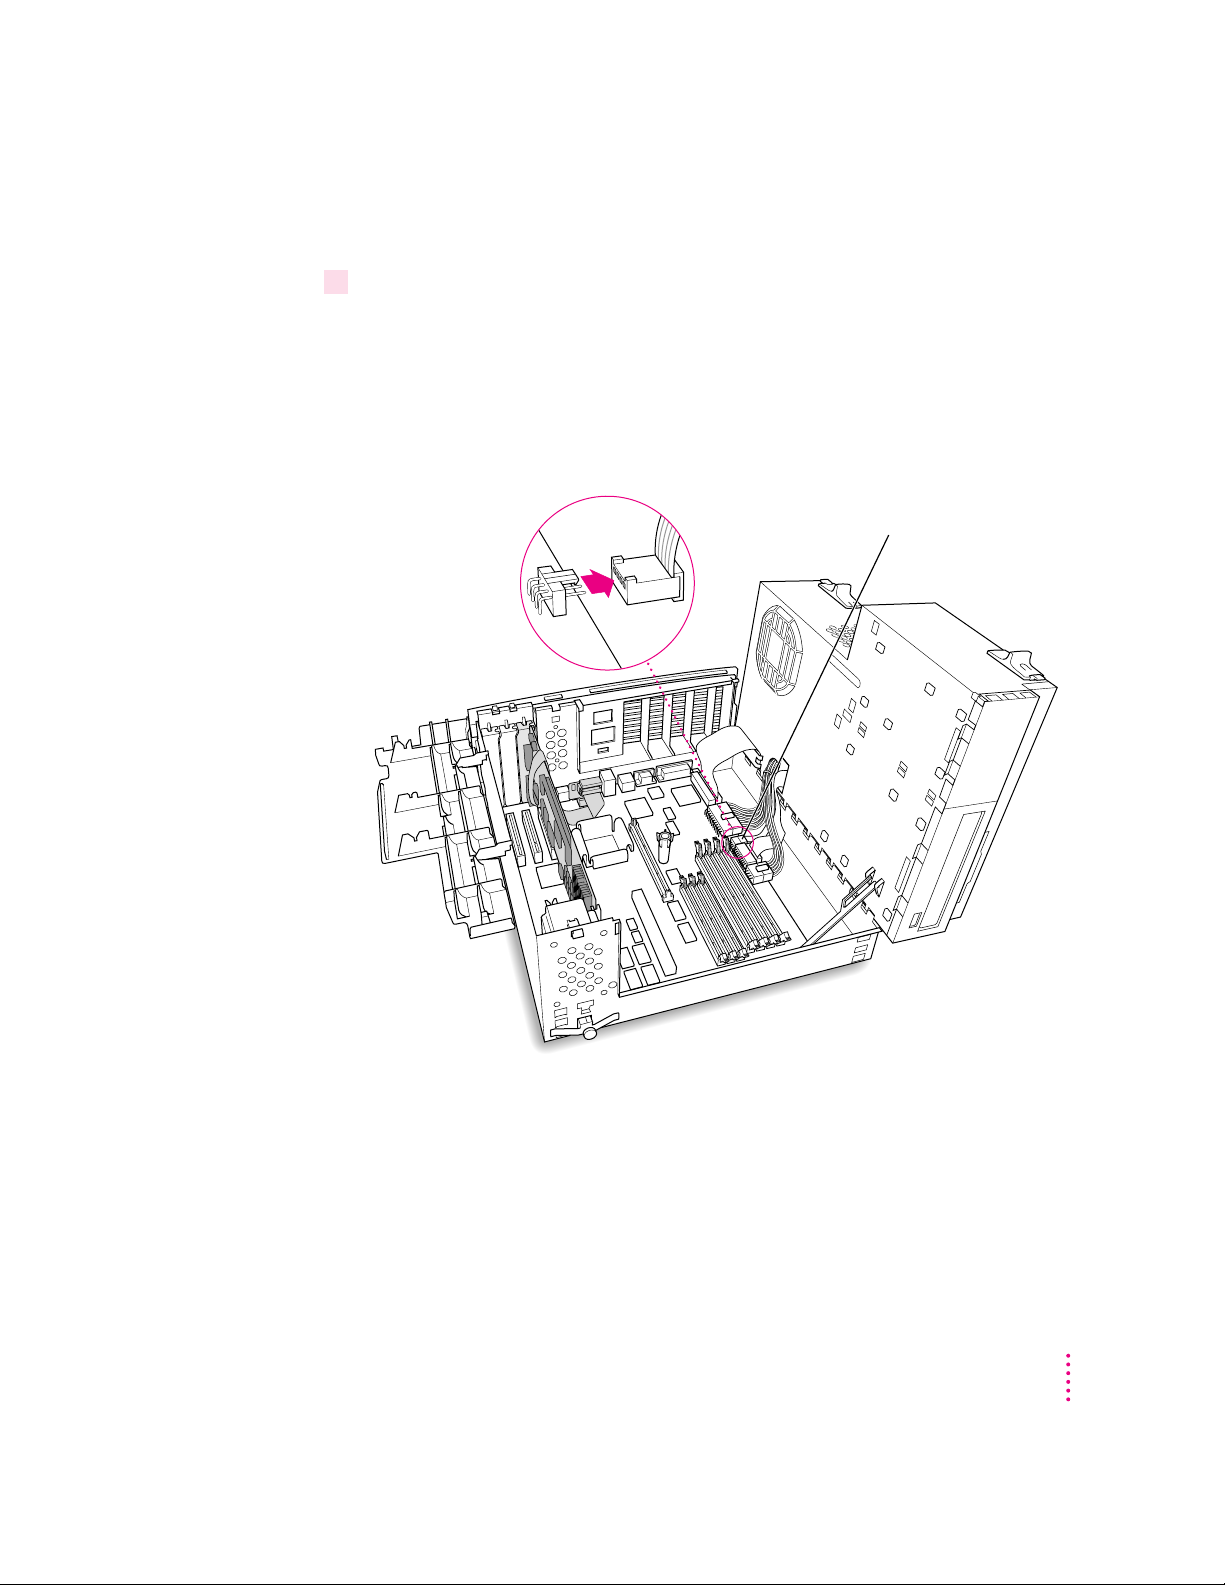
15
(Power Macintosh 7200 only)
Plug the large end of the internal PC audio/video connector
into the socket on the computer’s main logic board.
If you have a Power Macintosh 7500 or 7600, you don’t need the PC
audio/video assembly. Go on to the next step.
Plug the internal PC audio/video card into the
internal audio/video socket on the computer’s main
logic board. The card will fit into the socket
only one way.
14
Internal PC audio/video card Internal PC audio/video socket
Chapter 1
Page 29
Connecting the CD audio cables to the card and the logic board
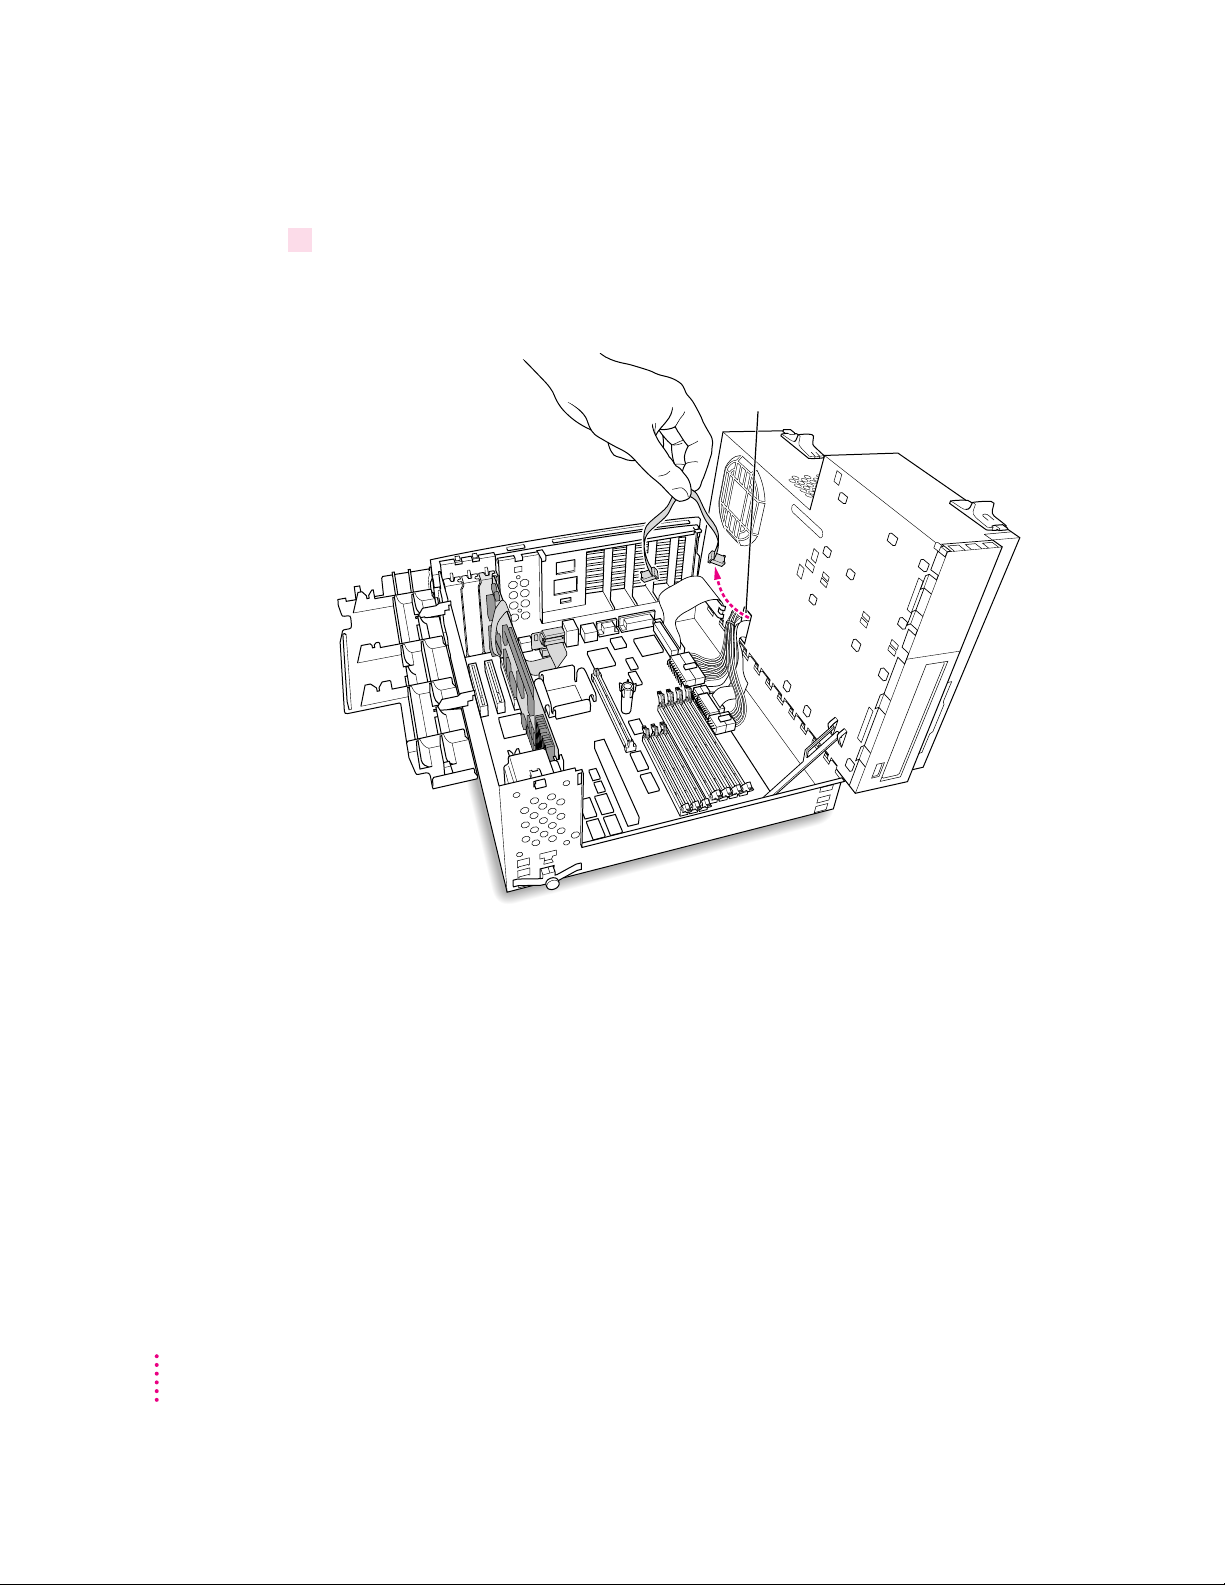
16 Disconnect the CD audio cable from the Sound In connector on the computer’s
logic board.
Be sure to pull the plug, not the cable.
This is the same cable you disconnected from the CD-ROM player in step 6.
You will be replacing it with new cables that came with your PC
Compatibility Card.
Disconnect the CD cable from the connector
on the computer’s main logic board.
Installing the Card in a Power Macintosh 7200, 7500, or 7600
15
Page 30
17 Pull the cable through the hole in the chassis and set it aside.
Don’t force the cable. If it resists, jiggle it or feed it back through the hole and
try pulling it loose again.
Pull the disconnected CD cable through
this hole in the computer chassis.
16
Chapter 1
Page 31

18 Plug one of the CD audio cables that came with your PC Compatibility Card into the
Sound Out connector on the PC Compatibility Card.
Your PC Compatibility Card came with two CD audio cables. They are
different colors to make it easier to distinguish between them, but both work
the same way.
The Sound Out connector is next to the CD In connector, which is at the
upper-left corner of the card.
Attach the small plug on
the end of one of the
CD audio cables to the
Sound Out connector on
the PC Compatibility
Card. You can use either
CD audio cable.
Sound Out connector on the
PC Compatibility Card
Installing the Card in a Power Macintosh 7200, 7500, or 7600
17
Page 32

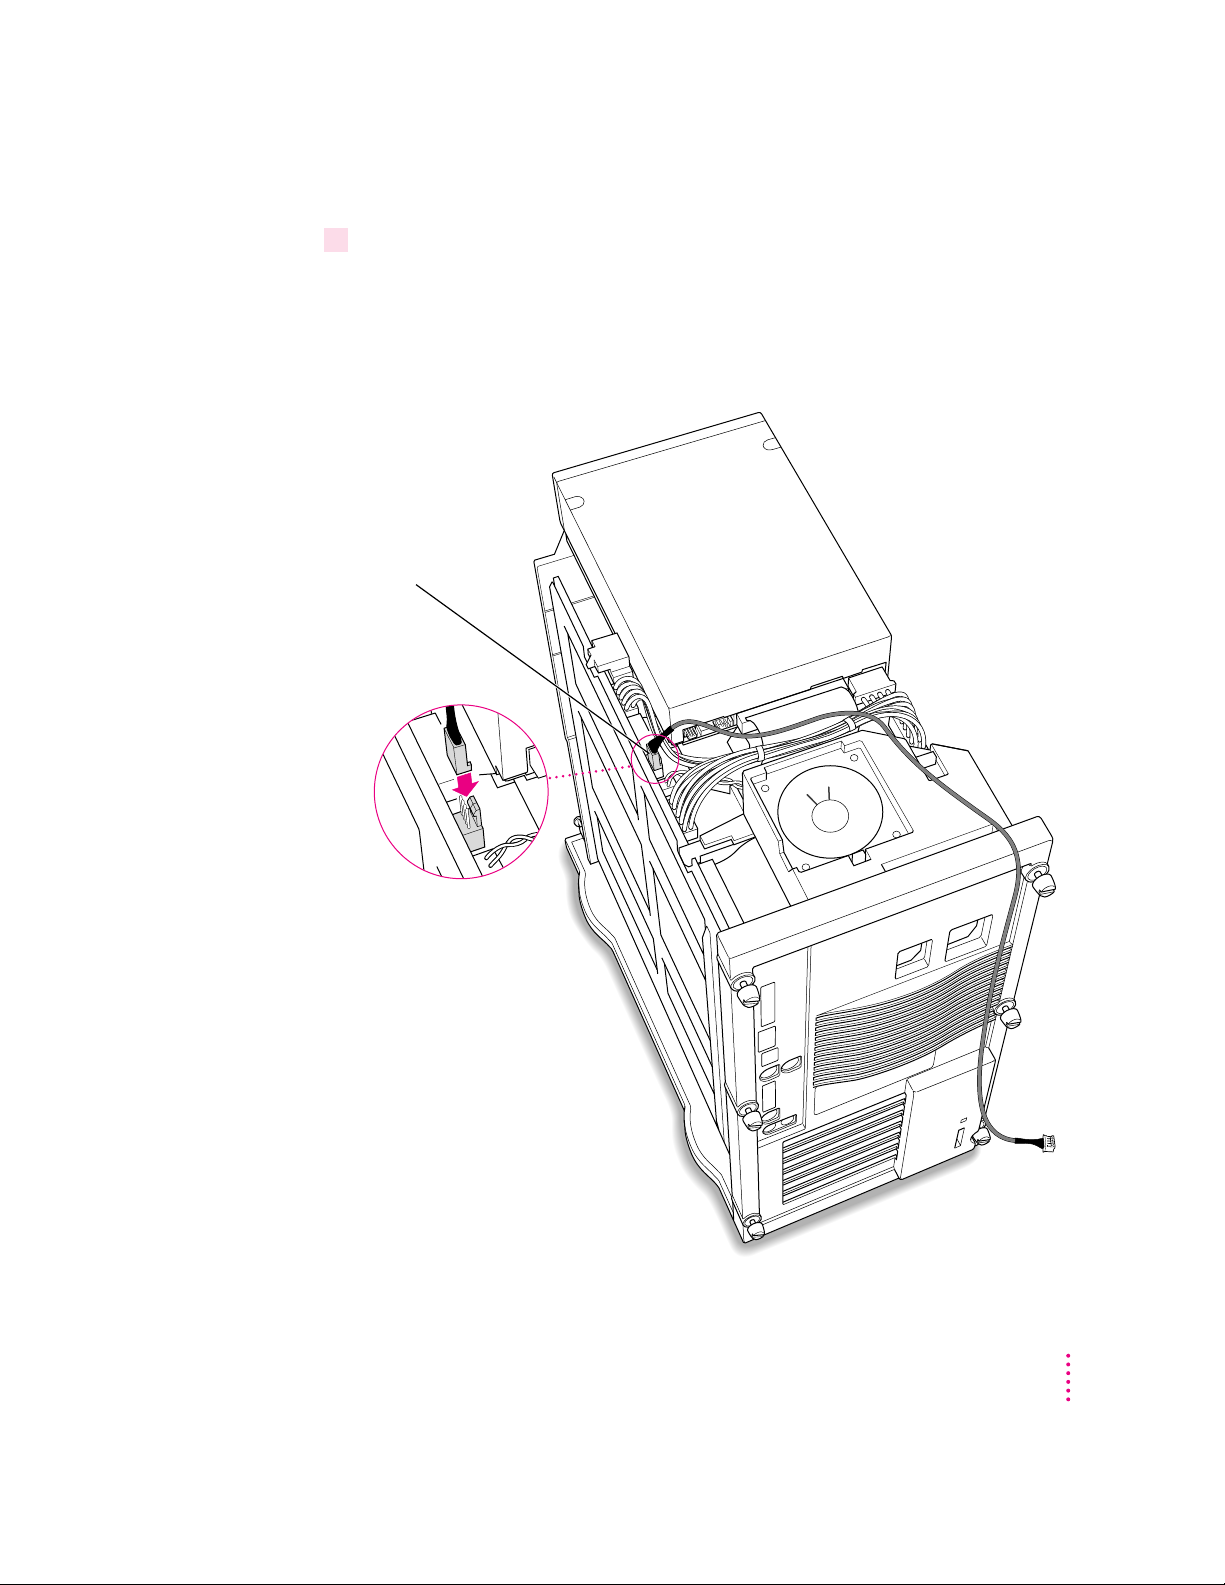
19 Route the cable over the top of the card and around the back of the computer’s logic
board. Then plug it into the Sound In connector on the computer’s logic board.
Keep the cable away from the heat sink and center support post.
1 Route the cable
around the back
of the computer’s
interior as shown.
Heat sink Support post
2 Plug the other end of the cable into the
connector on the computer’s main logic board.
18
Chapter 1
Page 33

If there is a processor card in your computer, route the cable between the
processor card and the back panel (not over the top of the processor card).
If your computer has
a processor card
installed, route
the cable so that
it passes between
the processor card
and the computer’s
back panel as shown.
Processor card
Installing the Card in a Power Macintosh 7200, 7500, or 7600
19
Page 34

20 Connect the second CD audio cable to the CD In connector on your PC Compatibility
Card.
The CD In connector is in the upper-left corner of the card.
Attach the small plug on
the end of the other
CD audio cable to the
CD In connector on the
PC Compatibility Card.
CD In connector on the
PC Compatibility Card
20
Chapter 1
Page 35

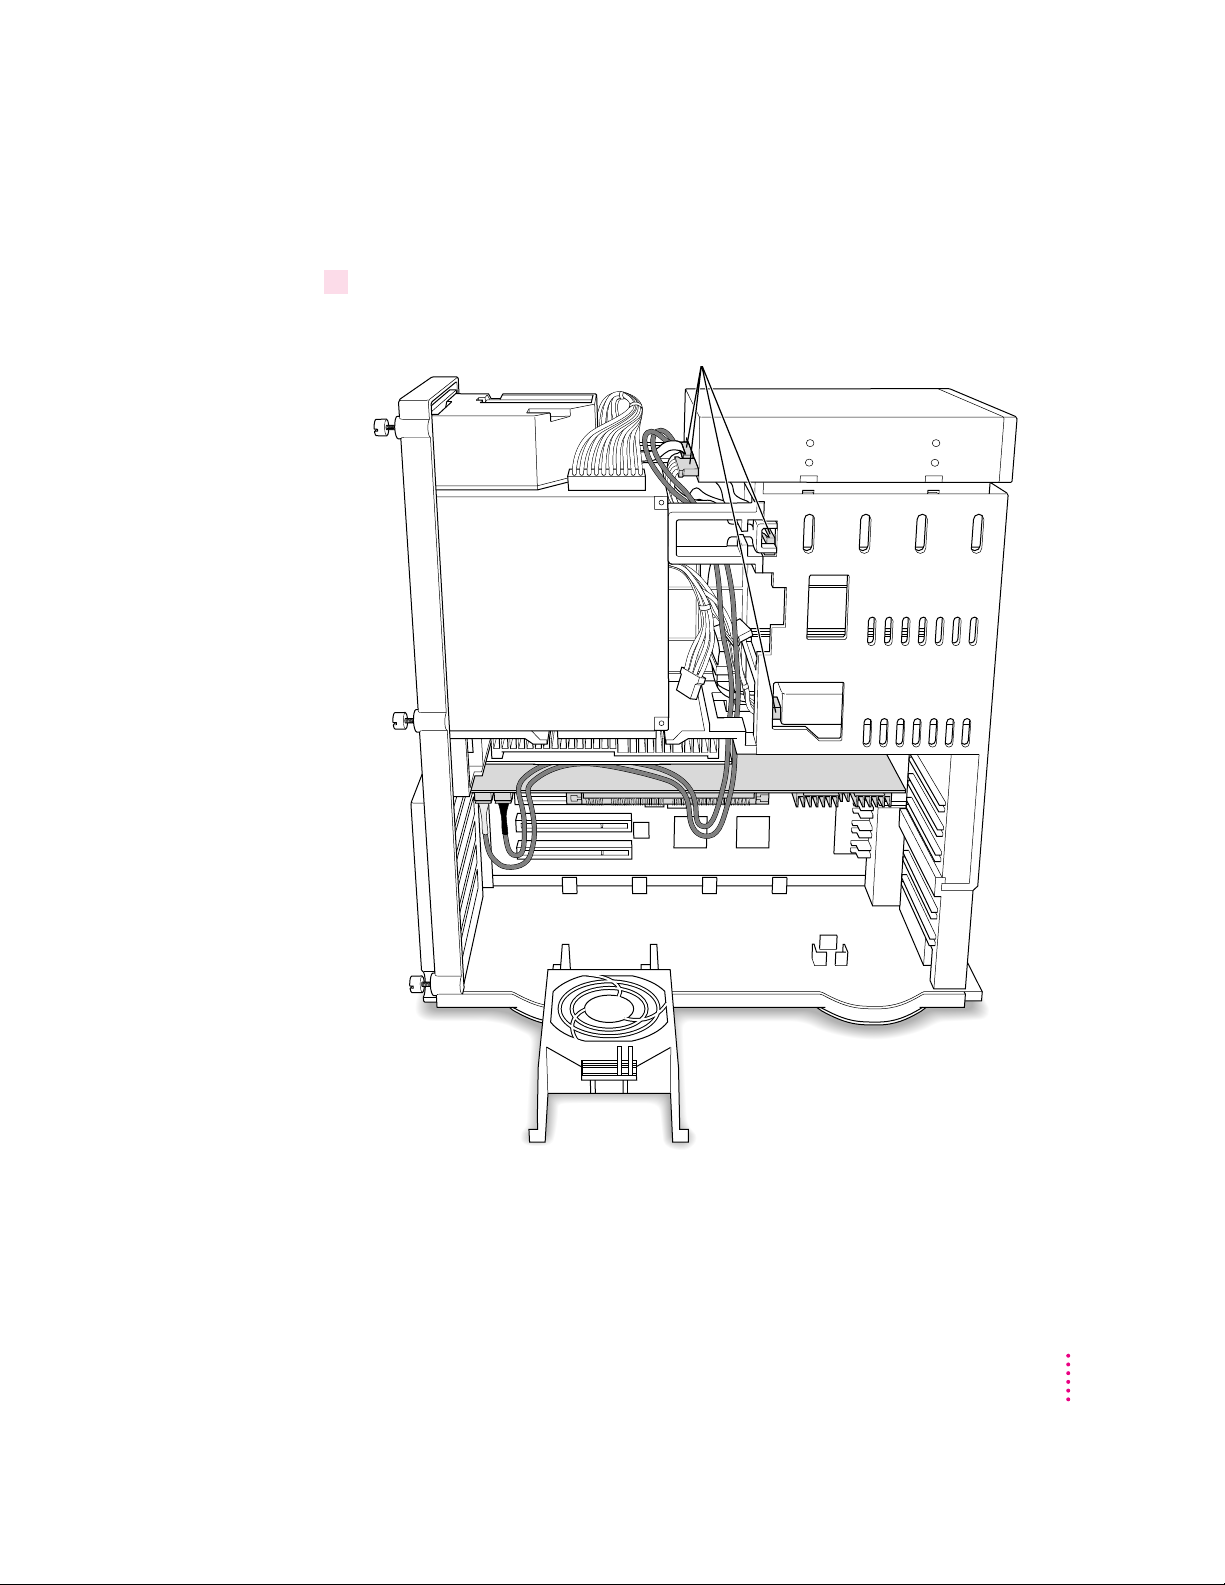
21 Route the second cable over the top of the card, around the back of the logic board, and
through the hole in the computer’s chassis.
Keep the cable away from the heat sink and the center support post.
You’ll connect this cable to the CD-ROM drive in step 27.
1 Route the cable
around the back
of the computer’s
interior as shown.
Heat sink Support post
2 Feed the other end of the cable a few inches into
this hole in the computer chassis. You will attach the
end of the cable to the back of the CD-ROM drive later.
Installing the Card in a Power Macintosh 7200, 7500, or 7600
21
Page 36
If there is a processor card in your computer, route the cable between the
processor card and the back panel (not over the top of the processor card).
If your computer has
a processor card
installed, route
the cable so that
it passes between
the processor card
and the computer’s
back panel as shown.
Processor card
22
Chapter 1
Page 37

Closing the computer’s chassis
22 Close the chassis.
Make sure that the support arm is disengaged. Make sure the cables you
connected are away from the heat sink and center support post.
Support arm
1 Disengage the support arm from the hole on the floor
of the bottom chassis by lifting up on the support arm.
2 Gently swing the top part of the chassis down until it rests securely on the bottom chassis.
Be sure that you don’t pinch any of the cables between the top and bottom parts of the chassis.
Installing the Card in a Power Macintosh 7200, 7500, or 7600
23
Page 38
23 Lock the release switches.
Move the release switches toward the outside
of the computer to lock the top chassis.
24 Replace the support foot.
24
Release the support foot by unsnapping the
catch with your fingertip, and swing the support
foot back inside the chassis.
Chapter 1
Page 39

25 If you unplugged the auxiliary fan cable, reconnect it.
Not all computer models have an auxiliary fan.
Reconnect the auxiliary fan cable to the main logic board.
Connector
(side view)
The connector on
the fan cable plugs
in only one way.
(Be sure to align
the connector
as shown.)
Auxiliary fan
Installing the Card in a Power Macintosh 7200, 7500, or 7600
25
Page 40

26 Flip the expansion card cover up and snap it back into place. (Be sure to snap the cover
back down on both ends.)
If the cover doesn’t snap into place easily, make sure no cables are in the way.
Flip the expansion
card cover closed
and snap it into place.
26
Chapter 1
Page 41

Connecting the CD audio cable to the CD-ROM drive
27 Connect the CD-ROM cable you threaded through the computer’s chassis (in step 21) to
the Audio connector on the CD-ROM drive.
Attach the end of the CD audio cable that you passed through the hole in the upper chassis
into the back of the CD-ROM drive.
(top, back of computer)
Installing the Card in a Power Macintosh 7200, 7500, or 7600
27
Page 42

Closing the computer’s case
28 Make sure all cables and cards are firmly connected.
Check to see that
these connectors were
not loosened during the
installation of the
PC Compatibility Card.
If they have come
loose, push them firmly
back into place.
28
Chapter 1
Page 43

29 Replace the cover on the computer.
Lower the cover all the way down onto the case, leaving a two-inch gap. Push
the cover back until it snaps into place.
Set the top cover down so that there is about a two-inch
gap between the back of the top cover and the back of
the chassis.
(front of computer)
Slide the top cover all the way back
until it snaps into place.
Installing the Card in a Power Macintosh 7200, 7500, or 7600
29
Page 44

What’s next?
30 Plug the computer’s power cord into the back panel.
Plug the power cord into the back of the computer.
You are now finished installing the card.
Go next to Chapter 3, “Connecting Monitors and Other Equipment.”
Then go to Chapters 4 through 7 for instructions on installing and using
your software.
30
Chapter 1
Page 45

Installing the Card in a
2
Power Macintosh 8500 or 9500
This chapter covers how to install the PC Compatibility Card hardware in a
Power Macintosh 8500 or 9500.
IMPORTANT
Compatibility Card hardware is already installed. Go to Chapter 3,
“Connecting Monitors and Other Equipment.” If you want to install
additional memory in your card, go to Appendix A, “Adding Memory to a PC
Compatibility Card.” Then turn to Chapters 4 through 7 to learn more about
installing and using PC software.
If you received this manual with a computer, the PC
31
Page 46

What you need
Before beginning the installation process, make sure you have all the
necessary parts: the PC Compatibility Card, two CD-ROM cables, and the
loopback cable. You will not need the internal audio/video assembly. You will
need a screwdriver to open the computer’s case.
Loopback cable
32
PC Compatibility Card
Internal PC audio/video assembly
(You do not need this assembly to install the PC Compatibility Card
in a Power Macintosh 8500 or Power Macintosh 9500 computer.)
CD audio cables
Chapter 2
Page 47

Installing the PC Compatibility Card hardware
WARNING
The installation of the PC Compatibility Card is technically
complex. Unless you are comfortable installing components inside
computers, Apple recommends that you have the PC Compatibility Card
installed by your Apple-authorized dealer (for a fee).
To avoid damaging the computer and the card, do not attempt to install
the card, install memory, or connect the cables without first reading this
documentation.
There are several steps to installing your PC Compatibility Card hardware:
m opening the computer
m installing the card
m connecting the CD audio cables
m closing the computer
Installing the Card in a Power Macintosh 8500 or 9500
33
Page 48

Opening the computer
1Shut down the computer.
Leave the computer plugged in to ground it and protect its components from
static electricity damage.
2Loosen the large screws on the back panel.
If you have a Power Macintosh 8500, there are four screws, one at each
corner of the back panel. If you have a Power Macintosh 9500, there are six
screws (one at each corner and also two screws on the sides of the back
panel). Do not completely remove the screws or the back panel.
34
Chapter 2
Page 49

3 Remove the cover from the computer.
Slide the cover away from the back panel an inch or two. Then raise the cover
straight up and off the computer.
Installing the Card in a Power Macintosh 8500 or 9500
35
Page 50

4Touch the metal part of the power supply case inside the computer to discharge static
electricity.
Always do this before you touch any parts, or install any components, inside
the computer.
Your computer may look slightly different from the one shown.
36
Power supply case
Chapter 2
Page 51
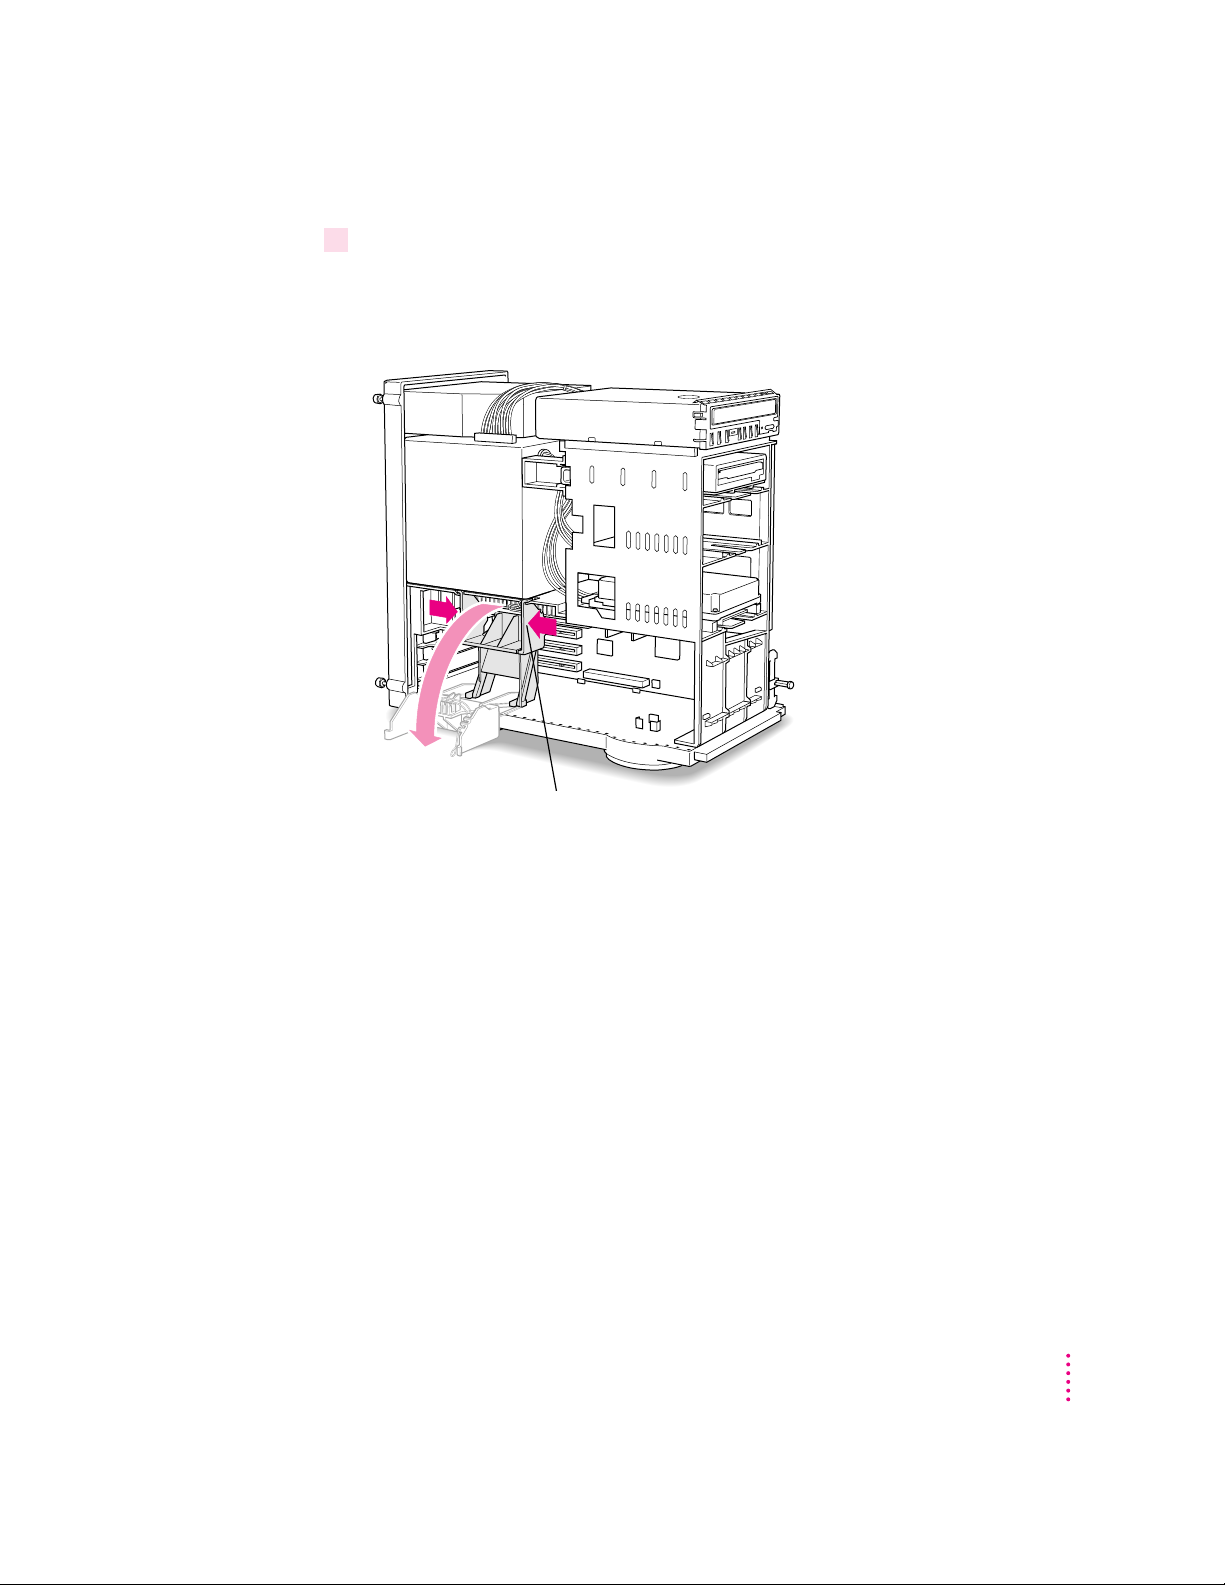
5 Lower the retainer or auxiliary fan.
Squeeze the sides of the retainer or fan and pull down.
If you have a Power Macintosh 8500, use this illustration:
To lower the retainer, squeeze the sides to unlatch it.
Installing the Card in a Power Macintosh 8500 or 9500
37
Page 52

If you have a Power Macintosh 9500, use this illustration:
To lower the auxiliary fan, squeeze the sides to unlatch it.
38
Chapter 2
Page 53

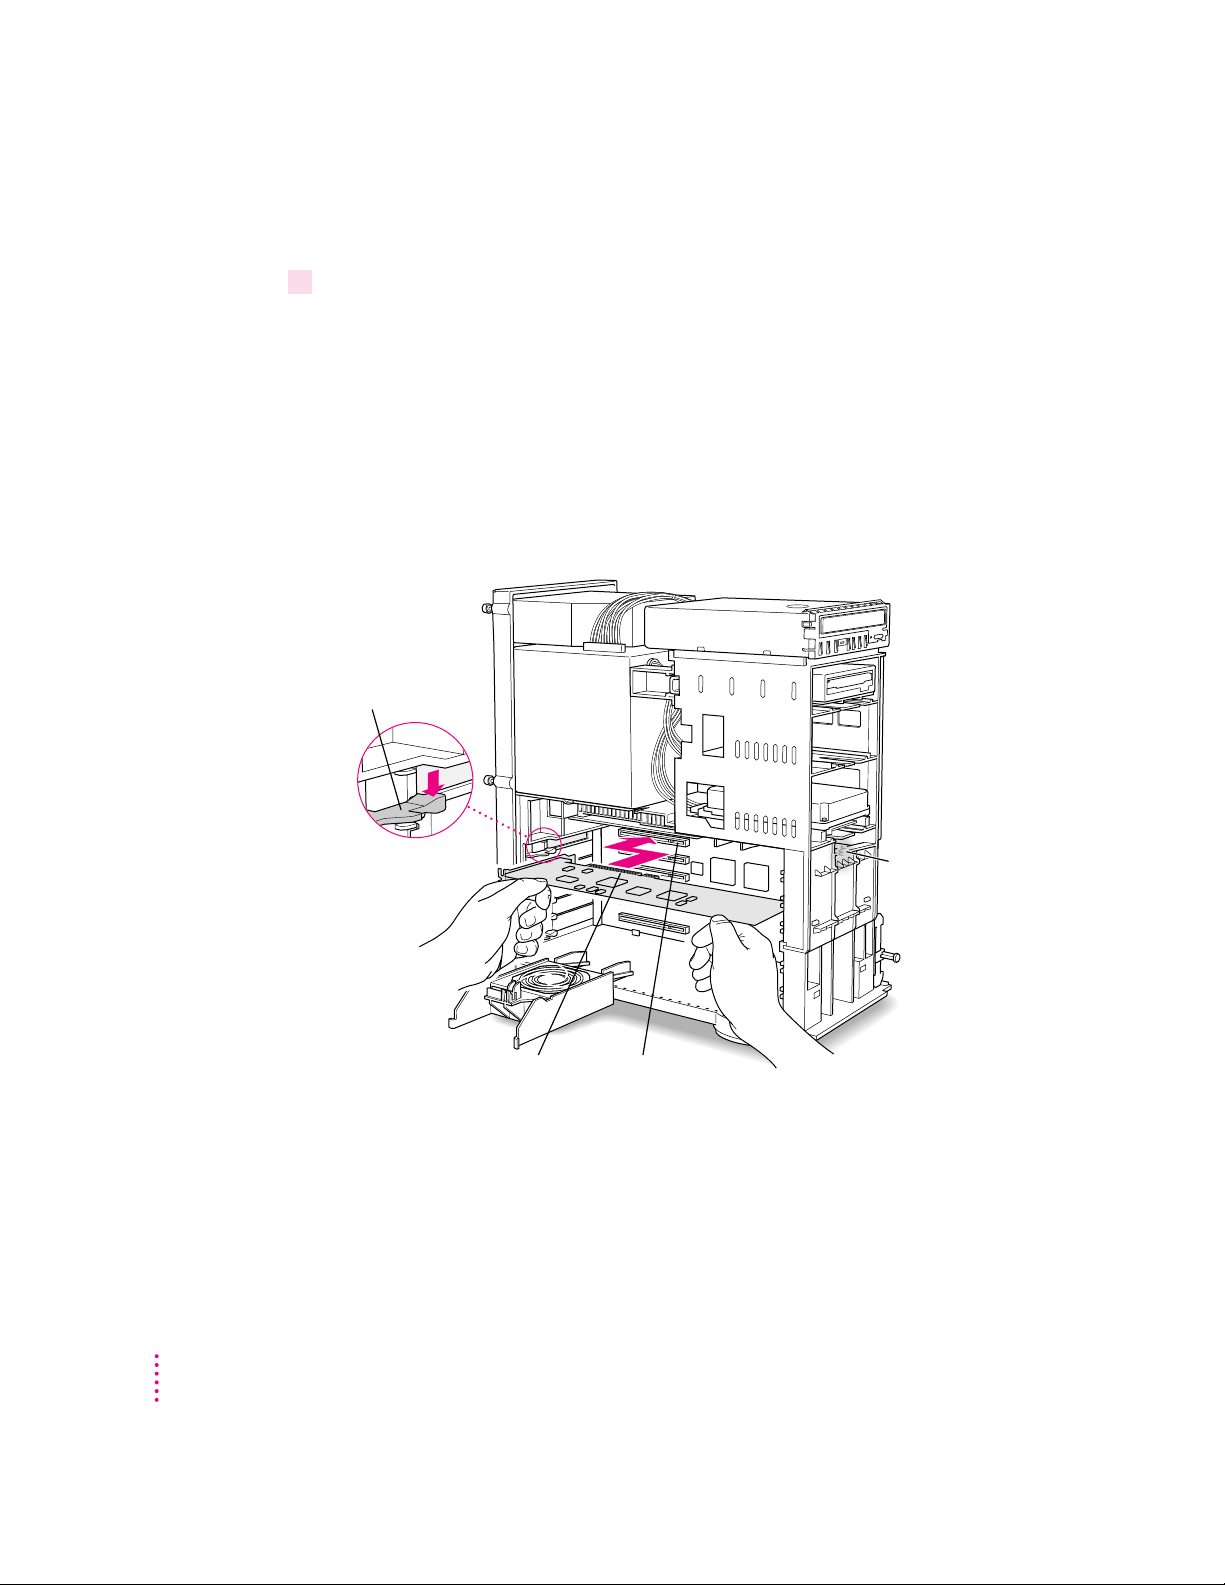
6Pull out the metal access port cover behind the expansion slot closest to the center of
the computer.
It’s recommended that you install your PC Compatibility Card in the first slot
(the one closest to the center of the computer). But if a card is already installed
in the first slot, you can install the PC Compatibility Card in another slot.
1 Press apart the two
levers next to the
card access port to
release the access
port cover.
2 Slide the access port cover out and away from the access port.
What you do next depends on whether you want to add a DIMM (dual inline
memory module) to your PC Compatibility Card to increase the amount of
RAM available to the card. The card comes with RAM installed, but adding
more memory may improve the performance of your PC applications.
If you want to add memory to your card, turn now to Appendix A, “Adding
Memory to a PC Compatibility Card.” Then come back to the next section,
“Installing the PC Compatibility Card.”
If you don’t want to add memory, go on to the next section, “Installing the PC
Compatibility Card.”
Installing the Card in a Power Macintosh 8500 or 9500
39
Page 54
Installing the PC Compatibility Card
7 Insert the long connector on the bottom edge of the card into the slot behind the access
port cover you removed.
Line up the connector end of the card with the slot. The port on the card
should face the port access opening on the computer’s back panel near a lever.
Press the lever away from the card access port and press down firmly on the
card until the connector is fully inserted. Be sure that the card fits into the
card guide on the front of the computer. Don’t force the card. If you meet a lot
of resistance, pull the card out and try again.
To see if the card is connected, pull it gently. If it resists, it is connected.
Press the lever away
from the card access
port opening while
installing the card.
40
Be sure that the
card engages the
card guide in the
computer’s interior.
Expansion slotConnector
Chapter 2
Page 55

Connecting the CD audio cables
8Unplug the CD audio cable from the computer’s logic board and the CD-ROM drive.
You will be replacing the cable with one that came with your PC
Compatibility Card.
Disconnect the CD cable
from the back of the
CD-ROM drive
and from the
computer’s main
logic board.
(back of computer)
Installing the Card in a Power Macintosh 8500 or 9500
41
Page 56

9 Remove the chassis brace by squeezing and pulling.
Squeeze here, and remove the chassis brace. You will replace it later.
42
Chapter 2
Page 57
10 Plug one of the CD audio cables that came with your PC Compatibility Card into the
Sound In connector on the computer’s logic board.
Your PC Compatibility Card came with two CD audio cables. They are
different colors to make it easier to distinguish between them, but both work
the same way.
Attach the large plug
on the end of one of the
CD audio cables to
the connector on the
computer’s main logic
board. You can use
either CD audio
cable.
Installing the Card in a Power Macintosh 8500 or 9500
43
Page 58

11 Thread the cable through the interior of the computer.
Route the cable through the interior of the computer as
shown. Pass the cable through this hole in the chassis.
44
Chapter 2
Page 59

12 Plug the other end of the cable into the Sound Out connector on the PC Compatibility
Card.
The Sound Out connector is next to the CD In connector, which is at the
upper-left corner of the card.
Attach the small plug on the other end of the
CD audio cable to the Sound Out connector
on the PC Compatibility Card.
Installing the Card in a Power Macintosh 8500 or 9500
Sound Out connector on
the PC Compatibility Card
45
Page 60

13 Plug the second CD audio cable into the CD Out connector on the CD-ROM drive.
Attach the large plug
on the end of the
other CD audio cable
to the connector on
the back of the
CD-ROM drive.
46
Chapter 2
Page 61

14 Thread the second cable through the interior of the computer.
Route the cable through the interior of the computer as
shown. Pass the cable through this hole in the chassis.
Installing the Card in a Power Macintosh 8500 or 9500
47
Page 62

15 Plug the other end of the second cable into the CD In connector on your PC
Compatibility Card.
48
Chapter 2
Attach the small plug on the other end of the
CD audio cable to the CD In connector on
the PC Compatibility Card.
CD In connector on the
PC Compatibility Card
Page 63

16 Replace the chassis brace.
Squeeze here, and reinstall the chassis brace. Be sure not to pinch
any of the cables between the chassis brace and the power supply case.
The tab on the chassis brace fits into
a slot in the power supply case.
Installing the Card in a Power Macintosh 8500 or 9500
49
Page 64

17 Lay the CD audio cables on top of the PC Compatibility Card or another card, so that
they’re out of the way of the retainer or auxiliary fan.
50
Tuck the CD audio cables in on top of the
PC Compatibility Card. This will help keep them
from getting pinched between the PC Compatibility
Card and the auxiliary fan (or retainer) when you
put the auxiliary fan (or retainer) back into position.
Chapter 2
Page 65
Closing the computer
18 Make sure all cables and cards are firmly connected.
Check to see that these connectors were not loosened during the installation of the
PC Compatibility Card. If they have come loose, push them firmly back into place.
Installing the Card in a Power Macintosh 8500 or 9500
51
Page 66

19 Replace the retainer or fan.
Make sure that the cables are not squeezed between the retainer or fan and
the top of the card.
If you have a Power Macintosh 8500, use this illustration:
Snap the retainer
back into place. Be
sure not to pinch the
CD audio cables.
This guide on the retainer engages the processor card in the computer.
Processor card
52
Chapter 2
Page 67

If you have a Power Macintosh 9500, use this illustration:
Snap the auxiliary
Processor card
fan back into place.
Be sure not to pinch
the CD audio cables.
This guide on the auxiliary fan housing engages the processor card in the computer.
Installing the Card in a Power Macintosh 8500 or 9500
53
Page 68

20 Replace the cover on the computer.
Lower the cover all the way down onto the case. Push the cover back until it
touches the back panel.
What’s next?
54
Chapter 2
21 Tighten the screws on the back panel.
You are now finished installing the card.
Go next to Chapter 3, “Connecting Monitors and Other Equipment.”
Then go to Chapters 4 through 7 for instructions on installing and using
your software.
Page 69

3
Connecting Monitors and Other Equipment
You can use a single monitor to display both the PC environment and the
Mac OS environment, or you can simultaneously display both environments
on two monitors.
Connecting a single monitor
How you connect a single monitor depends on the kind of computer you have
and whether you installed the internal video connector assembly.
Connecting a single monitor to a Power Macintosh 7200 using the
built-in monitor port
If you’re using a single monitor with the Power Macintosh 7200, simply
connect it to the computer’s built-in monitor port. The internal video
connector allows you to view the PC and Macintosh environments on your
monitor without connecting an extra monitor cable.
Power Macintosh 7200
Attach the monitor cable to the
built-in monitor port on the back
of your computer.
55
Page 70

Connecting a single monitor to a Power Macintosh 7200 using a
video card or to a Power Macintosh 7500, 7600, 8500, or 9500
To connect a monitor, you use the loopback cable that came with your PC
Compatibility Card.
This connector (“short connector”)
attaches to your monitor cable.
This connector
(“middle connector”)
attaches to the
PC Compatibility Card.
IMPORTANT
A previous product, the DOS Compatibility Card, came with a
This connector (“long connector”)
attaches to either your computer’s built-in
monitor port or video card. It is left
disconnected if you are using two monitors.
different loopback cable that has four connectors on it instead of three. That
cable does not work with your PC Compatibility Card.
To connect a monitor, you plug the loopback cable into your monitor, your
computer’s built-in monitor port (or video card port), and the port on the
PC Compatibility Card.
56
Chapter 3
Page 71
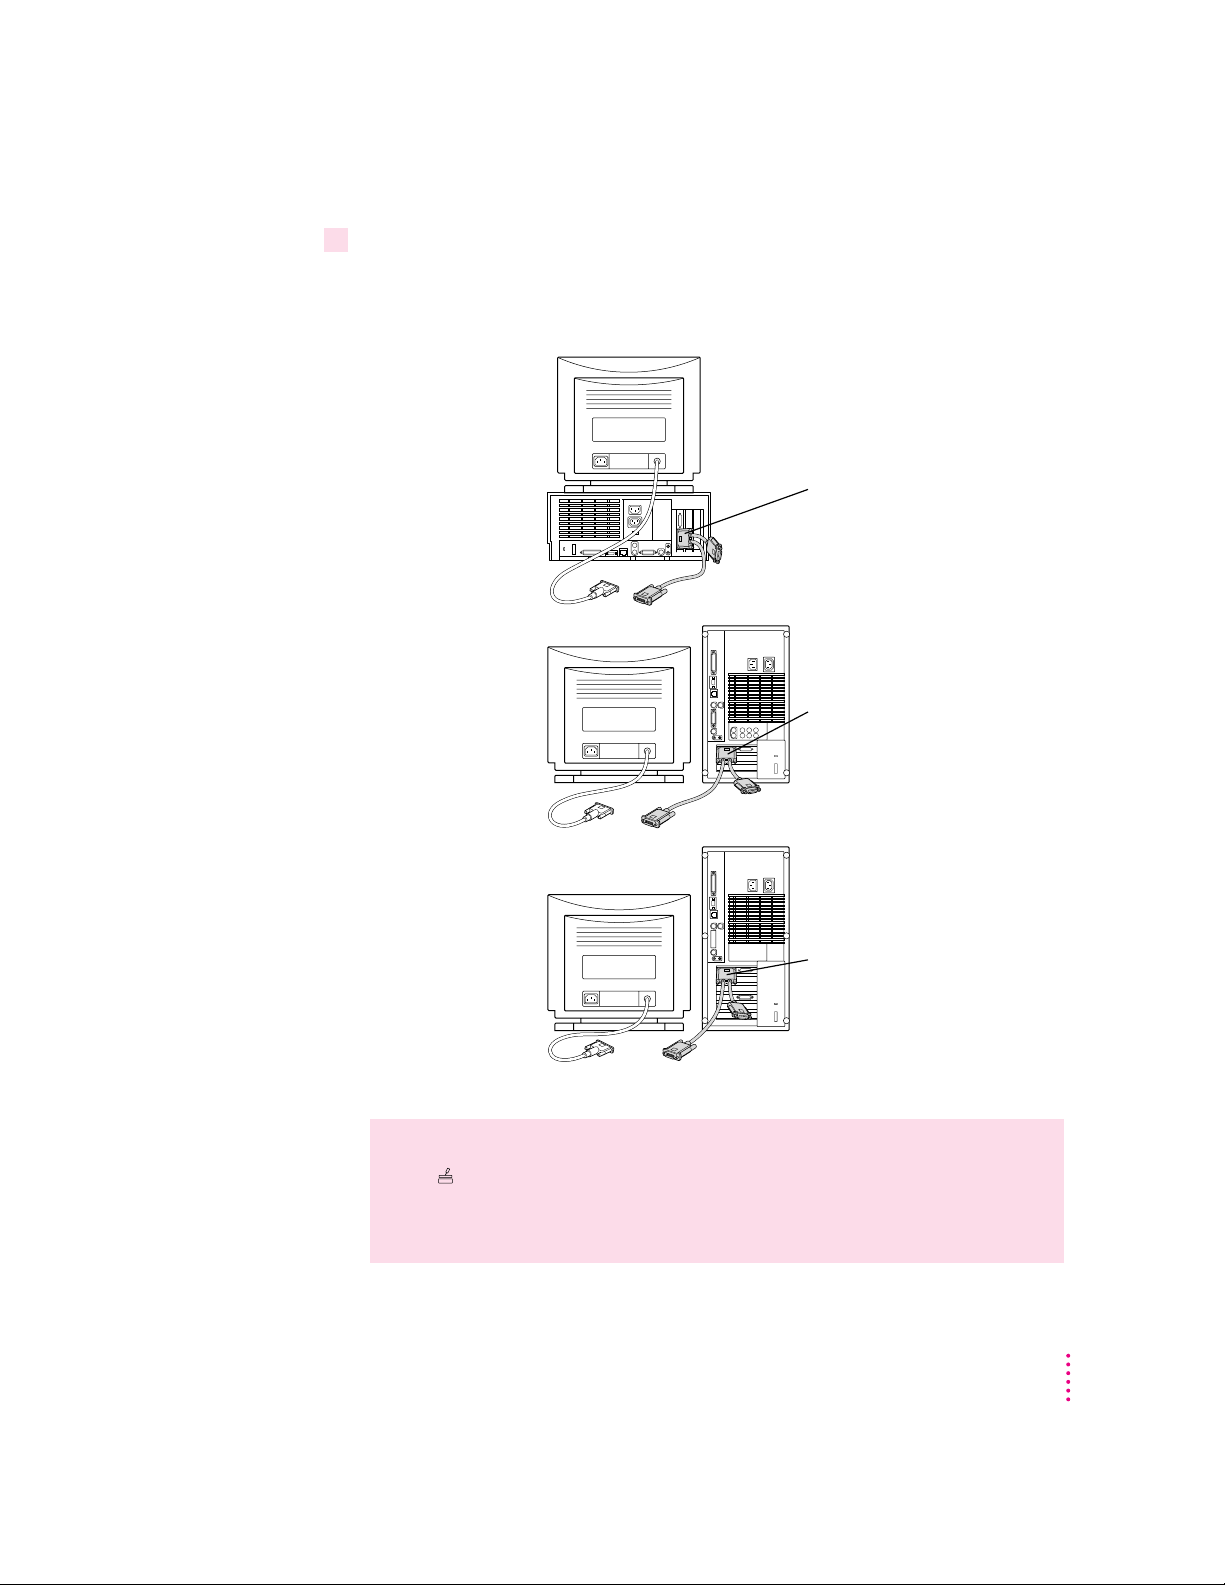
1Plug the middle connector into the port on the PC Compatibility Card, and tighten the
thumbscrews.
This connector has a double row of pins and an Apple (K) icon on either side.
Power Macintosh 7200
Power Macintosh 7500
Power Macintosh 7600
Attach the middle connector on the
loopback cable to the 26-pin port on
the PC Compatibility Card.
Power Macintosh 8500
Attach the middle connector on the
loopback cable to the 26-pin port on
the PC Compatibility Card.
Power Macintosh 9500
Attach the middle connector on the
loopback cable to the 26-pin port on
the PC Compatibility Card.
WARNING
Do not plug a monitor into the joystick port marked with the
icon that comes on some models of the PC Compatibility Card, and
do not plug a joystick into a monitor port (marked with the icon ™).
Serious damage can result to your equipment.
Connecting Monitors and Other Equipment
57
Page 72

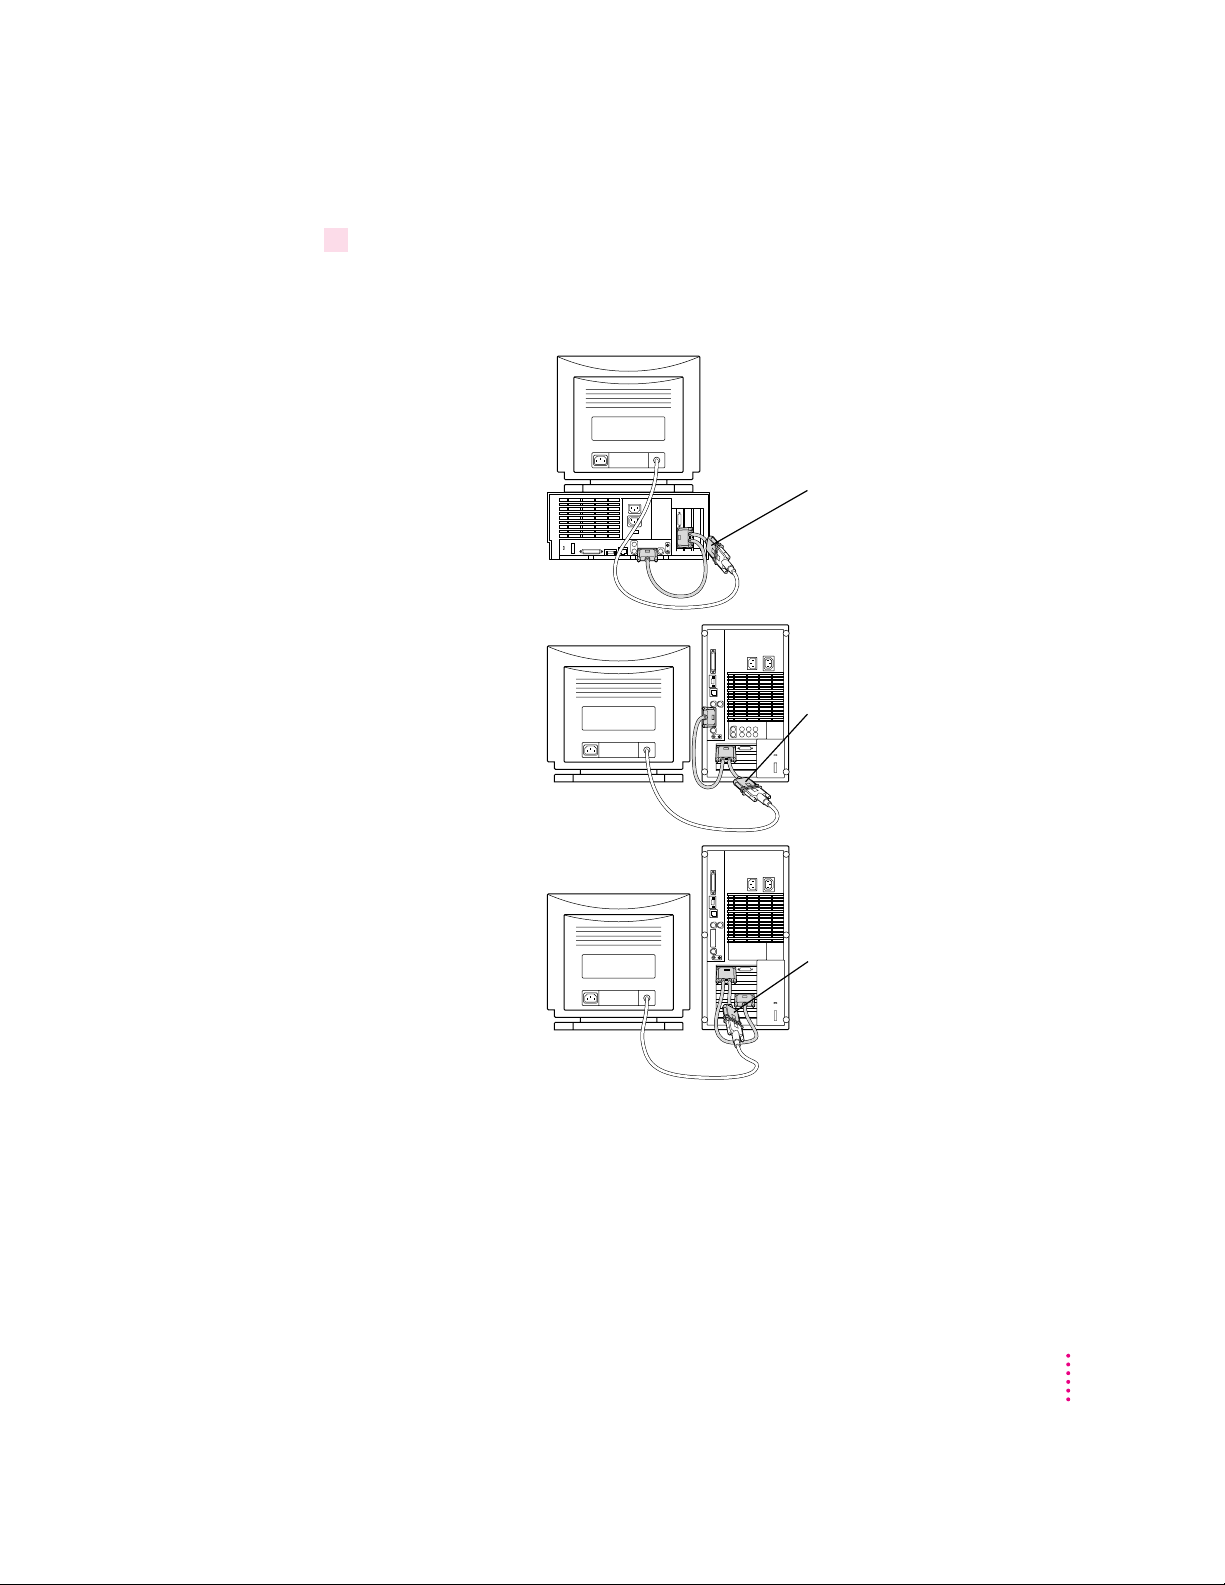
2Plug the connector on the long end of the loopback cable into your computer’s built-in
monitor port or video card.
This connector has an Apple (K) icon on one side and a monitor (™) icon on
the other.
Power Macintosh 7200
Power Macintosh 7500
Power Macintosh 7600
Power Macintosh 8500
Attach the long connector on
the loopback cable to the built-in
monitor port (Power Macintosh
7500 and 7600) or video card
(Power Macintosh 7200, 7500
and 7600).
Attach the long connector on
the loopback cable to the
built-in monitor port on
the back of your computer
(or a video card, if one is installed).
58
Power Macintosh 9500
Attach the long connector on the
loopback cable to the port on your
video card.
Chapter 3
Page 73
3Plug the connector on the short end of the loopback cable into your monitor’s cable.
This connector has an Apple (K) icon on one side and a monitor (™) icon on
the other.
Power Macintosh 7200
Power Macintosh 7500
Power Macintosh 7600
Attach the short connector on
the loopback cable to your
monitor’s cable.
Power Macintosh 8500
Attach the short connector on
the loopback cable to your
monitor’s cable.
Power Macintosh 9500
Attach the short connector on
the loopback cable to your
monitor’s cable.
Connecting Monitors and Other Equipment
59
Page 74

Connecting an AudioVision 14 Display: Plug the short end of the loopback
cable into your AudioVision adapter cable. Plug the AudioVision adapter
cable into the AudioVision monitor cable. Then plug the ADB, sound output,
and sound input cables from the adapter cable into the corresponding ports
on the back of your computer. (For more information, see the documentation
that came with your AudioVision monitor.)
Plug the ADB (V),
sound output (
sound input (
into the corresponding
ports on the back of
the computer.
Connecting two monitors
If you connect two monitors, you see the Mac OS environment on one and
the PC environment on the other. You can use any combination of Macintosh
and/or PC-compatible monitors (with the proper cable adapters, available
from your monitor vendor or Apple-authorized dealer or service provider).
To connect two monitors, you connect one to your Macintosh built-in monitor
port or video card, and the other to the short end of the loopback cable. Then
you plug the middle connector on the loopback cable into the port on the PC
Compatibility Card.
Multiple-scan monitor: If you want to use a multiple-scan monitor from a
manufacturer other than Apple to display the PC environment, you also need
to use a VGA-to-Macintosh adapter (available from your computer vendor).
You connect this adapter between the monitor’s cable and the loopback cable.
-
), and
≈
) cables
Plug the short connector on
the loopback cable into the
AudioVision adapter cable.
AudioVision adapter cable
60
Chapter 3
Page 75

To connect two monitors, follow these steps:
1Connect the monitor you want to use for the Mac OS environment to the monitor port
™
) or video card port on the back panel of your computer.
(
Power Macintosh 7200
Power Macintosh 7500
Power Macintosh 7600
Attach the monitor cable
to the built-in monitor
port on the back of your
computer (or a video
card, if one is installed).
Power Macintosh 8500
Attach the monitor cable
to the built-in monitor
port on the back of your
computer (or a video
card, if one is installed).
Power Macintosh 9500
Attach the monitor
cable to the port on
your video card.
WARNING
Do not plug a monitor into the joystick port marked with the
icon that comes on some models of the PC Compatibility Card, and
do not plug a joystick into a monitor port (marked with the icon ™).
Serious damage can result to your equipment.
Connecting Monitors and Other Equipment
61
Page 76

2Plug the middle connector on the loopback cable into the port on the PC Compatibility
Card and tighten the thumbscrews.
Power Macintosh 7200
Power Macintosh 7500
Power Macintosh 7600
Attach the middle
connector on the
loopback cable to the
26-pin port on the
PC Compatibility Card.
Power Macintosh 8500
Attach the middle
connector on the
loopback cable to the
26-pin port on the
PC Compatibility Card.
Power Macintosh 9500
62
Attach the middle
connector on the
loopback cable to the
26-pin port on the
PC Compatibility Card.
Chapter 3
Page 77

3Plug the connector on the short end of the cable into the cable for the monitor that you
want to use with the PC environment.
Power Macintosh 7200
Power Macintosh 7500
Power Macintosh 7600
Attach the short
connector on the
loopback cable to the
second monitor’s cable.
Long connector
Power Macintosh 8500
Attach the short
connector on the
loopback cable to the
second monitor’s cable.
Long connector
Power Macintosh 9500
Attach the short
connector on the
loopback cable to the
second monitor’s cable.
Long connector
In most cases, you leave the long connector on the loopback cable unplugged.
But if your computer has an additional video card or monitor port, you can
plug the long connector into it. This will allow you to switch the monitor
between the PC environment and the Mac OS environment.
Connecting Monitors and Other Equipment
63
Page 78

Connecting a MIDI device
You can connect a MIDI (musical instrument digital interface) device to the
game controller port that comes on some models of the PC Compatibility
Card. To connect a MIDI device, you need a Sound Blaster–compatible
MIDI-to-joystick adapter (available from your computer dealer). For
instructions on connecting devices to the joystick port, see the next section,
“Connecting a PC Game Controller.”
Connecting a PC game controller
Some models of the PC Compatibility Card come with a game controller port.
To connect a PC game controller, such as a joystick, remove the plastic cover
on the game controller port, then plug your game controller into the port.
Power Macintosh 7200
Power Macintosh 7500
Power Macintosh 7600
The joystick port is marked with the icon. Remove
the port cover before plugging a game controller into
the joystick port. Leave the port cover on if you are
not going to attach a game controller.
Plug the game controller
into the joystick port.
64
Game controller
Power Macintosh 8500
Plug the game controller
into the joystick port.
Game controller
Power Macintosh 9500
Plug the game controller
into the joystick port.
Game controller
Chapter 3
Page 79

WARNING
icon and do not plug a joystick into a monitor port (marked with the
icon ™). Serious damage can result to your equipment.
Connecting a mouse
You can use a standard Macintosh one-button mouse or other pointing device
with the PC Compatibility Card. You can simulate the behavior of a PC
mouse (which has two buttons) using keys on your keyboard. For more
information, see the section “Using a Mouse” in Chapter 6.
You can also use a Macintosh-compatible ADB (Apple Desktop Bus) multibutton mouse and configure it to work as a PC-style mouse.
You connect this mouse to any available ADB port (marked with V) on your
Macintosh. You also need to install PC and Macintosh software to configure
the mouse. See the documentation that came with your computer and mouse
for more information.
Pointing devices specifically for a PC can’t be used with the Macintosh
because they do not use the ADB protocol.
Do not plug a monitor into the joystick port marked with the
ADB multibutton mouse devices are available from your Apple-authorized
dealer.
Connecting a printer
You can print from the PC environment to any printer connected to the
Macintosh.
You can also purchase a package such as GDT’s PowerPrint that lets you
attach your PC-compatible printer to the Macintosh.
For more information, see the section “Setting Printer Options” in Chapter 5.
Connecting Monitors and Other Equipment
65
Page 80

Connecting to a network
You can connect to shared disks on an AppleTalk or other Macintoshcompatible network, using the Mac OS file sharing feature and a sharing
utility that comes with your PC Compatibility Card.
By installing the appropriate networking software, you can also connect your
computer to a PC-compatible network, such as a Novell Netware network.
For more information, see the section “Setting Up Your PC on a Network” in
Chapter 5, and also Appendix B, “Installing Network Client Software.”
Connecting a modem or other serial device
You can use a modem or other serial device connected to the Macintosh serial
port in the PC environment. Macintosh computers do not use the same serial
protocol that PCs use, so your modem or communications software may
require adjustment. For more information, see Chapter 5, “Setting Up the PC
Environment.”
66
Chapter 3
Page 81

4
Installing the PC Compatibility Card Software
This chapter covers how to install software for your PC Compatibility Card.
For information on setting up the software after you install it, including
additional changes you may need to make to the DOS AUTOEXEC.BAT and
CONFIG.SYS files, see Chapter 5, “Setting Up the PC Environment.”
IMPORTANT
Card and its Mac OS software are already installed and a drive container has
been created that contains MS-DOS. You may need to install the PC software
on the PC Utilities CD.
There are several steps to installing your PC Compatibility Card software:
m installing the Mac OS software
m creating a storage area (called a drive container) for your PC software
m installing MS-DOS
m installing support software for DOS
m installing Microsoft Windows (optional)
m installing support software for Windows (necessary only if you install
Windows)
m installing PC utilities (optional)
m installing your own PC software
To learn how to set up and use the software once you have installed it, refer to
Chapter 5, “Setting Up the PC Environment” and Chapter 6, “Working in the
PC Environment.”
If this guide came with your new computer, the PC Compatibility
67
Page 82

Installing Mac OS software
The Mac OS software for operating your PC Compatibility Card is on the
CD-ROM disc labeled PC Compatibility Card Mac OS Software CD that came
with your card.
Installing System 7.5 Update 2.0
If your computer is not running System 7.5.3, you should install the System 7.5
Update 2.0 from the PC Compatibility Card Mac OS Software CD. Installing
this update will update previous versions of System 7.5 to System 7.5.3.
To install the System 7.5 Update 2.0, follow these steps:
1Insert the CD-ROM disc labeled
disk drive.
PC Compatibility Card Mac OS Software
CD into the
If necessary, double-click the disc icon to open it.
2Double-click the System 7.5 Update 2.0 folder to open it.
3Double-click the Installer icon to open it.
A message may appear describing the Installer software. Click OK. The
Installer window appears.
4Make sure the disk named in the box is the one on which you want to install software.
If not, click Switch Disk until the correct disk name appears.
Note: If you want to install only specific components, choose Custom Install
from the Easy Install menu. In the Custom Install window, click to place an X
in the boxes next to the components you want to install. Click the information
symbol for more information about a component.
68
Chapter 4
Page 83

5 Click Install.
The software is automatically installed onto your hard disk.
6When the installation is complete, follow the instructions on the screen to quit the
Installer and restart your Macintosh.
Installing the PC Compatibility Card software
To install the Mac OS software for operating your PC Compatibility Card,
follow these steps:
1 Insert the CD-ROM disc labeled
disk drive.
PC Compatibility Card Mac OS Software
CD into the
If necessary, double-click the disc icon to open it.
2Double-click the PC Compatibility folder to open it.
3Double-click the Installer icon in the PC Compatibility folder.
A message may appear describing the Installer software. Click OK.
The Installer window appears.
4Make sure the disk named in the box is the one on which you want to install software.
If not, click Switch Disk until the correct disk name appears.
Note: If you want to install only specific components, choose Custom Install
from the Easy Install menu. In the Custom Install window, click to place an X
in the boxes next to the components you want to install. Click the information
symbol for more information about a component.
5 Click Install.
The software is automatically installed onto your hard disk.
Installing the PC Compatibility Card Software
69
Page 84

6When the installation is complete, follow the instructions on the screen to quit the
Installer and restart your Macintosh.
The following Mac OS software is now installed:
Name Location
Macintosh Easy Open Control Panels folder
PC Exchange Control Panels folder
PC Setup Control Panels folder
Ethernet (built-in) Extensions folder
PC Compatibility Guide Extensions folder
PC Clipboard Extensions folder
PC Clipboard Translators Extensions folder
PC Net Exchange Extensions folder
PC Network Extension Extensions folder
PC Print Spooler Extensions folder
Installing mouse software
70
If you have a Macintosh-compatible multibutton mouse for use with your PC,
it may come with software that needs to be installed on the Macintosh.
Follow the instructions that came with your mouse.
Chapter 4
Page 85
Creating a drive container
A drive container is a file on your Macintosh hard disk that acts as a hard drive
for the PC. You create a drive container using the PC Setup control panel.
IMPORTANT
If you received this manual with a computer, your hard disk
already has a drive container that includes PC software. The container is
called PC Container and is located on the desktop. You do not need to create
another drive container unless you need more room to accommodate the
software you want to install. You may want to install Microsoft Windows, the
software on the PC Utilities CD, and your own PC software. For instructions,
see “Installing Microsoft Windows” and “Installing PC Utilities,” later in this
chapter. Then turn to Chapter 5, “Setting Up the PC Environment,” to learn
more about your PC Compatibility Card.
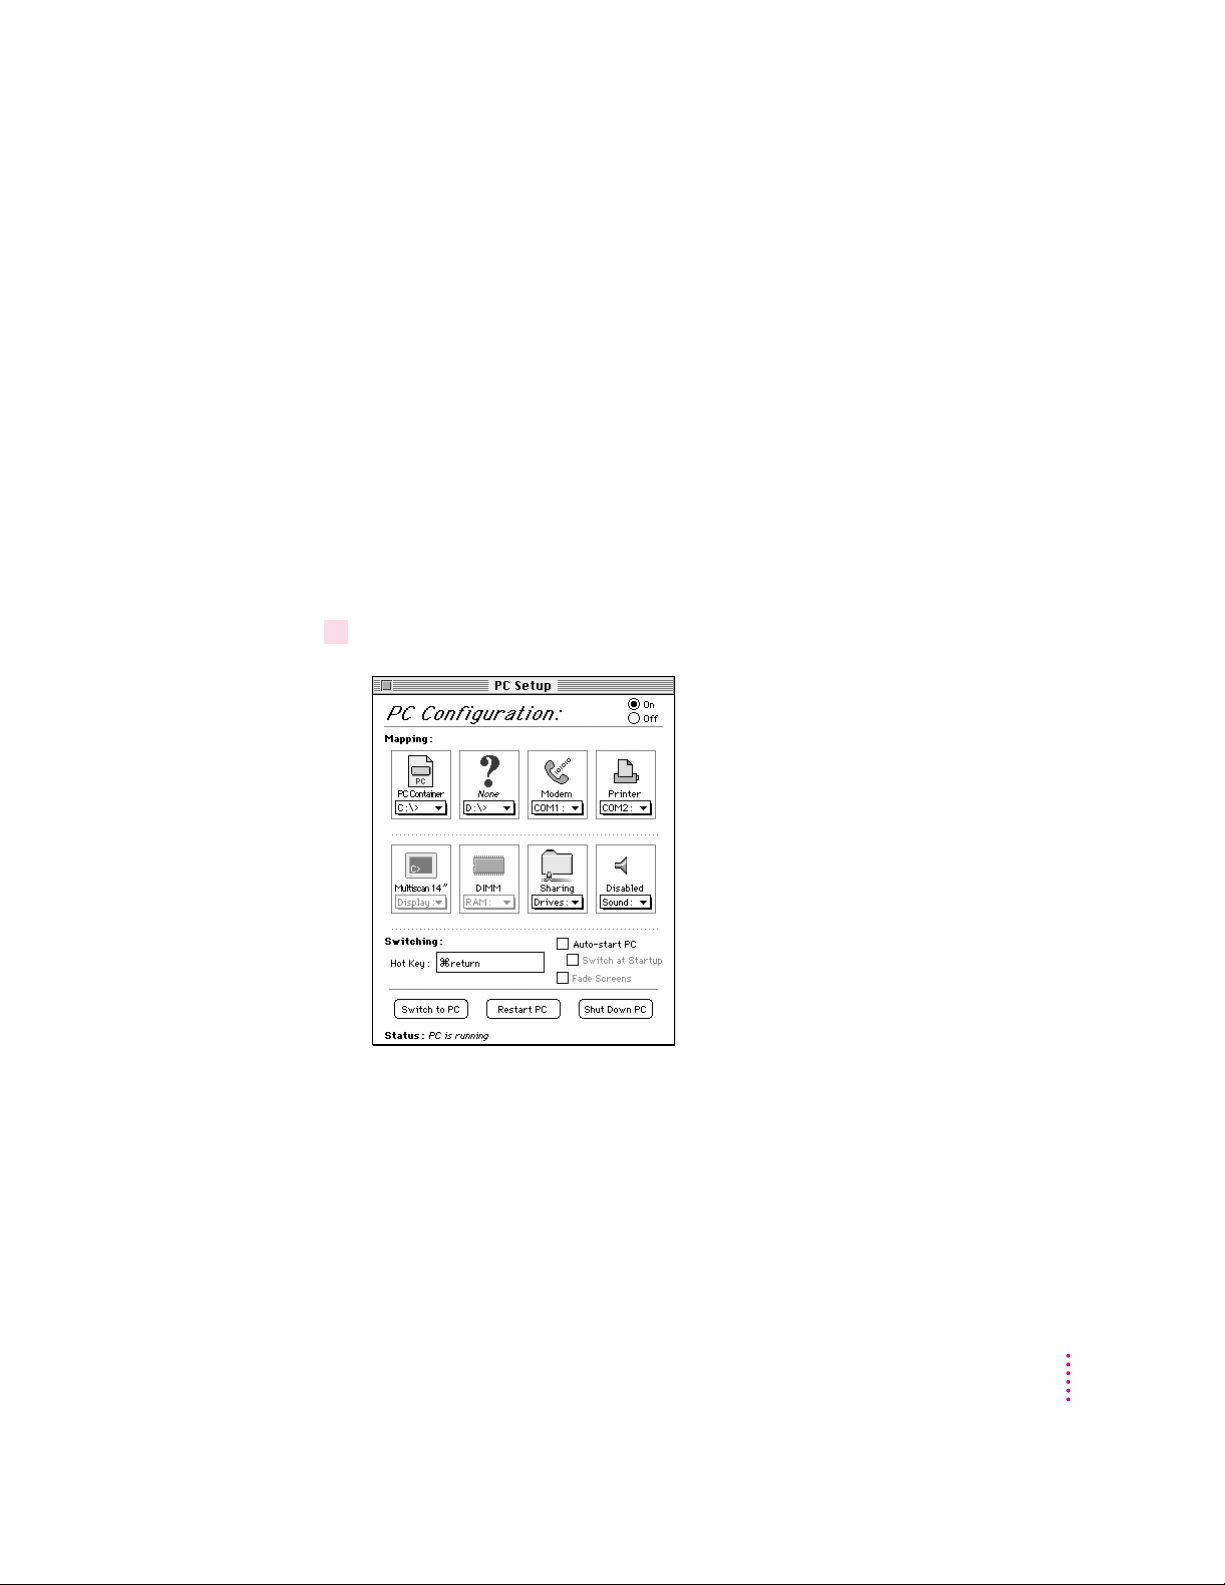
1 Open the PC Setup control panel.
Installing the PC Compatibility Card Software
71
Page 86

2Choose New Drive File from the C: or D: pop-up menu.
A dialog box appears.
3Choose a location for the drive container.
The drive container can be on any hard disk attached to the Macintosh that
has sufficient free space.
4Type a name for the drive container; then press the Tab key.
You can type up to 31 characters.
72
5 Type a size (in MB) for the drive container.
You can make the container as large as you want (limited by the space
available on your hard disk).
The amount of space you need depends on the software you want to install. If
you are installing DOS and a few small applications, you’ll need about
20 MB. If you are installing Microsoft Windows 95, you’ll need at least
10 0 MB. Check the documentation that came with your software to estimate
how much space you’ll need; then allow some extra room for growth.
6Click Create.
Chapter 4
Page 87

Installing MS-DOS
To install MS-DOS software in a new drive container, you’ll need the
MS-DOS installation disks. Follow these steps:
IMPORTANT
If you received this guide with a computer, MS-DOS is already
installed. You do not need to reinstall the software unless you are having
problems.
1 Open the PC Setup control panel and click Switch to PC.
The Macintosh desktop disappears. (If you’re using two monitors, the image
on the Macintosh monitor dims.) You see a message about a missing operating
system or about a disk error.
2 Insert the Microsoft MS-DOS Setup floppy disk and restart the PC by pressing the
Control-Alt-…(Del) keys.
Make sure you press the … Del key (not the Delete key) when you press
Control-Alt-… to restart the PC.
3 Follow the instructions that appear on the screen.
Press x-E to eject a disk when necessary.
4When installation is complete, restart the PC again.
Press the Control-Alt-… keys to restart the PC.
You should now see the DOS prompt.
Installing the PC Compatibility Card Software
73
Page 88

Installing support software for DOS
The software on the PC Compatibility Card PC Software floppy disk that came
with your PC Compatibility Card allows the card to work with the Macintosh
computer, the Macintosh CD-ROM drive, networks, and other equipment.
IMPORTANT
If you received this guide with a computer, the support software
for DOS is already installed. You do not need to reinstall the software unless
you are having problems.
To install the software, follow these steps:
1 In the PC environment, insert the
PC Compatibility Card PC Software
floppy disk.
To switch to the PC environment from the Mac OS, press x-Return, or open
the PC Setup control panel and click Switch to PC.
2 Type
3You may see a message asking if you want to install support for DOS or Windows. Press
4You’re asked to choose a drive for the files. Choose the C drive.
5You’re asked to choose a directory. It’s best to accept the suggested directory,
6Choose Yes to continue installation. If you’re asked whether you want to overwrite files,
7You’re asked whether you want the program to modify your system files. Choose “Apply
A:\SETUP
D for DOS.
C:\APPLE.
choose Yes.
changes directly to system files.”
; then press Return.
74
Chapter 4
If you choose to apply the changes to copies of the system files, the copies are
called filename.number.
8When installation is complete, restart the PC by switching to the Mac OS (by pressing
x
-Return), opening the PC Setup control panel, and clicking Restart PC.
You can also restart the PC by pressing the Control-Alt-… keys. (For more
information on restarting the PC, see “Switching Between the Mac OS and
PC Environments” in Chapter 6.)
Page 89

Installing mouse software
If you have a Macintosh-compatible mouse for use with the PC environment,
you may need to install drivers for the mouse in the DOS environment.
Follow the instructions that came with your mouse.
Installing Microsoft Windows
The PC Compatibility Card works with Microsoft Windows 3.1, Windows 3.11,
Windows for Workgroups, and Windows 95.
You must install MS-DOS and the Windows support software on the PC
Compatibility Card PC Software floppy disk before you can install any version
of Windows.
IMPORTANT
If you are installing a Windows 95 upgrade, you must have
available a qualifying product from which you are upgrading (such as the
Windows for Workgroups installation disks).
1 In the PC environment, insert the first Windows installation floppy disk or CD-ROM disc.
To switch to the PC environment from the Mac OS, press x-Return, or open
the PC Setup control panel and click Switch to PC.
2 Start the Windows setup program.
If you are installing from floppy disks, type A:\SETUP; then press Return.
If you are installing from a CD-ROM disc, type
E:\SETUP; then press
Return.
3 Follow the instructions that appear on the screen.
If you are installing from floppy disks, you can press x-E to eject a disk when
necessary.
4When installation is complete, restart the PC by switching to the Mac OS (by pressing
x
-Return), opening the PC Setup control panel, and clicking Restart PC.
You can also restart the PC by pressing the Control-Alt-… keys.
Installing the PC Compatibility Card Software
75
Page 90

Installing support software for Windows
Next, you need to install the Windows support software. Follow these steps:
1If necessary, switch to the PC environment.
To switch to the PC environment from the Mac OS, press x-Return, or open
the PC Setup control panel and click Switch to PC.
2 Insert the
3 In Windows, choose Run from the File menu. In Windows 95, click Start; then choose
Run from the menu that appears.
4 Type
5You’re asked if you want to install support for DOS or Windows. Press W for Windows.
6Follow the instructions that appear on the screen.
PC Compatibility Card PC Software
A:\SETUP
; then press Return.
floppy disk.
The recommended directory to install files is C:\APPLE. To change this
location, click Set Location.
By default, all options will be installed. You may choose not to install specific
options. The installation options are:
m Install Macintosh/Windows Copy and Paste: allows you to transfer
Clipboard information between the Macintosh and PC environments.
m Install Macintosh/PC Folder Sharing: allows you to share a Macintosh
folder as a shared drive.
m Install CD-ROM Support: allows you to use the CD-ROM discs in the PC
environment.
7When installation is complete, restart the PC by switching to the Mac OS (by pressing
x
-Return), opening the PC Setup control panel, and clicking Restart PC.
76
You can also restart the PC by pressing the Control-Alt-… keys.
Configuring network support in Windows
To configure network support in Windows, see Appendix B, “Installing
Network Client Software.”
Chapter 4
Page 91

Installing PC utilities
Your PC Compatibility Card comes with the following programs and utilities
on a CD-ROM disc labeled PC Utilities CD:
m QuickTime for Windows lets you view and manipulate video on the PC.
m Sound Blaster software lets you play music and manipulate sound files.
m Video drivers let you configure and use a variety of monitors.
m Keyboard files let you use keyboard layouts for a variety of languages.
It’s best to install the video drivers. QuickTime, Sound Blaster, and the
keyboard files are optional.
Installing QuickTime for Windows software
Follow these steps to install the QuickTime for Windows software:
1 In the PC environment, insert the
2 In Windows, choose Run from the File menu. In Windows 95, click Start; then choose
Run from the menu that appears.
3 In the dialog box that appears, type
Return.
4 Follow the instructions that appear on your screen to complete the installation.
PC Utilities
E:\QUICKTME\QTINSTAL
CD into the CD-ROM drive.
and then press
Installing Sound Blaster software in DOS or Windows
1 In the DOS environment, insert the
If you are in Windows, exit Windows to return to the DOS prompt. Do not
attempt this installation from a DOS window in Windows.
2Type the following to start the install program:
CD E:\SOUND <return>
W31SETUP.BAT <return>
3A message appears. Type <F2> to view the Read Me file. When you’re finished viewing
the file, type ESC to return to the main install screen.
4Choose full installation by pressing Enter.
PC Utilities
CD into the CD-ROM drive.
Installing the PC Compatibility Card Software
77
Page 92

5Choose the recommended paths by pressing Enter.
6Choose the recommended settings by pressing Enter.
7Allow the install program to modify your files by pressing Enter.
8Choose to back up your existing file.
9When the installer asks if you want to reboot the PC, choose No.
Your sound software is now installed.
10 Manually restart the PC by pressing Control-Alt-
…
.
Installing Sound Blaster software in Windows 95
1 In the PC environment, insert the
2 In Windows 95, click Start; then choose Run from the menu that appears. In the dialog
box that appears, type the following:
E:\SOUND\W95SETUP.BAT
If a message asks you to insert a disk, click OK.
Let the setup program modify your .INI file.
3When the installer asks if you want to reboot the PC, choose No.
4When the installation is complete, quit and restart Windows 95.
To use the Sound Blaster programs in Windows 95, click Start, choose
Programs, and select the Sound Blaster 16 directory.
IMPORTANT
To use sound, Internal CD must be selected as the sound source
in the Mac OS, and sound must be turned on. For more information, see
“Configuring PC Sound” in Chapter 5.
PC Utilities
CD into the CD-ROM drive.
78
Chapter 4
Page 93

Installing and configuring video software
This section describes basic installation and configuration. For more
information about the video software, including installing and configuring
video for DOS, see Appendix C, “Configuring Video Software.”
Installing and configuring video software for Windows
1 In the DOS environment, insert the
PC Utilities
CD into the CD-ROM drive.
If you are in Windows, exit Windows to return to the DOS prompt. Do not
attempt this installation from a DOS window in Windows.
2Type the following:
CD E:\VIDEO\DRIVER\ <Enter>
INSTALL <Return>
The Install program’s main menu appears.
3Select Drivers Installation from the menu.
4Choose Microsoft Windows.
5Choose Install Windows driver.
6Choose to install display drivers only.
7Verify the path for the drivers and press Return.
8When installation is finished, press ESC until you get back to the main menu.
9Select Utilities Installation from the menu.
10 Verify the path for the utilities and press Return.
11 You see a message asking whether the program can modify your AUTOEXEC.BAT file.
Choose Yes.
12 Exit the INSTALL program and start Windows.
13 Open the ATI DeskTop program.
To learn more about the program, use the help feature or turn to Appendix C,
“Configuring Video Software.”
Installing the PC Compatibility Card Software
79
Page 94

14 Select a monitor type.
15 If you have a multiple-scan monitor, you can customize the display using the Screen
Adjustment program.
16 Select a resolution and color depth using the FlexDesk+ program.
Installing video software for Windows 95
The Windows 95 display driver that comes with the PC Compatibility Card
offers better performance than the standard driver. To install the driver, follow
these steps:
1 In the PC environment, insert the
2 Start the PC.
PC Utilities
CD into the CD-ROM drive.
Windows 95 appears.
3 Click Start.
4 Select Run.
5Type the following:
E:\VIDEO\WIN95\SETUP
6Follow the on-screen help instructions to complete the installation.
You may need to move windows to see the information presented. To move a
window, drag the window’s top bar.
Selecting and configuring monitors in Windows 95
Before performing this procedure, you need to install the video software as
described in the previous section.
1Switch to the Mac OS, open the PC Setup control panel, and make a note of the monitor
type that appears in the Monitors section of the control panel.
80
You can switch to the Mac OS by typing x-Return.
2Switch to the PC and make sure Windows 95 is running.
You can switch to the PC by clicking Switch to PC in the PC Setup control
panel, or by pressing x-Return.
Chapter 4
Page 95

3Click Start, choose Settings, choose Control Panel, and double-click the Display icon to
open the Display control panel.
4Click the Settings tab in the Display control panel.
Note: If you have a DDC compliant monitor (such as an AppleVision display)
connected directly to the video port on the PC Compatibility Card, you do not
need to select a monitor type. Windows 95 will make the appropriate settings
for you. In addition, Windows 95 will configure the Display control panel so
that only settings that work with your monitor appear.
5 Click Change Display Type.
6 In the Monitor Type area, click Change.
7If your monitor is listed in the dialog box that appears, click its name, click OK, and
restart Windows. If not, click “Have Disk” and go on to the next steps.
8 Insert the
PC Software
floppy disk. Make sure the path in the text box is
A:\
and then
click OK.
9Click Show All Devices.
10 In the Models box, choose a model corresponding to the monitor type listed in the PC
Setup control panel, then click OK.
If this type is listed in PC Setup... ...choose this type in the Models box
Apple 14" (this type appears if you’ve The “(all other Apple monitors)” type
connected a 12-, 13-, or 14-inch
fixed-frequency monitor)
Apple 16" The “(all other Apple monitors)” type
Multiscan (this type appears if you’ve Choose Plug and Play Monitor (VESA DDC) if this
connected an AppleVision or other type is automatically selected in the list. Otherwise,
DDC compliant monitor) choose AppleVision 1710AV, AppleVision 1710,
or AppleVision 1705.
Multiscan 14" Apple Multiple Scan 14" or Apple Multiple Scan 15"
Multiscan 17" Apple Multiple Scan 17"
Multiscan 20" Apple Multiple Scan 20"
19" Color Your monitor model (if listed), or
SuperVGA 1024 x 768
continued
Installing the PC Compatibility Card Software
.
81
Page 96

If this type is listed in PC Setup... ...choose this type in the Models box
Portrait The “(all other Apple monitors)” type
21" Color The “(all other Apple monitors)” type
21" Monochrome The “(all other Apple monitors)” type
VGA Standard VGA 640 x 480
To customize a multiple-scan monitor, click the Adjustments tab in the
Display control panel.
11 Restart Windows.
A help window will appear with information on the video software. When
you’re finished with the help window, uncheck the box at the bottom of the
window to prevent its appearing each time you start up.
Installing keyboard files
Keyboard files allow you to use keyboard layouts for other languages and
keyboards. For a list of languages supported, see the Read Me document that
came with the PC Compatibility Card software.
(continued)
82
Chapter 4
Installing keyboard files in Windows
1 Start Windows.
2 Insert the
3 Open the International control panel.
4Select the language you want in the Keyboard Layout area; then click OK.
5 In the Install Driver dialog box, click Browse.
6 Select the E drive, then locate the folder for the language you want.
PC Utilities
CD into the CD-ROM drive.
The path is E:\KEYBOARD\WIN31\<language>\
7Select the file you want; then close the control panel and restart Windows.
Page 97

Installing keyboard files in Windows 95
1 Start Windows 95 and click the Start button.
2Click Settings; then click Control Panel.
3Double-click the Keyboard icon.
4Select the Language tab.
5 Click Add.
6 In the list that appears, select the language you want; then click OK.
7Click the name of the language whose keyboard layout you want to use; then click Set as
Default, then click OK.
8 Insert the
9Click Browse; then select the E drive in the Drives window.
10 In the Folders window, locate the folder and file you want; then click OK.
PC Utilities
The path is E:\KEYBOARD\WIN95\<language>
Installing your own PC software
You can now install your own PC programs in the drive container you’ve
created. Follow the instructions that came with the programs.
You may need to eject disks during installation. Press x-E to eject a disk.
Press x-Y to eject a CD. For more information on working with disks, see
“Using Floppy Disk Drives and Floppy Disks” and “Using CD-ROM Discs
and Drives” in Chapter 6.
For further information on installing network client software, see
Appendix B, “Installing Network Client Software.”
What’s next?
CD and click OK.
Yo u’ve finished installing your PC software. Turn now to Chapter 5, “Setting
Up the PC Environment,” to learn how to configure your PC software.
Installing the PC Compatibility Card Software
83
Page 98

Page 99

5
Setting Up the PC Environment
This chapter contains information on the following aspects of your PC
environment:
m DOS configuration files
m the PC Setup control panel
m monitors and video software
m RAM
m printer settings
m sound options
m PC drives
m shared volumes
m network settings
m serial port settings
m modem settings
85
Page 100

Setting up your DOS configuration files
You may need to modify your DOS CONFIG.SYS file to work efficiently with
your PC Compatibility Card. Follow these guidelines:
Editing the CONFIG.SYS file
Your CONFIG.SYS should include the following statements:
DOS=HIGH,UMB
DEVICE=C:\DOS\HIMEM.SYS /TESTMEM:OFF
DEVICE=C:\DOS\EMM386.EXE NOEMS
The first line loads DOS into high memory.
If you’re using the DOS utility EMM386 and you don’t require expanded
memory, use the EMM386 line shown above. If you are using EMM386 and
you do require expanded memory, include the following line instead:
DEVICE=C:\DOS\EMM386.EXE
For more information on making the best use of memory, see the
information on memory management in the documentation for DOS or for
your memory manager.
86
Chapter 5
Setting the number of drive letters
You can share folders and volumes with the PC by assigning them to PC drive
letters. When you install your PC software, the statement
LASTDRIVE=M is
included in the CONFIG.SYS file. This allows you to view up to nine folders
or volumes at once.
To specify the number of drive letters, change your CONFIG.SYS file to
include the following statement:
LASTDRIVE=x
where x is a letter between F and Z. (The PC reserves drive letters A
through E.)
Each drive letter uses 100 bytes of PC memory.
 Loading...