

Page 1

Installing the PC Compatibility Card
1
in a 5400 Series Macintosh Computer
This chapter describes how to install the PC Compatibility Card hardware in
a 5400 series Macintosh computer, such as the Macintosh Performa 5400,
Macintosh Performa 5420, and the Power Macintosh 5400.
IMPORTANT
Card hardware is already installed. Skip ahead to “Connecting Another
Monitor to a 5400 Series Macintosh Computer” later in this chapter. If you
want to install additional memory on your card or learn more about installing
and using PC software, see the PC Compatibility Card User’s Manual.
If you received this manual with a computer, the PC Compatibility
1
Page 2
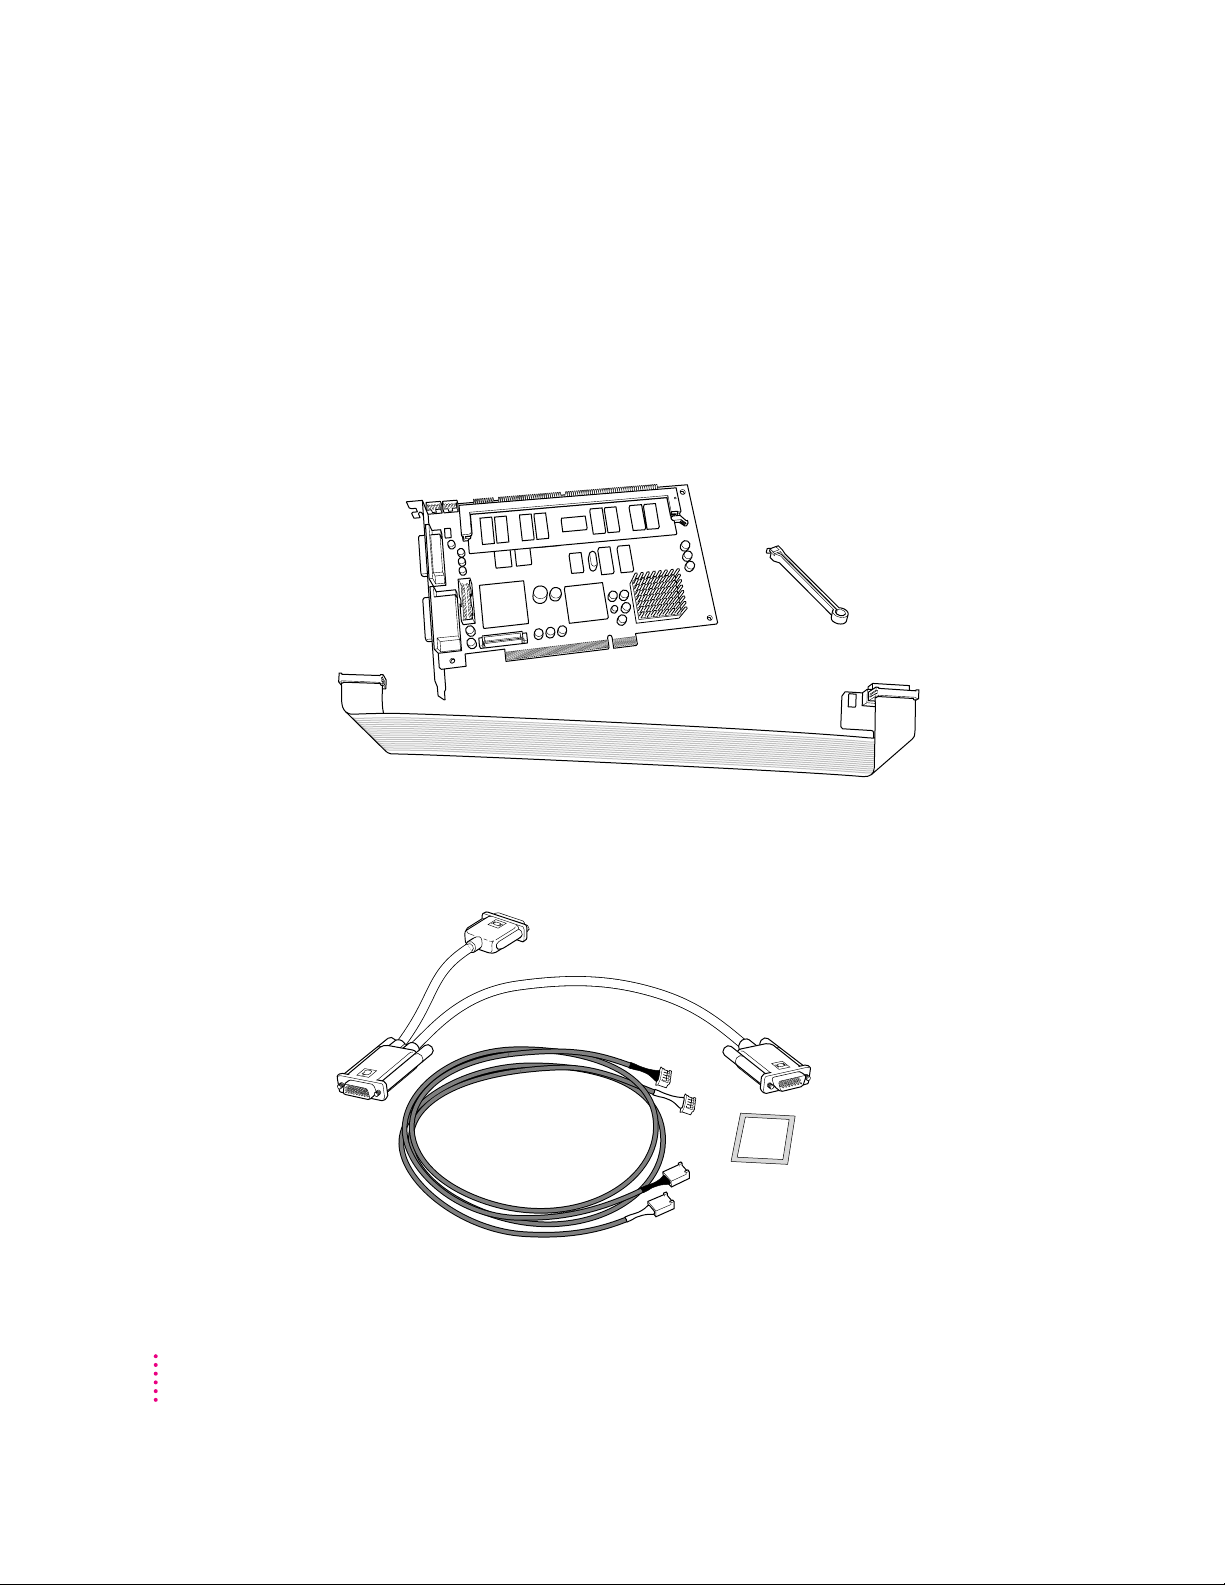
What you need
Before beginning the installation process, make sure you have all the parts
and tools that are necessary to install the card in your computer. To install the
card in a 5400 series Macintosh computer, you need the PC Compatibility
Card, the internal PC audio/video assembly, and the cable clamp. You also
need a Phillips screwdriver.
Cable clamp
PC Compatibility Card
Internal PC audio/video assembly
2
You won’t need the CD audio cables shown below. Also, the loopback cable is
only necessary if you plan to attach an external monitor to your computer.
Loopback cable
CD audio cables
Adhesive film
Chapter 1
Page 3
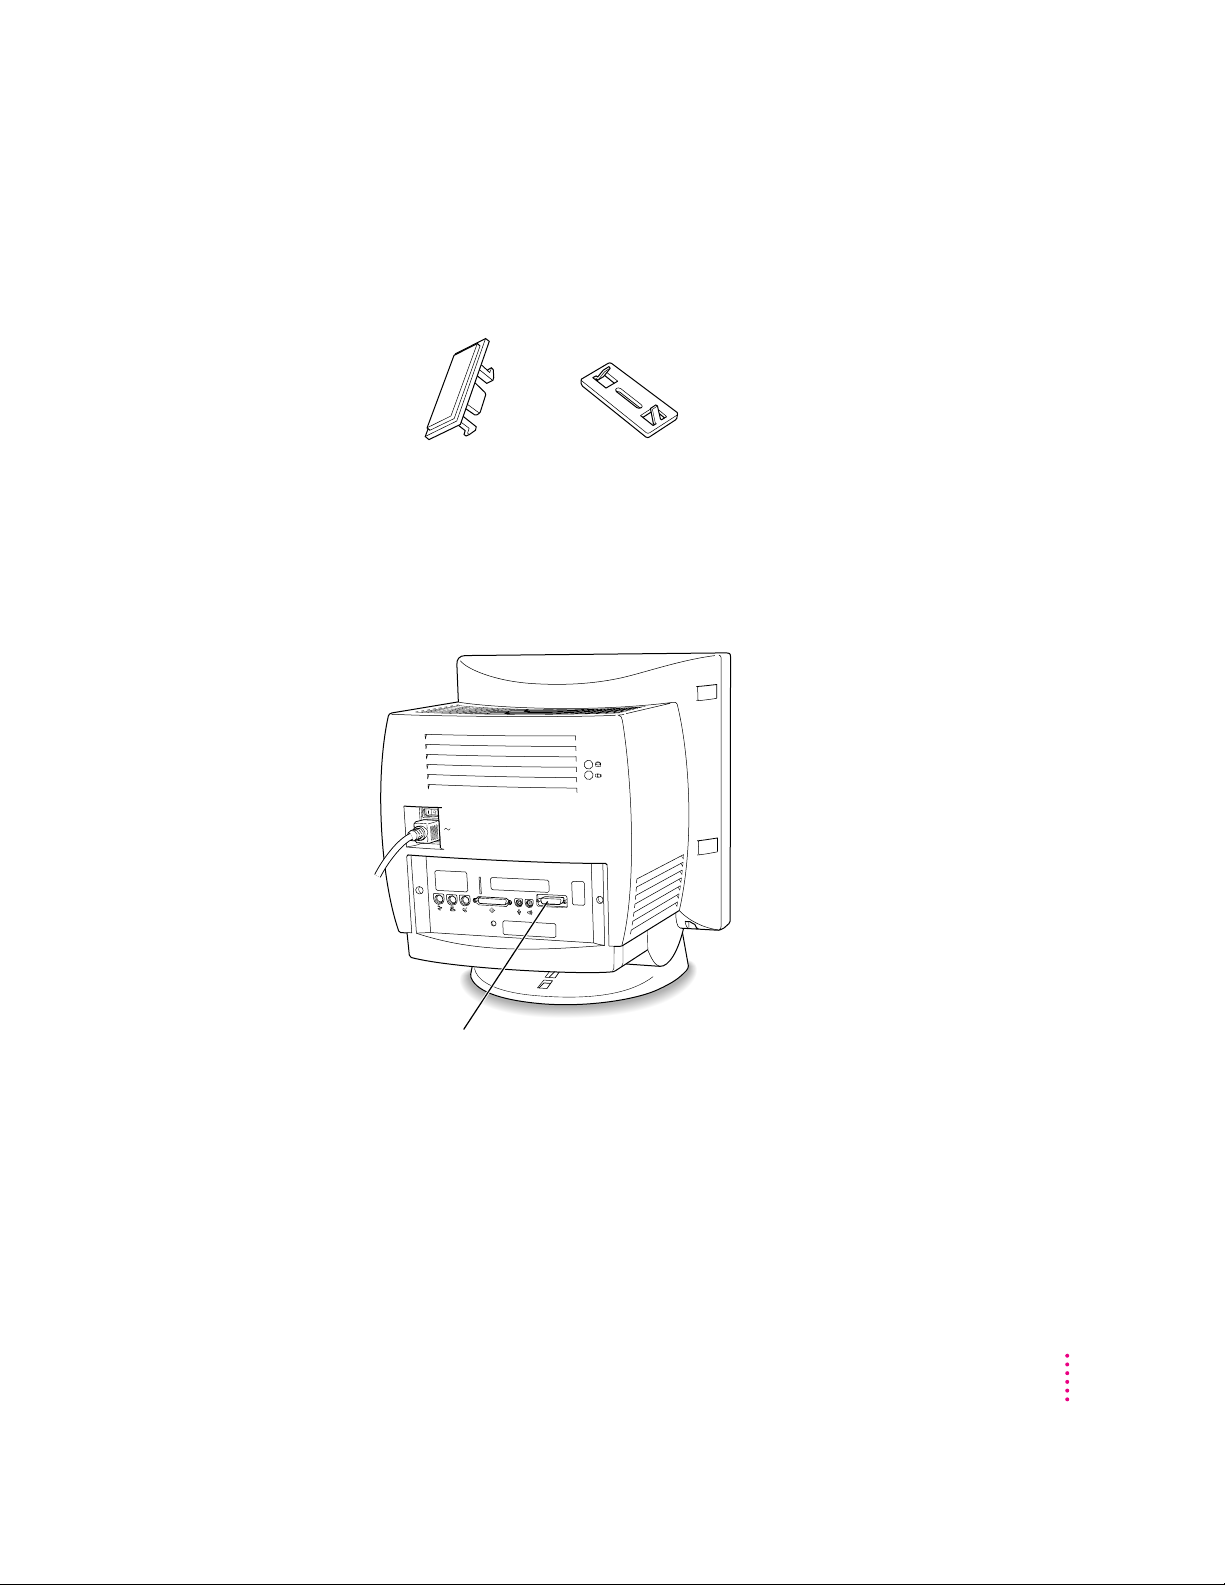
You only need the plastic access port cover and metal retainer if you are
removing the Apple External Video Connector during the PC Compatibility
Card installation.
Plastic access port cover Metal retainer
The Apple External Video Connector and the PC Compatibility Card cannot
be installed together into a 5400 series Macintosh computer. If your
computer has the video connector shown below, you will have to remove it
during the installation of the PC Compatibility Card.
If this connector is present, then an Apple External
Video Connector is installed in your computer.
Instructions for removing the Apple External Video Connector are included
in the installation instructions that follow.
Installing the PC Compatibility Card in a 5400 Series Macintosh Computer
3
Page 4

Installing the PC Compatibility Card hardware
There are several steps to installing your PC Compatibility Card hardware:
m opening the computer
m removing the Apple External Video Connector if there is one installed
m installing the card
m installing the internal PC audio/video assembly
m closing the computer
Opening the computer
IMPORTANT
To avoid generating static electricity that may damage
components, do not walk around the room until you have completed the
installation of the PC Compatibility Card and closed the computer.
Additionally, move the logic board as little as possible while it is outside the
computer case.
1Shut down the computer.
2 Press the power switch on the back of the computer to turn it completely off.
Press the side of the switch marked with the j symbol.
3Unplug all the cables except the power cord from the computer (including the cable that
connects your keyboard to the computer).
Note: Leaving the power cord plugged in helps protect the computer from
damage caused by electrostatic discharge.
4
Chapter 1
Page 5
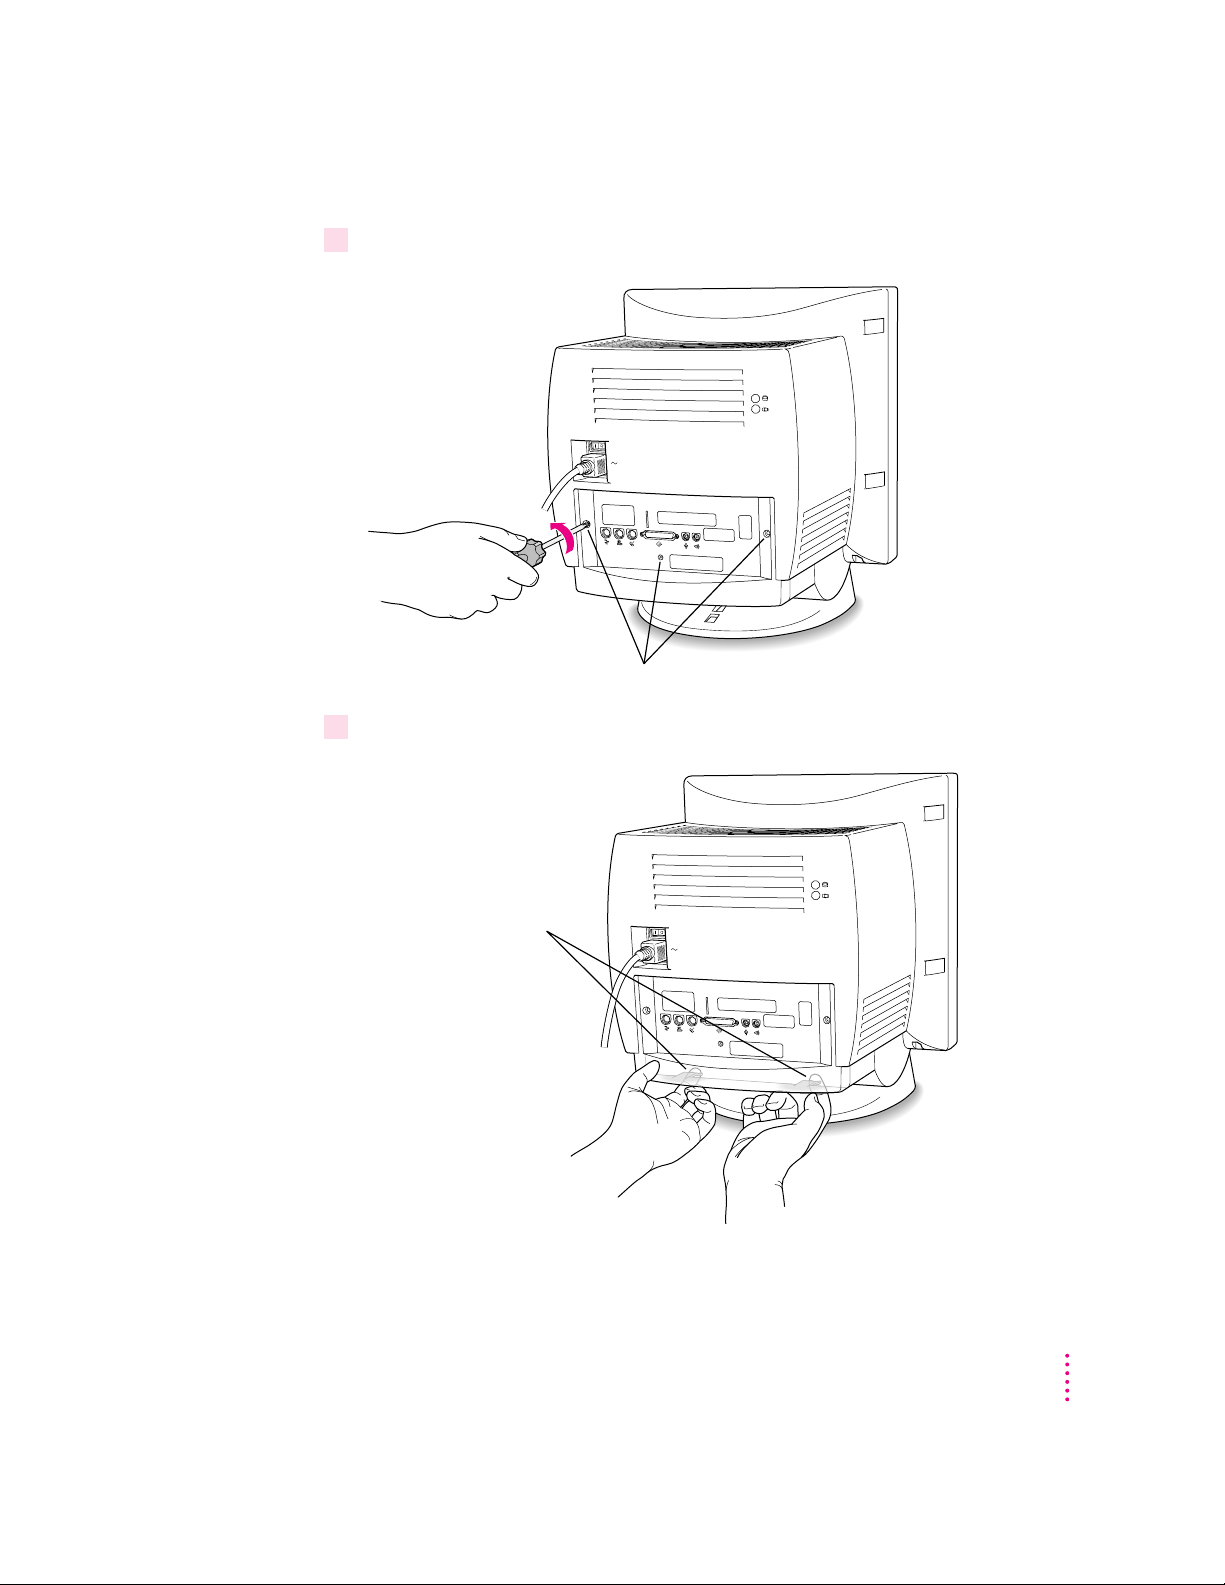
4 Remove the security screws from the computer’s back panel with a Phillips screwdriver.
Remove these screws.
5With your fingertips, find the two latches on the underside of the computer’s case.
Locate the two latches on
the underside of the computer’s
case with your fingertips.
Installing the PC Compatibility Card in a 5400 Series Macintosh Computer
5
Page 6
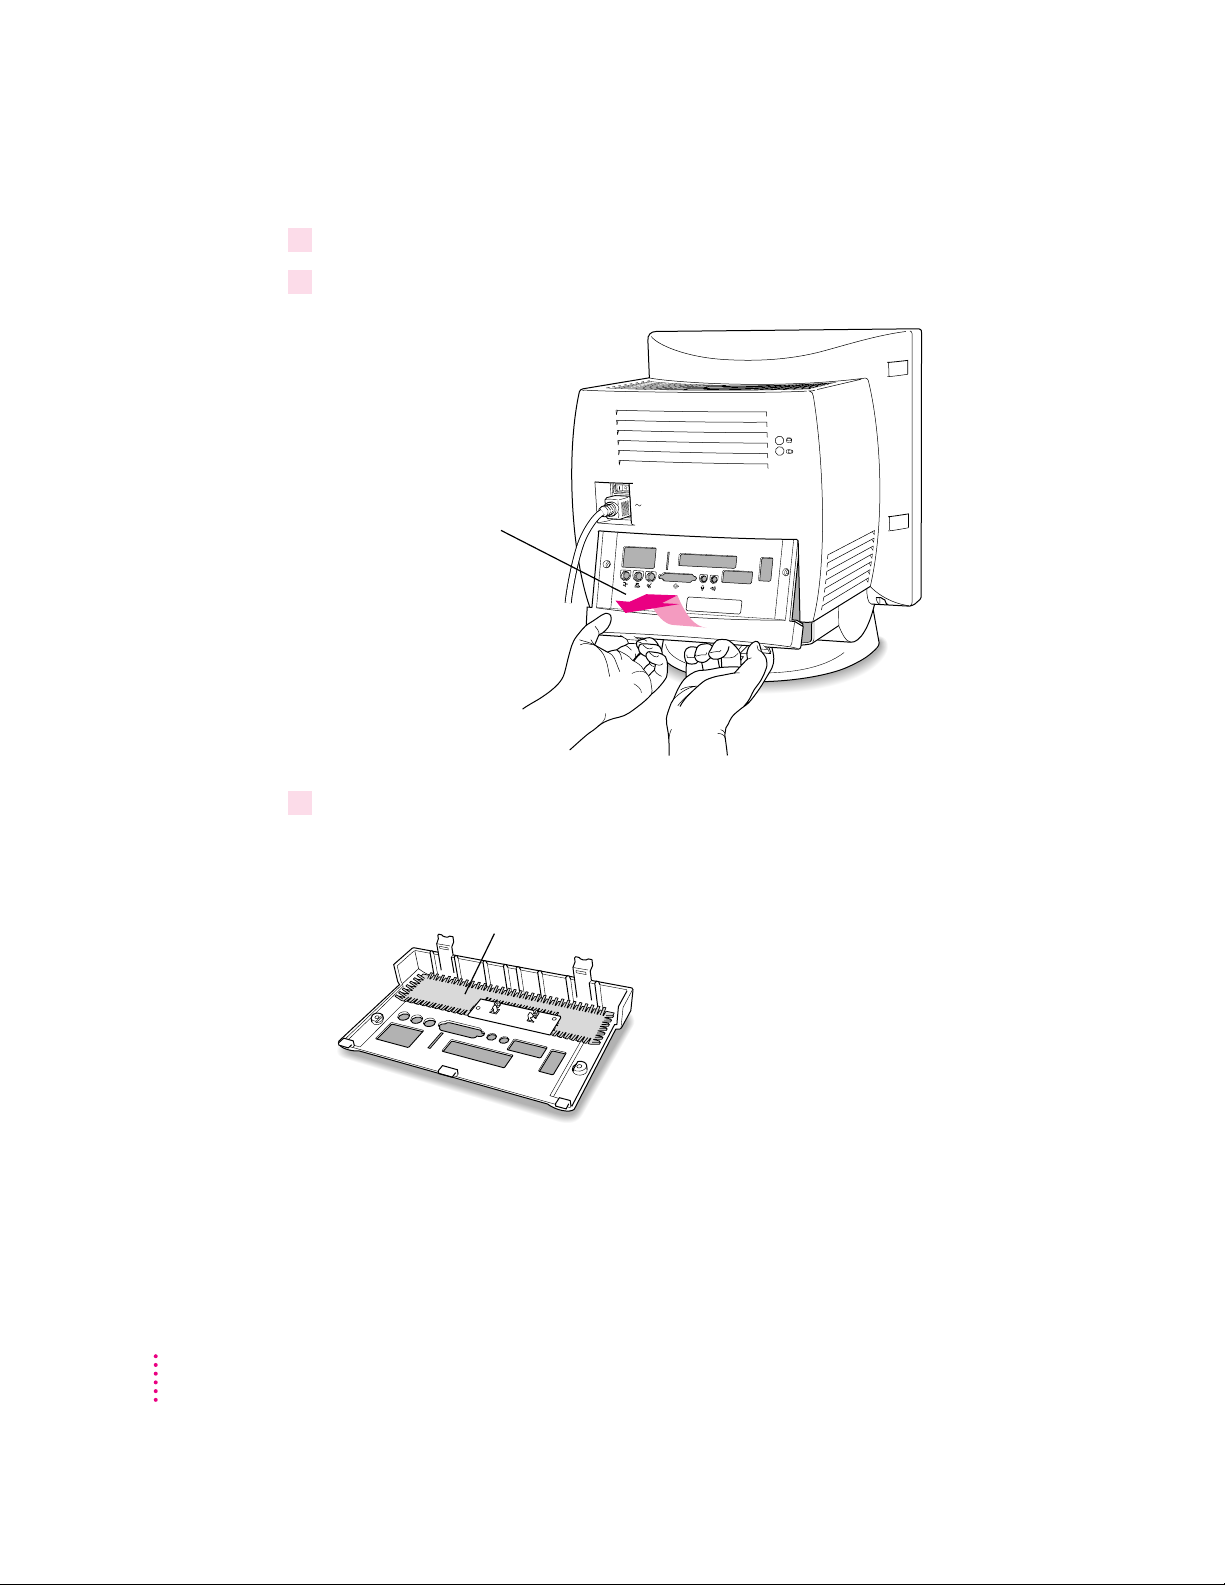
6Pull gently on the latches.
7Swing the panel up and slip it out.
Pulling gently, swing the
panel up, and slip it out.
8 Carefully set the panel aside.
6
To protect the metal shielding on the inside of the panel, lay down the panel
so that the metal shielding faces up.
Metal shielding
Chapter 1
Page 7

9Pull down on the wire handle and swing it out to unlock it from its storage position. Then
grasp the handle and gently pull the logic board out of the computer.
The vertical plate and the logic board to which it’s attached slide all the way
out of the computer.
Wire handle
Installing the PC Compatibility Card in a 5400 Series Macintosh Computer
7
Page 8

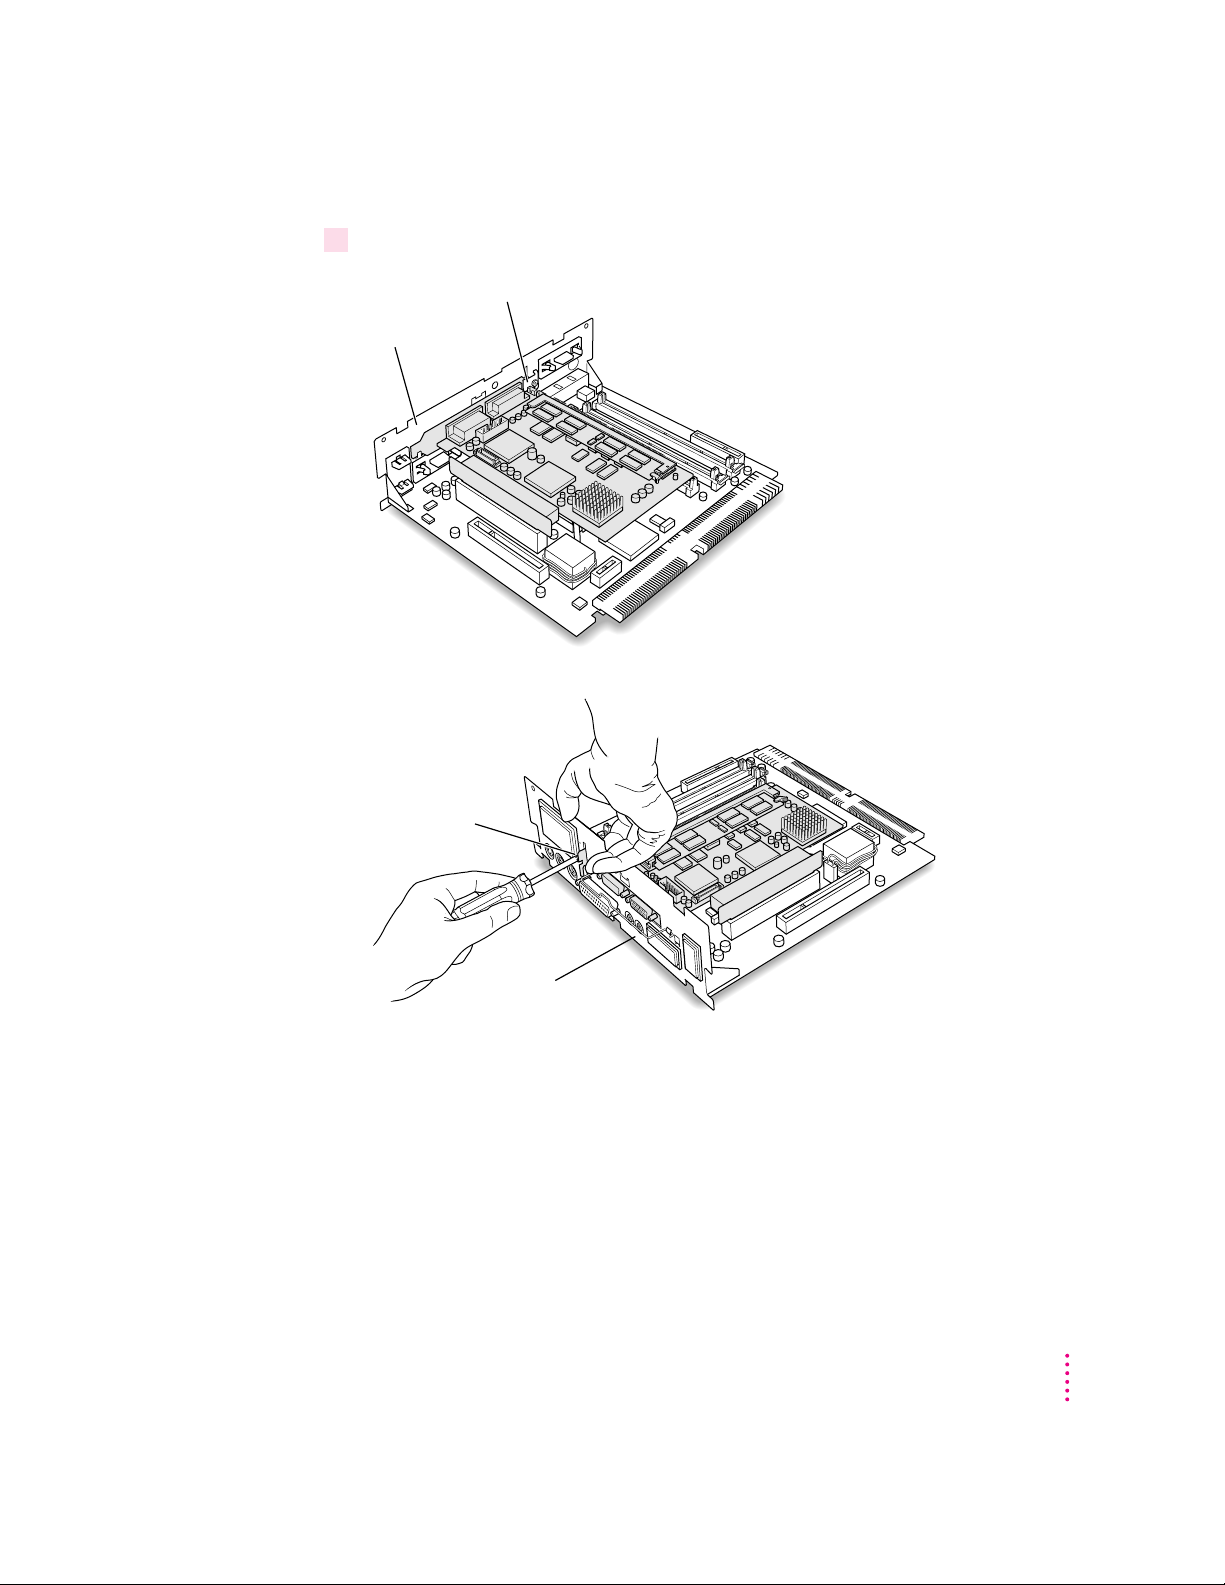
10 Place the logic board on a stable, clean, flat surface, and use a thick magazine to prop up
one end of the logic board as shown below.
The magazine helps protect the components on the bottom of the logic board
during the installation.
I
l
l
u
st
r
a
tion
Wo
rl
d
N
e
w
Vol. 1, No. 1
s
Rest the logic board on a clean, flat, stable surface.
Place a thick magazine under this end of the logic
board to help protect the components underneath.
8
Chapter 1
Page 9
Removing an Apple External Video Connector
This section describes how to remove the Apple External Video Connector if
there is one installed on your computer. If your computer does not have a
video connector installed, skip ahead now to “Installing the Card.”
1Unscrew the jack nuts from the video connector, and remove the small metal bracket.
Remove the two jack nuts and the small metal bracket.
Installing the PC Compatibility Card in a 5400 Series Macintosh Computer
9
Page 10
2 Remove the video connector assembly from the logic board.
Unplug the assembly from the logic board. Then remove the video connector
and the other metal bracket from the vertical plate.
1 Unplug the small card from the monitor-out slot
on the main logic board.
2 Remove the small metal bracket (shown
tinted here) and the video
connector from the
vertical plate.
Vertical plate Monitor-out slot
10
Chapter 1
Page 11
3 Install the plastic access port cover and the metal retainer to cover the opening on the
vertical plate.
Place the metal retainer over the opening on the inside of the vertical plate.
Then insert the access port cover through the opening on the other side, and
snap it into the metal retainer.
1 Place the metal retainer over the opening
inside
on the
of the vertical plate.
2 Insert the access port cover
through the opening, and snap
it into the metal retainer.
Vertical plate
Installing the PC Compatibility Card in a 5400 Series Macintosh Computer
11
Page 12
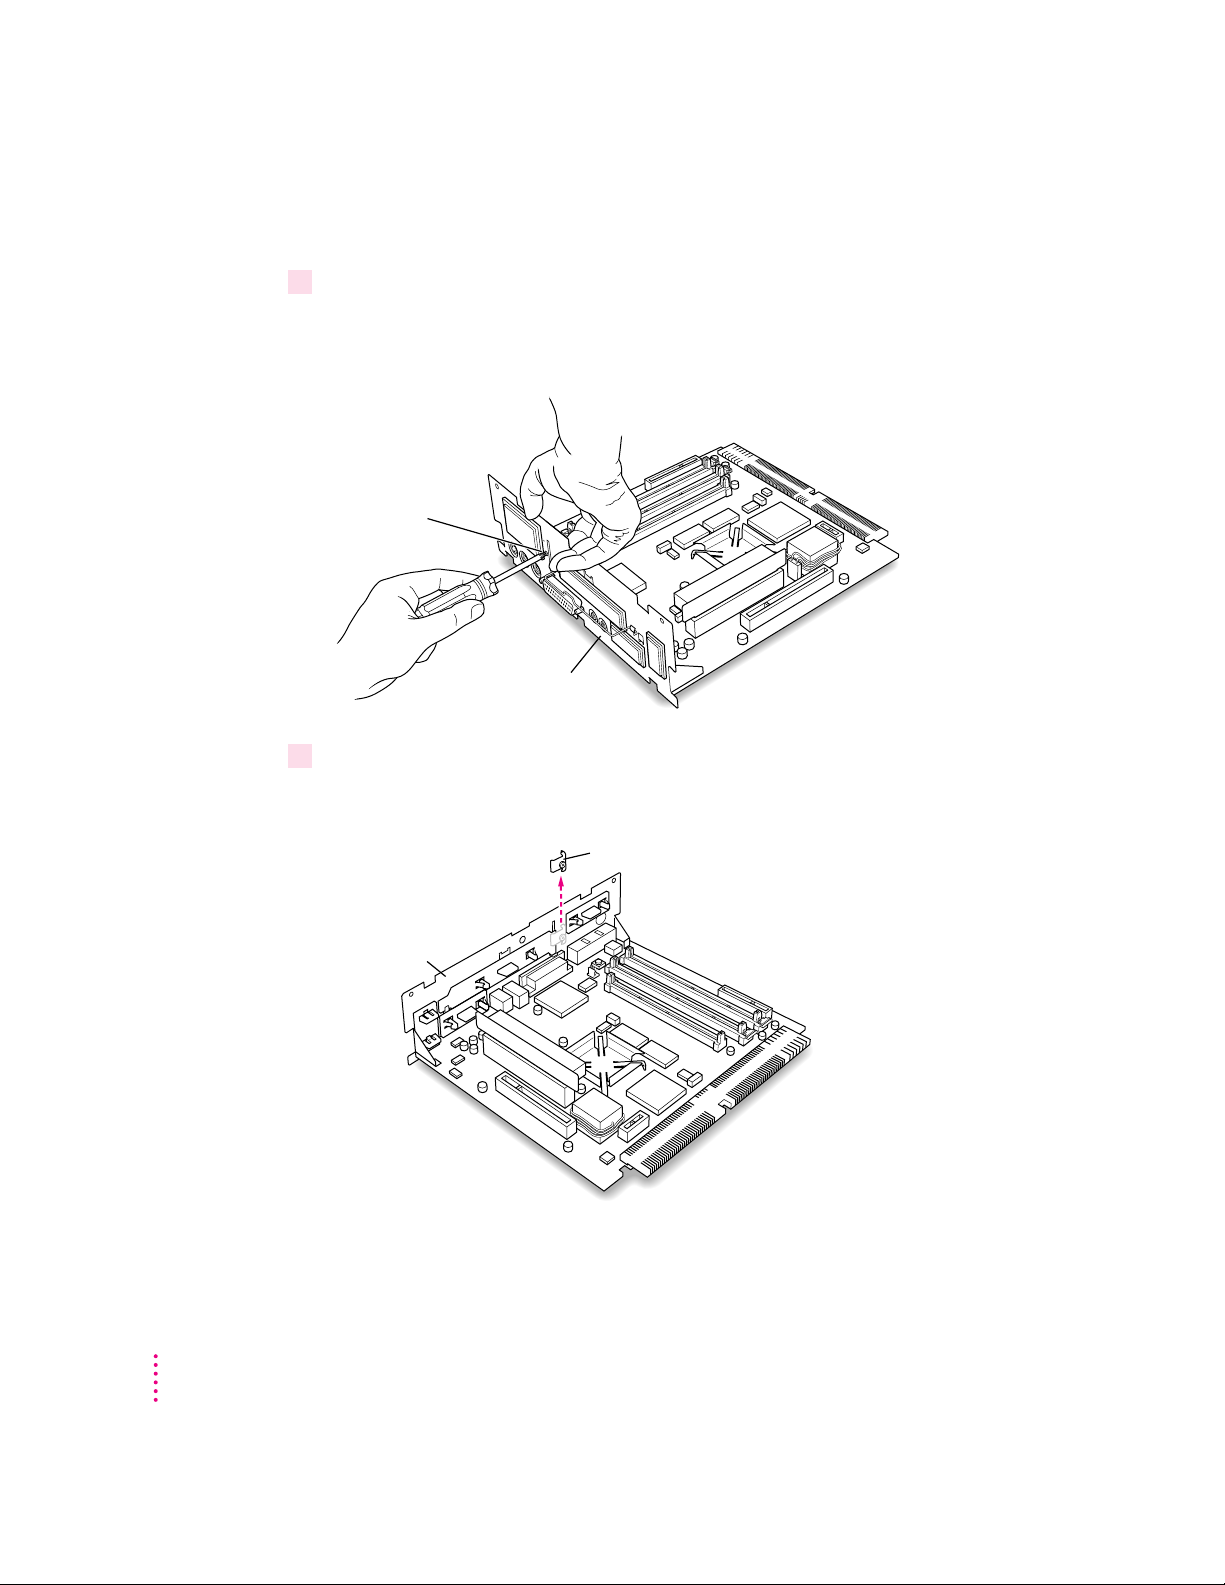
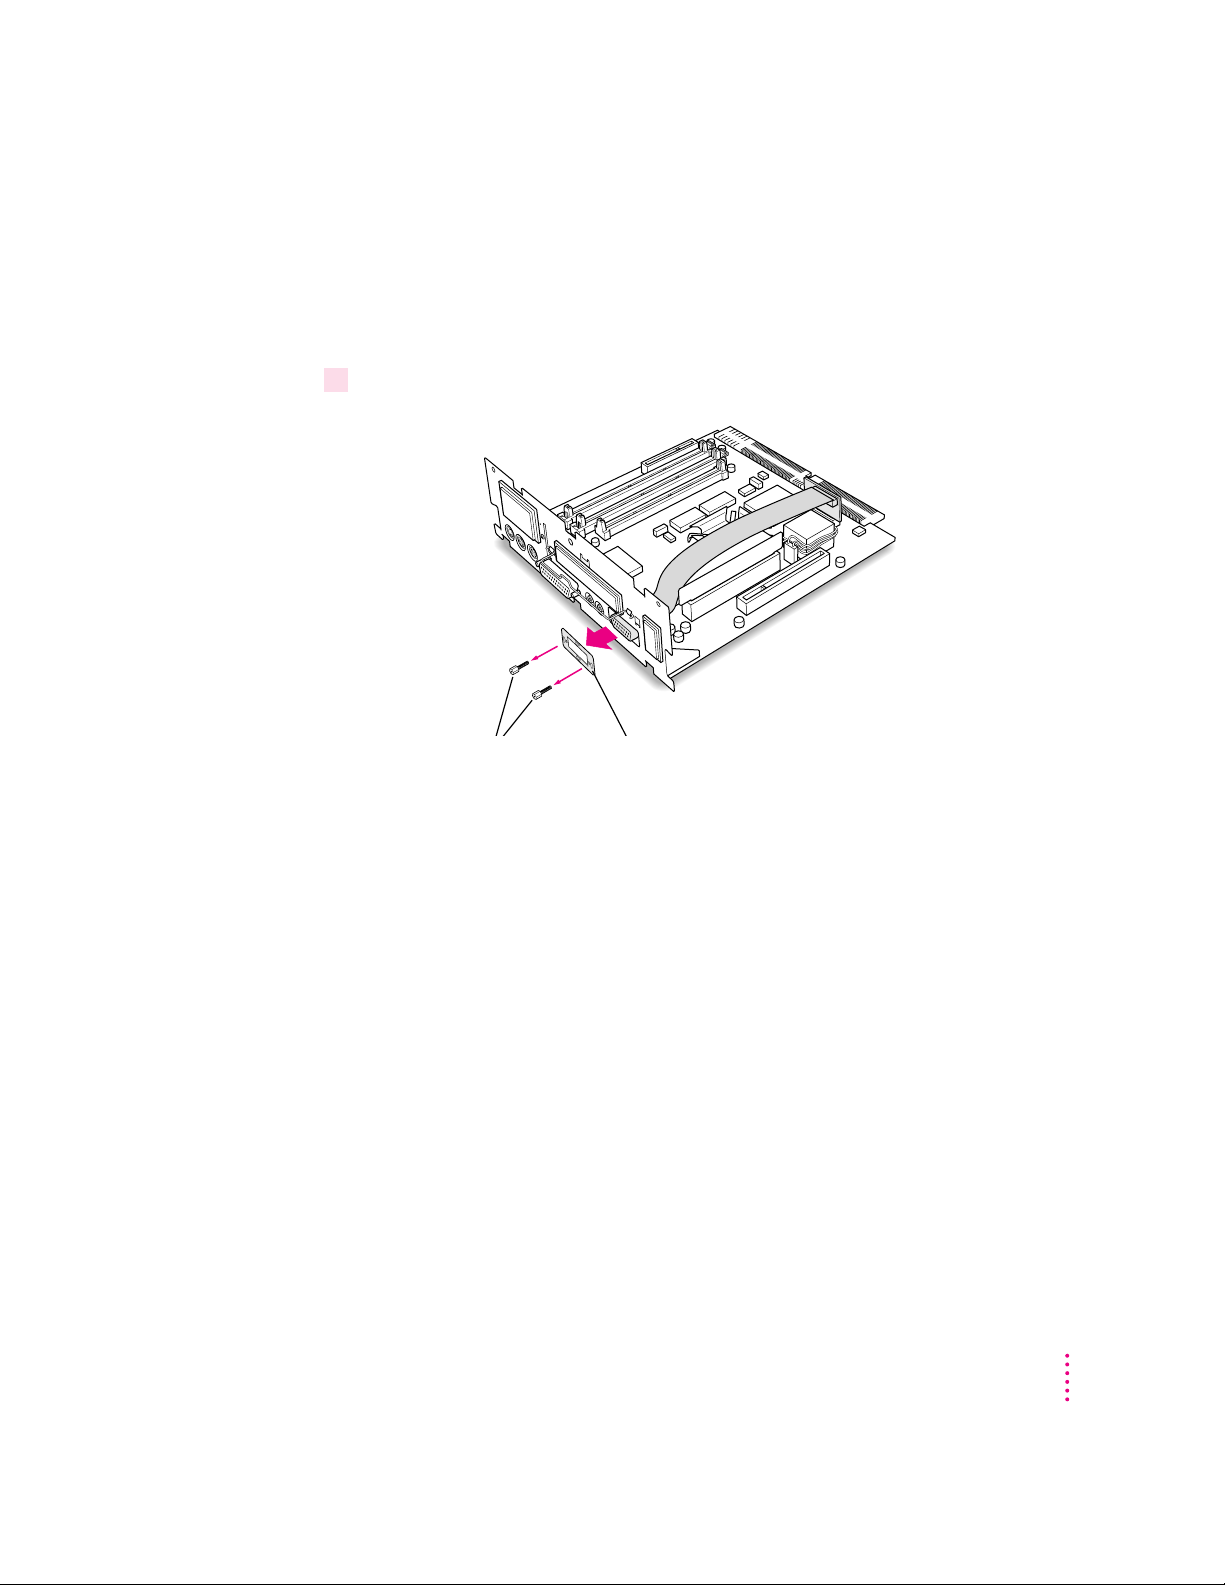
Installing the card
1Unscrew the retainer clamp screw from the front of the vertical plate, while holding in
place the clamp on the back.
Avoid letting the retainer clamp fall onto the logic board.
While holding
the retainer clamp
in place, remove the
screw that secures
the clamp to the
vertical plate.
Vertical plate
2 Lift out the retainer clamp and set it aside.
You’ll need the retainer clamp later, after you install the card.
12
Remove the retainer clamp.
Vertical plate
Chapter 1
Page 13
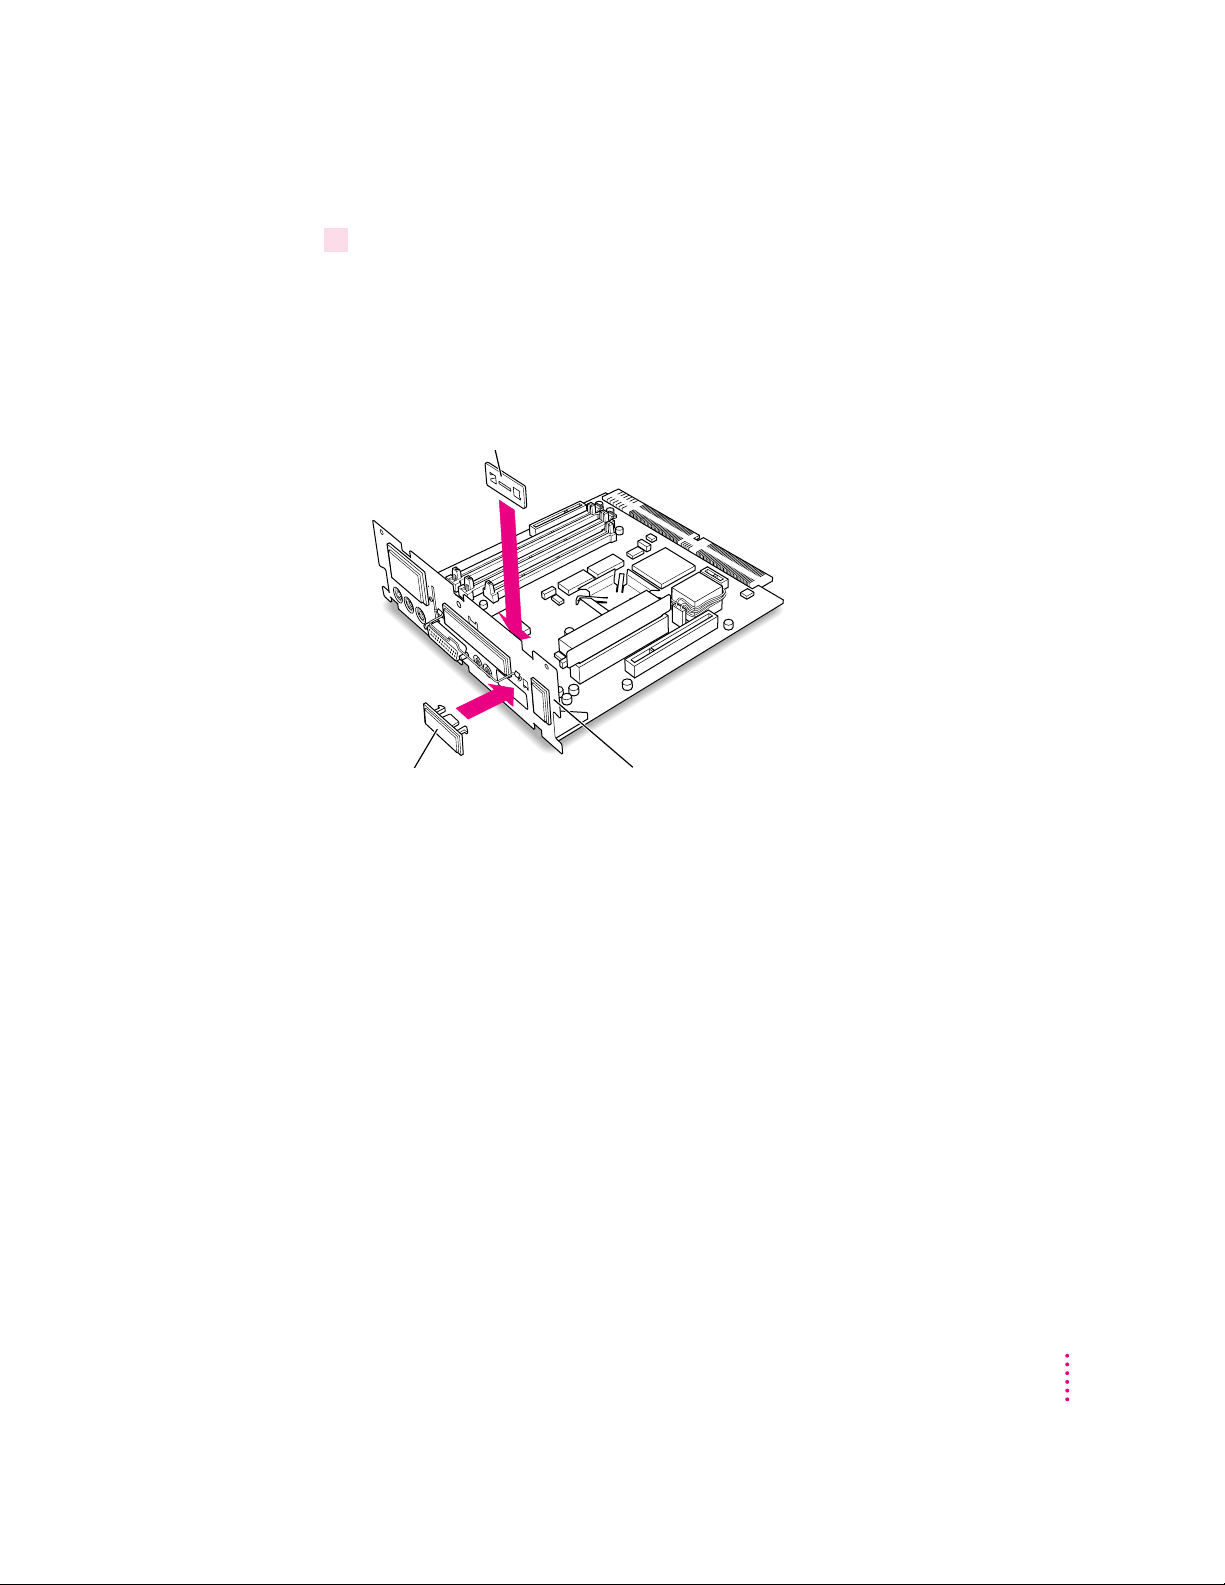
3 Remove the plastic access port cover from the vertical plate.
Squeeze together the two plastic tabs holding the access port cover in place;
then pull the access port cover off from the outside.
Squeeze the two plastic tabs together.
Vertical plate
Metal retainer
PCI slot
Plastic access port cover
Vertical plate
Installing the PC Compatibility Card in a 5400 Series Macintosh Computer
13
Page 14
4 Remove the metal retainer from the inside of the vertical plate.
Vertical plate Metal retainer
5 Remove the PCI card adapter from the main logic board.
PCI card adapter
14
PCI slot
6 Remove the PC Compatibility Card from its static-proof bag.
Hold the card by its edges to avoid touching any of its connectors.
Chapter 1
Page 15
7Connect the PC Compatibility Card and the PCI card adapter.
Place the adapter on top of a magazine on a firm surface. (Make sure the
magazine is thick enough to protect your working surface from being
scratched by the metal pins on the adapter.)
Press the card firmly into the adapter. You may find it helpful to place the
card and the adapter near the edge of a table with the metal edge of the card
hanging over the end of the table. In this position, you can easily insert the
card completely into the adapter.
Place the adapter on
top of a magazine on
a firm surface.
on
i
t
a
r
t
s
u
l
Il
Vol. 1, No. 1
Wor
s
w
e
N
d
l
PC Compatibility Card
PCI card adapter
8Align the PC Compatibility Card and the adapter over the PCI slot.
PCI access port
Vertical plate
Installing the PC Compatibility Card in a 5400 Series Macintosh Computer
PCI slot
15
Page 16
9 Insert the adapter into the PCI slot on the main logic board. Make sure the metal fence on
the PC Compatibility Card engages the hook on the vertical plate and that the connectors
on the card protrude through the PCI access port opening.
The card is properly seated when the card’s metal
“fence” engages this hook on the vertical plate.
Vertical plate Card fence
If you meet resistance, pull the adapter out and try again. To see if the
adapter is properly connected, lift it gently. If it resists and stays in place,
it’s connected.
16
Chapter 1
Page 17
10 Insert the retainer clamp back into the hole and hold it there while you screw it into place.
Replace the retainer clamp.
Vertical plate
Screw the retainer
clamp in place.
Vertical plate
Installing the PC Compatibility Card in a 5400 Series Macintosh Computer
17
Page 18
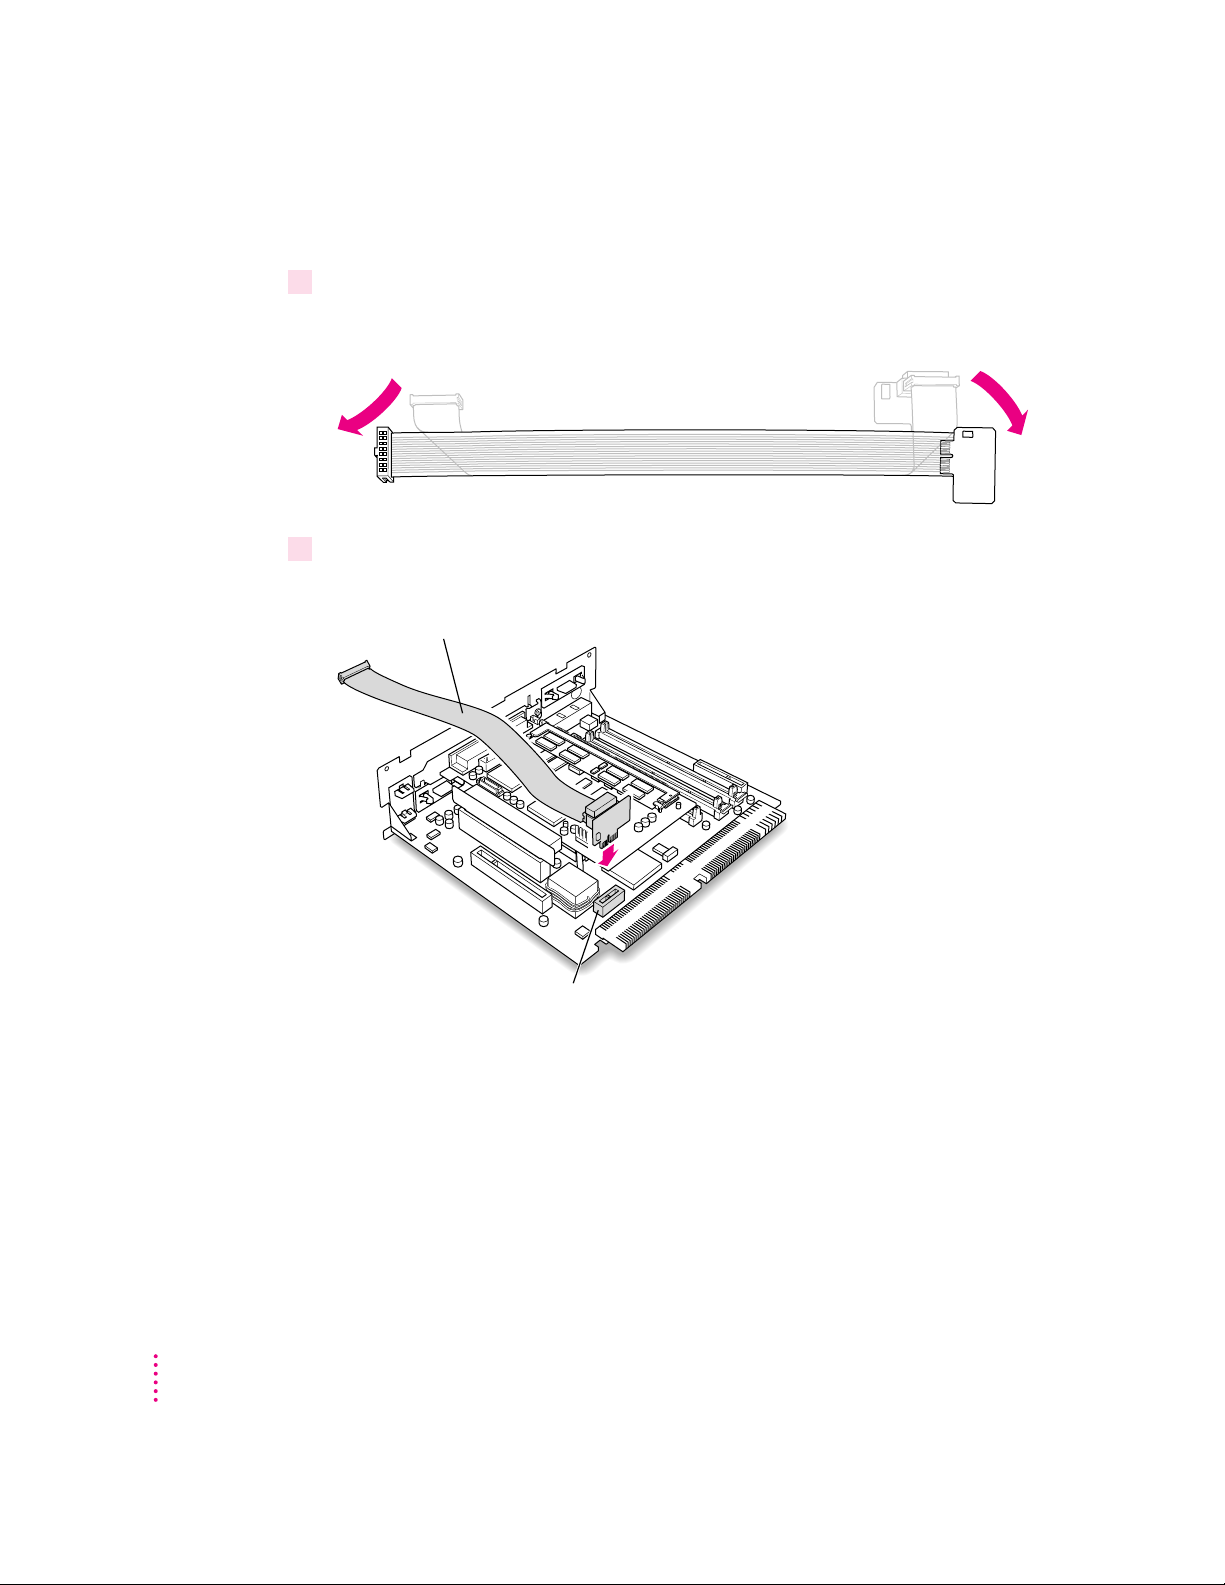
Installing the internal PC audio/video assembly
1Pick up the internal PC audio/video assembly, and unfold the two folds in the cable.
You should unfold the folds near each connector so that the cable is straight.
2Plug the large end of the internal PC audio/video connector into the socket on the
computer’s main logic board.
Internal PC audio/video assembly
18
Internal PC audio/video socket
Chapter 1
Page 19
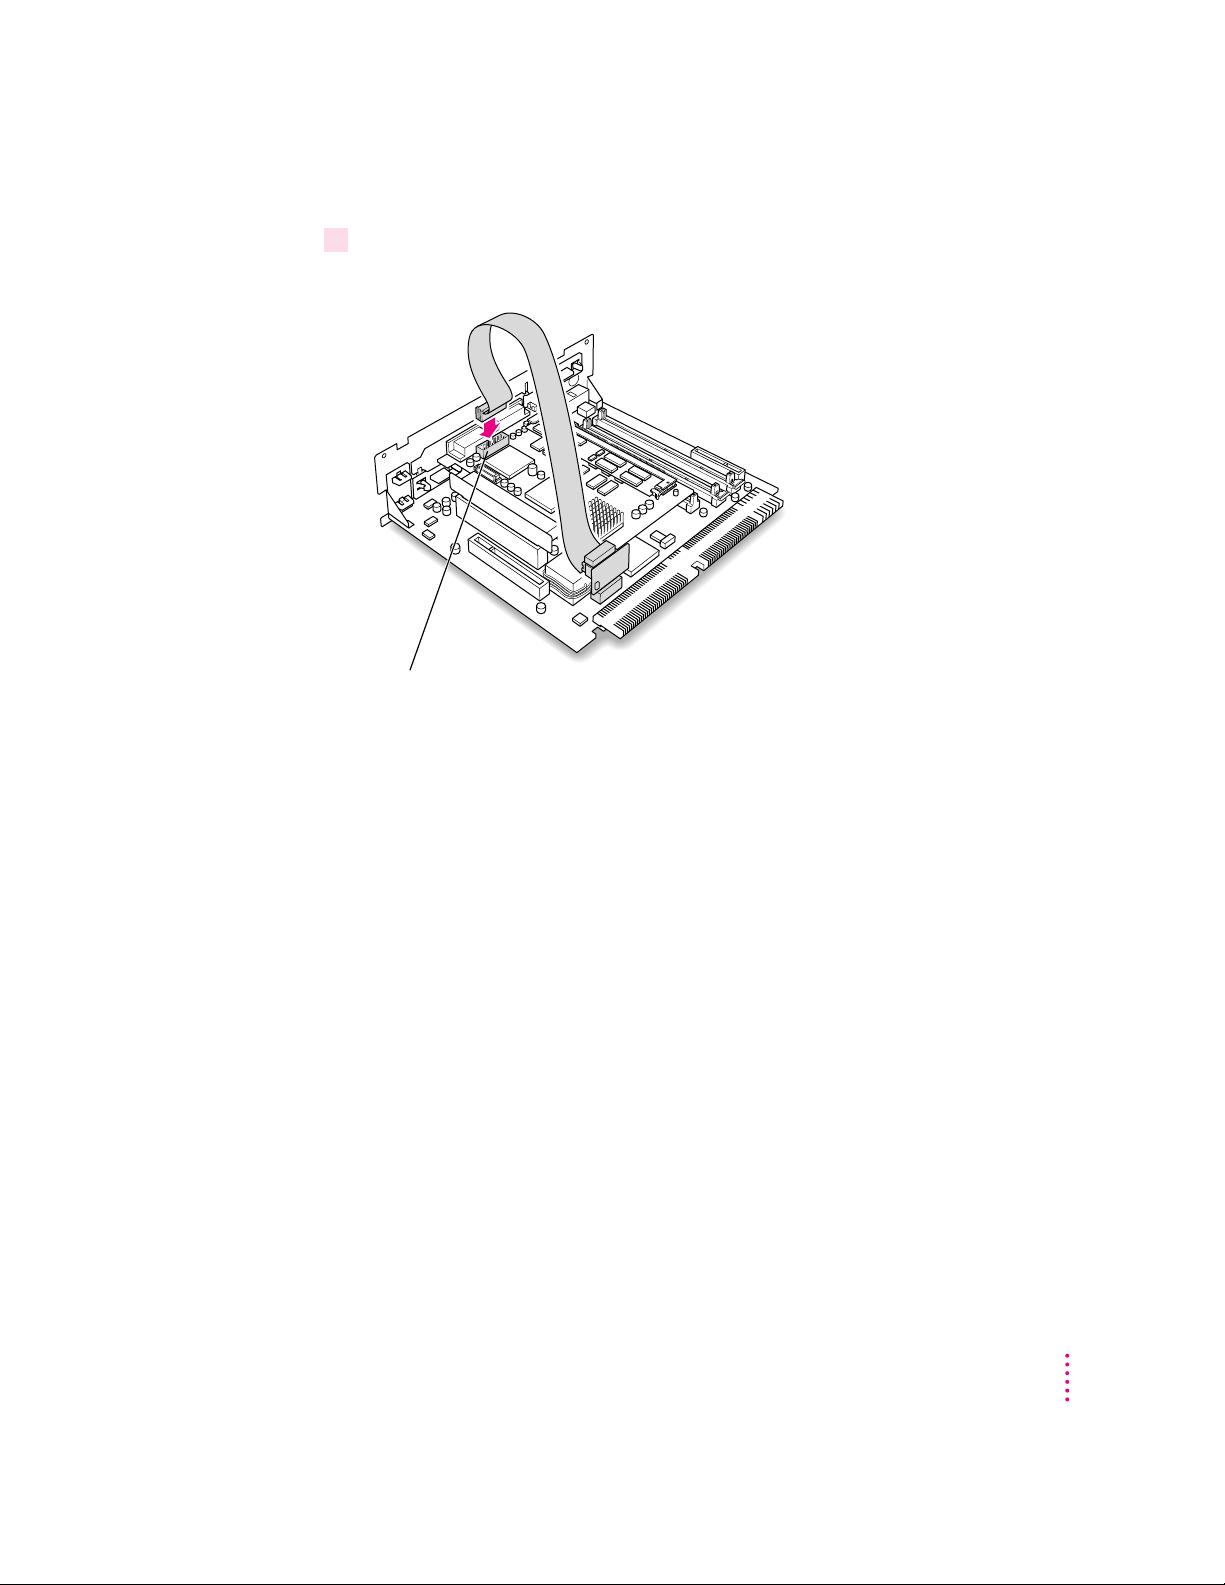
3 Insert the small end of the internal PC audio/video assembly into the socket in the corner
of the PC Compatibility Card.
Internal PC audio/video socket
Installing the PC Compatibility Card in a 5400 Series Macintosh Computer
19
Page 20
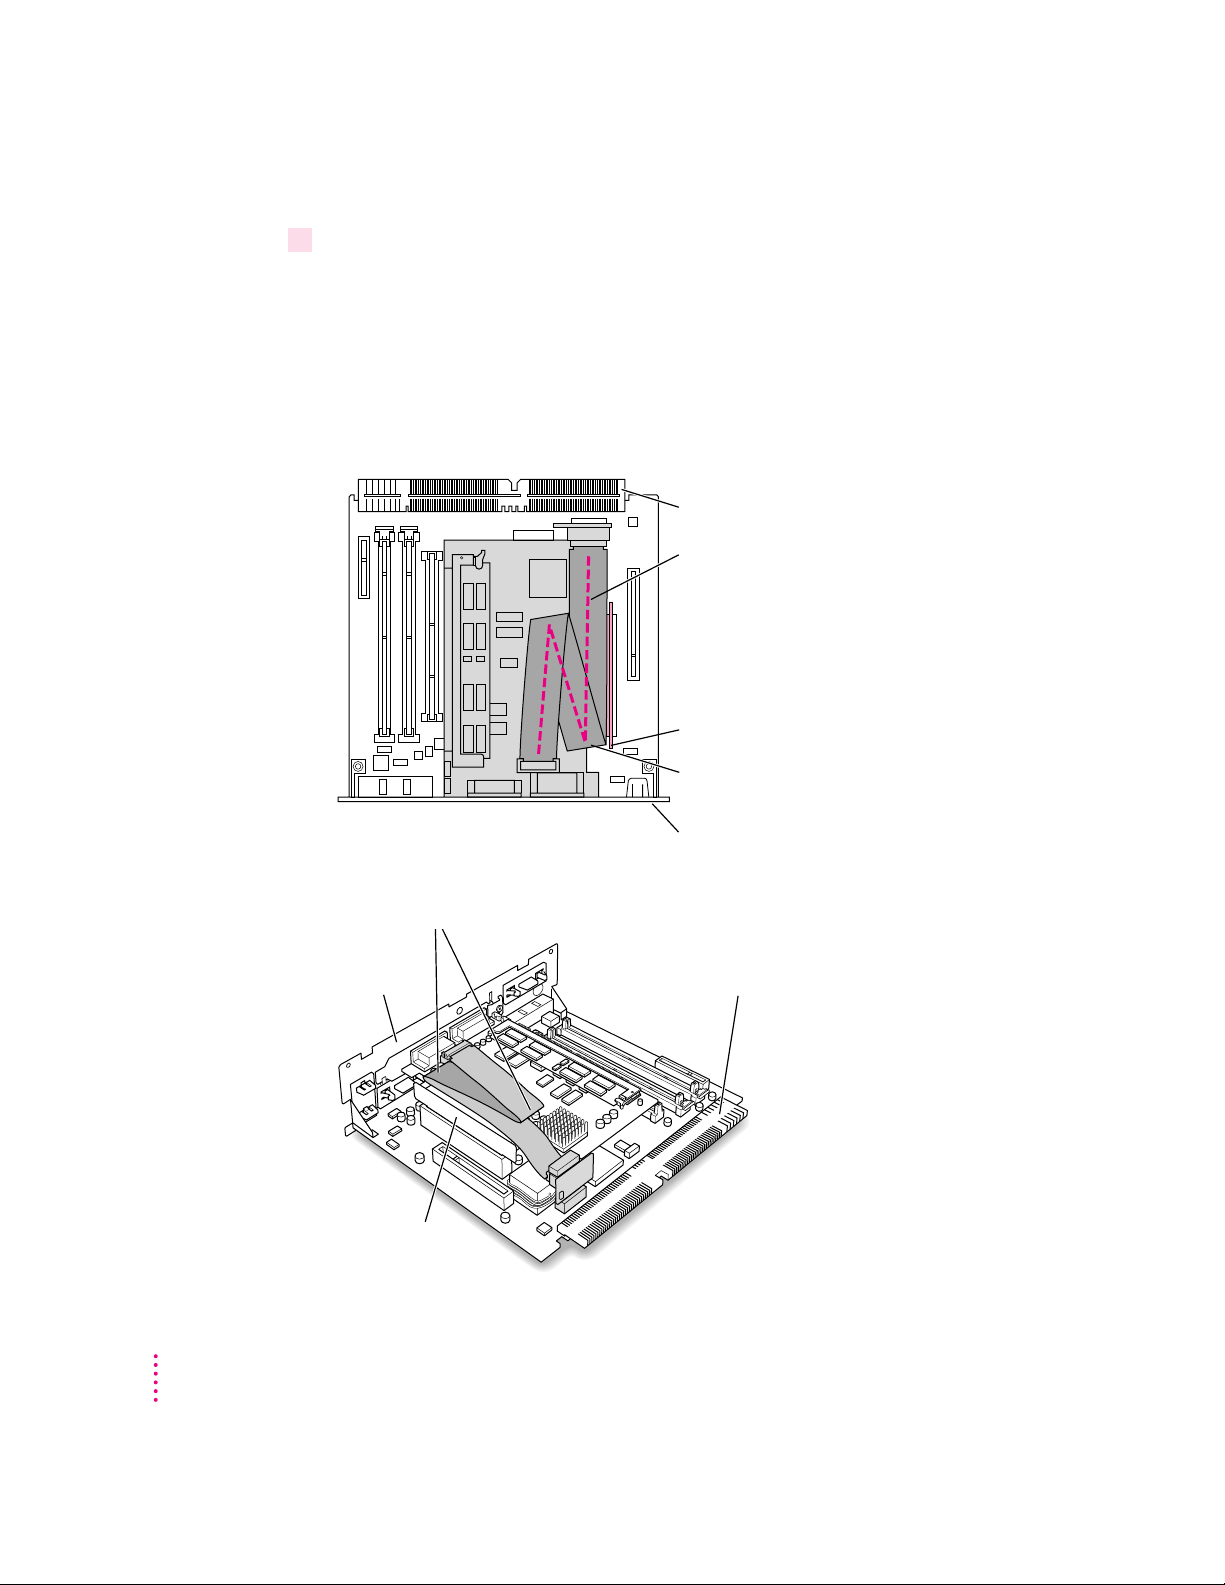
4Fold the slack in the internal PC audio/video assembly cable into the shape of a Z on top
of the card. Firmly pinch the two new folds so that the cable lies flat along the top of
the card.
IMPORTANT
Do not press down too hard on the top of the card. Applying
excessive pressure to the card may damage the card and your logic board.
Once you have folded the slack in the cable into a loose Z shape on top of the
card, firmly pinch the new folds in the cable so that it lies flat.
Logic board connector
Fold the cable in a Z shape,
as indicated by the dashed line.
PCI card adapter (shown tinted here)
This fold in the cable should line up
with the end of the PCI card adapter.
(Top view)
Pinch these two new folds in the cable so that it lies flat.
Vertical plate
20
Chapter 1
Vertical plate
PCI card adapter
Logic board connector
Page 21
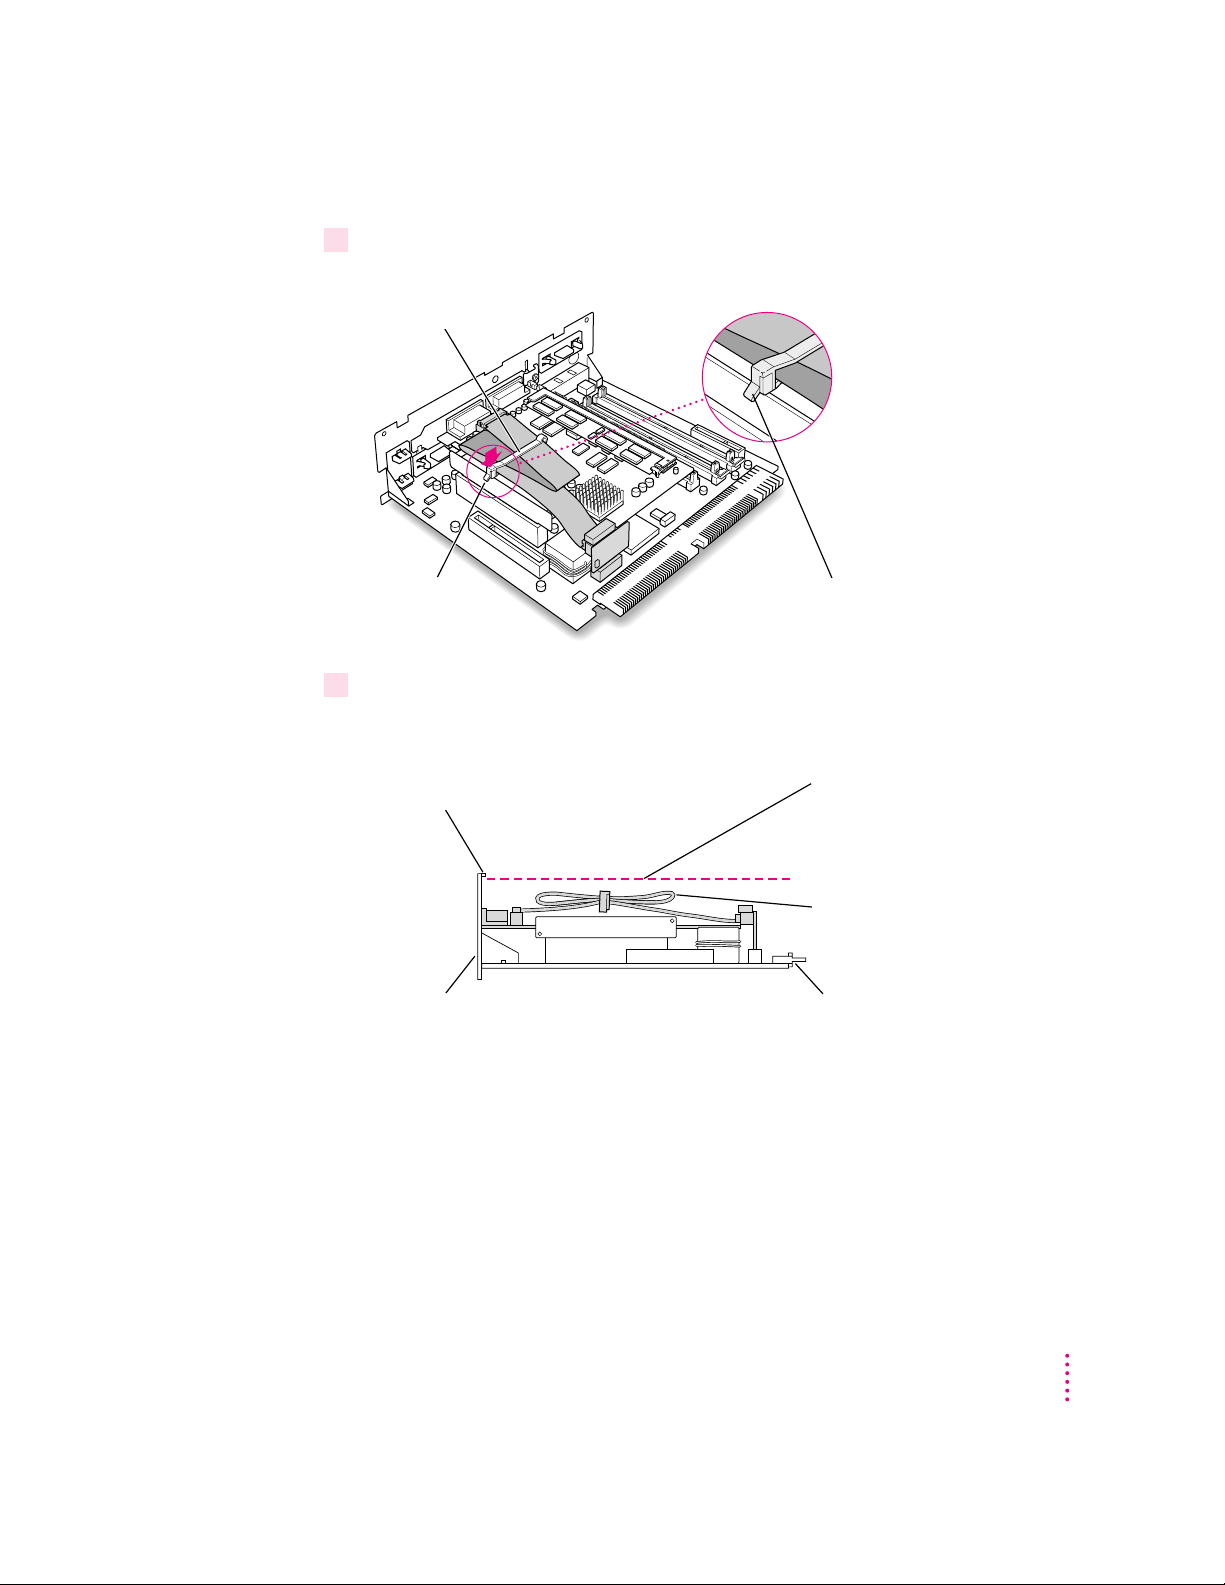
5Slip the cable clamp over the three folds in the internal PC audio/video assembly cable.
Then pinch the open ends of the cable clamp to close it and hold the folds in place.
Cable clamp
Pinch the open
ends of the cable
clamp to close it.
Make sure the tab on the
cable clamp is on this side
of the cables and points down.
6Make sure the folded cable lies flat along the top of the card.
If necessary, pinch the folds in the cable more to flatten the folded cable.
Sheet metal tabs on
vertical plate
Vertical plate Logic board connector
(Side view)
The folded, clamped cable should
not rise up above the bottom of
the sheet metal tabs on the vertical
plate (approximately 3/32" below
the top of the vertical plate).
Folded, clamped cable
Installing the PC Compatibility Card in a 5400 Series Macintosh Computer
21
Page 22

Closing the computer
1Slip the base of the logic board into the guide rails inside the computer case.
Make sure the logic board slides
into the guides that are on both
sides of the computer’s interior.
22
Chapter 1
Page 23
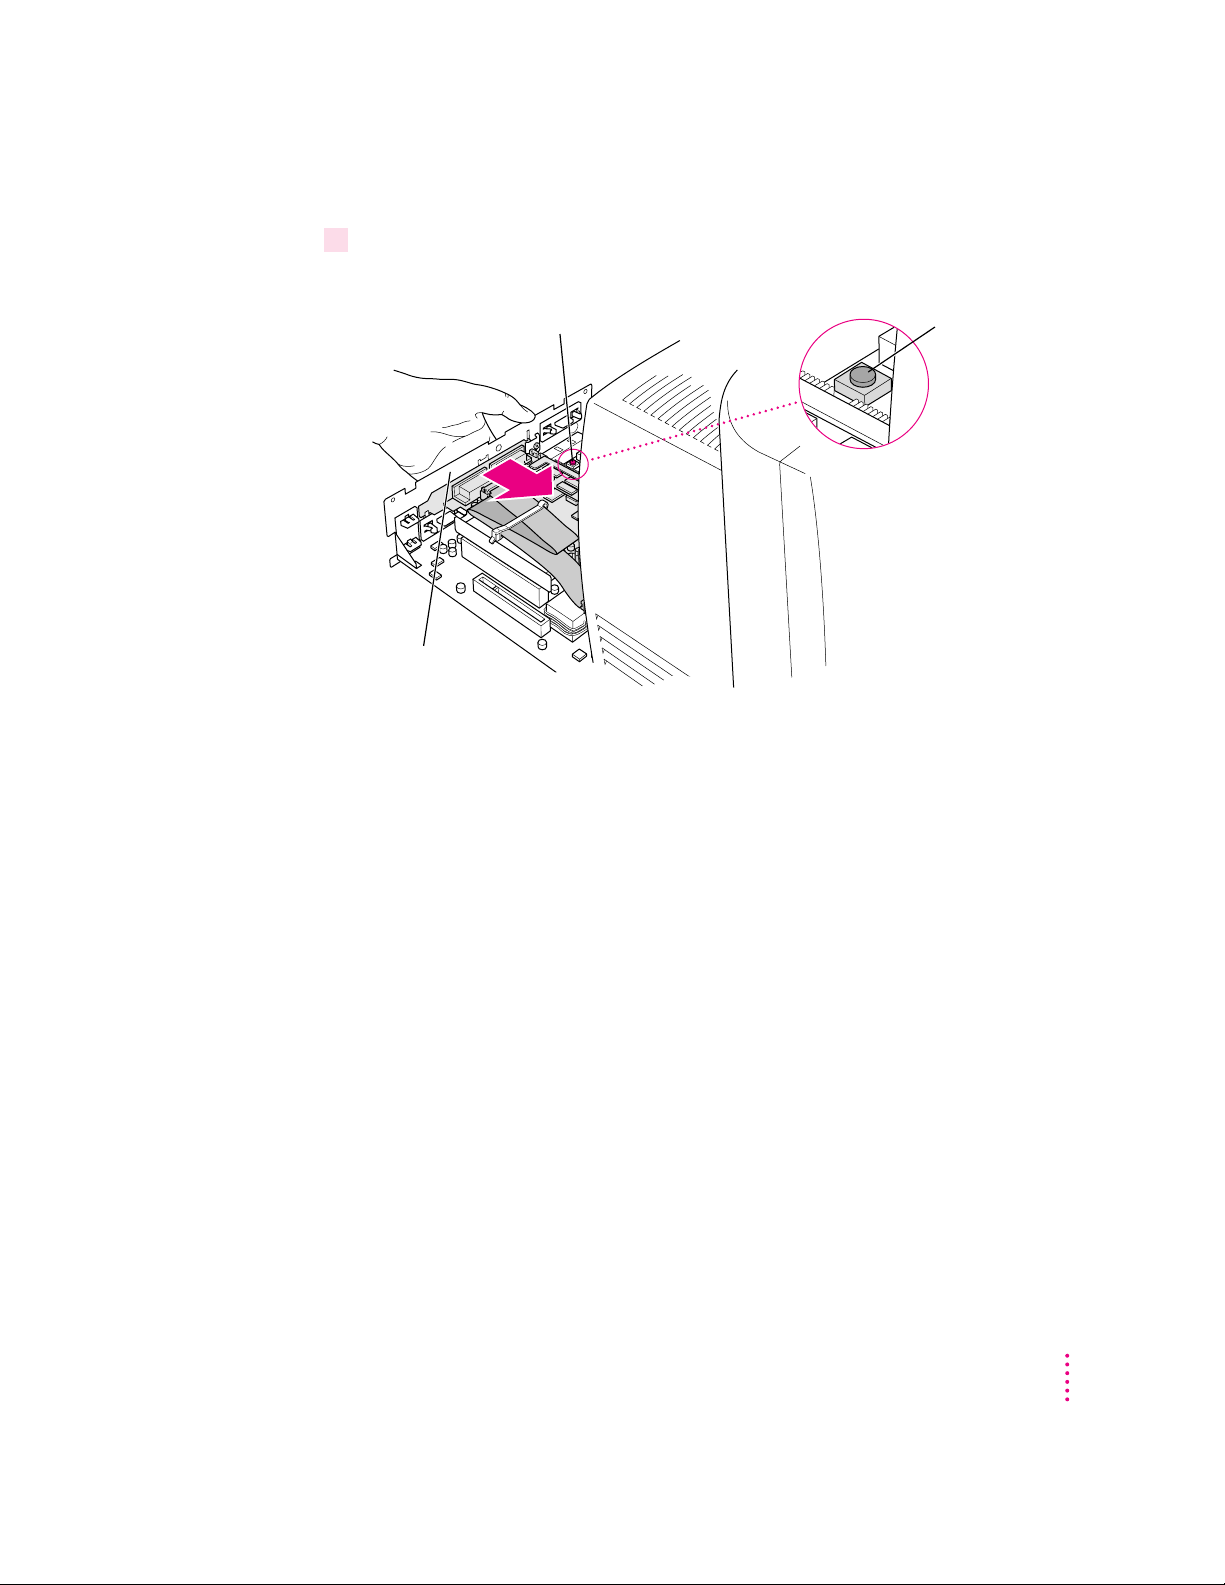
2Press the reset button on the logic board, and slide the logic board back into
the computer.
1 Press the reset button on the main logic board. Reset button
2 Gently but
firmly push the
vertical plate until the
logic board is solidly back in place.
Note: When you press the reset button, some of your computer’s software
settings will change. You may want to open the control panels for the date
and time, keyboard, and mouse to make sure that they are set the way you
want them. For more information about working with control panels, see
Macintosh Guide, the on-screen help that’s available in the Guide (h) menu.
Installing the PC Compatibility Card in a 5400 Series Macintosh Computer
23
Page 24

3Swing the wire handle back into its storage position.
Swing the handle up,
into its storage position.
4Slip the three tabs at the top of the back panel into the grooves in the computer case.
Slip the three tabs on the
back panel into the grooves
in the computer case.
24
Chapter 1
Page 25
5Snap the base of the back panel into place.
Snap the plastic back panel into place.
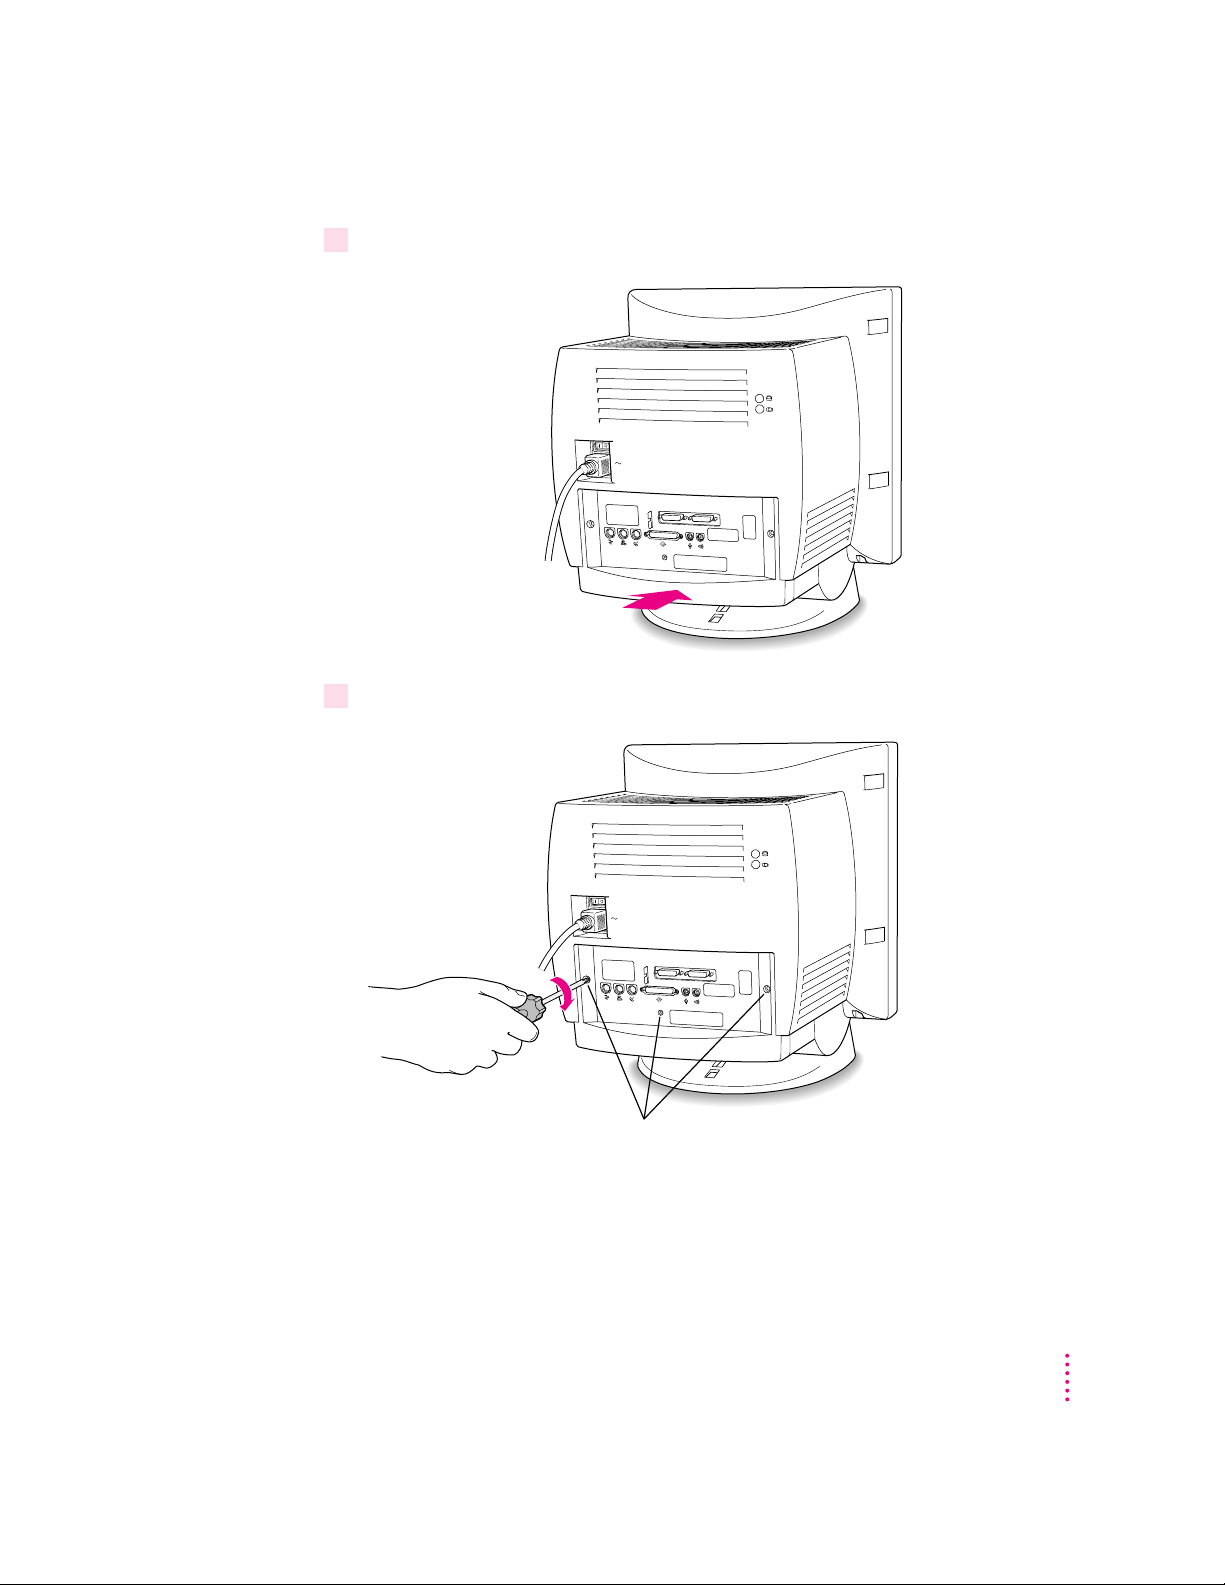
6 Reinsert the three security screws.
Reinsert these screws.
Installing the PC Compatibility Card in a 5400 Series Macintosh Computer
25
Page 26

7Plug the cables back into the computer.
You are now finished installing the card.
Reminder: When you turn on your computer, don’t forget to open the control
panels for the date and time, keyboard, and mouse to make sure that they are
set the way you want them. (Pressing the reset button on the logic board
changed these settings.) For more information about working with control
panels, see Macintosh Guide, the on-screen help that’s available in the
Guide (h) menu.
Connecting another monitor to a 5400 series Macintosh computer
You can display both the PC environment and the Mac OS environment on
the monitor that is built in to a 5400 series Macintosh computer. You can also
connect another monitor to display both environments simultaneously.
If you connect another monitor, you see the Mac OS environment on the builtin monitor and the PC environment on the other one. You can connect any
Macintosh- or PC-compatible monitor (with the proper cable adapter, available
from your monitor vendor or Apple-authorized dealer or service provider).
To connect another monitor, plug the middle connector on the loopback cable
into the port on the PC Compatibility Card. Then connect the monitor cable
to the short end of the loopback cable.
26
Chapter 1
Note: If you want to use a multiple-scan monitor from a manufacturer other
than Apple to display the PC environment, you also need to use a VGA-toMacintosh adapter (available from your computer vendor). Connect this
adapter between the monitor’s cable and the loopback cable.
WARNING
Do not plug a monitor into the joystick port that comes on
some models of the PC Compatibility Card, and do not plug a joystick
into a monitor port (marked with the icon ™). Serious damage can
result to your equipment.
Page 27

To connect another monitor, follow these two steps:
1Plug the middle connector on the loopback cable into the monitor port on the
PC Compatibility Card and tighten the thumbscrews.
Attach the middle
connector on the
loopback cable to the
26-pin port on the
PC Compatibility Card.
2Plug the connector on the short end of the cable into the cable for the monitor that you
want to use with the PC environment.
Attach the short
connector on the
loopback cable to the
second monitor’s cable.
The long connector
remains unplugged.
The long connector is only used with other computer models, and should
remain unplugged.
Installing the PC Compatibility Card in a 5400 Series Macintosh Computer
27
Page 28

Connecting a PC game controller
Some models of the PC Compatibility Card come with a game controller port.
To connect a PC game controller, such as a joystick, remove the plastic cover
on the game controller port; then plug your game controller into the port.
The joystick port is marked with the icon.
Remove the port cover before plugging a
game controller into the joystick port. Leave
the port cover on if you are not going to
attach a game controller.
Plug the game controller
into the joystick port.
Game controller
What’s next?
WARNING
Do not plug a monitor into the joystick port, and do not plug a
joystick into a monitor port (marked with the icon ™). Serious damage
can result to your equipment.
Go next to Chapters 4 through 7 of the PC Compatibility Card User’s Manual
for instructions on installing and using your software.
For information on connecting a mouse, printer, MIDI device, modem or
other serial device, or connecting to a network, see Chapter 3, “Connecting
Monitors and Other Equipment,” in the PC Compatibility Card User’s Manual.
28
Chapter 1
Page 29

Installing the PC Compatibility Card
2
in a 6400 Series Macintosh Computer
This chapter describes how to install the PC Compatibility Card hardware in
a 6400 series Macintosh computer, such as the Macintosh Performa 6400 or
the Power Macintosh 6400.
IMPORTANT
Card hardware is already installed. Skip ahead to the section “Connecting
Monitors and Other Equipment” later in this chapter. If you want to install
additional memory on your card, see the PC Compatibility Card User’s Manual.
If you received this manual with a computer, the PC Compatibility
29
Page 30

What you need
Before beginning the installation process, make sure you have all the parts
and tools that are necessary to install the card in your computer. To install the
card in a 6400 series Macintosh computer, you need the PC Compatibility
Card, the internal PC audio/video assembly, and the adhesive film. You also
need a Phillips screwdriver.
Adhesive film
PC Compatibility Card
Internal PC audio/video assembly
You won’t need the cable clamp, the CD audio cables, the plastic access port
cover, or the metal retainer shown below. Also, the loopback cable is only
necessary if you plan to attach two monitors to your computer.
30
Chapter 2
Cable clamp
Loopback cable
CD audio cables
Plastic access
port cover
Metal retainer
Page 31

Installing the PC Compatibility Card hardware
There are several steps to installing your PC Compatibility Card hardware:
m opening the computer
m temporarily removing the video input card if there is one installed
m installing the internal PC audio/video assembly
m installing the card
m closing the computer
Opening the computer
IMPORTANT
To avoid generating static electricity (from your body) that may
damage components, do not walk around the room until you have completed
the installation of the card and closed the computer. Additionally, move the
logic board as little as possible while it is outside the computer case.
1Shut down your computer by choosing Shut Down from the Special menu.
You can also press the Power key (marked with a π) on the keyboard.
2Unplug all the cables except the power cord from the computer (including the cable that
connects your keyboard to the computer).
Leaving the power cord plugged in helps protect the computer from
electrostatic discharge damage. You’ll unplug the power cord later.
Installing the PC Compatibility Card in a 6400 Series Macintosh Computer
31
Page 32

3With a Phillips screwdriver, remove the two screws shown here from the computer’s
back panel.
Remove these
two screws.
Leave the power cord plugged
Do not remove this screw.
in for now. You’ll unplug it later.
32
Chapter 2
Page 33

4 Touch the recessed metal parts in the back panel to discharge static electricity from
your body.
Always do this before you touch any parts or install any components inside
the computer. This discharges static electricity from your body and helps
protect components inside the computer from being damaged.
Touch the metal
parts inside the
recessed area.
Installing the PC Compatibility Card in a 6400 Series Macintosh Computer
33
Page 34

5Unplug the power cord from your computer.
You can unplug the power cord now that you discharged static electricity in
the previous step.
Unplug the power
cord from the back
of the computer.
34
Chapter 2
Page 35

6Grasping the two plastic tabs, gently pull the logic board all the way out of the computer.
Gently but firmly
pull the logic board
all the way out of
the computer.
7 Once the logic board is all the way out, set it on a clean, flat, stable surface. Rest the end
of the board on a thick magazine or a thin book to protect the components underneath.
Rest the logic board on a clean, flat, stable surface.
Place a thick magazine under this
end of the logic board to help
protect the components
underneath.
ws
e
N
d
orl
W
n
o
i
t
a
lustr
l
I
Vol. 1, No. 1
Installing the PC Compatibility Card in a 6400 Series Macintosh Computer
35
Page 36

Removing the video input card and the PCI port cover
If you have a video input card already installed, you need to remove
it temporarily to give yourself more room while you install the
PC Compatibility Card.
1Unscrew the screw on the front of the vertical plate that holds the video input card in
place, and remove the card as shown. (You’ll reinstall the card later.)
Skip this step if there is not a video input card installed on your logic board.
Video input card If you have a video input card installed,
you will need to remove it to give yourself
room to install the PC Compatibility Card
in the lower PCI slot.
Video-in slot
Screw
36
Chapter 2
Page 37

2 Remove the screw that holds the lower port cover in place. Hold your finger under the
screw to catch it and the port cover when they come loose.
Try not to let the port cover or the screw fall onto the logic board.
Remove the screw that holds the lower port cover in place.
Position your hand so that the screw and the
port cover do not fall onto the logic board.
IMPORTANT
The PC Compatibility Card should only be installed in the
bottom PCI slot. Be sure to remove the lower port cover, not the upper one.
If you already have a PCI card installed in the bottom PCI slot, remove it
now, and then reinstall it in the top slot after you have finished installing the
PC Compatibility Card. For instructions on how to remove the PCI card,
refer to the manual that came with the card.
Installing the PC Compatibility Card in a 6400 Series Macintosh Computer
37
Page 38

3 Remove the lower port cover and set it aside.
You won’t need the port cover for the rest of these instructions, but save it
in case you ever remove the PC Compatibility Card and need to cover the
port again.
Remove the lower port cover.
38
Installing the internal PC audio/video assembly
1Pick up the internal PC audio/video assembly, and unfold the two folds in the cable.
Unfold the folds near each connector so that the cable is straight.
Chapter 2
Page 39

2 Remove the rubber block from the large end of the internal PC audio/video assembly.
The rubber block is glued to the top of the connector, but you can peel
it off easily with your fingers. The rubber block must be removed for
this installation.
Peel off the rubber block with your fingers.
3Plug the large end of the internal PC audio/video connector into the socket on the
computer’s main logic board, and fold the cable near the connector as shown in the
illustration below.
Pinch the fold in the cable so that the cable lies flat.
Small card Connector
The ribbon cable should extend from the bottom of the connector as shown
here. If the ribbon cable extends from the top of the connector, unplug
the cable from the small card, and plug the connector on the
other end of the ribbon cable into the small card.
(Side view)
Fold the ribbon cable as shown here.
Small card Ribbon cable
Installing the PC Compatibility Card in a 6400 Series Macintosh Computer
Connectors
39
Page 40

4Peel the adhesive film off of its backing, and apply it to the top of the connector, as
shown below.
Apply the adhesive film to the small
card as shown.
40
Chapter 2
Page 41

Installing the card
1 Remove the PC Compatibility Card from its static-proof bag.
Hold the card by its edges to avoid touching the components on the card.
2 Insert the card into the lower PCI slot. Make sure the PC audio/video assembly cable lies
underneath the card, and that the card fence matches up to the opening where the port
cover was.
The card fence should slide through the slot in the adapter fence.
Card fenceSlot in adapter fenceLower PCI slot
Adapter fence
Installing the PC Compatibility Card in a 6400 Series Macintosh Computer
41
Page 42

3While supporting the adapter fence with one hand, push the card until it snaps into place.
Don’t force the card. If you meet resistance, pull it out and try again.
Card fence
Adapter fence
4 Reinsert the screw into the PC Compatibility card fence and screw it into place.
42
To help insert the screw, push the card fence forward with your thumb so the
screw holes align. Insert the screw until it’s somewhat steady, hold your thumb
underneath it (to prevent it from falling), and use the screwdriver to tighten it.
You may find it helpful to
support the screw with the
thumb of your other hand.
Chapter 2
Page 43

5 Insert the small end of the internal PC audio/video assembly into the socket in the corner
of the PC Compatibility Card.
Socket
6 Fold the slack in the internal PC audio/video assembly into the shape of an L on top of
the card. Firmly pinch the fold as shown below.
IMPORTANT
Do not press down too hard on the top of the card. Applying
excessive pressure to the card may damage the card and your logic board.
Fold the cable in an L shape and pinch it firmly here.
Installing the PC Compatibility Card in a 6400 Series Macintosh Computer
43
Page 44

7Fold down the cable as shown below, so that the cable lies flat along the top of the card.
You should be able to pinch both folds between your thumb and forefinger so
that the cable lies flat.
IMPORTANT
Do not press down too hard on the top of the card. Applying
excessive pressure to the card may damage the card and your logic board.
Fold down the cable so that it lies flat against the card.
8If you removed a PCI card from the bottom PCI slot, reinstall it now in the top PCI slot.
Remove the screw that holds the upper port cover in place, and remove the
port cover. Then insert the PCI card into the top PCI slot. For detailed
instructions, refer to the manual that came with the PCI card.
44
Chapter 2
Page 45

9If you removed a video input card from the logic board, reinsert it now.
Video input card If you removed
a video input
card, reinstall it.
Video-in slot
Screw
Installing the PC Compatibility Card in a 6400 Series Macintosh Computer
45
Page 46

Closing the computer
1Grasping the plastic tabs on the vertical plate, orient the logic board vertically and slide
it into the guide rails on the left inside of the computer.
Align and insert the logic
board so that it engages
the guides on the top
and bottom of the
computer chassis.
46
Chapter 2
Page 47

2Press the reset button on the logic board, and slide the logic board back into
the computer until it snaps into place.
1 Press the reset button.
2 Gently but firmly push
on the vertical plate until
the logic board is solidly
back in place.
Note: When you press the reset button, some of your computer’s software
settings will change. After you finish this installation and turn on your
computer, you may want to open the control panels for the date and time,
keyboard, and mouse to make sure that they are set the way you want. For
more information about working with control panels, see the information
about customizing your computer in Macintosh Guide, available in the
Guide (h) menu.
Installing the PC Compatibility Card in a 6400 Series Macintosh Computer
47
Page 48

3 Reinsert the two screws.
Reinsert these
two screws.
4 Reconnect the power cord.
48
Plug the power
cord into the back
of the computer.
Chapter 2
Page 49

5 Reconnect the other cables (except those for your monitor) back into the computer.
For information about properly connecting one or more monitors, see the
next section, “Connecting Monitors and Other Equipment.”
You are now finished installing the card.
Reminder: When you turn on your computer, don’t forget to open the control
panels for the date and time, keyboard, and mouse to make sure that they are
set the way you want them. (Pressing the reset button on the logic board
changed these settings.) For more information about working with control
panels, see the information about customizing your computer in Macintosh
Guide, the on-screen help that’s available in the Guide (h) menu.
Connecting monitors and other equipment
You can use a single monitor to display both the PC environment and the
Mac OS environment, or you can simultaneously display both environments
on two monitors.
Connecting a single monitor
If you’re using a single monitor with your Macintosh computer, simply
connect it to the computer’s built-in monitor port.
Attach the monitor cable to the
built-in monitor port on the back
of your computer.
Installing the PC Compatibility Card in a 6400 Series Macintosh Computer
49
Page 50

Connecting two monitors
If you connect two monitors, you see the Mac OS environment on one and
the PC environment on the other. You can use any combination of Macintoshand/or PC-compatible monitors (with the proper cable adapters, available
from your monitor vendor or Apple-authorized dealer or service provider).
To use two monitors, you connect one to your Macintosh built-in monitor
port. Then you plug the middle connector on the loopback cable into the port
on the PC Compatibility Card, and connect the second monitor to the short
connector on the loopback cable.
This connector (“short connector”)
attaches to your monitor cable.
This connector
(“middle connector”)
attaches to the
PC Compatibility Card.
This connector (“long connector”)
usually remains unplugged, or
attaches to an optional video card
installed in the second PCI slot.
Multiple-scan monitor: If you want to use a multiple-scan monitor from a
manufacturer other than Apple to display the PC environment, you also need
to use a VGA-to-Macintosh adapter (available from your computer vendor).
You connect this adapter between the monitor’s cable and the short connector
on the loopback cable.
50
Chapter 2
Page 51

To connect two monitors, follow these steps:
1Connect the monitor you want to use for the Mac OS environment to the monitor port
(™) on the back panel of your computer.
Attach the monitor cable
to the built-in monitor
port on the back of your
computer (or a video
card, if one is installed).
WARNING
Do not plug a monitor into the joystick port that comes on
some models of the PC Compatibility Card, and do not plug a joystick
into a monitor port (marked with the icon ™). Serious damage can
result to your equipment.
2Plug the middle connector on the loopback cable into the port on the PC Compatibility
Card and tighten the thumbscrews.
Attach the middle
connector on the
loopback cable to the
26-pin port on the
PC Compatibility Card.
Installing the PC Compatibility Card in a 6400 Series Macintosh Computer
51
Page 52

3Plug the connector on the short end of the cable into the cable for the monitor that you
want to use with the PC environment.
Attach the short
connector on the
loopback cable to the
second monitor’s cable.
Long connector
In most cases, you leave the long connector on the loopback cable unplugged.
But if your computer has an additional video card installed in the second PCI
slot, you can plug the long connector into it. This will allow you to switch the
second monitor between the PC environment and the Mac OS environment.
Connecting a PC game controller
Some models of the PC Compatibility Card come with a joystick port. To
connect a PC game controller, such as a joystick, remove the plastic cover on
the joystick port; then plug your game controller into the port.
52
Chapter 2
The joystick port is marked with the icon. Remove
the port cover before plugging a game controller into
the joystick port. Leave the port cover on if you are
not going to attach a game controller.
Plug the game controller
into the joystick port.
Game controller
WARNING
Do not plug a monitor into the joystick port, and do not plug a
joystick into a monitor port (marked with the icon ™). Serious damage
can result to your equipment.
Page 53

What’s next?
Go next to Chapters 4 through 7 of the PC Compatibility Card User’s Manual
for instructions on installing and using your software.
For information on connecting a mouse, printer, MIDI device, modem or
other serial device, or connecting to a network, see Chapter 3, “Connecting
Monitors and Other Equipment,” in the PC Compatibility Card User’s Manual.
Installing the PC Compatibility Card in a 6400 Series Macintosh Computer
53
Page 54

Page 55

Installing the PC Compatibility Card
3
in a Modular Desktop Macintosh Computer
This chapter describes how to install the PC Compatibility Card hardware in
a Macintosh computer that has a PCI expansion slot and looks like the
illustration below.
Some Macintosh models that look like this do not have a PCI expansion slot
and are not compatible with the PC Compatibility Card. If you are not sure if
your computer model has a PCI expansion slot, refer to the technical
specifications that came with your computer.
IMPORTANT
Card hardware is already installed. Skip ahead to “Connecting Monitors and
Other Equipment” later in this chapter. If you want to install additional
memory on your card, see the PC Compatibility Card User’s Manual.
If you received this manual with a computer, the PC Compatibility
55
Page 56

What you need
Before beginning the installation, make sure you have all the necessary parts
and tools. You need the PC Compatibility Card, the internal PC audio/video
assembly, and the cable clamp. You also need a Phillips screwdriver.
Cable clamp
PC Compatibility Card
Internal PC audio/video assembly
You won’t need the adhesive film, CD audio cables, plastic access port cover,
or metal retainer shown below. Also, the loopback cable is only necessary if
you plan to attach two monitors to your computer.
56
Chapter 3
Adhesive film
Loopback cable
CD audio cables
Plastic access
port cover
Metal retainer
Page 57

Installing the PC Compatibility Card hardware
There are several steps to installing your PC Compatibility Card hardware:
m opening the computer
m installing the card
m installing the internal PC audio/video assembly
m closing the computer
Opening the computer
IMPORTANT
To avoid generating static electricity that may damage
components, do not walk around the room until you have completed the
installation of the expansion card or memory and closed the computer.
Additionally, move the logic board as little as possible while it is outside the
computer case.
1Shut down your computer by choosing Shut Down from the Special menu.
You can also press the Power key (marked with a π) on the keyboard.
2Unplug all the cables except the power cord from the computer (including the cable that
connects your keyboard to the computer).
Leaving the power cord plugged in helps protect the computer from damage
caused by electrostatic discharge. You’ll unplug the power cord later.
Installing the PC Compatibility Card in a Modular Desktop Macintosh Computer
57
Page 58

3Place your thumbs on the two tabs at the top of the computer’s back panel, and
press down.
Leave the power cord plugged in for now. You’ll unplug it later.
4Pulling gently, swing the panel down, and slip it out.
58
Remove the back panel.
5To discharge static electricity from your body that could damage the components inside,
touch the metal vertical plate on the back of the computer.
Touch any metal on the
exposed metal plate.
Chapter 3
Page 59

6If there are security screws on the vertical plate on the back of the computer, remove
them with a screwdriver.
If there are security screws, remove both screws from the vertical plate.
7Unplug the power cord from your computer.
Unplug the power
cord from the back
of the computer.
8Gently pull down on the wire handle and swing it out to unlock it from its storage
position. Then grasp the handle and gently pull the logic board out of the computer.
The vertical plate and the logic board to which it’s attached slide all the way
out of the computer.
Installing the PC Compatibility Card in a Modular Desktop Macintosh Computer
59
Page 60

9Place the logic board on a stable, clean, flat surface, and use a thick magazine to prop up
one end of the logic board as shown below.
The magazine helps protect the components on the bottom of the logic board
during the installation.
I
l
l
u
s
t
r
a
tio
n
W
orld
N
e
w
Vol. 1, No. 1
s
Rest the logic board on a clean, flat, stable surface.
Place a thick magazine under this end of the logic
board to help protect the components underneath.
60
Chapter 3
Page 61

Installing the card
1Unscrew the retainer clamp screw from the front of the vertical plate, while holding in
place the clamp on the back.
Avoid letting the retainer clamp fall onto the logic board.
While holding
the retainer clamp
in place, remove the
screw that secures
the clamp to the
vertical plate.
Vertical plate
2 Lift out the retainer clamp and set it aside.
You’ll need the retainer clamp later, after you install the card.
Vertical plate
Remove the retainer clamp.
Installing the PC Compatibility Card in a Modular Desktop Macintosh Computer
61
Page 62

3 Remove the plastic access port cover from the vertical plate.
Squeeze together the two plastic tabs holding the access port cover in place;
then pull the access port cover off from the outside.
Squeeze the two plastic tabs together.
Vertical plate
Metal retainer
PCI slot
62
Plastic access port cover
Vertical plate
Chapter 3
Page 63

4 Remove the metal retainer from the inside of the vertical plate.
Vertical plate Metal retainer
5 Remove the PCI card adapter from the main logic board.
PCI card adapter
PCI slot
6 Remove the PC Compatibility Card from its static-proof bag.
Hold the card by its edges to avoid touching the components on the card.
Installing the PC Compatibility Card in a Modular Desktop Macintosh Computer
63
Page 64

7Connect the PC Compatibility Card and the PCI card adapter.
Place the adapter on top of a magazine on a firm surface. (Make sure the
magazine is thick enough to protect your working surface from being
scratched by the metal pins on the adapter.)
Press the card firmly into the adapter. You may find it helpful to place the
card and the adapter near the edge of a table with the metal edge of the card
hanging over the end of the table. In this position, you can easily insert the
card completely into the adapter.
Place the adapter on
top of a magazine on
a firm surface.
on
i
t
a
r
t
s
u
l
Il
Vol. 1, No. 1
Wor
s
w
e
N
d
l
PC Compatibility Card
PCI card adapter
64
Chapter 3
8Align the PC Compatibility Card and the adapter over the PCI slot.
PCI access port
Vertical plate
PCI slot
Page 65

9 Insert the adapter into the PCI slot on the main logic board. Make sure the metal fence on
the PC Compatibility Card engages the hook on the vertical plate and that the connectors
on the card protrude through the PCI access port opening.
The card is properly seated when the card’s metal
“fence” engages this hook on the vertical plate.
Vertical plate Card fence
If you meet resistance, pull the adapter out and try again. To see if the
adapter is properly connected, lift it gently. If it resists and stays in place,
it’s connected.
Installing the PC Compatibility Card in a Modular Desktop Macintosh Computer
65
Page 66

10 Insert the retainer clamp back into the hole and hold it there while you screw it
into place.
Replace the retainer clamp.
Vertical plate
66
Screw the retainer
clamp in place.
Vertical plate
Chapter 3
Page 67

Installing the internal PC audio/video assembly
1Pick up the internal PC audio/video assembly, and unfold the two folds in the cable.
Unfold the folds near each connector so that the cable is straight.
2Plug the large end of the internal PC audio/video connector into the socket on the
computer’s main logic board.
Internal PC audio/video assembly
Internal PC audio/video socket
Installing the PC Compatibility Card in a Modular Desktop Macintosh Computer
67
Page 68

3 Insert the small end of the internal PC audio/video assembly into the socket in the corner
of the PC Compatibility Card.
Internal PC audio/video socket
68
Chapter 3
Page 69

4 Fold the slack in the internal PC audio/video assembly cable into the shape of a Z on
top of the card. Firmly pinch the two new folds so that the cable lies flat along the top
of the card.
IMPORTANT
Do not press down too hard on the top of the card. Applying
excessive pressure to the card may damage the card and your logic board.
Once you have folded the slack in the cable into a loose Z shape on top of the
card, firmly pinch the new folds in the cable so that it lies flat.
Logic board connector
Fold the cable in a Z shape,
as indicated by the dashed line.
PCI card adapter (shown tinted here)
This fold in the cable should line up
with the end of the PCI card adapter.
(Top view)
Pinch these two new folds in the cable so that it lies flat.
Vertical plate
Vertical plate
PCI card adapter
Logic board connector
Installing the PC Compatibility Card in a Modular Desktop Macintosh Computer
69
Page 70

5Slip the cable clamp over the three folds in the internal PC audio/video assembly cable.
Then pinch the open ends of the cable clamp to close it and hold the folds in place.
Cable clamp
Pinch the open
ends of the cable
clamp to close it.
Make sure the tab on the
cable clamp is on this side
of the cables and points down.
6Make sure the folded cable lies flat along the top of the card.
If necessary, pinch the folds in the cable more to flatten the folded cable.
Sheet metal tabs on
vertical plate
Vertical plate Logic board connector
(Side view)
The folded, clamped cable should
not rise up above the bottom of
the sheet metal tabs on the vertical
plate (approximately 3/32" below
the top of the vertical plate).
Folded, clamped cable
70
Chapter 3
Page 71

Closing the computer
1Slip the base of the logic board into the guide rails inside the computer’s case.
Make sure the logic board slides
into the guides that are on both
sides of the computer’s interior.
Installing the PC Compatibility Card in a Modular Desktop Macintosh Computer
71
Page 72

2Press the reset button, and slide the logic board back into the computer.
1 Press the reset button on the main logic board.
2 Gently but
firmly push the
vertical plate until the
logic board is solidly back in place.
Reset button
Note: When you press the reset button, some of your computer’s software
settings will change. You may want to open the control panels for the date and
time, keyboard, and mouse to make sure that they are set the way you want
them. For more information about working with control panels, see the
information about customizing your computer in Macintosh Guide, the onscreen help that’s available in the Guide (h) menu.
72
3Swing the wire handle back into its storage position.
Swing the handle up,
into its storage position.
Chapter 3
Page 73

4If you removed security screws earlier, reinsert them now.
Reinstall security screws here.
5Slip the three hooks at the base of the back panel into the grooves on the
computer case.
Slip the three hooks on the back panel
into the grooves in the computer case.
6Swing the back panel up and snap it into place.
Snap the plastic back panel into place.
Installing the PC Compatibility Card in a Modular Desktop Macintosh Computer
73
Page 74

7Plug the cables back into the computer, and reconnect the power cord.
Your computer is now ready to turn on and use.
WARNING
Never turn on your computer unless all of its internal and
external parts are in place. Operating the computer when it is open or
missing parts can be dangerous, and can damage your computer.
Reminder: When you turn on your computer, don’t forget to open the control
panels for the date and time, keyboard, and mouse to make sure that they are
set the way you want them. (Pressing the reset button on the logic board
changed these settings.) For more information about working with control
panels, see the information about customizing your computer in Macintosh
Guide, the on-screen help that’s available in the Guide (h) menu.
Connecting monitors and other equipment
You can use a single monitor to display both the PC environment and the
Mac OS environment, or you can simultaneously display both environments
on two monitors.
Connecting a single monitor
If you’re using a single monitor with your Macintosh, simply connect it to the
computer’s built-in monitor port.
74
Attach the monitor cable to the
built-in monitor port on the back
of your computer.
Chapter 3
Page 75

Connecting two monitors
If you connect two monitors, you see the Mac OS environment on one and
the PC environment on the other. You can use any combination of Macintoshand/or PC-compatible monitors (with the proper cable adapters, available
from your monitor vendor or Apple-authorized dealer or service provider).
To use two monitors, you connect one to your Macintosh built-in monitor
port. Then you plug the middle connector on the loopback cable into the port
on the PC Compatibility Card, and connect the second monitor to the short
connector on the loopback cable.
This connector (“short connector”)
attaches to your monitor cable.
This connector (“middle connector”)
attaches to the PC Compatibility Card.
This connector (“long connector”)
is left disconnected.
Multiple-scan monitor: If you want to use a multiple-scan monitor from a
manufacturer other than Apple to display the PC environment, you also need
to use a VGA-to-Macintosh adapter (available from your computer vendor).
You connect this adapter between the monitor’s cable and the short connector
on the loopback cable.
Installing the PC Compatibility Card in a Modular Desktop Macintosh Computer
75
Page 76

To connect two monitors, follow these steps:
1Connect the monitor you want to use for the Mac OS environment to the monitor port
(™) on the back panel of your computer.
Attach the monitor cable
to the built-in monitor
port on the back of your
computer (or a video
card, if one is installed).
WARNING
Do not plug a monitor into the joystick port that comes on
some models of the PC Compatibility Card, and do not plug a joystick
into a monitor port (marked with the icon ™). Serious damage can
result to your equipment.
2Plug the middle connector on the loopback cable into the port on the PC Compatibility
Card and tighten the thumbscrews.
Attach the middle
connector on the
loopback cable to the
26-pin port on the
PC Compatibility Card.
76
Chapter 3
Page 77

3Plug the connector on the short end of the cable into the cable for the monitor that you
want to use with the PC environment.
Attach the short
connector on the
loopback cable
to the second
monitor’s cable.
Long connector
Leave the long connector on the loopback cable unplugged.
Connecting a PC game controller
Some models of the PC Compatibility Card come with a joystick port. To
connect a PC game controller, such as a joystick, remove the plastic cover on
the joystick port; then plug your game controller into the port.
The joystick port is marked with the icon. Remove the port cover
before plugging a game controller into the joystick port. Leave the
port cover on if you are not going to attach a game controller.
Plug the game controller
into the joystick port.
Game controller
WARNING
Do not plug a monitor into the joystick port, and do not plug a
joystick into a monitor port (marked with the icon ™). Serious damage
can result to your equipment.
Installing the PC Compatibility Card in a Modular Desktop Macintosh Computer
77
Page 78

What’s next?
Go next to Chapters 4 through 7 of the PC Compatibility Card User’s Manual
for instructions on installing and using your software.
For information on connecting a mouse, printer, MIDI device, modem or
other serial device, or connecting to a network, see Chapter 3, “Connecting
Monitors and Other Equipment,” in the PC Compatibility Card User’s Manual.
78
Chapter 3
Page 79

PC Co
Installation
Installation instructions for newer Macintosh models
not covered in the User’s Manual
m
patibility Card
G
uide
Page 80

K Apple Computer, Inc.
© 1996 Apple Computer, Inc. All rights reserved.
Under the copyright laws, this manual may not be copied, in whole or in part, without the
written consent of Apple.
The Apple logo is a trademark of Apple Computer, Inc., registered in the U.S. and other
countries. Use of the “keyboard” Apple logo (Option-Shift-K) for commercial purposes without
the prior written consent of Apple may constitute trademark infringement and unfair
competition in violation of federal and state laws.
Every effort has been made to ensure that the information in this manual is accurate. Apple is
not responsible for printing or clerical errors.
Apple Computer, Inc.
1 Infinite Loop
Cupertino, CA 95014-2084
408-996-1010
http://www.apple.com
Apple, the Apple logo, Macintosh, Performa, and Power Macintosh are trademarks of Apple
Computer, Inc., registered in the U.S. and other countries.
Adobe, Acrobat, Adobe Photoshop, and PostScript are trademarks of Adobe Systems
Incorporated or its subsidiaries and may be registered in certain jurisdictions.
Helvetica and Times are registered trademarks of Linotype-Hell AG and/or its subsidiaries.
NuBus is a trademark of Texas Instruments.
Simultaneously published in the United States and Canada.
Mention of third-party products is for informational purposes only and constitutes neither an
endorsement nor a recommendation. Apple assumes no responsibility with regard to the
performance or use of these products.
Page 81

Contents
Introduction v
1 Installing the PC Compatibility Card in a 5400 Series
Macintosh Computer 1
What you need 2
Installing the PC Compatibility Card hardware 4
Connecting another monitor to a 5400 series Macintosh computer 26
Connecting a PC game controller 28
What’s next 28
2Installing the PC Compatibility Card in a 6400 Series
Macintosh Computer 29
What you need 30
Installing the PC Compatibility Card hardware 31
Connecting monitors and other equipment 49
What’s next 53
iii
Page 82

3 Installing the PC Compatibility Card in a Modular Desktop
Macintosh Computer 55
What you need 56
Installing the PC Compatibility Card hardware 57
Connecting monitors and other equipment 74
What’s next 78
iv
Contents
Page 83

Introduction
This booklet describes how to install the PC Compatibility Card hardware in
three newer Macintosh computer models. It also describes how to connect
equipment—such as a monitor—to these models for use with the card.
If you want to install the PC Compatibility Card in a Power Macintosh 7200,
7500, 7600, 8500, or 9500, see the installation instructions in the PC
Compatibility Card User’s Manual.
IMPORTANT
Card hardware is already installed. If you want to install additional memory
on your card, see the PC Compatibility Card User’s Manual.
WARNING
complex. Unless you are comfortable installing components inside
computers, Apple recommends that you have the PC Compatibility Card
installed by your Apple-authorized dealer (who may charge an
installation fee).
To avoid damaging the computer and the card, do not attempt to install
the card, install memory, or connect the cables without first reading
this documentation.
If you received this manual with a computer, the PC Compatibility
The installation of the PC Compatibility Card is technically
v
Page 84

Go to Chapter 1 if you have a 5400 series Macintosh computer (shown
below), such as the Macintosh Performa 5400, Macintosh Performa 5420, and
the Power Macintosh 5400.
Go to Chapter 2 if you have a 6400 series Macintosh computer (shown
below), such as the Macintosh Performa 6400, the Power Macintosh 6400, or
any tower Macintosh computer with two PCI (peripheral component
interconnect) expansion slots.
vi
Introduction
Page 85

Go to Chapter 3 if you have a Macintosh computer with a PCI expansion slot
that looks like the illustration below.
Some Macintosh models that look like this one do not have a PCI expansion
slot and are not compatible with the PC Compatibility Card. If you are not
sure if your computer model has a PCI expansion slot, check the technical
specifications information that came with your computer.
vii
 Loading...