

Page 1

K
Service Source
PowerBook G3 Series
(Bronze Keyboard)
Page 2

K
Service Source
Basics
PowerBook G3 Series (Bronze
Keyboard)
Page 3
Basics Product Overview - 1
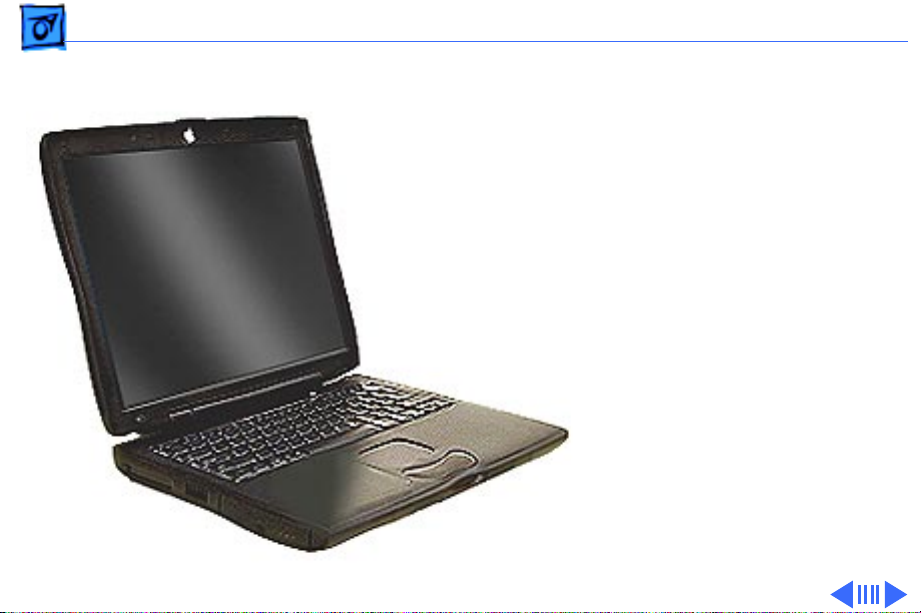
Product Overview
The newest PowerBooks in
the PowerBook G3 Series
combine all the features of
the previous PowerBook G3
Series computers in a
slimmer, lighter design.
To differentiate this model
from earlier models, check
for the bronze see-through
keyboard and a small, white
Apple logo on the inside top
of the display bezel.
Page 4

Basics Product Overview - 2
Features
The features of the PowerBook G3 Series (Bronze Keyboard)
include:
• PowerPC G3 microprocessor running at clock speeds of
333 or 400 MHz
• Backside L2 cache of up to 1 MB of fast static RAM
• Two standard SO-DIMM expansion slots for SDRAM
modules and 64 MB minimum of SDRAM installed,
expandable to 384 MB total
• Built-in hard drive of 4 or 6 GB
• 14.1-inch TFT display with XGA resolution (1024 x 768
pixels)
• Standard VGA video connector for external video monitor
with XGA resolution, and S-video connector that supports
PAL and NTSC video monitors
• 8 MB of video SDRAM
Page 5

Basics Product Overview - 3
• Built-in 2D and 3D graphics acceleration via video
circuits
• Two hot-swappable expansion bays for two batteries or
one battery and one CD-ROM drive, DVD-ROM drive, or
other IDE or PCI device
• One CardBus slot that accepts one Type II CardBus card or
PC Card
• Two USB ports for external keyboard, mouse, and other
USB devices
• One SCSI port with HDI-30 connector
• Built-in Ethernet port with RJ-45 connector for
10BaseT and 100Base-TX operation
• Infrared link for up to 4 Mbit-per-second IrDA data
transfer
• Built-in modem with 56 Kbps data rate
• Built-in microphone and speakers as well as a line-level
stereo input jack and a stereo headphone jack
Page 6

Basics Product Overview - 4
• Keyboard with embedded numeric keypad and inverted-T
arrow keys. Some function keys control the display and
speakers
• Trackpad with tap/double tap and drag features
System Configurations
At introduction in May 1999, two basic configurations of the
PowerBook G3 Series (Bronze Keyboard) are available.
With configure-to-order options, customers may customize
their computers in a variety of ways. For more information
on configurations and configure-to-order options, see the
Specifications chapter of this manual.
Page 7
Basics Product Overview - 5
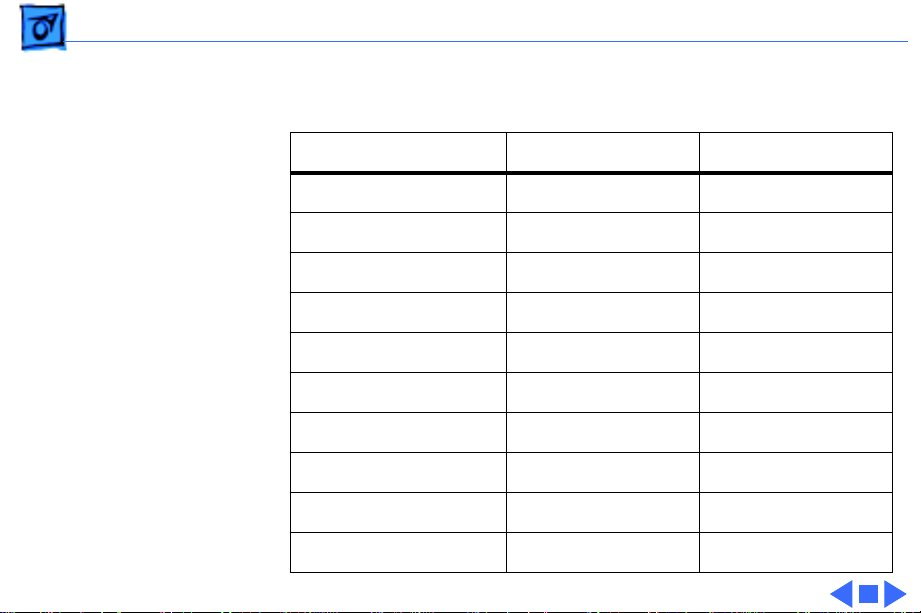
PowerBook G3 Series (Bronze K eyboard) Configurations
Introduced May 1999
M7304 M7308
Display
Processor Speed
Backside L2 Cache
Memory (SDRAM)
Video (SGRAM)
Hard Drive
CD-ROM Drive
DVD-ROM Drive
K56flex Modem
14.1 TFT 14.1 TFT
333 MHz 400 MHz
512k 1 MB
64 MB 64 MB
8 MB 8 MB
4 GB IDE 6 GB IDE
Yes No
No Yes
Yes Yes
S-video Out Yes Yes
Page 8
Basics View of Front and Right Side - 6
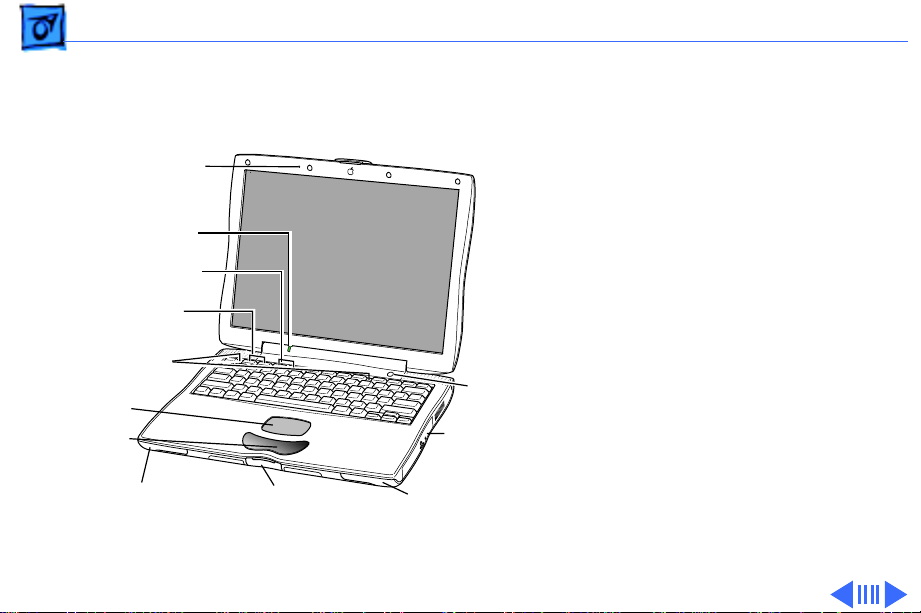
View of Front and Right Side
Microphone
Sleep Indicator
Brightness
Controls
Keyboard
Release Tabs
Trackpad
Trackpad
Button
Battery Bay
Release Lever
Volume
Controls
Display Latch
Power
Button
Expansion Bay
Module
Expansion Bay
Release Lever
The front of the computer
includes the: microphone,
sleep indicator, volume and
brightness controls,
keyboard release tabs,
trackpad and trackpad
button, battery bay release
lever, display latch, and
expansion bay release lever.
The right side includes the:
expansion bay release lever
and the power button.
Page 9

Basics View of Rear and Left Side - 7
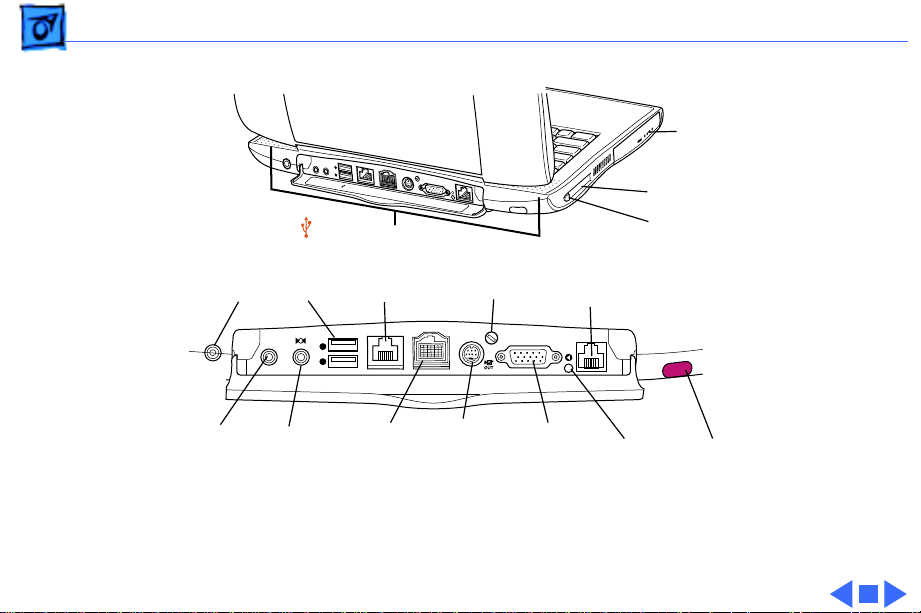
View of Rear and Left Side
The rear of the computer includes the: power adapter port,
sound output, sound input, two USB ports, Ethernet (10/
100 Base-T), SCSI port (HDI-30), external TV out port
(S-video), keyboard locking screw, external video port,
reset button, internal modem port, and infrared window.
The left side includes the PC card eject button, PC Card slot,
and battery bay.
The rear and left side of the computer is pictured on the
following page.
Page 10
Basics View of Rear and Left Side - 8
Battery
with LED
Status
Lights
PC Card Slot
PC Card
Eject Button
Reset
Button
Infrared
Window
Power
Adapter
-
Sound
Input
¯
Port
¯
USB
Ports
(2)
-
√
Sound
Output
-
√
1
2
-
√
G
Ethernet Port
(10/100
Base-T)
1
2
SCSI
Port
(HDI-30)
G
G
g
g
G
g
™
W
Æ
Æ
™
W
g
Æ
External
TV Out Port
(S-video)
Keyboard
Locking
Screw
™
W
Internal
Modem
Port
W
™
External
Video
Port
PowerBook G3 Series (Bronze Keyboard) Rear View
Page 11

Basics System Software—NewWorld ROM - 9
System Software—NewWorld ROM
The PowerBook G3 Series (Bronze Keyboard) is different
from previous Macintosh PowerBook computers in that it
has no single, large ROM that contains many components of
the Mac OS software, the 68K emulator, hardware
initialization, and the nanokernel. Instead, a small ROM
provides hardware initialization functions and provides a
mechanism to load the Mac OS ROM image into RAM. The new
software architecture that is centered around ROM-in-RAM
and its ramifications has the code name NewWorld.
ROM-in-RAM
Hardware-specific code resides in firmware (ROM) that
fits into one ROM called the boot ROM. The boot ROM includes
the code and tables needed to start up the computer, load an
Page 12

Basics System Software—NewWorld ROM - 10
operating system, and provide common hardware access
services.
All higher-level software resides in what has been
historically known as the Mac OS ROM, but with much of the
old hardware-specific code moved into the boot ROM. As
before, the Mac OS ROM can still be augmented by enablers,
the System file, and extensions.
Prior to the iMac, all Macintosh computers required a ROM
component that contained many components of the Mac OS
software. The NewWorld approach sidesteps this
requirement by copying an image of the Mac OS ROM into
RAM before the Mac OS begins operation. Once the Mac OS
begins operation, a Mac OS ROM image in RAM and an actual
Mac OS ROM behave in the same way. No new or different
software interfaces are directly accessible from the Mac OS.
During the boot process, software contained in the Mac OS
Page 13

Basics System Software—NewWorld ROM - 11
ROM file communicates with Open Firmware to collect
information about the hardware, using the Open Firmware
Client Interface.
Performance
Performance of a PowerBook computer using ROM-in-RAM
should exceed performance measurements for other
Macintosh computers with comparable CPUs and speeds due
to the improved interrupt handling with the NewWorld
approach. In addition, performance is improved due to
executing code that normally exists in ROM-in-RAM,
because the RAM devices operate faster than the ROM devices
normally used.
Page 14

Basics System Software—NewWorld ROM - 12
RAM Footprint
Because the Mac OS ROM image is stored in RAM,
approximately 3 MB of RAM is removed from availability
for other uses. In effect, a system with 64 MB of RAM
appears to have only 61 MB available. Some portion of the
missing 3 MB is offset by having fewer patches in RAM.
Data Structures and Files
The Mac OS ROM image is contained in a new file, named Mac
OS ROM, that is kept in the System Folder. The Mac OS ROM
image is exactly the same as it would be if it were an actual
Mac OS ROM, containing the high-level software, the kernel
software, and the 68K emulator.
Page 15

Basics System Software—NewWorld ROM - 13
Startup Disk Control Panel
Previous systems stored the user's selected startup device
in Parameter RAM (PRAM) when the user selected a device
in the Startup Disk control panel. This device was honored
by the Mac OS ROM unless the selected device was
unavailable or was overridden by the user.
The startup disk routine for the PowerBook computer,
rather than setting Mac OS PRAM, sets an Open Firmware
config variable called boot-device. This setting is honored by
Open Firmware unless the selected device is unavailable or
is overriden by the user.
The following keys can be pressed to override the selected
startup device:
• Command-Option-Shift-Delete: ignore the boot-device
setting and scan for alternate devices
• C: force the internal CD-ROM drive to be the startup
Page 16

Basics System Software—NewWorld ROM - 14
device
• D: force the internal hard drive to be the startup device.
Open Firmware and Startup Devices
In order for a device supported by a PCI expansion card to
participate in the startup process, the card must include an
expansion ROM containing startup firmware. Expansion
cards for startup devices must contain all the driver code
required during startup in the expansion ROM on the card.
Depending on their functions, such cards may also need to
provide support resources such as fonts.
Examples of devices needed during system startup include
display, keyboard, mouse devices, and storage devices such
as hard drives and CD-ROM drives.
Important:
If Open Firmware code is not included in the
Page 17

Basics System Software—NewWorld ROM - 15
expansion card for a startup device, the card will not be
usable until the operating system loads its supporting
software from the startup device after the startup process
has concluded.
Page 18

Basics Hard Disks and HFS Plus - 16
Hard Disks and HFS Plus
The PowerBook G3 Series (Bronze Keyboard) hard drives
use Mac OS Extended format (HFS Plus). Some disk utility
and disk locking programs manufactured by companies other
than Apple are incompatible with HFS Plus.
Using an incompatible disk utility or disk locking program
could result in hard drive corruption and loss of all data on
the hard disk. Check the documentation that came with the
program or contact the manufacturer or the vendor of the
program before attempting to use it. Apple recommends
using the utility Disk First Aid, which is included on the
system software CD that ships with the PowerBook G3
Series (Bronze Keyboard).
Page 19

Basics Hard Disks and HFS Plus - 17
Norton Utilities
Warning:
will not run on any of the PowerBook G3 Series computers.
Running versions 3.5.1 and below may cause hard drive
corruption and loss of all data on the hard drive. See the
Symantec Web site at http://www.symantec.com/nu/numhfs.html for more information on Norton Utilities and Mac
OS Extended format.
Norton Utilities for Macintosh, v3.5.2 and 3.5.3
Page 20

Basics SCSI Disk Mode - 18
SCSI Disk Mode
To use a PowerBook in SCSI disk mode, the computer you are
connecting to must be running Mac OS 8.1 or later. If the
computer is running an earlier version of system software,
no user files will be visible on the PowerBook hard drive.
With NewWorld ROM, a valid system image must exist on the
PowerBook hard drive for SCSI disk mode to work.
In addition, SCSI disk mode is set to SCSI ID 2 only and
cannot be changed.
Page 21

Basics USB Ports - 19
USB Ports
The PowerBook G3 Series (Bronze Keyboard) has two
Universal Serial Bus (USB) ports that can be used to
connect I/O devices such as a USB mouse, printers,
scanners, and low-speed storage devices. The ports use USB
Type A connectors, which have four pins.
The USB ports take the place of the ADB and serial I/O ports
found on earlier PowerBook computers, but they do not
function the same way.
• USB is a serial communications channel, but it does not
replace LocalTalk functionality on Macintosh computers;
you cannot connect two Macintosh computers using the
USB. The best method for networking PowerBook
computers is through the built-in Ethernet port.
• The Macintosh USB software does not support booting
from an external USB storage device.
Page 22

Basics Ethernet Port - 20
Ethernet Port
The PowerBook G3 Series (Bronze Keyboard) has a built-in
10/100 Mbps Ethernet port. When connected to either a
10Base-T or a 100Base-TX hub, the port will recognize
which type of hub is connected.
The connector for the Ethernet port is a a short, shielded
RJ-45 connector on the back of the computer.
Page 23

Basics Keyboard - 21
Keyboard
The PowerBook G3 Series (Bronze Keyboard) keyboard
includes a built-in numeric keypad and controls to adjust
display brightness, speaker volume, and external audio port
volume.
Several of the keys on the keyboard have more than one mode
of operation. These changes are controlled by the Fn key, the
Num Lock key, and the Function Keys checkbox in the
Keyboard control panel.
Page 24
Basics Keyboard - 22
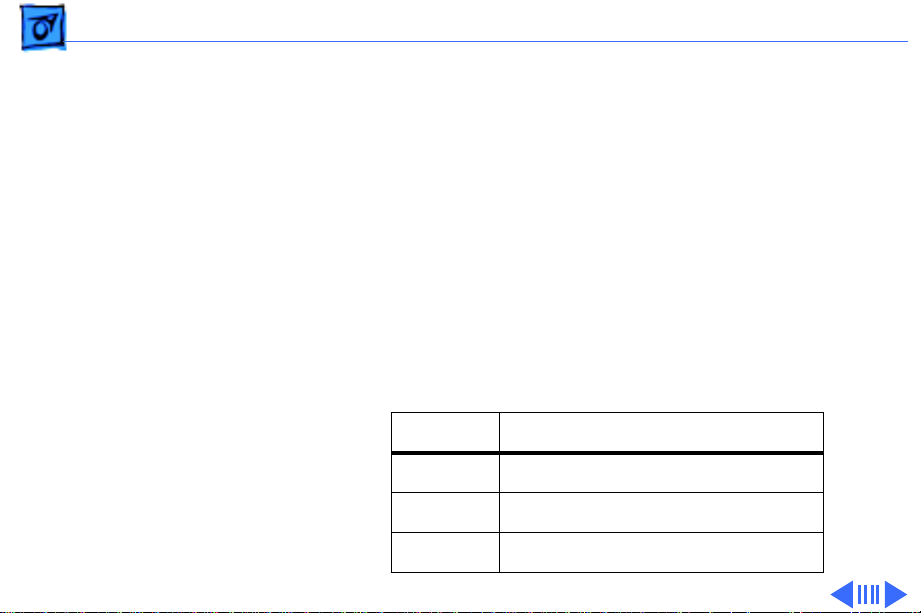
Fn Key
Press the Fn key to:
• Toggle the function keys between their normal control
functions and their alternate F1–F12 functions
• Select the embedded numeric keypad on the right portion
of the alphanumeric keys
• Change certain control keys, including the cursor control
keys, to page control keys.
Table 1 below shows the operations controlled by function
keys when the Fn key is pressed.
Key Operation
F1 Decrease display brightness
F2 Increase display brightness
F3 Decrease speaker volume
Page 25
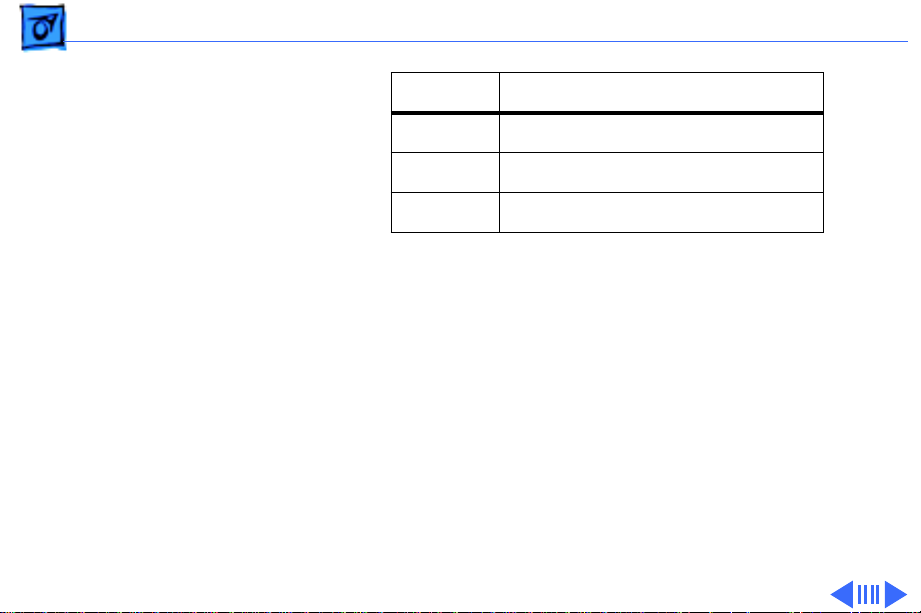
Basics Keyboard - 23
Key Operation
F4 Increase speaker volume
F5 Num Lock
F6 Mute speaker
Table 1: Function Key Operation
Num Lock Key
Press the Num Lock key to:
• Select the embedded numeric keypad on the right portion
of the alphanumeric keys
• Make the rest of the alphanumeric keys functionless
Page 26

Basics Keyboard - 24
Function Keys Checkbox
The Function Keys checkbox is a checkbox in the Keyboard
control panel that lets the user choose whether the function
keys F1–F12 are primary or secondary.
Primary means the function keys default to their control
functions when the Fn key is not depressed. Secondary means
the function keys default to their F1–F12 functions when the
Fn key is not depressed. In either case, pressing the Fn key
reverses the functions of the function keys from the default
functions set by the checkbox.
Page 27

Basics DVD-Video - 25
DVD-Video
Some configurations of the PowerBook G3 Series (Bronze
Keyboard) have a built-in DVD decoder that provides video
support for a DVD drive in the right expansion bay. This
decoder provides MPEG-2 audio and video decoding as well as
full NTSC and PAL decoding.
The Macintosh PowerBook DVD-Video Kit offered by Apple
for earlier PowerBook G3 Series computers is not supported
in this model. The DVD expansion bay module sold with the
kit will not physically fit in this version of the PowerBook
G3 Series.
Page 28

Basics Expansion Bay Modules - 26
Expansion Bay Modules
Expansion bays are not the same as those in previous
PowerBook G3 Series computers. Expansion bay modules
designed for earlier PowerBook computers will not fit in the
expansion bays of the PowerBook G3 Series (Bronze
Keyboard).
The left expansion bay accepts PowerBook G3 Series
(Bronze Keyboard) batteries only. The right expansion bay
accepts batteries and the wider 5.25-inch CD-ROM drive
and DVD-ROM drive. When a smaller device is inserted, the
expansion bay flip door covers the empty part of the bay.
Expansion bay modules may be removed while the
PowerBook is turned on, in sleep, or shut down. Do not swap
modules while the computer is starting up.
Page 29

Basics Battery Information - 27
Battery Information
The Lithium Ion (LiIon) batteries used for the PowerBook
G3 Series (Bronze Keyboard) are not compatible with any
earlier PowerBooks, including others in the PowerBook G3
Series. The connector is physically different, and the
battery is thinner than previous batteries.
LiIon batteries have battery level indicator lights that tell
whether the battery is fully charged, three-fourths
charged, one-half charged, one-fourth charged, or empty.
To check the battery charge, press the status button located
next to the status lights. The battery charges whenever the
external AC adapter is connected.
If the battery lights blink, there is a problem with the
battery. If only one light blinks, the battery is fully depleted
and needs to be recharged.
Page 30

Basics Battery Information - 28
Battery Handling Guidelines
Warning:
should not be thrown out with household or office trash.
Review battery handling and disposal instructions in Safety
Information in Bulletins/Safety.
The following are guidelines for properly handling
batteries:
• Handle the battery carefully. Do not drop, puncture,
disassemble, mutilate, or incinerate it.
• Do not leave a battery in the computer for longer than a
week without plugging in the power adapter.
• Do not short the battery contacts.
• Do not leave the battery in hot locations (such as the
trunk of a car).
• Do not leave a battery in storage for longer than six
months without recharging it.
LiIon batteries contain hazardous chemicals and
Page 31

Basics Battery Information - 29
• Never get batteries wet.
• Recharge batteries only as described in the user’s manual
and only in ventilated areas.
Page 32

Basics PC Card Handling - 30
PC Card Handling
The PC Card slot accepts one Type I or Type II card. The slot
supports both 16-bit PC Cards and 32-bit CardBus c ards.
Cards can be removed and replaced while the computer is
operating. The slot supports Zoomed Video on the card.
Previous PowerBook G3 Series computers featured an autoeject mechanism for the PC Card slots.The PowerBook G3
Series (Bronze Keyboard) eject mechanism is manual. To
operate it, first drag the PC Card icon (if present) to the
trash. Then push once on the eject button to release the
button, and a second time to eject the card.
The following are guidelines for properly handling PC Cards:
• Use only cards that are compatible with the PC Card unit.
Refer to the compatibility information that came with the
PC Card. If you cannot find the compatibility information,
Page 33

Basics PC Card Handling - 31
contact the card vendor.
• Do not insert anything other than a PC Card into the card
slots.
• The computer must be on or off to eject a PC Card. Do not
eject a PC Card when the computer is in sleep mode.
• Before you eject a card, make sure nothing is blocking
the card’s slot.
• To use the card again immediately, pull it out about an
inch more and then push it back in. If you don’t follow
this procedure and try to push the card back in to use it
again, the card will not engage properly.
• Do not pull on a PC Card before it has been ejected out of
the slot. Forcing a PC Card out of the slot may damage the
computer or the card. If the card is partially ejected, use
pliers to carefully pull the card out the rest of the way.
Page 34

Basics Boards and Cards - 32
Boards and Cards
The architecture of the PowerBook G3 Series (Bronze
Keyboard) is designed around two main circuit boards: the
microprocessor board and the I/O logic board.
Besides the two main boards, the PowerBook G3 Series
(Bronze Keyboard) can contain up to six cards: power
supply card, sound card, RAM card (factory installed), RAM
card (user installed), modem, and modem EMI filter.
The I/O logic board and microprocessor board are shown on
the following pages.
Page 35

Basics Boards and Cards - 33
I/O Logic Board
The I/O logic board includes all the I/O interfaces, video and
display support, and battery and expansion bays. The
PCMCIA cardcage mechanism (CardBus slot), RJ-11 cable/
phone jack, and reset button are separate parts that connect
to the I/O logic board.
The I/O logic board is pictured on the next page.
Page 36

Basics Boards and Cards - 34
RJ-11 Cable/
Phone Jack
Inverter
Cable Connector
PC Card
Connector
Fan
Connector
Modem
Connector
Keyboard
Connector
I/O Logic Board
Trackpad
Connector
Sound Card
Connector
Microprocessor
Board Connector
Hard Drive
Connector
Display
Cable Connector
Backup Battery
Connector
Power Supply
Card Connector
Expansion Bay
Connector
Page 37

Basics Boards and Cards - 35
Microprocessor Board
The microprocessor board
contains the high-speed
components: G3
microprocessor backside
cache memory, main
memory slots, system ROM,
memory controller, and PCI
bus bridge IC.
The Microprocessor board
has two memory card slots.
The top slot is the userreplaceable slot. The slot on
the underside of the board is
used by the factory.
Microprocessor
Board
Heat Spreader
RAM
Card Slot
I/O Logic Board
Connector
(Underside
of Board)
Page 38

Basics Internal Hardware Locator - 36
Internal Hardware Locator
Microprocessor
Board
I/O Logic Board
PC Card Cage
Modem Card
Fan
Battery
Inverter
Board
Sound
Card
Hard
Drive
Backup
Battery
Expansion
Bay
Power
Supply
Card
Page 39

Basics Repair Issues - 37
Repair Issues
Prevent Cosmetic Damage
The outside plastics of the PowerBook G3 Series (Bronze
Keyboard) are vulnerable to scratches and finger marks
from skin oil. To prevent cosmetic damage to a customer’s
PowerBook, do not wear jewelry when handling the
computer, and wear gloves if you have them available. Wipe
fingerprints from the outside plastics with a damp cloth.
Caution:
alcohol to clean the outside of the computer, or damage to the
plastics will result.
Do not use any substance containing isopropyl
Page 40

Basics Repair Issues - 38
Left Heatsink Screw Must Be Installed
Three Philips screws hold the heatsink in place over the
microprocessor board. The screw on the left holds the
heatsink firmly over the microprocessor on the
microprocessor board. If the screw is not installed, the
system could overheat.
Verify Parts Before Placing Orders
PowerBook G3 Series (Bronze Keyboard) computers offer
configure-to-order features. For this reason, it is
mandatory that you either see the part you are replacing, or
use diagnostics to identify the part, before you place a parts
order. Misidentification of parts may occur if this step is
not performed first.
Page 41

Basics Repair Issues - 39
Exchange Parts Like for Like
Unless directed otherwise in the Service Parts Database,
exchange parts like for like.
Three ways to identify I/O logic boards:
• Remove the microprocessor board and look for
components at locations U8 and G2 on the top side of the
I/O logic board. Boards with DVD have components at
these locations, while boards without DVD do not.
• Check for a Ziva chip on the underside of the board.
Boards with DVD have the chip, while board without DVD
do not.
• Look for the ID code in the last five digits of the serial
number on the board. Boards with DVD may have the ID
code 601, and non-DVD boards may have 801. Some
boards exist without these ID codes.
Page 42

Basics Repair Strategy - 40
Repair Strategy
Beginning July 26, 1999, parts for the PowerBook G3
Series (Bronze Keyboard) will be available for order
through the Service Price Pages and the AppleOrder and
ARIS systems. Except for the displays, Apple Authorized
Service Providers in the US can now repair PowerBook G3
Series (Bronze Keyboard) systems. In Canada, Apple
Authorized Service Providers can also repair displays.
Service PowerBook G3 Series (Bronze Keyboard)
computers through module exchange and parts replacement.
Customers can request on-site service from Apple Canada
Technical Answerline (Canada only). They can also choose
carry-in service from an AASP.
Page 43

Basics Repair Strategy - 41
Ordering
Apple Service Providers planning to support the computer
systems covered in this manual may purchase Service
modules and parts to develop servicing capability. To order
parts, use the AppleOrder (US only) or ARIS (Canada only)
system and refer to the PowerBook G3 Series (Bronze
Keyboard) Service Price Pages.
Large businesses, universities, and K-12 accounts must
provide a purchase order on all transactions, including
orders placed through the AppleOrder (US only) or ARIS
(Canada only) system.
US Ordering
US Service providers not enrolled in AppleOrder may fax
their orders to Service Provider Support (512-908-
8125) or mail them to:
Page 44

Basics Repair Strategy - 42
Apple Computer, Inc.
Service Provider Support
MS 212-SPS
Austin, TX 78714-9125
For US inquiries, please call Service Provider Support at
800-919-2775 and select option #1.
Canadian Ordering
In Canada, all service parts (including the displays) are
available through ARIS. Refer to the Service Price Pages or
Service Source Online for part numbers and pricing.
Canadian Service Providers not enrolled in ARIS may fax
their orders to Service Provider Support in Canada (800903-5284). For Canadian inquiries, please call Service
Provider Support at 905-513-5782 and select option #3.
Page 45

Basics Warranty/AppleCare/ARIS - 43
Warranty/AppleCare/ARIS
US Only
PowerBook G3 Series (Bronze Keyboard) computers are
covered under the Apple One-Year Global Limited Warranty.
The AppleCare Service Plan is also available for these
products. Service Providers are reimbursed for warranty
and AppleCare repairs made to these computers. For pricing
information, refer to the Service Price Pages.
Canada Only
PowerBook G3 Series (Bronze Keyboard) computers are
covered under first-year AppleCare. The Extended
AppleCare Service Plan is also available for these products.
Service Providers are reimbursed for warranty and
Page 46

Basics Warranty/AppleCare/ARIS - 44
AppleCare repairs made to these computers. For pricing
information, refer to the Service Price Pages.
Page 47

K
Service Source
Specifications
PowerBook G3 Series (Bronze
Keyboard)
Page 48

Specifications Introduction - 1
Introduction
Specifications information for this product can be found in the Spec Database, which you can
access in one of three ways:
— Launch it directly by double-clicking the Apple Spec Database runtime alias at the top
level of the Main Service Source CD.
— Select "Apple Spec Database" from the Service Source drop-down main menu.
— Click the Acrobat toolbar icon for the database, which is near the right end of the toolbar with the letters "SP."
Page 49

K
Service Source
Troubleshooting
PowerBook G3 Series (Bronze
Keyboard)
Page 50

Troubleshooting General - 1
General
In each product manual on Service Source, you will find
Flowcharts and/or Symptom Charts designed to help you
diagnose and repair Apple computers.
If you have narrowed the problem down to a particular
symptom, start with the Symptom Charts. Because cures are
listed in the order of most likely solution, try the first cure
first. Verify whether or not the product continues to exhibit
the symptom. If the symptom persists, try the next cure.
If you are not sure what the problem is, or if the Symptom
Charts do not resolve the problem, refer to the Flowcharts.
If you require additional assistance, contact Apple Technical
Support.
Page 51

Troubleshooting Power-On Self Test/ - 2
Power-On Self Test
There is a power-on self test that resides in the ROM of the
PowerBook G3 Series (Bronze Keyboard). This test
automatically runs whenever the computer is powered on after
being fully shut down (the power-on self test does not run if
the computer is only restarted).
If a problem is detected during the test, you will not hear a
normal startup chime. Instead, the system will beep as
explained below.
On the next page is a definition of what the error beeps at
startup time signify.
Page 52

Troubleshooting Power-On Self Test/
Power-On Self Test Beep Definitions
Beeps Definition
Power-On Self Test Beep Definitions
- 3
1 beep
2 beeps
3 beeps
4 or 5 beeps
No RAM is installed or detected.
EDO memory is installed. The PowerBook G3 Series
(Bronze Keyboard) ships with SDRAM SO-DIMMs
and does not accept EDO memory.
No RAM banks passed memory testing.
Bad checksum for the remainder of the boot ROM. The
ROM (which is located on the microprocessor module) is bad.
Page 53

Troubleshooting Symptom Charts/Startup - 4
Symptom Charts
Startup
RAM failure occurs
(breaking glass sound
after startup chord)
Note:
There is no RAM on the microprocessor board itself, so
this tone will occur if no memory is installed in at least one of the
slots.
1 Remove top RAM SO DIMM (if present) and restart computer.
If startup sequence is normal, replace RAM SO DIMM and
retest.
2 Replace bottom RAM SO DIMM and retest.
3 Replace microprocessor board.
4 Replace I/O logic board.
Page 54

Troubleshooting Symptom Charts/Startup - 5
Hardware failure
occurs (breaking
glass sound after
startup chord)
1 Turn off the computer and disconnect any external devices.
2 Reset PRAM (during startup, hold Command-Option-P-R
keys until the second startup tone is heard).
3 Remove expansion module from right expansion bay and
restart computer. If startup sequence is normal, insert
expansion module and retest.
4 Disconnect hard drive cable from the I/O logic board and
restart computer. If startup sequence is normal, reconnect
cable and retest.
5 Replace hard drive cable (pull up evenly on the cable to avoid
bending pins).
6 Replace hard drive.
7 Replace microprocessor board.
8 Replace I/O logic board.
Page 55

Troubleshooting Symptom Charts/Power - 6
Power
Computer won’t
power up
1 Restart computer by pressing the reset button on the back of
the unit. Wait five seconds and press the power on key.
2 Try known-good power adapter.
3 Try known-good, firmly seated, charged battery. Repeat once.
4 Connect power adapter and restart computer in 3–4 minutes.
5 Disconnect internal keyboard completely and try powering up
unit. If unit powers up, replace keyboard.
6 Verify that microprocessor card is seated firmly in
connector.
7 Replace sound card.
8 Replace power supply card.
9 Replace microprocessor board.
10 Replace I/O logic board.
Page 56

Troubleshooting Symptom Charts/Power - 7
Screen is blank;
backlight isn’t on;
computer doesn’t
respond
1 Restart computer by pressing the reset button on the back of
the unit. Wait five seconds and press the power on key.
2 Restart computer.
3 Disconnect power adapter, remove battery, and restart
computer in 3-4 minutes.
4 Check power adapter cable.
5 Try known–good, charged battery.
6 Try known-good power adapter.
7 Remove all power (power adapter and batteries) and
disconnect backup battery for ten minutes.
8 Check all I/O logic board cables and connections.
9 Replace sound card.
10 Replace microprocessor board.
11 Replace power supply card.
12 Replace I/O logic board.
Page 57

Troubleshooting Symptom Charts/Power - 8
After you remove
battery and power
adapter, some control
panel settings are
different
Power adapter is
plugged in, but
Control Strip doesn’t
indicate adapter is
connected
1 Connect power adapter to unit for 24 hours to see if backup
battery is just depleted. (It takes approximately 48 hours to
fully charge the backup battery.)
2 Check backup battery cable and connections.
3 Replace backup battery.
4 Replace I/O logic board.
1 Verify that power adapter is connected correctly and the
power cord is plugged solidly in the adapter.
2 Verify that there is power at the outlet.
3 Try known-good power adapter.
4 Try known-good power cord.
5 Reset power manager (press the reset button behind the I/O
door.
6 Replace sound card.
7 Replace I/O logic board.
Page 58

Troubleshooting Symptom Charts/Power - 9
Computer runs when
plugged into wall
outlet but not on
battery power
1 Turn off the computer, then restart by pressing the reset
button on the back of the unit. Wait five seconds and press the
power on key.
2 Reseat battery to make sure battery is mating with contacts
on I/O logic board.
3 Try battery in opposite expansion bay.
4 Try known-good, firmly seated, charged battery. Repeat once.
Note:
LED should light up if battery is functioning.
5 Try known-good power adapter.
6 Replace power supply card.
7 Replace I/O logic board.
Page 59

Troubleshooting Symptom Charts/Power - 10
Battery won’t charge 1 Turn off the computer, then restart by pressing the reset
button on the back of the unit. Wait five seconds and press the
power on key.
2 Try battery in opposite expansion bay.
3 Insert battery, leave in 15 seconds, then eject it. Repeat 4–5
times.
4 Try known-good battery. Repeat once.
up if battery is functioning.
5 Replace power supply card.
6 Replace I/O logic board.
Note:
LED should light
Battery will not
charge unless unit is
in sleep mode or shut
down
Verify that the appropriate power adapter is being used.
Page 60

Troubleshooting Symptom Charts/Video - 11
Video
Note:
A certain number of defects are inherent in display
technology and vary by many factors, including type of technology.
If you suspect that your display contains an abnormal number of
defects, call Apple Technical Support.
Caution:
cables, or shorting could result. Use a plastic or nylon tool.
Do not use a metal screwdriver to reseat the display
Partial or full row of
pixels is always on or
never comes on in an
active matrix display
1 Check display cable and connections.
2 Replace display cable (international only).
3 Replace display (international only).
4 Replace I/O logic board. (In the US, call Technical Support
before replacing the I/O logic board.)
Page 61

Troubleshooting Symptom Charts/Video - 12
Display is very light
or totally white
No display, but
computer appears to
operate correctly
1 Verify display cable and inverter board cable connections to
the I/O logic board.
2 Replace inverter board.
3 Replace display cable (international only).
4 Replace display (international only).
1 Connect power adapter.
2 Adjust screen brightness setting.
3 Verify display cable, inverter board, and I/O logic board
connections.
4 Connect external, known-good monitor.
5 Verify inverter cable is properly connected.
6 Replace inverter cable.
7 Replace inverter board.
8 Replace display cable (international only).
9 Replace display (international only).
10 Replace I/O logic board.
Page 62

Troubleshooting Symptom Charts/Video - 13
An external monitor
connected to the
PowerBook shows no
video
An external monitor
connected to the
PowerBook shows
either horizontal or
vertical rolling, or
horizontal or vertical
distortion
1 Verify external monitor has power.
2 Try different resolutions in the Monitors and Sound control
panel.
3 Try another display cable and/or proper video adapter.
4 Try another monitor.
5 Restart unit and reset PRAM.
6 Replace I/O logic board.
1 Try different resolutions in the Monitors and Sound control
panel.
2 Verify monitor using another computer.
3 Try another video adapter if using one with the monitor.
4 Replace I/O logic board.
Page 63

Troubleshooting Symptom Charts/Video - 14
Backlight doesn’t
operate; screen is
very dim
1 Adjust screen brightness setting.
2 Verify that backlight cable connection is secure.
3 Check display cable and inverter board connections to the I/O
logic board.
4 Verify that inverter cable is properly connected and that
cable is good.
5 Verify that cables are not pinched or severed.
6 Replace inverter board.
7 Replace display (international only).
8 Replace I/O logic board.
Page 64

Troubleshooting Symptom Charts/Sound - 15
Sound
No sound from
speaker(s)
Startup sound is
heard, then no sound
from speaker(s)
1 Verify that mute mode is not enabled (F6 on the keyboard).
2 Check the volume setting by pressing F4 on the keyboard
without hitting the function key first.
3 Verify no external speakers or headphones are plugged in.
4 Reset PRAM.
5 Make sure speaker cable is plugged into sound card.
6 Replace sound card.
7 Replace speaker(s).
8 Replace I/O logic board
1 Remove sound preferences from System Folder, reset PRAM,
then restart.
2 Perform clean install of system software.
.
Page 65

Troubleshooting Symptom Charts/Hard Drive - 16
Hard Drive
Internal hard drive
does not spin
1 Make sure power adapter is connected.
2 Disconnect external SCSI or USB devices.
3 Check hard drive connection.
4 Replace hard drive cable.
to avoid bending pins.
5 Replace hard drive.
6 Replace I/O logic board.
Note:
Pull up evenly on the cable
Page 66

Troubleshooting Symptom Charts/CD-ROM Drive/DVD-ROM Drive - 17
CD-ROM Drive/DVD-ROM Drive
Drive does not accept
disc
Volume control does
not operate correctly
Macintosh cannot
mount drive
1 Verify disc is properly seated in the carrier.
2 Replace disc (if dirty or damaged).
3 Reinsert drive in expansion bay.
4 Replace drive.
5 Replace I/O logic board.
1 Check Monitors and Sound control panel setting.
2 Verify that mute mode is not enabled.
3 Verify the setting of volume control button.
4 Reinsert drive.
1 Reinsert drive.
2 Verify that Apple CD/DVD ROM extension is installed.
3 Replace drive.
4 Replace I/O logic board.
Page 67

Troubleshooting Symptom Charts/CD-ROM Drive/DVD-ROM Drive - 18
Expansion bay module
will not insert
properly in the
expansion bay
Drive makes grinding
sound
1 Check for obstructions in the expansion bay.
2 Check that the far right keyboard tab is inserted properly and
not extending into the expansion bay.
3 Try another module.
4 Replace I/O logic board.
1 Check the top of the drive module for scratches.
2 Check the keyboard to see if the far right tab is correctly
inserted in its slot. If the tab is under the palmrest and
extending into the drive bay, it will interfere with the drive.
Install the keyboard correctly.
3 Try another module.
4 Replace drive.
Page 68

Troubleshooting Symptom Charts/CD-ROM Drive/DVD-ROM Drive - 19
PC Card Module (PCMCIA)
PC Card won’t eject 1 Make sure computer is not in sleep mode.
2 Make sure PC Card slot is not blocked.
3 Drag PC Card to trash.
4 Try PC Card eject button. (Press the PC Card eject button
once to release the button, then again to eject the card.)
5 Remove keyboard and heat sink, then gently push the card out
with your finger.
6 Verify that PC Card is not warped or damaged in any way; if
so, replace with new card.
7 Replace PCMCIA cardcage.
Page 69

Troubleshooting Symptom Charts/CD-ROM Drive/DVD-ROM Drive - 20
PC Card is inserted
but doesn’t appear on
desktop
Note:
Modem and communication cards may not appear on
desktop.
1 Verify that correct software for the PC Card is installed.
2 Manually eject the PC Card and reinsert it.
3 Try another PC Card.
4 Replace PCMCIA cardcage.
5 Replace I/O logic board.
Note:
If “defective card” or “unrecognizable card” appears in
place of card name in PCMCIA Eject control panel, card is damaged
or computer does not have software required to support it. Eject
card.
Page 70

Troubleshooting Symptom Charts/CD-ROM Drive/DVD-ROM Drive - 21
PC Card can’t be
inserted
1 Make sure PC Card is right side up (cards are keyed and
cannot be inserted upside down).
2 Check for obstructions in the PC Card slot.
3 Push PC Card in from center of the exposed edge, not off
center.
4 Try a different PC Card.
5 Replace PCMCIA cardcage.
Page 71

Troubleshooting Symptom Charts/DVD-Video - 22
DVD-Video
Movie plays, but
special features (such
as director’s notes,
other languages, etc.)
unavailable
DVD video disc will
not play
1 Not all DVD titles offer special features. Check the liner notes
included with the disc for a list of features available.
2 If both the picture and sound are okay, then DVD drive is
functional. This means either the software or the movie title
(DVD video disc) is the source of the symptom. Try playing
another title to determine if the disc is the cause. If the
software is the cause, reinstall software.
1 Verify that the expansion module is a DVD drive.
2 Verify the disc is a DVD video disc.
3 Verify the computer has DVD support by looking at the label
on the bottom of the unit or by running Apple System
Profiler.
4 Clean the disc with an appropriate cleaner.
5 Try another disc.
6 Ensure DVD video disc appears on desktop.
Page 72

Troubleshooting Symptom Charts/DVD-Video - 23
7 Check that Parental Controls setting is set to On. Select an
MPAA rating at the same level or higher than the title being
viewed.
8 Reinstall software. Use Extensions Manager to ensure that
DVD extensions are enabled (select All On).
9 Check region code for DVD video title. (Warning message
appears.)
Poor performance of
DVD video disc (poor
sound or picture)
1 Check the DVD video disc for scratches.
2 Ensure Virtual Memory is set to Off.
3 Check that Energy Saver control panel does not have advanced
settings for Reduced Processor Speed selected.
4 Use Extensions Manager to disable extensions except for the
standard Apple extensions and DVD extensions. Restart the
PowerBook.
5 For an audio problem, try playing an audio CD. If problem
persists, refer to the Sound symptom chart in this chapter.
Page 73

Troubleshooting Symptom Charts/Infrared Communication - 24
Infrared Communication
Infrared
communication is not
working
1 Clean infrared window with soft lint-free cloth.
2 Make sure units are spaced greater than 3 feet but less than 6
feet and at less than a 20 degree angle.
3 Verify infrared signal is being received by host computer.
4 Replace I/O logic board.
Page 74

Troubleshooting Symptom Charts/Modem - 25
Modem
No dial tone 1 Verify known-good analog (not digital) telephone line.
2 Verify cable is not plugged into Ethernet port.
3 If using Apple Remote Access 3.0, select Ignore Dial Tone in
the Modem control panel. If the modem connects with this
setting selected, try another phone line. If using a terminal
or communications program, enter atx1 to disable tone
detection. To reset the modem back to the factory settings,
enter atz.
4 Replace cable/phone jack.
5 Replace modem EMI filter card.
6 Replace modem.
No internal modem
selection available
1 Remove keyboard and verify modem is properly installed and
modem EMI filter card is plugged in.
2 Verify correct modem software is installed and selected.
3 Replace modem.
Page 75

Troubleshooting Symptom Charts/USB and SCSI Peripherals - 26
USB and SCSI Peripherals
After you connect
external USB device,
computer does not
boot
Computer boots to
flashing SCSI icon
(similar to SCSI Disk
Mode)
1 Disconnect all external devices and boot computer. Then plug
in USB peripherals.
2 Eliminate chain by plugging in only one peripheral.
3 Try the other USB port.
4 If USB device is self-powered, switch on external USB device
before starting computer.
5 Check cable connections.
6 Try known-good USB cable.
7 Try known-good external USB device.
8 Replace I/O logic board.
1 Verify the cable is Apple SCSI Cable (29 pins), not Disk Mode
Cable (30 pins).
2 Try known-good SCSI system cable.
3 Reset PRAM.
4 Replace I/O logic board.
Page 76

Troubleshooting Symptom Charts/USB and SCSI Peripherals - 27
After you connect
external SCSI device,
computer does not
boot or device does not
show up
In SCSI disk mode,
computer does not
display SCSI icon
until host is booted,
or computer crashes
when host is shut
down
1 Verify that device and SCSI chain are terminated correctly.
2 Switch on external SCSI device before starting computer.
3 Check cable connections.
4 Try known-good Apple SCSI cable.
5 Verify that the SCSI ID select switch setting on external
device is unique.
6 Try known-good external SCSI device.
7 Try known-good external SCSI device without terminator.
8 Replace I/O logic board.
1 Check that there is a valid System Folder on the PowerBook’s
internal hard drive.
2 Make sure password security is off.
3 Verify that computer has a unique SCSI ID in PowerBook SCSI
Setup control panel.
4 Try Apple-brand SCSI disk mode cable with 30 pins.
5 Verify SCSI disk mode cable is good and check the connection.
6 Replace I/O logic board.
Page 77

Troubleshooting Symptom Charts/USB and SCSI Peripherals - 28
USB device such as
digital camera not
recognized by
computer
I/O devices are
unrecognized, or
garbage is
transmitted or
received
Note:
If you are trying to use a serial device with a USB/Serial
adapter, check with the manufacturer for compatibility.
1 Verify current driver for the device is installed.
2 Turn on camera after initiating download with camera
application.
3 Try different USB device on same port.
4 Eliminate chain by plugging in only one peripheral.
5 Try the other USB port.
6 Replace I/O logic board.
1 Check cables.
2 Check with vendor for current drivers.
3 Try other USB port if device is USB.
4 Reset PRAM.
5 Test device with known-good computer.
6 Replace I/O logic board.
Page 78

Troubleshooting Symptom Charts/USB and SCSI Peripherals - 29
Cursor does not move
when you are using
trackpad
Cursor moves on
screen with external
mouse connected, but
clicking or doubleclicking the mouse
has no effect
1 Shut down computer, unplug power adapter, and remove
battery. Let computer sit for one minute before restarting.
2 Reset power manager (press the reset button behind the I/O
door.
3 Check trackpad connections.
4 Connect USB mouse and try to move cursor. If trackpad does
not move cursor but external USB mouse does, replace
trackpad (included in top case).
5 Replace I/O logic board.
1 If the mouse is connected to an external keyboard, connect the
mouse to one of the USB ports on the computer.
2 Try the other USB port.
3 Try another mouse.
4 Reset PRAM.
5 Boot off the CD that came with the computer. If the mouse
works, reinstall the system software.
6 Replace I/O logic board.
Page 79

Troubleshooting Symptom Charts/USB and SCSI Peripherals - 30
Cursor moves, but
clicking trackpad
button has no effect
Cursor does not move
on the screen with an
external mouse, but
USB external
keyboard works
1 Reset power manager (press the reset button behind the I/O
door.
2 Remove top case and manually press trackpad button on
power supply with a nylon tool or other non-metal object. If
button activates cursor, check top case seating.
3 Replace power supply card.
4 Replace trackpad button actuator (included in the top case).
1 Verify that the mouse is connected securely to the USB
keyboard or port.
2 Check inside mouse for buildup of dirt or other contaminants.
Clean mouse if necessary.
3 If mouse is connected to the keyboard, connect it to a USB
port.
4 Try the other USB port.
5 Try another mouse.
6 Replace I/O logic board.
Page 80

Troubleshooting Symptom Charts/USB and SCSI Peripherals - 31
Cursor intermittently
does not move or
moves erratically
Note:
User must touch trackpad with the surface of only one
finger at a time and point directly down on the trackpad surface.
1 Clean trackpad surface (with computer off, using a non-
static-inducing material).
2 Reset power manager (press the reset button behind the I/O
door.
3 Try unit on battery power. If problem goes away, replace
power adapter.
4 Check trackpad connections.
5 Replace trackpad (included in top case).
6 Replace trackpad cable.
7 Replace I/O logic board.
Page 81

Troubleshooting Symptom Charts/USB and SCSI Peripherals - 32
No response to any
key on keyboard
Known-good Ethernet
network printer does
not print
1 Verify that computer is on.
2 Reset the power manager (press the reset button behind the
I/O door.
3 Check keyboard connection by disconnecting and reconnecting
keyboard cables.
4 Replace keyboard.
5 Replace I/O logic board.
1 Verify that Chooser and control panel settings are correct.
2 Reinstall printer drivers.
3 Check cables.
4 Attach computer directly to printer using Ethernet crossover
cable, and retest.
5 Reset PRAM.
6 Replace I/O logic board.
Page 82

Troubleshooting Symptom Charts/USB and SCSI Peripherals - 33
Known-good USB
printer does not print
USB device
experiences a partial
lack of power
1 Verify that computer has correct driver installed. Check
vendor’s Web site to download current driver.
2 Reset PRAM.
3 Verify that Chooser and control panel settings are correct.
4 Run Apple System Profiler to see if it recognizes that a USB
printer is connected. If it does, it is a software issue.
5 Try the other port. Make sure the printer is connected
directly to the computer.
6 Check cables.
7 Replace I/O logic board.
1 Plug the device into an electrical outlet if it has a power cord.
2 Unplug the device and plug it into another USB port on the
computer or another device plugged into a power outlet such
as a USB hub.
Page 83

Troubleshooting Symptom Charts/USB and SCSI Peripherals - 34
Not enough power for
the USB device to
function at all
After sleep, a USB
peripheral is
sometimes not
recognized
1 Plug the device into an electrical outlet if it has a power cord.
2 Unplug the device and plug it into another USB port on the
computer or another device plugged into a power outlet such
as a USB hub.
1 Restart the unit.
2 Contact peripheral manufacturer for latest driver update.
Page 84

Troubleshooting Symptom Charts/Miscellaneous - 35
Miscellaneous
Sleep light won’t
come on
Screen goes blank and
computer shuts down
every few minutes
Application seems to
run slower after a few
seconds
1 Verify that computer is in sleep mode and not off.
2 Reset power manager (press the reset button behind the I/O
door.
3 Replace inverter board.
1 Computer is going into system sleep to conserve battery
power. Adjust sleep delays in Energy Saver control panel or
connect power adapter.
2 Verify that the appropriate power adapter is being used.
3 Try a known-good power adapter.
Computer is either in processor cycling mode or in reduced
processor speed mode. If this interferes with operation of
application, turn off Allow Processor Cycling and Reduce
Processor Speed in the Energy Saver control panel.
features conserve energy when running off battery power.
Note:
These
Page 85

Troubleshooting Symptom Charts/Miscellaneous - 36
Hard drive is slow to
respond, or screen
goes blank too often
Intermittent
operating problems
such as no booting or
initialization errors
FAX software is not
working
Adjust sleep delays in Energy Saver control panel or connect
power adapter.
1 Check that all three screws are in the heat sink.
2 Verify that microprocessor board is properly installed.
3 Press on microprocessor board a second time to make sure
the board is fully seated.
Caution:
and the computer will still function. However, over time, heat
will cause a partially seated microprocessor board to lose contact
and cause intermittent system problems. The connection of these
boards is checked and double-checked at the factory.
The PowerBook G3 Series (Bronze Keyboard) comes with FAXSTF
software installed. Apple does not provide support for this
software. Contact STF Technology at 660-463-2021 or at
stfsupport@stfinc.com.
The microprocessor board can be partially inserted
Page 86

Troubleshooting PowerBook G3 Series Troubleshooting - 37
PowerBook G3 Series Troubleshooting
Flowchart—Startup Problems
START
Reset the
power manager.
Press power button to
begin boot sequence.
Do you
hear the
startup
tones?
Yes
Are the
startup tones
normal?
Yes
Does a
gray screen
appear with
pointer?
Yes
1
No
No
No
Does any
video
appear?
Yes
1. Check the volume.
2. Check the keyboard and
display cables.
3. Replace the sound card.
4. Replace the speaker.
5. Replace the I/O logic board.
See Startup in the
Symptom Charts.
1. Check display/inverter cable
connections.
2. Replace the display and
backlight cables.
3. Replace the inverter.
4. Replace the display.
5. Replace the I/O logic board.
1. Check the display cables.
No
2. Replace the power supply
card.
3. Replace the sound card.
Page 87

Troubleshooting Symptom Charts/Miscellaneous - 38
PowerBook G3 Series Troubleshooting
Flowchart—Startup Problems (continued)
1
Does
the
PowerBook continue
to boot to the
desktop?
Yes
Do the
trackpad and
keyboard
function?
Yes
Insert a known-good
CD-ROM or DVD disc
and see if it mounts.
1. Boot with extensions off.
No
No
Does
the flashing
question mark
appear?
Yes
1. Reset PRAM.
2. Boot from the CD that comes with the computer.
3. If hard drive appears, reinstall system software.
4. If hard drive doesn't appear,see if Drive Setup
can reformat it.
5. Replace the hard drive cable.
6. Replace the hard drive.
7. Replace the I/O logic board.
1. Reset the power manager.
2. Check the trackpad and
keyboard cables.
3. Replace the trackpad and
keyboard cables.
4. Replace the trackpad.
5. Replace the keyboard.
6. Replace the I/O logic board.
2. Boot with the CD that
No
comes with the computer
(hold the "c" key down).
3. Replace the hard drive.
4. Replace the I/O logic
board.
Go to
Start
Does the
disc
mount?
Yes
END
1. Check for proper software drivers.
No
2. Reseat the module.
3. Replace the module.
4. Replace the I/O logic board
Page 88

K
Service Source
T ak e Apart
PowerBook G3 Series (Bronze
Keyboard)
Page 89

Take Apart Tools - 1
Tools
Use the following tools for procedures in this chapter:
• 5 mm nut driver
• #8 Torx screwdriver (T-8)
• #1 Phillips screwdriver (for the heatsink and modem)
• Flat-head screwdriver
• Flat-blade nylon or plastic tool (spudger)
• Dental pick or hook tool (to open flex connectors)
• Torque screwdriver (highly recommended for some
replacement procedures)
• Razor blade or Exacto knife (to remove screw covers)
• Needlenose pliers (for some cable connections)
Caution:
around the hard drive or the sleep reed switch.
If you use a magnetic Torx driver, do not use it
Page 90

Take Apart Cables - 2
Cables
Follow these guidelines when working with cables:
• Ensure that all cables are routed exactly when
reassembling. Use all grooves and/or protrusions to
align cabling. If the cable is improperly routed, you
may not be able to reassemble the computer, or once
reassembled, the computer may fail to function.
• Check that all cables are properly aligned in the
connectors and that the connections are tight.
• Handle flex cables carefully. Using excessive force to
disconnect a cable can tear the cable or damage it so it
will not work properly.
• Use a nylon tool or dental pick to help loosen cable
connections.
Page 91

Take Apart Expansion Bay Modules - 3
Expansion Bay Modules
Before you begin, unplug the
AC adapter.
Caution:
all modules (batteries and
drives) in the expansion
bays before performing any
Take Apart procedure.
1 Open the display to a
You must remove
90-degree angle to
prevent the computer
from tipping over when
the expansion bay
modules are removed.
Page 92

Take Apart Expansion Bay Modules - 4
Note:
If you open the
display all the way, support
the underside of the screen
with a book or other flat
object.
2 Pull the expansion bay
eject arm toward you to
eject the module.
3 Slide the module out of
the expansion bay.
Page 93

Take Apart Keyboard - 5
Keyboard
Before you begin, remove
the following:
• AC adapter
• Expansion bay modules
• Modem
Note:
You do not need to
disconnect and remove the
keyboard completely to gain
access to the modem, hard
drive, SDRAM DIMMs,
backup battery, and some
other modules.
Page 94

Take Apart Keyboard - 6
1 Unlock the keyboard if it
is locked. Use a flathead
screwdriver to turn the
keyboard locking screw
at the back of the
computer counterclockwise.
Note:
The keyboard locking
screw is captured and should
not be completely removed.
Page 95

Take Apart Keyboard - 7
2 Pull down on the
keyboard release tabs
located to the left of the
F1 and F9 keys until the
top portion of the
keyboard pops up.
Caution:
keyboard by the keycaps.
Keycap replacement
procedures can be found in
the Additional Procedures
chapter of this manual.
3 Lift the top of the
Do not lift the
keyboard up and pull it
toward you to disengage
the tabs holding the
keyboard in place.
Page 96

Take Apart Keyboard - 8
Replacement Note:
that the far right tab on the
keyboard is in the slot and
not protruding into the
expansion bay.
4 Flip the keyboard over
and lay it on top of the
palm rests and trackpad.
5 Remove the heatsink and
modem by following the
instructions in the
“Heatsink” and
“Modem” sections of
this chapter if you are
removing the keyboard.
Check
Page 97

Take Apart Keyboard - 9
6 Pull up on the keyboard
connector handle to
release the keyboard
cable from its connector.
Page 98

Take Apart Heatsink - 10
Heatsink
Before you begin, remove
the following:
• AC adapter
• Expansion bay modules
• Keyboard
Look through the viewing
hole in the center of the
heatsink to verify that the
top of the heat spreader is
white.
If blue shows through the
hole, remove the heatsink
and peel the blue film off the
heat spreader. This will
Page 99

Take Apart Heatsink - 11
prevent the microprocessor
from overheating.
Caution:
left side of the heatsink must
be installed or the heatsink
will not touch the
microprocessor board. This
will cause the unit to
overheat.
1 Remove the three
2 Pull up on the handle and
The screw on the
Phillips screws on the
heatsink.
pull the heatsink
forward.
Page 100

Take Apart Heatsink - 12
Replacement Notes:
cable toward the clutch when replacing the heatsink. Make
sure the heatsink does not press down on the ferrite bead.
Align the five tabs on the rear of the heatsink to the
corresponding slots below the clutch cover.
Tuck the hard drive tab under the heatsink before screwing
the heatsink down.
The heat spreader on top of the microprocessor may loosen
and stick to the bottom of the heatsink. Make sure that the
microprocessor has a heat spreader in place if you replace
either the microprocessor board or heatsink.
Slide the ferrite bead on the flex display
 Loading...