

Page 1
Motion
Getting Started
Page 2

Apple Computer, Inc.
© 2004 Apple Computer, Inc. All rights reserved.
Under the copyright laws, this manual may not be
copied, in whole or in part, without the written consent
of Apple. Your rights to the software are governed by
the accompanying software license agreement.
The Apple logo is a trademark of Apple Computer, Inc.,
registered in the U.S. and other countries. Use of the
“keyboard” Apple logo (Option-Shift-K) for commercial
purposes without the prior written consent of Apple
may constitute trademark infringement and unfair
competition in violation of federal and state laws.
Every effort has been made to ensure that the
information in this manual is accurate. Apple Computer,
Inc. is not responsible for printing or clerical errors.
Apple Computer, Inc.
1 Infinite Loop
Cupertino, CA 95014-2084
408-996-1010
www.apple.com
Apple, the Apple logo, Apple Cinema Display, DVD
Studio Pro, Final Cut, Final Cut Pro, FireWire, iTunes, Mac,
Mac OS, Macintosh, PowerBook, and QuickTime are
trademarks of Apple Computer, Inc., registered in the
U.S. and other countries.
Finder is a trademark of Apple Computer, Inc.
Adobe is a registered trademark of Adobe Systems
Incorporated in the U.S. and/or other countries.
Primatte RT Copyright (c) Photron USA, Inc. 2004. All
rights reserved.
Other company and product names mentioned herein
are trademarks of their respective companies. Mention
of third-party products is for informational purposes
only and constitutes neither an endorsement nor a
recommendation. Apple assumes no responsibility with
regard to the performance or use of these products.
Some images used to demonstrate the application in
this manual were acquired from Getty Images, Inc. All
rights reserved.
Page 3
1
Contents
Chapter 1 5Orientation
7
About Motion
8
Getting Started
8
Creating a New Project
10
The Motion Interface
12
12
15
16
17
18
19
20
23
24
31
34
34
42
43
45
45
48
56
The Utility Window
The File Browser
Dynamic Guides
Importing Adobe Photoshop and Adobe Illustrator Files
The Canvas
The Toolbar
Current Frame and Project Duration Fields
The Transport Controls
The Mini-Timeline
The Library
Motion Dashboards
The Inspector
Parameter Basics
Using the Animation Menu vs. Using the Record Button
The Project Pane
Using the Layers Tab
Compositing Basics
Selecting and Nudging Objects
Transforming Objects and Layers
Chapter 2 61 The Playground
61
About Behaviors
64
67
74
84
84
Applying Behaviors
Working With Basic Motion Behaviors
Working With Simulation Behaviors
Behaviors vs. Keyframes
Using Parameter Behaviors
3
Page 4

91
Working With Filters
92
Animating Filters With Parameter Behaviors
Chapter 3 95 Your No. 2 Pencil
95
Using the Timeline
96
97
10 2
10 3
10 3
10 4
10 6
10 8
10 8
112
112
113
113
11 4
11 6
11 8
The Timeline Layer List
The Timeline
Modifying Behaviors in the Timeline
Using Keyframes in Motion
Keyframe Basics
Creating Keyframes in the Canvas
Using Animation Paths
Keyframe Interpolation Basics
Using the Keyframe Editor
Checking Your Selection
Recording Keyframes During Playback
Keyframing Objects With Applied Behaviors
Keyframing in the Dashboard
Keyframing in the Inspector
Keyframing Filters
Converting Behaviors to Keyframes
Chapter 4 121Arts and Letters
121
Creating and Animating Text
12 2
12 4
12 6
12 9
13 9
14 0
141
Adding Text
Modifying Text
Editing Text Style
Applying Text Behaviors
Creating Particles
Particle Systems
Adding Particles to Your Project
Chapter 5 14 9Extra Credit
14 9
Keying and Masking
14 9
15 4
157
162
163
163
164
166
168
4
Creating a Key
Masking Layers and Objects
Editing Mask and Shape Control Points
Audio
Adding and Removing Audio Files
Audio Tab
Audio Editor
Saving and Exporting Your Project
Learning More About Motion
Contents
Page 5
1
Orientation
1
Allow us to introduce Motion, a new school of interactive
motion graphics. The best part of this school is the time
spent on the playground—the freedom to let the Wind
blow, to Spin, to Spring, to Glow, or to Throw things
about with just a drag and drop.
To create motion and effects in Motion, you simply drag a behavior (such as Spin or
Throw), or a filter (such as Glow) to your object and let go. Behaviors automatically
create motion on an image or object without creating any keyframes. Filters also yield
instant results—drop a blur filter on an image and the image is blurred—you don’t
need to set a value before seeing an effect on your image.
With this instant feedback, you can sit with your clients or your creative or art directors
and interactively design a motion graphics project on your desktop. You don’t have to
set up a tedious keyframed animation, wait for the preview to render, adjust the
animation, and wait again. You want a title to fade on, do a little shimmy, and then
slide out of view? Simply click Play, then drag the Fade, Random Motion, and Gravity
behaviors onto the title in the Canvas—no preview rendering time. “Behaving” has
never been so much fun!
5
Page 6
Behaviors are designed for creating generalized, fluid motion effects, as well as for
creating animated effects that might be too complex or time-consuming to keyframe
manually. For example, when the Vortex behavior is applied to an object, all
surrounding objects automatically orbit around that object. Or, you can quickly specify
that only certain objects are affected.
When recess is over and it’s time for precision-timed graphics, you can head off to
keyframing class with the click of a button. Keyframing can be used to create an
animation in which the object must hit a specific value at a specific time. You can also
use a combination of behaviors and keyframes, or create editable keyframes from an
applied behavior.
The Motion school not only has a playground, but a Library that is chock full of
goodies, including a suite of more than 95 filters. All behaviors, particle systems, fonts,
generators, as well as any installed third-party filters are housed in the Library. The
Library contains a Preview area that makes browsing and selecting effects fast and fun.
For example, you can see an animated preview of a particle system before you bring
the particles into your project. The Library also contains stacks of content, including
professionally-designed, editable templates that you can use as building blocks for a
project. For animated textures such as gradients, swirls, or noise, check out a generator.
By working with content, creating shapes, text, or particles, or by using behaviors or
filters within Motion, you can create beautiful, original content such as animated
backgrounds, particle effects, and titles—even without importing any external media
into your project. This makes Motion an excellent classmate for Final Cut Pro HD, DVD
Studio Pro, or your favorite motion graphics or compositing application—you can
scoot over to Motion, quickly create professional-level elements, and bring the content
into your project. You can even import a saved Motion project into Final Cut Pro HD
and DVD Studio Pro, without exporting (rendering) the project.
Whether you produce commercials, documentaries, titles, broadcast or web graphics,
corporate presentations, DVD menus, or your own personal video projects—and
whether you need the precision of keyframed animation, the free-flow animated
effects of behaviors, or a little of both—Motion has the toolset to meet your motion
graphics needs. Welcome to Motion, a place where work and play come together.
Motion graphics with moxie.
6 Chapter 1
Orientation
Page 7

About Motion
In Motion, you create motion graphics and basic compositing projects with imported
images (such as Adobe Photoshop or Illustrator files), image sequences, QuickTime
movies, audio files, as well as objects created within Motion. These objects include text,
masks, shapes, and particles.
All media imported into Motion, or elements created within a project, are referred to as
objects
. In your project, you can apply effects such as filters or behaviors to any object.
A
filter
is a process that changes the appearance of an image. For example, a blur filter
takes an input image and outputs a blurred version of that image. A
process that applies a value range to an object’s parameters, creating an animation
based on the affected parameters. For example, the Spin behavior rotates an object
over time at a rate that you specify.
behavior
is a
A Motion project is made up of
layers
that contain objects. The layer acts as a “parent”
to its objects. If you move or apply a filter or behavior to a layer, all objects within that
layer are affected. You can also apply filters and behaviors to the individual objects
within a layer. Layers and objects can be moved and animated by using behaviors or by
setting keyframes. Filters can also be animated.
A
project
represents a single flow of image data built from the bottom up. In a
composite with a single layer, the objects within that layer are stacked above one
another. Filters and behaviors that are applied to an object appear beneath the object
in the Layers list (and can be hidden using the disclosure triangle, or by filtering what is
displayed in the Layers tab). The layer represents the resulting image of its objects and
their applied behaviors, filters, and composite modes (blend modes).
In a simple example, a layer contains a single image with applied color correction and
blur filters (in that order). The image provides the input data to the color correction filter.
The output data of the color correction is the input data for the blur filter. The layer
represents the result of that image data flow. Layers are also stacked one above the other
in a project—the output of the lower layer is the input to the layer above it in the list.
No matter what your level of experience, this tour introduces you to creating motion
graphics in Motion. In a style that is a blend of tutorial and user’s manual, the tour
provides an overview of the user interface components, and a quick start to every main
feature of Motion and its general workflow.
Chapter 1
Orientation
7
Page 8

Getting Started
The first steps in any project are to determine your project settings and bring in your
media files (unless you are generating content solely from within Motion). A Motion
project is a file that contains information that references all media that you import into
a project, content created within the project itself (such as shapes, text, and particles),
and any filters, behaviors, or animation applied to those objects.
This section introduces the basic Motion workflow, including creating a new project
and importing some media files. Once a few elements are imported into the project,
the Motion interface is presented in an order relative to building a project.
Note:
If you have a three-button mouse connected to your computer, you can rightclick to access the same controls specified by the
documentation. If you are working on a PowerBook G4, keep in mind that some
keyboard shortcuts require you to use the
in conjunction with the keys specified in the user documentation.
Creating a New Project
When you first start Motion, the Welcome Screen appears that contains new project
options. From this dialog, you can choose to start with a new project, a premade
template, an introductory tutorial, or link to the web-based QuickTime tours.
Control
Function
-click commands in the user
key (fn—next to the
Control
key)
Note:
To skip the initial screen, turn off the “Show the Welcome Screen at startup”
checkbox in Motion Preferences. In the Startup section of General Preferences, you can
set Motion to automatically do one of the following at startup: Open Last Project(s),
Create New Project, Show the Welcome Screen, or Browse Templates.
8 Chapter 1
Orientation
Page 9
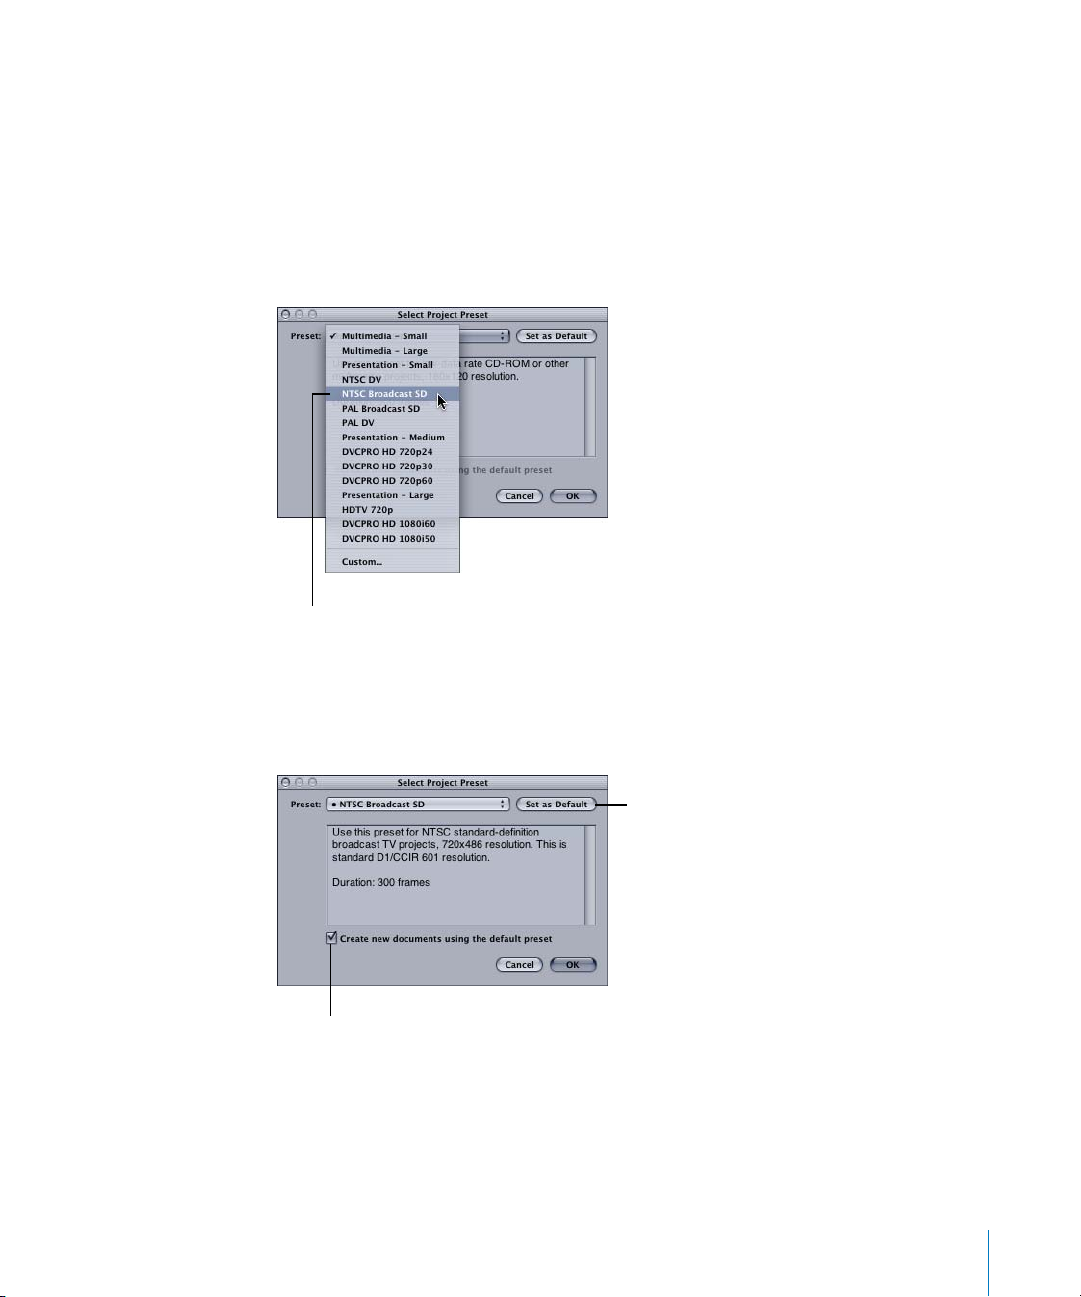
The following example project uses the NTSC Broadcast SD (Standard Definition)
project preset. For more information on creating new projects and project presets, see
Chapter 2, “Creating and Managing Projects,” in
Motion Help
.
To create a project:
1
From the Welcome Screen, click Start with a New Project.
The Select Project Preset dialog appears.
2
Choose NTSC Broadcast SD from the Preset pop-up menu.
Choose a project preset.
The NTSC Broadcast SD preset is selected. In the Select Project Preset dialog, you can
set a default project preset that is used each time you start a new project in Motion. To
set the preset as the default, click Set as Default and turn on the “Create new
documents using the default preset option.”
Click to set the current
preset as the default
project setting.
Turn on this checkbox to use the default
project preset for any new project.
3
Click OK (or press
Return
).
A new standard-definition broadcast resolution (D1, 720 x 486) project opens with a
default duration of 300 frames, or 10 seconds.
Chapter 1
Orientation
9
Page 10
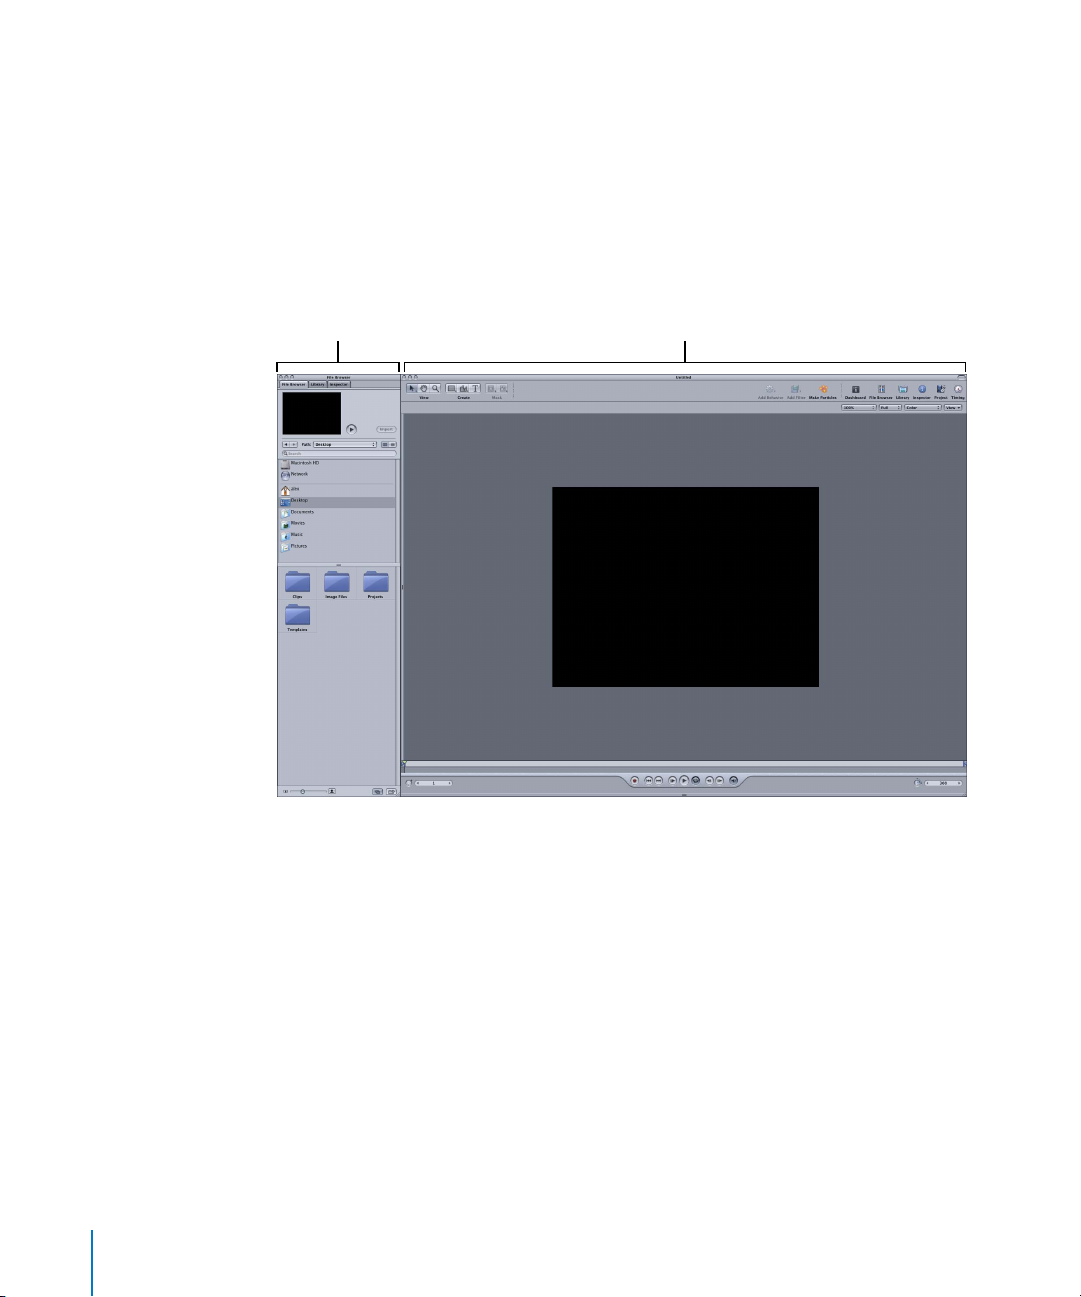
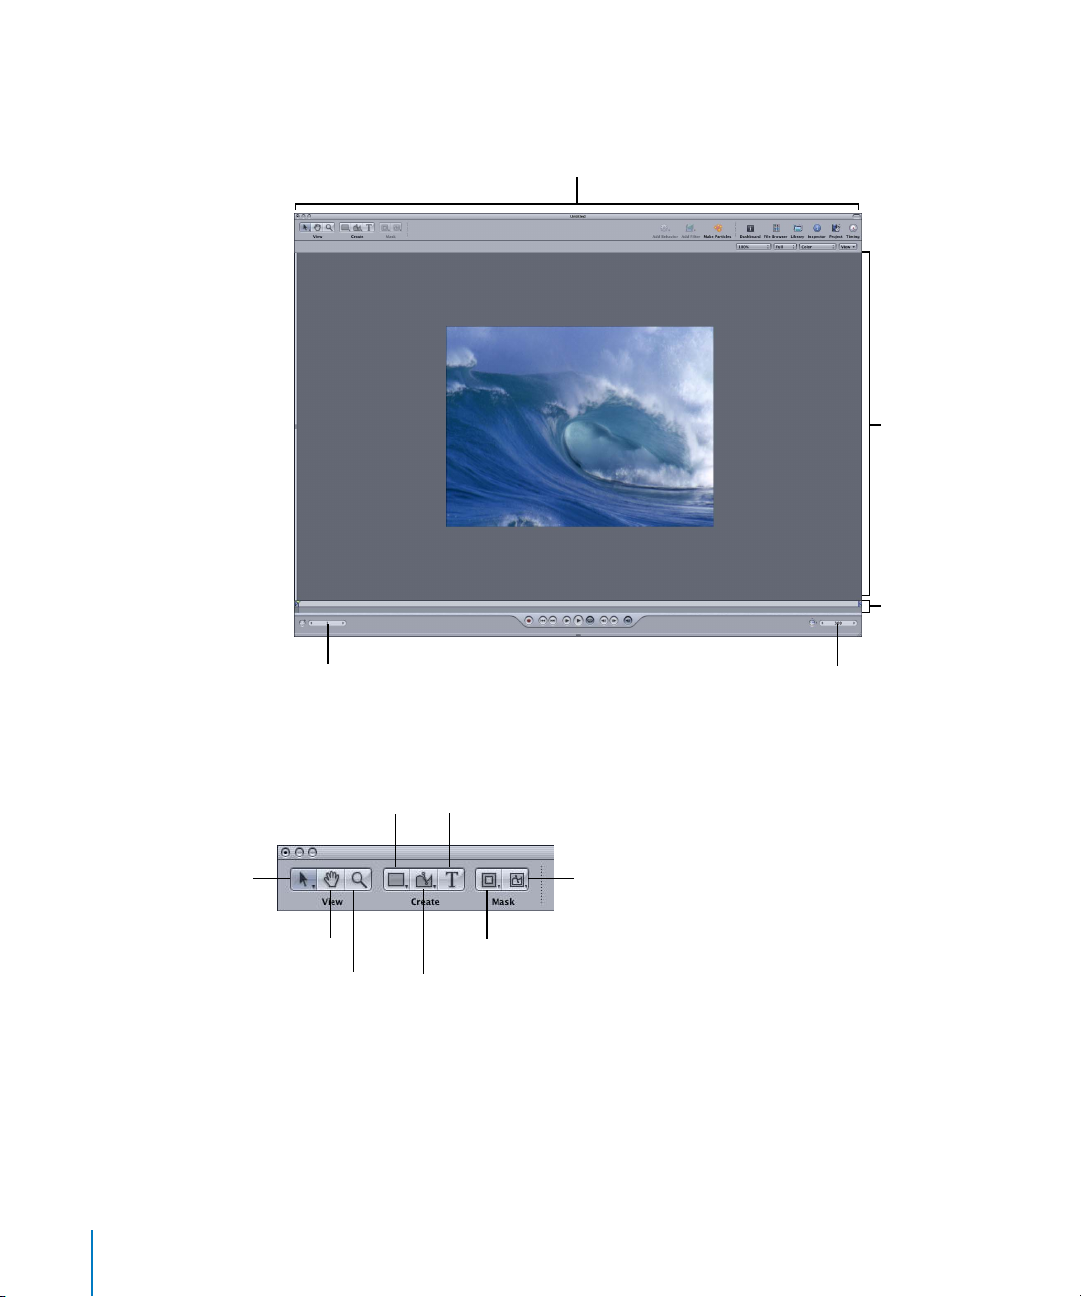
The Motion Interface
Once a project is created, the Motion interface appears and is comprised of two main
components: The Utility window and the Canvas. The Utility window is used to import
media files, to preview, select, and apply effects, and to edit and animate the controls
for those applied effects. The Canvas is the main area in which to view your project and
its elements, as well as select, transform, and animate those elements. The additional
interface components, the Project pane and the Timing pane, are not displayed by
default. With the intuitive design of Motion, you can easily show and hide interface
components when needed.
Utility window Canvas
10 Chapter 1
Orientation
Page 11
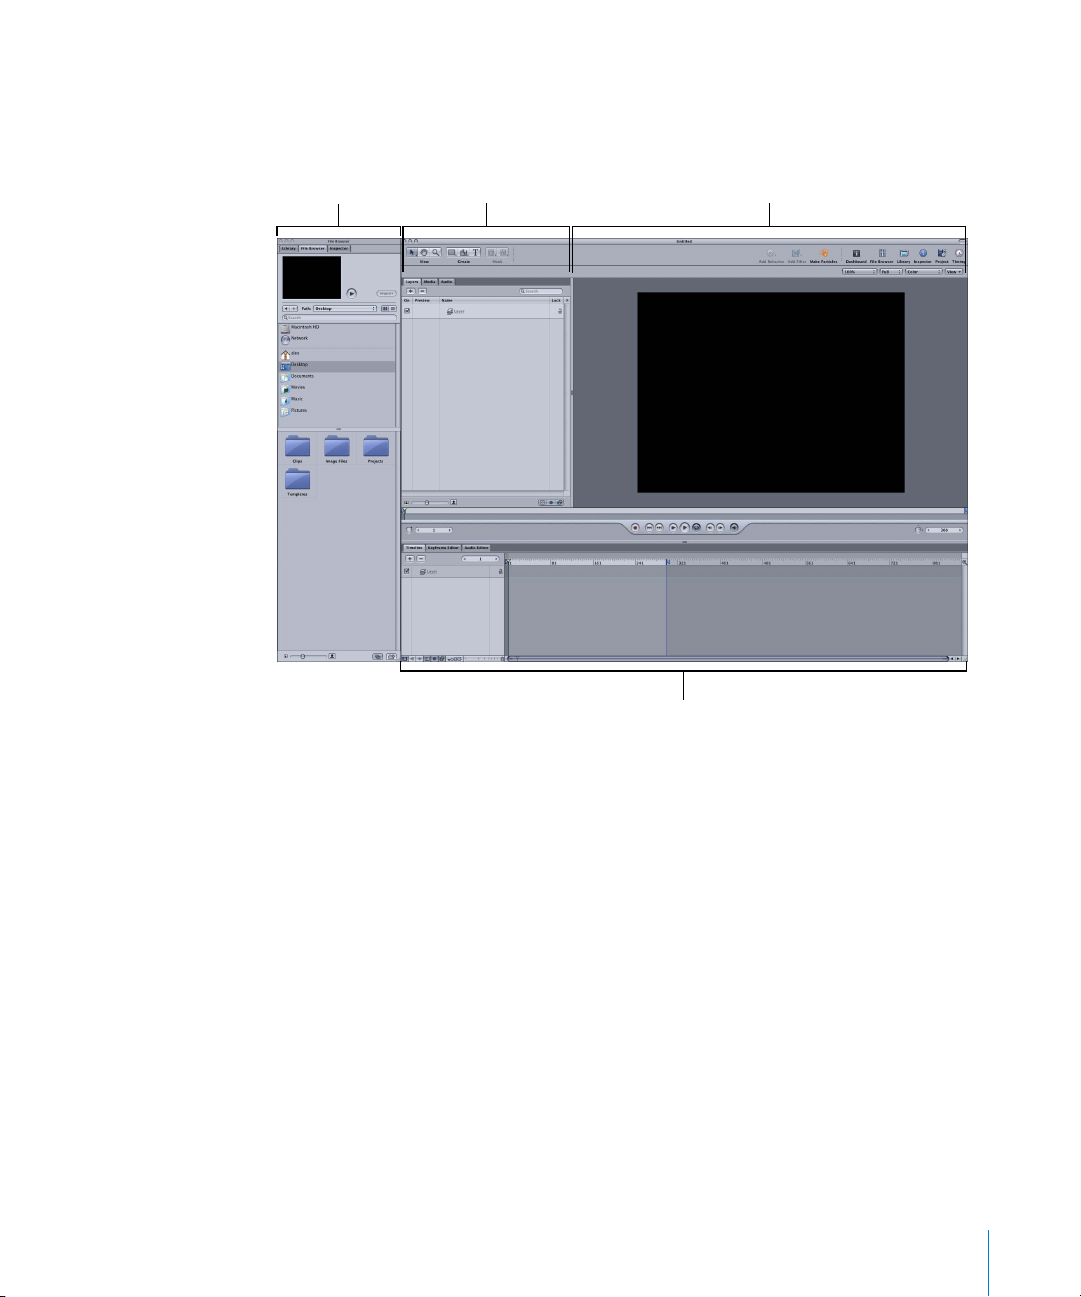
The Project pane is used to organize and reorder project elements and to control audio.
The Timing pane contains the full-featured Timeline, Keyframe Editor, and Audio Editor,
which give you an editable, global view of your project, including all project elements
and animated parameters.
Utility window CanvasProject pane
Timing pane
The following sections discuss the Utility window and the Canvas, in an order that
represents a typical workflow. The File Browser is addressed first, since it is used to
import media files into a Motion project. The Canvas is discussed next, which is where
you drag the files from the File Browser. Once the files are imported, the discussion
moves back to the Utility window to introduce the Library and the Inspector. From the
Library, you browse and apply effects to objects in the Canvas. The applied effects are
then edited in the Inspector and the Dashboards.
Chapter 1
Orientation
11
Page 12
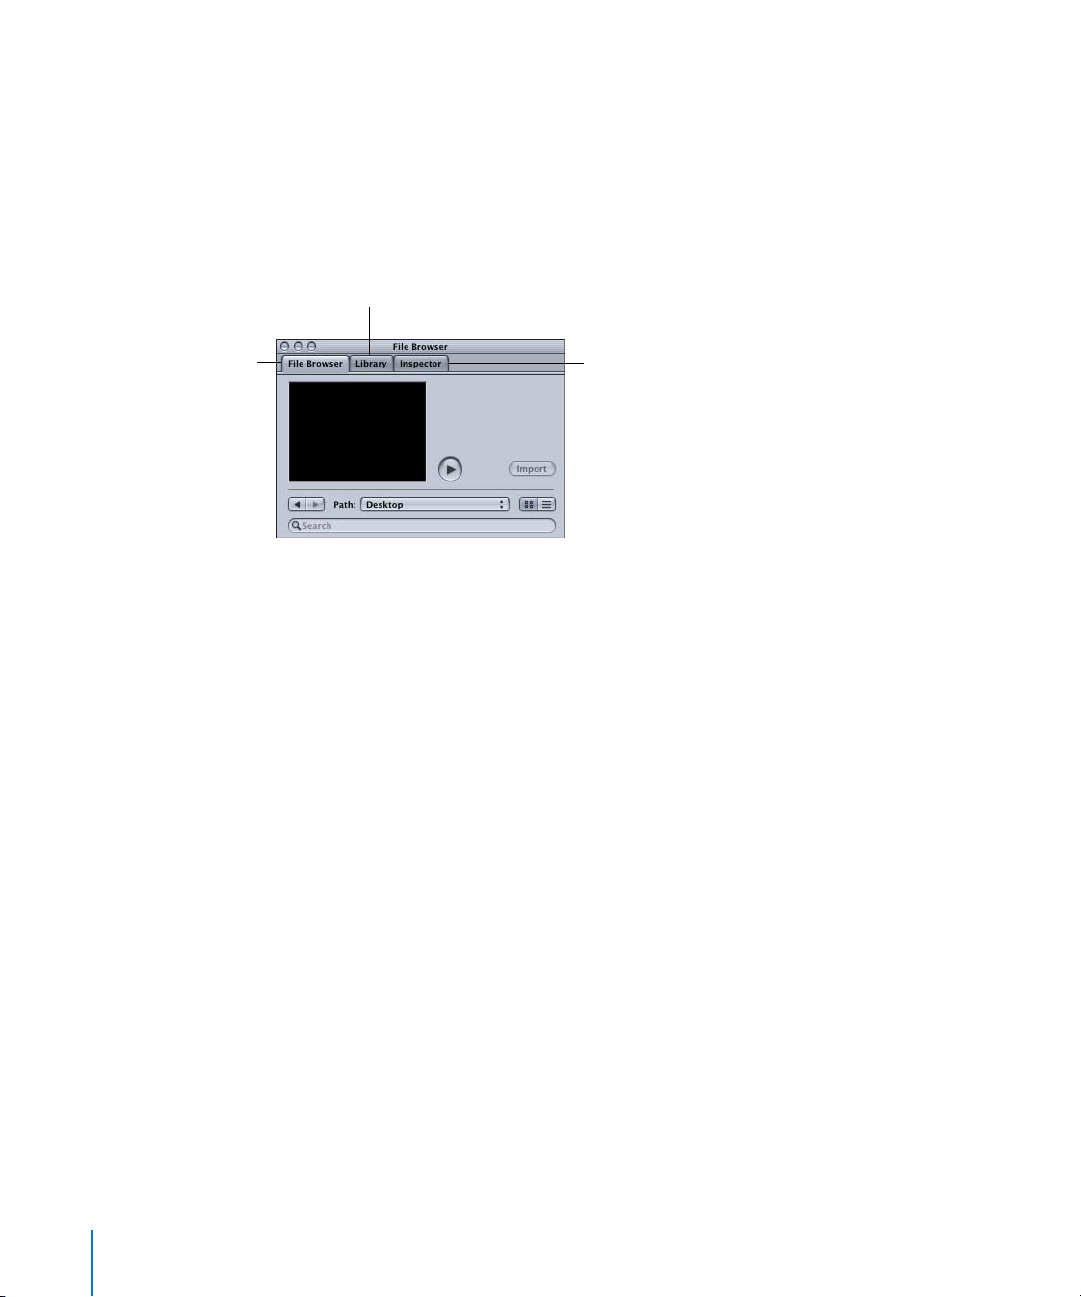
The Utility Window
The Utility window contains the following tabs:
• File Browser: Use the File Browser to select and import media files (single images,
image sequences, QuickTime movies, and audio files).
• Library: Use the Library to browse, select, and apply effects to the objects in your
project, as well as to access content such as preset particles and gradients.
• Inspector: Use the Inspector to adjust the parameters for all effects and objects in
your project, and to create keyframes.
Library tab
File Browser tab
Inspector tab
The File Browser
Use the File Browser to locate, preview, and bring in media files from your computer or
network. A preview area appears at the top of the browser, and the upper pane
contains your hard drives, mounted servers, and home folder. The lower pane displays
the folders and folder contents from the location that is selected in the upper pane of
the browser.
12 Chapter 1
Orientation
Page 13
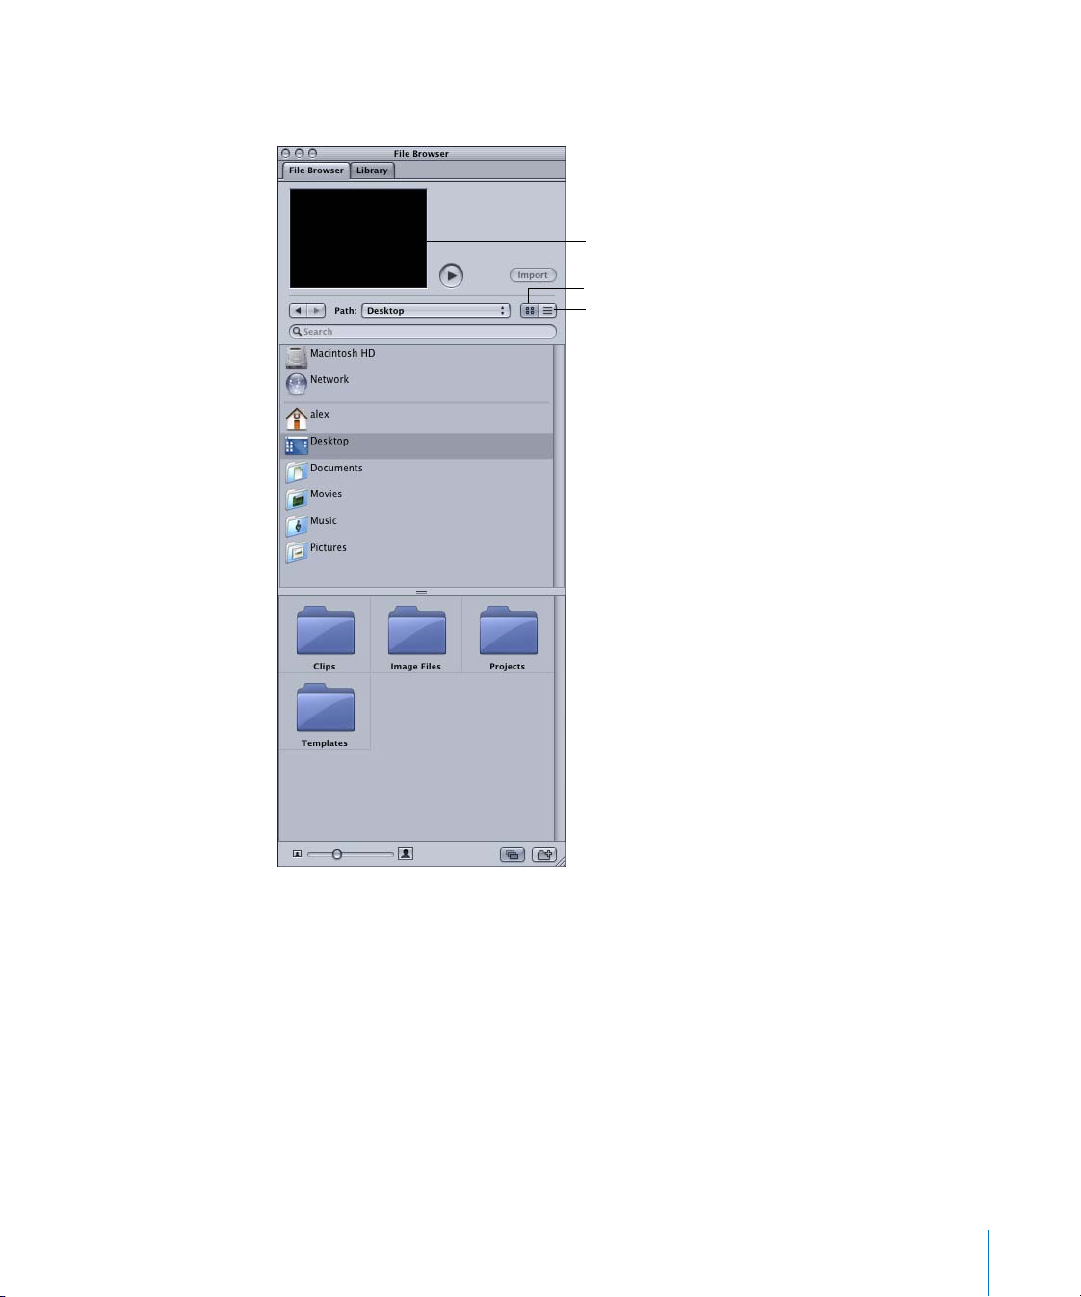
Note: Like the Mac OS X Finder, you can display the browser contents in icon or list
view.
Preview area
Icon view
List view
Importing Media
There are three ways to import media into your project:
• The File Browser, which allows you to preview images and play clips (including audio)
prior to importing the media
• The File > Import command in the menu bar, which opens the Import Files dialog
• The Finder, which allows you to drag files into a project
To bring in media using the File Browser:
1 Click the File Browser tab.
Note: You can also choose Window > File Browser, or press Command+1 to display the
File Browser.
Chapter 1 Orientation 13
Page 14
2 In the upper pane of the browser, select the location of the media file you want to
bring in to your project.
The contents of that location appear in the lower pane of the browser.
3 In the lower pane of the browser, do one of the following:
• If the file is not in a folder, select the file.
• If the file is located in a folder, double-click the folder, and then select the file.
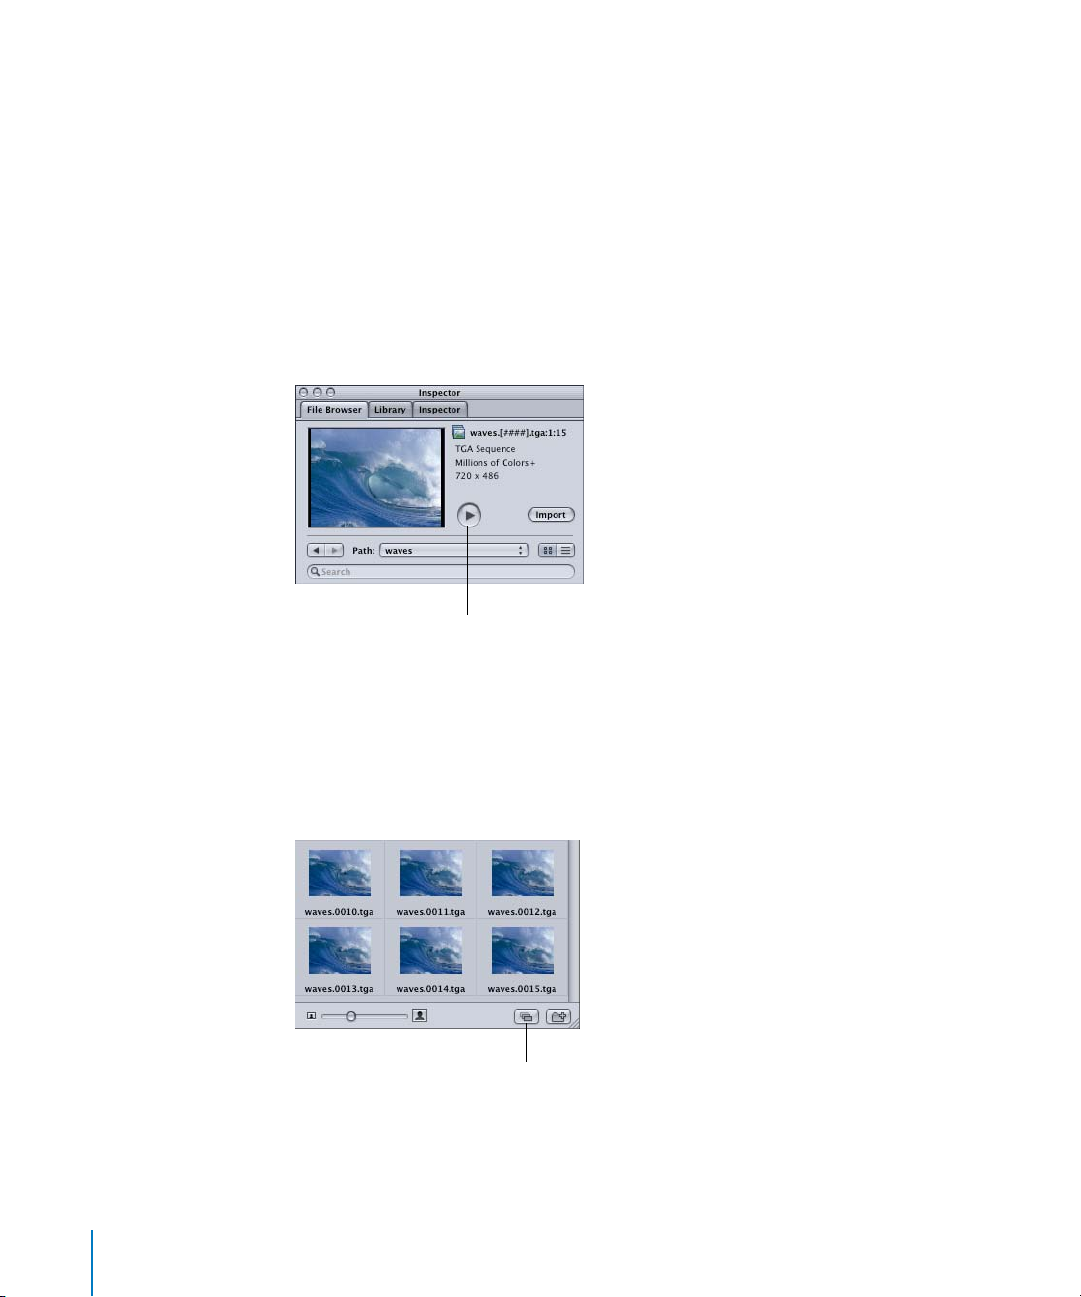
In the top of the File Browser, the selected file appears in the Preview area and the
file properties, such as format and size, are listed. If the selected media is an image
sequence, QuickTime movie, or audio file, the file plays automatically. You can click
the Play button next to the Preview area to play or pause the playback.
Play button
You can preview an image in a larger preview window, called the Viewer. Controlclick the media, then choose Open in Viewer from the shortcut menu. If the file is a
QuickTime movie, choose Open in QuickTime Player. You can also double-click the
file to open the file in the Viewer.
Note: To uncollapse image sequences, click the Image Sequence button in the lowerright corner of the File Browser.
Image Sequence button
4 Drag the selected file to the Canvas.
14 Chapter 1 Orientation
Page 15
Note: To bring in multiple files, you can Shift-click or Command-click the files (in icon
or list view), or drag-select (when in list view). The files are placed in the same position
in the Canvas. To move the individual files, click away from the selected files to deselect
them, then drag the individual images.
Dynamic Guides
As you drag your image in the Canvas, yellow guides appear and indicate when the
file is aligned to the horizontal and vertical center of the Canvas. These guides are
called Dynamic Guides, and are enabled and disabled using the View menu in the
Canvas View controls (in the upper-right corner of the interface, below the Toolbar).
To temporarily disable the guides while actively dragging objects in the Canvas, press
Command as you drag. To toggle the Dynamic Guides on or off, press N.
The Dynamic Guides really start to earn their keep when you import and align several
objects in the Canvas, as they indicate when objects snap together in alignment.
For more information on file management and importing media, see Chapter 2,
“Creating and Managing Projects,” in Motion Help.
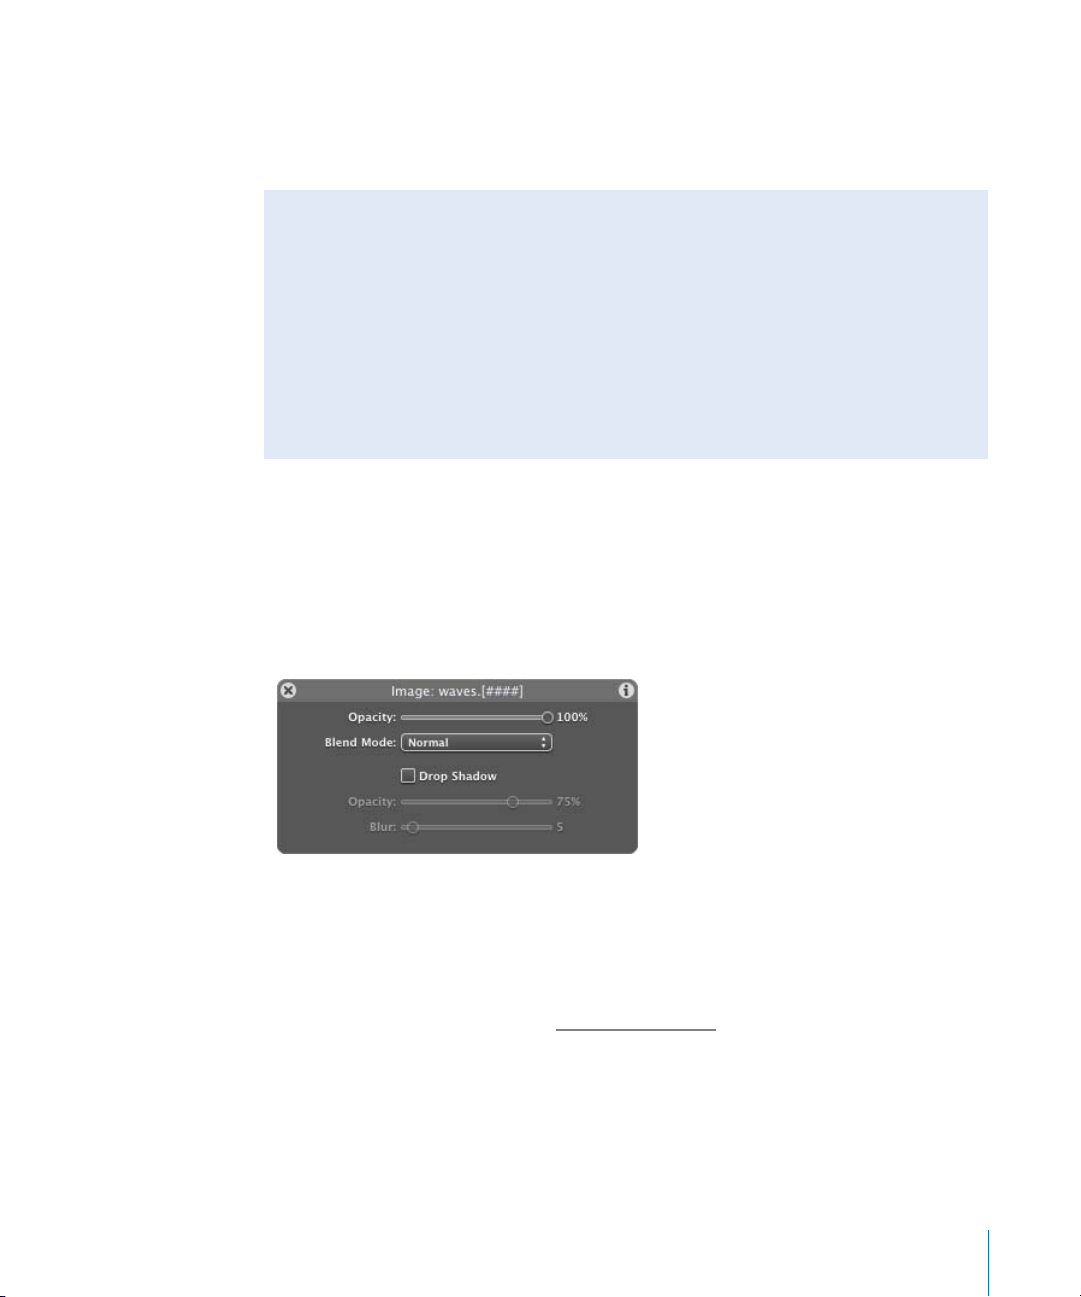
Once an object is imported into Motion, a small floating transparent window appears
and displays editable properties, such as Opacity and Blend Mode, for that object. This
window is called a Dashboard. All objects (images, shapes, masks, and text), filters, and
behaviors have associated Dashboards.
The Dashboard includes a title bar that displays the type and name of the currently
selected object, filter, or behavior. For example, the Dashboard title for the example
above reads, “Image: waves.[####],” which represents a Targa sequence (with a fourdigit padding). “Image” is the type of object that is selected (an image, image
sequence, or a QuickTime movie), and “waves.[####]” is the filename of the selected
object. For more information, see “M
Chapter 1 Orientation 15
otion Dashboards” on page 31.
Page 16
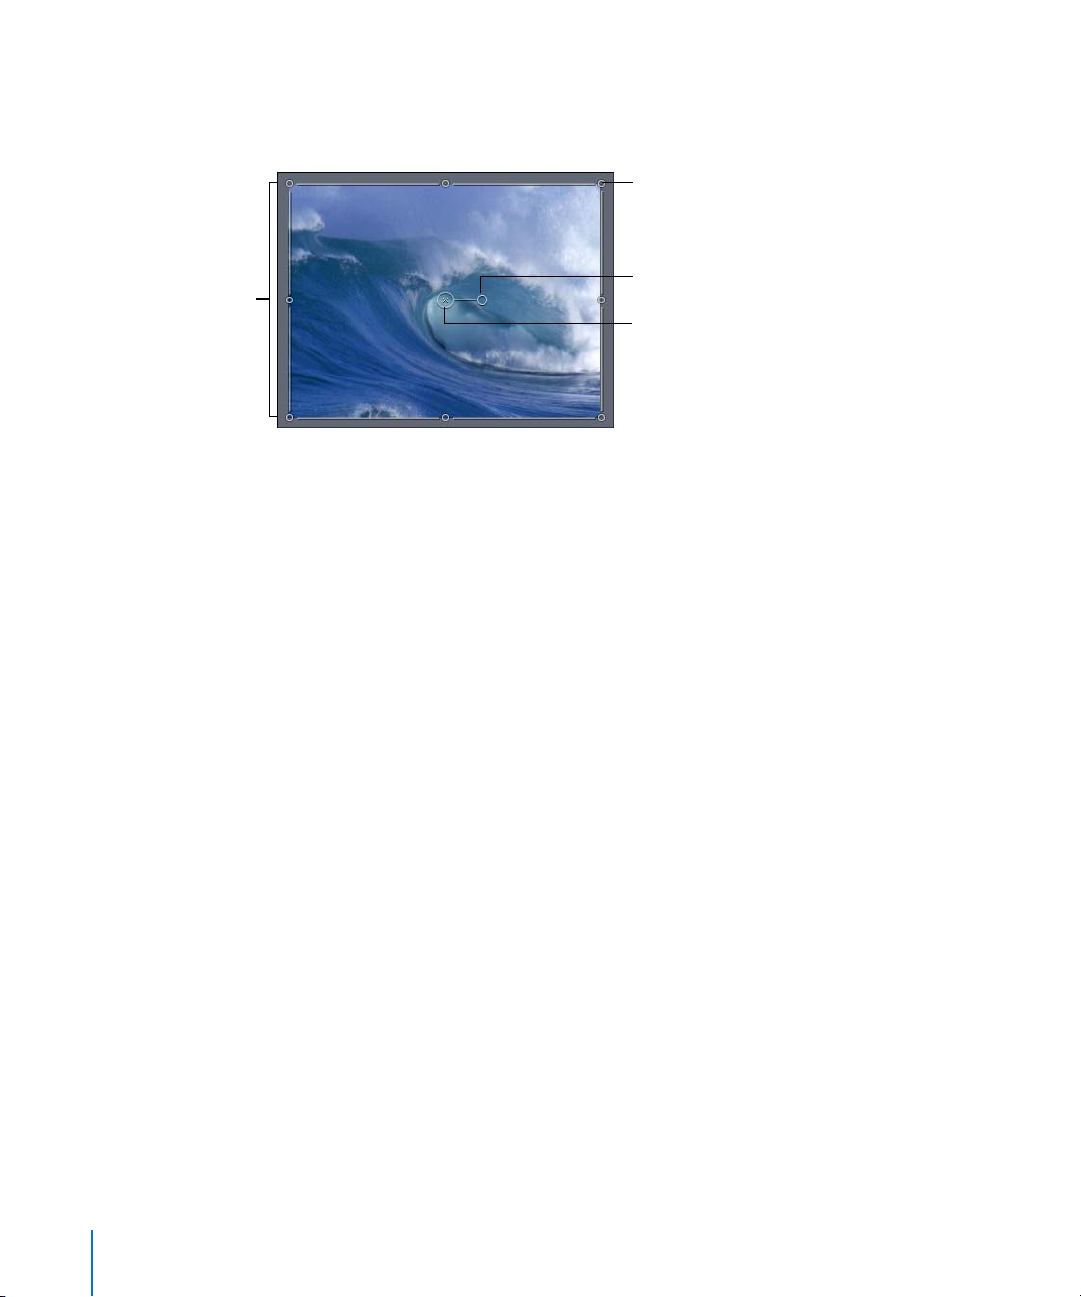
In addition to the Dashboard, an active bounding box appears in the Canvas around
the selected object. The default onscreen controls for the bounding box include
handles for scaling and rotating, and a pivot point.
Handle
Rotation handle
Bounding box
Pivot point
These controls let you transform and animate objects directly in the Canvas.
Importing Adobe Photoshop and Adobe Illustrator Files
You can import Adobe Photoshop files and Adobe Illustrator PDF files into Motion. For
multilayer Photoshop files, there are three import options:
• Import the layers as a single, merged image.
• Import all layers in the file as a group.
• Import a single layer from the file.
The alpha channels for the Photoshop layers are preserved. There are controls to
change the default alpha channel interpretation in the Inspector. For more
information on importing and working with Photoshop and Illustrator files, see
Chapter 2, “Creating and Managing Projects,” in Motion Help.
To import a Photoshop file:
1 In the File Browser, select the Photoshop file.
2 Drag the file over the Canvas or Layers tab, and keep the mouse button pressed until
the drop menu appears.
3 Choose one of the following options from the drop menu:
• To import the file as a single layer, choose Import Merged Layers. This option creates
a single object in a Motion layer.
• To import all layers in the file as a group, choose Import All Layers. This option
creates a nested layer within a Motion layer—a group in which the individual objects
(original Photoshop layers) of that nested layer can be individually modified.
• To import a single layer, choose the layer name from the drop menu. This option
creates a single object in a Motion layer.
16 Chapter 1 Orientation
Page 17

Note: When a Photoshop file contains more layers than can be displayed in the drop
menu, the Choose Layer option appears in the drop menu. Once Choose Layer is
chosen, use the Pick Layer to Import dialog to select which layer to import.
To import an Illustrator PDF file:
1 In the File Browser, select the Illustrator PDF file.
2 Drag the file to the Canvas.
The file creates a single object in a Motion layer.
The file is imported as a vector image and can be scaled without any degradation to
the image (when Fixed Resolution is deselected in the Media tab of the Inspector). The
imported file is the size of the Illustrator file. For more information on working with
Illustrator PDF files, see Chapter 2, “Creating and Managing Projects,” in Motion Help.
You can also use the File > Import command to import a Photoshop or Illustrator file.
The Canvas
You use the Canvas to view and interact with the objects in your project. You can drag
media files directly to the Canvas from the File Browser, as well as apply effects from
the Library to those files. As you add and edit effects, your changes update
immediately in the Canvas. Text, shapes, and masks are also created directly in the
Canvas.
The Canvas also includes the transport controls for scrubbing through and playing your
project. Once you have explored the Canvas, return to the Library to apply effects to
those objects in the Canvas.
In addition to the viewing area, the Canvas contains the following components:
• Toolbar: Use the Toolbar to transform objects, show and hide the Motion interface
components, add effects, and to change the view of your composite.
• Current Frame and Project Duration fields: The Current Frame field displays the
current location (frame or timecode) of the project playhead. The Project Duration
field displays the length of the project.
• Transport controls: Use the transport controls to play or scrub through your project,
to enable audio playback, and to enable keyframing.
Chapter 1 Orientation 17
Page 18
• Mini-Timeline: The mini-Timeline allows you to add objects to your project, to move
objects in time, and to trim the duration of an object without having to go into the
Timing pane, which contains the full Timeline.
Toolbar
Canvas
Mini-Timeline
Current Frame field
The Toolbar
The left side of the Toolbar contains tools for transforming objects onscreen, creating
shapes, and panning and zooming the Canvas.
Rectangle
Select
Pan
Zoom
18 Chapter 1 Orientation
Project Duration field
Tex t
Mask
Rectangle Mask
Shape
Page 19
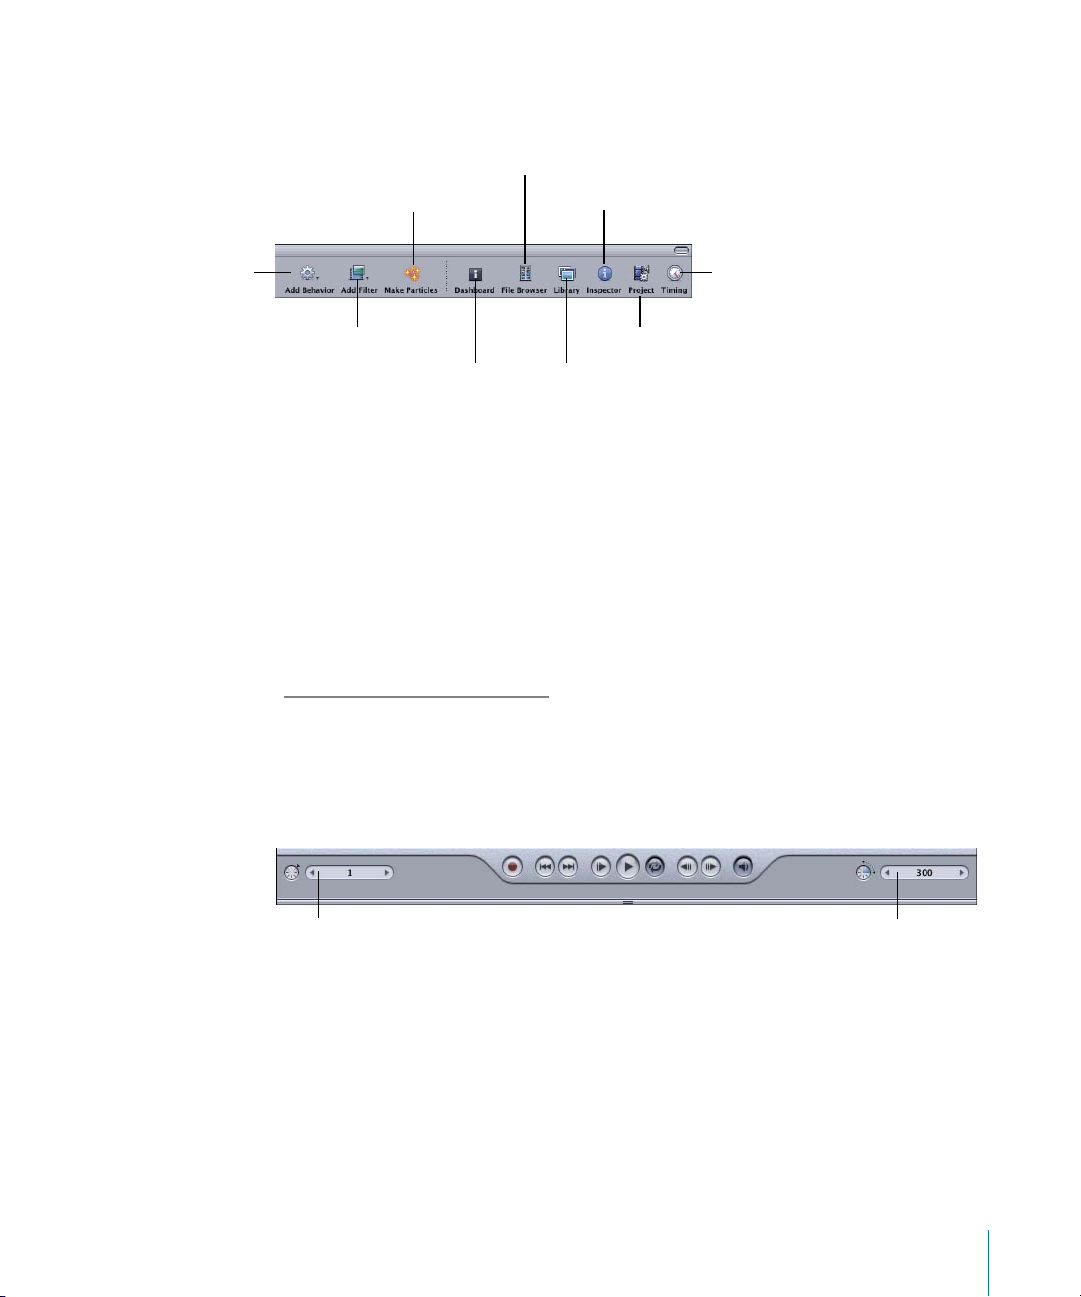
The right side of the Toolbar contains icons that add filters, behaviors, and particle
emitters to objects or layers, as well as show and hide the Motion interface
components.
Switch to File Browser
Make Particles icon
Switch to Inspector Tab
Add Behavior icon
Show/Hide Timing pane
Add Filter icon
Show/Hide Dashboard
Switch to Library Tab
Show/Hide Project pane
Note: You can customize the Toolbar to better suit your own workflow. For example,
you can move the Add Filter and Add Behavior icons so that they are positioned
adjacent to the shape tools, or add a shortcut to the Keyframe Editor or Timeline. To
access the Customize Toolbar sheet, Control-click in an empty area of the Toolbar, then
choose Customize Toolbar from the shortcut menu, or choose View > Customize
Toolbar. For more information, see Chapter 1, “Getting to Know Motion,” in Motion Help.
In the Toolbar, a small arrow in the lower-right corner of a tool indicates additional
options or modes for that tool. These editing modes change the onscreen controls
associated with a selected object. Click the tool and hold down the mouse button to
display and select the tool options. For more information on the transform modes, see
ransforming Objects and Layers” on page 56.
“T
Current Frame and Project Duration Fields
The Current Frame field displays the current location (frame or timecode) of the project
playhead. The Project Duration field displays the length of the project (usually defined
in the Project Properties).
Current Frame field
Project Duration field
To go to a specific frame in a project:
m
Click in the Current Frame field and type the new frame number. You can type a value
or drag to increase or decrease the existing value.
Note: You can also drag the playhead (located in the mini-Timeline) to a specific frame.
As you drag the playhead, the current frame is displayed in the Current Frame field.
Chapter 1 Orientation 19
Page 20
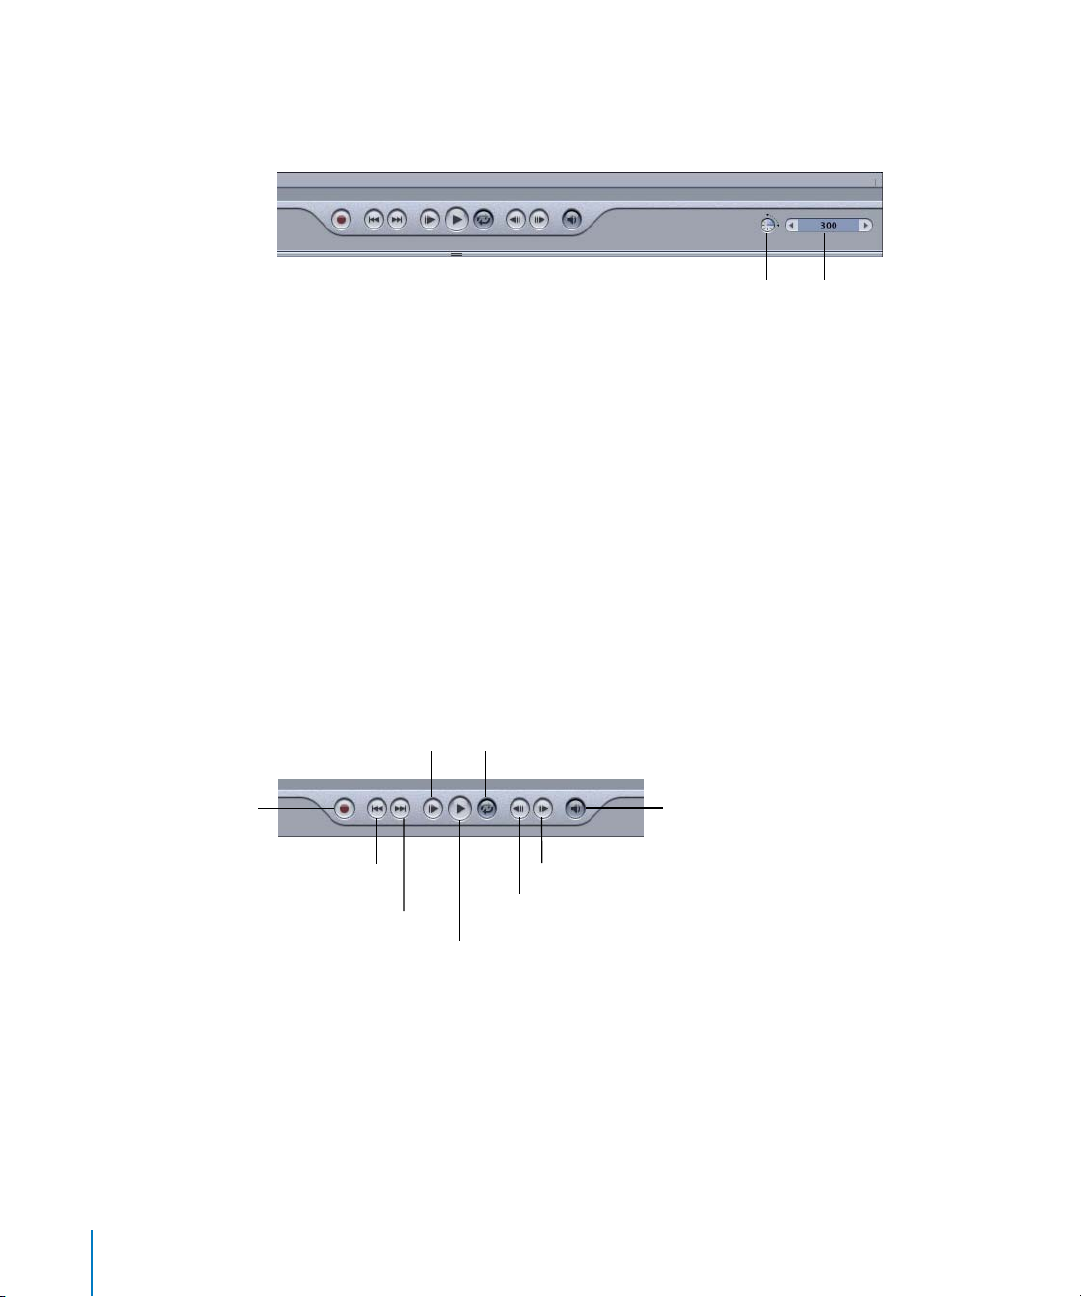
To switch the time display in a project from frames to timecode:
m
Click the stopwatch next to the Project Duration field or next to the Current Frame
field.
Record
Stopwatch
Project Duration field
To change the length of an existing project:
m
Enter a new project duration in the Project Duration field (located in the lower-right
portion of the Canvas adjacent to the transport controls).
Note: You can also choose Edit > Project Properties (or press Command+J) and set the
Duration field to a new project length, as well as change additional project settings.
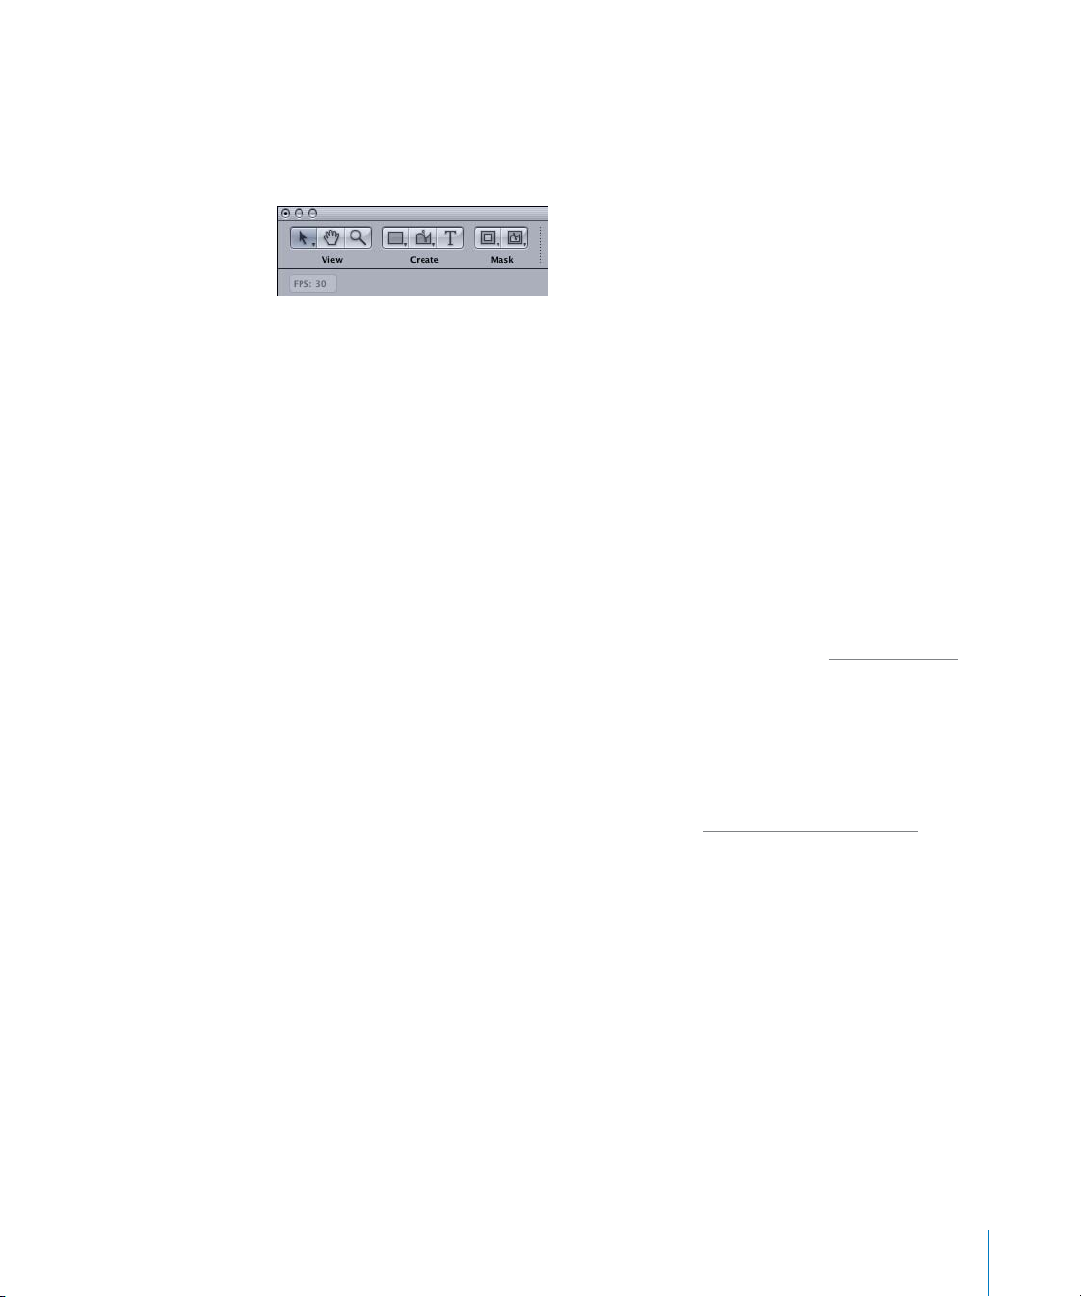
The Transport Controls
Use the transport controls to play your project, move to the beginning or end of a
project, or scrub through your project one frame at a time. The controls also enable
keyframing and audio playback.
If you have a Wacom tablet installed on your computer, you can use gestures to control
playback and scrubbing, as well as to navigate your project. Gestures are contiguous
patterns drawn on your tablet that represent specific commands, such as advance one
frame forward, zoom in or out of the Canvas, and so on. For more information, see
Appendix C, “Using Gestures,” in Motion Help.
Play from start
Loop playback
Play/Mute audio
Go to start
of project
Go to end of project
Play/Pause
To play your project:
m
Click the Play button.
The Play button changes to a Pause button.
To stop or pause playback:
m
Click the Pause button.
20 Chapter 1 Orientation
Go to next frame
Go to previous frame
Page 21
Note: You can also start and stop playback by pressing the Space bar. To quickly return
to the beginning of a project, press Home.
During playback, the Status Bar (located below the Toolbar) displays the project’s fps
(frames per second).
In the Appearance pane of Motion Preferences, you can also choose to display Color
(the color the pointer is over in the Canvas) and Coordinates (the position of the
pointer in the Canvas) information in the Status Bar.
Note: In addition to using the step frames controls in the transport controls, you can
press Left Arrow or Page Up to move back a single frame or press Right Arrow or Page
Down to advance a single frame. There are several keyboard shortcuts for the transport
controls and additional frame navigation in the Mark menu.
The Record Button
Use the Record button to enable automatic keyframing. When Record is enabled,
keyframes are automatically created whenever you change the value of a parameter.
This means that when Record is enabled, any value changes in the Canvas, Dashboard,
or Inspector creates a keyframe. For a description of keyframes, see “K
eyframe Basics”
on page 103.
With Record enabled and while playing the project, you can create a motion sketch
animation path by dragging an object in the Canvas in the pattern of your choice. Both
the position and speed of your movement are recorded and applied to the position
keyframes for that object. You can set Motion to record a keyframe at each frame, or to
apply keyframe thinning. For more information, see “S
etting Recording Options” on
page 112.
To enable automatic keyframing:
m
Click the Record button (or press A).
The Record button pulses red.
To disable automatic keyframing:
m
Click the Record button (or press A).
The Record button stops pulsing red.
Chapter 1 Orientation 21
Page 22
To animate the position of an object using motion sketch (during playback):
1 In the transport controls, enable Record (or press A).
2 Click Play (or press the Space bar).
3 Drag the object you want to animate in the Canvas.
To animate the position and rotation of an object:
1 In the transport controls, enable Record (or press A).
2 Go to the frame where you want to set the first keyframe.
3 In the Canvas, position the object.
4 Go to the frame where you want to set the next keyframe.
5 Move the object to its new position and drag the rotation handle.
Note: Do not drag the actual keyframe (the red point) to move the object. Rather than
creating a new keyframe, you merely reposition the existing keyframe.
6 Disable the Record button.
You can press the Space bar, or scrub the playhead, to view the animated object. As it
rotates, the object moves from its initial position to the position set in step 5 above.
The Basic Motion behaviors allow you to quickly set up this type of animation without
having to create keyframes. For more information, see “A
pplying Behaviors and Filters
to Objects” on page 27.
Note: You can also use the Animation menu to explicitly set keyframes for objects and
effects without using the Record button. The Animation menu, located in the Inspector,
also displays whether or not a parameter is animated. For more information, see
eyframing in the Inspector” on page 114.
“K
Keyframes can be viewed in the Timeline and modified in the Keyframe Editor, both of
which are located in the Timing pane. For more information, see “U
Motion” on page 103.
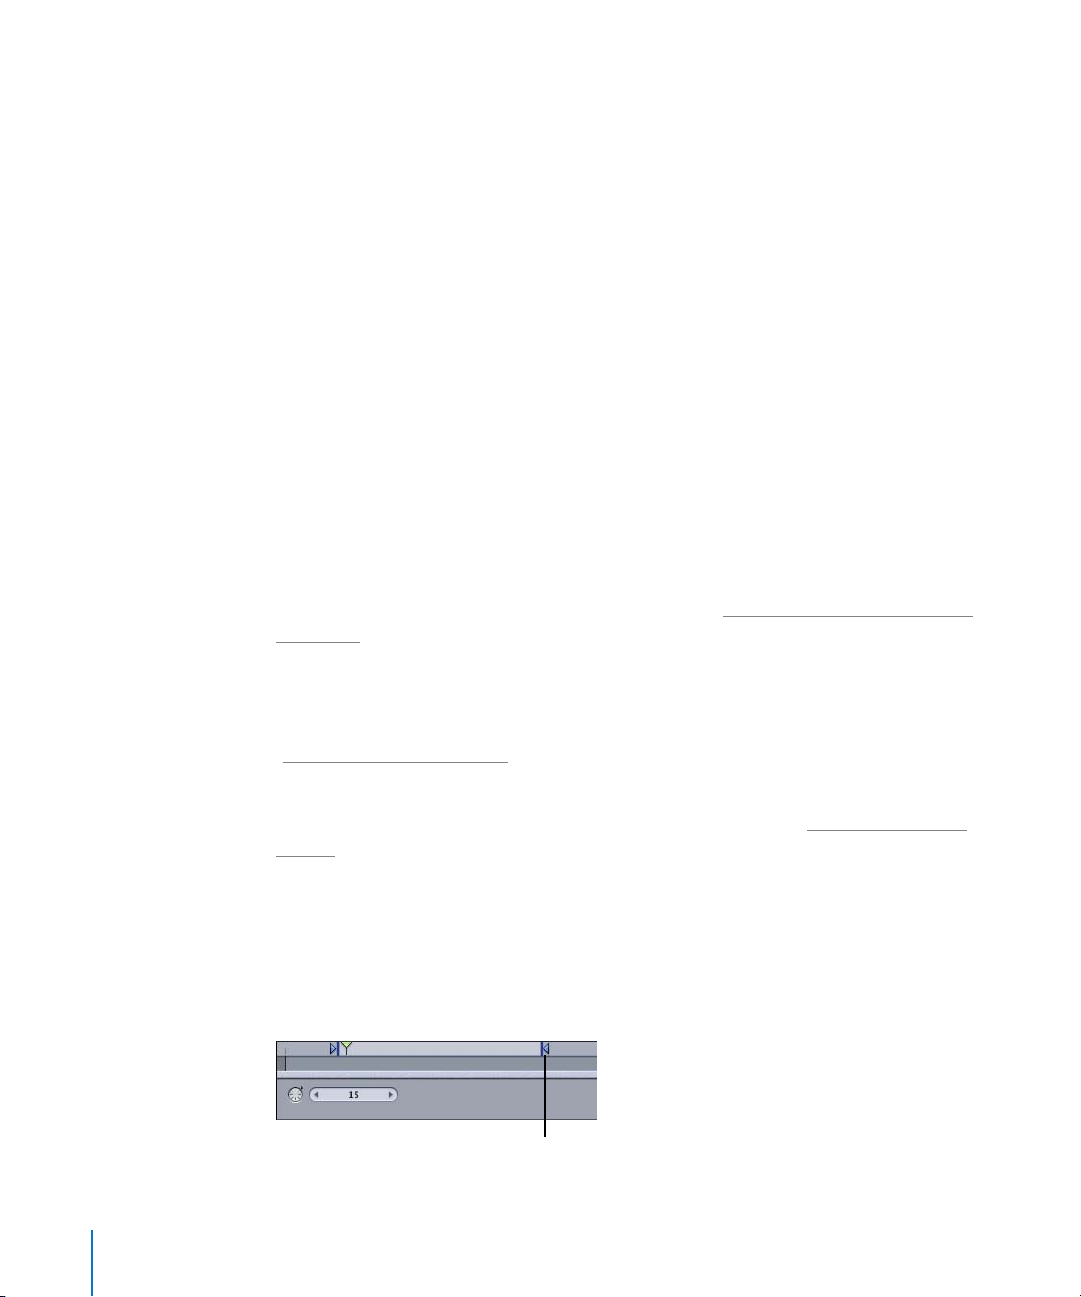
To set a play range shorter than your project duration:
1 Move the playhead to the In point you want, then choose Mark > Mark Play Range In
(or press Command+Option+I).
2 Move the playhead to the Out point you want, and choose Mark > Mark Play Range
Out (or press Command+Option+O).
22 Chapter 1 Orientation
sing Keyframes in
Play Range arrow
Page 23
Note: You can also drag the Play Range arrows to define a playback range. As you drag
the In or Out point, the new In or Out point frame number is displayed.
The Mini-Timeline
You can use the mini-Timeline to import files, as well as to quickly slip objects in time
or trim the duration of an object (without having to open the Timing pane and display
the full Timeline). The bar that appears in the mini-Timeline represents the currently
selected object or layer.
Note: Keyframes can appear in the full Timeline, but do not appear in the mini-Timeline.
When you import multiple files from the File Browser to the mini-Timeline, you have
the option to composite the objects (place the objects on top of each other), or to
sequence the objects (place the objects one after the other). This option is also
available in the full Timeline.
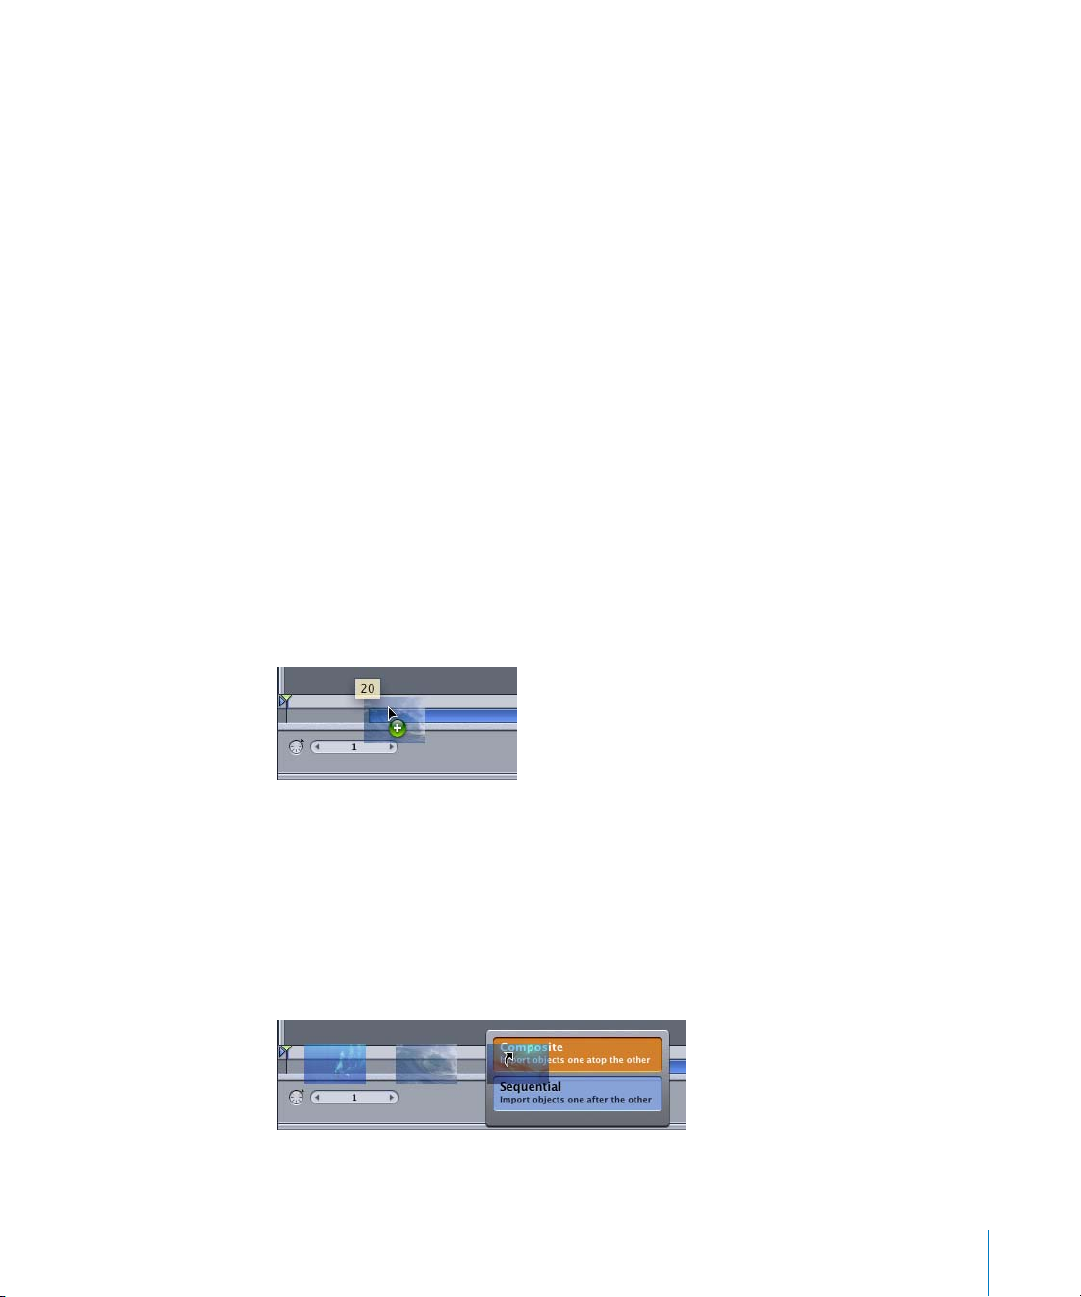
To add a file to the mini-Timeline:
1 In the File Browser, select the file you want to import.
2 Drag the file to the mini-Timeline and position the pointer over the gray bar in
between the light-gray bar (that contains the playhead) and the transport controls.
While dragging the pointer in the mini-Timeline, the current frame is displayed and the
“+” sign appears next to the pointer, indicating you can drop the object at any time. A
transparent thumbnail of the object also appears next to the pointer.
3 At the correct frame, release the mouse button.
The object is added to your project at the specified frame.
To add multiple files to the mini-Timeline:
1 In the File Browser, select the files you want to import.
2 Drag the files to the mini-Timeline, and keep the mouse button pressed until the drop
menu appears.
Chapter 1 Orientation 23
Page 24

3 Make one of the following choices from the drop menu:
• Choose Composite to place the objects on top of one another. The objects are
positioned in the order selected—the last object selected is placed at the top of the
object list.
• Choose Sequential to place the objects one after the other. The objects are
positioned in the order selected—the last object selected in the File Browser is
placed at the end of the sequence.
When importing Photoshop and Illustrator files to the mini-Timeline, the import
options are identical to the drop menu in the Canvas. For more information, see
orting Adobe Photoshop and Adobe Illustrator Files” on page 16.
“Imp
Note: Files can also be added to a project in the Timeline, located in the Timing pane.
For more information, see “T
he Timeline” on page 97.
The next section returns to the Utility window and discusses previewing and selecting
effects in the Library, and applying those effects to the objects in the Canvas as the
project plays back.
The Library
The Library, located in the Utility window, can be thought of as the place from which
you “check out” all the goodies for your project. These include effects (behaviors, filters,
particle emitters), generators (solids, gradients, animated patterns), text styles, gradient
presets, any third-party filters you have installed, and so on.
You can also save modified behaviors, filters, gradients, text styles, and so on to the
Library. These saved presets can then be applied to other objects in your current
project or future projects. Layers or objects can also be saved to the Library and used in
other projects. Your saved Library content can be shared with other users. For more
information on saving and sharing, see Motion Help.
To display the Library:
m
In the Utility window, click the Library tab.
Note: You can also choose Window > Library (or press Command+2), to display the
Library.
24 Chapter 1 Orientation
Page 25
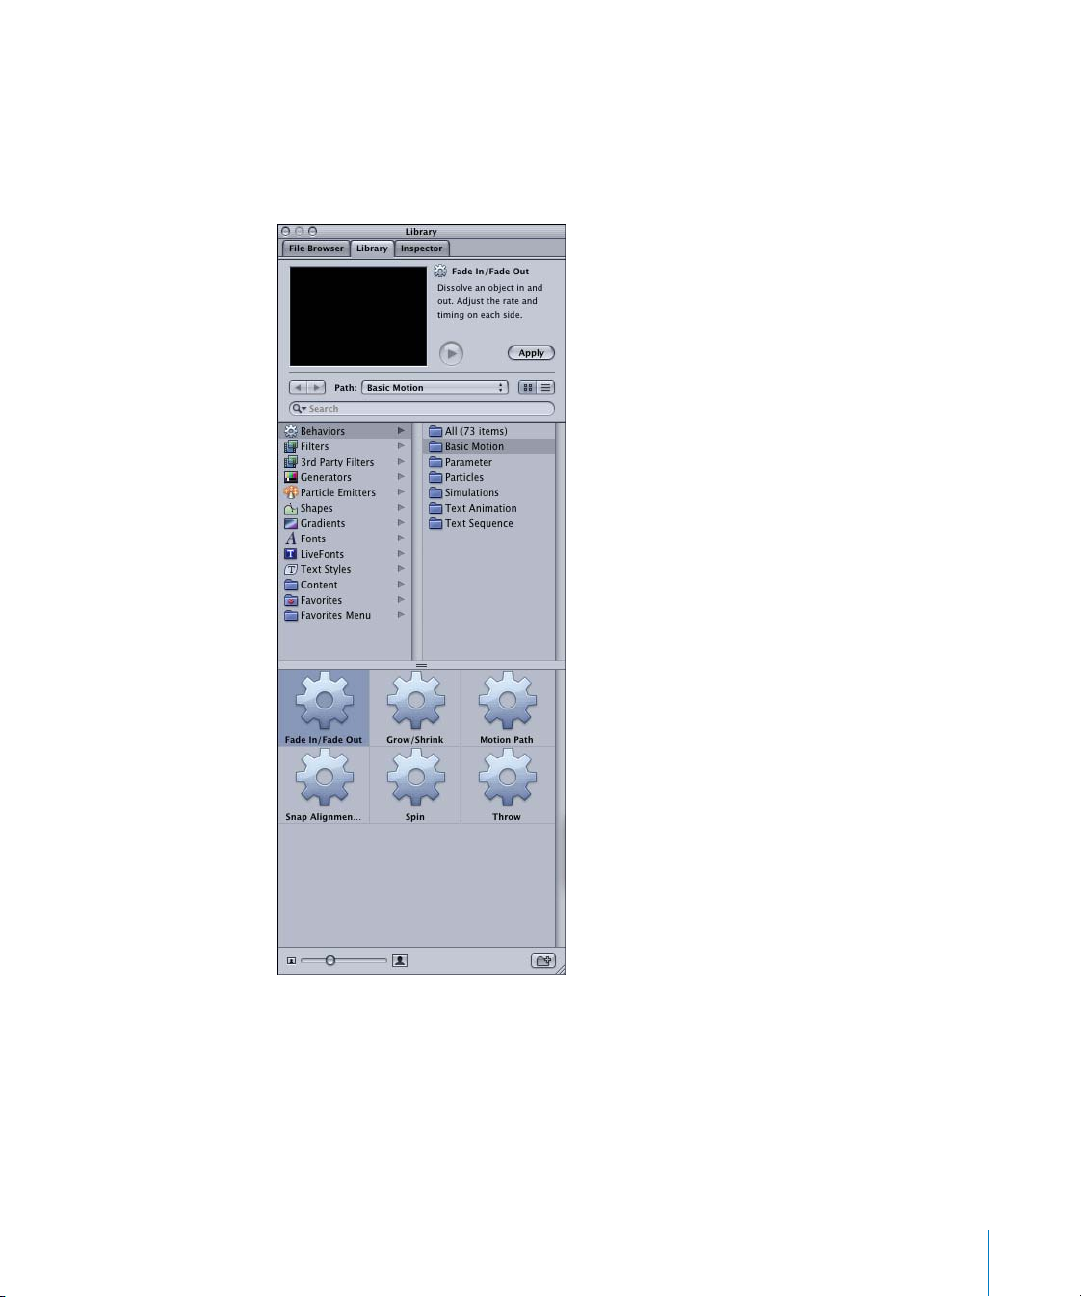
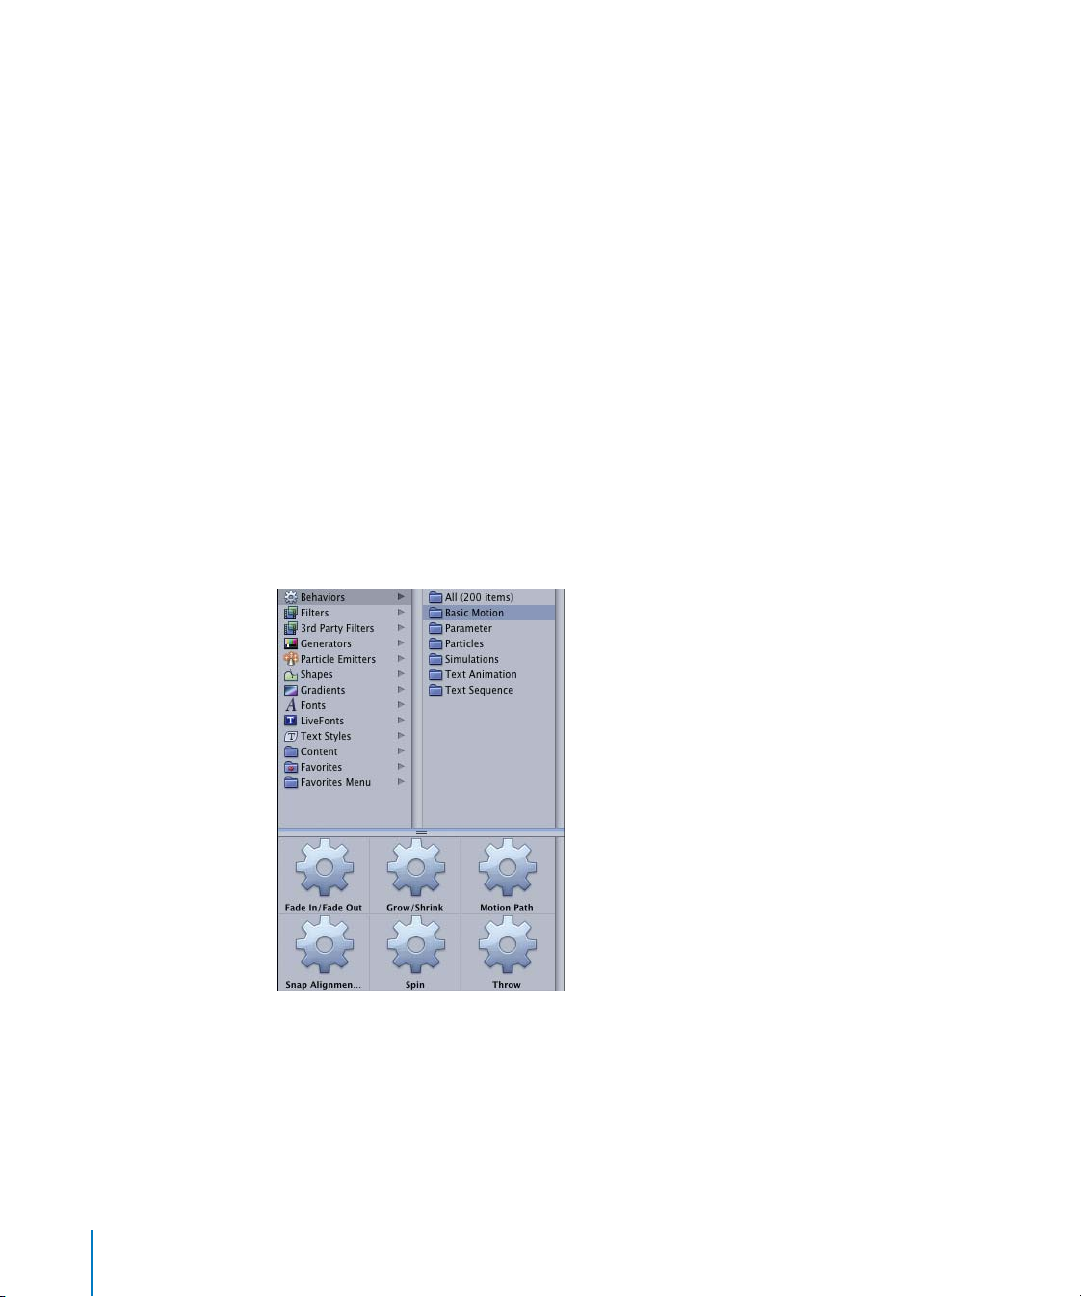
The Library categories are listed in the left column of the Library, and the subcategories
appear in the right column. For example, when the Behaviors category is selected, the
Behaviors subcategories (All, Basic Motion, Parameter, Particles, Simulations, Text
Animation, and Text Sequence) appear in the right column. The contents of the
subcategory appear in the lower pane of the Library, which is referred to as the stack.
Chapter 1 Orientation 25
Page 26
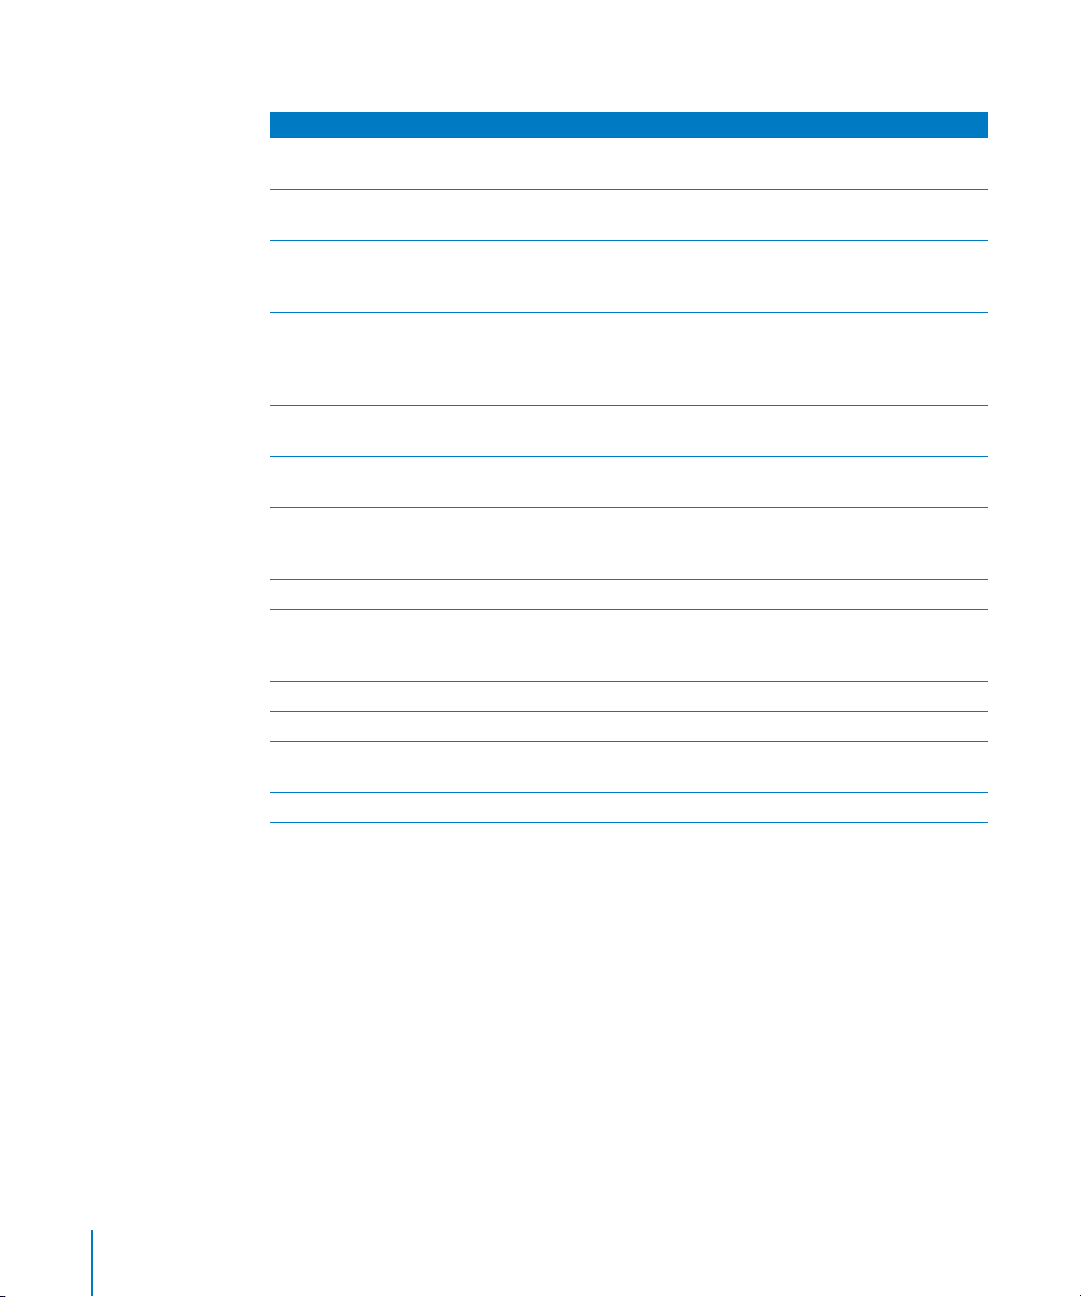
The following table describes the Library folders, categories, and subcategories.
Library folder or category Description
Behaviors category Includes the Basic Motion, Parameter, Particles, Simulations, Text
Animation, and Text Sequence behavior subcategories.
Filters category Includes the Blur, Border, Color Correction, Distortion, Glow, Keying,
Matte, Sharpen, Stylize, Tiling, Time, and Video filter subcategories.
3rd Party Filters category Includes any third-party filters you have installed on your system.
You can set the path to your third-party filters in Motion General
Preferences (Command+, [comma]), 3rd Party Plug-ins section.
Generators category Includes the Generators subcategory. Generators are preset objects,
such as Noise, Color Solid, and Soft Gradient, with parameters that
you can edit or animate to create still or animated elements in your
project.
Particle Emitters category Includes the Abstract, Nature, Pyro, SciFi, Smoke, and Sparkles
emitter subcategories.
Shapes category Contains premade shapes that can be animated as project
elements, used as image masks, or as sources for particle cells.
Gradients category Includes the Gradients subcategory. The preset gradients can be
applied to text, particles, and shapes. For example, a gradient can
be dragged to a text object in the Canvas or Layers tab.
Fonts category Provides a browser for installed fonts.
LiveFonts category Includes the ProSeries LiveFonts subcategory, which consists of 10
fonts. If Final Cut Pro HD and LiveFonts are installed on your
computer, you can use the full suite of LiveFonts in Motion.
Text Styles category Contains premade text styles that can be applied to text objects.
Content folder Includes the Particle Images and Template Media.
Favorites folder Provides a customizable location for frequently-used or customized
filters, effects, gradients, and so on.
Favorites Menu folder Any items saved in this folder appear in the Favorites menu.
Any modified filters, behaviors, and other presets can be saved to the Library. For
example, a customized gradient is saved to the Gradients category in the Library. Or,
you can drag a customized generator into the Library, and it is automatically saved to
the Generators category. When a file is saved to the Favorites or Favorites menu groups,
an alias is created in that group, and the preset is stored in its own category. For
example, if you drag a customized behavior into the Favorites group, an alias is created
in the Favorites group, and the behavior is saved in the Behaviors category.
26 Chapter 1 Orientation
Page 27
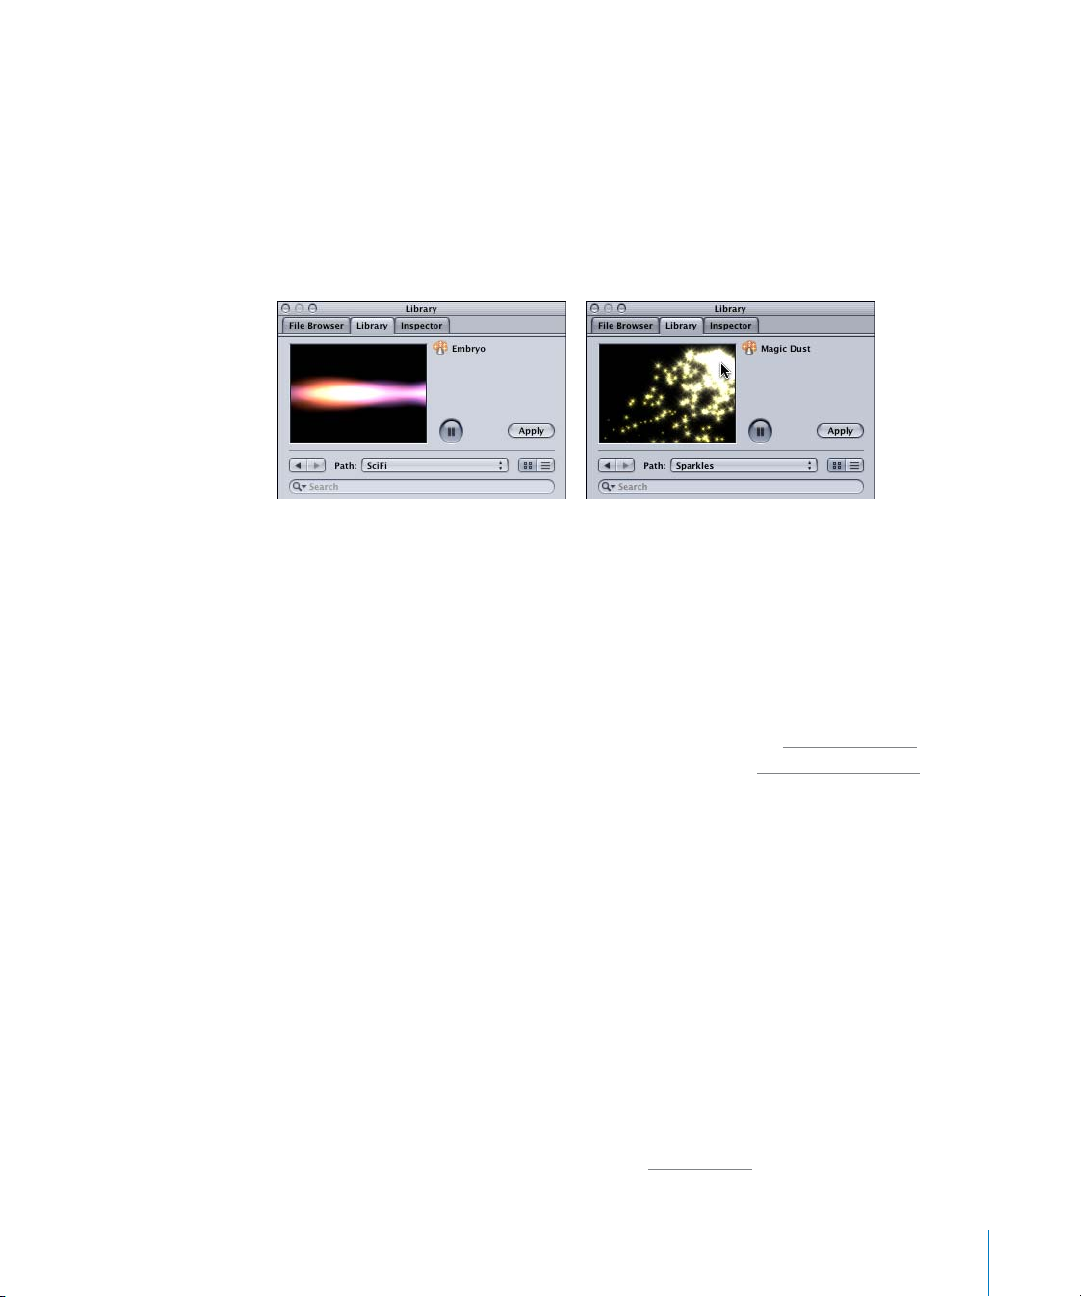
Previewing Items in the Library
You can preview items in the stack before bringing the item into your project. For
example, in the Particle Emitters category, click a preset in the Library stack to play the
particle system in the Preview area at the top of the Library tab. Some particle emitters
let you drag the pointer in the Preview area to see how the emitter looks when it
moves. In following images, the Embryo particle emitter is selected from the SciFi
particle emitter subcategory and the Magic Dust particle emitter is selected from the
Sparkles subcategory.
Selected particle emitter playing in Preview
area
Mouse pointer dragging particle emitter in
Preview area
The organizing and previewing capabilities of the Library make selecting an effect
quick and fun. Simply click an item in the stack—if the preview makes you happy, drag
the item to your project.
Applying Behaviors and Filters to Objects
This section provides a quick start to applying behaviors and filters to objects in the
Canvas. For more information on working with behaviors, see “A
page 61. For more information on working with filters, see “W
bout Behaviors” on
orking With Filters” on
page 91.
In Motion, behaviors can be applied to objects while a project plays back, or when
playback is stopped. Behaviors animate an object by automatically generating a range
of values for that object’s parameters. When a behavior or filter is applied to an object,
it is always applied at the beginning of the object—no matter where the playhead is in
time when the behavior is applied—and exists for the duration of that object (with the
exception of Text Sequence behaviors). This is also true for behaviors and filters applied
during playback. For example, if you are playing a project and you drag a behavior to
an object (that is 300 frames in duration) when the playhead is at frame 100, the
behavior is placed at frame 1 (and ends at frame 300). This method allows for truly
interactive animating—you see immediate results for behaviors and filters while your
project plays.
Note: There is an editable, graphical representation of behavior and filter durations in
the Timeline and mini-Timeline, discussed in “T
Chapter 1 Orientation 27
he Timeline” on page 97.
Page 28
In the following steps, a play range of 60 frames is set in a 300-frame project. After that,
two behaviors from the Basic Motion group are applied to an object in the Canvas. The
applied behaviors create a simple animation in which an image fades in and scales up.
Next, the speed and simplicity of filter application is demonstrated with a color
correction filter added to the object.
To set a 60-frame play range:
1 In the Current Frame field, enter 60.
The playhead moves to frame 60.
2 Choose Mark > Mark Play Range Out (or press Command+Option+O).
The play range is defined as 60 frames in the 300-frame project.
To start playback:
m
In the transport controls, click the Play button (or press the Space bar).
To apply a Basic Motion behavior from the Library:
1 In the Library, click the Behaviors category.
The Behaviors subcategories appear and are listed alphabetically. The All subcategory is
selected by default, and the behaviors appear in the Library stack.
2 Click the Basic Motion subcategory.
3 From the stack, drag the Fade In/Fade Out behavior to an object in the Canvas.
Note: After selecting an item in the Library stack, you can also click the Apply button in
the Preview area to add the behavior (or filter) to a selected object.
28 Chapter 1 Orientation
Page 29
When the “+” (plus) sign appears next to the pointer, the behavior can be “dropped” on
the object.
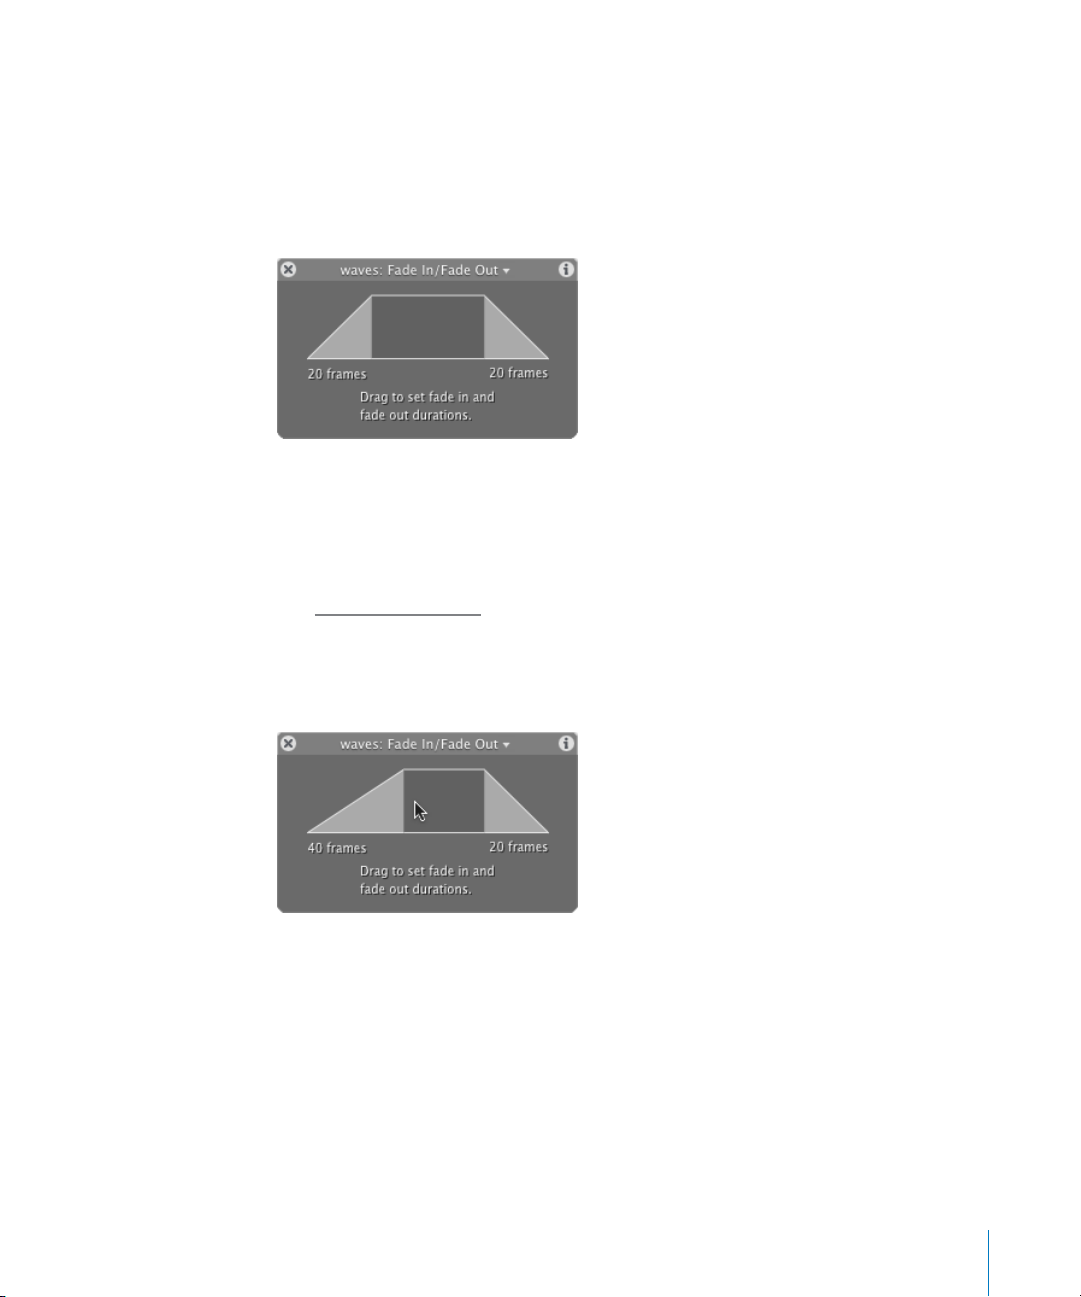
The Fade In/Fade Out Dashboard should appear. If the Dashboard is not displayed,
press D. By default, the object’s opacity fades in from 0 percent to 100 percent over the
first 20 frames of the object, and fades out from 100 percent to 0 percent over the last
20 frames.
Note: You do not have to select an object before a behavior is dragged to that object
in the Canvas. However, if you are working with many objects, you may need to select
the object from the Layers list in order to locate the correct object. To use the Add
Behavior icon in the Toolbar to select and apply behaviors, you must first select an
object to enable the icon. For more information on working with layers and objects,
sing the Layers Tab” on page 45.
see “U
4 In the Fade In/Fade Out Dashboard, click in the gray shaded fade-in region (on the left
side of the controls) and drag to the right until the Fade-In frame duration reads 40
frames.
The object fades in from frame 1 to frame 40. The behavior has applied a value range to
the object’s Opacity parameter; however, it has not created any keyframes for the
Opacity parameter.
To apply a Basic Motion behavior from the Toolbar:
1 In the Canvas, select the object to which you want to apply the behavior. This example
uses the same object to which the Fade In/Fade Out behavior was applied.
Chapter 1 Orientation 29
Page 30
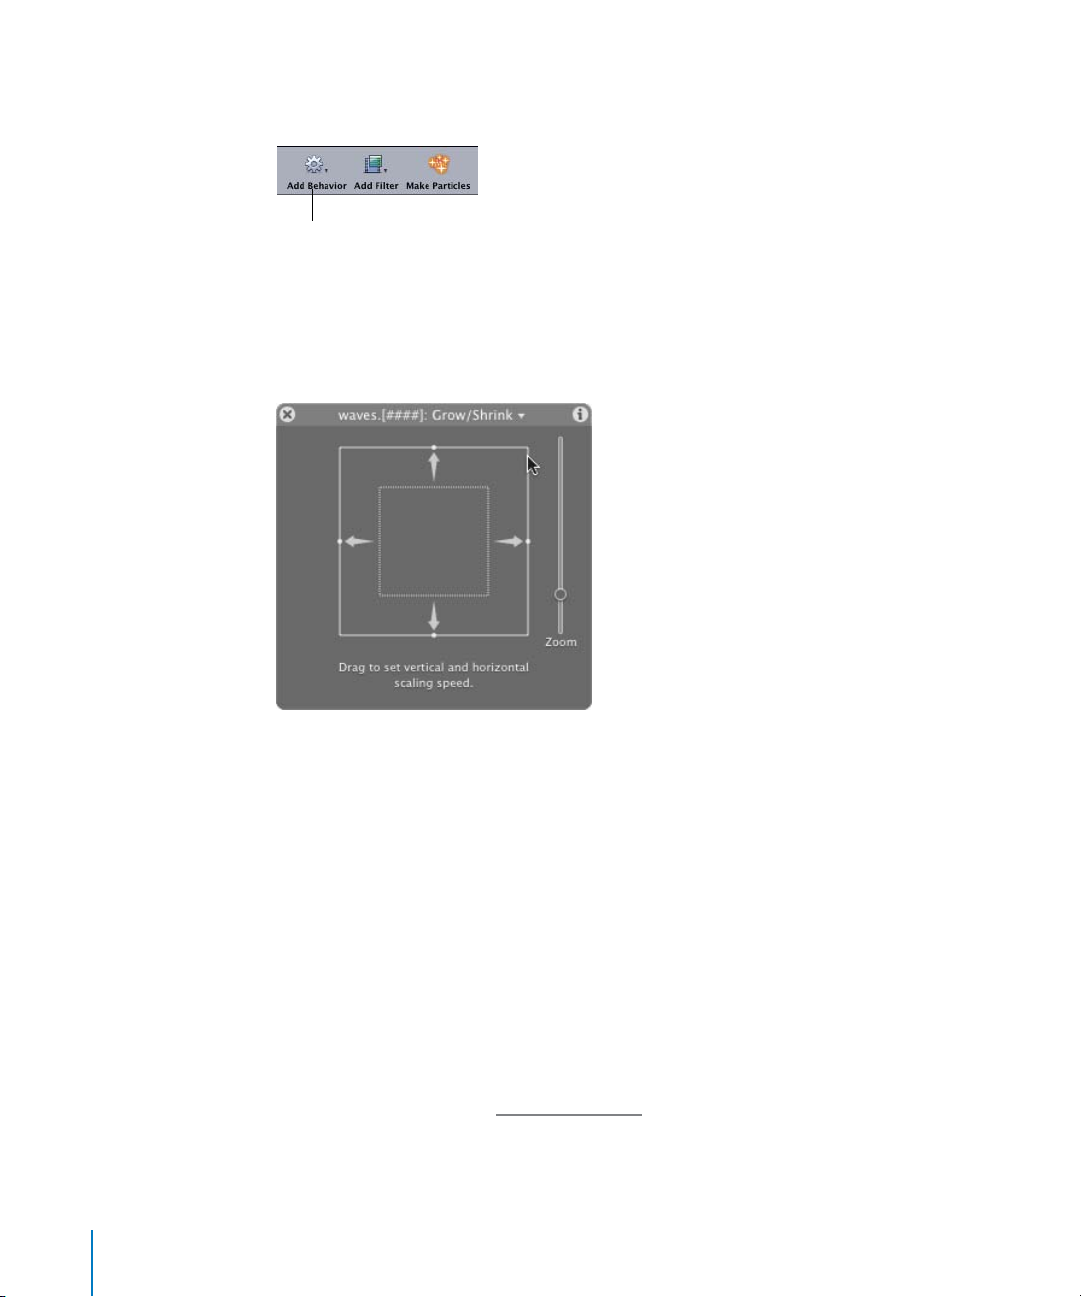
2 In the Toolbar, click the Add Behavior icon, then choose Basic Motion > Grow/Shrink
from the pop-up menu.
Add Behavior icon
The Fade In/Fade Out Dashboard is replaced by the Grow/Shrink Dashboard.
Note: To select and apply behaviors and filters using the Toolbar icons, you must first
select an object.
3 In the Grow/Shrink Dashboard, click the edge of the box and drag outward.
The object scales up over time.
To apply a filter to an object:
1 In the Library, click the Filters category.
The Filters subcategories appear and are listed alphabetically. The All subcategory is
selected by default, and all available filters appear in the Library stack.
2 Click the Color Correction subcategory.
3 In the stack, drag the Contrast filter to the object in the Canvas.
The Dashboard changes to the Contrast filter Dashboard.
Note: You can also apply a filter to an object from the Add Filter icon in the Toolbar.
4 In the Contrast Dashboard, move the slider to adjust the Contrast value.
Note: Filters can be easily keyframed in the Inspector or by using the Record button.
For more information, see “K
30 Chapter 1 Orientation
eyframing Filters” on page 116.
Page 31

Motion Dashboards
Whenever an object is added to your project, or an effect is applied to an object, the
Dashboard for that object or effect (behavior, filter, mask, text, shape, and so on)
appears by default (if the Dashboard is not hidden). The Dashboard is a floating
window that contains a group of commonly-adjusted parameters for the selected
object or effect. Using the school analogy, you can think of the Dashboards as the place
where the “popular kids” hang out. As effects are added to the object, the Dashboard
updates to show the most recently-added effect.
The Dashboard is a subset of the main parameters group of an object or effect, which
is located in the Inspector tab of the Utility window. The Inspector contains every
available parameter for any object or any effect. Often, the controls in the Dashboard
provide a more graphical representation of a behavior’s parameters that is easier and
more fun to use than digging into the Inspector (seriously, these things are the cat’s
pajamas). The requirements of your individual project elements are likely to define
when you use the Dashboards and when you use the Inspector.
The following examples illustrate what is probably the biggest difference between the
Dashboard and the Inspector—the Particle Emitter Dashboard and the Particle Emitter
tab in the Inspector. Don’t be alarmed: The single-shape Particle Emitter tab contains
the most parameters of any effect in Motion.
Life slider control
Emission Angle (the
angle of the arrows
in between the
white lines)
The first image shows the Particle Emitter Dashboard.
Birth Rate slider control
Scale slider control
Emission Range (the gray
area with the arrows
between the white lines)
Cheeky little monkeys, aren’t they? The Emitter Dashboard contains the following
particle parameters:
• Birth Rate (slider control)
• Life (slider control)
• Scale (slider control)
• Emission Range (“pie-graph” control)
• Emission Angle (“pie-graph” control)
• Speed (length of arrows in “pie-graph” control)
Chapter 1 Orientation 31
Page 32
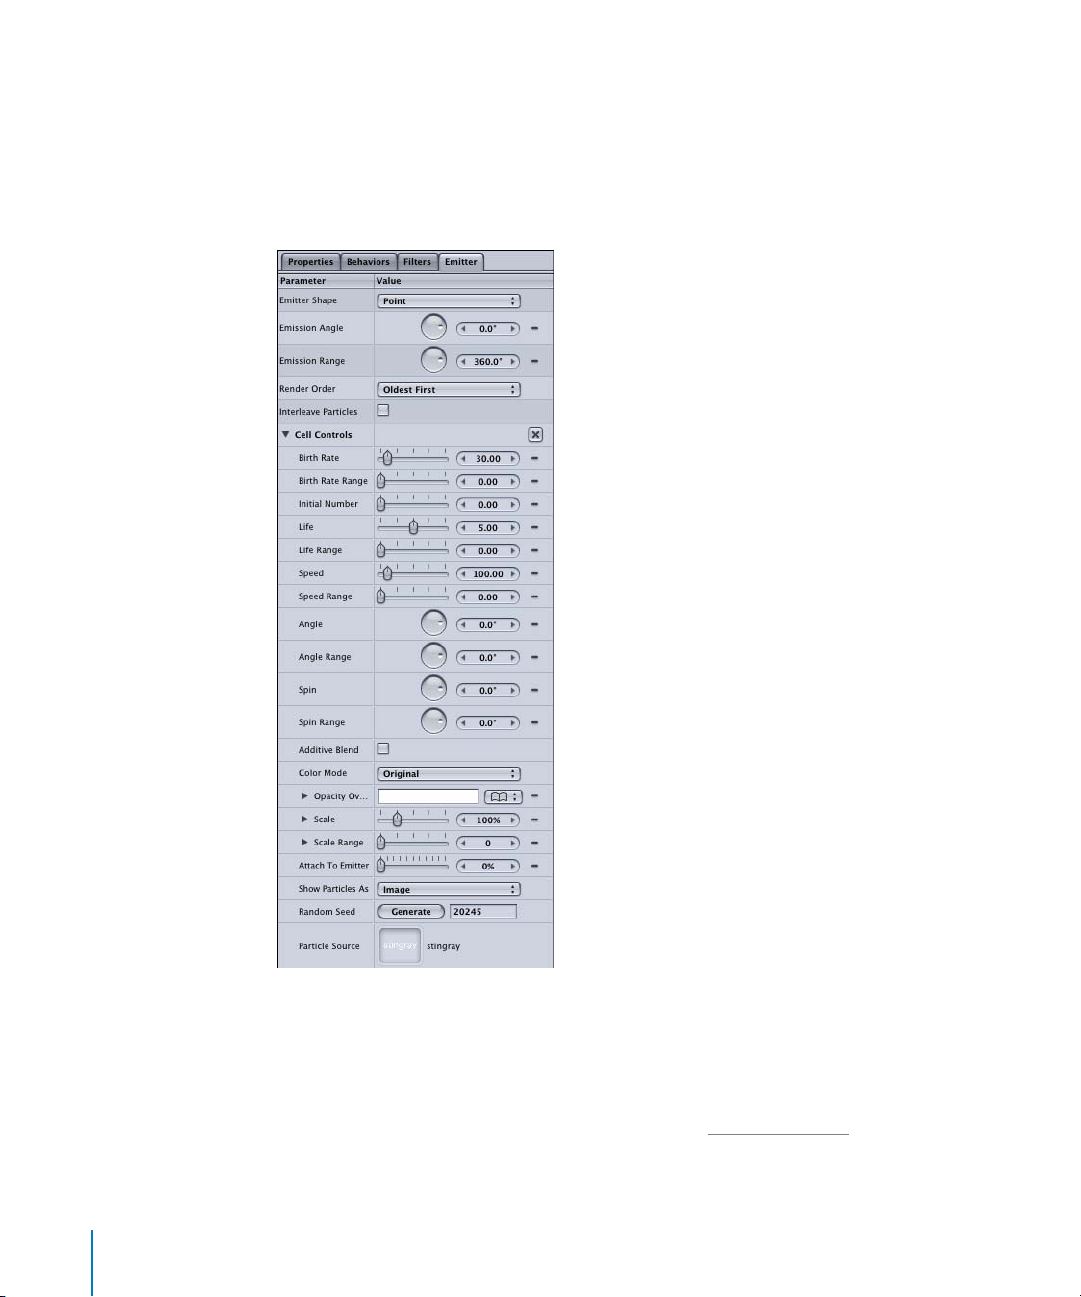
The second image shows the Emitter tab in the Inspector. The emitter contains a single
particle cell (the text object “stingray,” as shown at the bottom of the tab in the Particle
Source parameter). A particle emitter can have multiple particle cells (which can
include text objects, images, or shapes drawn in Motion). Notice that the Emitter tab
also contains the Birth Rate, Life, Scale, Emission Range, and Emission Angle parameters
found in the Emitter Dashboard.
Quite a bit bigger monkey, admittedly. The Particle Emitter tab shows every available
parameter for the emitter (including the parameters in the Dashboard). Since the
Dashboard is a subset of the larger Inspector parameter group, any change to a
parameter value in the Dashboard is reflected in the Inspector.
For more information on working with particles, see “C
32 Chapter 1 Orientation
reating Particles” on page 139.
Page 33

To display the Dashboard, do one of the following:
m
In the Toolbar, click the Dashboard icon.
m
Select the object or effect, then press D (or F7).
Dashboard icon
To hide the Dashboard, do one of the following:
m
Click the close button on the Dashboard.
m
In the Toolbar, click the Dashboard icon.
To reposition the Dashboard:
m
Drag on a blank area of the Dashboard.
When multiple behaviors and filters are applied to an object, you can cycle through the
Dashboards for all of the effects applied to the selected object.
To cycle the Dashboards of an object:
m
With the object selected, press D.
The Dashboards are cycled in the order that the effects are applied. To cycle the
Dashboards in reverse, press Shift+D.
When multiple objects of the same type are selected, a combined Dashboard appears,
and “Multiple Selection” appears in its title bar.
The following section continues the Motion tour by moving to the Inspector, which is
used to modify objects, shapes, and text, as well as the behaviors and effects applied to
the objects in a project.
For information on animating using the Dashboard controls, see “K
eyframing in the
Dashboard” on page 113.
Chapter 1 Orientation 33
Page 34

The Inspector
While the Dashboard contains the “popular” controls, think of the Inspector as the
school principal—with its eye on everything. The Inspector contains all parameters—
including the parameters found in the Dashboards—for all objects and effects within a
project. You can use the Inspector to transform objects, change blend modes or colors
of objects, adjust object and footage properties, adjust all behavior or filter parameters,
create keyframes, and so on.
Parameter Basics
A parameter can be described as a property whose value determines the
characteristics or behavior of an object. In a basic example, a Scale parameter set to a
value of 200 at frame 1 and a value of 50 at frame 30, makes that object two times its
original size (200 percent) at frame 1 and scales it down to one-half its original size
(50 percent) at frame 30.
To display the Inspector, do one of the following:
m
In the Utility window, click the Inspector tab.
m
In a Dashboard, click the Show Inspector button.
Show Inspector button
m
In the Toolbar, click the Inspector icon.
Inspector icon
m
Choose Window > Inspector, (or press Command+3).
34 Chapter 1 Orientation
Page 35

The Inspector contains four tabs: Properties, Behaviors, Filters, and Object. The first
three tabs—Properties, Behaviors, and Filters—are common to all objects. The fourth,
the Object tab, changes depending on the object that is selected. The following
sections provide a brief description of the four tabs.
Properties Tab
The Properties tab contains controls for the basic object properties, such as Position,
Rotation, Scale, Blend Modes, Opacity, and so on. The Properties tab, shown in the
image below, is displayed by default when an image, image sequence, or QuickTime
movie is selected.
The following image represents the Properties tab in the Inspector for a selected
object—a QuickTime movie called “waves.” The “waves” file appears in the Media
parameter of the Properties tab.
Properties tab
Behaviors tab
Filters tab
Image tab (represents
currently selected
object)
Chapter 1 Orientation 35
Page 36

Behaviors Tab
The Behaviors tab contains all controls for any behaviors that are applied to the
currently selected object. If no behaviors are applied to the currently selected object,
the Behaviors tab is empty.
Filters Tab
The Filters tab contains all controls for any filters that are applied to the currently
selected object. If no filters are applied to the currently selected object, the Filters tab is
empty.
Object Tab
The fourth tab in the Inspector is the Object tab. The Object tab changes depending on
the type of object that is currently selected. In the above images, the Object tab is the
Image tab, because an image is the currently selected object. When a text object is
selected, the Object tab becomes the Text tab and contains text-specific parameters. In
the following image, a shape is the selected object, so the tab changes to the Shape tab.
36 Chapter 1 Orientation
Page 37

Note: When an image is the selected object, the Image tab is empty because all of the
image parameters are displayed in the common Properties tab.
Inspector Controls
The parameters in the Inspector are edited by several different types of controls, such
as sliders, value sliders, dials, color wells, pop-up menus, and so on. This section
provides a brief description of the Inspector’s parameter controls.
Sliders
Drag the sliders left or right to set a value. Depending on the specific parameter, sliders
have assorted value ranges.
Slider
Value slider
Value sliders
The value slider allows you to type a specific number in the value field, or to drag in the
value field to set a value. Often, you can type a much higher number in the value slider
than can be achieved by dragging the normal sliders. When using the value sliders, you
can use a modifier key to make normal, small, or large value adjustments. The value
sliders are contextual, which means that the “normal,” “fine,” and “coarse” increments
are specific to the parameter. For example, a “normal” increment for Opacity is 1, a “fine”
increment is .1, and a “coarse” increment is 10.
Chapter 1 Orientation 37
Page 38

To change values in normal increments, do one of the following:
m
Drag left or right in the value field.
m
Click the decrement arrow (to the left of the field) to decrease a value, or click the
increment arrow (to the right of the field) to increase a value.
m
If you have a three-button mouse with a scroll wheel, click in the value field and use
the scroll wheel on the mouse.
To change values in fine increments, do one of the following:
m
Option-drag in the value field.
m
Option-click the decrement arrow to decrease a value, or Option-click the increment
arrow to increase a value.
m
If you have a mouse with a scroll wheel, Option-scroll in the value field.
To change values in coarse increments, do one of the following:
m
Shift-drag in the value field.
m
Shift-click the decrement arrow to decrease a value, or Shift-click the increment arrow
to increase a value.
m
If you have a mouse with a scroll wheel, Shift-scroll in the value field.
Reset options
You can choose to reset an individual parameter of a property, or all parameters of a
property. For example, you can reset only the X or Y position of the Transform property,
or you can reset all Transform properties, which include Position, Rotation, Scale, Shear,
and Anchor Point. Resetting the parameters of an effect that is applied to an object
removes any keyframes and sets the parameters back to their default values.
To reset all parameters of a property:
m
Click the Reset button in the parameter row.
38 Chapter 1 Orientation
Reset button
Page 39

To reset an individual parameter:
m
Click the Animation menu icon, then choose Reset Parameter.
Dials
Drag a dial to control parameters such as the angle of gradients and the rotation of
objects.
Dial
Checkboxes
Use checkboxes to turn objects on and off. This applies to filters and behaviors, drop
shadows, four-corner pinning, cropping, and so on.
Checkbox
Pop-up menus
Click a pop-up menu and hold down the mouse button to choose fill options for text
and shapes fill options, to set blend modes, and so on.
Pop-up menu
Chapter 1 Orientation 39
Page 40

Use to pick a color
from your image.
Color wells
Use the color wells to set a color for drop shadows, shape fills, text properties, and so on.
To select a color, do one of the following:
m
Click the color well and select a color from the Colors window.
Color well
Color picker modes
(wheel, slider, image palette, crayons)
Drag the slider to lighten or darken
the selected color.
Drag in the color wheel
to select a color.
The Opacity controls appear in the Colors
window if the Color parameter supports an
alpha channel.
Note: To select a color from the screen, click the Color Picker tool in the Colors window,
then click the color you want to use on the screen.
40 Chapter 1 Orientation
Page 41

m
Control-click a color well to display the color picker, and drag in the color spectrum to
select a color.
Drag here to lighten or darken the
selected color.
Displays original color
Displays new color
The Animation menu
In the Inspector, notice that most of the parameters are followed by a “–” button at the
end of the parameter row. This provides access to the Animation menu, in which you
can add keyframes, reset a modified parameter, choose to show an animated
parameter in the Keyframe Editor, and so on. If the parameter is affected by a behavior,
a behavior icon appears in the Animation menu and allows quick access to the
Inspector tab for that behavior.
There are two modes of working with the Animation menu. When the Record button is
enabled, a keyframe is created any time a parameter is adjusted in the Inspector. You
can use the Animation menu to create a keyframe without changing a value, for
example, to hold an animated parameter’s value for a specified frame range.
When the Record button is disabled, you can add keyframes explicitly in the Animation
menu. In the following example, an object’s position is keyframed so the object travels
across the screen. The Animation menu in the Inspector is used to create the
keyframes, and the Record button is disabled.
To explicitly create keyframes in the Inspector (when Record is disabled):
1 Select the object to be animated and show the Inspector.
2 Go to the frame where you want to set the first keyframe.
Chapter 1 Orientation 41
Page 42

3 In the Properties tab, click the Animation menu in the Position parameters, then choose
Add Keyframe.
Animation
menu
A filled gray diamond appears in the Animation menu, indicating that a keyframe exists
at that frame. The keyframe is set to the current position.
4 Position the object.
The keyframe updates to the new position values.
5 Go to the next frame where you want to create a keyframe.
6 Choose Add Keyframe from the Animation menu.
Important: Notice that a keyframe must be added first, before you change the position
of the object. If you adjust the object’s position at this point, before adding a second
keyframe, you shift the entire curve because Record is disabled.
7 Move the object to the new position.
Using the Animation Menu vs. Using the Record Button
When Record is disabled, setting a keyframe using the Animation menu is not the
same as when Record is enabled. When Record is enabled, any changes to a
parameter’s value result in the creation of a keyframe. When Record is disabled, the
Animation menu allows you to explicitly set keyframes. This method can be useful for
changing the value of an entire curve, without having to go in and delete or edit your
initial keyframe. Also, explicit keyframing can be handy for playing with your design
and only setting a few pivotal keyframes, rather than keyframing every move you
make in your project.
When explicitly setting keyframes, keep in mind that you must add a keyframe prior
to modifying a value, or you are merely changing the overall value for that parameter
(shifting the entire curve). For more information, see “K
page 114.
42 Chapter 1 Orientation
eyframing in the Inspector” on
Page 43
The Project Pane
When media (such as movies, images, and image sequences) is brought into Motion, it
becomes an object in a layer. Shapes, text, and masks created within Motion also
become objects in a layer. Any imported media is added to the Media tab, which acts
as a sort of storage unit for your media. Shapes, text, and other objects created within
Motion are not added to the Media tab.
On import, objects can be added to an existing layer, or you can create a new layer for
the objects.
You can apply behaviors, transformations, filters, masks, or blend modes to any object
in a layer. You can also apply behaviors, transformations, filters, masks, or blend modes
to the layer itself. You can have as many objects in a single layer as you want—a layer
acts as the “parent” of its objects (movies, images, image sequences, shapes, and so
on). For example, if you move a layer, all objects within that layer are also moved. If
you apply a behavior or filter to a layer, that behavior or filter is applied to all objects
within the layer as a “nest.” The size of a layer is determined by the objects contained
within the layer.
You can view and organize all layers and objects within a project in the Project pane.
This section provides a general overview of the Project pane, but mainly focuses on the
Layers tab of the Project pane in which most of your compositing takes place.
The Project pane contains lists of all media and objects in your project, as well as the
effects applied to those objects.
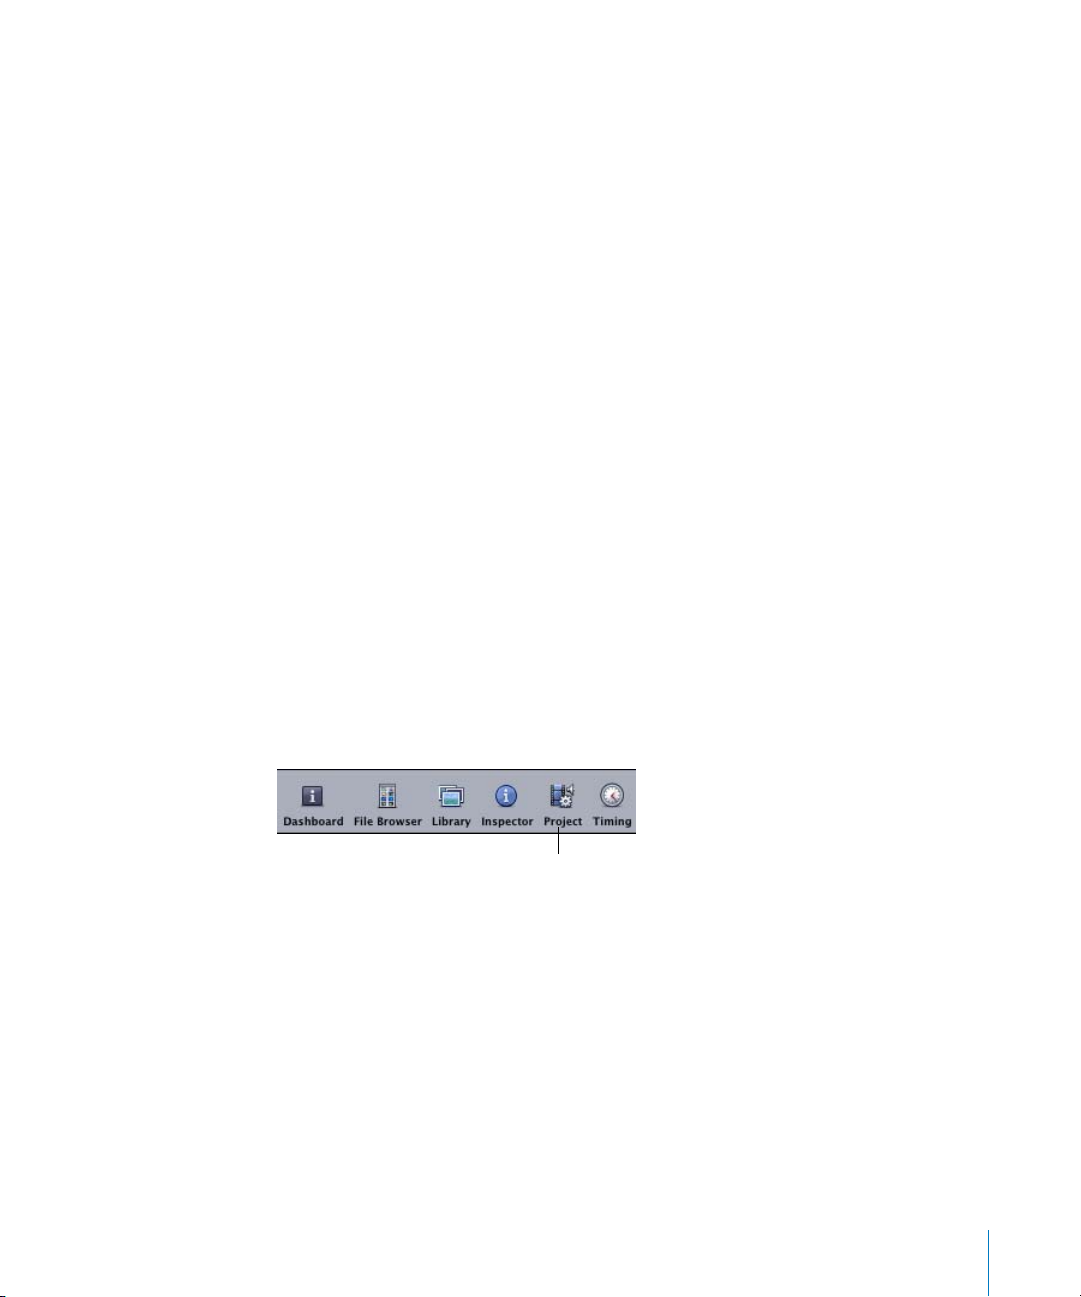
To display the Project pane, do one of the following:
m
In the Toolbar, click the Project icon.
Project icon
Chapter 1 Orientation 43
Page 44
m
Choose Window > Show Project Pane (or press F5).
The Project pane appears.
The Project pane contains three tabs that allow you to view the objects in your project.
Layers Tab
The Layers tab displays the structure of your project. The main building block of a
project is a layer. A layer contains objects and the behaviors and filters applied to those
objects. Filters and behaviors can also be applied to layers. Use the Layers tab to
manage your composite.
Media Tab
The Media tab displays all media (including audio) that has been imported into a
project, whether or not the media is used as an object in the project. You can import
media directly into the Media tab by clicking the Add button (“+”) at the top of the
Media pane, or by using the File > Import menu command (from within the Media tab).
When media is imported in this manner, you can think of the Media tab as a holding
bin. One reason to import files into the Media tab is so you can use the media as the
source for a text object texture or a mask. You can add files from the Media tab to your
project at any time by dragging the file to the Canvas or Timeline.
Note: Text objects and other shapes created within Motion do not appear in the
Media tab.
44 Chapter 1 Orientation
Page 45

Audio
The Audio tab allows you to control the volume (gain) and panning (balance) of an
audio track, as well as turn tracks on or off, solo a track, add and remove tracks, and
search for tracks. For more information, see “A
udio” on page 162.
Using the Layers Tab
Use the Layers tab to assist in building your project. In the tab, you can view and
manage the structure of your composite—the relationships between objects (including
layers) and their applied effects. Use the Layers tab to:
• Add and delete objects and effects
• Rename and reorder objects and effects
• Show, hide, and lock objects and effects
• Change the opacity of an object
• Set the blend mode of an object
• Search for objects, behaviors, filters, and so on
The Layers tab also contains buttons to show or hide any filters, behaviors, and masks
that are applied to objects.
Compositing Basics
Compositing is an essential part of motion graphics. Any time you have more than
one object in your Layers tab, you are compositing—it is the process of combining
images and objects together to create a single-layered, final image.
The compositing process can range from the very simple, such as placing a logo over
an animated background, to the very complex, such as keying multiple green screen
elements over a background plate, performing color correction, integrating 3D
objects, and adding an animated particle effect.
For more information, see Chapter 3, “Basic Compositing,” in Motion Help.
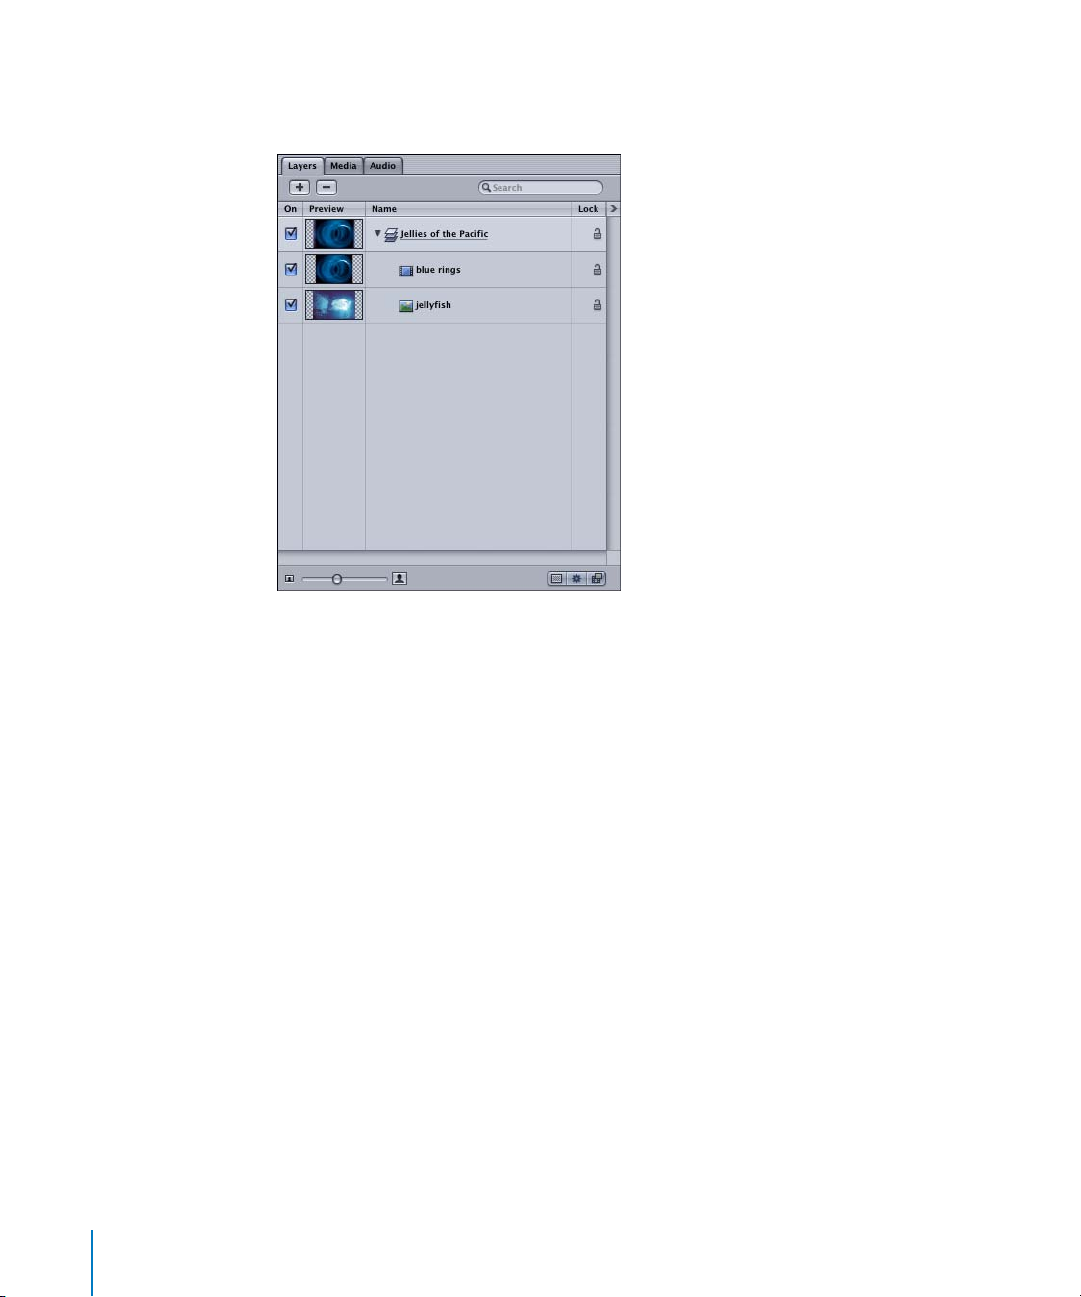
To display the Layers tab:
m
In the Project pane, click the Layers tab (or press Command+4).
Show Columns button
Lock icon
Filter icon
Behavior icon
Chapter 1 Orientation 45
Page 46

Adding Media to the Layers Tab
Any media you have dragged to the Canvas from the Library (or imported by choosing
File > Import) appears in the Layers tab. You can also drag media directly to the Layers
tab.
To add media directly to the Layers tab:
1 In the File Browser or Library, select the file you want to import.
2 Drag the file to the Layers tab, and do one of the following:
• To add the file to an existing layer, position the file over the layer. When a black
outline appears around the layer in the list, release the mouse button.
The object is added as the topmost object in that layer.
46 Chapter 1 Orientation
Page 47

• To add the file to a new layer, position the file over the lower, empty portion of the
Layers list. When a black outline appears around the whole Layers list, release the
mouse button.
• To add the file in between the existing objects of a layer, position the file over the
two existing objects. When the position indicator appears, release the mouse button.
Position indicator
Chapter 1 Orientation 47
Page 48

To swap media in the Layers tab:
1 In the File Browser, select the file you want to use to replace the existing object.
2 Drag the file to the Layers tab, and position the file over an existing object. When a
black outline appears around the object, release the mouse button.
The object is replaced with the new file.
Note: Media that is replaced in the Layers tab is not replaced or removed from the
Media tab.
Selecting Layers and Objects
You can select individual or multiple objects and effects in the Layers tab.
To select a single object:
m
Click the object.
If the object selected is an image, shape, mask, or text object, a bounding box appears
around the object in the Canvas. Behaviors and filters selected in the Layers tab or
Timeline do not appear with a bounding box in the Canvas.
Selecting and Nudging Objects
An object (or layer) selected in the Layers tab appears highlighted in blue. An object
selected in the Canvas appears highlighted in gray in the Layers tab. In both cases, the
selected object has a bounding box in the Canvas. Once you have selected an object
in the Layers tab, you can nudge the object (in one-pixel increments) in the Canvas by
pressing Command and the Up/Down/Left/Right Arrow keys. For example, to nudge
two objects after they are selected in the Layers tab, press the Command+Up/Down/
Left/Right Arrow keys to nudge the objects in the Canvas. To nudge the object in 10pixel increments, press Shift with the Command and arrow keys.
To select the object above the currently selected object in the list, press the Up Arrow.
To select the object below the currently selected object, press the Down Arrow.
Note: The arrow keys are also used to step through the frames of your project. Press
the Left Arrow (or Page Up) to move back a single frame or press the Right Arrow (or
Page Down) to advance a single frame. There are several keyboard shortcuts for the
transport controls and additional frame navigation in the Mark menu.
48 Chapter 1 Orientation
Page 49

To select multiple objects, do one of the following:
m
To select consecutive objects, drag in the empty space between the thumbnail preview
and the object icon and name. You can also press Shift and click the uppermost and
lowermost object you want in the list.
m
Press Shift and select the objects.
m
To select objects that are not consecutive, press Command, then select the objects.
Note: When a layer is selected, all objects within the layer are selected, and a single
bounding box appears around that layer’s objects in the Canvas.
To jump selections:
m
Once an object is selected, press the Up Arrow and Down Arrow keys to select objects
above or below that object in the list.
The selected objects update in the Canvas.
Reordering Layers and Objects
In the Canvas, layers that are arranged higher up in the list appear in front of the lower
layers. The same is true for objects—the objects at the top of the list appear in front of
objects at the bottom. You can reorder the objects in your project in the Layers tab or
in the Timeline Layer list.
To reorder an object or layer:
m
In the Layers tab, click the name of the object or layer and drag up or down in the list.
When the position indicator appears where you want to place the object or layer,
release the mouse button.
Note: To move multiple objects, Shift-select the objects (or drag downward in the
empty area immediately to the left of the object name), and drag up or down in the list.
If an object that is reordered in the list has applied behaviors or filters, the behaviors
and filters are moved with the object.
Chapter 1 Orientation 49
Page 50

To move an object beneath an object with an applied behavior or filter:
m
In the Layers tab, click the name of the object or layer and drag up or down in the list
with the pointer to the left of the behavior or filter icons. When the position indicator
appears where you want to place the object or layer, release the mouse button.
To create a new layer by reordering an object:
m
In the Layers tab, click the name of the object or layer and drag up or down in the list
with the pointer to the left (slightly more to the left than when moving an object
beneath an object with applied effects) of the icons. When the position indicator
appears with the “+” sign where you want to place the object or layer, release the
mouse button.
50 Chapter 1 Orientation
Page 51

As shown in the following image, a new layer is created from the repositioned object.
Turning Layers and Objects On or Off
You can turn layers and objects on or off in the Layers tab. An object that is turned off
is invisible to the composite. Objects that are turned off are not rendered in your final
project.
To turn an object on or off:
m
In the Layers tab, click the activation checkbox.
A checkmark in the box indicates an active object.
Note: You can also enable and disable masks, filters, and behaviors by toggling their
activation checkboxes. If a layer has some objects turned on, and some turned off, the
checkbox shows a dash instead of a checkmark.
Locking and Unlocking Layers and Objects
To prevent an object or layer from being further modified, you can enable its lock
control in the Layers tab.
Chapter 1 Orientation 51
Page 52

To lock and unlock a layer or object:
m
In the Layers tab, click the lock icon for the object you want to lock or unlock.
In the Canvas, a red line appears around the edge of a locked object.
Unlocked Locked
Renaming Layers and Objects
When files are imported, Motion uses the filename as the object or layer name. You can
rename the objects in the Layers tab.
To rename a layer or object:
1 In the Layers tab, double-click the name of the object.
The text field becomes active (appears highlighted).
2 Type the new object name, then press Return.
Copying, Duplicating, and Deleting Objects
You can copy, duplicate, and delete layers and objects in the Layers tab using the Edit
menu, the shortcut (Control-click) menu, or shortcut keys. You can also copy objects in
the Canvas.
To copy and paste an object (or layer):
1 In the Layers tab (or Canvas), select the object and do one of the following:
• Choose Edit > Copy (or press Command+C).
• Control-click the object, then choose Copy from the shortcut menu.
Note: To quickly create an instance of an object, you can press Option and drag the
object in the Canvas. Any behaviors, filters, or keyframes applied to the object are also
copied.
2 Select the new layer in which you want to paste the object, then do one of the
following:
• Choose Edit > Paste (or press Command+V).
• Control-click, then choose Paste from the shortcut menu.
52 Chapter 1 Orientation
Page 53

Note: If you do not select another layer to paste the object into, the object is pasted
into its original layer.
Use the Edit menu, the shortcut (Control-click) menu, and the Canvas for additional
Duplicate, Cut, and Delete commands. In addition to the Layers tab, you can also copy,
duplicate, and delete objects in the Canvas and Timeline. Deleting an object (an audio
file, image, or image sequence) from any of these locations does not delete the
associated media file from your project. To permanently remove a media file from your
project, you must delete it from the Media tab.
Grouping Objects
You can group multiple objects in the Layers list. Grouping objects creates a new layer
within the layer that contains the nested objects. When behaviors, filters, and
transforms are applied to a layer created by grouping, all objects within the layer are
affected. You can also expand the layer and apply effects to its individual objects.
To group objects in the Layers list:
1 Select the objects that you want to group.
Selected objects prior to grouping
2 Choose Object > Group (or press Command+Shift+G).
Chapter 1 Orientation 53
Page 54

The grouped objects are nested into a layer within the original layer. The new layer is
named “Layer” by default.
The grouped objects are nested into a new layer.
Note: You can also group layers. When two or more layers are grouped, a new layer is
created that contains the original layers. You cannot group objects from different layers.
To ungroup grouped objects:
m
Choose Object > Ungroup (or press Command+Option+G).
Changing Blend Modes and Opacity
Like filters, blend modes are one of motion graphics artists’ best friends. However,
while filters are the kind of friends who will share a dinner and a good story with you
(as long as you buy), blend modes are the kind of friends who show up on moving day.
Blend modes affect the way images in a stack are combined, and can create a
completely new look for a composite with little expense in processing time. Using
blend modes with two of the same image (one below the other in the Layers list) can
give a dull image an immediate face lift, as shown in the following images.
Normal blend mode
Overlay blend mode
Multiply blend mode
54 Chapter 1 Orientation
Page 55
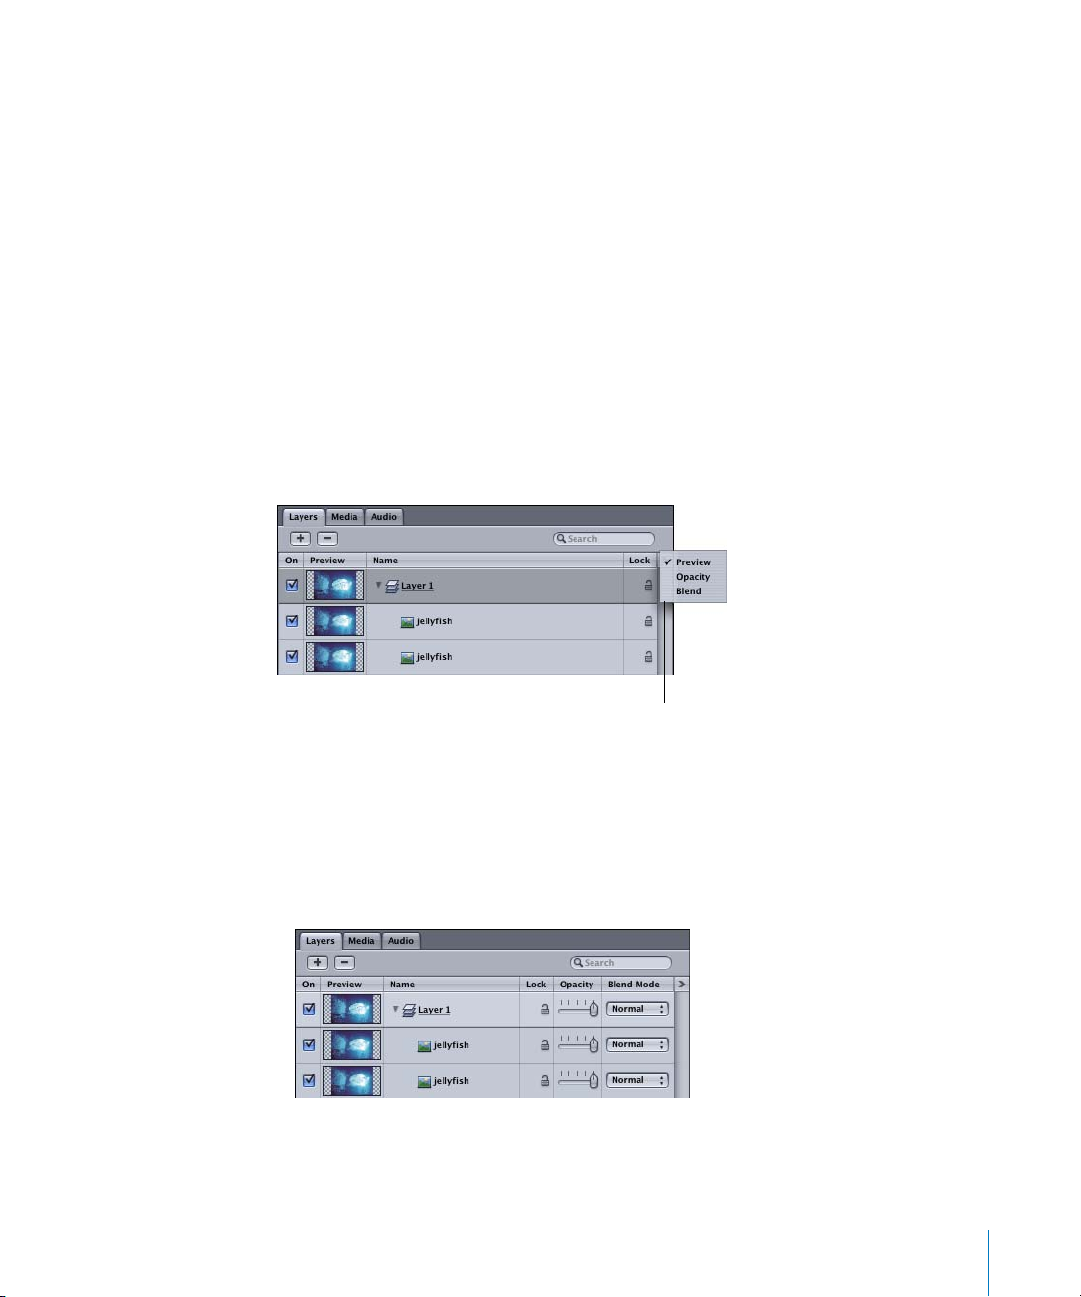
The default blend mode is Normal. An object with a Normal blend mode above
another object in the list merely sits over that image with its normal colors. When a
different blend mode is applied to the upper object, the color pixels in the top image
are blended with the lower image in a certain way. For example, if the upper image is
set to the Add blend mode, the red, green, and blue (RGB) values of the upper image
are added to the RGB values of the underlying image. The resulting image is usually
much brighter than the original. An image set to the Stencil Alpha blend mode creates
a stencil using the image’s alpha channel.
The Layers tab contains controls for adjusting the opacity and blend modes of layers
and objects. The Opacity and Blend Mode controls are not displayed by default.
Note: The Opacity and Blend Mode parameters (including animation controls) for an
object also appear in the Inspector > Properties tab, as well as the Dashboard.
To show the Opacity and Blend Mode controls:
1 In the Layers tab, click the Show Columns button (the “>” button that is adjacent to Lock).
Layers tab display options
2 Make one of the following choices from the pop-up menu:
• Choose Opacity to show the Opacity controls.
The Opacity parameter is added to the Layers tab.
• Choose Blend to show the Blend Mode button.
The Blend Mode button is added to the Layers tab.
Note: Use the Preview option in the Layers tab to show and hide the object thumbnail.
Chapter 1 Orientation 55
Page 56

To adjust the object opacity:
m
Drag the Opacity slider.
To select a blend mode:
m
Click the Blend Mode button and choose a mode from the pop-up menu.
Note: You can also Control-click an object in the Layers tab or Canvas and choose a
blend mode, or choose Object > Blend Mode > (blend mode).
The objects within a layer can be set to different blend modes, and the layer itself can
also be set to a blend mode. For more information, and for a full description of all
blend modes, see Chapter 3, “Basic Compositing,” in Motion Help.
Transforming Objects and Layers
The “motion” part of motion graphics involves transforming objects in compelling,
artistic, or even downright silly ways. There are several ways to transform objects in
Motion—you can apply behaviors to automatically transform and animate objects, you
can keyframe transformations, or you can work with a combination of behaviors and
keyframes.
The following section discusses the most basic way to transform objects and layers—
using the onscreen controls in the Canvas. For information on using the onscreen
controls in conjunction with the Record button to create animations, see “U
Keyframes in Motion” on page 103.
sing
Onscreen Controls
You can choose the onscreen control mode in the Toolbar or the object shortcut menu
(Control-click an object) in the Canvas.
To select a transform mode in the Toolbar:
1 In the Toolbar, click and hold the Select/Transform tool to display the transform modes.
Select/Transform tool (default tool)
Transform
Anchor Point
Shear
Drop Shadow
Four Corner
Crop
Edit Points
Item (contextual)
56 Chapter 1 Orientation
Page 57

2 Select a transform mode.
The object transform modes are also available in the onscreen controls in the Canvas.
To display the modes, Control-click a selected object, then choose an object transform
mode from the shortcut menu.
For all of the following transforms, ensure that the object is selected (a bounding box
appears around a selected object in the Canvas). You can select an object in the Layers
tab or directly in the Canvas.
Note: The object parameters for all of the following controls (move, rotate, and so on)
also appear in the Inspector > Properties tab. Although the values are displayed in the
Canvas at the pointer while transforming an object, it is a bit easier to specify exact
values in the Inspector. For example, to shear an object precisely 10.25 percent in X, go
to the Shear parameter in the Properties tab, and enter that value in the X value field.
To select an object in the Canvas:
1 In the Toolbar, click the Select/Transform tool (or press S).
2 In the Canvas, click the object that you want to transform.
Note: To select multiple objects in the Canvas, Shift-click or drag-select the objects.
A bounding box appears around the selected object in the Canvas. In the following
image, two objects are selected, so two bounding boxes appear.
Bounding box
Handle
Rotation handle
Anchor point
Note: You can also select objects in the Timeline. For more information, see “T
Timeline” on page 97.
To move an object:
m
Click within the bounding box and drag the object. Do not click a bounding box
handle, or you resize the object.
he
Chapter 1 Orientation 57
Page 58

Note: To lock the movement of the object to the X or Y axis, or to 90-degree angles,
press Shift while you drag the object. To lock the movement of multiple objects, first
select the objects, release the mouse button, click one of the selected objects, then
press Shift and move the objects.
To rotate the object:
m
Drag the rotation handle.
Note: To rotate the object in 45-degree increments, press Shift while rotating the
object.
To scale the object, do one of the following:
m
To scale in X, drag a center left or right handle.
m
To scale in Y, drag a center upper or lower handle.
m
To scale in X and Y, drag one of the corner handles on the bounding box.
Note: To scale proportionally, press Shift while dragging any of the handles. To scale
around the center of an object, press Option.
To move the anchor point of an object:
1 Do one of the following to select the Anchor Point mode:
• Click and hold the Select/Transform Tool, then choose the Anchor Point mode.
• In the Canvas, Control-click the object, then choose Anchor Point from the shortcut
menu.
2 Drag the anchor point to the new position.
Note: The anchor point of an object is the point around which an object rotates, as
well as the point where an object is attached to an animation path.
To shear an object:
1 Do one of the following to select the Shear mode:
• Click and hold the Select/Transform tool, then choose the Shear mode.
• In the Canvas, Control-click the object, then choose Shear from the shortcut menu.
2 Shear the object:
• To shear in X, drag either of the upper or lower handles.
• To shear in Y, drag either of the right or left handles.
To add a drop shadow to an object:
1 Do one of the following to select the Drop Shadow mode:
• Click and hold the Select/Transform tool, then choose the Drop Shadow mode.
• In the Canvas, Control-click the object, then choose Drop Shadow from the shortcut
menu.
58 Chapter 1 Orientation
Page 59

2 To edit the shadow Blur and Opacity parameters, use the object Dashboard. To edit all
shadow properties, including color, use the Properties tab in the Inspector.
The shadow is applied to the object as a whole. If the object contains an alpha channel,
the alpha channel is respected by the drop shadow.
To use the Four Corner mode:
1 Do one of the following to select the Four Corner mode:
• Click and hold the Select/Transform tool, then choose the Four Corner mode.
• In the Canvas, Control-click the object, then choose Four Corner from the shortcut
menu.
2 Drag one of the four-corner control points.
To crop the object:
1 Do one of the following to select the Crop mode:
• Click and hold the Select/Transform tool, then choose the Crop mode.
• In the Canvas, Control-click the object, then choose Crop from the shortcut menu.
2 Drag one of the crop control handles.
Note: Once an object is selected, press Ta b to quickly scrub through the transform
modes. Once a transform mode is active, such as Shear, pressing S does not select the
standard Select tool—press Shift+S to return to the standard Select tool. This is
because the transform modes are options for the Select/Transform tool.
Aligning Layers and Objects
There are several tools you can use to help you align and arrange objects in the Canvas.
These tools include Dynamic Guides, Rulers and Guides, the Canvas Grid, and the
alignment commands in the Object menu.
Chapter 1 Orientation 59
Page 60

The following table briefly describes the alignment tools in the View options.
Canvas View menu Function
Grid Displays a grid in the Canvas.
You can change the grid color and spacing in the Alignment
section of Canvas Preferences.
Guides Enabled by default, allow you to drag out and manually position a
horizontal or vertical guide. To create a guide, the Rulers must also
be enabled in the View menu. Once Rulers are displayed, click in
the ruler area, then drag toward the Canvas to create the guide.
Once your guides are created, you can disable the Rulers and
continue to move the guides.
You can change the guide color in the Alignment section of Canvas
Preferences.
Dynamic Guides Enabled by default, the Dynamic Guides appear automatically as
you drag an object in the Canvas. When working with a single
object, the guides indicate alignment with the center and edges of
the Canvas. When working with several objects, the guides indicate
when those objects align with each other.
You can change the Dynamic Guide color in the Alignment section
of Canvas Preferences.
Rulers Displays rulers along two sides of the Canvas. The ruler measure is
in10-pixel increments.
You can change the position of the Rulers in the Alignment section
of Canvas Preferences.
While the Canvas Guides are useful for manually positioning objects in your project, the
Object menu contains commands to automatically align objects. You can align the left,
right, top, and bottom edges of objects, as well as their horizontal or vertical centers.
You can also distribute the centers and edges of objects.
To use the Object menu alignment options:
1 Select the objects to be aligned.
2 Choose Object > Alignment, then choose an alignment option from the submenu.
60 Chapter 1 Orientation
Page 61

2 The Playground
2
The playground lets you explore the possibilities of your
project. Throw objects about, or easily create complex
motion with simulation behaviors. Add filters for that
extra wow factor, or combine filters and behaviors for
unique new looks. Let your mind go, and your motion
graphics project will follow.
About Behaviors
Behaviors are the heart of Motion. With just a drag and drop, you can quickly and easily
create sophisticated motion effects or complex simulated interactions between
multiple objects in real time—without creating any keyframes.
Behaviors animate an object by automatically generating a range of values for that
object’s parameters. For example, an object with an applied Grow/Shrink behavior
automatically scales the object up or down based on the rate you set. You can adjust
the effect of a behavior using simple, graphical controls in the Dashboard, or dig into
all controls for the behavior in the Inspector.
Think of behaviors as applying a rate of change to the parameters of an object over the
duration of that object. In turn, think of keyframes as setting specific values for the
parameters of an object at specific points in time.
The ideal use for behaviors is creating fluid motion graphics that do not require specific
timing. For objects in a project that call for precise timing, or to “land” in a very specific
area of the screen, use keyframing. For more information, see “U
Motion” on page 103.
61
sing Keyframes in
Page 62
With the exception of the Text Sequence behaviors, the duration of a behavior is the
length of the object to which it is applied. Although behaviors are designed for more
flexible graphics, you can shorten or stop the effect of the Basic Motion behaviors (such
as Grow/Shrink and Throw) by shortening their durations in the Timeline. For more
information on editing behaviors in the Timeline, see “M
odifying Behaviors in the
Timeline” on page 102.
Although the application of most behaviors is elementary, their power is quite
sophisticated. Understanding the differences between the five Motion behavior types is
essential in mastering their use.
Basic Motion behaviors: Among the simplest behaviors in Motion, Basic Motion
behaviors animate specific parameters of the object to which they are applied. Some
affect position, such as Throw, while others affect opacity, such as Fade In/Fade Out.
Simulation behaviors: The Simulation behaviors perform one of two tasks: Some
Simulation behaviors, such as Gravity, animate the parameters of an object in a way
that simulates a real-world phenomenon. Other simulation behaviors, such as Attractor
and Repel, affect the parameters of one or more objects surrounding the object to
which they are applied. These behaviors allow you to create some very sophisticated
interactions among multiple objects in your project with minimal editing. Like the Basic
Motion behaviors, Simulation behaviors also affect specific object parameters. For
example, Gravity affects the position parameter of an object, at a rate you define.
Unlike Basic Motion behaviors, you cannot stop or change the motion of a Simulation
behavior in the Timeline. However, you can affect the rate of a Simulation behavior by
changing its duration in the Timeline, as well as change the starting frame of the
behavior. A handy way to remember the differences in modifying the Basic Motion and
Simulation behaviors in the Timeline is that “you cannot control ‘Mother Nature.’”
Changing the duration of a Timeline bar for a Simulation behavior does stop the
“active” force on the object, but does not stop the motion of the object. In other words,
because the Simulation behaviors simulate natural effects, such as Gravity, the laws of
inertia apply—an external force set the object in motion, and that object stays in
motion even once the active force is no longer present. You can, of course, control
Simulation behaviors using their parameters.
62 Chapter 2 The Playground
Page 63
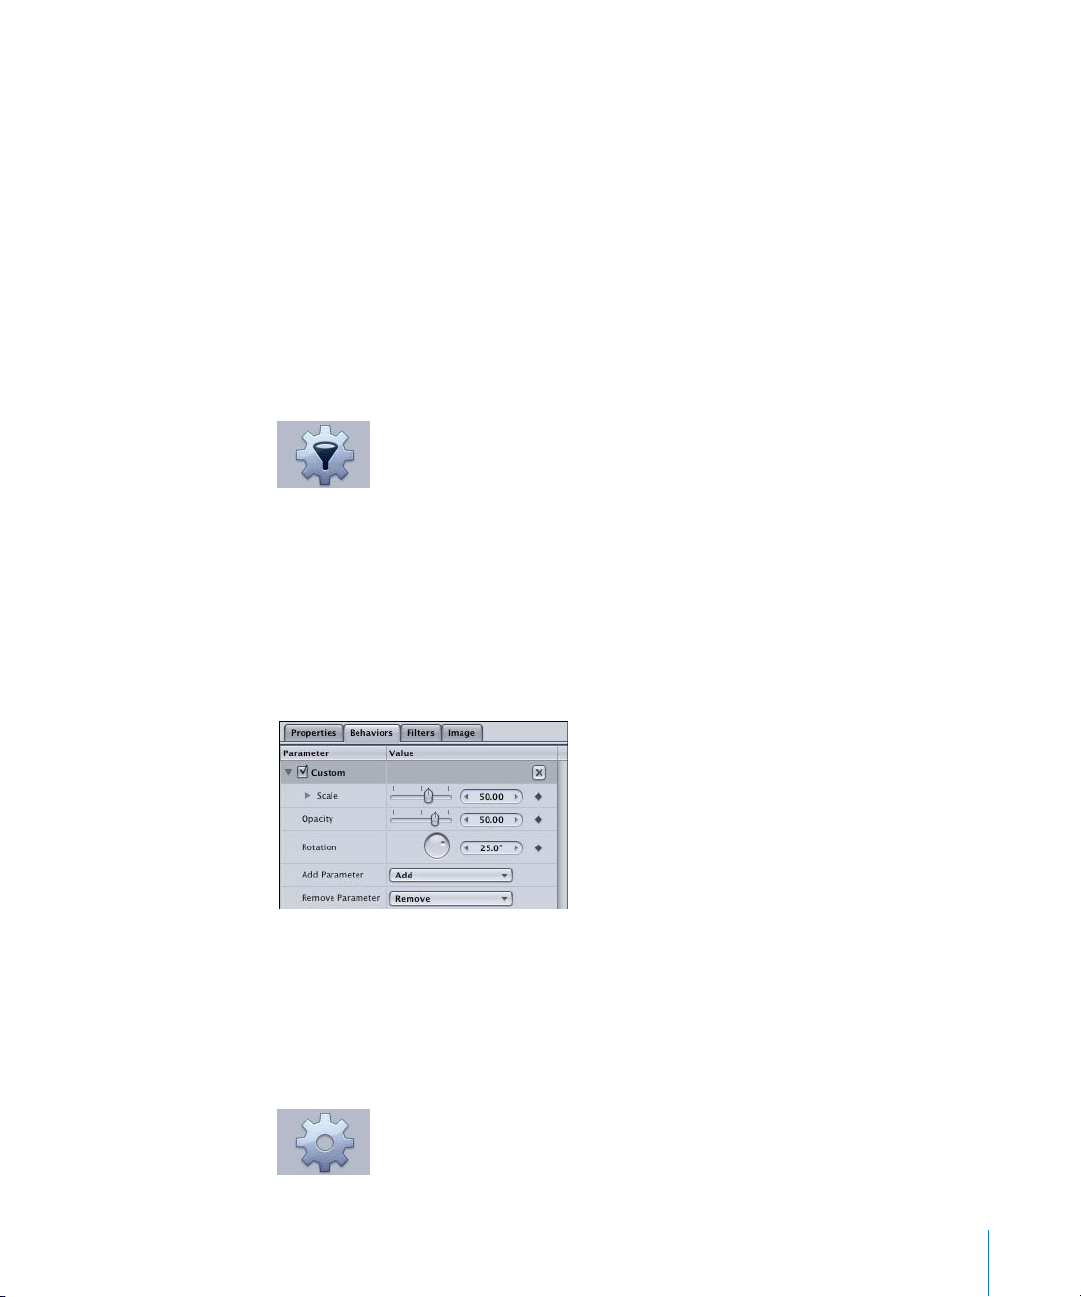
Parameter behaviors: Parameter behaviors can be applied to any object parameter,
and their effects are limited to just that parameter. For example, you can apply the
Oscillate parameter behavior to the Opacity parameter of an object to make the object
rhythmically flash on and off. The same Parameter behavior can be added to different
parameters, resulting in completely different effects. If the Oscillate behavior is applied
to the Rotation parameter of an object, the object rocks back and forth. Parameter
behaviors can also be applied to filter parameters, generator parameters, or the
parameters of particle systems. If you really want to go nuts, you can apply a Parameter
behavior to the parameters of other behaviors.
Notice that the Parameter behavior icon includes an image of a funnel (or a martini,
depending on your mood). The funnel represents the “channeling” of individual
parameters.
There is also a Custom behavior in the Parameter behaviors category, which works a bit
differently from the rest of the Parameter behaviors. (There is always that one different
kid in class, who later turns out to be your best friend.) The Custom behavior allows you
to design your own behavior—you hand pick and keyframe a set of parameters to
create a completely custom behavior. Once you have created your Custom behavior,
you can name and save the behavior to use on other objects or in future projects. For
more information, see Chapter 5, “Using Behaviors,” in Motion Help.
Custom behavior with animated Scale,
Opacity, and Rotation parameters
Particle behaviors: There is a single Particle behavior called Scale Over Life. When
applied to a particle cell, the Scale Over Life behavior affects the rate of scale over the
lifetime of the particle.
Chapter 2 The Playground 63
Page 64
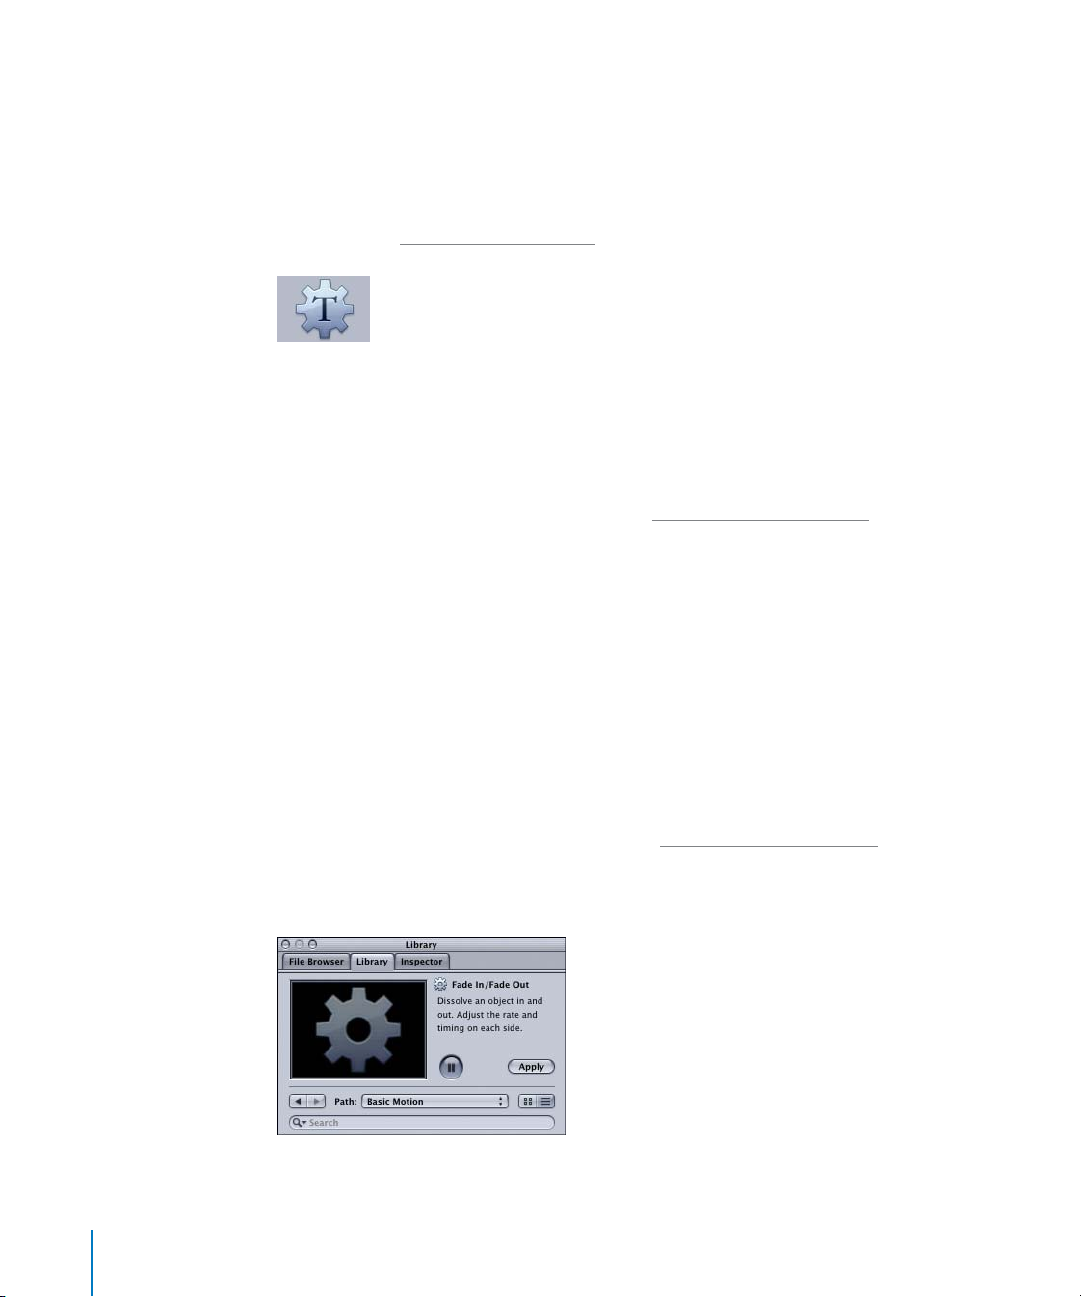
Text Animation and Text Sequence behaviors: Te xt Animation and Text Sequence
behaviors animate the parameters specific to text titling effects. For example, the Crawl
Left behavior automatically animates a text object to move across the screen from right
to left, while the Type On behavior reveals a text object one character at a time. The
Text Sequence behaviors allow you to create animations that move through the
characters of a text object over time. For more information on using Text Animation
behaviors, see “A
pplying Text Behaviors” on page 129.
Applying Behaviors
This section provides a quick introduction to applying behaviors to the objects in your
project. These guidelines apply to the Basic Motion, Simulation, Text Animation, and
Text Sequence behaviors, which you apply directly to objects in the Canvas, Layers tab,
or Timeline. Once applied, these behaviors automatically animate the parameters they
affect. Parameter behaviors are introduced in “Using Parameter Behaviors” on page 84.
Behaviors can be applied and modified while your project plays back, or while playback
is stopped.
To apply a behavior to an object, do one of the following:
m
From the Library stack, drag a Basic Motion, Simulation, Text Animation, or Text
Sequence behavior onto an object in the Canvas, Layers tab (in the Project pane), or
Timeline.
Note: Text Animation and Text Sequence behaviors should only be applied to text
objects. Although you can drag a Parameter behavior from the Library to an object, the
behavior does not affect the object until you select a parameter to which you want to
apply to the Parameter behavior. The best way to apply a Parameter behavior is by
using the Inspector. For more information, see “Using Parameter Behaviors” on page 84.
m
Select the object to which you want to apply a behavior, then select a behavior from
the Library stack, and click Apply in the Library Preview area.
64 Chapter 2 The Playground
Page 65

m
Select the object to which you want to apply a behavior. Then, click the Add Behavior
icon in the Toolbar and choose the behavior you want to apply.
Add Behavior icon
To apply a behavior to multiple objects:
1 Select all of the objects to which you want to apply the behavior.
2 Do one of the following:
• Choose a behavior from the Add Behavior pop-up menu in the Toolbar.
• Select a behavior in the Library, then click Apply in the Preview area.
Note: You can also apply behaviors directly to layers in the Layers tab or Timeline. In
general, behaviors applied to a layer affect all the objects nested within that layer as if
they were a single object. Some Simulation behaviors, however, can be set to affect
elements individually.
Once a behavior is applied to an object, use the Dashboard or the Behaviors tab to
adjust the behavior parameters.
Applying Multiple Behaviors to Objects
There is no limit to the number of behaviors you can add to an object or layer in
Motion. When multiple behaviors are applied to a single object, they all work together
to create a final animated effect.
Each behavior applies a value range to a specific parameter of an object. When multiple
behaviors are added to an object, the values generated by all behaviors that affect the
same parameters are combined together to create the end result. For example, applying
the Throw and Gravity behaviors to a single object results in the combined result of the
Throw and Gravity behaviors affecting the position of the object.
Multiple behaviors applied to a single object appear beneath that object in the Layers
tab and Timeline.
Chapter 2 The Playground 65
Page 66

Note: Generally, you can change the stacking order of the Simulation behaviors with no
effect on the animation. Changing the stacking order of other behaviors, however, does
affect the result. These include many of the Parameter behaviors, such as Negate and
Average, and the Snap Alignment to Motion behavior (from the Basic Motion
subcategory).
Copying Behaviors From One Object to Another
Once you have applied behaviors to objects in your project, you can copy those
behaviors to other objects.
Note: Although the following commands are presented in the Project pane, they can
also be performed in the Timeline.
Behaviors can be cut, copied, and pasted like any other object in Motion. When you cut
or copy a behavior in the Project pane, you also copy all of the current parameter
settings for that behavior.
To cut or copy a behavior:
1 In the Layers tab of the Project pane, select the behavior.
2 Do one of the following:
• Choose Edit > Copy (or press Command+C) to leave the behavior applied to the
current object, so you can paste a copy to another object.
• Control-click the behavior, then choose Copy from the shortcut menu.
• Choose Edit > Cut (or press Command+X) to remove the behavior from its current
object.
• Control-click the behavior, then choose Cut from the shortcut menu.
To paste a behavior:
1 Select the object to which you want to paste the behavior.
2 Do one of the following:
• Choose Edit > Paste (or press Command+V).
• Control-click the behavior, then choose Paste from the shortcut menu.
The cut or copied behavior is applied to the selected object, with all its parameter
settings intact.
Moving Behaviors
You can also move a behavior from one object to another in the Project pane or
Timeline. You move behaviors between layers and objects in the same manner as other
objects in the Layers tab or Timeline.
To move a behavior:
m
In the Layers tab or Timeline Layer list, drag the behavior from one object to another.
Note: If you drag a Parameter behavior from one object to another, it is applied to the
same parameter of the new object.
66 Chapter 2 The Playground
Page 67

For more information on duplicating, removing, locking, and renaming behaviors, see
Chapter 5, “Using Behaviors,” in Motion Help.
Working With Basic Motion Behaviors
The following section provides a quick introduction to working with the Basic Motion
behaviors. In the first example, an object is animated to move across the screen using
the Throw behavior. In the second example, an object is animated to spin while
traveling along a set path. This is accomplished using the Spin and Motion Path
behaviors.
Using the Throw Behavior
The Throw behavior is one of the easiest ways to set an object in motion—an object is
“thrown” in a direction and at a rate that you specify in the Dashboard or in the
Inspector. Once the initial throw is applied, the object continues to glide in a straight
line at a constant speed for the duration of the Throw behavior. In the following image,
the lion picture is animated with the Throw behavior.
Note: Remember that since the duration of most behaviors is the length of the object
to which it is applied, you can apply and manipulate behaviors while playing a project.
To use the Throw behavior:
1 Using one of the methods described above (in “A
the Throw behavior to an object in your project.
The Throw behavior appears in the Layers tab and Timeline, and the Throw Dashboard
appears. If the Dashboard does not appear, make sure the Throw behavior is selected,
then press D.
Chapter 2 The Playground 67
pplying Behaviors” on page 64), apply
Page 68

2 Set the rate and direction of the Throw.
• Click in the center of the Dashboard and drag outward in the direction you want the
object to move.
• The smaller the arrow, the slower the rate of the Throw. To increase the rate of the
Throw once the arrow is dragged to the limit, drag the Zoom slider to zoom out of
the Dashboard controls then drag again.
Once you set the direction and rate of the Throw, the projected motion path of the
behavior is displayed onscreen. The motion path for a behavior is different than an
animation path created by keyframing an object. A behavior’s motion path helps you
see what kind of movement an applied behavior creates for the object to which it is
applied. With the exception of the Motion Path behavior, the behavior motion paths
cannot be modified onscreen. Animation paths created by keyframing can be changed
by adjusting, adding, or removing control points. For more information on keyframed
animation paths, see “C
reating Keyframes in the Canvas” on page 104.
Note: You can enable and disable the animation path display in the View pop-up menu
located just below the right side of the Toolbar.
68 Chapter 2 The Playground
Page 69

It is important to remember that applying a behavior to an object applies a rate of
change to an object’s parameters, and does not create editable keyframes. For fine
tuning, many behaviors can be converted to keyframes. For more information, see
onverting Behaviors to Keyframes” on page 118. You can affect some of the Basic
“C
Motion behaviors in the Timeline.
Stopping the Effect of Basic Motion Behaviors
You can stop the effect of the Basic Motion behaviors in two ways: Change the
duration of the behavior in the Timeline, or apply a Stop parameter behavior to the
parameter that is affected by the behavior. Since the Throw behavior affects the
Position parameter of the lion object, the Stop behavior is applied to the Position
parameter.
To stop the Throw in the Timeline:
1 In the Toolbar, click the Timing icon (in the upper-right corner of the interface).
Timing icon
The Timeline appears. Layers and objects appear as blue bars, and behaviors (as well as
filters) appear as purple bars. To change the duration of an object, you can drag the
end (or beginning) of a bar. Since the duration of the Throw behavior is the length of
the object to which it is applied, trim the Throw behavior bar to stop the Throw before
the end of the object to which it is applied.
2 Click the right end of the Throw behavior and drag toward the left to the frame where
you want the object to stop moving.
The object stops at the frame where the Throw duration bar ends.
Chapter 2 The Playground 69
Page 70

Important: As mentioned previously, changing the duration of a behavior in the
Timeline does not have the same effect on all behaviors. While you can shorten, stop, or
change the rate of the Basic Motion behaviors in the Timeline, you cannot stop or
change the motion of a Simulation behavior in the Timeline. However, you can affect
the rate of a Simulation behavior by changing its duration in the Timeline. Remember,
you cannot control “Mother Nature.”
To stop the Throw using a Parameter behavior:
1 With the object selected, show the Inspector.
2 In the Properties tab, Control-click the Position parameter, then choose Stop from the
Parameter behavior shortcut menu.
3 In the Timeline, click the left end of the Stop behavior and drag toward the right to the
frame where you want the object to stop moving.
70 Chapter 2 The Playground
Page 71

The object stops at the frame where the Stop behavior bar starts. For more information
on working with Parameter behaviors, see “U
sing Parameter Behaviors” on page 84.
Using the Motion Path Behavior
The Motion Path behavior is an easy way to create predictable motion (without having
to use keyframes) by adding an editable motion path for an object to follow. When first
applied to an object, the default motion path is a straight path with control points at
the beginning and end of the path. Bezier control points can be added anywhere along
the path that allow you to reshape the motion path.
To use the Motion Path behavior:
1 Apply the Motion Path behavior to the object you want to animate.
The initial motion path—a straight path defined by two points at the beginning and
end of the path—appears. The first point on the path is the position of the object in
the Canvas at the first frame of the behavior.
2 If the project is not playing back, click Play (or press the Space bar).
The object travels along the motion path. The speed at which the object travels is
defined by the duration of the behavior. You can make the object travel faster by
trimming the duration of the Motion Path behavior in the Timeline, as well as stop the
movement of the traveling object (like the Throw behavior in the above example). You
can also slow the object by extending the behavior beyond the end of the object to
which it is applied.
Chapter 2 The Playground 71
Page 72

To change the shape of the path, do one of the following:
m
Click either point at the end of the path to change the path’s start and end location.
m
To create Bezier handles at the end points, Command-click and drag away from the
point. Flattening out the motion path at a control point slows the animation of the
object as it approaches the point. This is also known as ease.
m
To add points to the path, Option-click or double-click the path.
For more information on working with paths, points, and handles, see “U
Animation Paths” on page 106.
In the Motion Path Dashboard or Inspector, you can quickly create an ease in or out
without having to manually adjust the shape of the path.
72 Chapter 2 The Playground
sing
Page 73

To change the acceleration or deceleration at the start or end of the path:
m
In the Motion Path Dashboard (or Inspector), click the Speed pop-up menu, then
choose one of the following:
• To make the object travel at a constant speed on the path, choose Linear (default).
• To make the object slowly begin its path animation, choose Ease In.
• To make the object slowly end its path animation, choose Ease Out.
• To make the object decelerate at the beginning and end of its path animation,
choose Ease Both.
Note: When an ease option is selected, the shape of the motion path in the Canvas
does not change.
Combining Behaviors
You can add multiple behaviors to a single object. The applied behaviors all work
together to create a final animated effect. Since each behavior applies a value to a
specific parameter, the values generated by all behaviors that affect the same
parameters are added together to create the end result.
In this section, the Spin behavior is applied to an object (from the above example) that
has an applied Motion Path behavior.
To use the Spin behavior:
1 Apply the Spin behavior to the object with the applied Motion Path behavior.
2 In the Spin Dashboard, click in the black area of the circle and drag in the direction you
want the object to spin.
Chapter 2 The Playground 73
Page 74

The two applied behaviors work together so that the object spins as it travels along the
motion path.
Working With Simulation Behaviors
The following section provides a quick introduction to working with the Simulation
behaviors. In the first example, a group of objects is animated to fall and bounce on the
bottom of the screen using the Gravity and Edge Collision behaviors. In the second
example, two methods for animating a group of objects to swirl around a specific
object are discussed. The first method is using the Vortex behavior, and the second
method is using the Orbit Around behavior.
Using the Gravity and Edge Collision Behaviors
Gravity makes an object fall over time at a rate specified in the Acceleration parameter
of the Dashboard or Inspector. Unless the Edge Collision behavior is also applied, the
object falls off of the bottom of the screen. In this example, a group comprised of four
objects (four circles) is used to illustrate the Gravity and Edge Collision behaviors.
Note: Although you can apply the Simulation behaviors to single objects, their
strength is in using multiple objects. Some Simulation behaviors, such as Vortex,
require the existence of other objects in a project to have any effect. (There needs to
be at least one object to circle around the object with the applied Vortex behavior.)
To use the Gravity behavior:
1 Apply the Gravity behavior to an object in your project. In this case, Gravity is applied
to a grouped object that contains four semi-transparent, colored circles.
Gravity behavior applied to group (not to
individual objects of the group)
74 Chapter 2 The Playground
Page 75
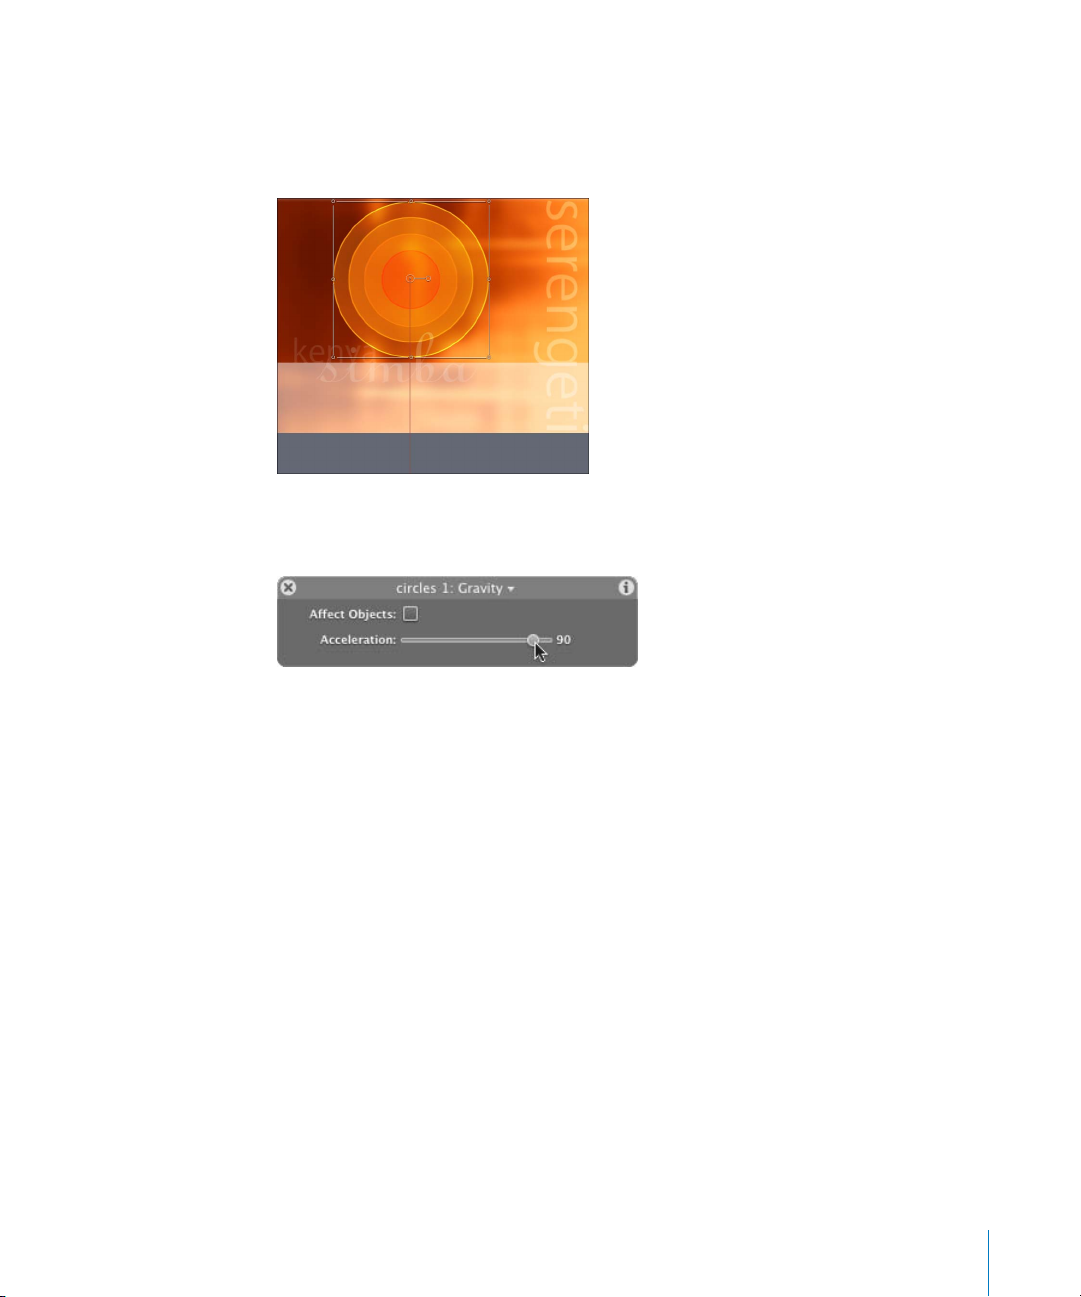
The motion path created by the Gravity behavior appears in the Canvas, and the object
falls. Because the object is applied to the group, all objects in the group fall at the same
rate. If Gravity is applied to only the small, orange center circle, for example, only the
orange circle falls.
2 To increase the rate of the falling object, drag the Acceleration slider in the Gravity
Dashboard or Inspector toward the right.
Note: You can enter a negative number in the Acceleration value field in the Inspector
to make the object float upward rather than fall.
To use the Edge Collision behavior:
1 Apply the Edge Collision behavior to the object with the applied Gravity behavior.
2 In the Edge Collision Dashboard (or Inspector), turn off Affect Objects.
Chapter 2 The Playground 75
Page 76

When the Edge Collision behavior is applied to a group, and the Affect Objects
parameter is disabled, the entire grouped is “bounced” off the bottom of the screen at
the anchor point of the group.
When the Edge Collision behavior is applied to a
group and Affect Objects is turned off, the layer
(group) bounces at the edge of the screen at its
anchor point.
3 In the Edge Collision Dashboard (or Inspector), turn on Affect Objects.
Affect Objects
Note: The Edge Collision behavior also includes edge controls for turning on and off
the edge of the screen with which an object collides. By default, an object is deflected
from all edges of the screen.
76 Chapter 2 The Playground
Page 77

When the bottom edge of each object hits the lower edge of the screen, the object is
deflected and bounces upward.
As the project plays, each object bounces up and down.
Other Simulation behaviors that also include the Affect Objects parameter include
Align To Motion, Drag, Gravity, Random Motion, and Rotational Drag.
Using the Orbit Around and Vortex Behaviors
The Orbit Around behavior makes an object orbit around another object in a perfect
circle. The parameters of the Orbit Around behavior can be modified to create a more
interesting animation. The Vortex behavior is the opposite of the Orbit Around
behavior—Orbit Around causes one object to orbit around another target object,
whereas Vortex exerts a force on all objects surrounding the object to which the Vortex
behavior is applied. The following example uses the same group of objects (circles)
used in the previous example; however, the objects are repositioned in the Canvas.
The Orbit Around Behavior
You create animation using the Orbit Around behavior by specifying a target object
that other objects circle around. You set the target object by dragging the object to the
Object well in the Orbit Around behavior parameters.
Chapter 2 The Playground 77
Page 78

To use the Orbit Around behavior:
1 Apply the Orbit Around behavior to the object (or group of objects) that you want to
circle around a target object.
In this case, the Orbit Around behavior is applied to the group of objects (circles) in the
project. The orange circle in the center of the Canvas is in a separate layer from the rest
of the objects.
When the Orbit Around behavior is first applied, no animation occurs. This is because
you must specify the object that the other objects orbit around. To set the target
object, the object is dragged from the Layers tab to the Object well in the Orbit Around
Dashboard or Inspector.
78 Chapter 2 The Playground
Page 79

2 Do one of the following:
• In the Layers tab, click-drag the name of the object that you want the other objects
to circle around, and drop it in the Object well of the Orbit Around Dashboard or
Inspector.
• In the Layers tab, drag the name of the object that you want the other objects to
circle around, and drop it onto the Orbit Around behavior.
Important: Dragging an object to a well may be tricky—be sure to click the object
name in the Layers tab and immediately drag the object to the Object well (without
releasing the mouse button). The behavior must remain active even though you are
clicking another object in the Layers tab. If you click the object in the Layers tab and
release the mouse button, that object is now selected, and the behavior’s parameters
are no longer displayed. This behavior is true of all wells, including Mask Source and
Image wells. To show the Orbit Around behavior parameters again, select the Orbit
Around behavior.
Drag object to Object well. The object can be dropped
when the arrow appears above the well.
When the object is dropped, it appears in the Object well.
Chapter 2 The Playground 79
Page 80

3 In the Orbit Around Dashboard (or Inspector), make sure Affect Objects is turned on.
When Affect Objects is turned on, all objects within the layer move around the target
object.
Other Simulation behaviors that also use a target object include Attracted To, Drift
Attractor To, Repel From, and Spring.
The Vortex Behavior
Animation is created using the Vortex behavior by exerting a force on all objects
surrounding the object to which the Vortex behavior is applied. You can specify
whether All Objects, Related Objects, or Specific Objects are affected by the Vortex. The
following example uses the same project as the above example.
To use the Vortex behavior:
m
Apply the Vortex behavior to the object that you want other objects to swirl around. In
this step, the Vortex is applied to the “center circle” object in the layer above the group
of circles.
80 Chapter 2 The Playground
Page 81
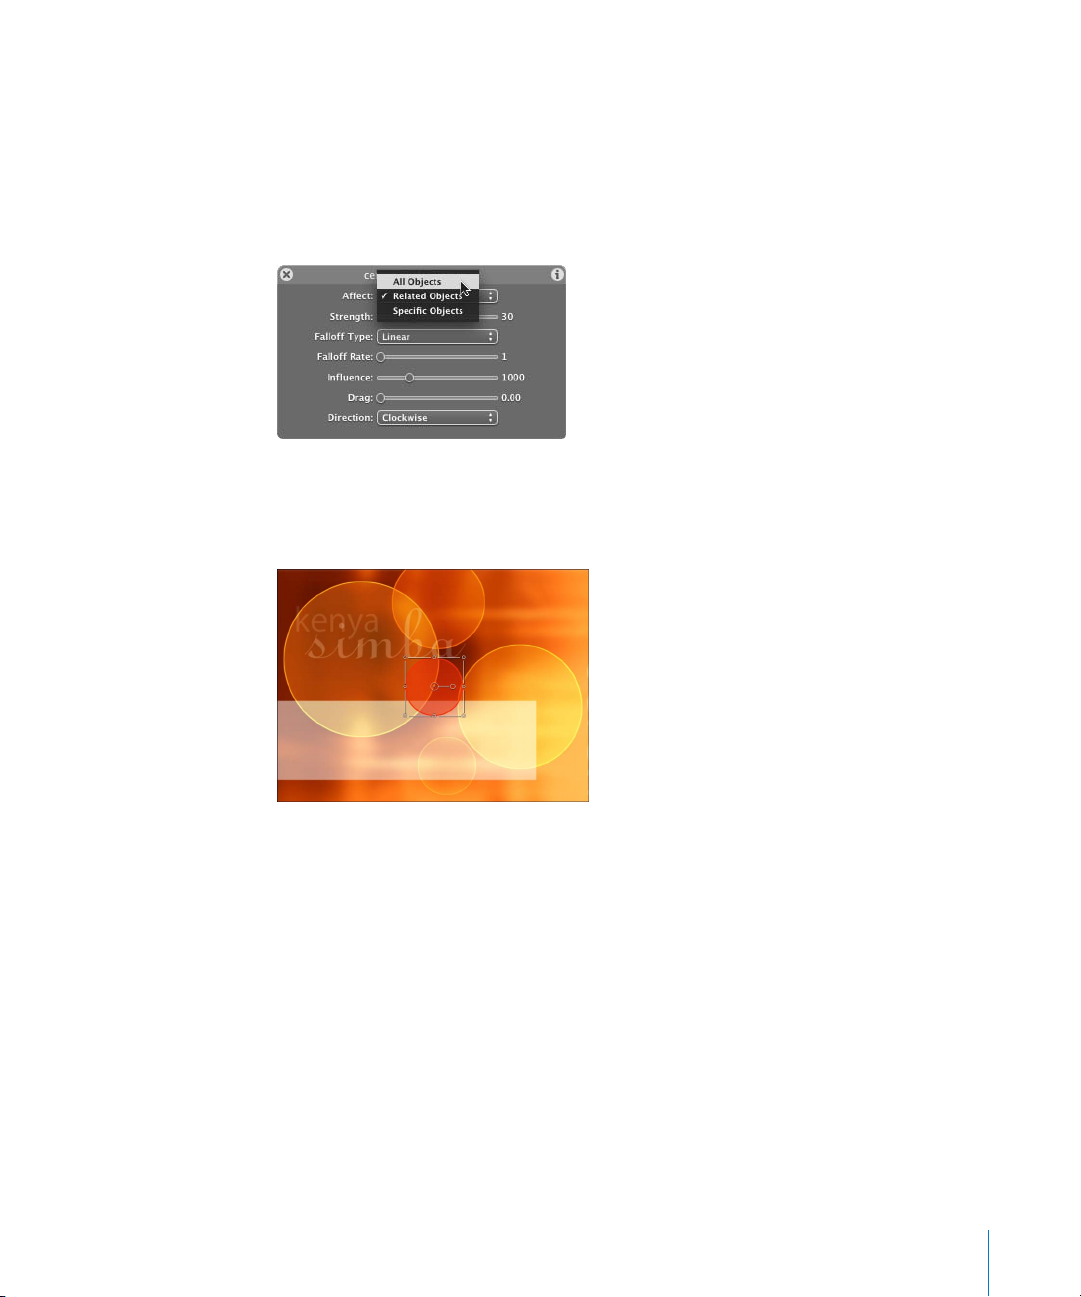
By default, Related Objects is selected in the Vortex Affect parameter. Because the circle
is the only object in the layer, nothing happens. When Related Objects is selected, all
objects that exist in the same layer as the object to which the Vortex behavior is
applied move around the object to which the Vortex behavior is applied.
Change the default Affect parameter setting:
m
In the Vortex Dashboard, click the Affect pop-up menu, then choose select All Objects.
When All Objects is chosen, all objects in the project—regardless of the layer in which
they exist—are affected and move around the object to which the Vortex behavior is
applied.
When All Objects is selected, all objects in the
project swirl around the object with the applied
behavior.
Using the Vortex behavior, there are two ways to create an animation in which only
certain objects (not every object in the project) swirl around the object with the
applied Vortex behavior: (1) Set the Affect parameter to Specific Objects and select
each object that you want to swirl around the target object, or; (2) Move the center
circle object (that has the applied Vortex behavior) into the same layer as the circle
objects, and set the Affect parameter to Related Objects.
Chapter 2 The Playground 81
Page 82

To set only the circles to vortex using Specific Objects:
1 In the Dashboard or Inspector, set the Vortex Affect parameter to Specific Objects
(without moving any objects).
2 If it is not displayed, show the Behaviors tab in the Inspector.
In the Vortex parameters, an Affected Objects list appears. To apply the vortex to
specific objects, drag the objects from the Layers tab to the Affected Objects list.
3 One at a time, click-drag the objects that you want to be affected by the Vortex
behavior. Like the Object wells, you can drop the object when the arrow appears above
the list.
As objects are added, the names of the object itself as well as the layer in which they
exist appear in the list.
Note: Objects from any layer in a project can be dragged to the Affected Objects list.
To remove an object, select the object in the list and click Remove.
82 Chapter 2 The Playground
Page 83

Any objects that are added to the Affected Objects list swirl around the object to which
the Vortex behavior is applied.
To set only the circles to swirl using Related Objects:
1 In the Layers tab, move the object with the applied Vortex behavior into the layer that
contains the objects you want to swirl around the object.
2 In the Dashboard or Inspector, set the Vortex Affect parameter to Related Objects.
Note: Other Simulation behaviors that also use the Affect parameter include Attractor,
Repel, and Drift Attractor.
Chapter 2 The Playground 83
Page 84

Behaviors vs. Keyframes
Behaviors do not add keyframes to object parameters. Instead, a behavior
automatically generates a range of values that are applied to an object’s parameters,
which animate the object over the duration of that behavior. With the exception of
the Text Sequence behaviors, the duration of a behavior is the length of the object to
which it is applied.
Keyframes, however, apply specific values directly to a parameter. An animated object
has at least two keyframes for a parameter, such as Rotation, at different points in
time in a project. A keyframe is a point in time that records any change in the value of
a parameter. The animation is created by these changes in parameter values, and can
be edited in the Keyframe Editor.
By design, behaviors are most useful for creating generalized, fluid motion effects, or
very complex animations. Keyframing gives you the ability to set precise parameter
values at specific frames. For example, for a project that requires the characters of a
text title to start with a Tracking value at frame 1 and end with a Tracking value of 100
at frame 60, you would keyframe the Tracking values at the specific frames.
You can also combine keyframes and behaviors. For more information, see Chapter 5,
“Using Behaviors,” in Motion Help. For more information on keyframing, see “U
Keyframes in Motion” on page 103.
sing
Using Parameter Behaviors
Parameter behaviors are very different from the other behavior categories—they are
applied in a different manner, and can be applied to nearly any parameter of an object.
The Basic Motion, Simulation, Text Animation, or Text Sequence behaviors affect
specific object parameters (determined by the behavior). For example, Throw only
affects the Position parameters of an object. A Parameter behavior can be applied to
nearly any of the parameters available for an object, such as X or Y Position, Opacity,
Rotation, Blend Mode, and so on. For example, you can apply the Randomize
parameter behavior to the Position of an object so that it jitters nervously onscreen.
Parameter behaviors can also be applied to the parameters of filters, as well as objects
belonging to particle effects. For even more variation, Parameter behaviors can be
applied to the parameters of applied behaviors. Wow. For example, the following
images show changes to the behavior animation path of an object when a Parameter
behavior is applied to a parameter of a Simulation behavior.
84 Chapter 2 The Playground
Page 85

In the first example, the Orbit Around behavior is applied to the upper dolphin object,
and the lower dolphin object is set as the target object. The behavior animation path
appears in red and forms a perfect circle around the lower dolphin object.
To show the animation path of a selected object, make sure Animation Path is selected
in the View pop-up menu.
Unlike animation paths for keyframed objects, behavior animation paths cannot be
modified directly—they are controlled by the parameters of the behavior. For
information on keyframed animation paths, see “U
Chapter 2 The Playground 85
sing Animation Paths” on page 106.
Page 86

In the second image, the Drag parameter of the Orbit Around behavior is adjusted in
the Inspector. After the Drag parameter is modified, the circle animation path becomes
a spiral.
In the last image, the Oscillate parameter behavior is applied to the Drag parameter of
the Orbit Around behavior. The spiral animation path becomes more irregular.
The effect of a Parameter behavior on an object depends on the parameter to which it
is applied. Therefore, you must select the parameter you want to apply the effect to
prior to applying the Parameter behavior.
86 Chapter 2 The Playground
Page 87

For example, applying the Oscillate Parameter behavior to the Scale parameter makes
the size of the object vary between alternate extremes, from very small to very large. As
shown in the following images, if you apply the Oscillate behavior to the Position
parameter of an object that is moving on a straight path across the screen, the object
travels in graceful waves up and down the newly-shaped path.
Animation path before Oscillate Parameter
behavior applied
Animation path after Oscillate Parameter
behavior applied
Applying Parameter Behaviors
The following section briefly describes the two ways to apply Parameter behaviors to
the properties of an object. The first method is to use a shortcut menu on the
parameters in the Inspector. The second method is similar to applying other behaviors,
in which you drag a behavior onto an object. However, once a Parameter behavior is
dragged to an object, you must go into the Parameter behavior controls and select a
property to which the Parameter behavior is applied. This means the first method is
more efficient.
Parameter behaviors can also be applied to filter parameters and behavior parameters.
For an example of applying a Parameter behavior to a filter, see “A
nimating Filters With
Parameter Behaviors” on page 92.
To apply a Parameter behavior to an object parameter using the shortcut menu:
1 Select the object to which you want to apply the Parameter behavior.
2 In the Inspector, display the Properties tab for the selected object.
Chapter 2 The Playground 87
Page 88

3 Control-click the parameter (such as Position), then choose a Parameter behavior (such
as Oscillate) from the Parameter behavior shortcut menu.
To apply a Parameter behavior to an object parameter using drag and drop:
1 In the Library, select the Parameter behavior you want to apply.
2 Drag the selected Parameter behavior to the object in the Canvas (or Layers tab).
3 In the Behaviors tab of the Inspector, expand the Parameter behavior.
88 Chapter 2 The Playground
Page 89
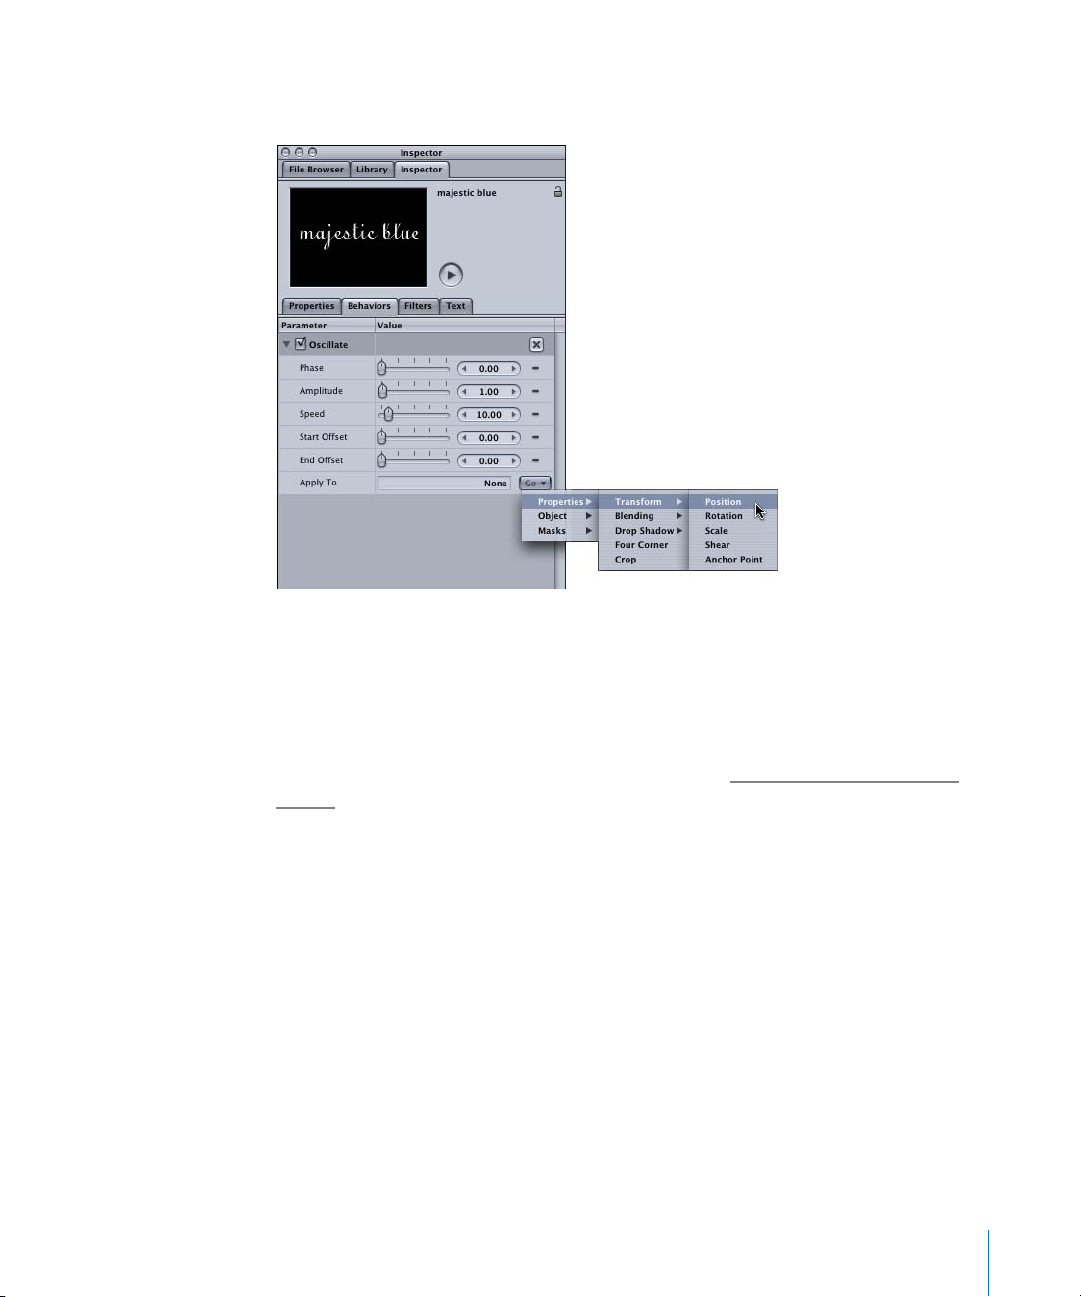
4 In the Apply To parameter (the last parameter in the list), choose the property to which
you want to apply the parameter from the Go pop-up menu.
Notice in the Go pop-up menu that the Parameter behavior can be applied to any text
parameter. The parameters that appear in the Go pop-up menu depend on the object
to which the Parameter behavior is applied. For example, when a Parameter behavior is
applied to a Gaussian Blur filter, only the Gaussian Blur parameters—Amount,
Horizontal, Vertical, and Crop—can be applied to the Parameter behavior.
For information on removing Parameter behaviors, see “W
here Parameter Behaviors
Appear” on page 90.
Chapter 2 The Playground 89
Page 90
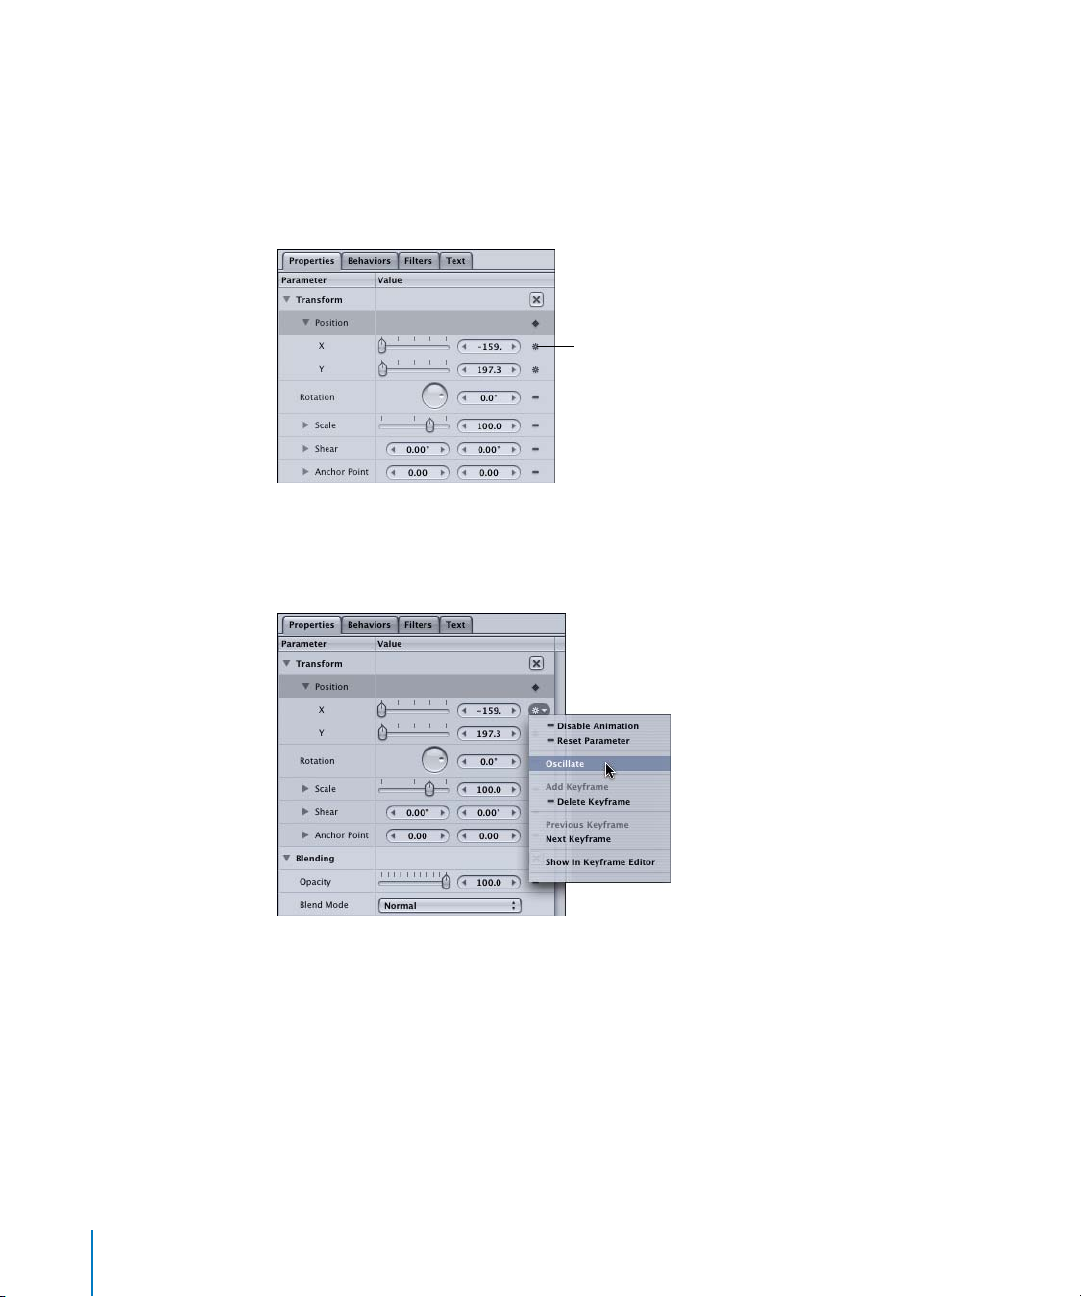
Where Parameter Behaviors Appear
Once a Parameter behavior has been applied to an object, the small behavior icon
appears in the Animation menu to the right of the affected parameter in the Properties,
Behaviors, or Filters tab. This indicates at a glance that a behavior is influencing that
parameter. Like other behaviors, the Parameter behaviors also appear in the Layers tab
and the Timeline.
Behavior icon
If you click the behavior icon, any applied Parameter behaviors appear in the pop-up
menu. To open the Behaviors tab, select the name of the Parameter behavior in the
Animation menu list.
Like other objects in Motion, Parameter behaviors can be disabled or removed.
To disable a Parameter behavior, do one of the following:
m
In the Behavior tab, turn off the Parameter behavior’s checkbox.
m
In the Layers tab or Timeline, turn off the behavior’s checkbox.
90 Chapter 2 The Playground
Page 91

To remove a Parameter behavior:
m
In the Layers tab or Timeline, select the behavior, then do one of the following:
• Choose Edit > Delete.
• Control-click the behavior, then choose Delete from the shortcut menu.
• Press Delete.
Note: You can also select a behavior in the Behaviors tab, then press Delete.
Working With Filters
Filters are the spice of a motion graphics project’s life (or were until behaviors came
along). The right use of filters can turn a good project into a sublime project; their
overuse can bring a good project to a grinding halt (in effect and processor speed). In
other words, at times it’s just the right amount of spice, and other times it’s as if the lid
fell off the pepper grinder and emptied the grinder’s contents into the sauce. It is up to
you to spice responsibly.
The Motion Library contains a suite of more than 95 filters that are divided into the
following 12 subcategories:
• Blur
• Border
• Color Correction
• Distortion
• Glow
• Keying
• Matte
• Sharpen
• Stylize
• Tiling
• Time
• Video
As demonstrated in “A
pplying Behaviors and Filters to Objects” on page 27, filters are
applied in the same manner as behaviors—by dragging or applying a filter from the
Library to an object in your project, or by using the Add Filter icon in the Toolbar.
You can animate filters by creating keyframes in the Dashboard or the Inspector. A very
cool but less obvious approach to use for animating filters is to apply Parameter
behaviors to the filter parameters. For information on keyframing filters, see
eyframing Filters” on page 116.
“K
Chapter 2 The Playground 91
Page 92

Animating Filters With Parameter Behaviors
This section provides a quick overview of applying Parameter behaviors to a filter. In
this example, a Bloom filter is applied to an object and its Brightness parameter is
keyframed. Then, a Randomize Parameter behavior is applied to the Threshold
parameter of the Bloom filter.
To apply a Bloom filter to an object:
1 In the Library, select the Filters category, then the Glow subcategory.
2 In the stack, select the Bloom filter and drag it to an object in the Canvas.
Original lion image Lion image after Bloom filter applied
The Bloom filter creates flowering highlights in the lighter areas of an object based on
a threshold.
To animate the Brightness parameter of the Bloom filter:
1 Go to the frame where you want to start the filter animation.
2 Enable Record (press A).
3 In the Bloom Dashboard (press D), set the first Brightness value. This example uses a
Brightness value of 47.
Note: You can also adjust the filter parameters in the Filters tab of the Inspector.
92 Chapter 2 The Playground
Page 93

4 Go to the last frame of the filter animation, and set the last Brightness value. This
example uses a Brightness value of 56.
5 Play the project.
The image brightens over the duration of the animation.
6 Disable Record (press A).
To apply a Parameter behavior to the Threshold parameter of the Bloom filter:
1 In the Filters tab of the Inspector, select the Threshold parameter of the Bloom filter.
2 Control-click the Threshold parameter, then choose Randomize from the Parameter
behavior shortcut menu.
A behavior icon appears on the Animation menu of the Threshold parameter.
Chapter 2 The Playground 93
Page 94
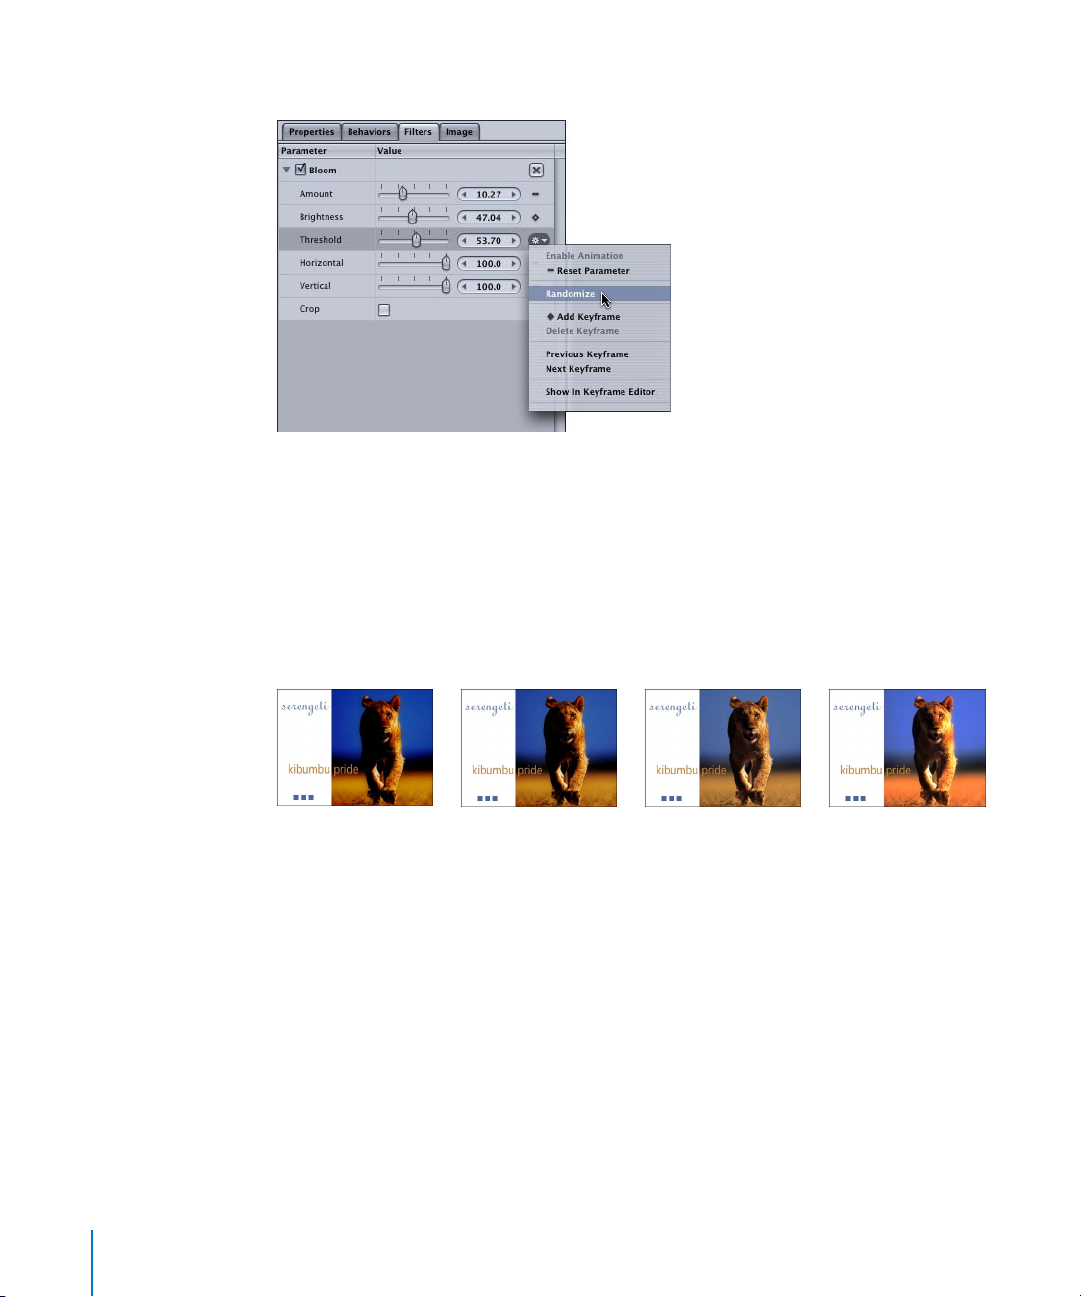
3 Click the behavior icon (Animation menu), then choose Randomize.
The Behaviors tab is selected and the Randomize parameters are displayed.
4 Adjust the Randomize settings.
5 Click the Filters tab and play the project (press the Space bar).
Rather than a smooth transition between the Brightness values, the Threshold values
are randomly animated. In the Filters tab, you can see the keyframed Brightness value
increasing, and the Threshold behavior values changing as a result of the Parameter
behavior.
Important: For optimal processing speed, keep in mind that applying a filter to a layer
containing several objects is more efficient than applying filters to each object within a
layer individually. Also, importing media at its intended size helps reduce processing
speed. For example, if you import a large image, scale the image down, and apply
filters and behaviors to the scaled object, Motion must process the scaling information
in addition to the filters and transforms. To save processing time, import the images as
close to the size required by your project whenever possible.
Note: For information on minimum and optimum hardware configurations, see
Installing Your Software.
94 Chapter 2 The Playground
Page 95
3 Your No. 2 Pencil
3
Sharpen those pencils! It’s time to get serious with the
full-featured Timeline and flexible keyframing options
that allow you to create and edit precision animation in a
friendly, clean curve editor.
Using the Timeline
Although you can create an entire motion graphics project without ever peeking at the
Timeline, it becomes an essential tool in modifying the timing and position of elements
in relation to each other, as well as editing the duration and rate of many behaviors.
Many of the features ordinarily reserved for nonlinear editing software are available in
the Motion Timeline.
While the mini-Timeline is handy for manipulating a single object or layer at a time, the
full Timeline gives you a global view of all elements (layers, objects, behaviors, and so
on) in your project, and the position and duration of those elements over time. Think of
the Timeline as the place where you rule over your project—you move the elements in
time, in stacking order, and in duration, as well as add or remove elements.
The Timeline allows for easy, graphical editing. You decide whether objects, audio,
keyframes, masks, behaviors, filters, or a combination of elements is displayed in the
Timeline. The Timeline contains two components: the Layer list (to the left) and the
Timeline itself (to the right).
The Timeline, located in the Timing pane, is not displayed by default.
95
Page 96

To display the Timeline, do one of the following:
m
In the Toolbar, click the Timing icon (in the upper-right corner of the interface).
Timing icon
m
Drag the drag handle directly below the Play button in the transport controls.
Drag handle
m
Choose Window > Layouts > Cinema.
m
Press F6.
Cinema layout is ideal for use with Cinema displays. This layout moves the Inspector to
the right side of the interface and shows the Timeline and Layers tab. If the workflow
on a certain project requires that you spend a lot of time in the Timeline and Inspector,
this is the recommended layout. This choice is not available unless your computer is
attached to an Apple Cinema Display.
Note: To change interface layouts, choose Window > Layouts, then choose Standard,
Alternate, or Cinema from the submenu. You can also create and save your own layout
arrangements. For more information, see Chapter 1, “Getting to Know Motion,” in
Motion Help.
The Timeline Layer List
The Timeline Layer list mirrors the Layers list in the Project pane. Like the Layers list, you
can select, reposition, lock, group and ungroup, and rename objects and layers. You
can also add and delete layers.
Also like the Layers list, the filter, behavior, and mask icons appear next to the object
name in the list.
96 Chapter 3 Your No. 2 Pencil
Page 97

The Timeline
In the Timeline, each object is represented by a colored bar that sits on a gray,
horizontal track. The object type is identified by the color of its bar. You can show or
hide the tracks for layers and objects or audio, as well as masks, behaviors, and filters
applied to those layers and objects. You can also display keyframes in the Timeline,
which can be moved or deleted. To add keyframes or modify the keyframe curves, use
the Keyframe Editor.
Show/Hide Keyframes
Show/Hide Layers
Show/Hide Audio
Show/Hide Behaviors
Resize Track Height
Show/Hide Filters
Show/Hide Masks
The following images show the Timeline for a project that contains one layer
comprised of three objects—two images and one text object (at the top of the list). In
the first image, only the Show Layers option is enabled, which displays any layers and
objects in a project. The bar color for layers and objects is blue. When selected, the
object is a darker blue.
Each layer in a project has a representative layer track, which can be used to move or
trim all of the objects within that layer. For layers that contain multiple overlapping
objects, a layer icon and the number of objects in that time region of the layer appear
on the layer track.
Note: In the mini-Timeline, only the overlap is shown, not the layer icon and number of
objects.
Chapter 3 Your No. 2 Pencil 97
Page 98

In the second image, the Show Behaviors and Show Filters options are enabled. Each
image has an applied behavior (Fade In/Fade Out), and the text object has an applied
text behavior (Text Tracking) and filter (Directional Blur). The bar color for behaviors and
filters is different.
Note: You can modify the way objects are displayed in the Timeline in the Appearance
group of Motion Preferences.
Navigating the Timeline
To zoom in and out of the Timeline, you can use the Zoom control or the Zoom slider.
Both allow you to zoom in and out of the Timeline horizontally. The more you zoom in,
the less time (frames) is displayed. As you zoom out, more time is displayed. When you
use the Zoom control, the zoom is centered on your current frame.
Zoom slider Zoom/Scroll control
Editing Objects and Layers
Use the Timeline to move objects and layers in time, as well as to slip or trim the
objects to better match the timing of other objects in your project. The terms move,
trim, and slip describe the different ways to edit Timeline objects.
Move: When you move an object in a track, the location of the object in the track (in
time) is changed without affecting its content or duration.
Trim: When an object is trimmed, the duration of the object is changed, without
affecting its location in the track or its content. Trimming an object is the equivalent to
setting new In or Out points for an object.
98 Chapter 3 Your No. 2 Pencil
Page 99

Slip: When an object is slipped, the content of the object is changed without affecting
its location in the track or duration. In other words, a slip allows you to use a different
portion of a clip without changing its duration or location in time. An object can only
be slipped after the object has been trimmed. Since there is no footage, behaviors and
filters cannot be slipped.
To move an object:
m
In the Timeline, drag an object track to the left or right.
As you drag, the new In and Out points of the clip appear above the pointer. The
triangle adjacent to the In and Out values represents Delta (the amount of change in
the edit).
Note: To snap to other objects in the Timeline, press Shift while dragging.
There are two ways to trim an object in the Timeline: You can drag an end of an
object’s bar in the Timeline to set an In or Out point, or you can use the Mark menu.
To trim an object by dragging its bar in the Timeline:
1 Position the pointer at the beginning or end of the object’s bar you want to trim.
The pointer changes to the Trim tool.
2 Drag the end of the bar until it reaches the frame where you want the clip to begin
or end.
Chapter 3 Your No. 2 Pencil 99
Page 100

To trim an object by setting the In or Out point:
1 Select the object you want to trim.
2 Move the playhead to the frame of the new In or Out point.
3 Choose Mark > Mark In (or press I) to set a new In point or choose Mark > Mark Out (or
press O) to set a new Out point.
The clip’s duration is trimmed to the new In and Out points.
To slip an object:
1 Position the pointer above the object you want to slip, and press Option.
The pointer changes to the Slip tool.
2 Drag the object to the left or right.
When you drag to the right, the frames are replaced with a section from later in the
source clip. When you drag to the left, the frames are replaced with a section from
earlier in the clip.
For more information on editing, navigating, and creating markers in the Timeline, see
Chapter 4, “Using the Timeline,” in Motion Help.
Adding Media to the Timeline
Like the Layers tab or the Canvas, you can add media to your project in the Timeline.
When media is dragged to the Timeline, a drop menu appears that contains options
that specify how the new files are placed in the project. Like the mini-Timeline, if
multiple objects are dragged to the Timeline, a drop menu appears that contains the
Composite and Sequential options.
100 Chapter 3 Your No. 2 Pencil
 Loading...