

Page 1

New Features in Motion 2
This document explains the new features and enhancements released in Motion 2.
Float Bit Depth Support
Motion now supports the following project bit depths:
Â
8-Bit (8-bit integer)
Â
16-Bit Float
Â
32-Bit Float
All bit depths are GPU hardware accelerated.
Although Motion’s float processing is handled by your system’s GPU hardware for
accelerated performance, working in float is very processor intensive. You can quickly
change the preview of the project to 8-bit to speed your workflow by turning off
“Preview for Float Bit Depth” in the View menu. The View pop-up menu is located in the
upper-right corner of the Canvas (below the Timing icon).
Note:
You can also choose View > Preview Float Bit Depth.
To change the bit depth of a project:
1
Choose Edit > Project Properties (or press
Command+J
).
1
Page 2
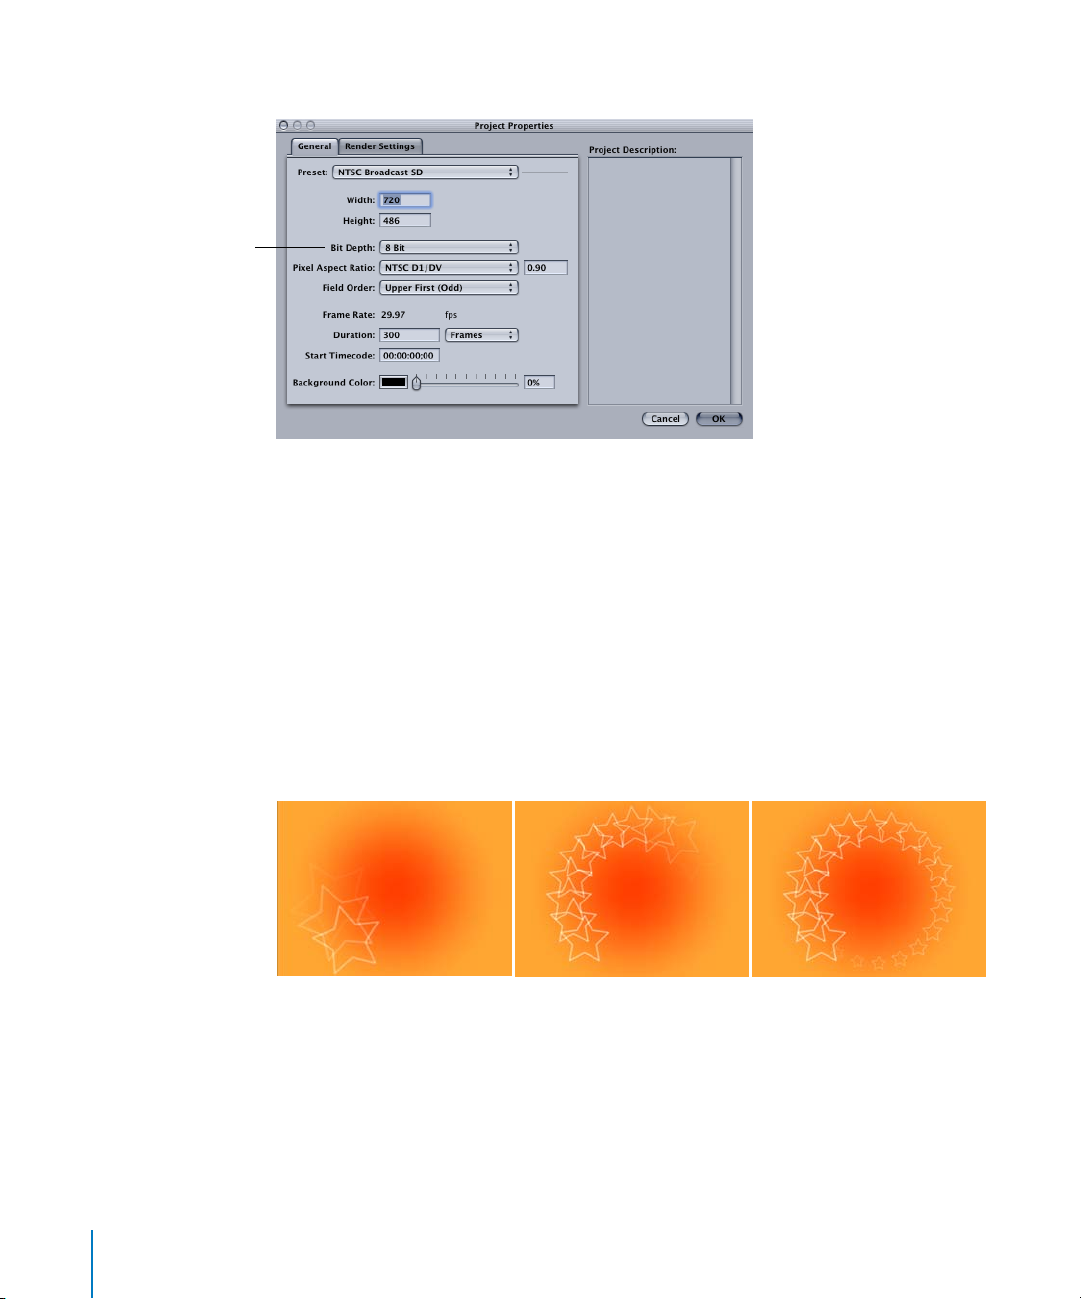
Bit Depth pop-up menu
2
In the Project Properties dialog, select a setting from the Bit Depth pop-up menu.
For more information about bit depth, choose Help > Motion User Manual and see
“About Bit Depth” in Chapter 2, “Creating and Managing Projects.”
The Replicator
The Replicator is a powerful new tool that allows you to quickly and fluently build
patterns of repeating elements, including video, still images, shapes, or other objects in
a Motion project. The patterns are built on a shape that you select, such as a circle,
spiral, or rectangle. Once the Replicator shape is determined, you can modify and
animate the parameters specific to that shape, such as the size of a circle or the
amount of twist in a spiral’s arms. You can also modify and animate the pattern’s cell
parameters.
The Replicator also has a special behavior called Sequence Replicator that allows you to
sequence the replicator parameters over the pattern. This behavior is very similar to the
Sequence Text behavior in the Text Animation behavior subcategory.
For more information, choose Help > Motion User Manual and see Chapter 9, “Using
the Replicator.”
2
Page 3

New Filters
Sixteen new filters have been added to the Motion Library:
Â
Extrude:
“front” and “back” of the object, offsetting them, and extruding the edges so that
they connect.
Â
Indent:
areas.
Â
Refraction:
Â
Relief:
creating a 3D height map.
Â
Basic 3D:
and perspective.
Â
Prism:
effect.
Â
Channel Swap:
channel, or its inverse. If you select Blue from Red, the value of blue in the object will
match the value of red across the entire object. Channel Swap can be used in a
variety of ways, including simply inverting the alpha channel of an object.
Â
Gradient Colorize:
determine the application of the colors in the gradient.
Â
Vectorize Color:
substituted over the entire color range of the object.
Â
Earthquake:
position as if shaken by an earthquake.
Â
Insect Eye:
the point of view of an insect.
Â
Noise Dither:
the banding seen on 8-bit images with subtle gradients.
Â
Vignette:
through some camera lenses.
Â
Random Tile:
Â
Scrub:
the clip without moving it in the Timeline. You can also use this filter to create a
freeze frame. Additionally, it allows you to animate the offset parameter, often with
interesting results. Try adding the Scrub filter to a clip, then applying the Randomize
behavior to the Frame offset, with the “Offset from” parameter set to Current Frame.
Â
Trails:
with moving images.
Gives an object with an alpha channel simulated depth, by creating a
Creates a shiny, bump-mapped appearance on an image, with raised and flat
Creates a glass-distortion effect on an image, with an optional height map.
Uses the color values of an object or height map to calculate height vertices,
Allows you to rotate an object on the X, Y, and Z axes, and set its position
Blurs and refracts the image as if seen through a prism, creating a rainbow
Substitutes the color value of a channel with that of either a selected
Colorizes an image, using color values instead of position to
Makes the object appear as multicolored polygons. Four colors are
Creates an animated displacement effect on an object, adjusting its
Maps a repeating hexagonal distortion pattern to an image, mimicking
Adds a small amount of noise to the pixels of an object, used to soften
Simulates the light fall-off and blurring in the corners of images as seen
Tiles your object in an irregular pattern with circular panels.
Moves a virtual playhead around a clip, allowing you to change the timing of
Draws light or dark trails following an object’s movement. This is only effective
For more information, choose Help > Motion User Manual and see Chapter 10, “Using
Filters.”
3
Page 4

Bonus Filters
Three additional new filters are available for download by registering on the Motion
website. Motion can be registered by launching the application or at http://
register.apple.com. Once registration is complete, go to http://www.apple.com/motion/
download to download the additional filters. The new filters are:
Â
Matte Magic:
Â
Movement Blur:
itself. This is unlike motion blur, which blurs an animated object in the Canvas.
Â
Underwater:
through a water surface.
Erodes and feathers matte edges.
Creates blur based on the movement of subjects in the footage
Applies an animated distortion to your object, as if it is being viewed
FxPlug
The FxPlug is an image-processing plug-in architecture developed by Apple’s
Professional Applications group. The FxPlug makes it possible for any plug-in developer
to develop hardware-accelerated effects using technologies such as OpenGL,
CoreGraphics, and CoreImage, as well as CPU-based effects.
New Generators
Three new Generators have been added to the Motion Library.
Â
Caustics:
brightness, and color of the caustics pattern can be modified and animated. You can
use the Caustics generator to add light patterns to a project, or as the source object
for an image map.
Â
Clouds:
scale, speed, and strength of the cloud layers.
Â
Membrane:
in 3D space. The speed, start and end points, offset, brightness, and color can be
modified and animated. To expand the animation beyond the Canvas borders,
increase the Width and Height parameters in the Inspector.
Creates an animated, simulated water surface. The size, speed, refraction,
Creates an animated cloud pattern. You can modify or animate the color,
Creates a sheer, animated sheet that appears to move gracefully about
For more information, choose Help > Motion User Manual and see Chapter 11, “Working
With Generators.”
Core Image Support
If you are running Mac OS X 10.4 or later, Motion supports the operating system’s Core
Image Units (filters). The Image Units category appears in the Motion Library.
4
Page 5

MIDI Controller Support
The MIDI behavior allows you to edit and animate object parameters using the controls
(knobs, dials, keys, etc.) of a standard MIDI device, such as a synthesizer. You can “teach”
Motion what control on the MIDI device manipulates each parameter to which the
MIDI behavior is applied.
For more information, choose Help > Motion User Manual and see “MIDI” in Chapter 5,
“Using Behaviors.”
Keyframing Enhancements
Several enhancements have been made to creating and working with keyframes in
Motion. You can now quickly add a keyframe to the last modified parameter of an
object, record keyframes only on parameters that are already animated, and modify the
exact value of a keyframe in the Keyframe Editor’s curve graph or parameter list.
New Add Keyframe Shortcuts
There are two ways to quickly add keyframes:
Â
You can quickly add a keyframe without accessing the Animation menu of the
Inspector (or the Animation Menu in the Keyframe Editor list) by pressing
A keyframe is automatically added to the last modified parameter of the selected
object (regardless of the status of the Record button).
Â
In the Animation menu of the Inspector, you can quickly add a keyframe to a
parameter by pressing
Option
and clicking on the Animation menu icon.
Control+K
.
New Keyframing Option
A new choice has been added to the Recording Options dialog that allows you to
record keyframes only on parameters that are already animated. When “Record
keyframes on animated parameters only” is turned on in the Recording Options dialog,
keyframes are only added to parameters that are already animated. For example, if the
position of an shape is animated (keyframed) and “Record keyframes on animated
parameters only” is enabled, only changes made to the position of that object are
keyframed. If you change the color of the object over time, the color changes are not
keyframed—even when the Record button is on.
Important:
animated parameters only” option. You can still explicitly add keyframes, regardless of
whether Record is enabled, by using the Animation menu in the Inspector or Keyframe
Editor list.
To record keyframes only on an animated parameter:
1
Choose Mark > Recording Options.
The Recording Options dialog appears.
5
The Record button must be on when using the “Record keyframes on
Page 6

2
Turn on “Record keyframes on animated parameters only.”
3
Click OK.
Fine-Tuning Keyframes
To make adjusting the value of keyframes easier, Motion now allows you to doubleclick on a keyframe in the Keyframe Editor and type in a number. You can also scrub or
type a number in the value field in the Keyframe Editor parameter list. Also, when
multiple keyframes are selected and you modify the tangent handles of one point, the
tangent handles of all selected keyframes are modified.
For more information, choose Help > Motion User Manual and see Chapter 6,
“Keyframing and Curves.”
Integration Enhancements
Enhancements have been made in Motion’s integration with Soundtrack Pro, MultiTrack QuickTime movie files, multi-channel audio files, iPhoto, iTunes, and Final Cut Pro.
Soundtrack Pro Integration
Soundtrack Pro can be opened from within Motion and used to modify an audio file.
After the file has been edited and saved in Soundtrack Pro, the audio file is
automatically updated in Motion.
For more information, choose Help > Motion User Manual and see “Using Soundtrack
Pro With Motion” in Chapter 13, “Working With Audio.”
Multi-Track QuickTime Movie and Multi-Channel Audio File Support
Motion now supports multi-channel audio files and multi-track QuickTime movie files.
You have the option to import the audio files as a single track, or with separate tracks
representing each channel in the audio file or each track in the QuickTime move file.
For more information, choose Help > Motion User Manual and see “Adding a MultiTrack QuickTime Movie File” or “Adding a Multi-Channel Audio File” in Chapter 13,
“Working With Audio.”
iPhoto Integration
A Photos category has been added to the Motion Library, which allows you to browse
for and import image files directly from your iPhoto library. The Photos subcategories
contain any albums created in iPhoto. The content of each album appears in the file
stack.
For more information, choose Help > Motion User Manual and see “Adding iTunes and
iPhoto Files From the Library” in Chapter 2, “Creating and Managing Projects.”
6
Page 7

iTunes Integration
A Music category has been added to the Motion Library, which allows you to browse
for and import audio files directly from your iTunes library. The Music subcategories
contain any playlists created in iTunes. The content of each playlist appears in the file
stack. When displayed in List view, the Music category shows the Name, Artist, Album,
Duration, and Size information created in iTunes.
For more information, choose Help > Motion User Manual and see “Adding iTunes and
iPhoto Files From the Library” in Chapter 2, “Creating and Managing Projects,” or
“Adding an Audio File” in Chapter 13, “Working With Audio.”
Final Cut Pro Integration
When you select clips or sequences to export to Motion, the following properties are
also now retained with the exported project:
Â
Markers (both global and clip markers)
Â
Audio keyframes
For more information, choose Help > Motion User Manual and see Appendix D,
“Integration With Final Cut Pro.”
Particle Emitter Enhancements
New shapes have been added to the particle emitter parameters that allow you to emit
points from the center or outline of a Rectangle, Burst, Spiral, or a Wave.
Star particles emitted from the Wave emitter shape.
For more information, choose Help > Motion User Manual and see Chapter 8, “Working
With Particles.”
7
Page 8

Fixed Layer Size
A control allowing you to define the size of a layer has been added to the Inspector.
The Fixed Resolution parameter appears in the Layer tab of the Inspector, which is
available when a layer is the selected object.
By default, the size of a layer is determined by the objects within that layer. Since
animated objects often grow in size, a layer can become quite large. When filters are
applied to very large layers, or large layers are used as the source object for other
objects, processing time is greatly affected. This control allows you to crop the size of
the layer and speed processing time.
To set the resolution of a layer:
1
In the Layers tab (or the Timeline Layer list), select the layer.
2
In the Inspector (press
3
Turn on the Fixed Resolution checkbox.
By default, the layer’s resolution is set to the project size.
4
To define a resolution other than that of the project, adjust the Fixed Width and Fixed
Height parameters.
Note:
When enabled, the Fixed Resolution parameter crops the layer to the size
specified in the Fixed Width and Fixed Height parameters around the anchor point of
the layer.
Command+3)
, click the Layer tab.
For more information, choose Help > Motion User Manual and see “Fixing the Size of a
Layer” in Chapter 2, “Creating and Managing Projects.”
Motion Path Behavior Enhancements
New parameters have been added to the Motion Path behavior that allow you to better
control the velocity of the object on the path, and to customize the position of the
object along the path in time. For example, you can keyframe custom values to make
an object travel forward a specific percentage of the path, then backward, then
forward, etc. before it reaches the end of the animation. You can modify the Custom
Speed velocity curve in the Keyframe Editor.
For more information, choose Help > Motion User Manual and see “Motion Path” in
Chapter 5, “Using Behaviors.”
Autosave
Motion now automatically saves backups of your project in a folder on your hard drive.
You can specify how frequently projects are automatically saved, as well as the location
of the saved files. Saved projects are time- and date-stamped.
8
Page 9

To view the Autosave settings:
m
In Motion Preferences (press
Command+,
), click the Project icon.
The Autosave settings are the last group of controls in the dialog.
© 2005 Apple Computer, Inc. All rights reserved.
Apple, the Apple logo, Mac, Mac OS, QuickTime, Final Cut Pro, iTunes, and Soundtrack are trademarks of Apple Computer,
Inc., registered in the U.S. and other countries. iPhoto is a trademark of Apple Computer, Inc. AppleCare is a service mark of
Apple Computer, Inc., registered in the U.S. and other countries.
9
 Loading...