

Page 1

Explanation of WARNING Symbols
Dangerous Voltage: The lightning flash with arrowhead symbol, within an
equilateral triangle, is intended to alert the user to the presence dangerous
voltage within the inside of the product that may be sufficient level to
constitute a risk of electric shock to persons.
Instruction: The exclamation point within an equilateral triangle is intended
to alert the user to the presence of important operating and servicing
instructions in the literature accompanying the appliance.
Safety instructions
1) Read these instructions.
2) Keep these instructions.
3) Heed all warnings.
4) Follow all instructions.
5) Do not use this LCD TV near water.
6) Clean only with dry cloth. Do not use liquid, alcohol, or aerosol cleaners.
7) Do not block any ventilation openings. Install your LCD TV in a well-ventilated
area.
8) Keep your LCD TV away from moisture, excessive dust and any heat sources,
such as radiators, heat registers, stoves, or any other apparatus (including
amplifiers) that produce heat.
9) Do not remove the back cover. There are no user-serviceable parts inside.
10) Do not defeat the safety purpose of the polarized or grounding-type plug. A
polarized plug has two blades with one wider than the other. A grounding type plug
has two blades and a third grounding prong. The third prong is provided for your
safety. If the provided plug does not fit into your outlet, consult an electrician for
replacement of the obsolete outlet.
11) Protect the power cord from being walked on or pinched particularly at plugs,
receptacles, and the point where they exit from the LCD TV.
12) Never rest objects on the power cord or place it in high traffic areas. It is better to
use the point where they exit from the apparatus.
13) Only use attachments/accessories specified by the
manufacturer.
14) Use only with the cart, stand, tripod, bracket, or table specified
by the manufacturer, or sold with the LCD TV. When a cart is
used, use caution to avoid injury from tip-over.
15) Unplug this LCD TV during lightening storms or when unused
for long periods of time.
16) Refer all servicing to qualified service personnel-- Servicing may be required if the
LCD TV has been damaged in any way, such as power-supply cord or plug is
damaged, liquid has been spilled or objects have fallen into the apparatus, the
apparatus has been exposed to rain or moisture, does not operate normally, or has
been dropped.
1
Page 2

17) Do not expose your LCD TV to dripping or splashing, and no objects filled with
liquids be placed on it.
18) The Shock Hazard Marking and Associated Graphical Symbol are provided on the
back panel of unit.
19) This product is only to perform the useful function of entertainment and visual
display tasks are excluded.
20) Wall or ceiling mounting: When mounting the product on a wall or ceiling, be sure
to install the product according to the method recommended by the manufacturer.
Use only their indicated mounting hardware for safety.
CAUTION: Any damage caused by incorrectly attempting to mount this
LCD TV is not covered under the terms of the manufacturers warranty.
WARNING: To reduce the risk of fire or electric shock, do not expose this
LCD TV to rain or moisture.
According to WEEE regulation, this monitor can't be handled as normal trash in
Europe when it is out of usage. Please refer to the recycle information from our
website to handle it.
2
Page 3

Content
ACCESSORIES ................................................................................................................... 1
FRONT PANEL CONTROL .................................................................................................. 2
BACK PANEL CONTROL .................................................................................................... 3
REMOTE CONTROL ........................................................................................................... 4
Function of remote control button ................................................................................. 5
Teletext function control button ..................................................................................... 6
INSTALLATION .................................................................................................................... 8
Connecting RF antenna, Cable TV Wire or DTV cable ................................................. 8
Connecting to DVD/ Set Top Box .................................................................................. 8
Connecting to the Headphone .................................................................................... 10
Connecting to a Computer .......................................................................................... 11
Connecting with the Power Cord ................................................................................ 11
BASIC OPERATION .......................................................................................................... 12
Power On/Off .............................................................................................................. 12
Selecting input source ................................................................................................ 12
DTV Channel Installation ............................................................................................ 12
Volume Adjust ............................................................................................................. 13
Channel Select ........................................................................................................... 13
Sleep Time Setting ...................................................................................................... 13
Sound Mode Select .................................................................................................... 13
Picture Mode Select .................................................................................................... 13
Aspect Ratio ............................................................................................................... 13
TV AUDIO ................................................................................................................... 13
Subtitle Select ............................................................................................................. 14
DTV/RADIO ................................................................................................................ 14
TV/DTV ....................................................................................................................... 15
INFO ........................................................................................................................... 15
Channel List ................................................................................................................ 15
Favorite List ................................................................................................................ 16
Electronic Program Guide (EPG) ................................................................................ 16
Using the OSD Menu .................................................................................................. 17
ADVANCED OPERATION—OSD MENU .......................................................................... 18
Picture Menu .............................................................................................................. 18
SOUND Menu ............................................................................................................. 21
TIME Menu ................................................................................................................. 22
OPTION Menu ............................................................................................................ 23
LOCK Menu ................................................................................................................ 25
CHANNEL Menu ......................................................................................................... 27
TECHNICAL INFORMATION ............................................................................................. 33
SAFETY PRECAUTIONS .................................................................................................. 34
CARE AND MAINTENANCE ............................................................................................. 35
TROUBLESHOOTING ....................................................................................................... 35
3
Page 4

Page 5

ACCESSORIES
Thank you for purchasing this LCD-TV of high performance!
This LCD-TV package comes with:
LCD TV
User’s Manual
Remote Control
Battery AAA x 2
Power Cord
VGA Cable
RCA A/V Cable
1
Page 6
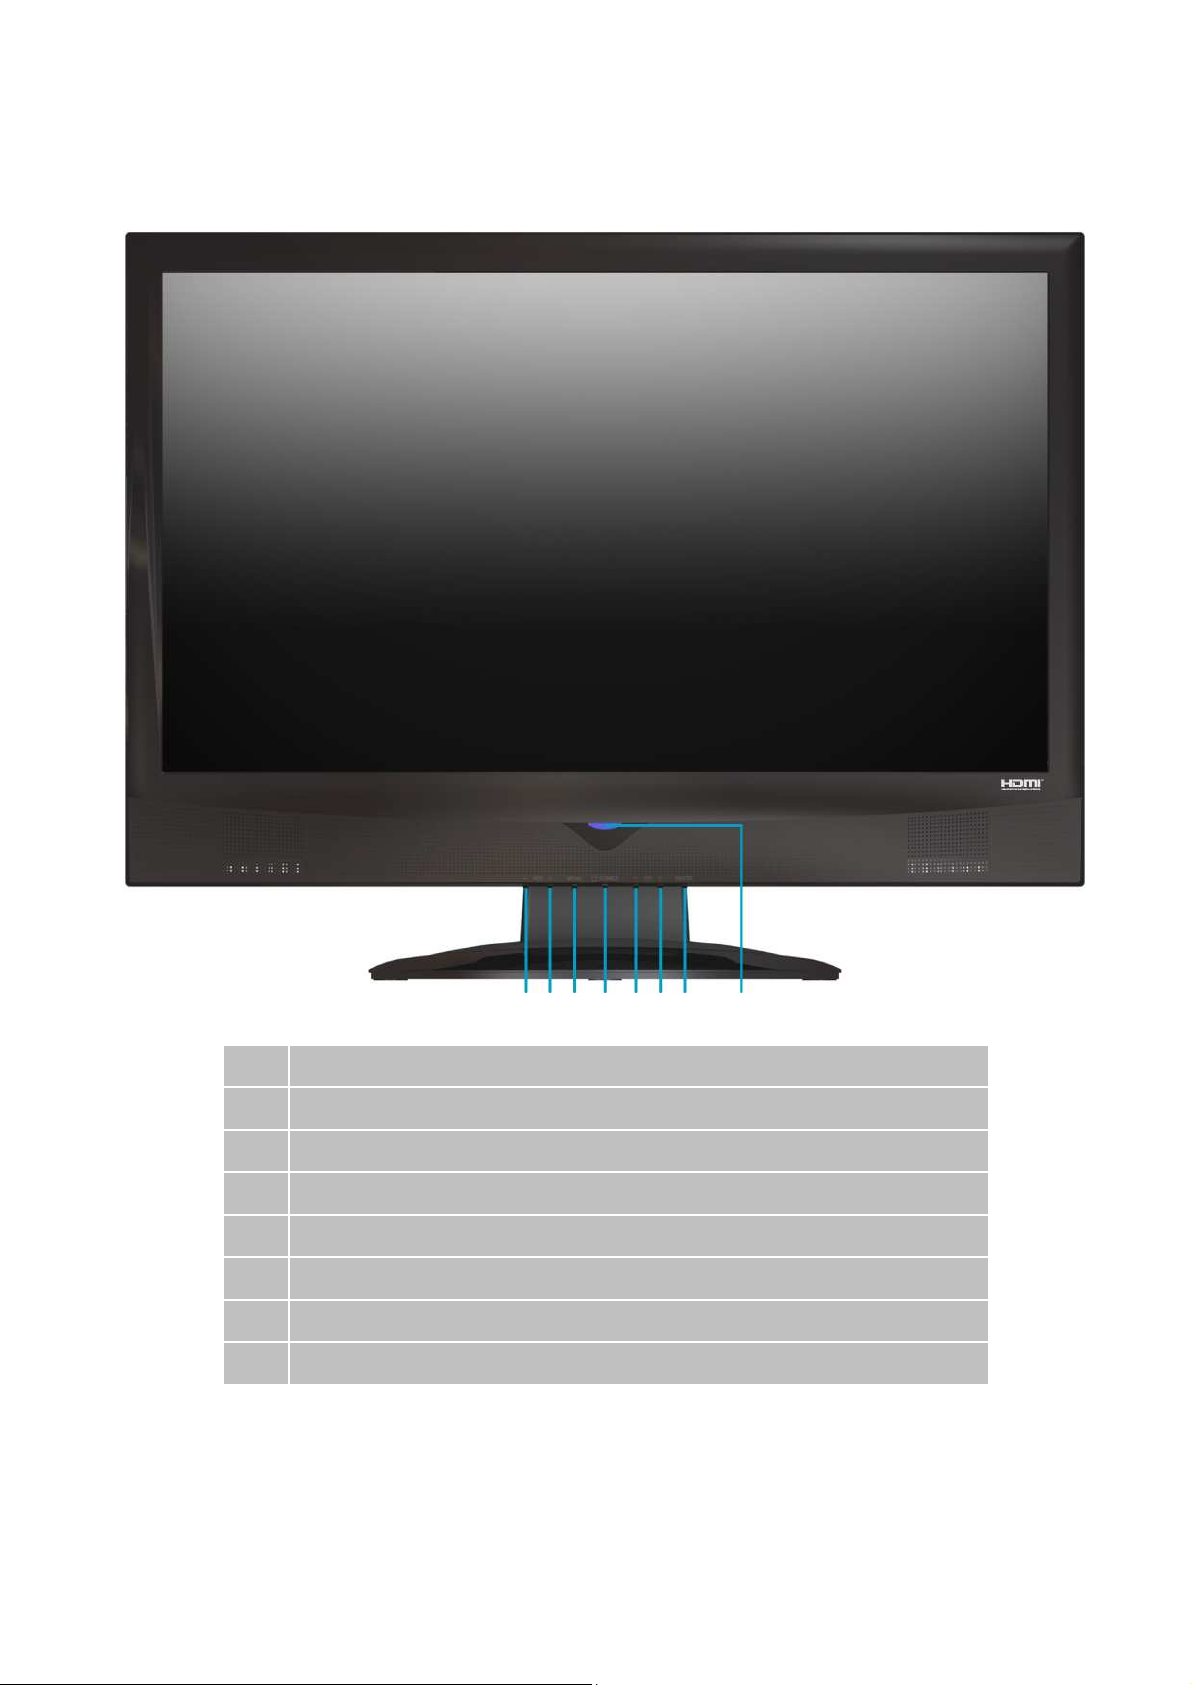
FRONT PANEL CONTROL
Volume Down (Adjust Decreasing)
Volume Up (Adjust Increasing)
On Screen Display Menu Key (Back to Previous Menu)
Power On/Off Switch
Scroll Down (Channel Down)
Scroll Up (Channel Up)
Input Source Selection (Enter)
Power LED Indicator/ Remote Control Receiver
2
Page 7
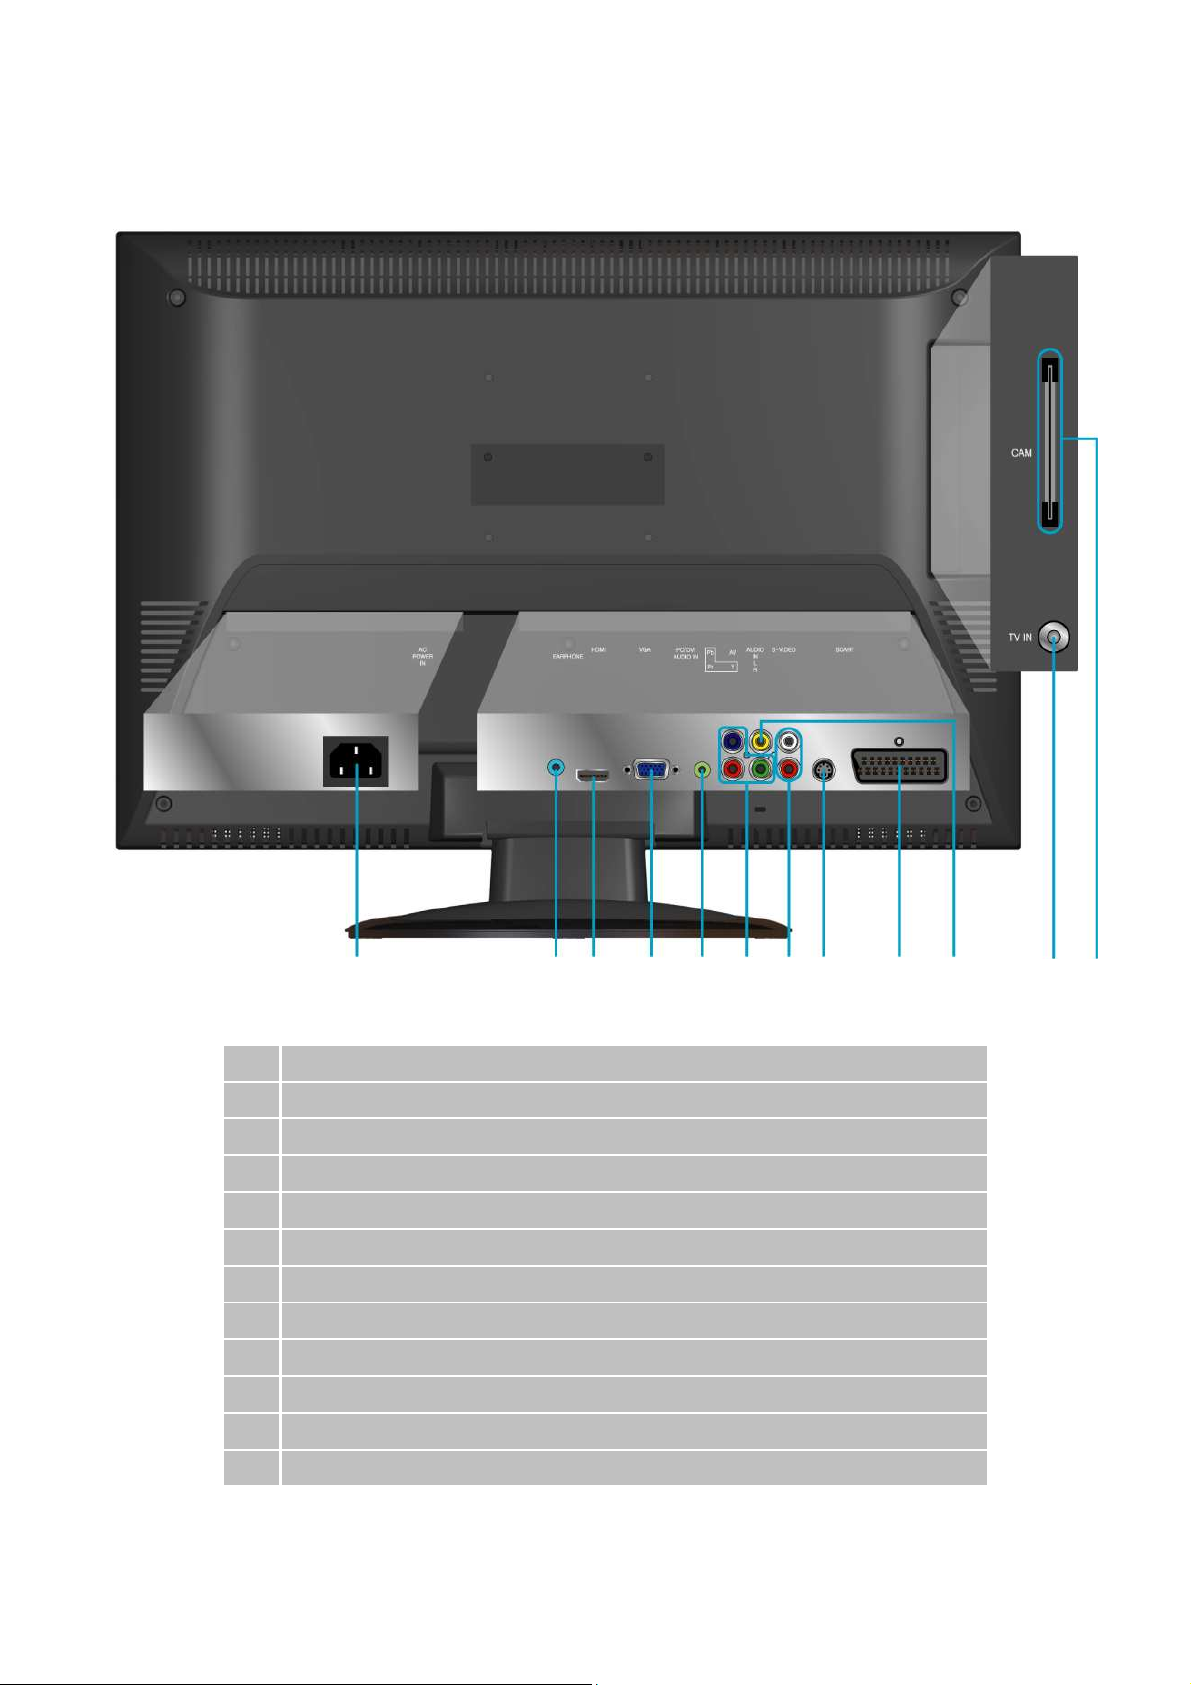
BACK PANEL CONTROL
A
B
C
D E
F
G
H
I J
K
L
A Power Input (AC Input)
B Headphone Jack
C HDMI (support HDCP or PC) Signal Input
D VGA (15 pin) Signal Input from Computer
E Audio Input for VGA or DVI
F YPbPr / HD Component Video Input
G Audio Input for AV, S-Video or YPbPr components (left/ right)
H S-Video Input
I SCART Signal Input
J Composite Video Input
K RF Antenna / Cable TV Input
L CAM Card Slot
3
Page 8
REMOTE CONTROL
4
Page 9

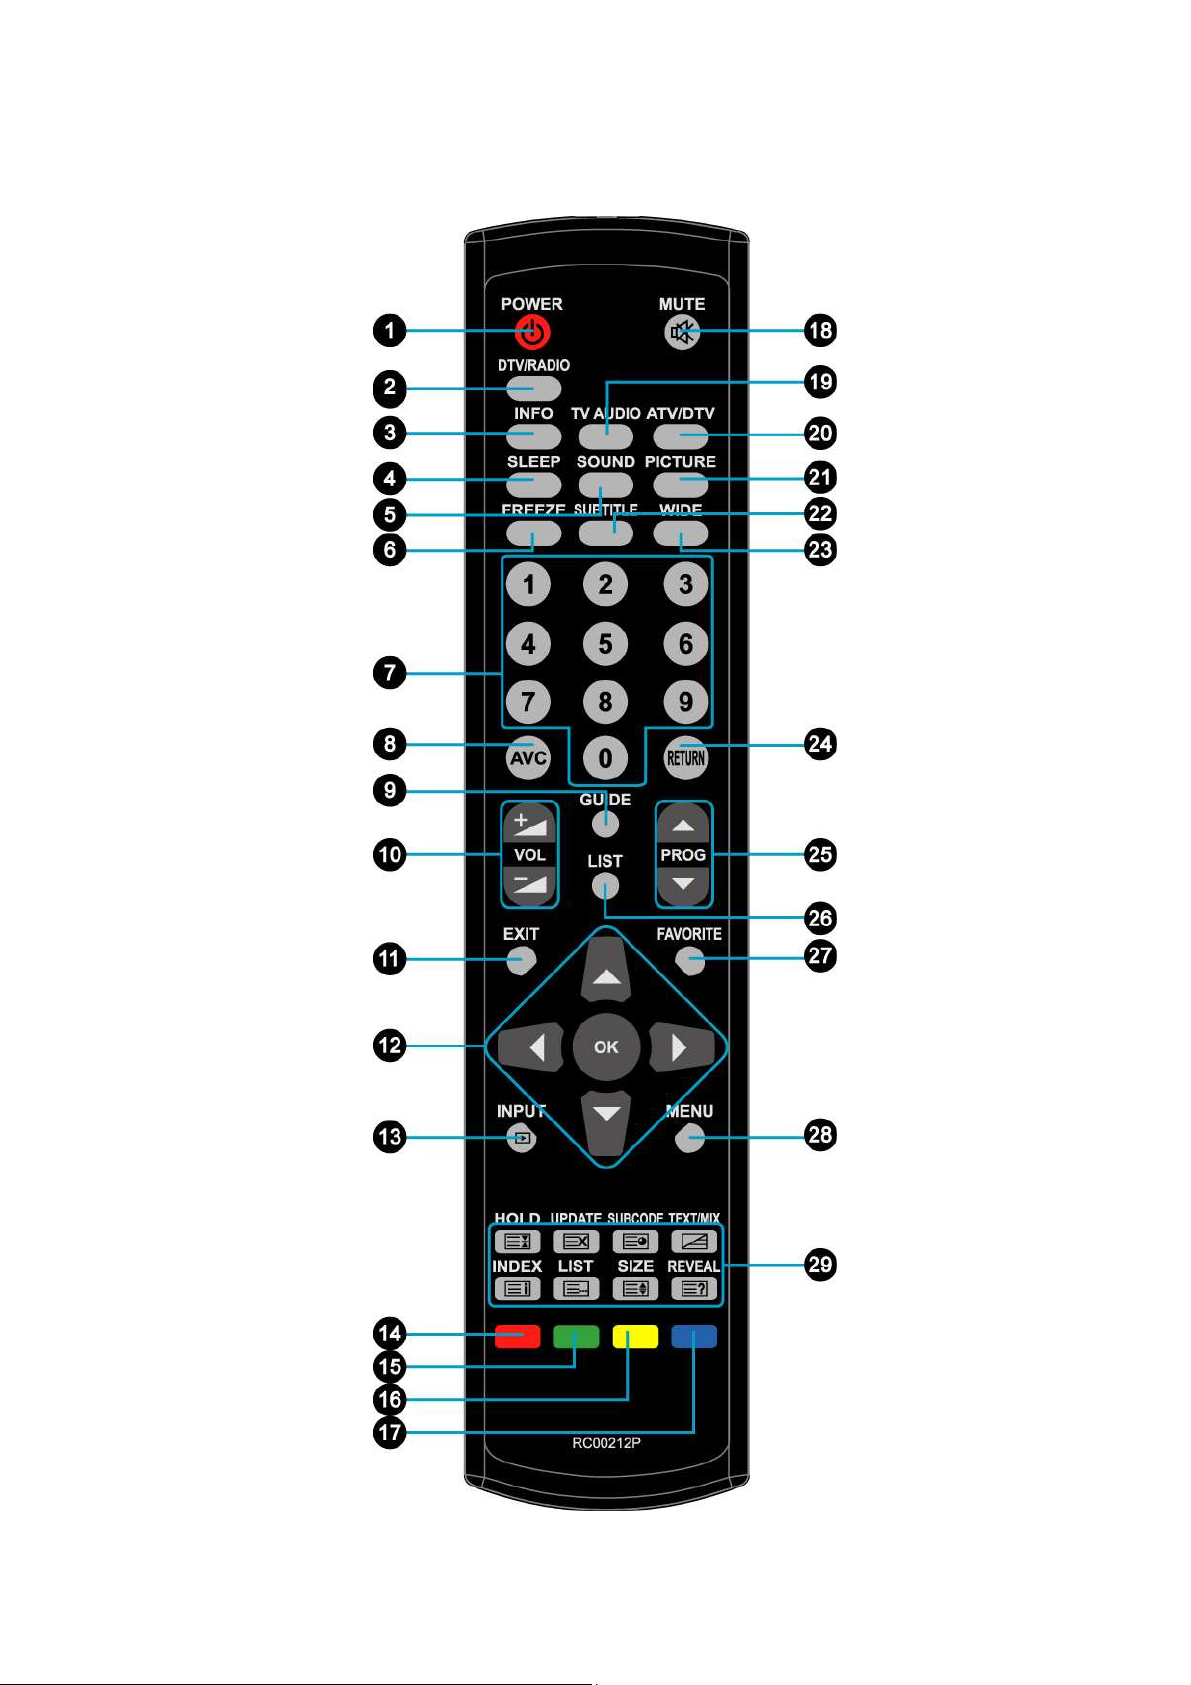
Function of remote control button
, Panorama, Auto, 4:3 or
n different
1 POWER Power ON/OFF
2 DTV/RADIO Digital TV function. Switch between DTV/RADIO programs
3 INFO Display the current information
4 SLEEP Set TV Sleep timer
5 SOUND Reverb Sound effect selections on Standard, Music, Movie, Sports,
and User
6 FREEZE Freeze picture
7 0~9 NUMBER Switch channel number keys
8 AVC The tuner contains automatic volume control circuitry (AVC) to
prevent converter overload
9 GUIDE Select electronic program guide (EPG) on Digital TV
10 VOL UP/ DOWN Adjust volume up or down
11 EXIT OSD exit
12 UP/ DOWN/ LEFT/
RIGHT/ OK
13 INPUT Select input source
14 RED Function key for teletext, program edit, or electric program guide
15 GREEN Function key for teletext, program edit, or electric program guide
16 YELLOW Function key for teletext, program edit, or electric program guide
17 BLUE Function key for teletext, program edit, or electric program guide
18 MUTE Volume mute ON/OFF
19 TV AUDIO Select sound modulation in ATV / Select audio language in DTV
20 ATV/DTV Swap between ATV/DTV. Swap to the last TV source when in other
21 PICTURE Select situation mode for picture
22 SUBTITLE ATV: Switch between available subtitle languages
23 WIDE Adjust image size for Full, Zoom 1, Zoom 2
24 RETURN Return to previous channel
UP/ DOWN/ LEFT/ RIGHT: Select or adjust the function of OSD
OK: Confirm the selection (in OSD menu)
source
DTV: Display subtitle language selection box
UnderScan. It has different image size effect depending o
source
25 PROGRAM UP/ DOWN Select up or down programs
26 LIST Display channel list
27 FAVORITE Display favorite list
28 MENU OSD menu ON/OFF
29 TELETEXT FUNCTION
CONTROL button
5
Please refer to page 6-7
Page 10

Teletext function control button
TEXT/ MIX/ PICTURE button
In TV Mode: Press the TEXT/ MIX/ PICTURE button to enter the Teletext mode.
In TELETEXT Mode: Press the button again to superimpose a Teletext broadcast onto the screen
of current TV program (mixed Mode).
In MIXED Mode: Press the button again to return back to the normal TV Screen (current
program).
SUBCODE button
When a selected Teletext page with hidden sub pages or timed pages, these pages can be seen by
the following manner:
Press the sub code button. Screen will show « /0001 ».
Enter 4 digits number button corresponding to the sub page desired. E.g. 0001 for sub page
number 1.
Wait until the page appears.
UPDATE button
Input a page number, and then press this button. The teletext page will be closed and will show
the update symbol+- on the top left corner. When the update symbol changes to the page number,
it means the page is complete downloaded.
Press this button again to open the teletext page.
HOLD button
Press this button to remove the information from the display and stop the automatic page change
which will occur if a teletext page consists of 2 or more sub pages.
To continue press this button again. The number of sub pages and the sub page displayed is,
usually, shown on the screen below the time. When this button is pressed the stop symbol is
displayed at the left-top corner of the screen and the automatic changing is inhibited.
REVEAL button
Press this button to display concealed information, such as solutions of riddles or puzzles.
Press this button again to remove the information from the display.
6
Page 11

SIZE button
Select double height text under Teletext mode for full screen.
Press this button to enlarge the top half of the page.
Press this button again to enlarge the bottom half of the page.
Press this button again to return to the normal display.
LIST button
Press this button you force the Teletext to LIST Mode. It means that row 24 (bottom row of
Teletext) will not have transmitting information, only the pages that you have previously stored in
the memory.
Press LIST button again to exit from LIST Mode to Teletext.
INDEX button
Press the Index button to return back to index page.
When you press this button in Teletext mode, a CURSOR appears. This cursor (rectangular box)
contains a page number and you can select the desired page simply by using the four colours.
RED button: Move cursor down.
GREEN button: Move cursor up.
YELLOW button: Change from current page to selected page.
BLUE button: Exit the CURSOR Mode.
Note: Please use PROG ▲▼ button to visit previous or next teletext page.
7
Page 12

INSTALLATION
(not supplied)
(not supplied)
Connecting RF antenna, Cable TV Wire or DTV cable
Make sure the power is OFF before installing your LCD TV.
1) ATV: Connect the LCD TV to TV antenna or set-top-box with 75-ohm coaxial cable. Preset the
TV channels into memory with Auto Tuning function (See page 27) when using an antenna or
cable TV system without a cable connecter box.
2) DTV: Connect the LCD TV to an antenna for Digital TV. To receive DTV programs, perform Auto
Tuning function (see page 27) for the first time. To watch subscription channels, insert the CAM
card into the CAM card slot.
RF Cable or Adapter
CAM card
Antenna
Connecting to DVD/ Set Top Box
Connect Video/ Audio cables from compatible devices into the back panel of LCD TV.
1) With RCA A/V cable:
RCA A/V Cable
VCD or DVD Player
8
Page 13

2) With S-Video cable:
S-Video Cable (not supplied)
Audio in Cable
(not supplied)
3) With YPbPr cable:
4) With SCART cable:
VCD or DVD Player
YPbPr Cable (not supplied)
VCD or DVD Player
SCART Cable (not supplied)
Audio in Cable
(not supplied)
VCD or DVD Player
9
Page 14

5) With HDMI cable:
HDMI
-
DVI Cable
(not supplied)
(not supplied)
(not su
pplied)
HDMI Cable (not supplied)
VCD or DVD Player
6) With HDMI to DVI cable:
Audio Cable
VCD or DVD Player
Connecting to the Headphone
Connect the headphone to the headphone output terminal of the LCD TV. (Headphone sold
separately)
Headphone
10
Page 15

Connecting to a Computer
PC
Audio In Cable
(not supplied)
1) VGA (15pin D-Sub): Connect the VGA cable from VGA output of the computer to the VGA
terminal input of your LCD TV. Also, connect the Audio In cable (green) from the audio output of
your computer to the audio input terminal (green) of the LCD TV.
PC
PC Audio In Cable
2)
HDMI-DVI cable
: Connect the HDMI-DVI cable from the DVI output of the computer to the
VGA 15Pin Cable
HDMI terminal input of the LCD TV. Also, connect the green end of the Audio In cable from the
audio output of your computer to the audio input terminal (green) of the LCD TV.
(not supplied)
HDMI to DVI Cable (not supplied)
Connecting with the Power Cord
Connect the power cord to the power cord connector on the back of your LCD TV, and plug the other
end of the power cord into a correctly grounded electrical outlet.
AC power
socket
Power cable
11
Page 16

BASIC OPERATION
Before using the LCD TV:
Connect external equipments properly.
Insert the power plug, and the power LED indicator will light orange.
To operate your LCD TV, you may use the TV remote control or bottom panel buttons to select input
source, change channels, or adjust volume.
Power On/Off
To turn the LCD TV on/off:
Press POWER button on the bottom of LCD TV or press POWER button on your remote control to
turn on/off the TV. The power LED indicator lights blue when the LCD TV is on.
Note:
1. When there is no signal in the PC mode, the power LED indicator lights orange after a few seconds’ idleness.
2. Colour of LED indicator is per brand designed for ON.
Selecting input source
Press the INPUT button on the remote control, and use ▲▼ to select the required input source
between DTV, ATV, SCART, YPbPr, VGA, HDMI, AV, or S-Video, and then press OK to confirm.
DTV Channel Installation
When you set up for DTV channels for the first time, an Installation Guide screen will appear. Follow
the following steps to complete the installation process.
1. When Language is highlighted, use the ◄► buttons to select the language displayed on the
menu.
2. Press ▼ button to select Auto Tuning and press the OK button.
3. Press ◄► to select the Country where you operate the TV, then select Start and press OK. The
Auto Tuning automatically creates a list of receivable channels. Press the EXIT button at any
time to interrupt the channel scanning process. (The list cannot be created if interrupted)
12
Page 17

Volume Adjust
Press VOL+/- to adjust volume.
To turn off the volume, press MUTE.
To restore volume, press MUTE again, or press VOL+/- directly.
Channel Select
Press number buttons or PROG ▲▼ buttons to select the desired channels.
Return to previous channel, press RETURN button.
Sleep Time Setting
Repeatedly press SLEEP key to set the off timer. The function is used to automatically shut off the
LCD TV after a preset period of time passed.
There are several times for choice – Off, 10min, 20min, 30min, 60min, 90min, 120min, 180min and
240min.
To cancel Sleep Time function, choose Off.
Sound Mode Select
Repeatedly press SOUND key to select the sound mode between Standard, Music, Movie, Sports,
and User.
Picture Mode Select
Repeatedly press PICTURE key to select picture mode between Standard, Mild, User, and Dynamic.
Aspect Ratio
Repeatedly press WIDE key to select the aspect ratio of screen. You can select between Full, Zoom1,
Zoom2, Panorama, Auto, or 4:3. When in HDMI source and Over Scan (see page 24) is set to off, the
option of Full will be replaced by UnderScan.
TV AUDIO
Press the TV AUDIO key to display audio channel information and select the Audio Language (in
DTV). In TV, select MTS sound.
13
Page 18

Subtitle Select
Press the SUBTITLE key to select subtitle language. Use ▲ or ▼ button to select subtitle language.
By selecting through the Subtitle key, the setting can only last until the TV is switch off, and will not be
saved. To save the subtitle setting, select from the Subtitle Language in OPTION menu.
DTV/RADIO
Press the DTV/RADIO key to switch between DTV and RADIO programs.
14
Page 19

TV/DTV
Repeatedly press the TV/DTV key to switch between TV/DTV. When pressed in other input source, it
will automatically direct to TV source.
INFO
To display the current information of the LCD TV:
Press INFO, and the banner displays the program No., current time, program name, teletext info, etc.
When in ATV mode, the displayed items may be different.
Note: The favorite channel icon will not be displayed in the channel banner.
Channel List
Press the LIST button and the Channel List will be displayed. Press OK key on the channel you
wish to watch, and you can be directed to that channel immediately.
15
Page 20

Favorite List
Press FAVORITE key to display the favorite channels you’ve added to the FAVORITE LIST. You can
use ▲ or ▼ to select a favorite channel, and then press OK to direct to that channel immediately. To
set up favorite channels, select the Program Edit function in CHANNEL menu.
Electronic Program Guide (EPG)
Press the GUIDE button to display the Electronic Program Guide.
Press the ▲ or ▼ button to scroll up or down the channels, ◄ or ► to change time period. To
change date, press the Yellow key first, and then select date with ◄ or ►. You can also pause at a
channel and press the INFO key to view the detailed program information, or press OK to switch to
that program directly. You can also add a reminder on a program by pressing the Blue button. When
the reminder event is about to start, a window will appear to remind you for watching. To check the
programs you’ve added by Reminder, press the Green key to display the SCHEDULE LIST. To
delete a Reminder, select with ▲ or ▼ and press the Red key. Press the EXIT button to exit
Electronic Program Guide.
16
Page 21

Using the OSD Menu
You are able to use OSD menus to adjust various settings by using your remote control or menu
button on the bottom of the LCD TV.
The basic operation is as following:
•
Press MENU to display OSD menu.
•
Use ◄► to select OSD menu page.
•
Press ▼ to enter the OSD menu page.
•
Use ▲▼ to select the optional item you want to adjust.
•
Press ◄► to adjust levels or select the items.
•
If the item is marked with ►, press ► to display the sub-menu or enable the function.
•
Press MENU again to exit current OSD page.
•
Use RED/GREEN/YELLOW/BLUE button to perform special functions.
17
Page 22

ADVANCED OPERATION—OSD MENU
You can use the OSD menu to adjust various settings for your LCD TV.
Press the MENU button to display the OSD Menu, and use ▲▼ to select the desired OSD menu.
Picture Menu
—To adjust the picture quality
In ATV, DTV, AV, S-Video, SCART, YPbPr, HDMI source:
Note: The LOCK and CHANNEL menu icons are only enabled in ATV and DTV source.
18
Page 23

Note: The LOCK and CHANNEL menu icons are only enabled in ATV and DTV source.
In VGA source:
19
Page 24

Picture Mode: To select picture mode between Standard, Mild, User, and Dynamic. When user is
selected, you can adjust the level of Contrast, Brightness, Colour, Tint, and Sharpness
separately.
Contrast: To adjust contrast of video.
Brightness: To adjust luminance of video.
Colour: To adjust colour.
Tint: To adjust tint level.
Sharpness: To adjust picture sharpness.
Colour Temperature: To select Colour Temperature from Normal, Cool, User, and Warm with
20
Page 25

◄►. When User is selected, you can adjust the level of Red, Green, and Blue separately.
Aspect Ratio: To select image size between Full, Zoom1, Zoom2, Panorama, Auto (auto format
switching), and 4:3 with ◄►. When in HDMI source and Over Scan (see page 24) is set to off,
the option of Full will be replaced by UnderScan, which means full screen without over-scan.
Backlight: Adjusting the backlight brightness.
ACE: Advance contrast enhance. (Off, Low, Standard, High)
Noise Reduction: To reduce the noise level of connected equipment.
Skin Tone: Skin Color adjust. (0-10)
Auto Adjust: To auto adjust picture’s horizontal position, vertical position, fine tune and H-Size.
H-Pos: To adjust the horizontal position of the picture.
V-Pos: To adjust the vertical position of the picture.
Size: To adjust the size of the picture.
Phase: To adjust delay time of phase in order to reduce the noise of picture.
SOUND Menu
—To set the audio quality and status
Note: The LOCK and CHANNEL menu icons are only enabled in ATV and DTV source.
Sound Mode: To select the sound mode between Standard, Music, Movie, Sports, and User.
When User is selected, you can adjust the level of Bass and Treble separately.
Balance: To adjust the left and right audio balance.
Bass: To adjust the bass.
Treble: To adjust the treble.
AVC: To turn on/ off AVC (automatic volume control) function.
Audio Only: To turn off the screen picture but keep the sound on.
21
Page 26

TIME Menu
—To set up time zone
Note: The LOCK and CHANNEL menu icons are only enabled in ATV and DTV source.
Clock: To adjust the current time. Press ► to enter sub-menu. Press ▲▼ to select Date, Month,
Year, Hour and Minute, and press ◄► to set current time. When you complete the adjustment,
move to Close and press OK to save the result.
Off Time: To set a regular turn-off time. Press ► to enter sub-menu. Press ▲▼ to select Repeat,
Hour, Minute, and press ◄► to set the time you want the unit to be turned off.
On Time: To set a regular turn-on time. Press ► to enter sub-menu. Press ▲▼ to select Activate,
Hour, Minute, Volume, Mode, and press ◄► to set the time you want the unit to be turned on.
Sleep Timer: Off, 10min, 20min, 30min, 60min, 90min, 120min, 180min, 240min.
Auto Sleep: If enabled, the TV will automatically turn into sleep mode after 10 minutes if there is
no remote action and no signal received. (OSD menu must be off)
Time Zone: To select the correct Time Zone for your area.
22
Page 27

OPTION Menu
—To adjust OSD setting
Note: When in AV, S-Video, SCART, YPbPr, VGA, HDMI source, some of the optional items will be disabled.
Also, the LOCK and CHANNEL menu icons will be disabled.
23
Page 28

Language: To select the OSD language between English, Spanish, French, Italian, Dutch,
Portuguese, Finnish, Swedish, and German with ◄►.
Audio Languages: Set the primary and secondary audio languages for watching program. (only
available in DTV)
Subtitle Language: Set the primary and secondary subtitle languages for displaying subtitle. (only
available in DTV)
Hearing Impaired: To provide close-captioning function for the hearing impaired, if the program
provides it. (only available in DTV)
Country: To display the country selected in Auto Tuning function.
DCR: To turn on/off the DCR (Dynamic Contrast Ratio) function.
SCART Input: To select SCART Input. (only enabled in SCART source)
OSD Time Out: To automatically shut off the OSD after a preset period of time passed.
Use ◄►to preset the time from 10 to 60 seconds. To keep the OSD on, select OFF.
Canal+: To enable SCART connector to support Canal+ Set Top Box (available in French). For
normal SCART function, please select OFF.
Note: The Canal+ function is available only when the input source is SCART.
HDMI Audio: To select Auto, PC In, HDMI as the audio output source. If Auto is selected, the
optimum source will be automatically selected. Only enabled in HDMI source.
Text Mode: To adjust edge sharpness of HDMI Video mode. Select PC for weaker edge
sharpness, and Video for stronger edge sharpness.
HDMI RGB Range: Selects HDMI RBG Range from Full or Standard.
Over Scan: Turn screen overscan on/off for HDMI video timing.
Memory Recall: To recall factory setting condition. Press ► to recall all settings.
24
Page 29

LOCK Menu
—To set up parental control
It is only active in TV source.
To access the LOCK Menu, enter the 4-digit number password.
The factory default password is 0000.
Lock System: If enabled, a password is required for access to the Auto Tuning, DTV Manual
Tuning, ATV Manual Tuning and Program Edit in Channel menu.
Set Password: To change the password, press ►. Enter the new password, and confirm by
entering it again.
25
Page 30

Block Program: To set the program to be blocked. Press ►. Select the program you want to
block, and press Green key on it. To watch the blocked program, the password is required.
Parental Guidance: To set the rating level of the programs. If the rating of the displayed program
is higher than the rating set in the Parental Guidance, the program will be locked.
26
Page 31

CHANNEL Menu
—To set up for TV
It is only active in TV source.
In ATV source:
In DTV source:
Select: Selects the Auto Tuning range.
Auto Tuning: To automatically preset the channels into TV’s memory. Select the country of your
area with ◄►, select Start, and then press OK to perform Auto Tuning. Kindly suggest you auto
scan all the channels before watching your TV for the first time.
27
Page 32

Note: After auto scanning all the channels, you need not to do it again when turning on your TV next time.
DTV Manual Tuning: Press ◄► to select the channel, then press OK to start scan.
ATV Manual Tuning: Press the ▲▼ to select the items, and press the ◄► button to adjust. See
details in the following sub-options.
♦ Storage to: Press ◄► to select the channel number you want to save to.
♦ System: Press ◄► to select the TV sound system.
28
Page 33

♦ Current CH: Press ◄► to select the current channel.
♦ Search: Press ◄► to search backward/forward.
Press MENU or EXIT to stop the program searching.
♦ Fine-Tune: Press ◄► to fine tuning when the signal level of the current channel is weak.
♦ Skip: Press ◄► to turn on/off the switch of skip. When it’s set to Yes, the current channel will
be skipped when you switch channels by pressing PROG ▲▼ buttons.
When completed, press Red key to save the result.
Note: It is possible to overwrite the Favorite channels by using manual tuning functions.
Program Edit: Press ► to enter Program Edit.
♦
Delete: Press ▲▼ to select a channel, and then press the Red key. Press Red key again to
confirm deletion. The channel you deleted will not be shown when browsing through the
channels with PROG▲▼ keys. To reappear them, use the Auto Tuning function.
♦ Rename: Press ▲▼ to select a channel, and then press the Green key. Use ▲▼◄► to edit
the name. When completed, press Green key again. (This function is only enabled for ATV.)
♦ Move: Press ▲▼ to select a channel, and then press the Yellow key. Select the other
channel you want to exchange place with, and press Yellow key again. (This function is only
enabled for ATV.)
♦ Skip: Press ▲▼ to select a channel, and then press the Blue key. The channel will be
marked with SKIP.
♦ The skipped channel will not be displayed when you browse through the channels with
PROG▲▼ keys. To access the channel, input the channel number with number keys directly.
♦ Favorite: Press ▲▼ to select a channel, and then press FAVORITE key. The channel will be
added to the FAVORITE LIST.
29
Page 34

CI Information: To check the CI information, the CI (CAM) Card must be plugged in. Press ► to
enter CAM Menu.
Note: The OSD is only for illustration and the menu options and screen format will vary according to the
services provider.
The most common seen CI Cards that have been tested so far include VIACCESS (PCMCIA), Magic
Module, Digital Conax, Irdeto Access, ZetaCAM, Irdeto smit, VIACCESS (LG.FT3/3), Boxer (VIACCESS),
NoVEL-TONGFANG, TopUp TV, CANAL+ CANALSAT, Irdeto Access (EpsilonCard), all of which can be
used in this TV.
Consultations: Press OK to check subscription and card information.
30
Page 35

Authorizations: Enter the factory default 4-digit pincode, then press OK. Pincode will vary
according to services provider.
• Maturity rating: Enter the maturity rating you want, then press OK.
• Bolts: Select Maturity rating or Consultations, then press OK to switch between Free and
Locked.
31
Page 36

• Changing PIN code: To change the pincode for entering Authorization menu. Enter your new
pincode and press OK, then repeat again to confirm.
Module information: Press OK to display module information.
32
Page 37

TECHNICAL INFORMATION
LCD Type 23.6” TFT Active Matrix
0.2715 (H) x 0.2715 (V) mm pixel pitch
Colour Filter RGB vertical stripe
Glass surface Anti-Glare
Input signal RGB RGB analog (0.7/1.0 Vp-p, 75 ohms) Separate Sync,
fh: 30-82 kHz, fv:55-76 Hz
RF TV system Antenna - PAL / SECAM and DVB-T
Video 1 composite RCA, 1 S-Video, 1 SCART, 1 HDMI,
1 YPbPr component,
Audio 1 mini-stereo, 1 pair of RCA (L/R) stereo
Compatibility PC Up to 1920 x 1080 Non-interlaced
Resolution Recommended
and supported
Speaker Output 5W x 2
Audio Output
Power Voltage 100-240 VAC, 50/60 Hz (auto switch)
Display area Full Scan 521.28 mm (H) x 293.22 mm (V)
Operating
conditions
Storage condition Temperature -4°F to + 140°F (-15°C to + 60°C)
Dimensions Physical 566.7mm (W) x 442.7mm (H) x 216.0mm (D)
Weight Net 6.9 kg (15.2 Ib)
Regulations CE, CB
Power saving modes On < 65 W (blue LED)
Preset Timing Mode (Pre-adjusted to GTF® 1920 x 1080 @ 60 Hz)
For VGA source only:
The following timing pairs are not distinguishable from each other.
720x400, 640x400, 1440x900, 1152x900, 1680x1050, 1400x1050
If the image is not displayed properly or info is not showing the correct timing, press down Menu and
Channel key at the bottom of the front panel simultaneously to switch to the other timing.
Warning: Do not set the graphics card in your computer to exceed these refresh rates; doing so may
result in permanent damage to the LCD TV
Temperature 32°F to + 104°F ( 0°C to + 40°C)
Humidity 20% to 65% (no condensation)
Altitude To 7,000 feet (2,000m)
Humidity 20% to 90% (no condensation)
Altitude To 40,000 feet (12,000m)
Active Off < 1 W (orange LED)
1920 X 1080 @ 60 Hz
1680 x 1050 @ 60 Hz
1440 x 900 @ 60 Hz
1280 x 1024 @ 60 Hz
1280 x 768 @ 60 Hz
1024 x 768 @ 60, 75 Hz
800 x 600 @ 60, 75 Hz
640 x 480 @ 60, 75 Hz
1 mini-stereo
20.5” (H) x 11.5” (V)
22.3’’ (W) x 17.4’’ (H) x 8.5’’ (D)
33
Page 38

SAFETY PRECAUTIONS
This LCD TV is manufactured and tested on a ground principle that a user’s safety comes first.
However, improper use or installation may result danger to the LCD TV as well as to the user.
Carefully go over the following WARNINGS before installation and keep this guide handy.
Warnings
This LCD TV should be operated only at the correct power sources indicated on the label on the
rear end of the LCD TV. If you are unsure of the power supply in your residence, consult your
local dealer or power company.
Do not try to repair the LCD TV by yourself as it contains no user-serviceable parts. The LCD TV
should be repaired by a qualified technician only.
Do not remove the LCD TV cabinet. There is high-voltage parts inside that may cause electric
shock to human bodies, even when the power cord is disconnected.
Stop using the LCD TV if the cabinet is damaged. Have it checked by a service technician.
Put your LCD TV only in a clean dry environment. Unplug the LCD TV immediately if it gets wet,
and consult your service technician.
Always unplug the LCD TV before cleaning it. Clean the cabinet with a clean dry cloth. Apply
non-ammonia based cleaner onto the cloth, not directly onto the glass screen.
Keep the LCD TV away from magnetic objects, motors, TV sets, and transformer.
Do not place heavy objects on the cable or power cord.
For PLUG CABLE EQUIPMENT, the Socket-outlet shall be installed near the equipment and
shall be easily accessible.
34
Page 39

CARE AND MAINTENANCE
Care
Avoid exposing your LCD TV directly to sunlight or other heat source. Place your LCD TV away
from the sunlight to reduce glare.
Put your LCD TV in a well ventilated area.
Do not place anything heavy on top of your LCD TV.
Make certain your LCD TV is installed in a clean and moisture-free area.
Keep your LCD TV away from magnets, motors, transformers, speakers, and other TV sets.
Safety Tips
If smoke, abnormal noise or odor appears to arise from your LCD TV. Remove the power cord
immediately and call your service center.
CAUTION-Never remove the rear cover of your LCD TV cabinet. The display unit inside contains
high-voltage and may cause electric shock to human bodies.
Never try to repair your LCD TV yourself. Always call your authorized service center or a qualified
technician to fix it.
TROUBLESHOOTING
No Power
Make sure A/C power cord is securely connected to the power supply is firmly connected to the
TV.
Plug another electrical device into the power outlet to verify the outlet is working.
Power on but no screen image
Make sure the video cables are tightly secured.
You have selected the correct video input.
Adjust brightness.
Make sure all cables are installed.
Wrong or abnormal colours
If any colours (red, green, blue) are missing, check the video cable to make sure it is securely
connected. Loose or broken pins in the cable connector could cause an improper connection.
Connect the TV unit to another video source or use another TVs to make sure the video source is
no problem.
35
 Loading...