Anvil 137, 137S User Manual

U-BOLTS & STRAPS
D
C
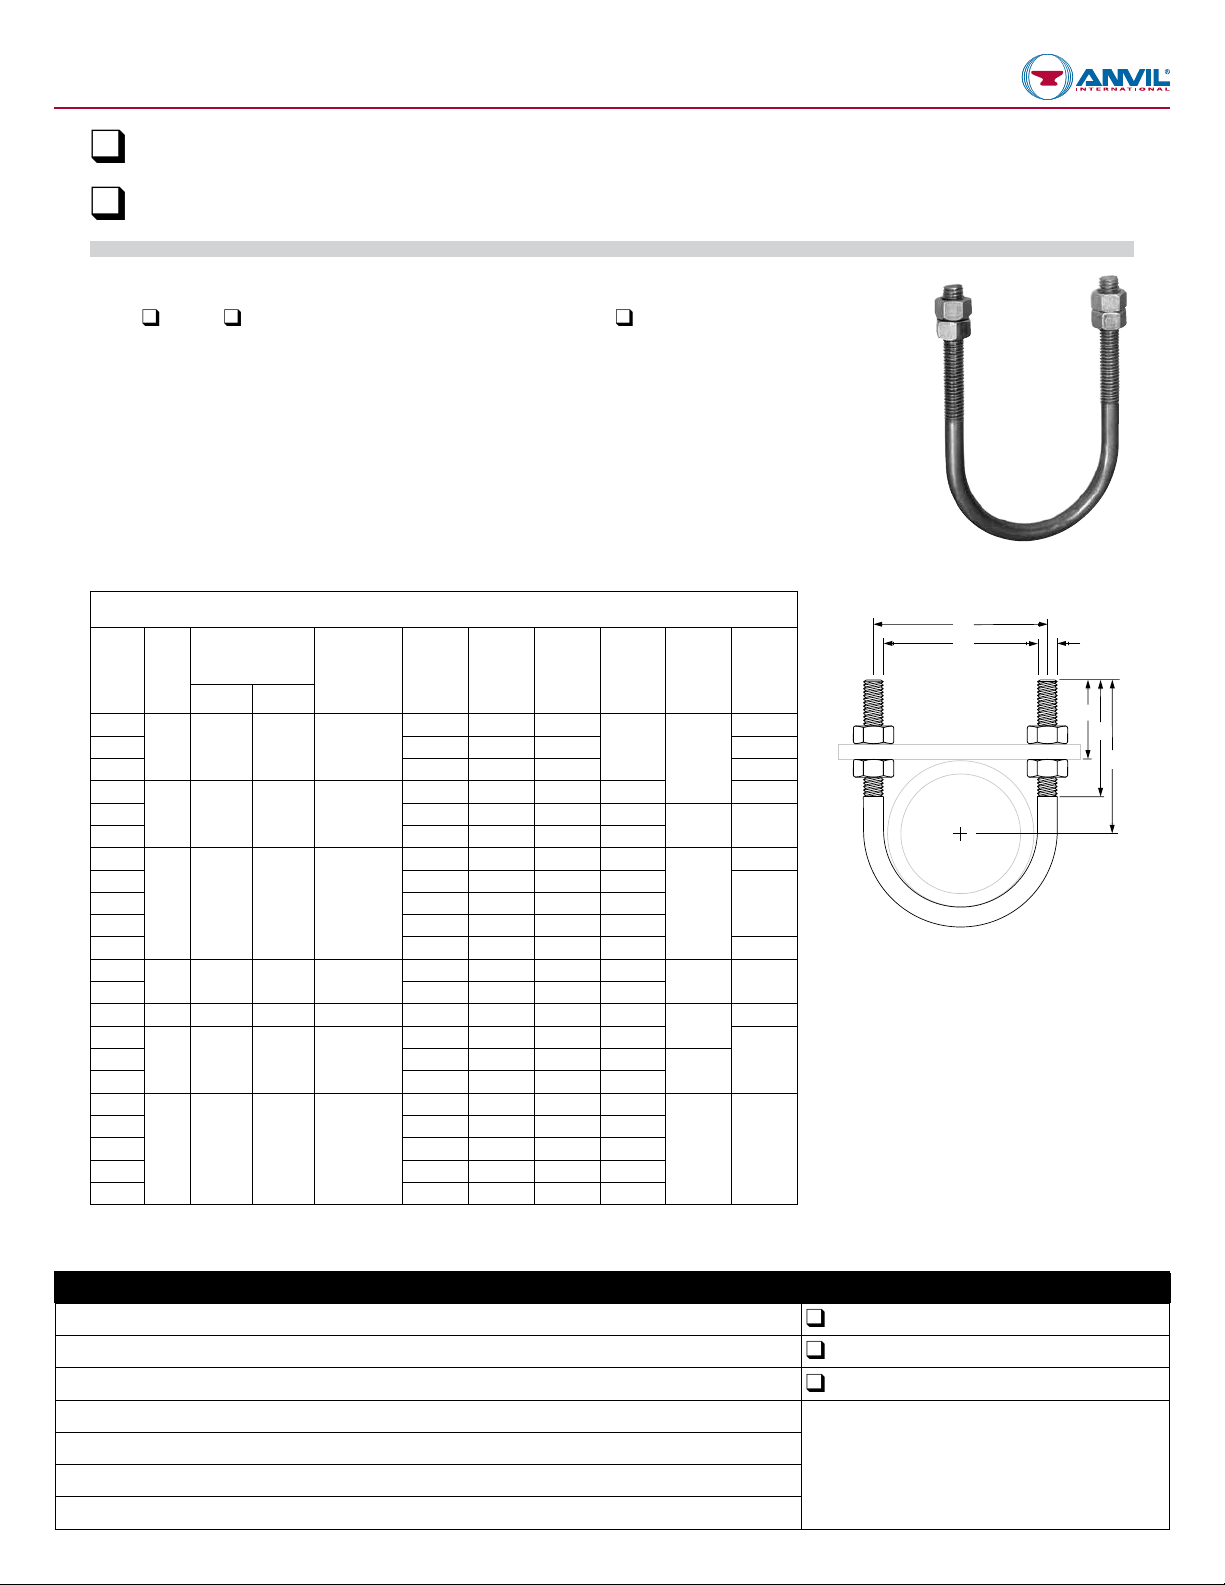
q Fig. 137: Standard U-bolt U-Bolts
q Fig. 137S*: Special U-bolt (non-standard)
Size Range: 1⁄2" through 36"
Material: Carbon steel U-bolt and four finished hex nuts
Finish:
(HDG not available for rod size 1/4". Stanless steel is offered as an alternative.)
Service: Recommended for support, or guide of heavy loads; often employed in power, process plant and
marine service.
Approvals: Complies with Federal Specification A-A-1192A (Type 24),
69 and MSS SP-58 (Type 24).
Ordering Fig. 137: Specify pipe size x rod size (e.g., 6 x
with longer tangents D or with longer threads E if so required and ordered. If hex nuts are not required,
specify “without hex nuts”.
Ordering Fig. 137S: Specify figure number, name, material specification, dimensions A, B, C, D, and E, and
“with hex nuts” or “without hex nuts”.
Note: The acceptability of galvanized coatings at temperatures above 450°F is at the discretion of the end user.
Plain or q Fig. 137: Zinc Plated (Hot-Dip Galvanized optional) or q Fig. 137S: Hot-Dip Galvanized
q
WW-H-171-E (Type 24)
5
⁄8), figure number, name. U-bolt will be furnished
, ANSI/MSS SP-
FIG. 137: DIMENSIONS (IN) • LOADS (LBS) • WEIGHTS (LBS)
Max Normal
Rod
Pipe
Size
Size
n
A
1
⁄2
1
3
⁄4 580 454 145
⁄4 0.12 11⁄8 13⁄8 27⁄32
1 0.12 13⁄8 15⁄8 23⁄32
11⁄4
3
⁄8 1,460 1,144 365
11⁄2 0.30 2 23⁄8 3
2 0.33 27⁄16 213⁄16 31⁄4
21⁄2
3 0.78 39⁄16 41⁄16 4
1
⁄2 2,700 2,114 675
4 0.90 49⁄16 51⁄16 41⁄2
5 1.0 55⁄8 61⁄8 5 27⁄32
6
5
⁄8 4,320 3,382 1,080
8 2.3 83⁄4 93⁄8 71⁄8
103⁄4 6,460 5,060 1,615 4.9 107⁄8 115⁄8 83⁄8
12
7
⁄8 9,960 7,016 2,240
16 9.2 161⁄8 17 111⁄4
18
20 14.6 201⁄8 211⁄8 135⁄8
1 11,800 9,240 –
24 16.9 241⁄8 251⁄8 155⁄8
30 19.1 301⁄8 311⁄8 185⁄8
36 23.2 361⁄8 371⁄8 215⁄8
Loads, weights and dimensions shown do not apply for Fig. 137S. Max load rating for carbon steel is based on 2 x
load rating for rod. Max load rating for stainless steel is 0.85 times the maximum stated load ratings listed above.
Load
650˚ F 750˚ F
650° F
Max Side
Load
Wt. B C D E F
0.11
0.28 111⁄16 21⁄16 27⁄8 21⁄32
0.73 215⁄16 37⁄16 33⁄4
2.0 63⁄4 73⁄8 61⁄8
7.7 127⁄8 133⁄4 95⁄8
13.5 181⁄8 191⁄8 125⁄8
15
⁄16 13⁄16
23⁄4
21⁄8
21⁄2 21⁄16
3
31⁄2 213⁄16
4
41⁄4
43⁄4 35⁄8
n
25⁄16
25⁄16
21⁄431⁄2 0.84 41⁄16 49⁄16 41⁄4
3
31⁄414 8.3 141⁄8 15 101⁄4
B
C
L
*When the combination of a normal load and
a side load occurs, a straight line interaction
formula may be used to determine if the Fig. 137
is still within the allowable stress range:
Pn/Pna + Ps/Psa ≤ 1
Where:
Pn = actual applied normal load;
Pna = allowable normal load for the Fig. 137;
Ps = actual applied side load;
Psa = allowable side load for the Fig. 137
Nuts must be snug tight in installation to
achieve side loads shown.
A
F
E
Project:
Address:
Contractor:
Engineer: Remarks:
Submittal Date:
Notes 1:
Notes 2:
PH-1.18
PROJECT INFORMATION APPROVAL STAMP
Approved
q
Approved as noted
q
Not approved
q
 Loading...