

Page 1
W-508 & W-510 Fog Machine
User Manual
Pl ea se read and save these instructions.
©2 009 Antari Lighting and Effects Ltd.
Page 2

Page> 01 Page> 11 Page> 22 Page> 32
Page 3

User Manual
W-508 & W-510 Fog Machine
Co ngratulations on the purchase of you r new
AN TARI W-S eri es FO G MAC HIN E.
Introduction
Th ank you f or choo sin g an Anta ri W-Series Fog Ma chine. You no w own a r ugged
and power ful state- of-th e-art m achine. Pr ior to use, we s ugges t tha t you
ca reful ly read all of t he instruc tions. By fo llowing th e suggesti ons found in t his
us er manu al, you c an lo ok forw ard to the rel iable and sa tisfa cto ry perf orm ance
of you r Ant ari Fog Machin e for yea rs to come.
Pl ease fo llo w these o perat ion, safet y and mai nte nance i nst ructi ons t o ensur e a
lo ng and sa fe life for yo ur fog ma chi ne.
Ri sk of Ele ctr ic Shoc k. Di sconn ect the appl iance from t he electri c
su pply be for e refil lin g liqui d, cl eanin g or pe rform ing mainte nance on
CA UTION
th e machi ne.
Danger of Electri c Shock
Keep this dev ice dry.
For in side us e onl y. No t designed f or outside u se.
For al l model s, us e a 3-pro ng gr ounde d ele ctric al ou tlet on ly. Prio r to use take
ca re to det ermine tha t the unit is in stalled at t he rate d volta ge.
Al ways unplug yo ur Anta ri W-Series Fog Ma chine befo re filling i ts tank.
Al ways keep t he fog machi ne in uprigh t position .
Turn of f or unpl ug the machi ne when not in u se.
Th is mach ine i s not wat er-pr oof. I f moist ure , water, or f og flui d get s inside
th e housi ng, immedi ately unpl ug the unit an d contact a se rvice tech nician or
your Anta ri deal er be fore us ing i t again .
No user ser viceable p arts insid e. Refe r to your A ntari deal er or oth er qu alifi ed
se rvice p ersonnel .
Danger of B urns
-0 1-
Page 4
Th is devi ce is for adul t use only and m ust be insta lled out of th e reach of
ch ildre n. Ne ver leave t he un it runn ing u natte nded.
Ne ver aim t he outp ut no zzle di rec tly at pe opl e.
Fog ma chine o utp ut is ver y hot. Avoi d com ing wit hin 5 0 cm of the o utput
no zzle du rin g operation.
Lo cate th e fog machin e in a well-vent ilated are a. Neve r cover t he unit's
vents. In o rder to g uaran tee adequa te vent ila tion, a llo w a free ai r spa ce of at
le ast 20 cm a round the si des and top of t he unit.
Ne ver aim t he outp ut no zzle at o pen f lames .
If the powe r cord is dama ged, it must b e replaced b y the man ufa cture r or it s
se rvice a gent or simi larly qual ifi ed pers onnel in ord er to avo id a hazard.
Th e outpu t noz zle bec omes ve ry ho t durin g ope ra tio n (200° C). Keep
fl ammab le materia ls at least 50 c m away fr om the no zzl e.
Al ways allow you r Antar i Fo g Mac hine to c ool d own bef ore a ttemp tin g to clea n
or servic e it.
Danger of E xplosion
Ne ver add f lamma ble l iquid s of any kind (s uch as oil, ga s, perfume ) to the fo g
li quid.
Us e only hi gh- quali ty, water- based fog li quid that your deal er recomme nds.
Ot her fog l iquids may c ause cl ogg ing or “s pit ting”.
Al ways make s ure there is s ufficien t liquid in th e tank. Operating t his unit
wi thout l iqu id will c aus e damag e to th e pump as w ell as over-he ati ng of the
heater.
If you r Ant ari W-508 or W-510 Fog M achine fai ls to work pro perly, discon tin ue
us e immed iately. Drain all fog li qui d from th e tank, pack t he unit secu rely
(p referably in t he origina l packing ma terial), a nd return it t o your An tari
de aler fo r service.
Al ways drai n the tank bef ore shi ppi ng or tra nspor tin g this un it.
Ne ver dri nk fog li qui d. If it is i nge sted, c all a d octor i mme diate ly. If fog l iquid
co mes in co ntact with s kin or eyes, r inse th oro ughly w ith water.
No te: Pay attention to all warning labels and instructions printed on the
exterior of your Antari Fog Machine.
Unpacking & Inspection
Op en the shippi ng carton and verify that all equipment necessary to
op erate the system has arrived i nta ct.
Th e shi ppi ng ca rto n sho uld c ont ain t he follo win g ite ms:
1. On e uni t of W-50 8 or W-510 Fog Machine
2. Powe r cor d
3. On e set of W- 1 Transmitter
-0 2-
Page 5

4. Us er manual
5. Mo unt ing b racke t wit h washers/screws (optional for W-5 10)
If a ny eq uipment is miss ing c ont act y our ANTARI d eal er
im med iately.
Before beginning your initial setup on the Antari W-508 or W-5 10 Fog
Machi ne, make sure that there is no evident damage caused by
transportation. In the event t hat t he un it' s hou sin g or ca ble i s dam age d,
do not plug it in and do not attempt to use it until after contacting your
Antari dealer for assistance.
Setup
Remove a ll pa cking m ate rials f rom the ship ping box. Ch eck tha t all f oam and
pl astic p add ing is re moved , especial ly in the nozz le area.
Pl ace the f og machine o n a flat surfa ce and remove th e fog l iquid t ank c ap.
Pl ace the l iqu id tube i nto a proper ly filled li qui d tank.
Fi ll with h igh -qual ity, water-based fog l iquid reco mmended by your Ant ari
de aler. The W-5 08 & W-51 0 only wo rk wi th unco nta minat ed An tari FL R or FLG
Fog Li quid. A ny other typ es of liq uid c an dama ge the unit an d result in
sp ittin g and s eriou s clo gging p rob lems. W hen filled , pla ce the ca p back on
li quid th e tan k. Be car eful not to ex ceed th e maximum fl uid level. D O NOT
OV ERFIL L.
Operation
Ad d fluid c arefully t o the liquid t ank. Do not overfil l the tank.
Pl ug the po wer cord int o a grounded e lectrica l outlet. Turn th e power swit ch
to “ON” on th e back of the ma chine. The warm-u p process is s tarted. Wh ile
th e unit is w armin g up, fog o utp ut will n ot be p ossib le yet. When t he warm -up
pr ocess i s com plete d, the red LED o n the handle o f the W-508 or the g reen
LE D on the re ar of the W-510 wi ll be flashi ng and stay on .
No w pleas e refer to cha pter “Wire less Re mote W-1” f or se tting t he re mote
co ntrol ler.
Im porta nt:
Al ways monitor t ank fluid le vel as yo u are fog gin g.
Ne ver dri nk fog li qui d. If it is i nge sted, c all a d octor i mme diate ly. If fog
li quid co mes i n conta ct wi th skin o r eyes, r ins e thoro ugh ly with w ater.
Al ways replace t he cap on the fo g liquid con tainer imm ediately a fter filli ng
to avo id contami nation.
W- 510: If your mod el include s a mounting b ra cket it can be s uspended
over head. It is im portant th at the fog doe s not shoot di rectly at
anyo ne's face. D o not allow th e unit to have mor e tha n a 25 degr ee
angle of in cli natio n.
-0 3-
Page 6
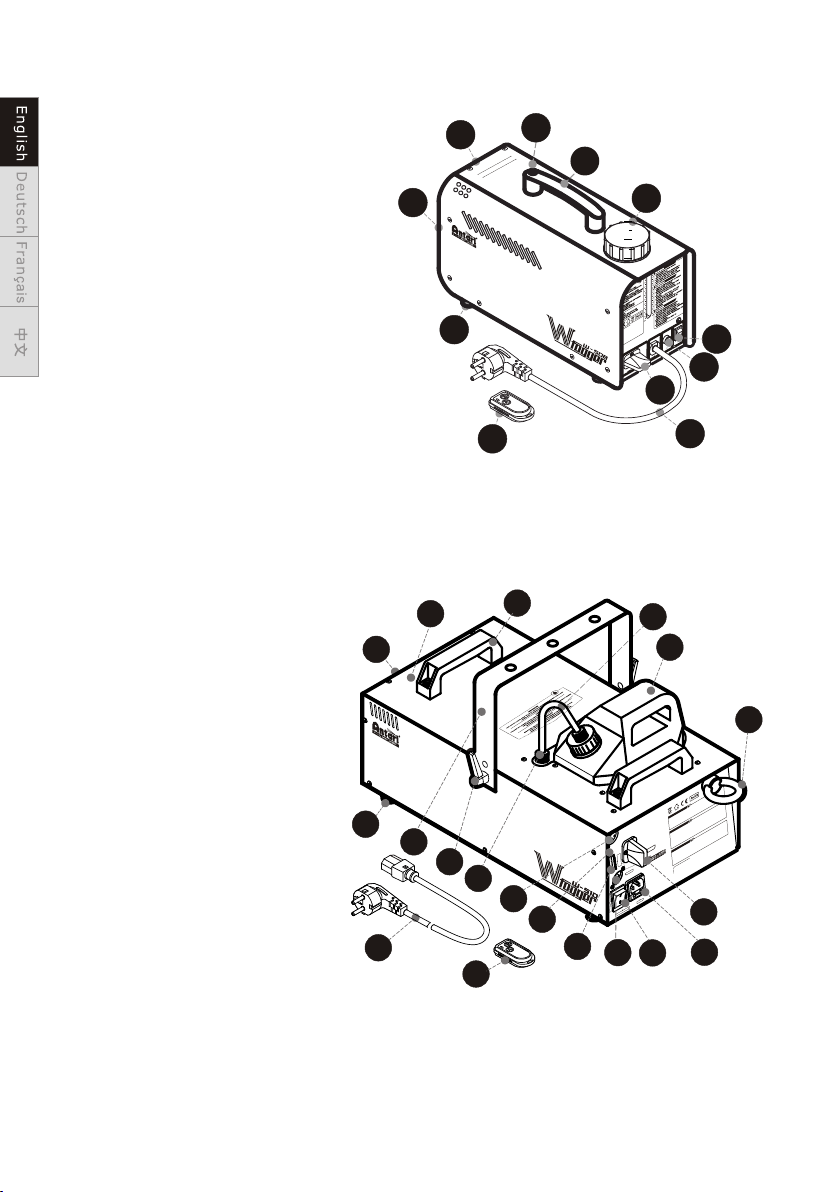
W-508 External Vi ew
01-Nozz le
02-Body
03-Hand le
04-Hand le pu sh butt on
05-Tank ca p & tank
06-Rocker s witch / Power
07-Fuse h old er
08-Power co rd
09-W ireless re ceive r
10-Foot
11-W-1 w ireless co ntroller
01
02
10
04
E
NC
0C
TA
IS
E 5
D
ZHOT
D
ZLE!
NING
T!
O
R
D E
CM
R!
INS
N
H
N
A
F
WA
T 50
MO
ULAN
M
AS
GE
À
BR
S
TEN.
R
L
C
G
A
E
N
CM ABSTA
B
H
AT LE
0
E
P
OCHE
E
5
NNU
S
E
K
N
PPR
R DÜ
E
R
EBRE
V
N D
DEST
PAS A
O
E
IN
V
N
M
03
05
F
OF
06
ON /
E
S
FU
07
09
W-510 External Vi ew
01-Nozz le
02-Body
03-Hand le
04-Tank & ta nk’s cap
05-PU tub e & filter
06-Tube adapt or
07-Cont rol o utlet s ocket
(3 Pin XLR fo r DMX)
08-Cont rol i nlet so cket
(3 Pin XLR fo r DMX)
09-Rocker s witch / Power
10-Power in let s ocker &
fusehol der
(120VAC 250 V/T10A)
(230VAC 250 V/T5A)
11-Power la mp
12-DIP sw itc h
13-W irele ss re ceive r
14-S afe ty ring
15-Power co rd
16-Foot
17-Tight ening scre w
18-Hang ing bra cket
19-W-1 Wireless c ontrolle r
16
01
15
18
02
17
06
19
11
03
07
11
12
W
SGN
I
R
LS
E
A
L
S
/
I
G
D XE
HTIL
M
O
N
OF
F
08
08
05
04
14
E.
S• DI
N
EIL.
UID.
QDO NO
!
ER BEFORECHANGI G FU
S
W
DULTES.
N
PO
IDE.
T
C .
HOUTLI
X LOS
EC
U
S S
KEEP DRY.
TH ADULT UPERV ISIO N.
.
I
O
WA GRNI
LOCA
C NN
S
ON
LY
E DÉBRANCHER L'APPAR
BLE PART IN
E
OPERATE WIT
T
E S
C
UE ONLY W
U
• S
QUIDE.
S
L
NID U
I
SERVI
I
•
EA
T
R
NS
PLOI DANS DES
ER
A
O
EM
• F
A N
C
PS DE PARTIES NÉCE SSITA T
NOU
N
R UN
• S
ION!
U
N
T
IENT
MPLA EMEN DU F SIBL
I R A• N'UTILISE
E
EN
TREN E .
Z
ISER L' PAREIL S
JAMAS L'APPAR EIL SANS SU VEIL LANCE DES
AC
L AP
T
ATTEN
Z
NET
V
ERW HS EN
A
I
AS UTI
V
• ANT LE R
OM
H É.
A ÉTÉ CONÇU PO
M
L
I
A
J
AP
HT VON
S
Ü N N
• NE
.
EL ALL
AUFIC
• L'APPARE
S POLIG
EN
E SCHTZE .
ETI
PROTÉGER DE L' UMIDI
ÄS
R
E
S
R
• L'INTÉRIEUR DE L' PAREIL NE CONT
O N S
!
N
R UNTR DER
.
G
U ENT
N
RUNGWECH
EN.
E
H
S
ST N
I U
H
GERÄT I NEREN.
R
D BET B
D SI
WIRELES
IM
VEWENDEN V
EM CE
AC TUN
DIEN N
RECEIVER
E U G
TEILE
E
• VOR
I B
DE
DEN
D
DIP W
MX-51
S IT
2
CH
WE
PO
S ONE UI REI
•
ENR MEN
GESA
TEN
TTT T.
MAL H FL
E
IN
I
N N ÄU
RI
• N
U
•
KEINE ZU WAR
•
N
I
DMX
T
I
RNPU
WE
O
P
S
FUE
IT
R SW CH
09
13
10
-0 4-
Page 7
No te: An op toelectr onic (OPTO) li quid senso r is install ed in the W-508 & W-
510 Fo g Machi ne. T he pump w ill a utoma tic ally st op wo rking a nd th e
LE D indic ato r on the re ar of the mach ine will sta rt to flash wh en there
is i nsuff ici ent liq uid . Pleas e ref ill liq uid t o the emp ty tank and re start
(t urn off t hen turn on) t o disengag e the LED indi cator. Th en the
machine i s ready to ope rate ag ain.
If you e xperienc e low ou tput, pum p noise or no out put a t all, u nplug
im media tel y. Che ck the fl uid level, t he exter nal fuse, and po wer fr om the
wall. If all of the above appears to b e O. K., p lug the unit agai n. I f fo g do es
no t com e out af ter holding th e remote bu tton dow n for 30 se conds, check
th e hose attached to the tan k to ma ke sur e there is fluid goi ng thr oug h the
ho se. If you are unable to de termi ne the cause of the problem , do not
si mply continue pu shi ng th e remote bu tto n, as th is may d amage the u nit.
Retu rn the ma chi ne to you r Antari dea ler.
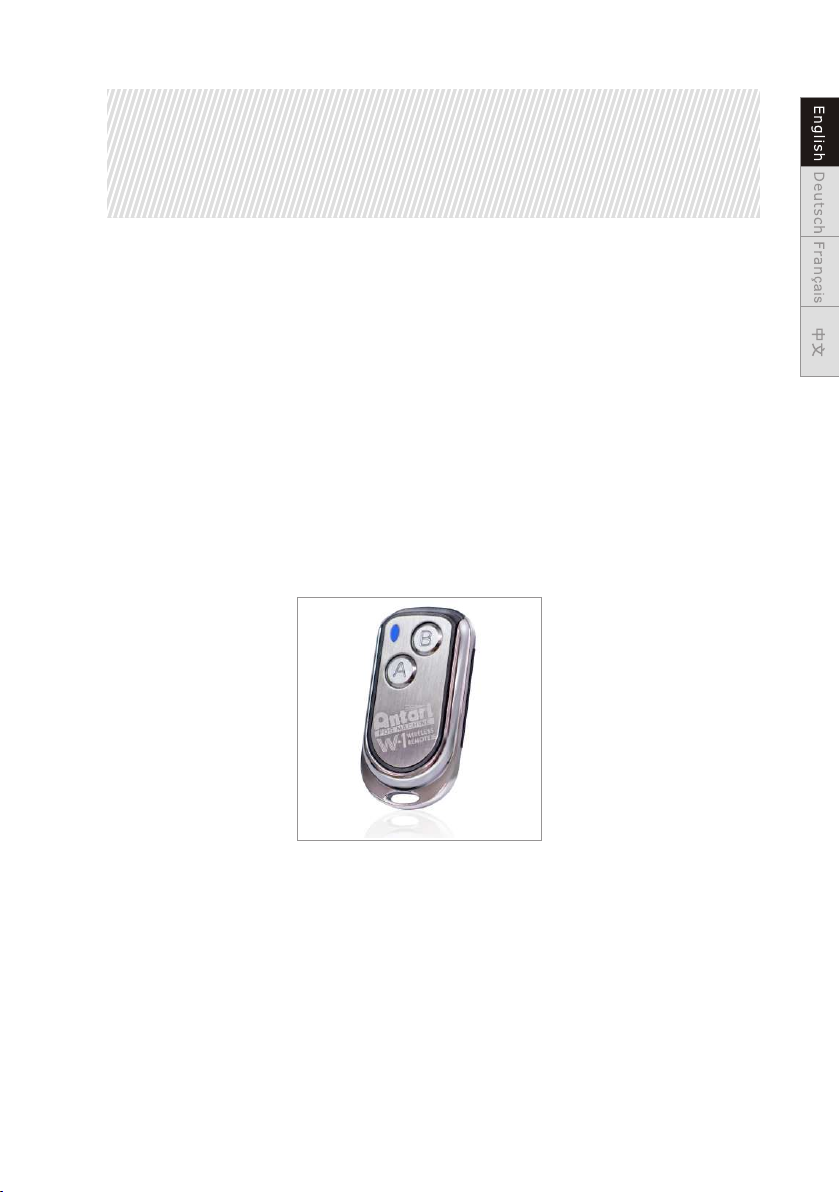
W-1 Wireless Remo te
Th e wirel ess r emote c ontrol sys tem W-1 c onsis ts of a t ra nsmitter e quipped
wi th two bu tto ns for fo g on and off, and a r ece iver pr e-att ached to the r ear
pa nel of ea ch W-se ries mo del .
* Tr ansmi tter:
Wi th the transmi tter it is pos sible to emi t fog via radio ov er a dist anc e of up to
50 meters . The tra nsmitter i s compatib le to any r eceiver of t he W-seri es an d
ca n contr ol an unlimi ted number o f machines i n paral lel.
Pr ess the b utton “A”, to emi t fog. As cont rol, the blu e LED lights . To stop the fo g
ou tput, p ress the but ton “B”.
-0 5-
Page 8

* Re ceive r:
Th e recei ver is te ste d and pre -attache d to the rear pa nel of ea ch W-se ries
mo del. Pl eas e do not tr y to remove it. The rec eiver r esponds to u p to 5
di ffere nt tran smitters t hat are regi stered wit h the machin e. The inclu ded
tran smitter ha s been regis tered with t he machine b efore ship ment. It can b e
di rectl y ope ra ted withou t any sta rt-up s etting.
Registering tra nsmitters
To operat e the mac hine with a di fferent transmi tter than th e included o ne, or
to operate it with u p to 5 differe nt tran smitt ers , each transmi tter must be
registe red first. T here is an LED i ndicator o n each machi ne. On the W-508 i t is
gr een and o n the W-5 10 it is orange. W hen the mach ine is turne d on, the LED
wi ll be fla shi ng for 15 s econds. Du ring the 15- second int erval , users c an
registe r sig nals fo r one or more transmi tters. For thi s purpose, p ress the
bu tton “A” on ea ch transmitt er. If the regis tering sig nals of the transmi tters
are well re ceived by th e recei ver, the LE D wil l stop fl ash ing and l igh t
pe rmane ntly. Th e previ ous t ra nsm itter s are cleare d from the mem ory of the
receive r. If no transmitt er is regist ered when th e machine is s witched on , the
memory of t he receive r will ke ep the recor d of the pr evi ous ope ratio n.
Se tting E xampl e 1:
In order to r egister se veral tra nsmitter s with a machi ne, turn on th e machine.
Wh ile the L ED is flashi ng, press th e button “A” o n eac h transmitte r to establi sh
th e signa l trans mission.
Se tting E xampl e 2:
In order to u se 1 tran smitter to c ontrol 2 or mo re mach ine s, turn o n the
machine s at the same ti me. While th e LEDs are fla shing, pre ss the butto n “A”
on the transmitt er to establ ish the sign al tran smission .
Battery change on t he tran smitter
If the range of the tran smi tter de cre ases, t he ba ttery i s pro bably e xhausted
-0 6-
Page 9

and must be r eplaced. For t his p urpos e, ta ke o ff th e housi ng cove r and remove
th e used ba ttery. Insert a f res h 12 V batt ery, type 23A as in dicated in t he
ba ttery c ompartme nt and refit t he housing c over.
W-510 DMX512 Fog Ma chine Settings
Ch annel A
0 - 5 = off (no out put)
6 - 255 = maxim um volu me (1 00 % outp ut)
Mo del W-510 h as on -boar d DMX c ontro l, mo del W-508 d oes n ot. Add res sing is
vi a DIP swi tches. W-510 u ses 1 c hanne l to control o n/o ff operation . The
ch annel h as a valu e ra nge o f 0 to 255. T he on/off fu nction can a lso be
pr ogrammed wit h a DMX contro ller or a DMX co ntrol soft ware us ed by the
li ghtin g and e ffect s opera tor.
If c hanne l A has a val ue fr om 0 t o 5, th e un it is o ff.
Be tween t he valu es 6 to 255 t he ma ch ine h as a maxi mum out put vol ume
of 1 00 %.
No te: If, for exa mple, t he ma chine i s ass igned t o the D MX addr ess 130, cha nnel
A corresp onds to DMX ad dress 130.
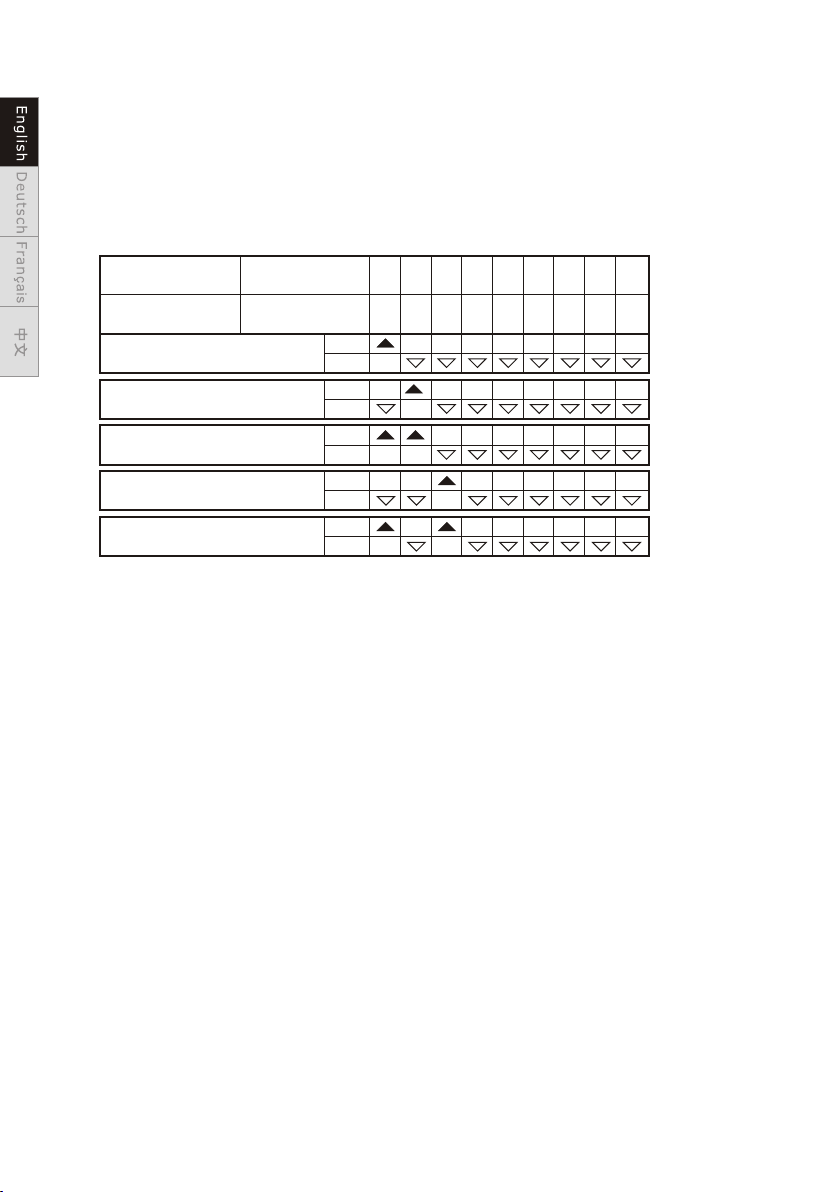
Addressing
Ea ch mach ine occupi es 1 channel . To en sure th at th e contr ol si gnals a re
pr operl y dir ected t o the machin e, it requir es address ing. If seve ra l machines
are used, e ach machin e must be addr essed by cha nging the DI P switches a s set
ou t in the ta ble below.
Th e start ing addres s is defined a s the first ch annel from w hich the mac hine will
respond t o the contro ller.
-0 7-
Page 10
Pl ease ma ke sure t hat you do not h ave any ove rlapp ing c hanne ls in o rder to
co ntrol e ach machin e correctl y and indepe ndently fr om any ot her fixtur e on the
DMX data li nk. If two, three or mo re devices a re address ed similar ly, they will
wo rk simi lar ly.
Oc cupat ion of th e DIP swi tch es :
Setting the DMXstarting address:
Device number
& channels
Device 1 - Channel 1
Device 2 - Channel 2
Device 3 - Channel 3
Device 4 - Channel 4
Device 5 - Channel 5
DIP-switch no.
Starting address
ON
OFF
ON
OFF
ON
OFF
ON
OFF
ON
OFF
112234485166327648
1289256
Performance Not e
Al l fog mac hines deve lop con den satio n aro und the o utp ut nozz le. B ecaus e thi s
may resul t in some mois ture ac cum ulati on on t he surf ace b elow th e out put
no zzle, c ons ider th is co ndens ati on when i nst allin g your unit.
Al l fog mac hines may sp utter s mal l amoun ts of f og occa sio nally d uri ng
op eration and fo r a minute or so a fter being t urned o ff.
Al l fog mac hines have a recycling per iod after lo ng bursts wh en the machi ne
wi ll shut i tse lf down f or a short per iod in order t o heat up agai n. During th is
ti me no fog c an be produc ed.
Cleaning and Stor age
Do not allo w the fog liqu id to become c ontamina ted. Always repla ce the cap on
th e fog liq uid contai ner and the fo g machine li quid tank im mediatel y after
fi lling . Cle aning y our fog mach ine reg ula rly can h elp you to red uce the
frequen cy of parts re placemen t and mainte nance cost s. After every 40 hou rs of
co ntinu ous o peration, it i s recommen ded to use dis tilled wat er to cle an the
heater ac cording to t he steps bel ow.
-0 8-
Page 11

Th e recom mende d clean ing r egime n is as fol lows:
1. Fill pro perly dist ill ed wate r into a cl ean t ank and c onn ect the f lui d tube of
th e fog mac hine to the ta nk.
2. Run t he un it in a wel l-ven tilat ed ar ea unti l the t ank is al most empty.
3. Use dry cl oth to wipe th e fog machin e. Cleanin g is now compl ete. Refill wi th
fog liqui d. Run th e mac hine br ief ly to cle ar any remai ning liqui d from th e
pu mp and he ater.
No te: Al l fog mac hin es are pr one to clogg ing due to the t hick consi stency
of fog liqu id and the hig h temperature at wh ich it va poriz es. Howeve r, a
pr operl y mai ntain ed fog machi ne should pr ovide years of reli able use.
Cl ean wit h a dry clo th only . Sto re d ry.
If the fog ma chine is not i n use, pleas e clean it bef ore storage. S tor e the fog
machine i n a dry and cool p lace. Operate the f og machine a t least o nce a
mo nth. A te st-ru n consists o f warmi ng-up the ma chine foll owed by a few
mi nutes o f fog emissi on.
Technical Speci fications
Mo de l
Power Su pp ly
Power Co ns umpti on
Ou tp ut Vol um e
Tank C apaci ty
Fl ui d Consump tion
Wei ght
Di me nsions (L xWxH)
Remote I nc luded
War m-up Ti me
W- 50 8
100~ 240V AC 50/ 60 H z
800 W
3,00 0 cu.ft/m in (85 m³/m in )
0.8 li ters
60 min / 0.8 liter
3.8 kg
315 x 12 8 x 166 (mm)
W-1
100 se conds
W- 51 0
100~ 240V AC 50/ 60 H z
1,00 0 W
10,0 00cu.ft /min (284 m ³/ min)
2.8 li ters
13 min / l iter
11.4 k g
468 x 25 0 x 148 (mm)
W-1
12mi n
Approval
Th is prod uct i s in acco rdance wit h the R&TTE dire ctive ( Radio a nd
Telecommun ication Technical Eq uipment) o f the Europe an Union and f alls into
eq uipme nt Cl ass 1. In a ll EU member c ountries , the operation of th is wireles s
sy stem is g enera lly approved by the n ation al te lecom r egu lator y aut horit y.
Th e syste m is license -free. In so me countri es outside t he EU, th e opera tion of
th is wire les s syste m may needs to b e appro ved by th e national t elecoms
regulat ory author ity.
-0 9-
Page 12

Warranty
Warranty s hall be valid only if t he product i s purchase d from An tar i's
authori zed distri butors or de alers. For war ra nty servic e, send the pr oduct
on ly to an au thorized d istribut or or dealer.
Al l wa rrant ies a re void i f the pro duc t has bee n mod ified i n any man ner ; if the
pr oduct h as been repa ired or serv iced by unau thorized p erson nel ; or the
pr oduct i s damaged du e to imprope r use or maint enance as se t forth in the
in struc tio n manua l.
Th is is not a s ervice con tract a nd does not in clude stan dard maint enance or
cl eanin g. Al l expen dables are n ot cove red by this warranty.
Ad ditio nal warranti es pr ovide d at the discr etion of the d istribut or dealers
sh all rem ain the sole o bligatio n of the distr ibutor or de aler.
Al ways quote the u nit's seri al number an d model name w hen contac ting yo ur
di strib uto r for inf orm ation o r assistan ce.
Pl ease sa ve thes e instruct ions.
-1 0-
Page 13

Bedienungsanl eitung
W-508 & W-510 Nebel maschine
Herzlic hen G lückw uns ch zum Kauf I hrer neuen
Antari- Neb elmas chi ne W-Seri e.
Einführung
Vi elen Da nk, dass Sie s ich für eine A ntari-Ne belmasch ine der W-S eri e
entschi ede n haben . Sie sind nun i m Besitz ein er robuste n und leistu ngsstark en
Ne belma sch ine. Vor Benutzu ng der Masch ine bitte un bedingt di ese
Bedienu ngs anlei tun g sorgf ält ig lese n. Wenn Sie d ie Hinw eis e in dies er
Bedienu ngs anlei tun g beach ten , könne n Sie sich in de n nächsten J ahren auf
ei ne zuve rlässige u nd über zeugende L eistung Ih rer Antari -Nebelma schine
freuen.
Bi tte hal ten Sie sich a n diese Bedi enungs- un d Sicherhe itsanwei sungen, um
ei ne lang e und sicher e Lebensda uer Ihrer Ne belmasch ine sicher zustelle n.
St romsc hla ggefa hr. Trennen Si e das Gerät vom Netz, b evor Si e
Fl üssig keit nachf üllen, sow ie vor je der Reinigun g und Wartu ng.
AC HTUNG :
Stromschlagge fahr
Vor Näss e schützen .
Nu r inner hal b gesch los sener R äume betre iben. Nich t für den Betr ieb im
Freien ge eignet.
Verwen den Sie bitt e ausschli eßlich 3-adrige , geerdete S teckdose n. Vor
In betri ebn ahme da rauf ac hten, dass d as Gerät an di e richtige S pannung
angesch los sen wir d.
„X Vor Befüllen d es Tank s ist I hre Ant ari -Nebe lma schin e imm er vom Ne tz zu
tr ennen .
„X Ach ten S ie darauf, dass d ie Ne belma sch ine ste ts au frech t ins talli ert i st.
„X Nac h dem B etrie b tre nnen Si e bitte die Ma schine vom N etz ode r sch alten
si e aus.
„X Die se Ma schin e ist wasser geschütz t. Sollte Feuc htigkeit , Wass er oder
Fl üssig keit ins Inn ere der M asc hine ge lan gen, tr enn en Sie di e Maschine b itt e
so fort vo m Netz un d tro cknen b zw. reinigen s ie. Sollte s ich die Masc hine nicht
reinige n las sen, ko ntakt ier en Sie bi tte e inen Se rvi cetec hni ker ode r Ihren
-1 1-
Page 14

Antari- Händler be vor Sie d ie Ma schin e ern eut ben utzen.
Im Innern d er Maschin e befinden s ich kei ne vom Be nut zer zu wa rtend en Teile.
Wenden S ie sich an Ihr en auto ris ierte n Fachhän dler für Wa rtung s- un d
Service arbeiten .
Stromschlagge fahr
Nu r für Erw achse ne. D ie Masc hin e muss au ßer halb de r Re ichweite v on
Ki ndern i nst allie rt we rden. B etreiben S ie das Gerät n iemals unb eaufsich tigt.
Ri chten S ie di e Austr ittsdüse n iemals dir ekt auf Person en.
Der Ausst oß der Masch ine ist sehr h eiß. Halte n Sie währen d des Bet rie bs
ei nen Sic herheits abs tand vo n ca. 50 cm z ur Austrit tsdüse ein .
Betreib en Sie das Ger ät in gut belü fteten Räu men, bis der Tank lee r ist .
Bedecke n Sie nie mal s den Luf tau strit t der M aschi ne. Um eine au sreichen de
Belüftu ng zu gewähr leisten, h alten Sie bi tte einen Mi ndestabs tand vo n etwa
20 cm um und üb er der Masch ine ein.
Ri chten S ie di e Austr ittsdüse n iemals auf o ffene Flam men.
Wenn die N etzleitu ng beschäd igt wird, mu ss sie durch d en autoris ierten
Fachha ndel erset zt werden, u m Gefäh rdu ngen zu v ermeiden .
Di e Austr ittsdüse w ird währen d des Betrie bs sehr heiß ( 200° C). Für l eicht
entflam mbare Mate rialien mu ss ein Minde stabstan d von 50 cm z ur
Austrit tsdüse ein gehalten w erden.
Lassen Si e die Maschi ne immer vor Rei nigungs- u nd War tungsarb eiten
ab kühle n.
Explosionsgef ahr
Mi schen S ie niemals e ntzündli che Flüssi gkeiten je glicher Ar t (Öl, Gas,
Duftsto ffe) unter d ie Nebelfl üssigkei t.
Verwen den Sie auss chließli ch hochwer tige un d von Ihrem Hä ndler
empfohl ene Nebelf lüssigke iten au f Wasserb asis. Ande re Nebelfl üssigkei ten
kö nnen zu m Verstop fen oder Tropfe n des Ger äte s führe n.
Ac hten Si e unbeding t darau f, das s sich im mer eine aus reichend e Menge
Ne belfl üss igkei t im Tank b efindet. D er Betrieb o hne Nebelf lüssigke it führ t zu
Pu mpens chä den und z ur Überhit zung des Hei zelement es.
So llte Ih re Antari- Nebelmas chi ne einm al nicht meh r ordnungs gemäß
arbeite n, schalte n Sie sie bitt e sofort ab. E ntlee ren S ie den Tank voll ständig,
verpacken Sie di e Maschine s orgfälti g (am besten i n der Origin alver packung)
un d schic ken Sie s ie be i Ihrem A nta ri-Hä ndl er ein.
En tleer en Si e den Tan k immer, be vor Sie d as Gerät verschic ken ode r
tran sportier en.
Trinken Sie ni emals N ebe lflüs sig keit. S ollte es den noch einma l versc hluckt
we rden, k onsul tie ren Sie b itt e sofor t ein en Arzt . Sol lte die H aut oder die
Augen ein mal mit Nebe lflüssig keit in B erührung k ommen , bit te sorg fäl tig mit
Wasser a uswas chen.
Hi nweis : Bitte b eac hten Si e alle auf Ihr er Antari- Maschine a ngebrachten
-1 2-
Page 15

Warnhi nweis e und A nweis ungen.
Auspacken und Prü fen der Maschin e
Öf fnen Si e den Ve rsa ndkar ton u nd stel len S ie sich er, das s alle Teile , die für
de n Betri eb des Sy stems notw endig sind , in einem ein wandf reien Zust and
ei ngetr offen sind .
Der Vers andkarto n sollte die f olgenden Pos ten beinha lten:
1. Ei ne Nebe lma schin e W- 508 o der W-510
2. Ne tzkab el
3. Ei ne W-1 Send eei nheit
4. Bedienu ngs anlei tun g
5. Mo ntage büg el mit Sc hraub en und Unter legschei ben (optio nal für W-510)
We nn Ausr üstun gst ei le fe hlen so llten , nehme n Sie b it te so fort mi t
Ih rem Ant ari-H änd le r Kon ta kt au f.
Bevo r Sie m it der In bet riebn ahm e Ihrer A nta ri-Ma sch ine beg inn en, ste lle n
Si e siche r, dass kei n off ensic htl icher Transport schaden vo rlieg t. Falls da s
Ge häuse d er Einheit o der das Kabel be schädigt s ein sollte , stecken Si e sie
ni cht in di e Steckdos e und ver suc hen Sie n ich t, sie zu b enu tzen, b evor Si e
Ih ren Ant ari-Händ ler kon tak tiert h abe n.
Inbetriebnahm e
En tfern en Sie jegli ches Verp ackungsm aterial vom Vers andka rto n.
Vergew issern Sie s ich, dass al le Schaums toff- und Plas tikei nlagen ent fernt
we rden, i nsb esond ere in der Näh e der Austri ttsdüse.
In stall ier en Sie di e Nebelmas chi ne auf ei ner ebenen O berfläch e und
sc hrauben Sie de n Decke l des Flüssi gkeit sta nks ab.
St ecken S ie den Fl üss igkei tsschlau ch in einen or dnungsge mäß gefüll ten
Fl üssig keitstan k.
Füllen Si e den Tank mit d en Antari- Nebelflü ssigkeiten FLR od er FLG od er
anderen h ochwerti gen Nebelf lüssigkeiten au f Wasserb asis, die von Ihrem
Händler e mpfohlen w urden. All e anderen Ne belflüss igkei ten k önnen
Beschäd igu ngen am G erät zur Folge h abe n. Nach d em Befülle n versc hli eßen
Si e den Tan k bitte wied er mit dem Dec kel. Ac hten Sie darau f, den Tank nic ht
zu überfü lle n. NICH T ÜBERFÜLL EN.
Bedienung
Füllen Si e vorsi cht ig Flüssig keit in d en Tank . NIC HT ÜBER FÜL LEN.
St ellen S ie den Netzs chalter au f der Rückse ite des Gerä ts auf “ON”. Darauf hin
be ginnt d ie Aufheiz phase. Wäh rend der Auf heizp has e kann no ch kein N ebe l
-1 3-
Page 16

ausgest oße n werde n. Die Aufhe izzei t ist b eende t, so bald di e rot e LED am Gr iff
de r W- 508 bzw. di e grüne LED au f der Rückse ite der W-510 bl inkt und
we iterh in au fleuc hte t.
Bi tte les en Sie nun das Kap itel “W1 Fun kfernbed ienung”, um die
Funkfer nbedienu ng einzuri cht en.
Wi chtig :
Während d es Betrieb s immer auf de n Flüssigk eitss tan d im Tank a chten.
Trinken Sie ni emals N ebe lflüs sig keit. S ollte es den noch einma l versc hluckt
we rden, k onsul tie ren Sie b itt e sofor t ein en Arzt . Sol lte die H aut o der die
Augen ein mal mit Nebe lflüssig keit in B erührung k ommen , bit te sorg fäl tig
mi t Wass er auswaschen.
Setzen Si e sofort nac h Befüllen d es Tank s den Deckel d es Tank s sowie des
Kanisters w ieder auf.
W- 510: Wenn Ihr M odell über e inen Monta gebügel verfügt , kann es
hängend i nstallie rt we rden. A chten Sie bi tte darauf, d ass der N ebel niema ls
di rekt in d as Gesicht e iner Pe rson au sge stoße n wir d und das s der
Ne igung swi nkel ni emals 25 Grad üb ers chrei tet .
W-508 Bedienele mente
01- Düse
02- Gehäu se
03- Griff
04- Griff-Taste mit Indi kator
05- Tankv ersch lus s & Tank
06- Netzs cha lter
07- Siche run gshal ter
08- Netzk abe l
09- Funke mpfän ger
10- Fuß
11- W- 1 Funkf ern bedie nun g
02
01
10
04
E
M
TANC
G
5
LE!
Z
MD
S DE
!
T
OZ
R
D
N
I 0C
N
0C IS
A NIN
HR
A !
AVE
L
TN
W
T
O
SA
E
H T N
N
M
E.
S F
C R
M AB
ALT
T LEAS
C
BE B U
A 5
0
E H
O H R
EP
R C E À O
S5
E
D
P
EN N
Ü
K
P
R
BR NU G G
R
DE
S A
N
P
A
N
E
VO
N
MIDESTEN
03
05
OF
F
06
ON /
FUSE
07
09
-1 4-
11
08
Page 17

W-510 Bedienele mente
01- Düse
02- Gehäu se
03- Griff
04- Tankversch lus s & Tank
05- PU-Sc hlauc h & Fil ter
06- Schla uchadapt er
07- DMX-Au sga ng
(3-pol. X LR)
08- DMX- Ein gang
(3-pol. X LR)
09- Netzs cha lter
10- Netza nsc hluss &
Si cheru ngs halte r
(120VAC 250 V/T10A)
(230VAC 250 V/T5A)
11- Betri ebsanzei ge
12- DIP-S chalt er
13- Funke mpfän ger
14- Fang seilöse
15- Netzk abel
16- Fuß
17- Fe stste lls chrau be
18- Hänge bügel (opt ional)
19- W- 1 Funkf ern bedie nun g
01
16
15
18
02
17
06
19
03
07
11
12
SI
I
R
G A L HT
E
N
LE
S
L
S/
W
I
G
DMX
ON
OF
F
08
05
04
14
NGING FUSE.
ON.
L A R
.
A
'A
W• ISCONN E T PO ER BEFORE CHA
G
ADULES
D
C
X CLOS.
S INSI E.N ERV C D
RNIN !
ANCHER
A
A
CA
N T
I
O U
W
ST NT
ÉR LPP REI .
L
LY WITH A ULT SUPER VISI
O
LLA CE DES
DB
N
D
DES
IB
N ES
S LE
N
URVEI
O
S
FU
I
IES ÉC
• USE O
SDE USE NLY. KEEP DRY.
T
N
I
AR
R
• DO N T OPERATE WITHOUT LIQUID .
ER S I EABLE PART
SOU
FO
SAN LIQUI
REI
•
EIL S DE.
.
UN
EMPLOI DA S
A EME
•
E
ION!
P
U
NN
EN
EN DP
N
'APAR
TI T PAS E
L
U O R
Ç P
ER
A L P
LE EMPL C NT DU
S
N
T
É.
E N
O
ATENT
Z JMAIS 'AP A L SANS
IT
C
D
TÉ
LISE
EI
É
• VANT
P
G OM NETZ TRE
L
N
I
.
L
• 'UTI
REL A
DE
EJA IS UTLI
L
POI V N
N MA I
I
P
•
GER 'HUMI
.
A
•L'AP
I
S
S N
ÉREUR DE 'AP AR L N CO
PROTÉ
T
'IN
L
S
EN.
•
.
N IEN
U ENTRET
E•KEINE ZU WARTE
IBEN.
UNG
IST NUR UNTER DER AUFS CHT VON ERWACHSE
ESS
G
BETRE
R
IVER
M
E
WIREL
A T !CH
UID
ENU
I N
REC
T.
• VOR DEM SICHERUNG WECH EL ALL
TE
H FL
T
ÄU
DEN TEILE I GERÄT INNER
• DIE BED
DIPSWIT H
MX- 1
C
52D
C
WE SWIT H
O R
P
N
MAL
GESTA
• NIE S O NE
U
• NR IN INNENR MEN VE WENDEN VOR NÄS E SCHÜTZE
X IN
MD
PUT
N
I
O R
P WE
E
S
FU
13
10
09
Hi nweis : Die Mod ell e W- 508 & W-510 besi tzen ei nen optoel ektronis che n
Fl üssig keitssen sor. Die Pu mpe s tellt a uto matis ch de n Betri eb ei n und der
LE D-Indikato r auf der Rück seite der Ma schine beg innt zu blin ken, we nn di e
Ne belfl üss igkei t nicht ausr eichend is t. Bitte bef üllen S ie in d iesem Fall den
le eren Tank und schal ten Sie die Ma schine aus u nd wieder ei n, um den L EDIn dikat or auszusc hal ten. Di e Machine is t jetzt wied er betrieb sbereit.
So llten S ie einen ver minde rte n Ausst oß, Pumpge räusche od er überhau pt
kein en Ausstoß f eststell en, sofort d ie Maschin e vom Net z tre nnen.
Kontrolli eren Sie den F lüssigkeitsst and, die ext erne Siche rung, den
Anschlu ß zur Fer nbedi enu ng und di e Str omversorgu ng. Sollte n ach 30
Sekunde n permanen ten Drücke ns des Fern bed ienun gsk nopfe s imm er noch
kein A usstoß erf olgen, übe rprüfen Si e bitte den Verbin dun gssch lau ch zum
Tank und vergewi ssern Sie si ch, dass Neb elflüssi gkeit h ind urch fl ieß en
kann. We nn Sie die Urs ache de s Pro blems n ich t fests tel len kön nen , drück en
Si e bitte n ich t weite r die Fer nbedi enu ngsta ste , da dies z u Sch äden am G erät
führen ka nn. Schick en Sie da s Ger ät bei Ih rem Antari -Händler e in.
-1 5-
Page 18

W-1 Funkfernbed ienung
Das Funkf ernsteue rsystem W-1 be ste ht aus ei ner Sendee inheit mit z wei Tasten
für den Neb elaussto ß und einer Em pfängere inheit, di e an jedem Mod ell der WSerie vor installi ert ist.
* Se ndeei nheit :
Mi t der Sen deeinhei t lässt sich d er Nebelau sstoß per Fu nkübertragung ü ber
ei ne Dist anz von b is zu 5 0 Meter n aus lösen . Die S endee inh eit ist k ompat ibe l
zu allen Em pfängern d er W-Serie und k ann ein e unb egren zte A nzahl v on
Maschin en para llel steue rn.
Drücken S ie die Taste “A”, um den Neb elaussto ß auszulös en. Die blau e
Kontroll- LED leucht et. Um den Neb elaussto ß zu stoppen , drücken Sie erneu t
di e Taste “ B”.
* Em pfäng er:
Der Empfä nger wurde g etestet un d an den Masch inen der W-Ser ie
vorinst alliert. Versu chen Sie nic ht, den Empf änger zu ent fernen. De r
Em pfäng er kann von bi s zu 5 Send eei nheit en ge steue rt we rden, d ie auf die
Maschin e adressie rt si nd. Die m itgelief erte Sende einheit is t vor der
Auslief erung adre ssiert wor den. Sie erf ordert keine Kon fig urati on und ka nn
so fort ve rwend et we rden.
-1 6-
Page 19

Sendeeinheite n adressieren
Um eine and ere Sendee inheit als d ie mitgeli eferte zur S teuerung d er
Maschin e zu verw end en oder u m die M aschi ne mi t bis zu 5 ve rschiede nen
Sendeei nheiten zu s teuern, mu ss jede Send eeinheit z uvor ad res siert w erd en.
An den Masc hinen befi ndet sich ei n LED-I ndikator. An d er W-508 ist er gr ün,
an der W-510 is t er oran ge. Die LED bl inkt 15 Seku nden lang na ch dem
Ei nscha lte n der Mas chi ne. Wäh renddess en können Se ndeeinhe iten adres siert
we rden. D rücke n Sie d azu die Taste “A” an je der Sendee inheit. Em pfängt der
Em pfäng er ordnung sgemäß das A dressier ungssign al der Sende einheite n,
hö rt die LE D auf zu blink en und le uch tet dau erh aft. Al le vorh er ad ressi ert en
Sendeei nheiten we rden aus dem S peicher de s Empfänge rs gelösch t. Wird
kein e neu e Sende ein heit na ch de m Einsc hal ten der N ebe lmasc hin e
ad ressi ert , bleib t die E inste llu ng aus de m vorhe rge hende n Bet rieb im
Em pfäng er erhalte n.
Ad ressi erung sbe is pie l 1:
So llen me hrere Send eeinheit en auf eine Ma schine adr essiert we rden,
sc halte n Sie die Masc hine ein. Dr ücken S ie di e Taste “A” an jeder
Sendeei nheit währ end die grün e (W-50 8) oder d ie oran gefarben e (W-510)
LE D blink t, um die Steu erver bin dung he rzu stell en.
Ad ressi erung sbe is pie l 2:
So ll eine S endeeinh eit zur Steu erung von zw ei oder m ehr M aschi nen
verwend et werd en, m üssen d ie Ma schin en gl eichz eitig eing eschalte t werden.
Drücken S ie die Taste “A” a n der S endeeinh eit währen d die grünen ( W- 508 )
od er die orangef arbenen (W-5 10) LEDs bli nken, u m die Steuer verbi ndu ng
herzust ell en.
-Batteriewech sel an der Sendeeinhei t
Lässt die Rei chweite de r Sendeein heit nach, i st wahr sch einli ch di e Batte rie
verbrauch t und m uss aus gew echse lt we rden. L ösen Sie daz u die
Ge häuse abd eckun g und entfer nen Sie die ve rbrauchte Ba tterie. Le gen Sie
ei ne fris che 12-V- Batterie Typ 23 A wie im Ba tte riefa ch an gegeb en ei n und
br ingen S ie die Gehäu seabdeck ung wieder a n.
-1 7-
Page 20

W-510 DMX512-Ei nstellungen
Kanal A
0 - 5 = aus (kein Aussto ß)
6 - 255 = maxim aler Ausst oß (100 %)
Das Model l W- 510 verfüg t über DMX-An steuerun g, das Model l W- 508 nicht.
Di e Masch ine wird mit d en DIP-Sch alter n adr essie rt. D ie W-510 ka nn üb er
ei nen Ste uerkanal a n- und ausge schaltet w erden. Der Kan al bewegt si ch
in nerha lb der DMX-Werte 0 bis 255 . Das Ein- und A ussch alt en kann a uch m it
ei nem DMX-C ontro lle r oder mi t der D MX-S teuersof tware p rogra mmiert
we rden.
Zw ische n den Wer ten 0 und 5 v on St eu erk anal A is t die Mas chine a us.
Zw ische n den Wer ten 6 bis 2 55 be si tzt d ie Masc hine ei n maxim ale s
Au sstoß volum en von 10 0 %.
Hi nweis : Wird das Ger ät zum Beisp iel auf die DM X-St artadres se 130 ko die rt,
entspri cht Kanal A gena u dieser DMX-Sta rta dress e.
Adressierung de r Maschine
Di e Masch ine belegt 1 S teuerkan al. Damit di e Steuersi gnale rich tig an die
Maschin e adressie rt werden, m uss diese Ma schine kod iert we rde n. Wer den
mehrere M aschinen v erwen der t, muss d ie Kodierung m uss an jeder M aschine
ei nzeln d urchgefü hrt werden , indem Sie di e DIP-S chalter en tspreche nd
un tenst ehender Tabelle eins tellen.
Di e Start adresse is t der erste Kana l, auf den die M aschine au f Signale vom
Co ntrol ler r eagie rt.
Bi tte ver gewisser n Sie sic h, da ss sich d er St euerk ana l nicht m it an deren
-1 8-
Page 21

Ge räten ü berlappt , damit die Ne belmasch ine kor rek t und una bhä ngig vo n
anderen G eräten in de r DMX-Verb indung fun ktionier t. Wer den m ehrer e
Maschin en auf eine Ad resse defi niert, arb eiten sie sy nchron.
Be legun g der DIP -Scha lte r:
Einstellen der
DMX-Startadresse:
Gerätenummer
& Kanäle
Gerät 1 - Kanal 1
Gerät 2 - Kanal 2
Gerät 3 - Kanal 3
Gerät 4 - Kanal 4
Gerät 5 - Kanal 5
DIP-Schalter Nr.
Startadresse
ON
OFF
ON
OFF
ON
OFF
ON
OFF
ON
OFF
112234485166327648
1289256
Hinweise zur Leis tung
Al le Nebe lmaschin en bi lden um d ie Austrit tsdüse Ko nde nswas ser. Beac hte n Sie
bi tte bei d er Install ati on, das s dies zu Flüs sig ke its ansam mlu ngen un ter halb de r
Austrit tsdüse füh ren kann.
Al le Nebe lmaschin en können wä hrend des Be triebs ode r kurz nachd em dem
Ausscha lten noch ge ringfügi g Nebel auss toßen.
Al le Nebe lmaschin en benötig en nach läng erem Dauer betrieb Be triebspa usen,
um wieder a uf die ko rre kte Bet rie bstem perat ur zu kom men. Währe nd diesen
Paus en ist ke in Nebelau sstoß mögl ich.
Reinigung und War tung
Ac hten Si e darau f, das s die Neb elflüssi gkeit nich t verun reinigt wi rd. Setzen S ie
so fort na ch Befülle n des Tanks de n Decke l des Tan ks so wie des Kan ist er wied er
auf. Re ini gen Sie I hr Nebelge rät regelm äßig, um hoh e Ko sten fü r Ers atzte ile
un d Re paraturen zu v ermei den . Nach 40 B etr iebss tun den wir d emp fohle n, das
Heizele ment mit des tilliert em Was ser z u reini gen .
Bitte gehen Sie wie f olgt vo r:
1. Füllen S ie destill ier tes Wa sser in den sa uberen Tank und ste cken Si e den
Fl üssig keitssch lauch in den Tank.
2. Betrei ben Sie das Ge rät in gut bel üfteten Rä umen, bis de r Tank fa st le er ist.
-1 9-
Page 22

3. Rei nigen S ie di e Masch ine m it eine m tro ckene n Tuc h. Die Reinigu ng ist damit
ab gesch los sen. Fü lle n Sie den Tank wieder m it Nebelfl üssigkeit. Betr eiben
Si e kurz di e Maschine u m die Pumpe un d die Heizun g von der
Rein igungslö sung zu säub ern.
Hi nweis : All e Nebelmas chinen sin d aufgrund d er Dickflü ssigkeit d er
Ne belfl üss igkei t und der h ohe n Verd ampfungs temperatur anfä llig fü r
Versto pfungen. N ichtsdes totrotz so llte eine re gelmäßig g ewart ete
Ne belma sch ine Ihn en jahrela ng treue Die nste leist en.
Re inige n Sie das G erät nu r mit e in em tr ocken en Tuch . Trock en la ge rn.
Rein igen Si e die M aschi ne vor jeder L agerung. L agern Sie di e Masch ine k ühl
un d trock en. Bet rei ben Sie d ie Ma schin e min deste ns ei nmal im M onat. Wir
empfehl en Ihnen mon atlich an de r Maschine e inen Testl auf durchz uführen, d er
aus einer A ufwärmze it best eht u nd eini gen M inute n Neb elaus sto ß.
Technische Date n
Mo de l
Sp an nungsve rs orgun g
Ge sa mtansch lusswer t
Auss toßvolu me n
Tank inhal t
Fl ui dverbrauc h
Aufw ärmzeit
Ge wi cht
Maße ( LxBxH)
Mi tg eliefer te Fer nbedi en ung
Trägerf re quenz
Batt erie
Reichw ei te
W- 50 8
100~ 240V AC 50/ 60 H z
800 W
ca . 85 m ³/Min.
0,8 Li ter
3,7 Mi n./0,8 Li ter
100 Se kunden
3,8 kg
315 x 12 8 x 166 (mm)
W-1
UHF 43 3,920 MHz
12 V, Typ 23A
ca . 50 m
W- 51 0
100~ 240V AC 50/ 60 H z
1,00 0 W
ca . 28 3 m³/Min.
2,8 Li ter
13 Min ./Liter
12 Min .
11,4 k g
468 x 25 0 x 148 (mm)
W-1
UHF 43 3,920 MHz
12 V, Typ 23A
ca . 50 m
Zulassung
Di eses Pr odukt ents pricht der R &TTE-Richt linie (Radio and Telecommun ication
Technical Eq uipment) d er Europäi schen Unio n und der G erä tekla sse 1 . Das
Pr odukt b esi tzt ein e All gemei nzu teilu ng in d en Staa ten der Euro päischen U nion
un d ist anm elde- und ge bührenfr ei. Für den Be trieb in ein em anderen L and
außerha lb der EU kann e s notwendi g sein, eine Z ulassung b ei den natio nalen
Behörde n zu beantragen.
-2 0-
Page 23

Garantiebesti mmungen
Es g ilt die g ese tzlic he Rege lung. Anta ri Ligh tin g and Eff ect L td. gew ähr t für all e
in d er Euro päi schen U nio n erwor benen und be triebene n Geräte ein e
Ga ra ntiezeit von 2 Jahr en ab Kaufdatu m. Für al le an deren L änd er gilt e ine
Ga ra ntiezeit von 6 Mona ten. Inner halb diese s Ze itrau ms wird e in de fekte s
Ge rät kos tenfr ei du rch den A nta ri-Hä ndl er, bei dem d as Gerät erw orben wurd e,
reparie rt oder erse tzt.
Di ese Garantie g ilt nicht fü r Geräte, di e entgegen d er bestimm ungsgemä ßen
Verwen dung einge setzt wurd en oder bei un sachgemä ßem Geb rauch u nd/ oder
entgege n der Hinwei se in der Bedi enungsan leitung. D iese Garanti e erl ischt
auch, wen n das Gerät vo n unges chu lten Persone n geöffnet , verän dert oder
reparie rt wurde.
Der Betre iber diese s Gerätes is t verpf lic htet, d ie Anweisu ngen in der
Bedienu ngs anlei tun gen zu be achten und i nsbesond ere die Hinw eise zur
Rein igung, Pfl ege und Wartung zu b efolgen.
In einem Ga ranti efall ist ne ben einer Fehl erbeschr eibung auc h eine Kopi e des
Kaufbeleg es beizule gen.
-2 1-
Page 24

Mode d'emploi
Antari W-508 & W-51 0 Machine à Fumée
No us vous f éliciton s pour l'ach at de vot re nouvelle
Machine à F umée d'An tari
Introduction
No us vous re merci ons d'avoir c hoi si un e mac hin e à fumée d'An tari. Vous êtes
en pos sessi on d 'un pro duit robu ste et p uis sant. En vue d'utili ser correcte ment
votre nouve l appar eil, veuillez lire att entiv ement ce mod e d'emp loi . Si vous
respect ez les instruc tions s uivan tes, vous p rofitere z d'une per for mance s olide
et convaincant e d e votre mac hine à fumée d'Antar i p our de nombre uses
années.
Pour assure r la l ongévité et le bon f onctionn ement d e votre machin e à fu mée,
veuille z lir e attent iveme nt les i nstru cti ons s uivan tes c oncernan t le maniemen t,
la sécuri té et l'entr etien.
Ri sques d 'El ectro cut ion. Dé mon tez l'a ppr ovisi onnement é lectriqu e de
l' appar eil ava nt de ret irer la couv ertur e.
Ri sques d 'El ectro cut ion
Pr otége r de l'humid ité.
L'a ppareil a ét é conçu pour u n emploi dan s des locaux c los. Ne pas ut iliser à
l' extér ieu r.
Ut ilise z uni queme nt de s prise s de courant à terre à 3 br oches. Avant la
pr emièr e mise en marc he, assure z vous qu e l'a ppare il so it branché à
l' alime nta tion co rre cte.
Débranchez l'a ppareil avan t de remplir l e réservoir.
As surez v ous d'i nst aller la mac hine à fu mée t oujou rs dr oit.
Mettre la m achine hor s de service q uand vo us n' utili sez p as la mac hin e.
Ce tte mac hine est pro tégée cont re les éclab oussemen ts et les proj ections
d'eau. Si d e l'humidi té, du liqui de ou du liqui de à fumée devai t pén étrer à
l' intér ieu r de l'ap pareil, dé branc hez le imméd iatement e t contacte z un
te chnic ien o u votre r evend eur Antari ava nt de le réuti liser.
A l'intér ieu r de l'ap pareil, il n 'y a aucune pa rtie qui ait b esoin d'êt re révisée .
Les travaux d'entr etien sont à f aire effec tuer pa r votre revendeur A ntari ou
pa r des spé cialiste s.
AT TENTI ON
-2 2-
Page 25

Danger d'Incend ie
L'u sage de cet a ppare il n'es t prévu que p our les adu ltes. I nstallez le ho rs d e
po rtée de s enfants. N e jamais fai re marcher s ans surveillanc e.
Ne jamais b raque r le bec de l'ap pareil dir ectement s ur des perso nnes.
Le débi t d e la mac hine à f umé e est tr ès chaud . Pen dant que la mach ine est en
marche, r espectez u ne distanc e d'env iro n 50 cm vis -à-vi s son bec.
Faites marchez la machine dan s une sall e bien aér ée jusqu' à ce que so n
réservo ir soit vide . Ne ja mais couvr ir les orifi ces d 'aération. Pour garan tir u ne
aéra tion suffi sante, lai ssez un espa ce libre de 20 c m tout autou r de l'ap par eil.
Ne jamais b raque r le bec de la mac hine sur des f lamme s.
Qu and le c âbl e se cte ur d e ce t appar eil est end omm agé, il doi t êt re remp lacé
pa r un inst all ateur a grée pour év iter des dan gers.
Le bec de la machi n e dev i e nt tr ès ch a ud (2 00° C) pen d a nt so n
fonctio nne ment. Respectez une dista nce mini mum d e 50 cm en tre l e bec de l a
machine e t les matéri aux inflam mables.
Laissez r efroidir l a machine à fu mée d'Ant ari avant t out e manip ula tion.
Risques d'Explo sion
Ne jamai s mélange r des liqu ides infl ammab les gazeu x ou hu ile ux avec le
li quide à f umée.
Em ployez uni queme nt des liqu ides à f umée de haute qualité à bas e d'e au
recomma ndée par vot re re vendeur. D'autr es liquides à f umée pou rraie nt
ca user de s problème s d'encrasser ou de s crach oteme nts .
Faites a tte ntion qu 'il y a it to ujours suffis amment de liqui de à fumée d ans l e
réservo ir. Un emploi sa ns liquid e pour rait endommage r la po mpe ou
pr ovoquer la sur chauffe de l 'élément d e chauffag e.
Si vo tre ma chine à fum ée d'Antar i n e d evait pl us fonction ner co rrecteme nt,
ét eigne z le imméd iat ement . Vi dez co mpl èteme nt le rése rvoir, emball ez le
so igneu sem ent (au mieux da ns son emballa ge d'o rig ine) et l'envoyez-le à
votre revendeu r Antari.
Toujours vid er le rés ervoir avant d 'envoye r ou tran sporter l' appareil .
Ne jamai s avaler le liq uid e à fumée. Si c'éta it tou t de mê me le c as, consu ltez
un médecin im médiatem ent. En cas de co ntact avec la peau ou les yeux,
ri ncer à grande ea u.
Re marqu e : Veuillez suivre toute ins truction de sécu rité app liquée sur le
bo îtier d e votre mach ine à fum ée d'Anta ri.
Déballage & Inspe ction
Ou vrez le carton extér ieu r et ass urez vous que t outes les p ièces n'aien t su bi
aucun dom mage durant leur tran spo rt.
As surez -v ous que l e car ton d'e xpé ditio n con tient l e art icles s uivan ts:
-2 3-
Page 26

1. Un e unité de W-508 o u W- 510 M achin e à Fumée
2. Câ ble d'alim entation
3. Un e unité de W-1 Tra nsmetteu r
4. Mo de d'emplo i
5. Lyre de fi xation avec vis et ro ndelle (op tionnell e pour W-510)
Se rvez vo us de la li ste d es ac cesso ires ci -join te po ur v éri fier si v otre
mo dèle vo us a été li vré ave c son é qu ipe ment co mplet .
En ca s d e livrai son en dom magée ou inc omp lèt e, tou jou rs contactez
im média tem ent vot re reve ndeur Anta ri.
Mise en Marche
En levez t out m atéri au d' embal lag e. Assurez v ous d'avoir enlev é tou te la
mo usse et l e rembourrage en pl astique, s ûr tout au bec d e la mach ine .
Pl acez la machin e à fumée s ur une su rface p lane et d éviss ez le cou vercle du
réservo ir du liquid e à fumée .
In sérez l e tuyau d e liquide da ns le réservoir ple ine.
Em ployez uni queme nt des liqu ides à f umée de haute qualité à bas e d'e au
recomma ndée par vot re reve ndeur. Remp lissez le ré servo ir de l iquide à fum ée
Antari FL R ou FL G ou d' un autre liq uide à fumée de hau te qu alité à base d 'ea u.
D'autre s liquides à f umé e pourraient causer des probl ème s d'enc rasse r ou
de s cra chotemen ts. Refer mez le réservoi r. Veu ill ez faire attent ion de ne
ja mais dé passer le ni veau ma xim ale de li qui de.
Opération
Remp lissez le réser voir de li quide à fumée. Veui llez faire a tte ntion de n e jam ais
dé passe r le nive au ma ximal e de li quide .
Bran chez la fiche d'a lim entat ion d ans une prise de co urant a vec terre. M ett ez le
co mmuta teur d 'alim ent ation à l 'ar rière de l'a ppare il en mod e " ON" . L e t emps
de préc hauffage est comme nce . Penda nt la phase d e cha uffe, l' appar eil ne p eut
pa s en core dé gager de la fumée. L e temps de p réc hauff age est ter min é, dès
qu e l'ind ica teur lu min eux rou ge (W-5 08) ou ve rt (W-510) s'a llume.
Veuill ez voir e le chapitr e “Contrôl eur sans fil W-1 ” pou r ajust er la contrô leu r.
No tices i mport antes :
Surveil lez t oujours le nive au de liquide à fu mée d ans le r éservoir pendant le s
je ts de fum ée.
Ne j amais avaler le liquid e à fum ée. S i c'é tait tout de même le cas, consul tez u n
médecin i mmédiate ment. En cas d e contact avec la pea u ou les ye ux, rincer à
gran de eau.
Ap rès l'a voir rempl i de li quide à fu mée, refer mez toujou rs im média tem ent les
co uverc les du bidon d e liquide et d u réser voir de la mac hine.
-2 4-
Page 27

W- 510 : Si vo tre mod èle dis pose d'une lyre de fi xat ion, on pe ut le fixer au
pl afond . Lor s de cette in stall ati on, f aites attenti on qu e la fumée ne s 'évap ore
pa s d ire cteme nt en d irect ion de vis ages d es per son nes. Faite s at tenti on à ce
qu e l'ang le d'incli nai son ne so it pas supér ieure à 25 deg rés.
W-508 Eléments et B ranchements
01- Be c
02- Bo îtier
03- Bras
04- Bras bouton -pous soir avec i ndica teur
01
05- Co uverc le du réservoir et r éservoir
06- Co mmuta teur se cteur
07- Port e-fus ible
08- Câ ble d'a limen tatio n
09- Ré cepte ur sans f il
10- Pi ed
11- W-1 Co ntrôl eur san s fil
W-508 Eléments et B ranchements
01- Bec
02- Boîti er
03- Bras
04- Couve rcle du r ése rvoir e t réservoir
05- Tuyau P C et filtre
06- Adapt er de tuyau
07- DMX sor tie
(XLR 3 pôle s)
02
01
08- DMX ent rée
(XLR 3 pôle s)
09- Commu tateur sec teur
10- Douil le d'alime ntation et
po rte-f usi ble
(120VAC 250 V/T10A)
(230VAC 250 V/T5A)
11- Indic ateur de ser vice
12- Inter rupteurs D IP
13- Récep teur sans fi l
14- Œille t de sécurit é
15- Câble d 'aliment ation
16- Pied
17- Vis de fi xation
18- Lyre d e fixat ion ( optio nel le)
19- W- 1 Contr ôle ur sans f il
16
18
17
06
15
19
02
10
03
07
HOT NOZZ
L
TE
P A
E
S A
A
E P
N
11
AS
B
RO HE
P
P
VE U GS F
MIN
GWARNI
E!
N
L
CM DIS N
5 TA CKE
0
T
R
C BRU
E A
C C
REN
T
RB
DES
VO
O
LNT!
À M
NN
NS50 M B
R
E
E
D
11
04
E
0 M
SDE 5
R!
IN
H
A
T D
SAN
N
GE
C A
E ALT .N
DÜ H E
03
05
FF
OO
N /
06
FUSE
07
09
08
05
04
14
GFU E.
AN IN S
C
ION.U
L
IS
.
REI.
ES
P
R B
UPERV
L U .
S
ADUL
NG!
PO E EFORE H G
T
S
NIDE.
X CLOS. I C
K
TS I
IT U
A
CA
TNT L
AR
N
LY
W H DUL
O U
WARNI
ÉR L
LY IT A T
LLA CE DES
DB ANCHER 'AP A
EON . EEP DRY.
DIC N
S
O
ÉCSS
• S ON ECT W
U
TOPERATE W HO T IQ ID
E N
IB
N E I
S
S LE
C BL
URVEI
IES
•
N DES
O
NIDE
D NO
IS
S E.
AR
R
•
E
O
SAN LIQUI D
RE S
L
EMPLOIDA S L
• F
I
E
C ENT DU FU
N SERVI
U
A EM
• O USER EA E P
ION!
EN DP T
TI T PAS
EMPL
ENEN
U O R N
R
Ç P U
TE T
ER L'APPAR
LE
S
N
É.
LI
O
AT N
Z JAMAIS L'APPA IL SANS
I
N Z TRENN EN.
D
VANT
IL N CO
ER S
LISE
A
OM ET
•
ON WACH
'UTI
V
L A ÉTÉ
N
.
•
DE IT
EJA IS UT
N MA
ICT
T
ÜZEN
•
GER L'HUMI
ALL
R DE L'APPAR
.
• L'APPARE
SEL POLIG V
ER AUF
H
PROTÉ
T E E N
T D S H
SWEC
NER
• 'IN ÉRIEU
ENTRET
G
N IEN
N
.
UR
NN
RU
U
I EREN.
D H
S
ICHE
RÄTE
E
S
E
ER
G
IV
ID BETREIBEN
NUNG IST
WIRELS
DEM
ACHTUNG!
U
EIM
RECE
EN VERWEN EN. VOR NÄSSE SC
OR
E
M
BEDIE
N U
• V
HN FL
ÄU
O
DEN I
• DIE
NEN
N R
GESTATTET.
IEMALS
W TEL
IN I
R
•N
EZU ARTEN
• NU
EIN
• K
DMX IN
WE T
PO R INPU
FUSE
H
09
13
10
12
WIR
SI
G
ELE
NAL
SS/
L
I
G
DM
HT
X
ON
O
FF
08
D
DI
MX-512
PSW
C
I
T H
POWER SWITC
-2 5-
Page 28

Re marqu e : Un détecte ur optoéle ctroniqe ( OPTO) e st install é dan s les
machine s W- 508 & W- 510. Qu and il n'y a pas su ffisa mme nt de liqui de, la
machine arr êt et la LE D au dos de l'a ppare il c ommen ce à clignote r. Re mplissez
le réserv oir de li qui de à fumé e et me ttre la m achine en se rvice autr e fois.
Si vous co nstatez un débit trop fai ble, un bru it de la po mpe ou un manq ue total
de fu mée, débran chez immédi atement vot re mac hine. Vérif iez le niveau de
li quide , l e f usible exte rne, la connex ion à la téléc omm ande et l'a limentat ion au
se cteur. Si tout app araît êt re corre ct, bran che z de nou veau. S'il n'y a aucune
pr oduct ion de f umé e apr ès que v ous a vez p res sé le bo uton de la té léc omman de
pe ndant 3 0 sec ondes , vér ifiez s i le li quide pass e par le dispe rser qui est a ttaché
au réservoi r. Si vous n' arr ivez pas á dét erminer la ca use du problè me, ne
co ntinu ez pas à pres ser le bo uto n de la télé com mande . Cela po urrai t
endomma ger vot re ma chine . Retou rnez la mach ine à vot re reve ndeur Anta ri.
W-1 Contrôleur sa ns fil
La contrôle ur s ans fil W- 1 co mpo se d 'un transmette ur a vec deux bout ons pour
ac tiver le débit de fumée et un ré cepteur fixé au dos de ch aque mod elé de la
sé rie W.
* Tr ansme tteur :
Avec le trans metteur, il est possible de déb iter de fu mée de dans un rayon
d'actio n de 50 m ètres. Le transme tteur est co mpatible a vec cha que r écept eur
de la série W e t peut contr ôler des mac hines illi mitée en mém é temps.
Pour déga ger l a fum ée, appu yez s ur la bout on “A”. Comme contrôl e, la LED bleu
et allumé e. Pour d ésact iver le débi t de fumée, ap puyez s ur la bouton “ B”.
-2 6-
Page 29

* Ré cepte ur :
Le réc epteur est testé et fi xé a u do s de c haque modèle de la série W. S' il vous
pl aît ne pa s essa yer de le détac her. Le récepteur réagi t à jus qu'à 5
tran smetteur s di fférents reg istrés avec l a ma chi ne. Le t ra nsmetteu r in clu s es t
registr é av ec la ma chine ava nt la li vrais on. Il est poss ibl e de l'u tiliser
di recte men t sans ré glage init ial e.
Registrer trans metteurs
Pour le fon ctionnem ent de la mac hine ave c un trans metteur différ ent comme
li vré, ou avec jusqu'à 5 tran smetteur s différ ent s, cha que transmett eur doit
êt re regis tré pr emièreme nt. Il y a un indi cateur LED aux appar eils. Au W- 508 il
es t vert, a u W- 510 i l est ora nge. Quand l a machine es t mis e n service, l a LED
co mmenc e à cl ignoter pour 15 se conde s. Pen dant l' intervalle de 15 sec onds,
l' usage r peut reg istrer un ou plu sieurs de trans mette urs en pre ssant le b outon
"A " sur chaque trans met teur. Fo r this pu rpose, press t he b utton “A” on ea ch
tran smitter. Qua nd le si gna l d'enr egistrem ent est bien réc u du récep teur, l a
LE D arr êt de clign oter et est allu mée . Les tran sme tteur s ava nt sont éteint d e l a
mémoire d u récept eur. Qu and v ous n e reg istre z pas d'un transmett eur q uand la
machine est mis e n ser vic e, la mémoire du ré cepteur conti ent l'opératio n
avan t.
Aj uster e xempl e 1 :
Veuill ez met tre la mac hin e e n ser vic e p our regi strer u n ou p lusieurs de
tran smetteur s. Avec la LED ver t (W- 508) ou orange (W-510 ) clig notan t,
pre ssez le bout o n " A " s u r c haque tra nsme t teur pou r co m menc e r l a
tran smission d u signal.
Aj uster e xempl e 2 :
Pour utili ser un tra nsmet teu r po ur c ont rôler deux ou plus ma chines, veui lle z
mettre le s ma chi nes en s ervice au m ême mom ent. Avec les LED s ve rtes (W-
508) ou orang es (W-51 0) cli gnotant, press ez le bou ton "A " s ur le tra nsmet teu r
po ur comm encer la transmis sion du sign al.
Changer la pile du tr ansmetteur
Qu and le ra yon d'acti on du t ransm etteur cesse, l a pil e est p rob ablement v ide e t
do it êt re re mpl acée. Veu ill ez ou vrier le couv ercle et quit ter l a pile v ide. Insérez
-2 7-
Page 30

un e pile nouve au 12 V, type 23A co mme i ndiqué dan s le co mpart ime nt de pile et
replace z le couverc le.
W-510 Réglages DM X512
Ca nal A
0 à 5 = arrêt (au cun dégage ment de fumé e)
6 à 255 = dégag ement maxi mal de fumée ( 100 %)
Le modèle W-5 10 c omporté un s ystème D MX512, m odèle W-5 08 n e pas .
Aj ustez l'adr ess e DMX par i nte rrupt eur s DIP. L'ap pareil d isp ose d' un canal de
co ntrôl e pou r march é/a rrêt. L e can al varie entre l es vale urs DMX 0 à 255. A près
avoi r co nnect é un contrôle ur DMX, le s fo nctio ns Timer comm e la durée de
fumée e t int ervalle peuvent être programmés par le c ontrôleu r DMX ou pa r le
lo gicie l DMX v ia la fen être d'eff ets lumine ux.
En tre les v aleur s 0 et 5, la ma chi ne e st en a rrêt.
En tre les v ale urs 6 e t 255, la mach ine f oncti onne avec un d ébi t de fu mée
ma ximal ( 100 %).
Rema rque : S'il vo us p laî t faite s att ention que si la mac hine était cod ée s ur
l' adres se initi ale DMX 1 30 dans l'exe mple en haut, le canal A corres pond
exactem ent à cette ad resse init iale DMX.
Codage
Ch aque ap par eil occupe 1 c ana l de contrôl e. Pour q ue les signa ux de c ommande
s'adres sent correcte ment à chaqu e app areil, les ap parei ls do ivent être codés.
Le co dage doit être ef fectué sépa rément à chaque ap pareil : régler le s
mi nirup teu rs selo n le relevé ci -contre.
L'a dresse i nit iale est le premi er canal à partir l'app areil ré pond au con trô leur
DMX.
As surez -v ous qu'il n'y ait pas de c anaux entre lac és pou r assur er un co ntrôl e
co rrect et indép end ant d'autre s appa reils DMX. Lorsqu e d eux ou pl us app areils
so nt codé s à la même adre sse initia le, ils fonc tionnero nt synchro nement.
-2 8-
Page 31

Configuration d es interrupteurs DIP
Ajuster l'adresse
initiale DMX :
Adresse initiale
Nombre de l'appareil
& canaux
Appareil 1 - canal 1
Appareil 2 - canal 2
Appareil 3 - canal 3
Appareil 4 - canal 4
Appareil 5 - canal 5
Interrupteur
DIP no.
Adresse initiale
ON
OFF
ON
OFF
ON
OFF
ON
OFF
ON
OFF
112234485166327648
1289256
Remarques de fonc tionnement
Toutes machines à fumée déga gen t une cond ensation auto ur de son bec de
so rtie qui pour rait mener à une accu mulation d'hu midité a u-d essus de
l' appar eil . Prene z cel a en cons idé ra tion lors du c hoix de l'em placemen t de votr e
ap parei l.
Pend ant son fon cti onnem ent ou quelq ue temps après, il se pe ut de temps à
autre qu' une machin e à fumée débi te spontan ément de la fu mée.
Ap rès u ne utili sation c ontinue toute s machin e à fumée a be soin de pause s de
fonctio nne ment pou r garder une température co rre cte. Penda nt la phase de
ch auffe , l'appare il ne peut pas e ncore déga ger de la fumé e.
Nettoyage et Main tenan ce
Faites toujours att ention de ne pas pollue r le liquide à fum ée. Après l'avo ir
rempli de l iquide à fumée, refe rme z t oujours immédi atement les couve rcles du
bi don de liquid e et du r ése rvoir de la machine . Ne ttoye r la machi ne
réguliè rem ent pour év iter des frai s d e réparation et parties de rechange . A près
un e uti lisation continu e de 40 heure s, il est reco mmandé de pro céd er à un
nettoyage de l' appar eil po ur évite r u ne accum ulation de rés idus dan s l 'élément
de chauff age ave c d'eau dist illée.
-2 9-
Page 32

Pr atiqu ez le net toyag e de la m an ièr e suiva nte :
1. Insére z l'eau dist illée dans l e réservoi r propr e et insérez l e tuyau d 'liquide
da ns le rés ervoi r.
2. Fa ite s m arche z la ma chi ne dans une salle bien aér ée jusqu'à ce que son
réservo ir soit vide .
3. Ne ttoyez le boî tier de la mac hine seu lement a vec u n c hiffon s ec. Le
nettoyage es t acco mpli. Rempl iss ez la machin e de liquide à fumée.
Veuill ez mettr e l a m achine e n s ervice cour te ment pou r n ettoy er la pompe
et le bloc de c hauffage .
Re marqu e : Dû à l a con sis tance vi squeuse du liquide à fu mée e t à l a hau te
te mpérature avec laque lle l a fumée s'évapore, tout es les m achin es à fum ée on t
te ndanc e à encrasser. Le e ntret ien régul ier de l a machi ne g arant i cependan t
so n usage s oli de pour d e nombreus es années.
Ne ttoye z le bo ît ier de la m ach in e se ul eme nt a vec un ch iff on s ec.
L' appar eil est à s tocke r au se c.
Ne ttoyer l' appar eil apr ès de st ocker. L'a ppare il est à stocke r au sec . No us
recomma ndons de contrôle r la mach ine men suelleme nt. C'e st constit ué du
te mps de ch auffage et d u débit de fum ée de quelqu es minutes .
Caractéristiq ues Techniques
Mo de l
Al im entatio n
Pu is sance de re ndement
Vol ume d'émi ssion
Co nt enu du rése rvoir
Co ns ommatio n de liquid e
Temps de chau ff age
Poids
Di me nsions (L xlxH)
Té lé command e inclus
Fréq uence por teuse
Batt erie
Portée
W- 50 8
100~ 240V AC 50/ 60 H z
800 W
env. 85 m³/ mi n.
0,8 li tres
3,7 mi n./0,8 li tres
100 se condes
3,8 kg
315 x 12 8 x 166 (mm)
W-1
UHF 43 3.920 MHz
12 V, type 2 3A
env. 50 m
W- 51 0
100~ 240V AC 50/ 60 H z
1,00 0 W
env. 283 m³ /m in.
2,8 li tres
13 min ./litre
12 min .
11,4 k g
468 x 25 0 x 148 (mm)
W-1
UHF 43 3.920 MHz
12 V, type 2 3A
env. 50 m
Ad missi on
Ce sy stème sa ns file êtr e testé et autor isé da ns l'Uni on europ éenne se lon le s
te rmes de la direct ive R+TTE. En la UE, le syst ème sans file possèd e un e
autoris ati on générale et n e n écessite pa s d e d éclaration sp éci fique . D épendant
de p ays d'opération , il p eut c epend ant ê tre n écessair e de d emand er une
at tribu tio n des fré quences au près des aut orités nat ionales.
-3 0-
Page 33

Garantie
La garantie e st valide s eul ement s i l'app are il est ac heté d' un dist rib uteur o u
revende ur autori sé par Ant ari. Po ur un service c ouver t par la garan tie,
expédie z vous l'app areil seul ement à u n dis tribu teu r ou reve ndeur auto risé.
Si l'a ppa reil es t modif ié de que lque ma nière, si l'entre tien et l es répa ra tio ns
so nt ef fectués par d u per sonnel de ser vice incompét ent, ou si le produit es t
ut ilisé au treme nt que décr it dan s ce mod e d'empl oi, ceci peu t cau ser des
do mmage s au produit e t la gara ntie cesse a lors.
Ce n' est pa s u n c ontra t d 'entreti en et de maint enance et ne compr end s pas
de s servi ces. Toute s piè ces d'u sur es ne son t pas c ouver t par la ga ranti e.
Ga ra nties addit ionnelle s p roposent selon la discr étion du distr ibuteur ou du
revende ur deme ure nt l'ob lig ation u niq ue du dis tri buteu r ou du r evend eur.
Qu and vo us contac tez votre revendeu r po ur l'info rmation ou l' assis tan ce,
to ujour s cit ez le cod e barre et le mo dèle de l'ap pareil.
Li sez et ga rdez ces ins truction s.
-3 1-
Page 34

使用 說明 書
W-508 & W-510 煙 霧 機
恭喜您 成 為Antari W無 線 系 列 煙 霧機的使用 者
感 謝 您 選 用 Antari 煙 霧 機 產 品 , 現 在 您 已 經 擁 有 高 科 技 的 專 業 煙 霧 機 , 在 開 始 使 用 之
前 , 我 們 建 議 您 先 仔 細 閱 讀 本 說 明 書 , 遵 循 使 用 手 冊 中 的 說 明 , 這 會 有 助 於 您 在 使 用
Antari 煙霧機時得 心 應 手 , 達到最滿意 的 煙 霧 效 果 ,對於機 器 的 使 用 壽 命也更為 延 長 。
請在連 結 電 源 之 前 ,先填裝好 煙 霧 油 , 機器使用完 畢 及 搬 運 前 ,請先確 認 清 空 煙 霧 油桶。
避免 觸 電 的 安全 使 用 方式:
特別 注 意
請保持 機 器 乾 燥 , 僅於室內使 用 , 本 產 品非為室外 使 用 所 設 計 。
使用前 請 小 心 判 定 電壓級數, 伏 特 及 機 型,當使用 所 有 電 壓 規 格的機種 請 應 配 合 接 地型
插座使 用 。
填充煙 霧 油 至 油 桶 前,請先拔 掉 插 頭 。
請保持 機 器 橫 放 , 勿傾斜放置 。
不使用 時 請 關 機 , 長時間不使 用 時 請 拔 掉插頭。
本產品 之 設 計 為 不 防水,遇潮 濕 或 浸 水 或煙霧油滲 出 時 請 即 刻 拔掉插頭 並 擦 乾 , 在 下次
使用前 , 聯 絡 技 術 人員或 Anta ri 的代理商 檢 修 。
本包裝 中 未 附 維 修 零件,敬請 聯 繫 Ant ari 代 理 商 , 或洽詢合格 技 術 人 員 。
避免 燃 燒 的 安全 使 用 方式:
機器內部並無一般使用者可變動之結構,請勿任意打開上蓋及作任何更改的動作,否則
可能造 成 起 火 的 危 險!
機器僅限成人使用,安裝煙霧機之地點應避免兒童可及之處,請於外出離去時確實關閉
電源。
請勿將 機 器 噴 嘴 對 著人體及動 物 直 射 。
煙霧機 所 產 生 的 煙 霧溫度較高 , 機 器 運 作時,請遠 離 噴 嘴50C M以 上。
請將煙霧機放置於通風良好的地方,請勿遮蓋機器散熱部分,為確保適度通風,機器的
上方及 周 圍 請 預 留20CM空間。
請勿將 機 器 噴 嘴 對 準火焰。
當 機 器 運 作 時 , 噴 嘴 輸 出 部 分 之 溫 度 高 達 攝 氏 200度 , 請 將 任 何 物 品 放 置 離 機 器
50CM。
清潔、 從 事 維 護 及 收納機器時 , 請 先 確 認機器已經 完 全 冷 卻 。
-3 2-
Page 35

避免 爆 炸 的 安全 使 用 方式:
請勿將任何可燃 性 液 體( 例 如 油 脂, 瓦斯, 香水),放置於煙 霧 油 槽 中 , 並 請 使 用 前 詳 細 閱
讀說明 書 。
請 使 用 代 理 商 所 推 薦 的A ntari高 品 質 FLR / F LG水 性 煙 霧 油 , 任 意 使 用 其 他 煙 霧 油 產
品,可 能 導 致 堵 管 現象甚至造 成 內 部 零 件腐蝕。
請確認 煙 霧 油 槽 中 有足夠的煙 霧 油 , 以 免造成煙霧 機 幫 浦 空 轉 過熱。
若 您 的An tari機 器 有 任 何 不 當 運 轉 情 況 時 , 請 即 刻 停 止 使 用 , 倒 出 煙 霧 油 , 機 器 冷 卻
後,仔細包好本產品(建 議 以原包裝) 送 至 代 理 商 或 經 銷 商 處 維 修 。 請 記 得 在 運 送 或 郵 寄
本產品 前 , 確 定 完 全傾倒出所 有 在 油 桶 中的煙霧油 。
煙霧油不能飲用,誤飲時,如有任 何 不 適 請 立 即 就 醫 , 若 不 甚 接 觸 眼 睛 , 請 即 刻 以 水 清
洗。
建議: 在 使 用 本 機 器之前,詳 細 閱 讀 一 次印刷在機 器 上 蓋 板 及 後背板的 警 語 標 示 。
拆除 包 裝 及 檢視 機 器
請打開包裝確認機器運作的所有設備齊全,請參考配置圖,確認您所購買的機型應包括之
項目, 倘 若 有 缺 少 任何項目, 請 即 刻 聯 絡An tar i 經 銷 商。 機器出 廠 時 應 包 含 以下物件:
1. W系 列 機 器 一 部
2. 電 源 線 一 條
3. W-1無 線 控 制 器 一個
4. 使 用 說 明 書 一本
5. 吊 架 一 組 附 墊片及螺 絲 (W- 510可 選 購)
在開始安裝機器之前,請先確認本產品未因運送過程造成外部的損壞,若機器外殼、控制
器 或 電 源 線 有 任 何 損 壞 , 請 勿 插 上 插 頭 , 並 請 勿 使 用 , 馬 上 與Anta ri 代 理 商 或 經 銷 商 聯
繫。
機器 的 安 裝
拆開包 裝 , 小 心 的 移除所有的 包 材 墊 片 ,特別是機 器 噴 嘴 的 部 分。
將煙霧 機 放 置 於 平 坦表面,取 下 裝 置 煙 霧油容器的 蓋 子 。
連結油 管 與 機 器 。
請 使 用ANTA RI代 理 商 所 推 薦 的 高 品 質 , 水 性 煙 霧 油 。 W- 515與 W-53 0機 器 只 能 添 加
AN TARI煙 霧 油FLR或FLG來 運 作 , 其 他 任 何 不 屬 於A NTAR I煙 霧 油 會 造 成 機 器 的 堵 管 與
損壞。
請注入A nta ri FLR或FL G煙 霧 油至八分 滿 , 並 仔 細 蓋上油蓋 。
操作 方 法
添加煙霧油至油桶時請勿過滿,且記得將油蓋旋緊。之後請將電源插頭插入插座,啟動機
器 後 方 的 電 源 開 關 , 機 器 便 會 開 始 加 熱 , 請 注 意 預 熱 中 的 機 器 並 無 法 輸 出 煙 霧 , 且W-
508機 器 把 手 上 的LED紅 燈 或W- 510機 器 後 方 的LED綠燈 會 持 續 閃 亮 直 到 機 器 預 熱 完 成 後
才停止 閃 爍 。
請參閱 以 下 設 定W- 508與W-5 10無線控 制 器 的 方 法。
-3 3-
Page 36

重點 指 示:
在噴煙時,請隨時注意油桶的剩油量。請勿食用煙霧油,若不小心勿食,請趕快就醫,不
慎讓煙霧油接觸到皮膚或眼睛,請徹底使用清水洗淨。請注意在添加完煙霧油之後,確實
將油桶 蓋 蓋 上 , 以 防灰塵或雜 質 進 入 油 箱。
W-51 0:Ant ari W-510機 型 的 煙 霧 配 有 吊 架 , 可 方 便 安 裝 或 吊 掛 使 用 , 倘 若 您 將 煙 霧 機
裝吊掛使用,請加上鋼索穿過馬達安全吊環,並請特別注意勿讓煙霧直接噴在任何人的臉
上,無 論 採 取 何 種 安裝方式, 請 勿 傾 斜 超過25度 。
W-508 外觀 說 明
01- 噴 嘴
02- 機 身主體
03- 把 手
04- 把 手開關
05- 油 桶與油桶蓋
06- 電 源開關
07- 保 險絲座
08- 電 源線
09- 無 線接收器
10- 腳 墊
11- W- 1 無 線發射器
W-510 外觀 說 明
01- 噴 嘴
02- 機 身主體
03- 把 手
04- 油 桶與油桶蓋
05- PU管與 濾 嘴
06- 油 管轉接頭
07- 控 制器輸出插 座
(3 梢 XLR 或 DMX)
08- 控 制器輸入插 座
(3 梢 XLR 或 DMX)
09- 電 源開關
10- 電 源插座與保 險 絲 座
(120VAC 250 V/T10A)
(230VAC 250 V/T5A)
11- 電 源指示燈
12- 指 撥開關
13- 無 線接收器
14- 安 全吊環
15- 電 源線
16- 腳 墊
17- 固 定螺絲
18- 吊 架
19- W- 1無 線發射器
16
01
15
01
02
18
-3 4-
10
17
02
06
19
N
T
WARNING
HO
AS
T
P ATLE
PRO
KEE
AP
S
VERB
E N
N PA
M
11
04
E
M
C
50
!
ITA
E
L
DS NC
Z
Z
E
M
!
!
O
D
R
N
0C
H
ANT
OIS DE
A
5
F
.
STA
UL
E
B
N
BBE
SG
R ÀM
LTE
E
C R
M A
A
H
C
H
C
NUNG
REN
TNS 50
S
DER DÜE
E
N
O
IND
V
03
05
06
ON/ OFF
S
FUE
07
09
08
03
05
04
14
G
H
ON.
L A R
ORE C ANGIN FUSE.D
.
EF
.
REI.
ES
PP
UT
T LIQUID
G
L'
U
OS.
L
N !
ULTSUPERVISI
SAD L
D
D
S INSI E.N ERV C D
WIHO
E E
AUX
AN H A A
N
W
O
WARNI
ST NT
LY ITH A
LLA C
ESI A
K
N
DES
B
• ISCONN ECT POWER B
T OPERATE
DE.
N
URVEI
O T
DE USEONLY. EEP DRY.
ES N
I
SI LE DÉBR C ER
• USE O
T
NS
I
DO N
S
ARI ÉC
S S
R
•
S
FO
AN LIQUI
EMPLOIDA S L C C
•
O UER S I EABLE PART
A EMEN
RUN
•
E• VOR DEM SICHE
U
LAPP REI
IEN SD P
PO
N
ENEN
L P EIL S
S
U
MAIS ' A L ANS
OT T PA E
Ç
LE EMPL C T DUFU
A
T
IS
É.
ATE TION!
NEC N
L
UTI
VANT
EI
•
AR
A É O
P
G VOM NETZ TRENN N.
L DIT
L
N'
AMA
UTIL ISEZ J
N
•
DE
OL
EJ IS L ER 'AP AR
L
P I
N
I• DIE BED
PAREI ÉT C N
•
GER 'HUMI
L
EUR DE 'AP
•'AP
IEN
T .
ÉR
PROTÉ
E
.
IN
T
WEC EL ALL
L' T I
S S
EN
•
N
UNG
R H
U EN R
INNER
E• KEI E ZU WARTENDEN T ILE IM GERÄT
IBEN.
IST NUR UNTER DER AUFS CHT VON ERWACH
T !ACHUNG
ELESS
• NIEM S OHNE
R
E
WI
UIDBETRE
ENUNG
I
ECIVER
R
. GESTA
E
TET
T
ÄU R .
AL FL
U
N
• NR IN INNENR MEN VE WENDEN VOR NÄSSE SCH ÜTZE .
DMX IN
PUT
I
O R N
P WE
EUS
F
13
10
09
07
11
12
I
R
G L H
E
N
L W
E
A
S
L
S/
I
GTSI
DMX
ON
OFF
08
DIPSWIT H
M- 1
X5 2D
C
C
WE SWIT H
O R
P
Page 37

其他事項 :W-5 08與W-510皆 配有電子油 量 偵 測 器 , 在 剩餘油量不 足 的 情 況 下 , 幫浦會自
動 停 止 動 作 , 且 機 器 後 方 的L ED燈 號 會 閃 爍 提 示 油 量 不 足 , 此 時 請 添 加 煙 油 至 空 油 桶 即 可
解除警 示 燈 號 。
在執行 添 油 動 作 之 後,即可再 恢 復 使 用 機器。
當您覺得煙量開始過少,幫浦開始吵雜或不再有任何煙霧輸出時,請馬上拔除機器插頭。
檢查剩餘油量是否足夠、外部保險絲、以及牆壁上的電源插座是否正常,當以上一切檢查
無誤,再插入電源,若在按住控制器按鈕的三十秒之後,仍無煙霧噴出,請確認輸油管是
否完全暢通無雜質卡住,若您無法真正確認問題發生的原因,勿直接再連續壓按控制器的
按鈕, 請 將 您 的 機 器送回Anta ri的經銷商 維 修 。
規格 明 細
型號
電源
瓦數
輸出功率(立方 呎/每分 鐘)
油桶容量
耗油量
重量
尺寸 (長x寬x高)
隨機附含發射 器
溫機時間
W- 50 8
100~ 240V AC 50/ 60 H z
800 瓦
3,00 0 cu.ft/m in (85 m³/m in )
0.8 公升
60 分 鐘 /0. 8 公 升
3.8 公斤
315 x 12 8 x 166 (mm)
W-1
100 秒
W- 51 0
100~ 240V AC 50/ 60 H z
1,00 0 瓦
10,0 00cu.ft /min (284 m ³/ min)
2.8 公升
13 分 鐘 / 公 升
11.4 公 斤
468 x 25 0 x 148 (mm)
W-1
12分 鐘
ANTARI W-508 & W-510 無 線 發射 器 使 用說明
* 發射器 :
- 發射器 : 使 用 DC 12 V 電 池
- 接收距 離 :50 公 尺的開放 空 間 ( 無 障 礙物)
- 發射器 都 可 與 任 一 台W系列接收器 搭 配 使 用 。
* 接收器 :
- 接收器 在 經 過 測 試 之後會固定 在 每 台W系 列 的機器後板 上 , 請 勿 嘗 試將它拔 除 。
-3 5-
Page 38

* 設定功 能 :
1. 所 有 的 接 收 器都能接 收 任 何 已 完 成對頻的 發 射 器 。
2. 每 個 接 收 器 都能記憶 五 組 發 射 器 的訊號。
3. 每個 發 射 器 在 出 廠 都 都 已 經 完 成 設 定 , 使 用 者 可 以 不 用 重 新 設 定 即 可 使 用 。 最 初 的
設定為 按A按 鈕 可 以 啟 動機器,按B按 鈕 則 可 以 停止機器運 作 。
4. 若使 用 者 希 望 透 過 其 他 發 射 器 來 控 制 機 器 ( 除 了 原 來 配 備 的 發 射 器 之 外 ) , 需 要 在
機器開 啟 的15秒 內完成設 定 , 否 則 機 器會在15秒 之 後 自 動離開設 定 模 式 。
設定範 例 :
在機器後方控制版上有LE D的 燈 號 , 當 機 器 啟 動 時 ,W-508機 器 後 方 綠 色L ED燈號或
W-51 0機 器 後 方 橘 色LED燈號 會 閃 爍1 5秒 , 在 這15秒 之 間 , 使 用 者 可 以 進 行 控 制 器
的設定,當設定完 成 後 , 綠/橘 色 的 燈 號 會 停 止 閃 爍 然 後 轉 成 亮 綠/橘 燈 。 若 使 用 者 想
使用一個 控 制 器 同 時 控 制 兩 台 甚致多台機 器 時 , 可 將 希 望 控 制 的機器數量全 部 啟 動 ,
然後在 啟 動 後 的15秒內, 按 下 控 制 器A按 鈕來完成 設 定 。
5. 機 器 具 有 記 憶 功 能 , 若 在 機 器 啟 動 也 完 成 設 定 之 後 , 沒 有 再 設 定 其 他 組 控 制 器 時 ,
機器可自動 記 憶 最 後 設 定 的 控 制 器 組 , 在機器下次使 用 開 機 時 , 請 勿 按 壓 任 何 控 制器
的按鈕 , 經 過1 5秒 的 設定時間之 後 , 即 可 以上次所記 憶 的 控 制 器 組來控制 機 器 。
6. 請 注 意 當 有 新 的 控 制 器 要 與 機 器 對 頻 時 , 無 論 先 前 有 幾 組 完 成 設 定 的 控 制 器 都 會 被
洗掉。
機器 注 意 事 項
1. 所 有 的 煙 霧 機 再 噴 嘴的地方都 會 有 煙 油 的 凝 結 , 因為這會導致 濕 氣 累 積 在 噴 嘴 下 方的表
面,所 以 請 在 要 設 置機器時, 將 這 個 凝 結的問題考 慮 進 去 。
2. 所 有 的 煙 霧 機 在 待 機時,每隔 幾 分 鐘 會 噴 出 微 量 的煙霧,即時 在 關 機 後 仍 有 一 小 段時間
機器會 噴 出 微 量 的 煙。
3. 所 有 煙 霧 機 在 運 作 噴煙之後, 會 自 己 暫 時 停 止 動 作來準備重覆 加 熱 , 在 加 熱 的 這 段期間
是無法 執 行 噴 煙 動 作。
清潔 與 收 藏
請勿讓煙霧油受到雜質污染,在每次添完油之後請馬上蓋好油桶蓋。定期的清潔與保養您
的機 器 , 可 以 將 零 件 的 損 壞 率 減 至 最 低 , 並 節 省 維 修 成 本 。 在 使 用 超過4 0個 小 時 之 後 , 建
議您可 以 使 用 蒸 餾 水,依尋以 下 的 步 驟 來清潔電熱 管 :
清潔的 步 驟 如 下 :
1. 在 油 箱 中 倒 進蒸餾過 的 乾 淨 清 水 ,然後將 聯 接 油 箱 與 機器的油 管 裝 上 。
-3 6-
Page 39

2. 在 通 風 的 地 方啟動並 運 作 機 器 , 直到油箱 內 的 清 水 幾 乎使用完 畢 。
3. 請 使 用 乾 淨 的棉布擦 拭 機 器 , 清 潔到此結 束 。 之 後 請 再添加煙 霧 油 , 啟 動 機器讓它運 作
一小段 時 間 來 清 掉 一些殘餘在 幫 浦 與 電 熱管上的煙 油 。
注 意:所 有 的 煙 霧 機 經 常 因 為 使 用 濃 稠 的 煙 油 而 導 致 阻 塞 , 無 論 如 何 , 正 確 的 使 用 方 法
與清潔 可 以 增 加 機 器的使用年 限 。
請使用 乾 棉 布 擦 拭 並在儲藏前 保 持 乾 燥 。
ANTARI W-510 DMX 設定 說 明
頻道說 明 A
0- 128 = Off / 關
129 255 = Max imum Volu me Outp ut 最大噴煙 輸 出 量(100%)
除了 ANTARI W-508 煙 霧 機 之 外 ,W- 510 煙 霧 機 備有 DM X 控 制列(指撥開關),W-5 10
只使用 一 個 控 制 頻 道,每一個 頻 道 的 輸 出量數值在 0 ~255 之 間。連結 D MX 控台後 ,
DMX 可 控制 Z-10 00II 及 Z-10 20 100% 最大 噴 煙 量 。 使 用相同的 系 統 您 可 以 輕易的連
結煙霧 機 、 燈 光 、 其他的特效 機 器 做 全 系統的演出 。
如果頻 道 A 的 設 定 數 值 在 0 ~ 12 8 之 間 ,這台機器 將 無 法 有 足夠的輸出 量 運 作 。
當頻道 A 的 數 值 從 129 到 2 55 時,煙 霧 機 將 運 轉輸出最大 的100% 輸 出 量 。
附注: 從以 上 的 說 明 舉 例:如果煙 霧 機 器 被 分派到第 130 的 DM X 位 址,頻道 A 的功 能 運
作將完 全 符 合 DMX 第 1 30 頻道的 控 制 要 求 。
保固條 款
1. 保 固 服 務 僅 提供於 ANTARI 授 權 代 理商出售的 產 品 , 請 直接將產品 寄 回 ANTA RI 授權
的代理 商 或 經 銷 商 維修。
2. 凡 是 擅 自 改 裝產品而 發 生 問 題 , 或產品是 由 未 經 授 權 的人員來 維 修 , 以 及 未依循使用 說
明來操 作 導 致 機 器 塤壞,恕不 提 供 保 固 服務。
3. 請 注 意 此 保 固條款並 非 維 修 合 約 ,故不包 含 免 費 的 機 器保養、 清 潔 服 務 及 消秏品的更
換。
4. 代 理 商 可 依 各自的義 務 或 責 任 來 提供不同 的 額 外 保 固 條款。
5. 若 需 售 後 服 務或任何 協 助 時 , 請 提供機器 的 序 號 及 型 號給 ANTARI 代 理 商 。
請妥善 保 存 此 說 明 書
-3 7-
Page 40

For curr ent pro du ct info rmati on v isit An tari at :
ww w.an tari.co m, www.anta ri.co m. tw
For info rmati on reques ts plea se c ontac t us at :
sa le s@ant ari.c om
C0 8W 50101
 Loading...