

Page 1
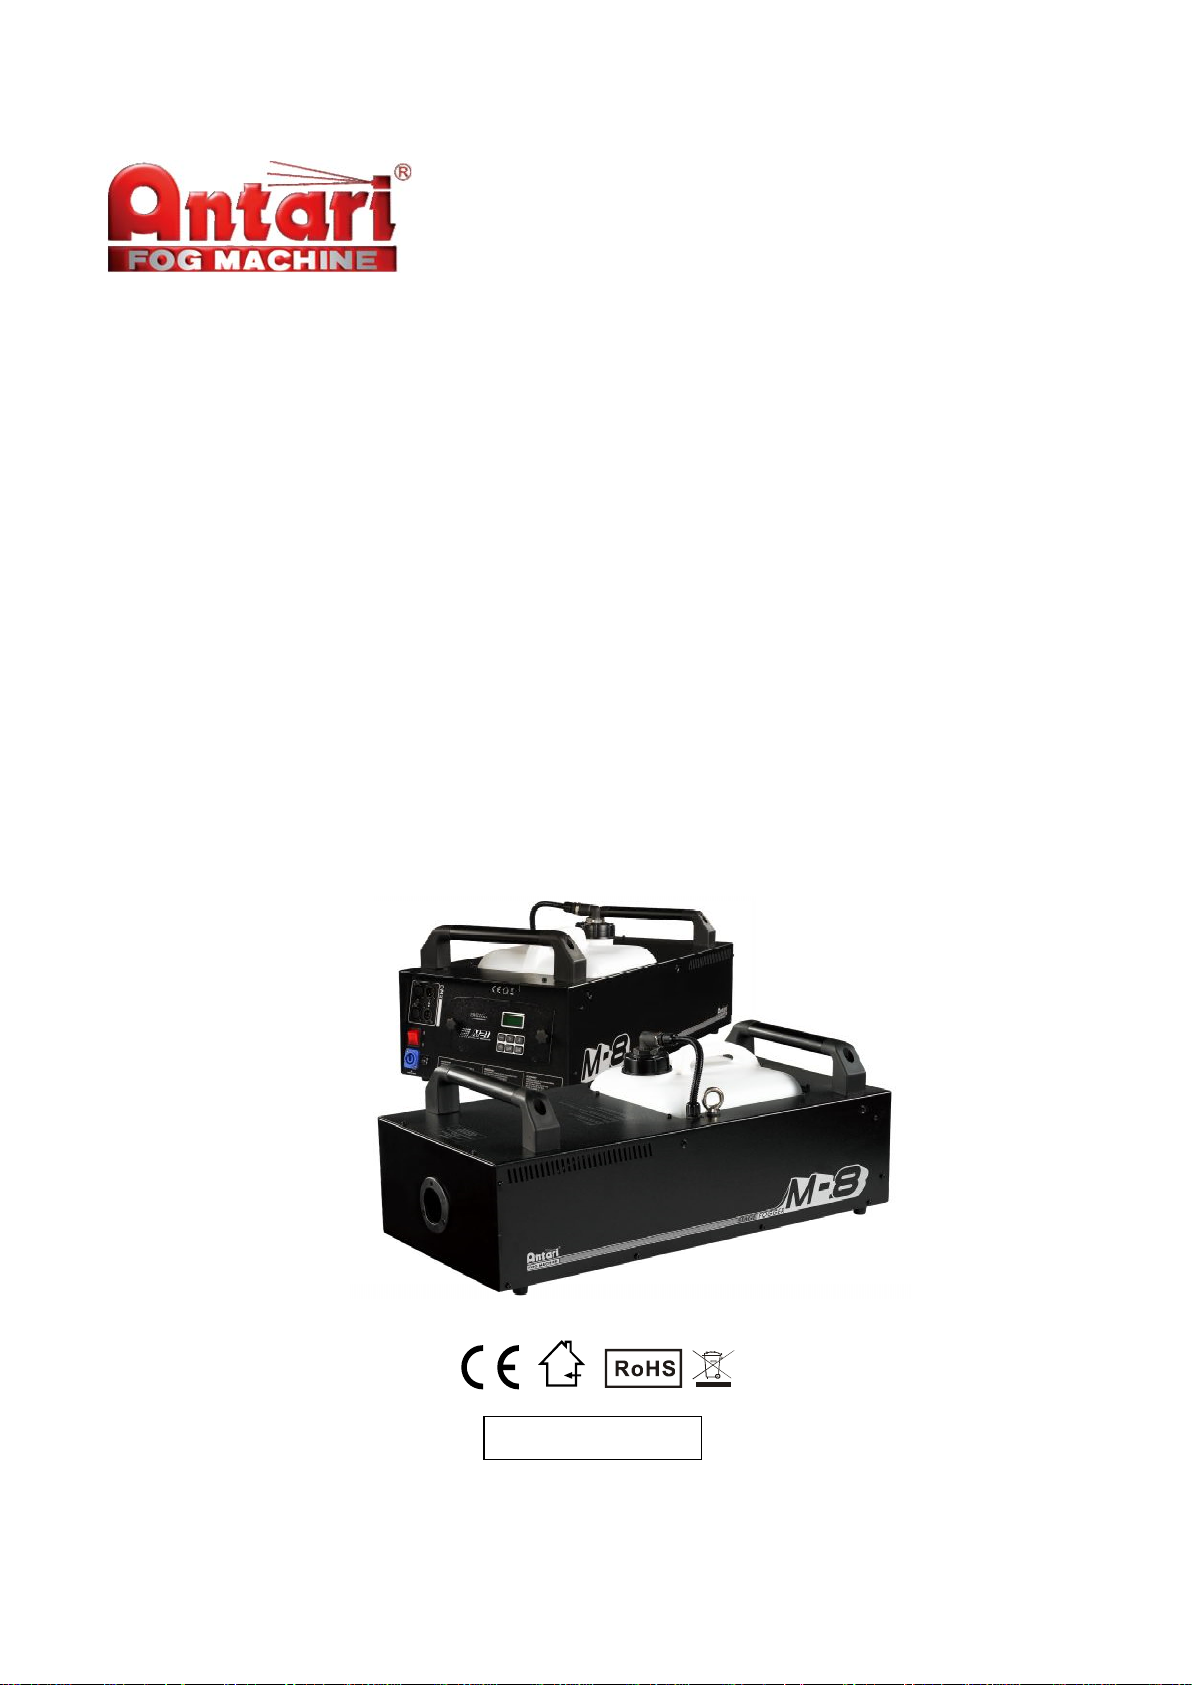
M-8
English ‧ 中文
Stage Fog Machine User Manual
© 2014 Antari Lighting and Effects Ltd.
1
Page 2

2
Page 3

Antari M-8 Stage Fog Machine
Congratulations on the purchase of your new ANTARI FOG MACHINE
Thank you for choosing Antari Fog Machine. You now own a rugged and powerful
state-of-the-art machine. Prior to use, we suggest that you carefully read all of the
instructions. By following the suggestions found in this user manual, you can look forward to
the reliable and satisfactory performance of your ANTARI FOG MACHINE for years to come.
Please follow these operation, safety and maintenance instructions to ensure a long
and safe life for your fog machine.
CAUTION
Risk of electric shock. Disconnect the machine from the electric supply before refilling liquid,
cleaning or performing maintenance on the machine.
-Danger of Electric Shock
-Keep this device dry.
-Always use 3-prong grounded electrical outlet for all power voltage. Prior to use take care to
determine that the unit is installed at the rated voltage.
-Always unplug your ANTARI FOG MACHINE before filling its tank.
-Always keep the fog machine in flat position.
-Turn off or unplug the machine when not in use.
-If moisture, water or fog liquid gets inside the machine, immediately use.
-Turn off or unplug the machine when not in use.
3
Page 4

-If moisture, water or fog liquid gets inside the machine, immediately unplug the unit and
wipe off and keep it dry.
-No user serviceable parts inside. Refer to your ANTARI dealer or other qualified Service
personnel.
Danger of Burns
-Structural modification inside the machine is not allowed at anytime, please do not attempt
to modify the machine by removing the cover, other wise burns may result.
-Never leave the unit running unattended.
-Never aim the output nozzle directly at people or animals.
-Fog machine output is very hot. Avoid coming with in 60cm of the output nozzle during
operating.
-Locate the fog machine in a well-ventilated area. Never cover the unit’s vents. In order to
guarantee adequate ventilation, allow a free air space of at least 20 cm around the sides
and top of the unit.
-Never aim the output nozzle at open flames.
-The output nozzle becomes very hot during operation (200℃). Keep flammable materials at
least 50cm away from the nozzle.
-Always allow your ANTARI FOG MACHINE to cool down before attempting to clean or
service it & transporting.
Danger of explosion
․ Never add flammable liquids of any kind (such as oil, gas, perfume) to the fog liquid.
․ Use only high-quality, water-based fog liquid that your dealer recommends. Other fog
liquids may cause clogging or damage to internal parts.
4
Page 5

․ Always make sure there is sufficient liquid in the tank. Operating this unit without liquid
will cause damage to the pump as well as over-heating of the heater. If you ANTARI fog
machine fails to work properly, discontinue use immediately. Drain all fog liquid from
thank, pack the unit securely (preferably in the original packing material), and return it to
your ANTARI dealer for service.
․ Always drain tank before mailing or transporting this unit.
․ Never drink fog liquid. If it is ingested, call a doctor immediately. If fog liquid comes in
Contact with skin or eyes, rinse thoroughly with water.
NOTE: Pay attention to all warning labels and instructions printed on the exterior
of your ANTARI Fog Machine.
․ Open the shipping carton and verify that all equipment necessary to operate the system
has arrived intact.
․ The shipping carton should contain the following items:
1. One unit of ANTARI M-8 Fog Machine with power cord.
2. M-21 multi-function remote control with attached 2 meter cord.
3. User Manual
If any equipment is missing contact your ANTARI dealer immediately.
Before beginning your initial setup on the ANTARI M-8 Fog Machine, make sure that
there is no evident damage caused by transportation. In the event that the unit’s housing
or cable is damaged, do not plug it in and do not attempt to use it until after contacting
your ANTARI dealer for assistance.
5
Page 6

Setup
․ Remove all packing materials from shipping box. Check that all foam and plastic padding
is removed, especially in the nozzle area.
․ Place fog machine on a flat surface and remove fog liquid tank cap.
․ Fill with high-quality, water-based fog liquid recommended by Antari dealer.
․ When filled, place cap back on liquid tank.
․ Firmly attach the M-21 control module cable to the connector inside the rear chamber for
the machine.
Operation
․ Plug power cord into a grounded electrical outlet. Turn the power switch to “ON” on the
back of the machine. Warm-up is completed when the display on the control module
shows “Ready to Fog”
․ To emit fog press the appropriate button on the M-21 control module for fogging duration,
interval and volume
․ The control unit display will display “Warming up” and “Ready to fog” as the machine
re-heats to the proper operating temperature.
․ For further information on operating your M-8 Fog Machine, see the section titled
“Control Module Operation”
․ The limited warranty is based on 8-hour operation per day. Exceeding usage may
shorten the lifetime of machines.
Caution
”Visibility during operation is reduced” This model can be operated at a floor level or sitting
on any regular surface. Whatever installation method you choose, do not allow the unit to
have more than 35 degree angle of inclination.
6
Page 7
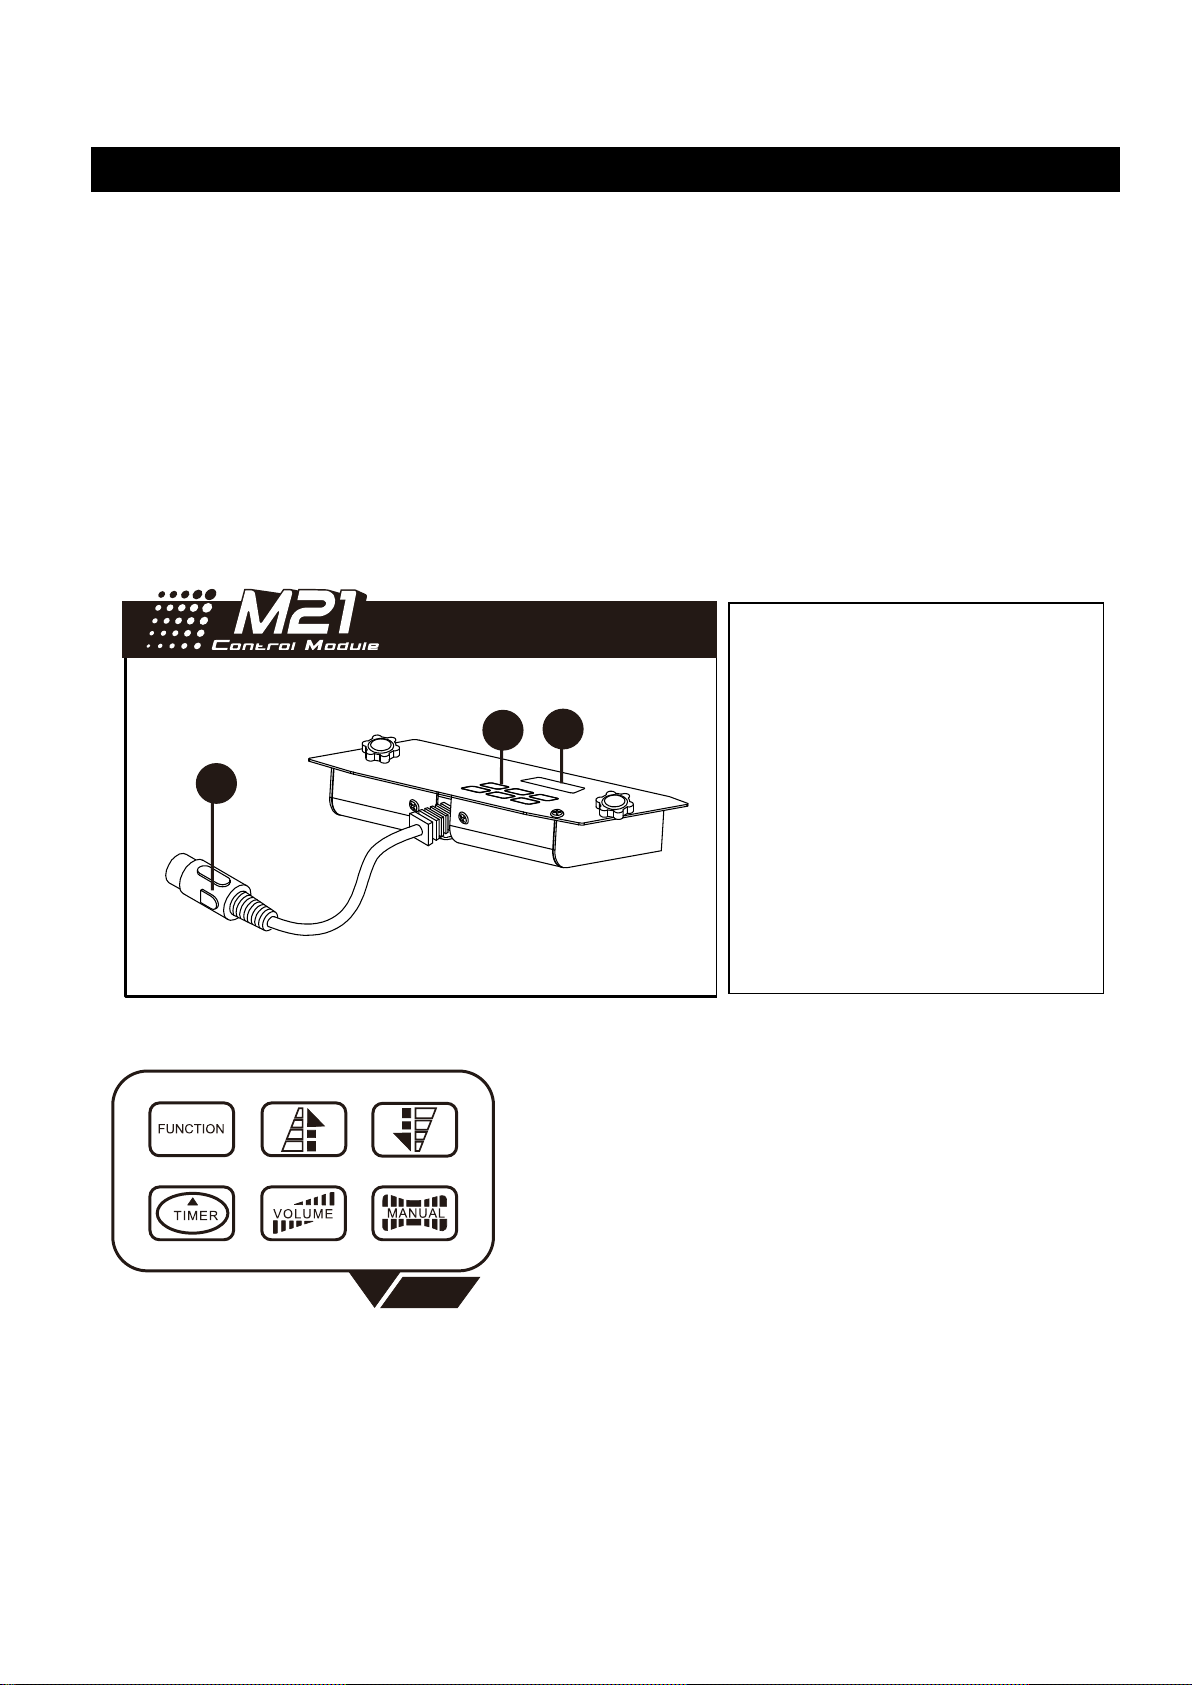
Control Module Operation
1
2
3
O F F
1. Function-button Sub-menus:
Interval Set
Duration Set
Timer Out
Volume Out
DMX 512 Add
Fluid Sensor
Quick Start
2. Up / Down button
3. Timer button
4. Volume button
5. Manual (OFF) button
1. 5-pin XLR
(Cable Length:2m)
2. LCD-Dispaly
3. Fuction Buttons
M-21 Control Remote
The M-21 is a 2 meter wired multi-function remote control with 5-pin XLR connector for
ANTARI Fog Machine models M-8 Its interface allows operator to customize fog machine
functions by adjusting fogging duration, interval and volume. Its LCD displays current
operating parameters, which are automatically stored in non-volatile memory, allowing the
machine to be turned off without losing function settings.
Setting time intervals for timer operation
Press the button FUNCTION until the display indicates »Interval Set«. Use the buttons UP
and DOWN to adjust the intervals between the individual fog outputs in timer mode within
7
Page 8

the range of 1 and 200 seconds.
Setting the output duration for timer operation
Press the button FUNCTION until the display indicates »Duration Set«. Use the buttons UP
and DOWN to adjust the duration of the fog outputs in timer mode within the range of 1 and
200 seconds.
Setting the fog output volume for timer operation
Press the button FUNCTION until the display indicates »Timer Out«. Use the buttons UP
and DOWN to choose the fog output volume (at High or Medium or Low) in timer mode.
Setting the fog output volume
Press the button FUNCTION until the display indicates »Volume Out«. Use the buttons UP
and DOWN to choose the fog output volume (at High or Medium or Low).
Setting the DMX512 address
Press the FUNCTION until the display indicates »DMX 512 Add.«. Use the buttons UP and
DOWN, to set the machine to the same address as on your DMX controller. Please refer to
chapter DMX512 settings for more information on DMX operation.
Switching the fluid sensor on and off
Press the button FUNCTION until the display indicates »Fluid Sensor On«. Use the buttons
UP and DOWN to deactivate the fluid sensor (indication »Fluid Sensor Off«) and to
reactivate it (indication »Fluid Sensor On«).
8
Page 9

Switching the Quick Start mode on and off
Press the button FUNCTION until the display indicates »Quick Start On«. Use the buttons
UP and DOWN to switch Quick Start mode of machine.
Quick Start mode:
If the “Quick Start” mode is activated, the M-8 will call the operating mode of previous
operation when it is turned on. For instance, if the timer was selected last time, the machine
will be directed in timer mode after the warm-up process is completed.
-Volume operation
Press the button VOLUME, to activate fog output at setting volume (High or Medium or Low
output). The display indicates »Volume« followed by the output that was set in menu item
»Volume Out«. To stop the fog output, press the button OFF (MANUAL).
-Manual operation
For immediate fog output at the maximum volume of fog, when the LCD screen displays
“Ready To Fog”, keep the button MANUAL pressed. The display indicates »Manual 100 %«.
The fog machine will always emit the maximum volume of fog when the button MANUAL is
pressed. As soon as you release the button, the fog output will stop.
-Timer operation
In the timer mode, the fog machine will automatically emit fog. The time intervals, duration
and fog volume depend on the corresponding menu settings. Press the button TIMER, to
activate the timer mode. The display indicates the set time interval. The unit counts down to
0 seconds and emits fog. To deactivate the timer mode, press the button OFF (MANUAL).
9
Page 10

M-31 Wireless Control Module Operation
1
23
4
5
1. 5-pin XLR
(Cable Length:2m)
2. LCD-Dispaly
3. Fuction Buttons
4. Transmitter
5. Receiver
The wireless control module M-31 consists of a transmitter equipped with two buttons for fog
on and off, and a signal receiver pre-attached to the panel of each M-31.
* Transmitter:
With the transmitter it is possible to emit fog via radio over a distance of up to 50 meters. The
transmitter is compatible to any receiver of the M-31 and can control an unlimited number of
machines in parallel.
Press the button “A”, to emit fog. The button “A” has the same function as the button
VOLUME on the LCD control panel, i.e. the fog output depends on the setting of menu item
»Volume Out«. The display indicates »Volume« (High or Medium or Low output). To stop the
fog output, press the button “B”.
10
Page 11

* Receiver:
The receiver is tested and pre-attached to the panel of each M-31. Please do not try to
remove it. The receiver responds to up to 5 different transmitters that are registered with the
machine. The included transmitter has been registered to the machine before shipping. It
can be directly operated without any start-up setting.
-Registering transmitters
To operate the machine with a different transmitter than the included one, or to operate it
with up to 5 different transmitters, each transmitter must be registered in advance. For this
purpose, turn on the machine. When the display indicates »Wireless Setup«, press the
button “A” 1 second on each transmitter. Thus the previous transmitters are cleared from the
memory of the receiver. The setting must be completed within 15 seconds after turning on
the machine. Then the machine will automatically exit the transmitter setting mode. The
display shows »Wireless Setup OK«. At this point, no further transmitter can be added.
If no transmitter is registered when the machine is switched on, the memory of the receiver
will keep the record of the previous operation.
Setting Example 1:
In order to register several transmitters with a machine, turn on the machine. When the
display indicates »Wireless Setup«, press the button “A” 1 second on each transmitter within
15 seconds to establish the signal transmission.
11
Page 12

Setting Example 2:
Pin
Function
1
Ground
2
Data-
3
Data+
In order to use 1 transmitter to control 2 or more machines, turn on the machines
respectively. When the displays indicate »Wireless Setup«, press the button “A” 1 second on
the transmitter within 15 seconds to establish the signal transmission.
-Battery change on the transmitter
If the range of the transmitter decreases, the battery is probably exhausted and must be
replaced. For this purpose, take off the housing cover and remove the used battery. Insert a
fresh DC 12V battery as indicated in the battery compartment and refit the housing cover.
․ Note: When warming-up process is completed and wireless function is activated the LCD
screen indicates “Ready To Fog W”. (“W” means Wireless) On the contrary, when the
wireless function is deactivated the LCD screen shows “Ready To Fog” (Without “W”).
DMX Connector Pin Assignment
The machine provide 3 or 5 pin XLR connector for DMX connection. Diagram below indicate
pin assignment information
12
Page 13

DMX Control Setting Operation
0-31 OFF
32-126 volume / Low output
127-191 volume / Medium output
192-255 volume / High output
ANTARI M-8 ON-BOARD DMX SETTINGS
The M-8 has on-board DMX control. It uses 1 channel to control volume output
operation. The channel has a value range of 0 to 255.
When the channel has a value between 0 and 31, the unit is OFF.
When the channel has a value between 32 and 126, the volume is at Low output.
When the channel has a value between 127 and 191, the volume is at Medium output.
When the channel has a value between 192 and 255, the volume is at High output.
13
Page 14

M-8 Description
3.
1.
2.
4.
5.
6.
7.
8.
9.
10.
11.
12.
14.
15.
3.
13. (M-21)
M-8 Machine Layout
If you experience low output, pump noisily or no output at all, unplug immediately. Check
fluid level, the fuse, remote control connection and mains power. If all of the above appears
to be O.K., plug the unit and try again. If fog still can not be produced, check the hose
attached to the tank to make sure there is fluid going through the hose. If you are unable to
determine the cause of the problem, do not continue pushing the buttons on controller, as
this may damage the unit. Return the machine to your Antari dealer.
14
Page 15

Technical Specifications
MODEL
M-8
Power Supply
100~230V AC, 50/60 Hz~
Power Consumption
1800W
Output Volume
700m3/min
Tank Capacity
10 liters
Fluid Consumption
7 min / Liter
Weight
22.5 kg
Dimensions(LxWxH)
668x319x170 mm
Remote Included
M-21
Optional Remote
M-31
Warm-Up Time
8 min
Performance Note
All fog machines develop condensation around the output nozzle. This may result in some
moisture accumulation on the surface below the output nozzle, gently wipe it clean. In order
to give the best performance and longest life-span of fog machines, please use high quality
fog fluids which Antari or the authorized distributor’s recommends.
Maintenance / Storage
Do not allow the fog fluids to become contaminated. Always replace the cap on the fog liquid
container and the fog machine liquid tank immediately after refilling. Cleaning your fog
machine regularly can help you to reduce the frequency of parts replacement and
maintenance costs. After every 40 hours of continuous operation, it is recommended to use
distilled water to clean the heater according to the steps below.
The recommended cleaning steps is as followings:
1. Fill properly distilled water into a clean tank and connect the fluid tube of the fog machine
15
Page 16

to the tank.
2. Run the unit in a well-ventilated area until the tank is almost empty.
3. Use dry cloth to wipe the fog machine. Cleaning is now completed. Refill with fog liquid.
Run the machine briefly to clear any remaining liquid from the pump and heater.
Note: All fog machines are prone to clogging due to the thick consistency of fog liquid and
the high temperature at which it vaporizes. However, a properly maintained fog
machine should provide years of reliable use.
Clean with a dry cloth only. Store dry.
If the fog machine is not in use, please clean it before storage. Store the fog machine in a dry
and cool place. Operate the fog machine at least once a month. A test-run consists of
warming-up the machine followed by a few minutes of fog emission.
Please read and save these instructions.
16
Page 17

使用說明書
歡迎您成為 Antari M-8 專業煙霧機的使用者
感謝您選用 Antari 專業煙霧機,在開始使用這部專業煙霧機之前,我們建議您先仔細閱讀說
明書,依照使用說明書中的說明,讓您再使用 Antari 專業煙霧機時非常安全,輕易的達到最
滿意的煙霧效果﹐也使得機器的使⽤壽命更為延⻑。
注意事項:
請在連結電源之前,先填裝好煙霧油,機器使用完畢及搬運前,請先確認清空煙霧油桶。
避免觸電的安全使用方式:
․ 請保持機器乾燥
․ 使用前請小心判定電壓伏特數,如果使用所有規格的機種並應配合接地型插座使用。
․ 填充煙霧油至油桶內時,請先拔掉插頭。
․ 請保持機器橫放,勿傾斜放置。
․ 不使⽤時請關機﹐⻑時間不使⽤時請拔掉插頭。
․ 本產品之設計為不防水,遇潮濕或浸水或煙霧油滲出時請即刻拔掉插頭並擦乾,在下次使用前,連絡技術
人員或 Antari 的代理商檢修。
․ 本包裝中未附服務零件,敬請連繫 Antari 代理商,或洽詢合格技術人員。
避免燃燒的安全使用方式:
․ 機器內部並無⼀般使⽤者可變動之結構﹐請勿任意打開上蓋及作任何更改的動作﹐否則可能造成起火的危險﹗
․ 機器僅限成人使用,安裝煙霧機之地點應避免兒童可處及之出,敬請於外出離去時關閉電源。
․ 請勿將機器噴嘴對著人體及動物直射。
․ 煙霧機所產生的煙霧溫度較高,機器運作時,請遠離噴嘴 60CM 以上。
․ 請將煙霧機放置於通風良好的地方,請勿遮蓋機器散熱部分,為確保適度通風,機器的上方及周圍請預留
20CM 空間。
․ 請勿將機器噴嘴對準火焰。
․ 當機器運作時,噴嘴輸出部分之溫度高達攝氏 200 度,請將任何物品放置離機器 50CM 之外。
․ 清潔、從事維護及收納機器時,請先確認機器已經完全冷卻。
17
Page 18

避免爆炸的安全使用方式:
․ 請勿將任何可燃性液體( 例如油脂, 瓦斯, 香水),放置於煙霧油槽中,並請使用前詳細閱讀說明書。
․ 請使用代理商所推薦的 Antari 高品質水性煙霧油,任意使用其他煙霧油產品,可能導致堵管現象甚至造成內
部零件腐蝕。
․ 請確認煙霧油槽中有足夠的煙霧油,以免造成煙霧機幫浦空轉過熱。
․ 若您的 Antari 機器有任何不當運轉情況時,請即刻停止使用,倒出煙霧油,機器冷卻後,仔細包好本產品(建
議以原包裝) 送至代理商或經銷商處維修。請記得在運送或郵寄本產品前,確定完全傾倒出所有在油桶中的
煙霧油。
․ 煙霧油不能飲用,誤飲時,如有任何不適請立即就醫,若不甚接觸眼睛,請即刻以水清洗。
建議: 在使⽤本機器之前﹐詳細的閱讀⼀次印刷在機器上蓋板及後背板的警語標⽰.
拆除包裝及檢視機器
請打開包裝確認機器運作的所有設備齊全,請參考配置圖,確認您所購買的機型應包括之項目,倘若有缺少任何
項目,請即刻聯絡 Antari 經銷商。 機器出廠時應包含以下物件:
1. M-8 煙霧機⼀部
2. M - 21 多功能遙控器附帶的 2 米⻑的線纜
3. 使⽤說明書⼀份
機器的安裝
․ 拆開包裝,小心的移除所有的保麗龍墊片,特別是機器噴嘴的部分。
․ 將煙霧機平放,取下裝置煙霧油容器的蓋子
․ 注入 Antari FLR 或 FLG 煙霧油
․ 注入完成後,並仔細蓋上油蓋。
․ 在機器後方將 M-21 控制器線插入正確的位置,並確定連結。
操作機器
․ 將電源線插在有接地的插座上,再將機後方之電源開關打開至”ON”,溫機直至控制器上綠燈持續亮顯示
噴煙準備就需為止。
․ 設定 M-20 控制器上的適當的按鍵以調整須要的噴煙時間,煙量大小及噴煙間距。
․ 控制器上的顯示螢幕會依機器運轉溫度循環溫顯示”Warming up”(加溫準備)以及”Ready to Fog”(準備
就緒)。
․ 更進⼀步的 M-8 煙霧機操作資訊,請參考 M-21 控制器操作說明。
․ 機器的保固是以⼀天 8 小時操作為計算單位,超負荷使用可能會造成機器壽命減短。
․ M-8 機型屬於高功率的大瓦數專業用煙霧機,操作時適宜平穩放置,如因特殊需要而傾斜時,請加以完全的
固定方式,傾斜的角度以不操過 35 度為宜。
18
Page 19

M - 21 多功能遙控器
1
2
3
O F F
1. 功能按鈕子菜單:
> Interval Set 煙量大小設定
> Duration Set 噴煙時間設定
> Timer Out 定時輸出
> Volume Out 煙量輸出
> DMX 512 Add
> Fluid Sensor
2. Up / Down button 上/下鍵
3. Timer button 計時器鍵
4. Volume button 輸出鍵
5. Manual (OFF) button 手動(關閉)鍵
1. 5 PIN XLR 連接頭
(控制器線⻑度: 2M)
2. LCD-Display 液晶顯示器
3. Function buttons 功能按鈕
適用於 Antari M-8 煙霧機型﹐控制器線⻑度 2M 的多功能控制器,採用 5 PIN XLR 連接頭,智慧型控制器,
使用者可以隨需要設定煙霧機運轉功能,只需操做面板按鈕就可以輕易設定噴煙時間、噴煙間隔及煙霧輸出量並
儲存在內部記憶體內﹐使得機器即使關機也能在下次開機後保存前⼀次的設定記錄。
其液晶顯示板,會顯示機器目前運作的情況,控制器面板有五個功能鍵說明如下:
․ Timer 定時器功能模組下設定間隔噴煙
按 FUNCTION 鍵至 LCD 螢幕出現[INTERVAL SET](間隔噴煙),在此模式之下,使用者可以透
過 Up (上)與 Down (下)來設定噴煙的時間間隔(範圍是 1 到 200 秒)。
19
Page 20

․ Timer 定時器功能模組下設定連續噴煙設定
按 FUNCTION 鍵至 LCD 螢幕出現[DURATION SET](連續噴煙)在此模式之下,使用者可以透過 Up (上)與
Down (下)來設定連續噴煙的時間。(定時器模式下可以設定 1 到 200 秒)。
․ Timer 定時器功能模組下設定煙霧輸出量設定
按 FUNCTION 鍵至 LCD 螢幕會顯示[TIMER OUT],在此模式之下,使用者可以在此時的模式下,透過
Up (上)與 Down (下)來調整煙霧輸出量(可設定”大”或”中”或”小”)。
․ 設定煙霧輸出量
按 FUNCTION 鍵至 LCD 螢幕會顯示[Volume Out]. 使用者可以透過 Up (上)與 Down (下)去選擇煙霧輸
出量(可設定”大”或”中”或”小”)。
․ 設定 DMX512 address
按 FUNCTION 鍵至 LCD 螢幕會顯示[DMX 512 Add] 使用者可以透過 Up (上)與 Down (下)來設定機器與
DMX 控台的相同位置。更多相關的 DMX 操作資訊,請參閱 DMX512 設定章節
․ 開啟及關閉油量感應器
按 FUNCTION 鍵至 LCD 螢幕會顯示[Fluid Sensor On]。使用者可以透過 Up (上)與 Down (下) 關閉油量
感應器 (顯示 »Fluid Sensor Off«) 及開啟油量感應器 (顯示»Fluid Sensor On«)。
切換 Quick Start 模式開啟及關閉
按 FUNCTION 鍵至 LCD 螢幕會顯示[Quick Start On]使用者可以透過 Up (上)與 Down (下) 切換機器 Quick
Start 模式。
Quick Start 模式:
如果[Quick Start On]模式啟動時 the M-8 會調整置之前的操作模式。例如﹐如果上⼀次最後所的選項為定時模
組,機器將會在預熱後直接進入定時設定模組。
-輸出量操作
按 VOLUME 鍵,在設定輸出量(大或中或小)中啟動煙霧輸出。螢幕顯示[Volume]followed by the output that
was set in menu item »Volume Out«. 若要停止煙霧輸出,按[OFF] (MANUAL)鍵
-手動操作
For immediate fog output at the maximum volume of fog, 當 LCD 液晶螢幕顯示 “Ready To Fog”,請持
續按壓 MANUAL 鍵。螢幕顯示 »Manual 100 %«. 此時持續的按 MANUAL 鍵,煙霧機會持續大量的輸出煙霧。
當鬆開按鈕時,煙霧輸出會停止。
-定時器操作
在定時器模式下,機器會依據菜單內所設定的 間隔、連續及煙霧輸出量自動輸出煙霧。按 TIMER 鍵,去啟動定
20
Page 21

時模組。螢幕會顯示 the set time interval. 機器會倒數至 0 秒後輸出煙霧。若要關閉定時模組,按 OFF
1
23
4
5
1. 5 PIN XLR 連接頭
(控制器線⻑度: 2M)
2. LCD-Display 液晶顯示器
3. Function buttons 功能按鈕
4. Transmitter 發射器
5. Receiver 接收器
(MANUAL)鍵。
M-31 無線控制器操作說明
無線控制器 M-31 是由發射器及接收器組成的。發射器上的兩個按鈕分別可開啟及關閉煙霧輸出。接收器已預先
連接⾄每⼀個 M-31 的面板上。
* Transmitter: 發射器
透過 W-1 發射器,可於 50 公尺內的飯為控制煙霧輸出。所有的 W-1 發射器皆可與所有的 M-31 內建的接收器
相容。所以可以同時控制數量無上限的機器。
按下”A”可輸出,按鍵”A”的功能等同於 LCD 控制版的輸出(VOLUME)鍵, 例如. 煙霧輸出是根據菜單的設定
» 輸出 «. 顯示器顯示 »輸出量« (大 或 中 或 小輸出量). 按”B”鍵則可中止輸出。
* Receiver 接收器:
21
Page 22

接收器是經測試預先的連接到每⼀個 M-31 面板上,請勿移除。每個接收器都能記憶五組發射器的訊號。每個發
射器在出廠都都已經完成設定,使用者可以不用重新設定即可使用。
* 設定發射器:
若使用者希望透過其他發射器來控制機器(除了原來配備的發射器之外),或需要用五個不同的發射器控制時,每
⼀個發射器必須再使⽤前設定完成。為了達成此⽬的﹐當機器啓動且螢幕顯⽰ [Wireless Setup] (無線設定),請
在 15 秒內分別按下所需設設定控制器的 A 鈕,否則機器會在 15 秒之後自動離開設定模式。當螢幕顯示[Wireless
Setup ok] (無線設定完成),在此時,任何的發射器都無法再增加。
1. 機器具有記憶功能,若在機器啓動也完成設定之後,沒有再設定其他組控制器時,機器可自動記憶最後設定
的控制器組,在機器下次使用開機時,請勿按壓任何控制器的按鈕,經過 15 秒的設定時間之後,即可以上次
所記憶的控制器組來控制機器。
2. 請注意當有新的控制器要與機器對頻時,無論先前有幾組完成設定的控制器都會被洗掉。
設定範例 1:
為了設定多組控制器對⼀台機器﹐當機器啓動且 LCD 螢幕顯示 [Wireless Setup] (無線設定),請在 15 秒內分別
按下所需設設定控制器的 A 鈕,即可完成設定配對。
設定範例 (2):
若使⽤者想⽤⼀個控制器配對兩台﹑或多台機器使⽤﹐可將希望控制的機器數量分別啓動,當 LCD 螢幕顯示
[Wireless Setup] (無線設定)時,在 15 秒之內按下控制器的 A 鈕來完成設定配對。
發射器的電池更換
當 W-1 的使用距離逐漸短縮,很可能是電池已消耗怠盡而需更換。作電池的更換,請先將外殼拆下,將舊電池
以 12V 新電池換上,將後再將外殼裝回。
․ 注意:當預熱程序已完成且無線控制功能已啟動 LCD 螢幕顯示”Ready To Fog W”。 (“W” 意指 無線
控制 ) 相反的,當無線控制功能停止時 LCD 螢幕顯示”Ready To Fog”(沒有”W”)。
22
Page 23

DMX 控制設定說明
M- 8
1.
2.
3.
4.
5.
6.
7.DMX 3Pin
8.DMX 3Pin
9.DMX 5Pin
10.DMX 5Pin
11.
12.
120V/15A, 230V/7A
13.
14.
15.M-20
32-126 volume / 小輸出量
127-191 volume / 中輸出量
192-255 volume / 大輸出量
0-31 關
ANTARI M-8 ON-BOARD DMX SETTINGS
M-8 有內建 DMX 控制的功能﹐僅使⽤⼀個頻道位置控制煙霧輸出。該頻道位址的數值範圍介於 0 至 255。
當頻道設定值在 0 到 31 之間, 這台機器將無法有足夠的輸出量運作。
當頻道設定值在 32 到 126, 機器能啟動最小的輸出量
當頻道設定值在 127 到 191, 機器能啟動中輸出量.
當頻道設定值在 192 到 255, 機器能啟動大輸出量.
M-8 機器規格說明
23
Page 24

10
倘若發生煙霧量過少、機器運轉時產生噪音或無法順常噴煙的動作,請立即拔掉插頭。檢查是否有足夠的煙霧油,
型號
M-8
適用電源供應
100~230V AC, 50/60 Hz~
輸出功率
1800W
輸出功率 (立方尺/ 每分鐘)
700m3/min
煙霧油桶容量 (公升)
10 liters
耗油量 ( 每分鐘/ 公升)
7 min / Liter
重量
22.5 kg
尺寸 L x W x H (mm)
668x319x170 mm
隨機附含控制器
M-21
選擇性配備
M-31
溫機時間
8 min
外部保險絲、控制器連結等,電源處等。若以上皆無問題,在插上插頭,若持續無法正常運作,請檢查連結煙霧
油桶的管子是否通暢,有無液體流通,若無法辨是原因,請勿繼續讓機器運轉。以免損壞機器,應立即關機冷卻,
並將機器送至 Antari 代理商或指定的服務處檢視。
產品規格
備註事項
煙霧機在使⽤⼀段時間後﹐噴嘴附近會有⼀些灰⾊沉澱物質。是因為菸霧油應過熱交換而產生的自然現象。只要
將他擦拭乾淨即可。為了保持機器在最佳的性能及⻑久的使⽤壽命﹐請使⽤ Antari 高品質的煙霧油或代理商所
建議的煙霧油。
24
Page 25

維護與收藏
請勿讓煙霧油受到雜質污染,在每次添完油之後請馬上蓋好油桶蓋。定期的清潔與保養您的機器,可以將零件的
損壞率減至最低,並節省維修成本。在使用超過 40 個小時之後,建議您可以使用蒸餾水,依尋以下的步驟來清
潔電熱管:
清潔的步驟如下:
1. 在油箱中倒進蒸餾過的乾淨清水,然後將聯接油箱與機器的油管裝上。
2. 在通風的地方啓動並運作機器,直到油箱內的清水幾乎使用完畢。
3. 請使⽤乾淨的棉布擦拭機器﹐清潔到此結束。之後請再添加煙霧油﹐啓動機器讓它運作⼀⼩段時間來清掉⼀
些殘餘在幫浦與電熱管上的煙油。
注意:所有的煙霧機經常因為使用濃稠的煙油而導致阻塞,無論如何,正確的使用方法與清潔可以增加機器的使
用年限。
請使用乾棉布擦拭並在儲藏前保持乾燥。
若煙霧機不打算使⽤﹐在儲藏前請先清潔﹐並保持機器乾燥然後存放在常溫之下。每個⽉請⾄少運作機器⼀次﹐
讓機器預熱,然後執行噴煙動作幾分鐘。
請妥善保存此操作手冊
25
Page 26

________________________________________
________________________________________
________________________________________
________________________________________
________________________________________
________________________________________
________________________________________
________________________________________
________________________________________
________________________________________
________________________________________
________________________________________
________________________________________
________________________________________
________________________________________
________________________________________
________________________________________
________________________________________
________________________________________
26
Page 27

________________________________________
________________________________________
________________________________________
________________________________________
________________________________________
________________________________________
________________________________________
________________________________________
________________________________________
________________________________________
________________________________________
________________________________________
________________________________________
________________________________________
________________________________________
________________________________________
________________________________________
________________________________________
________________________________________
27
Page 28

C08M08001
28
 Loading...