


Owner’s Guide
for the
B3 / B328 / B3158
Bass Amplifier
Made in the U.S.A. by
 B3/B328/B3158 Bass Amplifier
TABLE OF CONTENTS
Introduction . . . . . . . . . . . . . . . . . . . . . . . . . . . . . .2 Features . . . . . . . . . . . . . . . . . . . . . . . . . . . . . . . .2 Important Safeguards and Precautions . . . . . . . . . .2 The Front Panel Controls and Their Use . . . . . . .3,4 The Rear Panel . . . . . . . . . . . . . . . . . . . . . . . . . .4,5 Some Suggested Settings . . . . . . . . . . . . . . . . . . .6 Troubleshooting . . . . . . . . . . . . . . . . . . . . . . . . . . .7 System Block Diagram . . . . . . . . . . . . . . . . . . . . . .7 Technical Specifications . . . . . . . . . . . . .back cover
An Introduction to your new Ampeg Bass Amplifier
Thank you for making one of the best choices you will ever make for your musical career – choosing one of the finest bass amps available, an Ampeg B3/B328/B3158.
Your new bass amplifier offers many outstanding features. One hundred fifty watts of pure bass energy, total tone control, and rugged construction make each a true performer’s bass amp.
Features
In the world of high performance bass amps, Ampeg amplifiers stand alone. In true Ampeg tradition, your new B3/B328/B3158 offers you more power, performance and flexibility than any other bass amplifier in its class. The outstanding features of your new amplifier, features which set it apart from the competition, are listed below:
•9-BAND GRAPHIC EQ: Use as a “second channel” for bass solos, or to shape the sound to your own exacting standards. An independent level control lets you adjust the Graphic EQ volume
•BALANCED LINE OUTPUTS: Independent level control. XLR type jack to patch into house consoles, mixing boards, or external power amplifiers
•EFFECTS LOOP: Connect your effects here for increased intensity and quieter operation
•DRIVE CONTROL: To add harmonics for tube-like overdrive
•BALANCE CONTROL (B3158 only): To fine tune the mix between the Biamp High and Biamp Low outputs
Important Safeguards and Precautions
All Ampeg products are designed for continuous safe operation, as long as common sense is used and steps are taken to help avoid certain problems. Abiding by the following rules can help prevent damage to your amplifier, yourself and others.
•The amplifier is equipped with a three-pronged AC power cord. To reduce the risk of electrical shock, NEVER remove or otherwise attempt to defeat the ground pin of the power cord.
•Connect the amplifier ONLY to a properly grounded AC outlet of the proper voltage for your amp.
•Avoid sudden temperature extremes, rain and moisture. Also, avoid sudden and intense impact. (If the unit has been subjected to any of the preceding abuses, have it looked at by an authorized service center.)
•NEVER set the amplifier on a support that might give out under its weight.
•Whenever using tall or stacked speaker cabinets, use them ONLY on a level surface. NEVER set tall or stacked cabinets on a surface with more than a five degree incline since tipping or falling could occur, possibly causing serious injuries.
•Always keep the total speaker impedance at or above the rated load.
•Unplug the amplifier before cleaning it. NEVER spray liquid cleaners onto the amplifier. Wipe it with a slightly dampened, lint-free cloth to remove dirt and film.
•Don’t use the amplifier if it has sustained damage to the chassis, controls, or power cord. Refer the unit to an authorized service center for inspection.
•Amplifiers capable of producing high volume levels are also capable of inflicting permanent hearing loss or damage, if the exposure to such levels is prolonged. Such damage is progressive and irreversible!
CAUTION |
ATTENTION |
VORSICHT |
RISK OF ELECTRIC SHOCK |
RISQUE D'ELECTROCUTION |
ELEKTRISCHE SCHLAGGEFAHR |
DO NOT OPEN |
NE PAS OUVRIR |
NICHT OFFENEN |
CAUTION: TO REDUCE THE RISK OF ELECTRIC SHOCK, |
ATTENTION: POUR REDUIRE D'ELECTROCUTION NE PAS |
VORSICHT: ZUR MINIMIERUNG ELEKTRISCHER SCHLAGGEFAHR NICHT |
DO NOT REMOVE COVER. |
ENLEVER LE COUVERCLE. AUCUNE PIECE INTERNE N'EST REPRABLE |
DEN DECKEL ABENHMEN. INTERNE TEILE KONNEN NICHT VOM |
NO USER-SERVICEABLE PARTS INSIDE. |
PAR L'UTILISATEUR. POUR TOUTE REPARATION, S'ADRESSER A UN |
BENUTZER GEWARTET WERDEN. DIE WARTUNG IS QUALIFIZIERTEM |
REFER SERVICING TO QUALIFIED SERVICE PERSONNEL. |
TECHNICIEN QUALIFIE. |
WARTUNGSPERSONAL ZU UBERLASSEN. |
THIS EQUIPMENT HAS BEEN DESIGNED AND ENGINEERED TO PROVIDE SAFE AND RELIABLE OPERATION. IN ORDER TO PROLONG THE LIFE OF THE UNIT AND PREVENT ACCIDENTAL DAMAGES OR INJURY, PLEASE FOLLOW THESE PRECAUTIONARY GUIDELINES:
WARNING: TO REDUCE THE RISK OF ELECTRIC SHOCK, DO NOT OPEN CHASSIS; DO NOT DEFEAT OR REMOVE THE GROUND PIN OF THE POWER CORD; CONNECT ONLY TO A PROPERLY GROUNDED AC POWER OUTLET.
CAUTION: TO REDUCE THE RISK OF FIRE OR ELECTRIC SHOCK, DO NOT EXPOSE THIS EQUIPMENT TO RAIN OR MOISTURE. CAUTION: NO USER-SERVICEABLE PARTS INSIDE. REFER SERVICING TO QUALIFIED SERVICE PERSONNEL.
CAUTION: OUR AMPLIFIERS ARE CAPABLE OF PRODUCING HIGH SOUND PRESSURE LEVELS. CONTINUED EXPOSURE TO HIGH SOUND PRESSURE LEVELS CAN CAUSE PERMANENT HEARING IMPAIRMENT OR LOSS. USER CAUTION IS ADVISED AND EAR PROTECTION IS RECOMMENDED IF UNIT IS OPERATED AT HIGH VOLUME. The chart below shows the U.S. Government Occupational Safety and Health Administration (OSHA) regulations which were in effect at the time of this publication for permissible noise exposure, per 29CRF1910, Table G-16.
SOUND LEVEL dBA |
DURATION PER DAY |
SOUND LEVEL dBA |
DURATION PER DAY |
SLOW RESPONSE |
IN HOURS |
SLOW RESPONSE |
IN HOURS |
|
|
|
|
90 |
8 |
102 |
1-1/2 |
92 |
6 |
105 |
1 |
95 |
4 |
110 |
1/2 |
97 |
3 |
115 |
1/4 or less |
100 |
2 |
|
|
According to OSHA, any exposure in excess of those listed above could result in some hearing loss.
|
EXPLANATION OF |
= |
"DANGEROUS VOLTAGE" |
"IT IS NECESSARY FOR THE USER TO REFER TO THE INSTRUCTION MANUAL" |
|
2 |
"DANGER HAUTE TENSION" |
= "REFERREZ-VOUS AU MANUAL D'UTILISATION" |
|||
GRAPHICAL SYMBOLS: |
|||||
|
"GEFAHLICHE SPANNUNG" |
"UNBEDINGT IN DER BEDIENUNGSANLEITUNG NACHSCHLAGEN" |
B3/B328/B3158 Bass Amplifier
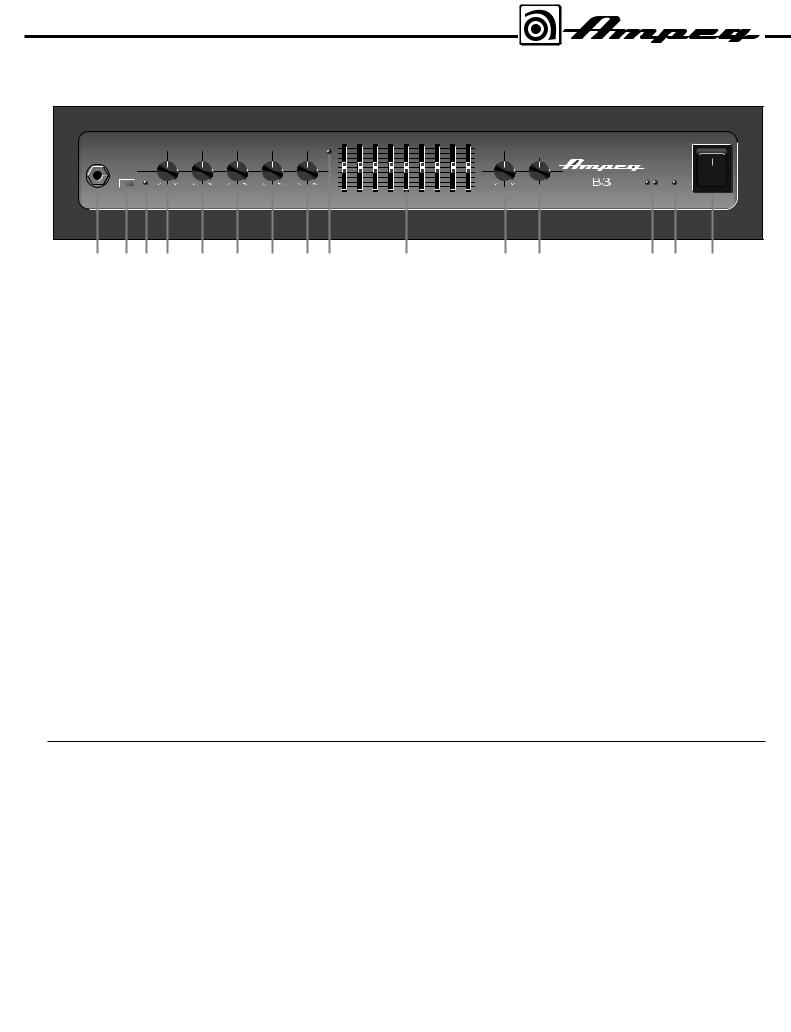
The Front Panel Controls and Their Use
INPUT |
|
|
GAIN |
DRIVE |
BASS |
ULTRA MID |
TREBLE |
EQ |
40Hz |
80Hz |
150Hz |
300Hz |
600Hz |
900Hz |
2kHz |
5kHz |
8kHz |
BALANCE |
|
|
|
|
|
ON |
|
|
|
|
|
|
|
|
MASTER |
|
|
||||||||
|
|
|
|
|
|
|
|
|
|
|
|
|
|
|
|
|
+12dB |
|
|
|
|
|
|
|
|
|
|
|
|
|
|
|
|
|
|
|
|
|
|
FLAT |
|
|
|
|
|
|
|
|
|
|
|
|
|
|
|
|
|
|
|
|
0 |
|
|
|
|
|
-15dB |
|
|
|
|
|
|
|
|
|
|
|
|
|
|
|
|
|
LIMIT |
ON |
|
|
PAD |
PEAK |
|
|
|
|
|
|
|
|
|
|
|
|
|
|
|
|
|
||
|
|
|
|
|
|
|
|
|
|
|
|
|
|
|
|
|
-12dB |
LO |
HI |
|
|
|
|
|
|
|
|
|
|
|
|
|
|
|
|
|
|
|
PULL |
|
LOW HIGH |
|
|
|
|
|
|
|
|
|
|
|
|
|
|
|
|
|
|
|
EQ ON |
|
|
|
|
|
|
|
|
|
|
|
|
|
|
|
|
|
|
|
|
|
|
|
|
|
|
1 |
2 |
3 |
4 |
5 |
6 |
7 |
8 |
9 |
|
|
|
|
10 |
|
|
|
11 |
12 |
13 |
14 |
15 |
1.INPUT: The signal output from an instrument (active or passive) or a line level signal may be connected here by means of a shielded instrument cable.
2.-15dB PAD: This switch, when depressed, attenuates the input signal by 15dB. Attenuation allows the Gain control (#4) to be used in a more usable (higher) position. If clipping is indicated with the Gain control at a low setting, attenuation is needed.
3.PEAK LED: This LED flashes when the signal level into the preamp approaches clipping. Adjust the Gain control (#4) until a strong signal from your instrument causes this LED to flicker.
NOTE: If the LED flashes frequently with the Gain at a low setting, use the -15dB pad (#2) to attenuate the input signal and readjust the Gain.
4.GAIN: This serves as the input level control for the amplifier. For the best signal to noise ratio set this control so the Peak LED (#3) flashes when you strike a string fairly hard.
5.DRIVE: This control is used to overdrive the preamp in order to get various harmonic enhancement or distorted sounds. In the fully counterclockwise position the preamp is in the cleanest condition. As the control is rotat-
ed clockwise, signal level is increased to drive the preamp harder (into distortion). The tone of the signal is also changed to provide a smoother overdrive. (The tone controls may have to be readjusted to obtain the overall desired tone.) The Gain control (#4) and - 15dB Pad (#2) interact with the Drive control. For greater overdrive, the Pad switch should be out and the Drive control fully clockwise. Use the Gain control to set the amount of overdrive desired. The Peak LED (#3) will illuminate steadily when the amp is used in this manner.
6. BASS: This is the primary low frequency control which allows for 12dB of cut or boost at 50Hz.
7. ULTRA MID: This is the primary midrange control. Rotate this control to the left of center
for a “contoured” sound (more distant, less NOTE: There are two Limit LEDs only on the midrange output) or to the right of center for a
pronounced (more up-front) tone.
B3158: one for its low frequency power amp
and one for its high frequency power amp.
8. TREBLE: This is the primary high frequency control which allows for 22dB of cut or 17dB of boost at 5kHz.
9. EQ ON LED: This LED illuminates when the EQ is turned on by either the Master Control (#11) or a footswitch (#24, rear panel).
1.ENTRADA: Conecte aquí su guitarra de bajos usando un cable blindado para instrumentos.
2.TERMINAL DE -15dB: Si su bajo tiene captadores de alta salida ó circuitos electrónicos activos, usted tal vez notará que el díodo (LED) de Picos (#3) parpadea ó permanece iluminado aún en posiciones bajas del control de Ganancia (#4). Conecte esta Terminal para conservar limpia la señal. Esto atenuará la señal de entrada hacia el preamplificador, lo que le permitirá obtener la mejor relación de señal-a-ruido para su bajo.
3.DIODO (LED) DE PICOS: Este LED se iluminará cuando cualquier etapa de preamplificación se encuentre cerca del punto de sobreimpulso. Ajuste el control de Ganancia (#4) hasta que una señal fuerte de su bajo cause un parpadeo de este LED.
NOTA: Si el LED permanece iluminado aún con la Ganancia en una posición baja, utilice la Terminal de -15dB (#2) para atenuar la señal de entrada y reajuste la Ganancia.
4. GANANCIA: Esto sirve como el control de nivel de entrada para el amplificador. Para lograr la mejor relación de señal-a-ruido fije este control para que el LED de Picos (#3) parpadee cuando usted pulse con fuerza alguna cuerda.
5. IMPULSO: Este control se usa para sobreimpulsar el preamplificador a fin de conseguir varios realces armónicos ó sonidos de distorsión. En la posición totalmente contraria a las manecillas del
reloj, el preamplificador se encontrará en la posición
más “limpia”. Conforme el control se gire a favor de 6. BAJOS: Esta perilla sirve como el control pri- las mane-cillas del reloj, el nivel de la señal se incre- mordial para las frecuencias bajas. Esto permite un
rango de 8dB de recorte ó de refuerzo a 50Hz.
3
 Loading...