

Page 1

DVD Navigation Map
EN
R
NVD-A801
SMART MAP PRO
Prog. Ver. 1.00
OWNER’S MANUAL
Please read before using this disc.
MODE D’EMPLOI
Veuillez lire avant d’utiliser ce disque.
FR
ES
MANUAL DE OPERACIÓN
Lea este manual antes de utilizar este disco.
SE
Page 2

USER AGREEMENT
Important information. Please read carefully
before using this product.
In using this DVD-ROM “SMART MAP PRO”
(hereinafter referred to as “Disk”), as part of the
Alpine Electronics, Inc. (“ALPINE”) and NAVTEQ
Corporation (“NAVTEQ”) Database (hereinafter
referred to as “Database”), you are bound by the
terms and conditions set forth below. By breaking
the seal on this package, and using your copy of the
Database and Disk, you have demonstrated your
agreement to the terms and conditions of this
Agreement. You should therefore, make sure that
you read and understand the following provisions.
• The Disk and Database may not be copied, duplicated,
processed, or otherwise modified, in whole or in part,
without the express written permission of NAVTEQ
and ALPINE.
• Neither the Disk nor the Database may be transferred
or sublicenced to any third party for profit, rent or loan,
or licensed for reuse in any manners.
• The Disk and/or Database may not be decompiled,
reverse engineered or otherwise disassembled, in whole
or in part.
• The Disk and Database may not be used in a network
or by any other manner of simultaneous use in multiple
systems.
• The Disk and Database are intended solely for personal
use (or internal use where the end-user business), or the
consumer. The Disk and Database are not to be used for
commercial purposes.
• Neither ALPINE nor NAVTEQ guarantees to the
customer that the functions included in the Disk and
Database meet a specific objective of user.
• Neither ALPINE nor NAVTEQ shall be responsible for
any damages caused by the use of the Disk and/or
Database to the actual user and to any third party.
• The Warranty on the Disk and Database shall not
extend to an exchange or refund due to misspelling,
omission of letters, or any other cosmetic discrepancy
in layout found in Disk and/or Database.
• The right to use the Disk and Database shall expire
either when the user destroys this software, or when
any of the terms for use is violated and ALPINE and/or
NAVTEQ exercises the option to revoke the license to
use this software.
• The terms and conditions hereof apply to all
subsequent users and owners as well as to the actual
purchaser.
The NAVTEQ Database may include or reflect data
of licensors, including Her Majesty The Queen in
right of CANADA. Such data is licensed on an “AS
IS” basis. The licensors, including Her Majesty The
Queen, make no guarantees, representations or
warranties respecting such data, either express or
implied, arising by law or otherwise, accuracy or
fitness for a particular purpose.
The licensors, including Her Majesty The Queen,
shall not be liable in respect of any claim, demand
or action, irrespective of the nature of the cause of
the claim, demand or action alleging any loss, injury
or damages, direct or indirect, which may result
from the use or possession of the data or the
NAVTEQ database. The licensors, including Her
Majesty The Queen, shall not be liable in any way
for loss of revenues or contracts, or any other
consequential loss of any kind resulting from any
defect in the data or the NAVTEQ database.
End User shall indemnify and save harmless the
licensors, including Her Majesty The Queen and the
minister, and their officers, employees and agents
from and against any claim, demand or action,
irrespective of the nature of the cause of the claim,
demand or action, alleging loss, costs, expenses,
damages or injuries (including injuries resulting in
death) arising out of the use or possession of the
data or the NAVTEQ database.
2-EN
Page 3

• There may be situations where the navigation system
PRECAUTIONS
IMPORTANT INFORMATION, PLEASE READ
CAREFULLY BEFORE USING THIS PRODUCT.
This product is intended to safely provide turn by turn
instruction to get you to a desired destination. Please
read the following precautions to ensure that you use
this navigation system correctly.
• This product is not a substitute for your personal
judgment. Any route suggestions made by this
navigation system should never supersede any local
traffic regulations or your personal judgment and/or
knowledge of safe driving practices. Do not follow
route suggestions if the navigation system instructs you
to perform an unsafe or illegal maneuver, places you in
an unsafe situation, or routes you into an area which
you consider unsafe.
• Glance at the screen only when necessary and safe to
do so. If prolonged viewing of the screen is necessary,
stop in a safe and legal manner and location.
• Do not input destinations, change settings, or access
any functions requiring a prolonged view of the
monitor and/or remote control while you are driving.
Stop in a safe and legal manner and location before
attempting to access the system.
• When using the navigation system to find/route to an
emergency service, please contact the facility to
validate and verify availability, prior to driving to it.
Not all locations of emergency service providers such
as police and fire stations, hospitals, and clinics are
contained in the database. Please use your own
judgment and your ability to ask for directions in these
situations.
• The map database contained within the media (DVD
ROM) in which it is stored is the most recent map data
available at the time of production. Because of changes
in streets and neighborhoods, there may be situations
where the navigation system may not be able to route
you to your desired destination. In these cases, use your
own personal judgment.
• The map database is designed to provide you with route
suggestions, it does not take account of the relative
safety of a suggested route, or of factors which may
affect the time required to reach your destination. The
system does not reflect road closures or construction,
road characteristics (i.e. type of road surface, slope or
grade, weight or height restrictions, etc.), traffic
congestion, weather conditions, or any other factors
which may affect the safety or timing of your driving
experience. Use your personal judgment if the
navigation system is unable to provide you with an
alternate route.
• Make certain that the volume level of the monitor is set
• Please make certain that any other person who intends
If there is anything in the manual about the operation
of the navigation system which you are uncertain
about, please contact your local Alpine authorized
navigation dealer or Alpine at 1-888-NAV-HELP (1-888628-4357) before using the navigation system.
may display the vehicle’s location erroneously. Use
your own driving judgment in this situation, taking into
account current driving conditions. Please be aware that
in this situation, the navigation system should correct
the vehicle’s position automatically; however, there
may be times where you may have to correct the
position yourself. If this is the case, stop in a safe and
legal manner and location before attempting operation.
to a level which still allows you to hear outside traffic
and emergency vehicles. Driving while unable to hear
outside sounds could cause an accident.
on using this navigation system reads these precautions
and the following instructions carefully.
EN
3-EN
Page 4
Points to Observe for Safe Usage
• Read this manual carefully before using this DVDROM. It contains instructions on how to use this
product in a safe and effective manner. Alpine cannot
be responsible for problems resulting from failure to
observe the instructions in this manual.
• This manual uses various pictorial displays to show you
how to use this product safely and to alert you to
potential dangers resulting from improper
connections and operation. Following are the meanings
of these pictorial displays. It is important to fully
understand the meanings of these pictorial displays in
order to use this manual and the system properly.
WARNING
DO NOT PLACE HANDS, FINGERS OR FOREIGN OBJECTS
IN INSERTION SLOTS OR GAPS.
Doing so may result in personal injury or damage to the product.
MINIMIZE DISPLAY VIEWING WHILE DRIVING.
Viewing the display may distract the driver from looking ahead of
the vehicle and cause an accident.
DO NOT FOLLOW ROUTE SUGGESTIONS IF THE
NAVIGATION SYSTEM INSTRUCTS YOU TO PERFORM AN
UNSAFE OR ILLEGAL MANEUVER, OR PLACES YOU IN AN
UNSAFE SITUATION OR AREA.
This product is not a substitute for your personal judgment. Any
route suggestions by this system should never supersede any local
traffic regulations or your personal judgment or knowledge of
safe driving practice.
• Operation of the system while driving is
dangerous. Users should stop vehicle before
operating the software.
• Road conditions and regulations take
precedence over information contained on
the map display: observe actual traffic
restrictions and circumstances while
driving.
• This software is designed for use exclusively
in the NVE-N872A series. It cannot and may
not be used in conjunction with other
hardware.
WARNING
This symbol means important instructions.
Failure to heed them can result in serious
injury or death.
DO NOT OPERATE ANY FUNCTION THAT TAKES YOUR
ATTENTION AWAY FROM SAFELY DRIVING YOUR
VEHICLE.
Any function that requires your prolonged attention should only
be performed after coming to a complete stop. Always stop the
vehicle in a safe location before performing these functions.
Failure to do so may result in an accident.
CAUTION
This symbol means important instructions.
Failure to heed them can result in injury or
material property damage.
HALT USE IMMEDIATELY IF A PROBLEM APPEARS.
Failure to do so may cause personal injury or damage to the
product. Return it to your authorized Alpine dealer or the nearest
Alpine Service Center for repairing.
KEEP SMALL OBJECTS SUCH AS BATTERIES OUT OF THE
REACH OF CHILDREN.
Swallowing them may result in serious injury. If swallowed,
consult a physician immediately.
USE THIS PRODUCT FOR MOBILE 12V APPLICATIONS.
Use for other than its designed application may result in fire,
electric shock or other injury.
4-EN
Page 5

Table of Contents
USER AGREEMENT
Important information. Please read carefully before
using this product. ............................................... 2
Precautions
IMPORTANT INFORMATION. PLEASE READ
CAREFULLY BEFORE USING THIS
PRODUCT. ......................................................... 3
Points to Observe for Safe Usage.............................. 4
WARNING ................................................................ 4
CAUTION ................................................................. 4
Preface
Navigation Terminology ............................................ 7
Features ..................................................................... 8
How to Use the Disc ................................................. 9
Manual Overview .................................................... 10
Getting Started
Turning the System On ........................................... 11
How to View a Current Display .............................. 12
Point Display ........................................................... 12
Selecting an Item in a List ....................................... 13
Using the On-screen Keyboard ............................... 13
Changing the Map Scale ......................................... 13
Changing the Orientation of the Map...................... 14
Entering a Destination
Displaying the Destination Menu Screen ................ 15
Entering a Destination by Address .......................... 15
Entering a Point of Interest by Place Name ............ 17
Entering a Point of Interest by Place Type .............. 18
Entering a Destination by Previous Destinations .... 20
Entering a Destination Using the Address Book ..... 20
Entering a Destination by Intersection .................... 21
Entering a Point of Interest by Phone Number ....... 23
Entering a Destination by Freeway Entrance .......... 24
Entering a Destination by Latitude and
Longitude .......................................................... 25
Using the Today's Plan Function ............................. 26
Entering a destination by Home .............................. 27
Entering a Destination Using the Favorites............. 27
Entering a Destination Using
ZAGAT SURVEY Data .................................... 28
Entering a Destination by Scrolling
Displayed Map .................................................. 30
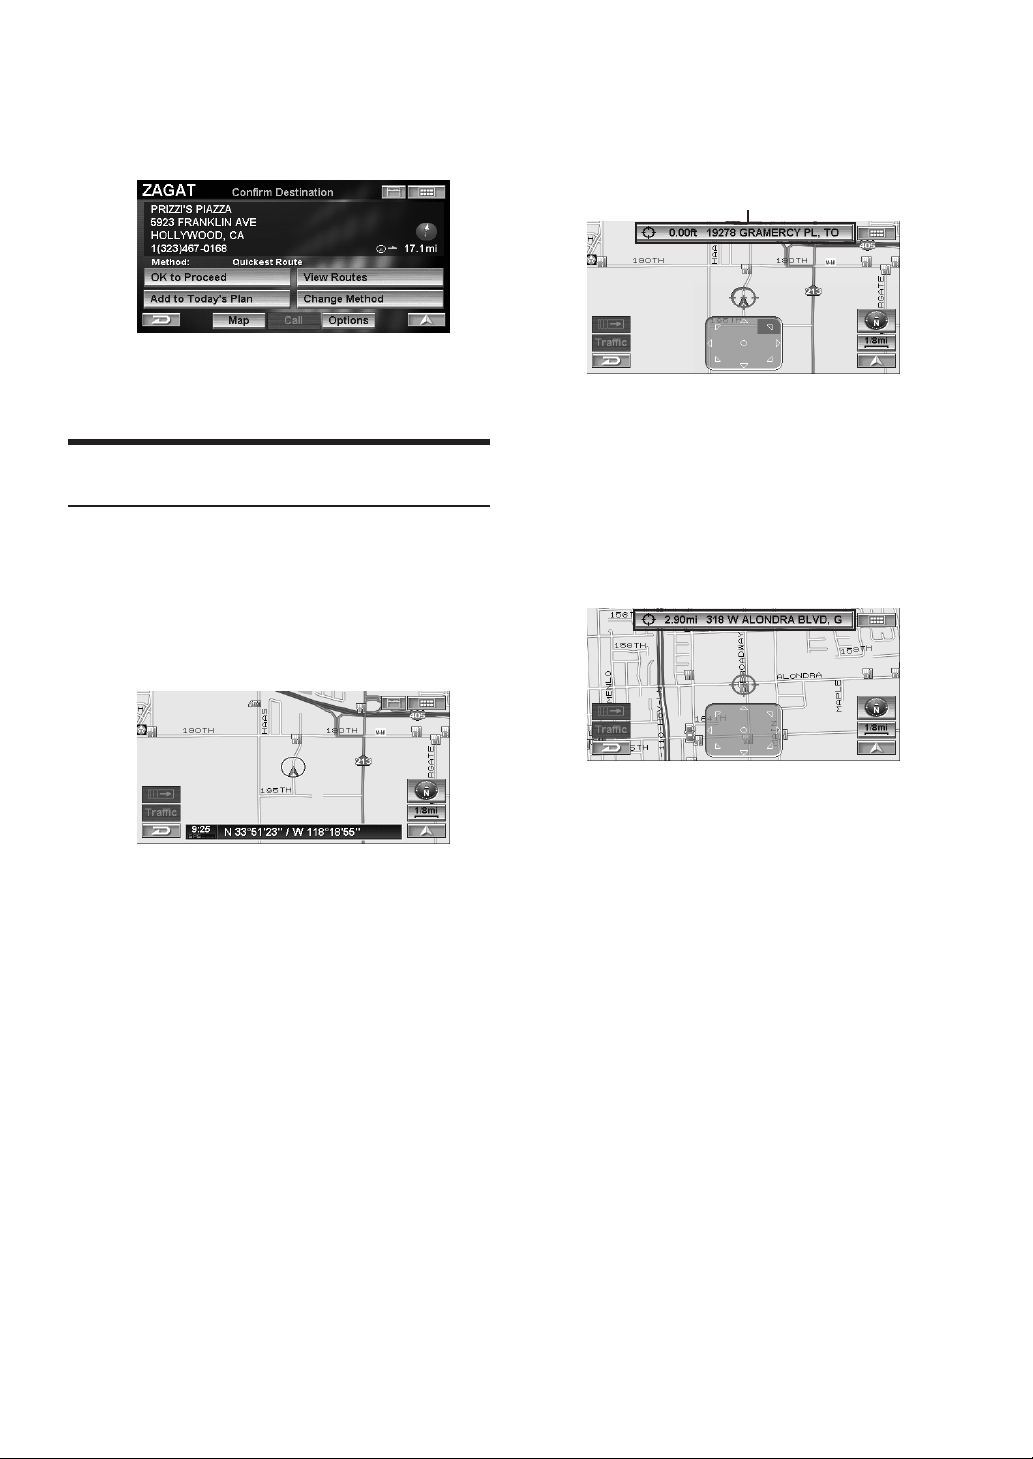
Confirm Destination
Add to Today's Plan ................................................ 32
View Route .............................................................. 33
Change Method ....................................................... 33
Open Map ................................................................ 34
Displaying the Option Menu Screen ....................... 34
Find Local POI (Point of Interest) .......................... 34
Save to Address Book ............................................. 35
Save as Home .......................................................... 36
Add to Favorites ...................................................... 36
Set as Waypoint ....................................................... 36
Set as Point A to B .................................................. 37
ENGLISHENGLISH
Driving to Your Destination
Changing the route guidance display ...................... 38
Recalling the Maneuver List during Guidance ....... 39
Recalling the Arrow Route Guidance Display ..... 40
Avoiding ............................................................... 40
Auto Reroute ........................................................... 40
Detour ...................................................................... 40
Displaying the Route Menu Screen ......................... 41
Display Entire Route ............................................... 41
Find POI Along Route............................................. 41
Change Method ....................................................... 42
Delete Destination ................................................... 43
Delete Waypoint ...................................................... 43
Edit Features
Displaying the Edit Menu Screen ........................... 44
Editing the Address Book ....................................... 44
Create a New Folder............................................. 45
Rename Folder ..................................................... 46
Delete Folder ........................................................ 46
Name Change ....................................................... 46
Address Change ................................................... 47
Phone Number Change ........................................ 47
Folder Change ...................................................... 47
Icon Change ......................................................... 48
Delete Address Book Entry .................................. 48
Editing the Favorites ............................................... 48
Edit/Delete Favorite Dest ..................................... 49
Delete Favorite Names ......................................... 50
Delete Favorite Types ........................................... 50
Delete Favorite Spot............................................. 51
Deleting the Today's Plan ........................................ 52
Editing the Home .................................................... 53
Deleting the Previous Destinations ......................... 53
Editing the Avoided Roads ...................................... 54
Editing the Avoided Areas ....................................... 55
EN
5-EN
Page 6

Information Features
Displaying the Information Menu Screen ............... 56
Trip Information ...................................................... 56
System Information ................................................. 57
Satellite Information................................................ 57
Navigation Simulation ............................................ 58
Calendar .................................................................. 58
Calculator ................................................................ 59
Setup
Displaying the Setup Menu Screen ......................... 60
Map Display ............................................................ 60
Region Selection ............................................... 61
Color ................................................................. 61
Orientation ........................................................ 61
Map Features ........................................................... 61
POI Icons .......................................................... 62
Landmark Icons ................................................ 63
Building Outlines .............................................. 63
One Way Icons .................................................. 63
Trail ................................................................... 63
Guidance ................................................................. 64
Voice Prompt ..................................................... 64
Display .............................................................. 64
Auto Zoom Map ................................................ 65
Estimated Time ................................................. 65
Calibration ............................................................... 65
Screen Adjustment ............................................ 66
Nav Volume Adjustment ................................... 66
Clock ....................................................................... 66
Time Zone ......................................................... 67
Time .................................................................. 67
Clock Display ................................................... 67
Language / Units ..................................................... 67
Language ........................................................... 67
Units (mile/ft or km/m) ..................................... 68
Others ...................................................................... 68
Keypad .............................................................. 68
Confirm Home .................................................. 68
Confirm Favorite Dest ....................................... 69
Confirm Voice Input .......................................... 69
Reference
Buttons and Functions of Remote Control
(RUE-4140)....................................................... 70
Names of the Parts ............................................ 70
Remote Control Reference Guide
for Head Unit .................................................... 71
Remote Control Reference Guide
for AV Head Unit .............................................. 72
Voice Recognition ................................................... 73
About Speak button........................................... 73
For Voice Recognition to Operate Correctly ..... 73
Using the Voice Control System ....................... 73
Using the Help command of the Voice
Control System ................................................. 74
Voice Command Index ............................................ 74
Navigation Operation ........................................ 74
Touch panel-compatible monitor IVA-D310
operation ........................................................... 75
In Case of Difficulty ................................................ 76
If this Message Appears .......................................... 77
ENGLISHENGLISH
6-EN
Page 7
Preface
Address Book
Up to 300 personal locations and phone numbers can be
stored in the system’s memory.
Navigation Terminology
Navigation
The navigation system displays and tracks the vehicle’s
position and movement on a moving map display. When a
destination is input, the navigation system quickly
calculates a route and guides you along the route with
pictorial displays and voice prompts.
Present Vehicle Position Indicator
The present vehicle position is indicated by an arrowhead
within a circle
Present vehicle position
Map matching
Since GPS navigation has an error window of about 100 –
650 feet (30 m – 200 m), the position of your vehicle may
be calculated in such a way that it is displayed incorrectly
off the road. Map matching automatically corrects this error
so that the position is displayed on the road.
Popular Points of Interest
Fourteen different POI icons can be displayed on the map.
These icons indicate the locations and names of the
nearest gas/fuel stations, restaurants, parking garages,
parking lots, ATMs, banks, convenience stores, grocery
stores, freeway exits with IA data, hotels & motels, bed &
breakfast, post offices, hospitals and schools. All 14 icons
can be displayed on the screen at one time.
• The brand icons (eight gasoline companies) of the gas
stations appear on the map. For details, see page 62 of this
Manual.
EN
Destination
The destination point is represented by a bullseye icon.
a
b
a Destination icon
b Route (Blue)
7-EN
Page 8

Features
Automatic Route Calculation
The navigation system displays and tracks your vehicle’s
position and movement via a moving map display. When
you input a destination, the navigation system quickly
calculates a route and guides you with pictorial displays
and voice prompts. When determining the route, the system
can be programmed to minimize the use of toll roads and
freeways.
This system combines GPS signals received with map
information stored on DVD-ROM to display the position and
direction of the vehicle. This navigation system also
includes an electronic gyro-sensor and a speed sensor that
enable it to display the present vehicle position even in
locations where GPS signals may be blocked.
Next Turn Guide
When an upcoming turn is approaching, the system will
give maneuver instructions via arrow guides and simple
voice prompts.
Real Time Voice Guide
Using voice prompts, the system will notify you of upcoming
turns and highways to enter. Pressing the VOICE button on
the remote control or touching [ ] on the map display
allows you to access this voice guidance feature at any time
with a single press.
Street Name Input
Allows you to input your destination’s street name (via
Address or Intersection search) if you don’t know your
destination’s city name.
Intersection Zoom (Auto Zoom Map)
As you near intersections and cross points, the map display
automatically zooms in to show a more detailed view that
you will need. This means there is no need to press the
zoom buttons.
Built-in Gyroscope and Speed Sensors
The gyroscope for sensing direction and the speed pulse
sensor for detecting distance provide data which allows the
vehicle position and direction to be displayed even in
locations where the GPS signals cannot be received such
as between high buildings or in tunnels.
Three Types of Operation
The operation for the navigation system can be performed
with both the supplied remote control (RUE-4140), touch
button* or voice control.
* Touch button operation can be performed only when you
connect to Alpine Touch panel-compatible monitor IVAD310 or TME-M770S, etc. For details, refer to “Manual
Overview” on page 10. See also the Owner’s Manual of
the touch panel-compatible monitor.
Traffic Information (Optional)
If you connect the XM Data Receiver HCE-100XM (sold
separately) or SIRIUS Data Receiver (sold separately), and
sign up for Traffic & Weather, you can receive traffic
information in real time. Traffic incidents and congestion can
be displayed on the map and also be listed by distance
from the vehicle. For more information, visit XM's website at
www.xmradio.com., or SIRIUS' website at www.sirius.com.
Direct Input of Name of Place of Interest
Input only the name of a place of interest (without inputting
the city name) to search for the route to the place of
interest.
Direct Inputting of Phone Number
You can search for a destination place of interest by
inputting the telephone number (if known).
Map Zooming
You can change the map display in nine magnification
scales to get more detail or more general views (1/32, 1/16,
1/8, 1/4, 1/2, 1, 2, 5, 15, 50, 150, 350 mile zoom scales). A
special 350 mile zoom scale is available when you view a
very long route.
Three Languages Selectable for
the Voice Guidance
Three Languages Selectable for the Voice Guidance.
You can choose one of the three languages (English,
French, Spanish) for the voice route guidance.
8-EN
Page 9

How to Use the Disc
There are two discs available for NVD-A801: the NORTH version, and the SOUTH version. Phone number/POI (Point of Interest)
information, etc., contained in the South area disc cannot be searched by the North disc, and vice versa. Places in the South area, for
example, can only be found on the South disc.
The North and South version discs cover the areas as shown in gray below. There are some overlap areas which are stored in both discs.
North disc stored area
EN
South disc stored area
9-EN
Page 10
Manual Overview
If the navigation system is connected to Alpine touch panelcompatible monitor IVA-D310, IVA-D300 or TME-M770S, etc.,
touch operation can be performed by directly touching the
monitor.
If the monitor (other than Alpine touch panel-compatible monitor
IVA-D310, IVA-D300 or TME-M770S, etc.) is connected,
operation can be performed with the supplied remote control.
Both touch button and remote control operations are
described in this manual. First, touch button operations,
and then remote control operations in italics are described.
Example:
Touch [Destination].
Select (highlight) “Destination” by tilting the
joystick and press ENTER.
L Touch Button Operation
L Remote Control Operation
Some of the remote control buttons have the same function
as touch buttons on the display. You can see the desired
map screen by pressing the corresponding button on the
remote control. For menu screen operations, select a
desired item by tilting the joystick and pressing the ENTER
button.
For details, refer to the “Buttons and Functions of Remote
Control (RUE-4140)”, on page 70.
Touch Button
• Be sure to touch the button lightly with the pad of your
finger on the display to protect the display.
• If you touch a button and there is no reaction, remove your
finger from the display once, and try again.
• Touch buttons that cannot be operated appear dull in color.
10-EN
Page 11
Getting Started
Turning the System On
With this system, when the display monitor is set in the
navigation display mode or external input display mode and the
ignition key is turned to the ACC or ON positions, the opening
screen will automatically be displayed.
1
When the system is used for the first time,
both the language selection menu and
IMPORTANT! are displayed on the same
screen, touch the desired language.
Select (highlight) the desired language by tilting
the joystick and press ENTER.
After the language has been selected, important
information is displayed in each language.
Be sure to read the important information.
2
After you have read this important
information, touch [I Accept].
Select (highlight) “I Accept” by tilting the joystick
and press ENTER.
3
After you have read this registration notice,
touch [Yes].
Select (highlight) “Ye s ” by tilting the joystick and
press ENTER.
The map screen is displayed.
• If there is no disc in the navigation system, “Please
insert DVD-ROM” is displayed. For details on how to
load the disc, see “Inserting the DVD-ROM” and
“Removing the DVD-ROM” in the navigation system’s
Hardware Manual.
• If the disc cannot be read, the message “Error reading
DVD-ROM. Please check the disc.” is displayed. Try
reloading the disk and if message does not go away,
consult an authorized Alpine dealer.
• If the monitor is kept on with the engine off for an
extended period of time, the vehicle’s battery may
discharge.
EN
The Registration Notice screen is displayed.
11-EN
Page 12

How to View a Current Display
The navigation map screen usually displays the current vehicle
position and surrounding area.
L Current Vehicle Position Map (without route)
a
i
a Landmark Icons
The 3D landmark icons can be displayed on the map
when map scale is 1/16 mile (100 m) or less, see
“Landmark Icons” (page 63).
b POI Icons
The POI icons can be displayed on the map when map
scale is 1/8 mile (200 m) or less, see “POI Icons” (page
62).
c Current vehicle position icon
d Building Outlines
The building outlines can be displayed on the map
when map scale is 1/16 mile (100 m) or less, see
“Building Outlines” (page 63).
e Main Source Screen button ( )
Displays the main source screen of the Alpine touch
panel-compatible monitor. For details, refer to the
Owner's Manual of the Alpine touch panel-compatible
monitor.
If a monitor other than Alpine touch panel-compatible
monitor is connected, this button cannot be used.
f MENU button ( )
Displays the Nav Menu.
g Compass Icon
Indicates North and heading mode on the current map.
: North up
: Heading up
(The arrowhead shows the direction of north. To
change the map orientation, see page 14.)
h Scale Icon ( )
Map scale is shown. (see page 13)
i Traffic button*
Traffic Incident List screen is displayed.
* If the XM Data Receiver HCE-100XM (sold
separately) or the SIRIUS Data Receiver (sold
separately) is connected, the traffic button can be
used.
b
c
d
e
f
mjk l
g
h
j Cancel button ( )
Cancels the current screen and returns to the previous
menu screen.
k GPS signal state and clock
Current time received from GPS signals; GPS signal
strength (indicated by a dot).
GPS: No satellite information is being received.
GPS L: Current position is being calculated.
GPS LL: GPS signal 2-D is being received.
GPS LLL: GPS signal 3-D is being received.
l Street name
Name of the current street.
m Current Map button ( )
Returns to the current position screen.
• When powering on the unit for the first time, it takes the
GPS receiver approximately 10 minutes to calculate the
vehicle’s current position. During this period, the
vehicle position icon may not move even if the vehicle
is being driven.
• For displays during route guidance, see page 38.
Point Display
The point display appears on the screen after you have scrolled
the map. “Entering a Destination by Scrolling Displayed Map”,
see page 30.
a
a Distance from the current vehicle position.
Distance in a straight line from the current vehicle
position.
b Street name on the crosshair icon
If the street name of the crosshair icon cannot be
displayed, the longitude/latitude appears in the display.
c Crosshair icon
Align the crosshair icon over the place to be searched
by scrolling the map.
d Scroll pad
The scroll pad is displayed when you scroll the map by
touch operation. Touch [8] on the scroll pad to scroll
the map.
Touch [8] on the scroll pad to select the location (see
page 30).
The scroll pad is not displayed when using the
remote control.
b
c
d
12-EN
Page 13
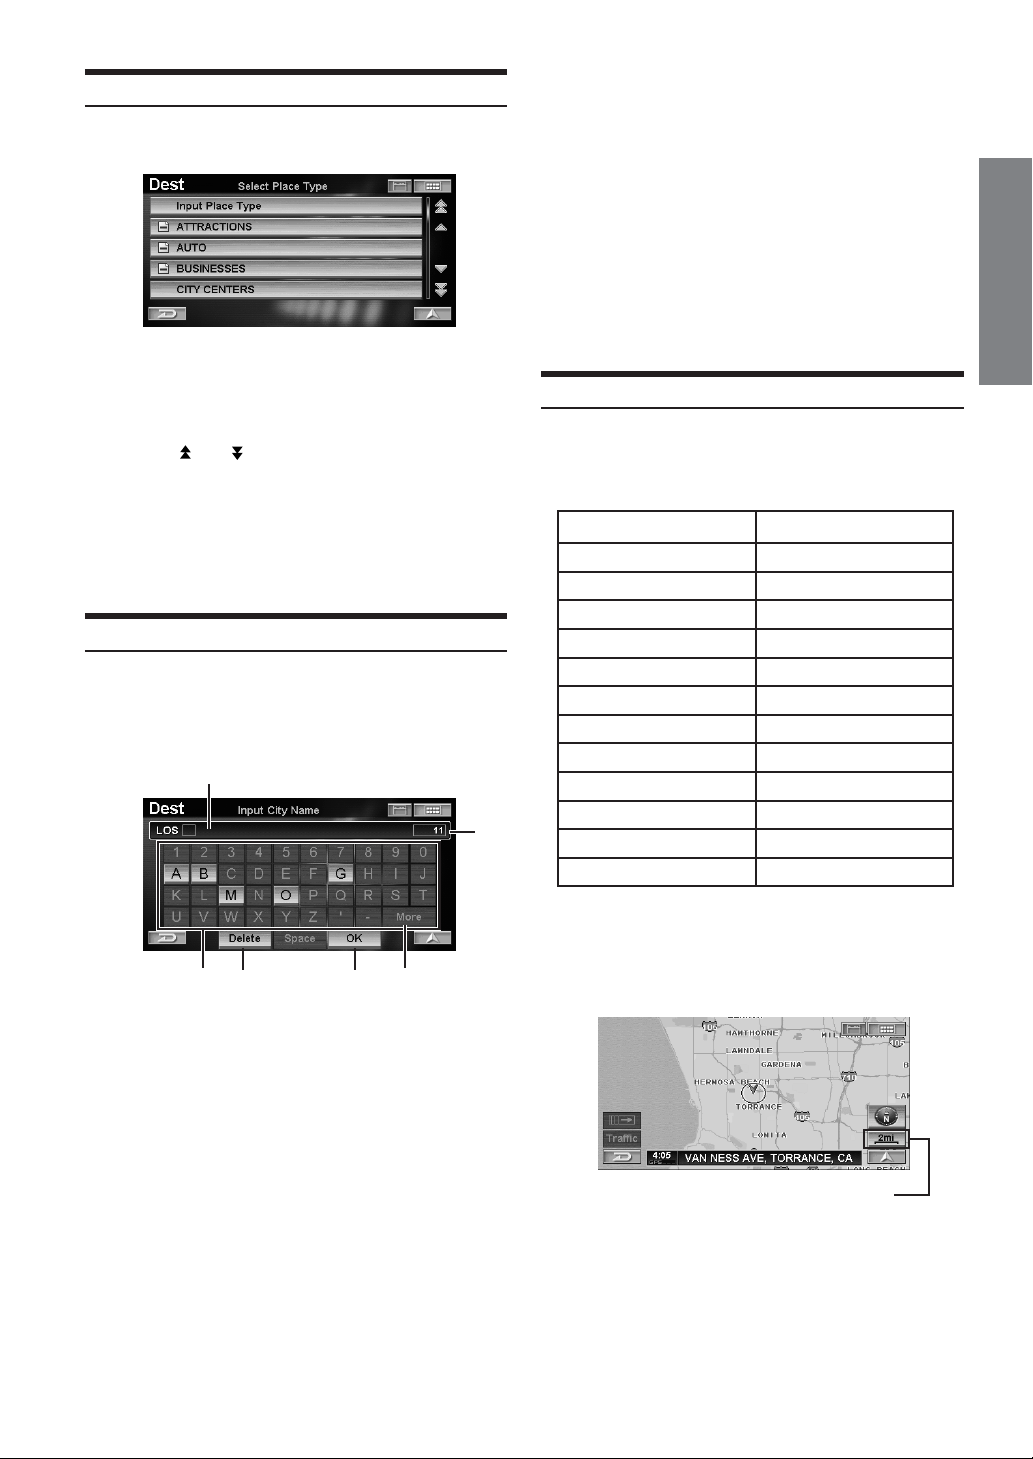
Selecting an Item in a List
To scroll through a list, perform operation as follows.
Touch Operation:
Touch the desired character.
Remote Control Operation:
Tilt the joystick to select the desired character and
press ENTER.
• When 1 character is input, the candidates for the next
character are narrowed down (and the others disappear
from the character pallet).
• The phone number, etc. can be input using the numeric
keypad on the remote control. After pressing the MODE
button, numbers may be input while the status indicator
is blinking.
EN
Touch Operation:
Touch [8] or [9] to scroll items one by one
up or down.
Touch [
item list, and 3 items for a 3 item list up or
down.
Remote Control Operation:
] or [ ] to scroll every 5 items for a 5
Tilt the joystick to up or down to scroll items one
by one or press 4 or 3 to scroll every 4 items.
Using the On-Screen Keyboard
When you are required to input a character on the screen using
the keyboard, the display changes to the keyboard. Use the
displayed characters to input information. How to select
characters, see the following procedure.
a
b
Changing the Map Scale
Change the map magnification ratio upwards or downwards
(in 12 steps).
Map scale
US (mile)
1/32 mile
1/16 mile
1/8 mile
1/4 mile
1/2 mile
1 mile
2 mile
5 mile
15 mile
50 mile
150 mile
350 mile
• You can change between miles or kilometers in setup,
see page 68.
Metric (km/m)
50 m
100 m
200 m
400 m
1 km
2 km
4 km
10 km
30 km
100 km
250 km
600 km
f
c
a Text window
Displays the selected characters/numerals.
b Number of candidates
c Character pallet
d Delete
Returns to the previous character and erases it.
e OK
The selected character is set. The available characters,
depending on the item, are shown in the list.
f More
Changes the character pallet to display additional
characters.
ed
1
Touch [Scale Icon].
The scale bar is displayed.
Scale Icon
Continued
13-EN
Page 14
2
Change the map magnification ratio by
touching [ 8] (zoom in) or [ 9 ] (zoom out)
within 5 seconds.
This changes rapidly by touching and holding either
button.
Press the 4 (zoom in) or 3 (zoom out) button
while displaying the map screen.
• The 3D landmark icons can be displayed on the map
when map scale is 1/16 mile (100 m) or less.
• The building outlines can be displayed on the map
when map scale is 1/16 mile (100 m) or less.
• The POI icons can be displayed when map scale is 1/8
mile (200 m) or less. For details, see page 62.
• The one-way road icons can be displayed on the map
when map scale is 1/16 mile (100 m) or less.
• If the current map orientation is heading up, it
automatically changes to north up when the map scale
is 50 mile (100 km) or more.
North up
Heading up
• If the current map orientation is heading up, it
automatically changes to north up when the map scale
is 50 mile (100 km) or more.
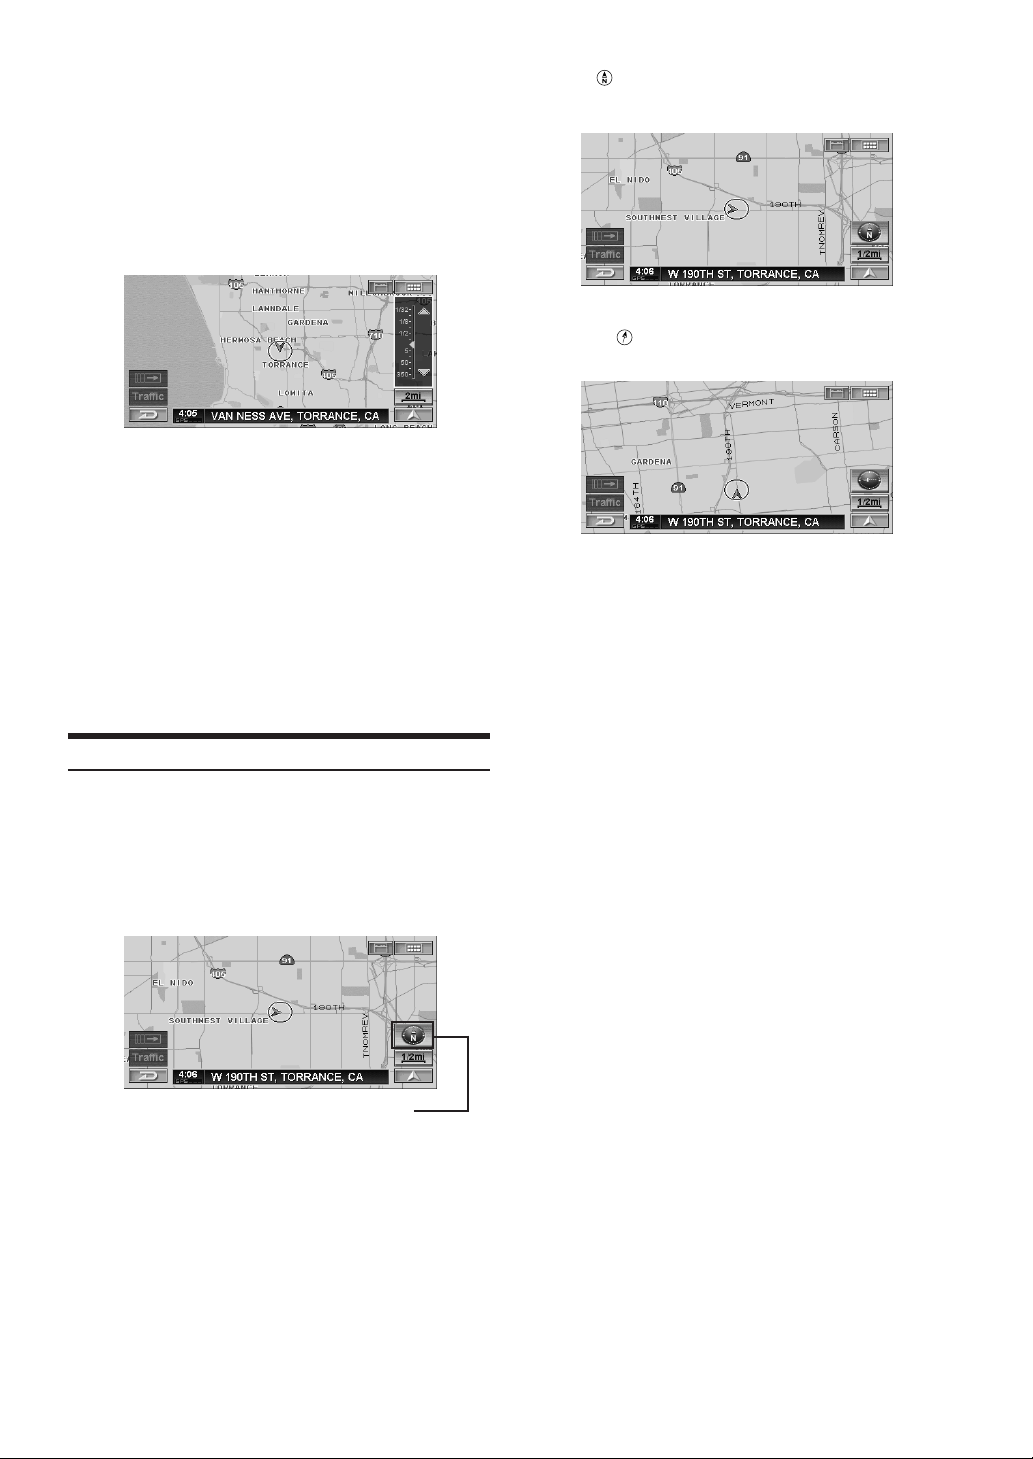
Changing the Orientation of the Map
The map orientation can be set for either north up, or your current
direction heading up. The icon in the lower right of the screen
above the map scale icon indicates the current orientation.
1
Touch [Compass Icon].
Press H/N.
Compass Icon
Each press changes the map orientation.
North up ↔ Heading up
14-EN
Page 15
Entering a Destination
Displaying the Destination Menu Screen
To use the navigation guidance system, you must first, search for
a destination.
1
Touch [ ].
Press MENU.
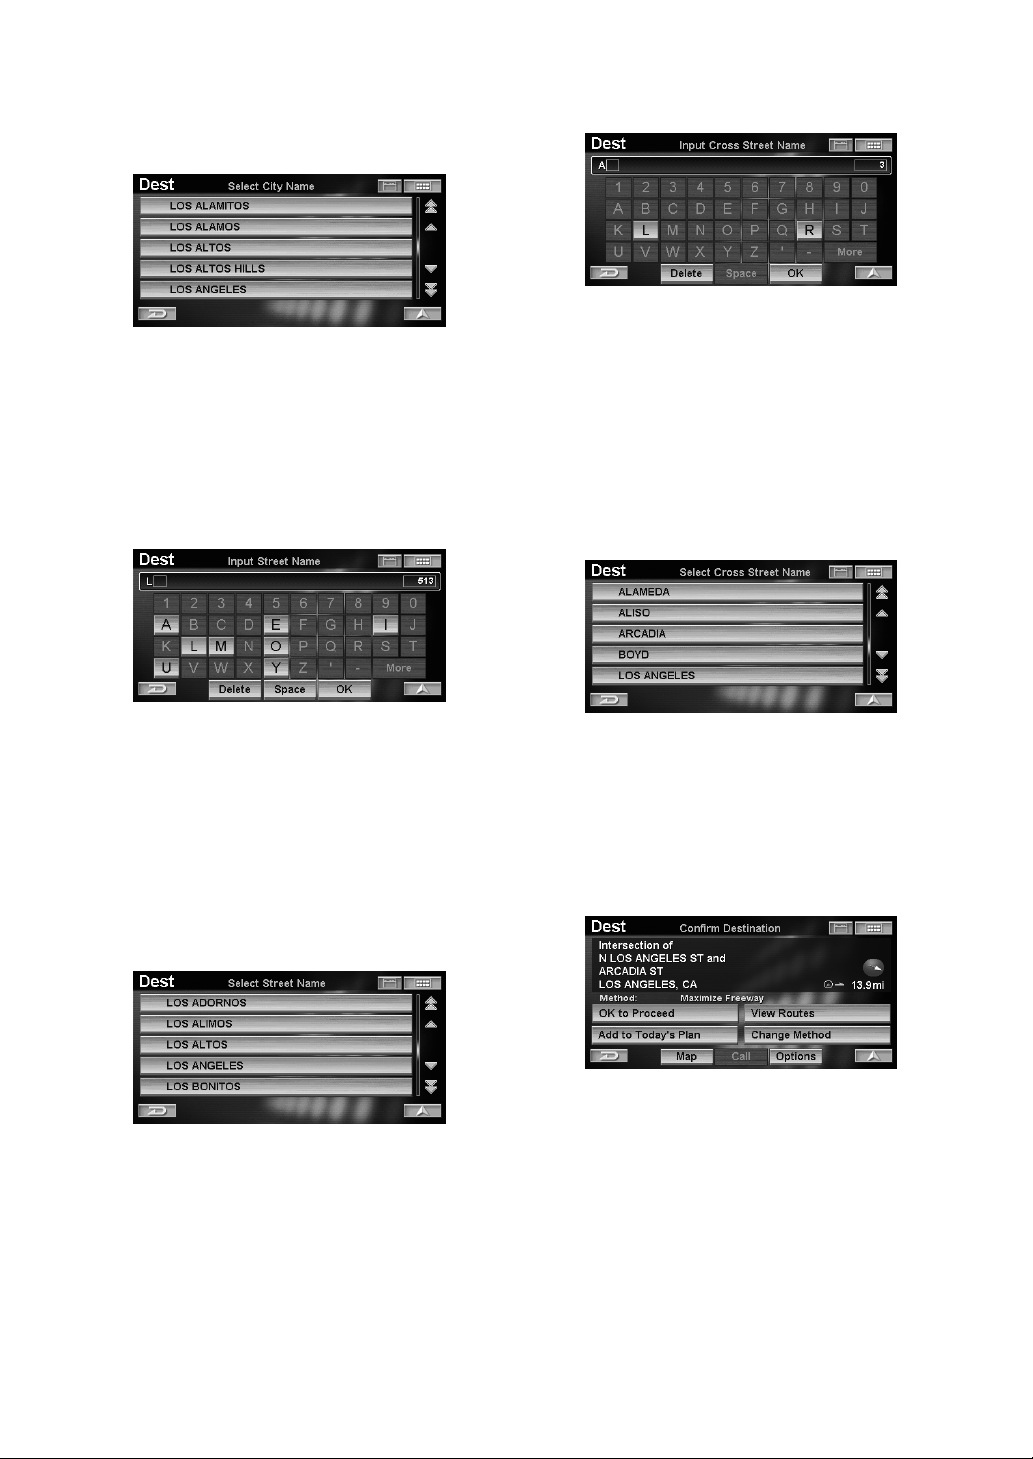
Entering a Destination by Address
If you know the address of the destination, the system can
calculate a route to that address.
1
Touch [Address] on the Find Destination
By screen.
Select (highlight) “Address” by tilting the joystick
and press ENTER.
The Find Address menu is displayed.
EN
The Nav Menu screen is displayed.
2
Touch [Destination].
Select (highlight) “Destination” by tilting the
joystick and press ENTER.
The Find Destination By screen is displayed.
You can search for a destination as follows.
Find Destination By
• Address (see page 15)
• Point of Interest (see page 17)
• Previous Destinations (see page 20)
• Address Book (see page 20)
• Intersection (see page 21)
• Phone Number (see page 23)
• Freeway Entrance (see page 24)
• Latitude / Longitude (see page 25)
• Today’s Plan (see page 26)
Others
• Home (see page 27)
• Favorites (see page 27)
• ZAGAT 2004 (see page 28)
• Map scrolling and Map input (see page 30)
2
The State or Province you are in is displayed
at the top of the screen. If your desired
destination is in another state, select
“Change.”
The Select State Name screen is displayed.
3
Touch desired State or Province.
Select (highlight) the desired State or Province by
tilting the joystick and press ENTER.
• Select USA or Canada.
Continued
15-EN
Page 16

4
To find an address, touch one of the following
items.
To find an address, select one of the following
items and press ENTER.
a
b
a By Street Name
The Input Street Name screen appears. Go to step 7.
b By City Name
The Input City Name screen is displayed. Go to step 5.
c Last 5
The last five city names searched are stored in
memory. You can reselect a city name from this list.
5
Input the city name.
c
7
Input the street name.
• If the number of candidates narrows down to less than
5, the display automatically shows the Select Street
Name screen.
The Select Street Name screen is displayed.
8
Touch the desired street name.
Select (highlight) the desired street name by tilting
the joystick and press ENTER.
• If the number of candidates narrows down to less than
5, the display automatically shows the Select City
Name screen.
• For details on how to input, see page 13.
The Select City Name screen is displayed.
6
Touch the desired city name.
Select (highlight) the desired city name by tilting
the joystick and press ENTER.
• For details on how to use the list, see page 13.
The Input Street Name screen is displayed.
• For details on how to use the list, see page 13.
The Input Address Number screen is displayed.
9
Input the house or building number.
a
a Any
Select Any if an address number is not known, or if you
want to search for the nearest street that matches your
input.
• For details on how to input, see page 13.
The Confirm Destination screen appears.
16-EN
Page 17
10
Touch [OK to Proceed].
Select (highlight) “OK to Proceed” by tilting the
joystick and press ENTER.
The system will begin calculating the route.
• For details of the Confirm Destination, see page 32.
3
Input a point of interest name.
• If the number of candidates narrows down to less than
5, the display automatically shows the Select Place
Name screen.
• For details on how to input, see page 13.
The Select Place Name screen is displayed.
EN
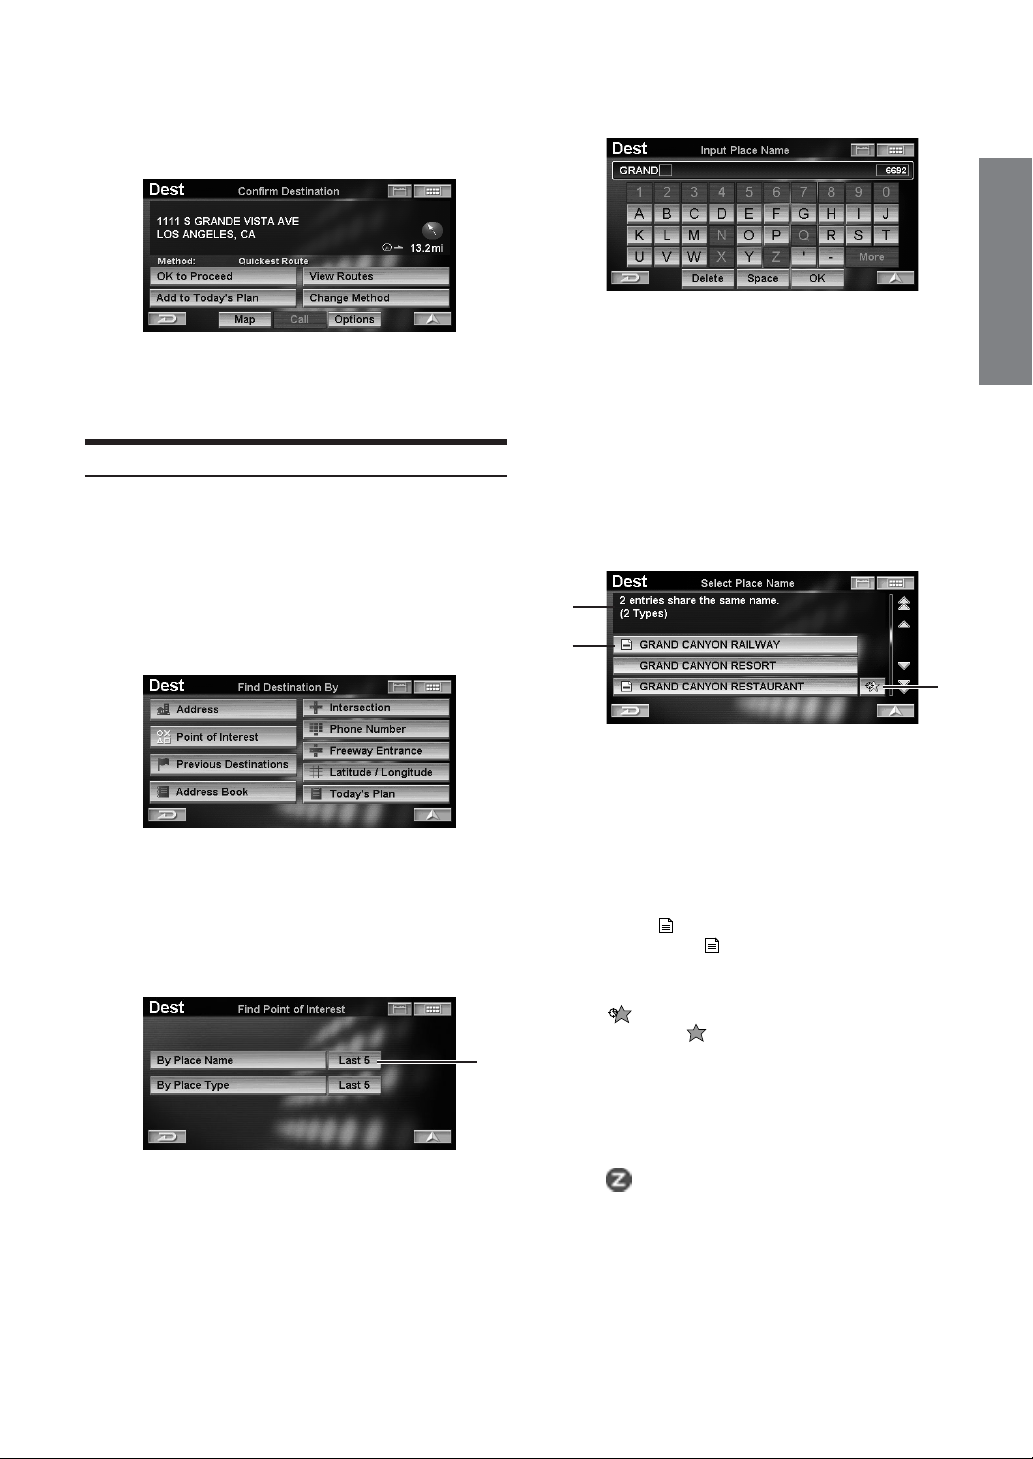
Entering a Point of Interest by Place Name
If you know the desired point of interest name, it can easily be
displayed by inputting that name using the on-screen keyboard.
1
Touch [Point of Interest] on the Find
Destination By screen.
Select (highlight) “Point of Interest” by tilting the
joystick and press ENTER.
The Find Point of Interest menu is displayed.
2
Touch [By Place Name].
Select (highlight) “By Place Name” by tilting the
joystick and press ENTER.
a Last 5
The last five place names searched are stored in
memory. You can reselect a place name from this list.
The Input Place Name screen is displayed.
a
4
Touch the desired point of interest name.
Select (highlight) the desired place name by tilting
the joystick and press ENTER.
b
c
b Information
Point of interest address, category, telephone number
and direction and distance from the current position are
displayed. If more than one point of interest name
exists, an entry number is displayed.
c Place Name
If more than one point of interest name exists, an icon
is displayed in front of its name. If the point of
interest name with is selected, the Select Place
Type or Select Address screen is displayed.
d POI Search Icon
: The system will display up to 10 asterisk
icons on the map screen representing
points of interest near the current vehicle
position. An icon can be selected and set as
a destination. You can easily find a point of
interest, such as a fast food restaurant, by
searching place names under the FAST
FOOD category.
:Review and Ratings of ZAGAT SURVEY
2004 are displayed. See page 28.
• For details on how to use the list, see page 13.
The Confirm Destination screen appears.
d
Continued
17-EN
Page 18
5
Touch [OK to Proceed].
Select (highlight) “OK to Proceed” by tilting the
joystick and press ENTER.
3
Touch the desired category of place type.
Select (highlight) the desired category of place
type by tilting the joystick and press ENTER.
The system will begin calculating the route.
• For details of the Confirm Destination, see page 32.
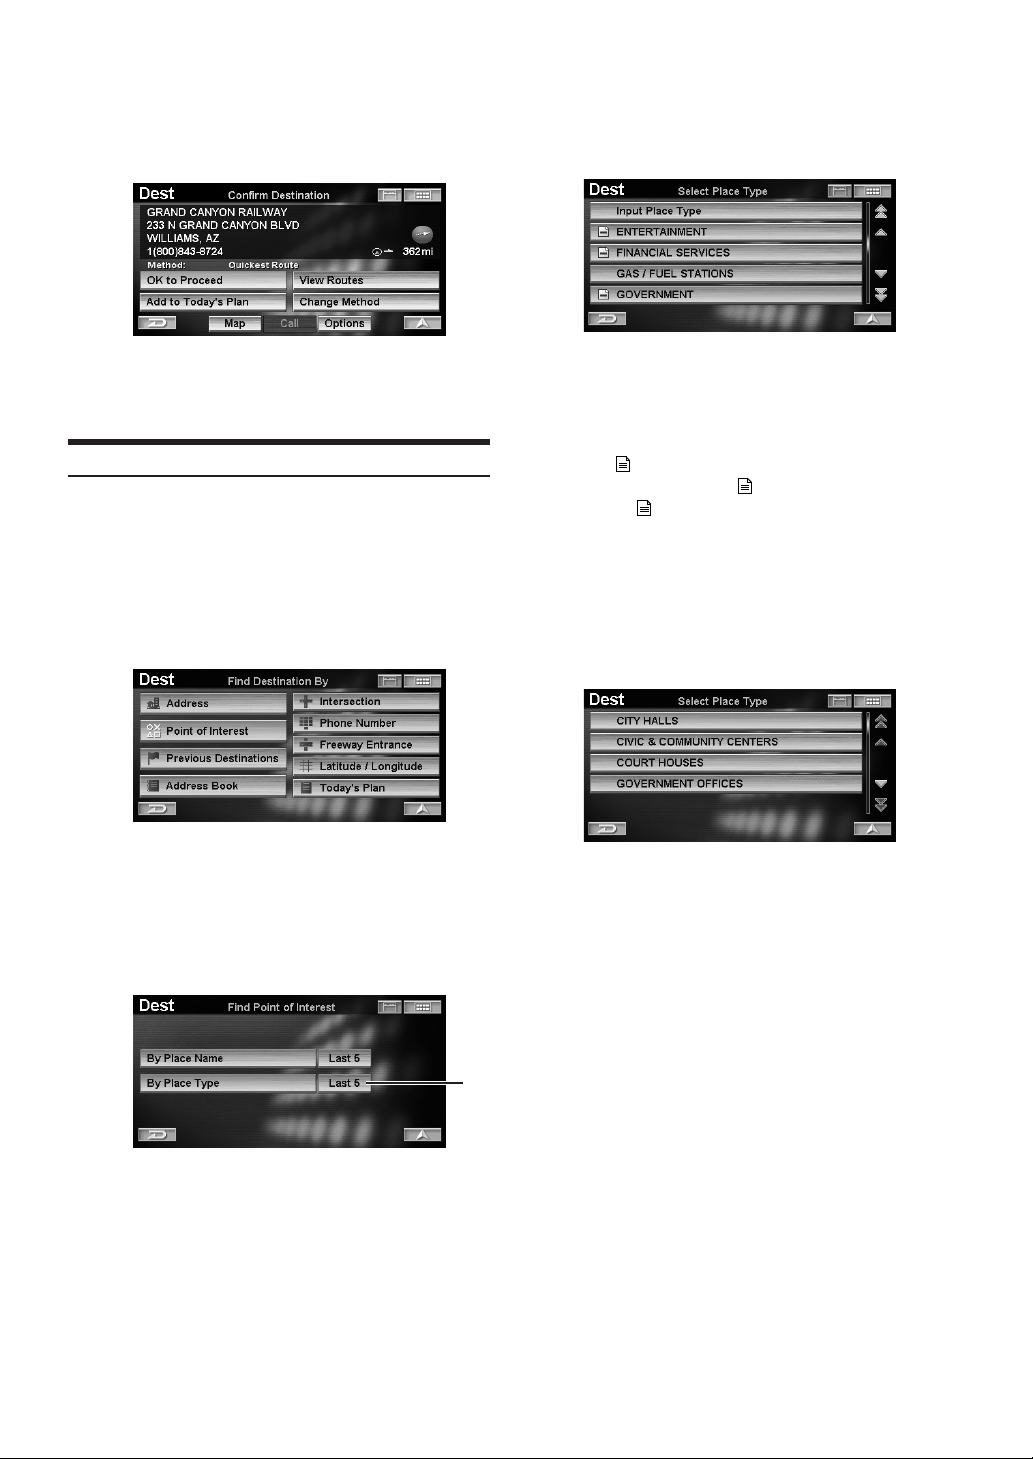
Entering a Point of Interest by Place Type
You can search for a destination place type (if known) by
selecting a list of categories.
1
Touch [Point of Interest] on the Find
Destination By screen.
Select (highlight) “Point of Interest” by tilting the
joystick and press ENTER.
The Find Point of Interest menu is displayed.
2
Touch [By Place Type].
Select (highlight) “By Place Type” by tilting the
joystick and press ENTER.
• For details on how to use the list, see page 13.
• If you select “Input Place Type,” input a keyword of
place type and select it.
• If more than one point of interest type exists, an icon is
displayed
select the place type with , go to step 4, or the place
type without
The sub-menu of Select Place Type screen is
displayed.
4
Touch the desired place type.
Select (highlight) the desired place type by tilting
the joystick and press ENTER.
• For details on how to use the list, see page 13.
The Find Place Type menu appears.
in front of point of interest type. If you
, go to step 5.
a Last 5
The last five place types searched are stored in
memory. You can reselect a place type from this list.
The Select Place Type screen is displayed.
18-EN
a
Page 19
5
To find a point of interest, touch one of the
following items.
To find a point of interest, select one of the
following items and press ENTER.
6
Touch the desired place name.
Select (highlight) the desired place name by tilting
the joystick and press ENTER.
a
b
c
d
a By Distance
The point of interest name list is displayed in order of
distance from the current position.
b By Place Name
The Input Place Name screen is displayed. Input the
desired place name.
c By Keyword Search
If you do not know the exact name of the destination,
you can find the place with a keyword.
By Distance:
Input a place name keyword.
By City Vicinity:
The system allows you to find points of interest in the
vicinity of the city you entered.
Select a city by inputting its name, then input a place
name keyword.
Last 5:
The last five city names searched are stored in
memory. You can reselect a city name from this list.
d By City Vicinity
The Input City Name screen is displayed.
Select a city by inputting its name, and input a point of
interest name.
The Select Place Name screen is displayed.
The Confirm Destination screen appears.
7
Touch [OK to Proceed].
Select (highlight) “OK to Proceed” by tilting the
joystick and press ENTER.
The system will begin calculating the route.
• For details of the Confirm Destination, see page 32.
EN
19-EN
Page 20
Entering a Destination by Previous
Destinations
If your destination is one of the fifty most recent destinations,
you can recall that destination using the procedure described in
this section.
1
Touch [Previous Destinations] on the
Find Destination By screen.
Select (highlight) “Previous Destinations” by
tilting the joystick and press ENTER.
The Select Previous Destination screen is displayed.
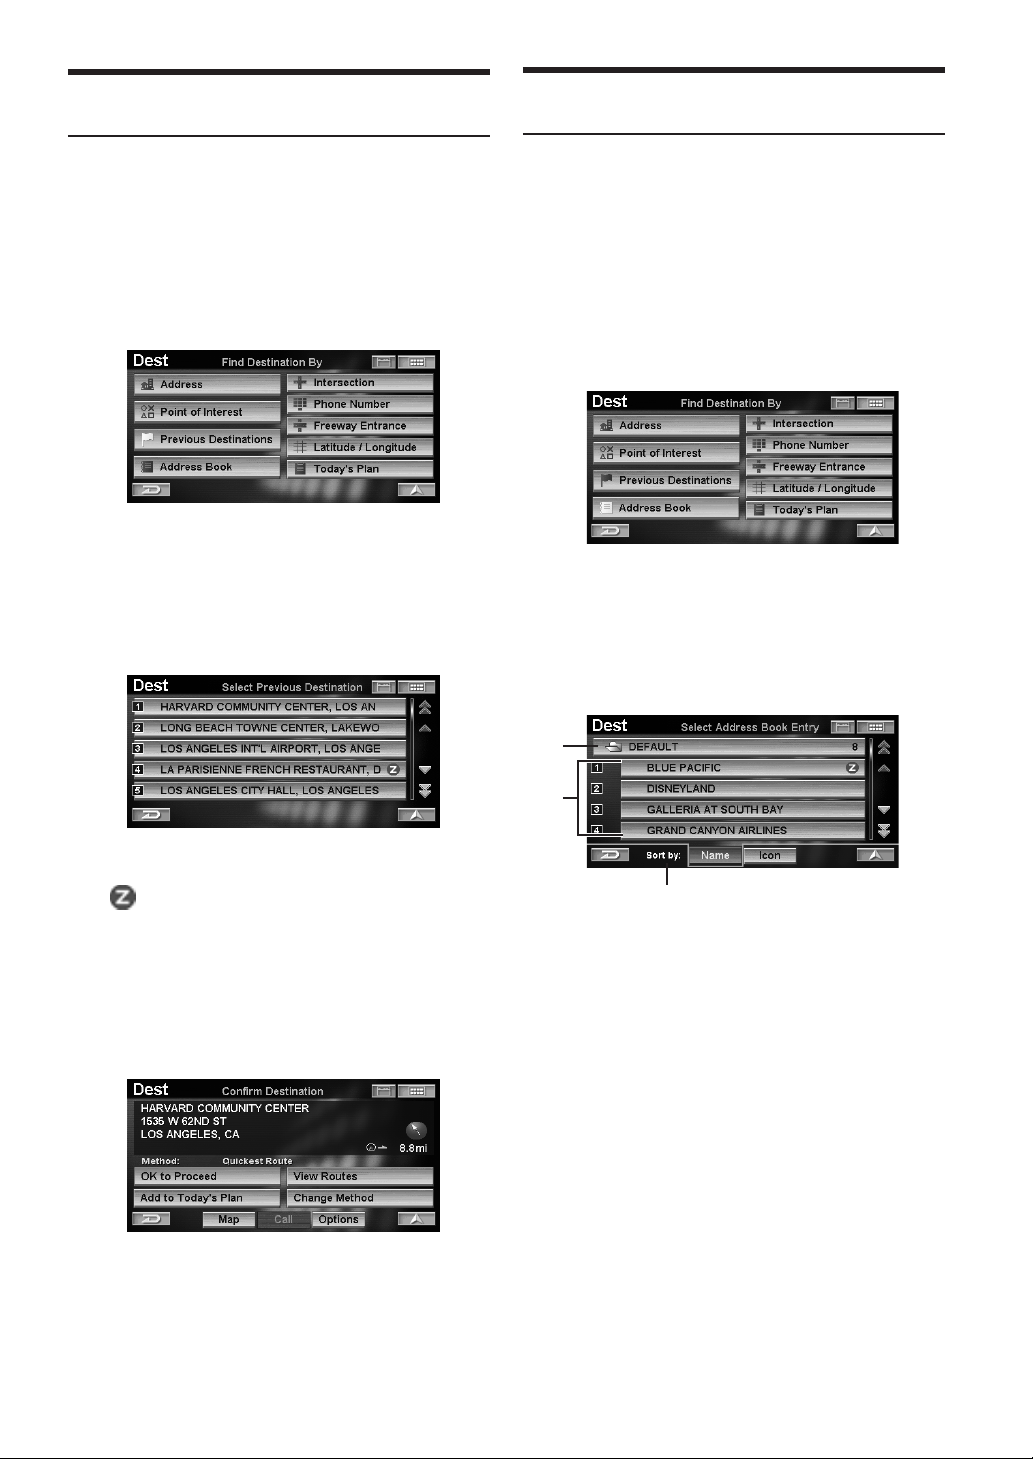
Entering a Destination Using the Address
Book
If a location has already been placed into your personal address
book, you can recall this location for use as a destination. The
Address Book holds up to 300 different addresses and phone
numbers. For more information on how to store locations in the
address book, see page 35.
1
Touch [Address Book] on the Find
Destination By screen.
Select (highlight) “Address Book” by tilting the
joystick and press ENTER.
2
Touch the desired destination.
Select (highlight) the desired destination by tilting
the joystick and press ENTER.
• For details on how to use the list, see page 13.
•A “ ” icon is displayed for places reviewed by Zagat
Survey. See page 28.
The Confirm Destination screen appears.
3
Touch [OK to Proceed].
Select (highlight) “OK to Proceed” by tilting the
joystick and press ENTER.
The Select Address Book Entry screen is displayed.
2
Touch the desired destination.
Select (highlight) the desired destination by tilting
the joystick and press ENTER.
a
b
c
a Folder Name
You can select the Address Book folder.
b Name
A list of places contained in the Address Book folder is
displayed.
c Sort by
You can sort the place list.
Name: You can sort the list by names.
Icon: You can sort the list by icons.
• For details on how to use the list, see page 13.
The Confirm Destination screen appears.
The system will begin calculating the route.
• For details of the Confirm Destination, see page 32.
20-EN
Page 21
3
Touch [OK to Proceed].
Select (highlight) “OK to Proceed” by tilting the
joystick and press ENTER.
3
Touch desired State or Province.
Select (highlight) the desired State or Province by
tilting the joystick and press ENTER.
EN
The system will begin calculating the route.
• For details of the Confirm Destination, see page 32.
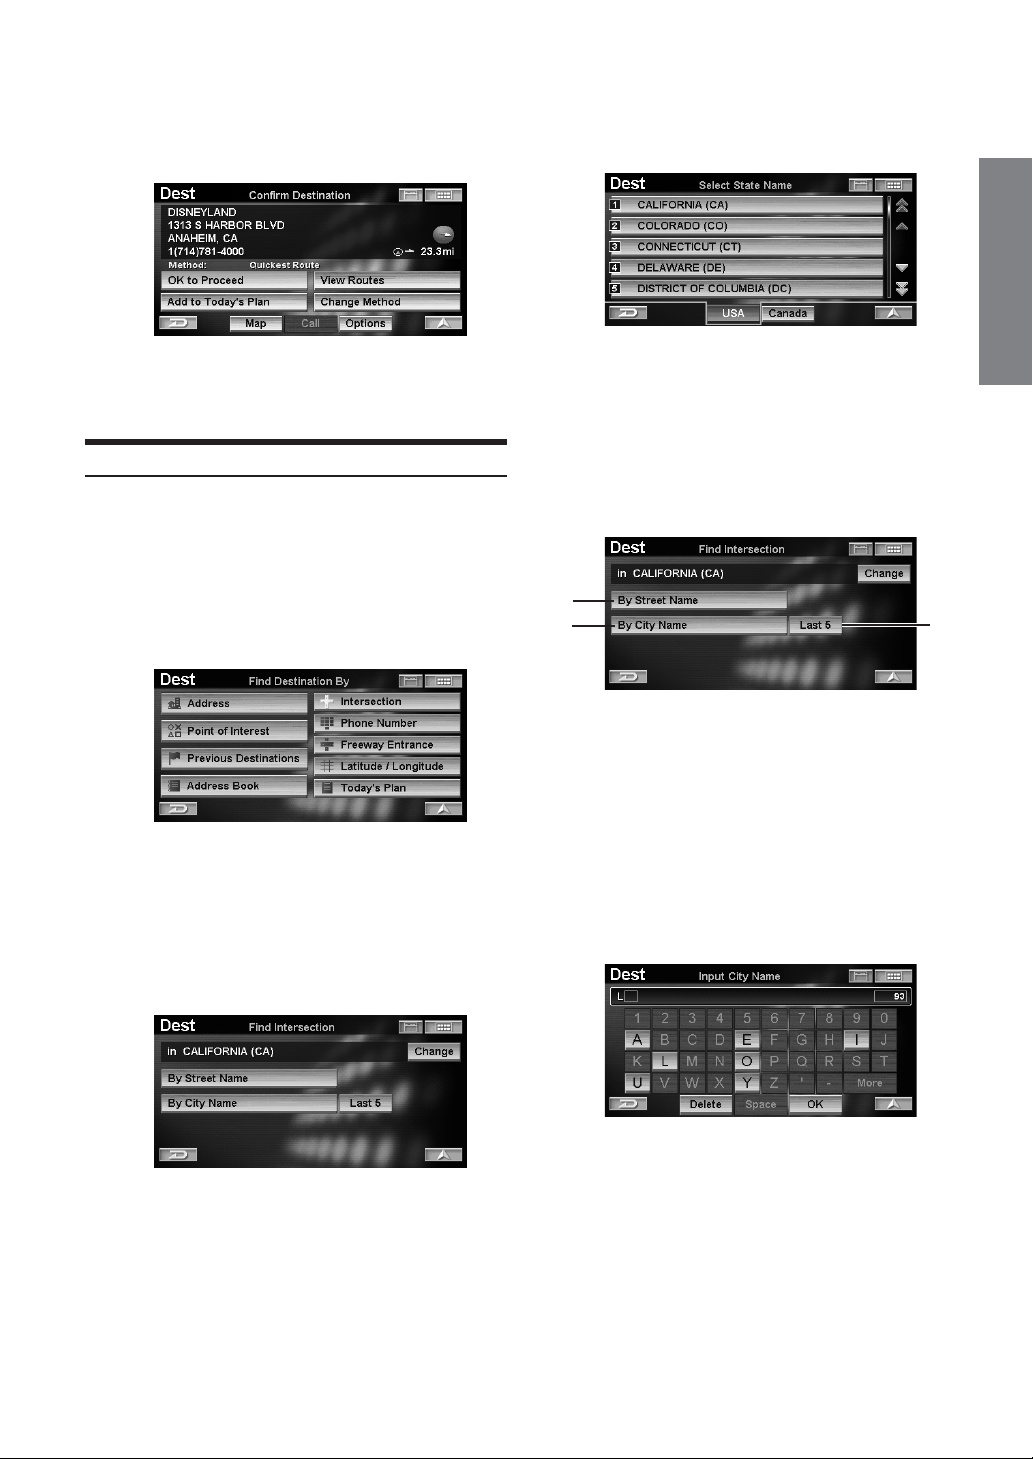
Entering a Destination by Intersection
If you know an intersection near where you want to go, you can
input two cross streets as your destination.
1
Touch [Intersection] on the Find
Destination By screen.
Select (highlight) “Intersection” by tilting the
joystick and press ENTER.
The Find Intersection menu is displayed.
2
Selecting the State or Province you are in is
displayed at the top of the screen. If your
desired destination is in another state, select
“Change.”
• Select USA or Canada.
4
To find an intersection, touch one of the
following items.
To find an intersection, select one of the following
items and press ENTER.
a
bc
a By Street Name
The Input Street Name screen appears. Go to step 7.
b By City Name
The Input City Name screen is displayed. Go to step 5.
c Last 5
The last five city names searched are stored in
memory. You can reselect a city name from this list.
5
Input the city name.
The Select State Name screen is displayed.
• If the number of candidates narrows down to less than
5, the display automatically shows the Select City
Name screen.
• For details on how to input, see page 13.
The Select City Name screen is displayed.
Continued
21-EN
Page 22
6
Touch the desired city name.
Select (highlight) the desired city name by tilting
the joystick and press ENTER.
• For details on how to use the list, see page 13.
The Input Street Name screen is displayed.
• If a street does not have an intersection in the city, the
no intersection dialog screen appears.
7
Input the street name.
9
Input the second street name.
• If the number of candidates narrows down to less than
5, the display automatically shows the Select Cross
Street Name screen.
• For details on how to input, see page 13.
The Select Cross Street Name screen is displayed.
10
Touch the desired second street name.
Select (highlight) the desired second street name
by tilting the joystick and press ENTER.
• If the number of candidates narrows down to less than
5, the display automatically shows the Select Street
Name screen.
• For details on how to input, see page 13.
The Select Street Name screen is displayed.
8
Touch the desired street name.
Select (highlight) the desired street name by tilting
the joystick and press ENTER.
• If the number of candidates narrows down to less than
5, the display automatically shows the Select Cross
Street Name screen. Go to step 10.
• For details on how to use the list, see page 13.
The Input Cross Street Name screen is displayed.
• For details on how to use the list, see page 13.
The Confirm Destination screen appears.
11
Touch [OK to Proceed].
Select (highlight) “OK to Proceed” by tilting the
joystick and press ENTER.
The system will begin calculating the route.
• For details of the Confirm Destination, see page 32.
22-EN
Page 23
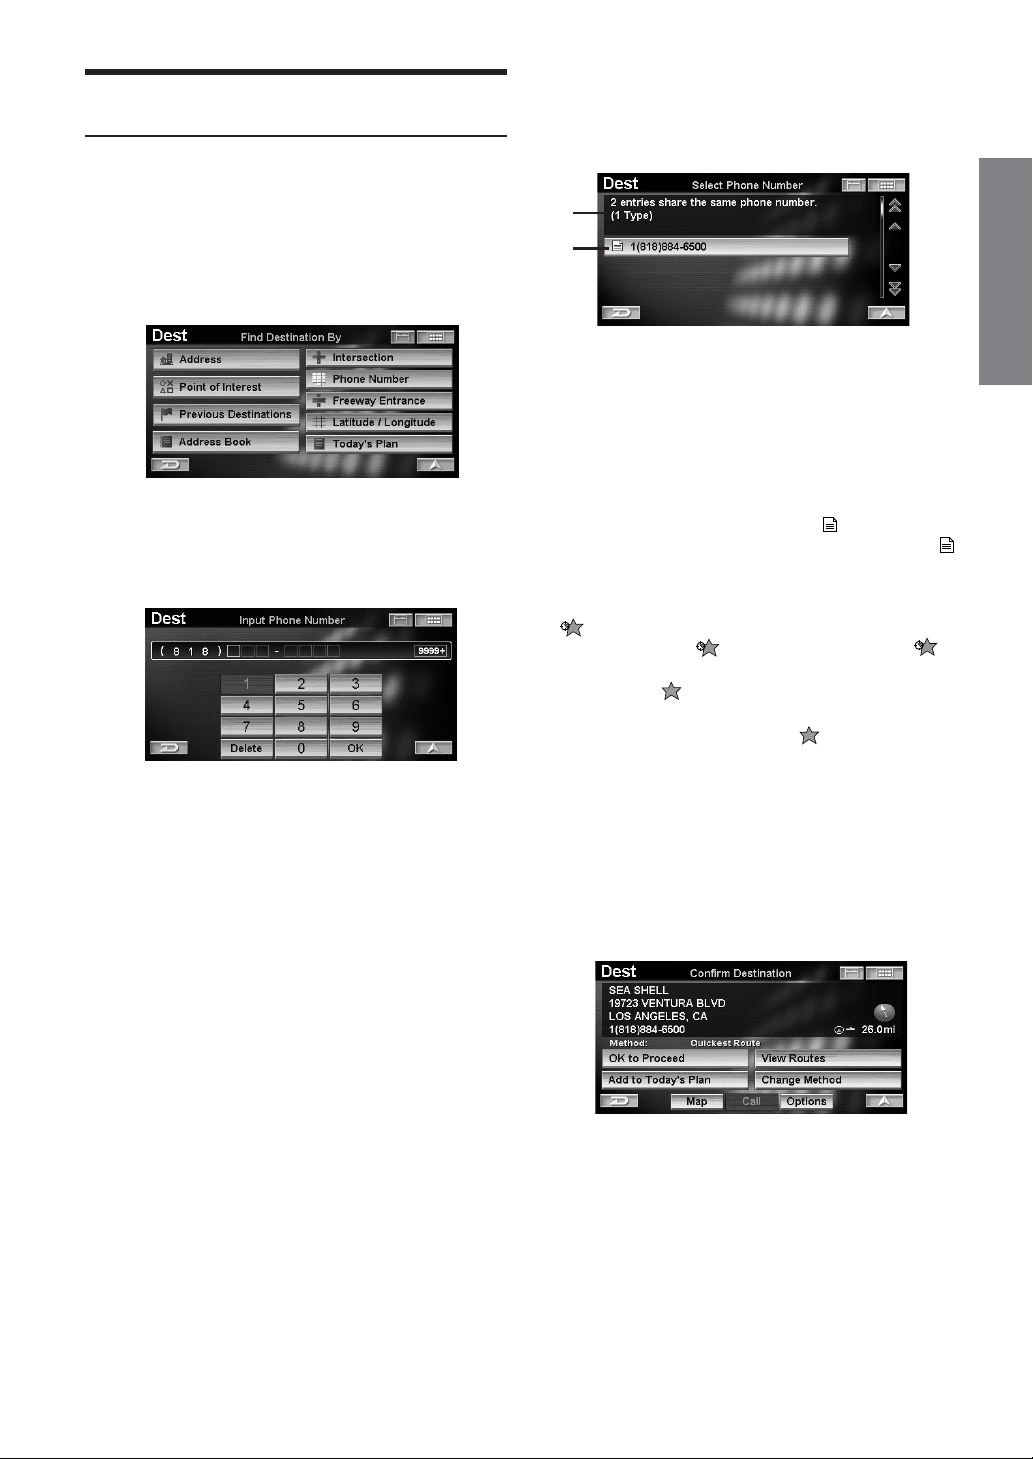
Entering a Point of Interest by Phone
Number
If you know the phone number of the point of interest you are
heading to, use this function to find the destination address.
3
Touch the phone number.
Select (highlight) the phone number by tilting the
joystick and press ENTER.
1
Touch [Phone Number] on the Find
Destination By screen.
Select (highlight) “Phone Number” by tilting the
joystick and press ENTER.
The Input Phone Number screen is displayed.
2
Input a telephone number.
• For details on how to input, see page 13.
The Select Phone Number screen is displayed.
a
b
a Information
Point of interest address, category, telephone number
and direction and distance from the current position are
displayed. If more than one place of interest name
exists for the number, an entry number is displayed.
b Phone Number
If more than one point of interest with the phone
number exists, an icon is displayed in front of the
phone number. If you select the phone number with ,
the Select Place Name or Select Place Type or
Select Address screen is displayed.
• : If more than one point of interest for a phone
number exists, the button is displayed. If the
button is selected, the display will show up to 10
asterisk icons on the map screen, representing points
of interest (with the same phone number), near the
current vehicle position. An icon
and set as a destination.
• For details on how to use the list, see page 13.
The Confirm Destination screen appears.
4
Touch [OK to Proceed].
Select (highlight) “OK to Proceed” by tilting the
joystick and press ENTER.
can be selected
EN
The system will begin calculating the route.
• For details of the Confirm Destination, see page 32.
23-EN
Page 24
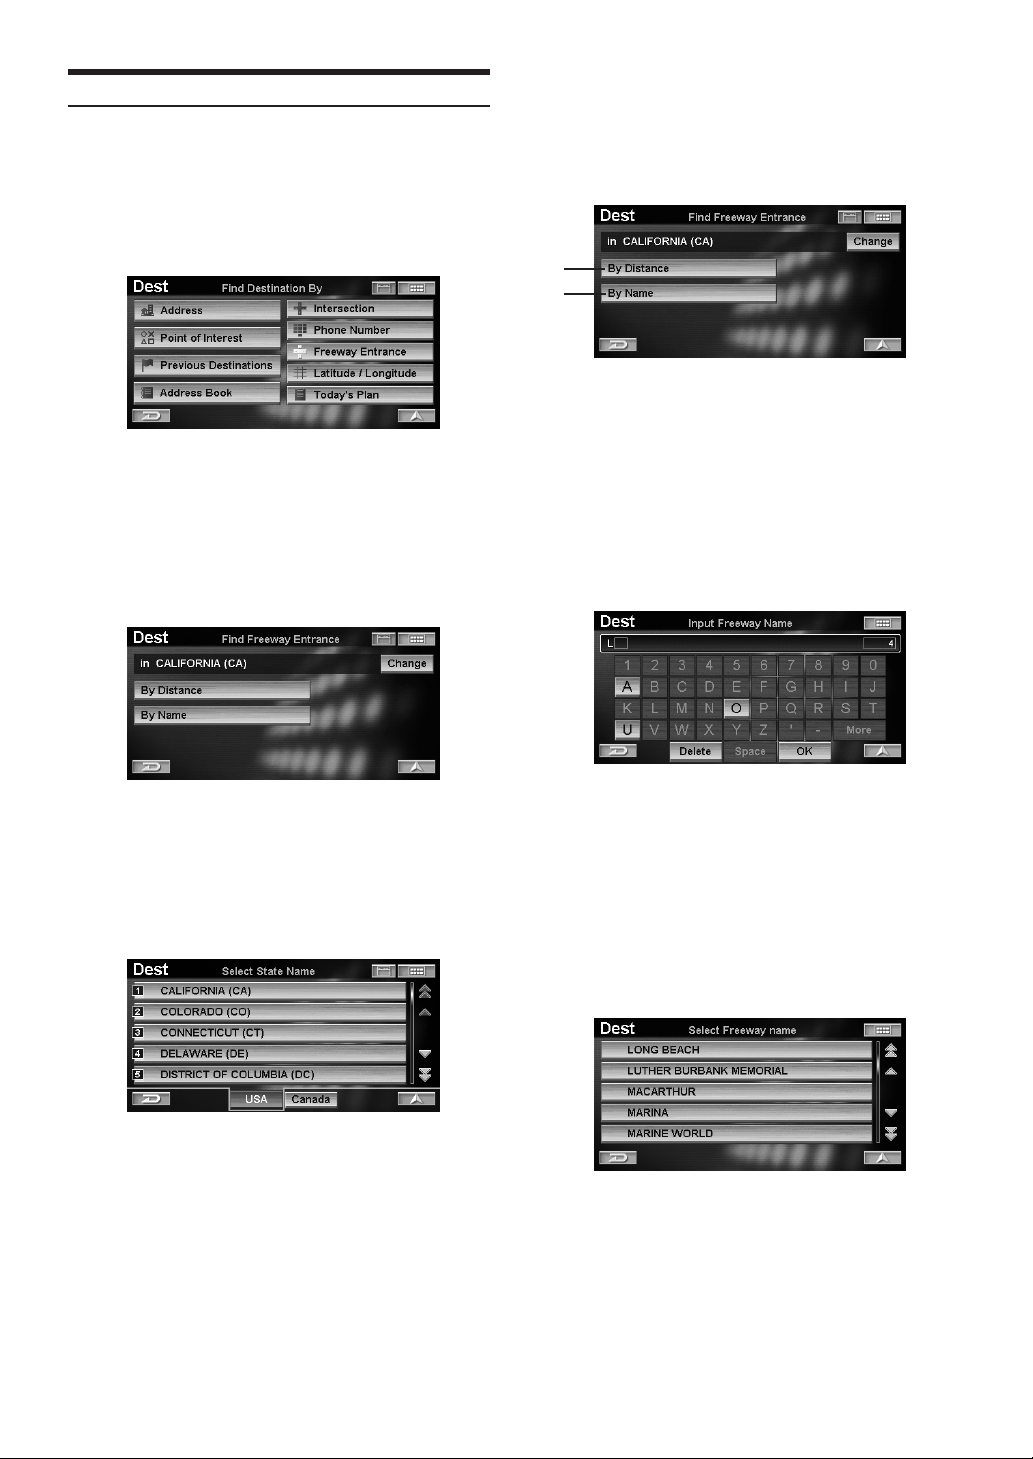
Entering a Destination by Freeway Entrance
You can search for a location from the freeway entrance or exit.
1
Touch [Freeway Entrance] on the Find
Destination By screen.
Select (highlight) “Freeway Entrance” by tilting
the joystick and press ENTER.
The Find Freeway Entrance menu is displayed.
2
The State or Province you are in is displayed
at the top of the screen. If your desired
destination is in another state, select
“Change.”
4
To find a freeway entrance, touch one of the
following items.
To find a freeway entrance, select one of the
following items and press ENTER.
a
b
a By Distance
The Select Freeway Entrance screen is displayed in
order of distance from the current position. Go to step
8.
b By Name
The Input Freeway Name screen is displayed. Go to
step 5.
5
Input the freeway name.
The Select State Name screen is displayed.
3
Touch the desired State or Province.
Select (highlight) the desired State or Province by
tilting the joystick and press ENTER.
• Select USA or Canada.
• If the number of candidates narrows down to less than
5, the display automatically shows the Select Freeway
Name screen.
• For details on how to input, see page 13.
The Select Freeway Name screen is displayed.
6
Touch the desired freeway name.
Select (highlight) the desired freeway name by
tilting the joystick and press ENTER.
• If the number of candidates narrows down to less than
5, the display automatically shows the Select Entrance
Name screen. Go to step 8.
• For details on how to use the list, see page 13.
The Input Entrance Name screen is displayed.
24-EN
Page 25
7
Input the entrance name.
• If the number of candidates narrows down to less than
5, the display automatically shows the Select Entrance
Name screen.
• For details on how to input, see page 13.
The Select Entrance Name screen is displayed.
8
Touch the desired entrance name.
Select (highlight) the desired entrance name by
tilting the joystick and press ENTER.
Select Freeway Entrance screen
Entering a Destination by Latitude and
Longitude
If you know the latitude and longitude of the desired location,
you can display that location by just inputting those numbers.
1
Touch [Latitude/Longitude] on the Find
Destination By screen.
Select (highlight) “Latitude / Longitude” by tilting
the joystick and press ENTER.
The Input Latitude screen is displayed.
2
Input the latitude.
EN
Select Entrance Name screen
• If more than one entrance in the selected entrance name
exists, the Select Entrance screen is displayed.
• For details on how to use the list, see page 13.
The Confirm Destination screen appears.
9
Touch [OK to Proceed].
Select (highlight) “OK to Proceed” by tilting the
joystick and press ENTER.
• For details on how to input, see page 13.
The Input Longitude screen is displayed.
3
Input the longitude.
• For details on how to input, see page 13.
The Confirm Destination screen appears.
The system will begin calculating the route.
• For details of the Confirm Destination, see page 32.
Continued
25-EN
Page 26
4
Touch [OK to Proceed].
Select (highlight) “OK to Proceed“ by tilting the
joystick and press ENTER.
2
To use Today’s Plan, touch one of the
following items.
To use Today’s Plan, select one of the following
items and press ENTER.
The system plots a straight red dotted line from your
current position to the destination. This is only used as
a reference. There is no guidance during this mode.
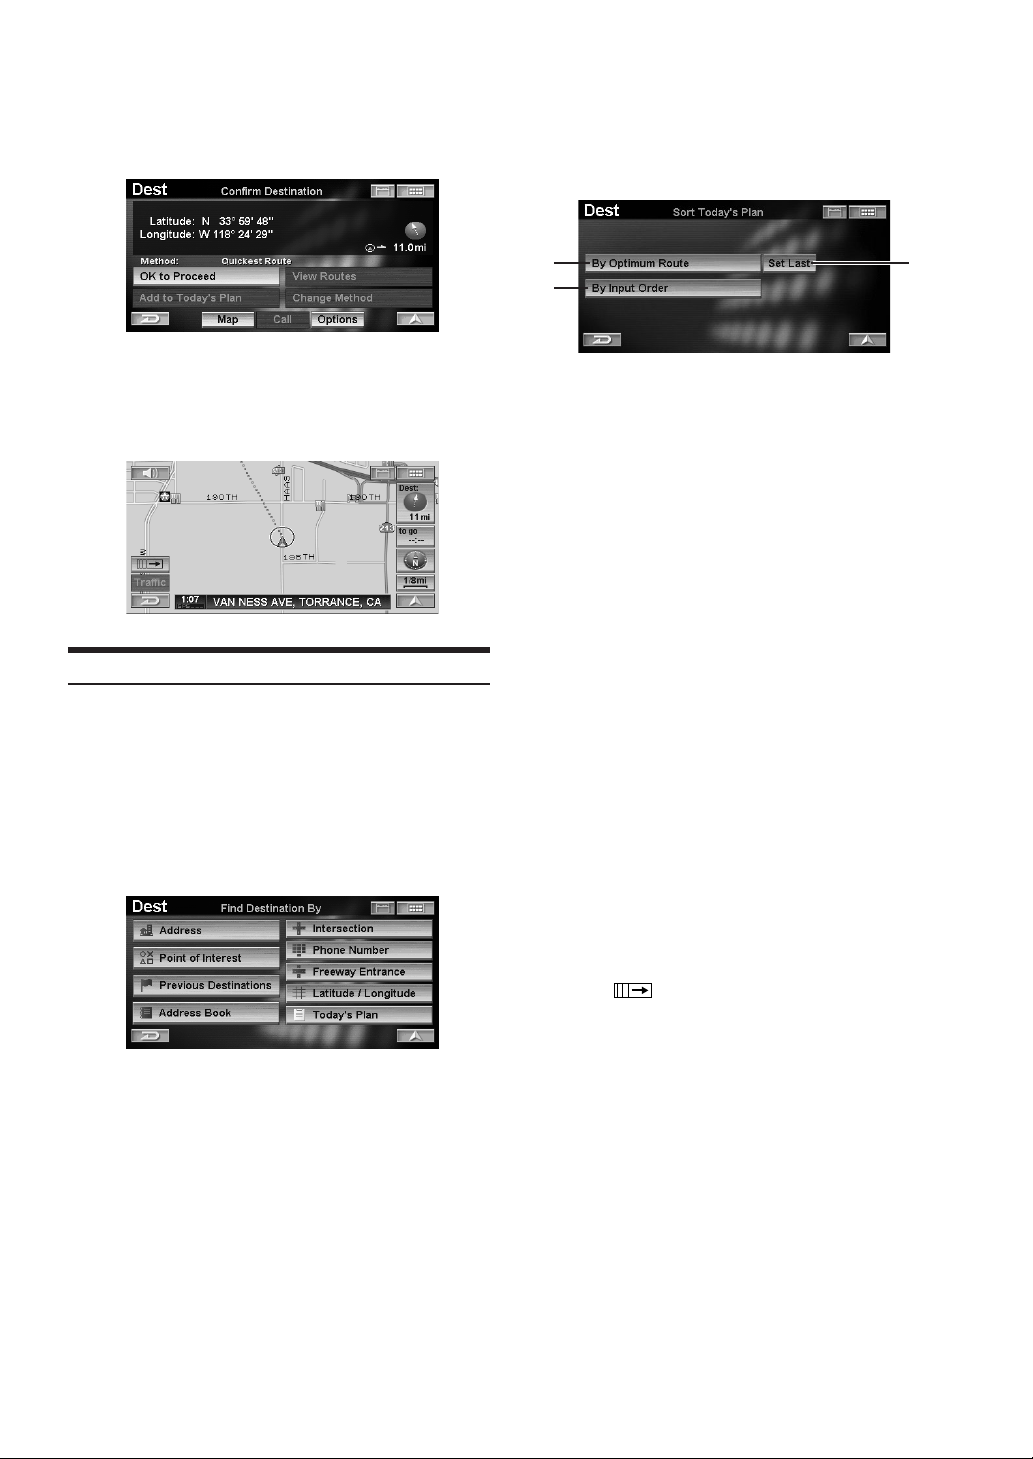
Using the Today’s Plan Function
Today’s Plan will calculate the most efficient travel order for
multiple destinations. Up to 100 destinations can be stored in
“Today’s Plan.”
1
Touch [Today’s Plan] on the Find
Destination By screen.
Select (highlight) “Today’s Plan” by tilting the
joystick and press ENTER.
a
c
a By Optimum Route
Optimizes the route by minimizing the travel distance
between all destinations in Today’s Plan. The Confirm
Destination screen of the nearest destination in Today’s
Plan List is displayed. If you would like to visit this
destination first, select “OK to Proceed.” The system
will begin calculating the route.
b Set Last
The Optimum route will be calculated to ensure that the
“Last” destination will be the final destination in the
plan. Select the destination you would like to go last,
then “Done.”
c By Input Order
Destinations in the Today’s Plan list can be visited in
the order they were input.
The Confirm Destination screen of the first destination
in Today’s Plan List is displayed. If you would like to
visit this destination first, select “OK to Proceed.” The
system will begin calculating the route.
• For details on how to use the list, see page 13.
• If you would like to select a different destination to
route first, select “Today’s Plan List.” Today’s Plan list
will appear. Select the destination you would like to
visit first.
• The Sort Today’s Plan screen can also be recalled by the
following operation:
Touch Operation:
Touch [ ], then [PLAN].
Remote Control Operation
Press PLAN.
b
The Sort Today’s Plan menu is displayed.
26-EN
Page 27
Entering a Destination by Home
If your home has already been registered, you can call it out with
a simple operation. For details about the registration method, see
page 36.
Entering a Destination Using the Favorites
If your favorite destinations have already been registered, a
simple operation can call them as your destination. For details on
the registration method, see page 36.
1
Touch [ ].
Press MENU.
The Nav Menu screen is displayed.
2
Touch [Home].
Select (highlight) “Home” by tilting the joystick
and press ENTER.
1
Touch [ ].
Press MENU.
The Nav Menu screen is displayed.
2
Touch [Favorites].
Select (highlight) “Favorites” by tilting the
joystick and press ENTER.
EN
The system will begin calculating the route.
• If Confirm Home is set to “Always,” the Confirm
Destination screen is displayed (see page 68).
Select “OK to Proceed,” then set the destination.
The Favorites list is displayed.
Continued
27-EN
Page 28
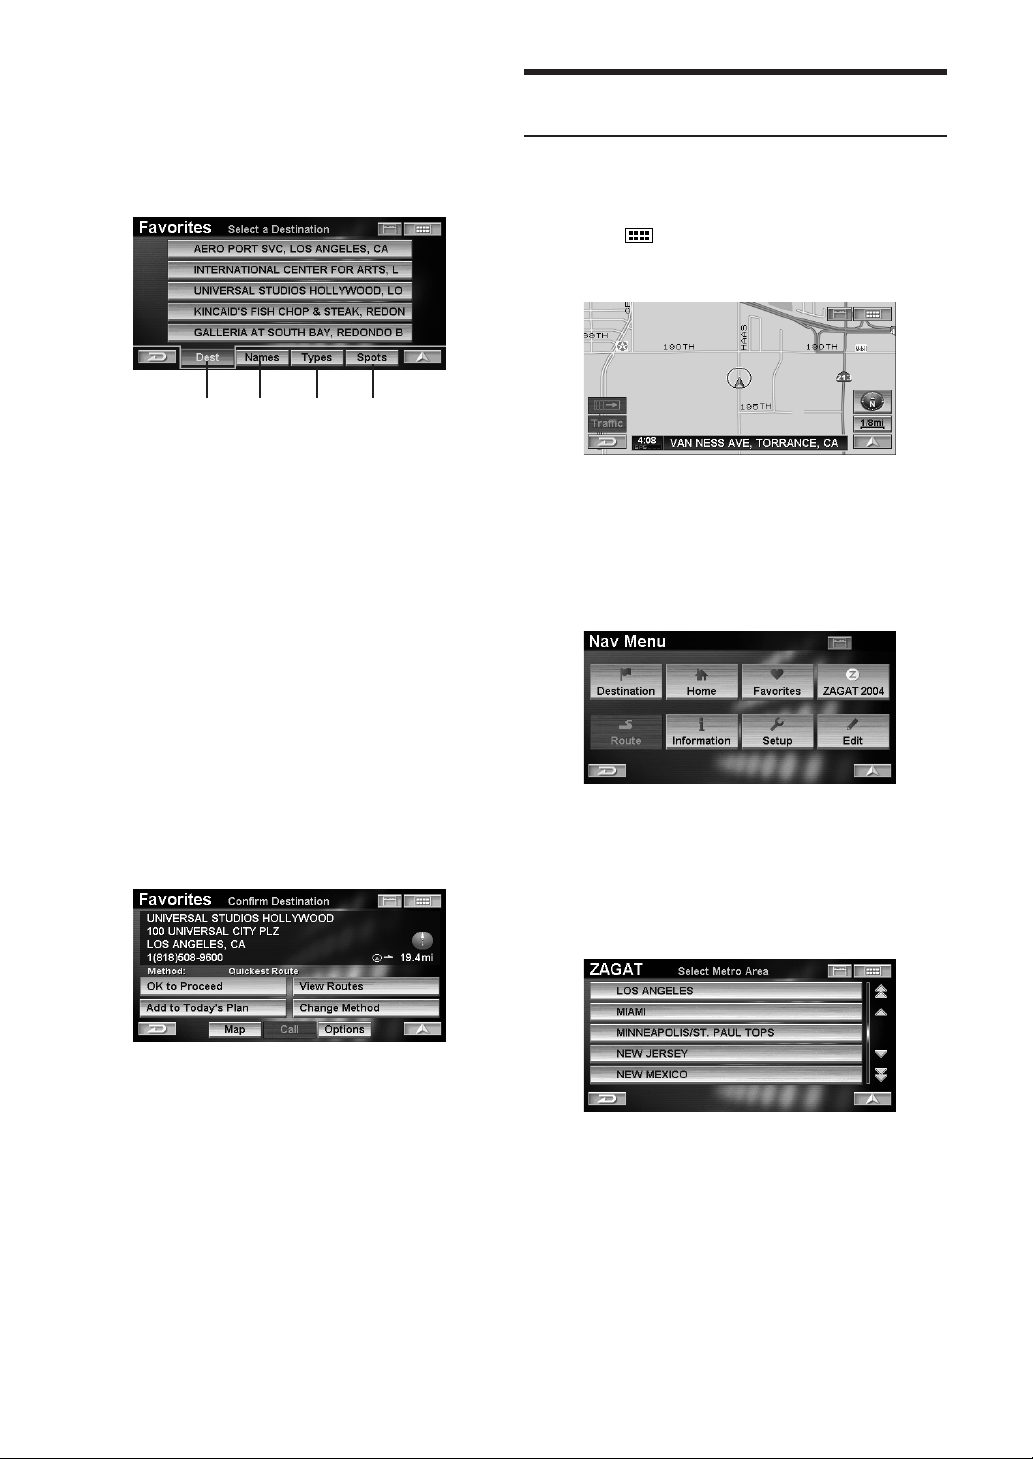
3
Touch the desired favorites category, then
item.
Select (highlight) the desired favorites category by
tilting the joystick and press ENTER. After that
select an item and press ENTER.
ab c d
a Dest
A place that is registered as “Dest” in Favorites can be
set as the destination.
b Names
A place name that is registered in “Name” can be easily
searched. Refer to step 4 in “Entering a Point of
Interest by Place Name” (see page 17).
c Types
A place name that is registered in “Type” can be easily
searched. Refer to step 5 in “Entering a Point of
Interest by Place Type” (see page 19).
d Spots
Places surrounding the location registered in “Spots”
can be easily searched. Refer to step 3 in “Entering a
Point of Interest by Place Type” (see page 18).
Entering a Destination Using ZAGAT SURVEY
Data
The system is supplied with data from the 2004 Zagat Survey
U.S. Restaurant Guide. The Zagat Survey ratings are displayed
for ease in selecting a desired restaurant.
1
Touch [ ].
Press MENU.
The Nav Menu screen is displayed.
2
Touch [ZAGAT 2004].
Select (highlight) “ZAGAT 2004” by tilting the
joystick and press ENTER.
4
Touch [OK to Proceed].
Select (highlight) “OK to Proceed” by tilting the
joystick and press ENTER.
The system will begin calculating the route.
• For details of the Confirm Destination, see page 32.
• If Confirm Favorite Dest is set to “Never” and a
Favorite Dest place is selected, the Confirm
Destination screen is not displayed, but the route is
calculated to the destination (see page 69).
The Select Metro Area screen is displayed.
3
Touch the desired metro area.
Select (highlight) the desired metro area by tilting
the joystick and press ENTER.
• For details on how to use the list, see page 13.
The Select Region screen is displayed.
28-EN
Page 29
4
Touch the desired region.
Select (highlight) the desired region by tilting the
joystick and press ENTER.
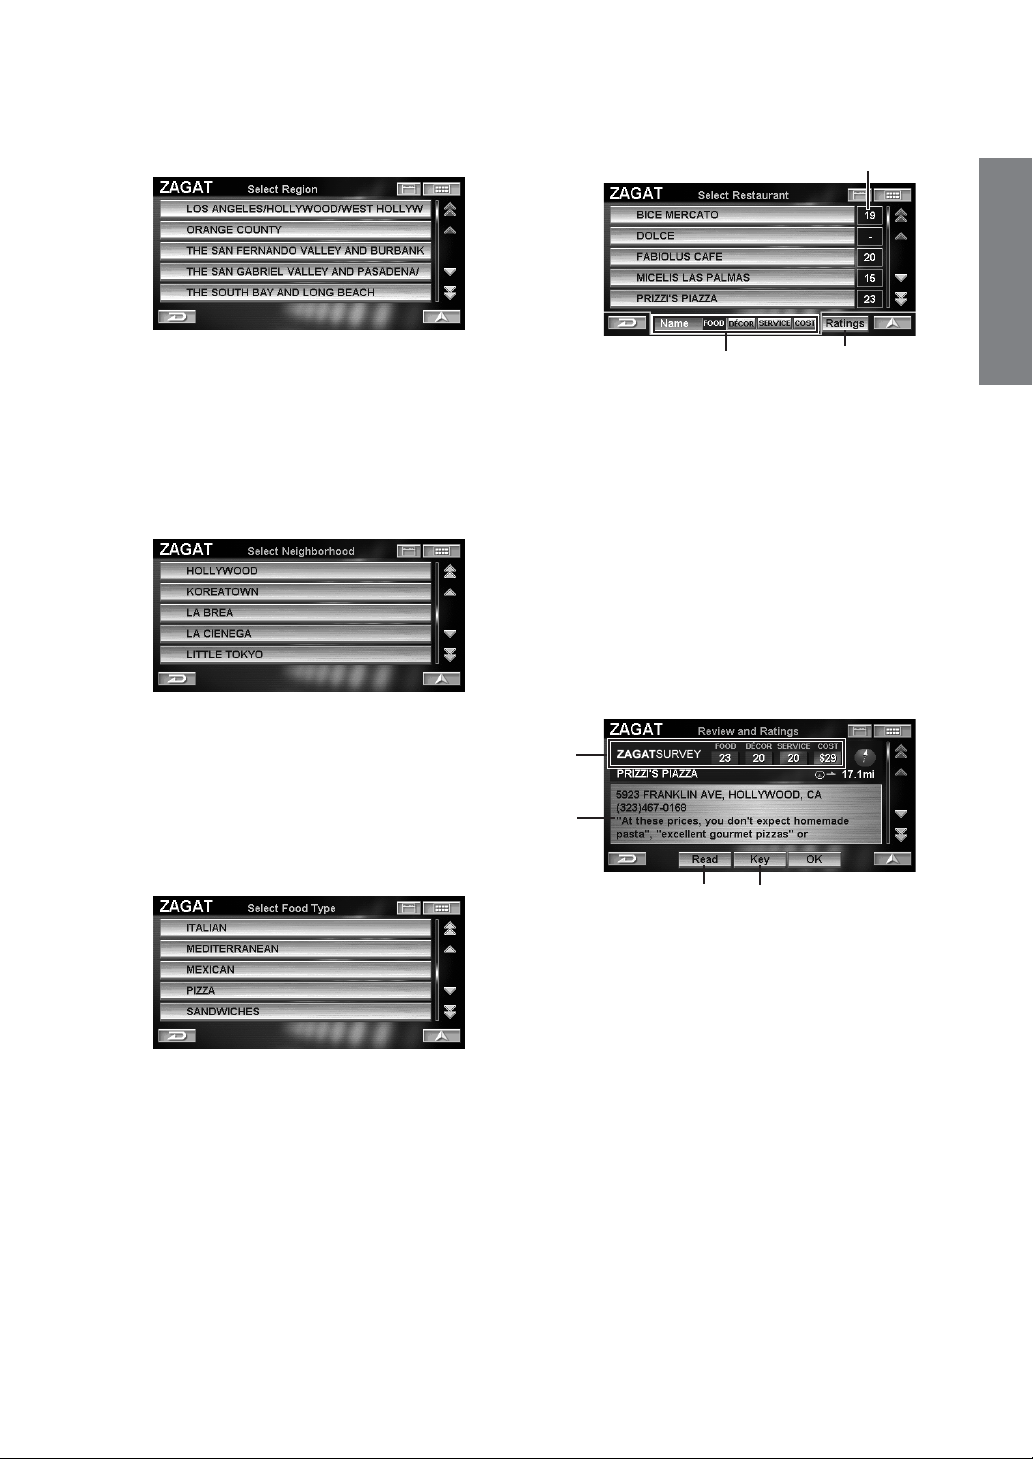
7
Touch the desired restaurant name.
Select (highlight) the desired restaurant name by
tilting the joystick and press ENTER.
a
EN
• For details on how to use the list, see page 13.
The Select Neighborhood screen is displayed.
5
Touch the desired neighborhood.
Select (highlight) the desired neighborhood by
tilting the joystick and press ENTER.
• For details on how to use the list, see page 13.
The Select Food Type screen is displayed.
6
Touch the desired food type.
Select (highlight) the desired food type by tilting
the joystick and press ENTER.
• For details on how to use the list, see page 13.
The Select Restaurant screen is displayed.
b
a Ranking
Selected ranking or average price is displayed.
b Name
Restaurant names are sorted alphabetically.
c Ratings
Restaurant names are sorted by rating.
• For details on how to use the list, see page 13.
The Review and Ratings screen is displayed.
8
Touch [OK].
Select (highlight) “OK” by tilting the joystick and
press ENTER.
a
b
cd
a Ranking
The ranking of each rating type and an average price
are displayed.
b Information
The address of the restaurant, telephone number and
review of the restaurant are displayed.
c Read
Information is read with voice guidance.
d Key
The ranking explanation is displayed.
The Confirm Destination screen is displayed.
c
Continued
29-EN
Page 30
9
Touch [OK to Proceed].
Select (highlight) “OK to Proceed” by tilting the
joystick and press ENTER.
The system will begin calculating the route.
• For details of the Confirm Destination, see page 32.
Entering a Destination by Scrolling
Displayed Map
This feature allows you quick and easy selection of a new
destination directly from a street segment or Point of interest icon
on the Detailed Map Display. By selecting a street segment or
icon, you can quickly enter a destination without inputting the
city name, street, etc.
1
Touch the Map Display.
2
Touch [8] for the direction you want to scroll
on the scroll pad and scroll the map.
Tilt the joystick to scroll the map in the desired
direction.
The street name button
The map scrolls.
• While moving the crosshair icon, the street name
display changes to the latitude/longitude display.
3
Align the crosshair icon on the destination,
and touch the street name button.
Align the crosshair icon on the destination, and
press ENTER.
The Scroll pad is displayed.
• The scroll pad is not displayed when scrolling the map
with the remote control.
• The latitude/longitude display changes to the street
name.
The Point Display sub menu appears.
30-EN
Page 31

4
Touch [Set as Destination].
Select (highlight) “Set as Destination” by tilting
the joystick and press ENTER.
5
Touch [OK to Proceed].
Select (highlight) “OK to Proceed” by tilting the
joystick and press ENTER.
a
b
c
d
e
a Set as Destination
A place can be set as a destination.
b View Icon List
The icons around the cursor are listed.
If a POI icon is set to “Hide,” “View Icon List” cannot be
selected. See “POI Icons” (page 62).
c Find Local POI
A selected place surrounding a POI can be searched.
d Save Position
A place is stored in Previous Destination.
e More
The following page is displayed.
f
g
h
EN
The system will begin calculating the route.
• For details of the Confirm Destination, see page 32.
i
f Add to Favorite Spot
A favorite place can be stored in Favorite Spot.
g Avoid Road
A place to be avoided can be stored in Avoid Road.
Select a distance from “1/2 mi”, “1 mi” or “2 mi.”
h Avoid Area
An area to be avoided can be stored in Avoid Area.
Select a distance from “1/2 mi”, “1 mi” or “2 mi.”
i Back
The previous page is displayed.
The Confirm Destination screen appears.
31-EN
Page 32

Confirm Destination
After a destination is searched, use the Confirm Destination
screen to customize the route. Setting a new destination, storing
Today’s Plan and Address Book, etc., can be performed on the
Confirm Destination screen.
L Confirm Destination screen
a
Add to Today’s Plan
Today’s Plan will calculate the most efficient travel order for
multiple destinations. Up to 100 destinations can be stored in
“Today’s Plan.”
1
Touch [Add to Today’s Plan] on the
Confirm Destination screen.
Select (highlight) “Add to Today’s Plan” by tilting
the joystick and press ENTER.
b
c
ghf
a Information
A place name, address, telephone number, direction
and distance from the current position are displayed.
b OK to Proceed
When you set a destination, the system begins
calculating a route to the destination.
c Add to Today’s Plan
To store a place in Today’s Plan, see “Add to Today’s
Plan” (page 32).
d View Routes
The system displays the entire route in a North up map
display. Different routes are displayed in 5 different
colors for easy selection of the desired route (see “View
Route,” page 33).
e Change Method
The system lets you select the way you want to drive to
your destination, see “Change Method” (page 33).
f Map
A map of the area surrounding the selected destination
is displayed (see “Open Map,” page 34).
g Call
Not used. The function will be available in the future.
h Options
The Select Option screen is displayed, see “Displaying
the Option Menu Screen” (page 34).
d
e
The Today's Plan list is displayed with the added
destination highlighted. The system returns to the Find
Destination by screen.
32-EN
Page 33

View Route
Different routes are displayed in 5 different colors for easy
selection of a desired route.
1
Touch [View Routes] on the Confirm
Destination screen.
Select (highlight) “View Routes” by tilting the
joystick and press ENTER.
5 different routes are displayed.
2
Touch [Next].
Select (highlight) “Next” by tilting the joystick and
press ENTER.
Change Method
You can change the way the system calculates a route.
1
Touch [Change Method] on the Confirm
Destination screen.
Select (highlight) “Change Method” by tilting the
joystick and press ENTER.
The Select Method menu is displayed.
2
Touch the desired Method.
Select (highlight) the desired method by tilting the
joystick and press ENTER.
EN
Current route, distance and anticipated arrival time to
the destination
• Each time “Next” is selected, the displayed route
changes.
Quickest Route → Max. Freeways → Min. Toll Roads
→ Shortest Route → Min. Freeways → Quickest Route
3
Touch the desired route.
Select (highlight) desired route by tilting the
joystick and press ENTER.
The selected route starts to guide.
a
b
c
d
e
a Quickest Route
When set to Quickest, the system will calculate the
most efficient way to arrive at your destination.
b Shortest Route
When set to Shortest Route, the system will calculate
the shortest route to the destination.
c Maximize Freeways
The Maximize Freeway option calculates a route that
makes most efficient use of freeways.
d Minimize Freeways
When set to Minimize Freeways, the system will
calculate a route that uses mostly regular streets or
roads.
e Minimize Toll Roads
The Minimize Toll Roads option calculates a route that
uses the least number of pay roads enroute to the
destination.
f Use Ferry
When you calculate a route, you can set whether to use
a ferry or not. If you set to Use Ferry, select any of the
above described methods so that the route can be
calculated to use ferries.
The display returns to the Confirm Destination screen.
f
33-EN
Page 34

Open Map
A map of the area surrounding the selected destination is
displayed. The area can be changed by scrolling the map.
1
Touch [Map] on the Confirm Destination
screen.
Select (highlight) “Map” by tilting the joystick and
press ENTER.
A map surrounding a selected place is displayed.
2
Scroll the map to change a place, see
“Entering a Destination by Scrolling
Displayed Map” on page 30.
Displaying the Option Menu Screen
You can register the searched destinations in Address Book or
Home, or add to Favorites in the option menu.
1
Touch [Options] on the Confirm
Destination screen.
Select (highlight) “Options” by tilting the joystick
and press ENTER.
a Find Local POI
View and select local POIs surrounding the current
destination, see “Find Local POI (Point of Interest)”
(page 34).
b Save to Address Book
A place can be stored in Address Book, see “Save to
Address Book” (page 35).
c Save as Home
A place can be stored as Home, see “Save as Home”
(page 36).
d Add to Favorites
A place can be stored in Favorites, see “Add to
Favorites” (page 36).
e Set as Waypoint
You can set up to 1 waypoint from your current position
to the destination, see “Set as Waypoint” (page 36).
f Set as Point A to B
Set current destination as point A. Input a point B to
calculate between two points, see “Set as Point A to B”
(page 37).
Find Local POI (Point of Interest)
Local POIs surrounding the current destination are listed. These
may be selected as a new destination.
1
Touch [Find Local POI] on the Select
Option screen.
Select (highlight) “Find Local POI” by tilting the
joystick and press ENTER.
The Select Option screen is displayed.
L Select Option screen
a
b
c
34-EN
d
e
f
The Select Place Type screen is displayed.
2
Touch the desired category of place type.
Select (highlight) the desired category of place
type by tilting the joystick and press ENTER.
• For details on how to use the list, see page 13.
• When you select “Input Place Type,” input a keyword
of place type and select Place Type.
Page 35

• If more than one point of interest type exists. an icon is
displayed
select the place type with , go to step 3. If you select
the place type without
The sub-menu of Select Place Type screen is
displayed.
3
Touch the desired place type.
Select (highlight) the desired place type by tilting
the joystick and press ENTER.
• For details on how to use the list, see page 13.
The Select Place Name screen is displayed.
4
Touch the desired place name.
Select (highlight) the desired place name by tilting
the joystick and press ENTER.
in front of point of interest type. If you
, go to step 4.
Save to Address Book
Up to 300 addresses can be stored in Address Book. Address
Book can be stored in any folder.
1
Touch [Save to Address Book] on the
Select Option screen.
Select (highlight) “Save to Address Book” by
tilting the joystick and press ENTER.
The Save to Address Book screen is displayed.
2
Touch [Done].
Select (highlight) “Done” by tilting the joystick
and press ENTER.
EN
The Confirm Destination screen appears.
5
Touch [OK to Proceed].
Select (highlight) “OK to Proceed” by tilting the
joystick and press ENTER.
The system will begin calculating the route.
• You can modify items in Address Book. For details, see
“Editing the Address Book” (page 44).
The display returns to the Confirm Destination screen.
35-EN
Page 36

Save as Home
Register any destination as home. By doing so, it can be instantly
recalled for finding your way home.
1
Touch [Save as Home] on the Select
Option screen.
Select (highlight) “Save as Home” by tilting the
joystick and press ENTER.
The Save as Home screen is displayed.
2
Touch [Done].
Select (highlight) “Done” by tilting the joystick
and press ENTER.
2
Touch [Add] of the desired item.
Select (highlight) “Add” of the desired item by
tilting the joystick and press ENTER.
a Dest
Register Dest as a frequent destination, which can
easily be recalled. When the Confirm Favorite
Destination screen is displayed, select “Done.”
b Name
Register only a place name. This function is useful for
finding places of the same name.
c Type
Register only a place type. This function is useful for
finding places of a particular type.
d Spot
Register a location. Use this location to find local POIs
within the surrounding area registered.
The system returns to the Confirm Destination screen.
• Items in Favorite can be modified, see “Editing the
Favorites” on page 48.
a
b
c
d
• You can modify items in Home. For details, see
“Editing the Home” (page 53).
• You can register only one “home.”
Add to Favorites
There are 4 categories, Destination, Name, Type and Spot. You
can register 5 different favorites for each category.
1
Touch [Add to Favorites] on the Select
Option screen.
Select (highlight) “Add to Favorites” by tilting the
joystick and press ENTER.
The Add to Favorites screen is displayed.
Set as Waypoint
You can set up to 1 waypoint from your current position to the
destination.
1
Touch [Set as Waypoint] on the Select
Option screen.
Select (highlight) “Set as Waypoint” by tilting the
joystick and press ENTER.
The system automatically calculates a route with your
set waypoints enroute.
• You can set up to 1 waypoint. Waypoint flag icon is
displayed on the map screen.
36-EN
Page 37

Set as Point A to B
Calculate a route between points A and B.
1
Touch [Set as Point A to B] on the Select
Option screen.
Select (highlight) “Set as Point A to B” by tilting
the joystick and press ENTER.
The confirmation message for whether to set a place
as A is displayed.
4
Touch [OK to Proceed A to B].
Select (highlight) the “OK to Proceed A to B” by
tilting the joystick and press ENTER.
The system begins calculating a route between A and B.
a View Routes A to B
Displays all routes between point A and B.
• Point A or B are displayed with a flag on the map.
Point A
EN
a
2
Touch [OK].
Press ENTER.
The Find Point B by screen is displayed.
3
The place set as B is searched.
The Confirm Point A to B screen appears.
Point B
37-EN
Page 38

Driving to Your Destination
Changing the route guidance display
Once the route has been calculated and driving begins, the
navigation system will guide the driver, turn-by-turn, to the
destination. Real time voice directions and map displays aid the
driver throughout the entire route.
The type of display that appears during your trip can be selected
according to your preference.
The Map Route Guidance Display automatically appears when
the destination is selected while the vehicle is in motion.
1
Touch [ ].
The route sub menu is displayed.
2
Touch [DISP.].
Press DISP.
L Map Route Guidance Display
ab c
e
f
a VOICE button ( )
Initiates vocal instruction for next route maneuver or
repeats last instruction.
b Information on the next intersection
c Street/highway name of next maneuver
d Route Line
A route is displayed in blue when you are driving on a
verified road to the destination. When you are driving
on an unverified road, a red dotted line gives the
bearing to your waypoint or destination. Before driving
onto an unverified road that traverses your route, a blue
dotted line is shown between the unverified roads.
e Distance to next maneuver
f
g Distance and Direction to Destination
h Estimated Remaining/ Arrival Time
L Split Route Guidance Display
button
Displays the route sub menu.
d
g
h
Route sub menu
• Each touch of DISP. changes the display.
• While driving on a freeway, Arrow Route Guidance
Display changes to the Freeway Junction display.
• During the Map Route Guidance Display or Split Route
Guidance display setting, if you set Auto Zoom Map to
ON in Setup, the map scale automatically zooms to a
suitable scale before an intersection (see page 65).
• When Display is set to Hybrid in Setup, the setting
automatically changes display type when approaching
an intersection (see page 64).
• You can also change the route guidance display by
touching [
].
38-EN
i
i Arrow Route Guidance Display
Information on the next intersection.
j Map Route Guidance Display
j
Page 39

L Arrow Route Guidance Display
m
k
k Arrow Route Guidance Display
Information on the next intersection.
l
The intersection or Freeway Junction map is displayed.
l
Recalling the Maneuver List during Guidance
During route guidance, you can display a list of maneuver to
preview upcoming turns and street names.
1
Touch [ ].
The route sub menu is displayed.
2
Touch [LIST].
Press LIST.
EN
m 8, 9
You can scroll the intersection or Freeway Junction
map display 2 ways:
Touch Operation:
Each touch of [8] or [9] scrolls items one by one, up or
down.
Remote Control Operation:
Tilt the joystick up or down.
L Freeway Junction Display
n
n Freeway Junction Display
Information on the next junction.
The Maneuver List is displayed.
a
a Distance / Arrow
b Next Street Name
b
Continued
39-EN
Page 40

Recalling the Arrow Route Guidance Display
The Arrow Route Guidance display for intersection or freeway
junction can be displayed.
1
Touch Distance/Arrow to preview a specified
Arrow Route Guidance display.
Select (highlight) the desired Distance / Arrow by
tilting the joystick and press ENTER.
The Arrow Route Guidance screen is displayed.
2
Touch [Avoid].
Select (highlight) “Avoid” tilting the joystick and
press ENTER.
The system begins calculating a new route.
Auto Reroute
When you are driving to the destination following Route
Guidance, if you deviate from the route, the system will
automatically calculate a new route.
Detour
You can calculate a new route from your current position around
an approaching detour on the current route. If there is a
construction site ahead, for example, search for a detour by
estimating the distance from your current position to the site.
Avoiding
You can choose to avoid a particular street or freeway junction
along your route.
1
Touch the street name to be avoided.
Select (highlight) the desired street name by tilting
the joystick and press ENTER.
The street name is checked.
1
Touch [ ].
The route sub menu is displayed.
2
Touch [DETOUR].
Press DETOUR.
40-EN
Page 41

3
Select the estimated distance of the detour.
Touch [1/2mi], [1mi], [2mi] or [5mi].
Tilt the joystick to select “1/2mi,” “1mi,” “2mi” or
“5mi” and press ENTER.
The system begins calculating a new route.
• If the route is longer than 30 miles, you can select a
detour distance of up to 30 miles.
Displaying the Route Menu Screen
You can find a POI along the route using the Edit Route function,
or change a route condition.
1
Touch [ ].
Press MENU.
You can select the following items.
• Display Entire Route (see page 41)
• Find POI Along Route (see page 41)
• Change Method (see page 42)
• Delete Destination (see page 43)
• Delete Waypoint (see page 43)
• Call Destination (Currently not used)
Display Entire Route
The navigation system allows you to view the entire route so that
you can verify the navigation system’s route calculation.
1
Touch [Display Entire Route] on the route
menu screen.
Select (highlight) “Display Entire Route” by
tilting the joystick and press ENTER.
EN
The Nav Menu screen is displayed.
2
Touch [Route].
Select (highlight) “Route” by tilting the joystick
and press ENTER.
The Route menu is displayed.
The entire route is displayed on a map with a large
enough view that you can see the entire route.
2
When you touch [ ], the system returns to
the map screen.
Press CANC., the system returns to the map
screen.
Find POI Along Route
A POI along the route can be set as a waypoint.
1
Touch [Find POI Along Route] on the route
menu screen.
Select (highlight) “Find POI Along Route” by
tilting the joystick and press ENTER.
The Select Place Type screen is displayed.
Continued
41-EN
Page 42

2
Touch the desired category of place type.
Select (highlight) the desired category of place
type by tilting the joystick and press ENTER.
5
Touch [OK to Proceed].
Select (highlight) “OK to Proceed” by tilting the
joystick and press ENTER.
• For details on how to use the list, see page 13.
• When you select “Input Place Type,” input a keyword
of place type and select Place Type.
• If more than one point of interest type exists, an icon is
displayed
select the place type with , the Select Place Type
screen is displayed.
The Select Distance screen is displayed.
3
Touch the desired distance.
Select (highlight) the desired distance by tilting the
joystick and press ENTER.
The Select Place Name screen is displayed.
4
Touch the desired place name.
Select (highlight) the desired place name by tilting
the joystick and press ENTER.
in front of point of interest type. If you
The system begins calculating a new route.
• A map surrounding the searched POI is displayed by
selecting “Map.”
Change Method
Change Method allows you to select the way the system
calculates the drive to your destination.
1
Touch [Change Method] on the route menu
screen.
Select (highlight) “Change Method” by tilting the
joystick and press ENTER.
The Select Method menu is displayed.
2
Touch the desired Method.
Select (highlight) the desired method by tilting the
joystick and press ENTER.
The Confirm as Waypoint screen is displayed.
42-EN
• For details of each Method, see page 33.
The system begins calculating a new route.
Page 43

Delete Destination
This section explains how to delete a destination you have
previously set. Any waypoints for that destination will also be
deleted.
1
Touch [Delete Destination] on the route
menu screen.
Select (highlight) “Delete Destination” by tilting
the joystick and press ENTER.
Delete Waypoint
This section explains how to delete all waypoints you have
previously set.
1
Touch [Delete Waypoint] on the route
menu screen.
Select (highlight) “Delete Waypoint” by tilting the
joystick and press ENTER.
EN
The confirmation dialog screen appears.
2
Touch [Yes].
Select (highlight) “Ye s ” by tilting the joystick and
press ENTER.
The destination is deleted and the screen returns to
the current vehicle position. If a waypoint existed, then
both the destination and the waypoint are deleted.
• If the destination was from Today’s Plan, then Today's
Plan guidance shall be canceled but destinations kept in
the Today’s Plan list.
• A destination can also be deleted by the following
operation.
Touch Operation:
Touch [ ], then [Delete Destination].
Remote Control Operation:
Press DEL.DEST.
The confirmation dialog screen appears.
2
Touch [Yes].
Select (highlight) “Ye s ” by tilting the joystick and
press ENTER.
The waypoint will be deleted. The system begins
calculating a new route.
• Waypoints can also be deleted by Touch Operation:
Touch [ ], then [Delete Waypoint].
43-EN
Page 44

Edit Features
Displaying the Edit Menu Screen
You can edit items registered in the system.
1
Touch [ ].
Press MENU.
Editing the Address Book
You can change the names, addresses, phone numbers, folders,
icons, etc. of the address books.
1
Touch [Address Book] on the edit menu
screen.
Select (highlight) “Address Book” by tilting the
joystick and press ENTER.
The Nav Menu screen is displayed.
2
Touch [Edit].
Select (highlight) “Edit” by tilting the joystick and
press ENTER.
The Edit menu is displayed.
The Select Folder screen is displayed.
2
Touch the desired folder.
Select (highlight) the desired folder by tilting the
joystick and press ENTER.
a
a Create a New Folder
You can create a new folder. (See “Create a New
Folder” on page 45.)
The Folder sub-menu is displayed.
3
Touch [Open Folder].
Select (highlight) “Open Folder” by tilting the
joystick and press ENTER.
You can edit the following items.
• Address Book (see page 44)
• Favorites (see page 48)
• Today’s Plan (see page 52)
• Home (see page 53)
• Previous Destinations (see page 53)
• Avoided Roads (see page 54)
• Avoided Areas (see page 55)
44-EN
b
c
b Rename Folder
The folder name can be modified. (See “Rename
Folder” on page 46.)
c Delete Folder
A folder can be deleted. (See “Delete Folder” on page 46.)
The Address Book list in the folder is displayed.
Page 45

4
Touch the desired address book entry.
Select (highlight) the desired address by tilting the
joystick and press ENTER.
The Change Entry screen is displayed
5
Modify each item.
d
e
f
g
h
6
When all changes have been completed, be
sure to touch [Done] to set the change.
Select (highlight) “Done” by tilting the joystick
and press ENTER.
Create a New Folder
1
Touch [Create a New Folder] on the
Select Folder screen.
Select (highlight) “Create a New Folder” by
tilting the joystick and press ENTER.
EN
i
d Name
The name of the entry can be changed. (See “Name
Change” on page 46.)
e Address
The address of the entry can be changed. (See
“Address Change” on page 47.)
f Phone
The telephone number of the entry can be changed.
(See “Phone Number Change” on page 47.)
g Folder
The folder in which the entry is stored in can be
changed. (See “Folder Change” on page 47.)
h Icon
The icon on the map for this entry can be changed.
(See “Icon Change” on page 48.)
i Delete
The entry can be deleted from the address book. (See
“Delete Address Book Entry” on page 48.)
j Done
Confirm all your address book entry changes. Select
Done when you have completed all changes to
Address Book.
j
The Input Folder Name screen is displayed.
2
Input a folder name.
• For details on how to input the name, see page 13.
3
Touch [Save].
Select (highlight) “Save” by tilting the joystick and
press ENTER.
After the folder name is saved, a new folder is created.
Continued
45-EN
Page 46

Rename Folder
The ALL and DEFAULT folder names cannot be changed.
1
Touch [Rename Folder] on the Folder sub-
menu screen.
Select (highlight) “Rename Folder” by tilting the
joystick and press ENTER.
The Input Folder Name screen is displayed.
2
Input a folder name.
2
Touch [Yes].
Select (highlight) “Ye s” by tilting the joystick and
press ENTER.
A folder is deleted.
• Address Book data in the deleted folder is also deleted.
If you do not want to delete the Address Book data,
move it to another folder before deleting. See “Folder
Change” (page 47).
Name Change
1
Touch the name on the Change Entry
screen.
Select (highlight) the name by tilting the joystick
and press ENTER.
• For details on how to input the name, see page 13.
3
Touch [Save].
Select (highlight) “Save” by tilting the joystick and
press ENTER.
A folder name is changed.
Delete Folder
The ALL and DEFAULT folders cannot be deleted.
1
Touch [Delete Folder] on the Folder sub-
menu screen.
Select (highlight) “Delete Folder” by tilting the
joystick and press ENTER.
The confirmation dialog screen appears.
The Input Name screen is displayed.
2
Input the address book entry name.
• For details on how to input the name, see page 13.
3
Touch [Save].
Select (highlight) “Save” by tilting the joystick and
press ENTER.
The address book name is changed.
46-EN
Page 47

Address Change
1
Touch the address on the Change Entry
screen.
Select (highlight) the address by tilting the joystick
and press ENTER.
The Find Address screen is displayed.
2
Refer to “Entering a Destination by Address”
in steps 4 to 9 (see page 16), and then input
an address.
2
Input a phone number.
• For details on how to input the number, see page 13.
3
Touch [Save].
Select (highlight) “Save” by tilting the joystick and
press ENTER.
The phone number of the entry is changed.
Folder Change
1
Touch the folder name on the Change Entry
screen.
Select (highlight) the folder name by tilting the
joystick and press ENTER.
EN
3
Touch [OK].
Select (highlight) “OK” by tilting the joystick and
press ENTER.
The address of the entry is changed.
Phone Number Change
1
Touch the phone number on the Change
Entry screen.
Select (highlight) the phone number by tilting the
joystick and press ENTER.
The Input Phone Number screen is displayed.
The Select Folder screen is displayed.
2
Touch the desired folder.
Select (highlight) the desired folder by tilting the
joystick and press ENTER.
The folder in address book is changed.
Continued
47-EN
Page 48

Icon Change
1
Touch [ Icon ] on the Change Entry screen.
Select (highlight) “Icon” by tilting the joystick and
press ENTER.
2
Touch [Yes].
Select (highlight) “Ye s” by tilting the joystick and
press ENTER.
The entry is deleted from Address Book.
The Select Icon screen is displayed.
2
Touch the desired icon.
Select (highlight) the desired icon by tilting the
joystick and press ENTER.
The address book icon is changed.
Delete Address Book Entry
1
Touch [Delete] on the Change Entry
screen.
Select (highlight) “Delete” by tilting the joystick
and press ENTER.
Editing the Favorites
Favorite information stored in a different category such as
Destination, Name, Type, Spot can be changed or deleted.
1
Touch [Favorites] on the edit menu screen.
Select (highlight) “Favorites” by tilting the
joystick and press ENTER.
The Favorites sub-menu is displayed.
The confirmation dialog screen appears.
48-EN
Page 49

2
Touch the desired item.
Select (highlight) the desired item by tilting the
joystick and press ENTER.
a
b
c
d
3
The following items of Favorite Destination
can be changed or deleted.
a
b
c
d
EN
a Edit/Delete Favorite Dest
The contents of Favorite Destination registered in
Favorite Dest can be changed or deleted. (See “Edit/
Delete Favorite Dest” on page 49.)
b Delete Favorite Names
A POI Name registered in Favorite Names can be
deleted. (See “Delete Favorite Names” on page 50.)
c Delete Favorite Types
A POI Type registered in Favorite Types can be
deleted. (See “Delete Favorite Types” on page 50.)
d Delete Favorite Spot
A favorite location registered in Favorite Spots can be
deleted. (See “Delete Favorite Spot” on page 51.)
Edit/Delete Favorite Dest
1
Touch [Edit/Delete Favorite Dest] on the
Favorites sub-menu screen.
Select (highlight) “Edit/Delete Favorite Dest” by
tilting the joystick and press ENTER.
e
a Name
The Favorite Destination name can be changed. (See
“Name Change” on page 46.)
b Address
The address of Favorite Destination can be changed.
(See “Address Change” on page 47.)
c Phone
The phone number of Favorite Destination can be
changed. (See “Phone Number Change” on page 47.)
d Icon
The icon displayed on the map can be changed. (See
“Icon Change” on page 48.)
e Delete
Favorite Destination can be deleted. (See “Delete
Address Book Entry” on page 48.)
f Done
Save all your Favorite Destination changes. Select
Done.
4
When all changes have been completed,
touch [Done] to set the change.
f
Select (highlight) “Done” by tilting the joystick
and press ENTER.
The Select Favorite Destination screen is displayed.
2
Touch the desired favorite destination.
Select (highlight) the desired favorite destination
by tilting the joystick and press ENTER.
The Change Favorite Destination screen is displayed.
Continued
49-EN
Page 50

Delete Favorite Names
1
Touch [Delete Favorite Names] on the
Favorites sub-menu screen.
Select (highlight) “Delete Favorite Names” by
tilting the joystick and press ENTER.
The Delete Favorite POI Name screen is displayed.
2
Touch the desired favorite POI name.
Select (highlight) the desired favorite POI name by
tilting the joystick and press ENTER.
3
Touch [Delete].
Select (highlight) “Delete” by tilting the joystick
and press ENTER.
The confirmation dialog screen appears.
4
Touch [Yes].
Select (highlight) “Ye s” by tilting the joystick and
press ENTER.
The selected favorite POI name is checked.
• All favorite POI names can be selected by [Select All].
The favorite name is deleted.
Delete Favorite Types
1
Touch [Delete Favorite Types] on the
Favorites sub-menu screen.
Select (highlight) “Delete Favorite Types” by
tilting the joystick and press ENTER.
The Delete Favorite POI Type screen is displayed.
50-EN
Page 51

2
Touch the desired favorite POI types.
Select (highlight) the desired favorite POI types by
tilting the joystick and press ENTER.
The favorite POI types are checked.
Delete Favorite Spot
1
Touch [Delete Favorite Spot] on the
Favorites sub-menu screen.
Select (highlight) “Delete Favorite Spot” by tilting
the joystick and press ENTER.
EN
• All favorite POI types can be selected by [Select All].
3
Touch [Delete].
Select (highlight) “Delete” by tilting the joystick
and press ENTER.
The confirmation dialog screen appears.
4
Touch [Yes].
Select (highlight) “Ye s ” by tilting the joystick and
press ENTER.
The Delete Favorite Spot screen is displayed.
2
Touch the desired favorite spots.
Select (highlight) the desired favorite spots by
tilting the joystick and press ENTER.
The selected favorite spots are checked.
• All the favorite spots can be selected by [Select All].
3
Touch [Delete].
Select (highlight) “Delete” by tilting the joystick
and press ENTER.
The favorite POI types are deleted.
The confirmation dialog screen appears.
Continued
51-EN
Page 52

4
Touch [Yes].
Select (highlight) “Ye s ” by tilting the joystick and
press ENTER.
3
Touch [Delete].
Select (highlight) “Delete” by tilting the joystick
and press ENTER.
The favorite spot is deleted.
Deleting the Today’s Plan
If you wish to delete a destination from Today’s Plan, you can use
this feature.
1
Touch [Today’s Plan] on the edit menu
screen.
Select (highlight) “Today’s Plan” by tilting the
joystick and press ENTER.
The Delete Today’s Plan screen is displayed.
2
Touch the desired address.
Select (highlight) the desired address by tilting the
joystick and press ENTER.
The confirmation dialog screen appears.
4
Touch [Yes].
Select (highlight) “Ye s” by tilting the joystick and
press ENTER.
The destinations are deleted from Today's Plan.
The selected address is checked.
• All addresses can be selected by [Select All].
52-EN
Page 53

Editing the Home
Information registered in home can be changed or deleted.
1
Touch [Home] on the edit menu screen.
Select (highlight) “Home” by tilting the joystick
and press ENTER.
The Change Home screen is displayed.
2
Touch the desired item.
Select (highlight) the desired item by tilting the
joystick and press ENTER.
a
b
c
d
3
When all changes have been completed,
touch [Done] to set the changes.
Select (highlight) “Done” by tilting the joystick
and press ENTER.
Deleting the Previous Destinations
If you wish to delete a destination from previous destinations,
you can use this feature.
1
Touch [Previous Destinations] on the edit
menu screen.
Select (highlight) “Previous Destinations” by
tilting the joystick and press ENTER.
EN
e
a Name
This cannot be changed.
b Address
Address can be changed. (See “Address Change” on
page 47.)
c Phone
Phone number can be changed. (See “Phone Number
Change” on page 47.)
d Icon
Icon displayed on the map can be changed. (See “Icon
Change” on page 48.)
e Delete
Home address can be deleted. (See “Delete Address
Book Entry” on page 48.)
f Done
Save all your Home changes. Select Done.
f
The Delete Previous Destination screen is displayed.
2
Touch the desired previous destinations.
Select (highlight) the desired previous destinations
by tilting the joystick and press ENTER.
The previously selected destination is checked.
• All previous destinations can be selected by [Select
All].
Continued
53-EN
Page 54

3
Touch [Delete].
Select (highlight) “Delete” by tilting the joystick
and press ENTER.
2
Touch the desired road to avoid.
Select (highlight) the desired road to avoid by
tilting the joystick and press ENTER.
The confirmation dialog screen appears.
4
Touch [Yes].
Select (highlight) “Ye s ” by tilting the joystick and
press ENTER.
The previous destination is deleted.
Editing the Avoided Roads
Areas or roads to be avoided can be changed or deleted.
1
Touch [Avoided Roads] on the edit menu
screen.
Select (highlight) “Avoided Roads” by tilting the
joystick and press ENTER.
A surrounding map of the area to be avoided and its
sub-menu are displayed.
3
Touch [1/2 mi], [1 mi], [2mi] or [Delete].
Select (highlight) “1/2 mi”, “1 mi”, “2mi” or
“Delete” by tilting the joystick and press ENTER.
• Select 1/2 mi, 1 mi or 2 mi, as the length of the road to
be avoided. The display returns to the Change/Delete
Avoided Distance screen.
• If you select Delete, the confirmation dialog screen is
displayed. Go to step 4.
4
Touch [Yes].
Select (highlight) “Ye s” by tilting the joystick and
press ENTER.
The Change/Delete Avoided Distance screen is
displayed.
54-EN
The avoided road is deleted.
Page 55

Editing the Avoided Areas
The area to be avoided can be changed or deleted.
1
Touch [Avoided Areas] on the edit menu
screen.
Select (highlight) “Avoided Areas” by tilting the
joystick and press ENTER.
The Change/Delete Avoided Area screen is displayed.
2
Touch the desired avoid area.
Select (highlight) the desired avoid area by tilting
the joystick and press ENTER.
4
Touch [Yes].
Select (highlight) “Ye s ” by tilting the joystick and
press ENTER.
The avoided area is deleted.
EN
A surrounding map of the area to be avoided and its
sub-menu are displayed. The current avoided area is
highlighted on the map.
3
Touch [1/2 mi], [1 mi], [2mi] or [Delete].
Select (highlight) “1/2 mi”, “1 mi”, “2mi” or
“Delete” by tilting the joystick and press ENTER.
• Select 1/2 mi, 1 mi or 2 mi, as the area to be avoided.
The display returns to the Change/Delete Avoided Area
screen.
• If you select Delete, the confirmation dialog screen is
displayed. Go to step 4.
55-EN
Page 56

Information Features
Displaying the Information Menu Screen
You can view various information provided by the navigation
system.
1
Touch [ ].
Press MENU.
The Nav Menu screen is displayed.
2
Touch [Information].
Select (highlight) “Information” by tilting the
joystick and press ENTER.
Trip Information
The system displays the following information: Average Speed,
Overall Speed, Maximum Speed, Driving Time, Idle Time, Total
Time, Odometer and Current Speed.
1
Touch [Trip Information] on the
Information menu screen.
Select (highlight) “Trip Information” by tilting
the joystick and press ENTER.
2
The Trip Information screen is displayed.
a
b
c
d
e
f
g
The Information menu is displayed.
Information items are described as follows.
• Traffic Incident List*
• Trip Information (see page 56)
• Weather Forecast*
• System Information (see page 57)
• Satellite Information (see page 57)
• Navigation Simulation (see page 58)
• Calendar (see page 58)
• Calculator (see page 59)
* Traffic Information is available only when the Receiver
HCE-100XM (sold separately) or SIRIUS Data
Receiver (sold separately) is connected.
For details, refer to the Owner's Manual of the Data
Receiver.
j
ih
a Average Speed
The average driving speed while the vehicle has been
in motion since Trip information was reset.
b Overall Speed
The average travelling speed since the beginning of the
trip, including idle time.
c Maximum Speed
The maximum speed the vehicle has reached during the
trip. Can be independently reset from all the other readings.
d Driving Time
Total time the vehicle has been moving since the trip
was reset.
e Idle Time
Total time the vehicle is idle (not moving).
f Total Time
Total elapsed time of the trip, i.e., driving time plus idle
time.
g Odometer button
The total distance in the odometer changes to the
distance of trip A or trip B. While displaying the
distance of trip A or trip B, touch and hold the odometer
button for at least 3 seconds or press and hold ENTER
to reset the odometer.
h Maximum Speed Reset button
Press or touch to reset Maximum Speed.
i Current Speed
The current speed is displayed by the analog
speedometer.
k
56-EN
Page 57

j Odometer
Total distance travelled since the odometer was last
reset.
k Reset All
Resets all values to zero, including the odometer
(Total, Trip A and Trip B).
System Information
The DVD-ROM’s version and the system status information are
viewable. Make note of this information and refer to it whenever
you contact Alpine Tech Support or an Alpine-authorized dealer.
1
Touch [System Information] on the
Information menu screen.
Select (highlight) “System Information” by tilting
the joystick and press ENTER.
Satellite Information
The navigation system allows you to view dynamic location
information received from GPS satellites.
This feature is very useful for off-road users in establishing a
starting point before trekking.
1
Touch [Satellite Information] on the
Information menu screen.
Select (highlight) “Satellite Information” by
tilting the joystick and press ENTER.
The Satellite Information screen is displayed.
EN
The Software Information screen is displayed.
2
Touch [Status] to display the System Status
screen.
Press ENTER.
Software Information
Touch [Status] Touch [Software]
Press ENTER Press ENTER
System Status
a
b
a Number of satellites received
Number of satellites received can be up to 12.
b Today’s date
c Elevation
Elevation is based on GPS elevation. Car icon moves
as elevation changes.
d Satellites received
Satellites from which you are receiving are displayed
green. Yellow indicates that your position is being
calculated.
a
c
d
a 2nd Car
Select this when you use the NVE-N872 navigation
system in a second vehicle. It provides the user with a
means to recalibrate the speed sensor information
once the navigation system has been installed in the
second vehicle. The user will have to drive for a while
for recalibration to be completed.
57-EN
Page 58

Navigation Simulation
You can watch a demonstration of the navigation system’s voice
and screen guidance by using this function. The vehicle position
icon will automatically move along the desired route showing a
simulation of how the navigation system functions.
Use this function only while the car is parked.
1
Touch [Navigation Simulation] on the
Information menu screen.
Select (highlight) “Navigation Simulation” by
tilting the joystick and press ENTER.
The Navigation Simulation screen is displayed.
2
Touch [Start], then [ ].
Select (highlight) “Start” by tilting the joystick
and press ENTER. Select (highlight) “
tilting the joystick and press ENTER.
” by
3
Touch [Stop] to finish the drive simulation.
Select (highlight) “Stop” by tilting the joystick and
press ENTER.
Calendar
You can use the calendar.
1
Touch [Calendar] on the Information menu
screen.
Select (highlight) “Calendar” by tilting the
joystick and press ENTER.
The drive simulation for the current route begins.
• When the drive simulation is activated, a DEMO icon is
displayed on the lower left side of the screen.
• When the drive simulation is activated, the map scale
and direction can be changed.
• The drive simulation can be activated only when a
destination has already been set.
• If the system detects that the vehicle is moving,
simulation mode will be stopped.
Calendar screen is displayed with today’s date
highlighted.
2
Touch [/] or [-] to change the displayed
month.
Tilt the joystick to the left or right.
• Touch [/] or tilt the joystick to the left: The previous
month is displayed.
• Touch [-] or tilt the joystick to the right: The
following month is displayed.
58-EN
Page 59

Calculator
You can use the calculator.
1
Touch [Calculator] on the Information menu
screen.
Select (highlight) “Calculator” by tilting the
joystick and press ENTER.
The Calculator screen is displayed.
2
Touch the screen or use the joystick to
calculate.
EN
• If a value is stored in memory, a small “M” icon is
indicated.
59-EN
Page 60

Setup
Displaying the Setup Menu Screen
1
Touch [ ].
Press MENU.
Map Display
1
Touch [Map Display] on the Setup menu
screen.
Select (highlight) “Map Display” by tilting the
joystick and press ENTER.
The Map Display screen is displayed.
The Nav Menu screen is displayed.
2
Touch [Setup].
Select (highlight) “Setup” by tilting the joystick
and press ENTER.
The Setup menu is displayed.
Setup items are described as follows.
• Map Display (see page 60)
• Map Features (see page 61)
• Guidance (see page 64)
• Calibration (see page 65)
• Clock (see page 66)
• Traffic Information*
• Language / Units (see page 67)
• Others (see page 68)
* Traffic Information is available only when the Receiver
HCE-100XM (sold separately) or SIRIUS Data
Receiver (sold separately) is connected.
For details, refer to the Owner's Manual of the Data
Receiver.
2
Touch the desired item.
Select (highlight) the desired item by tilting the
joystick and press ENTER.
Setting items:
Region Selection / Color / Orientation
3
Touch the desired Item to change its setting.
Select (highlight) the desired item by tilting the
joystick and press ENTER.
60-EN
Page 61

Region Selection
Two discs (a North and South version) are available for use. If the
South version disc is used, the region to be used must be set.
Setting item: Region Selection
Setting content: Continental USA (Initial setting)/Hawaii
Orientation
You can set your most frequently used map orientation.
Setting item: Orientation (Map Orientation)
Setting content: North Up (Initial setting) / Heading Up
EN
If you change regions, the confirmation screen is
displayed.
If you touch [Yes], the region is changed and
the opening screen is displayed.
Select (highlight) “Ye s ” by tilting the joystick and
press ENTER.
• If the North Version disc is used, the region is fixed as
Canada and North America and cannot be changed.
Color
The system allows you to set the display's map color. For most
drivers, a dark tone screen is preferred when driving at night. The
system can be set to automatically switch to dark tone screen
when headlights are turned on.
Setting item: Color (Map Color)
Setting content: Day / Night / Auto (Initial setting)
North up: Displays the map with north always
Heading up: Displays the map with the vehicle
at the top of the screen. The vehicle
position icon rotates depending on
the driving direction.
position icon always pointed to the
top of the screen. The map screen
rotates depending on the driving
direction.
Map Features
1
Touch [Map Features] on the Setup menu
screen.
Select (highlight) “Map Features” by tilting the
joystick and press ENTER.
The Map Features screen is displayed.
Day: DAY mode maintains a bright tone screen even
while your headlights are on.
Night: NIGHT mode maintains a dark tone screen
even when your headlights are off.
Auto: AUTO mode switches automatically between
Day and Night screen color when your head
lamps are turned on and off.
2
Touch the desired item.
Select (highlight) the desired item by tilting the
joystick and press ENTER.
Setting items:
POI Icons / Landmark Icons / Building Outlines / One
Way Icons / Trail
Continued
61-EN
Page 62

3
Touch the desired Item to change its setting.
Select (highlight) the desired item by tilting the
joystick and press ENTER.
POI Icons
The system can display icons on the map for points of interest
such as gas/fuel stations, restaurants, parking lots, etc.
Setting item: POI Icons
Setting content: Show (Initial setting) / Hide
Show: The selected POI icon is displayed on the map
screen. Select the Edit menu to display the POI
icon.
Hide: Clear the POI icon from the map screen.
“Show” is set, select the POI icon to be displayed.
1 Touch [Edit...] to display the Select Place Type screen.
Select (highlight) “Edit…” by tilting the joystick and press
ENTER.
2 Touch the desired place type.
Select (highlight) the place type by tilting the joystick and
press ENTER.
• The selected place type is checked and the POI icon
lights up at the same time.
• If “Restaurant” is selected, you can select food type.
3 Touch [Done].
Select (highlight) ”Done” by tilting the joystick and press
ENTER.
POI Icons
Icon
Legend
GAS/FUEL STATIONS*
RESTAURANTS
PARKING GARAGES
PARKING LOTS
ATMS
BANKS
CONVENIENCE STORES
GROCERY STORES
FREEWAY EXITS
HOTEL & MOTELS
BED AND BREAKFAST
POST OFFICES
HOSPITALS
SCHOOLS
* Brand icons for the following eight gas companies
selected from GAS/FUEL STATION are displayed.
Icon Company's name
Amoco
BP
Chevron
Exxon
Mobil
• If “Default” is selected, GAS/FUEL STATIONS (initial
setting) can be displayed.
62-EN
Shell
Texaco
Union76
Page 63

Landmark Icons
The system can display on the map the landmark icons.
Setting item: Landmark Icons
Setting content: Show (Initial setting) / Hide
One Way Icons
The system can display on the map the one way icons.
Setting item: One Way Icons
Setting content: Show (Initial setting) / Hide
EN
Show: Display Landmark icons on the map screen.
Hide: Clear Landmark icons from the map screen.
• For details on Landmark Icons, see “How to View a
Current Display” on page 12.
Building Outlines
The system can display on the map the building outlines.
Setting item: Building Outlines
Setting content: Show (Initial setting) / Hide
Show: Display building outlines on the map screen.
Hide: Clear building outlines from the map screen.
• For details on building outlines, see “How to View a
Current Display” on page 12.
Show: Display One Way Icons on the map screen.
Hide: Clear One Way Icons from the map screen.
• The one way icons can be displayed on the map when
map scale is 1/16 mile (100 m) or less.
Trail
A trail of dots showing where you have driven in the last 150
miles can be displayed on the map screen for easy location of
previously travelled roads.
Setting item: Trail (Recorded trail dots)
Setting content: Recording On /
Recording Off (Initial setting)
Recording On: Trail dots are recorded and displayed
on the map screen.
Recording Off: Trail dots are not recorded.
• Select “Clear” to clear Recorded Trail dots displayed on
the map screen.
63-EN
Page 64

Guidance
1
Touch [Guidance] on the Setup menu
screen.
Select (highlight) “Guidance” by tilting the
joystick and press ENTER.
Voice Prompt
The system allows you to choose the type or frequency of audible
prompts you receive as you are guided along your route.
Setting item: Voice Prompt
Setting content: Off / Minimum / Normal (Initial setting)/
Maximum
The Guidance screen is displayed.
2
Touch the desired item.
Select (highlight) the desired item by tilting the
joystick and press ENTER.
Setting items:
Voice Prompt / Display / Auto Zoom Map / Estimated
Time
3
Touch the desired Item to change its setting.
Select (highlight) the desired item by tilting the
joystick and press ENTER.
• If you select Off, you are not guided with voice prompt.
• “Maximum” setting includes voice guidance for street
names using the TTS (Text to speech) Engine. (ie. “Left
turn on Gramercy Place”).
Display
During route guidance, you can select the map display type.
Setting item: Display
Setting content: Arrow / Map / Split (Initial setting) /
Hybrid
Arrow: Your route is guided along by the Arrow Route
Guidance Display.
Map: Your route is guided along by the Map Route
Guidance Display.
Split: Your route is guided by a dual-screen display,
comprising of both Map Route Guidance and
Arrow Route Guidance.
Hybrid: Your route is guided by using the display
transition you chose in the Hybrid menu.
Hybrid Display Type
64-EN
Current Display
Arrow
Map
Arrow
Map
• For details on each display, see “Changing the route
guidance display” on page 38.
• “Next Display” is shown when approaching the
intersection.
Next Display
Map
Arrow
Split
Split
Page 65

Auto Zoom Map
You can set whether to display the zoom map or not when
approaching a maneuver point.
Setting item: Auto Zoom Map
Setting content: On / Off (Initial setting)
Calibration
1
Touch [Calibration] on the Setup menu
screen.
Select (highlight) “Calibration” by tilting the
joystick and press ENTER.
EN
On: Zoom level is automatically adjusted depending
on distance to maneuver.
Off: Zoom level does not change.
Estimated Time
When the system calculates a route, it also estimates the time it
will take to the destination. Arrival (ETA) is displayed in the time
of the destination time zone (PST or EST,etc.), or Remaining
(ETE) is displayed as “to go.”
Setting item: Estimated Time
Setting content: Arrival (ETA) (Initial setting) /
Remaining (ETE)
Arrival (ETA): Arrival (ETA) is displayed in the time
of the destination time zone (PST or
EST, etc.).
Remaining (ETE): Remaining (ETE) is displayed as
“to go.”
• The time estimates are based on the average speed of
the vehicle. The Estimated Time will vary accordingly,
as the vehicles speed varies.
The Calibration screen is displayed.
2
Touch the desired item.
Select (highlight) the desired item by tilting the
joystick and press ENTER.
Setting items:
Screen Adjustment / Nav Volume Adjustment
3
Touch the desired Item to change its setting.
Select (highlight) the desired item by tilting the
joystick and press ENTER.
Continued
65-EN
Page 66

Screen Adjustment
The navigation screen will appear out of position when connected
to some displays. The image position can be optimized for a
particular monitor being used with the system.
Setting item: Screen Adjustment
Setting content: -10 to +10 (horizontal)
-5 to +5 (vertical)
1 Touch [Tuning] to display the Screen Adjustment screen.
Select (highlight) “Tuning” by tilting the joystick and press
ENTER.
2 Touch [8], [9], [/] or [-] to adjust the display position.
Adjust the display position by tilting the joystick.
Clock
1
Touch [Clock] on the Setup menu screen.
Select (highlight) “Clock” by tilting the joystick
and press ENTER.
The Clock screen is displayed.
2
Touch the desired item.
Select (highlight) the desired item by tilting the
joystick and press ENTER.
3 Touch [Set].
Select (highlight) ”Set” by tilting the joystick and press
ENTER.
• Select “Default” to return to the initial setting.
Nav Volume Adjustment
The volume of the tones and voice is adjusted in 11 steps.
Setting item: Nav Volume Adjustment
Setting content: 0 to 10 (Initial setting: 5)
1 Touch [/] or [-] to adjust volume.
Adjusting the volume by tilting the joystick.
Setting items:
Time Zone / Time / Clock Display
3
Touch the desired Item to change its setting.
Select (highlight) the desired item by tilting the
joystick and press ENTER.
66-EN
Page 67

Time Zone
Set a time zone selection to display approximate time.
Setting item: Time Zone
Setting content: Automatic (Initial setting) / Pacific
(PST) / Mountain (MST) / Central (CST)/
Eastern (EST)
Language / Units
1
Touch [Language/Units] on the Setup menu
screen.
Select (highlight) “Language/Units” by tilting the
joystick and press ENTER.
EN
• The “More” button allows you to choose Newfoundland
(NST), Atlantic (AST) or Alaska (AKST) timezones.
Time
Select standard or Daylight Savings time.
Setting item: Time
Setting content: Standard (Initial setting) / Daylight
Savings
Clock Display
Set for the current GPS time is displayed or not on the map
screen.
Setting item: Clock Display
Setting content: Show (Initial setting) / Hide
The Language/Units screen is displayed.
2
Touch the desired item.
Select (highlight) the desired item by tilting the
joystick and press ENTER.
Setting items:
Language/Units
3
Touch the desired Item to change its setting.
Select (highlight) the desired item by tilting the
joystick and press ENTER.
Language
You can select the language for menu and voice guidance.
Setting item: Language
Setting content: English (Initial setting) / Français /
Español
Show: Current time is displayed on the map screen.
Hide: Current time is cleared from the map screen.
• If you select a language other than the current one, a
disclaimer appears on the screen. Touch or press
ENTER.
Continued
67-EN
Page 68

Units (mile/ft or km/m)
Allows you to select the units for the entire system (mile or km).
Setting item: Units
Setting content: US (mi/ft) (Initial setting) / Metric (km/m)
Keypad
Allows you to select the displayed keypad screen: Alphabet or
QWERTY.
Setting item: Keypad
Setting content: Alphabet (Initial setting) / QWERTY
Others
1
Touch [Others] on the Setup menu screen.
Select (highlight) “Others” by tilting the joystick
and press ENTER.
The Others screen is displayed.
2
Touch the desired item.
Select (highlight) the desired item by tilting the
joystick and press ENTER.
Confirm Home
If you set your home as the destination, you can set whether to
confirm a route in the Destination screen.
Setting item: Confirm Home
Setting content: Always (Initial setting) / Never
Always: Confirm your route home in the Confirm
Destination screen.
Never: Calculate your route home without displaying
the Confirm Destination screen.
Setting items:
Keypad / Confirm Home / Confirm Favorite Dest /
Confirm Voice Input
3
Touch the desired Item to change its setting.
Select (highlight) the desired item by tilting the
joystick and press ENTER.
68-EN
Page 69

Confirm Favorite Dest
If the destination you set exists in Favorites, you can set whether
to confirm the destination or not in the Confirm Destination
screen.
Setting item: Confirm Favorite Dest
Setting content: Always (Initial setting) / Never
Always: Confirm the destination in the Confirm
Destination screen.
Never: Calculates your route without showing the
Confirm Destination screen.
Confirm Voice Input
You can confirm whether the system has recognized the
command you spoke by using the voice recognition.
Setting item: Confirm Voice Input
Setting content: Always / Never (Initial setting)
EN
Always: The command you spoke is always repeated.
Never: The command you spoke is never repeated.
69-EN
Page 70

Reference
Buttons and Functions of Remote Control
(RUE-4140)
Names of the Parts
1
2
4
5
6
7
8
9
!
"
1 Remote Control transmitter
Transmits the remote control signals. Aim toward the
display monitor for operation.
2 Status indicator
Illuminates when the remote is transmitting.
3 Joystick/ENTER button
Selects highlighted items in menus and moves map
displays and vehicle position icon. Tilt this to scroll the
map. Press the ENTER button to select any highlighted
function, screen icon or street segment.
4 Zoom/Scroll buttons
Changes map magnification ratio upward or downward
in 12 steps.
mile: 1/32, 1/16, 1/8, 1/4, 1/2, 1, 2, 5, 15, 50, 150,
350
m: 50, 100, 200, 400 m, 1, 2, 4, 10, 30, 100,
250, 600 km
Changes map magnification ratio smoothly by pressing
and holding either button.
In menu scrolls the page if the list is more than 2
pages.
5 AUDIO/NAV. button
Switches between Audio and Navigation operations.
Pressing this button illuminates the keys on the remote
control.
6 VOICE button
Initiates vocal instruction for next route maneuver or
repeats last instruction.
3
#
$
%
&
(
)
~
+
,
7 Numeric Keypad
Use these buttons to enter phone numbers, address
numbers or street names containing numbers (i.e.,
42nd St.). Works in conjunction with the MODE button.
8 LIST button
Displays list of the streets currently set for the route. To
return to the guidance mode, press the DISP button.
9 PLAN button
Allows you to advance to the next destination in
Today’s Plan list.
! DEL. button
Deletes the character previously input. Works in
conjunction with the MODE button.
" SPEAK button
Press the button to operate the navigation using Voice
Commands.
# DISP. button
When setting the route, switches the map and guidance
display. If in a menu, displays the map.
$ MODE button
Press this button to input numerals using the numeric
keypad. The numerals can be input while the status
indicator blinks.
% MENU button
Displays the Nav Menu screen.
& CANC. button
Cancels current display screen and switches back to
previous screen with menus.
( H/N button
Toggles between Heading Up and North Up orientation.
) DETOUR button
Allows user to select detouring distance or avoid traffic
congestion.
~ DEL. DEST. button
Deletes current destination.
+ HOME button
Calculates route to Home destination.
OK button
Executes numeral inputting. Works in conjunction with
the MODE button.
, TRAFFIC INFO. button
Traffic information list is displayed.
• If an operation is not accepted, the navigation system
beeps.
• The Alpine head unit can be operated with the remote
control.
For details, refer to pages 71 and 72.
• After pressing the MODE button, press the following
buttons while the status indicator is blinking : numerals
(0 to 9), DEL. and OK.
• Due to continuous product improvement, specifications
are subject to change.
70-EN
Page 71

Remote Control Reference Guide for Head Unit
When you use an Alpine Head Unit, you can operate it with the
remote control (supplied with NVE-N872A). Change the
AUDIO/NAV. Switch, on the side of the remote control, to
AUDIO.
" V.SEL.
Not Used
# Numeric Keypad
Not Used
$ AUDIO/NAV.
Switching AUDIO/NAV.
% MODE
Operates 9 to ! (Flashes the Status Indicator for 5
seconds.)
EN
2
$
3
5
7
8
9
1 :/J
Push : PLAY/PAUSE
Radio mode:Preset Selection (C/B), SEEK UP/DOWN
(@/A)
CD/MD Player/Changer mode:
Disc Selection (C/B), Music Sensor (@/A),
BW/FF (@/A Hold)
Tape Mode: Program Sensor (C/B), REW/FF (@/A
Hold)
2 VOL.
Volume Control
3 A.PROC.
Audio Processor
4 SOURCE
Source Selection
5 MUTE
Audio Mute
6 BAND
Radio Band Selection
7 FUNC.
Not Used
8 OP/CL
Not Used
9 9
Display Angle DOWN (MODE button must be pressed
first.)
! 8
Display Angle UP (MODE button must be pressed first.)
1
%
4
6
#
!
"
71-EN
Page 72

Remote Control Reference Guide for AV Head Unit
When you use the Alpine head unit with the monitor, you can
operate the AV head unit with the remote control (supplied with
NVE-N872A). Change the AUDIO/NAV. Switch, on the side of
the remote control, to AUDIO.
2
&
3
5
7
8
"
1 :/J
Push:
PLAY/PAUSE (IVA-D310/IVA-D300/IVA-D901/IVAD900/CVA-1014/CVA-1004/CVA-1003)
Push: Changes the modes as follows:
Volume/Bass/Treble/Fader
(CVA-1005/CVA-1006/IVA-C800/IVA-C801)
Push hold: PLAY/PAUSE
(CVA-1005/CVA-1006/IVA-C800/IVA-C801)
Radio mode:
Preset Selection (C/B), SEEK UP/DOWN (@/A)
CD/MD Player/Changer mode:
Disc Selection (C/B), Music Sensor (@/A), BW/FF
(@/A Hold)
Tape Mode:
Program Sensor (C/B), REW/FF (@/A Hold)
2 VOL.
Volume Control
3 A.PROC.
Audio Processor
4 SOURCE
Source Selection
5 MUTE
Audio Mute
6 BAND
Radio Band Selection
7 FUNC.
This function button has the same function as the
following models:
CVA-1003/CVA-1005/CVA-1006/IVA-C800/IVA-C801.
1
(
4
6
%
9
!
#
$
8 OP/CL
Indash Display OPEN/CLOSE (only pressing MODE
button)
9 ;
Indash Display Angle LEFT(only pressing MODE
button)
! :
Indash Display Angle RIGHT(only pressing MODE
button)
" 9
Indash Display Angle DOWN(only pressing MODE
button)
# 8
Indash Display Angle UP(only pressing MODE button)
$ V.SEL.
Switching V.SEL
% Numeric Keypad
This numeric keypad has the same function of the
preset buttons (1 to 6) as the following models: CVA1003/CVA-1005/CVA-1006/IVA-C800/IVA-C801.
& AUDIO/NAV.
Switching AUDIO/NAV. Switch to AUDIO side.
( MODE
Operates 8 to # (Flashes the Status Indicator for 5
seconds.)
72-EN
Page 73

Voice Recognition
About Speak Button
The Speak button is used for voice navigation. Press the button to
activate the voice operation mode.
For Voice Recognition to Operate Correctly
Voice navigation may not operate correctly, depending on the
situation in which it is used.
For voice recognition to operate correctly, make sure that you
read the following provisions.
Mount the microphone in a suitable location.
Mount the microphone where the driver’s voice can be picked
up clearly. Adjust the distance between microphone and the
driver’s position so that the driver has no difficulty speaking
into the microphone. For installation details, refer to the
supplied Installation Manual.
Lower the volume of the car audio.
To ensure your voice is recognized, reduce the car audio
volume (radio, etc.) as necessary.
Close the windows.
Make sure all windows are closed during voice operation as
ambient, engine or wind noise may interfere with recognition.
Using the Voice Control System
Most of the system’s functions can be controlled by voice
commands. The voice control system is activated with the
SPEAK button. To control your navigation system by voice, press
and release the SPEAK button, wait for the beep, then give a
voice command. Once the microphone picks up your command,
the system changes the display in response to the command and
prompts you for the next command. Using the SPEAK button,
answer the prompt as required.
1
Press the SPEAK button.
A sound beeps, and the voice icon is displayed
for 2 seconds on the screen.
2
When the voice icon is displayed, say the
desired voice command into the microphone.
The system changes the display in response to the
command and prompts you for the next command.
EN
Speak clearly.
Speak directly into the microphone, at suitable pace, avoiding
long pauses.
Only use the specified voice commands.
The system only recognizes these commands.
Also, make sure you use the correct pronunciation.
Do not converse when speaking a voice command.
Your voice may not be recognized if you mix regular
conversation with voice commands.
Maintain a natural driving posture while speaking voice
commands, so that you can hold the steering wheel in
the usual way, without the need to lean in towards the
microphone to speak.
Any accent in your voice may not be recognized.
Therefore, always speak the commands clearly.
• If the IN-INT cable (supplied with the Alpine head unit)
is connected, volume is automatically lowered by the
mute cable connection.
For connection, refer to the extra Installation Manual.
• If your voice is not recognized, change the location of
the microphone. Your voice recognition may be
improved.
• Voice guidance announcements will be interrupted
during voice operation.
Voice Icon
3
Perform operations in steps 1 and 2
repeatedly.
• The spoken commands are mostly the same as the
phrases displayed on the screen. For those that are not,
see “Voice Command Index” (pages 74 and 75).
• If you do not know which voice command to use, use
the help function, see “Using the Help Command of the
Voice Control System” (page 74).
• If the system does not understand a command or you
wait too long to give a command, it responds with
“Pardon me.” If the system cannot perform a command
or the command is not appropriate for the screen you
are on, it sounds a beep.
73-EN
Page 74

Using the Help Command of the Voice
Control System
For voice commands of the voice recognition control, see “Voice
Command Index” (pages 74 and 75). If you do not know which
voice command to use, you can use the Help Command function.
Then, search the desired voice command.
1
Press the SPEAK button and say “Help.”
The Voice Command List screen is displayed.
2
To listen to the available voice commands,
press the SPEAK button and say “Read.”
(Help command screen example when Nav Menu is
displayed.)
The voice command is read.
• To scroll the list of Voice Commands say “Page up” or
“Page down.”
3
To stop reading the command list, press the
SPEAK button and say “Stop.”
• When the Voice Command is complete, the system will
automatically stop reading.
4
Press the SPEAK button and say “Done”,
“Cancel” or “(Go) Back.”
The Voice Command List screen closes.
• The Voice Command List can be controlled by touch or
remote control operation.
Voice Command Index
The NVE-N872 navigation or Alpine touch panel-compatible
monitor IVA-D310 is controllable by voice recognition operation.
When you use voice recognition operation, most phrases
displayed on the screen are the actual voice commands you say to
perform the operation. The following explains the representative
voice commands that are not displayed on the screen.
• If you do not know which voice command to use, use
the Help function, see “Using the Help Command of the
Voice Control System” (page 74).
Navigation Operation
L Go back one step
“Cancel”
“(Go) Back”
L Help Command
“(Voice) (Command) Help”
L Respond to the Command of the System
“Yes”
“No”
L Repeat Voice Command of the System
“Repeat (Voice) Feedback”
L Displaying Map
“Show Map (Display)”
L Changing the Map Scale
“Zoom In”
“Zoom Out”
“Zoom to ## miles” (# is Map scale)
“Zoom to ## meters” (# is Map scale)
“Max Zoom In”
“Max Zoom Out”
L Changing the Orientation of the Map
“North Up”
“Heading Up”
L Confirm the Current Vehicle Position
“Where am I ?”
L POI Icons
“Show ##### Icons” (# is icon name)
“Hide ##### Icons” (# is icon name)
L Displaying the Nav Menu Screen
“(Nav) Menu”
L Entering a destination by Home
“Go home”
L To register your current location as Previous Destination
“Save current location”
L Changing the route guidance display
“Show Split (Display)”
“(Show) Split Display”
“Show Arrow (Display)”
“(Show) Arrow Display”
L Displaying the Traffic Incident List Screen
“Traffic (Information)”
L Traffic Icons
“Show Traffic Icons”
“Hide Traffic Icons”
74-EN
Page 75

Touch panel-compatible monitor IVA-D310
operation
L Monitor action
“Display Open”
“Display Close”
“Display Flat”
L Source select
“Media Radio”
“Media Band”
“Media CD”
“Media DVD”
“Media Changer”
“Media TV”
“Media AUX or AUX One (or Two or Three)”
“Media VCR”
“Media GAME One (or Two)”
“Media External DVD”
“Media XM”
“Media iPod”
L Media action
“Media Skip”
“Media Back”
“Media Repeat”
“Media Play”
“Media Pause”
“Media Mute On”
“Media Mute Off”
“Media Next”
“Media Previous”
L System feature
“Media VSEL (or Media V select)”
L Navigation select
“Navigation”
EN
75-EN
Page 76

In Case of Difficulty
If you encounter a problem, please review the items in the following checklist. This guide will help you isolate the problem if the unit is
at fault. Otherwise, make sure the rest of your system is properly connected or consult your authorized Alpine dealer.
Symptom
No operation
The present vehicle
position cannot be
measured correctly.
Vehicle position is
displayed incorrectly
on the screen.
Cannot read disc is
displayed for a certain
operation.
Unstable operation
Cause
Blown fuse
Ambient temperature over 122°F
(50°C)
Moisture condensation
The vehicle position changed after the
ignition was switched off.
• Movement on a ferry boat
• Rotation of a parking lot turntable
• Movement by tow truck
Poor satellite configuration
Measurement is 2 dimensional.
The disc is dirty.
The pickup lens is dirty.
The remote control batteries are
wearing out.
Solution
Replace with a fuse of the prescribed rating.
Lower the temperature in the vehicle below 122°F
(50°C), for example by running for a while with the
window open or by using the air conditioner.
Allow enough time for the condensation to evaporate
(about 1 hour, depending on ambient temperature and
humidity).
Drive the vehicle in an area of good GPS reception to
allow the unit to recalibrate itself.
Move to a location where GPS satellite reception is
easy. (See page 57.)
Clean the disc.
Do not use a commercial available lens cleaner disc.
Consult your nearest ALPINE dealer.
Replace the remote control batteries, see NVE-N872A
of the Owner's Manual on page 12.
76-EN
Page 77

If this Message Appears
Various messages are displayed on the screen during operation. In addition to the messages telling you the current status or providing
guidance for the next operation, there are also the following error messages. If one of these error messages is displayed, carefully follow
the instructions in the solution column.
Message
Please insert DVD-ROM.
Error reading DVD-ROM.
Please check the disc.
If you are driving, please pull
over before using this
function.
Vehicle is out of Map display
region.
Please refer to the Owner's
Manual.
Destination is out of Map
display region.
Route cannot be calculated.
Cause
• The disc has been removed.
• There was no disc in the system
when the power was switched on.
• A disc that this system cannot
read has been loaded.
• The disc is dirty or upside down.
• The disc cannot be read because
of condensation.
• The MENU button was pressed
while the vehicle was running.
• A menu selection operation was
carried out while the vehicle was
running.
• The inserted DVD-ROM does not
cover the map display region or
map display region needs to be
changed to the correct region in
Setup (if map region exists in
Source Disc).
• The destination is outside the map
display region and not contained
in the inserted DVD-ROM.
Solution
Insert the disc.
Take out the disc, check if it was upside down,
clean it if necessary, then reinsert it.
Take out the disc, allow enough time for the
condensation to evaporate (about 1 hour), then
reinsert the disc.
Move the vehicle to a safe location, stop, and
engage the parking brake, then carry out this
operation.
Insert the DVD-ROM that applies to the current
map display region. If map region exists in the
Source Disc, change Map display region in Setup
to the correct region.
Insert the DVD-ROM in which the destination is
registered and contained in the map display
region.
EN
Temperature is too high.
Please allow system to cool
down.
Update failed.
Please check your disc.
• Ambient temperature over 122ºF
(50ºC)
• Application error
Lower the temperature in the vehicle below
122ºF (50ºC), for example by running for a while
with the window open or by using the air
conditioner.
If the South disc is inserted, replace it with the
North disc.
The application starts updating.
77-EN
Page 78

R
ALPINE ELECTRONICS MARKETING, INC.
1-1-8 Nishi Gotanda,
Shinagawa-ku, Tokyo 141-0031, Japan
Phone 03-5496-8231
ALPINE ELECTRONICS OF AMERICA, INC.
19145 Gramercy Place, Torrance,
California 90501, U.S.A.
Phone 1-800-ALPINE-1 (1-800-257-4631)
1-888-NAV-HELP (1-888-628-4357)
ALPINE ELECTRONICS OF CANADA, INC.
777 Supertest Road, Toronto,
Ontario M3J 2M9, Canada
Phone 1-800-ALPINE-1 (1-800-257-4631)
1-888-NAV-HELP (1-888-628-4357)
ALPINE ELECTRONICS OF AUSTRALIA PTY. LTD.
161-165 Princes Highway,
Hallam Victoria 3803, Australia
Phone 03-8787-1200
ALPINE ELECTRONICS GmbH
Frankfurter Ring 117,
80807 München, Germany
Phone 089-32 42 640
ALPINE ELECTRONICS OF U.K. LTD.
Alpine House
Fletchamstead Highway,
Coventry CV4 9TW, U.K.
Phone 0870-33 33 763
ALPINE ELECTRONICS FRANCE S.A.R.L.
(RCS PONTOISE B 338 101 280)
98, Rue de la Belle Etoile, Z.I. Paris Nord Il,
B.P. 50016, 95945 Roissy Charles de Gaulle Cedex,
France
Phone 01-48638989
ALPINE ITALIA S.p.A.
Viale C. Colombo 8, 20090 Trezzano
Sul Naviglio (MI), Italy
Phone 02-484781
ALPINE ELECTRONICS DE ESPAÑA, S.A.
Portal de Gamarra 36, Pabellón, 32
01013 Vitoria (Alava)-APDO 133, Spain
Phone 945-283588
ALPINE ELECTRONICS (BENELUX) GmbH
Leuvensesteenweg 510-B6,
1930 Zaventem, Belgium
Phone 02-725-13 15
YAMAGATA Corporation
2-6-34, Takashima,
Nishi-ku, Yokohama,
Kanagawa, Japan
© 2005 ALPINE ELECTRONICS, INC.
All rights reserved.
© 2004 NAVTEQ. All Rights Reserved.
© info USA Inc, Omaha, NE
Interstate Exit and Service Data provided by
ZENRIN CO.,LTD.
Copyright © 2005, All Rights Reserved.
Certain business data provided by infoUSA, Inc.,
Omaha, Nebraska, Copyright © 2004, All Rights Reserved.
Designed by ALPINE Japan
Printed in Japan (Y)
68-02065Z58-A
Page 79

Satellite Linked Navigation
NVE-N872A
R
Guide for Installation and Connections
Guide d’installation et de connexion
Guía de instalación y conexiones
English
Français
Español
Page 80

PRECAUTIONS
■ GUIDE FOR INSTALLATION AND CONNECTIONS
FOR AUTHORIZED ALPINE DEALERS
• Please read this GUIDE FOR INSTALLATION
AND CONNECTIONS FOR AUTHORIZED
ALPINE DEALERS and the OWNER’S MANUAL
thoroughly to familiarize yourself with each control
and function. We at ALPINE hope that your new
NVE-N872A will give you many years of
enjoyment.
In case of problems when installing your unit, please
contact your authorized ALPINE dealer.
Points to Observe for Safe Usage
• For safe operation of this system, please read this
manual carefully. We cannot be responsible for
problems resulting from failure to observe the
instructions in this manual.
• Pictorial displays are used to point out safety tips
to prevent harm to yourself or others and property
damage. Here is what these pictorial displays
mean. Knowing them is important to understand
this manual.
• Meaning of displays
This symbol means important
Warning
Caution
instructions. Failure to heed them
can result in serious injury or
death.
This symbol means important
instructions. Failure to heed them
can result in injury or material
property damage.
Warning
DO NOT DISASSEMBLE OR ALTER.
Doing so may result in an accident, fire or electric shock.
KEEP SMALL OBJECTS SUCH AS BOLTS OR
SCREWS OUT OF THE REACH OF CHILDREN.
Swallowing them may result in serious injury. If swallowed, consult a physician immediately.
USE THE CORRECT AMPERE RATING WHEN
REPLACING FUSES.
Failure to do so may result in fire or electric shock.
USE ONLY IN CARS WITH A 12 VOLT NEGATIVE
GROUND.
(Check with your dealer if you are not sure.) Failure to
do so may result in fire, etc.
2
BEFORE WIRING, DISCONNECT THE CABLE FROM
THE NEGATIVE BATTERY TERMINAL.
Failure to do so may result in electric shock or injury
due to electrical shorts.
DO NOT ALLOW CABLES TO BECOME ENTANGLED IN SURROUNDING OBJECTS.
Arrange wiring and cables in compliance with the
manual to prevent obstructions when driving. Cables or
wiring that obstruct or hang up on places such as the
steering wheel, shift lever, brake pedals, etc. can be
extremely hazardous.
DO NOT SPLICE INTO ELECTRICAL CABLES.
Never cut away cable insulation to supply power to
other equipment. Doing so will exceed the current
carrying capacity of the wire and result in fire or electric
shock.
DO NOT INSTALL IN LOCATIONS WHICH MIGHT
HINDER VEHICLE OPERATION, SUCH AS THE
STEERING WHEEL OR SHIFT LEVER.
Doing so may obstruct forward vision or hamper
movement etc. and results in serious accident.
DO NOT DAMAGE PIPE OR WIRING WHEN
DRILLING HOLES.
When drilling holes in the chassis for installation, take
precautions so as not to contact, damage or obstruct
pipes, fuel lines, tanks or electrical wiring. Failure to
take such precautions may result in fire.
DO NOT USE BOLTS OR NUTS IN THE BRAKE OR
STEERING SYSTEMS TO MAKE GROUND
CONNECTIONS.
Bolts or nuts used for the brake or steering systems (or
any other safety-related system), or tanks should
NEVER be used for installations or ground connections.
Using such parts could disable control of the vehicle
and cause fire etc.
DO NOT INSTALL THE MONITOR NEAR THE
PASSENGER SEAT AIR BAG.
If the unit is not installed correctly the air bag may not
function correctly and when triggered the air bag may
cause the monitor to spring upwards causing an
accident and injuries.
MAKE THE CORRECT CONNECTIONS.
Failure to make the proper connections may result in
fire or product damage.
DO NOT ALTER HARDWARE USED IN ANY
SAFETY-RELATED SYSTEMS DURING INSTALLATION
Never use hardware, utilized to mount critical
components in the steering and brake systems or fuel
tanks, to make wiring or ground connections. Failure to
take such precautions can result in serious damage
from fire or vehicle failure.
DO NOT BLOCK VENTS OR RADIATOR PANELS.
Doing so may cause heat to build up inside and may
result in fire.
Page 81

Caution
Precautions
ARRANGE THE WIRING SO IT IS NOT CRIMPED OR
PINCHED BY A SHARP METAL EDGE.
Route the cables and wiring away from moving parts
(like the seat rails) or sharp or pointed edges. This will
prevent crimping and damage to the wiring. If wiring
passes through a hole in metal, use a rubber grommet
to prevent the wire’s insulation from being cut by the
metal edge of the hole.
HAVE THE WIRING AND INSTALLATION DONE BY
EXPERTS.
The wiring and installation of this unit requires special
technical skill and experience. To ensure safety, always
contact the dealer where you purchased this product to
have the work done.
USE SPECIFIED ACCESSORY PARTS AND INSTALL
THEM SECURELY.
Be sure to use only the specified accessory parts. Use
of other than designated parts may damage this unit
internally or may not securely install the unit in place.
This may cause parts to become loose resulting in
hazards or product failure.
DO NOT INSTALL IN LOCATIONS WITH HIGH
MOISTURE OR DUST.
Avoid installing the unit in locations with high incidence
of moisture or dust. Moisture or dust that penetrates into
this unit may result in product failure.
IMPORTANT
Please record the serial number of your unit in the
space provided on the back cover of Owner’s
Manual and keep it as a permanent record. The
serial number plate is located on the bottom of the
unit.
• For installation of the main unit, avoid areas with a
high incidence of dust or moisture. Installing the
unit in such locations may result in contamination
of the DVD ROM making it unreadable.
• Do not install the navigation system near a CD
player that may interfere with GPS signal
reception.
• The optimum locations for installing the GPS
antenna are:
– on the dashboard where no metal piece (such
as the defogger wire or antenna wire) is located
on the windshield.
– where no metal cover is located.
• Route the Speed Pulse Sensor cable away from
the audio cables in order to avoid picking up
noises.
3
Page 82

Contents
PRECAUTIONS 2
1. Preparation 5
2. Connections 7
3-1. NVE-N872A Wiring Diagram With IVA-D310/IVA-D300/
TME-M770 (Touch panel-compatible Alpine products) 9
3-2. NVE-N872A Wiring Diagram With CVA-1014/CVA-1004/
CVA-1003 10
3-3. NVE-N872A Wiring Diagram With IVA-D901/IVA-D900/
IVA-C801/IVA-C800/CVA-1006/CVA-1005/TME-M790/
TME-M760/TME-M750A 11
4. Mounting 12
5. Confirmation 13
4
Page 83

1. Preparation
1 Check accessory parts.
× 5
GPS antenna (5 m)
Remote control
double-faced tape
(for voice recognition
Speak button )
1 Bracket 5
One each for left
and right
6 Spring washer
(M6)
×
4
Antenna mounting plate
Remote control holder
Cable clamp
(for voice recognition
Speak button )
2 Floor base
7 Flanged hex nut
(M6)
×
4
× 4
×
2
8 Wing nut (M6) 9 Velcro fastener " Self-tapping
Cable clamp
(for GPS antenna)
× 2
Battery (AAA)
(2.5 m) (4.5 m)
Power cables
washer (M4 × 8)
×
4
×
4
Microphone for voice
recognition (3.5 m)
4 Hex bolt (M6 × 50)3 Screw with double
×
! Velcro tape
2
Solderless connectorParking brake aux. cord
Speak button for voice
×
4
× 2
recognition (7 m)
13P RGB extension
cable (6 m)
Flanged self-tapping
screw (M5 × 15)
×
4
×
screw (M3
12)
×
4
2 Prepare tools and mounting information.
Screwdriver
Multimeter
Pencil and eraserSpanner
PliersElectrical tape
3 Park the vehicle in a safe and level location.
Note:
Before working on the installation check and verify that
your vehicle lights are working correctly and your
vehicle status indicators e.g. Engine needs service, etc.
are not on. If these indicators are on, please resolve the
problem before installing the Navigation System.
4 Apply the brake and remove the ignition key.
5 Mount the antenna on the roof.
Clean dust and oil at the mounting location and
mount the antenna.
Antenna
Notes:
• The magnet of the antenna is very strong. Proceed
cautiously to prevent any damage to the vehicle’s body.
Keep the magnet away from articles susceptible to
magnetic fields such as credit cards, watches, etc.
• Do not paint the antenna. Reception sensitivity may be
decreased.
5
Page 84

Mounting the antenna inside the vehicle.
1. Clean the mounting location.
2. Put on the antenna mounting plate.
3. Mount the antenna.
Antenna
Notes:
• Mount the antenna on a flat plane of the dash board or
rear tray.
• Some thermal reflection type or thermal absorption
type glass may interrupt high frequency waves. If
reception is poor with the antenna installed inside the
car, try to mount the antenna outside the car.
• Make sure the antenna is not covered (obstructed) by
any metallic surface or object.
6 Routing the antenna cable.
1. Route the cable using the provided cable clamps
to take up the cable’s slack.
2. Use the waterproof pad when running the cable
under the vehicle’s rubber gasket.
3. Attach the cable at several points using the
remaining cable clamps.
1. Connect the microphone cable to the speak
button for voice recognition.
As the cable connection is
subject to vibration, etc.,
bind the connection with
vinyl tape so that it will not
come apart.
• When the voice recognition microphone/speak button
is mounted, the zip wire can be further split to
lengthen it.
1) Mount the microphone and the speak button in
your desired locations, and split the zip wire until
both can be connected.
Split the wire
wire
2) Use vinyl tape and bind the wire so that it will not
split further.
wire
Vinyl tape
Water
proof pad
Cable clamp
7 Mounting the Voice Recognition Microphone
and Speak Button.
Notes:
For safe use, make sure of the following:
• location is stable and firm.
• driver’s view or operations are not obstructed.
• voice recognition microphone is located where the
driver’s voice can be easily picked up (sun visor, etc.).
When you speak into microphone, you should not have
to change your driving posture. This may cause a
distraction, taking your attention away from safely
driving your vehicle. Carefully consider direction and
distance while mounting the microphone. Confirm that
the driver’s voice can be easily picked up at the
selected location.
• speak button is located where the driver can easily
press the button (near the shift lever, etc.).
When pressing the button, you should not have to
change your driving posture. This may cause a
distraction, taking your attention away from driving
your vehicle safely. Mount the button so that the driver
can easily press it.
2. Apply the double-faced tape to the back side of
the speak button for voice recognition. After
finding an appropriate mounting location, peel off
the paper backing and press in place.
Speak button for
voice recognition
Note:
Before applying the double-faced tape, the mounting
location area must be clean and free from any dirt or
grease.
3. Mount the microphone for voice recognition.
Microphone for
voice recognition
Cable clamp
6
Page 85

2. Connections
1 Disconnect the battery (–) terminal.
Note:
Some vehicles contain a vehicle control computer etc. in this case, contents
of the computer memory may be erased when the battery (–) lead is
disconnected.
2 Parking Brake Lead Connection.
If necessary, use a solderless connector to connect the parking brake lead, speed sensor lead, etc.
Preparation
Navigation side lead
1
Vehicle lead
Solderless connector
(supplied with the unit)
Navigation side
lead
Stopper
Parking Brake Lead Connection
NVE-N872A
PARKING BRAKE
(Yellow/Blue)
Pinch Connector
Parking brake lead
Parking brake lamp
Connection Diagram of SPST Switch (Sold Separately)
(If the ACC power supply is not available)
IGNITION
(Red)
(Yellow)
NVE-N872A
BATTERY
2
Parking brake switch
SPST SW (Optional)
Pliers
Battery
FUSE (5A)
(Optional)
FUSE (10A)
(Optional)
Chassis
Battery
• If your vehicle has no ACC power supply, add an SPST (Single-Pole, Single-Throw) switch (sold separately) and fuse
(sold separately).
• The diagram and the fuse amperage shown above are in systems where the NVE-N872A is used individually.
• If the switched power (ignition) lead of the NVE-N872A is connected directly to the positive (+) terminal of the vehicle’s
battery, the NVE-N872A draws some current (several hundred milliamperes) even when its switch is placed in the OFF
position. In some cases, this is enough to discharge the battery.
7
Page 86

3 Connect the power lead to this unit.
Insert until a click sound is heard.
4 Wrap electrical tape around end of leads not
used.
5 Connect the battery (–) terminal and turn the
ignition key to the ACC or ON position. Check
to see if operation can be performed properly.
(Is the power turned on? Is the illumination
turned on?)
You can check the language selection menu with
the monitor. (Refer to the Owner’s Manual for
details.) Go to step 6 after checking is completed.
7 Pull out the ignition key and remove the
battery terminal (–) again to begin installation
procedure.
ON
Note:
Before connecting the battery terminal, check the battery
voltage using the multimeter and make sure that it
registers at least 12V.
6 Turn the ignition key to the OFF position to
turn off the power after completion of the
check.
OFF
8
Page 87

3-1.
NVE-N872A Wiring Diagram With IVA-D310/IVA-D300/
TME-M770 (Touch panel-compatible Alpine products)
Battery Lead (Yellow)
(10A)
ACC (Ignition) (Red)
BATTERY
To the Acc power lead
SUBW.
PRE IN/OUT
REAR
POWER SUPPLY
REMOTE IN/OUT
NAVIGATION IN
DISPLAY OUT
13P RGB Extension Cable Included
FRONT
AUX OUT
VIDEO
L
AUDIO
R
AUX IN
RADIO ANTENNA IN
Ground (Black)
Dimmer In (Illumination) (+) (White/Blue)
Parking Brake (Yellow/Blue)
Reverse (+) (Orange/White)
L
R
Ai-NET
EXT.OUT
AV SELECTOR
CAMERA IN
XM Data Receiver HCE-100XM
(Sold Separately)
Connect to VSS (Digital or Analog 0V - 3V)
Speed Sensor (Green/White)
Mute (Pink/Skyblue)
Connect to a metal
part of chassis
body with screw
To the Illumination
signal line
To the parking brake
signal line
To reverse lights
(+12V signal)
To the vehicle speed
pulse line
Use this to connect
a device having the
IN-INT function (-)
output for Audio Mute
Microphone for voice recognition/
Speak button for voice recognition
(Included)
GPS Antenna (Included)
GPS
ANTENNA
5
10
POWER
1
6
MIC/SW DISPLAY EX-2EX-3 EX-1
Use for future system expansion
A
1234 5
678910
A
Power Connector
Pin Configuration
1
Ground (Black)
2
ACC (Ignition) (Red)
3
Mute (Pink/Skyblue)
4
Open
5
Open
6
Battery (Yellow)
Dimmer In (Illumination) (White/Blue)
7
Speed Sensor (Green/White)
8
Parking Brake (Yellow/Blue)
9
Reverse (Orange/White)
10
Improper connection of the
speed pulse line may cause
important safety features of the
vehicle to fail (such as the
brakes or air bags). Such
failures may result in an
accident and loss of life. We
strongly recommend that the
installation be performed by a
trained, authorized Alpine
dealer.
9
Page 88

3-2. NVE-N872A Wiring Diagram With
CVA-1014/CVA-1004/CVA-1003
Battery Lead (Yellow)
(10A)
ACC (Ignition) (Red)
BATTERY
To the Acc power lead
13P RGB Extension Cable Included
XM Data Receiver HCE-100XM
(Sold Separately)
Ground (Black)
Dimmer In (Illumination) (+) (White/Blue)
Parking Brake (Yellow/Blue)
Reverse (+) (Orange/White)
Connect to VSS (Digital or Analog 0V - 3V)
Speed Sensor (Green/White)
Mute (Pink/Skyblue)
Connect to a metal
part of chassis
body with screw
To the Illumination
signal line
To the parking brake
signal line
To reverse lights
(+12V signal)
To the vehicle speed
pulse line
Use this to connect
a device having the
IN-INT function (-)
output for Audio Mute
Microphone for voice recognition/
Speak button for voice recognition
(Included)
GPS Antenna (Included)
GPS
ANTENNA
5
10
POWER
1
6
MIC/SW DISPLAY EX-2EX-3 EX-1
Use for future system expansion
Power Connector Pin
1234 5
678910
A
A
Configuration
1
Ground (Black)
2
ACC (Ignition) (Red)
3
Mute (Pink/Skyblue)
4
Open
5
Open
6
Battery (Yellow)
Dimmer In (Illumination) (White/Blue)
7
Speed Sensor (Green/White)
8
Parking Brake (Yellow/Blue)
9
Reverse (Orange/White)
10
Improper connection of the
speed pulse line may cause
important safety features of the
vehicle to fail (such as the
brakes or air bags). Such
failures may result in an
accident and loss of life. We
strongly recommend that the
installation be performed by a
trained, authorized Alpine
dealer.
10
Page 89

3-3.NVE-N872A Wiring Diagram With IVA-D901/IVA-D900/IVA-C801/
IVA-C800/CVA-1006/CVA-1005/TME-M790/TME-M760/TME-M750A
Battery Lead (Yellow)
(10A)
ACC (Ignition) (Red)
BATTERY
To the Acc power lead
SUB W.
REAR
PRE IN/OUT
POWER SUPPLY
REMOTE IN/OUT
NAVIGATION IN
DISPLAY OUT
FRONT
VIDEO
L
AUX OUT
AUDIO
R
VIDEO
(MONO)
L
AUX IN 1/2
AUDIO
R
VIDEO
CAMERA IN
(MONO)
AUX IN 3
AUDIO
RADIO ANTENNA IN
13P RGB Extension Cable Included
Ground (Black)
Dimmer In (Illumination) (+) (White/Blue)
Parking Brake (Yellow/Blue)
Reverse (+) (Orange/White)
L
R
Ai-NET
1
2
1
2
3
L
R
XM Data Receiver HCE-100XM
(Sold Separately)
Connect to VSS (Digital or Analog 0V - 3V)
Speed Sensor (Green/White)
Mute (Pink/Skyblue)
Connect to a metal
part of chassis
body with screw
To the Illumination
signal line
To the parking brake
signal line
To reverse lights
(+12V signal)
To the vehicle speed
pulse line
Use this to connect
a device having the
IN-INT function (-)
output for Audio Mute
Microphone for voice recognition/
Speak button for voice recognition
(Included)
GPS Antenna (Included)
GPS
ANTENNA
5
10
POWER
1
6
MIC/SW DISPLAY EX-2EX-3 EX-1
Use for future system expansion
A
1234 5
678910
A
Power Connector
Pin Configuration
1
Ground (Black)
2
ACC (Ignition) (Red)
3
Mute (Pink/Skyblue)
4
Open
5
Open
6
Battery (Yellow)
Dimmer In (Illumination) (White/Blue)
7
Speed Sensor (Green/White)
8
Parking Brake (Yellow/Blue)
9
Reverse (Orange/White)
10
Improper connection of the
speed pulse line may cause
important safety features of the
vehicle to fail (such as the
brakes or air bags). Such
failures may result in an
accident and loss of life. We
strongly recommend that the
installation be performed by a
trained, authorized Alpine
dealer.
11
Page 90

4. Mounting
Caution
Do not block the unit’s fan, thus preventing air
circulation. If blocked, heat will accumulate inside the
unit and may cause a fire.
Air ventilation hole
(Rear of NVE-N872A)
Note:
The main unit must be mounted within ±5 degrees of the
horizontal plane, left to right, and 30 degrees of the
horizontal plane, back to front.
Less than 30°
a When mounting using Velcro fastener
1 Place Velcro fasteners.
Place two pieces of Velcro fasteners onto the
mounting surface. The rough side should be
facing the navigation unit.
2 Press the Navigation unit onto the Velcro
fastener at the mounting position.
Remove the backing to the adhesive on the
Velcro strips. Press the Navigation unit onto the
mounting location.
2 Attach the unit on the rear tray.
Attach the unit securely with hex bolts (M6×50)
4, flanged hex nuts (M6) 7, spring washers
(M6) 6, and wing nuts (M6) 8.
Continued to step 5 "Securing leads, etc."
4
7
(Bottom
side)
6
8
a
When mounting the unit directly on the floor
1 Mount the brackets 1 on the unit.
Mount the brackets at both sides of the unit with
screws with double washer (M4×8) 3.
Depending on the locations of the
mounting screw holes, the
mounting brackets (for the left and
3
1
right) can be used on either side.
12
Continued to the step 5 "Securing leads, etc."
Floor
Velcro fasteners
a When mounting on the rear tray
1 Mount the brackets 1 on the unit.
Mount the brackets at both sides of the unit with
screws with double washer (M4×8) 3.
3
(Bottom side)
Depending on the locations of
the mounting screw holes, the
mounting brackets (for the left
and right) can be used on either
side.
1
3
1
3
2 Mount the unit on the floor.
Mount the unit on the floor with flanged self-tapping
screws (M5×15) 5 and spring washers (M6) 6.
• Make sure the unit is protected from dust and debris
and dampness.
Warning: Do not damage pipe or wiring when
drilling holes.
Continued to step 5 "Securing leads, etc."
5
6
Page 91

a When mounting with floor base
brackets
1 Mount the brackets 1.
Mount the brackets 1 at both sides of the unit
with screws with double washer (M4×8) 3.
Depending on the
locations of the mounting
screw holes, the
3
1
mounting brackets (for
the left and right) can be
used on either side.
3 Cut the carpet in "x" shape with a cutter and
insert the floor bases 2 from under side of
the carpet.
2
4 Mount the unit on the carpet with spring
washers (M6) 6 and wing nuts (M6) 8.
1
3
2 Determine mounting position of the floor
bases 2 for placement under the carpet.
8
6
2
Continued to step 5 "Securing leads, etc."
8
6
5 Securing leads, etc.
Make sure leads are not pinched by moving parts
such as the seat rail, etc. Also check for damaged from sharp edges or protrusion.
6 Connect the battery (−) terminal.
5. Confirmation
1 Turn on the engine key. Make sure the unit is
operating correctly by referring to the
Owner’s Manual.
ON
2 Make sure all factory components such as the
brake lamps, etc. work correctly.
a
Remote control holder mounting method
• If the remote control is in direct sunlight, remove it
from the holder and keep it in the glove box.
• When the holder cannot be mounted securely with
double-sided adhesive tape !, mount it by using
screws ".
Reinforcement screws "
Remote
control
holder
Protective
Paper
Console box, etc.
* Double-sided adhesive tape. (Before attaching
the tape, make sure the mounting location is free
from dust or dirt.)
Remote control
!*
13
Page 92

ALPINE ELECTRONICS MARKETING, INC.
1-1-8 Nishi Gotanda,
Shinagawa-ku, Tokyo 141-0031, Japan
Phone 03-5496-8231
ALPINE ELECTRONICS OF AMERICA, INC.
19145 Gramercy Place, Torrance,
California 90501, U.S.A.
Phone 1-800-ALPINE-1 (1-800-257-4631)
1-888-NAV-HELP (1-888-628-4357)
ALPINE ELECTRONICS OF CANADA, INC.
777 Supertest Road, Toronto,
Ontario M3J 2M9, Canada
Phone 1-800-ALPINE-1 (1-800-257-4631)
1-888-NAV-HELP (1-888-628-4357)
ALPINE ELECTRONICS OF AUSTRALIA PTY. LTD.
161-165 Princes Highway, Hallam
Victoria 3803, Australia
Phone 03-8787-1200
ALPINE ELECTRONICS GmbH
Frankfurter Ring 117,
80807 München, Germany
Phone 089-32 42 640
R
Yamagata Printing Co., Ltd.
2-6-34, Takashima,
Nishi-ku, Yokohama,
Kanagawa, Japan
ALPINE ELECTRONICS OF U.K. LTD.
Alpine House
Fletchamstead Highway,
Coventry CV4 9TW, U.K.
Phone 0870-33 33 763
ALPINE ELECTRONICS FRANCE S.A.R.L.
(RCS PONTOISE B 338 101 280)
98, Rue de la Belle Etoile, Z.I. Paris Nord Il,
B.P. 50016, 95945 Roissy Charles de Gaulle
Cedex, France
Phone 01-48638989
ALPINE ITALIA S.p.A.
Viale C. Colombo 8, 20090 Trezzano
Sul Naviglio (MI), Italy
Phone 02-484781
ALPINE ELECTRONICS DE ESPAÑA, S.A.
Portal de Gamarra 36, Pabellón, 32
01013 Vitoria (Alava)-APDO 133, Spain
Phone 945-283588
Designed by ALPINE Japan
Printed in Japan (Y)
68-02065Z15-A
Page 93

R
NVE-N872A
Satellite Linked Navigation
HARDWARE MANUAL
Please read before using this product.
MANUEL DU MATERIEL INFORMATIQUE
Veuillez lire attentivement ce mode d’emploi
avant la mise en service du produit.
MANUAL DE HARDWARE
Lea lo siguiente antes de utilizar este
producto.
Page 94

Precautions
English
PRECAUTIONS
IMPORTANT INFORMATION, PLEASE READ CAREFULLY
BEFORE USING THIS PRODUCT.
This product is intended to safely provide turn by turn instruction to get you to a
desired destination. Please read the following precautions to ensure that you use
this navigation system correctly.
✵
This product is not a substitute for your personal judgment. Any route suggestions made by this navigation system should never supersede any local traffic
regulations or your personal judgment and/or knowledge of safe driving practices.
Do not follow route suggestions if the navigation system instructs you to perform
an unsafe or illegal maneuver, places you in an unsafe situation, or routes you into
an area which you consider unsafe.
✵
Glance at the screen only when necessary and safe to do so. If prolonged viewing of the screen is necessary, stop in a safe and legal manner and location.
✵
Do not input destinations, change settings, or access any functions requiring a
prolonged view of the monitor and/or remote control while you are driving. Stop in a
safe and legal manner and location before attempting to access the system.
✵
When using the navigation system to find/route to an emergency service,
please contact the facility to validate and verify availability, prior to driving to it.
Not all locations of emergency service providers such as police and fire stations,
hospitals, and clinics are contained in the database. Please use your own judgment
and your ability to ask for directions in these situations.
✵
The map database contained within the media (DVD ROM) in which it is stored is
the most recent map data available at the time of production. Because of changes
in streets and Neighborhoods, there may be situations where the navigation system
may not be able to route you to your desired destination. In these cases, use your
own personal judgment.
✵
The map database is designed to provide you with route suggestions, it does not
take account of the relative safety of a suggested route, or of factors which may
affect the time required to reach your destination. The system does not reflect road
closures or construction, road characteristics (i.e. type of road surface, slope or
grade, weight or height restrictions, etc.), traffic congestion, weather conditions, or
any other factors which may affect the safety or timing of your driving experience.
Use your personal judgment if the navigation system is unable to provide you with
an alternate route.
✵
There may be situations where the navigation system may display the vehicle’s
location erroneously. Use your own driving judgment in this situation, taking into
account current driving conditions. Please be aware that in this situation, the navigation system should correct the vehicle’s position automatically; however, there
may be times where you may have to correct the position yourself. If this is the
2
case, stop in a safe and legal manner and location before attempting operation.
Page 95

✵
Make certain that the volume level of the monitor is set to a level which still
allows you to hear outside traffic and emergency vehicles. Driving while unable to
hear outside sounds could cause an accident.
✵
Position the monitor so that glancing at the screen can be performed quickly and
easily by the driver. If any adjustments are necessary, stop in a safe and legal
manner and location.
✵
The monitor used with this system should not be placed in a location which
hinders the driver’s view of any critical elements necessary to operate the vehicle
properly (i.e. the road, mirrors, instruments, vehicle’s surroundings). In addition,
the monitor should not be placed in a location which may obstruct the air bags
should they deploy.
✵
Remember to wear your seat belt at all times when the car is in motion. This will
help you avoid impact with anything in the car’s interior, including the system itself.
✵
Be sure to reset the system before starting operation whenever the system is
reinstalled on another vehicle. The navigation system measures the distance with
the speedometer pulse. Since the speedometer pulses depend on the vehicle manufacturer and the tire size, when you buy a new vehicle or replace your tires, the
speedometer pulses are compared with the distance measured with GPS waves and
the distance coefficient is automatically recalibrated.
✵
Do not use a portable telephone or transceiver near the system. Using them may
cause noise or operating error to the system, or prevent for the portable telephone
or transceiver from proper communications. Use them away from the system.
✵
Please make certain that any other person who intends on using this navigation
system reads these precautions and the following instructions carefully.
✵
If there is anything in the manual which you do not understand, or are uncertain
about the operation of the navigation system, please contact an authorized representative before using the navigation system.
✵
Should the system become necessary for service or repair, make sure the DVDROM is removed from the main unit. Place the DVD-ROM in its case and ship it
along with the main unit.
3
Page 96

Precautions
Points to Observe for Safe Usage
a Read this manual carefully before using this
navigation system. It contains instructions on how
to use this product in a safe and effective manner.
Alpine cannot be responsible for problems
resulting from failure to observe the instructions in
this manual.
a This manual uses various pictorial displays to
show how to use this product safely and to alert
you to potential dangers resulting from improper
connections and operation. Following are the
meanings of these pictorial displays. It is important
to fully understand the meanings of these pictorial
displays in order to use this manual and the
system properly.
• Meaning of displays
This symbol means important
Warning
Caution
Tips
instructions. Failure to heed them
can result in serious injury or
death.
This symbol means important
instructions. Failure to heed them
can result in injury or material
property damage.
This indicates supplementary
explanation of operation of this
system.
DO NOT OPERATE ANY FUNCTION THAT
TAKES YOUR ATTENTION AWAY FROM
SAFELY DRIVING YOUR VEHICLE. Any func-
tion that requires your prolonged attention
should only be performed after coming to a complete stop. Always stop the vehicle in a safe location before performing these functions. Failure to
do so may result in an accident.
MINIMIZE DISPLAY VIEWING WHILE DRIVING. Viewing the display may distract the driver
from looking ahead of the vehicle and cause an
accident.
DO NOT FOLLOW ROUTE SUGGESTIONS IF
THE NAVIGATION SYSTEM INSTRUCTS YOU
TO PERFORM AN UNSAFE OR ILLEGAL MANEUVER, OR PLACES YOU IN AN UNSAFE
SITUATION OR AREA. This product is not a
substitute for your personal judgment. Any route
suggestions by this system should never supersede any local traffic regulations or your personal judgment or knowledge of safe driving
practice.
DO NOT PLACE HANDS, FINGERS OR FOREIGN OBJECTS IN INSERTION SLOTS OR
GAPS. Doing so may result in personal injury or
damage to the product.
Caution
Warning
DO NOT DISASSEMBLE OR ALTER. Doing so
may result in an accident, fire or electric shock.
KEEP SMALL OBJECTS SUCH AS BATTERIES OUT OF THE REACH OF CHILDREN.
Swallowing them may result in serious injury. If
swallowed, consult a physician immediately.
USE THE CORRECT AMPERE RATING WHEN
REPLACING FUSES. Failure to do so may re-
sult in fire or electric shock.
USE THIS PRODUCT FOR MOBILE 12V APPLICATIONS. Use for other than its designed
application may result in fire, electric shock or
other injury.
4
HALT USE IMMEDIATELY IF A PROBLEM
APPEARS. Failure to do so may cause per-
sonal injury or damage to the product. Return it
to your authorized Alpine dealer or the nearest
Alpine Service Centre for repairing.
DO NOT MIX NEW BATTERIES WITH OLD
BATTERIES. INSERT WITH THE CORRECT
BATTERY POLARITY. When inserting the
batteries, be sure to observe proper polarity (+
and –) as instructed. Rupture or chemical
leakage from the battery may cause fire or
personal injury.
Page 97

Contents
Precautions
Preface
Before Using
This System
Operation
Reference
Points to Observe for Safe Usage ............................................ 4
Warning ....................................................................................... 4
Caution ........................................................................................ 4
Navigation systems ................................................................... 6
Remote control (RUE-4140) ...................................................... 8
Main unit ................................................................................... 11
Precautions for the remote control ........................................ 12
Turning the System On ........................................................... 13
Voice Recognition.................................................................... 14
In case of difficulty .................................................................. 15
If this message appears .......................................................... 16
Specifications........................................................................... 16
END USER LICENSE AGREEMENT ........................................ 17
CAUTION
CAUTION-Laser radiation when open, DO NOT STARE INTO BEAM
(Bottom side of player)
5
Page 98

Preface
Preface
Navigation systems
This navigation system uses three different sensing devices to determine the present location
and to track the progress of the vehicle. These three devices are: a GPS (Global Positioning
System) receiver which receives digital signals from the GPS satellites to determine the
current position of the vehicle, a gyroscope which determines which direction the vehicle turns,
and a speedometer pulse sensor which determine how far the vehicle has travelled. Because
this system incorporates a gyroscope and a speed sensor, the system will be able to display
the vehicle’s position and track the vehicle’s progress even in areas where the GPS signal
may be blocked.
All map data is contained on a removable DVD ROM (sold separately). This system integrates
this unique map database with the sensing devices to automatically plot out a route when a
destination is entered. While driving, the navigation system guides you along the route with
pictorial displays and verbal prompts.
Note: Altitude display accuracy can vary widely since the system uses only GPS signals for
determining altitude approximations. Unlike altitude measurement, map matching
accuracy is much more precise due to calculation methods that utilize three inputs: 1)
GPS signals, 2) vehicle speed signals, and 3) the system’s built-in electronic gyro
signals.
GPS (Global Positioning System)
There may be a delay before the
actual vehicle’s position is displayed
Determination of the present vehicle’s position starts when the ignition key is turned to
the ACC or ON positions and ends when the
key is turned OFF. When the key is first
turned to the ACC or ON positions, there is a
slight delay of approximately one to two
minutes before the present vehicle’s position
can be displayed.
This system receives signals from 3 or more
GPS satellites (operated by the United States
Department of Defense) orbiting at an altitude
of 13,100 miles (21,000 kilometers) and
measures the present car position using the
same principles as triangulation.
The error from the actual position
of the vehicle
When GPS signals can be received from 4 or
more satellites, 3 dimensional positioning (the
altitude, latitude, and longitude) of the vehicle
can be determined. In this case, the error
from the actual position of the vehicle is in the
range of 100 to 655 feet (30 to 200 meters).
When GPS signals can only be received from
3 satellites, only two dimensional positioning
(latitude and longitude) can be determined,
resulting in a slightly increased error. When
GPS signals can only be received from less
than three satellites, positioning of the vehicle
through GPS is not possible. In addition to
the inherent errors from GPS, the error rate
can also be increased if the United States
Department of Defense deliberately changes
the accuracy rate.
6
Page 99

Gyroscope
The gyroscope is a sensor that accurately
measures the angle by which the direction of
a vehicle or other moving body changes.
Gyroscopes are used in inertial navigation
systems for airliners and ships. In this
navigation system, the gyroscope is used
together with the speed sensor, making it
possible to display the position of the vehicle
even in locations where GPS signals may be
blocked.
Locations where GPS signals are received easily
The optimum locations for receiving GPS
signals are locations that command a
good view where there are no tall
buildings, trees, or other objects to
obstruct the signals.
Locations where GPS signals cannot be received
In the following locations or conditions GPS signals cannot be received. However even in
these locations, the gyroscope and speed sensor will provide a substitute means of
determining the vehicle’s position and the system will be able to continue to track the
vehicle’s progress along the route.
Preface
In tunnels and indoor
parking lots
On the bottom level of
double-decker motorways
Locations surrounded
by tall buildings
When a GPS satellite is low on the horizon (angle
below 10°), obstructions sometimes make normal
reception impossible
Locations surrounded
by tall trees
7
Page 100

Before Using This System
Before Using This System
Remote control (RUE-4140)
Names of the Parts
Joystick/ENTER button
Selects highlighted items in menus and
moves map displays and vehicle position
icon. Tilt this to scroll the map. Press the
ENTER button to select any highlighted
function, screen icon or street segment.
Zoom/Scroll buttons
Changes map magnification ratio upward or
downward in 12 steps.
mile: 1/32, 1/16, 1/8, 1/4, 1/2, 1, 2, 5, 15,
50, 150, 350
m: 50, 100, 200, 400m, 1, 2, 4, 10, 30,
100, 250, 600km
Changes map magnification ratio Smoothly
by pressing and holding either button.
In menu scrolls the page if the list is more
than 2 pages.
AUDIO/NAV. button
Switches between Audio and
Navigation operations.
Pressing this button illuminates the
keys on the remote control.
VOICE button
Initiates vocal instruction for next
route maneuver or repeats last
instruction.
Numeric Keypad
Use these buttons to enter phone
numbers, address numbers or street
names containing numbers (i.e.,
42nd St.). Works in conjunction with
the MODE button.
LIST button
Displays list of the streets currently set
for the route. To return to the guidance
mode, press the DISP button.
DEL. button
Deletes the character previously input.
SPEAK button
Press the button to operate the
navigation using Voice
Commands.
Remote Control transmitter
Transmits the remote control
signals. Aim toward the display
monitor for operation.
Status indicator
Illuminates when the remote is
transmitting.
DISP. button
When setting the route, switches
the map and guidance display. If
in a menu, displays the map.
MODE button
Press this button to input
numerals using the numeric
keypad. The numerals can be
input while the status indicator
blinks.
MENU button
Displays the Nav. menu.
CANC. button
Cancels current display screen
and switches back to previous
screen with menus.
H/N button
Toggles between Heading Up,
North Up and a 3D orientation.
DETOUR button
Allows user to select detouring
distance or avoid traffic
congestion.
DEL. DEST. button
Deletes current destination.
HOME button
Calculates route to Home
destination.
OK button
Executes numeral inputting.
TRAFFIC INFO. button
Traffic information list is
displayed.
PLAN button
Allows you to advance to the
next destination in Today’s Plan
list.
a If an operation is not accepted, the navigation system beeps.
a The Alpine head unit can be operated with the remote control.
Tips
Note: Due to continuous product improvement, specifications are subject to change.
For details, refer to pages 9 and 10.
a After pressing the MODE button, press the following buttons while the status indicator is
blinking : numerals (0 to 9), DEL. and OK.
8
 Loading...