

Page 1

KCE-635UB
USB Multimedia Interface
• OWNER’S MANUAL
Please read before using this equipment.
EN
DE
• BEDIENUNGSANLEITUNG
Lesen Sie diese Bedienungsanleitung bitte vor Gebrauch des Gerätes.
• MODE D'EMPLOI
Veuillez lire avant d'utiliser cet appareil.
• MANUAL DE OPERACIÓN
Léalo antes de utilizar este equipo.
• INSTRUZIONI PER L'USO
Si prega di leggere prima di utilizzare l'attrezzatura.
• ANVÄNDARHANDLEDNING
Innan du använder utrustningen bör du läsa igenom denna användarhandledning.
FR
ES
IT
SE
• РУКОВОДСТВО ПОЛЬЗОВАТЕЛЯ
Пожалуйста, прочитайте руководство перед использованием оборудования.
RU
Page 2
ENGLISH
Contents
Operating Instructions
WARNING
WARNING …………………………………… 2
CAUTION ……………………………………. 2
PRECAUTIONS ……………………………. 3
SAFETY ……………………………………… 3
BASIC OPERATION
Remote Controller Operation ………………. 4
Touch Screen & General Operation ……. 5, 6
SYSTEM SETUP
Setup Menu ……………………………..... 7, 8
OSD Structure ………………………….…… 9
INSTALLATION & CONNECTIONS
EN
Warning ……………………………………... 10
Caution ……………………………………… 10
Precautions …………………………………. 11
Installation ………………………………….. 11
Package Contents …………………………. 11
Connections & System Wiring Diagram …. 12
Specifications ………………………………. 13
1-EN
Page 3
WARNING
WARNING
This symbol means important instructions.
Failure to heed them can result in serious injury or
death.
DO NOT OPERATE ANY FUNCTION THAT TAKES
YOUR ATTENTION AWAY FROM SAFELY DRIVING
YOUR VEHICLE.
Any function that requires your prolonged attention should
only be performed after coming to a complete stop.
Always stop the vehicle in a safe location before performing
these functions. Failure to do so may result in an accident.
DO NOT DISASSEMBLE OR ALTER.
Doing so may result in an accident, fire or electric shock.
USE THIS PRODUCT FOR MOBILE 12V
APPLICATIONS.
Use for other than its designed application may result in fire,
electric shock or other injury.
KEEP SMALL OBJECTS SUCH AS BATTERY OUT OF
THE REACH OF CHILDREN.
Swallowing them may result in serious injury. If swallowed,
consult a physician immediately.
USE THE CORRECT AMPERE RATING WHEN
REPLACING FUSES.
Failure to do so may result in fire or electric shock.
CAUTION
This symbol means important instructions.
Failure to heed them can result in injury or material
property damage.
HALT USE IMMEDIATELY IF A PROBLEM APPEARS.
Failure to do so may cause personal injury or damage to the
product. Return it to your authorized Alpine dealer or the
nearest Alpine Service Centre for repairing.
DO NOT MIX NEW BATTERIES WITH OLD
BATTERIES. INSERT WITH THE CORRECT BATTERY
POLARITY.
When inserting the batteries, be sure to observe proper polarity
(+ and –) as instructed.
Rupture or chemical leakage from the battery may cause fire or
personal injury.
2-EN
Page 4
WARNING
PRECAUTIONS
Temperature
Be sure the temperature inside the vehicle is between +45C
(+113F) and 0C (+32F) before turning your unit on.
Fuse Replacement
When replacing the fuse(s), the replacement must be of the
same amperage as shown on the fuse holder. If the fuse(s)
blows more than once, carefully check all electrical connections
for shorted circuitry. Also have your vehicle’s voltage regulator
checked.
Maintenance
If you have problems, do not attempt to repair the unit yourself.
Return it to your Alpine dealer or the nearest Alpine Service
Station for servicing.
Installation Location
Make sure the KCE-635UB will not be exposed to:
• Direct sun and heat
• High humidity
• Excessive dust
• Excessive vibrations
SAFETY
Video Output (front)
In order to ensure vehicle safety, the driver side screen must be
connected to the front video output connector.
This will ensure the driver won’t be able to watch video while
the vehicle is moving, if the yellow/blue handbrake wire is
properly connected. The driver will be able to watch video once
the handbrake is pulled. The rear passenger screens, connected
to the rear video output connectors, do not fall under this
restriction.
EN
3-EN
Page 5
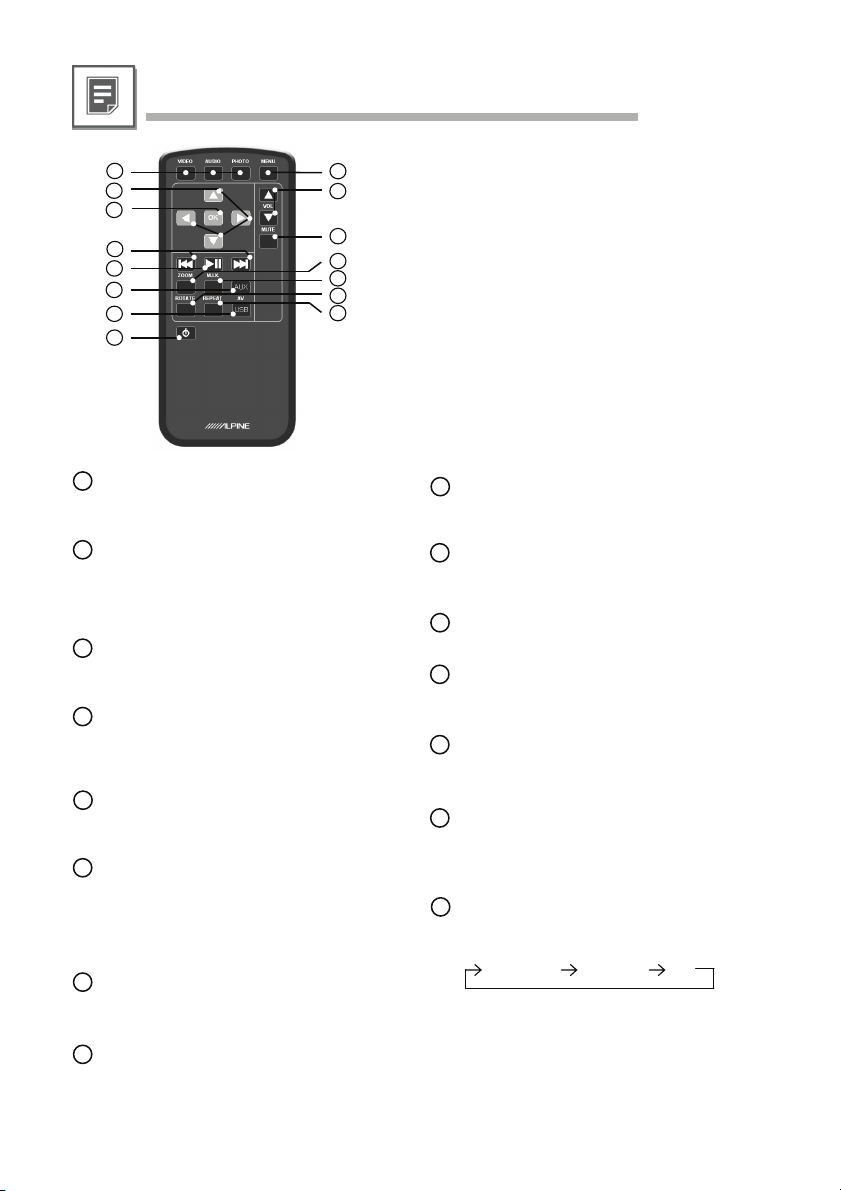
Remote Controller Operation
1
2
3
4
5
6
7
8
Source buttons
1
RUE-4230
9
10
11
12
13
14
15
Select the desired player mode by pressing the
corresponding source button.
Arrow buttons (up, down, left, right)
2
Use the arrow buttons to navigate the OSD and
to do select the desired settings.
In file browser mode, the left/right arrow buttons
can be used scrolling page-wise.
OK button
3
Press the OK button to select a highlighted menu
item.
4
Skip/Seek forward/backward buttons
Press these buttons to select the next/prev. file to
be played. A long press (> 2sec.) will start the fast
forward/backward seek mode.
Play/Pause button
5
Press the play/pause button to start, pause and
resume the current playback.
6
AUX button
Press the AUX button in order to activate the
auxiliary AV input. A long press (> 2sec.) will
switch the camera signal to the front video output.
Any other command will switch back to the
previously selected video signal.
USB button
7
Press the USB button in order to return from the
AV auxiliary to the USB playback mode.
Power button
8
Press the button to turn the device on/off.
Mute button
11
Press the mute button to switch on/off the audio
output.
10
VOL+ / VOL- buttons
Press these buttons to adjust the volume ouput
level.
Menu button
9
Press the menu button to enter the main menu.
12
ZOOM button
Press the zoom button in order to select the desired
screen zoom level (audio and video mode only).
13
M.I.X. button
Press the M.I.X. button in order to activate file
playback in random order.
14
ROTATE button
Press the rotate button in order to turn the picture
clockwise by 90 degrees (photo mode only).
A long press (>4sec.) will reset and reboot the
player.
REPEAT button
15
Press the repeat button in order to select the
desired repeat mode.
repeat one
repeat all off
4-EN
Page 6

Touch Screen & General Operation
• Direct Touch Support
If KCE-635UB is connected to a Direct Touch enabled monitor device (e.g. iXA-W404R, iXA-W407BT,
IVA-D511R, INE-S900R, TME-S370), you can operate it even more conveniently by touch control.
It is recommended to perform a touch screen calibration (setup menu) prior to first time use.
For basic Direct Touch operation please refer to the below illustration.
• File Selection
(1) Select a source type (e.g. video mode)
Note: ONLY video files will be listed.
1
• Playback Mode
Depending on the selected operation mode and file format the following controls
are available during playback.
(2) Browse the file/folder structure and select
the desired file. (3) Start playback.
2
play
pause
3
M.I.X.
repeat one
repeat all
EN
• Unsupported Files
Files of an unsupported format will be
automatically greyed-out.
zoom
rotate clockwise
by 90°
5-EN
Page 7

Touch Screen & General Operation
• Position Jump function
Since the fast forward / fast backward touch commands may not be operable by some monitors
you can alternatively access a certain position within the audio/video file by touching the desired
position above the progress bar. Please refer to the below illustrated virtual touch area.
6-EN
• MP3 with JPEG
If there is no embedded cover artwork with the audio file, KCE-635UB can alternatively display
valid JPEG files from within the same folder location in alphabetical order. If none available, the
default cover artwork icon will be shown.
default cover artwork icon
Page 8

Setup Menu
• ID3 Tag Character Set
If your audio files’ ID3 tag information (artist, title etc.) is not
properly displayed, please select another character set
according to the desired region.
[Automatic, Western EU, Eastern EU, Cyrillic, Greek]
• On Screen Display (OSD) Timeout
You can select a preferred OSD timeout period.
[2 sec., 4 sec., 6 sec., 8 sec., 10 sec.]
• On Screen Display (OSD) Opacity
You can select a preferred OSD opacity.
[100%, 50%]
• Text Scrolling
This selects whether extra-long file names and ID3 tag
information on the screen are scrolled, or not.
[on, off]
• Slideshow Timing
This selects the desired picture slideshow speed in photo
mode.
[2 sec., 4 sec., 6 sec., 8 sec., 10 sec.]
• Volume Level
This selects whether KCE-635UB’s volume output level is
adjustable or shall be fixed at the current value.
[variable, fixed]
EN
• Remote Command Support
This selects whether KCE-635UB’s remote controllability
Shall be limited to its exclusive remote commands, or not.
This setting may only need to be changed if experiencing
interferences with other devices in larger multimedia systems.
[enhanced, USB only]
• Restore Factory Default Settings
This restores all KCE-635UB factory default settings.
• Software Version
This displays the current system software versions for service
purposes.
7-EN
Page 9

Setup Menu
• Touch Screen Calibration
The Touch Screen Calibration menu is only accessible
with a Direct Touch enabled monitor device.
It is recommended to perform a touch screen calibration
prior to first time use.
Please follow the instructions on the screen in order
calibrate KCE-635UB for Direct Touch operation with
your monitor.
Depending on the connected monitor device, you may
need to wait for 2 seconds between each step of the
calibration.
8-EN
Page 10

OSD Structure
Video
Audio
EN
Tag Char. Set
OSD Timeout
OSD Opacity
Photo
Setup
Scrolling
Slideshow
Volume Level
RC Support
Factory Defaults
SW Version
Touch Screen
AUX CAM
9-EN
Page 11

Installation and Connections
Before installing or connecting the unit, please
read the following and pages 4 and 5 of this
manual thoroughly for proper use.
Warning
MAKE THE CORRECT CONNECTIONS.
Failure to make the proper connections may result in fire or
product damage.
USE ONLY IN CARS WITH A 12 VOLT NEGATIVE
GROUND.
(Check with your dealer if you are not sure.)
Failure to do so may result in fire, etc.
BEFORE WIRING, DISCONNECT THE CABLE FROM
THE NEGATIVE BATTERY TERMINAL.
Failure to do so may result in electric shock or injury due to
electrical shorts.
DO NOT SPLICE INTO ELECTRICAL CABLES.
Never cut away cable insulation to supply power to other
equipment. Doing so will exceed the current carrying capacity
of the wire and result in fire or electric shock.
DO NOT USE BOLTS OR NUTS IN THE BRAKE OR
STEERING SYSTEMS TO MAKE GROUND
CONNECTIONS.
Bolts or nuts used for the brake or steering systems (or any
other safety-related system), or tanks should NEVER be used
for installations or ground connections. Using such parts could
disable control of the vehicle and cause fire etc.
KEEP SMALL OBJECTS SUCH AS BATTERY OUT
OF THE REACH OF CHILDREN.
Swallowing them may result in serious injury. If swallowed,
consult a physician immediately.
DO NOT INSTALL IN LOCATIONS WHICH MIGHT
HINDER VEHICLE OPERATION, SUCH AS THE
STEERING WHEEL OR GEARSHIFT.
Doing so may obstruct forward vision or hamper movement
etc. and results in serious accident.
HAVE THE WIRING AND INSTALLATION DONE BY
EXPERTS.
The wiring and installation of this unit requires special
technical skill and experience. To ensure safety, always contact
the dealer where you purchased this product to have the work
done.
USE SPECIFIED ACCESSORY PARTS AND INSTALL
THEM SECURELY.
Be sure to use only the specified accessory parts. Use of other
than designated parts may damage this unit internally or may
not securely install the unit in place.
This may cause parts to become loose resulting in hazards or
product failure.
ARRANGE THE WIRING SO IT IS NOT CRIMPED OR
PINCHED BY A SHARP METAL EDGE.
Route the cables and wiring away from moving parts (like the
seat rails) or sharp or pointed edges. This will prevent crimping
and damage to the wiring. If wiring passes through a hole in
metal, use a rubber grommet to prevent the wire’s insulation
from being cut by the metal edge of the hole.
DO NOT INSTALL IN LOCATIONS WITH HIGH
MOISTURE OR DUST.
Avoid installing the unit in locations with high incidence of
moisture or dust. Moisture or dust that penetrates into this unit
may result in product failure.
Caution
10-EN
Page 12

Installation and Connections
Precautions
Be sure to disconnect the cable from the (–) battery post
before installing your KCE-635UB. This will reduce any
chance of damage to the unit in case of a shortcircuit.
• Be sure to connect the color coded leads according to the
diagram. Incorrect connections may cause the unit to
malfunction or damage the vehicle’s electrical system.
• When making connections to the car’s electrical system, be
aware of the factory installed components (e.g. on-board
computer). Do not tap into these leads to provide power for
this unit. When connecting the KCE-635UB to the fuse box,
make sure the fuse for the intended circuit of the KCE635UB has the appropriate amperage. Failure to do so may
result in damage to the unit and/or the vehicle. When in
doubt, consult your ALPINE dealer.
• The KCE-635UB uses female RCA-type jacks for
connection to other units (e.g. amplifier) having RCA
connectors. You may need an adaptor to connect other units.
If so, please contact your authorized ALPINE dealer for
assistance.
Installation
Installing USB Mediaplayer
This USB Mediaplayer can be placed inside the trunk,
on the kick panel of the front passenger’s seat or
underdash. However, to avoid unnecessary signal
wiring, it is better to mount the device as close as
possible to the Display.
DO NOT MOUNT THE UNIT IN LOCATIONS
THAT WILL BE IN THE VICINITY OF MOISTURE
OR EXTREME HEAT (such as the engine
compartment).
Package Contents
• KCE-635UB
• IR Remote Controller (RUE-4230)
• Power Cable (2.0m)
• AV Cable (2m)
• USB Extension Cable (1.5m)
• Installation Screws (4x)
• Owner’s Manual
EN
11-EN
Page 13

Installation and Connections
Connections and System Wiring Diagram
(not included)
7
(not included)
(not included)
Reset button
1
USB socket
2
3
Power status LED
1x RCA A/V auxiliary input
4
1x RCA A/V output & front video output
5
Camera input
6
7
External IR sensor (optional)
4
5
6
1
2
3
(not included)
9
8
10
11
12
13
14
15
16
Battery lead (yellow)
8
Connect to a live terminal in the fuse block connecting to the car
battery (bypassing the ignition switch).
Fuse holder (5A)
9
Switched power lead (Ignition) (red)
10
Connect to an accessory terminal in the fuse block.
Parking brake lead (yellow/blue)
11
Connect to vehicle’s parking brake lead of the car.
Reverse Lead (orange/white)
12
Use when connecting a rear view camera.
Connect to a Reverse gear activated 12 volt signal.
The camera signal is switched to the front video output only.
Remote control input lead (white/brown, male connector)
13
Connect to remote control output lead of monitor.
Remote control output lead (white/brown, female connector)
14
Connect to remote control input lead of auxiliary source device.
Remote Turn-on lead (blue)
15
Ground lead (black)
16
Connect to metallic body or chassis of the car.
(not included)
12-EN
Page 14

e
Specifications
Hardware
POWER SUPPLY
Input voltage 10V - 16V DC
Power consumption max. 15W
MAIN CONNECTORS
USB connector Type-A socket, (5V, 500mA)
Audio input 1 Pairs RCA (stereo)
Video input 1x RCA (AUX) / 1x RCA (camera)
Audio output 1 Pairs RCA (stereo)
Video output 1x RCA (rear screen); 1x RCA (front screen)
Video output format NTSC
Software
OPERATING SYSTEM Windows CE
ID3 TAG CHARCTER SETS Western EU / Eastern EU
SOFTWARE UPGRADE via USB socket
USB MEDIA SUPPORT Single partitioned FAT32 formatted
GENERAL INFORMATION
Operating temperature -20 - 70 °C
Dimensions 136(119) x 91 x 41 mm
Weight 400 g
Format Support
Mode Code c Bit Ra te
Mpeg-1 3Mbps H x V = 414720 *.mpg, *.mpeg
Mpeg-2 3Mbps H x V = 414720 *.mpg, *.mpeg
Mpeg-4 3Mbps H x V = 414720 *.avi, *.mp4
ipod Mpeg-4 Movi
DivX 3 3Mbps H x V = 414720 *.avi
DivX 4 1.5Mbps H x V = 414720 *.avi
VIDEO
DivX 4 2.8Mbps H x V = 720 x 480 *.avi
DivX 5 3Mbps H x V = 414720 *.avi
Xvid 3Mbps H x V = 414720 *.avi
MPC-Mpeg-2 3Mbps H x V = 414720 *.avi
WMV1 (WMV v7) 2Mbps 720 x 576 *.wmv
WMV2 (WMV v8) 2Mbps 720 x 576 *.wmv
WMV3 (WMV 9) 2Mbps 720 x 576 *. wmv
MP2 320Kbps *.MP2
MP3 320Kbps *.MP3
MP3-Cover & Tag 320Kbps *.MP3
AC3 320Kbps *.ac3
AUDIO
AAC 320Kbps *.aac, *.m4a
AAC-Cover & Tag 320Kbps *.m4a iTunes Files only
WAV 320Kbps *.wav
WMA 320Kbps *.wma
BMP H x V = 6144000 *.bmp
PHOTO
Please refer to the product website at www.alpine-europe.com for further technical information.
We do strongly recommend to backup your data before carrying your USB memory device into the
automotive environment. Alpine cannot be held liable for any loss of data from the connected devices.
JPG H x V = 6144000 *.jpg, *.jpeg
GIF H x V = 6144000 *.gif
PNG H x V = 6144000 *.png
3Mbps H x V = 414720 *.mp4
Max.
Resolution
File Extension
(conta iner)
Max. Resolution
H x V = 414720
For example:
H720 x V576 = 414720
H800 x V518 = 414720
Max. Resolution
H720 x V576
Max. Resolution
H x V = 6144000
For example:
H3200 x V1920 = 6144000
EN
Cyrillic / Greek
USB mass storage devices
Rem arks
13-EN
Page 15

ALPINE ELECTRONICS MARKETING, INC.
1-1-8 Nishi Gotanda,
Shinagawa-ku,
Tokyo 141-0031, Japan
Phone 03-5496-8231
ALPINE ELECTRONICS OF AMERICA, INC.
19145 Gramercy Place, Torrance,
California 90501, U.S.A.
Tel. 1-800-ALPINE-1 (1-800-257-4631)
ALPINE ELECTRONICS OF CANADA, INC.
7300 Warden Ave., Suite 203, Markham,
Ontario L3R 9Z6, Canada
Tel. 1-800-ALPINE-1 (1-800-257-4631)
ALPINE ELECTRONICS GmbH
Wilhelm-Wagenfeld-Straße 1-3
80807 München, Germany
Tel. 089-3242640
ALPINE ELECTRONICS FRANCE S.A.R.L.
(RCS PONTOISE B 338 101 280)
98, Rue de la Belle Etoile, Z.I. Paris Nord Il,
B.P. 50016, 95945 Roissy Charles de Gaulle
Cedex, France
Tel. 01-48638989
ALPINE ELECTRONICS DE ESPAÑA, S.A.
Portal de Gamarra 36, Pabellón 32
01013 Vitoria (Álava). APDO. 133, Spain
Tel. 945-283588
ALPINE ELECTRONICS OF AUSTRALIA PTY. LTD.
161-165 Princes Highway, Hallam
Victoria 3803, Australia
Phone 03-8787-1200
ALPINE ELECTRONICS OF U.K. LTD.
Alpine House
Fletchamstead Highway, Coventry CV4 9TW,
United Kingdom
Tel. 0870-33 33 763
ALPINE ITALIA S.p.A.
Viale C. Colombo 8,
20090 Trezzano Sul Naviglio (MI), Italy
Tel. 02-484781
ALPINE ELECTRONICS (Benelux) GmbH
Leuvensesteenweg 510-B6
1930 Zaventem, Belgium
Tel. 02-7251315
Printed in the Republic of Korea
 Loading...