

Page 1
DK
D
GB
NL
F
E
P
I
SLO
HR
PL
CZ
SK
H
SRB MK
S
N
FIN
EST
LV
LT
RUS
UA
BG
RO
GR
TR
INFORMATION I MANUALS I SERVICE
BENZINRASENMÄHER
HIGHLINE
Bedienungsanleitung
455046_a I 11/2012
Page 2

Benzin-Rasenmäher Powerline
© Copyright 2009
AL-KO KOBER GROUP Kötz, Germany
This documentation is allowed to-also in excerpts-only with express authorization of the AL-KO KOBER GROUP duplicates or third
accessible is done. Technical alterations of infl uence of the function reservations.
2
Original-Betriebsanleitung
Page 3

Notice
3
Page 4
Benzin-Rasenmäher Powerline
2
7
6
5
4
3
2
2
6
1
1
5
a
b
7
10
4
8
9
2122
1
11
Original-Betriebsanleitung
Page 5
1
START
121
12
13
15 16
17 18
19
1
2
20
5
Page 6
Benzin-Rasenmäher Powerline
21
23 24
Honda, AL-KO
22
25 26
Briggs & Stratton
27 28
6
Original-Betriebsanleitung
Page 7

7
Page 8

D
Benzin-Rasenmäher Powerline
Zu diesem Handbuch
Lesen Sie diese Dokumentation vor der Inbetrieb-
nahme durch. Dies ist Voraussetzung für sicheres
Arbeiten und störungsfreie Handhabung. Machen
Sie sich vor der Benutzung mit den Bedienelementen und dem Gebrauch der Maschine vertraut.
Beachten Sie die Sicherheits- und Warnhinweise in
dieser Dokumentation und auf dem Gerät
Diese Dokumentation ist permanenter Bestandteil
des beschriebenen Produkts und sollte bei Veräußerung dem Käufer mit übergeben werden
Zeichenerklärung
Achtung!
Genaues Befolgen dieser Warnhinweise kann
Personen- und / oder Sachschäden vermeiden.
Spezielle Hinweise zur besseren Verständlichkeit
und Handhabung.
Das Kamerasymbol verweist auf Abbildungen.
Inhaltsverzeichnis
Zu diesem Handbuch ....................................................8
Produktbeschreibung ..................................................... 8
Sicherheits- und Schutzeinrichtungen ........................... 8
Sicherheitshinweise ..................................................... 10
Montage ........................................................................11
Tanken ..........................................................................11
Inbetriebnahme ............................................................ 12
Wartung und Pfl ege ..................................................... 16
Lagerung ..................................................................... 18
Garantie ....................................................................... 18
Reparatur ..................................................................... 18
Entsorgung .................................................................. 18
EG-Konformitätserklärung ........................................... 18
Hilfe bei Störungen ...................................................... 19
Produktbeschreibung
In dieser Dokumentation werden verschiedene Modelle
von Benzin-Rasenmähern beschrieben. Einige Modelle
sind mit Grasfangbox ausgerüstet und/oder sind zusätzlich zum Mulchen geeignet.
Identifi zieren Sie ihr Modell anhand der Produktbilder
und der Beschreibung der verschiedenen Optionen.
Bestimmungsgemäße Verwendung
Dieses Gerät ist zum Mähen eines Rasenbodens im privaten Bereich bestimmt und darf nur auf abgetrocknetem
Rasen eingesetzt werden.
Eine andere oder darüber hinausgehende Verwendung,
gilt als nicht bestimmungsgemäß.
Möglicher Fehlgebrauch
Dieser Rasenmäher ist nicht zur Verwendung in öf-
fentlichen Anlagen, Parks, Sportstätten sowie in der
Land- und Forstwirtschaft geeignet
Sicherheitseinrichtungen dürfen nicht demontiert
oder überbrückt werden
Das Gerät nicht bei Regen oder auf nassem Rasen
benutzen
Das Gerät darf nicht im gewerblichen Einsatz be-
trieben werden
Sicherheits- und Schutzeinrichtungen
Achtung - Verletzungsgefahr!
Sicherheits- und Schutzeinrichtungen dürfen
nicht außer Kraft gesetzt werden!
Sicherheitsbügel
Das Gerät ist mit einem Sicherheitsbügel ausgerüstet. Im
Gefahrenmoment Sicherheitsbügel loslassen.
Schneidmesser wird gestoppt
Motor wird gestoppt
Prallklappe
Die Prallklappe schützt vor herausschleudernden Teilen.
8
Original-Betriebsanleitung
Page 9
D
2
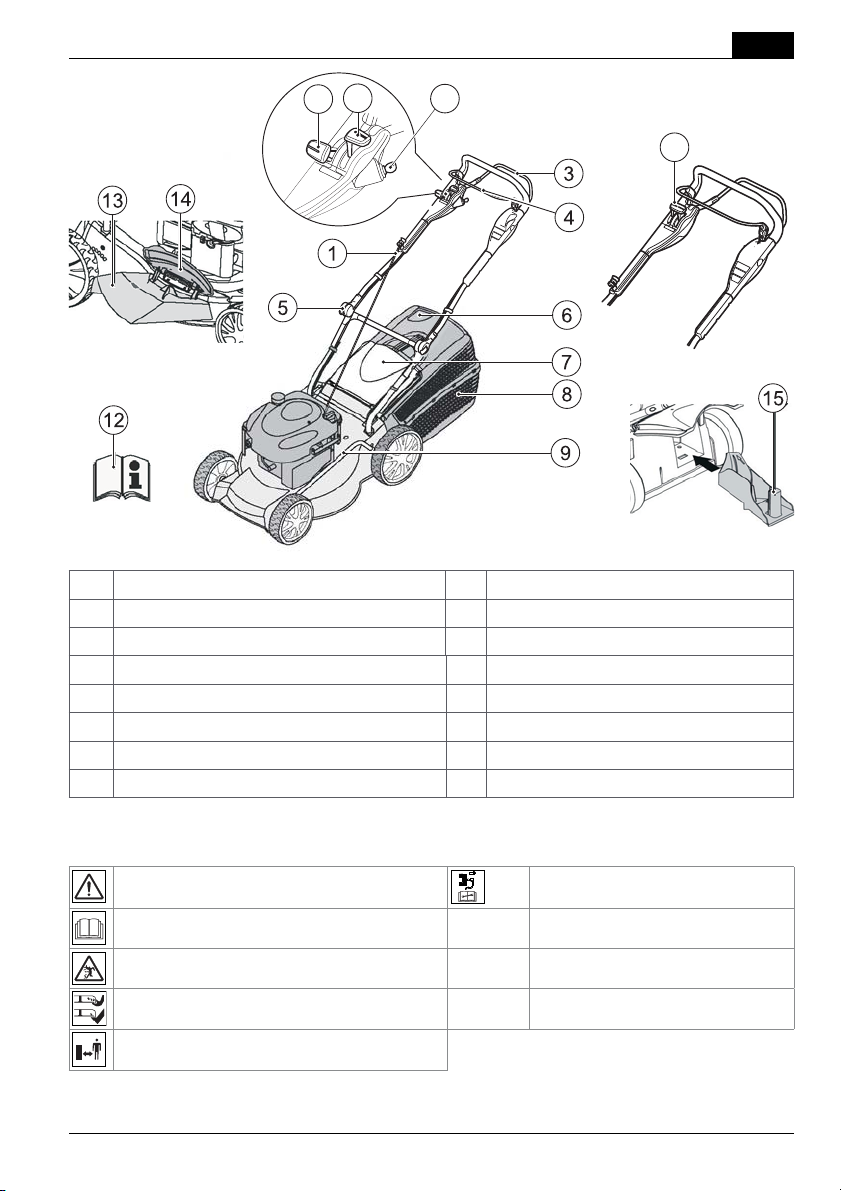
11
1 Starterseil 9 Schnitthöhenverstellung*
2 Gasfernbedienung 11 Variogetriebe*
3 Radantrieb* 12 Betriebsanleitung
4 Sicherheitsbügel 13 Auswurfeinsatz*
5 Ergonomische Höhenverstellung* 14 Verschlußklappe*
6 Füllstandsanzeige* 15 Mulchkit*
7 Prallklappe* 16 Zündschloss für Elektrostart*
8 Grasfangbox*
16
2
* je nach Ausführung
Symbole am Gerät
Achtung!
Besondere Vorsicht bei der Handhabung.
Vor Inbetriebnahme Gebrauchsanleitung lesen!
Dritte aus dem Gefahrenbereich fernhalten!
Hände und Füße vom Schneidwerk fernhalten!
Abstand zum Gefahrenbereich halten.
Vor Arbeiten am Schneidwerk
Zündkerzenstecker ziehen.
9
Page 10
D
Suchen sie nach Beschädigungen am Rasenmäher und führen Sie die erforderlichen Reparaturen durch, bevor Sie erneut starten und mit
dem Rasenmäher arbeiten.
Zusatzsymbole bei Geräten mit Elektrostart
Achtung! Gefahr durch Stromschlag.
Anschlussleitung von Schneidmessern fernhalten.
Gerät vor Wartungsarbeiten oder bei beschädigtem Kabel immer vom Netz trennen.
Sicherheitshinweise
Achtung!
Gerät nur in technisch einwandfreiem Zustand
benutzen!
Achtung - Verletzungsgefahr!
Sicherheits- und Schutzeinrichtungen dürfen
nicht außer Kraft gesetzt werden!
Achtung - Brandgefahr!
Betankte Maschine nicht in Gebäuden aufbewahren, in denen Benzindämpfe mit offenem Feuer
oder Funken in Berührung kommen könnten!
Bereich um Motor, Auspuff, Batteriekasten, Kraftstofftank frei von Mähgut, Benzin, Öl halten.
Dritte aus dem Gefahrenbereich fernhalten
Der Maschinenführer oder der Benutzer ist für
Unfälle mit anderen Personen und deren Eigentum
verantwortlich
Kinder oder andere Personen, die die Betriebs-
anleitung nicht kennen, dürfen das Gerät nicht
benutzen.
Örtliche Bestimmungen zum Mindestalter der Be-
dienungsperson beachten
Gerät nicht unter Einfl uss von Alkohol, Drogen oder
Medikamenten bedienen
Zweckmäßige Arbeitskleidung tragen
Lange Hose
Festes und rutschsicheres Schuhwerk
Gehörschutz
Beim Arbeiten an Hängen
immer auf sicheren Stand achten
immer quer zum Hang mähen, niemals auf-
oder abwärts
Benzin-Rasenmäher Powerline
nicht an Hängen mit einer Steigung von mehr
als 20° mähen
Besondere Vorsicht beim Wenden
Nur bei ausreichendem Tageslicht oder künstlicher
Beleuchtung arbeiten
Körper, Gliedmaßen und Kleidung vom Schneid-
werk fernhalten
Landesspezifi sche Bestimmungen für die Betriebs-
zeit beachten
Betriebsbereites Gerät nicht unbeaufsichtigt lassen
Nur mit scharfem Schneidmesser mähen
Gerät nie mit beschädigten Schutzeinrichtungen /
Schutzgittern betreiben
Gerät nie ohne vollständig eingebaute Schutzein-
richtungen betreiben (z. B.: Prallklappe, Grasfang-
einrichtungen)
Gerät vor jedem Gebrauch auf Beschädigungen
prüfen, vor erneutem Gebrauch beschädigte Teile
ersetzen lassen
Motor abstellen, Stillstand des Gerätes abwarten
und Zündkerzenstecker abziehen
Beim Verlassen des Gerätes
nach dem Auftreten von Störungen
vor dem Lösen von Blockierungen
vor dem Beseitigen von Verstopfungen
nach dem Kontakt mit Fremdkörpern
Störungen und ungewöhnliche Vibrationen am
Gerät auftreten
Suchen sie nach Beschädigungen am Rasenmäher und führen Sie die erforderlichen Reparaturen durch, bevor Sie erneut starten und mit
dem Rasenmäher arbeiten.
Zündkerzenstecker aufstecken und Motor starten
nach Störungsbeseitigung (siehe Störungsta-
belle) und Prüfung des Gerätes
nach dem Reinigen des Gerätes
Das zu mähende Terrain vollständig und sorgfältig
prüfen, alle Fremdkörper entfernen
Besondere Aufmerksamkeit beim Umkehren des
Rasenmähers oder wenn Sie den Rasenmäher zu
sich heranziehen
Nicht über Hindernisse mähen
10
Original-Betriebsanleitung
Page 11
(z. B. Zweige, Baumwurzeln)
Altöl nicht:
in den Abfall geben
in die Kanalisation, den Abfl uss oder auf die
Erde schütten
Schnittgut nur bei stehendem Motor entfernen
Motor / Schneidmesser abschalten, wenn eine an-
dere als die zu mähende Fläche überquert wird
Gerät niemals mit laufendem Motor heben oder
tragen
Beim Einfüllen von Benzin oder Motoröl nicht Essen
oder Trinken
Benzindämpfe nicht einatmen
Führen Sie das Gerät im Schrittempo
Vor Gebrauch auf festen Sitz der Muttern, Schrau-
ben und Bolzen achten
Montage
Beiliegende Montageanleitung beachten.
Achtung!
Das Gerät darf erst nach vollständiger Montage
betrieben werden.
Tanken
Vor der Inbetriebnahme müssen Sie den Rasenmäher
auftanken.
Warnung - Brandgefahr!
Benzin und Öl sind hochgradig entfl ammbar!
Immer die mitgelieferte Bedienungsanleitung des
Motorenherstellers beachten.
Betriebsmittel
Benzin und Öl nur in dafür vorgesehene Behälter
aufbewahren
Benzin und Öl nur bei kaltem Moter im Freien ein-
füllen oder entleeren
Nicht bei laufendem Motor Benzin oder Öl einfüllen
Tank nicht überfüllen (Benzin dehnt sich aus)
Beim Tanken nicht rauchen
Den Tankververschluss bei laufendem oder heißen
Motor nicht öffnen
Beschädigten Tank oder Tankverschluss austau-
schen
Tankdeckel immer fest schließen
Wenn Benzin ausgelaufen ist:
Motor nicht starten
Zündversuche vermeiden
Gerät reinigen
Wenn Motoröl ausgelaufen ist:
Motor nicht starten
Ausgelaufenes Motoröl mit Ölbindemittel oder
Lappen aufsaugen und sachgemäß entsorgen
Gerät reinigen
Altöl nicht:
in den Abfall geben
in die Kanalisation, den Abfl uss oder auf die
Erde schütten
Wir empfehlen, Altöl in einem geschlossenen Behälter
beim Recycling-Center oder einer Kundendienststelle
abzugeben.
Benzin einfüllen
D
Benzin Motoröl
Sorte
Füllmenge
Normalbenzin /
bleifrei
siehe Hinweise
des Motorenherstellers
Sicherheit
Warnung!
Motor nie in geschlossenen Räumen laufen
lassen. Vergiftungsgefahr!
siehe Hinweise
des Motorenherstellers
ca. 0,6 l
1. Tankdeckel abschrauben, an sauberer Stelle
lagern.
2. Benzin mit einem Trichter einfüllen.
3. Tankeinfüllöffnung fest verschließen und reinigen.
Motoröl einfüllen
1. Öleinfülldeckel abschrauben, Verschluß an sauberer Stelle lagern.
2. Öl mit einem Trichter einfüllen.
3. Öleinfüllöffnung fest verschließen und reinigen.
11
Page 12
D
Benzin-Rasenmäher Powerline
Inbetriebnahme
Achtung!
Mit losem, beschädigtem oder abgenutztem
Schneidwerk oder Befestigungsteilen darf das
Gerät nicht benutzt werden!
Führen Sie vor jeder Inbetriebnahme eine Sichtkontrolle durch.
Das Kamerasymbol auf den folgenden Seiten
verweist auf die Abbildungen, Seite 4–7.
Schnitthöhe einstellen
Achtung - Verletzungsgefahr!
Schnitthöhe nur bei abgeschaltetem Motor und
stillstehendem Schneidmesser verstellen.
▪ Immer alle Räder auf die gleiche Schnitthöhe
einstellen.
▪ Schnitthöhenverstellung ist modellabhängig.
Zentralverstellung (
1. Hebel zum Entriegeln zur Seite drücken und halten.
2. Hebel nach links oder rechts in die gewünschte
Schnitthöhe schieben.
3. Hebel einrasten lassen.
4. Auf gleiche Rastposition bei allen Rädern achten.
2)
Mähen mit Grasfangbox
Achtung - Verletzungsgefahr!
Grasfangbox nur bei ausgeschaltetem Motor und
stillstehendem Schneidmesser abnehmen oder
anbringen.
1. Prallklappe anheben und Grasfangbox in die Halter
einhängen (
6).
Füllstandsanzeige
Die Füllstandsanzeige wird durch den Luftstrom beim
Mähen nach oben gedrückt (
Ist die Grasfangbox voll, liegt die Füllstandsanzeige an
der Box an (
den.
5b). Die Grasfangbox muss geleert wer-
5a).
Grasfangbox leeren
1. Prallklappe anheben.
2. Grasfangbox aushängen und nach hinten abnehmen (
6).
3. Grasfangbox leeren.
4. Prallklappe anheben und Grasfangbox wieder in die
Halter einhängen (
6).
Mähen ohne Grasfangbox
Achtung!
Nur bei funktionsfähiger Drehfeder der
Prallklappe ohne Grasfangbox mähen.
Die Prallklappe liegt durch Federkraft am Rasenmähergehäuse an. Der Grasschnitt wird so nach hinten unten
ausgeworfen.
12
Original-Betriebsanleitung
Page 13
D
Mulchen mit Mulchkit (Option)
Beim Mulchen wird das Schnittgut nicht aufgesammelt,
sondern verbleibt auf dem Rasen. Der Mulch schützt den
Boden vor dem Austrocknen und versorgt ihn mit Nährstoffen.
Die besten Ergebnisse werden durch regelmäßigen
Rückschnitt um ca. 2 cm erreicht. Nur junges Gras mit
weichem Blattgewebe verrottet schnell.
Grashöhe vor dem Mulchen: Maximal 8 cm
Grashöhe nach dem Mulchen: Mindestens 4 cm
Schrittgeschwindigkeit dem Mulchen anpassen,
nicht zu schnell gehen.
Mulchkit einsetzen
Achtung - Verletzungsgefahr!
Mulchkit nur bei ausgeschaltetem Motor und
stillstehendem Schneidmesser einsetzen oder
entfernen.
1. Grasfangbox abnehmen (
2. Prallklappe anheben und Mulchkit in den Auswurfschacht einsetzen (
Verriegelung muss einrasten.
Rastet das Mulchkit nicht ein, können Mulchkit und
Schneidmesser beschädigt werden.
6).
7).
Mähen mit Seitenauswurf (Option)
Achtung - Verletzungsgefahr!
Seitenauswurf nur bei ausgeschaltetem Motor und
stillstehendem Schneidmesser abnehmen oder
anbringen.
Seitenauswurf einsetzen
1. Grasfangbox entfernen und Mulchkit einsetzen.
2. Abdeckung für Seitenauswurf aufklappen und
festhalten (
3. Seitenauswurfkanal einsetzen (
4. Abdeckung langsam schließen.
Die Abdeckung sichert den Seitenauswurfkanal vor
dem Herausfallen.
Seitenauswurf entfernen
1. Abdeckung für Seitenauswurf aufklappen und
festhalten ( 9/1).
2. Seitenauswurf entfernen und Abdeckung schließen
(
9/2).
9/1).
9/2).
Griffhöhe einstellen (Option)
Klemmverstellung
Mulchkit entfernen
1. Prallklappe anheben.
2. Verriegelung am Mulchkit lösen (
3. Mulchkit herausziehen (
8/2).
8/1).
1. Holm festhalten und beide Klemmungen lösen
(
10).
2. Holm in gewünschte Position bringen
3. Klemmungen schließen.
13
Page 14

D
Benzin-Rasenmäher Powerline
Motor starten
Achtung - Vergiftungsgefahr!
Motor nie in geschlossenen Räumen laufen
lassen.
Achtung - Verletzungsgefahr!
Gerät bei Startvorgang nicht kippen.
▪ Motor nur bei montiertem Messer starten
(Messer dient als Schwungmasse)
▪ Beim Starten des betriebswarmem Motors
Choke oder Primerknopf NICHT benutzen
▪ Reglereinstellungen am Motor nicht verändern
Gerät nicht starten, wenn der Auswurfkanal nicht
durch eines der folgenden Teile abgedeckt ist:
Grasfangbox
Prallklappe
Mulchkit
Betätigen Sie den Anlass-Schalter mit besonderer
Aufmerksamkeit, entsprechend den Herstelleranweisungen
Achten Sie auf ausreichendem Abstand der Füße
zum Schneidwerkzeug
Gerät in niedrigem Gras starten
Manuelles Starten
mit Gasfernbedienung, mit Choke
1. Gashebel auf Position max
2. Sicherheitsbügel zum Oberholm herziehen und festhalten (
3. Starterseil zügig herausziehen und danach langsam
wieder aufrollen lassen (
4. Nach dem Aufwärmen des Motors (ca. 15–20
Sekunden) Gashebel auf eine Position zwischen
min und max stellen.
mit Gasfernbedienung, ohne Primer/Choke
1. Gashebel auf Position max stellen (
2. Sicherheitsbügel zum Oberholm herziehen und
festhalten (
3. Starterseil zügig herausziehen und danach langsam
wieder aufrollen lassen (
4. Nach dem Aufwärmen des Motors (ca. 15–20
Sekunden) Gashebel auf eine Position zwischen
min und max stellen.
16) – Sicherheitsbügel rastet nicht ein.
16) - Sicherheitsbügel rastet nicht ein.
stellen ( 11/1).
17).
12/1).
17).
Positionszeichen am Gerät:
* je nach Ausführung
14
mit Gasfernbedienung, mit Primer (
1. Gashebel auf Position max stellen (
2. Primerknopf 3x drücken, im Zeitabstand von ca.
2 Sekunden (
den Primerknopf 5x drücken.
3. Sicherheitsbügel zum Oberholm herziehen und
festhalten (
4. Starterseil zügig herausziehen und danach langsam
wieder aufrollen lassen ( 17).
5. Sobald der Motor läuft, Gashebel für die gewünschte Motordrehzahl in eine Position zwischen
min und max stellen.
15). Bei Temperaturen unter 10 °C
16) - Sicherheitsbügel rastet nicht ein.
16)
12/1).
Original-Betriebsanleitung
Page 15

D
ohne Gasfernbedienung, mit Choke
Choke
Ein Aus
1. Choke auf Position 1 stellen ( 13/1).
2. Sicherheitsbügel zum Oberholm herziehen und
festhalten (
3. Starterseil zügig herausziehen und danach langsam wieder aufrollen lassen (
4. Nach dem Aufwärmen des Motors (ca. 15–20 Sekunden) den Choke auf Position 2 stellen (
Der Motor hat eine Festgaseinstellung.
Eine Drehzahlregulierung ist nicht möglich.
ohne Gasfernbedienung, mit Primer (
1. Primerknopf 3x drücken, im Zeitabstand von ca.
2 Sekunden (
den Primerknopf 5x drücken.
2. Sicherheitsbügel zum Oberholm herziehen und
festhalten (
3. Starterseil zügig herausziehen und danach langsam wieder aufrollen lassen (
17) – Sicherheitsbügel rastet nicht ein.
18).
13/2).
16)
16). Bei Temperaturen unter 10 °C
17) – Sicherheitsbügel rastet nicht ein.
18).
Elektro-Start ohne Primer/Choke ( 13)
1. Gashebel auf Position „
2. Sicherheitsbügel zum Oberholm herziehen und
festhalten (
3. Zündschlüssel im Zündschloss ganz nach rechts
drehen (
4. Sobald der Motor läuft, Zündschlüssel loslassen
(springt auf Position „0“ zurück).
5. Gashebel entsprechend der gewünschten Motordrehzahl in eine Position zwischen
min und max stellen.
16) – Sicherheitsbügel rastet nicht ein.
18).
START“ stellen ( 13/1).
Der Motor hat eine Festgaseinstellung.
Eine Drehzahlregulierung ist nicht möglich.
ohne Gasfernbedienung, ohne Primer/Choke
4. Sicherheitsbügel zum Oberholm herziehen und
festhalten (
5. Starterseil zügig herausziehen und danach langsam wieder aufrollen lassen (
Der Motor hat eine Festgaseinstellung.
Eine Drehzahlregulierung ist nicht möglich.
17) – Sicherheitsbügel rastet nicht ein.
18).
15
Page 16
D
Benzin-Rasenmäher Powerline
Motor ausschalten
Gerät ohne Messerkupplung
1. Gashebel auf Position min stellen
(
12/2)
2. Sicherheitsbügel loslassen (
- Motor schaltet aus.
Achtung schwere Schnittverletzung!
Motor kann nachlaufen. Nach Ausschalten vergewissern, dass Motor steht.
22).
Variogetriebe (Vario Speed) ( Option)
Mit dem Variogetriebe kann die Fahrtgeschwindigkeit des
Rasenmähers stufenlos verändert werden.
Achtung!
Hebel nur bei laufendem Motor betätigen.
Schalten ohne Motorantrieb kann den Antriebsmechanismus beschädigen.
Für höhere Geschwindigkeit den Hebel (
in Richtung ( 20/1) ziehen
Für niedrigere Geschwindigkeit den Hebel (
in Richtung ( 20/2) ziehen
Fahrtgeschwindigkeit immer dem aktuellen Boden- und Rasenzustand anpassen.
20)
20)
Wartung und Pfl ege
Achtung - Verletzungsgefahr!
▪ Vor allen Wartungs- und Pfl egearbeiten immer
Motor abschalten und den Zündkerzenstecker
ziehen.
▪ Motor kann nachlaufen. Nach Ausschalten ver-
gewissern, dass Motor steht.
▪ Bei Wartungs- und Pfl egearbeiten am Schneid-
messer immer Arbeitshandschuhe tragen!
Radantrieb (Option) ( 20)
Achtung!
Getriebe nur bei laufendem Motor zuschalten.
Radantrieb einschalten
1. Getriebeschaltbügel gegen den Oberholm drücken
und festhalten (
nicht ein.
- Radantrieb wird eingeschaltet.
Radantrieb ausschalten
1. Getriebeschaltbügel loslassen (
- Radantrieb wird ausgeschaltet.
16
19) – Getriebeschaltbügel rastet
21).
Grasfangeinrichtung regelmäßig auf Funktion und
Verschleiß prüfen.
Das Gerät nach jedem Gebrauch reinigen
Gerät nicht mit Wasser abspritzen
Eindringendes Wasser kann zu Störungen führen
(Zündanlage, Vergaser)
Schneidmesser regelmäßig auf Beschädigungen
kontrollieren
Defekte Schalldämpfer immer ersetzen
Mäher neigen
Je nach Motorenhersteller muss:
der Vergaser / Luftfi lter nach oben zeigen (
die Zündkerze nach oben zeigen (
Bedienungsanleitung des Motorenherstellers
beachten!
24)
Original-Betriebsanleitung
23)
Page 17
D
Schneidmesser nachschleifen / auswechseln
Stumpfe oder beschädigte Schneidmesser nur bei
einer Servicestelle oder einem autorisierten Fachbetrieb schärfen / erneuern lassen
Nachgeschliffene Schneidmesser müssen ausge-
wuchtet sein
Achtung!
Nicht ausgewuchtete Messer führen zu starken
Vibrationen und beschädigen den Mäher.
Fachmännische Überprüfung ist immer erforderlich:
nach Auffahren auf ein Hindernis
bei plötzlichem Stillstand des Motors
bei Getriebeschaden
bei defektem Keilriemen
bei verbogenem Messer
bei verbogener Motorwelle
Starterbatterie laden (Option)
Die Starterbatterie ist wartungsfrei und
wird im Normalfall vom Mäher geladen.
In Sonderfällen muss die Batterie durch den Benutzer
geladen werden:
Vor der ersten Inbetriebnahme des Mähers
Bei Entladung, vor der Winterpause oder bei län-
geren Standzeiten (> 6 Monate)
Ladevorgang:
1. Ladegerät aus dem Batteriekasten nehmen.
2. Batteriekabel vom Motorkabel trennen (
3. Batteriekabel mit Ladegerätekabel verbinden
26).
(
4. Ladegerät an Stromnetz anschließen.
Die Spannung des Stromnetzes muss mit der
Betriebsspannung des Ladegeräts übereinstimmen.
Die Ladezeit beträgt ca. 36 Stunden.
Nur das mitgelieferte Original-Ladegerät verwenden.
Achtung!
▪ Starterbatterie nur in trockenen, gut gelüfteten
Räumen laden.
▪ Rasenmäher wärend des Ladevorgangs nicht
in Betrieb nehmen.
25).
Motorpfl ege
Motoröl wechseln
1. Zum Auffangen des Öls einen geeigneten Behälter
bereitstellen.
2. Öl über die Öleinfüllöffnung vollständig ablaufen
lassen oder absaugen.
Gebrauchtes Motoröl umweltfreundlich entsorgen!
Wir empfehlen, Altöl in einem geschlossenen
Behälter beim Recycling-Center oder einer
Kundendienststelle abzugeben.
Altöl nicht
▪ in den Abfall geben
▪ in Kanalisation oder Abfl uss schütten
▪ auf die Erde schütten
Luftfi lter wechseln
Hinweise des Motorenherstellers beachten.
Zündkerze wechseln
Hinweise des Motorenherstellers beachten.
Radantrieb (Option)
Bowdenzug einstellen
Lässt sich bei laufendem Motor der Radantrieb nicht
mehr ein- oder ausschalten, muss der entsprechende
Bowdenzug nachgestellt werden.
Achtung!
Bowdenzug nur bei ausgeschaltetem Motor
verstellen.
1. Drehen Sie das Verstellteil am Bowdenzug in
Pfeilrichtung (
2. Zum Prüfen der Einstellung den Motor starten und
den Radantrieb einschalten.
3. Funktioniert der Radantrieb immer noch nicht, muss
der Rasenmäher zu einer Servicestelle oder einem
autorisierten Fachbetrieb gebracht werden.
27).
17
Page 18

D
Benzin-Rasenmäher Powerline
Antriebsritzel ölen
Antriebsritzel auf Getriebewelle von Zeit zu Zeit mit
Sprühöl einölen
Das Getriebe des Radantriebs ist wartungsfrei.
Lagerung
Achtung - Explosionsgefahr!
Gerät nicht bei offenen Flammen oder Hitzequellen lagern.
Motor auskühlen lassen
Zum platzsparenden Aufbewahren den Oberholm
abklappen (
Gerät trocken und unzugänglich für Kinder und un-
befugte Personen lagern
Starterbatterie frostfrei lagern
Starterbatterie von Zeit zu Zeit nachladen
Benzintank entleeren
Zündkerzenstecker ziehen
28)
Reparatur
Reparaturarbeiten dürfen nur Servicestellen und autorisierte Fachbetriebe durchführen.
Entsorgung
Ausgediente Geräte, Batterien oder Akkus
nicht über den Hausmüll entsorgen!
Verpackung, Gerät und Zubehör sind aus recyclingfähigen Materialien hergestellt und entsprechend zu
entsorgen.
EG-Konformitätserklärung
siehe Montageanleitung
Garantie
Etwaige Material- oder Herstellungsfehler am Gerät beseitigen wir während der gesetzlichen Verjährungsfrist
für Mängelansprüche entsprechend unserer Wahl durch Reparatur oder Ersatzlieferung.
Die Verjährungsfrist bestimmt sich jeweils nach dem Recht des Landes, in dem das Gerät gekauft wurde.
Unsere Garantiezusage gilt nur bei: Die Garantie erlischt bei:
Sachgemäßer Behandlung des Gerätes
Beachtung der Bedienungsanleitung
Verwendung von Original-Ersatzteilen
Von der Garantie ausgeschlossen sind:
Lackschäden, die auf normale Abnutzung zurückzuführen sind
Verschleißteile, die auf der Ersatzteilkarte mit Rahmen xxx xxx (x) gekennzeichnet sind
Verbrennungsmotoren – Für diese gelten die separaten Garantiebestimmungen der jeweiligen Motorenhersteller
Im Garantiefall wenden Sie sich bitte mit dieser Garantieerklärung und dem Kaufbeleg an Ihren Händler oder die nächste autorisierte Kundendienststelle. Durch diese Garantiezusage bleiben die gesetzlichen Mängelansprüche des Käufers gegenüber
dem Verkäufer unberührt.
18
Reparaturversuchen am Gerät
Technischen Veränderungen am Gerät
nicht bestimmungsgemäßer Verwendung
(z. B. gewerblicher oder kommunaler Nutzung)
┌──────┐
└──────┘
Original-Betriebsanleitung
Page 19

Hilfe bei Störungen
Achtung!
Messer und Motorwelle dürfen nicht ausgerichtet werden.
Störung Lösung
Motor springt nicht an ▪ Benzin einfüllen
▪ Gashebel auf „Start“ stellen
▪ Choke einschalten
▪ Motorschalterbügel zum Oberholm drücken
▪ Zündkerzen prüfen, eventuell erneuern
▪ Luftfi lter reinigen
▪ Mähmesser frei drehen
▪ Starterbatterie nachladen
▪ Auf gemähter Fläche starten
Motorleistung lässt nach ▪ Schnitthöhe korrigieren
▪ Mähmesser nachschleifen / erneuern
▪ Auswurfkanal/Gehäuse reinigen
▪ Luftfi lter reinigen
▪ Arbeitsgeschwindigkeit verringern
Unsauberer Schnitt ▪ Mähmesser nachschleifen / erneuern
▪ Schnitthöhe korrigieren
Grasfangbox füllt nicht ausreichend
Radantrieb funktioniert nicht ▪ Bowdenzug nachstellen
Räder drehen bei eingeschaltetem Getriebe nicht
Gerät vibriert außergewöhnlich stark
▪ Schnitthöhe korrigieren
▪ Rasen abtrocknen lassen
▪ Mähmesser nachschleifen / erneuern
▪ Gitter der Grasfangbox säubern
▪ Auswurfkanal/Gehäuse reinigen
▪ Keilriemen defekt
▪ Kundendienst-Werkstatt aufsuchen
▪ Schmutz in Radantrieb, Zahnriemen und Getriebe entfernen
▪ Freiläufe (Antriebsritzel auf Getriebewelle) mit Sprühöl ölen
▪ Radschrauben nachziehen
▪ Radnabe defekt
▪ Keilriemen defekt
▪ Kundendienst-Werkstatt aufsuchen
▪ Mähmesser überprüfen
D
Bei Störungen, die nicht in dieser Tabelle aufgeführt sind oder die Sie nicht selbst beheben können, wenden Sie
sich bitte an unseren zuständigen Kundendienst
19
Page 20
GB
S
The camera symbol refers to illustrations
Petrol lawnmower
About this handbook
Read through these operating instructions before
starting up the machine. This is a prerequisite for
safe and trouble-free working. Before use, familiar-
ize yourself with the control elements and the cor-
rect use of the machine.
You should save these instructions, and also pass
them on to any subsequent users.
Observe the safety and warning signs on the
machine.
Pictogram description
Caution!
Strict following of these warning alerts can
prevent injury to persons and/or materials.
Special information for better understanding and
handling.
The camera symbol refers to illustrations
Contents
About this handbook .................................................... 20
Product description ...................................................... 20
Safety and protection devices .....................................20
Safety instructions ....................................................... 22
Assembly ..................................................................... 23
Fuelling ........................................................................ 23
Initial startup ................................................................ 24
Maintenance and care ................................................. 28
Repairs ........................................................................ 29
Storage ........................................................................ 29
Disposal ....................................................................... 29
EC declaration of conformity .......................................29
Faults and remedies .................................................... 30
Warranty ...................................................................... 31
Product description
This document describes various models of petrol
lawnmowers. Some models are equipped with a grass
catcher and/or are suitable for mulching.
Please identify your particular model in the product
illustrations and descriptions of the various options.
Proper use
This equipment is intended for moving lawns on private
property and should be used on dry grass only.
Use for any other purpose is considered improper use.
Incorrect use
This lawnmower is not suitable for use in public
spaces, parks, sports grounds, farming or forestry
Safety devices must not be removed or bypassed
Do not use the equipment on damp grass, or if it is
raining
The equipment is intended for domestic use only
Safety and protection devices
Caution - Risk of injury!
Safety/protection devices should not be disabled!
Safety brake handle
The lawnmower is equipped with a safety brake.
Release the brake handle if there is an immediate
danger.
Mower blade is stopped
Motor is stopped
Defl ector plate
The defl ector plate provides protection against any
projectiles thrown up.
20
Translation of original user instructions
Page 21

GB
2
11
1 Starter cable 9 Cutting height adjustment*
2 Start, stop* 11 Vario transmission*
3 Wheel drive* 12 Operating instructions
4 Safety brake handle 13 Outlet shaft insert*
5 Ergonomic height adjustment* 14 Cover fl ap*
6 Fill level indicator* 15 Mulch kit*
7Defl ector plate* 16 Ignition switch for electric start
8 Grass catcher*
16
2
Symbols on the device
Caution!
Be particularly careful when handling.
Before initial startup read the instructions for use!
Keep other people out of the danger area!
Keep hands and feet away from the cutting gear!
Keep away from the danger area.
Remove the spark plug connector before
working on the cutting gear.
21
Page 22
GB
Check the lawnmower for damage, and carry out
the necessary repairs before restarting or using
the lawnmower again.
Additional symbols on lawnmowers with
Electrostart
Caution! Risk of electric shock.
Keep the connection line away from the mower
blades.
If the cable is damaged, or when carrying out
maintenance work, always disconnect the
equipment from the mains supply.
Safety instructions
Caution!
Use the equipment only if it is in correct operating
condition!
Caution - Risk of injury!
Safety/protection devices should not be disabled!
Caution - risk of fi re!
After fuelling, do not store the machine in
buildings where the petrol fumes might come into
contact with naked fl ames or sparks!
Keep the area around the motor, exhaust, battery
case, and fuel tank clear of grass cuttings, petrol
and oil.
Keep other people out of the danger area
The machine operator or user is responsible for any
accidents affecting other people or their property
Children, or any persons who have not read these
operating instructions, should not be allowed to use
this machine
Follow the local regulations regarding the minimum
age for operators of this type of machine
Do not use the equipment if under the infl uence of
alcohol, drugs or medication
Wear appropriate work clothes
Long trousers
Hard, non-slip shoes
Hearing protection
If working on slopes
always make sure you are positioned securely
always work across the slope, never upward
or downward
Petrol lawnmower
do not work on slopes where the gradient is
greater than 20°
Take particular care when turning
Only use the lawnmower if there is suffi cient
daylight or artifi cial lighting
Keep the body, limbs and clothing away from the
cutting gear
Follow the hours of use regulations applying in the
country concerned
Do not leave the equipment unattended when ready
to operate
Only use the lawnmower if the mower blade is sharp
Do not operate the equipment if the safety devices /
protective grilles are damaged
Never operate the equipment if the safety devices
are not fully assembled (e.g. defl ector plate, grass
catching devices)
Before each use, check the equipment for damage;
replace any damaged parts before using again
Switch off the motor, wait for the equipment to
come to a standstill, then pull out the spark plug
connector
if leaving the equipment unattended
if a fault has occurred
before clearing blockages
before removing obstructions
if the lawnmower has run into foreign objects
if malfunctions or unusual vibrations occur on
the machine
Check the lawnmower for damage, and carry out
the necessary repairs before restarting or using
the lawnmower again.
Insert the spark plug connector and start the motor
after correcting the fault (see Faults table) and
checking the equipment
after cleaning the equipment
Carefully check the ground to be mowed, and
remove any foreign objects
Take particular care when turning the lawnmower
around, or if pulling it towards you
Do not mow over obstacles
(such as branches, tree roots)
22
Translation of original user instructions
Page 23
Remove cuttings only when the motor has stopped
Used oil should not be:
disposed of with domestic rubbish
poured into the sewage system, drains, or
onto the ground
Switch off the motor / mower blade when passing
over areas other than those that have to be mowed
Never lift or carry the equipment while the motor is
running
Do not eat or drink when topping up the petrol or
motor oil
Do not inhale the petrol fumes
Move the machine at walking speed
Before use, ensure that all nuts, screws and bolts
are securely fastened.
Assembly
Follow the accompanying assembly instructions.
Caution!
The equipment can be used only after complete
assembly.
Fuelling
Fill the lawnmower with fuel before the initial startup.
Warning - risk of fi re!
Petrol and oil are highly infl ammable!
Always observe the operating instructions supplied by the motor manufacturer.
Operating fl uids
Petrol Motor oil
Grade
Filling
capacity
Regular petrol /
unleaded
Refer to the motor
manufacturer's
instructions
Safety
Warning!
Never leave a motor running in an enclosed
space. Toxic hazard!
Refer to the motor
manufacturer's
instructions
about 0.6 l
GB
Store petrol and oil only in containers intended for
this purpose
Only add or drain oil in the open air, and when the
motor has cooled down
Do not add petrol or oil while the motor is running
Do not overfi ll the tank (petrol expands)
Do not smoke when refuelling
Do not open the tank lock when the motor is
running or when hot
Replace the tank or tank lock if damaged
Always close the tank cap fi rmly
If petrol has been spilt:
Do not start the motor
Do not start the equipment
Clean the equipment
If motor oil has been spilled:
Do not start the motor
Soak up the spilled oil with an oil binding agent
and dispose of appropriately
Clean the equipment
Used oil should not be:
disposed of with domestic rubbish
poured into the sewage system, drains, or
onto the ground
We recommend to collect the used oil in a closed
container and to deliver it to a suitable recycling or
service station.
Adding petrol
1. Unscrew the tank cap, and keep in a clean place.
2. Pour in petrol using a funnel.
3. Firmly replace the cap on the fi ller opening and
clean it.
Adding motor oil
1. Unscrew the fi ller cap, and keep in a clean place.
2. Pour in oil using a funnel.
3. Firmly replace the cap on the fi ller opening and
clean it.
23
Page 24
GB
Initial startup
Caution!
The equipment should not be used if the cutting
gear and/or fastenings are loose, damaged or
worn.
Carry out a visual inspection before each startup.
Petrol lawnmower
The camera symbol on the following page refers
to the illustrations on Page 4–7.
Adjusting the cutting height
Caution - Risk of injury!
Adjust the cutting height only with the motor
switched off and when the mower blade has
come to a standstill.
▪ Always set all the wheels to the same cutting
height.
▪ Cutting height adjustment depends on the
particular model.
Central adjustment (
1. To release the lever, press to the side and hold.
2. Push the lever to the left or right to select the
desired cutting height.
3. Let the lever click into position.
4. Check that all wheels are set to the same position.
2)
Mowing with the grass catcher
Caution - Risk of injury!
Attach/detach the grass catcher only when the
motor is switched off and the mower blade has
come to a standstill.
1. Lift the defl ector plate and insert the grass catcher
in the holders (
6).
Fill level indicator
The fi ll level indicator is pushed upward by the air fl ow
when mowing (
If the grass catcher is full, the indicator points to the box
5b). The grass catcher must be emptied.
(
5a).
Emptying the grass catcher
1. Lift the defl ector plate.
2. Unhook the grass catcher and pull backward to
remove (
3. Empty the grass catcher.
4. Lift the defl ector plate and insert the grass catcher
in the holders (
6).
6).
Mowing without the grass catcher
Caution!
Only work without the grass catcher if the
defl ector plate torsion spring is working correctly.
The defl ector plate is held to the mower housing by
spring force. This causes the mowed grass to be thrown
backward and downward.
24
Translation of original user instructions
Page 25
GB
Mulching with the mulch kit (optional)
When mulching, the grass cuttings are not collected, but
are left on the lawn. The grass mulch prevents the soil
from drying out, and supplies it with nutrients.
The best results are obtained by cutting back regularly
by about 2 cm. Only young grass with a soft leaf texture
decomposes quickly.
Grass height before mulching: 8 cm maximum
Grass height after mulching: 4 cm minimum
Adapt your walking pace to the mulching process,
do not walk too fast.
Inserting the mulch kit
Caution - Risk of injury!
Insert/remove the mulch kit only with the motor
switched off and when the mower blade has come
to a standstill.
1. Remove the grass catcher (
2. Lift the defl ector plate and insert the mulch kit in the
outlet shaft (
It must lock into place.
If the mulch kit is not locked into position, both the
mulch kit and the mower blade may be damaged.
Removing the mulch kit
1. Lift the defl ector plate.
2. Release the lock on the mulch kit (
3. Pull out the mulch kit (
7).
6).
8/1).
8/2).
Mowing with the side outlet duct (optional)
Caution - risk of injury!
Attach/detach the side outlet only when the motor
is switched off and the mower blade has come to
a standstill.
Inserting the side outlet
1. Remove the grass catcher and insert the mulch kit.
2. Fold up the side outlet cover and hold it (
3. Insert the side outlet duct (
4. Slowly close the cover.
The cover holds the side outlet duct and prevents
it falling out.
Removing the side outlet
1. Fold up the side outlet cover and hold it (
2. Remove the side outlet and close the cover
(
9/2).
9/2).
9/1).
9/1).
Setting the handle height (optional)
Clamp adjustment
1. Hold the bar and loosen both clamps (
2. Move the bar to the desired position
3. Lock the clamps.
10).
25
Page 26
GB
Starting the motor
Caution - risk of poisoning!
Never leave a motor running in an enclosed
space.
Caution - Risk of injury!
Do not tilt the lawnmower while starting.
Petrol lawnmower
2. Pull in the safety brake handle on the handlebar and
hold it (
3. Pull out the starter cord sharply, then allow it to
slowly rewind (
4. When the motor has warmed up (about 15–20
seconds), set the throttle lever to a position
between min and max.
16) - the brake handle does not lock.
17).
▪ Start the motor only when the blade is mounted
(the blade acts as a fl ywheel mass)
▪ If starting the motor when hot do NOT use the
choke or primer button
▪ Do not change the motor controller settings
Do not start the equipment if the outlet shaft is not
covered by one of the following parts:
Grass catcher
Defl ector plate
Mulch kit
Be particularly careful when operating the starter
switch - follow the manufacturer's instructions
Keep your feet at a safe distance from the cutting
gear
Start the lawnmower where the grass is shorter
Starting manually
with remote throttle control, with choke
1. Set the throttle lever to position max
(
11/1).
2. Pull in the safety brake handle on the handlebar and
hold it (
3. Pull out the starter cord sharply, then allow it to
slowly rewind (
4. When the motor has warmed up (about 15–20
seconds), set the throttle lever to a position
between min and max.
16) – the brake handle does not lock.
17).
with remote throttle control, with primer (
1. Set the throttle lever to position max (
2. Press the primer button 3 times at intervals of about
2 seconds (
10 °C, press the primer button 5 times.
3. Pull in the safety brake handle on the handlebar and
hold it (
4. Pull out the starter cord sharply, then allow it to
slowly rewind (
5. As soon as the motor starts running, set the throttle
lever for the desired motor rpm, at a position
between min and max.
15). If the temperature is below
16) - the brake handle does not lock.
17).
16)
12/1).
Starting manually
without remote throttle control, with choke
Choke
On Off
1. Set the choke at position 1 ( 13/1).
2. Pull in the safety brake handle on the handlebar and
17) – the brake handle does not lock.
hold it (
3. Pull out the starter cord sharply, then allow it to
slowly rewind (
4. When the motor has warmed up (about 15–20
seconds), set the choke to position 2 (
18).
13/2).
with remote throttle control, without primer/choke
1. Set the throttle lever to position max (
26
12/1).
Motor speed (rpm value) is fi xed.
Motor speed cannot be adjusted.
Translation of original user instructions
Page 27
GB
without remote throttle control, with primer (
1. Press the primer button 3 times at intervals of about
2 seconds (
10 °C, press the primer button 5 times.
2. Pull in the safety brake handle on the handlebar and
hold it (
1. Pull out the starter cord sharply, then allow it to
slowly rewind (
Motor speed (rpm value) is fi xed.
Motor speed cannot be adjusted.
without remote throttle control, without primer/
choke
2. Pull in the safety brake handle on the handlebar and
hold it (
3. Pull out the starter cord sharply, then allow it to
slowly rewind (
Motor speed (rpm value) is fi xed.
Motor speed cannot be adjusted.
16). If the temperature is below
17) – the brake handle does not lock.
18).
17) – the brake handle does not lock.
18).
16)
Turn the motor off
Lawnmower without blade coupling
1. Set the throttle lever to position min (
2. Release the safety brake handle (
- The motor is switched off.
Caution - danger of serious cut injuries!
The motor may continue running. After switching
off, make sure the motor has stopped turning.
12/2).
22).
Wheel drive (optional) ( 20)
Caution!
Engage the transmission only when the motor is
running.
Switching on the wheel drive
1. Press the transmission control handle against the
handlebar and hold it (
control handle does not lock.
- The wheel drive is switched on.
Switching off the wheel drive
19) – the transmission
Electrostart without primer/choke ( 13)
1. Set the throttle lever to the "START" position
13/1).
(
2. Pull in the safety brake handle on the handlebar and
hold it (
3. Turn the ignition key fully to the right in the ignition
lock (
4. As soon as the motor starts running, release the
ignition key (it returns automatically to position "0").
5. According to the desired motor speed, set the
throttle lever to a position between min and
max.
16) – the brake handle does not lock.
18).
1. Release the transmission control handle (
- The wheel drive is switched off.
21).
Vario transmission (Vario Speed) (optional)
The Vario transmission allows continuous variation of the
ground speed of the lawnmower.
Caution!
Operate the lever only when the motor is running.
Operating the lever without the motor drive may
damage the drive mechanism.
To increase the speed, pull the lever (
towards ( 20/2)
To lower the speed, pull the lever (
( 20/1)
Always adjust the ground speed to suit the current
ground and lawn conditions.
20)
20) towards
27
Page 28

GB
Petrol lawnmower
Maintenance and care
Caution - Risk of injury!
▪ Before carrying our any care or maintenance
work, always switch off the motor and pull out
the spark plug connector.
▪ The motor may continue running. After switching
off, make sure the motor has stopped turning.
▪ Always wear working gloves when carrying out
maintenance or repair work.
Check the grass catcher regularly for wear, and to
ensure it is working correctly
Clean the equipment after each use
Do not wash the equipment by hosing or spraying
with water
Water infi ltration can cause faults (in the ignition
system, carburettor)
Check the mower blade regularly for damage
Always replace the muffl er if faulty
Tilting the lawnmower
Depending on the motor manufacturer:
the carburettor / air fi lter must be facing upward
23)
(
the spark plug must be facing upward (
Follow the operating instructions of the motor
manufacturer!
24)
Charging the starter battery (optional)
The starter battery is maintenance-free and is normally
charged by the lawnmower.
In certain cases, however, the battery will need to be
charged by the user:
Before the initial start-up of the lawnmower
If discharged, before the winter season, or if left
unused for long periods (> 6 months)
Charging procedure:
1. Take the battery charger out of the battery box.
2. Disconnect the battery cable from the motor cable
25).
(
3. Connect the battery cable with the charger cable
26).
(
4. Connect the charger to the mains supply.
The mains voltage must match the operating
voltage of the charger.
The required charging time is about 36 hours.
Use only the original battery charger supplied.
Caution!
▪ Charge the starter battery only in dry, well-
ventilated rooms.
▪ Do not start up the lawnmower while the battery
is charging.
Care of the motor
Changing the motor oil
Resharpening/replacing the mower blade
Blunt or damaged blades should be
resharpened / replaced only at a service point or by
an authorised specialist
Resharpened blades must be rebalanced
Caution!
Blades that have not been rebalanced can cause
serious vibrations, and may result in damage to
the lawnmower.
28
1. Have a suitable container ready to collect the used
oil.
2. Drain or suction off all the oil through the oil fi ller
opening.
Dispose of used motor oil in a manner that is
compatible with the environment!
We recommend to collect the used oil in a closed
container and to deliver it to a suitable recycling
or service station.
Used oil should not be
▪ disposed of with domestic rubbish
▪ poured into the sewage system or drains
▪ poured out onto the ground
Translation of original user instructions
Page 29
GB
Changing the air fi lter
Follow the instructions of the manufacturer of the
motor.
Changing the spark plug
Follow the instructions of the manufacturer of the
motor.
Wheel drive (optional)
Adjusting the Bowden cable
If the wheel drive can no longer be switched on or off
while the motor- is running, the related Bowden cable
needs to be adjusted.
Caution!
Adjust the Bowden cable only when the motor is
switched off.
1. Turn the adjuster on the Bowden cable in the
direction of the arrow (
2. To test the cable setting, switch on the motor and
switch on the wheel drive.
3. If the wheel drive is still not working, the lawnmower
must be taken to a service point or an authorised
specialist.
27).
Lubricating the drive pinion
From time to time, lubricate the drive pinion on the
transmission shaft
The wheel drive gearing is maintenance free.
Storage
Caution - risk of explosion!
Do not store the equipment where there are
naked fl ames or heat sources.
Allow the motor to cool down
To save storage space, fold the handlebar down
(
28)
Store the equipment in an area which is kept dry,
and which cannot be accessed by children or
unauthorised persons
Store the starter battery where it will be protected
from frost
Recharge the starter battery from time to time
Drain the fuel tank
Pull out the spark plug connector
Disposal
Do not dispose of old equipment,
batteries or accumulators as household
waste!
Machine, packaging, and accessories were made
with recyclable materials, and should be disposed of
accordingly.
Always have the equipment checked out by a pro-
fessional in the following cases:
after bumping against an obstacle
if the motor stops suddenly
if there is damage to the transmission
if the V-belt is faulty
if the blade is bent
if there is warping of the motor shaft
Repairs
Repairs should be carried out only by a service point or
an authorised specialist.
EC declaration of conformity
see assembly instructions
29
Page 30

GB
Faults and remedies
Caution!
The motor shaft and mower blade should not be aligned.
Fault Solution
The motor does not start ▪ Add petrol
▪ Set throttle lever to "Start"
▪ Switch on the choke
▪ Press the motor switch at the handlebar
▪ Check the spark plugs and replace if necessary.
▪ Clean the air fi lter.
▪ Spin the mower blade
▪ Recharge the starter battery
▪ Start on a surface already mowed
Motor power reduced ▪ Adjust the cutting height
▪ Resharpen / replace the mower blade
▪ Clean the outlet shaft/housing
▪ Clean the air fi lter.
▪ Reduce the working speed
Lawnmower cuts unevenly ▪ Resharpen/replace the mower blade
▪ Adjust the cutting height
Grass catcher does not fi ll
suffi ciently
Wheel drive does not work ▪ Adjust the Bowden cable
Wheels do not turn when the
transmission is switched on
Unusually strong vibrations in
the lawnmower
▪ Adjust the cutting height
▪ Allow the lawn to dry
▪ Resharpen/replace the mower blade
▪ Clear the grille on the grass catcher
▪ Clean the outlet shaft/housing
▪ V-belt faulty
▪ Contact the service-workshop
▪ Clean any dirt away from the wheel drive, toothed belt and gearing
▪ Lubricate the freewheels (drive pinion on drive shaft) with spray oil
▪ Retighten the wheel bolts
▪ Wheel hub faulty
▪ V-belt faulty
▪ Contact the service-workshop
▪ Check the mower blade
Petrol lawnmower
For faults not listed in this table, or which you cannot resolve by yourself, please contact our customer service.
30
Translation of original user instructions
Page 31

Warranty
If any material or manufacturing defects are found during the statutory customer protection period, we will either
repair or replace the equipment, whichever we consider the more appropriate. This statutory period may vary
according to the legislation in force in the country where the equipment was purchased.
Our warranty is valid only if: The warranty is no longer valid if:
The equipment has been used properly
The operating instructions have been followed
Genuine replacement parts have been used
The following are not covered by warranty:
The equipment has been tampered with
Technical modifi cations have been made
The equipment was not used for its intended purpose
(for example, used for commercial or communal
applications)
GB
Paint damage due to normal wear
Wear parts identifi ed by a border XXX XXX (X) on the spare parts list
Combustion motors – these are covered by a separate warranty from the manufacturer concerned
To make a claim under warranty, please take this statement of warranty and proof of purchase to the nearest
authorised customer service centre. This warranty does not affect the usual statutory rights of the customer relative to
the seller.
┌──────┐
└──────┘
31
Page 32

NL
Benzinegrasmaaier
Over dit handboek
Lees voor de ingebruikname eerst deze
documentatie volledig door. Dit is een voorwaarde
voor veilig werken en een storingsvrij gebruik. Maak
u voor het gebruik vertrouwd met de bedieningselementen en de functies van de machine.
U moet de veiligheidsinstructies en
waarschuwingen die in dit document en op het
apparaat vermeld staan opvolgen.
Bewaar de bedieningshandleiding voor het gebruik
en geef deze ook door aan toekomstige gebruikers.
Legenda
Let op!
Nauwkeurig opvolgen van de
waarschuwingsinstructies kan schade aan
personen en zaken voorkomen.
Speciale instructies voor een beter begrip en een
goed gebruik.
Het camerasymbool verwijst naar afbeeldingen.
Inhoudsopgave
Over dit handboek ....................................................... 32
Productbeschrijving ..................................................... 32
Veiligheidsinrichtingen en beschermende componenten
32
Veiligheidsinstructies ................................................... 34
Montage ....................................................................... 35
Tanken ......................................................................... 35
Ingebruikname ............................................................. 36
Elektrische starten (optie) ............................................ 39
Onderhoud en reiniging ............................................... 40
Opslag ......................................................................... 41
Reparaties ................................................................... 41
Afvoer .......................................................................... 41
Hulp bij storingen ......................................................... 42
Garantie ....................................................................... 43
EG-conformiteitsverklaring .......................................... 43
Productbeschrijving
In deze documentatie worden verschillende modellen
benzinegrasmaaiers beschreven. Enkele modellen zijn
uitgerust met een grasopvangbox en/of zijn bovendien
geschikt voor mulchen.
Identifi ceer uw model aan de hand van de productfoto's
en de beschrijving van de verschillende opties.
Gebruik volgens bestemming
Dit apparaat is bestemd voor het maaien van gras in
privégebruik en mag niet enkel op droog gazon worden
ingezet.
Een ander of verdergaand gebruik geldt niet als gebruik
volgens bestemming.
Mogelijk verkeerd gebruik
Deze grasmaaier is niet geschikt voor gebruik in
openbare plantsoenen, parken en sportvelden of
voor land- en bosbouw
Veiligheidsinrichtingen mogen niet worden
gedemonteerd of overbrugd
Het apparaat niet gebruiken bij regen of op een nat
gazon
Het apparaat mag niet professioneel worden
toegepast
Veiligheidsinrichtingen en beschermende
componenten
Let op! - Gevaar voor letsel!
Veiligheidsinrichtingen en beschermende
componenten mogen niet buiten werking worden
gesteld!
Veiligheidsbeugel
Het apparaat is uitgerust met een veiligheidsbeugel. Bij
gevaar moet de veiligheidsbeugel worden losgelaten.
mes wordt gestopt
motor wordt gestopt
32
Vertaling van de originele gebruikershandleiding
Page 33

Veiligheidsklep
De veiligheidsklep beschermt tegen het eruit vliegen van de onderdelen.
NL
11
2
16
2
1 Startkabel 9 Snijhoogteverstelling*
2 Start, stop* 11 Varioaandrijving*
3 Wielaandrijving* 12 Gebruikshandleiding
4 Veiligheidsbeugel 13 Uitwerpinzet*
5 Ergonomische hoogteverstelling* 14 Sluitklep*
6 Vulstandindicatie* 15 Mulchkit*
7 Veiligheidsklep* 16 Zünschloss voor elektrische start
8 Grasopvangbox*
Symbolen op het apparaat
Let op!
Voorzichtig handelen bij gebruik.
Vóór de ingebruikname gebruiksaanwijzing lezen!
Derden buiten het gevarenbereik houden!
Handen en voeten bij messen vandaan houden
Afstand houden van het gevarenbereik.
Voordat u werkzaamheden gaat
uitvoeren aan het snijmechanisme, eerst
de bougiedop uittrekken.
33
Page 34

NL
Zoeken naar beschadigingen aan de grasmaaier
en de vereiste reparaties uitvoeren, voordat u de
grasmaaier opnieuw start en er mee gaat werken.
Extra symbolen bij apparaten met elektrische start
Let op! Gevaar door elektrische schok.
Aansluitleiding uit de buurt houden van het
mes.
Apparaat voor onderhoudswerkzaamheden of
bij beschadigde kabel altijd van het stroomnet
halen.
Veiligheidsinstructies
Let op!
Apparaat alleen in een technisch perfecte staat
gebruiken!
Let op! - Gevaar voor letsel!
Veiligheidsinrichtingen en beschermende
componenten mogen niet buiten werking worden
gesteld!
Let op! - Brandgevaar!
Machines met volle tank niet in gebouwen
opbergen, waarin benzinedampen met open vuur
of vonken in aanraking kunnen komen!
Bereik rondom de motor, uitlaat, accuhuis,
brandstoftank vrij van maaigoed, benzine en olie
houden.
Derden buiten de gevarenzone houden
De machinebestuurder of gebruiker is
verantwoordelijk voor ongevallen met andere
personen of hun eigendommen
Kinderen of andere personen die de
gebruikshandleiding niet kennen mogen het
apparaat niet gebruiken
Lokale voorschriften over de miniumleeftijd voor
een bediener in acht nemen
Het apparaat niet bedienen onder invloed van
alcohol, drugs of medicijnen
Doelmatige werkkleding dragen
lange broek
stevige en niet glijdende schoenen
gehoorbescherming
Bij het werken op hellingen
altijd opletten dat u stabiel staat
altijd dwars ten opzichte van de helling
maaken, nooit omhoog of omlaag
Benzinegrasmaaier
niet maaien op helling van meer dan 20
Wees zeer voorzichtig bij het keren
Enkel bij voldoende daglicht of kunstmatige
verlichting werken
Lichaam, ledematen en kleding uit de buurt van het
mes houden
Landspecifi eke voorschriften voor de tijd van het
gebruik in acht nemen
Gebruiksklaar apparaat niet onbeheerd laten
Enkel met scherp mes maaien
Apparaat nooit gebruiken met beschadigde
veiligheidsinrichtingen / veiligheidsroosters
Apparaat nooit zonder volledig gemonteerde
veiligheidsinrichtingen gebruiken (bijv.:
veiligheidsklep, grasopvangvoorzieningen)
Apparaat voor ieder gebruik controleren op
beschadigingen, voordat u het apparaat weer in
gebruik neemt de beschadigde onderdelen laten
vervangen
Motor uitzetten, wachten tot het apparaat stilstaat
en bougiedop uittrekken
als u het apparaat verlaat
na het optreden van storingen
voor het ontgrendelen van blokkeringen
voor het verwijderen van verstoppingen
na het contact met vreemde voorwerpen
Als storingen en ongewoonlijke trillingen in het
apparaat optreden
Zoeken naar beschadigingen aan de grasmaaier
en de vereiste reparaties uitvoeren, voordat u de
grasmaaier opnieuw start en er mee gaat werken.
Bougiedop opsteken en motor starten
na het verhelpen van storingen (zie tabel met
storingen) en controle van het apparaat
na het reinigen van het apparaat
Het grasvlak dat moet worden gemaaid volledig en
nauwkeurig controleren, alle vreemde voorwerpen
verwijderen
Bijzonder goed opletten bij het omkeren van de
grasmaaier of wanneer u de grasmaaier naar u
toetrekt
Niet over hindernissen maaien (bijv. takken,
boomwortels)
Snijdsel enkel verwijderen bij stilstaande motor
34
Vertaling van de originele gebruikershandleiding
Page 35

Motor / mes uitschakelen, wanneer er over een
Oude olie mag u
niet bij het afval voegen
in de riolering, de afvoer of op de grond
uitgieten
ander vlak dan het te maaien grasvlak moet worden
gereden
Apparaat nooit bij draaiende motor optillen of
dragen
Bij het vullen met benzine of motorolie niet eten of
drinken
Benzinedampen niet inademen
Beweeg het apparaat stapvoets voort.
Controleer voor het gebruik of alle moeren, schroe-
ven en bouten vastzitten
Montage
Meegeleverde montagehandleiding in acht nemen.
Let op!
Het apparaat mag pas na volledig te zijn
gemonteerd gebruikt worden.
Tanken
Voor de ingebruikname moet u de grasmaaier voltanken.
Waarschuwing - Brandgevaar!
Benzine en olie zijn zeer licht ontvlambaar!
Steeds de bijgeleverde gebruiksaanwijzing van
de motorfabrikant in acht nemen.
Verbruiksstoffen
NL
Benzine en olie enkel in daarvoor bestemde
reservoirs bewaren
Benzine en olie enkel bij koude motor en buiten
vullen of aftappen
Bij draaiende motor geen benzine of olie vullen
Tank niet te vol vullen (benzine zet uit)
Tijdens het tanken niet roken
De tankdop niet bij draaiende of warme motor
openen
Beschadigde tank of tankdop vervangen
Tankdop altijd stevig vastdraaien
Als er benzine gemorst is:
Motor niet starten
Startpogingen vermijden
Apparaat reinigen
Als er motorolie gemorst is:
Motor niet starten
Uitgestroomde motorolie met oliebindmiddel of
een lap opzuigen en juiste wijze afvoeren
Apparaat reinigen
Oude olie mag u
niet bij het afval voegen
in de riolering, de afvoer of op de grond
uitgieten
Wij adviseren u om de afgewerkte olie in een gesloten
tankje af te geven bij het recyclingcentrum of bij een
klantenservice locatie.
Benzine Motorolie
Soort
Vulhoeveelheid
normale
benzine /
loodvrij
zie de
aanwijzingen
van de
motorfabrikant
Veiligheid
Waarschuwing!
Motor niet in afgesloten ruimten laten lopen.
Vergiftigingsgevaar!
zie de
aanwijzingen
van de
motorfabrikant
ca. 0,6 l
Benzine vullen
1. Tankdop afschroeven, op een schone plek leggen.
2. Benzine met een trechter vullen.
3. Vulopening van de tank stevig sluiten en reinigen.
Motorolie vullen
1. Olievuldop afschroeven, dop op een schone plek
leggen.
2. Olie met een trechter vullen.
3. Olievulopening stevig sluiten en reinigen.
35
Page 36

NL
Ingebruikname
Let op!
Met een loszittend, of versleten snijmechanisme,
en/of loszittende onderdelen, mag het apparaat
niet gebruikt worden!
Voor iedere ingebruikname moet u een visuele
controle uitvoeren.
Het camerasymbool op de volgens pagina's wijst
op de afbeeldingen op pagina 4–7.
Snijhoogte instellen
Let op! - Gevaar voor letsel!
Snijhoogte enkel bij uitgeschakelde motor en
stilstaand mes verstellen.
▪ Altijd alle wielen op dezelfde snijhoogte instellen.
▪ Snijhoogteverstelling is afhankelijk van het
model.
Centrale verstelling (
1. Hendel voor de ontgrendeling opzij duwen en
vasthouden.
2. Hendel naar links of rechts naar de gewenste
snijhoogte schuiven.
3. Hendel laten vergrendelen.
4. Op gelijke vergrendelpositie bij alle wielen letten.
2)
Benzinegrasmaaier
Maaien met grasopvangbox
Let op! - Gevaar voor letsel!
Grasopvangbox enkel bij uitgeschakelde motor
en stilstaand mes verwijderen of monteren.
1. Veiligheidsklep optillen en grasopvangbox in de
houders hangen (
6).
Vulstandindicatie
De vulstandindicatie wordt door de luchtstroom tijdens
het maaien omhoog geduwd (
Wanneer de grasopvangbox vol is, ligt de vulstandindicatie
tegen de box (
geleegd.
5b). De grasopvangbox moet worden
5a).
Grasopvangbox leegmaken
1. Veiligheidsklep optillen.
2. Grasopvangbox eruit hangen en naar achteren toe
verwijderen (
3. Grasopvangbox leegmaken.
4. Veiligheidsklep optillen en grasopvangbox weer in
de houders hangen (
6).
6).
Maaien zonder grasopvangbox
Let op!
Enkel bij goed werkende draaiveer van de
veiligheidsklep zonder grasopvangbox maaien.
De veiligheidsklep ligt met veerkracht tegen de
behuizing van de grasmaaier. Het gemaaide gras wordt
zo naar achteren uitgeworpen.
36
Vertaling van de originele gebruikershandleiding
Page 37

Mulchen met mulchkit (optie)
Bij het mulchen wordt het snijdsel niet opgevangen,
maar blijft liggen op het gazon. De mulchlaag beschermt
de bodem tegen uitdrogen en verzorgt deze met
voedingsstoffen.
De beste resultaten worden bereikt wanneer regelmatig
ca. 2 cm wordt teruggesneden. Enkel jong gras met
zachte bladeren verrotten snel.
Grashoogte vóór het mulchen: maximaal 8 cm
Grashoogte na het mulchen: minimaal 4 cm
Stapsnelheid aanpassen aan het mulchen, niet te
snel gaan.
Mulchkit inzetten
Let op! - Gevaar voor letsel!
Mulchkit enkel bij uitgeschakelde motor en
stilstaand mes inzetten of verwijderen.
1. Grasopvangbox afnemen (
2. Veiligheidsklep optillen en mulchkit in de
uitwerpschacht plaatsen (
Vergrendeling moet vastklikken.
6).
7).
NL
2. Afdekking voor zijuitworp openklappen en
vasthouden (
3. Zijuitwerpkanaal inzetten (
4. Afdekking langzaam sluiten.
De afdekking beveiligt het zijuitwerpkanaal tegen
eruit vallen.
Zijuitworp verwijderen
1. Afdekking voor zijuitworp openklappen en
vasthouden (
2. Zijuitworp verwijderen en afdekking sluiten
(
9/2).
Greephoogte instellen (optie)
Klemverstelling
1. Beugel vasthouden en beide klemmen losmaken
(
10).
2. Beugel in de gewenste positie zetten.
3. Klemmen sluiten.
9/1).
9/2).
9/1).
Wanneer de mulchkit niet vastklikt, kunnen
mulchkit en mes worden beschadigd.
Mulchkit verwijderen
1. Veiligheidsklep optillen.
2. Vergrendeling aan mulchkit losmaken (
3. Mulchkit eruit trekken (
8/2).
8/1).
Maaien met zijuitworp (optie)
Let op! - Gevaar voor letsel!
Zijuitworp enkel bij uitgeschakelde motor en
stilstaand mes verwijderen of monteren.
Zijuitworp inzetten
1. Grasopvangbox verwijderen en mulchkit erin zetten.
37
Page 38

NL
Benzinegrasmaaier
Motor starten
Let op! - Vergiftigingsgevaar!
Motor niet in afgesloten ruimten laten lopen.
Let op! - Gevaar voor letsel!
Apparaat tijdens het starten niet kantelen.
▪ Motor enkel starten als het mes is gemonteerd
(mes dient als rotatiemassa)
▪ Bij het starten van de warme motor choke of
primerknop NIET gebruiken
▪ Regelaarinstellingen aan de motor niet wijzigen
Apparaat niet starten, wanneer het uitwerpkanaal
niet door één van de volgende onderdelen is
afgedekt:
grasopvangbox
veiligheidsklep
mulchkit
Goed opletten bij het bedienen van de
startschakelaar en de aanwijzingen van de
fabrikant opvolgen
Erop letten dat er voldoende afstand is tussen de
voeten en het snijgereedschap
Apparaat in laag gras starten
met snelheidsregelaar, zonder primer/choke
5. Gashendel in stand max zetten (
6. Veiligheidsbeugel naar de duwbeugel trekken en
vasthouden (
vast.
7. Startkabel krachtig en snel uittrekken en daarna
weer langzaam laten oprollen (
8. Na het opwarmen van de motor
(ca. 15–20 seconden) gashendel op een stand
zetten tussen min en min.
met snelheidsregelaar, met primer (
1. Gashendel in stand max zetten (
2. Primerknop 3x indrukken, met tussenpozen van ca.
2 seconden (
de primerknop 5x indrukken.
3. Veiligheidsbeugel naar de duwbeugel trekken en
vasthouden (
vast.
4. Startkabel uittrekken en vervolgens weer langzaam
laten oprollen (
5. Op het moment dat de motor draait, gashendel voor
het gewenste motortoerental op een stand tussen
min en max zetten.
16) – veiligheidsbeugel klikt niet
15). Bij temperaturen onder 10 °C
16) – veiligheidsbeugel klikt niet
17).
12/1).
17).
16)
12/1).
Handmatig starten
met snelheidsregelaar, met choke
1. Gashendel in stand max
2. Veiligheidsbeugel naar de beugel trekken en
vasthouden (
vast.
3. Startkabel krachtig en snel uittrekken en daarna
weer langzaam laten oprollen (
4. Na het opwarmen van de motor (ca. 15–20
seconden) gashendel op een stand zetten tussen
min en max.
38
16) – veiligheidsbeugel klikt niet
zetten ( 11/1).
17).
zonder snelheidsregelaar, met choke
Choke
aan uit
1. Choke in stand 1 zetten ( 13/1).
2. Veiligheidsbeugel naar de duwbeugel trekken en
vasthouden (
vast.
3. Startkabel krachtig en snel uittrekken en daarna
weer langzaam laten oprollen (
4. Na het opwarmen van de motor
(ca. 15–20 seconden) de choke in stand 2 zetten
( 13/2).
De motor heeft een vast toerental.
U kunt het toerental daarom niet regelen.
17) – veiligheidsbeugel klikt niet
18).
Vertaling van de originele gebruikershandleiding
Page 39

NL
zonder snelheidsregelaar, met primer (
1. Primerknop 3x indrukken, met tussenpozen van ca.
2 seconden (
de primerknop 5x indrukken.
2. Veiligheidsbeugel naar de duwbeugel trekken en
vasthouden (
vast.
3. Startkabel krachtig en snel uittrekken en daarna
weer langzaam laten oprollen (
De motor heeft een vast toerental.
U kunt het toerental daarom niet regelen.
zonder snelheidsregelaar, zonder primer/choke
4. Veiligheidsbeugel naar de duwbeugel trekken en
vasthouden (
5. Startkabel krachtig en snel uittrekken en daarna
weer langzaam laten oprollen (
De motor heeft een vast toerental.
U kunt het toerental daarom niet regelen.
16). Bij temperaturen onder 10 °C
17) – veiligheidsbeugel klikt niet
17) – veiligheidsbeugel klikt niet vast.
16)
18).
18).
Motor uitzetten
Apparaat zonder meskoppeling
1. Gashendel in stand min zetten (
2. Veiligheidsbeugel loslaten (
- Motor schakelt uit.
Let op ernstige snijwonden!
Motor kan nalopen. Na het uitschakelen
controleren of de motor stilstaat.
22).
12/2).
Elektrische starten (optie)
Elektrische start zonder primer/choke ( 13)
1. Gashendel in stand „START“ zetten (
2. Veiligheidsbeugel naar de duwbeugel trekken en
vasthouden (
vast.
3. Contactsleutel in het contactslot steken en
helemaal naar rechts draaien (
4. Op het moment dat de motor draait, contactsleutel
loslaten (springt terug in de stand „0“).
5. Gashendel afhankelijk van het gewenste
motortoerental in een stand tussen min en max
zetten.
16) – veiligheidsbeugel klikt niet
18).
13/1).
Wielaandrijving (optie) ( 20)
Let op!
Aandrijving enkel bij draaiende motor schakelen.
Wielaandrijving inschakelen.
1. Aandrijfbeugel tegen de duwbeugel duwen en
vasthouden (
- Wielaandrijving wordt ingeschakeld.
Wielaandrijving uitschakelen
1. Aandrijfbeugel loslaten (
- Wielaandrijving wordt uitgeschakeld.
19) – aandrijfbeugel klikt niet vast.
21).
39
Page 40

NL
Benzinegrasmaaier
Varioaandrijving (Speed Control) (optie)
Met de varioaandrijving kan de rijsnelheid van de
grasmaaier traploos worden gewijzigd.
Let op!
Hendel enkel bij draaiende motor bedienen.
Schakelen zonder motoraandrijving kan het
aandrijfmechanisme beschadigen.
Voor een hogere snelheid de hendel (
richting ( 20/1) trekken
Voor een lagere snelheid de hendel (
richting ( 20/2) trekken
Rijsnelheid altijd aanpassen aan de actuele
toestand van de bodem en het gras.
20) in de
20) in de
Onderhoud en reiniging
Let op! - Gevaar voor letsel!
▪ Voor onderhouds- en reinigingswerkzaamheden
altijd de eerst de motor uitschakelen en de
bougiedop eruit trekken.
▪ Motor kan nalopen. Na het uitschakelen
controleren of de motor stilstaat.
▪ Bij onderhouds- en reinigingswerkzaamheden
aan het mes altijd werkhandschoenen dragen!
Grasopvangvoorziening regelmatig controleren op
goede werking en slijtage
Het apparaat na ieder gebruik reinigen
Apparaat niet met water schoonspuiten. Indringend
water kan tot storingen leiden (ontstekingssysteem,
carburateur)
Mes regelmatig controleren op beschadigingen
Defecte geluidsdempers altijd vervangen
Grasmaaier kantelen
Mes bijslijpen / vervangen
Stomp of beschadigd mes enkel bij een servicepunt
of een geautoriseerd vakbedrijf laten slijpen /
vervangen
Bijgeslepen messen moeten uitgebalanceerd zijn
Let op!
Niet uitgebalanceerde messen veroorzaken
sterke trillingen en beschadigen de grasmaaier.
Startaccu opladen (optie)
De startaccu is onderhoudsvrij en wordt normaliter door
de grasmaaier geladen.
In uitzonderingsgevallen moet de accu door de
gebruiker worden geladen:
Voordat de grasmaaier voor het eerst in gebruik
wordt genomen
Bij een lege accu, voor de winterpauze of na
langere stilstandstijden (> 6 maanden)
Werkwijze voor het opladen:
1. Lader uit het accuhuis nemen.
2. Accukabel van de motorkabel losmaken (
3. Accukabel met laderkabel verbinden (
4. Lader aan het stroomnet aansluiten.
De spanning van het stroomnet moet
overeenkomen met de bedrijfsspanning van de
lader.
De laadtijd bedraagt ca. 36 uur.
Enkel de meegeleverde originele lader gebruiken.
Let op!
▪ Startaccu enkel in droge, goed geventileerde
ruimtes laden.
▪ Grasmaaier tijdens het laden niet aanzetten.
25).
26).
Afhankelijk van de motorproducent moet:
de carburateur / het luchtfi lter naar boven wijzen
23)
(
de bougie naar boven wijzen (
Bedieningshandleiding van de motorproducent in
acht nemen!
40
24)
Vertaling van de originele gebruikershandleiding
Page 41

NL
Motoronderhoud
Motorolie verversen
1. Een geschikte bak klaarzetten om de olie op te
vangen.
2. Olie via de olievulopening volledig laten uitstromen
of afzuigen.
De afgewerkte motorolie op een milieuvriendelijke
manier afvoeren!
Wij adviseren u om de afgewerkte olie
in een gesloten tankje af te geven bij het
recyclingcentrum of bij een klantenservice locatie.
Afgewerkte olie moet u
▪ niet bij het afval voegen
▪ niet in de riolering of afvoer gieten
▪ niet op de grond uitgieten
Luchtfi lter vervangen
Aanwijzingen van de motorproducent in acht
nemen.
Bougie vervangen
Aanwijzingen van de motorproducent in acht
nemen.
Wielaandrijving (optie)
Bowdenkabel instellen
Wanneer de wielaandrijving bij draaiende motor niet meer
kan worden in- of uitgeschakeld moet de betreffende
bowdenkabel worden bijgesteld.
Let op!
Bowdenkabel enkel bij uitgeschakelde motor
verstellen.
1. Het verstelstuk aan bowdenkabel in de richting van
de pijl draaien (
2. Voor het controleren van de instelling de motor
starten en de wielaandrijving inschakelen.
3. Wanneer de wielaandrijving nog steeds niet werkt,
moet de grasmaaier naar een servicepunt of een
geautoriseerd vakbedrijf worden gebracht.
27).
Aandrijfwiel met olie insmeren
Aandrijfwiel op de aandrijfas van tijd tot tijd
insmeren met spuitolie
De aandrijving van de wielaandrijving is
onderhoudsvrij.
Opslag
Let op! - Explosiegevaar!
Apparaat niet bij open vuur of warmtebronnen
opslaan.
Motor laten afkoelen
Om bij het opslaan plaats te besparen kunt u de
duwbeugel inklappen (
Apparaat droog en op een voor kinderen niet
toegankelijke plaats opslaan
Startaccu vorstvrij opslaan
Startaccu van tijd tot tijd bijladen
Benzinetank legen
Bougiedop eruit trekken
28)
Reparaties
Reparatiewerkzaamheden mogen enkel worden
uitgevoerd in servicepunten en geautoriseerde
vakbedrijven.
Afvoer
Apparaten, batterijen of accu's die
niet meer worden gebruikt niet bij het
huisvuil gooien!
Verpakking, apparaat en accessoires zijn gemaakt van
recyclebare materialen en moeten ook als zodanig
worden afgevoerd.
41
Page 42

NL
Hulp bij storingen
Let op!
Mes en motoras mogen niet worden uitgelijnd.
Storing Oplossing
Motor slaat niet aan ▪ Benzine vullen
▪ Gashendel op „start“ zetten
▪ Choke inschakelen
▪ Motorschakelbeugel naar de duwbeugel duwen
▪ Bougie controleren, indien nodig vervangen
▪ Luchtfi lter reinigen
▪ Maaimes vrijdraaien
▪ Startaccu bijladen
▪ Op gemaaid vlak starten
Motorprestatie schiet te kort ▪ Snijhoogte corrigeren
▪ Maaimes bijslijpen / vervangen
▪ Uitwerpkanaal / behuizing reinigen
▪ Luchtfi lter reinigen
▪ Werksnelheid verlagen
Niet zuiver maaien ▪ Maaimes bijslijpen / vervangen
▪ Snijhoogte corrigeren
Grasopvangbox vult niet
voldoende
Wielaandrijving werkt niet ▪ Bowdenkabel bijstellen
Wielen draaien niet bij
ingeschakelde aandrijving
Apparaat trilt buitengewoon
sterk
▪ Snijhoogte corrigeren
▪ Gras laten drogen
▪ Maaimes bijslijpen / vervangen
▪ Rooster van de grasopvangbox schoonmaken
▪ Uitwerpkanaal / behuizing reinigen
▪ V-snaar defect
▪ Werkplaats van klantenservice raadplegen
▪ Vuil in wielaandrijving, tandriem en aandrijving verwijderen
▪ Vrijlopen (aandrijfwiel op aandrijfas) met spuitolie insmeren
▪ Wielschroeven bijdraaien
▪ Wielnaaf defect
▪ V-snaar defect
▪ Werkplaats van klantenservice raadplegen
▪ Maaimes controleren
Benzinegrasmaaier
Bij storingen die niet in deze tabel zijn beschreven of die u niet zelf kunt verhelpen verzoeken we u contact op
te nemen met onze geautoriseerde klantenservice.
42
Vertaling van de originele gebruikershandleiding
Page 43

In de volgende gevallen is er altijd een inspectie
door een vakman nodig:
als het tegen een obstakel gereden is
als de motor plotseling stilvalt
bij drijfwerkschade
als de V-snaar defect is
als een mes verbogen is
als de motoras is verbogen
Garantie
NL
EG-conformiteitsverklaring
zie montagehandleiding
Eventuele materiaal- of fabricagefouten aan het apparaat verhelpen we gedurende de wettelijke termijn voor
garantieaanspraken naar onze keuze door reparatie of een vervangende levering. Deze garantietermijn wordt
bepaald door de wetgeving in het land, waar het apparaat is gekocht.
Onze garantietoezegging geldt enkel bij: De garantie vervalt bij:
correcte behandeling van het apparaat
inachtneming van de bedieningshandleiding
gebruik van originele reserveonderdelen
Uitgesloten van de garantie zijn:
lakschade die is veroorzaakt door normale slijtage
slijtageonderdelen, die op de kaart met reserveonderdelen zijn gekenmerkt met de omkadering XXX XXX (X)
verbrandingsmotoren – hiervoor gelden de aparte garantiebepalingen van de betreffende motorfabrikant
Bij garantieaanspraken kunt u zich met deze garantieverklaring en het aankoopbewijs wenden tot de distributeur
of de bevoegde klantenservice bij u in de buurt. Met deze garantietoezegging blijven de wettelijke aanspraken bij
gebreken van de koper tegenover de verkoper onverkort van kracht.
pogingen tot reparatie van het apparaat
technische wijzigingen aan het apparaat
gebruik dat niet in overeenstemming is met
de bestemming (bijvoorbeeld bedrijfsmatig of
gemeentelijk gebruik)
┌──────┐
└──────┘
43
Page 44

F
Tondeuse à gazon à essence
Informations sur ce manuel
Lire ce mode d'emploi avant la mise en service.
C'est une condition préalable pour une sécurité
d'utilisation et une manipulation sans problèmes.
Avant l'utilisation, familiarisez-vous avec les éléments de commande et l'utilisation de la machine.
Respecter les consignes de sécurité et les
avertissements de cette documentation ainsi que
celles qui se trouvent sur la machine.
Conserver ce mode d'emploi pour l'utilisation et le
remettre aussi à tous les utilisateurs ultérieurs.
Légende
Attention !
Le respect de ces avertissements permet d'éviter
tout dommage aux personnes et/ou matériel.
Notes particulières d'explication pour une bonne
manipulation.
L'icône de l'appareil-photo vous renvoie aux
illustrations.
Table des matières
Informations sur ce manuel ......................................... 44
Description du produit .................................................. 44
Dispositifs de sécurité et de protection ........................ 44
Consignes de sécurité ................................................. 46
Montage ....................................................................... 47
Ravitaillement d'essence .............................................47
Mise en service ............................................................ 48
Démarrage électrique (en option) ................................ 51
Maintenance et entretien ............................................. 52
Stockage ...................................................................... 53
Réparation ................................................................... 53
Élimination ................................................................... 53
Aide en cas de mauvais fonctionnement ..................... 54
Garantie ....................................................................... 55
Déclaration de conformité CE ...................................... 55
Description du produit
Cette document décrit différents modèles de tondeuses
à gazon à essence. Certains modèles sont équipés d'un
bac à herbe et/ou sont également compatibles pour le
hachage.
Identifi ez votre modèle à l'aide des images du produit et
de la description des différentes options.
Utilisation conforme aux fi ns prévues
Cet appareil est conçu pour tondre un gazon dans le
domaine privatif et ne doit être utilisé que sur de l'herbe
sèche.
Une utilisation différente ou une utilisation dépassant ce
cadre n'est pas conforme.
Utilisation incorrecte possible
Cette tondeuse à gazon n'est destinée à être
utilisée dans les installations ouvertes au public,
les parcs, les installations sportives ainsi que dans
l'agriculture et l'exploitation forestière
Les dispositifs de sécurité ne doivent pas être
démontés ni shuntés
Ne pas utiliser l'appareil par temps de pluie ou sur
de l'herbe mouillée
L'utilisation de la machine dans un domaine
industriel est interdite
Dispositifs de sécurité et de protection
Attention - Risque de blessure !
Ne pas mettre les dispositifs de sécurité et de
protection hors service !
Barre de sécurité
L'appareil est équipé d'une barre de sécurité. En cas de
danger, relâcher la barre de sécurité.
La lame de coupe est arrêtée
Le moteur est coupé
Volet défl ecteur
Le défl ecteur sert de protection en cas d'éjection de
pièces.
44
Traduction du mode d'emploi original
Page 45

F
11
2
16
2
1 Câble de démarrage 9 Réglage de la hauteur de coupe*
2 Départ, Arrêt* 11 Transmission Vario
3 Transmission roues* 12 Notice d'instruction
4 Barre de sécurité 13 Insert d'éjection*
5 Réglage de la hauteur ergonomique* 14 Volet de fermeture*
6 Indicateur de niveau* 15 Kit de hachage*
7 Volet défl ecteur* 16 Allumage Démarreur électrique
8 Bac à herbe*
Symboles sur la machine
Attention !
Faire preuve d'un maximum de précautions
lors de la manipulation.
Avant la mise en service, lire le mode d'emploi !
Les tiers doivent être tenus hors de la zone
dangereuse !
Maintenir les mains et les pieds loin de l'outil de
coupe !
Se tenir à l'écart de la zone de danger.
Avant d'intervenir sur l'outil de coupe,
retirer la cosse de bougie d'allumage.
45
Page 46

F
Rechercher les dommages sur la tondeuse à
gazon et procéder aux réparations nécessaires
avant de repartir et continuer à travailler avec la
tondeuse à gazon.
Pictogrammes supplémentaires sur les appareils
avec démarreur électrique
Attention ! Danger d'électrocution.
Tenir le câble de raccordement éloigné des
lames de coupe.
Avant les travaux d'entretien ou en cas de
câble endommagé toujours débrancher
l'appareil du secteur.
Consignes de sécurité
Attention !
Utiliser la machine seulement si elle est en parfait
état du point de vue technique !
Attention - Risque de blessure !
Ne pas mettre les dispositifs de sécurité et de
protection hors service !
Attention - Risque d'incendie !
Ne pas conserver les appareils remplis d'essence
dans des bâtiments dans lesquels les vapeurs
d'essence pourraient s'enfl ammer au contact
d'une fl amme nue ou d'étincelles !
Maintenir la zone autour du moteur, de
l'échappement, du coffre à batterie et du
réservoir d'essence exempte de tout résidu de
coupe, d'essence et d'huile.
Les tiers doivent être tenus hors de la zone dan-
gereuse
Le propriétaire ou l'utilisateur de la machine est
responsable en cas d'accident impliquant d'autres
personnes et leur propriété
Les enfants ou les autres personnes qui ne con-
naissent pas ce notice d'instructions ne doivent pas
utiliser l'appareil
Observer les dispositions locales en matière d'âge
minimum de l'utilisateur
Ne pas utiliser l'appareil sous l'emprise de l'alcool,
de la drogue ou après avoir pris des médicaments
Porter des vêtements adaptés
Pantalon long
Chaussures solides et antidérapantes
Protection auditive
En cas de travail sur une pente
Toujours veiller à la stabilité
Toujours tondre en travers de la pente, jamais
Tondeuse à gazon à essence
dans le sens ascendant ou descendant
Ne pas tondre sur un pente inclinée à plus de 20°
Faire particulièrement attention en tournant
Ne travailler qu'à la lumière du jour suffi sante ou
avec un éclairage artifi ciel
Tenir le corps, les membres et les vêtements à
l'écart du mécanisme de coupe
Observer les dispositions en vigueur pour les ho-
raires d'utilisation
Ne pas laisser la machine en état de marche sans
surveillance
Ne tondre qu'avec une lame de coupe affûtée
Ne jamais utiliser l'appareil avec des dispositifs de
protection/des grilles de protection endommagés
Ne jamais utiliser l'appareil sans dispositifs de
protection intégralement montés (p. ex. : volet dé-
fl ecteur, dispositifs de collecte de l'herbe)
Contrôler l'appareil avant toute utilisation à la re-
cherche de dommages, avant la prochaine utilisati-
on, faire remplacer les pièces endommagées
Arrêter le moteur, attendre que l'appareil s'arrête
complètement et retirer l'embout de la bougie
d'allumage
avant de laisser la machine sans surveillance
après qu'une panne est survenue
avant de corriger les blocages
avant d'éliminer les obstructions
après être passé sur un corps étranger
si des pannes ou des vibrations anormales se
produisent sur l'appareil
Rechercher les dommages sur la tondeuse à
gazon et procéder aux réparations nécessaires
avant de repartir et continuer à travailler avec la
tondeuse à gazon.
Remettre l'embout de bougie d'allumage en place
et redémarrer le moteur
après voir éliminé la panne (voir tableau des
pannes) et contrôlé l'appareil
après avoir nettoyé l'appareil
Inspecter avec soin le terrain à tondre et en retirer
tous les corps étrangers
Faire particulièrement attention en cas de demi-tour
avec la tondeuse ou en cas de traction vers vous
de la tondeuse
Ne pas passer sur des obstacles
(p. ex. branches, racines d'arbre)
46
Traduction du mode d'emploi original
Page 47

Ne retirer les résidus de coupe qu'une fois le mo-
L'huile usée ne doit pas être :
éliminée avec les déchets
être déversée dans les égouts, dans le
conduit d'écoulement ou sur le sol
teur arrêté
Couper le moteur/la lame de coupe en cas de pas-
sage sur une zone à ne pas tondre
Ne jamais soulever ni porter l'appareil alors que le
moteur tourne
Ne pas manger ni boire en faisant le plein
d'essence ou d'huile moteur
Ne pas inhaler les vapeurs d'essence
Faites avancer l'appareil au ralenti
Avant l'utilisation, veiller à ce que les écrous, vis et
boulons soient bien serrés
Montage
Observer les instructions de montage ci-jointe.
Attention !
La machine ne peut être utilisée qu'une fois le
montage complètement terminé.
Ravitaillement d'essence
Avant de mettre la tondeuse à gazon en service, il faut
faire le plein d'essence.
Avertissement - Risque d'incendie !
L'essence et l'huile sont hautement infl ammables !
Toujours respecter les instructions d'emploi
fournies par le constructeur du moteur.
Ravitaillements
Essence Huile moteur
Type
Quantité de
remplissage
essence
ordinaire/sans
plomb
voir les
recommandations
du fabricant du
moteur
Sécurité
Avertissement !
Ne jamais laisser tourner le moteur dans un local
fermé. Risque d'intoxication !
Ne conserver l'essence et l'huile que dans des
voir les
recommandations
du fabricant du
moteur
env. 0,6 l
récipients prévus à cet effet
Ne rajouter ou ne vidanger de l'essence et de l'huile
qu'à l'air libre et moteur froid
Ne pas ajouter de l'essence ni de l'huile quand le
moteur tourne
Ne pas trop remplir le réservoir (l'essence se dilate)
Ne pas fumer pendant le remplissage
Ne jamais ouvrir le bouchon de réservoir pendant
que le moteur roule ou qu'il est chaud
Remplacer le réservoir ou le bouchon s'ils sont
endommagés
Toujours bien fermer le bouchon du réservoir
En cas d'écoulement d'essence :
ne pas démarrer le moteur
éviter les essais d'allumage répétés
nettoyer la machine
En cas d'écoulement d'huile moteur :
ne pas démarrer le moteur
absorber l'huile moteur renversée avec un
agent agglutinant ou un chiffon et l'éliminer
dans les règles
nettoyer la machine
L'huile usée ne doit pas être :
éliminée avec les déchets
être déversée dans les égouts, dans le
conduit d'écoulement ou sur le sol
Nous vous recommandons d'apporter l'huile usée dans
un récipient fermé dans un centre de recyclage ou un
centre de service après-vente.
Faire le plein d'essence
1. Dévisser le bouchon du réservoir et le poser dans
un endroit propre.
2. Ajouter de l'essence avec un entonnoir.
3. Refermer l'orifi ce de remplissage du réservoir et le
nettoyer.
Faire le plein d'huile
1. Dévisser le bouchon de remplissage d'huile et le
poser dans un endroit propre.
2. Ajouter de l'huile avec un entonnoir.
3. Refermer l'orifi ce de remplissage d'huile et le nettoyer.
F
47
Page 48

F
Mise en service
Attention !
Si l'outil de coupe ou les éléments de fi xation
sont lâches, endommagés ou usés, il ne faut en
aucun utiliser la machine !
Procéder à un contrôle visuel avant chaque mise
en service.
Le pictogramme de caméra aux pages suivantes
renvoie aux fi gures, page 4–7.
Réglage de la hauteur de coupe
Attention - Risque de blessure !
Ne régler la hauteur de coupe qu'après avoir
coupé le moteur et une fois que la lame de coupe
est arrêtée.
▪ Toujours régler les roues sur la même hauteur
de coupe.
▪ Le réglage de la hauteur de coupe varie en
fonction du modèle.
Tondeuse à gazon à essence
Tondre avec le bac à herbe
Attention - Risque de blessure !
Ne retirer ou n'installer le bac à herbe qu'une fois
le moteur coupé et la lame de coupe arrêtée.
1. Soulever le volet défl ecteur et accrocher le bac à
herbe dans les supports (
6).
Indicateur de niveau*
L'indicateur de niveau est poussé vers le haut par le
courant d'air lors de la tonte (
5a).
Réglage centralisé (
1. Pousser le levier de déverrouillage sur le côté et
le tenir.
2. Pousser le levier vers la gauche ou la droite dans la
hauteur de coupe souhaitée.
3. Laisser s'enclencher le levier.
4. Veiller à la position sur le même cran pour toutes
les roues.
48
2)
Quand le bac à herbe est plein, l'indicateur de
remplissage sur le bac se trouve en (
le bac à herbe.
5b). Il faut vider
Vidage du bac à herbe
1. Soulever le volet défl ecteur.
2. Décrocher le bac à herbe et le sortir en le tirant en
arrière (
3. Vider le bac à herbe.
4. Soulever le volet défl ecteur et raccrocher le bac de
ramassage dans les supports (
6).
6).
Tondre sans bac à herbe
Attention !
Ne tondre sans bac à herbe qu'avec un ressort
rotatif de volet défl ecteur opérationnel.
La force du ressort plaque le volet défl ecteur contre le
carter de la tondeuse à gazon. L'herbe coupée est ainsi
éjectée vers le bas et en arrière.
Traduction du mode d'emploi original
Page 49

Débroussailler avec le kit de hachage (en option)
Lors du hachage, l'herbe coupée n'est pas ramassée
mais reste sur la pelouse. L'herbe hachée protège le sol
de l'assèchement et lui apporte des nutriments.
Les meilleures résultats sont obtenus avec une recoupe
régulière d'env. 2 cm. Seule l'herbe jeune avec un
feuillage tendre pourrit rapidement.
Hauteur de l'herbe avant le hachage : 8 cm max.
Hauteur de l'herbe après le hachage : au moins 4 cm.
Adapter la vitesse de progression au hachage, ne
pas avancer trop vite.
2. Ouvrir le panneau pour l'éjection latérale et le
maintenir ouvert (
3. Insertion du canal d'éjection latérale (
4. Refermer lentement le panneau.
Le panneau bloque le canal d'éjection latérale pour
ne pas qu'il tombe.
Retrait du canal d'éjection latérale
1. Ouvrir le panneau pour l'éjection latérale et le
maintenir ouvert (
2. Retirer le canal d'éjection latérale et refermer le
panneau (
9/1).
9/2).
9/1).
9/2).
F
Insertion du kit de hachage
Attention - Risque de blessure !
N'insérer ou ne déposer le kit de hachage qu'avec
le moteur coupé et la lame de coupe arrêtée.
1. Retirer le bac à herbe (
2. Soulever le volet défl ecteur et insérer le kit de
hachage dans l'orifi ce d'éjection (
Le verrouillage doit s'enclencher.
Si le kit de hachage ne s'enclenche pas, la
lame de coupe et le kit de hachage risque d'être
endommagés.
Dépose du kit de hachage
1. Soulever le volet défl ecteur.
2. Débloquer le verrouillage sur le kit de hachage
(
8/1).
3. Sortir le bac de ramassage (
6).
7).
8/2).
Tondre avec éjection latérale (en option)
Attention - Risque de blessure !
Ne retirer ou n'installer le canal d'éjection latérale
qu'une fois le moteur coupé et la lame de coupe
arrêtée.
Insertion du canal d'éjection latérale
1. Retirer le bac à herbe et insérer le kit de hachage.
Réglage de la hauteur de la poignée (en option)
Réglage par blocage
1. Tenir le longeron et desserrer les deux dispositifs
de serrage (
2. Amener le longeron dans la position souhaitée.
3. Serrer les dispositifs de serrage.
10).
Démarrage du moteur
Attention - Risque d'intoxication !
Ne jamais laisser tourner le moteur dans un local
fermé.
Attention - Risque de blessure !
Ne pas renverser l'appareil lors de l'opération de
démarrage.
▪ Ne démarrer le moteur que si la lame est
montée (la lame sert de masse d'équilibrage)
▪ Lors du démarrage du moteur à température de
service NE PAS utiliser le starter ni le bouton
d'amorçage
▪ Ne pas modifi er les réglages du moteur
Ne pas démarrer l'appareil si le conduit d'éjection
n'est pas recouvert par l'une des pièces suivantes :
bac à herbe
volet défl ecteur
49
Page 50

F
kit de hachage
Actionner le bouton de démarrage avec la plus
grande attention et conformément aux instructions
du fabricant
Rester suffi samment éloigné de l'outil de coupe
Démarrer l'appareil sur un secteur où l'herbe est
courte
Démarrage manuel
avec télécommande des gaz, avec starter
1. Placer la manette des gaz sur la position max
( 11/1).
2. Tirer la barre de sécurité vers la partie supérieure du
guidon et la maintenir (
ne s'enclenche pas.
3. Tirer rapidement le câble de démarrage, puis le
laisser s'enrouler lentement (
4. Une fois le moteur chaud (env. 15 à 20 s), placer
la manette des gaz sur une position entre min et
max.
16) – La barre de sécurité
17).
Tondeuse à gazon à essence
avec télécommande des gaz, avec amorçage (
1. Placer la manette des gaz sur la position max
(
12/1).
2. Appuyer 3 fois sur le bouton du système
d'amorçage à des intervalles d'environ 2 s ( 15).
Si la température est inférieure à 10 ° C, appuyer
5 fois sur le bouton d'amorçage.
3. Tirer la barre de sécurité vers la partie supérieure du
guidon et la maintenir (
ne s'enclenche pas.
4. Tirer rapidement le câble de démarrage, puis le
laisser s'enrouler lentement (
5. Dès que le moteur tourne, placer la manette des gaz
de la vitesse de rotation du moteur souhaitée sur
une position entre min et max.
16) - La barre de sécurité
17).
16)
Démarrage manuel
sans télécommande des gaz, avec starter
Starter
Marche Arrêt
avec télécommande des gaz, sans amorçage/starter
1. Placer la manette des gaz sur la position
(
12/1).
2. Tirer la barre de sécurité vers la partie supérieure du
guidon et la maintenir (
ne s'enclenche pas.
3. Tirer rapidement le câble de démarrage, puis le
laisser s'enrouler lentement ( 17).
4. Une fois le moteur chaud (env. 15 à 20 secondes),
placer la manette des gaz sur une position entre
min et max
50
16) - La barre de sécurité
( 20).
max
1. Placer le démarrer sur la position 1 ( 13/1).
2. Tirer la barre de sécurité vers la partie supérieure du
guidon et la maintenir (
ne s'enclenche pas.
3. Tirer rapidement le câble de démarrage, puis le
laisser s'enrouler lentement (
4. Une fois le moteur chaud (env. 15 à 20 secondes),
placer le starter sur la position 2 (
Le réglage des gaz du moteur est fi xe.
Un réglage du régime n'est pas possible.
17) – La barre de sécurité
18).
13/2).
Traduction du mode d'emploi original
Page 51

F
sans télécommande des gaz, avec amorçage (
1. Appuyer 3 fois sur le bouton du système
d'amorçage à des intervalles d'environ 2 s (
Si la température est inférieure à 10 °C, appuyer
5 fois sur le bouton d'amorçage.
2. Tirer la barre de sécurité vers la partie supérieure du
guidon et la maintenir (
ne s'enclenche pas.
3. Tirer rapidement le câble de démarrage, puis le
laisser s'enrouler lentement (
Le réglage des gaz du moteur est fi xe.
Un réglage du régime n'est pas possible.
sans télécommande des gaz, sans amorçage/starter
4. Tirer la barre de sécurité vers la partie supérieure du
guidon et la maintenir (
ne s'enclenche pas.
5. Tirer rapidement le câble de démarrage, puis le
laisser s'enrouler lentement (
Le réglage des gaz du moteur est fi xe.
Un réglage du régime n'est pas possible.
17) – La barre de sécurité
18).
17) – La barre de sécurité
18).
16)
16).
Coupure du moteur
Appareil sans embrayage de lame
1. Placer la manette des gaz sur la position min
(
12/2)
2. Relâcher l'étrier de sécurité (
- Le moteur s'éteint.
Attention risque de graves blessures par
coupure !
Le moteur peut continuer à tourner avant de
s'arrêter défi nitivement. Après la coupure,
s'assurer que le moteur ne tourne plus.
22).
Transmission roues (en option) ( 20)
Attention !
Ne commuter le réducteur que lorsque le moteur
tourne.
Activer la transmission roues.
1. Presser la barre de commande de la transmission
contre la partie supérieure du guidon et la maintenir
19) – La barre de commande de la transmission
(
ne s'enclenche pas.
- La transmission roues est enclenchée.
Démarrage électrique (en option)
Démarrage électrique sans amorçage/starter ( 13)
1. Placer la manette des gaz sur la position
« START » (
2. Tirer la barre de sécurité vers la partie supérieure du
guidon et la maintenir (
ne s'enclenche pas.
3. Tourner la clé de contact totalement vers la droite
dans la serrure de contact (
4. Dès que le moteur tourne, relâcher la clé de contact
(retourne en position « 0 »).
5. Placer la manette des gaz conformément à la
vitesse de rotation du moteur souhaitée sur une
position entre min et max.
13/1).
16) – La barre de sécurité
18).
Désactivation de la transmission roues
1. Relâcher la barre de commande de la transmission
21).
(
- La transmission roues est désactivée.
51
Page 52

F
Tondeuse à gazon à essence
Transmission Vario (Speed Control) (en option)
La transmission Vario permet de modifi er en continu la
vitesse d'avance de la tondeuse à gazon.
Attention !
N'actionner la manette que lorsque le moteur
tourne.
L'activation sans entraînement moteur peut
endommager le mécanisme d'entraînement.
Pour augmenter la vitesse, tirer la manette (
dans le sens ( 20/1)
Pour réduire la vitesse, tirer la manette (
dans le sens ( 20/2)
Toujours adapter la vitesse d'avance l'état actuel
du sol et de la pelouse.
20)
20)
Maintenance et entretien
Attention - Risque de blessure !
▪ Avant tous les travaux de maintenance et
d'entretien, toujours couper le moteur et retirer
l'embout de la bougie d'allumage.
▪ Le moteur peut continuer à tourner avant de
s'arrêter défi nitivement. Après la coupure,
s'assurer que le moteur ne tourne plus.
▪ Toujours porter des gants de travail en cas
d'intervention sur la lame de coupe !
S'assurer régulièrement du bon fonctionnement
du dispositif de collecte d'herbe et de l'absence de
toute usure
Nettoyer l'appareil après chaque utilisation
Ne pas nettoyer l'appareil au jet d'eau
Toute pénétration d'eau peut provoquer des pannes
(allumage, carburateur)
Contrôler régulièrement la lame de coupe à la re-
cherche de dommages
Toujours remplacer les silencieux endommagés
Inclinaison de la tondeuse
Selon le fabricant du moteur :
le carburateur/fi ltre à air doit être orienté vers le
23)
haut (
la bougie d'allumage doit être orientée vers le haut
( 24)
Observer les instructions de service du fabricant
du moteur !
Affûtage/remplacement de la lame de coupe
Ne faire affûter/remplacer les lames émoussées ou
endommagées qu'auprès d'un centre de service
après-vente ou d'une entreprise spécialisée agréée
Les lames de coupe raffûtées doivent être
équilibrées
Attention !
Les lames non équilibrées entraînent de fortes
vibrations et endommagent la tondeuse.
Chargement de la batterie de démarrage (en
option)
La batterie de démarrage est sans entretien et
normalement est rechargée par la tondeuse.
Dans des cas particuliers, c'est l'utilisateur qui doit
recharger la batterie :
Avant la première utilisation de la tondeuse
En cas de décharge, avant la pause hivernale ou
en cas d'arrêts prolongés (> 6 mois)
Procédure de charge :
1. Sortir le chargeur du coffre à batterie.
2. Débrancher le câble de batterie du câble moteur
(
25).
3. Relier le câble de batterie au câble du chargeur
26).
(
4. Brancher le chargeur au secteur.
La tension du secteur doit coïncider avec la tension
de service du chargeur.
La durée de charge est d'env. 36 heures.
N'utiliser que le chargeur d'origine fourni.
52
Traduction du mode d'emploi original
Page 53

Attention !
▪ Ne charger la batterie de démarrage que dans
un local sec et bien ventilé.
▪ Ne pas mettre la tondeuse à gazon en marche
pendant la procédure de charge.
F
2. Pour vérifi er le réglage, démarrer le moteur et
activer la transmission roues.
3. Si la transmission roues ne fonctionne toujours pas,
il faut confi er la tondeuse à gazon à un centre de
service après-vente ou à une entreprise spécialisée
agréée.
Entretien du moteur
Remplacement de l'huile moteur
1. Afi n de recueillir l'huile, préparer un bac approprié.
2. Laisser entièrement s'écouler l'huile par l'orifi ce de
remplissage d'huile ou l'aspirer.
Éliminer l'huile de moteur usée de manière
écologique !
Nous vous recommandons d'apporter l'huile usée
dans un récipient fermé au centre de recyclage
ou à un centre de service après-vente.
L'huile usée ne doit pas être
▪ éliminée avec les déchets
▪ versée dans les égouts ni la conduite
d'évacuation
▪ versée sur le sol
Remplacement du fi ltre à air
Observer les recommandations du fabricant du
moteur.
Remplacement de la bougie d'allumage
Observer les recommandations du fabricant du
moteur.
Transmission roues (en option)
Réglage du câble Bowden
S'il s'avère impossible d'activer ou de désactiver la
transmission roues pendant que le moteur tourne, il faut
régler le câble Bowden correspondant.
Huiler le pignon d'entraînement
Pulvériser de temps à autre de l'huile sur le pignon
d'entraînement de l'arbre d'engrenage
Les engrenages de la transmission roues sont
sans entretien.
Stockage
Attention - Risque d'explosion !
Ne pas stocker l'appareil à proximité de fl ammes
nues ou de sources de chaleur.
Laisser refroidir le moteur
Pour gagner de la place lors du stockage, replier la
partie supérieure du guidon (
Stocker l'appareil dans un endroit sec et hors
de portée des enfants et des personnes non
autorisées
Entreposer la batterie de démarrage à l'abri du gel
Recharger de temps à autre la batterie de
démarrage
Vider le réservoir d'essence
Sortir l'embout de bougie d'allumage
28)
Réparation
Seuls les centres de service après-vente et les
entreprises spécialisées agréées sont habilitées à
effectuer les travaux de réparation.
Élimination
Attention !
Ne régler le câble Bowden que lorsque le moteur
est arrêté.
1. Tourner l'organe de réglage sur le câble Bowden
dans le sens de la fl èche (
27).
Ne pas éliminer les appareils usagés, les
batteries ou les accus avec les déchets
ménagers !
Le carton d‘emballage, l‘appareil et les accessoires
sont fabriqués en matériaux recyclables et doivent
être éliminés en conséquence.
53
Page 54

F
Aide en cas de mauvais fonctionnement
Attention !
Ne pas redresser la lame ni l'arbre moteur.
Problème Solution
Le moteur ne démarre pas ▪ Faire le plein d'essence
▪ Placer la manette des gaz sur « Start »
▪ Actionner le démarreur
▪ Pousser la commande d'entraînement du moteur vers la partie supérieure du
guidon
▪ Contrôler les bougies d'allumage et les remplacer si nécessaire
▪ Nettoyer le fi ltre à air
▪ Faire tourner la lame de coupe librement
▪ Recharger la batterie de démarrage
▪ Démarrer sur une surface déjà tondue
La puissance du moteur
diminue
Coupe irrégulière ▪ Affûter/remplacer la lame de coupe
Le bac à herbe ne se remplit
pas suffi samment
La transmission roues ne
fonctionne pas
Les roues ne tournent pas
alors que la transmission est
engagée
L'appareil produit des vibrations
anormalement élevées
▪ Corriger la hauteur de coupe
▪ Affûter/remplacer la lame de coupe
▪ Nettoyer le conduit d'éjection/carter
▪ Nettoyer le fi ltre à air
▪ Réduire la vitesse de travail
▪ Corriger la hauteur de coupe
▪ Corriger la hauteur de coupe
▪ Laisser sécher la pelouse
▪ Affûter/remplacer la lame de coupe
▪ Nettoyer la grille du bac à herbe
▪ Nettoyer le conduit d'éjection/carter
▪ Régler le câble Bowden
▪ Courroie trapézoïdale défectueuse
▪ S'adresser à un atelier de service après-vente
▪ Saletés dans la transmission roues, retirer la courroie dentée et la transmission
▪ Pulvériser de l'huile sur les roues libres (pignon d'entraînement sur l'arbre de
commande)
▪ Resserrer les vis de roue
▪ Moyeu de roue défectueux
▪ Courroie trapézoïdale défectueuse
▪ S'adresser à un atelier de service après-vente
▪ Vérifi er la lame de coupe
Tondeuse à gazon à essence
En cas de défauts ne fi gurant pas sur ce tableau ou que vous ne pouvez pas corriger vous-même, veuillez-vous
adresser à notre service après-vente compétent.
54
Traduction du mode d'emploi original
Page 55

Une vérifi cation par un spécialiste est toujours
nécessaire :
après avoir heurté un obstacle
en cas d'arrêt soudain du moteur
en cas de détérioration de la transmission
en cas de courroie défectueuse
en cas de déformation du couteau
en cas de déformation de l'arbre moteur
F
Déclaration de conformité CE
voir les instructions de montage
Garantie
Les défauts matériels ou de fabrication éventuels sur l'appareil sont couverts par notre garantie pendant la période
de garantie légale pour les réclamations et nous les corrigeons à notre gré par une réparation ou une livraison de
remplacement. La période de garantie est déterminée selon la loi du pays où l'appareil a été acheté.
Notre confi rmation de garantie ne s'applique
qu'en cas de :
traitement correct de l'appareil
respect du mode d‘emploi original
utilisation de pièces de rechange d'origine
Ne sont pas couverts par la garantie :
Les détériorations de la peinture dues à une usure normale
Les pièces d'usure sui fi gurent en encadré sur la carte des pièces de rechange XXX XXX (X)
Les moteurs à combustion – ces derniers sont couverts par les prestations de garantie des fabricants de moteur
correspondants
Dans un cas impliquant la garantie, veuillez-vous adresser avec cette carte de garantie et votre bon d'achat à votre
revendeur ou au centre de service-après vente agréé le plus proche. De par cet accord de garantie, les prestations
en garantie légales de l'acheteur vis à vis du vendeur ne sont pas affectées.
La garantie s'éteint en cas de :
tentatives de réparation sur l'appareil
modifi cations techniques de l'appareil
d'utilisation non conforme à l'usage prévu
(p. ex utilisation commerciale ou municipale)
┌──────┐
└──────┘
55
Page 56

E
Cortacésped de gasolina
Respecto a este manual
Lea detenidamente estas instrucciones de
uso antes de proceder a la puesta en marcha.
La lectura de las instrucciones es requisito
imprescindible para el trabajo seguro y el manejo
exento de fallos.
funcionamiento, familiarícese con los elementos de
manejo y su uso.
Tenga en cuenta las indicaciones de seguridad y de
advertencia que encontrará en esta documentación
y en el aparato.
Conserve estas instrucciones para el uso y
entrégueselas también a posteriores usuarios.
Antes de poner el aparato en
Aclaración de los símbolos
¡Atención!
La observancia estricta de estas indicaciones de
advertencia puede evitar lesiones físicas y / o
daños materiales.
Indicaciones especiales para una mejor
comprensión y manejo.
El símbolo de la cámara le remite a ilustraciones.
Índice
Respecto a este manual .............................................. 56
Descripción del producto ............................................. 56
Dispositivos de seguridad y de protección .................. 56
Indicaciones de seguridad ........................................... 58
Montaje ........................................................................ 59
Repostar ...................................................................... 59
Puesta en marcha .......................................................60
Arranque eléctrico (opción) .........................................63
Cuidado y mantenimiento ............................................ 64
Almacenamiento .......................................................... 65
Solución en caso de anomalías ................................... 66
Reparaciones .............................................................. 67
Eliminación .................................................................. 67
Garantía ....................................................................... 67
Declaración de conformidad CE .................................. 67
56
Descripción del producto
En la presente documentación están descritos diferentes
modelos de cortacésped de gasolina. Algunos modelos
están equipados con un recogedor de hierba y además
tienen la función de mantillo.
Identifi que su modelo mediante las fi guras de los
productos y la descripción de las distintas funciones.
Uso acorde a los fi nes establecidos
Este aparato está concebido para cortar el césped en un
área privada y debe emplearse únicamente en césped
seco.
Un uso distinto o más amplio se considerará no acorde a
los fi nes establecidos.
Posible uso indebido
Este cortacésped no es adecuado para el uso en
lugares públicos, parques, instalaciones deportivas,
ni para la agricultura o la silvicultura.
Los dispositivos de seguridad no se deben
desmontar ni puentear.
El aparato no debe utilizarse si hay lluvia o el
césped está mojado.
El aparato no debe emplearse en el ámbito
industrial.
Dispositivos de seguridad y de protección
¡Atención! - Peligro de lesiones
No se deben desactivar los dispositivos de
seguridad y de protección.
Estribo de seguridad
El aparato está equipado con un estribo de seguridad.
En caso de peligro suelte el estribo de seguridad.
La cuchilla se detiene.
El motor se detiene.
Traducción del manual de instrucciones original
Page 57

Trampilla de desvío
La trampilla de desvío protege de partículas que puedan salir despedidas.
E
11
2
16
2
1 Cuerda de arranque 9 Ajuste de la altura de corte*
2 Arranque, parada* 11 Transmisión vario*
3 Transmisión de las ruedas* 12 Manual de instrucciones
4 Estribo de seguridad 13 Función de proyección*
5 Ajuste de altura ergonómico* 14 Trampilla de cierre*
6 Indicador del nivel de llenado* 15 Kit de mantillo*
7 Trampilla de desvío* 16 De encendido de arranque eléctrico
8 Recogedor de hierba*
Símbolos en el aparato
¡Atención!
Preste especial atención durante la manipulación.
¡Antes de poner en marcha el aparato, lea las
instrucciones de manejo!
¡Mantenga alejadas a terceras personas de la zona
de peligro!
¡Mantenga alejados las manos y los pies del
dispositivo de corte!
Manténgase a distancia de la zona de peligro.
Antes de realizar trabajos en el dispositivo
de corte, retire el enchufe de las bujías.
57
Page 58

E
Localice los daños en el cortacésped y lleve
a cabo los trabajos de reparación necesarios,
antes de ponerlo en servicio de nuevo.
Símbolos adicionales en aparatos con arranque
eléctrico
¡Atención! Peligro de descarga eléctrica.
Mantenga alejado el cable de conexión de las
cuchillas de corte.
Desconecte siempre el aparato antes de los
trabajos de mantenimiento o en caso de cables
dañados.
Indicaciones de seguridad
¡Atención!
Utilice el aparato únicamente si se encuentra en
perfecto estado técnico.
¡Atención! - Peligro de lesiones
No se deben desactivar los dispositivos de
seguridad y de protección.
¡Atención! - Riesgo de incendio
No almacene la máquina con el depósito de
gasolina lleno en edifi cios, en los que el humo de
la gasolina pueda entrar en contacto con llamas
o chispas.
Mantenga la zona del motor, del escape, del
compartimento de la batería y del depósito de
combustible libre de residuos de hierba, gasolina
y aceite.
Mantenga alejadas a terceras personas de la zona
de peligro
La persona encargada de la máquina o el usuario
será responsable de accidentes que afecten a otras
personas y a sus pertenencias
No pueden utilizar esta máquina los niños ni otras
personas que no conozcan estas instrucciones de uso
Tenga en cuenta las disposiciones locales respecto
a la edad mínima del operario
No manipule este aparato bajo los efectos del
alcohol, drogas o medicamentos
Póngase ropa de trabajo adecuada
Pantalón largo
Calzado fi rme y que no resbale
Protección auditiva
Al realizar trabajos en pendientes
asegúrese de estar en una posición segura
Cortacésped de gasolina
corte el césped siempre en sentido transversal
a la pendiente, nunca hacia arriba o abajo
no corte césped en pendientes con una
inclinación superior a los 20°
preste especial atención al girar
Trabaje solamente si dispone de sufi ciente luz solar
o artifi cial
Mantenga el cuerpo, los miembros y las prendas de
vestir alejados del dispositivo de corte
Tenga en cuenta las disposiciones específi cas de
cada país respecto a las horas de servicio
No deje sin vigilancia el aparato estando listo para
el servicio
Corte el césped sólo con una cuchilla afi lada
No utilice el aparato si tiene los dispositivos o
rejillas de seguridad dañadas
No utilice el aparato si no tiene todos los
dispositivos de seguridad montados (p. ej.: trampilla
de desvío, dispositivos de recogida de hierba)
Compruebe antes su utilización si el aparato
presenta daños, sustituya los componentes
dañados antes de volver a utilizarlo
Desconecte el motor, espere a que el aparato se
detenga completamente y retire el enchufe de las
bujías
al abandonar el aparato
tras la aparición de averías
antes de desbloquearlo
antes de desatascarlo
tras el contacto con cuerpos extraños
cuando se produzca alguna anomalía o el apa-
rato vibre de forma inusual
Localice los daños en el cortacésped y lleve
a cabo los trabajos de reparación necesarios,
antes de ponerlo en servicio de nuevo.
Conecte el enchufe de las bujías y arranque el motor
tras solucionar la avería (véase tabla de
averías) y comprobar el aparato
tras limpiar el aparato
Compruebe completamente y con cuidado el
terreno sobre el cual se va a cortar el césped
y retire todos los cuerpos extraños
Tenga especial cuidado al darle la vuelta al
cortacésped o al acercarlo hacia usted
No corte el césped donde haya obstáculos
(p. ej. ramas, raíces de árboles)
58
Traducción del manual de instrucciones original
Page 59

Retire el material cortado sólo con el motor apagado
El aceite usado no debe:
tirarse a la basura
ni verterse por una alcantarilla, un desagüe
o a la tierra
Desconecte el motor y la cuchilla de corte cuando
vaya a atravesar una zona que no sea la que
vayamos a cortar
No eleve ni transporte el aparato estando el motor
en marcha
No coma ni beba al rellenar la gasolina o el aceite
de motor
No inhale el humo de la gasolina
Guíe el aparato lentamente
Antes del uso, compruebe que las tuercas, los tor-
nillos y los pernos están bien apretados.
Montaje
Tenga en cuenta las instrucciones de montaje adjuntas.
¡Atención!
El aparato no podrá manejarse hasta que no se
haya montado completamente.
Repostar
Antes de la puesta en servicio, deberá echar gasolina al
cortacésped.
Advertencia - Riesgo de incendio
¡La gasolina y el aceite son altamente infl amables!
Tenga siempre en cuenta las instrucciones de
manejo suministradas del fabricante del motor.
Materiales de servicio
Conserve la gasolina y el aceite sólo en los
recipientes previstos para ello
Rellene o vacíe la gasolina o el aceite únicamente
con el motor frío y al aire libre
No rellene la gasolina o el aceite con el motor en
marcha
No llene en exceso el depósito (la gasolina se dilata)
No fume al rellenar el depósito
No abra el tapón del depósito con el motor
encendido o caliente
Sustituya el depósito o el tapón del mismo en caso
de estar dañados
Cierre con fuerza el tapón del depósito
En caso de que se haya derramado gasolina:
No arranque el motor
Evite intentar encenderlo
Limpie el aparato
En caso de derrame del aceite de motor:
No arranque el motor
Recoja el aceite derramado con un aglutinante
o con un paño y elimínelo de forma apropiada
Limpie el aparato
El aceite usado no debe:
tirarse a la basura
ni verterse por una alcantarilla, un desagüe
o a la tierra
Le recomendamos entregar el aceite usado en un
recipiente cerrado en un centro de reciclaje o en una
delegación del servicio postventa.
Rellenar de gasolina
E
Gasolina Aceite de motor
Clase
Cantidad de
llenado
Gasolina
normal /
sin plomo
véanse las
indicaciones del
fabricante
véanse las
indicaciones del
fabricante
aprox. 0,6 l
Seguridad
Advertencia
No deje nunca el motor en marcha en estancias
cerradas. ¡Peligro de intoxicación!
1. Desatornille la tapa del depósito, colóquela en un
lugar limpio.
2. Rellene de gasolina con ayuda de un embudo.
3. Cierre bien la apertura para rellenar el depósito y
límpiela.
Rellenar de aceite de motor
1. Desatornille la tapa de llenado de aceite, coloque el
cierre en un lugar limpio.
2. Rellene de aceite con ayuda de un embudo.
3. Cierre bien la apertura para rellenar de aceite y
límpiela.
59
Page 60

E
Puesta en marcha
¡Atención!
No utilice nunca el aparato si el dispositivo de
corte o las piezas de sujeción estuvieran sueltas,
dañadas o desgastadas.
Realice un control visual antes de cada puesta
en servicio.
El símbolo de la cámara que encontrará en las
siguientes páginas le remite a las ilustraciones en
la página 4–7.
Cortacésped de gasolina
Cortar el césped con recogedor de hierba
Ajustar la altura de corte
¡Atención! - Peligro de lesiones
Ajuste la altura de corte únicamente con el motor
y la cuchilla de corte apagados.
▪ Ajuste siempre todas las ruedas a la misma
altura de corte.
▪ El ajuste de la altura de corte depende de cada
modelo.
Ajuste de ejes o central (
1. Presione hacia un lado la palanca para
desbloquear y sujétela.
2. Empuje hacia la izquierda o derecha la palanca
hasta alcanzar la altura de corte deseada.
3. Encaje la palanca.
4. Asegúrese de que todas las ruedas tengan la
misma posición de encaje.
2)
¡Atención! - Peligro de lesiones
Retire o coloque el recogedor de hierba
únicamente con el motor y la cuchilla de corte
apagados.
1. Eleve la trampilla de desvío y cuelgue el recogedor
de hierba en el soporte (
6).
Indicador del nivel de llenado
El indicador del nivel de llenado va subiendo según
se corta el césped presionado por la corriente de aire
5a).
(
Si el recogedor de hierba está lleno, el indicador del nivel
de llenado habrá llegado al depósito (
ciarse el recogedor de hierba.
5b). Deberá va-
Vaciar el recogedor de hierba
1. Levante la trampilla de desvío.
2. Descuelgue el recogedor de hierba y retírelo hacia
atrás (
6).
3. Vacíe el recogedor de hierba.
4. Levante la trampilla de desvío y vuelva a colocar el
recogedor de hierba en el soporte (
6).
60
Traducción del manual de instrucciones original
Page 61

E
Cortar el césped sin recogedor de hierba
¡Atención!
Corte el césped sin recogedor de hierba
únicamente cuando el muelle giratorio de
la trampilla de desvío muestre un correcto
funcionamiento.
La trampilla de desvío se ajusta a la cubierta del
cortacésped mediante unos resortes. Así, la hierba
cortada cae debajo por detrás.
Cubrir con mantillo con su kit correspondiente
(opción)
Al cubrir con mantillo, el material cortado no se recoge,
sino que se queda sobre la hierba. El mantillo protege
el suelo haciendo que no se reseque y le proporciona
nutrientes.
Los mejores resultados se obtienen cortando aprox.
2 cm de forma regular. Sólo el césped joven con hojas
blandas se descompone rápido.
Altura del césped antes de cubrir con mantillo:
Máximo 8 cm
Altura del césped después de cubrir con mantillo:
Mínimo 4 cm
Adapte la velocidad de sus pasos al cubrir el
mantillo, no vaya demasiado rápido.
Emplear el kit de mantillo
¡Atención! - Peligro de lesiones
Coloque o retire el kit de mantillo únicamente con
el motor y cuchilla de corte apagados.
1. Retire el recogedor de hierba (
2. Levante la trampilla de desvío y coloque el kit de
mantillo en el compartimento de proyección (
El bloqueo deberá encajarse.
Si no se encaja el kit de mantillo, tanto éste como
la cuchilla de corte podrían dañarse.
6).
7).
Retirar el kit de mantillo
1. Levante la trampilla de desvío.
2. Suelte el bloqueo del kit (
3. Extraiga el kit (
8/2).
8/1).
Cortar el césped con proyección lateral (opción)
¡Atención! - Peligro de lesiones
Retire o coloque el sistema de proyección lateral
únicamente con el motor y la cuchilla de corte
apagados.
Colocar el sistema de proyección lateral
1. Retire el recogedor de hierba y coloque el kit de
mantillo.
2. Abra la protección para el sistema de proyección
lateral y sujétela (
3. Coloque el canal de proyección lateral (
4. Cierre lentamente la protección.
Esta protección evita que se caiga el canal de
proyección lateral.
Retirar el sistema de proyección lateral
1. Abra la protección para el sistema de proyección
lateral y sujétela (
2. Retire el sistema de proyección lateral y cierre la
protección (
9/1).
9/2).
9/1).
9/2).
Ajuste de la altura de la barra (opción)
Ajuste mediante sujeción
1. Sujete la barra y suelte ambas sujeciones
(
10).
2. Coloque la barra en la posición deseada.
3. Cierre las sujeciones.
61
Page 62

E
Cortacésped de gasolina
Arranque del motor
¡Atención! - Peligro de intoxicación
No deje nunca el motor en marcha en estancias
cerradas.
¡Atención! - Peligro de lesiones
No vuelque el aparato antes de arrancarlo.
▪ Arranque el motor únicamente con la cuchilla
montada (la cuchilla actúa como volante de
inercia)
▪ Al arrancar un motor caliente no pulse los
botones de Choke o Primer
▪ No modifi que los ajustes del regulador del
motor
No arranque el motor si el canal de proyección
no está protegido por uno de los siguientes
componentes:
Recogedor de hierba
Trampilla de desvío
Kit de mantillo
Accione el conmutador de arranque con especial
cuidado, siguiendo las indicaciones del fabricante
Asegúrese de mantener los pies a sufi ciente
distancia de la herramienta de corte
Arranque el aparato en césped bajo
Arranque manual
con aceleración con mando a distancia, con Choke
1. Sitúe la palanca de aceleración en la posición
max
2. Tire de la palanca de seguridad hacia el larguero
superior y sujétela (
seguridad no se enclava.
3. Tire de la cuerda de arranque rápido hacia fuera
para dejar después que se enrolle de nuevo
lentamente (
4. Después de calentar el motor (aprox. 15–20
segundos) sitúe la palanca de aceleración en una
posición entre min y max.
( 11/1).
16) – la palanca de
17).
con aceleración con mando a distancia, sin Primer/
Choke
5. Sitúe la palanca de aceleración en la posición
max (
6. Tire de la palanca de seguridad hacia el larguero
superior y sujétela (
no se enclava.
7. Tire de la cuerda de arranque rápido hacia fuera
para dejar después que se enrolle de nuevo
lentamente (
8. Después de calentar el motor (aprox. 15–20
segundos) sitúe la palanca de aceleración en una
posición entre min y max.
con aceleración con mando a distancia, con Primer
16)
(
1. Sitúe la palanca de aceleración en la posición
max (
2. Pulse el botón primer 3 veces, con un intervalo de
tiempo aproximado de 2 segundos (
temperaturas inferiores a 10 °C pulse el botón
primer 5 veces.
3. Tire de la palanca de seguridad hacia el larguero
exterior y sujétela (
no se enclava.
4. Tire de la cuerda de arranque rápido hacia fuera
para dejar después que se enrolle de nuevo
lentamente (
5. Tan pronto como el motor esté en marcha, sitúe la
palanca de aceleración en una posición entre
min y max.
12/1).
16) - la palanca de seguridad
17).
12/1).
15). Con
16) - la palanca de seguridad
17).
Arranque manual
sin aceleración con mando a distancia, con Choke
Choke
Encendido Apagado
1. Ponga el Choke en la posición 1 ( 13/1).
2. Tire de la palanca de seguridad hacia el larguero
superior y sujétela (
no se enclava.
17) – la palanca de seguridad
62
Traducción del manual de instrucciones original
Page 63

3. Tire de la cuerda de arranque rápido hacia fuera
para dejar después que se enrolle de nuevo
lentamente (
4. Después de calentar el motor (aprox. 15–20
segundos) ponga el Choke en la posición 2
(
13/2).
El motor dispone de un ajuste fi jo de revolu-
ciones.
No es posible regular las revoluciones.
sin aceleración con mando a distancia, con Primer
16)
(
1. Pulse el botón primer 3 veces, con un intervalo de
tiempo aproximado de 2 segundos (
temperaturas inferiores a 10 °C pulse el botón
primer 5 veces.
2. Tire de la palanca de seguridad hacia el larguero
superior y sujétela (
no se enclava.
3. Tire de la cuerda de arranque rápido hacia fuera
para dejar después que se enrolle de nuevo
lentamente (
El motor dispone de un ajuste fi jo de
revoluciones.
No es posible regular las revoluciones.
sin aceleración con mando a distancia, sin Primer/
Choke
4. Tire de la palanca de seguridad hacia el larguero
superior y sujétela (
no se enclava.
18).
16). Con
17) – la palanca de seguridad
18).
17) – la palanca de seguridad
Arranque eléctrico (opción)
Arranque eléctrico sin Primer/Choke ( 13)
1. Sitúe la palanca de aceleración en la posición
"START" (
2. Tire de la palanca de seguridad hacia el larguero
exterior y sujétela (
no se enclava.
3. Gire la llave de encendido en la cerradura de
encendido del todo hacia la derecha (
4. En cuanto el motor arranque, suelte la llave de
encendido (volverá a la posición "0").
5. Sitúe la palanca de aceleración según el régimen
del motor deseado en una posición entre
min y max.
Desconectar el motor.
Aparato sin acoplamiento de cuchillas
1. Sitúe la palanca de aceleración en la posición
min (
2. Suelte la palanca de seguridad (
- El motor se desconecta.
¡Atención peligro de cortes graves!
El motor puede seguir en marcha. Tras
desconectarlo, asegúrese de que el motor se
encuentra detenido.
13/1).
16) – la palanca de seguridad
18).
12/2)
22).
E
63
Page 64

E
Transmisión de las ruedas (opción) ( 20)
¡Atención!
Conecte adicionalmente el mecanismo de
transmisión únicamente con el motor en marcha.
Conectar la transmisión de las ruedas
1. Presione la palanca de accionamiento hacia el
larguero superior y sujétela (
accionamiento no se enclava.
- Se conecta la transmisión de las ruedas.
Desconectar la transmisión de las ruedas
1. Suelte la palanca de accionamiento (
- Se desconecta la transmisión.
Transmisión vario (Speed Control) (opción)
Gracias a la transmisión vario se puede cambiar sin etapas la velocidad de marcha del cortacésped.
¡Atención!
Accione la palanca únicamente con el motor en
marcha.
Cambiar sin motor de accionamiento puede dañar
el mecanismo de accionamiento.
Para una mayor velocidad tire de la palanca
20) en dirección ( 20/1)
(
Para una menor velocidad tire de la palanca
(
20) en dirección ( 20/2)
Adapte siempre la velocidad de la marcha al estado actual del suelo y del césped.
Cuidado y mantenimiento
¡Atención! - Peligro de lesiones
▪ Antes de ejecutar cualquier trabajo de
mantenimiento o conservación, desconecte el
motor y retire el enchufe de las bujías.
▪ El motor puede seguir en marcha. Tras
desconectarlo, asegúrese de que el motor se
encuentra detenido.
▪ Póngase guantes siempre que realice trabajos
de mantenimiento y conservación en la cuchilla
de corte.
19) – la palanca de
21).
Cortacésped de gasolina
Compruebe regularmente si el dispositivo de
recogida de hierba funciona correctamente y si está
desgastado
Limpie el aparato después de cada uso
No rocíe el aparato de agua, ya que el agua que
se introduzca podría producir averías (sistema de
encendido, carburador)
Compruebe con frecuencia posibles daños en la
cuchilla
Los silenciadores defectuosos deberán sustituirse
Inclinar el cortacésped
Según el fabricante:
el carburador o el fi ltro de aire deberá mirar hacia
arriba (
23)
la bujía de encendido deberá mirar hacia arriba
(
24)
Tenga en cuenta las instrucciones de uso del
fabricante del motor
Afi lar o sustituir la cuchilla
Las cuchillas desafi ladas o dañadas deberán afi lar-
se o sustituirse solamente en un punto de servicio
o taller autorizado
Las cuchillas afi ladas deberán equilibrarse
¡Atención!
Las cuchillas no equilibradas producen fuertes
vibraciones y dañan el cortacésped.
Cargar la batería del estárter (opción)
La batería del estárter no precisa mantenimiento y normalmente se carga con el cortacésped.
En casos excepcionales el usuario deberá cargar la
batería:
Antes de la primera puesta en servicio del corta-
césped
Si se descarga, antes del invierno o durante largos
períodos sin servicio (> 6 meses)
Proceso de carga:
1. Sacar el cargador del compartimento de la batería.
64
Traducción del manual de instrucciones original
Page 65

2. Desconecte el cable de la batería del cable del
motor (
3. Conecte el cable de la batería al cable del cargador
(
4. Conecte el cargador a la red.
La tensión de la red deberá ser igual a la tensión
de servicio del cargador.
El tiempo de carga es de aprox. 36 horas.
Utilice exclusivamente el cargador original suministrado.
25).
26).
¡Atención!
▪ Cargue la batería del estárter en un lugar seco
y bien ventilado.
▪ No ponga en marcha el cortacésped durante el
proceso de carga.
Mantenimiento del motor
Cambiar el aceite del motor
1. Prepare un recipiente adecuado para recoger el
aceite.
2. Dejar escurrir o aspirar el aceite completamente a
través de la apertura de llenado de aceite.
¡Elimine el aceite usado del motor conforme a las
disposiciones medioambientales!
Le recomendamos entregar el aceite usado en
un recipiente cerrado en un centro de reciclaje o
en una delegación del servicio postventa.
El aceite usado no deberá
▪ tirarse a la basura
▪ verterse por una alcantarilla o desagüe
▪ tirarse al suelo
Cambiar el fi ltro de aire
Tenga en cuenta las indicaciones del fabricante de
motores.
Cambiar las bujías
Tenga en cuenta las indicaciones del fabricante de
motores.
E
Transmisión (opción)
Ajuste del cable de Bowden
En caso de que no se pueda conectar o desconectar la
transmisión con el motor encendido, se deberá reajustar
el cable de Bowden correspondiente.
¡Atención!
Ajuste el cable de Bowden únicamente con el
motor desconectado.
1. Gire la pieza de ajuste del cable de Bowden en el
sentido de la fl echa (
2. Para comprobar el ajuste arranque el motor y
encienda la transmisión.
3. En caso de que siga sin funcionar la transmisión,
deberá llevar el cortacésped a un punto de servicio
o a un taller autorizado.
Engrasar el piñón de accionamiento
Engrase de vez en cuando el piñón de
accionamiento del árbol de engranajes con aceite
en spray
El mecanismo de la transmisión de las ruedas no
precisa mantenimiento.
Almacenamiento
¡Atención! - Peligro de explosión
No almacene el aparato donde pueda haber
llamas o fuentes de calor.
Deje enfriar el motor
Puede plegar el larguero superior para almacenar
ahorrando espacio (
Guarde el aparato en un lugar seco y fuera del
alcance de los niños o personas no autorizadas
Almacene la batería del estárter en un lugar sin
heladas
Cargue de nuevo la batería del estárter de vez en
cuando
Vacíe el depósito de gasolina
Retire el enchufe de las bujías
27).
28)
65
Page 66

E
Solución en caso de anomalías
¡Atención!
No manipule la cuchilla ni el eje del motor.
Anomalía Solución
El motor no arranca ▪ Repostar gasolina
▪ Situar la palanca de aceleración en "Start"
▪ Conectar el Choke
▪ Presionar el estribo de conmutación hacia el larguero superior
▪ Comprobar las bujías de encendido, sustituyéndolas en caso necesario
▪ Limpiar el fi ltro de aire
▪ Girar libremente la cuchilla de corte
▪ Recargar la batería del estárter
▪ Arrancar en una superfi cie con hierba cortada
La potencia del motor
disminuye
El corte no es limpio ▪ Afi lar o sustituir cuchilla de corte
El recogedor de hierba no se
llena lo sufi ciente
El mecanismo de transmisión
de las ruedas no funciona
Las ruedas con giran estando
la transmisión activada
El aparato vibra más de lo
habitual
▪ Corregir la altura de corte
▪ Afi lar o sustituir la cuchilla de corte
▪ Limpiar el canal de proyección de la hierba cortada o la carcasa
▪ Limpiar el fi ltro de aire
▪ Disminuir la velocidad de trabajo
▪ Corregir la altura de corte
▪ Corregir la altura de corte
▪ Dejar secar la hierba
▪ Afi lar o sustituir la cuchilla de corte
▪ Limpiar la rejilla del recogedor de hierba
▪ Limpiar el canal de proyección de la hierba cortada o la carcasa
▪ Reajustar el cable de Bowden
▪ Correa trapezoidal defectuosa
▪ Contactar con el servicio de atención al cliente
▪ Eliminar la suciedad del mecanismo de transmisión, correa dentada y transmisión
▪ Engrasar los piñones libres (piñón de accionamiento del árbol de engranajes) con
aceite en spray
▪ Volver a apretar los tornillos de las ruedas
▪ Cubo de rueda defectuoso
▪ Correa trapezoidal defectuosa
▪ Contactar con el servicio de atención al cliente
▪ Comprobar cuchilla de corte
Cortacésped de gasolina
En caso de anomalías que no se citen en esta tabla o que usted mismo no pueda solucionar diríjase, por
favor, al servicio de atención al cliente correspondiente.
66
Traducción del manual de instrucciones original
Page 67

Reparaciones
Los trabajos de reparación sólo podrán llevarse a cabo
en un punto de servicio o en un taller autorizado.
Eliminación
¡No tire a la basura doméstica los
aparatos, pilas o baterías usados!
E
Siempre será necesaria la comprobación por parte
de un experto:
tras haber chocado contra un obstáculo
al pararse de forma repentina el motor
en caso de daños en la transmisión
en caso de correa trapezoidal defectuosa
en caso de cuchillas dobladas
en caso de eje del motor doblado
El embalaje, el aparato y los accesorios están
fabricados con materiales reciclables y deben
eliminarse del modo adecuado.
Declaración de conformidad CE
Véanse las instrucciones de montaje
Garantía
Nosotros solucionamos los posibles fallos del material o de fabricación durante el plazo legal de prescripción de
derechos por defi ciencias según nuestro criterio mediante reparación o entrega supletoria. El plazo de prescripción se
determinará con arreglo a la legislación del país en el que se haya adquirido el aparato.
Nuestra declaración de garantía
es válida únicamente en caso de: La garantía se extingue cuando:
uso correcto del aparato
observancia de las instrucciones de uso
utilización de piezas de repuesto originales
Quedan excluidos de la garantía:
los daños de lacado derivados del desgaste normal
las piezas de desgaste que en la fi cha de piezas de repuesto están identifi cadas con el marco XXX XXX (X)
motores de combustión: para éstos serán de aplicación las regulaciones de garantía propias del fabricante de
motor en cuestión
se realizan intentos de reparación en el aparato
se realizan modifi caciones técnicas en el aparato
en caso de utilización no conforme a la fi nalidad
prevista (por ejemplo, utilización industrial o
comunal)
┌──────┐
└──────┘
En caso de proceder la garantía, rogamos se dirija con la presente declaración de garantía y el comprobante de
compra a su vendedor o al servicio autorizado de postventa más cercano. Los derechos legales por defi ciencias del
comprador frente al vendedor no se ven afectados por esta declaración de garantía.
67
Page 68

P
Cortador de relva a gasolina
Sobre este manual
Leia este manual de instruções antes de proceder
à colocação em funcionamento. Esta é uma
condição essencial para trabalhos seguros e um
manuseamento sem avarias. Antes da utilização,
deve familiarizar-se com os elementos de comando
e funcionamento da máquina.
Tenha atenção aos avisos de segurança e de
advertência constantes nesta documentação e no
aparelho.
Tenha o manual de instruções por perto durante a
utilização e faculte-o também a outros utilizadores.
Explicação dos símbolos
Atenção!
O cumprimento escrupuloso destas indicações
de advertência pode evitar danos pessoais e/ou
materiais.
Indicações especiais para facilitar a
compreensão e o manuseamento.
O símbolo da máquina fotográfi ca indica a
existência de imagens.
Índice
Sobre este manual ......................................................68
Descrição do produto ..................................................68
Dispositivos de segurança e de protecção .................. 68
Indicações de segurança ............................................. 70
Montagem .................................................................... 71
Abastecimento do depósito ......................................... 71
Colocação em funcionamento ..................................... 72
Arranque eléctrico (opção) .......................................... 75
Manutenção e conservação ........................................76
Armazenamento .......................................................... 77
Reparação ................................................................... 77
Eliminação ................................................................... 77
Ajuda em caso de avarias ........................................... 78
Garantia ....................................................................... 79
Declaração de conformidade CE ................................. 79
Descrição do produto
Neste documento, são descritos vários modelos de
cortadores de relva a gasolina. Alguns modelos estão
equipados com cesto de recolha de relva e/ou são
também adequados para "mulching" (cobertura do solo
com a relva cortada).
Pode identifi car o seu modelo através das imagens do
produto e da descrição das várias opções.
Utilização adequada
Este aparelho destina-se a cortar superfícies com relva
no sector privado e deve ser utilizado apenas em relva
seca.
Qualquer outro tipo de utilização é considerado
inadequado.
Possível utilização incorrecta
Este cortador de relva não é adequado para
utilização em instalações públicas, parques,
estádios desportivos, nem para agricultura ou
silvicultura.
Os dispositivos de segurança não devem ser
desmontados nem contornados.
O aparelho não deve ser utilizado à chuva ou em
relva molhada.
O aparelho não deve ser utilizado no sector
industrial.
Dispositivos de segurança e de protecção
Atenção - perigo de danos pessoais!
Não é permitido inutilizar os dispositivos de
segurança e de protecção!
Trave de segurança
O aparelho está equipado com uma trave de segurança.
Em situações de perigo deve soltar a trave de segurança.
Aparelho sem embraiagem da lâmina:
A lâmina de corte pára
O motor pára
Aparelho com embraiagem da lâmina:
A lâmina de corte pára
O motor continua em funcionamento
Defl ector
68
Tradução do manual de instruções original
Page 69

O defl ector protege contra a projecção de peças.
P
11
2
16
2
1 Cabo de arranque 9 Regulação da altura de corte*
2 Interruptor iniciar/parar* 10 Embraiagem da lâmina*
3 Trave de tracção às rodas* 11 Transmissão variável*
4 Trave de segurança 12 Manual de instruções
5 Regulação ergonómica da altura* 13 Unidade de descarga*
6 Indicador do nível de enchimento* 14 Tampa de fecho*
7Defl ector* 15 Kit de mulching*
8 Cesto de recolha de relva* 16 Ignição começo elétrico
17 Guia Rápido
Símbolos no aparelho
Atenção!
Tenha especial cuidado durante o manuseamento.
Leia o manual de instruções antes da colocação em
funcionamento!
Mantenha terceiros afastados da área de perigo!
Mantenha as mãos e os pés afastados do
mecanismo de corte!
Mantenha-se afastado da área de perigo.
Antes de efectuar trabalhos no
mecanismo de corte, desligue o conector
da vela de ignição.
Guia Rápido
Solte o travão do motor.
Guia Rápido
Active a tracção às rodas.
Guia Rápido
Inicie/pare o controlo da aceleração à
distância.
69
Page 70

P
Verifi que a existência de danos no cortador de
relva e efectue as reparações necessárias antes
de ligar e voltar a utilizar o cortador.
Símbolos adicionais nos aparelhos com arranque
eléctrico
Atenção! Perigo de choque eléctrico.
Mantenha o cabo de ligação afastado das
lâminas de corte.
Desligue sempre o aparelho da corrente antes
de realizar trabalhos de manutenção ou se o
cabo estiver danifi cado.
Indicações de segurança
Atenção!
Utilize o aparelho apenas em perfeitas condições
técnicas!
Atenção - perigo de danos pessoais!
Não é permitido inutilizar os dispositivos de
segurança e de protecção!
Atenção - perigo de incêndio!
Não armazene o aparelho com combustível no
depósito no interior de edifícios onde os vapores
da gasolina possam entrar em contacto com
chamas nuas ou faíscas!
Mantenha a área à volta do motor, escape,
caixa da bateria e depósito de combustível sem
resíduos de relva cortada, gasolina ou óleo.
Mantenha terceiros afastados da área de perigo
O operador ou utilizador do aparelho é responsável
por danos causados a outras pessoas e
respectivos bens
O aparelho não deve ser utilizado por crianças
nem por pessoas que não tenham lido o manual de
instruções
Respeite as disposições locais relativas à idade
mínima do operador
Não utilize o aparelho sob o efeito de álcool,
drogas ou medicamentos
Use vestuário de trabalho apropriado
calças compridas
calçado resistente e antiderrapante
protecção auricular
Nos trabalhos em superfícies inclinadas
tenha atenção para manter sempre a estabilidade
corte a relva sempre na diagonal, nunca para
Cortador de relva a gasolina
cima ou para baixo
não corte relva em inclinações com um ângulo
superior a 20°
cuidado especial na mudança de direcção
Trabalhe apenas com luz do dia ou iluminação
artifi cial sufi ciente
Mantenha o corpo, os membros e o vestuário
afastados do mecanismo de corte
Respeite as disposições nacionais relativas ao
tempo de funcionamento
Não deixe o aparelho sem supervisão quando está
pronto a utilizar
Corte a relva apenas com a lâmina de corte afi ada
Nunca utilize o aparelho com dispositivos/grelhas
de protecção danifi cados
Nunca utilize o aparelho sem ter os dispositivos
de protecção totalmente montados (por exemplo:
defl ector, dispositivos de recolha de relva)
Verifi que se o aparelho apresenta danos antes de
cada utilização e substitua as peças danifi cadas
antes de voltar a usá-lo
Desligue o motor, espere que o aparelho pare e
desligue o conector da vela de ignição
ao abandonar o aparelho
após a ocorrência de avarias
antes da remoção de bloqueios
antes da eliminação de entupimentos
após o contacto com corpos estranhos
quando surgem avarias e vibrações anormais
do aparelho
Verifi que a existência de danos no cortador de
relva e efectue as reparações necessárias antes
de ligar e voltar a utilizar o cortador.
Ligue o conector da vela de ignição e ligue o motor
depois de eliminar avarias (consulte a tabela
de avarias) e de inspeccionar o aparelho
depois de limpar o aparelho
Inspeccione cuidadosamente todo o terreno onde a
relva será cortada e retire todos os corpos estranhos
Tenha especial cuidado ao virar ou ao puxar o
cortador de relva
Não corte a relva sobre obstáculos
(por exemplo: ramos ou raízes de árvores)
70
Tradução do manual de instruções original
Page 71

Retire a relva cortada apenas com o motor desligado
O óleo usado não deve:
ser eliminado juntamente com o lixo
ser deitado em canalizações, esgotos ou
no solo
Desligue o motor/a lâmina de corte para atravessar
uma superfície onde não haja relva a cortar
Nunca levante nem transporte o aparelho com o
motor em funcionamento
Não coma nem beba durante o abastecimento de
gasolina ou óleo do motor
Não respire os vapores da gasolina
Conduzir o aparelho num ritmo lento
Antes da utilização, ter atenção ao correcto assen-
Montagem
Respeite as instruções de montagem fornecidas.
Atenção!
O aparelho só pode ser utilizado após estar
completamente montado.
Abastecimento do depósito
Antes da colocação em funcionamento, necessita de
abastecer o depósito do cortador de relva.
Aviso - perigo de incêndio!
A gasolina e o óleo são altamente infl amáveis!
Siga sempre o manual de instruções do fabricante do motor fornecido com o produto.
Consumíveis
Gasolina Óleo do motor
Tipo
Quantidade
Gasolina
normal/sem
chumbo
Consulte as
indicações do
fabricante do
motor
Segurança
Aviso!
Nunca ligue o motor em espaços fechados.
Perigo de intoxicação!
Armazene a gasolina e o óleo apenas nos
recipientes previstos para o efeito
Consulte as
indicações do
fabricante do motor
Aproximadamente
0,6 l
P
Abasteça ou drene a gasolina e o óleo apenas
quando o motor estiver frio e ao ar livre
Não abasteça de gasolina ou óleo com o motor em
funcionamento
Não encha o depósito excessivamente (a gasolina
dilata)
Não fume durante o abastecimento
Não abra a tampa do depósito com o motor quente
ou em funcionamento
Substitua o depósito ou a tampa do depósito se
estiverem danifi cados
Feche sempre bem a tampa do depósito
Em caso de vazamento de gasolina:
não ligue o motor
evite tentativas de ignição
limpe o aparelho
Em caso de vazamento de óleo do motor:
não ligue o motor
absorva o óleo do motor derramado com
um agente aglomerante de óleo ou trapos e
elimine correctamente
limpe o aparelho
O óleo usado não deve:
ser eliminado juntamente com o lixo
ser deitado em canalizações, esgotos ou
no solo
Recomendamos que o óleo usado seja entregue, num
recipiente fechado num centro de assistência técnica ou
num centro de reciclagem.
Abastecer com gasolina
1. Desenrosque a tampa do depósito e coloque-a
num local limpo.
2. Deite a gasolina através de um funil.
3. Feche bem e limpe a abertura de abastecimento
do depósito.
Abastecer com óleo do motor
1. Desenrosque a tampa de abastecimento de óleo e
coloque-a num local limpo.
2. Deite o óleo através de um funil.
3. Feche bem e limpe a abertura de abastecimento
de óleo.
71
Page 72

P
Cortador de relva a gasolina
Colocação em funcionamento
Atenção!
O aparelho não deve ser utilizado com o
mecanismo de corte ou as peças de fi xação
soltos, danifi cados ou desgastados!
Realize uma inspecção visual antes de cada
colocação em funcionamento.
O símbolo da máquina fotográfi ca apresentado
nas páginas seguintes remete para as fi guras da
página 4–7.
Regular a altura de corte
Atenção - perigo de danos pessoais!
Regule a altura de corte apenas com o motor
desligado e com a lâmina de corte parada.
▪ Regule sempre todas as rodas com a mesma
altura de corte.
▪ A regulação da altura de corte depende do
modelo.
Regulação central (
1. Mantenha pressionado o botão de regulação
central da altura (
Para relva curta, empurre o manípulo de
regulação central da altura para baixo (
Para relva comprida, puxe o manípulo de
regulação central da altura para cima (
Será mostrado o nível da regulação central da
altura (
2. Solte o botão na altura de corte desejada.
Regulação por eixo ou regulação central (
1. Para desengatar a alavanca, empurre e segure-a
para o lado.
2. Desloque a alavanca para a esquerda ou para a
direita até à altura de corte desejada.
3. Deixe a alavanca engatar.
4. Assegure que todas as rodas fi cam na mesma
posição de engate.
1)
1/1).
1/2)
1/2)
1/3)
2, 3)
Regulação por eixo (
1. Para desengatar a alavanca, empurre e segure-a
para o lado.
2. Desloque a alavanca para a esquerda ou para a
direita até à altura de corte desejada.
3. Deixe a alavanca engatar.
4. Assegure que todas as rodas fi cam na mesma
posição de engate.
4)
Cortar relva com o cesto de recolha
Atenção - perigo de danos pessoais!
Retire ou coloque o cesto de recolha de relva
apenas com o motor desligado e com a lâmina
de corte parada.
1. Levante o defl ector e engate o cesto de recolha de
relva nos suportes (
6).
Indicador do nível de enchimento
O indicador do nível de enchimento é empurrado para
cima pela corrente de ar criada ao cortar a relva (
Se o cesto de recolha de relva estiver cheio, o indicador
do nível de enchimento fi ca encostado ao cesto (
O cesto de recolha de relva deve ser esvaziado.
5a).
5b).
Esvaziar o cesto de recolha de relva
1. Levante o defl ector.
2. Desengate o cesto de recolha de relva e retire-o
por trás (
3. Esvazie o cesto de recolha de relva.
4. Levante o defl ector e volte a engatar o cesto de
recolha de relva nos suportes (
6).
6).
Cortar relva sem o cesto de recolha
Atenção!
Cortar relva sem cesto de recolha apenas
se a mola rotativa do defl ector estiver funcional.
Devido à força da mola, o defl ector permanece encostado
à caixa do cortador de relva. Desta forma, a relva cortada
é atirada para trás, por baixo do cortador.
72
Tradução do manual de instruções original
Page 73

Cobertura do solo com o kit de mulching
(opção)
No mulching, a relva cortada não é recolhida, fi cando de-
positada no relvado. O mulching impede que o solo fi que
ressequido e alimenta-o com nutrientes.
Os melhores resultados são obtidos com um corte paralelo regular de aproximadamente 2 cm. Apenas a relva
nova com textura mole apodrece rapidamente.
Altura da relva antes do mulching: no máximo 8 cm
Altura da relva depois do mulching: no mínimo 4 cm
Adapte a velocidade de corte ao mulching, não
devendo utilizar uma velocidade demasiado
rápida.
Colocar o kit de mulching
1. Retire o cesto de recolha de relva e coloque o kit
de mulching.
2. Abra e segure a tampa da unidade de descarga
lateral (
3. Coloque o canal de descarga lateral (
4. Feche a tampa lentamente.
A tampa impede que o canal de descarga lateral
caia.
Retirar a unidade de descarga lateral
1. Abra e segure a tampa da unidade de descarga
lateral (
2. Retire a unidade de descarga lateral e feche a
tampa (
9/1).
9/2).
9/1).
9/2).
Defi nir a altura do guiador (opção)
P
Atenção - perigo de danos pessoais!
Coloque e retire o kit de mulching apenas com o
motor desligado e com a lâmina de corte parada.
1. Retire o cesto de recolha de relva (
2. Levante o defl ector e coloque o kit de mulching na
conduta de descarga (
O dispositivo de bloqueio deve fi car engatado.
Se o kit de mulching não engatar, tanto o kit de
mulching como a lâmina de corte podem fi car
danifi cados.
Remover o kit de mulching
1. Levante o defl ector.
2. Solte o dispositivo de bloqueio do kit de mulching
(
8/1).
3. Retire o kit de mulching (
7).
8/2).
6).
Cortar relva com a unidade de descarga lateral
(opção)
Atenção - perigo de danos pessoais!
Retire e coloque a unidade de descarga lateral
apenas com o motor desligado e com a lâmina de
corte parada.
Colocar a unidade de descarga lateral
Regulação dos bloqueios
1. Segure a barra e solte os dois bloqueios
(
10).
2. Coloque a barra na posição desejada.
3. Feche os bloqueios.
Ligar o motor
Atenção - perigo de intoxicação!
Nunca ligue o motor em espaços fechados.
Atenção - perigo de danos pessoais!
Não incline o aparelho durante o processo de
arranque.
▪ Ligue o motor só depois de montar a lâmina
(a lâmina funciona como massa oscilante)
▪ NÃO utilize a bobina de arranque nem o botão
da ignição para ligar o motor já operacional
▪ Não altere a regulação do controlador no motor
Não ligue o aparelho se o canal de descarga não
estiver coberto por uma das seguintes peças:
cesto de recolha de relva
defl ector
kit de mulching
Accione o interruptor de arranque com bastante
cuidado, de acordo com as instruções do fabricante
73
Page 74

P
Assegure que existe distância sufi ciente entre os
pés e a ferramenta de corte
Ligue o motor em relva baixa
Arranque manual
Com controlo da aceleração à distância e com
bobina de arranque
1. Coloque a alavanca de aceleração na posição
max
2. Aproxime a trave de segurança da barra superior
e segure-a (
engata.
3. Puxe rapidamente o cabo de arranque e deixe
rebobinar lentamente (
4. Quando o motor aquecer (aproximadamente 15–20
segundos), coloque a alavanca de aceleração
numa posição entre min e max.
Com controlo da aceleração à distância, mas
sem botão de ignição/bobina de arranque
1. Coloque a alavanca de aceleração na posição
max (
2. Aproxime a trave de segurança da barra superior
e segure-a (
engata.
3. Puxe rapidamente o cabo de arranque e deixe
rebobinar lentamente (
4. Quando o motor aquecer (aproximadamente 15–20
segundos), coloque a alavanca de aceleração
numa posição entre min e max.
Arranque manual
Sem controlo da aceleração à distância, mas com
bobina de arranque
Bobina de
arranque
Ligada Desligada
1. Coloque a bobina de arranque na posição 1 ( 13/1).
2. Aproxime a trave de segurança da barra superior e
segure-a (
3. Puxe rapidamente o cabo de arranque e deixe
rebobinar lentamente (
74
( 11/1).
16) – a trave de segurança não
17).
12/1).
16) – a trave de segurança não
17).
17) – a trave de segurança não engata.
18).
Cortador de relva a gasolina
4. Quando o motor aquecer (aproximadamente
15–20 segundos), coloque a bobina de arranque
na posição 2 (
O motor dispõe de uma regulação fi xa da
aceleração.
Não é possível regular a velocidade.
Sem controlo da aceleração à distância, mas com
botão de ignição (
1. Prima o botão da ignição 3 vezes com um intervalo
de aproximadamente 2 segundos (
temperaturas inferiores a 10 °C, prima o botão da
ignição 5 vezes.
2. Aproxime a trave de segurança da barra superior e
segure-a (
3. Puxe rapidamente o cabo de arranque e deixe
rebobinar lentamente (
O motor dispõe de uma regulação fi xa da
aceleração.
Não é possível regular a velocidade.
Sem controlo da aceleração à distância e sem botão
de ignição/bobina de arranque
4. Aproxime a trave de segurança da barra superior e
segure-a (
5. Puxe rapidamente o cabo de arranque e deixe
rebobinar lentamente (
Com controlo da aceleração à distância e com botão
de ignição (
1. Coloque a alavanca de aceleração na posição
max (
2. Prima o botão da ignição 3 vezes com um intervalo
de aproximadamente 2 segundos (
temperaturas inferiores a 10 °C, prima o botão da
ignição 5 vezes.
3. Aproxime a trave de segurança da barra superior e
segure-a (
4. Puxe rapidamente o cabo de arranque e deixe
rebobinar lentamente ( 17).
5. Assim que o motor ligar, coloque a alavanca de
aceleração numa posição entre max e max
para defi nir a velocidade desejada.
13/2).
16)
16). Com
17) – a trave de segurança não engata.
18).
17) – a trave de segurança não engata.
18).
16)
12/1).
15). Com
16) - a trave de segurança não engata.
Tradução do manual de instruções original
Page 75

P
Arranque eléctrico (opção)
Arranque eléctrico com botão de ignição ( 13)
1. Coloque a alavanca de aceleração na posição
"START" (
2. Prima o botão da ignição 3 vezes com um intervalo
de aproximadamente 2 segundos (
temperaturas inferiores a 10 °C, prima o botão da
ignição 5 vezes.
3. Aproxime a trave de segurança da barra superior e
segure-a (
4. Com a chave na ignição, rode totalmente para a
direita (
5. Assim que o motor ligar, solte a chave de ignição
(volta para a posição "0").
6. Coloque a alavanca de aceleração numa posição
entre min e max, de acordo a velocidade
desejada.
Arranque eléctrico sem botão de ignição/bobina de
arranque (
1. Coloque a alavanca de aceleração na posição
"START" (
2. Aproxime a trave de segurança da barra superior e
segure-a (
3. Com a chave na ignição, rode totalmente para a
direita (
4. Assim que o motor ligar, solte a chave de ignição
(volta para a posição "0").
5. Coloque a alavanca de aceleração numa posição
entre min e max, de acordo a velocidade
desejada.
Embraiagem da lâmina (opção)
Com a embraiagem da lâmina é possível activar e desactivar a lâmina de corte, sem desligar o motor.
Activar a lâmina de corte
1. Desloque a trave de segurança em direcção à
barra superior e segure-a (
segurança não engata.
13/1).
15). Com
16) – a trave de segurança não engata.
18).
13)
13/1).
16) – a trave de segurança não engata.
18).
16) - A trave de
2. Afaste a alavanca da embraiagem do corpo ( 14/1)
- A lâmina de corte é activada.
Desactivar a lâmina de corte
Solte a trave de segurança (
- A lâmina de corte é desactivada.
- A alavanca da embraiagem volta para a posição de
repouso (
14/2).
22).
Desligar o motor
Aparelho sem embraiagem da lâmina
1. Coloque a alavanca de aceleração na posição
min (
2. Solte a trave de segurança (
- O motor desliga.
Aparelho com embraiagem da lâmina
1. Solte a trave de segurança (
2. Coloque a alavanca de aceleração na posição
min (
- O motor desliga.
12/2)
22).
Atenção! Perigo de ferimentos por corte graves!
O motor pode continuar a funcionar por inércia.
Depois de desligar, certifi que-se de que o motor
pára.
22).
12/2).
Atenção! Perigo de ferimentos por corte graves!
O motor pode continuar a funcionar por inércia.
Depois de desligar, certifi que-se de que o motor
pára.
Tracção às rodas (opção) ( 20)
Atenção!
Ligue a transmissão apenas com o motor em
funcionamento.
Activar a tracção às rodas
1. Empurre a alavanca de accionamento da
transmissão em direcção à barra superior e
segure-a (
transmissão não engata.
- A tracção às rodas é activada.
19) – a alavanca de accionamento da
75
Page 76

P
Cortador de relva a gasolina
Desactivar a tracção às rodas
1. Solte a alavanca de accionamento da transmissão
21).
(
- A tracção às rodas é desactivada.
Transmissão variável (Speed Control) (opção)
Com a transmissão variável é possível alterar continuamente a velocidade de marcha do cortador de relva.
Atenção!
Accione a alavanca apenas com o motor em
funcionamento.
Caso contrário, o mecanismo da transmissão
pode fi car danifi cado.
Para velocidades mais altas, desloque a alavanca
20) na direcção ( 20/2)
(
Para velocidades mais baixas, desloque a alavanca
(
20) na direcção ( 20/1)
Adapte sempre a velocidade de marcha ao estado actual do solo e da relva.
Manutenção e conservação
Atenção - perigo de danos pessoais!
▪ Antes de quaisquer trabalhos de manutenção
e conservação, desligue sempre o motor e o
conector da vela de ignição.
▪ O motor pode continuar a funcionar por inércia.
Depois de desligar, certifi que-se de que o motor
pára.
▪ Use sempre luvas de trabalho durante os
trabalhos de manutenção e conservação na
lâmina de corte!
Verifi que regularmente o funcionamento e o
desgaste do dispositivo de recolha de relva.
Limpe sempre o aparelho depois de cada utilização
Não lave o aparelho com jactos de água.
A penetração da água pode causar avarias
(sistema de ignição, carburador)
Inspeccione regularmente se a lâmina de corte
apresenta danos
Substitua sempre os silenciadores danifi cados
Inclinar o cortador de relva
Conforme o fabricante do motor, deve:
virar o carburador/fi ltro de ar para cima (
virar a vela de ignição para cima (
Siga o manual de instruções do fabricante do
motor!
23)
24)
Afi ar/substituir a lâmina de corte
As lâminas de corte rombas ou danifi cadas devem
ser afi adas/substituídas apenas num centro de
assistência técnica ou ofi cina autorizada
As lâminas de corte afi adas devem ser equilibradas
Atenção!
As lâminas não equilibradas causam vibrações
fortes e danifi cam o cortador de relva.
Carregar a bateria de arranque (opção)
A bateria de arranque não requer manutenção e,
normalmente, é carregada pelo cortador de relva.
Em casos especiais, o utilizador deve carregar a bateria:
Antes da primeira colocação em funcionamento do
cortador de relva
Em caso de descarga, antes da pausa do Inverno
ou devido a longos períodos de inactividade
(> 6 meses)
Processo de carregamento:
1. Retire o carregador da caixa da bateria.
2. Desligue o cabo da bateria do cabo do motor ( 25).
3. Ligue o cabo da bateria ao cabo do carregador
26).
(
4. Ligue o carregador à rede eléctrica.
A tensão da rede eléctrica deve estar em
conformidade com a tensão de funcionamento do
carregador.
O tempo de carregamento é de aproximadamente
36 horas.
Utilize apenas o carregador original fornecido.
76
Tradução do manual de instruções original
Page 77

Atenção!
▪ Carregue a bateria de arranque apenas em
espaços secos e bem ventilados.
▪ Não coloque o cortador de relva em
funcionamento durante o carregamento.
P
2. Para verifi car a regulação, ligue o motor e active a
tracção às rodas.
3. Se ainda assim a tracção às rodas não funcionar,
deve levar o cortador de relva a um centro de
assistência técnica ou ofi cina autorizada.
Conservação do motor
Mudar o óleo do motor
1. Tenha disponível um recipiente adequado para
recolher o óleo.
2. Drene ou aspire todo o óleo através da abertura de
abastecimento.
Elimine o óleo do motor usado de modo a não
poluir o ambiente!
Recomendamos que o óleo usado seja entregue,
num recipiente fechado, num centro de assistência técnica ou num centro de reciclagem.
O óleo usado não deve
▪ ser eliminado juntamente com o lixo
▪ ser deitado em canalizações ou esgotos
▪ ser deitado no solo
Substituir o fi ltro de ar
Respeite as instruções do fabricante do motor.
Substituir a vela de ignição
Respeite as instruções do fabricante do motor.
Tracção às rodas (opção)
Regular o cabo de controlo
Caso não seja possível activar ou desactivar a tracção
às rodas com o motor em funcionamento, deve regular o
respectivo cabo de controlo.
Lubrifi car o pinhão de accionamento
Lubrifi que regularmente o pinhão de accionamento
do eixo da transmissão, pulverizando-o com óleo
A engrenagem da trave de tracção às rodas não
requer manutenção.
Armazenamento
Atenção - perigo de explosão!
Não armazene o aparelho perto de chamas nuas
ou fontes de calor.
Deixe o motor arrefecer
Para poupar espaço, dobre a barra superior
28)
(
Guarde o aparelho num local seco e inacessível a
crianças e pessoas não autorizadas
Guarde a bateria de arranque num local onde não
fi que sujeita a geada
Recarregue a bateria de arranque regularmente
Esvazie o depósito da gasolina
Desligue o conector da vela de ignição
Reparação
Os trabalhos de reparação devem ser realizados
apenas num centro de assistência técnica ou ofi cina
autorizada.
Eliminação
Atenção!
Regule o cabo de controlo apenas com o motor
desligado.
1. Vire a peça de regulação do cabo de controlo na
direcção da seta (
27).
Não elimine aparelhos fora de uso,
pilhas e baterias juntamente com o lixo
doméstico!
A embalagem, o aparelho e os acessórios são
fabricados com materiais recicláveis e devem ser
eliminados de forma correspondente.
77
Page 78

P
Ajuda em caso de avarias
Atenção!
A lâmina e o eixo do motor não devem ser alinhados.
Avaria Solução
O motor não arranca ▪ Abasteça com gasolina
▪ Coloque a alavanca de aceleração na posição "Start"
▪ Ligue a bobina de arranque
▪ Empurre a alavanca do motor em direcção à barra superior
▪ Verifi que as velas de ignição e substitua, se necessário
▪ Limpe o fi ltro de ar
▪ Rode a lâmina de corte livremente
▪ Recarregue a bateria de arranque
▪ Arranque sobre uma superfície com relva já cortada
Redução da potência do
motor
Corte desigual ▪ Afi e/substitua a lâmina de corte
O cesto de recolha de relva
não enche o sufi ciente
A tracção às rodas não
funciona
As rodas não giram com a
transmissão ligada
O aparelho gera vibrações
invulgarmente intensas
▪ Corrija a altura de corte
▪ Afi e/substitua a lâmina de corte
▪ Limpe o canal de descarga/a caixa
▪ Limpe o fi ltro de ar
▪ Reduza a velocidade de trabalho
▪ Corrija a altura de corte
▪ Corrija a altura de corte
▪ Deixe a relva secar
▪ Afi e/substitua a lâmina de corte
▪ Limpe a rede do cesto de recolha de relva
▪ Limpe o canal de descarga/a caixa
▪ Regule o cabo de controlo
▪ A correia trapezoidal apresenta defeito
▪ Contacte a ofi cina de assistência técnica
▪ Remova a sujidade no sistema de tracção às rodas, correia dentada e engrenagem
▪ Lubri
fi que as rodas livres (pinhão de accionamento no eixo de transmissão),
pulverizando-as com óleo
▪ Retire os parafusos das rodas
▪ O cubo da roda apresenta defeito
▪ A correia trapezoidal apresenta defeito
▪ Contacte a ofi cina de assistência técnica
▪ Verifi que a lâmina de corte
Cortador de relva a gasolina
Em caso de avarias não indicadas nesta tabela ou que não consiga resolver, contacte o nosso serviço de
apoio a clientes pertinente.
78
Tradução do manual de instruções original
Page 79

A inspecção por um técnico especializado é sem-
pre necessária em caso de:
colisão com um obstáculo
paragem brusca do motor
danos na transmissão
correia trapezoidal com defeito
lâmina torta
eixo do motor torto
P
Declaração de conformidade CE
Consulte o manual de instruções de montagem
Garantia
Garantimos a reparação ou substituição do produto em caso de eventuais falhas de material ou erros de fabrico,
durante o prazo de validade legal aplicável da prestação de garantia. O prazo da garantia varia em função da legislação
do país de compra do aparelho.
Só podemos aceitar a garantia: Não podemos aceitar a garantia:
Se o aparelho for usado correctamente
Se o manual de instruções for respeitado
Se forem usadas peças sobressalentes originais
Situações não abrangidas pela garantia:
Danos na pintura provocados pelo desgaste normal
Peças de desgaste que estejam identifi cadas com XXX XXX (X) no cartão de peças sobressalentes
Motores de combustão - neste caso aplica-se a garantia separada do fabricante do motor em questão
Para fazer uso da garantia, dirija-se ao seu vendedor ou ao serviço de apoio a clientes autorizado mais próximo
e apresente esta declaração de garantia e o recibo de compra. Esta aceitação da garantia não afecta o direito a
reivindicações de garantia legais do comprador em relação ao vendedor.
Se se tentar reparar o aparelho
Se forem feitas alterações técnicas no aparelho
Se o aparelho não for usado correctamente
(por exemplo, utilização industrial ou comunitária)
┌──────┐
└──────┘
79
Page 80

I
Tagliaerba a benzina
Riguardo questo manuale
Leggere attentamente queste istruzioni prima
di mettere in funzione la macchina. Questo è il
presupposto per un lavoro sicuro e un utilizzo
senza inconvenienti. Familiarizzare con gli elementi
di comando e il funzionamento della macchina,
prima di usarla.
Prestare attenzione alle istruzioni e alle avvertenze
di sicurezza presenti in questa documentazione e
sulla macchina.
Conservare le istruzioni per l‘uso e consegnarle a
un eventuale utilizzatore successivo.
Legenda
Attenzione!
Attenendosi strettamente a queste avvertenze si
possono evitare danni a cose e/o persone.
Note speciali per una migliore comprensione e
un migliore utilizzo.
Il simbolo della macchina fotografi ca rimanda a
illustrazioni.
Sommario
Riguardo questo manuale ...........................................80
Descrizione del prodotto .............................................. 80
Dispositivi di sicurezza e di protezione ........................ 80
Avvertenze di sicurezza ............................................... 82
Montaggio .................................................................... 83
Rifornimento di carburante .......................................... 83
Messa in funzione ........................................................ 84
Avvio elettrico (opzione) .............................................. 87
Manutenzione .............................................................. 88
Aiuto per la risoluzione dei malfunzionamenti più comuni
90
Conservazione ............................................................. 91
Riparazione ................................................................. 91
Garanzia ...................................................................... 91
Dichiarazione di conformità CE ................................... 91
Smaltimento ................................................................. 91
80
Descrizione del prodotto
Questa documentazione descrive vari modelli di
tagliaerba a benzina. Alcuni modelli sono dotati di box
raccoglierba e/o sono anche indicati per la pacciamatura.
Per identifi care il proprio modello è suffi ciente fare
riferimento alle immagini dei prodotti e alla descrizione
delle varie opzioni.
Impiego conforme agli usi previsti
Questa macchina è destinata alla tosatura di prati da
giardino in ambito privato e deve essere impiegata
esclusivamente su prati asciutti.
Qualsiasi altro uso è da ritenersi non conforme alle
prescrizioni.
Possibili usi errati
Questo tagliaerba non è indicato per la tosatura di
superfi ci erbose su impianti pubblici, parchi, campi
sportivi o per l'agricoltura e la silvicoltura.
I dispositivi di sicurezza non devono essere
smontati né bypassati.
Non utilizzare la macchina sotto la pioggia o su
prati bagnati.
La macchina non è destinata all'uso professionale.
Dispositivi di sicurezza e di protezione
Attenzione - Pericolo di infortuni!
Non disattivare i dispositivi di sicurezza e di
protezione!
Archetto di sicurezza
La macchina è dotata di un archetto di sicurezza. In caso
di pericolo rilasciare l'archetto di sicurezza.
le lame vengono arrestate
il motore viene arrestato
Sportello di protezione
Questo sportello protegge dall'eventuale proiezione di
materiale fuori dal tagliaerba.
Traduzione delle istruzioni per l‘uso originali
Page 81

I
11
2
16
2
1 Fune di avviamento 9 Regolazione in altezza progressiva*
2 Avvio, stop* 11 Trasmissione Vario*
3 Trazione ruote* 12 Istruzioni per l'uso
4 Archetto di sicurezza 13 Inserto per scarico*
5 Regolazione in altezza ergonomica* 14 Sportello di chiusura*
6 Indicatore di riempimento* 15 Kit pacciamatura*
7 Sportello di protezione* 16 Inizio elettrico di accensione
8 Box raccoglierba*
Simboli sulla macchina
Attenzione!
Particolare attenzione durante l'impiego.
Prima della messa in funzione leggere le istruzioni
d'uso!
Tenere lontano le altre persone dalla zona di
pericolo!
Tenere mani e piedi lontano dalla lama completa!
Mantenere una distanza corretta dall'area di
pericolo.
Prima di eseguire dei lavori sulla lama
completa estrarre il cappuccio della
candela di accensione.
81
Page 82

I
Prima di ogni avvio del tagliaerba verifi care
che esso non sia danneggiato ed eseguire le
riparazioni necessarie.
Simboli aggiuntivi per le macchine con avviamento
elettrico
Attenzione! Pericolo di scossa elettrica.
Mantenere il cavo di collegamento lontano dalle
lame.
Prima di eseguire interventi di manutenzione o
in caso di cavo danneggiato, scollegare sempre
la macchina dalle rete elettrica.
Avvertenze di sicurezza
Attenzione!
Utilizzare la macchina solo in condizioni tecniche
perfette!
Attenzione - Pericolo di infortuni!
Non disattivare i dispositivi di sicurezza e di
protezione!
Attenzione - Pericolo di incendio!
Non riporre la macchina con il serbatoio pieno in
edifi ci dove i vapori di benzina possano entrare a
contatto con fi amme libere o scintille!
Mantenere libera da residui di tosatura, da benzina e da olio l'area del motore, dello scappamento, della batteria e del serbatoio carburante.
Tenere lontano le altre persone dalla zona di pericolo.
L'utente o il proprietario della macchina è da
considerarsi responsabile in caso di incidenti con
danni a terzi o alle relative proprietà.
La macchina non deve essere utilizzata da bambini
o da persone che non conoscano queste istruzioni
per l'uso.
Rispettare le disposizioni locali in merito all'età
minima dell'utente della macchina.
Non utilizzare la macchina quando si è sotto
l'infl usso di alcol, droghe o medicinali.
Indossare indumenti da lavoro adeguati:
pantaloni lunghi
scarpe robuste e antiscivolo
cuffi e protettive per l'udito
Qualora si lavori su un tratto in pendenza:
mantenere sempre una posizione stabile
posizionarsi sempre trasversalmente al pendio,
mai in senso longitudinale
non tosare superfi ci erbose con un dislivello
Tagliaerba a benzina
superiore ai 20°
usare particolare attenzione quando si cambia
direzione di marcia
Lavorare sempre con un'illuminazione suffi ciente
(che si tratti di luce naturale o artifi ciale).
Mantenere il corpo, gli arti e i vestiti
suffi cientemente lontano dalle lame.
Osservare le disposizioni nazionali in materia di
durata d'esercizio.
Non lasciare incustodita la macchina pronta al
funzionamento.
Lavorare soltanto con lame adeguatamente affi late.
Non azionare mai la macchina con dispositivi/griglia
di sicurezza difettosi.
Non azionare mai la macchina con dispositivi di
sicurezza non completamente montati (per es.:
sportello di protezione, dispositivi di raccolta erba).
Prima di ogni utilizzo controllare che la macchina
sia in perfetto stato, se necessario sostituire i
componenti danneggiati.
Spegnere il motore, attendere l'arresto completo
della macchina ed estrarre il cappuccio della
candela di accensione:
quando si ripone la macchina
qualora si verifi chino anomalie
prima di rimuovere eventuali blocchi
prima di rimuovere eventuali ostruzioni
in seguito al contatto con corpi estranei
in caso di guasti e vibrazioni insolite dell'ap-
parecchio
Prima di ogni avvio del tagliaerba verifi care
che esso non sia danneggiato ed eseguire le
riparazioni necessarie.
Inserire il cappuccio della candela di accensione e
avviare il motore:
dopo aver rimosso le anomalie (vedere tabella
anomalie) e aver controllato la macchina
dopo aver pulito la macchina
Controllare accuratamente la superfi cie erbosa da
tosare e rimuovere tutti i corpi estranei.
Prestare particolare attenzione quando si inverte
la direzione di marcia del tagliaerba o quando lo si
avvicina a sé.
Non utilizzare il tagliaerba sopra a ostacoli
(per es. rami, radici di alberi).
Rimuovere l'erba tagliata solo a motore
82
Traduzione delle istruzioni per l‘uso originali
Page 83

completamente fermo.
L'olio esausto non deve:
essere gettato nei rifi uti
essere versato nella rete fognaria, negli
scarichi o per terra
Disattivare il motore / le lame qualora si attraversi
una superfi cie che non si intende tosare.
Non sollevare o trasportare mai la macchina con il
motore in funzione.
Non mangiare o bere durante il rabbocco della
benzina o dell'olio del motore.
Non inalare i vapori di benzina.
Condurre l'apparecchio a passo d'uomo
Prima dell'uso assicurarsi che i dadi, le viti e i bullo-
ni siano inseriti saldamente
Montaggio
Fare riferimento alle istruzioni di montaggio allegate.
Attenzione!
La macchina deve essere azionata solo dopo
essere stata completamente montata.
Rifornimento di carburante
Prima della messa in funzione del tagliaerba occorre
riempire il serbatoio.
Attenzione - Pericolo di incendio!
La benzina e l'olio sono estremamente
infi ammabili!
Attenersi sempre al manuale d'uso fornito in
dotazione dal produttore del motore.
Mezzi di esercizio
Benzina Olio motore
Tipo:
Quantità:
benzina normale /
senza piombo
vedere le indicazioni
del produttore del
motore
Sicurezza
Avvertimento!
Non lasciare mai il motore acceso in luoghi
chiusi. Pericolo di avvelenamento!
Conservare la benzina e l'olio solo in contenitori
vedere le
indicazioni del
produttore del
motore
ca. 0,6 l
previsti per questo scopo.
Rabboccare o scaricare la benzina o l'olio solo a
motore freddo e all'aperto.
Non rabboccare la benzina o l'olio quando il motore
è in funzione.
Non riempire eccessivamente il serbatoio (la
benzina si espande).
Non fumare durante il rifornimento.
Non aprire il tappo del carburante con motore caldo
o in funzione.
Sostituire il serbatoio o il tappo del carburante se
danneggiati.
Chiudere sempre saldamente il coperchio del
serbatoio.
Se è fuoriuscita della benzina:
non avviare il motore
evitare tentativi di accensione
pulire la macchina
Se è fuoriuscito dell'olio:
non avviare il motore
raccogliere l'olio versato con un legante
appropriato o con uno strofi naccio, dopodiché
smaltirlo in maniera conforme alle normative
vigenti
pulire la macchina
L'olio esausto non deve:
essere gettato nei rifi uti
essere versato nella rete fognaria, negli
scarichi o per terra
Consigliamo di mettere l'olio esausto in un contenitore
chiuso e di portarlo presso un centro di riciclaggio o un
centro di assistenza clienti.
Rabbocco della benzina
1. Svitare il tappo del serbatoio e riporlo in un luogo
pulito.
2. Rabboccare la benzina servendosi di un imbuto.
3. Chiudere bene l'apertura del serbatoio e pulirla.
Rabbocco dell'olio del motore
1. Svitare il tappo del serbatoio dell'olio e riporlo in un
luogo pulito.
2. Rabboccare l'olio servendosi di un imbuto.
3. Chiudere bene l'apertura del serbatoio dell'olio
e pulirla.
I
83
Page 84

I
Messa in funzione
Attenzione!
Non utilizzare la macchina in caso di lame o
componenti di fi ssaggio allentati, danneggiati o
usurati.
Prima di ogni messa in funzione effettuare un
controllo visivo.
Il simbolo della macchina fotografi ca nelle pagine
seguenti fa riferimento alle illustrazioni, pagina 4–7.
Impostazione dell'altezza di taglio
Attenzione - Pericolo di infortuni!
Regolare l'altezza di taglio solo a motore spento
e con le lame perfettamente ferme.
▪ Regolare sempre tutte le ruote alla stessa
altezza di taglio.
▪ La regolazione dell'altezza di taglio dipende dal
modello di tagliaerba.
Regolazione centrale ( 2)
1. Spingere lateralmente la leva di sblocco e
mantenerla premuta.
2. Spostare la leva verso sinistra o destra all'altezza di
taglio desiderata.
3. Far scattare in sede la leva.
4. Assicurarsi che tutte le ruote siano regolate nella
stessa posizione.
Tagliaerba a benzina
Quando il box raccoglierba è pieno, l'indicatore di
riempimento arriva fi no al box stesso (
raccoglierba deve essere svuotato.
5b). Il box
Svuotamento del box raccoglierba
1. Sollevare lo sportello di protezione.
2. Sganciare il box raccoglierba ed estrarlo tirandolo
all'indietro (
3. Svuotare il box raccoglierba.
4. Sollevare lo sportello di protezione e riagganciare il
box raccoglierba agli appositi sostegni (
6).
6).
Tosatura senza box raccoglierba
Attenzione!
Effettuare la tosatura senza box raccoglierba solo
se la molla a torsione dello sportello di protezione
funziona correttamente.
Grazie alla forza della molla, lo sportello di protezione
aderisce al corpo del tagliaerba. L'erba tagliata viene
quindi espulsa verso il basso all'indietro.
Tosatura con kit di pacciamatura (opzione)
Con la pacciamatura il materiale tagliato non viene
raccolto, ma rimane sul prato. In questo modo il terreno
non si secca eccessivamente e viene alimentato con
sostanze nutritive.
I migliori risultati si ottengono eseguendo dei tagli
regolari di ca. 2 cm. Solo l'erba giovane con foglioline
tenere marcisce velocemente.
Tosatura con box raccoglierba
Attenzione - Pericolo di infortuni!
Rimuovere o montare il box raccoglierba solo
a motore spento e con le lame perfettamente
ferme.
1. Sollevare lo sportello di protezione e agganciare il
box raccoglierba agli appositi sostegni (
6).
Indicatore di riempimento
Il fl usso d'aria durante la tosatura spinge verso l'alto
l'indicatore di riempimento (
84
5a).
Altezza dell'erba prima della pacciamatura:
al massimo 8 cm
Altezza dell'erba dopo la pacciamatura:
almeno 4 cm
Adattare la velocità al processo di pacciamatura,
non procedere troppo velocemente.
Inserimento del kit di pacciamatura
Attenzione - Pericolo di infortuni!
Rimuovere o montare il kit di pacciamatura solo a
motore spento e con le lame perfettamente ferme.
Traduzione delle istruzioni per l‘uso originali
Page 85

I
1. Rimuovere il box raccoglierba (
2. Sollevare lo sportello di protezione e inserire il kit di
pacciamatura nel vano di espulsione (
Il dispositivo di blocco deve scattare in sede.
Qualora il kit di pacciamatura non scatti in sede,
esso rischia di essere danneggiato, così come le
lame.
Rimozione del kit di pacciamatura
1. Sollevare lo sportello di protezione.
2. Sbloccare il kit di pacciamatura (
3. Estrarre il kit di pacciamatura (
6).
7).
8/1).
8/2).
Tosatura con scarico laterale (opzione)
Attenzione - Pericolo di infortuni!
Rimuovere o montare l'inserto per lo scarico
laterale solo a motore spento e con le lame
perfettamente ferme.
Applicazione dell'inserto per lo scarico laterale
1. Rimuovere il box raccoglierba e inserire il kit di
pacciamatura.
2. Aprire la copertura per lo scarico laterale e tenerla
ferma (
3. Inserire il canale di scarico laterale (
4. Chiudere lentamente la copertura.
La copertura fa sì che il canale di scarico laterale
non cada.
Rimozione dell'inserto per lo scarico laterale
9/1).
9/2).
Regolazione dell'altezza di impugnatura
(opzione)
Regolazione con staffe di bloccaggio
1. Tenere fermo il manico e allentare entrambe le
staffe di montaggio (
2. Portare il manico nella posizione desiderata.
3. Chiudere le staffe di bloccaggio.
10).
Avviamento del motore
Attenzione - Pericolo di avvelenamento!
Non lasciare mai il motore acceso in luoghi
chiusi.
Attenzione - Pericolo di infortuni!
Durante l'avvio non ribaltare la macchina.
1. Aprire la copertura per lo scarico laterale e tenerla
ferma (
2. Rimuovere lo scarico laterale e chiudere la
copertura (
9/1).
9/2).
85
Page 86

I
▪ Avviare il motore solo con le lame montate
(la massa delle lame dà impulso).
▪ All'avvio del motore a temperatura di esercizio
NON utilizzare la leva choke o il primer.
▪ Non modifi care le impostazioni di regolazione
sul motore.
Non mettere in funzione la macchina qualora il
canale di scarico non sia coperto da uno di questi
componenti:
box raccoglierba
sportello di protezione
kit di pacciamatura
Premere l'interruttore di avviamento con particolare
attenzione, conformemente alle indicazioni del
produttore.
Mantenere i piedi a un'adeguata distanza di
sicurezza dalle lame della macchina.
Avviare la macchina in un punto dove l'erba sia
bassa.
Avviamento manuale
con comando a distanza acceleratore, con choke
1. Portare la leva dell'acceleratore in posizione
max
2. Portare l'archetto di sicurezza verso la parte
superiore del manico e mantenercelo (
L'archetto di sicurezza non scatta in sede.
3. Tirare con forza la corda dello starter e poi lasciarla
arrotolare lentamente ( 17).
4. Dopo che il motore si è riscaldato (ca. 15–20 secondi)
portare la leva choke in posizione tra
min
con comando a distanza acceleratore, senza primer/
choke
5. Portare la leva dell'acceleratore in posizione max
(
6. Portare l'archetto di sicurezza verso la parte
superiore del manico e mantenercelo (
e
12/1).
( 11/1).
max
16) -
.
16) -
Tagliaerba a benzina
L'archetto di sicurezza non scatta in sede.
7. Tirare con forza la corda dello starter e poi lasciarla
arrotolare lentamente (
8. Dopo che il motore si è riscaldato (ca. 15–20 secondi)
portare la leva choke in posizione tra
min
e
max
.
17).
Avviamento manuale
senza comando a distanza acceleratore, con choke
Choke
ON OFF
1. Portare la leva choke in posizione 1 ( 13/1).
2. Portare la barra di sicurezza verso la parte superiore
del manico e mantenercela (
sicurezza non scatta in sede.
3. Tirare con forza la corda dello starter e poi lasciarla
arrotolare lentamente (
4. Dopo che il motore si è riscaldato (ca. 15–20 secondi)
portare la leva choke in posizione 2 (
La regolazione di accelerazione del motore è
fi ssa.
Non è possibile regolare il numero di giri.
senza comando a distanza acceleratore, con primer
16)
(
1. Premere il primer 3 volte con un intervallo di circa
ca. 2 secondi (
10 °C premere il primer 5 volte.
2. Portare l'archetto di sicurezza verso la parte
superiore del manico e mantenercelo (
L'archetto di sicurezza non scatta in sede.
3. Tirare con forza la corda dello starter e poi lasciarla
arrotolare lentamente (
16). Con temperature inferiori ai
17) – La barra di
18).
13/2).
17) -
18).
86
Traduzione delle istruzioni per l‘uso originali
Page 87

I
La regolazione di accelerazione del motore è
fi ssa.
Non è possibile regolare il numero di giri.
senza comando a distanza acceleratore, senza
primer/choke
4. Portare l'archetto di sicurezza verso la parte
superiore del manico e mantenercelo (
L'archetto di sicurezza non scatta in sede.
5. Tirare con forza la corda dello starter e poi lasciarla
arrotolare lentamente (
con comando a distanza acceleratore, con primer
(
16)
1. Portare la leva dell'acceleratore in posizione max
12/1).
(
2. Premere il primer 3 volte con un intervallo di circa
ca. 2 secondi (
10 °C premere il primer 5 volte.
3. Portare l'archetto di sicurezza verso la parte
superiore del manico e mantenercelo (
L'archetto di sicurezza non scatta in sede.
4. Tirare con forza la corda dello starter e poi lasciarla
arrotolare lentamente (
5. Non appena il motore entra in funzione, per
raggiungere il numero di giri desiderato portare la
leva dell'acceleratore in una posizione tra
min e max.
18).
15). Con temperature inferiori ai
17).
17) -
16) -
Avvio elettrico (opzione)
Avviamento elettrico senza primer/choke ( 13)
1. Portare la leva dell'acceleratore in posizione
"START" (
2. Portare l'archetto di sicurezza verso la parte
superiore del manico e mantenercelo (
L'archetto di sicurezza non scatta in sede.
3. Ruotare completamente verso destra la chiave di
accensione nell'interruttore di accensione (
4. Non appena il motore entra in funzione, rilasciare
la chiave di accensione (quest'ultima ritornerà alla
posizione "0").
5. A seconda del numero di giri desiderato portare la
leva dell'acceleratore in una posizione tra
min e max.
Spegnimento del motore
Macchina senza frizione lame
1. Portare la leva dell'acceleratore in posizione min
(
12/2).
2. Rilasciare l'archetto di sicurezza (
- Il motore si spegne.
13/1).
16) -
18).
22).
Attenzione - Pericolo di gravi lesioni da taglio!
Il motore può continuare a girare. Dopo lo
spegnimento, assicurarsi che il motore sia fermo.
87
Page 88

I
Tagliaerba a benzina
Trazione ruote (opzione) ( 20)
Attenzione!
Inserire la trazione solo a motore acceso.
Inserimento della trazione ruote
1. Premere l'archetto di innesto della trasmissione
contro la parte superiore del manico e mantenerlo
premuto (
trasmissione non scatta in sede.
- La trazione ruote viene inserita.
Disinserimento della trazione ruote
1. Rilasciare l'archetto di innesto della trasmissione
(
- La trazione ruote viene disinserita.
19) - L'archetto di innesto della
21).
Trasmissione Vario (Speed Control) (opzione)
Grazie alla trasmissione Vario la velocità di marcia del
tagliaerba può essere regolata in maniera continua.
Attenzione!
Inserire la leva solo a motore acceso.
L'attivazione a motore spento può danneggiare il
meccanismo di trasmissione.
Per aumentare la velocità spostare la leva (
in direzione ( 20/2).
Per diminuire la velocità spostare la leva (
direzione ( 20/1).
Adattare sempre la velocità di marcia alle
condizioni del terreno e del prato.
20)
20) in
Manutenzione
Attenzione - Pericolo di infortuni!
▪ Prima di qualsiasi intervento di manutenzione
spegnere sempre il motore ed estrarre il
cappuccio della candela di accensione.
▪ Il motore può continuare a girare. Dopo lo
spegnimento, assicurarsi che il motore sia
fermo.
▪ Per qualunque intervento di manutenzione e
cura della lama, indossare sempre guanti da
lavoro!
Controllare regolarmente il funzionamento e lo stato
Inclinazione del tagliaerba
A seconda del tipo di fabbricazione del motore:
il carburatore / fi ltro dell'aria devono essere rivolti
verso l'alto (
la candela di accensione deve essere rivolta verso
l'alto (
Osservare il manuale operativo del produttore
del motore!
23)
24)
Affi lamento / sostituzione delle lame
Far affi lare / sostituire le lame consumate o danneg-
giate esclusivamente da un apposito centro di assistenza o da una ditta specializzata autorizzata.
Dopo esser state affi late, le lame devono essere
equilibrate.
Attenzione!
Lame non equilibrate causano forti vibrazioni che
danneggiano il tagliaerba.
88
Traduzione delle istruzioni per l‘uso originali
Page 89

I
Caricamento della batteria dello starter
(opzione)
La batteria dello starter è esente da manutenzione
e normalmente viene ricaricata dal tagliaerba.
In casi particolari la batteria necessita di essere ricaricata
dall'utente:
dopo l'acquisto del tagliaerba per la prima messa
in funzione
qualora sia scarica, prima della pausa invernale o
in caso di tempi di arresto prolungati (> 6 mesi)
Processo di carica:
1. Estrarre il caricabatteria dal vano batteria.
2. Staccare il cavo della batteria dal cavo del motore
(
25).
3. Collegare il cavo della batteria con il cavo del
caricabatteria (
4. Collegare il caricabatteria alla rete elettrica.
La tensione di rete deve corrispondere alla tensione
di esercizio del caricabatteria.
Il tempo di carica è di ca. 36 ore.
Utilizzare esclusivamente il caricabatteria originale in
dotazione.
Attenzione!
▪ Caricare la batteria dello starter solo in ambienti
asciutti e ben aerati.
▪ Durante il processo di carica non mettere in
funzione il tagliaerba.
26).
Manutenzione del motore
Cambio dell'olio del motore
Smaltire l'olio motore esausto in modo ecologico!
Consigliamo di mettere l'olio esausto in un
contenitore chiuso e di portarlo presso un centro
di riciclaggio o un centro di assistenza clienti.
L'olio esausto non deve
▪ essere gettato nei rifi uti
▪ essere versato nella rete fognaria o negli
scarichi
▪ essere versato sul terreno
Sostituzione del fi ltro dell'aria
Seguire le indicazioni del produttore del motore.
Sostituzione della candela di accensione
Seguire le indicazioni del produttore del motore.
Trazione ruote (opzione)
Regolazione del cavo bowden
Qualora con il motore in funzione non si riesca a inserire o
disinserire la trazione ruote, sarà necessario correggere
la posizione del cavo bowden.
Attenzione!
Regolare il cavo bowden solo a motore spento.
1. Ruotare in direzione della freccia l'elemento di
regolazione del cavo bowden (
2. Per verifi care la regolazione accendere il motore e
inserire la trazione ruote.
3. Qualora la trazione ruote continui a non funzionare,
far riparare il tagliaerba presso un centro di
assistenza o una ditta specializzata autorizzata.
27).
1. Per raccogliere l'olio utilizzare un recipiente
adeguato.
2. Lasciar scorrere tutto l'olio fuori dall'apposita
apertura o aspirarlo.
Lubrifi cazione della ruota dentata motrice
Di tanto in tanto occorre lubrifi care con dell'olio
a spray la ruota dentata motrice sull'albero di
trasmissione.
La trasmissione della trazione ruote è esente da
manutenzione.
89
Page 90

I
Aiuto per la risoluzione dei malfunzionamenti più comuni
Attenzione!
Non intervenire sulla regolazione delle lame e dell'albero motore.
Malfunzionamento Soluzione
Il motore non si avvia ▪ Rabboccare la benzina
▪ Posizionare la leva dell'acceleratore su "Start"
▪ Inserire la leva choke
▪ Premere l'archetto di innesto della trasmissione contro la parte superiore del
manico
▪ Controllare ed eventualmente sostituire le candele
▪ Pulire il fi ltro dell'aria
▪ Far ruotare le lame
▪ Ricaricare la batteria dello starter
▪ Mettere in funzione la macchina su una superfi cie già tosata
Potenza del motore ridotta ▪ Correggere l'altezza di taglio
▪ Affi lare / sostituire le lame
▪ Pulire il canale di scarico / il corpo della macchina
▪ Pulire il fi ltro dell'aria
▪ Diminuire la velocità di esercizio
Taglio non netto ▪ Affi lare / sostituire le lame
▪ Correggere l'altezza di taglio
Il box raccoglierba non si
riempie a suffi cienza
La trazione ruote non
funziona
Con la trasmissione inserita le
ruote non girano
La macchina produce
vibrazioni eccessive
▪ Correggere l'altezza di taglio
▪ Lasciare asciugare il prato
▪ Affi lare / sostituire le lame
▪ Pulire la griglia del box raccoglierba
▪ Pulire il canale di scarico / il corpo della macchina
▪ Regolare il cavo bowden
▪ Cinghia trapezoidale difettosa
▪ Rivolgersi a un'offi cina dell'assistenza clienti
▪ Rimuovere la sporcizia dalla trazione ruote, dalla cinghia dentata e dalla trasmissione
▪ Lubrifi care i pignoni con olio a spray (ruota dentata motrice sull'albero della
trasmissione)
▪ Serrare i bulloni delle ruote
▪ Mozzo difettoso
▪ Cinghia trapezoidale difettosa
▪ Rivolgersi a un'offi cina dell'assistenza clienti
▪ Controllare le lame
Tagliaerba a benzina
90
Traduzione delle istruzioni per l‘uso originali
Page 91

I
Conservazione
Attenzione - Pericolo di esplosione!
Non conservare la macchina in prossimità di
fi amme libere o fonti di calore.
Lasciar raffreddare il motore.
Per risparmiare spazio ribaltare la parte superiore
del manico (
Asciugare la macchina e conservarla fuori dalla
portata di bambini e persone non autorizzate
all'uso.
Conservare la batteria dello starter al riparo dal
gelo.
Di tanto in tanto ricaricare la batteria dello starter.
Svuotare il serbatoio della benzina.
Estrarre il cappuccio della candela di accensione.
28).
Riparazione
Gli interventi di riparazione possono essere eseguiti
esclusivamente da centri di assistenza o ditte
specializzate autorizzate.
Dichiarazione di conformità CE
vedere le istruzioni di montaggio
Controllo di un tecnico specializzato sempre ne-
cessario:
dopo lo scontro con un ostacolo
in caso di arresto improvviso del motore
in caso di danni alla trasmissione
se la cinghia trapezoidale è difettosa
se la lama è storta
se l'albero motore è storto
Smaltimento
Non smaltire vecchie macchine, pile o
batterie con i rifi uti domestici!
Imballaggio, macchina e accessori sono prodotti
con materiali riciclabili e devono essere smaltiti di
conseguenza.
Garanzia
Qualsiasi difetto del materiale o di fabbricazione sarà eliminato durante il periodo di garanzia previsto dalla legge, a nostra
scelta, tramite riparazione o sostituzione. Il periodo di garanzia dipende dalle leggi del paese, in cui viene acquistata la macchina.
La nostra garanzia è valida solo nei seguenti casi: La garanzia decade nei seguenti casi:
utilizzo corretto della macchina
rispetto delle istruzioni per l'uso
impiego di ricambi originali
Sono esclusi dalla garanzia:
danni alla vernice riconducibili alla normale usura
particolari soggetti a usura, che sulla scheda ricambi siano contrassegnati da XXX XXX (X)
motori a combustione – Per questi valgono le norme di garanzia del produttore del motore
Per richiedere una prestazione in garanzia rivolgersi - con questa dichiarazione e lo scontrino dell'acquisto - al rivenditore o al Centro assistenza autorizzato più vicino. La presente garanzia lascia invariate le rivendicazioni di garanzia legali
dell'acquirente nei riguardi del venditore.
tentativi di riparazione sulla macchina
modifi che tecniche alla macchina
impiego non conforme alle prescrizioni
(per es. impiego professionale o in ambito pubblico)
┌──────┐
└──────┘
91
Page 92

SLO
Bencinska kosilnica
Spremna beseda k priročniku
Pred zagonom preberite pričujoče navodilo
za uporabo. To je predpogoj za varno delo in
nemoteno delovanje. Pred uporabo spoznajte upravljalne elemente in uporabo naprave.
Upoštevajte varnostne napotke in opozorila v tej
dokumentaciji in na napravi.
Navodilo za uporabo shranite in ga izročite
morebitnemu naslednjemu uporabniku.
Pojasnilo oznak
Pozor!
Ravnanje strogo v skladu s temi opozorili lahko
prepreči poškodbe oseb in materialno škodo.
Posebna navodila za boljše razumevanje in
rokovanje.
Simbol fotoaparata opozarja na slike.
Vsebina
Spremna beseda k priročniku ...................................... 92
Opis izdelka ................................................................. 92
Varnostne in zaščitne naprave .................................... 92
Varnostna opozorila ..................................................... 94
Montaža ....................................................................... 95
To čenje ........................................................................ 95
Zagon .......................................................................... 96
Električni zagon (opcija) ..............................................99
Nega in vzdrževanje .................................................. 100
Skladiščenje .............................................................. 101
Popravilo .................................................................... 101
Odstranjevanje .......................................................... 101
Pomoč pri motnjah ..................................................... 102
Garancija ................................................................... 103
Izjava ES o skladnosti ...............................................103
Opis izdelka
V tej dokumentaciji se opisujejo različni modeli bencinskih
kosilnic. Nekateri modeli so opremljeni z zbiralno košaro
za travo in/ali so dodatno ustrezni za zastiranje.
Identifi cirajte svoj model v skladu s slikami izdelka in
opisom različnih opcij.
Namenska uporaba
Ta naprava je namenjena za košnjo trate v privatnem
območju in se sme uporabljati le na suhi trati.
Drugačna ali uporaba izven tu opisane velja kot
neustrezna.
Možna neustrezna uporaba
Ta kosilnica ni ustrezna za uporabo na javnih
poslopjih, v parkih, na športnih poslopjih ter v
kmetijstvu in gozdarstvu
Varnostnih naprav se ne sme demontirati niti
premostiti
Naprave ne uporabljajte na dežju ali po mokri trati
Naprava ni namenjena za uporabo v industrijskem
okolju
Varnostne in zaščitne naprave
Pozor – Nevarnost poškodb!
Varnostnih in zaščitnih naprav ne smete
onesposobiti!
Varnostno streme
Naprava je opremljena z varnostnim stremenom. V
trenutku nevarnosti pustite varnostno streme.
Rezilo se ustavlja
Motor se ustavlja
92
Prevod izvirnika navodila za uporabo
Page 93

Prestrezni zaklop
Prestrezni zaklop ščiti pred padajočimi deli.
SLO
2
11
1 Vrv zaganjalnika 9 Nastavitev višine rezanja*
2 Start, Stop* 11 Menjalnik Vario*
3 Kolesni pogon* 12 Navodila za uporabo
4 Varnostno streme 13 Vstavek za izmetavanje*
5 Ergonomska nastavitev višine* 14 Zaporna loputa*
6 Kazalnik nivoja napolnjenosti* 15 Komplet za zastiranje*
7 Prestrezni zaklop* 16 Električni vžig Start
8 Zbiralna košara za travo*
16
2
Simboli na napravi
Pozor!
Pri rokovanju z napravo bodite posebno previdni.
Pred zagonom skrbno preberite navodilo za
uporabo!
Poskrbite, da se v območju nevarnosti ne zadržujejo
druge osebe!
Z rokami in nogami se ne približujte rezalnemu
sklopu!
Vzdržujte oddaljenost od nevarnih področij.
Pred deli na rezalnem sklopu
izvlecite vtič vžigalne svečke.
93
Page 94

SLO
Poiščite poškodbe na kosilnici in opravite
potrebna popravila, preden je zaženete znova in
z njo začnete delati.
Dodatni simboli pri napravah z električnim zagonom
Pozor! Nevarnost električnega udara.
Priključni vodnik ne sme biti v bližini rezila.
Napravo pred vzdrževalnimi deli ali v primeru
poško dovanega kabla vedno odklopite iz
električnega omrežja.
Varnostna opozorila
Pozor!
Napravo uporabljajte samo v tehnično
brezhibnem stanju!
Pozor – Nevarnost poškodb!
Varnostnih in zaščitnih naprav ne smete
onesposobiti!
Pozor – nevarnost požara!
Stroja z natočenim gorivom ne hranite v
zgradbah, v katerih bencinski hlapi lahko pridejo
v stik z odprtim ognjem ali iskrami!
Področje okoli motorja, izpušne cevi, škatle za
akumulator, rezervoarja goriva držite proste
pokošenega materiala, bencina, olja.
Poskrbite, da se v območju nevarnosti ne
zadržujejo druge osebe
Upravljavec ali uporabniks troja je odgovoren, če se
drugim osebam ali njihovi lastnini zgodi nesreča
Otroci ali osebe, ki niso seznanjene z navodili za
uporabo, naprave ne smejo uporabljati
Upoštevajte morebitne krajevne predpise glede
minimalne starosti za delo z napravo
Naprave ne uporabljajte pod vplivom alkohola,
poživil ali zdravil
Nosite ustrezna delovna oblačila
dolge hlače
trdno in nedrsljivo obutev
glušnik
Pri delih na strminah
vedno pazite na varno stojo
vedno kosite prečno ob strmini, nikoli navzgor
ali navzdol
Bencinska kosilnica
ne kosite na strminah z vzponom večjim od 20°
bodite posebej previdni pri obračanju
Delajte samo pri zadostni dnevni svetlobi ali umetni
osvetlitvi
S telesom in oblačili se ne približujte rezalnemu
sklopu
Upoštevajte nacionalne določbe glede časa
uporabe
Za obratovanje pripravljene naprave ne puščajte
brez nadzora
Kosite le z ostrim rezilom
Naprave ne poganjajte s poškodovanimi zaščitnimi
napravami / zaščitnimi rešetkami
Naprave nikoli ne poganjajte brez popolnoma
vgrajenih zaščitnih naprav (npr.: prestreznega
zaklopa, naprav za sprejemanje trave)
Napravo pred vsako uporabo preverite glede
poškodb, pred vnovično uporabo dajte zamenjati
poškodovane dele
Ugasnite motor, pričakajte, da se naprava ustavi, in
izvlecite vtič vžigalne svečke
kadar napravo odložite
po pojavu motenj
pred sprostitvijo blokad
pred odstranitvijo zamašitev
po stiku s tujkami
če se na napravi pojavijo motnje ali nenavadne
vibracije
Poiščite poškodbe na kosilnici in opravite
potrebna popravila, preden je zaženete znova in
z njo začnete delati.
Natakite vtič vžigalne svečke in zaženite motor
po odpravljanu motenj (glejte tabelo motenj) in
preverjanju naprave
po čiščenju naprave
Poslopje za košenje preverite v popolnosti in
skrbno, odstranite vse tujke
Bodite posebej previdni pri obračanju kosilnice ali
pa če kosilnico vlečete proti sebi
Ne kosite preko ovir (n. pr. vej, korenin)
Odrezanih drobcev odstranjujte samo pri mirujočem
motorju
94
Prevod izvirnika navodila za uporabo
Page 95

Izklopite motor / rezilo, če prehajate preko površine,
Starega olja ne smete:
odvreči med gospodinjske odpadke
vlivati v kanalizacijo, odtok ali na tla
ki ni namenjena za košnjo
Naprave nikoli ne dvigujte ali nosite, če je motor
vklopljen
Pri polnjenju bencina ali motornega olja ne jejte niti
ne pijte
Ne vdihavajte bencinskih hlapov
Napravo vozite le korakoma
Pred uporabo prevetite, ali so matice, vijaki in sorni-
ki močno priviti
Montaža
Upoštevajte priloženo navodilo za montažo.
Pozor!
Napravo lahko uporabljate šele takrat, ko je v
celoti montirana.
Točenje
Pred zagonom morate v kosilnico natočiti gorivo.
Opozorilo – nevarnost požara!
Bencin in olje sta visoko vnetljiva!
Vedno upoštevajte priložena navodila za uporabo
proizvajalca motorja.
Obratovalna sredstva
SLO
Bencin in olje hranite le v za to predvidenih
posodah
Bencin in olje polnite ali praznite le pri mrzlem
motorju na odprtem
Bencina ali olja ne polnite, če je motor vklopljen
Rezervoarja ne napolnite preveč (bencin se
razširja)
Med točenjem goriva ne kadite
Zamaška rezervoarja za gorivo ne odpirajte, če
motor dela ali če je vroč
Zamenjajte poškodovan rezervoar ali pokrov
rezervoarja
Pokrov rezervoarja morate vedno tesno zapreti
V primeru iztekanja bencina:
Motorja ne smete zagnati
Preprečite morebitni poskus vžiga
Očistite napravo
V primeru iztekanja motornega olja:
Motorja ne smete zagnati
Iztečeno motorno olje poberite s sredstvom za
vezanje olja ali krpo in strokovno odstranite
Očistite napravo
Starega olja ne smete:
odvreči med gospodinjske odpadke
vlivati v kanalizacijo, odtok ali na tla
Priporočamo, da staro olje v zaprti posodi odnesete v
zbirni center ali na servisno mesto.
Bencin Motorno olje
Vrsta
Polnilna
količina
običajen bencin /
neosvinčeni
glejte navodila
proizvajalca
motorja
glejte navodila
proizvajalca
motorja
pribl. 0,6 l
Varnost
Opozorilo!
Motorja nikoli ne pustite teči v zaprtem prostoru.
Nevarnost zastrupitve!
Nalivanje bencina
1. Odvijte pokrov rezervoarja, pospravite ga na čisto
mesto.
2. Bencin polnite z lijakom.
3. Odprtino za polnjenje rezervoarja trdno zaprite in
očistite.
Polnjenje motornega olja
1. Odvijte pokrov za polnjenje olja, zamašek
pospravite na čisto mesto.
2. Olje polnite z lijakom.
3. Odprtino za polnjenje olja trdno zaprite in očistite.
95
Page 96

SLO
Zagon
Pozor!
Naprave ne smete uporabljati, če so rezalni
sklop in/ali pritrdilni deli majavi, poškodovani ali
obrabljeni!
Pred vsakim zagonom opravite vizualno kontrolo.
Simbol kamere na naslednjih straneh opozarja na
slike na strani 4–7.
Nastavitev višine reza
Pozor – Nevarnost poškodb!
Rezalno višino nastavljajte le ob izklopljenem
motorju in mirujočem rezilu.
▪ Na isto rezalno višino vedno nastavite vsa
kolesa.
▪ Nastavitev rezalne višine je odvisna od modela.
Bencinska kosilnica
Košnja z zbiralno košaro za travo
Pozor – Nevarnost poškodb!
Zbiralno košaro za travo snemite ali postavite le,
če je motor izklopljen in če rezilo miruje.
1. Dvignite prestrezni zaklop in zbiralno košaro za
travo obesite na držaje (
6).
Kazalnik nivoja napolnjenosti
Centralna nastavitev (
1. Pritisnite in držite vzvod za odklepanje na stran.
2. Vzvod premaknite na levo ali desno v želeno
rezalno višino.
3. Pustite, da se vzvod zaskoči.
4. Pazite na enak položaj zaskočitve pri vseh kolesih.
2)
Kazalnik nivoja napolnjenosti se s pretokom zraka pri
košnji pritiska navzgor (
Če je zbiralna košara za travo polna, nalega kazalnik nivoja napolnjenosti na košaro (
travo se mora izprazniti.
5a).
5b). Zbiralna košara za
Pražnjenje zbiralne košare za travo
1. Dvignite prestrezni zaklop.
2. Snemite zbiralno košaro za travo in je odstranite
nazaj (
6).
3. Izpraznite zbiralno košaro za travo.
4. Dvignite prestrezni zaklop in zbiralno košaro za
travo ponovno obestie na držaje (
6).
Košnja brez zbiralne košare za travo
Pozor!
Kosite le pri delujoči vrtilni vzmeti
prestreznega zaklopa brez zbiralne košare za
travo.
Prestrezni zaklop nalega zaradi vzmetne sile na ohišje
kosilnice. Trava se tako izmetava spodaj navzdol.
96
Prevod izvirnika navodila za uporabo
Page 97

SLO
Zastiranje s kompletom za zastiranje (opcija)
Pri zastiranju se odrezani drobci ne zbirajo, ampak
ostanejo na trati. Zastirka ščiti tla pred izsuševanjem in
ga oskrbuje s hranili.
Najboljši rezultati se dosegajo z rednim vzvratnim
rezanjem za pribl. 2 cm. Hitro razpade le mlada trava z
mehkim listnim tkivom.
Višina trave pred zastiranjem: maksimalno 8 cm
Višina trave po zastiranju: najmanj 4 cm
Hitrost rezanja prilagodite zastiranju, ne hodite
prehitro.
Vstavljanje kompleta za zastiranje
Pozor – Nevarnost poškodb!
Komplet za zastiranje vstavite ali odstranite le, če
je motor izklopljen in rezilo miruje.
1. Snemite zbiralno košaro za travo (
2. Dvignite prestrezni zaklop in komplet za zastiranje
vstavite v jašek za izmetavanje (
Zapora se mora zaskočiti.
Če se komplet za zastiranje ne zaskoči, se lahko
komplet za zastiranje in rezilo poškodujeta.
6).
7).
Košnja z bočnim izmetalom (opcija)
Pozor – Nevarnost poškodb!
Bočno izmetalo snemite ali postavite le, če je motor
izkloplje in rezilo miruje.
Vstavljanje bočnega izmetala
1. Odstranite zbiralno košaro za travo in vstavite
komplet za zastiranje.
2. Odprite pokrov za bočno izmetalo in ga čvrsto
držite (
9/1).
3. Vstavite kanal za bočno izmetalo (
4. Počasi zaprite pokrov.
Pokrov zavaruje kanal bočnega izmetala pred
izpadanjem.
Odstranitev bočnega izmetala
1. Odprite pokrov za bočno izmetalo in ga čvrsto
držite (
9/1).
2. Odstranite bočno izmetalo in zaprite pokrov
(
9/2).
9/2).
Nastavitev višine ročaja (opcija)
Nastavitev sponke
Odstranjevanje kompleta za zastiranje
1. Dvignite prestrezni zaklop.
2. Sprostite zapiralo na kompletu za zastiranje
8/1).
(
3. Izvlecite komplet za zastiranje (
8/2).
1. Čvrsto držite ročaj in sprostite obe sponki
(
10).
2. Ročaj privedite v želeni položaj.
3. Zaprite sponke.
Zagon motorja
Pozor – nevarnost zastrupitve!
Motorja nikoli ne pustite teči v zaprtem prostoru.
Pozor – Nevarnost poškodb!
Naprave pri poskusu zagona ne prevračajte.
97
Page 98

SLO
Bencinska kosilnica
▪ Motor zaženite, le če je rezilo montirano
(rezilo služi kot rotacijska inercija)
▪ Pri zagonu obratovalno zagretega motorja
NE uporabljajte čoka ali gumba črpalke
▪ Ne spreminjajte nastavitev regulatorja na
motorju
Naprave ne zaganjajte, če kanal za izmetavanje ni
prekrit z enim iz naslednjih delov:
zbiralno košaro za travo
prestrezni zaklop
kompletom za zastiranje
Sprožite stikalo zaganjalnika s posebno pozornostjo
v skladu z navodili proizvajalca
Pazite na zadostno oddaljenost nog od rezalnega
orodja
Zagon naprave v nizki travi
Ročni zagon
z daljinskim upravljanjem plina, s čokom
1. Vzvod za plin postavite na položaj max
(
11/1).
2. Varnostno streme izvlecite do zgornjega dela ročaja
in ga čvrsto držite (
zaskoči.
3. Vrv zaganjalnika hitro izvlecite in potem pustite, da
se ponovno počasi navije ( 17).
4. Po ogrevanju motorja (pribl. 15–20 sekund) vzvod
za plin postavite na položaj med min in max.
brez daljinskega upravljanja plina, brez gonilne
črpalke/čoka
5. Vzvod za plin postavite na položaj max (
6. Varnostno streme povlecite do zgornjega dela ročaja
in ga čvrsto držite (
zaskoči.
7. Vrv zaganjalnika hitro izvlecite in potem pustite, da
se ponovno počasi navije (
8. Po ogrevanju motorja (pribl. 15–20 sekund) vzvod
za plin postavite na položaj med
min i max.
98
16) – varnostno streme se ne
16) - varnostno streme se ne
17).
12/1).
z daljinskim upravljanjem plina, z zaganjalno
črpalko (
1. Vzvod za plin postavite na položaj max (
2. 3x pritisnite na gumb črpalke v časovnem obdobju
3. Varnostno streme izvlecite do zgornjega dela ročaja
4. Vrv zaganjalnika hitro izvlecite in potem pustite, da
5. Takoj ko motor steče, vzvod za plin prestavite glede
16)
12/1).
od pribl. 2 sekund ( 15). Pri temperaturah pod
10 °C pritisnite na gumb črpalke 5x.
in ga čvrsto držite (
zaskoči.
se ponovno počasi navije (
na želeno število vrtljajev v območje med oznakama
min in max.
16) - varnostno streme se ne
17).
Ročni zagon
brez daljinskega upravljanja plina, s čokom
Čok*
Vkl Izkl
1. Čok postavite na položaj 1 ( 13/1).
2. Varnostno streme izvlecite do zgornjega dela ročaja
in ga čvrsto držite (
zaskoči.
3. Vrv zaganjalnika hitro izvlecite in potem pustite, da
se ponovno počasi navije (
4. Po ogrevanju motorja (pribl. 15–20 sekund)
postavite čok na položaj 2 (
Motor ima vnaprejšnjo nastavitev plina.
Spreminjanje števila vrtljajev zato ni možno.
brez daljinskega upravljanja plina, z zaganjalno
črpalko ( 16)
1. 3x pritisnite na gumb črpalke v časovnem obdobju
od pribl. 2 sekund (
10 °C pritisnite na gumb črpalke 5x.
2. Varnostno streme izvlecite do zgornjega dela ročaja
in ga čvrsto držite (
zaskoči.
17) – varnostno streme se ne
18).
13/2).
16). Pri temperaturah pod
17) – varnostno streme se ne
Prevod izvirnika navodila za uporabo
Page 99

3. Vrv zaganjalnika hitro izvlecite in potem pustite, da
se ponovno počasi navije (
Motor ima vnaprejšnjo nastavitev plina.
Spreminjanje števila vrtljajev zato ni možno.
brez daljinskega upravljanja plina, brez gonilne
črpalke/čoka
4. Varnostno streme izvlecite do zgornjega dela ročaja
in ga čvrsto držite (
zaskoči.
5. Vrv zaganjalnika hitro izvlecite in potem pustite, da
se ponovno počasi navije (
Motor ima vnaprejšnjo nastavitev plina.
Spreminjanje števila vrtljajev zato ni možno.
18).
17) – varnostno streme se ne
18).
Električni zagon (opcija)
Električni zagon brez gonilne črpalke/čoka ( 13)
1. Vzvod za plin postavite na položaj (
2. Varnostno streme izvlecite do zgornjega dela ročaja
in ga čvrsto držite (
zaskoči.
3. Ključ za vžig v ključavnici obrnite do konca v desno
18).
(
4. Takoj ko motor steče, pustite ključ za vžig (se vrne
na položaj "0").
5. Vzvod za plin postavite v skladu z želenim številom
vrtljajev motorja na položaj med oznakama
min in max.
16) – varnostno streme se ne
13/1).
SLO
Izklop motorja
Naprava brez sklopke rezila
1. Vzvod za plin postavite na položaj min
(
12/2)
2. Pustite varnostno streme (
- Motor se izklopi.
Pozor, težka vreznina!
Motor lahko dela še nekaj časa. Po izklopu se
prepričajte, da motor miruje.
Kolesni pogon (opcija) ( 20)
Pozor!
Menjalnik priklopite le ob vklopljenem motorju.
Vklop kolesnega pogona
1. Vklopno ročico menjalnika pritisnite proti zgornjem
delu ročaja in čvrsto držite (
menjalnika se ne zaskoči.
- Kolesni pogon se vklopi.
Izklop pogona koles
1. Pustite vklopno ročico menjalnika (
- Kolesni pogon se izklopi.
Menjalnik vario (Speed Control) (opcija)
Z menjalnikom Vario se lahko hitrost vožnje kosilnice
spreminja brezstopenjsko.
Pozor!
Vzvod sprožite le ob vklopljenem motorju.
Spreminjanje prestav brez motornega pogona
lahko poškoduje pogonski mehanizem.
22).
19) – vklopna ročica
21).
Za višjo hitrost povlecite vzvod (
v smeri ( 20/2)
Za višjo hitrost povlecite vzvod (
( 20/1)
Hitrost vožnje vedno prilagodite trenutnemu stanju tal in trate.
20)
20) v smeri
99
Page 100

SLO
Bencinska kosilnica
Nega in vzdrževanje
Pozor – Nevarnost poškodb!
▪ Pred vsemi vzdrževalnimi deli in negi vedno
izklopite motor in izvlecite vtič vžigalne svečke.
▪ Motor lahko dela še nekaj časa. Po izklopu se
prepričajte, da motor miruje.
▪ Pri vzdrževalnih delih in negi rezila vedno
nosite delovne rokavice!
Napravo za zajemanje trave redno preverjajte glede
delovanja in obrabe
Po vsaki uporabi kosilnico temeljito očistite
Naprave ne smete poškropiti z vodo.
Vdor vode v uplinjač ali sistem vžiga lahko povzroči
motnje v delovanju
Rezilo redno kontrolirajte glede poškodb
Pokvarjene glušnike vedno zamenjajte
Nega kosilnice
V skladu z navodili proizvajalca motorja mora usmerjen
navzgor biti naslednji del:
Polnjenje baterije zaganjalnika (opcija)
Baterije zaganjalnika ni potrebno vzdrževati
in se v običajnem primeru polni v kosilnici.
V posebnih primerih baterijo mora napolniti uporabnik:
pred prvim zagonom kosilnice
če se izprazni, pred zimo ali v primeru daljšega
obdobja mirovanja (> 6 mesecev)
Postopek polnjenja:
1. Vzemite polnilnik iz predala baterije.
2. Kabel baterije odklopite od kabla motorja (
3. Kabel baterije povežite s kablom polnilnkka (
4. Polnilnik priključite na električno omrežje.
Napetost električnega omrežja se mora ujemati z
obratovalno napetostjo polnilnika.
Polnjenje poteka približno 36 ur.
Uporabljajte izključno priložen originalni polnilnik.
Pozor!
▪ Baterijo zaganjalnika polnite le v suhih, dobro
prezračenih prostorih.
▪ Med postopkom polnjenja kosilnice ne smete
zagnati.
25).
26).
uplinjač / fi lter za zrak (
vžigalna svečka (
Upoštevajte navodilo za uporabo proizvajalca
motorja!
23)
24)
Brušenje / zamenjava rezila
Topa ali poškodovana rezila dajte izbrusiti / obnoviti
le pri servisnem mestu ali pooblaščenem
strokovnem obratu
Pobrušena rezila morajo biti centrirana
Pozor!
Necentrirana rezila privedejo do močnih vibracij
in poškodujejo kosilnico.
100
Prevod izvirnika navodila za uporabo
 Loading...