

Page 1

.
.
.
.
.
.
.
.
.
ALCATEL
.........
PIMphony
the power of speech
for MS Outlook
.
Page 2

Alcatel PIMphony
Contents
Introducing Alcatel PIMphony ....................................................................................................3
General presentation....................................................................................................................3
Hardware and software installation guide....................................................................................4
Installing Alcatel PIMphony standard version .............................................................................5
PC configuration required for standard version............................................................................5
Installation of standard version hardware.....................................................................................6
Installation of standard version software......................................................................................8
Installing the Alcatel PIMphony application network version on a client terminal........................8
PC configuration required for network version............................................................................9
Installation of network version software....................................................................................10
Getting started with Alcatel PIMphony......................................................................................10
Running Alcatel PIMphony for the first time.............................................................................11
Tutorial .....................................................................................................................................11
Making a call using the Telephone module................................................................................12
Making a call using the Dialler module......................................................................................13
Showing a Popup entry..............................................................................................................14
Alcatel PIMphony user's guide..................................................................................................14
The Telephone module..............................................................................................................15
Running the Telephone module.................................................................................................15
Personal directory......................................................................................................................16
Telephone Bar...........................................................................................................................16
Call status and management window.........................................................................................17
Control buttons..........................................................................................................................18
Telephone Bar function selection...............................................................................................18
Telephone module main window...............................................................................................19
Main control bar........................................................................................................................20
Call status and management window.........................................................................................22
Call status icon..........................................................................................................................23
Control icons .............................................................................................................................23
Status window function selection...............................................................................................23
Programmable function keys..................................................................................................... 24
1
Page 3

Alcatel PIMphony
Unanswered calls window.........................................................................................................24
Call log window........................................................................................................................25
Call list......................................................................................................................................25
Command bar ............................................................................................................................26
Using the Telephone..................................................................................................................27
Using the Call log......................................................................................................................27
Using the personal directory......................................................................................................28
Managing calls..........................................................................................................................30
Making a call.............................................................................................................................30
Putting a call on hold.................................................................................................................31
Transferring a call.....................................................................................................................32
Setting up a conference..............................................................................................................33
Programming a function key......................................................................................................34
Programming an una ssigned fu nction key..................................................................................34
The Popup module.....................................................................................................................36
Main Po pup configuration window............................................................................................36
Configuring Popup using the Wizard.........................................................................................37
Customized Popup configurat ion...............................................................................................38
Creating or mod ifying an action ................................................................................................39
Loading a pre-programmed action file.......................................................................................41
Synchro nize Alcatel PIMphony with Outlook............................................................................42
The Dialler module....................................................................................................................42
Using the Dialler module...........................................................................................................43
Dialling using Copy-Paste.........................................................................................................44
Dialling using the mouse right-hand button ...............................................................................45
Miscellaneous............................................................................................................................46
Glossar y....................................................................................................................................46
In the event of technical problems.............................................................................................48
Copyright..................................................................................................................................48
2
Page 4

Alcatel PIMphony
Introducing Alcatel PIMphony
Thank you for choosing the Alcatel PIMphony application.
This Online Help will help you become familiar with the product, and its organisation is described
below.
The Online Help is divided into 5 sections:
1. General presentation of the product, its functions and practical features.
2. Installatio n guide, covering both hardwar e and software .
3. Getting started with the application, which guides you t hrough the early stages.
4. Detailed user's guide for the 3 main modules in the application:
• Telephone, which is the main user interface.
• Dialler, w hich appears as an ic on in t he too l bar.
• Popup, which concerns the PIM.
5. Miscellaneous, which inc ludes a g lossary, instructions in the event of technical prob lems, etc.
General presentation
The Alcatel PIMphony application is a personal productivity tool installed on an office PC.
If you have the following telephone configuration:
• an Alcatel Reflexes telephone terminal,
• connected to an Alcatel Office PABX,
• with a Personal Information Manager (PIM) installed on yo ur PC,
the Alcatel PIMphony application provides the interface betwee n your telep hone and your PIM.
Alcatel PIMphony is specifically dedicated to PIM MS Outlook 97 and 98.
The a pplication is available in two versio ns :
• The standard version, fo r inst allation on a single PC,
• The network version, for installat ion on a telephone server and each of its client terminals.
CAUTION: The availability of the functions described in this Online Help will depend on the
version you are using.
3
Page 5

Alcatel PIMphony
Main features of Alcatel PIMphony are:
• Enhanced user-friend l iness t o manage your telephone calls (on the screen),
• Operates with PIM MS Out loo k 97 and 98,
• A personal director y supplied w ith the basic app lication, so that it can be run without PIM.
Main functions are:
• Call management (holding, tr ansfer, conference, etc.),
• Search using a telephone number in the PIM database to ident ify the corr esponding name,
and vice-versa,
• Manageme nt of a copy-paste and drag-and-drop facility (name or number) wit h an
application such as Not epad, Word , Excel, et c,
• An automatic PIM window Popup facility, as a function of predefined criteria or on request,
• Customized Popup configuration, using a Wizard,
• Synchro nisation with the P IM co ntact s databas e,
• Storage of calls and manageme nt s of the Cal ls log.
Hardware and software installation guide
Depending on the version of the applicat ion you w ish to install (st a ndard or net work version), click
on the corresponding chapter:
• Installing Alcatel PIMphony standard version
• Installing Alcatel P IMpho n y netw ork version on a client te rminal
WARNING: Concerning the network version, only installation on a client terminal is described.
The server installation is d e s cribe d in the Installation Manu al for the A lcatel PIMphony network
version.
4
Page 6

Alcatel PIMphony
Installing Alcatel PIMphony standard version
The Alcatel PIMphony application standard version is supplied in a pack containing:
• A CD-ROM containing the software to be installed.
• A PC-Telephone connection module CTI (Alcatel 4091 CTI).
• A V24 serial connection cable.
• A product installat ion manual.
Telephone configuration required
1. You must be connected to an Alcatel Office PABX, running software r elease R3.1 o r later.
2. You must have an Alcatel Reflexes telephone.
PC configuration required
1. Before attempting to install the application, check that your PC configurat ion corr esponds to
the minimum required configuration.
The a pplication is installed in two p ha s es, in the seq uence shown b elow:
• Hardware installat io n
• So ftware ins tallation
PC configuration required for standard
version
Hardw are configuration
Yo u r PC must have the following minimum char a cteristic s :
• Processor: Pentium 166 MHz or better.
• RAM: minimum 48 MB.
• Hard disk: 30 MB available.
• CD-ROM drive.
• 1 RS232 serial port available (COM1 or COM2).
5
Page 7

Alcatel PIMphony
Software confi guration
The operating system installed on your PC must be one of the following:
• MS Windows 95.
• MS Windows 98.
• MS Windows NT 4.0 Workstation with Pack 3 or later.
• MS Internet Explorer V3.02 (or later) o r Acrobat Reader is recommended to view the On
Line Help.
The Alcatel PIMphony application is based on the Microsoft TAPI standard.
Environment TAPI version
Windows 95 TAPI 1.4
TAPI 2.1
Windows 98 TAPI 2.1
Windows NT 4.0 TAPI 2.0
TAPI 2.1
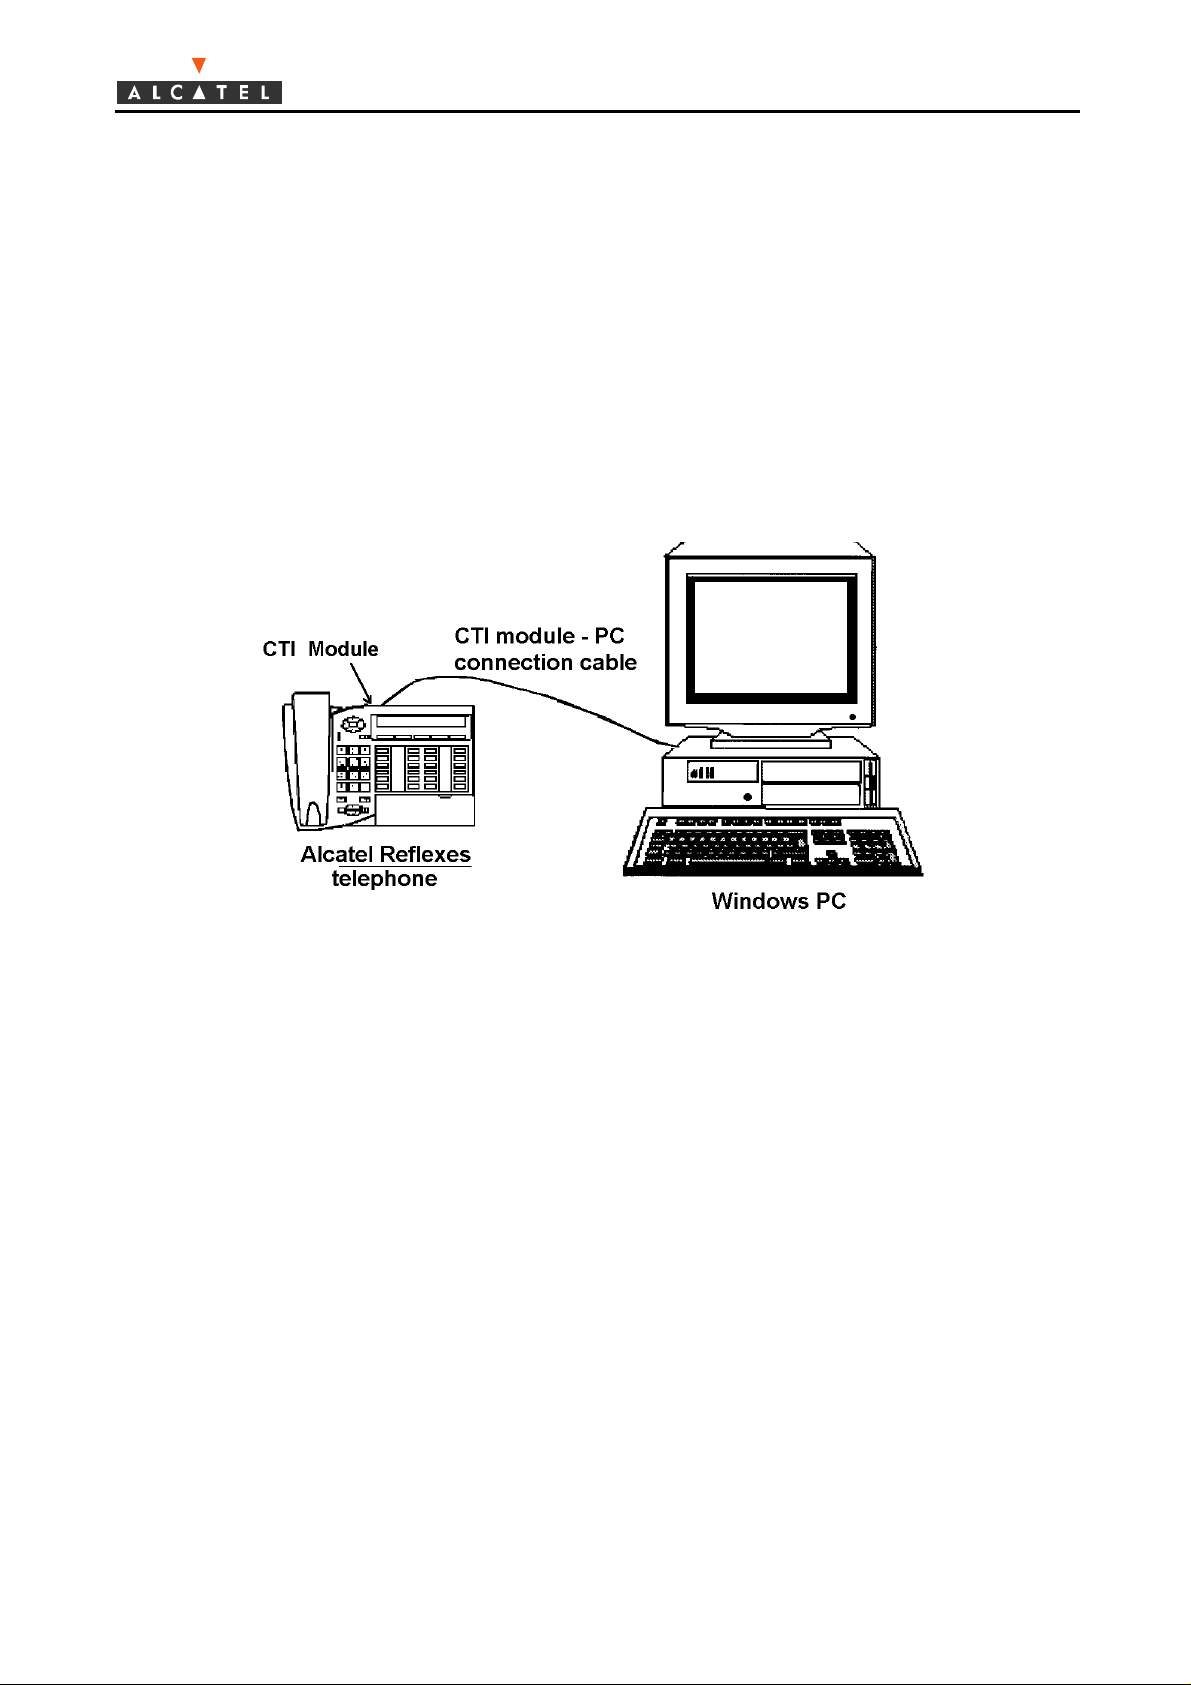
Installation of standard version hardware
The hardware insta llation for the standard version involves connect ing the PC-telephone connection
module supplied in the pack to your Reflexes terminal, and then connecting the same module to a
serial port (COM1 or COM2) on the PC, using the CTI module-PC cable.
Installation of PC-Telephone connection module
6
Page 8
If your terminal is a Premium or Advanced Reflexes:
1. Disconnect t he t elephone co r d fro m its socket.
2. Turn the terminal upside down.
3. In stall the module in t he termin al.
4. Connect the module to the terminal.
5. Mount the module on the terminal using the screw supplied in the kit.
6. Connect the module output to the serial port on y our PC.
7. Reconnect the t elephone co r d to its socket.
Alcatel PIMphony
If your terminal is a First or Easy Reflexes:
1. The PC-Telephone connection module cannot be mounted inside the terminal and only an
exte r na l inst a l la tion is poss ible.
2. Thus , inst allation si mply involve s connecting the termina l, the module and the s eria l port on
the PC.
7
Page 9

Alcatel PIMphony
Installation of standard version software
The software is installed fro m the CD-ROM supp l ied in the pack.
1. Insert the CD-ROM into the drive.
2. In Windows Explorer, se lect the CD-ROM dr ive and click on Setup.exe.
3. The installation windo w the n appears.
4. Follow the instructions given on the screen, through the installation.
5. The de fau lt in st a lla tion fo lder is C:\Program Files\Alcatel PIMphony, but you can install
the application in another folder o f your choice.
6. The de fau lt pr o g ra mme folder is Alcatel PIMphony, but you can change it or select an
existing programme fo lder, in which t he app lication icons w ill be st or ed.
7. Select the serial port assigned to the PC-telephone connect ion and the language for t he erro r
messages.
8. Check and change, if necessary, the Windows d ialling pro p ert ies (Area code, country,
outgoing code for a loca l call, outgo ing code for a long d ist ance cal l).
9. When the installation is complete, you can creat e a direct selection facility for the
application, on your Desktop.
IMPORTANT: A fter the initial installation, it is recommended t ha t you r e start your syst em, as
prompted.
Installing the Alcatel PIMphony application
network version on a client terminal
The Alcatel PIMphony application network version is supplied in a pack containing:
• A CD-ROM containing the software to be installed.
• A product installat ion manual.
Telephone configuration required
1. You must be connected to an Alcatel Office PABX, running software r elease R3.1 o r later.
2. Your telephone can be analogue, such as an Alcatel Reflexes, or DECT.
8
Page 10

Alcatel PIMphony
PC configuration required
1. Before attempting to install the application, check that your PC configurat ion corr esponds to
the minimum required configuration.
The ne two rk version ins talla tion o nly involves the softwar e installat ion. No hardware installa tion is
necessary.
PC configuration required for network version
Hardw are configuration
Yo u r PC must have the following minimum char a cteristic s :
• Processor: Pentium 166 MHz or better.
• RAM: minimum 48 MB.
• Hard disk: 30 MB available.
• CD-ROM drive.
Software confi guration
The operating system installed on your PC must be one of the following:
• MS Windows 95.
• MS Windows 98.
• MS Windows NT 4.0 with Pack 3.
• MS Internet Explorer V3.02 or later is recommended to view the On Line Help.
The Alcatel PIMphony application is based on the Microsoft TAPI standard.
Environment TAPI version
Windows 95 TAPI 1.4
TAPI 2.1
Windows 98 TAPI 2.1
Windows NT 4.0
TAPI 2.0
TAPI 2.1
9
Page 11

Alcatel PIMphony
Installation of network version software
The software is installed fro m the CD-ROM supp l ied in the pack.
1. With Windows running, insert the CD-ROM into the drive.
2. In Windows Explorer, se lect the CD-ROM dr ive and click on Setup.exe.
3. The Welcome window t hen appears.
4. Fo llow the instructio ns given on the screen, throu gh the ins tallation.
5. The de fau lt in st a lla tion fo lder is C:\Program Files\Alcatel PIMphony, but you can install
the application in another folder o f your choice.
6. The de fau lt pr o g ra mme folder is Alcatel PIMphony, but you can change it or select an
existing programme fo lder, in which t he app lication icons w ill be st or ed.
7. Select the serial port assigned to the PC-telephone connect ion and the language for t he erro r
messages.
8. Check and change, if necessary, the Windows d ialling pro p ert ies (Area code, country,
outgoing code for a loca l call, outgo ing code for a long d ist ance cal l).
9. When the installation is complete, you can creat e a direct selection facility for the
application, on your Desktop.
IMPORTANT: A fter the initial installation, it is recommended t ha t you r e start your syst em, as
prompted.
Before attempting to run Alcatel PIMphony, check the Windows telephone configuration on your
PC:
Getting started with Alcatel PIMphony
If you are just starting to use the Alcatel PIMphony application, then this section is for you:
• It describes the oper at ions required t he first t ime the app lication is run.
• In the form of a short tutorial, it gives examp les o f the implement ation of the main
functions. This guides you through t he early phases of learning and also pro v ides a check
that the ins t a lla tion is co r re ct .
10
Page 12

Alcatel PIMphony
Running Alcatel PIMphony for the first time
To run the Alcatel PIMphony application for the first time, proceed as described below:
1 - Running Alcatel PIMphony
• From the Windows tool bar: click on Start and then select the PIMphony application in the
Programmes/Alcatel PIMphony menu .
2 - Sy nchronisation of Alc atel PIMphony with the PIM
• The first time the Telephone module is run, the Alcatel PIMphony application is
synchronised with the PIM contacts base. This operation can take severa l minutes.
• A confirmation s c reen is displayed: click on Yes.
3 - Configuring Popup using the Wizard
• The Popup Wizard helps you configure automatic Popup operation and can configure the
Popup as a function of predefined profiles.
• Follow the instructions on the screen and, from the predefined profiles, se lect the
configuration which corresponds to your requirements.
4 - Display of Telephone and Dialler
• The Telephone mod ule main wind ow is d isplaye d.
• The Dialler icon is displayed in the tool bar, indicating that the PC-Telephone connection is
active.
5 - Tutorial
• We recommend that you practice the simple oper ations described in the Tutorial, to get to
know the application and check that the main functions are available.
Tutorial
The tutorial guides you through your initial contact with the Alcatel PIMphony application. It also
provides a check that the app lication was correctly installed and that the main funct ions are
available.
Three simple operat ions are covered:
1. Making a call using the Telephone
2. Making a call using the Dialler
3. Automatic Popup of the PIM entry corresponding to an incoming call
11
Page 13
Alcatel PIMphony
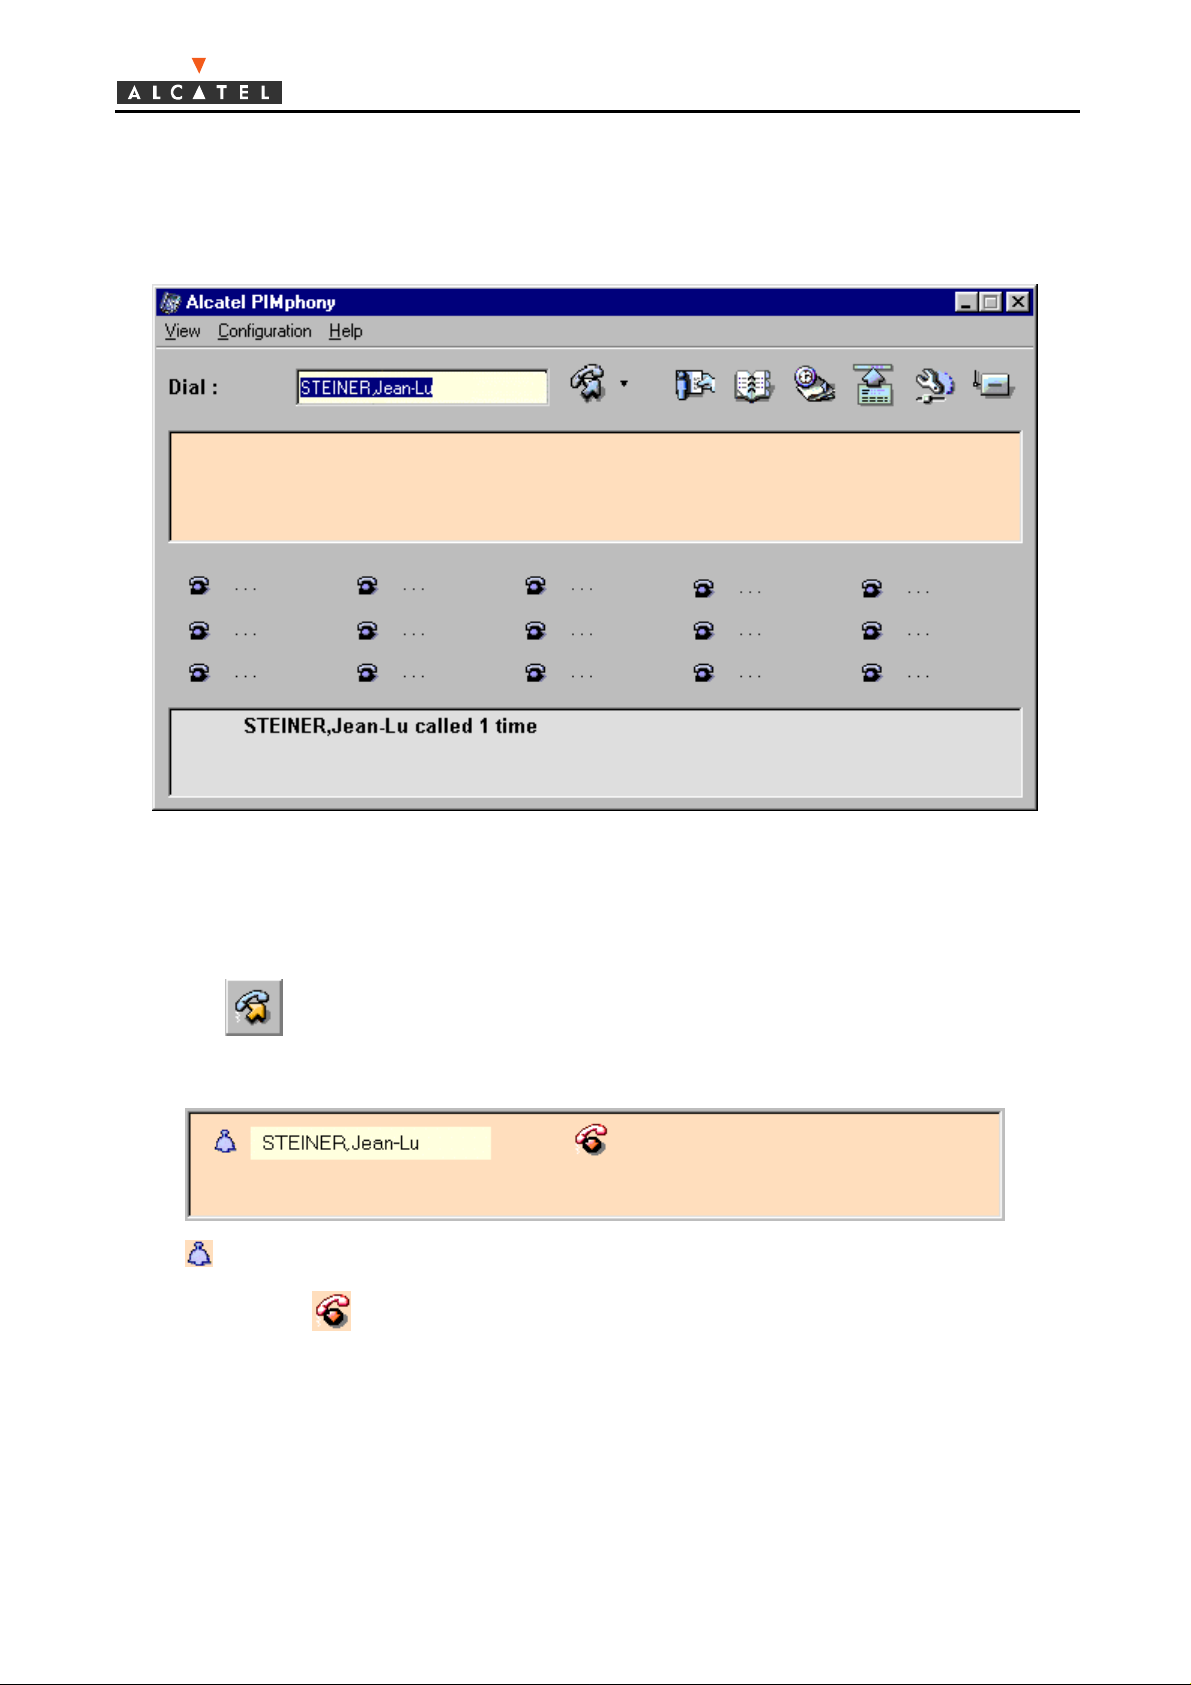
Making a call using the Telephone module
In the example below, you are going to make a call using the Telephone module.
1. On the keyboard, enter the name or number of the person you wish to call in the entry window
(for example 77895).
2. When the first few letters have been entered, the name is completed from the Outlook list of
contacts, or from that of the personal directory if Outlook is not installed.
3. Click on , to dial the number.
4. The call status and management window is as shown below.
• indicates that t he call is "ringing" (unanswered).
• Cont r ol icon indicates that the o nly action available is "terminate call".
12
Page 14
Alcatel PIMphony
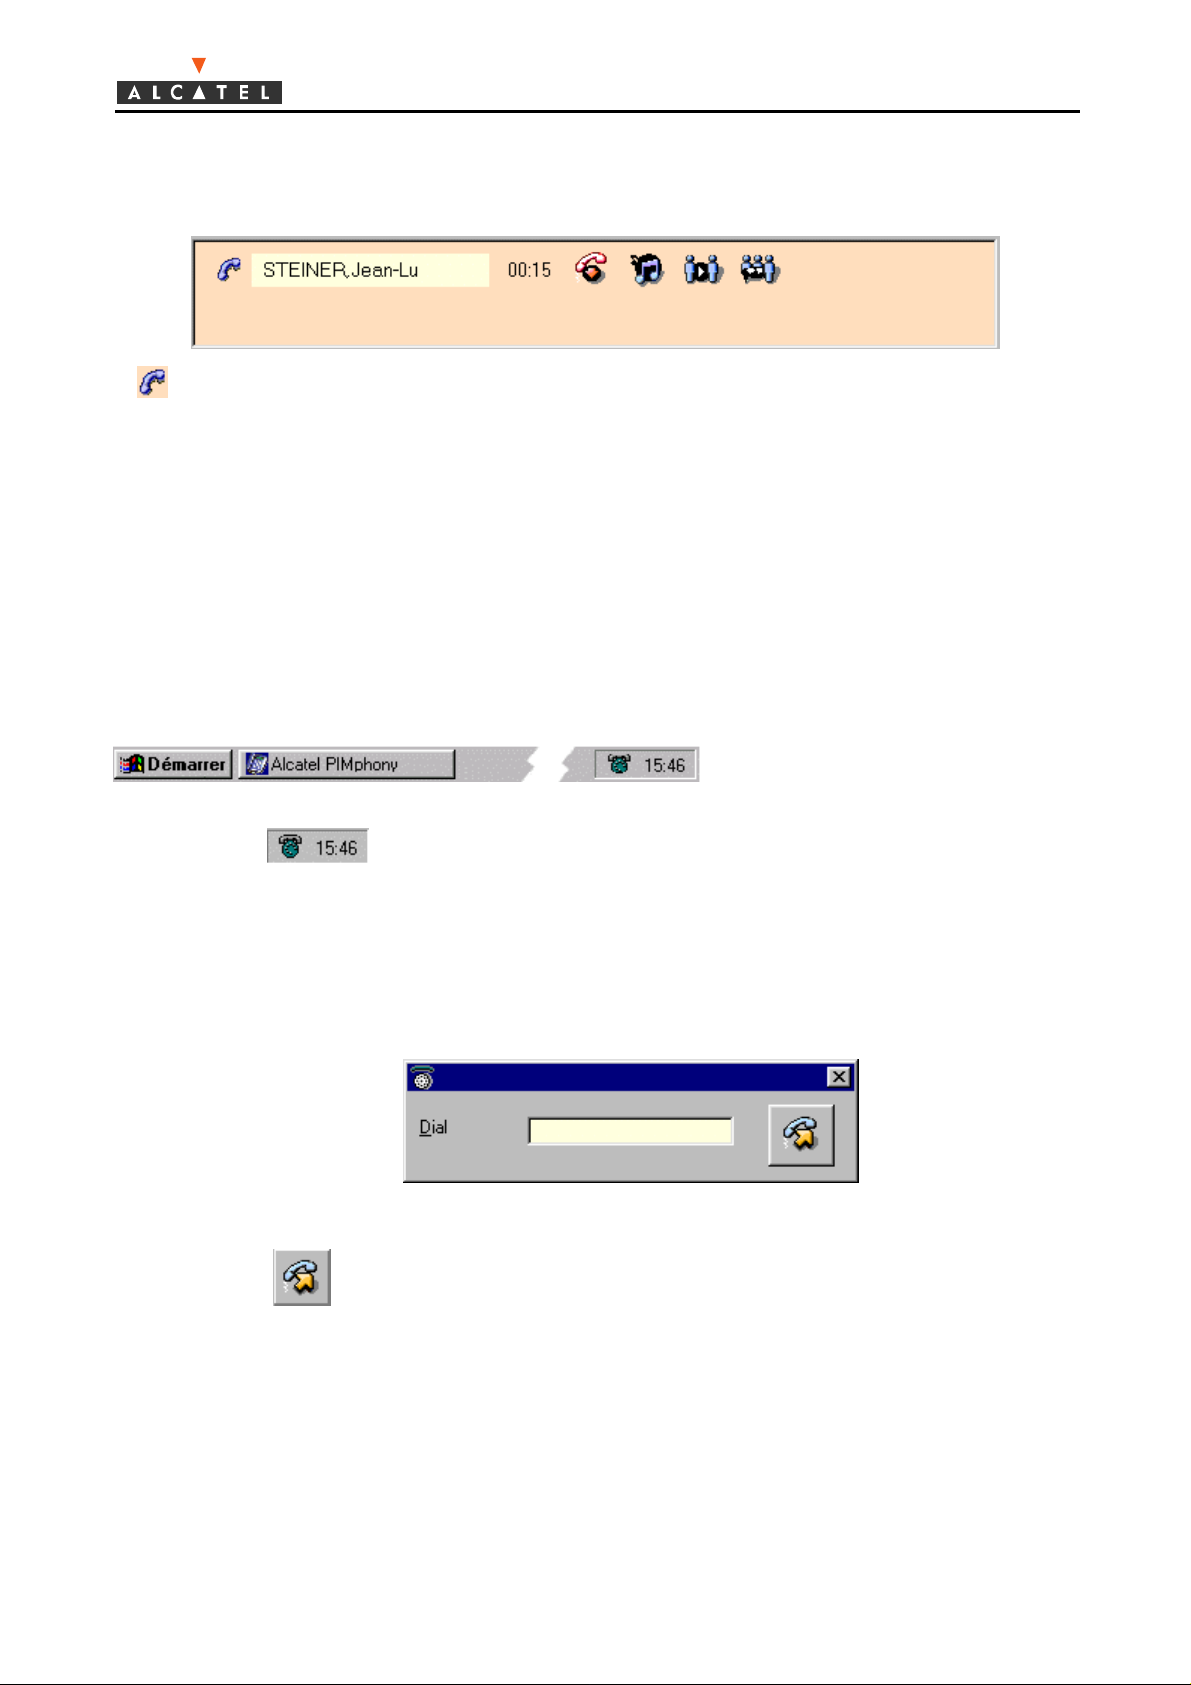
5. When the call is answered and during the conversation, t he ca ll status and management window
is as s hown below.
6. indicates that t he call is connected.
• Possible act ions are indicated by the control icons: "terminate call", "put on hold", "tr ansfer "
and "conference".
7. You can lift your receiver and speak to the person called.
Making a call using the Diall er module
In the example below, you are going to make a call using a "copy-paste" o per ation between a
compatible Microso ft application, suc h as Notepad, Word or Excel, and the Dialler module.
1. Firstly, check that t he PC-T elephone connection is in the "connected". T he icon should look
like this .
2. Open a compatible Microso ft applicat ion (for example Notepad).
3. Copy (CTRL+C) the required telephone number.
4. Click RH on the Dialler icon and the screen shown below appears (depend ing on t he
configuration).
5. Modify the number if necessar y.
6. Click on and the number is dialled.
7. The Telephone window appears, if it was previously closed.
8. The call status and manageme nt window shows the call stat us, the name o f the person called
and possible actions.
9. When your call is answered, you are in contact with the person called.
13
Page 15

Alcatel PIMphony
Showing a Popup entry
This action enables you to check the oper ation of the Po pup that you just configured, during the
installation.
In the example below, we shall consider that the Popup is configured to show an entry for the first
incoming call.
1. Ask a colleague for whom you have an entry in your PIM, or in your Personal directory, to
call yo u.
2. Check that his entry appears on the screen, in the conditions you defined.
Alcatel PIMphony user's guide
The Alcatel PIMphony user's guide gives a detailed description of the application modules with,
for each module, examples to sho w ho w to use t he main funct ions ava ilable.
This guide contains 3 sections, each cor r esponding to an application module:
• The Telephone mo du le, which is the user's main interface.
• The Dialler module, which appears as an icon in the tool bar.
• The Popup module, which provides the interface with t he external PIM.
14
Page 16

Alcatel PIMphony
The Telephone module
The Telephone module is the core of the Alcatel PIMphony application. It enables you to use t he
basic functions of your telephone without any keyboard operations.
Fo llowing activation, the T e lephone module main windo w is displayed.
The size of the window varies as a function of the number of calls and the supplementary options
selected.
The window may not be displayed while calls are in progress (configuration).
Running the Telephone module
The Telephone module can be run in three ways:
• From the Windows tool bar, click on Run and select the PIMphony application in the
Programmes/Alcatel PIMphony menu .
• From the workspace or the Windows tool bar, double-click on the Alcatel PIMphony icon,
if the icon is displa yed.
• Using the Dialler module (if ru n ning), click RH on the Dialler icon and sele c t the Zoom
menu.
If the Outlook base has been updated (entries added, deleted or modified), the PIMphony
application is synchronised with Outlook.
15
Page 17

Alcatel PIMphony
Personal directory
The Personal directory provides a loca l te lephone directory which can manage up to 400 entries.
If you are running a PIM with your Alcatel PIM phony applicat ion, t he Personal dir ectory is
managed in parallel and can be synchronised with the PIM window Popup.
The user interface is simply a directory display table containing 3 columns: name, first na me and
telephone number. Windows are pr esent ed in name alphabetical order.
The table is accompanied by a tool bar comprising the following buttons:
• : to create a new entry.
• : to modify an entry.
• : to delete an entry.
• : to dial the number.
Remark: The same funct ions can be accessed from the Edit menu .
Dire c t ca lling is possib le by do uble-clicking on the name or nu mber.
Telephone Bar
To save space on the screen, the Telephone windo w is rep laced by a Telephone bar, which is
activated from the Telephone window and is posit ioned at the to p of the screen.
16
Page 18

Alcatel PIMphony
The bar appearance differs as a function of the status of the terminal:
• Idle:
• Ringing:
• In conversation ( in this case w it h Jea n-Luc ST EINER)
The ba r contains:
• a Call Status and Management Window s imilar to that of the Telephone window when the
te rmin a l is in o pe r at io n,
• a group of 5 control buttons.
The Telephone Bar function selection icons pro v ide access t o supplementary functions.
Call status and management window
The call status and management window has a single line, which displays the call status.
The window below shows an examp le o f a call stat us line dur ing the conversation phase.
This line conta ins the following:
• call status icon,
• call identification window, wh ich displays the correspondent's name or t e lepho ne number,
• duration of call,
• cont r ol icon s .
The function selection icons specific to the call status and manageme nt window fac ilitat e your
operations.
17
Page 19

Control buttons
The Telephone Bar co mpris es the following control buttons:
• : make a call.
• : Popup the Outlook entry for the current call.
• : call the application Personal director y.
• : call the Popup configuration Wizard.
• : open the Telephone window and close t he Telephone Bar.
Alcatel PIMphony
Telephone Bar function selection
L'icône ouvre la fenêtre Téléphone.
L'icône minimise la Barre Téléphone.
L'icône donne accès aux autr es communications en-cours ; jusqu'à 8 communications sont
possibles.
18
Page 20

Alcatel PIMphony
Telephone module main window
The Telephone window shown be low co rresponds to a call in progress, with 1 unanswered call.
This window meets two contradictory requirements: maximum function selection facility using a
minimum of PC screen area.
The window comprises several control windows and bars, of various sizes, some of which are
optional:
1. Main control bar for dialling, using the personal director y and call log, etc. This bar is
always dis played.
2. Call status and management w indow to answer a ca ll, hang up, transfer, put on ho ld,
conference, etc. The size of this window is a funct ion of the number of calls (max. 8).
3. Programmable function key window for direct calls, forwarding, etc. This window is
optional.
4. Unanswered calls window the size of this window is a function of the number of
unanswered calls (max. 3).
Main Telepho ne functions can also be accessed fro m t he menu o ptions.
19
Page 21

Alcatel PIMphony
Main control bar
The main control bar cont ains t he main functions required to make a call. This is the "minimum"
telephone represent ation when the terminal is idle, there are no unanswered calls a nd t he o pt ional
secondary control bar has not bee n programmed .
The window contains:
A control bar for dialling:
• normal dialling,
• dialling using the name,
A control bar for window Popup and access to other modules such as the personal directory or
the call log. etc.
The dialling control bar contains:
• : an entry field in which the name or nu mber to be dialled is
entered.
• : a multi fun ction bu tton:
* Click to make a ca l l to the perso n or number specified in the entry field.
* Click : to access a menu, from which you can :
- make a call to one of the numbers stor ed in the contact file corresponding to
the name typed in the entry field.
- activate a telephone function :
• redial one of the ten last dialed numbers using "Red ia l".
• activate the feature keys fro m the "Direct call" or "Function" menu.
- activate the new call window from the "New call" menu.
20
Page 22

Alcatel PIMphony
The control bar for window Popup and access to other modu les conta ins:
• : a button for the Outlook window Popup for a call selected in the status window.
• : a button to call the application persona l direct ory.
• : a button to call the call log.
• : a button to call the Telephone bar.
• : a button to call the Popup configuration Wizard.
• : a button to open/close the Programmable function keys window.
Appearance of buttons
Each button o n the contro l bar indicat es its status in the application. If the button is active, it
appears in colour when the mouse po inter is po sit ioned over it. Ot herwise it remains grey.
Dialling procedure
Calls can be made using a copy/paste or drag-and-drop operation.
21
Page 23

Alcatel PIMphony
Call status and management window
The number of lines displayed in the call st atus and management window varies as a function of the
numb e r of calls. U p to 8 lines can be displayed .
Each call is represented by a line which g ives t he st at us of the call.
The window below shows an examp le o f a call stat us line dur ing the conversation phase.
This line conta ins the following:
• call status icon,
• call id e ntification win dow,
• duration of call,
• cont r ol icon s .
The function selection icons specific to the call status and manageme nt window fac ilitat e your
operations.
22
Page 24

Alcatel PIMphony
Call status icon
This icon indicates the status of the current call:
• : Ringing.
• : Conversa tion in progress.
• : On hold.
When the mo u s e pointer is on the icon, the icon is displayed in colo ur.
Control icons
The status window control icons are used to assign the available co mmand s, dynamically and
directly, to each line. T he co nt rol icons are:
• : Hang up
• : Answer call
• : Put on hold
• : Transfer
• : Conference
• : Cancel (conference o r tr ansfer)
Status window function selection
When the mouse pointer is positioned over an icon, the icon appears in co lour and, after one seco nd,
a Tool tip informs the user of the icon's exact function.
To activate a command, you simply click on the corresponding icon.
A call can be picked up by double-clicking on a line if the icon is pre se nt.
23
Page 25

Alcatel PIMphony
Programmable function keys
The display of the programmable function keys window can be act ivat ed or disabled from the
Telephone main window (icon ). The pro gramma ble func tion k eys window is shown below.
Fifteen keys are available for customised programming to your own requirements.
Unanswered calls window
The window showing unanswered calls or the manag ement of calls current ly being made s hows a l l
unanswered calls, incoming and outgoing. This window is completely independent of the Call log.
This window is not shown when t here are no unanswered ca l ls.
The window can display up to three lines simultaneously. The lines contain the following
information:
• incoming or outgoing call unanswered,
• outgoing call to busy terminal,
• outgoing call to unavailable terminal or wrong number,
• call-back requested,
• name or number of correspondent (if in system)
• number of calls of cor r espondent
The window cannot sho w more t han three lines simu lta neo us ly. A pu ll-dow n scroll can be used to
show other lines.
24
Page 26

Alcatel PIMphony
Call log window
The Call log records all calls ( incoming and outgoing, answered or unanswered) over t he last
30 days.
Call records are enter ed in the log continuously if the PC is on and the Telephone connect ion is
made (see Dialler).
Incoming a nd outgoing c alls are shown in sepa rate window s , but it is po s sible t o show all the calls
in the same windo w .
The Call log window contains:
• The lis t of calls
• The command bar
Two pull-down menus provide the same functions as the command bar buttons.
Call list
The Call log window can display up to 10 lines simultaneously. Calls are shown in reverse
chronolog ical sequence, from the latest to the oldest.
25
Page 27

Each line correspo nds to a call and cont ains t he following information:
• gener a l in fo r ma tion ico n ( : incoming c all or : outgoing call),
• call status icon ( : unanswered ca ll),
• name of correspondent (if in system),
• correspondent 's nu mber,
• date,
• time,
• duration of call.
A selecte d line is highl ighte d in yel low.
Alcatel PIMphony
Command bar
The call log co mmand bar contains:
a group o f s i x butt ons for log management:
• : sho ws incoming calls.
• : shows outgoing calls.
• : shows incoming and ou tgoing c alls.
• : shows calls for a chosen co r r espondent.
• : deletes entries from the log
• : deletes all log entries.
a group o f 2 buttons to manage the selected line :
• : Popup of Outlook entry for correspondent.
• : calls back the number.
26
Page 28

Alcatel PIMphony
Using the Telephone
From the Telephone module main window, you can access t he following funct ions:
1. Call ma na g e me nt
2. Programming a function key
3. Using the Call log
4. Using the Personal directory
Using the Call log
Using the Call log you can:
• Display a type of call (incoming or outgoing) or filter calls fro m a specified number.
• Delete any or all of the Log lines.
• Call back a correspondent .
• Popup the PIM window for a correspo ndent .
• Access the Telephone window.
To display a type of call (incoming, outgoing or both):
1. Click on the corresponding icon.
27
Page 29

To filter all calls to or from a specified number:
1. Select a line of the number concerned.
2. Click on .
To call back a correspondent:
1. Select a line of the number concerned.
2. Click on .
3. You can also click RH on the line and select the Dialling option in the menu.
To Popup the PIM window for a correspondent:
1. Select a line of the number concerned.
Alcatel PIMphony
2. Click on .
3. You can also click RH on the line and select the Popup option in the menu.
4. The window corresponding to the selected PIM pops up.
Using the personal directory
From the Personal directory, you can:
• Access an existing entry
• Create a new entry
• Modify an existing entry
• Delete an entry
• Make a call from the directory
28
Page 30

Alcatel PIMphony
Accessing an existing ent ry:
1. Click on the scrolling bar or use the arrow keys on the keyboard.
2. You can directly access the first entr y in the directo r y with a name beginning with the lett er
I (for example) by entering I on the keyboard (quick search).
Creating a new entry:
1. Click on and the following new entr y screen will be displayed.
2. Enter the name and telephone number of the perso n and click on Save.
3. This creates a new entr y in the Persona l direct or y.
Modifying an existing entry:
1. Click on ; and the same edit screen will be disp layed.
2. Modify the person's name and/or number, as required, and click on Save.
3. The entry is updated in the Personal directory.
Remark: The same functions can be obtained using the Functions menu.
Making a call from the Personal directory:
1. Select the entry for the person you wish to call.
2. Click on . T he number is dialled and the Telephone window is d ispla yed.
3. You can also double-click on the directory entry.
29
Page 31

Alcatel PIMphony
Managing calls
Call management can be accessed from the status window and the following actions are possible:
1. Making a call
2. Putting a call on hold
3. Transferr ing a call
4. Setting up a conference
Making a call
To make a call:
1. Using the keyboard, enter the number or name of the person required, in the entry window.
2. If the name is entered, when the first few letters have been typed, the name is completed
from the Outlook list of contacts or from the personal direct or y.
3. Click on , to dial the number.
You can also select o ne of the last t en numbers dialled (Redial function):
1. Click on .
2. The numbers or na mes for t he last t en numbers dialled are stored in a pull-down list.
3. Select one of the previous calls stored.
4. Click on , to dial the number.
If the call is unanswered, t he call stat us and management window appears as shown below:
• indicates that t he call is ringing (no answer) .
• Cont r ol icon indicates that the o nly availa ble act ion is "terminate call".
30
Page 32

Alcatel PIMphony
When the call is answered and during the conversat ion, t he call status and management window
appears as shown below:
• indicates that t he call is connected.
• In this case, poss ible actions are, in order: "terminate call", "put on hold", "tr ansfer" and
"conference".
Putting a call on hold
Putting a call on hold enables you to suspend the call for a short time and to pick it up again later.
The correspondent hears holding music.
To put a call on hold:
1. Click on .
2. The call status and management window appears as shown below:
• indicates that t he call is on hold.
• Cont r ol icon indicates that the only action available is to recover the call.
When making an enquiry call, you can put the first call on hold and speak to the second
correspondent.
In the example shown below you are speaking to STEINER and BERI is on hold.
31
Page 33

To put STEINER on hold and speak to BE RI:
1. Click on co ntrol icon for BERI.
To put both calls o n hold:
2. Click on co ntrol icon for STE INER.
Transferring a call
Alcatel PIMphony
Transferring a call means divert ing a call to anot her number of your own choosing.
In the example below, you want to tr ansfer the ca ll received from STEINER to BERI.
To transfer the call received from STEINE R:
1. Click on the control icon for ST EIN ER's ca ll.
2. Another line is then displa yed, asking you to ent er the name or number of the perso n to
whom you wish to transfer the call.
3. Enter the name or number of the person to whom you wish to transfer the call in the entry
window and then click on .
Note: the person to whom you wish to transfer the call can also be o bt ained fro m the PIM or
from the personal directory.
32
Page 34

Alcatel PIMphony
4. You are now in contact with BERI. Inform him that you are transferring a call.
5. Click on the icon for S TE I NER's cal l to validate the transfer.
6. STEINER and BERI ar e no w in contact.
Setting up a conference
Setting up a conference puts you in simultaneous cont act with two other numbers. The co nference
initiator calls the other two people and can disconnect one or both of them.
In the example below, after receiving a call fro m STEINER, you want to set up a conference with
BERI:
1. Click on the control icon for STEINER's call. You are now the init iator of the
conference.
2. Another line is then displayed, ask ing you to ent er t he name or number of the third person
participating in the conference.
3. Enter the name or number of the second contact, and click on .
Note: the name of the third participant can also be obtained from the PIM or from the
personal directory.
4. When BERI answers, you w ill be in conference wit h ST E I NER and BERI.
5. You can disconnect one or both of the other participants.
33
Page 35

Alcatel PIMphony
Programming a function key
You can use the Telephone module main window to ass ign a predefined function to a key.
To display the programmable function key window:
1. Click on in the main contro l ba r.
2. The programmable function key window is shown below.
You can program a function key, on an unassigned key.
Programming an unassigned function key
To programme a function key
1. Click RH on an unassigned key. You are now in programming mode and the following screen
appears.
34
Page 36

Alcatel PIMphony
2. Select a function from the list of pre-programmed functions:
• Speed dial: to obtain directly a frequently called number.
• Interception of individual or group calls: to intercept a call to one terminal or to a group
of terminals (in this ca s e , the PABX mus t be pr ogrammed).
• Direct dialling to the operator (by default "0").
• Pre-programmed forward (direct, when busy or timed).
• Do not disturb: to pr event any call fro m being received on your terminal (you can still
make calls).
• Deflect to allow selective forwarding on incoming calls.
• Cancel Forward to cancel a pre-programmed forward, Do not disturb or Deflect.
3. Enter the name which appears on the button, the number called (speed dial, op er ator, forwar ding)
and the time in seconds (in the case o f timed forwar ding).
4. Click on Save to valid ate the programming or on Next to programme another function key.
5. The Reset key resets a ll fields .
6. The Cancel key cancels the programming.
Show forwarding in status window
When forwarding or "Do not disturb" is programmed, this is indicated in the status window, the
background of which becomes grey. The t ype of forward (icon) and the receiving number ar e
shown in t he window.
The animated image and the Dialler icon also change, to display the new terminal status.
If a call appears in the stat us window, t he forwarding displa y t emporarily disappears (while the call
remains act ive).
Notes:
Forwarded calls are not recor ded in the calls received log.
The forwarding remains active on the terminal even if the PC is switched off.
35
Page 37

Alcatel PIMphony
The Popup module
The Popup module provides the interface between the Alcatel PIMphony application and the PIM
external to the applicat ion (such as Outloo k).
It displays telephone contact ent r ies on the basis of criteria entered during the configuration.
Configuring the Popup enables the user to define criter ia for the display and closing of the Popup
entries (actions, events, filters).
Examples:
• Displaying the Popup entry of the first outside caller (action) when the telephone rings
(filtered event).
• Sending an e-mail (action) if the first internal call is unanswered (filtered event).
The selected action is automat ically tr iggered, with or without t he opt ional confirmat ion request
window.
The main Popup configuration window is accessed from the Telephone module main tool bar.
Main Popup configuration window
The default version of the main Popup configuration window is shown below.
36
Page 38

Alcatel PIMphony
This windo w enables you to:
• configure the Popup using the Wizard (Wizard key).
• or customize the Popup configuration to suit your own requirements (vertical function
buttons and tabs).
If you are relatively inexperienced, we reco mmend that you use t he Wizard.
Configuring Popup using the Wizard
Running the Wizard displays screens that give you instructions for the selection of a pre-recorded
Popup configuration.
1. Follow the instructions given and select the options presented that co rrespond to your
requirements.
2. To go on to t he next screen, click on Next.
3. To cancel an action and return to the previous screen, click on Back.
4. To cancel all actions and exit from the Wizard, click on Cancel.
Step 1
Presents the Wizard, Click on Next.
Step 2
Step 2 defines the type of Popup use:
• Incoming and Outgoing calls (Desktop),
• Incoming calls (Attendant),
• Outgoing calls(Telemarketing),
• Incoming calls with Popup of caller information (Telesecretariat).
Select the option you want, then click on Next.
Step 3
Step 3 defines the moment at which the caller's Popup entry is displayed (event) and the action to be
performed in the event of an enquiry call.
Select the options you want, t hen click on Next.
37
Page 39

Alcatel PIMphony
Step 4
In Step 4, you select the event to close the Popup (at hang-up or after a timed delay, with or without
confirmation).
Select the options you want, t hen click on Next.
End of configuration
The Congratulations screen indicates that t he Popup configurat ion was success ful.
Click on Finish, to validate your options, close the Wizard and run the Popup.
Customized Popup configuration
From the main Popup configuration window, you can customize Popup operation to suit your own
requirements.
This window presents a list of six default actions:
• Popup of the entry of the first and second callers (case of enquiry call),
• Popup of the entry of the first and second persons called (case o f enquiry call),
• close the Popup entries of the caller and the person called.
38
Page 40

Alcatel PIMphony
To configure Popup:
1. Select one or more actions in the list, by ticking the appropr iate square.
2. Click on OK to validate the configuration.
If no predefined action suits your requirements, you can:
• Create a new action
• Modify an existing act ion
• Load a pre-programmed action file (*.saa)
You can also synchronise the Alcatel PIMphony application with the latest vers ion of PIM.
Creating or modifying an action
From the main Popup configuration screen, you can:
• Create a new action: click on .
• Modify an existing action: click on .
The action Features screen appears, with three configurat ion tabs: Event , Act ion and Filter.
Configuring an event
39
Page 41

Alcatel PIMphony
1. In the Name window, enter or modify the name of the action, which will then appear in the
list of actions (for example Close outgoing contact).
2. Select the event which will trigger the action (for example On: Each call).
3. You can request the display of an optional confirmat ion screen befor e the action is executed.
Configuring an action
1. Click on the Act ion tab. The following sc reen is then dis played.
2. Select the action to be executed, for example Send mail to.
3. In the Values column, enter the destinat ion e-mail addres s.
4. Select the attached cond it ion: with or without prompt.
5. Using the cursor, select the timed delay before the action is executed ( from 0 to 60 seconds).
40
Page 42

Configuring a filter
1. Click on the Fi lt e r tab. The fo llowing screen is then displayed.
Alcatel PIMphony
2. Select the criteria for the filtering or non-filtering of the previously defined event.
Loading a pre-programmed action file
1. On the main Popup configuration screen, click on .
2. This will open a window for the se lection of a file with suffix saa (stand a lone action), from
within the file organisation structure.
3. Validate and the action file is loaded. The name of the action is automat ically displa yed in
the list of actions in the Popup configur ation window.
41
Page 43

Alcatel PIMphony
Synchronize Alcatel PIMphony with Outlook
1. From the main Popup configuration screen, click on the Advanced tab. The following
screen is t hen displayed.
2. Click on Synchronize with Outlook to start synchronization of the app lication with PIM.
The Dialler module
The Dialler module is the basic level of the Alcatel PIMphony application, represented by an icon
which is always v isible in the Windo w s tool bar.
If the Windows tool bar is hidden, use the mouse to make it visible.
The Dialler module is automatically activated when the PC is start ed up.
42
Page 44

Alcatel PIMphony
Display ing the status of the PC -telephone connection and the
terminal
The appearance of the Dialler modu le icon indicates the status of the PC-telephone connection and
your telephone.
Supplementar y information is given in the Too lTips which appears w hen t he mouse po inter is on
the icon.
Telephone status Icon ToolTips
App lic a tion not oper ationa l
Application oper at ional
Telephone ringing
Conversation in progress
Calls fo r w ar de d
Telephone connected w ith
unanswered calls
(telephone with bar)
(green telephone)
(a lternating green and yel low
bel ls )
(green handset)
(red telephone with white
forwarding arrow)
(green telephone)
Personal number
Calle r's number
Calle r's number
(or number called)
Number rec eiving
forward
Number of
unanswered calls
Using the Dialler module
The Dialler is a fully ind epend ent module w hich ca n be used for va rious simple oper ations, without
using the Telephone module:
• Pick up a call directly, by clicking on the icon with the mouse left-hand butto n.
• Dial using copy-paste or directly using the mouse right-hand button from an application
such as Notepad, Word, Outlook, Exce l, etc.
• Access more sophisticated functions in a menu, using the mouse right-hand button:
43
Page 45

Alcatel PIMphony
• Hang up: to t erminate a call in prog ress.
• Redial: to redia l the last number dialled (redial funct ion).
• Dial: to make a call, the number required can be entered in a window.
• Maximise: to activate the main Telephone window.
• Features: to configure quick dialling using the mouse right-hand button.
• Close: to close the Dialler.
Dialling using Copy-Paste
The Dialler modu le enables a ca ll to be mad e by "copying-pasting" from a compatible application
such as Notepad, Word, Outlook, Exce l, etc.
The telephone number of the person you wish to call is "copied-past ed".
To make a call using "copy-paste":
1. Open a compatible Microso ft applicat ion (for example Notepad).
2. Copy (CTRL+C) the telephone number o r name of the person you wish to call, recorded in
the PIM or personal directory.
3. Click on the Dialler icon. The following screen then appears.
4. Modify the number if necessary (for example for an international call).
5. Click on Dial, and the numb er is dialled.
6. The Telephone window is then displayed, if it was closed.
7. The call status and management window then indicates the call stat us, and gives you t he
name of the person called and the actions available.
44
Page 46

Alcatel PIMphony
Dialling using the mouse right-hand button
The Dialler module can be used to make a call directly from a compatible applicat ion, suc h as
Notepad, Word, Outlook or Excel, using the mouse right-hand button.
The dialling function uses the telephone number.
To make a call using the mouse right-hand button:
1. First, the function has to be act ivated. Click RH on the D ialler icon and select Features in
the menu. The following screen the n appears.
2. Activate the Quick dialling funct ion and select the button (Shift or Ctrl) to be pressed,
using the mouse right-hand button.
3. Click on OK and the quick dialling function is active.
4. From a compatible application (for example Notepad), select the telephone number of the
person you wish to call.
5. Press the previously selected button (Shift or Ctrl) and click RH on the mouse. The
following screen t hen appears.
6. Modify the number if necessary (for example for an international call).
7. Click on Dial and the call is dial le d.
8. The Telephone window is displayed, if it was closed.
9. The call status and management window indicates the call status and gives the name o f the
person called and the actions available.
45
Page 47

Miscellaneous
This section includes:
• A Glossary of the technical terms given in this Online Help
• A list of frequently asked questions and their answers
• Instruct ions to follow in the event of technical problems
• A statement o f the rights associated to the use of the software ( co pyright)
Glossary
This glossary gives the main technical terms used in this Online Help:
Alcatel PIMphony
A B C D E F G H I J K L M N O P Q R S T U V W
• Action: Action executed automatically by the Popup when a specific event occurs (e.g.
contact window Popup).
• Alcatel PIMphony: Application providing the interface betwen an Alcat el Reflexes
telephone connected to an Office PABX and a commercial PIM (e. g . Out look).
• Calls log: Ar chive record of the last 400 calls and their main characteristics.
• CTI: PC - Telephone connection.
• Conference: Telephone facility providing simultaneous conversation with two other
terminals.
• Dialler: Alcatel PIMphony module shown as an icon in the tool bar.
• DECT (Digital Enha nced Co r dless Telecommunications): Eu ro pean t eleco m standard for
digital mobile telephones.
• E-mail: Electronic mail.
• Event: Situation detected by the Popup to trigger a specific action.
• Filter: Characteristic associated with an event detected by the Popup to trigger a specific
action.
• Forward: Te lephone a ctio n which directs all c alls to a made to ter minal, to another terminal
which is specified as receiving the forwarding.
• MS Outlook: Microsoft application which manages the sending and receiving of e-mail,
and the address book and personal directory functions.
46
Page 48

Alcatel PIMphony
• MS Word: Microsoft word processing software.
• MS Excel: Microsoft spreadsheet software.
• Notepad: Microsoft Windows small edit/print application.
• PIM (Personal Information Manager): Application which manages the address boo k and
personal directory functions.
• Popup: Alcatel PIMphony module providing the interface with the PIM insta lled on your
PC. Provides an automatic PIM window Popup facilit y.
• Putting on hold: Telephone action of putting a call on hold.
• TAPI: Microso ft t elep hone app lications control software.
• Telephone: Alcatel PIMphony module providing main user interface.
• Transfer: Telephone ac tion w hich, follow ing an enq uiry c all, e nables the firs t call to be
transferred to anot her terminal.
• Wizard: Popup configuration aid.
Frequently asked questions
A number of frequently asked questions, and the corr espo nding answers, ar e given below:
What is the minimum hardware configuration required to install Alcatel PIMphony?
• Depending on the version you want to install, click on PC configuration required for
standard versio n or on that required for the network versio n in this Online Help.
What is t he minimum software configuration required?
• Depending on the version you want to install, click on PC configuration required for
standard versio n or on that required for the network versio n in this Online Help.
What do the icons represent in the various windows?
• Depending on the screen displayed, click on Telephone module, Calls log or Personal
directory.
How can I make a telephone call using Alcatel PIMphony?
• Click on Making a call if you want to use the Telephone module, or on Dialling using Copy-
paste if you want to use the Dialler.
What is the Popup used for?
• Popup provides the interface your PIM and t he application. For example, when a specified
event occurs, it auto maticall y raises the window of a terminal recorded in your PIM.
47
Page 49

Alcatel PIMphony
How can I configure Popup?
• Use the Wizard, which will guide you through the configuration using predefined profiles.
What should I do if the operation is not operating correctly?
• Click on In the event of technical problems. If the problems persist, contact your dealer.
In the event of technical problems
If the application is not operating correctly after insta l lation :
1. For the standard vers ion, check the hardware installation.
2. Check that the serial port to which the CTI is connected is available and is the same as you
sele c ted during insta llatio n.
3. Check the Windows telephone configuration (in the Contro l Panel, Telephone folder).
4. For the network version, check the Windows telephone configuration on your PC.
5. Contact yo ur network a dministrator.
If, after several attempts, the application is still not working:
1. Contact your dealer.
Copyright
© Alcatel Business Systems 1999. All rights reserved.
Warning: this software is protected by the copyright law and by international agreements. Any
partial or comp lete reproduct ion or distribution of t his software, by any means w hatsoever, is
strictly prohibited. Infringement o f these conditions shall c onstitut e a crimina l offence, a nd
offenders shall be liable to prosecution and punishment, under the terms of the law.
48
 Loading...