


User Guide
Release 9.0 - August 2020
8AL90087ENAA Ed. 01


OpenTouch Fax Center
Version Number 9.0.0.582 – August 2020.
Patents
Protected by patents : US 7,283,270; US 7,924,454; CA 2,417,202; JP 4,417,111; EP 1,472,859.
Acknowledgments
This software includes several libraries and software owned by third parties and distributed under their
respective license. For more information see the \3rd folder included in this distribution (when
applicable).
• .NET Framework 4.0: Copyright©2010 Microsoft Corporation. All rights reserved.
• ACE/TAO: Copyright©1993-2009, Douglas C. Schmidt and his research group at Washington
University, University of California, Irvine, and Vanderbilt University.
• Azul Zulu: Copyright©2019, Azul Systems, Inc. All rights reserved.
• Apache POI: Copyright©2003-2014, The Apache Software Foundation
• Axis: Copyright©1999-2004, the Apache Software Foundation. All Rights Reserved.
• Birt: Copyright©2004, 2009, the Actuate Corporation.
• cURL: Copyright©1996 - 2011, Daniel Stenberg, (daniel@haxx.se). All rights reserved.
• CxImage: Copyright©1995, Alejandro Aguilar Sierra (asierra@servidor.unam.mx). Copyright
2001-2008, Davide Pizzolato.
• Eclipse Info Center: Copyright©2007 IBM Corporation and others.
• EZMorph: Copyright©2006-2008, The Apache Software Foundation. All Rights Reserved.
• Firebird: Copyright©2000-2011, Borland/Inprise. All Rights Reserved.
• Google Gson: Copyright©2008-2011, Google Inc.
• Google Guice: Copyright©Google Inc.
• GPL Ghostscript: Copyright©2010 Artifex Software, Inc. All rights reserved.
• ICU: Copyright©1995-2011, International Business Machines Corporation and others.
• ini4j: Copyright 2005 [ini4j] Development Team. All Rights Reserved.
• JacORB: Copyright©The JacORB project, 1997-2006.
• jaxws: Copyright 1997-2007 Sun Microsystems, Inc. All rights reserved.
• JPEG: Copyright©1991-2011, Thomas G. Lane.
• JSON spirit: Copyright©2007-2011 John W. Wilkinson. Distributed under MIT License.
• Leptonica: Copyright©2001-2015, Dan Bloomberg.
• LibGIF: Copyright©1989-1990, Gershon Elber. Copyright©1990-1996, Eric S. Raymond. Copyright
©
1998, Toshio Kuratomi.
• Libphonenumber: Copyright©2008-2011, Google Inc., Ian Galpin, Ben Gertzfield.
• LibPNG: Copyright©1995-1996 Guy Eric Schalnat, Group 42 Inc. Copyright©1996-1997 Andreas
Dilger. Copyright©1998-2010 Glenn Randers-Pehrson.
• LibTIFF: Copyright©1988-1997, Sam Leffler. Copyright©1991-1997, Silicon Graphics Inc.
• libssh2: Copyright©2004-2007 Sara Golemon <sarag@libssh2.org>, Copyright©2005,2006 Mikhail
Gusarov <dottedmag@dottedmag.net>, Copyright©2006-2007 The Written Word, Inc., Copyright
2007 Eli Fant <elifantu@mail.ru>, Copyright©2009-2014 Daniel Stenberg, Copyright©2008, 2009
Simon Josefsson. All rights reserved.
• mysql-connector-java: Copyright©2000, 2011, Oracle and/or its affiliates. All rights reserved.
• Net-SNMP: Copyright©1989, 1991, 1992 by Carnegie Mellon University, Copyright©1996, 1998-2000
The Regents of the University of California. All Rights Reserved.
• OpenDS: Copyright©2002-2006 Sleepycat Software. All rights reserved.
©
©

• OpenID4Java Library : Copyright©2006-2008 Sxip Identity Corporation.
• OpenLDAP: Copyright 1998-2018 The OpenLDAP Foundation. All rights reserved.
• OpenSSL: Copyright©1998-2011, the OpenSSL Project. Copyright©1995-1998 Eric Young
(eay@cryptsoft.com). All Rights Reserved.
• Protobuf: Copyright©2008 Google Inc.
• Python: Copyright©2001-2010, Python Software Foundation.
• Simplexlsx: Copyright©2012-2013, Pavel Akimov.
• Struts: Copyright©1999-2011, The Apache Software Foundation. All Rights Reserved.
• Tesseract Open Source OCR Engine: Copyright©1985-2005, Hewlett-Packard. Copyright
2005-2015, Google Inc.
• Tomcat: Copyright©1999-2011, The Apache Software Foundation. All Rights Reserved.
• WinPcap: Copyright©1999 - 2005 NetGroup, Politecnico di Torino (Italy). / Copyright©2005 - 2010
CACE Technologies, Davis (California). All rights reserved.
• wkhtmltopdf: Copyright©2008,2009 Wkhtmltopdf Authors.
• Xalan: Copyright©2005, The Apache Software Foundation. All Rights Reserved.
• Xerces: Copyright©1999-2011, The Apache Software Foundation. All Rights Reserved.
• ZLib: Copyright©1995-2010, Jean-loup Gailly and Mark Adler. All Rights Reserved.
Copyright
www.al-enterprise.com
©
The Alcatel-Lucent name and logo are trademarks of Nokia used under license by ALE.
To view other trademarks used by affiliated companies of ALE Holding, visit:
www.al-enterprise.com/en/legal/trademarks-copyright.
All other trademarks are the property of their respective owners. The information presented is subject
to change without notice. Neither ALE Holding nor any of its affiliates assumes any responsibility for
inaccuracies contained herein.
©
Copyright 2020 ALE International, ALE USA Inc. All rights reserved in all countries.

Table of Contents
Table of Contents
Chapter 1 : Introduction......................................................................................................1
Purpose of this document...............................................................................................................................1
Windows Tools..................................................................................................................................................1
Web Tools..........................................................................................................................................................2
External Tools...................................................................................................................................................2
Chapter 2 : Faxing with SendFax.......................................................................................3
Overview............................................................................................................................................................3
Launching SendFAX..............................................................................................................................................................3
Interface Description.............................................................................................................................................................3
Menu Bar Details and Associated Icons.............................................................................................................................4
Result of Fax Sending Depending on Destination Type....................................................................................................7
Settings..............................................................................................................................................................7
Connection Settings..............................................................................................................................................................8
User Settings with On-Premises Deployment..................................................................................................................................9
Email Settings......................................................................................................................................................................10
Phone Book Integrations....................................................................................................................................................11
SendFAX Interface Display Options..................................................................................................................................13
Setting the default fax resolution for printing..................................................................................................................14
Sending a Fax.................................................................................................................................................14
Using Cover Sheets.............................................................................................................................................................14
Managing Fax Documents..................................................................................................................................................15
Addressing Transmissions.................................................................................................................................................16
Manually addressing a transmission..............................................................................................................................................16
Selecting a recipient from a phone book........................................................................................................................................16
Selecting a recipient when the phone book is not displayed.......................................................................................................17
Modifying the Recipients List..........................................................................................................................................................18
Modifying Transmission Settings......................................................................................................................................19
Editing sender or company information.........................................................................................................................................19
Changing fax transmission settings...............................................................................................................................................20
Sending a Fax with a Specific Resolution.........................................................................................................................21
Submitting a Fax With SendFAX Through a Command Line......................................................................22
8AL90087ENAA - Ed. 01 - August 2020 - OpenTouch Fax Center User Guide i

Table of Contents
Chapter 3 : SendFAX Local Phone Book.........................................................................25
Local Phone Book Overview.........................................................................................................................25
Launching the phone book............................................................................................................................25
Menu Bar Details and Associated Icons.......................................................................................................26
Phone book contacts.....................................................................................................................................27
Managing Phone Books......................................................................................................................................................29
Managing Contacts Lists....................................................................................................................................................29
Managing Contacts.............................................................................................................................................................30
Phone Book Groups............................................................................................................................................................30
Compacting the Database .............................................................................................................................31
Phone book searches.....................................................................................................................................31
Finding a contact.................................................................................................................................................................31
Using advanced find...........................................................................................................................................................32
External data sources....................................................................................................................................33
Importing an external data source.....................................................................................................................................33
Linking to an external data source....................................................................................................................................34
Linking procedure.............................................................................................................................................................................34
Updating a linked external source...................................................................................................................................................34
Chapter 4 : Viewing Faxes................................................................................................37
Overview..........................................................................................................................................................37
Launching the Viewer.....................................................................................................................................37
Menu Bar Details and Associated Icons.......................................................................................................38
Working with the Viewer................................................................................................................................39
Chapter 5 : Using Annotations.........................................................................................41
Overview..........................................................................................................................................................41
Annotation Types............................................................................................................................................41
Working with Annotations.............................................................................................................................41
Chapter 6 : Fax Utilities for General Applications..........................................................43
Overview..........................................................................................................................................................43
Faxing from Windows Applications by Using SendFAX.............................................................................43
Faxing From Windows Applications by Using PrintToMail........................................................................44
Faxing from Windows Applications by Using the Web Fax Composer Printer........................................45
Sending a Fax Using the Fax Add-in for MS Word......................................................................................45
Sending a Fax from MS Word with the Send Fax feature................................................................................................45
Fax Merge Feature for MS Word........................................................................................................................................46
Sending a Fax from MS Word Using the Fax Merge feature.........................................................................................................46
Sending a Fax Using the Microsoft Office Internet Fax Service................................................................48
Chapter 7 : Faxing with Email Clients.............................................................................51
ii 8AL90087ENAA - Ed. 01 - August 2020 - OpenTouch Fax Center User Guide

Table of Contents
Faxing with Email Clients: Overview............................................................................................................51
Faxing with Email Clients Using SMTP........................................................................................................51
Sending a Fax with an Email Client Using SMTP.............................................................................................................51
Receiving Faxes and Notifications....................................................................................................................................52
Changing the Cover Sheet..................................................................................................................................................53
Changing Sender Information and Fax Options...............................................................................................................53
Managing Recipients...........................................................................................................................................................54
Adding Recipient Information through the Email Recipient Field................................................................................................54
Adding Recipient Information through the Email Message Body................................................................................................57
Adding Recipients from the Email Address Book.........................................................................................................................57
Body Codes (Reference).....................................................................................................................................................58
Faxing with Outlook using Exchange and the OpenTouch Fax Center Forms........................................62
Using the OpenTouch Fax Center Add-In for Outlook.....................................................................................................62
Sending a Fax with Outlook Connected to an Exchange Server....................................................................................63
Receiving Faxes and Notifications with Outlook.............................................................................................................64
Changing Cover Sheet, Sender Information and Fax Options with Outlook.................................................................65
Managing Recipients with Outlook....................................................................................................................................67
Adding Recipient Information with Outlook...................................................................................................................................68
Adding Recipients from the Outlook Address Book.....................................................................................................................70
Chapter 8 : Editing Cover Sheets.....................................................................................71
Overview..........................................................................................................................................................71
Launching the Cover Sheet Editor................................................................................................................71
Menu Bar Details and Associated Icons.......................................................................................................72
Creating a Cover Sheet..................................................................................................................................73
Adding and Editing Items...................................................................................................................................................74
Cover Sheet Variables.........................................................................................................................................................74
Setting the Page Format.....................................................................................................................................................76
Setting the Cover Sheet Locale (Language and Date Format)........................................................................................76
Setting the Cover Sheet Resolution..................................................................................................................................77
OLE 2.0 compatible objects...........................................................................................................................77
Embedding and Linking OLE 2.0 Objects.........................................................................................................................78
Managing OLE 2.0 Objects in a Cover Sheet....................................................................................................................78
Chapter 9 : Web Client......................................................................................................81
Overview..........................................................................................................................................................81
Logging into the Web Client...............................................................................................................................................81
Web Client Environment Description................................................................................................................................82
Web Client Options...........................................................................................................................................................................83
The Fax Folders..............................................................................................................................................84
Inbound History Folder.......................................................................................................................................................84
8AL90087ENAA - Ed. 01 - August 2020 - OpenTouch Fax Center User Guide iii

Table of Contents
Inbound History - Current Folder View...........................................................................................................................................84
Inbound History - Deleted Folder View...........................................................................................................................................85
Managing your Inbound Faxes........................................................................................................................................................85
Viewing the Inbound Fax Details.....................................................................................................................................................89
Outbound History Folder....................................................................................................................................................93
Outbound History - Current Folder View........................................................................................................................................94
Outbound History - Deleted Folder View........................................................................................................................................94
Managing your Outbound Faxes.....................................................................................................................................................95
Viewing the Outbound Fax Details..................................................................................................................................................96
Outgoing Queue Folder......................................................................................................................................................99
Outgoing Queue Folder View...........................................................................................................................................................99
Managing your Queued Faxes.......................................................................................................................................................100
Viewing the Outgoing Queue Fax Details.....................................................................................................................................100
Sort and Search Features.................................................................................................................................................102
Sorting the Fax List.........................................................................................................................................................................102
Searching the Fax List....................................................................................................................................................................103
The Compose Feature..................................................................................................................................106
Compose Interface Description.......................................................................................................................................106
The Compose Tab...........................................................................................................................................................................106
Sender and Company Information Tab.........................................................................................................................................108
The Options Tab..............................................................................................................................................................................109
Creating and Sending a Fax.............................................................................................................................................110
Adding One or More Recipients to a Fax......................................................................................................................................111
Adding One or More Attachments to a Fax..................................................................................................................................111
Delegation.....................................................................................................................................................112
Adding and Managing Delegates.....................................................................................................................................113
Accessing the Interface (of Another User) as Delegate................................................................................................114
Attaching Documents to a Fax by Using the Web Fax Composer Printer..............................................115
Upload Options..................................................................................................................................................................116
General Settings................................................................................................................................................................117
Web Phone Book..........................................................................................................................................118
Access and Browse the Phone Books............................................................................................................................118
Contacts Management......................................................................................................................................................119
Creating a Contact or Group..........................................................................................................................................................119
Managing Contacts and Groups....................................................................................................................................................120
Copying Public Contacts to Your Private Contacts List..............................................................................................................120
Importing Contacts From an External Source..............................................................................................................................120
Sending a Fax From a Phone Book.................................................................................................................................121
Configuring Automated Adding of Contacts..................................................................................................................121
iv 8AL90087ENAA - Ed. 01 - August 2020 - OpenTouch Fax Center User Guide

Table of Contents
Lexicon..........................................................................................................................................................122
8AL90087ENAA - Ed. 01 - August 2020 - OpenTouch Fax Center User Guide v

Table of Contents
vi 8AL90087ENAA - Ed. 01 - August 2020 - OpenTouch Fax Center User Guide

Chapter 1 | Introduction
IntroductionChapter 1
Purpose of this document
This manual is written for anyone using OpenTouch Fax Center to send, receive or manage faxes.
Note: It does not cover OpenTouch Fax Center server and client installation (see the Installation and
Maintenance Guide), and server configuration and management (see the Administration Guide).
Windows Tools
OpenTouch Fax Center offers several tools that can be installed and used on the Microsoft Windows
environment.
SendFAX
SendFAX is a fax interface that offers users all the functions involved in the sending of a fax (see chapter:
Overview on page 3).
SendFAX Local Phone Book
The SendFAX Local Phone Book is an application that allows you to locally manage your contacts for easy
selection in SendFAX. Any number of phone books can be created (see chapter: Local Phone Book Overview
on page 25).
Note: Additionally to this local phone book application, the personal and public Web Phone Books can
be used from SendFAX (see Web Phone Books on page 2).
Viewer
The Viewer allows users to display and read faxes. It is actually a TIFF files viewer that offers some additional
editing features (see chapter: Overview on page 37).
Note: If you do not have the Viewer installed on your computer, you can use the Windows Imaging
Preview to view your faxes.
Fax Utilities for General Applications
OpenTouch Fax Center provides several utilities that allow you to send faxes directly from your general
applications. These can be printer drivers, used from any application by the print feature – or integrated fax
features for MS Office/Word – (see chapter: Overview on page 43).
8AL90087ENAA - Ed. 01 - August 2020 - OpenTouch Fax Center User Guide 1

Chapter 1 | Introduction
Fax Utilities for Email Clients
OpenTouch Fax Center allows you to send and receive faxes with your email software. Also, if you are using
Microsoft Outlook – connected to an Exchange server – some additional tools are available to facilitate the
management of your faxes (see chapter: Faxing with Email Clients: Overview on page 51).
Cover Sheet Editor
Cover Sheet Editor allows to create fax cover sheets or modify the provided ones. A cover sheet can contain
variables that are resolved at send time – sender name, company name, address, telephone and fax numbers,
etc. – (see chapter: Overview on page 71).
Web Tools
OpenTouch Fax Center offers several tools that can be accessed by using a Web browser. All of them are
available through the same Web interface. For more information, please refer to the concerned chapter
(Overview on page 81).
Note: The OpenTouch Fax Center Web client interface is optimized for use with assistive technologies,
which are used by individuals that are visually impaired or have reduced mobility.
Fax Browser
The Web interface provides a means to view the status of your faxes in the Inbound History, Outbound History
and Outgoing Queue.
Web Compose
The Web Compose is the part of the Web interface where you can create and send faxes.
Web Phone Books
The Web Phone Books allow you to manage your personal contacts (and possibly view public contacts) that
can be used to address faxes from the Web Client – and optionally from SendFAX.
External Tools
Depending on the implementation performed by your administrator, you may be able to benefit from OpenTouch
Fax Center functionalities through several external clients (other than the ones provided along with the
OpenTouch Fax Center client installer).
Email Clients (for Faxing)
You may be able to fax through OpenTouch Fax Center by using your email client; email attachments are
then sent as fax pages. See Faxing with Email Clients: Overview on page 51.
2 8AL90087ENAA - Ed. 01 - August 2020 - OpenTouch Fax Center User Guide

Chapter 2 | Faxing with SendFax
Faxing with SendFaxChapter 2
Overview
SendFAX is the fax interface for users with advanced faxing needs. If Outlook has been configured on your
local machine, SendFAX can be integrated with Outlook.
This chapter includes information about configuring SendFAX and using it to send faxes with various options.
Launching SendFAX
Among your installed OpenTouch Fax Center applications, choose SendFAX.
The SendFAX interface will appear.
Note: SendFAX can also be accessed through any Windows applications with a printing function (see
Faxing from Windows Applications by Using SendFAX on page 43) or from Microsoft Outlook by clicking
the button (if the Outlook add-in is installed on your PC).
Interface Description
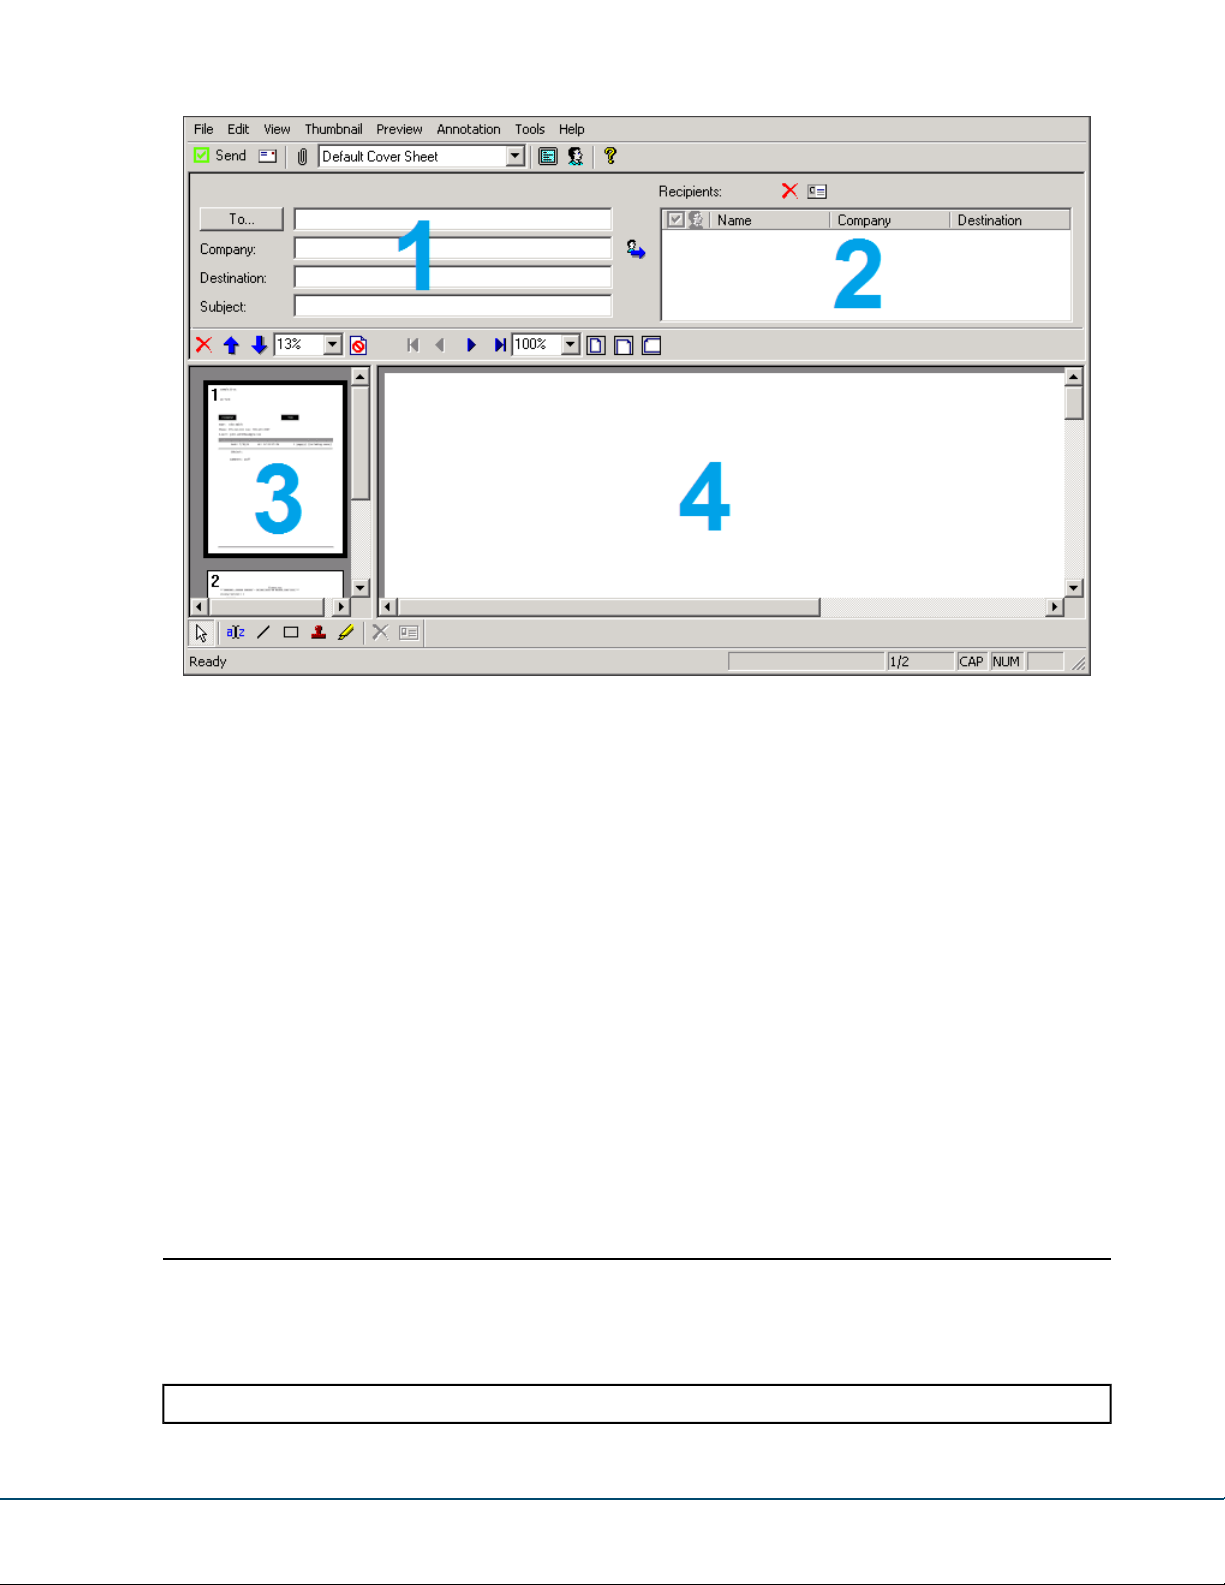
Menus and toolbars aside, after initial installation the default SendFAX interface is divided into four main
areas:
8AL90087ENAA - Ed. 01 - August 2020 - OpenTouch Fax Center User Guide 3
Chapter 2 | Faxing with SendFax
1. The Manual Addressing Fields section – To, Company, Destination, and Subject – allow you to type
recipient information directly. Usually, To receives the recipient's name. Destination, which is the only
mandatory field of the four, receives the fax number or the email address.
2. The Recipients section displays the individuals and groups to receive the transmission, either selected
from a phone book or typed directly into the manual addressing fields.
3. The Thumbnail View section displays successively a reduced image of each page of the fax. A scrollbar
enables you to view any page; selecting a page in the Thumbnail View displays that page in the Fax
Preview. The Thumbnail View also makes it possible to reorder and delete pages from the fax.
4. The Fax Preview section displays a single page of the fax at a time. It is here that you add annotations
to a fax before sending it. For more details on annotations, see the corresponding chapter (Overview on
page 41).
Also, SendFAX provides the means:
• to select a cover sheet among the ones available on the fax server,
• to display a contact list of potential recipients from one of several phone books available to you,
• to alter transmissions settings, modify your sender and recipient information,
• to change the interface to suit your requirements,
• to send faxes to fax numbers as well as to email addresses.
Menu Bar Details and Associated Icons
Description of all the items of the SendFAX menu bar.
The File Menu
cancels the current fax, clearing the fax recipient list and begins a new one.New
4 8AL90087ENAA - Ed. 01 - August 2020 - OpenTouch Fax Center User Guide
Chapter 2 | Faxing with SendFax
lets you insert a file into your fax.Insert
lets you save your fax in a local or network directory.Save As
prints the fax and any cover sheet.Print
sends the fax and closes the SendFAX interface.Send
Send without Closing
Connection Settings
User Settings
Email Settings
The Edit Menu
Faxing Properties
Fax Recipient
sends the fax but keeps the SendFAX interface open, for example, to allow you
to send the same fax to other recipients.
allows you to change the Fax Server Host Name and other parameters. For more
details refer to Connection Settings on page 8.
allows the user to change his User Name and Password. For more details, refer
to Connection Settings on page 8. This option is only available in native mode
(when sending through an XML gateway),
allows the user to set up the SMTP settings and email content (used by the email
feature of SendFAX). For more details refer to Email Settings on page 10.
closes SendFAX.Exit
displays a tabbed window in which you enter sender information or organization
information and specify fax settings. For additional details refer to Editing sender
or company information on page 19 and Changing fax transmission settings on
page 20.
allows you to modify the information about a selected fax recipient in the fax
recipient list.
enters a comment in the cover sheet.Cover Sheet Comments
The View Menu
Toolbar
Full Preview
Languages
lets you configure the OpenTouch Fax Center printer.Printer Properties
displays the SendFAX toolbars. When a toolbar is visible, a check mark appears beside its
name. The four toolbars; Main, Preview, Thumbnail, and Annotation; are displayed by default.
displays or hides the Status Bar. A check mark appears beside it when it is visible.Status Bar
displays a phone book section on the right or left of the interface.Phone Book
displays only the thumbnails and fax preview. The display of the manual addressing fields, the
fax recipient list, and the contact information is suspended. Deselecting Full Preview re-displays
that information in the SendFAX window.
displays a window that allows to:Options
•
select the phone books you wish to integrate with SendFAX (see Phone Book Integrations
on page 11).
• choose the default SendFAX interface to be launched via the FaxCenter virtual printer (for
more details, see SendFAX Interface Display Options on page 13)
sets the language used in client applications for the current user (MMC Snap-in, SendFAX,
TIFF Viewer, Local Phone Book, and Cover Sheet Editor). Changes occur after restarting
SendFAX.
8AL90087ENAA - Ed. 01 - August 2020 - OpenTouch Fax Center User Guide 5
Chapter 2 | Faxing with SendFax
The Thumbnail Menu
removes pages selected in the thumbnail view from your fax.Delete
moves the selected page to the first page after a cover sheet.Move ➤ First
moves the selected page up one pageMove ➤ Up
moves the selected page down one pageMove ➤ Down
moves the selected page to the last page of the faxMove ➤ Last
Mark As ➤ Do not
Send
The Preview Menu
instructs SendFAX to exclude the page selected in the thumbnail view when you
transmit the fax.
restores an excluded page.Mark As ➤ Send
increases or decreases the magnification of pages in the thumbnail view.Zoom
lets you view the first page of your fax.First Page
lets you view the previous page of your fax.Previous Page
lets you view the next page of your fax.Next Page
lets you view the last page of your fax.Last Page
displays the page at the magnification that best fits the preview window.Best Fit
displays the page at the maximum width that fits in the preview window.Fit to Width
displays the page at the maximum height that fits in the preview window.Fit to Height
lets you choose one of the preset magnification values.Zoom
The Annotations Menu
Annotations are objects you can add to draw attention to certain parts of a fax. For more information about
annotations, refer to the corresponding chapter (Overview on page 41).
Note: The Annotations feature cannot be used on cover sheets when composing a fax in SendFAX.
The Tools Menu
OpenTouch Fax Center
Local Phone Book
launches your local phone book to manage contacts usable with SendFAX. See SendFAX
Local Phone Book Local Phone Book Overview on page 25 for detailed information.
Note: Your OpenTouch Fax Center Web Phone Book can be managed through the
Web Cilent (see Web Phone Book on page 118).
The Help Menu
Help Topics
opens the online help, where you can get more information about using OpenTouch Fax
Center .
6 8AL90087ENAA - Ed. 01 - August 2020 - OpenTouch Fax Center User Guide

Chapter 2 | Faxing with SendFax
displays version and copyright information about SendFAX.About SendFAX
Result of Fax Sending Depending on Destination Type
SendFAX allows you to send a fax to a destination that is either a fax number or an email address. When the
destination is a fax number, the behavior is like any other fax. When the destination is an email address, the
fax (with the cover sheet, if applicable) is sent as an attachment with the email. Email settings, including the
attachment format, can be configured here: Email Settings on page 10.
Depending on how SendFAX is configured to send faxes, you will have different behaviors for destinations
and sent fax records. For more information on configurations, see Settings on page 7.
SendFAX Configured to Fax via the Server's XML Gateway
In that configuration, regular faxes are directly sent to the fax server (via XML Gateway) and emails are sent
via a separate mail server.
When the destination is a fax number, the record of the sent fax will appear in the Outbound History folder
of the Web Client.
When the destination is an email address, the record of the sent email will appear in a .log file:
C:\Users\<user_name>\AppData\Roaming\Fax\SendFAX\Trace\SendFaxEmail.log. You can open this
log with any text editing software.
SendFAX Configured to Fax via Outlook
In that configuration, faxes and emails are sent via Outlook to the appropriate server (fax/email).
When the destination is a fax number, the record of the sent fax appears in the Sent Items folder of Outlook
as well as in the Outbound History folder of the Web Client.
When the destination is an email address, the record of the sent fax appears only in the Sent Items folder
of Outlook.
Email Behavior With or Without a Cover Sheet
When a fax is sent to multiple fax numbers, a record is always kept for each fax destination whether there is
a cover sheet or not. The behavior when sending to email addresses is different.
When a fax is sent to multiple email addresses without a cover sheet, SendFAX creates only one email and
sends it to all recipients. The To: field of the email received by the recipients will contain the names of all the
recipients.
On the other hand, if the fax is sent with a cover sheet, SendFAX creates an email for each recipient and the
To: field will contain only the email of the recipient.
When sending to multiple email addresses while SendFax is not configured to fax via Outlook, a record for
each recipient is always created in the .log file, whether there is a cover sheet or not. In Outlook, a record is
kept only for each email that is sent.
Settings
In this section you will find the various settings that can be configured in SendFAX. Normally, these settings
are configured by the system administrator and the user should not have to configure or modify them.
8AL90087ENAA - Ed. 01 - August 2020 - OpenTouch Fax Center User Guide 7
Chapter 2 | Faxing with SendFax
Connection Settings
If you need to modify your connection settings that were configured during initial installation, proceed as
follows:
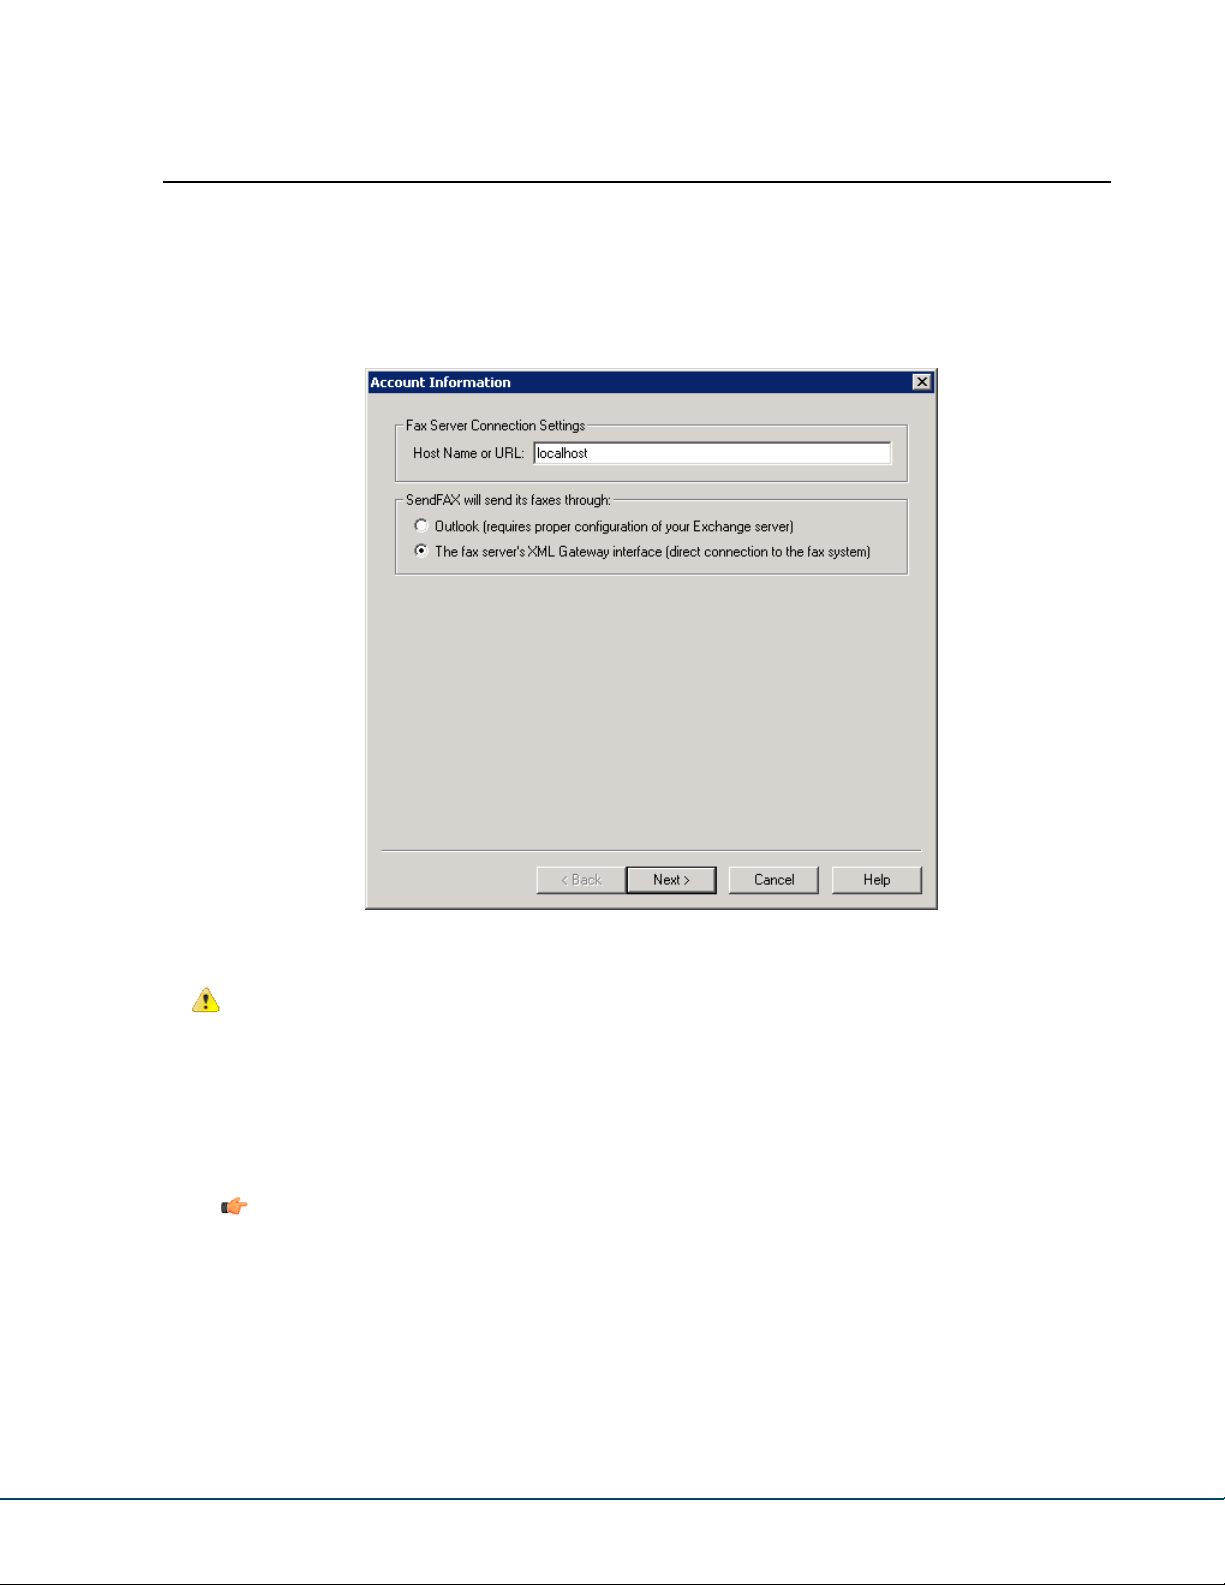
1. From the SendFAX menubar, click File ➤ Connection Settings.
The Account Information dialog box appears.
2. In the Connection Settings section, specify the Host Name or URL.
Attention: This value should have been correctly set (or communicated) by your administrator while
installing SendFAX; you should not have to change it.
• The name used to reach the on-premises Fax Server host.
Acceptable syntax: [{http|https}://] <ServerName_or_IP>[: <Port>]
In HTTPS context, <ServerName_or_IP> must be the Common Name of the Fax Server (and not its
IP address).
Note: If you want to benefit from the Web Phone Book integration, you must ensure that the
entered URL will allow to reach the OpenTouch Fax Center Web Services (which use HTTPS by
default).
3. In the SendFAX will send its faxes through section, select the radio button that corresponds to your
desired settings:
• Select Outlook if you want to use the SendFAX integration with Outlook. Outlook must already be
configured on the local computer and the administrator must have correctly configured the Microsoft
Exchange server of your organization.
8 8AL90087ENAA - Ed. 01 - August 2020 - OpenTouch Fax Center User Guide

Chapter 2 | Faxing with SendFax
•
In an on-premises deployment configuration: click Finish to finalize the configuration.
Note: To be able to send faxes to email addresses, no additional email configuration is required.
Outlook will automatically manage this.
• Select The fax server's XML Gateway interface in order to use SendFAX in normal mode.
•
In an on-premises deployment configuration: click Next and continue with User Settings with
On-Premises Deployment on page 9.
Note: To be able to send faxes to email addresses, you must configure specific email settings
(see Email Settings on page 10).
User Settings with On-Premises Deployment
Continued from Connection Settings on page 8 for an on-premises deployment configuration.
1. In the Authentication section, select the radio button that corresponds to your desired settings:
• Select Use Windows Integrated Single Sign-On to log in automatically with your regular NT identity.
Note: The check box, Get sender information from the active directory on startup, fills the
sender information with active directory information if the user selected the Use Custom Sender
& Company Information option in the advanced transmission settings. For additional details on
the latter, refer to the section, Editing sender or company information on page 19, found further
on in this chapter.
• Select Use Basic Authentication, and enter your user login in the User Name field and password in
the Password field. If you want these values to be used every time you log on, check the Remember
password box.
8AL90087ENAA - Ed. 01 - August 2020 - OpenTouch Fax Center User Guide 9
Chapter 2 | Faxing with SendFax
2. In the Email confirmations should be sent to section, select one of the options for the e-mail address
to which the feedback notifications are to be sent:
DescriptionOption
You will not receive any confirmation by email.Do not send email confirmations
Use the email address associated with my account
You will receive confirmations through the email address
associated to the account defined at the previous step.
Note: This option is selected by default.
Use this email address
You will receive confirmations through the email address
entered manually in the field beside.
3. Click Finish.
Subsequent SendFAX sessions will use the same settings. If the Remember password box wasn’t checked,
a password dialog will prompt you when sending a fax if required.
Note: If there is a problem with the system when you try to log into SendFAX and an error message
appears, consult your system administrator to make sure you have the proper authorization, or to ascertain
when the system will be back and running.
If at any time you wish to change the gateway or modify the connection properties, perform the set-up procedure
once again as detailed above.
Email Settings
To access the Email Settings dialog box, click File ➤ Email Settings... in the SendFAX menubar.
10 8AL90087ENAA - Ed. 01 - August 2020 - OpenTouch Fax Center User Guide
Chapter 2 | Faxing with SendFax
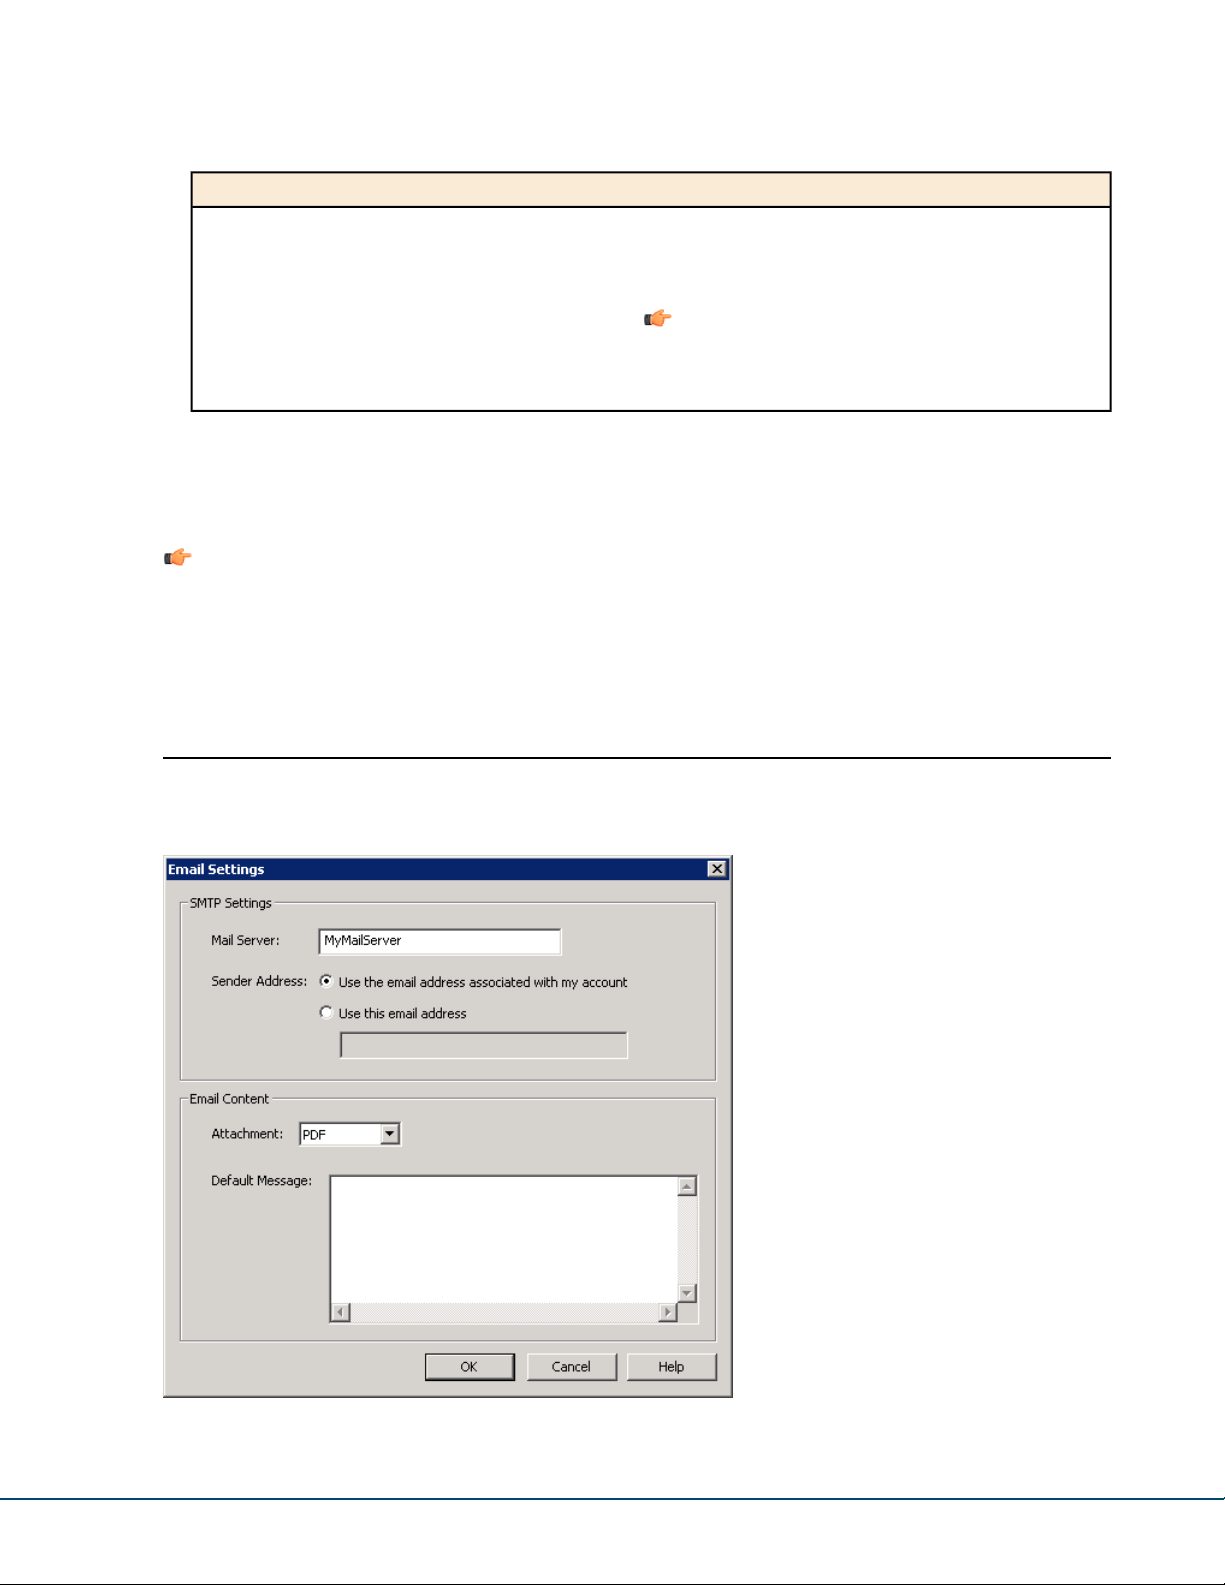
SMTP Settings
If you intend to send faxes to email addresses (in addition to fax numbers), you will need to configure the
email settings. If you are configured to send your faxes through Outlook (see Connection Settings on page
8), the SMTP settings are already configured and cannot be modified in this dialog (the SMTP Settings box
is grayed out).
If you do not use Outlook and want to send faxes to email addresses through a mail server, configure the
SMTP settings.
Attention: When sending faxes to email addresses (as opposed to fax numbers), the records for sent
faxes are not logged in the Web Client folders. See Result of Fax Sending Depending on Destination
Type on page 7 for more information.
Mail Server
Sender Address
Specify the Mail Server. The administrator must have already correctly configured
the mail (SMTP) server of your organization.
Note: Acceptable syntax: <MailServerName_or_IP>[:<Port>]
By default, the port number is 25. You need to enter a port number only if you
use a different port.
Select Use the email address associated with my account if you want SendFAX
to use your normal email as your return address. If you want a reply to a different
email address, select Use this email address, and supply a valid email address in
the input field.
Email Content
In this box you can select the format of the email attachment and write a default message.
Attachment
Default Message
When sending a fax to an email address, the fax is in the form of an attachment. You
can select PDF or TIFF as the format. The default is PDF.
Type in your default message. The message will be shown in the body of the email
only when there is no text in the cover sheet Comments field or when there is no
cover sheet.
Phone Book Integrations
How to select the phone books you wish to integrate with SendFAX, and how to display them in the interface.
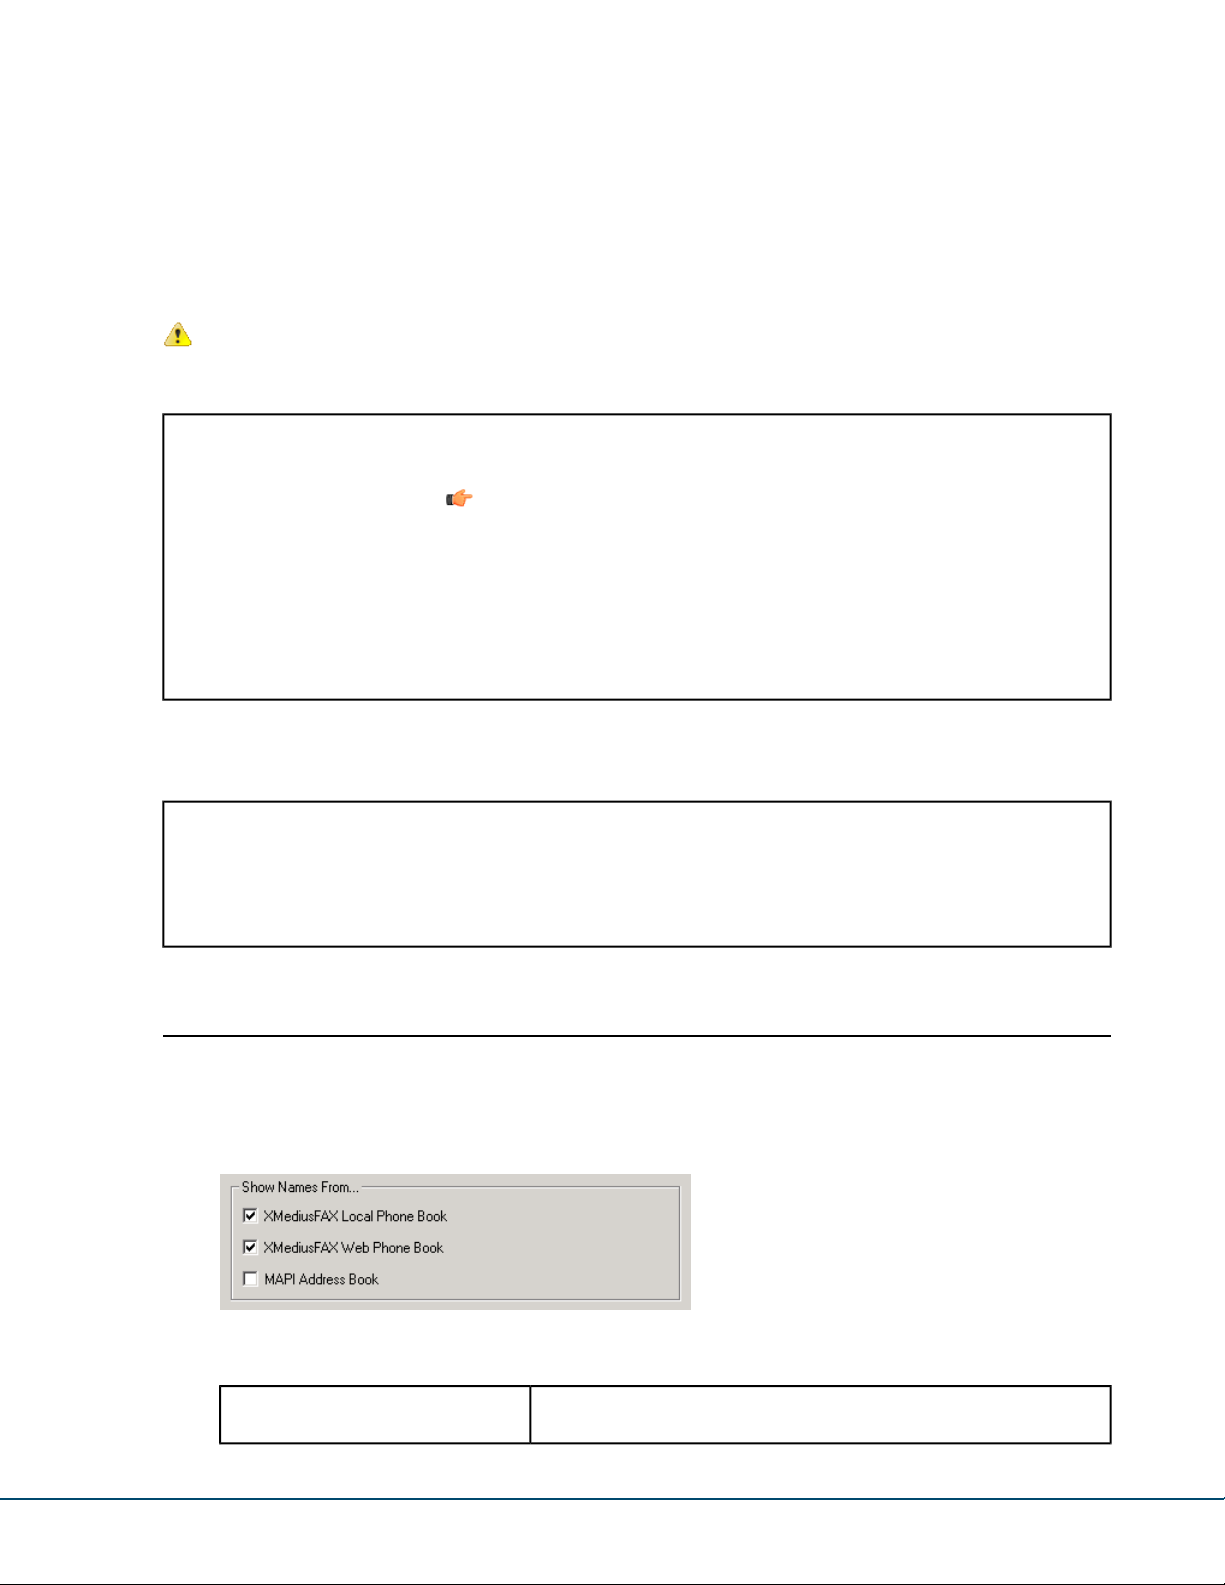
1. Select the sources of your contacts:
a) In the menu bar, choose View ➤ Options.
b) Select the phone books that you wish to integrate with SendFAX (depending on your needs and on
your corporate environment):
OpenTouch Fax Center Local
Phone Book
8AL90087ENAA - Ed. 01 - August 2020 - OpenTouch Fax Center User Guide 11
Includes all phone books that are available in your Local Phone Book
application (see Local Phone Book Overview on page 25).
Chapter 2 | Faxing with SendFax
OpenTouch Fax Center Web Phone
Book
MAPI Address Book
Includes your personal Web Phone Book, as well as any public Web
Phone Book that may have been made available to you by your
administrator (see Web Phone Book on page 118).
Note: The Web Phone Book integration requires that:
• The URL to the fax server – as specified in SendFAX connection
settings – allows to reach the Web Services (by default in
HTTPS).
• You are logged in using one of the following methods:
• Basic authentication using HTTPS
• SSO (connected to IIS) using HTTP or HTTPS
(See Connection Settings on page 8)
Includes the contacts that are stored in your Outlook (or any other email
application compatible with MAPI).
c) Click OK.
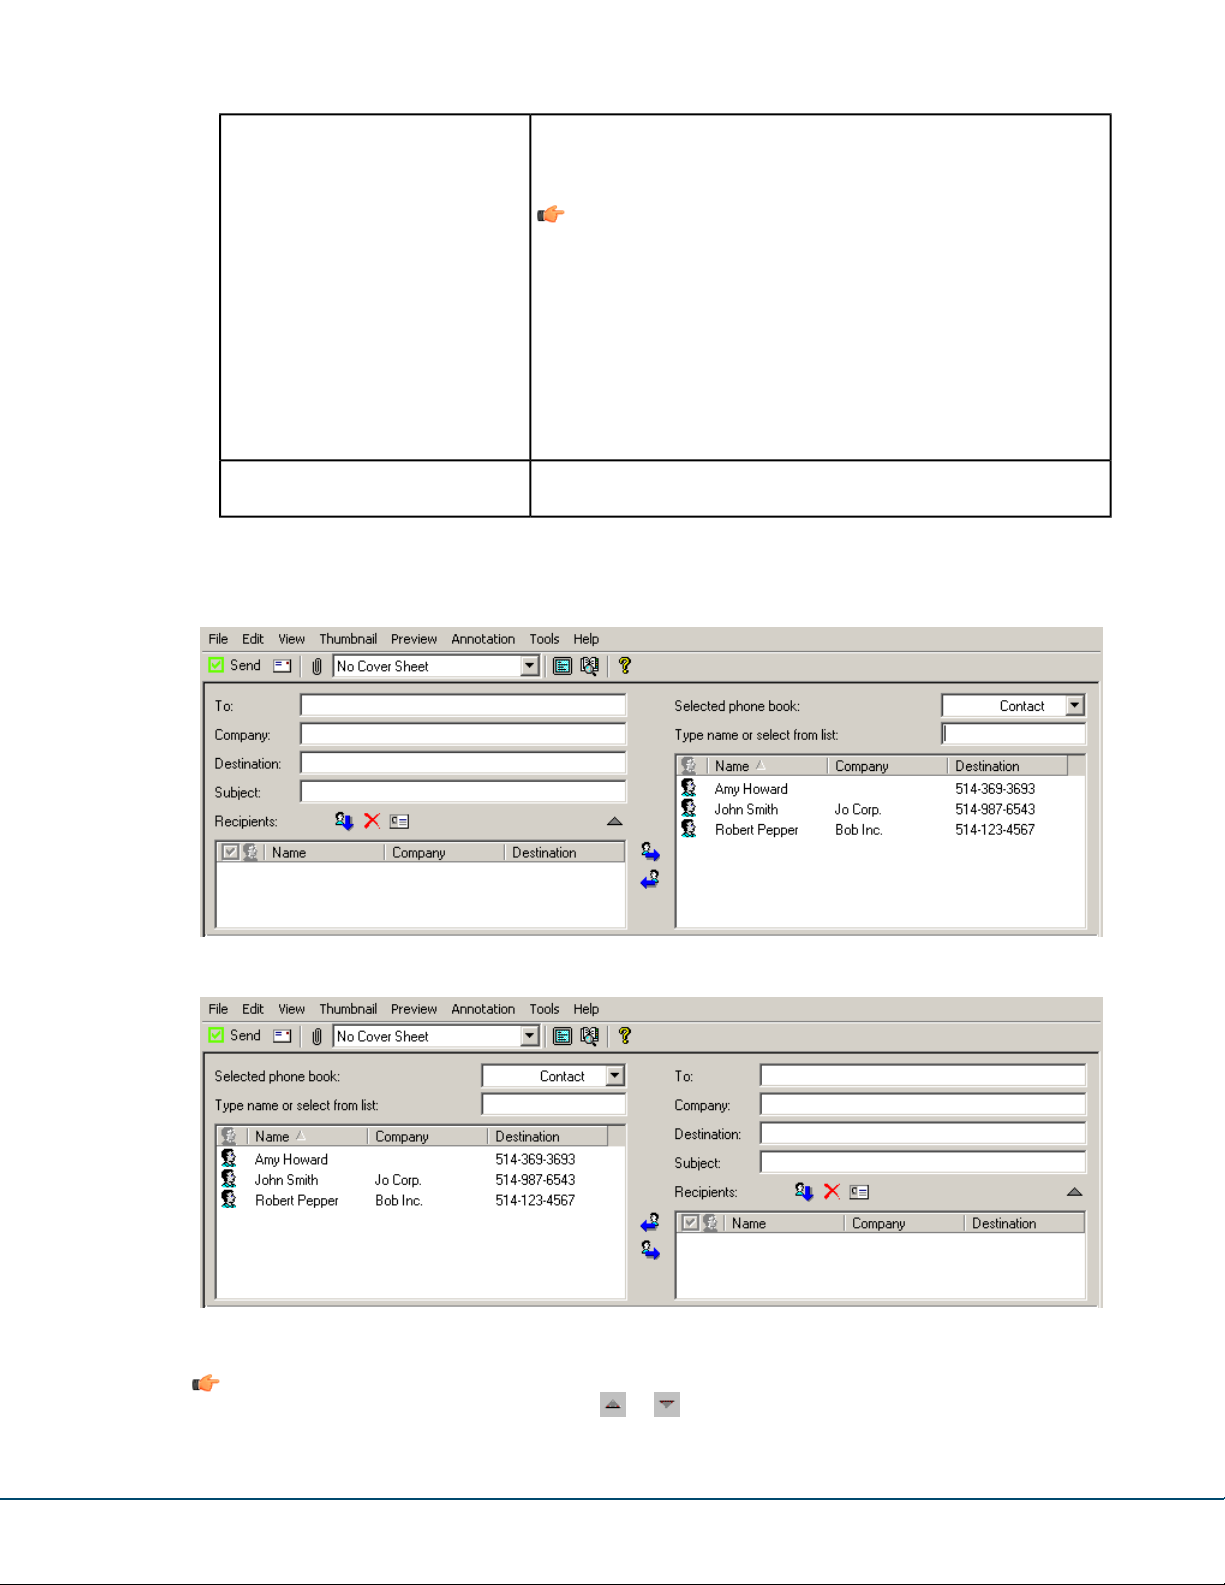
2. Select View ➤ Phone Book, then choose Show Right or Show Left, depending on the display you wish
to obtain.
Figure 1: The “Show Right” display
Figure 2: The “Show Left” display
Note: With the phone book displayed, you can hide or display the manual addressing fields (To,
Company and Destination) by using the or button above the Recipients list.
12 8AL90087ENAA - Ed. 01 - August 2020 - OpenTouch Fax Center User Guide
Chapter 2 | Faxing with SendFax
3. If you have more than one Phone Book source, you can display them alternately by using the Selected
Phone Book drop-down list.
4. If you need to remove the phone book section from the SendFAX interface:
a) Select View ➤ Phone Book.
The current display selection appears checked in the sub-menu.
b) Select this checked item.
The Phone Book disappears from the SendFAX interface.
Note: This documentation assumes that phone book information is displayed on the right side of the
SendFAX interface.
SendFAX Interface Display Options
SendFAX can be used for composing faxes from scratch, as described in this chapter, but it can also be
launched from any Windows application by printing on a dedicated virtual printer named FaxCenter (see
Overview on page 43).
When launched via such a print, SendFAX will be displayed by default with the interface type that is selected
in View ➤ Options (SendFAX menu).
You can change this default according to your needs:
DescriptionOption
Always display basic interface
Always display full interface
SendFAX will be displayed with the minimal interface required for quick
faxing (see details below).
SendFAX will be displayed with the full interface described in this
chapter (see Launching SendFAX on page 3).
Note: When accessed via the Windows Start menu, SendFAX will be always displayed with its full
interface.
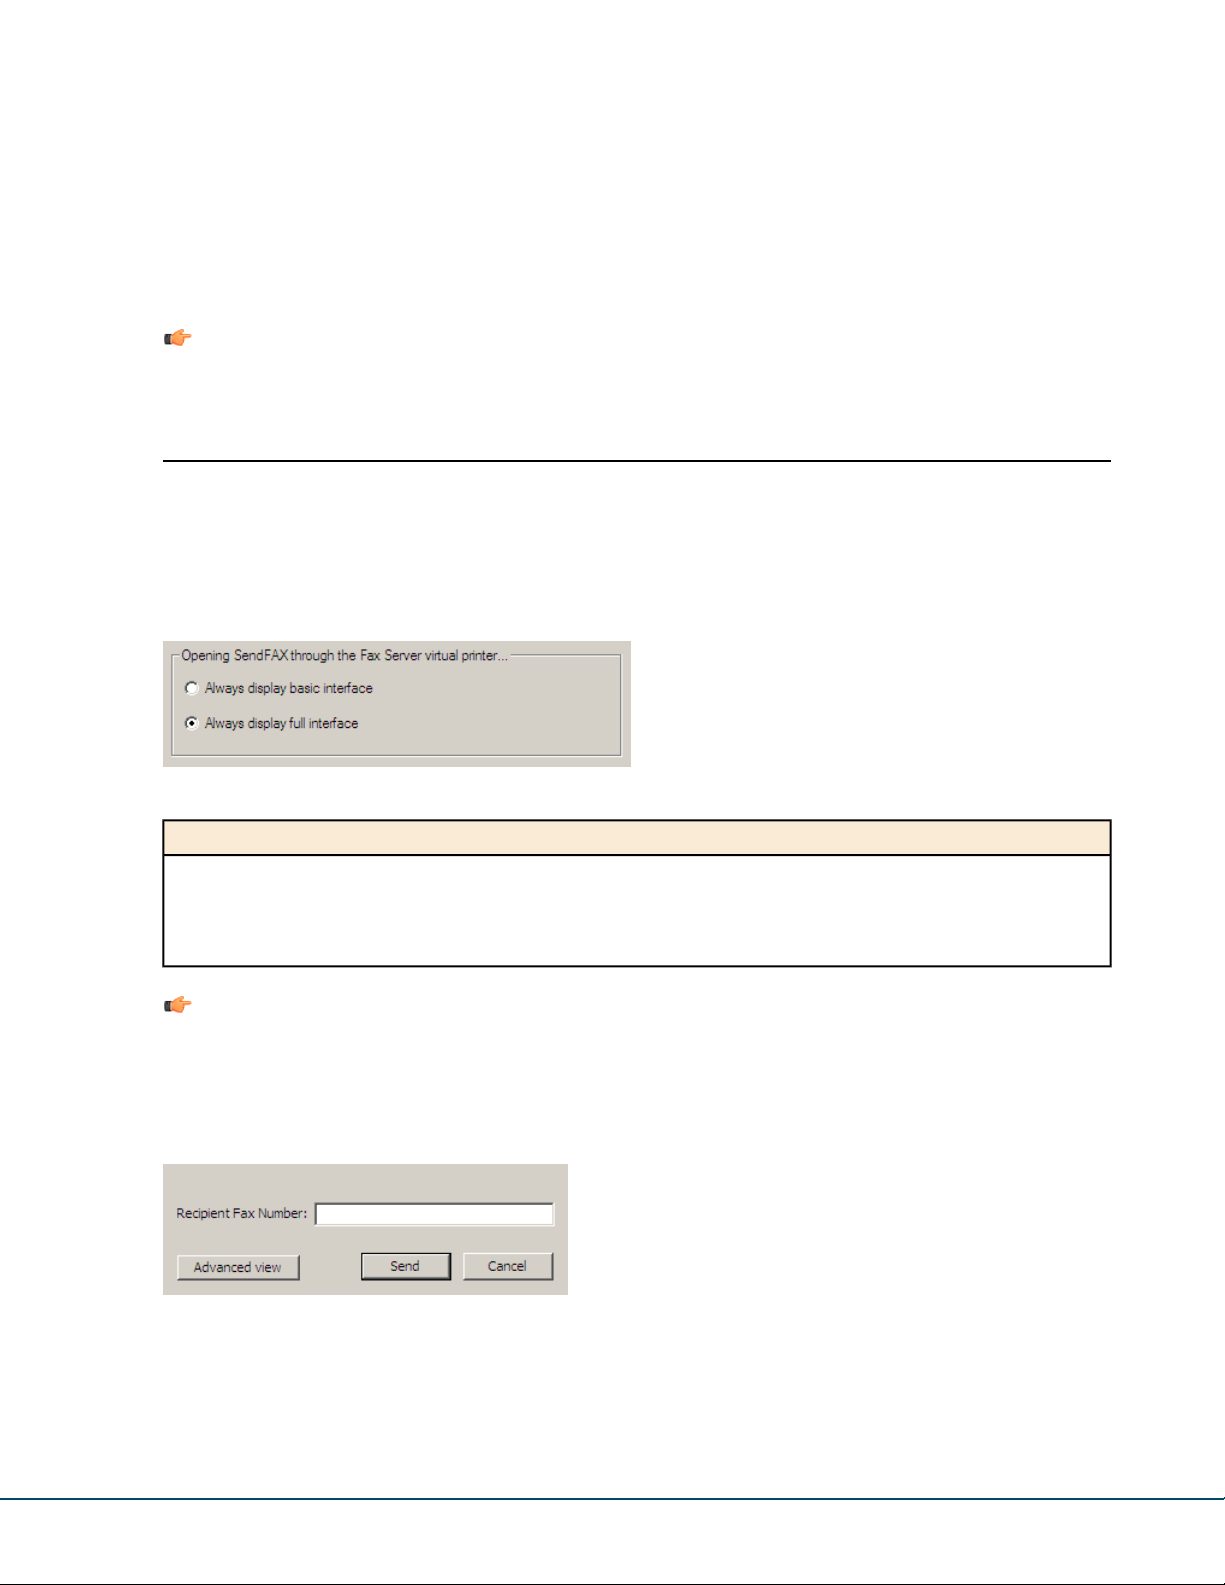
Basic Interface Overview
The SendFAX basic interface includes a single field for entering the recipient fax number, which is the minimum
information required for sending a fax.
Clicking Send will immediately send the fax to the specified destination.
The Advanced view (full interface) can however be displayed before sending the fax if you wish to benefit
from all other SendFAX features.
8AL90087ENAA - Ed. 01 - August 2020 - OpenTouch Fax Center User Guide 13

Chapter 2 | Faxing with SendFax
Setting the default fax resolution for printing
To change the printer driver’s default resolution for faxes, proceed as follows:
1. Choose Edit ➤ Printer Properties.
2. Click the Paper/Quality tab.
3. Click on the Advanced button.
4. Set the printer driver's resolution in the Graphic-Print Quality field. Choices are Low(200x100),
High(200x200), Fine(300x300) or Ultra Fine(400x400).
At the next logon in SendFAX, the program will validate the printer driver resolution. If the printer driver
default resolution is higher than the maximum resolution allowed by the user profile, SendFAX sets it to
the latter.
5. You can also choose different dithering algorithms though the Half-toning option. If you decide to use an
Error Diffusion algorithm, you can also adjust the intensity of the rendering.
This changes the printer resolution for the whole system, and remains so until it is changed again, using
the above procedure.
Sending a Fax
To send a fax using SendFAX:
1. Launch SendFAX.
2.
If needed, select a cover sheet and type a message in it (see Using Cover Sheets on page 14).
3. Insert one or more documents to be sent, either via the attachment feature, or by drag-and-drop, or using
the OpenTouch Fax Center printer (see Managing Fax Documents on page 15).
Tip: At this step, you can reorder, cancel, or delete fax pages as you wish. You can also add
annotations in the fax preview pane (see Annotations Overview on page 41).
4. Address the transmission with a fax number, an email address or recipients from your contact lists (see
Addressing Transmissions on page 16).
5.
If needed, modify the sender information or the fax transmission settings (see Modifying Transmission
Settings on page 19)
6.
If needed, modify the fax resolution (see Sending a Fax with a Specific Resolution on page 21)
7. Click Send to send the fax and close the SendFAX application.
Tip: You can choose File > Send without Closing if you wish to compose another fax.
Using Cover Sheets
Selecting a Cover Sheet
To select a cover sheet, use the drop-down cover sheet menu of the toolbar.
14 8AL90087ENAA - Ed. 01 - August 2020 - OpenTouch Fax Center User Guide
Chapter 2 | Faxing with SendFax
Note: OpenTouch Fax Center offers default cover sheets. In addition, the cover sheet editor allows you
to compose and save your own cover sheets. Refer to Cover Sheets Overview on page 71 for more
information.
Note: A fax sent to an email address behaves differently when sent with or without a cover sheet. See
Email Behavior With or Without a Cover Sheet on page 7 for more information.
Adding a Comment to a Cover Sheet
To add a comment to a cover sheet, select a cover sheet and go to Edit > Cover Sheet Comments.
Note: When sending a fax to an email address, a default message can be used when no comment is
entered on the cover sheet. See Email Content on page 11 for more information.
Managing Fax Documents
Here is the list of actions available to modify the fax being sent with SendFAX:
Inserting a Document
It is possible to add pages to the fax you are composing by using existing documents. A lot of file types are
supported: it can be, for example, a Microsoft Office document, a basic text file, an image, a PDF file...
To proceed, click and browse for the file to insert.
All the pages of the selected document are converted into the TIFF format and inserted as new pages after
the last page of your fax.
Note: More than one document can be added to the same fax.
Reordering Fax Pages
The pages of the fax being sent can be reordered through the Thumbnail View.
To proceed, select a page and use the and buttons to move it up and down.
Note: You can also quickly move the page to the first or last page of your fax by selecting Thumbnail
➤ Move and choosing First or Last. Note that “first” means “the first page after the cover sheet”, if there
is a cover sheet.
Another way to move the pages can be dragging and dropping the page trhough the Thumbnail View (insertion
point will be indicated by two yellow arrows during the dragging phase).
Cancelling the Transmission of a Page
This function can be useful when you want to send only a part of your fax without having to physically remove
the undesired pages.
To mark the pages that will not be sent with the fax, select them in the Thumbnail View and click .
All the cancelled pages are marked with a red sign. If you need to restore the cancelled pages, just select
them and click again the button.
Deleting a Page
To physically remove a page from the fax, select it and click above the Thumbnail View.
8AL90087ENAA - Ed. 01 - August 2020 - OpenTouch Fax Center User Guide 15

Chapter 2 | Faxing with SendFax
Saving a Fax
To save a copy of the fax in your PC, select File ➤ Save As.
Note: The faxes are saved in the TIFF format.
Printing a Fax
To print the current fax, select File ➤ Print.
Note: For setting a specific print resolution as default, see Setting the default fax resolution for printing
on page 14.
Addressing Transmissions
You can address a transmission by entering manually a recipient or by selecting a contact from one of your
phone books.
More than one recipient can be added to the recipient list of the fax being sent. Also, that list can be easily
modified.
Manually addressing a transmission
How to address manually a fax from SendFAX.
1. Type a name in the To field.
2. If desired, type an entry in the Company field.
3. Type a fax number or an email address in the Destination field. Only this entry is mandatory.
Tip: You can add a "+" sign in front of an international country code to apply the correct formatting
to the To: fax number on the Cover Sheet. However, the "+" sign feature may not be supported
depending on your phone company and/or the fax server configuration done by your administrator.
Tip: If you need to add a DTMF code (such as an extension number or a long-distance code), you
can enter it after the fax number, preceded with one or several pauses (comma or letter p – not case
sensitive).
For example: (514) 222-3333p1234 (equivalent to (514) 222-3333,1234).
4. If desired, type an entry in the Subject field.
5.
Click .
The recipient is added to the Recipients list.
Tip: Any recipient of the Recipients list can also be added to the currently selected phone book (even
if not displayed), by right-clicking on the recipient.
Selecting a recipient from a phone book
How to address a fax by selecting a recipient from a phone book in SendFAX.
1. Choose View > Phone Book > Show Right if the phone book section is not displayed on the right of the
SendFAX interface.
16 8AL90087ENAA - Ed. 01 - August 2020 - OpenTouch Fax Center User Guide
Chapter 2 | Faxing with SendFax
2. Use Selected phone book to select your contact list, if needed – according to your current integration
(see Phone Book Integrations on page 11).
3. Search and select contacts according to the selected source:
• Web Phone Book: Start to type the text to search (contact/group name, company or fax number) to
see results in the list, then select the targeted contact or group.
• Local Phone Book: Start to type a contact/group name to quickly browse through the list, then select
the targeted contact or group.
4.
Click .
The recipient is added to the Recipients list.
Note: If the contact Preferred Address is an email, the fax will be sent to the email address and not to
a fax number. See Phone book contacts on page 27.
Tip: Any recipient of the Recipients list can also be added to the selected phone book, by clicking .
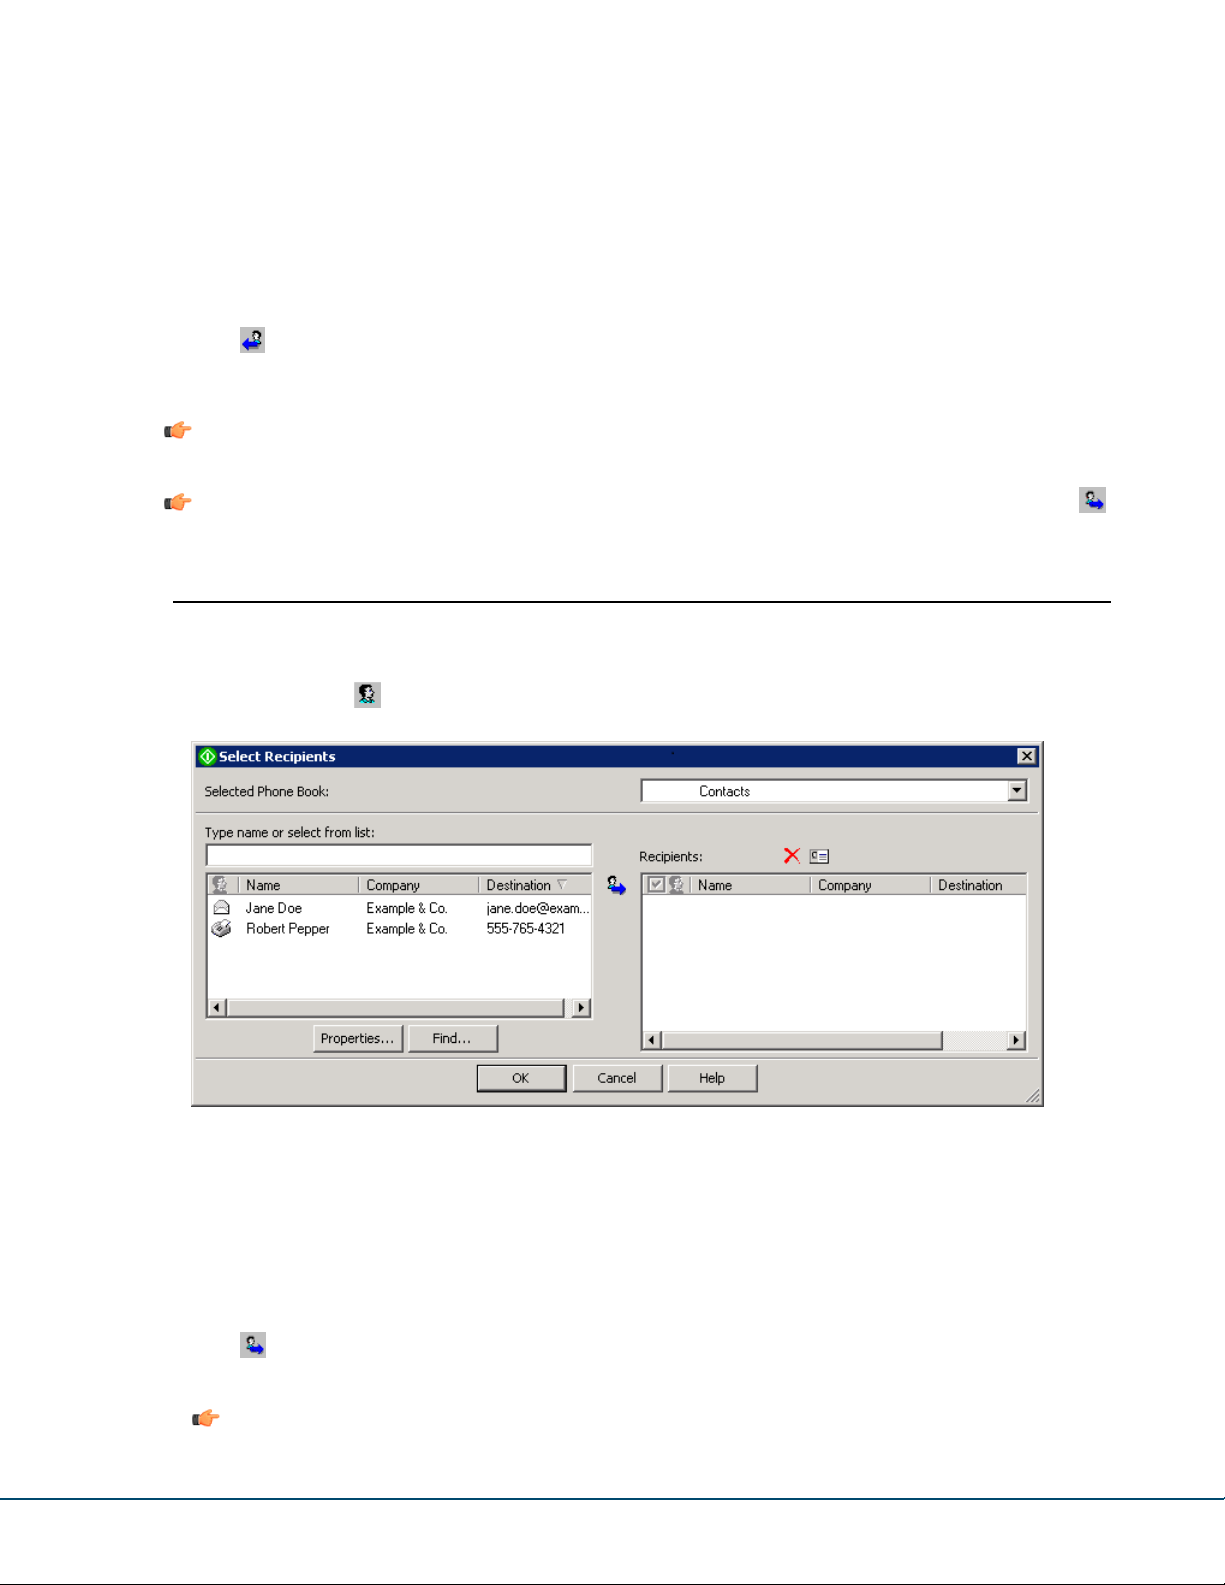
Selecting a recipient when the phone book is not displayed
How to select a recipient from a phone book in SendFAX when the phone book is not displayed in the interface.
1.
In SendFAX, click or the To button.
SendFAX displays the phone book view in a separate window.
2. Use Selected phone book to select your contact list, if needed – according to your current integration
(see Phone Book Integrations on page 11).
3. Search and select contacts according to the selected source:
• Web Phone Book: Start to type the text to search (contact/group name, company or fax number) to
see results in the list, then select the targeted contact or group.
• Local Phone Book: Start to type a contact/group name to quickly browse through the list, then select
the targeted contact or group.
4.
Click .
The recipient is added to the Recipients list.
Note: If the contact Preferred Address is an email, the fax will be sent to the email address and not
to a fax number. See Phone book contacts on page 27.
8AL90087ENAA - Ed. 01 - August 2020 - OpenTouch Fax Center User Guide 17

Chapter 2 | Faxing with SendFax
Tip: Any recipient of the Recipients list can also be added to the currently selected phone book, by
right-clicking on the recipient.
5. Click OK to close the phone book window.
Modifying the Recipients List
How to modify parameters within the recipients list in SendFAX.
You may need to change some information or parameters of the recipients after having added them to the
Recipients list.
Note: Any modification applied this way to the recipients do not affect the information contained in the
phone book, but only for the fax being sent.
Here are the possible actions:
Editing the fax recipient information
This option allows you to change some information of the recipients, only for the fax being sent, without
changing anything in the phone book.
To proceed, select the recipient in the Recipients list and click .
Changing the recipient destination
This option can be useful when the contact has more than one fax number or email address and you wish to
select another one than the default one for the fax being sent.
To proceed, right-click on the recipient in the Recipients list, select Destinations and choose the fax number
or email address to use for the transmission.
Filtering the recipients list for the transmission
This option allows you to deselect/select recipients of the Recipients list in order to send them or not the
current fax. It can be useful if you need to address two slightly different versions of the same fax to two different
batches of recipients that are in the same recipient list.
To proceed, check or uncheck the box beside the name of each concerned recipient in the Recipients list.
Note: Once the fax is sent to the first batch of recipients, the recipients list and the fax are still displayed,
so you can modify the fax and send it to a second batch of recipients only by checking and unchecking
boxes.
Deleting a recipient from the recipient List
This option simply removes the recipient from the Recipients list.
Note: There is no possible undo.
To proceed, select the recipient in the Recipients list and click .
18 8AL90087ENAA - Ed. 01 - August 2020 - OpenTouch Fax Center User Guide
Chapter 2 | Faxing with SendFax
Modifying Transmission Settings
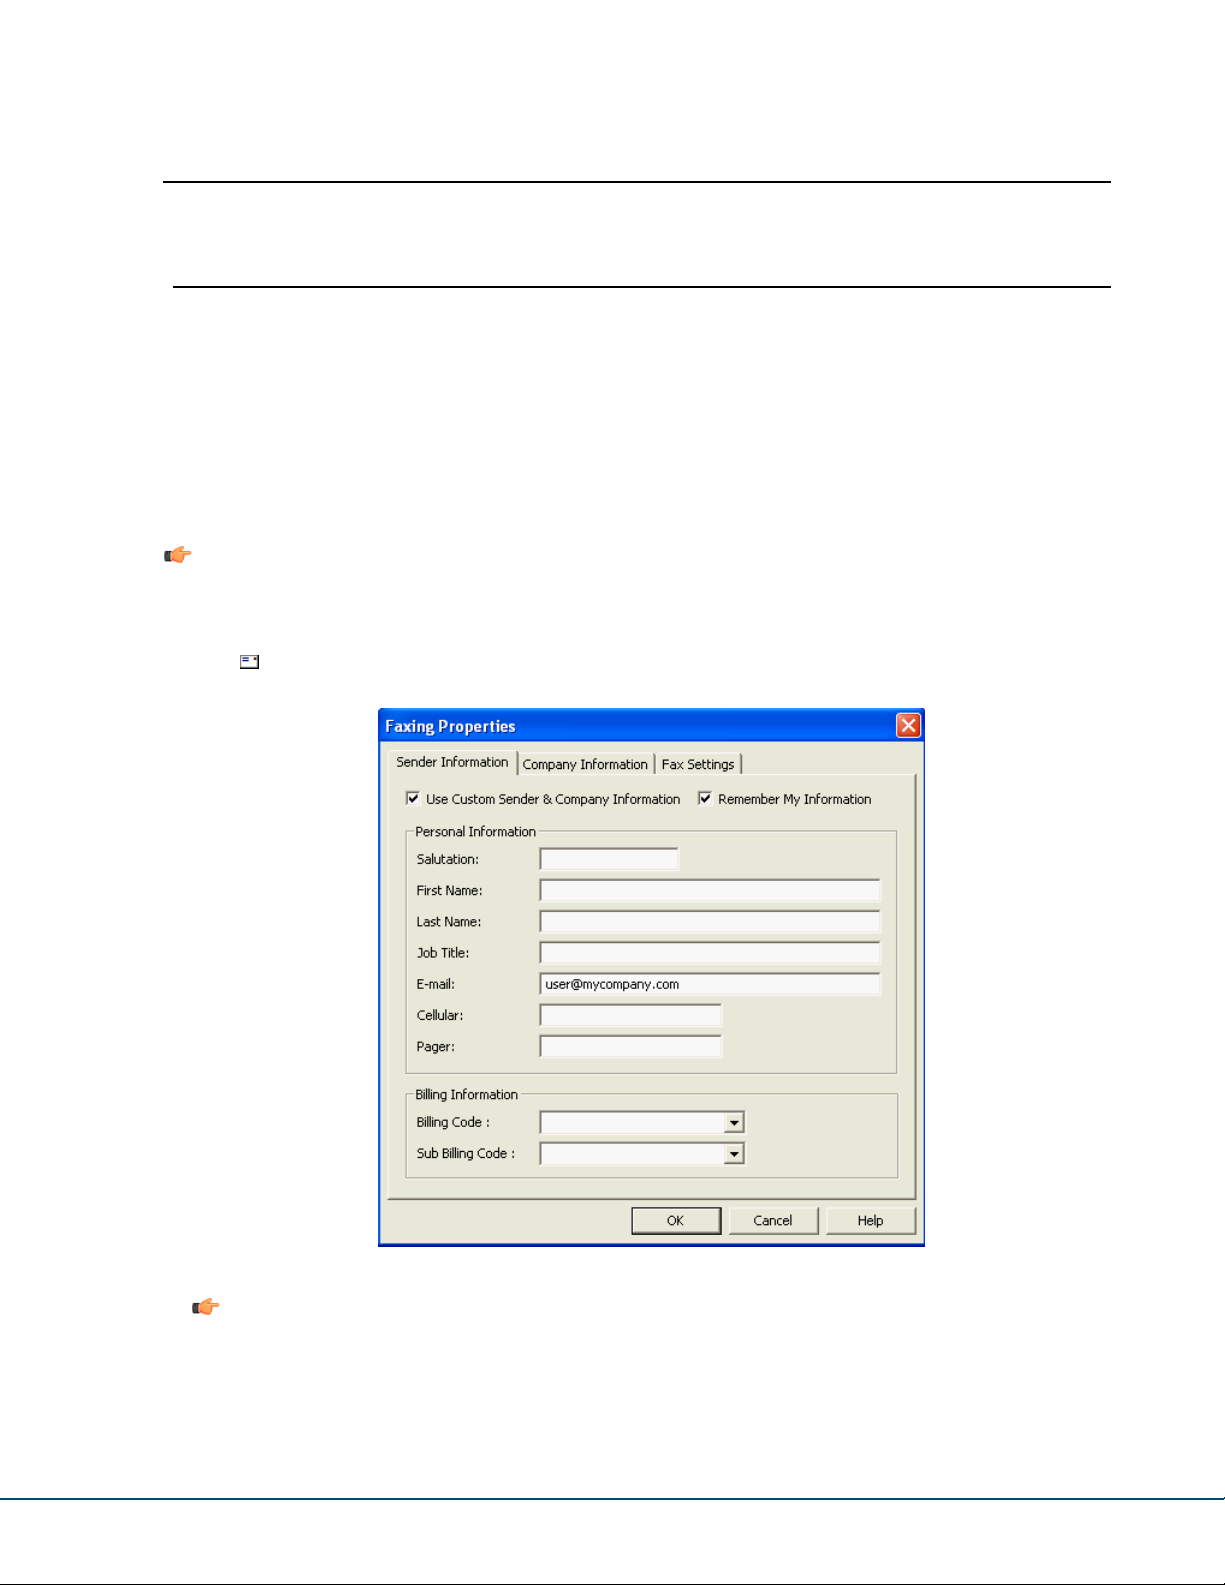
Editing sender or company information
How to modify the information appearing on a fax in SendFAX.
You must have the modifications rights at this level. If not, please contact the administrator.
You might need to modify sender and company information that will appear on the fax being sent, without
modifying this information as it is written in the OpenTouch Fax Center database. For example, it might be
necessary to edit sender information when you send a fax on behalf of another user.
Changes to sender and company information are applied only to the current fax, and the next time you will
use SendFAX, all this information will be taken back from the fax server database.
Note: You can however choose the option to remember your changes for all future transmissions trough
SendFAX. It will not affect, anyway, your real information written in the database.
To proceed:
1. Click .
2. In the Sender Information tab, check the Use Custom Sender & Company Information box.
You can now modify the fields.
Note: If you check the Remember My Information box, the changes will be used as well for future
SendFAX sessions.
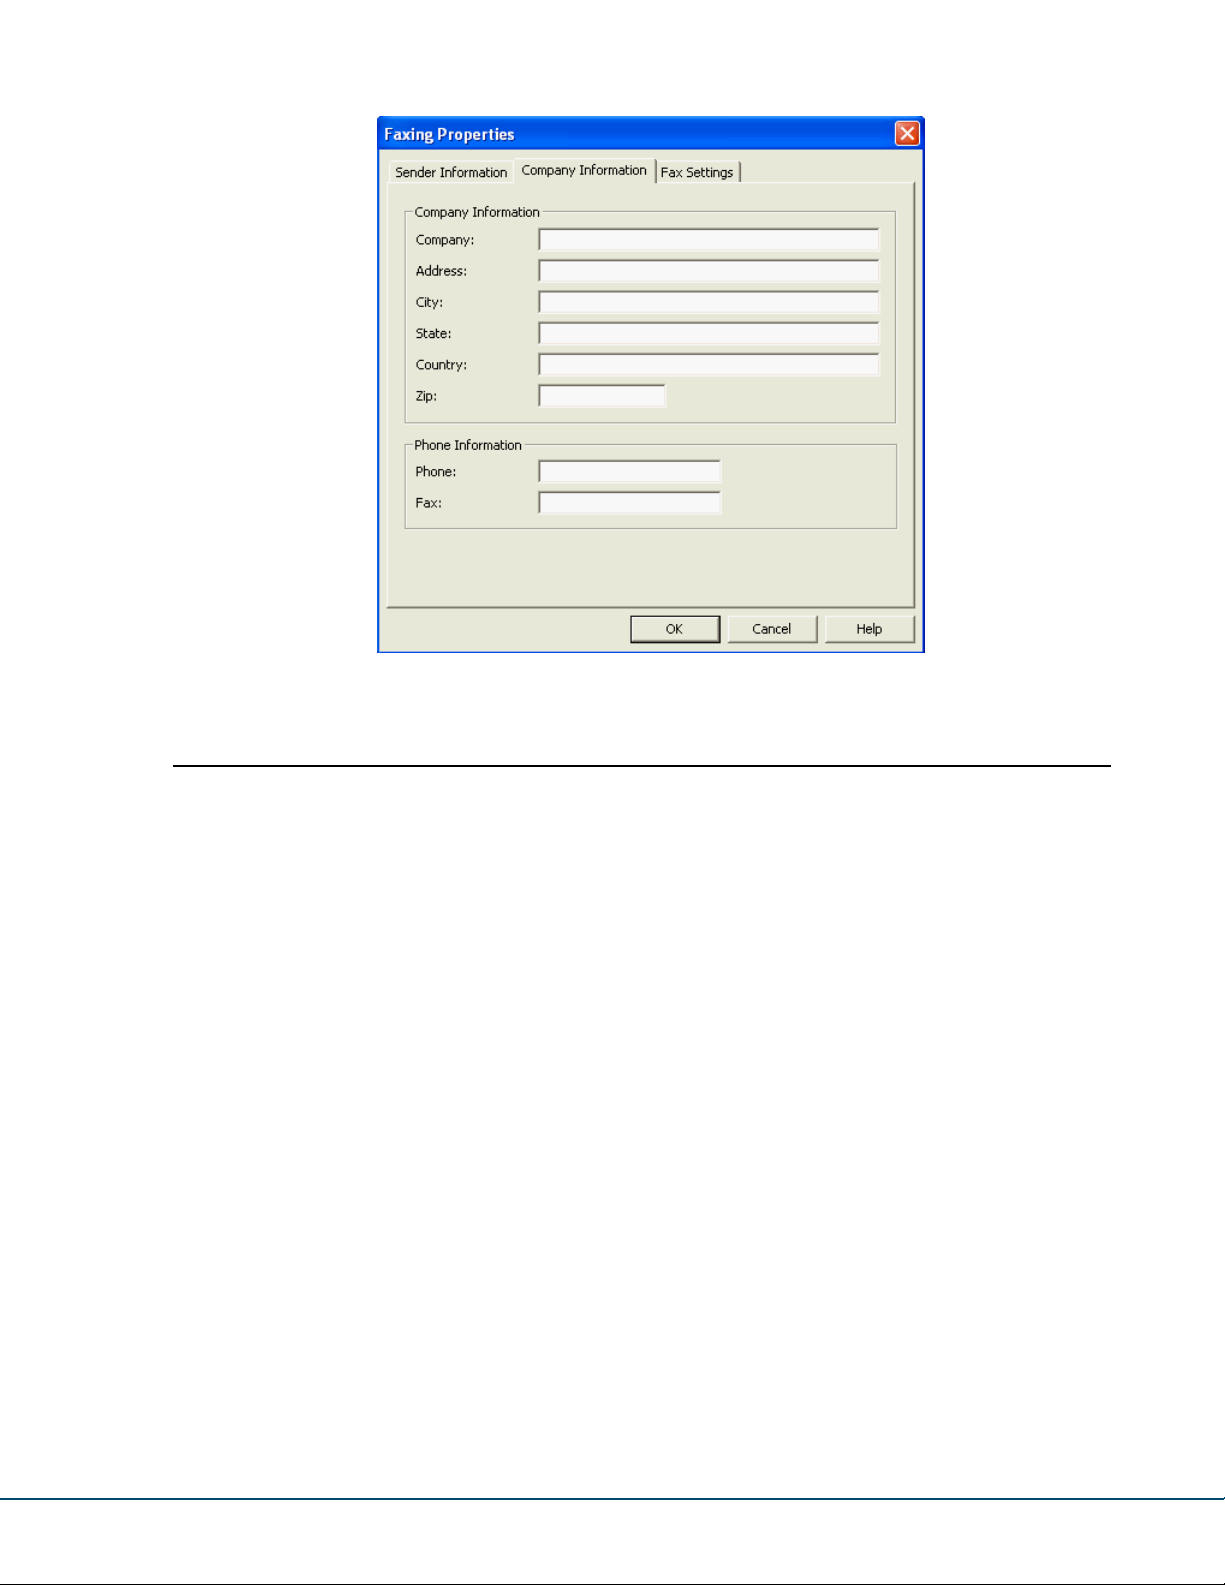
3. To modify the Information of the company, select the Company Information.
8AL90087ENAA - Ed. 01 - August 2020 - OpenTouch Fax Center User Guide 19
Chapter 2 | Faxing with SendFax
4. Click OK to apply the information to the transmission.
Changing fax transmission settings
How to change the transmission settings for a fax in SendFAX.
You must have the modifications rights at this level. If not, please contact the administrator.
Transmission settings include the fax priority and the number of retries, and notification options.
1. Select Edit > Faxing Properties.
2. Select the Fax Settings tab.
20 8AL90087ENAA - Ed. 01 - August 2020 - OpenTouch Fax Center User Guide
 Loading...