

Page 1

Conventions used in this guide
In this user guide, we use the following symbols to indicate useful and important information:
Warning Situations that could cause injury to yourself or others
Caution Situations that could cause damage to your device or other equipment
NOTE
NOTE Notes, usage tips, or additional information
AUTHORITY 1
Page 2

Contents
Speci cations
Basics
In Box ..........................................................................................................................................................................................................................7
Phone Overview ....................................................................................................................................................................................................7
Proper Holding Position .....................................................................................................................................................................................8
Battery ........................................................................................................................................................................................................................8
microSD
Turning Phone On or O ................................................................................................................................................................................. 10
Phone Options ..................................................................................................................................................................................................... 11
Touchscreen Gestures ...................................................................................................................................................................................... 11
TM
Card .......................................................................................................................................................................................................9
Keyboard
Using Swype Text Entry Method .................................................................................................................................................................. 12
Using the Android Keyboard ......................................................................................................................................................................... 14
Editing Text ........................................................................................................................................................................................................... 17
Getting Started
Google Account .................................................................................................................................................................................................. 18
Getting to Know the Home Screen ............................................................................................................................................................. 19
Customizing the Home Screen ..................................................................................................................................................................... 20
Essential Display Icons ...................................................................................................................................................................................... 21
Noti cations Panel ............................................................................................................................................................................................. 23
Opening and Switching Between Applications ..................................................................................................................................... 24
Sleep Mode ........................................................................................................................................................................................................... 25
Adjusting Volume ............................................................................................................................................................................................... 25
Searching Your Phone and the Web ........................................................................................................................................................... 26
Connecting Your Phone to a Computer .................................................................................................................................................... 28
Phone Calls
Making Calls ......................................................................................................................................................................................................... 29
Answering or Rejecting Calls ......................................................................................................................................................................... 31
Using In-Call Options ........................................................................................................................................................................................ 32
Using Call Log ...................................................................................................................................................................................................... 32
Listening to Your Voicemail ............................................................................................................................................................................ 34
AUTHORITY 2
Page 3

Using Voice Dialer............................................................................................................................................................................................... 35
Contacts
About Contacts ...................................................................................................................................................................................................36
Opening Your Contacts ....................................................................................................................................................................................36
Getting Started .................................................................................................................................................................................................... 36
Editing/Deleting Contacts .............................................................................................................................................................................. 39
Communicating .................................................................................................................................................................................................. 40
Account Setting .................................................................................................................................................................................................. 42
Groups .................................................................................................................................................................................................................... 43
Messaging
About Messaging ............................................................................................................................................................................................... 45
Sending Messages ............................................................................................................................................................................................. 45
Reading Messages ............................................................................................................................................................................................. 47
Receiving Emergency Alerts Messages ..................................................................................................................................................... 48
Changing Messaging Settings ...................................................................................................................................................................... 49
Google
Gmail ....................................................................................................................................................................................................................... 50
Google Talk ............................................................................................................................................................................................................ 53
Google+ ................................................................................................................................................................................................................. 56
Messenger ............................................................................................................................................................................................................. 56
Maps ........................................................................................................................................................................................................................ 57
Places ....................................................................................................................................................................................................................... 59
Navigation ............................................................................................................................................................................................................. 59
Latitude .................................................................................................................................................................................................................. 61
YouTube .................................................................................................................................................................................................................. 63
Calendar ................................................................................................................................................................................................................. 66
News & Weather .................................................................................................................................................................................................. 69
Play Store ............................................................................................................................................................................................................... 70
Play Books .............................................................................................................................................................................................................. 72
Easy Installer ......................................................................................................................................................................................................... 74
Web
Email ........................................................................................................................................................................................................................ 76
Browser ................................................................................................................................................................................................................... 79
Wi-Fi ......................................................................................................................................................................................................................... 83
Downloads ............................................................................................................................................................................................................ 84
Tra c Manager ................................................................................................................................................................................................... 85
Facebook ................................................................................................................................................................................................................86
Twitter .....................................................................................................................................................................................................................86
AUTHORITY 3
Page 4

Bluetooth
Using Bluetooth .................................................................................................................................................................................................. 87
Disconnecting or Unpairing from a Bluetooth Device ....................................................................................................................... 88
Connecting to a Bluetooth Headset ........................................................................................................................................................... 89
Sending and Receiving Information Using Bluetooth ........................................................................................................................ 89
Entertainment
Camera/Camcorder ........................................................................................................................................................................................... 91
Gallery ..................................................................................................................................................................................................................... 94
Videos ...................................................................................................................................................................................................................... 97
Play Movies ........................................................................................................................................................................................................... 97
Sound Recorder ..................................................................................................................................................................................................98
Music ....................................................................................................................................................................................................................... 99
Play Music ............................................................................................................................................................................................................101
Radio ......................................................................................................................................................................................................................103
Picsay .....................................................................................................................................................................................................................103
Layar.......................................................................................................................................................................................................................104
TuneIn Radio ......................................................................................................................................................................................................104
Tools
Clock ......................................................................................................................................................................................................................105
Calculator ............................................................................................................................................................................................................107
Notes .....................................................................................................................................................................................................................107
File Manager .......................................................................................................................................................................................................108
O ceSuite ...........................................................................................................................................................................................................109
Battery Saver ......................................................................................................................................................................................................111
Ringdroid .............................................................................................................................................................................................................112
Barcode Scanner ...............................................................................................................................................................................................112
Alcatel Setup Wizard .......................................................................................................................................................................................113
LED Torch .............................................................................................................................................................................................................113
Skifta ......................................................................................................................................................................................................................113
Cricket Applications
Alcatel help .........................................................................................................................................................................................................115
Cricket Navigator ..............................................................................................................................................................................................115
MyBackup ............................................................................................................................................................................................................115
Storefront .............................................................................................................................................................................................................115
My Account .........................................................................................................................................................................................................116
Cricket 411...........................................................................................................................................................................................................116
Mobile Web .........................................................................................................................................................................................................116
eBooks ...................................................................................................................................................................................................................116
MuveMusic ..........................................................................................................................................................................................................118
AUTHORITY 4
Page 5

NQ Mobile Security ..........................................................................................................................................................................................118
Block Breaker 3 ..................................................................................................................................................................................................119
UNO ........................................................................................................................................................................................................................119
Settings
Settings on Your Phone..................................................................................................................................................................................120
Safety and use
Please read before proceeding ...................................................................................................................................................................124
Limitation of damages ...................................................................................................................................................................................124
Important health information and safety precautions .....................................................................................................................125
Regulatory agency identi cations ............................................................................................................................................................132
Warranty
Manufacturer’s Warranty ...............................................................................................................................................................................136
AUTHORITY 5
Page 6

Specifications
Display
• 4.3” WVGA, TFT 16M colors
• Multitouch capacitive touch screen
Camera
• 5MP Full Frame with LED ash and VGA self camera
Dimensions and Weight
• Dimensions: 5 x 2.7 x 0.4 inch (127 X 68 X 9.95 mm)
• Weight: 4.5 oz (127.6 g)
Memory
• 2GB(ROM)/512MB(RAM)
• External memory: supports up to 32GB
Operating Frequencies
• Network: CDMA BC0/BC1/BC15 -1xEV-DO rA,
Wi-Fi(802.11b/g/n)(802.11n 2.4Ghz only)
Operating System
• Android 2.3.6 (Gingerbread)
Connectivity
• BT3.0+EDR(HSP/HFP/A2DP/OPP),
Wi-Fi 802.11b/g/n
Sensors
• Accelerometer, E-compass, Proximity, Light Sensor
LBS
• A-GPS
Power Management (Performance)
Battery Type Capacity
Lithium-Ion(Li-ion) 1530mAh
Standby Time Talk Time
300hours (Slot Index 2) 6 hours (CDG89)
• Data speed: Up To HSDPA 7.2Mbps
AUTHORITY 6
Page 7
Basics
In Box
The AuthorityTM comes with the following items included in the box:
• AuthorityTM mobile phone
• USB power adapter
• Charger
• MUVE Music Guide – English
NOTE
AuthorityTM is a trademark of Personal Communications Devices LLC.
Battery
ⰺ
Micro USB cable
ⰺ
Device QSG (English and Spanish)
ⰺ
MUVE Music Guide – Spanish
ⰺ
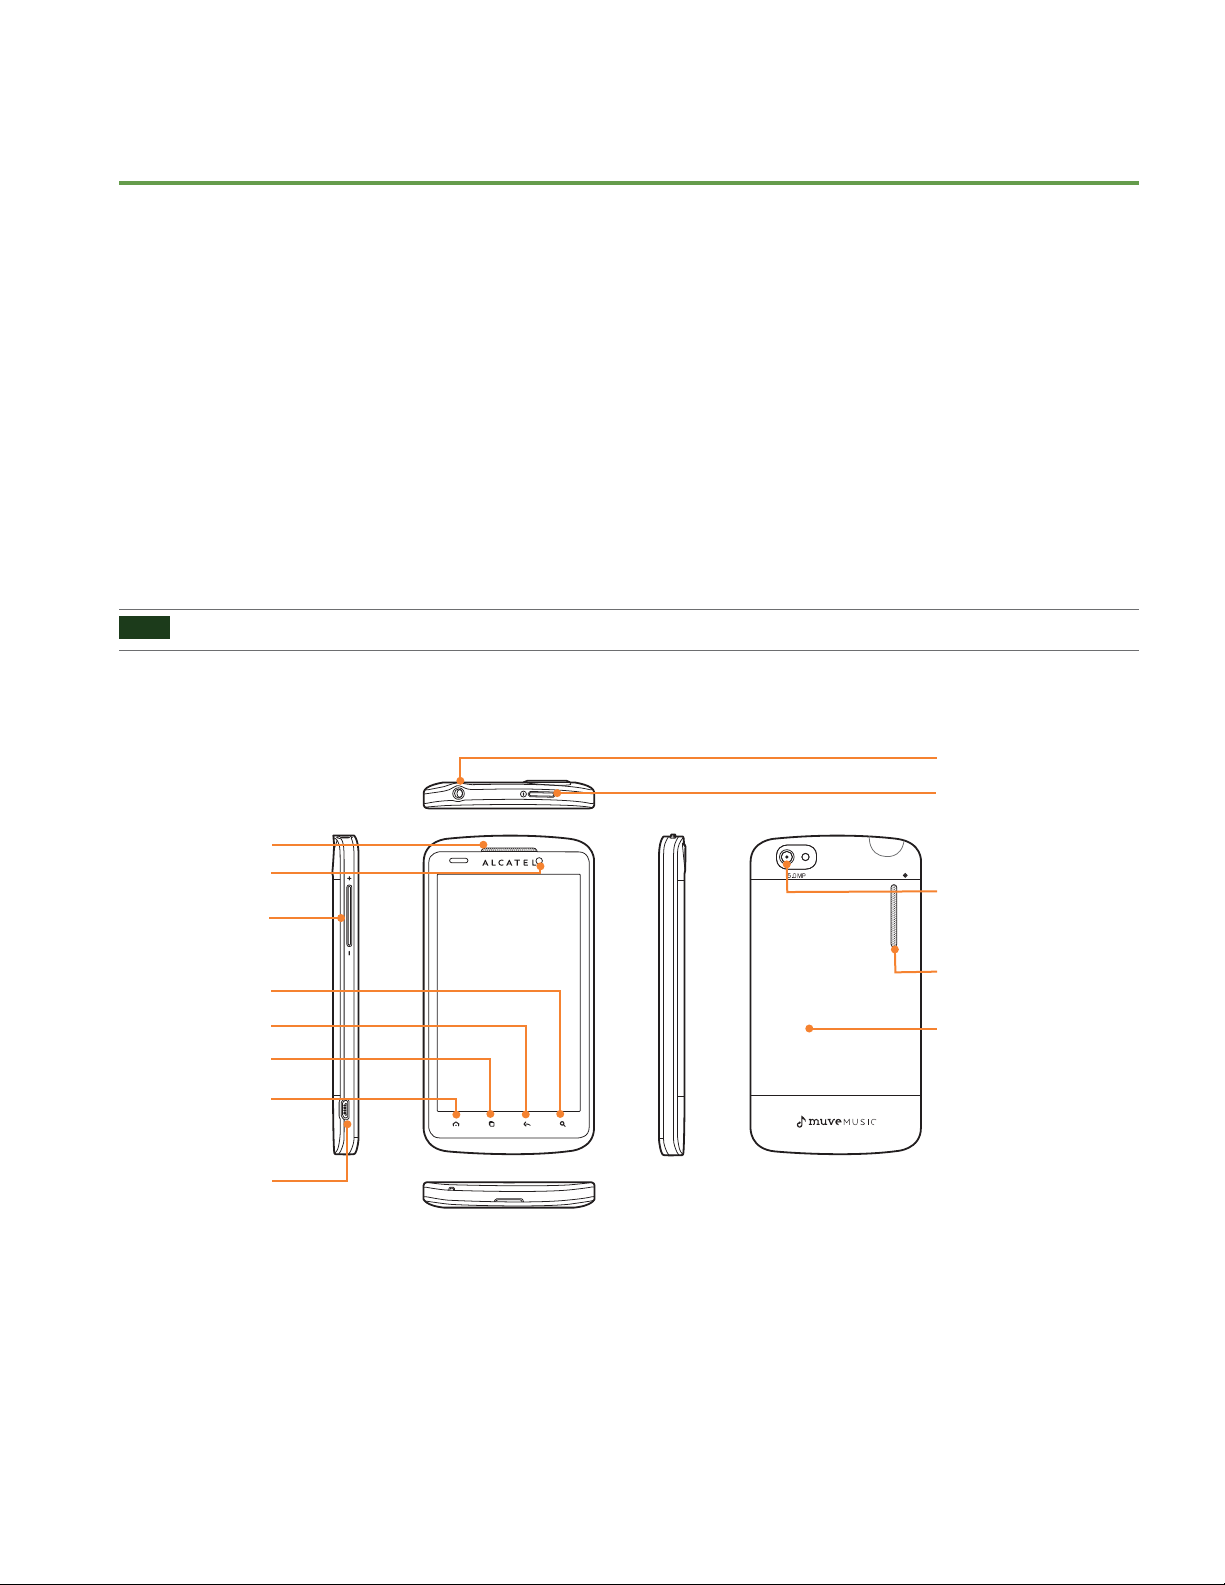
Phone Overview
1
2
3
4
5
6
Battery cover
ⰺ
microSD
ⰺ
User Manual Lite (English and Spanish)
ⰺ
TM
Card (mounted in the device)
9
10
11
12
13
7
8
1. Earpiece
2. Front camera
3. Volume key
Volume Up / Down
4. Search key
Quick search
5. Back key
Move to the previous screen
6. Menu key
Options
7. Home key
Move to Home screen
Press and hold : Show eight most
recently used apps.
8. USB port
Charging / PC connectivity
AUTHORITY 7
9. Headset jack
3.5 mm headset jack
10. Power/Lock key
Short press: Screen lock mode
Press and hold: Power ON / Phone
options
11. Camera
12. External speaker
13. Battery cover
Page 8
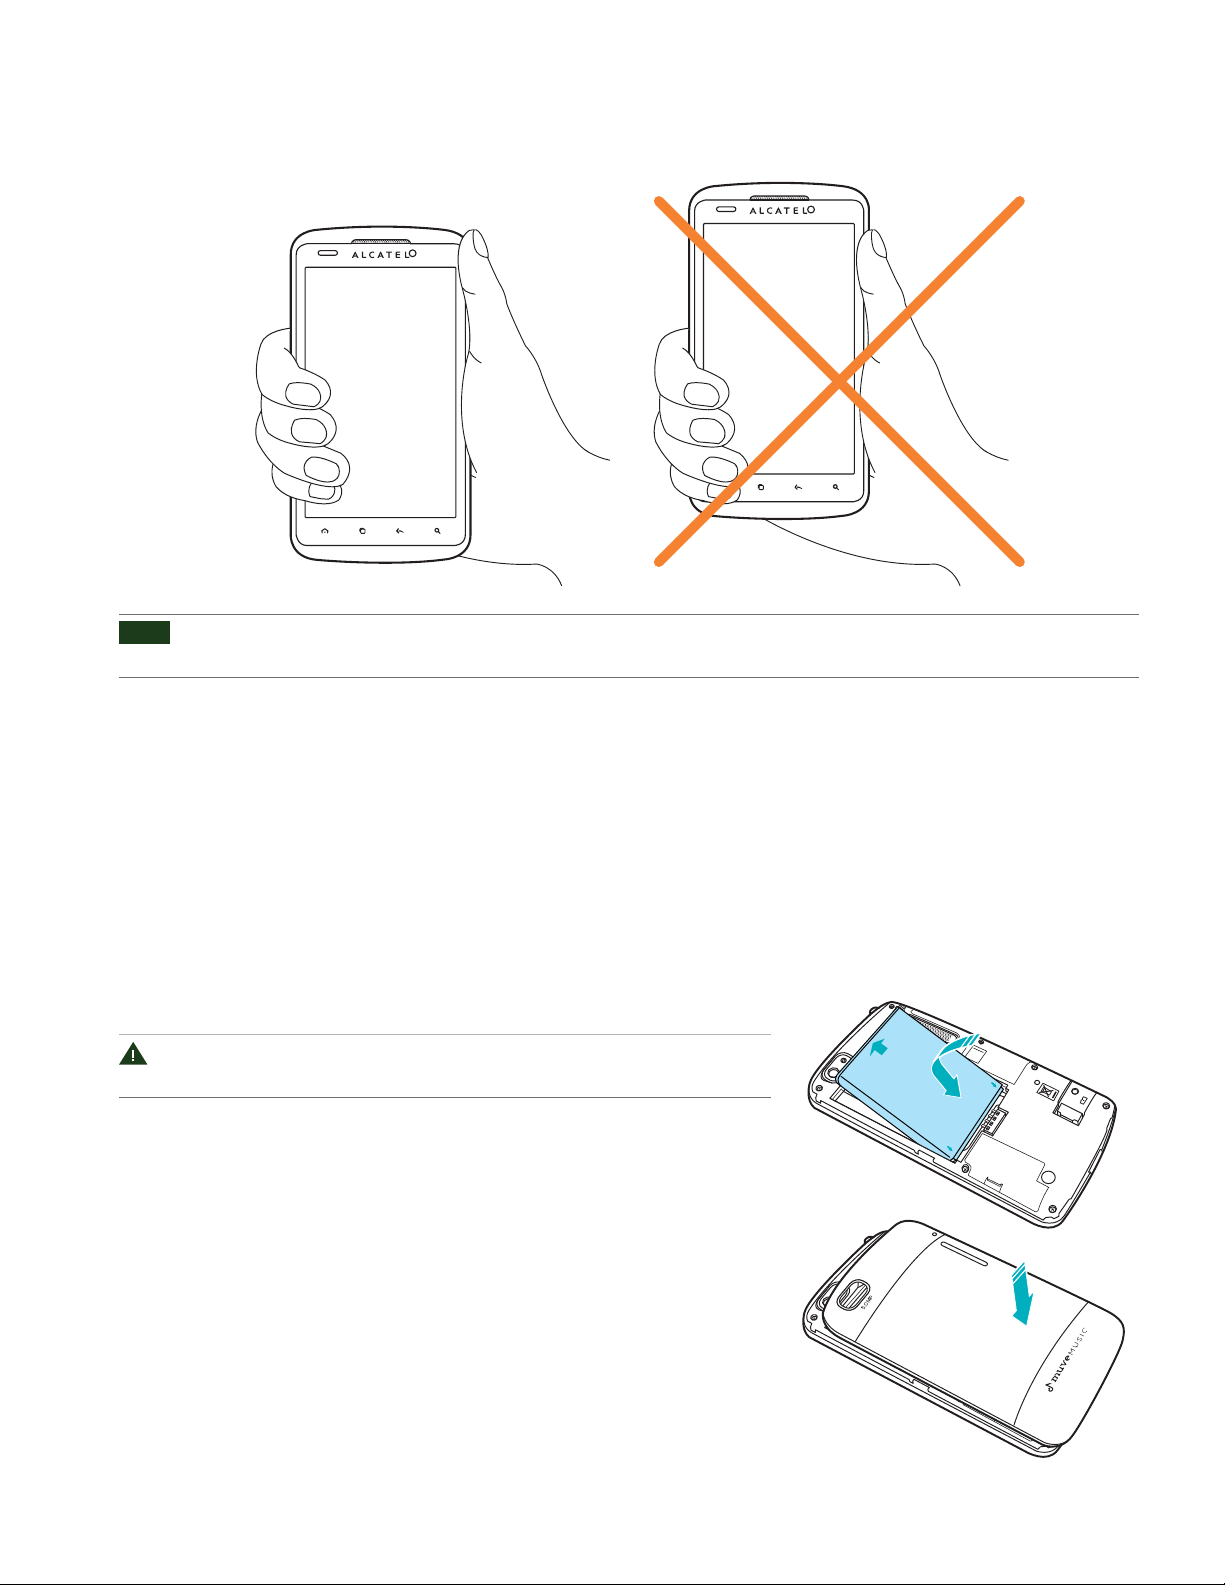
Proper Holding Position
NOTE
The AuthorityTM is equipped with an antenna located in the base of the unit. For optimum call quality, hold the phone along the
sides and avoid touching the top and bottom of the phone while in a call.
Battery
Note that browsing the web frequently, extended data usage, being in a poor signal area, or subjecting the device
to extreme temperatures will cause the battery to discharge quickly. To increase battery life, limit your data usage,
or turn o GPS and Bluetooth when not required.
Installing the battery
Please use only the original batteries and accessories you received with your
phone or CricKet recommended replacements.
1. Remove the battery cover from the unit.
2. Align the battery’s exposed gold contacts with the battery connectors
inside the battery compartment.
3. Insert the contact side of the battery rst and then gently push the battery
into place.
4. Replace the battery cover over the battery compartment and press down
until you hear a click.
AUTHORITY 8
Page 9
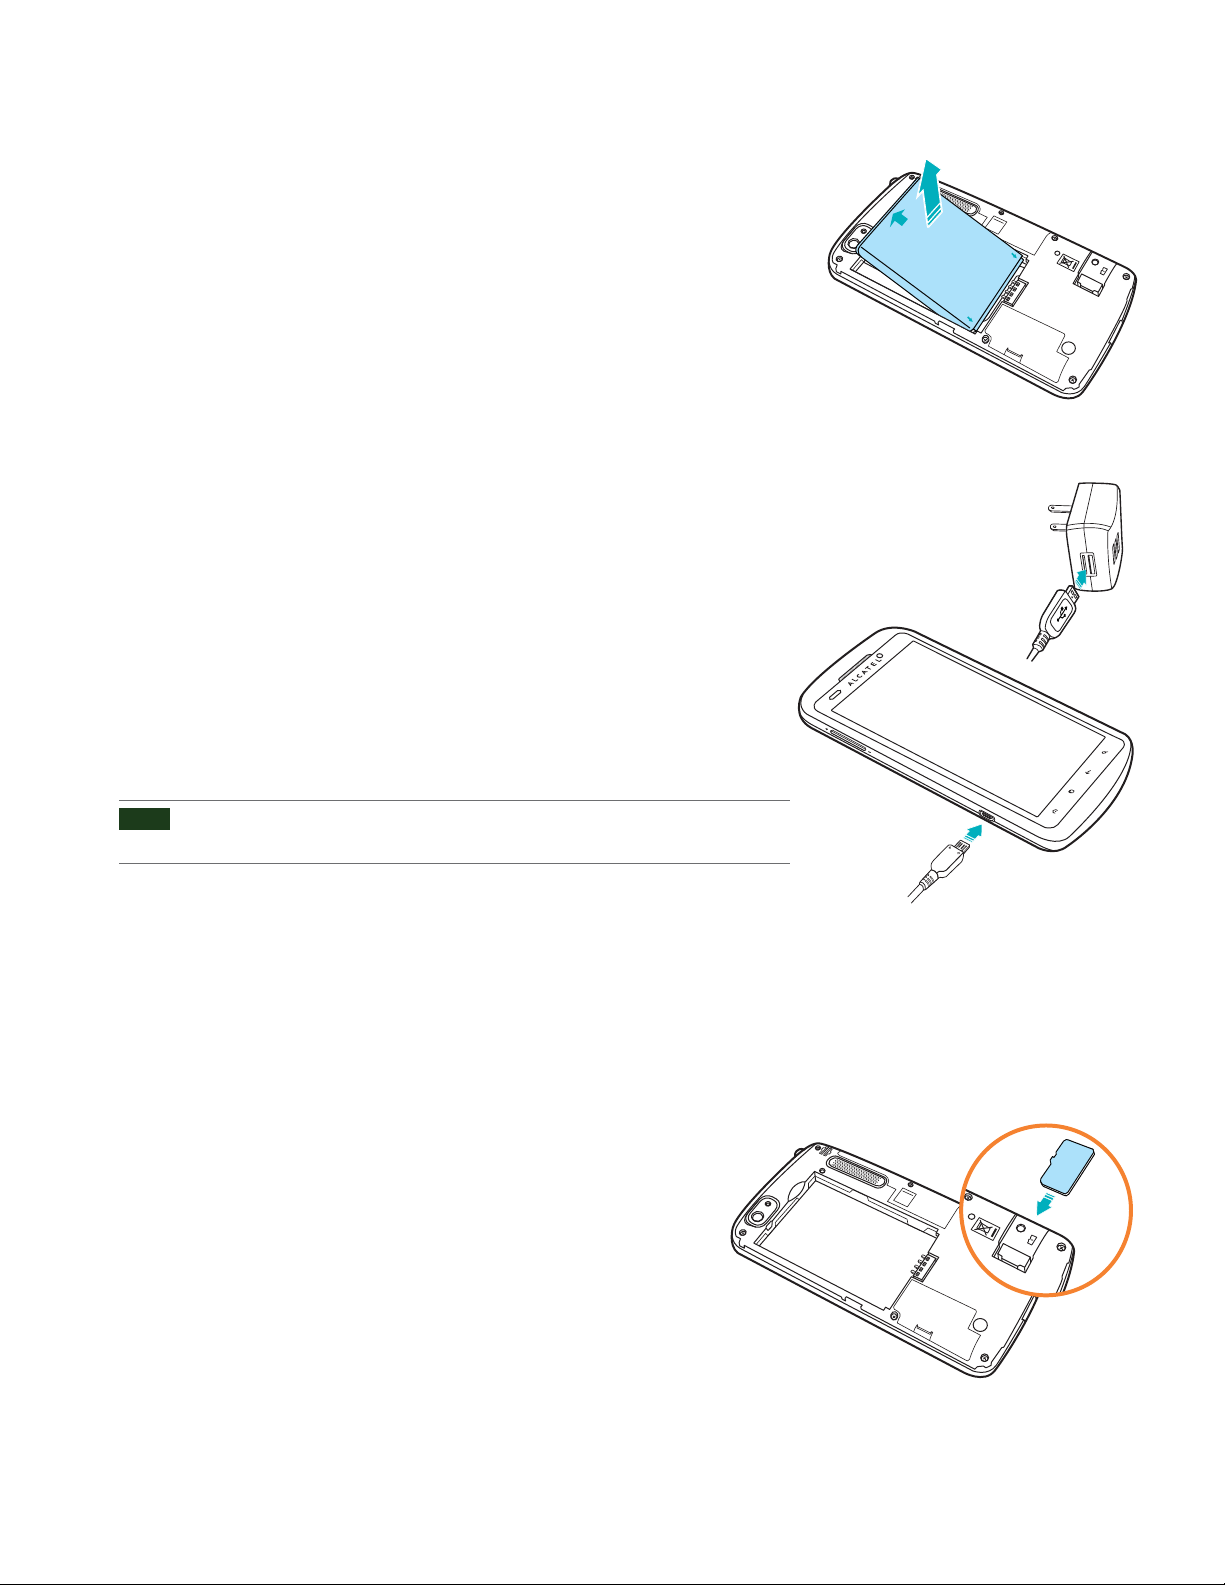
Removing the battery
1. Make sure that your device is turned o . To remove the battery cover from your
phone, try open the back cover using your nger at the small opening on the
bottom of the phone.
2. Push the bottom of the battery upwards and remove the battery.
Charging your battery
Before you turn on your device and start using it, it is recommended that
you charge the battery.
1. Plug the USB cable into the USB power adapter.
2. Plug the power adapter into a standard outlet.
3. Locate the USB port located on the left side of your device.
4. Plug the other end of the USB cable into the phone’s micro USB port.
5. The USB icon on the cable should always face down when connecting the cable
to your device as shown.
NOTE
• It is more efficient to charge the battery with your device powered off.
• Battery operating time gradually decreases over time.
microSDTM Card
Use the microSDTM card to store your photos, videos, music and certain apps from AndroidTM Market. You can also
move and copy les to your computer from your device.
Inserting the microSDTM card
1. Remove the battery cover.
TM
2. Locate the microSD
3. Insert the microSD
until it clicks into place.
card slot.
TM
card into the slot with its gold contacts facing down
4. Replace the battery cover.
AUTHORITY 9
Page 10
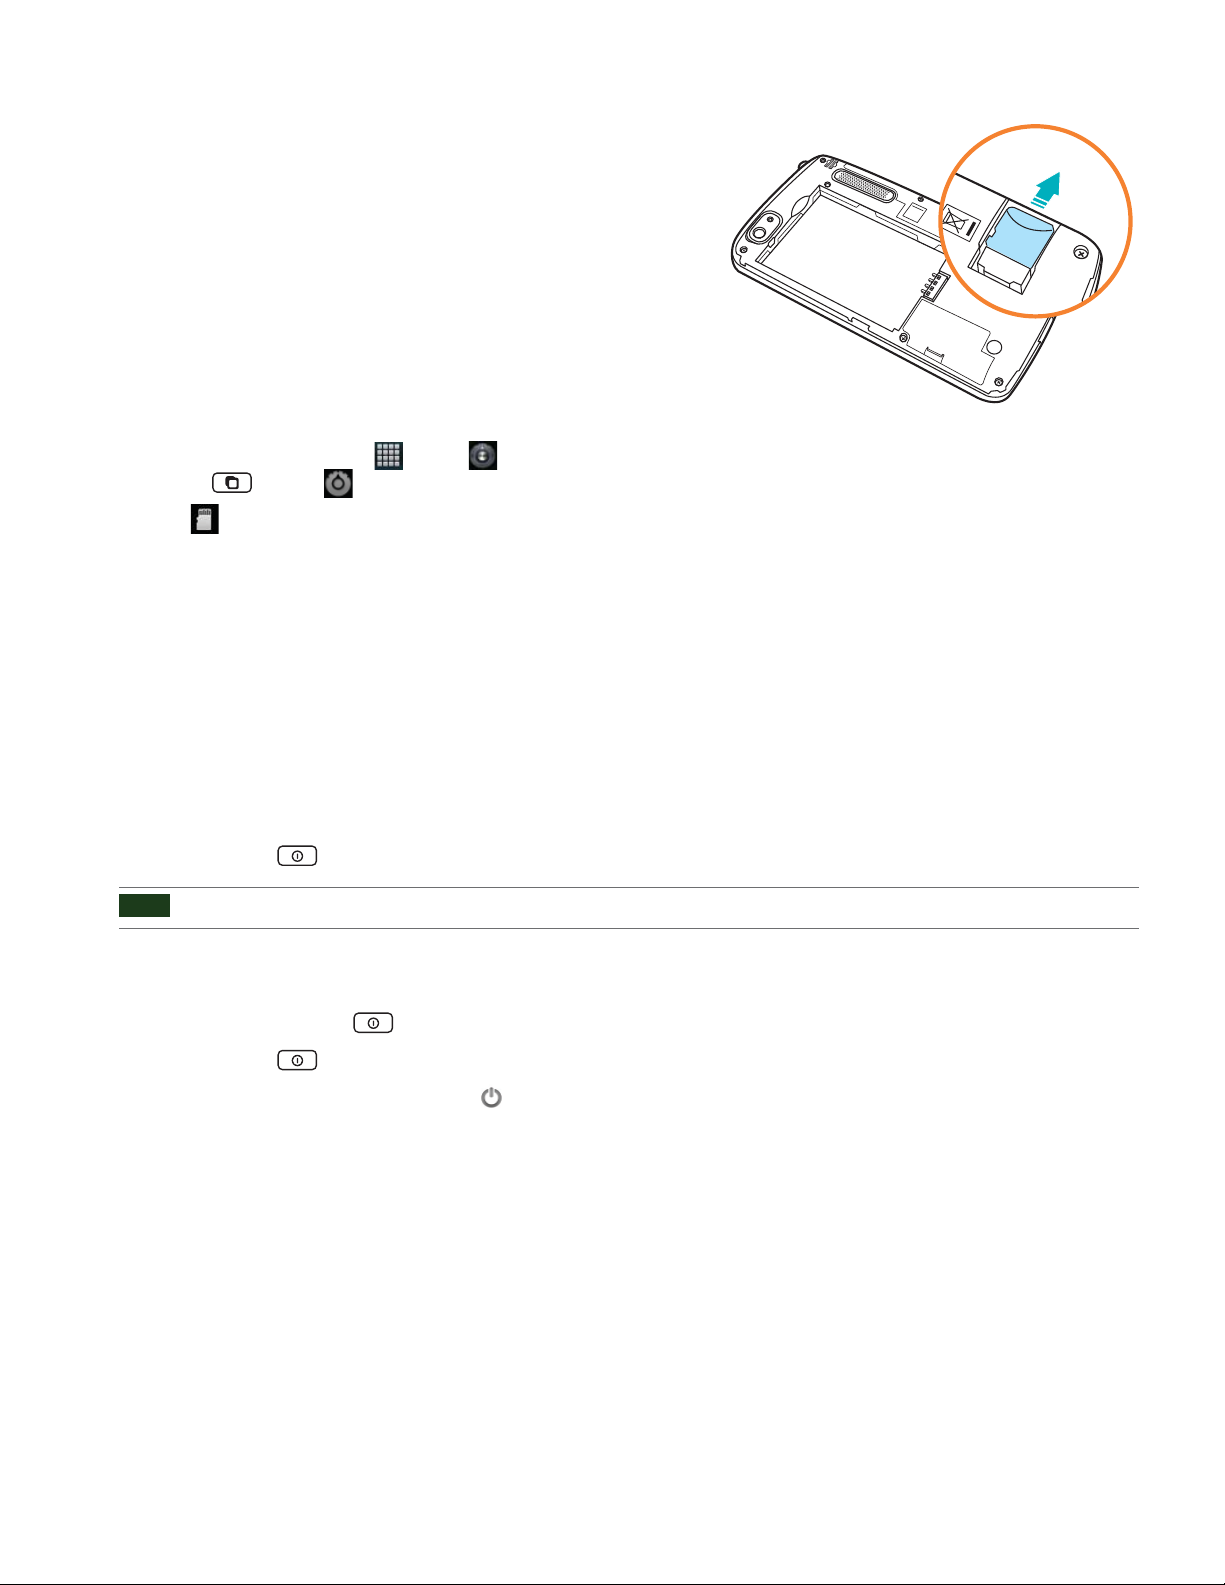
Removing the microSDTM card
1. Make sure that your device is turned o ,
and then remove the battery cover.
2. Slide the microSD
TM
card out the rest of the way.
Removing the microSDTM card while the phone is on
If you need to remove the microSDTM card while the phone is
on, unmount the microSD
damaging the les in the microSDTM card.
1. From the Home screen, tap Apps > Settings.
Or tap
Menu > Settings.
TM
card rst to prevent corrupting or
2. Tap
3. Remove the microSD
Storage > Unmount SD card > OK.
TM
card by following the steps in “SD card safe to
remove
”.
Turning Phone On or Off
Turning your phone on
1. Press and hold Power/Lock.
NOTE
The first time you use your phone you’ll need to set it up. See the Getting Started chapter for details.
Turning your phone o
1. If the display is o , press Power/Lock to turn it back on.
2. Press and hold
3. When Phone options menu appears, tap
Power/Lock for a few seconds.
Power o > OK.
AUTHORITY 10
Page 11
Phone Options
Silent mode
1. Press and hold Power/Lock.
2. Tap
• When you select Silent mode,
Silent mode.
is displayed in the Status bar. Ringtones, alerts, and all audible sounds except media and
alarms are silenced.
NOTE
To turn silent mode off, press and hold Power/Lock and then tap Silent mode again.
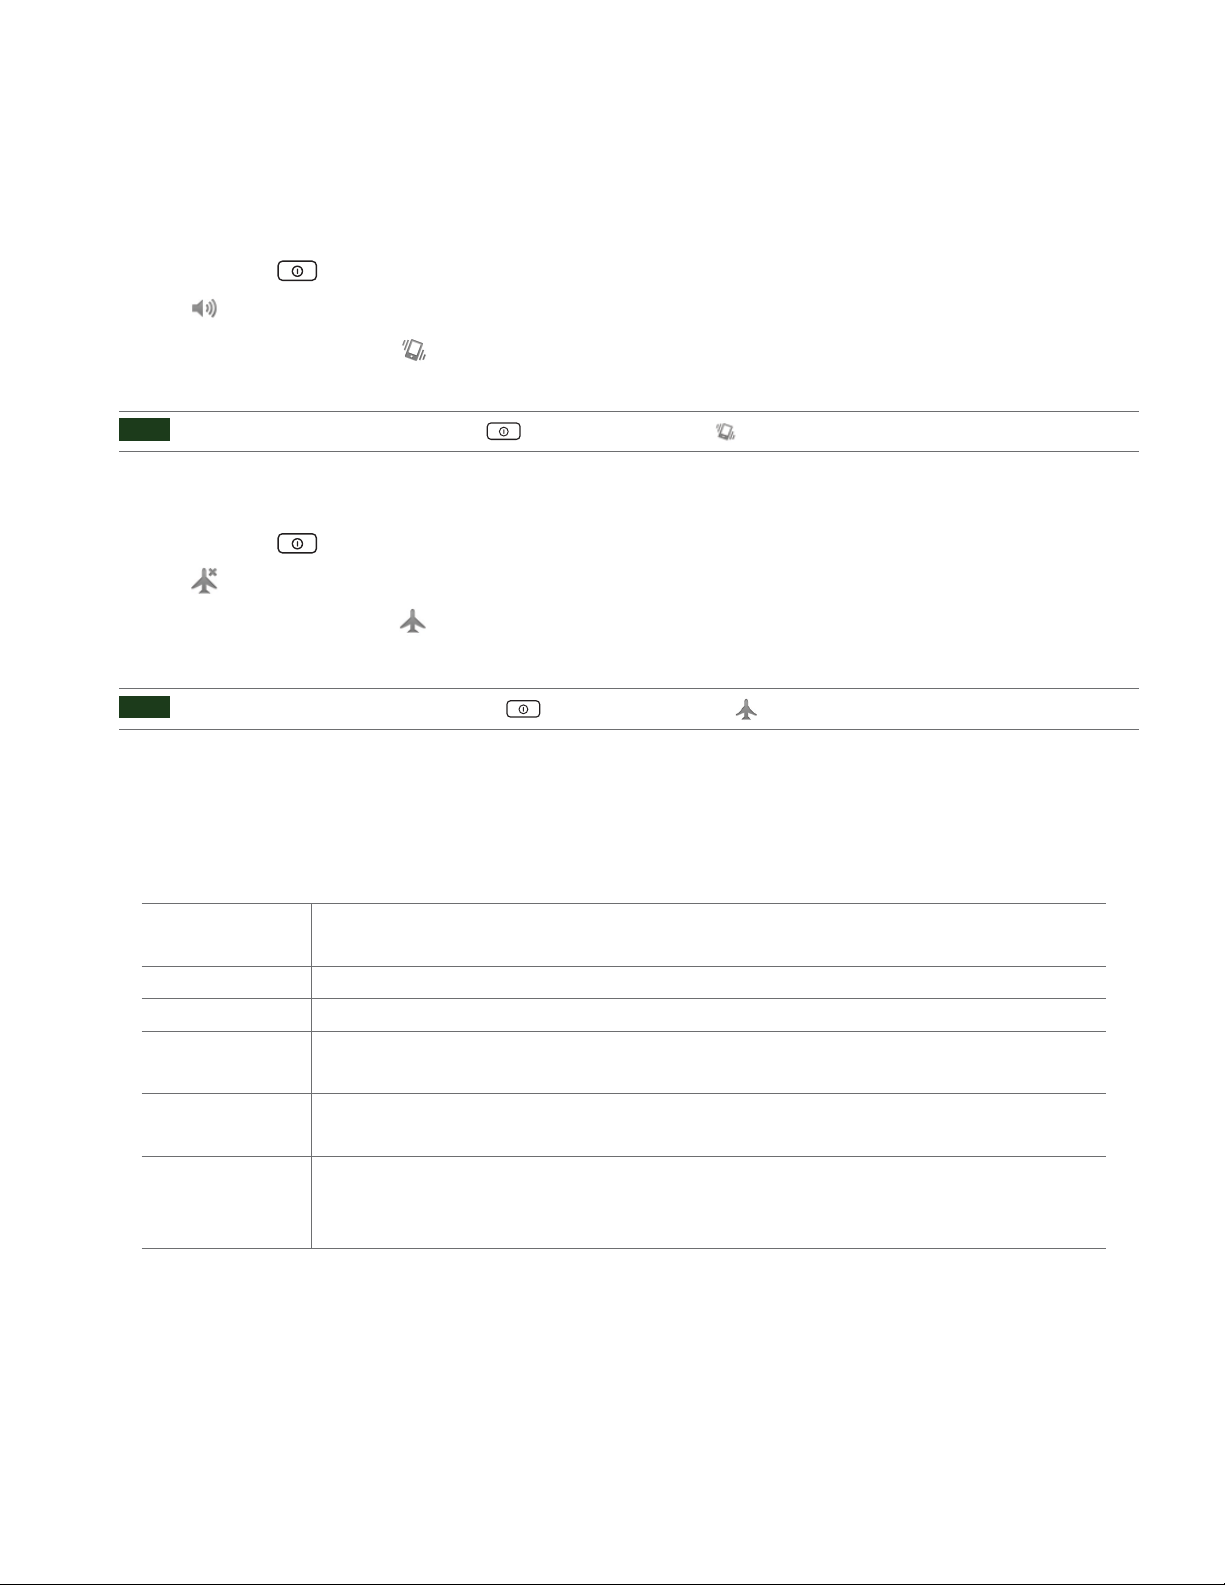
Airplane mode
1. Press and hold Power/Lock.
Airplane mode.
2. Tap
• When you set Airplane mode,
is displayed in the Status bar. Wi-Fi, Bluetooth, and mobile network functions are all
disabled.
NOTE
To turn airplane mode off, press and hold Power/Lock and then tap Airplane mode again.
Touchscreen Gestures
Tap To select onscreen items such as application and settings icons or press onscreen buttons, simply touch them
with your nger.
Tap and hold To open available options for the item, simply touch and hold your nger on the screen over the item.
Swipe or slide Quickly drag your nger vertically or horizontally across the screen.
Drag Tap and hold your nger before you start to drag. While dragging, do not release your nger until the item
reaches your desired location.
Flick Flicking the screen is similar to swiping, but you only need to swipe your nger in lighter and quicker strokes.
This nger gesture is always in a vertical direction, such as icking through the contacts or the message lists.
Rotate For most screens, you can automatically change the screen orientation from portrait to landscape by turning
the phone sideways. When entering text, you can turn the phone sideways to bring up a bigger on-screen
keyboard.
AUTHORITY 11
Page 12
Keyboard
Using Swype Text Entry Method
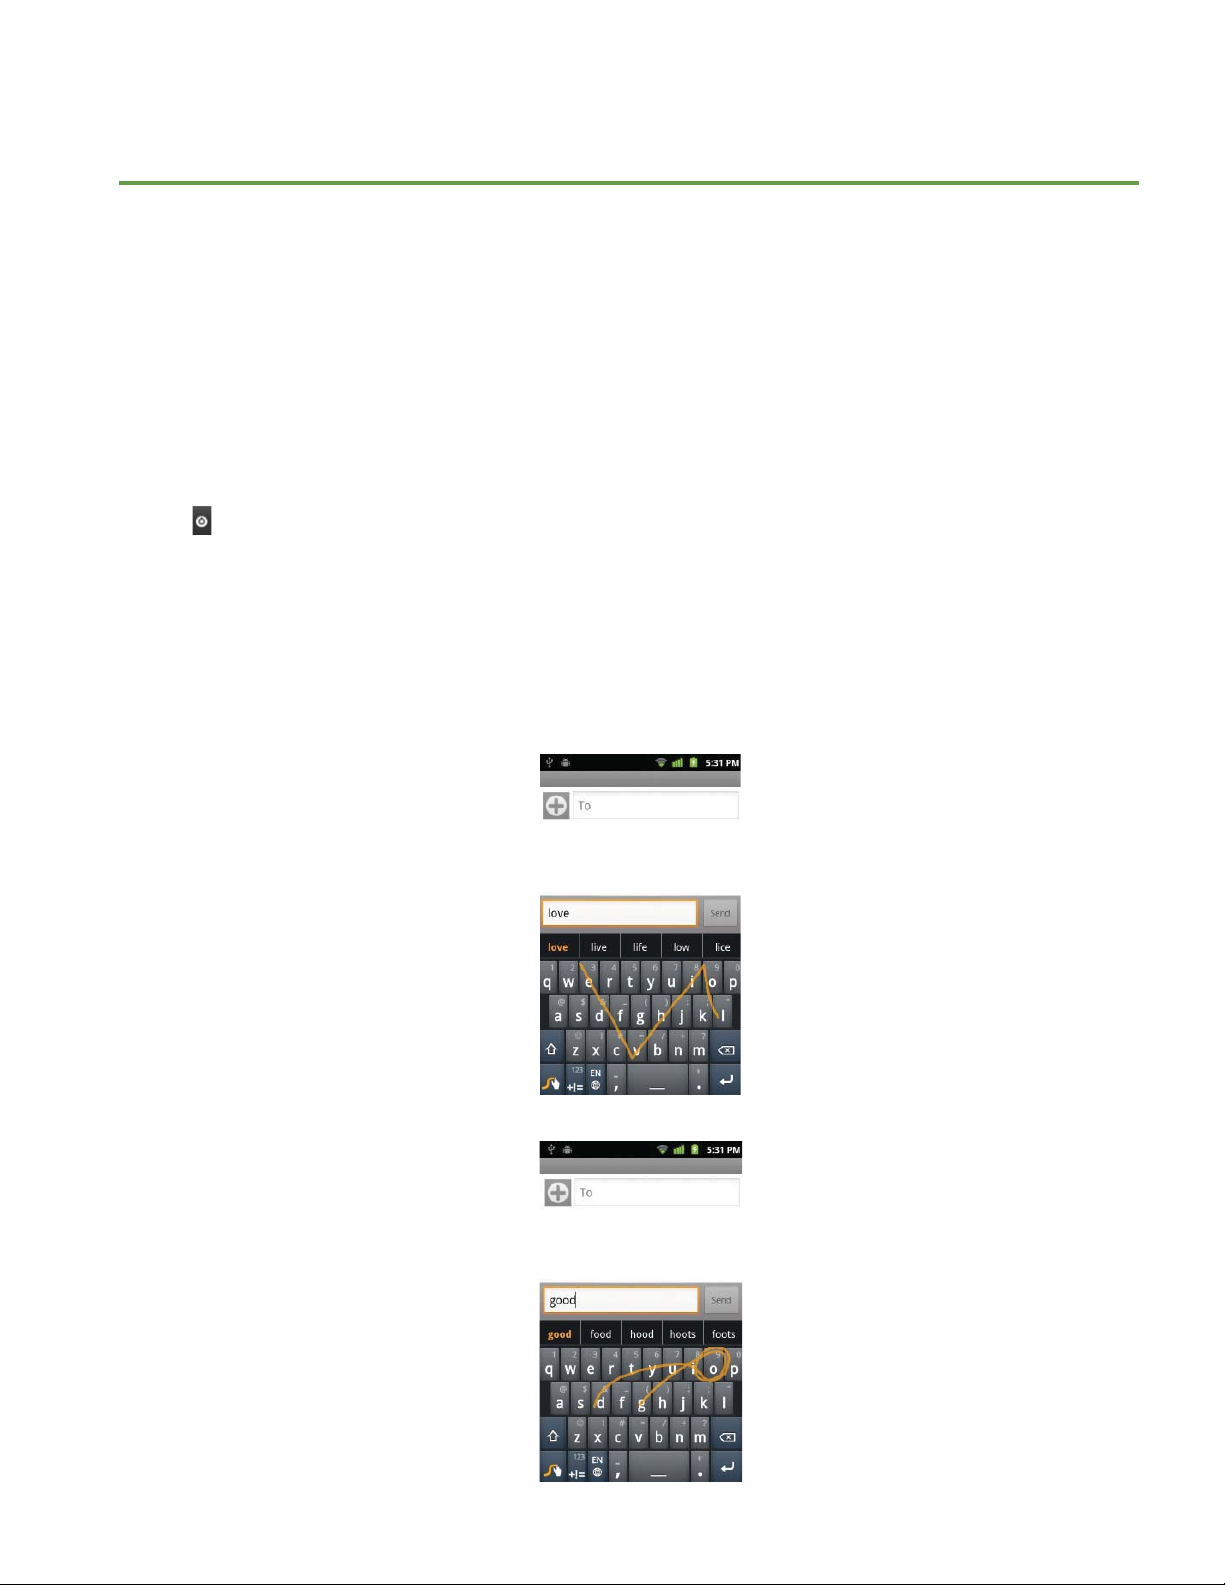
Entering text using the Swype keyboard
Swype lets you enter a word with one continuous motion: just drag your nger over the letters in the word.
1. Tap Input options to open Input options menu. Tap Select input method and select Swype.
2. Place your nger on the key with the rst letter of the word and drag your nger to each subsequent letter without lifting
your nger o the screen.
3. Continue until you have nished the word. Lift your nger after the last letter.
4. If Swype cannot clearly determine your word, the word choice window opens. Select an alternative word from the list.
• For example, to enter ‘love’ : Trace from
top of the keyboard and without lifting, glide your nger back down to the next letter of the word.
• good : To enter a double letter within a word, make a small circle on the letter.
l to o to v to e. To capitalize a letter, glide your nger from the rst letter up past the
AUTHORITY 12
Page 13
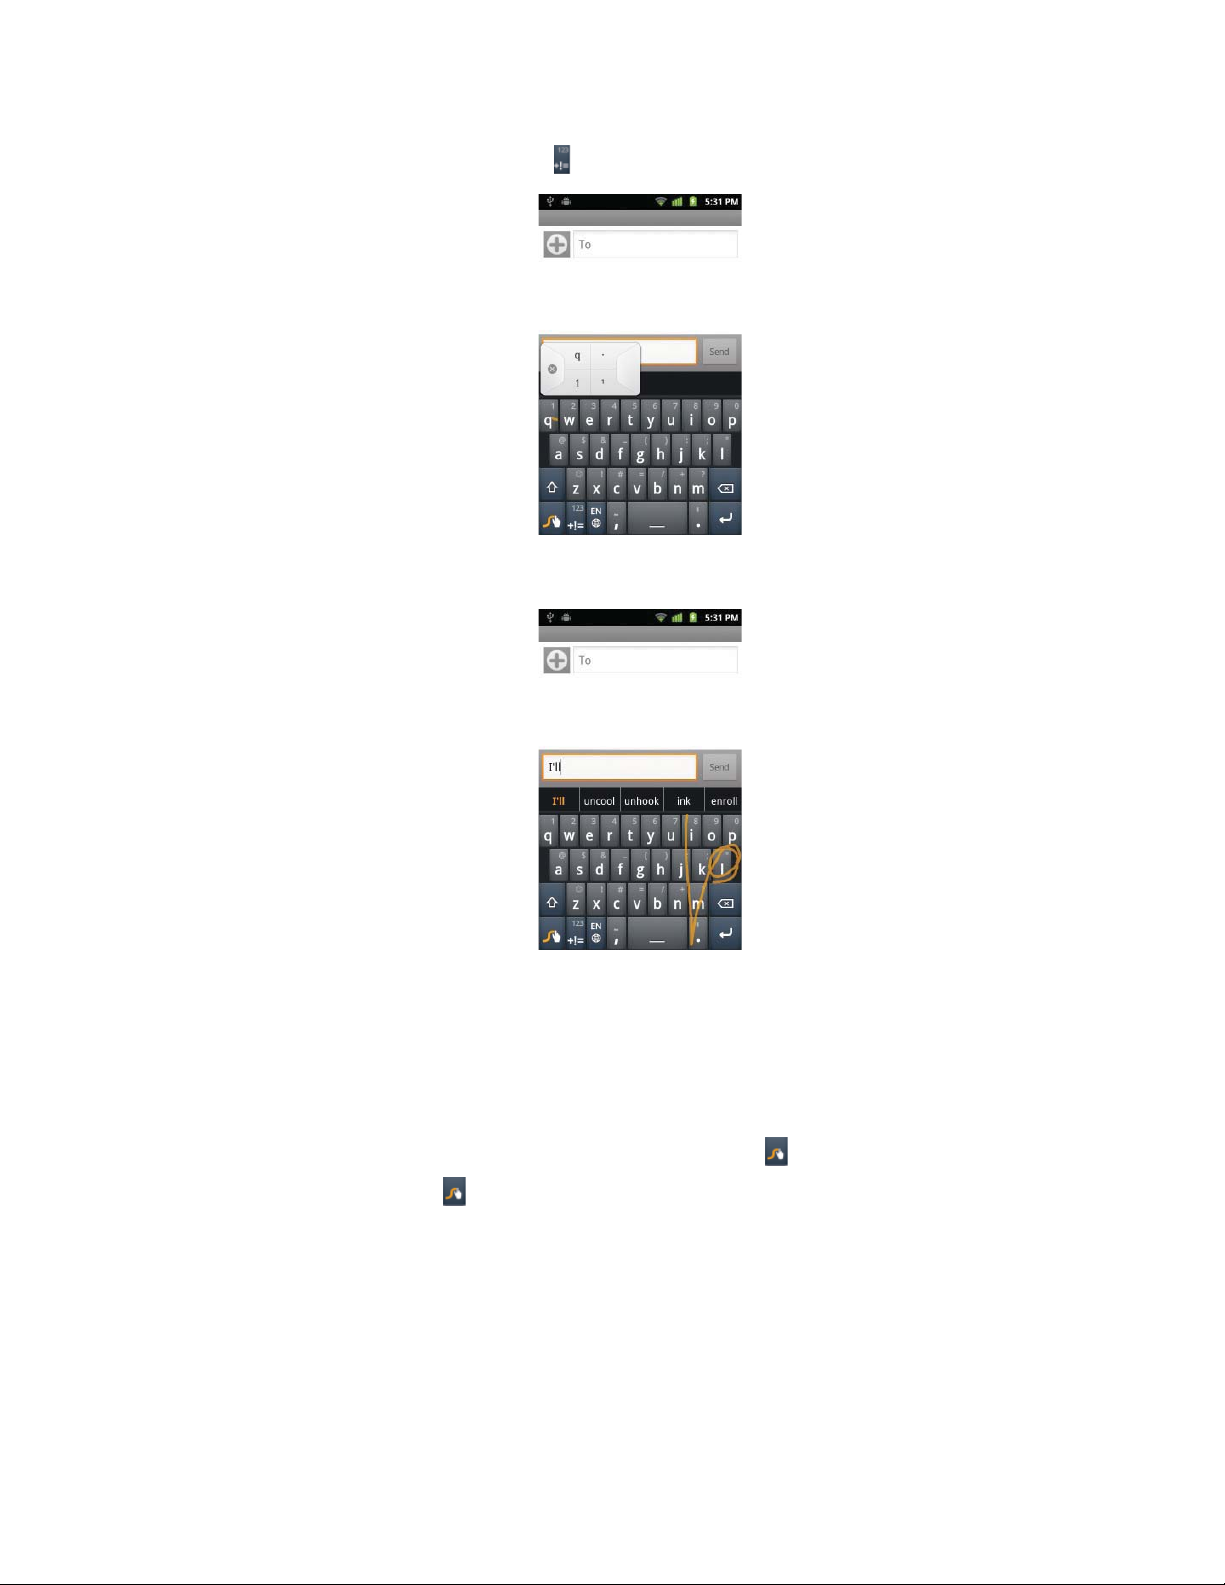
• 123... : To enter characters on the upper half of the key, tap and hold the key. When the character list appears, you can enter
special characters, symbols, and numbers. Or, tap to enter several symbols or numbers.
• I’ll: To enter apostrophes in common words, drag through the ‘ .
• Swype auto-spaces after each word. To add a period, comma, exclamation/question mark you simply drag from the
punctuation mark to the spacebar. Swype will automatically insert the character in the correct place and automatically insert
a space in anticipation of the next word.
• If Swype doesn’t know the word, you can tap the letter keys to enter it. To add words to Swype’s dictionary, tap in the letters
of the word, then select it from the word choice list. Tap the prompt that appears to add the word. To remove a word from the
dictionary, highlight only the word that you want to delete, and then tap the
.
• For more information, tap and hold and tap How to Swype.
AUTHORITY 13
Page 14

Using the Android Keyboard
You can enter text using the onscreen keyboard. Some applications open the keyboard automatically. In others,
tap anywhere in a text eld to open the keyboard.
Android keyboard is similar to a desktop computer’s keyboard.
NOTE
You can change keyboard settings including User dictionary through the settings menu.
From the Home screen, tap Apps > Settings > Language & keyboard.
Or tap
Menu > Settings > Language & keyboard.
1
2
3
4
5
1 The characters you’ve typed appear in a strip above the keyboard with word predictions to the right. Tap a suggested word to
enter it. You can also save the characters you’ve typed by tapping it twice in a strip above the keyboard.
2 Shift key. Tap once to capitalize the next letter you type. Tap it twice for all caps.
3 Symbol key. Tap to switch to the numeric and symbol keyboard.
4 Tap to open Input options and tap and hold to select input method.
5 Voice input key. Tap to input by voice.
6 Backspace key. Tap to delete the previous character.
7 Enter key. Tap to create a new line.
6
7
1. Tap the text eld to open the onscreen keyboard.
2. Tap the onscreen keys to type.
3. Use
4. When you’ve nished typing, tap
to erase characters to the left of the cursor.
Back to close the keyboard.
AUTHORITY 14
Page 15
To enter numbers, symbols, and other characters
Tap
on the numeric keyboard
Tap
Tap and hold a vowel or the C, N, or S key To open a pop up menu to select an accented vowel or other alternate letter.
Tap and hold
Tap and hold a number or symbol key To open a pop up menu of additional symbols. Not all keys have additional symbols.
• Tap and hold the main keyboard to open an extension keyboard, with numbers and symbols. To enter a number or symbol
from that keyboard, slide your nger onto it and then lift your nger. When you lift your nger, the extended keyboard will
no longer be visible.
• When you tap a key, a larger version displays brie y over the keyboard. Keys with alternate characters display an ellipsis (...)
below the character.
To switch to the numeric and symbol keyboard.
To view additional symbols, tap it again to switch back.
To open a pop up menu with a set of common symbols.
Changing the keyboard language
Selecting the Android keyboard languages
1. Tap a text eld to open the onscreen keyboard.
2. Tap
Input options > Android keyboard settings.
Or tap and hold
> Input options > Android keyboard settings.
3. Tap
Input languages > Select one or more languages.
4. Tap
Back to save.
Changing the keyboard language
If you’ve selected more than one keyboard language, the active keyboard language is displayed on the Space bar.
You can switch languages easily as follows:
1. Tap and hold .
2. Without lifting your nger, move it to the left or right until the language you want appears in the center of the small window
above
3. Lift your nger.
If you have many languages available, you may have to repeat the above steps to reach your desired language.
.
Entering the text by speaking
You can use voice input to enter text. Voice input is an experimental feature using Google’s speech-recognition
service. You must have a data connection on a mobile or Wi-Fi network to use voice input.
Turning on voice input
If the onscreen keyboard does not display , voice input is not turned on or you have con gured it to display
only on the symbol keyboard.
AUTHORITY 15
Page 16
1. From the Home screen, tap Apps > Settings. Or tap Menu > Settings.
2. Tap
• You can also tap and hold on the onscreen keyboard. In the alternate menu that opens, tap Input options > Android
3.Tap
4. Tap the option for where you want to use
Language & keyboard > Android keyboard.
Or tap
keyboard settings
Input options on the onscreen keyboard > Android keyboard settings.
.
Voice input.
(On main keyboard or On symbols keyboard). Or tap O to turn o voice input.
Entering text by speaking
You can enter text by speaking, in most places that you can enter text with the Android keyboard.
1. Tap a text eld.
2. Tap the
3. When prompted to “Speak now,” speak what you want to enter.
• Say “comma,” “period,” “question mark,” or “exclamation point” to enter punctuation.
• When you pause, what you spoke is transcribed by the speech-recognition service, entered in the text eld and underlined.
You can tap
• You can edit the onscreen text by typing or speaking.
on the keyboard.
to erase the underlined text. If you start typing or entering more text by speaking, the underline disappears.
Adding, Editing or Deleting Words in the User Dictionary
Sometimes you may need to add a word to the predictive text dictionary, for example, a name or a specialized
technical word. If you want to add a word to your User dictionary while entering text, tap and hold the word and
select Add ** to dictionary.
Adding a word manually
1. From the Home screen, tap Apps > Settings. Or tap Menu > Settings.
2. Tap
3. Tap
4. Type the word > Tap
Editing or deleting a word
1. From the Home screen, tap Apps > Settings. Or tap Menu > Settings.
2. Tap
• To edit words from the dictionary, tap the word you want to edit >
• To delete words from the dictionary, tap the word you want to delete >
Language & keyboard > User dictionary.
Menu > Add.
OK.
Language & keyboard > User dictionary.
Edit > Edit the word > Tap OK.
Delete.
AUTHORITY 16
Page 17

Editing Text
You can select, copy or cut the text you’ve entered, then paste it in another text eld within the user interface.
NOTE
Some applications may offer different text editing methods.
Selecting text
1. Tap the text eld.
2. Move the cursor to the beginning or end of the desired text by tapping in the location you want the cursor.
3. Tap and hold the text eld.
4. Tap
Select word in the pop up menu.
• Or tap
5. Drag your nger to move the text cursor to a letter within the text that you want to select. The selected text is highlighted in
Select all to select all the text in the text eld.
orange.
Cutting and copying the text
1. Select the text to cut or copy it.
2. Tap and hold the selected text.
3. Tap
Cut or Copy in the menu that opens.
• If you tap
paste it into another text eld.
NOTE
Be sure to only cut one section of text at a time, as the clipboard only saves a single text string.
Cut, the selected text is removed from the text eld. In this case, the text is saved to the clipboard, so that you can
Pasting the text
1. Cut or copy the text to paste.
2. Tap the text eld where you want to paste the text and move the cursor to your desired location.
• You can paste text that you copied from one application into the text eld in any other application.
3. Tap and hold then select
• The text is inserted after the cursor. The text also remains in the clipboard, so you can paste that same text into another
location.
Paste in the pop up menu.
AUTHORITY 17
Page 18

Getting Started
Google Account
You must sign in to a Google account to use Gmail, Google Calendar, and other Google applications; to download
applications from Play Store; to back up your settings to Google servers; and to take advantage of other Google
services on your phone.
Registering a Google account
Gmail, Play Store, and other applications require a valid Google account for use. You will be prompted to login in to
Google the rst time you use these applications.
1. Tap Sign in to register your Google account.
• If you don’t have a Google account, tap
2. Enter your Google account
Username and Password > Tap Sign in.
Create instead. See the next section for more details.
Creating a new Google account
1. Tap Create > Enter First name, Last name and Username > Tap Next.
2. Enter a password in to the
• Password tip: Your password must be a minimum of 8 characters in length.
3. Select
4. Read through Google Terms of Service > Tap
5. Enter the letters shown on the screen > Tap
Security question and enter the Answer, which will be needed if you forget your password and then enter a Secondary
Email
> Create.
Type a password, Con rm password elds, then tap Next.
I agree, Next.
Next > Finish.
Adding a Google account
1. From the Home screen, tap Apps > Settings.
2. Tap
3. Tap
Accounts & sync > Add account.
Google > Tap Next.
4. Tap
Sign in to register your Google account.
5. Enter your Google account
• The Authority
• If you have the same contact across multiple Google accounts, you can merge duplicates into a single item in the contact list.
TM
supports multiple Google accounts.
Username and Password > Tap Sign in > Finish.
AUTHORITY 18
Page 19
Removing a Google account
1. From the Home screen, tap Apps > Settings.
2. Tap
3. Select the account to be deleted > Tap
Accounts & sync.
Remove account > Remove account.
• All information associated with that account will be deleted. This includes contacts, emails, messages, calendar events, etc.
At least one Google account is required for normal phone operation.
NOTE
You cannot remove the first Google account you added to your phone except by resetting your phone to the factory defaults and
erasing all of your user data.
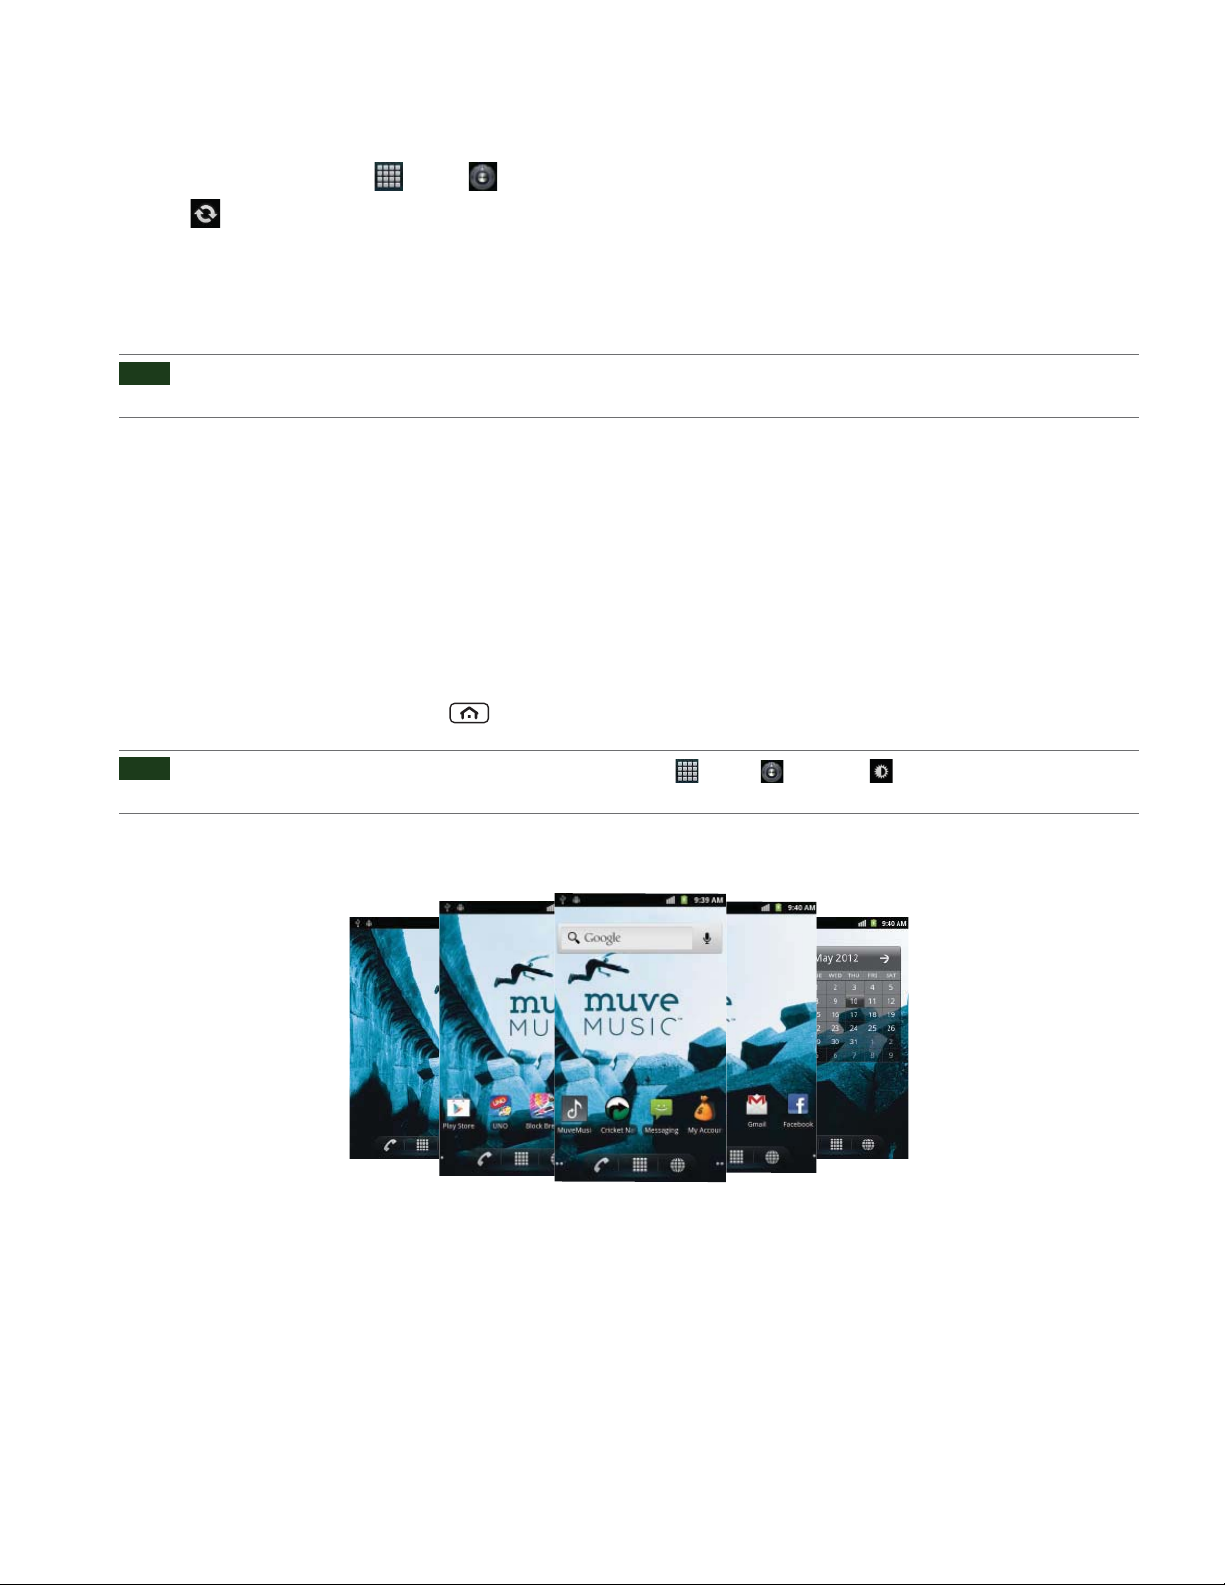
Getting to Know the Home Screen
The Home screen is displayed when the device is in idle mode. You can add your favorite apps, shortcuts, folders
and widgets to the Home screen so they’re only a tap away.
The Home screen is actually ve separate screens. Slide your nger the left or right and you’ll discover more space
to add icons, widgets, and more. Tap
NOTE
To change number of Home screens, from the Home screen, tap Apps > Settings > Display > Number of home
screens > Select 3 screen, 5 screen or 7 screen > OK.
Home to return to the center Home screen.
AUTHORITY 19
Page 20
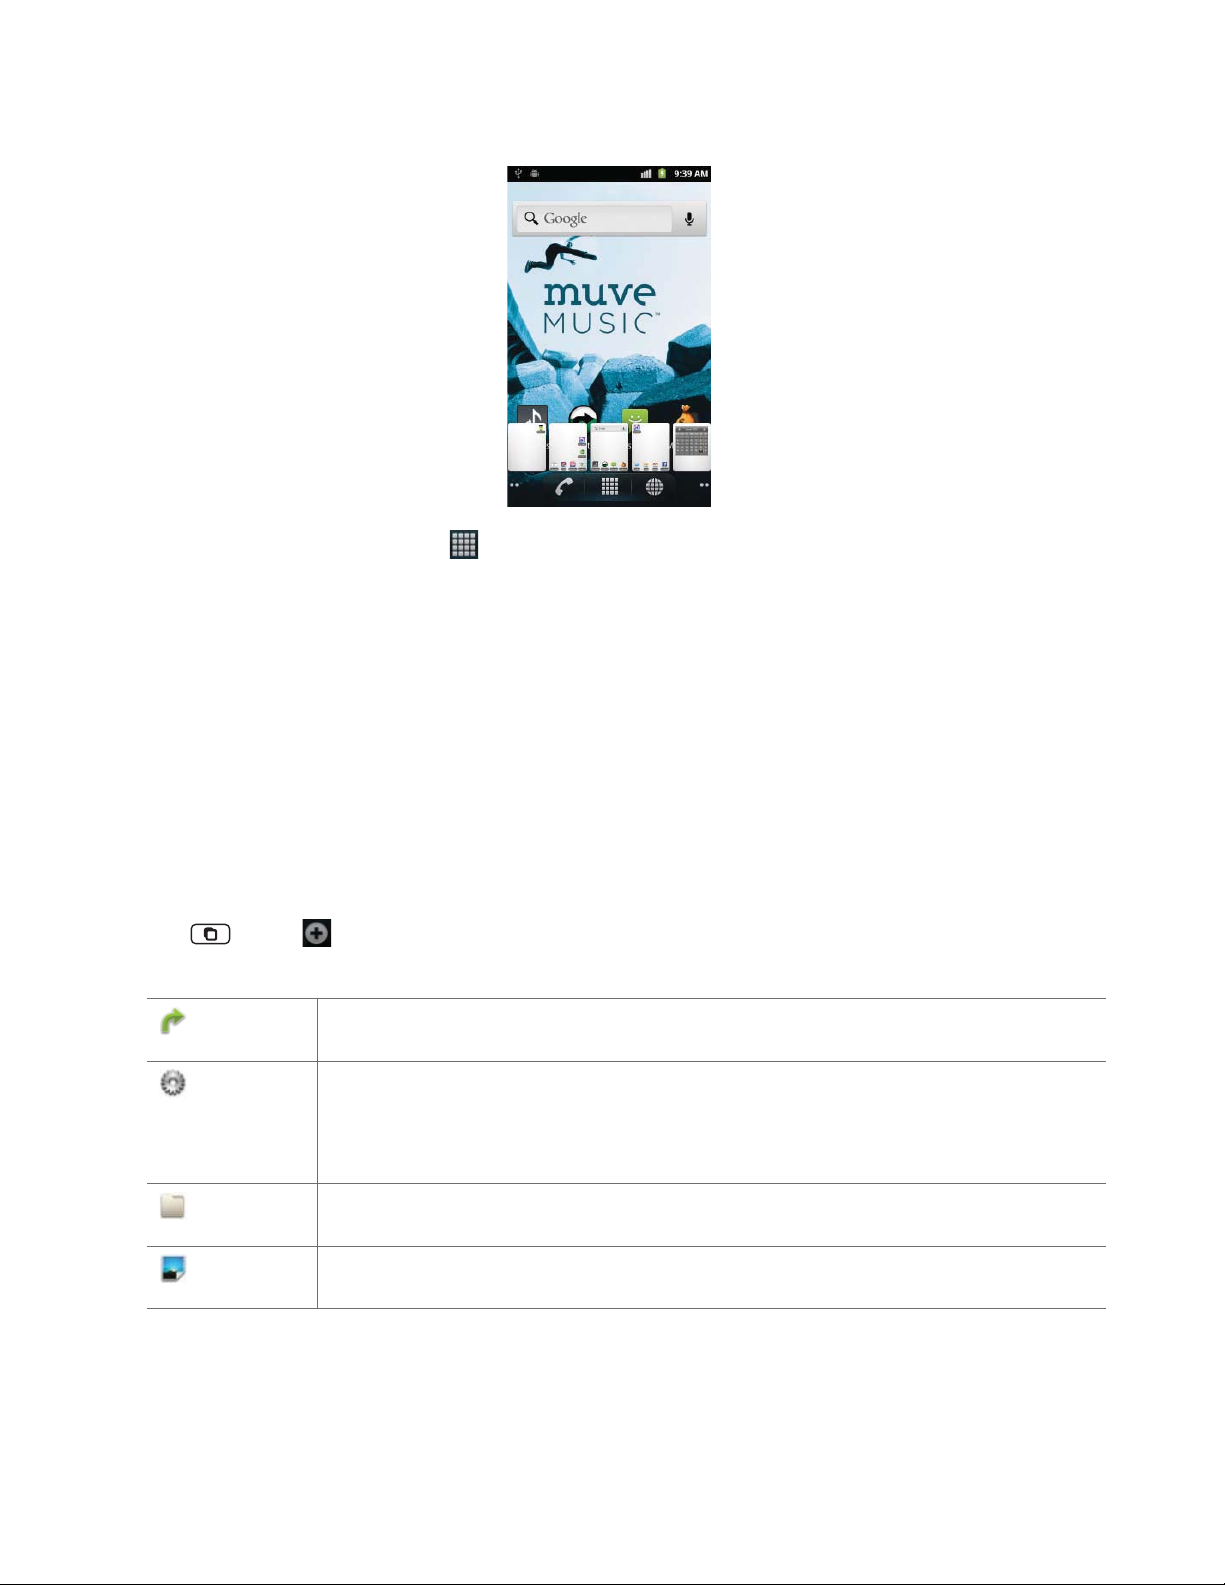
Previewing the Home screens
1. From any Home screen, tap and hold Apps.
2. When you choose a desired Home screen, the display shifts to the selected Home screen.
Customizing the Home Screen
The Home screens and display wallpaper are extensively customizable.
Home screen customization options
1. Open the Home screen you want to customize.
2. Tap
3. On the menu that appears, select from the following choices.
Shortcuts
Widgets
Folders
Wallpapers
Menu > Add. Or just tap and hold an empty area on the Home screen.
Shortcuts can cover such functions as Applications, Bookmark, Contact, Cricket Navigator, Direct dial, Direct
message, Directions & Navigation, Email, Gmail label, Music playlist, Music playlist and Settings.
Widgets are mini-applications for functions as Analog clock, Calendar Agenda, Calendar Month, Data On/
O , Facebook, Google Play Music, Google Search, Google+, Home screen tips, Latitude, Music, News &
Weather, Notes, NQ Mobile Security, Picture frame, Play Store, Power Control, Radio, Tra c, Tra c Manager,
TuneIn Radio, Twitter (large), Twitter (small) and YouTube.
If you create a new folder, you can drag icons into the folder to organize them. You can also select All
contacts, Bluetooth received, Contacts with phone numbers or Favorite contacts.
You can choose from your Gallery photos, Graphics, Live wallpapers or Wallpapers to change the display
background.
Moving an item on the Home screen
1. From the Home screen, tap and hold the item you want to move until it vibrates. Don’t lift your nger.
2. Drag the item to a new location on the Home screen.
AUTHORITY 20
Page 21
3. Lift your nger at the location where you want the item.
To add a shortcut to any application from the Launcher, tap Apps, tap and hold the item, then drag it o the
Launcher and onto a Home screen.
Removing an item from the Home screen
1. From the Home screen, tap and hold an item until it vibrates. Don’t lift your nger. The Dock menu changes into the .
2. Drag the item to the
.
3. When the item turns red, lift your nger.
Changing the Wallpaper of the Home screen
1. From the Home screen, tap Menu > Wallpaper. Or just tap and hold any empty area on a Home screen
>
Wallpapers.
2. Tap one of the following:
Gallery
Graphics
Live wallpapers
Wallpapers
Choose a photo from your camera gallery or memory card storage. You can crop the image before
setting it as the w
Choose image from your downloaded DRM image from Storefront app.
Choose from pre-loaded animated wallpapers. Additional live wallpapers can be downloaded from the
Pla
y Store.
Choose from the pre-loaded animated or static wallpapers. Additional wallpapers can be downloaded
fr
om the Play Store.
allpaper.
3. Tap Save or Set wallpaper.
Renaming a folder
1. Tap the folder to open it.
2. Tap and hold the title bar of the folder window.
3. Enter a new name in the dialog box that appears, and then tap OK.
AUTHORITY 21
Page 22
Essential Display Icons
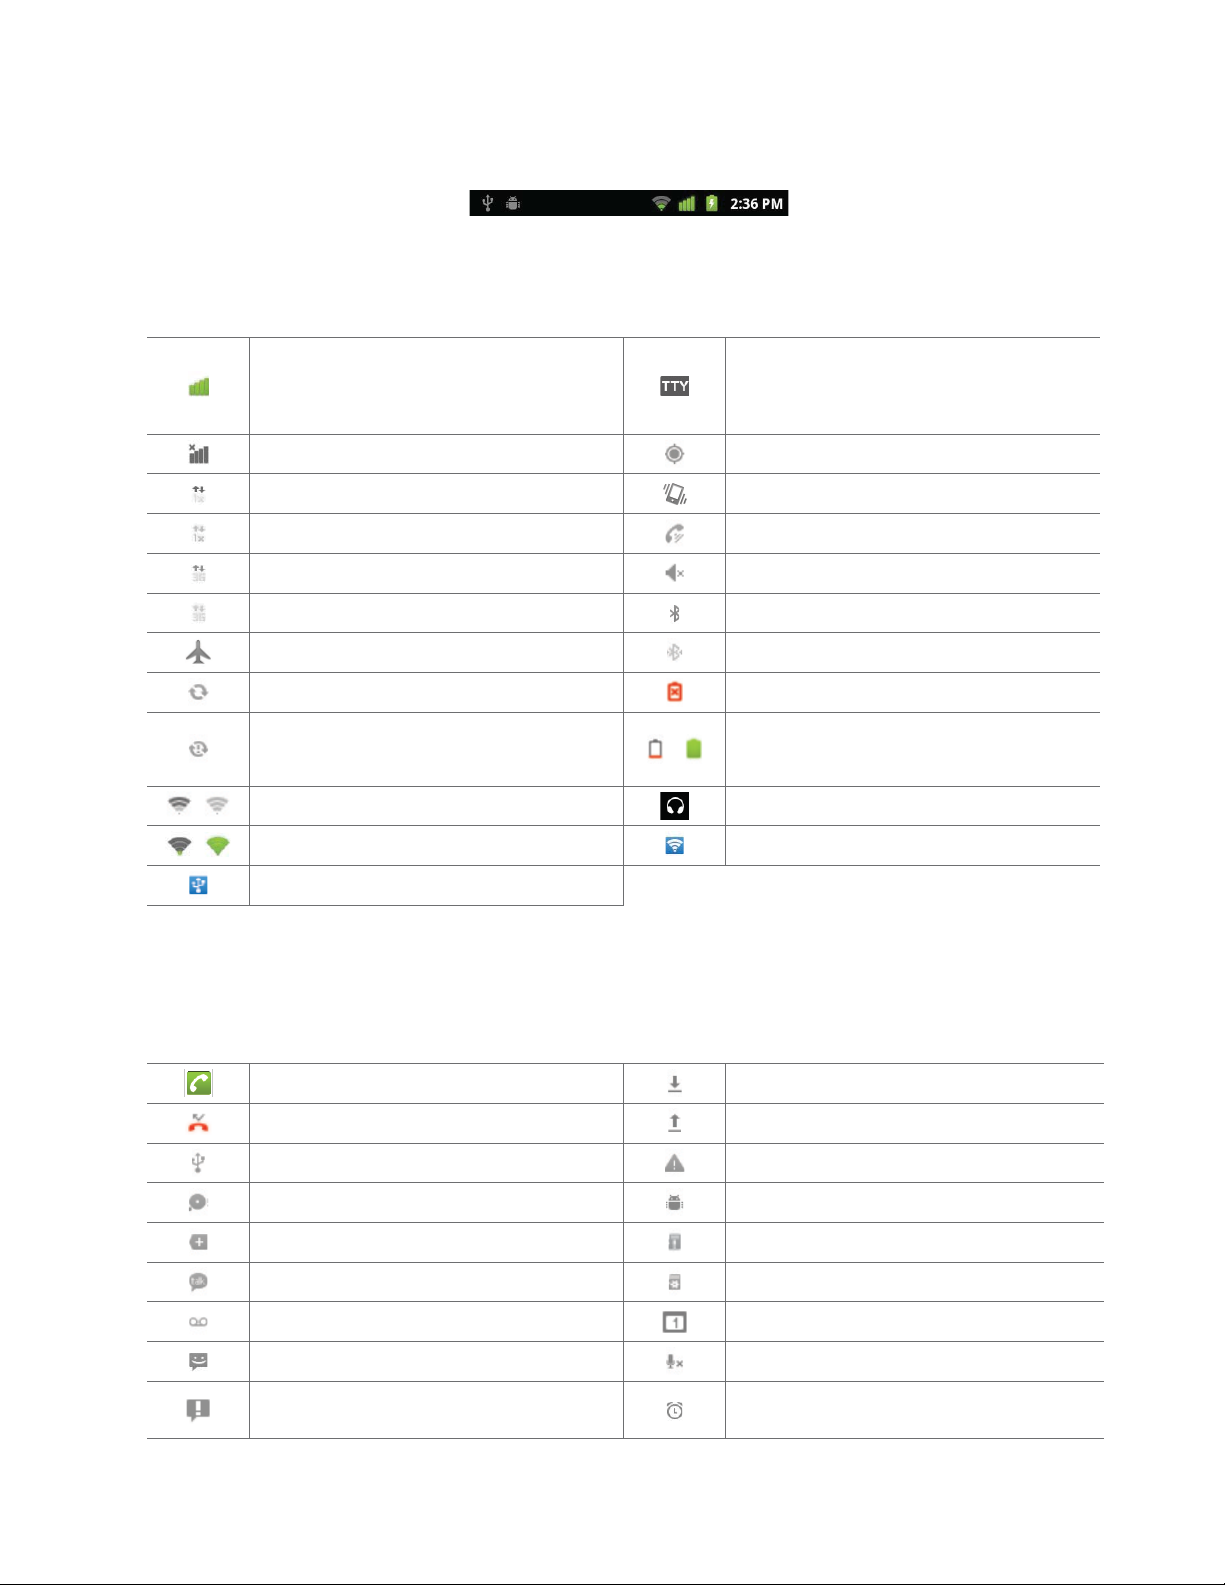
Status icons
You can tell a lot about your phone when you understand the icons in the Status bar. Here’s what each one means:
Signal strength/Basic icon is white and icon color
is changed to green when Google account is
syncronized
No signal GPS is on and active
1X CDMA connected Vibrate only mode
1X CDMA in use Speakerphone is on
EvDo connected Silent mode-no audio or vibration
EvDo in use Bluetooth is on
Airplane mode Bluetooth device connected
Data synchronizing No battery
TTY connected
Synchronization error
~
~
Wi-Fi signal strength Wired headset connected
Wi-Fi/when connected to Google service Wi-Fi hotspot connected
Tethering or USB connected
~
It indicates that battery is remaining
(Empty to full charge states)
Noti cation icons
Noti cation icons in the Status bar alert you to items that may require your attention such as new messages,
calendar event reminders, missed call noti cations, etc. Here’s what each one means:
Call in progress Downloading data
Missed call Uploading data (animated)
Connected to a computer via USB cable General Warning Icon
Storage card memory is low USB debugging connected
More (not displayed) noti cations No microSDTM card installed
New Google Talk instant message microSDTM card is being prepared
New voicemail Upcoming event
New message Microphone is muted
Problem with text or multimedia message
delivery
AUTHORITY 22
Alarm is set
Page 23
New Gmail Wi-Fi is on and wireless networks are available
Connected to or disconnected from VPN Song is playing
New Email Car mode is active
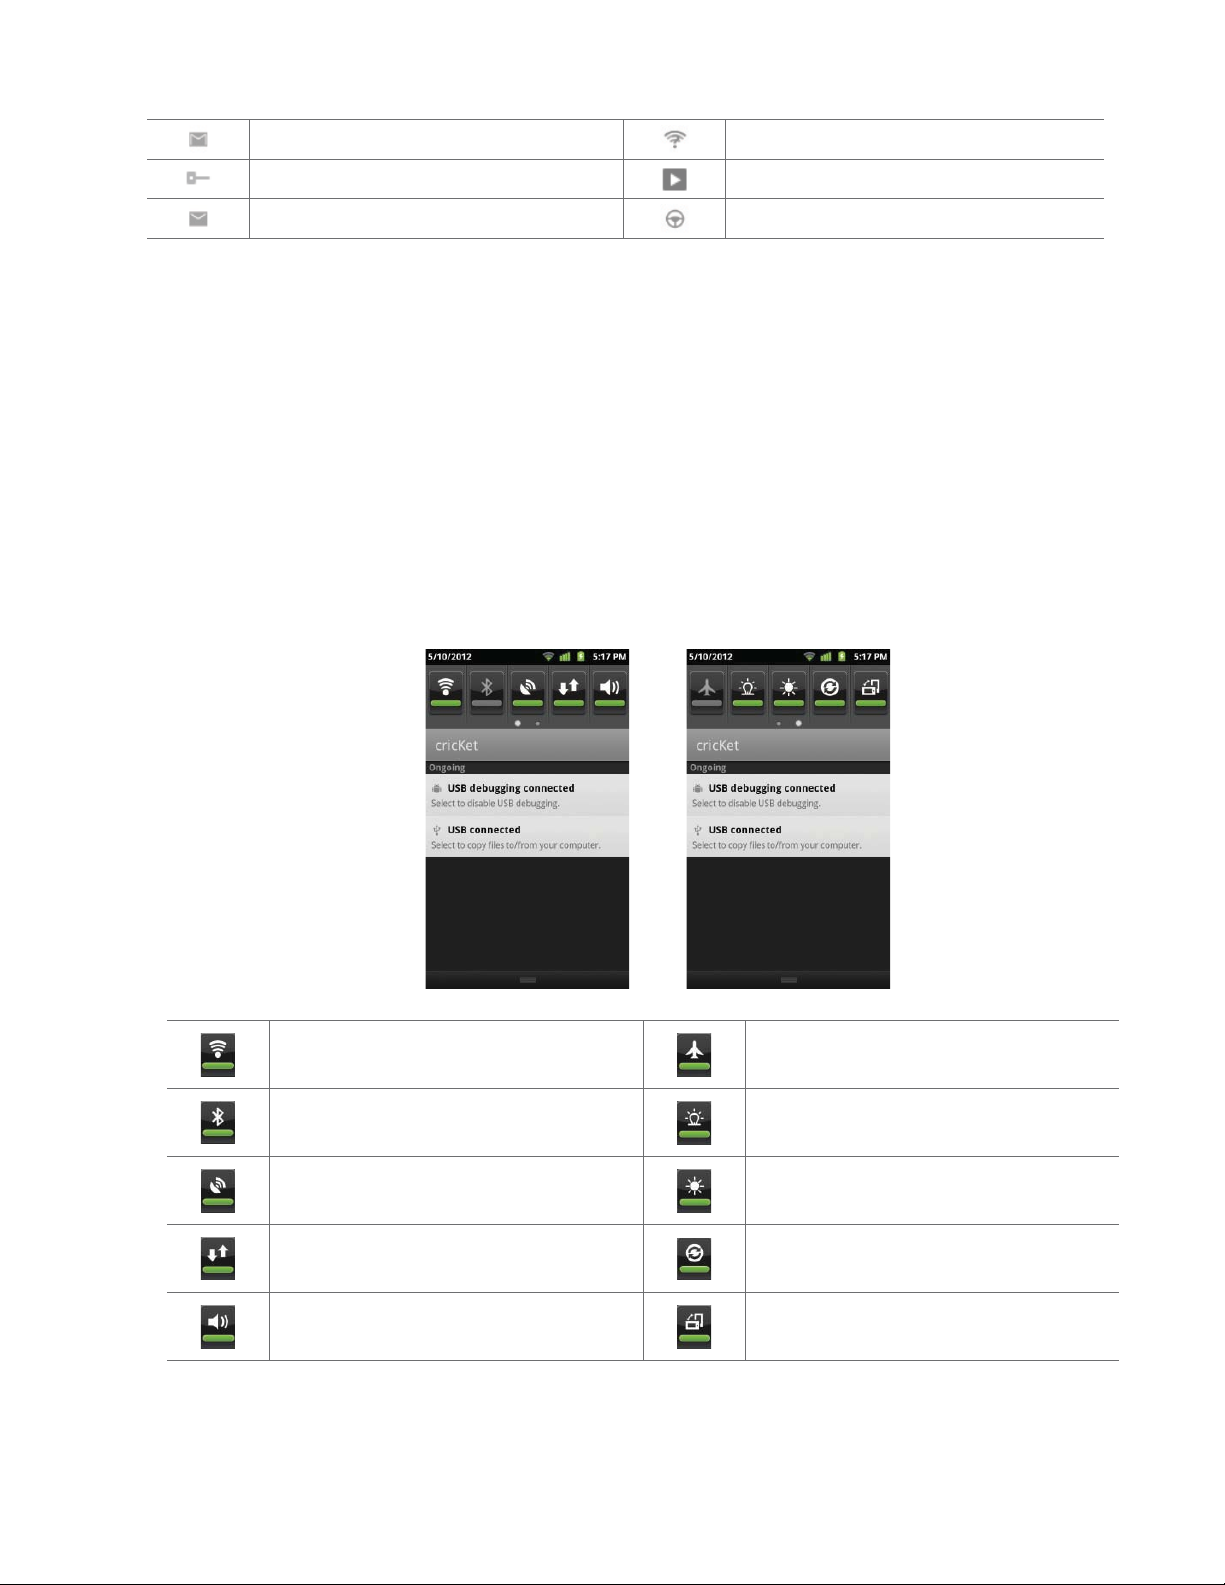
Notifications Panel
When you receive a new noti cation, an icon will be displayed in your Status bar at the top of your screen.
Viewing and responding to Noti cations
1. Tap and hold Status bar, and then slide your nger downward to open the Noti cations panel. You can set your phone such as
Wi-Fi, Bluetooth, etc. with these icons without the need to go to Settings application.
• Drag the screen to the left to see more icons.
Wi-Fi on / o .
Tap and hold it to go directly to Wi-Fi settings.
Bluetooth on / o .
Tap and hold it to go directly to Bluetooth settings.
GPS on / o . Adjust the brightness of the screen.
Data on / o .
Sound on / o .
Tap and hold it to go directly to Sound settings.
2. If you have multiple noti cations, you may need to scroll to see them all.
3. Tap a noti cation to respond to it.
• Tap
Clear to clear all Noti cations.
AUTHORITY 23
Airplane mode on / o .
Noti cation ash on / o .
Data synchronizing on / o . Tap and hold it to go
directly to Accounts & sync settings.
Landscape mode of the screen on / o .
Page 24
Closing the Noti cations panel
Drag the bottom bar of the panel up. Or just tap Back.
Opening and Switching Between Applications
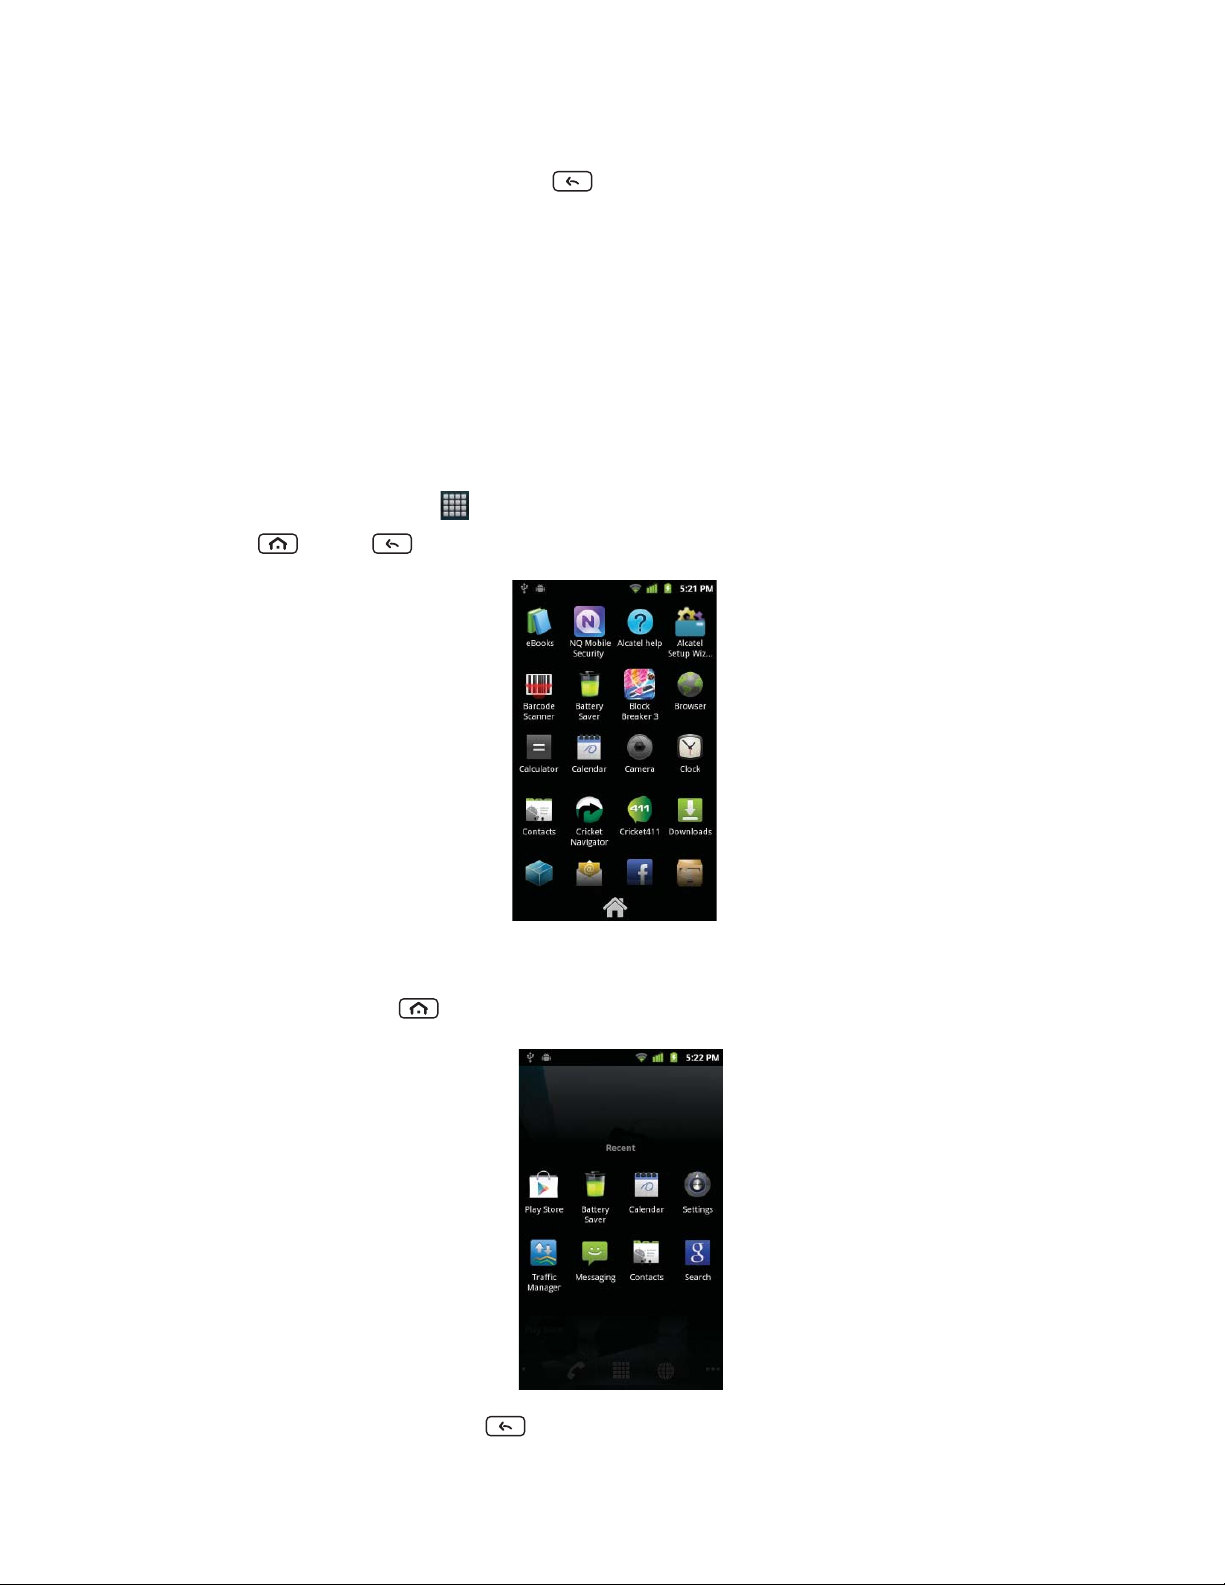
The Launcher, which you open from the Home screen, shows the icons of all installed applications on your phone.
Opening and closing the Launcher
1. To open, from the Home screen, tap Apps.
2. To close, tap
Home or Back.
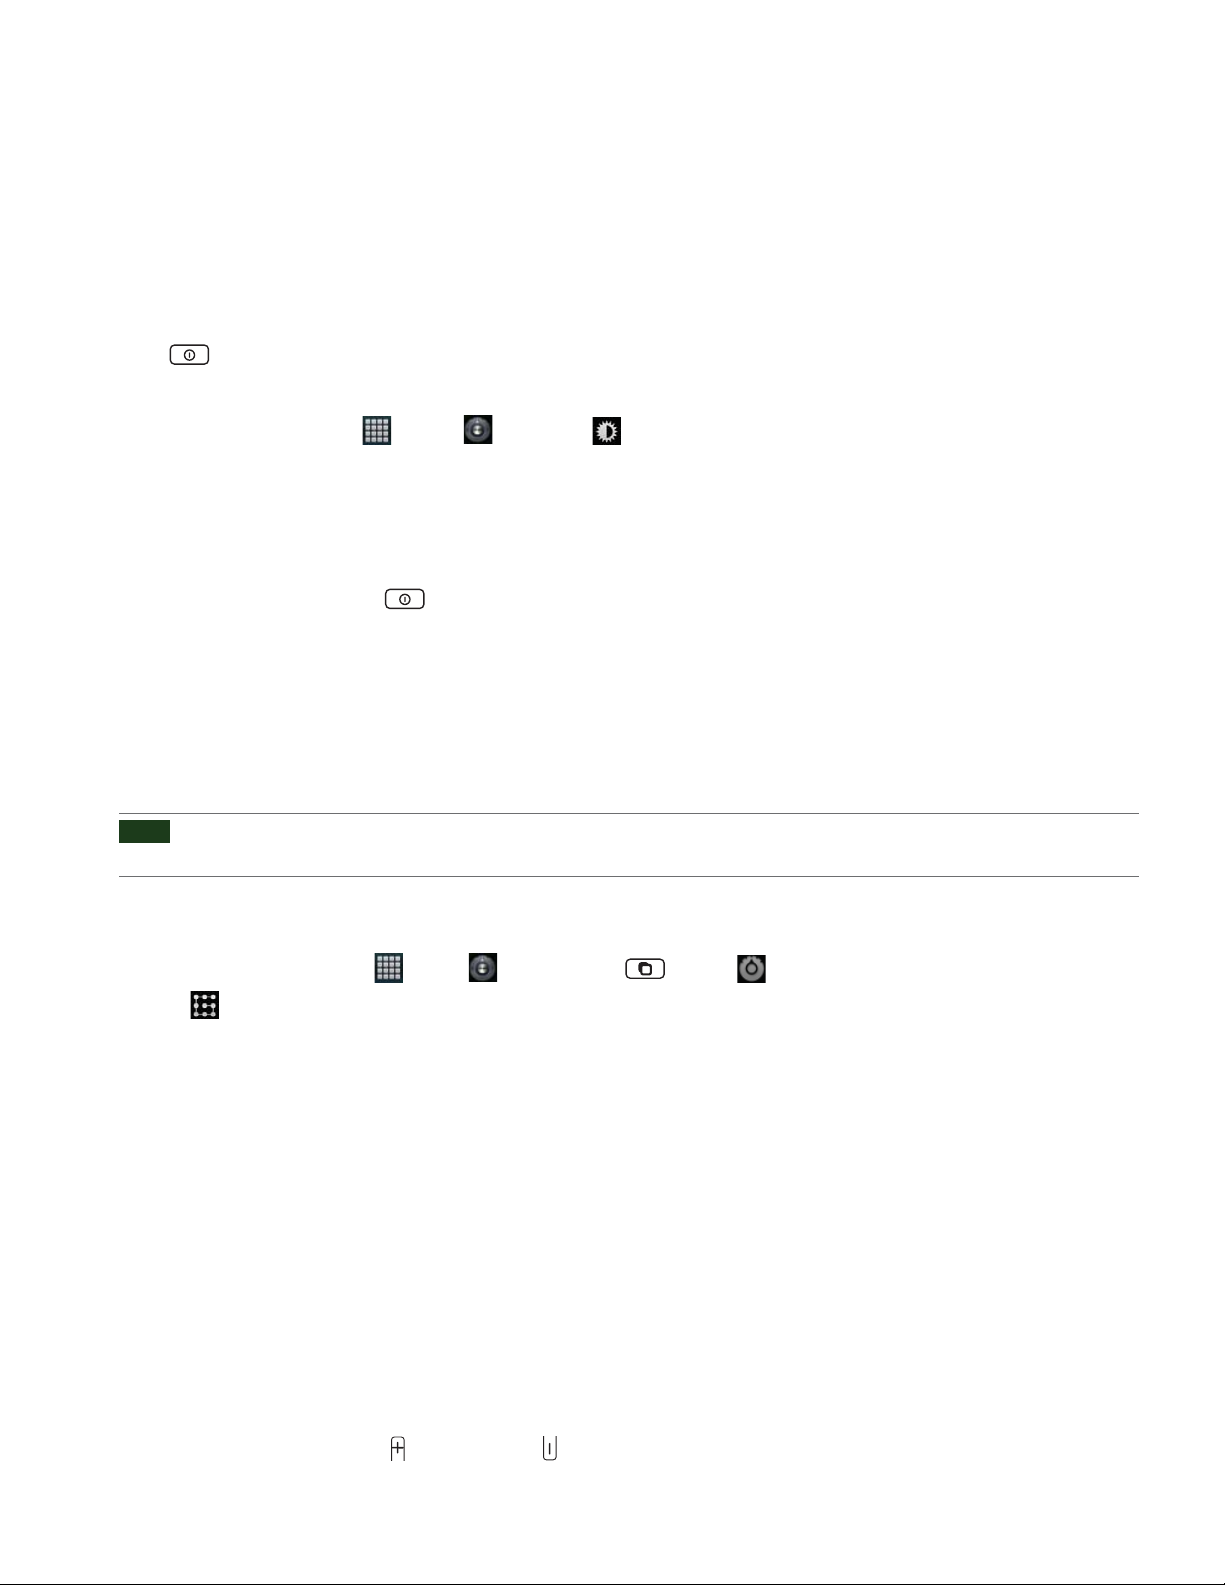
Switching to a recently used application
1. From any screen, tap and hold Home.
2. Tap an icon to open the application or tap Back to return to your previous screen.
AUTHORITY 24
Page 25
Sleep Mode
Sleep mode saves battery power by turning o your display. You will still receive messages and calls when the
display is turned o .
Switching to Sleep mode
Press Power/Lock to switch your phone to Sleep mode.
Your phone automatically turns o the display after a period of inactivity. To customize the screen timeout settings,
from the Home screen, tap
Waking up from Sleep mode
Your phone automatically wakes up when you have an incoming call.
Apps > Settings > Display > Screen timeout.
To wake it up manually, press
Power/Lock. You’ll need to unlock the screen as described below.
Unlocking the screen
On the lock screen, tap the left or right side of the screen and swipe all of the way across the screen to unlock the
screen. If you fail to unlock the screen during the third attempt, the screen will show tip for unlocking the screen.
The screen unlocks automatically when you answer an incoming call.
NOTE
If you have set up a screen unlock pattern, pin, or password, you will be asked to draw the pattern on the screen or enter the
PIN or password to access the phone software.
Activating Secure Screen Lock
1. From the Home screen, tap Apps > Settings. Or tap Menu > Settings.
2. Tap
• If you have already con gured the screen lock, tap
3. Tap
• If you select ‘
Location & security > Set up screen lock.
Change screen lock to change how to lock or unlock your screen.
Pattern, PIN, or Password. And then, enter a custom pattern, PIN or password as prompted.
None’, screen unlock security is cancelled.
Adjusting Volume
Ringtone and Media volume are independent of each other and adjusted separately.
Adjusting the ringer volume
From the Home screen, press Volume up or Volume down on the left side of the phone to adjust the ringer
AUTHORITY 25
Page 26
volume to your desired level.
• While in the lowest ringer volume level, press Volume down once to set your phone to Vibrate mode. To set your phone to
Silent mode, from the Home screen, tap
Silent mode
.
Apps > Settings > Sound > Vibrate > Select Never or Only when not in
• While in the Silent mode or Vibrate mode, press
Volume up once to switch to ringtone mode.
Adjusting the media volume
While playing music, watching a video or using preloaded or downloaded games or applications, press Volume
up or Volume down on the left panel of the phone to adjust the media volume.
Adjusting the earpiece volume for phone calls
During a phone call, press Volume up or Volume down.
Adjusting the volume via Settings menu
1. From the Home screen, tap Apps > Settings. Or tap Menu > Settings.
2. Tap
3. Drag the volume sliders left or right to adjust your phone’s Ringtone, Media, and Alarm. Your phone plays a sample tone at
NOTE
Sound > Volume.
the selected volume level while you drag the slider.
If you uncheck the option to use incoming call volume for notifications, you can set the notification ringtone volume
independently.
4. When you’re done, tap OK.
Searching Your Phone and the Web
The search key is a powerful part of the AuthorityTM’s software and enables you to quickly locate les, contacts, and
applications. You can also search the web using your favorite web search service.
1. From the Home screen, tap Search. Or tap Apps > Search.
2. Begin entering text, or tap a previously used search term.
• As you enter the text, matching items on your phone and suggestions from Google web search will appear on the screen.
3. Tap a suggestion to go directly to that result.
AUTHORITY 26
Page 27

1 Type in your search criteria.
2 Tap to search by voice.
Setting search options
1. Tap Search.
2
1
2. Tap
Menu > Search settings.
3. Tap any of the following:
Device
Search
Web Google Search Use My Location, Search on google.com, Terms of Service, Open Source Licenses.
Searchable items Opens list of searchable locations on your phone.
Clear on-device history Clear search history for on-device content and apps.
Using Voice search
1. Tap and hold Search.
Or tap the
2. Speak what you want to search for.
3. Searched words with similar pronunciations are listed. If you select a desired search result, the Google result appears with the
corresponding keyword.
• If you speak inaccurately, the desired keyword may not appear.
in the Google search box or in the Browser’s URL box.
AUTHORITY 27
Page 28

Connecting Your Phone to a Computer
Copying les to/from the microSDTM card
You can copy your music, photos, and other les to the microSDTM card of your phone.
NOTE
This option is available only when a microSDTM card is inserted into the slot of your phone. While your phone is connected to a
computer, USB Mass storage mode prevents you from using applications that access the memory card.
1. Connect your phone to your computer using the supplied USB cable.
2. Open the Noti cations panel > Tap
3. Tap
Turn on USB storage.
USB connected.
On your computer, the connected phone is recognized as a removable hard drive.
4. Navigate to the removable drive and open it.
5. Do one of the following:
TM
• Copy the les from the computer to the microSD
• Copy the les from the phone’s microSD
TM
card to a folder in your computer.
card’s root folder.
6. After copying the les, unmount the removable drive (that is, your phone) as required by your computer’s operating system to
safely remove your phone.
7. After you have unmounted the removable drive, you can disconnect the phone from the computer.
AUTHORITY 28
Page 29
Phone Calls
Making Calls
The simplest way to make a call is to dial the number directly. You can also call numbers listed in your call log or
Contacts list.
Making a call from the dialer screen
1. From the Home screen, tap Phone. Or tap Apps > Phone.
2. Tap the number you want to dial.
• If you make a mistake, tap
3. Tap
• The Calling screen is shown and the
• To change the volume during a call, press
4. To end the call, tap
.
to erase a single character. Tap and hold to erase the entire string.
appears in the Status bar while the call is active.
Volume up / Volume down.
End Call.
Making a call using dial search
1. From the Home screen, tap Phone.
2. Start typing the rst few numbers you want to dial. Matches contacts are displayed.
• Tap
3. Tap the matching contact in the list > Tap
at the right of the screen to view the matched contacts list.
.
Entering a Pause/Wait
Pause and wait options can help you dial additional numbers such as a voicemail password, or phone banking
system menus.
1. From the Home screen, tap Phone.
2. Tap the number you wish to dial > Tap
Or tap and hold
•
Add 2-sec pause : Your phone will wait for 2 seconds then continue to dial the remaining numbers automatically.
• Add wait : Your phone will wait with the message, ‘Send the following tones?’ until Send is tapped, then continue dialing
the remaining numbers.
* to enter Add 2-sec pause or tap and hold # to enter Add wait on the keypad.
Menu > Add 2-sec pause or Add wait.
AUTHORITY 29
Page 30
Making an international call
1. From the Home screen, tap Phone.
2. Tap and hold
3. Tap the country code, area code, and phone number.
4. Tap
0 until the international pre x ‘+’ appears.
.
Calling a number from the Call log
Your phone logs all incoming and outgoing calls.
1. From the Home screen, tap Phone > Call log. Or tap Apps > Contacts > Call log.
2. Tap
• Calls are listed with the most recent at the top.
• Calls to the same phone number are grouped together.
• Scroll up or down to view additional entries in the log.
• If you want to edit a number before calling, tap and hold the desired number, and then tap
at the right of any entry to dial.
Edit number before call.
Making a call from the Contact list
1. From the Home screen, tap Phone > Contacts. Or tap Apps > Contacts.
2. Scroll through the contact list.
• To nd a speci c contact, you can search by tapping
contact you’re searching for. As you type, contacts with matching names appear below the search box. Or you can use the tab
on the right hand side of the screen to scroll through the alphabetical contacts.
3. Tap the contact you want to call.
4. Tap
.
Search or tap Menu > Search. Enter the name of the
Making an emergency call
Your phone supports international emergency numbers such as 911. Emergency calling is supported anywhere
the phone has a network signal.
Making an emergency call
1. From the Home screen, tap Phone.
2. Tap the emergency number for your location. This is usually
3. Tap
4. To end the emergency call, tap
.
End Call.
Making an emergency call while the phone is locked
1. When your phone is no service status, Emergency call button is displayed on the lock screen. Tap Emergency call.
911, *911 or #911.
2. Tap the emergency number for your location. This is usually
AUTHORITY 30
911, *911 or #911.
Page 31

3. Tap .
4. To end the emergency call, tap
End Call.
Answering or Rejecting Calls
When you receive a phone call, the screen displays the caller’s name, phone number, and caller ID icon (if stored in
Contacts). When you receive a phone call from a phone number not stored in your Contacts, only the default caller
ID icon and phone number are shown.
All incoming calls are recorded in the Call log. If you miss a call, you receive a reminder noti cation.
Answering or rejecting an incoming call
1. Drag the icon to the right to answer the call. Or drag the icon to the left to reject the call.
• If you were already in a call, the rst call is placed on hold during answering the new call.
• To silence the ringer before answering the call, press either of the volume keys.
• Press
Power/Lock to reject the call or lock the screen. You can set Power button ends call on the Accessibility settings.
NOTE
The caller you reject is sent directly to your voicemail box to leave a message.
Checking missed calls
• If you miss a call, is displayed in the Status bar.
• If you open the Noti cations panel, you will see the number of missed calls. Tap the noti cation to be taken to the call log
and view detailed information.
AUTHORITY 31
Page 32

Using In-Call Options
When a call is in progress, the following options are available:
Speaker
Mute
Swap
Bluetooth
Dial Pad
Contacts
Tap
NOTE
Menu
To avoid damaging your hearing, do not hold the phone up to your ear when the speakerphone is on.
You can turn the speakerphone o by tapping the Speaker icon again.
The speaker is turned o automatically when your current call ends.
You can unmute the microphone by tapping Mute icon again.
You can switch between two calls by tapping Swap icon.
When a Bluetooth device is paired and connected to your phone, you can conduct all calls using
Bluetooth for hands-free conversation. When using Bluetooth headset during a call, the current call
screen has a blue border and the Ongoing Call icon turns blue in the Status bar.
Tap
Bluetooth icon to toggle in-call audio to and from the Bluetooth accessory.
Tap Dial Pad to enter additional numbers during your call. Tap Dial Pad icon again to close dial pad.
You can search for contacts during a call.
Tap Add call to add another call.
Merge calls to merge calls during conversation.
Tap
Using Call Log
The phone stores the numbers of all incoming and outgoing calls in the Call log. The Call log displays the details of
the call including time, date, and duration.
Opening the Call log
1. From the Home screen, tap Phone > Call log. Or tap Apps > Contacts > Call log.
• Calls are listed with the most recent at the top. Calls of the same phone number are grouped together. Scroll to view earlier
entries in the log.
NOTE
You can tap and hold the desired number in the call log list to select options such as Call, View contact, Edit number before call,
Send text message, Add to contacts, Remove from call log.
AUTHORITY 32
Page 33

1
2
5
3
4
1 Missed call.
2 Incoming call.
3 Tap to open a group of calls to the same phone number.
4 Outgoing call.
5 Tap to dial this contact.
6 Tap the number for more call details, or tap and hold the contact for more options.
Calling a number from the Call log
6
1. From the Home screen, tap Phone > Call log.
2. If you want to call a number directly, tap at the right of the entry.
Or, select a contact > Tap
• If you want to edit a number before calling, tap and hold the desired entry, and then tap
.
Edit number before call.
• When headset is plugged in your phone, you can dial the last call contact by pressing the headset’s button in the call log.
Adding a phone number from your Call log to your contacts list
1. From the Home screen, tap Phone > Call log.
2. Tap and hold the desired entry >
3. In the list of contacts that opens, tap
4. Tap
Done.
Add to contacts.
Create new contact or add to an existing contact.
Sending a text message from the Call log
1. From the Home screen, tap Phone > Call log.
2. Tap and hold the contact >
3. Enter your message and tap
Send text message.
Send.
AUTHORITY 33
Page 34

Clearing the Call log
1. From the Home screen, tap Phone > Call log.
2. Tap
• To remove just one entry from the Call log, tap and hold the entry. In the pop up menu, tap
Menu > Clear call log > OK.
Filtering the Call log
1. From the Home screen, tap Phone > Call log.
2. Tap
3. Select
Menu > Filter.
Incoming calls, Outgoing calls, Missed calls or All calls.
Viewing call statistics for your calls
1. From the Home screen, tap Phone > Call log.
2. Tap
• To reset all data, tap
Menu > Call statistics.
Menu > Reset.
Listening to Your Voicemail
Remove from call log.
Voicemail application is displayed only when phone calls are available. When you have a new voicemail message,
appears in the Status bar.
Calling your voicemail from the Dial Pad
1. From the Home screen, tap Phone.
2. Tap and hold
1 or tap 1 and then tap .
AUTHORITY 34
Page 35

Using Voice Dialer
You can use the Voice Search application or Voice Dialer application to place a phone call by speaking the name of
a contact or a phone number.
1. From the Home screen, tap Apps > Voice Dialer.
• If you have a Bluetooth headset that supports “voice-recognition” or “voice-dialing,” you may be able to open Voice Search
pressing and holding your headset’s main button and dial by voice using your headset. For details, see your headset manual.
2. The Voice Dialer opens, listens for your spoken instructions, and displays some hints for how to use it.
3. Say “Call” followed by the name of the contact to call.
• Or, follow one of the suggestions for dialing a number or controlling your phone in other ways.
by
AUTHORITY 35
Page 36

Contacts
About Contacts
Contacts give you quick and easy access to the people you want to reach. Contacts from Google accounts are also
downloaded and synced with the Contact list.
You can manage your communications with your contacts via phone, messaging, and email without the need to
jump from one app to another.
Opening Your Contacts
Open Contacts to add, view, and communicate with your friends and acquaintances.
1. From the Home screen, tap Apps > Contacts.
• All of your contacts are displayed alphabetically in a scrolling list.
• You can use the tab on the right hand side of the screen, or ick your nger up or down to scroll quickly.
Getting Started
Adding a new contact
1. From the Home screen, tap Apps > Contacts.
2. Tap
3. If you have more than one account, select an account, then enter the information for the contact.
• Tap
• Enter your contact’s information.
4. Tap
Menu > New contact.
> Select Take photo or Select photo from Gallery to add a picture.
Done.
AUTHORITY 36
Page 37

Saving a phone number from the Dial Pad
1. From the Home screen, tap Phone.
2. Enter the number > Tap
3. Tap
Create new contact or an existing contact.
4. Enter the information for the contact > Tap
Menu > Add to contacts.
Done.
Storing a contact using Call log
1. From the Home screen, tap Apps > Contacts.
2. Tap
3. Tap
4. If you have more than one account, tap the account where you want to save the contact > Enter the information for the
Call log > Tap the number you want to save > Add to contacts.
Create new contact or select an existing contact.
contact > Tap
Done.
Importing / Exporting / Sharing contacts
Importing contacts from your microSDTM card
If you have contacts stored in vCard format on the microSDTM card, you can import them into Contacts on your
phone.
1. From the Home screen, tap Apps > Contacts.
2.
Tap Menu > Import/Export.
3. Tap
Import from SD card.
4. If you have more than one account on your phone, select the desired account.
5. Tap the option to
6. Tap
OK to con rm. The contacts are imported.
Import one vCard le, Import multiple vCard les or Import all vCard les on the microSDTM card.
Exporting contacts to your microSDTM card
1. From the Home screen, tap Apps > Contacts.
2. Tap
3. Tap
4. Tap
• This process creates a le containing all your contacts with a .vcf extension on your microSD
Menu > Import/Export.
Export to SD card.
OK to con rm.
Sharing visible contacts
1. From the Home screen, tap Apps > Contacts.
2. Tap
3. Tap
Menu > Import/Export.
Share visible contacts > Select Bluetooth, Email, Gmail, Messaging or Share via barcode.
TM
card.
AUTHORITY 37
Page 38

Viewing details about a contact
1. From the Home screen, tap Apps > Contacts.
2. Tap the contact whose details you want to view.
3. Tap the communication icon to start dialing, texting, or emailing the contact.
1
1 Tap to open Quick Contact.
Add to favorites : To remove a contact from your favorites list, tap the gold star again. The star turns gray and the contact
2
is removed from your favorites list.
3 Tap to call.
4 Tap to compose a text message.
5 Tap to send an email.
6 Tap to chat.
7 Tap to view the address on Maps.
2
3
4
5
6
7
Search for a contact
1. From the Home screen, tap Apps > Contacts.
2. Start entering the contact’s name in the search box at the top of the screen.
As you type, contacts with matching names appear below the search box.
3. Tap the matching contact in the list to open.
AUTHORITY 38
Page 39

Editing/Deleting Contacts
Editing contact details
1. From the Home screen, tap Apps > Contacts.
2. Tap and hold the contact you want to edit > Tap
3. Edit the contact information.
4. Tap
Done.
Edit contact.
Setting a contact’s default phone number/email
Setting a contact’s default phone number
The default phone number is used when you initiate a call or text message by tapping and holding a contact.
1. From the Home screen, tap Apps > Contacts.
2. Find the desired contact > Tap and hold the phone number to designate it as the default phone number.
3. Tap
Make default number.
• The default phone number is indicated with a checkmark.
Setting a contact’s default email
The default email is used when you send an email from the list by tapping and holding a contact.
1. From the Home screen, tap Apps > Contacts.
2. Find the desired contact > Tap and hold the email address to designate it as the default email address.
3. Tap
Make default email.
• The default email is indicated with a checkmark.
Setting a ringtone for a contact
1. From the Home screen, tap Apps > Contacts.
2. Tap the desired contact.
3. Tap
• Tap a ringtone from the list to play when the contact calls. A sample of the ringtone is played.
4. Tap
Menu > Options > Ringtone.
OK.
Adding a contact to your favorites
1. From the Home screen, tap Apps > Contacts.
2. Tap and hold the desired contact >
• To remove a contact from your favorites list, tap and hold the contact >
Add to favorites.
Remove from favorites.
AUTHORITY 39
Page 40

Joining contacts
1. From the Home screen, tap Apps > Contacts.
2. Tap the contact you want to save. The others will merge into this le. This is the contact you will see in contacts after joining.
3. Tap
4. Tap the contact you want to join with the rst contact. The information from the second contact is added to the rst contact,
and the second contact is hidden.
Menu > Edit contact > Tap Menu > Join.
Separating contacts
1. From the Home screen, tap Apps > Contacts.
2. Tap the contact you want to separate.
3. Tap
4. The contact information is split into separate contacts.
Menu > Edit contact > Tap Menu > Separate > OK.
Deleting a contact
1. From the Home screen, tap Apps > Contacts.
2. Tap and hold the contact you want to delete >
Or tap the contact you want to delete > Tap
• Tap Menu > More > Delete contact > Check or uncheck the contacts you want to delete > Done.
3. Tap
OK.
Delete contact.
Menu > Delete contact.
Communicating
Sending text message
1. From the Home screen, tap Apps > Contacts.
2. Tap and hold the contact you want to send >
• The Primary Phone Number is used, or you are prompted to choose a phone number.
Making calls
1. From the Home screen, tap Apps > Contacts.
2. Tap and hold the contact you want to call >
• The Primary Phone Number is used, or you are prompted to choose a phone number.
Text contact.
Call contact.
AUTHORITY 40
Page 41

Map of contacts
1. From the Home screen, tap Apps > Contacts.
2. Tap the desired contact > Tap the
3. Select
Cricket Navigator or Maps > The mapping application will be opened.
place icon of the address.
Connecting by using Quick Contact
1. From the Home screen, tap Apps > Contacts.
2. Tap the icon or photo next to your desired contact > Tap the desired communication method.
• Only the icons relevant to your contact’s data are displayed.
• If there are too many icons to t on the screen, drag to the left or right to select an icon.
AUTHORITY 41
Page 42

Account Setting
Working with Google accounts
1. From the Home screen, tap Apps > Contacts.
2.
Tap Menu > Accounts.
• After registering your Google account, your online Google contacts are synchronized to your phone. Changes made online or
on the phone are automatically synchronized and updated in both locations. This address book will be used throughout the
user interface.
• If you register two or more accounts, you can merge address books from the multiple accounts into one address book.
Contact List Display Options
1. From the Home screen, tap Apps > Contacts.
2. Tap
• Only contacts with phones: Only contacts with phone numbers are shown in the contacts list.
• Sort list by: Select
• View contact names as: Select
• Choose contacts to display: Tap an account to open its list of groups. Check or uncheck the groups you want to display in the
contact list.
3. Tap
Menu > Display options.
First name or Last name.
First name rst or Last name rst.
Done.
AUTHORITY 42
Page 43

Groups
Assign contacts to groups to easily send a message or email to a whole group. You can also sync groups on your
phone with your Google groups, which are accessible via the web browser of your computer.
Viewing contact groups
1. From the Home screen, tap Apps > Contacts.
2. Tap
Group > Select the account you want.
3. Tap the group you want to view.
Creating a new group
1. From the Home screen, tap Apps > Contacts.
2. Tap
Group > Select the account you want.
3. Tap
4. Enter a name for the group > Tap
5. Select the contacts you want to add to the group > Tap
Menu > New group.
Done.
Done.
Adding a contact to an existing group
1. From the Home screen, tap Apps > Contacts.
2. Tap and hold a contact you want to edit > Tap
3. Select or deselect groups using the checkboxes.
4. Tap
OK.
Group.
Adding contacts to the group on the group list
1. From the Home screen, tap Apps > Contacts.
2. Tap
Group > Select the account you want.
3. Tap the group you want to select.
4. Tap
5. Add or remove group contacts by checking or un-checking the boxes.
Menu > Add member.
Done.
6. Tap
Sending a group message
NOTE
Group messages are billed according to the number of messages sent to each individual group member. Meaning a single
message sent to a group of 5 people will be billed as 5 messages.
1. From the Home screen, tap Apps > Contacts.
2. Tap
Group > Select the account you want.
AUTHORITY 43
Page 44

3. Tap the desired group > Tap Menu > Send group message.
Or, tap and hold the group you want >
Send group message.
4. Select recipients > Tap
Done.
• The list is shown with only contacts with phone numbers of the group. Select members to whom you want to send a
message.
• The top checkbox is used for selecting or deselecting all group members at once.
• If more than 40 recipients are selected, the outgoing messages will be batched in groups of 40.
5. Compose the message and tap
Send.
Renaming a group
1. From the Home screen, tap Apps > Contacts.
2. Tap
Group > Select the account you want.
3. Tap the group you want to rename > Tap
Or tap and hold the group you want to rename >
4. Enter a name for the group > Tap
Done.
Menu > Rename group.
Rename group.
• The renamed group list is shown as part of the group list.
Deleting a group
1. From the Home screen, tap Apps > Contacts.
2. Tap
Group > Select the account you want.
3. Tap the group you want to delete > Tap
Or tap and hold the group you want to delete >
Menu > Delete group > OK.
Delete group > OK.
• Deleting a group does not delete the contacts contained within the group.
NOTE
You can only delete groups you have created.
AUTHORITY 44
Page 45

Messaging
About Messaging
Use Messaging to send text messages (SMS) and multimedia messages (MMS) to other mobile phones and email
addresses.
1. From the Home screen, tap Apps > Messaging.
On the Messaging screen, your sent and received messages are neatly grouped into conversations, by contact
names or phone number. You can:
• Scroll up or down the list of conversations by icking your nger on the screen.
• Tap a contact name or number to view the conversation history.
• Tap the photo or
to open additional menu options.
Sending Messages
Sending a Text Message
NOTE
Depending on your billing plan, if you exceed the single text message character limit, you will be billed for multiple messages.
1. From the Home screen, tap Apps > Messaging.
2. Tap
New message. Or tap Menu > Compose.
3. Enter the phone number in the
• Enter the rst few letters of a contact name or phone number. Matching contacts are displayed. Continue typing or tap a
name or phone number from the search results.
• Tap
4. Tap
> Select message recipients from your contact list > OK.
Type to compose > Enter your message.
To eld. Fill in one or more recipients. You can:
• Tap
Menu to see more options.
Add subject
Attach
Send
Add subject.
Attach Media Files or a Slideshow within the message.
Send your message.
AUTHORITY 45
Page 46

Insert smiley
Insert a smiley in the message.
Discard
All threads
Delete the message in progress.
Go back to text messaging inbox.
5. Tap Send.
• Tap
NOTE
Your text message automatically becomes a multimedia message on below condition:
Back to save the message as a draft.
• Compose a message over 160 characters
• Add subject
• Attach an item
Sending a multimedia message (MMS)
To compose a multimedia message, start by creating a new text message. Then simply add an attachment.
1. From the Home screen, tap Apps > Messaging.
2. Tap
New message. Or tap Menu > Compose.
3. Enter the phone number in the
4. Tap
Type to compose > Enter your message.
5. Tap
Menu > Attach > Choose the type of attachment.
To eld. Or select recipients from the contact list.
Pictures
Capture picture
Videos
Capture video
Audio
Record audio
Slideshow
vCard
Select a photo.
Capture a new photo.
Select a video.
Record a new video.
Select an audio le.
Record a new audio le.
Create a slideshow from up to 10 of your photos.
Select a contact card.
6. From the message body, tap:
•
View: To view the attached item.
•
Replace: To change attached les.
• Remove: To remove attached les.
7. Tap
Send MMS.
• Tap
Back to save it as a draft.
Resuming a draft message
1. From the Home screen, tap Apps > Messaging.
2. Tap the message indicated by “
Draft” to resume editing.
AUTHORITY 46
Page 47

3. When you nish editing, tap Send.
Reading Messages
1. From the Home screen, tap Apps > Messaging.
2. Tap a message thread.
3. Tap and hold an individual message to see more options.
Lock/Unlock message To lock/unlock a message.
Call *** To call the message sender. (Only on incoming messages)
Add *** to Contacts To save the phone number or email address to Contacts. (Only on incoming messages)
Forward To forward a message. Enter a recipient, edit the content of the message as needed > Tap Send.
Copy message text To copy text from a message.
View message details To view details about a message.
Delete message To delete a message.
Deleting a message thread
1. From the Home screen, tap Apps > Messaging.
2. Tap and hold the message thread >
• If you want delete all message threads, tap
3. Tap
Delete.
Delete thread.
Menu > Delete threads.
Searching messages
1. From the Home screen, tap Apps > Messaging.
2. Tap
Menu > Search or tap Search.
3. Enter the search term > Tap
.
Replying to a message
1. From the Home screen, tap Apps > Messaging.
2. Tap the received message > Tap
3. Tap
Send.
Type to compose > Enter your message.
AUTHORITY 47
Page 48

Receiving Emergency Alerts Messages
Emergency Alerts service allows you to receive automatic alerts in times of crisis. (e.g., earthquake, hurricanes, etc.)
Wireless Emergency Alerts (WEA), also known as CMAS, is a part of a national alerting system called
IPAWS (Integrated Public Alert and Warning System) that enables emergency management o cials to
rapidly disseminate the warnings and safety information via text alerts to wireless phones based on the
phones’ geographic location, The Federal Emergency Management Agency or FEMA is responsible for
receiving the alerting information and forwarding the alerts to participating wireless carriers such as
Cricket. Such alerts may come from the President of the United States; the National Weather Service, state
or county public safety o cials. This system is integrated into the same national alerting services that
serve television and radio today. For more information regarding WEA/CMAS please go to: FEMA website.
http://www.fema.gov/emergency/ipaws/projects.shtm#6
Receiving Emergency Alerts Messages
1. From the Home screen, tap Apps > Messaging.
2. Tap Emergency alerts message you want to view.
Emergency alert messages are indicated with
Emergency alert icon.
• If Emergency alert arrives on your phone during a call,
Emergency alert icon ashes. If non-Presidential, Emergency alert icon is static icon.
• ONLY the Presidential Emergency Alert icon is displayed under the Time/Date on the unlock/lock screen.
• If you are on a Emergency alert message screen in the Messaging application, the following options are removed or disabled :
Reply, Forward, and Call.
• If you have power cycled your phone and a Presidential Emergency Alert has NOT been viewed, the Presidential Emergency
Alert icon will continue to ash when the device is powered on again.
is displayed in the Status bar. If Presidential Emergency Alert,
AUTHORITY 48
Page 49

Changing Messaging Settings
1. From the Home screen, tap Apps > Messaging.
2. Tap
Menu > Settings.
Storage settings
Delete old messages Check to delete older messages in a thread when messaging memory or thread limits are reached.
Uncheck to keep all messages. You may need to manually delete messages if the messaging memory
limit is reached.
Text message limit Tap to set the number of messages to save per message thread. When the limit is reached, older text
messages are deleted if ‘Delete old messages’ is checked.
Multimedia message limit Tap to set the number of multimedia messages to save per message thread. When the limit is reached,
older multimedia messages are deleted if ‘Delete old messages’ is checked.
Text message (SMS) settings
Delivery reports Check to request a delivery report for each message you send.
Multimedia message (MMS) settings
Delivery reports Check to request a delivery report for each message you send.
Auto-retrieve Uncheck to download only the heading of multimedia messages. You will need to tap the MMS message
heading and manually download each MMS message.
Roaming auto-retrieve Check to retrieve messages automatically while roaming.
Noti cation settings
Noti cations Check to be noti ed in Status bar whenever you receive a new message.
Select ringtone Select a ringtone to sound when you receive new message noti cations.
Vibrate Set the phone to vibrate every time you receive a new message noti cation, only when silent mode, or
never.
Signature
Enable Signature Check to enable signature.
Signature Text Enter a signature to append to outgoing messages.
Receive Emergency Alerts
Received Alerts Set to receive Extreme, Severe or Amber Emergency Alerts.
Alert Reminder Select Once, Every 2 minutes or Every 15 minutes.
Vibrate Check to vibrate when noti ed.
AUTHORITY 49
Page 50

Google
Gmail
Opening your Inbox and Reading your Gmail
The inbox is your default Gmail view. All your received emails are delivered to your inbox.
1. From the Home screen, tap Apps > Gmail.
2. Tap the email you want to read.
• Tap
• If the sender is a friend in Google Talk, you can see your friend’s online status.
• Tap
• Tap
• Tap
• Tap
to star the email.
Archive to archive the message.
Delete to delete the message from your inbox.
or to see the previous or next message in the list.
Menu to see more options( Change labels, Mark read/Mark unread, Mark important/Not important,
Go to inbox, Mute, More(Add star/Remove star, Report spam, Settings, Help, Select text)).
Replying to or forwarding an email message
1. From the Home screen, tap Apps > Gmail.
2. When reading a message,
• To reply to the sender, tap
• To reply to all message recipients, tap
• To forward the message, tap > .
.
> .
AUTHORITY 50
Page 51

Sending a new email
1. From the Home screen, tap Apps > Gmail.
2. From any message list, tap
3. Enter a name or address in the
4. Enter a subject in the
5. Type the message text in the
• To attach an image le, tap
6. Tap
• To save the message as a draft, Tap or tap Menu > Save draft.
or tap Menu > Send.
Subject eld.
Menu > Compose.
To eld. To send the email to several recipients, separate each email address with a comma.
Compose Mail eld.
Menu > Attach > Select the picture you want to attach.
Working with Multiple Email Messages
You can archive, delete or label groups of email messages at the same time.
1. From the Home screen, tap Apps > Gmail.
2. From any message list,
• Tap
Archive to move messages out of your inbox without deleting. Archived emails are assigned the All Mail label.
• Tap
Delete to delete selected messages.
• Tap
Labels > Select the labels that you want to assign > Tap OK.
check the box next to the email messages you want to work with.
• Or tap
Report spam, Mute, More(Deselect all, Help, About).
Menu > To Add star/Remove star, Mark read/Mark unread, Mark important/Not important,
Switching between Google accounts
If you have set up two or more Google accounts on your phone, you can switch between them in Gmail.
Gmail displays only one Google account at a time. The current account is shown at the top right of any message
list.
1. From the Home screen, tap Apps > Gmail.
2. From any message list, tap
3. Tap the account that you want to view. You can also tap the account name at the top of the screen to see a list of your
accounts.
Menu > Accounts.
AUTHORITY 51
Page 52

Searching for email messages
All elds of your email messages are searchable.
Search will include all your Gmail Messages, not just those that synchronized to your phone.
1. From the Home screen, tap Apps > Gmail.
2. From any message list, tap
3. Enter a search term >
• Your previous searches are shown below the search box.
Menu > Search or tap Search.
Tap .
Labeling email messages
You can organize your emails by label. Gmail has preset labels. Or you can create your own labels in Gmail when
viewed on a computer. (Note: Custom label colors created on the web are not supported on your phone.)
Labeling an email
1. From the Home screen, tap Apps > Gmail.
2. When reading a message, tap
3. Select a label > Tap
OK.
Menu > Change labels.
Viewing emails by label
1. From the Home screen, tap Apps > Gmail.
2. From any message list, tap
3. Tap a label to view matching email messages.
Menu > Go to labels.
Starring/un-starring an email message
You can star an important email to make it easy to nd again. Starred emails are assigned the Starred labels.
1. From the Home screen, tap Apps > Gmail.
2. From any message list,
• Tap
• Tap
NOTE
to star a message.
to un-star a message.
Google services (Gmail, Google Talk, etc.) are a data-intensive feature. Cricket recommends that you upgrade to an unlimited
data plan to avoid additional data charges.
AUTHORITY 52
Page 53

Google Talk
Use Google Talk to send instant messages to other Google Talk users anywhere they are logged in.
Signing in or out of Talk
Opening Talk and Signing in
1. From the Home screen, tap Apps > Talk.
When you rst open Talk, your friends list is displayed.
NOTE: When you rst turn on your phone and sign in to your Google account, you are automatically signed in to
Google Talk. You will remain signed in, even while you’re using other applications, until you deliberately sign out.
Talk syncs data only from the rst Google account you added to your phone.
Signing out of Talk
1. From the Talk friends list, tap Menu > Sign out.
Updating Your Online Status, Pro le Picture, and Status Message
1. From the Home screen, tap Apps > Talk.
2. Tap your name at the top of the Talk friends list.
• Tap your picture
• Tap the online status
• Enter a new status message.
3. Tap
Done.
Your picture, online status, and message will be updated anywhere your Talk status is displayed.
> Remove to delete the image or Change to select another picture from your microSDTM card.
bar > Select your online status: Available, Busy, or Invisible.
Adding and managing friends list
Online Status Indicators
Available
Away O ine
Monitoring online status
The Talk friends list is sorted by online status: active chats, online, away, busy, and o ine. Within each status group,
friends are listed alphabetically.
Busy
Icons in Google Talk, Gmail, Maps, and other applications indicate Talk status.
Adding a friend to your friends list
1. From the Home screen, tap Apps > Talk.
AUTHORITY 53
Page 54

2. Tap Menu > Add friend.
3. Enter a Google Talk ID or a Gmail address
When your friend accepts the invitation, the friend is added to your Talk contacts list.
To view a list of pending invitations to friends, tap
> Send invitation.
Menu > More > Invites.
Accepting chat invitations
When you are added to a friend’s Talk contact list, you will receive a noti cation and an invitation appears in your
friends list.
1. From the Home screen, tap Apps > Talk.
2. From the Talk friends list, tap
• Tap
Accept to accept the invitation. The friend is added to your friend list.
• Tap
Cancel if you don’t want to chat or share your Talk status with the sender.
• Tap
Block to block and add the sender to your blocked users list.
Chat invitation.
Viewing all friends or most popular friends
1. From the Home screen, tap Apps > Talk.
• Tap
Menu > All friends to view all your friends.
• When viewing all friends, tap Menu > Most popular to view only friends that you often chat with.
Managing a friend
1. From the Home screen, tap Apps > Talk.
2. Tap and hold a friend’s name to see more options (
View contact, Always show friend/Auto show friend, Hide friend).
NOTE
Block friend: This option will block a user from sending you messages and add the user to your blocked friends list.
Always show friend: This setting will add the friend to your Most popular list. To remove a friend from the Most popular list, tap
and hold the friend’s name then tap Auto show friend.
Start chat/Go to chat/End chat, Friend info, Block friend, Remove friend,
Chatting with friends
Chatting with a friend
1. From the Home screen, tap Apps > Talk.
2. Tap an online friend.
3. Enter your message in the text box >
Accepting an invitation to chat
When a friend sends you a Talk message, you receive a noti cation. There are 2 ways to respond:
Send.
• On your friends list, tap the friend who sent you the chat invitation or
• Open the noti cations panel and tap the chat noti cation.
AUTHORITY 54
Page 55

Adding another friend to your chat
1. When you’re chatting with a friend, tap Menu > Add to chat.
2. Tap a friend to invite.
This will start a new group chat for all parties. Only those who accept the new chat invitation will be joined to the
group chat.
Switching between active chats
You can switch between multiple active chats.
1. When you’re chatting with a friend,
• Tap
Menu > Switch chats > Tap the desired active chat.
• Or swipe left or right across the screen to switch between chats.
On the record or o the record your chats
You can make your chats on the record or o the record.
1. When you’re chatting with a friend, tap Menu > Chat on record.
• Or tap Menu > Chat o record to make your chats o the record.
Ending your current chat
1. From the Home screen, tap Apps > Talk.
2. From any chat window, tap
Menu > End chat.
Talk settings
1. From the Home screen, tap Apps > Talk.
2. Tap
General settings Automatically sign in Automatically sign in to Google Talk when you turn your phone on.
Noti cation settings IM noti cations Show a noti cation icon in Status bar when you have a new message.
About Terms & privacy Read detailed Google Talk legal Terms and privacy statements.
Menu > Settings.
Mobile indicator When selected, your status will indicate you are using Google Talk on your mobile
phone.
Automatic away-status Set your status to away when your phone’s display is o .
Clear search history Clear previous Google Talk chat searches from showing up in the Search box.
Select ringtone Select the Google Talk noti cation ringtone.
Vibrate Set to vibrate the phone when a new Google Talk message arrives.
Invitation noti cations Notify in Status bar when friend invitations are received.
AUTHORITY 55
Page 56

Google+
With Google+, you can not only share your thoughts and location but also upload your photos or videos.
1. From the Home screen, tap Apps > Google+.
2. Tap the category you want;
• Tap
• Tap
• Tap
• Tap
• Tap Menu > Send feedback to submit your feedback.
• Tap
• Tap
• Tap
• Tap Menu > Terms of service to view Google terms of service.
to search for posts.
to create a post.
to view noti cations.
Menu > Settings to set Google+.
Menu > Sign out to sign out.
Menu > Help to get help and details on how to use Google+.
Menu > Privacy policy to view Google service privacy policy.
Stream, Messenger, Photos, Pro le or Circles.
Messenger
With Messenger application, you can chat with your friends directly.
1. From the Home screen, tap Apps > Messenger.
2. Tap
• Tap
• Tap
• Tap
• Tap
to start conversation with friends.
to go to Google+ screen.
Menu > Settings to set Messenger noti cations or photo settings.
Menu > Send feedback to submit your feedback.
Menu > Help to get help and details on how to use Messenger.
AUTHORITY 56
Page 57

Maps
Use Maps to nd your current location and get directions. You can search for addresses, landmarks and businesses
directly on a street map or satellite image.
NOTE
You need an active mobile data or Wi-Fi connection to use Maps.
To see your location and get directions, you must turn on location services. From the Home screen, tap Apps > Settings
> Location & security. Select one or both from Use wireless networks or Use GPS satellites.
Maps may not be available for all locations.
Opening and viewing Maps
Viewing your location
1. From the Home screen, tap Apps > Maps.
2. Tap
.
shows your location on the map and points north for your reference.
Using Maps
1. From the Home screen, tap Apps > Maps.
2. While viewing a map, swipe to any direction on the screen.
Zooming in and out of a map
1. From the Home screen, tap Apps > Maps.
2. To Zoom In/Out of a map,
• Tap
• Tap
or double-tap on the map to zoom in.
to zoom out.
Viewing a map in Compass mode
1. From the Home screen, tap Apps > Maps.
2. To view a map in compass mode, tap
• The
3. Tap
icon will turn into icon.
.
.
• The map will orient itself in the direction you’re facing and shift from an overhead view to a more angled view.
• To exit Compass mode, tap
.
Viewing location details
Viewing information for a location
1. From the Home screen, tap Apps > Maps.
2. While viewing a map, tap and hold a location, starred place, or a search result on the map.
• A balloon opens over the location, with summary information.
AUTHORITY 57
Page 58

3. Tap the balloon to see the address or more information.
Starring or un-starring a location
Add a Star to bookmark and easily return to a map location.
1. While viewing detail information for a location,
• Tap
• Tap
to star the location.
to un-star the location.
Viewing a location in Street view
Street view mode provides a street-level view of the location. Street view may not be available for all areas.
1. From the Home screen, tap Apps > Maps.
2. While viewing detailed information for a location, tap
• To view surrounding areas, swipe the screen in any direction.
.
Searching for a location
You can search Google Maps for speci c locations, company names, or business types.
1. From the Home screen, tap Apps > Maps.
2. Tap
Menu > Search or tap Search to open the Search Maps.
3. Enter the search criteria. As you type, suggested matches from your contacts, the web, and previously searched items are
displayed.
• Tap
to search or
• Tap a suggested search term.
4. The search results are displayed as
• Tap markers and titles to view more information.
• Tap
to show the search results as a list > Tap each item to see more information.
markers with letter labels on the map.
Viewing map layers
Initially, Google Maps opens with a street map. You can view additional map layers, such as satellite images and
tra c information. You can also view custom Web created Google Maps.
1. From the Home screen, tap Apps > Maps.
. A dialog opens with a list of layers.
2. Tap
3. Turn layers on or o by tapping the layer name. A check mark indicates the layer is selected.
• Tap
Clear Map to deselect all layers.
Layers may change the map entirely or overlay additional information. Tap icons or interactive items to explore di erent
layer types.
AUTHORITY 58
Page 59

Getting directions
1. From the Home screen, tap Apps > Maps.
2. Tap
Menu > Directions.
3. Use your current location as the starting point, or enter a location in the
Or tap
4. Enter your destination in the
to select an address from your contacts, a point that you tap on a map, or My Places.
End point eld. Or tap to select an address from your contacts, a point that you tap on the
map, or My Places.
5. Tap
or or to select your transportation method > Tap Get directions.
Places
Use Google Places to explore your current location.
NOTE
You need an active mobile data or Wi-Fi connection to use Places.
To see your location and get directions, you must turn on location services. From the Home screen, tap
> Location & security. Select one or both from Use wireless networks or Use GPS satellites.
Maps may not be available for all locations.
Searching
Start point eld.
Apps > Settings
1. From the Home screen, tap Apps > Places.
2. Tap the place category you want to search.
• To add a search category, tap
Menu > Add a search.
3. The search results display in a list, with their approximate distance and direction.
• Tap
to see your results on a map.
• Tap a place to view more information.
Navigation
Navigation is an internet-connected GPS navigation system with voice guidance.
Navigation provides both spoken and on-screen turn-by-turn driving directions.
NOTE
You need an active mobile data or Wi-Fi connection to use Navigation.
To see your location and get directions, you must turn on location services. From the Home screen, tap
> Location & security. Select one or both from Use wireless networks or Use GPS satellites.
Maps may not be available for all locations.
Apps > Settings
AUTHORITY 59
Page 60

Opening & Using Navigation
There are many ways to view the map and travel progress while in Navigation mode. See the Changing Views
section below for more information.
Navigating with Turn by Turn Directions
1. From the Home screen, tap Apps > Navigation or tap when viewing driving directions in Google Maps.
2. Customize your navigation settings for highways or tolls by tapping
• Tap
3. From the list of destination options,
• Tap
• Tap Type destination to enter the destination.
• Tap
• Tap
• Tap a recent destination to select the previous destination.
A map opens with your route drawn in blue. Speci c instructions are listed at the top of the screen.
As you navigate your route, each direction is spoken in turn, and the next turn is displayed. Your current location is
shown as a blue arrow on the map, which is updated as you navigate your route.
Google Navigation downloads and temporarily stores a copy of the directions and other information about your
route on the phone, so if you lose your connection to a data network, you can still navigate to your destination.
You can control the volume of the spoken instructions with
directions, tap
Map to begin tracking your journey, even if you haven’t chosen a destination.
Speak destination to search the destination with voice.
Contacts to use a contact’s address information.
Starred places to select the destination from starred places.
Volume up / Volume down. To turn o the spoken
Menu > Mute.
.
Previewing your route
1. From an active navigation, tap the directional instruction banner at the top of the screen.
2. Tap
When you preview a route, tap to switch to the street-level view of your route.
or to preview the next or previous segment of your route.
Changing views of your route
You can view your progress on your route as a map with di erent informational layers. Zoom in and out or drag to
view adjacent areas. You can also view your progress in Satellite or Street View.
1. While viewing an active navigation,
• Tap
other landmarks along your route.
• Tap
information, and more.
Tap while on the Route Info screen to view each turn as a scrolling list of written directions.
• Drag the map to view adjacent areas, or tap the map to see controls for zooming in and out.
Menu > Layers to switch to views tra c or a Satellite View, or to show the locations of parking, restaurants, and
Menu > Route Info for a high-level summary of your route, with options to pick a new route, see tra c
AUTHORITY 60
Page 61

Finding an alternate route
If tra c is slow on your current route, or if you just want to try a di erent route, you can request an alternate route
from the Google Maps Navigation service.
1. From an active navigation,
2. Tap
3. Select the alternate route you’d like to use to resume turn-by-turn guidance.
Menu > Route Info > .
Exiting Navigation
You can exit Navigation mode when you reach your destination, or at any time by tapping Menu > Exit Navigation.
Latitude
Latitude allows you to share your location with friends and view their locations on a map.
Your location is not shared automatically. You must join Latitude, and then invite your friends to view your location
or accept their invitations. Only friends that you have explicitly invited or accepted can see your location.
NOTE
You need an active mobile data or Wi-Fi connection to use Latitude.
To see your location and get directions, you must turn on location services. From the Home screen, tap
> Location & security. Select one or both from Use wireless networks or Use GPS satellites.
Maps may not be available for all locations.
Apps > Settings
Joining and opening Latitude
1. From the Home screen, tap Apps > Latitude.
2. The rst time you join Latitude, you’re prompted to accept or reject the Google privacy policy.
Adding friends
Add friends to Latitude to share your location with them and request to see their location. Only friends you have
explicitly invited or accepted can see your location within Latitude.
Inviting friends
1. From the Home screen, tap Apps > Latitude.
2. Tap
• Tap
• Or tap
• Or tap
If your friends are current Latitude users, they will appear at the top of your Google Contacts lists with a Latitude
or tap Menu > Add friends.
Select from Contacts > Select contacts to invite > When asked to con rm, Ye s.
Add via email address > Enter one or more email addresses, separated by “ , ” > Add friends > When asked to con rm,
Ye s.
to add a friend from suggested friends’ list > Yes .
AUTHORITY 61
Page 62

icon. Current users will receive email request and a request within Latitude.
If your friends aren’t using Latitude, they’ll receive a location request email, but they must sign into Latitude with a
supported Google account before they can accept your request. If you invite a friend who is not using a Google ID,
you or your friends will need to re-send any location requests once they have signed into Latitude with a supported
Google account.
Responding to an invitation
1. From the Home screen, tap Apps > Latitude.
New sharing request.
2. Tap
• Tap Accept and share back to share locations between you and your friend.
• Tap
Accept, but hide my location to see the friend’s location, and hide your location.
• Tap
Don’t accept to reject the request.
Viewing friends’ locations and managing friends
You can view your friends’ locations on a map or in a list.
• When you open Latitude, you are shown list of your Latitude friends with location summaries.
• When you open Maps, your friends’ locations are shown. Each friend is represented by a photo and arrow indicating their
approximate location. If a friend has chosen to share only city-level location details, the friend’s photo is shown in the friend’s
city center location.
Viewing friends’ pro le
• While using Map mode, tap the friend’s photo. Your friend’s name appears in a balloon. Tap the balloon.
• From the Latitude friend’s list, tap a friend.
Managing friends’ communication and privacy options
1. From the Home screen, tap Apps > Latitude.
2. From a friend’s pro le,
• Tap
• Tap
• Tap
• Tap the friend’s photo to open Quick contact where you can view contact details, send an email, and more.
• Tap
Share best available location Share your precise location information.
to view the friend’s location on the map.
to get directions to the friend’s location.
to view the friend’s location in street view.
Sharing options to change sharing options for the friend.
Share only city level location Share only your city location, not a street-level location. Your friend will see your picture in the
middle of your current city.
Hide from this friend Stop sharing your location with this friend.
• Tap Remove this friend to remove the friend from your list and stop sharing locations.
AUTHORITY 62
Page 63

Privacy settings
Only the last location sent to Latitude is stored by Google. If you turn o Latitude or are hiding, no location is
stored.
To change your privacy settings:
1. From the Home screen, tap Apps > Latitude.
2. Tap
Location reporting Detect your location Let Latitude detect and update your location as you move. The update
Location history Enable location history Check to store your location history using background location reporting.
Latitude location
sharing
Menu > Location Settings.
frequency is determined by several factors, including your phone’s battery
level and how recently your location has been updated.
Set your location Choose from several methods and set your location manually.
Do not update your location Hide your location from all your friends.
Manage your friends Add or remove friends who can see your location.
Sign out of Latitude Disable Latitude and stop sharing your location and status. You can always
join Latitude again.
YouTube
YouTube is Google’s online video streaming service for viewing, discovering, and sharing videos.
Opening and signing into YouTube
Signing into YouTube
You can discover and watch YouTube videos without a YouTube account, but if you want to take advantage of
many YouTube features, you must sign into your YouTube account.
1. From the Home screen, tap Apps > YouTube.
2. Tap
The rst time you use a YouTube feature that requires an account, you’re prompted to sign in. Create a new account
or enter your YouTube sign in information if you already have an account.
For more information about YouTube accounts, visit YouTube on the web.
Menu > My Channel.
Finding videos
Browsing videos by category
1. From the Home screen, tap Apps > YouTube.
2. Tap
Menu > Browse.
AUTHORITY 63
Page 64

3. Tap a category in the scrolling list.
• Tap the current time lter setting at the top of the category screen to change the time period and reduce the number of
videos listed.
• Tap
Most viewed, Top rated, Most discussed or Top favorited.
Searching for videos
1. From the Home screen, tap Apps > YouTube.
2. Tap
3. Enter the search criteria > Tap
or tap Search.
.
4. Scroll through the search results and tap a video to watch it.
Watching videos
1. From the Home screen, tap Apps > YouTube.
2. Tap a video to begin playback.
• Tap the video to pause or resume playback.
• Tap
Info, Related or Comments to learn more about the video.
• Rotate your phone to watch the video in full-screen view. You can also double-tap the video to toggle full-screen view on and
o .
Add to
Share
Watch later
Favorites
New playlist
Share the video via Bluetooth, Email, Facebook, Gmail, Google+, Messaging,
Share via barcode, Skifta or Twitter.
Bookmark the video to watch it later.
Add the video to your Favorites.
Add your new playlist.
More
Flag
Copy URL
Flag the video as inappropriate.
Copy the video’s web address. You can paste into a message or other applications.
Uploading videos
To shoot and upload a new video
1. From the Home screen, tap Apps > YouTube.
2. Tap
3. Tap
4. Enter the title for the video and more details > Tap
To upload an existing video
1. From the Home screen, tap Apps > YouTube.
2. Tap
. The Camera will open in video mode.
to start recording > Tap to stop recording.
Menu > Upload. The Gallery will open.
Upload.
AUTHORITY 64
Page 65

3. Tap the video you want to upload.
4. Enter the title for the video and more details > Tap
Upload.
Sharing videos
1. From the Home screen, tap Apps > YouTube.
2. Tap a video to play.
3. Tap
Share.
4. Tap the application you want to use to share the video.
YouTube settings
You can change the following settings for YouTube on your phone.
1. From the Home screen, tap Apps > YouTube.
2. Tap
General settings High quality on mobile Check if you prefer to watch videos in high resolution by default when
Search settings Clear search history Remove previous YouTube video search results.
About Help Open the YouTube Help Center in your phone’s Browser.
Menu > Settings.
connected to mobile networks. Watch videos in standard mode to reduce
startup time and data use. This setting has no e ect if you are connected to a
Wi-Fi network, where videos are always shown in higher resolution.
Caption font size Set the preferred text size when viewing video captions.
Uploads Specify network preferences for uploads.
SafeSearch ltering Select if you want Google SafeSearch ltering to block some results when
you search for videos. Settings are: Block no search results (Don’t lter), only
explicit or o ensive videos (Moderate), or both explicit and o ensive text and
videos (Strict).
Feedback Open a YouTube feedback form in your phone’s Browser.
Google Mobile Terms of Service Display the Google Mobile Terms of Service.
YouTube Terms of Service Display the YouTube Terms of Service.
Google Mobile Privacy Policy Display the Google Mobile Privacy Policy.
YouTube Privacy Policy Display the YouTube Privacy Policy.
Open source licenses Display license details for open source software.
Application version The YouTube application version number installed on your phone.
AUTHORITY 65
Page 66

Calendar
The Calendar application data on your phone syncs with the web-based Google Calendar service. It is also
compatible with Microsoft Exchange ActiveSync Calendar.
Opening Calendar
1. From the Home screen, tap Apps > Calendar.
Events are color coded to enable you to distinguish between multiple calendars. Events times are shown using
your local time zone, which is provided by your active mobile network. When traveling, you may want to set a
home time zone in Calendar.
Creating an event
Events created on your phone will be synced to Google Calendar or Microsoft Exchange automatically.
1. From the Home screen, tap Apps > Calendar.
2. There are two ways to create an event:
• Tap
• In Day, Week, or Month view, tap and hold the screen at the date and/or time you want >
3. Enter the name, time, location, description, and optional additional details for your event.
• If you have more than one calendar, choose the calendar to which to add the event.
• In the Guests eld, enter email addresses of anyone you want to invite. Separate multiple addresses with commas ( , ). If your
invitees use Google Calendar, they’ll receive an invitation in Calendar and by email.
• If the event occurs on a regular basis, tap the Repetition box and choose the reoccurrence information.
• Tap
• Tap
4. Tap
Menu > More > New event.
New event.
to add reminders. You can set multiple for an event.
Menu > Show extra options to add additional details about the event.
Done.
AUTHORITY 66
Page 67

Viewing calendar and events
Changing calendar view
When you open Calendar, Month view is shown by default. You can also view the Calendar by Agenda, Day, or
Week.
1. From the Home screen, tap Apps > Calendar.
2. Tap
Day
Menu > Choose the type of view that you want.
Displays a chart of the events of one day, in a table of one-hour rows. All-day and multiday events are displayed
at the top. Each event is displayed at the corresponding time. Swipe left or right to change dates, and swipe up or
down to view earlier or later times.
Week
Month
Agenda
Today
More
Displays one week calendar. All-day and multiday events are displayed at the top. Swipe left or right to change
weeks, and swipe up or down to view earlier or later times.
Displays a chart of the events of the month. Events are shown as blue bars on each calendar date. Swipe left or right
to change months.
A list of your events in chronological order. All-day and multiday events are listed at the start of each day. Days
without events are not shown. Flick up or down to view earlier or later events.
Displays a chart of the events of today.
You can select New event, Calendars or Settings.
Viewing event details
• In Day, Week, or Agenda view, tap an event.
• In Month view, tap a day to switch to Day view > Tap an event.
Search for an agenda
1. From the Home screen, tap Apps > Calendar.
2. Tap
Search.
3. Start entering the agenda name you want to view.
As you type, agendas with matching names appear below the search box.
4. Tap the matching agenda in the list to view it.
Editing or deleting an event
1. In event details view, tap Menu > Edit event to edit the event.
2. Make your changes to the event > Tap
• To delete the event, tap Menu > Delete event > Tap OK.
Done.
AUTHORITY 67
Page 68

Synchronizing and displaying calendars
You can select which calendars to show or hide on your phone’s Calendar, and which ones to synchronize.
1. From the Home screen, tap Apps > Calendar.
2. Tap
Menu > More > Calendars.
All the calendars you’ve added or subscribed to are displayed. (Calendars for accounts you’ve con gured not to
synchronize are not included in the list.)
3. Tap the icon next to a calendar to change storage and visibility settings.
Calendar events stored on phone and visible in Calendar
Calendar events stored on phone but not visible in Calendar
Calendar events not synchronized to phone
4. Tap OK.
Changing Calendar settings
1. From the Home screen, tap Apps > Calendar.
2. Tap
Calendar view setting Hide declined events Check if you don’t want to see events to which you’ve declined invitations.
Menu > More > Settings.
Use home time zone Displays calendars and event times in your home time zone when traveling.
Home time zone If Use home time zone is checked, you can set home time zone.
First day of week Select Saturday, Sunday or Monday.
Week number setting Display week number Check if you want to see week number in Calendar.
First week of year If Display week number is checked, you can set rst week of year.
Reminder settings Set alerts & noti cations Con gure event reminders.
Select ringtone Select which ringtone will sound when you receive an event reminder.
Vibrate Con gure the phone to vibrate whenever you receive an event reminder.
Default reminder time Select the default reminder time used when creating new calendar events.
AUTHORITY 68
Page 69

News & Weather
The News & Weather application o ers updates on current events and local weather forecasts.
Viewing the weather information
1. From the Home screen, tap Apps > News & Weather.
2. Tap
Weather at the top of the screen. Or ick left across the screen to switch to Weather view.
3. Tap the weather summary for a more detailed forecast.
• Tap a time on the weather graph for a detailed, hour-by-hour forecast.
• Tap the weather detail screen to return the weather summary.
• Tap
Menu > Refresh to get the latest information.
Reading news articles
1. From the Home screen, tap Apps > News & Weather.
2. Tap a news category at the top of the screen. Or swipe left or right across the screen to switch news categories.
• Tap
3. Tap a headline to view a detailed news article in your browser.
Menu > Refresh to get the latest information.
News & Weather settings
1. From the Home screen, tap Apps > News & Weather.
2. Tap
Weather settings Use my location Use the phone’s location service to determine your location when displaying
News settings Select news topics Select the categories of news to include in the scrolling list of News & Weather
Menu > Settings.
Set location When Use my location is unchecked, tap to specify the location for weather
Use metric Toggle metric/imperial units.
Prefetch articles Download news articles so that they open more quickly and are available when
Prefetch images Prefetch news images in addition to news text, when the headlines are
News terms of service Details about the terms of service for Google News.
Mobile privacy policy Display the Google Mobile Privacy Policy.
weather information.
information by entering a city or postal code.
tabs. You can also tap
you don’t have a data connection.
downloaded. This setting is only available when Prefetch articles is checked.
Custom topic to enter speci c topics.
AUTHORITY 69
Page 70

Refresh settings Auto-refresh Update information automatically, at the frequency you set with Refresh interval.
For automatic refresh to work, you must also have Background Data turned on in
the Settings application.
Refresh interval Set how often to update the News & Weather automatically, if Auto-refresh is
checked.
Refresh status Displays the date and time of the last refresh.
Application version Displays the application version installed on your phone.
Play Store
Play Store provides direct access to applications and games to download and install on your phone.
To access Play Store, you must rst sign into your Google account using a Wi-Fi or data connection.
When you open Play Store for the rst time, you must read and accept the Google Play Terms of Service to continue.
Finding applications
Browsing applications
You can browse and sort applications by category.
1. From the Home screen, tap Apps > Play Store.
GAMES, BOOKS & REFERENCE, BUSINESS or COMICS, etc. at the left of the Play Store screen.
2. Tap
• Scroll to view subcategories and tap one to explore.
3. Tap the subcategory you want.
Searching for applications
1. From the Home screen, tap Apps > Play Store.
2. Tap
3. Enter the name or type of app you’re looking for > Tap
at the top right of the screen, or tap Search.
.
Viewing details about an application
1. While browsing Play Store, or in a list of search results, tap an application to view more details.
Application details screens include a description, ratings, and speci c information about the application. The
Comments tab includes comments from people who have used the application. You can download and install an
application from this screen.
AUTHORITY 70
Page 71

Installing applications
Installing an application
1. From the Home screen, tap Apps > Play Store.
2. Find the application you want to purchase and view the application details.
3. Tap
Install to download and install the application.
For paid applications, the Install button is labeled with the application’s price. Tap the price to buy the application.
The subsequent screen noti es you whether the app will require access to your personal information or access to
certain functions or settings of your phone.
4. Tap Accept & download to begin downloading and installing the app. If you selected a paid app, you will be redirected to the
Google Checkout screen to pay for the app before it’s downloaded to your phone.
NOTE
Be cautious when downloading apps that have access to phone functionality or a significant amount of personal data. You’re
responsible for the results of using downloaded apps on your phone.
Creating a Google Checkout account
You must have a Google Checkout account to purchase items from Play Store. You can set up a Checkout account
with your rst purchase from Play Store.
• In a web browser, go to http://checkout.google.com to create a Google Checkout account.
• From the phone, you will be prompted to enter your billing and credit card information when you buy your rst application
from Play Store.
NOTE
Once you’ve purchased something from Play Store, the phone remembers your password, so you don’t need to enter it the next
time. Be sure to secure your phone with a password to prevent unauthorized purchases.
Managing your downloads
Viewing downloaded applications
1. From the Home screen, tap Apps > Play Store.
2. Tap
In the list of the free and paid applications that opens, you can tap an application to rate it, uninstall it, request a
refund, and more.
Updating an application
You can update downloaded applications.
1. From the Home screen, tap Apps > Play Store.
2. Tap
Menu > My Apps.
Menu > My Apps > Tap the application to update.
3. Tap
Update > Accept & download.
4. Tap the explanation that best matches why you’re installing > Tap
Open or tap Back.
The application is installed. You can uninstall the application again at any time. If you paid to buy the application,
you will not be charged again.
AUTHORITY 71
Page 72

Uninstalling an application
You can uninstall applications from Play Store. You can also uninstall downloaded applications from the Settings.
1. From the Home screen, tap Apps > Play Store.
2. Tap
3. Tap
The application is uninstalled. You can install the application again at any time. If you paid to buy the application,
you will not be charged again.
Menu > My Apps > Tap the application to uninstall.
Uninstall > OK.
Play Books
You can search books you want and enjoy reading books on your phone with Play Books application.
If you aren’t signed in to your Google account, you must rst sign into your Google account using a Wi-Fi or data
connection to access Play Books.
Opening Play Books
1. From the Home screen, tap Apps > Play Books.
2. Tap the book you want to read.
• Tap
• Tap
• Tap
• Tap
Menu > Sort order to sort the books by Date, Title or Author.
Menu > Manage My Books to remove a book from the My Books shelf or manage your downloaded books.
Menu > Refresh to refresh the current page.
Menu > Accounts to select the desired account or add account.
Finding books
Browsing books in the Play Store
1. From the Home screen, tap Apps > Play Books.
2. Tap
3. Tap
4. Enter the title, author or keyword of the book you want > Tap
5. Scroll through the search results and tap a book to view details about the book.
to open Play Store.
at the top right of the screen, or tap Search.
.
AUTHORITY 72
Page 73

Searching for books
1. From the Home screen, tap Apps > Play Books.
2. Tap
3. Enter the title or author of the book you’re looking for > Tap
4. Scroll through the search results from My Books or Google eBooks.
at the top right of the screen, or tap Search.
.
Reading a book
Viewing contents of the book
1. While reading a book, tap Menu > Catalog.
2. Scroll through the contents of the book and tap the chapter you want to read.
Changing reading settings
1. While reading a book, tap Menu > Con g.
2. Set
Font size, Line space, Screen stays turn on, Font color (day), Background (day), Font color (night) or Background (night).
Going to the previous or next page
1. While reading a book, slide your nger to the left or right to go to the previous or next page.
Or, tap
• While reading a book, tap
Menu > Previous to go to the previous page.
Menu > Next to go to the next page.
Changing to Day/Night mode
1. While reading a book, tap Menu > Day/Night to switch to Day mode.
• While reading a book, tap
Menu > Day/Night to switch to Night mode.
Viewing information about the book
1. While reading a book, tap Menu > About to view information about the book you are reading.
Play Books settings
Customize your Play Books settings to optimize your reading experience.
1. From the Home screen, tap Apps > Play Books.
2. Tap
Storage location Set the location to store your books. You can select microSDTM card or internal storage.
About Show the version of Play Books application on your phone.
Terms of Service Read the Mobile Terms of Service.
Privacy Policy Read the Mobile Privacy Policy.
Open source licenses Check out license details for open source software and fonts.
Menu > Settings.
AUTHORITY 73
Page 74

Easy Installer
You can install apps from apk les on the microSDTM card with Easy Installer.
Opening Easy Installer
1. From the Home screen, tap Apps > Easy Installer.
2. You can see apk les on your microSD
• Type app name in the textbox to search the apps that you want to install.
• Tap
Clear to delete the entire entry.
TM
card.
• Tap
Menu or tap to see more options( Un/Check All, Delete, Sort, Setting, Scan Apps or
More(Feedback, Featured Apps, About, Help, Remove Ad)).
Installing apk les on the microSDTM card
1. From the Home screen, tap Apps > Easy Installer.
2. Check apps that you want to install > Tap
• Tap and hold the speci ed app in the list to view a pop-up menu. You can select
Search Google Market.
3. Tap
Install to install the app. Or tap Cancel to cancel the installation.
• If your phone is set to block installation of apps not obtained from Play Store, you can check Unknown sources in the
Application settings and then install apps.
Install Selected Apps.
Install, Exclude this path, Delete, Send or
AUTHORITY 74
Page 75

Easy Installer settings
1. From the Home screen, tap Apps > Easy Installer.
2. Tap
System Noti cation Bar Icon Check if you want to show noti cation bar icon to switch quickly.
Installer Save Sort-By Type Check it to save sort-by type as default when changed.
Scan Excluded Paths Manage excluded paths.
Feedback Feedback You can send the feedback to the author.
Share Share With Friends You can share Easy Installer with your friends.
Update Automatically Update Check it to update and notice automatically.
Menu or tap > Setting.
Automatically Startup Check if you want to start up automatically when boot your phone.
Clear Cache You can clear apk scan cache, and it will lead to re-scan the microSD
next open.
Scan On Startup Check to scan automatically apps from external storage on system startup.
Scan On SD Mounted Check to scan automatically apps on external storage mounted.
Regularly Remind Check to remind users to scan apps frequently.
Remind Frequency If Regularly Remind is checked, you can set remind frequency.
Scan Hidden Directories Check to scan hidden directories in the external storage.
Max Scan Depth Max traversal depth in scanning.
More Applications You can view more applications.
TM
card in the
AUTHORITY 75
Page 76

Web
Email
The Email application is used to read and send email from services other than Gmail. The Email application includes
a wizard enabling easy setup for several popular email service providers.
Email Account Setup
Initial setup
1. From the Home screen, tap Apps > Email.
2. Enter the
• If you select email account from the list, account settings will be set automatically. Some email accounts are not supported.
3. Enter a name for this account and a name to include on outgoing messages >
Email address and Password for your email account > Next.
Done.
Adding an additional email account
You can add one or more email accounts to your phone.
1. From the Home screen, tap Apps > Email.
2. Tap
3. Tap
4. Repeat the steps to add an account as described in Initial setup above.
Menu > Accounts.
Menu > Add account.
Deleting an email account
1. From the Home screen, tap Apps > Email.
2. Tap
3. Tap and hold the account >
Menu > Accounts.
Remove account.
Refreshing an email account
1. From the Home screen, tap Apps > Email.
2. Tap
• If you have several email accounts, you can refresh them all at the same time.
From any message inbox, tap
Menu > Refresh.
Menu > Accounts > Combined Inbox > Refresh.
AUTHORITY 76
Page 77

Reading an email
You can read messages in your Combined Inbox or individual account folders.
1. From the Home screen, tap Apps > Email.
• Tap
2. Tap an email you want to read.
• Tap
Menu to see more options.
Menu to see more options.
Replying to a message
1. While reading an email, select Reply or Reply all.
• A Compose Message window opens with recipient addresses, and subject line pre-populated. A copy of the original message
is quoted below the message body text box.
2. Compose your response and tap
Send.
Forwarding a message
1. While reading an email, tap Menu > Forward.
2. Enter the email address and a subject, and type your message in the appropriate text elds.
3. Tap
Send.
Deleting a message
1. While reading an email, tap Delete.
Sending a new email
1. From the Home screen, tap Apps > Email.
2. Tap
3. Enter a name or email address in the
with a comma “ , ”.
• As you enter text, matching addresses are suggested from your Contacts list.
• Tap
4. Enter a subject in the
• To attach an image le, tap Menu > Add attachment > Select the picture you want to attach.
NOTE
5. Tap Send.
• To save an unsent email message on your phone, tap
• To cancel an email message, tap
Menu > Compose.
To eld. If you are sending the mail to several recipients, separate the email addresses
Menu > Add Cc/Bcc to add additional recipient eld types.
Subject eld and type your message.
The attachable file size is limited to 5 MB.
Save as draft.
Discard.
AUTHORITY 77
Page 78

Starring/un-starring an email
You can star an important message to nd it easily later. Once you star a message, a Starred folder is added to the
Accounts screen.
1. From any email list or while reading a message,
• Tap to star the message.
• Tap
to un-star.
Working with email messages
Viewing starred messages
1. From the Home screen, tap Apps > Email.
2. Tap
Resuming a draft email message
1. From the Home screen, tap Apps > Email.
2. Tap
3. Tap an email you want to resume > Finish editing the message.
4. Tap
Viewing individual account folders
1. From the Home screen, tap Apps > Email.
2. Tap
contents.
Menu > Accounts > Starred.
Menu > Folders or Accounts > Drafts.
Send.
Menu > Accounts > Select to view individual account folders. Select any folder to open, view, or edit
Email account settings
1. From the Home screen, tap Apps > Email.
2. Tap
General settings Account name The name of the account as it appears in the Accounts and Folders screens.
Menu > Account settings.
Your name Your name shown in outgoing messages.
Use Signature Check it to use signature.
Signature Enter a signature to append to messages sent from this account.
Email check
frequency
Default account Check it to set this account as the ‘default’ account for outgoing messages.
Only receive email
header
Download Options You can select All, 1k, 5k, 25k, 50k, 100k or 1M.
Set how often the phone will for new email sent to this account.
Check it to only receive email header and ignore body and attachments.
AUTHORITY 78
Page 79

Noti cation
settings
Server settings Incoming settings Con gure Incoming server settings for this account.
3. Tap Back to save changes.
NOTE
Web services (Email, Browser, YouTube, etc.) are a data-intensive feature. Cricket recommends that you upgrade to an
unlimited data plan to avoid additional data charges.
Email noti cations Check it to receive noti cations when new messages are received in this account.
Select ringtone Select a noti cation ringtone.
Vibrate Select to con gure vibration noti cations when new emails arrive in this account.
Outgoing settings Con gure Outgoing server settings for this account.
Browser
Search for information or browse webpages using the Browser. To access the internet, you must have an active
data or Wi-Fi connection.
Opening Browser
1. From the Home screen, tap Browser. Or tap Apps > Browser.
• When you open the Browser, the default homepage is displayed. If you have used the Browser recently, your most recently
viewed webpage is displayed.
• The Browser also opens when you select a web link in other applications like email or text messaging.
Accessing a webpage or searching the web
1. From the Home screen, tap Apps > Browser.
2. Tap the URL eld on top of the screen.
3. Enter the URL of a webpage or search term and tap
• As you type, suggestions of webpages and key words will appear on the screen. Tap a suggestion to go directly to that
webpage or view search results.
.
Navigating on a webpage
Some websites are displayed as special mobile versions, designed to be easily viewed from a mobile phone.
Webpages that aren’t designed speci cally for mobile devices typically open in overview mode. You can view these
webpages by zooming and scrolling.
AUTHORITY 79
Page 80

Zooming in or out on a webpage
• Double-tap the screen to zoom in. To return to the default zoom level, double-tap again.
• Tap your nger on the screen to reveal the Zoom controls. Tap
• You can also use 2 ngers on the screen, pinching them open and closed to zoom in and out.
or to zoom out or in.
Scrolling a webpage
1. Slide your nger on the screen to navigate and view other areas of the webpage.
Using Browser options
Stopping page loading
1. While webpage is loading, tap Menu > Stop. Or tap on the right of the URL eld.
Refreshing the current page
1. Tap Menu > Refresh.
Getting information about the current page
1. On the Browser screen,
2. Tap
Finding the text on the current page
Menu > More > Page info.
1. While viewing any webpages, tap Menu > More > Find on page.
2. Enter the search term.
• As you type, matching characters will be highlighted. Tap
or to scroll to the previous or next matching term.
Selecting and copying text from a webpage
1. While viewing any webpages, tap Menu > More > Select text.
2. Drag across the text you want to copy.
• The text you select is copied to the clipboard. You can paste the copied text into any text eld by tapping and holding on a
text box and selecting paste.
Sharing a webpage
1. While viewing any webpages, tap Menu > More > Share page.
2. Tap an application to send the URL. The application opens with the URL you’ve entered.
Downloading les
You can download images, les, and applications from webpages. All downloaded les are saved to the microSDTM
card.
1. Tap and hold an image, a link or a le you want to download.
2. Tap the desired action (
Save image, View image or Set as wallpaper).
AUTHORITY 80
Page 81

Viewing downloaded les
1. From the Home screen, tap Apps > Browser.
2. Tap
• The les you’ve downloaded are arranged by date. Tap a le to open.
• If you want to delete a downloaded le, check the le >
Menu > More > Downloads.
Delete.
Navigating webpages
Opening a new Browser window
1. From the Home screen, tap Apps > Browser.
2. Tap
A new window opens with the default homepage.
Opening a link
1. Tap any link to open it.
If you prefer to open the link in a new window, tap and hold the link >
Navigating between webpages
• Tap Back to return to the previous webpages.
Or tap Menu > Forward if you tapped Back by accident.
Menu > New window.
Open in new window.
Switching between Browser windows
1. From any webpages, tap Menu > Windows.
2. Tap the window to view it full screen. You can also tap
NOTE
You can have up to 8 browser windows open at one time.
to close a window.
Using bookmarks
Browser bookmarks are stored shortcuts which allow you to quickly access webpages without having to type in its
full address.
Bookmarking a webpage
1. While viewing webpages, tap Menu > More > Add bookmark.
2. Edit the name or location if needed > Tap
Opening a bookmark
1. When viewing any webpages, tap at the right of the URL eld. Or tap Menu > Bookmarks.
2. Tap a bookmark to open it.
• If you prefer to open the webpages in a new window, tap and hold the bookmark and tap
OK.
Open in new window.
Editing a bookmark
1. From any webpages, tap Menu > Bookmarks.
AUTHORITY 81
Page 82

2. Tap and hold the bookmark to edit > Edit bookmark.
3. Edit the name and/or location > Tap
OK.
Deleting a bookmark
1. From any webpages, tap Menu > Bookmarks.
2. Tap and hold the bookmark to delete >
Delete bookmark > OK.
Browser settings
Customize your browser settings to optimize your browsing experience.
1. From the Home screen, tap Apps > Browser.
2. Tap
Page content settings Text size Select the size of the text.
Privacy settings Clear cache Delete locally cached content and databases.
Security settings Remember passwords Save your passwords for some webpages that require you to sign in.
Advanced settings Set search engine Select the web search engine you want to use.
Menu > More > Settings.
Default zoom Select the zoom level that Browser uses when rst opening a webpage.
Open pages in overview Check to open webpages zoomed out.
Text encoding Change the character-encoding standard.
Block pop-up windows Prevent pop-up windows unless you request it.
Load images Display images on webpages.
Auto- t pages Optimize the presentation of text and other elements of webpages to t your
phone’s screen.
Landscape-only display Display webpages in landscape orientation on your screen.
Enable JavaScript Allow JavaScript to run on webpages.
Enable plug-ins Allow plug-ins to run on webpages.
Open in background Open new windows in the background.
Set home page Set the default homepage.
Invert color Check to display pages in inverted color.
Clear history Delete the history of webpages you visited.
Accept cookies Allow sites to save and read cookie data.
Clear all cookie data Delete all cookie data.
Remember form data Remember what you enter in form elds.
Clear form data Delete all the information the browser remembered.
Enable location Allow sites to request access to your location.
Clear location access Delete location access for all websites.
Clear passwords Delete all saved passwords.
Show security warnings Show warning of security alerts.
Website settings Advanced settings for individual websites.
UAString Select Android, Desktop, iPhone, iPad or Froyo-N1.
Reset to default Restore default settings.
AUTHORITY 82
Page 83

Wi-Fi
Turning Wi-Fi on and connecting to a wireless network
1. From the Home screen, tap Apps > Settings.
2. Tap
3. Select the
4. The network names and security settings of detected Wi-Fi networks are displayed.
5. Tap a Wi-Fi network to connect.
• If you selected a network that is secured, enter the security key and then tap
Wireless & networks > Wi-Fi settings.
Wi-Fi check box to turn Wi-Fi on.
Connect. Depending on the network type and
security settings, you may also need to enter more information or choose a security certi cate.
Connecting to a Wi-Fi network with EAP-TLS security
You may need to install a network certi cate to your phone before you can connect to a Wi-Fi network with EAPTLS authentication protocol.
1. Save the certi cate le to the root folder of the microSDTM card.
2. From the Home screen, tap
3. Tap
4. Select the network certi cate needed to connect to the EAP-TLS network.
5. After the certi cate is installed, follow the steps in the previous section to connect to the Wi-Fi network.
Location & security > Install from SD card.
Apps > Settings.
Checking wireless network status
1. From the Home screen, tap Apps > Settings.
2. Tap
3. Tap the wireless network that the phone is currently connected to.
A message box is then displayed showing the Wi-Fi network name, status, speed, signal strength, and more.
Wireless & networks > Wi-Fi settings.
Connecting to another Wi-Fi network
1. From the Home screen, tap Apps > Settings.
2. Tap
3. Detected Wi-Fi networks are displayed in the Wi-Fi networks section. To manually scan for available Wi-Fi networks, on the
• To set advanced settings, on the Wi-Fi settings screen, tap
4. Tap another Wi-Fi network to connect to it.
Wireless & networks > Wi-Fi settings.
Wi-Fi settings screen, tap
Menu > Scan.
Menu > Advanced.
AUTHORITY 83
Page 84

Downloads
Images, les and other items you download in Browser, Gmail, Email are stored on your phone. You can view,
manage or delete what you have downloaded.
Opening Downloads
1. From the Home screen, tap Apps > Downloads.
2. Tap an item you want to view it.
• Check the checkbox of the item you want to delete and then tap
• Tap
Menu to select Sort by size or Sort by time.
Delete.
Viewing a le
1. From the Home screen, tap Apps > Downloads.
2. Tap the le you want to open.
• Turn your phone left or right to view the le in upright (portrait) or sideways (landscape) orientation.
3. Tap the screen to see the controls.
• Tap
• Tap
• Tap Menu to view more options.
or double-tap the screen to zoom in or out.
Slideshow to watch a slideshow of the les you downloaded. Tap the screen to stop the slideshow.
Working with les
1. From the Home screen, tap Apps > Downloads.
2. Tap the le you want to manage, and then tap
3. Tap
Share, Delete or More.
Menu.
• Tap
• Tap Delete > Tap Con rm Delete to delete the selected le.
• Tap
Share > Tap the application to use to share the selected le.
More > Tap one of the icons shown below:
Details
Set as
Crop
Rotate Left /
Rotate Right
Get details about the le.
Contact icon
Wallpaper Use a picture as Home screen wallpaper.
Crop a picture.
Rotate a picture.
Use a picture as a contact icon.
AUTHORITY 84
Page 85

Traffic Manager
You can check use of Data, Call, SMS and Applications on your phone very easily with Tra c Manager.
Viewing Tra c Manager
1. From the Home screen, tap Apps > Tra c Manager.
2. Tap
General or Apps.
•
General : You can view usage of Data, Call and SMS.
•
Apps : You can view usage of Applications. Apps are sorted in data usage from highest to lowest.
• To refresh the current page, tap
• To reset values, tap Menu > Reset all > Yes . All general counter is reset to 0.
• To set counter settings for Data, Call and SMS, tap each item.
Counter enabled Set to enable or disable this counter.
Counting period Set period length of counting.
Period start Set day of month to start counting.
Reset Set to reset counter value to
*** limit Set to warn you when *** limit is reached. When limit is reached, dialog box is displayed.
Limit You can set a limit to use of Data, Call and SMS.
.
0.
Tra c Manager settings
1. From the Home screen, tap Apps > Tra c Manager.
2. Tap
Update interval You can set update interval of tra c values.
Noti cation If checked, Tra c Manager icon is displayed in the Status bar.
Menu > Settings.
Using Tra c Manager widget
1. Tap and hold an empty area on the Home screen.
2. Tap
3. Tap Tra c Manager widget and then you can go to Tra c Manager directly.
Widgets > Tra c Manager. Tra c Manager widget is displayed.
AUTHORITY 85
Page 86

Facebook
The rst time you launch the Facebook application, you must agree to the End User License Agreement.
1. From the Home screen, tap Apps > Facebook.
2. If you already have a Facebook account, enter your Email and Password >
• If you do not have a Facebook account, tap
NOTE
You can view the recent activities of contacts in the Facebook application.
Sign Up for Facebook to create one.
Log In.
Twitter
Adding a Twitter account
1. From the Home screen, tap Apps > Twitter.
2. Enter your twitter Username or email and Password >
• You can post and read tweets, send and receive direct messages and search for new Twitter users to follow.
Creating a tweet
1. From the Home screen, tap Apps > Twitter.
Sign In.
2. Tap
3. Type your tweet >
• Tap
.
or to post a picture from Gallery or Camera to your default photo hosting site and add the link to the picture
your tweet.
Tweet.
in
AUTHORITY 86
Page 87

Bluetooth
Using Bluetooth
Bluetooth is a short-range wireless communications technology that devices can use to exchange information
over a distance of about 30 feet. The most common Bluetooth devices are headphones, hands-free car kits, and
portable devices, including laptops and cell phones.
Turning Bluetooth on or o
1. From the Home screen, tap Apps > Settings.
2. Tap
3. Check or uncheck Bluetooth to turn it on or o .
Wireless & networks.
Changing the phone’s Bluetooth name
The phone name identi es your phone to other devices.
1. From the Home screen, tap Apps > Settings.
2. Tap
3. If Bluetooth isn’t turned on, check Bluetooth to turn it on.
4. Tap
5. Enter the name for your phone in the dialog box >
Wireless & networks.
Bluetooth settings > Device name.
OK.
Pairing your phone with a Bluetooth device
1. From the Home screen, tap Apps > Settings.
2. Tap
3. If Bluetooth isn’t turned on, check Bluetooth to turn it on.
4. Tap
Wireless & networks.
Bluetooth settings > Scan for devices. A list of nearby Bluetooth devices is displayed.
5. Tap the ID of the other device to pair them.
AUTHORITY 87
Page 88

Connecting to a Bluetooth device
Once paired, your phone will automatically connect whenever it detects a paired Bluetooth device. You can also
manually connect Bluetooth devices as follows:
1. From the Home screen, tap Apps > Settings.
2. Tap
3. If Bluetooth isn’t turned on, check Bluetooth to turn it on.
4. Tap
5. When the phone and the device are connected, the device is displayed as connected in the list.
Wireless & networks.
Bluetooth settings > Scan for devices.
Disconnecting or Unpairing from a Bluetooth
Device
Disconnecting a Bluetooth device
1. From the Home screen, tap Apps > Settings.
2. Tap
3. In the Bluetooth devices section, tap and hold the device name to disconnect.
4. Tap
Wireless & networks > Bluetooth settings.
Disconnect.
Unpairing from a Bluetooth device
You can make your phone forget its pairing connection with another Bluetooth device.
1. From the Home screen, tap Apps > Settings.
2. Tap
3. In the Bluetooth devices section, tap and hold the device name to unpair.
4. Tap
Wireless & networks > Bluetooth settings.
Unpair.
AUTHORITY 88
Page 89

Connecting to a Bluetooth Headset
1. From the Home screen, tap Apps > Settings.
2. Tap
3. If Bluetooth isn’t turned on, check Bluetooth to turn it on.
4. Tap
5. When you see the name of your headset displayed in the Bluetooth devices section, tap the name. Your phone then
6. If automatic pairing fails, enter the passcode supplied with your headset.
Wireless & networks > Bluetooth settings.
Scan for devices. Your phone will start to scan for Bluetooth devices within range.
automatically tries to pair with the Bluetooth device.
Reconnecting a headset
1. Put the Bluetooth device in pairing mode.
2. From the Home screen, tap
3. Tap
4. If Bluetooth isn’t turned on, check Bluetooth to turn it on.
5. Tap the device’s name in the Bluetooth devices section.
6. If prompted to enter a passcode, try 0000 or 1234, or consult the headset documentation to nd the passcode.
Wireless & networks > Bluetooth settings.
Apps > Settings.
Sending and Receiving Information Using
Bluetooth
You can use Bluetooth to transfer information between your phone and another Bluetooth-enabled device such
as a phone or laptop computer. You can send the following types of information, depending on the device you are
sending to:
• Images and videos
• Contacts
• Audio les
To send les, your phone must have a microSDTM card installed.
NOTE
The first time you transfer information between your phone and another device, you need to enter or confirm a security
passcode. Your phone and the other device are then paired, and you will not need to exchange passcodes to transfer
information in the future.
1. On your phone, open the application that contains the item you want to send.
2. Follow the steps for the type of the application, select
3. If you are prompted to turn on Bluetooth, tap
4. Tap the name of the receiving device.
Turn on.
Send File or Send in the menu. Then select Bluetooth.
5. On the receiving device, accept the le.
AUTHORITY 89
Page 90

Receiving information from another device
Your device is capable of receiving a wide variety of le types with Bluetooth, including photos, music tracks, and
documents such as PDFs.
TM
To receive les from another device, your phone must have a microSD
1. From the Home screen, tap Apps > Settings.
card installed.
2. Tap
Wireless & networks > Bluetooth settings.
3. If Bluetooth isn’t turned on, check Bluetooth to turn it on.
4. Tap the
Discoverable check box.
5. On the sending device, send one or more les to your phone.
6. If a Bluetooth authorization request is displayed on your phone, enter the same passcode on both your phone and the other
device, or con rm the auto-generated passcode.
7. When your phone receives a le transfer request noti cation, slide down the noti cations panel, and then tap
Accept.
8. When the transfer is complete, a noti cation is displayed. To open the le immediately, slide down the noti cations panel,
and tap the noti cation.
Adding the Bluetooth received folder to the Home screen
You can add a folder to the Home screen that shows all les you have received with Bluetooth.
1. Tap and hold an empty area on the Home screen, tap Folders > Bluetooth received.
2. Tap and hold the Bluetooth received folder icon, and drag it to your desired Home screen location.
• To rename the folder, tap and hold the title bar of the folder window > Enter a new name >
To view the folder contents, tap the folder icon. To open a le, tap the le name.
OK.
AUTHORITY 90
Page 91

Entertainment
Camera/Camcorder
You can take pictures and shoot videos with Camera/Camcorder.
TM
Photos and videos captured with the camera will be stored on the phone’s microSD
be installed to use the Camera/Camcorder.
Opening Camera
• From the Home screen, tap Apps > Camera.
• Or, when in Camcorder mode, drag the to the Camera position. Or, tap Menu > Switch to camera.
When you’re in Camera mode and you turn your phone left or right, the onscreen camera controls automatically
rotate the display.
card. A microSDTM card must
NOTE
When camera mode is on, you cannot use notification flash and LED Torch.
Camera settings
When in Camera mode, Camera settings are displayed on the screen. Before taking the photo, you can adjust your
camera settings or leave the controls in automatic mode.
1. From the Home screen, tap Apps > Camera.
2. Tap a setting icon. The settings open over the screen.
• To hide settings on the screen, tap the screen or, tap
3. Tap the setting you want to change.
Menu > Settings.
AUTHORITY 91
Page 92

General settings
Exposure +2, +1, 0, -1, -2
Scene mode
Picture size 5M Pixels, 3M Pixels, 2M Pixels, 1M Pixels
Picture quality Super ne, Fine, Normal
Color e ect None, Mono, Sepia, Negative
Select ISO Auto, ISO 100, ISO 200, ISO 400
Touch AF/AEC O , On
Anti Banding O , 50 Hz, 60 Hz, Auto
Delay On, O
Remaining shots Show, Hide
Camera settings Restore defaults
Auto, Action, Portrait, Landscape, Night, Beach, Snow, Sunset, Sports, Party, Candlelight,
Backlight
Store location
White balance
Flash mode
Zoom
O / On
Auto,
Auto,
On,
1x ~ 4x
Activate to use your phone’s location-based services. Take pictures wherever you are and
tag them with the location.
Incandescent,
O
Tap the amount of zoom you want.
Daylight,
Fluorescent, Cloudy
4. Tap Back or tap the screen to close the settings menus.
Taking a picture
1. From the Home screen, tap Apps > Camera.
2. Frame your subject on the screen.
• Tap
. The camera brings the image into focus. When the image is in focus, the camera takes a picture.
The picture you just took is brie y previewed full-screen, and then is displayed as a thumbnail at the right of screen.
Tap the thumbnail to view, share, or work with your pictures in Gallery.
Taking a picture using front camera
1. From the Home screen, tap Apps > Camera.
2. Tap
Menu > Front camera.
3. Frame your subject on the screen > Tap
• To switch to main camera, tap
Menu > Main camera.
.
AUTHORITY 92
Page 93

Opening Camcorder
• When you’re in Camera mode, drag the to the Camcorder position. Or, tap Menu > Switch to video.
Camcorder settings
When in Camcorder mode, Camcorder settings are displayed on the screen. Before recording, you can adjust your
camcorder settings or leave them in automatic mode.
1. Tap a setting icon. The settings open over the screen.
• To hide settings on the screen, tap the screen or, tap
Menu > Settings.
2. Tap the setting you want to change.
General settings
Store location
White balance
Flash mode
Continuous AF On, O
Video quality 720P, D1, WVGA, VGA, CIF, QVGA, QCIF
Color e ect None, Mono, Sepia, Negative
Video Size High (30m), Low (30m), MMS (Low, 20s), YouTube (High, 10m), custom
Remaining time Show, Hide
Camera settings Restore defaults
O / On
Auto,
On,
Activate to use your phone’s location-based services. Recording videos wherever you are and
tag them with the location.
Incandescent,
O
Daylight,
Fluorescent,
Cloudy
3. Tap Back or tap the screen to close the settings menus.
NOTE
Depending on the selected video quality, not all video quality and video encoder options may be available.
Recording videos
1. When you’re in Camera mode, drag the to the Camcorder position. Or, tap Menu > Switch to video.
2. Frame the scene where you want to start recording.
3. Tap
4. Tap
An image from your most recent video is displayed as a thumbnail at the right of screen. Tap the thumbnail to
view, share, or work with your videos in Gallery.
to start recording.
to stop recording.
AUTHORITY 93
Page 94

Recording videos using front camcorder
1. When you’re in Camera mode, drag the to the Camcorder position. Or, tap Menu > Switch to video.
2. Tap
3. Frame the scene where you want to start recording.
4. Tap
5. Tap
• To switch to main camcorder, tap
Menu > Front camcorder.
to start recording.
to stop recording.
Menu > Main camcorder.
Gallery
Use Gallery to view your pictures and videos. You can edit and add e ects to your photos. You can also easily add a
photo as your contact icon, location icon, or wallpaper.
Opening Gallery and viewing album lists
Opening Gallery
• From the Home screen, tap Apps > Gallery.
• Or when you’re in Camera/Camcorder mode, tap the thumbnail image at the right of screen.
Your album list is displayed. Albums are groups of images and videos in folders.
Managing albums
1. From the Home screen, tap Apps > Gallery.
2. Tap
3. Check the albums you want.
• Tap
albums.
• Tap
• Tap
Menu twice.
Share > Tap the application to use to share the selected albums. You can share the entire contents of one or more
Delete > Tap Con rm Delete to delete selected albums and all contents from your microSDTM card.
More > Tap Details to get details about selected albums.
Opening an album and viewing its contents
Viewing contents of an album
After you’ve selected an album, you can browse through your pictures and videos. Albums open displaying the
pictures and videos they contain in a chronologically ordered grid. The name of the album is shown at the top of
the screen.
1. From the Home screen, tap Apps > Gallery.
AUTHORITY 94
Page 95

2. Swipe left or right across the screen to view additional albums, then tap an album to open and view its contents.
3. When you open an album,
• Swipe left or right across the screen to view more contents. Tap a thumbnail image to view it.
• Drag
locate an image.
• Tap to change the album view mode. You can view the pictures and videos in a grid or in stacks, sorted by date and
location.
to the left or right to scroll adjust scrolling speed. The image creation dates is displayed enabling you to easily
Viewing contents of an album with spreading album mode
1. From the Home screen, tap Apps > Gallery.
2. Pinching an album with two ngers and spreading images apart to peek into an album.
• The preview image shows 8 latest images in an album.
• Tap an image to view it.
• Tap
• Turn your phone left or right to view the album in landscape mode.
to enter the album and view all the images of the album.
Working with pictures or videos in batches
You can select one or more pictures or videos in an album to work on them in batches.
1. From the Home screen, tap Apps > Gallery.
2. Tap the album you want to open, and then tap
Menu twice.
3. Check the pictures or videos you want.
• Tap
• Tap
• Tap
The controls available depend on the mix of selected items.
Share > Tap the application to use to share the selected items.
Delete > Tap Con rm Delete to delete selected items from your microSDTM card.
More > Tap Details to get details about selected items.
Viewing pictures
Viewing a picture
1. From the Home screen, tap Apps > Gallery.
2. Tap the album you want to open, and then tap a thumbnail image of picture to view it.
• Swipe left or right across the screen to view the previous or next picture in the album.
• Turn your phone left or right to view the picture in upright (portrait) or sideways (landscape) orientation.
3. Tap the screen to see the controls.
• Tap
• Tap
or double-tap the screen to zoom in or out.
Slideshow to watch a slideshow of your pictures and videos in the album. Tap the screen to stop the slideshow.
• Tap
Menu to view more options.
AUTHORITY 95
Page 96

Working with pictures
1. From the Home screen, tap Apps > Gallery.
2. Tap the album you want to open, and then tap a thumbnail image of the picture.
3. Tap
Menu. Or tap the screen > Menu.
• Tap Share > Tap the application to share the picture. You can share a picture by sending it to friends or posting it in a
Picasa web album.
• Tap
• Tap
Delete > Tap Con rm Delete to delete the picture from your microSDTM card.
More > Tap one of the icons shown below:
Details
Set as
Crop
Rotate Left /
Rotate Right
Get details about the picture.
Contact icon Use a picture as a contact icon.
Wallpaper Use a picture as Home screen wallpaper.
Crop a picture. It is not applicable to DRM image.
Rotate a picture. It is not applicable to DRM image.
Playing videos
1. From the Home screen, tap Apps > Gallery.
2. Tap the album you want to open, and then tap a thumbnail image of the video to view it. You can view the video in landscape
or portrait mode.
3. Tap the screen to view the controls.
• Tap
• Tap
• Tap
to skip backwards.
to pause the video.
to resume playback.
• Tap to skip forward.
AUTHORITY 96
Page 97

Videos
Opening Videos and viewing video lists
Use the Videos application to play videos that you’ve recorded with the Camcorder, downloaded from the web, or
copied onto your microSDTM card.
• From the Home screen, tap Apps > Videos.
Your video list is displayed.
Playing videos
1. From the Home screen, tap Apps > Videos.
2. Tap a video to view it.
3. Tap the screen to view the controls.
• Tap
• Tap
• Tap to resume playback.
• Tap
to skip backwards.
to pause the video.
to skip forward.
Play Movies
Opening Play Movies
Use the Play Movies application to play movies or videos that you’ve recorded with the Camcorder, downloaded
from the web, or copied onto your microSDTM card.
• From the Home screen, tap Apps > Play Movies.
Your movies or video list is displayed in the
Searching for movies or videos from Play Store
My Rentals and Personal Videos.
1. From the Home screen, tap Apps > Play Movies.
2. Tap
3. Play Store application will be opened.
at the top right of the screen.
Playing movies or videos
1. From the Home screen, tap Apps > Play Movies.
2. Tap a movie or video you want to view it.
AUTHORITY 97
Page 98

3. Tap the screen to view the controls.
• Tap
• Tap
• Tap
• Tap to skip forward.
to skip backwards.
to pause the video.
to resume playback.
Sound Recorder
Opening Sound Recorder
You must have a microSDTM card installed to use Sound Recorder.
1. From the Home screen, tap Apps > Sound Recorder.
• Tap Menu > All Records > You can view all your voice clips.
Using Sound Recorder
1. From the Home screen, tap Apps > Sound Recorder.
2. Tap
3. Tap
• To save the voice clip, enter voice record name > Tap
• To discard the voice clip, tap
• Tap
• Tap
• Tap Menu > New Record to start new recording.
• Tap
• Tap
• Tap
• Tap
• Tap
to start recording a voice clip.
to stop recording.
Save.
Discard.
to listen to the recording.
/ to listen to the previous or next voice clip.
Menu > All Records to view all your voice clips.
Menu > Share to share your voice clip > Tap the application you want to use to share it.
Menu > Rename to rename the selected voice clip > Enter new voice record name > Tap Save.
Menu > Set as ringtone to use the voice clip as ringtone.
Menu > Delete to delete the selected voice clip > Tap Done.
AUTHORITY 98
Page 99

Music
Play music and audio les with Music application.
NOTE
You need to copy music files to your microSDTM card to use the Music application.
Viewing your music library
1. From the Home screen, tap Apps > Music.
2. You can select library to open at the top of the screen.
• You can view the lists of music in the microSD
• The lists are automatically organized according information contained in the music les. To view each list of music, you can
tap the corresponding category;
Artists, Albums, Songs or Playlists.
TM
card.
Searching for music in the library
1. From the Home screen, tap Apps > Music.
2. Tap
• Start typing the name of an artist, album, or track. Matches are displayed in the list below the search box.
• Tap a matching song to play it. Or tap a matching album or artist to view a list of associated songs.
Search.
Using a song as a ringtone
You can use a song as your phone ringtone.
1. From the Home screen, tap Apps > Music.
2. Tap and hold a song in a library list. In the menu that opens, tap
Or on the Playback screen, tap
Menu > Use as ringtone.
Use as phone ringtone.
Deleting a song from the microSDTM card
1. From the Home screen, tap Apps > Music.
2. Tap and hold a song. In the menu that opens, tap
Delete > OK. Or on the Playback screen, tap Menu > Delete > OK.
AUTHORITY 99
Page 100

NOTE
If you are playing the song, the song can not be deleted.
Playing music
1. From the Home screen, tap Apps > Music.
2. Tap the library you want to open at the top of the screen.
3. Tap a song or tap
Menu > Tap Play all mode, Party shu e mode or Shu e all mode.
Available playback modes vary according to each library setting.
• Tap the onscreen icons to control music playback, select a song to play, repeat songs, and more.
1
2
3
4
5
6
1 Open the current playlist.
2 Turn shu e on or o . (Shu e is o when button is gray.)
3 Repeat the current playlist: Repeat all songs, Repeat current song, Repeat o .
4 Tap and hold, then search for the corresponding information in Browser/Music/Play Music/YouTube.
5 Go to the previous song in the current playlist.
6 Play/Pause.
7 Go to the next song in the current playlist.
8 Drag the slider to go directly to a speci c section of a track.
7
8
Music playing features
1. From the Home screen, tap Apps > Music.
2. Open the library you want, and then tap the music le.
• To adjust the volume, press
Volume up and Volume down.
• While music is playing, it is possible to exit to the Home screen or open another application.
• You can also return to the Music application by opening the Noti cation panel.
Working with playlists
You can organize the music les by creating playlists.
AUTHORITY 100
 Loading...