

Page 1

1
MANUEL D’UTILISATION
42
USER MANUAL
DLC-E2250/DLC-E2450
Lire attentivement la notice avant d’utiliser l’appareil
Before operating this product, please read user manual completely
Page 2

Ce téléviseur contient la technologie de l’Interface Multimédia à Haute
Dénition (HDMITM). HDMI, le logo HDMI et High-Denition Multimedia
Interface sont des marques ou des marques déposées de HDMI Licensing
LLC.
Ce signe indique que ce produit ne peut pas être jeté avec les ordures
ménagères ordinaires. Vous êtes responsable du recyclage et de la collecte
sélective de ces produits. Veuillez déposer les déchets mentionnés cidessus à un endroit désigné pour le recyclage des déchets d’équipements
électriques et électroniques. Si vous ne savez pas où déposer vos déchets
d’équipements pour le recyclage, veuillez contacter votre mairie ou le service
de collecte des déchets ménagers.
Page 3
FRAN-
FRANÇAIS
1
Avertissements et Précautions
AVERTISSEMENTS ET PRECAUTIONS
Pour réduire les risques d’incendie ou de décharge électrique, n’exposez pas cet appareil à la
pluie ou à l’humidité.
Ce symbole est destiné à alerter l’utilisateur d’éviter le risque de décharge électrique.
Cet équipement ne doit pas être démonté par toute personne autre que le personnel de service
qualié.
Ce symbole est destiné à alerter l’utilisateur de la présence des instructions importantes
d’opération et d’entretien dans la documentation accompagnant l’appareil.
▪ POUR REDUIRE LES RISQUES DE DECHARGE ELECTRIQUE.
▪ NE PAS ENLEVER LE COUVERCLE (OU L’ARRIERE).
▪ AUCUNE PIECE UTILISABLE POUR L’UTILISATEUR A L’INTERIEUR.
▪ CONFIER TOUTE REPARATION A UN PERSONNEL QUALIFIE.
L’utilisation de commandes, de réglages ou de procédures autres que ceux spéciés ici peut
entraîner une exposition à des rayonnements dangereuse.
Instructions de sécurité importantes
Pour éviter toute blessure, les précautions de sécurité suivantes doivent être observées dans l’installation,
l’utilisation, l’entretien et la maintenance de cet équipement.
Avant d’utiliser cet équipement, veuillez lire complètement ce manuel et le garder à proximité pour
référence future.
▪ Ne mettez pas l’équipement sur des chariots, des supports, des tables, des étagères
irréguliers ou instables. L’équipement peut tomber et causer les blessures graves aux enfants
ou aux adultes et les dommages importants à l’équipement lui-même.
▪ Utilisez uniquement un chariot ou un support recommandé par le fabricant. Cet équipement et
le chariot ou le support recommandé doivent être manipulés avec soin. L’arrêt brutal, la force
excessive et des surfaces inégales peuvent provoquer l’équipement et le chariot / support à
renverser.
▪ Ne mutilez pas la che tripolaire de type de connexion de masse. La broche de masse sur la
che tripolaire est une caractéristique importante. L’enlèvement de la broche de masse
augmentera le risque d’endommagement à l’équipement.
▪ Si vous ne pouvez pas insérer la che dans la prise électrique, contactez un électricien pour
l’installation d’une prise mise à la terre.
▪ Toujours faire fonctionner cet équipement à partir du type d’alimentation indiqué sur l’arrière.
▪ Ne surchargez jamais les prises murales et les rallonges.
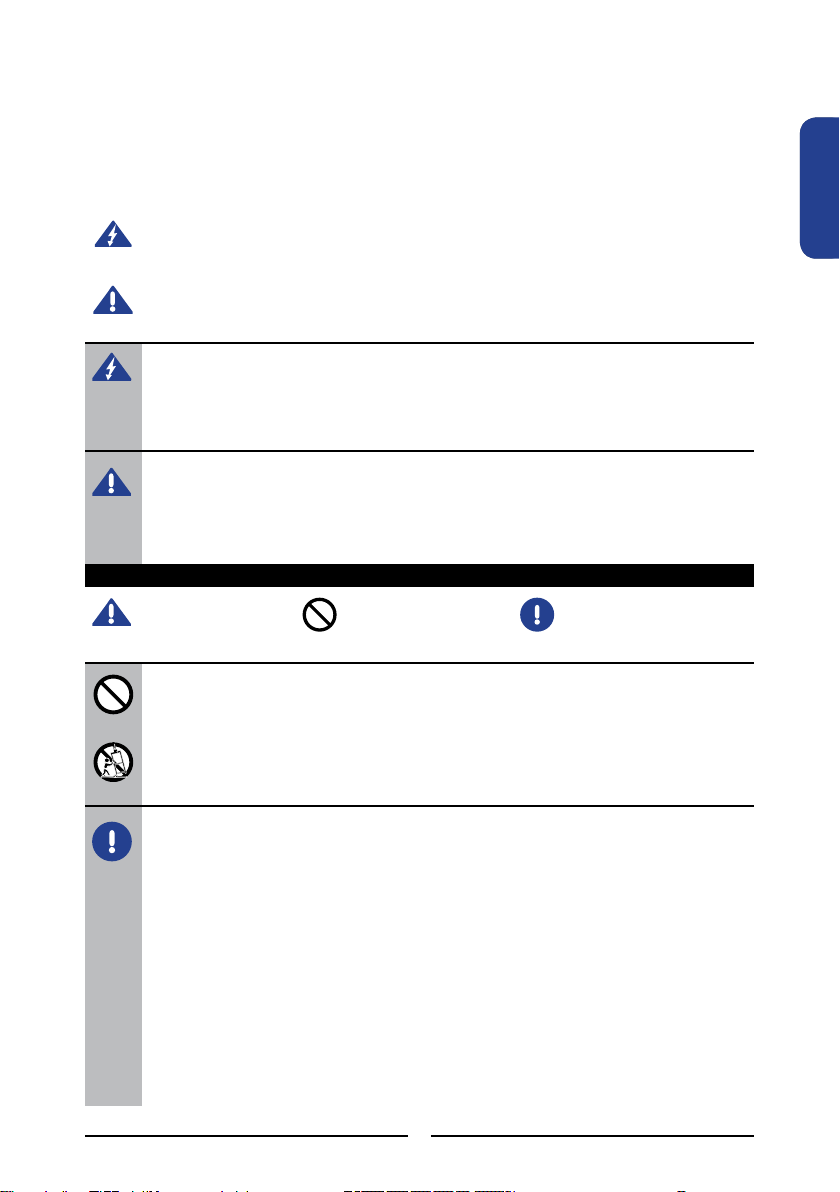
Ce symbole indique les
points de prudence.
Ce symbole indique les
actions qui ne doivent
pas être effectués.
Ce symbole indique les
actions qui doivent être
effectués.
AVERTISSE-
MENT
ATTENTION
Page 4
2
Avertissements et Précautions
▪ Toujours retirez le cordon d’alimentation de la prise avant de nettoyer l’équipement.
▪ N’appliquez jamais de nettoyant liquide ou d’aérosol sur l’équipement.
Nettoyez-le uniquement avec un chiffon doux et sec.
▪ Utilisez uniquement les accessoires spécifiés par le fabricant.
▪ La précaution doit être prise lors de l’utilisation du produit. Aucune force mécanique ne doit
être appliquée sur le cordon d’alimentation secteur et la prise de courant secteur. Les prises
secteur partiellement desserrées peuvent provoquer un arc électrique ou un incendie.
▪ Lorsque la prise secteur ou un coupleur d’appareil est utilisé en tant que périphérique
déconnecté, le périphérique déconnecté doit rester facilement accessible.
▪ Utilisez et manipulez le cordon d’alimentation avec soin. Ne mettez pas d’objets lourds sur le
cordon d’alimentation secteur.
▪ Ne tirez pas sur le cordon d’alimentation. Ne manipulez pas le cordon d’alimentation avec des
mains mouillées.
▪ Ne touchez pas le cordon d’alimentation et le câble d’antenne au cours de la foudre.
▪ Retirez la che de la prise murale, si l’équipement ne sera pas utilisé pendant une longue
période de temps.
▪ Ne placez, ni n’utilisez, ni ne manipulez cet équipement près d’eau.
▪ N’exposez jamais l’équipement au liquide, à la pluie ou à l’humidité.
Demandez un service si l’une des substances liquides mentionnées ci-dessus est déversée
sur l’équipement.
▪ N’exposez pas l’équipement aux températures extrêmes ou aux rayons directs du soleil, car
l’équipement peut être surchauffé et subir des dommages.
▪ N’installez pas l’équipement près des sources de chaleur telles que les radiateurs, le
chauffage, les fours ou tout autre appareil pouvant produire de la chaleur.
▪ Ne tentez pas de réparer l’équipement vous-même.
▪ L’ouverture et l’enlèvement des couvercles peuvent vous exposer à des tensions
dangereuses ou à d’autres dangers et peuvent annuler votre garantie. Conez la réparation
au personnel qualié.
▪ Ne mettez ni ne laissez tomber tout autre objet sur le dessus.
▪ N’insérez pas tout objet dans les trous de ventilation de votre équipement.
L’insertion de tout objet métallique inammable peut provoquer un incendie ou une décharge
électrique.
▪ Ne mettez pas l’équipement sur des chariots, des supports, des tables, des étagères
irréguliers ou instables.
L’équipement peut tomber et causer les blessures graves aux enfants ou aux adultes et les
dommages importants à l’équipement lui-même. Toujours placez l’équipement sur le plancher
ou sur une surface robuste, plane, stable et sufsamment solide pour supporter le poids de
l’équipement.
▪ Ne bloquez pas les ouvertures de ventilation. Laissez un espace libre autour de l’équipement.
Ne placez jamais l’équipement:
sur un lit, un canapé, un tapis ou toute autre surface semblable; trop près des draperies /
rideaux / murs, dans une bibliothèque, un placard intégré, ou tout autre endroit similaire qui
peut causer une mauvaise ventilation.
▪ Débranchez cet appareil pendant les orages ou lorsqu’il n’est pas utilisé pendant une longue
période de temps.
▪ Confiez toute réparation au personnel qualifié. Un entretien est requis lorsque l’appareil a été
endommagé de quelque façon, comme le cordon d’alimentation ou la fiche est endommagé,
tout liquide a été renversé ou tout objet est tombé dans l’appareil, l’appareil a été exposé à la
pluie ou à l’humidité, l’appareil ne fonctionne pas normalement, ou il est tombé.
Page 5
FRAN-
FRANÇAIS
3
Avertissements et Précautions
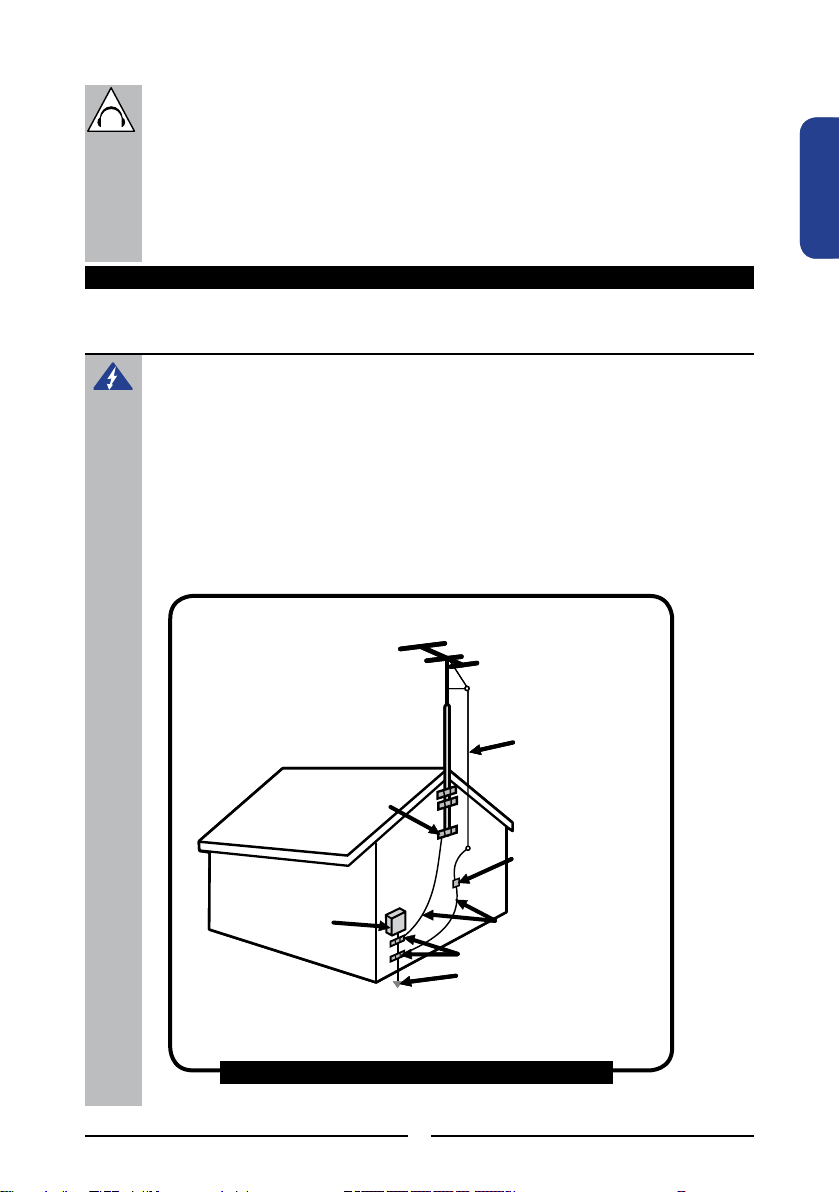
Consignes de sécurité pour l’Antenne
Fil d’entrée d’antenne
Unité de décharge
d’antenne
Conducteurs à la terre
Mise à la terre du circuit
d’abonné
Bornes de terre
Equipement de
service
Si une antenne extérieure est connectée, suivez les précautions ci-dessous:
EXEMPLE DE LA MISE A LA TERRE D’UNE ANTENNE EXTERIEURE
▪ Une antenne extérieure ne devrait pas être située dans un endroit où elle pourrait entrer en
contact avec des lignes aériennes d’électricité, ou tout autre éclairage électrique ou d’autres
circuits d’électricité.
▪ Lorsque vous installez une antenne extérieure, des précautions extrêmes doivent être prises
pour éviter tout contact avec des lignes électriques. Le contact direct avec des lignes
électriques peut être fatal et doit être évité à tout prix.
Consignes de sécurité pour l’Antenne Extérieur
Bornes de terre
Bornes de terre
Equipement de
service électrique
Si une antenne extérieure est connectée, suivez les précautions ci-dessous:
ECOUTE AVEC ECOUTEURS
▪ Ecoutez à un volume modéré pour éviter d’endommager l’ouïe.
▪ Si vous n’entendez rien pendant la lecture, n’augmentez pas le volume au maximum car la
musique peut soudainement éclater à un volume élevé. La pression acoustique excessive des
écouteurs et du casque d’écoute peut provoquer une perte auditive.
▪ Pour éviter d’endommager vos oreilles, réglez le volume au niveau le plus bas avant la
lecture, et augmentez le volume à un niveau désiré lorsque la lecture a commencé.
Page 6

4
SOMMAIRE
AVERTISSEMENTS ET PRECAUTIONS
Instructions de sécurité importantes ............................................................................1
Consignes de sécurité pour l’Antenne Extérieur ..........................................................3
PRESENTATION DE L’ECRAN LCD TV LED
Principales fonctions ....................................................................................................5
Contenu de l’emballage ...............................................................................................6
Mise en place de votre LCD TV LED ...........................................................................7
Votre LCD TV LED .....................................................................................................10
Votre télécommande ..................................................................................................13
Installation LCD TV LED
Connexion d’un câble TV ou d’une antenne ..............................................................15
Connexion d’un périphérique A/V à l’aide du connecteur SCART/PERITEL .............20
Connexion d’un périphérique A/V à l’aide du connecteur SCART/PERITEL YPbPr
(optionnel) ..................................................................................................................21
Connexion d’un équipement AV à l’aide d’un connecteur HDMI ................................22
Connexion d’un équipement AV à l’aide d’un connecteur DVI ...................................23
Connexion d’un ordinateur .........................................................................................24
Connexion d’un récepteur audio ................................................................................25
UTILISATION DES FONCTIONS
Utilisation de guide du programme ............................................................................26
Personnalisation des paramètres IMAGE ..................................................................29
Personnalisation des paramètres SON ......................................................................32
Personnalisation des paramètres TEMPS .................................................................33
Personnalisation des paramètres OPTION ................................................................35
Personnalisation des paramètres CHAINE ................................................................36
Personnalisation des paramètres VERROU ..............................................................38
DEPANNAGE
.........................................................................................................................................40
SPECIFICATIONS
...................................................................................................................................................41
Page 7

FRANÇAIS
5
Présentation de l’écran LCD TV LED
Diverses bornes Audio/Vidéo pour la connexion des équipements externes
▪ 1 Borne d’entrée SCART PERITEL/Le SCART offre le signal YPbPr (câble optionnel)
▪ 1 Borne VGA
▪ 1 VGA LINE IN (ENTRÉE LIGNE)
▪ 1 Prise d’entrée HDMI.
▪ 1 Prise de sortie audio coaxiale numérique
▪ 1 sortie casque
Interface Multimédia Haute Dénition (HDMI)
▪ L’Interface Multimédia Haute Dénition (HDMI) est une interconnexion petite et
conviviale qui peut transporter jusqu’à 5 Gbps de vidéo et audio combinés dans un
seul câble. Ce système élimine les coûts, la complexité et la confusion de plusieurs
câbles utilisés pour connecter des systèmes A/V actuels.
3D Réduction de Bruit Numérique
▪ Cette fonction permet de réduire numériquement le bruit d’image pour assurer une
meilleure qualité d’image.
Détection de mode Film
▪ Cette fonction peut détecter automatiquement le contenu dérivé d’un lm et ajuster le
cadre d’entrelacement correspondant an de fournir une apparence plus naturelle et
plus claire de l’image animée.
PRESENTATION DE L’ECRAN LCD
TV LED
Principales fonctions
Page 8

6
Présentation de l’écran LCD TV LED
LCD TV LED
Assurez-vous que tous les contenus suivants sont inclus.
Ces articles sont tout ce qu’il faut pour mettre en place et faire fonctionner le LCD TV LED
dans sa conguration de base.
Contenu de l’emballage
Télécommande /
Pile AAA/LR.03 x 2 (non fournies)
Manuel d'utilisation Guide Rapide
1 2
3
4
5
6
7
8 9
JUMP
0
Le type de cordon d’alimentation peut
être différent selon le type d’alimentation
de votre pays.
Cordon d’alimentationAdaptateur AC-DC
Assurez-vous que tous les contenus ci-dessus sont inclus.
Remarque : Les photos des accessoires sont pour référence seulement. La couleur
de la télécommande et le type de cordon d’alimentation sont variables selon les
modèles réels.
Page 9
FRANÇAIS
7
Présentation de l’écran LCD TV LED
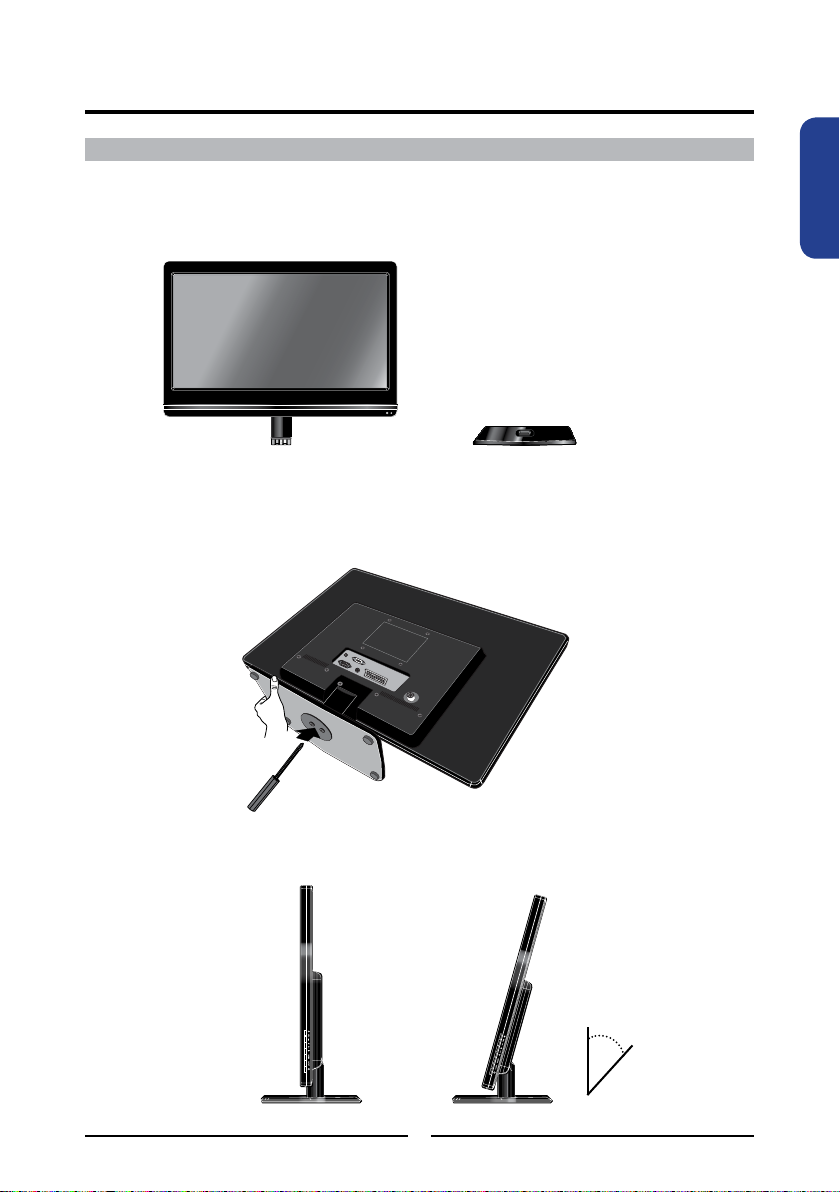
Mise en place de votre LCD TV LED
Suivez les instructions ci-dessous pour installer le support TV :
Ouvrez la boîte et vériez que toutes les pièces nécessaires sont dans la boîte. La boîte
contient:
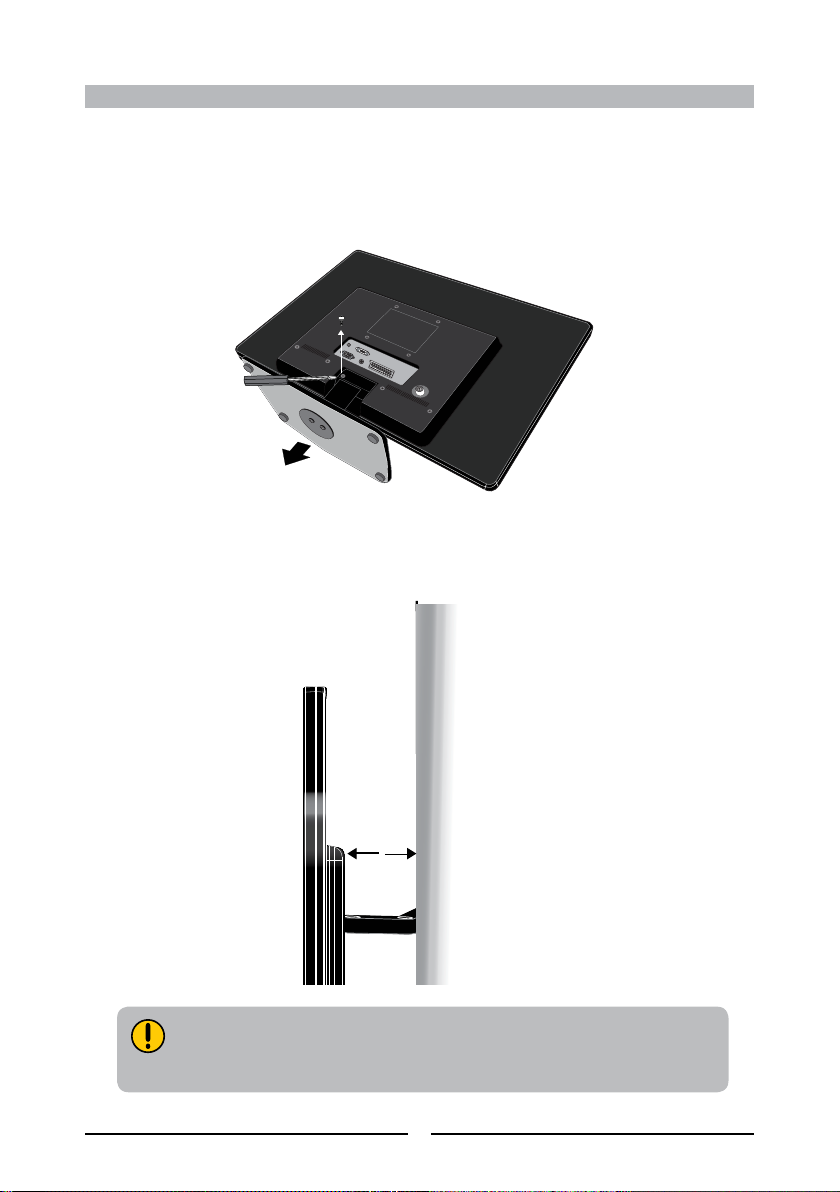
Comment installer le support de TV
Couvrez une surface stable et égale avec un tissu doux. Mettez l’appareil LCD TV LED avec
la face vers le bas sur le tissu. Montez le support sur la partie inférieure de l’appareil LED
TV LCD comme indiqué, puis utilisez un tournevis pour serrer la vis sur le bas du support
jusqu’à ce que la vis soit solidement xée en place.
LCD TV LED
Support
An d'assurer une position saine et détendue du corps lors de l'utilisation de la
télévision aux postes de travail à écran de visualisation, vous êtes en mesure de
régler l'angle du support du téléviseur. L'angle de LCD TV LED peut être ajusté
d'environ 20 degrés.
20
o
Page 10
8
Présentation de l’écran LCD TV LED
Si vous préférez monter votre nouveau téléviseur sur un mur au lieu de l’attacher au support,
reportez-vous aux instructions incluses dans le kit de montage mural (non fourni).
Fixez le montage VESA à l'arrière du téléviseur à l'aide des quatre vis fournies dans le kit de
montage mural. Lors de l’installation du téléviseur au mur, laissez de l'espace.
Comment enlever le support de TV
Pour éviter d’endommager la surface de LCD TV LED, mettez le téléviseur sur un tissu doux.
Dévissez le support et détachez-le du téléviseur.
Lors de l’installation du téléviseur au mur, laissez de l’espace (6 cm au moins).
Vériez le modèle de votre téléviseur et assurez-vous d’utiliser le kit de
montage mural spécié pour le modèle de votre téléviseur uniquement.
Contactez votre technicien pour l’assistance lors de l’installation du kit de
montage mural.
6 cm
Page 11
FRANÇAIS
9
Présentation de l’écran LCD TV LED
N’utilisez pas de nettoyants caustiques (porcelaine, acier inoxydable, toilette ou
nettoyant de four, etc.) sur la télécommande, car elle pourrait subir des dommages.
Utilisez un câble d’antenne fourni pour connecter le signal VHF/UHF à la borne d’ANT LCD
TV LED. (Voir page 15-19).
Connectez l’adaptateur AC-DC à l’arrière du téléviseur et branchez le cordon d’alimentation
à une prise murale.
Insérez les piles (non fournies) dans la télécommande.
Connectez d’autre appareil AV externe (Voir page 20-24).
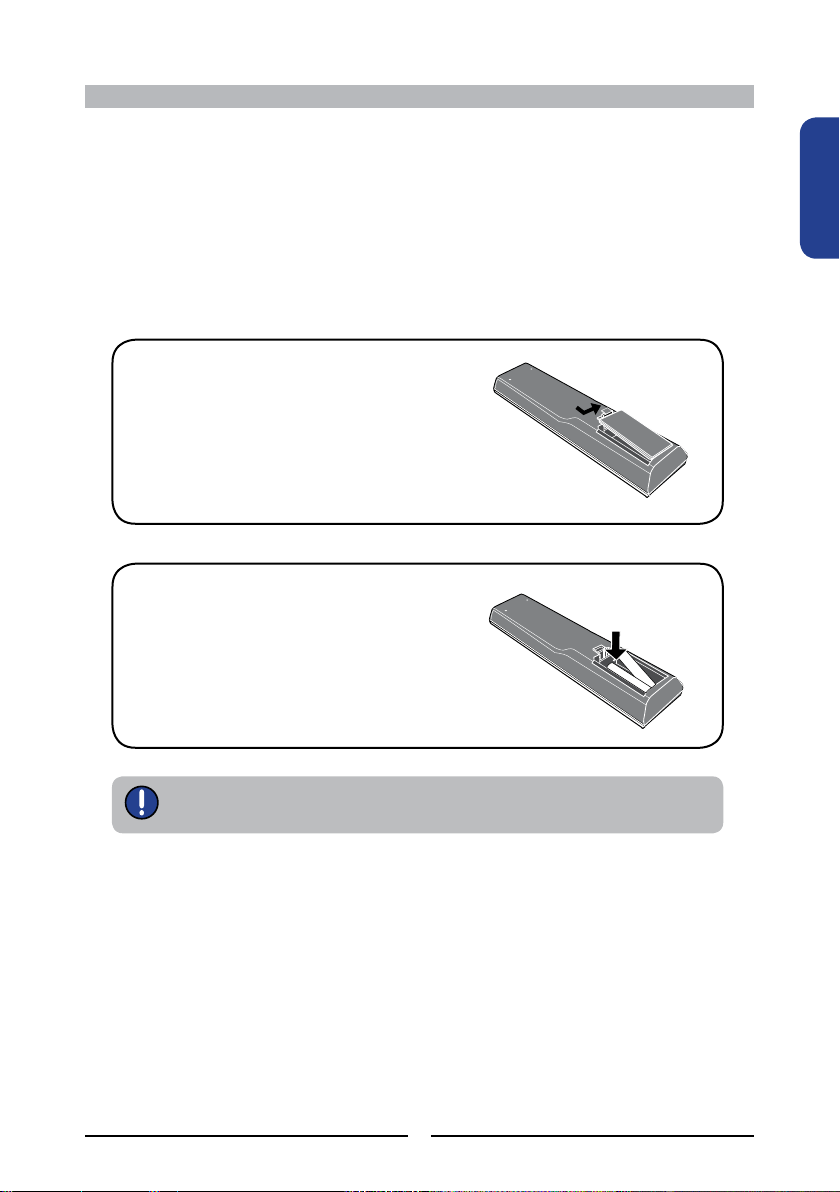
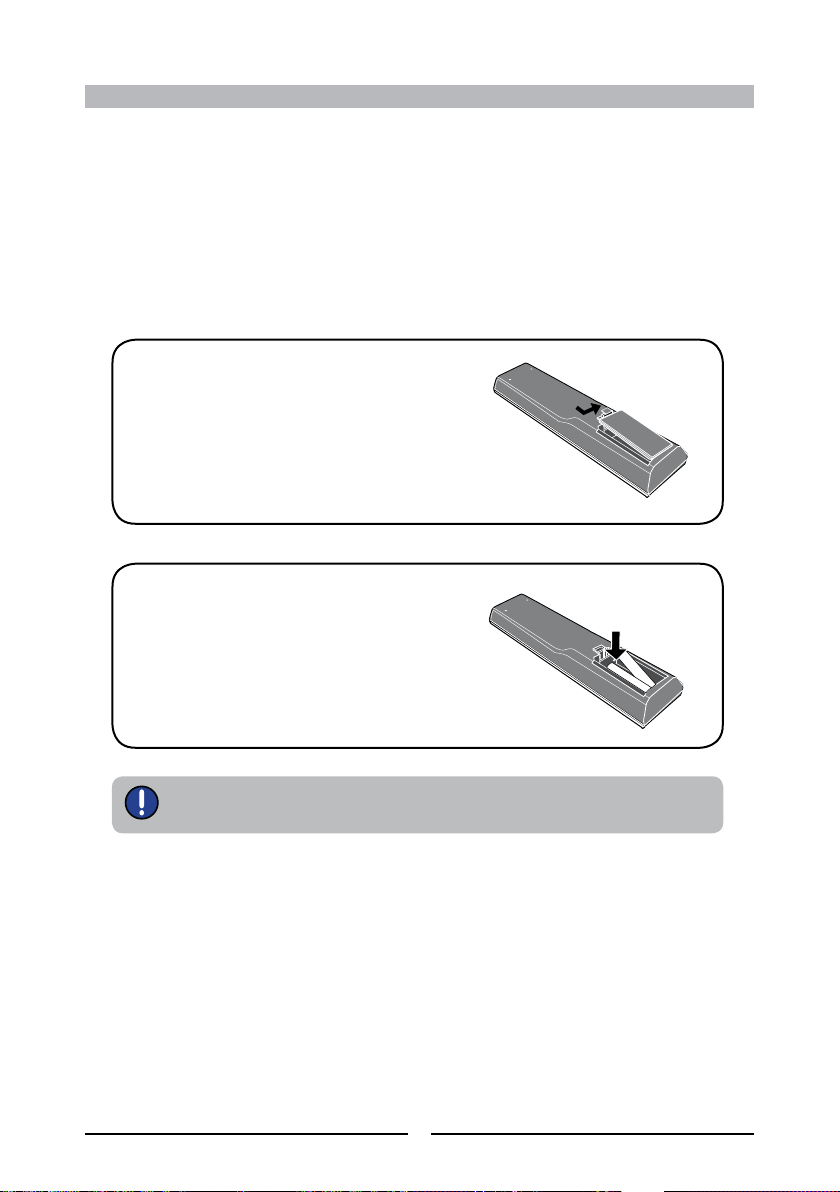
Etape 1 Faites glisser le couvercle vers le haut
pour ouvrir le compartiment à piles de
la télécommande.
Etape 2 Insérez deux piles de type AAA /LR.03.
Veillez à mettre les polarités (+) et (-) des
piles correspondantes auxquelles (+) et
(-) indiquées dans le compartiment à
piles.
Faites glisser le couvercle en place.
Comment installer le téléviseur
Page 12
10
Présentation de l’écran LCD TV LED
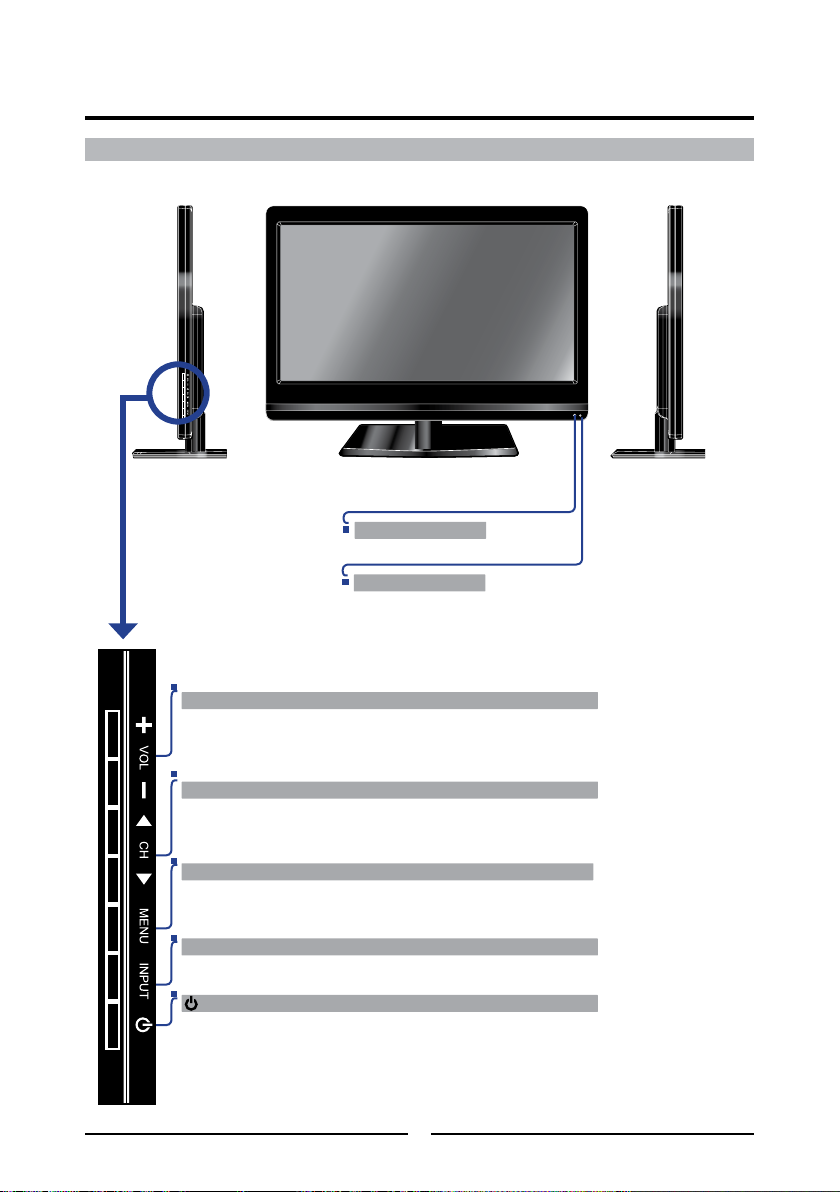
Votre LCD TV LED
Vue Avant/Gauche/Droite et Commandes
MENU
Appuyez une fois pour afcher l’OSD (Afchage sur écran),
appuyez à nouveau pour désactiver l’OSD.
VOL+-
Pour augmenter ou diminuer le volume. Pour sélectionner
l’élément du menu principal et pour changer les valeurs des
éléments en mode OSD.
Pour allumer le LCD TV LED et pour mettre
le téléviseur en mode veille.
CH▲▼
Pour chercher les chaînes. Pour sélectionner l’élément du
sous-menu en mode OSD.
INPUT
Pour choisir parmi différentes sources d’entrée du signal.
IR
Récepteur Infrarouge
LED
Le voyant LED indique que le LCD
TV LED est allumé.
Vue avant
Vue latérale gaucheVue latérale droite
Page 13
CABLE/AIR
FRANÇAIS
11
Présentation de l’écran LCD TV LED
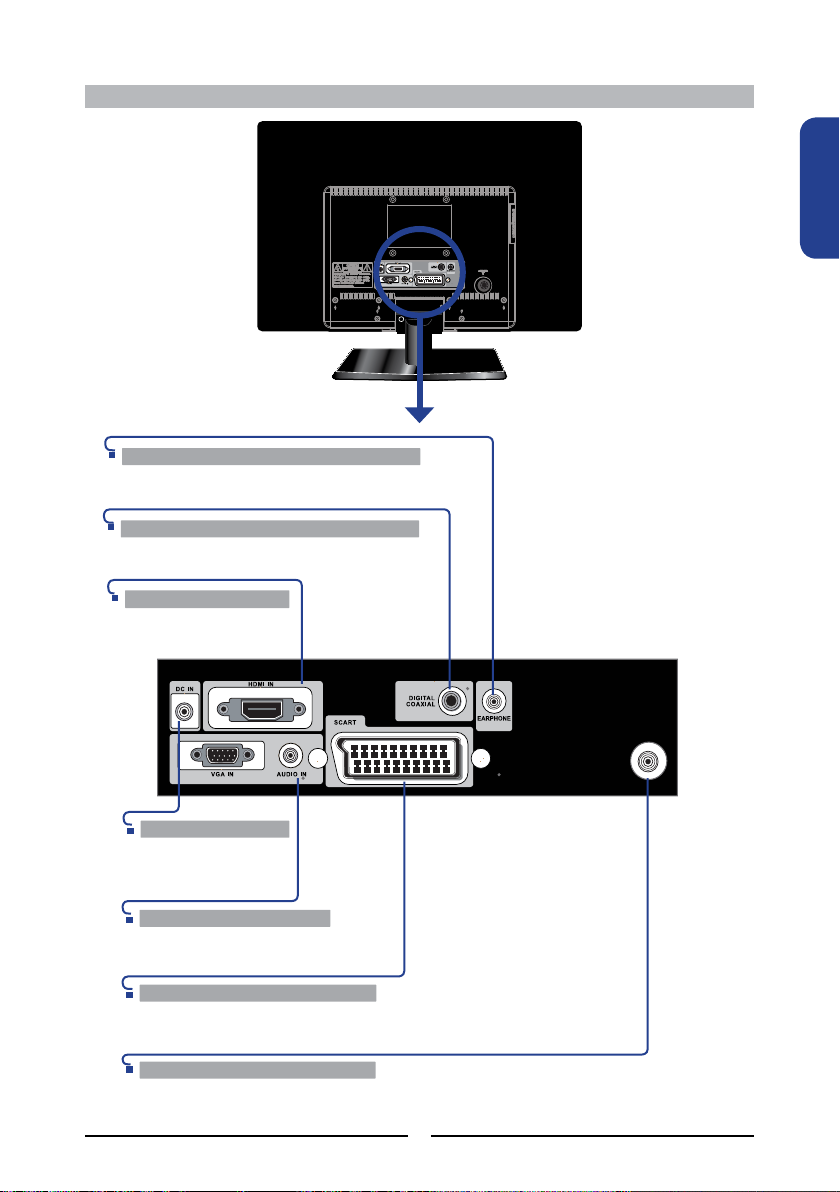
Vue arrière et prises
HDMI IN
Pour connecter tous les équipements
audio et vidéo numériques avec un
connecteur HDMI.
DC IN
Connectez le cordon
d’alimentation à
l’adaptateur AC-DC et
à la prise murale.
VGA IN/AUDIO IN
Pour connecter un PC ou d’autres
équipements AV avec VGA et ligne
d’entrée audio.
CABLE/AIR
Pour connecter l’entrée RF de l’antenne VHF/UHF ou du câble pour recevoir l’image
de télévision à haute/standard dénition.
SCART
Pour connecter à un équipement externe avec prise péritel. L’interface SCART offre
des signaux RGB, AV, YUV (facultatif) avec entrée/sortie audio entre le téléviseur et
l’équipement vidéo externe.
DIGITAL COAXIAL
Pour connecter à la prise audio sur le système
audio 5,1 numérique/standard.
EARPHONE
Pour connecter au casque d’écoute externe pour
une écoute privée.
Page 14
12
Présentation de l’écran LCD TV LED
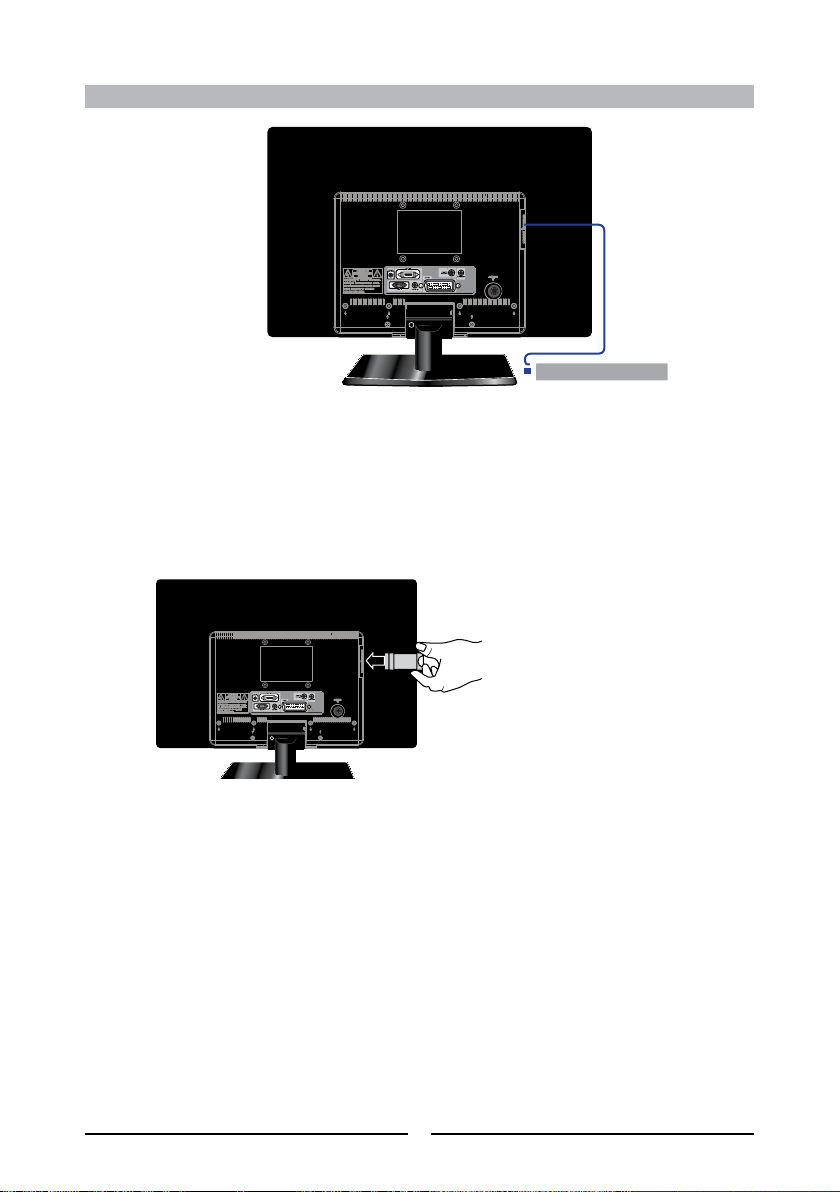
Comment connecter la carte CI (Interface Commune)
Pour proter des services cryptés (à payer) en mode TV numérique.
Cette fonction vous permet de regarder les services cryptés (services payants) dans
certaines chaînes. Si vous retirez le module CI, vous pouvez regarder les programmes
numériques/analogiques disponibles dans certaines chaînes.
Appuyez sur la touche INPUT de la télécommande pour afcher le menu d’entrée, puis
utilisez les touches ▲▼ pour sélectionner le DTV.
POUR INSERER UNE CARTE CI
Insérez la carte dans l’orice CI au sens de la èche jusqu’à sa place.
POUR RETIRER UNE CARTE CI
Retirez la carte CI de son orice.
ORIFICE CI
Page 15
FRANÇAIS
13
Présentation de l’écran LCD TV LED
POWE R
FREEZ E SUBTI TLE
SLEEP
GUIDE
P.SIZE
1 2
3
4
5
6
7 8 9
JUMP
0
VOL. CH.
INFO
INPUT
OK
MENU
EXIT
S.MOD E P.MODE
Votre télécommande
15
13
12
14
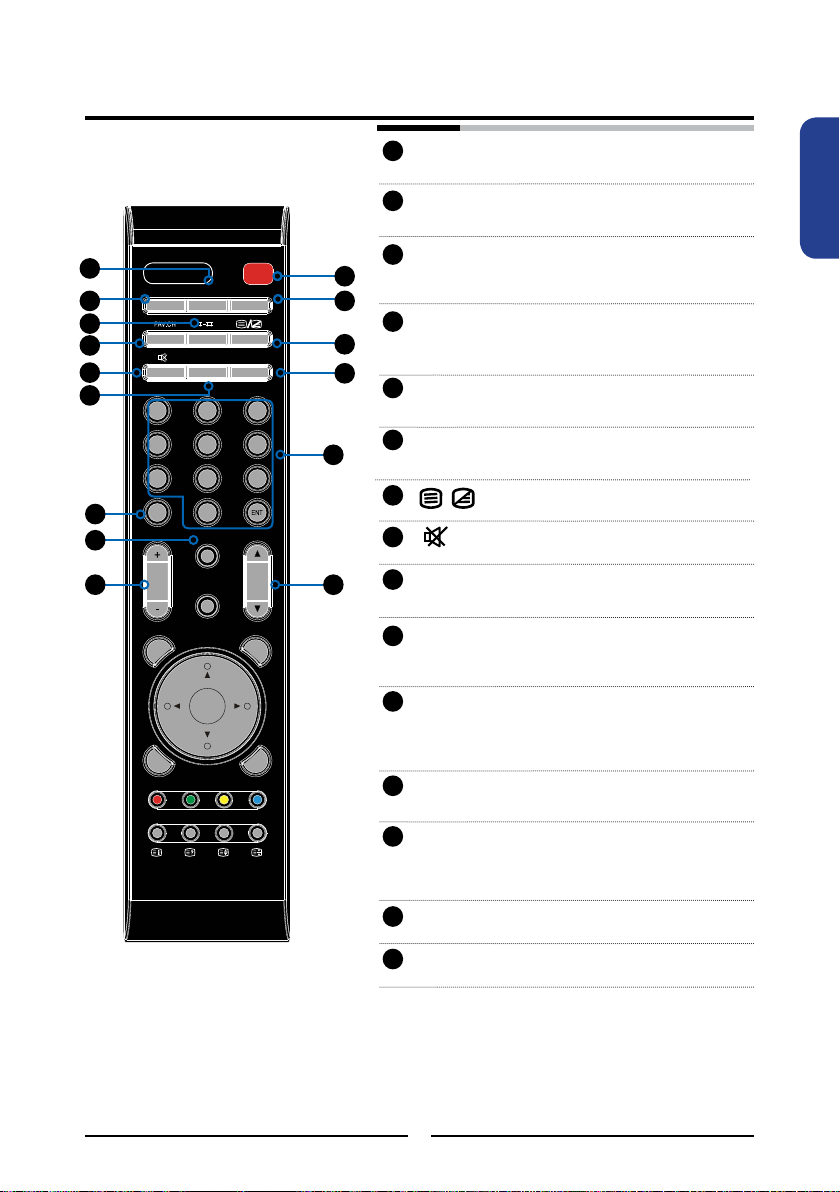
POWER Pour allumer le LCD TV LED et pour
mettre le téléviseur en mode veille.
SUBTITLE Pour activer et désactiver le mode de
sous-titres en mode DTV.
FREEZE Appuyez sur FREEZE pour ger l’image
courante, appuyez à nouveau pour
restaurer l’image.
GUIDE Pour afcher le guide du programme sur
l’écran en mode DTV. Appuyez de
nouveau pour désactiver le guide.
I-II Pour naviguer parmi les options de son
de la télévision (NICAM): MONO/
DOUBLE/STEREO
FAV.CH Appuyez sur FAV.CH pour afcher les
chaînes préférées.
Pour activer et désactiver la fonction
Télétexte.
Pour couper le son et rétablir le son de
votre LCD TV LED.
SLEEP Pour naviguer parmi les options de durée
de passage en veille de LCD TV LED.
P. SIZE Pour naviguer parmi les paramètres du
mode Large: Panorama/Auto/4: 3/16: 9/
ZOOM1/ZOOM2
0-9/ENT Appuyez sur un certain numéro pour
sélectionner une chaîne.
Après la sélection, appuyez sur
ENT pour
activer la chaîne, ou attendez 3 secondes
pour l’activation automatique de la chaîne.
JUMP Pour commuter entre la chaîne en cours
et celle précédente.
INFO Appuyez une fois pour afcher une
variété d’informations telles que la chaîne
actuelle et la source d’entrée.
VOL.+- Pour augmenter et diminuer le volume.
CH.+- Pour chercher les chaînes.
1
2
10
11
12
13
14
15
3
4
5
6
7
8
9
1
2
3 4
5
6
7
8
9
10
11
Page 16
14
Présentation de l’écran LCD TV LED
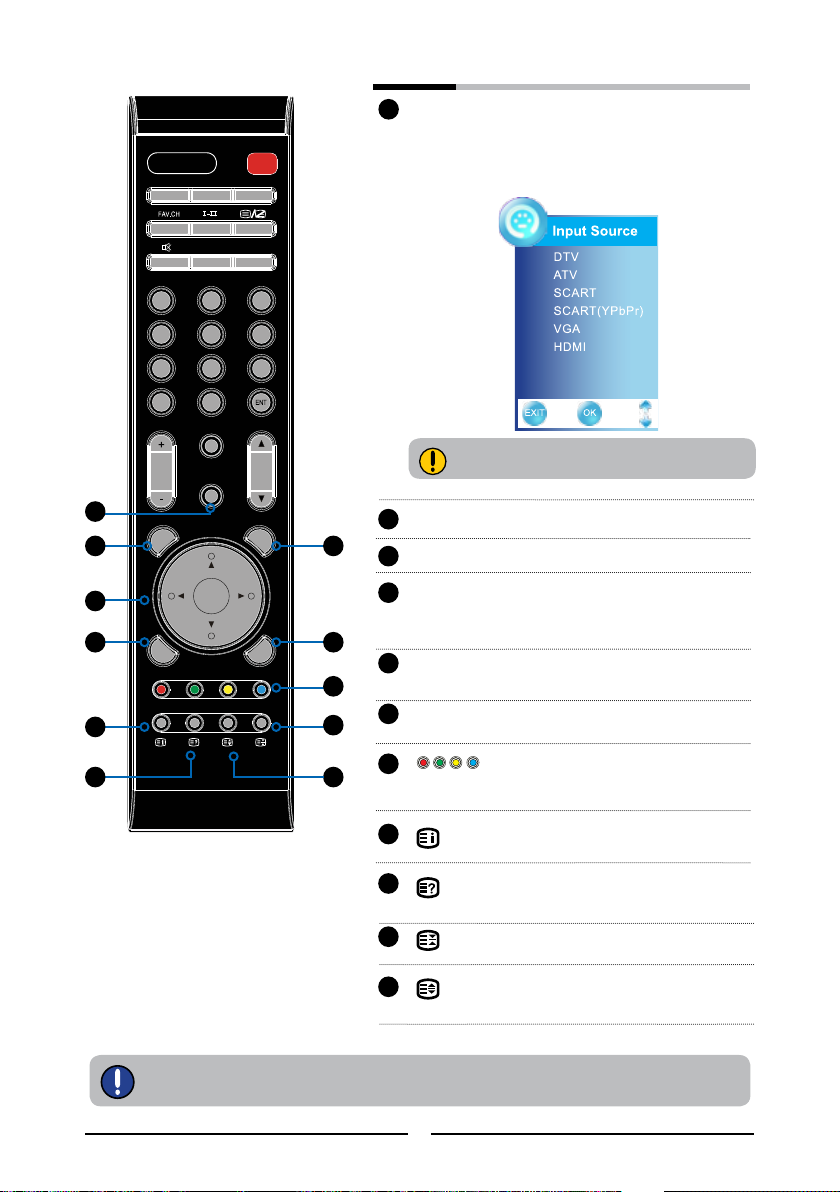
EXIT Pour quitter le menu OSD.
MENU Pour afcher le menu OSD à l’écran.
▲▼►◄ OK Pour naviguer parmi les options OSD et
pour sélectionner les éléments individuels
du menu. Appuyez sur OK pour conrmer
les réglages des options.
S. MODE Pour sélectionner l’un des effets sonores:
Sports / Film / Musique / Encerclement /
Standard / Utilisateur
P. MODE Pour sélectionner le mode d’image :
Utilisateur / Doux / Standard / Dynamique
Appuyez sur la couleur appropriée pour
diriger les fonctions d’accès en mode
Télétexte ou EPG.
Pour afcher l’indice principal en mode
Télétexte.
Pour révéler des informations cachées
telles que la réponse à un quiz en mode
Télétexte.
Pour congeler un message de plusieurs
pages sur l’écran en mode Télétexte.
Pour afcher la partie supérieure/
inférieure ou la totalité de la page pour
faciliter la lecture en mode Télétexte.
Portée efcace:
La télécommande peut contrôler le LCD TV LED à la limite de 5 mètres, si elle est dirigée
directement sur le récepteur.
INPUT Appuyez sur INPUT pour afcher la
liste des sources, utilisez ▼ ▲ pour
sélectionner l’équipement vidéo
connecté aux entrées vidéo de votre
LCD TV LED, et appuyez sur OK pour
conrmer.
17
18
19
20
21
22
23
24
25
26
POWE R
FREEZ E SUBTI TLE
SLEEP
GUIDE
P.SIZE
1 2
3
4
5
6
7 8 9
JUMP
0
VOL. CH.
INFO
INPUT
OK
MENU
EXIT
S.MOD E P.MODE
19
17
20
18
21
22
25
26
23
24
16
16
L’entrée YPbPr dépend du modèle.
Page 17
15
Installation LCD TV LED
FRAN-
FRANÇAIS
Installation LCD TV LED
Reportez-vous au manuel d’utilisation de tout équipement externe à connecter.
Lorsque vous connectez un équipement externe, ne connectez pas les cordons d’alimentation
AC aux prises murales avant que toutes les autres connexions soient terminées.
Connexion d’Antenne
Les exigences de l’antenne pour une bonne réception de TV en couleur sont plus importantes que
celles pour une réception de TV en noir et blanc. Pour cette raison, une antenne extérieure de bonne
qualité est fortement recommandée.
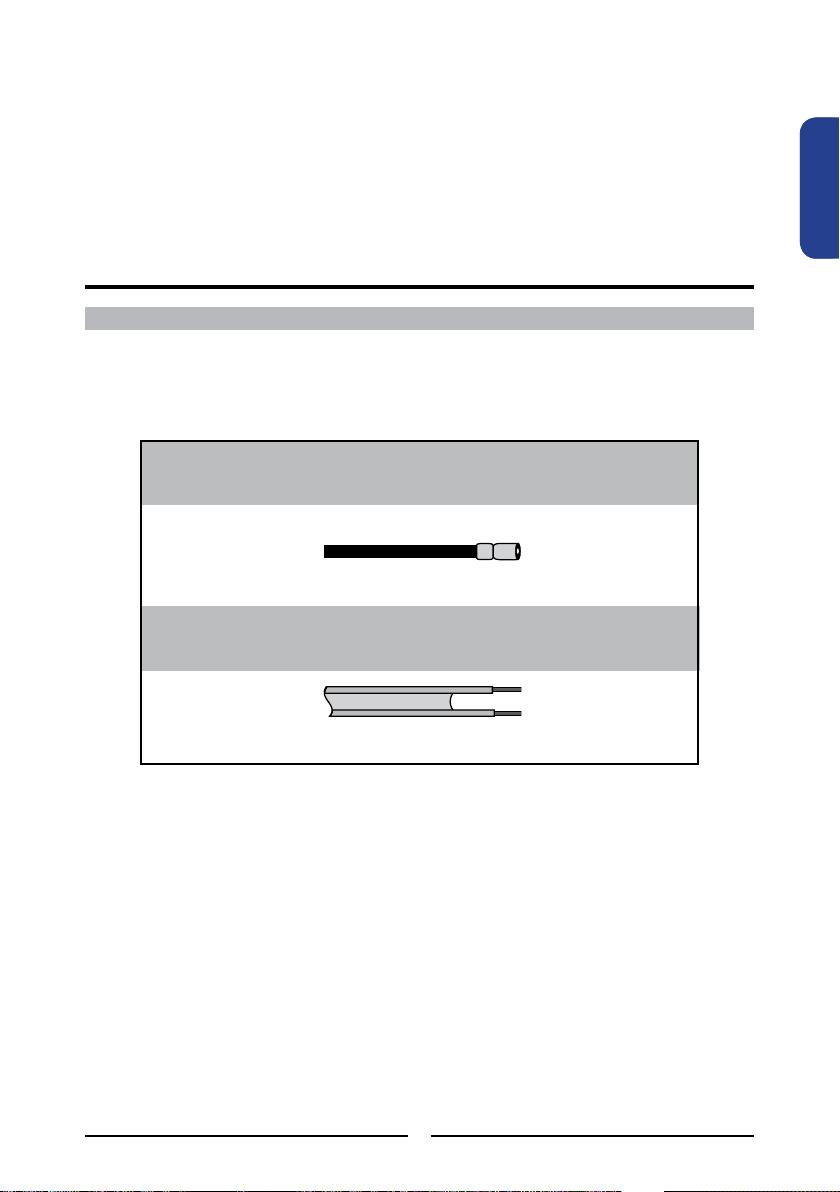
Ce qui suit est une brève explication du type de connexion qui est fournie avec les différents
systèmes d’antenne.
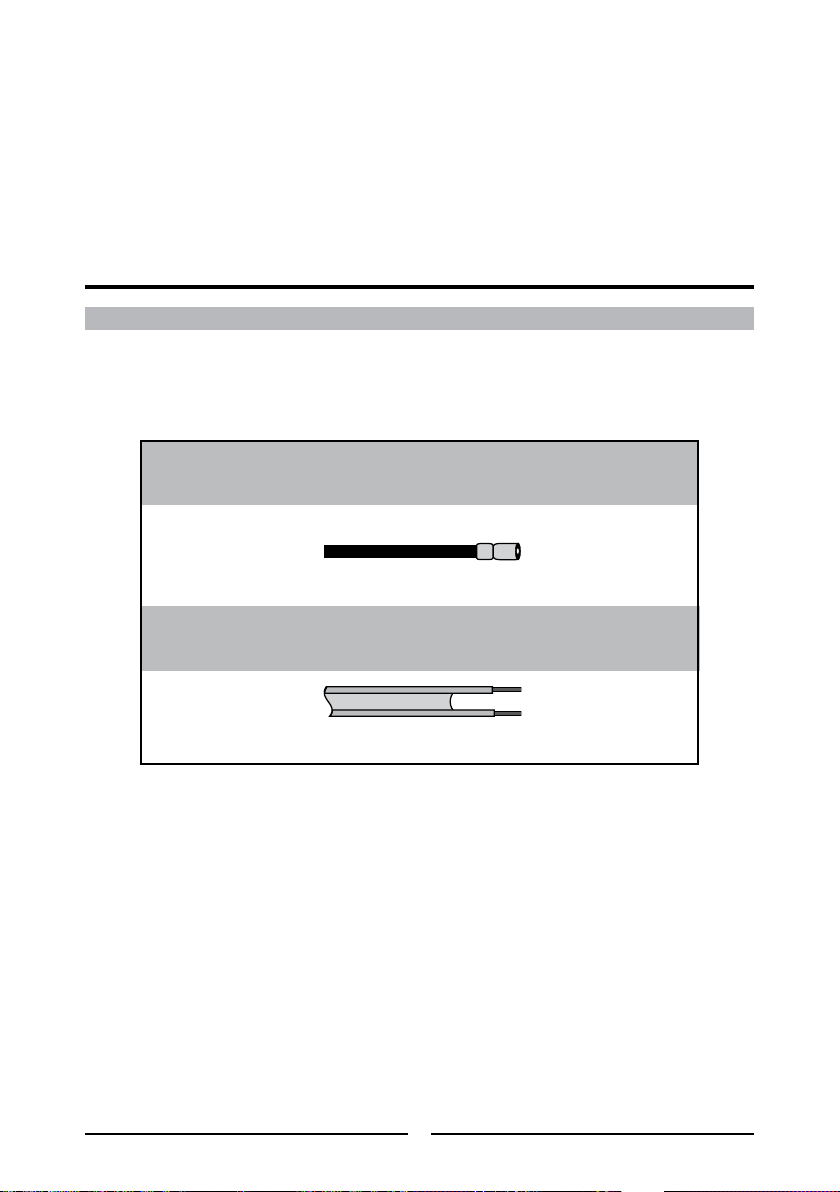
Câble coaxial de 75 ohm (rond)
Connecteur de type IEC
Câble jumelé de plomb de 300-ohm (plat)
■ Un système de 300-ohm est un câble plat jumelé de plomb (non
fourni) qui peut être at taché à une borne de 75-ohm au moyen
d’un adaptateur de 300 -75-ohm (non fourni).
Connexion d’un câble TV ou d’une antenne
■ Un système de 75- ohm est généralement un câble rond (non fourni)
avec connecteur de type IEC qui peut facilement être attaché à une
borne sans outils.
Page 18
16
Installation LCD TV LED
OUT
IN
Câble jumelé de
plomb de 300-ohm
Câble jumelé
de plomb de
300-ohm
Câble coaxial
de 75 ohm
Antenne
UHF
Antenne
VHF
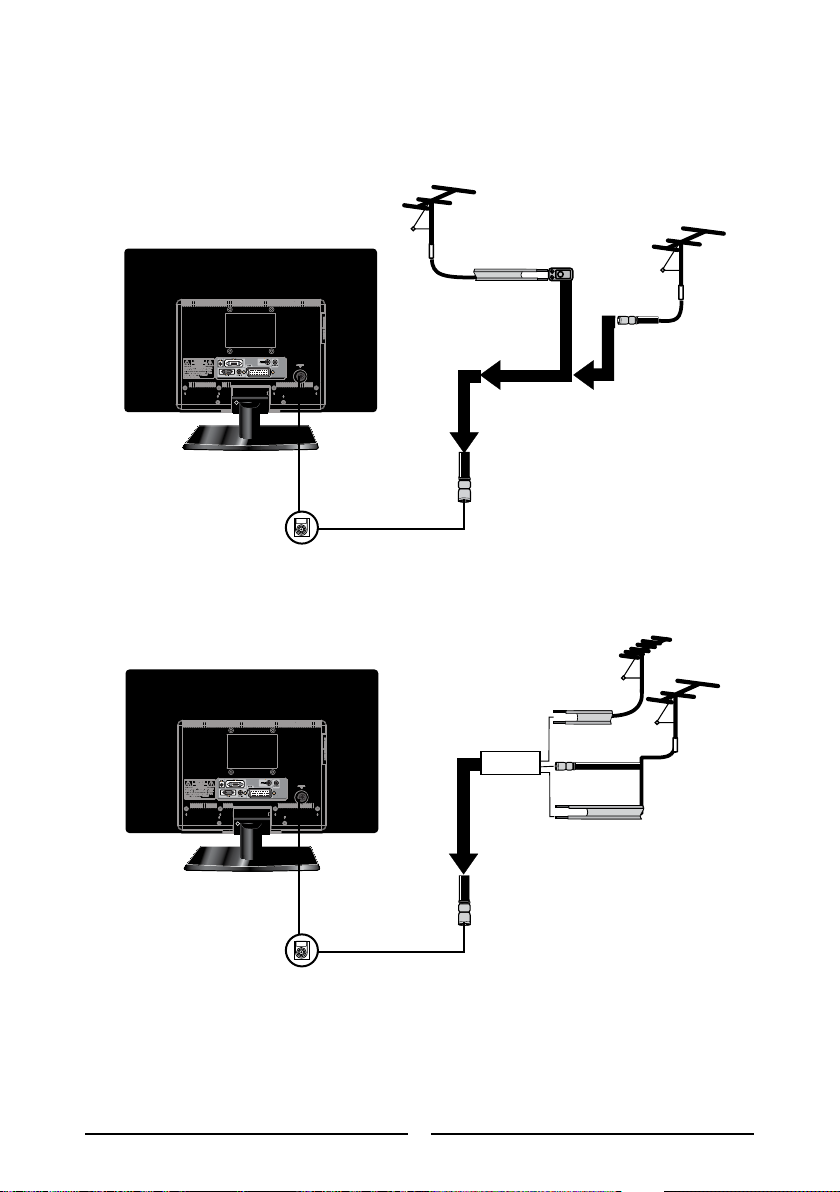
Combinateur
(non fourni)
A. Antenne de combinaison VHF/UHF
Câble jumelé
de plomb de
300-ohm
Câble coaxial
de 75 ohm
Antenne VHF/UHF
Antenne
VHF/UHF
Adaptateur 300/75ohm (non fourni)
B. Antenne Séparée VHF et/ou UHF
Utilisez l’un des deux schémas suivants lors de la connexion d’une antenne extérieure.
A : Indique comment utiliser une antenne extérieure de combinaison VHF/UHF.
B : Indique comment utiliser une antenne extérieure VHF et/ou UHF.
Page 19
17
Installation LCD TV LED
FRAN-
FRANÇAIS
A
IN
B
OU T
Ligne de TV
par câble
2 séries de
séparateur de
signal (non
fourni)
Commutateur RF
(non fourni)
Convertisseur/
décodeur de TV par
câble (non fourni)
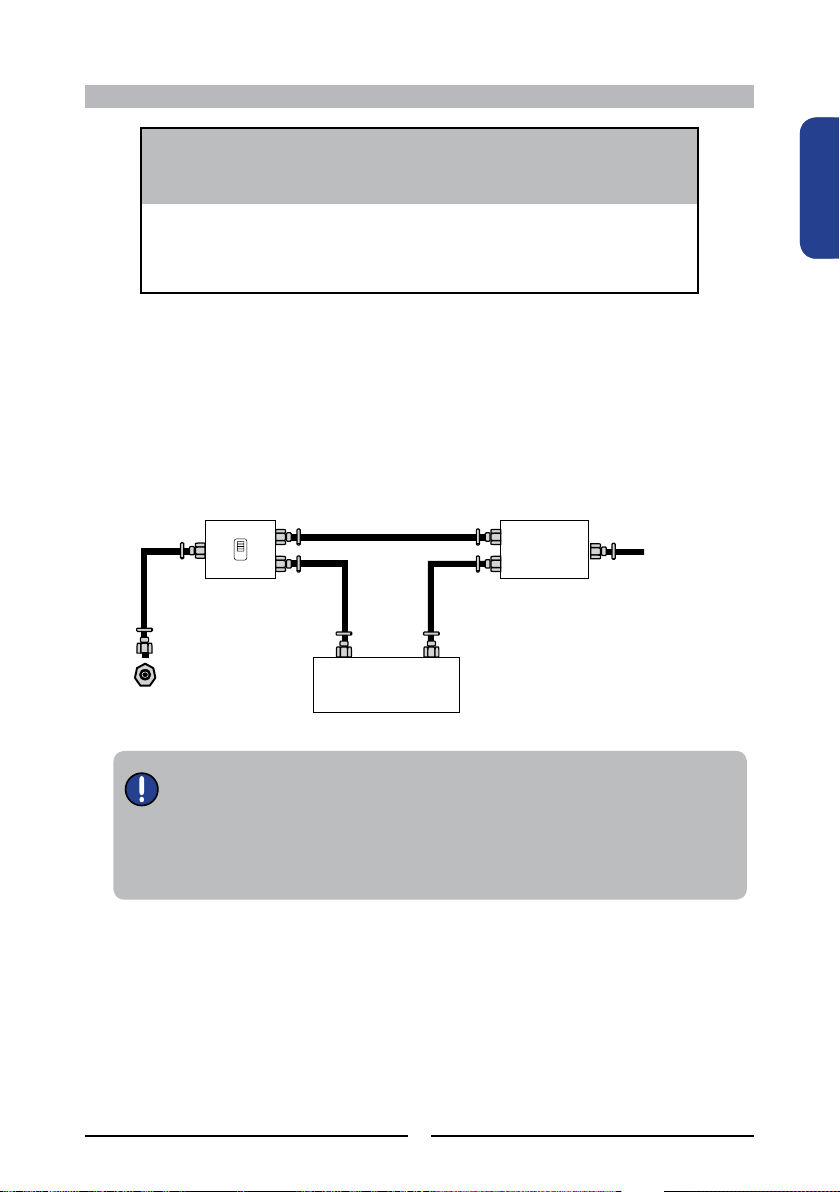
Connexion de TV par câble (CATV)
■
Le commutateur RF (non fourni) est nécessaire pour fournir deux
entrées (A et B). La mise du commutateur RF en position A vous permet
de regarder toutes les chaînes en clair en utilisant les touches de chaîne
de télévision.
■ La mise du commutateur RF en position B vous permet de regarder
toutes les chaînes cryptées au moyen du convertisseur/décodeur en
utilisant les touches de chaîne du convertisseur.
■
Un connecteur de câble coaxial de 75-ohm est intégré dans le téléviseur
pour faciliter la transmission.
Lorsque vous connectez le câble coaxial de 75 ohm au téléviseur,
connectez le câble de 75-ohm à la borne d’ANT.
■
Certains fournisseurs de TV par câble offrent des chaînes payantes
premium. Etant donné que les signaux de ces chaînes payantes
« premium » sont cryptés, un convertisseur / un décodeur de télévision
par câble est généralement fourni à l’abonné par le fournisseur de
télévision par câble.
Ce convertisseur / décodeur est nécessaire pour regarder des chaînes cryptées.
(Réglez votre téléviseur sur la chaîne 3 ou 4, normalement l’une de ces chaînes est utilisée. Si
vous ne savez pas, consultez votre fournisseur de télévision par câble.)
Pour des instructions plus spéciques sur l’installation de la télévision par câble, consultez votre
fournisseur de télévision par câble.
Une méthode possible de connecter le convertisseur/décodeur fourni par votre fournisseur de
télévision par câble est indiquée dans le schéma ci-dessous.
VHF/UHF IN
Page 20
18
Installation LCD TV LED
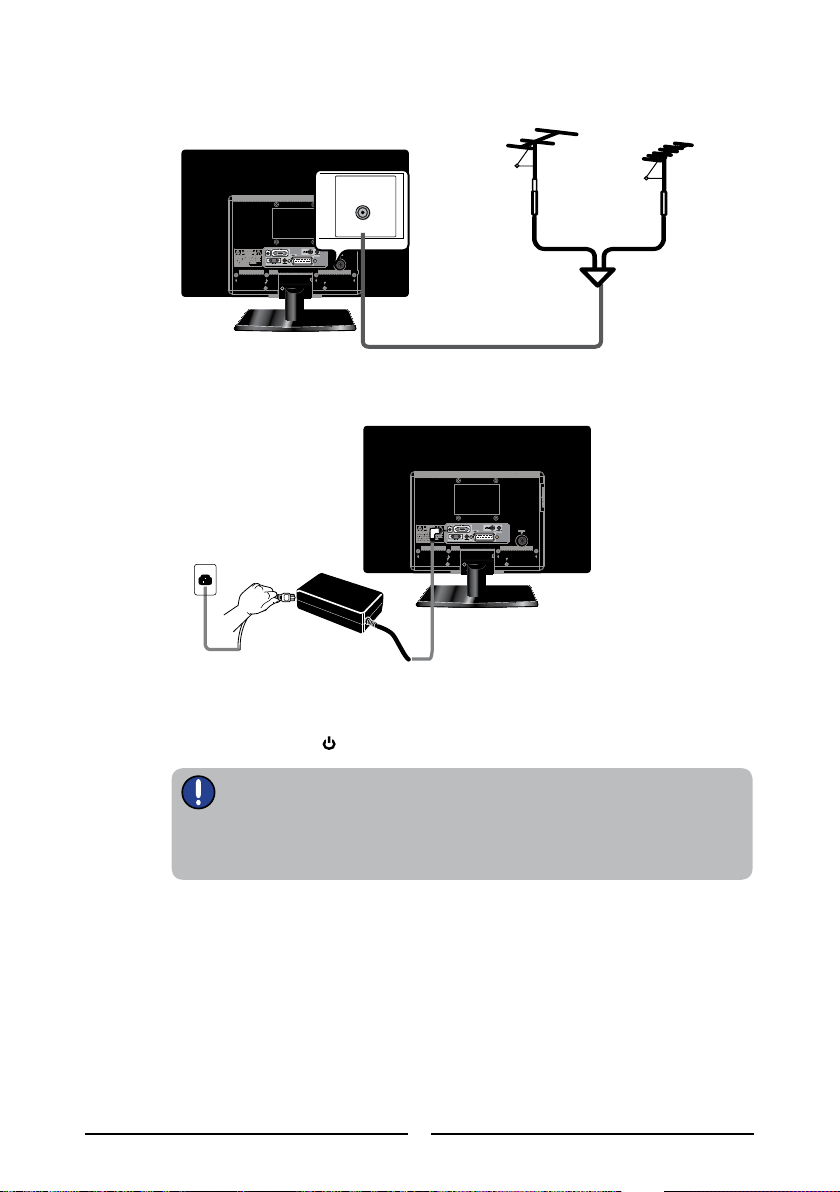
Utilisez un câble d’antenne fourni pour connecter le signal TV à la borne CABLE TV de
LCD TV LED.
Connectez la che DC de l’adaptateur AC-DC au port DC 12V à l’arrière du
téléviseur. Connectez le cordon d’alimentation à l’adaptateur AC-DC et à la prise
murale.
Appuyez sur la touche de la télécommande pour allumer le LCD TV LED.
Toujours débranchez le LCD TV LED de la prise de courant lorsque le LCD
TV LED ne sera pas utilisé pendant une longue période de temps.
La touche POWER du panneau avant est uniquement utilisée pour passer le
LCD TV LED en veille. Cela ne déconnecte pas l’appareil de la tension
principale. Pour débrancher complètement la tension principale, veuillez
retirer la che d’alimentation de la prise.
VHF/UHF IN
Appuyez sur la touche INPUT de la télécommande pour afcher la liste Source.Utilisez
les touches ▲▼ pour sélectionner DTV/TV, et appuyez sur la touche OK.
Page 21
19
Installation LCD TV LED
FRAN-
FRANÇAIS
EXIT
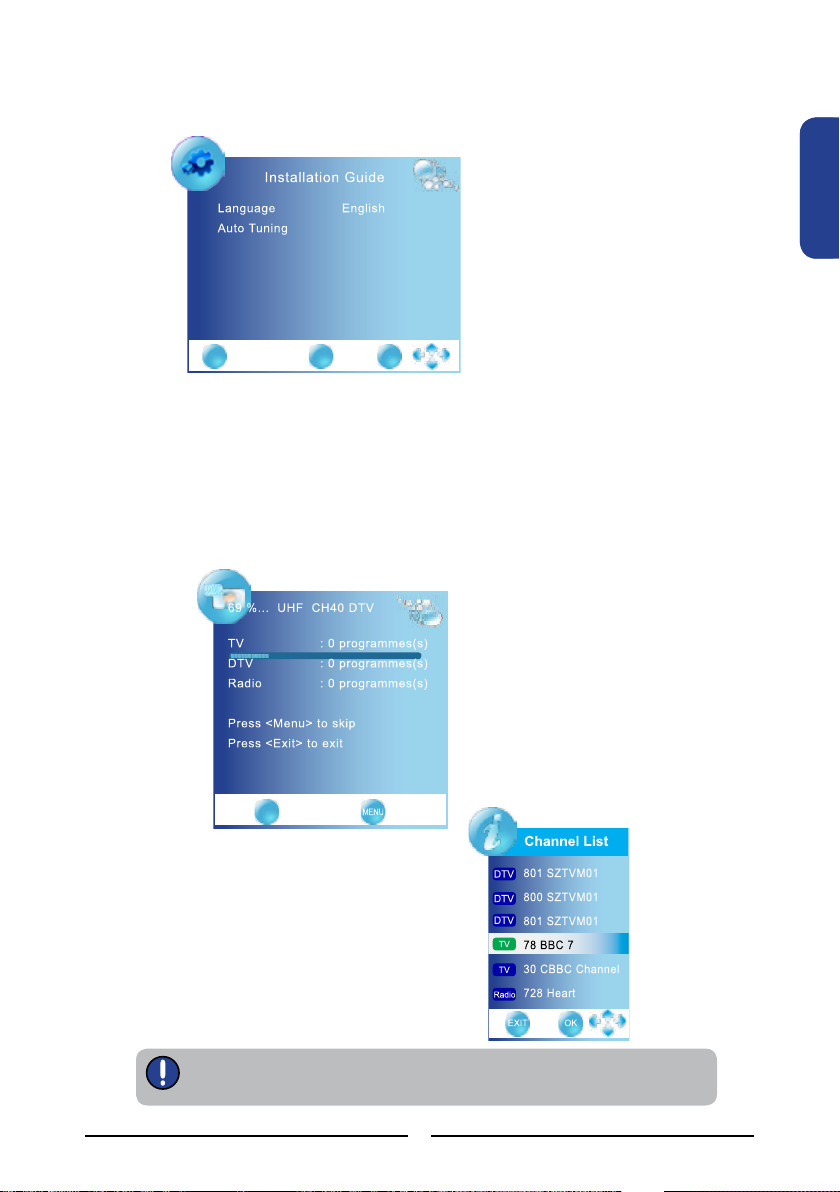
Lorsque vous allumez le téléviseur pour la première fois, le menu des réglages initiaux
apparaît sur l’écran.
Appuyez sur les touches ◄► pour sélectionner la langue afchée dans le menu.
Appuyez sur la touche ▼ pour sélectionner Réglage Auto et appuyez sur la touche
OK, puis utilisez les touches ◄► pour sélectionner le pays où vous ferez fonctionner
le téléviseur (Vous devez sélectionner votre aérien actuel si vous souhaitez recevoir
toutes les chaînes de manière able.). La fonction Réglage Auto crée
automatiquement une liste de chaînes recevables. Appuyez sur la touche EXIT à tout
moment pour interrompre le processus de mémorisation. (La liste ne peut pas être
créée en cas d’interruption)
Appuyez sur la touche OK pour afcher la
liste des chaînes et de la radio reçues,
puis appuyez sur les touches ▲▼ pour
sélectionner une chaîne ou une radio.
Le système MPEG apparaît en fonction du signal d’émission. Seuls le
Royaume-Uni et la Nouvelle-Zélande prennent en charge le format MPEG5.
EXIT OK
Page 22
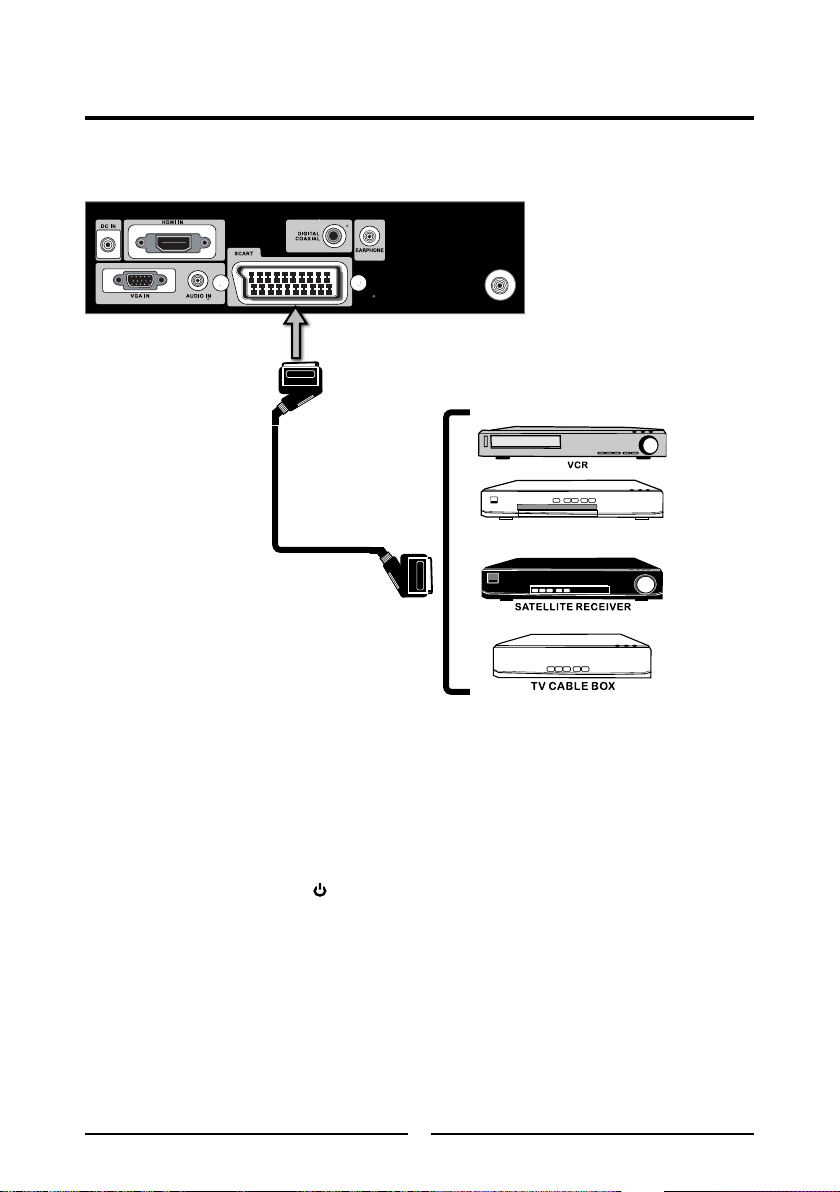
Arrière du téléviseur
CABLE/AIR
20
Installation LCD TV LED
Utilisez un câble SCART(PERITEL) pour relier la prise SCART(PERITEL) du
périphérique A/V externe au jack SCART(PERITEL) de LCD TV LED.
Connectez toutes les sources d’alimentation AC avant de mettre en marche le LCD TV
LED ou autre équipement connecté.
Appuyez sur la touche de la télécommande pour allumer le LCD TV LED.
Appuyez sur la touche INPUT de la télécommande pour sélectionner SCART(PERITEL).
Connexion d’un périphérique A/V à l’aide du connecteur SCART (PERITEL)
Câble SCART (PERITEL)
DVD P LAYER
Page 23
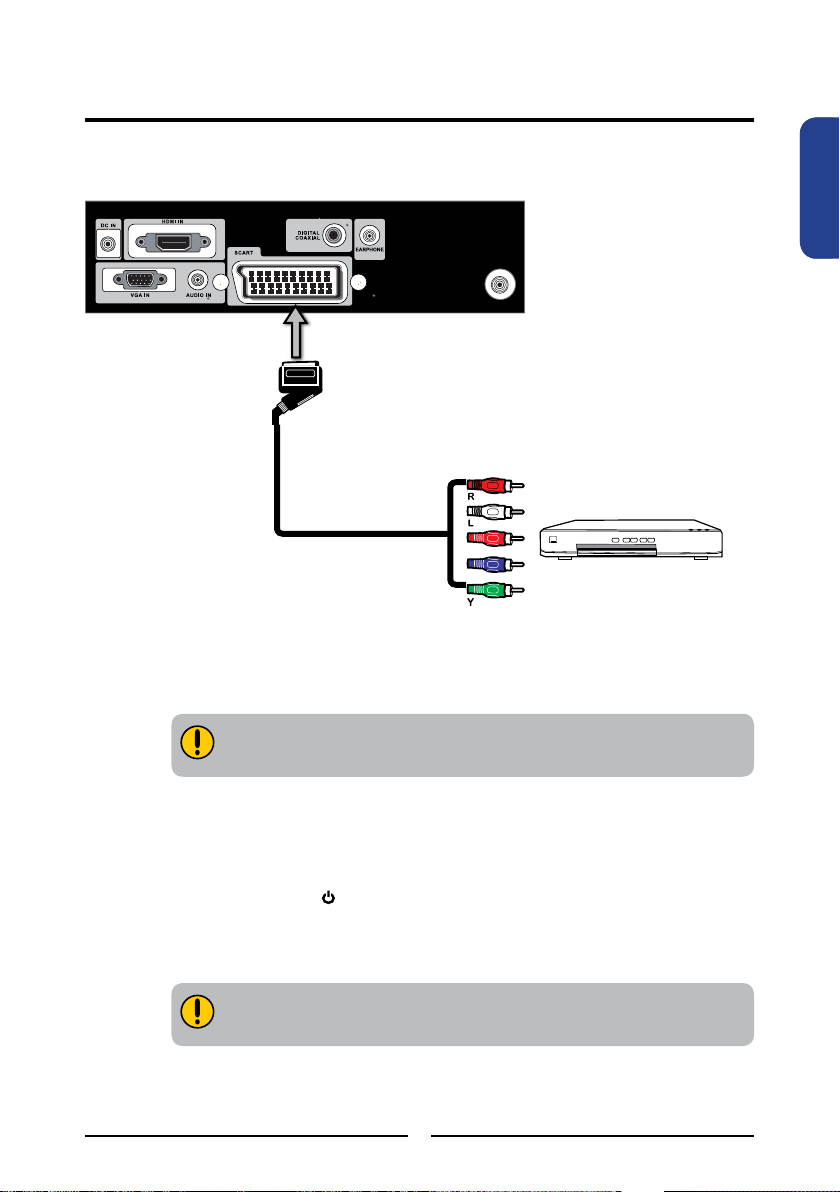
CABLE/AIR
Arrière du téléviseur
21
Installation LCD TV LED
FRAN-
FRANÇAIS
DVD P LAYER
Connexion d’un périphérique A/V à l’aide du connecteur
SCART(YPbPr)/PERITEL YPbPr (OPTIONNEL)
Câble SCART-à-YPbPr
Pr/Cr
Pb/Pb
Utilisez un câble SCART/PERITEL-à-YPbPr(optionnel) pour relier les prises de sortie
YPbPr du périphérique A/V externe au jack SCART de LCD TV LED.
Les prises vidéo YPbPr de votre appareil A/V sont parfois marqués YPbPr ou
YCbCr. Pour une explication de vidéo composante, consultez le guide de
l’utilisateur de votre appareil A/V.
Si le câble SCART/PERITEL-à-YPbPr n’est pas connecté aux prises YPbPr sur
votre appareil A/V, veuillez ajouter un câble vidéo/audio composant
disponible.
Connectez toutes les sources d’alimentation AC avant de mettre en marche le LCD TV
LED ou autre équipement connecté.
Appuyez sur la touche de la télécommande pour allumer le LCD TV LED.
Appuyez sur la touche INPUT de la télécommande pour sélectionner YPbPr.
Page 24
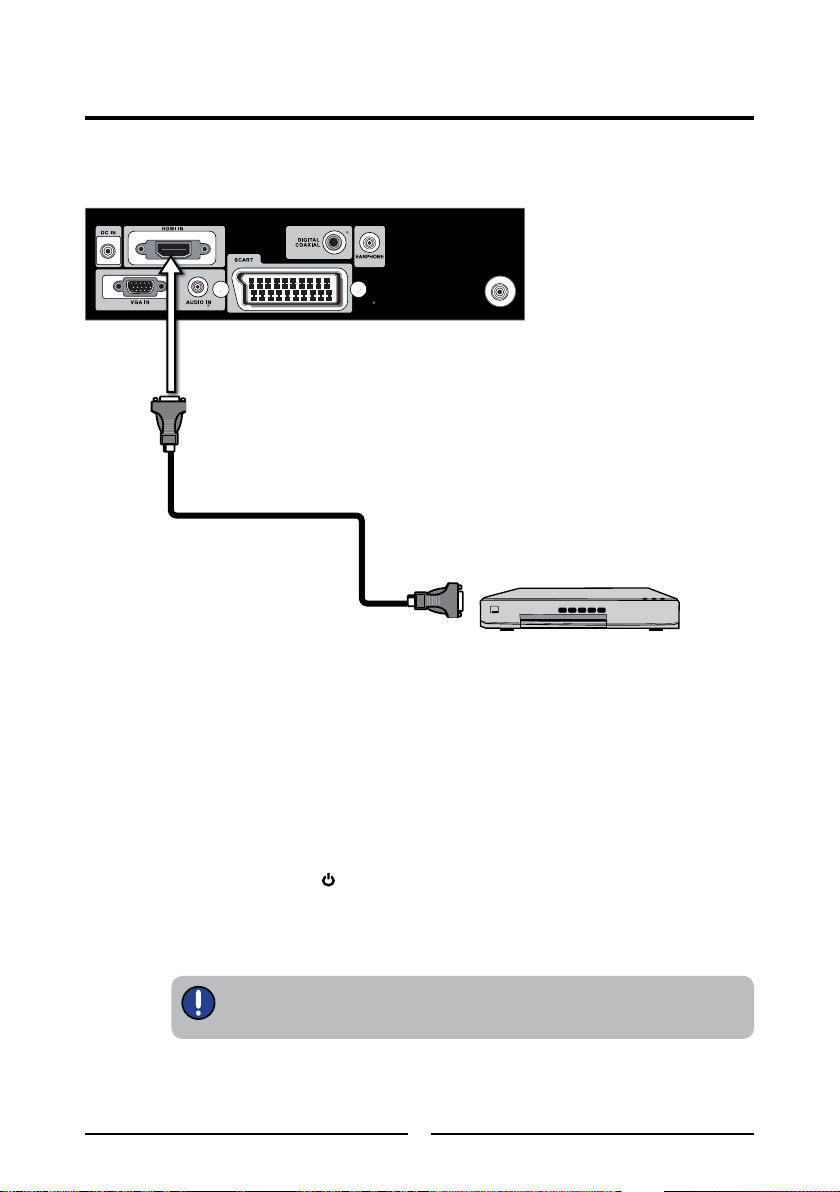
22
Installation LCD TV LED
CABLE/AIR
Utilisez un câble HDMI pour connecter le jack de sorite HDMI de l’équipement AV aux
prises HDMI IN de LCD TV LED.
Connectez toutes les sources d’alimentation AC avant de mettre en marche le LCD TV
LED ou autre équipement connecté.
Appuyez sur la touche de la télécommande pour allumer le LCD TV LED.
Appuyez sur la touche INPUT de la télécommande pour sélectionner HDMI.
Connexion d’un équipement AV à l’aide d’un connecteur HDMI
Le connecteur HDMI fournit à la fois les signaux vidéo et audio, il n’est pas
nécessaire de connecter le câble audio.
Câble HDMI
AV EQUIPMENT
Arrière du téléviseur
Page 25
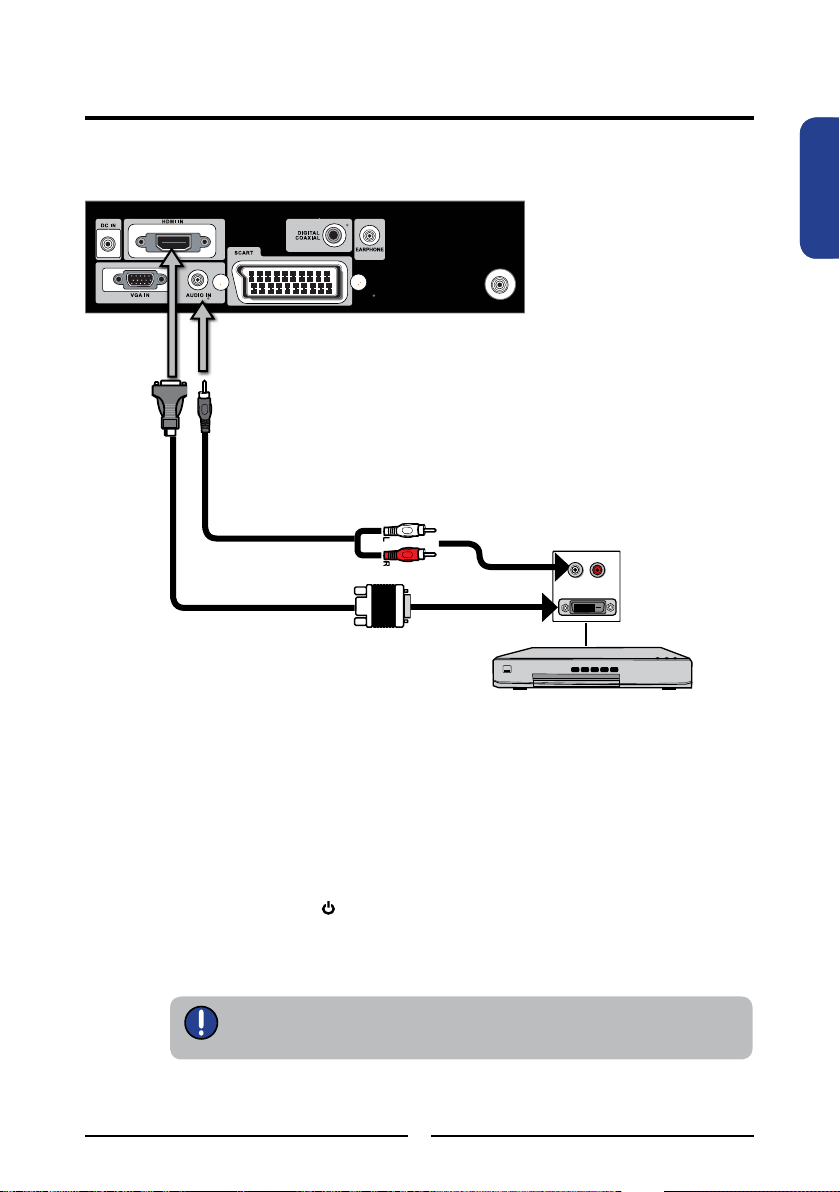
CABLE/AIR
Arrière du téléviseur
23
Installation LCD TV LED
FRAN-
FRANÇAIS
Utilisez un câble HDMI-à-DVI(non fourni) pour connecter le jack de sortie DVI de
l’équipement AV aux prises HDMI IN de LCD TV LED.
Utilisez un câble audio pour connecter les prises de sortie audio de l’équipement AV
aux prises HDMI AUDIO de LCD TV LED.
Connectez toutes les sources d’alimentation AC avant de mettre en marche le LCD TV
LED ou autre équipement connecté.
Appuyez sur la touche de la télécommande pour allumer le LCD TV LED.
Appuyez sur la touche INPUT de la télécommande pour sélectionner HDMI.
Connexion d’un équipement AV à l’aide d’un connecteur DVI
Si le LCD TV LED est raccordé au connecteur DVI de l’équipement AV, il vous
faudra un câble HDMI-à-DVI (non fourni) ou un adaptateur HDMI (non fourni)
et un câble audio.
AV EQUIPMENT
Câble HDMI-à-DVI
Câble audio
DVI IN
AUDIO
L R
Page 26
CABLE/AIR
Arrière du téléviseur
24
Installation LCD TV LED
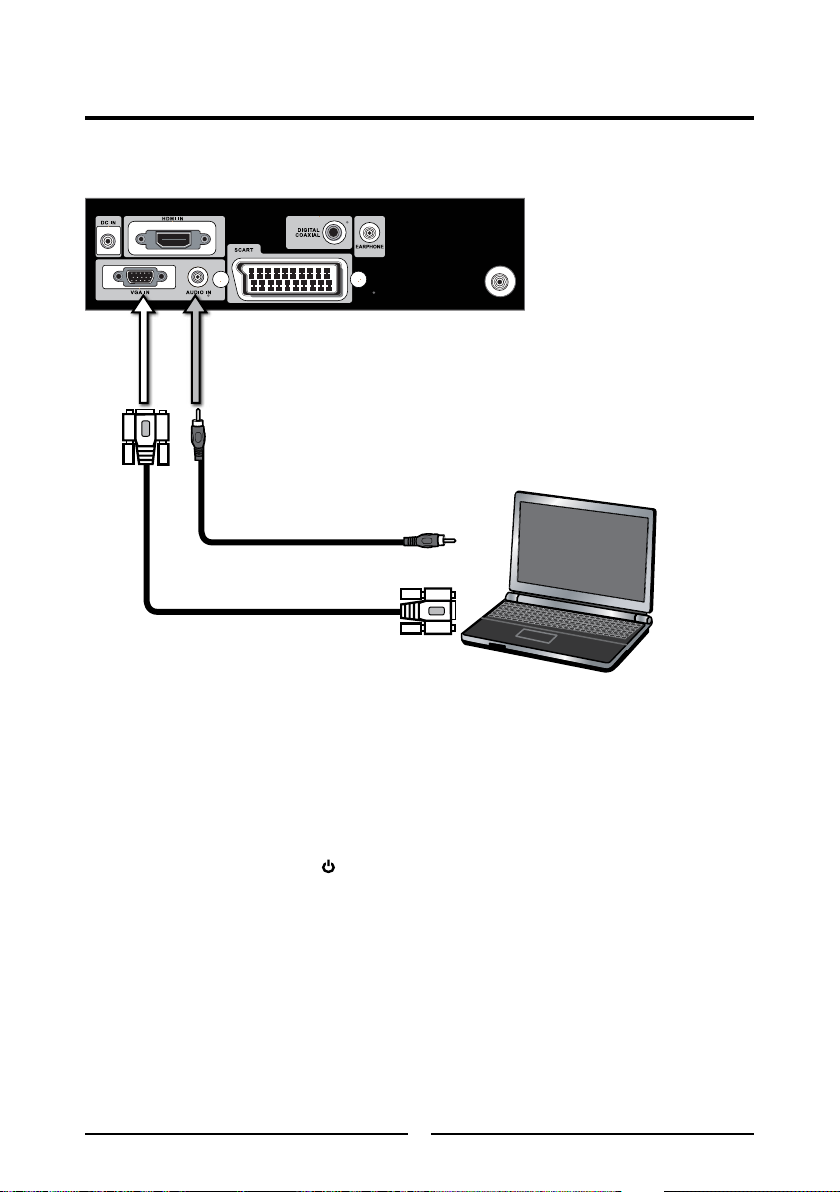
Utilisez un câble D-SUB(non fourni) pour connecter le jack de sortie D-SUB de
l’ordinateur au jack d’entrée VGA de LCD TV LED. Utilisez un câble audio pour
connecter les prises de sortie audio de l’ordinateur aux prises de LCD TV LED.
Connectez toutes les sources d’alimentation AC avant de mettre en marche le LCD TV
LED ou autre équipement connecté.
Appuyez sur la touche de la télécommande pour allumer le LCD TV LED.
Appuyez sur la touche INPUT de la télécommande pour sélectionner VGA.
Connexion d’un ordinateur
Câble VGA
Câble audio
PC
Page 27
CABLE/AIR
25
Utilisation des fonctions
FRAN-
FRANÇAIS
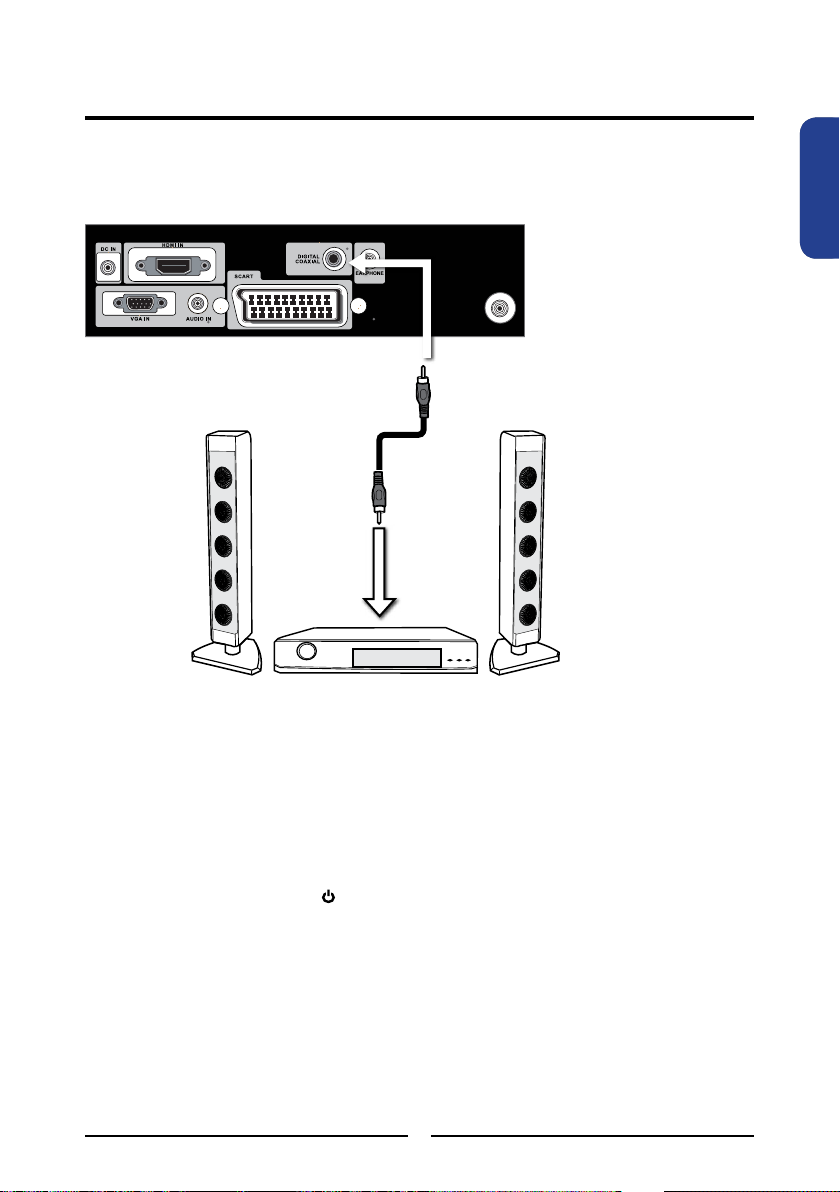
Utilisez un câble audio pour connecter les prises LINE IN(entrée ligne audio) audio du
récepteur AV aux prises audio COAXIAL de LCD TV LED.
Connectez toutes les sources d’alimentation AC avant de mettre en marche le LCD TV
LED ou autre équipement connecté.
Appuyez sur la touche de la télécommande pour allumer le LCD TV LED.
Connexion d’un récepteur audio
Pour obtenir une meilleure qualité sonore, vous pouvez souhaiter jouir du son de LCD TV LED par
votre système stéréo.
Câble audio
Audio Receiver
Arrière du téléviseur
Page 28

Avec le LCD TV LED connecté à une source d’émissions de télévision, appuyez sur la
touche INPUT de la télécommande, puis utilisez ▲▼ pour sélectionner DTV et appuyez
sur la touche OK.
Appuyez sur la touche GUIDE de la télécommande, le guide du programme apparaîtra
sur l’écran:
Le guide du programme est un guide du programme électronique qui offre aux téléspectateurs un
moyen simple et rapide pour consulter la liste complète des programmes numériques. La fonction de
Guide du Programme apporte toutes sortes d’informations à votre écran, telles que le titre du
programme, la durée des programmes, le temps restant, les informations de classement, la
disponibilité, etc.
Appuyez sur les touches ▲▼ pour sélectionner les chaînes et appuyez sur la touche OK
pour conrmer.
Appuyez sur les touches ▲▼◄► pour sélectionner le programme dans une liste, le guide
du programme présente l’introduction sur le programme actuel de chaque chaîne.
(Les informations du programme dans le guide sont fournies par les diffuseurs)
Appuyez sur la touche EXIT de la télécommande pour quitter le guide du programme
Utilisation de guide du programme
Nom de la chaîne
Liste Programme
26
Utilisation des fonctions
UTILISATION DES FONCTIONS
Page 29

Rappel (touche bleue)
DATE (touche jaune)
Les fonctions de Guide du programme sont afchées au bas de l’écran. Utilisez les touches
de couleur (rouge, vert, jaune, bleu) sur la télécommande pour activer.
Touches de
fonction
La fonction rappelle le téléspectateur à regarder un programme lorsque la minuterie du programme
arrive à temps voulu.
Appuyez sur les touches ▲▼ pour sélectionner les chaînes et appuyez sur la touche OK
pour afcher le menu Rappel.
La fonction permet au téléspectateur de voir la liste des programmes d’une journée.
Appuyez sur les touches ▲▼ pour sélectionner le mode, et sur les touches ◄► pour
sélectionner un mode de rappel.
Appuyez sur la touche OK pour conrmer. Vous pouvez dénir 5 rappels pour les différents
programmes.
Au démarrage du programme sélectionné, un message apparaîtra à l'écran pour conrmer
si vous voulez regarder le programme. Sélectionnez OK, et le téléviseur passera sur la
chaîne sélectionnée.
27
Utilisation des fonctions
FRAN-
FRANÇAIS
Page 30

Liste Calendrier (touche verte)
La fonction vous montre la liste de programmes à rappeler.
Appuyez sur les touches ▲▼ pour mettre en évidence un programme.
Appuyez sur les touches rouges pour supprimer.
Appuyez sur la touche MENU pour revenir au Guide du Programme.
28
Utilisation des fonctions
Page 31

Les éléments de menu disponibles dépendent de la source d’entrée
sélectionnée. Toute représentation est pour référence uniquement.
29
Utilisation des fonctions
FRAN-
FRANÇAIS
Vous permet de faire des modifications aux paramètres de votre image.
Appuyez sur la touche pour allumer le LCD TV LED.
Appuyez sur la touche MENU de la télécommande pour afcher le menu principal, et
utilisez les touches ◄► pour sélectionner IMAGE.
Utilisez les touches ▲▼ pour mettre en évidence une option d’image individuelle,
utilisez les touches ◄► pour changer le réglage, puis appuyez sur la touche EXIT
pour quitter le menu.
Personnalisation des paramètres IMAGE
▪ Si la source du signal est VGA, le menu IMAGE apparaît comme suit:
▪ Si la source du signal est DTV/TV/SCART/YPbPr (Facultatif)/HDMI, le menu IMAGE
apparaît comme suit:
Page 32

30
Utilisation des fonctions
Le menu IMAGE comprend les options suivantes:
Mode Image Pour naviguer parmi les différents types d’afchage: Dynamique/Standard/
Doux/Utilisateur
Utilisateur: Permet d’enregistrer vos réglages préférés. Si vous
sélectionnez le mode Utilisateur, vous pouvez régler individuellement les
éléments afchés:
Contraste Pour régler la différence entre les régions les plus brillantes et les plus
sombres de l’image.
Luminosité Pour contrôler la luminosité globale de l’image.
Couleur Pour contrôler l’intensité des couleurs.
Netteté Augmentez la valeur de ce paramètre pour voir des bords nets dans
l’image; diminuez-la pour des bords doux.
Teinte Pour régler la différence entre les régions vertes et rouges de l’image.
Ratio d’Aspect Sélectionnez parmi les paramètres du mode Large:
En mode TV et vidéo:Panorama/Auto/4: 3/16: 9/ZOOM1/ZOOM2
En mode VGA/DVI : 4:3 / 16:9
Page 33

31
Utilisation des fonctions
FRAN-
FRANÇAIS
Température de couleur Réglez indépendamment la valeur de couleur pour obtenir un effet
chaud ou froid: Froid/Chaud/Moyen/Utilisateur
▪ Chaud: Pour augmenter la teinte rouge
▪ Froid: Pour augmenter la teinte bleue
▪ Moyen: Pour augmenter la teinte naturelle
▪ Utilisateur: Permet à l’utilisateur d’ajuster indépendamment le niveau
de couleur rouge, verte et bleue.
Réduction du bruit Sélectionnez cette option pour réduire le niveau sonore du matériel
connecté: Auto/Inactif/Bas/Haut
Réglage Auto
Appuyez sur la touche OK pour ajuster automatiquement les
paramètres d’afchage pour optimiser la performance basée sur le
mode VGA.
Ecran Appuyez sur la touche OK pour entrer dans le réglage VGA :
▪ Pos. Horizontale: Pour régler la position de l’image à gauche et à
droite dans la fenêtre.
▪ Pos. Verticale:
Pour régler la position de l’image en haut et en
bas dans la fenêtre.
▪ Taille:
Pour ajustez la largeur de l’image en fonction du
mode VGA
▪ Phase:
Pour contrôler la phase du signal, ce qui peut
améliorer la clarté du foyer et la stabilité de
l’image en fonction du mode VGA.
Page 34

32
Utilisation des fonctions
Appuyez sur la touche pour allumer le LCD TV LED.
Appuyez sur la touche MENU de la télécommande pour afcher le menu principal, et utilisez
les touches ◄► pour sélectionner SON.
Utilisez les touches ▲▼ pour mettre en évidence une option de son individuelle, utilisez les
touches ◄► pour changer le réglage, puis appuyez sur la touche MENU pour quitter le
menu.
Le menu SON comprend les options suivantes:
Mode du Son Permet la sélection d’une technique d’amélioration audio parmi les options
suivantes: Sports/Film/Musique/Encerclement/Standard/Utilisateur
Utilisateur: Permet d’enregistrer vos paramètres préférés. If vous
sélectionnez le mode Utilisateur, vous pouvez régler individuellement les
éléments afchés.
Aigu Pour contrôler l’intensité relative des sons plus aigus.
Basse Pour contrôler l’intensité relative des sons plus graves.
Balance Permet de régler le volume relatif des haut-parleurs dans un système à
enceintes multiples.
Malentendant Lorsque vous regardez une chaîne numérique, cette fonction peut être
sélectionnée.
Sélectionnez l’option Actif, le téléviseur activera le sous-titre pour un
malentendant.
Commutateur AD Lorsque vous regardez une chaîne numérique, cette fonction peut être
sélectionnée.
Sélectionnez l’option Actif, le téléviseur mettra en évidence le volume
vocal.
AD Volume: Vous pouvez ajuster le volume de la description audio.
AD Output: Vous pouvez choisir d’écouter le son des enceintes TV, du
casque d’écoute ou les deux.
Personnalisation des paramètres SON
Vous permet de personnaliser les options et les effets audio.
PAGE 1 PAGE 2
Page 35

33
Utilisation des fonctions
FRAN-
FRANÇAIS
Personnalisation des paramètres TEMPS
Appuyez sur la touche pour allumer le LCD TV LED.
Appuyez sur la touche MENU de la télécommande pour afcher le menu principal, et
utilisez les touches ◄► pour sélectionner TEMPS.
Utilisez les touches ▲▼ pour mettre en évidence une option de Temps individuelle,
utilisez les touches ◄► pour changer le réglage, puis appuyez sur la touche MENU
pour quitter le menu.
Le menu TEMPS comprend les options suivantes:
Horloge Sélectionnez pour régler l’heure actuelle en mode ATV.
Appuyez sur la touche OK pour afcher le menu Horloge:
Appuyez sur les touches ▲▼ pour passer parmi Jour, Mois, Année,
Heure et Minute.
Appuyez sur les touches ◄► pour régler.
REMARQUE: En mode DTV, l’heure actuelle dépend de la station
d’émission. La fonction Horloge ne peut pas être dénie.
Temps Arrêt Permet de dénir la minuterie d’Arrêt que le téléviseur s’éteindra
automatiquement au moment déni.
Appuyez sur la touche OK pour afcher le menu Horloge:
Appuyez sur les touches ▲▼ pour passer parmi Répétition, Heure
et Minute.
Appuyez sur les touches ◄► pour régler.
Temps Marche Permet de dénir la minuterie de Marche que le téléviseur s’allumera
automatiquement en mode de votre choix au moment déni.
Appuyez sur la touche OK pour afcher le menu Horloge:
Appuyez sur les touches ▲▼ pour passer parmi Activation, Heure,
Minute, Volume et Mode.
Appuyez sur les touches ◄► pour régler.
Vous permet de régler une variété de minuterie.
Page 36

34
Utilisation des fonctions
Minuterie de mise en veille Utilisez les touches ◄► pour sélectionner une période de
temps au bout de laquelle le téléviseur passera
automatiquement en mode veille: Inactif, 10, 20, 30, 60, 90,
120, 180, 240 (minutes)
Mise en veille Auto Sélectionnez l’option Actif, le téléviseur s’éteindra
automatiquement en cas d’aucun signal d’entrée TV & aucune
source d’entrée ou aucune commande de la télécommande.
Fuseau Horaire
Utilisez les touches ◄► pour naviguer parmi les fuseaux
horaires disponibles dans le pays.
Page 37

35
Utilisation des fonctions
FRAN-
FRANÇAIS
Appuyez sur la touche pour allumer le LCD TV LED.
Appuyez sur la touche MENU de la télécommande pour afcher le menu principal, et
utilisez les touches ◄► pour sélectionner OPTION.
Utilisez les touches ▲▼ pour mettre en évidence une option de Option individuelle,
utilisez les touches ◄► pour changer le réglage, puis appuyez sur la touche MENU
pour quitter le menu.
Le menu OPTION comprend les options suivantes:
Langue Sélectionnez pour afcher tous les menus à l’écran dans la langue de
votre choix.
Langue audio Permet de sélectionner la langue audio.
Langue sous-titres Permet de sélectionner la langue de sous-titres à l’écran.
Entrée SCART Permet la sélection du signal d’entrée SCART: AV+RGB, SV+RGB
Durée OSD Permet de sélectionner la durée d’afchage du menu à l’écran: Inactif,
10, 15, 30, 45, 60 (secondes)
Actif: Sélectionnez pour augmenter les niveaux de contraste de
l’image avec des scènes changeantes.
Inactif: Sélectionnez pour désactiver la fonction de renforcement de
contraste.
Réinitialisation par défaut
Appuyez sur OK, utilisez ◄ ou ► pour sélectionner «Oui» pour
restaurer les réglages d’usine.
Personnalisation des paramètres OPTION
Vous permet de régler une variété de fonctions: Langue, Réinitialisation, Minuterie de mise
en veille.
Renforcement
de Contraste
Page 38

36
Utilisation des fonctions
Personnalisation des paramètres CHAINE
Appuyez sur la touche pour allumer le LCD TV LED.
Appuyez sur la touche MENU de la télécommande pour afcher le menu principal, et
utilisez les touches ◄► pour sélectionner CHAINE.
Utilisez les touches ▲▼ pour mettre en évidence une option de réglage Chaîne
individuelle, utilisez les touches ◄► pour changer le réglage, puis appuyez sur la
touche MENU pour quitter le menu.
Vous permet d’éditer et d’étiqueter les chaînes.
Le menu CHAINE comprend les options suivantes:
Réglage Auto Appuyez sur la touche OK, et la fonction Réglage Auto crée
automatiquement une liste de chaînes recevables. Vous devez
sélectionner votre pays actuel si vous souhaitez recevoir toutes les
chaînes de manière able.
▪ Pays Vous permet de sélectionner le pays: Royaume-Uni, Irlande,
Danemark, Finlande, Italie, Norvège, Espagne, Suède,
Luxembourg, France, Tchèque, Pologne, Hongrie, Autriche,
Allemagne, Suisse, Belgique, Pays-Bas, autre.
Réglage Manuel DTV Permet le réglage manuel pour la chaîne particulière avec une réception
optimale en mode DTV.
Appuyez sur la touche OK pour afcher le menu Réglage Manuel
DTV.
Appuyez sur les touches ◄► pour sélectionner un numéro de
chaîne.
Appuyez sur la touche OK pour lancer le balayage.
Réglage Manuel ATV Permet le réglage manuel pour la chaîne particulière avec une réception
optimale en mode ATV.
Appuyez sur la touche OK pour afcher le menu Réglage Manuel ATV.
Appuyez sur les touches ◄► pour sélectionner un numéro de
chaîne.
Appuyez sur la touche OK pour lancer le balayage.
Page 39
La fonction optionnelle dépend du modèle.
37
Utilisation des fonctions
FRAN-
FRANÇAIS
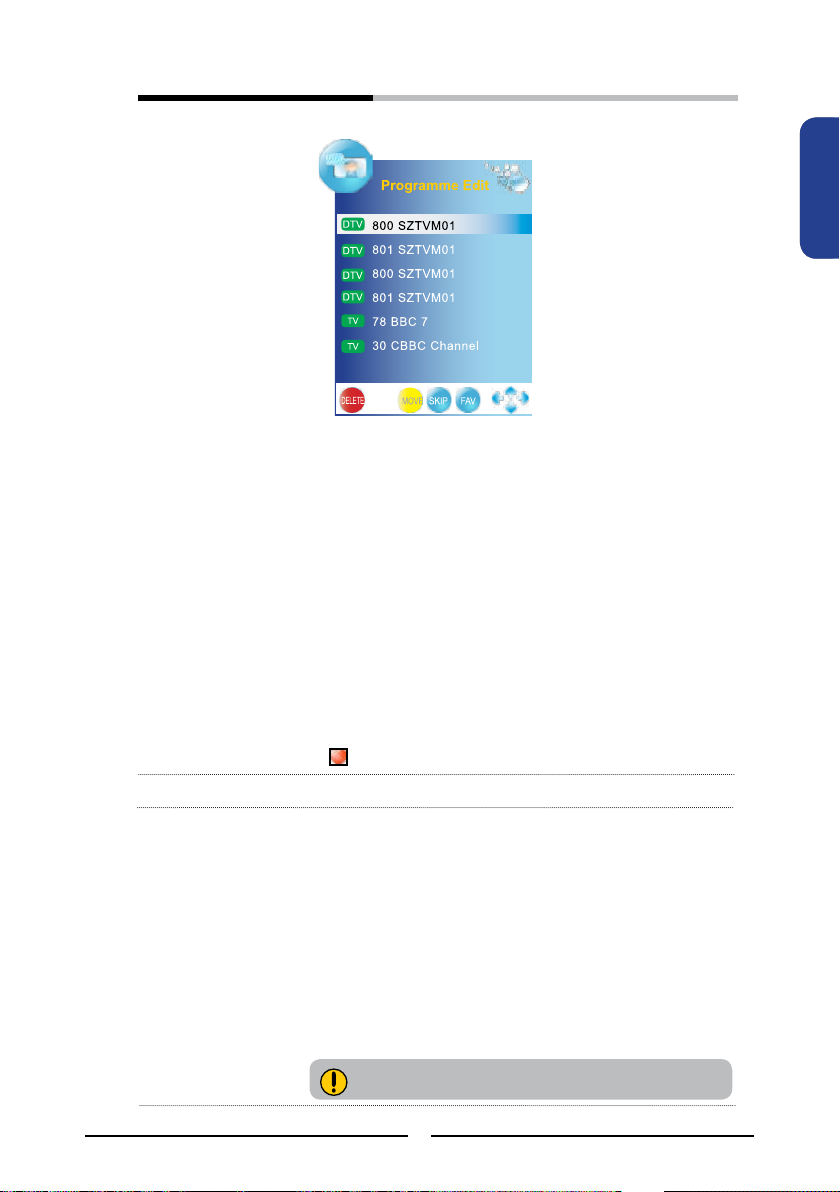
Modication du programme Permet de SUPPRIMER/RENOMMER/DEPLACER/
SAUTER des chaînes sur la liste des chaînes.
▪
SUPPRIMER (touche rouge)
Appuyez sur la touche rouge de la télécommande avec la chaîne
sélectionnée, puis appuyez à nouveau sur cette touche si vous
souhaitez la supprimer.
▪ DEPLACER (touche jaune)
Appuyez sur la touche jaune de la télécommande avec la chaîne
sélectionnée, déplacez la chaîne en appuyant sur les touches ▲▼
puis appuyez à nouveau sur la touche jaune.
REMARQUE : Tous les noms des chaînes de télévision ne peuvent
pas être modiés. Les chaînes dans les pays Royaume-Uni,
France, Danemark, Finlande, Italie, Pays-Bas et Suède ne
prennent pas en charge de la fonction DEPLACER.
▪ SAUTER (touche bleue)
Appuyez sur la touche bleue de la télécommande avec la chaîne
sélectionnée; appuyez à nouveau pour annuler.
▪ Réglage des chaînes préférées (touche FAV.CH)
Appuyez sur les touches ▲▼ pour sélectionner votre chaîne favorite.
Appuyez sur la touche FAV.CH pour choisir la chaîne, une icône
apparaîtra.
Information CI Permet d’afcher les informations CI: Information Module,
Information de Carte à puce, Langue, Téléchargement des logiciels
Sélectionnez la mise à niveau du logiciel par chaîne.
Mise à niveau du logiciel en utilisant le signal d’émission. Si la
fonction est sélectionnée pendant la période de transmission
logiciel, cette fonction recherche le logiciel disponible et
télécharge le logiciel et l’option « Mise à niveau du logiciel » est
mise en évidence.
Appuyez sur la touche OK pour afcher la barre de progression de
la mise à niveau du logiciel.Cette fonction commencera la mise à
niveau de logiciel.
Le temps nécessaire pour télécharger le logiciel dépend de l’état
du signal. N’éteignez pas le téléviseur avant que la mise à niveau
du logiciel soit ter minée. Le téléviseur s’allumera automatiquement
après la mise à niveau du logiciel.
Mise à niveau
du logiciel
(FACULTATIF)
Page 40

38
Utilisation des fonctions
Appuyez sur la touche pour allumer le LCD TV LED.
Appuyez sur la touche MENU de la télécommande pour afcher le menu principal, et
utilisez les touches ◄► pour sélectionner VERROU.
Utilisez les touches ▲▼ pour mettre en évidence une option de réglage Verrou
individuelle, utilisez les touches ◄► pour changer le réglage, puis appuyez sur la
touche MENU pour quitter le menu.
Un mot de passe à quatre chiffres sera nécessaire pour utiliser cette fonction. Le mot
de passe par défaut est 0000.
Le menu VERROU comprend les options suivantes:
Système de Verrou Le Système de verrou est conçu pour empêcher le
réglage accidentel de la télévision et la perte des
chaînes. Lorsque le système de Verrou est « Actif »,
un mot de passe valide est nécessaire pour régler
de nouveau le téléviseur.
Dénition de mot de passe
Permet de dénir le mot de passe. Un mot de passe
à quatre chiffres sera nécessaire pour utiliser cette
fonction. Le mot de passe par défaut est 0000.
Personnalisation des paramètres VERROU
Le contrôle parental peut être mis en place à la TV pour bloquer les chaînes et la source
vidéo et pour changer le mot de passe.
Page 41

39
Utilisation des fonctions
FRAN-
FRANÇAIS
Blocage de programme Sélectionnez pour régler les options Verrou de Programme TV:
Appuyez sur la touche OK pour afcher le menu Blocage de
Programme:
Appuyez sur les touches ▲▼ pour passer à la chaîne que vous
souhaitez bloquer.
Appuyez sur la touche verte pour bloquer le programme, une
icône Cadenas apparaîtra. Appuyez sur la touche ver te de
nouveau pour débloquer.
Guide Parental Sélectionnez le niveau de contrôle parental pour vos enfants,
seuls les programmes à ce niveau seront bloqués: 4 à 18 ans,
inactif
Page 42

40
Dépannage
Avant de consulter le personnel de service, consultez le tableau suivant pour
une cause possible du problème et pour trouver une solution.
L’appareil ne s’allume pas.
Assurez-vous que le cordon d’alimentation est branché, puis appuyez sur la touche
<IMAGE> sur la télécommande.
Les piles de la télécommande peuvent être vides.
Remplacez les piles.
Aucune image ni son
Vériez le câble d’interface entre la télévision et l’antenne/la télévision par câble.
Appuyez sur la touche de la télécommande.
Appuyez sur la touche INPUT de la télécommande pour sélectionner les sources
vidéo connectées.
Image normale avec mauvais son
Le son peut être coupé. Appuyez sur la touche de la télécommande.
Appuyez sur la touche VOL + pour augmenter le volume.
DEPANNAGE
Mauvaise image avec le son normal
Vériez le câble d’interface entre la télévision et l’antenne/la télévision par câble.
Essayez une autre chaîne, la station peut rencontrer des difcultés de diffusion.
Réglez la luminosité/contraste dans le menu VIDEO.
Bruit Sonore
Déplacez tout équipement infrarouge loin de la TV.
Page 43

41
Spécications
FRAN-
FRANÇAIS
SPECIFICATIONS
MODÈLE
DLC-E2250 DLC-E2450
Ecran LCD Taille de l’écran 21,5” TFT LCD 23,6” TFT LCD
Luminosité 250 250
Rapport de contraste 1000:1 1000:1
Renforcement du
contraste dynamique
6000:1 6000:1
Max. Résolution 1920x1080 1920x1080
Rétro-éclairage LED LED
Ratio d’Aspect 16:9 16:9
Filtre en peigne 3D 3D
Son « surround » (stéréo) OUI OUI
Haut-parleurs 3W x 2 3W x 2
Connecteur
d’entrée
SCART/PERITEL 1 1
VGA 1 1
HDMI 1 1
SORTIE COAXIALE 1 1
CASQUE 1 1
VHF/UHF IN (Antenne) 1 1
Alimentation 12V DC, 4A 12V DC, 5A
Consommation Max. 45 W, veille <1 W Max. 52 W, veille <1 W
Dimensions (LxPxH) 528,8*171*384,8 mm 573,3*171*410,2 mm
Poids (net) 3,78 kg 5 kg
Fonctions et spécications sont sujettes à changement sans préavis.
Page 44

This TV incorporates High-Denition Multimedia Interface (HDMITM)
technology. HDMI, the HDMI logo and High-Denition Multimedia Interface
are trademarks or registered trademarks of HDMI Licensing LLC.
This sign indicates that this product may not be disposed of with your regular
household waste. The recycling and separate collection of such products
is your responsibility. Please drop off the above-mentioned waste at a
designated place for recycling waste electrical and electronic equipment.
If you do not know where to drop off your waste equipment for recycling,
please contact your local city ofce or household waste collection service.
Page 45

42
Warnings and Precautions
WARNINGS AND PRECAUTIONS
To reduce the risk of re or electric shock, do not expose this equipment to rain or moisture.
This symbol is intended to alert the user to avoid the risk of electric shock.
This equipment must not be disassembled by anyone except qualied service
personnel.
This symbol is intended to alert the user to the presence of important operating and
maintenance instructions in the literature accompanying the appliance.
▪ TO REDUCE THE RISK OF ELECTRIC SHOCK,
▪ DO NOT REMOVE COVER (OR BACK).
▪ NO USER-SERVICEABLE PARTS INSIDE.
▪ REFER SERVICING TO QUALIFIED SERVICE PERSONNEL.
Use of controls, adjustments or performance of procedures other than those specied herein
may result in hazardous radiation exposure.
Important Safety Instructions
To prevent any injuries, the following safety precautions should be observed in the installation, use,
servicing and maintenance of this equipment.
Before operating this equipment, please read this manual completely, and keep it nearby for future
reference.
▪ Do not place the equipment on any uneven or unstable carts, stands, tables, shelves etc.
The equipment may fall, causing serious injury to children or adults and serious damage to
the equipment itself.
▪ Use only a cart or stand recommended by the manufacturer. This equipment and
recommended cart or stand should be handled with care. Quick stops, excessive force, and
uneven surfaces may cause the equipment and cart/stand to overturn.
▪ Do not disable the 3-wire grounding type plug. The grounding pin on the 3-prong plug is an
important feature. Removing the grounding pin will increase the risk of damaging the
equipment.
▪ If you can not t the plug into the electrical outlet, contact an electrician to install a grounding
outlet.
▪ Always operate this equipment from the type of power source indicated on the rear.
▪ Never overload wall outlets and extensions.
This symbol indicates
caution points.
This symbol indicates
actions that should not
be done.
This symbol indicates actions
that must be performed.
Page 46

ENGLISHENGLISH
43
Warnings and Precautions
▪ Use and handle the power cord with care. Do not place any heavy objects on the AC
power cord.
▪ Do not pull the AC power cord. Do not handle the AC power cord with a wet hand.
▪ Do not touch the power cord and antenna cable during lightning.
▪ Remove the plug from the wall outlet, if the equipment will not be used for a long period
of time.
▪ Do not place, use or handle this equipment near water.
▪ Never expose the equipment to liquid, rain, or moisture.
Seek for service if any of the above is spilled into the equipment.
▪ Do not expose the equipment to extreme temperature or to direct sunlight, as the
equipment may heat up and suffer damage.
▪ Do not install the equipment near any heat sources such as radiators, heat, stoves, or
any other apparatus that might produce heat.
▪ Do not attempt to service the equipment yourself.
▪ Opening and removing the covers may expose you to dangerous voltage or other
hazards and may void your warranty. Refer service to qualied personnel.
▪ Do not place or drop any other objects on top.
▪ Do not insert anything into the ventilation holes of your equipment.
Inserting any metal or ammable objects may result to re or electric shock.
▪ Do not place the equipment on uneven or unstable carts, stands, tables, shelves etc.
The equipment may fall, causing serious injury to children or adults and serious damage
to the equipment itself. Always place the equipment on the oor or on a surface that is
sturdy, level, stable and strong enough to support the weight of the equipment.
▪ Do not block any ventilating openings. Leave an open space around the equipment.
Never place the equipment :
on a bed, sofa, rug, or any other similar surfaces; too close to drapes/curtains/walls, in a
bookcase, built-in cabinet, or any other similar places that may cause poor ventilation.
▪ Unplug this apparatus during lightning storms or when unused for long periods of time.
▪ Refer all servicing to qualified service personnel. Servicing is required when the
apparatus has been damaged in any way, such as power-supply cord or plug is
damaged, liquid has been spilled or objects have fallen into the apparatus, the apparatus
has been exposed to rain or moisture, does not operate normally, or has been dropped.
▪ Always remove the power cord from the outlet before cleaning the equipment.
▪ Never use liquid or aerosol cleaners on the equipment.
Clean only with a soft dry cloth.
▪ Only use attachments/accessories specified by the manufacturer.
▪ Precaution has to be taken that during the use of the product, no mechanical forces shall
be applied on the mains cord and mains socket. Partly loosened mains plugs can cause
arcing or fire.
▪ Where the mains plug or an appliance coupler is used as the disconnected device, the
disconnect device shall remain readily operable.
Page 47

44
Warnings and Precautions
Outdoor Antenna Safety Instructions
Antenna lead-in wire
Antenna discharge unit
Grounding conductors
Ground clamps
Power service grounding
Ground clamps
Electric service
equipment
If an outdoor antenna is connected, follow the precautions below:
EXAMPLE OF OUTDOOR ANTENNA GROUNDING
▪ An outdoor antenna should not be located in any area where it could come in contact with
overhead power lines, or any other electric light or power circuits.
▪ When installing an outdoor antenna system, extreme caution should be taken to prevent
contact with power lines. Direct contact with power lines may be fatal and should be avoided
at all costs.
Outdoor Antenna Safety Instructions
Antenna lead-in wire
Antenna discharge unit
Grounding conductors
Ground clamps
Power service grounding
Ground clamps
Electric service
equipment
If an outdoor antenna is connected, follow the precautions below:
LISTENING WITH EARPHONES
▪ Listen at moderate Volumes to avoid hearing damage.
▪ If you hear no sound during playback, do not turn the Volume up as the music may suddenly
begin at a high Volume. Excessive sound pressure from earphones and headphones can
cause hearing loss.
▪ To avoid damaging your ears, adjust the Volume to the lowest level before playback, and turn
up to the desired level when playback has started.
Page 48

45
ENGLISHENGLISH
CONTENTS
WARNINGS AND PRECAUTIONS
Important Safety Instructions ..................................................................................... 42
Antenna Safety Instructions ....................................................................................... 44
INTRODUCING THE LCD LED TV
Key Features ............................................................................................................. 46
Package Contents ..................................................................................................... 47
Setting Your LCD LED TV .......................................................................................... 48
Your LCD LED TV ...................................................................................................... 51
Your Remote Control ................................................................................................. 54
INSTALLING THE LCD LED TV
Connecting a TV Cable or an Antenna ...................................................................... 56
Connecting optional AV Equipment
Connecting an AV Equipment with SCART Connector ....................................... 61
Connecting an AV Equipment with YPbPr Connector ......................................... 62
Connecting an AV Equipment with HDMI Connector .......................................... 63
Connecting an AV Equipment with DVI Connector ............................................. 64
Connecting a PC ................................................................................................. 65
Connecting an Audio Receiver ........................................................................... 66
USING THE FEATURES
Using the Programme Guide ........................................................................... 67
Customizing the PICTURE Settings ..................................................................70
Customizing the SOUND Settings .....................................................................73
Customizing the TIME Settings ......................................................................... 74
Customizing the OPTION Settings ....................................................................76
Customizing the CHANNEL Settings .................................................................77
Customizing the LOCK Settings ........................................................................79
TROUBLESHOOTING
......................................................................................................................................... 81
SPECIFICATIONS
......................................................................................................................................... 82
Page 49

46
Introducing the LCD LED TV
Various Audio/Video terminals for external equipment connection
▪ 1 SCART input terminal/The SCART offers YPbPr signal(Option)
▪ 1 VGA terminal
▪ 1 VGA LINE IN terminal
▪ 1 HDMI input terminal
▪ 1 coaxial audio output terminal
▪ 1 Headphone terminal
High Definition Multimedia Interface (HDMI)
▪ High Denition Multimedia Interface (HDMI) is a small, user-friendly interconnect that
can carry up to 5 Gbps of combined video and audio in a single cable. This system
eliminates the cost, complexity and confusion of multiple cables used to connect
current A/V systems.
3D Digital Noise Reduction
▪ This function can digitally reduce image noise to provide better picture quality.
Film-Mode Detection
▪ This function can automatically detect content derived from lm and adjust the
interlacer’s frame matching to provide a more natural-looking, clearer image of the
moving picture.
INTRODUCING THE LCD LED TV
Key Features
Page 50

ENGLISH
47
Introducing the LCD LED TV
LCD LED TV
Make sure all of the following contents are included.
These items are all you need to set up and operate the LCD LED TV in its basic
conguration.
Package Contents
Remote Control/
AAA Batteries x 2 (not supplied)
User Guide Quick Guide
1 2
3
4
5
6
7
8 9
JUMP
0
The power cord type may be different
depending on your country’s power type.
Power Cord AC-DC Adapter
Make sure all of the above contents are included.
Note: The photos of the accessories are for reference only, the color of the remote
control, the type of power cord are variable based on the actual models.
Page 51

48
Introducing the LCD LED TV
Setting Up Your LCD LED TV
Follow the instructions below to install the TV stand:
Open the box, and make sure all necessary parts are in the box. The package contains:
How to install the TV Stand
Cover an even stable surface with a soft cloth. Place the LCD LED TV unit face-down on the
cloth. Fit the stand onto the bottom of the LCD LED TV unit as shown, then use a
screwdriver to tighten the screw on the bottom of the stand until the screw is rmly xed in
place.
LCD LED TV Stand
In order to ensure a healthy and relaxed body position when using the TV at
visual display workstations, you are able to adjust the TV’s angle of the stand.
The angle of the LCD LED TV may be adjusted approximately 20 degrees.
20
o
Page 52

ENGLISH
49
Introducing the LCD LED TV
If you prefer to mount your new TV on a wall instead of attaching it to the stand, please reference
the instructions included in the wall mounting kit (sold separately).
Afx the VESA mount to the back of the TV using the four screws provided in the wall-
mount kit. When install the TV on the wall, allow to leave some space.
How to remove the TV Stand
To prevent damaging the surface of the LCD LED TV, place the TV on a soft cloth.
Remove the screw of the table stand and detach the table stand from the TV.
When install TV on the wall, allow to leave some space(6 cm at least).
Verify your TV’s model and be sure to use the wall mounting kit specied
for your TV model only. Contact your technician for assistance when
installing the wall mounting kit.
6 cm
Page 53
50
Introducing the LCD LED TV
Do not use caustic cleaners (porcelain, stainless steel, toilet, or oven cleaner
etc.) on the remote, as it may suffer damage.
Use a supplied antenna cable to connect the VHF/UHF signal to the LCD LED TV’s ANT.
terminal (refer to page 56-60).
Connect the AC-DC adapter at the back of the TV and connect the power cord to wall outlet.
Insert the batteries not supplied in remote control.
Connect other an external AV device (refer to page 61-66).
Step1 Slide the back cover up to open the
battery compartment of the remote
control.
Step2 Insert two AAA size batteries.
Make sure to match the (+) and
( - ) ends of the batteries with
the (+) and ( - ) ends indicated
in the battery compartment.
Slide the cover back into place.
How to setup the TV
Page 54

ENGLISH
51
Introducing the LCD LED TV
Your LCD LED TV
Front/Left /Right Side View and Controls
MENU
Press once to display the OSD (on screen display), press
again to turn the OSD off.
VOL+-
Adjusts the volume up and down. Selects the main-menu item
and change values for items when in the OSD mode.
Turns the LCD LED TV on and into standby
mode.
CH▲▼
Scans up and down through channels. Selects sub-menu item
when in the OSD mode.
INPUT
Chooses from different input signal sources.
IR
Infrared Receiver
LED
The LED light indicates when the
LCD LED TV is activated.
Front View
Left Side ViewRight Side View
Page 55

CABLE/AIR
52
Introducing the LCD LED TV
Rear View and Jacks
HDMI IN
Connects the all digital AV
equipment with HDMI
connector.
DC IN
Connect the power cord
to the AC-DC adapter
and wall outlet.
VGA IN/AUDIO IN
Connects the PC, or other AV equipment
with VGA and line in jacks.
CABLE/AIR
Connects RF input from VHF/UHF antenna or cable to receive high/standard
denition television.
SCART
Connect to external equipment with scart socket. The SCART interface offers RGB, AV,
YPbPr(option) signals with audio input/output between the TV and external video
equipment.
DIGITAL COAXIAL
Connects to the audio jack on the digital/
standard 5.1 audio system.
EARPHONE
Connects to the external headphone for private
listening.
Page 56

ENGLISH
53
Introducing the LCD LED TV
How to connect CI(Common Interface) card
To view the scrambled (pay) services in digital TV mode.
This function enables you to watch the scrambled services (pay services) in some channels.
If you remove the CI Module, you can watch the available digital/analogue programme in
some channels.
Press the INPUT button the remote control to display the Input menu,and use the ▲▼
buttons to select the DTV.
TO INSERT A CI CARD
Insert the CI card into the slot in the direction of the arrow until it ts.
TO REMOVE A CI CARD
When removing the CI card, do pull it from its slot.
CI SLOT
Page 57

54
Introducing the LCD LED TV
POWE R
FREEZ E SUBTI TLE
SLEEP
GUIDE
P.SIZE
1 2
3
4
5
6
7 8 9
JUMP
0
VOL. CH.
INFO
INPUT
OK
MENU
EXIT
S.MOD E P.MODE
Your Remote Control
1
15
11
7
4
10
6
3
2
8
9
13
12
14
5
POWER Turns the LCD LED TV on and into
standby mode.
SUBTITLE Turns on and off the Subtitle mode in
DTV mode.
FREEZE Pressing FREEZE to freeze the current
picture, press again to restore the
picture.
GUIDE Displays the Programme Guide on the
screen in DTV mode. Pressing again to
turn GUIDE off.
I-II Cycles through the TV sound options
(NICAM) : MONO/DUAL/STEREO
FAV.CH Pressing FAV.CH display favorite
channels.
Turns on and off the Teletext function.
Mutes and restores your LCD LED TV
sound.
SLEEP Cycles through the LCD LED TV sleep
time.
P.SIZE Cycles through Wide mode settings:
Panorama/Auto/4:3/16:9/ZOOM1/
ZOOM2
0-9/ENT Pressing a number selects a channel.
Following selection, pressing ENT
activates the channel, or channel
activates automatically in 3 seconds.
JUMP Switches back and forth between the
current and previous channels.
INFO Pressing once displays a variety of
information such as the current channel
and the input source.
VOL.+- Increases and decreases volume.
CH.+- Scans up and down the channels.
1
2
3
4
5
6
7
8
9
10
11
12
13
14
15
Page 58

55
Installing the LCD LED TV
ENGLISHENGLISH
EXIT Exits the OSD menu.
MENU Displays the OSD menu on the screen.
▲▼►◄
Cycles through OSD options and
OK selects individual menu items. OK
conrms option settings.
S.MODE Selects sound effect options: Sports/
Movie/Music/Surround/Standard/User
P.MODE Selects picture mode: User/Mild/
Standard/Dynamic
Press the appropriate color to direct
access functions in TELETEXT or EPG
mode.
Displays the main index in TELETEXT
mode.
Reveals hidden information such as the
answer to a quiz in TELETEXT mode.
Freezes a multi-page passage on
screen in TELETEXT mode.
Displays the top, bottom or all of page,
to easily read in TELETEXT mode.
Effective range:
The remote can control the LCD LED TV from up to 5m away, if pointed directly at the
receiver.
INPUT Pressing INPUT displays the source
list, use ▲▼ to select the video
equipment connected to the video
inputs of your LCD LED TV, and press
OK button to conrm.
17
18
19
20
21
22
23
24
25
26
POWE R
FREEZ E SUBTI TLE
SLEEP
GUIDE
P.SIZE
1 2
3
4
5
6
7 8 9
JUMP
0
VOL. CH.
INFO
INPUT
OK
MENU
EXIT
S.MOD E P.MODE
19
17
20
18
21
22
25
26
23
24
16
16
Input Source
DTV
TV
SCA RT
YPb Pr
VGA
HDM I
EXIT OK
The YPbPr input is dependent on model.
Page 59
56
Installing the LCD LED TV
Installing the LCD LED TV
Refer to the owner’s manual of any external equipment to be connected.
When connecting any external equipment, do not connect any AC power cords to wall outlets
until all other connections are completed.
Antenna Connection
The antenna requirements for good color TV reception are more important than those for a black &
white TV reception. For this reason, a good quality outdoor antenna is strongly recommended.
The following is a brief explanation of the type of connection that is provided with the various antenna
systems.
75-ohm coaxial cable (round)
IEC-type connector
300-ohm twin-lead cable (flat)
■ A 300 -ohm system is a flat twin-lead cable (not included) that can
be attached to a 75 -ohm terminal through a 300-75- ohm adapter
(not included).
Connecting a TV Cable or an Antenna
■ A 75-ohm system is generally a round cable (not included) with IEC-
type connector that can easily be attached to a terminal without
tools.
Page 60

57
Installing the LCD LED TV
ENGLISHENGLISH
OUT
IN
300-ohm twinlead cable
300-ohm twinlead cable
75-ohm
coaxial cable
UHF
Antenna
VHF
Antenna
Combiner
(not included)
A. Combination VHF/UHF antenna
300-ohm twinlead cable
75-ohm
coaxial cable
VHF/UHF
Antenna
VHF/UHF
Antenna
300/75-ohm adapter
(not included)
B. Separate VHF and/or UHF antennas
Use one of the following two diagrams when connecting an outdoor antenna.
A: Shows how to use a VHF/UHF combination outdoor antenna.
B: Shows how to use a separate VHF and/or UHF outdoor antenna.
Page 61

58
Installing the LCD LED TV
A
IN
B
OU T
Cable TV Line
2 set signal
splitter
(not included)
RF switch
(not included)
Cable TV converter/
descrambler
(not included)
Cable TV (CATV) Connection
■
The RF switch (not included) is required to provide two inputs (A and B). Setting
the RF switch to position A allows viewing of all unscrambled channels by using
the TV channel keys.
■ Setting the RF switch to position B allows viewing of all scrambled channels via
the converter/descrambler by using the converter channel keys.
■ A 75-ohm coaxial cable connector is built into the set for easy hoo kup.
When connecting t he 75- ohm coaxial cable to the set, connect the 75 -
ohm cable into the ANT. terminal.
■ Some cable TV companies offer premium pay channels. Since the
signals of these premium pay channels are scrambled, a cable TV
converter/descrambler is generally provided to the subscriber by the
cable TV company.
This converter/descrambler is necessary for normal viewing of scrambled channels.
(Set your TV to channel 3 or 4, typically one of these channels is used. If this is unknown,
consult your cable TV company.)
For more specic instructions on installing cable TV, consult your cable TV company.
One possible method of connecting the converter/descrambler provided by your cable TV
company is shown in the diagram below.
VHF/UHF IN
Page 62
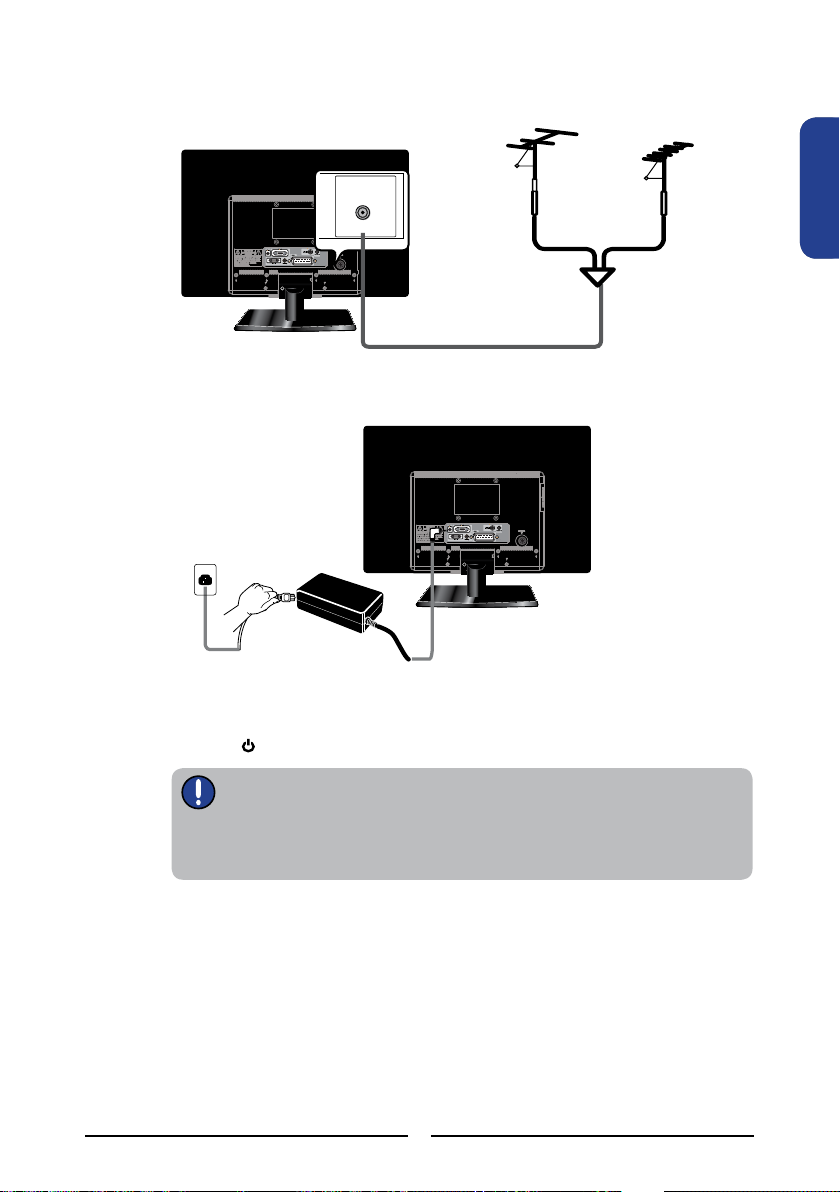
59
Installing the LCD LED TV
ENGLISHENGLISH
Use a supplied antenna cable to connect the TV signal to the LCD LED TV’s TV CABLE
terminal.
Connect the DC plug of the AC-DC adapter to the DC 12V port at the rear of the
TV. Connect the power cord to the AC-DC adapter and wall outlet.
Press the button on the remote to turn on the LCD LED TV.
Always disconnect the LCD LED TV from the power outlet when the LCD
LED TV will not be used for a long period of time.
The POWER button on the front panel is only used for switching the LCD
LED TV into standby, it does not disconnect the device from the main
voltage. To completely disconnect the main voltage, please remove the
power plug from the socket.
VHF/UHF IN
Press the INPUT button on the remote to display the Source List. Use the ▲▼ buttons to
select DTV/TV, and press the OK button.
Page 63
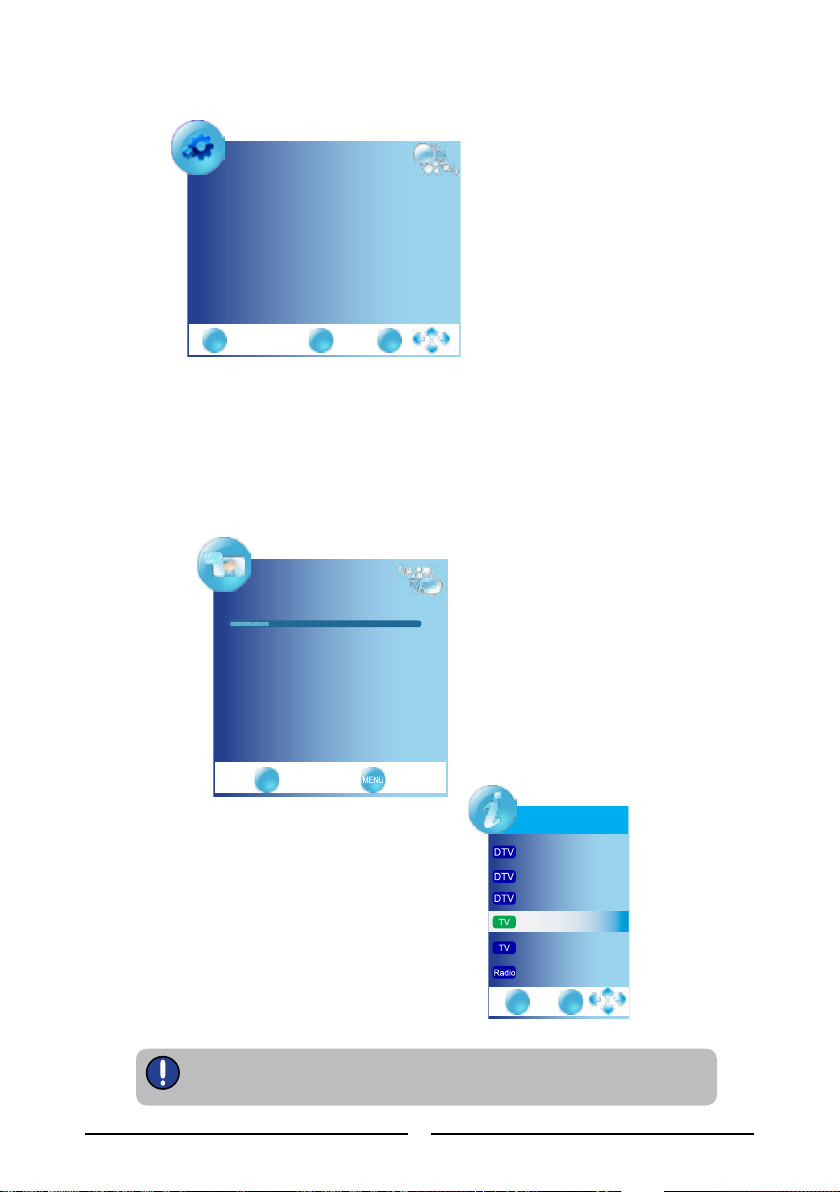
60
Installing the LCD LED TV
EXIT OK
Lan guage Engl ish
Aut o Tuni ng
Insta ll ation Guide
Channel Tuning
TV : 0 progra mmes( s)
DTV : 0 pr ogram mes(s )
Rad io : 0 p rogramm es(s)
Pre ss <M enu> to sk ip
Pre ss <E xit> to ex it
69 %... UHF CH40 DTV
EXIT
When you switch on the TV for rst time, the Initial Setup menu appears on the screen.
Press the ◄► buttons to select the language displayed on the menu.
Press the ▼ button to select Auto Tuning and press the OK button, and use the ◄►
buttons select the country in which you will operate the TV( You need to select your
current aerial if you wish to receiving all channels reliably.). The Auto Tuning
automatically creates a list of receivable channels. Press the EXIT button at any time to
interrupt the memorization process. (The list cannot be created if interrupted)
Channel List
EXIT OK
801 SZTV M01
800 SZTV M01
801 SZTV M01
78 BBC 7
30 CBBC Chann el
728 H ear t
Press OK button to display the received
channels and radio list, then press ▲▼
buttons to select a channel or radio.
The MPEG system appears according to the broadcasting signal. Only UK
and New Zealand support the MPEG5 format.
Page 64

Rear of TV
CABLE/AIR
61
Installing the LCD LED TV
ENGLISHENGLISH
Use a SCART cable to connect the external A/V device’s SCART socket to the LCD LED
TV’s SCART jack.
Connect all AC power sources, before turning on the power switch of the LCD LED TV
or other connected equipment.
Press the button on the remote to turn on the LCD LED TV.
Press the INPUT button on the remote to select SCART.
Connecting an A/V Device with SCART Connector
SCART Cable
DVD P LAYER
Page 65

CABLE/AIR
Rear of TV
62
Installing the LCD LED TV
DVD P LAYER
Connecting an A/V Device with YPbPr Connector (OPTION)
SCART-to-YPbPr Cable
Pr/Cr
Pb/Pb
Use a SCART-to-YPbPr cable to connect the external A/V device’s YPbPr output jacks to
the LCD LED TV’s SCART jack.
The YPbPr video jacks on your A/V device are sometimes labeled YPbPr, or
YCbCr. For an explanation of component video, see your A/V device’s user
guide.
If the SCART-to YPbPr cable is not connected to the YPbPr jacks on your A/V
device, please add a available component video/audio cable.
Connect all AC power sources, before turning on the power switch of the LCD LED TV
or other connected equipment.
Press the button on the remote to turn on the LCD LED TV.
Press the INPUT button on the remote to select YPbPr.
Page 66

63
Installing the LCD LED TV
ENGLISHENGLISH
CABLE/AIR
Use a HDMI cable to connect the AV equipment’s HDMI output jack to the LCD LED TV’s
HDMI IN jacks.
Connect all AC power sources, before turning on the power switch of the LCD LED TV
or other connected equipment.
Press the button on the remote to turn on the LCD LED TV.
Press the Input button on the remote to select HDMI.
Connecting an AV Equipment with HDMI Connector
The HDMI connector provides both video and audio signals, it’s not
necessary to connect the audio cable.
HDMI Cable
AV EQUIPMENT
Rear of TV
Page 67

CABLE/AIR
Rear of TV
64
Installing the LCD LED TV
Use a HDMI-to-DVI cable to connect the AV equipment’s DVI output jack to the LCD LED TV’s
HDMI IN jacks.
Use an audio cable to connect the AV equipment’s audio output jacks to LCD LED TV’s
HDMI AUDIO jacks.
Connect all AC power sources, before turning on the power switch of the LCD LED TV
or other connected equipment.
Press the button on the remote to turn on the LCD LED TV.
Press the Input button on the remote to select HDMI.
Connecting an AV Equipment with DVI Connector
If the LCD LED TV is connected to AV equipment’s DVI connector, you will
need an HDMI-to-DVI cable or an HDMI adapter(not supplied) and an audio
AV EQUIPMENT
HDMI-to-DVI Cable
AUDIO Cable
DVI IN
AUDIO
L R
Page 68

CABLE/AIR
Rear of TV
65
Installing the LCD LED TV
ENGLISHENGLISH
Use a D-SUB cable to connect the PC’s D-SUB output jack to the LCD LED TV’s VGA
input jack. Use an audio cable to connect the PC’s audio output jacks to LCD LED TV’s.
Connect all AC power sources, before turning on the power switch of the LCD LED TV
or other connected equipment.
Press the button on the remote to turn on the LCD LED TV.
Press the INPUT button on the remote to select VGA.
Connecting a PC
VGA Cable
AUDIO Cable
PC
Page 69

CABLE/AIR
66
Using the Features
Use an audio cable to connect the audio receiver’s audio LINE IN jacks to LCD LED
TV’s COAXIAL audio jacks.
Connect all AC power sources, before turning on the power switch of the LCD LED TV
or other connected equipment.
Press the button on the remote to turn on the LCD LED TV.
Connecting an Audio Receiver
For better sound quality, you may want to play the LCD LED TV audio through your stereo system.
AUDIO Cable
Audio Receiver
Rear of TV
Page 70

DATE
PROGRAMME GUIDE
30 M ay
13 M ay 20 08 063 3
06:0 0 - 0 6:58 G MTV Ne wshou r
The Hoobs Fres hly S queeze d Ev erybo dy Lov e... Jus t Sho ot Me
Bike r Mic e fro. .. No Inform ation
More 4 Pre view
06:3 0 07:30
DTV ITV1
D TV
1 I TV1
2 C hanne l 4
3 I TV2
4 I TV3
5 C hanne l 4
6 M ore4
Upst airs, Downs tairs The R ockfo rd Fil es .
C.. . . . Cu. . The Hoobs The Ho obs Fre shly S queeze d
GMTV News hour GMTV Tod ay
With the LCD LED TV connected to a television programming source, press the INPUT
button on the remote control then use ▲▼ to select DTV and press OK button .
Press the GUIDE button on the remote control, the Programme Guide will appear on the
screen:
The Programme Guide is an Electronic Programme guide that provides viewers with a quick and
easy way to view a complete list of digital of programmes. The Program Guide feature brings all
sorts of information to your screen, such as program title, program duration, time remaining, rating
information, availability, etc.
Press ▲▼ buttons to select channels and press OK button to conrm.
Press ▲▼◄► buttons to select the programme from a list, the Programme Guide provides
introduction about the current programme being shown on each channel.
(The Programme information in the guide is provided by the broadcasters)
Press EXIT button on the remote control to exit the Programme Guide
Using the Programme Guide
Channel name
Programme list
67
Using the Features
ENGLISHENGLISH
USING THE FEATURES
Page 71

DATE
PROGRAMME GUIDE
30 M ay
13 M ay 20 08 063 3
06:0 0 - 0 6:58 G MTV Ne wshou r
The Hoobs Fres hly S queeze d Ev erybo dy Lov e... Jus t Sho ot Me
Bike r Mic e fro. .. No Inform ation
More 4 Pre view
06:3 0 07:30
DTV ITV1
D TV
1 I TV1
2 C hanne l 4
3 I TV2
4 I TV3
5 C hanne l 4
6 M ore4
Upst airs, Downs tairs The R ockfo rd Fil es .
C.. . . . Cu. . The Hoobs The Ho obs Fre shly S queeze d
GMTV News hour GMTV Tod ay
Reminder (blue key)
DATE (yellow key)
The Programme Guide features are displayed at the botton of the screen. Use the color keys
Feature keys
The feature reminds viewer to watch a programme when the programme show timer is due.
Press ▲▼ buttons to select channels and press OK button to display the Reminder menu:
The feature enables viewer to view the programme list by one day.
Cha nnel 2
Hou r 10
Min ute 30
Mod e Every day
Dat e Fri .10
Mon the j ul
Reminder
10 J ul 20 09 06: 33
Press ▲▼buttons to select the Mode, and Press ◄► buttons to select a reminder mode.
Press OK button to conrm, you can set 5 reminders for different programmes.
When the selected programme starts, a message will appear on the screen to conrm
whether you want to watch the programme. Select OK, the TV will switch to the channel you
selected.
68
Using the Features
Page 72

REMINDER SCHEDULE LIST
10 J ul 20 09 063 3
Title Time Da te Pr ogramme M ode
Fre shly S queez ed 07: 00 We d. 7 May 4 Cha nne ls 4
5
Jus t shoo t me 09: 00 We d. 7 May 4 Cha nne ls 4
Jus hanne l 4
6 M ore4
Schedule List (green key)
The feature shows the list of reminding programmes.
Press ▲▼ buttons to highlight a programme.
Press red buttons to delete.
Press MENU button to back the Programme Guide.
69
Using the Features
ENGLISHENGLISH
Page 73

The available menu items are dependent on the input source being
selected. All illustration is for reference only.
70
Using the Features
Allows you to make adjustments to your picture settings.
Press the button to turn the LCD LED TV on.
Press the MENU button on the remote control to display the Main menu, and use the
◄► buttons to select the PICTURE.
Use the ▲▼ buttons to highlight an individual picture option, use the ◄► buttons to
change the setting, and press the EXIT to exit the menu.
Customizing the PICTURE Settings
PICTURE
Pic ture Mode User
Asp ect R atio 16:9
Col or Tempera ture
Noi se Re ducto n Au to
EXIT OK
PICTURE
Con trast 50
Bri ghtne ss 50
Asp ect R atio 16:9
Col or Tempera ture
Aut o Adju st
Scr een
EXIT OK
▪ If the signal source is VGA, the PICTURE MENU appears as:
▪ If the signal source is DTV/TV/SCART/YPbPr(Option)/HDMI, the PICTURE MENU
appears as:
Page 74
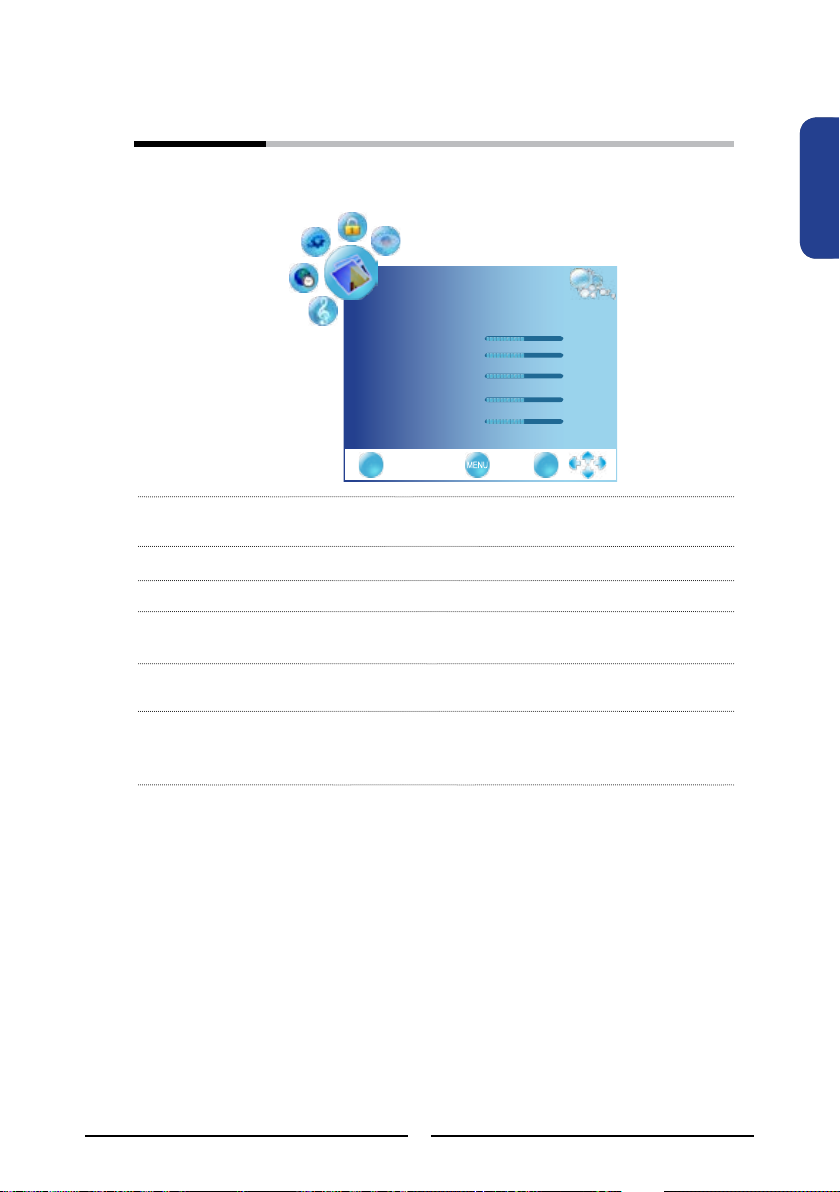
71
Using the Features
ENGLISHENGLISH
The PICTURE menu includes the following options:
Picture Mode Cycles among display types: Dynamic/Standard/Mild/User
User: Allows to store your preferred settings. If you select the User
mode, you can individually set the items shown:
Contrast Controls the difference between the brightest and darkest regions of
the picture.
Brightness Controls the overall brightness of the picture.
Color Controls the color intensity.
Sharpness Increase this setting to see crisp edges in the picture; decrease it for
soft edges.
Tint Controls the difference between the green and red regions of the
picture.
Aspect Ratio Selects through Wide mode settings :
In TV and video mode: Panorama/Auto/4:3/16:9/ZOOM1/ZOOM2
In VGA/DVI mode:4:3/16:9
PICTURE
Pic ture Mode User
Con trast 50
Bri ghtne ss 50
Col or 50
Sha rpnes s 50
Tint 0
EXIT OK
Page 75
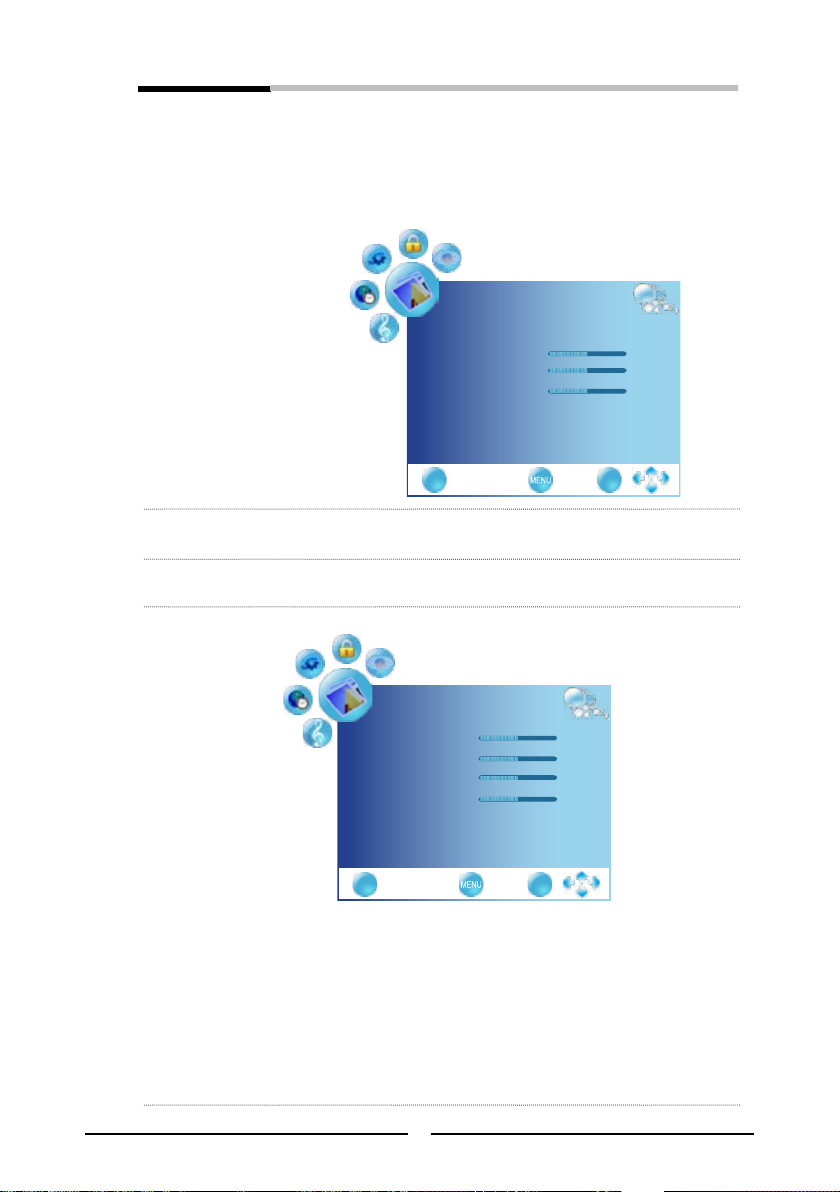
72
Using the Features
Color Temperature Adjusts color components independently to achieve a warm or cool
effect: Cool/Warm/Medium/User
▪ Warm: Increases red tint
▪ Cool: Increases blue tint
▪ Medium: Increases nature tint
▪ User: Allows the user to adjust red, green and blue color
component levels independently.
PICTURE
Hor izont al Po s. 50
Vert ical Pos. 50
Siz e 50
Pha se 50
EXIT OK
Noise Reduction Select to reduce the noise level of connected equipment: Auto/off/low/
hight
Auto Adjust Press the OK button to automatically adjust the display settings to
optimize performance based on the VGA mode.
Screen Press the OK button to enter the VGA Setting:
PICTURE
Col or Tempera ture Use r
Red 50
Gre en 50
Blu e 50
EXIT OK
▪ Horizontal Pos.: Adjusts the position of the picture left and right in the
window.
▪ Vertical Pos.: Adjusts the position of the picture up and down in the
window.
▪ Size: Controls the width of the picture based on the VGA
mode
▪ Phase: Controls the signal phase, which can improve focus
clarity and image stability based on the VGA mode.
Page 76

73
Using the Features
ENGLISHENGLISH
Press the button to turn the LCD LED TV on.
Press the MENU button on the remote control to display the Main menu, and use the
◄► buttons to select the SOUND.
Use the ▲▼ buttons to highlight an individual sound option, use the ◄► buttons to
change the setting, and press the MENU to exit the menu.
The SOUND Setup menu includes the following options:
Sound Mode Allows selection of an audio-enhancement technique from among the
following options: Sports/Movie/Music/Surround/Standard/User.
User: Allows to store your preferred settings.If you select the User
mode, you can individually set the items shown.
Treble Controls the relative intensity of higher pitched sounds.
Bass Controls the relative intensity of lower-pitched sounds.
Balance Adjusts the relative volume of the speakers in a multiple speaker
system.
Hard of hearing While viewing a digital channel, this function can be selected.
Select on, the TV will be activated the subtitle for a hearing-impaired
person.
AD Switch While viewing a digital channel, this function can be selected.
Select on, the TV will be emphasized voice volume.
AD Volume: You can adjust the audio description volume.
AD Output: You can select to listen the sound from the TV speaker,
headphone or both.
Customizing the SOUND Settings
SOUND
Sou nd Mo de Us er
Treble 50
Bas s 50
Bal ance 0
Har d of heari ng Off
EXIT OK
SOUND
AD Switc h Of f
AD Volume 50
AD Outpu t Spe aker
EXIT OK
Allows you to customize the audio options and effects.
PAGE 1 PAGE 2
Page 77
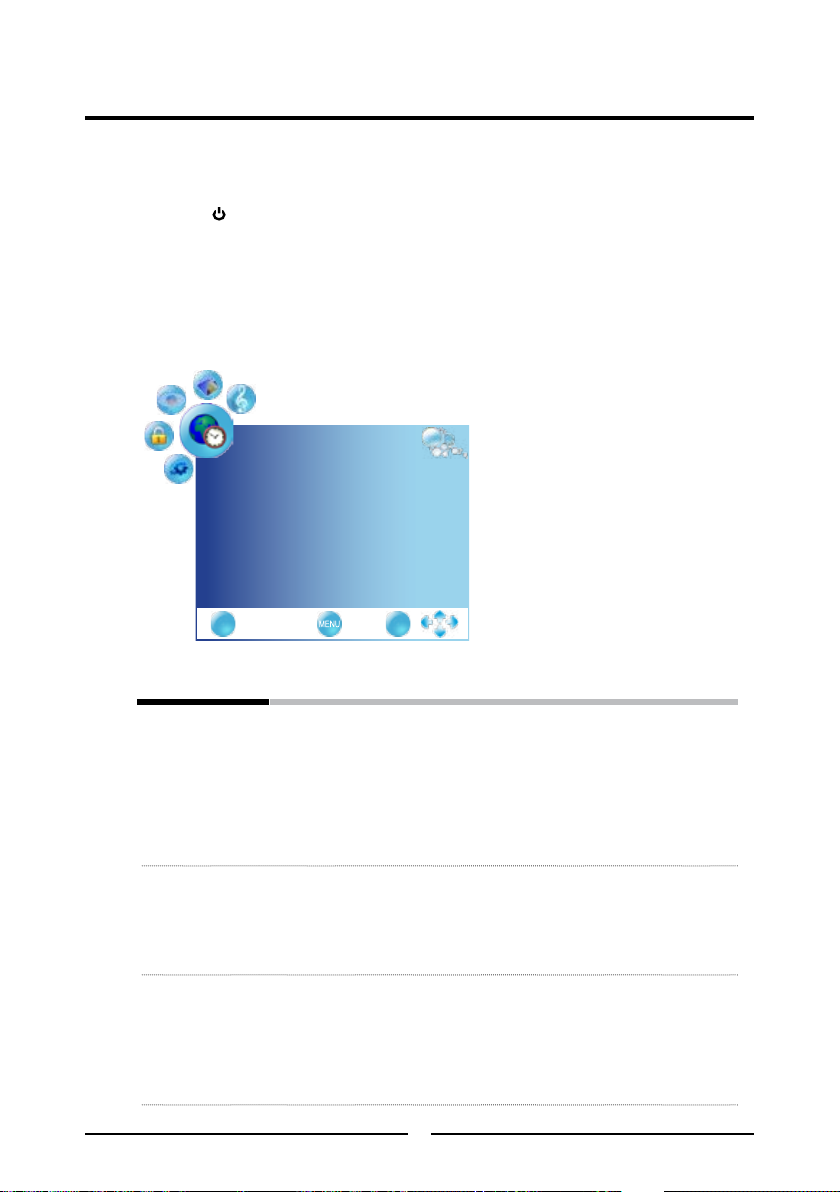
74
Using the Features
Customizing the TIME Settings
TIME
Clo ck _ _ _ _ _ _ _ _
Off Tim e off
On Time off
Sle ep Tim er off
Aut o Sle ep off
Time Z one Canary G MT
EXIT OK
Press the button to turn the LCD LED TV on.
Press the MENU button on the remote control to display the Main menu, and use the
◄► buttons to select the TIME.
Use the ▲▼ buttons to highlight an individual time option, use the ◄► buttons to
change the setting, and press the MENU to exit the menu.
The TIME menu includes the following options:
Clock Selects to set the current clock in ATV mode.
Press OK button to display the Clock menu:
Press ▲▼ buttons to move to Date, Month, Year, Hour and
Minute.
Press ◄► buttons to set.
NOTE: In DTV mode, the current time depends on the
broadcast station. The clock function can not be set.
Off Time Allows to set the Off timers that the TV will switch off automatically at the
time you select.
Press OK button to display the Clock menu:
Press ▲▼ buttons to move to Repeat, Hour and Minute.
Press ◄► buttons to set.
On Time Allows to set the On timers that the TV will switch on automatically and
tune to the mode of your choice at the time you select.
Press OK button to display the Clock menu:
Press ▲▼ buttons to move to Activate, Hour, Minute, Volume,
and Mode.
Press ◄► buttons to set.
Allows you to set up a variety of timer.
Page 78

75
Using the Features
ENGLISHENGLISH
Sleep Timer Use ◄► buttons to select a period of time after which the TV
automatically switches to standby mode:O f f , 10 , 20 ,30 , 60 , 90,
120, 180, 240 (minutes)
Auto Sleep Select on, the TV will be automatically turned off, in case of no
signal inTV & input source or no remote control input.
Time Zone
Use ◄► buttons to cycle through the available time zones in the
country.
Page 79
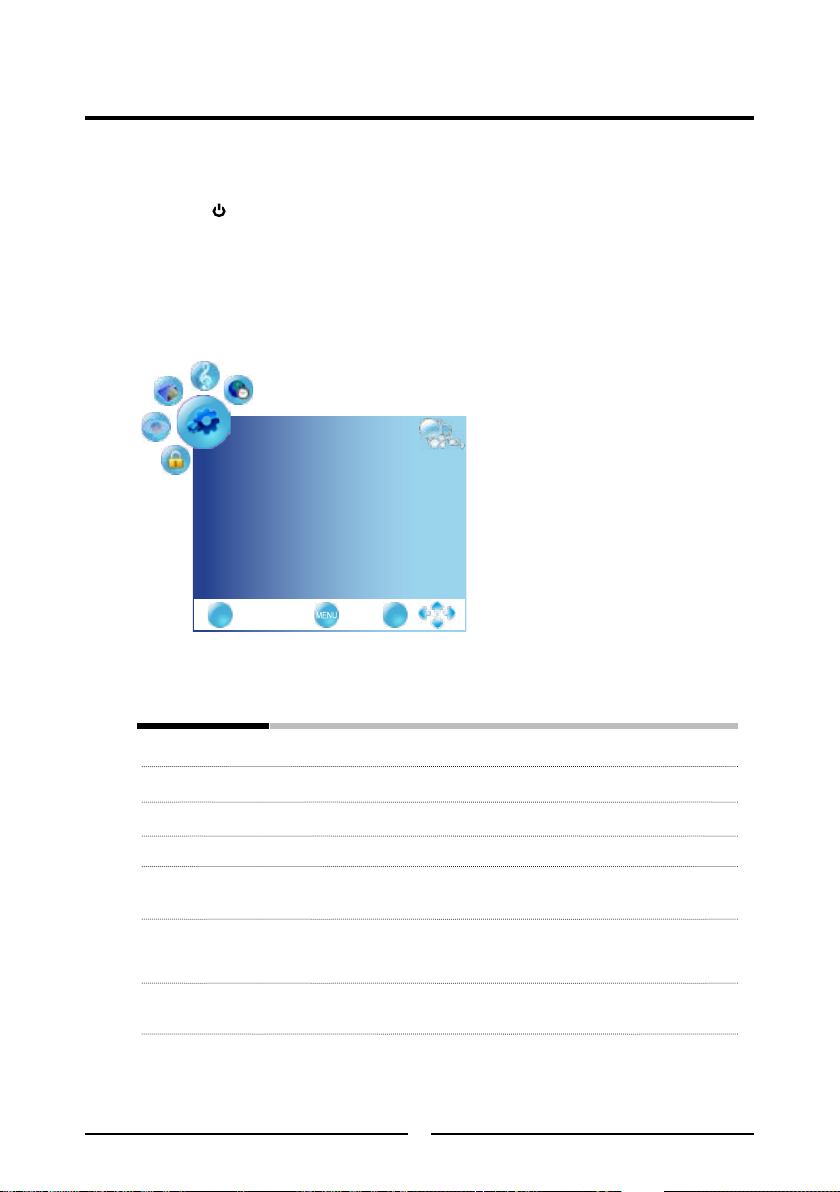
76
Using the Features
OPTION
Lan guage Engl ish
Aud io La nguag e E nglis h
Sub title Lang uage E nglis h
SCA RT Input AV+RGB
OSD Time Out off
Con trast Enha nceme nt
Res tore Facto ry De fault
EXIT OK
Press the button to turn the LCD LED TV on.
Press the MENU button on the remote control to display the Main menu, and use the
◄► buttons to select the OPTION.
Use the ▲▼ buttons to highlight an individual option option, use the ◄► buttons to
change the setting, and press the MENU to exit the menu.
The OPTION menu includes the following options:
Language Selects to display all on-screen menus in your language of choice.
Audio Language Allows to select the audio language.
Subtitle Language Allows to select the subtitle language on the screen.
SCART Input Allows selection of the SCART signal input: AV+RGB, SV+RGB
OSD Time Out Allows selection of the display time of the on-screen menu: off, 10, 15,
30, 45, 60(seconds)
Contrast On: Selects to increase the contrast levels of the image with
Enhancement changing scenes.
Off: Selects to turn off the contrast enhancement function.
Restore Factory Default
Press OK, use ◄ or ► to select “Yes” to restore factory settings.
Customizing the OPTION Settings
Allows you to set up a variety of features: Language, factory reset, sleep timer.
Page 80

77
Using the Features
ENGLISHENGLISH
Customizing the CHANNEL Settings
CHANNEL
EXIT OK
Aut o Tuni ng
DTV Manu al Tun ing
ATV Man ual Tu ning
Pro gramm e Edi t
CI Infor matio n
Sof tware Upda te
Press the button to turn the LCD LED TV on.
Press the MENU button on the remote control to display the Main menu, and use the
◄► buttons to select the CHANNEL.
Use the ▲▼ buttons to highlight an individual channel Setup option, use the ◄►
buttons to change the settings, and press the MENU exits the menu.
The CHANNEL menu includes the following options:
Auto Tuning Press the OK button, the Auto Tuning automatically creates a list of
receivable channels. You need to select your current country if
you wish to receiving all channels reliably.
▪Country Allows you select the country: UK, Ireland,
Denmark, Finland, Italy, Norway, Spain, Sweden,
Luxemburg, France, Czech., Poland, Hungary,
Austria, Germany, Switzerland, Belgium,
Netherlands, other.
DTV Manual Tunig Allows adjustment manually for the particular channel with optimal
reception in DTV mode.
Press OK button to display the DTV Manual Tuning menu.
Press ◄► buttons to select channel number.
Press OK button button to start scanning.
ATV Manual Tunig Allows adjustment manually for the particular channel with optimal
reception in ATV mode.
Press OK button to display the ATV Manual Tuning menu.
Press ◄► buttons to select channel number.
Press OK button button to start scanning.
Allows you to edit and label channels.
Page 81

The optional function is dependent on model.
78
Using the Features
Programme Edit Allows DELETE/RENAME/MOVE/SKIP of channels on the channel list.
▪
DELETE (red button)
Press the red button on the remote control with the selected
channel, then press it again if you wish to delete it.
▪ MOVE (yellow button)
Press the yellow button on the remote control with the selected
channel, move the channel by pressing the ▲▼ buttons then press
the yellow button again.
NOTE: Not only all TV channel names can be edited. The
channels in UK, France, Denmark, Finland, Italy, Netherlands
and Sweden do not support MOVE function.
▪ SKIP (blue button)
Press the blue button on the remote control with the highlighted
channel; press again to un-skip.
▪ Set up the favourite channels (FAV.CH button)
Press ▲▼ buttons to select your favourite channel.
Press Fav.CH button to set the channel, a icon will appear.
CI Information Allows to display the CI information: Module Information,
Smart Card Information, Language, Software Download
Software Update Selects for software upgrades by channel.
(OPTION) Upgrades the software using the broadcasting signal. If the
function is selected during the software transmission period, this
function searches for available software and downloads the
software and the “Software Update” option is changed to
highlight.
Press OK button to display the Software Update progress bar.
This function will start software upgrading.
The time required to download the software is determined by the
signal status. Do not turn the TV off before software update has
nished. The TV will turn on again automatically after completing the
software.
Programme Edit
800 SZTV M01
801 SZTV M01
800 SZTV M01
801 SZTV M01
78 BBC 7
30 CBBC Chann el
Page 82

79
Using the Features
ENGLISHENGLISH
LOCK
Loc k Sys tem o ff
Set Pass word
Blo ck Pr ogram
Par ental Guid ance off
EXIT OK
Press the button to turn the LCD LED TV on.
Press the MENU button on the remote control to display the Main menu, and use the
◄► buttons to select the LOCK.
Use the ▲▼ buttons to highlight an individual lock Setup option, use the ◄► buttons
to change the settings, and press the MENU exits the menu.
Use the function, must enter a four-digit password. The factory password is 0000.
The LOCK menu includes the following options:
Lock System Lock System is designed to prevent accidentally retuning the T V
and losing channels. When the Lock System is “ON”, a valid
password is required if the TV is to be retuned.
Set Password Allows to set the password. Use the function, must enter a four-digit
password. The factory password is 0000
Customizing the LOCK Settings
The Parental Control can be set up to the TV to block Channel, Video Source and to change
password.
Page 83

80
Using the Features
Block Program Selects to setup the TV Programme Lock options:
Press OK button to display the Block Programme menu:
Block Program
EXIT
1 C -25
2 C -28
Press ▲▼ buttons to move to the channel you want to block.
Press Green button to block the programme, a padlock icon
will appear. Press the Green button again to unblock.
Parental Guidance Select the parental level for your children, only programmes with
this feature will be blocked: 4 to 18 year olds, off
OK
Page 84

81
Troubleshooting
ENGLISHENGLISH
Before consulting service personnel, check the following chart for a possible
cause of problem and for a possible solution.
Audio noise
Move any infrared equipment away from the TV.
TV will not turn on
Make sure the power cord is plugged in, then press the button on the remote.
The batteries in the remote control may be exhausted.
Replace the batteries.
No picture, no sound
Check the interface cable between TV and antenna/cable TV.
Press the button on the remote.
Press the INPUT button on the remote repeatedly to select the connected video
sources.
Picture OK, poor sound
Sound may be muted. Press the button on the remote.
Press the VOL+ button to increase the volume.
TROUBLESHOOTING
Poor picture, sound OK
Check the interface cable between TV and antenna/cable TV.
Try another channel, the station may have broadcast difculties.
Adjust the Brightness/Contrast options in the VIDEO Menu.
Page 85

82
Specifications
SPECIFICATIONS
MODEL
DLC-E2250 DLC-E2450
LCD Panel Panel Size 21.5” TFT LCD 23.6” TFT LCD
Brightness 250 250
Contrast Ratio 1000:1 1000:1
Dynamic Contrast Enhancement 6000:1 6000:1
Max. Resolution 1920x1080 1920x1080
Backlight LED LED
Aspect ratio 16:9 16:9
Comb lter 3D 3D
Surround sound (stereo) YES YES
Speakers 3W x 2 3W x 2
Input Connector
SCART 1 1
VGA 1 1
HDMI 1 1
COAXIAL OUT 1 1
HEADPHONE 1 1
VHF/UHF IN 1 1
Power Source 12V DC, 4A 12V DC, 5A
Power Consumption Max. 45 W, standby < 1 W Max. 52 W, standby < 1 W
Dimension(WxDxH) 528.8*171*384.8 mm 573.3*171*410.2 mm
WEIGHT(Net) 3.78 kg 5 kg
Features and Specications are subject to change without notice.
Page 86

www.akai-france.com
DLC-E2250/DLC-E2450
 Loading...