

Page 1

ENGLISH
PORTABLE DVD PLAYER PORTABLE DVD PLAYER
DUAL SCREENS PORTABLE DVD PLAYER DUAL SCREENS PORTABLE DVD PLAYER
OWNER`S MANUAL
OWNER`S MANUALOWNER`S MANUAL
Please read this manual before operating
REVERSE 16:9 / 4:3 MODE UP DOWN
REVERSE 16:9 / 4:3 MODE UP DOWN
UNIVERSAL SERIAL BUS
ACVDS731UXT
Page 2

Page 3

Table of Contents
Table of Contents.......................................................................................................................................................................1
Safety Information......................................................................................................................................................................2
Remote Control..........................................................................................................................................................................3
Description of the Player.............................................................................................................................................................4
Description of the LCD Screen.....................................................................................................................................................5
Using the Remote Control............................................................................................................................................................6
Connecting the LCD Screens.......................................................................................................................................................7
Using USB Port..........................................................................................................................................................................8
Using the AC Adapter..................................................................................................................................................................9
Connecting Earphones to the DVD Player...................................................................................................................................10
Mounting the Screens for In-Car Use..........................................................................................................................................11
Playing a Disc.....................................................................................................................................................................12-14
Playing MP3 and Regular Audio CD...........................................................................................................................................15
Playing Picture CD....................................................................................................................................................................16
Displaying and Sorting Files......................................................................................................................................................17
Setting Language for OSD, Menu, Audio, Subtitle........................................................................................................................18
Setting Screen for Display Format, Screen Saver, TV System.......................................................................................................19
Setting Audio for Downmix ........................................................................................................................................................20
Setting Parental Control, Password, Camera Angle, Default.........................................................................................................21
Adjusting LCD Screen...............................................................................................................................................................22
Troubleshooting.......................................................................................................................................................................23
Specifications..........................................................................................................................................................................24
~ 1 ~
Page 4

Safety Information
Please read all of the safety and operating instructions before operating this Player, follow all warnings placed on the Player
and in the user's manual. These safety and operating instructions should be retained for future reference.
Safety Information
Do not expose the system to excessive moisture, rain, sand, or heat sources.
Place the DVD Player on a firm, flat surface.
Keep the DVD Player away from domestic heating equipment and direct sunlight.
When placing the DVD Player in a cabinet, allow about one inch of space all around the DVD Player for ventilation.
SAFETY WARNING
CLASS 1 LASER PRODUCT / KLASSE 1 LASER PRODUKT / LUOKAN 1 LASER LAITE / KLASS 1 LASER APPARAT / PRODUCTO
LASER CLASE.
INVISIBLE LASER RADIATION WHEN OPEN AND INTERLOCKS DEFEATED. AVOID EXPOSURE TO BEAM.
WARNING
1.To prevent fire or electrical shock, do not expose this Player to rain or moisture.
2.To avoid electrical shock, do not open the cabinet, no user-serviceable parts inside, refer servicing to qualified personnel only.
3.Listening with earphones for many hours at maximum volume may damage your hearing.
4.The Player should be connected to a power supply only of the type described in the operating instructions or as marked on the Player.
Attention:
Remove the protection card inside the disc compartment before using this Player.
~ 2 ~
Page 5

Remote Control
Remote Control
14
15
16
17
18
19
20
21
22
23
24
25
1.MENU/PBC Button
Brings up the disc menu.
2.L/R Button
Selects left, right and stereo
sound tracks.
1
3.P/N Button
Selects PAL/NTSC/AUTO TV systems.
2
4.TITLE Button
3
5.SUBTITLE Button
4
Selects the subtitle's language.
5
6.Number Buttons (0,1,...,9)
6
7.SETUP Button
Brings up the setup MENU
to set up the system's
7
language, audio, display,
password etc.
8.(PLAY/ENTER)/DIRECTION Buttons
8
9.STOP ( ) Button
9
10.SKIP FORWARD ( )Button
Use to skip to next title, chapter or track.
10
11.SKIP BACKWARD ( ) Button
11
Use to skip to previous title,
12
chapter or track.
13
12.ZOOM Button
13.GOTO Button
Use to enter the specific chapter, track
or time to playback.
14.DVD/USB Button
Switches between DVD and USB
mode.
15.DISPLAY Button
Displays the current disc playback
information.
16.MUTE Button
17.ANGLE Button
Use to access various
camera angles on a DVD.
18.LANGUAGE Button
Selects the voice language in a DVD.
19.SLOW Button
20.VOL- Button
Use to decrease the volume.
21.VOL+ Button
Use to increase the volume.
22.FAST REVERSE ( ) Button
23.FAST FORWARD ( ) Button
24.REPEAT Button
Allows you to repeat play
a title, chapter, track, or disc.
25.MARK Button
Use to mark a point where the
playback starts each time when
the MARK button is pressed
later on.
~ 3 ~
Page 6
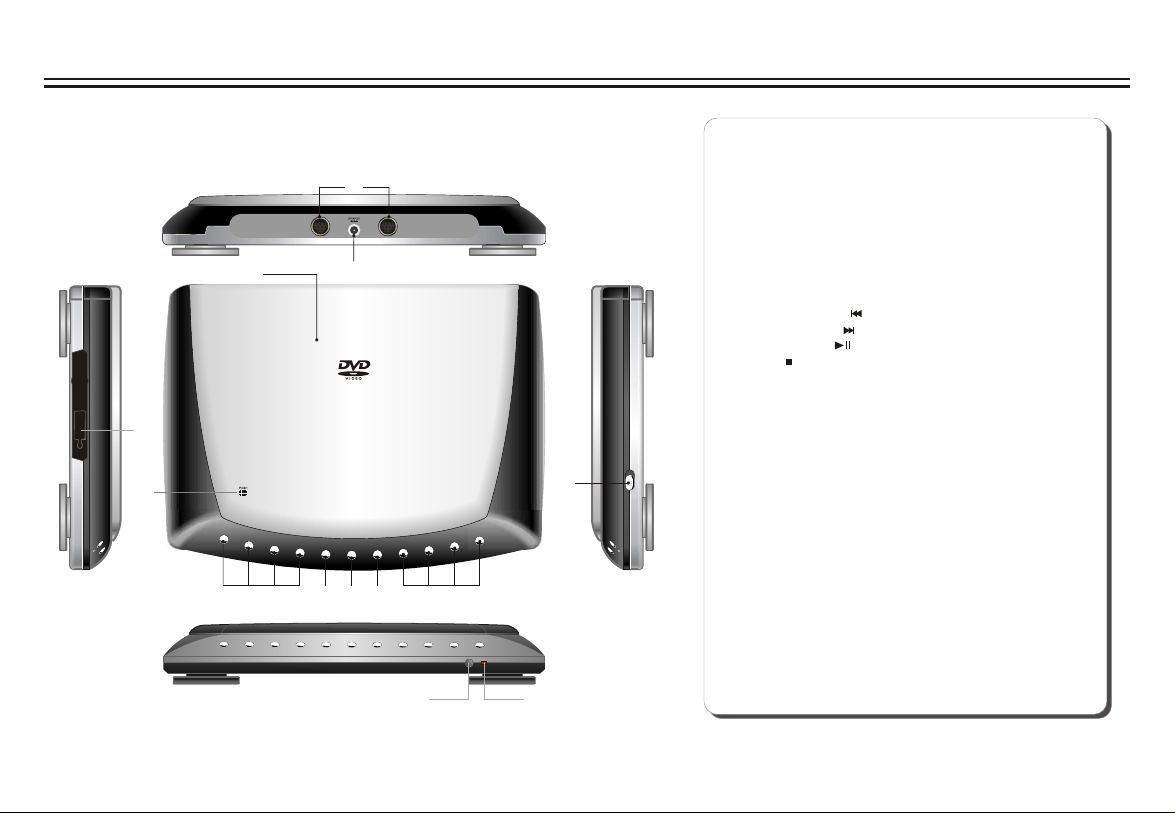
Description of the Player
1
OUT1 OUT 2
3
USB
11
9
2
1.OUT1/OUT2 jack
2.DC IN 12 V jack
3.DISC COVER
4.DIRECTION button ( up / down / left / right )
5.ENTER button
6.MENU button
7.DVD/USB button
8.PLAY BUTTONS
SKIP BACKWARD ( )
SKIP FORWARD ( )
PLAY / PAUSE ( )
STOP ( )
9.PUSH: Press here to open and close disc
compartment cover
10.POWER ON/OFF
F
F
O
RE
W
O
10
P
N
O
11.USB slot
12.REMOTE CONTROL SENSOR
13.LED LIGHT
4
7
5
6
8
12 13
~ 4 ~
Page 7

Description of the LCD Screen
1
2
3
REVERSE 16:9 / 4:3 MODE UP DOWN
4
9
5 6 7 8
1
Heat vent
1.
2.LCD
3.LED
4.REVERSE button
5.16:9/4:3 button
6.MODE button
7.UP button
8.DOWN button
11
VOL
12
9.SPEAKER
Socket for connecting stand or
10.
mounting device.
Speaker volume knob
11.
12.EARPHONE JACK
Power On/Off switch
13.
14.DC.AV IN PUT jack
POWER
13
ON OFF
DC .AV INPUT
14
10
~ 5 ~
Page 8

Using the Remote Control
Installing the battery
1. Open the battery compartment cover using a coin.
2. Insert a 3V lithium battery into the battery compartment with
the polarity ( + ) facing up as marked.
Battery
3. Replace the battery compartment cover and turn clockwise
until it stops.
battery compartment
cover
Using the remote control
Point the remote control directly at the remote sensor
on the front of the DVD Player.
O
O
30
30
2m(6.5ft)
Remote Control Sensor
Corrosion, oxidation, battery-leakage and any other gradually
acidic defect of this nature will invalidate the guarantee.
~ 6 ~
Page 9

Connecting the LCD Screens
The power for the two screens is provided by the DVD player through the provided cables which also serve to provide the audio/video
signal from the player to the screens. Follow these steps to make the connections.
1. Connect one end of the Power/AV cable (mini DIN) to the OUT1 on the player and the other end to the DC. AV INPUT on the screen.
2. Repeat step 1 for the other screen.
OUT1 OUT 2
DVD Player
LCD Screen
DC .AV INPUT
POWER
ON OFF
VOL
DC .AV INPUT
POWER
ON OFF
VOL
Power/AV Cable
Warning!
1. Do not turn on the DVD player power until the connection of Power/AV cable between the Player and the screen is done.
2. Always turn off the DVD player power before disconnecting the Power/AV cable between the Player and the screen.
~ 7 ~
Page 10

Using USB Port
USB
The player accepts most USB devices such as MP3, DSC, USB- drive, Digital Camcorder etc. The USB in this Player supports
version 1.1/2.0.
USB slot
Pluging a USB device
1.Plug in the USB device to the USB port on the player.
2.Repeatedly press DVD/USB to select USB mode.
Removing a USB device
You can remove the USB device anytime even it is playing. To remove the USB device, simply grasp the end of the USB and remove it
from the slot.
Playing a USB device
1.Insert the USB device and repeatedly press DVD/USB to select USB mode. The file manager appears and the first song file of the
first folder plays.
2.Use direction key ( and ) to select the file you want to play and press to play.
Note:
If you have different file types (photo, music, video) in the USB, make sure you have selected to display all file types ( see "
Displaying and Sorting Files") otherwise, some file types may not display.
~ 8 ~
Page 11

Using the AC Adapter
AC adaptor (optional). For more information please visit www.akai.eu .
This portable DVD player is powered by AC through a switching power AC adapter.
For in-car use, this Player is powered by car battery through the car(DC) adapter.
OUT1 OUT 2
To DC12V IN on the DVD player
supplied
AC adapter(optional)
(Optional)
To home power outlet
Power cord
Important !
Always turn off the DVD Player before connecting or disconnecting the AC cord.
It is strongly recommended to use the original AC adapter for this product. Using a different type of adapter may cause malfunction or
damage to the product.
When the AC adapter is used for prolonged period of time, the adaptor may heat up, this is normal and is not a cause for concern.
When not using the adapter, unplug it from the outlet.
Do not use the AC adapter if damaged. And do not try to disassemble or repair this adapter.
Do not use this AC adapter for other products.
~ 9 ~
Page 12

Connecting Earphones to the DVD Player
You can use the earphones (optional accessory) for private listening to the audio by connecting them to the earphone jack on the
LCD screen. Use the speaker VOLUME knob to adjust the volume.
Note: When the earphone is connected to the Phone Jack ( ), the speaker will be disconnected.
VOL
POWER
ON OFF
DC .AV INPUT
Notes on DSP
The DSP decodes the digital audio signal into stereo dts or Dolby digital audio signal for speaker and earphone playback after
converting the signal to analog and amplifying it.
~ 10 ~
Page 13

Mounting the Screens for In-Car Use
You can mount the screens to the head rest of your car using the provided straps. Depending on the type of your car seat, you can
mount the screens the following two ways.
(A) Car with height-adjustable head rest
1.Tug one strap under the two vertical mounting rods.
Repeat fthe step for the other strap
2.Mount the screen to the head rest and tighten the strap.
3.Repeat steps 1 and 2 for the other screen.
B) Car with fixed head rest.
1.Tug the strap through the two horizontal mounting rods.
2.Mount the screen to the head rest and tighen the strap.
~ 11 ~
Page 14

Playing a Disc
Preparation for Playback
1.Make sure the Player has the power either from the AC
adapter or DC(car) adapter.
2.Load a disc, following these steps:
Open the top cover.
Press the OPEN button to open the disc cover.
Place a disc into the tray with the label side facing up.
Close the disc cover.
3.Slide POWER to ON to turn on the power.
Play
Press (on the remote control) or (on the player) to start
play.
Resume
There are two ways to resume your playback when interrupted.
Method 1: for short time interruption
1.Press STOP ( ), the Player remembers where you stopped.
2.To resume, press PLAY, the Player will play from where you
stopped.
Method 2: for longer time interruption
1.Press OPEN to open the disc compartment door
2.You can turn off the power, and even remove the disc from the
desk, when you turn on the power and replace the disc, the
Player will play from where you stopped.
Stop
1.Press (on the remote or on the player) to temporarily stop
the playback, " " appears on the screen.
2.Press again to stop the playback.
Adjusting volume
Press VOL+ or VOL- to change volume.
Skip
You can skip chapters on DVD-Video, tracks on CDs, and
Video CDs.
1.To skip forward, press during play ,it skips to the next
chapter or track. Each press increases the numbers of skips.
2.To skip to previous chapter or track, press .
Fast Forward and Reverse
1.During playback, to fast forward, press and hold (on the
player) to increase the fast forward speed 2x, then repeatedly
press to increase to 4x, 8x, 16x, 32x.You can also simply
repeatedly press on the remote control to increase the
fast forward speed.
2.During playback, to fast reverse, press and hold (on the
player) to increase the fast reverse speed 2x ,then repeatedly
press to increase to 4x, 8x, 16x, 32x. You can also simply
repeatedly press on the remote control to increase the
fast reverse speed.
3.To resume normal playback, press .
~ 12 ~
Page 15

Playing a Disc
Slow Motion
1.During playback, repeatedly press SLOW to play at 1/2, 1/4,
1/8, 1/16, 1/32 speeds.
2.To resume normal playback, press .
You can only perform slow motion play in the forward direction.
Repeat Playback
You can play a chapter, a track, a title, a file or the entire disc
repeatedly.
1.During playback, repeatedly press REPEAT to choose a
Repeat option. Depending on the type of disc, the Repeat
options may be different.
2.To cancel repeat playback, repeatedly press REPEAT until
“ off ”appears on the screen.
Mark (Bookmark)
The Mark function lets you "bookmark" points on the disc for
playback at a later time. You can store up to 20 bookmark
locations.
Follow these steps to set up marker playback:
1.During playback, press MARK on the remote control.
2.Use to select a bookmark location.
3.When you reach the scene you want to mark, press to
confirm.
4.Repeat the above procedure for a new scene. You can have
up to 20 bookmarks.
You can perform marker playback at any time by pressing
MARK, and using to select one of the bookmarks, then
pressing to start playing the bookmarked scene. The
Playback continues until the end of the disc. Repeat the above
to play the other marked scenes.
GOTO
You can go directly to a desired chapter and play, or play at a
desired point of time. Follow these steps:
(A)To play a specific chapter
1. Press GOTO, use to select title (TT) and chapter (CH)
and enter the desired number.
2. Press ENTER to confirm and start play.
(B)To play from a specific point of time.
1. Press GOTO twice to move to the time display and it
changes 00:00:00.
2. Fill in the time (hour: minute: second).
3. Press ENTER to confirm and start play.
ZOOM
ZOOM lets you enlarge the video image during playback and
pan through the enlarged image.
1.Press ZOOM repeatedly during video playback to enlarge
the image to x 2 or x 4 times of the normal size.
2.Press ZOOM repeatedly while displaying JPEG file and
Picture CD disc to zoom in the picture at 150% or 200% and
zoom out the picture at 25% or 50%.
Use direction keys ( and ) to move around (pan and
scan) the enlarged video or picture.
~ 13 ~
Page 16

Playing a Disc
Mute
Press MUTE to silence the audio, press MUTE again to restore
it.
Menu/PBC
During DVD playback, press MENU/PBC to return to the disc's
Start Menu. If the disc does not have the Start Menu, or discs
that refuse MENU function, appears.
For VCD playback, press MENU/PBC to turn on/off PBC
(Playback Control). If PBC is enabled, menu of scene's
thumbnails appears, you can make selection for playback.
LANGUAGE
Repeatedly press LANGUAGE during DVD playback to change
the language of the voice if the disc has multiple languages.
This function is only valid for DVDs.
Subtitle
Repeatedly press SUBTITLE during DVD playback to change
the subtitle's language If the disc has multiple subtitle's
languages.
This function is only valid for DVDs.
Angle
Repeatedly press ANGLE during DVD playback to change the
camera angle if the disc has different camera angles.
This function is only valid for DVDs.
TITLE
Press TITLE, it takes you to the very beginning of the title and
play, or to the MENU if it has title menu.
DISPLAY
Repeatedly press DISPLAY during playback to display various
playback information such as current title, chapter, track
elapsed time, languages etc.
L/R
This function is mostly used for karaoke (sing along) discs, by
repeatedly pressing L/R, you can select STEREO, MONO
(Left), MONO (Right), MIX MONO etc.
P/N
This is used when you connect the Player to a TV and watch
video on the TV. Repeatedly press P/N to select NTSC, PAL
and AUTO to match that of your TV.
The LCD screen does not have NTSC or PAL, so if you watch
video on the Player's screen, it is recommended to set to
NTSC which will give a better video quality. The player will
play both PAL or NTSC DVD's titles even when the Player is
set to NTSC.
~ 14 ~
Page 17

Playing MP3 and Regular Audio CD
Valid MP3 CD
Your MP3 files should be ISO 9660 or JOLIET format.
Play
In most cases, when a MP3 or audio disc is placed into the
player, the first song file of the first folder plays.
In other cases, the file manager appears. Use direction keys
( and ) to select the song file and press to play.
~ 15 ~
Page 18

Playing Picture CD
Valid Picture
The player can play both Kodak Picture CD that you order from
photo processing store, and home-made CD by burning JPEG
files onto a CD-R or CD-RW disc.
Play
In most cases, after the disc is placed into the player, the first
file will be shown.
In other cases, the file manager appears. Use direction keys
( and ) to select the picture and press PLAY on the
Player or on the remote control to start the slide show
( plays photos automatically).
To return to file manager, press MENU/PBC.
To display thumbnail, press " " during playback of images.
To start slide show, press " " during playback of images.
Press ZOOM to enlarge the photo and use and to move
around the enlarged photo. The slide show function stops when
you press ZOOM.
Next/Previous
You can manually skip to the next picture by pressing , and
to skip to the previous picture by pressing .
Rotate
The picture can be rotated and flipped.
1.During playback, use direction keys ( and ) to
rotate right 90 degrees, left 90 degrees, flip vertically and
horizontally respectively.
Rotate Right 90
Original
Flip Vertically
Flip vertically Flip horizontally
Rotate right 90 degrees
Flip Horizontally
O
~ 16 ~
Page 19

Displaying and Sorting Files
Displaying files
When a disc or USB device contains multiple file types, you
can select and display only certain file types.
1. Press STOP and select FILE TYPE and press " " to
confirm.
2. Select the file type you do not want to display and repeatedly
press " " so the check mark disappears.
3. Repeat STEP 2 to hide the other file type.
4. Select EXIT and press " " to get out.
ROOT
FILE TYPE:
MP3
MP2
JPEG
DAT
OP-06NW1
OP-06NW2 2
OP-06NW3
MPG
OP-06NW4
VOB
AVI
OP-06NW5
WMA
OP-06NW6
Exit
OP-06NW7
OP-06NW8
File Type
1
3
4
5
6
7
8
Sort File
Sorting files
You can list the file in the order according to its type, name or
date.
1. Press STOP and select SORT FILE, press " " to
confirm.
2. Select one of the sorting criteria ( by type, by name
and by date).
3. Select Ascending or Descending order for listing the
files, press " " to confirm.
4. Select EXIT and press " " to get out.
NOTE: If the file is listed by name, It will first list the file
names with capital letter in alphabetical order,
then files with lower case.
ROOT
SORT FILE:
Method: Sequence:
By type
By name
By date
OP-06NW1
OP-06NW2 2
OP-06NW3
OP-06NW4
Ascending
OP-06NW5
Descending
OP-06NW6
OP-06NW7
Exit
OP-06NW8
File Type
1
3
4
5
6
7
8
Sort File
~ 17 ~
Page 20

Setting Language for OSD, Menu, Audio, Subtitle
OSD
OSD
OSD
OSD
1. Press SETUP on the remote control.
2. Use the direction keys ( ) to select Language Setup
and its sub-menu.
3. Press to confirm your selection.
4. Press SETUP to exit.
Changing OSD language
Language Setup
OSD
Menu
Audio
Subtitle
:Select
English
French
German
Italian
Spanish
Changing menu language
Language Setup
OSD
Menu
Audio
Subtitle
English
Chinese
Japanese
French
German
Changing voice language
Language Setup
OSD
Menu
Audio
Subtitle
:Select
Changing subtitle language
Language Setup
OSD
Menu
Audio
Subtitle
:Select
English
Chinese
Japanese
French
German
English
Chinese
Japanese
French
German
:Select
~ 18 ~
Page 21

Setting Screen for Display Format, Screen Saver, TV System
OSD
OSD
OSD
1. Press SETUP on the remote control.
2. Use the direction keys ( ) to select Screen Setup and
its sub-menu.
3. Press to confirm your selection.
4. Press SETUP to exit.
Adjusting the Aspect Ratio
4:3 LB (Letter Box)
Displays the content of the DVD title in 16:9 aspect ratio.
The black bars will appear at the top and bottom of the screen.
4:3 PS( Pan Scan)
The left and right of the screen are cut off and displays the
central portion of the 16:9 screen.
Screen Setup
Display Format
Screen Saver
TV System
:Select
4:3 PS
4:3 LB
16:9
Turning on/off screen saver
Screen Setup
Display Format
Screen Saver
TV System
:Select
Selecting TV system
Screen Setup
Display Format
Screen Saver
TV System
:Select
On
Off
NTSC
PAL
Auto
~ 19 ~
Page 22

Setting Audio for Downmix
OSD
1. Press SETUP on the remote control to access Main Menu.
2. Select DVD Setup and Press to confirm .
3. Use the direction keys ( ) to select Audio Setup
and its sub-menu.
4. Press to confirm your selection.
55. Select Exit or press SETUP to exit.
Changing Downmix
DVD Setup-Audio Setup
Downmix
: Select : Confirm
Lo/Ro
Lt/Rt
~ 20 ~
Page 23

Setting Parental Control, Password, Camera Angle, Default
OSD
OSD
OSD
OSD
1. Press SETUP on the remote control.
2. Use the direction keys ( ) to select Custom Setup and
its sub-menu.
3. Press to confirm your selection.
4. Press SETUP to exit.
Setting parental control
Custom Setup
Parental Ctrl
Password
Angle Mark
Default
:Select
5
…
6
7
8
Off
Changing password
. Use direction keys ( ) to select Password and press
1
ENTER to confirm.
2. Key in your old password ( 8888 if this is the first use).
3. Key in new password and again to verify.
Custom Setup
Parental Ctrl
Password
Angle Mark
Default
Old:
New:
Verify:
…
:Select
Turning on/off camera angle
When ON is selected, the player will display multi-angle mark
on the screen if the disc has multi-angle shot.
Custom Setup
Parental Ctrl
Password
Angle Mark
Default
:Select
On
…
Off
Returning to default setting
All settings will revert to the original factory settings when
Reset is selected.
Custom Setup
Parental Ctrl
Password
Angle Mark
Default
:Select
Reset
…
~ 21 ~
Page 24

Adjusting LCD Screen
Following these steps to adjust the LCD quality during playback or while paused.
1.Repeatedly press MODE on the screen panel to select the parameters listed in the menu.
You can change BRIGHTNESS, CONTRAST, SHARPNESS, COLOR and TINT.
2.Repeatedly press (or hold down) UP and DOWN to change the setting of the parameter selected.
3.To reset the setting to its defaulted value, select RESET by repeatedly pressing MODE then press UP or DOWN to confirm.
16:9/4:3
REVERSE
MODE
UP
DOWN
REVERSE 16:9 / 4:3 MODE UP DOWN
~ 22 ~
Page 25

Troubleshooting
If your DVD player dose not seem to be functioning properly, check the items below before you contact a service center.
Symptom
Power does not turn on
or suddenly turns off
Remote control does not work
Disc does not play
No picture and sound
No sound
Check
Make sure the AC Power cord is securely plugged into an AC outlet.
Turn the power off and then back on.
Check that the battery is inserted in the "+" and "-" directions properly.
The batteries may be dead. Replace them with new batteries.
Check that the signal transmission is directed at the remote control sensor on the DVD player.
Check that the disc is a DVD, DVD-RW, VIDEO CD, or AUDIO CD.
Do not use a disc that has scratches or dirt.
Check that the label-side of the disc is facing up.
The pick-up lens of the DVD player may be dirty. Contact the service center for lens cleaning.
Check if the Player and the screens have power (LED indicators are on).
Check if the DC/AV cables are connected properly.
Check the volume setting. If set to zero, turn up volume level.
Check that the headphones are plugged into the PHONES and Audio jack. Speakers
cannot be used with the headphones.
~ 23 ~
Page 26

Specifications
General
Readable
Disc
Readable USB
Video
Output
Audio
Power Requirements
Power Consumption
Weight
Dimensions
Operating Temperature Range
DVD, DVD-R, DVD+R, DVD-RW, DVD+RW, VCD, DVCD, CVD, Mp3, PICTURE CD,
CD, CD-G, HDCD, CD-R, CD-RW, MPEG4
DSC, Camcorder, U-drive, MP3 player, and other USB storage devices
Composite Video
2 Channel
DVD Player
LCD Screen
DVD Player
LCD Screen
Output
Frequency Response
The specifications are subject to change without notice.
Weight and dimensions are approximate.
Due to continued product improvements, if there is any discrepancy in this user manual, the actual unit prevails.
Input AC 100V~240V, 50/60 Hz, Output DC 12V
>
15 W
408.5g
346g
224mm ( W ) x 166mm ( D ) x 43.8mm ( H )
188mm ( W ) x 138mm ( D ) x 24.8mm ( H )
OO
+10 C~ +40 C
1 channel : 1.0 Vp-p (75 load)
L, R
20Hz - 20 kHz 2.5dB
+
-
~ 24 ~
Page 27

Disposal of Used Electrical & Electronic Equipment
The meaning of the symbol on the product, its accessory or packaging indicates that this
product shall not be treated as household waste. Please, dispose of this equipment at your
applicable collection point for the recycling of electrical & electronic equipments waste. In
the European Union and Other European countries which there are separate collection
systems for used electrical and electronic product. By ensuring the correct disposal of this
product, you will help prevent potentially hazardous to the environment and to human
health, which could otherwise be caused by unsuitable waste handling of this product. The
recycling of materials will help conserve natural resources. Please do not therefore dispose
of your old electrical and electronic equipment with your household waste. For more
detailed information about recycling of this product, please contact your local city office,
your household waste disposal service or the shop where you purchased the product.
Page 28

Information : www.akai.eu
 Loading...