

Page 1

User Guide
English ( 3 – 6 )
Guía del usuario
Español ( 7 – 10 )
Guide d’utilisation
Français ( 11 – 14 )
Guida per l’uso
Italiano ( 15 – 18 )
Benutzerhandbuch
Deutsch ( 19 – 22 )
Appendix
English ( 23 )
Page 2

2
Page 3
User Guide (English)
Introduction
Box Contents
LPK25 Wireless, USB Cable, Software Download Card, User Guide, Safety & Warranty Manual
Important: Visit akaipro.com and find the webpage for LPK25 Wireless to download the free
editor software.
Support
For the latest information about this product (documentation, technical specifications, system
requirements, compatibility information, etc.) and product registration, visit akaipro.com.
For additional product support, visit akaipro.com/support.
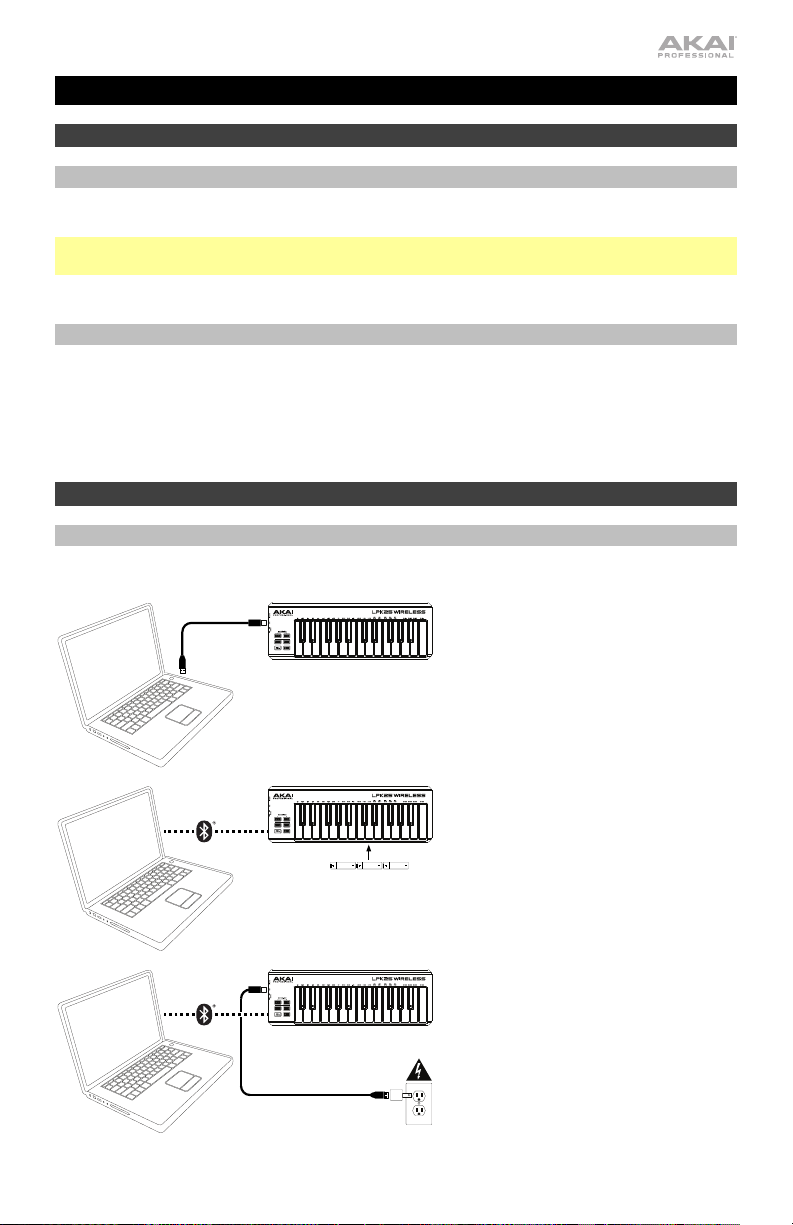
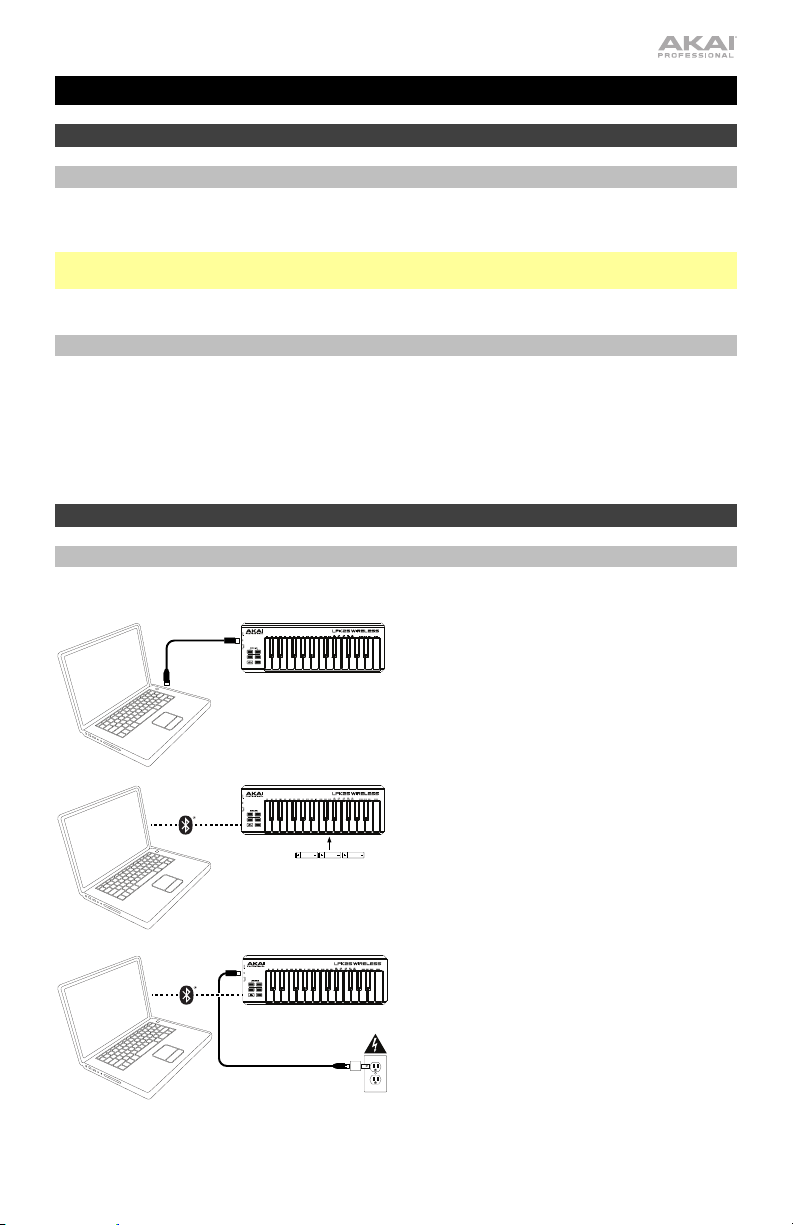
Quick Start
Connection Diagram
Items not listed under Introduction > Box Contents are sold separately.
USB Connectivity & Power: Use a
standard USB cable to connect
LPK25 Wireless to your computer. Set
its power switch to USB.
Bluetooth Connectivity & Battery
Power: Install 3 AA batteries into the
battery compartment underneath
LPK25 Wireless. Set its power switch
to Batt. See Operation > Bluetooth
to learn how to pair LPK25 Wireless
to your computer (or other device)
using Bluetooth technology.
Bluetooth Connectivity & USB
Power: Use a standard USB cable
and USB power adapter to connect
LPK25 Wireless to a power outlet. Set
its power switch to USB. See
Operation > Bluetooth to learn how
to pair LPK25 Wireless to your
computer (or other device) using
Bluetooth technology.
3
Page 4
Features
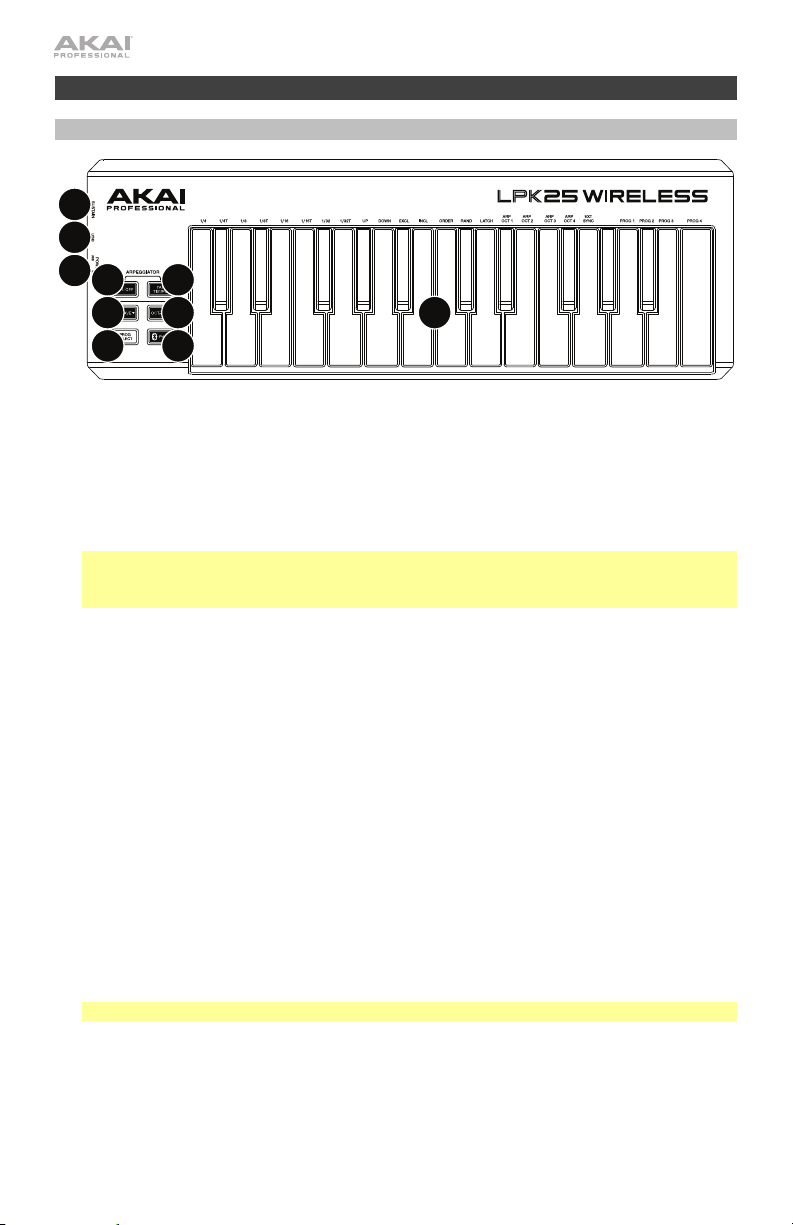
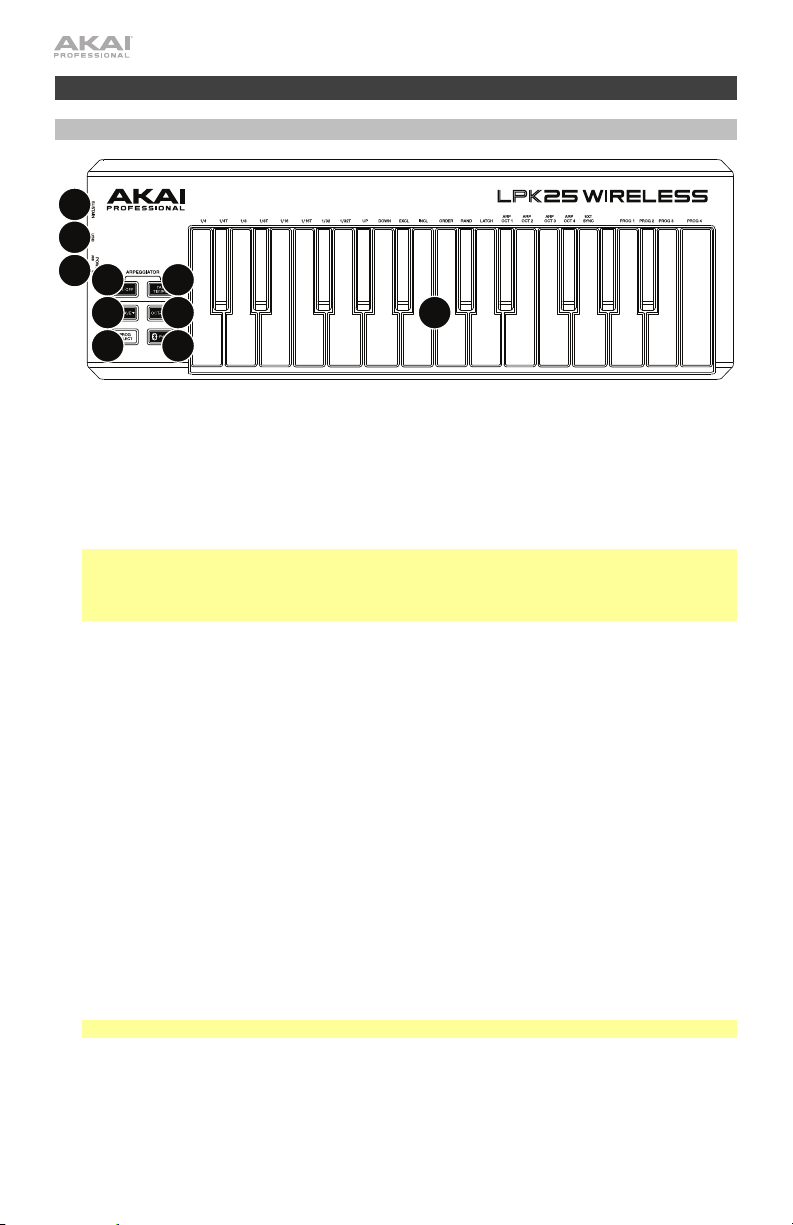
Top Panel
3
1
2
7
5
6
1. USB Port: Use a standard USB cable to connect this USB port to your computer. The
computer’s USB port provides ample power to LPK25 Wireless, though you may use 3 AA
batteries instead. This connection is also used to send and receive MIDI data to and from
your computer.
2. Power Switch: Use this switch to power LPK25 Wireless on or off. To use USB power, set
it to USB. To use batteries, install 3 AA batteries into the battery compartment underneath
LPK25 Wireless, and set it to Batt.
Note: If you have installed batteries into LPK25 Wireless, you can power it off by setting the
power switch to USB (when it is disconnected from a computer). If you have not installed
batteries into LPK25 Wireless, you can power it off by setting the power switch to Batt.
3. Sustain Pedal Input: Connect an optional 1/4” (6.35 mm) TS sustain pedal to this input.
4. Keyboard: This 25-note keyboard is velocity-sensitive and, in conjunction with the Octave
Down/Up buttons, can access the full range of 127 available MIDI notes (11 octaves).
The Prog Select and Arp On/Off buttons allow some of its keys to access additional
commands. See Operation > Programs and Arpeggiator to learn more.
5. Octave Down/Up (/): Use these buttons to shift the keyboard’s range down or up.
Press both buttons simultaneously to reset the octave shift to “zero.”
6. Prog Select: Hold down this button and press one of the keys on the keyboard labeled
Prog 1, 2, 3 or 4 to load the program of the same number.
7. Arp On/Off: Press this button to enable or disable the internal arpeggiator. The
arpeggiator affects notes being played on the keyboard only, and its rate is based on the
current tempo and time division settings.
Hold this button down press a labeled key on the keyboard to enter new settings for the
arpeggiator. See Operation > Arpeggiator to learn more.
8. Tap Tempo: Tap this button at the desired rate to enter a new tempo for the internal
arpeggiator.
Important: Tap Tempo does not work when LPK25 Wireless is externally synced.
9. Pair: Press this button once to make it available to pair and connect to a nearby Bluetooth
device.
Press this button once more to disconnect it from the currently device. It will automatically
be available to connect to another one.
See Operation > Bluetooth to learn more.
4
8
5
4
9
Page 5

Operation
Bluetooth
Instead of using a “wired” USB connection to connect LPK25 Wireless to your computer, you
can connect wirelessly to a Bluetooth-compatible device.
Important: Your host device must support Bluetooth Low Energy (Bluetooth LE) to use this
feature. For the most current and complete system requirements, visit akaipro.com and find
the webpage for LPK25 Wireless.
To pair LPK25 Wireless to your Bluetooth device:
1. Power on your Bluetooth device.
2. Power on your LPK25 Wireless:
• If you are using battery power, set the power switch to Batt.
• If its USB port is connected to a power outlet (using a USB power adapter), set the
power switch to USB.
3. Press Pair once. The button will flash.
4. Enable Bluetooth connectivity on your device:
• Mac OS X: Press +Space, type Audio MIDI Setup, and open the Audio MIDI
Setup application. In the MIDI Studio window that appears, click the Bluetooth icon.
In the window that appears, click Connect next to Akai LPK25 Wireless.
• iOS: Download and open the GarageBand application. Tap the Settings button (the
gear icon), and then tap Song. Tap Advanced, and then tap Bluetooth MIDI
Devices. Tap Akai LPK25 Wireless, and then tap Connect.
When successfully paired, the Pair button will stay continuously lit.
To unpair LPK25 Wireless from your Bluetooth device, press Pair again. When unpaired,
the Pair button will be unlit.
Programs
You can store up to 4 programs in LPK25 Wireless’s internal memory. Each program includes
all configurable arpeggiator settings, described below in the Arpeggiator section.
To select a program, press and hold Prog Select, and press Prog 1, 2, 3, or 4.
To manage your programs, use the LPK25 Wireless editor software. Visit akaipro.com and
find the webpage for LPK25 Wireless to download it.
Arpeggiator
While using the arpeggiator, playing a chord causes the individual notes of the chord to play
one at a time in a set order and repeat until the chord is released. The arpeggiator affects
notes being played on the keyboard only.
To enable or disable the arpeggiator, press Arp On/Off.
5
Page 6

The rate of the arpeggiator is based on the current tempo and time division settings.
To set the tempo, press Tap Tempo several times at the desired rate. The arpeggiator will
automatically detect the new tempo.
Important: Tap Tempo does not work when LPK25 Wireless is externally synced.
To set the time division, press and hold Arp On/Off, and press one of these keys on the
keyboard:
1/4 (quarter notes) 1/16 (sixteenth notes)
1/4T (quarter-note triplets) 1/16T (sixteenth-note triplets)
1/8 (eighth notes) 1/32 (thirty-second notes)
1/8T (eighth-note triplets) 1/32T (thirty-second-note triplets)
The arpeggiation type determines the order in which the notes of a chord play, whether they
ascend or descend, etc.
To set the arpeggiation type, press and hold Arp On/Off, and press one of these keys on the
keyboard:
• Up: Notes arpeggiate from the lowest note up to the highest note.
• Down: Notes arpeggiate from the highest note down to the lowest note.
• Incl (Inclusive): Notes arpeggiate from the lowest to the highest note and back down.
Lowest and highest notes are retriggered when the arpeggio changes direction.
• Excl (Exclusive): Notes arpeggiate from the lowest to the highest note and back down.
Lowest and highest notes are not retriggered when the arpeggio changes direction.
• Order: Notes will be repeated in the same order in which their keys were pressed.
• Rand (Random): Plays the held notes in random selection.
The arpeggiation range determines the number of octaves across which the arpeggio will play.
After the arpeggio plays at the highest octave in the range, the arpeggio will repeat from the
lowest octave.
To set the arpeggiation range, press and hold Arp On/Off, and press
Arp 1, 2, 3, or 4.
The Arp On/Off button can function in one of two ways:
• Momentary: To activate the arpeggiator, press and hold Arp On/Off while playing a
chord. To deactivate the arpeggiator, release Arp On/Off. This is the default setting.
• Latching (toggle): To activate the arpeggiator, press and release Arp On/Off while
playing a chord. To deactivate the arpeggiator, press and release Arp On/Off once more.
To set Arp On/Off as a momentary or latching button, press and hold Arp On/Off, and
press the Latch key on the keyboard.
You can set the arpeggiator to follow the tempo of LPK25 Wireless’s internal MIDI clock or
the external tempo of the project in your digital audio workstation (DAW).
To set whether the arpeggiator is internally or externally synced, press and hold Arp
On/Off, and press the Ext Sync key on the keyboard.
6
Page 7
Guía del usuario (Español)
Introducción
Contenido de la caja
LPK25 Wireless, cable USB, tarjeta de descarga de software, guía del usuario, manual sobre
la seguridad y garantía
Importante: Visite akaipro.com y entre a la página web del LPK25 Wireless para descargarlo
el gratis software de edición.
Soporte
Para obtener la información más reciente acerca de este producto (documentación,
especificaciones técnicas, requisitos de sistema, información de compatibilidad, etc.) y
registrarlo, visite akaipro.com.
Para soporte adicional del producto, visite akaipro.com/support.
Instalación rápida
Diagrama de conexión
Los elementos que no se enumeran en Introducción > Contenido de la caja se venden por separado.
Conexiones y corriente a través de USB:
Utilice un cable USB estándar para conectar el
LPK25 Wireless a su ordenador. Coloque su
interruptor de encendido en USB.
Conectividad Bluetooth y alimentación
mediante pilas: Instale 3 pilas AA en el
compartimiento para pilas debajo del LPK25
Wireless. Coloque su interruptor de encendido
en Batt. Consulte Funcionamiento >
Bluetooth para aprender a aparear el LPK25
Wireless a su ordenador (u otro dispositivo
mediante la tecnología Bluetooth.
Conectividad Bluetooth y alimentación
mediante USB: Utilice un cable USB estándar
y un adaptador de corriente USB para
conectar el LPK25 Wireless a una toma de
corriente. Coloque su interruptor de
encendido en USB. Consulte
Funcionamiento > Bluetooth para aprender
a aparear el LPK25 Wireless a su ordenador (u
otro dispositivo mediante la tecnología
Bluetooth.
7
Page 8
Características
Panel superior
3
1
2
7
5
6
1. Puerto USB: Utilice un cable USB estándar para conectar este puerto USB a su ordenador. El
puerto USB del ordenador suministra suficiente corriente al LPK25 Wireless, aunque puede
querer utilizar 3 pilas AA en cambio. Esta conexión también se utiliza para enviar y recibir datos
MIDI desde y hacia su ordenador.
2. Interruptor de encendido: Utilice este interruptor para encender y apagar el LPK25 Wireless.
Para utilizar alimentación mediante USB, colóquelo en posición USB. Para utilizar pilas, instale 3
pilas AA en el compartimiento para pilas debajo del LPK25 Wireless y colóquelo en posición
Batt.
Nota: Si ha instalado pilas en el LPK25 Wireless, puede apagarlo colocando el interruptor de
encendido en posición USB (cuando no esté conectado a un ordenador). Si no ha instalado
pilas en el LPK25 Wireless, puede apagarlo colocando el interruptor de encendido en posición
Batt.
3. Entrada para pedal de sostenido: Conecte a esta entrada un pedal de sostenido TS de 6,35
mm (1/4 pulg.) opcional.
4. Teclado: Este teclado de 25 notas con post-pulsación es sensible a la velocidad y, en conjunto
con los botones de subir/bajar octava, pueden acceder al rango completo de las 127 notas
MIDI disponibles (11 octavas).
Los botones Prog Select (Selección de programa) y Arp On/Off (Arpegiador
encendido/apagado) permiten que algunas de sus teclas accedan a comandos adicionales.
Consulte Funcionamiento > Programas y Arpegiador para aprender más.
5. Subir/Bajar octava (/): Utilice estos botones para desplazar el rango del teclado hacia
arriba o abajo. Pulse ambos botones simultáneamente para resetear el desplazamiento de
octavas a "cero".
6. Selección de programa: Mantenga pulsado este botón y pulse una de las teclas rotuladas Prog
1, 2, 3 o 4 en el TECLADO para recuperar el preset con el mismo número.
7. Arpegiador encendido/apagado: Pulse este botón para activar o desactivar el arpegiador
interno. El arpegiador solo afecta a las notas que se están tocando en el teclado y su velocidad
se basa en el tempo actual y los ajustes de división de tiempo.
Mantenga pulsado este botón y toque una tecla rotulada en el teclado para introducir ajustes
nuevos para el arpegiador. Consulte Funcionamiento > Arpegiador para aprender más.
8. Tap Tempo: Toque ligeramente este botón al ritmo deseado para introducir un nuevo tempo
para el arpegiador interno.
Importante: Tap Tempo no funciona cuando el LPK25 Wireless está sincronizado externamente.
9. Apareamiento: Pulse este botón una vez para que la unidad esté disponible para aparearse y
conectarse a un dispositivo Bluetooth cercano.
Pues este botón una vez más para desconectarlo del dispositivo actual. Estará disponible de
forma automática para conectarse con otro.
Consulte Funcionamiento > Bluetooth para aprender más.
8
8
5
4
9
Page 9

Funcionamiento
Bluetooth
En lugar de usar una conexión USB "cableada" para conectar al LPK25 Wireless a su
ordenador, puede conectarlo de forma inalámbrica a un dispositivo compatible con Bluetooth.
Importante: Su dispositivo huésped debe ser compatible con Bluetooth de baja energía
(Bluetooth LE) para poder utilizar esta característica. Para obtener los requerimientos del
sistema más actuales y completos, visite akaipro.com y entre a la página web del LPK25
Wireless.
Para aparear el LPK25 Wireless con su dispositivo Bluetooth:
1. Encienda su dispositivo Bluetooth.
2. Encienda su LPK25 Wireless:
• Si está alimentando la unidad mediante pilas, con lo que el interruptor de
encendido en la posición Batt.
• Si su puerto USB está conectado a una toma de corriente (utilizando un adaptador
de corriente USB), coloque el interruptor de encendido en la posición USB.
3. Pulse Pair una vez. El botón parpadeará:
4. Active la conectividad Bluetooth en su dispositivo:
• Mac OS X: Pulse +espacio, tipee Audio MIDI Setup (Configuración de audio MIDI)
y abra la aplicación Audio MIDI Setup. En la ventana MIDI Studio que aparece, haga
clic en el icono Bluetooth. En la ventana que aparece, haga clic en Connect
(Conectar) junto a Akai LPK25 Wireless.
• iOS: Descargue y abra la aplicación GarageBand. Toque el botón Settings (Ajustes)
(el icono del engranaje) y luego toque Song (Canción). Toque Advanced (Avanzado) y
luego toque Bluetooth MIDI Devices (Dispositivos MIDI Bluetooth). Toque Akai
LPK25 Wireless y luego toque Connect.
Una vez apareado exitosamente, el botón Pair quedará encendido permanentemente.
Para desaparear el LPK25 Wireless de su dispositivo Bluetooth, pulse Pair nuevamente.
Una vez desapareado, el botón Pair se apagará.
Programas
Puede almacenar hasta 4 programas en la memoria interna del LPK25 Wireless. Cada
programa incluye todos los ajustes configurables del arpegiador, descritos más abajo en la
sección Arpegiador.
Para seleccionar un programa, mantenga pulsado Prog Select y pulse Prog 1, 2, 3 o 4.
Para administrar sus programas, use el software de edición del LPK25 Wireless. Visite
akaipro.com y entre a la página web del LPK25 Wireless para descargarlo.
Arpegiador
Cuando se utiliza el arpegiador, al tocar un acorde las notas individuales del acorde sonarán
de a una a la vez en un orden determinado y se repetirán hasta que se deje de tocar el acorde.
El arpegiador solo afecta a las notas que se están tocando en el teclado.
Para activar o desactivar el arpegiador, pulse Arp On/Off.
9
Page 10

La frecuencia del arpegiador se basa en el tempo y los ajustes de división de tiempo actuales.
Para ajustar el tempo, pulse Tap Tempo varias veces a la velocidad deseada. El arpegiador
detectará el nuevo tempo automáticamente.
Importante: Tap Tempo no funciona cuando el LPK25 Wireless está sincronizado
externamente.
Para ajustar la división de tiempo, mantenga pulsado Arp On/Offy pulse una de las
siguientes teclas del teclado:
1/4 (negras) 1/16 (semicorcheas)
1/4T (tresillos de negras) 1/16T (tresillos de semicorcheas)
1/8 (corcheas) 1/32 (fusas)
1/8T (tresillos de corcheas) 1/32T (tresillos de fusas)
El tipo de arpegio determina el orden en el que se tocan las notas de un acorde, ya sea
ascendente o descendente, etc.
Para ajustar el tipo de arpegio, mantenga pulsado Arp On/Off y pulse una de las siguientes
teclas del teclado:
• Up: Las notas arpegian desde la más baja a la más alta.
• Down: Las notas arpegian desde la más alta a la más baja.
• Incl (Inclusivo): Las notas arpegian desde la más baja a la más alta y de allí a la más baja.
Las notas más alta y más baja se redisparan cuando el arpegio cambia de sentido.
• Excl (Exclusivo): Las notas arpegian desde la más baja a la más alta y de allí a la más
baja. Las notas más alta y más baja no se redisparan cuando el arpegio cambia de
sentido.
• Order: Las notas se repiten en el mismo orden en que se pulsaron sus teclas.
• Rand (Aleatorio): Las notas retenidas se reproducen aleatoriamente.
El rango del arpegiador determina la cantidad de octavas a través de las cuales sonará el
arpegio. Luego de que el arpegio haga sonar la octava más alta en el rango, se repetirá desde
la octava más baja.
Para determinar el rango del arpegiador, mantenga pulsado Arp On/Off (Apagar/Encender
arpegiador) y pulse
Arp 1, 2, 3 o 4.
El botón Arp On/Off puede funcionar de dos maneras:
• Momentáneo: Para activar el arpegiador, mantenga pulsado Arp On/Off mientras toca
un acorde. Para desactivar el arpegiador, suelte Arp On/Off. Éste es el ajuste
predeterminado.
• Conmutación (enganche): Para activar el arpegiador, pulse y suelte Arp On/Off mientras
toca un acorde. Para desactivar el arpegiador, pulse y suelte Arp On/Off una vez más.
Para configurar Arp On/Off como botón momentáneo o de conmutación, mantenga
pulsado Arp On/Off, y pulse la tecla Latch del teclado.
Puede ajustar el arpegiador para que siga el tempo del reloj MIDI interno del LPK25 Wireless
o tempo externo del proyecto de su estación de trabajo de audio digital (DAW).
Para configurar si el arpegiador se sincroniza de forma interna o externa, mantenga
pulsado Arp On/Off, y pulse la tecla Ext Sync (Sincronización externa) del teclado.
10
Page 11

V
Guide d’utilisation (Français)
Présentation
Contenu de la boîte
LPK25 Wireless, câble USB, carte de téléchargement de logiciel, guide d’utilisation, consignes
de sécurité et informations concernant la garantie
Important : Visitez akaipro.com pour trouver la page Web du LPK25 Wireless afin de le
télécharger le gratuite logiciel d’édition.
Assistance
Pour les toutes dernières informations concernant la documentation, les spécifications
techniques, la configuration requise, la compatibilité et l’enregistrement du produit, veuillez
visiter akaipro.com.
Pour toute assistance supplémentaire, veuillez visiter le site akaipro.com/support.
Démarrage rapide
Schéma de connexion
Les éléments qui ne figurent pas dans Présentation > Contenu de la boîte sont vendus séparément.
Connectivité et alimentation USB : Utilisez
un câble USB standard afin de relier le
LPK25 Wireless à un ordinateur. Réglez
l’interrupteur d’alimentation sur USB.
Connectivité Bluetooth et alimentation par
piles : Insérez 3 piles AA dans le
compartiment à piles sur le dessous du
LPK25 Wireless. Réglez l’interrupteur
d’alimentation sur Batt. Veuillez consulter la
section Fonctionnement > Bluetooth afin
d’apprendre comment jumeler le LPK25
Wireless à votre ordinateur (ou autre appareil)
à l’aide de la technologie Bluetooth.
Connectivité Bluetooth et alimentation
USB : Utilisez un câble USB standard et un
adaptateur secteur USB afin de relier le
LPK25 Wireless à une prise secteur. Réglez
l’interrupteur d’alimentation sur USB.
consulter la section Fonctionnement >
Bluetooth afin d’apprendre comment
jumeler le LPK25 Wireless à votre ordinateur
(ou autre appareil) à l’aide de la technologie
Bluetooth.
euillez
11
Page 12

Caractéristiques
Panneau supérieur
3
1
2
7
5
6
1. Port USB : Utilisez un câble USB afin de relier ce port USB au port USB d’un ordinateur. Le port
USB de l'ordinateur permet d’alimenter le LPK25 Wireless. Vous pouvez cependant utiliser 3
piles AA. Cette connexion est également utilisée pour la transmission de données MIDI vers et
depuis votre ordinateur.
2. Interrupteur d'alimentation : Cet interrupteur permet la mise sous et hors tension du LPK25
Wireless. Pour utiliser l’alimentation USB, réglez-le sur USB. Pour utiliser l’alimentation par pile,
insérez 3 piles AA dans le compartiment à piles sur le dessous du LPK25 Wireless et réglez
l’interrupteur sur Batt.
Remarque : Lorsque des piles sont insérées dans le LPK25 Wireless, vous pouvez le mettre
hors tension en réglant l’interrupteur d’alimentation à USB (lorsqu’il n’est pas connecté à un
ordinateur). Lorsque des piles ne sont pas insérées dans le LPK25 Wireless, vous pouvez le
mettre hors tension en réglant l’interrupteur d’alimentation à Batt.
3. Entrée pour pédale de maintien : Cette entrée permet de brancher une pédale de maintien TS
de 6,35 mm optionnelle.
4. Clavier : Ce clavier de 25 notes sensibles à la dynamique peut commander toute la gamme des
127 notes MIDI disponibles à l’aide des touches Octave / (11 octaves).
Les touches Prog Select et Arp on/off permettent à certaines des touches d’accéder à des
commandes supplémentaires. Veuillez consulter les sections Fonctionnement > Programmes
et Arpégiateur afin d’en savoir plus.
5. Octave (/) : Ces touches permettent d'augmenter ou de diminuer la plage d'octaves du
clavier. Appuyez sur les deux touches simultanément afin de remettre le clavier à l’octave du
milieu (zéro) par défaut.
6. Prog Select : Enfoncez cette touche tout en enfonçant une des touches du clavier identifiées
par PROG 1, 2, 3 ou 4 afin de rappeler le programme avec le même numéro.
7. Arp On/Off : Cette touche permet d’activer et de désactiver l’arpégiateur interne. L’arpégiateur
affecte uniquement les notes jouées sur le clavier et sa vitesse est basée sur les réglages actuels
du tempo et la division temporelle.
Maintenez cette touche enfoncée et appuyez sur une des touches identifiées du clavier afin
d’entrer les nouveaux paramètres pour l’arpégiateur. Veuillez consulter les sections
Fonctionnement > Arpégiateur afin d’en savoir plus.
8. Tap Tempo : Tapez cette touche au rythme désiré afin de régler un nouveau tempo pour
l’arpégiateur interne.
Important : Cette fonctionnalité ne fonctionne pas lorsque le LPK25 Wireless est réglé sur la
synchronisation externe.
9. Pair : Appuyez sur cette touche afin que l’appareil puisse être jumelé à un appareil Bluetooth à
proximité.
Appuyez de nouveau sur cette touche pour supprimer la connexion Bluetooth. Il sera
automatiquement disponible pour se connecter à un autre appareil.
Veuillez consulter la section Fonctionnement > Bluetooth afin d’en savoir plus.
12
8
5
4
9
Page 13

Fonctionnement
Bluetooth
Si votre appareil dispose de la technologie Bluetooth, au lieu d’utiliser la connexion USB
« filaire » pour le connecter au LPK25 Wireless, vous pouvez utiliser la connexion Bluetooth.
Important : Votre appareil hôte doit prendre en charge la fonction Bluetooth Low Energy
(Bluetooth LE) pour utiliser cette fonctionnalité. Pour tous les renseignements à jour
concernant la configuration système minimale requise, veuillez visiter akaipro.com pour
trouver la page Web du LPK25 Wireless.
Pour jumeler le LPK25 Wireless à votre appareil Bluetooth :
1. Mettez votre appareil Bluetooth sous tension.
2. Mettez le LPK25 Wireless sous tension :
• Si vous souhaitez utiliser l’alimentation par pile, réglez l’interrupteur d’alimentation
sur Batt.
• Si le port USB est connecté à une prise secteur (en utilisant un adaptateur secteur
USB), réglez l’interrupteur d’alimentation sur USB.
3. Appuyez sur la touche Pair. La touche clignotera.
4. Activez la connectivité Bluetooth sur votre appareil :
• MAC OS X : Appuyez sur +Space, saisissez Audio MIDI Setup et lancez
l’application Audio MIDI Setup. Dans la fenêtre MIDI Studio qui s’affiche, cliquez sur
l’icône Bluetooth. Dans la fenêtre qui s’affiche, cliquez sur Connect à côté de Akai
LPK25 Wireless.
• iOS : Téléchargez et lancez l'application GarageBand. Tapez sur Réglages (l’icône
d’engrenage) et ensuite appuyez sur Morceau. Tapez sur Avancé et puis tapez sur
appareils MIDI Bluetooth. Tapez sur Akai LPK25 Wireless, et puis tapez sur
Connecter.
Lorsqu'un appareil est jumelé, la touche Pair est allumée.
Pour supprimer la connexion du LPK25 Wireless à un appareil Bluetooth, appuyez de
nouveau sur la touche Pair. Lorsqu'aucun appareil n’est jumelé, la touche Pair est éteinte.
Programmes
Vous pouvez sauvegarder jusqu'à 4 programmes dans la mémoire interne du LPK25 Wireless.
Chaque programme comprend tous les paramètres configurables de l’arpégiateur, décrits
ci-dessous dans la section Arpégiateur.
Pour sélectionner un programme, maintenez la touche Prog Select enfoncée et appuyez
sur Prog 1, 2, 3 ou 4.
Pour gérer vos programmes, utilisez le logiciel d’édition du LPK25 Wireless. Visitez
akaipro.com pour trouver la page Web du LPK25 Wireless afin de le télécharger.
Arpégiateur
Lorsque l’arpégiateur est activé, jouer un accord fait jouer chaque note de l’accord, une à la
fois, dans un ordre établi et ce processus se répète jusqu'à ce que l’accord soit relâché.
L’arpégiateur affecte uniquement les notes jouées sur le clavier.
Pour activer et désactiver l’arpégiateur, appuyez sur la touche Arp On/Off.
13
Page 14

La vitesse de l’arpégiateur est basée sur les réglages actuels du tempo et la division
temporelle.
Pour définir le tempo, appuyez plusieurs fois sur la touche Tap Tempo au rythme désiré.
L’arpégiateur détectera automatiquement le nouveau tempo.
Important : Tap Tempo ne fonctionne pas lorsque le LPK25 Wireless est réglé sur la
synchronisation externe.
Pour définir la division temporelle, maintenez la touche Arp On/Off enfoncée et appuyez sur
l’une des touches suivantes sur le clavier :
1/4 (noires) 1/16 (doubles croches)
1/4T (triolet de noire) 1/16T (triolet de double-croche)
1/8 (croche) 1/32 (triple croche)
1/8T (triolet de croche) 1/32T (triolet de triple croche)
Le type d'arpegiation détermine l'ordre dans lequel les notes d'un accord sont jouées, si elles
montent ou baissent, etc.
Pour définir le type d'arpegiation, maintenez la touche Arp On/Off enfoncée et appuyez sur
l’une des touches suivantes sur le clavier :
• Up : Les notes passent de la note la plus basse à la note la plus haute.
• Down : Les notes passent de la note la plus haute à la note la plus basse.
• Incl : Les notes passent de la note la plus basse à la note la plus haute, puis de nouveau
à la note la plus basse. Les notes les plus basses et les plus hautes sont redéclenchées
lorsque l’arpège change de direction.
• Excl : Les notes passent de la note la plus basse à la note la plus haute, puis de nouveau
à la note la plus basse. Les notes les plus basses et les plus hautes ne sont pas
redéclenchées lorsque l’arpège change de direction.
• Order : Les notes seront répétées dans le même ordre que les touches du clavier ont été
enfoncées.
• Rand : Joue les notes maintenues de manière aléatoire.
La plage de l’arpegiation détermine le nombre d’octaves l’arpège jouera. Une fois l’octave la
plus haute jouée, le processus se répétera à partir de l’octave la plus basse.
Pour définir la plage d'arpegiation, maintenez la touche Arp On/Off enfoncée et appuyez
sur Arp 1, 2, 3 ou 4
La touche Arp On/Off
peut être utilisée de deux façons :
• Momentary (momentanée) : Pour activer l’arpégiateur, maintenez la touche Arp On/Off
enfoncée tout en jouant un accord. Pour désactiver l’arpégiateur, relâchez la touche Arp
On/Off. Ceci est le réglage par défaut.
• Latching (verrouillage) : Pour activer l’arpégiateur, enfoncez et relâchez la touche Arp
On/Off tout en jouant un accord. Pour désactiver l’arpégiateur, appuyez de nouveau sur
la touche Arp On/Off.
Pour régler le fonctionnement de la touche Arp On/Off (momentanée ou verrouillage),
maintenez la touche Arp On/Off enfoncée et appuyez sur la touche Latch sur le clavier.
Vous pouvez définir l’arpégiateur pour suivre le tempo de l’horloge MIDI interne du LPK25
Wireless ou le tempo externe du projet dans votre logiciel audionumérique (DAW).
Pour définir si l’arpégiateur est synchronisé en interne ou en externe, maintenez la touche
Arp On/Off enfoncée et appuyez sur la touche Ext Sync sur le clavier.
14
Page 15

Guida per l’uso (Italiano)
Introduzione
Contenuti della confezione
LPK25 Wireless, cavo USB, scheda per il download del software, guida per l’uso, istruzioni di
sicurezza e garanzia
Importante: Recarsi su akaipro.com e trovare la pagina dell'LPK25 Wireless per scaricare del
gratuito software editor
Assistenza
Per le ultime informazioni in merito a questo prodotto (documentazione, specifiche tecniche,
requisiti di sistema, informazioni sulla compatibilità, ecc.) e per effettuarne la registrazione,
recarsi alla pagina akaipro.com.
Per ulteriore assistenza, recarsi alla pagina akaipro.com/support.
Inizio rapido
Schema dei collegamenti
Elementi non elencati sotto Introduzione > Contenuti della confezione sono venduti separatamente.
Connettività e alimentazione USB: servirsi
di un cavo USB standard per collegare
l'LPK25 Wireless al computer. Posizionare
l'interruttore di alimentazione su USB.
Connettività Bluetooth e alimentazione a
batteria: inserire 3 batterie AA nello
scomparto batterie a livello della parte
inferiore dell'LPK25 Wireless. Posizionare
l'interruttore di alimentazione su Batt. Si
veda Operazione > Bluetooth per maggiori
informazioni su come collegare l'LPK25
Wireless al computer (o a un altro dispositivo)
utilizzando la tecnologia Bluetooth.
Connettività Bluetooth e alimentazione
USB: Servirsi di un cavo USB standard e di
un adattatore USB per collegare l'LPK25
Wireless a una presa elettrica. Posizionare
l'interruttore di alimentazione su USB. Si
veda Operazione > Bluetooth per maggiori
informazioni su come collegare l'LPK25
Wireless al computer (o a un altro dispositivo)
utilizzando la tecnologia Bluetooth.
15
Page 16

Caratteristiche
Pannello superiore
3
1
2
7
5
6
1. Porta USB: servirsi di un cavo USB standard per collegare questa porta USB al computer. La
porta USB del computer garantisce ampiamente l'alimentazione dell'LPK25 Wireless; è altrimenti
possibile servirsi di 3 batterie AA. Questo collegamento serve anche a inviare e ricevere dati
MIDI da e verso il computer.
2. Interruttore di alimentazione: servirsi di questo interruttore per accendere e spegnere l'LPK25
Wireless. Per utilizzare l'alimentazione USB, impostarlo su USB. Per utilizzare le batterie, inserire
3 batterie AA nell'apposito scomparto sotto l'LPK25 Wireless, e impostarlo su Batt.
Nota bene: se nell'LPK25 Wireless sono state installate batterie, è possibile spegnerlo
posizionando l'interruttore di alimentazione su USB (quando è scollegato da un computer). Se
nell'LPK25 Wireless non sono state installate batterie, è possibile spegnerlo posizionando
l'interruttore di alimentazione su Batt.
3. Ingresso pedale sustain: collegare un pedale sustain TS da 1/4" (6,35 mm) opzionale a questo
ingresso.
4. Tastiera: questa tastiera a 25 note è sensibile alla velocità e, unitamente ai tasti Octave
Down/Up, può accedere alla gamma completa delle 127 note MIDI disponibili (11 ottave).
I tasti Prog Select e Arp On/Off consentono ad alcuni dei suoi tasti di accedere a comandi
aggiuntivi. Si veda Operazione > Programmi e Arpeggiatore per saperne di più.
5. Octave Down/Up (ottava giù/su) (/): servirsi di questi tasti per spostare la gamma della
tastiera verso il basso o verso l'alto. Premere entrambi i tasti contemporaneamente per azzerare
lo shift delle ottave.
6. Prog Select (seleziona programma): tenere premuto questo tasto e premere uno dei tasti della
tastiera etichettati Prog 1, 2, 3 o 4 per caricare il preset recante lo stesso numero.
7. Arp On/Off: premere questo tasto per abilitare o disabilitare l'arpeggiatore interno.
L'arpeggiatore influisce unicamente sulle note suonate sulla tastiera e la frequenza è basata sul
tempo corrente e sulle impostazioni relative alla divisione del tempo.
Tenere premuto questo tasto e premere un tasto etichettato sulla tastiera per inserire nuove
impostazioni per l'arpeggiatore. Si veda Operazione > Arpeggiatore per saperne di più.
8. Tap Tempo: battere questo pulsante al tempo desiderato per inserire un nuovo tempo per
l'arpeggiatore interno.
Importante: Tap Tempo non funziona quando l’LPK25 Wireless è sincronizzato esternamente.
9. Pair: premere una volta questo tasto per renderlo disponibile al collegamento con un dispositivo
Bluetooth nelle vicinanze.
Premere nuovamente questo tasto per scollegarlo dal dispositivo corrente. Sarà
automaticamente disponibile per il collegamento con un nuovo dispositivo.
Si veda Operazione > Bluetooth per saperne di più.
16
8
5
4
9
Page 17

Operazione
Bluetooth
Anziché utilizzare un collegamento USB “cablato” per collegare l'LPK25 Wireless al computer,
è possibile collegarlo senza fili a un dispositivo compatibile Bluetooth.
Importante: il dispositivo host deve supportare Bluetooth Low Energy (Bluetooth LE) per
utilizzare questa funzione. Per conoscere i requisiti di sistema completi e più aggiornati, recarsi
alla pagina akaipro.com e trovare la pagina dedicata all'LPK25 Wireless.
Per collegare l'LPK25 Wireless al dispositivo Bluetooth:
1. Accendere il dispositivo Bluetooth.
2. Accendere l'LPK25 Wireless:
• Se si utilizza l'alimentazione a batteria, posizionare l'interruttore di alimentazione su
Batt.
• Se la porta USB è collegata a una presa elettrica (servendosi di un adattatore di
alimentazione USB), posizionare l'interruttore di alimentazione su USB.
3. Premere Pair (collega) una volta. Il tasto lampeggia.
4. Abilitare la connettività Bluetooth sul proprio dispositivo:
• Mac OS X: premere +Space, digitare Audio MIDI Setup e aprire l'applicazione
Audio MIDI Setup. Nella finestra MIDI Studio che compare, fare clic sull'icona
Bluetooth. Nella finestra che si apre, fare clic su Connect (collega), accanto ad Akai
LPK25 Wireless.
• iOS: scaricare e aprire l'applicazione GarageBand. Toccare il tasto Settings
(impostazioni) (l'icona a forma di ruota dentata), quindi toccare Song (canzone).
Toccare Advanced (avanzate), quindi Bluetooth MIDI Devices (dispositivi MIDI
Bluetooth). Toccare Akai LPK25 Wireless, quindi Connect.
Una volta effettuato il collegamento, il tasto Pair rimane acceso.
Per scollegare l'LPK25 Wireless dal dispositivo Bluetooth, premere nuovamente Pair. Una
volta scollegato, il tasto Pair sarà spento.
Programmi
Nella memoria interna dell'LPK25 Wireless è possibile salvare fino a un massimo di 4
programmi. Ciascun programma include tutte le impostazioni configurabili dell'arpeggiatore,
descritte di seguito nella sezione Arpeggiatore.
Per selezionare un programma, tenere premuto Prog Select e premere Prog 1, 2, 3, o 4.
Per gestire i programmi, servirsi del software editor dell'LPK25 Wireless. Recarsi su
akaipro.com e trovare la pagina dell'LPK25 Wireless per scaricarlo.
Arpeggiatore
Quando si utilizza l'arpeggiatore, suonando un accordo le singole note di tale accordo
suonano in un ordine determinato e si ripetono fino a quando l'accordo non viene rilasciato.
L’Arpeggiatore influenzerà unicamente le note suonate sulla tastiera.
Per attivare o disattivare l'arpeggiatore, premere Arp On/Off.
17
Page 18

La frequenza dell'arpeggiatore è basata sul tempo corrente e sulle impostazioni di time
division.
Per impostare il tempo, premere più volte Tap Tempo alla velocità desiderata.
L'arpeggiatore individuerà automaticamente il nuovo tempo.
Importante: Tap Tempo non funziona quando l’LPK25 Wireless è sincronizzato
esternamente.
Per impostare la divisione di tempo, tenere premuto Arp On/Off, e premere uno dei
seguenti tasti sulla tastiera:
1/4 (semicrome) 1/16 (sedicesimi)
1/4T (terzine di semicrome) 1/16T (terzine di sedicesimi)
1/8 (crome) 1/32 (biscrome)
1/8T (terzine di crome) 1/32T (terzine di biscrome)
Il tipo di arpeggio determina l'ordine in cui vengono suonate le note di un accordo, se sono
ascendenti o discendenti, ecc.
Per impostare il tipo di arpeggio, tenere premuto Arp On/Off, e premere uno dei seguenti
tasti sulla tastiera:
• Up: le note arpeggiano dalla più bassa alla più alta.
• Down: le note arpeggiano dalla più alta alla più bassa.
• Incl (Inclusive): le note arpeggiano dalla più bassa alla più alta e di nuovo alla più bassa.
Le note più basse e più alte vengono nuovamente attivate quando l’arpeggio cambia
direzione.
• Excl (Exclusive): le note arpeggiano dalla più bassa alla più alta e di nuovo alla più bassa.
Le note più basse e più alte non vengono nuovamente attivate quando l’arpeggio cambia
direzione.
• Order: le note vengono ripetute nello stesso ordine in cui sono stati premuti i relativi tasti.
• Rand (casuale): riproduce le note trattenute con scelta casuale.
La gamma degli arpeggi determina il numero di ottave attraverso il quale verrà suonato
l'arpeggio. Dopo che l'arpeggio viene suonato all'ottava più alta dell'intervallo, viene ripetuto
dall'ottava più bassa.
Per impostare l'intervallo di arpeggio, tenere premuto Arp On/Off, quindi premere Arp 1, 2,
3 o 4.
Il tasto Arp On/Off può funzionare in due modi:
• Momentaneo: per attivare l'arpeggiatore, tenere premuto Arp On/Off mentre si suona un
accordo. Per disattivare l'arpeggiatore, lasciare Arp On/Off. Questa è la configurazione
predefinita.
• Bloccaggio (commutazione): per attivare l'arpeggiatore, premere e rilasciare Arp On/Off
mentre si suona un accordo. Per disattivare l'arpeggiatore, premere e rilasciare Arp
On/Off un'altra volta.
Per impostare Arp On/Off come tasto momentaneo o di bloccaggio, tenere premuto Arp
On/Off, quindi premere il tasto Latch sulla tastiera.
Si può configurare l'arpeggiatore in modo che segua il tempo dell'orologio MIDI interno
dell'LPK25 Wireless o il tempo esterno del progetto nella propria workstation audio digitale
(DAW).
Per impostare la sincronizzazione interna o esterna dell'arpeggiatore, tenere premuto Arp
On/Off, quindi premere il tasto Ext Sync sulla tastiera.
18
Page 19

Benutzerhandbuch (Deutsch)
Einführung
Lieferumfang
LPK25 Wireless, USB-Kabel, Software-Download-Karte, Benutzerhandbuch, Sicherheitshinweise
und Garantieinformationen
Wichtig: Besuchen Sie akaipro.com und suchen die Webseite für LPK25 Wireless, um sie
herunterzuladen die frei Bearbeitungssoftware..
Kundendienst
Für die neuesten Informationen zu diesem Produkt (Dokumentation, technische Daten,
Systemanforderungen, Informationen zur Kompatibilität etc.) und zur Produktregistrierung
besuchen Sie akaipro.com.
Um weitere Unterstützung zu Ihrem Produkt zu erhalten, besuchen Sie akaipro.com/support.
Schnelles Einrichten
Anschlussdiagramm
Teile, die nicht unter Einführung > Lieferumfang angegeben sind, sind separat erhältlich.
Bluetooth-Funktion & Stromversorgung:
Verwenden Sie ein Standard-USB-Kabel, um
LPK25 Wireless mit Ihrem Computer zu
verbinden. Setzen Sie den Netzschalter auf
USB.
Bluetooth-Funktion & Batteriebetrieb:
Legen Sie 3 AA-Batterien in das
Batteriefach unter dem LPK25 Wireless ein.
Setzen Sie den Netzschalter auf Batt. Siehe
Betrieb > Bluetooth, um zu erfahren, wie
Sie Ihr LPK25 Wireless mit Ihrem Computer
(oder einem anderen Gerät) mithilfe der
Bluetooth-Technologie koppeln können.
Bluetooth-Funktion & USBStromversorgung: Verwenden Sie ein
Standard-USB-Kabel und ein USB-Netzteil,
um Ihr LPK25 Wireless mit einer Steckdose
zu verbinden. Setzen Sie den Netzschalter
auf USB. Siehe Betrieb > Bluetooth, um zu
erfahren, wie Sie Ihr LPK25 Wireless mit
Ihrem Computer (oder einem anderen Gerät)
mithilfe der Bluetooth-Technologie koppeln
können.
19
Page 20

Funktionen
Oberseite
3
1
2
7
5
6
1. USB-Anschluss: Verwenden Sie ein handelsübliches USB-Kabel, um diesen USB-Port mit Ihrem
Computer zu verbinden. Der USB-Port des Computers bietet dem LPK25 Wireless ausreichend
Energie. Statt dem USB-Port können Sie jedoch auch 3 AA-Batterien verwenden. Diese
Verbindung wird auch verwendet, um MIDI-Daten vom und zum Computer zu senden und zu
empfangen.
2. Netzschalter: Mit diesem Schalter können Sie LPK25 Wireless ein- oder ausschalten. Um die
USB-Stromversorgung zu verwenden, stellen Sie den Schalter auf USB. Um Batterien zu
verwenden, legen Sie 3 AA-Batterien in das Batteriefach unterhalb des LPK25 Wireless und
setzen Sie ihn auf Batt.
Hinweis: Wenn Sie die Batterien in das LPK25 Wireless eingelegt haben, können Sie es
ausschalten, indem Sie den Netzschalter auf USB stellen (wenn es vom Computer getrennt ist).
Wenn Sie keine Batterien in das LPK25 Wireless eingelegt haben, können Sie es ausschalten,
indem Sie den Netzschalter auf Batt stellen.
3. Sustain Pedal-Eingang: Schließen Sie ein optionales 1/4" (6,35 mm) TS Sustain-Pedal an
diesen Eingang an.
4. Keyboard: Das 25-Tasten Keyboard ist anschlagdynamisch, besitzt eine Aftertouch-Funktion
und kann mit den Oktaventasten Auf/Ab auf den gesamten Bereich der 127 verfügbaren MIDINoten zugreifen (11 Oktaven).
Über die Tasten Programmauswahl und Arp Ein/Aus können manche Tasten auf zusätzliche
Befehle zugreifen. Siehe Betrieb > Programme und Arpeggiator, um mehr zu erfahren.
5. Oktaventasten Abwärts/Aufwärts (/): Mit diesen Tasten können Sie den Tastaturbereich
nach oben oder unten verschieben. Drücken Sie beide Tasten gleichzeitig, um die
Oktavenverschiebung auf "Null" zurückzusetzen.
6. Programmauswahl: Halten Sie diese Taste und eine der Tasten am Keyboard mit der Aufschrift
Prog 1, 2, 3 oder 4 gedrückt, um das Programm mit der gleichen Nummer zu laden.
7. Arp Ein/Aus: Drücken Sie diese Taste, um den internen Arpeggiator zu aktivieren oder zu
deaktivieren. Der Arpeggiator wirkt sich nur auf am Keyboard gespielte Noten aus. Seine
Geschwindigkeit basiert am aktuellen Tempo und den Zeiteinteilungseinstellungen.
Halten Sie diese Taste gedrückt und drücken eine markierte Taste am Keyboard, um neue
Einstellungen für den Arpeggiator einzugeben. Siehe Betrieb > Arpeggiator, um mehr zu
erfahren.
8. Tap-Tempo: Tippen Sie im gewünschten Tempo auf diese Taste, um ein neues Tempo für den
internen Arpeggiator einzugeben.
Wichtig: Tap-Tempo funktioniert nicht, wenn LPK25 Wireless extern synchronisiert wird.
9. Koppeln: Drücken Sie einmal auf diese Taste, um sie für eine Verbindung mit einem BluetoothGerät in der Nähe verfügbar zu machen.
Drücken Sie diese Taste erneut, um es vom aktuellen Gerät zu trennen. Das Gerät wird
automatisch für eine Verbindung mit einem anderen verfügbar sein.
Siehe Betrieb > Bluetooth , um mehr zu erfahren.
20
8
5
4
9
Page 21

Betrieb
Bluetooth
Um das LPK25 Wireless mit Ihrem Computer zu verbinden, können Sie auch eine drahtlose
Verbindung zu einem Bluetooth-kompatiblen Gerät herstellen.
Wichtig: Ihr Host-Gerät muss Bluetooth Low Energy (Bluetooth LE) unterstützen, um diese
Funktion nutzen zu können. Für aktuelle und vollständige Systemanforderungen besuchen Sie
akaipro.com und suchen die Webseite für LPK25 Wireless.
So koppeln Sie Ihr LPK25 Wireless mit Ihrem Bluetooth-Gerät:
1. Schalten Sie Ihr Bluetooth-Gerät ein.
2. Schalten Sie das LPK25 Wireless ein:
• Wenn Sie Batterien verwenden, bringen Sie den Netzschalter auf Batt.
• Wenn der USB-Anschluss an eine Steckdose (mit einem USB-Netzadapter)
angeschlossen ist, stellen Sie den Netzschalter auf USB.
3. Drücken Sie einmal auf Koppeln. Die Taste blinkt.
4. So aktivieren Sie die Bluetooth-Funktion auf Ihrem Gerät:
• Mac OS X: Drücken Sie +Leertaste, tippen Audio MIDI Setup und öffnen die App
Audio MIDI Setup. Im Fenster MIDI Studio klicken Sie auf das Bluetooth-Symbol.
Im nun angezeigten Fenster klicken Sie auf Verbinden neben Akai LPK25 Wireless.
• iOS: Laden Sie die App GarageBand herunter und öffnen sie. Tippen Sie auf die
Taste Einstellungen (das Zahnrad-Symbol) und tippen dann Song. Tippen Sie
Erweitert und tippen dann auf Bluetooth-MIDI-Geräte. Tippen Sie Akai LPK25
Wireless und tippen Sie dann Verbinden.
Konnte die Verbindung erfolgreich hergestellt werden, dann leuchtet die Koppel-Taste
kontinuierlich weiter.
Um die Verbindung zwischen LPK25 Wireless und Ihrem Bluetooth-Gerät zu trennen,
drücken Sie erneut Koppeln. Wenn keine Verbindung hergestellt ist, leuchtet die Koppel-Taste
nicht.
Programme
Sie können bis zu vier Programme im internen Speicher des LPK25 Wireless speichern. Jedes
Programm enthält alle konfigurierbaren Arpeggiator-Einstellungen, wie im Abschnitt
Arpeggiator unten beschrieben.
Um ein Programm auszuwählen, halten Sie Progammauswahl gedrückt und drücken Prog
1, 2, 3 oder 4.
Um Ihre Programme zu verwalten, verwenden Sie die LPK25 Wireless-
Bearbeitungssoftware. Besuchen Sie akaipro.com und suchen die Webseite für LPK25
Wireless, um sie herunterzuladen.
Arpeggiator
Wenn Sie den Arpeggiator verwenden und einen Akkord spielen, werden die einzelnen Noten
des Akkords nacheinander in einer festgelegten Reihenfolge abgespielt und wiederholt bis der
Akkord losgelassen wird. Der Arpeggiator wirkt sich nur auf Noten aus, die am Keyboard
gespielt werden.
Um den Arpeggiator zu aktivieren oder deaktivieren, drücken Sie Arp Ein/Aus.
21
Page 22

Das Arpeggiotempo basiert auf den aktuellen Tempo- und Zeiteinteilungseinstellungen.
Um das Tempo einzustellen, drücken Sie mehrmals Tap-Tempo in der gewünschten
Geschwindigkeit. Der Arpeggiator wird das neue Tempo automatisch erkennen.
Wichtig: Tap-Tempo funktioniert nicht, wenn LPK25 Wireless extern synchronisiert wird.
Um die Zeiteinteilung einzustellen, halten Sie Arp Ein/Aus gedrückt und drücken eine der
Tasten am Keyboard:
1/4 (Viertelnoten) 1/16 (Sechzehntelnoten)
1/4T (Vierteltriolen) 1/16T (Sechzehnteltriolen)
1/8 (Achtelnoten) 1/32 (Zweiunddreißigstel)
1/8T (Achteltriolen) 1/32T (Zweiunddreißigstel-Triolen)
Der Arpeggiator-Typ bestimmt die Reihenfolge, in der die Noten eines Akkords spielen, ob sie
auf- oder absteigend gespielt werden usw.
Um den Arpeggiator-Typ einzustellen, halten Sie Arp Ein/Aus gedrückt und drücken eine
dieser Tasten am Keyboard:
• Up: Die Noten werden von der tiefsten Note bis zur höchsten Note gespielt.
• Down: Die Noten werden von der höchsten Note bis zur tiefsten Note gespielt.
• Incl (Inclusive): Die Noten werden von der niedrigsten bis zur höchsten Note und wieder
nach unten gespielt. Die tiefsten und höchsten Noten werden erneut getriggert, wenn der
Arpeggio die Richtung wechselt.
• Excl (Exclusive): Die Noten werden von der tiefsten bis zur höchsten Note und wieder
nach unten gespielt. Die tiefsten und höchsten Noten werden nicht erneut getriggert,
wenn der Arpeggio die Richtung wechselt.
• Order: Die Noten werden in jener Reihenfolge wiederholt, in der die Tasten gedrückt
wurden.
• Rand (Random): Spielt die gehaltenen Noten in zufälliger Reihenfolge.
Der Arpeggiator-Bereich bestimmt die Anzahl der Oktaven, über die das Arpeggio abgespielt
wird. Nachdem das Arpeggio auf der höchsten Oktave im Bereich gespielt wird, wiederholt
sich das Arpeggio von der tiefsten Oktave.
Um den Arpeggiator-Bereich festzulegen, halten Sie Arp Ein/Aus gedrückt und drücken
Arp 1, 2, 3 oder 4.
Die Taste Arp Ein/Aus kann auf eine von zwei Arten funktionieren:
• Momentary: Um den Arpeggiator zu aktivieren, halten Sie Arp Ein/Aus gedrückt und
spielen einen Akkord. Um den Arpeggiator zu deaktivieren, lassen Sie Arp Ein/Aus los.
Dies ist die Standardeinstellung.
• Latching (Schalter): Um den Arpeggiator zu aktivieren, drücken Sie kurz Arp Ein/Aus
während Sie einen Akkord spielen. Um den Arpeggiator zu deaktivieren, drücken Sie
erneut kurz auf Arp Ein/Aus.
So stellen Sie Arp Ein/Aus als Momentary- oder Latching-Taste ein: Halten Sie Arp
Ein/Aus gedrückt und drücken die Latch-Taste am Keyboard.
Sie können den Arpeggiator so einstellen, dass er dem Tempo der LPK25 Wireless-internen
MIDI-Clock oder dem externen Tempo des Projekts in Ihrer Digital Audio Workstation (DAW)
folgt.
Um festzulegen, ob der Arpeggiator intern oder extern synchronisiert wird, halten Sie Arp
Ein/Aus gedrückt und drücken die Ext Sync-Taste am Keyboard.
22
Page 23

Appendix (English)
Technical Specifications
Keyboard
Arpeggiator Range
Programs
Bluetooth Profile
Connections
Power
Dimensions
(width x depth x height)
Weight
Specifications are subject to change without notice.
* Bluetooth range is affected by walls, obstructions, and movement. For optimal performance, place the
product in the center of the room so it is unobstructed by walls, furniture, etc.
Trademarks & Licenses
Akai Professional is a trademark of inMusic Brands, Inc., registered in the U.S. and other countries.
The Bluetooth word mark and logos are owned by the Bluetooth SIG, Inc. and any use of such marks by
Akai Professional is under license.
GarageBand, Mac and OS X are trademarks of Apple Inc., registered in the U.S. and other countries.
IOS is a registered trademark of Cisco in the U.S. and other countries and is used under license.
Windows is a registered trademark of Microsoft Corporation in the United States and other countries.
All other product names, company names, trademarks, or trade names are those of their respective owners.
25 keys, velocity-sensitive
11-octave range (127 MIDI notes)
1–4 octaves
Modes
Up, Down, Inclusive, Exclusive, Order, Random
Latching (toggle) or momentary functionality
Time
Divisions
Tempo
1/4-note, 1/4-note triplet, 1/8-note, 1/8-note triplet,
1/16-note, 1/16-note triplet, 1/32-note, or 1/32-note triplet
30–240 BPM via Tap Tempo button (internal sync)
Based on software tempo (external sync)
4 stored programs, configurable via free downloadable editor software
Bluetooth Low Energy (LE)
Range*
Over 100 feet / 30.5 meters
(1) USB port
(1) 1/4” (6.35 mm) TS sustain pedal input
Via USB or (3) AA batteries
14.37” x 4.88” x 1.42”
365 x 124 x 36 mm
1.08 lbs.
0.49 kg
23
Page 24

Manual Version 1.0
 Loading...