


AP-D2
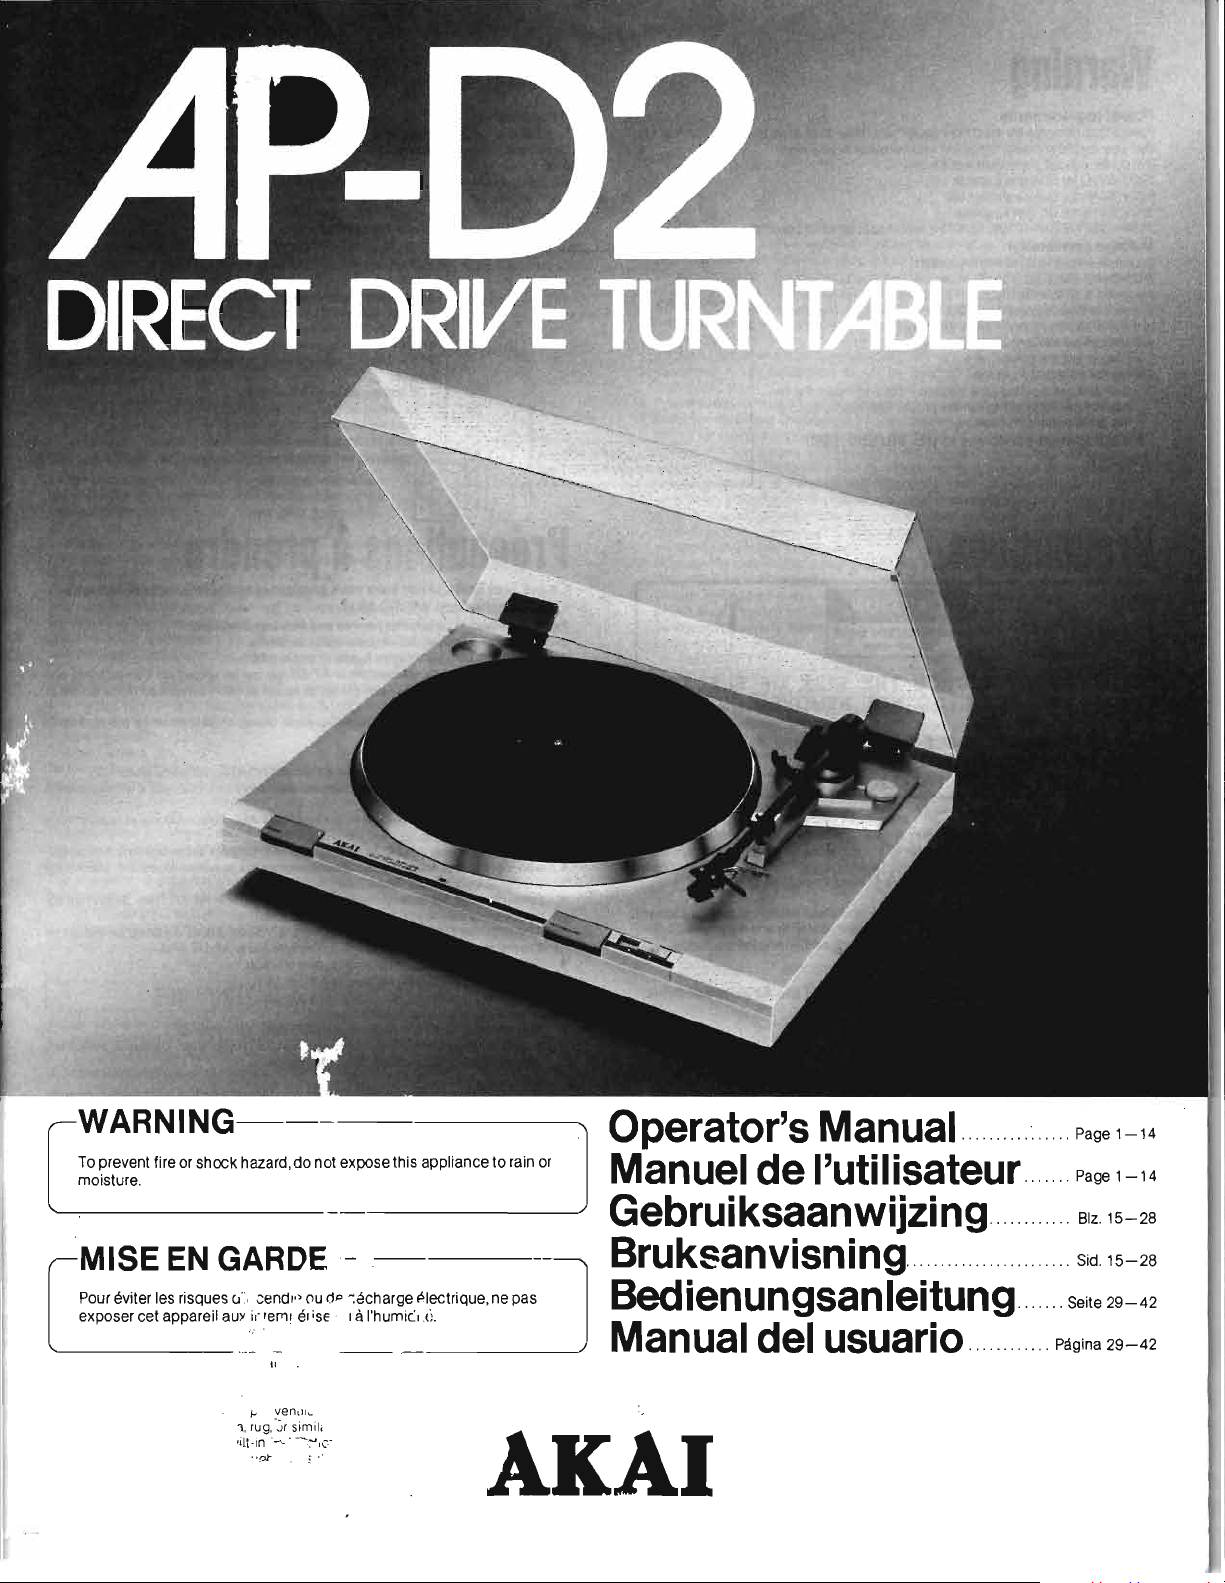
WARNING
To
prevent fire or shock hazard,do not expose this appliance to rain
or
moisture.
MISE
EN
GARDE-
Pour eviter les risques
Cl':,
.::endl"
ou
dp -:acharge plectrique, ne pas
exposer cet appareil
auy
if'reM!
el
iS€'
I al'humicll),
--
---------'
\I I
.
...
venlll\,.
'I. rug,:ir simili
Operator's
Manual
Page
1-14
Manuel
de
I'utilisateur
Page
1-14
Gebruiksaanwijzing
Slz.15-28
Bruksanvisning
'"
Sid.15-28
Bedienungsanleitung
s
eit
e29-42
Manual
del
usuario
Pagina
29-42
·ilHn
'--~IC·~
.'w ;
~
J
AKAI
warning
Mise
en
garde
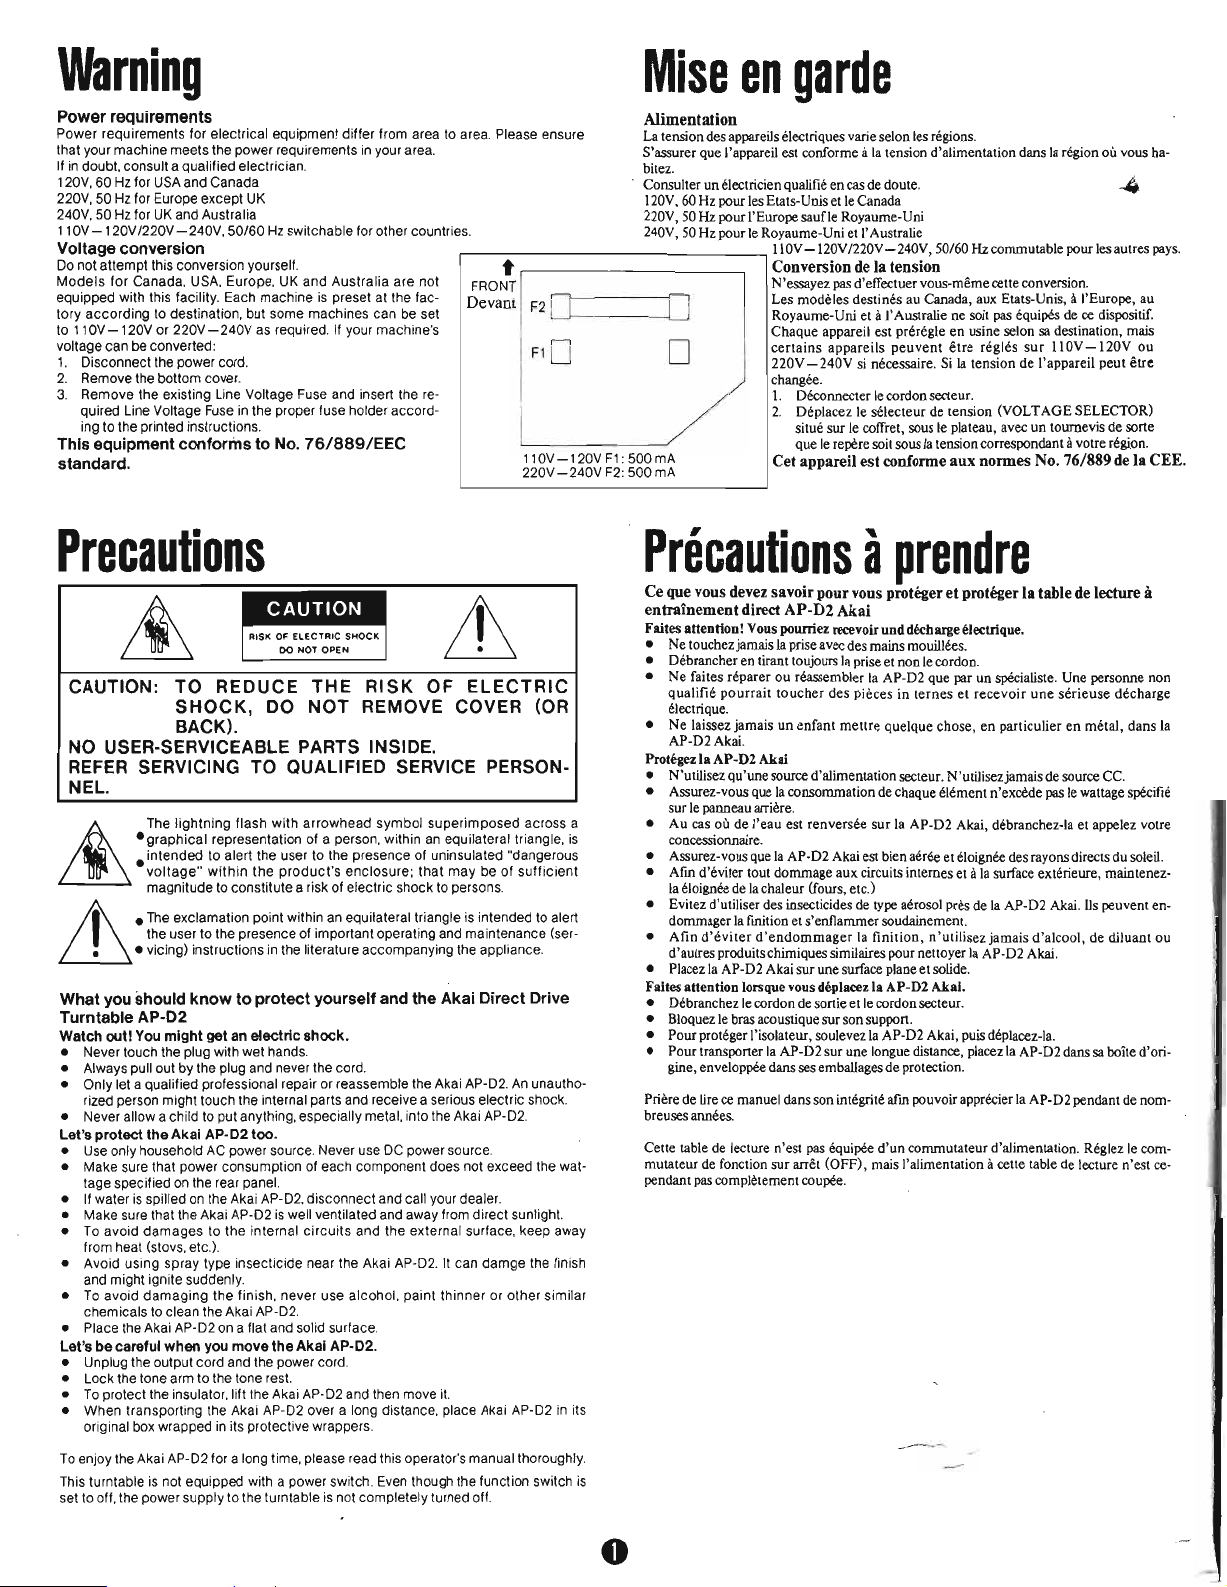
Power requirements
Alimentation
Power
requirements for electrical
equipment
differ
from area to area. Please ensure
La tension
des
appareils electriques varie selon
les
regions.
that your
machine
meets
the power requirements in your area.
S'assurer que I'appareil
est
conforme a
la
tension d'alimentation dans
la
region ou vous ha-
If in doubt, consult a qualified electrician.
bitez.
120V,
60
Hz for USA and Canada
Consulter
un
electricien qualifie
en
cas
de
dOUle.
220V,
50
Hz for Europe except UK
120Y,
60
Hz
pour
les
Etats-UnisetleCanada
240V,
50
Hz for
UK
and Australia
220Y,
50
Hz
pour I'Europe saufle Royaume-Uni
11
OV
-120V
/nov
-240V,
50/60
Hz switchable for other countries.
240Y,
50
Hz
pourle Royaume-Uni et
I'
Australie
Voltage conversion
,--
-,
llOY
-120Y
1220Y
-240Y,
50/60
Hz
commutable pour
les
autres
pays.
Do
not
attempt
this conversion yourself.
Conversion de la tension
Models
for
Canada, USA, 'Europe, UK
and
Australia
are
not
FRONT
t
1,-----------,
N'essayez
pas
d'efTectuer vous-meme cette conversion.
equipped with this facility. Each
machine
is
preset at the fac-
Les modeles destines
au
Canada, aux Etats-Unis, al'Europe,
au
Devant
F2
Df----------'O
tory
according
to destination, but some machines can be set
to
110V-120V
or
220V-240V
as required. If your machine's
voltage
can
be converted:
1.
Disconnect the power cord.
2.
Remove the bottom cover.
3.
Remove
the
existing Line Voltage Fuse and insert the re-
quired Line Voltage Fuse in the proper fuse holder accord-
ing
to
the printed instructions.
This equipment
conforms
to No.
76/889/EEC
standard.
Precautions
F1D
D
110V-120V
F1:
500mA
220V
-240V
F2:
500
mA
CAUTION: TO REDUCE
THE
RISK
OF
ELECTRIC
SHOCK,
DO
NOT REMOVE COVER (OR
BACK).
NO
USER-SERVICEABLE PARTS INSIDE.
REFER
SERVICING TO QUALIFIED SERVICE PERSON-
NEL.
&
The
lightning
flash
with
arrowhead
symbol
superimposed
across a
-graphical
representation of a person, within an equilateral triangle,
is
_
intended
to
alert the user to the presence of uninsulated "dangerous
voltage"
within
the
product's
enclosure;
that
may
be
of
sufficient
magnitude to constitute a risk of
electric
shock to persons.
~
_
The exclamation point within an equilateral triangle is intended to alert
the user
to
the presence of important operating and maintenance (ser-
• - vicing) instructions in the literature accompanying the appliance.
What you should
know
to
protect
yourself and the Akai Direct Drive
Turntable AP-D2
Watch out! You
might
get
an
electric shock.
• Never touch the plug with wet hands.
• Always pull out
by
the plug and never the cord.
• Only let a qualified professional repair or reassemble the Akai AP-D2. An unautho-
rized person might touch the internal parts and receive a serious
electric
shock.
• Never allow a child to put anything, especially metal, into the Akai AP-D2.
Let's protect the Akai AP-D2 too.
• Use only household AC power source. Never use DC power source.
• Make sure that power consumption of each component does
not
exceed the wat-
tage specified on the rear panel.
• If water
is
spilled on the Akai AP-D2,
disconnect
and call your dealer.
• Make sure that the Akai AP-D2 is well ventilated and away from
direct
sunlight.
•
To
avoid
damages
to
the
internal
circuits
and
the
external
surface, keep away
from heat (stovs. etc.).
• Avoid
using
spray type insecticide near the Akai AP-D2. It can
damge
the finish
and might ignite suddenly.
• To avoid
damaging
the
finish,
never
use
alcohol,
paint
thinner
or
other
similar
chemicals
to clean the Akai AP-D2.
• Place the Akai AP-D2 on a flat and solid surface.
Let's
be
careful when you move the Akai AP-D2.
• Unplug the output
cord
and the power cord.
• Lock the tone arm to the tone rest.
•
To
protect the insulator, lift the Akai AP-D2 and then move it.
•
When
transporting the Akai AP-D2 over a long distance, place Akai AP-D2
in
its
original box wrapped in its protective wrappers.
To enjoy the Akai AP-D2 for a long time, please read this operator's manual thoroughly.
This turntable is not equipped with a power switch. Even though the function switch
is
set to off, the power
supply
to the turntable
is
not
completely
turned off.
Royaume-Uni et
a
I'
Australie ne soit
pas
equipes
de
ce
dispositif.
Chaque appareil est preregle en usine selon
sa
destination, mais
certains appareils
peuvent
etre
regles
sur
IIOY-120Y
ou
220Y-240Y
si necessaire.
Si
la tension de I'appareil peut etre
changee.
I. Deconnecter le cordon secteur.
2.
Deplacez le selecteur de tension
(YOLTAGE
SELECTOR)
situe sur le cofTret,
sous
le plateau, avec un tournevis
de
sorte
que le repere soit
sous
la tension correspondant avotre region.
Cet appareil
est
conforme
aux
normes No. 76/889 de
la
CEE.
Precautions
a
prendre
Ce que vous devez savoir pour vous proteger
et
proteger
la
table de lecture it
entrainement
direct AP-D2
Akai
Faites attention! Yous pourriez recevoir
und
decharge electrlque.
•
Ne
touchezjamais
la
prise avec des mains mouillees.
• Debrancher
en
tiranttoujours
la
prise et non le cordon.
•
Ne
faites reparer ou reassembler
la
AP-D2 que
par
un sp6ciatiste. Une personne non
qualifie
pourrait
toucher
des pieces
in
ternes et
recevoir
une serieuse decharge
electrique.
•
Ne
laissez jamais
un
enfant
mettre
quelque chose, en particulier en metal, dans la
AP-D2Akai.
Protegez
la
AP-D2
Akai
• N'utilisez qu'une source d'alimentation secteur. N'utilisezjamais
de
souroe
Cc.
• Assurez-vous que la consommation
de
chaque eh!ment n'excede
pas
le wattage specifie
sur le panneau arriere.
•
Au
cas
ou de I'eau
est
renversee sur la
AP-D2
Akai, debranchez-Ia et appelez votre
concessionnaire.
• Assurez-vous que la
AP-D2
Akai
est
bien
aeree
et eloignee
des
rayoDS
directs du soleil.
•
Afm
d'eviter tout dommage aux circuits intemes et ala surface exterieure, maintenez-
la eloignee de la chaleur (fours, etc.)
• Evitez d'utiliser
des
insecticides
de
type aerosol
pres
de
la
AP-D2 Akai. lis peuvent en-
dommager la fmition et s'enllammer soudainemenl.
•
Afin
d'eviter
d'endommager
la
finition,
n'utilisezjamais
d'alcool,
de
diluaot
ou
d'autres produitschimiques similaires pour nelloyer
la
AP-D2
Akai.
•
Placez
la
AP-D2
Akai sur une surface plane et sotide.
FaUes
attention lorsque vous deplacez
la
AP-D2
Aka!.
• Debranchez le cordon
de
sortie et le cordon secteur.
• Bloquez le
bras
acoustique sur son suppon.
• Pour proteger I'isolateur, soulevez la
AP-D2
Akai, puis deplacez-Ia.
• Pour transporter la AP-D2 sur une longue distanoe, placez la
AP-D2
danssa boite
d'ori-
gine, enveloppee dans
ses
emballages de protection.
Priere
de
tire
ce
manuel dans son integrite afm pouvoir apprecier la AP-D2 pendant
de
nom-
breuses
annees.
Celle table
de
lecture n'est
pas
equipee
d'un
commutateur d'alimentation. Reglez le com-
mutateur
de
fonction sur arret (OFF), mais I'alimentation acelle table
de
lecture n'est
ce-
pendant
pas
oompletement coupee.
----
....
-
o
I
FOR
CUSTOMERS
IN
THE
U.K.
IMPORTANT FOR YOUR SAFETY
The
flex supplied with your machine will have either two wires
or
three
as
shown in the
illustrations
THREE CORE FLEX WARNING
Green/Yellow
THIS
APPARATUS
MUST
BE
EARTHED
(Earth)
IMPORTANT
The
wires
in
this mains lead are coloured
in
accord-
ance with the following code:
Green-and-yellow:
Earth
Blue: Neutral
Brown: Live
As
the colours
of
the wires
in
the mains lead
of
this ap-
paratus
may
not correspond with the coloured mark-
ings identifying the terminals
in
your plug, proceed
as
follows:
The
wire which
is
coloured green-and-yellow must
be
Blue
connected to the terminal
in
the plug which
is
marked (Neutral)
by the letter E
or
by the safety earth symbol
or
coloured green
or
coloured green-and-yellow.
The
wire which
is
coloured blue must
be
connected to the terminal which
is
marked
with the letter N
or
coloured black.
The
wire which
is
coloured brown must
be
connected to the terminal which
is
marked
with the letter L
or
coloured
red.
TWO CORE FLEX IMPORTANT
The
wires in this mains lead are coloured
in
accord- L
ance with the following code:
Blue: Neutral
Brown: Live
As
the colours
of
the wires
in
the mains lead
of
this
ap-
paratus may not correspond with the coloured mark-
ings identifying the terminals
in
your plug, proceed
as
follows:
The
wire which
is
coloured blue must
be
connected to Blue
Brown
the
terminal
which is
marked
with the
letter
N or
(Neutral).
(Live)
coloured black.
The
wire which
is
coloured brown must
be
connected to the terminal which
is
marked
with the letter L
or
coloured
red.
Do not connect any wire to the larger pin marked E
or
.,},--
when
wiring a plug.
Ensure that
all
terminals
are
securely tightened
and
that no loose strands
of
wire
exist.
Brown
(Live)
FOR
CUSTOMERS
IN
AUSTRALIA
If
your machine comes with a three core power cord,
FOR
YOUR
SAFETY.
1.
Insert this plug only into
an
effectively earthed three-pin plug socket outlet.
2.
If
any doubt exists regarding the earthing, consult a qualified electrician.
3,
Extension cords, if used, must
be
three core correctly wired.
I
FOR
CUSTOMERS
IN
THE
U.S.A.
SAFETY INSTRUCTIONS
1.
Read
Instructions
-
All
the safely and operating instructions should be read
before the equipment
is
operated.
2.
Retain
Instructions
-
The
safety
and
operating instructions should be retained
for
future reference.
3,
Heed
Warnings
-
All
warnings
on
the equipment
and
in
the operating instruc-
tions should be adhered
to.
4.
Follow
Instructions
-
All
instructions
for
operating and use should be followed.
5.
Water
and
Moisture
-
The
equipment should not be used near water - for
example, near a bathtub, washbowl, kitchen sink, laundry tub,
in
a wet basement,
or
near a swimming pool, etc.
6.
Carts and
Stands
-
The
equipment should be used only with a cart
or
stand that
is
recommended by Akai.
7.
Wall
or
Ceiling
Mounting
-
Akai
does not recommend mounting the equipment
on
a wall
or
a ceiling.
8.
Ventilation
-
The
equipment should
be
situated so that its location
or
position
does not interfere with its proper ventilation.
For
example, the equipment should
not
be
situated
on
a bed, sofa,
rug,
or
similar surface that may block the ventilation
openings;
or,
placed
in
a built-in installation, such
as
a bookcase
or
cabinet that
may impede the flow of air through the ventilation openings.
9.
Heat -
The
equipment should be situated away from heat sources such
as
radia-
tors, heat registers, stoves,
or
other equipments (including amplifiers) that pro-
duce heat.
10.
Power Sources -
The
equipment should be connected to a power supply only of
the type described
in
the operating instructions
or
as
marked on the equipment.
,
1.
Grounding
or
Polarization
- The precautions should be taken so that the
grounding
or
polarization means of
an
equipment
is
not defeated.
12.
Power-Cord
Protection
- Power-supply cords should be routed
so
that they
are
not
likely
to be
walked
on or pinched by items placed upon or against them,
paying particular attention to cords at plugs, convenience receptacles,
and
the
point where they exit from the equipment.
13.
Cleaning
-
The
equipment should be cleaned only
as
recommended by the
manufacturer.
14.
Power
Lines
-
An
outdoor antenna should be located away from power lines.
15.
Outdoor
Antenna
Grounding
-
If
an
outside antenna
is
connected to the
re-
ceiver, be sure the antenna system
is
grounded
so
as
to provide some protection
against voltage surges and built up static charges, Section 810 of the National
Electrical Code, ANSI/NFPA
No.
70-1981,
provides information with respect
10
proper grounding of the mast
and
supporting structure, grounding of the lead-in
wire to
an
antenna
discharge
unit, size
of
grounding conductors, location of
antenna-discharge unit, connection to grounding conductors, location of antenna-
discharge
unit, connection to grounding electrodes, and requirements for the
grounding electrode.
See
Figure
1.
16.
Nonuse
Periods -
The
power cord of the equipment should be unplugged from
the outlet when left unused
for
a long period
of
time.
17.
Object
and
Liquid
Entry - Care should be taken so that objects do not fall and
liquids
are
not spilled into the enclosure through openings.
18
Damage
Requiring
Service
-
The
equipment should be serviced by qualified
service personnel when:
A.
The
power-supply cord
or
the plug
has
been damaged;
or
B.
Objects have fallen,
or
liquid has' been spilled into the equipment;
or
C.
The
equipment has been exposed
to
rain;
or
D,
The
equipment does not appear to operate normally
or
exhibits a marked
change
in
performance;
or
E
The
equipment has been dropped,
or
the enciosuredamaged,
19.
Servicing
-
The
user should not attempt to service the equipment beyond that
described
in
the operating instructions.
All
other servicing should be referred to
qualified service personnel.
FIGURE 1
EXAMPLE OF
ANTENNA
GROUNDING
AS
PER
NATIONAL
ELECTRICAL CODE
INSTRUCTIONS
dGROUNDING ELECTRODE
II
DRIVE
8'INTO
THE
~
EARTH
(2.44
METERS)
a
Use
No,
10
AWG
(5.3
mm')
copper,
No.
8
AWG
(8,4
mm')
aluminum,
No.
17
AWG
(1.0
mm')
copper-clad steel
or
bronze wire,
or
larger,
as
ground wire.
b
Secure antenna lead-in and ground wires to house with stand-ort insulators spaced
from 4 feet (1.22 m)
to
6 feet (1.83 m) apart.
c
Mount antenna discharge unit
as
close
as
possible to where lead-in enters house.
TO
RECEIVER
ANTENNA
....
LEAD-IN WIREb
~
GROUND
WIREa,b
Features
Caracteristiques
The Akai AP-D2 is a
Direct
Drive Turntable which uses
FG
servo
direct drive motor for stable record playback.
Use the Akai AP-D2
in
combination with the other components
in
the
Pro
Series and you will have
an
excellent hi-fi system.
1.
Auto return turntable system.
2.
Highly sensitive straight tone arm.
3.
Uses low resonant cabinet which
is
effective against howling.
4.
Front panel operations.
Table
of
contents
Warning 1
Precautions 1- 2
Features 3
Controls 4
Turntable set-up 5
Connections 6
Let's adjust the Akai Direct Drive Turntable AP-D2
for good playback , , " ,
..
7-8
Let's listen toa record. , , ,.. ,
..
9
-10
Changing the cartridge . , ,
..
, , , .,
11
-12
Useful facts , , , ,. ... 12
Let's check first , , , , . ,
..
, ,
..
, ,.
..
13
Specifications , , , , ,
..
14
La AP-D2Akai est une table de lecture entrainement direct utilisant
un servo-moteur
aentrainement direct agenerateur de frequence.
Utilisez
la
AP-D2 Akai de dinensions moyennes avec les autres ele-
ments de
la
serie Pro
et
vous aurez une excellente chaine haute
fide-
lite.
1.
Systeme de retour automatique.
2.
Bras acoustique hautement sensible.
3.
Incorpore un coffret afaible resonance qui est tres efficace pour re-
duire le ronflement.
4.
Operation par panneau frontal.
Table
des
matieres
Mise
en
garde . . . . . . . .. . . . . . . . . . . . . . . . . . . . . . . . . . . . . . . . . . . .
..
1
Precautions
aprendre. . . . . . . . . . . . . . . . . . . . . . . . . . . . . . . . . . . . . .
..
1
Caracteristiques. . . . . . . . . . . . . . . . . . . . . . . . . . . . . .. . . . . . . . . . . . .
..
3
Commandes
:.
. . . . . . . . . . . . . . .. .. .
..
4
Assemblage de
la
table de lecture. . . . . . . . . . . . . . . . . . . . . . . . . .. .
..
5
Connexions. .. . . . . . . . . . . . .. . . . . . . . . . . . . . . . . . . . . . . . . . . . . . .
..
6
Reglez
la
table de lecture aentrainement direct AP-D2
Akai pour obtenir une bonne reproduction. . . . . . . . . . . . . . . . .
..
7-8
Ecouted'undisque
,
9-10
Remplacement de
la
cellule ,
11-12
Connaissances utiles , , . . .. . . . . . . . . . . . . .
..
12
Verifiez tout d'abord . . . . . . . . . . . . . . . .. . . . . . . . . . . . . . . . . . . . .
..
13
Caracteristiques. . . . . . . . . . . . . . . . . . . . . . . . . . . . . . . . . . . . . . . . . .
..
14
* The Akai AP-D2's head shell cannot be removed.
* La coquille de tete de I' AP-D2
ne
peut pas
etre
enlevee.
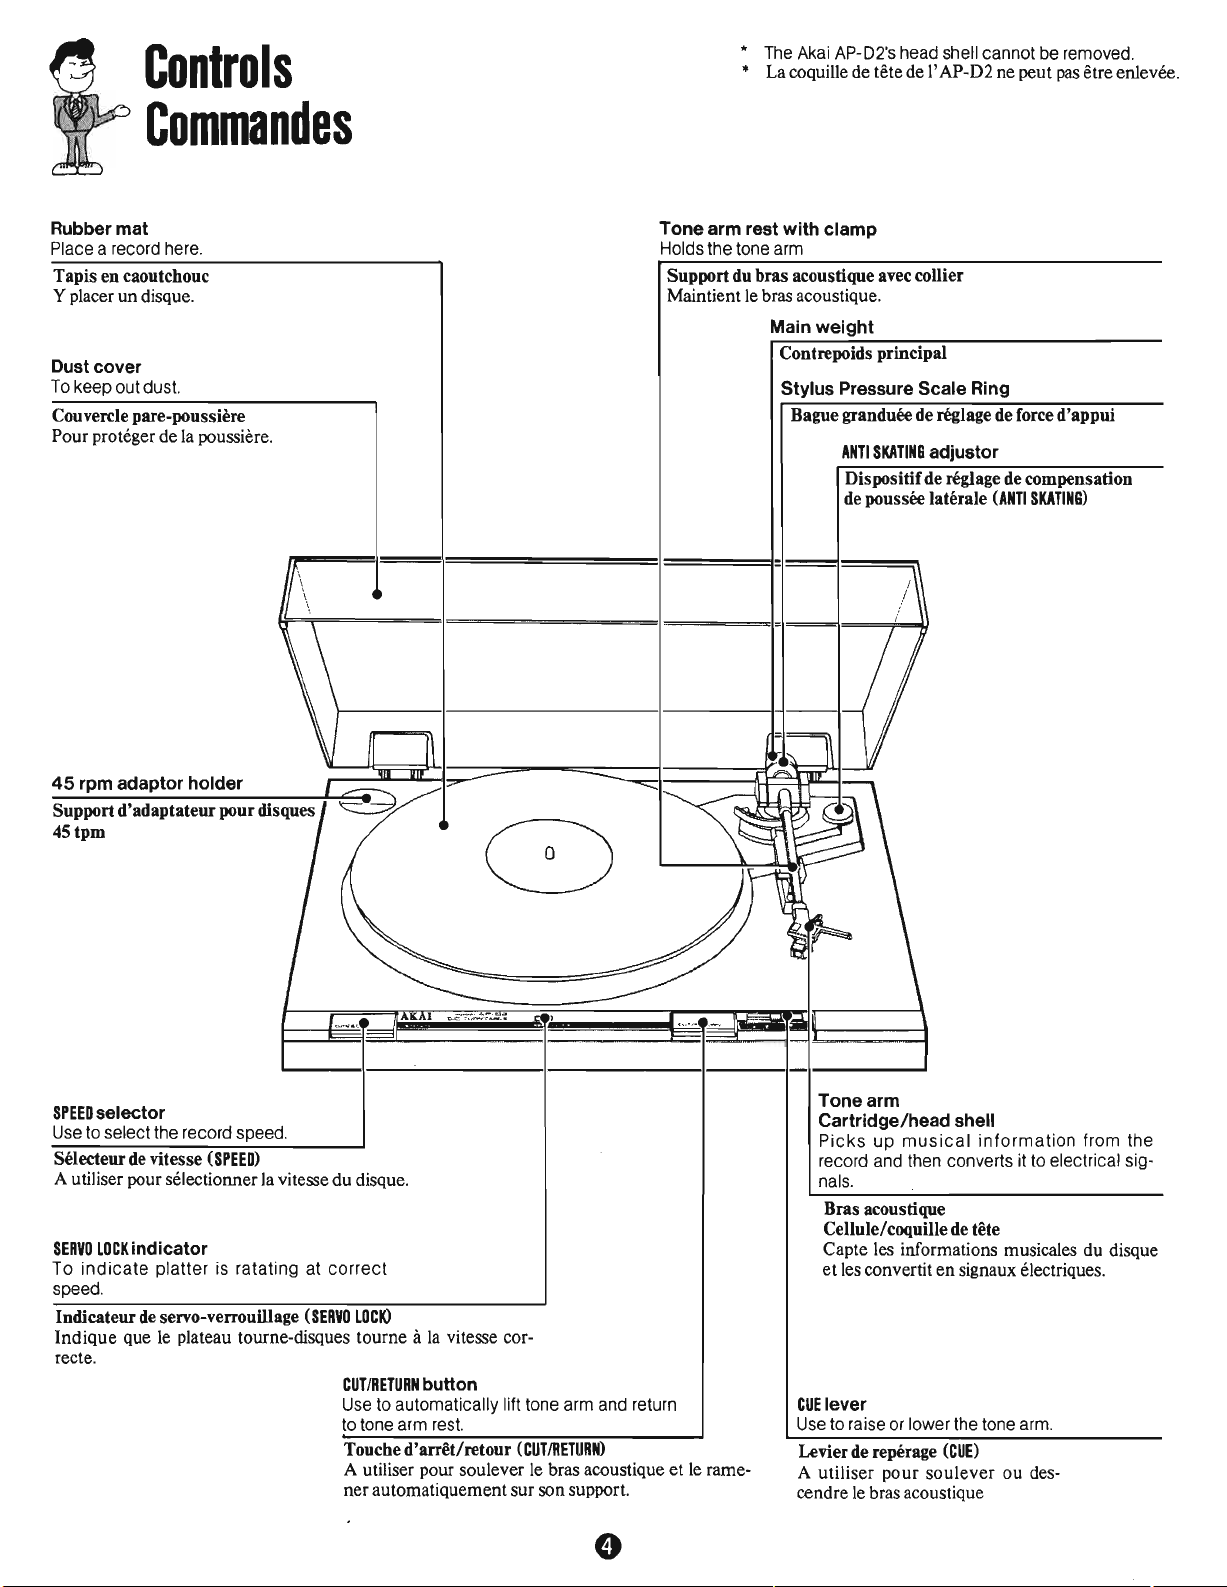
Controls
Commandes
Rubber mat
Place a record here.
Tapis
en
caoutchouc
Y placer
un
disque.
Dust cover
To
keep out dust.
Couvercle pare-poussiere
Pour proteger de la poussiere.
Tone arm rest with clamp
Holds the tone arm
Support du bras acoustique avec collier
Maintient le bras acoustique.
Main
weight
Contrepoids principal
Stylus Pressure Scale Ring
Bague granduee de riglage de force
d'appui
ANTI
SKATING
adjustor
Dispositif de riglage de compensation
de poussee laterale
(ANTI
SKATING)
45
rpm adaptor holder
Support
d'adaptateur
pour disques
45tpm
Levier de reperage
(CUE)
A utiliser
pour
soulever
ou
des-
cendre le bras acoustique
SPEED
selector
Use to select the record speed.
SeIecteur de vitesse
(SPEED)
A utiliser pour selectionner la vitesse
du
disque.
SERVO
LOCK
indicator
To
indicate
platter
is
ratating
at
correct
speed.
Indicateur de servo-verrouillage
(SERVO
LOCK)
lndique
que le plateau tourne-disques tourne
it
la
vitesse cor-
recte.
Tone arm
Cartridge/head shell
Picks
up
musical
information
from the
record and then converts it to electrical sig-
nals.
Bras acoustique
Cellule/coquille de tete
Capte les informations musicales du disque
et
les convertit
en
signaux electriques.
CUT/RETURN
button
Use to automatically lift tone arm and return
to tone arm rest.
Touche
d'arret/retour
(CUTIRETURN)
A utiliser pour soulever le bras acoustique
et
le rame-
ner automatiquement sur son support.
CUE
lever
Use to raise or lower the tone arm.
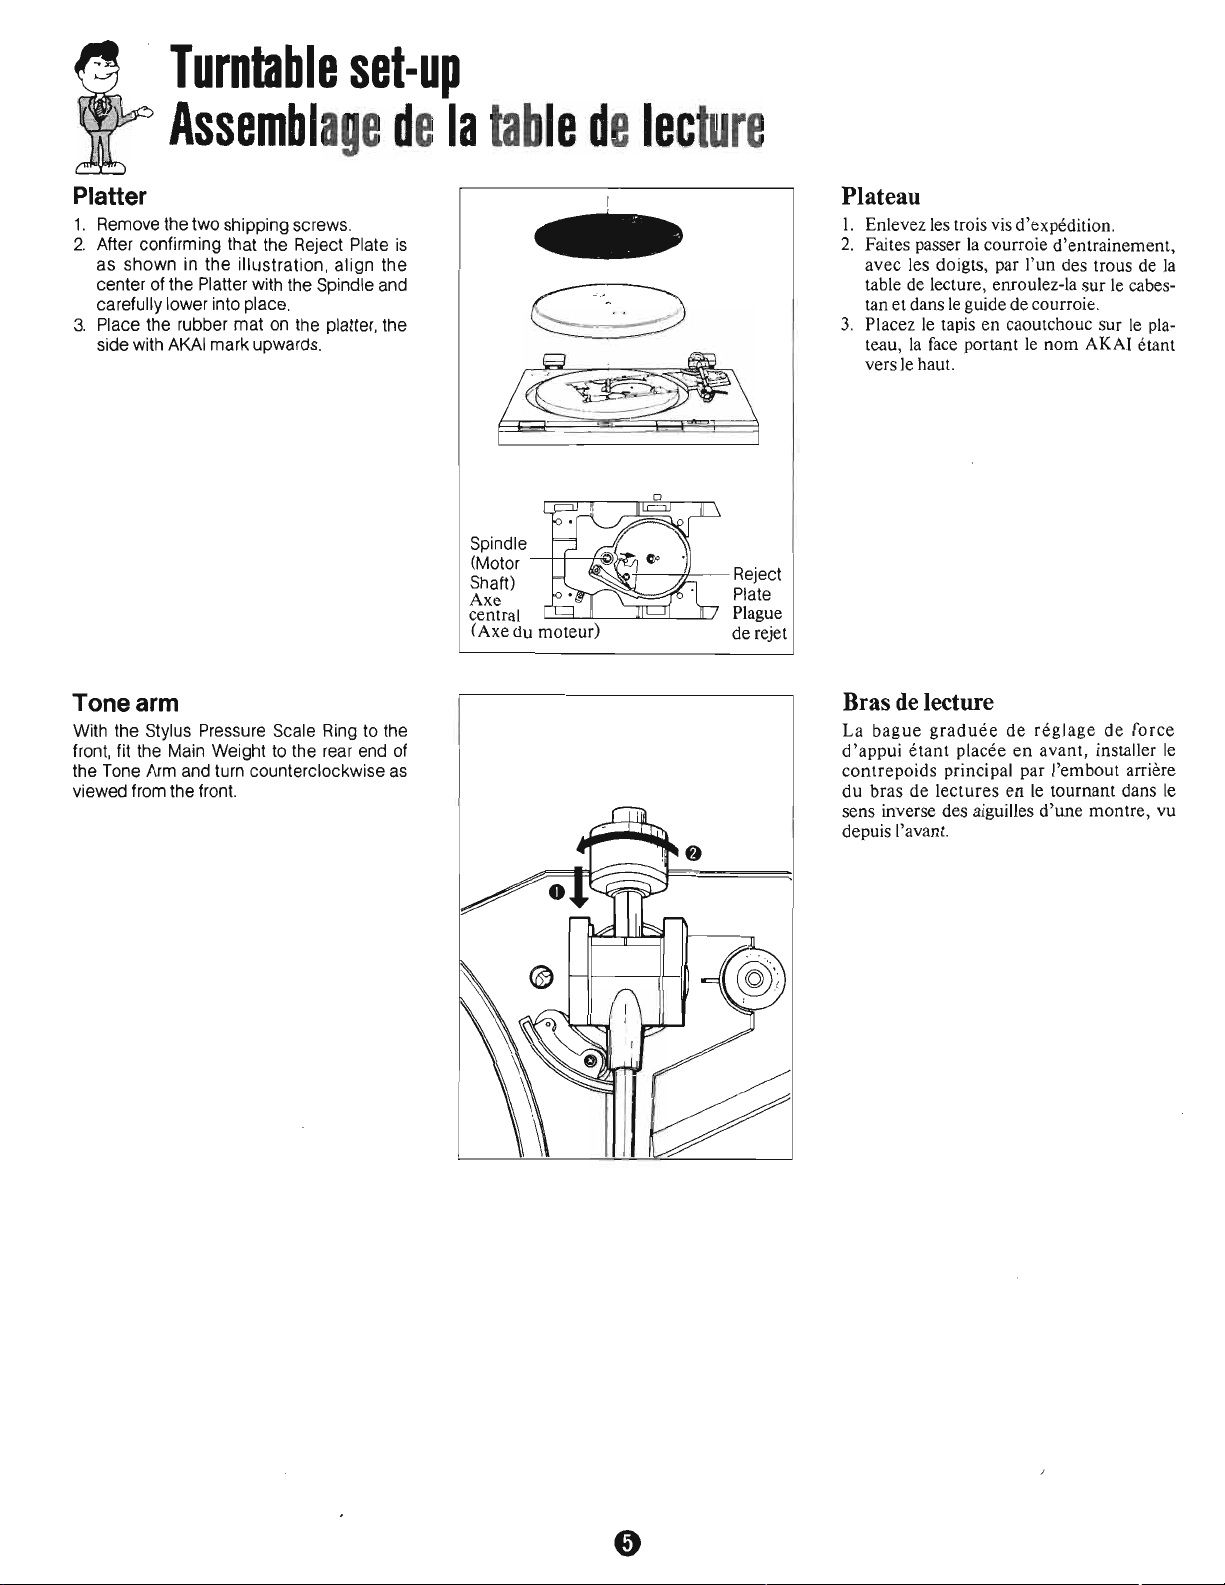
Turntable
set-up
Assemblage
de
la
table
de
lecture
Platter
1.
Remove the two shipping screws.
2.
After confirming that the Reject Plate
is
as shown in the illustration, align the
center of the Platter with the Spindle and
carefully lower into place.
3.
Place the rubber mat
on
the platter, the
side with
AKAI
mark upwards.
Tone arm
With the Stylus Pressure Scale Ring to the
front, fit the Main Weight to the rear end of
the Tone
Arm
and turn counterclockwise
as
viewed from the front.
Spindle
(Motor
----jf-+---+~)),;;~
Shaft)
~~~--j,I.----
Reject
Axe Plate
central Plague
(Axe du moteur) de rejet
Plateau
1.
Enlevez les trois
vis
d'expedition.
2.
Faites passer
la
courroie d'entrainement,
avec les doigts, par I'un des trous de
la
table de lecture, enroulez-la sur
le
cabes-
tan
et
dans
le
guide de courroie.
3.
Placez
le
tapis en caoutchouc sur
le
pla-
teau,
la
face
portant
le
nom AKA! etant
vers le haut.
Bras
de
lecture
La
bague
graduee
de
reglage
de
force
d'appui
etant
placee
en
avant, installer
le
contrepoids principal par I'embout arriere
du bras de lectures
en
le tournant dans
le
sens inverse des aiguilles d'une montre, vu
depuis I'avant.
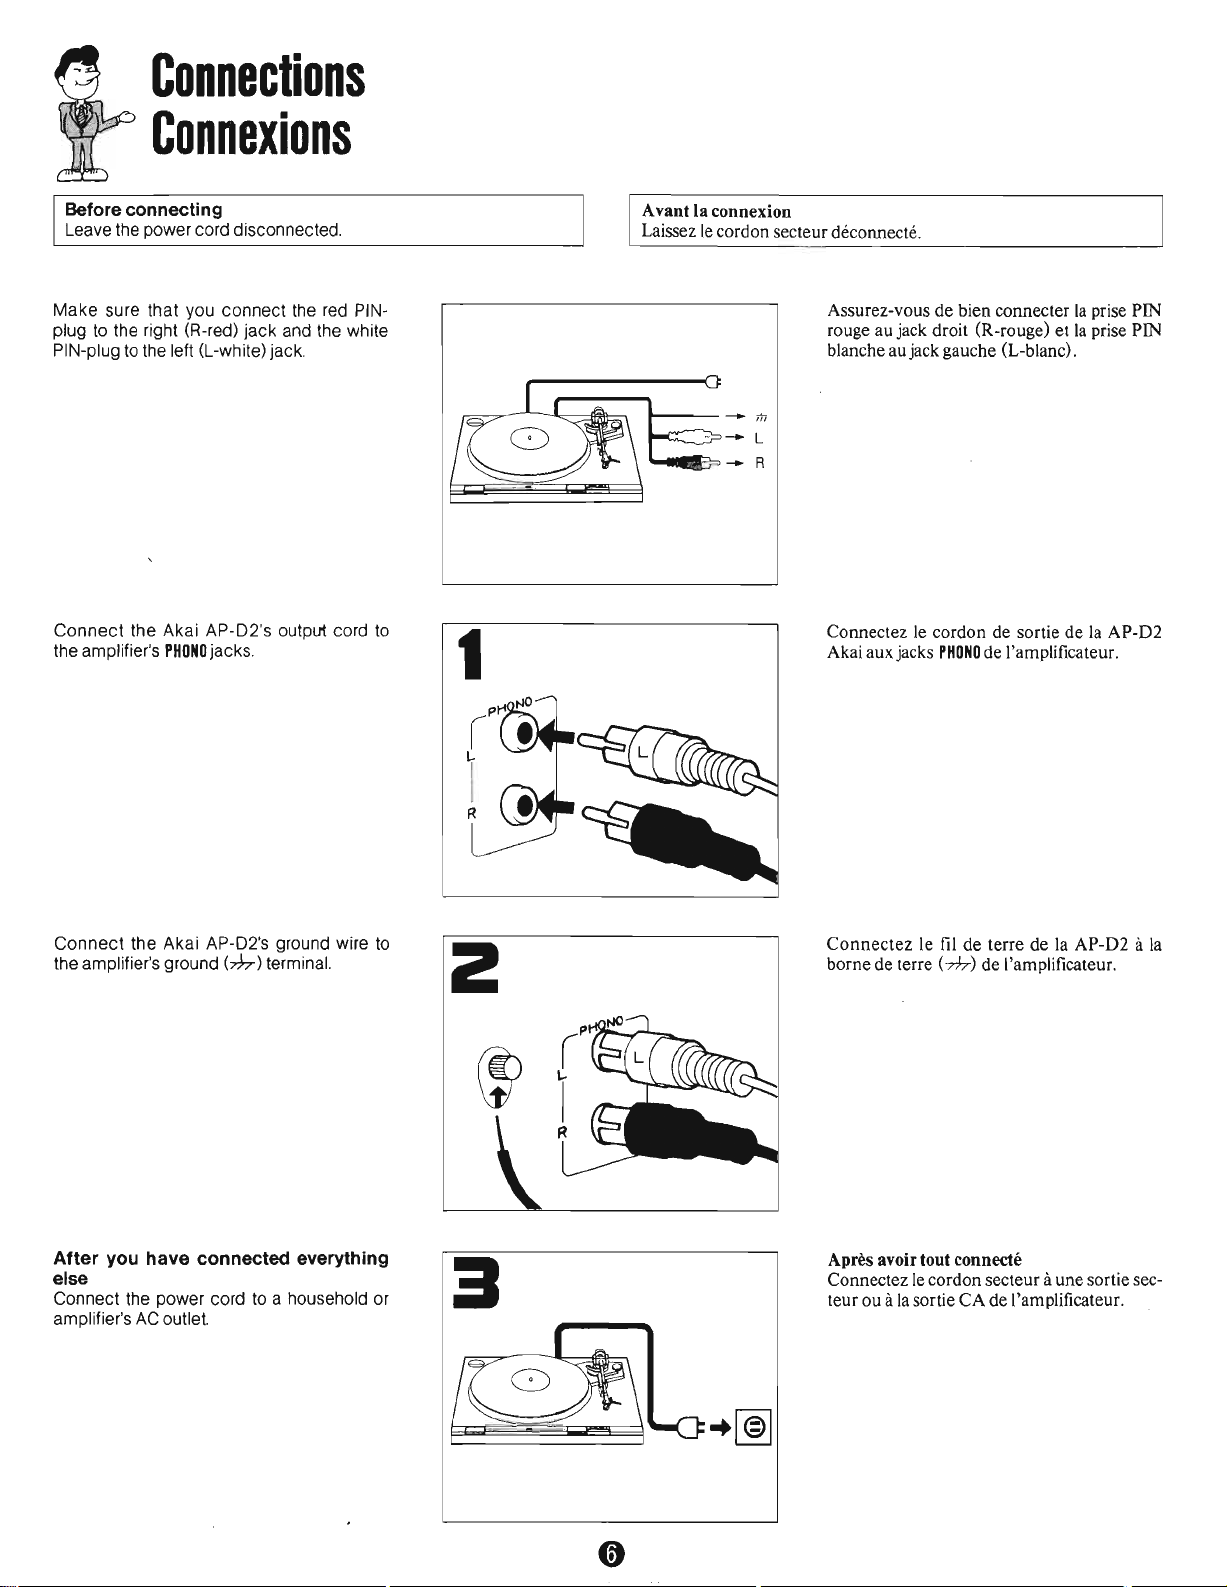
Connections
Connexions
Before connecting
Leave the power cord disconnected.
Make sure that you connect the
red
PIN-
plug
to
the right (R-red) jack and the white
PIN-plug
to
the left (L-white) jack.
A
vant
la connexion
Laissez
le
cordon secteur deconnecte.
Assurez-vous de bien connecter
la
prise
PIN
rouge au jack droit (R-rouge) et
la
prise
PIN
blanche au jack gauche (L-blanc).
t----+
m
L
.......
E?-
R
Connect the Akai AP-D2's output cord
to
Connectez
le
cordon de sortie de
la
AP-D2
the amplifier's
PHONO
jacks.
Akai auxjacks
PHONO
de l'amplificateur.
Connect
the Akai AP-D2's ground wire
to
Connectez
le
fil
de terre de la AP-D2
it
la
the amplifier's ground
(~)
terminal.
borne de terre
(w)
de l'amplificateur.
2
After
you
have connected everything
Apres
avoir
tout
connecte
else
Connectez
le
cordon secteur
it
une sortie sec-
Connect the power cord
to
a household or
teur ou
it
la
sortie CA de \'amplificateur.
amplifier's
AC
outlet.

Let's
adjust
the
Akai
Direct
Drive
Turntable
AP-D2
for
good
Reglez
la
table
de
lecture
a
entrainement
direct
AP-D2
Akai
In
order for the stylus to track the record
grooves properly, the stylus pressure must
be set correctly. Incorrect stylus pressure
can lead to damgages
to
the record
as
well
as
distorted sound.
Afin que la pointe de lecture lise correcte-
ment
les
sillons du disque,
la
pression de
la
pointe
de
lecture doit
etre
correctement
regll~e.
Vne pression incorrecte de
la
pointe
de
lecture peut endommager les disques et
provoquer une distorsion du son.
Dust cover
Attach
the
dust
cover
after
setting the
stylus pressure.
Couvercle
pare-
poussiere
Fixez
le
couvercle
pare-poussiere apres
avoir regle
la
pression de
la
pointe de lecture.
You
have now completed the procedure for
setting the stylus pressure. When
you
re-
place
the attached cartridge with a new
one,
you
must perform the same procedure.
Vous avez maintenant termine le reglage de
la pression de la pointe de lecture. Vous
devez effectuer les memes operations pour
remplacer
la
cellule.
Set
the
ANTI
SKATING
adjustor to
"0".
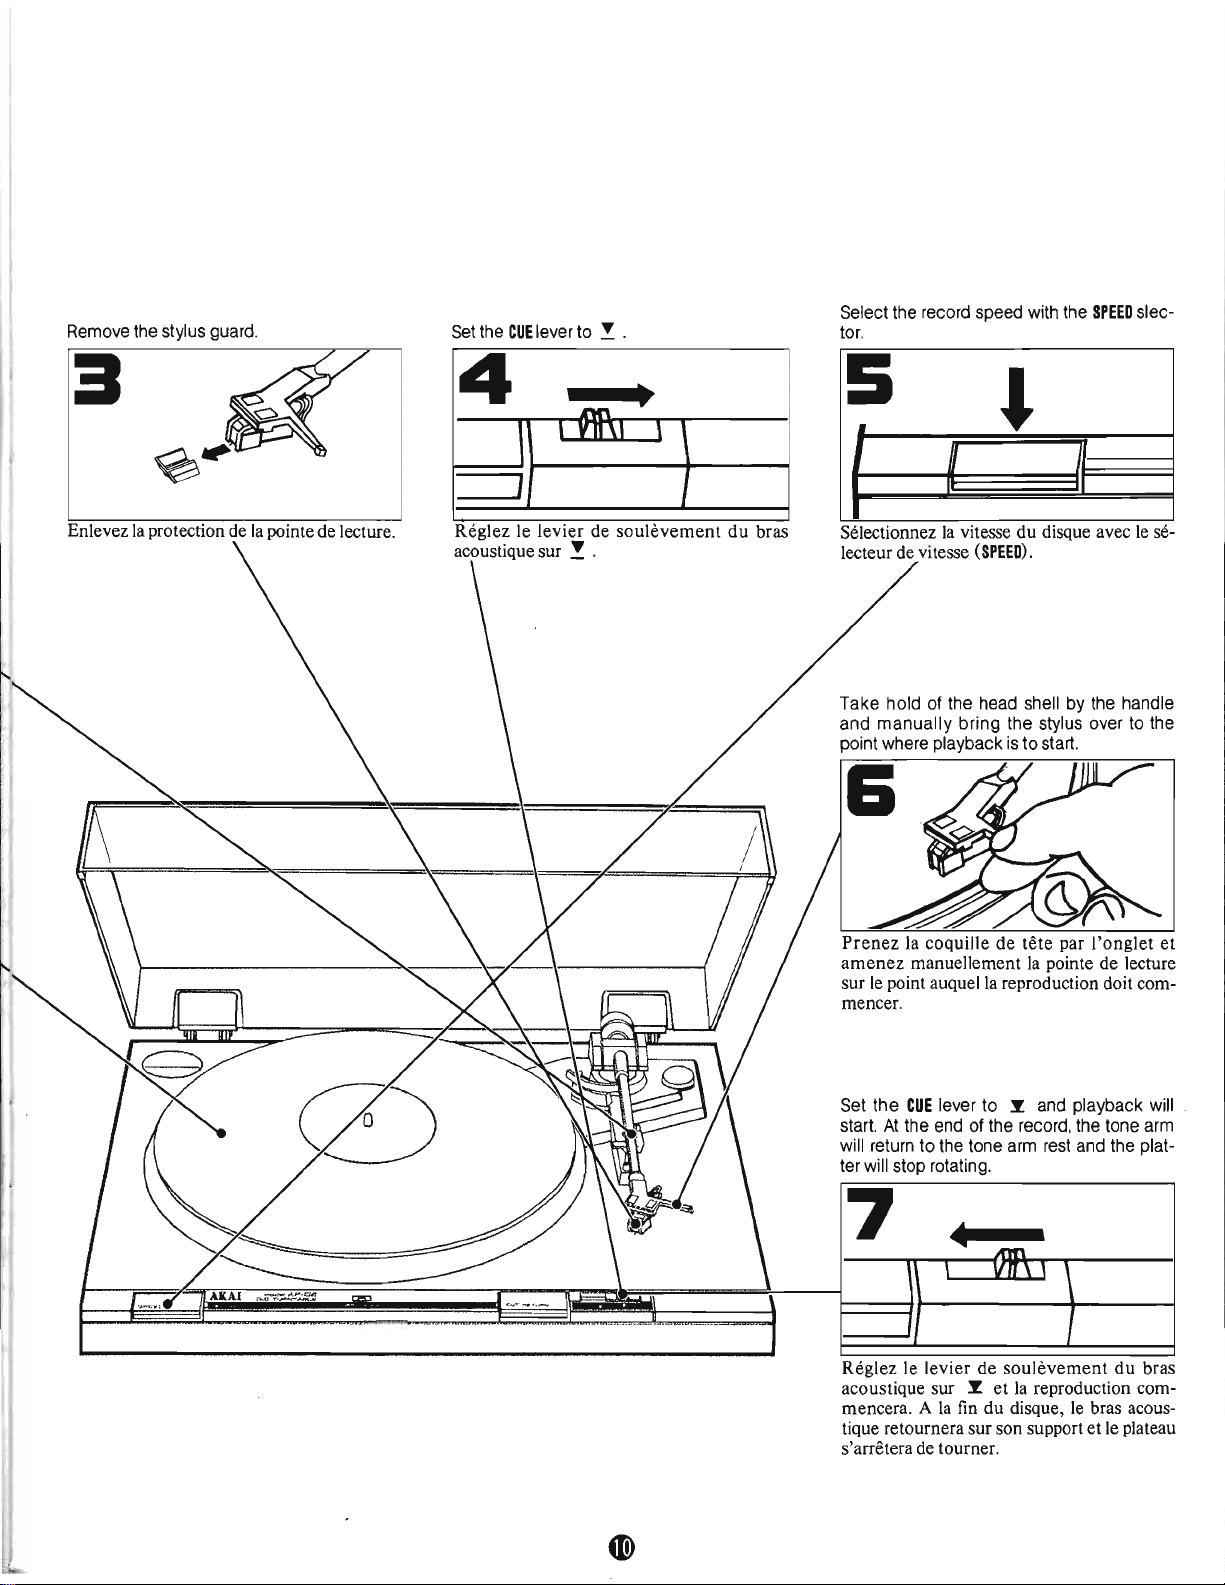
Remove the stylus guard.
2
Enlevez
la
protection de
la
pointe de lecture.
B
Set
the
ANTI
SKATING
Adjuster to
"2".
Lock
the
tone
arm and rotate the main
weight counterclockwise,
as
viewed from
the front (the Stylus Pressure Scale
Ring
will move with
it),
until the Stylus Pressure
Scale indication "2"
is
in
line with the mark
on
the shaft.
BlolIuez
le
bras acoustique et faites tourner
le
contrepoids principal dans
le
sens inverse
a celui du
mouvement
des aigulles
d'une
montre, vu depuis l'avant
(la
bague de
cali-
brage de pression de
la
pointe de lecture se
deplacera en meme temps), jusqu'a ce que
l'indication
"2"
de
la
bague alignee avec
le
repere sur l'axe.
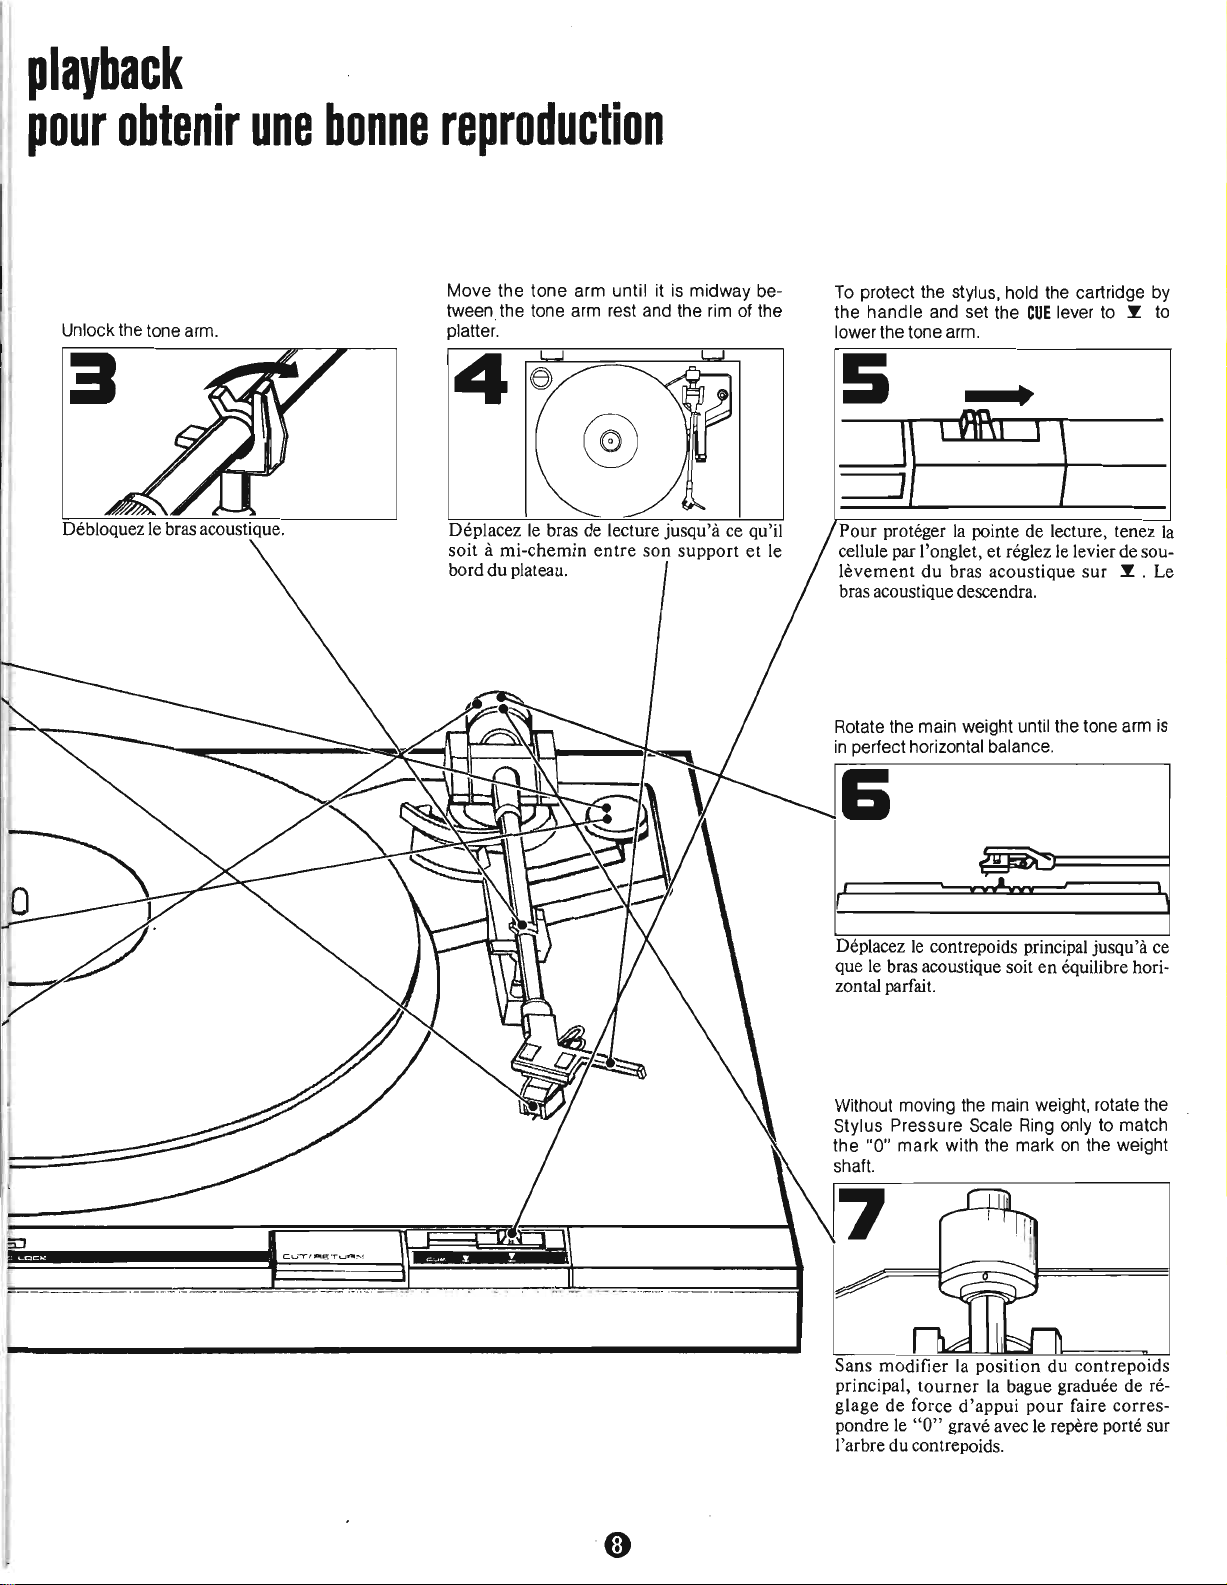
playback
pour
obtenir
une
bonne
reproduction
Move the tone arm until it
is
midway be-
tween the tone arm rest and the rim of the
Unlock the tone arm. platter.
4
Deplacez le bras de lecture jusqu'a ce qu'il
soit a mi-chemin
entre
son
support et le
bord du plateau.
To
protect the stylus. hold the cartridge by
the handle and set the
CUE
lever
to
~
to
lower the tone arm.
5 .
~l---
Pour proteger
la
pointe de lecture, tenez
la
cellule par l'onglet, et reglez le levier de sou-
levement
du
bras acoustique
sur
~.
Le
bras acoustique descendra.
Rotate the main weight until the tone arm
is
in
perfect horizontal balance.
Deplacez
le
contrepoids principal jusqu'a ce
que
le
bras acoustique soit
en
equilibre hori-
zontal parfait.
Without moving the main weight, rotate the
Stylus Pressure Scale
Ring
only to match
the
"0"
mark with the mark
on
the weight
shaft.
Sans modifier la position du contrepoids
principal,
tourner
la
bague graduee de re-
glage de force d'appui pour faire corres-
pondre le
"0"
grave avec le repere porte sur
l'arbre du contrepoids.

Let's
listen
to
a
record
Ecoute
d'un
disque
Place a record
on
the platter.
1
Placez
le
disque sur
la
plateau.
To change the stylus
The replacement stylus for the Akai AP-D2
is
RS-85.
For
good playback, change the stylus after approximately 400 hours
of use.
Attention
1.
Do not touch the tone arm or the platter and do not turn off the
power under the following conditions:
• During record playback.
• When the platter is turning.
• When the tone arm is moving automatically
2.
Set the amplifier's volume control to zero when lifting or lowering
the tone arm during playback.
3.
The auto-return system
is
set to return the tone arm at a specified
point
on
the
record. There should be no problem with regular
sized records, but with some types of record which contain music
grooves beyond this point, playback will be interrupted.
Pour changer
la
pointe
de
lecture
Pour
remplacer la pointe
de
lecture
de
la
AP-D2 Akai, utilisez
la
RS-85.
Pour
obtenir
une bonne reproduction, changez
la
pointe de lecture
apres apporoximativement 400 heures d'utilisation.
Attention
1.
Ne touchez pas le bras acoustique ou le plateau et ne coupez
pas
l'a-
limentation dans les conditions suivantes:
• Pendant une reproduction de disque.
• Lorsque le plateau tourne.
• Lorsque le bras acoustique se deplace automatiquement.
2.
Reglez a zero
la
commande de volume de I'amplificateur pour sou-
lever ou descendre le bras acoustique pendant une reproduction.
3.
Le systeme de retour automatique est regie pour que
le
bras acous-
tique retourne sur son support a un point speeifie du disque.
11
ne
devrait y avoir
aucun
probleme avec les disques de dimensions
standard, mais avec certains types de disques dont les sillons musi-
caux vont au-dela de ce point,
la
.reproduction sera interrompue.
To
stop
playback before the end
of
the record
Depress the
CUT/RETURN
button.
Pour
arreter une reproduction avant
la
fm
du
disque
Appuyez sur
la
touche d'arret/retour
(CUT/RETURN).
To
temporarily stop playback
Set the
CUE
lever
to
Y . The tone arm will rise.
To
lower the
tone arm, set the
CUE
lever to
~
.
Pour
arreter temporairement
la
reproduction
Regler
le
levier de soulevement du bras acoustique
sur!
. Le
bras acoustique se soulevera.
Pour descendre le bras acoustique, regIer
le
levier de souleve-
ment du bras acoustiq'ue sur
~
.
Unlock the tone arm.
2
Debloquez le bras acoustique.
Remove the stylus guard.
Set
the
CUE
lever to ! .
4
,
~
\
' vn"
,
1
Enlevez
la
protection de
la
pointe de lecture. Reglez le leVier de
soulevement
du
bras
acoustique sur
! .
Select the record speed with the
SPEED
slec-
tor.
5
•
SelectlOnnez
la
Vltesse
du
dlsque avec le se-
lecteur de vitesse
(SPEED).
Take hold of the head shell by the handle
and
manually
bring the stylus over to the
point where playback is
to
start.
Prenez
la coquille
de
tete par
I'onglet
et
amenez
manuellement
la
pointe de lecture
sur le point auquella reproduction doit com-
mencer,
Set the
CUE
lever to
~
and playback will
start,
At
the end of the record, the tone arm
will return
to
the tone arm rest and the plat-
ter will stop rotating.
7
Reglez le levier
de
sou!l~vement
du
bras
acoustique sur
~
et
la
reproduction com-
mencera. A
la
fin
du disque,
le
bras acous-
tique retournera sur son support
et
le
plateau
s'arretera de tourner.
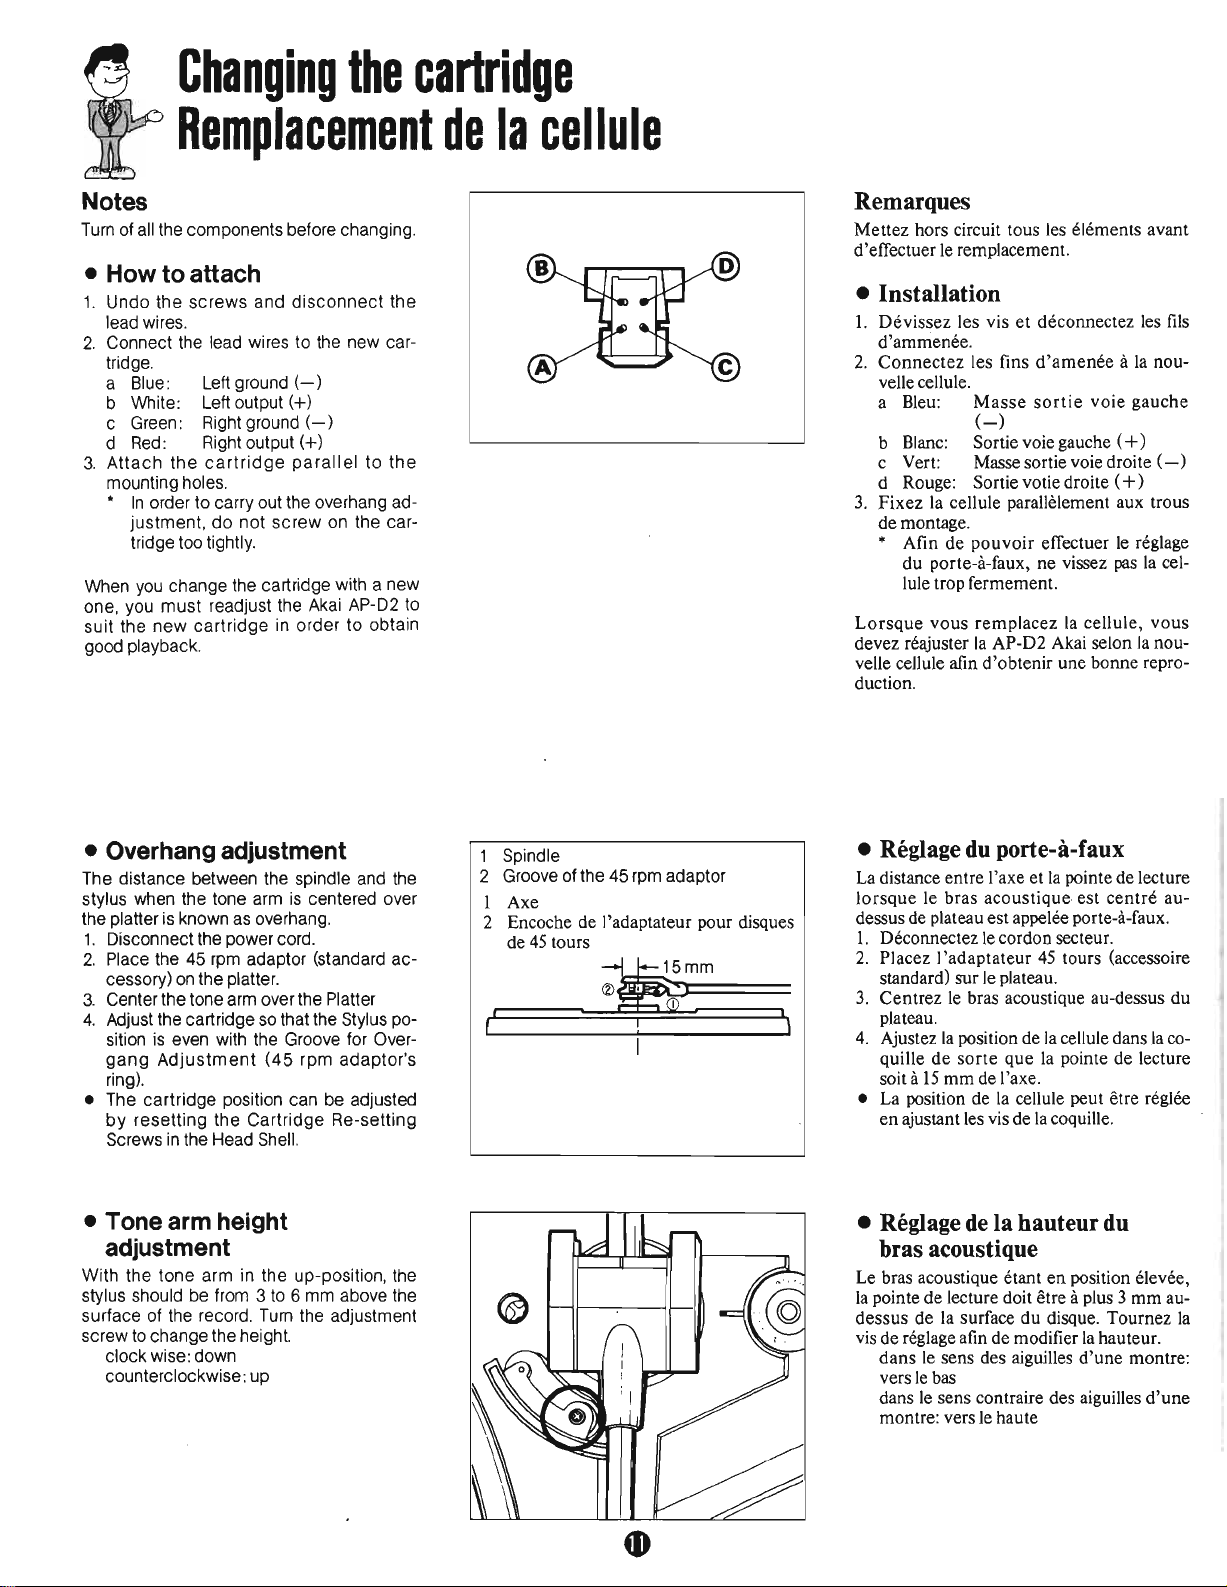
Changing
the
cartridge
Remplacement
de
la
cellule
Notes
Turn
of
all
the components before changing.
•
How
to
attach
1.
Undo the screws and
disconnect
the
lead wires.
2.
Connect the lead wires to the new car-
tridge.
a Blue: Left ground
(-)
b White: Left output (+)
c Green: Right ground
(-)
d
Red:
Right output (+)
3.
Attach
the
cartridge
parallel
to
the
mounting holes.
*
In
order to carry out the overhang ad-
justment,
do
not
screw
on the car-
tridge too tightly.
When
you
change the cartridge with a new
one, you must readjust the
Akai
AP-D2
to
suit the
new
cartridge in order to obtain
good playback.
•
Overhang
adjustment
The distance between the spindle and the
stylus when the tone arm
is
centered over
the platter
is
known as overhang.
1.
Disconnect the power cord.
2.
Place the 45 rpm adaptor (standard ac-
cessory)
on
the platter.
3.
Cent
er
the tone arm over the Platter
4.
Adjust the cartridge so that the Stylus po-
sition
is
even with the Groove for Over-
gang
Adjustment
(45
rpm adaptor's
ring).
• The cartridge position can be adjusted
by
resetting the Cartridge Re-setting
Screws
in
the Head
Shell.
• Tone
arm
height
adjustment
With the tone arm in the up-position, the
stylus should be from 3
to
6 mm above the
surface of the record.
Turn
the adjustment
screw
to
change the height.
clock wise: down
counterclockwise: up
1 Spindle
2 Groove of the 45 rpm adaptor
1
Axe
2 Encoche de I'adaptateur pour disques
de
45
tours
I j
Remarques
Mettez hors circuit tous les elements avant
d'efTectuer
le
remplacement.
• Installation
1.
Devissez
les vis
et
deconnectez les fils
d'ammenee.
2.
Connectez
les fins
d'amenee
a
la
nou-
velle cellule.
a
B1eu:
Masse
sortie
voie
gauche
(-)
b Blanc: Sortie voie gauche (+)
c Vert: Masse sortie voie draite
(-)
d Rouge: Sortie votie draite ( +)
3.
Fixez
la cellule parallelement aux trous
de
montage.
* Afin
de
pouvoir
efTectuer
le
reglage
du
porte-a-faux,
ne
vissez pas
la
cel-
lule trap fermement.
Lorsque
vous
remplacez
la cellule,
vous
devez reajuster
la
AP-D2 Akai selon
la
nou-
velle cellule afin d'obtenir une bonne repro-
duction.
• Reglage
du
porte-a-faux
La distance entre I'axe et
la
pointe de lecture
lorsque
le bras
acoustique
est
centre
au-
dessus de plateau est appelee porte-a-faux.
1.
Deconnectez le cordon secteur.
2.
Placez I
'adaptateur
45
tours (accessoire
standard) sur le plateau.
3.
Centrez
le
bras acoustique au-dessus
du
plateau.
4.
Ajustez
la
position de la cellule dans
la
co-
quille
de
sorte
que
la
pointe de lecture
soit a
15
mm
de I'axe.
• La position de
la
cellule peut etre regl6e
en
ajustant les vis de
la
coquille.
• Reglage
de
la hauteur
du
bras
acoustique
Le
bras acoustique etant
en
position elevee,
la
pointe
de
lecture doit etre aplus 3
mm
au-
dessus
de la surface
du
disque. Tournez
la
vis
de
reglage afm de modifier
la
hauteur.
dans
le
sens des aiguilles
d'une
montre:
vers
le
bas
dans
le
sens contraire des aiguilles
d'une
montre: vers le haute
•
Auto-Return
adjustment
If
the Tone
Arm
does not return automatical-
ly to
the
Tone Arm Rest at the end of the
playback, or does so during playback:
1.
Leave the Power Cord connected.
2.
Adjust
the
Auto-Return
Adjusment
Screw.
Turn clockwise:
If
the Tone
Arm
returns
before the end of record.
Turn counterclockwise:
If
the Tone
Arm
does not return at the end of record.
•
Do
not turn the Screw counterclockwise
too much.
Note
Akai recommends that a record be placed
on
the Platter and Auto-return operation be
carried out after each adjustment to confirm
that the adjustment is successful.
Useful
facts
Connaissance
uliles
Keep
the
records
and
the
stylus
clean.
Dirty records and stylus can lead to distortion and make the stylus
jump. Therefore, clean the records and the stylus with the optional ac-
cessory Cleaning Kit CK-200.
Don't
bump
the
Akai
AP-D2.
This can make the stylus jump, leading to damages to the stylus and
the record.
Let's
protect
the
speaker
system
from
damages.
Set the amplifier's volume control to zero when lifting or lowering the
tone arm during playback.
Let's
be
careful
when
you
move
the
Akai
AP-D2.
a) Unplug the output cord and the power cord.
b) Lock the tone arm to the tone arm rest.
c)
To
protect the insulator, lift the Akai AP-D2 and then move
it.
d) When transporting the Akai AP-D2 over a long distance, place the
Akai AP-D2
in
its original box wrapped
in
is
protective wrappers.
Be careful where
you
place the
Akai
AP-D2.
Away
from television, speaker system. amplifier's transformer, etc.
These generate signals
or
vibrations which can be picked up by the
stylus.
Let's
protect the
records.
Do
not
touch the grooves when handling the record. Dirty' grooves
will produce distortions.
Store the records, standing
in
a well ventilated place. relatively free of
dust.
• Reglage
de
retour automatique
Si
le bras de lecture ne revient pas automati-
quement
sur son repose-bras
en
fin
de
lec-
ture ou y revient en cours de lecture:
1.
Laisser le cordon d'alimentation branche.
2.
Ajuster
la
vis de reglage de retour auto-
matique.
Tourner dans le sens du mouvement des
aiguilles
d'une
montre:
Si
le
bras de lec-
ture retourne avant
la
fin du disque.
Tourner
dans le sens inverse:
Si
le
bras
de
lecture
ne
retourne
pas a
la
fin
du
disque.
• Ne
pas
trap tourner
la
vis dans le sens in-
verse du mouvement des aiguilles
d'une
montre.
Remarque
Akai recommande de placer un disque sur le
plateau
et
d'effectuer l'operation de retour
automatique apres chaque reglage afin de ve-
rifier
si
celui-ci est correct.
Conservez propres
les
disques et la pointe de
lecture.
Des disques et une pointe de lecture sales peuvent provoquer des dis-
torsions
et
faire sauter
la
pointe
de
lecture.
IJ
faut donc nettoyer perio-
diquement les disques
et
la
pointe de lecture avec le kit de nettoyage
CK-200 (accessoire en option).
Ne
faites pas subir de chocs a
la
AP-D2
Akai.
La
pointe de lecture pourrait sauter, ce qui endommagerait
la
pointe
de lecture
et
le
disque.
Protegez le systeme haut-parleurs.
Reglez azero
la
commande de volume de l'amplificateur lors du sou-
levement ou de
la
descente du bras acoustique pendant
la
reproduc-
tion.
Prenez des precautions lorsque vous deplacez
la
AP-D2
Akai.
a)
Debranchez
le
cordon de sortie et le cordon secteur.
b) Bloquez
le
bras acoustique sur son support.
c)
Afin de proteger l'isolateur, soulevez
la
AP-D2 puis deplacez-la.
d) Pour transporter
la
AP-D2 Akai sur une longue distance, placez
la
AP-D2 dans sa
bOlte
d'origine, enveloppee dans ses emballages de
protection.
Choisissez avec soin l'emplacement de la
AP-D2
Akai.
Loin
d'un
televiseur,
d'un
systeme haut-parleurs,
d'un
transforma-
teur pour amplificateur, etc. Ces appareils generent des signaux ou des
vibrations qui peuvent etres captes par
la
pointe de lecture.
Protegez les disques.
Ne touchez
pas
les
siLIons
lorsque vous manipulez
le
disque. Des sil-
Ions sales provoquerant des distorsions.
Rangez les disques, debout, dans un endroit bien aere, relativement
a
l'abri de
la
poussieres.
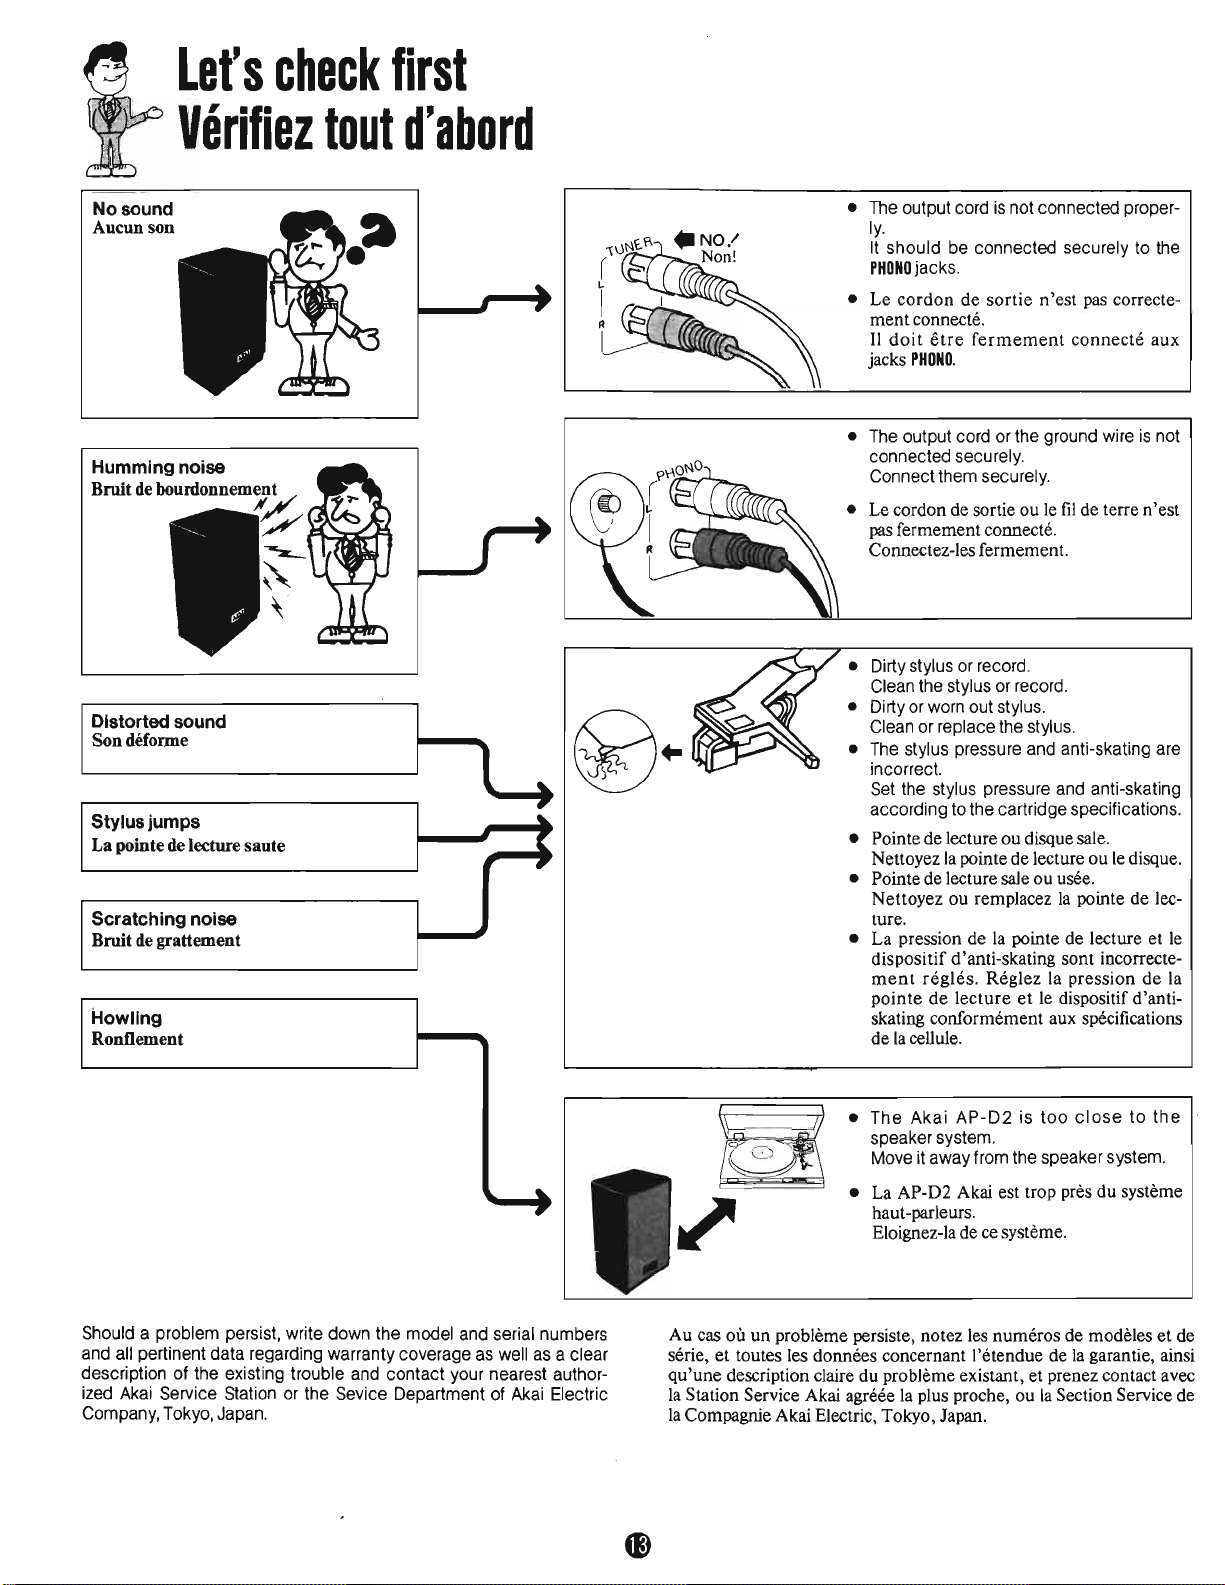
Let's
check
first
Verifiez
tout
d'
abord
• The output cord
is
not connected proper-
No sound
Aucun
son
ly.
It
should
be connected securely to the
PHONO
jacks.
• Le cordon de sortie n'est
pas
correcte-
ment connecte.
II
doit
etre
fermement
connecte aux
jacks
PHONO.
• The output cord or the ground wire
is
not
connected securely.
Humming
noise
Connect them securely.
Broit
de
boUrdOnnem~
• Le cordon de sortie ou le
fil
de terre n'est
y
pas fermement connecte.
Connectez-les fermement.
~
~
,-
• Dirty stylus or record.
Clean the stylus or record.
• Dirty
or
worn out stylus.
Distorted
sound
Clean or replace the stylus.
Sondeforme
• The stylus pressure and anti-skating are
incorrect.
Set the stylus pressure and anti-skating
according to the cartridge specifications.
Stylus
jumps
• Pointe de lecture ou disque sale.
(
La
pointe
de
lecture
saute
,
Scratching
noise
Broit
de
grattement
Howling
RonOement
Nettoyez
la
pointe de lecture ou le disque.
• Pointe de lecture sale ou usee.
Nettoyez ou remplacez
la
pointe de lec-
ture.
• La pression de
la
pointe de lecture et le
dispositif d'anti-skating sont incorrecte-
ment
regles.
Reglez la pression de la
pointe
de
lecture
et
le dispositif d'anti-
skating conformement aux specifications
de
la
cellule.
•
The
Akai
AP-D2
is
too
close
to
the
speaker system.
Move it away from the speaker system.
• La AP-D2 Akai est trop pres du systeme
haut-parleurs.
Eloignez-Ia de ce systeme.
~
Should a problem persist, write down the model and serial numbers
and all pertinent data regarding warranty coverage
as
well
as
a clear
description of the existing trouble and contact your nearest author-
ized Akai Service Station or the Sevice Department of Akai Electric
Company, Tokyo, Japan.
Au cas oil un probleme persiste, notez les numeros de modeles
et
de
serie,
et
toutes les donnees concernant I'etendue de
la
garantie, ainsi
qu'une description claire du probleme existant, et prenez contact avec
la
Station Service Akai agreee
la
plus proche, ou
la
Section Service de
la
Compagnie Akai Electric, Tokyo, Japan.
 Loading...