


APC40 mkII

User Guide
English ( 2 – 6 )
Guía del usuario
Español ( 7 – 11 )
Guide d'utilisation
Français ( 12 – 16 )
Guida per l'uso
Italiano ( 17 – 21 )
Benutzerhandbuch
Deutsch ( 22 – 26 )
Appendix
English ( 27 )

User Guide (English)
Introduction
Box Contents
APC40 mkII USB Cable
Ableton Live Lite
Software Download Card Safety & Warranty Manual
Support
For the latest information about this product (system requirements, compatibility information,
etc.) and product registration, visit akaipro.com/apc40-mkii.
For additional product support, visit akaipro.com/support.
Quick Start
1. Use the included USB cable to connect APC40 mkII's USB port to an available USB port
on your computer (powered on).
2. On your computer, open Ableton Live.
3. In Live, open the Preferences:
• Windows: Options > Preferences
• Mac OS X: Live > Preferences
4. Click the MIDI/Sync Tab.
5. Click an available Control Surface drop-down menu and select Akai APC40 mkII.
6. Click an available Input drop-down menu and select Akai APC40 mkII.
7. Click an available Output drop-down menu and select Akai APC40 mkII.
8. Close the Preferences window.
You can now use APC40 mkII with Live.
Basic Operation
Refer to this section to learn how to do basic tasks in Ableton Live using APC40 mkII.
Important: Before doing any of the following, set up APC40 mkII as a controller in Live
(described in the Quick Start section above).
To start or pause playback, press the Play button.
To start recording, press the Record button (to record normally) or the Session button (to
execute Live's Session Record feature).
To stop all clips, press the Stop All Clips button.
To launch a clip, press one of the Clip Launch buttons that corresponds to a clip in the
current 8x5 matrix. In Live, this is represented by a rectangle around the clips. The Clip
Launch buttons' colors will match the clips' colors as assigned in Live.
(download) User Guide
2

To stop a clip, press the Clip Stop button in the same track (column) as the clip you want to
stop.
To launch a scene, press one of the five Scene Launch buttons to the right of the 8x5 matrix
of Clip Launch buttons.
To move around the matrix of clips, use the Bank Select buttons to shift the viewable 8x5
matrix. In Live, this is represented by a rectangle around the clips. The Clip Launch buttons'
colors will match the clips' colors as assigned in Live.
To solo a track, press its Solo button.
To record-arm a track, press its Record-Arm button.
To mute or unmute a track, press its Track Activator (the button with the track's number
printed on it, above its Solo button).
To select a track, press its Track Selector (the button below the track's Clip Stop button).
To adjust volumes, use the Track Volume Faders.
To adjust panning, press the Pan button to put APC40 mkII's Assignable Knobs in Pan
Mode. The eight Assignable Knobs will control the panning positions of the current eight
tracks.
To adjust send levels, press the Sends button to put APC40 mkII's Assignable Knobs in
Sends Mode, allowing them to control the levels of Send A for the current eight tracks.
You can select a different send by pressing and holding Sends and then pressing a Track
Selector (Track Selector 1 will select Send A, Track Selector 2 will select Send B, etc.).
Note: Your return tracks will be shown in the matrix as the right-most tracks available in the
Live Set.
To use the Assignable Knobs to control other functions, press the User button to put
APC40 mkII's Assignable Knobs in User Mode. You can then assign them in Live's MIDI Map
Mode, allowing them (while in User Mode) to control whatever mappable parameters you
want.
To adjust devices:
1. Select a track by pressing the desired Track Selector.
2. If the Device View is not shown at the bottom of the window, press the Clip/Dev. View
until it is.
3. Use the Device Left/Right (/) buttons to select the desired device.
4. Use the eight Device Control Knobs to control the parameters of the current device's
first bank. You can use the Bank Left/Right (/) buttons to select the previous or next
bank in that device.
Tip: Alternatively, you can press the Device Lock button to lock or unlock APC40 mkII to or
from the currently selected device. When locked, you can use APC40 mkII's controls for that
device regardless of where the current focus is in your Live Set.
3
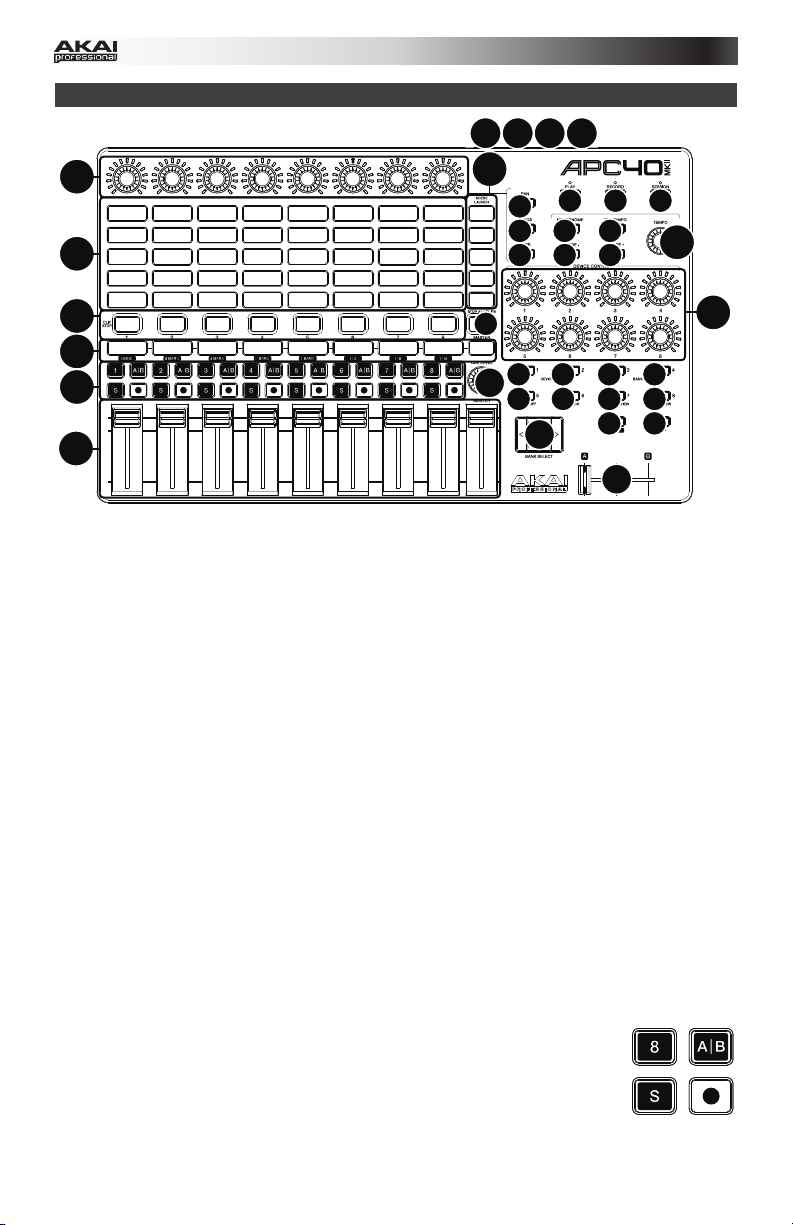
Features
123
4
13
5
7
6
8
14
15
16
32 33 34
28
30
31 31
29
20
9
19
232623
25
27
19
10
12
1. USB Port: Use a standard USB cable to connect this port to a USB port on your computer. The
computer's USB port provides power to APC40 mkII. This connection is also used to send and
receive MIDI data to and from your computer.
2. Power Switch: Press this button to power APC40 mkII on and off.
3. Footswitch Input: Connect an optional 1/4" (6.35mm) TS footswitch to this input.
4. Kensington Lock Slot: You can use this Kensington lock slot to secure the APC40 mkII to a
table or other surface.
5. Clip Launch Buttons: While in Session View, use these buttons in this 8x5 to launch clips.
Each button represents a single clip slot. The eight columns represent eight tracks while the
five rows represent five scenes. The Clip Launch buttons' colors will match the clips' colors as
assigned in Live.
You can launch the entire scene by pressing the Scene Launch buttons to the right of the row
of clips.
6. Scene Launch Buttons: You can press one of these buttons to launch the corresponding
scene, represented by the row of clips to its left.
7. Clip Stop Buttons: Press one of these buttons to stop the clip that is playing in the
corresponding track, represented by the column of clips just above it.
8. Stop All Clips: Press this button to stop all clips when they reach the end.
9. Track Selectors: Press one of these buttons to select its track, allowing you to use the Device
Control Knobs for a device on that track. The right-most button (labeled Master) selects the
Master track.
Press and hold Shift and then press one of the first eight Track Selectors to select a Global
Quantization setting: None, 8 Bars, 4 Bars, 2 Bars, 1 Bar, 1/4, 1/8, or 1/16.
10. Track Buttons:
• Track Activator (#): Press this button to activate (unmute) or deactivate
(mute) the track.
• Crossfade Assign (A|B): Press this button to cycle through the track's
three possible crossfade assignments: A, B, or Off.
• Solo (S): Press this button to solo the track.
• Record-Arm (): Press this button to record-arm the track.
4
11
21 22 18 17
24

11. Cue Level: Use this knob to control the Cue Volume.
12. Track Volume Faders: Use these faders to control each track's volume level. The right-most
fader (labeled Master) controls the Master track's volume level.
13. Assignable Knobs: Use these knobs controls track panning, track send levels, or other userassignable parameters. Press the Pan button, Sends button, or User button to put the these
knobs in the corresponding mode (described below).
14. Pan: Press this button to put the Assignable Knobs in Pan Mode, allowing them to control the
panning positions of the current eight tracks.
15. Sends: Press this button to put the Assignable Knobs in Sends Mode, allowing them to
control the levels of Send A for the current eight tracks.
You can select a different send by pressing and holding Sends and then pressing a Track
Selector (Track Selector 1 will select Send A, Track Selector 2 will select Send B, etc.).
16. User: Press this button to put the Assignable Knobs in User Mode. You can then assign them
in Live's MIDI Map Mode, allowing them (while in User Mode) to control whatever mappable
parameters you want.
17. Detail View: Press this button to hide or show Detail View, which contains the Clip View or
Device View. (Select which you are viewing by pressing the Clip/Device View button.)
Press and hold Shift and then press this button to select Bank 8 of the currently selected
device.
18. Clip/Device View: Press this button to switch between Clip View (to view and adjust clip
properties) and Device View (to view all devices in the current track).
Press and hold Shift and then press this button to select Bank 7 of the currently selected
device.
19. Device Left/Right (/): Use these buttons to select the previous or next device in a track's
device chain. Each of these buttons will light up if there is an available device in that direction.
Press and hold Shift and then press one of these buttons to select Bank 1 or Bank 2
(respectively) of the currently selected device.
20. Device Control Knobs: Use these eight knobs to control the parameters of the current
device's first bank. Use the Bank Left/Right (/) buttons to select the previous or next bank
in that device. Use the Device Left/Right (/) buttons to select another device.
21. Device On/Off: Press this button to activate or deactivate the currently selected device.
Press and hold Shift and then press this button to select Bank 5 of the currently selected
device.
22. Device Lock: Press this button to lock or unlock APC40 mkII to or from a device. When locked,
you can use APC40 mkII's controls for that device regardless of where the current focus is in
your Live Set.
Press and hold Shift and then press this button to select Bank 6 of the currently selected
device.
23. Bank Left/Right (/): Use these buttons to select the previous or next bank of controls in a
device. Each of these buttons will light up if there is an available bank in that direction. The
status bar at the bottom of the window displays the current bank.
Press and hold Shift and then press one of these buttons to select Bank 3 or Bank 4
(respectively) of the currently selected device.
24. Bank Select: These cursor buttons move the cursor/selection in your Live Set by one track (left
or right) or by one scene (up or down).
Press and hold Bank while using these buttons to move the selection by 8 tracks (left or right)
or by 5 scenes (up or down), effectively shifting the entire 8x5 matrix controlled by the Clip
Launch buttons (represented in Live by a rectangle). The Clip Launch buttons' colors will
match the clips' colors as assigned in Live.
Note: Your return tracks will be shown in the matrix as the right-most tracks available in the
Live Set.
5

25. Bank: Press this button to activate or deactivate while using the Bank Select buttons to move
the selection by 8 tracks (left or right) or by 5 scenes (up or down), effectively shifting the entire
8x5 matrix controlled by the Clip Launch buttons (represented in Live by a rectangle). The Clip
Launch buttons' colors will match the clips' colors as assigned in Live.
26. Shift: Press and hold this button to access certain buttons' secondary functions.
When holding down this button, the 8x5 matrix of Clip Launch buttons will enter Session
Overview Mode. In this view, each Clip Launch button represents an entire 8-track-by-5-scene
matrix of clips in Live. You can then press one of them to view that 8x5 matrix in the Clip
Launch buttons. This allows you to access and use more than the 5 rows and 8 tracks
represented by the Clip Launch buttons. While in Session Overview Mode, the Clip Launch
buttons' colors represent the following:
• Off: No clips are present in this 8x5 matrix.
• Amber: Clips are present in this 8x5 matrix, which is currently selected.
• Green: Clips are present in this 8x5 matrix, which contains clip slots that are currently
playing.
• Red: Clips are present in this 8x5 matrix, but no clip slots are currently playing.
Note: If the current matrix of Clip Launch buttons is "between" two 8x5 matrices, when you
enter Session Overview Mode, both Clip Launch buttons representing those two matrices will
light up amber.
27. Crossfader: Use this crossfader to control Live's crossfader.
28. Metronome: Use this to activate or deactivate the metronome.
29. Tempo Knob: Use this knob to adjust the tempo.
30. Tap Tempo: Tap this button at the desired rate to enter a new tempo.
31. Nudge -/+: Use these buttons to temporarily increase or decrease tempo.
32. Play: Press this button to start/resume or pause playback.
33. Record: Press this button to start or stop Arrangement Record.
34. Session: Press this button to start or stop Session Record.
6

Guía del usuario (Español)
Introducción
Contenido de la caja
APC40 mkII Cable USB
Ableton Live Lite (descarga) Guía del usuario
Tarjeta de descarga de software Manual sobre la seguridad y garantía
Soporte
Para obtener la información más reciente acerca de este producto (requisitos de sistema,
información de compatibilidad, etc.) y registrarlo, visite akaipro.com/apc40-mkii.
Para obtener soporte adicional del producto, visite akaipro.com/support.
Inicio rápido
1. Utilice el cable USB incluido para conectar el puerto USB del APC40 mkII a un puerto USB
disponible en su ordenador (encendido).
2. En su ordenador, abra Ableton Live.
3. En Live, abra Preferences (Preferencias):
• Windows: Options (Opciones) > Preferences (Preferencias)
• Mac OS X: Live > Preferences (Preferencias)
4. Haga clic en la pestaña MIDI/Sync (MIDI/Sincronismo).
5. Haga clic en un menú desplegable Control Surface (Superficie de control) disponible y
seleccione Akai APC40 mkII.
6. Haga clic en un menú desplegable Input (Entrada) disponible y seleccione Akai APC40 mkII.
7. Haga clic en un menú desplegable Output (Salida) disponible y seleccione Akai APC40 mkII.
8. Cierre la ventana Preferences.
Ahora puede utilizar el APC40 mkII con Live.
Funcionamiento básico
Consulte esta sección para aprender a efectuar las tareas básicas en Ableton Live utilizando el
APC40 mkII.
Importante: Antes de efectuar lo siguiente, configure el APC40 mkII como un controlador en Live
(como se describió anteriormente en la sección Inicio rápido).
Para comenzar o realizar una pausa en la reproducción, pulse el botón Play (Reproducir).
Para comenzar a grabar, pulse el botón Record (Grabar) (para grabar normalmente) o el botón
Session (Sesión) (para ejecutar la característica Session Record [Grabación estilo sesión] de Live).
Para detener todos los clips, pulse el botón Stop All Clips (Detener todos los clips).
Para lanzar un clip, pulse uno de los botones de lanzamiento de clip que corresponde a un clip en
la grilla de 8x5 actual. En Live, esto se representa con un rectángulo alrededor de los clips. Los
colores de los botones de lanzamiento de clip coincidirán con los colores de los clips asignados en
Live.
7

Para detener un clip, pulse el botón Clip Stop (Detener clip) en la misma pista (columna) del clip
que desea detener.
Para lanzar una escena, pulse uno de los cinco botones Scene Launch (Lanzamiento de escena)
de la derecha de la grilla de botones de lanzamiento de clip de 8x5.
Para moverse por la grilla de clips, utilice los botones Bank Select (Selección de banco) para
desplazar la grilla de 8x5 visible. En Live, esto se representa con un rectángulo alrededor de los
clips. Los colores de los botones de lanzamiento de clip coincidirán con los colores de los clips
asignados en Live.
Para hacer un solo de pista, pulse el botón de solo.
Para armar una pista para grabación, pulse su botón de armar para grabación.
Para silenciar o anular el silenciamiento de una pista, pulse su botón activador de pista (el
botón con el número de pista impreso, encima de su botón de solo).
Para seleccionar una pista, pulse su selector de pista (el botón que está debajo del botón de
detener clip).
Para ajustar los volúmenes, utilice los faders de volumen de pista.
Para ajustar el balance, pulse el botón Pan (Balance) para colocar las perillas asignables del
APC40 mkII en modo Balance. Las ocho perillas asignables controlan las posiciones de balance de
las ocho pistas actuales.
Para ajustar los niveles de envío, pulse el botón Sends (Envíos) para colocar las perillas
asignables del APC40 mkII en modo Envíos, permitiendo que controlen los niveles del envío A para
las ocho pistas actuales.
Puede seleccionar un envío diferente manteniendo pulsado Sends y luego pulsando un selector de
pista (el selector de pista 1 selecciona el envío A, el selector de pista 2 selecciona el envío B, etc.).
Nota: Sus pistas de retorno se muestran en la grilla como las pistas de más a la derecha disponibles
en la sesión de Live.
Para utilizar las perillas asignables a fin de controlar otras funciones, pulse el botón User
(Usuario) para colocar las perillas asignables del APC40 mkII en modo Usuario. Puede asignarlas
entonces en el modo de mapeo MIDI de Live, permitiéndoles (estando en modo Usuario) controlar
cualquier parámetro mapeable que desee.
Para ajustar dispositivos:
1. Seleccione una pista pulsando el selector de pista deseado.
2. Si no se muestra la vista del dispositivo en la parte inferior de la ventana, pulse Clip/Dev. View
(Vista clip/dispositivo) hasta que se muestre.
3. Utilice los botones Device Left/Right (/) (Dispositivo izquierda/derecha) para seleccionar
el dispositivo deseado.
4. Utilice las ocho perillas Device Control (Control de dispositivo) para controlar los parámetros
del primer banco del dispositivo actual. Puede utilizar los botones Bank Left/Right (/)
(Banco izquierda/derecha) para seleccionar el banco anterior o siguiente de ese dispositivo.
Consejo: Como alternativa, puede pulsar el botón Device Lock (Bloqueo de dispositivo) para
bloquear o desbloquear el APC40 mkII al o desde el dispositivo actualmente seleccionado. Estando
bloqueado, puede utilizar los controles del APC40 mkII para ese dispositivo sin importar en dónde
esté el foco en su sesión de Live.
8

Características
123
4
13
5
7
6
8
14
15
16
32 33 34
28
30
31 31
29
20
9
232623
19
19
10
12
1. Puerto USB: Utilice un cable USB estándar para conectar este puerto a un puerto USB
de su ordenador. El puerto USB del ordenador le proporciona corriente al APC40 mkII.
Esta conexión también se utiliza para enviar y recibir datos MIDI desde y hacia su
ordenador.
2. Interruptor de encendido: Pulse este botón para encender y apagar el APC40 mkII.
3. Entrada del interruptor de pedal: Conecte un pedal o interruptor de pedal TS de 6,35
mm (1/4 pulg.) opcional a esta entrada.
4. Ranura de bloqueo Kensington: Puede utilizar esta ranura de bloqueo Kensington a fin
de sujetar el APC40 mkII a una mesa u otra superficie.
5. Botones de lanzamiento de clip: En la vista de sesión, utilice estos botones de esta
grilla de 8x5 para lanzar clips. Cada botón representa una ranura de un único clip. Las
ocho columnas representan ocho pistas mientras que las cinco filas representan cinco
escenas. Los colores de los botones de lanzamiento de clip coincidirán con los colores
de los clips asignados en Live.
Puede lanzar la escena entera pulsando los botones Scene Launch (Lanzamiento de
escena) de la derecha de la fila de clips.
6. Botones de lanzamiento de escena: Puede pulsar uno de estos botones para lanzar la
escena correspondiente, representada por la fila de clips de su izquierda.
7. Botones para detener clip: Pulse uno de estos botones para detener el clip que se está
reproduciendo en la pista correspondiente, representado por la columna de clips situada
inmediatamente encima de él.
8. Detener todos los clips: Pulse este botón para detener todos los clips cuando lleguen al
final.
9. Selectores de pista: Pulse uno de estos botones para seleccionar su pista,
permitiéndole utilizar las perillas Device Control para un dispositivo en esa pista. El
botón de más a la derecha (rotulado Master) selecciona la pista maestra.
Mantenga pulsado Shift y luego pulse uno de los primeros ocho selectores de pista
para seleccionar un ajuste global de cuantificación: None (Ninguno), 8 Bars (8 Barras), 4
Bars (4 Barras), 2 Bars (2 Barras), 1 Bar (1 Barra), 1/4, 1/8 o 1/16.
11
21 22 18 17
24
25
27
9
 Loading...