


User Guide
English ( 3 – 6 )
Guía del usuario
Español ( 7 – 10 )
Guide d'utilisation
Français ( 11 – 14 )
Guida per l'uso
Italiano ( 15 – 18 )
Benutzerhandbuch
Deutsch ( 19 – 22 )
Appendix
English ( 23 )

User Guide (English)
Introduction
Box Contents
AMX
USB Cable
Software Download Card
User Guide
Safety & Warranty Manual
Support
For the latest information about this product (system requirements, compatibility information, etc.) and product registration, visit akaipro.com/amx.
For additional product support, visit akaipro.com/support.
Quick Start
1.Windows users only: Install the drivers before installing the software.
2.Make sure you have already installed the latest version of Serato DJ from serato.com.
3.Make sure all devices are off and all faders and gain knobs are set to "zero."
4.Make all necessary connections in your DJ setup (e.g., controller to computer, turntables to mixer, etc.).
5.Connect AMX to your computer with a standard USB cable (included).
6.Open Serato DJ and go!
Read the rest of this User Guide to get the most out of AMX's features.
3
Features
1 |
2 |
4 |
3 |
|
3 |
8 |
9 |
|
10 |
9 |
7 |
19 |
20 17 |
6 |
17 20 |
19 |
|
21 |
28 |
|
28 |
|
21 |
22 |
27 |
|
27 |
|
22 |
23 |
26 |
|
26 |
23 |
|
29 |
16 |
|
15 |
|
29 |
|
25 |
14 |
25 |
|
|
24 |
18 |
18 |
18 |
24 |
|
|
13 |
|
|
|
|
11 |
|
|
12 |
|
|
|
5 |
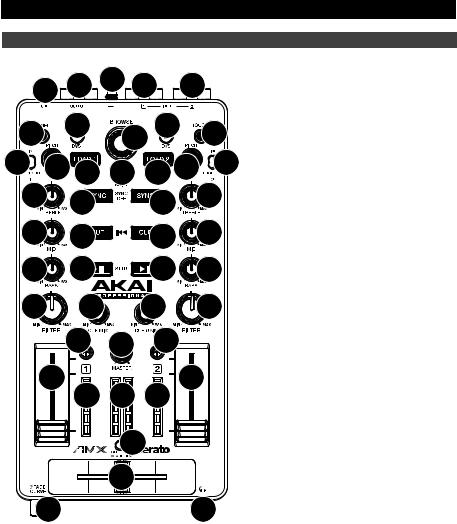
1.USB Port: Use a standard USB cable to connect this USB port to your computer. The computer's USB port provides ample power to AMX. This connection is also used to send and receive MIDI data to and from your computer.
2.Master Output (RCA): Use standard RCA cables to connect this output to a speaker or amplifier system. The level of this output is controlled by the
Master knob.
3.Line/Phono Inputs (RCA): Connect your audio sources to these inputs. These inputs can accept both line and phono-level signals.
4.Grounding Terminal: If using phonolevel turntables with a grounding wire, connect the grounding wire to these terminals. If you experience a low "hum" or "buzz", this could mean that your turntables are not grounded. Some turntables have a grounding wire built into the RCA connection and, therefore, nothing needs to be connected to the grounding terminal.
5.Headphones (1/8" / 3.5 mm):
Connect your 1/8" (3.5 mm) headphones to this output for cueing and mix monitoring.
6.Shift: Press and hold this button to access the secondary functions (in red lettering) of other controls on AMX.
7.Touch: Press this button to activate the functions of AMX's touchcapacitive knobs: the Channel Treble, Channel Mid, Channel Bass, and Channel Filter. When the Touch button is activated (Touch Mode), touch any of these knobs to activate or deactivate their corresponding functions momentarily.
8.Panel / View: Press this to toggle through the Recording (Rec), Effects (FX), Sampler (SP-6), and Flip panels. Press and hold Shift and then press this button to toggle through the available software display modes.
4

9.Search / DVS: While the track is paused, press and hold this button and turn the Browse Knob to move through the track on the corresponding deck.
During playback, press and hold this button and turn the Browse Knob to temporarily bend the pitch of the track on the corresponding deck. This does not apply when the deck's vinyl control is in Absolute Mode (ABS).
Press and hold Shift and then press this button to switch the vinyl control mode between Internal (INT) and the last-selected mode: Absolute Mode (ABS), Relative Mode (REL), or Through (THR). You must be using the Serato DVS Expansion Pack (sold separately) in order to use this function.
10.Browse Knob: Use this knob to scroll through lists of tracks, Crates, etc. in the software. You can also press it to move between the panels shown in the software.
11.Crossfader: Blends audio between the channels assigned to the left and right side of the crossfader.
12.Crossfader Curve: Adjusts the crossfader curve. Turn the knob to the left for a smooth fade (mixing) or to the right for a sharp cut (scratching). The center position is a typical setting for club performances.
13.Crossfader Reverse: Reverses the direction of the crossfader.
14.Master Volume: Adjusts the output volume of the Program Mix.
15.Cue Gain: Adjusts the volume level of the Headphones output.
16.Cue Mix: Turn to mix between Cue and Program in the Headphones output. When all the way to the left, only channels routed to Cue will be heard. When all the way to the right, only the Program mix will be heard.
17.Load 1 / Load 2: Press one of these buttons while a track is selected to assign it to Deck 1 or Deck 2, respectively.
18.LED Meters: Monitors the audio levels of the corresponding channel.
19.Line/Phono Switch: Flip this switch to the appropriate position, depending on the device connected to the Line/Phono Inputs. If you are using phono-level turntables, set this switch to Phono to provide the additional amplification needed for phono-level signals. If using a line-level device, such as a CD player or sampler, set this switch to Line.
20.Gain Trim: Adjusts the pre-fader, pre-EQ audio level of the corresponding channel in the software.
If the software's vinyl control mode is set to Internal (INT), press and hold Shift and turn this knob to adjust the pitch of the track.
21.Channel Treble: Adjusts the high (treble) frequencies. When the Touch button is activated, touching this knob will mute the corresponding channel's high frequencies (an "EQ kill").
22.Channel Mid: Adjusts the mid-range frequencies. When the Touch button is activated, touching this knob will mute the corresponding channel's mid-range frequencies (an "EQ kill").
23.Channel Bass: Adjusts the low (bass) frequencies. When the Touch button is activated, touching this knob will mute the corresponding channel's low frequencies (an "EQ kill").
24.Channel Fader: Adjusts the audio level on the corresponding channel in the software.
25.PFL: Press this button to send this channel's pre-fader signal to the Cue Channel for monitoring. When engaged, the button will be lit. By pressing one PFL button at a time, you will cue that channel alone (and deactivate PFL monitoring for the other channels). To cue to multiple channels simultaneously, press the PFL buttons for those channels at the same time.
5

26.Play / Pause: This button pauses or resumes playback.
Press and hold Shift and then press this button to "stutter-play" the track from the last set Cue Point.
27.Cue: When the Deck is paused, you can set a Temporary Cue Point by moving the Platter to place the Audio Pointer at the desired location and then pressing the Cue Button.
During playback, you can press the Cue Button to return the track to this Temporary Cue Point. (If you did not set a Temporary Cue Point, then it will return to the beginning of the track.)
If the Deck is paused, you can press and hold the Cue Button to play the track from the Temporary Cue Point. Releasing the Cue Button will return the track to the Temporary Cue Point and pause it. To continue playback without returning to the Temporary Cue Point, press and hold the Cue Button, then press and hold the Play Button, and then release both buttons.
Press and hold Shift and then press this button to return to the beginning of the track.
28.Sync: Press this button to automatically match the corresponding Deck's tempo with the opposite Deck's tempo and phase. Press and hold Shift and press this button to deactivate Sync.
29.Channel Filter: Turn this knob to apply and adjust a low-pass filter to the corresponding channel when turned counter-clockwise or a high-pass filter when turned clockwise.
When the Touch button is activated, it will also apply a Loop Roll to the filter and will decrease in length as the knob moves further away from the center position.
6
Guía del usuario (Español)
Introducción
Contenido de la caja
AMX
Cable USB
Tarjeta de descarga de software
Guía del usuario
Manual sobre la seguridad y garantía
Soporte
Para obtener la información más reciente acerca de este producto (requisitos de sistema, información de compatibilidad, etc.) y registrarlo, visite akaipro.com/amx.
Para obtener soporte adicional del producto, visite akaipro.com/support.
Inicio rápido
1.Usuarios de Windows: Instale los drivers antes de instalar el software.
2.Asegúrese de tener instalada la última versión de Serato DJ de serato.com.
3.Asegúrese que todos los dispositivos estén apagados y que todos los faders y perillas de ganancia estén en posición "cero".
4.Asegúrese de tener todas las conexiones necesarias en su instalación de DJ (por ej, controlador a ordenador, giradiscos a mezclador, etc.).
5.Conecte el AMX a su ordenador con el cable USB estándar (incluido).
6.¡Abra Serato DJ y a tocar!
Lea el resto de esta Guía del usuario para sacar el máximo partido de las características AMX.
7

Características
1 |
2 |
4 |
3 |
|
3 |
8 |
9 |
|
10 |
9 |
7 |
19 |
20 17 |
6 |
17 20 |
19 |
|
21 |
28 |
|
28 |
|
21 |
22 |
27 |
|
27 |
|
22 |
23 |
26 |
|
26 |
23 |
|
29 |
16 |
|
15 |
|
29 |
|
25 |
14 |
25 |
|
|
24 |
18 |
18 |
18 |
24 |
|
|
13 |
|
|
|
|
11 |
|
|
12 |
|
|
|
5 |
1.Puerto USB: Utilice un cable USB estándar para conectar este puerto USB a su ordenador. El puerto USB de la computadora suministra suficiente alimentación al AMX. Esta conexión también se utiliza para enviar y recibir datos MIDI desde y hacia su ordenador.
2.Salida maestra (RCA): Use cables RCA estándar para conectar esta salida a un sistema de altavoces o amplificador. El nivel de esta salida está controlado por la perilla Master (volumen maestro).
3.Entradas fonográficas y de línea (RCA): Conecte sus fuentes de sonido a estas entradas. Estas entradas pueden aceptar señales de nivel de línea y fonográfico.
4.Terminal de tierra: Si utiliza giradiscos de nivel fonográfico con cable de conexión a tierra, conecte dicho cable a estos terminales. Si se experimenta un zumbido grave, puede significar que sus giradiscos no están conectados a tierra. Algunos giradiscos tienen el cable de conexión a tierra incorporado a la conexión RCA y, por lo tanto, no es necesario conectar nada al terminal de tierra.
5.Auriculares (1/8 pulg. / 3,5 mm):
Conecte sus auriculares de 1/8" pulg. (3,5 mm) a esta salida para búsqueda de punto inicial (cue) y monitoreo de la mezcla.
6.Función secundaria: Mantenga pulsado este botón para acceder a las funciones secundarias (en letra roja) de los demás controles del AMX.
7.Táctil: Pulse este botón para activar las funciones de las perillas capacitivas táctiles del AMX: los agudos, medios, graves y filtro del canal. Cuando se activa el botón Touch (Modo táctil), toque cualquiera de estas perillas para activar o desactivar temporalmente sus funciones correspondientes.
8.Panel / Vista: Pulse este control para alternar entre los paneles de grabación (Rec), Efectos (FX), Muestreador (SP-6) y Flip. Mantenga pulsado Shift y pulse este botón para alternar entre los modos de visualización de software disponibles.
8
 Loading...