Page 1

Version 2.0 User’s Guide
Page 2

INTRODUCTION..............................................................................1
MULTIPLE MACHINE CONTROL........................................................................2
CONNECTING AKAI DRIVES TO YOUR COMPUTER...........................................3
NOTES REGARDING CONNECTING AKAI DISKS TO YOUR MAC/PC...................5
IMPORTANT NOTE ABOUT CONNECTIONS......................................................6
CONNECTING Z4/8 AND S5/6000......................................................................7
IN USE - NOTES FOR EXISTING S5/6000 USERS...............................................9
ABOUT THIS USER’S GUIDE.............................................................................10
INSTALLATION...............................................................................11
INSTALLING AK.SYS - PC..................................................................................12
INSTALLING THE USB DRIVER - PC...................................................................12
INSTALLING AK.SYS - MAC...............................................................................12
LAUNCHING AK.SYS.........................................................................................12
THE AK.SYS BROWSER - MAC VERSION ............................................13
MENU BAR (MAC ONLY)....................................................................................15
THE AK.SYS BROWSER - PC VERSION...............................................17
TOOLBAR (PC ONLY).......................................................................................19
MENU ITEMS....................................................................................................20
BROWSER CONTEXTUAL MENUS......................................................21
VIRTUAL Z8 REMOTE PANEL............................................................33
MULTI EDITOR................................................................................34
CONTEXTUAL MENUS......................................................................................36
PROGRAM EDITOR - GENERAL .........................................................37
PROGRAM EDITOR - PANELS/CONTROLS.......................................................44
PANEL PAGES.................................................................................................54
FILTER/KGRP...................................................................................................62
ENVELOPES....................................................................................................74
LFOs................................................................................................................75
MODULATION MATRIX......................................................................................80
USING THE MOD MATRIX..................................................................................82
SAMPLE EDITING WITH AK.SYS - MAC................................................84
SAMPLE EDITING WITH AK.SYS - PC..................................................86
AK.SYS SEARCH ENGINE.................................................................88
Z48/MPC OS LOADER .....................................................................92
INSTALLING THE OS LOADER - PC...................................................................92
INSTALLING THE Z48/MPC OS LOADER - MAC.................................................92
USING THE Z48/MPC OS LOADER....................................................................92
APPENDIX.....................................................................................93
USING AK.SYS WITH A ‘WHEEL EQUIPPED’ MOUSE ON A MAC........................93
Page 3

KEY FEATURES OF AK.SYS FOR THE Z4/8...
• Control of up to 32 samplers (inc. S5000 and/or S6000) from your Mac or PC
• No SCSI conflicts - all control and data transfer is done via a single USB cable
• Run your Z4/8 on your desktop alongside your preferred sequencer/DAW
• Double click on a multi in ak.Sys to launch the Multi Editor mixing console
• Double click on a program in ak.Sys to launch the Program Editor synth panel
• Use the virtual Z8 remote panel to access every function in the sampler
• Use the context sensitive Search engine to find what you want
• Double click on a sample in ak.Sys to launch your favourite sample editor
• Save samples edited in your sample editor directly back to your sampler
• Drag and drop data from your disk drives into the sampler(s)
• Drag and drop data from your sampler(s) to your computer desktop
• Drag and drop keygroups between programs
• Drag and drop samples into keygroups
• Drag and drop programs into Multi parts
• Drag and drop data between samplers
• Sort data by name, date, size, sample rate
• External sampling hardware places no overhead on your computer
• Superior sound quality through dedicated, external hardware
And more....
Page 4
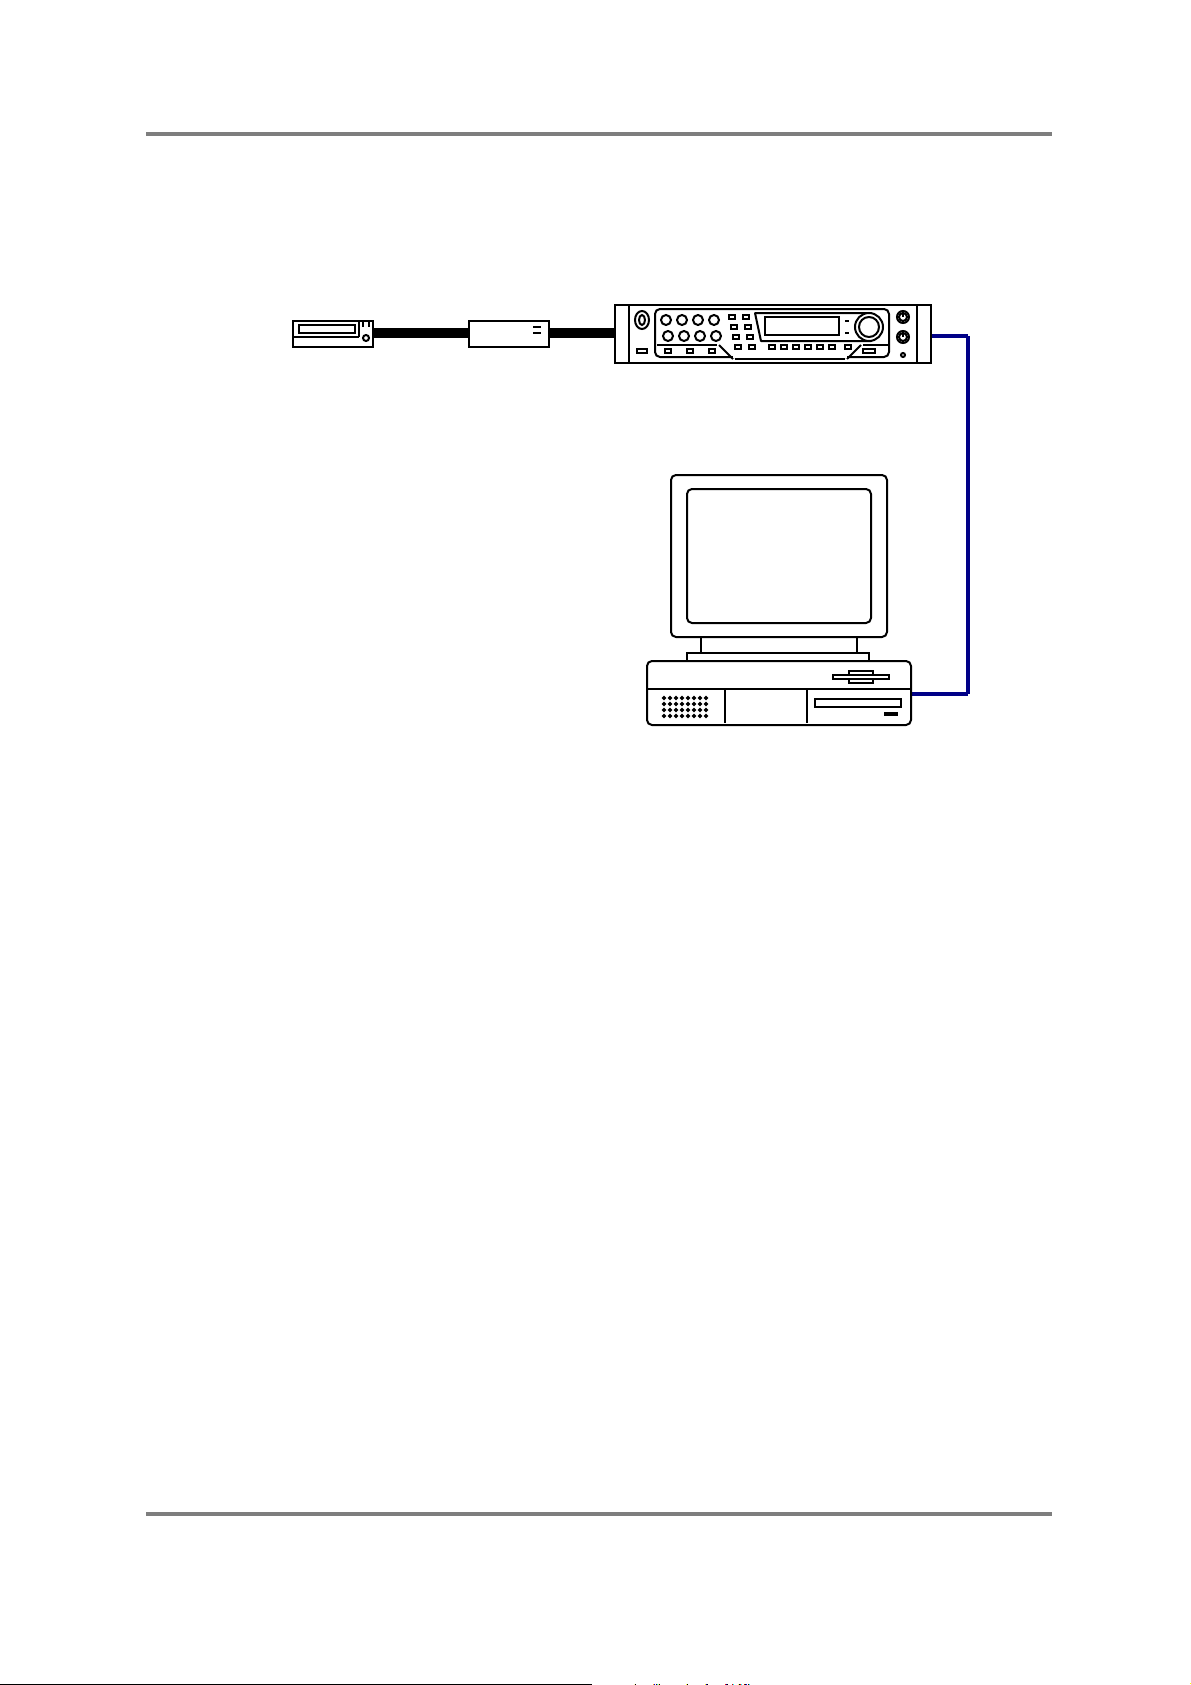
INTRODUCTION
INTRODUCTION
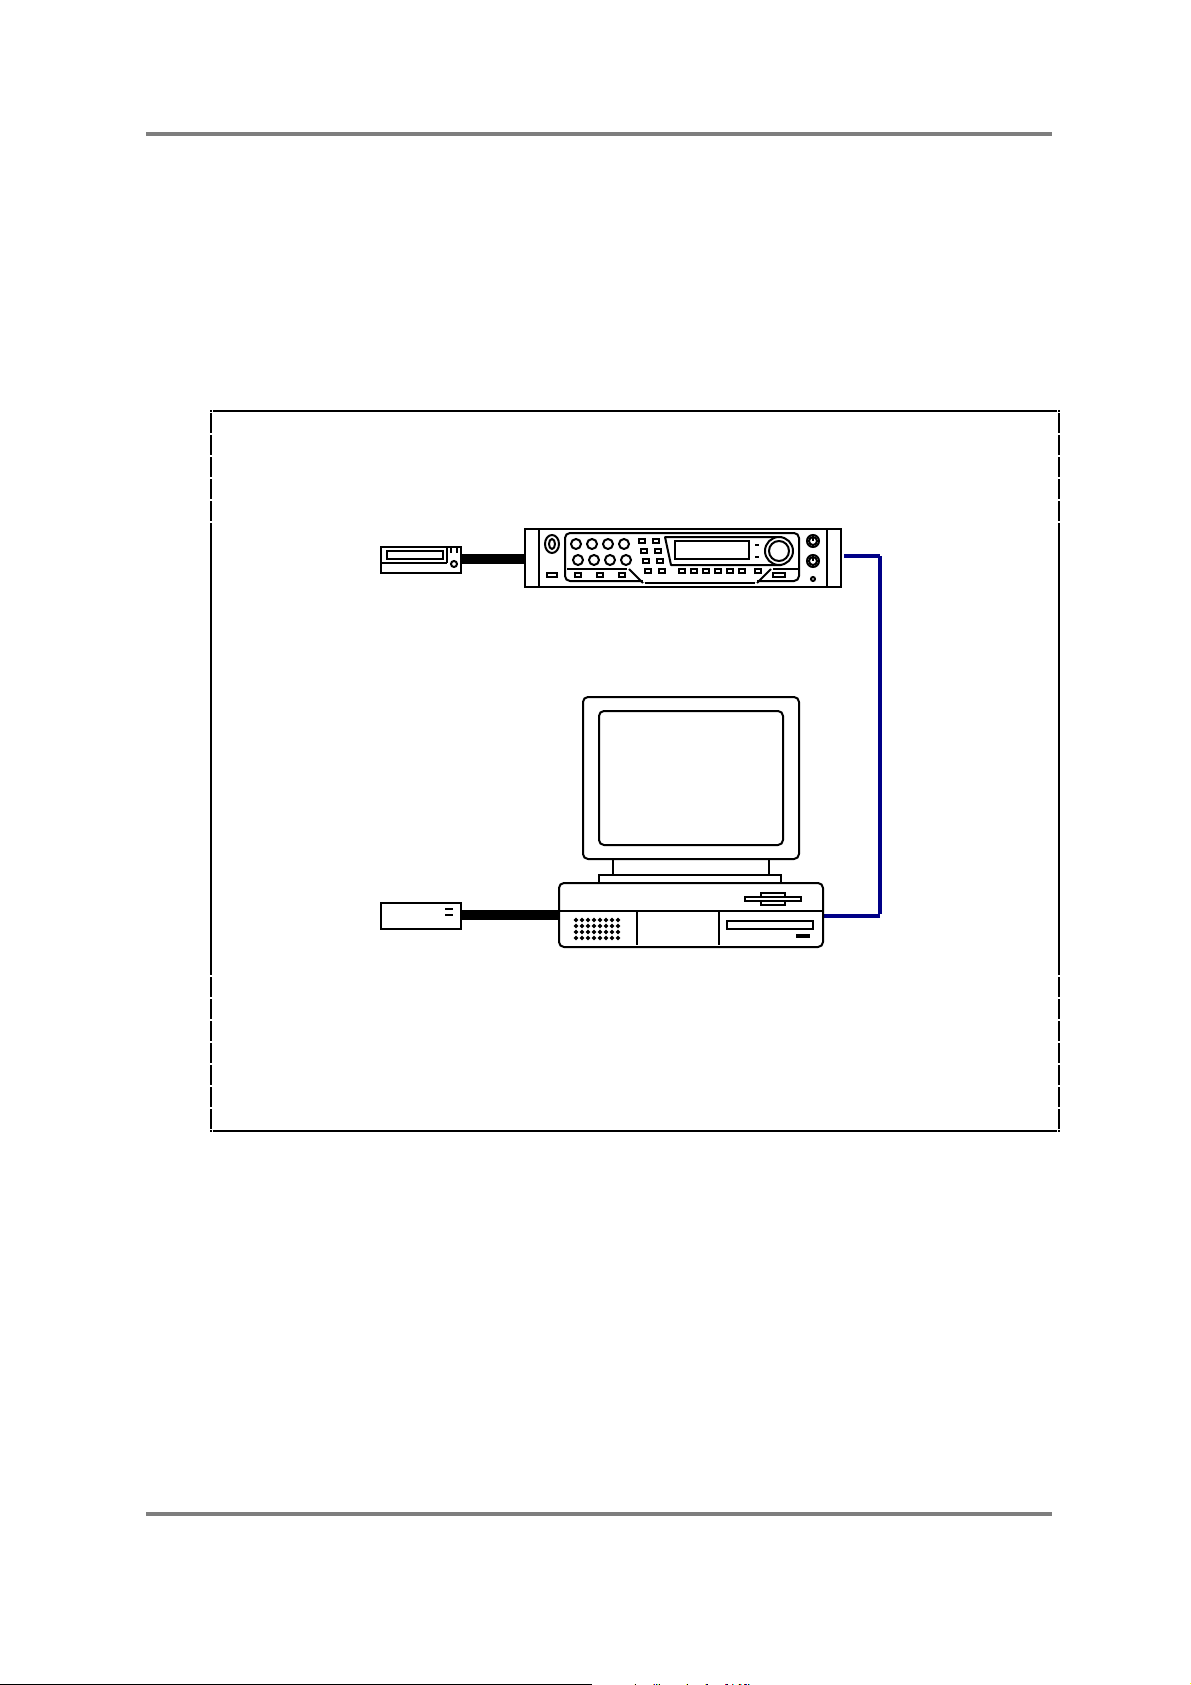
ak.Sys is a suite of software components that allow remote control and editing of your Z4
and/or Z8 from your Mac or PC. It uses USB (Universal Serial Bus) for this control and does
away with potentially dangerous SCSI connections between your computer and sampler:
HARD DISKCD-ROM
USB
Here we see a single Z8 connected to a computer via a single USB connection. A hard disk
drive and a CD-ROM are connected via SCSI to the sampler. All control is via the USB link and
all data transfer between the sampler and its disk drives is initiated via USB. All data transfer
between the sampler and the computer is also via USB.
Of course, to use ak.Sys, your computer needs to support USB.
ak.Sys - Version 2.00 Page 1
Page 5
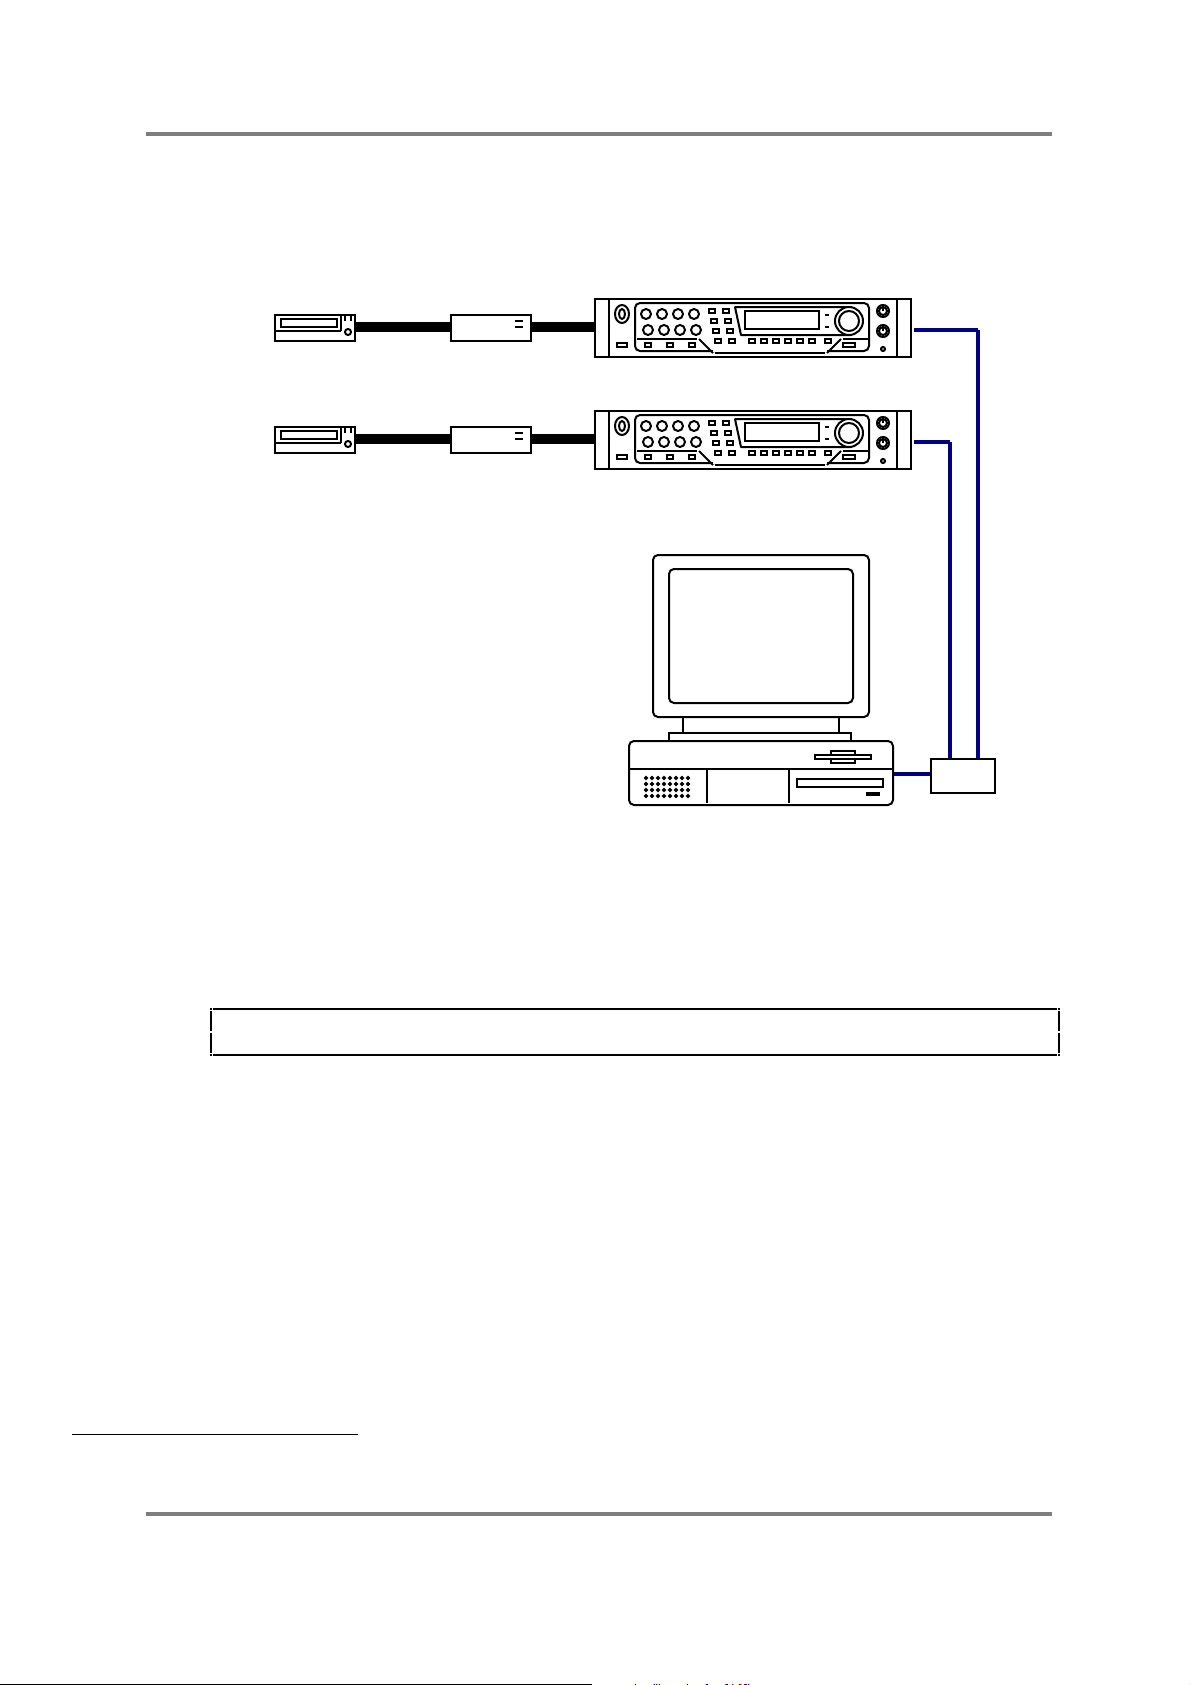
MULTIPLE MACHINE CONTROL
It is also possible to control two or more samplers via ak.Sys1:
HARD DISKCD-ROM
HARD DISKCD-ROM
INTRODUCTION
ID #1
ID #0
USB
HUB
To allow this, a USB ‘hub’ is required. These are inexpensive and readily available in any decent
computer store. Once connected in this way, both samplers may be controlled via USB in much
the same way as a single sampler and data transfer between the samplers and the computer is
via USB.
NOTE: In this set-up, each sampler has its own drives. It is not strictly necessary to equip both
samplers with disk drives as it is possible in ak.Sys to load data from drive to the other sampler.
1 Up to 32 samplers may be controlled using ak.Sys. These can also include S5000 and/or S6000
ak.Sys - Version 2.00 Page 2
Page 6
INTRODUCTION
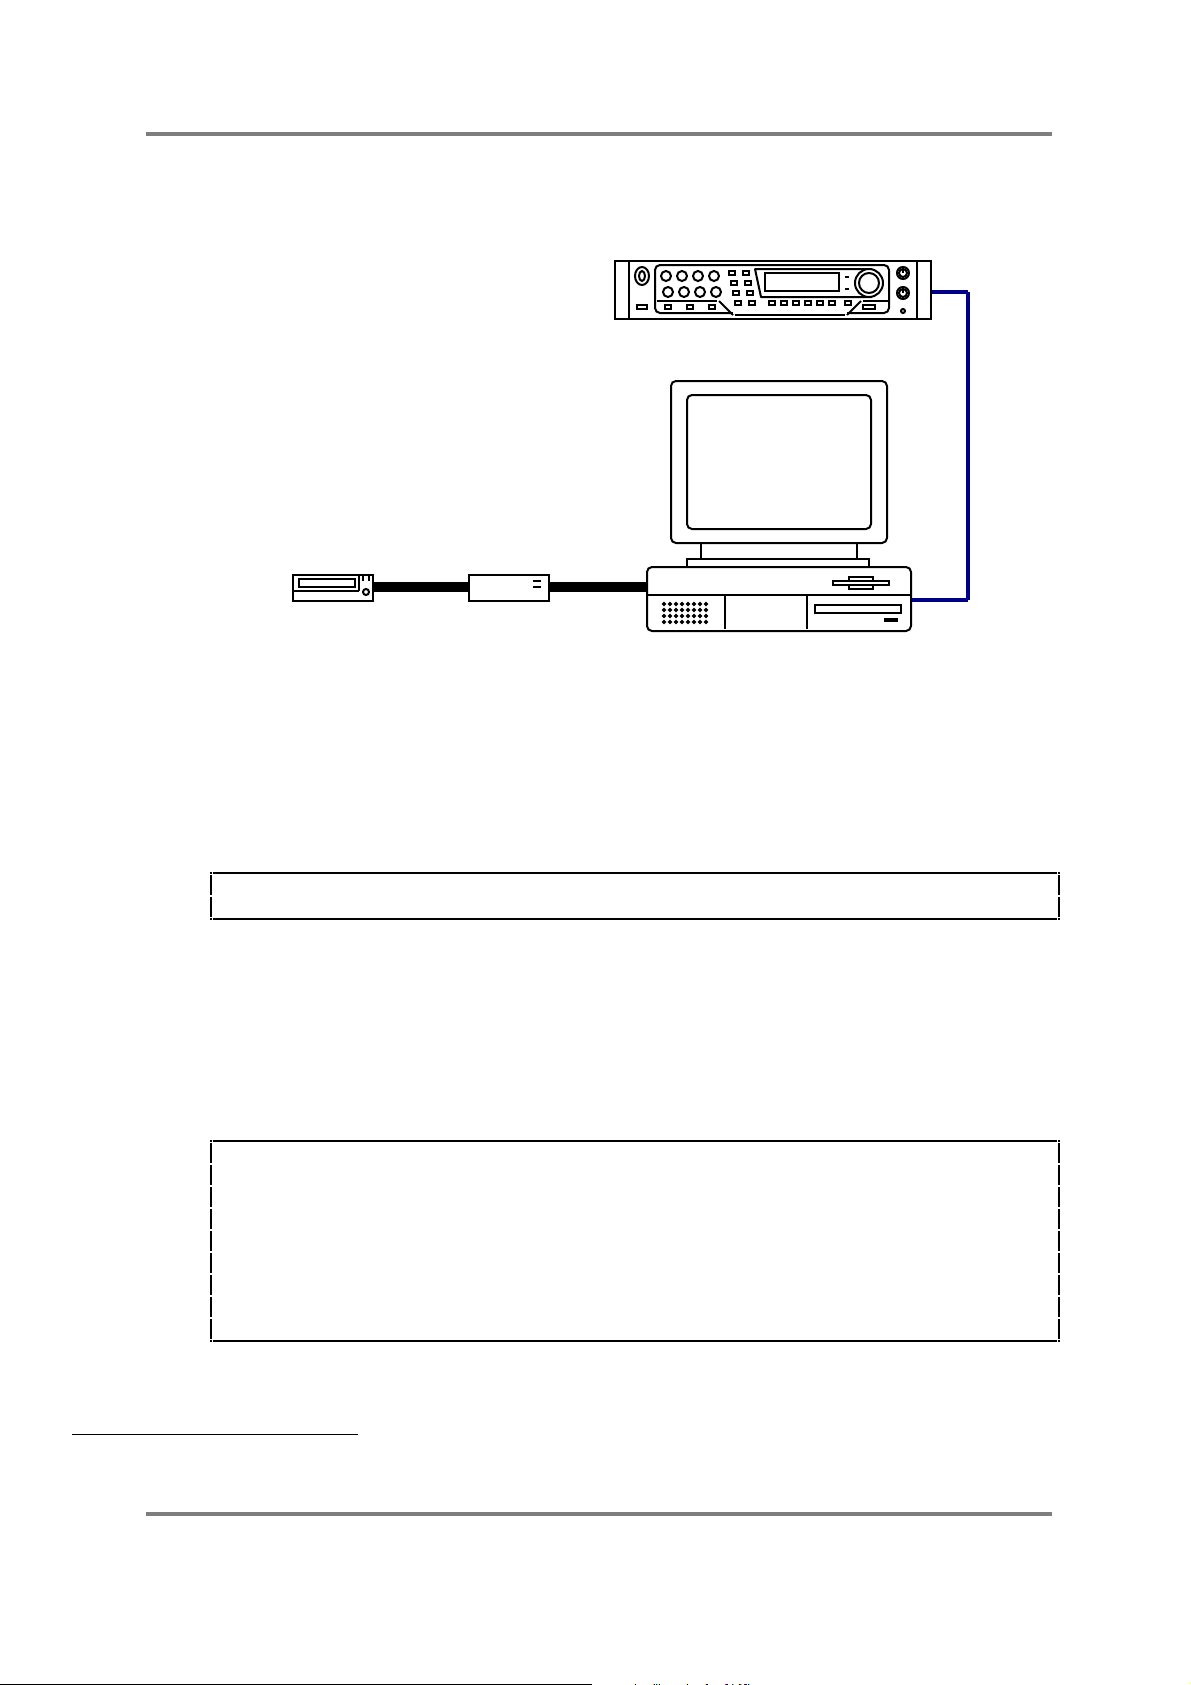
CONNECTING AKAI DRIVES TO YOUR COMPUTER
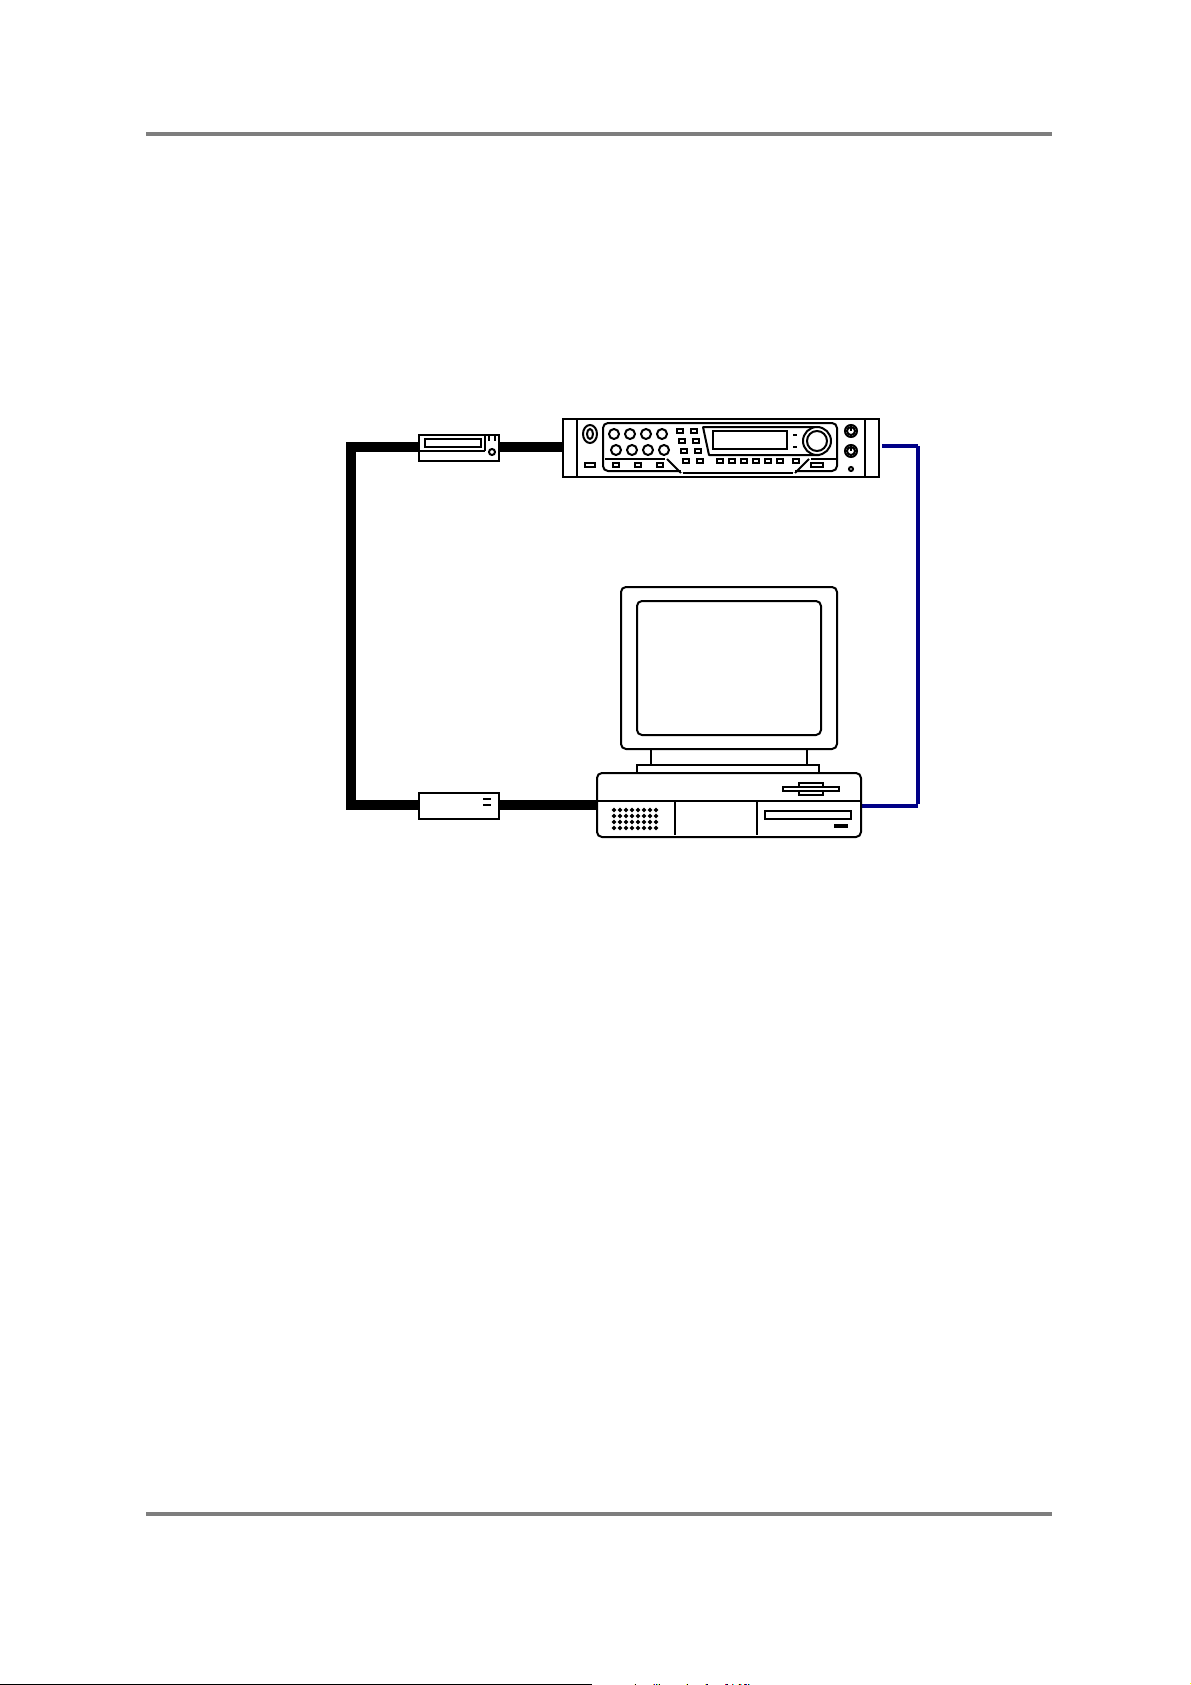
Another way to connect your sampler to your Mac/PC is as follows:
USB
HARD DISKCD-ROM
Instead of connecting your sound library disk drives to the sampler, they are connected to your
computer2. On the Mac, you will see the sampler’s drives on the desktop - by opening these,
you will see the contents of the drive’s folders. These can be ‘loaded’ into the sampler simply
by dragging them from the folder and dropping them onto the ak.Sys Browser shown in the
background.
In the PC Version, the Akai drives would appear in Windows Explorer. Again, files to be loaded
into the sampler can be dragged from Explorer onto the ak.Sys Browser.
NOTE: The external CD-ROM shown in the above setup is not really required because you
can use your computer’s internal CD-ROM.
In both the Mac and PC versions of ak.Sys, as well as dragging Akai sound library onto the
Browser, any valid data (e.g. .wav files) from your Mac’s/PC’s hard disk(s) and CD-ROMs can be
dragged to the Browser to load them into the sampler.
To save data back to your sampler’s or computer’s drives, simply drag the items you want to
save from the Browser to the destination drive (all this will be covered in more detail later in this
User’s Guide).
For Mac users....
Using drag and drop from the Browser, you can save sampler data to a Mac formatted HFS disk
and you don’t have to set up a special DOS formatted drive or partition. Of course, you may also
load such data from a Mac formatted HFS disk into the sampler using drag and drop from the
Mac disk to the Browser.
It is also possible to load .AIFF samples into the sampler. However, please note that these get
converted to .WAVs in the sampler itself - if you ‘save’ them back to your Mac HD, the samples
will be saved in this format
2 Of course, this requires your computer to have a suitable SCSI connection.
ak.Sys - Version 2.00 Page 3
Page 7
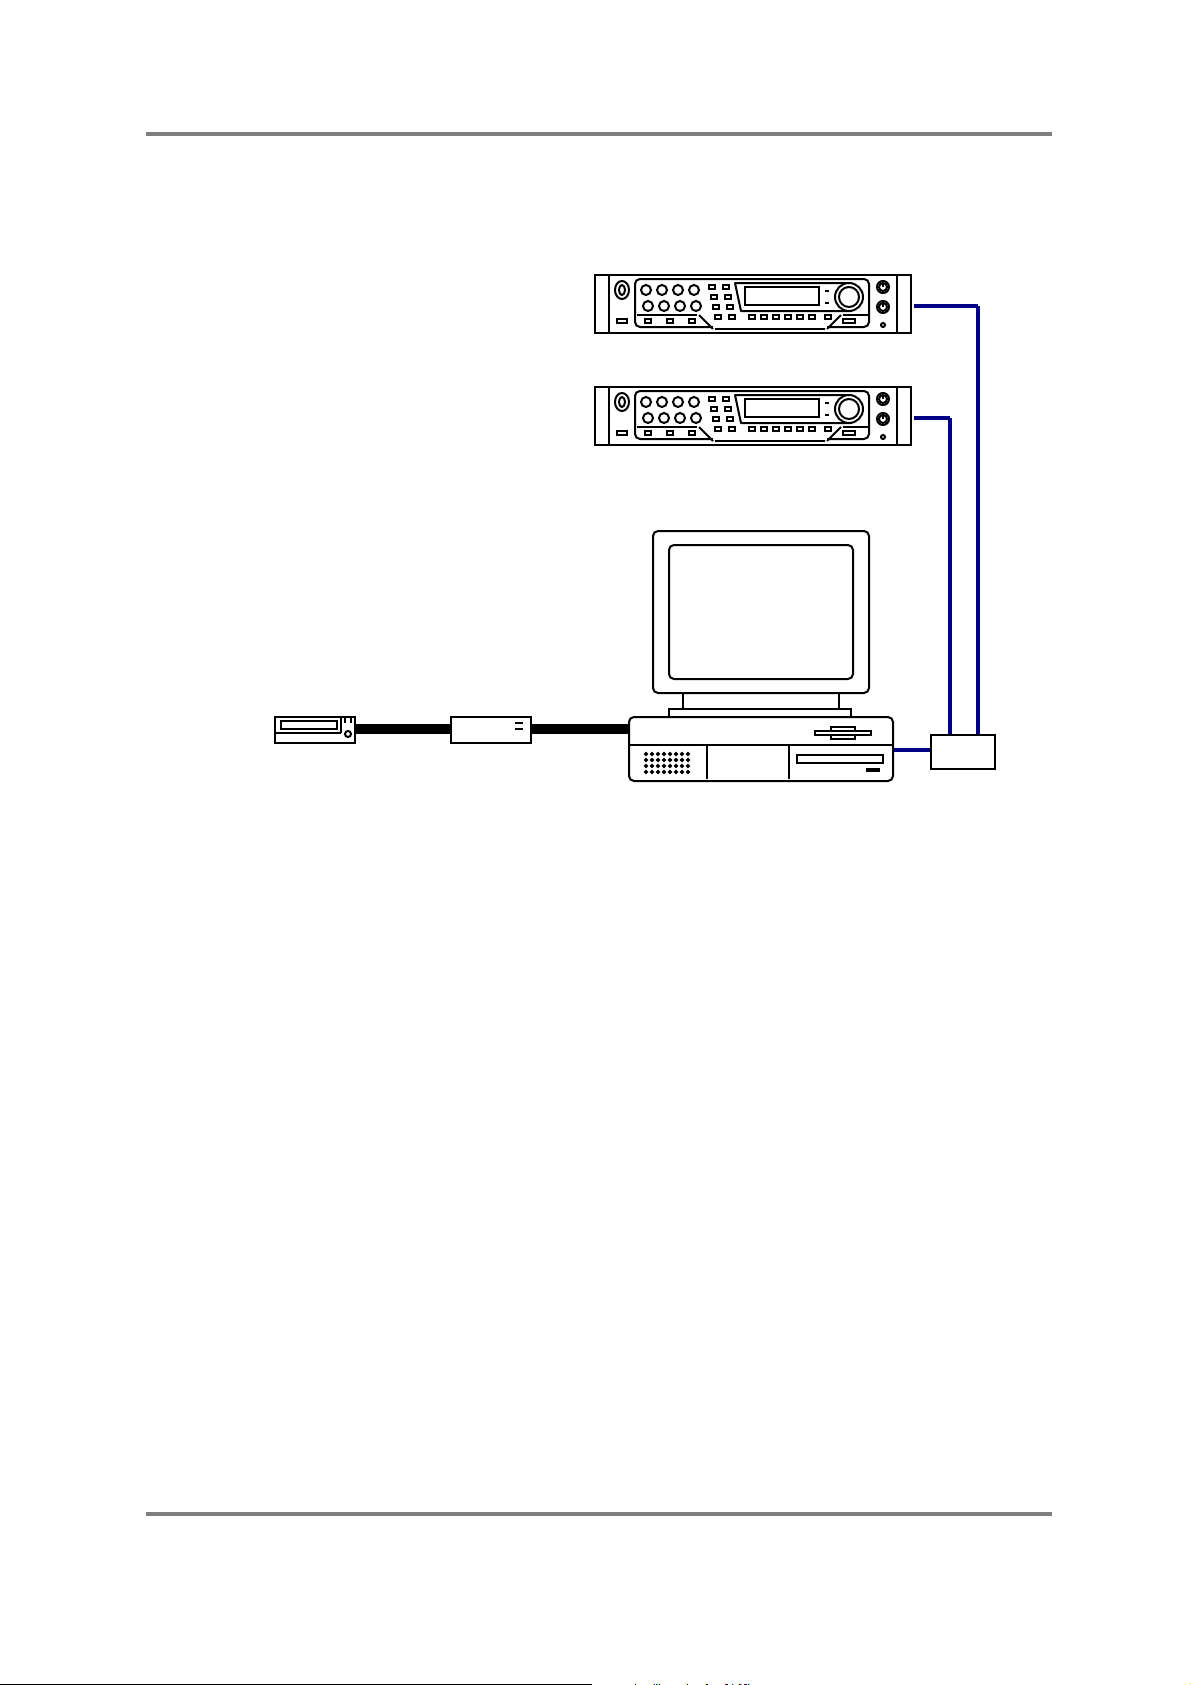
Multiple samplers may be connected in a similar way:
INTRODUCTION
ID #1
ID #0
USB
HARD DISKCD-ROM
HUB
A hub is required to connect multiple samplers and the samplers are controlled via USB as with
a single machine setup. However, in this setup, drives can be shared between the two
samplers and data can be dragged from the CD-ROM or hard disk onto either Sampler ID#0 or
ID#1. Similarly, data from either sampler may be saved back to the hard disk drive.
ak.Sys - Version 2.00 Page 4
Page 8
INTRODUCTION
NOTES REGARDING CONNECTING AKAI DISKS TO YOUR MAC/PC
Connecting your sampler’s drive(s) to your Mac/PC is a very convenient way of working as you
can view the files on your disk(s), CD-ROM, etc., using a large monitor and folders can just be
double clicked directly to see their contents.
However, you should be aware that older Akai formatted CD-ROMs and hard disks (i.e. those
made for S1000, S3000, etc.) may not be ‘seen’ by your computer - only MS.DOS disks and
ISO9660 and Joliet encoded CD-ROMs can be used.
TIP: To overcome this limitation, you may like to keep your sampler’s CD-ROM drive attached
to your sampler just for use with older Akai CD formats that cannot be recognised by your
Mac/PC:. E.g.
CD-ROM
USB
HARD DISK
Because the CD-ROM will show up in the ak.Sys Browser, data may be loaded into the Z4/8
using drag and drop
ISO9660 and Joliet encoded CD-ROMs, however, can be used in your computer’s CD-ROM
drive and data can be loaded into the sampler very quickly and conveniently using drag and
drop.
ak.Sys - Version 2.00 Page 5
Page 9
INTRODUCTION
IMPORTANT NOTE ABOUT CONNECTIONS
You will have seen that whichever way you choose to set your system up (i.e. drives connected
to the sampler or drives connected to your Mac/PC), there is no SCSI connection
between the computer and the sampler.
It is absolutely vital that your sampler and computer are not connected via SCSI. For example,
the following connection is potentially very dangerous:
CD-ROM
USB
HARD DISK
*** THIS SETUP IS NOT RECOMMENDED AND SHOULD NOT BE USED ***
In this setup, there are two SCSI ‘masters’ on the bus - the sampler and the computer - which
may well cause contention on the bus resulting in general system unreliability, crashes and
even irreparable data loss.
Whichever way you choose to set your system up, please ensure that your computer and
sampler are only connected using USB.
AKAI Professional cannot accept any liability for damage to equipment and/or data loss if the
advice given above is not heeded and this precaution is ignored.
ak.Sys - Version 2.00 Page 6
Page 10
CONNECTING Z4/8 AND S5/6000
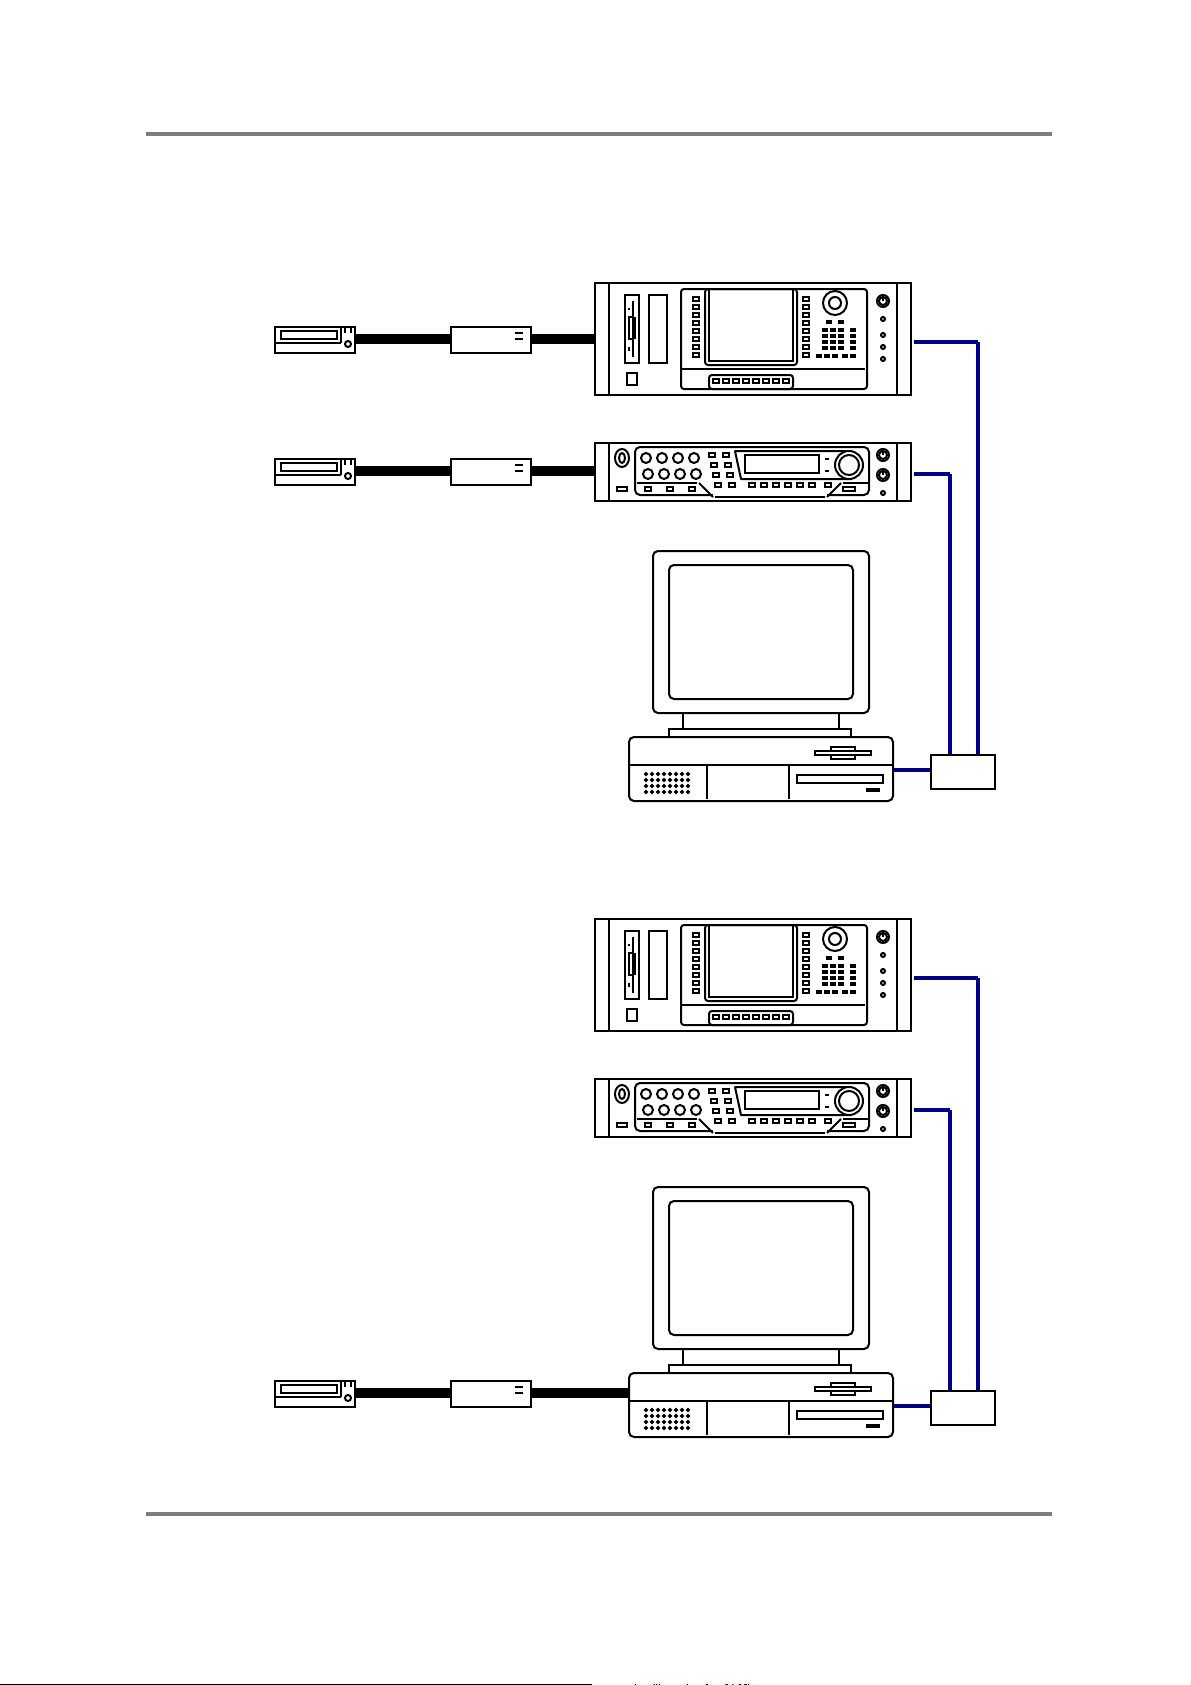
It is possible to connect a mixture of S5000, S6000, Z4 and/or Z8:
HARD DISKCD-ROM
HARD DISKCD-ROM
INTRODUCTION
ID #1
ID #0
USB
HUB
In this setup, each sampler has its own drives. Another way to connect the samplers would be
as follows:
ID #1
ID #0
USB
HUB
HARD DISKCD-ROM
ak.Sys - Version 2.00 Page 7
Page 11
INTRODUCTION
In this setup, both samplers can share the same drives via the Mac/PC.
Of course, if you are using CD-ROMs on either (or both) that are rejected by your Mac/PC (older
S1000 or S3000 format CD-ROMs, for example), the following might be a sensible setup:
CD-ROM
CD-ROM
USB
HUB
In this setup, you could employ your computer’s CD-ROM drive to load sounds from an ISO
format sound library CD-ROMs (e.g. those created on an S5/6000) into either sampler whilst
each sampler’s CD-ROM drive could be used for loading older Akai sound library (or ‘foreign’
sound library formats) that would otherwise be rejected by the computer due to their
proprietary disk formats. However, because it is possible for the two samplers to share one CDROM drive within ak.Sys, it may not be strictly necessary for both samplers to have their own
CD-ROM drive.
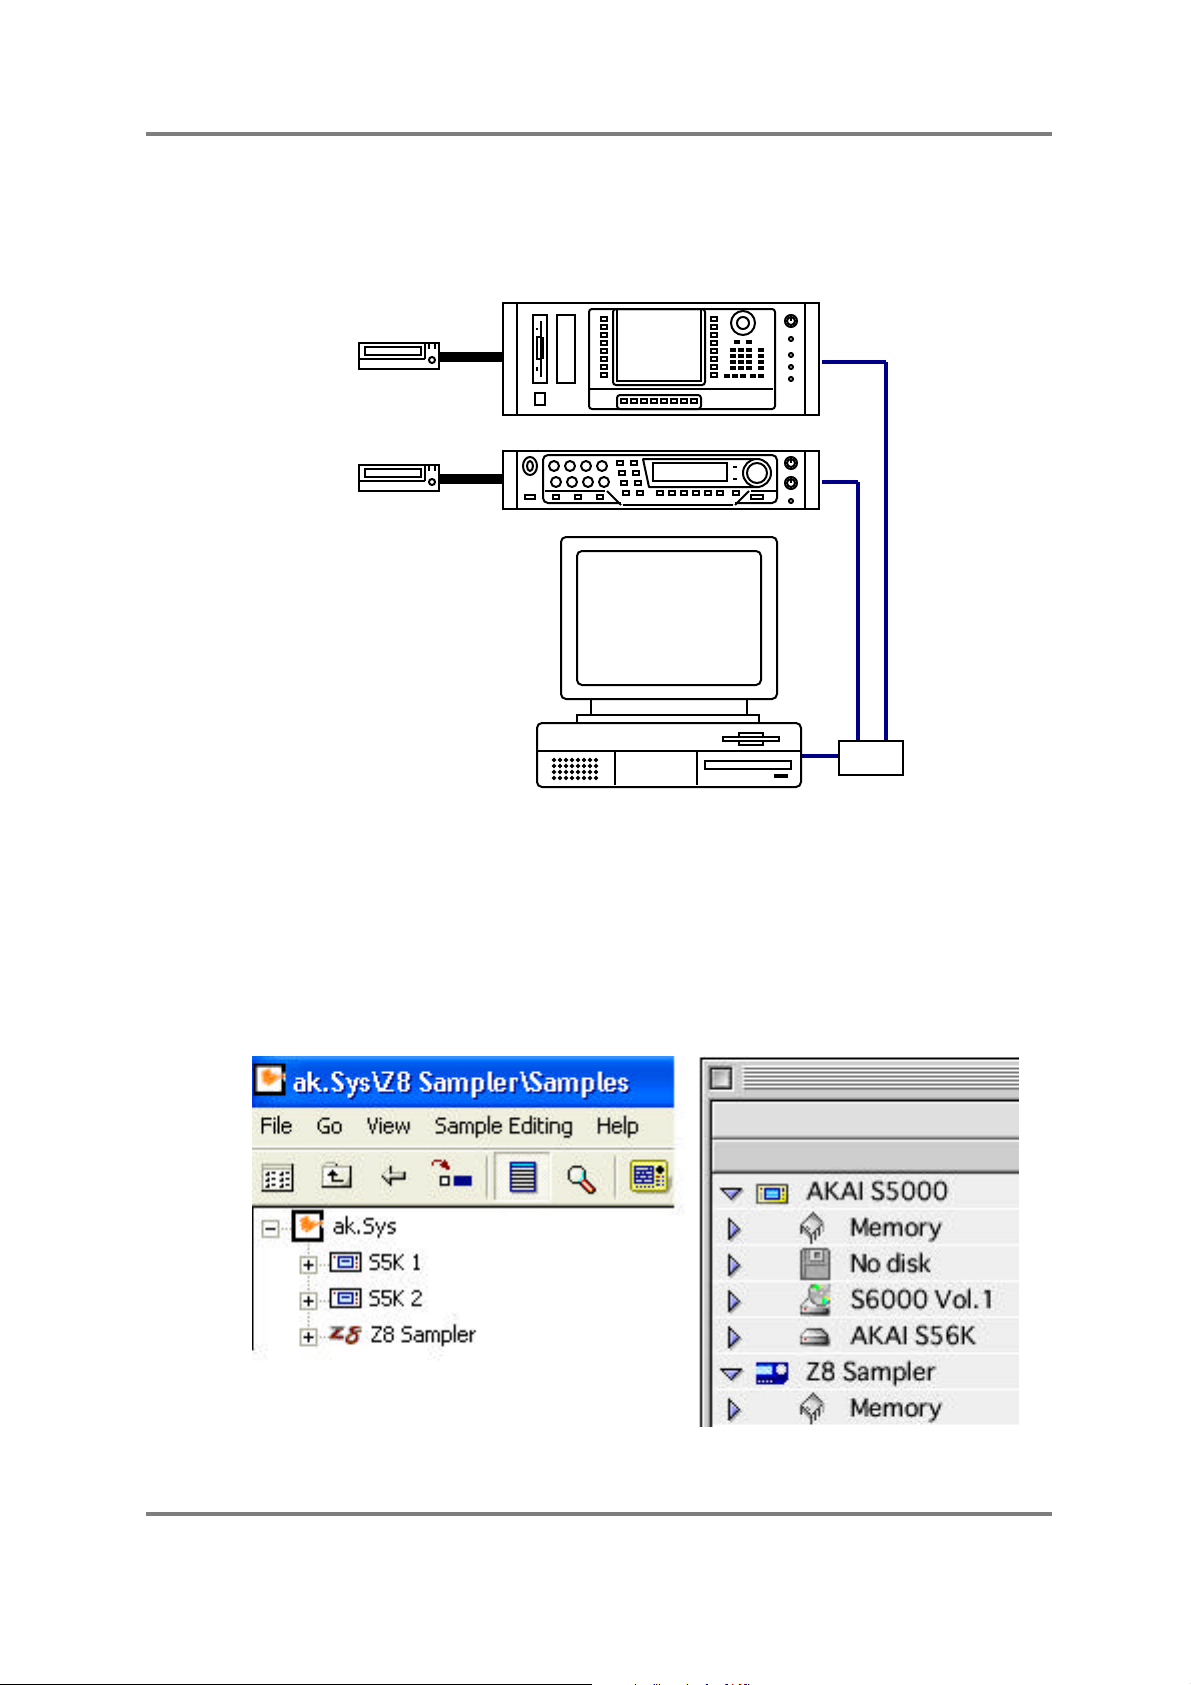
When you launch ak.Sys with an S5000 and/or S6000 attached, you will see the S5/6000 and
the Z4/8 in the ak.Sys Browser:
ak.Sys - Version 2.00 Page 8
Page 12

INTRODUCTION
IN USE - NOTES FOR EXISTING S5/6000 USERS
If you already have an S5/6000 and ak.Sys, you will already be very familiar with its operation.
Double clicking on a program in the S5/6000 ak.Sys will launch the original Program Editor and
double clicking on a multi in the S5/6000 ak.Sys will launch the original Multi Editor. However,
you will note that the new facilities in ak.Sys V2.00 (and the new graphics) can only used with
the new Z4/8 samplers - ak.Sys V2.00 retains the original themed styles used in ak.Sys V1.xx.
However, please note that multis, programs and samples can be dragged and dropped
between machines - for example, you can drag a program from your S5000 to your Z8 or vice
versa.
NOTE: If you try to drag 24-bit samples from your Z4 or Z8 to your S5/6000 within ak.Sys,
these will be rejected. It is not possible to use 24-bit samples in the S5/6000.
You can also drag multis, programs and samples from the S5/6000’s disk drive/CD-ROM to the
Z4/8.
NOTE: You cannot drag and drop folders from your S5/6000’s disk drive/CD-ROM to the Z4/8
but you can select the entire contents of a folder and drag those to achieve the same thing.
If you are an old hand with ak.Sys V1.xx, you can probably put this User’s Guide away now and
get on with enjoying your new purchase as the concepts presented here are pretty much the
same as previous versions of ak.Sys for the S5/6000. However, it might be worth skimming
through the Guide to gain a full understanding of the system as a whole and to understand
some of the functionality unique to the Z4/8.
The remainder of this User’s Guide will refer only to operation of ak.Sys with regard to the Z4/8.
ak.Sys - Version 2.00 Page 9
Page 13

INTRODUCTION
ABOUT THIS USER’S GUIDE
ak.Sys has been developed for both Mac and PC and a great deal of effort has been made to
ensure that operationally and functionally, they are as similar as possible.
Of course, some ‘platform dependent’ differences exist due to differences in the computer’s
operating systems. Apart from that, most windows, dialogue boxes, pop-ups and functions are
almost identical.
As a result, screen shots used in this User’s Guide refer equally to both. Where there are
differences between the two versions, these will be described specifically.
NOTE FOR PC USERS: It should be mentioned that this User’s Guide was written on a Mac
and so most of the screen shots were taken from the Mac version of ak.Sys. As a result, they
may vary slightly from the actual dialogue boxes that appear on your screen. However, as
functionality is so similar between the two versions, Windows users can use them for reference
as almost all the functions are the same.
Where there are differences, screen shots from the Windows version are used as appropriate.
ak.Sys - Version 2.00 Page 10
Page 14

LAUNCHING AK.SYS
INSTALLATION
Minimum requirements:
MACINTOSH
• Any Power PC Mac with USB (PCI or internal)
• 8 Megabytes of free RAM
• Monitor capable of at least 800 x 600 resolution in thousands of colours (ideally a monitor
capable of 1280 x 1024 is recommended)
• USB Manager 1.21 or newer
• Mac OS 8.6
• 15Mb of free disk space
NOTE: If you plan to connect your sampler’s drives to your Mac it must have a SCSI
connection. This is standard on older Power PCs and G3 Macs but newer models will require a
SCSI board installed.
PC
• Pentium 200 + with USB
• 32 Mb ram
• Monitor/video card capable of at least 800 x 600 resolution in 16 bit colour (ideally a 17”
monitor with 1280 x 1024 resolution is recommended)
• USB support software
• Windows98
• 20Mb of free disk space
NOTE 1: For Windows 98 users, it is also necessary to ensure that Comctl32.dll v5.0+ is
installed. This dll is available at:
http://www.microsoft.com/downloads/release.asp?ReleaseID=11916
NOTE 2: If you plan to connect your sampler’s drives to your PC it must have a SCSI card
installed.
SAMPLER
• Z4 or Z8 with Version 1.00 (or later) Operating System installed.
NOTE: Older Akai samplers such as the S1000 series, S2000 and S3000 series cannot be
used with ak.Sys. However, it is possible to use the S5000 and/or S6000 with ak.Sys V2.00
The software components installed with ak.Sys include:
• ak.Sys BROWSER
• ‘VIRTUAL’ FRONT PANEL
• MULTI EDITOR
• PROGRAM EDITOR
• ak.Sys SEARCH engine
• Z48/MPC OS LOADER
ak.Sys - Version 2.00 Page 11
Page 15
LAUNCHING AK.SYS
INSTALLING AK.SYS - PC
Double click on the file AKSYS1.EXE and follow the on-screen instructions.
INSTALLING THE USB DRIVER - PC
With both units powered down, attach your sampler’s USB connector to the PC’s USB
connector using an appropriate USB cable. Turn the sampler on and wait for it to complete
booting. Now turn on your PC. At some point, Windows will pop-up a prompt saying that it has
found new hardware (i.e. the sampler) and that its driver needs to be installed. Follow the onscreen instructions exactly as you would were you installing a new printer, scanner or whatever.
INSTALLING AK.SYS - MAC
Double click on the ak.Sys V2.00 Installer and follow the on-screen instructions.
LAUNCHING AK.SYS
Locate the ak.Sys folder on your desktop. Open this and locate the ak.Sys application icon:
With the sampler(s) connected and switched on, double click on this to launch ak.Sys.
ak.Sys - Version 2.00 Page 12
Page 16
AK.SYS BROWSER - MACINTOSH
THE AK.SYS BROWSER - MAC VERSION
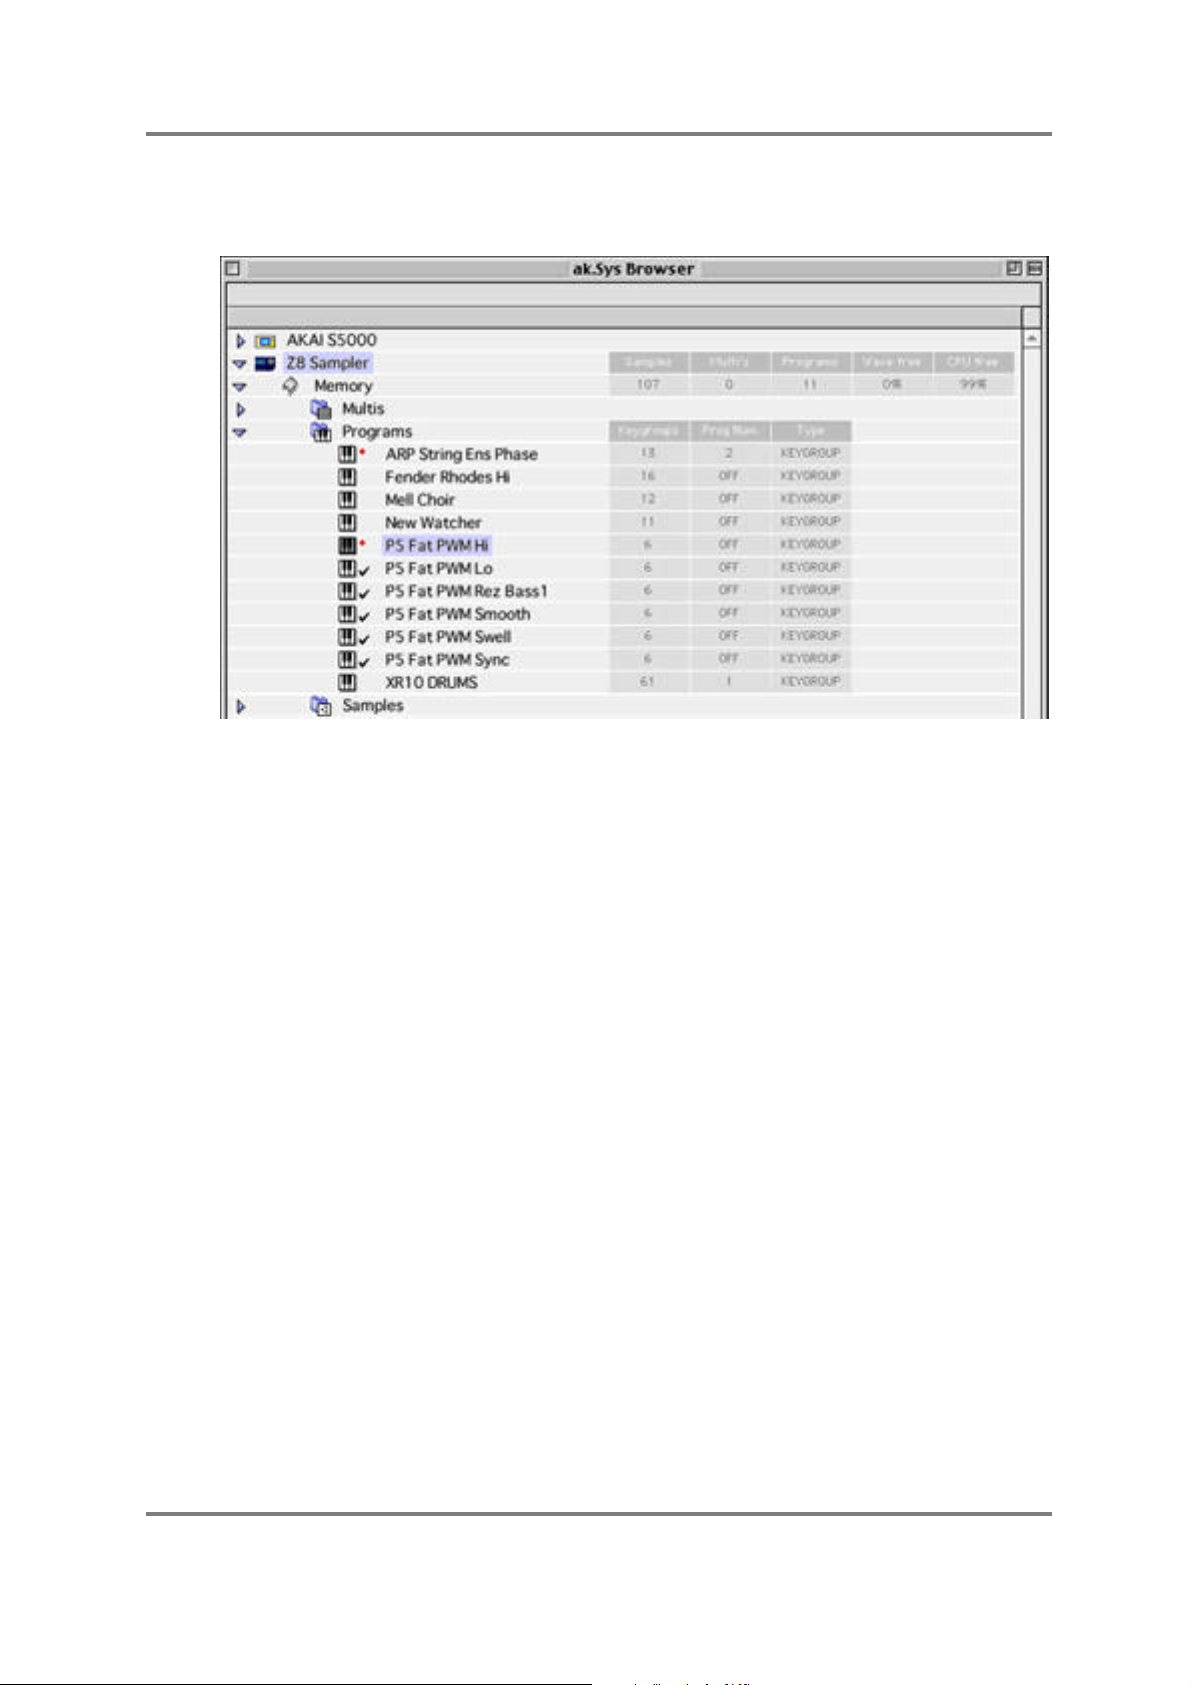
When you launch ak.Sys, you see the ak.Sys Browser:
In the Browser, you can see the sampler and the contents of its memory. Each file type (i.e.
multi, program, samples, etc.) is contained within a suitably named sub-folder (referred to as
‘nodes’ in this User’s Guide). These can be opened by clicking on the triangle to their left or by
double clicking on the actual folder. Within each folder, you will see a list of the items loaded
into memory. When any item is edited or changed in any way, a red cross appears alongside it.
It is also possible to ‘tag’ items by clicking on slightly to the right of the item - a ‘tick’ appears
alongside the item. Items can untagged by clicking on the ‘tick’.
To the right of the various files, you can see information about each item. For example, next to
the memory icon, it tells you how many samples, programs, multis, etc., are in memory; next to
each multi, it tells you how many parts it contains whilst next to the programs, you can see how
many keygroups each one contains. The sample list shows a more comprehensive set of
details such as playback mode, length, sample rate, etc.. None of these fields are editable and
are shown for reference only.
The browser also allows you to name/rename files in the usual way. You may also delete files
from the Browser (and hence the sampler) by dragging them to the Mac wastebasket/trash can.
It is also possible to use the Browser to load and save data using ‘drag and drop’. For example,
you can drag a .WAV file from your Mac’s HD to the Browser to load samples into memory. If
your Z4/8 has a drive connected to it, that will show up in the Browser and data may be dragged
from it to the MEMORY node to load data into the sampler. Conversely, data can be dragged
from the sampler onto the drive to save it. If you have your sampler’s drive(s) connected to your
Mac, multis, programs, samples and MIDI Song Files may be loaded using drag and drop. You
can drag each item onto its own ‘node’ if you want (i.e. samples onto the Samples node,
programs onto the Programs node, etc.) but ak.Sys will sort out which node the items should
be placed into so that if you do drop a .WAV onto the Multi node (for example), it will actually be
placed correctly into the Samples node.
ak.Sys - Version 2.00 Page 13
Page 17
AK.SYS BROWSER - MACINTOSH
Similarly, you may drag items from the Browser onto your desktop or internal HD to effectively
‘save’ them to your Mac’s drive3. These may subsequently be ‘loaded’ into memory by
dragging them from the ‘desktop’ onto the ak.Sys Browser.
If you also have an S5/6000 attached, you may drag and drop data from it to the Z4/8 and vice
versa. If the S5/6000 has one or more drives attached to it, the drive will appear in the Browser
and you may drag and drop data from that drive onto the Z4/8 to load it and from the Z4/8 to the
drive to save it. Similarly, if your Z4/8 has a drive attached, the S5/6000 can share it.
HANDY TIP: You can drag a folder from your Mac’s disk drive onto the ak.Sys Browser to load
the entire contents of that folder.
Similarly, you can drag the Memory icon onto your Mac’s desktop drive to save the entire
contents of the sampler’s memory. This will create a folder called MEMORY on your drive which
you can rename to something more meaningful.
IMPORTANT NOTE 1: When dragging multis and programs across to the ak.Sys Browser,
data contained within them is not automatically loaded as they are when loaded from the
sampler’s own LOAD mode.
For example, drag a multi across and the programs it uses (and the samples they use) will not
automatically follow. Similarly, dragging a program across will not automatically load the samples
it uses either. However, by using CTRL+drag with these items4, you can drag the item and its
dependants onto the Browser.
The converse is also true - drag items from the Browser to a drive to save them and the items
they might contain will not automatically be saved as they would be in the sampler’s own SAVE
mode. However, please note that you cannot CTRL+drag items to your PC’s drive to save the
item(s) with dependents.
One way around this is to save multis (plus their programs and the samples they use) to their
own unique folders (or drag the Memory icon across to save the entire contents of your
sampler as described above). In future, these can be dragged onto the Browser so that all the
correct data will be loaded in one transaction.
Wherever possible, it’s advisable to use the LOAD/SAVE functions on the appropriate
contextual menu.
IMPORTANT NOTE 2: When dragging and dropping items from your hard disk to the
ak.Sys Browser, ak.Sys has no way of knowing that the sampler’s wave and/or CPU memory is
full.
Attempting to drag items across to the Browser when the sampler’s memory is full will not cause
any problems - in fact, nothing will happen! However, once you have reached this state, it is
advisable to delete unwanted items from ak.Sys and/or not attempt any more drag and drop
loading.
3 Sampler data may be saved to and loaded from Mac formatted HFS disks. However, please note
that this is only via ak.Sys - if that drive is connected to the sampler directly, the disk will not be
recognised.
4 Because CTRL+click pops up the Mac’s contextual menus, you should start dragging the item
and then press CTRL.
ak.Sys - Version 2.00 Page 14
Page 18
AK.SYS BROWSER - MACINTOSH
MENU BAR (MAC ONLY)
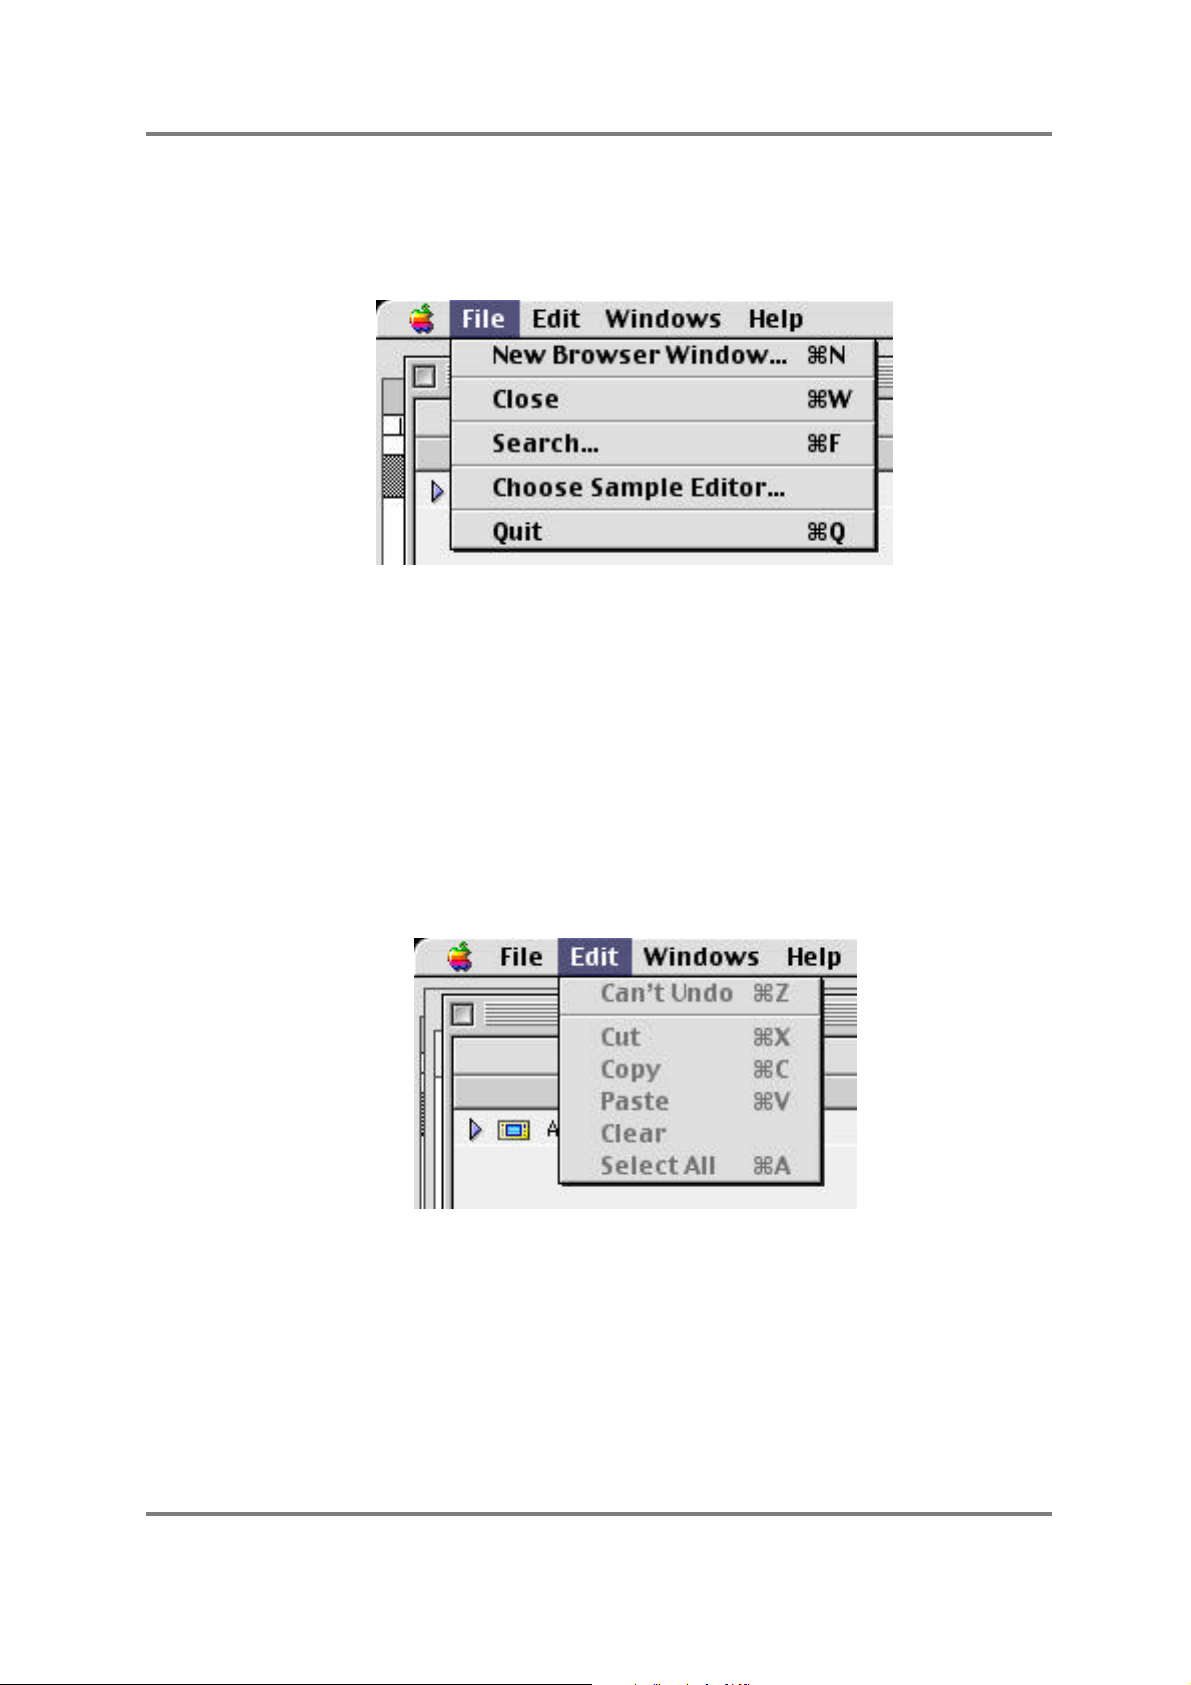
The menu bar items for the Mac version of ak.Sys are as follows:
FILE
NEW BROWSER WINDOW Opens a new Browser window.
CLOSE Closes the front most window.
SEARCH... Launches the ak.Sys Search function (more on this later).
CHOOSE SAMPLE EDITOR Allows you to specify which sample editor will be used for
editing samples within ak.Sys (more on this later).
QUIT Quits ak.Sys
EDIT
UNDO Will undo/redo the last control movement in the Program
Editor and Multi Editor. It has no function in the Browser.
CUT/COPY/PASTE/CLEAR These have no function. Functions such as copying and
pasting (for example, programs, samples, keygroups, etc.),
are either done with drag and drop or via contextual menus.
SELECT ALL This has no function.
ak.Sys - Version 2.00 Page 15
Page 19
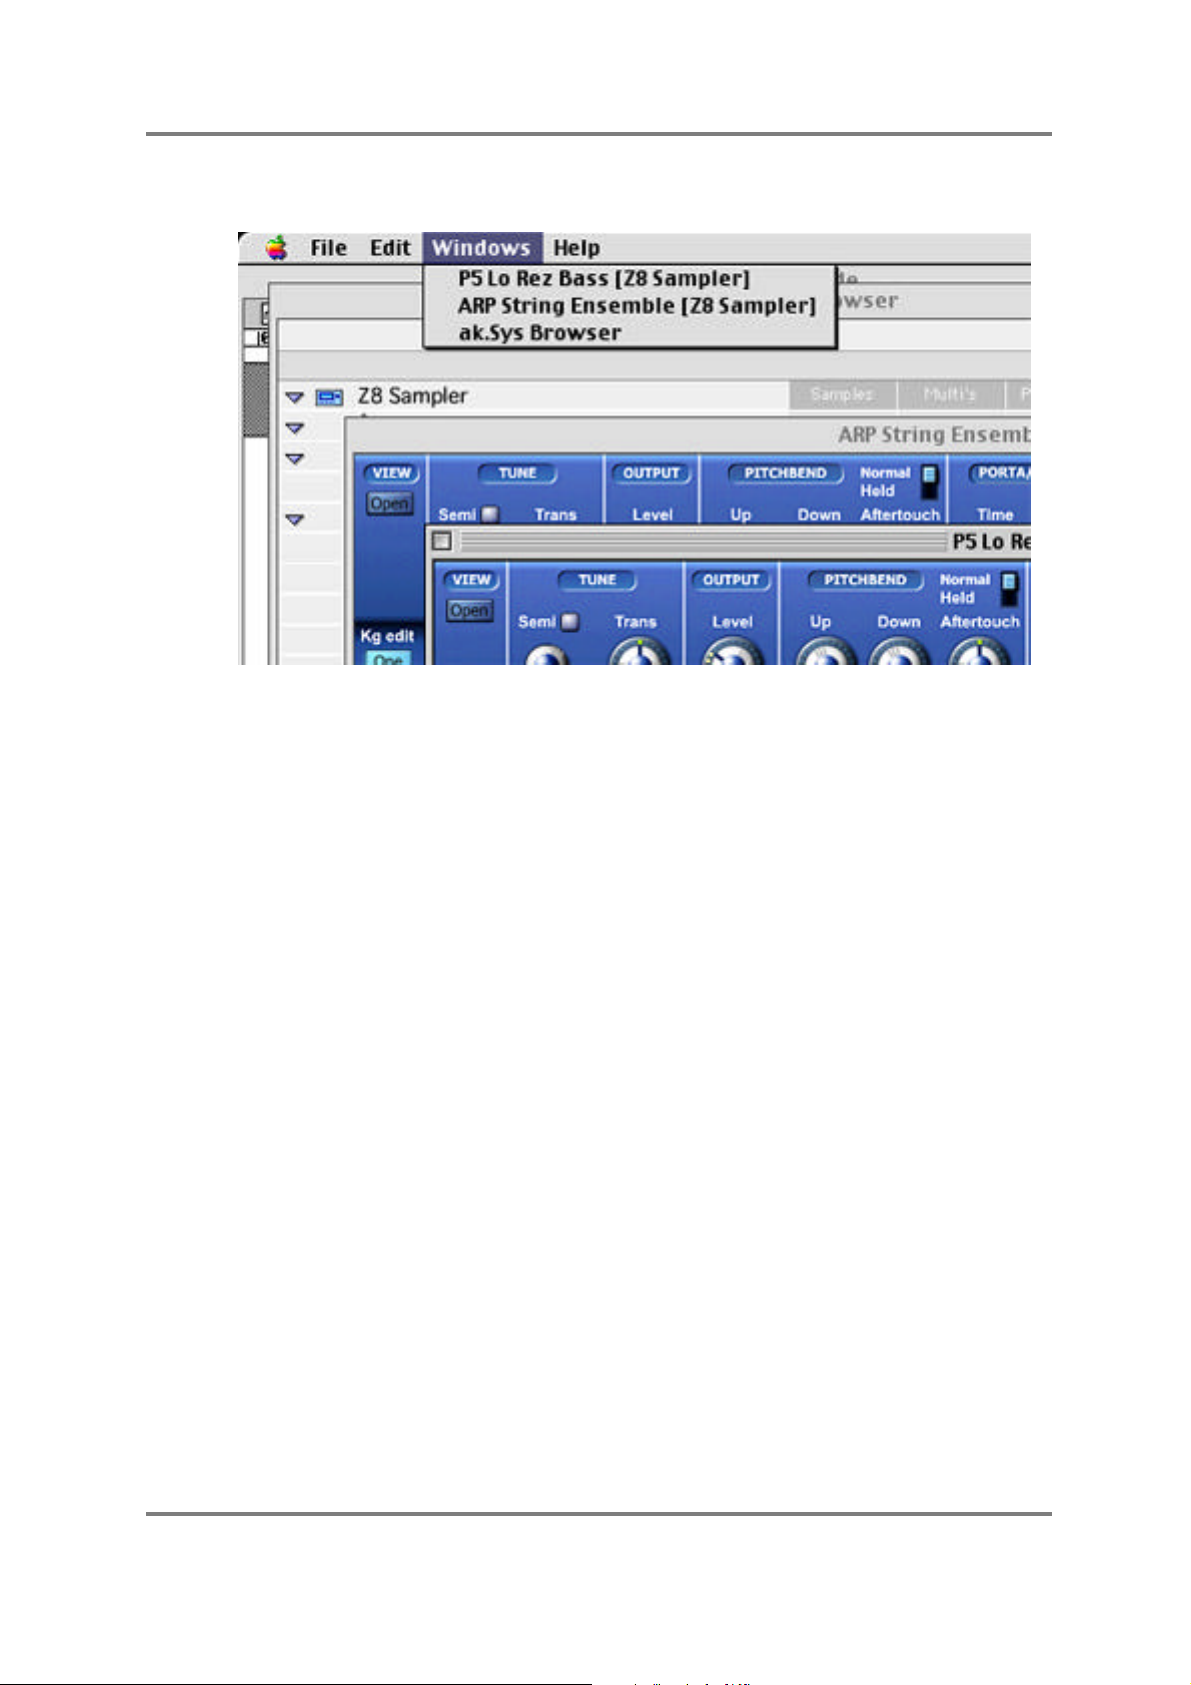
WINDOWS
AK.SYS BROWSER - MACINTOSH
This shows the currently open editor windows. Windows can be brought to the front by
selecting them in this menu or by ‘touching’ the actual windows with the mouse.
ak.Sys - Version 2.00 Page 16
Page 20
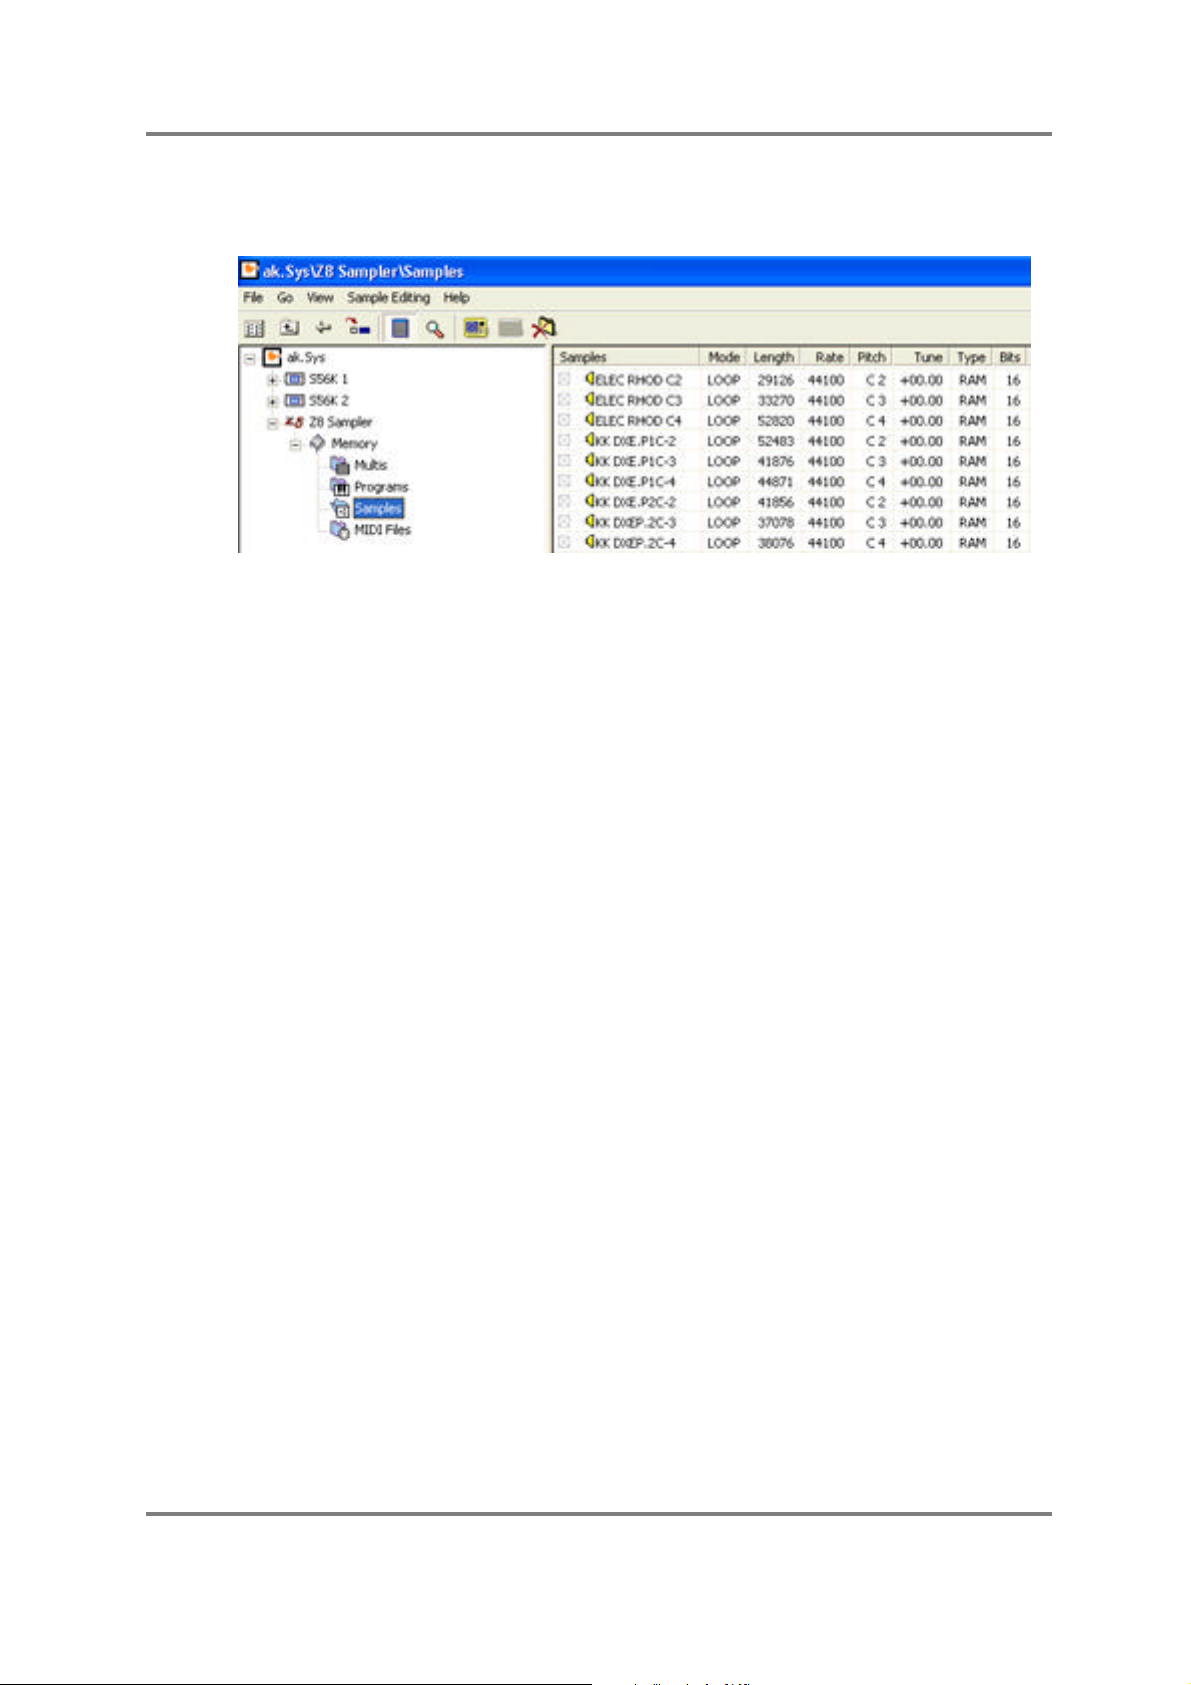
AK.SYS BROWSER - PC
THE AK.SYS BROWSER - PC VERSION
When you launch ak.Sys, you see the ak.Sys Browser:
In the Browser, you can see the sampler and the contents of its memory. Each file type (i.e.
multi, program, samples, etc.) is contained within a suitably named sub-folder (referred to as
‘nodes’ in this User’s Guide). When you click on a ‘node’ (i.e. file type folder - Multis, Programs,
Samples, etc.), the right window changes to show the contents of that folder (in the above
example, you can see the Multis node and hence the multis loaded into memory). When any
item is edited or changed in any way, a red cross appears alongside it. It is also possible to ‘tag’
items by clicking on slightly to the right of the item - a ‘tick’ appears alongside the item. Items
can untagged by clicking on the ‘tick’.
To the right of the various files, when in DETAIL VIEW, you can see information about each
item. For example, with the ‘Memory’ node selected, the right hand window shows you how
many samples, programs, multis, etc., are in memory; with the ‘Multis’ node selected, it tells you
how many parts it contains and when the ‘Programs’ node is selected, you can see how many
keygroups each one contains. The ‘Samples’ node (shown above) shows a more
comprehensive set of details such as playback mode, length, sample rate, etc.. None of these
fields are editable and are shown for reference only.
The browser also allows you to name/rename files in the usual way. You may also delete files.
It is also possible to use the Browser to load and save data using ‘drag and drop’. For example,
you can drag a .WAV file from your PC’s HD to the Browser to load samples into memory. If your
Z4/8 has a drive connected to it, that will show up in the Browser and data may be dragged from
it to the MEMORY node to load data into the sampler. Conversely, data can be dragged from
the sampler onto the drive to save it. If you have your sampler’s drive(s) connected to your Mac,
multis, programs, samples and MIDI Song Files may be loaded using drag and drop. You can
drag each item onto its own ‘node’ if you want (i.e. samples onto the Samples node, programs
onto the Programs node, etc.) but ak.Sys will sort out which node the items should be placed
into so that if you do drop a .WAV onto the Multi node (for example), it will actually be placed
correctly into the Samples node.
Similarly, you may drag items from the Browser onto your PC’s hard disk drive to save them.
These may subsequently be ‘loaded’ into memory by dragging them from that drive onto the
ak.Sys Browser.
If you also have an S5/6000 attached, you may drag and drop data from it to the Z4/8 and vice
versa. If the S5/6000 has one or more drives attached to it, the drive will appear in the Browser
and you may drag and drop data from that drive onto the Z4/8 to load it and from the Z4/8 to the
drive to save it. Similarly, if your Z4/8 has a drive attached, the S5/6000 can share it.
ak.Sys - Version 2.00 Page 17
Page 21

AK.SYS BROWSER - PC
HANDY TIP: You can drag a folder from your PC’s disk drive onto the ak.Sys Browser to load
the entire contents of that folder.
Similarly, you can drag the Memory icon onto your PC’s disk drive to save the entire contents
of the sampler’s memory. This will create a folder called MEMORY on your drive which you can
rename to something more meaningful.
IMPORTANT NOTE 1: When dragging multis and programs across to the ak.Sys Browser,
data contained within them is not automatically loaded as they are when loaded from the
sampler’s own LOAD mode.
For example, drag a multi across and the programs it uses (and the samples they use) will not
automatically follow. Similarly, dragging a program across will not automatically load the samples
it uses either. However, by using CTRL+drag on these items, you can drag the item and its
dependants onto the Browser.
The converse is also true - drag items from the Browser to a drive to save them and the items
they might contain will not automatically be saved as they would be in the sampler’s own SAVE
mode. However, please note that you cannot CTRL+drag items to your PC’s drive to save the
item(s) with dependents.
One way around this is to save multis (plus their programs and the samples they use) to their
own unique folders (or drag the Memory icon across to save the entire contents of your
sampler as described above). In future, these can be dragged onto the Browser so that all the
correct data will be loaded in one transaction.
Wherever possible, it’s advisable to use the LOAD/SAVE functions on the appropriate
contextual menu.
IMPORTANT NOTE 2: When dragging and dropping items from your hard disk to the
ak.Sys Browser, ak.Sys has no way of knowing that the sampler’s wave and/or CPU memory is
full.
Attempting to drag items across to the Browser when the sampler’s memory is full will not cause
any problems - in fact, nothing will happen! However, once you have reached this state, it is
advisable to delete unwanted items from ak.Sys and/or not attempt any more drag and drop
loading.
IMPORTANT NOTE 3: It is not possible to drag items to the Recycle bin to delete them.
Items should be deleted by way of the contextual menu available by right clicking.
ak.Sys - Version 2.00 Page 18
Page 22
AK.SYS BROWSER - PC
TOOLBAR (PC ONLY)
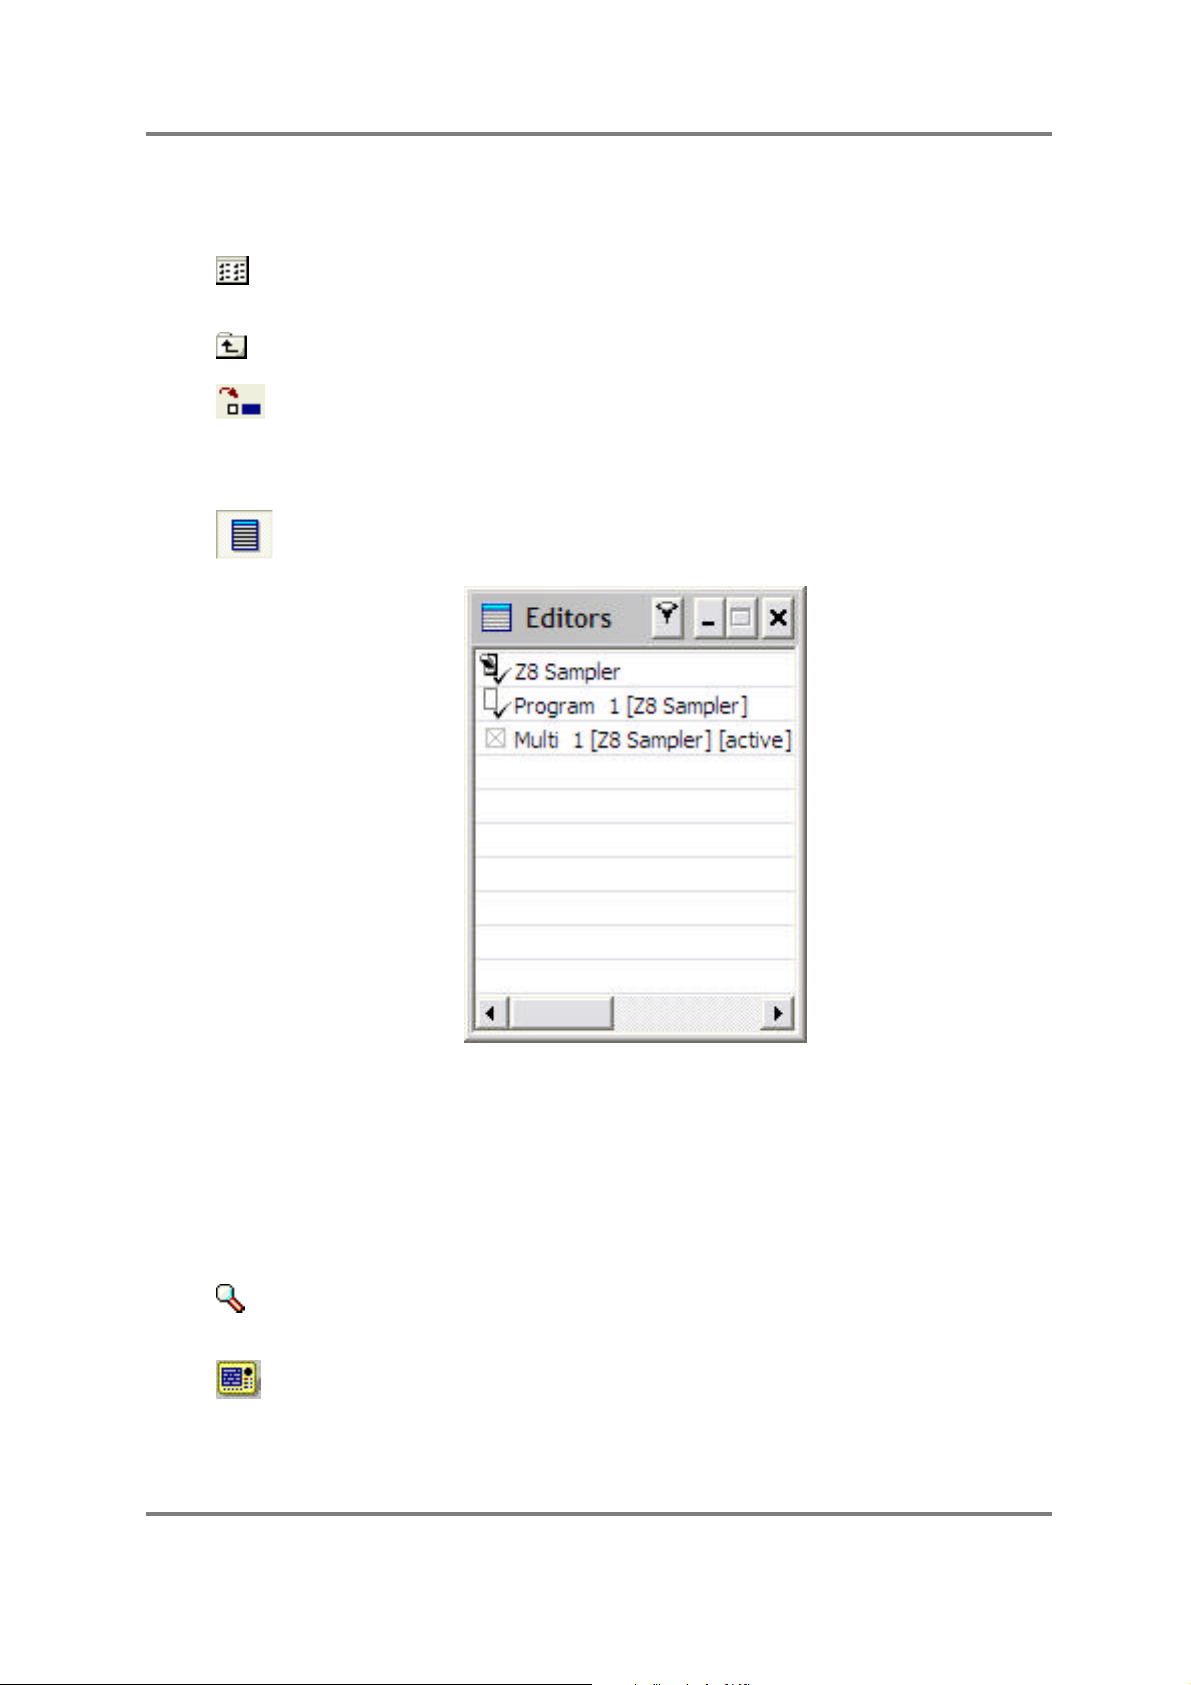
Across the top of the window is a ‘toolbox’ which has the following functions:
This allows you change the ‘view’ style of the right window of the Browser. You
may select LARGE ICON, SMALL ICON or DETAIL VIEW.
Takes you back up a level.
This will update the selected node/folder. For example, if you have loaded
some samples from the sampler’s front panel, you can click on the ‘Samples’
node and click on the Update function to update ak.Sys with the latest sample
list.
This shows a list of all the currently open editor windows:
The editor windows can be managed using this window. Editors can be
opened/closed by clicking on their names in this window (or more simply by
clicking on the actual editor window). When an editor is open a tick is shown.
Switching the 'pin' icon on keeps the selected window at the front at all times.
In the above example, the top line shows that the editor is open (the tick) and
topped (the pin). The second line shows an editor open but not topped whilst
the third shows that a program is available to open but closed.
This launches the FIND function which allows you to search for items by name
(see later in this User’s Guide).
Opens the front panel emulator (see later in this User’s Guide).
ak.Sys - Version 2.00 Page 19
Page 23

AK.SYS BROWSER - PC
MENU ITEMS
The MENU ITEMS are very simple:
FILE Offers just one option - EXIT - which will quit ak.Sys.
SAMPLE WATCH Offers you the ability to clear the ‘watched’ sample editing folder (see
the chapter that describes sample editing for the PC for information on
this).
VIEW Allows you to select how you will view items in the Browser (i.e. large
icons, small icons, detail).
HELP Shows the ABOUT AKSYS splash screen. It also provides a link to our
website.
ak.Sys - Version 2.00 Page 20
Page 24
AK.SYS BROWSER
BROWSER CONTEXTUAL MENUS
ak.Sys supports contextual menus that offer options appropriate to the selected node.
NOTES FOR MAC USERS
• If you have a mouse with two or more buttons, pressing and holding down the right key
whilst pressing the left key will pop-up contextual menus
• If you are using the standard one-button Mac mouse, pressing and holding CTRL whilst
clicking on the mouse will also pop up the contextual menus.
• You can just press and hold the mouse and wait a second to pop -up the contextual menu.
The contextual menu items in the ak.Sys Browser are:
SAMPLER NODE
REFRESH Updates all data in ak.Sys.
SCAN DISKS This will scan all disks connected to the sampler(s) and update
ak.Sys. This shouldn’t need to be used much if at all but can
sometimes be useful when using certain types of removable
media that may not automatically mount/unmount.
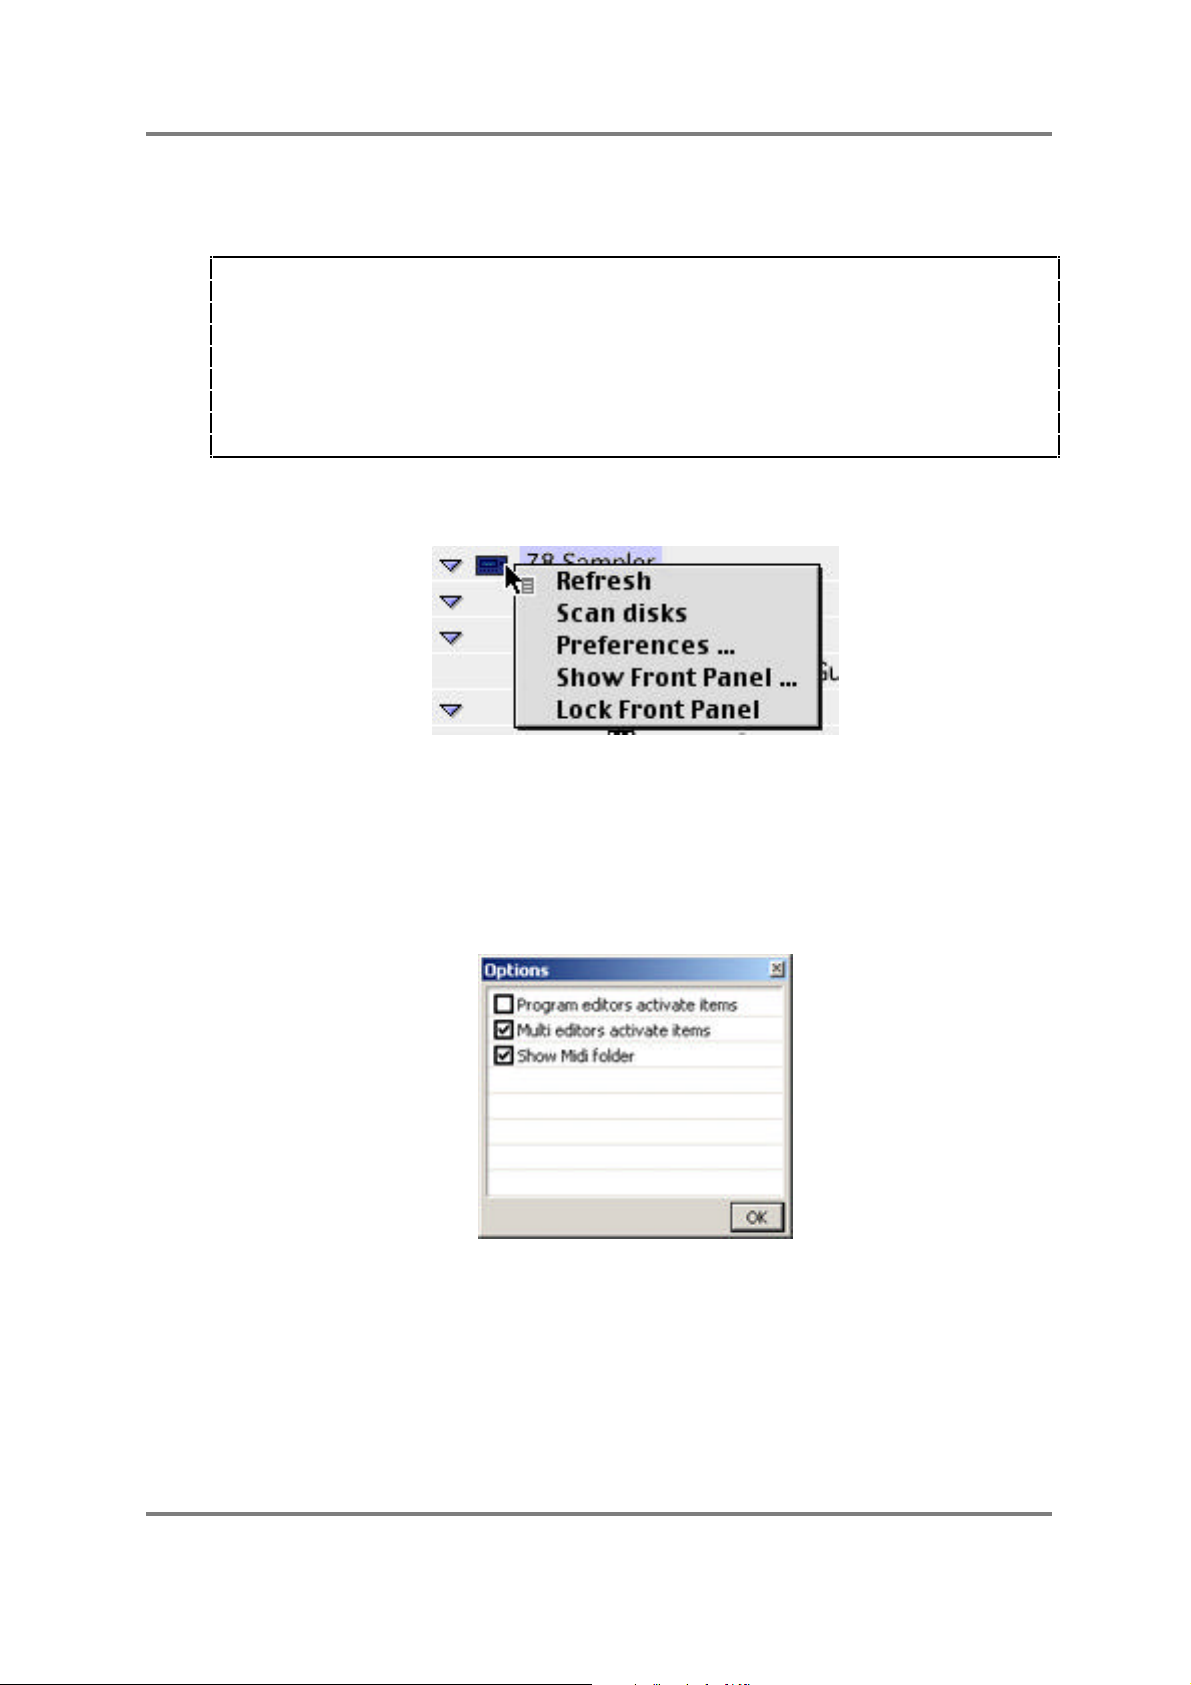
PREFERENCES Selecting this pops up this window :
You can select whether launching a program or multi editor
actually makes that the active item in the sampler itself. With
these options disabled, you can launch a program/multi editor
but you won’t necessarily hear it. With these options enabled,
you will automatically hear the items when they are launced.
You can also choose whether to display the MIDI song file
folder in the ak.Sys Browser or not.
ak.Sys - Version 2.00 Page 21
Page 25

AK.SYS BROWSER
SHOW FRONT PANEL Launches the remote front panel emulator (see later).
LOCK FRONT PANEL This function allows you to lock the sampler’s front panel to
prevent tampering on the front panel when you are using
ak.Sys. If you are using the ‘virtual’ remote, the pages on the
sampler’s front panel LCD will change according to those
selected on the ‘virtual’ panel but you cannot make any
changes on the sampler itself using the front panel’s DATA
wheel or numeric keypad.
To unlock the front panel, simply ‘un-tick’ the LOCK FRONT
PANEL menu item.
NOTE: It is not a good idea to use the Z4/8 LOAD/SAVE and other disk operations from the
sampler’s front panel AND also perform disk based operations in the ak.Sys Browser at the
same time. Data can get out of sync and serious problems could arise. It is recommended to
lock the front panel so that whilst you are using ak.Sys, no-one can tamper with the front panel.
ak.Sys - Version 2.00 Page 22
Page 26
AK.SYS BROWSER
MEMORY NODE
REFRESH Updates all data in memory.
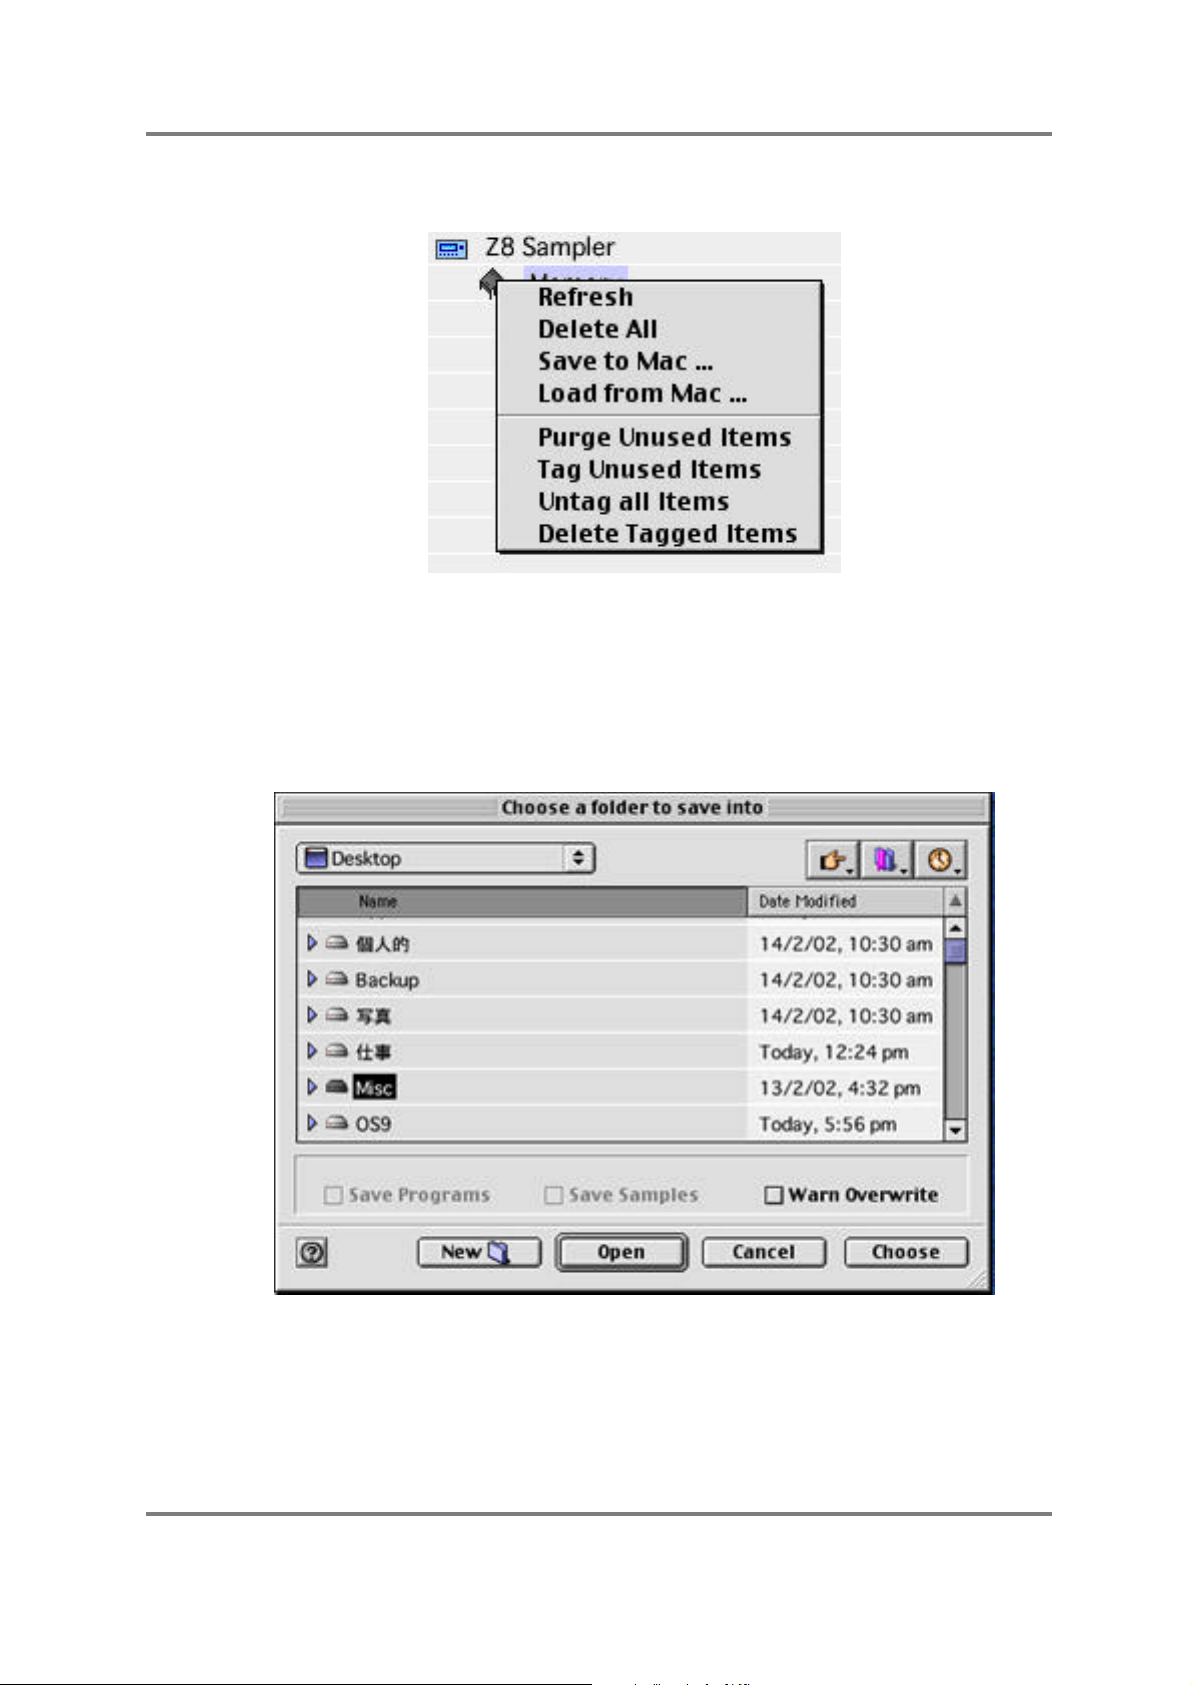
DELETE ALL Clears the sampler’s memory completely. This issues an “Are
you sure...?” prompt.
SAVE TO MAC/PC Pops up a typical SAVE prompt allowing you to save data to
your Mac/PC:
You should navigate your folder structures to where you want to save the memory contents to
and press CHOOSE to save the data,
ak.Sys - Version 2.00 Page 23
Page 27
AK.SYS BROWSER
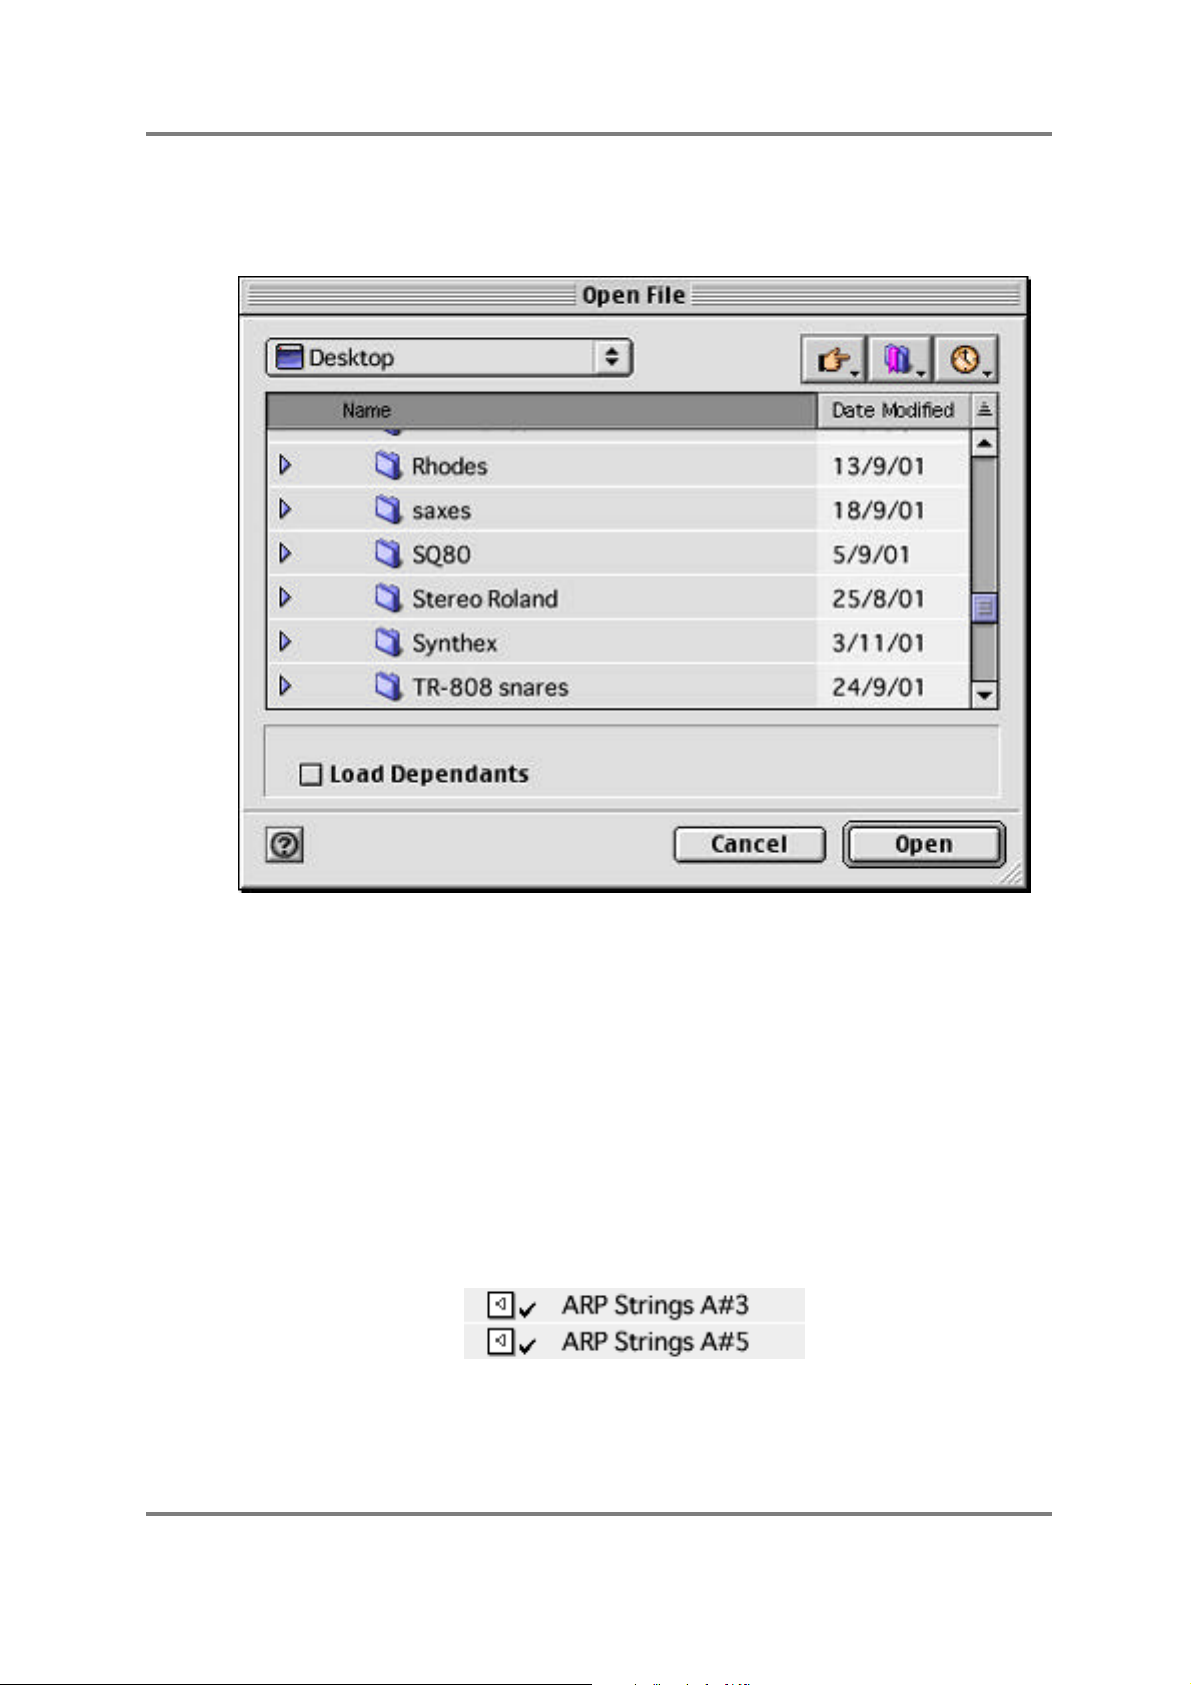
LOAD FROM MAC/PC This will pop up a typical load window which you can use to
navigate your way to sound library stored on your Mac/PC’s
disk drive:
The LOAD DEPENDANTS option allows you to select
whether the various components that make up multis,
programs and samples are also loaded. For example, if a multi
is selected to load, with this option unchecked, only the multi
would be loaded. However, if LOAD WITH DEPENDANTS is
checked, the programs associated with that multi (and the
samples associated with those programs) will also be loaded .
PURGE UNUSED ITEMS This will delete all unused items such as samples not used in
any programs or programs (and their samples) not used in any
multis. This is a quick and easy way of freeing up some
memory.
TAG UNUSED ITEMS This will tag any unused items. These will be shown in the
Browser with a ‘tick’ next to them:
This is useful for identifying unused items in memory
DELETE TAGGED ITEMS Allows you to delete items tagged as described above.
ak.Sys - Version 2.00 Page 24
Page 28
AK.SYS BROWSER
MULTIS NODE
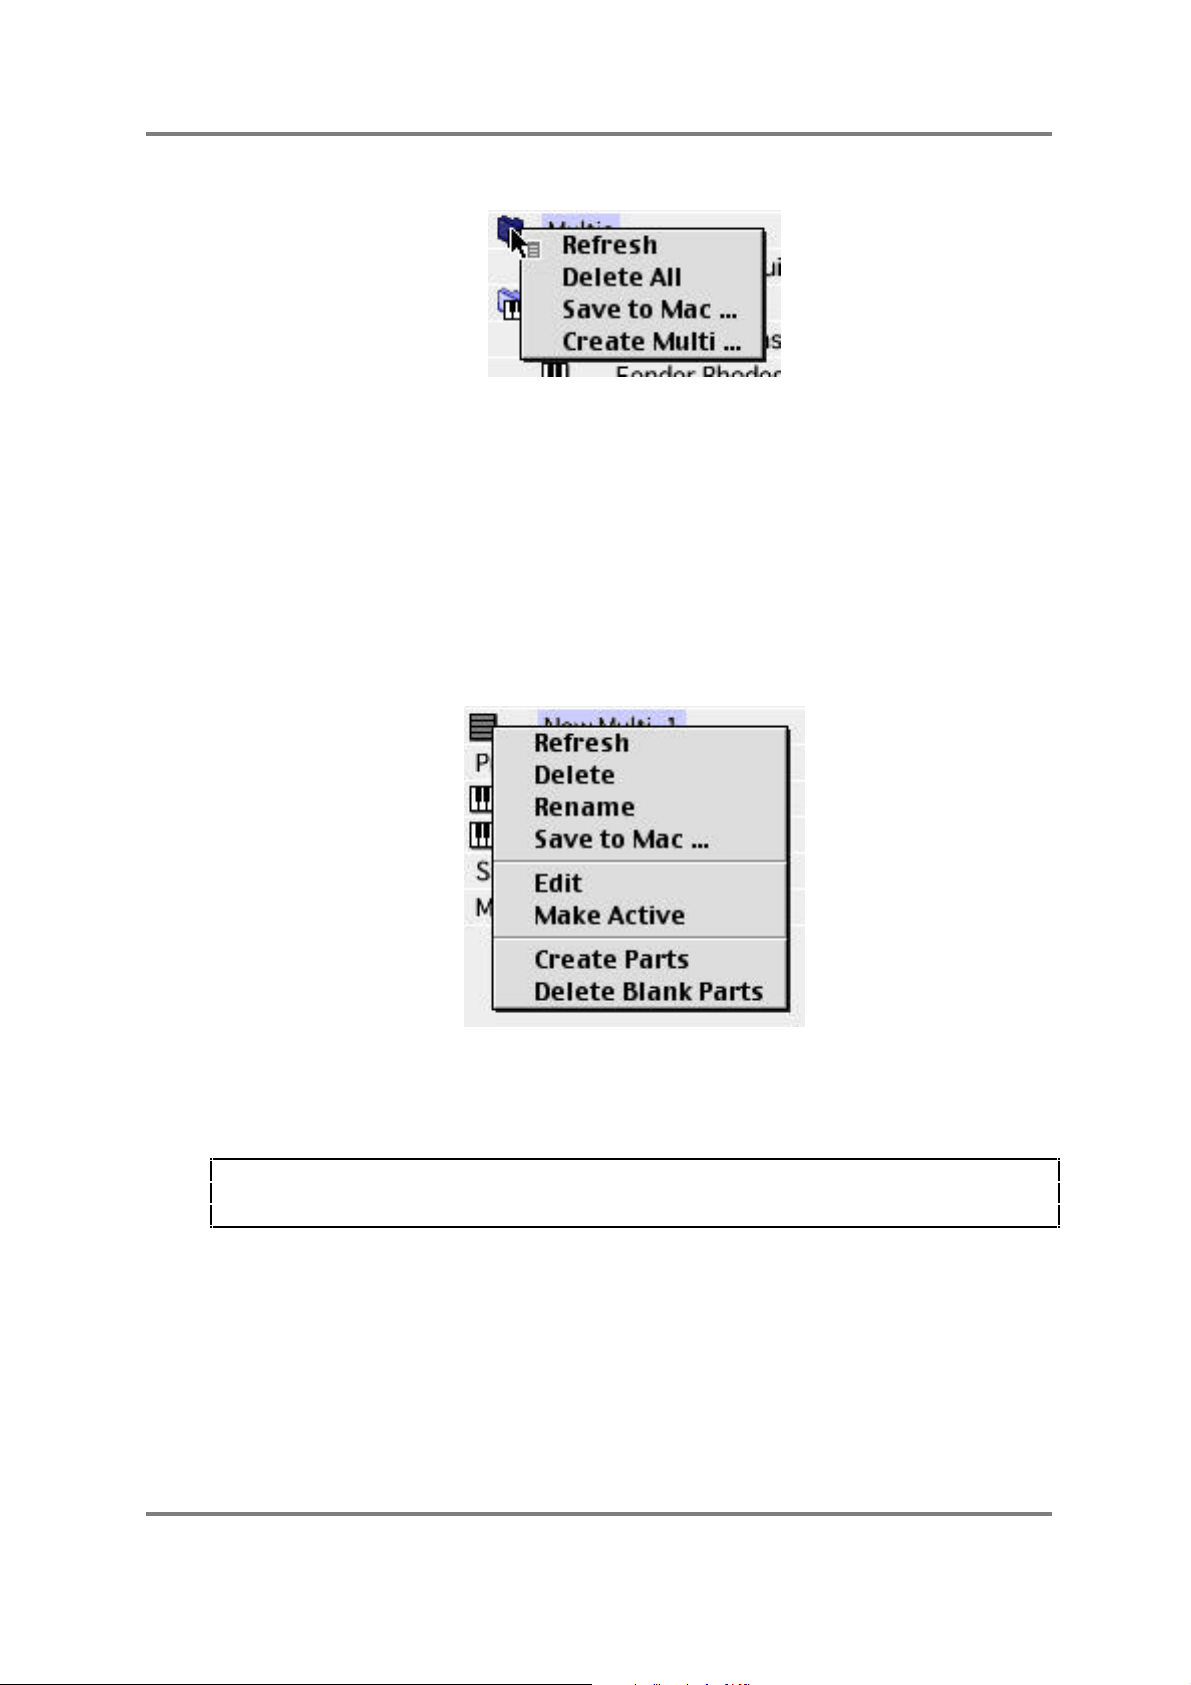
REFRESH Updates all multi data in ak.Sys.
DELETE ALL Deletes all multis in memory.
SAVE TO MAC/PC Allows you to save all multis in memory to your Mac/PC’s disk.
It pops up a typical SAVE prompt. Operation is the same as
described earlier.
CREATE MULTI... Allows you to create a new multi. This pops up a prompt where
you can name the multi and set the number of parts that will be
included.
MULTI
REFRESH Updates data for the selected multi.
DELETE Deletes the selected multi.
NOTE FOR MAC USERS: You can also delete a multi (or any item in the Browser) by
dragging it to the wastebasket/trash can. However, please note that the multi will not be placed
in the wastebasket/trash can for deletion later on - it will be deleted immediately.
RENAME Allows you to rename the selected multi.
ak.Sys - Version 2.00 Page 25
Page 29
AK.SYS BROWSER
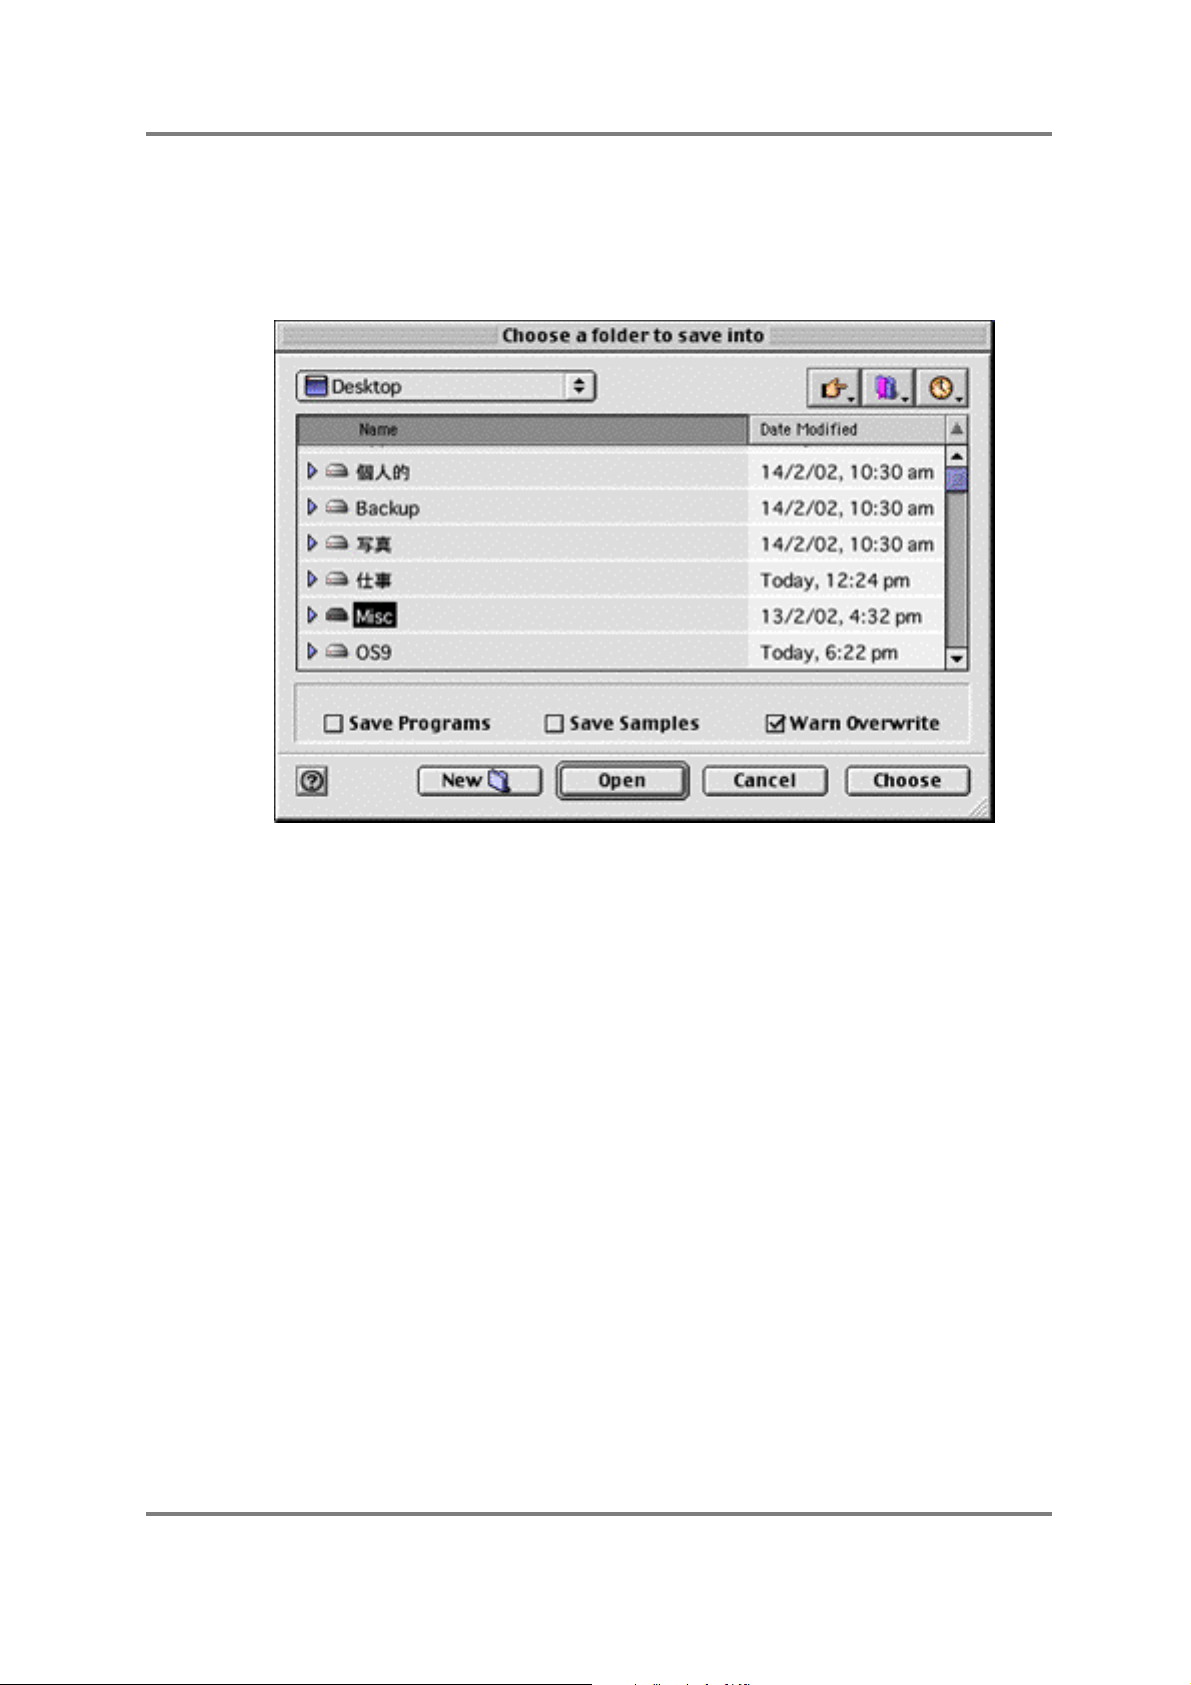
SAVE TO MAC This pops up a typical SAVE window. Operation is exactly the
same as described earlier except that you have the option of
deciding whether to save the programs (and their samples)
used in the selected multi:
It is recommended that you ‘check’ SAVE PROGRAMS and
SAVE SAMPLES so that loading this multi in the future will
also cause the programs and samples used in the multi to be
loaded correctly.
EDIT Launches the Multi Editor (or brings that multi’s Editor window
to the front if already open).
MAKE ACTIVE Makes the selected multi active in the sampler. For example,
even though you may be editing MULTI 2 in ak.Sys, it might
not be the selected multi in the sampler itself (for example,
you may have selected another multi on the sampler itself). In
this case, use MAKE ACTIVE to select the appropriate multi in
the sampler.
ak.Sys - Version 2.00 Page 26
Page 30
AK.SYS BROWSER
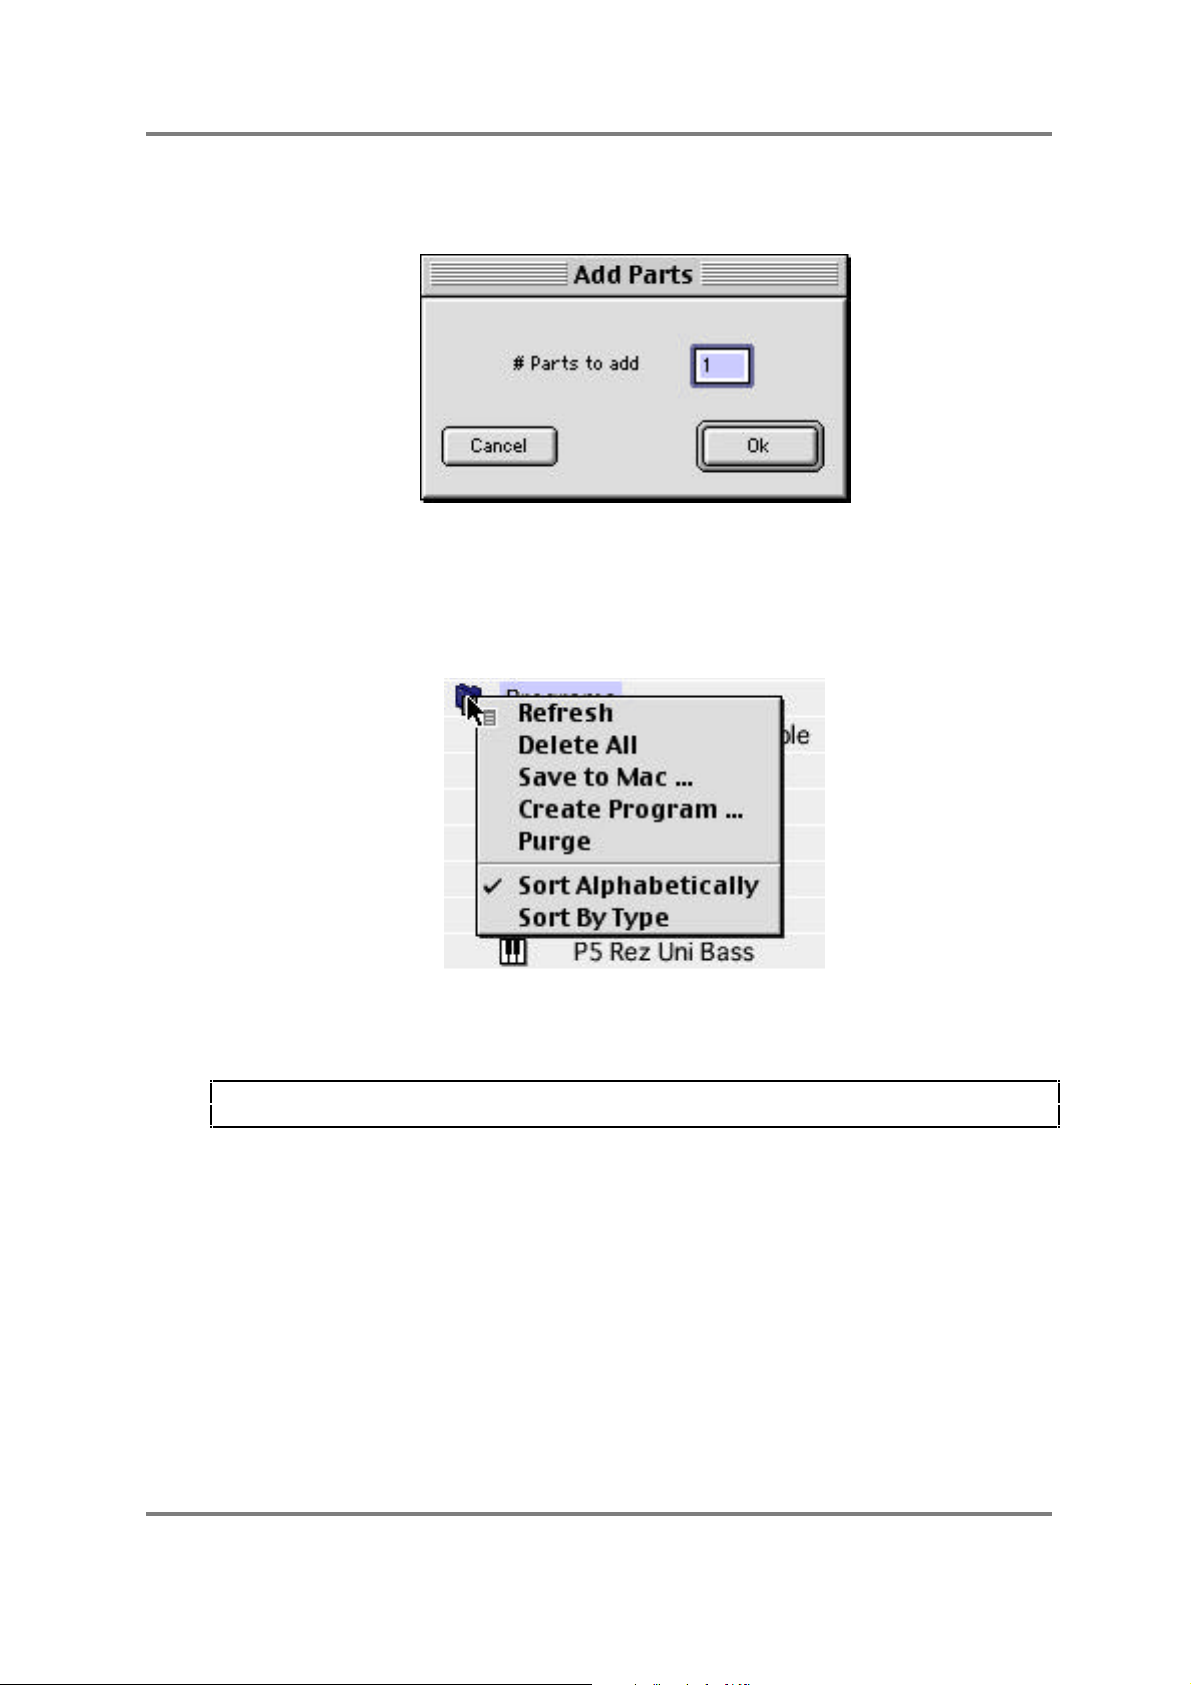
CREATE PARTS Allows you to add parts to the selected multi. This will pop up a
prompt:
You should enter the number of parts you want to add to the
multi and press OK.
DELETE BLANK PARTS Allows you to delete empty parts from the selected multi.
PROGRAMS NODE
REFRESH Updates all program data in ak.Sys.
DELETE ALL Deletes all programs from memory.
NOTE: This does not delete all the programs’ associated samples. These have to be deleted
separately.
SAVE TO MAC This pops up a SAVE window. Operation is the same as the
save procedure described earlier.
CREATE PROGRAM... Allows you to create a new program from scratch. This will pop
up a prompt allowing you to name the new program as well as
set how many keygroups it will contain.
PURGE This will delete all unused programs from memory - that is,
programs that are not used in any multis.
SORT ALPHABETICALLY Sorts the Browser’s list of programs alphabetically.
SORT BY TYPE This will sort programs alphabetically with normal keygroup
programs listed first and drum programs listed after those.
ak.Sys - Version 2.00 Page 27
Page 31

PROGRAM
AK.SYS BROWSER
REFRESH Updates data for the selected program.
DELETE Deletes the selected program.
NOTE FOR MAC USERS: You can also delete a program (or any item in the Browser) by
dragging it to the wastebasket/trash can. However, please note that the program will not be
placed in the wastebasket/trash can for deletion later on - it will be deleted immediately.
RENAME Allows you to rename the selected program.
SAVE TO MAC/PC Allows you to save the selected program to your Mac/PC’s
disk drive. The SAVE pop-up offers the option to select that
the program’s samples will also be saved.
EDIT Launches the Program Editor (or brings that program’s Editor
window to the front if already open).
MAKE ACTIVE Makes the selected program active in the sampler. For
example, even though you may be editing PROGRAM 1 in
ak.Sys, it might not be the selected program in the sampler
itself. In this case, use MAKE ACTIVE to select the
appropriate program in the sampler.
CREATE NEW KEYGROUPS Allows you to create new keygroups in the selected program.
This will pop up a window where you can enter the number of
keygroups you would like to create.
ak.Sys - Version 2.00 Page 28
Page 32

AK.SYS BROWSER
SAMPLES NODE
REFRESH Updates all sample data in ak.Sys.
DELETE ALL Deletes all samples in memory.
SAVE TO MAC/PC Allows you to save all samples in memory to your Mac/PC’s
disk drive. Operation is the same as the save procedures
described earlier.
PURGE Deletes all unused samples - that is, samples not used in any
programs.
SORT ALPHABETICALLY Sorts the sample list into alphabetical order.
SORT BY SIZE Sorts the samples in the list according to size.
SORT BY PITCH Sorts the samples in the list according to pitch.
SORT BY SAMPLE RATE Sorts the samples in the list according to their sample rates.
ak.Sys - Version 2.00 Page 29
Page 33

AK.SYS BROWSER
SAMPLE
REFRESH Updates data for the selected sample.
EDIT Launches your preferred sample editor (see later).
DELETE Deletes the selected sample.
NOTE FOR MAC USERS: You can also delete a sample (or any item in the Browser) by
dragging it to the wastebasket/trash can. However, please note that the sample will not be
placed in the wastebasket/trash can for deletion later on - it will be deleted immediately.
RENAME Allows you to rename the selected sample.
SAVE TO MAC/PC Allows you to save the sample to your Mac/PC’s disk drive.
Selecting this will pop-up the usual SAVE window and you
should proceed as described earlier.
EDIT Allows you to edit the selected sample. Selecting this will
launch the sample editor you have nominated as your
preferred editor.
AUDITION Allows you to hear the selected sample.
NOTE 1: If the sample is looped, the loop will play indefinitely. You must click again to stop
playback.
NOTE 2: If the sample is a one-shot sample, you must click on again to stop playback. Note
also that even if the one-shot sample has stopped playback, you must click again to cancel the
‘audition’ function.
ak.Sys - Version 2.00 Page 30
Page 34

AK.SYS BROWSER
PROPERTIES This will pop up a window where you can edit the selected
samples pitch, tuning and loop type.
This is offered for convenience as it allows you to edit these
basic parameters without needing to launch your sample
editor. It also allows access to certain parameters that maybe
your sample editor does not have access to.
Using the AUDITION button, you can play the sample.
However, you might find it more convenient to use your
Mac/PC’s keyboards spacebar as this allows you to audion
whilst using the mouse to tune the sample.
ak.Sys - Version 2.00 Page 31
Page 35

AK.SYS BROWSER
MIDI FILES NODES
REFRESH Updates all MIDI FILE data in ak.Sys.
DELETE ALL Deletes all MIDI FILES from memory.
SAVE TO MAC/PC... Allows you to save all MIDI files loaded into memory to you
Mac/PC’s disk drive,
MIDI FILE
DELETE Deletes the selected MIDI FILES.
NOTE FOR MAC USERS: You can also delete a MIDI song file (or any item in the Browser)
by dragging it to the wastebasket/trash can. However, please note that the MIDI Song File will
not be placed in the wastebasket/trash can for deletion later on - it will be deleted immediately.
SAVE TO MAC/PC... Allows you to save the selected MIDI file to your Mac/PC’s disk drive.
ak.Sys - Version 2.00 Page 32
Page 36

REMOTE PANEL
VIRTUAL Z8 REMOTE PANEL
By right clicking on the sampler icon at the top of the BROWSER window, you can launch the
ak.Sys ‘virtual’ remote panel:
Every function in the sampler is available in real-time and operation is pretty much the same as
on the sampler itself.
The various sampler ‘modes’ (Multi, FX, Edit Sample/Program, etc.) are selected by clicking on
the keys along the bottom underneath the LCD.
Functions may be selected in a variety of ways:
• You can click on the parameter directly on the LCD using your mouse
• You can use your Mac/PC keyboards cursor keys to move around the LCD
• You can use the Z8’s panel cursor keys
In all cases, the DATA wheel can be used to enter parameter values. However, you can also
enter a parameter’s value directly using your Mac/PC keyboard’s numeric keys.
If you have a mouse equipped with a wheel, this can be used to set parameter values as well.
Simply click the parameter and move the wheel to edit the parameter’s value.
NOTE: Some wheel-equipped mice may need to be specifically set up for this via a control
panel on your Mac/PC.
You may also use your computer keyboard’s function keys F1-F6 to emulate the function keys
on the sampler.
You can use your mouse to rotate the 8 Q-Link controls.
NOTE FOR Z4 USERS: Even though you have access to the 8 Q-Link controls on the
virtual front panel, you won’t, of course, be able to use Q5-Q8 on the actual front panel itself.
But of course you realised this!
As mentioned, all the sampler’s functions are available via the virtual remote panel and any
functions not directly supported in an ak.Sys editor can be accessed via the panel emulator.
When using ak.Sys with multiple samplers on the network, you can have several front panel
emulators open with each one controlling their respective samplers.
ak.Sys - Version 2.00 Page 33
Page 37

MULTI EDITOR
MULTI EDITOR
It is possible to create and edit multis using the MULTI EDITOR. To launch the MULTI EDITOR,
simply double click on a multi in the ak.Sys BROWSER:
Each part is represented as a channel of a mixer and the mixer can have up to 128 channels.
You can set level, pan, output assign, effects assignment, effects level, tuning, MIDI channel
and note range for each part using the mouse. You may also set certain MIDI parameters such
as low and high note range, program number and polyphony priority.
Channels may be solo’d and muted using the ‘S” and ‘M’ keys on each channel strip. These
keys illuminate making their status clear
Channel levels may also be grouped using the 8 light blue group keys to the left of the channel
fader. Once two or more channels are grouped, moving a fader in any of the grouped channels
will cause all other faders in the group to move. You will note that relative offsets between
channels are retained as you move the grouped faders.
At the bottom of each channel strip is a meter. This is not an actual ‘level’ meter as such but
instead, represents voice usage for that channel. In other words, the more notes a particular
part is playing, the higher this meter will be.
ak.Sys - Version 2.00 Page 34
Page 38

MULTI EDITOR
Clicking on the name field directly to the right of the each channel’s fader provides the
following options:
SEARCH Accesses the ak.Sys SEARCH function (more later) so that you may search for
a program to assign to the part.
ASSIGN Pops up a list showing all the programs in memory. Scroll up and down this list
and release the mouse on the appropriate program.
CLEAR Clears the program from the currently selected multi part.
AUDITION No function the Multi Editor
EDIT Will launch the ak.Sys Program Editor for the program assigned to the channel
(see the next section for details of the Program Editor).
More conveniently, perhaps, you can also drag and drop programs from the ak.Sys BROWSER
directly onto the multi part channel - simply grab the program you want to assign in the
BROWSER and drag it onto the appropriate channel of the MULTI EDITOR to assign it. You can
also drag and drop programs from your Mac/PC disk drive directly onto a multi channel - this will
load the program and its samples and will, of course, assign the program to the selected multi
channel.
Multiple Multi Editor windows may be opened simultaneously and you can select them simply
by bringing the appropriate one you want to edit to the front or by way of the WINDOWS menu.
Multi windows can be ‘collapsed’ in the usual way.
NOTE FOR MAC USERS: 128-part multis use a lot of the Mac’s memory. If you plan to have
a lot of large multis open simultaneously, increase the memory allocation for ak.Sys.
ak.Sys - Version 2.00 Page 35
Page 39

MULTI EDITOR
CONTEXTUAL MENUS
Right clicking on a blank portion of the Multi Editor panel pops up this contextual menu:
REFRESH Updates data for the selected multi.
DELETE Deletes the selected multi.
RENAME No function, hence greyed out.
SAVE TO MAC This pops up a typical SAVE window. Operation is exactly the
same as described earlier.
EDIT No function - the editor is open!
MAKE ACTIVE Makes the selected multi active in the sampler. For example,
even though you may be editing MULTI 2 in ak.Sys, it might
not be the selected multi in the sampler itself (for example,
you may have selected another multi on the sampler itself). In
this case, use MAKE ACTIVE to select the appropriate multi in
the sampler.
CREATE PARTS Allows you to add parts to the selected multi. This will pop up a
prompt where you may enter the number of parts you want to
add.
DELETE BLANK PARTS Allows you to delete empty parts from the selected multi.
ak.Sys - Version 2.00 Page 36
Page 40

PROGRAM EDITOR
PROGRAM EDITOR - GENERAL
ak.Sys also features a PROGRAM EDITOR. To launch it, simply double click on a program in the
ak.Sys BROWSER:
Program parameters are presented with a ‘knobby’ synthesiser interface. The knobs have a
pointer that show its position but around the knob is a virtual collar of LEDs that also show the
knob’s position. Below the knob is a small window that shows the parameter’s value.
NOTE: It is also possible to CTRL+click on these windows to enter values numerically from
your Mac/PC keyboard:
The panel is divided into logical sections. Across the top are the global program parameters.
(i.e. those that affect the program as a whole). Below that, you can set keyspan whilst the ALL
button allows you to switch between EDIT SINGLE and EDIT ALL and ADD allows you to select
the ‘add’ mode.
Below that are the keygroup ‘tabs’ which allow you to select keygroups. . When ALL or ADD are
selected, all the tabs are highlighted in red.
ak.Sys - Version 2.00 Page 37
Page 41

PROGRAM EDITOR
Below the keygroup tabs are the keygroup parameters. These are sib-divided into logical
‘pages’:
ZONES Parameters related to setting up keygroup zones
FILTER/KGRP Parameters related to setting up the filters and keygroups
ENVELOPES For setting up the amplitude, filter and auxilliary envelopes
LFOs For setting the two Low Frequency Oscillators
MODULATION For assigning and setting modulation sources and destinations.
Parameters can be changed simply by dragging on the appropriate pot on the panel (if you
have an Intellimouse or similar multi-button mouse with a ‘wheel’, the wheel may be used to
adjust pots). Envelopes are set by dragging on the ‘handles’ on the envelope shape graphic.
Some parameters (LFO waveform, filter type, etc.) present you with pop-up lists from which you
can select your options in the usual way by scrolling up to them and releasing the mouse on
the appropriate selection:
Simply move the mouse through the list to select the LFO waveform. If your mouse is
equipped with a wheel, you should be able to scroll through the list using that.
The filters work in a similar fashion:
Simply move the mouse up and down the list to select the filter type you want to use. If your
mouse is equipped with a wheel, you should be able to scroll through the list using that.
ak.Sys - Version 2.00 Page 38
Page 42

PROGRAM EDITOR
Keygroups are selected using the keygroup ‘tabs’ shown underneath the keyboard icon:
Simply click on a tab to select a keygroup. You can also use CURSOR </> on your Mac/PC
keyboard to select keygroups sequentially. You can also use ALT+CLICK on the keyboard
graphic itself to select keygroups. However, you select a keygroup, it is shown with red
lettering in the keygroup tab. However, when ALL or ADD are switched on, all the keygroup
tabs are highlighted irrespective of which keygroup is selected:
Drag and drop of keygroups is also supported in the PROGRAM EDITOR. You can...
• Drag and drop keygroups between programs
• Drag and drop a keygroup within a program to effectively copy/paste an existing keygroup
• Drag and drop keygroups to/from the desktop
ak.Sys - Version 2.00 Page 39
Page 43

PROGRAM EDITOR
Right clicking on the Program Editor panel pops up the following contextual menu:
The functions are:
REFRESH Updates data for the selected program.
DELETE Deletes the selected program
RENAME No function, hence greyed out.
SAVE TO MAC This pops up a typical SAVE window. Operation is exactly the
same as described earlier.
EDIT No function - the editor is open!
MAKE ACTIVE Makes the selected program active in the sampler. For
example, even though you may be editing PROGRAM 2 in
ak.Sys, it might not be the selected program in the sampler
itself (for example, you may have selected another program on
the sampler itself). In this case, use MAKE ACTIVE to select
the appropriate program in the sampler.
CREATE NEW KEYGROUPS Allows you to add keygroups to the selected program. This will
pop up a prompt where you may enter the number of
keygroups you want to add.
DELETE CURRENT KG Allows you to delete the currently selected keygroup.
ak.Sys - Version 2.00 Page 40
Page 44

PROGRAM EDITOR
COPY CURRENT KEYGROUP Allows you to copy the currently selected keygroup. This may
be subsequently be pasted into either the currently selected
program or, indeed, any other program.
NOTE It is not possible to copy/paste keygroups between the Z4/8 and an S5/6000 that may
be connected via ak.Sys.
PASTE KEYGROUP Allows you to paste the copied keygroup the currently
selected program. If a keygroup has not been copied, the
PASTE KEYGROUP selection is greyed out (as shown).
DELETE BLANK KGs Allows you to delete blank or ‘empty’ keygroups (i.e. any that
do not have any samples assigned to them).
SEARCH Allows you to search for samples to assign to the currently
selected keygroup. This will pop-up the SEARCH window
where you may enter the name of the sample(s) you are
looking for (SEARCH is described later in this User’s Guide).
ak.Sys - Version 2.00 Page 41
Page 45

PROGRAM EDITOR
Clicking on the SAMPLE name field in the top right ZONES section of the Program Editor pops
up the following contextual menu:
The same pop-up is shown when you click on the SAMPLE name field in the ZONES window:
SEARCH Launches the ak.Sys SEARCH function (more later).
ASSIGN Pops up a list showing all the samples in memory. Scroll up and down this list
and release the mouse on the appropriate sample to assign it to the selected
KG zone.
More conveniently, perhaps, you can also drag and drop samples from the
ak.Sys BROWSER directly onto the sample name field. This will assign the
sample into the selected zone of the selected keygroup.
Furthermore, it is possible to drag a sample directly on a note in the keyboard
graphic shown on the panel. The logic is simple:
Drag a sample onto a note on the keyboard graphic and a ‘one-note’ keygroup
will be created and the sample you are dragging will be assigned to it. For
example, drag a sample called “KICK1” onto CI on the keyboard graphic and a
keygroup with a keyspan of C1-C1 will be created and “KICK1” will be assigned
to that keygroup. Drag a sample called “SNARE1” onto D1 and a keygroup
with a keyspan of D1-D1 will be created and “SNARE1” will be assigned. Etc..
ak.Sys - Version 2.00 Page 42
Page 46

PROGRAM EDITOR
When you drag a sample onto a note, the note is highlighted in red:
You will note that if a keygroup already exists on the note you are dragging a
sample to, the new keygroup will be layered on top of the existing one.
To overwrite an existing keygroup (i.e. replace one keygroup with another),
using CTRL+drag will cause the existing keygroup to be deleted and replaced
with the new keygroup.
NOTE: Mac users should drag and then press CTRL - pressing CTRL first will pop up the
item’s contextual menu.
This function makes program creation very quick and easy. Of course, once
you have done the keygroup creation/sample assignment process (arguably
the most tedious aspect of program creation!) using the above method, the
program can be edited in the usual way.
CLEAR Clears the sample from the currently selected keygroup zone.
AUDITION Allows you to hear the assigned sample.
NOTE: This auditions the sample in its ‘raw’ state regardless of the settings of the PLAYBACK
parameter in the selected KG zone (or other program parameters such as filter setting, etc.).
So, for example, if the sample is looped, even though you may set ONE-SHOT in the zone’s
PLAYBACK parameter, this ‘local’ Program override is ignored and the sample will have looped
playback.
EDIT Will launch your preferred sample editor (more on this in the next chapter).
The actual program parameters should be fairly obvious if you are familiar with using your
sampler from the front panel. If some parameters are not clear, please consult the Z4/8
Operator’s Manual and update documentation.
ak.Sys - Version 2.00 Page 43
Page 47

PROGRAM EDITOR
PROGRAM EDITOR - PANELS/CONTROLS
The top panel deals mostly with ‘global’ parameters. These are from left to right:
VIEW
This has just one button - OPEN. Clicking on this allows you to ‘collapse’ or ‘minimise’ the
Program Editor window so that only the upper ‘global’ portion is shown thus maximising
available screen space on your monitor.
TUNE
This has two controls - SEMI and TRANS. SEMI allows you to adjust tuning of the program in
semitone steps and also allows you to fine tune the program. The button alongside the “SEMI”
label allows you to swap the control below it between semitone tuning and fine tuning:
When the SEMI button is illuminated, the control below shows a collar of LEDs around it and
you may adjust semitones. When the SEMI button is not illuminated, you can adjust the fine
tuning. In this state, the collar of LEDs is not shown and the control becomes more like an
encoder which can be continuously rotated. As you rotate the control round and round, as you
pass a semitone boundary (i.e. past xx.99), the semitone field advance to the next semitone.
The TRANSPOSE control also tunes the program but is a MIDI offset function - i.e. with a
setting of +12, if the program receives C3, the sample(s) on C4 will actually be played. This is
often a better way of tuning a program as it avoids the unpleasant artefacts you get
(“munchkinisation”) when samples are played at higher or lower pitches.
ak.Sys - Version 2.00 Page 44
Page 48

PROGRAM EDITOR
OUTPUT
This single control sets the overall output level for the program. The value shown represents
the program’s output level in dBs.
PITCHBEND
Here, you may set the pitchbend range for the program. You have independent control over
pitch bend up and pitch bend down - both have a range of 24 semitones.
The NORMAL/HELD toggle switch affects the way the pitchbend works and allows you to
choose whether the pitchbend will happen on all notes or only on held notes. This is
particularly useful on sounds with long releases.
Let us say, for example, that you have a sound that has a long release and you are performing a
solo that uses a lot of pitchbend. Using NORMAL, when you pitchbend the note, all of the
notes that are sounding - whether they are being held or are notes currently in the release
stage of their envelope - will bend. Sometimes this is what you want but there can be times
when this spoils the effect you are trying to create.
By selecting the HELD mode of pitchbend, ONLY THE KEY(S) YOU ARE CURRENTLY
HOLDING DOWN WILL BEND and all those notes you are not playing but which are fading
through their release stage will remain unchanged. If you release your finger from the key with
the pitchbend up (or down), as the note dies away, if you let the pitchbend return to zero, that
last note’s pitch will not change. If you release just one note of a chord with pitchbend up or
down, if you let the wheel or lever settle at zero, only the notes you are holding will bend.
The AFTERTOUCH control allows you to use your keyboard’s aftertouch facility to pitchbend
notes - i.e. play a note and then press harder on the key to pitchbend up or down accordingly.
The range is -12 to +12. You may only bend up or down depending on the selection made and
unlike the bend wheel/lever, you cannot pitchbend both ways. Whilst this is a useful
performance tool, it has to be said that it takes some practice to control it accurately.
ak.Sys - Version 2.00 Page 45
Page 49

PROGRAM EDITOR
P
I
T
C
H
TIME
PORTA/GLISS
Portamento is a function that allows you to ‘glide’ from one note to another instead of moving in
steps as is normally the case.
P
I
T
C
H
NORMAL PLAYBACK (NO PORTAMENTO)
TIME
WITH PORTAMENTO SWITCHED ON
As you can see, when portamento is on, each note ‘slides’ to the next and the speed with
which it slides is set by the portamento’s TIME parameter.
The portamento effect is useful when playing acoustic sounds such as stringed instruments
that have no frets (violins, violas, etc., fretless bass) and instruments such as trombone, penny
whistle, etc.. It is also effective on vocal sounds as few, if any, singers hit the note accurately
and most slide into it. Of course, portamento was also a standard feature on older analogue
synths, particularly monophonic ones (where it was often called GLIDE) and was responsible
for the creation of some highly distinctive (although often over-used!) synth effects.
Using the switch to the right of the PORTA/GLISS label, the effect can be switched ON or OFF
(red = ON; grey = OFF). When it is switched ON you will hear the portamento effect as you play.
The TIME control sets the speed of the portamento. It is difficult to specify its range as this
depends on whether SPEED or TIME is selected using the switch to the bottom left of the
PORTA/GLISS panel. You will note that if the TIME parameter is set high but you play notes
quickly, the portamento effect may be so slow that your notes never hit the right pitches! If you
anticipate playing a particular sound quickly, set lower portamento rates.
ak.Sys - Version 2.00 Page 46
Page 50

PROGRAM EDITOR
If TIME is selected, the TIME control sets the portamento effect so that the time of the effect is
constant regardless of the interval played. For example, if the rate is set to give a glide of 1
second, it will take one second to glide up a semi-tone or seven octaves. For example:
1 sec
1 sec
1 sec
1 sec
1 sec
When TIME is selected
When set to SPEED, the speed of the effect takes depends on the interval. For example, if it
takes one second to cover an octave, it will take two seconds to cover two octaves, four
seconds to cover three octaves, eight seconds to cover four octaves, etc.. For example:
1 sec
2 secs
4 secs
8 secs
16 secs
When SPEED is selected
You may use these two portamento modes to create a range of different musical effects.
The GLISS option allows you to select a ‘glissando’ effect. This is similar to portamento (i.e. a
glide between notes) except that the glide is quantized into semitone steps
ak.Sys - Version 2.00 Page 47
Page 51

PROGRAM EDITOR
GLOBAL
In the GLOBAL section of the upper panel, you can set certain parameters that affect the
program as a whole.
You can rename the program in the Program Name field:
Simply click on the field and you will enter a ‘name entry’ mode where you can enter a 20
character name. Hit RETURN to confirm the entry.
NOTE: You can enter a longer name than 20 characters if you wish but only the first 20 will be
shown in this field
Whilst you are free to enter whatever name(s) you want, please bear in mind that the last
characters in the name will not be shown making it potentially difficult to identify certain program
names. It is recommended to stick with the 20 character limitation wherever possible.
The PROG NO field allows you to enter a program number for the selected program (useful if
you plan to select programs via remote MIDI program change). Simply type in the program
number you wish to assign to the selected program.
NOTE: The range is 0 (OFF - no program number assigned) through 1 - 128. Typing in
numbers greater than 128 will ‘round’ to 128.
The POLY field allows you to set the polyphony of the selected program. The default is (of
course) 64 voices but this can be set as you wish according to your circumstances (best to
keep to 64 and let the sampler’s dynamic voice allocation take care of the rest!).
NOTE: This field is ‘ranged’ within the Z4/8’s limits. For example, entering a value of 999 will
set a value of 64 - the X4/8’s maximum polyphony; entering a value of 000 will set a value of 1,
the Z4/8’s minimum polyphony.
ak.Sys - Version 2.00 Page 48
Page 52

PROGRAM EDITOR
The MONO LEGATO switch (red = ON; grey = OFF) allows you to turn the selected program
into a monophonic synth with single triggering. The effect of single triggering is that if you hold
one note and play another, the pitch changes to the new note but the attack of the new note is
not re-triggered.
For example:
Of course, the sample either has to be looped or has to be of sufficient length to allow this.
Even when MONO LEGATO is ON, playing each note separately will cause the attack of each
note to be re-triggered.
This function is extremely useful for emulating the playing styles and phrasing of solo
instruments such as flutes, oboe, clarinet, saxophone, etc.. It can also be effectively used on
solo and ensemble strings and brass. It is almost essential when playing synth bass sounds as
it emulates the classic monophonic synth keyboard. You will find it useful too when playing
leadlines of any kind.
ak.Sys - Version 2.00 Page 49
Page 53

PROGRAM EDITOR
The X-FADE switch determines whether keygroup crossfade is enabled or not. Sometimes,
when multi-sampling certain instruments, it is beneficial to crossfade adjacent keygroups to
achieve a smoother transition from one keygroup to another. The X-FADE switches the
function on (all overlapping keygroups will be affected) and the LIN / EXP / LOG switch below it
allows you to select different crossfade curves. They are as follows:
ak.Sys - Version 2.00 Page 50
Page 54

PROGRAM EDITOR
ZONES
Although not strictly a ‘global’ function, this section of the panel shows the samples assigned
to Zones 1-4 of the currently selected keygroup at all times regardless of which keygroup panel
is selected. Samples may be assigned here by clicking on the SAMPLE name field - this will
pop up the following contextual menu:
Drag down to ASSIGN to pop-up a list of samples in memory:
Drag to the sample you want to assign and release the mouse - the selected sample will be
assigned to the selected zone.
Alternatively, you can simply drag samples from a desktop drive directly onto one of the name
fields to drop them into the selected zone.
ak.Sys - Version 2.00 Page 51
Page 55

PROGRAM EDITOR
KG EDIT
Here, you can select the type of keygroup editing you want to perform. There are three
options:
ONE Editing actions will affect only the selected keygroup - all other keygroups will
remain unaffected. This is useful in drum programs and the like where you may
only want to edit the characteristics of one sound.
ALL Any editing actions will affect all keygroups equally. This is useful for editing
certain instrument sounds - for example, you might want to adjust the attack
time and/or release time of a strings pad.
ADD Any editing actions performed with this option enabled will affect all keygroups
but, instead of all the other keygroups’ parameters changing to the value you
set in the selected keygroup (as is the case when ALL is selected), the
change you make in the selected keygroup will be added to the other
keygroups. For example, you have a program where the release times are set
as follows:
KG1 40
KG2 45
KG3 50
KG4 55
With KG1 selected, if you change the release time to 50, the other keygroups
will be affected as follows:
KG1 50
KG2 55
KG3 60
KG4 65
This is useful where you have different keygroups whose parameters vary and
you want to retain the relative differences between the keygroups. A practical
example of this might be a piano sound - to cater for the fact that low notes
sound for longer than high notes, the amplitude envelopes’ decay times may
be different with each keygroup getting progressively faster as you play up the
keyboard range. Selecting ALL would be inappropriate because editing the
decay time on one keygroup would force all other keygroups’ decay time to be
the same. However, by selecting ADD, the decay times would retain their
relative offsets.
ak.Sys - Version 2.00 Page 52
Page 56

PROGRAM EDITOR
KEYSPAN
Keyspan is set using the keyboard graphic:
Simply click and drag the left and/or right edges of the keyspan to set low and high note range
accordingly. Some useful keyboard modifiers may also be used:
SHIFT+DRAG Moves both the high and low note ranges in parallel. For example, in a
keygroup spanning C1-C2, SHIFT+DRAGGING to C3 will move the keyspan to
C2-C3.
CMND+CLICK Using CMND+CLICK on a note on the keyboard graphic will set a one note
keyspan (e.g. CMND+CLICK on C3 to set a keyspan of C3-C3 - useful for
setting drum keygroups).
NOTE: The HI/LO note fields to the right of the keyboard icon are merely for indication only
and are not used to set note ranges - this is done purely by dragging on the keyboard graphic.
ak.Sys - Version 2.00 Page 53
Page 57

PROGRAM EDITOR
PANEL PAGES
Down the left of the lower panel are buttons that select different ‘pages’ within the Program
Editor:
They are:
ZONES Displays a page where you may set parameters related to keygroup zones.
FILTER/KGRP Displays a page where you may set parameters related to the filters and
‘master’ keygroup settings.
ENVELOPES Displays a page where you may set the Z4/8’s envelope generators.
LFOs Displays a page where you can set the Z4/8’s low frequency oscillators (LFOs)
MODULATION Displays a page where you can set the Z4/8’s extensive modulation matrix.
These are described in detail next.
The various pages are selected simply by clicking on the appropriate button.
ak.Sys - Version 2.00 Page 54
Page 58

PROGRAM EDITOR
ZONES
In the ZONES panel, you can assign samples to each of the keygroup’s 4 zones and these may
be balanced, panned, tuned, sent to individual outputs and more. Each zone’s parameters are
identical and are as follows:
SAMPLE
Here you can see the name of the sample assigned to the zone. Samples may be assigned
here by clicking on the field. This will pop-up the following contextual menu:
Dragging down to ASSIGN will pop-up a list of samples in memory - simply drag to the one you
want to assign and release the mouse.
Alternatively, samples can be dragged from a desktop drive directly onto the field.
NOTE: Samples can be stereo or mono and a single stereo file can be assigned to a single
sample field. If a stereo sample is assigned to a zone, the PAN control acts as a balance control.
Please note that stereo samples use two voices each. This doesn’t mean that the sampler’s
polyphony is halved as soon as a stereo sample is assigned, just that any time a stereo sample
is played, it uses two voices. Theoretically, if every sample was stereo, then yes - overall
polyphony would be halved but in practice, you are going to use a mixture of mono and stereo
samples and the voice allocation is totally dynamic and transparent.
ak.Sys - Version 2.00 Page 55
Page 59

PROGRAM EDITOR
LEVEL/PAN
These two controls allow you to set the level and pan position of the zone. Level is expressed
in dBs.
OUTPUT
Using this field you can assign the zone to the sampler’s individual outputs. Clicking on this
field pops up the following menu:
When MULTI is selected, the zone will be automatically assigned to the output used by the
program when it is used in a multi. However, it is also possible to send individual keygroup
zones to stereo pairs of outputs or single individual outputs. This is useful for use with drum
and percussion programs where each drum can be connected to individual channels on an
external mixing console where they may be separately processed.
ak.Sys - Version 2.00 Page 56
Page 60

PROGRAM EDITOR
NOTE: When a stereo sample is routed to a single output, the left/right legs of the sample are
summed to the mono output.
NOTES ON USING THE INDIVIDUAL OUTPUTS....
Normally, programs are assigned to the individual outputs within a multi:
Part 1 Chan 1A Piano Out 1
Part 2 Chan 2A Bass Out 2
Part 3 Chan 3A Stereo strings Out 3/4
Part 4 Chan 4A Flutes Out 5
Etc.. In this way, each part can be brought up in separate channels of a mixing console where
they can be more easily balanced as well as have EQ, compression, etc., applied.
However, in the case of drums and percussion, the situation is slightly different as it is likely that
rather than apply a single effect at one level to the whole program, you would probably want the
individual drums to have their own outputs for balancing and processing on a mixing console.
For example,
KG1 Kick Out 1
KG2 Snare Out 2
KG3 Closed hi-hat Out 3
KG4 Open hi-hat Out 4
KG5 Low tom Out 5
KG6 Mid tom Out 6
KG7 Hi tom Out 7
Etc..
Of course, this is easily possible in a program and individual keygroups can, as we have seen,
be routed to the individual outputs with great flexibility.
However, you should be aware that if you have made up such a drum/percussion program,
some odd (but logical) things can happen when you assign that program to a multi.
For example, let’s imagine you have made up a multi as described in the above example. To
that, you now add the drum program we created above. You can probably imagine what is
going to happen. That’s right - the kick drum is going to share the piano’s output, the snare is
going to come out of the same output as the bass, the hi-hats and low tom will share the stereo
strings output, etc..
Of course, it doesn’t have to be a drums program - you could load a program from a
commercially available CD-ROM library where the programmers (for some reason) have routed
the programs keygroups to, say, outs 1 and 2 - in this case, you might add it to the multi and
wonder why, however much you tweak the part’s output assignment, it’s always coming out
through outputs 1 and 2
Other than re-organising your output assignments, there’s not much that can be done to avoid
this. However, it is mentioned in case you add a program to a multi and odd things start
happening with the output assignments in a multi you are creating.
ak.Sys - Version 2.00 Page 57
Page 61

PROGRAM EDITOR
FILTER
This allows to set an offset for the filter cutoff frequency in each zone. Not only does this
control allow you to fine tune the filter cutoff slightly to maintain a consistent tone between
keygroups and zones but can also be used more dramatically with filter sweeps. As an
example, layer the same sample(s) in Zone 1 and 2 and set a filter offset between them - the
effect will be two filters sweeping in parallel. There are many other possibilities.
START
This parameter allows you to determine the way in which velocity affects the playback starting
point for each sample in a keygroup. The higher the positive number, the earlier in the sample
playback will start relative to the key velocity (i.e. a high key velocity will start playback earlier in
the sample). A negative number has the opposite effect (a high key velocity will start playback
later in the sample than a low key velocity).
Played with a high velocity and a setting of +1000, the sample
starts at the beginning allowing the attack to be heard.
Played with a low velocity and a setting of +1000, the same sample
starts later in the sample thereby missing the attack of the sample .
This can be effective on drums where a low velocity hit skips the drum’s natural attack creating a
softer sound but hitting hard will cause the natural attack to sound. The same technique can be
usefully employed with other sounds that have a distinctive attack.
ak.Sys - Version 2.00 Page 58
Page 62

PROGRAM EDITOR
TUNE
This allows you tune the zone. The control works in exactly the same way as the global tuning
controls described earlier. You can switch the control for setting semitones or fine tuning using
the button at the top right of the control.
PITCH
This allows you to turn keyboard control of pitch off (or on) There are only two options - ON or
OFF. Switching keyboard off is best suited for drum or phrase samples (loops, etc.) that need
to played only at their nominal pitch.
PLAYBACK
This parameter allows you to override the assigned sample’s playback characteristics:
The options are:
SAMPLE The sample assigned to the zone will playback according to the playback
settings of the sample.
ak.Sys - Version 2.00 Page 59
Page 63

PROGRAM EDITOR
ONE SHOT The sample will play to its end regardless of how long you hold the note. This is
useful (recommended even!) for drum samples.
NOTE: A quick way of getting drum and/or percussion samples to playback with ONE-SHOT is
to press ALL (to edit all keygroups equally) and select ONE-SHOT in the PLAYBACK field. This
is far easier than setting the same parameter on all the samples individually in your sample
editor.
NO LOOP If the sample has a loop set in it, this option will turn it off. If, of course, the
sample has no loop set, this option has no effect.
LOOP This will turn looping on in the assigned sample. However, you will need to use
your sample editor to actually set the loop start and end points.
RANGE
These controls allow you to set how the four zones react to incoming velocity and it is possible
to switch or crossfade between different samples in different zones.
For example, you could have three separate samples: SOFT BASS in Zone 1, HARD BASS in
Zone 2 and PULL BASS in ZONE 3 and their velocity ranges could be split as follows:
ak.Sys - Version 2.00 Page 60
Page 64

PROGRAM EDITOR
As you play across these ranges, you can switch between the different samples allowing you to
emulate more closely the many tones available from just one note of a real bass guitar. The
same could be done with drums or any other instrument.
If the velocity ranges overlap (i.e. 0-70, 63-100 and 93-127) and X-FADE (shown above) is
switched on (i.e. illuminated), then the velocity zones will crossfade giving a smoother
transition between zones in some cases. You can select from three crossfade profiles
according to the crossfade you want to achieve. The crossfade curves are the same as those
described for KEYSPAN.
OTHER USES FOR KEYGROUP ZONES
As well as velocity switching and crossfading, keygroup zones can be used for layering
sounds. Some examples.....
• Assign various kick drums to the zones in a keygroup to create a fat foundation to your
track. Do the same with snares and other drum/percussion sounds.
• Assign a kick drum to Zone 1 and a low frequency, almost sub-sonic sine wave to Zone 2.
This will create a deep, speaker-rattling kick drum.
• Following on from the kick drum ‘fattener’ above, assign a synth bass to Zone 1. Now add a
low frequency sine or triangle wave to Zone 2 (it should be in tune with the synth sample in
Zone 1 of course!). The result will be a solid synth bass sound reinforced by the strong
fundamental frequency provided by the sine/triangle wave.
• In a similar vein to the suggestion above....
Some commercially available sound libraries use very short loops on some of their synth
samples. The result is that you can have a fat, juicy attack where you hear the oscillator
detune at the start of the sample but when the loop kicks in, it goes thin, buzzy and lifeless.
To overcome this, sample a single sawtooth (or whatever other waveform may be
appropriate) and loop it (simple single waveforms such as this are easy to loop). Put the
‘buzzy’ sample in Zone 1 and your sawtooth (or whatever) sample in Zone 2 - now detune
them slightly using the FINE TUNE control. The result will be that you hear the attack but
when the lifeless loop of the original sample kicks in, it will be detuned against your
waveform sample and so will have some life and movement. Adjust the fine tune detune
between them as appropriate for the sustain portion of the sound.
• In a pad sounds, layer the same samples on top of each other. E.g..
Zone 1 String pad C1
Zone 2 String Pad C1
Repeat this for all the other keygroups in the program (if any). Now use FINE TUNE to set a
detune between them - this will create a rich, thick, chorused pad.
• As above, assign the same samples to Zones 1 and 2 and add some detune. Now pan
Zone 1 hard left and Zone 2 hard right to create a ‘pseudo-stereo’ program.
• As above, assign the same samples to Zones 1 and 2 but tune them apart by, say, 7
semitones so that they play a fifth apart. Pan them if you want. This is a common trick used
on preset ‘ROMplers’ (i.e. synths that use samples as their waveforms) to create dramatic
‘film soundtrack’ presets.
Food for thought!
ak.Sys - Version 2.00 Page 61
Page 65

PROGRAM EDITOR
FILTER/KGRP
In this panel you can adjust parameters relating to the Z4/8’s powerful multi-mode filters and to
the master keygroup functions. These are:
FILTER
The TYPE menu allows you to choose from 34 filter types including various lowpass, bandpass
and hipass filters and also various ‘combination’ filters, peak filters, notch filters and phase shift
filters. Each filter’s response graph is shown below the TYPE field which give an indication of
the effect they will have on the sound.
The filters types are as follows
2-POLE LP
This is a 12dB/Octave lowpass filter with resonance.
2-POLE LP+
This is another 12dB/Octave lowpass filter but with enhanced
resonance.
ak.Sys - Version 2.00 Page 62
Page 66

4-POLE LP
4-POLE LP+
6-POLE LP
2-POLE BP
PROGRAM EDITOR
This offers a 24dB/Octave lowpass filter with resonance. This does the
same as the 12dB/Octave filter except that the roll-off slope is steeper.
Thus high frequencies are attenuated more dramatically giving what
some people refer to as a ‘punchier’ sound compared with the slightly
‘fizzier’ sound of the 2-POLE lowpass filter.
This also offers a 24dB/Octave filter but with enhanced resonance.
This offers a 36dB/Octave lowpass filter.
2-POLE BP+
4-POLE BP
4-POLE BP+
This is a resonant bandpass filter with a 6dB/Octave roll-off slope
either side of the band.
This is a bandpass filter with a 6dB/Octave roll-off slope either side of
the band but with enhanced resonance.
This is a resonant bandpass filter with a 12dB roll-off slope either side
of the band. This has a similar effect to the 2-POLE bandpass filter but
its steeper rolloff attenuates the harmonics more profoundly.
This is a resonant bandpass filter with a 12dB roll-off slope either side
of the band but with enhanced resonance.
ak.Sys - Version 2.00 Page 63
Page 67

6-POLE BP
1-POLE HP
1-POLE HP+
PROGRAM EDITOR
This is a resonant bandpass filter with an 18dB/Octave rolloff either
side of the band.
A 6dB/Octave highpass with resonance. This allows high frequencies
to pass though unaffected but attenuates low frequency harmonics as
the cutoff frequency is raised from 0 to 100.
This offers a 12dB/Octave highpass filter but with enhanced
resonance.
2-POLE HP
2-POLE HP+
4-POLE HP
4-POLE HP+
A 12dB/Octave resonant highpass filter similar to the 1-POLE HP but
with a steeper roll-off.
Another 12dB/Octave resonant highpass filter but with enhanced
resonance.
A 24dB/Octave resonant highpass filter.
Another 24dB/Octave resonant filter but with enhanced resonance.
6-POLE HP
A 36dB/Octave resonant highpass filter.
ak.Sys - Version 2.00 Page 64
Page 68

LO<>HI
LO<>BAND
BAND<>HI
PROGRAM EDITOR
A resonant filter that is lowpass at the lower end of the frequency
spectrum and highpass at the upper end.
A resonant filter that is lowpass at the lower end of the frequency
spectrum and bandpass at the upper end.
A resonant filter that is band pass at the lower end of the frequency
range and highpass at the top end.
NOTCH 1
NOTCH 2
NOTCH 3
WIDE NOTCH
A notch filter with a single notch that attenuates harmonics. The cutoff
control sets the point of attenuation whilst resonance simultaneously
increases the depth of the notch and narrows its width.
A notch filter with a two notches spaced two octaves apart. Resonance
increases the depth of the notches and narrows their width.
A notch filter with a two notches spaced three octaves apart.
Resonance increases the depth of the notches and narrows their
width.
Another dual notch filter with one notch in the upper frequencies and
the other in the lower frequencies. Resonance has the same effect as
the other notch filters.
ak.Sys - Version 2.00 Page 65
Page 69

PROGRAM EDITOR
BI-NOTCH
A dual notch filter based on NOTCH 1 in which modulation sweeps the
notches in opposite directions. As one moves up through the
frequency range, the other moves down and vice versa.
NOTE: The differences between the five notch filters are subtle, it must be said but with
different cutoff frequency and resonance settings and depending on the modulation settings
and the sound being processed, you will hear quite distinct differences.
PEAK 1
A peak filter with a single peak that can be used to emphasise a band
of frequencies much like a single band of EQ. Resonance increases
the intensity of the peak.
PEAK 2
A peak filter with a two peaks spaced two octaves apart. Resonance
increases the intensity of the peaks.
PEAK 3
A peak filter with a two peaks spaced three octaves apart. Resonance
increases the intensity of the peaks.
WIDE PEAK
Another dual peak filter with one peak in the upper frequencies and
the other in the lower frequencies.
BI-PEAK
A dual peak filter based on PEAK 1 in which modulation sweeps the
peaks in opposite directions - as one moves up through the frequency
range, the other moves down and vice versa.
NOTE: The differences between the five peak filters are subtle, it must be said but with
different cutoff frequency and resonance settings and depending on the modulation settings
and the sound being processed, you will hear quite distinct differences.
ak.Sys - Version 2.00 Page 66
Page 70

PHASER 1
PHASER 2
BI-PHASE
PROGRAM EDITOR
A phase shifter created with a notch and peak filter at around the same
frequency. Resonance increases the intensity of the peak and the
depth of the notch.
A phase shifter created with a notch and peak filter with offset
frequencies that has a slightly ‘swirlier’ sound as the frequency is
modulated. Resonance increases the intensity of the peak and the
depth of the notch.
A phase shifter based on PHASER 1 in which modulation sweeps the
peak and notch in opposite directions - as one moves up through the
frequency range, the other moves down and vice versa.
VOWELISER
This is a special filter configuration that is able to produce certain vowel
sounds and articulations (EE-OO, EE-OR, EE-AH and OO-AA, OOEH, OO-OW). The graphic depiction indicates that a cutoff frequency
setting of around 75 will give an “Aaah” sound. Increasing cutoff will
create and “Eeeeh” sound and lowering the cutoff below 75 will give
an “Ooooh” sound.
If you modulate this filter type, you can create vocal articulations.
Of course, the results depend very much on the sample(s) being
processed and you may need to experiment with the cutoff frequency
and resonance controls (and modulation settings) to produce the
vowel effect you want.
And finally, this filter type doesn’t have to be used solely for the
creation of vocal or vowel sounds - it can be used as an interesting
filter in its own right.
With the exception of the VOWELISER, the grey area in the graphics give a rough indication of
how the incoming audio will be processed.
ak.Sys - Version 2.00 Page 67
Page 71

PROGRAM EDITOR
CUTOFF
This control sets the initial cutoff frequency of the selected filter type. The nature of the sound
depends very much on the type of filter being used.
RESONANCE
This allows you to sharpen the point at the cutoff frequency thereby emphasising the
harmonics at that point in some way (the exact effect depends on the type of filter selected).
The range is 0-64.
NOTE: Because of the high amounts of gain boost that take place with resonance, high
settings of resonance can cause distortion. If you experience such distortion, either back off
the resonance parameter a bit or, alternatively, reduce the input level to the filter using the
ATTENUATION parameter described below.
In extreme cases where the above measures do not reduce distortion, one option is to re-scale
the level of the actual sample(s) in your sample editor.
ATTENUATION
This allows you to turn down the level of the signal going to the filters to compensate for
potential distortion when using high resonance settings. The range is 0-30dB in 6dB steps.
0dB is the normal setting but if you experience any distortion with extreme resonance settings,
try adjusting ATTENUATION.
NOTE: The gain boost produced by the ‘+’ type filters that offer enhanced resonance can be
so severe that even an ATTENUATION setting of -30dB may not be enough to reduce
distortion. In this case, back off the resonance a little or try other means of level reduction.
ak.Sys - Version 2.00 Page 68
Page 72

TRIPLE MODE
PROGRAM EDITOR
TRIPLE mode is a special mode of filter operation where three independent, multi-mode filters
are separately available. The filter options for each filter in this mode are:
These are wired in series and allow you to create your own unique filter combinations. The
cutoff frequency and resonance for each filter can be separately modulated in the modulation
matrix allowing an enormous range of synth sounds to be created.
ak.Sys - Version 2.00 Page 69
Page 73

KEYGROUP
OPEN HI-HAT
CLOSED HI-HAT
PROGRAM EDITOR
This panel offers parameters that affect the selected keygroup as a whole. They are:
LEVEL
This sets the overall level of the keygroup. The value is expressed in dBs.
POLYPHONY
Sets the polyphony of the keygroup. The range is 1-64.
MUTE GROUP
This allows you to group several keygroups together so that they are essentially monophonic.
The main reason for this is for drums where sometimes you want a sample to stop playing when
another is played.
For example, you would want a closed hi-hat to stop an open hi-hat. To do this, simply assign all
the relevant keygroups to the same Mute Group. For example, if all your hi-hats are in
keygroups 3-6, assign those keygroups to, say, Mute Group 1. All other keygroups will be
unaffected but all those in mute group 1 will be mutually exclusive - that is, if one is sounding
when another is played, it will be cut. For example:
(or triangle, etc)
(or triangle, etc)
OPEN AND CLOSED HI-HAT WITH MUTE GROUP OFF
ak.Sys - Version 2.00 Page 70
Page 74

PROGRAM EDITOR
OPEN HI-HAT
(or triangle, etc)
OPEN AND CLOSED HI-HAT WITH MUTE GROUP ON
CLOSED HI-HAT
(or triangle, etc)
In the first diagram, the open hi-hat continues to sound even though the closed hi-hat is
played. In the second example, however, the open hi-hat is shut off by the closed hi-hat
thereby creating a more natural effect.
This function may also be used to emulate the characteristics of older drum machines. On
these early drum machines, whilst they offered maybe 8 voice polyphony, each individual drum
sound was usually monophonic. This only became apparent when you tried to perform a snare
roll or something similar. Instead of the snare’s natural decay being allowed to sound, the next
hit would cut the previous one dead resulting in a rather unnatural staccato effect. Of course, at
the time, this was undesirable but the dictates of musical fashion now say that this effect is
popular in some music styles!! By assigning your snare drum into a mute group, you may recreate this effect. For example:
SNARE DRUM ROLL WITH MUTE GROUP OFF
In this example, each snare hit is allowed to decay naturally.
SNARE DRUM ROLL WITH MUTE GROUP ON
In this example, each hit is cut short by the next one.
Up to 32 mute groups may be set.
SEMI
Allows you to tune the keygroup. As with other tuning controls we have seen, the button to
the top right of the control allows you to switch between setting semitone tuning and fine
tuning.
ak.Sys - Version 2.00 Page 71
Page 75

PROGRAM EDITOR
FX LEVEL
Sets the level going to the internal effects unit (if fitted). Normally, effects are set in the MULTI
and applied to the program overall. However, using the FX OUTPUT field, it is possible to
override this. And you may send the keygroup to the effects as follows:
This allows you to send individual keygroups to the effects by overriding the main program’s
effects routing. The default will be MULTI (i.e. the routing uses the effects bus selection set
when the program is placed in a MULTI) but you may also select OFF (i.e. the selected
keygroup is not routed to the effects) or FX A, B, C, D, A and B or C and D.
NOTE REGARDING THE USE OF FX OUTPUT : OFF
Please be aware of the following situation that could arise....
In some commercially available sound library, some programs are set so that all keygroups FX
OUTPUT is set to OFF. Of course, this is something you may also do in your own programs.
This is not a problem in itself but there is one situation where this can cause confusion: if you
use such a program in a multi and then attempt to assign that part to an effects channel,
nothing will happen and regardless of what you do, no effect will be added. The reason, of
course, is that the programs FX OUTPUT setting is forcing the effects routing to OFF so that
effects cannot be applied. To overcome this, edit the program, set keygroup edit to ALL and
change the FX OUTPUT to MULTI.
In fairness, this isn’t a common problem and it seems to be related mostly to S3000XL sound
library where, for some reason, this parameter was set to OFF by the programmers. However, it
is mentioned in case you come across this situation.
ak.Sys - Version 2.00 Page 72
Page 76

PROGRAM EDITOR
PLAY TRIGGER
This parameter determines how notes trigger the Keygroup. The options are as follows:
NOTE ON Sample playback is triggered by MIDI note-ons and playback is stopped by MIDI
note-offs (in other words, normal operation).
NOTE OFF When this option is selected, a new control appears above the switch (don’t
you just love virtual control panels!):
. Playback of the selected keygroup is now triggered by MIDI note-off. At first,
this might seem a bit odd but this function allows you to do many creative
things. As an example, you have a program comprised of acoustic guitar
samples. By also including samples of the various ‘squeaks’ and ‘scrapes’ that
often occur during an acoustic guitar performance and assigning these to
keygroups set to NOTE OFF, you can play the guitar sound but, at note-off,
some of the characteristic ‘squeaks’ and ‘scrapes’ can be made to sound. Of
course, this technique could be applied to any sound - the ‘grunt’ of a damped
heavy metal guitar, the ‘rattle’ of a plucked acoustic double bass string as the
player takes his finger off the neck of the instrument. You could even trigger a
completely different sample at note-off - trigger a swirling sound effect when
you stop playing a pad sound, for example.
With the ‘virtual’ control that appears, you can set whether the note-off sample
will trigger at the note-on velocity (i.e. N-ON as shown above) or at a different
velocity setting. For example, with the control set at 110, playing below this
value will not trigger the note-off sample but hit the keyboard hard (i.e. above a
velocity of 110) and the note-off sample will sound.
TRIGGER A MIDI note-on will trigger the sound and it will play until another note-on is
received - the new note-off will stop playback. This is useful for triggering
looped samples - trigger the sample and it will sound (loop) for as long as you
want until you hit the key again to stop it.
This option can be used for very long samples too (even if they are not
looped).
ak.Sys - Version 2.00 Page 73
Page 77

PROGRAM EDITOR
ENVELOPES
The ENVELOPES panel is where you set the Z4/8’s envelopes. The Z4/8 has three envelope
shapers - an ADSR for amplitude and a multi-stage filter and auxilliary envelope. These
envelopes are set by dragging ‘handles’ and these are highlighted as you hover over each
envelope:
Not only that, but as you hover over each envelope, the envelope times and levels are
displayed (as shown above). To change an envelope, click and drag the ‘handle’.
To assist in the creation of envelope shapes, each envelope shaper has a series of presets
that can be selected from the TEMPLATE field:
ak.Sys - Version 2.00 Page 74
Page 78

PROGRAM EDITOR
LFOs
The Z4/8 has two Low Frequency Oscillators (LFOs) and both are identical. Each one can be
employed for a variety of uses from simple vibrato to filter sweeps, panning and more. The
parameters are:
WAVEFORM
Clicking on this field pops up a list of available modulation waveforms:
Selecting one shows the waveform in the graphic display. These are as follows:
Triangle Sine Square
Sawtooth Up Sawtooth Down Random
ak.Sys - Version 2.00 Page 75
Page 79

PROGRAM EDITOR
SHIFT/PHASE
These two controls allow you to set the control shape of the selected waveform. SHIFT sets
the rotation point of the selected waveform. At a setting of 00, the waveform ‘rotates’ around a
zero crossing but you can move this up or down in variable amounts:
The PHASE control allows you to set where in the waveform the cycle will start:
You can see that in the screen shot to the left, the cycle will start at the waveform’s leading
edge whilst in the screen shot to the right, the cycle starts midway through the waveform.
NOTE: RE-TRIGGER (see the next page) needs to be switched ON for the PHASE function
to have an effect.
DEPTH
This sets the modulation amount for the LFO. A value has to be set here regardless of any
modulation levels set for the LFOs in the modulation matrix.
ak.Sys - Version 2.00 Page 76
Page 80

PROGRAM EDITOR
RATE
This sets the speed of the LFO. The range is 0-100 which equates to 0.1Hz to 10Hz in .1Hz
steps. The value shown above, therefore, is 5.8Hz.
DELAY
This control sets the length of time it takes for the LFO to fade in to full depth after a note is
played.
RE-TRIG
This allows you to set whether or not the LFO will re-trigger with every new note-on or not. With
RETRIGGER set to ON, each note you play will reset the cycle of the selected waveform. For
example, with the triangle wave selected, you would get this result:
MIDI NOTE ON
This is useful for certain types of modulation effects where you want the effect to start at the
same point in the modulation waveform for every note you play.
However, there are occasions when you want the LFO to be free running in the background.
For example, on filter or panning sweeps where you want the effect to be gradual as you play,
you will want to switch RETRIGGER to OFF to get this result:
MIDI NOTE ON
Here, the modulation waveform will ignore incoming note-on messages and will be rising and
falling giving you a gradual sweep through whatever it is applied to.
ak.Sys - Version 2.00 Page 77
Page 81

PROGRAM EDITOR
MIDI SYNC
This allows you to switch MIDI clock sync on or off. When it is switched on, the LFO will only run
when the sampler receives MIDI clock signals.
When MIDI SYNC is on, the RATE control sets how many beats there will be for each complete
LFO cycle. This way, you can synchronise filter, panning or other sweeps with your song. For
example, with it set to 4, one complete LFO cycle will take place over the space of four crotchet
beats so, in a 4/4 time signature, that equates to one cycle per bar:
Triangle wave set to 4 Beats/Cycle
To set the LFO to cycle, for example, over 4 bars of a 4/4 piece, you should set 16 and for 8
bars, 32, etc.. The total amount is 64 beats per cycle or 16 bars.
This scheme also allows you to cater for 3/4 time signature and so, for example, to set the LFO
to have one cycle over 4 bars of a 3/4 time signature, you would set 12 or to have two cycles
every two bars, you would set 6.
You may also set how many cycles there will be per beat and once you go back beyond 1, the
parameter changes to 1/x. Thus, a setting of 1/8 will give you (not surprisingly!) 8 cycles for
every crotchet beat.
**** NOTES ABOUT MIDI CLOCK SYNC ****
• The MIDI clock tempo is actually a ‘global’ value that affects all programs equally. However,
each program may have its own clock division so that, for example, in one multi, you could
have four programs each set to sync to MIDI clock. Program 1 could be set to sweep the
filter once every four bars whilst program 2 could do the same over sixteen bars whilst
program 3 is panning back and forth over eight bars and program 4 uses a faster clock
division to sync vibrato to MIDI clock. I
• You should only receive MIDI clock through one of the sampler’s MIDI inputs A or B. DO
NOT SEND MIDI CLOCK TO BOTH MIDI INPUTS. If you do, you will get extremely
unpredictable results (the LFOs will run twice as fast in fact as well as having erratic sync). If
your sequencer has multiple MIDI outputs and two are connected to the Z4/8 for 32channel sequencing, you should disable clock transmission on one the outputs (it doesn’t
matter which).
SYNC
When set to ON, all 64 LFOs (one per voice) run together at the same rate. When switched to
OFF, they each run at a slightly different speed to create a more ‘ensemble’ effect on sounds
such as strings, brass, pads, etc..
ak.Sys - Version 2.00 Page 78
Page 82

PROGRAM EDITOR
IMPORTANT NOTE ABOUT THE LFOs FOR EXISTING AKAI SAMPLER USERS
In previous Akai samplers, the LFOs were set at the ‘global’ level - that is, anything you set for
the LFOs affected all keygroups equally.
However, on the Z4/8, the LFOs are now set at the keygroups level. This means that every
keygroup in a program can have its own unique settings. For example, KG 1 could use LFO2
set to SQUARE wave at a RATE of 55 whilst KG2, 3 and 4 could use LFO 2 set to TRIANGLE at
a RATE of 10.
If you want the an LFO to affect all keygroups equally, just switch KG EDIT to ALL.
ak.Sys - Version 2.00 Page 79
Page 83

PROGRAM EDITOR
MODULATION MATRIX
In the MODULATION panel, you can route the various modulation destinations to the various
modulation sources.
The modulation sources available are:
MOD WHEEL
BEND UP
BEND DOWN
AFT’TOUCH
VELOCITY
TILT VELO
OFF VELO
KEY-BOARD
LFO1
LFO2
AMP ENV
FILT ENV
AUX ENV
CONTROLLER: (Control Changes can be assigned)
EXT 1–8 (for use with the front panel Q-Link controls)
•MODWHEL
•BEND UP
•BEND DWN
•EXT1-8
•LFO1
•LFO2
•CTRL
NOTE: The controllers prefixed with a ‘•’ (e.g. •MODWHEEL) only have an effect at note-on.
The control sources are selected simply by clicking on the appropriate field. A list of the
possible controllers listed above will be shown - drag and release to make your selection.
ak.Sys - Version 2.00 Page 80
Page 84

The available modulation destinations are as follows:
AMPLITUDE
PAN
PITCH
LFO1 RATE
LFO2 RATE
LFO1 DEPTH
LFO2 DEPTH
LFO1 DELAY
LFO2 DELAY
CUTOFF
RESONANCE
TF CUTOFF 1 (triple filter)
TF RES 1
TF CUTOFF 2
TF RES 2
TF CUTOFF 3
TF RES 3
AMP ENV ATT
AMP ENV DEC
AMP ENV REL
FILT ENV R1
FILT ENV R4
AUX ENV R1
AUX ENV R4
ZONE SELECT
ZONE1 LEVEL
ZONE1 PAN
ZONE1 PITCH
ZONE1 START
ZONE1 FILT (same again for Zones 2–4).
PROGRAM EDITOR
Modulation destinations are selected simply by clicking on the appropriate field. A list of
possible destinations is shown - drag to the one you want to use and release to make your
selection.
ak.Sys - Version 2.00 Page 81
Page 85

PROGRAM EDITOR
USING THE MOD MATRIX
Up to 64 possible ‘connections’ can be made in any one program and these connections are
selected simply by clicking on the appropriately numbered field. You can scroll up and down
the connection fields using the scroll bar to the left of the fields.
To make a connection, click on a SOURCE field to pop-up the list of possible sources:
Now click on the appropriate DESTINATION field to pop-up the list of possible destinations:
You may now set a modulation amount using the DEPTH control.
NOTE: Selections made for modulation sources and destinations affect all keygroups equally.
For example, if MODWHEEL is assigned to FILTER CUTOFF in connection slot 7 in KG1, all
keygroups will have MODWHEEL assigned to FILTER CUTOFF in that connection slot.
However, the depth of modulation is individually and separately adjustable in each keygroup.
ak.Sys - Version 2.00 Page 82
Page 86

A typical modulation configuration may look something like this:
PROGRAM EDITOR
As is clear to see, VELOCITY is controlling AMPLITUDE, the FILT ENV is routed to filter
CUTOFF but, with a DEPTH of 0, has no effect. LFO is routed to PITCH (for vibrato) and
MODWHEEL is controlling LFO1 DEPTH for modwheel control of the vibrato. AFTERTOUCH is
routed to filter CUTOFF as is the AUX ENV.
Complex and elaborate modulation patching can be set that allow you to exercise an
astonishing degree of sound manipulation and performance control.
ak.Sys - Version 2.00 Page 83
Page 87

SAMPLE EDITING - MAC
SAMPLE EDITING WITH AK.SYS - MAC
Ak.Sys does not include its own sample editor, the reason being that there are so many good
third party sample editors that are very popular, it seems a waste of resources to re-invent the
wheel and develop one specifically for ak.Sys.
However, third party sample editors are supported with clean integration between them and
ak.Sys.
Your preferred sample editor is nominated in the ak.Sys FILE menu:
Using the CHOOSE SAMPLE EDITOR menu item, you can nominate your preferred sample
editor that will be used for editing samples within ak.Sys. Selecting it will allow you to navigate
your way to the application...
ak.Sys - Version 2.00 Page 84
Page 88

SAMPLE EDITING - MAC
You should click on OPEN when you have located your sample editor. The window will close
and the sample editor will be selected. Once nominated as your preferred editor, it will launch
under the following circumstances:
• When you double click on a sample in the ak.Sys BROWSER
• When you select EDIT in the contextual menu in the sample name field of a keygroup zone
• When you select EDIT in the sample SEARCH window (see later regarding this)
When you use your sample editor in any of the ways described above, the sample is
automatically transferred via USB to your computer where it can be edited in your nominated
sample editor. When you are happy with the results of your edits, use the editor’s SAVE or
SAVE AS... function to save the sample - it will be automatically transferred back to the sampler.
ak.Sys - Version 2.00 Page 85
Page 89

SAMPLE EDITING - PC
SAMPLE EDITING WITH AK.SYS - PC
Ak.Sys does not include its own sample editor. The reason for this is that there are so many
good third party sample editors that are very popular, it seems a waste of resources to re-invent
the wheel and develop one specifically for ak.Sys.
However, third party sample editors are supported with clean integration between them and
ak.Sys.
There should be no special setup procedure to launch your sample editor from with ak.Sys on
a PC and basically, if opening files with a .wav extension opens your sample editor elsewhere
on your PC, then the association between .wav files and the sample editor has been made and
samples can be edited from within ak.Sys as well.
NOTE: If there is some problem opening .wav files within ak.Sys, you may like to visit Windows
Explorer, click on My Computer and in the VIEW menu, select FOLDER OPTIONS and then in
the FOLDER OPTIONS window, select FILE TYPE - here you can set your own file
associations manually.
However, you can also nominate a sample editor by clicking on the SAMPLE EDITING menu
item. In the menu select CHOOSE SAMPLE EDITOR. The usual navigation windows will be
shown and you should find your way to the sample editor you want to nominate. For example:
Simply double click on the application’s icon.
You can revert to the default system association using the USE SYSTEM ASSOCIATION
button. Also, if the nominated application is deleted or uninstalled (or can’t be found for
whatever reason), ak.Sys will revert to the system association.
ak.Sys - Version 2.00 Page 86
Page 90

SAMPLE EDITING - PC
Your sample editor will launch within ak.Sys under the following circumstances:
• When you double click on a sample in the ak.Sys BROWSER
• When you select EDIT in the contextual menu in the sample name field of a keygroup zone
• When you select EDIT in the sample SEARCH window (see later regarding this)
When you use your sample editor in any of the ways described above, the sample is
automatically transferred via USB to your computer where it can be edited in your nominated
sample editor. When you are happy with the results of your edit, use the editor’s SAVE or
SAVE AS... function to save the sample - it will be automatically transferred back to the sampler.
NOTES ABOUT SAVING/TRANSFERRING SAMPLES
When you edit a sample in your sample editor via ak.Sys, the file is transferred from the sampler
to your computer and placed in a temporary, invisible ak.Sys folder called “AKSYS WATCHED”.
The sample editor is also launched (if not open already) and the sample can be edited in the
editor.
When you come to save the sample, it is saved to this ‘watched’ folder and then automatically
transferred back to the sampler .
The SAMPLE WATCH menu option allows you to clear this folder if disk space is at a premium.
However, please note that the ‘watched’ folder is automatically flushed whenever you exit
ak.Sys.
NOTES ABOUT SOME SAMPLE EDITORS
Some sample editors save their loop information in a separate file within the WAVE file. If you
edit a sample from the sampler in such an editor, when transferred back, there is a risk that loop
information will not be preserved.
ak.Sys - Version 2.00 Page 87
Page 91

AK.SYS SEARCH ENGINE
AK.SYS SEARCH ENGINE
One powerful function of ak.Sys is it’s search engine that allows you to find items by name.
SEARCH is available in the FILE menu on the Mac and pops up this window:
On the PC, the find function is available by clicking on the magnifying glass icon in the
Browser’s toolbar. It shows a similar window. Functionally, both are identical.
ak.Sys - Version 2.00 Page 88
Page 92

AK.SYS SEARCH ENGINE
You can choose the type of item you want to search for using the IN FOLDER pop up at the top
of the Window:
The options are:
AKSYS Searches the whole of ak.Sys. If multiple samplers are on-line, they will
all be searched.
DEVICE NAME Will search only the selected device
MEMORY Same as DEVICE NAME
MULTIS Only searches for multis
PROGRAMS Only searches for programs
SAMPLES Only searches for samples
MIDI FILES Only searches for MIDI song files
If you have a drive attached, it will also show up in this list. If you also have an S5/6000 attached,
it will show up in the list as well - in fact, anything you can see in the ak.Sys Browser will be
shown in the list of available nodes/folders you can search in.
ak.Sys - Version 2.00 Page 89
Page 93

AK.SYS SEARCH ENGINE
To search for something, click on the FIND WHAT window and type a string - i.e. some
characters from the item you wish to search for. As you type, so items with those characters will
be shown in the list below. For example:
As you continue to type, so the list updates:
Once the item you are looking for is shown in the list, you can edit it or delete it. In the case of
samples, you can audition it and then maybe drag it onto a program editor to assign it to the
currently selected keygroup. In the case of programs, these can be dragged onto a channel of
the multi editor to assign that program to a part.
ak.Sys - Version 2.00 Page 90
Page 94

AK.SYS SEARCH ENGINE
Right clicking on an item in the SEARCH window pops up a contextual menu according to the
selected file type. For a program, the following is shown:
REFRESH This will cause ak.Sys to update itself to allow for any changes that may have
been made (useful if any changes have been made from the sampler’s own
front panel).
EDIT Will launch the PROGRAM EDITOR.
DELETE Will delete the selected item.
The greyed out options have no function.
Different file types show different contextual menus of course.
ak.Sys - Version 2.00 Page 91
Page 95

OS LOADER
Z48/MPC OS LOADER
Another component that comes with ak.Sys is a sampler OS Loader. This allows you to dump a
new sampler operating system to your sampler(s) via USB. Updates to the Z4/8 Operating
System will be posted regularly at our website:
http://www.akaipro.com
Be sure to visit regularly to ensure you have the latest OS in your sampler. Updates to ak.Sys
will also be posted on the site.
INSTALLING THE OS LOADER - PC
Locate the Z48/MPC OS LOADER installer. Double click on this and follow the on-screen
instructions.
INSTALLING THE Z48/MPC OS LOADER - MAC
No installation is required - simply drag the Z48/MPC OS LOADER folder to your Mac’s hard
disk drive.
USING THE Z48/MPC OS LOADER
Locate the Z48/MPC OS LOADER.exe and double click on it to launch it. You will see a typical
‘load’ window - locate the OS file you want to load and double click on it.
The operating system will be sent to your sampler via USB (you will see progress displays) and
at the end, you will be notified that the update has completed. You must now reboot your
sampler to use the new version of the sampler Operating System.
*** IMPORTANT NOTES REGARDING THE Z48/MPC OS LOADER ***
• If you have several samplers connected via USB, each one should be updated in turn.
MAKE SURE ONLY ONE SAMPLER IS CONNECTED TO YOUR PC VIA USB WHEN
USING THE Z48/MPC OS LOADER (i.e. turn off or disconnect the other samplers).
• Make sure there are no other applications running.
• AFTER UPDATING YOUR SAMPLER VIA USB USINGt THE Z48/MPC OS LOADER, IT IS
VITAL THAT YOU RESTART YOUR SAMPLER (I.E. TURN IT OFF THEN BACK ON
AGAIN).
• DO NOT UNDER ANY CIRCUMSTANCES ATTEMPT TO UPDATE YOUR
SAMPLER TWICE IN SUCCESSION VIAt THE Z48/MPC OS LOADER
WITHOUT REBOOTING THE SAMPLER IN BETWEEN UPDATES. Failure to
observe this precaution may result in a corrupted OS.
• DO NOT UNDER ANY CIRCUMSTANCES SWITCH YOUR SAMPLER OFF
DURING THE UPDATE PROCESS.
NOTE FOR MAC USERS
If you use AppleScript, an easy way to use the Z48/MPC OS LOADER is to simply drag the .BIN
OS file onto the script called “Drop .bin file on me” in the Z48/MPC OS LOADER folder - the
process will just take place automatically. Once done, restart your sampler.
ak.Sys - Version 2.00 Page 92
Page 96

APPENDIX 1
USING AK.SYS WITH A ‘WHEEL EQUIPPED’ MOUSE ON A MAC
ak.Sys supports control movement of parameters via the ‘wheel’ on suitably equipped mice (for
example, Microsoft Intellimouse).
To achieve this, however, you should visit your mouse’s Control Panel and set FORWARD
ROLL of the wheel as ‘KEYSTROKE +’ and BACKWARDS ROLL as ‘KEYSTROKE -’ for the
ak.Sys application.
Please consult your mouse’s documentation (and/or experiment) for best results.
ak.Sys - Version 2.00 Page 93
Page 97

INDEX
1-POLE HP 64
1-POLE HP+ 64
2-POLE BP 63
2-POLE BP+ 63
2-POLE HP 64
2-POLE HP+ 64
2-POLE LP 62
2-POLE LP+ 62
4-POLE BP 63
4-POLE BP+ 63
4-POLE HP 64
4-POLE HP+ 64
4-POLE LP 63
4-POLE LP+ 63
6-POLE BP 64
6-POLE HP 64
6-POLE LP 63
A
ADD 52
ak.Sys and SCSI 6
ak.Sys Browser - Mac 13
ak.Sys Browser - PC 17
ALL 52
Assigning FX (Keygroup) 72
Assigning samples 51, 55
ATTENUATION 68
B
BAND<>HI 65
Bandpass Filters 63
Browser - Mac 13
Browser - PC 17
C
Clock Division (LFO) 78
Connecting to a USB hub 2, 4, 7
Connecting to USB 1, 2
Contextual menus 21
CUTOFF 68
D
DELAY 77
Disk Drives and ak.Sys 1
E
Editing Samples (Mac) 84
Editing Samples (PC) 86
ENVELOPES 54, 74
F
Filter (Keygroup) 62
Filter (Zones) 58
Filter - Triple Mode 69
Filter Types) 62
FILTER/KGRP 54
Find/Search 88
FX Assign (Keygroup) 72
FX Level (Keygroup) 72
G
GLOBAL 48
H
Highpass Filters 64
I
Installing ak.Sys 11
K
Keyboard Track (Zones) 59
KEYGROUP 70
KEYSPAN 53
KG EDIT 52
L
Layering samples 61
Level (Keygroup) 70
Level (Zones) 56
LFO Delay 77
LFO Depth 76
LFO MIDI Clock Sync 78
LFO Rate 77
LFO Re-trigger 77
LFO Sync 78
LFO Waveform 75
LFOs 54, 75
LO<>BAND 65
LO<>HI 65
Lowpass Filters 62, 63
M
Menu Bar (Mac only) 15
Menu items (PC) 20
MIDI Clock Sync (LFO) 78
MODULATION 54
Modulation Destinations 81
Modulation Matrix 80
Modulation Sources 80
MONO LEGATO 49
Multi Editor 34
Multiple machine control 2, 4
MUTE GROUP 70
N
Notch Filters 65
O
OS Loader 92
Output (Program global) 45
Output (Zones) 56
ak.Sys - Version 2.00
Page 98

P
Pan (Zones) 56
Peak Filters 66
Phase Shift Filters 67
Pitch (Zones) 59
PITCHBEND 45
PLAY TRIGGER 73
Playback (Zones) 59
Polyphony (Global) 48
Polyphony (Keygroup) 70
PORTA/GLISS 46
Program Editor 37
Program Name 48
R
Range (Zones) 60
RATE 77
RE-TRIG 77
Remote panel 33
RESONANCE 68
S
S5/600 and Z4/8 7
Sample editing (Mac) 84
Sample editing (MPC) 86
SAMPLE field (Zones) 55
Sample Start (Zones) 58
SCSI 6
Search Engine 88
SHIFT/PHASE 76
Show Front Panel 33
Start (Zones) 58
SYNC 78
INDEX
T
Toolbar (PC only) 19
Track (Zones) 59
TRIPLE MODE 69
Tune (Program global) 44
Tune (Zones) 59
Tune(Keygroup) 71
U
USB Connection 1, 2
USB Hub 2, 4, 7
V
Velocity Switch/Xfade 60, 61
VIEW 44
VOWELISER 67
W
Waveform (LFO) 75
X
X-Fade (keyspan) 50
X
Z4/8 and S5/600 7
Z8 Remote panel 33
ZONES 51, 54, 55
ak.Sys - Version 2.00
Page 99

Printed in Japan
 Loading...