

Page 1
ACTIVE SPEAKER SYSTEM (POWERED SUBWOOFER)
SISTEMA DE ALTAVOCES ACTIVOS (ALTAVOZ DE SUBGRAVES ACTIVO)
ENCEINTE ACOUSTIQUE ACTIVE (CAISSON DE GRAVES ALIMENTE)
TS-W45
OPERATING INSTRUCTIONS
MANUAL DE INSTRUCCIONES
MODE D'EMPLOI
Page 2
OWNER’S RECORD
For your convenience, record the model number and serial number
(you will find them on the rear of your set) in the space provided below.
Please refer to them when you contact your AIWA dealer in case of
difficulty.
Model No.
TS-W45 U
TABLE OF CONTENTS
FEATURES.....................................................................................2
PRECAUTIONS..............................................................................4
Serial No.
CAUTION
RISK OF ELECTRIC SHOCK
DO NOT OPEN
“CAUTIONiTO REDUCE THE RISK OF
ELECTRIC SHOCK.
DO NOT REMOVE COVER (OR BACK).
NO USER-SERVICEABLE PARTS INSIDE.
REFER SERVICING TO QUALIFIED
SERVICE PERSONNEL”
Explanation of Graphical Symbols:
The lightning flash with arrowhead symbol,
within an equilateral triangle, is intended to alert
the user to the presence of uninsulated
“dangerous voltage” within the product’s
enclosure that may be of sufficient magnitude
to constitute a risk of electric shock to persons.
The exclamation point within an equilateral
triangle is intended to alert the user to the
presence of important operating and
maintenance (servicing) instructions in the
literature accompanying the appliance.
WARNING: TO REDUCE THE RISK OF FIRE OR
ELECTRIC SHOCK, DO NOT EXPOSE
THIS APPLIANCE TO RAIN OR
MOISTURE.
POSITIONING
CONNECTIONS..............................................................................6
OPERATION...................................................................................8
SPECIFICATIONS........................................................................10
................................................................................
FEATURES
• VOLUME control
• PHASE switch (NORMAL/REVERSE)
You can use the PHASE switch to change the quality or volume
of sound reproduced by the powered subwoofer.
• AUTO POWER function
You can set the powered subwoofer to be powered on
automatically when it receives signal from the stereo system.
• Two-way connection to the amplifier
The TS-W45 can be connected to equipment either with an RCA
phono jack for a super woofer, or typical L and R speaker
terminals.
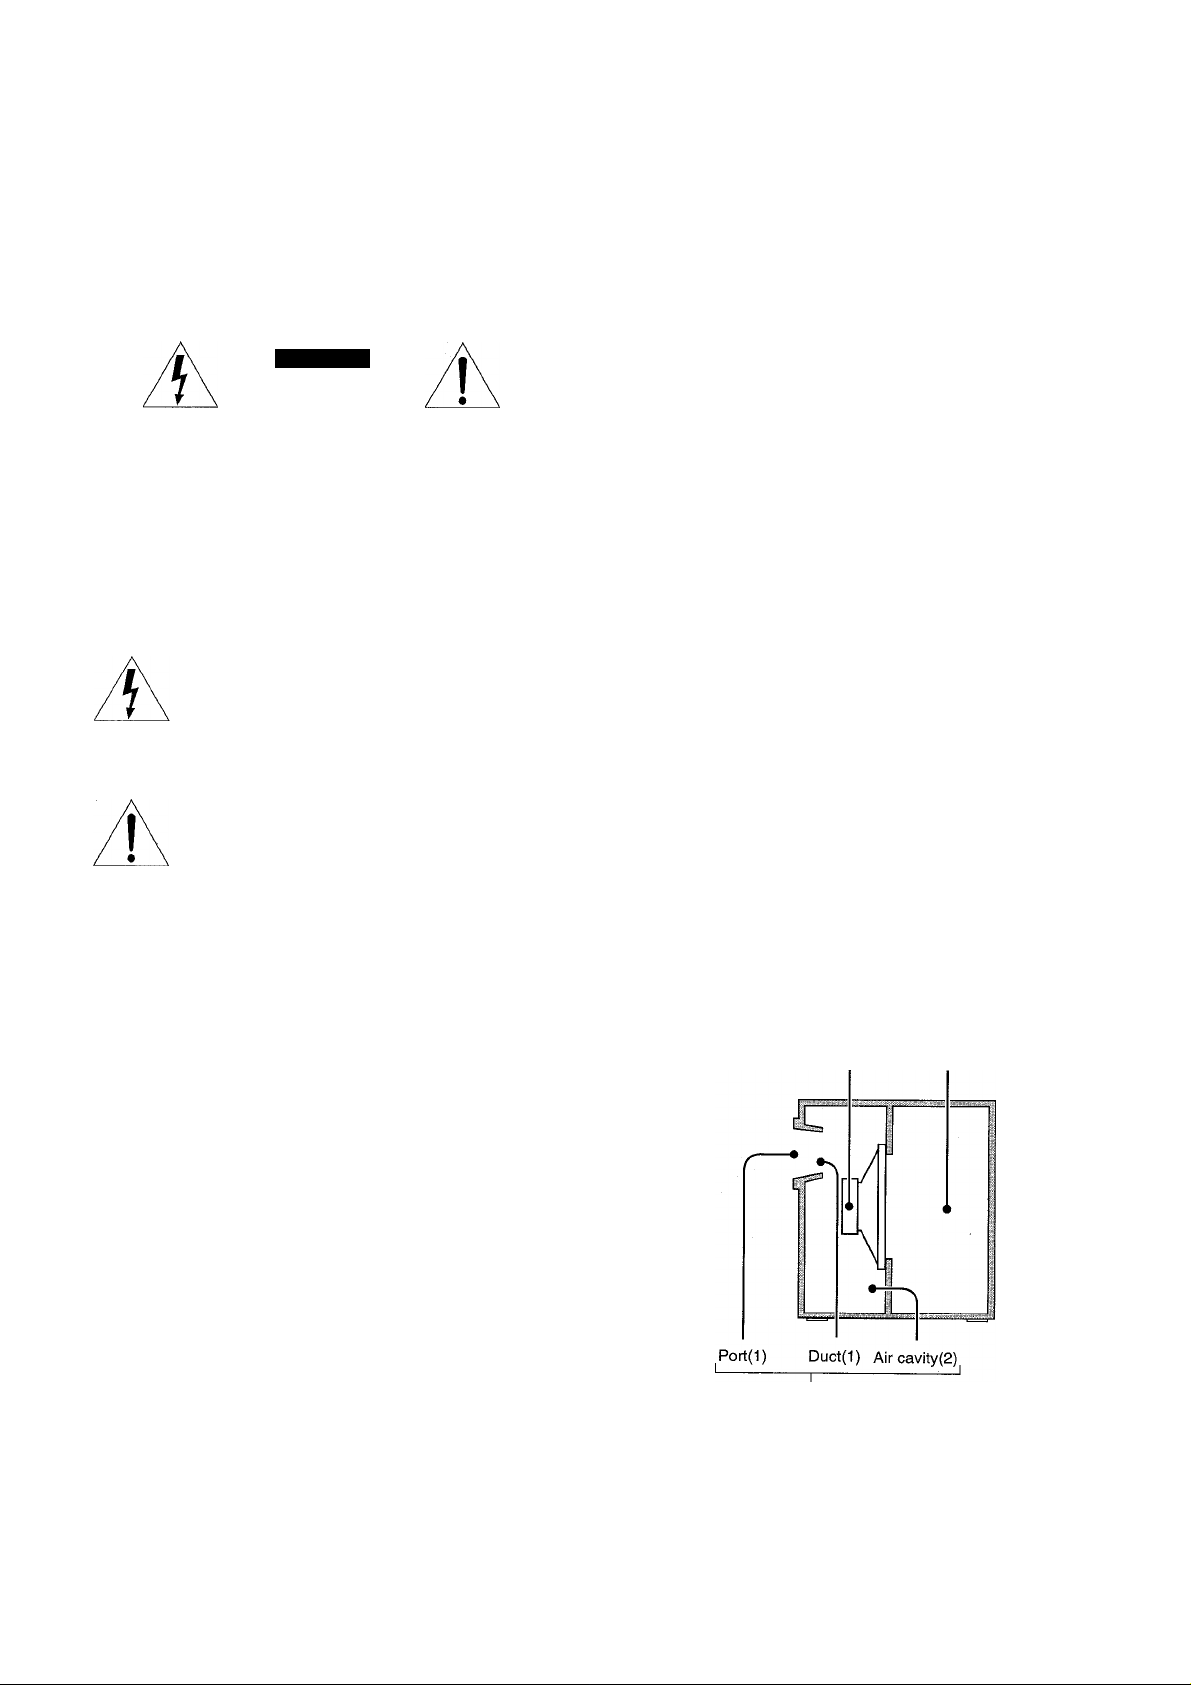
• SINGLE VENTED BANDPASS system
TS-W45 adopts a SINGLE VENTED BANDPASS system in
which port (1), duct (1), and air cavity (2) compose an acoustic
bandpass filter in front of air cavity (1). By virtue of this structure,
the bass reproduction limit is extended and sounds higher than
middle range frequencies are reduced in the SINGLE VENTED
BANDPASS system. This makes it possible for the TS-W45 to
reproduce powerful bass sound.
6
Speaker unit Aircavity(l)
Acoustic bandpass filter
Page 3
INDICE
TABLE DES IVIATIERES
CARACTERISTICAS
PRECAUCIONES...........................................................................5
UBICACION
CONEXIONES............................................................................... 7
OPERACIONES
ESPECIFICACIONES..................................................................11
...................................................................................
.....................................................................
.............................................................................
CARACTERISTICAS
Contrai VOLUME
• Selector PHASE (NORMAL/REVERSE)
Usted podrá utilizar el selector PHASE para cambiar la calidad
o el volumen del sonido reproducido por el altavoz de subgraves
activo.
- Función AUTO POWER
Podrá hacer que el altavoz de subgraves activo se encienda
automáticamente cuando reciba señales del sistema estéreo.
' Dos formas de conexión al amplificador
El TS-W45 podrá conectarse a equipos que posean toma fono
RCA para altavoz de supergraves o terminales para altavoces
típicos L y R.
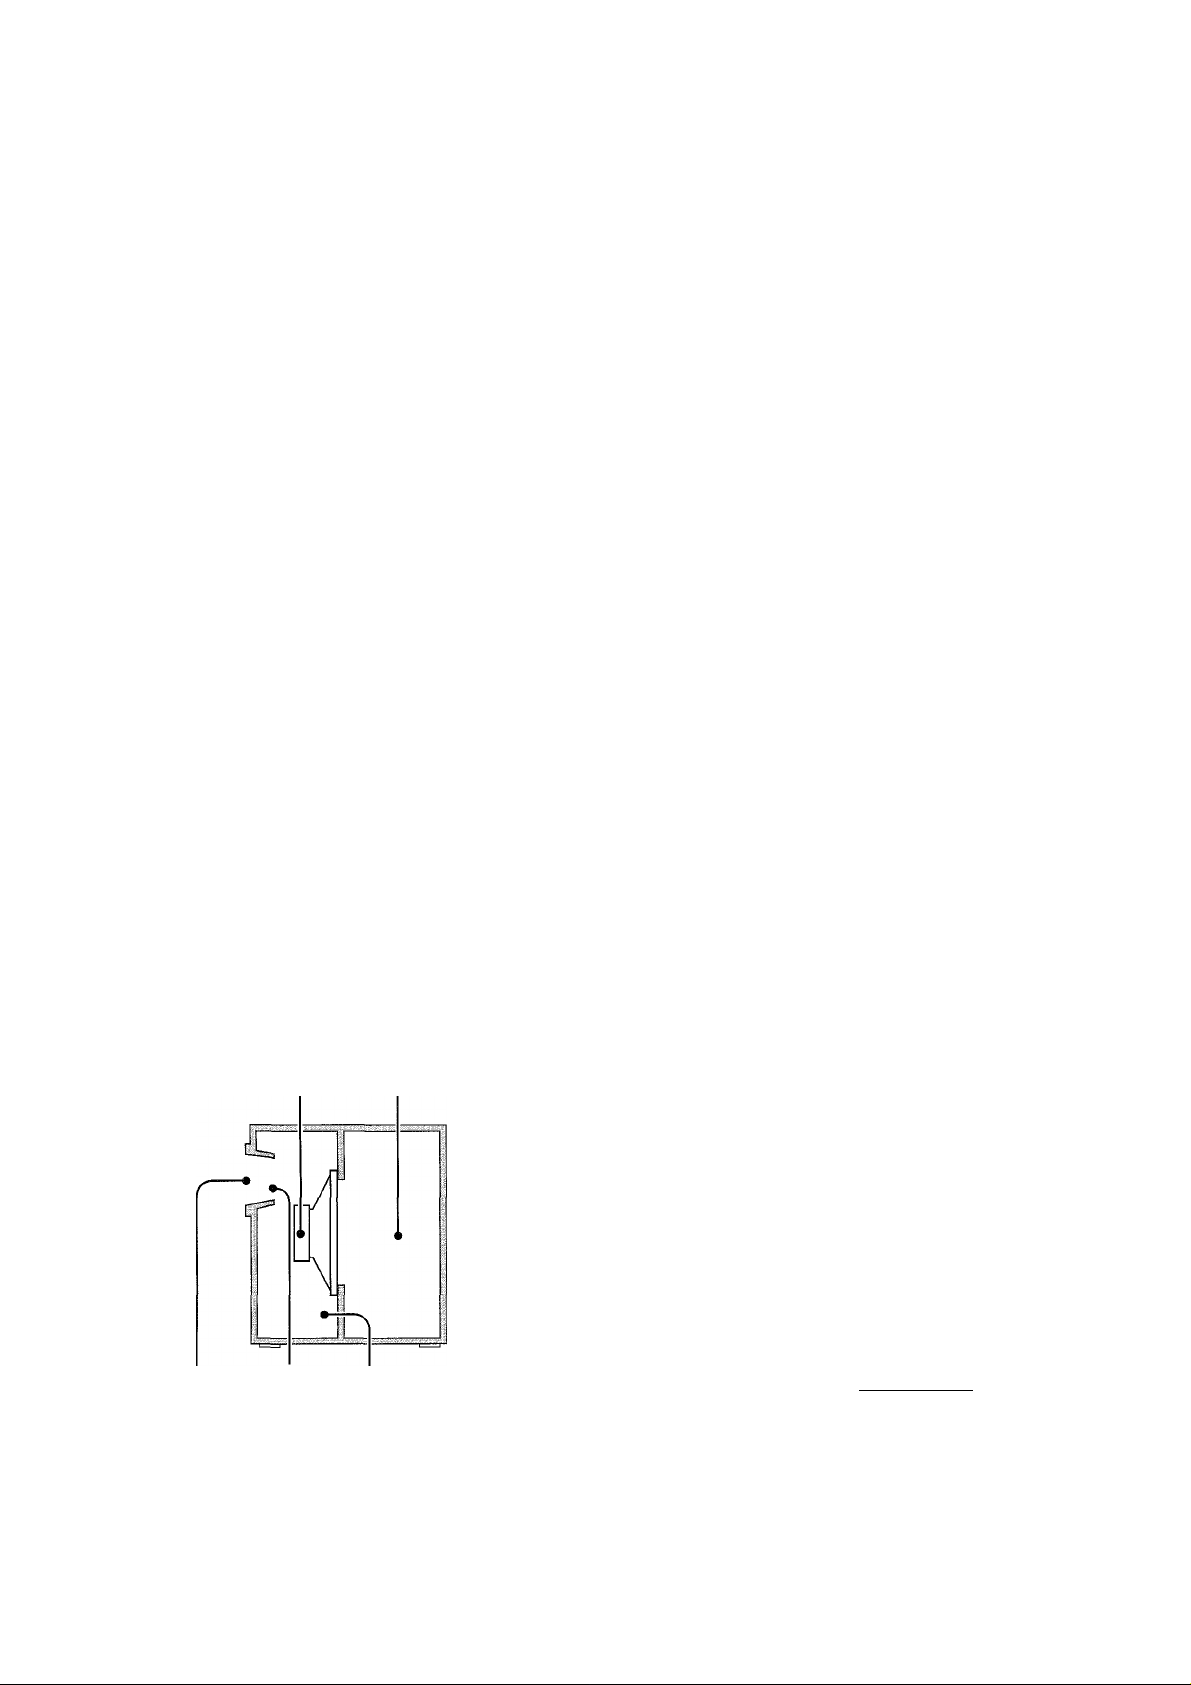
> Sistema PASABANDA DE UNA SALIDA
El TS-W45 adopta un sistema PASABANDA DE UNA SALIDA
en el que el orificio (1), el conducto (1) y la cavidad de aire (2)
forman un filtro pasabanda acústico en frente de la cavidad de
aire (1). Debido a esta estructura, el límite de reproducción de
los graves se amplía y los sonidos más altos que las frecuencias
de la gama media son reducidos en el sistema PASABANDA
DE UNA SALIDA. Esto hace posible que el TS-W45 pueda
reproducir un potente sonido grave.
Unidad del altavoz Cavidad de aire(f)
3
7
9
CARACTERISTIQUES.................................................................. 3
PRECAUTIONS
POSITIONNEMENT
CONNEXIONS.............................................................................. 7
UTILISATION................................................................................ 9
SPECIFICATIONS...................................................................... 11
..........................................................................
......................................................................
5
7
CARACTERISTIQUES
• Commande VOLUME
• Sélecteur PHASE (NORMAL/REVERSE)
On peut utiliser le sélecteur PHASE pour changer la qualité ou
le volume du son restitué par le caisson de graves alimenté.
• Fonction mise sous tension automatique
On peut régler le caisson de graves pour qu’il soit alimenté
automatiquement quand il reçoit un signai de la chaîne stéréo.
• Deux façons de raccorder à l’amplificateur
On peut raccorder le TS-W45 à un appareil équipé soit d’une
prise phono RCA pour caisson de graves, soit de bornes
d’enceintes classiques L et R.
• SYSTEME PASSE-BANDE A EVENT SIMPLE
Le TS-W45 est muni d’un système PASSE-BANDE A EVENT
SIMPLE dans lequel l’orifice (1), le conduit (1) et la cavité d’air
(2) constituent un filtre passe-bande acoustique devant la cavité
d’air (1). Grâce à cette structure, la limite de reproduction des
graves est étendue et les sons plus élevés que les fréquences
de la gamme moyenne sont réduits dans le système PASSE
BANDE A EVENT SIMPLE. Ceci permet au TS-W45 de
reproduire des graves puissants.
Haut-parleur Cavité d’air(l)
Orificio(l) Conducto(l) Cavidad de aire(2)
'
---------------------Filtro pasabanda acústico
^--------------------------------------'
¿C
Orifice(1) Conduit(1 ) Cavité d’air(2) ^
Filtre passe-bande acoustique
Page 4

PRECAUTIONS
Follow the advice below for safe and correct operation.
ON AC voltage
Before connectlong AC cord, check that the rated voltage shown
on the rear panel matches your local voltage.
AC 120 V, 60 Hz
Positioning
• Do not use the unit in places which are extremely hot, cold, dusty
or humid. ,
• The unit should be situated with adequate space around it so
that proper heat ventilation is assured. Allow 10 cm clearance
from the rear and the top of the unit, and 5 cm from the each
side.
- Do not place the unit on a bed, rug, or similar surface that may
block the ventilation openings.
- Do not install the unit in a bookcase, cabinet, or airtight rack
where ventilation may be impeded.
Using the unit near a TV set
Although the unit is magnetically shielded, there may be cases in
which the picture on some TV sets may become magnetically
distorted.
• If the TV picture is distorted, turn off the power of the TV set
once, and after 15 to 30 minutes turn it on again.
• If there seems to be no improvement, move the unit further away
from the TV set.
• Furthermore, be sure not to place magnets or objects using
magnets, such as audio racks, toys etc. near the TV set. These
may cause magnetic distortion to the picture due to their
interaction with the unit.
Howling or buzzing sound
A howling or buzzing sound may be heard if a turntable or a stereo
system is placed near the unit. Move the unit away from the
equipment or decrease the volume.
Safety
• When connecting and disconnecting the AC cord, always grasp
the plug. Do not pull the cord by itself since pulling the cord may
damage it and thus be hazardous.
• When you are not going to use the unit for a long period of time,
disconnect the AC cord. If the cord is plugged in, a small amount
of current keeps on flowing to the unit even if the power button is
not ON.
Cleaning
To clean the cabinet, use a soft cloth slightly moistened with a
mild detergent solution. Do not use strong solvents, such as
alcohol, benzine or thinner.
Keep away magnetic items
Keep cassette tapes, personal credit card etc. using magnetic
cording away from the unit as the recorded information may be
erased or some noise may be added on cassette tapes.
Should any problem occur, disconnect the AC cord and refer
servicing to qualified personnel only.
4
Page 5

PRECAUCIONES
PRECAUTIONS
Para lograr una operación segura y correcta, siga los consejos
ofrecidos a continuación.
Acerca de la tensión de CA
Antes de conectar el cable de alimentación de CA, compruebe si
la tensión nominal mostrada en el panel trasero concuerda con la
tensión de su localidad.
120 VGA 60 Hz
Ubicación
• No Utilice la unidad en lugares extremadamente cálidos, fríos,
polvorientos ni húmedos.
• La unidad deberá situarse donde tenga suficiente espacio libre
a su alrededor, para que la ventilación apropiada quede
asegurada Deje un espacio libre de 10 cm por la parte posterior
y superior de la unidad, y 5 cm por cada lado.
- No ponga la unidad sobre una cama, una alfombra o superficies
similares que podrían tapar las aberturas de ventilación.
- No instale la unidad en una librería, mueble o estantería cerrada
herméticamente donde la ventilación no sea adecuada.
Utilización de la unidad cerca de un televisor
Aunque la unidad está magnéticamente apantallada, puede
suceder que las imágenes de algunos televisores sufran
distorsiones magnéticas.
• Si las imágenes del televisor sufren distorsiones, desconecte la
alimentación del televisor, y vuelva a conectarla después de 15
a 30 minutos,
• Cuando parezca que no se producen mejoras, aleje la unidad
del televisor.
• Además, no coloque ¡manes ni objetos que los utilicen, como
bastidores de audio, juguetes, etc. cerca del televisor. Estos
objetos podrían causar la distorsión magnética de las imágenes
debido a su interacción con la unidad
Sonido de aullido o zumbido
Si coloca un giradiscos o un sistema estéreo cerca de la unidad,
es posible que oiga un sonido de aullido o zumbido. Aleje la unidad
de e.ste equipo o reduzca el volumen.
Seguridad
• Para conectar y desconectar el cable de alimentación de CA,
tire siempre del enchufe. No tire nunca del propio cable porque
podría dañarlo y resultaría peligroso.
• Cuando no vaya a utilizar la unidad durante mucho tiempo,
desconecte el cable de alimentación de CA. Si deja el cable
enchufado, circulará una pequeña cantidad de comente por la
unidad incluso aunque el botón de alimentación no esté en ON.
Limpieza
Para limpiar la caja, utilice un paño suave ligeramente humedecido
en una solución poco concentrada de detergente. No use
disolventes fuertes, como alcohol, bencina, ni diluidor de pintura
Mantenga alejados objetos magnéticos
Mantenga los casetes, las tarjetas de crédito, etc. que utilicen
codificación magnética alejados de la unidad, porque la
información grabada podría borrarse, o en las cintas podría entrar
cierto ruido.
Suivre les conseils ci-dessous pour utiliser l'appareil correctement
et en toute sécurité.
Tension du secteur
Avant de brancher le cordon secteur, s’assurer que la tension
nominale indiquée sur le panneau arrière correspond à celle du
secteur local.
Secteur 120 V, 60 Hz
Positionnement
• Ne pas utiliser l’appareil dans un endroit très chaud, froid,
poussiéreux ou humide.
• Lappareil doit être positionné avec un espace suffisant autour
afin d’assurer une dissipation adéquate de la chaleur. Laisser
un espace de 10 cm derrière et dessus l’appareil, et un espace
de 5 cm de chaque côté.
- Ne pas mettre l’appareil sur un lit, un tapis ou sur une surface
similaire qui pourrait obstruer les orifices de ventilation.
- Ne pas mettre l’appareil dans une bibliothèque, un coffret ou
un meuble complètement fermé où l’aération serait insuffisante.
Utilisation de l’appareil près d’un téléviseur
Bien que l’appareil soit à blindage antimagnétique, l’image de
certains téléviseurs peut subir une distorsion magnétique.
• Si l’image du téléviseur est déformée, mettre le téléviseur hors
tension, puis le remettre sous tension au bout de 15 à 30 minutes.
• Si la situation ne s’améliore pas, éloigner l’appareil du téléviseur.
• En outre, veiller à ne pas placer des aimants ou objets contenant
un aimant, comme des racks audio, des jouets ou autres prés
du téléviseur. Leur interaction avec l’appareil peut provoquer une
distorsion magnétique de l'image.
Hurlement ou ronronnement
Un hurlement ou un ronronnement risque de se produire si
l’appareil se trouve près d’un tourne-disque ou d’une chaîne
stéréo. Eloigner l'appareil de cet appareil ou baisser le volume.
Sécurité
• Pour brancher ou débrancher le cordon d’alimentation secteur,
tenir la fiche. Ne jamais tirer sur le cordon proprement dit car il
pourrait être endommagé, ce qui serait dangereux.
• Si on ne compte pas utiliser l’appareil pendant longtemps,
débrancher le cordon d’alirnentation secteur. S’il est raccordé
au secteur, une petite quantité de courant circule dans l’appareil,
même si l’interrupteur d’alimentation n’est pas sur ON.
Nettoyage
Pour nettoyer le coffret, utiliser un chiffon doux légèrement
imprégné d’une solution détergente douce. Ne pas utiliser de
solvant puissant, comme de l'alcool, de la benzine ou du diluant.
Eloigner les objets aimantés
Eloigner les cassettes, cartes de crédils ou autres objets à code
magnétique de l’appareil car les données enregistrées pourraient
être effacées et les cassettes risqueraient d’être altérées par des
parasites.
En cas de problème, débrancher le cordon d’alimentation
secteur et consulter uniquement un technicien qualifié.
Si tiene algún problema, desconecte el cable de alimentación
de CA y consulte solamente a personal de reparación
cualificado.
Page 6

B-1
POSITIONING
Because low-frequency sound reproduced by the powered
subwoofer is mostly non-directlonal, the listener will be unable to
localize the bass source. Accordingly, the powered subwoofer
provides maximum flexibility in terms of positioning. For the most
effective low-frequency sound, the powered subwoofer should be
placed on the floor close to a wall or in a corner of the room.
CONNECTIONS
Connect the speaker cords before connecting the AC cord.
Connect in □ way if your stereo system has a SUPER
WOOFER output jack, if not, connect in [0 way.
Never connect in both of □ and □ ways simuitaneousiy.
□ Connecting an AIWA stereo system with
a SUPER WOOFER or SUB WOOFER
output jack (RCA phono jack) to the
powered subwoofer
Preparations
Turn off the power of this unit.
1 Connect the SUPER WOOFER or SUB WOOFER jack on the
stereo system side O to the INPUT 1 (FROM SUPER
WOOFER TERM INAL) jack on the powered subwoofer © with
the supplied connecting cord.
2 Set the INPUT SELECT switch to “1”.
□ Connecting a stereo system with typical
L and R speaker terminals to the powered
subwoofer
Preparations
Turn off the power of the stereo system and remove the speaker
cords from the speaker terminals on the system.
1 Connect the stereo system speaker terminals O to the INPUT
2 (FROM SPEAKERS OUT) terminals on the powered
subwoofer © with the supplied speaker cords O.
Make sure the L and R and the ® and © cords are connected
correctly.
2 Using the speaker cords removed in “Preparations” above,
connect the right and left speakers O © to the SPEAKERS
OUT terminals on the powered subwoofer ©.
3 Set the INPUT SELECT switch to “2”.
Connecting the AC cord
Connect the AC cord to a wall outlet.
Use left/right speakers whose impedance corresponds with the
value specified on the stereo system.
6
Page 7

UBICACION POSITIONNEMENT
Como el sonido de baja frecuencia reproducido por el altavoz de
subgraves activo es prácticamente no direccional, el oyente no
podrá localizar la fuente de graves. Por consiguiente, el altavoz
de subgraves activo proporciona la máxima flexibilidad en términos
de ubicación. Para obtener el sonido más efectivo de bajas
frecuencias, el altavoz de subgraves activo deberá colocarse sobre
el piso cerca de un pared o en una esquina de ia sala.
CONEXIONES
Conecte los cables de los altavoces antes de conectar el cable
de alimentación de CA.
Conecte de la forma □ si su sistema estéreo tiene una toma
de salida SUPER WOOFER. Si no, conecte de la forma Bl.
Nunca conecte simultáneamente de las formas Q y B.
m Conexión de un sistema estéreo AiWA
provisto de toma de salida SUPER
WOOFER o SUB WOOFER (toma fono
RCA) al altavoz de subgraves activo
Preparativos
Desconecte la alimentación de esta unidad.
1 Conecte la toma SUPER WOOFER o SUB WOOFER del
sistema estéreo O a la toma INPUT 1 (FROM SUPER
WOOFER TERMINAL) del altavoz de subgraves activo O con
el cable conector suministrado.
2 Ponga el selector INPUT SELECT en “1”.
Etant donné que le son de basse fréquence reproduit par le caisson
de graves est pratiquement non-directionnel, il est impossible de
localiser la source des graves. Par conséquent, on dispose d’une
grande flexibilité en termes de positionnement. Cependant, pour
obtenir un son de basse fréquence optimum, il est recommandé
de placer le caisson de graves sur le sol près d’un mur ou dans un
coin de la pièce.
CONNEXIONS
Raccorder les cordons d’enceinte avant de brancher le cordon
d’alimentation secteur.
Connecter de la façon Q si la chaîne stéréo possède une
prise de sortie SUPER WOOI-ER. Sinon, connecter de la façon
B. Ne jamais connecter des façons □ et B en même temps.
□ Connexion d’une chaîne stéréo AIWA
dotée d’une prise de sortie SUPER
WOOFER ou SUBWOOFER (prise phono
RCA) au caisson de graves
Préparations
Couper l'alimentation de cet appareil.
1 Raccorder la prise SUPER WOOFER ou SUB WOOFER de la
chaîne 0 à la prise INPUT 1 (FROM SUPER WOOFER
TERMINAL) du caisson de graves © avec le cordon de
raccordement fourni.
2 Régler le sélecteur INPUT SELECT sur“1”.
□ Conexión a un sistema estéreo con
terminales de altavoces típicos L y R para
altavoz de subgraves activo
Preparativos
Desconecte la alimentación del sistema estéreo y extraiga los
cables de los altavoces de los terminales para altavoces del
sistema.
1 Conecte los terminales de altavoces del sistema estéreo O a
los terminales INPUT 2 (FROM SPEAKERS OUT) del altavoz
de subgraves activo © con los cables de altavoz suministrados
O
Cerciórese de que los conductores © y © para los altavoces
izquierdo (L) y derecho (R) estén correctamente conectados.
2 Utilizando los cables de los altavoces desconectados en
“FTeparativos”, conecte los altavoces derecho e izquierdo, O
y ©, a los terminales SPEAKERS OUT del altavoz de
subgraves activo ©.
3 Ponga el selector INPUT SELECT en “2”.
Conexión dei cable de CA
Conexión del cable de CA a una toma de la red.
Utilice altavoces izquierdo/derecho cuya impedancia corresponda
al valor especificado en el sistema estéreo.
□ Connexion d’une chaîne stéréo dotée de
bornes d’enceinte classiques L et R au
caisson de graves
Préparations
Mettre la chaîne hors tension et débrancher les cordons d’enceinte
des ses bornes.
1 Raccorder les bornes d’enceinte de la chaîne stéréo 0 aux
bornes INPUT 2 (FROM SPEAKERS OUT) du caisson de
graves © avec les cordons d’enceinte fournis Q.
Veiller à connecter correctement les cordons © et 0 des
canaux gauche (L) et droit (R).
2 Raccorder les enceintes gauche et droite O 0 aux bornes
SPEAKERS OUT du caisson de graves © à l’aide des cordons
d’enceinte que l’on a débranchés à la partie “Préparations”.
3 Régler le sélecteur INPUT SELECT sur “2”.
Branchement du cordon d’alimentation secteur
Brancher le cordon d’alimentation secteur à une prise murale.
REMARQUE
Utiliser des enceintes gauche et droite d’une impédance
correspondant aux spécifications de la chaîne stéréo.
7
Page 8

1
FRONT
0
PC
POWER
ON
JLOFF
OPERATION
ADJUSTING THE VOLUME BALANCE
Adjust the volume balance between the powered subwoofer and
the left and right speakers of the connected stereo system.
1 Press the POWER button.
The indicator above the button lights up.
2 Start playback on the connected stereo system. 3 Adjust the volume of the powered subwoofer.
Moderate volume setting
To get natural bass sounds, adjust the volume of the powered
subwoofer according to its position and the graphic equalizer
setting of the stereo system.
Adjustment examples
@ Set the VOLUME control to a little lower than the middle when
the subwoofer is placed on the floor and the graphic equalizer
is set to off.
(b) Set the VOLUME control to the middle when the subwoofer is
positioned higher than the floor and the graphic equalizer is
set to off.
• To avoid overloading the powered subwoofer, do not set the
volume of the stereo system so high that the sound is distorted.
• Low frequency sounds may be distorted when they are
emphasized by the graphic equalizer on the stereo system. Adjust
the VOLUME control on the powered subwoofer or the graphic
equalizer on the stereo system.
• If the powered subwoofer will not be used for a long period of
time, press the POWER button to turn off the power, and unplug
the AC cord from the wall outlet.
CHANGING THE PHASE ^ Q
Depending upon the room or the characteristics of the right and
left speakers, sound from the powered subwoofer may seem
unnatural or unusually loud or soft.
In this case, try changing the PHASE switch setting. Set to the
NORMAL or REVERSE position, whichever sounds better.
USING THE AUTO POWER FUNCTION ^ □
Before using this function, make sure the POWER button is set to
ON.
While the AUTO POWER switch is set to ON, the power is
automatically turned on when receiving a signal input from either
INPUT 1 or INPUT 2.
The power is automatically turned off if no signal is input for a
while and the indicator of the POWER button becomes dimmer. If
input signal is too weak, this function does not effect.
While the AUTO POWER switch is set to OFF, the power is turned
on or off by pressing the POWER button.
8
Page 9

OPERACIONES
UTILISATION
AJUSTE DEL EQUILIBRIO DEL VOLUMEN
Ajuste el equilibrio dei volumen entre el altavoz de subgraves activo
y los altavoces izquierdo y derecho del sistema estéreo conectado.
1 Presione el botón POWER.
El indicador situado encima del botón se encenderá.
2 Inicie la reproducción del sistema estéreo
conectado.
3 Ajuste el volumen del altavoz de subgraves activo.
Ajuste del volumen a un nivel moderado
Para obtener sonido con graves naturales, ajuste el volumen del
altavoz de subgraves activo de acuerdo con su ubicación y con el
ajuste del ecualizador gráfico del sistema estéreo.
Ejemplos de ajuste
(á) Cuando haya colocado el altavoz de subgraves en el piso,
y el ecualizador gráfico esté desactivado, ponga el control
VOLUME en una posición ligeramente inferior a la central.
® Cuando haya colocado el altavoz de subgraves en un lugar
situado a mayor altura que el piso y el ecualizador gráfico
esté desactivado, ponga el control VOLUME en la posición
central.
НОТА
• Para evitar la sobrecarga del altavoz de subgraves activo, no
aju,ste el volumen del sistema estéreo demasiado alto de forma
que se distorsione el sonido.
• Los sonidos de baja frecuencia pueden distorsionares cuando
se acentúen con el ecualizador gráfico del sistema estéreo.
Ajuste el control VOLUME del altavoz de subgraves activo o dei
ecualizador gráfico del sistema estéreo.
• Cuando no vaya a utilizar el altavoz de subgraves activo durante
mucho tiempo, presione el botón POWER para desconectar la
alimentación, y desenchufe el cable de alimentación de CA del
tomacorriente de la red.
REGLAGE DE LA BALANCE DU VOLUME
Régler la balance du volume entre le caisson de graves et les
enceintes gauche et droite de la chaîne stéréo raccordée.
1 Appuyer sur la touche POWER.
Le témoin situé au-dessus de la touche s’allume.
2 Démarrer la lecture sur la chaîne stéréo raccordée. 3 Régler le volume du caisson de graves.
Réglage sur un niveau de volume modéré
Pour obtenir des sons de basse fréquence naturels, régler le
volume du caisson de graves selon son emplacement et selon le
réglage de l’égaliseur graphique de la chaîne stéréo.
Exemples de réglage
(D Régler la commande VOLUME à un niveau un peu inférieur à
la moitié quand le caisson de graves est posé sur le sol et
que l’égaliseur graphique est hors service.
(g) Régler la commande VOLUME à la moitié quand le caisson de
graves est placé à un endroit plus haut que le sol et que
l’égaliseur graphique est hors service.
• Afin d’eviter de surcharger le caisson de graves, ne pas régler le
volume de la chaîne stéréo sur un niveau trop élevé qui
déformerait le son.
• Les sons de basse fréquence risquent d’être déformés quand
ils sont accentués par l’égaliseur graphique de la chaîne stéréo.
Régler la commande VOLUME du caisson de graves ou
l’égaliseur graphique de la chaîne stéréo.
• Si on ne compte pas utiliser le caisson de graves pendant
longtemps, appuyer sur la touche POWER pour le mettre hors
tension et débrancher le cordon d’alimentation secteur de la prise
murale.
CHANGEMENT DE LA PHASE ^ □
CAMBIO DE LA FASE □
Dependiendo de la sala o de las características de los altavoces
derecho e izquierdo, el sonido del altavoz de subgraves activo
puede resultar innatural, o excepcionalmente fuerte o suave.
En tal caso, pruebe a cambiar el ajuste del selector PHASE.
Póngalo en la posición NORMAL o REVERSE, la que ofrezca el
mejor sonido.
UTILIZACION DE LA FUNCION
DE
ENCENDIDO AUTOMATICO ^ ¡ñ
Antes de utilizar esta función, asegúrese de que el botón POWER
esté en ON.
Mientras el conmutador AUTO POWER esté en ON, la
alimentación se conectará automáticamente cuando se reciba una
señal procedente de INPUT 1 o INPUT 2.
La alimentación se desconectará automáticamente si no entra
ninguna señal durante un rato y el indicador del botón POWER
pierde intensidad. Si la señal de entrada es muy débil, esta función
no se activará.
Mientras el conmutador AUTO POWER esté en OFF, la
alimentación se conectará y desconectará pulsando el botón
POWER.
Selon le type de pièce et les caractéristiques des enceintes gauche
et droite, le son provenant du caisson de graves peut manquer
de naturel ou sembler anormalement fort ou doux.
Dans ce cas, essayer de changer le réglage du sélecteur PHASE.
Le régler sur NORMAL ou REVERSE, selon la position qui donne
les meilleurs résultats.
UTILISATION DE LA FONCTION MISE SOUS
TENSION AUTOMATIQUE □
Avant d’utiliser cette fonction, s’assurer que la touche POWER
est réglée sur ON.
Quand le sélecteur AUTO POWER est réglé sur ON, le caisson
de graves est automatiquement mis sous tension quand il reçoit
un signai par l’entrée INPUT 1 ou INPUT 2.
Si aucun signal n’est entré pendant quelques instants,
l’alimentation est automatiquement coupée et la luminosité du
témoin de la touche POWEFi diminue. Si le signal d’entrée est
trop faible, cette fonction est inopérante.
Quand le sélecteur AUTO POWER est réglé sur OFF, la mise
sous ou hors tension se fait en appuyant sur la touche POWEFI.
Page 10

SPECIFICATIONS
input terminals
Input sensitivity/impedance
Output terminals
Power output FTC RULE
Frequency response
Speaker type Bass reflex type
Speaker unit 20 cm (8 in.) (Magnetically shielded type)
Power requirement
Power consumption
Dimensions (w/h/d)
INPUT 1 jack
INPUT 2 terminals
INPUT 1: 0.3 V/50 kilo ohms (at 60 Hz)
INPUT 2: 3 V/4.4 kilo ohms (L and R) (at 60 Hz)
SPEAKERS OUT terminals
50 watts, Min. RMS at 8 ohms, from 45 Hz to
150 Hz, with no more than 1 % Total Harmonic
Distortion
50 W (8 ohms, T.H.D. 1% at 60 Hz)
60 W (8 ohms. T.H.D. 10 % at 60 Hz)
35 Hz - 200 Hz
AC 120 V, 60 Hz
40 W
385 X 325 X 345 mm (15V4 x 127e x 13=/8 in.)
Weight 7.5 kg (16 lbs 9 oz.)
Supplied accessories
Connecting cord with RCA phono plugs (1)
Speaker cords (2)
Specifications and external appearance are subject to change
without notice due to product improvement.
10
Page 11

ESPECIFICACIONES
SPECIFICATIONS
Terminales de entrada
Toma INPUT 1
Terminales INPUT 2
SensIbilídad/impedancia de entrada
INPUT 1: 0,3 V/50 kiloohmios (a 60 Hz)
INPUT 2: 3 V/4,4 kiloohmios (L y R) (a 60 Hz)
Terminales de salida
Terminales SPEAKERS OUT
Salida de potencia
NORMA PTC
50 vatios, mín. valor eficaz, a 8 ohmios, de 45
Hz a 150 Hz, con no más del 1 % de distorsión
armónica total
50 vatios (8 ohmios, 1% de distorsión
armónica total a 60 Hz)
60 vatios (8 ohmios, 10 % de distorsión
armónica total a 60 Hz)
Respuesta en frecuencia
35 Hz-200 Hz
Tipo de aitavoz Tipo reflejo de graves
Unidad de altavoz
20 cm (tipo magnéticamente apantallado)
Alimentación 120 VGA, 60 Hz
Consumo 40 W
Dimensiones (an/al/prf)
385 X 325 X 345 mm
Peso 7,5 kg
Accesorios suministrados
Cable conectar con clavijas fono RCA (1 )
Cables de altavoces (2)
Las especificaciones y el aspecto externo están sujetos a cambio
sin previo aviso debido a mejoras del producto.
Bornes d’entrée
Prise INPUT 1
Bornes INPUT 2
Sensibilité/impédance d’entrée
INPUT 1: 0,3 V/50 kilohms (à 60 Hz)
INPUT 2: 3 V/4,4 kilohms (L et R) (à 60 Hz)
Bornes de sortie
Bornes SPEAKERS OUT
Puissance de sortie
NORME PTC
50 watts. Min. RMS sous 8 ohms, de 45 Hz à
150 Hz, avec pas plus de 1 % de distorsion
harmonique totale.
50 watts (8 ohms, 1% de distorsion harmonique
totale, 60 Hz)
60 watts (8 ohms, 10 % de distorsion
harmonique totale, 60 Hz)
Réponse en fréquence
35 Hz - 200 Hz
Type d’enceinte Type bass-ireflex
Haut-parieur 20 cm (Type à blindage antimagnétique)
Alimentation Secteur 120 V, 60Hz
Puissance absorbée
40 W
Dimensions (№/p)
385 X 325 X 345 mm
Poids 7,5 kg
Accessoires fournis
Cordon de raccordement à fiches phono RCA
(1)
Cordons d’enceinte (2)
Les spécifications et l’apparence extérieure sont modifiables sans
préavis dans le but d’améliorer le produit.
11
Page 12

AIWA CO., LTD.
Printed in Maiaysia
8Z-YP2-903-01
981225AMI-U-2
 Loading...