

Page 1

Page 2

Welcome:
Dear user, thank you for purchasing this product.
We hope that our commitment to delivering a reliable and well-engineered product will
provide you with an excellent user experience and years of hassle-free use.
Safety Notice:
1. Warranty will be voided if the camera is dropped, punctured or disassembled.
2. Avoid all contact with water, and dry hands before using.
3. Do not expose the camera to high temperature or leave it in direct sunlight.
4. Avoid applying unnecessary pressure to the camera body.
5. For your own safety, avoid using the camera during a lightning storm.
6. Only use accessories supplied by the manufacturer.
7. Keep the camera out of the reach of infants.
FCC Compliance Statement:
This device complies with Part 15 of the FCC Rules. Operation is
subjected to the following two conditions: (1) this device may not cause
harmful interference, and (2) this device must accept any interference
received, including interference that may cause undesired operation.
This equipment has been tested and found to comply with limits for a
Class B digital device, pursuant to Part 15 of the FCC rules. These limits
are designed to provide reasonable protection against harmful interference in residential
installations. This equipment generates, uses, and can radiate radio frequency energy, and if
not installed and used in accordance with the instructions, may cause harmful interference to
radio communications.
However, there is no guarantee that interference will not occur in a particular installation. If this
equipment does cause interference to radio or television equipment reception, which can be
determined by turning the equipment off and on, the user is encouraged to try to correct the
interference by one or more of the following measures:
-Reorient or relocate the receiving antenna.
-Move the equipment away from the receiver.
-Plug the equipment into an outlet on a circuit different from that to which the receiver is
connected.
-Consult the dealer or an experienced radio/television technician for additional suggestions.
You are cautioned that any change or modications to the equipment not expressly approved
by the party responsible for compliance could void your authority to operate such equipment.
If the time arises to throw away your product, please
recycle all the components possible.
Batteries and rechargeable batteries are not to be
disposed of in your domestic waste! Please recycle
them at your local recycling point.
Together we can help to protect the environment.
Page 3
Getting Started
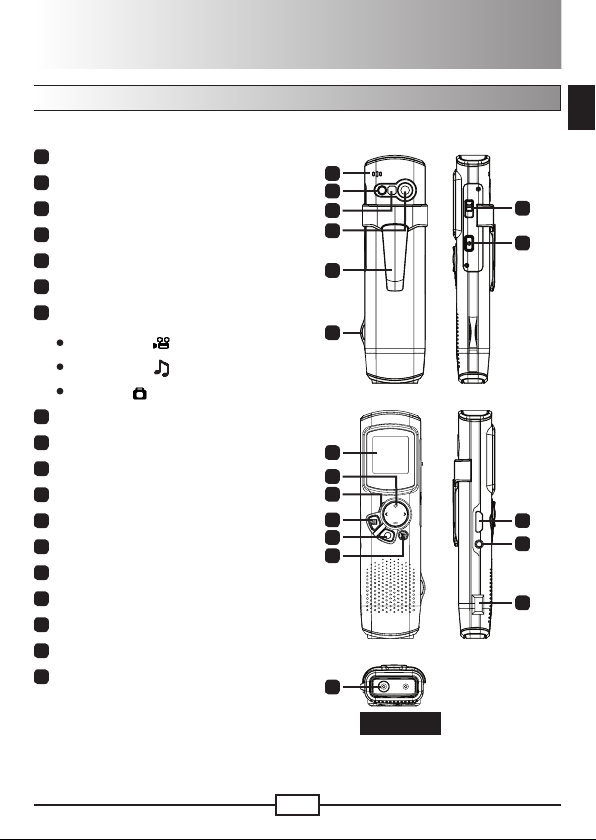
Product overview
Microphone
1
LED light/strobe
2
Mirror (for self-portrait)
3
Lens
4
Clip
5
Strap holder
6
Mode switch:
7
Camcorder ( )
MP3 player ( )
Camera ( )
Power button
8
OLED display
9
Directional button
10
LED indicator
11
Playback button
12
OK (Record/Shutter) button
13
Delete button
14
HDMI output
15
TV-out/Earphone connector
16
USB port
17
Tripod connector
18
EN
1
2
3
4
5
6
9
10
11
12
13
14
18
7
8
15
16
17
Bottom view
1
Page 4
2
EN
EN
Product operations
Product introduction
This digital camcorder comes with the following features:
Ultra slim, pen-like compact design offers maximum mobility and freedom
•
1280 x 720 (720P) HD high denition video resolution up to 30fps
•
Multi-functions: digital camcorder, digital still camera, MP3 player
•
2.84cm (1.1”) compact design and energy efcient high quality OLED display
•
Up to 5 Mega-pixel still pictures
•
Built-in 4GB/8GB* memory for storage
•
Supports MOV, JPEG, and MP3 le format
•
Supports USB PC connection
•
Supports TV-out / HDMI-out / earphone
•
* Model dependent
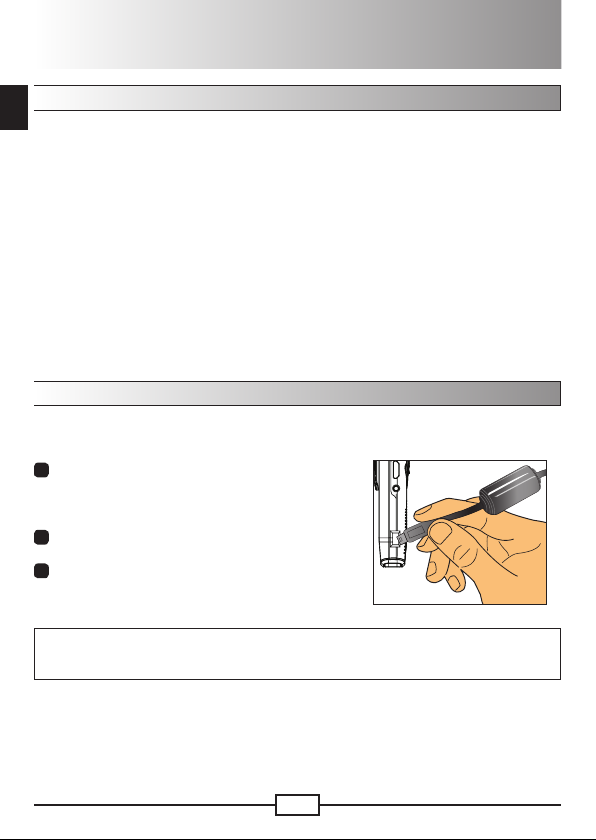
Charging battery
When using for the rst time, please charge the built-in Li-polymer battery for at least
8 hours.
1
Make sure that the camcorder is powered off.
Then, insert one end of the USB cable provided
into the USB port of the camcorder and the
opposite end into a powered PC.
2
The LED light will appear red to indicate that the
device is charging.
3
The LED light will turn off if the charging is
interrupted or complete.
Note:
When using a PC to charge the battery, do not power on the camcorder or it will stop
charging.
Page 5

EN3EN
Powering on/off
Hold the Power button down for 1 second to turn on, or to turn off
the unit.
Note:
If the camcorder fails to turn on after pressing the Power button,
1)
please recharge the battery rst.
If an AV cable or earphone connector is plugged in upon powering
2)
on, you will be prompted to select a connection option.
Display ratio
Due to the nature of OLED screens, the display ratio of still picture/video on the
camcorder and TV/PC will vary. Please see the following table for details.
Mode 1.1” OLED display TV/PC display
Video (preview/recording)
Video (playback)
Picture (preview/snapshot)
Picture (playback)
Note:
When outputting videos to a 4:3 screen, the display will be framed by black areas towards
the top and bottom. When displaying pictures on a 16:9 screen, the display will be framed
by black areas to the left and right.
(1:1)
(1:1)
(1:1)
(1:1)
(16:9)
(16:9)
(4:3)
(4:3)
Page 6

4
EN
EN
Recording/Reviewing a video
To record a video:
1
Power on the camcorder and switch to camcorder mode ( ).
2
Press the OK (Record) button to start recording. Use the
directional button up/down to zoom in/out.
3
To stop recording, press the OK (Record) button again.
Note:
Press the directional button to the right to enable the LED Light
when operating in a dark environment.
To review a video:
1
In camcorder preview mode, press the Playback button and the last recorded
video will play automatically.
2
When the unit is connected to TV or earphones, you can press the directional
button up/down to adjust the volume. While playing, you can press the Playback
button to pause/resume video playback.
3
During playback, press and hold down the directional button left/right to fast
rewind/forward the video. Tap left/right to shift between video les.
4
To switch back to preview mode, press the OK button.
Note:
After copying your videos onto your PC, you can play them back using the “Quicktime” player.
Recordable time
LED light
Zoom bar
Battery life
Taking/Reviewing a picture
To take a picture:
1
Power on the camcorder and switch to camera mode ( ).
2
Use the directional button up/down to zoom in/out.
3
Press the OK (Shutter) button to take a picture.
Note:
Press the directional button to the right to enable the LED Strobe
for picture taking in dark environments.
To review a picture:
1
In camera preview mode, press the Playback button.
2
Use the directional button left/right to select the picture you wish to review.
3
While in Playback mode you can zoom in/out by pressing up/down. You can then
press the Playback button to lock the ratio and navigate the picture by using the
directional button. Press the Playback button again to unlock the ratio.
4
To return to preview mode, press the OK button.
Remaining shots
LED light
Zoom bar
Battery life
Page 7

EN5EN
Deleting les
1
Press the Playback button while in preview mode.
2
Use the directional button left/right to select the le you want to delete and press
the Delete button.
3
To delete the current le:
Use the directional button left/right to select “Yes” and press
the Playback button.
To delete all les:
Use the directional button left/right to select “All” and press the
Playback button. Then select “Yes” and press the Playback
button to conrm.
4
To leave the deletion screen, press the Delete button.
Delete les
MP3 player
To listen to music, you must copy MP3 les from your PC rst. Please refer to the
“PC connection” section for more information.
To use earphones, insert them into the earphone jack on the side
of the unit. When prompted, select the earphone icon and press
OK to conrm.
Operations in MP3 player mode:
How to... Action
Switch to MP3 player mode
Select le Press the directional button up/down in MP3 list.
Play/Pause/Resume while playing
Adjust sound volume Press the directional button up/down while playing.
Return to MP3 list Press the OK button. The music will continue playing.
Delete one le / all les
Power on the camcorder and move the switch to the ( ) icon.
Press the Playback button.
Press the Delete button in MP3 list, and follow the
instructions in the “Deleting les - Step 3” section.
Set earphone
connection
Note:
Sub folders are supported by the camcorder. To browse a sub-folder, use the directional
1)
button up/down to select a folder and press the Playback button to enter. To return to
an upper-level folder, press the OK button.
Only one-tier of sub folders can be accessed by the camcorder.
2)
When you choose to Delete All MP3 les, the sub-folders and all of the MP3 les within
3)
them will be erased completely.
The length of MP3 le name cannot be greater than 54 English (single-byte, including
4)
space) characters. MP3 les with names exceeding the above regulation may cause the
camcorder to malfunction.
Page 8

6
EN
EN
PC connection
TV
Vídeo Áudio
Modo AV
Televisão
SAÍDA
DE TV
When the camcorder is powered on and connected to a PC via
the accessory USB cable, the system enters USB Slave mode.
The internal memory is then treated as a removable disk on the
PC, allowing you to directly copy or delete les stored in the
camcorder.
Note:
Once connected to a PC, you can copy MP3 les directly into the
“Music” folder for playback.
Connecting to a standard TV and HDTV
Connect your camcorder and TV via the included AV cable for real-time display.
TV : Traditional CRT TV
1
Turn on your TV and switch to AV
mode.
2
Connect the audio and video ends of
the AV cable to the TV.
3
Turn on the camcorder.
4
Connect the other end of the AV cable
to your camcorder.
5
Select the TV icon and press the OK
button.
TV : HDTV with HDMI input port
1
Turn on your HDTV.
2
Connect the HDMI-in connector (the
larger end) of the HDMI cable to the
HDTV.
3
Turn on the camcorder.
4
Connect the other end of the HDMI
cable to your camcorder.
5
Switch the HDTV to “HDMI input”
mode.
Select the TV icon
on the left
TV
AV mode
HDMI outHDMI in
TVout
Page 9

EN7EN
Addendum
Troubleshooting
Problem Cause Solution
Q
The camcorder is frozen
and unresponsive.
A
The camcorder
has encountered a
software failure.
S
Press and hold down the
power button to force a
manual shut down to reset
the camcorder.
Battery life indicator
Icon Description
Full battery life
Moderate battery life
Low battery life
* The LED light/strobe will be disabled.
Empty battery life
Note: To avoid sudden and unexpected loss of power, it is recommended that you recharge
the battery once the indicator reaches “Low”.
Page 10

8
EN
EN
Battery life
Still picture Video clip
* shoot every 30 seconds
** alternate ash (CIPA standard test method)
*** resolution set to 5M (2592x1944)
Note: This table is for reference purposes only and is approximate. Actual battery life may
vary slightly due to numerous factors including recharge level.
Number of shots Recording time (minutes)
310 125
* resolution set to HD 30f (1280x720 )
Storage capacity
Memory Video
4GB 100 min 2357 1000
8GB 200 min 4714 2000
Note: This table is for reference purposes only and is approximate. Actual capacity may
vary (up to ± 30%) depending on the complexity of your subject and surroundings.
(HD30f 1280x720)
Still picture
(5M)
Music
(.MP3)
System requirements
Video Resolution PC system requirements
OS = Windows XP SP2, Vista or above
HD 30f (1280x720) @30fps
Note: These are recommended minimum system requirements. The videos may be viewed
and edited on lower spec. systems, but those systems may experience a noticeable
decrease in performance.
CPU = Pentium 4 3.2GHz or above
System RAM = 1GB (2GB recommended)
Display card = 256MB of RAM
Page 11

EN9EN
Specications
Item Specication
Image Sensor 5 Mega-pixel (2592x1944)
Resolution
File Format MOV, JPEG, MP3
Video Frame Rate HD 720P up to 30fps
Internal Memory 4GB/8GB for storage*
LCD Display 2.84cm OLED (1.1”)
Lens Fixed lens (F 3.0; f=7.15mm)
Flash Light LED Back Lighting Support
Digital Zoom 3X
Night Shot Mode Auto
White Balance Auto
Music Yes
Microphone Yes
Speaker None
TV out HDMI-out / Composite AV-out (NTSC/PAL system supported)
Power Save Mode 3 min.
Battery Built-in Li-Polymer battery (950mAh)
* Model dependent.
Note: Specications are subject to change without notication.
For additional information and the Video User’s Manual, please visit the
PenCam HD website at: http://www.aiptek.com/PenCamHD
Camcorder: HD 720P (1280x720)
Camera: 5 Mega-pixel
Page 12

82-496-90020v1.0
 Loading...