

Page 1
Mega Camera
Manager
E-Manual
Page 2
USB
English
Chapter 1: Installation
Software Installation
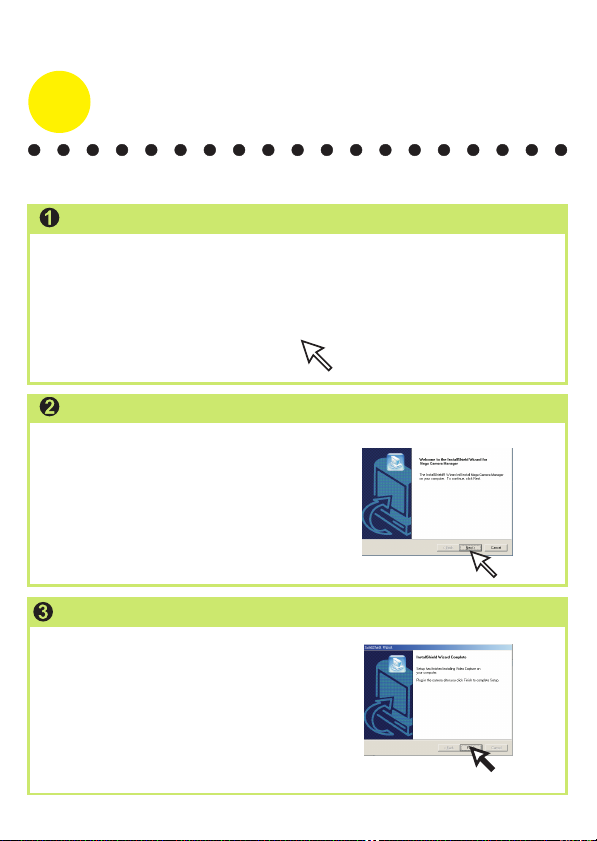
Mega Camera Manager Installation
Place the CD into your CD-ROM and click on the Mega Camera Manager
Icon to begin the installation. If the CD does not automatically launch,
locate the CD-ROM Drive in Windows Explorer, and double-click on "
Setup.exe ".
Mega Camera Manager
After the welcome screen appears, click
"Next".
The dialog box that appears asks if you
would like to restart your computer now
or later. Press "Finish" to complete
installation.
Page 3
USB
English
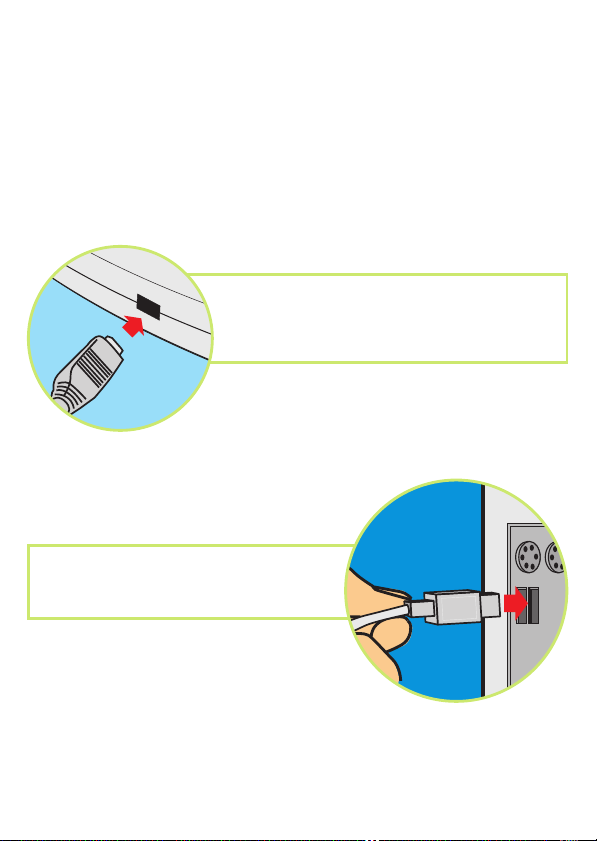
Hardware Installation
Connect the smaller end of the USB cable to
the USB port of your camera.
Plug the larger end of the USB cable to
the USB port of your PC.
Page 4

English
Chapter 2: How to Use Your Digital Camera
Introduction
The built-in memory of your camera is 16MB (128Mbits) Flash memory plus
16 MB (128Mbits ) SDRAM memory. It supports two kinds of resolution - high
resolution (1248x960) pictures and low resolution (640x480) pictures. It also
supports AVI Movie mode( 624x480) and (304x240) for high resolution and
low resolution. With a USB cable, you can transfer all the pictures to your PC.
Installing batteries
Your camera is powered by 2 AA Alkaline batteries or by a PC via a USB
cable.
When batteries are removed, all the stored AVI Movies are
cleared; however, still pictures will remain.
With 2 AA Alkaline batteries, you are able to take 160 pictures.
Battery standby works for approximately 10 days.
Page 5
English
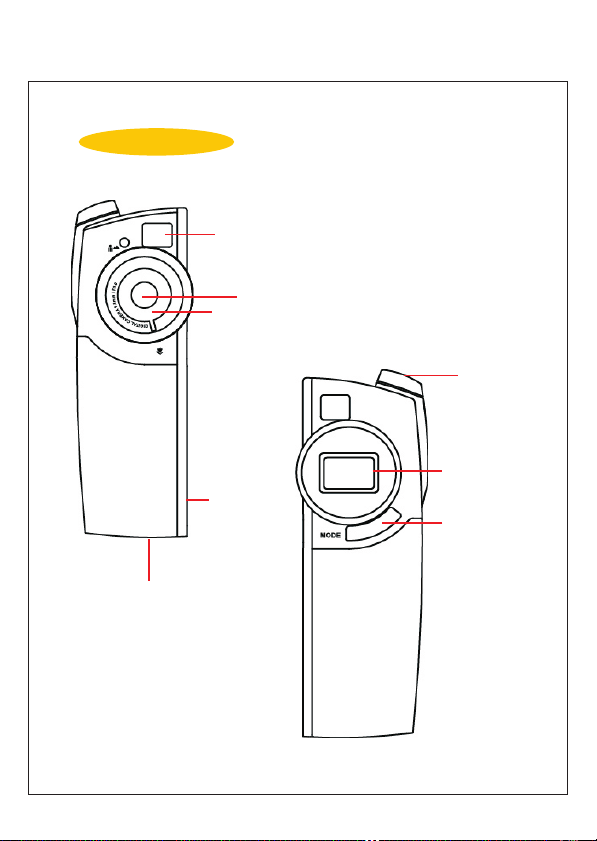
Your camera
View Finder
Lens
Focal Length
Shutter button
LCD Display
USB port
Mode button
Battery Cover
Page 6
English
Turning on / off your camera
Hold down the mode button to activate your camera.
Press the mode button, the LCD indicates still image, AVI movie,
Self-timer, erase last, erase all, resolution and good battery icons
in order.
To use the function of the icons, press the shutter button.
Your camera turns off automatically when idle over 60
seconds.
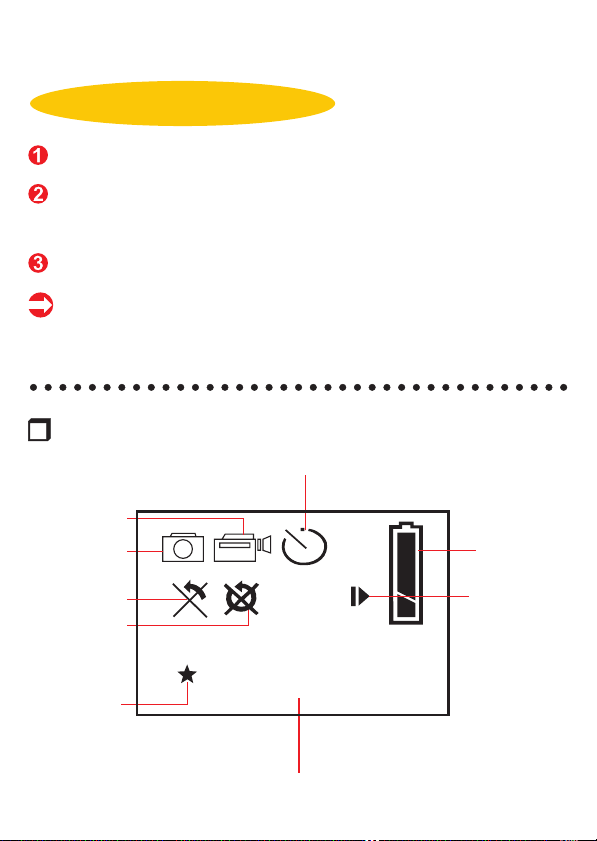
LCD Display
Self Timer
AVI Movie Mode
Still Image
Good Battery
Erase Last
Erase All
H
L
Resolution
888
Digit Counter
Plug in USB
Cable
Page 7
English
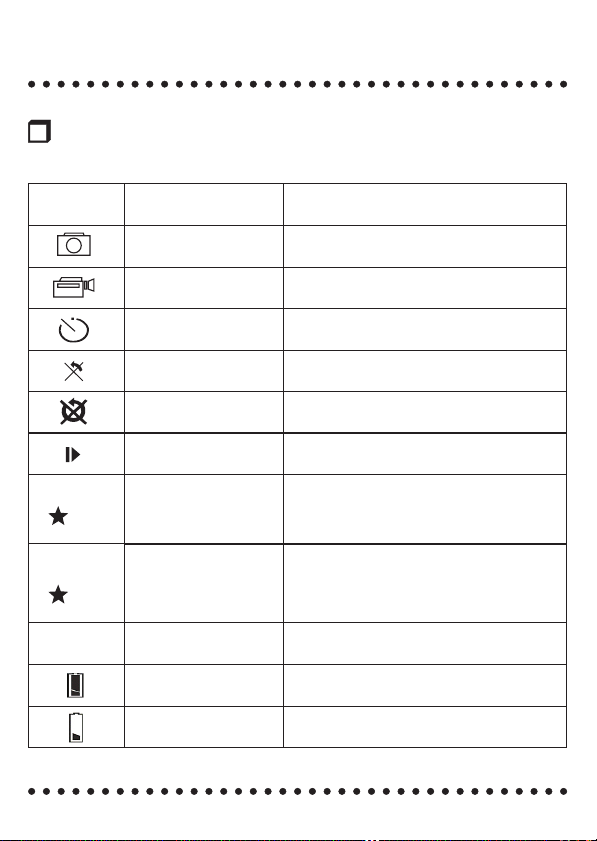
Description of LCD Display
Icon Functions
Still Image mode
AVI Movie mode
Self Timer
Erase Last
Erase All
Plug in USB Cable
H
L
888
High Resolution
Low Resolution
Digit Counter - displays the number of the pictures you take
Good battery
Low battery - indicates low battery status
Description
- takes still pictures
- takes AVI Movie
- starts 10 second self-timer to take a picture
- erases the last picture or AVI Movie
- erases all of the pictures or AVI Movie
in the memory
- indicates USB cable is plugged in
Still image mode
(1248x960), up to 40 pictures
AVI Movie mode
( 624x480 ), up to 30sec/10fps
Still image mode
(640x480), up to160 pictures
AVI Movie mode
( 304x240 ), up to 120sec/10fps.
- indicates good battery status
Page 8

English
Chapter 3: Taking Pictures
Taking a picture
Still Image Mode
Press the mode button.
The LCD shows the Still
Image Mode icon.
Press the shutter button
to take a single picture.
You've taken a picture when LCD shows the first flashing
number. When the sixth flashing number appears, the
whole image storing process is completed.
AVI Movie Mode
Press the mode button.
The LCD shows the AVI
Movie Mode icon.
Press the shutter button
to take AVI Movie.
Press the shutter button
again to stop AVI Movie.
Two beeps with blinking number suggests that there is no
room for storing further AVI Movie.
H
H
0
0
Page 9

English
Self Timer
Press the mode button.
The LCD shows the Self
Timer icon.
Press the shutter button.
Your camera starts a 10second countdown and
takes a picture.
Erase Last
Press the mode button.
The LCD shows the Erase Last icon.
Press the shutter button.
The Erase Last icon starts to blink.
Press the shutter button again and the last stored picture
or AVI Movie is cleared.
Press the mode button to leave Erase Last mode.
H
0
H
0
Erase the last still picture Erase the last AVI Movie
H
0
Page 10

English
Erase All
Press the mode button.
The LCD shows the Erase All icon.
Press the shutter button.
The Erase All icon starts to blink.
Press the shutter button again and all the stored picture
and AVI Movie are cleared.
Press the mode button to leave Erase All mode.
H
H
0
Erase all still pictures Erase all AVI Movie
Digit Counter
It shows the total images and AVI Movie taken.
The digit counter is also a second counter when
taking AVI Movie.
Blinking number indicates that the data is being
processed.
0
Page 11

English
Battery Indicators
When running out of power, the LCD changes from a good battery icon to
a low battery icon. It tells you to replace batteries.
Good Battery Low Battery
Function icons on the LCD are unable to be removed when low
battery icon starts blinking. Your camera will be automatically
turned off when idle over 60 seconds.
How to Adjust the Focal Length
We suggest adjusting the focal length to
the following positions as taking distinct
shots.
Also use this setting
for infinite focus
Landscape & People
( whole-length)
People
(half-length)
15 Inches 6 Feet
Extreme close-up
Page 12

English
Resolution Settings
H
L
Choosing the Resolution
Press the mode button until a star icon with H or L is shown.
To change "H" or "L" resolution, press the shutter.
Select a function icon to take a picture, such as Still Image mode.
Press the shutter and a picture is taken.
Note for Still Image Mode & AVI Movie mode
High Resolution: (1248x960), up to 40 pictures
Low Resolution:(640x480), up to160 pictures
Still image mode
AVI Movie mode
Note: Still pictures are stored in Flash Memory. Pictures
will not be erase even you upload or install new batteries
or unplug USB cable.
High Resolution: ( 624x480 ), up to 30sec/10fps
Low Resolution: ( 304x240 ), up to 120sec/10fps.
Note:AVI Movies are stored in SDRAM. When removing
batteries or disconnecting the USB cable, all AVI Movies
will be erase. Please upload all AVI Movies to the PC
before removing the batteries or unplugging the USB
cable.
Page 13

English
Chapter 4: How to Transfer Photo and Video to PC
Click the " Mega Camera Manager " icon on the Desktop to open the
Mega Camera Manager program.
Mode Selecting
Press the "Live View" button to change the camera to PC Camera mode.
Press the "DSC Function" button to change the camera to DSC mode.
DSC Function
(DSC Mode)
Live View
(PC Camera Mode)
Page 14

English
Live View Mode
This mode allows you to view the camera in a Live View as a PC Camera,
to record Video and take snapshots.
The current view is displayed in the "preview" window.
Live View Mode
Record
Snapshot
Video Format
Video Source
Live preview
Video Record
= Press "Video Source"
button to adjust advanced
settings.
Press "Video Format"
button to set image size.
If you wish to change the
recording speed, adjust the
Frame rate from 1 to 30.
The recording time is also
adjustable. Press " Start to
record" to record.
Press "Snapshot" button to
capture an image to the
work area.
Press "Record button" to
record a video clip to the
work area.
Page 15

English
DSC Mode
DSC Function
(DSC Mode)
Upload images to
the work area
Transfer images
to the album
Create AVI file
Send Mail
Select All
Delete
Use this function to upload images from the camera to
the manager Work Area.
Use this function to transfer photos to the album.
Select All
Delete
Image
Album Manager
Work area
Minimize
Album
Exit
Shortcut Menu
Right-click the work area, a shortcut menu will pop up.
You can use the shortcut menu to select the select all,
transfer to album, save as, mail to or delete options.
This function allows you to add many individual image
files together to create an AVI file.
Open or close album
Page 16

English
Uploading image from the camera
Update
Upload
First, the total taken images in the
camera are displayed .Click "Upload"
to transfer images to the work area.
To take pictures directly from the
PC, click " Apply format" to choose
"1248x960" or " 640x480" image
format.
Click" Take a snapshot" or the shutter
button to take a picture. Then click
"Update"to display the next image.
Preview window
Transferring images to the Album
Click a JPG/ BMP image or an AVI image . Then click " Transfer
images to the album" button. Images are transferred from the
work area to the album. To delete an image, select it and click
"Delete".
Page 17

English
Making AVI file
Select JPG/ BMP images and
click " Make AVI file" icon to
make an AVI file.
Images sequence and frame
rate are adjustable
Playing picture
You can play any picture file you want by double clicking the picture icon to
open the preview window. To display a Slide, click " Go to the next
picture" or " Go to the previous picture". Then adjust Slide Show Timer and
click "OK". Pictures in the work area are displayed in order. To stop Slide
show, simply click " Stop".
Picture icon
Go to the next picture
Go to the previous picture
Slide Show
Exit
Page 18

English
Slide Show Timer
Playing Video
You can play any video clip file (AVI format)
you want by double clicking the AVI file
icon to execute your default media
application.
Editing Photos
Pictures can be edited in image editing software, such as PhotoShop,
Imaging, CorelDraw, etc.
Page 19

English
Album
Delete
Click the button. All the files you select in the album
window are cleared forever. Therefore, you should be
very careful with the delete button.
Select All
Click the button. You select all the files in the album
window.
Making Your Album Folders
Click the button and key in your file name. Then you'll
have a new album folder, which can store lots of
images or video files. If you want to cancel any of the
album folders, just select the album and click the delete
button below.
Mail Function:
Click the "Mail" button to attach the selected image to a
new email document.
Page 20

English
TWAIN Manager
To start using the TWAIN Manager, simply click on the "Start" menu and
go up to "Programs" Then go to the folder named "Imaging" ( or any other
TWAIN- supported imaging application software ), and select it.
How to enter TWAIN Manager
Go to "File" and choose "select device"
Choose " Data Source" and click "OK"
Go to "File" again and select " Acquire Image"
Preview Window
Work area
After connecting USB cable with your
PC, images are transferred to the
preview window automatically.
Page 21

English
Mode Selecting
DSC Mode
Live View
Live View Mode
Transfer
Transfer All
Snapshot
Save AVI
Setting
Press "Snapshot" button to capture an image
Press "Video Source" button to adjust advanced
settings.
Page 22

English
DSC Mode
Select an image and transfer it to the work area
Select images and transfer it to the work area
Select an AVI file and click "Save AVI"
Press "Snapshot" button to capture an image
Page 23

English
AddendumforMSwindows98User:
SincethedefaultsettingofWin98harddiskcontrollerhasclosedthe
DMAchannel,thereisachancethatthesystemmightbehungwhen
youareexecutingthe“Recording”functionunderthe“Live”modeof
ourMegaCameraManager.YouareadvisedtoopentheDMA
channelasfollowings:
1.Select“MyComputer“,clicktherightbuttonofyourmouseand
selectthe“Properties”.
2.Selectthe“DeviceManager”tap,clickonthe“Diskdrivers”and
double-clickthe“GenericDiskType”astheright-sidepicture:
3.Clickonthe“Settings”andselectthe“DMA”boxastheright-side
picture:
4.Click“OK”to confirmthechangeofDMAchannelsetting,andrestartyourcomputerinaccordancewiththesystemrequest.
82-093-90010v1.1
 Loading...