

Page 1
Page 2

Welcome:
Dear user, thank you for purchasing this product.
Much investment in time and effort has gone into its development, and it is our hope
that it will give you many years of trouble-free service.
FCC Compliance Statement:
This device complies with Part 15 of the FCC Rules. Operation is
subjected to the following two conditions: (1) this device may not cause
harmful interference, and (2) this device must accept any interference
received, including interference that may cause undesired operation.
This equipment has been tested and found to comply with limits for a
Class B digital device, pursuant to Part 15 of the FCC rules. These limits
are designed to provide reasonable protection against harmful interference in residential
installations. This equipment generates, uses, and can radiate radio frequency energy, and if
not installed and used in accordance with the instructions, may cause harmful interference to
radio communications.
However, there is no guarantee that interference will not occur in a particular installation. If this
equipment does cause interference to radio or television equipment reception, which can be
determined by turning the equipment off and on, the user is encouraged to try to correct the
interference by one or more of the following measures:
-Reorient or relocate the receiving antenna.
-Move the equipment away from the receiver.
-Plug the equipment into an outlet on a circuit different from that to which the receiver is
connected.
-Consult the dealer or an experienced radio/television technician for additional suggestions.
You are cautioned that any change or modications to the equipment not expressly approved
by the party responsible for compliance could void Your authority to operate such equipment.
Safety Notice:
1. Do not drop, puncture or disassemble the camcorder; otherwise the warranty will be voided.
2. Avoid all contact with water, and dry hands before using.
3. Do not expose the camcorder to high temperature or leave it in direct sunlight. Doing so may
damage the camcorder.
4. Use the camcorder with care. Avoid pressing hard on the camcorder body.
5. For your own safety, avoid using the camcorder when there is a storm or lightning.
6. Do not use batteries of different specications. Doing so may lead to the potential for serious
damage.
7. Remove the battery during long periods between usage, as a deteriorated battery may affect
the functionality of the camcorder.
8. Remove the battery if it shows signs of leaking or distortion.
9. Use only the accessories supplied by the manufacturer.
10. Keep the camcorder out of the reach of infants.
11. Risk of explosion if battery is replaced by an incorrect type.
12. Dispose of used batteries according to the instructions.
If the time arises to throw away your product, please
recycle all the components possible.
Batteries and rechargeable batteries are not to be
disposed in your domestic waste! Please recycle
them at your local recycling point.
Together we can help to protect the environment.
Page 3
Preparing the Camcorder
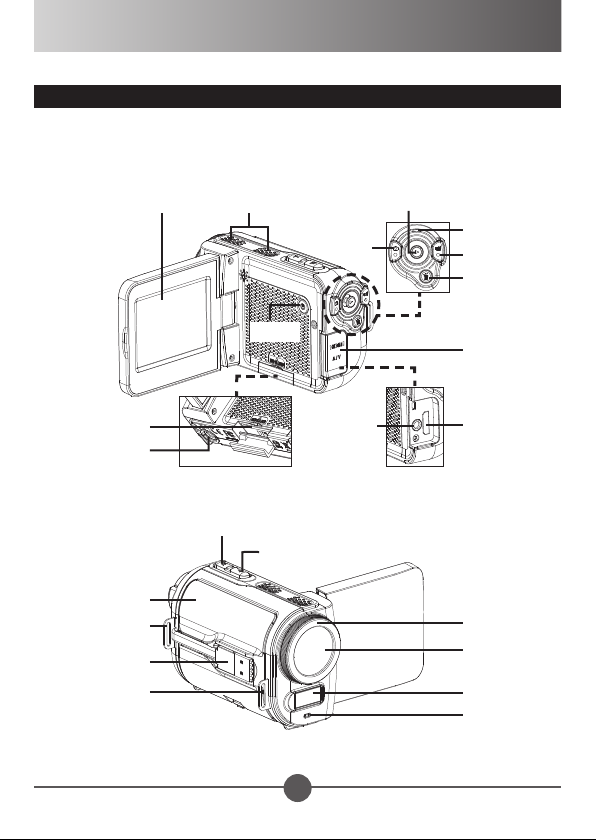
Product overview
SpeakerLCD display
Shutter
Playback
As Joystck Up: Icon
Down: Video resolution
Left: Flash
Right: Menu
LED indicator
Record
Delete
SD card slot
Tripod socket
Battery cover
Wrist strap
holder (back)
USB connector
Wrist strap
holder (front)
Power
connector
Zoom out/Volume down
Zoom in/Volume up
1
earphone
Connector cover
HDMI outputTV-out /
Focus switch
Lens
Flash strobe
Microphone
Page 4

Getting Started
Loading the battery
1
Detach the USB connector as indicated,
and then unfasten the battery cover to
remove the cover.
2
Place the accessory Li-Ion battery into
the compartment. Note that the metallic
contacts must be aligned with the
contacts in the compartment.
3
Replace the cover.
When using for the rst time, please fully charge the battery for
at least 8 hours.
Charging the battery
1
Detach the USB connector and plug it into a USB port on a powered PC. Make
sure the camcorder is powered off.
2
The charging LED turns red and the charge starts.
3
When the charging is interrupted or the battery pack is fully charged, the charging
LED will turn off.
When using a PC to charge the battery:
1) Do not power on the camcorder or the
charge will stop.
2) If necessary, use a USB extension
cable to extend the connection.
2
Page 5

Inserting the SD card
1
Lift the memory card cover to open it as indicated.
2
Insert the card as the direction of indication until it
reaches the end of the slot.
3
When the card is inserted successfully, the icon ( )
will appear on screen. To remove the card, push the
card to release it and then pull it out gently.
4
Put the cover back.
Turning the power on/off
To turn on the camcorder, either open the LCD panel or press the Power button.
To turn off the camcorder, either close the LCD panel or press the Power button.
If the power is not turned on after you have completed the above procedures, please
check the following have been done correctly: 1) The battery is correctly loaded; 2) The
loaded battery has enough power.
Please choose your local language before starting using the camcorder.
3
Page 6

Realizing the battery life indicator
Icon Description
Full battery life
Moderate battery life
Low battery life
* The ash strobe will be disabled.
Empty battery life
Note: To avoid sudden outage of power supply, you are recommended to replace the
battery when the icon indicates low battery life.
Recording a video clip
1
Set the focus to an appropriate setting. Normally, you
may set the focus to ( ) for most lming conditions.
Select ( ) only for close-ups.
2
Press the Record button ( ) to start recording.
3
Use the Zoom buttons ( / ) to zoom in or zoom out the screen.
4
Use the Joystick Enter to pause, and Enter again to resume.
5
Press the Record button ( ) again to stop recording.
50cm ~
30cm ~ 50cm
Focus settings
Taking a still picture
1
Set the focus to an appropriate setting. Normally, you
may set the focus to ( ) for most lming conditions.
Select ( ) only for close-ups.
2
Use the Zoom buttons ( / ) to zoom in or zoom
out the screen.
50cm ~
30cm ~ 50cm
Focus settings
3
Press the Shutter button ( ) to take a still picture.
If you want to playback the recorded videos/pictures, press the Playback ( ) button.
4
Page 7

Exporting to a standard TV and HDTV
TV : Traditional CRT TV
The TV system is different across areas. If you need to adjust the TV-out setting, please
refer to the “Advanced settings” section for more information. (Taiwan: NTSC; America:
NTSC; Europe: PAL; China: PAL)
1
Turn on your TV and switch the TV to
AV mode.
2
Connect the audio and video ends of
the AV cable to the TV.
3
Turn on the camcorder.
4
Connect the other end of the AV
cable to your camcorder.
The AV cable is an optional item. Please
purchase the cable at your local retailer:
White
Red
Yellow
TV : HDTV with HDMI input port
1
Turn on your HDTV.
2
Connect the HDMI-in connector (the
larger end) of the HDMI cable to the
HDTV.
3
Turn on the camcorder.
4
Connect the other end of the HDMI
cable to your camcorder.
5
Switch the HDTV to the “HDMI input”
mode.
Camcorder and Camera functions are not available in AV/HDMI-out mode.
The HD TV will display your video clips in 1080i (60 elds) resolution mode although it is
recorded in 1080P (30 frames) setting.
AV Mode
Video
Audio
TV-out
HDMI-out
5
Page 8

Advanced settings
Key tips
Item Option Description
Flash Strobe
(Joystick Left)
Video Resolution
(Joystick Down)
Icon
(Joystick Up)
On ( )
Auto ( )
Off ( )
Please refer to the package printing for resolution specication.
On/Off Enable/Disable OSD icons to display on the screen.
Setting menu ( ) options
Press the Joystick Right ( ) to enter.
Item Option Description
Video
Resolution
Picture
Resolution
Slideshow
Date Stamp
Clock - Set date and time.
Language - Let you select the language used for OSD.
Please refer to the package printing for resolution specication.
Please refer to the package printing for resolution specication.
On ( )/ Off ( )
On ( )/ Off ( )
The ash is forced to re in every shot.
The ash automatically res when the lighting is
insufcient.
The ash is disabled.
Start picture slideshow. / Repeat playing all video clips.
Enable this feature to print a date mark on each picture.
6
Page 9

Setting menu ( ) options (continued)
82-711-90010v1.0
Item Option Description
Off ( )
Beep
TV System
Flicker
NightShot
On ( )
Shutter On ( )
NTSC ( )
PAL ( )
50Hz ( )
60Hz ( )
Auto ( )/
Off ( )
* Flicker settings reference:
Region England Germany France Italy Spain
Setting 50Hz 50Hz 50Hz 50Hz 50Hz 50Hz 50Hz
Region Portugal America Taiwan China Japan Korea Thailand
Setting 50Hz 60Hz 60Hz 50Hz 50/60Hz 60Hz 50Hz
Note: The icker setting is based on the frequency standard of your local power supply.
Disable beep sound.
Enable beep sound.
Disable beep sound, but keep Shutter sound.
Set TV system compatibility to NTSC. This option is
suitable for America, Taiwan, Japan, and Korea areas.
Set TV system compatibility to PAL. This option is suitable
for Germany, England, Italy, Netherlands, China, Japan,
and Hong Kong.
Set icker frequency to 50Hz.
Set icker frequency to 60Hz.
Enabling this setting allows you to take a photograph with a
dark background. Since the shutter speed will slow down
when taking photographs and videos at a dark place, we
recommend using a tripod to eliminate blurring from hand
shake.
Warning: Noise increases when NightShot is enabled.
Netherlands
Russia
7
 Loading...