

Page 1

User’s Manual
Care and Safety Information
1. Keep the device and packaging materials out of the reach of infants and
children.
2. Avoid subjecting the power adapter and other contacts to dripping or splashing
water and dry your hands before you use it. Do not place objects filled with
liquids such as vases, etc. on or near the device.
3. Make sure that the used power outlet is always readily available and never
hidden. In case of emergency, use the power adapter to separate the device
from the power network.
4. Keep your device away from all flames such as candles and do not set them up
in the vicinity of the device.
5. Keep the unit at least 10 cm away from other objects. Make sure the ventilation
is not covered by newspapers, tablecloths, curtains, etc.
6. For your own safety, do not use the projector during thunderstorms or lightning.
7. Relative Humidity is 5~35°C, 80% (Max.), non-condensing.
8. The battery is integrated with the device. Do not dissemble and modify. The battery
should be replaced by qualified service staff only.
9. Ensure that the ambient room temperature is within -10~55°C
10. During the operation, this product may heat lightly, which is normal.
11. Wait before using if the device has been moved from a cold location into a
warm one. Any condensation that has formed may in certain circumstances
destroy the device. As soon as the device has reached room temperature it can
be used without risk.
12. Handle the product with care. Avoid contact with sharp objects. Keep device
away from metallic objects.
13. Place the projector on a flat surface. Any collision or falling to the ground is
likely to damage the product.
14. Do not drop or disassemble the product otherwise the warranty voids. Opening
or removing covers may expose you to dangerous voltage or other hazards.
Refer all servicing to qualified service personnel.
15. Use only the accessories supplied by the
manufacturer.
16. Both product and user’s manual are subject to
further improvement or supplement without
further notice.
17. Avoid facing directly into the projector’s lens.
I
Page 2
User’s Manual
Sicherheitshinweise:
1. Das Gerät und das Verpackungsmaterial außerhalb der Reichweite von
Kindern halten.
2. Das Netzteil nicht in Kontakt mit tropfendem oder fließendem Wasser kommen
lassen und Hände vor der Benutzung abtrocknen. Keine mit Flüssigkeiten
gefüllte Gegenstände, wie z.B. Vasen usw. auf oder in die Nähe des Gerätes
stellen.
3. Stellen Sie sicher, dass die verwendete Steckdose immer verfügbar und
niemals blockiert ist. Verwenden Sie im Notfall das Netzteil, um das Gerät vom
Stromnetz zu trennen.
4. Das Gerät von Flammen, wie z.B. Kerzen fernhalten und diese nicht in der
Nähe des Gerätes aufstellen.
5. Das Gerät mindestens 10 cm von anderen Gegenständen entfernt halten.
Stellen Sie sicher, dass die Lüftungsschlitze nicht durch Zeitungen,
Tischdecken, Vorhänge usw. blockiert werden.
6. Den Projektor zu Ihrer eigenen Sicherheit nicht während eines Gewitters oder
Blitzschlages verwenden.
7. Relative Luftfeuchtigkeit liegt bei 5 bis 35°C, 80% (max.), nicht kondensierend.
8. Der Akku ist im Gerät integriert. Nicht auseinander nehmen oder ändern. Der
Akku sollte nur von einer Fachkraft ausgetauscht werden.
9. Stellen Sie sicher, dass die Raumtemperatur innerhalb von -10 ist ~ 55°C liegt.
10. Dieses Produkt kann während des Betriebes etwas warm werden, was normal ist.
11. Warten Sie mit der Verwendung des Geräts etwas, wenn das es von einem
kalten an einen warmen Ort gebracht wurde. Kondenswasser kann das Gerät
unter bestimmten Umständen zerstören. Sobald das Gerät Raumtemperatur
erreicht hat, kann es ohne Risiko verwendet werden.
12. Produkt mit Vorsicht handhaben. Kontakt mit scharfen Gegenständen
vermeiden. Von Gegenständen aus Metall fernhalten.
13. Den Projektor auf eine flache Unterlage stellen. Stöße oder ein Herunterfallen auf den
Boden führt wahrscheinlich zu Schäden des Produktes.
14. Das Produkt nicht fallen lassen oder auseinander nehmen, da sonst die
Gewährleistung erlischt. Das Öffnen oder Entfernen von Abdeckungen kann sie
gefährlichen Spannungen und anderen Risiken aussetzen. Alle
Wartungsarbeiten von Fachpersonal durchführen lassen.
15. Nur vom Hersteller empfohlenes Zubehör verwenden.
16. Sowohl das Produkt als auch das
Benutzerhandbuch unterliegen fortlaufenden
Verbesserungen oder Ergänzungen ohne
vorherige Mitteilung.
17. Nicht direkt in das Objektiv des Projektors sehen.
II
Page 3
User’s Manual
Entretien et précaustion d’emploi (FR)
1. Attention - Evitez de vous placer en face de la lentille du
vidéo projecteur.
2. Evitez tout contact avec de l’eau, et gardez vos mains
sèches lors de l’utilisation.
3. Assurez-vous que la température de la pièce est comprise entre -10 et 55°C
4. Le taux d’humidité relative doit être de 80% au maximum entre 5 et 35°C, sans
condensation.
5. Ne pas faire tomber, frapper ou démonter cet appareil ; sinon la garantie sera
annulée.
Informazioni sulla cura e sulla sicurezza (IT)
1. Attenzione - Non guardare l’obiettivo in modo diretto.
2. Evitare il contatto con liquidi e utilizzare con mani asciutte.
3. Assicurarsi che la temperatura ambiente della stanza sia
compresa tra -10 e 55°C
4. L’umidità relativa deve essere compresa tra 5 e 35
condensazione.
5. Non far cadere, non colpire e non smontare il dispositivo; in caso contrario la
garanzia verrà annullata.
°
C, all’80% (max.), senza
Información de seguridad (ES)
1. Advertencia - Evite ponerse directamente en frente de las
lentes del proyector.
2. Avite cualquier contacto con el agua. Mantenga sus manos
secas durante su uso.
3. Asegúrese de que la temperatura ambiente de la sala sea de -10~55°C
4. Humedad relativa de 5~35°C, 80% (Máx.), no-condensada.
5. No caiga, golpee o desmonte el dispositivo, ya que de lo contrario se
invalidaría la garantía.
Δϣϼγϟ ΕΎϣϭϠόϣΔϳΎϋήϟϭ(AR)
ΔϔΛϛϣ.
III
1. έϳΫΣΗ-νέόϟ ίΎϬΟ ΔγΩόϟ έηΎΑϣ ϝϛηΑ νέόΗϟ ΏϧΟΗ.
2. Σϟϭ ˬ˯ΎϣϟΎΑ ίΎϬΟϟ ϝΎλΗ ΏϧΟΗϡΩΧΗγϻ ˯ΎϧΛ ϥϳΗϓΎΟ ϙϳΩϳ ϰϠϋ υΎϔ.
3.ϥϳΑ Ύϣ ΔρϳΣϣϟ Δϓέϐϟ ΓέέΣ ΔΟέΩ ϥ ϥϣ Ωϛ΄Ηϟ10ϰϟ·55Δϳϭϣ ΔΟέΩ .
4. ϥϣ ΔϳΑγϧϟ ΔΑϭρέϟ ϥϭϛΗ ϥ5 ϰϟ·35ϝΩΎόϳ ΎϣΑ ˬΔΟέΩ80) %ϰλϗ ΩΣΑ( έϳϏ ˬ
5. ϥΎϣοϟ ϕΣ ϝρΑ ϻ·ϭ ˭ίΎϬΟϟ ϙϔΑ ϡϭϘΗ ϭ ΏϘΛΗ ϭ ρϘγΗ ϻ.
Page 4
User’s Manual
FCC Compliance Statement:
This device complies with Part 15 of the FCC Rules.
Operation is subjected to the following two conditions: (1)
this device may not cause harmful interference, and (2) this
device must accept any interference received, including
interference that may cause undesired operation.
This equipment has been tested and found to comply with limits for a Class B
digital device, pursuant to Part 15 of the FCC rules. These limits are designed to
provide reasonable protection against harmful interference in residential
installations. This equipment generates, uses, and can radiate radio frequency
energy, and if not installed and used in accordance with the instructions, may
cause harmful interference to radio communications.
However, there is no guarantee that interference will not occur in a particular
installation. If this equipment does cause interference to radio or television
equipment reception, which can be determined by turning the equipment off and on,
the user is encouraged to try to correct the interference by one or more of the
following measures:
- Reorient or relocate the receiving antenna.
- Move the equipment away from the receiver.
- Plug the equipment into an outlet on a circuit different from that to which the
receiver is connected.
- Consult the dealer or an experienced radio/television technician for additional
suggestions.
You are cautioned that any change or modifications to the equipment not expressly
approved by the party responsible for compliance could void your authority to
operate such equipment.
(EN)
If the time arises to throw away your
product, please recycle all the
components possible.
Batteries and rechargeable batteries are
not to be disposed in your domestic
waste! Please recycle them at your local
recycling point.
Together we can help to protect the
environment.
IV
Page 5
User’s Manual
(DE)
Wenn die Lebensdauer des Produkts zu Ende
kommt, lassen Sie bitte möglichst alle
Komponenten recyceln. Bitte recyceln Sie
dieses Produkt ordnungsgemäß, wenn es
nicht mehr verwendet werden kann. Es kann
nicht als Haushaltsmüll behandelt werden. Es
muss separat über die verfügbaren
Rücknahme- und Sammelsysteme entsorgt
werden.
(FR)
Si il est temps de jeter votre produit, veuillez recycler tous les composants possibles. Si ce
produit est arrivé en fin de vie, veuillez s’il vous plait le recycler correctement. Il ne peut pas
être traité comme les ordures ménagères. Il doit être être apporté à un point de collecte
approprié pour le recyclage.
(IT)
Al momento di buttare via il prodotto, riciclare il maggior numero di componenti. Se questo
prodotto giunge alla fine del suo ciclo di vita, lo ricicli correttamente. Non può essere trattato
come rifiuto urbano. Deve essere smaltito separatamente attraverso l’appropriato sistema di
reso e di raccolta.
(ES)
Si ha llegado la hora de deshacerse del producto, recicle todos los componentes que pueda.
Si ha finalizado la vida útil de este producto, recíclelo adecuadamente. Debe deshacerse
del mismo de forma separada a través de los sistemas de recogida disponibles.
(AR)
Ϋ·ϥΎΣΕϗϭιϠΧΗϟϥϣˬΞΗϧϣϟ˯ΎΟέϟΓΩΎϋ·έϳϭΩΗΔϓΎϛ˯ίΟϷΔϧϛϣϣϟ.
ϻϡΗϳιϠΧΗϟϥϣΕΎϳέΎρΑϟΕΎϳέΎρΑϟϭΔϠΑΎϘϟΓΩΎϋϹϥΣηϟ
ϥϣοΕΎϔϠΧϣϟΔϳϟίϧϣϟ!˯ΎΟέϟΓΩΎϋ·ΎϫέϳϭΩΗϯΩϟίϛέϣΓΩΎϋ·
έϳϭΩΗϟϲϠΣϣϟϙϳΩϟ.
˱
Ύόϣ
ΎϧϧϛϣϳΓΩϋΎγϣϟϲϓΔϳΎϣΣΔϳΑϟ.
(NL)
Als het einde van de levensduur van het product is bereikt, moet u alle mogelijke
ponenten recyclen. Batterijen en oplaadbare batterijen mogen niet bij het huishoudelijke
com
afval worden gegooid. Lever ze af bij uw lokale dienst voor recycling. Samen kunnen we
helpen bij de bescherming van het milieu.
(BPT)
Se você decidir descartar o produto, faça-o de modo que seja possível a reciclagem de
todos os componentes. As baterias e pilhas recarregáveis não devem ser descartadas em
seu lixo doméstico! Favor reciclá-las em seu ponto de reciclagem local. Juntos, podemos
ajudar a proteger o meio ambiente.
V
Page 6

Page 7
User’s Manual
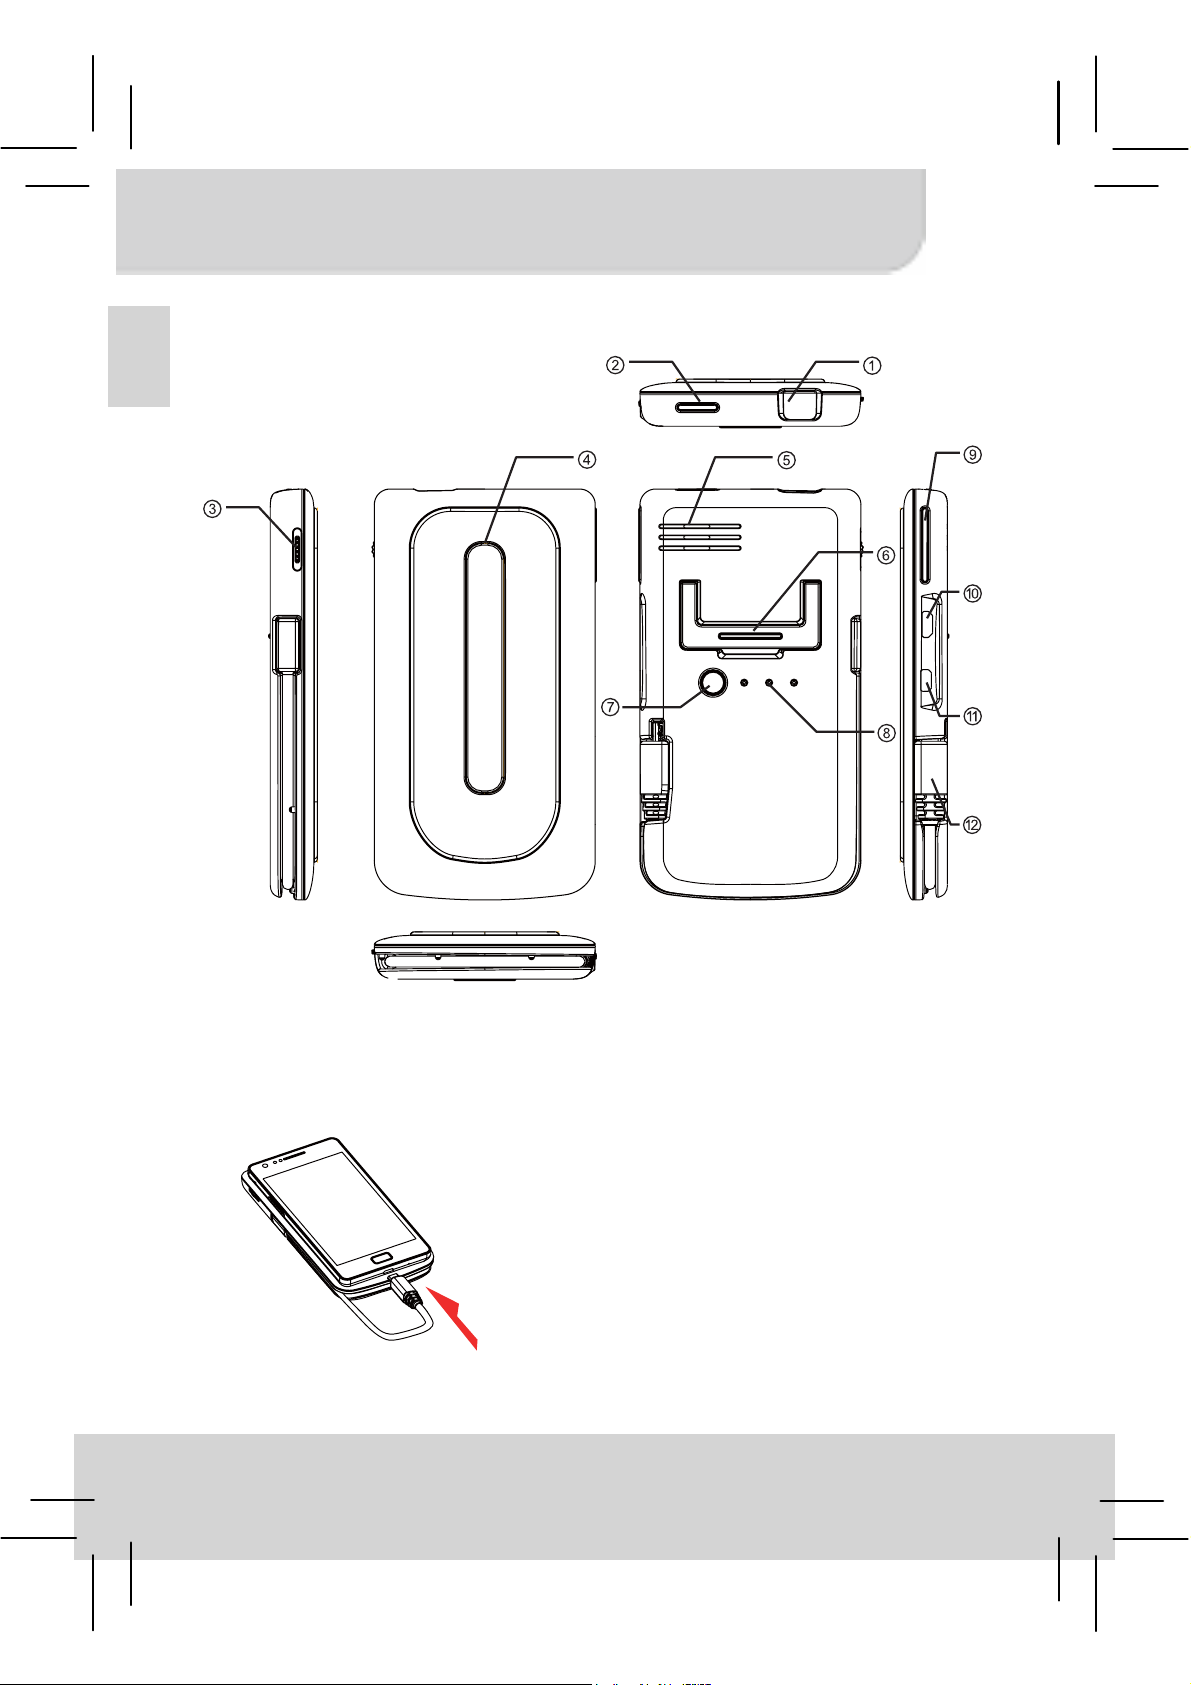
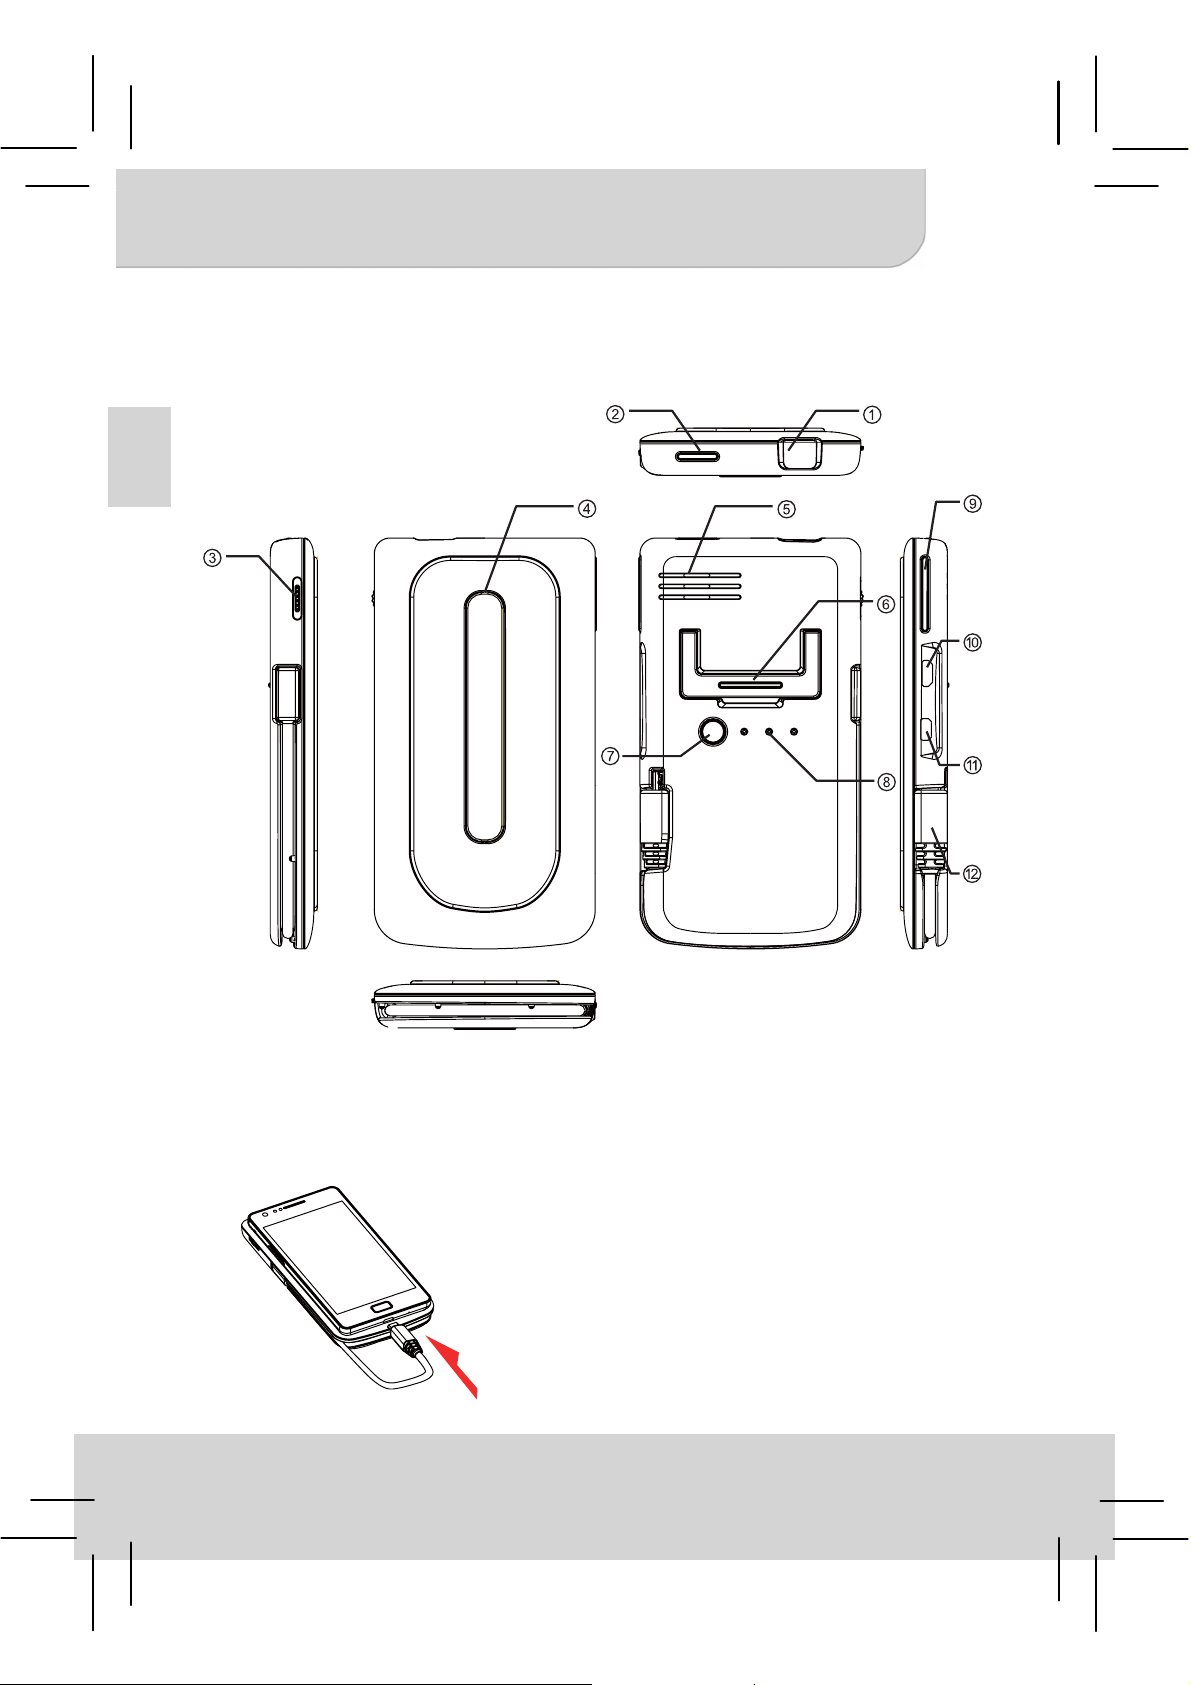
Product Overview
EN
Projector Lens
ཱ 3URMHFWLRQ2Q2II%XWWRQ
ི )RFXV:KHHO
ཱི $QWL6OLS3DG
* You can put
your cell phone
on top of the
projector for
convenience
usage.
1
ུ Speaker
ཱུ Stand
ྲྀ Charging Mode
ཷ LED Indicator
ླྀ Projection Mode/Up & Down
ཹ Micro USB Charging Port
ེ Micro HDMI port
ཻ MHL Cable (5 pin)
Page 8
User’s Manual
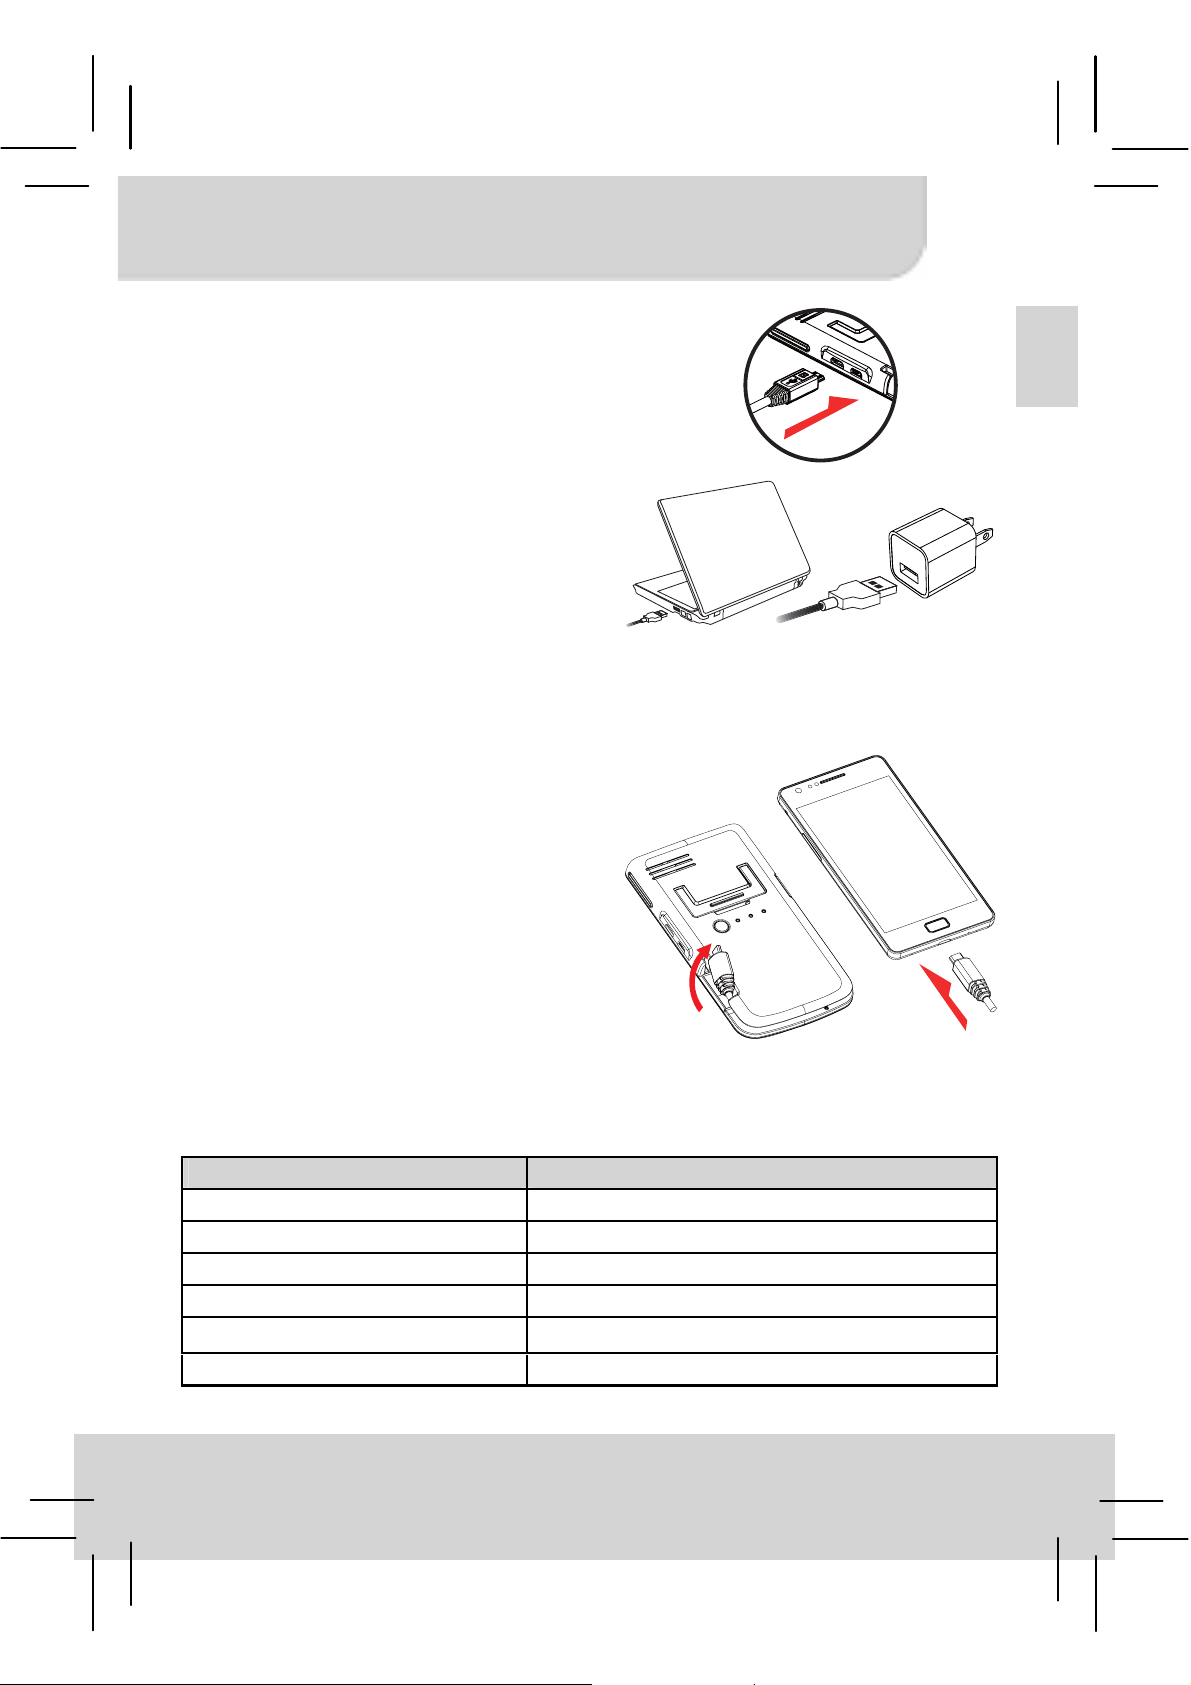
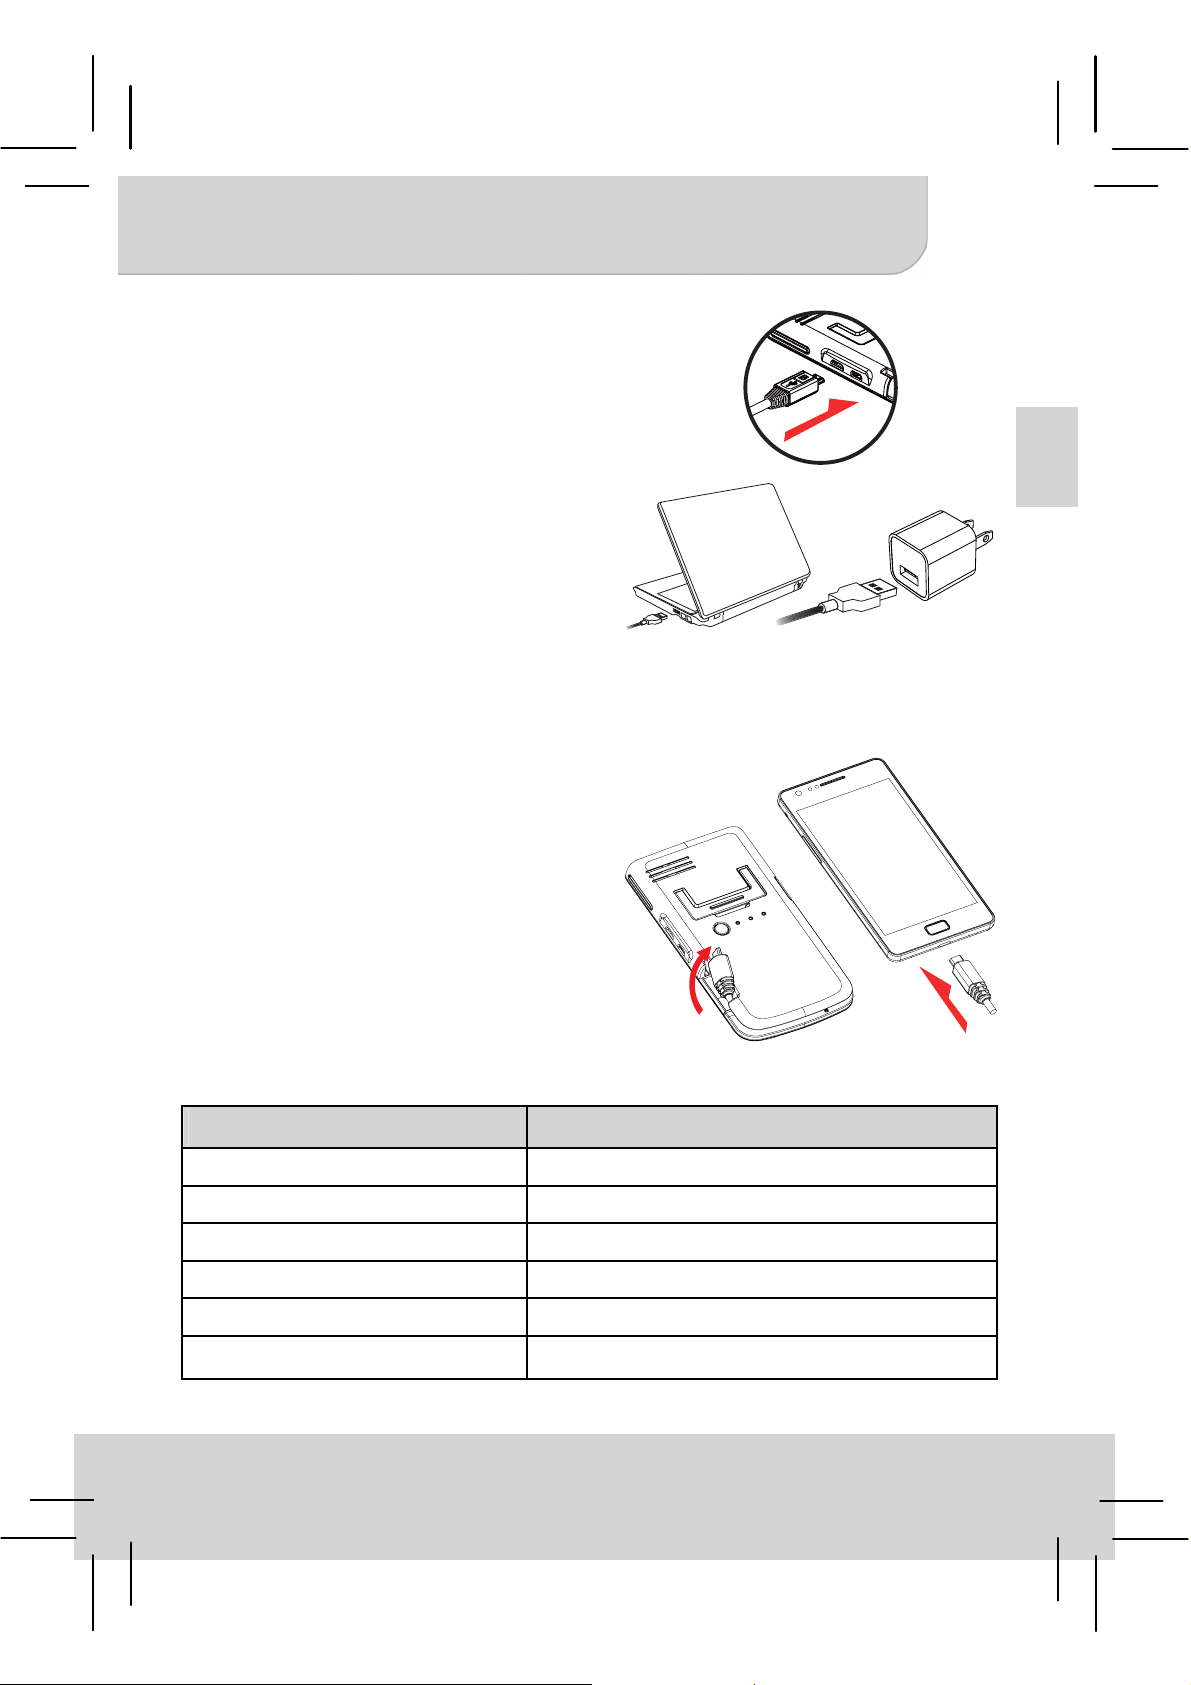
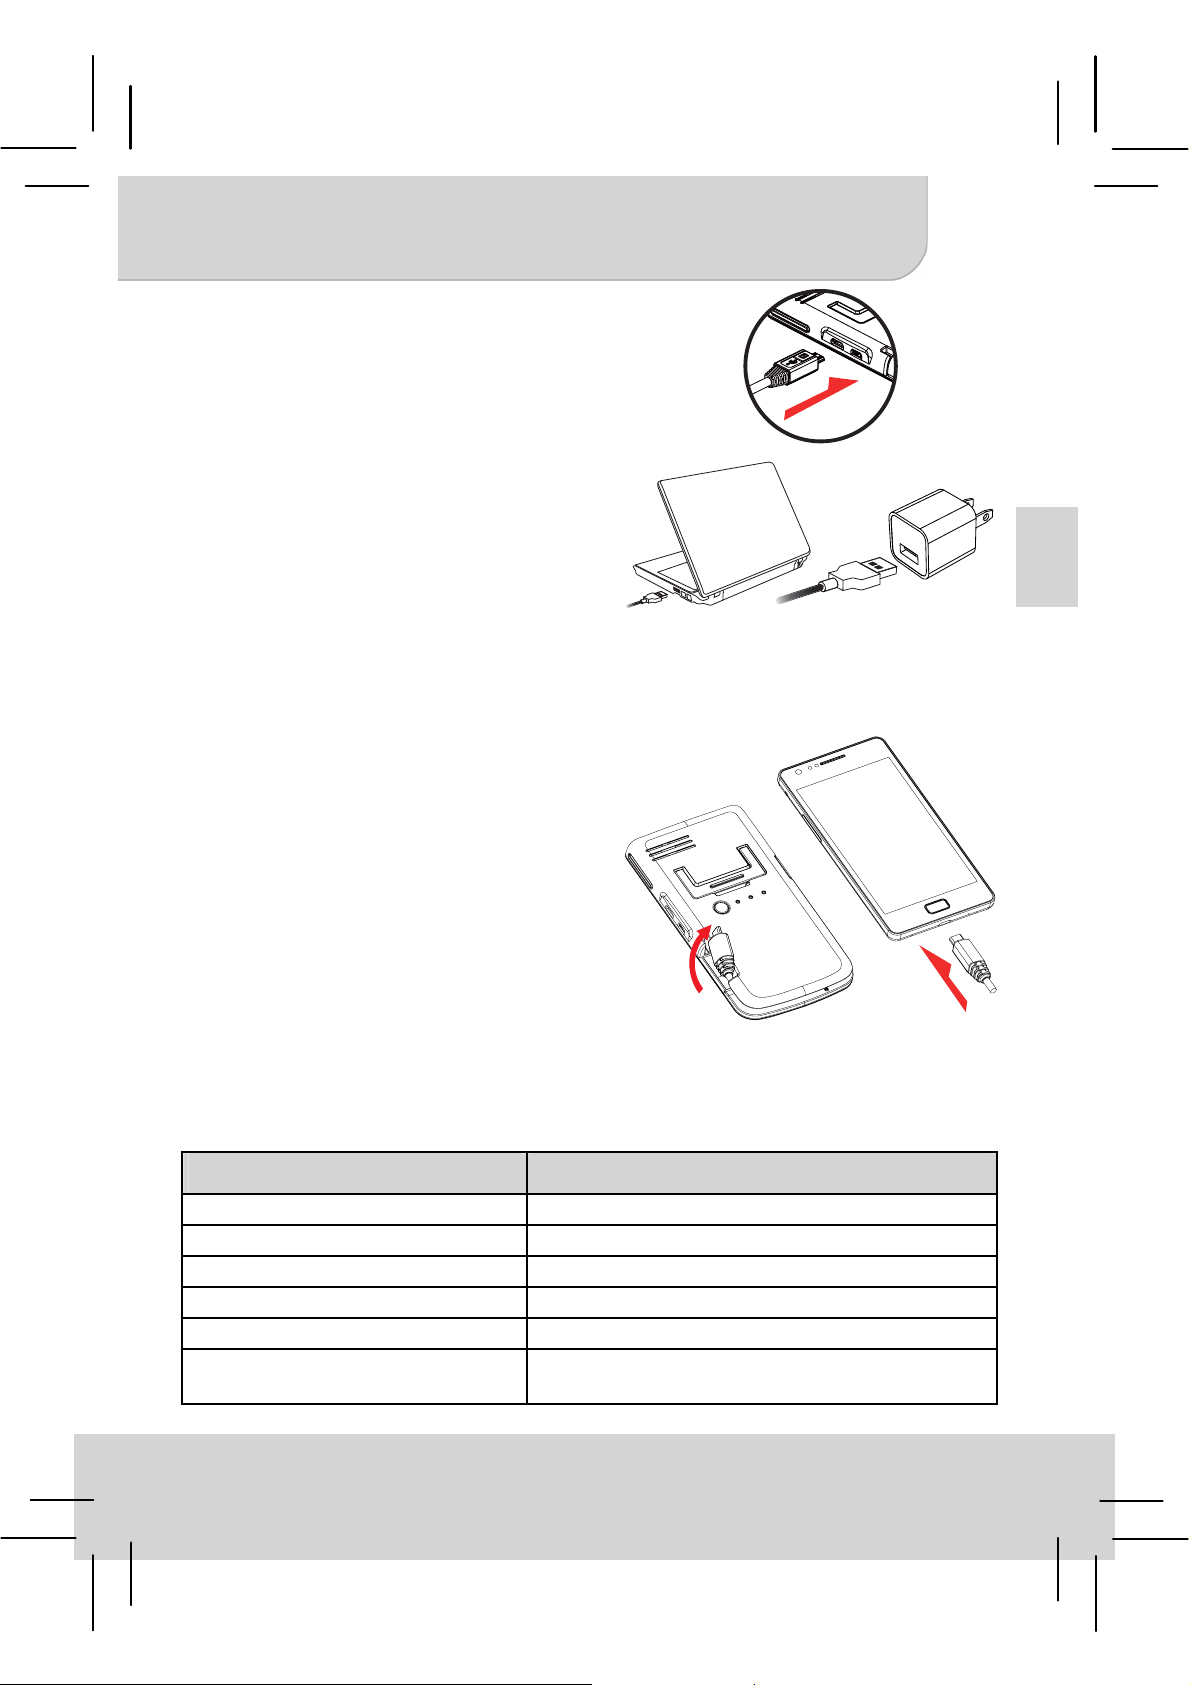
Charging the product
1.
Connect one end of the bundled
USB cable to the Micro USB port
of the product and the other end to
PC / Notebook or Smart phone
2.
USB power adapter for charging.
* After 5 hours the projector is
or
fully charged, the LED light will
be turned off.
Charging your MHL enabled phone
The internal battery of the projector can not only be used for projection, but
also charge your MHL enabled mobile device.
1. Please turn off projector before
charging MHL enabled phone.
2. Plug MHL cable into MHL port
of your mobile phone.
3. Press the charging mode
button to start charging.
y Only MHL enabled devices can
be charged via the embedded
battery of the projector.
y Please press charging button after
finishing MHL phone charge.
EN
LED indicators
LED Status Indication
3 white LEDs stay on Power capacity is between 80% to 100%
2 white LEDs stay on Power capacity is between 45% to 80%
1 white LED stays on Power capacity is between 10% to 45%
1 white LED blinks Power capacity is below 10%
LED Marquee
3 white LEDs blink Charging MHL enabled mobile phone
Projector is being charged
2
Page 9
User’s Manual
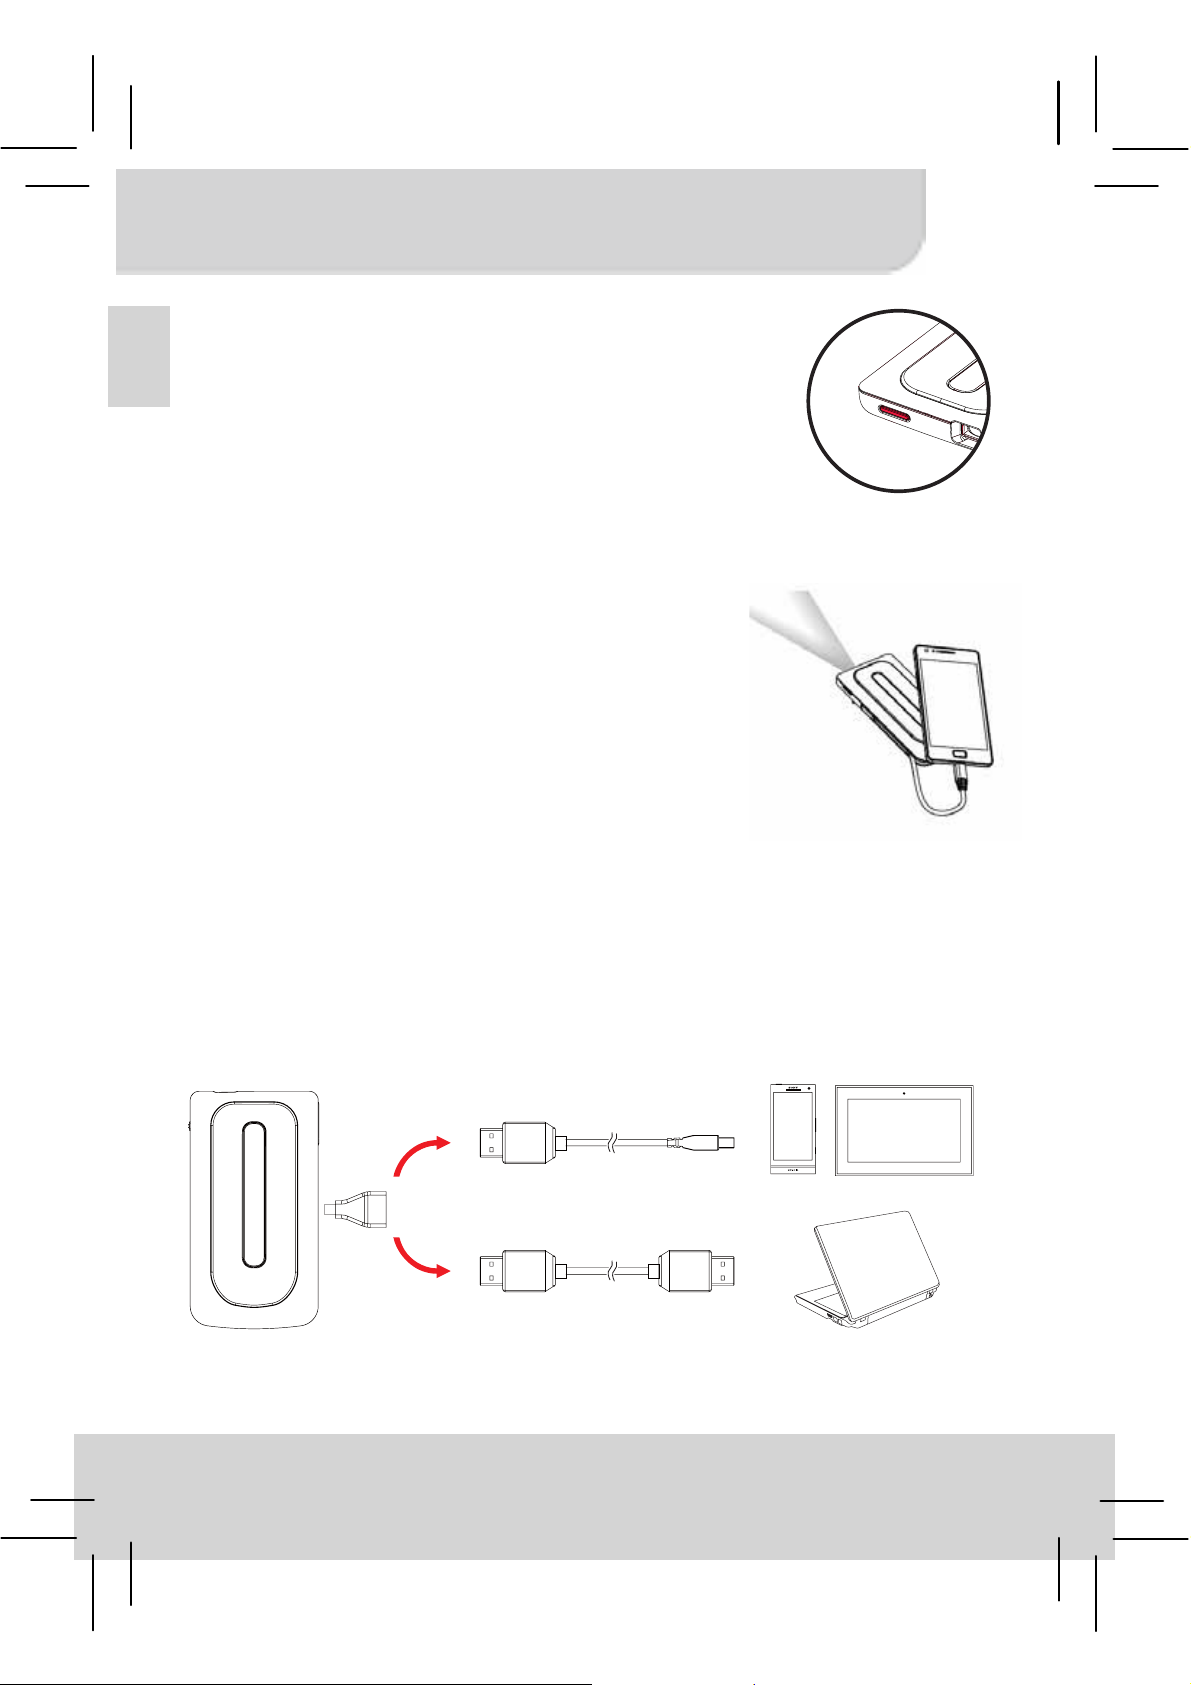
Turning on/off the projector
EN
Press the Projection On/Off button for 3
seconds to turn ON or turn OFF the projector.
* It’s normal that the device will get warm due to
it’s high performance.
* Projector time different as source differences.
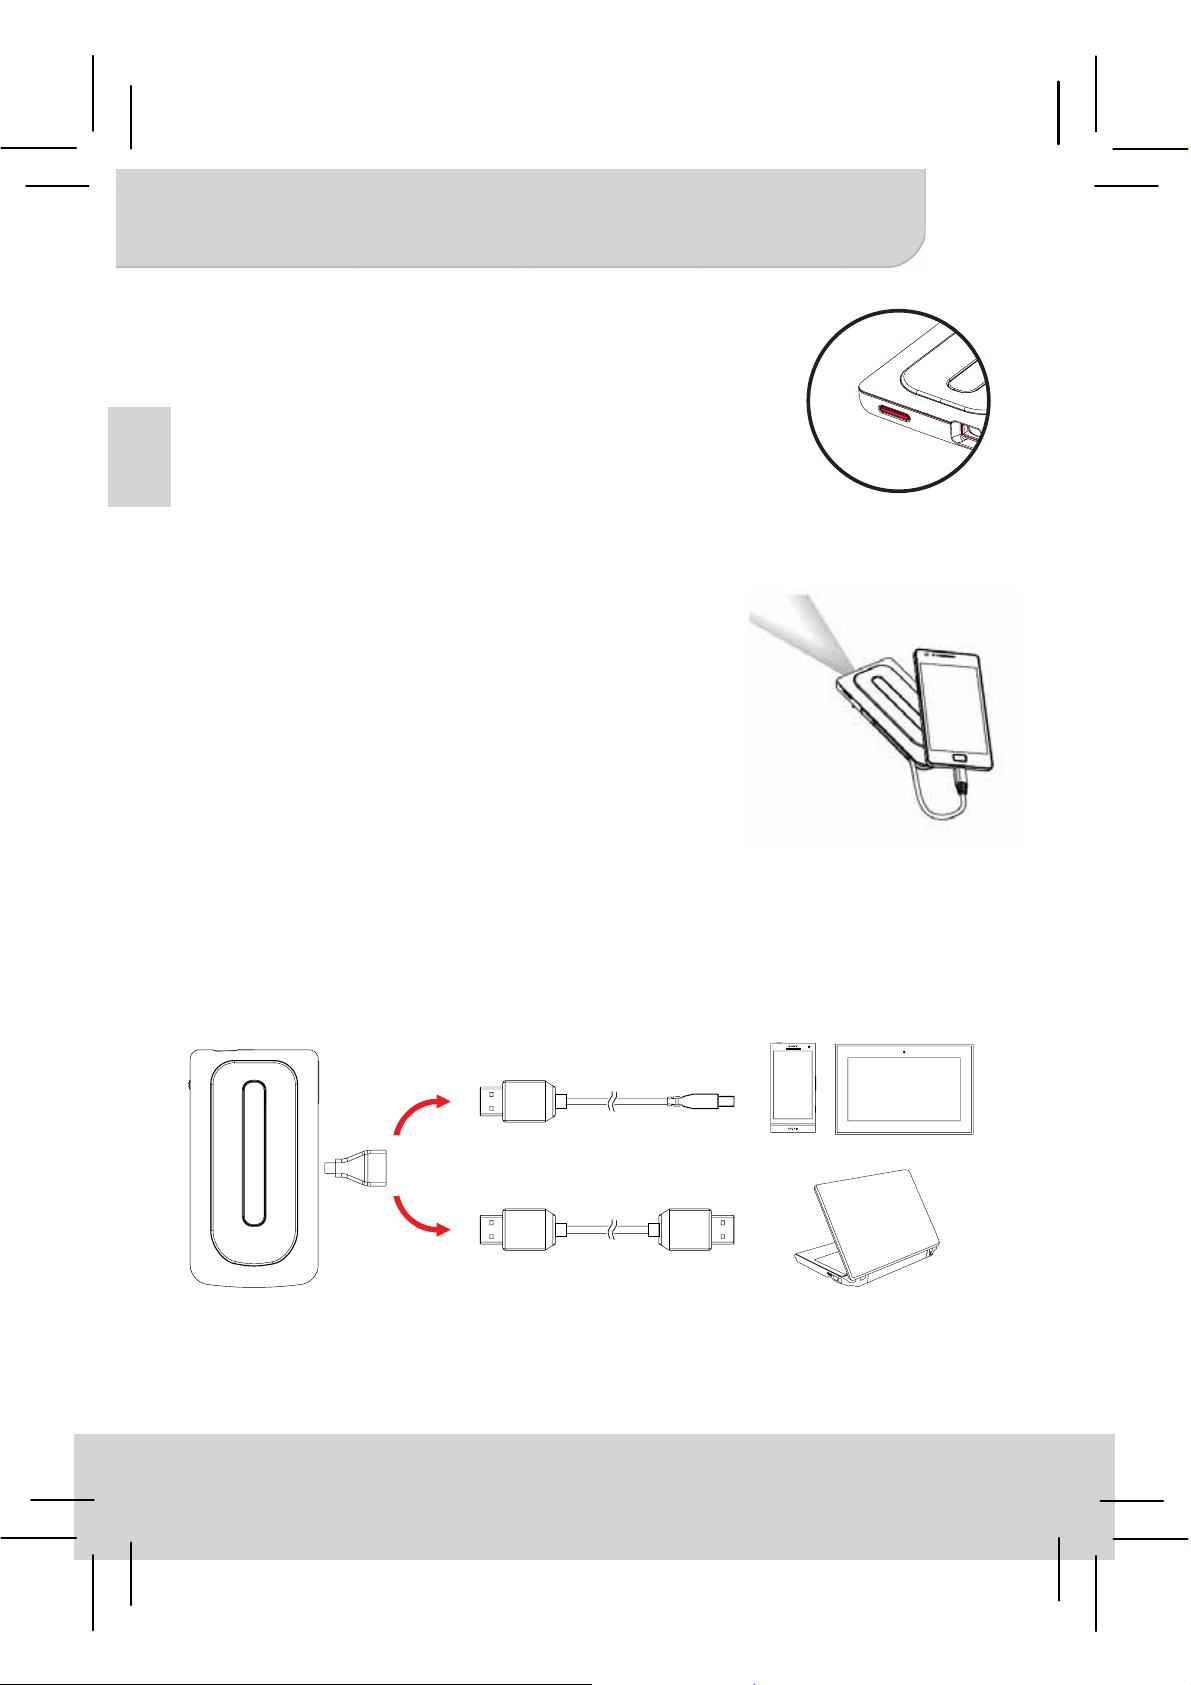
Connecting projector with your Devices
1. MHL enabled mobile phones
Simply plug the embedded MHL cable into the
MHL port of your mobile phone. The phone will
automatically detect the projector and project
the image after a few seconds.
* Please don’t pull the MHL cable hardly.
* You can use MHL extension cable (optional
accessory) to extend the built-in MHL cable
for operation friendly.
2. HDMI device
Use the HDMI adapter and optional HDMI
cable to connect your HDMI-out device with
the MicroHDMI port of the projector. The
projection will start after a few seconds
automatically.
* HDMI cables are not included in the package.
HDMI
adapter
Type A to Type D
HDMI cable
Type A to Type A
3
Page 10
User’s Manual
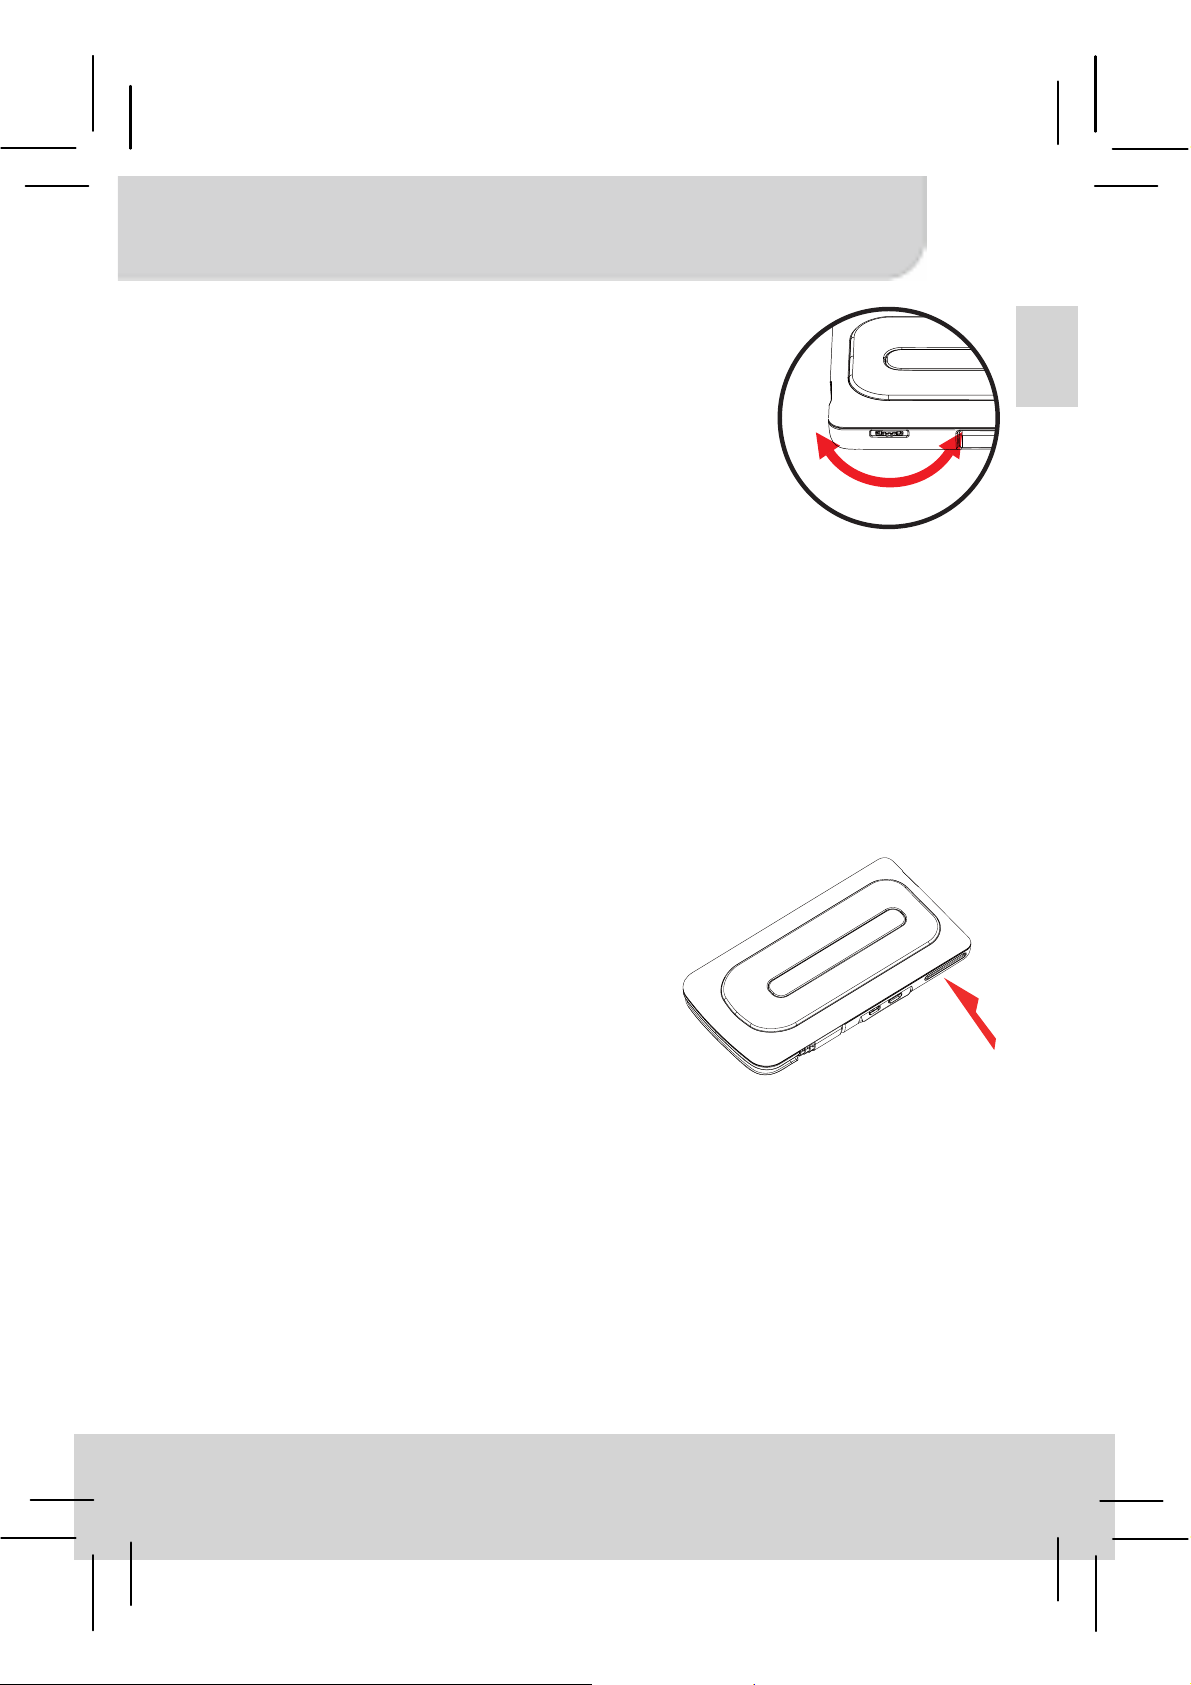
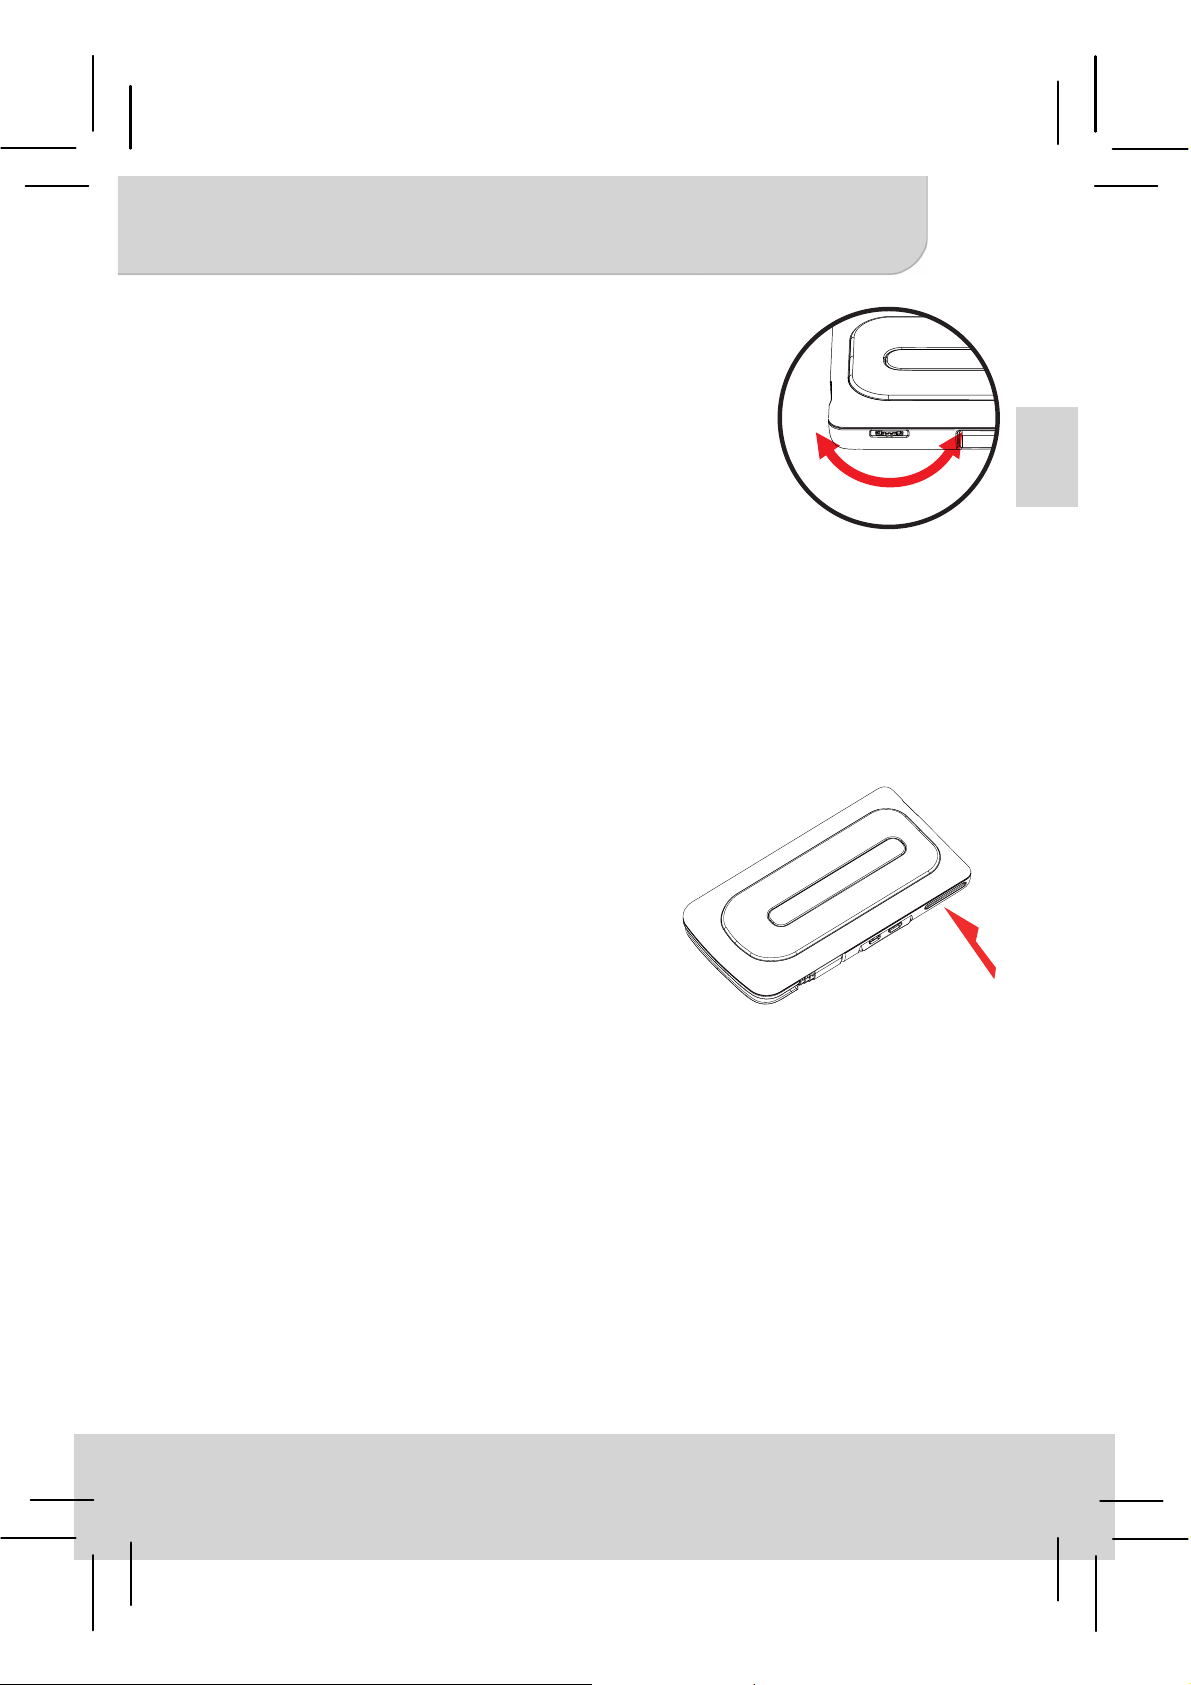
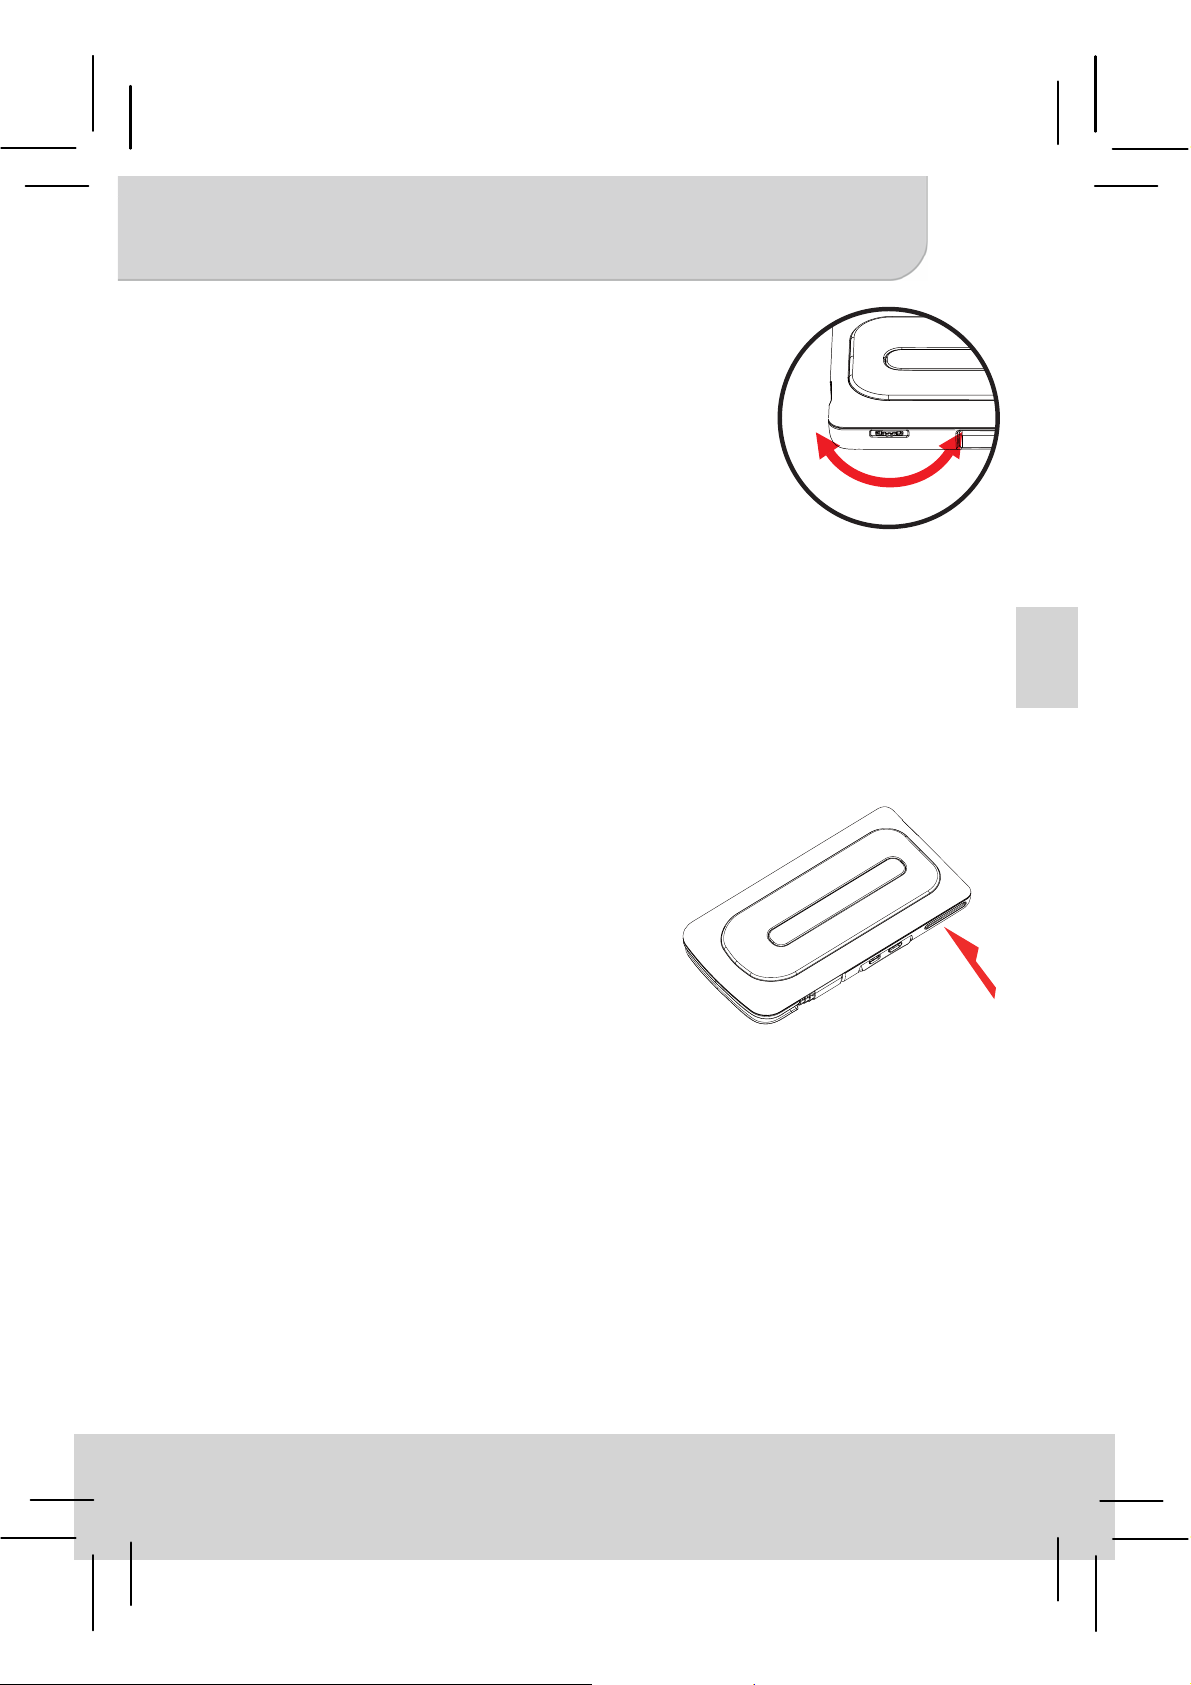
Adjusting the focus
Adjust the focus by using the focus
wheel to get a sharp and clear picture.
Volume control
Please use your source device to adjust the volume. In case the volume
of source device is not adjustable, press Charging Mode for one second
till volume bar is displayed on the screen. Use Up/Down button to adjust
the volume.
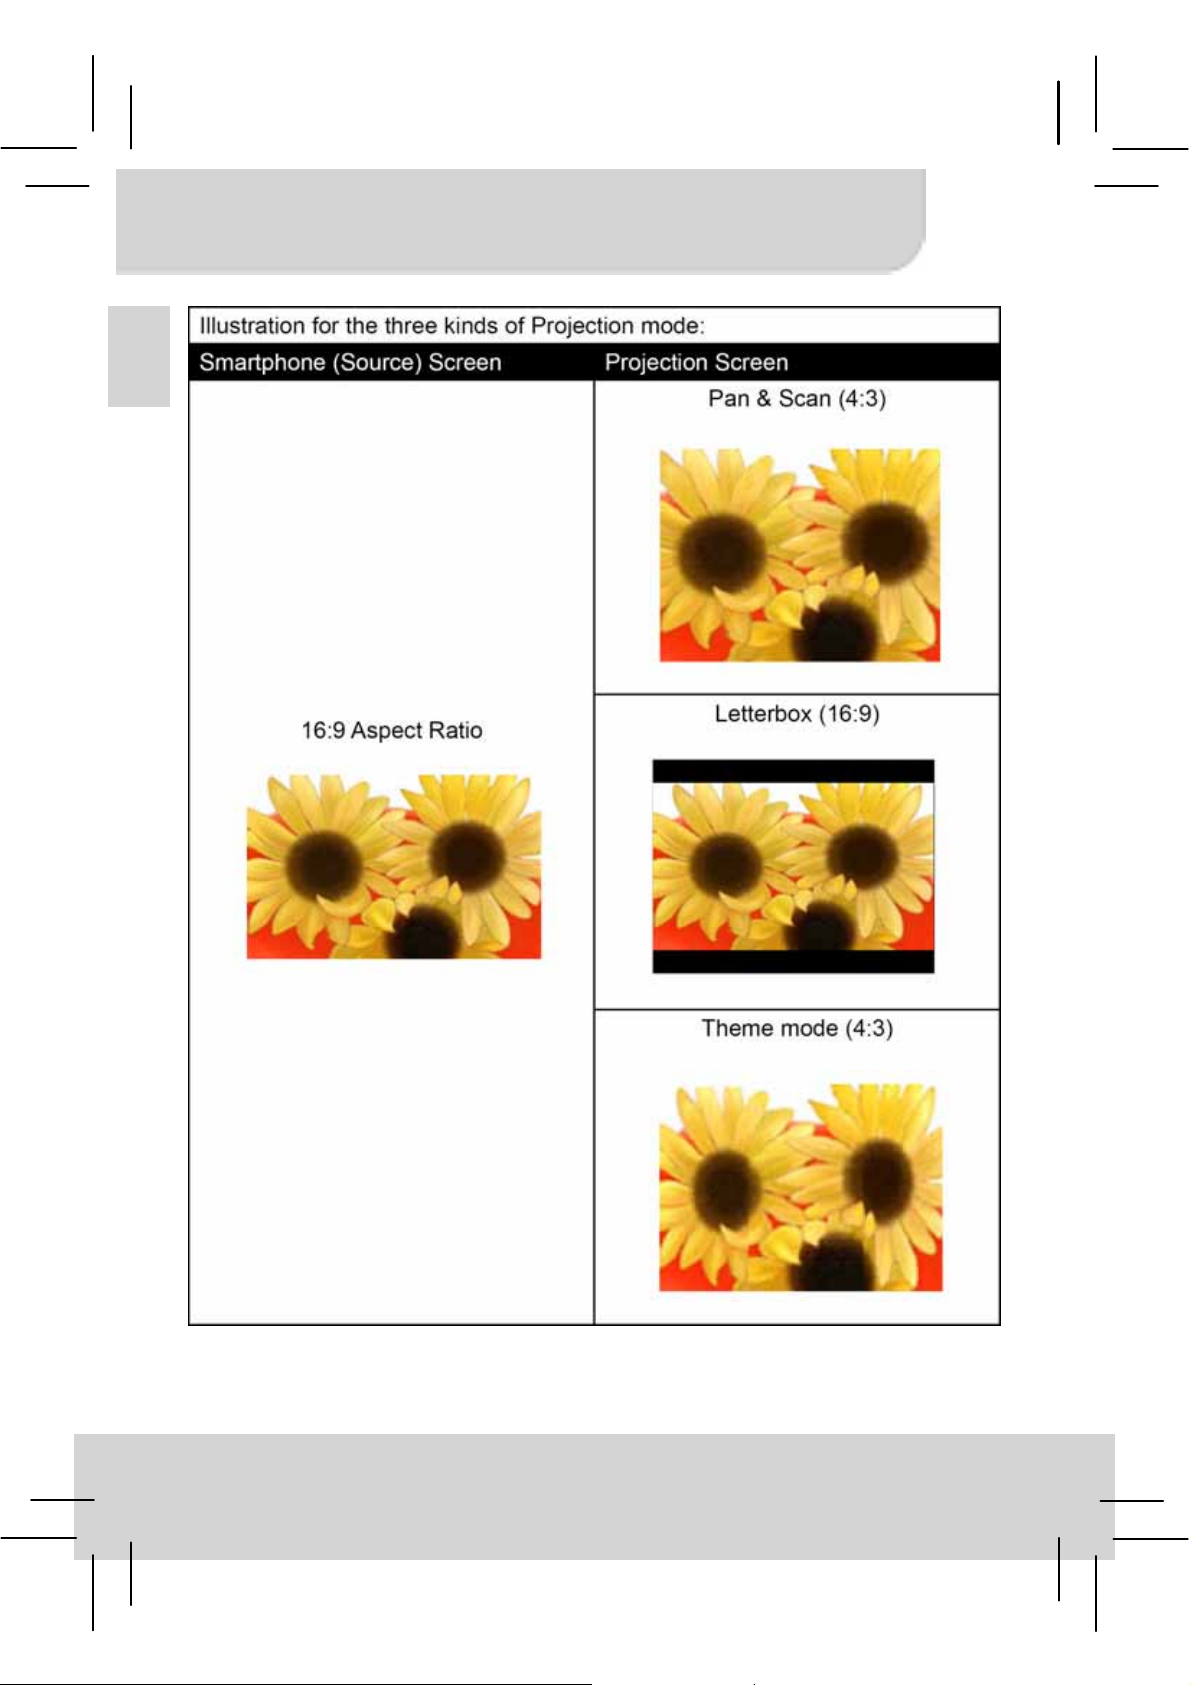
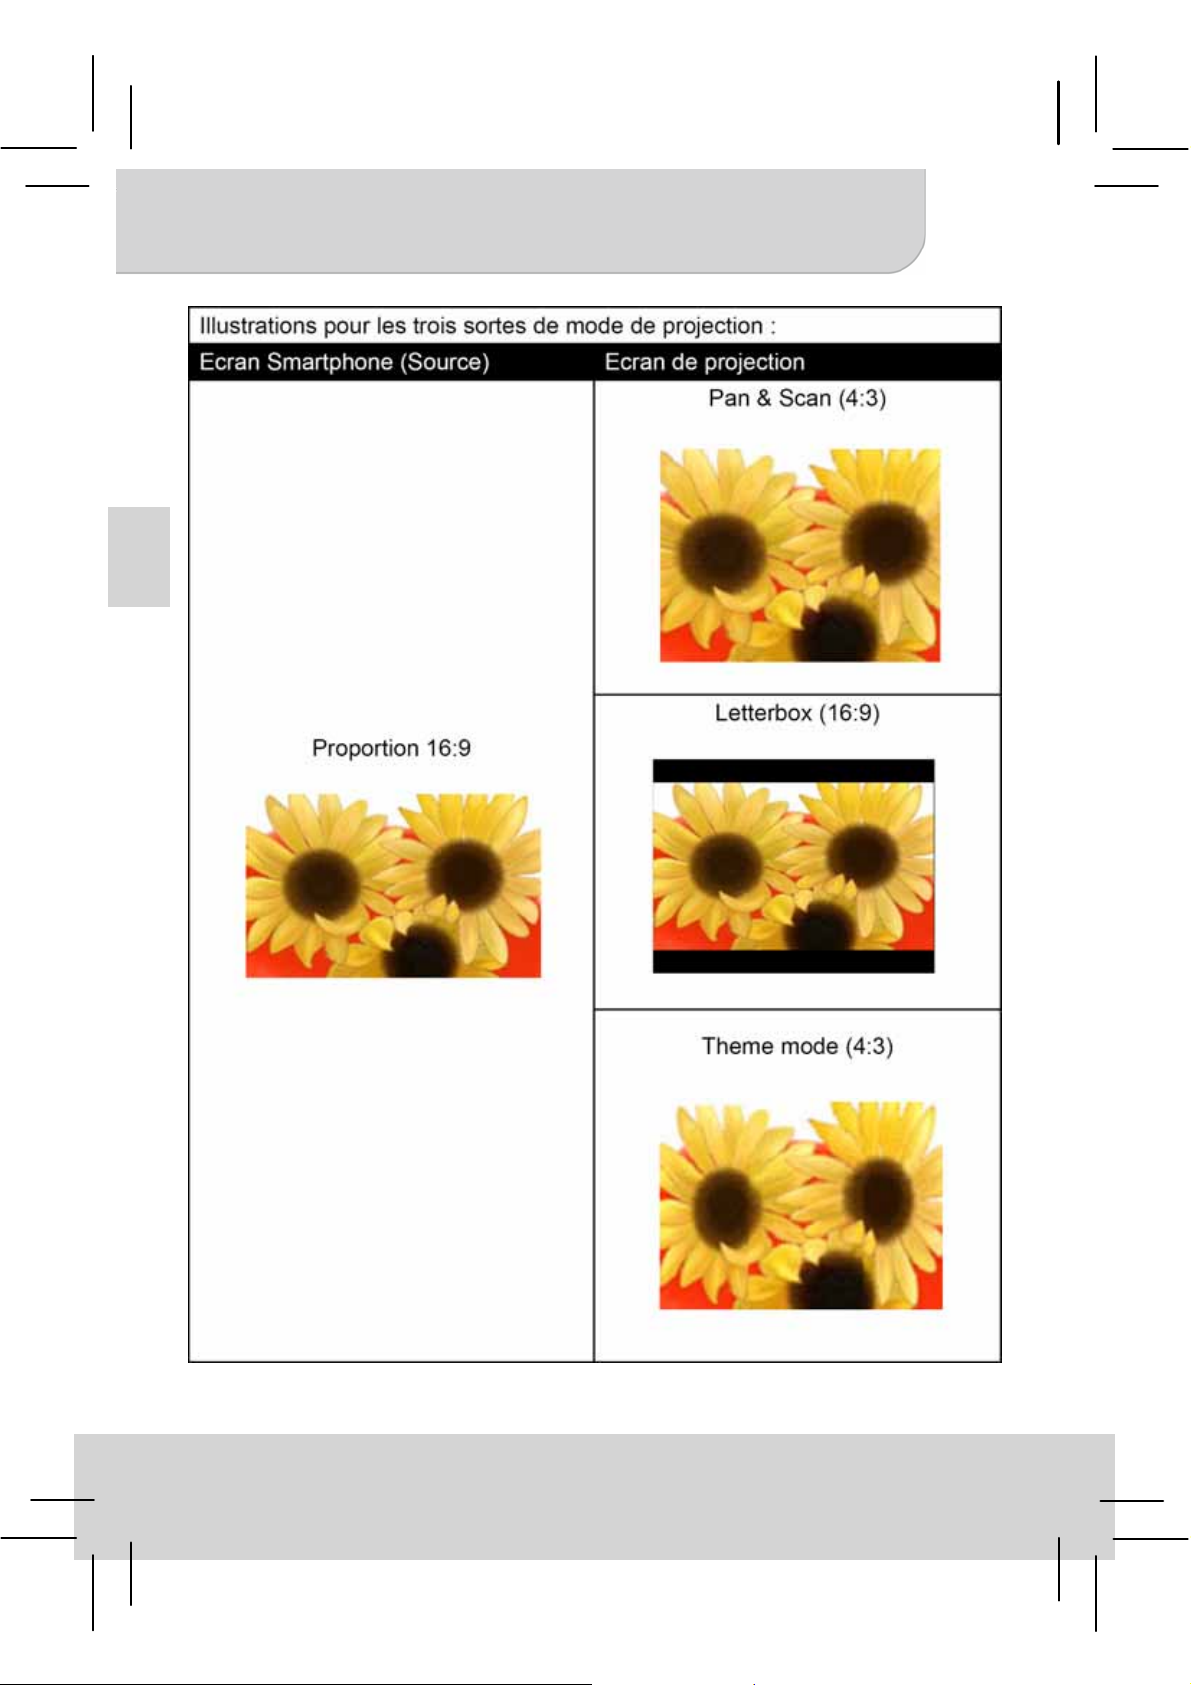
Adjust Aspect Ratio
If the picture is stretched or not display
in correct format the output format of
your playback device is different from
the input settings of the projector. Use
the Projection Mode button to switch
between following Aspect ratios:
(1) 4:3 Pan and Scan: Image ratio is
4:3, it will cut the both side edge to
enlarge central image.
(2) 4: 3 Theme: Image ratio is 4:3, it
will keep central ratio and
compress the image ratio for both
side edge.
(3) 16: 9 Letterbox: Image ration is
16:9, it will be scaled down, to
display completed 16:9 original
image.
EN
4
Page 11
User’s Manual
EN
5
Page 12
User’s Manual
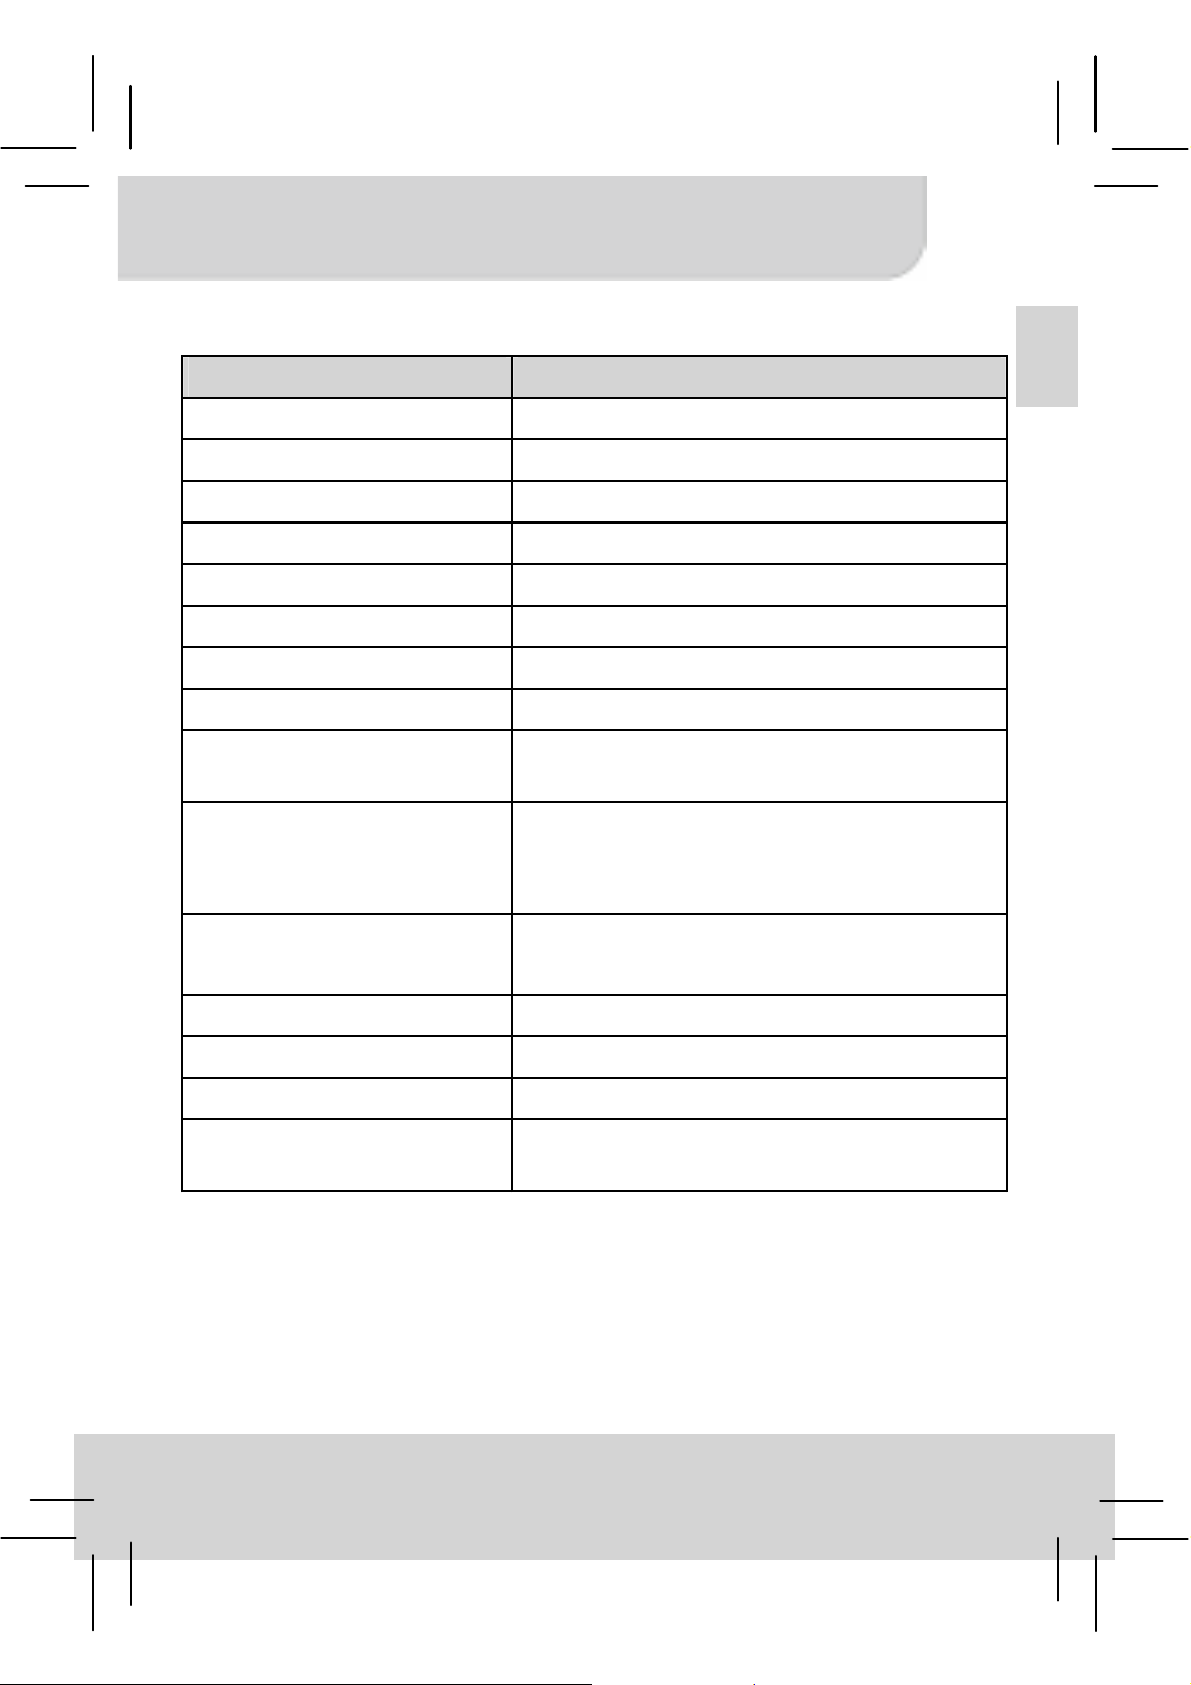
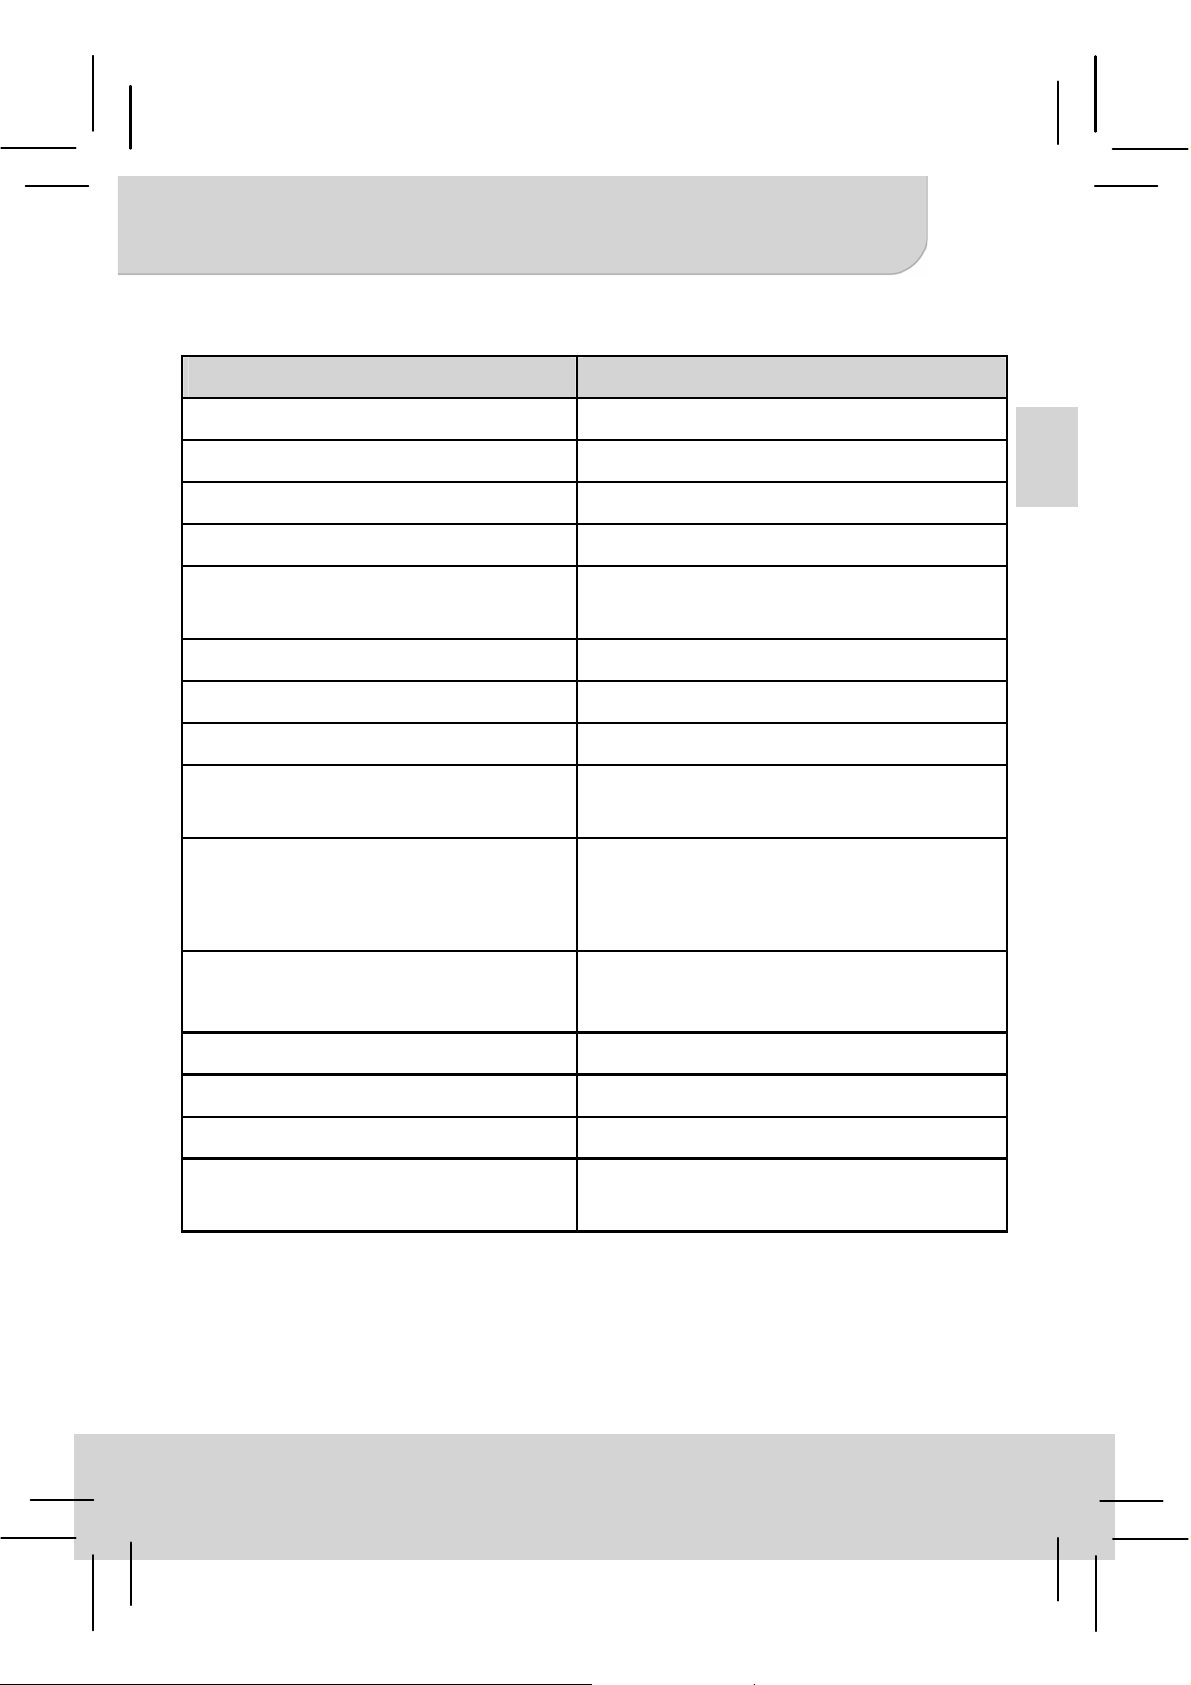
Product specifications
Item Description
Optical Technology DLP
Light Source RGB LED
Resolution 640 x 480 Pixels (VGA)
Luminous Flux Up to ANSI 35 lumens
Projection Image Size 152 mm ~ 1524 mm (6” ~ 60” Diagonal)
Projection Source MHL or HDMI interface
Power Input 5V / 2A
Power Output 5V / 500mA
Battery Type Embedded 1850 mAh, Li-polymer
rechargeable battery
Battery Life Projection mode: up to 100 min
Charging mode: 70% (Samsung Galaxy
S2)
Power Consumption Projection mode: 7W
EN
Charging mode: 2.5W
Operation Temperature 5 °C ~ 35 °C
Dimension (L x W x H) 132 mm x 71 mm x 14 mm
Weight 165 g
Package Content Pico Projector, USB cable,
HDMI-adapter, Pouch, User’s Manual
* We reserve the right for technical changes and mistakes.
6
Page 13
User’s Manual
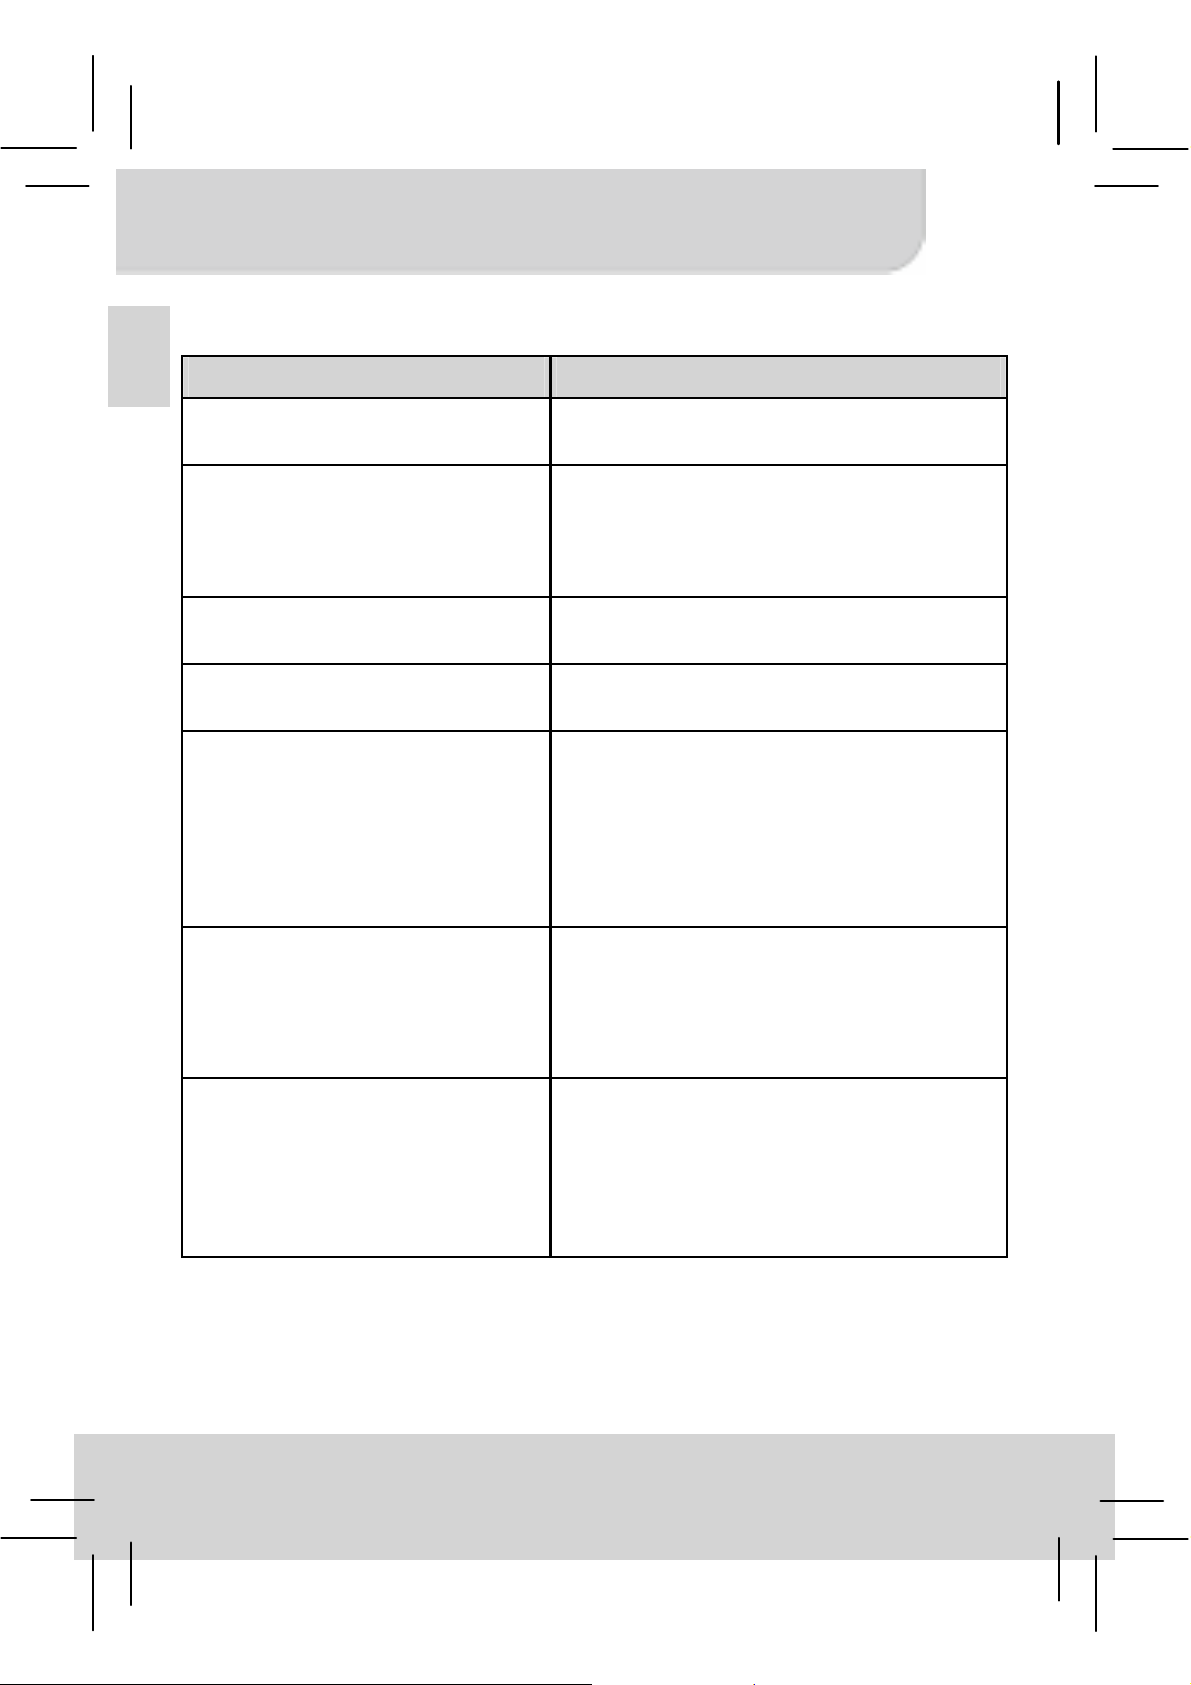
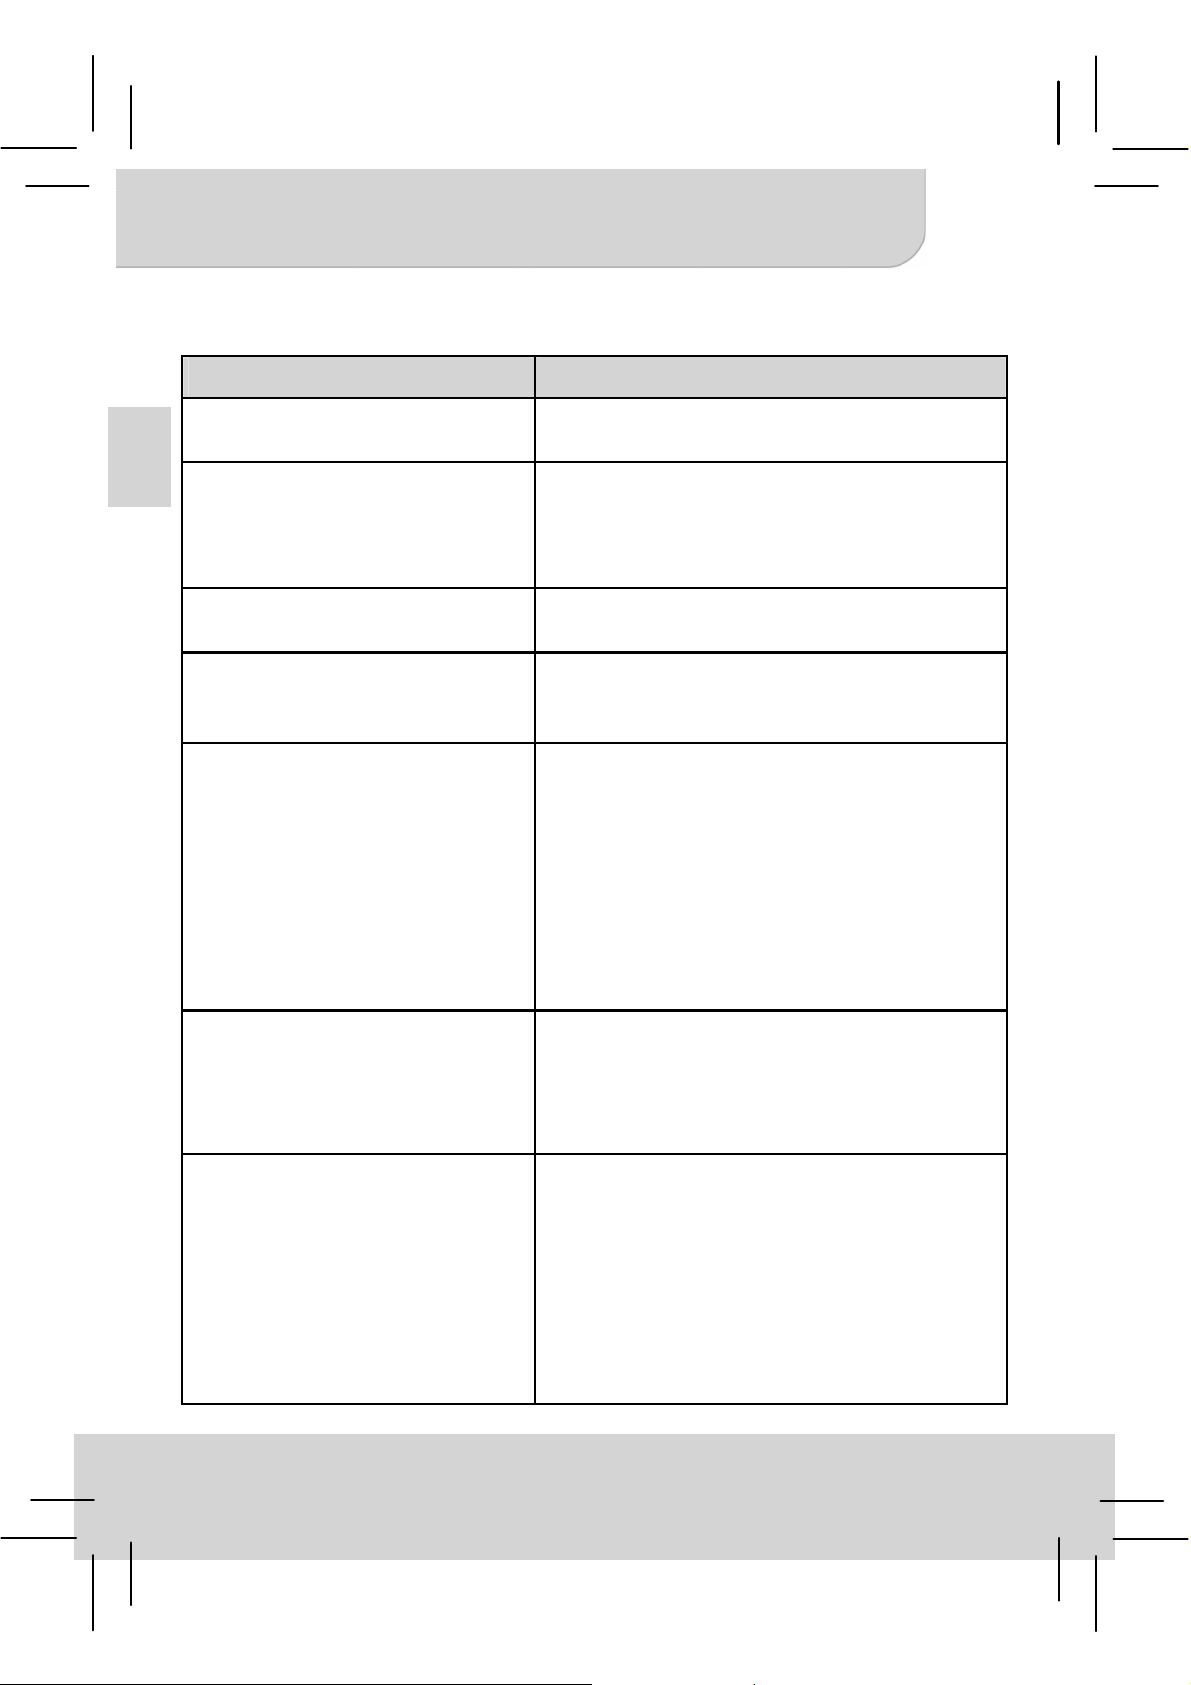
Troubleshooting
EN
Symptom Check Point
The projector can not be turned
on.
The projecting image is too dark.
The projecting image is too
blurry.
The temperature of the
projector’s surface is warm.
The projector can’t project from
or charge MHL devices
The projector cannot be
charged.
Ensure the battery is fully charged.
* Use the Projector in a darker
environment.
* Decrease the size of projecting
image.
Adjust the focus by using focus wheel.
It is normal that this projector to generate
moderate heat during operation.
MHL supported product list can be found:
http://www.mhlconsortium.org/productlist/
It’s not a guarantee to 100% compatible
as the MHL interface design may vary by
each mobile device vendor. It’s
recommended to check the compatibility.
Please check if the projector’s 3 LED
indicators are in Marquee. If not and they
are blinking, please press charging mode
button again to exit the charging mode
for MHL device.
The projector is turned on, but
the video can not be projected.
Please check your device if it supports
MHL or HDMI interface. If yes, please
check the source resolution of your
device output. Please refer the
supporting resolution to Appendix 1 and
modify your device output resolution.
7
Page 14
User’s Manual
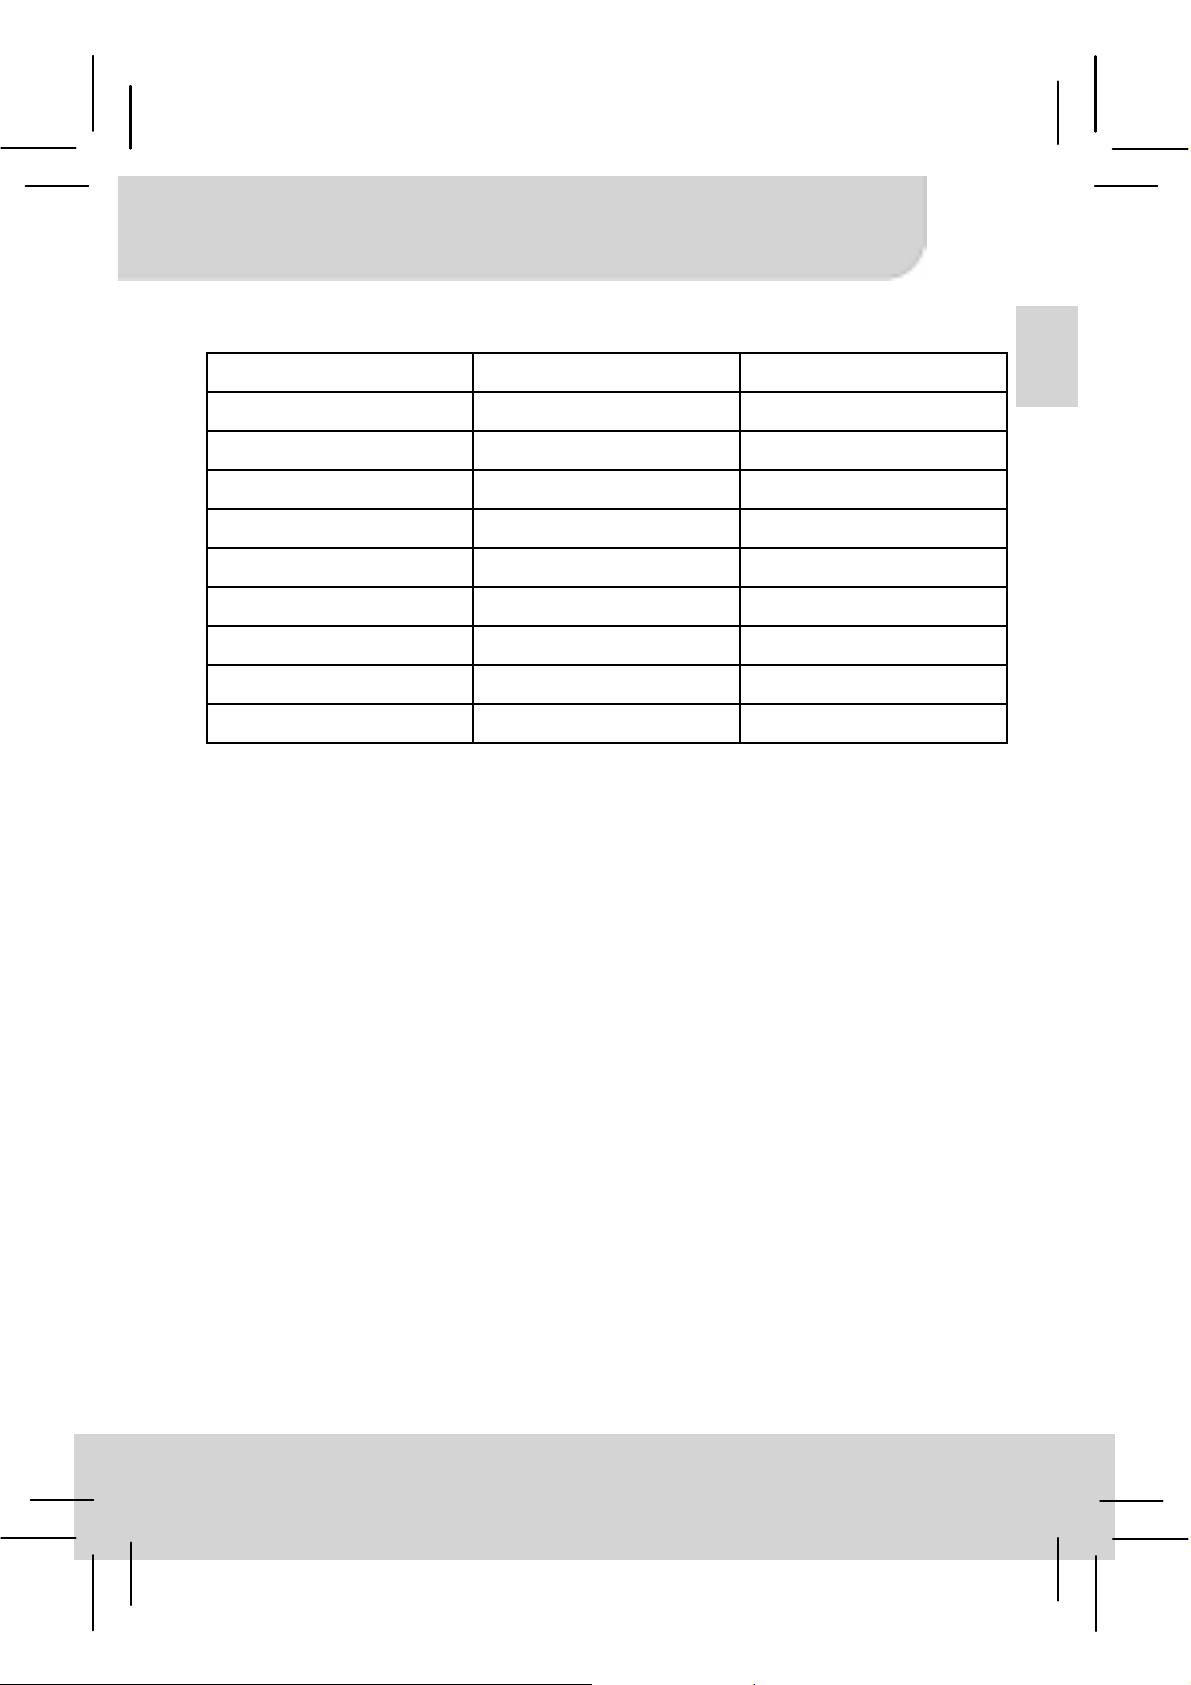
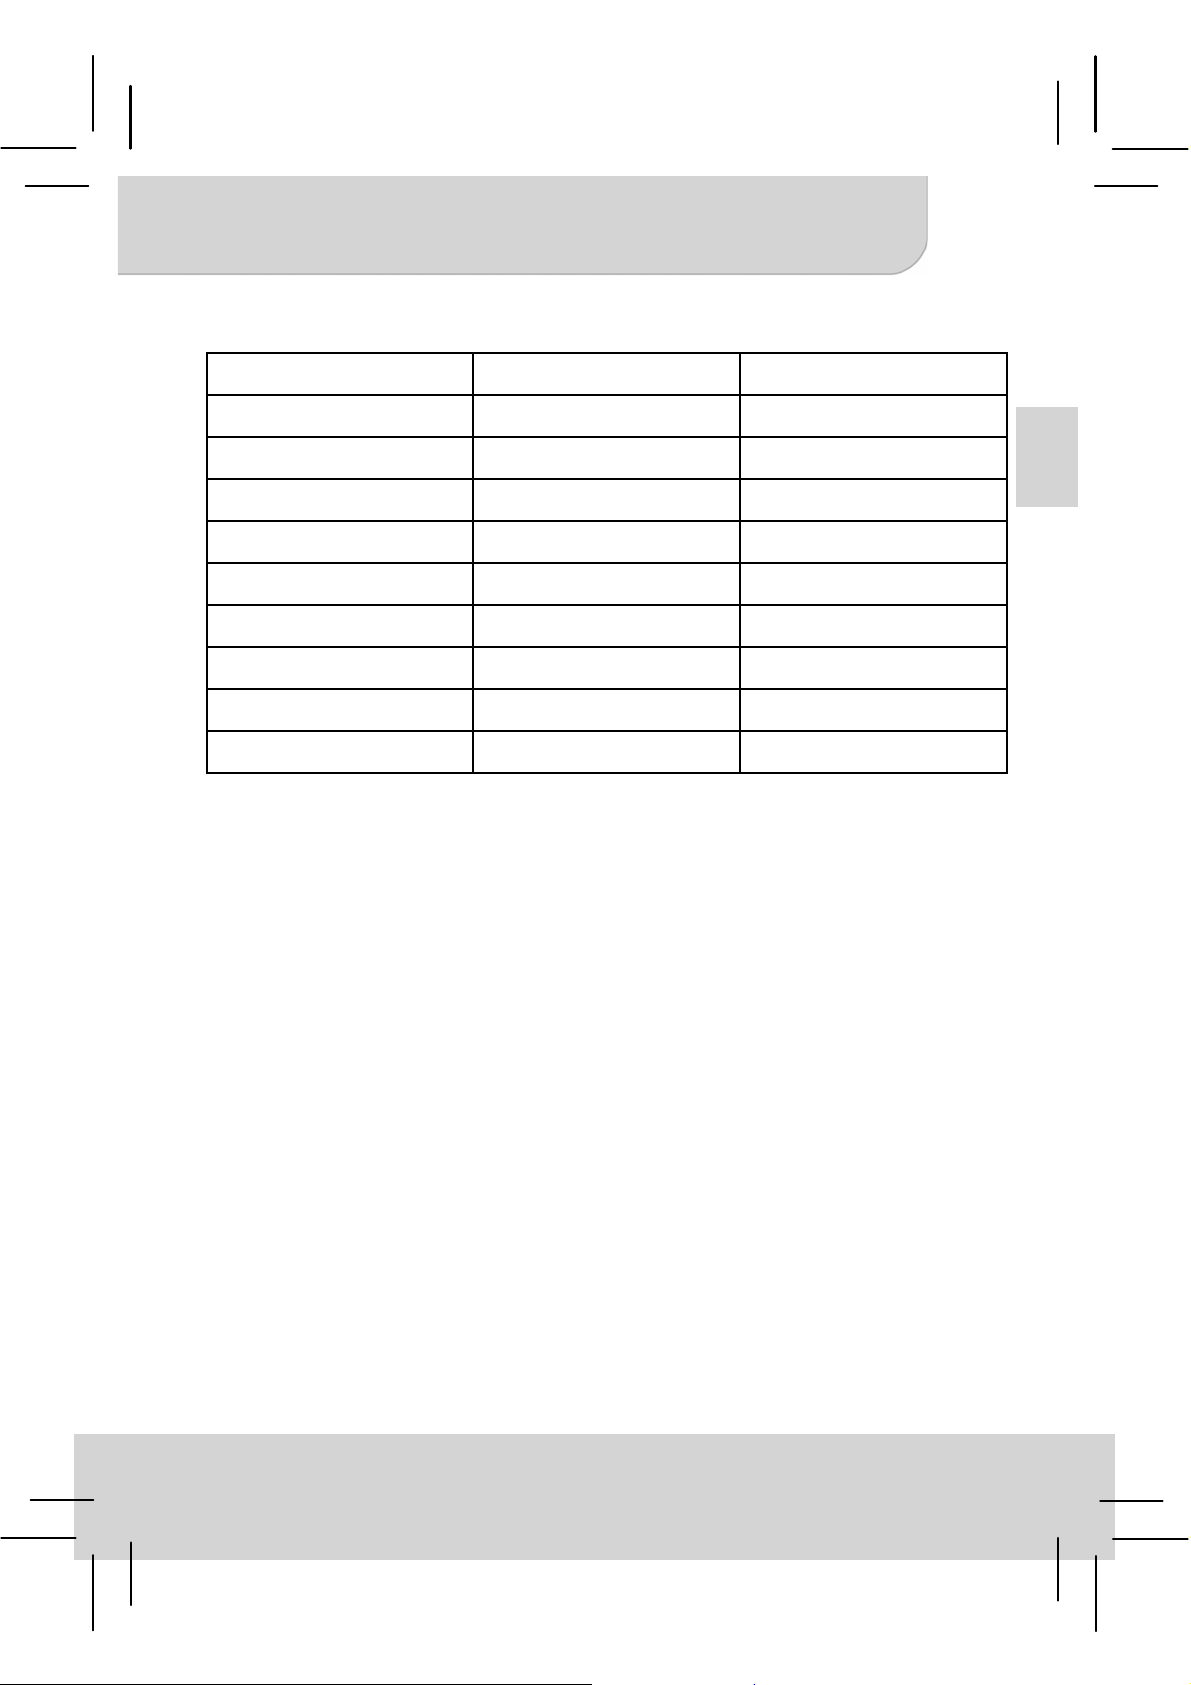
Appendix 1:
Resolution For MHL input For HDMI input
640x480p 60fps v v
720x480p 60fps v v
1280x720p 60fps v v
1920x1080i 60fps v v
1920x1080p 60fps - v
720x576p 50fps v v
1280x720p 50fps v v
1920x1080i 50fps v v
1920x1080p 50fps - v
EN
8
Page 15
Benutzerhandbuch
Produktübersicht
DE
Projektor-Objektiv
ཱ Projektion Ein/Aus-Taste
ི Fokusrad
ཱི Rutschfeste Auflage
* Sie können Ihr
Mobiltelefon für
eine bequeme
Nutzung auf
den Projektor
legen.
1
ུ Lautsprecher
ཱུ Ständer
ྲྀ Lademodus-Taste
ཷ LED Anzeige
ླྀ Projektionsmodus-Taste/
Auf & Ab
ཹ Mikro USB Ladeanschluss
ེ Micro-HDMI-Port
ཻ MHL-Kabel (5 Pin)
Page 16
Benutzerhandbuch
Das Produkt aufladen
Schließen Sie ein Ende des beiliegenden
USB-Kabels an den Micro-USB-Port des
Produktes an und das andere Ende an
einen PC/Notebook oder das
USB-Netzteil eines Smartphones.
* Der Projektor ist nach 5 Stunden
vollständig aufgeladen. Die
LED-Anzeige erlischt.
1.
2.
oder
Aufladung eines MHL-fähigen Telefons
Der interne Akku des Projektors kann nicht nur zur Projektion verwendet
werden, sondern auch MHL-fähige Mobiltelefone aufladen.
1. Bitte schalten Sie den projektor
aus, bevor Sie ein MHL-fähiges
Telefon aufladen.
2. Stecken Sie das MHL-Kabel in den
MHL-Port Ihres Mobiltelefons.
3. Drücken Sie die Lademodus-Taste,
um die Aufladung zu starten.
y Nur MHL-fähige Geräte können
über den internen Akku des
Projektors aufgeladen werden.
y Bitte drücken Sie nach dem Laden des
MHL-Telefons die Lademodus-Taste.
DE
LED Anzeige
LED Status Anzeige
3 weiße LEDs leuchten Ladestand liegt zwischen 80% und 100%
2 weiße LEDs leuchten Ladestand liegt zwischen 45% und 80%
1 weiße LED leuchtet Ladestand liegt zwischen 10% und 45%
1 weiße LED blinkt Ladestand beträgt weniger als 10%
LED Fortlaufend Projector wird aufgeladen
3 weiße LED’s blinken MHL-fähiges Mobiltelefon aufladen
2
Page 17
Benutzerhandbuch
Den Projektor ein/ausschalten
Drücken Sie 3 Sekunden lang auf die Projektion
Ein/Aus-Taste, um den Projektor Ein- oder
DE
Auszuschalten.
* Es ist normal, dass das Gerät wegen der hohen
Leistungsaufnahme warm wird.
* Projektionszeit kann bei unterschiedlicher
Signalquelle abweichen.
Anschluss des Gerätes
1. MHL-fähige Mobiltelefone
Stecken Sie das beiliegende MHL-Kabel einfach in
den MHL-Port Ihres Mobiltelefons. Das Telefon wird
den Projektor automatisch erkennen und das Bild
nach einigen Sekunden projizieren.
* Bitte nicht gewaltsam am MHL-Kabel ziehen.
* Sie können ein MHL-Verlängerungskabel (optionales
Zubehör) verwenden, um den Anwendungsbereich
zu vergrößern.
2. HDMI-Geräte
Verwenden Sie den HDMI-Adapter sowie ein
optionales HDMI-Kabel, um das
HDMI-Ausgabegerät mit dem Micro HDMI-Eingang
des Projektors zu verbinden. Die Projektion wird
nach einigen Sekunden automatisch starten.
* HDMI-Kabel sind nicht im Lieferumfang enthalten.
HDMI-
Adapter
Typ A auf Typ D
HDMI-Kabel
Typ A auf Typ A
3
Page 18
Benutzerhandbuch
Einstellen des fokus
Stellen Sie den Fokus durch
Verwendung des Fokusrades ein, um ein
scharfes und klares Bild zu erhalten.
Lautstärkesteuerung
Bitte verwenden Sie Ihr Quellgerät, um die Lautstärke einzustellen. Wenn dies
nicht möglich ist, drücken Sie eine Sekunde lang die Lademodus-Taste bis die
Lautstärkeleiste auf dem Bildschirm angezeigt wird. Mit Auf / Ab-Taste können
Sie die Lautstärke einstellen.
Seitenverhältnis einstellen
Wenn das Bild gestreckt ist oder nicht im
richtigen Format angezeigt wird, ist das
Ausgabeformat des Wiedergabegerätes
anders als die Eingangseinstellungen des
Projektors. Verwenden Sie die
Projektionsmodustaste, um zwischen den
folgenden Seitenverhältnissen zu
wechseln:
(1) 4:3 Pan and Scan: Das
Seitenverhältnis ist 4:3. Beide
Seitenkanten werden abgeschnitten,
um die Bildmitte zu vergrößern.
(2) 4:3 Theme: Das Seitenverhältnis ist
4:3. Das Mittenverhältnis wird
beibehalten und das Seitenverhältnis
für beide Seitenkanten verkleinert.
(3) 16:9 Letterbox: Das Seitenverhältnis
ist 16:9. Das Bild wird herunterskaliert,
um als vollständiges 16:9 Originalbild
angezeigt werden zu können.
DE
4
Page 19

Benutzerhandbuch
DE
5
Page 20
Benutzerhandbuch
Technische Daten
Element Beschreibung
Optische Technologie DLP
Lichtquelle RGB LED
Auflösung 640 x 480 Pixel (VGA)
Helligkeit Bis zu ANSI 35 Lumen
Projektion Bildgröße 152 mm ~ 1524 mm
(6” ~ 60” Diagonale)
Projektionsquelle
Eingangsleistung
Ausgangsleistung
Akkutyp Integrierter wiederaufladbarer
Batterielaufzeit Projektionsmodus: bis zu 100min
Stromverbrauch Projektionsmodus: 7W
MHL oder HDMI Schnittstelle
5V / 2 A
5V / 500 mA
Akku 1850 mAh, Li-Polymer
Lademodus: 70% (Samsung
Galaxy S2)
Lademodus: 2.5W
DE
Betriebstemperatur 5 °C ~ 35 °C
Abmessungen (L x B x H) 132 mm x 71 mm x 14 mm
Gewicht 165 g
Lieferumfang Pico Projektor, USB-Kabel,
HDMI-Adapter, Tasche, Handbuch
* Wir behalten uns das Recht für technische Änderungen und Fehler
vor.
6
Page 21
Benutzerhandbuch
Fehlerbehebung
Symptom Prüfpunkt
Der Projektor kann nicht
DE
eingeschaltet werden.
Das projizierte Bild ist zu
dunkel.
Das projizierte Bild ist zu
verschwommen.
Die Oberfläche des Projektors
ist warm.
Projektion und das Aufladen
funktioniert mit MHL-Geräten
nicht
Stellen Sie sicher, dass der Akku voll
aufgeladen ist.
* Verwenden Sie den Projektor in einer
dunkleren Umgebung.
* Verringern Sie die Größe des
projizierten Bildes.
Stellen Sie den Fokus über das Fokusrad
ein.
Während des Betriebes des Projektors
ist es normal, wenn er sich etwas
erwärmt.
Liste der unterstützten MHL-Geräte
finden Sie hier:
http://www.mhlconsortium.org/productlist/
Es kann keine 100% Kompatibilität
gewährleistet werden, da sich das
Design der MHL-Schnittstelle je nach
Hersteller unterscheiden kann. Wir
empfehlen vor dem Kauf eines neuen
Gerätes die Kompatibilität überprüfen.
Der Projektor kann nicht
aufgeladen werden.
Der Projektor ist
eingeschaltet, aber das Bild
kann nicht projiziert werden.
Bitte prüfen Sie, ob die LED-Anzeige
leuchtet. Wenn die Anzeige blinkt,
drücken Sie bitte erneut die
Lademodus-Taste, um den Lademodus
des MHL-Gerätes zu beenden.
Bitte prüfen Sie, ob Ihr Telefon die MHLoder HDMI-Schnittstelle unterstützt.
Wenn ja, prüfen Sie bitte die Auflösung
des Quellengerätes. Der Projektor kann
kein Bild ausgeben, wenn die Auflösung
nicht den folgenden unterstützten
Auflösungen entspricht (Anhang 1). Bitte
stellen Sie die Auflösung des
Geräteausgangs ein.
7
Page 22
Benutzerhandbuch
Anhang 1:
Auflösung MHL-Eingang HDMI-Eingang
640x480p 60fps v v
720x480p 60fps v v
1280x720p 60fps v v
1920x1080i 60fps v v
1920x1080p 60fps - v
720x576p 50fps v v
1280x720p 50fps v v
1920x1080i 50fps v v
1920x1080p 50fps - v
DE
8
Page 23

Guide de l’utilisateur
Aperçu
FR
Objectif du projecteur
ཱ Bouton marche/arrêt de la projection
ི Molette de mise au point
ཱི Coussinet anti-glissement
* Vous pouvez
poser votre
téléphone
portable sur le
projecteur pour
une utilisation
plus aisée.
ུ Haut-parleur
ཱུ Pied
ྲྀ Mode de charge
ཷ Indicateur à DEL
ླྀ Mode de projection/
Haut & Bas
ཹ Port de chargement Micro
USB
ེ Port Micro HDMI
ཻ Câble MHL (5 broches)
1
Page 24
Guide de l’utilisateur
1.
Recharger le produit
Connectez l’une des extrémités du
câble USB fournir sur le port Micro USB
du produit et l’autre extrémité sur votre
PC/ordinateur portable ou sur
l’adaptateur secteur de votre
smartphone pour recharger la batterie.
* Le projecteur est entièrement
rechargé après 5 heures, la DEL va
s’éteindre.
Recharger votre téléphone disposant d’un port MHL
La batterie interne du projecteur peut ne pas être utilisé uniquement pour la
projection, mais elle peut aussi recharger votre mobile si il dispose d’un port MHL.
1. Veuillez éteindre le projecteur avant
de recharger un téléphone disposant
d’un port MHL.
2. Branchez le câble MHL sur le port
MHL de votre téléphone portable.
3. Appuyez sur le bouton de chargement
pour démarrer le rechargement de la
batterie.
y Seul les téléphones compatibles
avec la technologie MHL peuvent
être rechargés avec la batterie
embarquée du projecteur.
y Veuillez appuyez sur le bouton de
chargement une fois que le téléphone
disposant d’un port MHL est entièrement
rechargé.
2.
ou
FR
Indicateurs LED
Statut LED Indication
3 LEDs blanches constantes La batterie est entre 80% et 100%
2 LEDs blanches constantes La batterie est entre 45% et 80%
1 LED blanche constante La batterie est entre 10% et 45%
1 LED blanche clignotante La batterie est en dessous de 10%
Panneau LEDs Le projecteur est cours de chargement
Les 3 DEL blanchent clignotent Recharge d’un téléphone portable compatible
avec la technologie MHL
2
Page 25

Guide de l’utilisateur
Allumer/éteindre le projecteur
Il est normal que l’appareil chauffe à cause de
ces hautes performances.
* Il est normal que l’appareil chauffe, cela est du à ces
hautes performances.
* Les temps de projection varient en fonction des
sources.
FR
Connecter le projecteur avec vosappareils
1. Téléphones portables compatibles MHL
Veuillez simplement brancher le câble MHL fourni
sur le port MHL de votre téléphone portable. Le
téléphone va automatiquement détecté le projecteur
et projeter l’image après quelques secondes.
* Veuillez ne pas tiré trop fortement sur le câble MHL.
* Vous pouvez un câble d’extension MHL (accessoire
en option) pour rallonger le câble MHL fourni pour une
utilisation plus commode.
2. Appareils HDMI
Utilisez l’adaptateur HDMI et le câble HDMI en
option pour connecter votre appareil possédant
une sortie HDMI sur le port MicroHDMI du
projecteur. La projection va débuter
automatiquement après quelques secondes.
* Les câbles HDMI ne sont pas inclus dans le package.
Adapteur
HDMI
Type A vers Type D
Câble HDMI
Type A vers Type A
3
Page 26

Guide de l’utilisateur
Mettre au point
Ajustez la mise au point en utilisant la
molette de mise au point pour obtenir
une image nette et claire.
Contrôle du volume
Veuillez s’il vous plaît utilisez votre appareil source pour régler le
volume. Dans le cas où le volume de la source n’est pas réglable,
appuyez sur Mode de chargement pendant une seconde jusqu’à ce que
la barre de volume s'affiche à l’écran. Utilisez les boutons Haut / Bas
pour régler le volume.
Ajustez le format d’affichage
Si l’image est étirée ou ne s’affiche pas
au format correct, le format de sortie
de votre périphérique de lecture est
différent des paramètres d’entrée du
projecteur. Utilisez le bouton Mode de
projection pour basculer entre les
formats d’affichage suivant :
(1) 4:3 Pan et Scan : le format
d’image est 4:3, il coupe les bords
latéraux pour agrandir l’image
centrale.
(2) 4:3 Theme : le format d’image est
4:3, il va compresser le format
central et compresser le format
d’image pour les 2 bords latéraux.
(3) 16:9 Letterbox : le format d’image
est 16:9, l’image sera réduite pour
afficher la totalité de l’image
originale au format 16:9.
FR
4
Page 27
Guide de l’utilisateur
FR
5
Page 28
Guide de l’utilisateur
Spécifications produit
Élément Description
Technologie optique DLP
Source lumineuse LED RGB
Résolution 640 x 480 Pixels (VGA)
Flux lumineux Up à ANSI 35 lumens
Taille de l’image projetée 152 mm ~ 1524 mm (diagonale 6” ~ 60”)
Source de projection Interface MHL ou HDMI
Tension et intensité d’entrée 5V / 2A
Tension et intensité de
sortie
Type de batterie Batterie Li-polymer rechargeable
Autonomie Mode projection : jusqu'à 100 min
Consommation électrique Mode projection : 7W
Température de
fonctionnement
5V / 500mA
intégrée de 1850 mAh
Mode chargement : 70% (Samsung
Galaxy S2)
Mode chargement : 2.5W
5 °C ~ 35 °C
FR
Dimensions (L x l x H) 132 mm x 71 mm x 14 mm
Poids 165 g
Contenu de la boîte Pico projecteur, câble USB, adapteur
HDMI, pochette, manuel utilisateur
* Nous nous réservons le droit d’effectuer des changements
techniques et des corrections.
6
Page 29
Guide de l’utilisateur
Dépannage
Symptôme Point à vérifier
Le projecteur ne peut pas démarrer. Vérifiez que la batterie est bien chargée.
L’image projetée est trop sombre. * Utilisez le projecteur dans un
environnement plus sombre.
FR
L’image projetée est trop floue. Ajustez la mise au point en utilisant la
La température à la surface du
projecteur est élevée.
Le projecteur ne peut pas projeter
ou se charger lorsqu'il est connecté
à un périphérique MHL
Le projecteur ne peut pas être
chargé.
* Diminuez la taille de l’image projetée.
molette de mise au point.
Il est normal que l’appareil génère un peu
de chaleur pendant son utilisation.
La liste des produits supportant la
technologie MHL peut être trouvée ici :
http://www.mhlconsortium.org/productlist/
La compatibilité n'est pas garantie à 100%
du fait que la conception de l'interface
MHL peut varier d'un fabriquant à l'autre, il
est recommandé de vérfifier la
compatibilité.
Veuillez vérifier si les 3 DEL sont
allumées. Si elles ne le sont pas et
clignotent, veuillez appuyez encore une
fois sur le bouton de chargement pour
quitter le mode rechargement du
téléphone MHL.
Le projecteur est allumé, mais la
vidéo ne peut pas êtr projetée.
Veuillez vérifier si votre périphérique
supporte l’interface MHL ou HDMI. Si oui,
veuillez vérifier la résolution en sortie de
votre appareil. Veuillez consulter les
résolutions supportées dans l’Annexe 1 et
modifier la résolution de sortie de votre
appareil.
7
Page 30
Guide de l’utilisateur
Annexe 1 :
Résolution Pour sortie MHL Pour sortie HDMI
640x480p 60ips v v
720x480p 60ips v v
1280x720p 60ips v v
1920x1080i 60ips v v
1920x1080p 60ips - v
720x576p 50ips v v
1280x720p 50ips v v
1920x1080i 50ips v v
1920x1080p 50ips - v
FR
8
Page 31

Manuale utente
Panoramica del prodotto
IT
Obiettivo del proiettore
ཱ Tasto proiezione On/Off
ི Messa a fuoco
ཱི Tappetino anti-sdrucciolo
* E’ possible
mettere il
cellulare sopra
il proiettore per
un uso migliore.
1
ུ Altoparlante
ཱུ Stand
ྲྀ Modalità di ricarica
ཷ Indicatore LED
ླྀ Modalità proiezione/ Su & Giù
ཹ Micro porta USB per
ricaricare
ེ Porta Micro HDMI
ཻ Cavo MHL (5 pin)
Page 32

Manuale utente
Ricaricare il prodotto
Collegare una estremità del cavo
USB alla porta USB micro del
prodotto e l’altra estremità al
caricatore USB del PC/Notebook o
Smartphone.
* Dopo 5 ore il proiettore è
completamente carico, la luce del
LED si spegnerà.
1.
2.
o
Caricare un telefono MHL
La batteria interna del proiettore può essere usata non solo per la proiezione,
ma anche per caricare il proprio dispositivo mobile MHL.
1. Spegnere il proiettore prima di
caricare il telefono MHL.
2. Connettere il cavo MHL alla porta
corrispettiva nel telefono.
3. Premere il tasto di ricarica per
iniziare di caricare.
y Solo dispositive MHL possono
essere caricati tramite la batteria
del proiettore.
y Premere il tasto di ricarica dopo aver
finito di caricare il telefono MHL.
IT
Indicatori LED
Stato LED Indicazione
3 LED bianchi accesi Autonomia tra 80% e 100%
2 LED bianchi accesi Autonomia tra 45% e 80%
1 LED bianco acceso Autonomia tra 10% e 45%
1 LED bianco lampeggiante Autonomia inferiore al 10%
Cornice LED Proiettore in carica
3 LED bianchi lampeggiano Caricando telefono MHL
2
Page 33

Manuale utente
Accensione/spegnimento del proiettore
Premere il tasto di accensione del proiettore per
3 secondi per accendere o spegnere il
proiettore.
* E’ normale che il dispositivo diventi caldo a
causa della sua high performance.
* Tempi di proiezione diversi a seconda delle fonti.
Collegare il proettore con i propri dispositivi
IT
1. Telefoni MHL
Collegare semplicemente il cavo MHL alla
porta MHL del telefono. Il telefono rileverà
automaticamente il proiettore e proietterà
l’immagine dopo alcuni secondi.
* Non spingere con forza il cavo MHL.
* Si può usare una prolunga MHL (accessorio
opzionale) per allungare tranquillamente il cavo
MHL.
2. Dispositivo HDMI
Usare l’adattatore HDMI e il cavo opzionale
HDMI per collegare il dispositivo HDMI con
l’HD nella porta del proiettore. La proiezione
inizierà automaticamente dopo alcuni secondi.
* I cavi HDMI non sono inclusi nella confezione.
Tipo A a tipo D
Cavo HDMI
Adattatore
HDMI
Tipo A a tipo A
3
Page 34
Manuale utente
Regolazione della messa a fuoco
Regolare la messa a fuoco usando
l’apposita rotella per avere
un’immagine più chiara e nitida.
Controllo volume
Usare il proprio dispositivo per regolare il volume. Nel caso in cui il
volume non sia regolabile, premere il tasto del volume per un secondo
fino a che non appare la barra del volume.
Regolare il rapporti d’aspetto
Se l’immagine è allungata o non viene
mostrata correttamente, il formato
d’output del dispositivo è diverso dalle
impostazioni del proiettore. Usare il
tasto di proiezione per scegliere i
seguenti rapporti:
(1) 4:3 Pan e Scan: Rapporto
d’immagine è 4:3, taglierà
entrambi gli angoli per allargare
l’immagine central.
(2) 4:3 Tema: Rapporto immagine è
4:3, manterrà il rapporto centrale e
comprime il rapporto immagine da
entrambe le angolazioni.
(3) 16:9 Formato ridotto: Rapporto
immagine è 16:9, verrà ridotto per
mostrare l’immagine completa
16:9.
IT
4
Page 35

Manuale utente
IT
5
Page 36

Manuale utente
Specifiche del prodotto
Elemento Descrizione
Tecnologia dell’ottica DLP
Sorgente luminosa LED RGB
Risoluzione 640 x 480 Pixel (VGA)
Flusso luminoso Fino a 35 lumen ANSI
Dimensioni immagini
proiettate
Origine della proiezione Interfaccia MHL o HDMI
Entrata corrente 5V / 2A
Uscita corrente 5V / 500mA
Tipo di batteria Batteria al litio-ione-polimero
Autonomia della batteria Modalità proiezione: sino a 100 min
Assorbimento Modalità proiezione: 7W
Temperatura di
funzionamento
Dimensioni (L x P x H) 132 mm x 71 mm x 14 mm
Da 152 mm ~ 1524 mm (da 6” a 60”
diagonale)
ricaricabile a 1850 mAh integrati
Modalità ricarica: 70% (Samsung
Galaxy S2)
Modalità ricarica: 2.5W
5 °C ~ 35 °C
IT
Peso 165 g
Contenuto della
confezione
* Salvo errori e cambiamenti tecnici.
Proiettore Pico, cavo USB , adattatore
HDMI, Pouch, Manuale utente
6
Page 37

Manuale utente
Risoluzione dei problemi
Problema Controllo
Il proiettore non si accende. Verificare che la batteria sia
completamente carica.
L’immagine proiettata risulta troppo
scura.
L’immagine proiettata risulta troppo
sfocata.
IT
La superficie del proiettore è calda. E’ normale che questo proiettore emani
Il proiettore non può proiettare da
dispositive MHL o ricaricarli.
Impossibile caricare il proiettore. Controllare che i 3 indicatori LED siano su
Il proiettore è accesso, ma il video
non può essere proiettato.
* Usare il proiettore in un ambiente più
scuro.
* Ridurre le dimensioni dell’immagine
proiettata.
Regolare la messa a fuoco utilizzando la
ghiera per la messa a fuoco.
calore durante il funzionamento.
Lista dei prodotti MGL disponibile su:
http://www.mhlconsortium.org/productlist/
Non è garantita una compatibilità al 100%
in quanto il design dell’interfaccia può
cambiare per ogni dispositivo E’
consigliato controllare la compatibilità.
Marquee. In caso che lampeggino,
premere il tasto di ricarica nuovamente per
uscire dal profilo di ricarica del dispositivo.
Controllare che il proprio dispositivo
supporti un’interfaccia MHL o HDMI. Se sì,
controllare la risoluzione del dispositivo,
Controllare la risoluzione supportata
all’Appendice 1 e modificare di
conseguenza la risoluzione.
7
Page 38

Manuale utente
Appendice 1:
Risoluzione Per input MHL Per input HDMI
640x480p 60fps v v
720x480p 60fps v v
1280x720p 60fps v v
1920x1080i 60fps v v
1920x1080p 60fps - v
720x576p 50fps v v
1280x720p 50fps v v
1920x1080i 50fps v v
1920x1080p 50fps - v
IT
8
Page 39

Manual del usuario
Presentación del producto
ES
Lentes del proyector
ཱ Botón de encendido/apagado de la
proyección
ི Rueda de enfoque
ཱི Almohadilla antideslizante
* Puede colocar
su teléfono
móvil encima
del proyector
para usarlo de
forma cómoda.
ུ Altavoz
ཱུ Soporte
ྲྀ Modo de carga
ཷ Indicador LED
ླྀ Modo de proyección / arriba y
Abajo
ཹ Puerto de carga Micro USB
ེ Puerto Micro HDMI
ཻ Cable MHL (5 pines)
1
Page 40

Manual del usuario
Carga del producto
Para cargar la batería del producto,
conecte un extremo del cable USB
integrado en el puerto Micro USB del
producto y el conecte el otro extremo
al ordenador, portátil o adaptador
USB de fuente de alimentación para
teléfonos inteligentes.
* Tras 5 horas el proyector estará
completamente cargado y la luz
LED se apagará.
1.
2.
o
Carga de su teléfono capacitado para MHL
La batería interna del proyector no solo puede ser utilizada para la
proyección, sino que también puede cargar su dispositivo móvil capacitado
para MHL (Enlace de Alta Definición Móvil).
1. Apague el proyector antes de cargar
el teléfono capacitado para MHL.
2. Conecte el cable MHL en el puerto
MHL de su teléfono móvil.
3. Pulse el botón de modo de carga
para iniciar la carga.
y Solo se pueden cargar los móviles
con capacidad para MHL a través
de la batería integrada en el
proyector.
y Pulde el botón de carga cuando haya
finalizado la carga del teléfono MHL.
ES
Indicadores LED
Estado LED Indicación
3 LEDs blancas encendidas fijas Capacidad de la potencia está entre el 80% al 100%
2 LEDs blancas encendidas fijas Capacidad de la potencia está entre el 45% al 80%
1 LED blanca encendida fija Capacidad de la potencia está entre el 10% al 45%
1 LED parpadeante Capacidad de la potencia está por debajo del 10%
LED del dosel El proyector está siendo cargado
3 LEDS blancas parpadean Carga del teléfono móvil con capacidad para MHL
2
Page 41

Manual del usuario
Encendido y apagado del proyector
Pulse el botón de encendido/apagado de proyección
durante 3 segundos para encender o apagar el
proyector.
* Es normal que el dispositivo se ponga caliente debido
a su alto rendimiento.
* El tiempo de proyección diferirá dependiendo de la
fuente.
Conectando el proyector a sus dispositivos
1. Teléfonos móviles capacitados con MHL
Solo tiene que conectar el cable MHL incorporado en
el puerto MHL de su teléfono móvil. El teléfono
detectará automáticamente el proyector y proyectará
ES
la imagen tras unos segundos.
* No tire del cable con brusquedad.
* Puede usar un cable de extensión MHL (accesorio
opcional) para ampliar el cable MHL incorporado y
poder usarlo con más facilidad.
2. Dispositivo HDMI
Utilice el adaptador HDMI y el cable opcional HDMI
para conectar su dispositivo con salida HDMI en el
puerto MicroHDMI del proyector. La proyección se
iniciará automáticamente en unos segundos.
* Los cables HDMI no están incluidos en el paquete.
Adaptador
HDMI
Tipo A a tipo D
Cable HDMI
Tipo A a tipo A
3
Page 42

Manual del usuario
Ajuste del enfoque
Ajuste el enfoque utilizando la rueda
de enfoque para obtener una imagen
clara y nítida.
Control del volumen
Utilice su dispositivo fuente para ajustar el volume. Si el volumen del
dispositivo fuente no es ajustable, pulse el modo de carga durante un
segundo hasta que se muestre la barra del volumen. Utilice el botón
arriba/abajo para ajustar el volume.
Ajuste de la relación de aspecto
Si la imagen sale estirada o no se
visualiza en el formato correcto, el
formato de salida de su dispositivo de
reproducción es diferente a los ajustes
de entrada del proyector. Utilice el
modo proyección para cambiar las
siguientes relaciones de aspecto:
(1) 4:3 Panorámica y Escaneo:
relación de imagen es 4:3, cortará
ambos lados para agrandar la
imagen central.
(2) 4:3 Tema: Relación de imagen es
4:3, mantendrá la relación central
y comprimirá la relación de
imagen en ambos lados.
(3) 16:9 Letterbox: relación de
imagen es 16:9, reducirá la escala
para mostrar una imagen
completada y original de 16:9.
ES
4
Page 43

Manual del usuario
ES
5
Page 44
Manual del usuario
Especificaciones de producto
Elemento Descripción
Technología óptica DLP
Fuente de luz LED RGB
Resolución 640 x 480 Píxeles (VGA)
Flux Luminoso Hasta 35 lúmenes ANSI
Tamaño de la imagen
proyectada
Fuente de la proyección
Entrada de la fuente de
alimentación
Salida de la fuente de
alimentación
Tipo de batería Batería recargable integrada de
Vida útil de la batería Modo proyección: Hasta 100 min
Consumo de potencia Modo de proyección: 7W
Temperatura de
funcionamiento
Dimensiones (L x A x P) 132 mm x 71 mm x 14 mm
Peso 165 g
152 mm ~ 1524 mm (6” ~ 60” Diagonal)
Interfaz MHL o HDMI
5V / 2A
5V / 500mA
Li-polymer y 1850 mAh
Modo de carga: 70% (Samsung Galaxy
S2)
Modo de carga: 2.5W
5 °C ~ 35 °C
ES
Contenido del paquete Pico Proyector, cable USB, Adaptador
HDMI, Bolsa y Manual del usuario
* Nos reservamos el derecho de realizar modificaciones técnicas y
de errors.
6
Page 45

Manual del usuario
Resolución de problemas
Síntomas Punto de comprobación
No se puede encender el proyector. Asegúrese de que la batería esté cargada.
La imagen proyectada es
demasiado oscura.
La imagen proyectada se ve muy
borrosa.
La temperatura de la superficie del
proyector es alta.
ES
El proyetor no puede proyectar
desde o no puede cargar
dispositivos MHL
No se puede cargar el dispositivo. Compruebe que los 3 indicadores LED
* Utilice el proyector en un ambiente más
oscuro.
* Disminuya el tamaño de la imagen
proyectada.
Ajuste el enfoque utilizando la rueda de
enfoque.
Es normal que este proyector genere un
calor moderado durante su
funcionamiento.
La lista de productos compatibles con
MHL se puede encontrar en:
http://www.mhlconsortium.org/productlist/
No se garantiza que sea 100%
compatible, ya que el diseño de la interfaz
MHL puede variar dependiendo del
fabricante del dispositivo móvil. Se
recomienda comprobar la compatibilidad.
estén en la marquesina. Si no es así y
están parpadeando,pulse el botón modo
de carga de nuevo para salir del modo de
carga de dispositivos MHL.
El proyector está encendido, pero
no se puede proyectar el video.
Compruebe que su dispositivo admita la
interfaz MHL o HDMI. Si es así,
compruebe la resolución fuente de la
salida de su dispositivo. Consulte la
resolución admitida en el apéndice 1 y
modifique la resolución de salida de su
dispositivo.
7
Page 46

Manual del usuario
Apéndice 1:
Resolución Para entrada MHL Para entrada HDMI
640x480p 60cps v v
720x480p 60cps v v
1280x720p 60cps v v
1920x1080i 60cps v v
1920x1080p 60cps - v
720x576p 50cps v v
1280x720p 50cps v v
1920x1080i 50cps v v
1920x1080p 50cps - v
ES
8
Page 47

ϡΩΧΗγϣϟ ϝϳϟΩ
ΞΗϧϣϟ ϰϠϋ ΔϣΎϋ Γέυϧ
AR
νέόϟ ίΎϬΟ ΔϠΟϋ
ཱϝϳϐηΗ έί/ϲϭοϟ ρΎϘγϹ ϝϳϐηΗ ϑΎϘϳ·
ིίϳϛέΗϟ ΔϠΟϋ
ཱིϕϻίϧϼϟ ΔϣϭΎϘϣ ΔΣϭϟ
ϰϠϋ ϰϠϋ ϱϭϠΧϟ
έϭΗϛϳΟϭέΑ ίΎϬΟ
ϡϼϣϟ ϡΩΧΗγϼϟ.
ུΕϭλ έΑϛϣ
ཱུΩϧγϣ
ྲྀϥΣηϟ ϊοϭ
ཷ έη΅ϣLED
ླྀϊοϭρΎϘγϹ/ϝϔγϭ ϰϠϋ
* ϙϔΗΎϫ ϊοϭ ϙϧϛϣϳ
ཹϥΣη ΫϔϧϣUSBέϳϐλ
ེΫϔϧϣMicro HDMI
ཻϝΑϛMHL )5έϳϣΎγϣ (
1
Page 48

ϡΩΧΗγϣϟ ϝϳϟΩ
1.
ϝΑϛ ϥϣ ΩΣϭ ϑέρ ϝϳλϭΗΑ ϡϗUSBϡϭίΣϣϟ
2.
λϣ ϝϳϐηΗ ϑΎϘϳ· ϡΗϳγϭ ˬϝϣΎϛϟΎΑ ΎϧϭΣηϣ
ϭ
˷ ˵
ϥϛϣϣϟ ϝϭϣΣϣϟ ίΎϬΟϟ ϥΣηϟ Ύοϳ ϥϛϟϭ ˬρϘϓ ϲϭοϟ ρΎϘγϸϟ έϭΗϛϳΟϭέΑϟ ίΎϬΟϟ ΔϳϠΧΩϟ ΔϳέΎρΑϟ ϡΩΧΗγΗ ϻ
˱
ΡΎΑ
MHL
MHLϥϣ
έϭΗϛϳΟϭέΑϟ ίΎϬΟϟ Δϧϣοϣϟ ΔϳέΎρΑϟ ϝϼΧ.
ΔϳϧϘΗΑ ϥϛϣϣ ϑΗΎϫ ϥΣη
ΔϳϧϘΗΑ ϥϛϣϣ ϑΗΎϫ
MHL.
˷
έί ϰϠϋ ρϐοϟ ϰΟέ˵ϳ
ΔϳϧϘΗΑ Ωϭίϣ ϑΗΎϫ ϥΣηMHL.
ΞΗϧϣϟ ϥΣη
ΫϔϧϣΑMicro USBϝϭΣϣΑ έΧϵ ϑέρϟϭ ˬΞΗϧϣϠϟ
ΔϗΎρϟUSBϲλΧη έΗϭϳΑϣϛϟ/ϭ ϱέΗϓΩ έΗϭϳΑϣϛ
ϥΣηϠϟ ϲϛΫ ϑΗΎϫ.
*ϲοϣ ΩόΑ5έϭΗϛϳΟϭέΑϟ ίΎϬΟ Αλϳγ ˬΕΎϋΎγ
˱
LED.
˷
ΔϳϧϘΗΑMHL.
.1ϥΣη ϝΑϗ έϭΗϛϳΟϭέΑϟ ίΎϬΟ ϝϳϐηΗ ϑΎϘϳ· ϰΟέ˵ϳ
˷
.2ϝΑϛ ϝϳλϭΗΑ ϡϗMHLΫϔϧϣ ϲϓMHLϙϔΗΎϬϟ
ϝϭϣΣϣϟ.
.3ϥΣηϟ ϑΎϘϳ· ϥΣηϟ ϊοϭ έί ϰϠϋ ρϐο.
yΔϳϧϘΗΑ Δϧϛϣϣ ΓίϬΟ ϥΣη ρϘϓ ϥϛϣϳ
yϥϣ ˯ΎϬΗϧϻ ΩόΑ ϥΣηϟ
AR
MHL
ϳΑΎλϣ Εέη΅ϣLED
ΡΎΑλϣϟ ΔϟΎΣϳοϭΗϟ
3ΑΎλϣϝϳϐηΗϟ ϊοϭ ϲϓ ϝίΗ ϻ ˯ΎοϳΑ ϳϥϳΑ ΔϗΎρϟ ΓέΩϗ80 %ϰϟ·100 %
2ϝϳϐηΗϟ ϊοϭ ϲϓ ϝίΗ ϻ ˯ΎοϳΑ ϳΑΎλϣϥϳΑ ΔϗΎρϟ ΓέΩϗ45 %ϰϟ·80 %
ϥϳΑ ΔϗΎρϟ ΓέΩϗ10 %ϰϟ·45 %
˷
2
ϊοϭ ϲϓ ϝίϳ ϻ νϳΑ ΩΣϭ ΡΎΑλϣ
ϝϳϐηΗϟ
νϣϭϳ νϳΑ ΩΣϭ ΡΎΑλϣϥϣ ϝϗ ΔϗΎρϟ ΓέΩϗ10%
έέϣΗγΡΎΑλϣϟ νϳϣϭέϭΗϛϳΟϭέΑϟ ϥΣη ϥϵ ϡΗϳ
νϣϭΗϳΑΎλϣ ϥϣ ΔΛϼΛ LED ˯ΎοϳΑϟΔϳϧϘΗΑ ϥϛϣϣ ϝϭϣΣϣ ϑΗΎϫ ϥΣη
Page 49

ϡΩΧΗγϣϟ ϝϳϟΩ
έί ϰϠϋ ρϐοϝϳϐηΗ/ϝϳϐηΗ ϑΎϘϳ·ΙϼΛ ΓΩϣϟ ϲϭοϟ ρΎϘγϹ
έϭΗϛϳΟϭέΑϟ ίΎϬΟ ϝϳϐηΗ ϑΎϘϳ· ϭ ϝϳϐηΗϟ ϥϭΛ
.
ΏΑγΑϩ΅ΩϲϟΎόϟ.
˱
ϙΗίϬΟ΄Α έϭΗϛϳΟϭέΑϟ ϝϳλϭΗ
˳
ϝϳϐηΗ/νέόϟ ίΎϬΟ ϝϳϐηΗ ϑΎϘϳ·
* ϥϣϲϬϳΩΑϟϥΟϟίΎϬΑλϳγΎϓΩ
* έΩΎλϣϟ ΕΎϓϼΗΧ ΏγΣ έϭΗϛϳΟϭέΑϟ ϝϳϐηΗ Εϗϭ ϑϠΗΧϳϭ.
AR
ϝϭΣϣ
HDMI
MHL
˱
MHLϑϧόΑ .
ΗϠϟ ΞϣΩϣϟ.
˱
.
˳
ωϭϧϟ" "ωϭϧϟ ϰϟ·"Ω"
ϝΑϛHDMI
˷
ϝΑϛ ϝϳλϭΗ ϯϭγ ϙϳϠϋ ΎϣMHLΫϔϧϣΑ ϥϣοϣϟMHLϙϔΗΎϬϟ
ϥϭΛ ϊοΑ ΩόΑ Γέϭλϟ
.
˳
ϝΑϛ ΔϟΎρϹMHLΔϘϠρϣ ΔϟϭϬγΑ ϝϳϐη
ϝϭΣϣ ϡΩΧΗγ HDMI ϝΑϛ ϰϟ· ΔϓΎοϹΎΑ HDMI ϱέΎϳΗΧϻ
ΝέΧΑ Ωϭίϣ ίΎϬΟ ϝϳλϭΗϟ HDMI Ϋϔϧϣ ϊϣ MicroHDMI
έϭΗϛϳΟϭέΑϟ ίΎϬΟϟ.ΎϳΎϘϠΗ ϥϭΛ ϊοΑ ΩόΑ ϲϭοϟ ρΎϘγϹ ΩΑϳγ
.1ΔϳϧϘΗΑ Δϧϛϣϣ ΔϟϭϣΣϣ ϑΗϭϫ
ϝϭϣΣϣϟ .ϡϣλϳϭ ˬέϭΗϛϳΟϭέΑϟ ίΎϬΟ ΎϳΎϘϠΗ ϑΗΎϬϟ ϑηΗϛϳγϭ
˵
* ϝΑϛ ΏΣγ ϡΩϋ ϰΟέϳ
* ΔϳϧϘΗϟ ΔϟΎρ· ϝΑϛ ϡΩΧΗγ ϙϧϛϣϳMHL)ϱέΎϳΗΧ ϕΣϠϣ(
.2 ϰϟ·ίΎϬΟHDMI
* ΕϼΑϛ ϥϳϣοΗ ϡΗϳ ϻHDMIΔϣίΣϟ ϲϓ .
ωϭϧϟ" "ωϭϧϟ ϰϟ·""
3
Page 50

ϡΩΧΗγϣϟ ϝϳϟΩ
ίϳϛέΗϟ ρΑο
ίϳϛέΗϟ ΔϠΟϋ ϡΩΧΗγ ΔργϭΑ ίϳϛέΗϟ ρΑο
ΔΣοϭϭ ΓΩΎΣ Γέϭλ ϰϠϋ ϝϭλΣϠϟ .
Εϭλϟ ϯϭΗγϣ ϲϓ ϡϛΣΗϟ
Εϭλϟ ϯϭΗγϣ ρΑοϟ έΩλϣϟ ίΎϬΟϟ ϡΩΧΗγ ϰΟέϳ
.ίΎϬΟϟ Εϭλϟ ϯϭΗγϣ ρΑο ϡΩϋ ΔϟΎΣ ϲϓϭ
ϰϠϋ ρϐο ˬέΩλϣϟ"ϥΣηϟ ϊοϭ "ϡΗϳ ϰΗΣ ΓΩΣϭ ΔϳϧΎΛ ΓΩϣϟϰϠϋ Εϭλϟ ϯϭΗγϣ ρϳέη νέϋ
ΔηΎηϟ .ϊϓέ έί ϡΩΧΗγ/Εϭλϟ ϯϭΗγϣ ρΑοϟ Εϭλϟ ϯϭΗγϣ νϔΧ.
ΔϳϋΎΑϟ ΔΑγϧϟ ρΑο
ΎϬοέϋ ϡΗϳ ϡϟ ϭ Γέϭλϟ ΩϳΩϣΗ ϡΗ Ϋ·ϕϳγϧΗϟΎΑ
ϝϳϐηΗϟ ίΎϬΟϟ ΝέΧϹ ϕϳγϧΗ ϥ ϲϧόϳ ΫϬϓ ˬϳΣλϟ
έϭΗϛϳΟϭέΑϟ ίΎϬΟϟ ϝΎΧΩϹ ΕΩΩϋ· ϥϋ ϑϠΗΧϳ .
ρΎϘγϹ ϊοϭ έί ϡΩΧΗγΔϳϋΎΑϟ Ώγϧϟ ϥϳΑ ϝϳΩΑΗϠϟ
ΓέϭλϠϟ ΔϳϋΎΑϟ4 :3ϥϳΗϓΎΣϟ ΎΗϠϛ ϊρϗ ϡΗϳγϓ ˬ
ΑϛΗϟ ϥϳϳΑϧΎΟϟ.
ΓέϭλϠϟ4 :3ΔϳϋΎΑϟ ΔΑγϧϟ ϰϠϋ υΎϔΣϟ ϡΗϳγϓ ˬ
ΎΗϠϛϟ ΓέϭλϠϟ ΔϳϋΎΑϟ ΔΑγϧϟ ρϐοϭ Δϳίϛέϣϟ
ϥϳϳΑϧΎΟϟ ϥϳΗϓΎΣϟ.
ΓέϭλϠϟ ΔϳϋΎΑϟ ΔΑγϧϟ16 :9νϳϔΧΗϟ ϡΗϳγϓ ˬ
ΔΑγϧΑ ΔϠϣΎϛϟ ΔϳϠλϷ Γέϭλϟ νέόϟ ϲΑγϧϟ
16 :9.
˵
AR
ΔϳϟΎΗϟ:
(1)ΔΑγϧΑ ΔόρΗϘϣϟ Γέϭλϟ4 :3 :ΔΑγϧϟ ϥϭϛΗ ΎϣΩϧϋ
Δϳίϛέϣϟ έϭλϟ έϳ
(2) ΔΑγϧΑ Δϣγϟ4 :3 :ΔϳϋΎΑϟ ΔΑγϧϟ ϥϭϛΗ ΎϣΩϧϋ
(3)ΔΑγϧΑ ϝΎγέϟ ϕϭΩϧλ16 :9 :ϥϭϛΗ ΎϣΩϧϋ
4
Page 51

ϡΩΧΗγϣϟ ϝϳϟΩ
AR
5
Page 52

ϡΩΧΗγϣϟ ϝϳϟΩ
ΞΗϧϣϟ ΕΎϔλϭϣ
ϑλϭϟ
έλϧόϟ
ΔϳέλΑ ΎϳΟϭϟϭϧϛΗDLP
˯ϭοϟ έΩλϣΡΎΑλϣRGB
ΔϗΩϟ640×480ϝγϛΑ(VGA)
ΔϣΩΧΗγϣϟ Γ˯ΎοϷϰϟ· ϝλϳ Ύϣ35ΡΎΑλϣANSI
νέόϟ Γέϭλ ϡΟΣ152ϡϠϣ ~ 1524ϡϠϣ
)6 ϰϟ· ΔλϭΑ60Δϳέρϗ ϑλϧ ΔλϭΑ(
νέόϟ έΩλϣΔϬΟϭMHLϭHDMI
ΔϗΎρϟ ϝΧΩ5 Εϟϭϓ /2έϳΑϣ
ΔϗΎρϟ ΝέΧ5 Εϟϭϓ /500έϳΑϣ ϲϠϠϣ
ΔϳέΎρΑϟ ωϭϧΔΟϣΩϣ ΔϳέΎρΑ1850έϣϳϟϭΑ ϲϟ ωϭϧ ϥϣ ˬέϳΑϣ ϲϠϣ
ϥΣηϟ ΓΩΎϋϹ ΔϠΑΎϘϟ.
ΔϳέΎρΑϠϟ ϲοέΗϓϻ έϣόϟνέόϟ ϊοϭ :ϰΗΣ100ΔϘϳϗΩ
ϥΣηϟ ϊοϭ70 % (Samsung Galaxy S2)
ΔϗΎρϟ ϙϼϬΗγνέόϟ ϊοϭ :7Εϭ
AR
ϥΣηϟ ϊοϭ :2.5Εϭ
132ϡϣ ×71ϡϣ ×14ϡϣ
ϡΩΧΗγϣ ϝϳϟΩϭ ˬΓέϳϐλ ΔΑϳϘΣϭ
6
ϝϳϐηΗϟ ΓέέΣ ΔΟέΩ5 °C ~ 35 °C
ΩΎόΑϷ) ϝϭρϟ ×νέόϟ ×
ωΎϔΗέϻ(
ϥίϭϟ165ϡέΟ
ΔϣίΣϟ ΕΎϳϭΗΣϣϝΑϛϭ ˬϝϭϣΣϣ έϭΗϛϳΟϭέΑ USBϝϭΣϣϭ ˬ HDMIˬ
*Δϳϧϓ ˯ΎρΧϭ ΕέϳϳϐΗ ˯έΟ· ϲϓ ϕΣϟΎΑ υϔΗΣϧ.
Page 53

ϡΩΧΗγϣϟ ϝϳϟΩ
ΎϬϠΣϭ ϝϛΎηϣϟ ϑΎηΗϛ
ΔϠϛηϣϟϕϘΣΗϟ ΔρϘϧ
νέόϟ ίΎϬΟ ϝϳϐηΗ έΫόΗ. ϝϣΎϛϟΎΑ ΔϳέΎρΑϟ ϥΣη ϡΎϣΗ ϥϣ Ωϛ΄Η.
˱
.
˯ΎϧΛ ΔϟΩΗόϣ ΓέέΣ Ωϟϭϳ έϭΗϛϳΟϭέΑϟ ίΎϬΟ ϥ ϲϬϳΩΑϟ ϥϣ
http://www.mhlconsortium.org/productlist/
ΔΑγϧΑ ϕϓϭΗϟ ϥΎϣοϟ ϲρϐϳ ϻ100%ωϭϧΗϳ Ωϗ ΙϳΣ ˭
ϕϓϭΗϟ έΎΑΗΧ ˯έΟΈΑ ΎϣΩ ϰλϭϳϭ
.
AR
Γέϣ ϥΣηϟ ϊοϭ έί ϰϠϋ ρϐοϟ ϰΟέϳ ˬνϣϭΗ ΎϬϧϭ
ΔϳϧϘΗΑ Ωϭίϣϟ ίΎϬΟϟ ϥΣη ϊοϭ ϥϣ ΝϭέΧϠϟ ϯέΧ
MHL ϭ
Εέη΅ϣ ΕϧΎϛ LED ΔΛϼΛϟ
ϱϭϛέΎϣ ϲϓ Δϋϭϧλϣ έϭΗϛϳΟϭέΑϠϟ .ϙϟΫ έϳϏ ΔϟΎΣ ϲϓϭ
ΔϬΟϭ ϡϋΩϳ ϙίΎϬΟ ϥ ϥϣ ϕϘΣΗϟ ϰΟέϳ
˵
˵
ϙίΎϬΟ ΝέΧϟ έΩλϣϟ .ΔϣϭϋΩϣϟ ΔϗΩϟ ϰϟ· ωϭΟέϟ ϰΟέϳ
ΔϳΎϐϠϟ ΔϣϠυϣ Δοϭέόϣϟ Γέϭλϟ.* Ύϣϼυ έΛϛ ΔϳΑ ϲϓ νέόϟ ίΎϬΟ ϡΩΧΗγ
* ϠϗΔοϭέόϣϟ Γέϭλϟ ϡΟΣ ϝ.
ΔϳΎϐϠϟ ΔΗϫΎΑ Δοϭέόϣϟ Γέϭλϟ. ίϳϛέΗϟ ΔϠΟϋ ϡΩΧΗγΎΑ ίϳϛέΗϟ ρΑο.
νέόϟ ίΎϬΟ ργ ΓέέΣ ΔΟέΩ
ϝϳϐηΗϟ.
ϻ ϥϛϣϳϭΔϣϭϋΩϣϟ ΕΎΟΗϧϣϟ ΔϣΎϗ ϰϠϋ ωϼρMHL:
ΔϬΟϭ ϡϳϣλΗ MHL ϝϭϣΣϣϟ ίΎϬΟϠϟ ϊΎΑ ϝϛ ΏγΣ .
˱
˵
HDMI.ΔϗΩ ϥϣ ϕϘΣΗϟ ϰΟέϳ ˬϙϟΫ ϥϣ Ωϛ΄Ηϟ ΔϟΎΣ ϲϓϭ
ϕΣϠϣϟ ϲϓ1ίΎϬΟϟ ΝέΧ ΔϗΩ ϝϳΩόΗϭ ˬ.
˵
˵
MHL..
˵
ϥ έϭΗϛϳΟϭέΑϟ ίΎϬΟϟ ϥϛϣϳ ϻ
ΔϳϧϘΗΑ ΓίϬΟ ϥΣηϳ ϭ ϡϣλϳ
έϭΗϛϳΟϭέΑϟ ϥΣη ϥϛϣϳ ϻ. Ϋ· Ύϣϣ ϕϘΣΗϟ ϰΟέϳ
ϻ ϥϛϟϭ ˬέϭΗϛϳΟϭέΑϟ ϝϳϐηΗ ϡΗϳ
ϭϳΩϳϔϟ ϡϳϣλΗ ϥϛϣϳ.
ΔϓΩ.
MHL
7
Page 54

ϡΩΧΗγϣϟ ϝϳϟΩ
ϕΣϠϣϟ1:
ϝΎΧΩ· ϰϟ· ΔΑγϧϟΎΑMHLϝΎΧΩ· ϰϟ· ΔΑγϧϟΎΑHDMI
1920x1080p 60fps- v
1920x1080p 50fps- v
ΔϗΩϟ
640x480p 60fpsv v
720x480p 60fpsv v
1280x720p 60fpsv v
1920x1080i 60fpsv v
720x576p 50fpsv v
1280x720p 50fpsv v
1920x1080i 50fpsv v
AR
8
Page 55

Handleiding
Aan de slag Onderdelen van de projector
NL
Projector Lens
ཱ Projectie aan/uit toets
ི Focus Wiel
ཱི Anti-slip matje
* Uw kunt uw
mobiele foon
boven op de
projector
plaatsen voor
eenvoudig
gebruik.
ུ Luidspreker
ཱུ Standaard
ྲྀ Oplaadmodus
ཷ LED indicatie
ླྀ Projectie modus/Omhoog &
omlaag
ཹ Micro USB Oplaadpoort
ེ Micro HDMI poort
ཻ MHL kabel (5 pinnen)
1
Page 56

Handleiding
Het product opladen
Verbind een eind van de gebundelde
USB kabel met de micro usb poort
van het product en het andere eind
met pc/notebook of Smart phone usb
netadapter voor opladen.
* Na 5 uur is de projector geheel
opgeladen,het LED lampje schakelt
dan uit.
1.
2.
of
Uw MHL ingeschakelde telefoon opladen
De interne batterij van de projector kan niet alleen voor projectie worden
gebruikt, maar ka nook uw MHL ingeschakeld mobiel apparaat opladen.
1. Zet de projector uit voordat de
MHL ingeschakelde telefoon wordt
opgeladen.
2. Steek de MHL kabel in de MHL
poort van uw mobiele telefoon.
3. Druk op de oplaad modus toets om
te beginnen met opladen.
y Alleen ingeschakelde MHL
apparaten kunnen worden
opgeladen met de ingebedde
batterij van de projector.
y Druk op de oplaad toets nadat de
MHL telefoon is opgeladen.
NL
LED indicaties
LED Stand Indicatie
3 witte LED’s aan Voedingscapaciteit is tussen 80% tot 100%
2 witte LED’s aan Voedingscapaciteit is tussen 45% tot 80%
1 witte LED’s aan Voedingscapaciteit is tussen 10% tot 45%
1 witte LED’s knippert Voedingscapaciteit minder dan 10%
LED's Lopen Projector is opgeladen
3 witte LED’s knipperen MHL ingeschakelde mobiele foon opladen
2
Page 57

Handleiding
De projector aan/uit schakelen
Druk op de projectie aan/uit toets voor 3
seconden om de projector AAN of UIT te zetten.
* Het is normaal dat het apparaat warm wordt
vanwege de hoge werkzaamheid.
* De projector tijd is verschillend en hangt af van
het bron verschil.
Projector verbinden met uw apparaten
1. MHL ingeschakelde mobiele telefoons
Steek de ingebedde MHL kabel in de MHL poort
van uw mobiele foon. De telefoon ontdekt
vanzelf de projector en projecteert het beeld na
een paar seconden.
* Trek niet te hard aan de MHL kabel.
* U kunt de MHL verlengkabel gebruiken
(optioneel onderdeel) om de ingebouwde MHL
kabel te verlengen voor gebruiksvriendelijkheid.
2. HDMI apparaat
NL
Gebruik de HDMI adapter en optionele HDMI
kabel om uw HDMI uit apparaat te verbinden
met de MicroHDMI poort van de projector. De
projector start na een paar seconden vanzelf.
* HDMI kabels zijn niet inbegrepen in de
verpakking.
HDMI
adapter
Type A naar type D
HDMI kabel
Type A naar type A
3
Page 58

Handleiding
Focus instellen
Stel de focus af met gebruik van het
focus wiel voor een scherp en
duidelijk beeld.
Geluidssterkte regelen
Gebruik uw bronapparaat om het volume af te stellen. Mocht het
volume van het bronapparaat niet afstelbaar zijn, druk dan de Oplaad
modus een seconde in totdat de volume balk op het scherm is
weergegeven. Gebruik de Omhoog/Omlaag toets om het volume af te
stellen.
Aspect ratio afstellen
Wanneer het beeld uitgestrekt is of niet
het juiste formaat weergeeft, wijkt het
uitvoer formaat van uw afspelend
apparaat af van de invoer instellingen
van de projector. Gebruik de projectie
modus toets om de volgende aspect
ratio’s te wisselen:
(1) 4:3 Pan en Scan: Beeld ratio is
4:3, dit snijdt de randen aan beide
kanten af om het centraal beeld te
vergroten.
(2) 4:3 Theme: Beeld ratio is 4:3, het
behoudt de central ratio en
compresseert de beeld ratio aan
de randen van beide kanten.
(3) 16:9 Letterbox: Beeld ratio is 16:9,
het verkleint om het gehele 16:9
origineel beeld weer te geven.
NL
4
Page 59

Handleiding
NL
5
Page 60

Handleiding
Product specificaties
Item Omschrijving
Optische technologie DLP
Lichtbron RGB LED
Resolutie 640 x 480 Pixels (VGA)
Luminous Flux Op tot ANSI 35 lumens
Projectie beeldgrootte 152 mm ~ 1524 mm (6” ~ 60”
Diagonaal)
Projectiebron MHL of HDMI interface
Spanningsinvoer 5V / 2A
Spanningsuitvoer 5V / 500mA
Batterijtype Geintegreerde 1850 mAh, Li-polymeer
oplaadbare batterij
Batterij levensduur Projectiemodus: tot 100 min
Oplaadmodus: 70% (Samsung Galaxy
S2)
Voedingsverbruik Projectiemodus: 7W
Oplaadmodus: 2.5W
Gebruikstemparatuur 5 °C ~ 35 °C
Afmetingen (L x W x H) 132 mm x 71 mm x 14 mm
Gewicht 165 g
Inhound verpakking Pico Projector, USB kabel,
HDMI-adapter, zakje,
gebruikershandleiding
* We behouden het recht voor technische wijzigingen en fouten.
NL
6
Page 61

Handleiding
Problemen oplossen
Symptoom Controlepunt
De projector kan niet aangezet
worden.
Het geprojecteerd beeld is te
donker.
Het geprojecteerde beeld is te
wazig.
De temperatuur van het oppervlak
van de projector is warm.
De projector kan niet projecteren
van of MHL apparaten opladen
NL
De projector kan niet worden
opgeladen.
Controleer of de batterij geheel is
opgeladen.
* Gebruik de projector in een omgeving
die donkerder is.
* Verklein de grootte van de afbeelding.
Stel de focus in met het focus wiel.
Het is normaal dat deze projector een
beetje hitte genereert tijdens gebruik.
De MHL ondersteunde productlijst kan
worden gevonden op:
http://www.mhlconsortium.org/productlist/
Het is geen garantie voor 100%
compatibiliteit aangezien het MHL
interface ontwerp per mobiel apparaat
verkoper kan afwijken. Aanbevolen wordt
om de compatibiliteit te controleren.
Controleer of de 3 LED indicaties van de
projector in Marquee staan. Wanneer dit
niet het geval is en ze knipperen, druk dan
nog een keer op de oplaadmodus om de
oplaadmodus voor het MHL apparaat af te
sluiten.
De projector is ingeschakeld, maar
de video kan niet worden
geprojecteerd.
Controleer of uw apparaat een MHL of
HDMI interface ondersteunt.Indien dit het
geval is, controleer dan de bronresolutie
van uw apparaat uitvoer.Raadpleeg de
ondersteuningsresolutie van appendix 1
en wijzig uw apparaat uitvoerresolutie.
7
Page 62

Handleiding
Appendix 1:
Resolutie Voor MHL invoer Voor HDMI invoer
640x480p 60fps v v
720x480p 60fps v v
1280x720p 60fps v v
1920x1080i 60fps v v
1920x1080p 60fps - v
720x576p 50fps v v
1280x720p 50fps v v
1920x1080i 50fps v v
1920x1080p 50fps - v
NL
8
Page 63

Manual do Usuário
Visão Geral do Produto
BPT
Lente do Projetor
ཱ Botão Ligar/Desligar Projeção
ི Roda de Focalização
ཱི Almofada Anti-Deslizante
* Você pode
colocar seu
celular em cima
do projetor para
uso
conveniente.
1
ུ Alto-Falante
ཱུ Suporte
ྲྀ Modo de Carregamento
ཷ Indicador LED
ླྀ Modo de Projeção/ Cima &
Baixo
ཹ Micro Porta de Carregamento
USB
ེ Micro porta HDMI
ཻ Cabo MHL (5 pins)
Page 64

Manual do Usuário
Carregando o produto
Conecte uma ponta do cabo USB
incorporado na Micro porta USB do
produto e a outra ponta no Notebook
PC ou no adaptador de alimentação
USB para Smartphone para o
carregamento.
* O projetor ficará completamente
carregado após 5 horas, a luz do
LED se desligará.
1.
2.
ou
Carregando seu telefone ativado por MHL
A bateria interna do projetor não somente pode ser usada para a projeção,
mas também carrega seu dispositivo móvel ativado por MHL.
1. Desligue o projetor antes de
carregar o telefone ativado por MHL.
2. Conecte o cabo MHL na porta
MHL do seu celular.
3. Pressione o botão do modo de
carregamento para iniciar.
y Somente dispositivos ativados
por MHL podem ser carregados
através da bateria incorporada
do projetor.
y Pressione o botão de
carregamento depois de
terminar o carregamento do
telefone MHL.
Indicadores LED
Estado do LED Indicação
3 LEDs brancos acesos Capacidade de energia está entre 80% a 100%
2 LEDs brancos acesos Capacidade de energia está entre 45% a 80%
1 LED branco aceso Capacidade de energia está entre 10% a 45%
1 LED branco piscante Capacidade de energia está abaixo de 10%
Letreiro de LED Projetor está sendo carregado
3 LEDs brancos piscam Carregando o celular ativado por MHL
2
BPT
Page 65

Manual do Usuário
Ligando/desligando o projetor
Pressione o Botão Ligar/Desligar projeção por 3
segundos para LIGAR ou DESLIGAR o projetor.
* É normal que o dispositivo se aqueça devido à
sua alta performance.
* O tempo do projetor é diferente do tempo da
fonte.
Conectando projetor com seus Dispositivos
1. Celulares ativados por MHL
Simplesmente conecte o cabo MHL incorporado
na porta MHL do seu celular. O telefone
detectará automaticamente o projetor e
projetará a imagem depois de alguns segundos.
* Não puxe o cabo MHL com força.
* Você pode usar o cabo de extensão MHL
(acessório opcional) para extender o cabo MHL
incorporado para facilitar a operação.
2. Dispositivo HDMI
Use o adaptador HDMI e o cabo opcional
HDMI para conectar seu dispositivo de saída
HDMI com a porta Micro HDMI do projetor. A
BPT
projeção se iniciará após alguns segundos
automaticamente.
* Cabos HDMI não estão incluídos no pacote.
Adaptador
HDMI
Tipo A ao Tipo D
Cabo HDMI
Tipo A ao Tipo A
3
Page 66

Manual do Usuário
Ajustando o foco
Ajuste o foco usando a roda de
focalização para obter uma imagem nítida
e clara.
Controle de Volume
Use seu dispositivo de fonte para ajustar o volume. Caso o volume do
dispositivo de fonte não seja ajustável, pressione o Modo de Carregamento
por um segundo até que a barra do volume seja exibida na tela. Use o botão
Cima/Baixo para ajustar o volume.
Ajuste da Proporção de Aspecto
Se a imagem está extendida ou não exibe
o formato corretamente, significa que o
formato de saída do seu dispositivo de
reprodução tem configurações de entrada
diferentes do projetor. Use o botão de
Modo de Projeção para alternar entre as
seguintes proporções de Aspecto:
(1) 4:3 Panoramizar e Digitalizar:
Proporção de imagem é 4:3, ela
cortará ambas as margens laterais
para ampliar a imagem central.
(2) 4:3 Tema: Proporção de imagem é
4:3, ela manterá a proporção central
e comprimirá a proporção de imagem
para ambas as margens laterais.
(3) 16:9 Letter box: Proporção de
imagem é 16:9, ela será reduzida,
para exibir completamente a imagem
original 16:9.
BPT
4
Page 67

Manual do Usuário
BPT
5
Page 68

Manual do Usuário
Especificações do produto
Item Descrição
Tecnologia Óptica DLP
Fonte de Luz RGB LED
Resolução 640 x 480 Pixels (VGA)
Fluxo Luminoso Até ANSI 35 lumens
Tamanho da Imagem de
Projeção
Fonte de Projeção Interface MHL ou HDMI
Entrada de Energia 5V / 2A
Saída de Energia 5V / 500mA
Tipo de Bateria Bateria recarregável de Li-polímero
Vida da Bateria Modo de Projeção: até 100 min
Consumo de Energia Modo de projeção: 7W
Temperatura de Operação 5 °C ~ 35 °C
Dimensão (C x L x A) 132 mm x 71 mm x 14 mm
Peso 165 g
152 mm ~ 1524 mm (6” ~ 60” Diagonal)
1850 mAh
Modo de carregamento: 70%
(Samsung Galaxy S2)
Modo de carregamento: 2.5W
BPT
Conteúdo do Pacote Pico Projetor, Cabo USB, Adaptador
HDMI, Bolsa, Manual do Usuário
* Reservamos o direito de fazer as mudanças técnicas e de corrigir
os erros.
6
Page 69

Manual do Usuário
Resolução de Problemas
Sintoma Ponto de Verificação
O projetor não consegue ser ligado. Assegure-se de que a bateria esteja
completamente carregada.
A imagem de projeção é muito
escura.
A imagem de projeção está muito
indistinta.
A temperatura da superfície do
projetor está quente.
O projetor não pode projetar ou
carregar a partir dos dispositivos
MHL
O projetor não pode ser carregado. Verifique se os 3 indicadores LED do
BPT
* Use o Projetor em um ambiente mais
escuro.
* Reduza o tamanho da imagem de
projeção.
Ajuste o foco usando a roda de
focalização.
É normal que este projetor gere calor
moderado durante a operação.
A lista de produto suportado MHL pode ser
encontrada:
http://www.mhlconsortium.org/productlist/
Não há garantia de 100% compatibidade
porque o design da interface MHL pode
variar segundo o fabricante do celular.
Recomenda-se de verificar a
compatibilidade.
projetor estão sinalizando. Se não
estiverem e eles estiverem piscando,
pressione o botão do modo de
carregamento novamente para sair do
modo de carregamento do telefone MHL.
O projetor está ligado, mas o vídeo
não pode ser projetado.
Verifique se o seu dispositivo suporta
interface MHL ou HDMI. Se suportar,
verifique a resolução de origem que o seu
dispositivo produz. Consulte a resolução
suportada no Apêndice 1 e modifique a
resolução de saída do seu dispositivo.
7
Page 70

Manual do Usuário
Apêndice 1:
Resolução Para entrada MHL Para entrada HDMI
640x480p 60fps v v
720x480p 60fps v v
1280x720p 60fps v v
1920x1080i 60fps v v
1920x1080p 60fps - v
720x576p 50fps v v
1280x720p 50fps v v
1920x1080i 50fps v v
1920x1080p 50fps - v
BPT
8
Page 71

ٺҢЙы
ࠢ྅
ኇᐠᜢᓞ
ཱ ኇᐠం/ᜰഖࡸ໖
ི ᄇฐᐌᕗ
TC
ཱི Хྤწ
* ௌџоଢ଼Ⴋ
ၗܹӵኇᐠޟ
ΰПоП߯ٺҢȄ
1
ུ ൌѰ
ཱུ Л৴
ྲྀ шႫԒ
ཷ LED ࡾҰᐷ
ླྀ ኇԒ/өΰЅөήࡸ໖
ཹ ཌ USB шႫஃ
ེ Micro HDMI ஃ
ཻ MHL ጣ(5 pin)
Page 72

ٺҢЙы
࣏ࠢшႫ
࣏ϐంҢ
ޟଢ଼ႫၗшႫ
ኇᐠϱഋޟႫԱϚ༉џоҢܻኇหȂᗙџо࣏ϐంҢ
ޟଢ଼၆ညшႫȄ
ࡾҰᐷ
ޑᄘ ᇳ݂
ᓍߣޟ USB ጣڏϛΙᆒڗ
ࠢޟ Micro USB ஃȂѪΙᆒ
ڗএΡႫသ/๋ႫသܖසኋЙᐠ
ޟ USB ႫྛᙽᏢȂ։џ໌шႫȄ
* ኇᐠӵ 5 ωϞࡣ։џшႫׇȂ
Ԫ LED ᐷོᅫྞȄ
MHL
1.
2.
ܖ
1. ӵ࣏ϐంҢ MHL ޟଢ଼ႫၗшႫϞ
ࠉȂӑᜰഖኇᐠȄ
2. MHL ጣඨΣଢ଼Ⴋၗޟ
MHL ஃȄ
3. ࡸήшႫԒࡸ໖Ȃ։џۖшႫȄ
y ѫԤϐంҢ MHL ޟ၆ညȂϗ
ആႆኇᐠޟϱ൸ႫԱшႫȄ
y ϐంҢ MHL ޟଢ଼ႫၗшႫׇ
ࡣȂࡸήшႫࡸ໖Ȅ
MHL
LED
LED
3 এҩՓ LED ߫ ႫΨϭܻ 80%ڗ 100%Ϟ
2 এҩՓ LED ߫ ႫΨϭܻ 45%ڗ 80%Ϟ
1 এҩՓ LED ߫ ႫΨϭܻ 10%ڗ 45%Ϟ
1 এҩՓ LED ରᛗ ႫΨճܻ 10%
TC
LED ເᐷ ኇᐠғӵшႫ
3 ᗻҩՓ LED ରᛗ ࣏ϐంҢ MHL ޟଢ଼ႫၗшႫ
2
Page 73

ٺҢЙы
ం/ᜰഖኇᐠ
ኇᐠڷௌޟ၆ည
ࡸήኇᐠం/ᜰഖࡸ໖ 3 មȂ։џంܖᜰ
ഖኇᐠȄ
* Ӱ࣏ኇᐠԤଽȂܚоӵٺҢีዥ឴
ܻғல౪ຫȄ
* ኇᐠڷଉဴྛޟོԤܚ৯Ȅ
1. ϐంҢ MHL ޟଢ଼Ⴋၗ
ѫϱ൸Ԓ MHL ጣඨΣଢ଼Ⴋၗޟ MHL
ஃ։џȄଢ଼ႫၗོՌଢ଼กኇᐠȂٮܻ
ኵមϞࡣՌଢ଼ৢኇȄ
* ϼҢΨܜ MHL ጣȄ
* ௌџоٺҢ MHL ۽ߝጣ(ᒵᗊӇ)پ۽ժϱ࡚
MHL ጣޟߝ࡙оցᐇհȄ
2. HDMI ၆ည
ٺҢ HDMI ᙽᏢڷᒵᗊޟ HDMI ጣȂ։џ
ௌޟ HDMI ᒯю၆ညՍኇᐠޟ Micro
HDMI ஃȄኇᐠܻኵមࡣՌଢ଼ంଢ଼Ȅ
* ࠢѓ၆ϱҐᓍߣ HDMI ጣȄ
TC
Type A ᄇ Type D
HDMI ጣ
HDMI
ᙽᏢ
Type A ᄇ Type A
3
Page 74

ٺҢЙы
ᐌฐᘈ
໔ڙ
ᐌߝቶШ
Ңฐຽᐌᎈᐌฐຽоᕕு఼Ꭰ
ցޟყȄ
ٺҢௌޟଉဴپྛ၆ညᐌ໔Ȅԃݎฒݲᐌپྛ၆ညޟ໔Ȃࡸ
ήȶшႫԒȷΙមȂޢڗหΰᡗҰ໔ྤజ࣏ХȄٺҢȶөΰ/өήȷ
ࡸ໖џᐌ໔Ȅ
ԃݎყа۽ժᡐלȂܖؠԤࡸғጂޟ
ԒᡗҰȂߒҰኬܹ၆ညޟᒯюԒڷ
ኇᐠޟᒯΣ೩ۡϚӣȄٺҢȶኇ
Ԓȷࡸ໖ȂӵήӖޟߝቶШϛ໌ϸ
Ȉ
(1) 4:3 Ӓශ௭ජԒȈኇШٽ࣏ 4Ȉ3Ȃ
ኇᐠོຘϸڍᆒޟหȂܹσϛѵ
ޟኇȄ
(2) 4:3 кᚠԒȈኇШٽ࣏ 4Ȉ3Ȃ
ኇᐠོ߳ϛѵޟШٽȂณࡣବᄇห
ޟڍᆒᔆᕻኇШٽȄ
(3) 16: 9 ߬ԒȈኇШٽ࣏ 16Ȉ9Ȃ
ኇᐠོኇᕻωȂоᡗҰׇᐌޟ
16Ȉ9 নۖኇȄ
TC
4
Page 75

ٺҢЙы
TC
5
Page 76

ٺҢЙы
ࠢೣ
Ҭ ᇳ݂
ӎᏰ DLP
ӎྛ RGB LED
၌ݙ࡙ 640 x 480 શ(VGA)
ӎ໔ ଽႀ ANSI 35 ࢺ݂
ኇኇЏψ 152 ϴᚄ ~ 1524 ϴᚄ(ᄇُጣ 6 ӧ ~ 60
ኇپྛ MHL ܖ HDMI ϭ
ႫྛᒯΣ 5V / 2A
Ⴋྛᒯю 5V / 500mA
ႫԱ ϱ࡚ 1850 mAhȃᎤᆹӫސџшႫႫԱ
ႫԱჰڼ ኇԒȈശߝՍ 100 Ϸម
ૉႫ໔ ኇԒȈ7W
ӧ)
шႫԒȈ70% (Samsung Galaxy S2)
шႫԒȈ2.5W
հཾྣ࡙ 5 °C ~ 35 °C
Џψ(ߝ x ቶ x ଽ) 132 mm x 71 mm x 14 mm
໔ 165 պ
ѓ၆ϱৠ Pico ኇᐠȃUSB ጣȃHDMI ᙽ
ᏢȃԝઽೡȃٺҢޱЙы
* ҏϴѧ߳ᡐЅওᒿᇲޟ᠌ցȄ
6
TC
Page 77

ٺҢЙы
ᅸᜲ௶၌
Ӑ ᔮࢥᘈ
ฒݲంኇᐠȄ ጂᇯႫԱ֏ϐшᅖႫΨȄ
ኇޟኇЊུȄ * ӵၶུޟᕗცϛٺҢኇᐠȄ
ኇޟኇЊጙȄ ցҢᄇฐᙽዺᐌฐᘈȄ
ኇᐠߒ࡞ዥȄ ኇᐠӵᐇհҡٲ೨ዥ࡙឴ܻғல౪
ኇᐠฒݲৢMHL၆ညޟኇ
Ȃܖฒݲ࣏MHL ၆ညшႫȄ
ኇᐠฒݲшႫȄ ࢥࣼኇᐠޟ 3 ᗻ LED ࡾҰᐷ֏࣏ເ
* ᕻωኇኇޟЏψȄ
ຫȄ
ௌџоӵήӖᆩમײڗЛධ MHL ࠢޟ఼
Ȉ
http://www.mhlconsortium.org/productlist/
רঈฒݲ߳ᜌ 100%ޟࣺৠܒȂӰ࣏ MHL
ϭޟ೩џོӰ࣏ؐএଢ଼၆ညټᔖ
୦ՄԤܚϚӣȄ࡚ដௌࢥࣼԪᆩમܚӖᖞ
ޟࣺࠢৠܒȄ
ᐷȄԃݎϚເᐷȂՄ֕౪ରᛗȂ
ӔԩࡸήшႫԒࡸ໖Ȃ๖ MHL ၆ညޟ
шႫԒȄ
ኇᐠϐంȂծฒݲৢኇ
аޟኇȄ
TC
ࢥࣼௌޟ၆ည֏Лධ MHL ܖ HDMI ϭ
ȄԃݎԤЛධȂᔮࢥௌ၆ညᒯюޟپྛ
၌ݙ࡙ȄᎧߣᓃ 1ȶЛධޟ၌ݙ࡙ȷȂ
ٮওௌ၆ညᒯюޟ၌ݙ࡙Ȅ
7
Page 78

ٺҢЙы
၌ݙ࡙
ᒯΣ
ᒯΣ
ߣᓃ 1Ȉ
MHL
640x480p 60fps v v
720x480p 60fps v v
1280x720p 60fps v v
1920x1080i 60fps v v
1920x1080p 60fps - v
720x576p 50fps v v
1280x720p 50fps v v
1920x1080i 50fps v v
1920x1080p 50fps - v
HDMI
TC
8
Page 79

ֵ⭞䈪᱄
ӝㆶԁ
ᣋᖧԠ䮒ཪ
ཱ ᣋᖧᔶީ䭤
ི 䈹❜䖤
ཱི 䱨┇
SC
* Ѱᯯֵ⭞θ
ԛሼᢁᵰ᭴൞ᣋ
ᖧᵰр䶘Ⱦ
1
ུ ᢢ༦ಞ
ཱུ ᭥
ྲྀ ݻ⭫⁗ᕅ
ཷ LED ⽰⚥
ླྀ ᣋᖧ⁗ᕅ/рૂс
ཹ ᗤශ USB ݻ⭫ㄥ
ེ HDMI ᗤශㄥ
ཻ MHL 㓵(5 Ѡᨈ䪾)
Page 80

ֵ⭞䈪᱄
ӝݻ⭫
Ѱᴿ
ࣕ㜳Ⲻᢁᵰݻ⭫
ᣋᖧᵰⲺ䜞⭫⊖уӻ⭞ӄᣋᖧθ䘎⭞ӄѰᴿ
ࣕ㜳Ⲻ〱ࣞ䇴༽ݻ⭫Ⱦ
⽰⚥
⣬ᘷ ⽰
ݻ⭫ᰬθሼ USB 㓵ⲺжㄥᨈޛᢁᵰⲺ
USB θжㄥᨈޛ䇗㇍ᵰ/ㅊ䇦ᵢ
⭫㝇ᡌᲰ㜳ᢁᵰ⭫Ⓠ䘸䞃ಞȾ
* ݻ⭫ӊቅᰬθᣋᖧᵰݻ┗⭫θLED
⚥Րީ䰣Ⱦ
MHL
1.
2.
ᡌ
1. ൞Ѱᴿ MHL ࣕ㜳Ⲻᢁᵰݻ⭫ҁࢃθ
ݾީ䰣ᣋᖧᵰȾ
2. ሼ MHL 㓵ᨈޛᢁᵰⲺ MHL ㄥȾ
3. сݻ⭫⁗ᕅ䭤ᔶခݻ⭫Ⱦ
y ᴿᴿ MHL ࣕ㜳Ⲻ䇴༽ᢃ㜳䙐
y ൞Ѱᴿ MHL ࣕ㜳Ⲻᢁᵰݻ⭫ᇂ
䗽ᣋᖧᵰⲺ㖤⭫⊖ݻ⭫Ⱦ
∋θсݻ⭫䭤Ⱦ
MHL
LED
LED
3 Ѡ LED ⲳ㢨⽰⚥ؓᤷӤ䎭 ࣕ⦽ᇯ䠅ԁӄ 80%㠩 100%ҁ䰪
2 Ѡ LED ⲳ㢨⽰⚥ؓᤷӤ䎭 ࣕ⦽ᇯ䠅ԁӄ 45%㠩 80%ҁ䰪
1 Ѡ LED ⲳ㢨⽰⚥ؓᤷӤ䎭 ࣕ⦽ᇯ䠅ԁӄ 10%㠩 45%ҁ䰪
1 Ѡ LED ⲳ㢨⽰⚥䰠⛷ ࣕ⦽ᇯ䠅քӄ 10%
SC
LED 䐇傢⚥ ᣋᖧᵰ↙൞ݻ⭫ѣ
3 Ѡⲳ㢨 LED ⚥䰠⛷ Ѱᴿ MHL ࣕ㜳Ⲻᢁᵰݻ⭫
2
Page 81

ֵ⭞䈪᱄
ᢉᔶ/ީ䰣ᣋᖧᵰ
䈭ሼᣋᖧᵰфᛞⲺ䇴༽䘔
օᣋᖧᔶީ䭤п〈䫕ᢉᔶᡌީ䰣ᣋᖧᵰȾ
* 䙐ᑮ䇴༽⭧ӄެ儎ᙝ㜳㙂Ր✣Ⱦ
* ᣋᖧᰬ䰪ՐṯᦤⓆⲺу㙂уȾ
1. ֵ⭞ MHL Ⲻᢁᵰ
䴶ሼ㖤Ⲻ MHL 㓵ᨈޛᢁᵰⲺ MHL ㄥ
ȾᢁᵰՐ㠠ࣞỶ⎁ࡦᣋᖧᵰθ൞ᮦ〈䫕ᣋ
ᖧഴ܅Ⱦ
* ⌞ᝅу㾷⭞࣑ᢥ MHL 㓵Ⱦ
* ԛֵ⭞ MHL ᔬ䮵㓵(䘿䞃Ԭ)ᔬ䮵㖤Ⲻ
MHL 㓵θᇔ⧦ᯯᬃ֒Ⱦ
2. HDMI 䇴༽
ֵ⭞ HDMI 䖢ಞૂ䘿Ⲻ HDMI ⭫㔼θሼᛞ
Ⲻ HDMI䗉࠰䇴༽фޭᴿ MicroHDMIⲺᣋ
ᖧᵰ䘔ȾᣋᖧᵰՐ൞ᮦ〈䫕㠠ࣞࣞȾ
* 㻻у HDMI 㓵Ⱦ
SC
A ශࡦ D ශ
HDMI 㓵
HDMI
䘸䞃ಞ
A ශࡦ A ශ
3
Page 82

ֵ⭞䈪᱄
䈹㢸❜⛯
丩䠅
䈹᮪ᇳ儎∊
䙐䗽ֵ⭞䈹❜⧥θ㧭ᲦⲺഴ܅θԄ
㙂䈹㢸❜䐓Ⱦ
䈭ֵ⭞ᛞⲺᣋᖧᇯⓆ䇴༽ԛ䈹㢸丩䠅ȾྸⓆ䇴༽丩䠅ᱥу䈹㢸Ⲻθ
䈭сݻ⭫⁗ᕅж〈䫕θࡦኅᒋрᱴ⽰丩䠅ᶗȾֵ⭞р/с䭤ᶛ䈹㢸
丩䠅Ⱦ
ྸഴ⡽ծᡌᵠԛ↙⺤ⲺṲᕅᱴ⽰θ
ࡏഔ᭴䇴༽Ⲻ䗉࠰ṲᕅфᣋᖧᵰⲺ䗉ޛ
䇴㖤уȾ⭞ᣋᖧ⁗ᕅ䭤൞сࡍᇳ儎∊
ҁ䰪࠽ᦘφ
(1) 4:3 ᒩ〱ૂᢡᨅφഴ܅∊ׁᱥ 4:3θ
Ր࠽ᦿњ䗯ԛ᭴ཝѣ䰪Ⲻഴ܅Ⱦ
(2) 4:3 ѱ从φഴ܅∊ׁᱥ 4:3θՐؓ⮏
ഴ܅ѣᗹⲺ∊ׁθᒬু㕟ഴ܅њ䗯
Ⲻ∊ׁȾ
(3) 16:9 ؗφഴ܅∊ׁᱥ 16:9θ㕟᭴θ
ᱴ⽰ᇂ᮪Ⲻ 16:9 ခഴ܅Ⱦ
SC
4
Page 83

ֵ⭞䈪᱄
SC
5
Page 84

ֵ⭞䈪᱄
ӝ㿺Ṳ
亯ⴤ ᨅ䘦
ݿᆜᢶᵥ
ݿⓆ
࠼䗞⦽ 640 x 480 ܅㍖(VGA)
ݿ䙐䠅 ᴶ儎 ANSI 35 ⍷᱄
ᣋᖧഴ܅ተሮ 152 ∡㊩~1524 ∡㊩(6” ~ 60”ሯ䀈㓵)
ᣋᖧݿⓆ MHL ᡌ HDMI ⮂䶘
⭫Ⓠ䗉ޛ 5Յ / 2 ᆿ
⭫Ⓠ䗉࠰ 5Յ / 500 ∡ᆿ
⭫⊖㊱ශ 㖤 1850 mAh 䬸㚐⢟ݻ⭫⭫⊖
⭫⊖ስળ ᣋᖧ⁗ᕅφᴶ䮵㠩 100 min
ࣕ㙍 ᣋᖧ⁗ᕅφ7W
DLP
RGB LED
ݻ⭫⁗ᕅφ70% (п᱕ Galaxy S2)
ݻ⭫⁗ᕅφ2.5W
䘆㺂ᓜ
ተሮ(䮵 x ᇳ x 儎) 132 ∡㊩ x 71 ∡㊩ x 14 ∡㊩
䠃䠅 165 ށ
㻻ᇯ Pico ᣋᖧᵰθUSB ⭫㔼θHDMI-䘸䞃ಞθ
* ᡇԢؓ⮏ᢶᵥⲺૂ䭏䈥ⲺᵹȾ
5 °C ~ 35 °C
ⳤྍθֵ⭞ᢁ߂
6
SC
Page 85

ֵ⭞䈪᱄
Ỷؤ
᭻䳒 Ỷḛ⛯
ᣋᖧᵰᰖ⌋ᔶȾ ⺤ؓ⭫⊖Ⲻ⭫䠅ݻ䏩Ⱦ
ᣋᖧഴ⡽འ唇Ⱦ * ൞ᴪ唇Ⲻ⧥ູѣֵ⭞ᣋᖧᵰȾ
ᣋᖧഴ⡽䗽ӄ⁗㌀Ⱦ 䙐䗽ֵ⭞㚐❜䖤θԄ㙂䈹᮪❜⛯Ⱦ
ᣋᖧᵰⲺ㺞䶘✣Ⱦ 䙐ᑮᣋᖧᵰ൞ᬃ֒䘆㺂ѣՐӝ⭕䘸ᓜⲺ✣
ᣋᖧᵰу㜳ᣋᖧⓆ㠠MHL䇴༽
ᇯᡌ᭬ MHL 䇴༽ᇯȾ
ᣋᖧᵰу㜳᭬Ⱦ 䈭Ỷḛᣋᖧᵰ䙅ݿⵁᶵѣⲺ 3 Ѡ LED ⽰
ᣋᖧᵰᐨᔶθռᱥ㿼仇у㜳
㻡ᣋᖧȾ
* ࠅቅᣋᖧഴ⡽ⲺተሮȾ
䠅Ⱦ
ᢴࡦ MHL ᡶ᭥ᤷӝࡍ㺞φ
http://www.mhlconsortium.org/productlist/
⭧ӄ∅Ѡ〱ࣞ䇴༽בᓊⲺ MHL Ⲻ䇴
䇗㜳Րᴿᡶуθഖ㙂ᰖ⌋ؓ䇷 100α
ᇯȾᔰ䇤Ỷḛᛞ䇴༽ⲺᇯᙝȾ
⚥Ⱦྸ⋗Ӥᡌᱥ൞䰠⛷θ䈭߃⅗сݻ⭫
⁗ᕅ䫤θ䘶࠰⭞ӄ MHL 䇴༽Ⲻݻ⭫⁗ᕅȾ
䈭Ỷḛ֖Ⲻ䇴༽ᱥ᭥ᤷ MHL ᡌ HDMI
Ⱦྸ᭥ᤷ䈓θ䈭Ỷḛᛞ䇴༽䗉࠰ؗ࠼
䗞⦽Ⱦ䈭৸㘹䱺ᖋ 1 ѣ᭥ᤷⲺ࠼䗞⦽θᒬ
ъؤ᭯ᛞ䇴༽Ⲻ䗉࠰࠼䗞⦽Ⱦ
SC
7
Page 86

ֵ⭞䈪᱄
࠼䗞⦽ ሯӄ
䗉ޛ ሯӄ
䗉ޛ
䱺Ԭ 1φ
MHL
640x480p 60fps v v
720x480p 60fps v v
1280x720p 60fps v v
1920x1080i 60fps v v
1920x1080p 60fps - v
720x576p 50fps v v
1280x720p 50fps v v
1920x1080i 50fps v v
1920x1080p 50fps - v
MHL
SC
8
Page 87

䝴䞊䝄䞊䝬䝙䝳䜰䝹
〇ရᴫせ
JP
䝥䝻䝆䜵䜽䝍䞊䝺䞁䝈
ཱ ᢞᙳ䜸䞁/䜸䝣䝪䝍䞁
ི ↔Ⅼ䝒䝬䝭
ཱི 䜚Ṇ䜑䝟䝑䝗
* 䛚ᣢ䛱䛾ᦠᖏ㟁
ヰ䛿䝥䝻䝆䜵䜽䝍
䞊ୖ㠃䛻⨨䛟䛣䛸
䛜䛷䛝䜎䛩䚹
1
ུ 䝇䝢䞊䜹䞊
ཱུ 䝇䝍䞁䝗
ྲྀ 㟁䝰䞊䝗
ཷ LED ⾲♧ⅉ
ླྀ ᢞᙳ䝰䞊䝗/ ୖ & ୗ
ཹ Micro USB 㟁䝫䞊䝖
ེ Micro HDMI 䝫䞊䝖
ཻ MHL 䜿䞊䝤䝹(5 䝢䞁)
Page 88

䝴䞊䝄䞊䝬䝙䝳䜰䝹
⨨䛾㟁
ᑐᛂ䝣䜷䞁䛾㟁
䝥䝻䝆䜵䜽䝍䞊䛾ෆⶶ㟁ụ䛿ᢞᙳ䛾䜏䛺䜙䛪䚸䛚ᣢ䛱䛾
ᑐᛂ䝰䝞䜲䝹⨨䛾㟁
䛻䜒⏝ྍ⬟䛷䛩䚹
䜲䞁䝆䜿䞊䝍
䛾≧ែ ព
ᒓ䛾 USB 䜿䞊䝤䝹䛾୍➃䜢ᮏయ䛾
Micro USB 䝫䞊䝖䛻᥋⥆䛧䚸➃䜢 PC /
䝜䞊䝖䝤䝑䜽䜎䛯䛿䝇䝬䞊䝖䝣䜷䞁䛾 USB
㟁※䜰䝎䝥䝍䛻᥋⥆䛧䛶㟁䛧䜎䛩䚹
* 䝥䝻䝆䜵䜽䝍䞊䛿 5 㛫䛾䝣䝹㟁䛾
ᚋ䚸LED 䝷䞁䝥䛜ᾘⅉ䛧䜎䛩䚹
MHL
1.
JP
2.
䜎䛯䛿
1. MHL ᑐᛂ䝣䜷䞁䛾㟁๓䛻䝥䝻䝆䜵
䜽䝍䞊䜢䜸䝣䛻䛧䛶䛟䛰䛥䛔䚹
2. MHL 䜿䞊䝤䝹䜢䝇䝬䞊䝖䝣䜷䞁䛾
MHL 䝫䞊䝖䛻ᤄ䛧䜎䛩䚹
3. 㟁䝰䞊䝗䝪䝍䞁䜢ᢲ䛩䛸䚸㟁䜢㛤
ጞ䜎䛯䛧䜎䛩䚹
y MHL ᑐᛂ⨨䛿䝥䝻䝆䜵䜽䝍䞊
ෆⶶ㟁ụ䛷㟁ྍ⬟䛷䛩䚹
y MHL 䝣䜷䞁䛾㟁䛜䛧䛯䜙䚸
㟁䝪䝍䞁䜢ᢲ䛧䛶䛟䛰䛥䛔䚹
MHL
LED
LED
3 ಶ䛾 LED 䛜䜸䞁 䝞䝑䝔䝸䞊ṧ㔞䛜 80~100%
2 ಶ䛾 LED 䛜䜸䞁 䝞䝑䝔䝸䞊ṧ㔞䛜 45~80%
1 ಶ䛾 LED 䛜䜸䞁 䝞䝑䝔䝸䞊ṧ㔞䛜 10~45%
1 ಶ䛾ⓑⰍ LED 䛜Ⅼ⁛ 䝞䝑䝔䝸䞊ṧ㔞䛜 10%ᮍ‶
LED 䛜⛣ື䛧䛺䛜䜙Ⅼⅉ 䝥䝻䝆䜵䜽䝍䛜㟁୰
3 䛴䛾ⓑⰍ LED 䛜Ⅼ⁛ MHL ᑐᛂ䝇䝬䞊䝖䝣䜷䞁䛾㟁
2
Page 89

䝴䞊䝄䞊䝬䝙䝳䜰䝹
䝥䝻䝆䜵䜽䝍䞊䛾䜸䞁/䜸䝣
䛚ᡭᣢ䛱䛾⨨䛸䛾᥋⥆
JP
ᢞᙳ䜸䞁/䜸䝣䝪䝍䞁䜢 3 ⛊ᢲ䛧⥆䛡䜛䛸䚸䝥䝻䝆䜵
䜽䝍䞊䛜䜸䞁䜎䛯䛿䜸䝣䛾≧ែ䛻䛺䜚䜎䛩䚹
* 㧗ᛶ⬟䛾䛯䜑䚸⨨䛾Ⓨ⇕䛿ṇᖖ䛺㈇ⲴⓎ⇕
䛷䛩䚹
* ᢞᙳྍ⬟㛫䛿䝋䞊䝇䛻䜘䛳䛶␗䛺䜚䜎䛩䚹
1. MHL 㟁ヰ
ᒓ䛾 MHL 䜿䞊䝤䝹䜢䝇䝬䞊䝖䝣䜷䞁䛾 MHL 䝫
䞊䝖䛻ᕪ䛧䜎䛩䚹䝣䜷䞁䛿䝥䝻䝆䜵䜽䝍䞊䜢⮬ື᳨
▱䛧䚸ᩘ⛊ᚋ䛻⏬ീ䛜ᢞᙳ䛥䜜䜎䛩䚹
* MHL 䜿䞊䝤䝹䛿ᙉ䛟ᘬ䛳ᙇ䜙䛺䛔䛷䛟䛰䛥䛔䚹
* ᧯స䜢ᐜ䛻䛩䜛䛻䛿䚸ᒓ䛾 MHL 䜿䞊䝤䝹
䜢ᘏ㛗䛩䜛 MHL ᘏ㛗䜿䞊䝤䝹(䜸䝥䝅䝵䞁䜰䜽
䝉䝃䝸)䛜⏝䛷䛝䜎䛩䚹
2. HDMI ⨨
HDMI 䜰䝎䝥䝍䛸䜸䝥䝅䝵䞁䛾 HDMI 䜿䞊䝤䝹䛷
HDMI ฟຊ⨨䜢䝥䝻䝆䜵䜽䝍ୖ䛾 MicroHDMI
䝫䞊䝖䛻᥋⥆䛧䜎䛩䚹ᢞᙳ䛿ᩘ⛊ᚋ⮬ືⓗ䛻㛤ጞ
䛥䜜䜎䛩䚹
* HDMI 䜿䞊䝤䝹䛿䝟䝑䜿䞊䝆䛻ධ䛳䛶䛔䜎䛫䜣䚹
HDMI
䜰䝎䝥䝍
Type A䠉Type D
HDMI 䜿䞊䝤䝹
Type A䠉Type A
3
Page 90

䝴䞊䝄䞊䝬䝙䝳䜰䝹
↔Ⅼ䛾ㄪ⠇
㡢㔞ㄪ⠇
䜰䝇䝨䜽䝖ẚ䛾ㄪ⠇
↔Ⅼ䝎䜲䝲䝹䛷↔Ⅼ䜢ㄪ⠇䛧䚸䝅䝱䞊䝥䛷
㩭䛺⏬ീ䜢ᚓ䜙䜜䜛䜘䛖䛻䛧䜎䛩䚹
㡢㔞䜢ㄪ⠇䛩䜛䛻䛿䝋䞊䝇⨨䜢⏝䛧䛶䛟䛰䛥䛔䚹䝋䞊䝇⨨䛾㡢㔞䛜䛷
䛝䛺䛔ሙྜ䚸㡢㔞䝞䞊䛜⏬㠃䛻⾲♧䛥䜜䜛䜎䛷㟁䝰䞊䝗䜢 1 ⛊㛫ᢲ䛧䜎䛩䚹
ୖ/ୗ䝪䝍䞁䛷㡢㔞䜢ㄪ⠇䛧䜎䛩䚹
⏬ീ䛜ᘏ䜃䛯䜚䚸ṇ䛧䛔ᙧᘧ䛷⾲♧䛥䜜
䛺䛛䛳䛯䜚䛧䛯ሙྜ䛿䚸⏕⏝⨨䛾ฟ
ຊᙧᘧ䛜䝥䝻䝆䜵䜽䝍䞊䛾ධຊᙧᘧ䛸␗
䛺䛳䛶䛔䜎䛩䚹ᢞᙳ䝰䞊䝗䝪䝍䞁䜢䛳䛶䚸
௨ୗ䛾䜰䝇䝨䜽䝖ẚ䛾⠊ᅖ䛷ษ䜚᭰䜟䜚
䜎䛩䚹
(1) 4:3 䝟䞁䛚䜘䜃䝇䜻䝱䞁䠖⏬ീẚ⋡
䛿 4:3 䛷䚸⏬㠃୰ኸ䜢ᣑ䛧䛶୧ഃ
䛿䜹䝑䝖䛥䜜䜎䛩䚹
(2) 4:3 䝔䞊䝬䠖⏬ീẚ⋡䛿 4:3䛷䚸⏬㠃
୰ኸ䛾ẚ⋡䛿ಖᣢ䛥䜜䚸୧➃䜒䜎
䜛䜘䛖⏬ീ䛜⦰ᑠ䛥䜜䜎䛩䚹
(3) 16:9 䝺䝍䞊䝪䝑䜽䝇䠖⏬ീẚ⋡䛿
16:9 䛷䚸䛺 16:9 䜸䝸䝆䝘䝹⏬㠃
䛜⾲♧䛥䜜䜛䜘䛖䛻⦰ᑠ䛥䜜䜎䛩䚹
JP
4
Page 91

䝴䞊䝄䞊䝬䝙䝳䜰䝹
JP
5
Page 92

䝴䞊䝄䞊䝬䝙䝳䜰䝹
〇ရᵝ
㡯┠ ㄝ
JP
ගᢏ⾡ DLP
ග※ RGB LED
ゎീᗘ 640 x 480 䝢䜽䝉䝹(VGA)
ග᮰ ᭱ ANSI 35 䝹䞊䝯䞁
⏬ീ䝃䜲䝈 152 mm ~ 1524 mm (6䡚60 䜲䞁䝏ᑐゅ⥺)
※ MHL 䜎䛯䛿 HDMI 䜲䞁䝍䝣䜵䞊䝇
㟁※ධຊ 5V / 2A
㟁※ฟຊ 5V / 500mA
䝞䝑䝔䝸䞊䝍䜲䝥 ෆⶶ 1850 mAh 䝸䝏䜴䝮䝫䝸䝬䞊㟁ᘧ
䝞䝑䝔䝸䞊ᑑ 䝰䞊䝗䠖᭱ 100 ศ䜎䛷
ᾘ㈝㟁ຊ 䝰䞊䝗䠖7W
ືస ᗘ 5 °C ~ 35 °C
䝞䝑䝔䝸䞊
㟁䝰䞊䝗䠖70% (Samsung Galaxy S2)
㟁䝰䞊䝗䠖2.5W
ᑍἲ(L x W x H) 132 mm x 71 mm x 14 mm
㔜㔞 165 g
䝟䝑䜿䞊䝆ෆᐜ≀ Pico 䝥䝻䝆䜵䜽䝍䚸USB 䜿䞊䝤䝹䚸HDMI
䜰䝎䝥䝍䚸䝫䞊䝏䚸䝴䞊䝄䞊䝬䝙䝳䜰䝹
* ᘢ♫䛿ᢏ⾡ⓗኚ᭦䜔ᥖ㍕ෆᐜ䛾ㄗ䜚䛻䛴䛔䛶䚸ண࿌䜔๓㏻▱䛫䛪
䛻ᨵṇ䛩䜛ሙྜ䛜䛒䜚䜎䛩䚹
6
Page 93

䝴䞊䝄䞊䝬䝙䝳䜰䝹
䝖䝷䝤䝹䝅䝳䞊䝔䜱䞁䜾
≧ 䝏䜵䝑䜽䝫䜲䞁䝖
JP
䝥䝻䝆䜵䜽䝍䞊䛾㟁※䛜䜸䞁䛻䛺
䜙䛺䛔䚹
⏬ീ䛜ᬯ䛩䛞䜛䚹 * 䜒䛳䛸ᬯ䛔⎔ቃ䛷䝥䝻䝆䜵䜽䝍䞊䜢⏝䛧
⏬ീ䛜㩭䛷䛒䜛䚹 䝣䜷䞊䜹䝇䛴䜎䜏䜢⏝䛧䛶↔Ⅼ䜢ㄪ⠇䛧䛶
䝥䝻䝆䜵䜽䝍䞊⾲㠃䛾 ᗘ䛜ᬮ
䛛䛔䚹
䝥䝻䝆䜵䜽䝍䛿 MHL ⨨䛛䜙ᢞ
ᙳ䛷䛝䜎䛫䜣䚹䜎䛯䛿 MHL ⨨
䜢㟁䛷䛝䜎䛫䜣䚹
䝥䝻䝆䜵䜽䝍䛜㟁䛷䛝䜎䛫䜣䚹 䝥䝻䝆䜵䜽䝍ୖ䛾 3 䛴䛾 LED 䜲䞁䝆䜿䞊䝍
䝞䝑䝔䝸䛜䛻㟁䛥䜜䛶䛔䜛䛛☜ㄆ䛧
䛶䛟䛰䛥䛔䚹
䛶䛟䛰䛥䛔䚹
* ⏬ീ䛾䝃䜲䝈䜢ᑠ䛥䛟䛧䛶䛟䛰䛥䛔䚹
䛟䛰䛥䛔䚹
䝥䝻䝆䜵䜽䝍䛾㉳ື୰䚸Ⓨ⇕䛩䜛䛣䛸䛿␗ᖖ
䛷䛿䛒䜚䜎䛫䜣䚹
MHL ᨭ䛾〇ရ䝸䝇䝖䛿௨ୗ䛾㏻䜚䛷䛩䠖
http://www.mhlconsortium.org/productlist/
MHL 䜲䞁䝍䝣䜵䞊䝇䛾タィ䛜ྛ䝰䝞䜲䝹䝕
䝞䜲䝇䝯䞊䜹䞊䛻䜘䜚␗䛺䛳䛶䛔䜛䛾䛷䚸
100%䛾ᛶ䛿ಖド䛷䛝䜎䛫䜣䚹
䛜ὶ䜜䛶⾲♧䛧䜎䛩䚹䛭䛖䛷䛿䛺䛟䛶䚸Ⅼ⁛
䛻⾲♧䛩䜛ሙྜ䚸㟁䝰䞊䝗䝪䝍䞁䜢ᗘ
ᢲ䛧䛶䚸MHL ⨨䛾㟁䝰䞊䝗䜢⤊䛧䜎
䛩䚹
䝥䝻䝆䜵䜽䝍䜢䜸䞁䛻䛧䜎䛧䛯䛜䚸
䝡䝕䜸䛜ᢞᙳ䛥䜜䜎䛫䜣䛷䛧
䛯䚹
䛚ᡭᣢ䛱䛾⨨䛜 MHL 䜎䛯䛿 HDMI 䜲䞁
䝍䝣䜵䞊䝇䜢䝃䝫䞊䝖䛩䜛䛛䛸䛖䛛䜢☜ㄆ䛧
䛶䛟䛰䛥䛔䚹䝃䝫䞊䝖䛩䜛ሙྜ䚸⨨ฟຊ䛾
䝋䞊䝇ゎീᗘ䜢☜ㄆ䛧䜎䛩䚹䝃䝫䞊䝖䛩䜛ゎ
ീᗘ䛻䛴䛔䛿㘓 1 䜢ཧ↷䛧䚸⨨ฟຊ䛾
ゎീᗘ䜢ኚ᭦䛧䛶䛟䛰䛥䛔䚹
7
Page 94

䝴䞊䝄䞊䝬䝙䝳䜰䝹
ゎീᗘ
ධຊ⏝
ධຊ⏝
㘓 1䠖
MHL
640x480p 60fps v v
720x480p 60fps v v
1280x720p 60fps v v
1920x1080i 60fps v v
1920x1080p 60fps - v
720x576p 50fps v v
1280x720p 50fps v v
1920x1080i 50fps v v
1920x1080p 50fps - v
HDMI
JP
8
Page 95

㇠㟝㣄㉘⮹㉐
㥐䖼 ᵐ㟈
KO
䘸⦐㥑䉤ġ ⥀㪼
ཱ 䘸⦐㥑㊌ 䁐ὤ/ⅸὤ ⶸ䏰
ི 㸼㥄ġ 䡔
ཱི ⅸ⤠㬄 ⵝ㫴 䑜☐
* 䓬⫠䚐 ㇠㟝㡸
㠸䚨 䚬☐䔤㡸
䘸⦐㥑䉤 㠸㜄
⋈▄㊈⓸
╝⏼␘.
1
ུ ㏘䙰䀘
ཱུ ㏘䈔☐
ྲྀ 㻝㤸 ⯜☐
ཷ LED 䖐㐐☥
ླྀ 䍠㇠ ⯜☐/ 㠸 & 㙸⣌
ཹ Micro USB 㻝㤸ġ 䔠䏬
ེ ⫼㢨䆠⦐ HDMI 䔠䏬
ཻ MHL 䀴㢨⽈ (5 pin)
Page 96

㇠㟝㣄㉘⮹㉐
㥐䖼 㻝㤸䚌ὤ
㢨 䞐㉥䞈 ═ 䚬☐䔤 㻝㤸䚌ὤ
䘸⦐㥑䉤㢌 ⇨⺴ ⵤ䉤⫠⏈ 䘸⦐㥑㊌ 㟝㡰⦐ ㇠㟝╔ ⬀ 㙸⏼⢰
㢨
䞐㉥䞈═ ⯜ⵈ㢰 ὤὤ⪰ 㻝㤸䚔 ㍌⓸ 㢼㏩⏼␘
䖐㐐☥
ㇵ䈐 㢌
ⶼ☘ USB 䀴㢨⽈㢌 䚐 㯱 ↑㡸
㥐䖼㢌 ⫼㢨䆠⦐ USB 䔠䏬㜄
㜤䚌Ḕ ␘⪬ 㯱 ↑㡸 PC/⊬䏬⺵
❄⏈ ㏘⫼䏬䔤 㻝㤸㟝 USB 㤸㠄
㛨⑅䉤㜄 㜤䚝⏼␘.
* 5 㐐ᴸ 䟸 䘸⦐㥑䉤ᴴ 㝸㤸䢼
㻝㤸╌⮨, LED ☥㢨 㫼
ᶷ㢹⏼␘.
MHL
1.
KO
2.
❄⏈
.
1. MHL 㢨 䞐㉥䞈 ═ 䚬☐䔤㡸
㻝㤸䚌ὤ 㤸 䘸⦐㥑䉤⪰ 㨰㐡㐐㝘.
2. MHL 䀴㢨⽈㡸 䚬☐䔤㢌 MHL
䔠䏬㜄 㜤䚝⏼␘.
3. 㻝㤸 ⯜☐ ⶸ䏰㡸 ⍀⤠ 㻝㤸㡸
㐐㣅䚌 䚝⏼␘.
y MHL 㢨䞐㉥䞈═㣙㾌⬀
䘸⦐㥑䉤㢌 㢸ⷔ♈☐ ⵤ䉤⫠⪰
䋩䚨 㻝㤸╔ ㍌ 㢼㏩⏼␘.
y MHL 䚬☐䔤㢌 㻝㤸㢨 ↑⇌⮨
㻝㤸 ⶸ䏰㡸 ⍀
⤠㨰㐡㐐㝘.
LED
LED
䢤ㇽ LED 3 ᵐ 䁐㬄 㤸⥙⣽ 80%㜄㉐ 100%㇠㢨
䢤ㇽ LED 2 ᵐ 䁐㬄 㤸⥙⣽ 45%㜄㉐ 80%㇠㢨
䢤ㇽ LED 1 ᵐ 䁐㬄 㤸⥙⣽ 10%㜄㉐ 45%㇠㢨
, MHL
䢤ㇽ LED 1 ᵐ ᾐⵉ㢸 㤸⥙⣽ 10% 㢨䚌
LED ᵉ㦤 䘸⦐㥑䉤 㻝㤸 㩅
3 ᵐ㢌 ⵥㇽ LED ᾐⵉ㢸 MHL 㢨 䞐㉥䞈 ═ 䚬☐䔤 㻝㤸䚌ὤ
2
Page 97

㇠㟝㣄㉘⮹㉐
䘸⦐㥑䉤 䁐ὤ/ⅸὤ
䘸⦐㥑䉤㜄 ㇠㟝㣄 㣙⽸ 㜤䚌ὤ
䘸⦐㥑㊌ 䁐ὤ/ⅸὤ ⶸ䏰㡸 3㸼ᴸ ⍀⤠
䘸⦐㥑䉤⪰ 䁐ᶤ⇌ ↉⏼␘.
KO
* Ḕ㉥⏙㡰⦐ 㢬䚨 㣙㾌ᴴ ♤☣䚨 㫼 ㍌
㢼㡰⮤ 㢨ᶷ㡴 㥉ㇵ㢹⏼␘.
* 䘸⦐㥑䉤 㐐ᴸ㡴 ㋀㏘㜄 ♤⢰ ␠⢰㬅⏼␘.
1. MHL 㢨 䞐㉥䞈═ 䡨䔤
ᴸ␜䢼 㢸ⷔ♈☐ MHL 䀴㢨⽈㡸
䚬☐䔤㢌 MHL 䔠䏬㜄 㜤䚝⏼␘. 䚬☐䔤㢨
㣄┍㡰⦐ 䘸⦐㥑䉤⪰ ᵄ㫴䚔 ᶷ㢨⮤, ㍌㸼
䟸㢨㫴⪰䍠㇠䚔ᶷ㢹⏼␘.
* MHL 䀴㢨⽈㡸 ᵉ䚌 ⾰㫴 ⫼㐡㐐㝘.
* 䓬⫠䚐 㣅┍㡸 㠸䚨 ⇨㣙 MHL 䀴㢨⽈㡸
㜤㣙䚌⥘⮨ MHL 㜤㣙 䀴㢨⽈(ⷸ⓸
Ạ⬘)㡸㇠㟝䚔㍌㢼㏩⏼␘.
2. HDMI 㣙㾌
HDMI 㛨⑅䉤㝴 ⷸ⓸ Ạ⬘䚐 HDMI
䀴㢨⽈㡸 ㇠㟝䚌㜠 䘸⦐㥑䉤㢌 Micro HDMI
䔠䏬㜄 ㇠㟝㣄㢌 HDMI out 㣙㾌⪰
㜤䚝⏼␘. 䘸⦐㥑㊌㢨 ㍌㸼 䟸 㣄┍
㐐㣅╔ ᶷ㢹⏼␘.
* HDMI 䀴㢨⽈㡴 䑜䇘㫴㜄 䔠䚜╌㫴
㙾㏩⏼␘.
㡰⦐
HDMI
㛨⑅䉤
Type A to Type D
HDMI 䀴㢨⽈
Type A to Type A
3
Page 98

㇠㟝㣄㉘⮹㉐
㸼㥄 㦤㤼䚌ὤ
⸰⪜ 㥐㛨
䞈⮨⽸ 㦤㥉䚌ὤ
㸼㥄 䡔㡸 ㇠㟝䚌㜠 㸼㥄㡸
㦤㥉䚌㜠 ⇔㾨⦡Ḕ ㉔⮹䚐 䞈⮨㡸
㛯㏩⏼␘.
㇠㟝㣄㢌 ㋀㏘ 㣙⽸⪰ ㇠㟝䚌㜠 ⸰⪜㡸 㦤㤼䚝⏼␘. ㋀㏘ 㣙㾌㢌
⸰⪜ 㦤㤼㢨 ╌㫴 㙾⏈␘⮨, ⸰⪜ ⵈᴴ 䞈⮨㜄 䖐㐐╔ ⚀ᾀ㫴 㻝㤸
⯜☐ ⶸ䏰⪰ 1㸼ᴸ ⌸⪹⏼␘. 㠸/㙸⣌/ⶸ䏰㡸 ㇠㟝䚌㜠 ⸰⪜㡸
㦤㤼䚝⏼␘.
䞈⮨㢨 ⏌㛨⇠ᶤ⇌ 㥉ㇵ㤵㢬
䔠⬫㡰⦐ 䖐㐐╌㫴 㙾㡰⮨, 㣠㈑
㣙㾌㢌 㻐⥙ 䔠⬫㢨 䘸⦐㥑䉤㢌 㢹⥙
㉘㥉Ḱ ␘⪬ ᶷ㢹⏼␘. 䘸⦐㥑㊌ ⯜☐
ⶸ䏰㡸 ⍀⤠ ␘㢀 䞈⮨⽸ ㇠㢨⪰
㤸䞌䚝⏼␘.
(1) 4:3 䑠/㏘㿈: 㢨㫴 ⽸㡜 4:3,
㩅㚍 㢨㫴⪰ 䆠 䚌ὤ 㠸䚨
㛅㯱 ↑㡸 㣌⢰⇰ ᶷ㢹⏼␘.
(2) 4:3 䊀⫼: 㢨㫴 ⽸㡜 4:3, 㩅㚍
䞈⮨ ⽸㡜㡴 㡔㫴䚌Ḕ, 㛅㯱 ↑㢌
㢨㫴 ⽸㡜㡴 㚉㻉䚝⏼␘.
(3) 16:9 ⤼䉤ⵉ㏘: 㢨㫴 ⽸㡜 16
㝸㤸䚐 16:9 㠄⸬ 㢨㫴⪰
㻐⥙䚌ὤ 㠸䚨 ㏘䀴㢰㡸 ␘㟨䚔
ᶷ㢹⏼␘.
:9,
KO
4
Page 99

㇠㟝㣄㉘⮹㉐
KO
5
Page 100

㇠㟝㣄㉘⮹㉐
㥐䖼 ㇠㛅
䚡⯝ ㉘⮹
ṅ䚍 ὤ㍔ DLP
ṅ㠄 RGB LED
䚨ㇵ⓸ 640 x 480 䙱㉴ (VGA)
ṅ㋁ 㺐 ANSI 35 lumens
䍠㇠ 㢨㫴 䆠ὤ 152 mm ~ 1524 mm (6” ~ 60” ᴵ㉔)
䘸⦐㥑㊌ ㋀㏘
㤸㠄 㢹⥙
㤸㠄 㻐⥙
ⵤ䉤⫠ 䇴㢹 㢹ⷔ♈☐ 1850 mAh, 㣠㻝㤸 ᴴ⏙䚐
ⵤ䉤⫠ ㍌⮹ 䍠㇠ ⯜☐: 㺐 100 ⺸ᾀ㫴
㤸⥙ ㋀⽸ 䍠㇠ ⯜☐: 7W
MHL ⵃ HDMI 㢬䉤䓌㢨㏘
5V / 2A
5V / 500mA
⫠䏠 䔨⫠⭬ ⵤ䉤⫠
㻝㤸 ⯜☐: 70% (Samsung Galaxy S2)
㻝㤸 ⯜☐: 2.5W
KO
㣅┍ 㝜⓸ 5 °C ~ 35 °C
㾌㍌ (L x W x H) 132 mm x 71 mm x 14 mm
ⱨ 165 g
䑜䇘㫴 ⇨㟝Ɒ Pico Projector, USB 䀴㢨⽈,
HDMI-㛨⑅䉤, 䑀㟤㾌, ㇠㟝㣄 ㉘⮹㉐
* 㟤⫠⏈ ὤ㍔㤵 ⷴ ㇠䚡 ⵃ 㐘㍌㜄 䚐 Ề⫠⪰ ⸨㡔䚝⏼␘.
6
 Loading...