

Page 1

AIM Srl
Via Cavalcanti, 8
20063 Cernusco S/N (Mi)
Italia
Tel. (+39) 02-9290571
Fax (+39) 02-92118024
www.aim-sportline.com
U.S. OFFICES
AIM SPORTS LLC
31889 Corydon, Suite 130
Lake Elsinore, CA 92530
U.S.A.
AIM SPORTS LLC SE
1636 9th St. SE Unit B
Roanoke, VA 24013
U.S.A.
Toll Free 1.800.718.9090
www.aimsports.com
USER MANUAL
Page 2

04
06
10
16
18
20
24
26
28
30
32
34
40
INTRODUCTION
INCLUDED ITEMS AND INSTALLATION ACCESSORIES
SOLO AT A GLANCE
POWERING AND CONNECTING SOLO
SOLO/SOLODL POWERING ON
SOLO CONFIGURATION
RACE STUDIO SOFTWARE
TRACK MANAGEMENT
USE OF SOLO DURING THE TESTS
DATA RECALL
DATA DOWNLOAD ON THE PC
AND DATA ANALYSIS THROUGH RACE STUDIO2
SOLODL CONNECTION WITH SMARTYCAM
SOLO TEAM
Thank You.
Siamo molto orgogliosi che la vostra fiducia
nei nostri prodotti vi abbia fatto preferire il
nuovo Lap Timer GPS Solo.
Solo è il risultato di migliaia di ore di lavoro
di una continua ricerca tecnologica di una
grande passione per le competizioni sportive e di una provata esperienza maturata
sulle piste di tutto il mondo a fianco di piloti
e tecnici specializzati in acquisizione e analisi dei dati e della telemetria.
Abbiamo voluto che Solo fosse piccolo, preciso, potente ma soprattutto esageratamente comodo per rispondere a tutte le
richieste di una utenza preparata ed esigente.
Solo è semplice da installare e ancora più
facile da usare, è uno strumento affidabile
e preciso, indispensabile per monitorare e
registrare le vostre migliori perfomances.
02 03
Page 3

INTRODUCTION
What is Solo?
Solo is an automatic lap timer
based on GPS technology.
What does it do?
Solo locates its GPS position,
identifies the track from the
internal list of the main world
tracks and starts automatically
sampling lap times.
If the track is not
in the database?
It can be easily added.
Types of tracks?
Circuits, hill climbs, regularity,
point to point races,
performance tests.
Solo can fit all situations with a
simple keyboard
configuration.
What else?
Speed, accelerations, braking…
all the details you need while
racing, a powerful data review
immediately after and… no
need for a track engineer, no
complicated sensors no
expensive wirings.
Is there more?
An elder brother, SoloDL.
Additional features: with an
easy connection, it can read all
data coming from your Engine
Control Unit.
Two systems, same logic:
maximum amount of information
with minimum effort.
The ECU connection is really
very simple, and the
information available is very
useful.
Who wants more?
You can connect SoloDL to
SmartyCam, AIM on- board
camera, and then you have a
video with high precision
figures.
04 05
Page 4

CHAPTER 1
INCLUDED ITEMS AND INSTALLATION ACCESSORIES
Included items
SOLO
• Solo (1)
• Solo USB cable (2)
• USB/AC power adapter (3)
• Solo power cable with 2m wired
car lighter socket (4)
• Mounting bracket with screws (5)
• Software installation CD (9)
SOLO DL
Kit for stock cars with stock ECUs OBDII
(K Line/CAN)
• SoloDL (6)
• USB cable (2)
• USB/AC power adapter (3)
• 2m OBDII/power cable (7)
• Mounting bracket with screws (5)
• Software installation CD (9)
Kit for racing cars with aftermarket ECUs
(CAN/RS232)
• SoloDL (6)
• USB cable (2)
• USB/AC power adapter (3)
• 4m CAN/RS232 ECU harness (8)
• Mounting bracket with screws (5)
• Software installation CD (9)
1
2
3
5
6
7
4
8
9
06 07
Page 5

Installation Accessories
CHAPTER 1
INCLUDED ITEMS AND INSTALLATION ACCESSORIES
Solo can be installed in a variety of ways
depending on the application and your
preferences.
Suction cup bracket kit with screws;
part number X46KSVS00.
Handlebar bracket kit accommodating bars
from 0.5” to 2.0’’ diameter;
part number: X46KSTG00.
Outlined below are several mounting options
available for application-specific installations:
Double bar bracket kit with U bolt for bars
from 0.75’’ to 1.25’’ diameter.
Metallic wrap for pipes from 1.57’’ to 3.15’’
diameter;
part number: X46KSTP00.
08
09
Page 6

CHAPTER 2
SOLO AT A GLANCE
Understanding Solo
Solo most important feature is to show
your Lap Times.
The calculation is done using the GPS position of your vehicle and the track starting line.
Solo calculates the position of your vehicle
1. Solo comes with a wide list of tracks.
You can check them pressing
>>>
<<<
or
until the page below on
the left appears; pressing VIEW button
you enter the page shown on the right;
ten times per second, and interpolates the
nearest position to the starting line with
very high precision.
Where do startline GPS info come from?
Of course, for obtaining lap Times, Solo has
to know the Starting Line Coordinates.
This can be done in three different ways:
SHOWS ALL TRACKS STORED
IN SOLO MEMORY
2. You can define the starting point
of the track by going to the starting
line and setting the desired point.
(see chapter 7)
3. You can define the same starting
point by the Track Manager feature
of Aim software Race Studio 2.
(see chapter 7)
ENTER TRACK DATABASE
10 11
SHOWS ALL TRACKS AVAILABLE
IN A 5KM RADIUS
Please, take note that if you are running a
Point to Point race, you have to define TWO
different points: Start and Finish.
Finally, if you run a Performance Test, like
a “Drag” contest, no starting point
coordinates are needed: Solo will start and
stop the test automatically.
Page 7

CHAPTER 2
SOLO AT A GLANCE
DISPLAY
GPS ANTENNA
USB PORT
ON/OFF
MAGNET
Display, and Buttons
Solo is equipped with a 128x64 pixel
graphical display and a built-in brilliant
backlight.
Press any of the four buttons and the
specific menu items will appear (for four
seconds) above each of the buttons.
you can lock the image
MENU>>Display Setup>>Keyboard
and select Locked.
USB Port
Solo uses USB connection for:
• Battery charging
• Receiving configuration ( SoloDL)
and track list upgrade
• Data download to PC
• Firmware upgrades
To access the USB port, slide the lock on the
waterproof USB door down and the door
will open revealing the USB port.
Connectors
Solo features a single connector located on
the bottom, which is used when powering
the system from a 12V source.
SoloDL features two connectors on the bottom of the system: one to connect to Aim’s
external CAN expansion (for example SmartyCam – see Chapter 11) and the
second is used for ECU connection and
power (bottom right image).
Please, take note that the external power
can be received from the first or the second
connector.
GPS Antenna
The integrated GPS antenna is located on the
THREAD INSERT
12 13
CONNECTOR
top of Solo. In order to mitigate any possible
GPS signal interference, avoid positioning
anything directly over the GPS antenna.
Page 8

CHAPTER 2
SOLO AT A GLANCE
Mounting Points
You can mount Solo to the included bracket using the two integrated magnets. This solution
allows you to quickly and easily install and remove Solo.
For more permanent installations, you can secure Solo using the four included inserts
(bottom image).
Solo Working Modes
You can configure Solo in order to optimize its activity in dependence upon the typology of
the track and of your race:
The tracks can be in a Closed Circuit or in a Pont to Point track, i.e. rallye or DownHill races.
The typology of your race can be:
Speed
A normal race in circuit.
Regularity
Where you have to maintain a certain
constant lap time.
Performance
Where you evaluate the performance of
your vehicle in an acceleration on a straight,
that can be, for example, 0-100 km/h, 0-1/4
mile etc.
14 15
Page 9

CHAPTER 3
POWERING AND CONNECTING SOLO
Powering Solo/SoloDL
Solo can be powered by the internal
rechargeable battery or by an external 12
Volt source, using the provided power
cable with 2m wired car lighter socket.
You can recharge the internal lithium
battery through the power socket or
through a PC using the provided USB cable.
ECU Connection
(SoloDL only)
SoloDL receives the engine parameters
from the ECU of your vehicle.
You can choose between two different
connections to the ECU:
1. OBDII that is typically used in most
manufactures stock cars.
The connection is extremely simple, since
we take advantage from a standard
connector that is available on all cars produced after 1985.
In this case, the power comes from the
OBDII connection.
2. CAN/RS232 connection: typically used
in race car installations.
In this case the connection is more complex
and has to be followed by expert
technicians and strictly depends upon the
ECU you have on your car.
Please note: in these installations, the
external power has to be connected to the
car battery through the vehicles main
isolation switch.
Documentation about a wide range of ECU
protocols and connections is available at our
website
www.aim-sportline.com >> Download
Area >> ECU section.
16 17
Page 10

CHAPTER 4
SOLO/SOLODL POWERING ON
First Power On
At first power on, Solo starts the
configuration wizard requiring the
following information:
• Language
• Unit of measure (Mph/Kmh)
• Type of race to be performed
(speed, regularity or performance in case
of performance test select the kind of
performance according to the selected
unit of measure)
• Type of track that the logger is to be used
on: Circuit or Point to Point
(except for performance tests)
Sampling GPS Signal
At switch on, Solo starts looking for a GPS
signal. You can see the level of the signal by
>>>
pressing
following page appears:
Please note: for a quick GPS signal
acquisition place Solo in the open air so
that a wide part of the sky is visible.
or
<<<
until the
The precision of the system computation
(routes and lap times) depends on the
number of connected satellites.
A good precision is provided with at least 6
satellites connected with an optimum
precision provided with at least 8 satellites
connected.
A Power On, Solo checks the tracks listed in
its memory. In case it finds a track near the
current position (within 5 km) it shows the
proper track name.
Solo will use the position of the beacon and
of the split points for all computations.
In case more tracks are near your position
it shows “tracks found”.
You can see them and select one by
>>>
pushing
or simply run a track lap to permit Solo to
identify which track is being run.
or
<<<
18 19
Page 11
CHAPTER 5
SOLO CONFIGURATION
Please, use AIM Race Studio 2 software to
configure the track beacon positions and to
define the ECU of your car
(for SoloDL only).
Any other parameter will need to be
configured by the onboard keyboard.
To enter configuration press MENU.
Race Modes
Solo can manage different race modes:
Speed, Regularity and Performance.
In all situations, it gives the proper time
information.
To set the type of race, follow this path:
MENU>>Race Mode SetUp.
Speed
Regularity
The rule of regularity races is as follows
• the lap time stored after the second
passage from starting/finish line
becomes the reference lap;
• the following laps have to be driven in the
same lap time or as close as the reference
lap.
Solo will continuously show the predictive
lap time, or the difference (+ or -) between
the predictive and the target lap time.
Performance tests in detail
In case of Performance tests, the Start Line
is triggered at the increment of Speed,
while the Finish line depends upon the selected length of test: Available length depends on the selected measure units.
If Imperial units are selected it is possible to
choose among:
• 1/4 miles;
• 1/8 miles;
• 0/60 mph;
If the metric units are selected it is possible
to choose among:
• 0-100 km/h
• 0-160 km/h
• 100m
• 400m
• 1000m
Circuits and Point to
Point Races
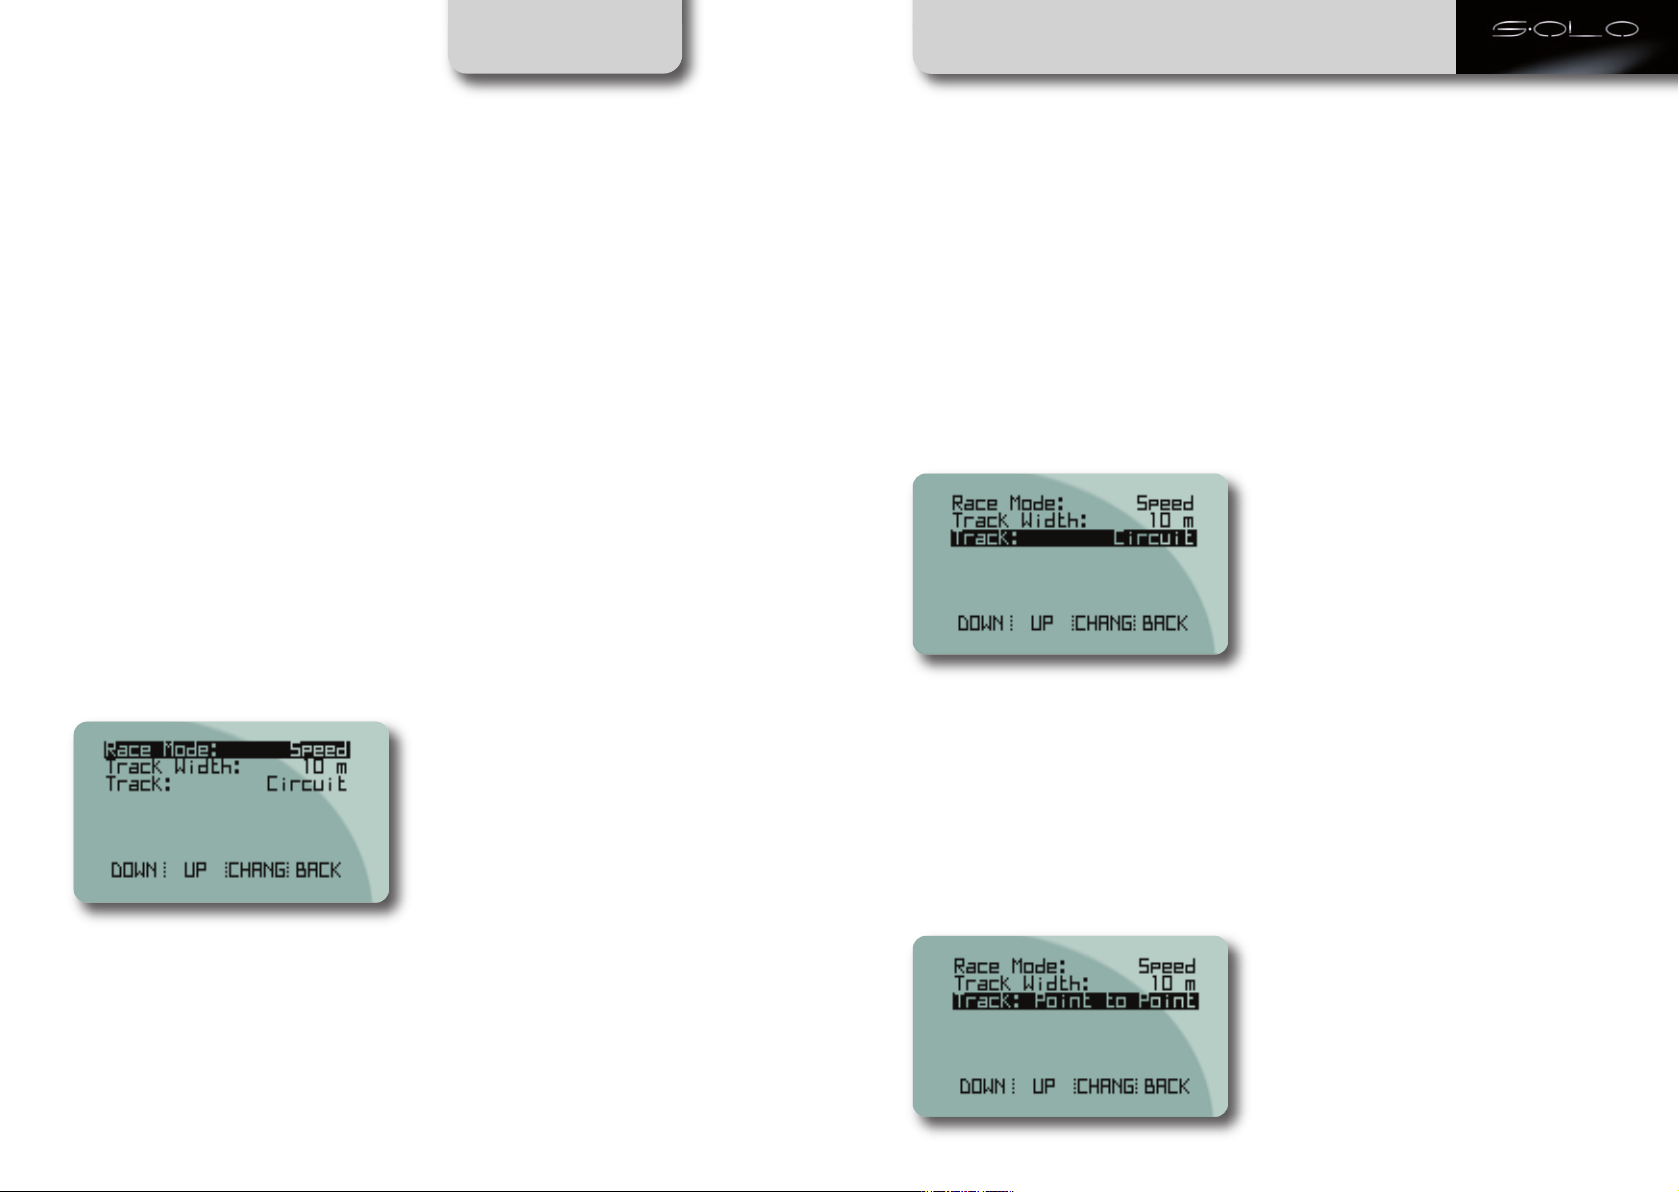
Circuit
Select this Mode when the lap begins and
finishes is at the same point.
Point to Point Race
If you configure Solo in order to manage
Point to Point Race, it starts the time (and
data recording) as soon as it passes in front
of the Starting Point and stops the timer
and shows the Lap Time when your vehicle
passes from the Finish Line.
We have already seen that there is a large
amount of information that you can see on
your display, while your vehicle is on the
track:
• Lap time;
• Predictive lap time
• Speed
• Lap number
• Acceleration
• GPS signal information
• Data coming from the engine via
the ECU. (for SoloDL only).
For showing all these data, Solo has some
pre-defined pages, showing pre-organised
fields.
This is the usual race or test: you have to
drive at the maximum possible speed.
The lap time is rolling until the vehicle
passes in front of the finish line, where it
stops for some seconds.
20 21
Data recording and time computation starts
when Speed passes from “ZERO” to more than
10 km/h. When the set length or speed is reached the display will freeze and then shows
the performance time and max speed.
Configuration pages
Page 12

CHAPTER 5
SOLO CONFIGURATION
You can easily change page by pushing
>>>
<<<
or
.
Also, you can freely configure up to
4 Custom Pages, that can show from 1 up
to 4 different information.
Every page can be enabled or disabled, so,
if you need only two pages, disable all the
others and swap between them, pushing
>>>
<<<
or
.
To enable the pages follow this path:
MENU >> Display Setup >> Pages Setup
>> Enable/Disable Pages.
For creating and managing the Custom
Pages:
MENU >> Display Setup >> Pages Setup
>> Custom Pages Setup.
Set how many custom pages to show, how
many fields to show on every page and
configure the page.
Below are shown examples of custom
pages with 1 up to 4 fields.
Units of measure selection
Solo/Solo DL can compute using Decimal
or Imperial units of measure.
To set the units of measure, follow this path:
MENU >> Set Units and select the Unit of
measure required.
Auto power off
Solo automatically powers off after
5 minutes of inactivity
(no movement and no button pressed).
Time zone and time/date format settings
Solo can show the date and time in
different formats enabling or not legal time.
Follow this path MENU >> Set Time/Date
and set:
• Actual Local Time
• Daylight Saving Time: OFF/ON
• Time format: 24h or 12h
• Date format: to be selected among:
DD/MM/YY, MM/DD/YY
or YY/MM/DD.
System information
This page shows logger firmware version
and serial number.
Follow this path:
MENU >> System Information
and this page will appear.
22 23
Page 13

CHAPTER 6
RACE STUDIO SOFTWARE
You are going to use Race Studio 2 software
for:
• Upgrading the track list
• Downloading the test data to your PC
• Analyzing the test data
Aim constantly updates Race Studio 2 software. Each new release is available free to
download from our web site www.aim-sportline.com, download Area/Software section.
Software Installation
To install Race Studio 2 software just place
the CD in the proper driver and wait for a
few seconds.
SoloDL Configuration
SoloDL can receive data from your
Engine Control Unit.
You can use RaceStudio2 for specifying the
ECU of your vehicle and for selecting the
desired information.
Once you have verified that the vehicle ECU
is supported, just follow this procedure
with SoloDL switched on and connected to
the PC:
• Run Race Studio 2 software
• Click on AIM System Manager
• Select ECU Manufacturer and model
• Enter configuration and vehicle name
• Select the desired information to be
received
• Press OK.
• Only in case the ECU does not transmit
the engaged gear activate
“System configuration” logger and set “
calculated” gears;
• Press Transmit
The system will ask the user:
• To choose if reading the documentation
or installing a software: select the second
option;
• Which software to install: select Race
Studio 2: the installation will start
automatically.
24 25
Please, refer to AIM website www.aim-sportline.com >> “ECU connection” area to
know which ECUs are currently supported
by AIM devices.
Page 14

CHAPTER 7
TRACK MANAGEMENT
We have already underlined that Solo
comes with a comprehensive database of
starting line / split line coordinates.
You can easily see the list of coordinates in
the track page; to reach it press
>>>
left appears and then press “VIEW” button.
You will see the tracks nearest to your position.
or
<<<
until the page below on the
Adding Starting Line
Coordinates directly
through Solo
It is very easy to add the coordinates of a
new starting point:
• Go to the Starting Point with Solo in your
hands
>>>
• Select Track page using
buttons
It is very easy to add the coordinates of a
new starting point:
• Go to the Starting Point with Solo in your
hands
• Select Track page using
buttons
>>>
or
or
<<<
<<<
Track
Management function
in Race Studio 2
You have full management of the track
database where you can add or remove
track information.
You can manage the list of the tracks inside
Solo memory by using the Track Manage-
ment feature of Race Studio 2.
Select the desired TRACKS from the list and
click on Send to Solo button.
Solo will receive the track data in a few
seconds.
If the track information is not available in
the list, but lap/splits coordinates are
available, please, follow these instructions:
• Click on New button to create a new
track.
• A panel appears: type in the track name
• The new track will appear in the window
left panel: Select it
• Manually insert the lap coordinates in the
window bottom left panel.
• If split coordinates are available click on
“+” and add as many split as are available
and manually fill in the related
coordinates;
• Click Save
• Click Send to Solo
In a similar way, you can read and modify
Tracks information in the Solo memory.
You can add new coordinates in two different ways:
• Directly through Solo;
• Using Race Studio 2. Software
26 27
• Press OK and you are ready to go.
In case you have previously selected a Point
to Point track, you will be asked to add the
Finish Point in the same way.
Page 15

Solo starts recording when the speed
increases.
So, if the vehicle does not move, even with
the engine ON, Solo does not record data.
CHAPTER 8
Speed Races
USE OF SOLO DURING THE TESTS
Regularity Races
Performance Tests
When Speed start going up, Solo changes
mode and starts recording all the data, that
is to say, speed, position and acceleration
every 1/10 of second.
SoloDL, of course, records also , all the
information coming from the ECU.
As we have already seen, there are three types
of Lap time information that we can see:
1. Rolling Lap Time, that is shown by default
2. Static Lap Time.
The lap time of your last lap remains active
if you select this field.
Anyway, the lap time information appears
for some seconds independently from what
the display shows, when you cross the
starting line.
3. Predictive Lap Time, is evaluated after
having finished the first lap.
>>>
With
one page to the other, according to the
number of configured pages.
<<<
or
buttons it switches from
As in Speed Races, Solo shows Rolling,
Static and Predictive lap time.
The only difference is that it calculates the
Predictive Lap Time referred to the speed of
the Second Lap and shows the Predictive
Difference Time between the Second lap
and the Actual one.
Performance tests can be ¼ mile, ½ mile,
0-60 mph, 0-100 km/h, 0-1 km.
The vehicle is placed at the starting point.
when the car starts, the time increment and
rolls on the dash and the data are recorded.
When the performance itest finishes, the
most important information appear on the
display:
28 29
Page 16

CHAPTER 9
Data Recall
To review data stored in Solo memory, push MEM button. The Data Recall page appears; it is
as shown below on the left for “Speed” and “Regularity” mode and can include more pages; for
performance mode however, all data is shown in a page as below:
DATA RECALL
Data in Memory Deletion
You can delete Solo memory in two different ways:
• Follow this path: MENU >> Stored Data >> Clear Test Data and press OK.
• After data download with Race Studio 2 software the system will ask you if you are
going to delete or not delete the logger memory.
30 31
Page 17

Data download on the
PC and Data Analysis
through Race Studio2
CHAPTER 10
DATA DOWNLOAD ON THE PC AND DATA ANALYSIS
THROUGH RACE STUDIO2
The best way to understand your
performance, is to analyse your Solo data
on your PC.
Only with a wide screen can you compare
two laps, sector after sector, evaluate when
and where you are braking and when you
are on and off the throttle.
For this analysis, you can take advantage of
Aim highly professional software
Race Studio 2.
This software, (that comes free of charge
with your Solo), is constantly upgraded by
Aim engineers: every new release can be
easily downloaded (free of charge) from the
web site: www.aim-sportline.com
“Download Area” Software section.
The first step is to download the recorded
data to your PC.
Data Download
Data Downloading is very simple:
• Connect Solo to your PC
• Run Race Studio 2 Software
• Click on Download data and follow
the instructions.
Data Analysis
Race Studio 2 Analysis software allows you
to veiw and analyse the data stored in
Solo/SoloDL using different graphs and the
GPS images also.
This is an example of Race Studio 2 Analysis
view.
32 33
Page 18

CHAPTER 11
SOLODL CONNECTION WITH SMARTYCAM
SoloDL Connection
with SmartyCam
If you have a SoloDL, you can connect it
to SmartyCam, to get a powerful system.
Let us introduce SmartyCam, AIM’s
on- board camera.
Briefly, it records the video, automatically
adding in the overlay and graphical
information about a lot of freely
configurable parameters coming from the
ECU and from GPS.
34 35
Page 19

CHAPTER 11
SOLODL CONNECTION WITH SMARTYCAM
So, the configuration SoloDL/SmartyCam is extremely synergic, since the two
systems can take advantage of features
from each other:
• SmartyCam can read Solo DL parameters
from ECU
• SmartyCam can read Solo DL GPS and
GPS lap time
• SoloDL display can show information
about SmartyCam Status, like the amount
of free “microSD” Card memory,
battery level,
recording status, diagnostic messages
etc.
• SmartyCam can record SoloDL data on its
“microSD” Card, for a quicker management
of them.
Later on your PC, you can easily
synchronise video and data.
Physical Connection
To connect SoloDL with SmartyCam use
the 5 pin CAN cable provided with SmartyCam.
SoloDL configuration of the data stream
to SmartyCam
To get data sampled by SoloDL visualised
on SmartyCam videos, you have to take a
maximum 16 channels among the data
coming from the ECU and send them to
SmartyCam.
This is done using Race Studio 2 software.
Follow this path:
System Manager >>Solo>>
SmartyCam functions setting
And the related panel shown below on the
right appears.
It shows on the left the functions that can
be visualised on the SmartyCam videos and
on the right the ECU channels you can set
that function on.
appear in the list, enable the bottom
checkbox to verify if that channel is
provided by your ECU.
Once all channels have been set click
Transmit on top of the page and these
channels will be automatically sent to
SmartyCam.
Entering the drop down menu you can see
some of the channels coming from the ECU
grouped by type (for instance on Water
Temp function you find all temperatures
ECU
36 37
coming from the ECU).
If you find the channel you need, simply
select it and associate it to SoloDL channel.
Should the channel you want to set not
Page 20

Interaction with
SmartyCam
CHAPTER 11
SOLO DL CONNECTION WITH SMARTYCAM
SoloDL is provided with a dedicated Smar-
tyCam page showing all the useful
information about SmartyCam Status, that
is to say Recording Status, SD card status
and SD card free space as shown below:
To enable this page follow this path:
MENU>>Display Setup>>Enable/Disable
Pages, scroll until finding SmartyCam page:
after having enabled it, you can look at it
and scroll the pages using VIEW button.
REC STATUSREMAINING SPACE
ON SMARTYCAM
MICRO SD
38 39
Page 21

The Solo Team
SOLO TEAM
GIULIO CERIANI
OUR CHIEF HARDWARE
DESIGNER FOR THE LAST 30
YEARS
EMILIANO BINA
LEAD SOFTWARE
DESIGNER AND THE
FATHER OF RACE STUDIO
ANALYSIS
PAOLO VIGANO
HARDWARE DESIGNER AND
SELFPROCLAIMED “DA VINCI
OF BOARDS”
FRANCESCO OTTOVEGGIO
FIRMWARE DESIGNER
AND OUR RESIDENT GPS
EXPERT
FRANCESCO BOZZANO
PRODUCTLINE MANAGER,
OFFICIAL FIELD TESTER, AND
THE GUY TO BLAME IF YOUR
SOLO MALFUNCTIONS
LAURA MILANI
ELECTRICAL ENGINEER, FIRMWARE
DESIGNER, PIANIST VIRTUOSO, MOTHER
OF TWO, AND OUR SOFTBALL TEAM
CAPTAIN
WITH A .344 BATTING AVERAGE
DIEGO BOLLANI
THE ONLY GUY IN OUR
OFFICE THAT WENT TO ART
SCHOOL AND WHO ALWAYS
KEEPS OUR PRODUCTS
LOOKING FRESH
40 41
 Loading...