

Page 1
AiM User Guide
Kit for EVO4, Solo and SoloDL
on Yamaha R1-R6
2004-2013
Release 1.02
1
Page 2
1
Models and years
This manual explains how to install AiM Solo and SoloDL on Yamaha R1-R6 2004-2013 and how to
connect EVO4 and SoloDL to the Engine Control Unit (ECU) of the bike. Supported models and years
are:
• Yamaha R1 1000cc 2004-2013
• Yamaha R6 600cc 2004-2013
Warning: do not remove the bike stock dash or the communication protocol will not work.
2
Kit content and part numbers
Different kits for Solo, Solo DL and EVO4 on Yamaha R1-R6 2004-2013 are available according to the
bike model and production year. All kits include the same installing bracket while the ECU connection
cable changes according to the bike production year.
1
Page 3

2.1
Kit for SoloDL and bracket for Solo
Available SoloDL kits are shown here below with the related part numbers.
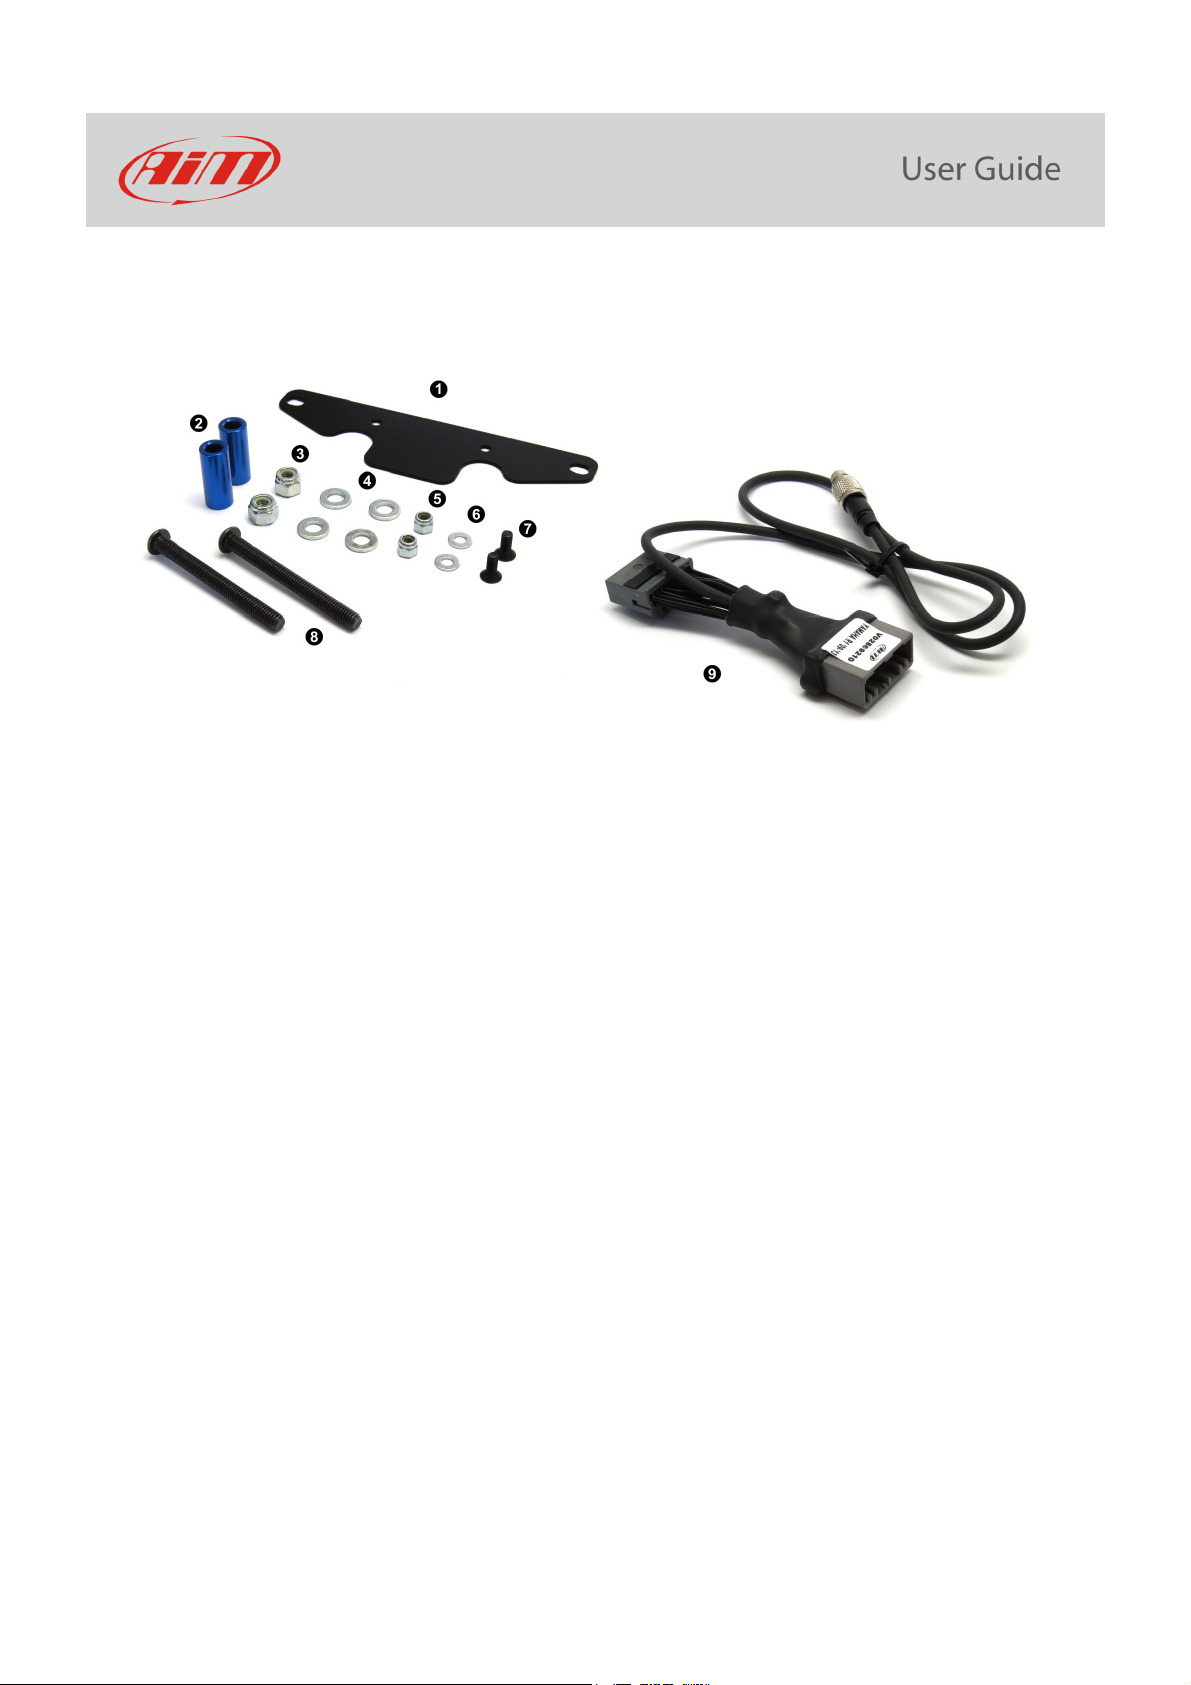
Kit SoloDL for Yamaha R1 2004-2008 and R6 2006-2013 – part number: V0256919CS
The kit includes:
• 1 bracket (1)
• 2 distance pieces (2)
• 2 M6 self-locking nut (3)
• 4 M6 washers (4)
• 2 M4 self locking nuts (5)
• 2 M4 washers (6)
• 2 4x10 Allen screws with countersunk head (7)
• 2 6x60 pan head Allen screws (8)
• 1 AiM interface cable for Yamaha R1 2004-2008 and R6 2006-2013 (9)
AiM cable (9) and bracket (1) can also be bought separately as spare parts.
• SoloDL cable for Yamaha R1 2004-2008 R6 2006-2013: V02569190
• Solo/SoloDL bracket for Yamaha R1 2004-2008: X46KSYR16
2
Page 4
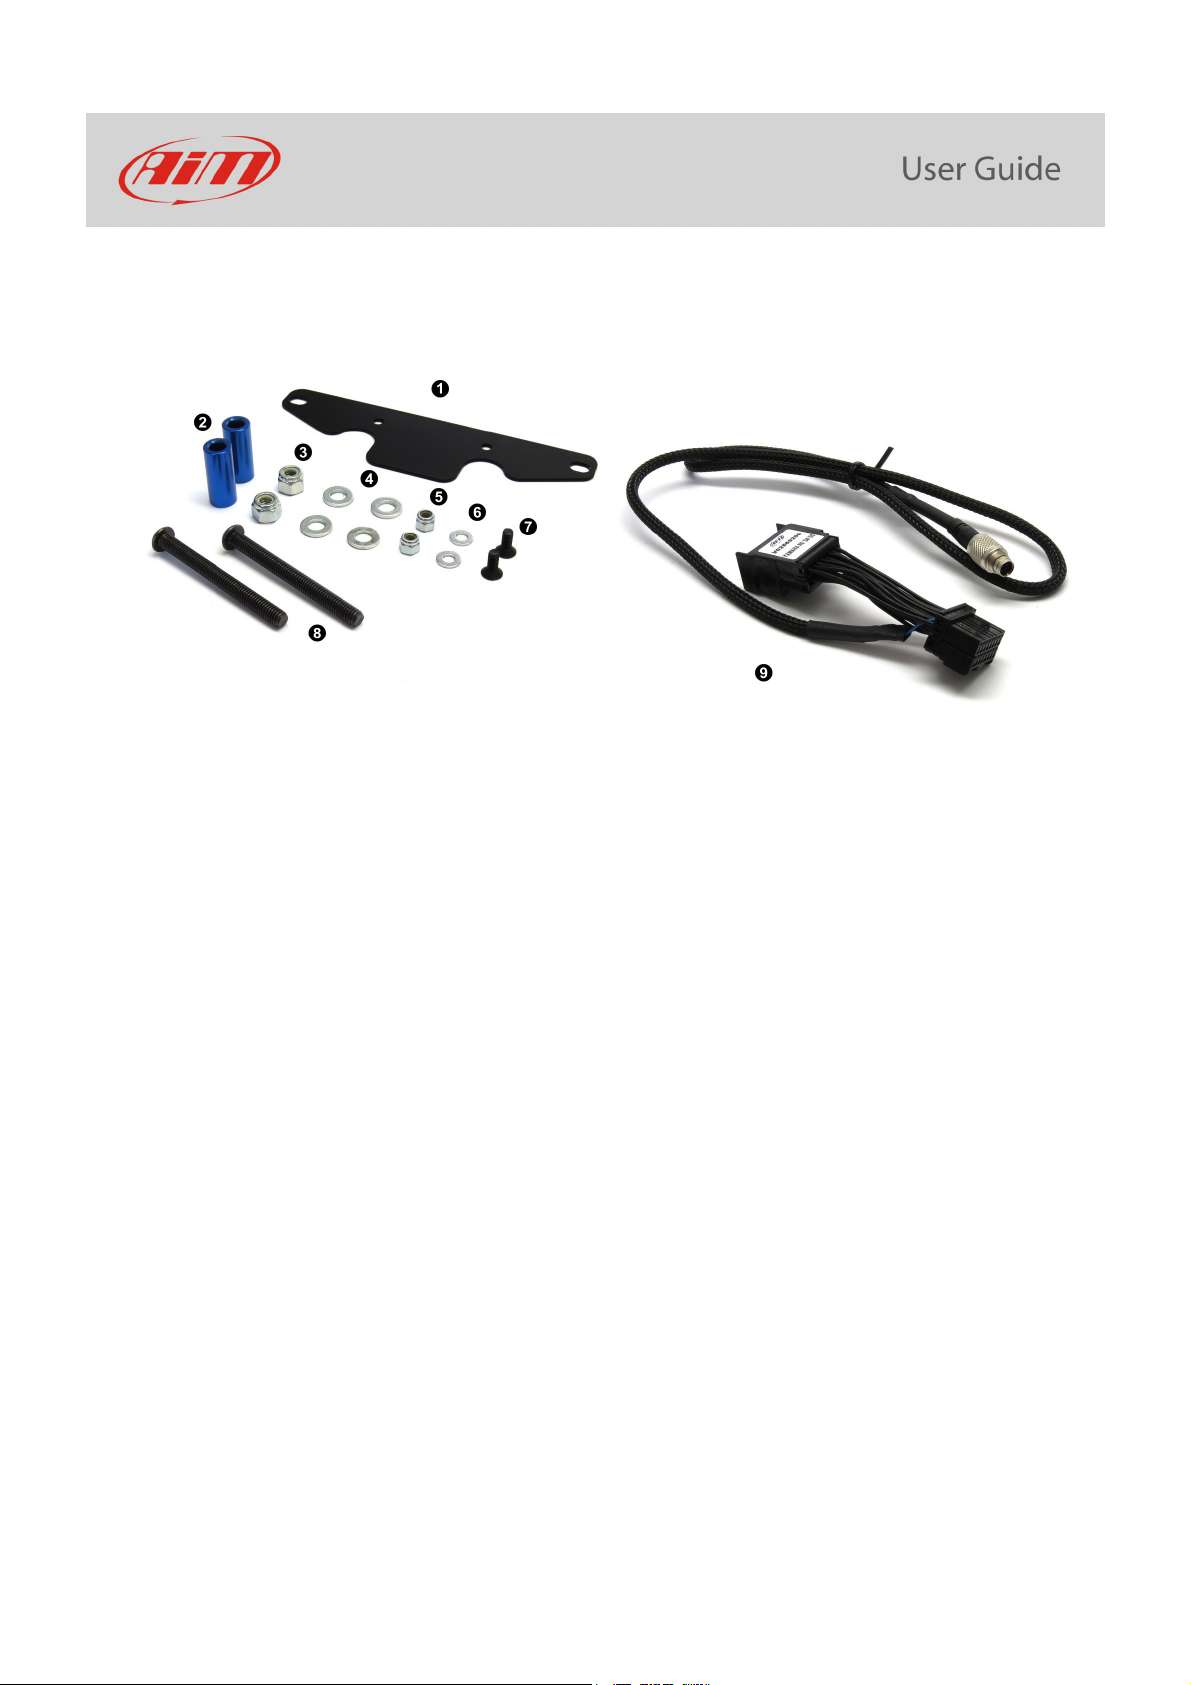
SoloDL kit for Yamaha R1 2009-2013 – part number: V0256921CS
The kit includes:
• 1 bracket (1)
• 2 distance pieces (2)
• 2 M6 self-locking nut (3)
• 4 M6 washers (4)
• 2 M4 self locking nuts (5)
• 2 M4 washers (6)
• 2 4x10 Allen screws with countersunk head (7)
• 2 6x60 pan head Allen screws (8)
• 1 AiM interface cable for Yamaha R1 2009-2013 (9)
AiM cable (9) and bracket (1) can also be bought separately as spare parts.
• SoloDL cable for Yamaha R1 2009-2013: V02569210
• Solo/SoloDL bracket for Yamaha R1 2009-2013: X46KSYR16
3
Page 5
SoloDL kit for Yamaha R6 2004-2005 – part number: V0256920CS
The kit includes:
• 1 bracket (1)
• 2 distance pieces (2)
• 2 M6 self-locking nut (3)
• 4 M6 washers (4)
• 2 M4 self locking nuts (5)
• 2 M4 washers (6)
• 2 4x10 Allen screws with countersunk head (7)
• 2 6x60 pan head Allen screws (8)
• 1 AiM interface cable for Yamaha R6 2004-2005 (9)
AiM cable (9) and bracket (1) can also be bought separately as spare parts.
• SoloDL cable for Yamaha R6 2004-2005: V02569200
• Solo/SoloDL bracket for Yamaha R6 2004-2005: X46KSYR16
4
Page 6
2.2
Cables for SoloDL
Different cables for SoloDL on Yamaha R1-R6 2004-2013 are available also as spare parts according to
the bike model and production year.
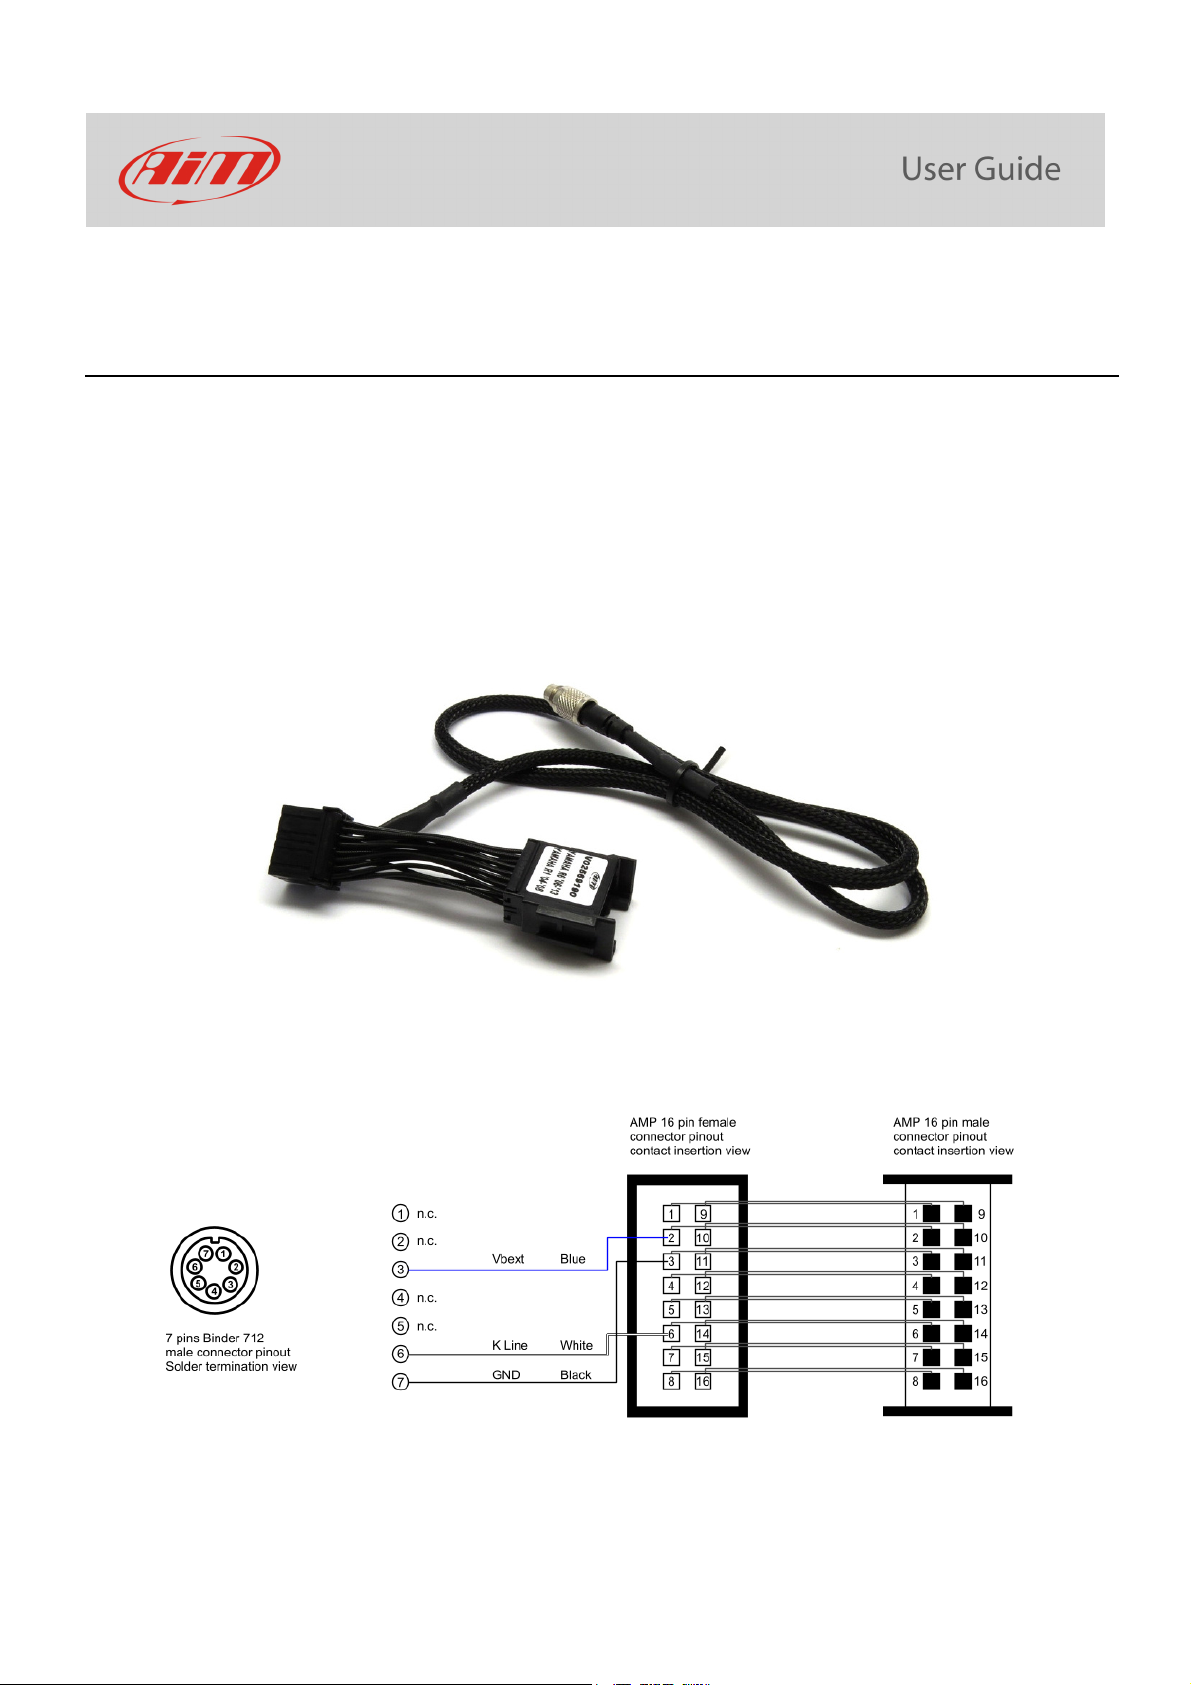
SoloDL cable for Yamaha R1 2004-2008 and R6 2006-2013 part number is: V02569190. Here below on
it is shown on top while on bottom you see the construction scheme.
5
Page 7
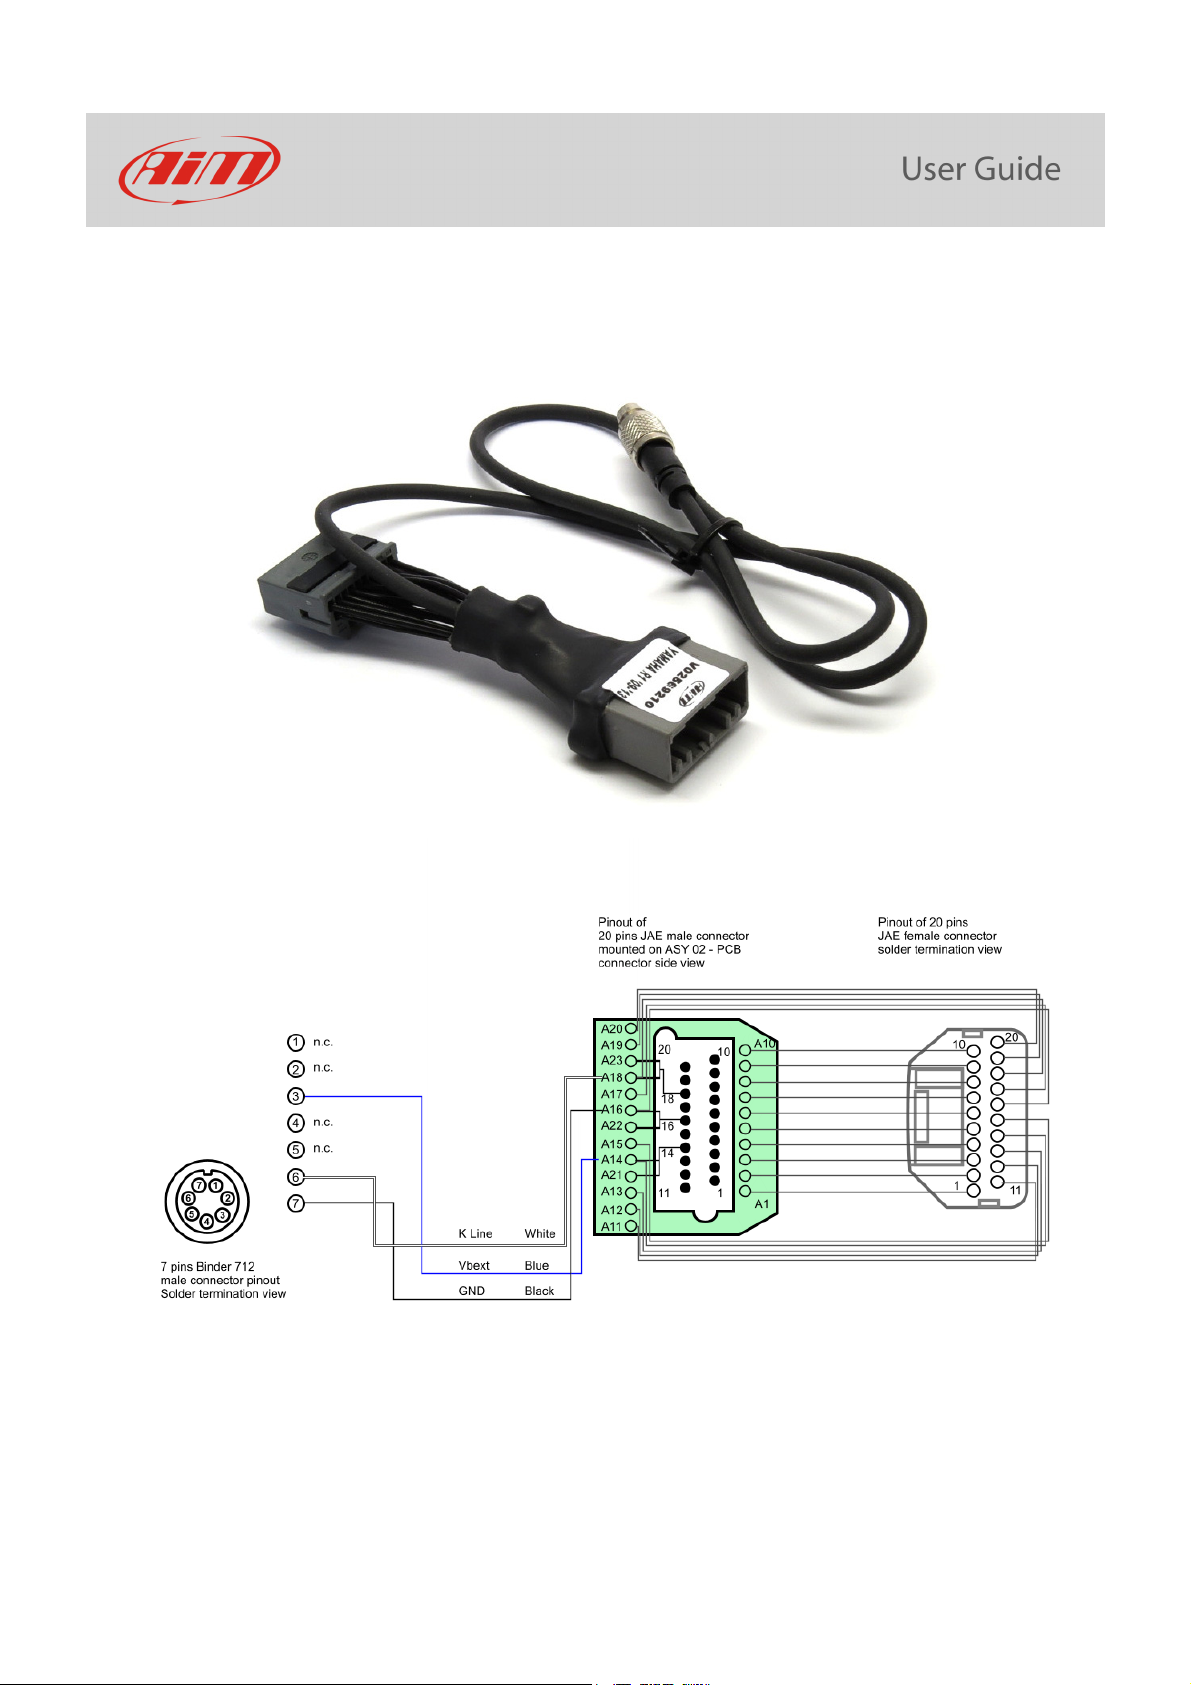
SoloDL cable for Yamaha R1 2009-2013 part number is: V02569210. Here below on it is shown on top
while on bottom you see the construction scheme.
6
Page 8
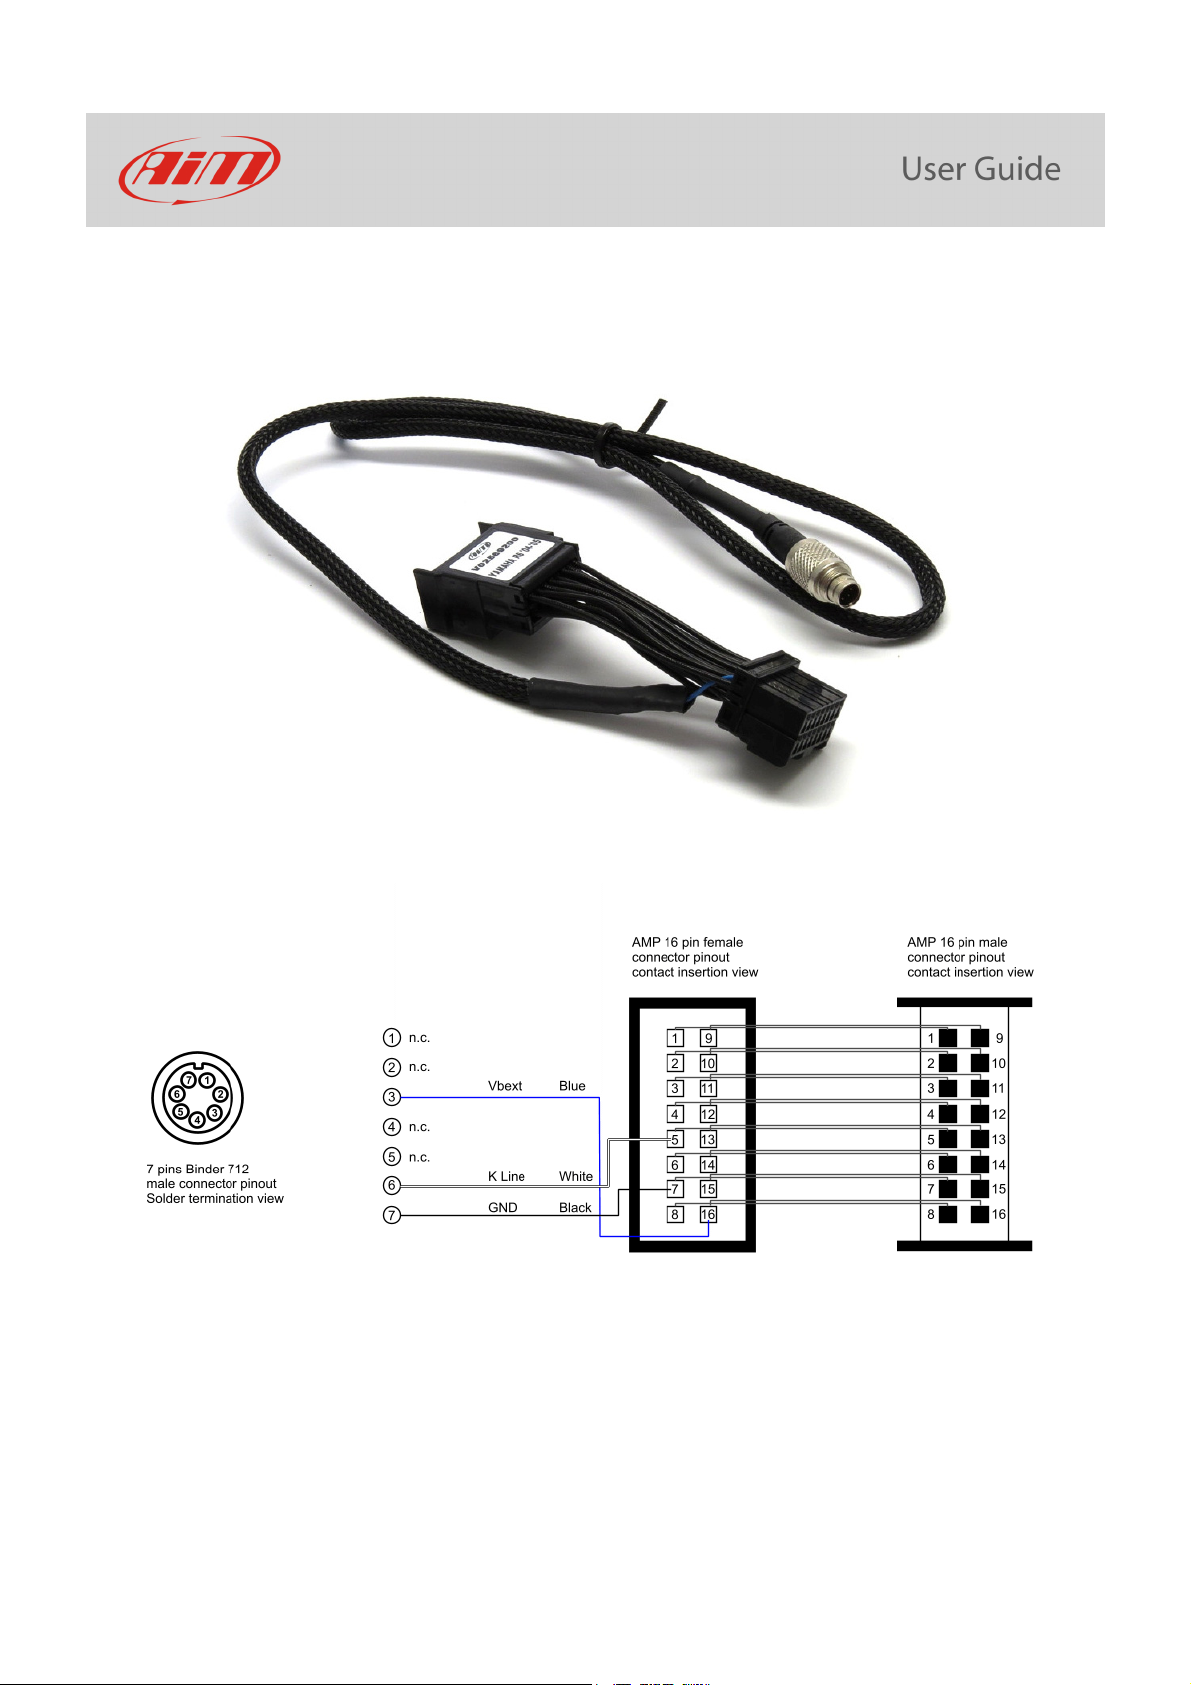
SoloDL cable for Yamaha R6 2004-2005 part number is: V02569200. Here below on it is shown on top
while on bottom you see the construction scheme.
7
Page 9

2.3
Cables for EVO4
Different cables for EVO4 on Yamaha R1-R6 2004-2013 are available according to the bike model and
production year.
EVO4 cable for Yamaha R1 2004-2008 and R6 2006-2013 part number is: V02563170. Here below on it
is shown on top while on bottom you see the construction scheme.
8
Page 10

EVO4 cable for Yamaha R1 2009-2013 part number is: V02563190. Here below on it is shown on top
while on bottom you see the construction scheme.
9
Page 11

EVO4 cable for Yamaha R6 2004-2005 part number is: V02563180. Here below on it is shown on top
while on bottom you see the construction scheme.
10
Page 12

3
Installation and connection
Here you find instructions to install Solo and SoloDL and to connect EVO4 and SoloDL to the ECU of
your Yamaha R1-R6 2004-2013. All EVO4 cables for Yamaha are long enough to allow installation of
the logger under the bike seat.
3.1
Installation of Solo and SoloDL
To install Solo/SoloDL on your Yamaha R1-R6 2004-2013:
Fix Solo/SoloDL bracket (1) to Yamaha R1-R6
2004-2013 adapter bracket (2) using the screws
included in the kit.
11
Page 13

Hook Solo/SoloDL to its bracket.
Fix it using the screws already inserted rear on
Solo/SoloDL bracket.
Remove the screw caps from the bike
handlebars.
12
Page 14

Remove the original screws that fix the
handlebars to the bike top plate.
Insert in the screws housings the cylindrical
distance pieces you find in the kit.
13
Page 15

Place the adapter bracket holes in line with the
distance pieces you inserted in the handlebars –
if original – and insert and tighten the screws.
If your handlebars are not original lock the bolt
with the nuts you find in the kit.
14
Page 16

The image here on the right shows SoloDL
correctly installed.
15
Page 17

3.2
Connection of SoloDL and EVO4 to the bike ECU
To connect EVO4 and SoloDL to your bike ECU use the connector you find rear of the bike stock dash.
Remove the windscreen chassis to uncover
the stock dash rear connector highlighted
here on the right.
Remove the rubber cover from the connector
as in the image.
16
Page 18

Unplug the connector (A).
Plug the stock wiring connector to the first
AiM wiring connector (B).
Plug the second AiM wiring connector (C) to
the stock dash rear connector.
17
Page 19

Pull the connector (C) shown in the previous
image until you hear a click. The image on the
right shows the connector correctly plugged
in.
If you installed EVO4, take AiM cable –
highlighted in the image – to it.
If you installed a SoloDL make AiM cable pass
around the bike stock dash.
The cable will come up over the original dash
as indicated here on the right.
18
Page 20

Make AiM cable pass between the bike
handlebar plate and SoloDL adapter bracket.
Connect SoloDL as shown here on the right.
19
Page 21

4
Configuring with Race Studio 2
When EVO4/SoloDL has been connected it is necessary to set it up as connected to that ECU using
Race Studio 2 software.
4.1
Configuring SoloDL
Run the software, press “Device configuration” on the software left keyboard and select “SoloDL” in
the panel that shows up on here below.
20
Page 22

The software shows SoloDL configuration page: press “Configuration manager” and select the
configuration you want to use or press “New” to create a new one. In this second case “New
configuration” panel shows up: select ECU Manufacturer “YAMAHA” and select an ECU model among
these available ones according to the production year of your bike. Here they are listed with the
different production years:
• BIKE_R1_04_05_06 for Yamaha R1 from 2004 to 2006 included
• BIKE_R1_07-08 for Yamaha R1 from 2007 to 2008 included
• BIKE_R1_09_11 for Yamaha R1 from 2009 to 2013 included
• BIKE_R6_04_05 for Yamaha R6 from 2004 to 2005 included
• BIKE_R6_06_10 for Yamaha R6 from 2006 to 2013 included
Confirm pressing “OK” in both panels and transmit the configuration to SoloDL pressing “Transmit” as
shown below.
21
Page 23

4.2
Configuring EVO4
Run the software, press “Device configuration” on the software left keyboard and select “EVO4” in the
panel that shows up on the right as here below.
22
Page 24

The software shows EVO4 configuration page: select the configuration you want to use or press “New”
to create a new one. In this second case “New configuration” panel shows up: select ECU Manufacturer
“Yamaha” and choose an ECU model among the available ones according to the production year of
your bike.
• BIKE_R1_07-08 for Yamaha R1 from 2007 to 2008 included
• BIKE_R1_09_11 for Yamaha R1 from 2009 to 2013 included
• BIKE_R6_04_05 for Yamaha R6 from 2004 to 2005 included
• BIKE_R6_06_10 for Yamaha R6 from 2006 to 2013 included
23
Page 25

Confirm pressing “OK” and transmit the configuration to SoloDL pressing “Transmit” as shown below.
5
Yamaha protocol
Channels received by SoloDL and EVO4 with Yamaha protocol are the same with the different
protocols but it is necessary to set the protocol corresponding to the year of production of your bike
to receive them correctly.
ID CHANNEL NAME FUNCTION
ECU_1 R1_RPM RPM
ECU_2 R1_WH_SPEED Wheel speed
ECU_3 R1_ECU_ERR ECU error
ECU_4 R1_WATER_TEMP Engine coolant temperature
ECU_5 R1_AIR_TEMP Intake air temperature
24
 Loading...