

Page 1
AiM User Guide
Kit for EVO4, Solo and SoloDL
on BMW S1000RR
Release 1.01
1
Page 2
1
Models and years
This user guide explains how to install AiM Solo and SoloDL on BMW S1000RR and how to connect
EVO4 and SoloDL to the Engine Control Unit (ECU) of the bike. Supported models and years are:
• BMW S1000RR all models and years
2
Kit content and part number
An installation kit with bracket and ECU interface cable is available for Solo/SoloDL while a connection
cable is available for EVO4.
1
Page 3
2.1
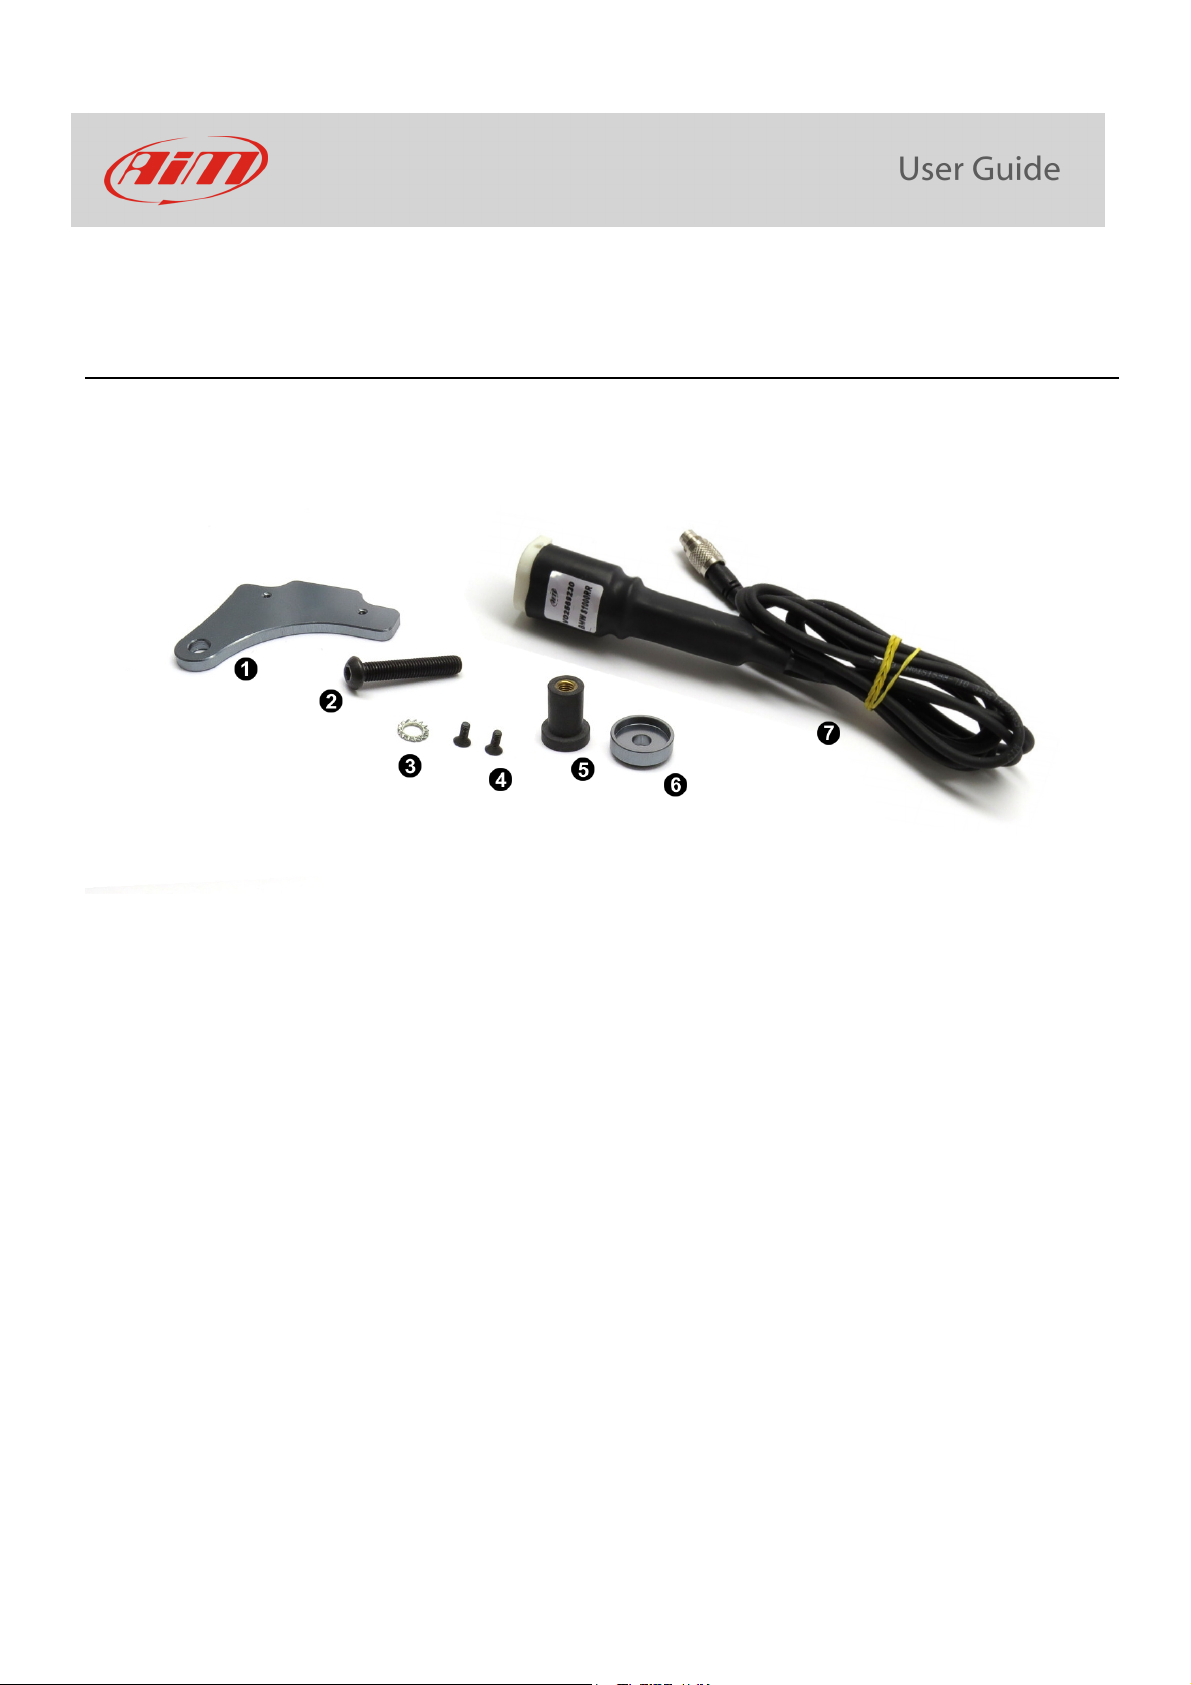
Kit for SoloDL and bracket for Solo
SoloDL installation kit is shown here below; part number is: V0256923CS.
The kit includes:
• 1 bracket (1)
• 1 8x45 pan head Allen screw (2)
• 1 toothed washer (3)
• 2 4x10 Allen screws with countersunk head (4)
• 1 rubber loose piece (5)
• 1 distance piece (6)
• 1 AiM interface cable for BMW S1000RR (7)
AiM cable (7) and bracket (1) can also be bought separately as spare parts.
• SoloDL cable for BMW S1000RR: V02569230
• Solo/SoloDL bracket for BMW S1000RR: X46KSBMWS1
2
Page 4

2.2
AiM cable for SoloDL
BMW S1000RR cable for SoloDL is shown below; its part number is: V02569230.
The image below shows the cable construction scheme.
3
Page 5
2.3
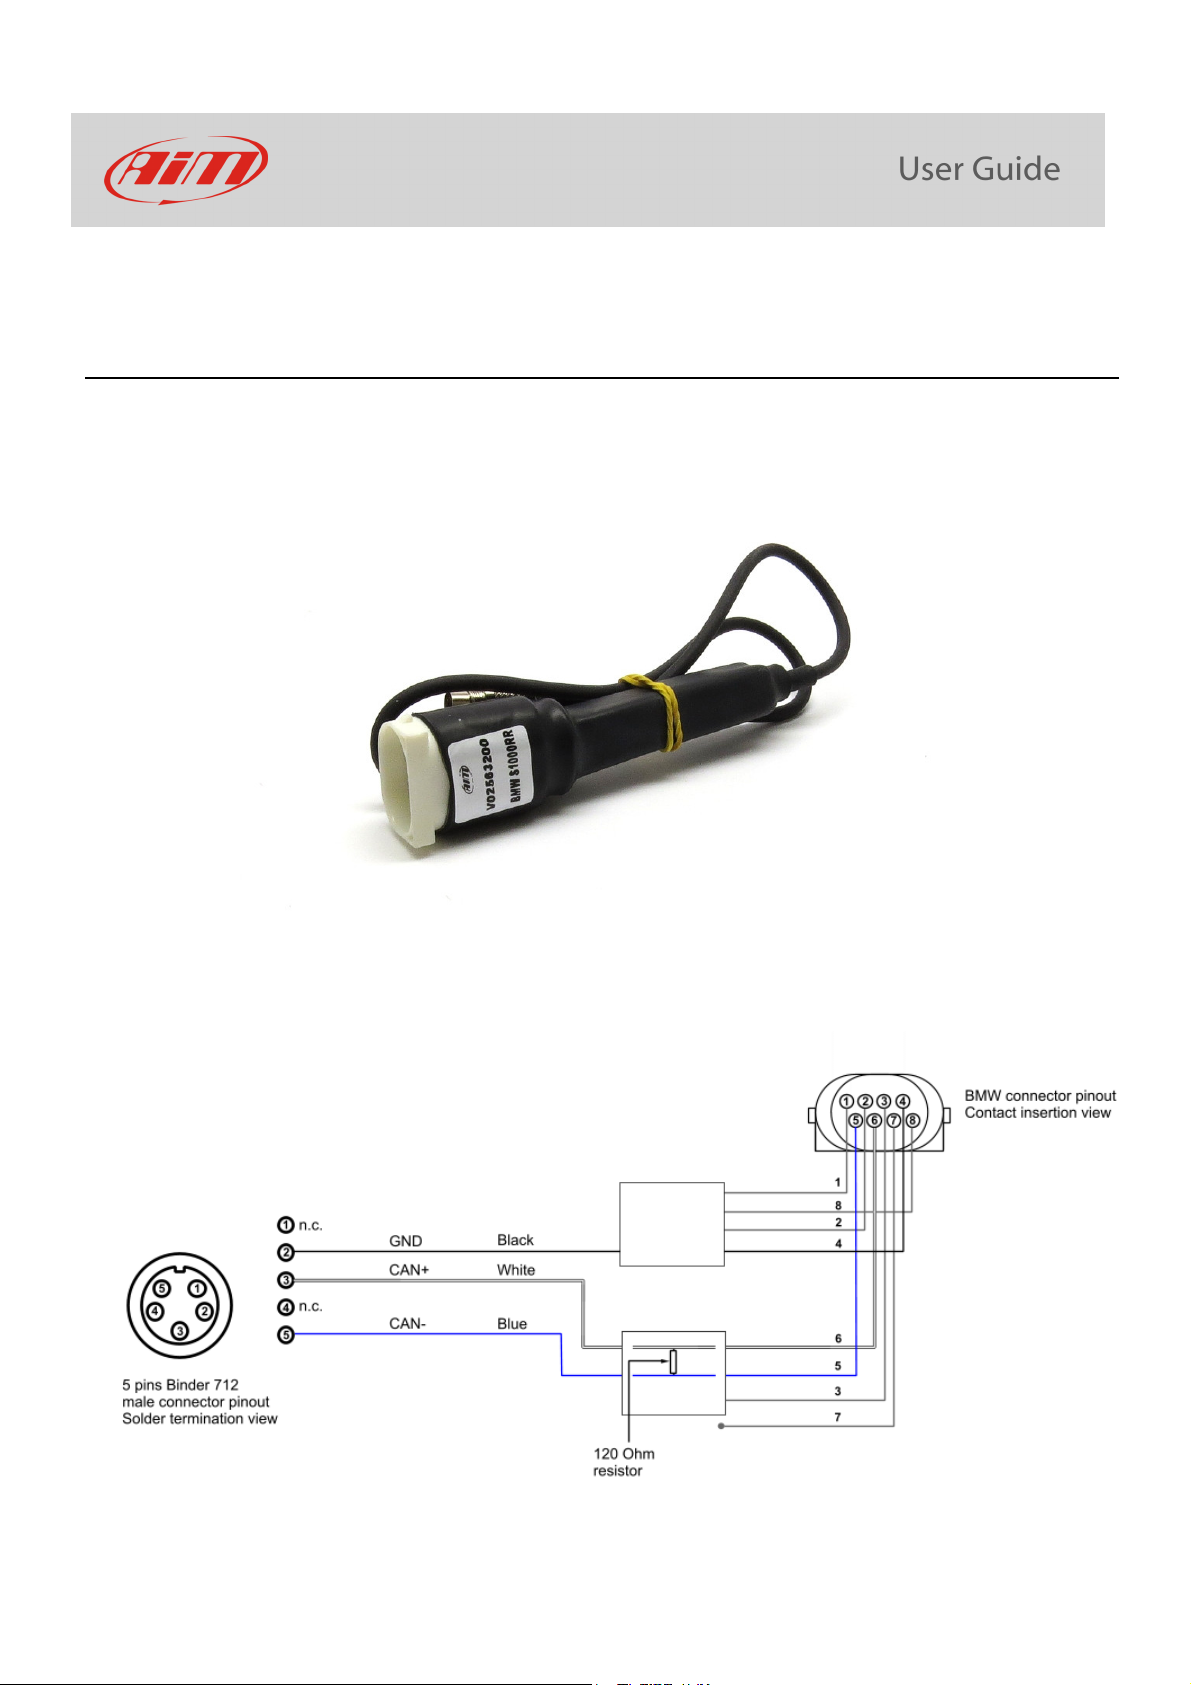
AiM cable for EVO4
BMW S1000RR cable for EVO4 is shown below; its part number is: V02563200.
The image below shows the cable construction scheme.
4
Page 6

3
Installation and connection
Here you find the instructions to install Solo and SoloDL and to connect EVO4 and SoloDL to your
BMW S1000RR bike ECU. EVO4 cable is long enough to allow installation of the logger under the bike
seat.
3.1
Installation of Solo and SoloDL
To install Solo/SoloDL on your BMW S1000RR:
Screw the rubber loose piece on the bolt
inserting the distance piece.
5
Page 7

Fix Solo/SoloDL bracket to the adapter bracket
for BMW S1000RR using the two countersunk
screws.
Hook Solo/SoloDL to its bracket.
Fix it using the screws already inserted rear on
the same bracket.
6
Page 8

Insert the loose piece in the handle bar hinge
until the distance piece abuts the hinge.
Tighten the central screw on the hinge so that
this last grips.
If necessary unscrew and replace – slightly
moving it – the brake liquid pan.
7
Page 9

3.2
Connection of SoloDL and EVO4 to the bike ECU
To connect EVO4 and SoloDL to the ECU of the bike use the connector you find under the bike tail
shown below.
Open the bike tail.
Please note: if your bike has an anti-theft
alarm system unplug its connector, if not just
remove the connector cup. In the image here
on the right the connector has been
unplugged.
The image on the right shows the connector
in detail.
Connect AiM wiring to BMW wiring as
highlighted on the right.
8
Page 10

If you have installed an AiM EVO4 logger
take the cable to the logger.
If you have installed an AiM SoloDL logger
make the cable pass along the saddle frame
indicated in the image here on the right.
Assemble SoloDL cable to the bike original
wiring making it pass between the fuel tank
and the chassis as in the image here on the
right.
Please avoid positions where the cable
would be exposed to direct heat.
Connect the cable to SoloDL as here on the
right.
9
Page 11

4
Configuring with Race Studio 2
When EVO4/SoloDL has been connected it is necessary to set it up as connected to that ECU using
Race Studio 2 software.
4.2
Configuring SoloDL
Run the software, press “Device Configuration” on the software left keyboard and select “SoloDL” in
the panel that shows up as below.
10
Page 12

The software shows SoloDL configuration page: press “Configuration Manager” and select the
configuration you want to use or press “New” to create a new one. In this second case “New
Configuration” panel appears: select ECU Manufacturer “BMW” and ECU model “BIKE_S1000RR” as
shown below.
Confirm pressing “OK” in both panels and transmit the configuration to SoloDL pressing “Transmit” as
shown below.
11
Page 13

4.2
Configuring EVO4
Run the software, press “Device configuration” on the software left keyboard and select “EVO4” in the
panel that shows up on the right as here below.
12
Page 14

The software shows EVO4 configuration page: select the configuration you want to use or press “New”
to create a new one. In this second case “New configuration” panel shows up: select ECU Manufacturer
“BMW” and ECU model “BIKE_S1000RR” as shown below.
Confirm pressing “OK” and transmit the configuration to EVO4 pressing “Transmit” as shown below.
13
Page 15

5
BMW S1000RR protocol
Channels received by SoloDL and EVO4 with BMW “BIKE_S1000RR” protocol are:
ID CHANNEL NAME FUNCTION
ECU_1 S1_RPM RPM
ECU_2 S1_THROTTLE Throttle position
ECU_3 S1_GEAR Engaged gear
ECU_4 S1_NEUTRAL Neutral sensor
ECU_5 S1_WATER_TEMP Engine coolant temperature
ECU_6 S1_SEL_MAP Selected map
ECU_7 S1_CHK_ENGINE Engine check
ECU_8 S1_SPEED_F Front wheel speed
ECU_9 S1_HAND_THRT Manual throttle
ECU_10 S1_SPEED_R Rear wheel speed
ECU_11 S1_INTK_AIR_T Intake air temperature
ECU_12 S1_YAW_RATE Yawing rate
ECU_13 S1_ROLL_RATE Rolling rate
ECU_14 S1_ACC_LATER Horizontal accelerometer
ECU_15 S1_ACC_VERTIC Vertical acceleration
ECU_16 S1_TC_INTERV Traction control intervention
ECU_17 S1_TC_OFF Traction control in OFF state (alarm)
ECU_18 S1_CLUTCH_SW Clutch switch
ECU_19 S1_SIDE_STAND Side stand
ECU_20 S1_BRK_FR_SW Front brake
ECU_21 S1_BRK_RR_SW Rear brake
ECU_22 S1_ACC_LONGIT Longitudinal acceleration
ECU_24 S1_OIL_PRESS_SW Oil pressure switch
ECU_25 S1_EWS_CTRL Immobilizer control
ECU_26 S1_BRK_FAIL Brake malfunctioning (error)
ECU_27 S1_ABS_OFF ABS in OFF state (alarm)
ECU_29 S1_MAP_MENU Map selection menu
14
 Loading...