

Page 1
PF3000 and PF3000 Pro
1
Ag Leader Technology
Using PF with HarvestMaster
Installation and Cable Connections
Hooking Up
PF3000 or PF3000
Pro
Step-by-Step
Procedure
NOTE: Insert these instructions in the Options Section of the PF3000 or
PF3000 Pro Operator's Manual.
Parts required for this procedure:
• PF3000 Tall U-bracket (PN 2000105-1)
• PF3000 Pro U-bracket (PN 3001124)
• Battery Cable for PF3000 or PF3000 Pro
PN 2000497-1 (8 ft) or 2000497-2 (16ft)
• HarvestMaster Serial Cable (comes with HarvestMaster yield monitor)
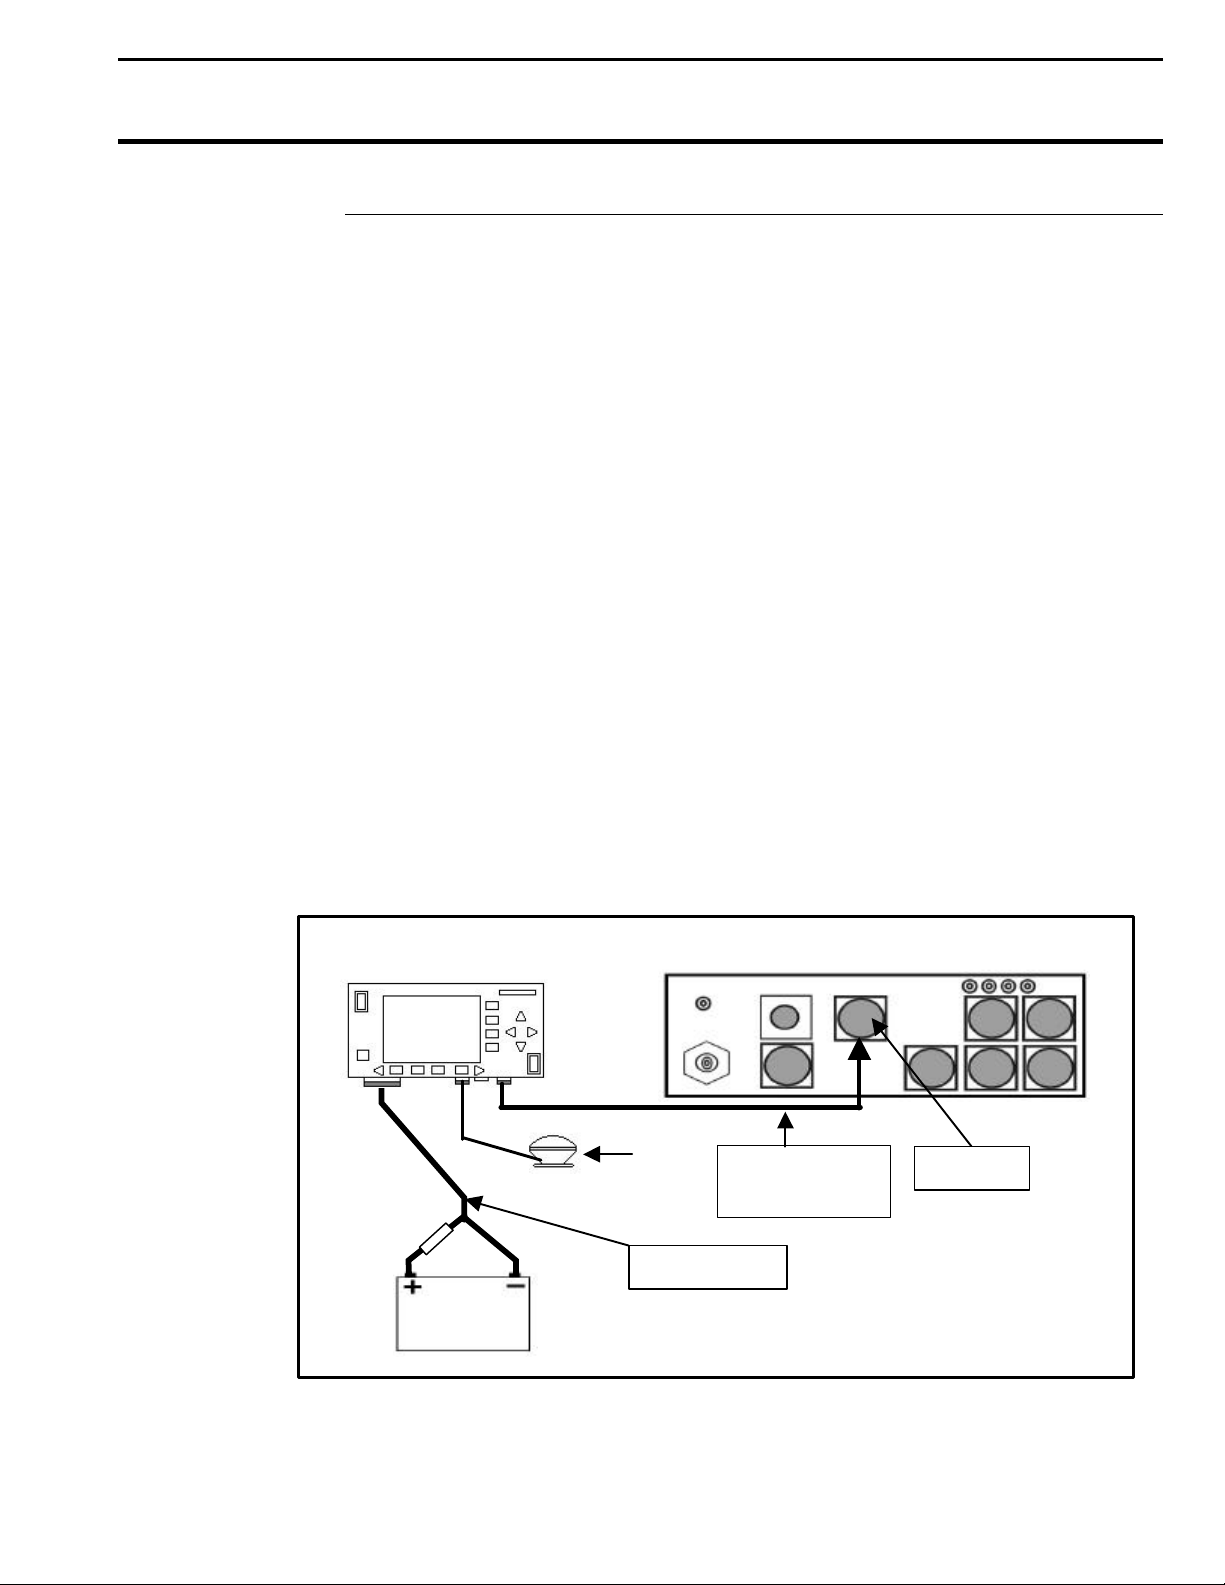
1. Attach the monitor bracket to the monitor
2. Determine a mounting location for the monitor and mark the holes for the
bracket at the location you determined in Step 1. Remove the monitor from
the bracket.
3. Drill the holes for the mounting bracket and mount the bracket.
4. Attach the HarvestMaster serial cable to Port 3 of the monitor and run the
cable to the HarvestMaster unit and attach to the Host port. See Figure 1.
PF3000 or PF3000 Pro
GPS
Antenna
Battery Cable
HarvestMaster
Serial Cable
HM 500 or 570
Host Port
Figure 1. Cable attachment on HarvestMaster Unit
September 2000
Page 2

Using PF with HarvestMaster
2
Installation and Cable Connections
5. Attach the Battery power cable at the battery. The red wire connects to the
positive batter terminal. The black wire connects to the negative battery
terminal. Route the cable to the monitor, securing the cable away from
moving parts every 12 to 18 inches.
6. Attach the battery cable to the 25-pin port on the monitor.
7. Power up the monitor to ensure the monitor is working. If not recheck the
cable connections at the battery.
PF3000 and PF3000 Pro
Ag Leader Technology
September 2000
Page 3
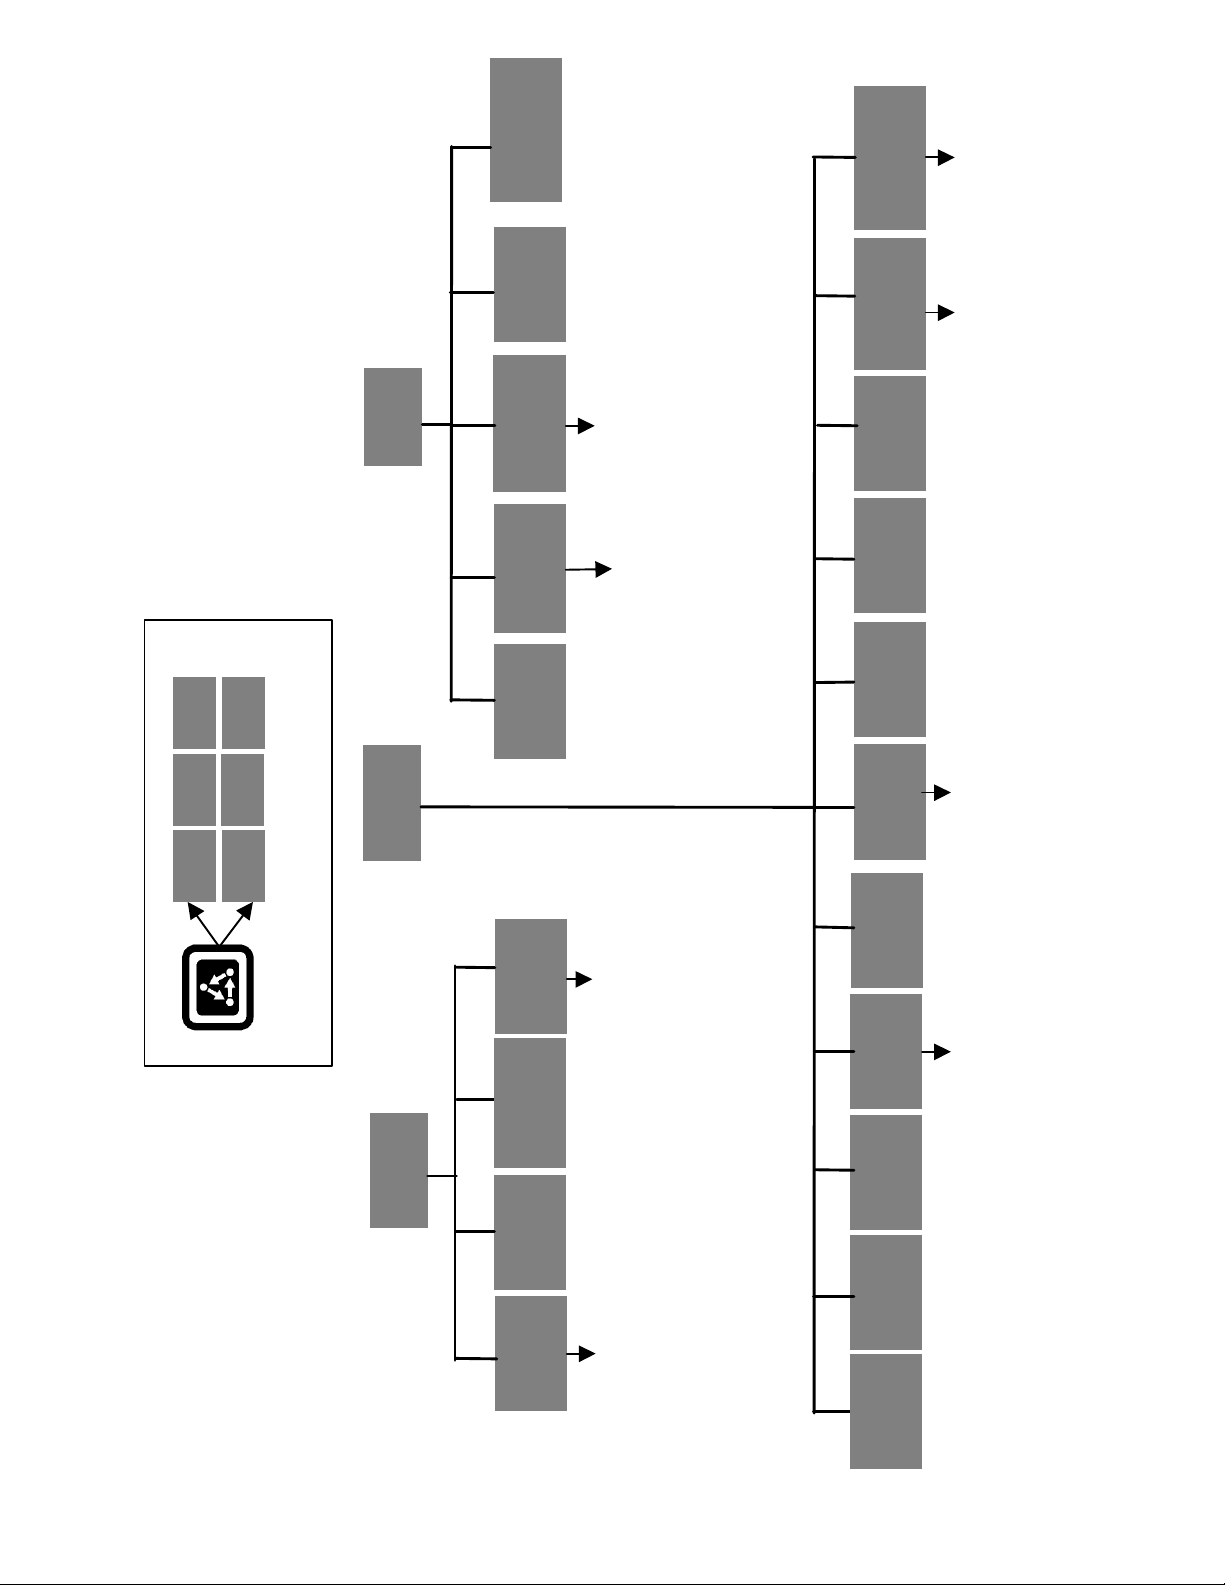
VEHICLE
Menu Key
Press Menu Key to switch between Main Menu keys
SENSOR
Area Count Switch Source
Belt Length
Belt Distance Per Pulse
Travel Distance Per Pulse
Tank Type
Discharge Delay
Discharge Rate
Area
Primary Speed Sensor
Secondary Speed Sensor
Speed Sensor Pulses/100ft
Logging Device
Logging Interval
Log File
Enter actual
weights and
perform
calibration
Tare, Load Cell A
Tare, Load Cell B
-
Tare, Profile A
Tare, Profile B
Tare, Profile C
Tare, Profile D
Tare, Profile E
RAW NEMA
DATA
SENSOR
GPSSYSTEM
HARVMAST
HARVMAST
OPTIONSLOADFIELD
DIAG
SETUP
CAL
DIAG
SETUP
GPSMEMORYCONSOLE
HARVMAST
HARVMAST
OPTION S
count stop beeps
VEHICLE
LOAD
or-
TARE
PF3000 or PF3000 Pro – Menu Tree for Harvest Master – September 2000
DISTANCE
CAL
AREA
MARKS CROP CARD
WEIGHT
SWATH
Page 4

Page 5

PF3000 and PF3000 Pro
Ag Leader Technology
Using PF with HarvestMaster
Setup
Before Setup
These instructions only cover information about interfacing with the
HarvestMaster HM500 or HM570 yield monitor. Information not found in these
instructions regarding the use of the PF3000 or PF3000 Pro can be found in the
Operators Manual.
Ensure your PF3000 or PF3000 Pro has the HarvestMaster firmware version
installed. Verify by checking the screen after turning on the monitor. It will
display "HarvestMaster Version X.XX"
NOTE: You may download the latest firmware version from our web site
at www.agleader.com.
NOTE: If you install the HarvestMaster firmware version over a nonHarvestMaster firmware version and you want to save the data from the
previous version, copy the data to the card before installing. After
installing the HarvestMaster version you will have to Newbox to get the
monitor to start. To Newbox, turn on the PF and when “Checking”
appears, press and hold down the bottom right arrow key. Press the
NEWBOX key when the monitor displays it.
To edit a setting in a setup screen, use the UP or DOWN ARROW keys to
highlight the item. Press the EDIT key and use the UP or DOWN or LEFT or
RIGHT ARROW keys to change the setting. Press ACCEPT key to make the
changed setting final.
Setup – Step 1
Metric or Imperial
Units
Setup – Step 2
HarvMast Sensor
Setup Screen
To view this screen, press the SETUP key and CONSOLE key.
Set Units of Measure to “Imperial” or “Metric”. This setting puts the PF in the
correct units’ mode.
To view this screen press the SETUP key and HARVMAST SENSOR key.
The following shows which settings are changeable based on “Yield Sensor
Type”.
Yield Sensor Type = Load Cell
Load Cell A Multiplier
Load Cell B Multiplier
Load Cell A Offset
Load Cell B Offset
Tilt Sensor Multiplier
Tilt Sensor Offset
Flow Cutoff
Yield Multiplier
Yield Sensor Type = Profile
Flow Cutoff
Profile Height Multiplier
Profile Threshold
Number of Profile Sensors
Yield Multiplier
September 2000 3
Page 6

Using PF with HarvestMaster
4
Setup
Yield Sensor Type: Set to the type of sensor used by your HarvestMaster
Load Cell A & B Multiplier:
To determine which type of load cell you have, look at the "Capacity"
value on the sticker on the load cell.
Load Cell A & B Offset: If you do not have a tilt sensor set this to 0. If
you have a tilt sensor do the following.
PF3000 and PF3000 Pro
Ag Leader Technology
yield monitor. The selections are Load Cell or
Profile. The Profile sensor is only used for grapes.
Load Cell Type Setting if Imperial Setting if Metric
500 lbs. 50.0 lbs/mV 22.7 kgs/mV
150 lbs. 15.0 lbs/mV 6.81 kgs/mV
a. Place the conveyor in a vertical position with the load cells
pointing down and the weight of the chain off the idler wheel
of load cell.
b. Go to the HarvestMaster Sensor Diagnostic screen. (Press the
EXIT key and the MENU key. Press the DIAG key and
HARVMAST SENSOR key.)
c. Write down the “gross” weight for Weight A and Weight B.
Go back to the Harvmast Sensor Setup Screen and enter gross
Weight A for Load Cell A Offset and gross Weight B for Load
Cell B Offset.
Tilt Sensor Multiplier: This is the degrees of tilt per volt. If you do not
have a tilt sensor set this to 0. If you do have a tilt sensor, obtain this
setting from the label on the tilt sensor. To check if the value is correct do
the following:
a. Place the portion of the conveyor with the load cells level. Use an
angle finder to make sure it is perfectly level.
b. Go to the HarvestMaster Sensor Diagnostic screen and view "Tilt".
c. Adjust the position of the tilt sensor until the “Tilt” reading is set to 0.
d. Using the angle finder, change the conveyor to a known angle (such
as 30 degrees).
e. Check the “Tilt” reading under the HarvestMaster Sensor Diagnostic
screen. If it does not match the known angle, divide the known angle
by the sensor reading. Multiply the result by the current Tilt Sensor
Multiplier. This is the final setting. Enter this value at the
HarvestMaster Sensor Setup Screen.
September 2000
Page 7

PF3000 and PF3000 Pro
Ag Leader Technology
Example:
Known Angle: 30 degrees
Tilt sensor reading: 33 degrees
Current Tilt Sensor Multiplier: 67 degrees
30
33
0.909 x 67 = 61
Final Tilt Sensor Multiplier Setting is 61.
Tilt Sensor Offset: This should be set to 0 if you do not have a tilt sensor.
If using a tilt sensor, and it cannot be adjusted to read “0” when the
conveyor is horizontal, set Tilt Sensor Offset according to the following:
a. With tilt sensor adjusted to its final adjustment and with conveyor
perfectly level, view "Tilt" reading under the HarvestMaster Sensor
Diagnostic Screen.
Using PF with HarvestMaster
Setup
= 0.909
b. Enter the "Tilt" reading as the setting for "Tilt Sensor Offset", but
enter the opposite sign of the “Tilt” value. Example: If “Tilt” value is
2, enter –2 for “Tilt Sensor Offset”. If “Tilt” value is –2, enter 2 for
“Tilt Sensor Offset”.
Flow Cutoff: This is the minimum flow rate for recording data. Initially,
this is usually set to zero.
Profile Height Multiplier: Set to - 3.34 inches. If using metric units set
to - 8.48 cm.
Profile Threshold: Set to 0 inches. If using metric units set to 0 cm.
Number of Profile Sensors: Set to 5.
September 2000 5
Page 8

Using PF with HarvestMaster
6
Setup
Yield Multiplier: If you have been using the HarvestMaster Mobile
Field Computer and are satisfied with the accuracy do not change this
setting. If you have not used the Mobile Field Computer or are not
satisfied with your accuracy set to:
If you change this setting you will have to calibrate for weight. See
“Weight Calibration Screen” instructions in the Calibration Section of this
instruction set.
PF3000 and PF3000 Pro
Ag Leader Technology
1.00 if using Load Cell sensors
3.00 if using Profile sensors (only used for Grapes)
IMPORTANT: After you set the Yield Multiplier value, DO
NOT CHANGE it. Changing this value after setup will
adversely impact harvest accuracy.
Setup – Step 3
HarvMast Vehicle
Setup Screen
To view this screen press the SETUP key and HARVMAST VEHICLE key.
Area Count Switch Source: Selections are Belt Speed or Hold/Run. Set
this to "Belt Speed" for area counting to be based on when the Belt is
stopped or moving. (Stopped = Area Off, Moving = Area On). Set this to
"Hold/Run" for area counting to be based on the Hold/Run switch. (Hold
= Area Off, Run = Area On).
Note: The Ag Leader Area Count switch (located on bottom right of front
panel) must be on in order to count area.
Belt Length: Measure the conveyor belt length, enter this length for this
setting. If using Imperial units enter feet, if using Metric units enter
meters.
Belt Distance Per Pulse: This is the pulses per foot (or meters) of belt
travel detected by the speed sensor. The sensor is located on the drive
shaft.
Belt Distance Per Pulse = Sprocket Diameter (feet or meters) x 3.14.
Note: This formula assumes that the sensor outputs one pules per
revolution of sprocket. Pulse is generated by magnet passing the
speed sensor.
Measure sprocket diameter from low points where chain rests not from
the tips or ends of the sprocket cogs.
September 2000
Page 9

PF3000 and PF3000 Pro
Tank Type:
Ag Leader Technology
Travel Distance Per Pulse: Measure the diameter of the wheel that has
the ground speed sensor installed. Use the following formula to
determine the setting:
Travel Distance Per Pulse =
If you are using a sugar beet harvester, refer to the HarvestMaster
instructions for the proper setting.
Discharge Delay: If you are not using a sugar beet harvester ignore this
setting. If you are using a sugar beet harvester, this setting is the time in
seconds from when the beets come out of the tank until they pass the
weighing rollers again, on their way to the truck. Typically this setting is
8 – 11 seconds.
Using PF with HarvestMaster
Setup
Tire Diameter (feet or meters) x 3.14
Number of magnets
If you are not using a sugar beet harvester ignore this setting.
Discharge Rate: If you are not using a sugar beet harvester ignore this
setting. If you are using a sugar beet harvester, this is the rate in lbs/sec
(or kgs/sec if metric) at which the beets come out of the holding tank.
Determine this setting by timing how much material comes out. Typical
settings are 50 –100 lbs/sec (23 – 45 kgs/sec).
September 2000 7
Page 10

Using PF with HarvestMaster
8
Setup
PF3000 and PF3000 Pro
Ag Leader Technology
Setup – Step 4
Swath Setup Screen
Setup – Step 5
Vehicle Setup Screen
To view this screen press the SETUP key and SWATH key.
a) Select the crop you will harvest.
b) Press the EDIT # ROWS key and set the correct rows.
c) Press the EDIT SPACING key and set the correct spacing.
To view this screen press the SETUP key and VEHICLE key.
It is recommended to set the Primary Speed Sensor to “Serial”. The only other
valid option is “GPS”. Do not set the Primary Speed Sensor to “Wheel”, “Radar”
or “Track”.
The default secondary speed sensor is “Wheel”. It is recommended to leave it set
on “Wheel”. The PF will not actually be connected to a secondary speed signal
but has to use the calibration number of the secondary speed sensor for the
primary speed sensor.
Setup – Step 6
Card Setup Screen
To view this screen press the SETUP key and CARD key.
Log Device: If you are using a GPS receiver, set to “Memory Card”
Logging Interval: Set to 2 or 3 seconds. 1 second is not recommended because
it logs more data than needed for most users.
Log File: After pressing EDIT key, press CREATE FILE key to create a new log
file.
Note: The monitor will automatically prompt you to make a new log file
everyday.
September 2000
Page 11

PF3000 and PF3000 Pro
Ag Leader Technology
Using PF with HarvestMaster
Setup
Setup – Step 7
Create Field and
Loads and set Crop
Type
Fields and Loads can be setup ahead of harvest or during harvest. Refer to the
steps below:
a) Press MENU key until FIELD key and LOAD key is displayed on bottom.
Press FIELD key (press twice if load displayed on top line) to display field on
entire screen.
b) If desired, name the field by pressing the Right Arrow key. Use the Up or
Down Arrow keys to set the character. Set another character by moving the
cursor using the Left or Right Arrow key. Press ACCEPT key once when
finished.
c) Press key to right of line displaying crop. Use Up or Down Arrow keys and
set the crop. Press ACCEPT key twice.
d) To create or change to a different field, press the FIELD key again. Use Up or
Down Arrow keys to select a different field. Name field and set crop. Press
ACCEPT key until at main screen. Field is now active.
e) To create or change to a different load, press the LOAD key. Change or
name the load as described for field in steps b & d. You can not set the crop
on a load.
September 2000 9
Page 12

Using PF with HarvestMaster
10
Calibration
PF3000 and PF3000 Pro
Ag Leader Technology
Calibration – Step 1
Tare Calibration
Screen
Calibration – Step 2
Weight Calibration
Screen
To view this screen, press the CAL key and TARE key.
Press the PERFORM TARE key to start the tare. Make sure the conveyor is
running empty when you press PERFORM TARE.
The tare value gets averaged over the belt length, thus the tare will take several
seconds (one complete belt revolution) to complete. The tare is complete when
“Tare Complete” gets to 100%.
In many operations, you might initiate a tare operation only once per day, or
even once every few days. In muddy operations, it is advisable to tare the
system right after completing a load.
To view this screen, press the CAL key and WEIGHT key. Refer to the steps
below:
Note: It is recommended to obtain the actual weight of three or four loads for
each crop harvested. Also, it is recommended that you tare the conveyor before
harvesting each load being used for calibration.
a) Use the Up or Down Arrow keys to select the crop.
b) Press ENTER WEIGHT key to add actual weights.
1) Use the Up or Down Arrow keys to set field.
2) Press key to right of Load and use Up or Down Arrow keys to set load.
3) Press key to right of “Act. Weight” and use Up or Down Arrow keys to
set actual weight.
4) Repeat steps 1-3 and enter all actual weights. Press EXIT key when
finished.
c) Press SHOW CAL LOADS key.
d) Press PERFORM CAL key. View the maximum and average error and
press the EXIT key.
e) If errors of any loads are too high you can uncheck the load by pressing the
CAL ON/OFF key. Press PERFORM CAL key again if you uncheck any
loads.
Note: When you calibrate weight for a crop, all the data that was previously
recorded and will be recorded (including logged data) for the crop will be
adjusted to the same calibration.
September 2000
Page 13

PF3000 and PF3000 Pro
Ag Leader Technology
Using PF with HarvestMaster
Operation
Operation
Information
Active Field and Load: This is the field and load that information will be
recorded in. These are displayed on the top line (if load not displayed, press
LOAD key once).
To change the active field and load press the FIELD or LOAD key and use the
Up or Down Arrow keys to scroll to new field or load. Press ACCEPT key to
set it as active. Refer to the “Setup-Step 7” instructions for more information.
Display Items: To change any of the four display items, press the key to the
right of a display item. After that, press the bottom right or left arrow keys to
see all the display items. Suggested items to display are: "Yield", "Crop Flow",
"Ground Speed", and "Weight". Other useful display items are “Belt Speed”,
“Swath” or “Area”
Showing fields and loads totals: To show the field totals for each display item,
display the field only on the top line (press the FIELD key once if field and load
on top line). To show the load totals for each display item, display the field and
load on the top line (press the LOAD key once if field only is on top line).
Copying data to card: When using a memory card, the monitor will prompt to
copy to the card every time the monitor is shut off. Be sure to do this. You can
manually copy data to the card under the Card Setup screen (press the SETUP
key and CARD key). Press the COPY TO CARD key to copy data to the file
set as the “Log File”.
Logging to card criteria: Anytime crop flow is greater than zero or area
counting is on, the PF will log data to the card. An arrow appears pointing
towards the card to indicate that data is being logged.
* * *
September 2000 11
 Loading...