

Page 1
Insight Cable Connections to
p
Rawson, New Leader Mark III & Mark IV,
Flexi-Coil Controllers
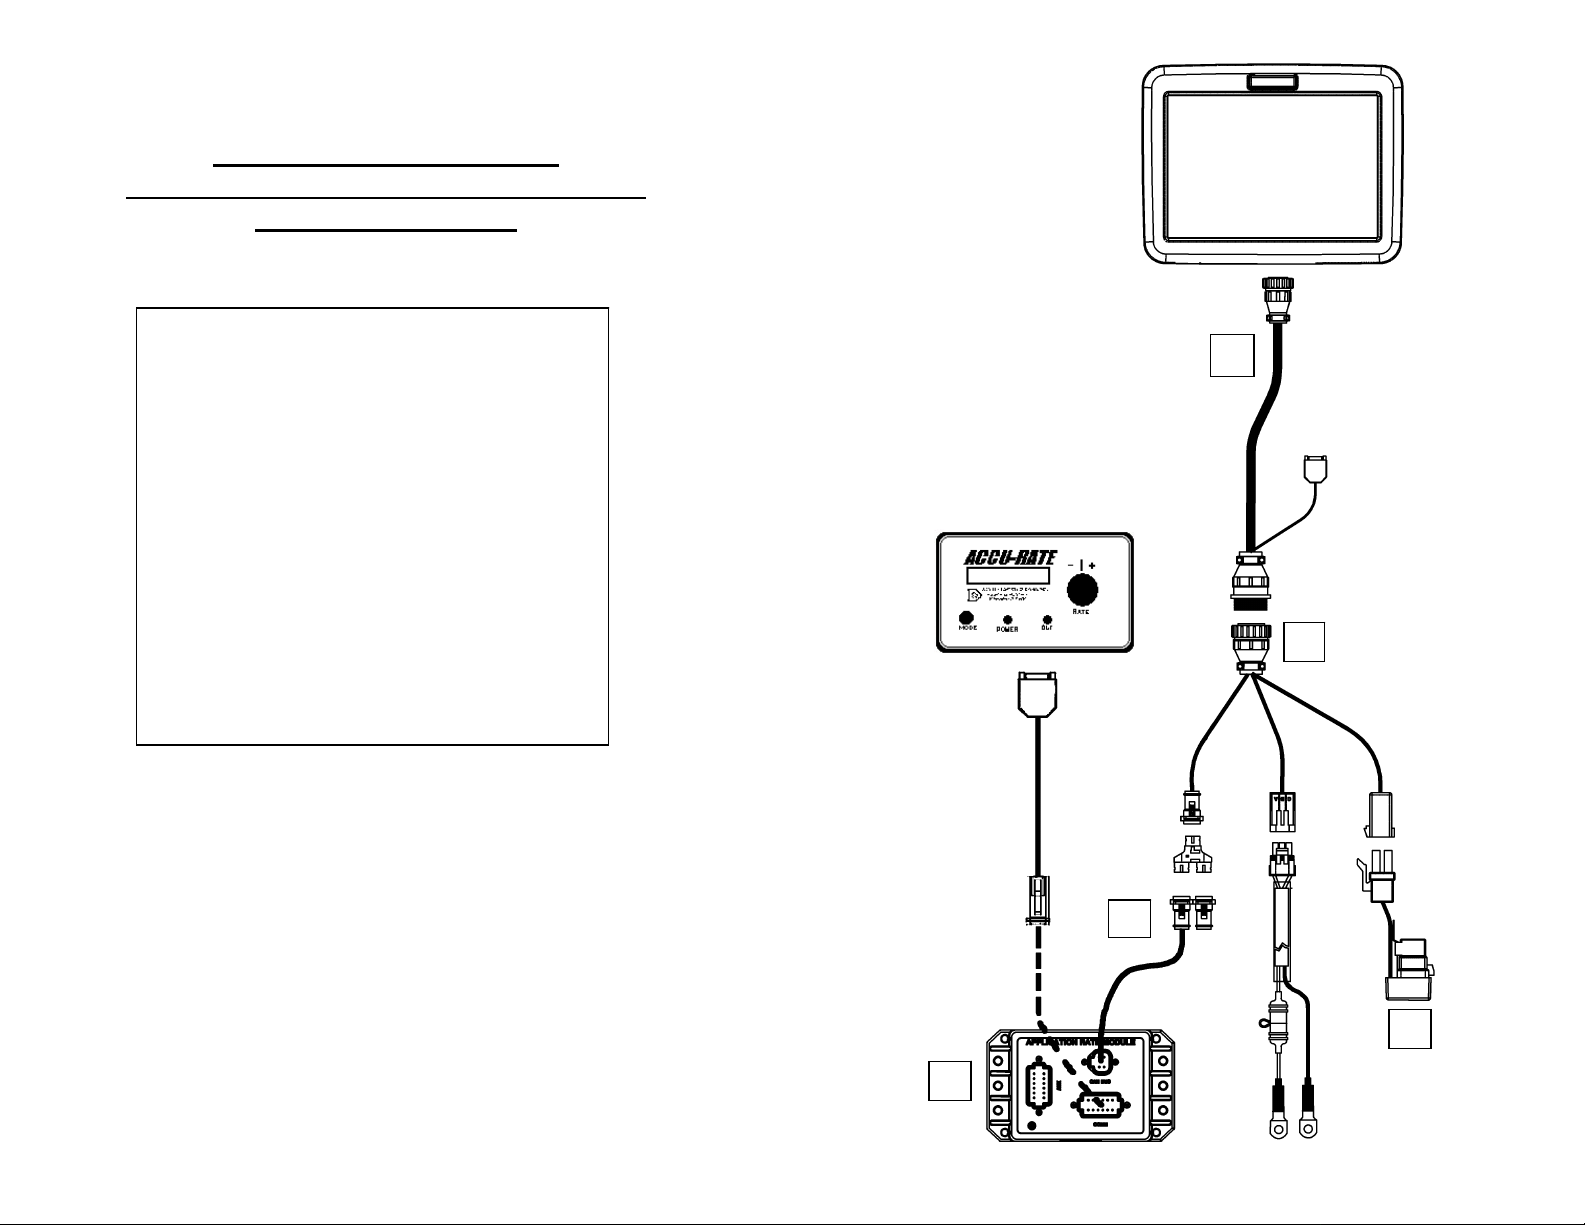
4100500 – Tractor Kit (A thru E)
A-4000306-10 - Display Cable (10ft)
B-4000307-1 - Distribution Cable
C-4000379 - Power Control Relay
D-4000318-3 - CAN stub (1.5ft)
E-4000160 - CAN App Rate Module
2000452-4 - Battery Power Cable (15ft)
4000315-6 - Serial Cable – normal 6’
Rawson Accu-Rate or Accu-Plant
New Leader Mark III or Mark IV
Mid-Tech Ag Logix & TASC controllers
Flexi-Coil Flex Controller**
**For Flexi-Coil systems cable PN 14927 needs to be
urchased from Flexi-Coil.
A
B
4000315-6
D
C
E
2000452-4
PN 2002831-35 Quick Reference for Rawson/New Leader/ Flexi-Coil (Sept. 2005) 1 of 5
Page 2

Page 3

p
g
pp
First Time Startu
Note: You must perform the initial Grower/Field Management section before
you can perform any operation on the Insight display.
(Grower / Field Mana
ement) A
Power on the Insight by pushing the WHITE POWER BUTTON, which can
be found on the back lower left hand corner of the display
Press the SETUP button to begin your initial setup (located on the
right hand side of the display.)
Press the GROWER/FIELD MANAGEMENT button.
1
To add a new Grower to the system, press the ADD button under the
2
Grower tab.
Press the NEW button to begin adding grower information
3
Press the KEYBOARD button to enter a Business name. (If
3a
you are using desktop software it is recommended to use the
same names as in the software.)
Once you have entered the Business name push the ACCEPT
3b
button to return to the Business/Person Setup screen. Press the
NEXT button.
Type the first and last name of the contact person for the
3c
Business using the keyboard on the display.
Press the FINISH button when finished entering information
3d
for the current grower.
If you wish to add additional growers, return to step 3 above.
3e
If you are done entering growers, press the ACCEPT button.
Select the SEASON tab.
4
Press the NEW SEASON button.
4a
Use the name provided or enter a name of your choice.
4b
Press the ACCEPT button when finished.
4c
Select the FIELD tab.
5
Verify that the current grower is displayed in the Grower
5a
Window. If the current grower is not displayed, choose the
correct one from the list.
To enter farms and fields, press the ADD button. Select a farm
5b
from the list, or press the NEW button to enter a new farm
name. Press NEXT to proceed.
Press the NEW button to add fields to the farm. Use the
5c
keyboard to type the field name and then press ACCEPT.
Repeat this step until all fields are entered for the farm.
Press the FINISH button when finished. If you have additional
5d
fields, it is recommended to enter them all at this time.
Once finished with Grower/Field Management setup you may press
6
the SETUP button to return to the setup screen or the Run button to
proceed to the main operating screen.
lication Setup (Mid-Tech Controllers w/ Datalink)
Note: The setup wizard built into the Insight will walk you through the steps
listed below.
APPLICATION CONFIGURATION
Press the APPLICATION button to enter the app rate configuration screen.
Press the ADD button to start the setup wizard to create a new configuration.
Step
Step
Press the SETUP button to begin your initial setup (located on the
right hand side of the display.)
Vehicle Setup - Select the desired vehicle from the list then press
NEXT and proceed to step 2. If your vehicle is not listed press the
1
NEW button and proceed to 1a.
Step
Step
Step
Step
Select correct Vehicle Type from the list and press the
NEXT button.
1a
Press the KEYBOARD button to enter the vehicle Make and
Model information. (These settings are OPTIONAL).
1b
Once the Make and Model information is entered press the
Next button.
1c
If using a Self-Propelled Spreader or Sprayer, you will be
prompted to enter a full swath width, number of boom
1d
sections and boom widths. (This step is skipped if using a
Tractor, ATV, or Pickup Truck)
Step
The Vehicle name will default to the Make and Model you
entered in step 2. If you would like to edit the name press the
1e
KEY BOARD button and type your preferred name. Press
the ACCEPT button when finished.
Step
Press the FINISH button to save your vehicle and proceed to
Step 2.
1f
Select the desired implement from the list then press NEXT and
proceed to step 3. If your vehicle is not listed press the NEW button
2
and proceed to 2a.
Note: This step is skipped with Self-Propelled Spreaders or Sprayers
Step
Step
Select correct Implement Attachment Method and press the
NEXT button.
2a
Enter appropriate swath width, number of boom sections,
boom widths and distance from hitch to application point.
2b
When finished, press the NEXT button to proceed
Step
Step
Press the KEYBOARD button to enter an implement name.
Press the ACCEPT button when finished.
2c
Press the FINISH button to save your implement settings and
proceed to Step 3.
2d
PN 2002831-35 Quick Reference for Rawson/New Leader/ Flexi-Coil (Sept. 2005) 3 of 5
Page 4

Step
3
Step
4
Step
5
APPLICATION CONFIGURATION (cont.)
Select the desired controller configuration from the list and press
NEXT and proceed to Step 3d. If the desired controller is not listed,
press the NEW button and proceed to Step 3a.
Step
Step
Step
Step
Step
Select the desired Ground Speed Source. In most cases GPS will be the
primary speed source with Wheel or Radar as the backup. If you are
using a backup ground speed source it is recommended that you calibrate
it before the season begins. Press NEXT. (Ground Speed calibrations
are completed under the CALIBRATE DISTANCE button on the
Application Rate Configuration Screen.)
The Configuration name will default to a name based on your previous
configuration settings. If you would like to edit the name press the
KEYBOARD button and type the preferred name. Press the ACCEPT
button when finished.
Press the FINISH button to save your Configuration.
Controller Setup – Select Serial Controller from the Device
window and press NEXT.
3a
Select the correct make and model from the lists provided. If
your controller is not listed, the Insight is not compatible on its
3b
current version. Press NEXT when finished.
The Controller name will default to the selected Controller
Make and Model. If you would like to edit the name, press the
3c
KEYBOARD button and type the preferred name and press the
Accept button.
Press the FINISH button to save your Controller Type.
For a New Leader SP.6 select the desired Target Rate Increment
from the list and press the NEXT button when finished. For all
3d
others proceed to step 3e.
Controller Settings - If Insight is not controlling the rate, ignore
this step and proceed to step 4. If Insight is controlling the rate,
3e
use the KEYPAD to set the Nominal Rate equal to nominal rate
of controller. Press the Mode button on the controller until the
following is displayed:
“Sds/A=x,xxx,xxx” setting in Rawson plant mode
“Rate=xxxx.x Lb/A” setting in Rawson fert mode (dry)
“Rate=xx.x Gal/A” setting in Rawson fert mode (liquid)
“Yield=xxxx Lb/A (or Ton/A if lime)” setting in New Leader
Percent Rate Change – Set equal to “Steps x.x%” of controller,
which can be found by pressing the Mode button on the
controller (setting may not be available in older Rawson
controllers). Common Settings are 4.00% for Rawson plant
mode, 6.66% for New Leader or Rawson fert mode.
Configuration Settings
Step
Additional settings may be necessary for proper operation. Highlight the
desired configuration from the Configuration Window and press the
6
CONFIGURATION SETTINGS button to adjust these settings.
Step
Many of these settings have already been set through the wizard.
New settings include:
6a
Target Rate Outside Field: (Only pertains to .tgt files)
Set to ZERO if want rate outside field to be zero.
Set to USE LAST if want rate to be the last rate used at the time
the vehicle is detected outside the field. This is useful when
experiencing problems with the vehicle being falsely detected
outside of the field during the outside pass.
Set to TGT DEFAULT if want rate outside field to be the default
rate stored in the target rate file.
Controller Time Delay: Set to 3 seconds.
Press the ACCEPT button when finished.
PRODUCT SETUP
Select the PRODUCT tab in the Application menu to setup your products.
Step
Press the ADD button to begin the Product Setup Wizard.
7
Step
Select the appropriate Product Type from the list and press
NEXT and proceed to 7b. If Fertilizer is selected, proceed to
7a
7d.
Step
If Planted Seed was selected you will be asked to identify
which crop it belongs to. If any other product type is
7b
selected you will be asked to set the units which will be
logged. Press the NEXT button when finished.
Step
Press the KEYBOARD button to label the product’s
manufacturer (optional) and name (required).
7c
Press the FINISH button to save your Product.
Step
If Fertilizer was selected you will then need to choose the
fertilizer that you will be applying. If the fertilizer that you
7d
are applying is not in the list choose User Defined. Press
NEXT when finished.
Step
Press the KEYBOARD button to label the fertilizer’s
manufacturer (optional).
7e
Press the FINISH button to save your product.
PN 2002831-35 Quick Reference for Rawson/New Leader/ Flexi-Coil (Sept. 2005) 4 of 5
Page 5

Step
Step
Operation
Press the RUN button to enter your main operating screen
1
(located on the lower right hand side of the display.)
Press the FIELD button to select which field you will be logging to.
2
Step
Select the appropriate Grower, Field, Operating
Configuration, and Product from the lists. If your item is not
2a
listed, refer to the appropriate section in this guide to set it
up. If you are applying the same product multiple times
during a single season, you can create a new Operational
Instance by pressing the Change button next to Operational
Instance.
Press the ACCEPT button when finished.
Step
2b
If data has not been logged to the current field, a window to
select the Region will appear. The name may be edited by
selecting the EDIT NAME button or you may press
ACCEPT to use the default.
PN 2002831-35 Quick Reference for Rawson/New Leader/ Flexi-Coil (Sept. 2005) 5 of 5
 Loading...